We provide data storage services that enhance reliability and efficiency through various storage configurations.
This is the multi-page printable view of this section. Click here to print.
Storage
- 1: Block Storage(BM)
- 1.1: Overview
- 1.1.1: Monitoring Metrics
- 1.1.2: ServiceWatch metric
- 1.2: How-to Guides
- 1.2.1: Connect to server
- 1.2.2: Use Snapshot
- 1.2.3: Using duplication
- 1.2.4: Using Volume Group
- 1.3: API Reference
- 1.4: CLI Reference
- 1.5: Release Note
- 2: File Storage
- 2.1: Overview
- 2.1.1: Monitoring Metrics
- 2.1.2: ServiceWatch Metrics
- 2.2: How-to guides
- 2.2.1: Connect to Server
- 2.2.2: Use Snapshot
- 2.2.3: File-level Recovery
- 2.2.4: Using Disk Backup
- 2.2.5: Using replication
- 2.3: API Reference
- 2.4: CLI Reference
- 2.5: Release Note
- 3: Parallel File Storage
- 3.1: Overview
- 3.2: How-to guides
- 3.2.1: Use Snapshot
- 3.2.2: Install Agent
- 3.2.3: File-level Recovery
- 3.3: API Reference
- 3.4: CLI Reference
- 3.5: Release Note
- 4: Object Storage
- 4.1: Overview
- 4.1.1: Amazon S3 Usage Guide
- 4.1.2: Monitoring Metrics
- 4.1.3: ServiceWatch metric
- 4.2: How-to guides
- 4.2.1: Access control
- 4.2.2: File and Folder Management
- 4.2.3: Version Management
- 4.2.4: Permission Management
- 4.2.5: Replication Policy Management
- 4.2.6: Copy original file
- 4.3: Release Note
- 5: Archive Storage
- 5.1: Overview
- 5.1.1: ServiceWatch Metrics
- 5.2: How-to guides
- 5.2.1: Managing Archiving Policies
- 5.2.2: Use Version Management
- 5.2.3: Archive Recovery
- 5.3: API Reference
- 5.4: CLI Reference
- 5.5: Release Note
- 6: Backup
- 6.1: Overview
- 6.2: How-to guides
- 6.2.1: Instant Backup
- 6.2.2: Restore
- 6.2.3: Using Backup Agent
- 6.2.4: Install Backup Agent
- 6.2.5: Use Replication
- 6.3: API Reference
- 6.4: CLI Reference
- 6.5: Release Note
1 - Block Storage(BM)
1.1 - Overview
Service Overview
Block Storage is a high-performance storage that stores data in block units arranged by a fixed size and layout.
Suitable for large-scale, high-performance requirements such as databases and mail servers, and users can directly allocate volumes to the server.
Features
- Large volume provision: You can create volumes up to 16TB in size.
- Full SSD-based high performance: Provides high durability and availability based on redundant Controllers and Disk Array RAID. * Full SSD disks are provided by default, making them suitable for high-speed data processing tasks such as database workloads.
- Snapshot Backup: Image snapshot functionality enables recovery of changed and deleted data. * The user selects the snapshot created at the desired recovery point from the list and performs the recovery.
- Replication: creates an identical replica volume at another location, and the user can set the data replication schedule. * If the original volume cannot be used due to failures or disasters, service can be provided through a replica volume.
Configuration diagram
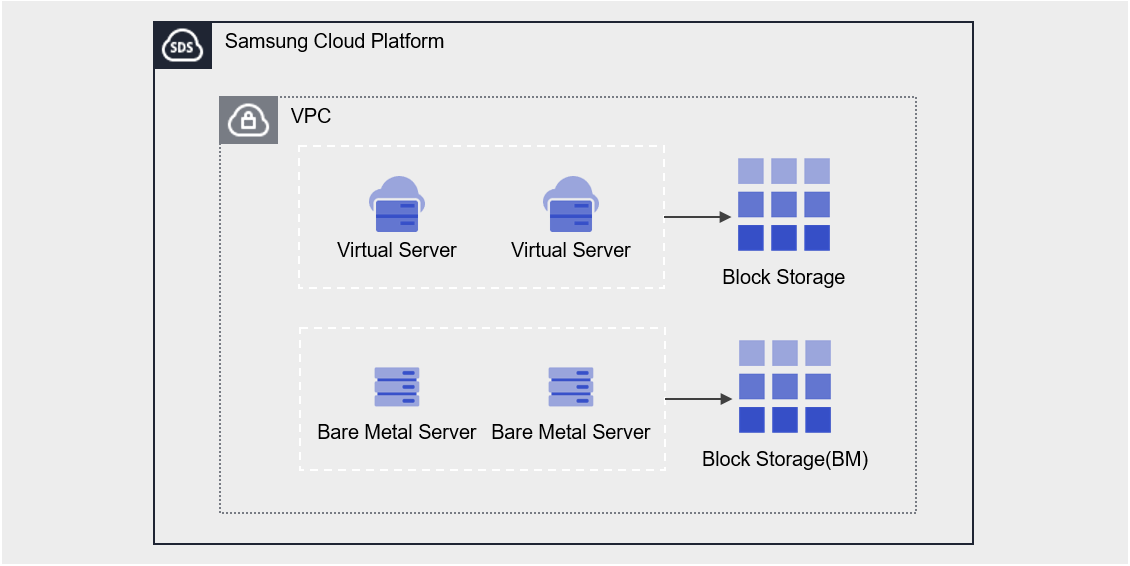
Provided features
Block Storage provides the following features.
- Volume Name: Users can set or edit the name for each volume.
- Capacity: You can create a volume with a capacity ranging from a minimum of 1 GB up to a maximum of 16 TB.
- Connection Server : You can select Bare Metal Server or Multi Node GPU Cluster to connect or disconnect.
- Multi-Server Connection (Multi Attach): Up to 5 servers can be connected, and there is no limit on the number of volumes that can be attached to a Bare Metal Server.
- Encryption: All volumes are encrypted with the AES-256 algorithm by default, regardless of disk type.
- Snapshot: Use the image snapshot feature to create a snapshot at a specific point in time or generate snapshots at regular intervals.
- Capacity: the capacity of the snapshot storage space
- Schedule: Snapshot auto-creation interval
- Recovery: Recover the original volume to the latest snapshot, or select a snapshot at a specific point in time to create a recovery volume
- Recovery copy a separate volume created with the same capacity as the original (additional cost incurred)
- Replication: It replicates the volume to another location, and the user can set the replication schedule.
- A replicated volume can also serve as the original via the snapshot feature in the event of a disaster.
- Volume Group: Configure up to 16 Block Storage volumes as a Group. * Snapshots and replication can be configured at the group level.
- Monitoring: You can view monitoring information such as IOPS, Latency, and Throughput through the ServiceWatch service.
Component
You can create a volume by entering the capacity and selecting the disk type according to the user’s service scale and performance requirements.
When using the snapshot feature, you can restore data to the desired point in time.
Volume
A volume (Volume) is the basic creation unit of the Block Storage service and is used as data storage space. The user sets the name, size, disk type, snapshots, etc., creates a volume, and then attaches it to a Bare Metal Server for use.
The volume name creation rules are as follows.
- Must start with a letter and can be set to 3~28 characters using letters, numbers, and special characters (
-).
snapshot
A snapshot (Snapshot) is an image backup of a volume at a specific point in time. The user can view the snapshot name and creation time in the snapshot list, select the snapshot to restore, and recover data that was modified or deleted using that snapshot.
The following are considerations when using snapshots.
Reference
- The snapshot creation time is based on Asia/Seoul (GMT +09:00).
- Up to 1,023 snapshots can be created. * (Automatic generation via schedule is limited to a maximum of 128.)
- Automatic creation is possible through snapshot schedule settings.
- Because snapshot capacity is added to Block Storage (BM) fees, adjust the size of your snapshot storage.
Volume Group
Volume Group is a group-level management feature that provides users who configure databases and applications across two or more volumes the ability to create snapshots and replications at a consistent point in time. The user can create a Volume Group by selecting a name and the target Block Storage.
Preceding Service
This is a list of services that must be pre-configured before creating the service. Please refer to the guide provided for each service and prepare in advance.
| Service Category | service | Detailed description |
|---|---|---|
| Compute | Bare Metal Server | High-performance physical server used without virtualization |
Table. Block Storage (BM) Preliminary Service
1.1.1 - Monitoring Metrics
Cloud Monitoring service termination notice
According to Samsung Cloud Platform’s policy, the Cloud Monitoring service is scheduled to be discontinued.
Accordingly, Starting after the September 2026 release, monitoring of Samsung Cloud Platform resources via Cloud Monitoring will no longer be possible.
With the new alternative service, you can continuously perform resource monitoring by using ServiceWatch, released in October 2025.
ServiceWatch provides more modern and powerful features, replacing Cloud Monitoring to deliver a smooth monitoring environment.
Block Storage is planned to be integrated with ServiceWatch from after the July 2026 release.
Detailed information about ServiceWatch can be found in the ServiceWatch Overview.
Block Storage BM Monitoring Metrics
The table below shows the monitoring metrics for Block Storage BM that can be viewed through Cloud Monitoring. For detailed usage of Cloud Monitoring, refer to the Cloud Monitoring guide.
| Performance Item Name | Explanation | unit |
|---|---|---|
| Instance Status | Block Storage volume status | status |
| Volume Total | Total byte count | bytes |
| IOPS [Total] | iops(total) | iops |
| IOPS [Read] | iops(read) | iops |
| IOPS [Write] | iops(write) | iops |
| IOPS [Other] | iops(other) | iops |
| Latency Time [Total] | Total latency | usec |
| Latency Time [Read] | Read latency | usec |
| Latency Time [write] | Latency (write) | usec |
| Latency Time [Other] | Latency (Other) | usec |
| Throughput [Total] | Throughput (total) | bytes/s |
| Throughput [Read] | Throughput (read) | bytes/s |
| Throughput [Write] | Throughput (write) | bytes/s |
| Throughput [Other] | Throughput (Other) | bytes/s |
Table. Block Storage BM Monitoring Metrics
1.1.2 - ServiceWatch metric
Block Storage BM sends metrics to ServiceWatch. The metrics provided by basic monitoring are data collected at 1‑minute intervals.
Reference
For how to view metrics in ServiceWatch, refer to the ServiceWatch guide.
Basic Metrics
The following are the basic metrics for the Block Storage BM namespace.
The indicators whose names are displayed in bold below are the key indicators selected from the basic indicators provided by Block Storage BM. The key metrics are used to build the service dashboards that are automatically created for each service in ServiceWatch.
Each metric offers user guidance on which statistical values are meaningful when viewing it, and the service dashboard allows you to view key metrics using their primary statistical values.
| Indicator Name | Detailed description | unit | meaningful statistics |
|---|---|---|---|
| Status | Block Storage(BM) volume status | - | - |
| Volume Total | Block Storage size | GB | - |
| IOPS [Read] | IOPS (read) | IOPS | maximum |
| IOPS [Write] | IOPS (write) | IOPS | maximum |
| Latency Time [Read] | Read latency | msec | maximum |
| Latency Time [write] | Write latency | msec | maximum |
| Throughput [Read] | Throughput (read) | MB/s | maximum |
| Throughput [Write] | Throughput (write) | MB/s | maximum |
Table. Block Storage BM Basic Metrics
1.2 - How-to Guides
A user can create the service by entering the required information for Block Storage(BM) and selecting detailed options through the Samsung Cloud Platform Console.
Create Block Storage(BM)
You can create and use the Block Storage (BM) service in the Samsung Cloud Platform Console.
To create Block Storage (BM), follow the steps below.
All Services > Storage > Block Storage(BM) Click the menu. 1. Go to the Service Home page of Block Storage (BM).
On the Service Home page, click the Create Block Storage (BM) button. 2. Navigate to the Block Storage(BM) Creation page.
On the Block Storage(BM) Creation page, enter the information required to create the service and select detailed options.
Category RequiredDetailed description Volume name Required Volume name - must start with an English letter and be entered using English letters, numbers, and special characters (
-) for 3~28 characters
- cannot be modified after service creation
Disk type Required Select disk type - SSD: High-performance general volume
- HDD: General volume
- Cannot be modified after service creation
capacity Required Capacity setting - Enter a number between 1~16,384GB
- Cannot be modified after service creation
Max IOPS Required Enter the IOPS value - Enter a number between 5,000~20,000
- HDD type does not provide performance metric configuration functionality
Max Throughput Essential Enter the throughput speed (MB/s) - Enter a number between 250~1,000
- HDD type does not provide performance metric setting functionality
Availability Zone Required Select the Availability Zone to create resources within the region - If you change the Availability Zone while a connection server has been added, the selected connection server will be reset
Connection server Required Select Bare Metal Server connection - Provide up to 8 Bare Metal Server connections
- No limit on the number of volumes that can be attached to a Bare Metal Server
Table. Block Storage(BM) Service Information Input Items- must start with an English letter and be entered using English letters, numbers, and special characters (
Summary Check the detailed information and estimated billing amount generated in the panel, and click the Create button.
When the popup indicating creation opens, click the Confirm button.
- Once creation is complete, check the created resources on the Block Storage(BM) List page.
Reference
- You can only attach a volume to a Bare Metal Server in the same Availability Zone.
- Regardless of disk type, all volumes have server-side encryption based on the AES-256 algorithm applied by default.
- The snapshot schedule can be set on the details page.
- The performance metrics (IOPS, Throughput) of the configured storage are based on maximum values and do not guarantee consistent values.
Caution
Capacity can be expanded only for the original volume that does not use the snapshot feature. For volumes that use snapshots, add the volume to the connected server to secure capacity.
Configure iSCSI
Volumes created by the user in addition to the OS default volume must be configured with iSCSI.
After checking the IP provided in the iSCSI information on the Block Storage (BM) Details page, follow the iSCSI configuration steps for each OS.
Linux operating system
Information
The iSCSI information (Storage Target IP) is assumed to be 10.40.40.41, 10.40.40.42.
- Check the iSCSI information on the Block Storage (BM) detail page.
- Click the All Services > Storage > Block Storage(BM) menu. 1. Go to the Service Home page of Block Storage (BM).
- On the Service Home page, click the Block Storage(BM) menu. 2. Block Storage(BM) List Navigate to the page.
- On the Block Storage(BM) List page, click the resource to be used on the connected server. 3. Block Storage(BM) Details Navigate to the page.
- After verifying the server in the Connection Server item, connect.
- Refer to the procedure below to set up iSCSI.
- Discover the connection information for Storage (target IP).Color mode
[root@localhost ~]# iscsiadm -m discovery -t st -p 10.40.40.41 10.40.40.41:3260,1024 iqn.2000-05.com.3pardata:20210002ac026169 [root@localhost ~]# iscsiadm -m discovery -t st -p 10.40.40.42 10.40.40.42:3260,1025 iqn.2000-05.com.3pardata:20220002ac026169[root@localhost ~]# iscsiadm -m discovery -t st -p 10.40.40.41 10.40.40.41:3260,1024 iqn.2000-05.com.3pardata:20210002ac026169 [root@localhost ~]# iscsiadm -m discovery -t st -p 10.40.40.42 10.40.40.42:3260,1025 iqn.2000-05.com.3pardata:20220002ac026169Code block. Storage (target IP) connection information Discovery - Connect to the Storage (target IP). * If it is already connected, proceed to the next step.Color mode
[root@localhost ~]# iscsiadm -m node -p 10.40.40.41:3260 --login Logging in to [iface: default, target: iqn.2000-05.com.3pardata:20210002ac026169, portal: 10.40.40.41,3260] (multiple) Logging in to [iface: default, target: iqn.2000-05.com.3pardata:20210002ac026169, portal: 10.40.40.41,3260] (multiple) Login to [iface: default, target: iqn.2000-05.com.3pardata:20210002ac026169, portal: 10.40.40.41,3260] successful. Login to [iface: default, target: iqn.2000-05.com.3pardata:20210002ac026169, portal: 10.40.40.41,3260] successful [root@localhost ~]# iscsiadm -m node -p 10.40.40.42:3260 --login Logging in to [iface: default, target: iqn.2000-05.com.3pardata:20220002ac026169, portal: 10.40.40.42,3260] (multiple) Logging in to [iface: default, target: iqn.2000-05.com.3pardata:20220002ac026169, portal: 10.40.40.42,3260] (multiple) Login to [iface: default, target: iqn.2000-05.com.3pardata:20220002ac026169, portal: 10.40.40.42,3260] successful. Login to [iface: default, target: iqn.2000-05.com.3pardata:20220002ac026169, portal: 10.40.40.42,3260] successful.[root@localhost ~]# iscsiadm -m node -p 10.40.40.41:3260 --login Logging in to [iface: default, target: iqn.2000-05.com.3pardata:20210002ac026169, portal: 10.40.40.41,3260] (multiple) Logging in to [iface: default, target: iqn.2000-05.com.3pardata:20210002ac026169, portal: 10.40.40.41,3260] (multiple) Login to [iface: default, target: iqn.2000-05.com.3pardata:20210002ac026169, portal: 10.40.40.41,3260] successful. Login to [iface: default, target: iqn.2000-05.com.3pardata:20210002ac026169, portal: 10.40.40.41,3260] successful [root@localhost ~]# iscsiadm -m node -p 10.40.40.42:3260 --login Logging in to [iface: default, target: iqn.2000-05.com.3pardata:20220002ac026169, portal: 10.40.40.42,3260] (multiple) Logging in to [iface: default, target: iqn.2000-05.com.3pardata:20220002ac026169, portal: 10.40.40.42,3260] (multiple) Login to [iface: default, target: iqn.2000-05.com.3pardata:20220002ac026169, portal: 10.40.40.42,3260] successful. Login to [iface: default, target: iqn.2000-05.com.3pardata:20220002ac026169, portal: 10.40.40.42,3260] successful.Code block. Storage (target IP) connection - Delete all unused Storage (target IP) to minimize search time.Color mode
[root@localhost ~]# iscsiadm -m node show 100.100.100.10:3260,1026 iqn.1992-08.com.netapp:sn.c9adbd09cf301d039ea2bc878:vs.3 10.40.40.41:3260,1024 iqn.2000-05.com.3pardata:20210002ac026169 10.40.40.42:3260,1025 iqn.2000-05.com.3pardata:20220002ac026169 [root@localhost ~]# iscsiadm -m node -o delete -p 100.100.100.10:3260[root@localhost ~]# iscsiadm -m node show 100.100.100.10:3260,1026 iqn.1992-08.com.netapp:sn.c9adbd09cf301d039ea2bc878:vs.3 10.40.40.41:3260,1024 iqn.2000-05.com.3pardata:20210002ac026169 10.40.40.42:3260,1025 iqn.2000-05.com.3pardata:20220002ac026169 [root@localhost ~]# iscsiadm -m node -o delete -p 100.100.100.10:3260Code block. Delete unused Storage (target IP) - Rescan to check the added Disk.Color mode
[root@localhost ~]# iscsiadm -m session --rescan Rescanning session [sid: 65, target: iqn.2000-05.com.3pardata:20210002ac026169, portal: 10.40.40.41,3260] Rescanning session [sid: 66, target: iqn.2000-05.com.3pardata:20210002ac026169, portal: 10.40.40.41,3260] Rescanning session [sid: 67, target: iqn.2000-05.com.3pardata:20220002ac026169, portal: 10.40.40.42,3260] Rescanning session [sid: 68, target: iqn.2000-05.com.3pardata:20220002ac026169, portal: 10.40.40.42,3260][root@localhost ~]# iscsiadm -m session --rescan Rescanning session [sid: 65, target: iqn.2000-05.com.3pardata:20210002ac026169, portal: 10.40.40.41,3260] Rescanning session [sid: 66, target: iqn.2000-05.com.3pardata:20210002ac026169, portal: 10.40.40.41,3260] Rescanning session [sid: 67, target: iqn.2000-05.com.3pardata:20220002ac026169, portal: 10.40.40.42,3260] Rescanning session [sid: 68, target: iqn.2000-05.com.3pardata:20220002ac026169, portal: 10.40.40.42,3260]Code block. Rescan - Set Auto Login so that you are logged in automatically even after a reboot.Color mode
[root@localhost ~]# iscsiadm -m node --op=update -n node.conn[0].startup -v automatic [root@localhost ~]# iscsiadm -m node --op=update -n node.startup -v automatic[root@localhost ~]# iscsiadm -m node --op=update -n node.conn[0].startup -v automatic [root@localhost ~]# iscsiadm -m node --op=update -n node.startup -v automaticcode block. Auto Login setting - Verify the configuration using the following command.Color mode
[root@localhost ~]# lsblk[root@localhost ~]# lsblkCode block. Check configuration contents
- Discover the connection information for Storage (target IP).
Windows operating system
information
The iSCSI information (Storage Target IP) is assumed to be 10.40.40.41, 10.40.40.42.
- Check the iSCSI information on the Block Storage(BM) details page.
- All Services > Storage > Block Storage(BM) Click the menu. 1. Go to the Service Home page of Block Storage (BM).
- On the Service Home page, click the Block Storage(BM) menu. 2. Block Storage(BM) List Go to the page.
- On the Block Storage(BM) List page, click the resource to be used on the connected server. 3. Block Storage(BM) Details Go to the page.
- Connection Server item, check the server and then connect.
- Proceed with iSCSI configuration by referring to the following procedure.
- Open Command Prompt (Admin) and run powershell.Color mode
Windows PowerShell
Copyright (C) Microsoft Corporation. All rights reserved.

PS C:\Users> cd ..
PS C:\>
Windows PowerShell Copyright (C) Microsoft Corporation. All rights reserved. PS C:\Users> cd .. PS C:\>Code block. Run powershell - Start the volume service.Color mode
PS C:\> Set-Service -Name MSiSCSI -StartupType Automatic
PS C:\> Start-Service -Name MSiSCSI
PS C:\> get-service -Name MSiSCSI |  select -Property Name, DisplayName, Status, StartType

Name       DisplayName                           Status    StartType
-------    --------------                        -------   -----------
MSiSCSI    Microsoft iSCSI Initiator Service     Running   Automatic
PS C:\> Set-Service -Name MSiSCSI -StartupType Automatic PS C:\> Start-Service -Name MSiSCSI PS C:\> get-service -Name MSiSCSI | select -Property Name, DisplayName, Status, StartType Name DisplayName Status StartType ------- -------------- ------- ----------- MSiSCSI Microsoft iSCSI Initiator Service Running AutomaticCode block. Start volume service - Install Multipath I/O. * If the Restart Needed item is set to Yes, a restart is required.Color mode
PS C:\> Install-WindowsFeature -name Multipath-IO

Success   Restart Needed   Exit Code   Feature Result
-------   --------------   ---------   -----------------
True      No               Success     {Multipath I/O}
PS C:\> Install-WindowsFeature -name Multipath-IO Success Restart Needed Exit Code Feature Result ------- -------------- --------- ----------------- True No Success {Multipath I/O}code block. Multipath I/O installation - Modify the Initiator Port Address. *
If you are not an Active Directory member, skip this procedure. The Initiator Port Address needs to be modified only when it is an Active Directory member.- The iqn is generated based on the hostname, but when joined to Active Directory, it changes to DNS format.
Since it is registered in Storage based on the default hostname, for iqn.1991-05.com.microsoft:iqn01.scp.com, iqn01 is the hostname. Remove the DNS information and change it to the name registered when creating the OS from the user Console, such as iqn.1991-05.com.microsoft:iqn01. - If you are not an AD member, no changes are required.Color mode
PS C:\> $address = (Get-InitiatorPort | select NodeAddress)
PS C:\> echo $address
NodeAddress
-----------
iqn.1991-05.com.microsoft:iqn01.scp.com

PS C:\> Set-InitiatorPort -NodeAddress $address.NodeAddress -NewNodeAddress "iqn.1991-05.com.microsoft:iqn01"
PS C:\> Get-InitiatorPort | select NodeAddress
NodeAddress
-----------
iqn.1991-05.com.microsoft:iqn01
PS C:\> $address = (Get-InitiatorPort | select NodeAddress) PS C:\> echo $address NodeAddress ----------- iqn.1991-05.com.microsoft:iqn01.scp.com PS C:\> Set-InitiatorPort -NodeAddress $address.NodeAddress -NewNodeAddress "iqn.1991-05.com.microsoft:iqn01" PS C:\> Get-InitiatorPort | select NodeAddress NodeAddress ----------- iqn.1991-05.com.microsoft:iqn01code block. Modify Initiator Port Address
- The iqn is generated based on the hostname, but when joined to Active Directory, it changes to DNS format.
- Set the Storage (target Portal) address as a variable.Color mode
PS C:\> $TargetPortalAddresses = @("10.40.40.41", "10.40.40.42")PS C:\> $TargetPortalAddresses = @("10.40.40.41", "10.40.40.42")Code block. Set the Storage (target Portal) address as a variable - Discover the Storage (target Portal).Color mode
PS C:\> Foreach ($TargetPortalAddress in $TargetPortalAddresses){
    New-IscsiTargetPortal -TargetPortalAddress $TargetPortalAddress
}
InitiatorInstanceName   :
InitiatorPortalAddress  :
IsDataDigest            : False
IsHeaderDigest          : False
TargetPortalAddress     : 10.40.40.41
TargetPortalPortNumber  : 3260
PSComputerName          :

InitiatorInstanceName   :
InitiatorPortalAddress  :
IsDataDigest            : False
IsHeaderDigest          : False
TargetPortalAddress     : 10.40.40.42
TargetPortalPortNumber  : 3260
PSComputerName          :
PS C:\> Foreach ($TargetPortalAddress in $TargetPortalAddresses){ New-IscsiTargetPortal -TargetPortalAddress $TargetPortalAddress } InitiatorInstanceName : InitiatorPortalAddress : IsDataDigest : False IsHeaderDigest : False TargetPortalAddress : 10.40.40.41 TargetPortalPortNumber : 3260 PSComputerName : InitiatorInstanceName : InitiatorPortalAddress : IsDataDigest : False IsHeaderDigest : False TargetPortalAddress : 10.40.40.42 TargetPortalPortNumber : 3260 PSComputerName :code block. Storage (target Portal) Discovery - Connect the disk (target).Color mode
PS C:\> Foreach ($TargetPortalAddress in $TargetPortalAddresses){
    Get-IscsiTarget | Connect-IscsiTarget -IsMultipathEnabled $true -IsPersistent $true -TargetPortalAddress $TargetPortalAddress
}
AuthenticationType      : NONE
InitiatorInstanceName   : ROOT\ISCSIPRT\0000_0
InitiatorNodeAddress    : iqn.1991-05.com.microsoft:iqn01
InitiatorPortalAddress  : 0.0.0.0
InitiatorSideIdentifier : 400001370000
IsConnected             : True
IsDataDigest            : False
IsDiscovered            : True
IsHeaderDigest          : False
IsPersistent            : True
NumberOfConnections     : 1
SessionIdentifier       : ffffcd0b7ba58010-4000013700000006
TargetNodeAddress       : iqn.1992-08.com.netapp:sn.f807925eeae311ec9270d039ea38b250:vs.3
TargetSideIdentifier    : 1100
PSComputerName          :

AuthenticationType      : NONE
InitiatorInstanceName   : ROOT\ISCSIPRT\0000_0
InitiatorNodeAddress    : iqn.1991-05.com.microsoft:iqn01
InitiatorPortalAddress  : 0.0.0.0
InitiatorSideIdentifier : 400001370002
IsConnected             : True
IsDataDigest            : False
IsDiscovered            : True
IsHeaderDigest          : False
IsPersistent            : True
NumberOfConnections     : 1
SessionIdentifier       : ffffcd0b7ba58010-4000013700000007
TargetNodeAddress       : iqn.1992-08.com.netapp:sn.f807925eeae311ec9270d039ea38b250:vs.3
TargetSideIdentifier    : 1000
PSComputerName          :IsHeaderDigest         : False
TargetPortalAddress     : 10.40.40.42
TargetPortalPortNumber  : 3260
PSComputerName          :
PS C:\> Foreach ($TargetPortalAddress in $TargetPortalAddresses){ Get-IscsiTarget | Connect-IscsiTarget -IsMultipathEnabled $true -IsPersistent $true -TargetPortalAddress $TargetPortalAddress } AuthenticationType : NONE InitiatorInstanceName : ROOT\ISCSIPRT\0000_0 InitiatorNodeAddress : iqn.1991-05.com.microsoft:iqn01 InitiatorPortalAddress : 0.0.0.0 InitiatorSideIdentifier : 400001370000 IsConnected : True IsDataDigest : False IsDiscovered : True IsHeaderDigest : False IsPersistent : True NumberOfConnections : 1 SessionIdentifier : ffffcd0b7ba58010-4000013700000006 TargetNodeAddress : iqn.1992-08.com.netapp:sn.f807925eeae311ec9270d039ea38b250:vs.3 TargetSideIdentifier : 1100 PSComputerName : AuthenticationType : NONE InitiatorInstanceName : ROOT\ISCSIPRT\0000_0 InitiatorNodeAddress : iqn.1991-05.com.microsoft:iqn01 InitiatorPortalAddress : 0.0.0.0 InitiatorSideIdentifier : 400001370002 IsConnected : True IsDataDigest : False IsDiscovered : True IsHeaderDigest : False IsPersistent : True NumberOfConnections : 1 SessionIdentifier : ffffcd0b7ba58010-4000013700000007 TargetNodeAddress : iqn.1992-08.com.netapp:sn.f807925eeae311ec9270d039ea38b250:vs.3 TargetSideIdentifier : 1000 PSComputerName :IsHeaderDigest : False TargetPortalAddress : 10.40.40.42 TargetPortalPortNumber : 3260 PSComputerName :Code block. Disk (target) connection - Refresh the Storage (target) information.Color mode
PS C:\> Update-IscsiTargetPS C:\> Update-IscsiTargetCode block. Refresh Storage (target) information - Register the Multipath I/O DSM and create an MPIO Disk. *
Inquiries occur when a reboot is required during MPIO disk creation. Press Y or the Enter key to reboot.Color modePS C:\> New-MSDSMSupportedHW -VendorId MSFT2005 -ProductId iSCSIBusType_0x9 PS C:\> Update-MPIOClaimedHW Confirm Are you sure you want to perform this action? The operation may require a system restart. [Y] Yes [A] Yes to All [N] No [L] No to All [S] Suspend [?] Help (default is "Y"): FalsePS C:\> New-MSDSMSupportedHW -VendorId MSFT2005 -ProductId iSCSIBusType_0x9 PS C:\> Update-MPIOClaimedHW Confirm Are you sure you want to perform this action? The operation may require a system restart. [Y] Yes [A] Yes to All [N] No [L] No to All [S] Suspend [?] Help (default is "Y"): Falsecode block. Multipath I/O DSM registration, MPIO Disk creation - Check the list and path of Multipath I/O Disks. *
You can view MPIO disk information using the mpclaim.exe command. Enter the generated MPIO disk number to view the disk path and status.Color modePS C:\> mpclaim.exe -s -d For more information about a particular disk, use 'mpclaim -s -d #' where # is the MPIO disk number. MPIO Disk System Disk LB Policy DSM Name ------------------------------------------------------------------------------- MPIO Disk3 Disk 1 RR Microsoft DSM PS C:\> mpclaim.exe -s -d 3 MPIO Disk3: 02 Paths, Round Robin, Symmetric Access Controlling DSM: Microsoft DSM SN: 600A098038314853475D543544614131 Supported Load Balance Policies: FOO RR RRWS LQD WP LB Path ID State SCSI Address Weight --------------------------------------------------------------------------- 0000000077040001 Active/Optimized 004|000|001|000 0 TPG_State : Active/Optimized , TPG_Id: 1000, : 25 0000000077040000 Active/Optimized 004|000|000|000 0 TPG_State : Active/Optimized , TPG_Id: 1001, : 26PS C:\> mpclaim.exe -s -d For more information about a particular disk, use 'mpclaim -s -d #' where # is the MPIO disk number. MPIO Disk System Disk LB Policy DSM Name ------------------------------------------------------------------------------- MPIO Disk3 Disk 1 RR Microsoft DSM PS C:\> mpclaim.exe -s -d 3 MPIO Disk3: 02 Paths, Round Robin, Symmetric Access Controlling DSM: Microsoft DSM SN: 600A098038314853475D543544614131 Supported Load Balance Policies: FOO RR RRWS LQD WP LB Path ID State SCSI Address Weight --------------------------------------------------------------------------- 0000000077040001 Active/Optimized 004|000|001|000 0 TPG_State : Active/Optimized , TPG_Id: 1000, : 25 0000000077040000 Active/Optimized 004|000|000|000 0 TPG_State : Active/Optimized , TPG_Id: 1001, : 26Code block. Check the list and path of Multipath I/O Disk - Check in Disk Management.
- Open Command Prompt (Admin) and run powershell.
Block Storage(BM) Check detailed information
Block Storage(BM) service allows you to view and edit the full resource list and detailed information. Block Storage(BM) Details page consists of the Detailed Information, Snapshot List, Replication, Operation History tabs.
To view detailed information about the Block Storage(BM) service, follow these steps.
- Click the All Services > Storage > Block Storage(BM) menu. 1. Go to the Service Home page of Block Storage (BM).
- On the Service Home page, click the Block Storage(BM) menu. 2. Go to the Block Storage(BM) List page.
- On the Block Storage(BM) List page, click the resource to view detailed information. 3. Block Storage(BM) Details Navigate to the page.
- The Block Storage(BM) Details page displays status information and additional feature information, and consists of Details, Snapshot List, Replication, Tags, Operation History tabs.
Category Detailed description Volume status 볼륨의 상태 - Creating: In progress
- Available: Creation complete, server connection available
- Attaching: Connecting to server
- Detaching: Disconnecting from server
- In Use: Server connection established
- Deleting: Service termination in progress
- Editing: Changing settings
- Error Deleting: Abnormal state during deletion
- Error: Abnormal state during creation
Clone creation Create a replica in a different location - For detailed information on creating a replica, see 복제 생성하기
Create snapshot Create a snapshot at a specific point in time - For detailed information on snapshot creation, see 스냅샷 생성하기
Service cancellation Button to cancel the service Table. Status information and additional features
- The Block Storage(BM) Details page displays status information and additional feature information, and consists of Details, Snapshot List, Replication, Tags, Operation History tabs.
Reference
In the case of a recovery copy, snapshot list, replication tabs are not displayed.
Detailed Information
Block Storage(BM) List page allows you to view detailed information of the selected resource and, if necessary, edit the information.
| Category | Detailed description |
|---|---|
| Service | Service name |
| Resource Type | Resource Type |
| SRN | Unique resource ID in Samsung Cloud Platform
|
| Resource Name | Resource name
|
| Resource ID | Service’s unique resource ID |
| Constructor | User who created the service |
| Creation date and time | Service creation date and time |
| Modifier | User who modified the service |
| Modification date and time | Service modification date and time |
| Volume name | Volume name
|
| Category | Distinguish original status related to duplication |
| Availability Zone | Availability Zone information |
| Storage volume name | Volume name within the storage device
|
| capacity | Volume capacity
|
| Max IOPS | The IOPS value set when creating the service
|
| Max Throughput | Throughput speed (MB/s) set when creating the service
|
| Disk type | Disk type |
| Encryption | Encryption status
|
| Volume Group | Name of the Volume Group that the volume belongs to |
| iSCSI information | Storage Target IP information for server connection |
| Snapshot capacity | Snapshot storage capacity
|
| Snapshot schedule | Snapshot auto-creation interval
|
| Recovery copy | Snapshot name
|
| Connection server | Connected Bare Metal Server
|
Table. Block Storage(BM) Detailed Information Items
Reference
For volumes created before December 18, 2025, IOPS and Throughput information is not displayed.
Snapshot List
Block Storage(BM) List page lets you view the snapshot of the selected resource.
| Category | Detailed description |
|---|---|
| Snapshot usage | Total size of stored snapshots |
| Snapshot name | Snapshot name |
| capacity | Snapshot capacity |
| Creation date and time | Snapshot creation time |
| Additional features > More | Snapshot management button
|
| Delete | Select the snapshots to delete from the snapshot list and delete them all at once. |
Table. Snapshot list tab detailed information items
Warning
- If the maximum number of snapshots or the snapshot space threshold (around 90%) is exceeded, older snapshots are deleted first.
- If the snapshot capacity usage is high (around 90%), replication may be stopped.
- Snapshots can be created up to a maximum of 1,023 (with up to 128 automatically generated via schedule), and if the maximum number is exceeded, no further snapshots can be created.
- Snapshot recovery must be performed while all connected servers are disconnected (Umount, Disk Offline), and the recovered volume can be used after it is reconnected (Mount, Disk Online).
- Only one recovery copy can be created, and it is a separate volume that incurs the same charges as the original.
Reference
- The snapshot creation time is based on Asia/Seoul (GMT +09:00).
- When using replication, snapmirror files cannot be deleted.
- When using a Volume Group, set the snapshot schedule on the Volume Group (BM) detail information screen. * The created snapshot can be viewed in the Block Storage (BM) snapshot list.
Replication
On the Block Storage(BM) List page, you can view the replication information of the selected resource.
| Category | Detailed description |
|---|---|
| Replication Policy | User-configured replication policy
|
| Replication cycle | User-configured replication interval of the source
|
| Replication status | Replication progress status based on policy settings |
| Lag Time | Time elapsed since the last successful replication
|
| Volume information | Volume information for the source and replica
|
Table. Replication tab detailed information items
Caution
If the snapshot capacity usage is high (around 90%), replication may be stopped.
Reference
- When creating a clone, a replica with the same disk type is created.
- You can create a replica after setting the snapshot capacity.
- If you are using a Volume Group, check the replication information on the Volume Group (BM) list page.
- If the replication policy is stopped or deleted, the replica can modify the connected server.
- A replica can use the snapshot feature after the replication policy is deleted.
- If the replication policy is stopped or the replication status is completed, you can modify the policy and schedule on the replica.
Tag
Block Storage (BM) List page lets you view, add, modify, or delete the tag information of the selected resource.
| Category | Detailed description |
|---|---|
| Tag list | Tag list
|
Table. Block Storage (BM) Tag Tab Items
Operation History
Block Storage(BM) List page allows you to view the operation history of the selected resource.
| Category | Detailed description |
|---|---|
| Task History List | Resource Change History
|
Table. Work History Tab Detailed Information Items
Block Storage(BM) Managing Resources
If you need to modify the settings of a created Block Storage(BM) or add or remove a connected server, you can perform the operation on the Block Storage(BM) Details page.
Edit volume name
You can edit the volume name. To modify the volume name, follow these steps.
- All Services > Storage > Block Storage(BM) Click the menu. 1. Go to the Service Home page of Block Storage (BM).
- On the Service Home page, click the Block Storage(BM) menu. 2. Block Storage(BM) List Navigate to the page.
- Block Storage (BM) List Click the resource to edit the volume name on the page. 3. Block Storage(BM) Details Navigate to the page.
- Volume Name’s Edit button, click it. 4. Edit Volume Name the popup window opens.
- Enter the volume name and click the Confirm button.
Reference
Must start with a letter and can be set to 3–28 characters using letters, numbers, and special characters (
-).Expand Capacity
You can expand the volume capacity. To increase capacity, follow the steps below.
- All Services > Storage > Block Storage(BM) Click the menu. 1. Go to the Service Home page of Block Storage (BM).
- On the Service Home page, click the Block Storage(BM) menu. 2. Go to the Block Storage(BM) List page.
- Block Storage(BM) List Click the resource to expand capacity on the page. 3. Block Storage(BM) Details Go to the page.
- Click the Capacity Edit button. 4. Capacity Edit The popup window opens.
- After adding the capacity you want to expand (1/~16,384 GB) to the current capacity and entering the total capacity, click the Confirm button.
Caution
- Capacity can be expanded only for the original volume that does not use the snapshot feature.
- Size reduction is not provided.
Modify snapshot size
You can modify the capacity of the snapshot storage space. To modify the snapshot capacity, follow these steps.
- All Services > Storage > Block Storage(BM) Click the menu. 1. Go to the Service Home page of Block Storage (BM).
- On the Service Home page, click the Block Storage(BM) menu. 2. Navigate to the Block Storage(BM) List page.
- Block Storage (BM) List page, click the resource to modify the snapshot capacity. 3. Block Storage(BM) Details Navigate to the page.
- Click the Edit button for the Snapshot Capacity item. 4. Edit Snapshot Capacity A popup window opens.
- Set the Use status and Generation Capacity (%), and click the Confirm button.
- Generation Capacity (%) can be selected in increments of 50 between 100 and ~500.
Caution
- Charges change based on snapshot usage and capacity. * (Example: when the volume size is 10GB and the snapshot creation size is 100%, a total of 20GB charge occurs)
- If the maximum number of snapshots or the snapshot space threshold (around 90%) is exceeded, older snapshots are deleted first.
- If the size after modification is smaller than the original, older snapshots will be deleted first.
- If changed to unused, all snapshots will be deleted.
- You can create a replica after setting the snapshot capacity.
- After configuring the snapshot size, it can be added to the Volume Group.
- If the snapshot capacity usage is high (around 90%), replication may be stopped.
- A replica can use the snapshot feature after the replication policy is deleted.
Edit Snapshot Schedule
You can modify the snapshot auto-creation interval. To modify the snapshot schedule, follow these steps.
- Click the All Services > Storage > Block Storage(BM) menu. 1. Go to the Service Home page of Block Storage (BM).
- On the Service Home page, click the Block Storage(BM) menu. 2. Block Storage(BM) List Navigate to the page.
- Block Storage (BM) List page, click the resource to edit the snapshot schedule. 3. Block Storage(BM) Details Navigate to the page.
- Click the Edit button of the Snapshot Schedule item. 4. Edit Snapshot Schedule The popup window opens.
- Set the snapshot auto‑creation status and creation interval, and click the Confirm button.
- If you want to automatically create snapshots based on the Generation interval, select Automatic creation as Enabled.
- Generation cycle is daily, hourly selectable, or weekly, day of week, hourly selectable.
Caution
Snapshots can be created up to a maximum of 1,023 (with up to 128 automatically generated via schedule), and if the maximum number is exceeded, no further snapshots can be created.
Reference
- The snapshot schedule is based on Asia/Seoul (GMT +09:00).
- You can register a schedule after setting the snapshot capacity.
- When configuring a snapshot schedule, it cannot be added to a Volume Group.
Max IOPS Update
You can modify the Max IOPS value. To modify the Max IOPS value, follow these steps.
- All Services > Storage > Block Storage(BM) Click the menu. 1. Go to the Service Home page of Block Storage (BM).
- On the Service Home page, click the Block Storage(BM) menu. 2. Block Storage(BM) List Go to the page.
- On the Block Storage(BM) List page, click the resource to modify the IOPS value. 3. Block Storage(BM) Details Navigate to the page.
- Click the Edit button for Max IOPS. 4. Max IOPS Edit The popup window opens.
- After entering the Max IOPS value to change, click the Confirm button.
- You can enter a Max IOPS value between 5,000 and 20,000.
Reference
- The Max IOPS value can be modified after the initial server attach.
- For a recovery copy, the Max IOPS value cannot be modified.
Edit Max Throughput
You can modify the Max Throughput speed. To modify the Max Throughput speed, follow these steps.
- Click the All Services > Storage > Block Storage(BM) menu. 1. Go to the Service Home page of Block Storage (BM).
- On the Service Home page, click the Block Storage(BM) menu. 2. Navigate to the Block Storage(BM) List page.
- On the Block Storage(BM) List page, click the resource to modify the Throughput speed. 3. Block Storage(BM) Details Navigate to the page.
- Click the Edit button of Max Throughput. 4. Edit Max Throughput The popup window opens.
- After entering the Max Throughput speed to change, click the Confirm button.
- Max Throughput speed can be set to a value between 250 ~ 1,000.
Reference
- The Max Throughput speed can be modified after the initial server attach.
- For recovery copies, the Max Throughput speed cannot be modified.
Edit connection server
You can connect or disconnect the Bare Metal Server, Multi Node GPU Cluster. To modify the connection server, follow these steps.
- Click the All Services > Storage > Block Storage(BM) menu. 1. Go to the Service Home page of Block Storage (BM).
- On the Service Home page, click the Block Storage(BM) menu. 2. Navigate to the Block Storage(BM) List page.
- On the Block Storage(BM) List page, click the resource to edit the connected server. 3. Block Storage(BM) Details Navigate to the page.
- If adding a connection server, click the Add button in the Connection Server item. 4. Add Connection Server The popup window opens.
- After selecting the server you want to connect to, click the Confirm button.
- If you are disconnecting the server, click the Disconnect button in the Connection Server item.
- Be sure to connect to the server, perform the disconnect operation (Umount, Disk Offline), and then disconnect.
Caution
- Connect to the server, be sure to perform the disconnect operations (Umount, Disk Offline), and then disconnect the server. * Releasing without OS actions may cause a status error (Hang) on the connected server. * For detailed information about disconnecting the server, please refer to 서버 연결 해제하기.
Reference
- You can connect up to 8 Bare Metal Servers created in the same location as the Block Storage.
- There is no limit on the number of volume connections for a Bare Metal Server.
- After adding a connected server, you can use it after performing connection tasks (Mount, Disk Online) on the server. * For detailed information about server connections, see 서버 연결하기.
- Connect to the server, be sure to perform the disconnect tasks (Umount, Disk Offline), and then disconnect the server. * If you release without OS operations, a status error (Hang) may occur on the connected server. * For detailed information about server disconnection, please refer to 서버 연결 해제하기.
- A replica can modify the connected server when the replication policy is stopped or deleted.
Block Storage(BM) Cancel
You can reduce operating costs by terminating unused Block Storage(BM). However, if you terminate the service, the running service may be stopped immediately, so you should proceed with the termination only after fully considering the impact that may arise from the service interruption.
Caution
- Please note that data cannot be recovered after termination.
- If a connected server exists, you can terminate it after removing all linked resources.
- The volume can be detached only when it is in the Available or Error state.
- If a replication policy is in use, you can cancel it after removing the policy from the connected replica.
- If a Volume Group is in use, you can disconnect the associated Volume Group before terminating it.
- If a recovery copy of the original exists, you can delete the recovery copy before terminating.
To cancel Block Storage, follow the steps below.
- All Services > Storage > Block Storage(BM) Click the menu. 1. Go to the Service Home page of Block Storage (BM).
- On the Service Home page, click the Block Storage(BM) menu. 2. Go to the Block Storage(BM) List page.
- On the Block Storage(BM) List page, select the resource to terminate, and click the Terminate Service button.
- After navigating to the detailed page of the resource to be terminated, you can also terminate it individually by clicking the Cancel Service button.
- When the pop-up notifying service termination opens, enter Delete and then click the Confirm button.
- When termination is complete, check on the Block Storage(BM) List page whether the resource has been terminated.
1.2.1 - Connect to server
When using a volume on the server, a connect or disconnect operation is required.
Block Storage(BM) Details On the page, after adding a connected server, log into the server and perform Multi Path configuration and connection tasks (Mount, Disk Online). After use is complete, perform the disconnect operation (Umount, Disk Offline) and remove the connected server.
Setting up Multi Path
A Multi Path configuration is required before using the volume on the connected server. Follow the steps below.
Caution
If Multi Path is not configured, service impact may occur due to maintenance work, failures, etc.
Linux operating system
Click the All Services > Storage > Block Storage(BM) menu. 1. Go to the Service Home page of Block Storage (BM).
On the Service Home page, click the Block Storage(BM) menu. 2. Navigate to the Block Storage(BM) List page.
Block Storage(BM) List page, click the resource to configure Multi Path. 3. Block Storage(BM) Details Navigate to the page.
After checking the server in the Connection Server item, connect. 4. Configure Multi Path according to the guide below.
Device check
- The created volume can be verified with the
fdisk -lcommand.
- The created volume can be verified with the
Verify DM-Multipath application
- In the Linux system, Multi Path is automatically applied during volume detection, and it can be verified with the
multipath –llcommand. - Volumes with Multi Path applied use Multipath device names such as
/dev/mapper/#####rather than the/dev/sd#format, and can be verified with thefdisk –lcommand.
- In the Linux system, Multi Path is automatically applied during volume detection, and it can be verified with the
iSCSI replacement timeout value setting
- When establishing an iscsi connection, set the
replacement timeout.
# vi /etc/iscsi/iscsid.conf node.session.timeo.replacement_timeout = 5 (default 120 값을 5 로 변경)- After modifying the above, restart the iscsi service.
# systemctl restart iscsid- When establishing an iscsi connection, set the
Windows operating system
Click the All Services > Storage > Block Storage(BM) menu. 1. Navigate to the Service Home page of Block Storage (BM).
On the Service Home page, click the Block Storage(BM) menu. 2. Go to the Block Storage(BM) List page.
On the Block Storage(BM) List page, click the resource to configure Multi Path. 3. Block Storage(BM) Details Navigate to the page.
After verifying the server in the Connection Server item, connect. 4. Configure Multi Path according to the guide below.
Device check
- Click the Start > Server Manager menu to launch Server Manager.
- When you click the Server Manager > File and Storage Services > Volumes > Disks menu, you can view the iscsi device.
- Since it is a Multi Path configuration, a single device appears as multiple devices for each path.
Install MPIO (Reboot required)
Click Server Manager > DashBoard > Add roles and features.
Add Roles and Features Wizard When the popup window opens, click the Next button.
On the Select installation type page, select Role-based or feature-based installation, and click the Next button.
Select destination server(Server selection) On this page, the current server is automatically detected. 4. Check the content and click the Next button.
Select features(Feature selection) On the page, select Features from the left menu, check Multipath I/O, and click the Next button.
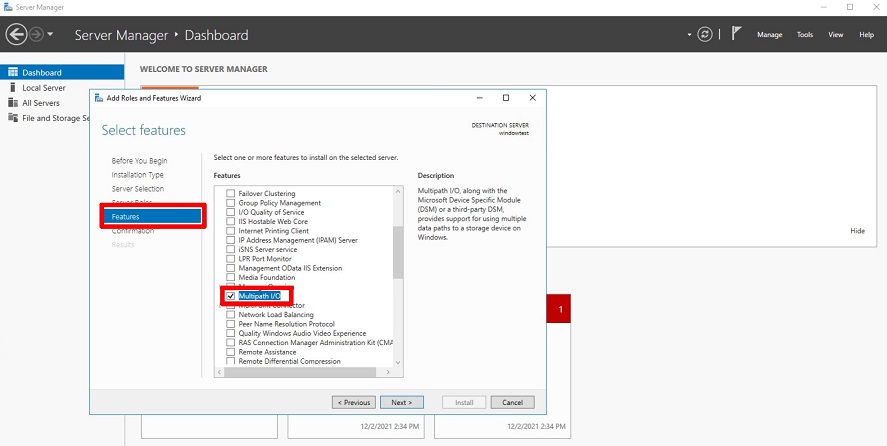
Confirm installation selections(Confirm installation selections) on the page, after checking Restart the destination server automatically if required, when the popup appears, click Yes and click the Install button.
The installation starts and automatically reboots.
When reconnecting to the server, the installation is already complete. 8. Click the close button to close the wizard popup window.
Click Server Manager > DashBoard > tools > MPIO.
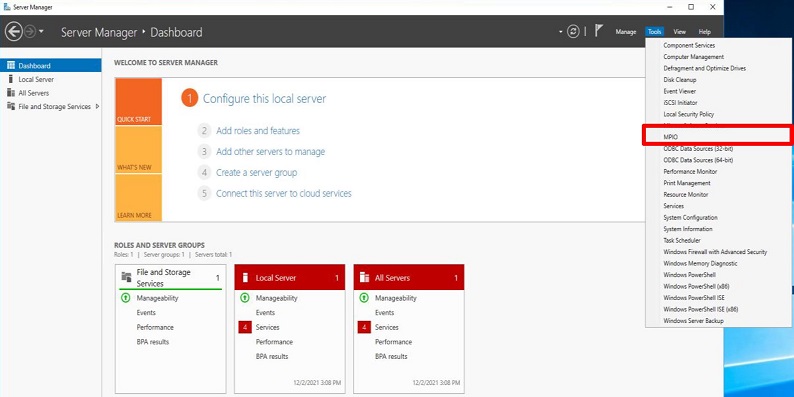
In the Discover Multi-Paths tab, check Add support for iSCSI devices and click the Add button.
- If a message appears, reboot the server again.
After the reboot, you can verify NETAPP Devices in MPIO devices.

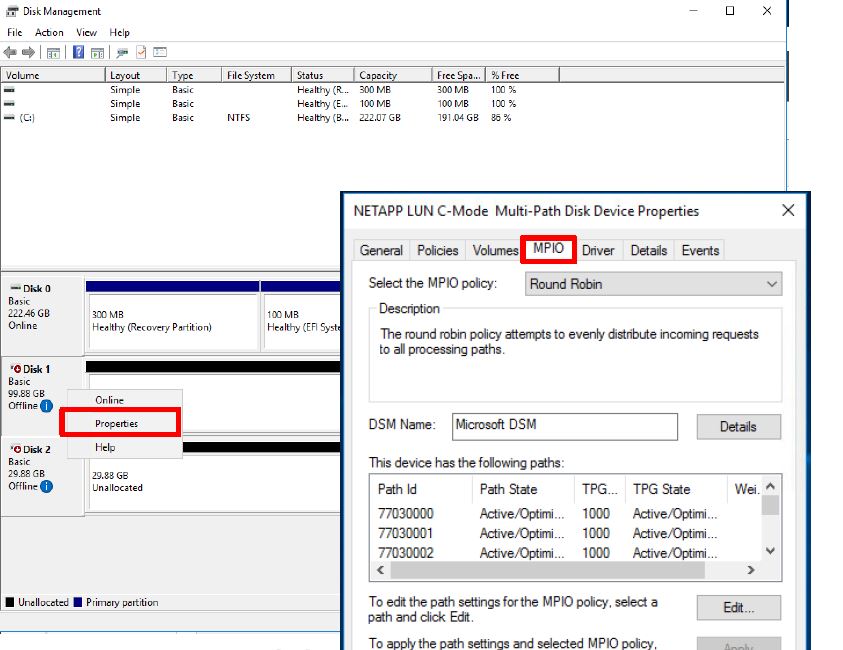
In the Windows Run dialog (Command Prompt), run diskmgmt.msc to open the Disk management popup window.
- You can verify that MPIO is applied by checking the properties of the volume created in the Block Storage (BM) service.
- You can verify that MPIO is applied by checking the properties of the volume created in the Block Storage (BM) service.
Connect to Server (Mount, Disk Online)
To use the volume added to the connected server, you must log in to the server and perform the connection tasks (Mount, Disk Online). Follow the steps below.
Linux operating system
Server connection example configuration
- Server OS: LINUX
- Mount location: /data
- Volume size: 24 GB
- File system: ext3, ext4, xfs etc
- Additional allocated disk: /dev/vdb
- Click the All Services > Storage > Block Storage(BM) menu. 1. Navigate to the Service Home page of Block Storage (BM).
- On the Service Home page, click the Block Storage(BM) menu. 2. Go to the Block Storage(BM) List page.
- On the Block Storage(BM) List page, click the resource to connect the server. 3. Block Storage(BM) Details Navigate to the page.
- After checking the server in the Connection Server item, connect. 4. Follow the guide below to mount the volume.
- Switch to root privilegesColor mode
$ sudo -i$ sudo -iCode block. Switch to root privileges - Check DiskColor mode
# lsblk
NAME    MAJ:MIN  RM   SIZE RO TYPE MOUNTPOINT
vda       252:0   0    24G  0 disk
├─vda1    252:1   0  23.9G  0 part [SWAP]
└─vda14   252:14  0     4M  0 part /
└─vda15   252:15  0   106M  0 part /boot/efi
vdb       252:16  0    24G  0 disk
# lsblk NAME MAJ:MIN RM SIZE RO TYPE MOUNTPOINT vda 252:0 0 24G 0 disk ├─vda1 252:1 0 23.9G 0 part [SWAP] └─vda14 252:14 0 4M 0 part / └─vda15 252:15 0 106M 0 part /boot/efi vdb 252:16 0 24G 0 diskCode block. Disk check - Create partitionColor mode
# fdisk /dev/vdb Command (m for help): n Partition type: p primary (0 primary, 0 extended, 4 free) e extended Select (default p): p Partition number (1-4, default 1): 1 First sector (2048-50331646, default 2048): Last sector, +/-sectors or +/-size{K,M,G,T,P} (2048-50331646, default 50331646): Created a new partition 1 of type 'Linux' and of size 24 GiB. Command (m for help): w The partition table has been altered! Calling ioctl() to re-read partition table. Syncing disks.# fdisk /dev/vdb Command (m for help): n Partition type: p primary (0 primary, 0 extended, 4 free) e extended Select (default p): p Partition number (1-4, default 1): 1 First sector (2048-50331646, default 2048): Last sector, +/-sectors or +/-size{K,M,G,T,P} (2048-50331646, default 50331646): Created a new partition 1 of type 'Linux' and of size 24 GiB. Command (m for help): w The partition table has been altered! Calling ioctl() to re-read partition table. Syncing disks.Code block. Create partition - Partition format setting (example: ext4)Color mode
# lsblk NAME MAJ:MIN RM SIZE RO TYPE MOUNTPOINT vda 252:0 0 24G 0 disk ├─vda1 252:1 0 23.9G 0 part [SWAP] └─vda14 252:14 0 4M 0 part / └─vda15 252:15 0 106M 0 part /boot/efi vdb 252:16 0 24G 0 disk └─vdb1 252:17 0 24G 0 part # mkfs.ext4 /dev/vdb1 mke2fs 1.46.5 (30-Dec-2021) ... Writing superblocks and filesystem accounting information: done# lsblk NAME MAJ:MIN RM SIZE RO TYPE MOUNTPOINT vda 252:0 0 24G 0 disk ├─vda1 252:1 0 23.9G 0 part [SWAP] └─vda14 252:14 0 4M 0 part / └─vda15 252:15 0 106M 0 part /boot/efi vdb 252:16 0 24G 0 disk └─vdb1 252:17 0 24G 0 part # mkfs.ext4 /dev/vdb1 mke2fs 1.46.5 (30-Dec-2021) ... Writing superblocks and filesystem accounting information: doneCode block. Partition format configuration - Volume MountColor mode
# mkdir /data

# mount /dev/vdb1 /data

# lsblk
NAME    MAJ:MIN  RM   SIZE RO TYPE MOUNTPOINT
vda       252:0   0    24G  0 disk
├─vda1    252:1   0  23.9G  0 part [SWAP]
└─vda14   252:14  0     4M  0 part /
└─vda15   252:15  0   106M  0 part /boot/efi
vdb       252:16  0    24G  0 disk
└─vdb1    252:17  0    24G  0 part /data

# vi /etc/fstab
(add) /dev/vdb1     /data       ext4     defaults,_netdev   0 0
# mkdir /data # mount /dev/vdb1 /data # lsblk NAME MAJ:MIN RM SIZE RO TYPE MOUNTPOINT vda 252:0 0 24G 0 disk ├─vda1 252:1 0 23.9G 0 part [SWAP] └─vda14 252:14 0 4M 0 part / └─vda15 252:15 0 106M 0 part /boot/efi vdb 252:16 0 24G 0 disk └─vdb1 252:17 0 24G 0 part /data # vi /etc/fstab (add) /dev/vdb1 /data ext4 defaults,_netdev 0 0Code block. Volume Mount Item Explanation cat /etc/fstab This is a Linux system’s filesystem information file. It is used when the server starts. df -h Check the total disk usage mounted on the Linux system. fdisk -l Check the partition information. - Physical disks are
/dev/sda,/dev/sdb,/dev/sdc, displayed as characters such asa,b,c
- Disk partitions are
/dev/sda1,/dev/sda2,/dev/sda3, displayed as numbers such as1,2,3
Table. Refer to the Mount commandReferenceThe_netdevoption is used when mounting network‑based file systems (NFS, iSCSI, CIFS/SMB, etc.) on Linux, and can prevent mount errors that may occur during boot.command Explanation m Check the usage of the fdisk command. n Create a new partition. p Check the updated partition information. t Change the partition’s system ID. w Save the partition information and then exit the fdisk configuration. Table. Refer to the partition creation command (fdisk) - Physical disks are
- Switch to root privileges
Windows operating system
Click the All Services > Storage > Block Storage(BM) menu. 1. Go to the Service Home page of Block Storage (BM).
On the Service Home page, click the Block Storage(BM) menu. 2. Go to the Block Storage(BM) List page.
On the Block Storage(BM) List page, click the resource to connect the server. 3. Block Storage(BM) Details Go to the page.
After verifying the server in the Connection Server item, connect. 4. Connect the volume (Disk Online) according to the guide below.
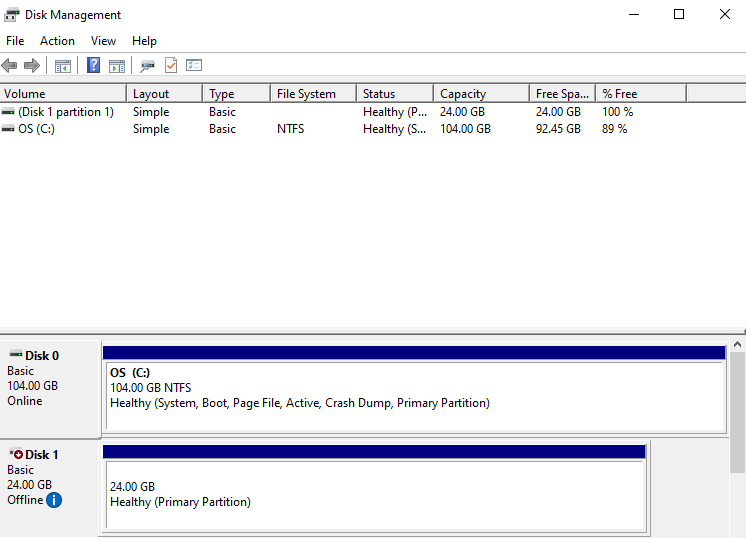
- Windows Start icon right-click, then run Computer Management.
- In the Computer Management tree structure, select Storage > Disk Management.
- Check Disk
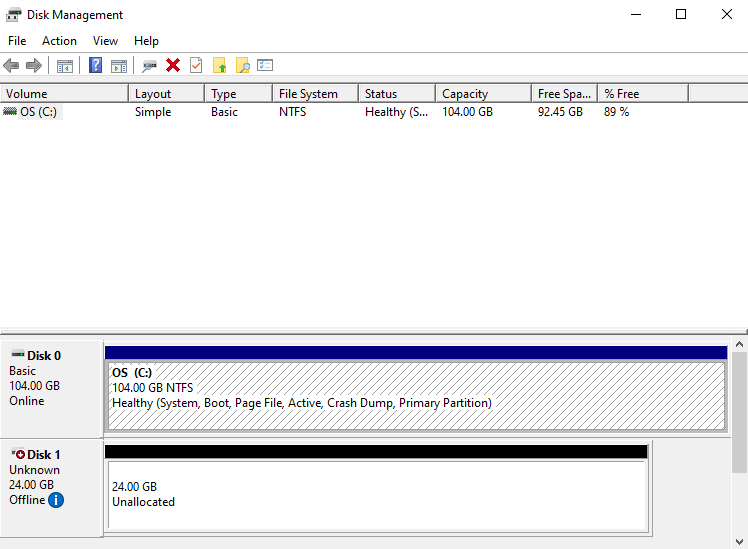
- Disk Online
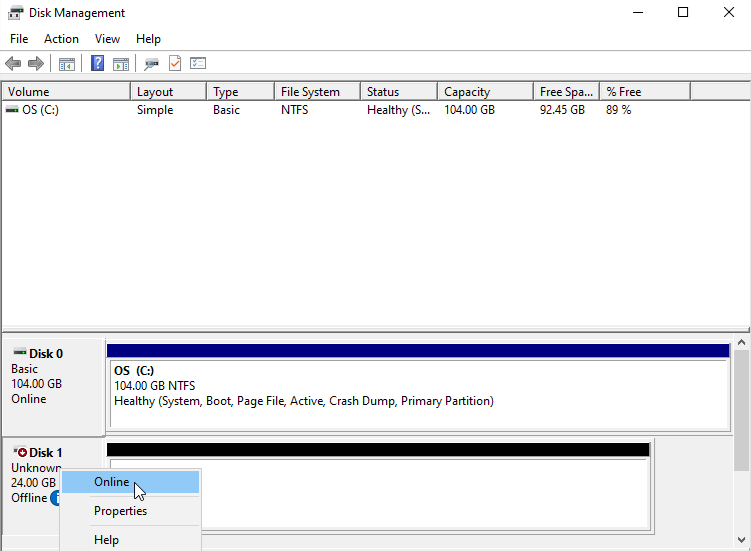
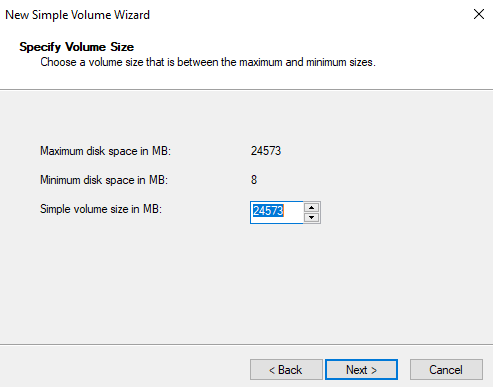
- Disk initialization
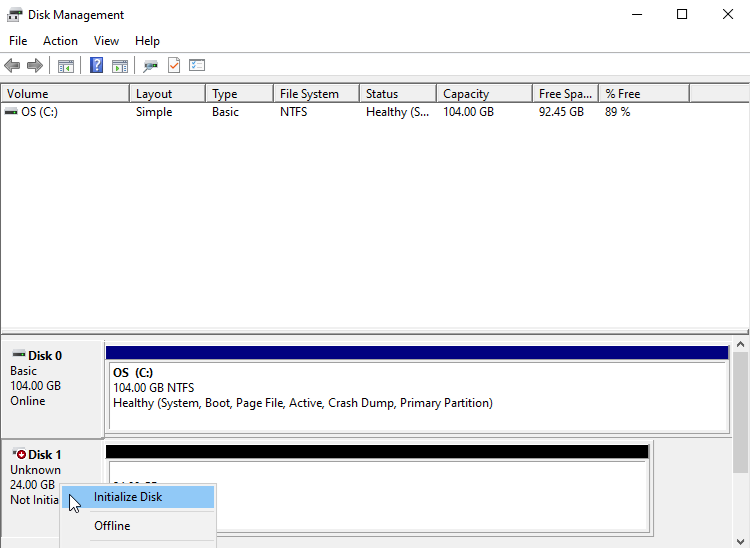
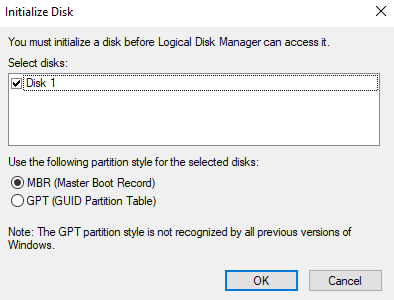
- Partition format
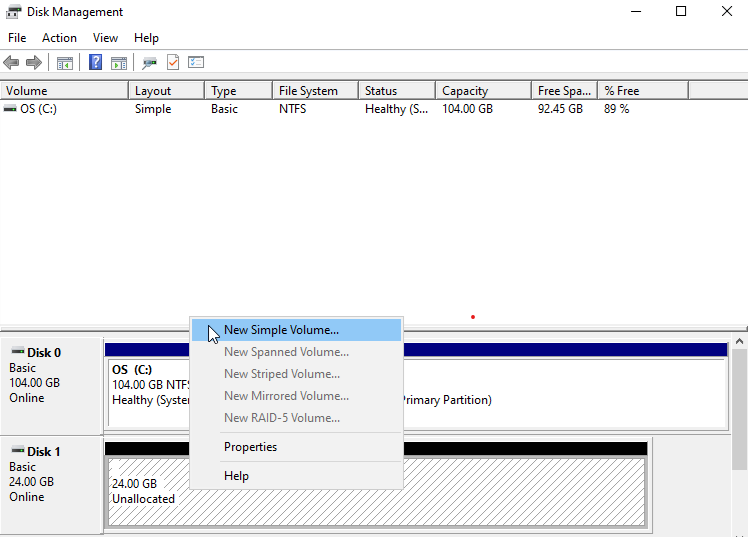

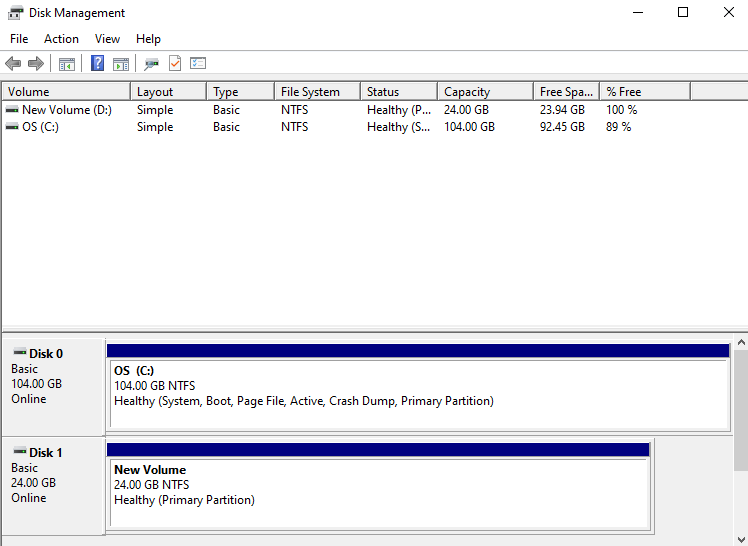
- Check volume
Disconnect Server (Umount, Disk Offline)
After accessing the server and performing the disconnect tasks (Umount, Disk Offline), you need to detach the server in the Console. Follow the steps below.
Caution
If you disconnect the server from the console without performing the disconnect operations (Umount, Disk Offlline) on the server, a server status error (Hang) may occur. Be sure to complete the OS tasks first.
Linux operating system
- Click the All Services > Storage > Block Storage(BM) menu. 1. Go to the Service Home page of Block Storage (BM).
- On the Service Home page, click the Block Storage(BM) menu. 2. Go to the Block Storage(BM) List page.
- On the Block Storage(BM) List page, click the resource to disconnect the server. 3. Block Storage(BM) Details Navigate to the page.
- Connection Server item, verify the server and then connect. 4. Unmount the volume according to the guide below.
- Volume UmountColor mode
# umount /dev/vdb1 /data

# lsblk
NAME    MAJ:MIN  RM   SIZE RO TYPE MOUNTPOINT
vda       252:0   0    24G  0 disk
├─vda1    252:1   0  23.9G  0 part [SWAP]
└─vda14   252:14  0     4M  0 part /
└─vda15   252:15  0   106M  0 part /boot/efi
vdb       252:16  0    24G  0 disk
└─vdb1    252:17  0    24G  0 part

# vi /etc/fstab
(delete) /dev/vdb1     /data       ext4     defaults   0 0
# umount /dev/vdb1 /data # lsblk NAME MAJ:MIN RM SIZE RO TYPE MOUNTPOINT vda 252:0 0 24G 0 disk ├─vda1 252:1 0 23.9G 0 part [SWAP] └─vda14 252:14 0 4M 0 part / └─vda15 252:15 0 106M 0 part /boot/efi vdb 252:16 0 24G 0 disk └─vdb1 252:17 0 24G 0 part # vi /etc/fstab (delete) /dev/vdb1 /data ext4 defaults 0 0Code block. Volume Umount
- Volume Umount
Windows operating system
Click the All Services > Storage > Block Storage(BM) menu. 1. Navigate to the Service Home page of Block Storage (BM).
On the Service Home page, click the Block Storage(BM) menu. 2. Go to the Block Storage(BM) List page.
Block Storage(BM) List On the page, click the resource to disconnect the server. 3. Block Storage (BM) Details Navigate to the page.
Connection Server item, verify the server and then connect. 4. Please disconnect the volume (Disk Offline) according to the guide below.
- Windows Start icon right-click, then run Computer Management
- In the Computer Management tree, select Storage > Disk Management
- Right-click the disk to be removed, then run Offline
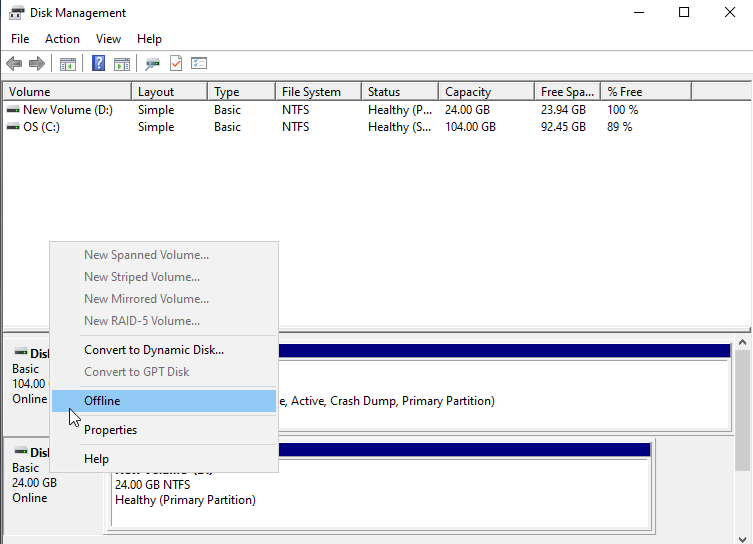
- Check disk status
1.2.2 - Use Snapshot
You can create, delete, or recover a snapshot of a created Block Storage (BM). You can perform these actions on the Block Storage (BM) Details page and the Snapshot List page.
Create Snapshot
Users can create a snapshot at the desired point in time.
guide
A replica can delete the replication policy, set the snapshot size for all block storage within the volume group, and then create a snapshot.
- Click the All Services > Storage > Block Storage(BM) menu. Navigate to the Service Home page of Block Storage(BM).
- On the Service Home page, click the Block Storage(BM) menu. You will be taken to the Block Storage(BM) List page.
- Click the resource to create a snapshot on the Block Storage(BM) List page. Navigate to the Block Storage(BM) Details page.
- Check the setting status of the Snapshot Capacity item.
- Snapshots can be created only when storage space has been secured by configuring snapshot capacity.
- For detailed information, refer to Modify Snapshot Capacity.
- Click the Create Snapshot button. The Create Snapshot popup opens.
- Click the Create button. It creates a snapshot of the current point in time.
- Click the Snapshot List page. You will be taken to the Block Storage(BM) Snapshot list page.
- Check the generated snapshot.
Caution
- If the maximum number of snapshots or the snapshot space threshold (around 90%) is exceeded, older snapshots are deleted first.
- If the usage rate within the snapshot capacity is high (around 90%), replication may be stopped.
- If there is a volume in the Volume Group with snapshot capacity not set, you cannot create a snapshot. Set the snapshot capacity for all volumes first.
- Snapshots can be created up to a maximum of 1,023 (with up to 128 automatically generated via schedule), and if the maximum number is exceeded, no further snapshots can be created.
Reference
- The snapshot creation time is based on Asia/Seoul (GMT +09:00).
- If you want to automatically create snapshots using a schedule, set the snapshot schedule on the Block Storage(BM) Details page.
- For detailed information about the snapshot schedule, refer to Modify Snapshot Schedule.
- Capacity can be expanded only for the original volume that does not use the snapshot feature.
Recover Snapshot
Block Storage(BM) volumes can be restored from a snapshot. To restore a snapshot, follow the steps below.
- Click the All Services > Storage > Block Storage(BM) menu. Navigate to the Service Home page of Block Storage(BM).
- On the Service Home page, click the Block Storage(BM) menu. You will be taken to the Block Storage(BM) List page.
- Block Storage(BM) List Click the resource to restore from a snapshot. Block Storage(BM) Details page will be opened.
- If a server has been added in the Connected Server item, connect to the server and then perform the disconnect tasks (Umount, Disk Offline).
- For more details, refer to Disconnect Server.
- Click the Snapshot List page. Navigate to the Block Storage(BM) Snapshot List page.
- After checking the Snapshot name and Creation timestamp, click the More button of the snapshot you want to restore.
- Recover button, click it. The snapshot recovery popup opens.
- After verifying the snapshot name and creation time, click the Confirm button. Recover the Block Storage volume from the snapshot.
- Click the Details button. Navigate to the Block Storage(BM) Details page.
- Connection Server If a server has been added to this item, connect to the server and perform the connection tasks (Mount, Disk Online).
- For detailed information, refer to Connect to Server.
Caution
- Snapshot recovery must be performed while all connected servers are disconnected (Umount, Disk Offline), and the restored volume can be used after it is reconnected (Mount, Disk Online).
- After the snapshot recovery is completed, all snapshots created after the snapshot used for recovery are deleted.
- When restoring a snapshot, the volume is restored to that point in time.
- If you are using Volume Group(BM), you can perform snapshot recovery from the detail page of Volume Group(BM).
Create a recovery copy
You can create a recovery copy from a snapshot of a Block Storage (BM) volume. To create a snapshot recovery copy, follow the steps below.
- Click the All Services > Storage > Block Storage(BM) menu. Navigate to the Service Home page of Block Storage(BM).
- On the Service Home page, click the Block Storage(BM) menu. You will be taken to the Block Storage(BM) List page.
- On the Block Storage(BM) List page, click the resource to restore from a snapshot. You will be taken to the Block Storage(BM) Details page.
- If a server has been added in the Connected Server item, connect to the server and then perform the disconnect tasks (Umount, Disk Offline).
- For more details, refer to Disconnect Server.
- Click the Snapshot List page. Go to the Block Storage(BM) Snapshot List page.
- After confirming the Snapshot name and Creation timestamp, click the More button of the snapshot you want to create a recovery copy for.
- Click the Create Recovery button. The snapshot recovery creation popup opens.
- After entering the Recovery volume name, click the Create button. A popup notifying the creation of the recovery image will appear.
- Click the Confirm button. The recovery copy creation request is complete.
Caution
- Only one recovery copy can be created per original.
- A recovery copy is a separate volume created with the same capacity as the original, and it incurs additional costs.
- If you are using Volume Group(BM), you can create a recovery copy on the detail page of Volume Group(BM).
Delete Snapshot
You can select a snapshot to delete. To delete a snapshot, follow these steps.
- Click the All Services > Storage > Block Storage(BM) menu. Go to the Service Home page of Block Storage(BM).
- On the Service Home page, click the Block Storage(BM) menu. You will be taken to the Block Storage(BM) List page.
- On the Block Storage(BM) List page, click the resource to delete the snapshot. You will be taken to the Block Storage(BM) Details page.
- Click Snapshot List. It navigates to the Block Storage(BM) Snapshot List page.
- After confirming the Snapshot name and creation time, click the More button of the snapshot you want to delete.
- Click the Delete button. The snapshot will be removed from the Snapshot List page.
- After selecting the snapshots to delete from the snapshot list, you can click the Delete button at the top of the list to delete them all at once.Reference
- Snapshots that contain snapmirror in the snapshot name cannot be deleted. snapmirror is included in the snapshot name when a replication is created.
- If you are using Volume Group(BM), you can delete snapshots from the detail page of Volume Group(BM).
- After selecting the snapshots to delete from the snapshot list, you can click the Delete button at the top of the list to delete them all at once.
1.2.3 - Using duplication
You can create a replica of the generated Block Storage (BM) in another location and synchronize it periodically. You can perform operations on the Block Storage(BM) Details page and the Replication page.
Reference
- The kr-south region does not provide Block Storage (BM) replication functionality.
Create Clone
You can create a replica volume in a different location.
Caution
Clones can only be created from the original volume.
Click the All Services > Storage > Block Storage(BM) menu. 1. Go to the Service Home page of Block Storage (BM).
Service Home on the page, click the Block Storage(BM) menu. 2. Go to the Block Storage(BM) List page.
On the Block Storage(BM) List page, click the resource to create a replica. 3. Block Storage(BM) Details Navigate to the page.
Verify the setting of the Snapshot Capacity item.
- Replication can be created only when storage space is available through snapshot capacity configuration.
- For more details, see 스냅샷 용량 수정하기.
Click the Create Clone button. 5. Create Clone popup window opens.
After entering the information for creating a clone, click the Create button. 6. Creates a replica with the same disk type.
Category Required statusDetailed description Replication Policy Required Select replication policy - Within region: Create replication in the same region’s Availability Zone
- Cross-region: Create replication in an Availability Zone of a different region
Clone location Essential Select the location to create the replica - Region: Select a location different from the original Block Storage (BM) volume
- Selection is required only when creating replication between regions
- Availability Zone: Select the Availability Zone to create the replica
복제 볼륨명 필수 영문으로 시작하며 영문, 숫자와 특수문자( -)를 사용하여 3~28자로 입력하세요.복제 주기 필수 5분, 1시간, 매일, 매주, 매월 중 선택하세요. 아래 주기로 복제를 수행합니다. - 매일: 매일 23:59:00
- 매주: 매주 일요일 23:59:00
- 매월: 매월 1일 23:59:00
Table. Replication creation information itemsOn the Block Storage(BM) Details page, after clicking the Replication tab, check the replication information you created.
- When selecting the volume name of the source or replica, you are taken to the volume’s Block Storage(BM) Details page.
Reference
- When creating a clone, a replica with the same disk type is created.
- After setting the snapshot size, you can create a replica, and the disk type of the created replica is the same as the original.
- If the snapshot capacity usage is high (around 90%), replication may be stopped.
- After setting the snapshot capacity, volumes added to the Volume Group can be replicated at the group level on the Volume Group page.
- One replica can be created per volume, and data transfer charges apply for cross‑region replication.
- A volume created by cloning cannot be added to a Volume Group.
- If you are using a Volume Group, you can view replication information in the Volume Group (BM).
Edit replication policy
You can change the replication status by modifying the replication policy.
Caution
During replication, you cannot modify the replication interval and replication policy.
To modify the replication policy, follow these steps.
- Click the All Services > Storage > Block Storage(BM) menu. 1. Go to the Service Home page of Block Storage (BM).
- On the Service Home page, click the Block Storage(BM) menu. 2. Go to the Block Storage(BM) List page.
- On the Block Storage(BM) List page, click the resource to edit the replication policy. 3. Block Storage(BM) Details Go to the page.
- Clone page, please click. 4. Block Storage(BM) Replication Go to the page.
- Click the Edit button of the Replication Policy. 5. Edit Replication Policy The popup window opens.
- Usage: Performs replication. * If it is Paused, you can change it to Enabled.
- Pause: Temporarily stops replication. * If use is the case, it can be changed to pause.
- Delete: Delete the replica. * If it is Paused, you can change it to Delete, and after deletion, you cannot use replication again.
- Check the modified Replication Policy on the Block Storage(BM) Replication page.
Caution
- When deleting a policy, please pay attention to the following.
- After the policy is deleted, replicas are not switched back to the original and cannot be created.
- After deleting the policy, you cannot connect to existing replicas and can only create new replicas.
- Data stored only in the replica after pausing will be deleted if replication is used again.
- When a replication policy is used, replicas are in read (Read only) state and data cannot be modified. * Use replication after unmounting on all connected resources.
- Mounting on the connected server is possible only when the replication policy is deleted or paused.
Modify replication cycle
You can change the synchronization interval between the primary and replica by modifying the replication interval.
Caution
During replication, you cannot modify the replication interval and replication policy.
To modify the replication interval, follow these steps.
- All Services > Storage > Block Storage(BM) Click the menu. 1. Go to the Service Home page of Block Storage (BM).
- On the Service Home page, click the Block Storage(BM) menu. 2. Go to the Block Storage(BM) List page.
- Block Storage(BM) List page, click the resource whose replication schedule you want to modify. 3. Block Storage(BM) Details Navigate to the page.
- Click the Clone page. 4. Navigate to the Block Storage(BM) Replication page.
- Click the Edit button of the Replication Cycle. 5. Edit Replication Cycle A popup window opens.
- Replication interval: Select from 5 minutes, 1 hour, daily, weekly, monthly. * Replication is performed at the following intervals.
- Daily: daily 23:59:00
- Weekly: Every Sunday 23:59:00
- Monthly: the 1st of each month at 23:59:00
- Replication interval: Select from 5 minutes, 1 hour, daily, weekly, monthly. * Replication is performed at the following intervals.
- Check the modified Replication Interval on the Block Storage(BM) Replication page.
1.2.4 - Using Volume Group
The Volume Group (BM) service allows you to configure up to 16 Block Storage (BM) volumes as a group, enabling the creation of consistent point-in-time snapshots and replication.
Users can create the service by entering the required information for the Volume Group(BM) and selecting detailed options through the Samsung Cloud Platform Console.
Create Volume Group(BM)
You can create and use the Volume Group (BM) service from the Samsung Cloud Platform Console.
To create Block Storage, follow the steps below.
All Services > Storage > Block Storage(BM) Click the menu. 1. Go to the Service Home page of Block Storage (BM).
Click the Volume Group(BM) menu. 2. Volume Group(BM) List Navigate to the page.
On the Volume Group(BM) page, click the Volume Group(BM) Create button. 3. Create Volume Group (BM) Navigate to the page.
Category whether requiredDetailed description Volume Group name Required Volume Group name - must start with an English letter and use English letters, numbers, and special characters (
-) to input 3~28 characters
- cannot be modified after service creation
Availability Zone Required Select the Availability Zone to create resources within the region - If you change the Availability Zone while a connected server has been added, the connected server will be reinitialized
Target volume Essential Add target volume to Volume Group - After clicking the Add button, select the target volume in the add target popup
- Target volume criteria
- Snapshot size: Set
- Snapshot auto-creation, creation interval: Not used
- Replication: Not used
- Up to 16 can be added
Table. Volume Group (BM) Service Information Input Items- must start with an English letter and use English letters, numbers, and special characters (
Click the Create button.
- When creation is complete, check the created resources on the Volume Group(BM) List page.
Reference
- When adding a target volume, you can add the following volume to the Volume Group (BM).
- Snapshot capacity: Settings
- Automatic snapshot creation, creation interval: not used
- Clone: Unused
- You can add up to 16 volumes that are created in the same Availability Zone.
Volume Group(BM) Check detailed information
The Volume Group (BM) service allows you to view and edit the full resource list and detailed information. The Volume Group(BM) Details page consists of the Details, Snapshot List, Replication, Activity Log tabs.
To view detailed information about the Volume Group (BM) service, follow these steps.
- All Services > Storage > Block Storage(BM) Click the menu. 1. Go to the Service Home page of Block Storage (BM).
- On the Service Home page, click the Volume Group(BM) menu. 2. Go to the Volume Group(BM) List page.
- Volume Group(BM) List On the page, click the resource to view detailed information. 3. Volume Group(BM) Details Go to the page.
- Volume Group(BM) Details page displays status information and additional feature information, and consists of Details, Snapshot List, Replication, Tags, Operation History tabs.
Category Detailed description Volume Group status Volume Group status - Creating: In progress
- Available: Creation complete, server connection possible
- Deleting: Service termination in progress
- Editing: Changing settings
- Error Deleting: Abnormal state during deletion
- Error: Abnormal state during creation
Clone creation Create a replica in a different location - For details on creating a replica, see 복제 생성하기
- Replication is not possible if the snapshot size is not set or a replication policy already exists
Create snapshot Create a snapshot at a specific point in time - For more details on snapshot creation, see 스냅샷 생성하기
Service termination Button to cancel the service Table. Status information and additional functions
- Volume Group(BM) Details page displays status information and additional feature information, and consists of Details, Snapshot List, Replication, Tags, Operation History tabs.
Reference
In the case of a recovery copy, snapshot list, replication tabs are not displayed.
Detailed Information
Volume Group(BM) List page lets you view detailed information of the selected resource and modify it if needed.
| Category | Detailed description |
|---|---|
| Service | Service name |
| Resource Type | Resource Type |
| SRN | Unique resource ID in Samsung Cloud Platform
|
| Resource Name | Resource Name
|
| Resource ID | Service’s unique resource ID |
| Constructor | User who created the service |
| Creation date and time | Service creation date and time |
| Modifier | User who modified the service |
| Modification date and time | Service modification date and time |
| Volume Group name | Volume Group name |
| Category | Distinguish original status related to duplication |
| Availability Zone | Availability Zone information |
| Storage Volume Group name | Volume Group name in the storage device
|
| Snapshot schedule | Snapshot auto-creation interval
|
| Recovery copy | Snapshot name of the Volume Group
|
| Target volume | Block Storage (BM) added to the Volume Group
|
Table. Volume Group (BM) detailed information items
Snapshot List
Volume Group(BM) Resource List page allows you to view the snapshot of the selected resource.
| Category | Detailed description |
|---|---|
| Snapshot name | Snapshot name |
| Creation timestamp | Snapshot creation time |
| Additional features > More | Snapshot management button
|
Table. Snapshot list tab detailed information items
Caution
- When creating a snapshot from a Volume Group, a snapshot is created in Block Storage (BM).
- When using Volume Group snapshots, manage the snapshot size and count of the target volume.
- If the maximum number of snapshots or the snapshot storage threshold (around 90%) is exceeded, older snapshots will be deleted first.
- If the snapshot capacity usage is high (around 90%), replication may be stopped.
- Snapshots can be created up to a maximum of 1,023 (with up to 128 automatically generated via schedule), and if the maximum number is exceeded, no further snapshots can be created.
- Snapshot recovery must be performed while all connected servers are disconnected (Umount, Disk Offline), and the recovered volume can be used after being reconnected (Mount, Disk Online).
Reference
- The snapshot creation time is based on Asia/Seoul (GMT +09:00).
- When using replication, snapmirror files cannot be deleted.
- When using a Volume Group, set the snapshot schedule on the Volume Group (BM) detail information screen. * The created snapshot can be viewed in the Block Storage (BM) snapshot list.
Replication
On the Volume Group(BM) Resource List page, you can view the replication information of the selected resource.
| Category | Detailed description |
|---|---|
| Replication Policy | the replication policy set by the user
|
| Replication cycle | User-configured source replication interval
|
| Replication status | Replication progress status based on policy settings |
| Lag Time | Time elapsed since the last successful replication
|
| Volume information | Volume information of the source and replica
|
Table. Replication tab detailed information items
Caution
- If the snapshot capacity utilization is high (around 90%), replication may be stopped.
Reference
- When creating a clone, a replica with the same disk type is created.
- You can create a replica after setting the snapshot capacity.
- If you are using a Volume Group, check the replication information on the Volume Group (BM) resource list page.
- Replica Block Storage can modify the connected server when the replication policy is paused or deleted.
- Replica Block Storage can use the snapshot feature after the replication policy is deleted.
- If the replication policy is stopped or the replication status is completed, you can modify the policy and schedule on the replica.
Tag
Volume Group(BM) List page lets you view the tag information of the selected resource, and you can add, modify, or delete it.
| Category | Detailed description |
|---|---|
| Tag list | Tag list
|
Table. Volume Group (BM) Tag Tab Items
Operation History
Volume Group(BM) Resource List You can check the operation history of the selected resource on the page.
| Category | Detailed description |
|---|---|
| Task History List | Resource Change History
|
Table. Work History tab detailed information items
Volume Group(BM) Managing Resources
If you need to modify the settings of a created Volume Group(BM) or add or remove target volumes, you can perform the operation on the Volume Group(BM) Details page.
Edit Snapshot Schedule
You can modify the snapshot auto-creation interval. To modify the snapshot schedule, follow these steps.
- All Services > Storage > Block Storage(BM) Click the menu. 1. Go to the Service Home page of Block Storage (BM).
- On the Service Home page, click the Volume Group(BM) menu. 2. Navigate to the Volume Group(BM) List page.
- Volume Group(BM) List page, click the resource to edit the snapshot schedule. 3. Volume Group(BM) Details Navigate to the page.
- Click the Edit button of the Snapshot Schedule item. 4. Edit Snapshot Schedule The popup window opens.
- Set the snapshot automatic creation status and creation interval, and click the Confirm button.
- If you want to automatically generate snapshots based on the Creation Cycle, select Automatic Creation as Enabled.
- Generation cycle can be selected daily, hourly, or weekly, day of week, hourly.
Caution
When using Volume Group snapshots, manage the target volume’s snapshot size and count.
- Snapshots can be created up to a maximum of 1,023 (with up to 128 automatically generated through scheduling), and if the maximum number is exceeded, no further snapshots can be created.
Reference
The snapshot schedule is based on Asia/Seoul (GMT +09:00).
Modify target volume
You can add or detach the target volume. To modify the target volume, follow these steps.
- Click the All Services > Storage > Block Storage(BM) menu. 1. Go to the Service Home page of Block Storage (BM).
- On the Service Home page, click the Volume Group(BM) menu. 2. Volume Group(BM) List Go to the page.
- On the Volume Group(BM) List page, click the resource to modify the target volume. 3. Volume Group(BM) Details page is opened.
- If you are adding a target volume, click the Target Volume Add button. 4. Add Volume The popup window opens.
- When disconnecting a volume, click the Disconnect button in the Target Volume field.
- Select the volume you want to add, then click the Confirm button.
Caution
If the Volume Group’s replication policy is enabled, the target volume cannot be modified.
Reference
- When adding a target volume, you can add the following volume to the Volume Group (BM).
- Snapshot capacity: Settings
- Automatic snapshot creation, creation interval: not used
- Clone: Unused
- You can add up to 16 volumes that are created in the same Availability Zone.
Volume Group(BM) Using Snapshots
You can create, delete, or recover using snapshots on the created Volume Group (BM). You can perform actions on the Volume Group(BM) Details page and the Snapshot List page.
Create Snapshot
The user can create a snapshot at the desired point in time.
information
- A replica can delete the replication policy, set the snapshot capacity for all Block Storage within the Volume Group, and then create a snapshot.
- Recovery images cannot create snapshots.
To create a snapshot, follow these steps.
- Click the All Services > Storage > Block Storage(BM) menu. 1. Go to the Service Home page of Block Storage (BM).
- On the Service Home page, click the Volume Group(BM) menu. 2. Volume Group(BM) List Go to the page.
- On the Volume Group(BM) List page, click the resource for which you want to create a snapshot. 3. Volume Group(BM) Details Go to the page.
- Click the Create Snapshot button. 4. Create Snapshot The popup window opens.
- Click the Confirm button. 5. Creates a snapshot of the current point in time.
- Click the Snapshot List page. 6. Volume Group(BM) Snapshot Go to the list page.
- Check the generated snapshot.
Caution
- When creating a snapshot in a Volume Group, a snapshot is also created on the connected target volume.
- Manage the snapshot capacity and count of the target volume to use Volume Group snapshots.
- If the maximum number of snapshots or the snapshot space threshold (around 90%) is exceeded, older snapshots are deleted first.
- If the snapshot capacity usage is high (around 90%), replication may be stopped.
- Snapshots can be created up to a maximum of 1,023 (with up to 128 automatically generated through scheduling), and if the maximum number is exceeded, no further snapshots can be created.
Reference
- The snapshot creation time is based on Asia/Seoul (GMT +09:00).
- Snapshot storage space is applied based on the settings you configured on the target volume’s Block Storage(BM) Details page.
- If you want to automatically create snapshots via a schedule, set the snapshot schedule on the Volume Group(BM) Details page.
- For detailed information about snapshot schedules, see 스냅샷 스케줄 수정하기.
Restore Snapshot
All target volumes of Volume Group(BM) can be restored from snapshots. To restore from a snapshot, follow these steps.
- All Services > Storage > Block Storage(BM) Click the menu. 1. Navigate to the Service Home page of Block Storage (BM).
- On the Service Home page, click the Volume Group(BM) menu. 2. Volume Group(BM) List Go to the page.
- On the Volume Group(BM) List page, click the resource to restore from a snapshot. 3. Navigate to the Volume Group(BM) Details page.
- Click the volume name of the volume added to the target volume. 4. Block Storage(BM) Details Navigate to the page.
- If there is a server added in the Connection Server item, connect to the server and then perform the disconnect operation (Umount, Disk Offline).
- For more details, refer to 서버 연결 해제하기.
- On the Volume Group(BM) Details page, click the Snapshot List page. 6. Go to the Volume Group(BM) Snapshot List page.
- After checking the snapshot name and creation timestamp, click the More button of the snapshot you want to restore.
- Click the Restore button. 8. The snapshot recovery popup window opens.
- After checking the snapshot name and creation timestamp, click the Confirm button. 9. Restores the target volumes from a snapshot.
- Detailed Information Click the button. 10. Volume Group(BM) Details Navigate to the page.
- Click the volume name of the volume added to the target volume. 11. Block Storage(BM) Details Navigate to the page.
- If a server has been added in the Connection Server item, connect to the server and then perform the connection tasks (Mount, Disk Online).
- For more details, please refer to 서버 연결하기.
Caution
- Snapshot recovery must be performed while all target volumes on the connected server are disconnected (Umount, Disk Offline), and the recovered volume can be used after being reconnected (Mount, Disk Online).
- After the snapshot recovery is completed, all snapshots created after the snapshot used for recovery are deleted.
Create a recovery copy
You can create a recovery copy from a snapshot of the target volume. To create a snapshot recovery copy, follow the steps below.
- Click the All Services > Storage > Block Storage(BM) menu. 1. Go to the Service Home page of Block Storage (BM).
- On the Service Home page, click the Volume Group(BM) menu. 2. Go to the Volume Group(BM) List page.
- Volume Group(BM) List page, click the resource for which you want to create a recovery copy. 3. Volume Group(BM) Details Go to the page.
- On the Volume Group(BM) Details page, click the Snapshot List page. 6. Volume Group(BM) Snapshot List Navigate to the page.
- After confirming the Snapshot Name and Creation Timestamp, click the More button of the snapshot you want to create a restore point for.
- Click the Create Recovery Copy button. 8. The snapshot recovery creation popup opens.
- After entering Prefix, click the Generate button. 9. A popup window notifying the creation of a recovery copy opens.
- The recovery copy’s name is generated as the entered Prefix value + original Block Storage name.
- Click the Confirm button. 10. The recovery copy creation request has been completed.
Caution
- Only one recovery copy can be created per original.
- A recovery copy is a separate volume created with the same capacity as the original, and it incurs additional costs.
Delete snapshot
You can select a snapshot and delete it. To delete a snapshot, follow these steps.
- All Services > Storage > Block Storage(BM) Click the menu. 1. Go to the Service Home page of Block Storage (BM).
- On the Service Home page, click the Volume Group(BM) menu. 2. Go to the Volume Group(BM) List page.
- On the Volume Group(BM) List page, click the resource to delete the snapshot. 3. Volume Group(BM) Details Navigate to the page.
- Click Snapshot List. 4. Go to the Volume Group (BM) Snapshot List page.
- After checking the Snapshot name and Creation time, click the More button of the snapshot you want to delete.
- Click the Delete button. 6. Snapshots are removed on the Snapshot List page.
Reference
When using replication, snapmirror files cannot be deleted.
Volume Group(BM) Using Replication
The created Volume Group (BM) can be synchronized at periodic, consistent points after creating a replica in another location. You can perform tasks on the Volume Group(BM) Details page and the Replication page.
Create Clone
You can create a replicated Volume Group and volumes at a different location.
guide
Clones and recovery copies cannot create replicas.
To create a copy, follow these steps.
Click the All Services > Storage > Block Storage(BM) menu. 1. Navigate to the Service Home page of Block Storage (BM).
On the Service Home page, click the Volume Group(BM) menu. 2. Volume Group(BM) List Navigate to the page.
Volume Group(BM) List page, click the resource for which you want to create a replica. 3. Volume Group(BM) Details Navigate to the page.
Click the Create Clone button. 4. Create Clone popup window opens.
After entering the information for creating a clone, click the Create button. 5. Creates a replica Block Storage volume with the same Volume Group and disk type as the replica.
Category RequiredDetailed description Replication Policy Required Select replication policy - Within region: Create replication in the same region’s Availability Zone
- Cross-region: Create replication in an Availability Zone of another region
Clone location Required Select the location to create the replica - Region: Choose a location different from the original Block Storage(BM) volume
- Selection required only when creating replication between regions
- Availability Zone: Select the Availability Zone for the replica
Clone Volume Group name Required Start with a letter and use letters, numbers, and special characters ( -) to input 3~28 charactersReplication Block Storage Name Prefix Required Start with an English letter and enter 3 to 28 characters using English letters, numbers, and special characters ( -)- A replica Block Storage (BM) is created with a volume name of ‘Replica Block Storage name Prefix + Original Block Storage volume name’
Replication cycle Required Select from 5 minutes, 1 hour, daily, weekly, or monthly - Daily: Daily 23:59:00
- Weekly: every Sunday 23:59:00
- Monthly: 1st day 23:59:00
Table. Replication creation information itemsOn the Block Storage(BM) Details page, click the Replication tab, then verify the replication information you created.
- When selecting the volume name of the source or replica, you are taken to the volume’s Block Storage(BM) Details page.
Reference
- When creating a replica in a Volume Group, a replica Volume Group and Block Storage (BM) are created.
- The replica Block Storage has the same disk type as the original.
- You can create one replica per Volume Group, and inter‑region replication incurs additional data transfer charges.
Edit Replication Policy
You can change the replication status by modifying the replication policy.
Caution
During replication, you cannot modify the replication interval and replication policy.
To modify the replication policy, follow these steps.
- Click the All Services > Storage > Block Storage(BM) menu. 1. Go to the Service Home page of Block Storage (BM).
- On the Service Home page, click the Volume Group(BM) menu. 2. Go to the Volume Group(BM) List page.
- Volume Group(BM) list page, click the resource to modify the replication policy. 3. Volume Group(BM) Details Navigate to the page.
- Click the Duplicate page. 4. Volume Group(BM) Replication Navigate to the page.
- Click the Edit button of the Replication Policy. 5. Edit Replication Policy The popup window opens.
- Usage: Performs replication. * If Paused, it can be changed to Enabled.
- Pause: Temporarily stops replication. * If use is the case, it can be changed to pause.
- Delete: Delete the replica. * If it is Paused, you can modify it to Delete, and after deletion, you cannot use replication again.
- On the Volume Group(BM) Replication page, check the modified Replication Policy.
Caution
- When deleting a policy, please note the following.
- After the policy is deleted, replicas are not switched back to the original and cannot be created.
- After deleting the policy, you cannot connect to existing replicas and can only create new replicas.
- Data stored only in the replica after pausing will be deleted if replication is used again.
- When using a replication policy, replicas are in read (Read only) state and data cannot be modified. * Use replication after Umount on all connected resources.
Edit replication cycle
You can change the synchronization interval between the primary and replica by modifying the replication interval.
Caution
During replication, you cannot modify the replication interval and replication policy.
To modify the replication interval, follow these steps.
- Click the All Services > Storage > Block Storage(BM) menu. 1. Go to the Service Home page of Block Storage (BM).
- On the Service Home page, click the Volume Group(BM) menu. 2. Volume Group(BM) List Go to the page.
- Volume Group(BM) List page, click the resource to modify the replication interval. 3. Volume Group(BM) Details Navigate to the page.
- Click the Duplicate page. 4. Navigate to the Volume Group(BM) Replication page.
- Click the Edit button of the Replication Cycle. 5. Edit Replication Cycle The popup window opens.
- Replication interval: Please select from 5 minutes, 1 hour, daily, weekly, monthly. * Replication is performed at the following intervals.
- Daily: Every day 23:59:00
- Weekly: Every Sunday 23:59:00
- Monthly: the 1st of each month 23:59:00
- Replication interval: Please select from 5 minutes, 1 hour, daily, weekly, monthly. * Replication is performed at the following intervals.
- On the Volume Group(BM) Replication page, check the modified replication interval.
Volume Group(BM) Cancel
You can delete an unused Volume Group (BM).
Volume Group (BM) has no separate termination procedure, and it is automatically deleted when you disconnect all volumes in the target volume item.
Caution
Please note that it cannot be recovered after cancellation.
1.3 - API Reference
API Reference
1.4 - CLI Reference
CLI Reference
1.5 - Release Note
Block Storage(BM)
2026.07.16
FEATURE
SeviceWatch service integration and other feature additions- ServiceWatch service has been integrated.
- You can view monitoring information such as IOPS, Latency, and Throughput through the ServiceWatch service.
- You can select an Availability Zone when creating resources.
- A text input feature has been added when deleting resources.
- To prevent accidentally deleting resources, you must verify the deletion information and enter Delete when deleting to proceed with the deletion operation.
2026.03.19
CHANGED
Performance metric (IOPS, Throughput) configuration range changed and volume expansion feature provided- The configuration range for the volume’s performance metrics (IOPS, Throughput) has been changed.
- Max IOPS: 5,000 ~ 20,000
- Max Throughput: 250 ~ 1,000
- Provides volume expansion feature
- Volume expansion is possible only for the original volume that does not use snapshots.
2025.12.16
FEATURE
Add IOPS, Throughput configuration feature- You can set the volume’s performance metrics (IOPS, Throughput) and modify them on the detail page.
- IOPS: 3,000 ~ 16,000
- Throughput: 125 ~ 1,000
- There is no separate charge during the preview period (billing is scheduled for the first half of 2026).
2025.10.23
FEATURE
Add snapshot recovery copy creation feature- The feature to create a recovery (Recovery) using snapshots has been added.
- A recovery copy is a separate volume created with the same capacity as the original, and it incurs additional costs.
2025.07.01
FEATURE
New feature addition and monitoring integration- HDD Disk type has been added. * When creating Block Storage(BM), you can select an HDD disk.
- We provide an IaC environment using Terraform.
- You can use the snapshot feature on a replicated volume.
- Integrated with Cloud Monitoring.
- You can view IOPS, Latency, and Throughput information in Cloud Monitoring.
2025.02.27
FEATURE
Add replication and Volume Group functionality- Block Storage (BM) feature change
- A replication feature that allows Block Storage (BM) volumes to be replicated to another location has been added.
- The Volume Group feature has been added, allowing you to configure up to 16 Block Storage (BM) volumes as a group to create snapshots and replication at a consistent point in time.
- For detailed information, please refer to Block Storage(BM) 개요.
- Samsung Cloud Platform Common Feature Change
- Account, IAM, and Service Home, tags, etc., have been updated to reflect common CX changes.
2024.10.01
NEW
Block Storage(BM) service official version release- We have launched a high-performance storage service suitable for handling large-scale data and database workloads.
2 - File Storage
2.1 - Overview
Service Overview
File Storage is a storage solution that allows servers connected via the network to easily store and share data, suitable for application environments that use multiple servers.
You can select the disk type based on performance requirements, and it will automatically scale up or down according to the user’s data volume without capacity limits.
Features
- Free volume usage: The volume size automatically expands or shrinks based on data creation and deletion without user configuration. * There is no cost for creating a volume; only usage fees for the stored data capacity are incurred.
- Various disk types provided: You can select a disk type based on the user’s intended use. * You can use HDDs that provide cost‑effective large‑capacity data storage, SSDs that offer reduced response times and high IOPS performance, and high‑performance SSDs.
- Snapshot Backup: Through the image snapshot feature, recovery of changed or deleted data is possible, and during disk backup, snapshots can be stored in a location different from the original. * The user selects the snapshot created at the desired recovery point from the list and performs the recovery.
- Replication: Creates an identical replica volume at another location, and the user can configure the data replication schedule. * If the original volume cannot be used due to failures or disasters, service can be provided through a replica volume.
- Multi-AZ: Create the same volume in a different location (AZ) within the region, so the service continues even in the event of a failure. * We need to verify availability by region.
Configuration
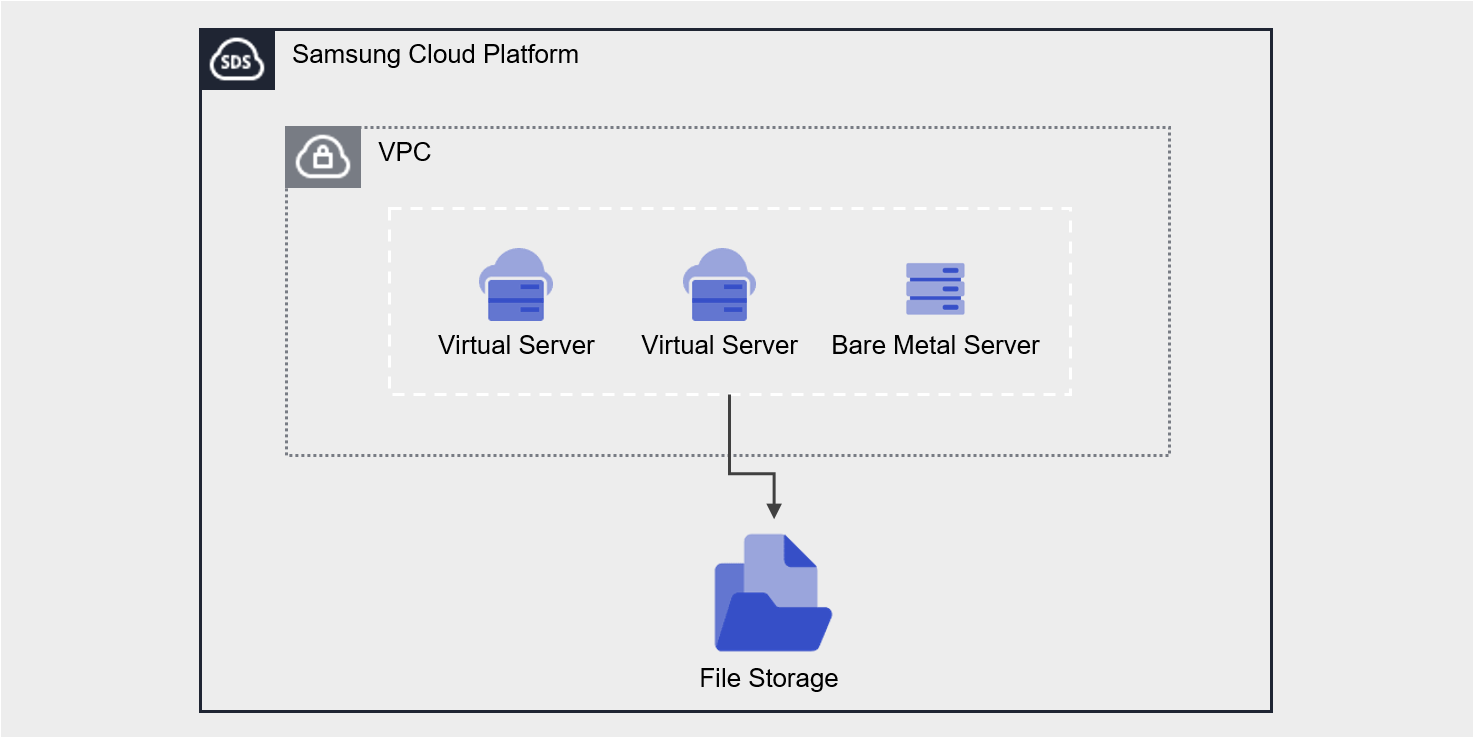
Provided features
File Storage provides the following features.
- Volume Name: You can set a name for each volume.
- Volume Type: You can select whether to enable Multi-AZ.
- Multi-AZ: Create the same volume in a different location (AZ) within the region
- Select the volume to connect to the server using Active Zone settings.
- When the Active Zone fails, it can be used with the volume replicated to the Standby Zone (with identical mount information).
- Single-AZ: Create a volume in a single location (AZ)
- Select an Availability Zone to specify the volume creation location.
- Multi-AZ: Create the same volume in a different location (AZ) within the region
- Disk Type: You can select the disk type based on performance requirements.
- HDD: General volume
- SSD: High‑performance General Volume
- High‑Performance SSD: Performance‑optimized volume that can be attached to a Multi-node GPU Cluster
- Protocol: You can select the protocol based on the user’s OS Image.
- NFS: primarily used on Linux operating systems
- CIFS: Primarily used in Windows operating systems
- Free Volume Usage: Provides flexible volume size based on stored data size without capacity settings.
- Connected Resources: Virtual Server, Bare Metal Server, GPU Server, Multi-node GPU Cluster can be connected to and used.
- Encryption: All volumes are encrypted with the XTS-AES-256 algorithm regardless of disk type.
- Snapshot: Through the image snapshot feature, you can create snapshots instantly or schedule snapshot creation.
- Retention Count: The number of snapshots retained that are automatically created by the schedule
- Schedule: Snapshot auto-creation interval
- Recovery: Recover the original volume to the latest snapshot, or select a snapshot at a specific point in time to create a recovery volume
- Replication: Replicates the volume to another location, and the user can set the replication schedule.
- Disk Backup: You can store snapshots on a backup-dedicated HDD storage and select the backup location.
- VPC Endpoint connection: File Storage can be used through a Private Network connection from an external network.
- ServiceWatch Service Integration: You can monitor data through the ServiceWatch service.
Component
You can create a volume by selecting the disk type and protocol according to the user’s service environment and performance requirements.
When using the snapshot feature, you can restore data to the desired point in time.
Volume
A volume (Volume) is the basic creation unit of the File Storage service and is used as data storage space. The user selects a name, disk type, and protocol (CIFS/NFS) to create a volume, then connects it to one or more servers for use.
The volume name creation rules are as follows.
- It must start with a lowercase English letter and can be set to 3-21 characters using lowercase letters, numbers, and special characters (
_).
Snapshot
A snapshot (Snapshot) is an image backup of a specific point in time. Using the image snapshot feature, you can recover changed or deleted data, or store snapshots in a different location from the original when performing disk backups. The user selects the snapshot created at the desired recovery point from the snapshot list and performs the recovery.
The following are considerations when using snapshots.
Reference
- The snapshot creation time is based on Asia/Seoul (GMT +09:00). Snapshots can be created up to a maximum of 800, and snapshots generated by schedule are not included. (Automatic creation via schedule is limited to a maximum of 128)
- Select the snapshot recovery button to restore the File Storage volume to the latest snapshot.
- If you select a specific snapshot from the snapshot list, you can recover by creating a new volume based on that snapshot.
- Automatic creation is possible through snapshot schedule settings.
- Since snapshot storage is included in File Storage usage and incurs charges, adjust the storage capacity by setting the snapshot retention period.
Preceding Service
This is a list of services that must be pre‑configured before creating the service. Refer to the guide provided for each service for detailed information and prepare in advance.
| Service Category | service | Detailed description |
|---|---|---|
| Compute | Virtual Server | Virtual server optimized for cloud computing |
| Compute | Bare Metal Server | High-performance physical server used without virtualization |
Table. File Storage pre-service
2.1.1 - Monitoring Metrics
Cloud Monitoring service termination notice
According to Samsung Cloud Platform’s policy, the Cloud Monitoring service is scheduled to be discontinued.
Accordingly, after the September 2026 release, resource monitoring of the Samsung Cloud Platform via Cloud Monitoring will no longer be possible.
With the new alternative service, you can continuously perform resource monitoring by using ServiceWatch, released in October 2025.
ServiceWatch provides more modern and powerful features, replacing Cloud Monitoring to deliver a smooth monitoring environment.
Detailed information about ServiceWatch: see the ServiceWatch Overview.
File Storage Monitoring Metrics
The table below shows the monitoring metrics for File Storage that can be viewed in Cloud Monitoring. For detailed usage of Cloud Monitoring, refer to the Cloud Monitoring guide.
| Performance Item Name | Explanation | unit |
|---|---|---|
| Instance Status | File Storage Volume Status | status |
| Volume Used | Usage | bytes |
| Volume Usage | Utilization | % |
| Volume Total | Total byte count | bytes |
| IOPS [Total] | iops(total) | iops |
| IOPS [Read] | iops(read) | iops |
| IOPS [Write] | iops(write) | iops |
| IOPS [Other] | iops(other) | iops |
| Latency Time [Total] | Latency (total) | usec |
| Latency Time [Read] | Read latency | usec |
| Latency Time [write] | Latency (write) | usec |
| Latency Time [Other] | Latency (Other) | usec |
| Throughput [Total] | Throughput (total) | bytes/s |
| Throughput [Read] | Throughput (read) | bytes/s |
| Throughput [Write] | Throughput (write) | bytes/s |
| Throughput [Other] | Throughput (Other) | bytes/s |
Table. File Storage Monitoring Metrics
2.1.2 - ServiceWatch Metrics
File Storage sends metrics to ServiceWatch. The metrics provided by default monitoring are data collected at 1‑minute intervals.
Reference
To view metrics in ServiceWatch, refer to the ServiceWatch guide.
Basic Metrics
The following are the basic metrics for the File Storage namespace.
The indicators whose names are displayed in bold below are the indicators selected as major metrics among the basic metrics provided by File Storage. Key metrics are used to configure service dashboards that are automatically generated for each service in ServiceWatch.
Each metric indicates, via the user guide, which statistical value is meaningful when viewing that metric, and among the meaningful statistics, the values shown in bold are the primary statistics. In the service dashboard, you can view key metrics using these primary statistical values.
| Indicator Name | Detailed description | unit | Meaningful statistics |
|---|---|---|---|
| status | File storage volume status | None | - |
| total_byte | Total bytes of file storage | Bytes |
|
| iops_read | IOPS (read) | - |
|
| iops_write | IOPS (write) | - |
|
| latency_read | Read latency | Microseconds |
|
| latency_write | Latency (write) | Microseconds |
|
| throughput_read | Throughput (read) | Bytes/Second |
|
| throughput_write | Throughput (write) | Bytes/Second |
|
Table. File Storage Basic Metrics
2.2 - How-to guides
Users can create a service by entering the required information for File Storage and selecting detailed options through the Samsung Cloud Platform Console.
Caution
- Service fees are charged based on usage without capacity limits.
- The volume is allocated 100 TB by default. * If you need to use more than 100 TB, please inquire through Support Center’s Contact.
- In Cost Management’s Billing Management, if you add or modify company information, the Mount name (IP information) of File Storage is automatically changed.
- Before editing company information, be sure to verify the service impact of changing the Mount name (IP information).
Create File Storage
You can create and use the File Storage service from the Samsung Cloud Platform Console.
To create a File Storage, follow these steps.
All Services > Storage > File Storage Click the menu. 1. Go to the Service Home page of File Storage.
On the Service Home page, click the Create File Storage button. 2. Go to the Create File Storage page.
File Storage Creation page: enter the information required to create the service and select detailed options.
Category required statusDetailed description Volume name Required Volume name - must start with a lowercase English letter and be entered using lowercase letters, numbers, and special characters (
_) for 3 to 21 characters
- ‘user input value+{6-character UUID composed of lowercase English letters and numbers}’ is generated
- cannot be modified after the service is created
Volume type Required Select volume type - Multi-AZ: Create an identical volume in a different location (AZ) within the region
- Select Active Zone location
- When the Active Zone fails, a volume replicated to the Standby Zone (with identical mount information) can be used
- If switched to a Standby Zone volume, volume control is unavailable from the user console
- Need to verify availability per region
- Single-AZ: Create a volume in a single location (AZ)
- When Single-AZ is selected, choose an Availability Zone location
Disk type Required Select disk type - HDD: Standard volume
- SSD: High‑performance standard volume
- High‑performance SSD: Performance‑optimized volume that can be attached to a Multi‑node GPU Cluster
- Available only in regions where high‑performance SSD equipment is installed
- Not available in Multi‑AZ
- Only the supported disk types are offered, and availability and schedule for Multi‑AZ must be inquired separately
- Cannot be modified after service creation
- When creating the service, it is set identical to the original via snapshot recovery volume creation and cannot be modified
Protocol Required Protocol for sharing volumes over the network from a server - NFS: primarily used on Linux operating systems
- CIFS: primarily used on Windows operating systems
- When creating a service, the snapshot recovery volume is set to be identical to the original and cannot be modified
Protocol > Password Required Set the account password for volume access when using the CIFS protocol - English letters, numbers, and special characters (
$%{}[]"\excluded) Enter 6 to 20 characters
Protocol > Password verification Required Confirm account password - Re-enter the password
Recovery snapshot name Selection Name of the recovery snapshot used when creating the volume - Provide the recovery snapshot name when creating a service via snapshot recovery volume creation
Table. File Storage service information input itemsCaution- Disk types and Multi-AZ availability differ by region. * If volume type is selected and disk type is not visible, please inquire about the availability of Multi-AZ or disk type in that region via Support Center’s Contact.
- must start with a lowercase English letter and be entered using lowercase letters, numbers, and special characters (
Summary Check the detailed information and estimated charges generated in the panel, and click the Create button.
When the popup notifying creation opens, click the Confirm button.
- When creation is complete, check the created resource on the File Storage List page.
Caution
- It is recommended to store up to 3.5 million files per directory within a volume. * If the number exceeds 3.5 million, performance may degrade sharply, so separate directories and manage the number of stored files.
- Disk types and Multi-AZ availability differ by region. * If volume type is selected and disk type is not visible, please inquire about the availability of Multi-AZ or disk type in that region via Support Center’s Contact.
Reference
- Regardless of disk type, all volumes have server-side encryption based on the XTS-AES-256 algorithm applied by default.
- The snapshot schedule can be set on the detail page.
File Storage Check Detailed Information
The File Storage service lets you view and edit the complete list of resources and their detailed information. The File Storage Details page consists of the Detailed Information, Snapshot List, Replication, Disk Backup, Tag, Job History tabs.
To view detailed information about the File Storage service, follow these steps.
- All Services > Storage > File Storage Click the menu. 1. Go to the Service Home page of File Storage.
- On the Service Home page, click the File Storage menu. 2. Go to the File Storage list page.
- File Storage list page, click the resource to view detailed information. 3. Go to the File Storage Details page.
- File Storage Details page displays status information and additional feature information, and consists of Details, Snapshot List, Replication, Disk Backup, Tags, Job History tabs.
Category Detailed description Volume status Volume status representation - Creating: Creating
- Creating From Snapshot: Creating a new volume from a snapshot
- Available: Creation complete, server connection available
- Deleting: Service termination in progress
- Error Deleting: Abnormal state during deletion
- Inactive: Abnormal state
- Error: Abnormal state during creation
- Migrating: Temporary maintenance state
- Migrating To: Temporary maintenance state
- Reverting: Snapshot recovery in progress
- Reverting Error: Abnormal snapshot recovery
Clone creation Create a replica in a different location - Backups and replicas cannot be used
- For detailed information on replica creation, see 복제 생성하기 refer
Create disk backup Create a backup copy to store snapshots on backup-dedicated HDD storage - HDD, SSD disk types are supported
- Up to 2 backup copies can be created
- Backup copies and replicas are not available
- For details on creating a disk backup, see 디스크 백업 생성하기
Create snapshot Immediately create a snapshot at the time of creation - For detailed information on creating snapshots, see 스냅샷 생성하기
More > Snapshot Recovery Recover the volume with the latest Available snapshot - For details on snapshot recovery, see 스냅샷 복구하기
More > File-level recovery Enable file-level recovery within snapshots - For detailed information on file-level recovery, see 파일 단위 복구 사용하기
More > Disable file-level recovery Disable file-level recovery within snapshots파일 단위 복구 해제하기 reference Service cancellation Cancel service button Table. Status information and additional features
- File Storage Details page displays status information and additional feature information, and consists of Details, Snapshot List, Replication, Disk Backup, Tags, Job History tabs.
Reference
Disk backup is not available for high-performance SSD disk types.
Detailed Information
File Storage List page lets you view detailed information of the selected resource and edit the information if needed.
| Category | Detailed description |
|---|---|
| service | service name |
| Resource Type | Resource Type |
| SRN | Unique resource ID in Samsung Cloud Platform
|
| Resource name | Resource name
|
| Resource ID | Service’s unique resource ID |
| Constructor | User who created the service |
| Creation date and time | Service creation date and time |
| Volume name | Volume name |
| Category | Distinguish original status for duplication and disk backup |
| Disk type | Volume Disk Type |
| Protocol | NFS and CIFS protocols for sharing volumes over the network from a server. |
| Volume type | Volume types based on storage method
|
| Active Zone | Location of the Active volume to connect to the server among Multi-AZ volumes
|
| Availablity Zone | Volume location
|
| Usage | Volume usage |
| Encryption | Encryption status
|
| Mount information |
|
| Snapshot > Schedule | Snapshot automatic creation schedule
|
| Snapshot > Retention Count | Snapshot retention count
|
| connection resource | Connected resources (Bare Metal Server, Virtual Server, GPU Server)
|
| VPC Endpoint | Connected VPC Endpoint service
|
Table. File Storage detailed information items
Caution
- When connecting a VPC Endpoint in a Multi-AZ region, once connections to all AZs are completed, the VPC Endpoint’s connection status is reported as success. If it appears as Failure or Partial Success, please check via Support Center > Contact.
Snapshot List
On the File Storage List page, you can view the snapshot of the selected resource.
| Category | Detailed description |
|---|---|
| Snapshot usage | Total size of stored snapshots |
| Snapshot name | Snapshot name |
| capacity | Snapshot capacity |
| Creation date and time | Snapshot creation time |
| status | Snapshot status
|
| Additional features > More | Snapshot Management Button
|
Table. Snapshot list item
Reference
- The snapshot creation time is based on Asia/Seoul (GMT +09:00). Snapshots can be created up to a maximum of 800, and snapshots generated by schedule are not included. (Automatic creation via schedule is limited to a maximum of 128)
- If replication or disk backup is in use, you cannot delete the snapmirror snapshot.
- When you click the snapshot recovery button, the volume is restored to the latest snapshot in the Available state.
- When you select Create recovery volume on the snapshot list page, a new snapshot‑based volume is created without altering the existing volume.
- The snapshot list can be viewed in both the original and the backup. * The replica can be viewed after the policy is deleted.
- Snapshot creation, recovery, and recovery volume creation are available on the source.
- When using replication or disk backup, you cannot recover with a snapshot and can only create a recovery volume.
Replication
On the File Storage List page, you can view the replication information of the selected resource.
Notice
Only one copy can be created.
| Category | Detailed description |
|---|---|
| Replication Policy | User-configured replication policy
|
| Replication cycle | User-configured replication interval of the source
|
| Replication status | Replication progress status according to policy settings |
| Volume information | Volume information of the original and replica
|
Table. Clone tab detailed information items
Caution
When replication is used, recovery via snapshot is not possible, and only a recovery volume can be created. If you need to restore from a snapshot, delete the replication policy first, then restore using the snapshot.
Reference
- When creating a clone, a replica with the same disk type is created.
- Replication policy, replication schedule can be modified when the replication status in the replica is completed or stopped.
- The replica’s file-level recovery can be used when the replication status is completed or stopped.
- The replica’s connection server, VPC Endpoint can be modified when the replication status is stopped.
- The snapshot-related features of the replica can be used after the replication policy is deleted.
Disk Backup
File Storage List page lets you view the disk backup information of the selected resource.
Notice
- Disk backup is possible only from the source where the Disk type is HDD or SSD. * Cannot be used on copies or high-performance SSD.
- You can create up to two backup copies.
| Category | Detailed description |
|---|---|
| Backup Policy | Backup policy set by the user
|
| Backup frequency | User-configured backup cycle of the original
|
| Backup status | Backup progress status according to policy settings |
| Number of backup copies | Number of snapshots retained in the backup |
| Volume information | Volume information for the source and backup
|
Table. Disk Backup Tab Detailed Information Items
Caution
When disk backup is used, recovery via snapshot is not possible; only a recovery volume can be created. If you need to restore from a snapshot, cancel the backup and restore using the snapshot.
Reference
- When creating a backup, it is created as an HDD disk type regardless of the original disk type.
- Backup Policy, Backup Schedule can be modified only when the backup status in the backup set is Completed or Stopped.
- File-level recovery of a backup can be used when the backup status is Completed or Stopped.
- The backup’s connected server, VPC Endpoint can be modified when the backup status is stopped.
- Snapshots of the backup can only be deleted.
Tag
File Storage List page lets you view the tag information of the selected resource, and you can add, modify, or delete it.
| Category | Detailed description |
|---|---|
| Tag list | Tag list
|
Table. File Storage tag tab items
Operation History
On the File Storage List page, you can view the operation history of the selected resource.
| Category | Detailed description |
|---|---|
| Task History List | Resource Change History
|
Table. Work History Tab Detailed Information Items
File Storage Resource Management
If you need to modify the settings of the created File Storage or add or remove connected servers, you can perform the operation on the File Storage Details page.
Change account password
If you are using the CIFS protocol, you can modify the mount password. To change the password, follow these steps.
- All Services > Storage > File Storage Click the menu. 1. Go to the Service Home page of File Storage.
- On the Service Home page, click the File Storage menu. 2. Go to the File Storage list page.
- On the File Storage List page, click the CIFS resource to modify the password. 3. Navigate to the File Storage Details page.
- Click the Edit button of the Mount Secret Myeonho item. 4. Password Confirmation popup window opens.
- Enter the user password for Samsung Cloud Platform. 5. Edit Account Password popup window opens.
- After setting a new password, click the Confirm button.
Reference
Even after changing the password, the existing user’s connection is maintained until you reconnect (Mount) again.
Edit Snapshot
You can modify the snapshot schedule and retention count. To modify a snapshot, follow these steps.
- All Services > Storage > File Storage Click the menu. 1. Go to the Service Home page of File Storage.
- On the Service Home page, click the File Storage menu. 2. Go to the File Storage list page.
- On the File Storage list page, click the resource to edit the snapshot settings. 3. Go to the File Storage Details page.
- Click the Edit button of the snapshot item. 4. Snapshot Edit popup window opens.
- Set the usage status and schedule, retention count, then click the Confirm button.
- If you want to automatically create snapshots based on the Schedule, select Use.
- Schedule can be selected daily by hour, or weekly by day of week and hour.
- Storage count: Enter a number between 1 and 128. * If not entered, it defaults to 10.
Caution
- If the number of retained items after modification is less than before, older snapshots will be deleted first.
- When changed to unused, previously created snapshots are retained.
- Since snapshot storage is included in File Storage usage and incurs charges, adjust the storage capacity by setting the number of snapshots to retain.
Reference
- The snapshot schedule is based on Asia/Seoul (GMT +09:00).
Edit linked resources
You can connect or disconnect resources.
Notice
- You cannot edit while a connection resource modification is in progress.
- If the edit progress status remains unchanged, please contact us via Support Center’s Contact.
To modify the connection resource, follow these steps.
- All Services > Storage > File Storage Click the menu. 1. Go to the Service Home page of File Storage.
- On the Service Home page, click the File Storage menu. 2. Go to the File Storage list page.
- File Storage list page, click the resource you want to edit the linked resource. 3. Go to the File Storage Details page.
- Linked Resource item’s Edit button. 4. Connection Resource Selection popup window opens.
- After selecting or deselecting the resource, click the Confirm button.
- You can select multiple resources simultaneously.
Caution
Access the server, be sure to perform the disconnect operations (Umount, disconnect network drive), and then release the server connection. If you release without OS operations, a status error (Hang) may occur on the connected server. For detailed information on disconnecting from the server, see 서버 연결 해제하기.
Reference
- You can connect up to 300 resources at the same location. * If you need more than 300 connections, use the API.
- After adding a connected server, you can use it after performing the connection tasks (Mount, network drive connection) on the server. * For detailed information about server connections, see 서버 연결하기.
- The replica’s connection server can be modified only when the replication status is stopped.
- The backup’s linked server can only be modified when the backup status is stopped.
VPC Endpoint Updating
You can connect or disconnect a VPC Endpoint.
To modify the connection resource, follow these steps.
- All Services > Storage > File Storage Click the menu. 1. Go to the Service Home page of File Storage.
- On the Service Home page, click the File Storage menu. 2. Go to the File Storage list page.
- On the File Storage List page, click the resource to modify the VPC Endpoint connection. 3. Go to the File Storage Details page.
- Click the Edit button of the VPC Endpoint item. 4. VPC Endpoint selection The popup window opens.
- After selecting or deselecting the resource, click the Confirm button.
- You can select multiple resources simultaneously.
Caution
- When connecting a VPC Endpoint in a Multi-AZ region, once connections to all AZs are completed, the VPC Endpoint’s connection status is reported as success. * If it appears as Failure or Partial Success, please check via Support Center > Contact.
- Connect to the server, be sure to perform the disconnection tasks (Umount, disconnect network drive), and then release the VPC Endpoint. * If you release without OS operations, a status error (Hang) may occur on the connected server. * For detailed information on server disconnection, see 서버 연결 해제하기.
- High‑Performance SSD disk type also allows data sharing by connecting a VPC Endpoint, but be careful as it does not guarantee sufficient performance of the high‑performance SSD for internal VPC resource connections.
- high‑performance SSD disk type, after checking the connection IP in the VPC Endpoint section, apply for the VPC Endpoint service. * You can add a VPC Endpoint generated based on the connection IP.
Reference
- The replica’s connection server can be modified only when the replication status is stopped.
- The backup’s linked server can only be modified when the backup status is stopped.
Cancel File Storage
You can cancel unused File Storage to reduce operating costs. However, if you terminate the service, the running service may be discontinued immediately, so you should proceed with the termination only after fully considering the impact that may arise from the service interruption.
Caution
- Be careful, as data cannot be recovered after termination.
- Service termination is possible for File Storage volumes that have no attached resources. * After removing all connected servers, cancel the service.
- Service termination of File Storage volumes without a VPC Endpoint connection is possible. * After removing all VPC Endpoints, terminate the service.
- If the volume is in Available, Error, or Inactive state, it can be terminated.
- The source using Replication or disk backup can be terminated after deleting the policy.
- Replication policy: Pause > Delete
- Backup policy: Pause > Service termination
- A replica can be terminated after the replication policy is deleted.
- The backup can be cancelled after stopping the backup policy schedule.
To cancel File Storage, follow the steps below.
- Click the All Services > Storage > File Storage menu. 1. Go to the Service Home page of File Storage.
- On the Service Home page, click the File Storage menu. 2. Go to the File Storage list page.
- On the File Storage List page, select the resource to cancel, and click the Service Cancellation button.
- After termination is complete, check on the File Storage List page whether the resource has been terminated.
2.2.1 - Connect to Server
When using a volume on the server, a connect or disconnect operation is required.
File Storage Details on the page, after adding a connected server, access the server and perform the connection tasks (Mount, network drive connection). After use, perform the disconnection tasks (Umount, disconnect network drive) and then remove the connected server.
Connect to server (Mount, network drive connection)
To use the volume added to the connected server, you must log into the server and perform the connection tasks (Mount, network drive connection). Follow the steps below.
Linux operating system (NFS)
Example configuration for server connection
- Mount information: 10.10.10.10:/filestorage
- Mount location: /data
Click the All Services > Storage > File Storage menu. Navigate to the Service Home page of File Storage.
On the Service Home page, click the File Storage menu. You will be taken to the File Storage List page.
On the File Storage List page, click the resource to be used on the connected server. You will be taken to the File Storage Details page.
Check the server in the Connection Server item and then connect.
Refer to the procedure below to mount the volume.
Switch to root privileges
$ sudo -iPackage installation (Redhat family)
# yum install nfs-utilsPackage installation (Debian-based)
# apt-get install nfs-commonEnable and start NFS-related daemon
# systemctl enable rpcbind.service
# systemctl start rpcbind.service
Volume Mount
# mkdir /data

# mount -t nfs -o vers=3,noresvport 10.10.10.10:/filestorage /data

# vi /etc/fstab
(추가) 10.10.10.10:/filestorage /data nfs defaults,vers=3,_netdev,noresvport 0 0
guide
- Supports NFS Version 3.
Windows operating system (CIFS)
Click the All Services > Storage > File Storage menu. Go to the Service Home page of File Storage.
On the Service Home page, click the File Storage menu. You will be taken to the File Storage list page.
On the File Storage List page, click the resource to be used on the connected server. You will be taken to the File Storage Details page.
In the Connection Server item, verify the server and then connect.
Refer to the steps below to connect the volume (network drive).
- In File Explorer, right-click This PC and click Connect network drive.
- Refer to the detailed information of the File Storage volume to be connected, enter the drive and folder, and then click Finish.
- To set it to reconnect automatically when the server restarts, select Reconnect when logging in.
In the network credential input popup, enter the account name (ID) and password, then click Confirm.
- Check the account name (ID) on the File Storage Details page.
- The password is the password set during File Storage creation.
- If you connect two or more volumes with the CIFS protocol enabled, add the storage IP and storage name to the hosts file before connecting.
* Mount명
\\10.10.10.10\filestorage1
\\10.10.10.10\filestorage2

* hosts 파일 내용 추가
10.10.10.10 filestoragename1 #설명
10.10.10.10 filestoragename2 #설명

* hosts 파일에 작성된 이름 사용
filestorage1 연결 시: \\ filestoragename1\filestorage1
filestorage2 연결 시: \\ filestoragename2\filestorage2
Disconnect server (Umount, disconnect network drive)
After connecting to the server and performing the disconnect tasks (Umount, disconnecting the network drive), you must detach the server in the Console. Follow the steps below.
Caution
If you disconnect the server from the console without performing the disconnection tasks on the server (Umount, disconnecting network drive), a server state error (Hang) may occur. Be sure to perform the OS tasks first.
Linux operating system (NFS)
Click the All Services > Storage > File Storage menu. Navigate to the Service Home page of File Storage.
On the Service Home page, click the File Storage menu. You will be taken to the File Storage List page.
On the File Storage List page, click the resource to detach the connected server. Go to the File Storage Details page.
In the Connection Server field, verify the server information and then connect to the server.
Refer to the commands listed in the table below to carry out the unmount (Umount) operation.
- Volume Umount
# umount /data

# vi /etc/fstab
(삭제) 10.10.10.10:/filestorage /data nfs defaults,vers=3,_netdev,noresvport 0 0
- Volume Umount
Windows operating system (CIFS)
- Click the All Services > Storage > File Storage menu. Navigate to the Service Home page of File Storage.
- On the Service Home page, click the File Storage menu. You will be taken to the File Storage list page.
- On the File Storage List page, click the resource to disconnect the server. Navigate to the File Storage Details page.
- In the Connection Server field, verify the server information and then connect to the server.
- Refer to the steps below to disconnect the volume (disconnect the network drive).
In
File Explorer, right-click thenetwork drivethat is already connected.Please select
Disconnect network drive
2.2.2 - Use Snapshot
You can create, delete, or restore snapshots of a created File Storage. You can perform these actions on the File Storage Details page and the Snapshot List page.
Create Snapshot
You can create a snapshot of the current point in time immediately. To create a snapshot, follow the steps below.
- Click the All Services > Storage > File Storage menu. Navigate to the Service Home page of File Storage.
- On the Service Home page, click the File Storage menu. You will be taken to the File Storage List page.
- File Storage List page, click the resource to create a snapshot. You will be taken to the File Storage Details page.
- Click the Snapshot Creation button. A popup indicating snapshot creation will open.
- Click the Confirm button. Creating a snapshot.
- Click the Snapshot List button. You will be taken to the File Storage Snapshot List page.
- Check the generated snapshot.
Caution
- Snapshot charges are included in the File Storage usage fees.
- When using replication or disk backup, you cannot recover with a snapshot; you can only create a recovery volume.
Reference
- The snapshot creation time is based on Asia/Seoul (GMT +09:00). Snapshots can be created up to 800, excluding those generated by schedule. (Automatic creation via schedule is limited to 128)
- If you want to automatically generate snapshots using a schedule, configure snapshots on the File Storage Details page.
- For detailed information about the snapshot schedule, see Update Snapshot.
Recover Snapshot
You can restore a File Storage volume to the latest snapshot in the Available state. To restore a snapshot, follow the steps below.
- Click the All Services > Storage > File Storage menu. Navigate to the Service Home page of File Storage.
- On the Service Home page, click the File Storage menu. You will be taken to the File Storage List page.
- On the File Storage List page, click the resource to restore from a snapshot. You will be taken to the File Storage Details page.
- Click the Snapshot List button. You will be taken to the File Storage Snapshot List page.
- Check the latest snapshot in the Available state. The volume will be restored using that snapshot.
- Click the snapshot recovery button. A popup indicating snapshot recovery will open.
- After checking the snapshot name and creation timestamp, click the Confirm button.
- When recovery starts, it becomes Reverting, and when completed, it becomes Available.
Caution
- If you want to restore from a snapshot that is not the latest, you can recover by creating a recovery volume.
- During recovery, it restores from the latest snapshot in the Available state, and recovery is not possible in the following situations.
- When the File Storage volume is not in the Available state.
- If there are no recoverable snapshots.
- If the latest snapshot changes while creating a recovery.
- If the latest snapshot is not in the Available state.
Create a snapshot recovery volume
You can create a volume using a snapshot. To create a snapshot recovery volume, follow these steps.
- Click the All Services > Storage > File Storage menu. Navigate to the Service Home page of File Storage.
- On the Service Home page, click the File Storage menu. You will be taken to the File Storage List page.
- On the File Storage List page, click the resource to restore from a snapshot. You will be taken to the File Storage Details page.
- Click the Snapshot List button. You will be taken to the File Storage Snapshot List page.
- After checking the Snapshot Name and Creation Time, click the More button of the snapshot you want to restore.
- Click Create Recovery Volume. A popup window indicating the creation of a snapshot recovery volume opens.
- Click the Confirm button. Go to the File Storage creation page.
- On the File Storage creation page, enter the information required to create the service, and select detailed options.
- Please enter the volume name and password.
- The disk type and protocol are set to match the original and cannot be modified.
Category Required or notDetailed description Volume name Required Volume name - must start with a lowercase English letter and be 3 to 21 characters using lowercase letters, numbers, and special characters (
_)
- is generated as ‘user input value + {6-character UUID composed of lowercase English letters and numbers}’
- cannot be modified after the service is created
Disk type Required Select disk type - HDD: Standard volume
- SSD: High‑performance standard volume
- Cannot be modified after service creation
- When creating a service via snapshot recovery volume, it is set identical to the original and cannot be modified
Protocol Required Protocols for sharing volumes over the network from a server - NFS: primarily used on Linux operating systems
- CIFS: primarily used on Windows operating systems
- When creating a service, the snapshot recovery volume is set identical to the original and cannot be modified
Protocol > Password Required Set the account password for volume access when using the CIFS protocol - Enter 6~20 characters, including English letters, numbers, and special characters(
$%{}[]"\excluded)
Protocol > Password Confirmation Required Confirm account password - Re-enter the same password
Recovery snapshot name Select Name of the recovery snapshot used when creating the volume - Provide the recovery snapshot name when creating a service via snapshot recovery volume creation
Table. File Storage Service Information Input Items - must start with a lowercase English letter and be 3 to 21 characters using lowercase letters, numbers, and special characters (
- Check the detailed information and estimated billing amount generated in the Summary panel, and click the Create button.
- When creation is complete, check the created resource on the File Storage List page.
Delete snapshot
You can select a snapshot to delete. To delete a snapshot, follow these steps.
- Click the All Services > Storage > File Storage menu. Navigate to the Service Home page of File Storage.
- On the Service Home page, click the File Storage menu. You will be taken to the File Storage list page.
- On the File Storage List page, click the resource to delete the snapshot. Go to the File Storage Details page.
- Click the Snapshot List button. You will be taken to the File Storage Snapshot List page.
- After checking the snapshot name and creation timestamp, click the More button of the snapshot you want to delete.
- Click the Delete button. The snapshot will be removed from the Snapshot List page.
Reference
- When using replication, snapmirror files cannot be deleted.
2.2.3 - File-level Recovery
You can restore data file by file using the generated snapshot. You can perform the operation on the File Storage Details page.
Using file-level recovery
You can enable the file-level recovery feature for use. After enabling the feature, connect to the server to select and recover data. To perform file-level recovery, follow these steps.
Click the All Services > Storage > File Storage menu. Navigate to the Service Home page of File Storage.
On the Service Home page, click the File Storage menu. You will be taken to the File Storage list page.
On the File Storage List page, click the resource to restore the file. You will be taken to the File Storage Details page.
Click the More button at the top right, then click the File-level Recovery button. The Enable File-level Recovery popup window opens.
Click the Confirm button. Activates the file-level recovery feature.
- When File-level recovery is enabled, the File-level recovery button is displayed as Disable file-level recovery.
In the Connection Server field, verify the server information and then connect to the server.
Refer to the procedure below to recover the data.
Connect to the server and verify the mount name of the File Storage.
Move to the snapshot location under the mount name.
# cd /Mount명/.snapshot/snapshot명- Check the files to be restored at the snapshot location and restore them to the required path.
Disable file-level recovery
You can disable the file-level recovery feature after using it. To disable file-level recovery, follow these steps.
- Click the All Services > Storage > File Storage menu. Navigate to the Service Home page of File Storage.
- On the Service Home page, click the File Storage menu. You will be taken to the File Storage list page.
- On the File Storage List page, click the resource to disable file-level recovery. You will be taken to the File Storage Details page.
- Click the More button at the top right, then click the Disable File-Level Recovery button. The Disable File-Level Recovery popup will open.
- Click the Confirm button. Disable the file-level recovery function.
2.2.4 - Using Disk Backup
After creating a backup of the File Storage on a dedicated backup HDD storage, you can periodically store snapshots. You can perform tasks on the File Storage Details page and the Disk Backup page.
Caution
The backup created through Disk backup can be restored using the file-level recovery feature. File-level recovery for detailed information, please refer to 파일 단위 복구하기.
Information
- Disk backup is only possible from the original where the disk type is HDD or SSD. * It cannot be used on copies or high-performance SSD.
- You can create up to two backup copies.
Create Disk Backup
You can create a backup volume on the original or another backup‑only HDD storage location.
To create a backup volume, follow these steps.
- Click the All Services > Storage > File Storage menu. 1. Navigate to the Service Home page of File Storage.
- On the Service Home page, click the File Storage menu. 2. Go to the File Storage List page.
- File Storage list On the page, click the resource to create a backup. 3. Go to the File Storage Details page.
- Create Disk Backup Click the button. 4. Create Disk Backup The popup window opens.
- After entering the backup information, click the Create button. 5. Creates a backup of the HDD disk type.
- Backup Location: Select the location where the backup will be created (the same location can be selected).
- Backup Frequency: Choose from 1 hour, daily, weekly, or monthly. * Perform replication in the next cycle.
- Daily: 23:59:00
- Weekly: Every Sunday 23:59:00
- Monthly: the 1st of each month at 23:59:00
- Disk Backup Click the page. 6. Go to the Disk Backup page.
- Check the disk backup information.
- When selecting the volume name of the original or backup, you are taken to the File Storage Details page of that volume.
Caution
When disk backup is used, recovery via snapshot is not possible, and only a recovery volume can be created. If you need to restore from a snapshot, cancel the backup and restore using the snapshot.
Reference
- A backup in HDD format is created regardless of the original disk type.
- You can create two backups per volume, and data transfer fees apply for cross‑region backups.
Edit Disk Backup Policy
You can change the backup status by modifying the backup policy. To modify the backup policy, follow the steps below.
- Click the All Services > Storage > File Storage menu. 1. Go to the Service Home page of File Storage.
- On the Service Home page, click the File Storage menu. 2. File Storage List Go to the page.
- On the File Storage List page, click the resource to modify the backup policy. 3. File Storage Details go to the page.
- Click the Disk Backup tab.
- Click the Edit button of the Backup Policy. 5. Edit Disk Backup Policy The popup window opens.
- Usage: Performs a backup. * If it is Paused, you can change it to Enabled.
- Pause: Temporarily pause the backup. * If use is the case, it can be changed to pause.
- Delete: Delete the backup. * If it is Paused, it can be changed to Delete, and after deletion you cannot use the backup again.
- Check the updated backup policy on the Disk Backup page of File Storage.
Reference
Backup policy, Backup schedule can be modified when the backup status in the backup set is completed or stopped.
Modify disk backup schedule
You can change the synchronization interval between the original and the backup by modifying the backup schedule. To modify the backup schedule, follow these steps.
- Click the All Services > Storage > File Storage menu. 1. Go to the Service Home page of File Storage.
- On the Service Home page, click the File Storage menu. 2. Go to the File Storage list page.
- On the File Storage List page, click the resource whose backup schedule you want to modify. 3. Navigate to the File Storage Details page.
- Click the Disk Backup page.
- Click the Edit button of Backup Schedule. 5. Backup Schedule Edit popup opens.
- Backup Frequency: select from 1 hour, daily, weekly, or monthly. 6. Create snapshots on the next cycle. * Daily: Every day 23:59:00 * Weekly: Every Sunday 23:59:00 * Monthly: the 1st of each month 23:59:00
- Check the updated backup schedule on the disk backup page of File Storage.
Reference
Backup policy, Backup schedule can be modified only when the backup status in the backup set is completed or stopped.
Modify the number of retained disk backups
You can set the number of snapshots retained in the backup. To modify the number of backup copies, follow these steps.
- Click the All Services > Storage > File Storage menu. 1. Navigate to the Service Home page of File Storage.
- On the Service Home page, click the File Storage menu. 2. Go to the File Storage list page.
- On the File Storage list page, click the resource to modify the backup schedule. 3. Go to the File Storage Details page.
- Click the Disk Backup page.
- Click the Edit button of Backup retention count. 5. Edit Disk Backup Retention Count A popup window opens.
- Please enter the Backup retention count. * The number of retained items can be set from 1 to 128.
- Check the modified Backup Schedule on the Disk Backup tab of the File Storage Details page.
2.2.5 - Using replication
You can create a replica of File Storage at another location and synchronize it periodically. You can perform tasks on the File Storage Details page and the Replication page.
Reference
- The kr-south region does not provide File Storage replication functionality.
Create Clone
You can create a replica volume in a different location. To create a replica volume, follow these steps.
- All Services > Storage > File Storage click the menu. 1. Go to the Service Home page of File Storage.
- On the Service Home page, click the File Storage menu. 2. Go to the File Storage list page.
- File Storage list page, click the resource for which you want to create a replica. 3. Navigate to the File Storage Details page.
- Click the Create Clone button. 4. Create Clone popup window opens.
- Enter the Replication location and Replication volume name, Password, Replication schedule, and click the Create button. 6. Creates a replica with the same disk type.
- Replication Location: Select a location different from the original File Storage volume.
- Replication Volume Name: Start with a lowercase English letter and use lowercase letters, numbers, and special characters (
_) to enter 3 to 21 characters. - Password: the account password for accessing the CIFS volume. * Enter 6 to 20 characters, including English letters, numbers, and special characters (
$%{}[]"\except). - Replication interval: Select from 5 minutes, 1 hour, daily, weekly, or monthly. * Replication is performed at the intervals below.
- Daily: daily 23:59:00
- Weekly: Every Sunday 23:59:00
- Monthly: the 1st of each month at 23:59:00
- Click the Clone page. 7. Go to the Clone page.
- Check the replication information.
- When selecting the volume name of the source or replica, you are taken to the volume’s File Storage Details page.
Caution
When using replication, you cannot recover with snapshots, and you can only create a recovery volume. If you need to restore from a snapshot, delete the replication policy first, then restore using the snapshot.
Reference
- When creating a replica, a copy with the same disk type and protocol is generated.
- One replica can be created per volume, and data transfer charges apply for cross‑region replication.
Edit Replication Policy
You can change the replication status by modifying the replication policy.
Information
- You cannot modify the replication policy while replication is in progress. * Refresh the screen to verify the replication status again.
- If the replication policy is stopped or the replication status is completed, you can modify the replication policy on the replica.
- All Services > Storage > File Storage Click the menu. 1. Navigate to the Service Home page of File Storage.
- On the Service Home page, click the File Storage menu. 2. Go to the File Storage list page.
- On the File Storage List page, click the resource to edit the replication policy. 3. Go to the File Storage Details page.
- Click the Copy page. 4. File Storage Replication Navigate to the page.
- Click the Edit button of the Replication Policy. 5. Edit Replication Policy The popup window opens.
- Usage: Performs replication. * If it is Paused, you can change it to Enabled.
- Pause: Temporarily stops replication. * If Use is selected, it can be changed to Pause.
- Delete: Delete the replica. * If it is Paused, it can be changed to Delete, and after deletion you cannot use replication again.
- On the File Storage Replication page, check the updated Replication Policy.
Caution
- After deletion, the replica becomes the original, so you cannot re‑replicate to the previous configuration by modifying the replication policy.
- After Pause, data stored only in the replica will be deleted when replication is used again.
- When using the replication policy, replicas become read-only and cannot modify data, so unmount from all connected resources before using replication.
Reference
Modify replication interval
You can change the synchronization interval between the primary and replica by modifying the replication interval.
Notice
- You cannot modify the replication interval while replication is in progress. * Refresh the page to verify the replication status again.
- If the replication policy is stopped or the replication status is completed, you can modify the replication interval on the replica.
- All Services > Storage > File Storage Click the menu. 1. Navigate to the Service Home page of File Storage.
- On the Service Home page, click the File Storage menu. 2. Go to the File Storage list page.
- On the File Storage list page, click the resource to modify the replication schedule. 3. File Storage Details navigate to the page.
- Click the Copy page. 4. File Storage Replication Navigate to the page.
- Click the Edit button of the Replication Cycle. 5. Edit Replication Cycle The popup window opens.
- Replication interval: Choose from 5 minutes, 1 hour, daily, weekly, monthly. * Replication is performed at the intervals below.
- Daily: Every day 23:59:00
- Weekly: Every Sunday 23:59:00
- Monthly: the 1st of each month at 23:59:00
- Replication interval: Choose from 5 minutes, 1 hour, daily, weekly, monthly. * Replication is performed at the intervals below.
- On the File Storage Replication page, check the updated Replication Interval.
Reference
If the replication policy is stopped or the replication status is completed, you can modify the policy and schedule on the replica.
2.3 - API Reference
API Reference
2.4 - CLI Reference
CLI Reference
2.5 - Release Note
File Storage
2026.07.16
FEATURE
Single-AZ/Multi-AZ support and UX improvement- When creating File Storage, you can select the volume type (Single-AZ/Multi-AZ) and create it.
- Single-AZ: You can select an Availability Zone.
- Multi-AZ: You can select the Active Zone.
- Even after creating a File Storage, you can change the account password for the CIFS protocol on the detail page.
2025.10.23
FEATURE
Add disk type and provide ServiceWatch integration- The SSD SAP_E, SSD SAP_E disk type, a volume dedicated to SAP Account, has been added.
- When using a volume dedicated to the SAP Account, the LIF (storage Mount IP) is automatically transferred when a failover occurs due to a fault.
- It can be used only with a SAP account.
- ServiceWatch service integration provision
- You can monitor data through the ServiceWatch service.
2025.07.01
FEATURE
Add disk type and disk backup functionality- High-performance SSD disk type has been added and can be used by connecting to a Multi-node GPU Cluster.
- Disk Backup allows you to store snapshots on a backup-dedicated HDD storage. * You can select a location other than the original location.
2025.02.27
FEATURE
Disk type and replication, VPC Endpoint connection feature added- File Storage feature change
- SSD disk types have been added, allowing you to select a disk type based on your purpose.
- You can create an identical replica volume at a different location and set the data replication schedule.
- File Storage can be used from external networks via a VPC Endpoint connection.
- Samsung Cloud Platform Common Feature Change
- Account, IAM, and Service Home, tags, etc., have been updated to reflect common CX changes.
2024.10.01
NEW
File Storage service official version release- Since it automatically scales up or down based on usage, users can use the volume without capacity limits.
- You can select the connection target using the access control feature.
2024.07.02
NEW
Beta version release- We have launched the File Storage service, a storage solution that enables multiple client servers to share files over a network connection.
3 - Parallel File Storage
3.1 - Overview
Service Overview
Parallel File Storage is a high‑performance parallel file storage based on All NVMe that can process large amounts of data quickly and efficiently.
Features
- Data processing speed improvement: Distribute file data across multiple storage nodes to improve data processing speed and reduce analysis time.
- Various Field Applications: Through fast data processing speed and analysis time, it can be utilized in various fields such as AI/ML analysis, big data analysis, etc.
Configuration diagram
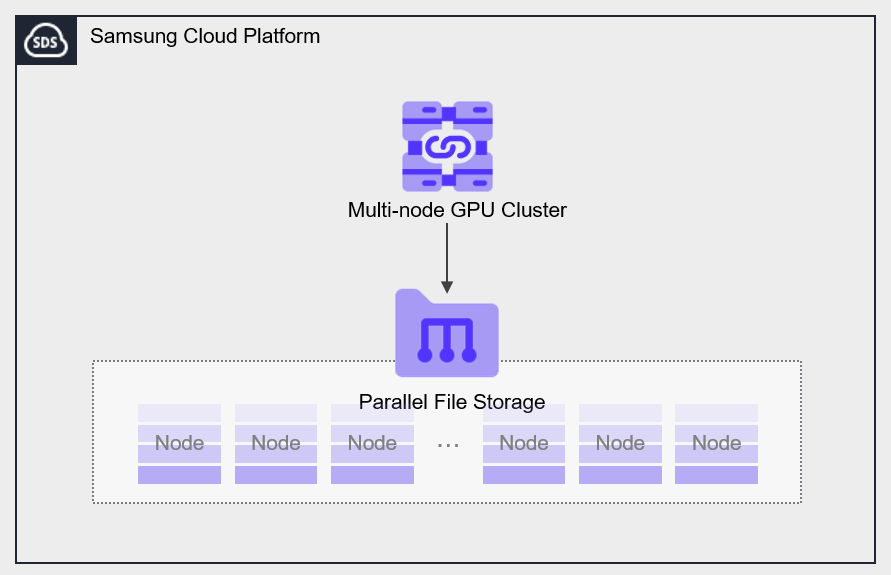
Provided features
Parallel File Storage provides the following features.
- Volume Name: Users can set a name for each volume.
- Snapshot: Through the image snapshot feature, it is possible to recover data that has been modified or deleted.
- Connection Resources: Can be connected to and used in a Multi-node GPU Cluster.
- Terraform provision: Provides an IaC environment through Terraform.
Component
You can create a volume by selecting the disk type and protocol based on the user’s service environment and performance requirements. When using the snapshot feature, you can restore data to the desired point in time.
Volume
A volume (Volume) is the basic creation unit of the Parallel File Storage service and is used as data storage space. The user selects a name and size to create a volume, then connects to and uses it in a Multi-node GPU Cluster.
The volume name creation rules are as follows.
- It must start with a lowercase English letter and can be set to 3 to 21 characters using lowercase letters, numbers, and special characters (
_).
Snapshot
A snapshot (Snapshot) is an image backup taken at a specific point in time. You can recover changed and deleted data using the image snapshot feature. The user can restore to the most recent snapshot from the snapshot list.
Reference
You can create up to 50 snapshots.
Prerequisite Service
This is a list of services that must be pre-configured before creating the service. Please refer to the guide provided for each service and prepare in advance.
| Service Category | service | Detailed description |
|---|---|---|
| Compute | Multi-node GPU Cluster | Physical GPU server for large-scale high-performance AI computing |
Table. Parallel File Storage Pre-service
3.2 - How-to guides
Users can create a service by entering the required information for Parallel File Storage and selecting detailed options through the Samsung Cloud Platform Console.
Create Parallel File Storage
You can create and use the Parallel File Storage service from the Samsung Cloud Platform Console.
To create a Parallel File Storage, follow these steps.
Click the All Services > Storage > Parallel File Storage menu. 1. Go to the Service Home page of Parallel File Storage.
On the Service Home page, click the Create Parallel File Storage button. 2. Go to the Create Parallel File Storage page.
On the Parallel File Storage creation page, enter the information required to create the service.
Category required statusDetailed description Volume name Required Enter the volume name - must start with a lowercase English letter
- Enter 3 to 21 characters using lowercase letters, numbers, and special characters (
_)
- Generate in the format ‘user input+{6-character UUID composed of lowercase English letters and numbers}’
- Cannot be modified after the service is created
Availability Zone Required Select the volume location - Can connect to Multi-node GPU Cluster resources created in the same location (AZ)
capacity Required Enter the desired capacity - 1 ~ 1000 TB available
- After the service is created, only expansion is possible
tag Selection Add tag - Up to 50 can be added per resource
- After clicking the Add Tag button, enter or select Key, Value values
Table. Parallel File Storage service creation information input fieldsCheck the detailed information and estimated billing amount generated in the summary panel, and click the Create button.
When the popup notifying creation opens, click the Confirm button.
- When creation is complete, check the created resources on the Parallel File Storage List page.
Reference
- Creating a Parallel File Storage may take more than several tens of minutes, depending on the service scale.
Parallel File Storage View detailed information
Parallel File Storage service allows you to view and edit the full resource list and detailed information.
To view detailed information about the Parallel File Storage service, follow these steps.
- Click the All Services > Storage > Parallel File Storage menu. 1. Go to the Service Home page of Parallel File Storage.
- On the Service Home page, click the Parallel File Storage menu. 2. Parallel File Storage List Navigate to the page.
- On the Parallel File Storage List page, click the resource to view detailed information. 3. Parallel File Storage Details Navigate to the page.
- Parallel File Storage Details The page displays status information and additional feature information, and consists of Details, Snapshot List, Tags, Operation History tabs.
Category Detailed description Volume status Volume status representation - Creating: Creating
- Available: Created, server connection available
- Extending: Extending
- Deleting: Deleting
- Error Deleting: Abnormal state during deletion
- Error: Abnormal state during creation
- Error Extending: Abnormal state during extension
Create snapshot Immediately create a snapshot at the time of creation - Up to 50 can be created
- For detailed information on snapshot creation, refer to 스냅샷 생성하기
Service cancellation Cancel service button Table. Parallel File Storage status information and additional features
- Parallel File Storage Details The page displays status information and additional feature information, and consists of Details, Snapshot List, Tags, Operation History tabs.
Detailed Information
Parallel File Storage List page lets you view detailed information of the selected resource and edit the information if needed.
| Category | Detailed description |
|---|---|
| service | service name |
| Resource Type | Resource Type |
| SRN | Unique resource ID in Samsung Cloud Platform
|
| Resource name | resource name
|
| Resource ID | Service’s unique resource ID |
| Constructor | User who created the service |
| Creation date and time | Service creation date and time |
| Volume name | Volume name |
| Availability Zone | Volume position |
| capacity | Volume size
|
| Mount information | Mount information
|
| connection resource | List of connected resources (Multi-node GPU Server)
|
Table. Parallel File Storage Details - Detail Tab Items
Snapshot List
Parallel File Storage List page allows you to view the snapshot of the selected resource.
Reference
- Refer to 스냅샷 사용하기 for how to create and manage snapshots.
- You can restore data on a per-file basis using snapshots. * For more details, please refer to 파일 단위 복구하기.
| Category | Detailed description |
|---|---|
| Use snapshots | Total size of stored snapshots |
| Snapshot name | Snapshot name |
| capacity | Snapshot capacity |
| Creation date and time | Snapshot creation timestamp |
| status | Snapshot status
|
| Delete | Delete the selected snapshot from the snapshot list |
Table. Parallel File Storage Details - Snapshot Tab Items
Reference
You can create up to 50 snapshots.
Tag
Parallel File Storage List page lets you view the tag information of the selected resource, and you can add, modify, or delete it.
| Category | Detailed description |
|---|---|
| Tag list | Tag list
|
Table. Parallel File Storage Details - Tag Tab Items
Operation History
Parallel File Storage List page allows you to view the operation history of the selected resource.
| Category | Detailed description |
|---|---|
| Task History List | Resource Change History
|
Table. Parallel File Storage Details - Work History Tab Items
Parallel File Storage Managing Resources
If you need to modify settings in Parallel File Storage or add or remove connected servers, you can perform the operation on the Parallel File Storage Detailed Information page.
Update capacity
You can increase the capacity of Parallel File Storage.
To modify the capacity, follow the steps below.
- All Services > Storage > Parallel File Storage Click the menu. 1. Go to the Service Home page of Parallel File Storage.
- On the Service Home page, click the Parallel File Storage menu. 2. Parallel File Storage List Navigate to the page.
- Parallel File Storage list page, click the resource to edit the capacity. 3. Parallel File Storage Details Navigate to the page.
- Click the Edit button of the Capacity item. 4. Capacity Edit popup window opens.
- After entering the capacity to be expanded, click the Confirm button.
- You can expand up to a maximum of 1000 TB, including the existing capacity.
- When the popup notifying capacity expansion opens, click the Confirm button.
Edit linked resources
You can attach resources to Parallel File Storage or detach attached resources.
Notice
- You can connect to Multi-node GPU Cluster resources created in the same AZ.
- While modifying the attached resource, further changes are not allowed, and the attached resource can only be edited when the volume is in the Available state.
- If communication with the target resource is lost or the connection is unavailable, you cannot modify the connection resource.
- When connecting resources, you can link up to 300 resources at the same location. * If you exceed 300 items, use the API.
To modify the connection resource, follow these steps.
- Click the All Services > Storage > Parallel File Storage menu. 1. Go to the Service Home page of Parallel File Storage.
- On the Service Home page, click the Parallel File Storage menu. 2. Parallel File Storage List Navigate to the page.
- On the Parallel File Storage List page, click the resource to edit the linked resource. 3. Parallel File Storage Details Navigate to the page.
- Click the Linked Resource item’s Edit button. 4. Connection Resource Selection popup window opens.
- After selecting the resource to connect or unchecking the resource to disconnect, click the Confirm button.
- You can select multiple resources simultaneously.
Caution
- The Multi-node GPU Cluster server is connected to the Parallel File Storage via two N/W interfaces. * Verify that both N/Ws are properly connected to optimize storage performance.
- On the Parallel File Storage Details page, when the resource connection status is Partially Successful, follow the steps below to verify.
- Please verify that the two N/W interfaces for connecting Parallel File Storage in the Multi-node GPU Cluster are functioning properly.
- After disconnecting from Parallel File Storage, reconnect.
- Parallel File Storage Details Check the connection status of the resource on the page.
- When disconnecting, you must first access the server and perform the disconnection tasks (Umount, disconnect network drive).
- If the connection is terminated without OS intervention, a state error (Hang) may occur on the connection server.
- For detailed information about the server unmount operation, please refer to 서버 연결 해제하기.
- When adding a connected server, you must first perform the connection tasks (Mount, network drive connection) on the server.
- For detailed information about server connections, refer to 서버 연결하기.
Cancel Parallel File Storage
You can reduce operating costs by terminating unused Parallel File Storage.
However, if you terminate the service, the running service may be stopped immediately, so you should proceed with the termination only after fully considering the impact that may arise from service interruption.
Caution
- Be careful, as data cannot be recovered after termination.
- If there are resources connected to Parallel File Storage, it cannot be terminated. * Remove all connected resources before terminating the service.
- The volume can be detached only when its status is Available or Error.
To cancel Parallel File Storage, follow the steps below.
- Click the All Services > Storage > Parallel File Storage menu. 1. Go to the Service Home page of Parallel File Storage.
- On the Service Home page, click the Parallel File Storage menu. 2. Parallel File Storage List Navigate to the page.
- On the Parallel File Storage List page, select the resource to cancel and click the Cancel Service button.
- Go to the Parallel File Storage Details page of the resource to be terminated and delete it individually.
- When the pop-up notifying termination opens, click the Confirm button.
- After termination is complete, check on the Parallel File Storage list page whether the resource has been terminated.
3.2.1 - Use Snapshot
You can create, delete, or recover using snapshots of Parallel File Storage.
Create Snapshot
You can create snapshots of Parallel File Storage.
To create a snapshot, follow these steps.
- Click the All Services > Storage > Parallel File Storage menu. You will be taken to the Service Home page of Parallel File Storage.
- From the Service Home page, click the Parallel File Storage menu. You will be taken to the Parallel File Storage List page.
- Parallel File Storage List page, click the resource to create a snapshot. You will be taken to the Parallel File Storage Details page.
- On the Parallel File Storage Details page, click the Create Snapshot button.
- When the popup notifying snapshot creation opens, click the Confirm button.
- Click the Snapshot List button. It takes you to the File Storage snapshot list page.
- Check the generated snapshot.
Caution
- You can only restore from the most recent snapshot. To restore from an earlier snapshot, delete the latest snapshot.
- Snapshot charges are included in the File Storage usage fees.
Reference
You can create up to 50 snapshots.
Recover Snapshot
You can restore using the snapshot you created.
To restore from a snapshot, follow these steps.
- Click the All Services > Storage > Parallel File Storage menu. You will be taken to the Service Home page of Parallel File Storage.
- From the Service Home page, click the Parallel File Storage menu. You will be taken to the Parallel File Storage List page.
- On the Parallel File Storage List page, click the resource to restore the snapshot. You will be taken to the Parallel File Storage Details page.
- On the Parallel File Storage Details page, click the Snapshot List tab.
- Check the latest snapshot with Available status in the snapshot list.
- When restoring, the volume is recovered from the selected snapshot.
- Click the Snapshot Recovery button. The Snapshot Recovery popup opens.
- After checking the snapshot name and creation timestamp, click the Confirm button.
- The snapshot status changes to Reverting when recovery starts and to Available upon completion.
Caution
- You can only restore from the most recent snapshot. To restore from an earlier snapshot, delete the latest snapshot.
- During recovery, it restores from the latest snapshot in the Available state, and the situations where recovery is not possible are as follows.
- When the Parallel File Storage volume is not in the Available state
- If there are no recoverable snapshots.
- If the latest snapshot changes while creating a recovery.
- If the latest snapshot is not in Available state.
Delete snapshot
You can delete snapshots of Parallel File Storage.
To delete a snapshot, follow these steps.
- Click the All Services > Storage > Parallel File Storage menu. You will be taken to the Service Home page of Parallel File Storage.
- From the Service Home page, click the Parallel File Storage menu. You will be taken to the Parallel File Storage List page.
- Parallel File Storage List page, click the resource to delete the snapshot. You will be taken to the Parallel File Storage Detail page.
- On the Parallel File Storage Details page, click the Snapshot List tab.
- In the snapshot list, click the More > Delete button at the far right of the snapshot to be restored.
- When the popup notifying you of snapshot deletion opens, click the Confirm button.
3.2.2 - Install Agent
To use the Parallel File Storage service, you must connect to the target server and install the Agent. After installing the Agent, mount on the server to use Parallel File Storage.
Install Agent and Connect to Server (Mount)
The Agent installation and server connection consist of six steps. Follow the procedure below.
- Agent installation
- Account login
- Create Mount Point
- Filesystem Mount
- Check mount
- fstab registration
Install Agent
Install the Agent using the Mount IP.
Reference
Mount IP can be found in the Mount name field on the detail page of the Samsung Cloud Platform Console.
- Click the All Services > Storage > Parallel File Storage menu. You will be taken to the Service Home page of Parallel File Storage.
- On the Service Home page, click the Parallel File Storage menu. You will be taken to the Parallel File Storage List page.
- On the Parallel File Storage List page, click the resource to be used on the connected server. You will be taken to the Parallel File Storage Details page.
- After checking the server in the Connection Server item, connect.
- Follow the example below to install the Volume Agent and connect the server (Mount).
curl <Mount IP>:14000/dist/v1/install | sh
root@RESD-s4sr3h:/# curl http://10.102.160.254:14000/dist/v1/install | sh
  % Total    % Received % Xferd  Average Speed   Time    Time     Time  Current
                                 Dload  Upload   Total   Spent    Left  Speed
100  1424  100  1424    0     0  1978k      0 --:--:-- --:--:-- --:--:-- 1390k
Downloading WekaIO CLI 4.2.4.29-hcsf
  % Total    % Received % Xferd  Average Speed   Time    Time     Time  Current
                                 Dload  Upload   Total   Spent    Left  Speed
100 58.7M  100 58.7M    0     0  1079M      0 --:--:-- --:--:-- --:--:-- 1088M
Installing...
Installing agent of version 4.2.4.29-hcsf
The agent is configured to detect cgroups - cgroups v1 not found, cgroups are disabled
Waiting for agent service to be ready
Installation finished successfully
WekaIO CLI 4.2.4.29-hcsf is now installed
Account login
Log in using the mount information for the server mount.
Reference
On the detail page of the Samsung Cloud Platform Console, you can view the Mount name, Mount account, and password in the Mount information section.
#weka user login -H <Mount IP>
root@RESD-s4sr3h:/# weka user login -H 10.102.160.254
Organization (enter name or ID, default: 0) admin_org
Username: admin_reg
Password: ###########
+------------------------------+
| Login completed successfully |
+------------------------------+
Create Mount Point
Create a mount point on the server to mount the filesystem.
#mkdir /mnt/weka
Filesystem Mount
Mount the filesystem according to the following procedure.
- Use the #ip a command to check the IP and Interface Name information for Mount.
root@RESD-s4sr3h:/# ip a |grep 10.102
  inet 10.102.160.248/23 brd 10.102.161.255 scope global ibs4f0.8010
  inet 10.102.160.249/23 brd 10.102.161.255 scope global ibP1s8f0.8010
Reference
The IP information and Interface Name that can be identified in the above example are as follows.
- IP: 10.102.160.10, 10.102.160.11
- Interface Name: ibs4f0.8010, ibP1s8f0.8010
- Use the verified IP and Interface Name to execute the Mount command.
mount -t wekafs <backend-server-IP-address>/<filesystem-name> -o net=<VF interface>/<synthetic network interface IP address>/mask -o mgmt_ip=<Management-IP> /mnt/weka
root@RESD-s4sr3h:/# mount -t wekafs -o num_cores=8 -o net:ha=ibs4f0.8010,net:ha=ibP1s8f0.8010,mgmt_ip='10.102.160.10+10.102.160.11' 10.102.160.254/wekafs /mnt/weka
Mounting 10.102.161.254/bmtfs on /weka_fs
Basing mount on container client
Downloading [1/21] http://10.102.160.254:14000/dist/v1/image/envoy-fe-e6b882a6bce3c0de8cd9c7833df1a567.squashfs
Downloading [2/21] http://10.102.160.254:14000/dist/v1/image/weka-driver-1.0.0-d10ca9cff59b98778b4314014569e00f.squashfs
Downloading [3/21] http://10.102.160.254:14000/dist/v1/image/weka-driver-igb-uio-4.0.0-7eee7dc5b7f1d85a1be0e448d5e97312.squashfs
Downloading [4/21] http://10.102.160.254:14000/dist/v1/image/container-s3-tmp-1.57f-9cb61c7e0ae3ca9e2b476c191e4e84ab.squashfs
Downloading [5/21] http://10.102.160.254:14000/dist/v1/image/container-smbw-weka-4.7.12.3-9b67132a85a950260f048955dc33c7a9.squashfs
Downloading [6/21] http://10.102.160.254:14000/dist/v1/image/weka-drain-tools-2d01044c641816d9002ca594a6ae9d90.squashfs
Downloading [7/21] http://10.102.160.254:14000/dist/v1/image/container-ganesha-dev-weka-5-11becf16b21c9635daa23a247340a7bd.squashfs
Downloading [8/21] http://10.102.160.254:14000/dist/v1/image/dependencies-1.0.0-9b64fdba87a4d6e6efa9ab5250169ec8.squashfs
Downloading [9/21] http://10.102.160.254:14000/dist/v1/image/weka-container-2.3.0-be66bcc7c9739b15cacd910d7cac031e.squashfs
Downloading [10/21] http://10.102.160.254:14000/dist/v1/image/weka-hostside-faf9aa30ec9ac7521ffbc9589ac23deb.squashfs
Downloading [11/21] http://10.102.160.254:14000/dist/v1/image/api-6f501306831ff9a223a7f706c5a661e1.squashfs
Downloading [12/21] http://10.102.160.254:14000/dist/v1/image/weka-s3-3508f2f1afb4900ab11c4772e327b1ac.squashfs
Downloading [13/21] http://10.102.160.254:14000/dist/v1/image/weka-ganesha-5c6ef6d08e31f80580f50bab7d1b8134.squashfs
Downloading [14/21] http://10.102.160.254:14000/dist/v1/image/dashboard-dfb78995154ab40fb274037ac9fe8a45.squashfs
Downloading [15/21] http://10.102.160.254:14000/dist/v1/image/container-samba-weka-4.7.12.3-69835f740573b7ded6faed1dfe737bed.squashfs
Downloading [16/21] http://10.102.160.254:14000/dist/v1/image/weka-smbw-8a1430e5f0f2cca6d2a4af603d630882.squashfs
Downloading [17/21] http://10.102.160.254:14000/dist/v1/image/ui-1.0.0-5bc747765d326e6e1c3488285822f459.squashfs
Downloading [18/21] http://10.102.160.254:14000/dist/v1/image/weka-samba-8102bcf3d3a81f02755cb2e75b1b8d16.squashfs
Downloading [19/21] http://10.102.160.254:14000/dist/v1/image/weka-node-fbd17baa570969b6da7e5561f1eb652f.squashfs
Downloading [20/21] http://10.102.160.254:14000/dist/v1/image/ofed-b643ca3e4fa06d84416d463afe74a66a.squashfs
Downloading [21/21] http://10.102.160.254:14000/dist/v1/image/driver-uio-pci-generic-1.0.0-322a3daa84c41eeb6f0cafd0802fbf50.squashfs
Finished getting version 4.2.4.29-hcsf
Creating Weka container 'client' in version 4.2.4.29-hcsf
Preparing version 4.2.4.29-hcsf of container client
Base port was not explicitly provided, the container will use 14000
Applying resources
Starting container 'client'
Waiting for container 'client' to join cluster
Container "client" is ready (pid = 392216)
Calling the mount command
Cgroups v1 not found, running without cgroups
Mount completed successfully
Check mount
#df -h Run the command to check whether the filesystem is mounted.
root@RESD-s4sr3h:/# df -h
Filesystem      Size  Used Avail Use% Mounted on
tmpfs           202G  3.8M  202G   1% /run
/dev/nvme2n1p2  3.5T   37G  3.3T   2% /
tmpfs          1008G     0 1008G   0% /dev/shm
tmpfs           5.0M     0  5.0M   0% /run/lock
/dev/nvme2n1p1  511M  6.1M  505M   2% /boot/efi
tmpfs           202G  4.0K  202G   1% /run/user/0
/dev/loop0      2.0G   47M  2.0G   3% /opt/weka/logs
tmpfs          1008G   12K 1008G   1% /opt/weka/data/agent/tmpfss/cleanup
tmpfs          1008G  2.0G 1006G   1% /opt/weka/data/agent/tmpfss/client-persistent-tmpfs
tmpfs          1008G     0 1008G   0% /opt/weka/data/agent/tmpfss/cross-container-rpc-the-tmpfs
tmpfs          1008G  4.0K 1008G   1% /opt/weka/data/agent/tmpfss/cleanup_before_stop_and_delete
bmtfs           1.9T  537G  1.3T  29% /weka_fs
fstab registration
Register fstab so that it automatically mounts on server Reboot.
To register fstab, run the #vi /etc/fstab command, then add the following command.
root@RESD-s4sr3h:/# cat /etc/fstab
# /etc/fstab: static file system information.
#
# Use 'blkid' to print the universally unique identifier for a
# device; this may be used with UUID= as a more robust way to name devices
# that works even if disks are added and removed. See fstab(5).
#
# <file system> <mount point>   <type>  <options>       <dump>  <pass>
# / was on /dev/nvme2n1p2 during curtin installation
/dev/disk/by-uuid/8683a4fb-ee21-47c2-938e-2be0beea2089 / ext4 defaults 0 1
# /boot/efi was on /dev/nvme2n1p1 during curtin installation
/dev/disk/by-uuid/92ED-55CC /boot/efi vfat defaults 0 1
/swap.imgnoneswapsw00
10.102.160.254/wekafs /mnt/weka wekafs num_cores=8,net:ha=ibs4f0.8010,net:ha=ibP1s8f0.8010,mgmt_ip=10.102.160.10+10.102.160.11,x-systemd.requires=wekaagent.service,x-systemd.mount-timeout=infinity,_net
dev 0 0
Disconnect server (Umount)
To disconnect the server, first log into the server and perform the disconnect operation (Umount), then disconnect the server from the Console.
To disconnect from the server, follow these steps.
- Click the All Services > Storage > Parallel File Storage menu. You will be taken to the Service Home page of Parallel File Storage.
- On the Service Home page, click the Parallel File Storage menu. You will be taken to the Parallel File Storage List page.
- On the Parallel File Storage List page, click the resource to disconnect the server. Navigate to the Parallel File Storage Details page.
- After checking the server information in the Connection Server item, connect to the server.
- Refer to the commands shown in the following example to perform the unmount (Umount) operation.
# umount /mnt/weka

# vi /etc/fstab
3.2.3 - File-level Recovery
You can restore data on a per‑file basis using the generated snapshot.
Using file-level recovery
You can connect to the server to select and recover data.
To perform file-level recovery, follow these steps.
- Click the All Services > Storage > Parallel File Storage menu. You will be taken to the Service Home page of Parallel File Storage.
- From the Service Home page, click the Parallel File Storage menu. You will be taken to the Parallel File Storage List page.
- On the Parallel File Storage List page, click the resource to recover the file. You will be taken to the Parallel File Storage Details page.
- In the Connected Resources item, verify the linked server and then connect to that server.
- Check the mount name of the File Storage on the server.
- The mount name is the same as the mount point configured on the server for mounting the filesystem.
- Navigate to the snapshot location under the mount name.
# cd /Mount명/.snapshots/snapshot명 - After checking the files to be restored at the snapshot location, restore them to the required path.
# cp -arp /Mount명/.snapshots/snapshot명/파일/{복구 디렉토리}/
guide
If needed, restart or create the container according to the application type.
3.3 - API Reference
API Reference
3.4 - CLI Reference
CLI Reference
3.5 - Release Note
Parallel File Storage
2026.03.19
FEATURE
Add snapshot recovery feature- The feature to restore from snapshots has been added.
- You can restore from the most recently created snapshot.
2025.12.16
NEW
Parallel File Storage service official version release- Parallel File Storage service has been officially launched.
- It can distribute file data across multiple storage nodes, allowing fast and efficient processing of large-scale data.
- Through fast data processing speed and reduced analysis time, it can be applied in various fields such as AI/ML analysis and big data analysis.
4 - Object Storage
4.1 - Overview
Service Overview
Object Storage is an object storage that allows users to easily store and use the data they want and can be accessed via URL, making data management very convenient. It enables searching and retrieving large-scale data, and you can leverage features such as encryption and version control. Provides public and private URLs, and the public URL can be accessed over the internet.
Features
- Using S3 API: Through a Restful API, applications can access it easily and quickly, and because it is compatible with Amazon S3, it can be used effortlessly in applications integrated with Amazon S3.
- Secure Use: Encryption (SSE‑S3), access control, and Public/Private access features are provided, making it suitable for safely storing user data or backup data for service recovery.
- Cost Efficiency: Users do not predefine the bucket capacity and are provided storage space with an efficient pricing model that charges only for the amount used.
- Replication: You can perform replication on a bucket in a different location or the same location. * You can configure multiple replication policies, and if the source bucket becomes unavailable due to a failure or disaster, you can provide service through the replica bucket.
Configuration diagram
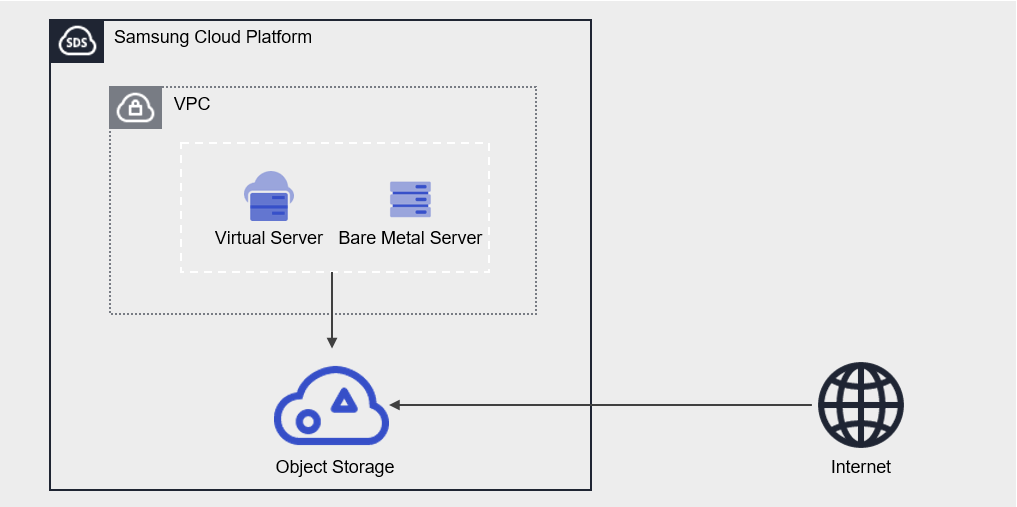
Provided Features
Object Storage provides the following features.
- Storage Management: Provides Object Storage creation, folder creation, folder deletion, file upload, file download, and file deletion functions.
- Version control: When you use version control, all versions of uploaded files are managed. * You can easily download previous files by viewing the version list.
- Encryption: If you enable encryption, encryption is provided using the SSE‑S3 method.
- Access Control: Using access control, you can directly enter the public IPs allowed to access Object Storage, or select resources within the same account (Virtual Server, Bare Metal Server, VPC Endpoint, etc.) that are permitted to access it.
- Replication: You can perform replication to a bucket in a different location or the same location.
- Multiple replication policies can be configured
- Permission Management: It is provided with Private permission by default, and offers Public permission and permission management features.
- Private permission: Allow file access and download only to users who know the authentication key.
- Public permission: If accessed via the file’s URL, the file is made public and downloadable to anyone worldwide.
- Monitoring: You can view monitoring information such as total file count, data size (Bytes), and HTTP method request counts through the Cloud Monitoring service.
- ServiceWatch Service Integration Provision: You can monitor data through the ServiceWatch service.
Component
authentication key
The authentication key is a required element that must be created in advance for using Object Storage.
The purpose of using the authentication key is as follows.
- In the Samsung Cloud Platform Console, you need an authentication key to create and access the Object Storage service.
- The API provided by Object Storage is compatible with Amazon S3, and you can use the same tools that leverage Amazon S3. * At this point, entering an authentication key is required, and it is used as a tool to identify whether the user has the appropriate permissions. For detailed instructions on creating and verifying authentication keys, see How-to guides > 인증키 생성하기.
Bucket
A bucket is the top-level folder, and all folders and files exist under the bucket. When you create an Object Storage service in the Samsung Cloud Platform Console, a bucket is created, and you can subsequently upload folders or files.
The bucket name creation rules are as follows.
- Bucket names must be at least 3 characters and no more than 63 characters.
- Bucket names can consist only of lowercase English letters, numbers, periods
.and hyphens-. - Bucket names must start with a lowercase letter or a digit.
- Bucket names must not contain two consecutive periods.
- Bucket names cannot end with a period or hyphen.
- Bucket names cannot have a period and hyphen adjacent to each other.
- Bucket names do not use the IP address format (e.g., 192.168.x.x).
- You cannot use admin as a bucket name.
- The bucket name must be unique within an Account/Region.
- The bucket name you previously used will be available in 1 hour.
| Example of a valid bucket name | Example of an invalid bucket name |
|---|---|
The following bucket names can be used
| The following bucket names cannot be used
|
Folder
Folder (Folder) is used to logically group files.
The folder name generation rules are as follows.
- Folder names can consist of Korean characters, English letters, numbers, and special characters.
- The special characters that cannot be entered are as follows.
| Special characters that cannot be used in folder names |
|---|
|
File
A file (File) refers to data stored in Object Storage and is the same as a regular file.
The filename generation rules are as follows.
- Filenames can consist of Korean characters, English letters, numbers, and special characters.
- The special characters that cannot be entered are listed below.
| Special characters that cannot be used in file names |
|---|
|
Folder names and file names are separated by a slash/. The following are examples of valid folder names and file names.
| Example of mixed use of folder and file names |
|---|
|
Reference
The length of the path, including the folder name, file name, and separator (
/), must be within 1,024 Bytes (UTF-8 encoding).URL
You can access the Object Storage bucket via URL. By providing both public and private URLs, access is possible not only within the same Samsung Cloud Platform environment but also from external internet environments.
The URL structure is organized as follows.
| URL without an Account ID | URL that uses the Account ID |
|---|---|
| https://[대표URL]/[bucket명]/[폴더명]/[파일명] | https://[대표URL]/[accountId]:[bucket명]/[폴더명]/[파일명] |
| Category | Explanation | Example |
|---|---|---|
| Main URL | Representative URL can be found at the Object Storage 상세 정보 확인하기 URL
| - |
| accountId | account ID
| c2ef8be0481d4094af3c6d046e536d25 |
| bucket name | User-created bucket name | bucketname |
| Folder name | Folder name where the file is located | folder/folder01/folder02/ |
| filename | File name | Filename02 |
Table. Object Storage URL components
The full URL information for the file can be found in 파일 정보 조회하기.
Constraints
The limitations of Object Storage are as follows.
| Category | Explanation |
|---|---|
| Number of creatable Object Storage services | Up to 1,000 per region |
| File name length (including path) | up to 1,024 Bytes |
| File upload size |
|
| Number of files in the bucket | 200 million or fewer |
Table. Object Storage constraints
Caution
- It is recommended to store up to 200 million files per bucket. * If the number exceeds 200 million, performance may degrade sharply, so manage the file count.
- S3 Backend Filesystem solution (ex. * When using s3fs, objectivefs, etc., we recommend not employing version control. * Performance degradation may occur when using version control.
Reference
- After changing IAM permissions, performing an Amazon S3 API call may take up to 30 seconds.
- Object Storage cannot be used for file upload and download when the IAM policy uses a temporary authentication type.
Reference
Access between Object Storage and SCP resources is supported only through the access control on the Object Storage detail screen.
Please note that when IP access control is used in IAM policies, access between Object Storage and SCP resources is not possible.
To use the service, you must set the IAM policy to ‘Applied IP: All IPs, Excluded IP: Not used’.
Please note that when IP access control is used in IAM policies, access between Object Storage and SCP resources is not possible.
To use the service, you must set the IAM policy to ‘Applied IP: All IPs, Excluded IP: Not used’.
Reference
- South Korea (kr-south3) region constraints
- File upload and download functions via the Samsung Cloud Platform Console are restricted.
- Use of the S3 API/CLI via a public URL is restricted.
- However, accessing a Private URL via resources (e.g., Virtual Server) created in the Samsung Cloud Platform Console is possible.
- Korea South 1 (kr-south1), Korea South 2 (kr-south2) region constraints
- A separate firewall rule must be allowed to enable access to the public URL.
- The public URL can be found on the Object Storage details page. * Please refer to Object Storage 상세 정보 확인하기.
Preliminary Service
Object Storage has no prerequisite services.
4.1.1 - Amazon S3 Usage Guide
Object Storage provides functions such as creating services, viewing lists, retrieving folder lists, creating folders, uploading files, and downloading files through the Samsung Cloud Platform Console. These features are also provided via an API compatible with Amazon S3. Therefore, tools that utilize Amazon S3 can be used in the same way.
Using Amazon S3’s utility tools requires generating and verifying an authentication key. For detailed information, please refer to 인증키 생성하기.
Amazon S3 API
The list of Amazon S3 APIs supported by the Samsung Cloud Platform Object Storage service is as follows.
Reference
For detailed information about the Amazon S3 API, see the Amazon S3 API Guide.
| Category | Detailed description |
|---|---|
| head-bucket | View bucket information |
| list-buckets | View bucket list |
| get-bucket-versioning | Bucket version management lookup |
| put-bucket-versioning | Bucket version control modification |
| get-bucket-encryption | View bucket encryption settings |
| put-bucket-encryption | Apply bucket encryption settings |
| delete-bucket-encryption | Delete bucket encryption settings |
| copy-object | Copy, move, and rename objects |
| put-object | Object creation |
| get-object | Object download |
| list-objects | Object List Retrieval |
| head-object | Object Detail Lookup |
| get-object-acl | Object ACL lookup |
| delete-object | Delete object
|
| list-object-versions | Retrieve object version list |
| delete-object | Delete object version |
| presign | Issue a Presigned URL for PUT object |
| get-bucket-acl | Check bucket public permissions |
| create-bucket | Create bucket |
| delete-bucket | Delete bucket |
| get-bucket-cors | Check bucket CORS (Cross OriginResources) configuration |
| put-bucket-cors | Create bucket CORS (PUT) |
| delete-bucket-cors | Delete bucket CORS |
| put-bucket-tagging | Create bucket tagging |
| get-bucket-tagging | Bucket tagging lookup |
| delete-bucket-tagging | Delete bucket tagging |
| put-bucket-website | Create bucket website |
| get-bucket-website | View bucket website |
| delete-bucket-website | Delete bucket website |
| get-bucket-policy-status | Check bucket policy status |
| put-bucket-acl | Create bucket ACL |
| create-multipart-upload | Create multipart upload |
| upload-part | Perform multipart upload |
| complete-multipart-upload | Multipart upload completed |
| list-multipart-uploads | Multipart upload list |
| abort-multipart-upload | Delete incomplete Multipart upload |
| put-object-tagging | Object tagging creation |
| get-object-tagging | Object tagging lookup |
| delete-object-tagging | Delete object tagging |
| list-objects-V2 | Object Lookup (v2) |
| put-object-acl | Create object ACL |
| list-parts | Parts lookup |
| put-public-access-block | Create public access block |
| get-public-access-block | public access block lookup |
| delete-public-access-block | Delete public access block |
| put-bucket-lifecycle | Create bucket Lifecycle (only Expiration rule can be used) |
| get-bucket-lifecycle | View bucket lifecycle |
| delete-bucket-lifecycle | Delete bucket lifecycle |
| put-bucket-policy | Create bucket policy
|
| get-bucket-policy | View bucket policy |
| delete-bucket-policy | Delete bucket policy |
| put-bucket-replication | Modify bucket replication policy
|
| get-bucket-replication | View bucket replication policy |
| delete-bucket-replication | Delete bucket replication policy |
Table. Amazon S3 Supported API List
Bucket policy creation example
When using put-bucket-policy, refer to the following example to write the JSON file.
Color mode
{
    "Statement": [
        {
            "Action": "s3:*"
            "Condition": {
                "IpAddress": {
                    "scp:SourceIp": []
                },
                "Resource": {
                    "scp:SourceDBaaSId": [],
                    "scp:SourceResourceId": [],
                    "scp:SourceVpcEndpointId": []
                },
                "Service": {
                    "scp:ServiceAiTraining": "true",
                    "scp:ServiceScf": "false"
                }
            },
            "Effect": "Allow"
            "Principal": "*"
            "Resource": [
                srn:e::1234:kr-west1::objectstorage:bucket/bucketname
                srn:e::1234:kr-west1::objectstorage:bucket/bucketname/*
            ]
        }
    ],
    "Version": "2012-10-17"
}
{
"Statement": [
{
"Action": "s3:*"
"Condition": {
"IpAddress": {
"scp:SourceIp": []
},
"Resource": {
"scp:SourceDBaaSId": [],
"scp:SourceResourceId": [],
"scp:SourceVpcEndpointId": []
},
"Service": {
"scp:ServiceAiTraining": "true",
"scp:ServiceScf": "false"
}
},
"Effect": "Allow"
"Principal": "*"
"Resource": [
srn:e::1234:kr-west1::objectstorage:bucket/bucketname
srn:e::1234:kr-west1::objectstorage:bucket/bucketname/*
]
}
],
"Version": "2012-10-17"
}Action,Effect,Principalcannot be modified.- Enter the Object Storage SRN and Object Storage SRN/* in
Resource. Condition’sIpAddress,Resource,Servicecan be modified as follows.IpAddress: Enter a single IP or CIDR format.Resource: Enter each resource ID.Service: Enterfalseortrue.- For detailed information about permissible targets, refer to Setting Access Control.
Bucket replication policy creation example
put-bucket-replication, when using it, refer to the following example to create the JSON file.
Color mode
{
    "Role": "srn:e::1234:::iam:user/abc3d3442"
    "Rules": [
        {
            "ID": "replication-policy-1"
            "Status": "Enabled",
            "Priority": 1,
            "DeleteMarkerReplication": {
                "Status": "Enabled"
            },
            "Filter": {
                "Prefix": ""
            },
            "Destination": {
                "Bucket": "srn:e::1234:kr-west1::objectstorage:bucket/bucketname"
            }
        }
    ]
}
{
"Role": "srn:e::1234:::iam:user/abc3d3442"
"Rules": [
{
"ID": "replication-policy-1"
"Status": "Enabled",
"Priority": 1,
"DeleteMarkerReplication": {
"Status": "Enabled"
},
"Filter": {
"Prefix": ""
},
"Destination": {
"Bucket": "srn:e::1234:kr-west1::objectstorage:bucket/bucketname"
}
}
]
}Role: Enter the IAM SRN.Rules > Destination’s Bucket: Please enter the Bucket SRN.- If you do not provide the ID of
Rule, it will be automatically generated with a random value. - If you change the ID of
Rule, a new policy is created and the existing policy is deleted.
Amazon S3 CLI
To use Amazon S3 with the AWS CLI, refer to the Amazon S3 CLI Guide.
Amazon S3 SDK for Java
To use the Amazon S3 SDK for Java, refer to the Amazon S3 SDK Guide.
Reference
For SDK guides and Rest API guides for other languages, see the AWS official website.
Reference
- Use the region parameter required for using the Amazon S3 SDK as referenced below.
- In case of Korea West (kr-west1): kr-west
- In the case of South Korea 1,2,3 (kr-south1,2,3): kr-south
- The region parameter is for reference only, and the actual region is determined based on the URL.
Reference
- Korea South 3 (kr-south3) region constraints
- File upload and download functions are limited through the Samsung Cloud Platform Console.
- Using the S3 API/CLI with a public URL is restricted.
- However, accessing a Private URL through resources (such as Virtual Server) created in the Samsung Cloud Platform Console is possible.
- Korea South 1 (kr-south1), Korea South 2 (kr-south2) region constraints
- You must allow a separate firewall rule to enable access to the public URL.
- The public URL can be found on the Object Storage details page. * Please refer to Object Storage 상세 정보 확인하기.
4.1.2 - Monitoring Metrics
Cloud Monitoring service termination notice
According to Samsung Cloud Platform’s policy, the Cloud Monitoring service is scheduled to be discontinued.
Accordingly, after the September 2026 release, resource monitoring of the Samsung Cloud Platform via Cloud Monitoring will no longer be possible.
With the new alternative service, you can continuously perform resource monitoring by using ServiceWatch, released in October 2025.
ServiceWatch provides more modern and powerful features, replacing Cloud Monitoring to deliver a smooth monitoring environment.
Detailed information about ServiceWatch is available in the ServiceWatch Overview.
Object Storage Monitoring Metrics
The table below shows the monitoring metrics for Object Storage that can be viewed through Cloud Monitoring. For detailed usage of Cloud Monitoring, refer to the Cloud Monitoring guide.
| Performance Item Name | Explanation | unit |
|---|---|---|
| Objects | Number of objects stored in the bucket | cnt |
| Bucket Used | Amount of data stored in the bucket (bytes) | bytes |
| Requests [Upload Avg] | Upload usage per bucket | bytes |
| Requests [Download Avg] | Download usage per bucket | bytes |
| Requests [Total] | Total number of HTTP requests executed in the bucket | cnt |
| Requests [Get] | Number of HTTP GET requests executed on objects in the bucket | cnt |
| Requests [Head] | Number of HTTP HEAD requests executed for objects in the bucket | cnt |
| Requests [List] | Number of LIST requests executed for objects in the bucket | cnt |
| Requests [Post] | Number of HTTP POST requests executed on objects in the bucket | cnt |
| Requests [Put] | Number of HTTP PUT requests executed on objects in the bucket | cnt |
| Requests [Delete] | Number of HTTP DELETE requests executed on objects within the bucket | cnt |
Table. Object Storage Monitoring Metrics
4.1.3 - ServiceWatch metric
Object Storage sends metrics to ServiceWatch. The metrics provided by basic monitoring are data collected at 5‑minute intervals. In Object Storage, you can view replication metrics for each replication policy in ServiceWatch by enabling replication metrics per bucket.
Refer to How-to guides > Object Storage 복제 지표 활성화하기 for how to enable ServiceWatch replication metrics.
Reference
For how to view metrics in ServiceWatch, refer to the ServiceWatch guide.
Basic Metrics
The following are basic metrics for the Object Storage namespace.
The indicators whose names are displayed in bold below are the indicators selected as key among the basic metrics provided by Object Storage. The key metrics are used to build service dashboards that are automatically created for each service in ServiceWatch.
Each metric provides guidance in the user guide on which statistical values are meaningful when querying that metric, and among the meaningful statistics, the values displayed in bold are the primary statistics. In the service dashboard, you can view key metrics through primary statistical values.
| Performance items | Detailed description | unit | meaningful statistics |
|---|---|---|---|
| object_count | Number of objects stored in the bucket | Count |
|
| object_byte | Amount of data stored in the bucket | Bytes |
|
| upload_bytes | Upload usage per bucket | bytes |
|
| download_bytes | Download usage per bucket | bytes |
|
| all_requests | Total number of HTTP requests executed in the bucket | cnt |
|
| get_requests | Number of HTTP GET requests executed for objects in the bucket | cnt |
|
| head_requests | Number of HTTP HEAD requests made for objects in the bucket | cnt |
|
| list_requests | Number of LIST requests executed for objects in the bucket | cnt |
|
| post_requests | Number of HTTP POST requests executed on objects in the bucket | cnt |
|
| put_requests | Number of HTTP PUT requests executed on objects in the bucket | cnt |
|
| delete_requests | Number of HTTP DELETE requests executed on objects within the bucket | cnt |
|
Table. Object Storage Basic Metrics
Replication metric
The following are replication metrics. Replication metrics are collected per replication policy. Replication metrics are collected only when ServiceWatch replication metrics are enabled for each bucket. The replication metrics are as follows.
| Performance items | Detailed description | unit | meaningful statistics |
|---|---|---|---|
| replication_total_count | Total number of objects to be transferred | Count |
|
| replication_transferred_count | Number of objects transmitted | Count |
|
| replication_progress_count | Number of objects being transferred | Count |
|
| replication_queued_count | Number of objects pending transmission | Count |
|
| replication_pending_count | Number of objects with transmission delay | Count |
|
| replication_failure_count | Number of failed transmission objects | Count |
|
| replication_total_bytes | Total transmission target size | Bytes |
|
| replication_transferred_bytes | Transferred data size | Bytes |
|
| replication_max_processing_time | Maximum processing time | Seconds |
|
| replication_avg_processing_time | Average processing time | Seconds |
|
Table. Object Storage Replication Metrics
4.2 - How-to guides
Users can create the service by entering the required Object Storage information and selecting detailed options through the Samsung Cloud Platform Console.
Create authentication key
To create and use the Object Storage service in the Samsung Cloud Platform Console, you need to generate an authentication key in advance.
Generating an authentication key is My menu > My Info. > Authentication Key Management > Authentication Key Creation can be created from . For more details, please refer to IAM > 인증키 생성하기.
Reference
- The authentication key (Access Key, Secret Key) is used when authenticating Amazon S3 utility tools.
- The authentication key is used not only for Object Storage but also for authentication in OpenAPI and CLI.
- Authentication keys can be generated up to a maximum of two.
Caution
- If the authentication key expires, access to the Object Storage service will be restricted. * Check the authentication key’s expiration period in advance to ensure smooth service usage.
- If you deactivate the authentication key, access permissions to the Object Storage service will be restricted.
Create Object Storage
You can create and use the Object Storage service from the Samsung Cloud Platform Console.
To create an Object Storage, follow the steps below.
- Click the All Services > Storage > Object Storage menu. 1. Navigate to the Service Home page of Object Storage.
- On the Service Home page, click the Create Object Storage button. 2. Go to the Create Object Storage page.
- Object Storage Creation page, enter the information required to create the service.
Category Required statusDetailed description Bucket name Required Bucket name created by the user - must start with a lowercase letter or digit and be entered using lowercase letters, digits, hyphen
-, period., with a length of 3 to 63 characters
- A period
.cannot appear consecutively two or more times.
- A period
.and hyphen-cannot be adjacent.
- A period
.or hyphen-cannot be at the end.
- IP address format is not allowed
- admin name is not allowed
- For detailed information about bucket naming, refer to 버킷명 생성 규칙.
Table. Object Storage required information input fields - must start with a lowercase letter or digit and be entered using lowercase letters, digits, hyphen
Caution
When creating with the bucket name that is currently used as an Archiving target in the Archive Storage service, the configured Archiving policy will be applied, so be careful.
- Summary Verify the detailed information and estimated charges generated in the panel, then click the Create button.
- When creation is complete, check the created resources on the Object Storage List page.
View Object Storage detailed information
You can view and edit the full list of resources and detailed information for the Object Storage service.
The Object Storage Details page consists of the Details, Folder List, Replication, Original File Copy, and Tags tabs.
Reference
Object Storage resources do not support operation history.
If you need to check the operation history, please use the Logging&Audit service. For more details, see Logging&Auddit > How-to Guides.
If you need to check the operation history, please use the Logging&Audit service. For more details, see Logging&Auddit > How-to Guides.
To view detailed information about the Object Storage service, follow these steps.
- Click the All Services > Storage > Object Storage menu. 1. Navigate to the Service Home page of Object Storage.
- On the Service Home page, click the Object Storage menu. 2. Go to the Object Storage List page.
- Click the resource to view detailed information on the Object Storage list page. 3. Navigate to the Object Storage Details page.
- The Object Storage Details page displays status information and additional feature information, and consists of Details, Folder List, Replication, Original File Copy, Tags tabs.
Category Detailed description Bucket status Bucket status - Active: Available
Service cancellation Button to cancel the service Table. Status information and additional functions
- The Object Storage Details page displays status information and additional feature information, and consists of Details, Folder List, Replication, Original File Copy, Tags tabs.
Detailed Information
Object Storage list page allows you to view detailed information of the selected resource and, if needed, modify the information.
| Category | Detailed description |
|---|---|
| service | Service name |
| Resource Type | Resource Type |
| SRN | Unique resource ID in Samsung Cloud Platform
|
| Resource name | Resource name
|
| Resource ID | Unique resource ID in the service |
| Bucket name | User-created bucket name |
| Usage | Total data usage of the bucket |
| Encryption | Encryption usage information
|
| Version control | Version Management Usage Information
|
| URL | Provide Public and Private URLs for accessing Object Storage via URL
|
| Access control | Access control usage status and allowed resource information
|
Table. Object Storage detailed information tab items
Folder list
You can view the list of folders and files stored in the bucket through the Folder List tab.
| Category | Detailed description |
|---|---|
| name | File name or folder name |
| Size | File size |
| Modification date and time | The file’s most recent modification timestamp |
| Additional features > More | File and folder management buttons
|
| New folder | Add new folder
|
| File upload | Upload a new file or a file you are working on
|
| Delete | Delete file or folder
|
| Download | File download
|
Table. Folder List Tab Item
Reference
- South Korea Region 3 (kr-south3) constraints
- File upload and download functions are restricted through the Samsung Cloud Platform Console.
- Using the S3 API/CLI with a public URL is restricted.
- However, accessing a Private URL through resources (such as Virtual Server) created in the Samsung Cloud Platform Console is possible.
- Korea South 1 (kr-south1), Korea South 2 (kr-south2) region constraints
- To access the public URL, you must allow a separate firewall configuration.
- The public URL address can be found on the Details tab of the Object Storage detail page. * Please refer to the Detailed Information.
- If the delete marker is the latest version, it cannot be seen in the folder list.
- The delete marker version cannot be viewed in the version list.
Replication
Object Storage List page allows you to view and manage the replication information of the selected resource.
| Category | Detailed description |
|---|---|
| Policy Name | Enter the replication policy name
|
| Clone target | Replication target bucket name |
| Clone location | Replication location (region) |
| Target file | List of files to be cloned |
| Priority | Priority by policy |
| status | Replication policy status
|
| Add | Add new replication policy
|
| More | Policy management possible
|
| Service Watch replication metric | By enabling the replication metric, you can view monitoring data for Object Storage replication in Service Watch
|
Table. Object Storage replication information tab items
Copy original file
On the Object Storage List page, you can view and manage the list of original file copy tasks and information for the selected resources.
| Category | Detailed description |
|---|---|
| Task name | Copy job name
|
| Target bucket name | Copy target bucket name |
| Target bucket location | Destination bucket location (region) |
| Start date and time | Copy start date and time |
| Completion time | Copy completion time |
| status | Task progress status
|
| Cancel operation | Cancel the selected task
|
| Add task | Add a new copy task
|
Table. Object Storage original file copy tab item
Tag
On the Object Storage List page, you can view the tag information of the selected resource, and add, modify, or delete it.
| Category | Detailed description |
|---|---|
| Tag list | Tag list
|
Table. Object Storage Tag Tab Items
Object Storage Encryption Configuration
You can configure it to encrypt the data stored in the bucket. After configuring bucket encryption, the encryption settings are applied to data uploaded thereafter. When encryption is used, the SSE‑S3 encryption key method and the AES256 encryption algorithm are applied.
Reference
Object Storage bucket encryption can provide two options (SSE-S3/SSE-KMS). SSE‑S3 is server‑side encryption (SSE‑S3) that uses Amazon S3 managed keys. SSE-KMS is server-side encryption (SSE-KMS) that uses Key Management Service (KMS) keys.
In this service, server-side encryption (SSE-S3) using Amazon S3 managed keys is offered as the default method, and server-side encryption (SSE-KMS) using Key Management Service (KMS) keys will be provided later according to the service roadmap.
In this service, server-side encryption (SSE-S3) using Amazon S3 managed keys is offered as the default method, and server-side encryption (SSE-KMS) using Key Management Service (KMS) keys will be provided later according to the service roadmap.
Information
If there is data saved before bucket encryption was configured, the encryption settings will not be applied.
- If you re-upload the file, the encryption will be applied.
- To set encryption for existing data, you need to re‑upload it.
Object Storage To use bucket encryption, follow the steps below.
- All Services > Storage > Object Storage menu, click it. 1. Navigate to the Service Home page of Object Storage.
- On the Service Home page, click the Object Storage menu. 2. Go to the Object Storage List page.
- On the Object Storage List page, click the resource (bucket) to use encryption. 3. Go to the Object Storage Details page.
- On the Object Storage Details page, verify that Encryption is Not Used.
- If Encryption is Unused, click the Edit button. The Encryption Edit Popup opens.
- After checking Enable for Encryption, click the Confirm button.
Terminate Object Storage
You can cancel unused Object Storage to reduce operating costs. However, if you terminate the service, the running service may be stopped immediately, so you should proceed with the termination only after fully considering the impact that may arise from the service interruption.
Caution
- Service termination is possible for buckets with no stored data.
- If a file is being uploaded, the upload will be canceled.
- Please be careful, as data cannot be recovered after deletion.
To cancel Object Storage, follow the steps below.
- All Services > Storage > Object Storage menu, click it. 1. Navigate to the Service Home page of Object Storage.
- On the Service Home page, click the Object Storage menu. 2. Go to the Object Storage List page.
- On the Object Storage List page, select the resource (bucket) to terminate, and click the Terminate Service button.
- Please enter the bucket name to confirm cancellation.
- If you entered the bucket name correctly, the Confirm button will be enabled. 5. Click the Confirm button.
- After termination is complete, check the Object Storage list page to see if the resource has been terminated.
4.2.1 - Access control
When you configure a bucket with access control enabled, only resources that are granted permission can access the bucket. Enter a public IP, or configure settings to allow access to resources created in the Samsung Cloud Platform Console.
Setting Access Control
You can set the bucket’s access control to enabled.
Object Storage Follow these steps to configure access control settings.
- Click the All Services > Storage > Object Storage menu. 1. Navigate to the Service Home page.
- On the Service Home page, click the Object Storage menu. 2. Go to the Object Storage List page.
- Object Storage list page, click the resource (bucket) for which you want to configure access control. 3. Go to the Object Storage Details page.
- On the Object Storage Details page, verify that Access Control is Not Used.
- If Access control is unused, click the Edit button. 5. Edit Access Control The popup window opens.
- After checking the use of access control, click the Confirm button. 6. On the Object Storage Details page, Access Control will be changed to enabled.
- If you change access control to Enabled, you can set access control for Public IP, service resources, Cloud Functions, Simple AI Training services.
- Click the Edit button of the resource or service you want to allow access to, to add resources or set whether to allow them.
Category Detailed description Allow public IP Registered Public IP or CIDR list - Example: 192.168.x.x, 192.168.x.x/24
- For detailed information on allowing Public IP access, see Public IP 접근 허용하기
Allow service resources List of service resources created in the same Account/Region - Service examples: Virutal Server, GPU Server, Bare Metal Server, Multi-node GPU Cluster, VPC Endpoint, PostgreSQL, MariaDB, MySQL, EPAS, Microsoft SQL Server
- For detailed information on allowing access to service resources, see 서비스 자원 접근 허용하기
Cloud Functions service Set whether to allow Object Storage access for modifying Java Runtime code in the Cloud Functions service - Allow when set, the Cloud Fuctions service can load Java Runtime executable files stored in Object Storage
- For detailed information about allowing the Cloud Functions service, see Cloud Functions 서비스 접근 허용하기
Simple AI Training Service Set whether to allow Object Storage access for retrieving the Training Script in the Simple AI Training service - Allow when set, the Simple AI Training service can retrieve the Training Script stored in Object Storage
- For more details about enabling the Simple AI Training service, see Simple AI Training 서비스 접근 허용하기
Table. Access control items
Reference
- When access control is set to unused, it is applied as full allow.
- If you modify the access permission, it may take up to 30 seconds for the changes to be applied.
Reference
Access between Object Storage and Samsung Cloud Platform resources is supported only through the access control on the Object Storage detail screen.
When using IP access control in an IAM policy, note that access between Object Storage and SCP resources is not possible.
To use the service, you must set the IAM policy to Applied IP: All IPs, Excluded IP: Not used.
When using IP access control in an IAM policy, note that access between Object Storage and SCP resources is not possible.
To use the service, you must set the IAM policy to Applied IP: All IPs, Excluded IP: Not used.
information
South Korea (kr-south) region constraints
- The South Korea (kr-south) region does not provide Cloud Funtions service, so the Allow Cloud Functions service feature cannot be used.
Allow public IP access
If the bucket’s access control is set to enabled, you can add a Public IP allowance. To enable Public IP access from Object Storage, follow these steps.
All Services > Storage > Object Storage Click the menu. 1. Navigate to the Service Home page.
On the Service Home page, click the Object Storage menu. 2. Go to the Object Storage List page.
On the Object Storage List page, click the resource (bucket) you want to set access control for. 3. Go to the Object Storage Details page.
Object Storage Details On the page, verify that access control is enabled.
- If Access Control is Unused, click the Edit button, then in the Access Control popup, change Access Control to Enabled.
- Access control can control access to IP access allowed, service resource allowed, Cloud Functions service, Simple AI Training service only when enabled.
Click the Edit button in Public IP Allow. 5. Public IP Allow Edit A popup window opens.
Enter the Public IP to allow access, and click the Add button. 6. The entered IP appears in the IP to add list.
column Required Detailed description Allow public IP Essential Enter a single IP or CIDR format - 192.168.x.x (IP format)
- 192.168.x.x/24 (CIDR format)
- Up to 150 entries can be entered
Table. Public IP Allowance Edit Popup Input ItemsAfter checking the IP to add list, press the Confirm button.
On the Object Storage Details page, check the added Public IP in the Access Control > Allow Public IP list.
Reference
- If you modify the Public IP allowance, it may take up to 30 seconds for the changes to be applied.
- Up to 150 public IPs are allowed.
Allow access to service resources
If access control on the bucket is set to enabled, you can add a service resource in the allowed service resources. Follow the steps below to allow access to service resources from Object Storage.
- All Services > Storage > Object Storage menu, click it. 1. Service Home Go to the page.
- On the Service Home page, click the Object Storage menu. 2. Go to the Object Storage List page.
- Object Storage List page, click the resource (bucket) for which you want to configure access control. 3. Go to the Object Storage Details page.
- Verify that Access Control is enabled on the Object Storage Details page.
- If Access Control is Unused, click the Edit button, then in the Access Control popup, change Access Control to Enabled.
- Access control can regulate access to IP access allowed, service resource allowed, Cloud Functions service, and Simple AI Training service only when it is enabled.
- Click the Edit button in Service Resource Allowance. 5. Select Service Resources The popup window opens.
- Select Service Resources In the popup window, select the service to grant access to, then select the resources to allow.
Information
The allowed criteria for each service are as follows.
- Virtual Server/GPU Server/Bare Metal Server/Multi-node GPU Cluster: Allowed per server
- VPC Endpoint: Allow per VPC Endpoint
- PostgreSQL, MariaDB, MySQL, EPAS, Microsoft SQL Server: Allowed per cluster
To access Object Storage from the server, you must first perform the following steps.
- Check the Object Storage IP on the server using the nslookup command.
- After registering a rule through the Security Group or Firewall service, apply it to the server.
- Target address: Object Storage IP confirmed in step 1
- Direction: Outbound
- Service: TCP 80, 443 (port 80 for http / port 443 for https)
Caution
When each service is in the following states, access to service resources can be granted or revoked. If it is not in the following state, the previously authorized service resources may also be affected.
- Virtual Server/GPU Server: Build, Building, Networking, Scheduling, Block_Device_Mapping, Spawning, Deleting, Error and other states
- Bare Metal Server/Multi-node GPU Cluster: Running, Starting, Stopping, Stopped
- VPC Endpoint: Active
- PostgreSQL/MariaDB/MySQL/EPAS/Microsoft SQL Server: Running
- After you finish selecting the resources to allow access, press the Confirm button.
- Check the resources you added in the Access Control > Service Resource Allow list on the Object Storage Details page.
Reference
- If you modify service resource allowances, it may take up to 30 seconds for the changes to be applied.
- A maximum of 150 service resources is allowed.
Allow access to Cloud Functions service
If access control on the bucket is set to enabled, you can allow the Cloud Functions service to access Object Storage.
To allow access to the Cloud Functions service from Object Storage, follow these steps.
- All Services > Storage > Object Storage Click the menu. 1. Navigate to the Service Home page.
- On the Service Home page, click the Object Storage menu. 2. Go to the Object Storage List page.
- Object Storage List page, click the resource (bucket) you want to configure access control for. 3. Go to the Object Storage Details page.
- Object Storage Details On the page, check that access control is enabled.
- If Access Control is Unused, click the Edit button, then in the Access Control popup window, change Access Control to Enabled.
- Access can be controlled for IP access allowed, service resource allowed, Cloud Functions service, and Simple AI Training service only when access control is enabled.
- Click the Edit button of the Cloud Functions service. 5. Cloud Functions Service Edit A popup window opens.
- After checking Allow, click the Confirm button.
Reference
- Once the access permission settings for the Cloud Functions service are completed, the Cloud Functions service can retrieve the Java Runtime executable stored in Object Storage.
- In the Cloud Fuctions service, refer to Java Runtime 코드 변경하기 for how to load the Java Runtime executable.
Reference
South Korea (kr-south) region constraints
- The South Korea (kr-south) region does not provide the Cloud Functions service, so the Allow Cloud Functions service feature cannot be used.
Simple AI Training Allow Service Access
If access control for the bucket is set to enabled, you can allow the Simple AI Training service to access Object Storage.
If you want to permit access to the Simple AI Training service from Object Storage, follow the steps below.
- Click the All Services > Storage > Object Storage menu. 1. Go to the Service Home page.
- On the Service Home page, click the Object Storage menu. 2. Go to the Object Storage List page.
- Object Storage List page, click the resource (bucket) for which you want to configure access control. 3. Object Storage Details Navigate to the page.
- Object Storage Details Verify that access control is enabled on the page.
- If Access Control is Unused, click the Edit button, then in the Access Control popup, change Access Control to Enabled.
- When access control is enabled, you can control access to IP access allowed, service resource allowed, Cloud Functions service, and Simple AI Training service.
- Click the Edit button of Simple AI Training Service. 5. Simple AI Training Service Edit A popup window opens.
- After checking Allow, click the Confirm button.
Reference
- Once the access permission settings for the Simple AI Training service are completed, you can retrieve the Training Script stored in Object Storage from the Simple AI Training service.
- In the Simple AI Training service, see Training Job 생성하기 for how to load a Training Script stored in Object Storage.
4.2.2 - File and Folder Management
If you need to manage the created Object Storage, such as saving files to it or downloading stored files, you can perform tasks on the Object Storage Details and Folder List pages.
Create new folder
A new folder may need to be created to store new data in the bucket.
To create a new folder in Object Storage, follow the steps below.
- All Services > Storage > Object Storage Please click the menu. 1. Go to the Service Home page.
- On the Service Home page, click the Object Storage menu. 2. Go to the Object Storage List page.
- On the Object Storage list page, click the resource (bucket) where you want to create a new folder. 3. Navigate to the Object Storage Details page.
- Folder List Click the tab. 4. Navigate to the Folder List page.
- Click the New Folder button. 5. New Folder The popup window opens.
- Enter the folder name to use, and click the Confirm button. 6. A popup window notifying the creation of a new folder opens.
Caution
- Folder names must not contain prohibited special characters. * For more details, refer to 폴더명 생성 규칙.
- The total path length, including folder name, file name, and delimiter (
/), must be within 1,024 Bytes (UTF-8 encoding).
- After clicking the Confirm button, check the created folder in the Folder List.
Upload File
Reference
- Korea South 3 (kr-south3) region constraints
- File upload and download functions via the Samsung Cloud Platform Console are restricted.
- Using the S3 API/CLI with a public URL is restricted.
- However, accessing a Private URL through resources (such as Virtual Server) created in the Samsung Cloud Platform Console is possible.
- South Korea South 1 (kr-south1), South Korea South 2 (kr-south2) region constraints
- To access the public URL, you must allow a separate firewall configuration.
- The public URL can be found on the Object Storage details page. * Please refer to Object Storage 상세 정보 확인하기.
You can upload a new file or a file in progress to the bucket. Object Storage Follow the steps below to upload files.
- All Services > Storage > Object Storage menu, please click. 1. Go to the Service Home page.
- On the Service Home page, click the Object Storage menu. 2. Go to the Object Storage List page.
- On the Object Storage List page, click the resource (bucket) to upload files. 3. Object Storage Details Navigate to the page.
- Click the Folder List tab. 4. Navigate to the Folder List page.
- Click the File Upload button. 5. File Upload popup window opens.
- After clicking the Attach File button, select the file to upload or drag and drop the file to attach into the popup window.
- Connection test button can be clicked to verify the connection.
Caution
- You can upload up to three files, each up to 3 GB.
- The attachment filename must not contain prohibited special characters. * For more details, refer to 파일명 생성 규칙.
- The attachment filename must not contain two or more consecutive periods.
- The total path length, including the folder name, file name, and separator (
/), must be within 1,024 bytes (based on UTF-8 encoding). - If duplicate files exist, you cannot upload.
- If you have selected all files, click the Upload button.
- If the upload was successful, check the file in the folder list.
Information
- If the Connection test or file upload fails, check the firewall connection and access control settings. * Access may be restricted in proxy environments.
- If you do not use the version control feature, you can overwrite a file when an identical file exists in the same location. * We recommend using version control for secure file management. * For detailed information about version management, please refer to 버전 관리 설정하기.
Download File
Reference
- South Korea Region 3 (kr-south3) constraints
- File upload and download functions are restricted through the Samsung Cloud Platform Console.
- Using the S3 API/CLI with a public URL is restricted.
- However, accessing a Private URL through resources (such as Virtual Server) created in the Samsung Cloud Platform Console is possible.
- Korea South 1 (kr-south1), Korea South 2 (kr-south2) region constraints
- To access the public URL, you must allow a separate firewall configuration.
- The public URL can be found on the Object Storage details page. * Please refer to Check Object Storage detailed information.
You can download files stored in the bucket. Object Storage Follow the steps below to download the file.
- All Services > Storage > Object Storage menu, click it. 1. Navigate to the Service Home page.
- On the Service Home page, click the Object Storage menu. 2. Go to the Object Storage List page.
- Object Storage List page, click the resource (bucket) you want to download. 3. Object Storage Details Go to the page.
- Click the Folder List tab. 4. Go to the Folder List page.
- Click the More > Download button located at the far right of the file to be downloaded. 5. The file download is starting.
- Check whether the file download has completed in the browser.
Query File Information
You can retrieve information about files stored in the bucket. Object Storage Follow the steps below to query file information.
- All Services > Storage > Object Storage menu, please click. 1. Navigate to the Service Home page.
- On the Service Home page, click the Object Storage menu. 2. Go to the Object Storage List page.
- On the Object Storage List page, click the resource (bucket) that contains the file you want to view information for. 3. Navigate to the Object Storage Details page.
- Click the Folder List tab. 4. Go to the Folder List page.
- Click the More > File Info button located at the far right of the file you want to view information for. 5. File Information The popup window opens.
- File Information View detailed file information in the popup window.
Category Detailed description Filename File name Content type Object type Total size File size Modification date and time The file’s most recent modification timestamp Permission Allow Public Access URL Provide Public and Private addresses to access the file path via URL - Public: Provided to be accessible from external internet network
- Private: Provides an address accessible from resources created in the same Account and region of the Samsung Cloud Platform Console
Table. File information items
Copy file
You can copy a file stored in a bucket to the same location. To copy a file, follow these steps.
- Click the Storage > Object Storage menu. 1. Go to the Object Storage List page.
- On the Object Storage List page, click the resource (bucket) to copy the file. 2. Go to the Object Storage Details page.
- Click the Folder List tab. 3. Navigate to the Folder List page.
- Click the More > Copy File button at the far right of the file to be copied. 4. File Copy a popup window opens.
- Enter the File name, then click the Confirm button. 5. A popup window indicating file copy opens.
Caution
- Only files whose full path—including bucket name, folder name, file name, and delimiter (
/)—is 1,024 bytes or less (based on URL encoding) can be copied. - In the Samsung Cloud Platform Console, you can only copy files if the file size is 5 GB or less. * If the file size exceeds 5 GB, you can copy it using the S3 API.
- You can copy within the same bucket and folder.
- If the bucket does not use versioning, a file with the same name in the folder will be overwritten.
- After clicking the Confirm button, check the copied file in the folder list.
Delete files and folders
You can delete files and folders stored in the bucket. Object Storage Follow the steps below to delete files and folders.
Caution
- When a folder is deleted, all subfolders and files inside it are also deleted.
- All versions are deleted at once when the file is deleted.
- Files with object lock (WORM) enabled cannot be deleted.
- All Services > Storage > Object Storage menu, click it. 1. Go to the Service Home page.
- On the Service Home page, click the Object Storage menu. 2. Go to the Object Storage List page.
- Object Storage List page, click the resource (bucket) that contains the file or folder you want to delete. 3. Object Storage Details Go to the page.
- Click the Folder List tab. 4. Go to the Folder List page.
- Click the More > Delete button located at the far right of the file or folder you want to delete. 5. Delete popup window opens.
- After selecting multiple files or folders in the left checkbox, you can delete multiple files or folders at once by clicking the Delete button at the top.
- In the delete popup, click the Confirm button to complete the deletion.
- Folder List Check that files or folders have been deleted from the list.
Reference
Deleting multiple files and folders simultaneously may take a long time.
4.2.3 - Version Management
By enabling versioning on a bucket, you can track the history of file modifications when uploading files with the same name. You can also view the file’s version list and download previous versions of the file from the list.
Information
With the version control feature, if you accidentally upload a file and overwrite an existing one, you can locate the previous version using the version list.
Setting up version control
You can enable versioning on the bucket.
Caution
When using S3 FileSystem Backend solutions (e.g., s3fs, objectivefs, etc.), it is recommended not to enable versioning. Enabling versioning may cause performance degradation.
Object Storage To set up versioning, follow the steps below.
- Click the All Services > Storage > Object Storage menu. Navigate to the Service Home page.
- On the Service Home page, click the Object Storage menu. You will be taken to the Object Storage List page.
- On the Object Storage List page, click the resource (bucket) for which you want to configure versioning. You will be taken to the Object Storage Details page.
- On the Object Storage Details page, verify whether Versioning is unused.
- If Version control is unused, click the Edit button. The Edit version control popup window opens.
- After checking version management as Enabled, click the Confirm button. On the Object Storage Details page, Version Management will be changed to Enabled.
reference
- When you configure version control for the first time, it may take some time for changes to be applied.
- The time required may vary depending on the size of the bucket. Work performed before the configuration is completed may not have the version applied.
Check version list
From the moment version control is configured, you can view and manage versions of file uploads and modifications.
Information
- Version control for file uploads and edits is available from the moment version control is configured.
- All files have a version ID. However, before version control is configured, the version ID is null(-), and files uploaded after version control is set up are assigned a generated version ID.
- For example, if you upload a file with the same name to the same location, the file name remains the same, but a new version file with a different version ID appears in the version list.
Object Storage To check the version list of a file, follow these steps.
- Click the All Services > Storage > Object Storage menu. Navigate to the Service Home page.
- On the Service Home page, click the Object Storage menu. You will be taken to the Object Storage List page.
- Object Storage List page, click the resource (bucket) that contains the file whose version list you want to view. You will be taken to the Object Storage Details page.
- Click the Folder List tab. The folder and file list will be displayed.
- In the folder and file list, click the More > Version List button located at the far right of the file whose version list you want to view. The Version List popup will open.
Category Detailed description filename File name Modification date File modification date and time Version ID Version ID assigned to each individual file - Before version control is enabled, the version ID of saved files is displayed as null(-)
- Files saved after version control is enabled are assigned a unique version ID
- If a file with the same name is uploaded to the same location, a version ID is generated, a versioned file is added, and it can be viewed in the version list
Etag Object that identifies files, specific version Size Version file size More Provides version file download and delete functions as additional features - File Download: Download the file of the selected version
- To restore a file to a previous version, download the previous version and re‑upload it
- Delete: Delete the file of the selected version
- If all version files are deleted, the original file will also be deleted
- To retain the original file, at least one version must be kept
Delete Delete file - Enable the button when selecting the checkbox of the version file to delete from the list
Table. Version list popup items
Download version file
Reference
- South Korea Region 3 (kr-south3) constraints
- File upload and download capabilities are limited through the Samsung Cloud Platform Console.
- Use of the S3 API/CLI via a public URL is restricted.
- However, private URL access is possible through resources (such as Virtual Server) created in the Samsung Cloud Platform Console.
- South Korea South 1 (kr-south1), South Korea South 2 (kr-south2) region restrictions
- To access the public URL, you must allow a separate firewall configuration.
- You can view the public URL address on the Object Storage details page. Refer to Check Object Storage Details.
You can download the version file. To download the version file of a Object Storage file, follow these steps.
- Click the All Services > Storage > Object Storage menu. Navigate to the Service Home page.
- On the Service Home page, click the Object Storage menu. You will be taken to the Object Storage List page.
- On the Object Storage List page, click the resource (bucket) that contains the version file to download. You will be taken to the Object Storage Details page.
- Click the Folder List tab. The folder and file list will be displayed.
- In the folder and file list, click the More > Version List button located at the far right of the file for which you want to download the version file. The Version List popup window will open.
- Click the More > File Download button located at the far right of the version file. File download will start.
- Verify that the file download has completed in the browser.
Reference
When you download a version file from the version list, the filename includes the version ID.
Delete version file
You can delete a file’s version list.
Caution
- If you delete all version files, the original file will also be deleted. To avoid deleting the original file, you must keep at least one version.
- Version files with object lock (WORM) enabled cannot be deleted.
Object Storage To delete a file’s version list, follow these steps.
- Click the All Services > Storage > Object Storage menu. Navigate to the Service Home page.
- On the Service Home page, click the Object Storage menu. You will be taken to the Object Storage List page.
- Object Storage List: Click the resource (bucket) that contains the versioned file you want to delete. You will be taken to the Object Storage Details page.
- Click the Folder List tab. The folder and file list will be displayed.
- In the folder and file list, click the More > Version List button located at the far right of the file whose version list you want to delete. The Version List popup window will open.
- Click the More > Delete button at the far right of the version file you want to download. Deletion will be completed.
4.2.4 - Permission Management
Each file is provided with Private permission by default, and each file can be changed to Public permission through permission settings. Private permission allows file access and download only to users who know the Access Key and Secret Key, whereas Public permission allows anyone worldwide to access and download the file via its Public URL, so caution is required.
Check permission management
You can check the file’s permission settings.
Object Storage Follow the steps below to verify file permissions.
- Click the All Services > Storage > Object Storage menu. Navigate to the Service Home page.
- On the Service Home page, click the Object Storage menu. You will be taken to the Object Storage List page.
- Object Storage List page, click the resource (bucket) that contains the file whose permissions you want to check. You will be taken to the Object Storage Details page.
- Click the Folder List tab. Navigate to the Folder List page.
- Click the More > File Info button located at the far right of the file you want to view file information for. The File Info popup window will open.
- Check the Permissions in the File Information popup window.
Category Detailed description Permission Public Access allowed or Public Access not allowed Table. Permission information description
Allow Public Access
You can set the file’s Public Access permission to Allow. To set the file permissions of Object Storage to allow Public Access, follow these steps.
- Click the All Services > Storage > Object Storage menu. Navigate to the Service Home page.
- On the Service Home page, click the Object Storage menu. You will be taken to the Object Storage List page.
- Object Storage List page: click the resource (bucket) that contains files to allow Public Access. You will be taken to the Object Storage Details page.
- Click the Folder List tab. Navigate to the Folder List page.
- Click the More > File Info button located at the far right of the file you want to view information for. The File Info popup window will open.
- Check that Permission is in Public Access not allowed state, then click the Confirm button.
- Click the More > Permission Management button located at the right end of the file. The Edit Permission Management popup window opens.
- Edit Permission Management popup window, check Permission Management’s Allow Public Access, and click the Confirm button. You will be taken to the Folder List page.
- Click the More > File Info button at the far right of the file. The File Info popup opens.
- Check that Permission is Public Access allowed.
guide
When Public Access is enabled, accessing the file’s Public URL makes the file publicly available and downloadable to anyone worldwide.
Please enable file sharing only when it is absolutely necessary.
Please enable file sharing only when it is absolutely necessary.
4.2.5 - Replication Policy Management
Replication can be performed on buckets in a different location or the same location.
You can configure multiple replication policies, and if the source bucket becomes unavailable due to a failure or disaster, you can provide service through the replica bucket.
information
- The replication feature operates in a 1:N structure, allowing replication within a region or between regions. * Data transfer charges are added when performing cross-region replication.
- The replication feature applies only to files uploaded after the replication policy is set.
- Deleting the versioned file in the source does not delete the files in the replica bucket.
- Example: When set from Bucket A → Bucket B, even if the version file in Bucket A is deleted, it remains in Bucket B.
- Bidirectional replication can be configured.
- Example: When set to Bucket A ↔ Bucket B, files uploaded to Bucket A are replicated to Bucket B, and files uploaded to Bucket B are replicated to Bucket A.
- The duplicated file will not be duplicated.
- Example: When configured as Bucket A → Bucket B → Bucket C, files replicated from Bucket A to Bucket B are not replicated from Bucket B to Bucket C.
- If there are no files in the original folder, that folder will not be duplicated as a copy.
Reference
The kr-south region does not provide inter-region Object Storage replication functionality.
Add replication policy
guide
- You can configure replication on the created bucket.
- To add a replication policy, you must set the versioning feature to enabled.
- For how to set up the version management feature, refer to 버전 관리 설정하기.
To add a replication policy, follow the steps below.
Click the All Services > Storage > Object Storage menu. 1. Navigate to the Service Home page of Object Storage.
On the Service Home page, click the Object Storage menu. 2. Go to the Object Storage List page.
On the Object Storage List page, click the resource to which you want to add a replication policy. 3. Object Storage Details Navigate to the page.
Click the Clone tab.
Click the Add button. 5. Add Replication Policy The popup window opens.
After entering the policy information, click the Confirm button. 6. A popup window notifying the creation of a backup policy opens.
Category Required status Detailed description Policy name Essential Enter the replication policy name - using English letters, numbers, and special characters (
-._) within 255 characters
Clone location Required Select the replication location (region) - Other locations can be selected
Replication bucket name Required Select the name of the replica bucket - If it is the same as the source bucket name or is being used as a replica bucket for another source, adding a replication policy is not allowed
Target file Essential Select files to replicate - All: Replicate all files
- Prefix: Replicate files that start with the value entered as a prefix
- Enter within 1,024 bytes based on UTF-8 encoding (same as file length restriction)
- Special characters(
%<>#\`^)
Priority Required When multiple replication policies are set, you can specify the priority - cannot be set redundantly with another replication policy that uses the same replication bucket
Delete marker duplication Selection Whether to use delete marker replication Table. Add replication policy popup items- using English letters, numbers, and special characters (
Click the Confirm button. 7. A replication policy will be added.
Caution
If an invalid policy exists, a replication policy cannot be added.
- Example: If a replication bucket has a deleted policy remaining, you cannot add a replication policy.
Modify replication policy
You can modify the replication location, replication bucket name, and target file of the replication policy.
Notice
- To modify the replication policy, you must set the versioning feature to enabled.
- For instructions on configuring the version management feature, see 버전 관리 설정하기.
Follow these steps to modify the replication policy.
All Services > Storage > Object Storage Click the menu. 1. Navigate to the Service Home page of Object Storage.
On the Service Home page, click the Object Storage menu. 2. Go to the Object Storage List page.
On the Object Storage List page, click the resource to edit the replication policy. 3. Object Storage Details Go to the page.
Click the Clone tab.
Click the More > Edit button for the policy you want to modify in the replication policy list. 5. Edit Replication Policy The popup window opens.
After modifying the replication policy information, click the Confirm button. 6. A popup window informing you of the replication policy modification opens.
Category Whether required Detailed description Clone location Required Select replication location (region) - Other locations can be selected
Replication bucket name Required Select the name of the replicated bucket - If the source or replica bucket does not have versioning enabled, selection is not allowed
- If it is the same as the source bucket name or is being used as a replica bucket for another source, selection is not allowed
Target file Required Select files to replicate - All: Replicate all files
- Prefix: Replicate files that start with the value entered as a prefix
- Enter within 1,024 bytes based on UTF-8 encoding (same as file length restriction)
- Special characters(
%<>#\`^)
Priority Required Specify priority when multiple replication policies are set - Cannot be configured redundantly with another replication policy that uses the same replication bucket
Delete marker duplication Selection Whether to use delete marker replication Table. Replication policy edit popup itemsClick the Confirm button. 7. The replication policy modification is complete.
Caution
If an invalid policy exists, a replication policy cannot be added.
- Example: If a replication bucket has a deleted policy remaining, you cannot add a replication policy.
Change Replication Policy Status
You can enable or disable the replication policy to change whether it is executed.
To change the replication policy status, follow these steps.
- Click the All Services > Storage > Object Storage menu. 1. Navigate to the Service Home page of Object Storage.
- On the Service Home page, click the Object Storage menu. 2. Go to the Object Storage List page.
- On the Object Storage list page, click the resource to change the replication policy status. 3. Object Storage Details Navigate to the page.
- Click the Clone tab.
- From the replication policy list, click the More > Enable or More > Disable button of the policy whose status you want to change. 5. A popup window opens to notify of a replication policy status change.
- Enabled: Performs replication according to the replication policy.
- Disable: Stop performing replication.
- Click the Confirm button. 6. The status of the replication policy changes.
Delete replication policy
You can delete unused replication policies.
Follow these steps to modify the replication policy.
- Click the All Services > Storage > Object Storage menu. 1. Navigate to the Service Home page of Object Storage.
- On the Service Home page, click the Object Storage menu. 2. Go to the Object Storage List page.
- On the Object Storage List page, click the resource to delete the replication policy. 3. Object Storage Details Navigate to the page.
- Click the Copy tab.
- Click the More > Delete button for the policy you want to edit in the replication policy list. 5. A popup window opens to notify the deletion of the replication policy.
- Click the Confirm button. 6. The replication policy is being deleted.
Caution
- If you change the versioning setting for the source and replica buckets, replication will not operate correctly.
- If versioning on the source bucket is set to disabled, replication will not be performed. * If you set it to use again, it will replicate uploaded files from the point it was set.
- If you set versioning of the replica bucket to disabled, replication will occur but versioning is not possible. * If you reset it to Use, version control will be applied from the point you set it.
- If you delete the source bucket, the configured replication policy will also be deleted.
- If you delete the replica bucket, the replication policy set on the source bucket remains.
- If you recreate a replication bucket with the same name as a deleted replication bucket, replication will be performed to that bucket.
Activating ServiceWatch replication metrics
By default, Object Storage is integrated with ServiceWatch and basic monitoring. To link Object Storage replication metrics to ServiceWatch, you must enable ServiceWatch replication metrics. For detailed information about ServiceWatch, see the ServiceWatch 개요.
Caution
- Basic monitoring is provided at no cost, but enabling replication metrics as a detailed monitoring item incurs additional fees.
- The ServiceWatch replication metric, once set for a bucket, applies to all replication policies of that bucket.
To enable the ServiceWatch replication metric for Object Storage, follow these steps.
- Click the All Services > Storage > Object Storage menu. 1. Navigate to the Service Home page of Object Storage.
- On the Service Home page, click the Object Storage menu. 2. Go to the Object Storage List page.
- Object Storage List page, click the resource to enable ServiceWatch replication metrics. 3. Object Storage Details Navigate to the page.
- On the Object Storage Details page, click the Replication tab. 4. Go to the Clone tab.
- Click the Edit button for ServiceWatch replication metrics. 5. ServiceWatch Replication Metric Edit Navigate to the popup window.
- ServiceWatch Replication Metric Modification In the popup window, after selecting Enable, check the guidance text and click the Confirm button.
- Check the ServiceWatch replication metric items in the Replication tab.
Disable ServiceWatch replication metrics
Caution
Disabling the replication metric is necessary for cost efficiency. Keep the replication metric enabled only when absolutely necessary, and disable the replication metric otherwise.
To disable the ServiceWatch replication metric for Object Storage, follow these steps.
- Click the All Services > Storage > Object Storage menu. 1. Navigate to the Service Home page of Object Storage.
- On the Service Home page, click the Object Storage menu. 2. Go to the Object Storage List page.
- On the Object Storage list page, click the resource to disable ServiceWatch detailed monitoring. 3. Navigate to the Object Storage Details page.
- On the Object Storage Details page, click the Replication tab. 4. Go to the Clone tab.
- Click the Edit button for the ServiceWatch replication metric. 5. ServiceWatch Replication Metric Edit Navigate to the popup window.
- ServiceWatch replication metric edit In the popup window, after deselecting Enable, review the guidance text and click the Confirm button.
- In the Replication tab, check the ServiceWatch replication metric items.
4.2.6 - Copy original file
Using the original file copy feature, you can copy the original file to the target bucket as is, regardless of replication policy settings.
information
- The entire file of the original is copied.
- If the original file copy operation fails, you need to re-execute it by adding a task, and the entire original file will be copied again during re-execution.
- If there are no files in the source folder, that folder will not be copied to the destination bucket.
- Copying the original file can only be performed in the Console and cannot be done via a separate API.
Add copy operation
Guide
If a copy operation is already in progress, you cannot add another copy operation.
To copy the original file in Object Storage, follow these steps.
- Click the All Services > Storage > Object Storage menu. 1. Navigate to the Service Home page of Object Storage.
- On the Service Home page, click the Object Storage menu. 2. Go to the Object Storage List page.
- On the Object Storage List page, click the resource to copy the original file. 3. Go to the Object Storage Details page.
- In the Copy Original File tab, click the Add Task button. 4. Add original file copy task A popup window opens.
- Add Task In the popup window, set the copy task information, then click the Confirm button.
Category Required status Detailed description Task name Required Enter the name of the copy job - Enter using English letters, numbers, and special characters (-,_) within 255 characters
Target bucket location Select the location of the target bucket Target bucket name Select the name of the target bucket Table. Copy task itemsReference- The file operates according to the versioning/encryption status of the replica bucket.
- Delete Marker is excluded from the copy target.
- Copying between the same bucket is not allowed.
- When a popup notifying the copy opens, click the Confirm button. 6. The original file copy operation is added.
Copy operation and view history
On the Object Storage Details page’s Original File Copy tab, you can view and manage the list of original file copy jobs and their information.
To view the list of source file copy jobs and job history, follow these steps.
- All Services > Storage > Object Storage Click the menu. 1. Navigate to the Service Home page of Object Storage.
- Service Home 페이지에서 Object Storage 메뉴를 클릭하세요. 2. Go to the Object Storage List page.
- Object Storage list On the Object Storage list page, click the resource to view the copy job information. 3. Object Storage Details Navigate to the page.
- Click the Original File Copy tab on the Object Storage Details page.
Category Detailed description Task name Copy job name - Click to view the status and detailed information of the job
Target bucket name Copy target bucket name Target bucket location Destination bucket location (region) Start date and time Copy start date and time Completion time Copy completion time status Task progress status - Pending: Task pending
- In progress: Task in progress
- Completed: Task completed
- Cancelled: Task cancelled
- Failed: Task failed due to an error during execution
Cancel Cancel the selected task - Pending or In progress tasks can only be canceled
Add task New copy task can be added - If there is an ongoing copy task, adding a copy task is not allowed
Table. Object Storage original file copy tab item
Cancel copy operation
information
Only copy jobs with a status of Pending or In Progress can be canceled.
To cancel the original file copy operation, follow these steps.
- All Services > Storage > Object Storage menu, click it. 1. Navigate to the Service Home page of Object Storage.
- On the Service Home page, click the Object Storage menu. 2. Go to the Object Storage List page.
- Object Storage List page, click the resource for which you want to cancel the copy operation. 3. Object Storage Details Navigate to the page.
- Original File Copy tab, click the Cancel Operation button for the copy job you want to cancel.
- When a popup indicating that the copy operation has been canceled opens, click the Confirm button.
- Original File Copy tab’s original file copy task list, verify whether the job was canceled.
4.3 - Release Note
Object Storage
2026.07.16
FEATURE
Copy original file and integrate Simple AI Training service- The replication feature of Object Storage has been improved.
- You can apply multiple replication policies by setting their priority.
- The original file copy feature has been added.
- You can copy the original file to the target bucket as is, regardless of the replication policy settings.
- The Simple AI Training service has been added to access control.
- You can load a Training Script stored in Object Storage from the Simple AI Training service.
2026.03.19
FEATURE
ServiceWatch service integration provision- ServiceWatch service integration offering
- You can monitor data using the ServiceWatch service.
2025.10.23
FEATURE
Cloning, file copy feature added and Cloud Functions service integration- The replication feature of Object Storage has been added.
- You can perform replication to buckets in a different location or the same location, and you can configure multiple replication policies.
- File copy feature has been added.
- You can copy the desired file within the same bucket and folder.
- The Cloud Functions service has been added to access control.
- You can upload Java Runtime executable files in Cloud Functions.
2025.07.01
FEATURE
Add access to server resources and Presigned URL functionality- A server resource target product has been added to Object Storage access control.
- Multi-node GPU Cluster, PostgreSQL, MariaDB, MySQL, EPAS, Microsoft SQL Server
- Presigned URL functionality has been added.
- You can download the file using a Presigned URL for the configured duration.
- You can perform Copyobject on encrypted files.
2025.04.28
FEATURE
Add Amazon S3 version- Additional versions of the Amazon S3 SDK and Amazon S3 CLI are now available.
2025.02.27
FEATURE
Add VPC Endpoint connection feature- Object Storage feature change
- Object Storage can be used from external networks via a VPC Endpoint connection.
- Samsung Cloud Platform Common Feature Changes
- Account, IAM, Service Home, tags, and other common CX changes have been reflected.
2024.10.01
NEW
Object Storage service official version release- We have launched an object storage service that facilitates data storage and retrieval.
2024.07.02
NEW
Beta version release- We have launched Object Storage, a service that offers space (bucket) for cost-effective storage of large amounts of data.
5 - Archive Storage
Data stored in Object Storage is automatically transferred to Archive Storage for retention and can be easily restored when needed.
5.1 - Overview
Service Overview
Archive Storage is a storage service suitable for long-term retention of large amounts of data. The user can set a schedule to automatically move infrequently accessed data stored in Object Storage to Archive Storage, enabling efficient storage configuration and cost management. Additionally, upon user request, data stored in Archive Storage can be restored to Object Storage for use.
Features
Free Capacity Usage: When you create a bucket in Archive Storage, the bucket automatically expands or contracts based on the user’s data archiving and deletion. There is no cost for creating a storage bucket; you are only charged for storage usage.
Stable Data Recovery: Data that has been stored long-term can be searched and reliably recovered within three hours. During data recovery, select the target file and the Object Storage bucket where you want to store the data to recover it.
Cost Efficiency: By configuring Object Storage and Archive Storage efficiently according to the purpose and frequency of data usage, you can store and manage data at a reasonable cost.
Convenient Use: You can conveniently use features such as creating buckets, setting archiving schedules, and data recovery in the Samsung Cloud Platform Console. After migrating data for all files in Object Storage, you can apply a source deletion policy.
Configuration diagram
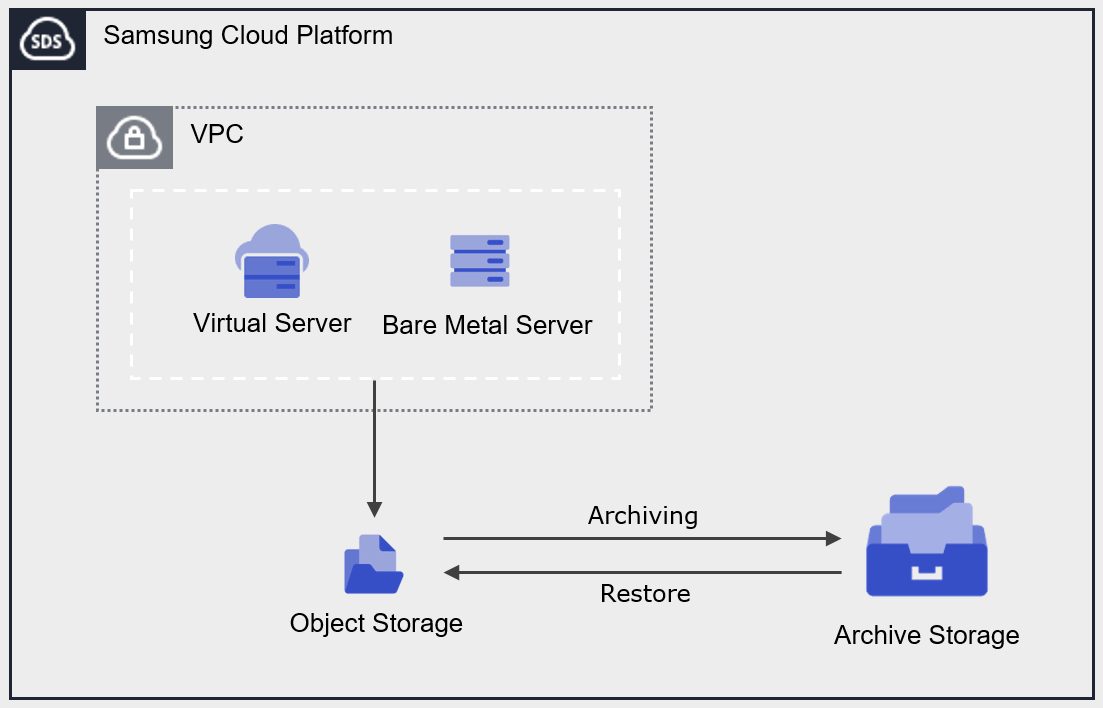
Provided features
Archive Storage provides the following features.
- Archiving Plan Configuration: Set a schedule to perform Archiving on all files in the Object Storage bucket.
- Data Recovery: You can recover to the target Object Storage bucket and folder using folders or files stored in Archive Storage.
- Archiving status monitoring: You can check the Archiving status (success, cancelled, failed, in progress, pending, skipped).
- Recovery status monitoring: You can view the recovery status (success, canceled, failed, in progress, pending).
- Encryption: When encryption is set to enabled, encryption is provided via the SSE‑S3 method.
- Version Management: You can manage archived files by version and restore a selected version.
- ServiceWatch Service Integration: You can monitor data using the ServiceWatch service.
Component
Authentication key
To create and access the Archive Storage service in the Samsung Cloud Platform Console, an authentication key is required. Therefore, to use Archive Storage, you must create an authentication key.
Bucket
A bucket is the top-level folder, and all folders and files reside under the bucket. When you create an Archive Storage service in the Samsung Cloud Platform Console, a bucket is created, and you can then upload folders or files.
The bucket name creation rules are as follows.
- Bucket names must be at least 3 characters and at most 63 characters.
- Bucket names can only be composed of lowercase English letters, numbers, periods
., and hyphens-. - Bucket names must start with a lowercase letter or a digit.
- Bucket names must not contain two consecutive periods.
- Bucket names cannot end with a period or hyphen.
- Bucket names cannot have a period and a hyphen adjacent to each other.
- Bucket names do not use the IP address format (e.g., 192.168.x.x).
- The bucket name cannot be admin.
- Bucket names must be unique within an Account/Region.
- The bucket name you previously used will be available after 1 hour.
| Example of a valid bucket name | Example of an invalid bucket name |
|---|---|
The following bucket names can be used
| The following bucket names cannot be used
|
folder
A folder (Folder) is used to logically group files.
The folder naming rules are as follows.
- Folder names can consist of Korean characters, English letters, numbers, and special characters.
- The special characters that cannot be entered are listed below.
| Special characters that cannot be used in folder names |
|---|
|
File
File (File) refers to data stored in Archive Storage and is the same as a regular file.
The filename generation rules are as follows.
- Filenames can consist of Korean characters, English letters, numbers, and special characters.
- The special characters that cannot be entered are listed below.
| Special characters that cannot be used in file names |
|---|
|
Folder names and file names are separated by slash /. The following are examples of valid folder and file names.
| Example of mixed use of folder names and file names |
|---|
|
Reference
The length of the path, including the folder name, file name, and separator (
/), must be within 1,024 bytes (based on UTF-8 encoding).Constraints
The limitations of Archive Storage are as follows.
| Category | description |
|---|---|
| Number of creatable Archive Storage services | 1000 or fewer |
| File name length (including path) | up to 1,024 Bytes |
Table. Archive Storage constraints
Preceding Service
This is a list of services that must be pre‑configured before creating the service. Please refer to the guide provided for each service for details and prepare in advance.
| Service Category | Service | Detailed description |
|---|---|---|
| Storage | Object Storage | Object storage that simplifies data storage and retrieval |
Table. Archive Storage preliminary service
5.1.1 - ServiceWatch Metrics
Archive Storage sends metrics to ServiceWatch. The metrics provided by default monitoring are data collected at 5‑minute intervals.
Reference
For checking metrics in ServiceWatch, refer to the ServiceWatch guide.
Basic Metrics
The following are the basic metrics for the Archive Storage namespace.
The indicators whose names are shown in bold below are the key indicators selected from the basic metrics provided by Archive Storage. Key metrics are used to configure service dashboards that are automatically generated for each service in ServiceWatch.
Each metric indicates, via the user guide, which statistical value is meaningful when viewing that metric, and among the meaningful statistics, the values shown in bold are the primary statistics. In the service dashboard, you can view key metrics using these primary statistical values.
| Performance items | Detailed description | unit | Meaningful statistics |
|---|---|---|---|
| object_count | Number of objects stored in the bucket | Count |
|
| object_byte | Amount of data stored in the bucket | Bytes |
|
Table. Archive Storage Basic Metrics
5.2 - How-to guides
Users can create a service by entering the required information for Archive Storage and selecting detailed options through the Samsung Cloud Platform Console.
Create Authentication Key
To create and use the Archive Storage service in the Samsung Cloud Platform Console, you must generate an authentication key in advance.
Authentication key creation is My Menu > My Info. > Authentication key management > Authentication keys can be created from . For more details, refer to IAM > 인증키 생성하기.
Reference
- The authentication key is used not only for Archive Storage but also for authentication in OpenAPI and CLI.
- You can create up to two authentication keys.
Warning
- If the authentication key expires, access to the Archive Storage service will be restricted. * Check the authentication key’s expiration period in advance to ensure smooth service usage.
- If you disable the authentication key, access to the Archive Storage service will be restricted.
Create Archive Storage
You can create and use the Archive Storage service in the Samsung Cloud Platform Console.
To create Archive Storage, follow these steps.
- Click the All Services > Storage > Archive Storage menu. 1. Navigate to the Service Home page of Archive Storage.
- Click the Create Archive Storage button on the Service Home page. 2. Go to the Create Archive Storage page.
- On the Archive Storage Creation page, enter the information required to create the service and select detailed options.
Category Required statusDetailed description Bucket name Essential Bucket name for performing archiving - must start with a lowercase letter or digit and be entered using 3 to 63 characters of lowercase letters, digits, hyphen
-, and period.
- period
.cannot appear consecutively two or more times
- period
.and hyphen-cannot be adjacent
- period
.or hyphen-cannot be used to end the name
- IP address format not allowed
- admin name not allowed
- cannot use a bucket name already in use in the same region within the Samsung Cloud Platform Console
- see 버킷명 생성 규칙 for details about the bucket
Table. Archive Storage service information input items - must start with a lowercase letter or digit and be entered using 3 to 63 characters of lowercase letters, digits, hyphen
- Summary Verify the detailed information and estimated billing amount generated in the panel, then click the Create button.
- When creation is complete, check the created resources on the Archive Storage List page.
Information
- After creating the bucket, configure encryption and versioning for secure data management.
- Encryption and versioning can be configured on the Archive Storage Details page. * For detailed information, refer to Archive Storage 암호화 설정하기 and 버전 관리 설정하기.
Archive Storage Check Detailed Information
Archive Storage Detailed page consists of Detail Information, Folder List, Archiving History, Recovery History, Tags tabs.
To view detailed information about the Archive Storage service, follow these steps.
- Click the All Services > Storage > Archive Storage menu. 1. Navigate to the Service Home page of Archive Storage.
- On the Service Home page, click the Archive Storage menu. 2. Go to the Archive Storage List page.
- Archive Storage List page, click the resource to view detailed information. 3. Go to the Archive Storage Details page.
- Archive Storage Details page displays status information and additional feature information, and consists of Details, Folder List, Archiving History, Recovery History, Tags tabs.
Category Detailed description Archive Storage status Archive Storage status information - Active: Available
- Error: Abnormal state during termination
- Deleting: Service termination in progress
Service cancellation Button to cancel the service Table. Archive Storage status information and additional features
- Archive Storage Details page displays status information and additional feature information, and consists of Details, Folder List, Archiving History, Recovery History, Tags tabs.
Detailed Information
Detailed Information tab lets you view the resource’s detailed information and modify it if needed.
| Category | Detailed description |
|---|---|
| service | service group |
| Resource Type | Resource Type |
| SRN | Unique resource ID in Samsung Cloud Platform |
| Resource name | Resource name
|
| Resource ID | Service’s unique resource ID |
| Bucket name | User-created bucket name |
| Usage | Total data usage of the bucket |
| Encryption | Encryption usage information
|
| Version control | Version control usage information
|
| Archiving policy | Check configured archiving targets and policy actions
|
| Archiving target | After adding the policy task for the Object Storage bucket
|
| Policy work | Archiving policy list
|
Table. Archive Storage detailed information tab items
Reference
- Archiving 대상 can be set only once initially. * It cannot be modified after being set.
- If the target files for the archiving policy are set to All, you cannot set additional policies.
- Archiving policies can be set up to a maximum of 100.
- The Archiving policy is performed once a day based on the addition point.
- Even if you delete all Archiving policies, the Archiving targets remain.
- The policy operation performs archiving on all versioned files in Object Storage.
Caution
If you reuse the bucket name of the archiving target, the configured archiving policy will be applied, so be careful.
Folder list
In the Folder List tab, you can view the list and size of folders that have been archived.
| Category | Detailed description |
|---|---|
| name | Name of the file or folder that was archived
|
| Size | Size of archived files or folders |
| Modification date/time | Last modified date and time of the file or folder |
| More button | Manage selected files or folders
|
Table. Archive Storage folder list tab item
Archiving History
In the Archiving History tab, you can view the list of archiving performed over a specific period.
| Category | Detailed description |
|---|---|
| Search area | Set the policy name, period, and status conditions for Archiving to search
|
| status | Select Archiving status
|
| Policy name | Archiving policy name
|
| Execution time | Archiving start time |
| Completion time | Archiving completion time |
| status | Archiving status information |
| Cancel operation | Cancel Archiving task
|
Table. Archive Storage Archiving History Tab Items
Recovery History
In the Recovery History tab, you can view the list of Archives that performed recovery tasks over a specific period.
| Category | Detailed description |
|---|---|
| Query period | Select the period to view the recovery history
|
| status | Select recovery status
|
| Recovery target | Recovery target Object Storage name
|
| Recovery Date/Time | Recovery start time |
| Completion date/time | Recovery completion time |
| status | Recovery status information |
| Cancel recovery operation | Cancel recovery operation
|
Table. Archive Storage recovery history tab items
Tag
In the Tag tab, you can view the resource’s tag information, and add, modify, or delete it.
| Category | Detailed description |
|---|---|
| Tag list | Tag list
|
Table. Archive Storage tag tab items
Archive Storage Encryption Settings
You can configure it to encrypt the data stored in the bucket. After configuring bucket encryption, the encryption settings are applied to data uploaded thereafter. When encryption is used, the SSE‑S3 encryption key method and the AES256 encryption algorithm are applied.
Reference
Archive Storage’s bucket encryption can provide two options (SSE-S3/SSE-KMS).
- SSE‑S3 is server‑side encryption (SSE‑S3) that uses Amazon S3 managed keys.
- SSE-KMS is server-side encryption (SSE-KMS) that uses Key Management Service (KMS) keys.
- In this service, server-side encryption using Amazon S3 managed keys (SSE‑S3) has been released as the default method, and server-side encryption using Key Management Service (KMS) keys (SSE‑KMS) will be provided in the future according to the service roadmap.
Information
If there is data saved before bucket encryption was configured, the encryption settings will not be applied.
- Re‑uploading the file will apply the encryption.
- To set encryption for existing data, you need to re‑upload it.
To set up encryption, follow these steps.
- Click the All Services > Storage > Archive Storage menu. 1. Navigate to the Service Home page of Archive Storage.
- On the Service Home page, click the Archive Storage menu. 2. Archive Storage List Navigate to the page.
- Archive Storage List page, click the resource (bucket) to use for encryption. 3. Navigate to the Archive Storage Details page.
- On the Archive Storage Details page, after confirming that encryption is not used, click the Edit button. The Edit Encryption popup window opens.
- After checking the use of encryption, click the Confirm button.
Cancel Archive Storage
Information
- You cannot cancel Archive Storage while archiving is in progress or while restoring an archive file.
- If data is stored in the bucket, the service cannot be terminated. * Delete the data in the bucket first.
- Deleted data cannot be recovered, so please exercise caution.
To cancel Archive Storage, follow the steps below.
- Click the All Services > Storage > Archive Storage menu. 1. Navigate to the Service Home page of Archive Storage.
- On the Service Home page, click the Archive Storage menu. 2. Go to the Archive Storage List page.
- On the Archive Storage list page, select the resource to cancel and click the Cancel Service button.
- When termination is complete, check on the Archive Storage list page whether the resource has been terminated.
5.2.1 - Managing Archiving Policies
You can add, modify, or delete archiving policies.
Add Archiving Policy
To add an Archiving policy, follow the steps below.
- Click the All Services > Storage > Archive Storage menu. 1. Navigate to the Service Home page of Archive Storage.
- On the Service Home page, click the Archive Storage menu. 2. Archive Storage List Navigate to the page.
- Archive Storage List page, click the resource to view detailed information. 3. Archive Storage Details Navigate to the page.
- Click the Add button of Policy Task. 4. Add Archiving Policy The popup window opens.
- After entering the Archiving policy information, click the Confirm button.
Category Detailed description Archiving target Select the Object Storage bucket to perform archiving - Cannot be modified after initial configuration
- Only buckets within the same region can be added
- Buckets used in policies of other Arcvhie Storage cannot be selected
Policy name Enter policy name - Enter within 60 characters using English letters, numbers, and special characters (- _)
- Cannot enter a policy name identical to another Archiving policy name
Target file Select files to archive - All: Perform archiving on all files
- If a prefix is used in another Archiving policy, All cannot be set
- Prefix: Perform archiving on files that include the specified prefix
- Prefix input required when selected
- The prefix cannot start with / and cannot contain special characters(%<>#\`^)
Policy work When selected, perform archiving on all versioned objects in Object Storage - When version management of Archive Storage is enabled: manage each version separately
- When version management of Archive Storage is not used: manage by overwriting the current version
execution time Enter the archiving execution time - 1 to 3,650 as a number
Table. Archiving policy addition popup items
Reference
- Archiving target can be set only once initially. * It cannot be modified after being set.
- If the target files for the archiving policy are set to All, you cannot set additional policies.
- Archiving policies can be set up to a maximum of 100.
- The Archiving policy is executed once per day based on the addition point.
- The policy operation performs archiving on all versioned files in Object Storage.
Modify Archiving Policy
To modify the Archiving policy, follow the steps below.
- All Services > Storage > Archive Storage menu, click it. 1. Navigate to the Service Home page of Archive Storage.
- On the Service Home page, click the Archive Storage menu. 2. Go to the Archive Storage List page.
- Archive Storage List Click the resource on the page to view its detailed information. 3. Go to the Archive Storage Details page.
- From the Policy Actions list, select the policy you want to edit, then click the More > Add button on the right. 4. Archiving policy edit The popup window opens.
- After modifying the Archiving policy information, click the Confirm button.
Caution
If you reuse the bucket name of the archiving target, the configured archiving policy will be applied, so be careful.
Delete Archiving Policy
You can delete unused Archiving policies.
Information
If archiving is in progress, it cannot be deleted. On the detail page’s Archiving History tab, after Cancel Operation, proceed with deletion.
To delete the Archiving policy, follow these steps.
- All Services > Storage > Archive Storage Click the menu. 1. Navigate to the Service Home page of Archive Storage.
- On the Service Home page, click the Archive Storage menu. 2. Go to the Archive Storage List page.
- Archive Storage List On the page, click the resource to view detailed information. 3. Archive Storage Details Navigate to the page.
- Policy Actions After selecting the policy you wish to delete from the list, click the More > Delete button on the right. 4. Delete Archiving Policy popup opens.
- After checking the Archiving policy information, click the Confirm button.
Reference
- Even if you delete all Archiving policies, the Archiving targets are retained.
- Deleted Archiving policies cannot be viewed in the Archiving history.
Changing Archiving Policy Status
You can enable or disable the Archiving policy to change whether the Archiving policy is executed.
To change the Archiving policy status, follow the steps below.
- Click the All Services > Storage > Archive Storage menu. 1. Navigate to the Service Home page of Archive Storage.
- On the Service Home page, click the Archive Storage menu. 2. Go to the Archive Storage List page.
- On the Archive Storage List page, click the resource to change the Archiving policy status. 3. Archive Storage Details Navigate to the page.
- In the Policy Actions list, click the More > Activate or More > Deactivate button for the policy whose status you want to change. 4. A popup window notifying the change of the Archiving policy status opens.
- Enable: Perform archiving according to the archiving policy.
- Disable: Stop performing archiving.
- Click the Confirm button. 6. The status of the Archiving policy will change.
Cancel Archiving operation
Information
Only Archiving tasks that are pending or in progress can be canceled.
To cancel Archiving, follow the steps below.
- All Services > Storage > Archive Storage Click the menu. 1. Navigate to the Service Home page of Archive Storage.
- On the Service Home page, click the Archive Storage menu. 2. Go to the Archive Storage List page.
- On the Archive Storage List page, click the resource to cancel the Archiving operation. 3. Archive Storage Details Navigate to the page.
- Archive History Click the tab.
- In the Archiving history list, verify that the status of the Archiving policy to cancel the job is Pending or In progress.
- Click the Cancel operation button. 6. A confirmation popup for canceling the operation opens.
- Click the Confirm button. 7. The Archiving operation will be canceled.
Archiving How it works
The Archiving behavior based on the Archiving target is as follows.
| Archiving target | Detailed description |
|---|---|
| previous version/current version file | Depends on whether versioning is used for Archive Storage
|
| Files that contain the Delete Marker version | Delete Marker version cannot be archived
|
| Empty folder | Cannot create folder in Archive Storage |
| Folder containing files | Depending on whether the folder is an Object, the folder deletion behavior in Object Storage differs after archiving
|
| If the target file does not exist | Archiving schedule performed as is
|
| If the target Object Storage bucket is deleted |
|
Table. Archiving method according to archiving target
Reference
- Archiving is performed based on the Etag value of the Object Storage file.
- After archiving, version ID and modification timestamp are changed. * However, the Etag value is the same.
5.2.2 - Use Version Management
By enabling versioning on a bucket, you can manage all Object Storage versions in Archive Storage.
Using version control, you can view a file’s version list and select a previous version from the list to restore it.
Setting up version control
To configure the version control feature, follow these steps.
- Click the All Services > Storage > Archive Storage menu. Navigate to the Service Home page of Archive Storage.
- On the Service Home page, click the Archive Storage menu. You will be taken to the Archive Storage list page.
- On the Archive Storage List page, click the resource to use the version control feature. You will be taken to the Archive Storage Details page.
- On the Archive Storage Details page, verify that Version Management is Not Used, then click the Edit button.Version Management Edit popup opens.
- After checking Enabled for version management, click the Confirm button. The Version Management on the Archive Storage Details page will be changed to Enabled.
Reference
- When you configure version control for the first time, it may take some time for changes to be applied.
- The time required varies depending on the size of the bucket, and versioning may not be applied until the configuration is completed.
Check version list
You can view and manage the list of file versions.
To view and manage the file’s version list, follow these steps.
- Click the All Services > Storage > Archive Storage menu. Navigate to the Service Home page of Archive Storage.
- On the Service Home page, click the Archive Storage menu. You will be taken to the Archive Storage list page.
- Archive Storage List page, click the resource to view the version list. Archive Storage Details page will be opened.
- On the Archive Storage Details page, click the Folder List tab.
- Click the More > Version Management button of the file whose version list you want to view. The version list popup will open.
| Category | Detailed description |
|---|---|
| filename | File name under version control |
| Modification date | File modification date and time |
| Version ID | Version ID assigned to each individual file
|
| Etag | Object that can identify a file, specific version |
| Size | Version file size |
| More | Delete or restore the version
|
Table. Version list items
guide
From the moment version control is configured, you can view and manage the version IDs of archived files.
- Before configuring version control, archived files: the version ID is shown as null(-).
- After configuring version control, the archived file: a version file is added, and a unique version ID is generated and assigned.
Delete version file
To delete unused version files, follow the steps below.
- Click the All Services > Storage > Archive Storage menu. Navigate to the Service Home page of Archive Storage.
- On the Service Home page, click the Archive Storage menu. You will be taken to the Archive Storage list page.
- Archive Storage List page, click the resource to view the version list. You will be taken to the Archive Storage Details page.
- On the Archive Storage Details page, click the Folder List tab.
- Click the More > Version Control button of the file whose version file you want to delete. The version list popup will open.
- Click the More > Delete button for the version file you want to delete. The version file will be removed from the version list.
- After selecting all version files to delete, click the Delete button at the top of the list to delete them all at once.
Caution
If you delete all version files, the original file will also be deleted. To retain the original file, keep at least one version.
5.2.3 - Archive Recovery
Archive Recovery
Reference
- Recovery can be performed on a per-file basis, and the data stored in Archive Storage is not deleted after recovery.
- When restoring an archive file, select the bucket and folder in Object Storage and restore to that location. Before starting the restoration, first verify the Object Storage you intend to restore.
Recover from folder list
If you are not using the version control feature, you can recover by selecting the Archive file from the folder list.
To check and recover the archive file, follow these steps.
- Click the All Services > Storage > Archive Storage menu. Navigate to the Service Home page of Archive Storage.
- On the Service Home page, click the Archive Storage menu. You will be taken to the Archive Storage List page.
- On the Archive Storage List page, click the resource to view detailed information. You will be taken to the Archive Storage Details page.
- Click the Folder List tab.
- Select the folder or file name to restore from the folder list. The Delete button and Restore button appear at the top of the list.
- Click the Restore button. The Archive Restore popup opens.
- After selecting the recovery information, click the Confirm button.
Category Detailed description Bucket name Object Storage bucket name Original location Original file or folder location Recovery target Select the bucket to recover Overwrite Select whether to use the overwrite function - When selecting a bucket in Object Storage with versioning enabled as the recovery target, using the overwrite function stores the existing file with the same name as a previous version
Table. Archive recovery popup items
Caution
- Recovery may fail due to character length restrictions on files and folders. For the character length restrictions on files and folders, see the File name creation rules and Folder name creation rules.
- After a recovery failure, if you perform the recovery again using the overwrite function, you may be charged duplicate fees.
Information
If recovery fails, verify that the completed files are present in the target Object Storage.
Recover from version list
When using the version control feature, you can check a file’s version and restore it to the desired version.
guide
- To view and restore a file’s version, set the version control feature to enabled..
- Refer to Configure Version Management for how to configure the versioning feature.
To restore an Archive file using a version file, follow these steps.
- Click the All Services > Storage > Archive Storage menu. Navigate to the Service Home page of Archive Storage.
- On the Service Home page, click the Archive Storage menu. You will be taken to the Archive Storage List page.
- Archive Storage List page, click the resource to view detailed information. You will be taken to the Archive Storage Details page.
- Click the Folder List tab.
- In the folder list, click the More > Version Management button for the file whose version list you want to view. The version list popup will open.
- In the version list, click the More > Restore button for the version file you want to recover. The Archive Restore popup window will open.
- After selecting the recovery information, click the Confirm button.
Category Detailed description Bucket name Object Storage bucket name Original location Original file or folder location Version list Modification timestamp, version ID, Etag, and size information of the version to be restored Recovery target Select the bucket to recover Overwrite Select whether to use the overwrite function - When selecting a bucket in Object Storage with versioning enabled as the recovery target, using the overwrite function stores the existing file with the same name as a previous version
Table. Archive recovery popup items
Caution
- Recovery may fail due to character length limits on files and folders. For the character length limits on files and folders, see File Name Creation Rules and Folder Name Creation Rules.
- After a recovery failure, if you perform the recovery again using the overwrite function, you may be charged duplicate fees.
guide
If recovery fails, verify that the completed files are present in the target Object Storage.
Cancel recovery operation
guide
Only recovery tasks that are pending or in progress can be canceled.
To cancel the recovery operation, follow these steps.
- Click the All Services > Storage > Archive Storage menu. Navigate to the Service Home page of Archive Storage.
- On the Service Home page, click the Archive Storage menu. You will be taken to the Archive Storage list page.
- On the Archive Storage List page, click the resource for which you want to cancel the recovery operation. You will be taken to the Archive Storage Details page.
- Click the Recovery History tab.
- Verify that the status of the recovery target to be canceled in the recovery history list is Pending or In Progress.
- Click the Cancel button. A confirmation popup for canceling the operation will open.
- Click the Confirm button. The recovery operation will be canceled.
Understanding archive recovery methods
The recovery methods according to the type of recovery are as follows.
| Recovery type | Status description |
|---|---|
| General recovery |
|
| If there are no files to recover (overwrite option not used) | Not shown in the status check list |
Table. Recovery method based on recovery type
5.3 - API Reference
API Reference
5.4 - CLI Reference
CLI Reference
5.5 - Release Note
Archive Storage
2026.07.16
FEATURE
Archiving policy improvement and addition of delete function- You can apply the archiving policy to target files based on their prefix.
- You can set a prefix to perform archiving on the relevant files.
- You can delete the Archiving policy.
2026.03.19
FEATURE
ServiceWatch service integration provision- ServiceWatch service integration offering
- You can monitor data using the ServiceWatch service.
2025.10.23
FEATURE
Add version control feature- You can manage archived folders or files by version.
- Users can view archived folders or files by version and select the desired version to delete or restore.
2025.07.01
NEW
Archive Storage service official version release- We have launched the Archive Storage service.
- Data stored in Object Storage is automatically transferred to Archive Storage for retention and can be easily restored when needed.
6 - Backup
6.1 - Overview
Service Overview
Backup is a service that backs up and recovers in case of an emergency the user’s data in a safe manner.
Since a backup policy includes the backup target, frequency, retention period, etc., users set a backup plan according to their business environment and requirements.
Features
- Backup Scope: Providing optimal backup and recovery services tailored to various business purposes, ensuring customers’ important data is safely preserved.
- Flexible Policy Configuration: You can set backup policies based on the usage environment and data importance. Users select backup targets and types, and specify retention periods and schedules.
- Backup Network: We minimized potential service impact during backup by using a backup network connection. The backup system and network block unauthorized access through permission management.
- Remote backup: Agentless backup can store backup copies at a different location. If a failure or disaster occurs at the backup site, you can recover using the backup copies stored at the other location.
- Replication: Agent backup can replicate the same backup to another location for storage. The schedule and retention period are set the same as the original, and in case of a failure or disaster at the backup location, recovery can be performed using the backup copy stored at the other location.
Configuration diagram
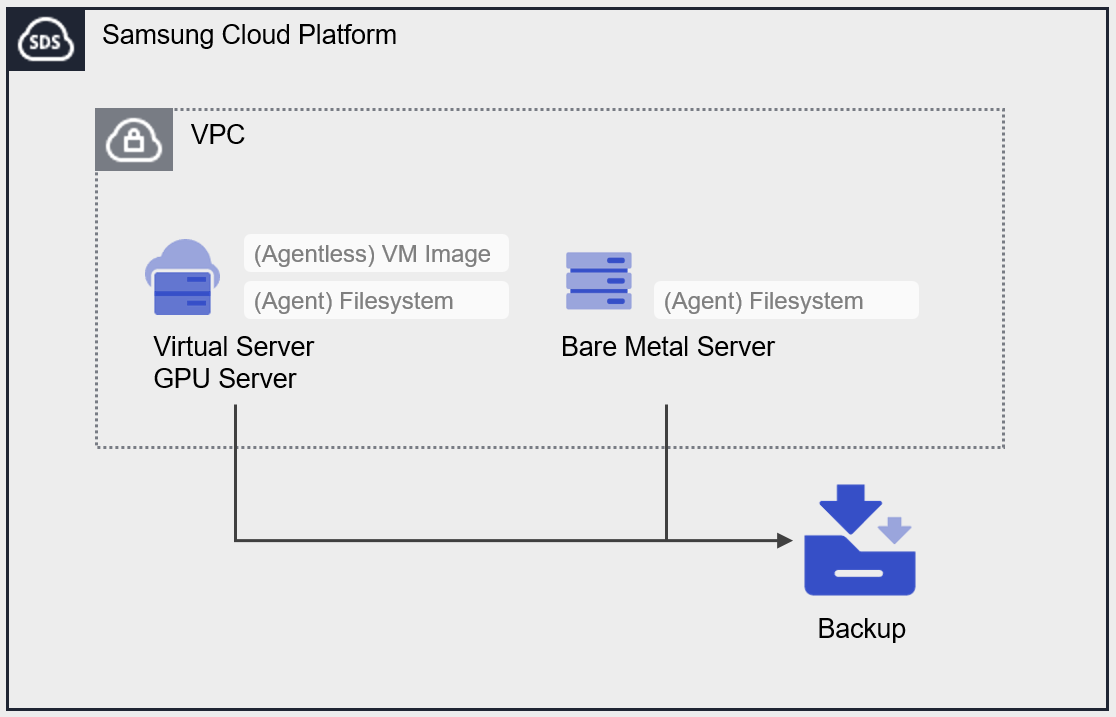
Provided features
Backup provides the following features.
- Backup target: The user can select the target server for which they want to obtain a backup.
- Backup Save: You can select the storage location for the backup.
- Encryption: AES-256 algorithm encryption is applied.
- Retention Period: You can set the retention period for backups. Backups whose retention period has elapsed are automatically deleted.
- Schedule: This is the automatic backup generation interval.
- Recovery: You can select a backup created at the desired point in time to restore resources.
Component
Backup provides a scheduling feature that automatically creates backup copies at predefined intervals and times. Users set retention periods and other parameters to ensure they can obtain backups from the desired point in time, and depending on the backup target and type, agent configuration may be required.
Backup type
Provides Agentless Backup and Agent Backup, and you can select based on the backup target.
- Agentless Backup: You can back up by creating a Backup service without configuring a separate agent. VM image backups of Virtual Server and GPU Server are considered Agentless Backup.
- Agent Backup: Before creating a Backup service, you need to create a Backup Agent and configure the Agent on the server you want to back up. This applies to filesystem backups.
Backup Category
- Full Backup: Backs up all data.
- Incremental Backup: Backs up data that has changed since the previous backup.
Schedule
Backups are automatically created according to the generation interval set by the user. You can schedule up to 1 Full Backup and up to 6 Incremental Backups.
When using the Immediate Backup feature, you can create a backup at a specific point in time desired by the user, in addition to the scheduled backups.
The backup intervals that can be configured in the schedule are as follows.
Daily: Start Time Select
Every week: day, start time select
Monthly: Week, Day of week, Start time selection
- Start Time: hour (1~23), minute (00, 30) select
- Day: Monday, Tuesday, Wednesday, Thursday, Friday, Saturday, Sunday Select
- Week: 1, 2, 3, 4, select the final week
Retention period
You can set the retention period for backups created through the Backup service.
The retention period can be selected and applied from 2 weeks (14 days), 1 month (31 days), 3 months (93 days), 6 months (186 days), or 1 year (365 days).
Preceding Service
This is a list of services that must be pre‑configured before creating the service. Please refer to the guide provided for each service for details and prepare in advance.
| Service Category | Service | Detailed description |
|---|---|---|
| Compute | Virtual Server | Virtual server optimized for cloud computing |
| Compute | Bare Metal Server | High-performance physical server used without virtualization |
Table. Backup pre-service
6.2 - How-to guides
Users can enter the required backup information and select detailed options through the Samsung Cloud Platform Console to create a service.
Create Backup
You can create and use a Backup service from the Samsung Cloud Platform Console.
Notice
- If you back up the OS of a Virtual Server or GPU Server using Agent Backup, you can use the required data after restoring additional storage.
- You can obtain an OS backup by utilizing the Image creation feature of Virtual server and GPU Server.
To create a backup, follow these steps.
All Services > Storage > Backup Click the menu. 1. Go to the Service Home page of Backup.
On the Service Home page, click the Create Backup button. 2. Go to the Create Backup page.
In the Service Information Input area, enter the Backup name and then select the Backup type. Enter the information required to create the service, and select detailed options.
Category required statusDetailed description Backup name Required Enter Backup name - Enter using letters and numbers, 3 ~ 30 characters
- Cannot be modified after service creation
Backup type Required Select backup type - (Agentless) VM Image: Use backup service without an agent
- (Agent) Filesystem: Configure the agent on the target server, then use the backup service
- Cannot be modified after service creation
Table. Backup service Backup name and type inputIn the Service Information Input area, enter the information required for the selected Backup type and select detailed options.
- If the backup type is (Agentless) VM Image
Category required statusDetailed description Backup Save Required Select storage location for Agentless Backup - One Backup service can be created per storage location
- Servers in the Korea South (kr-south) region can select only the same location
- Cannot modify after service creation
Backup target Required After clicking the Target Server button, in the Select Backup Target popup, select the backup target server - Select one pre‑created server from the Virtual Server or GPU Server service
- For GPU Server, the target server location and backup storage location must be identical
- Cannot be modified after the service is created
Encryption - Basic encryption is applied and cannot be modified. Retention period Required Select the storage period for the recovery target (backup) - 2 weeks (14 days), 1 month (31 days), 3 months (93 days), 6 months (186 days), 1 year (365 days)
Schedule Selection Set the automatic backup generation interval - You can configure 1 Full Backup and up to 6 Incremental Backups
- Select Daily, Weekly, or Monthly
- Daily: Set the Start Time
- Weekly: Set the Day of Week and Start Time
- Monthly: Set the Week Number, Day of Week, and Start Time
- Week Number: Choose from 1, 2, 3, 4, or the last week
- Day of Week: Choose from Mon, Tue, Wed, Thu, Fri, Sat, Sun
- Start Time: Select in 30‑minute increments (00–23 hours, 00/30 minutes)
Table. Backup Service (Agentless) VM Image Information Input Items - When the backup type is (Agent) Filesystem
Category required statusDetailed description Availability Zone Required Required Backup target Required After clicking the Target Server button, in the Backup Target Selection popup, select the Backup target server - Agent: Select one pre‑created server from the Virtual Server, GPU Server, Bare Metal Server service
- Cannot be modified after service creation
Backup replication Selection Selection of replication option and location for Agent Backup - Replication can be set only when creating the Backup service
- When used, a Backup identical to the original (Backup name, schedule, retention period) is created at the replication location
- The South Korea (kr-south) region is not available
- Cannot be modified after service creation
Filesystem Required Set the backup target Filesystem - All can be checked, or you can enter a specific Filesystem name
- Backup is not possible in the following situations
- When the Filesystem in use by the operating system is not entered correctly
- When the Filesystem is already registered in another backup policy
- If it is a File Storage volume
/dev/zero,/dev/null
- When it contains the following special characters for each operating system
- Linux:
*<>\
- Linux:
Encryption Selection Select whether to use encryption - Cannot be modified after service creation
Retention period Required Select the storage period for the recovery target (backup) - 2 weeks (14 days), 1 month (31 days), 3 months (93 days), 6 months (186 days), 1 year (365 days)
Schedule Selection Set the automatic backup generation interval - You can configure 1 Full Backup and up to 6 Incremental Backups
- Select Daily, Weekly, or Monthly
- Daily: Set the Start Time
- Weekly: Set the Day of Week and Start Time
- Monthly: Set the Week Number, Day of Week, and Start Time
- Week Number: Choose from 1, 2, 3, 4, or the last week
- Day of Week: Choose from Mon, Tue, Wed, Thu, Fri, Sat, Sun
- Start Time: Select in 30‑minute increments (00–23 hours, 00/30 minutes)
Table. Backup Service (Agent) Filesystem Information Input ItemsCaution- File Storage volumes cannot be backed up. * Therefore, the added File Storage is excluded from Backup.
- Agent Backup applies server-side encryption based on the AES-256 algorithm when encryption is selected, which may cause a performance degradation of approximately 20 ~ 30%.
- If the backup type is (Agentless) VM Image
Additional Information Input in this area, enter or select the required information.
Category required statusDetailed description tag Selection Add Tag - Up to 50 per resource can be added
- Add Tag button after clicking, enter or select Key, Value values
Table. Backup service additional information input fieldsSummary Check the detailed information and estimated billing amount generated in the panel, and click the Create button.
When the popup notifying creation opens, click the Confirm button.
- When creation is complete, check the resources you created on the Backup List page.
Caution
- The initial backup is created as a Full Backup regardless of the request details.
- When you choose the Backup storage or Backup replication location in a different region, additional data transfer fees apply.
Reference
- When creating or terminating a Virtual, GPU Server, it may take approximately 180 minutes for the backup target list to be updated.
- Virtual Server’s (Agentless) VM Image backup can be performed to a remote location by selecting a storage location (excluding GPU Server).
- To create a remote backup, set up the Backup service at the location where the target Backup server is created. * Select the remote location in the Backup Save item.
- Backup target can create one Backup service per region. * It is possible to ensure reliability against failures and disasters by creating Backup services in two or more regions.
- To optimize backup and recovery speed, set the backup storage location to be the same as the target server’s location.
Backup View detailed information
The Backup service can view and modify the entire resource list and detailed information. Backup Details page consists of Details, Schedule, Backup History, Recovery Targets, Recovery History, Replication, Tags, Job History tabs.
To view detailed information about the Backup service, follow these steps.
- All Services > Storage > Backup Click the menu. 1. Go to the Service Home page of Backup.
- Click the Backup menu on the Service Home page. 2. Go to the Backup List page.
- On the Backup list page, click the resource to view detailed information. 3. Go to the Backup Details page.
- Backup Details page displays status information and additional feature information, and consists of Details, Schedule, Backup History, Recovery Target, Recovery History, Replication, Tags, Job History tabs.
Category Detailed description Backup status Backup status information - Creating: Creating
- Available: Creation complete
- Deleting: Service termination in progress
- Editing: Changing settings
- Error: Abnormal state
- Error Deleting: Abnormal state during deletion
- Restoring: Restoring
Immediate Backup Immediately create a backup at the time of creation - For more details about instant Backup, see 즉시 Backup하기
Service cancellation Cancel service button Table. Status information and additional functions
- Backup Details page displays status information and additional feature information, and consists of Details, Schedule, Backup History, Recovery Target, Recovery History, Replication, Tags, Job History tabs.
Detailed Information
Backup list page lets you view detailed information of the selected resource and edit the information if needed.
| Category | Detailed description |
|---|---|
| service | Service group |
| Resource Type | Resource Type |
| SRN | Unique resource ID in Samsung Cloud Platform |
| Resource name | resource name
|
| Resource ID | Service’s unique resource ID |
| Constructor | User who created the service |
| Creation date and time | Service creation date and time |
| Modifier | User who modified the service |
| Modification date and time | Service modification date and time |
| Backup name | Backup name
|
| Availability Zone | Target and Backup storage location
|
| Backup Save | Backup storage location
|
| Backup type | Backup types related to Agent configuration |
| Category | Original status identification information for duplication |
| Backup target | Backup target server
|
| Retention period | Retention period of the recovery target (backup)
|
| Filesystem | Backup target FileSystem information
|
| Encryption | Whether to use encryption |
Table. Backup Details - Detail Information Tab Items
Schedule
Backup List page allows you to view the automatic backup schedule of the selected resources.
Notice
It is recommended to configure periodic Full Backups to optimize backup and recovery performance.
| Category | Detailed description |
|---|---|
| Modify schedule | Schedule edit button
|
| Schedule name | Schedule name
|
| Backup type | Full, Incremental Backup distinction |
| Backup frequency | User-configured automatic backup creation interval |
Table. Backup Details - Schedule Tab Items
Reference
- The schedule is based on Asia/Seoul (GMT +09:00).
- The schedule can be set to one Full Backup and up to six Incremental Backups.
- If the status is Available, the schedule can be modified.
- The schedule of the replica is the same as the original and can be viewed in the original.
- If the original is deleted, the replica’s schedule will be removed.
- If the Backup server is deleted, the Backup schedule will also be deleted. * At this point, the backup is retained and can be utilized during recovery.
Backup history
On the Backup List page, you can view the immediate backup and scheduled backup execution history of the selected resources.
| Category | Detailed description |
|---|---|
| Schedule name | Schedule name
|
| Backup timestamp | Backup start time |
| Completion time | Backup completion time |
| status | Backup status information (success/failure/in progress) |
| Cancel backup | Cancel button while backup is in progress
|
Table. Backup Details - Backup History Tab Items
Reference
- Backup and completion times are based on Asia/Seoul (GMT +09:00).
- Queries can be performed based on the backup timestamp within a maximum of 30 days.
- When a backup fails, you can receive a notification and check it in Management > Logging&Audit.
- In the replica, the Cancel Backup button is not displayed.
- The backup history for both the original and the replica is provided by the original.
- Click the Excel Download button at the top of the list to download the retrieved Backup history list as an Excel file.
Restore target
On the Backup List page, you can view the recovery target (backup) of the selected resource.
| Category | Detailed description |
|---|---|
| Schedule | Schedule name
|
| Backup timestamp | Backup start time |
| Retention period | Retention period of the recovery target
|
| capacity | Capacity of the recovery target |
| Additional features > More | Management button for the recovery target
|
Table. Backup Details - Recovery Target Tab Items
Reference
- Backup time is based on Asia/Seoul (GMT +09:00).
- Recovery can be performed using only Incremental Backup without a Full Backup.
- Queries can be performed based on the backup timestamp within a maximum of 30 days.
- You can click the Excel Download button at the top of the list to download the retrieved recovery target list as an Excel file.
- If the backup target server is terminated, you can verify the target server through the schedule name on the recovery target page.
Recovery History
Backup list page allows you to view the recovery execution history of the selected resources.
| Category | Detailed description |
|---|---|
| Schedule | Schedule name
|
| Recovery server name | The name of the server created through recovery |
| Backup timestamp | Backup start time of the recovery target used for recovery |
| Recovery date and time | Recovery start time |
| Recovery completion time | Recovery completion time |
| status | Recovery status information (success/failure/in progress) |
Table. Bacup Details - Recovery History Tab Items
Reference
- Backup and recovery times are based on Asia/Seoul (GMT +09:00).
- Queries can be performed based on the recovery timestamp within a maximum of 30 days.
- Click the Excel Download button at the top of the list to download the retrieved recovery history list as an Excel file.
Replication
On the Backup List page, you can view the replication information of the selected resources.
Notice
- Replication tab information is provided only when you set Agent Backup and Backup Replication to Enabled when applying for the Backup service.
- (Agentless) VM Iamge Backup type does not provide the replication feature (Replication tab), and when applying for the service, you can select a Backup storage location to store the backup copy in a different location.
| Category | Detailed description |
|---|---|
| Replication Policy | User-configured replication policy
|
| Clone information | Volume information of the original and replica
|
Table. Backup Details - Replication Tab Items
Tag
Backup List page allows you to view the tag information of selected resources, and you can add, modify, or delete them.
| Category | Detailed description |
|---|---|
| Tag list | Tag list
|
Table. Backup Details - Tag Tab Items
Operation History
On the Backup List page, you can view the operation history of the selected resources.
| Category | Detailed description |
|---|---|
| Task History List | Resource Change History
|
Table. Backup Details - Job History Tab Items
Backup Resource Management
If you need to modify the schedule or retention period of a created backup, cancel a backup, or delete a recovery target, you can perform the tasks on the Backup Details, Schedule, Recovery Target pages.
Edit Retention Period
You can modify the backup retention period. To modify the retention period, follow these steps.
- All Services > Storage > Backup Click the menu. 1. Go to the Service Home page of Backup.
- Click the Backup menu on the Service Home page. 2. Go to the Backup List page.
- On the Backup List page, click the resource whose retention period you want to modify. 3. Navigate to the Backup Details page.
- Click the Edit button for Retention Period. 4. Edit Retention Period The popup window opens.
- Select the retention period and click the Confirm button.
- Choose from 2 weeks (14 days), 1 month (31 days), 3 months (93 days), 6 months (186 days), or 1 year (365 days).
- Check the modified retention period on the Backup Details page.
- Click the Recovery Target page. 7. Check the updated retention period for the recovery targets.
Caution
- Agentless Backup: When the retention period is modified, the retention period of all existing backup copies will be changed uniformly.
- Agent Backup: After modifying the retention period, the generated backup will have the updated retention period applied.
Reference
If you modify the original, the changes will also be applied to the copy.
Modify Filesystem
You can modify the registered Filesystem.
Caution
File Storage volumes cannot be backed up. Therefore, the added File Storage is excluded from Backup.
To modify the Filesystem, follow the following procedure.
- All Services > Storage > Backup Click the menu. 1. Go to the Service Home page of Backup.
- On the Service Home page, click the Backup menu. 2. Go to the Backup List page.
- On the Backup List page, click the resource whose retention period you want to modify. 3. Navigate to the Backup Details page.
- Click the Edit button for Filesystem. 4. Filesystem Edit a popup window opens.
- Modify the Filesystem and click the Confirm button.
- After entering the Filesystem to add, click the Add Target button. * The filesystem is added to the list.
- Click the X button of the Filesystem you want to delete from the Filesystem list. * The specified Filesystem will be removed from the list.
Caution
- A Filesystem with the same name, or a Filesystem registered in another Backup, cannot be added.
- /dev/zero, /dev/null cannot be added to a Filesystem.
- Recovery is impossible when the following special characters are included, depending on the operating system.
- Linux:
:*<>|not allowed - Windows:
/?*<>|not allowed
- Linux:
Edit Schedule
You can modify the backup schedule.
Notice
- For replicas, the schedule cannot be modified.
- It is recommended to configure periodic Full Backups to optimize backup and recovery performance.
To modify the schedule, follow these steps.
- All Services > Storage > Backup Click the menu. 1. Go to the Service Home page of Backup.
- Click the Backup menu on the Service Home page. 2. Go to the Backup List page.
- On the Backup List page, click the resource to edit the schedule. 3. Backup Details navigate to the page.
- Click the Schedule page. 4. Go to the Backup schedule page.
- Click the Edit Schedule button. 5. Edit Schedule popup opens.
- Select the schedule and click the Confirm button.
- Please select daily, weekly, monthly.
- Daily: Set the Start time.
- Weekly: Please set the day, start time.
- Monthly: Week, Day, Start Time.
- Week: 1, 2, 3, 4, you can select the final week.
- Day: You can choose from Monday, Tuesday, Wednesday, Thursday, Friday, Saturday, Sunday.
- Start Time: can be selected in 30‑minute intervals (00–23 hours, 00/30 minutes).
- Click the Add button to add a schedule, or click the X button to delete a schedule.
Reference
- The schedule is based on Asia/Seoul (GMT +09:00).
- The schedule can be set to one Full Backup and up to six Incremental Backups, and at least one Full Backup schedule must be registered.
- If the status is Available, the schedule can be modified.
- After modifying the schedule, the initial backup is created as a Full Backup regardless of the request details.
- If you modify the original, the changes will also be applied to the copy.
Cancel backup
You can cancel an ongoing backup. To cancel the backup, follow these steps.
- All Services > Storage > Backup Click the menu. 1. Go to the Service Home page of Backup.
- Click the Backup menu on the Service Home page. 2. Go to the Backup List page.
- On the Backup List page, click the resource to cancel the backup. 3. Navigate to the Backup Details page.
- Click the Backup History page. 4. Go to the Backup History page.
- Check the backup you want to cancel. 5. When the Backup status is in progress, Backup cancellation is possible.
- Click the Backup Cancel button. 6. Backup Cancel The popup window opens.
- After checking information such as Backup name, Backup date/time, click the Confirm button. 7. The backup is canceled.
Reference
If you cancel the backup, the backups of both the original and the replica will be canceled.
Delete recovery target
You can delete the generated recovery target (backup copy). To delete the recovery target, follow these steps.
- All Services > Storage > Backup Click the menu. 1. Go to the Service Home page of Backup.
- Click the Backup menu on the Service Home page. 2. Go to the Backup List page.
- On the Backup list page, click the resource to delete the recovery target. 3. Go to the Backup Details page.
- Click the Recovery Target page. 4. Navigate to the Backup recovery target page.
- After selecting all items you want to delete, click the Delete button. 5. Delete popup window opens.
- After verifying Backup schedule name, Backup date/time, authenticate via the logged-in user’s mobile phone.
- When deleting more than one item, you can only view the count of items to be deleted in the popup window.
- When authentication is complete, click the Confirm button. 7. The recovery target will be deleted.
- After the deletion is complete, check on the Backup recovery target page whether the target has been deleted.
Reference
- You can delete two or more recovery targets using multiple selection.
- Deleting the recovery target of the original does not delete the replica.
Terminate Backup
You can cancel unused Backup to reduce operating costs. However, if you terminate the service, the running service may be discontinued immediately, so you should proceed with the termination only after fully considering the impact that may arise from the service interruption.
Caution
- All saved backup data and history will be deleted. * Be careful, as data cannot be recovered after termination.
- If the status is Available, Error, or Error Deleting, it can be terminated.
- If you cancel the original Backup service, the replica’s schedule will be deleted, but the stored backup data will remain.
- Agent Backup that uses replication cannot be disabled. * After changing the replication policy to unused in the source, cancel it.
To cancel the backup, follow these steps.
- All Services > Storage > Backup Click the menu. 1. Go to the Service Home page of Backup.
- Click the Backup menu on the Service Home page. 2. Go to the Backup List page.
- On the Backup List page, select the resource to cancel and click the Service Cancellation button.
- Authenticate using the logged-in user’s mobile phone. 4. If verification is completed, the service will be terminated.
- After termination is complete, check on the Backup List page whether the resource has been terminated.
6.2.1 - Instant Backup
You can perform an immediate backup at the current time on a generated backup regardless of any schedule settings. You can perform the operation on the Backup Details page.
Instant Backup
You can create a backup of the current point in time immediately. To perform an immediate backup, follow these steps.
- Click the All Services > Storage > Backup menu. Go to the Service Home page of Backup.
- On the Service Home page, click the Backup menu. You will be taken to the Backup List page.
- Backup List page, click the resource to perform the backup. You will be taken to the Backup Details page.
- Click the Instant Backup button. The Instant Backup popup opens.
- Click the Confirm button. It will perform a backup immediately.
- Click the Backup History page. Navigate to the Backup History page.
- Check the ongoing backup.
Reference
- If the status is Available, backup can be performed immediately.
- Immediate backup is performed as a full backup.
6.2.2 - Restore
You can perform a restore using the generated backup as the restore target (backup copy). You can perform tasks on the Backup recovery target page.
Information
Recovery can be performed using only Incremental Backup without a Full Backup.
Recover VM Image
You can restore using the backup copy intended for recovery.
To recover, follow the steps below.
Click the All Services > Storage > Backup menu. 1. Go to the Service Home page of Backup.
On the Service Home page, click the Backup menu. 2. Go to the Backup List page.
Backup List page, click the resource to perform the restore. 3. Backup Details page is accessed.
Click the Recovery Target page. 4. Navigate to the Backup recovery target page.
After checking the Schedule and Backup time, click the More button of the target you want to recover.
Click the Restore button. 6. Backup Recovery The popup window opens.
After reviewing the recovery information, enter the required information.
Category Required statusDetailed description Recovery information - Backup Basic Information: Backup Name, Backup Target, Backup Type, Backup Date/Time, Schedule Name Recovery location Essential For remote backups, select the recovery location (target server or backup location). Recovery server name Essential Enter the recovery server name using English letters, numbers, spaces, and special characters ( -_) within 63 charactersServer type Essential Set the server type Network Settings Essential Set the network of the recovery server - When recovering to the same location as the backup target server: no configuration needed
- When recovering to a different location from the backup target server: need to configure the recovery server’s VPC, standard Subnet, and local Subnet information
Security Group Select Configure Security Group for required access - Select button can be clicked to choose the recovery server’s Security Group
- If the Security Group is not configured, all connections will be blocked
Table. VM Image recovery itemsAfter reviewing the entered information, click Confirm.
Click the Recovery History page. 9. Navigate to the Backup Recovery History page.
Check the ongoing recovery tasks.
Caution
- If the status is Available, recovery is possible.
- Since the original Security Group, NAT IP, and Delete on termination settings are not restored, configure them after recovery.
- The original server’s Server Group is not applied to the recovery server.
- The restored server cannot use the Rebuild feature.
Reference
- During recovery, a new server is created, and the Block Storage type and Keypair are set to match the original.
Filesystem Restore
You can recover by using the backup copy to be restored.
Caution
When performing file-level recovery, also specify a file for the recovery location.
- Original location example:
/dir/test.txt - Recovery location example:
/dir_recovery/test.txt
- All Services > Storage > Backup Click the menu. 1. Go to the Service Home page of Backup.
- On the Service Home page, click the Backup menu. 2. Navigate to the Backup list page.
- On the Backup List page, click the resource to recover. 3. Navigate to the Backup Details page.
- Click the Recovery Target page. Backup 복구 대상 페이지로 이동합니다. 스케줄과 Backup 일시를 확인 후 복구하고자 하는 대상의 더보기 버튼을 클릭하세요. 복구 버튼을 클릭하세요. Backup 복구 팝업창이 열립니다. Backup 대상과 Backup 일시 등을 확인하세요.
- Click the Select Server button for the recovery target item. 8. Server Selection popup window opens.
- After selecting the server, click Confirm.
- Only servers that have been configured as Backup Agents can be selected among the servers created in the backup storage location.
- Only servers that use the same Backup Master and OS as the backup target server can be selected.
- Filesystem Check the Filesystem to recover from the list at the bottom of the item, then enter the recovery location.
- If you enter the same ‘Backup target server name’ in the top-level recovery location, the entire filesystem will be restored (e.g., source location: servername, recovery location: servername)
- Enter the exact name of the filesystem currently used on the OS.
- When /dev/zero or /dev/null is input, recovery is impossible.
- Recovery is impossible when the following special characters are included, depending on the operating system.
- Linux:
:*<>| - Windows:
/?*<>|
- Linux:
- When Overwrite is selected, files with the same type and name are overwritten. * If you do not select it, the file will be excluded from recovery.
- After reviewing the entered information, click Confirm.
- Click the Recovery History page. 12. Navigate to the Backup Recovery History page.
- Check the ongoing recovery tasks.
6.2.3 - Using Backup Agent
Users can create and manage the Agent required to use Filesystem backup in the Backup service.
Create Backup Agent
You can create and use the Backup Agent service in the Samsung Cloud Platform Console.
To create a Backup Agent, follow the steps below.
Click the All Services > Storage > Backup menu. 1. Go to the Service Home page of Backup.
On the Service Home page, click the Backup Agent menu. 2. Navigate to the Backup Agent list page.
On the Backup Agent List page, click the Create Service button. You will be taken to the Create Backup Agent page.
On the Backup Agent Creation page, enter the information required to create the service.
- In the Service Information Input area, enter or select the required information.
Category RequiredDetailed description Availability Zone Essential Select Availability Zone location Target server Required Click the Select button to choose the server for creating a Backup Agent - Virtual Server: 1 unit, GPU Server: 1 unit, Bare Metal Server: up to 100 units
Subnet Required Set Backup IP and Port information to be created in the Subnet - General Subnet Name: Select one General Subnet created in the VPC connected to the Target Server
- Target Server is selected when it is a Virtual Server or GPU Server
Table. Backup Agent Service Information Input Items - In the Additional Information Input area, enter or select the required information.
Category Required statusDetailed description tag Select Add tag - Up to 50 per resource can be added
- After clicking the Add tag button, enter or select Key, Value values
Table. Backup service additional information input fields
- In the Service Information Input area, enter or select the required information.
Summary Check the detailed information generated in the panel, and click the Done button.
When the popup notifying creation opens, click the Confirm button.
- When creation is complete, check the created resources on the Backup Agent List page.
Caution
- After creating the Backup Agent, connect to the target server and install the Agent.
- If the connection status on the Agent installation and Backup Agent details screen is confirmed as successful, you can create a Backup service to back up the filesystem.
- For performance optimization, use the Subnet and Port selected in the Backup Agent exclusively for backup.
Information
- After creating the Bacup Agent service, access the backup target server and install the Backup Agent.
- For detailed information about installing the Backup Agent, please refer to Backup Agent 설치하기.
- After installation is complete, check the connection status on the Backup Agent Details page.
Backup Agent Check detailed information
The Backup Agent service can view and edit the full resource list and detailed information. Backup Agent Details page consists of Details, Tags, Job History tabs.
To view detailed information about the Backup Agent service, follow these steps.
- Click the All Services > Storage > Backup menu. 1. Go to the Service Home page of Backup.
- On the Service Home page, click the Backup Agent menu. 2. Go to the Backup Agent List page.
- On the Backup Agent List page, click the resource you want to view detailed information for. 3. Go to the Backup Agent Details page.
- The Backup Agent Details page displays status information and additional feature information, and consists of Details, Tags, Job History tabs.
Category Detailed description Backup Agent status Backup Agent status information - Creating: In progress
- Available: Creation completed
- Deleting: Service termination in progress
- Error: Abnormal state
Service cancellation Button to cancel the service Table. Status information and additional features
- The Backup Agent Details page displays status information and additional feature information, and consists of Details, Tags, Job History tabs.
Detailed Information
Backup Agent 목록 페이지에서 선택한 자원의 상세 정보를 확인하고, 필요한 경우 정보를 수정할 수 있습니다.
| Category | Detailed description |
|---|---|
| service | Service name |
| 자원 유형 | 자원 유형 |
| SRN | Unique resource ID in Samsung Cloud Platform |
| Resource name | Resource name
|
| Resource ID | Service’s unique resource ID |
| Constructor | User who created the service |
| Creation date and time | Service creation date and time |
| Modifier | User who modified the service |
| Modification date and time | Service modification date and time |
| Backup Agent name | Backup Agent name |
| Availability Zone | Availability Zone information |
| Number of backup policies | Number of Backup services connected to the backup target server |
| Backup Master | Management server (Backup Master) name and connection IP |
| Installation file URL | Agent installation file download location |
| Backup Media | Management server (Backup Media) name and connection IP |
| Target server | Backup Agent target server information
|
Table. Backup Agent detailed information items
Information
Bacup Agent 서비스를 생성한 후, Backup 대상 서버에 접속하여 Backup Agent를 설치하세요.
Backup Agent 설치에 대한 자세한 내용은 Backup Agent 설치하기를 참고하세요.
설치 완료 후, Backup Agent 상세 페이지에서 연결 상태를 점검하세요.
태그 {#tag}
Backup Agent 목록 페이지에서 선택한 자원의 태그 정보를 확인하고, 추가하거나 변경 또는 삭제할 수 있습니다.
| Category | Detailed description |
|---|---|
| Tag list | Tag list
|
Table. Tag tab item
작업 이력 {#job}
Backup Agent 목록 페이지에서 선택한 자원의 작업 이력을 확인할 수 있습니다.
| Category | Detailed description |
|---|---|
| Task History List | Resource Change History
|
Table. Work History tab detailed information items
Backup Agent 해지하기 {#terminate} 사용하지 않는 Backup Agent를 해지할 수 있습니다.
Caution
- Available, can be terminated only when in Error state.
- If a Backup service is connected to the Backup Agent, it cannot be terminated.
- Backup policy count is the number of Backup services connected to the Backup Agent. * After terminating all connected backups, terminate the Backup Agent.
To cancel the Backup Agent, follow these steps.
- All Services > Storage > Backup menu, click it. 1. Go to the Service Home page of Backup.
- On the Service Home page, click the Backup Agent menu. 2. Go to the Backup Agent list page.
- Backup Agent List On the page, select the resource to cancel and click the Cancel Service button.
- After the termination is complete, check on the Backup Agent List page whether the resource has been terminated.
6.2.4 - Install Backup Agent
Caution
To install the Backup Agent, you must first apply for the Backup Agent service. Please refer to Backup Agent 생성하기.
- Backup Agent Apply
- Install Backup Agent
- Register backup in the Backup service –>
To use an Agent-based backup, you must access the target server and install the Backup Agent. After installing the Backup Agent, register a backup through the Backup service.
Pre‑setup work
To install the Backup Agent, we check the installation space, download the Backup Agent file, verify Backup Master/Agent information, and perform other preparatory tasks.
Check Backup Agent installation space
The required storage for installing the Backup Agent is as follows.
| OS type | Path | Required capacity | Remarks |
|---|---|---|---|
| Linux | /tmp (temporarily used during installation) | 3 GB | When /usr space is insufficient, a separate space can be linked #ln -s separate space /usr/openv |
| Linux | /opt | 3 GB | When /usr space is insufficient, a separate space can be linked #ln -s separate space /usr/openv |
| Linux | openv installation path (typically /usr) | 3~5 GB | When /usr space is insufficient, a separate space can be linked #ln -s separate space /usr/openv |
| Windows | Veritas installation path (usually C:\) | 3~5 GB | If there is insufficient space on C:, you can install to another drive. |
| - | Installation file | 10 GB |
Table. Required storage for Backup Agent installation
Download Backup Agent installation file
To download the Backup Agent installation file, follow these steps.
- All Services > Storage > Backup Click the menu. 1. Go to the Service Home page of Backup.
- On the Service Home page, click the Backup Agent menu. 2. Go to the Backup Agent list page.
- On the Backup Agent List page, click the resource to view detailed information. 3. Go to the Backup Agent Details page.
- After checking the installation file URL, go to that URL. 4. You can download the Backup Agent installation file.
Linux OS
If you are using Linux OS, refer to the following example and enter the command.
# cd [다운로드할 위치]
# curl -O 설치파일 → 설치 파일에 복사한 설치 파일 다운로드 URL을 넣어주세요.
Windows OS
If you are using Windows OS, you can download using a web browser or Windows PowerShell.
When using an internet browser
After launching the web browser, enter the copied installation file download URL into the address bar. After navigating to the download screen, the download will start.
Reference
- It may take some time to navigate to the download screen.
- If you do not go to the download screen, download using Windows PowerShell.
When using Windows PowerShell
- Right-click the Windows Start icon and run Command Prompt (Admin).
- Run Windows PowerShell in administrator mode.
- Please enter the command by referring to the following example.
# wget "다운로드 URL" -OutFile "저장할 파일명"
Check Backup Master and Agent information
To install the Backup Agent, you need the Backup Master and Agent information for routing configuration and host file registration. Backup Agent Details on the page, check the Backup Master IP, Backup IP, Gateway information. Please refer to View detailed information of Backup Agent.
Setting up Security Group (Linux/Window)
If it is a backup of a Virtual Server or GPU Server, you must configure the Security Group to communicate with the Backup Master. To set up a Security Group, check the backup information on the Backup Agent Details page and register it in the Security Group attached to the Server.
- IP: Backup Master IP
- Inbound / Outboud / (TCP) 1556, 13724 port
- Action: allow the connection
Reference
For detailed information about Backup details, please refer to Backup Agent 상세 정보 확인하기.
Register Backup Master information in the hosts file
To register Backup Master information in the hosts file, follow these steps.
- Open the host file using a file editing tool.
- Linux operating system: /etc/hosts
- Windows operating system: C:\Windows\System32\drivers\etc\hosts
- Open the hosts file and register the Backup Master and Backup Agent information (IP, name).
- You must append .scpbackup after the Backup Agent name as shown in the following example.
10.252.8.4 takre1p1bkm1
10.252.25.4 agent_tgdrhw.scpbackup
Adding a port for Backup Agent (when using Windows firewall)
If you are using the Windows firewall, you must add the Backup Agent port for communicating with the Backup Master to the Windows firewall.
The ports and settings to add to the Windows firewall are as follows.
- Inbound Rule: (TCP) 1556, 13724 port
- Action: allow the connection
- Profile: select all domain, private, public
Configure routing for communication with Backup Master
To communicate with the Backup Master, you must configure routing in the operating system.
Linux OS - CentOS/RHEL
Linux OS - To configure routing on CentOS/RHEL, follow the steps below.
Reference
- The IP, Gateway, and VLAN ID information for the Backup Master and Agent used in the routing configuration example are as follows.
- Backup Master IP: 10.242.8.4
- Backup IP (Agent IP): 10.252.25.4
- Gateway (Agent Gateway): 10.252.25.1
- vlan: 100
- vlan can be configured in the Config file of a Bare Metal Server. * For more details, refer to 로컬 Subnet 설정하기.
- Use the following command to check the backup network Interface information.
- ip a
- bash /usr/local/bin/ip.sh
Reference
If it is a backup of a Virtual Server or GPU Server, check the Interface information of the selected Subnet in the Console when Backup Agent Service Creation.
- Set up routing using the nmcli command.
# nmcli connection NAME UUID TYPE DEVICE System eth0 abcdefghijklmnop ethernet eth0 Wired connection 1 cdefghijklmnopqr ethernet eth1 # nmcli con mod "Wired connection 1" +ipv4.routes "10.242.8.0/24 10.242.25.1" # nmcli device reapply eth1 Connection successfully reapplied to device 'eth1'. - Verify that the routing configuration has been applied correctly.
# telnet [Backup Master명] 1556
Linux OS - ubuntu
Linux OS - To set up routing on Ubuntu, follow these steps.
Reference
- The IP, Gateway, and VLAN ID information for the Backup Master and Agent used in the routing configuration example are as follows.
- Backup Master IP: 10.242.8.4
- Backup IP (Agent IP): 10.252.25.4
- Gateway (Agent Gateway): 10.252.25.1
- vlan: 100
- vlan can be configured in the Config file of a Bare Metal Server. * For detailed information, refer to 로컬 Subnet 설정하기.
- Use the following command to check the backup network Interface information.
- ip a
- bash /usr/local/bin/ip.sh
Reference
If it is a backup of a Virtual Server or GPU Server, check the Interface information of the selected Subnet in the Console when Backup Agent Service Creation.
Open the 50-cloud-init.yaml file and configure routing.
# vi /etc/netplan/50-cloud-init.yaml (기존 내용에 routes 내용 추가)
  network:
  bonds:
  ...................... 생략
  ethernets:
  ...................... 생략
  vlans:
  bond.srv.100:
  addresses:
  ...................... 생략
  routes:
  - to:10.252.8.0/24
  via:10.252.25.1
  # netplan apply
Verify that the routing configuration has been applied correctly.
# telnet [Backup Master명] 1556
Windows OS
To set up routing in Windows OS, follow these steps.
Reference
- The IP, Gateway, and VLAN ID information for the Backup Master and Agent used in the routing configuration example are as follows.
- Backup Master IP: 10.242.8.4
- Backup IP (Agent IP): 10.252.25.4
- Gateway (Agent Gateway): 10.252.25.1
- ifindex: 100
- ifindex can be set in the Config file of a Bare Metal Server. * For more details, refer to 로컬 Subnet 설정하기.
- Right-click the Windows Start icon and run Command Prompt (Admin).
- Run Windows PowerShell in administrator mode.
- Use the ipconfig and Get‑NetAdapter commands to verify the backup network interface index (ifindex) settings.
# ipconfig /all → Agent IP에 할당된 interface name을 확인하세요.
# Get-NetAdapter → 위에서 확인한 interface name 참고해 interface index를 확인하세요.
Reference
If it is a backup of a Virtual Server or GPU Server, check the interface index (ifindex) information of the Subnet selected when creating the Backup Agent Service Creation in the Console.
Set up routing using the NetRoute command.
# Get-NetRoute -ifindex 100
# New-NetRoute -ifIndex 100 -DestinationPrefix 10.252.8.0/24 -NextHop 10.252.25.1
Verify that the routing configuration has been applied correctly.
# telnet [Backup Master명] 1556
Check whether the package is installed (when using RHEL 8)
If you are using RHEL 8, the libnsl package must be installed to install the Backup Agent.
- Use the following command to check whether the libnsl package is installed.
# rpm -qa | grep libnsl - If the libnsl package is not installed, install the package using the following command.
# yum install libnsl
Install Backup Agent
Install the Backup Agent appropriate for the operating system.
Linux OS
Follow the steps below to install the Backup Agent on Linux OS.
- After moving to the directory where the Backup Agent 10.1.1 installation file was extracted, change the permissions of the installation-related files.
# chmod 755 installs # chmod –R 755 NBClients - Run ./install.
- [root@bkclientlin ~]# ./install
- After the install description, when confirming whether to proceed with the installation, enter y and press the Enter key.
Do you wish to continue? [y,n] (y) y - When checking the installation progress status of Software on the client, enter y and press the Enter key.
Do you want to install the ~~~~~~~~~~~~ software for this client? [y,n] (y) y - When checking the Backup master server name, enter Backup Master name and press the Enter key.
Enter the name of the ~~~~~~ master server : bkmaster - When checking the client server configuration name, enter n and then input the Agent information.
- Agent information input required: Backup Agent name.scpbackup (e.g., agent_tgdrhw.scpbackup)
Would you like to use "bkclientlin" as the configured name of the ~~~~~~~ client? [y,n] (y) n agent_tgdrhw.scpbackup - Check the Master Server information and, if there are no issues, enter y.
Master server [bkmaster] reports the following CA Certificate fingerprints: SHA-256 Fingerprint: [BB:38:~~~~~~~~] SHA-1 Fingerpritn: [0D:E6:~~~~~~~] Is this correct [y,n] y ... Primary server [s-krw1a-dp-bk-msa] reports the following CA Certificate fingerprints: SHA-256 Fingerprint: [A0:C2:70:CA:4A:DA:DA:AF:6E:04:5D:87:38:B1:F0:89:A6:9A:7A:7B:F3:49:D8:5D:A9:9F:DD:55:70:4C:62:DB], SHA-1 Fingerprint: [4B:05:C3:21:8B:95:27:A5:5E:B7:D3:72:85:36:5B:CA:6F:18:BA:76]. Is this correct? [y,n] y ... Do you wish to proceed with installation even though NetBackup will not operate? [y,n] (n) y - When selecting the Java GUI and JRE option, enter 2. 8. Java GUI and JRE package installation are excluded.
Choose an option from the list below. 1) Include the Java GUI and JRE 2) Exclude the Java GUI and JRE Java GUI and JRE option: [1,2] (2) :2 Excluding the installation of Java GUI and JRE packages - Verify that the installation completed successfully.
Windows OS
To install the Backup Agent on Windows OS, follow these steps.
Notice
Backup Agent installation must be performed with the Default Administrator account. If you are not using the Default Administrator account, log in with the Default Administrator account and then proceed with the installation.
- After moving to the folder where the Backup Agent 10.1.1 installation file has been extracted, run the Setup.exe file with administrator privileges.
Notice
- If the installation archive contains an EEB directory in the
NB_10.4.0.1_ETXXXXXX_1format, you must perform the patch after installing the Backup Agent, following the steps below.- After the Backup Agent installation is complete, go to the
NB_10.4.0.1_ETXXXXXX_1folder. eebinstaller_XXXXXXX_1_AMD64.exeRun the file with administrator privileges.- If there are multiple files, install all of them.
- After the Backup Agent installation is complete, go to the
- After selecting the Client to install in the client selection popup, click the OK button.
- In the Vertias NetBackup popup window, select Yes. 3. The installation popup opens, and the installation steps are displayed on the left side of the popup.
- Welcome When the step description is displayed, click the Next button.
- License Agreement When the step description is displayed, select the Agree with the veritas Software License Agreement item, then click the Next button.
- If the Install Type step description is displayed, make sure the Install to the computer only option is checked, then select the Custom installation option. 6. After making your selection, click the Next button.
Notice
If an option other than Install to the computer only is selected, check whether the program is already installed.
- Option When the step description is displayed, check the installation path and click the Next button. 7. Client option information is displayed.
- You can click the Change… button to change the installation path.
- After checking the Client Options information, click the Next button. 8. Log on information is displayed.
- After checking the Log on information, click the Next button.
- Safe Abort Option: If a system restart is required, this option aborts the installation (optional).
- When the System Name step description is displayed, enter the server environment information, then click the Next button. 10. Master Server information is displayed.
- Client Name: Enter the Agent information. * Backup Agent name.scpbackup (e.g., agent_tgdrhw.scpbackup)
- Master Server Name: Enter the Backup Master name.
- After checking the Master Server information, I recognize the fingerprint for this host. 11. Proceed with the certificate deployment. Please select an item. 11. After making your selection, click the Next button.
- Security When the step description appears, verify that the certificate deployment succeeded, then click the Next button.
- If the Install step description is displayed, review the Installation Summary and then click the Install button.
- When the installation is complete, click the Finish button.
Backup Agent status check
After the Backup Agent installation is complete, perform a communication test with the Backup Master and check the status.
Linux OS
To conduct a communication test with the Backup Master on Linux OS, follow these steps.
- After entering the following command, perform a communication test with the Backup Master and check the results.
- Command: # /usr/openv/netbackup/bin/bpclntcmd -pn
- An example of the communication test inspection results is as follows.
/usr/openv/netbackup/bin/bpclntcmd -pn
expecting response from server takre1p1bkm1
10.252.25.4 agent_tgdrhw.scpbackup 10.252.25.4 45789
- In the Samsung Cloud Platform Console, click the All Services > Storage > Backup menu. 2. Go to the Service Home page of Backup.
- On the Service Home page, click the Backup Agent menu. 3. Go to the Backup Agent list page.
- Backup Agent List page, click the resource to verify the communication test. 4. Go to the Backup Agent Details page.
- Click the Check Connection Status button in the Connection Status item. 5. When it communicates normally with Backup Master, Success is displayed.
- If an error such as certificate issuance failure occurs, execute the following command.
- Obtain Backup Master CA public certificate from the Agent:
/usr/openv/netbackup/bin/nbcertcmd -getcacertificate -server s-krw1a-dp-bk-msa - Authenticate the Agent (HostID) from the Backup Master:
/usr/openv/netbackup/bin/nbcertcmd -getcertificate -server s-krw1a-dp-bk-msa
- Obtain Backup Master CA public certificate from the Agent:
- If an error such as certificate issuance failure occurs, execute the following command.
- Verify that the result values of the Backup Master communication test performed on the OS and the Samsumg Cloud Platform Console are the same.
Reference
If the result values of the Backup Master communication test performed on the OS and the Samsumg Cloud Platform Console differ, please contact the Support Center. Please refer to Contact Us.
Windows OS
Follow these steps to conduct a communication test with Backup Master on Windows OS.
- After entering the following command, perform a communication test with the Backup Master and check the results.
- Command: # [설치경로]\Vertitas\NetBackup\bin\bpclntcmd.exe -pn
- An example of the communication test inspection results is as follows.
# C:\Vertitas\NetBackup\bin\bpclntcmd.exe -pn
expecting response from server takre1p1bkm1
agent_tgdrhw.scpbackup agent_tgdrhw.scpbackup 10.252.25.4 52096
- In the Samsung Cloud Platform Console, click the All Services > Storage > Backup menu. 2. Go to the Service Home page of Backup.
- On the Service Home page, click the Backup Agent menu. 3. Go to the Backup Agent list page.
- Backup Agent List page, click the resource to check the communication test. 4. Go to the Backup Agent Details page.
- Click the Check Connection Status button in the Connection Status item. 5. When it communicates normally with Backup Master, Success is displayed.
- Verify that the result values of the Backup Master communication test performed on the OS and the Samsumg Cloud Platform Console are the same.
Reference
If the result values of the Backup Master communication test performed on the OS and the Samsumg Cloud Platform Console differ, please contact the Support Center. Please refer to Contact Us.
Delete Backup Agent
If you do not use the Backup Agent, you must delete the Backup Agent installed on each operating system.
Linux OS
To uninstall the Backup Agent on Linux OS, follow these steps.
- Stop the Backup Agent service.
# /usr/openv/netbackup/bp.kill_all # /opt/VRTSpbx/bin/vxpbx_exchanged stop # /usr/openv/netbackup/bin/vxlogcfg -r -p 51216 - Delete the Backup Agent installation file.
# rpm –qa | grep –i VRTS → Backup Agent package 확인
# rpm –e VRTSnbcfg
# /opt/pdde/pddeuninstall.sh –forceclean
# rpm -e VRTSnbjava
# rpm -e VRTSnbjre
# rpm -e VRTSnbclt
# rpm -e VRTSpbx
# rpm -e VRTSnbpck
# rpm -qa | grep -i VRTS → Backup Agent package 확인 후 남은 package 삭제
# rm -rf /usr/openv
Windows OS
To uninstall the Backup Agent on Windows OS, follow these steps.
- Stop the Backup Agent service.
# [설치경로]\Vertitas\NetBackup\bin\bpdown.exe -f -v # [설치경로]\Vertitas\NetBackup\bin\bpps.exe → 남은 Process 확인 후 kill 수행 - Control Panel > Programs and Features: Remove the Backup Agent program.
- Delete the Backup Agent installation folder.
6.2.5 - Use Replication
You can create a replica of the Agent Backup in a different location.
Reference
- The kr-south region does not provide replication functionality.
- Agentless Backup does not provide a replication feature.
- With Agentless Backup, you can select a backup storage location when applying for the service and store the backup copy in a different location.
Create a clone
When creating a Backup service, you can set up replication for use.
To create a backup, follow the steps below.
- Click the All Services > Storage > Backup menu. Go to the Service Home page of Backup.
- On the Service Home page, click the Create Backup button. You will be taken to the Create Backup page.
- On the Backup Creation page, enter the information required to create the service and select detailed options.
Category RequiredDetailed description Backup name Required Backup name - Enter 3 to 30 characters using letters and numbers
- Cannot be edited after service creation
Backup type Required Agent > Filesystem selection Backup replication Select Use after checking, select the clone location (region) - South Korea (kr-south) region is unavailable
Backup target Required After clicking the Select Server button, select one pre‑created server from the Bare Metal Server service. Filesystem Required Enter the target FileSystem for backup - The exact Filesystem used by the operating system must be entered. Incorrect input will prevent backup
- Backup is not possible when /dev/zero, /dev/null is entered
- Backup is not possible if the following special characters are included, depending on the operating system
- Linux:
:*<>\
- Linux:
Encryption Select Select whether to apply encryption Retention period Selection Retention period of the recovery target (backup) - Select from 2 weeks (14 days), 1 month (31 days), 3 months (93 days), 6 months (186 days), 1 year (365 days)
Schedule Select Backup auto-creation schedule - Set 1 Full Backup and up to 6 Incremental Backups
- Select Daily, Weekly, or Monthly
- Daily: Set the start time
- Weekly: Set the day of week and start time
- Monthly: Set the week number, day of week, and start time
- Week number: Choose from 1, 2, 3, 4, or the last week
- Day of week: Choose from Monday, Tuesday, Wednesday, Thursday, Friday, Saturday, Sunday
- Start time: Select in 30‑minute increments (00–23 hours, 00/30 minutes)
Table. Backup service information input fields - Summary Verify the detailed information and estimated billing amount generated in the panel, then click the Complete button.
- Once creation is complete, check the created resources on the Backup List page.
Caution
- Agent Backup applies server‑side encryption based on the AES‑256 algorithm when encryption is selected, which may cause a performance degradation of approximately 20 ~ 30%.
- The initial backup is created as a Full Backup regardless of the request details.
- Backup replication If you select a location in a different region, data transfer fees will be added.
Edit replication policy
You can change the replication status by modifying the replication policy.
To modify the replication policy, follow these steps.
- Click the All Services > Storage > Backup menu. You will be taken to the Service Home page of Backup.
- On the Service Home page, click the Backup menu. You will be taken to the Backup List page.
- On the Backup List page, click the resource to edit the replication policy. You will be taken to the Backup Details page.
- On the Backup Details page, click the Clone tab.
- Click the Edit button of the Replication Policy. The Edit Replication Policy popup opens.
- Use: Performs replication. If it is not used, you can modify it to be used.
- Unused: Stop backup replication. If unused, the Backup service can be terminated.
- Check the modified replication policy in the Replication tab of the Backup Details page.
6.3 - API Reference
API Reference
6.4 - CLI Reference
CLI Reference
6.5 - Release Note
Backup
2026.03.19
CHANGED
Add target server- When performing Agent Backup, Virtual Server and GPU Server have been added as target servers.
- Now you can select one of Virtual Server, GPU Server, or Bare Metal Server.
2025.12.16
FEATURE
Add duplicate tab and additional features- Add Backup Replication Tab
- In the Backup detail page, you can view the original and replica information in the Clone tab.
- Add feature to download backup-related information
- On the Backup detail page, you can download the Backup history, recovery targets, and recovery history list as an Excel file.
2025.07.01
FEATURE
Recovery location expansion- Expanded recovery scope
- When restoring from an agentless remote backup, you can select the restore location (target server or backup location).
2025.04.28
FEATURE
Backup location and target expansion- Expand backup locations and targets
- Agentless-based remote backup: You can back up and recover to a different location from the backup target server.
- Backup Agent feature added: You can back up the filesystem of a Bare Metal Server by configuring the Agent.
2025.02.27
FEATURE
Common feature change- Samsung Cloud Platform Common Feature Change
- Account, IAM, and Service Home, tags, etc., have been updated to reflect common CX changes.
2024.12.23
NEW
Backup service official version release- We launched the Backup service to provide secure data backup and recovery.
- Since backup policies include the target, frequency, retention period, and other factors, users can configure backup plans to suit their business environment and requirements.