How-to guides
사용자는 Samsung Cloud Platform Console을 통해 Key Management Service 서비스의 필수 정보를 입력하고, 상세 옵션을 선택하여 해당 서비스를 생성할 수 있습니다.
Key Management Service 생성하기
Samsung Cloud Platform Console에서 Key Management Service 생성하여 사용할 수 있습니다.
Key Management Service를 생성하려면 다음 절차를 따르세요.
모든 서비스 > Security > Key Management Service메뉴를 클릭하세요. Key Management Service의 Service Home 페이지로 이동합니다.
Service Home 페이지에서 Key Management Service 생성버튼을 클릭하세요. Key Management Service 생성 페이지로 이동합니다.
Key Management Service 생성 페이지에서 서비스 생성에 필요한 정보들을 입력하고 추가 정보를 입력하세요.
- 서비스 정보 입력 영역에서 필요한 정보를 입력 또는 선택하세요.
구분 | 필수 여부 | 상세 설명 |
|---|
| 키 이름 | 필수 | 키 이름을 입력 |
| 공공 인증 알고리즘 | 옵션 | 공공 인증 알고리즘 사용 여부를 선택- 공공 인증 알고리즘 옵션은 SCP Sovereign에서만 사용 가능
- 공공 인증 알고리즘에서는 국정원 보안검증이 완료된 Aria 알고리즘을 제공
|
| 용도 | 필수 | 키의 용도 및 암호화 방식을 선택 |
| 자동회전 | 옵션 | 키의 자동회전 사용 여부를 선택- 사용을 선택하면 설정한 회전주기마다 생성한 키의 내부 알고리즘을 다른 값으로 변환하여 적용
|
| 자동회전 > 회전주기 | 필수 | 키의 회전주기를 입력- 회전주기는 1~730일 사이의 값을 입력 가능. 회전주기를 입력하지 않으면 90일로 자동 설정됨
|
| 설명 | 옵션 | 키의 추가 정보를 입력 |
표. Key Management Service 서비스 정보 입력 항목
- 추가 정보 입력 영역에서 필요한 정보를 입력 또는 선택하세요.
| 구분 | 필수 여부 | 상세 설명 |
|---|
| 태그 | 선택 | 태그 추가- 태그 추가 버튼을 클릭한 후 Key, Value 값을 입력 또는 선택
|
표. Key Management Service 추가 정보 입력 항목
요약 패널에서 생성한 상세 정보와 예상 청구 금액을 확인하고, 완료 버튼을 클릭하세요.
- 생성이 완료되면, Key Management Service 목록 페이지에서 생성한 자원을 확인하세요.
Key Management Service 상세 정보 확인하기
Key Management Service는 전체 자원 목록과 상세 정보를 확인하고 수정할 수 있습니다. Key Management Service 상세 페이지에서는 상세 정보, 태그, 작업 이력 탭으로 구성되어 있습니다.
Key Management Service 상세 정보를 확인하려면 다음 절차를 따르세요.
- 모든 서비스 > Security > Key Management Service 메뉴를 클릭하세요. Key Management Service의 Service Home 페이지로 이동합니다.
- Service Home 페이지에서 Key Management Service 메뉴를 클릭하세요. Key Management Service 목록 페이지로 이동합니다.
- Key Management Service 목록 페이지에서 상세 정보를 확인할 자원을 클릭하세요. Key Management Service 상세 페이지로 이동합니다.
- Key Management Service 상세 페이지 상단에는 상태 정보 및 부가 기능에 대한 설명이 표시됩니다.
| 구분 | 상세 설명 |
|---|
| 상태 | Key Management Service 의 상태를 표시- Creating: 생성 중/생성 오류 (재성성 시도를 위한 즉시 해지만 가능)
|
| 키 회전 | 생성한 키를 수동으로 회전 할 수 있는 버튼 |
| 키 비활성화 | 생성한 키를 비활성화 할 수 있는 버튼 |
| 서비스 해지 | 서비스를 해지하는 버튼 |
표. Key Management Service 상태 정보 및 부가 기능
상세 정보
Key Management Service 목록 페이지에서 선택한 자원의 상세 정보를 확인하고, 필요한 경우 정보를 수정할 수 있습니다.
구분 | 상세 설명 |
|---|
| 서비스 | 서비스명 |
| 자원 유형 | 자원 유형 |
| SRN | Samsung Cloud Platform에서의 고유 자원 ID |
| 자원명 | 자원 이름 |
| 자원 ID | 서비스에서의 고유 자원 ID |
| 생성자 | 서비스를 생성한 사용자 |
| 생성 일시 | 서비스를 생성한 일시 |
| 키 이름 | 생성된 키의 이름 |
| 공공 인증 알고리즘 | 한국 암호 모듈 검증 제도(Korea Cryptographic Module Validation Program)를 통해 검증된 암호 알고리즘- 선택 시, 공공 암호화 기준에 부합하는 암호화 키 생성 가능
- 공공 인증 알고리즘 옵션은 SCP Sovereign 에서만 사용 가능
|
| 용도 | 암/복호화 및 서명/검증 같은 키의 용도 및 암호화 방식 |
| 자동 회전 | 키의 자동회전 사용 여부 |
| 회전 주기 | 자동회전 사용 시 회전주기 기간 설정 |
| 다음 회전일 | 회전주기에 따른 키의 다음 회전일 표시 |
| 사용 횟수 | 키를 사용해 암/복호화 기능이 호출된 횟수 |
| 설명 | 키에 대한 추가 설명 표시 |
표. Key Management Service 상세 정보 탭 항목
태그
Key Management Service 목록 페이지에서 선택한 자원의 태그 정보를 확인하고, 추가하거나 변경 또는 삭제할 수 있습니다.
| 구분 | 상세 설명 |
|---|
| 태그 목록 | 태그 목록- 태그 입력 시 기존에 생성된 Key와 Value 목록을 검색하여 선택
|
표. Key Management Service 태그 탭 항목
작업 이력
Key Management Service 목록 페이지에서 선택한 자원의 작업 이력을 확인할 수 있습니다.
| 구분 | 상세 설명 |
|---|
| 작업 내역 | 작업 수행 내용- 암호화, 복호화, 서명, 검증, 데이터 키 생성, rewrap API 로그 항목 표시
|
| 작업 일시 | 작업 수행 일시 |
| 자원 유형 | 자원 유형 |
| 자원명 | 자원 이름 |
| 작업 결과 | 작업 수행 결과(성공/실패) |
| 작업자 정보 | 작업을 수행한 사용자 정보 |
표. Key Management Service 작업 이력 탭 상세 정보 항목
Key Management Service 관리하기
등록된 키의 새로운 버전을 생성하거나 사용 상태를 변경할 수 있습니다.
KMS 키 회전 설정하기
키 회전은 생성한 키의 내부 알고리즘을 다른 값으로 변환하는 기능입니다.
참고
- 키 회전 시 마스터 키 값만 변경되며, 기존에 생성한 데이터 키의 ciphertext 및 plaintext 값은 변경되지 않습니다.
- 키 회전이 수행되더라도 이전 버전의 데이터를 마스터 키가 가지고 있기 때문에 마스터 키를 통한 복호화 수행에 대한 영향은 없으며, 사용하는 데이터 키의 값 또한 변경되지 않습니다.
- 단, 변경된 마스터 키로 래핑(복호화 후 재 암호화)하는 경우 rewrapData API를 호출하면 키 회전 기능이 실행됩니다.
생성한 Key Management Service의 새로운 버전을 생성(키 회전)하려면 다음 절차를 따르세요.
- 모든 서비스 > Security > Key Management Service 메뉴를 클릭하세요. Key Management Service의 Service Home 페이지로 이동합니다.
- Service Home 페이지에서 Key Management Service 메뉴를 클릭하세요. Key Management Service 목록 페이지로 이동합니다.
- Key Management Service 목록 페이지에서 상세 정보를 확인할 자원을 클릭하세요. Key Management Service 상세 페이지로 이동합니다.
- Key Management Service 상세 페이지에서 키 회전 버튼을 클릭하세요. 키 회전 팝업창으로 이동합니다.
- 키 회전 팝업창에서 메시지를 확인하고 확인 버튼을 클릭하세요.
KMS 키 활성화 설정하기
선택한 키의 사용 여부를 설정할 수 있습니다.
참고
키를 비활성화 상태로 변경하면, 해당 키를 사용하는 사용자들이 더 이상 키를 사용할 수 없습니다.
생성한 Key Management Service를 활성화/비활성화 여부를 설정하려면 다음 절차를 따르세요.
- 모든 서비스 > Security > Key Management Service 메뉴를 클릭하세요. Key Management Service의 Service Home 페이지로 이동합니다.
- Service Home 페이지에서 Key Management Service 메뉴를 클릭하세요. Key Management Service 목록 페이지로 이동합니다.
- Key Management Service 목록 페이지에서 상세 정보를 확인할 자원을 클릭하세요. Key Management Service 상세 페이지로 이동합니다.
- Key Management Service 상세 페이지에서 키 활성화/키 비활성화 버튼을 클릭하세요. 키 활성화/키 비활성화 팝업창으로 이동합니다.
- 키 활성화/키 비활성화 팝업창에서 메시지를 확인하고 확인 버튼을 클릭하세요.
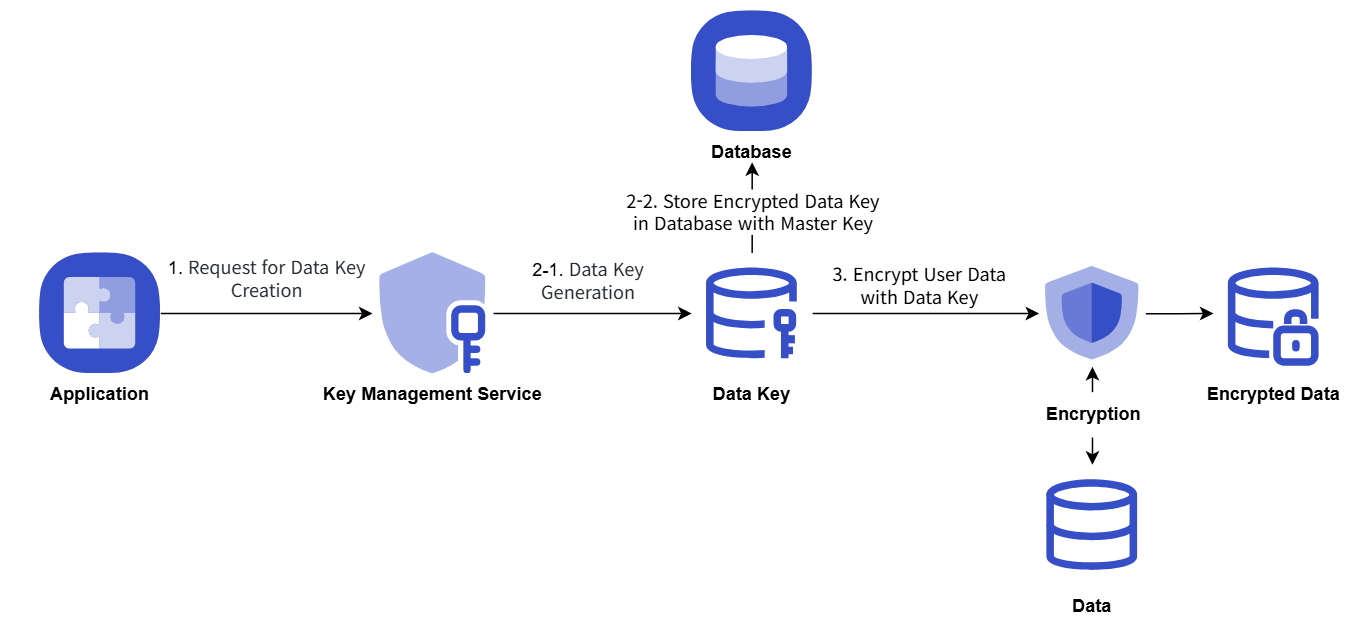
Key Management Service 키를 활용한 암호화 사례
사용자 Application의 중요 데이터를 KMS로부터 데이터 키를 발급받아 암호화 저장하는 절차 예시는 다음과 같습니다.
- Application 기동 시 KMS 마스터 키 정보로 데이터 키를 발급받고, 평문 형태 데이터 키로 Client 단에서 보안 데이터 암호화를 수행하고 저장합니다.
- 데이터 키는 마스터 키로 암호화된 형태로 데이터베이스에 저장합니다.
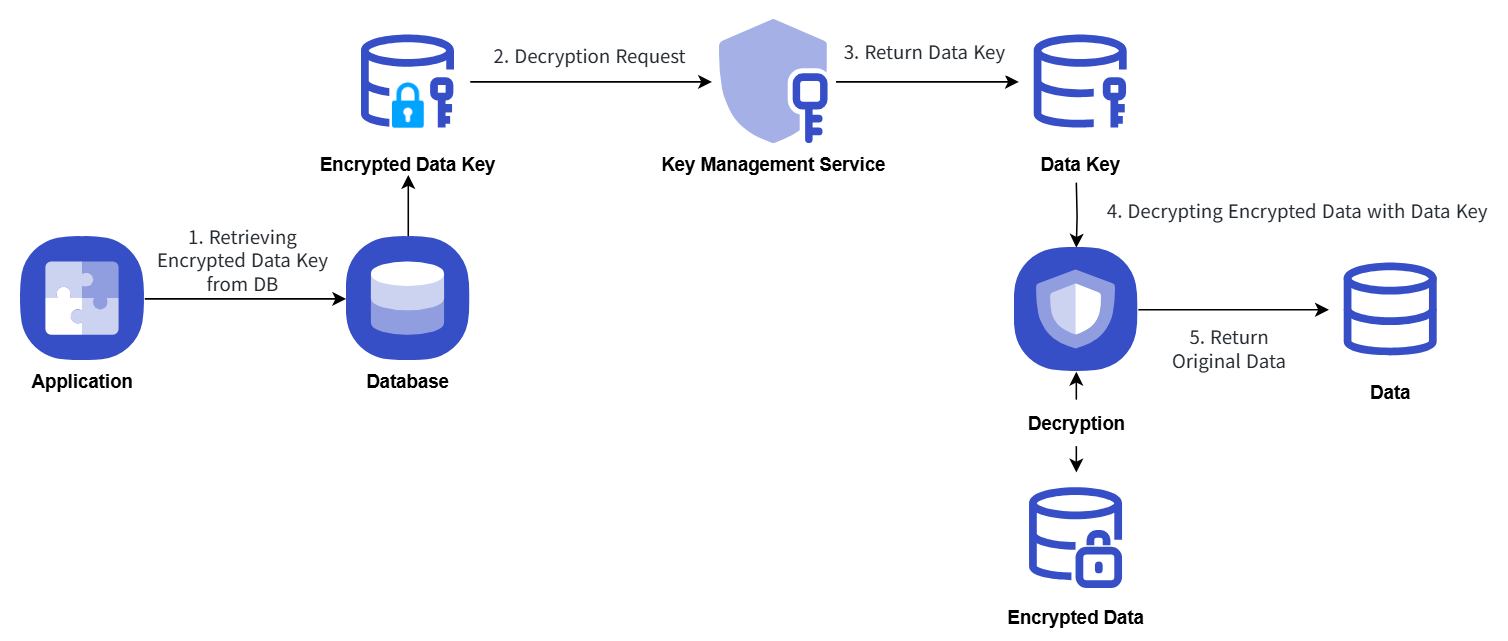
- 보안 데이터 복호화 수행 시 데이터베이스에 저장되어 있던 데이터 키를 조회하여 KMS 마스터 키 정보로 복호화를 요청합니다.
Key Management Service 키를 활용한 암호화/복호화 절차를 다음 개념도로 설명합니다.
암호화
복호화
Key Management Service 해지하기
사용하지 않는 Key Management Service를 해지할 수 있습니다.
주의
키를 해지하면 Key Management Service의 모든 요청 및 기능을 사용할 수 없으며, 즉시 해지하거나 예약 해지를 통해 72시간 후 영구적으로 삭제됩니다.
Key Management Service를 해지하려면 다음 절차를 따르세요.
- 모든 서비스 > Security > Key Management Service 메뉴를 클릭하세요. Key Management Service의 Service Home 페이지로 이동합니다.
- Service Home 페이지에서 Key Management Service 메뉴를 클릭하세요. Key Management Service 목록 페이지로 이동합니다.
- Key Management Service 목록 페이지에서 상세 정보를 확인할 자원을 클릭하세요. Key Management Service 상세 페이지로 이동합니다.
- Key Management Service 상세 페이지에서 서비스 해지 버튼을 클릭하세요. 서비스 해지 팝업창으로 이동합니다.
- 서비스 해지 팝업창에서 즉시 해지/예약 해지 선택 및 내용 확인 후, 확인 버튼을 클릭하세요.
- 해지가 완료되면, Key Management Service 목록 페이지에서 자원이 해지되었는지 확인하세요.
- 키 삭제가 완료되면 키를 생성한 사용자와 삭제한 사용자 모두에게 알림이 발송됩니다.
참고
- 생성된 KMS 목록 오른쪽 끝 더보기 메뉴 버튼 내 서비스 해지버튼을 클릭해도 선택한 키를 해지할 수 있습니다.
- 예약 해지된 서비스 해지를 취소하려면 KMS 목록 페이지 또는 상세 페이지에서 해지 취소 버튼을 클릭하세요.
- 서비스 해지 취소 팝업창에서 확인 을 클릭하면, 선택한 키는 삭제되지 않고 비활성화 상태로 복구됩니다.
- 키를 다시 사용하려면 Key Management Service 상세 페이지에서 키 활성화 버튼을 클릭하세요.
1 - Key Management Service 키를 활용한 암호화 예제
Key Management Service 키를 활용한 암호화 예제
KMS에서 생성한 키를 사용하여 봉투 암호화(Envelope Encryption) 및 데이터 서명/검증을 구현하기 위한 Java 코드 예제입니다.
참고
아래의 코드는 Samsung Cloud Platform KMS에 대한 이해를 돕기 위한 단순 참고용 예시입니다.
KMS 기능 수행에 필요한 함수만 기술했기 때문에 그대로 실행하면 Error가 발생합니다. 반드시 사용자의 실제 시나리오에 맞게 수정하여 활용하세요.
봉투 암호화
봉투 암호화 시나리오를 제시하고 시나리오에 따라 작성된 Java, Go, Python 예제 코드와 결과값을 확인할 수 있습니다.
시나리오
- 비밀번호 정보를 봉투 암호화 방식으로 암호화하기 위해 Data Key를 발급 받습니다.
- 발급 받은 Data Key 정보를 사용해 비밀번호를 암호화합니다.
- 암호화된 비밀번호, 암호화된 Data Key 정보를 봉투 암호화하여 JSON 파일로 저장합니다.
Java 예제 코드
제시된 시나리오에 따라 작성된 Java 예제 코드입니다.
// URI
static String KMS_API_BASE_URI = {{ OpenAPI 가이드의 URL 참조 }};
// END POINT
static String KMS_API_DECRYPT = "/v1/kms/openapi/decrypt/%s";
static String KMS_API_CREATE_DATAKEY = "/v1/kms/openapi/datakey/%s";
// KEY ID
static String KEY_ID = {{마스터 키 ID}};

createEnvelop() {
    // 새로운 데이터 키 생성을 요청
    String encryptedDataKey = getDataKey();
    // 암호화를 할 데이터
    String example_json_data = "{\"PASSWORD\":\"SECRET_CREDENTIAL\"}";
    // 암호화된 데이터 봉투(Envelop encryption)
    String envelope = encryptData(example_json_data, encryptedDataKey);
    // 이 예제 코드에서는 암호화된 데이터 봉투를 파일로 저장
    File envelopeFile = new File("envelope.json");
}

getDataKey() {
    String endPoint = String.format(KMS_API_CREATE_DATAKEY, KEY_ID);
    String url = KMS_API_BASE_URI + endPoint;
    JSONObject data = new JSONObject();
    data.put("key_type", "plaintext");
    JSONObject respJsonObject = callApi(endPoint, data.toJSONString());
    return respJsonObject.get("ciphertext").toString();
}

encryptData() {
    Map<String, String> envelope = new HashMap<>();
    // 데이터 키 복호화
    String dataKey = decryptDataKey(encryptedDataKey);
    // 생성된 데이터 키를 AES-CBC 방식으로 암호화
    // Cipher Class 사용 (사용자가 기 사용 중인 암호화 알고리즘 사용 가능)
    SecretKey secretKey = new SecretKeySpec(decodeBase64(dataKey), "AES");
    Cipher cipher = Cipher.getInstance("AES/CBC/PKCS5Padding");
    cipher.init(Cipher.ENCRYPT_MODE, secretKey);
    byte[] iv = cipher.getParameters().getParameterSpec(IvParameterSpec.class).getIV();
    byte[] cipherText = cipher.doFinal(obj.toString().getBytes());

    envelope.put("encryptedKey", encryptedDataKey);
    envelope.put("cipherText", encodeBase64(cipherText));
    envelope.put("iv", encodeBase64(iv));

    return JSONValue.toJSONString(envelope);
}

decryptDataKey() {
    String endPoint = String.format(KMS_API_DECRYPT, KEY_ID);
    JSONObject data = new JSONObject();
    data.put("cipherText", sealedKey);
    JSONObject respJsonObject = callApi(endPoint, data.toJSONString());
    String plaintext = (respJsonObject.get("plaintext")).toString();
    return plaintext;
}
Go 예제 코드
제시된 시나리오에 따라 작성된 Go 예제 코드입니다.
// URI
const KMS_API_BASE_URI = {{ OpenAPI 가이드의 URL 참조 }}

// END POINT
const KMS_API_DECRYPT = "/v1/kms/openapi/decrypt/%s"
const KMS_API_CREATE_DATAKEY = "/v1/kms/openapi/datakey/%s"

// KEY ID
const KEY_ID = {{마스터 키 ID}}

createEnvelop() {
        // 새로운 데이터 키 생성을 요청
        encryptedDataKey := getDataKey()
        // 암호화를 할 데이터
        example_json_data := "{\"PASSWORD\":\"SECRET_CREDENTIAL\"}"
        // 암호화된 데이터 봉투(Envelop encryption)
        envelope := encryptData(example_json_data, encryptedDataKey)
        // 이 예제 코드에서는 암호화된 데이터 봉투를 파일로 저장
        file, _ := os.Create("envelope.json")
        defer file.Close()
        file.WriteString(envelope)
}

getDataKey() {
        endPoint := fmt.Sprintf(KMS_API_CREATE_DATAKEY, KEY_ID)
        data := map[string]interface{}{
            "key_type": "plaintext",
        }
        jsonData, _ := json.Marshal(data)
        respJsonObject := callApi(endPoint, jsonData)
        info := &KMSDatakeyInfo{}
        json.Unmarshal([]byte(respJsonObject), info)

        return info.DataKey
}

encryptData() {
        envelope := make(map[string]string)
        // 데이터 키 복호화
        dataKey := decryptDataKey(encryptedDataKey)
        secretKey, _ := base64.StdEncoding.DecodeString(dataKey)
        // 생성된 데이터 키를 AES-CBC 방식으로 암호화
        // Cipher Class 사용
        block, _ := aes.NewCipher(secretKey)
        cipherText := make([]byte, aes.BlockSize+len(example_json_data))
        iv := cipherText[:aes.BlockSize]
        if _, err := io.ReadFull(rand.Reader, iv); err != nil {
               panic(err)
        }

        mode := cipher.NewCFBEncrypter(block, iv)
        mode.XORKeyStream(cipherText[aes.BlockSize:], []byte(example_json_data))

        envelope["encryptedKey"] = encryptedDataKey
        envelope["cipherText"] = base64.StdEncoding.EncodeToString(cipherText)
        envelope["iv"] = base64.StdEncoding.EncodeToString(iv)

        jsonString, _ := json.Marshal(envelope)

        return string(jsonString)
}

decryptDataKey() {
        endPoint := fmt.Sprintf(KMS_API_DECRYPT, KEY_ID)
        data := map[string]interface{}{
               "cipherText": sealedKey,
        }
        jsonData, _ := json.Marshal(data)
        respJsonObject := callApi(endPoint, jsonData)
        info := &KMSDecryptInfo{}
        json.Unmarshal([]byte(respJsonObject), info)

        return info.DecryptedData

}
Python 예제 코드
제시된 시나리오에 따라 작성된 Python 예제 코드입니다.
# URI
KMS_API_BASE_URI = {{ OpenAPI 가이드의 URL 참조 }}

# END POINT
KMS_API_DECRYPT = "/v1/kms/openapi/decrypt/"
KMS_API_CREATE_DATAKEY = "/v1/kms/openapi/datakey/"

# KEY ID
KEY_ID = {{마스터 키 ID}}

create_envelop()
    # 새로운 데이터 키 생성을 요청
    encrypted_data_key = get_dataKey()

    # 암호화를 할 데이터
    example_json_data = {"PASSWORDTEST":"SECRET_CREDENTIALTEST"}
    json_data_str = json.dumps(example_json_data)

    # 암호화된 데이터 봉투(Envelop encryption)
    envelope = encrypt_data(json_data_str,encrypted_data_key)

    # 이 예제 코드에서는 암호화된 데이터 봉투를 파일로 저장
    with open("envelope.json", "w") as file:
        file.write(envelope)


get_dataKey()
    end_point = f"{KMS_API_CREATE_DATAKEY}{KEY_ID}"
    data = {
        "key_type": "plaintext"
    }
    response_object = call_api(end_point, data)

    data_key = response_object.get("ciphertext", "")

    return data_key


encrypt_data()
    envelope = {}
    # 데이터 키 복호화
    dataKey = decrypt_data_key(encrypted_data_key)
    decoded_data_key = base64.b64decode(dataKey)

    # 생성된 데이터 키를 AES-CBC 방식으로 암호화
    # Cipher Class 사용
    iv = get_random_bytes(16)
    cipher = AES.new(decoded_data_key, AES.MODE_CBC, iv)
    data_to_encrypt = obj
    data_bytes = data_to_encrypt.encode()
    padded_data = pad(data_bytes, AES.block_size)
    cipher_text = cipher.encrypt(padded_data).hex()

    envelope["encryptedKey"] = encrypted_data_key
    envelope["cipherText"] = cipher_text
    envelope["iv"] = base64.b64encode(iv).decode()

    return json.dumps(envelope)

decrypt_data_key()
    end_point = f"{KMS_API_DECRYPT}{KEY_ID}"
    data = {}
    data["cipherText"] = sealed_key
    resp_json_object = call_api(end_point,data)
    plaintext = resp_json_object.get("decryptedData")
    return plaintext
예제 코드 결과값
예제 코드의 결과값을 표시합니다.
  {
        "cipherText":"d3S81rzaGAl8U12LlKSlRbDekPlGuibTntXX962KCjBIKuXdPOG8N8vk3Jet8lyG",
        "iv":"0kP7QKZ6BUeQPlThk4tySA==",
        "encryptedKey":"vault:v1:KJjjLtGHTbaV5N8LWC5O9eMDCaJVeff5SM\/MAYseugjiqiXFVgdXaKXg6kym0NmjHkO\/wLPsa+YK0aVk"
    }
봉투 암호화 사용
봉투 암호화 사용 시나리오를 제시하고 시나리오에 따라 작성된 Java, Go, Python 예제 코드와 결과값을 확인할 수 있습니다.
시나리오
- 암호화된 봉투 파일의 Data Key를 복호화합니다.
- 복호화된 Data Key로 봉투 파일의 암호화 데이터를 복호화합니다.
Java 예제 코드
제시된 시나리오에 따라 작성된 Java 예제 코드입니다.
// URI
static String KMS_API_BASE_URI = {{ OpenAPI 가이드의 URL 참조 }};
// END POINT
static String KMS_API_DECRYPT = "/v1/kms/openapi/decrypt/%s";
// KEY ID
static String KEY_ID = {{마스터 키 ID}};;


getData() {
    // 암호화된 데이터 봉투(Envelop encryption)
    String envelope = new String(Files.readAllBytes(Paths.get("envelope.json")));
    JSONParser parser = new JSONParser();
    JSONObject envelopeJson = (JSONObject) parser.parse(envelope);
    String encryptedDataKey = envelopeJson.get("encryptedKey").toString();
    String cipherText = envelopeJson.get("cipherText").toString();
    String iv = envelopeJson.get("iv").toString();

    return decryptData(cipherText, encryptedDataKey, iv);
}

decryptData() {
    String dataKey = decryptDataKey(encryptedDataKey);
    IvParameterSpec ivParameterSpec = new IvParameterSpec(decodeBase64(iv));
    SecretKey secretKey = new SecretKeySpec(decodeBase64(dataKey), "AES");
    Cipher cipher = Cipher.getInstance("AES/CBC/PKCS5Padding");
    cipher.init(Cipher.DECRYPT_MODE, secretKey, ivParameterSpec);
    byte[] plaintext = cipher.doFinal(decodeBase64(cipherText));

    return new String(plaintext);
}

decryptDataKey() {
    String endPoint = String.format(KMS_API_DECRYPT, KEY_ID);
    JSONObject data = new JSONObject();
    data.put("cipherText", sealedKey);
    JSONObject respJsonObject = callApi(endPoint, data.toJSONString());
    String plaintext = (respJsonObject.get("plaintext")).toString();
    return plaintext;
}
Go 예제 코드
제시된 시나리오에 따라 작성된 Go 예제 코드입니다.
// URI
const KMS_API_BASE_URI = {{ OpenAPI 가이드의 URL 참조 }}

// END POINT
const KMS_API_DECRYPT = "/v1/kms/openapi/decrypt/%s"

// KEY ID
const KEY_ID = {{마스터 키 ID}}

getData() {
    // 암호화된 데이터 봉투(Envelop encryption) 불러오기
    jsonData, _ := os.ReadFile("envelope.json")
    var envelope map[string]interface{}
    if err := json.Unmarshal(jsonData, &envelope); err != nil {
           fmt.Println("JSON 파싱 오류:", err)
           os.Exit(1)
    }
    encryptedDataKey := envelope["encryptedKey"].(string)
    cipherText := envelope["cipherText"].(string)
    iv := envelope["iv"].(string)

    return decryptData(cipherText, encryptedDataKey, iv)
}

decryptData() {
    dataKey := decryptDataKey(encryptedDataKey)
    ciphertext, _ := base64.StdEncoding.DecodeString(cipherText)
    dataKeyBytes, _ := base64.StdEncoding.DecodeString(dataKey)
    decodedData := ciphertext[aes.BlockSize:]
    ivparam := ciphertext[:aes.BlockSize]
    block, _ := aes.NewCipher(dataKeyBytes)

    mode := cipher.NewCFBDecrypter(block, ivparam)
    mode.XORKeyStream(decodedData, decodedData)
    decryptedData := string(decodedData)

    return decryptedData
}

decryptDataKey() {
    endPoint := fmt.Sprintf(KMS_API_DECRYPT, KEY_ID)
    data := map[string]interface{}{
           "cipherText": sealedKey,
    }
    jsonData, _ := json.Marshal(data)
    respJsonObject := callApi(endPoint, jsonData)
    info := &KMSDecryptInfo{}
    json.Unmarshal([]byte(respJsonObject), info)

    return info.DecryptedData
}
Python 예제 코드
제시된 시나리오에 따라 작성된 Python 예제 코드입니다.
# URI
KMS_API_BASE_URI = {{ OpenAPI 가이드의 URL 참조 }}

# END POINT
KMS_API_DECRYPT = "/v1/kms/openapi/decrypt/"

# KEY ID
KEY_ID = {{마스터 키 ID}}

get_data()
    # 암호화된 데이터 봉투(Envelop encryption) 열기
    with open("envelope.json", "r") as file:
        envelope = file.read()
    envelope_json = json.loads(envelope)
    encrypted_data_key = envelope_json["encryptedKey"]
    cipher_text = envelope_json["cipherText"]
    iv = envelope_json["iv"]
    return decrypt_data(cipher_text, encrypted_data_key, iv)

decrypt_data()
    data_key = decrypt_data_key(encrypted_data_key)
    iv_bytes = base64.b64decode(iv)
    decoded_data_key = base64.b64decode(data_key)
    cipher_txt = bytes.fromhex(cipher_text)

    cipher = AES.new(decoded_data_key, AES.MODE_CBC, iv_bytes)
    plain_text_bytes = unpad(cipher.decrypt(cipher_txt), AES.block_size)
    plain_text = plain_text_bytes.decode('utf-8')
    return plain_text

decrypt_data_key()
    end_point = f"{KMS_API_DECRYPT}{KEY_ID}"
    data = {}
    data["cipherText"] = sealed_key
    resp_json_object = call_api(end_point,data)
    plaintext = resp_json_object.get("decryptedData")
    return plaintext
예제 코드 결과값
예제 코드의 결과값을 표시합니다.
{"PASSWORD":"SECRET_CREDENTIAL"}
데이터 서명 사용
데이터의 무결성을 보증하기 위한 데이터 서명 사용 시나리오를 제시하고 시나리오에 따라 작성된 Java, Go, Python 예제 코드와 결과값을 확인할 수 있습니다.
시나리오
- 서명할 데이터를 OpenAPI로 호출하여 서명합니다.
- 서명된 데이터는 봉투화하여 json 파일로 저장합니다.
Java 예제 코드
제시된 시나리오에 따라 작성된 Java 예제 코드입니다.
// URI
static String KMS_API_BASE_URI = {{ OpenAPI 가이드의 URL 참조 }};

// END POINT
static String KMS_API_SIGN = "/v1/kms/openapi/sign/%s";

// KEY ID
static String KEY_ID = {{마스터 키 ID}};

signEnvelop() {
    // 서명 데이터 봉투(Envelop encryption)
    String envelope = sign();
    // 이 예제 코드에서는 서명 데이터 봉투를 파일로 저장
    File envelopeFile = new File("signEnvelope.json");
    OutputStream os = new BufferedOutputStream(new FileOutputStream(envelopeFile));

    try {
        os.write(envelope.getBytes());
    } finally {
        os.close();
    }
}

sign() {
    Map<String, String> envelope = new HashMap<>();

    String example_credential = "SCP KMS Sign Test!!!";
    String endPoint = String.format(KMS_API_SIGN, KEY_ID);
    JSONObject data = new JSONObject();
    data.put("input", encodeToBase64(example_credential));

    JSONObject respJsonObject = callApi(endPoint, data.toJSONString());

    envelope.put("signature", respJsonObject.get("signature").toString());
    if(respJsonObject.get("batch_results") != null) {

        envelope.put("batch_results", respJsonObject.get("batch_results").toString());
    }

    return JSONValue.toJSONString(envelope);
}
Go 예제 코드
제시된 시나리오에 따라 작성된 Go 예제 코드입니다.
// URI
const KMS_API_BASE_URI = {{ OpenAPI 가이드의 URL 참조 }}

// END POINT
const KMS_API_SIGN = "/v1/kms/openapi/sign/%s"

// KEY ID
const KEY_ID = {{마스터 키 ID}}

signEnvelop() {
    // 서명 데이터 봉투(Envelop encryption)
    envelope := sign()
    // 이 예제 코드에서는 서명 데이터 봉투를 파일로 저장
    file, _ := os.Create("signEnvelope.json")
    defer file.Close()
    file.WriteString(envelope)
}

sign() {
    envelope := make(map[string]string)
    example_credential := "SCP KMS Sign Test!!!"
    endPoint := fmt.Sprintf(KMS_API_SIGN, KEY_ID)
    data := map[string]interface{}{
        "input": base64.StdEncoding.EncodeToString([]byte(example_credential)),
    }
    jsonData, _ := json.Marshal(data)
    respJsonObject := callApi(endPoint, jsonData)
    info := &KMSSignInfo{}
    json.Unmarshal([]byte(respJsonObject), info)

    envelope["signature"] = info.Signature

    jsonString, _ := json.Marshal(envelope)

    return string(jsonString)
}
Python 예제 코드
제시된 시나리오에 따라 작성된 Python 예제 코드입니다.
# URI
KMS_API_BASE_URI = {{ OpenAPI 가이드의 URL 참조 }}

# END POINT
KMS_API_SIGN = "/v1/kms/openapi/sign/"

# KEY ID
KEY_ID = {{마스터 키 ID}}

sign_envelop()
    # 서명 데이터 봉투(Envelop encryption)
    envelope = sign()

    # 이 예제 코드에서는 서명 데이터 봉투를 파일로 저장
    with open("signEnvelope.json", "w") as file:
        file.write(envelope)


sign()
    envelope = {}

    example_credential = "SCP KMS Sign Test!!!"
    end_point = f"{KMS_API_SIGN}{KEY_ID}"
    credential_bytes = example_credential.encode('utf-8')

    data = {
        "input": base64.b64encode(credential_bytes).decode('utf-8')
    }

    resp_json_object = call_api(end_point,data)

    envelope["signature"] = resp_json_object.get("signature")

    return json.dumps(envelope)
예제 코드 결과값
예제 코드의 결과값을 표시합니다.
  {
    "signature":"vault:v1:qHGf4ALkTao1Yy\/lpSbLQ2l8YVpsHWBP6ic3Ux1BKSodQQxnEIrjPyUwXXQ1NZfGSVxdeVe5Y6kb0nUPNADQpzkOh9\/e8T\/QCOs9==",
    "projectId":"PROJECT-qWrHRJX5sZnTkopcr9N1dk"
}
데이터 검증 사용
데이터의 무결성을 검증하기 위한 검증 사용 시나리오를 제시하고 시나리오에 따라 작성된 Java, Go, Python 예제 코드와 결과값을 확인할 수 있습니다.
시나리오
- 서명된 봉투 파일의 서명값을 가져옵니다.
- 서명된 데이터를 검증하여 결과값을 출력합니다.
Java 예제 코드
제시된 시나리오에 따라 작성된 Java 예제 코드입니다.
// URI
static String KMS_API_BASE_URI = {{ OpenAPI 가이드의 URL 참조 }};

// END POINT
static String KMS_API_VERIFY = "/v1/kms/openapi/verify/%s";

// KEY ID
static String KEY_ID = {{마스터 키 ID}};

getSign() {
    // 서명 데이터 봉투(Envelop encryption)
    String envelope = new String(Files.readAllBytes(Paths.get("signEnvelope.json")));
    JSONParser parser = new JSONParser();
    JSONObject envelopeJson = (JSONObject) parser.parse(envelope);
    String signature = envelopeJson.get("signature").toString();

    return verify(signature);
}

verify() {
    String endPoint = String.format(KMS_API_VERIFY, KEY_ID);
    JSONObject data = new JSONObject();
    data.put("input", "U0NQIEtNUyBTaWduIFRlc3QhISE=");
    data.put("signature", signature);
    JSONObject respJsonObject = callApi(endPoint, data.toJSONString());
    String valid = (respJsonObject.get("valid")).toString();
    return valid;
}
Go 예제 코드
제시된 시나리오에 따라 작성된 Go 예제 코드입니다.
// URI
const KMS_API_BASE_URI = {{ OpenAPI 가이드의 URL 참조 }}

// END POINT
const KMS_API_VERIFY = "/v1/kms/openapi/verify/%s"

// KEY ID
const KEY_ID = {{마스터 키 ID}}

getSign() {
    // 서명 데이터 봉투(Envelop encryption) 불러오기
    jsonData, _ := os.ReadFile("signEnvelope.json")
    var envelope map[string]interface{}
    if err := json.Unmarshal(jsonData, &envelope); err != nil {
           fmt.Println("JSON 파싱 오류:", err)
           os.Exit(1)
    }
    signature := envelope["signature"].(string)

    return verify(signature)
}

verify() {
    endPoint := fmt.Sprintf(KMS_API_VERIFY, KEY_ID)
    data := map[string]interface{}{
           "input":          "U0NQIEtNUyBTaWduIFRlc3QhISE=",
           "signature":      signature,
    }
    jsonData, _ := json.Marshal(data)
    respJsonObject := callApi(endPoint, jsonData)
    info := &KMSVerifyInfo{}
    json.Unmarshal([]byte(respJsonObject), info)

    return info.Valid
}
Python 예제 코드
제시된 시나리오에 따라 작성된 Python 예제 코드입니다.
# URI
KMS_API_BASE_URI = {{ OpenAPI 가이드의 URL 참조 }}

# END POINT
KMS_API_VERIFY = "/v1/kms/openapi/verify/"

# KEY ID
KEY_ID = {{마스터 키 ID}}

get_sign()
    # 서명 데이터 봉투(Envelop encryption) 열기
    with open("signEnvelope.json", "r") as file:
        envelope = file.read()
    envelope_json = json.loads(envelope)
    signature = envelope_json["signature"]

    return verify(signature)


verify()
    end_point = f"{KMS_API_VERIFY}{KEY_ID}"

    data = {
        "input": "U0NQIEtNUyBTaWduIFRlc3QhISE=",
        "signature": signature
    }

    resp_json_object = call_api(end_point,data)
    valid = resp_json_object.get("valid")

    return valid
예제 코드 결과값
예제 코드의 결과값을 표시합니다.
  {
    "valid": true
}