API별 지원되는 SDK
AIOS의 모델은 OpenAI 및 Cohere의 API와 호환되므로 OpenAI, Cohere의 SDK와도 호환됩니다. Samsung Cloud Platform AIOS 서비스에서 지원하는 OpenAI, Cohere 호환 API 목록은 다음과 같습니다.
| API명 | API | 상세 설명 | 지원 SDK |
|---|---|---|---|
| 텍스트 완성 API | 입력값으로 주어진 문자열에 이어지는 자연스러운 문장을 생성합니다. |
| |
| 대화 완성 API | 대화 내용에 뒤이은 답변을 생성합니다. |
| |
| Embeddings API | 텍스트를 고차원 벡터(임베딩)로 변환하여 텍스트 간 유사도 계산, 클러스터링, 검색 등 다양한 자연어 처리(NLP) 작업에 활용할 수 있습니다. |
| |
| Rerank API | 임베딩 모델이나 크로스 인코더 모델을 적용하여 단일 쿼리와 문서 목록의 각 항목 간 관련성을 예측합니다. |
|
- Request Examples 가이드는 Python/NodeJS/Go 런타임 환경이 구성된 Virtual Server 환경을 기준으로 설명합니다.
- 실제 실행 시 토큰 수, 메시지 내용이 예시와 다를 수 있습니다.
패키지 설치
사용 중인 실행 환경에 따라 AIOS 모델의 API 요청을 지원하는 SDK 패키지를 설치할 수 있습니다.
pip install requests openai cohere \
  langchain langchain-openai langchain-cohere langchain-together
pip install requests openai cohere \
langchain langchain-openai langchain-cohere langchain-togethernpm install openai cohere-ai langchain \
@langchain/core @langchain/openai @langchain/coherenpm install openai cohere-ai langchain \
@langchain/core @langchain/openai @langchain/coherego get github.com/openai/openai-go \
github.com/cohere-ai/cohere-go/v2go get github.com/openai/openai-go \
github.com/cohere-ai/cohere-go/v2텍스트 완성 API
텍스트 완성 API는 입력값으로 주어진 문자열에 바로 이어지는 자연스러운 문장을 생성합니다.
non-stream 요청
Request
import json
import requests
from urllib.parse import urljoin

aios_base_url = "<<aios endpoint-url>>" # AIOS 모델 호출을 위한 aios endpoint-url을 입력합니다.
model = "<<model>>"                     # AIOS 모델 호출을 위한 모델 ID를 입력합니다.

# 요청 데이터를 구성합니다.
# 여기에는 사용할 모델 ID와 프롬프트(prompt)가 포함됩니다.
data = {
  "model": model,
  "prompt": "Hi"
}

# AIOS API의 v1/completions 엔드포인트로 POST 요청을 보냅니다.
# urljoin 함수를 사용하여 기본 URL과 엔드포인트 경로를 결합합니다.
response = requests.post(urljoin(aios_base_url, "v1/completions"), json=data)

# 응답 본문을 JSON 형식으로 파싱합니다.
body = json.loads(response.text)

# 응답 본문의 choices[0].text는 AI 모델이 생성한 응답 텍스트입니다.
print(body["choices"][0]["text"])
import json
import requests
from urllib.parse import urljoin
aios_base_url = "<<aios endpoint-url>>" # AIOS 모델 호출을 위한 aios endpoint-url을 입력합니다.
model = "<<model>>" # AIOS 모델 호출을 위한 모델 ID를 입력합니다.
# 요청 데이터를 구성합니다.
# 여기에는 사용할 모델 ID와 프롬프트(prompt)가 포함됩니다.
data = {
"model": model,
"prompt": "Hi"
}
# AIOS API의 v1/completions 엔드포인트로 POST 요청을 보냅니다.
# urljoin 함수를 사용하여 기본 URL과 엔드포인트 경로를 결합합니다.
response = requests.post(urljoin(aios_base_url, "v1/completions"), json=data)
# 응답 본문을 JSON 형식으로 파싱합니다.
body = json.loads(response.text)
# 응답 본문의 choices[0].text는 AI 모델이 생성한 응답 텍스트입니다.
print(body["choices"][0]["text"])from openai import OpenAI
from urllib.parse import urljoin
aios_base_url = "<<aios endpoint-url>>" # AIOS 모델 호출을 위한 aios endpoint-url을 입력합니다.
model = "<<model>>" # AIOS 모델 호출을 위한 모델 ID를 입력합니다.
# OpenAI 클라이언트를 생성합니다.
# base_url은 AIOS API의 v1 엔드포인트를 가리키며,
# api_key는 AIOS에서 요구하는 키로, 일반적으로 "EMPTY_KEY"로 설정됩니다.
client = OpenAI(base_url=urljoin(aios_base_url, "v1"), api_key="EMPTY_KEY")
# AIOS 모델을 사용하여 completion을 생성합니다.
# model 매개변수는 사용할 모델 ID를 지정하고,
# prompt 매개변수는 AI에게 제공할 입력 텍스트입니다.
response = client.completions.create(
model=model,
prompt="Hi"
)
# response.choices[0].text는 AI 모델이 생성한 응답 텍스트입니다.
print(response.choices[0].text)from openai import OpenAI
from urllib.parse import urljoin
aios_base_url = "<<aios endpoint-url>>" # AIOS 모델 호출을 위한 aios endpoint-url을 입력합니다.
model = "<<model>>" # AIOS 모델 호출을 위한 모델 ID를 입력합니다.
# OpenAI 클라이언트를 생성합니다.
# base_url은 AIOS API의 v1 엔드포인트를 가리키며,
# api_key는 AIOS에서 요구하는 키로, 일반적으로 "EMPTY_KEY"로 설정됩니다.
client = OpenAI(base_url=urljoin(aios_base_url, "v1"), api_key="EMPTY_KEY")
# AIOS 모델을 사용하여 completion을 생성합니다.
# model 매개변수는 사용할 모델 ID를 지정하고,
# prompt 매개변수는 AI에게 제공할 입력 텍스트입니다.
response = client.completions.create(
model=model,
prompt="Hi"
)
# response.choices[0].text는 AI 모델이 생성한 응답 텍스트입니다.
print(response.choices[0].text)from langchain_openai import OpenAI
from urllib.parse import urljoin
aios_base_url = "<<aios endpoint-url>>" # AIOS 모델 호출을 위한 aios endpoint-url을 입력합니다.
model = "<<model>>" # AIOS 모델 호출을 위한 모델 ID를 입력합니다.
# LangChain의 OpenAI 클래스를 사용하여 LLM(대형 언어 모델) 인스턴스를 생성합니다.
# base_url은 AIOS API의 v1 엔드포인트를 가리키며,
# api_key는 AIOS에서 요구하는 키로, 일반적으로 "EMPTY_KEY"로 설정됩니다.
# model 매개변수는 사용할 모델 ID를 지정합니다.
llm = OpenAI(
base_url=urljoin(aios_base_url, "v1"),
api_key="EMPTY_KEY",
model=model
)
# LLM에 "Hi"라는 프롬프트를 전달하여 응답을 받습니다.
# invoke 메서드는 모델의 출력을 반환합니다.
print(llm.invoke("Hi"))from langchain_openai import OpenAI
from urllib.parse import urljoin
aios_base_url = "<<aios endpoint-url>>" # AIOS 모델 호출을 위한 aios endpoint-url을 입력합니다.
model = "<<model>>" # AIOS 모델 호출을 위한 모델 ID를 입력합니다.
# LangChain의 OpenAI 클래스를 사용하여 LLM(대형 언어 모델) 인스턴스를 생성합니다.
# base_url은 AIOS API의 v1 엔드포인트를 가리키며,
# api_key는 AIOS에서 요구하는 키로, 일반적으로 "EMPTY_KEY"로 설정됩니다.
# model 매개변수는 사용할 모델 ID를 지정합니다.
llm = OpenAI(
base_url=urljoin(aios_base_url, "v1"),
api_key="EMPTY_KEY",
model=model
)
# LLM에 "Hi"라는 프롬프트를 전달하여 응답을 받습니다.
# invoke 메서드는 모델의 출력을 반환합니다.
print(llm.invoke("Hi"))const aios_base_url = "<<aios endpoint-url>>" // AIOS 모델 호출을 위한 aios endpoint-url을 입력합니다.
const model = "<<model>>" // AIOS 모델 호출을 위한 모델 ID를 입력합니다.
// 요청 데이터를 구성합니다.
// 여기에는 사용할 모델 ID와 프롬프트(prompt)가 포함됩니다.
const data = {
model: model,
prompt: "Hi",
};
// AIOS API의 v1/completions 엔드포인트 URL을 생성합니다.
let url = new URL("/v1/completions", aios_base_url);
// AIOS API에 POST 요청을 보냅니다.
const response = await fetch(url, {
method: "POST",
headers: {
"Content-Type": "application/json",
},
body: JSON.stringify(data),
});
// 응답 본문을 JSON 형식으로 파싱합니다.
const body = await response.json();
// 응답 본문의 choices[0].text는 AI 모델이 생성한 응답 텍스트입니다.
console.log(body.choices[0].text);const aios_base_url = "<<aios endpoint-url>>" // AIOS 모델 호출을 위한 aios endpoint-url을 입력합니다.
const model = "<<model>>" // AIOS 모델 호출을 위한 모델 ID를 입력합니다.
// 요청 데이터를 구성합니다.
// 여기에는 사용할 모델 ID와 프롬프트(prompt)가 포함됩니다.
const data = {
model: model,
prompt: "Hi",
};
// AIOS API의 v1/completions 엔드포인트 URL을 생성합니다.
let url = new URL("/v1/completions", aios_base_url);
// AIOS API에 POST 요청을 보냅니다.
const response = await fetch(url, {
method: "POST",
headers: {
"Content-Type": "application/json",
},
body: JSON.stringify(data),
});
// 응답 본문을 JSON 형식으로 파싱합니다.
const body = await response.json();
// 응답 본문의 choices[0].text는 AI 모델이 생성한 응답 텍스트입니다.
console.log(body.choices[0].text);import OpenAI from "openai";
const aios_base_url = "<<aios endpoint-url>>" // AIOS 모델 호출을 위한 aios endpoint-url을 입력합니다.
const model = "<<model>>" // AIOS 모델 호출을 위한 모델 ID를 입력합니다.
// OpenAI 클라이언트를 생성합니다.
// apiKey는 AIOS에서 요구하는 키로, 일반적으로 "EMPTY_KEY"로 설정됩니다.
// baseURL은 AIOS API의 v1 엔드포인트를 가리킵니다.
const client = new OpenAI({
apiKey: "EMPTY_KEY",
baseURL: new URL("v1", aios_base_url).href,
});
// AIOS 모델을 사용하여 completion을 생성합니다.
// model 매개변수는 사용할 모델 ID를 지정하고,
// prompt 매개변수는 AI에게 제공할 입력 텍스트입니다
const completions = await client.completions.create({
model: model,
prompt: "Hi",
});
// 응답 본문의 choices[0].text는 AI 모델이 생성한 응답 텍스트입니다.
console.log(completions.choices[0].text);import OpenAI from "openai";
const aios_base_url = "<<aios endpoint-url>>" // AIOS 모델 호출을 위한 aios endpoint-url을 입력합니다.
const model = "<<model>>" // AIOS 모델 호출을 위한 모델 ID를 입력합니다.
// OpenAI 클라이언트를 생성합니다.
// apiKey는 AIOS에서 요구하는 키로, 일반적으로 "EMPTY_KEY"로 설정됩니다.
// baseURL은 AIOS API의 v1 엔드포인트를 가리킵니다.
const client = new OpenAI({
apiKey: "EMPTY_KEY",
baseURL: new URL("v1", aios_base_url).href,
});
// AIOS 모델을 사용하여 completion을 생성합니다.
// model 매개변수는 사용할 모델 ID를 지정하고,
// prompt 매개변수는 AI에게 제공할 입력 텍스트입니다
const completions = await client.completions.create({
model: model,
prompt: "Hi",
});
// 응답 본문의 choices[0].text는 AI 모델이 생성한 응답 텍스트입니다.
console.log(completions.choices[0].text);import { OpenAI } from "@langchain/openai";
const aios_base_url = "<<aios endpoint-url>>" // AIOS 모델 호출을 위한 aios endpoint-url을 입력합니다.
const model = "<<model>>" // AIOS 모델 호출을 위한 모델 ID를 입력합니다.
// LangChain의 OpenAI 클래스를 사용하여 LLM(대형 언어 모델) 인스턴스를 생성합니다.
// model 매개변수는 사용할 모델 ID를 지정합니다.
// apiKey는 AIOS에서 요구하는 키로, 일반적으로 "EMPTY_KEY"로 설정됩니다.
// configuration.baseURL은 AIOS API의 v1 엔드포인트를 가리킵니다.
const llm = new OpenAI({
model: model,
apiKey: "EMPTY_KEY",
configuration: {
baseURL: new URL("v1", aios_base_url).href,
},
});
// LLM에 "Hi"라는 프롬프트를 전달하여 응답을 받습니다.
// invoke 메서드는 모델의 출력을 반환합니다.
const completion = await llm.invoke("Hi");
// 생성된 응답을 출력합니다.
// 이 텍스트는 AI 모델이 생성한 응답입니다.
console.log(completion);import { OpenAI } from "@langchain/openai";
const aios_base_url = "<<aios endpoint-url>>" // AIOS 모델 호출을 위한 aios endpoint-url을 입력합니다.
const model = "<<model>>" // AIOS 모델 호출을 위한 모델 ID를 입력합니다.
// LangChain의 OpenAI 클래스를 사용하여 LLM(대형 언어 모델) 인스턴스를 생성합니다.
// model 매개변수는 사용할 모델 ID를 지정합니다.
// apiKey는 AIOS에서 요구하는 키로, 일반적으로 "EMPTY_KEY"로 설정됩니다.
// configuration.baseURL은 AIOS API의 v1 엔드포인트를 가리킵니다.
const llm = new OpenAI({
model: model,
apiKey: "EMPTY_KEY",
configuration: {
baseURL: new URL("v1", aios_base_url).href,
},
});
// LLM에 "Hi"라는 프롬프트를 전달하여 응답을 받습니다.
// invoke 메서드는 모델의 출력을 반환합니다.
const completion = await llm.invoke("Hi");
// 생성된 응답을 출력합니다.
// 이 텍스트는 AI 모델이 생성한 응답입니다.
console.log(completion);package main
import (
"bytes"
"encoding/json"
"fmt"
"io"
"net/http"
)
const (
aiosBaseUrl = "<<aios endpoint-url>>" // AIOS 모델 호출을 위한 aios endpoint-url을 입력합니다.
model = "<<model>>" // AIOS 모델 호출을 위한 모델 ID를 입력합니다.
)
// POST 요청에 사용될 데이터 구조를 정의합니다.
// Model: 사용할 모델 ID
// Prompt: AI에게 제공할 입력 텍스트
// Stream: 스트리밍 응답 여부 (옵션)
type PostData struct {
Model string `json:"model"`
Prompt string `json:"prompt"`
Stream bool `json:"stream,omitempty"`
}
func main() {
// 요청 데이터를 생성합니다.
data := PostData{
Model: model,
Prompt: "Hi",
}
// 데이터를 JSON 형식으로 마샬링합니다.
jsonData, err := json.Marshal(data)
if err != nil {
panic(err)
}
// AIOS API의 v1/completions 엔드포인트로 POST 요청을 보냅니다.
response, err := http.Post(aiosBaseUrl + "/v1/completions", "application/json", bytes.NewBuffer(jsonData))
if err != nil {
panic(err)
}
defer response.Body.Close()
// 응답 본문을 모두 읽습니다.
body, err := io.ReadAll(response.Body)
if err != nil {
panic(err)
}
var v map[string]interface{}
json.Unmarshal(body, &v)
// 응답에서 choices 배열을 추출합니다.
choices := v["choices"].([]interface{})
// 첫 번째 데이터의 text를 추출합니다.
choice := choices[0].(map[string]interface{})
text := choice["text"]
// AI 모델이 생성한 응답 텍스트를 출력합니다.
fmt.Println(text)
}package main
import (
"context"
"fmt"
"github.com/openai/openai-go"
"github.com/openai/openai-go/option"
"github.com/openai/openai-go/packages/param"
)
const (
aiosBaseUrl = "<<aios endpoint-url>>" // AIOS 모델 호출을 위한 aios endpoint-url을 입력합니다.
model = "<<model>>" // AIOS 모델 호출을 위한 모델 ID를 입력합니다.
)
func main() {
// OpenAI 클라이언트를 생성합니다.
// option.WithBaseURL을 사용하여 AIOS API의 v1 엔드포인트를 설정합니다.
client := openai.NewClient(
option.WithBaseURL(aiosBaseUrl+"/v1"),
)
// AIOS 모델을 사용하여 completion을 생성합니다.
// openai.CompletionNewParams를 사용하여 모델과 프롬프트를 설정합니다.
completion, err := client.Completions.New(context.TODO(), openai.CompletionNewParams{
Model: openai.CompletionNewParamsModel(model),
Prompt: openai.CompletionNewParamsPromptUnion{OfString: param.Opt[string]{Value: "Hi"}},
})
if err != nil {
panic(err)
}
// 응답 본문의 choices[0].text는 AI 모델이 생성한 응답 텍스트입니다.
fmt.Println(completion.Choices[0].Text)
}Response
choices의 text 필드에 모델의 답변이 포함되어 있는 것을 확인할 수 있습니다.
future president of the United States, I hope you’re doing well. As a
stream 요청
stream 기능을 이용하면 모델이 답변을 전부 완성할 때까지 기다리지 않고, 모델이 토큰을 생성할 때마다 토큰 단위로 답변을 받을 수 있습니다.
Request
stream 파라미터값을 True로 입력합니다.
import json
import requests
from urllib.parse import urljoin

aios_base_url = "<<aios endpoint-url>>" # AIOS 모델 호출을 위한 aios endpoint-url을 입력합니다.
model = "<<model>>"                     # AIOS 모델 호출을 위한 모델 ID를 입력합니다.

# 요청 데이터를 구성합니다.
# 여기에는 사용할 모델 ID, 프롬프트(prompt), 그리고 스트리밍 여부(stream)가 포함됩니다.
data = {
  "model": model,
  "prompt": "Hi",
  "stream": True
}

# AIOS API의 v1/completions 엔드포인트로 POST 요청을 보냅니다.
# stream=True를 설정하여 실시간 스트리밍 응답을 받습니다.
response = requests.post(urljoin(aios_base_url, "v1/completions"), json=data, stream=True)

# 모델이 토큰을 생성할 때마다 응답으로 받을 수 있습니다.
# 응답은 각 줄(line)로 분리되어 전송되므로 iter_lines()로 처리합니다.
for line in response.iter_lines():
  if line:
    try:
	  # 'data: ' 접두사를 제거하고 JSON 데이터를 파싱합니다.
      body = json.loads(line[len("data: "):])
	  # 응답 본문의 choices[0].text는 AI 모델이 생성한 응답 텍스트입니다.
      print(body["choices"][0]["text"])
    except:
      pass
import json
import requests
from urllib.parse import urljoin
aios_base_url = "<<aios endpoint-url>>" # AIOS 모델 호출을 위한 aios endpoint-url을 입력합니다.
model = "<<model>>" # AIOS 모델 호출을 위한 모델 ID를 입력합니다.
# 요청 데이터를 구성합니다.
# 여기에는 사용할 모델 ID, 프롬프트(prompt), 그리고 스트리밍 여부(stream)가 포함됩니다.
data = {
"model": model,
"prompt": "Hi",
"stream": True
}
# AIOS API의 v1/completions 엔드포인트로 POST 요청을 보냅니다.
# stream=True를 설정하여 실시간 스트리밍 응답을 받습니다.
response = requests.post(urljoin(aios_base_url, "v1/completions"), json=data, stream=True)
# 모델이 토큰을 생성할 때마다 응답으로 받을 수 있습니다.
# 응답은 각 줄(line)로 분리되어 전송되므로 iter_lines()로 처리합니다.
for line in response.iter_lines():
if line:
try:
# 'data: ' 접두사를 제거하고 JSON 데이터를 파싱합니다.
body = json.loads(line[len("data: "):])
# 응답 본문의 choices[0].text는 AI 모델이 생성한 응답 텍스트입니다.
print(body["choices"][0]["text"])
except:
passfrom openai import OpenAI
from urllib.parse import urljoin
aios_base_url = "<<aios endpoint-url>>" # AIOS 모델 호출을 위한 aios endpoint-url을 입력합니다.
model = "<<model>>" # AIOS 모델 호출을 위한 모델 ID를 입력합니다.
# OpenAI 클라이언트를 생성합니다.
# base_url은 AIOS API의 v1 엔드포인트를 가리키며,
# api_key는 AIOS에서 요구하는 키로, 일반적으로 "EMPTY_KEY"로 설정됩니다.
client = OpenAI(base_url=urljoin(aios_base_url, "v1"), api_key="EMPTY_KEY")
# AIOS 모델을 사용하여 completion을 생성합니다.
# model 매개변수는 사용할 모델 ID를 지정하고,
# prompt 매개변수는 AI에게 제공할 입력 텍스트입니다.
# stream=True를 설정하여 실시간 스트리밍 응답을 받습니다.
response = client.completions.create(
model=model,
prompt="Hi",
stream=True
)
# 모델이 토큰을 생성할 때마다 응답으로 받을 수 있습니다.
# response는 스트림 형태로 전송되므로 반복하여 처리할 수 있습니다.
for chunk in response:
# 각 청크에서 choices[0].text는 AI 모델이 생성한 응답 텍스트입니다.
print(chunk.choices[0].text)from openai import OpenAI
from urllib.parse import urljoin
aios_base_url = "<<aios endpoint-url>>" # AIOS 모델 호출을 위한 aios endpoint-url을 입력합니다.
model = "<<model>>" # AIOS 모델 호출을 위한 모델 ID를 입력합니다.
# OpenAI 클라이언트를 생성합니다.
# base_url은 AIOS API의 v1 엔드포인트를 가리키며,
# api_key는 AIOS에서 요구하는 키로, 일반적으로 "EMPTY_KEY"로 설정됩니다.
client = OpenAI(base_url=urljoin(aios_base_url, "v1"), api_key="EMPTY_KEY")
# AIOS 모델을 사용하여 completion을 생성합니다.
# model 매개변수는 사용할 모델 ID를 지정하고,
# prompt 매개변수는 AI에게 제공할 입력 텍스트입니다.
# stream=True를 설정하여 실시간 스트리밍 응답을 받습니다.
response = client.completions.create(
model=model,
prompt="Hi",
stream=True
)
# 모델이 토큰을 생성할 때마다 응답으로 받을 수 있습니다.
# response는 스트림 형태로 전송되므로 반복하여 처리할 수 있습니다.
for chunk in response:
# 각 청크에서 choices[0].text는 AI 모델이 생성한 응답 텍스트입니다.
print(chunk.choices[0].text)from langchain_openai import OpenAI
from urllib.parse import urljoin
aios_base_url = "<<aios endpoint-url>>" # AIOS 모델 호출을 위한 aios endpoint-url을 입력합니다.
model = "<<model>>" # AIOS 모델 호출을 위한 모델 ID를 입력합니다.
# LangChain의 OpenAI 클래스를 사용하여 LLM(대형 언어 모델) 인스턴스를 생성합니다.
# base_url은 AIOS API의 v1 엔드포인트를 가리키며,
# api_key는 AIOS에서 요구하는 키로, 일반적으로 "EMPTY_KEY"로 설정됩니다.
# model 매개변수는 사용할 모델 ID를 지정합니다.
llm = OpenAI(
base_url=urljoin(aios_base_url, "v1"),
api_key="EMPTY_KEY",
model=model
)
# LLM에 "Hi"라는 프롬프트를 전달하여 스트리밍 응답을 받습니다.
# stream 메서드는 실시간으로 토큰을 생성하는 스트림을 반환합니다.
response = llm.stream("Hi")
# 모델이 토큰을 생성할 때마다 응답으로 받을 수 있습니다.
# response는 스트림 형태로 전송되므로 반복하여 처리할 수 있습니다.
for chunk in response:
# 각 청크를 출력합니다.
# 이 청크는 AI 모델이 생성한 응답 토큰입니다.
print(chunk)from langchain_openai import OpenAI
from urllib.parse import urljoin
aios_base_url = "<<aios endpoint-url>>" # AIOS 모델 호출을 위한 aios endpoint-url을 입력합니다.
model = "<<model>>" # AIOS 모델 호출을 위한 모델 ID를 입력합니다.
# LangChain의 OpenAI 클래스를 사용하여 LLM(대형 언어 모델) 인스턴스를 생성합니다.
# base_url은 AIOS API의 v1 엔드포인트를 가리키며,
# api_key는 AIOS에서 요구하는 키로, 일반적으로 "EMPTY_KEY"로 설정됩니다.
# model 매개변수는 사용할 모델 ID를 지정합니다.
llm = OpenAI(
base_url=urljoin(aios_base_url, "v1"),
api_key="EMPTY_KEY",
model=model
)
# LLM에 "Hi"라는 프롬프트를 전달하여 스트리밍 응답을 받습니다.
# stream 메서드는 실시간으로 토큰을 생성하는 스트림을 반환합니다.
response = llm.stream("Hi")
# 모델이 토큰을 생성할 때마다 응답으로 받을 수 있습니다.
# response는 스트림 형태로 전송되므로 반복하여 처리할 수 있습니다.
for chunk in response:
# 각 청크를 출력합니다.
# 이 청크는 AI 모델이 생성한 응답 토큰입니다.
print(chunk)const aios_base_url = "<<aios endpoint-url>>" // AIOS 모델 호출을 위한 aios endpoint-url을 입력합니다.
const model = "<<model>>" // AIOS 모델 호출을 위한 모델 ID를 입력합니다.
// 요청 데이터를 구성합니다.
// 여기에는 사용할 모델 ID, 프롬프트(prompt), 그리고 스트리밍 여부(stream)가 포함됩니다.
const data = {
model: model,
prompt: "Hi",
stream: true,
};
// AIOS API의 v1/completions 엔드포인트 URL을 생성합니다.
let url = new URL("/v1/completions", aios_base_url);
// AIOS API에 POST 요청을 보냅니다.
// stream: true를 설정하여 실시간 스트리밍 응답을 받습니다.
const response = await fetch(url, {
method: "POST",
headers: {
"Content-Type": "application/json",
},
body: JSON.stringify(data),
});
// 모델이 토큰을 생성할 때마다 응답으로 받을 수 있습니다.
// 응답 본문을 텍스트 디코더 스트림으로 변환하여 읽습니다.
const reader = response.body.pipeThrough(new TextDecoderStream()).getReader();
let buf = "";
while (true) {
const { value, done } = await reader.read();
if (done) break;
// 받은 데이터를 버퍼에 추가합니다.
buf += value;
let sep;
// 버퍼에서 줄바꿈 문자(\n\n)를 찾아서 데이터를 분리합니다.
while ((sep = buf.indexOf("\n\n")) >= 0) {
const data = buf.slice(0, sep);
buf = buf.slice(sep + 2);
// 각 줄을 처리합니다.
for (const rawLine of data.split("\n")) {
const line = rawLine.trim();
if (!line.startsWith("data: ")) continue;
// "data: " 접두사를 제거하고 JSON 데이터를 추출합니다.
const payload = line.slice("data: ".length).trim();
if (payload === "[DONE]") break;
// JSON 데이터를 파싱합니다.
const json = JSON.parse(payload);
// choices[0].text는 AI 모델이 생성한 응답 텍스트입니다.
console.log(json.choices[0].text);
}
}
}const aios_base_url = "<<aios endpoint-url>>" // AIOS 모델 호출을 위한 aios endpoint-url을 입력합니다.
const model = "<<model>>" // AIOS 모델 호출을 위한 모델 ID를 입력합니다.
// 요청 데이터를 구성합니다.
// 여기에는 사용할 모델 ID, 프롬프트(prompt), 그리고 스트리밍 여부(stream)가 포함됩니다.
const data = {
model: model,
prompt: "Hi",
stream: true,
};
// AIOS API의 v1/completions 엔드포인트 URL을 생성합니다.
let url = new URL("/v1/completions", aios_base_url);
// AIOS API에 POST 요청을 보냅니다.
// stream: true를 설정하여 실시간 스트리밍 응답을 받습니다.
const response = await fetch(url, {
method: "POST",
headers: {
"Content-Type": "application/json",
},
body: JSON.stringify(data),
});
// 모델이 토큰을 생성할 때마다 응답으로 받을 수 있습니다.
// 응답 본문을 텍스트 디코더 스트림으로 변환하여 읽습니다.
const reader = response.body.pipeThrough(new TextDecoderStream()).getReader();
let buf = "";
while (true) {
const { value, done } = await reader.read();
if (done) break;
// 받은 데이터를 버퍼에 추가합니다.
buf += value;
let sep;
// 버퍼에서 줄바꿈 문자(\n\n)를 찾아서 데이터를 분리합니다.
while ((sep = buf.indexOf("\n\n")) >= 0) {
const data = buf.slice(0, sep);
buf = buf.slice(sep + 2);
// 각 줄을 처리합니다.
for (const rawLine of data.split("\n")) {
const line = rawLine.trim();
if (!line.startsWith("data: ")) continue;
// "data: " 접두사를 제거하고 JSON 데이터를 추출합니다.
const payload = line.slice("data: ".length).trim();
if (payload === "[DONE]") break;
// JSON 데이터를 파싱합니다.
const json = JSON.parse(payload);
// choices[0].text는 AI 모델이 생성한 응답 텍스트입니다.
console.log(json.choices[0].text);
}
}
}import OpenAI from "openai";
const aios_base_url = "<<aios endpoint-url>>" // AIOS 모델 호출을 위한 aios endpoint-url을 입력합니다.
const model = "<<model>>" // AIOS 모델 호출을 위한 모델 ID를 입력합니다.
// OpenAI 클라이언트를 생성합니다.
// apiKey는 AIOS에서 요구하는 키로, 일반적으로 "EMPTY_KEY"로 설정됩니다.
// baseURL은 AIOS API의 v1 엔드포인트를 가리킵니다.
const client = new OpenAI({
apiKey: "EMPTY_KEY",
baseURL: new URL("v1", aios_base_url).href,
});
// AIOS 모델을 사용하여 completion을 생성합니다.
// model 매개변수는 사용할 모델 ID를 지정하고,
// prompt 매개변수는 AI에게 제공할 입력 텍스트입니다.
// stream: true를 설정하여 실시간 스트리밍 응답을 받습니다.
const completions = await client.completions.create({
model: model,
prompt: "Hi",
stream: true,
});
// 모델이 토큰을 생성할 때마다 응답으로 받을 수 있습니다.
// for await...of 루프를 사용하여 스트림 이벤트를 순차적으로 처리합니다.
for await (const event of completions) {
// 각 이벤트의 choices[0].text는 AI 모델이 생성한 응답 텍스트입니다.
console.log(event.choices[0].text);
}import { OpenAI } from "@langchain/openai";
const aios_base_url = "<<aios endpoint-url>>" // AIOS 모델 호출을 위한 aios endpoint-url을 입력합니다.
const model = "<<model>>" // AIOS 모델 호출을 위한 모델 ID를 입력합니다.
// LangChain의 OpenAI 클래스를 사용하여 LLM(대형 언어 모델) 인스턴스를 생성합니다.
// model 매개변수는 사용할 모델 ID를 지정합니다.
// apiKey는 AIOS에서 요구하는 키로, 일반적으로 "EMPTY_KEY"로 설정됩니다.
// configuration.baseURL은 AIOS API의 v1 엔드포인트를 가리킵니다.
const llm = new OpenAI({
model: model,
apiKey: "EMPTY_KEY",
configuration: {
baseURL: new URL("v1", aios_base_url).href,
},
});
// LLM에 "Hi"라는 프롬프트를 전달하여 스트리밍 응답을 받습니다.
// stream 메서드는 실시간으로 토큰을 생성하는 스트림을 반환합니다.
const completion = await llm.stream("Hi");
// 모델이 토큰을 생성할 때마다 응답으로 받을 수 있습니다.
// for await...of 루프를 사용하여 스트림 청크를 순차적으로 처리합니다.
for await (const chunk of completion) {
// 각 청크를 출력합니다.
// 이 청크는 AI 모델이 생성한 응답 토큰입니다.
console.log(chunk);
}package main
import (
"bufio"
"bytes"
"encoding/json"
"fmt"
"net/http"
)
const (
aiosBaseUrl = "<<aios endpoint-url>>" // AIOS 모델 호출을 위한 aios endpoint-url을 입력합니다.
model = "<<model>>" // AIOS 모델 호출을 위한 모델 ID를 입력합니다.
)
// POST 요청에 사용될 데이터 구조를 정의합니다.
// Model: 사용할 모델 ID
// Prompt: AI에게 제공할 입력 텍스트
// Stream: 스트리밍 응답 여부 (옵션)
type PostData struct {
Model string `json:"model"`
Prompt string `json:"prompt"`
Stream bool `json:"stream,omitempty"`
}
func main() {
// 요청 데이터를 생성합니다.
// Stream: true를 설정하여 실시간 스트리밍 응답을 받습니다.
data := PostData{
Model: model,
Prompt: "Hi",
Stream: true,
}
// 데이터를 JSON 형식으로 마샬링합니다.
jsonData, err := json.Marshal(data)
if err != nil {
panic(err)
}
// AIOS API의 v1/completions 엔드포인트로 POST 요청을 보냅니다.
response, err := http.Post(aiosBaseUrl+"/v1/completions", "application/json", bytes.NewBuffer(jsonData))
if err != nil {
panic(err)
}
defer response.Body.Close()
// 모델이 토큰을 생성할 때마다 응답으로 받을 수 있습니다.
// HTTP 응답 본문을 스캔하여 줄 단위로 처리합니다.
var v map[string]interface{}
scanner := bufio.NewScanner(response.Body)
for scanner.Scan() {
line := bytes.TrimSpace(scanner.Bytes())
// 줄이 "data: "로 시작하지 않으면 건너뜁니다.
if !bytes.HasPrefix(line, []byte("data: ")) {
continue
}
// "data: " 접두사를 제거합니다.
payload := bytes.TrimPrefix(line, []byte("data: "))
// payload가 "[DONE]"이라면 스트리밍을 종료합니다.
if bytes.Equal(payload, []byte("[DONE]")) {
break
}
// JSON 데이터를 파싱합니다.
json.Unmarshal(payload, &v)
// 응답에서 choices 배열을 추출합니다.
choices := v["choices"].([]interface{})
// 첫 번째 데이터를 추출합니다.
choice := choices[0].(map[string]interface{})
// AI 모델이 생성한 응답 토큰을 추출합니다.
text := choice["text"]
fmt.Println(text)
}
}package main
import (
"context"
"fmt"
"github.com/openai/openai-go"
"github.com/openai/openai-go/option"
"github.com/openai/openai-go/packages/param"
)
const (
aiosBaseUrl = "<<aios endpoint-url>>" // AIOS 모델 호출을 위한 aios endpoint-url을 입력합니다.
model = "<<model>>" // AIOS 모델 호출을 위한 모델 ID를 입력합니다.
)
func main() {
// OpenAI 클라이언트를 생성합니다.
// option.WithBaseURL을 사용하여 AIOS API의 v1 엔드포인트를 설정합니다.
client := openai.NewClient(
option.WithBaseURL(aiosBaseUrl + "/v1"),
)
// AIOS 모델을 사용하여 스트리밍 completion을 생성합니다.
// openai.CompletionNewParams를 사용하여 모델과 프롬프트를 설정합니다.
completion := client.Completions.NewStreaming(context.TODO(), openai.CompletionNewParams{
Model: openai.CompletionNewParamsModel(model),
Prompt: openai.CompletionNewParamsPromptUnion{OfString: param.Opt[string]{Value: "Hi"}},
})
// 모델이 토큰을 생성할 때마다 응답으로 받을 수 있습니다.
// Next() 메서드는 다음 청크가 있을 때 true를 반환합니다.
for completion.Next() {
// 현재 청크의 choices 슬라이스를 가져옵니다.
chunk := completion.Current().Choices
// choices[0].text는 AI 모델이 생성한 응답 텍스트입니다.
fmt.Println(chunk[0].Text)
}
}Response
토큰마다 답변이 생성되고, 각 토큰은 choices의 text 필드에서 확인할 수 있습니다.
 I
'm
 looking
 for
 a
 way
 to
 check
 if
 a
 specific
 process
 is
 running
 on
대화 완성 API
대화 완성 API는 순서대로 나열된 메시지 목록(맥락)을 입력받으면 모델이 다음 순서로 적합한 메시지를 생성하여 응답합니다.
non-stream 요청
Request
텍스트 메시지로만 이루어진 경우, 다음과 같이 호출할 수 있습니다.
import json
import requests
from urllib.parse import urljoin

aios_base_url = "<<aios endpoint-url>>" # AIOS 모델 호출을 위한 aios endpoint-url을 입력합니다.
model = "<<model>>"                     # AIOS 모델 호출을 위한 모델 ID를 입력합니다.

# 요청 데이터를 구성합니다.
# 여기에는 사용할 모델 ID와 메시지 목록(messages)가 포함됩니다.
# 메시지 목록은 시스템 메시지와 사용자 메시지를 포함합니다.
data = {
  "model": model,
  "messages": [
    {"role": "system", "content": "You are a helpful assistant."},
    {"role": "user", "content": "Hi"}
  ]
}

# AIOS API의 v1/chat/completions 엔드포인트로 POST 요청을 보냅니다.
response = requests.post(urljoin(aios_base_url, "v1/chat/completions"), json=data)

# 응답 본문을 JSON 형식으로 파싱합니다.
body = json.loads(response.text)
# choices[0].message는 AI 모델이 생성한 응답입니다.
print(body["choices"][0]["message"])
import json
import requests
from urllib.parse import urljoin
aios_base_url = "<<aios endpoint-url>>" # AIOS 모델 호출을 위한 aios endpoint-url을 입력합니다.
model = "<<model>>" # AIOS 모델 호출을 위한 모델 ID를 입력합니다.
# 요청 데이터를 구성합니다.
# 여기에는 사용할 모델 ID와 메시지 목록(messages)가 포함됩니다.
# 메시지 목록은 시스템 메시지와 사용자 메시지를 포함합니다.
data = {
"model": model,
"messages": [
{"role": "system", "content": "You are a helpful assistant."},
{"role": "user", "content": "Hi"}
]
}
# AIOS API의 v1/chat/completions 엔드포인트로 POST 요청을 보냅니다.
response = requests.post(urljoin(aios_base_url, "v1/chat/completions"), json=data)
# 응답 본문을 JSON 형식으로 파싱합니다.
body = json.loads(response.text)
# choices[0].message는 AI 모델이 생성한 응답입니다.
print(body["choices"][0]["message"])from openai import OpenAI
from urllib.parse import urljoin
aios_base_url = "<<aios endpoint-url>>" # AIOS 모델 호출을 위한 aios endpoint-url을 입력합니다.
model = "<<model>>" # AIOS 모델 호출을 위한 모델 ID를 입력합니다.
# OpenAI 클라이언트를 생성합니다.
# base_url은 AIOS API의 v1 엔드포인트를 가리키며,
# api_key는 AIOS에서 요구하는 키로, 일반적으로 "EMPTY_KEY"로 설정됩니다.
client = OpenAI(base_url=urljoin(aios_base_url, "v1"), api_key="EMPTY_KEY")
# AIOS 모델을 사용하여 채팅 completion을 생성합니다.
# model 매개변수는 사용할 모델 ID를 지정합니다.
# messages 매개변수는 시스템 메시지와 사용자 메시지를 포함하는 메시지 목록입니다.
response = client.chat.completions.create(
model=model,
messages=[
{"role": "system", "content": "You are a helpful assistant."},
{"role": "user", "content": "Hi"}
]
)
# 생성된 응답에서 choices[0].message를 출력합니다.
print(response.choices[0].message.model_dump())from openai import OpenAI
from urllib.parse import urljoin
aios_base_url = "<<aios endpoint-url>>" # AIOS 모델 호출을 위한 aios endpoint-url을 입력합니다.
model = "<<model>>" # AIOS 모델 호출을 위한 모델 ID를 입력합니다.
# OpenAI 클라이언트를 생성합니다.
# base_url은 AIOS API의 v1 엔드포인트를 가리키며,
# api_key는 AIOS에서 요구하는 키로, 일반적으로 "EMPTY_KEY"로 설정됩니다.
client = OpenAI(base_url=urljoin(aios_base_url, "v1"), api_key="EMPTY_KEY")
# AIOS 모델을 사용하여 채팅 completion을 생성합니다.
# model 매개변수는 사용할 모델 ID를 지정합니다.
# messages 매개변수는 시스템 메시지와 사용자 메시지를 포함하는 메시지 목록입니다.
response = client.chat.completions.create(
model=model,
messages=[
{"role": "system", "content": "You are a helpful assistant."},
{"role": "user", "content": "Hi"}
]
)
# 생성된 응답에서 choices[0].message를 출력합니다.
print(response.choices[0].message.model_dump())from langchain_openai import ChatOpenAI
from urllib.parse import urljoin
aios_base_url = "<<aios endpoint-url>>" # AIOS 모델 호출을 위한 aios endpoint-url을 입력합니다.
model = "<<model>>" # AIOS 모델 호출을 위한 모델 ID를 입력합니다.
# LangChain의 ChatOpenAI 클래스를 사용하여 채팅 LLM(대형 언어 모델) 인스턴스를 생성합니다.
# base_url은 AIOS API의 v1 엔드포인트를 가리키며,
# api_key는 AIOS에서 요구하는 키로, 일반적으로 "EMPTY_KEY"로 설정됩니다.
# model 매개변수는 사용할 모델 ID를 지정합니다.
chat_llm = ChatOpenAI(
base_url=urljoin(aios_base_url, "v1"),
api_key="EMPTY_KEY",
model=model
)
# 채팅 메시지 목록을 구성합니다.
# 시스템 메시지와 사용자 메시지를 포함합니다.
messages = [
("system", "You are a helpful assistant."),
("human", "Hi"),
]
# 채팅 LLM에 메시지 목록을 전달하여 응답을 받습니다.
# invoke 메서드는 모델의 출력을 반환합니다.
chat_completion = chat_llm.invoke(messages)
# 생성된 응답을 출력합니다.
print(chat_completion.model_dump())from langchain_openai import ChatOpenAI
from urllib.parse import urljoin
aios_base_url = "<<aios endpoint-url>>" # AIOS 모델 호출을 위한 aios endpoint-url을 입력합니다.
model = "<<model>>" # AIOS 모델 호출을 위한 모델 ID를 입력합니다.
# LangChain의 ChatOpenAI 클래스를 사용하여 채팅 LLM(대형 언어 모델) 인스턴스를 생성합니다.
# base_url은 AIOS API의 v1 엔드포인트를 가리키며,
# api_key는 AIOS에서 요구하는 키로, 일반적으로 "EMPTY_KEY"로 설정됩니다.
# model 매개변수는 사용할 모델 ID를 지정합니다.
chat_llm = ChatOpenAI(
base_url=urljoin(aios_base_url, "v1"),
api_key="EMPTY_KEY",
model=model
)
# 채팅 메시지 목록을 구성합니다.
# 시스템 메시지와 사용자 메시지를 포함합니다.
messages = [
("system", "You are a helpful assistant."),
("human", "Hi"),
]
# 채팅 LLM에 메시지 목록을 전달하여 응답을 받습니다.
# invoke 메서드는 모델의 출력을 반환합니다.
chat_completion = chat_llm.invoke(messages)
# 생성된 응답을 출력합니다.
print(chat_completion.model_dump())const aios_base_url = "<<aios endpoint-url>>"; // AIOS 모델 호출을 위한 aios endpoint-url을 입력합니다.
const model = "<<model>>"; // AIOS 모델 호출을 위한 모델 ID를 입력합니다.
// 요청 데이터를 구성합니다.
// 여기에는 사용할 모델 ID와 메시지 목록(messages)가 포함됩니다.
// 메시지 목록은 시스템 메시지와 사용자 메시지를 포함합니다.
const data = {
model: model,
messages: [
{ role: "system", content: "You are a helpful assistant." },
{ role: "user", content: "Hi" },
],
};
// AIOS API의 v1/chat/completions 엔드포인트 URL을 생성합니다.
let url = new URL("/v1/chat/completions", aios_base_url);
// AIOS API에 POST 요청을 보냅니다.
const response = await fetch(url, {
method: "POST",
headers: {
"Content-Type": "application/json",
},
body: JSON.stringify(data),
});
// 응답 본문을 JSON 형식으로 파싱합니다.
const body = await response.json();
// 생성된 응답에서 choices[0].message를 출력합니다.
console.log(body.choices[0].message);const aios_base_url = "<<aios endpoint-url>>"; // AIOS 모델 호출을 위한 aios endpoint-url을 입력합니다.
const model = "<<model>>"; // AIOS 모델 호출을 위한 모델 ID를 입력합니다.
// 요청 데이터를 구성합니다.
// 여기에는 사용할 모델 ID와 메시지 목록(messages)가 포함됩니다.
// 메시지 목록은 시스템 메시지와 사용자 메시지를 포함합니다.
const data = {
model: model,
messages: [
{ role: "system", content: "You are a helpful assistant." },
{ role: "user", content: "Hi" },
],
};
// AIOS API의 v1/chat/completions 엔드포인트 URL을 생성합니다.
let url = new URL("/v1/chat/completions", aios_base_url);
// AIOS API에 POST 요청을 보냅니다.
const response = await fetch(url, {
method: "POST",
headers: {
"Content-Type": "application/json",
},
body: JSON.stringify(data),
});
// 응답 본문을 JSON 형식으로 파싱합니다.
const body = await response.json();
// 생성된 응답에서 choices[0].message를 출력합니다.
console.log(body.choices[0].message);import OpenAI from "openai";
const aios_base_url = "<<aios endpoint-url>>"; // AIOS 모델 호출을 위한 aios endpoint-url을 입력합니다.
const model = "<<model>>"; // AIOS 모델 호출을 위한 모델 ID를 입력합니다.
// OpenAI 클라이언트를 생성합니다.
// apiKey는 AIOS에서 요구하는 키로, 일반적으로 "EMPTY_KEY"로 설정됩니다.
// baseURL은 AIOS API의 v1 엔드포인트를 가리킵니다.
const client = new OpenAI({
apiKey: "EMPTY_KEY",
baseURL: new URL("v1", aios_base_url).href,
});
// AIOS 모델을 사용하여 채팅 completion을 생성합니다.
// model 매개변수는 사용할 모델 ID를 지정합니다.
// messages 매개변수는 시스템 메시지와 사용자 메시지를 포함하는 메시지 목록입니다.
const response = await client.chat.completions.create({
model: model,
messages: [
{ role: "system", content: "You are a helpful assistant." },
{ role: "user", content: "Hi" },
],
});
// 생성된 응답에서 choices[0].message를 출력합니다.
console.log(response.choices[0].message);import OpenAI from "openai";
const aios_base_url = "<<aios endpoint-url>>"; // AIOS 모델 호출을 위한 aios endpoint-url을 입력합니다.
const model = "<<model>>"; // AIOS 모델 호출을 위한 모델 ID를 입력합니다.
// OpenAI 클라이언트를 생성합니다.
// apiKey는 AIOS에서 요구하는 키로, 일반적으로 "EMPTY_KEY"로 설정됩니다.
// baseURL은 AIOS API의 v1 엔드포인트를 가리킵니다.
const client = new OpenAI({
apiKey: "EMPTY_KEY",
baseURL: new URL("v1", aios_base_url).href,
});
// AIOS 모델을 사용하여 채팅 completion을 생성합니다.
// model 매개변수는 사용할 모델 ID를 지정합니다.
// messages 매개변수는 시스템 메시지와 사용자 메시지를 포함하는 메시지 목록입니다.
const response = await client.chat.completions.create({
model: model,
messages: [
{ role: "system", content: "You are a helpful assistant." },
{ role: "user", content: "Hi" },
],
});
// 생성된 응답에서 choices[0].message를 출력합니다.
console.log(response.choices[0].message);import { HumanMessage, SystemMessage } from "@langchain/core/messages";
import { ChatOpenAI } from "@langchain/openai";
const aios_base_url = "<<aios endpoint-url>>"; // AIOS 모델 호출을 위한 aios endpoint-url을 입력합니다.
const model = "<<model>>"; // AIOS 모델 호출을 위한 모델 ID를 입력합니다.
// LangChain의 ChatOpenAI 클래스를 사용하여 채팅 LLM(대형 언어 모델) 인스턴스를 생성합니다.
// model 매개변수는 사용할 모델 ID를 지정합니다.
// apiKey는 AIOS에서 요구하는 키로, 일반적으로 "EMPTY_KEY"로 설정됩니다.
// configuration.baseURL은 AIOS API의 v1 엔드포인트를 가리킵니다.
const llm = new ChatOpenAI({
model: model,
apiKey: "EMPTY_KEY",
configuration: {
baseURL: new URL("v1", aios_base_url).href,
},
});
// 채팅 메시지 목록을 구성합니다.
// SystemMessage와 HumanMessage 객체를 사용하여 시스템 메시지와 사용자 메시지를 포함합니다.
const messages = [
new SystemMessage("You are a helpful assistant."),
new HumanMessage("Hi"),
];
// 채팅 LLM에 메시지 목록을 전달하여 응답을 받습니다.
// invoke 메서드는 모델의 출력을 반환합니다.
const response = await llm.invoke(messages);
// 생성된 응답의 내용(content)을 출력합니다.
// 이 내용은 AI 모델이 생성한 응답 텍스트입니다.
console.log(response.content);import { HumanMessage, SystemMessage } from "@langchain/core/messages";
import { ChatOpenAI } from "@langchain/openai";
const aios_base_url = "<<aios endpoint-url>>"; // AIOS 모델 호출을 위한 aios endpoint-url을 입력합니다.
const model = "<<model>>"; // AIOS 모델 호출을 위한 모델 ID를 입력합니다.
// LangChain의 ChatOpenAI 클래스를 사용하여 채팅 LLM(대형 언어 모델) 인스턴스를 생성합니다.
// model 매개변수는 사용할 모델 ID를 지정합니다.
// apiKey는 AIOS에서 요구하는 키로, 일반적으로 "EMPTY_KEY"로 설정됩니다.
// configuration.baseURL은 AIOS API의 v1 엔드포인트를 가리킵니다.
const llm = new ChatOpenAI({
model: model,
apiKey: "EMPTY_KEY",
configuration: {
baseURL: new URL("v1", aios_base_url).href,
},
});
// 채팅 메시지 목록을 구성합니다.
// SystemMessage와 HumanMessage 객체를 사용하여 시스템 메시지와 사용자 메시지를 포함합니다.
const messages = [
new SystemMessage("You are a helpful assistant."),
new HumanMessage("Hi"),
];
// 채팅 LLM에 메시지 목록을 전달하여 응답을 받습니다.
// invoke 메서드는 모델의 출력을 반환합니다.
const response = await llm.invoke(messages);
// 생성된 응답의 내용(content)을 출력합니다.
// 이 내용은 AI 모델이 생성한 응답 텍스트입니다.
console.log(response.content);package main
import (
"bytes"
"encoding/json"
"fmt"
"io"
"net/http"
)
const (
aiosBaseUrl = "<<aios endpoint-url>>" // AIOS 모델 호출을 위한 aios endpoint-url을 입력합니다.
model = "<<model>>" // AIOS 모델 호출을 위한 모델 ID를 입력합니다.
)
// 메시지 구조를 정의합니다.
// Role: 메시지 역할 (예: system, user)
// Content: 메시지 내용
type Message struct {
Role string `json:"role"`
Content string `json:"content"`
}
// POST 요청에 사용될 데이터 구조를 정의합니다.
// Model: 사용할 모델 ID
// Messages: 메시지 목록
// Stream: 스트리밍 응답 여부 (옵션)
type PostData struct {
Model string `json:"model"`
Messages []Message `json:"messages"`
Stream bool `json:"stream,omitempty"`
}
func main() {
// 요청 데이터를 생성합니다.
// 메시지 목록에는 시스템 메시지와 사용자 메시지가 포함됩니다.
data := PostData{
Model: model,
Messages: []Message{
{
Role: "system",
Content: "You are a helpful assistant.",
},
{
Role: "user",
Content: "Hi",
},
},
}
// 데이터를 JSON 형식으로 마샬링합니다.
jsonData, err := json.Marshal(data)
if err != nil {
panic(err)
}
// AIOS API의 v1/chat/completions 엔드포인트로 POST 요청을 보냅니다.
response, err := http.Post(aiosBaseUrl+"/v1/chat/completions", "application/json", bytes.NewBuffer(jsonData))
if err != nil {
panic(err)
}
defer response.Body.Close()
// 응답 본문을 모두 읽습니다.
body, err := io.ReadAll(response.Body)
if err != nil {
panic(err)
}
// 응답 본문을 맵 형식으로 언마샬링합니다.
var v map[string]interface{}
json.Unmarshal(body, &v)
// 응답에서 choices 배열을 추출합니다.
choices := v["choices"].([]interface{})
// 첫 번째 데이터를 추출합니다.
choice := choices[0].(map[string]interface{})
// AI 모델이 생성한 응답 메시지를 JSON 형식으로 포맷하여 출력합니다.
message, err := json.MarshalIndent(choice["message"], "", " ")
if err != nil {
panic(err)
}
fmt.Println(string(message))
}package main
import (
"context"
"fmt"
"github.com/openai/openai-go"
"github.com/openai/openai-go/option"
)
const (
aiosBaseUrl = "<<aios endpoint-url>>" // AIOS 모델 호출을 위한 aios endpoint-url을 입력합니다.
model = "<<model>>" // AIOS 모델 호출을 위한 모델 ID를 입력합니다.
)
func main() {
// OpenAI 클라이언트를 생성합니다.
// option.WithBaseURL을 사용하여 AIOS API의 v1 엔드포인트를 설정합니다.
client := openai.NewClient(
option.WithBaseURL(aiosBaseUrl + "/v1"),
)
// AIOS 모델을 사용하여 채팅 completion을 생성합니다.
// openai.ChatCompletionNewParams를 사용하여 모델과 메시지 목록을 설정합니다.
// 메시지 목록에는 시스템 메시지와 사용자 메시지가 포함됩니다.
response, err := client.Chat.Completions.New(context.TODO(), openai.ChatCompletionNewParams{
Model: model,
Messages: []openai.ChatCompletionMessageParamUnion{
openai.SystemMessage("You are a helpful assistant."),
openai.UserMessage("Hi"),
},
})
if err != nil {
panic(err)
}
// AI 모델이 생성한 응답 메시지를 JSON 형식으로 포맷하여 출력합니다.
fmt.Println(response.Choices[0].Message.RawJSON())
}Response
choices의 message에서 모델의 답변 내용을 확인할 수 있습니다.
{
  'annotations': None,
  'audio': None,
  'content': 'Hello! How can I help you today?',
  'function_call': None,
  'reasoning_content': 'The user says "Hi". We respond politely.',
  'refusal': None,
  'role': 'assistant',
  'tool_calls': []
}
stream 요청
stream을 이용하여 모델이 모든 답변을 생성할 때까지 기다렸다가 한번에 응답을 받지 않고, 모델이 생성하는 토큰마다 응답을 받아 처리할 수 있습니다.
Request
stream 파라미터값을 True로 입력합니다.
import json
import requests
from urllib.parse import urljoin

aios_base_url = "<<aios endpoint-url>>" # AIOS 모델 호출을 위한 aios endpoint-url을 입력합니다.
model = "<<model>>"                     # AIOS 모델 호출을 위한 모델 ID를 입력합니다.

# 요청 데이터를 구성합니다.
# 여기에는 사용할 모델 ID, 메시지 목록(messages), 그리고 스트리밍 여부(stream)가 포함됩니다.
# 메시지 목록은 시스템 메시지와 사용자 메시지를 포함합니다.
data = {
  "model": model,
  "messages": [
    {"role": "system", "content": "You are a helpful assistant."},
    {"role": "user", "content": "Hi"}
  ],
  "stream": True
}

# AIOS API의 v1/chat/completions 엔드포인트로 POST 요청을 보냅니다.
# stream=True를 설정하여 실시간 스트리밍 응답을 받습니다.
response = requests.post(urljoin(aios_base_url, "v1/chat/completions"), json=data, stream=True)

# 모델이 토큰을 생성할 때마다 응답으로 받을 수 있습니다.
# 응답은 각 줄(line)로 분리되어 전송되므로 iter_lines()로 처리합니다.
for line in response.iter_lines():
  if line:
    try:
	  # 'data: ' 접두사를 제거하고 JSON 데이터를 파싱합니다.
      body = json.loads(line[len("data: "):])
	  # 델타(choices[0].delta)를 출력합니다.
      # 델타는 AI 모델이 생성한 응답 토큰입니다.
      print(body["choices"][0]["delta"])
    except:
      pass
import json
import requests
from urllib.parse import urljoin
aios_base_url = "<<aios endpoint-url>>" # AIOS 모델 호출을 위한 aios endpoint-url을 입력합니다.
model = "<<model>>" # AIOS 모델 호출을 위한 모델 ID를 입력합니다.
# 요청 데이터를 구성합니다.
# 여기에는 사용할 모델 ID, 메시지 목록(messages), 그리고 스트리밍 여부(stream)가 포함됩니다.
# 메시지 목록은 시스템 메시지와 사용자 메시지를 포함합니다.
data = {
"model": model,
"messages": [
{"role": "system", "content": "You are a helpful assistant."},
{"role": "user", "content": "Hi"}
],
"stream": True
}
# AIOS API의 v1/chat/completions 엔드포인트로 POST 요청을 보냅니다.
# stream=True를 설정하여 실시간 스트리밍 응답을 받습니다.
response = requests.post(urljoin(aios_base_url, "v1/chat/completions"), json=data, stream=True)
# 모델이 토큰을 생성할 때마다 응답으로 받을 수 있습니다.
# 응답은 각 줄(line)로 분리되어 전송되므로 iter_lines()로 처리합니다.
for line in response.iter_lines():
if line:
try:
# 'data: ' 접두사를 제거하고 JSON 데이터를 파싱합니다.
body = json.loads(line[len("data: "):])
# 델타(choices[0].delta)를 출력합니다.
# 델타는 AI 모델이 생성한 응답 토큰입니다.
print(body["choices"][0]["delta"])
except:
passfrom openai import OpenAI
from urllib.parse import urljoin
aios_base_url = "<<aios endpoint-url>>" # AIOS 모델 호출을 위한 aios endpoint-url을 입력합니다.
model = "<<model>>" # AIOS 모델 호출을 위한 모델 ID를 입력합니다.
# OpenAI 클라이언트를 생성합니다.
# base_url은 AIOS API의 v1 엔드포인트를 가리키며,
# api_key는 AIOS에서 요구하는 키로, 일반적으로 "EMPTY_KEY"로 설정됩니다.
client = OpenAI(base_url=urljoin(aios_base_url, "v1"), api_key="EMPTY_KEY")
# AIOS 모델을 사용하여 채팅 completion을 생성합니다.
# model 매개변수는 사용할 모델 ID를 지정합니다.
# messages 매개변수는 시스템 메시지와 사용자 메시지를 포함하는 메시지 목록입니다.
# stream=True를 설정하여 실시간 스트리밍 응답을 받습니다.
response = client.chat.completions.create(
model=model,
messages=[
{"role": "system", "content": "You are a helpful assistant."},
{"role": "user", "content": "Hi"}
],
stream=True
)
# 모델이 토큰을 생성할 때마다 응답으로 받을 수 있습니다.
# response는 스트림 형태로 전송되므로 반복하여 처리할 수 있습니다.
for chunk in response:
# 델타(choices[0].delta)를 출력합니다.
# 델타는 AI 모델이 생성한 응답 토큰입니다.
print(chunk.choices[0].delta.model_dump())from openai import OpenAI
from urllib.parse import urljoin
aios_base_url = "<<aios endpoint-url>>" # AIOS 모델 호출을 위한 aios endpoint-url을 입력합니다.
model = "<<model>>" # AIOS 모델 호출을 위한 모델 ID를 입력합니다.
# OpenAI 클라이언트를 생성합니다.
# base_url은 AIOS API의 v1 엔드포인트를 가리키며,
# api_key는 AIOS에서 요구하는 키로, 일반적으로 "EMPTY_KEY"로 설정됩니다.
client = OpenAI(base_url=urljoin(aios_base_url, "v1"), api_key="EMPTY_KEY")
# AIOS 모델을 사용하여 채팅 completion을 생성합니다.
# model 매개변수는 사용할 모델 ID를 지정합니다.
# messages 매개변수는 시스템 메시지와 사용자 메시지를 포함하는 메시지 목록입니다.
# stream=True를 설정하여 실시간 스트리밍 응답을 받습니다.
response = client.chat.completions.create(
model=model,
messages=[
{"role": "system", "content": "You are a helpful assistant."},
{"role": "user", "content": "Hi"}
],
stream=True
)
# 모델이 토큰을 생성할 때마다 응답으로 받을 수 있습니다.
# response는 스트림 형태로 전송되므로 반복하여 처리할 수 있습니다.
for chunk in response:
# 델타(choices[0].delta)를 출력합니다.
# 델타는 AI 모델이 생성한 응답 토큰입니다.
print(chunk.choices[0].delta.model_dump())from langchain_openai import ChatOpenAI
from urllib.parse import urljoin
aios_base_url = "<<aios endpoint-url>>" # AIOS 모델 호출을 위한 aios endpoint-url을 입력합니다.
model = "<<model>>" # AIOS 모델 호출을 위한 모델 ID를 입력합니다.
# LangChain의 ChatOpenAI 클래스를 사용하여 채팅 LLM(대형 언어 모델) 인스턴스를 생성합니다.
# base_url은 AIOS API의 v1 엔드포인트를 가리키며,
# api_key는 AIOS에서 요구하는 키로, 일반적으로 "EMPTY_KEY"로 설정됩니다.
# model 매개변수는 사용할 모델 ID를 지정합니다.
llm = ChatOpenAI(
base_url=urljoin(aios_base_url, "v1"),
api_key="EMPTY_KEY",
model=model
)
# 채팅 메시지 목록을 구성합니다.
# 시스템 메시지와 사용자 메시지를 포함합니다.
messages = [
("system", "You are a helpful assistant."),
("human", "Hi"),
]
# 모델이 토큰을 생성할 때마다 응답으로 받을 수 있습니다.
# llm.stream 메서드는 실시간으로 토큰을 생성하는 스트림을 반환합니다.
for chunk in llm.stream(messages):
# 각 청크를 출력합니다.
# 이 청크는 AI 모델이 생성한 응답 토큰입니다.
print(chunk)from langchain_openai import ChatOpenAI
from urllib.parse import urljoin
aios_base_url = "<<aios endpoint-url>>" # AIOS 모델 호출을 위한 aios endpoint-url을 입력합니다.
model = "<<model>>" # AIOS 모델 호출을 위한 모델 ID를 입력합니다.
# LangChain의 ChatOpenAI 클래스를 사용하여 채팅 LLM(대형 언어 모델) 인스턴스를 생성합니다.
# base_url은 AIOS API의 v1 엔드포인트를 가리키며,
# api_key는 AIOS에서 요구하는 키로, 일반적으로 "EMPTY_KEY"로 설정됩니다.
# model 매개변수는 사용할 모델 ID를 지정합니다.
llm = ChatOpenAI(
base_url=urljoin(aios_base_url, "v1"),
api_key="EMPTY_KEY",
model=model
)
# 채팅 메시지 목록을 구성합니다.
# 시스템 메시지와 사용자 메시지를 포함합니다.
messages = [
("system", "You are a helpful assistant."),
("human", "Hi"),
]
# 모델이 토큰을 생성할 때마다 응답으로 받을 수 있습니다.
# llm.stream 메서드는 실시간으로 토큰을 생성하는 스트림을 반환합니다.
for chunk in llm.stream(messages):
# 각 청크를 출력합니다.
# 이 청크는 AI 모델이 생성한 응답 토큰입니다.
print(chunk)const aios_base_url = "<<aios endpoint-url>>"; // AIOS 모델 호출을 위한 aios endpoint-url을 입력합니다.
const model = "<<model>>"; // AIOS 모델 호출을 위한 모델 ID를 입력합니다.
// 요청 데이터를 구성합니다.
// 여기에는 사용할 모델 ID, 메시지 목록(messages), 그리고 스트리밍 여부(stream)가 포함됩니다.
// 메시지 목록은 시스템 메시지와 사용자 메시지를 포함합니다.
const data = {
model: model,
messages: [
{ role: "system", content: "You are a helpful assistant." },
{ role: "user", content: "Hi" },
],
stream: true,
};
// AIOS API의 v1/chat/completions 엔드포인트 URL을 생성합니다.
let url = new URL("/v1/chat/completions", aios_base_url);
// AIOS API에 POST 요청을 보냅니다.
const response = await fetch(url, {
method: "POST",
headers: {
"Content-Type": "application/json",
},
body: JSON.stringify(data),
});
// 모델이 토큰을 생성할 때마다 응답으로 받을 수 있습니다.
// 응답 본문을 텍스트 디코더 스트림으로 변환하여 읽습니다.
const reader = response.body.pipeThrough(new TextDecoderStream()).getReader();
let buf = "";
while (true) {
const { value, done } = await reader.read();
if (done) break;
// 받은 데이터를 버퍼에 추가합니다.
buf += value;
let sep;
// 버퍼에서 줄바꿈 문자(\n\n)를 찾아서 데이터를 분리합니다.
while ((sep = buf.indexOf("\n\n")) >= 0) {
const data = buf.slice(0, sep);
buf = buf.slice(sep + 2);
// 각 줄을 처리합니다.
for (const rawLine of data.split("\n")) {
const line = rawLine.trim();
if (!line.startsWith("data: ")) continue;
// "data: " 접두사를 제거하고 JSON 데이터를 추출합니다.
const payload = line.slice("data: ".length).trim();
if (payload === "[DONE]") break;
// JSON 데이터를 파싱합니다.
const json = JSON.parse(payload);
// 델타(choices[0].delta)를 출력합니다.
// 델타는 AI 모델이 생성한 응답 토큰입니다.
console.log(json.choices[0].delta);
}
}
}const aios_base_url = "<<aios endpoint-url>>"; // AIOS 모델 호출을 위한 aios endpoint-url을 입력합니다.
const model = "<<model>>"; // AIOS 모델 호출을 위한 모델 ID를 입력합니다.
// 요청 데이터를 구성합니다.
// 여기에는 사용할 모델 ID, 메시지 목록(messages), 그리고 스트리밍 여부(stream)가 포함됩니다.
// 메시지 목록은 시스템 메시지와 사용자 메시지를 포함합니다.
const data = {
model: model,
messages: [
{ role: "system", content: "You are a helpful assistant." },
{ role: "user", content: "Hi" },
],
stream: true,
};
// AIOS API의 v1/chat/completions 엔드포인트 URL을 생성합니다.
let url = new URL("/v1/chat/completions", aios_base_url);
// AIOS API에 POST 요청을 보냅니다.
const response = await fetch(url, {
method: "POST",
headers: {
"Content-Type": "application/json",
},
body: JSON.stringify(data),
});
// 모델이 토큰을 생성할 때마다 응답으로 받을 수 있습니다.
// 응답 본문을 텍스트 디코더 스트림으로 변환하여 읽습니다.
const reader = response.body.pipeThrough(new TextDecoderStream()).getReader();
let buf = "";
while (true) {
const { value, done } = await reader.read();
if (done) break;
// 받은 데이터를 버퍼에 추가합니다.
buf += value;
let sep;
// 버퍼에서 줄바꿈 문자(\n\n)를 찾아서 데이터를 분리합니다.
while ((sep = buf.indexOf("\n\n")) >= 0) {
const data = buf.slice(0, sep);
buf = buf.slice(sep + 2);
// 각 줄을 처리합니다.
for (const rawLine of data.split("\n")) {
const line = rawLine.trim();
if (!line.startsWith("data: ")) continue;
// "data: " 접두사를 제거하고 JSON 데이터를 추출합니다.
const payload = line.slice("data: ".length).trim();
if (payload === "[DONE]") break;
// JSON 데이터를 파싱합니다.
const json = JSON.parse(payload);
// 델타(choices[0].delta)를 출력합니다.
// 델타는 AI 모델이 생성한 응답 토큰입니다.
console.log(json.choices[0].delta);
}
}
}import OpenAI from "openai";
const aios_base_url = "<<aios endpoint-url>>"; // AIOS 모델 호출을 위한 aios endpoint-url을 입력합니다.
const model = "<<model>>"; // AIOS 모델 호출을 위한 모델 ID를 입력합니다.
// OpenAI 클라이언트를 생성합니다.
// apiKey는 AIOS에서 요구하는 키로, 일반적으로 "EMPTY_KEY"로 설정됩니다.
// baseURL은 AIOS API의 v1 엔드포인트를 가리킵니다.
const client = new OpenAI({
apiKey: "EMPTY_KEY",
baseURL: new URL("v1", aios_base_url).href,
});
// AIOS 모델을 사용하여 채팅 completion을 생성합니다.
// model 매개변수는 사용할 모델 ID를 지정합니다.
// messages 매개변수는 시스템 메시지와 사용자 메시지를 포함하는 메시지 목록입니다.
// stream: true를 설정하여 실시간 스트리밍 응답을 받습니다.
const response = await client.chat.completions.create({
model: model,
messages: [
{ role: "system", content: "You are a helpful assistant." },
{ role: "user", content: "Hi" },
],
stream: true,
});
// 모델이 토큰을 생성할 때마다 응답으로 받을 수 있습니다.
// for await...of 루프를 사용하여 스트림 이벤트를 순차적으로 처리합니다.
for await (const event of response) {
// 델타(choices[0].delta)를 출력합니다.
// 델타는 AI 모델이 생성한 응답 토큰입니다.
console.log(event.choices[0].delta);
}import { ChatOpenAI } from "@langchain/openai";
const aios_base_url = "<<aios endpoint-url>>"; // AIOS 모델 호출을 위한 aios endpoint-url을 입력합니다.
const model = "<<model>>"; // AIOS 모델 호출을 위한 모델 ID를 입력합니다.
// LangChain의 ChatOpenAI 클래스를 사용하여 채팅 LLM(대형 언어 모델) 인스턴스를 생성합니다.
// model 매개변수는 사용할 모델 ID를 지정합니다.
// apiKey는 AIOS에서 요구하는 키로, 일반적으로 "EMPTY_KEY"로 설정됩니다.
// configuration.baseURL은 AIOS API의 v1 엔드포인트를 가리킵니다.
const llm = new ChatOpenAI({
model: model,
apiKey: "EMPTY_KEY",
configuration: {
baseURL: new URL("v1", aios_base_url).href,
},
});
// 채팅 메시지 목록을 구성합니다.
// 시스템 메시지와 사용자 메시지를 포함합니다.
const messages = [
{ role: "system", content: "You are a helpful assistant." },
{ role: "user", content: "Hi" },
];
// 모델이 토큰을 생성할 때마다 응답으로 받을 수 있습니다.
// llm.stream 메서드는 실시간으로 토큰을 생성하는 스트림을 반환합니다.
const completion = await llm.stream(messages);
for await (const chunk of completion) {
// 각 청크의 내용(content)을 출력합니다.
// 이 내용은 AI 모델이 생성한 응답 토큰입니다.
console.log(chunk.content);
}package main
import (
"bufio"
"bytes"
"encoding/json"
"fmt"
"net/http"
)
const (
aiosBaseUrl = "<<aios endpoint-url>>" // AIOS 모델 호출을 위한 aios endpoint-url을 입력합니다.
model = "<<model>>" // AIOS 모델 호출을 위한 모델 ID를 입력합니다.
)
// 메시지 구조를 정의합니다.
// Role: 메시지 역할 (예: system, user)
// Content: 메시지 내용
type Message struct {
Role string `json:"role"`
Content string `json:"content"`
}
// POST 요청에 사용될 데이터 구조를 정의합니다.
// Model: 사용할 모델 ID
// Messages: 메시지 목록
// Stream: 스트리밍 응답 여부 (옵션)
type PostData struct {
Model string `json:"model"`
Messages []Message `json:"messages"`
Stream bool `json:"stream,omitempty"`
}
func main() {
// 요청 데이터를 생성합니다.
// 메시지 목록에는 시스템 메시지와 사용자 메시지가 포함됩니다.
// Stream: true를 설정하여 실시간 스트리밍 응답을 받습니다.
data := PostData{
Model: model,
Messages: []Message{
{
Role: "system",
Content: "You are a helpful assistant.",
},
{
Role: "user",
Content: "Hi",
},
},
Stream: true,
}
// 데이터를 JSON 형식으로 마샬링합니다.
jsonData, err := json.Marshal(data)
if err != nil {
panic(err)
}
// AIOS API의 v1/chat/completions 엔드포인트로 POST 요청을 보냅니다.
response, err := http.Post(aiosBaseUrl+"/v1/chat/completions", "application/json", bytes.NewBuffer(jsonData))
if err != nil {
panic(err)
}
defer response.Body.Close()
// 모델이 토큰을 생성할 때마다 응답으로 받을 수 있습니다.
// HTTP 응답 본문을 스캔하여 줄 단위로 처리합니다.
var v map[string]interface{}
scanner := bufio.NewScanner(response.Body)
for scanner.Scan() {
line := bytes.TrimSpace(scanner.Bytes())
// 줄이 "data: "로 시작하지 않으면 건너뜁니다.
if !bytes.HasPrefix(line, []byte("data: ")) {
continue
}
// "data: " 접두사를 제거합니다.
payload := bytes.TrimPrefix(line, []byte("data: "))
// payload가 "[DONE]"이라면 스트리밍을 종료합니다.
if bytes.Equal(payload, []byte("[DONE]")) {
break
}
// JSON 데이터를 파싱합니다.
json.Unmarshal(payload, &v)
// 응답에서 choices 배열을 추출합니다.
choices := v["choices"].([]interface{})
// 첫 번째 데이터를 추출합니다.
choice := choices[0].(map[string]interface{})
// 델타(delta)를 JSON 형식으로 직렬화하여 출력합니다.
message, err := json.Marshal(choice["delta"])
if err != nil {
panic(err)
}
fmt.Println(string(message))
}
}package main
import (
"context"
"fmt"
"github.com/openai/openai-go"
"github.com/openai/openai-go/option"
)
const (
aiosBaseUrl = "<<aios endpoint-url>>" // AIOS 모델 호출을 위한 aios endpoint-url을 입력합니다.
model = "<<model>>" // AIOS 모델 호출을 위한 모델 ID를 입력합니다.
)
func main() {
// OpenAI 클라이언트를 생성합니다.
// option.WithBaseURL을 사용하여 AIOS API의 v1 엔드포인트를 설정합니다.
client := openai.NewClient(
option.WithBaseURL(aiosBaseUrl + "/v1"),
)
// AIOS 모델을 사용하여 스트리밍 채팅 completion을 생성합니다.
// openai.ChatCompletionNewParams를 사용하여 모델과 메시지 목록을 설정합니다.
// 메시지 목록에는 시스템 메시지와 사용자 메시지가 포함됩니다.
response := client.Chat.Completions.NewStreaming(context.TODO(), openai.ChatCompletionNewParams{
Model: model,
Messages: []openai.ChatCompletionMessageParamUnion{
openai.SystemMessage("You are a helpful assistant."),
openai.UserMessage("Hi"),
},
})
// 모델이 토큰을 생성할 때마다 응답으로 받을 수 있습니다.
// Next() 메서드는 다음 청크가 있을 때 true를 반환합니다.
for response.Next() {
// 현재 chunk의 델타(choices[0].delta)를 출력합니다.
// 델타는 AI 모델이 생성한 응답 토큰입니다.
chunk := response.Current().Choices[0].Delta
fmt.Println(chunk.RawJSON())
}
}Response
토큰마다 답변이 생성되고, 각 토큰은 choices의 delta 필드에서 확인할 수 있습니다.
{'role': 'assistant', 'content': ''}
{'reasoning_content': ''}
{'reasoning_content': 'The'}
{'reasoning_content': ' user'}
{'reasoning_content': ' says'}
{'reasoning_content': ' "'}
{'reasoning_content': 'Hi'}
{'reasoning_content': '".'}
{'reasoning_content': ' We'}
{'reasoning_content': ' respond'}
{'reasoning_content': ' with'}
{'reasoning_content': ' a'}
{'reasoning_content': ' greeting'}
{'reasoning_content': '.'}
{'content': ''}
{'content': 'Hello'}
{'content': '!'}
{'content': ' How'}
{'content': ' can'}
{'content': ' I'}
{'content': ' assist'}
{'content': ' you'}
{'content': ' today'}
{'content': '?'}
{}
tool calling
Tool Calling 기능은 모델이 특정 작업을 수행하기 위해 외부 함수를 호출할 수 있게 해줍니다.
모델은 사용자의 요청을 분석하여 필요한 도구를 선택하고, 해당 도구를 호출하기 위한 인수를 응답으로 생성합니다.
모델이 생성한 tool call 메시지를 활용하여 실제 도구를 실행한 다음 그 결과를 tool message로 구성하여 모델에게 다시 요청하면,
도구 실행 결과를 바탕으로 사용자에게 자연스러운 답변을 생성합니다.
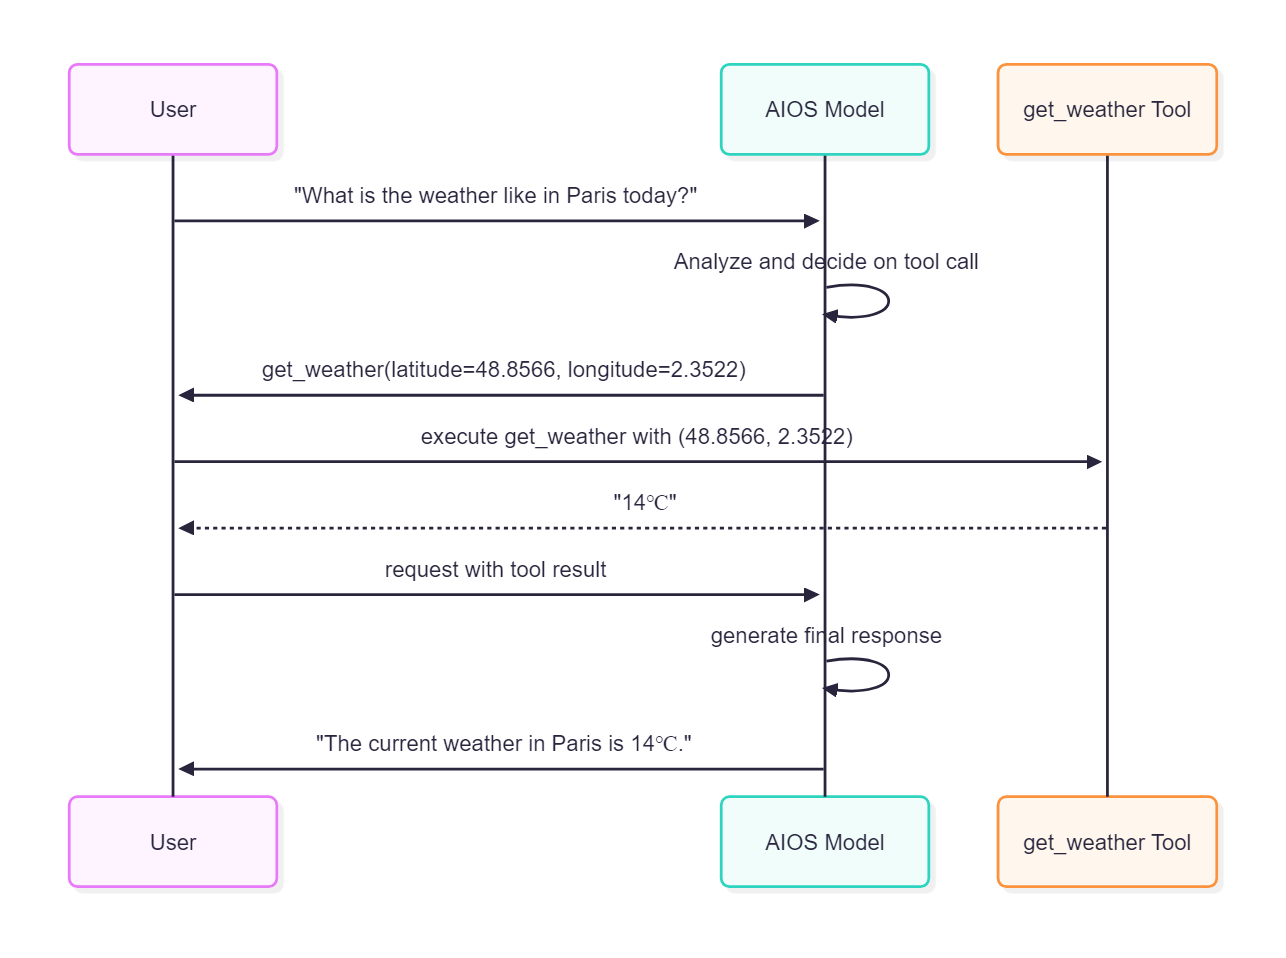
- openai/gpt-oss-120b 모델은 tool calling 기능이 작동되지 않습니다.
Request
import json
import requests
from urllib.parse import urljoin

aios_base_url = "<<aios endpoint-url>>" # AIOS 모델 호출을 위한 aios endpoint-url을 입력합니다.
model = "<<model>>"                     # AIOS 모델 호출을 위한 모델 ID를 입력합니다.

# 날씨 정보를 알아보는 함수를 정의합니다.
# 이 함수는 제공된 좌표에 대한 현재 온도를 섭씨로 반환합니다.
tools = [{
    "type": "function",
    "function": {
        "name": "get_weather",
        "description": "Get current temperature for provided coordinates in celsius.",
        "parameters": {
            "type": "object",
            "properties": {
                "latitude": {"type": "number"},
                "longitude": {"type": "number"}
            },
            "required": ["latitude", "longitude"],
            "additionalProperties": False
        },
        "strict": True
    }
}]

# 사용자 메시지를 정의합니다.
# 사용자는 파리의 오늘 날씨를 묻고 있습니다.
messages = [{"role": "user", "content": "What is the weather like in Paris today?"}]

# 요청 데이터를 구성합니다.
# 여기에는 사용할 모델 ID, 메시지 목록(messages), 및 도구 목록(tools)이 포함됩니다.
data = {
  "model": model,
  "messages": messages,
  "tools": tools
}

# AIOS API의 v1/chat/completions 엔드포인트로 POST 요청을 보냅니다.
# 이 요청은 모델에게 사용자 질문을 처리하고 필요한 도구 호출을 결정하도록 합니다.
response = requests.post(urljoin(aios_base_url, "v1/chat/completions"), json=data)

# 응답 본문을 JSON 형식으로 파싱합니다.
body = json.loads(response.text)
# AI 모델이 생성한 응답에서 도구 호출 정보를 출력합니다.
# 이 정보는 모델이 어떤 도구를 호출해야 하는지를 나타냅니다.
print(body["choices"][0]["message"]["tool_calls"])

# 날씨 함수의 구현체, 항상 14도를 응답합니다.
def get_weather(latitude, longitude):
  return "14℃"

# 첫 번째 응답에서 도구 호출 정보를 추출합니다.
# 이는 모델이 요청한 도구 호출 정보를 가져옵니다.
tool_call = body["choices"][0]["message"]["tool_calls"][0]

# json 문자열 형식의 도구 호출의 인수를 dict 포맷으로 파싱합니다.
args = json.loads(tool_call["function"]["arguments"])

# 실제 함수를 호출하여 결과를 얻습니다. (예: "14℃")
# 이 단계에서는 실제 날씨 정보 조회 로직이 실행됩니다.
result = get_weather(args["latitude"], args["longitude"]) # "14℃"

# 함수의 호출 결과값을 **tool** 메시지로 대화 맥락에 추가하고 다시 모델을 호출하면
# 함수의 호출 결과값을 이용하여 모델이 적절한 답변을 생성합니다.
# 모델의 tool call 메시지를 messages에 추가하여 대화 맥락을 유지합니다.
messages.append(body["choices"][0]["message"])

# 실제 함수를 호출한 결과를 messages에 추가합니다.
# 이는 모델이 도구 호출 결과를 기반으로 최종 답변을 생성할 수 있도록 합니다.
messages.append({
  "role": "tool",
  "tool_call_id": tool_call["id"],
  "content": str(result)
})

# 두 번째 요청 데이터를 구성합니다.
# 여기에는 사용할 모델 ID와 업데이트된 메시지 목록(messages)이 포함됩니다.
data = {
  "model": model,
  "messages": messages,
}

# AIOS API의 v1/chat/completions 엔드포인트로 POST 요청을 보냅니다.
# 이 요청은 도구 호출 결과를 바탕으로 최종 답변을 생성합니다.
response_2 = requests.post(urljoin(aios_base_url, "v1/chat/completions"), json=data)

# 응답 본문을 JSON 형식으로 파싱합니다.
body = json.loads(response_2.text)
# 두 번째 응답에서 AI가 생성한 메시지를 출력합니다.
# 이는 사용자 질문에 대한 최종 답변입니다.
print(body["choices"][0]["message"])
import json
import requests
from urllib.parse import urljoin
aios_base_url = "<<aios endpoint-url>>" # AIOS 모델 호출을 위한 aios endpoint-url을 입력합니다.
model = "<<model>>" # AIOS 모델 호출을 위한 모델 ID를 입력합니다.
# 날씨 정보를 알아보는 함수를 정의합니다.
# 이 함수는 제공된 좌표에 대한 현재 온도를 섭씨로 반환합니다.
tools = [{
"type": "function",
"function": {
"name": "get_weather",
"description": "Get current temperature for provided coordinates in celsius.",
"parameters": {
"type": "object",
"properties": {
"latitude": {"type": "number"},
"longitude": {"type": "number"}
},
"required": ["latitude", "longitude"],
"additionalProperties": False
},
"strict": True
}
}]
# 사용자 메시지를 정의합니다.
# 사용자는 파리의 오늘 날씨를 묻고 있습니다.
messages = [{"role": "user", "content": "What is the weather like in Paris today?"}]
# 요청 데이터를 구성합니다.
# 여기에는 사용할 모델 ID, 메시지 목록(messages), 및 도구 목록(tools)이 포함됩니다.
data = {
"model": model,
"messages": messages,
"tools": tools
}
# AIOS API의 v1/chat/completions 엔드포인트로 POST 요청을 보냅니다.
# 이 요청은 모델에게 사용자 질문을 처리하고 필요한 도구 호출을 결정하도록 합니다.
response = requests.post(urljoin(aios_base_url, "v1/chat/completions"), json=data)
# 응답 본문을 JSON 형식으로 파싱합니다.
body = json.loads(response.text)
# AI 모델이 생성한 응답에서 도구 호출 정보를 출력합니다.
# 이 정보는 모델이 어떤 도구를 호출해야 하는지를 나타냅니다.
print(body["choices"][0]["message"]["tool_calls"])
# 날씨 함수의 구현체, 항상 14도를 응답합니다.
def get_weather(latitude, longitude):
return "14℃"
# 첫 번째 응답에서 도구 호출 정보를 추출합니다.
# 이는 모델이 요청한 도구 호출 정보를 가져옵니다.
tool_call = body["choices"][0]["message"]["tool_calls"][0]
# json 문자열 형식의 도구 호출의 인수를 dict 포맷으로 파싱합니다.
args = json.loads(tool_call["function"]["arguments"])
# 실제 함수를 호출하여 결과를 얻습니다. (예: "14℃")
# 이 단계에서는 실제 날씨 정보 조회 로직이 실행됩니다.
result = get_weather(args["latitude"], args["longitude"]) # "14℃"
# 함수의 호출 결과값을 **tool** 메시지로 대화 맥락에 추가하고 다시 모델을 호출하면
# 함수의 호출 결과값을 이용하여 모델이 적절한 답변을 생성합니다.
# 모델의 tool call 메시지를 messages에 추가하여 대화 맥락을 유지합니다.
messages.append(body["choices"][0]["message"])
# 실제 함수를 호출한 결과를 messages에 추가합니다.
# 이는 모델이 도구 호출 결과를 기반으로 최종 답변을 생성할 수 있도록 합니다.
messages.append({
"role": "tool",
"tool_call_id": tool_call["id"],
"content": str(result)
})
# 두 번째 요청 데이터를 구성합니다.
# 여기에는 사용할 모델 ID와 업데이트된 메시지 목록(messages)이 포함됩니다.
data = {
"model": model,
"messages": messages,
}
# AIOS API의 v1/chat/completions 엔드포인트로 POST 요청을 보냅니다.
# 이 요청은 도구 호출 결과를 바탕으로 최종 답변을 생성합니다.
response_2 = requests.post(urljoin(aios_base_url, "v1/chat/completions"), json=data)
# 응답 본문을 JSON 형식으로 파싱합니다.
body = json.loads(response_2.text)
# 두 번째 응답에서 AI가 생성한 메시지를 출력합니다.
# 이는 사용자 질문에 대한 최종 답변입니다.
print(body["choices"][0]["message"])import json
from openai import OpenAI
from urllib.parse import urljoin
aios_base_url = "<<aios endpoint-url>>" # AIOS 모델 호출을 위한 aios endpoint-url을 입력합니다.
model = "<<model>>" # AIOS 모델 호출을 위한 모델 ID를 입력합니다.
# OpenAI 클라이언트를 생성합니다.
# base_url은 AIOS API의 v1 엔드포인트를 가리키며,
# api_key는 AIOS에서 요구하는 키로, 일반적으로 "EMPTY_KEY"로 설정됩니다.
client = OpenAI(base_url=urljoin(aios_base_url, "v1"), api_key="EMPTY_KEY")
# 날씨 정보를 알아보는 함수를 정의합니다.
# 이 함수는 제공된 좌표에 대한 현재 온도를 섭씨로 반환합니다.
tools = [{
"type": "function",
"function": {
"name": "get_weather",
"description": "Get current temperature for provided coordinates in celsius.",
"parameters": {
"type": "object",
"properties": {
"latitude": {"type": "number"},
"longitude": {"type": "number"}
},
"required": ["latitude", "longitude"],
"additionalProperties": False
},
"strict": True
}
}]
# 사용자 메시지를 정의합니다.
# 사용자는 파리의 오늘 날씨를 묻고 있습니다.
messages = [{"role": "user", "content": "What is the weather like in Paris today?"}]
# AIOS 모델을 사용하여 채팅 completion을 생성합니다.
# model 매개변수는 사용할 모델 ID를 지정합니다.
# messages 매개변수는 사용자 메시지를 포함하는 메시지 목록입니다.
# tools 매개변수는 모델에게 사용할 수 있는 도구의 메타데이터를 제공합니다.
response = client.chat.completions.create(
model=model,
messages=messages,
tools=tools # 모델에게 사용할 수 있는 도구의 메타데이터를 알려 줍니다.
)
# AI 모델이 생성한 응답에서 도구 호출 정보를 출력합니다.
# 이 정보는 모델이 어떤 도구를 호출해야 하는지를 나타냅니다.
print(response.choices[0].message.tool_calls[0].model_dump())
# 날씨 함수의 구현체, 항상 14도를 응답합니다.
def get_weather(latitude, longitude):
return "14℃"
# 첫 번째 응답에서 도구 호출 정보를 추출합니다.
# 이는 모델이 요청한 도구 호출 정보를 가져옵니다.
tool_call = response.choices[0].message.tool_calls[0]
# 도구 호출의 인수를 JSON 형식으로 파싱합니다.
args = json.loads(tool_call.function.arguments)
# 실제 함수를 호출하여 결과를 얻습니다. (예: "14℃")
# 이 단계에서는 실제 날씨 정보 조회 로직이 실행됩니다.
result = get_weather(args["latitude"], args["longitude"]) # "14℃"
# 함수의 호출 결과값을 **tool** 메시지로 대화 맥락에 추가하고 다시 모델을 호출하면
# 함수의 호출 결과값을 이용하여 모델이 적절한 답변을 생성합니다.
# 모델의 tool call 메시지를 messages에 추가하여 대화 맥락을 유지합니다.
messages.append(response.choices[0].message)
# 실제 함수를 호출한 결과를 messages에 추가합니다.
# 이는 모델이 도구 호출 결과를 기반으로 최종 답변을 생성할 수 있도록 합니다.
messages.append({
"role": "tool",
"tool_call_id": tool_call.id,
"content": str(result)
})
# 두 번째 채팅 completion을 생성합니다.
# 여기에는 사용할 모델 ID와 업데이트된 메시지 목록(messages)이 포함됩니다.
# 이 요청은 도구 호출 결과를 바탕으로 최종 답변을 생성합니다.
response_2 = client.chat.completions.create(
model=model,
messages=messages,
)
# 두 번째 응답에서 AI가 생성한 메시지를 출력합니다.
# 이는 사용자 질문에 대한 최종 답변입니다.
print(response_2.choices[0].message.model_dump())import json
from openai import OpenAI
from urllib.parse import urljoin
aios_base_url = "<<aios endpoint-url>>" # AIOS 모델 호출을 위한 aios endpoint-url을 입력합니다.
model = "<<model>>" # AIOS 모델 호출을 위한 모델 ID를 입력합니다.
# OpenAI 클라이언트를 생성합니다.
# base_url은 AIOS API의 v1 엔드포인트를 가리키며,
# api_key는 AIOS에서 요구하는 키로, 일반적으로 "EMPTY_KEY"로 설정됩니다.
client = OpenAI(base_url=urljoin(aios_base_url, "v1"), api_key="EMPTY_KEY")
# 날씨 정보를 알아보는 함수를 정의합니다.
# 이 함수는 제공된 좌표에 대한 현재 온도를 섭씨로 반환합니다.
tools = [{
"type": "function",
"function": {
"name": "get_weather",
"description": "Get current temperature for provided coordinates in celsius.",
"parameters": {
"type": "object",
"properties": {
"latitude": {"type": "number"},
"longitude": {"type": "number"}
},
"required": ["latitude", "longitude"],
"additionalProperties": False
},
"strict": True
}
}]
# 사용자 메시지를 정의합니다.
# 사용자는 파리의 오늘 날씨를 묻고 있습니다.
messages = [{"role": "user", "content": "What is the weather like in Paris today?"}]
# AIOS 모델을 사용하여 채팅 completion을 생성합니다.
# model 매개변수는 사용할 모델 ID를 지정합니다.
# messages 매개변수는 사용자 메시지를 포함하는 메시지 목록입니다.
# tools 매개변수는 모델에게 사용할 수 있는 도구의 메타데이터를 제공합니다.
response = client.chat.completions.create(
model=model,
messages=messages,
tools=tools # 모델에게 사용할 수 있는 도구의 메타데이터를 알려 줍니다.
)
# AI 모델이 생성한 응답에서 도구 호출 정보를 출력합니다.
# 이 정보는 모델이 어떤 도구를 호출해야 하는지를 나타냅니다.
print(response.choices[0].message.tool_calls[0].model_dump())
# 날씨 함수의 구현체, 항상 14도를 응답합니다.
def get_weather(latitude, longitude):
return "14℃"
# 첫 번째 응답에서 도구 호출 정보를 추출합니다.
# 이는 모델이 요청한 도구 호출 정보를 가져옵니다.
tool_call = response.choices[0].message.tool_calls[0]
# 도구 호출의 인수를 JSON 형식으로 파싱합니다.
args = json.loads(tool_call.function.arguments)
# 실제 함수를 호출하여 결과를 얻습니다. (예: "14℃")
# 이 단계에서는 실제 날씨 정보 조회 로직이 실행됩니다.
result = get_weather(args["latitude"], args["longitude"]) # "14℃"
# 함수의 호출 결과값을 **tool** 메시지로 대화 맥락에 추가하고 다시 모델을 호출하면
# 함수의 호출 결과값을 이용하여 모델이 적절한 답변을 생성합니다.
# 모델의 tool call 메시지를 messages에 추가하여 대화 맥락을 유지합니다.
messages.append(response.choices[0].message)
# 실제 함수를 호출한 결과를 messages에 추가합니다.
# 이는 모델이 도구 호출 결과를 기반으로 최종 답변을 생성할 수 있도록 합니다.
messages.append({
"role": "tool",
"tool_call_id": tool_call.id,
"content": str(result)
})
# 두 번째 채팅 completion을 생성합니다.
# 여기에는 사용할 모델 ID와 업데이트된 메시지 목록(messages)이 포함됩니다.
# 이 요청은 도구 호출 결과를 바탕으로 최종 답변을 생성합니다.
response_2 = client.chat.completions.create(
model=model,
messages=messages,
)
# 두 번째 응답에서 AI가 생성한 메시지를 출력합니다.
# 이는 사용자 질문에 대한 최종 답변입니다.
print(response_2.choices[0].message.model_dump())from langchain_openai import ChatOpenAI
from langchain_core.tools import tool
from urllib.parse import urljoin
aios_base_url = "<<aios endpoint-url>>" # AIOS 모델 호출을 위한 aios endpoint-url을 입력합니다.
model = "<<model>>" # AIOS 모델 호출을 위한 모델 ID를 입력합니다.
# 날씨 정보를 조회하는 도구 함수를 정의합니다.
# 이 함수는 제공된 좌표에 대한 현재 온도를 섭씨로 반환합니다.
@tool
def get_weather(latitude: float, longitude: float) -> str:
"""Get current temperature for provided coordinates in celsius."""
return "14℃"
# LangChain의 ChatOpenAI 클래스를 사용하여 채팅 LLM(대형 언어 모델) 인스턴스를 생성합니다.
# base_url은 AIOS API의 v1 엔드포인트를 가리키며,
# api_key는 AIOS에서 요구하는 키로, 일반적으로 "EMPTY_KEY"로 설정됩니다.
# model 매개변수는 사용할 모델 ID를 지정합니다.
chat_llm = ChatOpenAI(
base_url=urljoin(aios_base_url, "v1"),
api_key="EMPTY_KEY",
model=model
)
# 모델에 도구를 바인딩합니다.
# get_weather 함수는 제공된 좌표에 대한 현재 온도를 섭씨로 반환합니다.
llm_with_tools = chat_llm.bind_tools([get_weather])
# 채팅 메시지 목록을 구성합니다.
# 사용자는 파리의 오늘 날씨를 묻고 있습니다.
messages = [("human", "What is the weather like in Paris today?")]
# 채팅 LLM에 메시지 목록을 전달하여 응답을 받습니다.
# invoke 메서드는 모델의 출력을 반환합니다.
# 이 단계에서는 모델이 사용자 질문을 분석하고 필요한 도구 호출을 결정합니다.
response = llm_with_tools.invoke(messages)
# AI 모델이 생성한 응답에서 도구 호출 정보를 출력합니다.
# 이 정보는 모델이 어떤 도구를 호출해야 하는지를 나타냅니다.
print(response.tool_calls)
# 모델의 tool call 메시지를 messages에 추가하여 대화 맥락을 유지합니다.
# 이는 모델이 이전 대화 내용을 기억하고 연결할 수 있도록 합니다.
messages.append(response)
# 실제 도구 함수를 호출하여 결과를 얻습니다.
# 이 단계에서는 get_weather 함수가 실행되어 날씨 정보를 반환합니다.
tool_call = response.tool_calls[0]
tool_message = get_weather.invoke(tool_call)
# 도구 호출 결과를 messages에 추가합니다.
# 이는 모델이 도구 호출 결과를 기반으로 최종 답변을 생성할 수 있도록 합니다.
messages.append(tool_message)
# 두 번째 요청을 수행하여 최종 답변을 얻습니다.
# 이제 모델은 도구 호출 결과를 바탕으로 사용자에게 적절한 답변을 생성합니다.
response2 = chat_llm.invoke(messages)
# 최종 AI 모델 응답을 출력합니다.
# 이는 사용자 질문에 대한 최종 답변입니다.
print(response2.model_dump())from langchain_openai import ChatOpenAI
from langchain_core.tools import tool
from urllib.parse import urljoin
aios_base_url = "<<aios endpoint-url>>" # AIOS 모델 호출을 위한 aios endpoint-url을 입력합니다.
model = "<<model>>" # AIOS 모델 호출을 위한 모델 ID를 입력합니다.
# 날씨 정보를 조회하는 도구 함수를 정의합니다.
# 이 함수는 제공된 좌표에 대한 현재 온도를 섭씨로 반환합니다.
@tool
def get_weather(latitude: float, longitude: float) -> str:
"""Get current temperature for provided coordinates in celsius."""
return "14℃"
# LangChain의 ChatOpenAI 클래스를 사용하여 채팅 LLM(대형 언어 모델) 인스턴스를 생성합니다.
# base_url은 AIOS API의 v1 엔드포인트를 가리키며,
# api_key는 AIOS에서 요구하는 키로, 일반적으로 "EMPTY_KEY"로 설정됩니다.
# model 매개변수는 사용할 모델 ID를 지정합니다.
chat_llm = ChatOpenAI(
base_url=urljoin(aios_base_url, "v1"),
api_key="EMPTY_KEY",
model=model
)
# 모델에 도구를 바인딩합니다.
# get_weather 함수는 제공된 좌표에 대한 현재 온도를 섭씨로 반환합니다.
llm_with_tools = chat_llm.bind_tools([get_weather])
# 채팅 메시지 목록을 구성합니다.
# 사용자는 파리의 오늘 날씨를 묻고 있습니다.
messages = [("human", "What is the weather like in Paris today?")]
# 채팅 LLM에 메시지 목록을 전달하여 응답을 받습니다.
# invoke 메서드는 모델의 출력을 반환합니다.
# 이 단계에서는 모델이 사용자 질문을 분석하고 필요한 도구 호출을 결정합니다.
response = llm_with_tools.invoke(messages)
# AI 모델이 생성한 응답에서 도구 호출 정보를 출력합니다.
# 이 정보는 모델이 어떤 도구를 호출해야 하는지를 나타냅니다.
print(response.tool_calls)
# 모델의 tool call 메시지를 messages에 추가하여 대화 맥락을 유지합니다.
# 이는 모델이 이전 대화 내용을 기억하고 연결할 수 있도록 합니다.
messages.append(response)
# 실제 도구 함수를 호출하여 결과를 얻습니다.
# 이 단계에서는 get_weather 함수가 실행되어 날씨 정보를 반환합니다.
tool_call = response.tool_calls[0]
tool_message = get_weather.invoke(tool_call)
# 도구 호출 결과를 messages에 추가합니다.
# 이는 모델이 도구 호출 결과를 기반으로 최종 답변을 생성할 수 있도록 합니다.
messages.append(tool_message)
# 두 번째 요청을 수행하여 최종 답변을 얻습니다.
# 이제 모델은 도구 호출 결과를 바탕으로 사용자에게 적절한 답변을 생성합니다.
response2 = chat_llm.invoke(messages)
# 최종 AI 모델 응답을 출력합니다.
# 이는 사용자 질문에 대한 최종 답변입니다.
print(response2.model_dump())const aios_base_url = "<<aios endpoint-url>>"; // AIOS 모델 호출을 위한 aios endpoint-url을 입력합니다.
const model = "<<model>>"; // AIOS 모델 호출을 위한 모델 ID를 입력합니다.
// 날씨 정보를 알아보는 함수를 정의합니다.
// 이 함수는 제공된 좌표에 대한 현재 온도를 섭씨로 반환합니다.
const tools = [
{
type: "function",
function: {
name: "get_weather",
description:
"Get current temperature for provided coordinates in celsius.",
parameters: {
type: "object",
properties: {
latitude: { type: "number" },
longitude: { type: "number" },
},
required: ["latitude", "longitude"],
additionalProperties: false,
},
strict: true,
},
},
];
// 사용자 메시지를 정의합니다.
// 사용자는 파리의 오늘 날씨를 묻고 있습니다.
const messages = [
{ role: "user", content: "What is the weather like in Paris today?" },
];
// 요청 데이터를 구성합니다.
// 여기에는 사용할 모델 ID, 메시지 목록(messages), 및 도구 목록(tools)이 포함됩니다.
let data = {
model: model,
messages: messages,
tools: tools,
};
// AIOS API의 v1/chat/completions 엔드포인트 URL을 생성합니다.
let url = new URL("/v1/chat/completions", aios_base_url);
// AIOS API에 POST 요청을 보냅니다.
// 이 요청은 모델에게 사용자 질문을 처리하고 필요한 도구 호출을 결정하도록 합니다.
const response = await fetch(url, {
method: "POST",
headers: {
"Content-Type": "application/json",
},
body: JSON.stringify(data),
});
// 응답 본문을 JSON 형식으로 파싱합니다.
let body = await response.json();
// AI 모델이 생성한 응답에서 도구 호출 정보를 출력합니다.
// 이 정보는 모델이 어떤 도구를 호출해야 하는지를 나타냅니다.
console.log(JSON.stringify(body.choices[0].message.tool_calls));
// 날씨 함수의 구현체, 항상 14도를 응답합니다.
function getWeather(latitude, longitude) {
return "14℃";
}
// 첫 번째 응답에서 도구 호출 정보를 추출합니다.
// 이는 모델이 요청한 도구 호출 정보를 가져옵니다.
const toolCall = body.choices[0].message.tool_calls[0];
// 도구 호출의 인수를 JSON 형식으로 파싱합니다.
// 이는 도구 호출에 필요한 파라미터들을 추출합니다.
const args = JSON.parse(toolCall.function.arguments);
// 실제 함수를 호출하여 결과를 얻습니다. (예: "14℃")
// 이 단계에서는 실제 날씨 정보 조회 로직이 실행됩니다.
const result = getWeather(args.latitude, args.longitude);
// 함수의 호출 결과값을 **tool** 메시지로 대화 맥락에 추가하고 다시 모델을 호출하면
// 함수의 호출 결과값을 이용하여 모델이 적절한 답변을 생성합니다.
// 모델의 tool call 메시지를 messages에 추가하여 대화 맥락을 유지합니다.
messages.push(body.choices[0].message);
// 실제 함수를 호출한 결과를 messages에 추가합니다.
// 이는 모델이 도구 호출 결과를 기반으로 최종 답변을 생성할 수 있도록 합니다.
messages.push({
role: "tool",
tool_call_id: toolCall.id,
content: String(result),
});
// 두 번째 요청 데이터를 구성합니다.
// 여기에는 사용할 모델 ID와 업데이트된 메시지 목록(messages)이 포함됩니다.
// 이 요청은 도구 호출 결과를 바탕으로 최종 답변을 생성합니다.
data = {
model: model,
messages: messages,
};
// AIOS API에 다시 POST 요청을 보냅니다.
// 이 요청은 도구 호출 결과를 바탕으로 최종 답변을 생성합니다.
const response2 = await fetch(url, {
method: "POST",
headers: {
"Content-Type": "application/json",
},
body: JSON.stringify(data),
});
body = await response2.json();
// 두 번째 응답에서 AI가 생성한 메시지를 출력합니다.
// 이는 사용자 질문에 대한 최종 답변입니다.
console.log(JSON.stringify(body.choices[0].message));const aios_base_url = "<<aios endpoint-url>>"; // AIOS 모델 호출을 위한 aios endpoint-url을 입력합니다.
const model = "<<model>>"; // AIOS 모델 호출을 위한 모델 ID를 입력합니다.
// 날씨 정보를 알아보는 함수를 정의합니다.
// 이 함수는 제공된 좌표에 대한 현재 온도를 섭씨로 반환합니다.
const tools = [
{
type: "function",
function: {
name: "get_weather",
description:
"Get current temperature for provided coordinates in celsius.",
parameters: {
type: "object",
properties: {
latitude: { type: "number" },
longitude: { type: "number" },
},
required: ["latitude", "longitude"],
additionalProperties: false,
},
strict: true,
},
},
];
// 사용자 메시지를 정의합니다.
// 사용자는 파리의 오늘 날씨를 묻고 있습니다.
const messages = [
{ role: "user", content: "What is the weather like in Paris today?" },
];
// 요청 데이터를 구성합니다.
// 여기에는 사용할 모델 ID, 메시지 목록(messages), 및 도구 목록(tools)이 포함됩니다.
let data = {
model: model,
messages: messages,
tools: tools,
};
// AIOS API의 v1/chat/completions 엔드포인트 URL을 생성합니다.
let url = new URL("/v1/chat/completions", aios_base_url);
// AIOS API에 POST 요청을 보냅니다.
// 이 요청은 모델에게 사용자 질문을 처리하고 필요한 도구 호출을 결정하도록 합니다.
const response = await fetch(url, {
method: "POST",
headers: {
"Content-Type": "application/json",
},
body: JSON.stringify(data),
});
// 응답 본문을 JSON 형식으로 파싱합니다.
let body = await response.json();
// AI 모델이 생성한 응답에서 도구 호출 정보를 출력합니다.
// 이 정보는 모델이 어떤 도구를 호출해야 하는지를 나타냅니다.
console.log(JSON.stringify(body.choices[0].message.tool_calls));
// 날씨 함수의 구현체, 항상 14도를 응답합니다.
function getWeather(latitude, longitude) {
return "14℃";
}
// 첫 번째 응답에서 도구 호출 정보를 추출합니다.
// 이는 모델이 요청한 도구 호출 정보를 가져옵니다.
const toolCall = body.choices[0].message.tool_calls[0];
// 도구 호출의 인수를 JSON 형식으로 파싱합니다.
// 이는 도구 호출에 필요한 파라미터들을 추출합니다.
const args = JSON.parse(toolCall.function.arguments);
// 실제 함수를 호출하여 결과를 얻습니다. (예: "14℃")
// 이 단계에서는 실제 날씨 정보 조회 로직이 실행됩니다.
const result = getWeather(args.latitude, args.longitude);
// 함수의 호출 결과값을 **tool** 메시지로 대화 맥락에 추가하고 다시 모델을 호출하면
// 함수의 호출 결과값을 이용하여 모델이 적절한 답변을 생성합니다.
// 모델의 tool call 메시지를 messages에 추가하여 대화 맥락을 유지합니다.
messages.push(body.choices[0].message);
// 실제 함수를 호출한 결과를 messages에 추가합니다.
// 이는 모델이 도구 호출 결과를 기반으로 최종 답변을 생성할 수 있도록 합니다.
messages.push({
role: "tool",
tool_call_id: toolCall.id,
content: String(result),
});
// 두 번째 요청 데이터를 구성합니다.
// 여기에는 사용할 모델 ID와 업데이트된 메시지 목록(messages)이 포함됩니다.
// 이 요청은 도구 호출 결과를 바탕으로 최종 답변을 생성합니다.
data = {
model: model,
messages: messages,
};
// AIOS API에 다시 POST 요청을 보냅니다.
// 이 요청은 도구 호출 결과를 바탕으로 최종 답변을 생성합니다.
const response2 = await fetch(url, {
method: "POST",
headers: {
"Content-Type": "application/json",
},
body: JSON.stringify(data),
});
body = await response2.json();
// 두 번째 응답에서 AI가 생성한 메시지를 출력합니다.
// 이는 사용자 질문에 대한 최종 답변입니다.
console.log(JSON.stringify(body.choices[0].message));import OpenAI from "openai";
const aios_base_url = "<<aios endpoint-url>>"; // AIOS 모델 호출을 위한 aios endpoint-url을 입력합니다.
const model = "<<model>>"; // AIOS 모델 호출을 위한 모델 ID를 입력합니다.
// 날씨 정보를 알아보는 함수를 정의합니다.
// 이 함수는 제공된 좌표에 대한 현재 온도를 섭씨로 반환합니다.
const tools = [
{
type: "function",
function: {
name: "get_weather",
description:
"Get current temperature for provided coordinates in celsius.",
parameters: {
type: "object",
properties: {
latitude: { type: "number" },
longitude: { type: "number" },
},
required: ["latitude", "longitude"],
additionalProperties: false,
},
strict: true,
},
},
];
// 사용자 메시지를 정의합니다.
// 사용자는 파리의 오늘 날씨를 묻고 있습니다.
const messages = [
{ role: "user", content: "What is the weather like in Paris today?" },
];
// OpenAI 클라이언트를 생성합니다.
// apiKey는 AIOS에서 요구하는 키로, 일반적으로 "EMPTY_KEY"로 설정됩니다.
// baseURL은 AIOS API의 v1 엔드포인트를 가리킵니다.
const client = new OpenAI({
apiKey: "EMPTY_KEY",
baseURL: new URL("v1", aios_base_url).href,
});
// AIOS 모델을 사용하여 채팅 completion을 생성합니다.
// model 매개변수는 사용할 모델 ID를 지정합니다.
// messages 매개변수는 사용자 메시지를 포함하는 메시지 목록입니다.
// tools 매개변수는 모델에게 사용할 수 있는 도구의 메타데이터를 제공합니다.
const response = await client.chat.completions.create({
model: model,
messages: messages,
tools: tools,
});
// AI 모델이 생성한 응답에서 도구 호출 정보를 출력합니다.
// 이 정보는 모델이 어떤 도구를 호출해야 하는지를 나타냅니다.
console.log(JSON.stringify(response.choices[0].message.tool_calls));
// 날씨 함수의 구현체, 항상 14도를 응답합니다.
function getWeather(latitude, longitude) {
return "14℃";
}
// 첫 번째 응답에서 도구 호출 정보를 추출합니다.
// 이는 모델이 요청한 도구 호출 정보를 가져옵니다.
const toolCall = response.choices[0].message.tool_calls[0];
// 도구 호출의 인수를 JSON 형식으로 파싱합니다.
// 이는 도구 호출에 필요한 파라미터들을 추출합니다.
const args = JSON.parse(toolCall.function.arguments);
// 실제 함수를 호출하여 결과를 얻습니다. (예: "14℃")
// 이 단계에서는 실제 날씨 정보 조회 로직이 실행됩니다.
const result = getWeather(args.latitude, args.longitude);
// 함수의 호출 결과값을 **tool** 메시지로 대화 맥락에 추가하고 다시 모델을 호출하면
// 함수의 호출 결과값을 이용하여 모델이 적절한 답변을 생성합니다.
// 모델의 tool call 메시지를 messages에 추가하여 대화 맥락을 유지합니다.
messages.push(response.choices[0].message);
// 실제 함수를 호출한 결과를 messages에 추가합니다.
// 이는 모델이 도구 호출 결과를 기반으로 최종 답변을 생성할 수 있도록 합니다.
messages.push({
role: "tool",
tool_call_id: toolCall.id,
content: String(result),
});
// 두 번째 채팅 completion을 생성합니다.
// 여기에는 사용할 모델 ID와 업데이트된 메시지 목록(messages)이 포함됩니다.
// 이 요청은 도구 호출 결과를 바탕으로 최종 답변을 생성합니다.
const response2 = await client.chat.completions.create({
model: model,
messages: messages,
});
// 두 번째 응답에서 AI가 생성한 메시지를 출력합니다.
// 이는 사용자 질문에 대한 최종 답변입니다.
console.log(JSON.stringify(response2.choices[0].message));import OpenAI from "openai";
const aios_base_url = "<<aios endpoint-url>>"; // AIOS 모델 호출을 위한 aios endpoint-url을 입력합니다.
const model = "<<model>>"; // AIOS 모델 호출을 위한 모델 ID를 입력합니다.
// 날씨 정보를 알아보는 함수를 정의합니다.
// 이 함수는 제공된 좌표에 대한 현재 온도를 섭씨로 반환합니다.
const tools = [
{
type: "function",
function: {
name: "get_weather",
description:
"Get current temperature for provided coordinates in celsius.",
parameters: {
type: "object",
properties: {
latitude: { type: "number" },
longitude: { type: "number" },
},
required: ["latitude", "longitude"],
additionalProperties: false,
},
strict: true,
},
},
];
// 사용자 메시지를 정의합니다.
// 사용자는 파리의 오늘 날씨를 묻고 있습니다.
const messages = [
{ role: "user", content: "What is the weather like in Paris today?" },
];
// OpenAI 클라이언트를 생성합니다.
// apiKey는 AIOS에서 요구하는 키로, 일반적으로 "EMPTY_KEY"로 설정됩니다.
// baseURL은 AIOS API의 v1 엔드포인트를 가리킵니다.
const client = new OpenAI({
apiKey: "EMPTY_KEY",
baseURL: new URL("v1", aios_base_url).href,
});
// AIOS 모델을 사용하여 채팅 completion을 생성합니다.
// model 매개변수는 사용할 모델 ID를 지정합니다.
// messages 매개변수는 사용자 메시지를 포함하는 메시지 목록입니다.
// tools 매개변수는 모델에게 사용할 수 있는 도구의 메타데이터를 제공합니다.
const response = await client.chat.completions.create({
model: model,
messages: messages,
tools: tools,
});
// AI 모델이 생성한 응답에서 도구 호출 정보를 출력합니다.
// 이 정보는 모델이 어떤 도구를 호출해야 하는지를 나타냅니다.
console.log(JSON.stringify(response.choices[0].message.tool_calls));
// 날씨 함수의 구현체, 항상 14도를 응답합니다.
function getWeather(latitude, longitude) {
return "14℃";
}
// 첫 번째 응답에서 도구 호출 정보를 추출합니다.
// 이는 모델이 요청한 도구 호출 정보를 가져옵니다.
const toolCall = response.choices[0].message.tool_calls[0];
// 도구 호출의 인수를 JSON 형식으로 파싱합니다.
// 이는 도구 호출에 필요한 파라미터들을 추출합니다.
const args = JSON.parse(toolCall.function.arguments);
// 실제 함수를 호출하여 결과를 얻습니다. (예: "14℃")
// 이 단계에서는 실제 날씨 정보 조회 로직이 실행됩니다.
const result = getWeather(args.latitude, args.longitude);
// 함수의 호출 결과값을 **tool** 메시지로 대화 맥락에 추가하고 다시 모델을 호출하면
// 함수의 호출 결과값을 이용하여 모델이 적절한 답변을 생성합니다.
// 모델의 tool call 메시지를 messages에 추가하여 대화 맥락을 유지합니다.
messages.push(response.choices[0].message);
// 실제 함수를 호출한 결과를 messages에 추가합니다.
// 이는 모델이 도구 호출 결과를 기반으로 최종 답변을 생성할 수 있도록 합니다.
messages.push({
role: "tool",
tool_call_id: toolCall.id,
content: String(result),
});
// 두 번째 채팅 completion을 생성합니다.
// 여기에는 사용할 모델 ID와 업데이트된 메시지 목록(messages)이 포함됩니다.
// 이 요청은 도구 호출 결과를 바탕으로 최종 답변을 생성합니다.
const response2 = await client.chat.completions.create({
model: model,
messages: messages,
});
// 두 번째 응답에서 AI가 생성한 메시지를 출력합니다.
// 이는 사용자 질문에 대한 최종 답변입니다.
console.log(JSON.stringify(response2.choices[0].message));import { HumanMessage } from "@langchain/core/messages";
import { tool } from "@langchain/core/tools";
import { ChatOpenAI } from "@langchain/openai";
import { z } from "zod";
const aios_base_url = "<<aios endpoint-url>>"; // AIOS 모델 호출을 위한 aios endpoint-url을 입력합니다.
const model = "<<model>>"; // AIOS 모델 호출을 위한 모델 ID를 입력합니다.
// 날씨 정보를 조회하는 도구 함수를 정의합니다.
// 이 함수는 제공된 좌표에 대한 현재 온도를 섭씨로 반환합니다.
const getWeather = tool(
function (latitude, longitude) {
/**
* Get current temperature for provided coordinates in celsius.
*/
return "14℃";
},
{
name: "get_weather",
description: "Get current temperature for provided coordinates in celsius.",
schema: z.object({
latitude: z.number(),
longitude: z.number(),
}),
}
);
// LangChain의 ChatOpenAI 클래스를 사용하여 채팅 LLM(대형 언어 모델) 인스턴스를 생성합니다.
// base_url은 AIOS API의 v1 엔드포인트를 가리키며,
// api_key는 AIOS에서 요구하는 키로, 일반적으로 "EMPTY_KEY"로 설정됩니다.
// model 매개변수는 사용할 모델 ID를 지정합니다.
const llm = new ChatOpenAI({
model: model,
apiKey: "EMPTY_KEY",
configuration: {
baseURL: new URL("v1", aios_base_url).href,
},
});
// 모델에 도구를 바인딩합니다.
// getWeather 함수는 제공된 좌표에 대한 현재 온도를 섭씨로 반환합니다.
const llmWithTools = llm.bindTools([getWeather]);
// 채팅 메시지 목록을 구성합니다.
// 사용자는 파리의 오늘 날씨를 묻고 있습니다.
const messages = [new HumanMessage("What is the weather like in Paris today?")];
// 채팅 LLM에 메시지 목록을 전달하여 응답을 받습니다.
// invoke 메서드는 모델의 출력을 반환합니다.
// 이 요청은 모델에게 사용자 질문을 처리하고 필요한 도구 호출을 결정하도록 지시합니다.
const response = await llmWithTools.invoke(messages);
// AI 모델이 생성한 응답에서 도구 호출 정보를 출력합니다.
// 이 정보는 모델이 어떤 도구를 호출해야 하는지를 나타냅니다.
console.log(response.tool_calls);
// 모델의 tool call 메시지를 messages에 추가하여 대화 맥락을 유지합니다.
// 이는 모델이 이전 대화 내용을 기억하고 연결할 수 있도록 합니다.
messages.push(response);
// 실제 도구 함수를 호출하여 결과를 얻습니다.
// 이 단계에서는 getWeather 함수가 실행되어 날씨 정보를 반환합니다.
const toolCall = response.tool_calls[0];
const toolMessage = await getWeather.invoke(toolCall);
// 도구 호출 결과를 messages에 추가합니다.
// 이는 모델이 도구 호출 결과를 기반으로 최종 답변을 생성할 수 있도록 합니다.
messages.push(toolMessage);
// 두 번째 요청을 수행하여 최종 답변을 얻습니다.
// 이제 모델은 도구 호출 결과를 바탕으로 사용자에게 적절한 답변을 생성합니다.
const response2 = await llm.invoke(messages);
// 최종 AI 모델 응답을 출력합니다.
console.log(response2.content);import { HumanMessage } from "@langchain/core/messages";
import { tool } from "@langchain/core/tools";
import { ChatOpenAI } from "@langchain/openai";
import { z } from "zod";
const aios_base_url = "<<aios endpoint-url>>"; // AIOS 모델 호출을 위한 aios endpoint-url을 입력합니다.
const model = "<<model>>"; // AIOS 모델 호출을 위한 모델 ID를 입력합니다.
// 날씨 정보를 조회하는 도구 함수를 정의합니다.
// 이 함수는 제공된 좌표에 대한 현재 온도를 섭씨로 반환합니다.
const getWeather = tool(
function (latitude, longitude) {
/**
* Get current temperature for provided coordinates in celsius.
*/
return "14℃";
},
{
name: "get_weather",
description: "Get current temperature for provided coordinates in celsius.",
schema: z.object({
latitude: z.number(),
longitude: z.number(),
}),
}
);
// LangChain의 ChatOpenAI 클래스를 사용하여 채팅 LLM(대형 언어 모델) 인스턴스를 생성합니다.
// base_url은 AIOS API의 v1 엔드포인트를 가리키며,
// api_key는 AIOS에서 요구하는 키로, 일반적으로 "EMPTY_KEY"로 설정됩니다.
// model 매개변수는 사용할 모델 ID를 지정합니다.
const llm = new ChatOpenAI({
model: model,
apiKey: "EMPTY_KEY",
configuration: {
baseURL: new URL("v1", aios_base_url).href,
},
});
// 모델에 도구를 바인딩합니다.
// getWeather 함수는 제공된 좌표에 대한 현재 온도를 섭씨로 반환합니다.
const llmWithTools = llm.bindTools([getWeather]);
// 채팅 메시지 목록을 구성합니다.
// 사용자는 파리의 오늘 날씨를 묻고 있습니다.
const messages = [new HumanMessage("What is the weather like in Paris today?")];
// 채팅 LLM에 메시지 목록을 전달하여 응답을 받습니다.
// invoke 메서드는 모델의 출력을 반환합니다.
// 이 요청은 모델에게 사용자 질문을 처리하고 필요한 도구 호출을 결정하도록 지시합니다.
const response = await llmWithTools.invoke(messages);
// AI 모델이 생성한 응답에서 도구 호출 정보를 출력합니다.
// 이 정보는 모델이 어떤 도구를 호출해야 하는지를 나타냅니다.
console.log(response.tool_calls);
// 모델의 tool call 메시지를 messages에 추가하여 대화 맥락을 유지합니다.
// 이는 모델이 이전 대화 내용을 기억하고 연결할 수 있도록 합니다.
messages.push(response);
// 실제 도구 함수를 호출하여 결과를 얻습니다.
// 이 단계에서는 getWeather 함수가 실행되어 날씨 정보를 반환합니다.
const toolCall = response.tool_calls[0];
const toolMessage = await getWeather.invoke(toolCall);
// 도구 호출 결과를 messages에 추가합니다.
// 이는 모델이 도구 호출 결과를 기반으로 최종 답변을 생성할 수 있도록 합니다.
messages.push(toolMessage);
// 두 번째 요청을 수행하여 최종 답변을 얻습니다.
// 이제 모델은 도구 호출 결과를 바탕으로 사용자에게 적절한 답변을 생성합니다.
const response2 = await llm.invoke(messages);
// 최종 AI 모델 응답을 출력합니다.
console.log(response2.content);package main
import (
"bytes"
"encoding/json"
"fmt"
"io"
"net/http"
)
const (
aiosBaseUrl = "<<aios endpoint-url>>" // AIOS 모델 호출을 위한 aios endpoint-url을 입력합니다.
model = "<<model>>" // AIOS 모델 호출을 위한 모델 ID를 입력합니다.
)
// 메시지 구조체를 정의합니다.
// Role: 메시지 역할 (user, assistant, tool 등)
// Content: 메시지 내용
// ToolCalls: 도구 호출 정보
// ToolCallId: 도구 호출 식별자
type Message struct {
Role string `json:"role"`
Content string `json:"content,omitempty"`
ToolCalls []map[string]any `json:"tool_calls,omitempty"`
ToolCallId string `json:"tool_call_id,omitempty"`
}
// POST 요청 데이터 구조체를 정의합니다.
// Model: 사용할 모델 ID
// Messages: 메시지 목록
// Tools: 사용 가능한 도구 목록
// Stream: 스트리밍 여부
type PostData struct {
Model string `json:"model"`
Messages []Message `json:"messages"`
Tools []map[string]any `json:"tools,omitempty"`
Stream bool `json:"stream,omitempty"`
}
// 날씨 정보를 조회하는 함수를 정의합니다.
// 이 함수는 항상 14도를 반환합니다 (샘플 구현).
func getWeather(latitude float32, longitude float32) string {
_ = fmt.Sprintf("latitude: %f, longitude: %f", latitude, longitude)
return "14℃"
}
func main() {
// 사용자 메시지를 정의합니다.
// 사용자는 파리의 오늘 날씨를 묻고 있습니다.
messages := []Message{
{
Role: "user",
Content: "What is the weather like in Paris today?",
},
}
// 날씨 정보를 알아보는 함수
// 이 도구는 제공된 좌표에 대한 현재 온도를 섭씨로 반환합니다.
tools := []map[string]any{
{
"type": "function",
"function": map[string]any{
"name": "get_weather",
"description": "Get current temperature for provided coordinates in celsius.",
"parameters": map[string]any{
"type": "object",
"properties": map[string]any{
"latitude": map[string]string{"type": "number"},
"longitude": map[string]string{"type": "number"},
},
"required": []string{"latitude", "longitude"},
"additionalProperties": false,
},
"strict": true,
},
},
}
// 요청 데이터를 구성합니다.
// 여기에는 사용할 모델 ID, 메시지 목록(messages), 및 도구 목록(tools)이 포함됩니다.
data := PostData{
Model: model,
Messages: messages,
Tools: tools,
}
// 요청 데이터를 JSON 형식으로 직렬화합니다.
jsonData, err := json.Marshal(data)
if err != nil {
panic(err)
}
// AIOS API의 v1/chat/completions 엔드포인트로 POST 요청을 보냅니다.
// 이 요청은 모델에게 사용자 질문을 처리하고 필요한 도구 호출을 결정하도록 합니다.
response, err := http.Post(aiosBaseUrl+"/v1/chat/completions", "application/json", bytes.NewBuffer(jsonData))
if err != nil {
panic(err)
}
defer response.Body.Close()
// 응답 본문을 읽습니다.
body, err := io.ReadAll(response.Body)
if err != nil {
panic(err)
}
// 응답 본문을 map 형식으로 파싱합니다.
var v map[string]interface{}
json.Unmarshal(body, &v)
// 첫 번째 응답에서 메시지 정보를 추출합니다.
choices := v["choices"].([]interface{})
choice := choices[0].(map[string]interface{})
message, err := json.MarshalIndent(choice["message"], "", " ")
if err != nil {
panic(err)
}
messageData := choice["message"].(map[string]interface{})
toolCalls := messageData["tool_calls"].([]interface{})
// AI 모델이 생성한 응답에서 도구 호출 정보를 출력합니다.
// 이 정보는 모델이 어떤 도구를 호출해야 하는지를 나타냅니다.
toolCallJson, err := json.MarshalIndent(toolCalls, "", " ")
if err != nil {
panic(err)
}
fmt.Println(string(toolCallJson))
// 첫 번째 응답에서 도구 호출 정보를 추출합니다.
// 이는 모델이 요청한 도구 호출 정보를 가져옵니다.
toolCall := toolCalls[0].(map[string]interface{})
function := toolCall["function"].(map[string]interface{})
// JSON 문자열 형식의 도구 호출의 인수를 map 형식으로 파싱합니다.
// 이는 도구 호출에 필요한 파라미터들을 추출합니다.
var args map[string]float32
err = json.Unmarshal([]byte(function["arguments"].(string)), &args)
if err != nil {
panic(err)
}
// 실제 함수를 호출하여 결과를 얻습니다. (예: "14℃")
// 이 단계에서는 실제 날씨 정보 조회 로직이 실행됩니다.
result := getWeather(args["latitude"], args["longitude"])
// 도구 호출 결과를 메시지로 변환합니다.
var toolMessage Message
err = json.Unmarshal(message, &toolMessage)
if err != nil {
panic(err)
}
// 모델의 tool call 메시지를 messages에 추가하여 대화 맥락을 유지합니다.
messages = append(messages, toolMessage)
// 실제 함수를 호출한 결과를 messages에 추가합니다.
// 이는 모델이 도구 호출 결과를 기반으로 최종 답변을 생성할 수 있도록 합니다.
messages = append(messages, Message{
Role: "tool",
ToolCallId: toolCall["id"].(string),
Content: string(result),
})
// 두 번째 요청 데이터를 구성합니다.
// 여기에는 사용할 모델 ID와 업데이트된 메시지 목록(messages)이 포함됩니다.
// 이 요청은 도구 호출 결과를 바탕으로 최종 답변을 생성합니다.
data = PostData{
Model: model,
Messages: messages,
}
jsonData, err = json.Marshal(data)
if err != nil {
panic(err)
}
// AIOS API에 다시 POST 요청을 보냅니다.
// 이 요청은 도구 호출 결과를 바탕으로 최종 답변을 생성합니다.
response2, err := http.Post(aiosBaseUrl+"/v1/chat/completions", "application/json", bytes.NewBuffer(jsonData))
if err != nil {
panic(err)
}
defer response2.Body.Close()
// 두 번째 응답 본문을 읽습니다.
body, err = io.ReadAll(response2.Body)
if err != nil {
panic(err)
}
// 두 번째 응답을 JSON 형식으로 파싱합니다.
json.Unmarshal(body, &v)
// 두 번째 응답에서 AI가 생성한 메시지를 출력합니다.
// 이는 사용자 질문에 대한 최종 답변입니다.
choices = v["choices"].([]interface{})
choice = choices[0].(map[string]interface{})
message, err = json.MarshalIndent(choice["message"], "", " ")
if err != nil {
panic(err)
}
fmt.Println(string(message))
}package main
import (
"context"
"encoding/json"
"fmt"
"github.com/openai/openai-go"
"github.com/openai/openai-go/option"
)
const (
aiosBaseUrl = "<<aios endpoint-url>>" // AIOS 모델 호출을 위한 aios endpoint-url을 입력합니다.
model = "<<model>>" // AIOS 모델 호출을 위한 모델 ID를 입력합니다.
)
// 날씨 정보를 조회하는 함수를 정의합니다.
// 이 함수는 항상 14도를 반환합니다 (샘플 구현).
func getWeather(latitude float32, longitude float32) string {
_ = fmt.Sprintf("latitude: %f, longitude: %f", latitude, longitude)
return "14℃"
}
func main() {
// OpenAI 클라이언트를 생성합니다.
// base_url은 AIOS API의 v1 엔드포인트를 가리킵니다.
client := openai.NewClient(
option.WithBaseURL(aiosBaseUrl + "/v1"),
)
// 사용자 메시지를 정의합니다.
// 사용자는 파리의 오늘 날씨를 묻고 있습니다.
messages := []openai.ChatCompletionMessageParamUnion{
openai.UserMessage("What is the weather like in Paris today?"),
}
// AIOS 모델을 사용하여 채팅 completion을 생성합니다.
// model 매개변수는 사용할 모델 ID를 지정합니다.
// messages 매개변수는 사용자 메시지를 포함하는 메시지 목록입니다.
// tools 매개변수는 모델에게 사용할 수 있는 도구의 메타데이터를 제공합니다.
response, err := client.Chat.Completions.New(context.TODO(), openai.ChatCompletionNewParams{
Model: model,
Messages: messages,
Tools: []openai.ChatCompletionToolParam{
{
Function: openai.FunctionDefinitionParam{
Name: "get_weather",
Description: openai.String("Get current temperature for provided coordinates in celsius."),
Parameters: openai.FunctionParameters{
"type": "object",
"properties": map[string]interface{}{
"latitude": map[string]string{
"type": "number",
},
"longitude": map[string]string{
"type": "number",
},
},
"required": []string{"latitude", "longitude"},
"additionalProperties": false,
},
Strict: openai.Bool(true),
},
},
},
})
if err != nil {
panic(err)
}
// AI 모델이 생성한 응답을 출력합니다.
// 이 응답은 도구 호출 정보를 포함합니다.
fmt.Println([]string{response.Choices[0].Message.ToolCalls[0].RawJSON()})
// 첫 번째 응답에서 도구 호출 정보를 추출합니다.
// 이는 모델이 요청한 도구 호출 정보를 가져옵니다.
var v map[string]float32
toolCall := response.Choices[0].Message.ToolCalls[0]
args := toolCall.Function.Arguments
// JSON 문자열 형식의 도구 호출의 인수를 map 형식으로 파싱합니다.
// 이는 도구 호출에 필요한 파라미터들을 추출합니다.
err = json.Unmarshal([]byte(args), &v)
if err != nil {
panic(err)
}
// 실제 함수를 호출하여 결과를 얻습니다. (예: "14℃")
// 이 단계에서는 실제 날씨 정보 조회 로직이 실행됩니다.
result := getWeather(v["latitude"], v["longitude"])
// 함수의 호출 결과값을 **tool** 메시지로 대화 맥락에 추가하고 다시 모델을 호출하면
// 함수의 호출 결과값을 이용하여 모델이 적절한 답변을 생성합니다.
// 모델의 tool call 메시지를 messages에 추가하여 대화 맥락을 유지합니다.
messages = append(messages, response.Choices[0].Message.ToParam())
// 실제 함수를 호출한 결과를 messages에 추가합니다.
// 이는 모델이 도구 호출 결과를 기반으로 최종 답변을 생성할 수 있도록 합니다.
messages = append(messages, openai.ToolMessage(string(result), toolCall.ID))
// 두 번째 채팅 completion을 생성합니다.
// 여기에는 사용할 모델 ID와 업데이트된 메시지 목록(messages)이 포함됩니다.
// 이 요청은 도구 호출 결과를 바탕으로 최종 답변을 생성합니다.
response2, err := client.Chat.Completions.New(context.TODO(), openai.ChatCompletionNewParams{
Model: model,
Messages: messages,
})
if err != nil {
panic(err)
}
// 두 번째 응답에서 AI가 생성한 메시지를 출력합니다.
// 이는 사용자 질문에 대한 최종 답변입니다.
fmt.Println(response2.Choices[0].Message.RawJSON())
}Response
첫 번째 응답 choices의 message.tool_calls에서 모델이 사용하기 좋다고 판단한 도구의 실행 방법을 확인할 수 있습니다.
tool_calls의 function에서 get_weather 함수를 사용하고, 어떤 인자를 넣어서 실행하는지 확인할 수 있습니다.
[
  {
    'id': 'chatcmpl-tool-xxxxxxxxxxxxxxxxxxxxxxxxxxxxxxxx',
    'type': 'function',
    'function': {
      'name': 'get_weather',
      'arguments': '{"latitude": 48.8566, "longitude": 2.3522}'
	}
  }
]
두 번째 요청에는 메시지에 3개의 메시지가 포함되었습니다.
- 최초의 사용자 메시지
- 첫 번째 모델이 생성한 tool calling 메시지
- get_weather 도구를 실행한 결과가 들어 있는 tool message
두 번째 응답에서는 위 메시지의 내용을 모두 이용하여 모델이 최종 응답을 생성합니다.
{
  'content': 'The current weather in Paris is 14℃.',
  'refusal': None,
  'role': 'assistant',
  'annotations': None,
  'audio': None,
  'function_call': None,
  'tool_calls': [],
  'reasoning_content': 'We have user asking weather in Paris today. We called '
                      'get_weather function with coordinates and got "14℃" as '
                      'comment. We need to respond. Should incorporate info '
                      'and maybe note we are using approximate. Provide '
                      'answer.',
}
reasoning
Request
reasoning을 지원하는 모델의 경우, 다음과 같이 reasoning값을 확인할 수 있습니다.
import json
import requests
from urllib.parse import urljoin

aios_base_url = "<<aios endpoint-url>>" # AIOS 모델 호출을 위한 aios endpoint-url을 입력합니다.
model = "<<model>>"                     # AIOS 모델 호출을 위한 모델 ID를 입력합니다.

# 요청 데이터를 구성합니다.
# 이 예제에서는 사용자가 두 숫자 중 어느 것이 큰지 비교하도록 요청합니다.
# "Think step by step"는 모델이 논리적 단계를 거쳐 생각하도록 유도하는 지시어입니다.
data = {
  "model": model,
  "messages": [
    {"role": "user", "content": "Think step by step. 9.11 and 9.8, which is greater?"}
  ]
}

# AIOS API의 v1/chat/completions 엔드포인트로 POST 요청을 보냅니다.
# 이 요청은 모델에게 사용자 질문을 처리하도록 지시합니다.
response = requests.post(urljoin(aios_base_url, "v1/chat/completions"), json=data)
body = json.loads(response.text)
# AI 모델이 생성한 응답을 출력합니다.
print(body["choices"][0]["message"])
import json
import requests
from urllib.parse import urljoin
aios_base_url = "<<aios endpoint-url>>" # AIOS 모델 호출을 위한 aios endpoint-url을 입력합니다.
model = "<<model>>" # AIOS 모델 호출을 위한 모델 ID를 입력합니다.
# 요청 데이터를 구성합니다.
# 이 예제에서는 사용자가 두 숫자 중 어느 것이 큰지 비교하도록 요청합니다.
# "Think step by step"는 모델이 논리적 단계를 거쳐 생각하도록 유도하는 지시어입니다.
data = {
"model": model,
"messages": [
{"role": "user", "content": "Think step by step. 9.11 and 9.8, which is greater?"}
]
}
# AIOS API의 v1/chat/completions 엔드포인트로 POST 요청을 보냅니다.
# 이 요청은 모델에게 사용자 질문을 처리하도록 지시합니다.
response = requests.post(urljoin(aios_base_url, "v1/chat/completions"), json=data)
body = json.loads(response.text)
# AI 모델이 생성한 응답을 출력합니다.
print(body["choices"][0]["message"])from openai import OpenAI
from urllib.parse import urljoin
aios_base_url = "<<aios endpoint-url>>" # AIOS 모델 호출을 위한 aios endpoint-url을 입력합니다.
model = "<<model>>" # AIOS 모델 호출을 위한 모델 ID를 입력합니다.
# OpenAI 클라이언트를 생성합니다.
# base_url은 AIOS API의 v1 엔드포인트를 가리키며,
# api_key는 AIOS에서 요구하는 키로, 일반적으로 "EMPTY_KEY"로 설정됩니다.
client = OpenAI(base_url=urljoin(aios_base_url, "v1"), api_key="EMPTY_KEY")
# AIOS 모델을 사용하여 채팅 completion을 생성합니다.
# model 매개변수는 사용할 모델 ID를 지정합니다.
# messages 매개변수는 사용자 메시지를 포함하는 메시지 목록입니다.
# "Think step by step"는 모델이 논리적 단계를 거쳐 생각하도록 유도하는 지시어입니다.
response = client.chat.completions.create(
model=model,
messages=[
{"role": "user", "content": "Think step by step. 9.11 and 9.8, which is greater?"}
],
)
# AI 모델이 생성한 응답을 출력합니다.
print(response.choices[0].message.model_dump())from openai import OpenAI
from urllib.parse import urljoin
aios_base_url = "<<aios endpoint-url>>" # AIOS 모델 호출을 위한 aios endpoint-url을 입력합니다.
model = "<<model>>" # AIOS 모델 호출을 위한 모델 ID를 입력합니다.
# OpenAI 클라이언트를 생성합니다.
# base_url은 AIOS API의 v1 엔드포인트를 가리키며,
# api_key는 AIOS에서 요구하는 키로, 일반적으로 "EMPTY_KEY"로 설정됩니다.
client = OpenAI(base_url=urljoin(aios_base_url, "v1"), api_key="EMPTY_KEY")
# AIOS 모델을 사용하여 채팅 completion을 생성합니다.
# model 매개변수는 사용할 모델 ID를 지정합니다.
# messages 매개변수는 사용자 메시지를 포함하는 메시지 목록입니다.
# "Think step by step"는 모델이 논리적 단계를 거쳐 생각하도록 유도하는 지시어입니다.
response = client.chat.completions.create(
model=model,
messages=[
{"role": "user", "content": "Think step by step. 9.11 and 9.8, which is greater?"}
],
)
# AI 모델이 생성한 응답을 출력합니다.
print(response.choices[0].message.model_dump())from langchain_openai import ChatOpenAI
from urllib.parse import urljoin
aios_base_url = "<<aios endpoint-url>>" # AIOS 모델 호출을 위한 aios endpoint-url을 입력합니다.
model = "<<model>>" # AIOS 모델 호출을 위한 모델 ID를 입력합니다.
# LangChain의 ChatOpenAI 클래스를 사용하여 채팅 LLM(대형 언어 모델) 인스턴스를 생성합니다.
# base_url은 AIOS API의 v1 엔드포인트를 가리키며,
# api_key는 AIOS에서 요구하는 키로, 일반적으로 "EMPTY_KEY"로 설정됩니다.
# model 매개변수는 사용할 모델 ID를 지정합니다.
chat_llm = ChatOpenAI(
base_url=urljoin(aios_base_url, "v1"),
api_key="EMPTY_KEY",
model=model
)
# 채팅 메시지 목록을 구성합니다.
# 사용자는 두 숫자 중 어느 것이 큰지 비교하도록 요청하고 있습니다.
# "Think step by step"는 모델이 논리적 단계를 거쳐 생각하도록 유도하는 지시어입니다.
messages = [
("human", "Think step by step. 9.11 and 9.8, which is greater?"),
]
# 채팅 LLM에 메시지 목록을 전달하여 응답을 받습니다.
# invoke 메서드는 모델의 출력을 반환합니다.
# 이 요청은 모델에게 사용자 질문을 처리하도록 지시합니다.
chat_completion = chat_llm.invoke(messages)
# AI 모델이 생성한 응답을 출력합니다.
print(chat_completion.model_dump())from langchain_openai import ChatOpenAI
from urllib.parse import urljoin
aios_base_url = "<<aios endpoint-url>>" # AIOS 모델 호출을 위한 aios endpoint-url을 입력합니다.
model = "<<model>>" # AIOS 모델 호출을 위한 모델 ID를 입력합니다.
# LangChain의 ChatOpenAI 클래스를 사용하여 채팅 LLM(대형 언어 모델) 인스턴스를 생성합니다.
# base_url은 AIOS API의 v1 엔드포인트를 가리키며,
# api_key는 AIOS에서 요구하는 키로, 일반적으로 "EMPTY_KEY"로 설정됩니다.
# model 매개변수는 사용할 모델 ID를 지정합니다.
chat_llm = ChatOpenAI(
base_url=urljoin(aios_base_url, "v1"),
api_key="EMPTY_KEY",
model=model
)
# 채팅 메시지 목록을 구성합니다.
# 사용자는 두 숫자 중 어느 것이 큰지 비교하도록 요청하고 있습니다.
# "Think step by step"는 모델이 논리적 단계를 거쳐 생각하도록 유도하는 지시어입니다.
messages = [
("human", "Think step by step. 9.11 and 9.8, which is greater?"),
]
# 채팅 LLM에 메시지 목록을 전달하여 응답을 받습니다.
# invoke 메서드는 모델의 출력을 반환합니다.
# 이 요청은 모델에게 사용자 질문을 처리하도록 지시합니다.
chat_completion = chat_llm.invoke(messages)
# AI 모델이 생성한 응답을 출력합니다.
print(chat_completion.model_dump())const aios_base_url = "<<aios endpoint-url>>"; // AIOS 모델 호출을 위한 aios endpoint-url을 입력합니다.
const model = "<<model>>"; // AIOS 모델 호출을 위한 모델 ID를 입력합니다.
// 요청 데이터를 구성합니다.
// 이 예제에서는 사용자가 두 숫자 중 어느 것이 큰지 비교하도록 요청합니다.
// "Think step by step"는 모델이 논리적 단계를 거쳐 생각하도록 유도하는 지시어입니다.
const data = {
model: model,
messages: [
{
role: "user",
content: "Think step by step. 9.11 and 9.8, which is greater?",
},
],
};
// AIOS API의 v1/chat/completions 엔드포인트 URL을 생성합니다.
let url = new URL("/v1/chat/completions", aios_base_url);
// AIOS API에 POST 요청을 보냅니다.
// 이 요청은 모델에게 사용자 질문을 처리하도록 지시합니다.
const response = await fetch(url, {
method: "POST",
headers: {
"Content-Type": "application/json",
},
body: JSON.stringify(data),
});
const body = await response.json();
// AI 모델이 생성한 응답을 출력합니다.
console.log(body.choices[0].message);const aios_base_url = "<<aios endpoint-url>>"; // AIOS 모델 호출을 위한 aios endpoint-url을 입력합니다.
const model = "<<model>>"; // AIOS 모델 호출을 위한 모델 ID를 입력합니다.
// 요청 데이터를 구성합니다.
// 이 예제에서는 사용자가 두 숫자 중 어느 것이 큰지 비교하도록 요청합니다.
// "Think step by step"는 모델이 논리적 단계를 거쳐 생각하도록 유도하는 지시어입니다.
const data = {
model: model,
messages: [
{
role: "user",
content: "Think step by step. 9.11 and 9.8, which is greater?",
},
],
};
// AIOS API의 v1/chat/completions 엔드포인트 URL을 생성합니다.
let url = new URL("/v1/chat/completions", aios_base_url);
// AIOS API에 POST 요청을 보냅니다.
// 이 요청은 모델에게 사용자 질문을 처리하도록 지시합니다.
const response = await fetch(url, {
method: "POST",
headers: {
"Content-Type": "application/json",
},
body: JSON.stringify(data),
});
const body = await response.json();
// AI 모델이 생성한 응답을 출력합니다.
console.log(body.choices[0].message);import OpenAI from "openai";
const aios_base_url = "<<aios endpoint-url>>"; // AIOS 모델 호출을 위한 aios endpoint-url을 입력합니다.
const model = "<<model>>"; // AIOS 모델 호출을 위한 모델 ID를 입력합니다.
// OpenAI 클라이언트를 생성합니다.
// apiKey는 AIOS에서 요구하는 키로, 일반적으로 "EMPTY_KEY"로 설정됩니다.
// baseURL은 AIOS API의 v1 엔드포인트를 가리킵니다.
const client = new OpenAI({
apiKey: "EMPTY_KEY",
baseURL: new URL("v1", aios_base_url).href,
});
// AIOS 모델을 사용하여 채팅 completion을 생성합니다.
// model 매개변수는 사용할 모델 ID를 지정합니다.
// messages 매개변수는 사용자 메시지를 포함하는 메시지 목록입니다.
// "Think step by step"는 모델이 논리적 단계를 거쳐 생각하도록 유도하는 지시어입니다.
const response = await client.chat.completions.create({
model: model,
messages: [
{
role: "user",
content: "Think step by step. 9.11 and 9.8, which is greater?",
},
],
});
// AI 모델이 생성한 응답을 출력합니다.
console.log(response.choices[0].message);import OpenAI from "openai";
const aios_base_url = "<<aios endpoint-url>>"; // AIOS 모델 호출을 위한 aios endpoint-url을 입력합니다.
const model = "<<model>>"; // AIOS 모델 호출을 위한 모델 ID를 입력합니다.
// OpenAI 클라이언트를 생성합니다.
// apiKey는 AIOS에서 요구하는 키로, 일반적으로 "EMPTY_KEY"로 설정됩니다.
// baseURL은 AIOS API의 v1 엔드포인트를 가리킵니다.
const client = new OpenAI({
apiKey: "EMPTY_KEY",
baseURL: new URL("v1", aios_base_url).href,
});
// AIOS 모델을 사용하여 채팅 completion을 생성합니다.
// model 매개변수는 사용할 모델 ID를 지정합니다.
// messages 매개변수는 사용자 메시지를 포함하는 메시지 목록입니다.
// "Think step by step"는 모델이 논리적 단계를 거쳐 생각하도록 유도하는 지시어입니다.
const response = await client.chat.completions.create({
model: model,
messages: [
{
role: "user",
content: "Think step by step. 9.11 and 9.8, which is greater?",
},
],
});
// AI 모델이 생성한 응답을 출력합니다.
console.log(response.choices[0].message);package main
import (
"bytes"
"encoding/json"
"fmt"
"io"
"net/http"
)
const (
aiosBaseUrl = "<<aios endpoint-url>>" // AIOS 모델 호출을 위한 aios endpoint-url을 입력합니다.
model = "<<model>>" // AIOS 모델 호출을 위한 모델 ID를 입력합니다.
)
// 메시지 구조체를 정의합니다.
// Role: 메시지 역할 (user, assistant 등)
// Content: 메시지 내용
type Message struct {
Role string `json:"role"`
Content string `json:"content"`
}
// POST 요청 데이터 구조체를 정의합니다.
// Model: 사용할 모델 ID
// Messages: 메시지 목록
// Stream: 스트리밍 여부
type PostData struct {
Model string `json:"model"`
Messages []Message `json:"messages"`
Stream bool `json:"stream,omitempty"`
}
func main() {
// 요청 데이터를 구성합니다.
// 이 예제에서는 사용자가 두 숫자 중 어느 것이 큰지 비교하도록 요청합니다.
// "Think step by step"는 모델이 논리적 단계를 거쳐 생각하도록 유도하는 지시어입니다.
data := PostData{
Model: model,
Messages: []Message{
{
Role: "user",
Content: "Think step by step. 9.11 and 9.8, which is greater?",
},
},
}
// 요청 데이터를 JSON 형식으로 직렬화합니다.
jsonData, err := json.Marshal(data)
if err != nil {
panic(err)
}
// AIOS API의 v1/chat/completions 엔드포인트로 POST 요청을 보냅니다.
response, err := http.Post(aiosBaseUrl+"/v1/chat/completions", "application/json", bytes.NewBuffer(jsonData))
if err != nil {
panic(err)
}
defer response.Body.Close()
// 응답 본문을 읽습니다.
body, err := io.ReadAll(response.Body)
if err != nil {
panic(err)
}
// 응답 본문을 JSON 형식으로 파싱합니다.
// 이는 서버로부터 받은 모델의 응답을 구조화된 데이터로 변환합니다.
var v map[string]interface{}
json.Unmarshal(body, &v)
choices := v["choices"].([]interface{})
choice := choices[0].(map[string]interface{})
message, err := json.MarshalIndent(choice["message"], "", " ")
if err != nil {
panic(err)
}
// AI 모델이 생성한 응답을 출력합니다.
fmt.Println(string(message))
}package main
import (
"context"
"fmt"
"github.com/openai/openai-go"
"github.com/openai/openai-go/option"
)
const (
aiosBaseUrl = "<<aios endpoint-url>>" // AIOS 모델 호출을 위한 aios endpoint-url을 입력합니다.
model = "<<model>>" // AIOS 모델 호출을 위한 모델 ID를 입력합니다.
)
func main() {
// OpenAI 클라이언트를 생성합니다.
// base_url은 AIOS API의 v1 엔드포인트를 가리킵니다.
client := openai.NewClient(
option.WithBaseURL(aiosBaseUrl + "/v1"),
)
// AIOS 모델을 사용하여 채팅 completion을 생성합니다.
// model 매개변수는 사용할 모델 ID를 지정합니다.
// messages 매개변수는 사용자 메시지를 포함하는 메시지 목록입니다.
// "Think step by step"는 모델이 논리적 단계를 거쳐 생각하도록 유도하는 지시어입니다.
response, err := client.Chat.Completions.New(context.TODO(), openai.ChatCompletionNewParams{
Model: model,
Messages: []openai.ChatCompletionMessageParamUnion{
openai.UserMessage("Think step by step. 9.11 and 9.8, which is greater?"),
},
})
if err != nil {
panic(err)
}
// AI 모델이 생성한 응답을 출력합니다.
fmt.Println(response.Choices[0].Message.RawJSON())
}Response
choices의 message 필드를 확인하면 content 외에도 reasoning_content를 확인할 수 있습니다.
reasoning_content는 최종 답변을 생성하기 전 추론(reasoning)단계에서 생성한 토큰을 의미합니다.
{
  'annotations': None,
  'audio': None,
  'content': 'Sure! Let’s compare the two numbers step by step.\n'
              '\n'
              '1. **Identify the numbers**  \n'
              '   - First number: **9.11**  \n'
              '   - Second number: **9.8**\n'
              '\n'
              '2. **Look at the whole-number part**  \n'
              '   Both numbers have the same whole‑number part, **9**. So the '
              'comparison will depend on the decimal part.\n'
              '\n'
              '3. **Compare the decimal parts**  \n'
              '   - Decimal part of 9.11 = **0.11**  \n'
              '   - Decimal part of 9.8  = **0.80** (since 9.8 = 9.80)\n'
              '\n'
              '4. **Determine which decimal part is larger**  \n'
              '   - 0.80 is greater than 0.11.\n'
              '\n'
              '5. **Conclude**  \n'
              '   Because the whole-number parts are equal and the decimal part '
              'of 9.8 is larger, **9.8 is greater than 9.11**.',
  'function_call': None,
  'reasoning_content': 'User asks: "Think step by step. 9.11 and 9.8, which is '
                        'greater?" We need to compare numbers 9.11 and 9.8. '
                        'Value: 9.11 < 9.8, so 9.8 is greater. Provide '
                        'step-by-step reasoning. No policy conflict.',
  'refusal': None,
  'role': 'assistant',
  'tool_calls': []
}
image to text
vision을 지원하는 모델의 경우, 다음과 같이 이미지를 입력할 수 있습니다.

vision 지원 모델에서의 입력 이미지는 크기 및 개수 제한이 있습니다.
이미지 입력 제한에 대한 내용은 제공 모델을 참조해 주세요.
Request
이미지를 MIME type과 함께 base64로 인코딩된 data URL 형식으로 입력할 수 있습니다.
import base64
import json
import requests
from urllib.parse import urljoin

aios_base_url = "<<aios endpoint-url>>" # AIOS 모델 호출을 위한 aios endpoint-url을 입력합니다.
model = "<<model>>"                     # AIOS 모델 호출을 위한 모델 ID를 입력합니다.

image_path = "이미지/경로.jpg"

# 이미지를 Base64 인코딩하는 함수를 정의합니다.
# 이는 이미지를 텍스트 형식으로 변환하여 API에 전송할 수 있도록 합니다.
def encode_image(image_path: str):
  with open(image_path, "rb") as image_file:
    return base64.b64encode(image_file.read()).decode("utf-8")

# 이미지를 Base64 형식으로 인코딩합니다.
base64_image = encode_image(image_path)

# 요청 데이터를 구성합니다.
# 이 예제에서는 사용자가 이미지에 대해 질문을 하도록 요청합니다.
# 이미지는 Base64 인코딩된 문자열로 전송됩니다.
data = {
  "model": model,
  "messages": [
    {
      "role": "user",
      "content": [
        {"type": "text", "text": "what's in this image?"},
        {
          "type": "image_url",
          "image_url": {
            "url": f"data:image/jpeg;base64,{base64_image}",
          },
        },
      ]
    },
  ]
}

# AIOS API의 v1/chat/completions 엔드포인트로 POST 요청을 보냅니다.
# 이 요청은 모델에게 이미지 분석을 요청합니다.
response = requests.post(urljoin(aios_base_url, "v1/chat/completions"), json=data)
body = json.loads(response.text)
# AI 모델이 생성한 응답을 출력합니다.
# 이 응답은 이미지 내용에 대한 모델의 설명입니다.
print(body["choices"][0]["message"])
import base64
import json
import requests
from urllib.parse import urljoin
aios_base_url = "<<aios endpoint-url>>" # AIOS 모델 호출을 위한 aios endpoint-url을 입력합니다.
model = "<<model>>" # AIOS 모델 호출을 위한 모델 ID를 입력합니다.
image_path = "이미지/경로.jpg"
# 이미지를 Base64 인코딩하는 함수를 정의합니다.
# 이는 이미지를 텍스트 형식으로 변환하여 API에 전송할 수 있도록 합니다.
def encode_image(image_path: str):
with open(image_path, "rb") as image_file:
return base64.b64encode(image_file.read()).decode("utf-8")
# 이미지를 Base64 형식으로 인코딩합니다.
base64_image = encode_image(image_path)
# 요청 데이터를 구성합니다.
# 이 예제에서는 사용자가 이미지에 대해 질문을 하도록 요청합니다.
# 이미지는 Base64 인코딩된 문자열로 전송됩니다.
data = {
"model": model,
"messages": [
{
"role": "user",
"content": [
{"type": "text", "text": "what's in this image?"},
{
"type": "image_url",
"image_url": {
"url": f"data:image/jpeg;base64,{base64_image}",
},
},
]
},
]
}
# AIOS API의 v1/chat/completions 엔드포인트로 POST 요청을 보냅니다.
# 이 요청은 모델에게 이미지 분석을 요청합니다.
response = requests.post(urljoin(aios_base_url, "v1/chat/completions"), json=data)
body = json.loads(response.text)
# AI 모델이 생성한 응답을 출력합니다.
# 이 응답은 이미지 내용에 대한 모델의 설명입니다.
print(body["choices"][0]["message"])import base64
from openai import OpenAI
from urllib.parse import urljoin
aios_base_url = "<<aios endpoint-url>>" # AIOS 모델 호출을 위한 aios endpoint-url을 입력합니다.
model = "<<model>>" # AIOS 모델 호출을 위한 모델 ID를 입력합니다.
# OpenAI 클라이언트를 생성합니다.
# base_url은 AIOS API의 v1 엔드포인트를 가리키며,
# api_key는 AIOS에서 요구하는 키로, 일반적으로 "EMPTY_KEY"로 설정됩니다.
client = OpenAI(base_url=urljoin(aios_base_url, "v1"), api_key="EMPTY_KEY")
image_path = "이미지/경로.jpg"
# 이미지를 Base64 인코딩하는 함수를 정의합니다.
# 이는 이미지를 텍스트 형식으로 변환하여 API에 전송할 수 있도록 합니다.
def encode_image(image_path: str):
with open(image_path, "rb") as image_file:
return base64.b64encode(image_file.read()).decode("utf-8")
# 이미지를 Base64 형식으로 인코딩합니다.
base64_image = encode_image(image_path)
# AIOS 모델을 사용하여 채팅 completion을 생성합니다.
# model 매개변수는 사용할 모델 ID를 지정합니다.
# messages 매개변수는 사용자 메시지를 포함하는 메시지 목록입니다.
# 이 예제에서는 사용자가 이미지에 대해 질문을 하도록 요청합니다.
# 이미지는 Base64 인코딩된 문자열로 전송됩니다.
response = client.chat.completions.create(
model=model,
messages=[
{
"role": "user",
"content": [
{"type": "text", "text": "what's in this image?"},
{
"type": "image_url",
"image_url": {
"url": f"data:image/jpeg;base64,{base64_image}",
},
},
]
},
],
)
# AI 모델이 생성한 응답을 출력합니다.
# 이 응답은 이미지 내용에 대한 모델의 설명입니다.
print(response.choices[0].message.model_dump())import base64
from langchain_openai import ChatOpenAI
from urllib.parse import urljoin
aios_base_url = "<<aios endpoint-url>>" # AIOS 모델 호출을 위한 aios endpoint-url을 입력합니다.
model = "<<model>>" # AIOS 모델 호출을 위한 모델 ID를 입력합니다.
# LangChain의 ChatOpenAI 클래스를 사용하여 채팅 LLM(대형 언어 모델) 인스턴스를 생성합니다.
# base_url은 AIOS API의 v1 엔드포인트를 가리키며,
# api_key는 AIOS에서 요구하는 키로, 일반적으로 "EMPTY_KEY"로 설정됩니다.
# model 매개변수는 사용할 모델 ID를 지정합니다.
chat_llm = ChatOpenAI(
base_url=urljoin(aios_base_url, "v1"),
api_key="EMPTY_KEY",
model=model
)
image_path = "이미지/경로.jpg"
# 이미지를 Base64 인코딩하는 함수를 정의합니다.
# 이는 이미지를 텍스트 형식으로 변환하여 API에 전송할 수 있도록 합니다.
def encode_image(image_path: str):
with open(image_path, "rb") as image_file:
return base64.b64encode(image_file.read()).decode("utf-8")
# 이미지를 Base64 형식으로 인코딩합니다.
base64_image = encode_image(image_path)
# 채팅 메시지 목록을 구성합니다.
# 이 예제에서는 사용자가 이미지에 대해 질문을 하도록 요청합니다.
# 이미지는 Base64 인코딩된 문자열로 전송됩니다.
messages = [
{
"role": "user",
"content": [
{"type": "text", "text": "what's in this image?"},
{
"type": "image_url",
"image_url": {
"url": f"data:image/jpeg;base64,{base64_image}",
},
},
]
},
]
# 채팅 LLM에 메시지 목록을 전달하여 응답을 받습니다.
# invoke 메서드는 모델의 출력을 반환합니다.
# 이 요청은 모델에게 이미지 분석을 요청합니다.
chat_completion = chat_llm.invoke(messages)
# AI 모델이 생성한 응답을 출력합니다.
# 이 응답은 이미지 내용에 대한 모델의 설명입니다.
print(chat_completion.model_dump())import base64
from langchain_openai import ChatOpenAI
from urllib.parse import urljoin
aios_base_url = "<<aios endpoint-url>>" # AIOS 모델 호출을 위한 aios endpoint-url을 입력합니다.
model = "<<model>>" # AIOS 모델 호출을 위한 모델 ID를 입력합니다.
# LangChain의 ChatOpenAI 클래스를 사용하여 채팅 LLM(대형 언어 모델) 인스턴스를 생성합니다.
# base_url은 AIOS API의 v1 엔드포인트를 가리키며,
# api_key는 AIOS에서 요구하는 키로, 일반적으로 "EMPTY_KEY"로 설정됩니다.
# model 매개변수는 사용할 모델 ID를 지정합니다.
chat_llm = ChatOpenAI(
base_url=urljoin(aios_base_url, "v1"),
api_key="EMPTY_KEY",
model=model
)
image_path = "이미지/경로.jpg"
# 이미지를 Base64 인코딩하는 함수를 정의합니다.
# 이는 이미지를 텍스트 형식으로 변환하여 API에 전송할 수 있도록 합니다.
def encode_image(image_path: str):
with open(image_path, "rb") as image_file:
return base64.b64encode(image_file.read()).decode("utf-8")
# 이미지를 Base64 형식으로 인코딩합니다.
base64_image = encode_image(image_path)
# 채팅 메시지 목록을 구성합니다.
# 이 예제에서는 사용자가 이미지에 대해 질문을 하도록 요청합니다.
# 이미지는 Base64 인코딩된 문자열로 전송됩니다.
messages = [
{
"role": "user",
"content": [
{"type": "text", "text": "what's in this image?"},
{
"type": "image_url",
"image_url": {
"url": f"data:image/jpeg;base64,{base64_image}",
},
},
]
},
]
# 채팅 LLM에 메시지 목록을 전달하여 응답을 받습니다.
# invoke 메서드는 모델의 출력을 반환합니다.
# 이 요청은 모델에게 이미지 분석을 요청합니다.
chat_completion = chat_llm.invoke(messages)
# AI 모델이 생성한 응답을 출력합니다.
# 이 응답은 이미지 내용에 대한 모델의 설명입니다.
print(chat_completion.model_dump())import { readFile } from "fs/promises";
const aios_base_url = "<<aios endpoint-url>>"; // AIOS 모델 호출을 위한 aios endpoint-url을 입력합니다.
const model = "<<model>>"; // AIOS 모델 호출을 위한 모델 ID를 입력합니다.
const imagePath = "이미지/경로.jpg";
// 이미지 파일을 Base64로 변환하는 함수를 정의합니다.
// 이는 이미지를 텍스트 형식으로 변환하여 API에 전송할 수 있도록 합니다.
async function imageFileToBase64(imagePath) {
// 파일 내용을 버퍼로 읽음
const fileBuffer = await readFile(imagePath);
// 버퍼를 Base64 문자열로 변환
return fileBuffer.toString("base64");
}
// 이미지 파일을 Base64 형식으로 변환합니다.
const base64Image = await imageFileToBase64(imagePath);
// 요청 데이터를 구성합니다.
// 이 예제에서는 사용자가 이미지에 대해 질문을 하도록 요청합니다.
// 이미지는 Base64 인코딩된 문자열로 전송됩니다.
const data = {
model: model,
messages: [
{
role: "user",
content: [
{ type: "text", text: "what's in this image?" },
{
type: "image_url",
image_url: {
url: `data:image/jpeg;base64,${base64Image}`,
},
},
],
},
],
};
// AIOS API의 v1/chat/completions 엔드포인트 URL을 생성합니다.
let url = new URL("/v1/chat/completions", aios_base_url);
// AIOS API에 POST 요청을 보냅니다.
// 이 요청은 모델에게 이미지 분석을 요청합니다.
const response = await fetch(url, {
method: "POST",
headers: {
"Content-Type": "application/json",
},
body: JSON.stringify(data),
});
const body = await response.json();
// AI 모델이 생성한 응답을 출력합니다.
// 이 응답은 이미지 내용에 대한 모델의 설명입니다.
console.log(body.choices[0].message);import { readFile } from "fs/promises";
const aios_base_url = "<<aios endpoint-url>>"; // AIOS 모델 호출을 위한 aios endpoint-url을 입력합니다.
const model = "<<model>>"; // AIOS 모델 호출을 위한 모델 ID를 입력합니다.
const imagePath = "이미지/경로.jpg";
// 이미지 파일을 Base64로 변환하는 함수를 정의합니다.
// 이는 이미지를 텍스트 형식으로 변환하여 API에 전송할 수 있도록 합니다.
async function imageFileToBase64(imagePath) {
// 파일 내용을 버퍼로 읽음
const fileBuffer = await readFile(imagePath);
// 버퍼를 Base64 문자열로 변환
return fileBuffer.toString("base64");
}
// 이미지 파일을 Base64 형식으로 변환합니다.
const base64Image = await imageFileToBase64(imagePath);
// 요청 데이터를 구성합니다.
// 이 예제에서는 사용자가 이미지에 대해 질문을 하도록 요청합니다.
// 이미지는 Base64 인코딩된 문자열로 전송됩니다.
const data = {
model: model,
messages: [
{
role: "user",
content: [
{ type: "text", text: "what's in this image?" },
{
type: "image_url",
image_url: {
url: `data:image/jpeg;base64,${base64Image}`,
},
},
],
},
],
};
// AIOS API의 v1/chat/completions 엔드포인트 URL을 생성합니다.
let url = new URL("/v1/chat/completions", aios_base_url);
// AIOS API에 POST 요청을 보냅니다.
// 이 요청은 모델에게 이미지 분석을 요청합니다.
const response = await fetch(url, {
method: "POST",
headers: {
"Content-Type": "application/json",
},
body: JSON.stringify(data),
});
const body = await response.json();
// AI 모델이 생성한 응답을 출력합니다.
// 이 응답은 이미지 내용에 대한 모델의 설명입니다.
console.log(body.choices[0].message);import OpenAI from "openai";
import { readFile } from "fs/promises";
const aios_base_url = "<<aios endpoint-url>>"; // AIOS 모델 호출을 위한 aios endpoint-url을 입력합니다.
const model = "<<model>>"; // AIOS 모델 호출을 위한 모델 ID를 입력합니다.
const imagePath = "이미지/경로.jpg";
// 이미지 파일을 Base64로 변환하는 함수를 정의합니다.
// 이는 이미지를 텍스트 형식으로 변환하여 API에 전송할 수 있도록 합니다.
async function imageFileToBase64(imagePath) {
// 파일 내용을 버퍼로 읽음
const fileBuffer = await readFile(imagePath);
// 버퍼를 Base64 문자열로 변환
return fileBuffer.toString("base64");
}
// 이미지 파일을 Base64 형식으로 변환합니다.
const base64Image = await imageFileToBase64(imagePath);
// OpenAI 클라이언트를 생성합니다.
// apiKey는 AIOS에서 요구하는 키로, 일반적으로 "EMPTY_KEY"로 설정됩니다.
// baseURL은 AIOS API의 v1 엔드포인트를 가리킵니다.
const client = new OpenAI({
apiKey: "EMPTY_KEY",
baseURL: new URL("v1", aios_base_url).href,
});
// AIOS 모델을 사용하여 채팅 completion을 생성합니다.
// model 매개변수는 사용할 모델 ID를 지정합니다.
// messages 매개변수는 사용자 메시지를 포함하는 메시지 목록입니다.
// 이 예제에서는 사용자가 이미지에 대해 질문을 하도록 요청합니다.
// 이미지는 Base64 인코딩된 문자열로 전송됩니다.
const response = await client.chat.completions.create({
model: model,
messages: [
{
role: "user",
content: [
{ type: "text", text: "what's in this image?" },
{
type: "image_url",
image_url: {
url: `data:image/jpeg;base64,${base64Image}`,
},
},
],
},
],
});
// AI 모델이 생성한 응답을 출력합니다.
// 이 응답은 이미지 내용에 대한 모델의 설명입니다.
console.log(response.choices[0].message);import OpenAI from "openai";
import { readFile } from "fs/promises";
const aios_base_url = "<<aios endpoint-url>>"; // AIOS 모델 호출을 위한 aios endpoint-url을 입력합니다.
const model = "<<model>>"; // AIOS 모델 호출을 위한 모델 ID를 입력합니다.
const imagePath = "이미지/경로.jpg";
// 이미지 파일을 Base64로 변환하는 함수를 정의합니다.
// 이는 이미지를 텍스트 형식으로 변환하여 API에 전송할 수 있도록 합니다.
async function imageFileToBase64(imagePath) {
// 파일 내용을 버퍼로 읽음
const fileBuffer = await readFile(imagePath);
// 버퍼를 Base64 문자열로 변환
return fileBuffer.toString("base64");
}
// 이미지 파일을 Base64 형식으로 변환합니다.
const base64Image = await imageFileToBase64(imagePath);
// OpenAI 클라이언트를 생성합니다.
// apiKey는 AIOS에서 요구하는 키로, 일반적으로 "EMPTY_KEY"로 설정됩니다.
// baseURL은 AIOS API의 v1 엔드포인트를 가리킵니다.
const client = new OpenAI({
apiKey: "EMPTY_KEY",
baseURL: new URL("v1", aios_base_url).href,
});
// AIOS 모델을 사용하여 채팅 completion을 생성합니다.
// model 매개변수는 사용할 모델 ID를 지정합니다.
// messages 매개변수는 사용자 메시지를 포함하는 메시지 목록입니다.
// 이 예제에서는 사용자가 이미지에 대해 질문을 하도록 요청합니다.
// 이미지는 Base64 인코딩된 문자열로 전송됩니다.
const response = await client.chat.completions.create({
model: model,
messages: [
{
role: "user",
content: [
{ type: "text", text: "what's in this image?" },
{
type: "image_url",
image_url: {
url: `data:image/jpeg;base64,${base64Image}`,
},
},
],
},
],
});
// AI 모델이 생성한 응답을 출력합니다.
// 이 응답은 이미지 내용에 대한 모델의 설명입니다.
console.log(response.choices[0].message);import { HumanMessage } from "@langchain/core/messages";
import { ChatOpenAI } from "@langchain/openai";
import { readFile } from "fs/promises";
const aios_base_url = "<<aios endpoint-url>>"; // AIOS 모델 호출을 위한 aios endpoint-url을 입력합니다.
const model = "<<model>>"; // AIOS 모델 호출을 위한 모델 ID를 입력합니다.
const imagePath = "이미지/경로.jpg";
// 이미지 파일을 Base64로 변환하는 함수를 정의합니다.
// 이는 이미지를 텍스트 형식으로 변환하여 API에 전송할 수 있도록 합니다.
async function imageFileToBase64(imagePath) {
// 파일 내용을 버퍼로 읽음
const fileBuffer = await readFile(imagePath);
// 버퍼를 Base64 문자열로 변환
return fileBuffer.toString("base64");
}
// 이미지 파일을 Base64 형식으로 변환합니다.
const base64Image = await imageFileToBase64(imagePath);
// LangChain의 ChatOpenAI 클래스를 사용하여 채팅 LLM(대형 언어 모델) 인스턴스를 생성합니다.
// base_url은 AIOS API의 v1 엔드포인트를 가리키며,
// api_key는 AIOS에서 요구하는 키로, 일반적으로 "EMPTY_KEY"로 설정됩니다.
// model 매개변수는 사용할 모델 ID를 지정합니다.
const llm = new ChatOpenAI({
model: model,
apiKey: "EMPTY_KEY",
configuration: {
baseURL: new URL("v1", aios_base_url).href,
},
});
// 채팅 메시지 목록을 구성합니다.
// 이 예제에서는 사용자가 이미지에 대해 질문을 하도록 요청합니다.
// 이미지는 Base64 인코딩된 문자열로 전송됩니다.
const messages = [
new HumanMessage({
content: [
{ type: "text", text: "what's in this image?" },
{
type: "image_url",
image_url: {
url: `data:image/jpeg;base64,${base64Image}`,
},
},
],
}),
];
// 채팅 LLM에 메시지 목록을 전달하여 응답을 받습니다.
// invoke 메서드는 모델의 출력을 반환합니다.
// 이 요청은 모델에게 이미지 분석을 요청합니다.
const response = await llm.invoke(messages);
// AI 모델이 생성한 응답을 출력합니다.
// 이 응답은 이미지 내용에 대한 모델의 설명입니다.
console.log(response.content);import { HumanMessage } from "@langchain/core/messages";
import { ChatOpenAI } from "@langchain/openai";
import { readFile } from "fs/promises";
const aios_base_url = "<<aios endpoint-url>>"; // AIOS 모델 호출을 위한 aios endpoint-url을 입력합니다.
const model = "<<model>>"; // AIOS 모델 호출을 위한 모델 ID를 입력합니다.
const imagePath = "이미지/경로.jpg";
// 이미지 파일을 Base64로 변환하는 함수를 정의합니다.
// 이는 이미지를 텍스트 형식으로 변환하여 API에 전송할 수 있도록 합니다.
async function imageFileToBase64(imagePath) {
// 파일 내용을 버퍼로 읽음
const fileBuffer = await readFile(imagePath);
// 버퍼를 Base64 문자열로 변환
return fileBuffer.toString("base64");
}
// 이미지 파일을 Base64 형식으로 변환합니다.
const base64Image = await imageFileToBase64(imagePath);
// LangChain의 ChatOpenAI 클래스를 사용하여 채팅 LLM(대형 언어 모델) 인스턴스를 생성합니다.
// base_url은 AIOS API의 v1 엔드포인트를 가리키며,
// api_key는 AIOS에서 요구하는 키로, 일반적으로 "EMPTY_KEY"로 설정됩니다.
// model 매개변수는 사용할 모델 ID를 지정합니다.
const llm = new ChatOpenAI({
model: model,
apiKey: "EMPTY_KEY",
configuration: {
baseURL: new URL("v1", aios_base_url).href,
},
});
// 채팅 메시지 목록을 구성합니다.
// 이 예제에서는 사용자가 이미지에 대해 질문을 하도록 요청합니다.
// 이미지는 Base64 인코딩된 문자열로 전송됩니다.
const messages = [
new HumanMessage({
content: [
{ type: "text", text: "what's in this image?" },
{
type: "image_url",
image_url: {
url: `data:image/jpeg;base64,${base64Image}`,
},
},
],
}),
];
// 채팅 LLM에 메시지 목록을 전달하여 응답을 받습니다.
// invoke 메서드는 모델의 출력을 반환합니다.
// 이 요청은 모델에게 이미지 분석을 요청합니다.
const response = await llm.invoke(messages);
// AI 모델이 생성한 응답을 출력합니다.
// 이 응답은 이미지 내용에 대한 모델의 설명입니다.
console.log(response.content);package main
import (
"bytes"
"encoding/base64"
"encoding/json"
"fmt"
"io"
"net/http"
"os"
)
const (
aiosBaseUrl = "<<aios endpoint-url>>" // AIOS 모델 호출을 위한 aios endpoint-url을 입력합니다.
model = "<<model>>" // AIOS 모델 호출을 위한 모델 ID를 입력합니다.
)
var imagePath = "이미지/경로.jpg"
// 메시지 구조체를 정의합니다.
// Role: 메시지 역할 (user, assistant 등)
// Content: 메시지 내용 (텍스트와 이미지 URL 포함)
type Message struct {
Role string `json:"role"`
Content []map[string]interface{} `json:"content"`
}
// POST 요청 데이터 구조체를 정의합니다.
// Model: 사용할 모델 ID
// Messages: 메시지 목록
// Stream: 스트리밍 여부
type PostData struct {
Model string `json:"model"`
Messages []Message `json:"messages"`
Stream bool `json:"stream,omitempty"`
}
// 이미지 파일을 Base64로 인코딩하는 함수를 정의합니다.
// 이는 이미지를 텍스트 형식으로 변환하여 API에 전송할 수 있도록 합니다.
func imageFileToBase64(imagePath string) (string, error) {
data, err := os.ReadFile(imagePath)
if err != nil {
return "", err
}
return base64.StdEncoding.EncodeToString([]byte(data)), nil
}
func main() {
// 이미지 파일을 Base64 형식으로 인코딩합니다.
base64Image, err := imageFileToBase64(imagePath)
if err != nil {
panic(err)
}
// 요청 데이터를 구성합니다.
// 이 예제에서는 사용자가 이미지에 대해 질문을 하도록 요청합니다.
// 이미지는 Base64 인코딩된 문자열로 전송됩니다.
data := PostData{
Model: model,
Messages: []Message{
{
Role: "user",
Content: []map[string]interface{}{
{
"type": "text",
"text": "what's in this image?",
},
{
"type": "image_url",
"image_url": map[string]string{
"url": fmt.Sprintf("data:image/jpeg;base64,%s", base64Image),
},
},
},
},
},
}
// 요청 데이터를 JSON 형식으로 직렬화합니다.
jsonData, err := json.Marshal(data)
if err != nil {
panic(err)
}
// AIOS API의 v1/chat/completions 엔드포인트로 POST 요청을 보냅니다.
// 이 요청은 모델에게 이미지 분석을 요청합니다.
response, err := http.Post(aiosBaseUrl+"/v1/chat/completions", "application/json", bytes.NewBuffer(jsonData))
if err != nil {
panic(err)
}
defer response.Body.Close()
// 응답 본문을 읽습니다.
body, err := io.ReadAll(response.Body)
if err != nil {
panic(err)
}
// 응답 본문을 JSON 형식으로 파싱합니다.
// 이는 서버로부터 받은 모델의 응답을 구조화된 데이터로 변환합니다.
var v map[string]interface{}
json.Unmarshal(body, &v)
// AI 모델이 생성한 응답을 출력합니다.
// 이 응답은 이미지 내용에 대한 모델의 설명입니다.
choices := v["choices"].([]interface{})
choice := choices[0].(map[string]interface{})
message, err := json.MarshalIndent(choice["message"], "", " ")
if err != nil {
panic(err)
}
fmt.Println(string(message))
}package main
import (
"context"
"encoding/base64"
"fmt"
"os"
"github.com/openai/openai-go"
"github.com/openai/openai-go/option"
)
const (
aiosBaseUrl = "<<aios endpoint-url>>" // AIOS 모델 호출을 위한 aios endpoint-url을 입력합니다.
model = "<<model>>" // AIOS 모델 호출을 위한 모델 ID를 입력합니다.
)
var imagePath = "이미지/경로.jpg"
// 이미지 파일을 Base64로 인코딩하는 함수를 정의합니다.
// 이는 이미지를 텍스트 형식으로 변환하여 API에 전송할 수 있도록 합니다.
func imageFileToBase64(imagePath string) (string, error) {
data, err := os.ReadFile(imagePath)
if err != nil {
return "", err
}
return base64.StdEncoding.EncodeToString([]byte(data)), nil
}
func main() {
// 이미지 파일을 Base64 형식으로 인코딩합니다.
base64Image, err := imageFileToBase64(imagePath)
if err != nil {
panic(err)
}
// OpenAI 클라이언트를 생성합니다.
// base_url은 AIOS API의 v1 엔드포인트를 가리킵니다.
client := openai.NewClient(
option.WithBaseURL(aiosBaseUrl + "/v1"),
)
// AIOS 모델을 사용하여 채팅 completion을 생성합니다.
// model 매개변수는 사용할 모델 ID를 지정합니다.
// messages 매개변수는 사용자 메시지를 포함하는 메시지 목록입니다.
// 이 예제에서는 사용자가 이미지에 대해 질문을 하도록 요청합니다.
// 이미지는 Base64 인코딩된 문자열로 전송됩니다.
response, err := client.Chat.Completions.New(context.TODO(), openai.ChatCompletionNewParams{
Model: model,
Messages: []openai.ChatCompletionMessageParamUnion{
openai.UserMessage([]openai.ChatCompletionContentPartUnionParam{
{
OfText: &openai.ChatCompletionContentPartTextParam{
Text: "what's in this image?",
},
},
{
OfImageURL: &openai.ChatCompletionContentPartImageParam{
ImageURL: openai.ChatCompletionContentPartImageImageURLParam{
URL: fmt.Sprintf("data:image/jpeg;base64,%s", base64Image),
},
},
},
}),
},
})
if err != nil {
panic(err)
}
// AI 모델이 생성한 응답을 출력합니다.
// 이 응답은 이미지 내용에 대한 모델의 설명입니다.
fmt.Println(response.Choices[0].Message.RawJSON())
}Response
다음과 같이 이미지를 분석하여 텍스트를 생성합니다.
{
  'annotations': None,
  'audio': None,
  'content': "Here's what's in the image:\n"
              '\n'
              '*   **A Golden Retriever puppy:** The main focus is a cute, '
              'fluffy golden retriever puppy lying on a patch of grass.\n'
              '*   **A bone:** The puppy is chewing on a pink bone.\n'
              '*   **Green grass:** The puppy is lying on a vibrant green lawn.\n'
              '*   **Background:** There’s a bit of foliage and some elements of '
              'a garden or yard in the background, including a small shed and '
              'some plants.\n'
              '\n'
              'It’s a really heartwarming image!',
  'function_call': None,
  'reasoning_content': None,
  'refusal': None,
  'role': 'assistant',
  'tool_calls': []
}
Embeddings API
Embeddings는 입력 텍스트를 정해진 차원의 고차원의 벡터로 변환합니다.
생성된 벡터를 활용하여 텍스트 간 유사도, 클러스터링, 검색 등 다양한 자연어 처리 작업에 활용할 수 있습니다.
Request
import json
import requests
from urllib.parse import urljoin

aios_base_url = "<<aios endpoint-url>>" # AIOS 모델 호출을 위한 aios endpoint-url을 입력합니다.
model = "<<model>>"                     # AIOS 모델 호출을 위한 모델 ID를 입력합니다.

# 모델에 전달할 데이터를 구성합니다.
data = {
  "model": model,
  "input": "What is the capital of France?"
}

# AIOS의 /v1/embeddings API 엔드포인트로 POST 요청을 보냅니다.
response = requests.post(urljoin(aios_base_url, "v1/embeddings"), json=data)
body = json.loads(response.text)
# 응답에서 생성된 임베딩 벡터를 출력합니다.
print(body["data"][0]["embedding"])
import json
import requests
from urllib.parse import urljoin
aios_base_url = "<<aios endpoint-url>>" # AIOS 모델 호출을 위한 aios endpoint-url을 입력합니다.
model = "<<model>>" # AIOS 모델 호출을 위한 모델 ID를 입력합니다.
# 모델에 전달할 데이터를 구성합니다.
data = {
"model": model,
"input": "What is the capital of France?"
}
# AIOS의 /v1/embeddings API 엔드포인트로 POST 요청을 보냅니다.
response = requests.post(urljoin(aios_base_url, "v1/embeddings"), json=data)
body = json.loads(response.text)
# 응답에서 생성된 임베딩 벡터를 출력합니다.
print(body["data"][0]["embedding"])from openai import OpenAI
from urllib.parse import urljoin
aios_base_url = "<<aios endpoint-url>>" # AIOS 모델 호출을 위한 aios endpoint-url을 입력합니다.
model = "<<model>>" # AIOS 모델 호출을 위한 모델 ID를 입력합니다.
# OpenAI 클라이언트를 생성합니다.
# base_url은 AIOS의 API 엔드포인트를 지정하고,
# api_key는 dummy 값("EMPTY_KEY")으로 설정됩니다.
client = OpenAI(base_url=urljoin(aios_base_url, "v1"), api_key="EMPTY_KEY")
# 임베딩(embedding)을 생성하기 위해 OpenAI 클라이언트의 embeddings.create 메서드를 호출합니다.
# 입력 텍스트와 모델 ID를 전달하여 임베딩 벡터를 생성합니다.
response = client.embeddings.create(
input="What is the capital of France?",
model=model
)
# 생성된 임베딩 벡터를 출력합니다.
print(response.data[0].embedding)from openai import OpenAI
from urllib.parse import urljoin
aios_base_url = "<<aios endpoint-url>>" # AIOS 모델 호출을 위한 aios endpoint-url을 입력합니다.
model = "<<model>>" # AIOS 모델 호출을 위한 모델 ID를 입력합니다.
# OpenAI 클라이언트를 생성합니다.
# base_url은 AIOS의 API 엔드포인트를 지정하고,
# api_key는 dummy 값("EMPTY_KEY")으로 설정됩니다.
client = OpenAI(base_url=urljoin(aios_base_url, "v1"), api_key="EMPTY_KEY")
# 임베딩(embedding)을 생성하기 위해 OpenAI 클라이언트의 embeddings.create 메서드를 호출합니다.
# 입력 텍스트와 모델 ID를 전달하여 임베딩 벡터를 생성합니다.
response = client.embeddings.create(
input="What is the capital of France?",
model=model
)
# 생성된 임베딩 벡터를 출력합니다.
print(response.data[0].embedding)from langchain_together import TogetherEmbeddings
from urllib.parse import urljoin
aios_base_url = "<<aios endpoint-url>>" # AIOS 모델 호출을 위한 aios endpoint-url을 입력합니다.
model = "<<model>>" # AIOS 모델 호출을 위한 모델 ID를 입력합니다.
# TogetherEmbeddings 클래스를 사용하여 임베딩 인스턴스를 생성합니다.
# base_url은 AIOS의 API 엔드포인트를 지정하고,
# api_key는 dummy 값("EMPTY_KEY")으로 설정됩니다.
# model은 사용할 임베딩 모델을 지정합니다.
embeddings = TogetherEmbeddings(
base_url=urljoin(aios_base_url, "v1"),
api_key="EMPTY_KEY",
model=model
)
# 입력 텍스트에 대한 임베딩 벡터를 생성합니다.
# embed_query 메서드는 단일 문장에 대한 임베딩을 생성합니다.
embedding = embeddings.embed_query("What is the capital of France?")
# 생성된 임베딩 벡터를 출력합니다.
print(embedding)from langchain_together import TogetherEmbeddings
from urllib.parse import urljoin
aios_base_url = "<<aios endpoint-url>>" # AIOS 모델 호출을 위한 aios endpoint-url을 입력합니다.
model = "<<model>>" # AIOS 모델 호출을 위한 모델 ID를 입력합니다.
# TogetherEmbeddings 클래스를 사용하여 임베딩 인스턴스를 생성합니다.
# base_url은 AIOS의 API 엔드포인트를 지정하고,
# api_key는 dummy 값("EMPTY_KEY")으로 설정됩니다.
# model은 사용할 임베딩 모델을 지정합니다.
embeddings = TogetherEmbeddings(
base_url=urljoin(aios_base_url, "v1"),
api_key="EMPTY_KEY",
model=model
)
# 입력 텍스트에 대한 임베딩 벡터를 생성합니다.
# embed_query 메서드는 단일 문장에 대한 임베딩을 생성합니다.
embedding = embeddings.embed_query("What is the capital of France?")
# 생성된 임베딩 벡터를 출력합니다.
print(embedding)const aios_base_url = "<<aios endpoint-url>>"; // AIOS 모델 호출을 위한 aios endpoint-url을 입력합니다.
const model = "<<model>>"; // AIOS 모델 호출을 위한 모델 ID를 입력합니다.
// 모델에 전달할 데이터를 구성합니다.
const data = {
model: model,
input: "What is the capital of France?"
};
// AIOS API의 v1/embeddings 엔드포인트 URL을 생성합니다.
let url = new URL("/v1/embeddings", aios_base_url);
// AIOS의 임베딩 API 엔드포인트로 POST 요청을 보냅니다.
const response = await fetch(url, {
method: "POST",
headers: {
"Content-Type": "application/json",
},
body: JSON.stringify(data),
});
const body = await response.json();
// 응답에서 생성된 임베딩 벡터를 출력합니다.
console.log(body.data[0].embedding);const aios_base_url = "<<aios endpoint-url>>"; // AIOS 모델 호출을 위한 aios endpoint-url을 입력합니다.
const model = "<<model>>"; // AIOS 모델 호출을 위한 모델 ID를 입력합니다.
// 모델에 전달할 데이터를 구성합니다.
const data = {
model: model,
input: "What is the capital of France?"
};
// AIOS API의 v1/embeddings 엔드포인트 URL을 생성합니다.
let url = new URL("/v1/embeddings", aios_base_url);
// AIOS의 임베딩 API 엔드포인트로 POST 요청을 보냅니다.
const response = await fetch(url, {
method: "POST",
headers: {
"Content-Type": "application/json",
},
body: JSON.stringify(data),
});
const body = await response.json();
// 응답에서 생성된 임베딩 벡터를 출력합니다.
console.log(body.data[0].embedding);import OpenAI from "openai";
const aios_base_url = "<<aios endpoint-url>>"; // AIOS 모델 호출을 위한 aios endpoint-url을 입력합니다.
const model = "<<model>>"; // AIOS 모델 호출을 위한 모델 ID를 입력합니다.
// OpenAI 클라이언트를 생성합니다.
// apiKey는 dummy 값("EMPTY_KEY")으로 설정되며,
// baseURL은 AIOS의 API 엔드포인트를 지정합니다.
const client = new OpenAI({
apiKey: "EMPTY_KEY",
baseURL: new URL("v1", aios_base_url).href,
});
// 임베딩(embedding)을 생성하기 위해 OpenAI 클라이언트의 embeddings.create 메서드를 호출합니다.
// 입력 텍스트와 모델 ID를 전달하여 임베딩 벡터를 생성합니다.
const response = await client.embeddings.create({
model: model,
input: "What is the capital of France?",
});
// 생성된 임베딩 벡터를 출력합니다.
console.log(response.data[0].embedding);import OpenAI from "openai";
const aios_base_url = "<<aios endpoint-url>>"; // AIOS 모델 호출을 위한 aios endpoint-url을 입력합니다.
const model = "<<model>>"; // AIOS 모델 호출을 위한 모델 ID를 입력합니다.
// OpenAI 클라이언트를 생성합니다.
// apiKey는 dummy 값("EMPTY_KEY")으로 설정되며,
// baseURL은 AIOS의 API 엔드포인트를 지정합니다.
const client = new OpenAI({
apiKey: "EMPTY_KEY",
baseURL: new URL("v1", aios_base_url).href,
});
// 임베딩(embedding)을 생성하기 위해 OpenAI 클라이언트의 embeddings.create 메서드를 호출합니다.
// 입력 텍스트와 모델 ID를 전달하여 임베딩 벡터를 생성합니다.
const response = await client.embeddings.create({
model: model,
input: "What is the capital of France?",
});
// 생성된 임베딩 벡터를 출력합니다.
console.log(response.data[0].embedding);import { OpenAIEmbeddings } from "@langchain/openai";
const aios_base_url = "<<aios endpoint-url>>"; // AIOS 모델 호출을 위한 aios endpoint-url을 입력합니다.
const model = "<<model>>"; // AIOS 모델 호출을 위한 모델 ID를 입력합니다.
// LangChain의 OpenAIEmbeddings 클래스를 사용하여 임베딩 인스턴스를 생성합니다.
// base_url은 AIOS API의 v1 엔드포인트를 가리키며,
// api_key는 AIOS에서 요구하는 키로, 일반적으로 "EMPTY_KEY"로 설정됩니다.
// model 매개변수는 사용할 모델 ID를 지정합니다.
const embeddings = new OpenAIEmbeddings({
model: model,
apiKey: "EMPTY_KEY",
configuration: {
baseURL: new URL("v1", aios_base_url).href,
},
});
// 입력 텍스트에 대한 임베딩 벡터를 생성합니다.
// embedQuery 메서드는 단일 문장에 대한 임베딩을 생성합니다.
const response = await embeddings.embedQuery("What is the capital of France?");
// 생성된 임베딩 벡터를 출력합니다.
console.log(response);import { OpenAIEmbeddings } from "@langchain/openai";
const aios_base_url = "<<aios endpoint-url>>"; // AIOS 모델 호출을 위한 aios endpoint-url을 입력합니다.
const model = "<<model>>"; // AIOS 모델 호출을 위한 모델 ID를 입력합니다.
// LangChain의 OpenAIEmbeddings 클래스를 사용하여 임베딩 인스턴스를 생성합니다.
// base_url은 AIOS API의 v1 엔드포인트를 가리키며,
// api_key는 AIOS에서 요구하는 키로, 일반적으로 "EMPTY_KEY"로 설정됩니다.
// model 매개변수는 사용할 모델 ID를 지정합니다.
const embeddings = new OpenAIEmbeddings({
model: model,
apiKey: "EMPTY_KEY",
configuration: {
baseURL: new URL("v1", aios_base_url).href,
},
});
// 입력 텍스트에 대한 임베딩 벡터를 생성합니다.
// embedQuery 메서드는 단일 문장에 대한 임베딩을 생성합니다.
const response = await embeddings.embedQuery("What is the capital of France?");
// 생성된 임베딩 벡터를 출력합니다.
console.log(response);package main
import (
"bytes"
"encoding/json"
"fmt"
"io"
"net/http"
)
const (
aiosBaseUrl = "<<aios endpoint-url>>" // AIOS 모델 호출을 위한 aios endpoint-url을 입력합니다.
model = "<<model>>" // AIOS 모델 호출을 위한 모델 ID를 입력합니다.
)
// POST 요청에 사용될 데이터 구조를 정의합니다.
// Model: 사용할 모델 ID
// Input: 임베딩을 생성할 입력 텍스트
type PostData struct {
Model string `json:"model"`
Input string `json:"input"`
}
func main() {
// 요청 데이터를 생성합니다.
data := PostData{
Model: model,
Input: "What is the capital of France?",
}
// 데이터를 JSON 형식으로 마샬링합니다.
jsonData, err := json.Marshal(data)
if err != nil {
panic(err)
}
// AIOS API의 v1/embeddings 엔드포인트로 POST 요청을 보냅니다.
response, err := http.Post(aiosBaseUrl+"/v1/embeddings", "application/json", bytes.NewBuffer(jsonData))
if err != nil {
panic(err)
}
defer response.Body.Close()
// 응답 본문을 모두 읽습니다.
body, err := io.ReadAll(response.Body)
if err != nil {
panic(err)
}
// 응답 본문을 맵 형식으로 언마샬링합니다.
var v map[string]interface{}
json.Unmarshal(body, &v)
responseData := v["data"].([]interface{})
firstData := responseData[0].(map[string]interface{})
// 첫 번째 데이터의 임베딩 벡터를 JSON 형식으로 포맷하여 출력합니다.
embedding, err := json.MarshalIndent(firstData["embedding"], "", " ")
if err != nil {
panic(err)
}
fmt.Println(string(embedding))
}package main
import (
"context"
"fmt"
"github.com/openai/openai-go"
"github.com/openai/openai-go/option"
)
const (
aiosBaseUrl = "<<aios endpoint-url>>" // AIOS 모델 호출을 위한 aios endpoint-url을 입력합니다.
model = "<<model>>" // AIOS 모델 호출을 위한 모델 ID를 입력합니다.
)
func main() {
// OpenAI 클라이언트를 생성합니다.
// option.WithBaseURL을 사용하여 AIOS API의 v1 엔드포인트를 설정합니다.
client := openai.NewClient(
option.WithBaseURL(aiosBaseUrl + "/v1"),
)
// AIOS 모델을 사용하여 임베딩을 생성합니다.
// openai.EmbeddingNewParams를 사용하여 모델과 입력 텍스트를 설정합니다.
// 입력 텍스트는 "What is the capital of France?"입니다.
completion, err := client.Embeddings.New(context.TODO(), openai.EmbeddingNewParams{
Model: model,
Input: openai.EmbeddingNewParamsInputUnion{
OfString: openai.String("What is the capital of France?"),
},
})
if err != nil {
panic(err)
}
// 생성된 임베딩 벡터를 출력합니다.
fmt.Println(completion.Data[0].Embedding)
}Response
data의 embedding에 벡터 형태로 변환된 값을 응답으로 받습니다.
[
  0.01319122314453125,
  0.057220458984375,
  -0.028533935546875,
  -0.0008697509765625,
  -0.01422119140625,
  ...생략...
]
Rerank API
Rerank는 주어진 문서들에 대해서 query와 연관도를 계산하여 순위를 부여합니다.
연관있는 문서를 앞쪽으로 조정하여 RAG(Retrieval-Augmented Generation) 구조의 애플리케이션의 성능을 향상시키는데 도움이 될 수 있습니다.
Request
import json
import requests
from urllib.parse import urljoin

aios_base_url = "<<aios endpoint-url>>" # AIOS 모델 호출을 위한 aios endpoint-url을 입력합니다.
model = "<<model>>"                     # AIOS 모델 호출을 위한 모델 ID를 입력합니다.

# 요청 데이터를 구성합니다.
# 여기에는 사용할 모델 ID, 쿼리(query), 문서 목록(documents), 그리고 상위 N개 결과(top_n)가 포함됩니다.
data = {
  "model": model,
  "query": "What is the capital of France?",
  "documents": [
    "The capital of France is Paris.",
    "France capital city is known for the Eiffel Tower.",
    "Paris is located in the north-central part of France."
  ],
  "top_n": 3
}

# AIOS API의 v2/rerank 엔드포인트로 POST 요청을 보냅니다.
# 쿼리와 문서 목록을 비교하여 관련성 높은 문서를 재정렬합니다.
response = requests.post(urljoin(aios_base_url, "v2/rerank"), json=data)
body = json.loads(response.text)
# 재정렬된 결과를 출력합니다.
# 이 결과는 쿼리와 문서 간의 관련성 점수를 기준으로 정렬된 문서 목록입니다.
print(body["results"])
import json
import requests
from urllib.parse import urljoin
aios_base_url = "<<aios endpoint-url>>" # AIOS 모델 호출을 위한 aios endpoint-url을 입력합니다.
model = "<<model>>" # AIOS 모델 호출을 위한 모델 ID를 입력합니다.
# 요청 데이터를 구성합니다.
# 여기에는 사용할 모델 ID, 쿼리(query), 문서 목록(documents), 그리고 상위 N개 결과(top_n)가 포함됩니다.
data = {
"model": model,
"query": "What is the capital of France?",
"documents": [
"The capital of France is Paris.",
"France capital city is known for the Eiffel Tower.",
"Paris is located in the north-central part of France."
],
"top_n": 3
}
# AIOS API의 v2/rerank 엔드포인트로 POST 요청을 보냅니다.
# 쿼리와 문서 목록을 비교하여 관련성 높은 문서를 재정렬합니다.
response = requests.post(urljoin(aios_base_url, "v2/rerank"), json=data)
body = json.loads(response.text)
# 재정렬된 결과를 출력합니다.
# 이 결과는 쿼리와 문서 간의 관련성 점수를 기준으로 정렬된 문서 목록입니다.
print(body["results"])import cohere
from urllib.parse import urljoin
aios_base_url = "<<aios endpoint-url>>" # AIOS 모델 호출을 위한 aios endpoint-url을 입력합니다.
model = "<<model>>" # AIOS 모델 호출을 위한 모델 ID를 입력합니다.
# Cohere 클라이언트를 생성합니다.
# api_key는 AIOS에서 요구하는 키로, 일반적으로 "EMPTY_KEY"로 설정됩니다.
# base_url은 AIOS API의 기본 경로를 가리킵니다.
client = cohere.ClientV2("EMPTY_KEY", base_url=aios_base_url)
# 문서 목록을 정의합니다.
# 이 문서들은 검색할 문서들입니다.
docs = [
"The capital of France is Paris.",
"France capital city is known for the Eiffel Tower.",
"Paris is located in the north-central part of France."
]
# AIOS 모델을 사용하여 문서를 재정렬합니다.
# model 매개변수는 사용할 모델 ID를 지정합니다.
# query 매개변수는 검색할 쿼리입니다.
# documents 매개변수는 검색할 문서 목록입니다.
# top_n 매개변수는 상위 N개의 결과를 반환합니다.
response = client.rerank(
model=model,
query="What is the capital of France?",
documents=docs,
top_n=3,
)
# 재정렬된 결과를 출력합니다.
# 이 결과는 쿼리와 문서 간의 관련성 점수를 기준으로 정렬된 문서 목록입니다.
print([result.model_dump() for result in response.results])import cohere
from urllib.parse import urljoin
aios_base_url = "<<aios endpoint-url>>" # AIOS 모델 호출을 위한 aios endpoint-url을 입력합니다.
model = "<<model>>" # AIOS 모델 호출을 위한 모델 ID를 입력합니다.
# Cohere 클라이언트를 생성합니다.
# api_key는 AIOS에서 요구하는 키로, 일반적으로 "EMPTY_KEY"로 설정됩니다.
# base_url은 AIOS API의 기본 경로를 가리킵니다.
client = cohere.ClientV2("EMPTY_KEY", base_url=aios_base_url)
# 문서 목록을 정의합니다.
# 이 문서들은 검색할 문서들입니다.
docs = [
"The capital of France is Paris.",
"France capital city is known for the Eiffel Tower.",
"Paris is located in the north-central part of France."
]
# AIOS 모델을 사용하여 문서를 재정렬합니다.
# model 매개변수는 사용할 모델 ID를 지정합니다.
# query 매개변수는 검색할 쿼리입니다.
# documents 매개변수는 검색할 문서 목록입니다.
# top_n 매개변수는 상위 N개의 결과를 반환합니다.
response = client.rerank(
model=model,
query="What is the capital of France?",
documents=docs,
top_n=3,
)
# 재정렬된 결과를 출력합니다.
# 이 결과는 쿼리와 문서 간의 관련성 점수를 기준으로 정렬된 문서 목록입니다.
print([result.model_dump() for result in response.results])from langchain_cohere.rerank import CohereRerank
aios_base_url = "<<aios endpoint-url>>" # AIOS 모델 호출을 위한 aios endpoint-url을 입력합니다.
model = "<<model>>" # AIOS 모델 호출을 위한 모델 ID를 입력합니다.
# CohereRerank 클래스를 사용하여 reranker 인스턴스를 생성합니다.
# base_url은 AIOS API의 기본 경로를 가리킵니다.
# cohere_api_key는 API 요청을 위해 요구하는 키로, 일반적으로 "EMPTY_KEY"로 설정됩니다.
# model 매개변수는 사용할 모델 ID를 지정합니다.
rerank = CohereRerank(
base_url=aios_base_url,
cohere_api_key="EMPTY_KEY",
model=model
)
# 문서 목록을 정의합니다.
# 이 문서들은 재정렬할 문서들입니다.
docs = [
"The capital of France is Paris.",
"France capital city is known for the Eiffel Tower.",
"Paris is located in the north-central part of France."
]
# reranker를를 사용하여 문서들을 재정렬합니다.
# documents 매개변수는 재정렬할 문서 목록입니다.
# query 매개변수는 검색할 쿼리입니다.
# top_n 매개변수는 상위 N개의 결과를 반환합니다.
ranks = rerank.rerank(
documents=docs,
query="What is the capital of France?",
top_n=3
)
# 재정렬된 결과를 출력합니다.
# 이 결과는 쿼리와 문서 간의 관련성 점수를 기준으로 정렬된 문서 목록입니다.
print(ranks)from langchain_cohere.rerank import CohereRerank
aios_base_url = "<<aios endpoint-url>>" # AIOS 모델 호출을 위한 aios endpoint-url을 입력합니다.
model = "<<model>>" # AIOS 모델 호출을 위한 모델 ID를 입력합니다.
# CohereRerank 클래스를 사용하여 reranker 인스턴스를 생성합니다.
# base_url은 AIOS API의 기본 경로를 가리킵니다.
# cohere_api_key는 API 요청을 위해 요구하는 키로, 일반적으로 "EMPTY_KEY"로 설정됩니다.
# model 매개변수는 사용할 모델 ID를 지정합니다.
rerank = CohereRerank(
base_url=aios_base_url,
cohere_api_key="EMPTY_KEY",
model=model
)
# 문서 목록을 정의합니다.
# 이 문서들은 재정렬할 문서들입니다.
docs = [
"The capital of France is Paris.",
"France capital city is known for the Eiffel Tower.",
"Paris is located in the north-central part of France."
]
# reranker를를 사용하여 문서들을 재정렬합니다.
# documents 매개변수는 재정렬할 문서 목록입니다.
# query 매개변수는 검색할 쿼리입니다.
# top_n 매개변수는 상위 N개의 결과를 반환합니다.
ranks = rerank.rerank(
documents=docs,
query="What is the capital of France?",
top_n=3
)
# 재정렬된 결과를 출력합니다.
# 이 결과는 쿼리와 문서 간의 관련성 점수를 기준으로 정렬된 문서 목록입니다.
print(ranks)const aios_base_url = "<<aios endpoint-url>>"; // AIOS 모델 호출을 위한 aios endpoint-url을 입력합니다.
const model = "<<model>>"; // AIOS 모델 호출을 위한 모델 ID를 입력합니다.
// 요청 데이터를 구성합니다.
// 여기에는 사용할 모델 ID, 쿼리(query), 문서 목록(documents), 그리고 상위 N개 결과(top_n)가 포함됩니다.
const data = {
model: model,
query: "What is the capital of France?",
documents: [
"The capital of France is Paris.",
"France capital city is known for the Eiffel Tower.",
"Paris is located in the north-central part of France.",
],
top_n: 3,
};
// AIOS API의 v2/rerank 엔드포인트 URL을 생성합니다.
let url = new URL("/v2/rerank", aios_base_url);
// AIOS API에 POST 요청을 보냅니다.
// 이 엔드포인트는 쿼리와 문서 목록을 비교하여 관련성 높은 문서를 재정렬합니다.
const response = await fetch(url, {
method: "POST",
headers: {
"Content-Type": "application/json",
},
body: JSON.stringify(data),
});
const body = await response.json();
// 재정렬된 결과를 출력합니다.
// 이 결과는 쿼리와 문서 간의 관련성 점수를 기준으로 정렬된 문서 목록입니다.
console.log(body.results);const aios_base_url = "<<aios endpoint-url>>"; // AIOS 모델 호출을 위한 aios endpoint-url을 입력합니다.
const model = "<<model>>"; // AIOS 모델 호출을 위한 모델 ID를 입력합니다.
// 요청 데이터를 구성합니다.
// 여기에는 사용할 모델 ID, 쿼리(query), 문서 목록(documents), 그리고 상위 N개 결과(top_n)가 포함됩니다.
const data = {
model: model,
query: "What is the capital of France?",
documents: [
"The capital of France is Paris.",
"France capital city is known for the Eiffel Tower.",
"Paris is located in the north-central part of France.",
],
top_n: 3,
};
// AIOS API의 v2/rerank 엔드포인트 URL을 생성합니다.
let url = new URL("/v2/rerank", aios_base_url);
// AIOS API에 POST 요청을 보냅니다.
// 이 엔드포인트는 쿼리와 문서 목록을 비교하여 관련성 높은 문서를 재정렬합니다.
const response = await fetch(url, {
method: "POST",
headers: {
"Content-Type": "application/json",
},
body: JSON.stringify(data),
});
const body = await response.json();
// 재정렬된 결과를 출력합니다.
// 이 결과는 쿼리와 문서 간의 관련성 점수를 기준으로 정렬된 문서 목록입니다.
console.log(body.results);import { CohereClientV2 } from "cohere-ai";
const aios_base_url = "<<aios endpoint-url>>"; // AIOS 모델 호출을 위한 aios endpoint-url을 입력합니다.
const model = "<<model>>"; // AIOS 모델 호출을 위한 모델 ID를 입력합니다.
// CohereClientV2 클라이언트를 생성합니다.
// token은 API 요청을 위해 요구하는 키로, 일반적으로 "EMPTY_KEY"로 설정됩니다.
// environment는 AIOS API의 기본 경로를 가리킵니다.
const cohere = new CohereClientV2({
token: "EMPTY_KEY",
environment: aios_base_url,
});
// 문서 목록을 정의합니다.
// 이 문서들은 재정렬할 문서들입니다.
const docs = [
"The capital of France is Paris.",
"France capital city is known for the Eiffel Tower.",
"Paris is located in the north-central part of France.",
];
// AIOS 모델을 사용하여 문서를 재정렬합니다.
// model 매개변수는 사용할 모델 ID를 지정합니다.
// query 매개변수는 검색할 쿼리입니다.
// documents 매개변수는 재정렬할 문서 목록입니다.
// topN 매개변수는 상위 N개의 결과를 반환합니다.
const response = await cohere.rerank({
model: model,
query: "What is the capital of France?",
documents: docs,
topN: 3,
});
// 재정렬된 결과를 출력합니다.
// 이 결과는 쿼리와 문서 간의 관련성 점수를 기준으로 정렬된 문서 목록입니다.
console.log(response.results);import { CohereClientV2 } from "cohere-ai";
import { CohereRerank } from "@langchain/cohere";
const aios_base_url = "<<aios endpoint-url>>"; // AIOS 모델 호출을 위한 aios endpoint-url을 입력합니다.
const model = "<<model>>"; // AIOS 모델 호출을 위한 모델 ID를 입력합니다.
// CohereClientV2 클라이언트를 생성합니다.
// token은 API 요청을 위해 요구하는 키로, 일반적으로 "EMPTY_KEY"로 설정됩니다.
// environment는 AIOS API의 기본 경로를 가리킵니다.
const cohere = new CohereClientV2({
token: "EMPTY_KEY",
environment: aios_base_url,
});
// CohereRerank 클래스를 사용하여 재정렬기 인스턴스를 생성합니다.
// model 매개변수는 사용할 모델 ID를 지정합니다.
// client 매개변수는 위에서 생성한 CohereClientV2 인스턴스를 전달합니다.
const reranker = new CohereRerank({
model: model,
client: cohere,
});
// 문서 목록을 정의합니다.
// 이 문서들은 재정렬할 문서들입니다.
const docs = [
"The capital of France is Paris.",
"France capital city is known for the Eiffel Tower.",
"Paris is located in the north-central part of France.",
];
// 검색할 쿼리를 정의합니다.
const query = "What is the capital of France?";
// reranker의 rerank 메서드를 사용하여 문서들을 재정렬합니다.
// 첫 번째 인자는 재정렬할 문서 목록입니다.
// 두 번째 인자는 검색할 쿼리입니다.
const response = await reranker.rerank(docs, query);
// 재정렬된 결과를 출력합니다.
// 이 결과는 쿼리와 문서 간의 관련성 점수를 기준으로 정렬된 문서 목록입니다.
console.log(response);import { CohereClientV2 } from "cohere-ai";
import { CohereRerank } from "@langchain/cohere";
const aios_base_url = "<<aios endpoint-url>>"; // AIOS 모델 호출을 위한 aios endpoint-url을 입력합니다.
const model = "<<model>>"; // AIOS 모델 호출을 위한 모델 ID를 입력합니다.
// CohereClientV2 클라이언트를 생성합니다.
// token은 API 요청을 위해 요구하는 키로, 일반적으로 "EMPTY_KEY"로 설정됩니다.
// environment는 AIOS API의 기본 경로를 가리킵니다.
const cohere = new CohereClientV2({
token: "EMPTY_KEY",
environment: aios_base_url,
});
// CohereRerank 클래스를 사용하여 재정렬기 인스턴스를 생성합니다.
// model 매개변수는 사용할 모델 ID를 지정합니다.
// client 매개변수는 위에서 생성한 CohereClientV2 인스턴스를 전달합니다.
const reranker = new CohereRerank({
model: model,
client: cohere,
});
// 문서 목록을 정의합니다.
// 이 문서들은 재정렬할 문서들입니다.
const docs = [
"The capital of France is Paris.",
"France capital city is known for the Eiffel Tower.",
"Paris is located in the north-central part of France.",
];
// 검색할 쿼리를 정의합니다.
const query = "What is the capital of France?";
// reranker의 rerank 메서드를 사용하여 문서들을 재정렬합니다.
// 첫 번째 인자는 재정렬할 문서 목록입니다.
// 두 번째 인자는 검색할 쿼리입니다.
const response = await reranker.rerank(docs, query);
// 재정렬된 결과를 출력합니다.
// 이 결과는 쿼리와 문서 간의 관련성 점수를 기준으로 정렬된 문서 목록입니다.
console.log(response);package main
import (
"bytes"
"encoding/json"
"fmt"
"io"
"net/http"
)
const (
aiosBaseUrl = "<<aios endpoint-url>>" // AIOS 모델 호출을 위한 aios endpoint-url을 입력합니다.
model = "<<model>>" // AIOS 모델 호출을 위한 모델 ID를 입력합니다.
)
// POST 요청에 사용될 데이터 구조를 정의합니다.
// Model: 사용할 모델 ID
// Query: 검색할 쿼리
// Documents: 재정렬할 문서 목록
// TopN: 상위 N개의 결과를 반환
type PostData struct {
Model string `json:"model"`
Query string `json:"query"`
Documents []string `json:"documents"`
TopN int32 `json:"top_n"`
}
func main() {
// 요청 데이터를 생성합니다.
// 쿼리는 "What is the capital of France?"이고,
// 문서 목록은 세 개의 문장으로 구성됩니다.
// TopN은 3으로 설정하여 상위 3개의 결과를 반환합니다.
data := PostData{
Model: model,
Query: "What is the capital of France?",
Documents: []string{
"The capital of France is Paris.",
"France capital city is known for the Eiffel Tower.",
"Paris is located in the north-central part of France.",
},
TopN: 3,
}
// 데이터를 JSON 형식으로 마샬링합니다.
jsonData, err := json.Marshal(data)
if err != nil {
panic(err)
}
// AIOS API의 v2/rerank 엔드포인트로 POST 요청을 보냅니다.
// 쿼리와 문서 목록을 비교하여 관련성 높은 문서를 재정렬합니다.
response, err := http.Post(aiosBaseUrl+"/v2/rerank", "application/json", bytes.NewBuffer(jsonData))
if err != nil {
panic(err)
}
defer response.Body.Close()
// 응답 본문을 모두 읽습니다.
body, err := io.ReadAll(response.Body)
if err != nil {
panic(err)
}
// 응답 본문을 맵 형식으로 언마샬링합니다.
var v map[string]interface{}
json.Unmarshal(body, &v)
// 재정렬된 결과를 JSON 형식으로 포맷하여 출력합니다.
// 이 결과는 쿼리와 문서 간의 관련성 점수를 기준으로 정렬된 문서 목록입니다.
rerank, err := json.MarshalIndent(v["results"], "", " ")
if err != nil {
panic(err)
}
fmt.Println(string(rerank))
}package main
import (
"context"
"fmt"
api "github.com/cohere-ai/cohere-go/v2"
client "github.com/cohere-ai/cohere-go/v2/client"
)
const (
aiosBaseUrl = "<<aios endpoint-url>>" // AIOS 모델 호출을 위한 aios endpoint-url을 입력합니다.
model = "<<model>>" // AIOS 모델 호출을 위한 모델 ID를 입력합니다.
)
func main() {
// Cohere 클라이언트를 생성합니다.
// WithBaseURL을 사용하여 AIOS API의 기본 경로를 설정합니다.
co := client.NewClient(
client.WithBaseURL(aiosBaseUrl),
)
// 검색할 쿼리를 정의합니다.
query := "What is the capital of France?"
// 문서 목록을 정의합니다.
// 이 문서들은 재정렬할 문서들입니다.
docs := []string{
"The capital of France is Paris.",
"France capital city is known for the Eiffel Tower.",
"Paris is located in the north-central part of France.",
}
// AIOS 모델을 사용하여 문서를 재정렬합니다.
// &api.V2RerankRequest를 사용하여 모델, 쿼리, 문서 목록을 설정합니다.
resp, err := co.V2.Rerank(
context.TODO(),
&api.V2RerankRequest{
Model: model,
Query: query,
Documents: docs,
},
)
if err != nil {
panic(err)
}
// 재정렬된 결과를 출력합니다.
// 이 결과는 쿼리와 문서 간의 관련성 점수를 기준으로 정렬된 문서 목록입니다.
fmt.Println(resp.Results)
}Response
results에서 query와 연관도가 높은 순서대로 정렬된 documents를 확인할 수 있습니다.
[
  {'document': {'text': 'The capital of France is Paris.'},
    'index': 0,
    'relevance_score': 0.9999659061431885},
  {'document': {'text': 'France capital city is known for the Eiffel Tower.'},
    'index': 1,
    'relevance_score': 0.9663000106811523},
  {'document': {'text': 'Paris is located in the north-central part of France.'},
    'index': 2,
    'relevance_score': 0.7127546668052673}
]