This is the multi-page printable view of this section. Click here to print.
Parallel File Storage
- 1: Overview
- 2: How-to guides
- 2.1: Use Snapshot
- 2.2: Install Agent
- 2.3: File-level Recovery
- 3: API Reference
- 4: CLI Reference
- 5: Release Note
1 - Overview
Service Overview
Parallel File Storage is a high‑performance parallel file storage based on All NVMe that can process large amounts of data quickly and efficiently.
Features
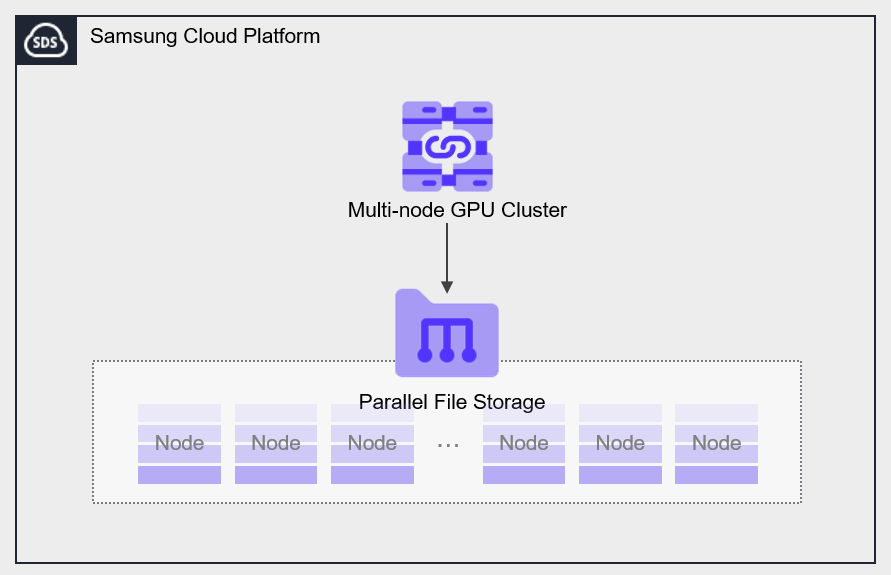
- Data processing speed improvement: Distribute file data across multiple storage nodes to improve data processing speed and reduce analysis time.
- Various Field Applications: Through fast data processing speed and analysis time, it can be utilized in various fields such as AI/ML analysis, big data analysis, etc.
Configuration diagram
Provided features
Parallel File Storage provides the following features.
- Volume Name: Users can set a name for each volume.
- Snapshot: Through the image snapshot feature, it is possible to recover data that has been modified or deleted.
- Connection Resources: Can be connected to and used in a Multi-node GPU Cluster.
- Terraform provision: Provides an IaC environment through Terraform.
Component
You can create a volume by selecting the disk type and protocol based on the user’s service environment and performance requirements. When using the snapshot feature, you can restore data to the desired point in time.
Volume
A volume (Volume) is the basic creation unit of the Parallel File Storage service and is used as data storage space. The user selects a name and size to create a volume, then connects to and uses it in a Multi-node GPU Cluster.
The volume name creation rules are as follows.
- It must start with a lowercase English letter and can be set to 3 to 21 characters using lowercase letters, numbers, and special characters (
_).
Snapshot
A snapshot (Snapshot) is an image backup taken at a specific point in time. You can recover changed and deleted data using the image snapshot feature. The user can restore to the most recent snapshot from the snapshot list.
Prerequisite Service
This is a list of services that must be pre-configured before creating the service. Please refer to the guide provided for each service and prepare in advance.
| Service Category | service | Detailed description |
|---|---|---|
| Compute | Multi-node GPU Cluster | Physical GPU server for large-scale high-performance AI computing |
2 - How-to guides
Users can create a service by entering the required information for Parallel File Storage and selecting detailed options through the Samsung Cloud Platform Console.
Create Parallel File Storage
You can create and use the Parallel File Storage service from the Samsung Cloud Platform Console.
To create a Parallel File Storage, follow these steps.
Click the All Services > Storage > Parallel File Storage menu. 1. Go to the Service Home page of Parallel File Storage.
On the Service Home page, click the Create Parallel File Storage button. 2. Go to the Create Parallel File Storage page.
On the Parallel File Storage creation page, enter the information required to create the service.
Category required statusDetailed description Volume name Required Enter the volume name - must start with a lowercase English letter
- Enter 3 to 21 characters using lowercase letters, numbers, and special characters (
_)
- Generate in the format ‘user input+{6-character UUID composed of lowercase English letters and numbers}’
- Cannot be modified after the service is created
Availability Zone Required Select the volume location - Can connect to Multi-node GPU Cluster resources created in the same location (AZ)
capacity Required Enter the desired capacity - 1 ~ 1000 TB available
- After the service is created, only expansion is possible
tag Selection Add tag - Up to 50 can be added per resource
- After clicking the Add Tag button, enter or select Key, Value values
Table. Parallel File Storage service creation information input fieldsCheck the detailed information and estimated billing amount generated in the summary panel, and click the Create button.
When the popup notifying creation opens, click the Confirm button.
- When creation is complete, check the created resources on the Parallel File Storage List page.
- Creating a Parallel File Storage may take more than several tens of minutes, depending on the service scale.
Parallel File Storage View detailed information
Parallel File Storage service allows you to view and edit the full resource list and detailed information.
To view detailed information about the Parallel File Storage service, follow these steps.
- Click the All Services > Storage > Parallel File Storage menu. 1. Go to the Service Home page of Parallel File Storage.
- On the Service Home page, click the Parallel File Storage menu. 2. Parallel File Storage List Navigate to the page.
- On the Parallel File Storage List page, click the resource to view detailed information. 3. Parallel File Storage Details Navigate to the page.
- Parallel File Storage Details The page displays status information and additional feature information, and consists of Details, Snapshot List, Tags, Operation History tabs.
Category Detailed description Volume status Volume status representation - Creating: Creating
- Available: Created, server connection available
- Extending: Extending
- Deleting: Deleting
- Error Deleting: Abnormal state during deletion
- Error: Abnormal state during creation
- Error Extending: Abnormal state during extension
Create snapshot Immediately create a snapshot at the time of creation - Up to 50 can be created
- For detailed information on snapshot creation, refer to 스냅샷 생성하기
Service cancellation Cancel service button Table. Parallel File Storage status information and additional features
- Parallel File Storage Details The page displays status information and additional feature information, and consists of Details, Snapshot List, Tags, Operation History tabs.
Detailed Information
Parallel File Storage List page lets you view detailed information of the selected resource and edit the information if needed.
| Category | Detailed description |
|---|---|
| service | service name |
| Resource Type | Resource Type |
| SRN | Unique resource ID in Samsung Cloud Platform
|
| Resource name | resource name
|
| Resource ID | Service’s unique resource ID |
| Constructor | User who created the service |
| Creation date and time | Service creation date and time |
| Volume name | Volume name |
| Availability Zone | Volume position |
| capacity | Volume size
|
| Mount information | Mount information
|
| connection resource | List of connected resources (Multi-node GPU Server)
|
Snapshot List
Parallel File Storage List page allows you to view the snapshot of the selected resource.
- Refer to 스냅샷 사용하기 for how to create and manage snapshots.
- You can restore data on a per-file basis using snapshots. * For more details, please refer to 파일 단위 복구하기.
| Category | Detailed description |
|---|---|
| Use snapshots | Total size of stored snapshots |
| Snapshot name | Snapshot name |
| capacity | Snapshot capacity |
| Creation date and time | Snapshot creation timestamp |
| status | Snapshot status
|
| Delete | Delete the selected snapshot from the snapshot list |
Tag
Parallel File Storage List page lets you view the tag information of the selected resource, and you can add, modify, or delete it.
| Category | Detailed description |
|---|---|
| Tag list | Tag list
|
Operation History
Parallel File Storage List page allows you to view the operation history of the selected resource.
| Category | Detailed description |
|---|---|
| Task History List | Resource Change History
|
Parallel File Storage Managing Resources
If you need to modify settings in Parallel File Storage or add or remove connected servers, you can perform the operation on the Parallel File Storage Detailed Information page.
Update capacity
You can increase the capacity of Parallel File Storage.
To modify the capacity, follow the steps below.
- All Services > Storage > Parallel File Storage Click the menu. 1. Go to the Service Home page of Parallel File Storage.
- On the Service Home page, click the Parallel File Storage menu. 2. Parallel File Storage List Navigate to the page.
- Parallel File Storage list page, click the resource to edit the capacity. 3. Parallel File Storage Details Navigate to the page.
- Click the Edit button of the Capacity item. 4. Capacity Edit popup window opens.
- After entering the capacity to be expanded, click the Confirm button.
- You can expand up to a maximum of 1000 TB, including the existing capacity.
- When the popup notifying capacity expansion opens, click the Confirm button.
Edit linked resources
You can attach resources to Parallel File Storage or detach attached resources.
- You can connect to Multi-node GPU Cluster resources created in the same AZ.
- While modifying the attached resource, further changes are not allowed, and the attached resource can only be edited when the volume is in the Available state.
- If communication with the target resource is lost or the connection is unavailable, you cannot modify the connection resource.
- When connecting resources, you can link up to 300 resources at the same location. * If you exceed 300 items, use the API.
To modify the connection resource, follow these steps.
- Click the All Services > Storage > Parallel File Storage menu. 1. Go to the Service Home page of Parallel File Storage.
- On the Service Home page, click the Parallel File Storage menu. 2. Parallel File Storage List Navigate to the page.
- On the Parallel File Storage List page, click the resource to edit the linked resource. 3. Parallel File Storage Details Navigate to the page.
- Click the Linked Resource item’s Edit button. 4. Connection Resource Selection popup window opens.
- After selecting the resource to connect or unchecking the resource to disconnect, click the Confirm button.
- You can select multiple resources simultaneously.
- The Multi-node GPU Cluster server is connected to the Parallel File Storage via two N/W interfaces. * Verify that both N/Ws are properly connected to optimize storage performance.
- On the Parallel File Storage Details page, when the resource connection status is Partially Successful, follow the steps below to verify.
- Please verify that the two N/W interfaces for connecting Parallel File Storage in the Multi-node GPU Cluster are functioning properly.
- After disconnecting from Parallel File Storage, reconnect.
- Parallel File Storage Details Check the connection status of the resource on the page.
- When disconnecting, you must first access the server and perform the disconnection tasks (Umount, disconnect network drive).
- If the connection is terminated without OS intervention, a state error (Hang) may occur on the connection server.
- For detailed information about the server unmount operation, please refer to 서버 연결 해제하기.
- When adding a connected server, you must first perform the connection tasks (Mount, network drive connection) on the server.
- For detailed information about server connections, refer to 서버 연결하기.
Cancel Parallel File Storage
You can reduce operating costs by terminating unused Parallel File Storage.
However, if you terminate the service, the running service may be stopped immediately, so you should proceed with the termination only after fully considering the impact that may arise from service interruption.
- Be careful, as data cannot be recovered after termination.
- If there are resources connected to Parallel File Storage, it cannot be terminated. * Remove all connected resources before terminating the service.
- The volume can be detached only when its status is Available or Error.
To cancel Parallel File Storage, follow the steps below.
- Click the All Services > Storage > Parallel File Storage menu. 1. Go to the Service Home page of Parallel File Storage.
- On the Service Home page, click the Parallel File Storage menu. 2. Parallel File Storage List Navigate to the page.
- On the Parallel File Storage List page, select the resource to cancel and click the Cancel Service button.
- Go to the Parallel File Storage Details page of the resource to be terminated and delete it individually.
- When the pop-up notifying termination opens, click the Confirm button.
- After termination is complete, check on the Parallel File Storage list page whether the resource has been terminated.
2.1 - Use Snapshot
You can create, delete, or recover using snapshots of Parallel File Storage.
Create Snapshot
You can create snapshots of Parallel File Storage.
To create a snapshot, follow these steps.
- Click the All Services > Storage > Parallel File Storage menu. You will be taken to the Service Home page of Parallel File Storage.
- From the Service Home page, click the Parallel File Storage menu. You will be taken to the Parallel File Storage List page.
- Parallel File Storage List page, click the resource to create a snapshot. You will be taken to the Parallel File Storage Details page.
- On the Parallel File Storage Details page, click the Create Snapshot button.
- When the popup notifying snapshot creation opens, click the Confirm button.
- Click the Snapshot List button. It takes you to the File Storage snapshot list page.
- Check the generated snapshot.
- You can only restore from the most recent snapshot. To restore from an earlier snapshot, delete the latest snapshot.
- Snapshot charges are included in the File Storage usage fees.
Recover Snapshot
You can restore using the snapshot you created.
To restore from a snapshot, follow these steps.
- Click the All Services > Storage > Parallel File Storage menu. You will be taken to the Service Home page of Parallel File Storage.
- From the Service Home page, click the Parallel File Storage menu. You will be taken to the Parallel File Storage List page.
- On the Parallel File Storage List page, click the resource to restore the snapshot. You will be taken to the Parallel File Storage Details page.
- On the Parallel File Storage Details page, click the Snapshot List tab.
- Check the latest snapshot with Available status in the snapshot list.
- When restoring, the volume is recovered from the selected snapshot.
- Click the Snapshot Recovery button. The Snapshot Recovery popup opens.
- After checking the snapshot name and creation timestamp, click the Confirm button.
- The snapshot status changes to Reverting when recovery starts and to Available upon completion.
- You can only restore from the most recent snapshot. To restore from an earlier snapshot, delete the latest snapshot.
- During recovery, it restores from the latest snapshot in the Available state, and the situations where recovery is not possible are as follows.
- When the Parallel File Storage volume is not in the Available state
- If there are no recoverable snapshots.
- If the latest snapshot changes while creating a recovery.
- If the latest snapshot is not in Available state.
Delete snapshot
You can delete snapshots of Parallel File Storage.
To delete a snapshot, follow these steps.
- Click the All Services > Storage > Parallel File Storage menu. You will be taken to the Service Home page of Parallel File Storage.
- From the Service Home page, click the Parallel File Storage menu. You will be taken to the Parallel File Storage List page.
- Parallel File Storage List page, click the resource to delete the snapshot. You will be taken to the Parallel File Storage Detail page.
- On the Parallel File Storage Details page, click the Snapshot List tab.
- In the snapshot list, click the More > Delete button at the far right of the snapshot to be restored.
- When the popup notifying you of snapshot deletion opens, click the Confirm button.
2.2 - Install Agent
To use the Parallel File Storage service, you must connect to the target server and install the Agent. After installing the Agent, mount on the server to use Parallel File Storage.
Install Agent and Connect to Server (Mount)
The Agent installation and server connection consist of six steps. Follow the procedure below.
- Agent installation
- Account login
- Create Mount Point
- Filesystem Mount
- Check mount
- fstab registration
Install Agent
Install the Agent using the Mount IP.
- Click the All Services > Storage > Parallel File Storage menu. You will be taken to the Service Home page of Parallel File Storage.
- On the Service Home page, click the Parallel File Storage menu. You will be taken to the Parallel File Storage List page.
- On the Parallel File Storage List page, click the resource to be used on the connected server. You will be taken to the Parallel File Storage Details page.
- After checking the server in the Connection Server item, connect.
- Follow the example below to install the Volume Agent and connect the server (Mount).
curl <Mount IP>:14000/dist/v1/install | sh
root@RESD-s4sr3h:/# curl http://10.102.160.254:14000/dist/v1/install | sh
  % Total    % Received % Xferd  Average Speed   Time    Time     Time  Current
                                 Dload  Upload   Total   Spent    Left  Speed
100  1424  100  1424    0     0  1978k      0 --:--:-- --:--:-- --:--:-- 1390k
Downloading WekaIO CLI 4.2.4.29-hcsf
  % Total    % Received % Xferd  Average Speed   Time    Time     Time  Current
                                 Dload  Upload   Total   Spent    Left  Speed
100 58.7M  100 58.7M    0     0  1079M      0 --:--:-- --:--:-- --:--:-- 1088M
Installing...
Installing agent of version 4.2.4.29-hcsf
The agent is configured to detect cgroups - cgroups v1 not found, cgroups are disabled
Waiting for agent service to be ready
Installation finished successfully
WekaIO CLI 4.2.4.29-hcsf is now installed
Account login
Log in using the mount information for the server mount.
#weka user login -H <Mount IP>
root@RESD-s4sr3h:/# weka user login -H 10.102.160.254
Organization (enter name or ID, default: 0) admin_org
Username: admin_reg
Password: ###########
+------------------------------+
| Login completed successfully |
+------------------------------+
Create Mount Point
Create a mount point on the server to mount the filesystem.
#mkdir /mnt/weka
Filesystem Mount
Mount the filesystem according to the following procedure.
- Use the #ip a command to check the IP and Interface Name information for Mount.
root@RESD-s4sr3h:/# ip a |grep 10.102
  inet 10.102.160.248/23 brd 10.102.161.255 scope global ibs4f0.8010
  inet 10.102.160.249/23 brd 10.102.161.255 scope global ibP1s8f0.8010
The IP information and Interface Name that can be identified in the above example are as follows.
- IP: 10.102.160.10, 10.102.160.11
- Interface Name: ibs4f0.8010, ibP1s8f0.8010
- Use the verified IP and Interface Name to execute the Mount command.
mount -t wekafs <backend-server-IP-address>/<filesystem-name> -o net=<VF interface>/<synthetic network interface IP address>/mask -o mgmt_ip=<Management-IP> /mnt/weka
root@RESD-s4sr3h:/# mount -t wekafs -o num_cores=8 -o net:ha=ibs4f0.8010,net:ha=ibP1s8f0.8010,mgmt_ip='10.102.160.10+10.102.160.11' 10.102.160.254/wekafs /mnt/weka
Mounting 10.102.161.254/bmtfs on /weka_fs
Basing mount on container client
Downloading [1/21] http://10.102.160.254:14000/dist/v1/image/envoy-fe-e6b882a6bce3c0de8cd9c7833df1a567.squashfs
Downloading [2/21] http://10.102.160.254:14000/dist/v1/image/weka-driver-1.0.0-d10ca9cff59b98778b4314014569e00f.squashfs
Downloading [3/21] http://10.102.160.254:14000/dist/v1/image/weka-driver-igb-uio-4.0.0-7eee7dc5b7f1d85a1be0e448d5e97312.squashfs
Downloading [4/21] http://10.102.160.254:14000/dist/v1/image/container-s3-tmp-1.57f-9cb61c7e0ae3ca9e2b476c191e4e84ab.squashfs
Downloading [5/21] http://10.102.160.254:14000/dist/v1/image/container-smbw-weka-4.7.12.3-9b67132a85a950260f048955dc33c7a9.squashfs
Downloading [6/21] http://10.102.160.254:14000/dist/v1/image/weka-drain-tools-2d01044c641816d9002ca594a6ae9d90.squashfs
Downloading [7/21] http://10.102.160.254:14000/dist/v1/image/container-ganesha-dev-weka-5-11becf16b21c9635daa23a247340a7bd.squashfs
Downloading [8/21] http://10.102.160.254:14000/dist/v1/image/dependencies-1.0.0-9b64fdba87a4d6e6efa9ab5250169ec8.squashfs
Downloading [9/21] http://10.102.160.254:14000/dist/v1/image/weka-container-2.3.0-be66bcc7c9739b15cacd910d7cac031e.squashfs
Downloading [10/21] http://10.102.160.254:14000/dist/v1/image/weka-hostside-faf9aa30ec9ac7521ffbc9589ac23deb.squashfs
Downloading [11/21] http://10.102.160.254:14000/dist/v1/image/api-6f501306831ff9a223a7f706c5a661e1.squashfs
Downloading [12/21] http://10.102.160.254:14000/dist/v1/image/weka-s3-3508f2f1afb4900ab11c4772e327b1ac.squashfs
Downloading [13/21] http://10.102.160.254:14000/dist/v1/image/weka-ganesha-5c6ef6d08e31f80580f50bab7d1b8134.squashfs
Downloading [14/21] http://10.102.160.254:14000/dist/v1/image/dashboard-dfb78995154ab40fb274037ac9fe8a45.squashfs
Downloading [15/21] http://10.102.160.254:14000/dist/v1/image/container-samba-weka-4.7.12.3-69835f740573b7ded6faed1dfe737bed.squashfs
Downloading [16/21] http://10.102.160.254:14000/dist/v1/image/weka-smbw-8a1430e5f0f2cca6d2a4af603d630882.squashfs
Downloading [17/21] http://10.102.160.254:14000/dist/v1/image/ui-1.0.0-5bc747765d326e6e1c3488285822f459.squashfs
Downloading [18/21] http://10.102.160.254:14000/dist/v1/image/weka-samba-8102bcf3d3a81f02755cb2e75b1b8d16.squashfs
Downloading [19/21] http://10.102.160.254:14000/dist/v1/image/weka-node-fbd17baa570969b6da7e5561f1eb652f.squashfs
Downloading [20/21] http://10.102.160.254:14000/dist/v1/image/ofed-b643ca3e4fa06d84416d463afe74a66a.squashfs
Downloading [21/21] http://10.102.160.254:14000/dist/v1/image/driver-uio-pci-generic-1.0.0-322a3daa84c41eeb6f0cafd0802fbf50.squashfs
Finished getting version 4.2.4.29-hcsf
Creating Weka container 'client' in version 4.2.4.29-hcsf
Preparing version 4.2.4.29-hcsf of container client
Base port was not explicitly provided, the container will use 14000
Applying resources
Starting container 'client'
Waiting for container 'client' to join cluster
Container "client" is ready (pid = 392216)
Calling the mount command
Cgroups v1 not found, running without cgroups
Mount completed successfully
Check mount
#df -h Run the command to check whether the filesystem is mounted.
root@RESD-s4sr3h:/# df -h
Filesystem      Size  Used Avail Use% Mounted on
tmpfs           202G  3.8M  202G   1% /run
/dev/nvme2n1p2  3.5T   37G  3.3T   2% /
tmpfs          1008G     0 1008G   0% /dev/shm
tmpfs           5.0M     0  5.0M   0% /run/lock
/dev/nvme2n1p1  511M  6.1M  505M   2% /boot/efi
tmpfs           202G  4.0K  202G   1% /run/user/0
/dev/loop0      2.0G   47M  2.0G   3% /opt/weka/logs
tmpfs          1008G   12K 1008G   1% /opt/weka/data/agent/tmpfss/cleanup
tmpfs          1008G  2.0G 1006G   1% /opt/weka/data/agent/tmpfss/client-persistent-tmpfs
tmpfs          1008G     0 1008G   0% /opt/weka/data/agent/tmpfss/cross-container-rpc-the-tmpfs
tmpfs          1008G  4.0K 1008G   1% /opt/weka/data/agent/tmpfss/cleanup_before_stop_and_delete
bmtfs           1.9T  537G  1.3T  29% /weka_fs
fstab registration
Register fstab so that it automatically mounts on server Reboot.
To register fstab, run the #vi /etc/fstab command, then add the following command.
root@RESD-s4sr3h:/# cat /etc/fstab
# /etc/fstab: static file system information.
#
# Use 'blkid' to print the universally unique identifier for a
# device; this may be used with UUID= as a more robust way to name devices
# that works even if disks are added and removed. See fstab(5).
#
# <file system> <mount point>   <type>  <options>       <dump>  <pass>
# / was on /dev/nvme2n1p2 during curtin installation
/dev/disk/by-uuid/8683a4fb-ee21-47c2-938e-2be0beea2089 / ext4 defaults 0 1
# /boot/efi was on /dev/nvme2n1p1 during curtin installation
/dev/disk/by-uuid/92ED-55CC /boot/efi vfat defaults 0 1
/swap.imgnoneswapsw00
10.102.160.254/wekafs /mnt/weka wekafs num_cores=8,net:ha=ibs4f0.8010,net:ha=ibP1s8f0.8010,mgmt_ip=10.102.160.10+10.102.160.11,x-systemd.requires=wekaagent.service,x-systemd.mount-timeout=infinity,_net
dev 0 0
Disconnect server (Umount)
To disconnect the server, first log into the server and perform the disconnect operation (Umount), then disconnect the server from the Console.
To disconnect from the server, follow these steps.
- Click the All Services > Storage > Parallel File Storage menu. You will be taken to the Service Home page of Parallel File Storage.
- On the Service Home page, click the Parallel File Storage menu. You will be taken to the Parallel File Storage List page.
- On the Parallel File Storage List page, click the resource to disconnect the server. Navigate to the Parallel File Storage Details page.
- After checking the server information in the Connection Server item, connect to the server.
- Refer to the commands shown in the following example to perform the unmount (Umount) operation.
# umount /mnt/weka

# vi /etc/fstab
2.3 - File-level Recovery
You can restore data on a per‑file basis using the generated snapshot.
Using file-level recovery
You can connect to the server to select and recover data.
To perform file-level recovery, follow these steps.
- Click the All Services > Storage > Parallel File Storage menu. You will be taken to the Service Home page of Parallel File Storage.
- From the Service Home page, click the Parallel File Storage menu. You will be taken to the Parallel File Storage List page.
- On the Parallel File Storage List page, click the resource to recover the file. You will be taken to the Parallel File Storage Details page.
- In the Connected Resources item, verify the linked server and then connect to that server.
- Check the mount name of the File Storage on the server.
- The mount name is the same as the mount point configured on the server for mounting the filesystem.
- Navigate to the snapshot location under the mount name.
# cd /Mount명/.snapshots/snapshot명 - After checking the files to be restored at the snapshot location, restore them to the required path.
# cp -arp /Mount명/.snapshots/snapshot명/파일/{복구 디렉토리}/
3 - API Reference
4 - CLI Reference
5 - Release Note
Parallel File Storage
- The feature to restore from snapshots has been added.
- You can restore from the most recently created snapshot.
- Parallel File Storage service has been officially launched.
- It can distribute file data across multiple storage nodes, allowing fast and efficient processing of large-scale data.
- Through fast data processing speed and reduced analysis time, it can be applied in various fields such as AI/ML analysis and big data analysis.