This is the multi-page printable view of this section. Click here to print.
Object Storage
1 - Overview
Service Overview
Object Storage is an object storage that allows users to easily store and use the data they want and can be accessed via URL, making data management very convenient. It enables searching and retrieving large-scale data, and you can leverage features such as encryption and version control. Provides public and private URLs, and the public URL can be accessed over the internet.
Features
- Using S3 API: Through a Restful API, applications can access it easily and quickly, and because it is compatible with Amazon S3, it can be used effortlessly in applications integrated with Amazon S3.
- Secure Use: Encryption (SSE‑S3), access control, and Public/Private access features are provided, making it suitable for safely storing user data or backup data for service recovery.
- Cost Efficiency: Users do not predefine the bucket capacity and are provided storage space with an efficient pricing model that charges only for the amount used.
- Replication: You can perform replication on a bucket in a different location or the same location. * You can configure multiple replication policies, and if the source bucket becomes unavailable due to a failure or disaster, you can provide service through the replica bucket.
Configuration diagram
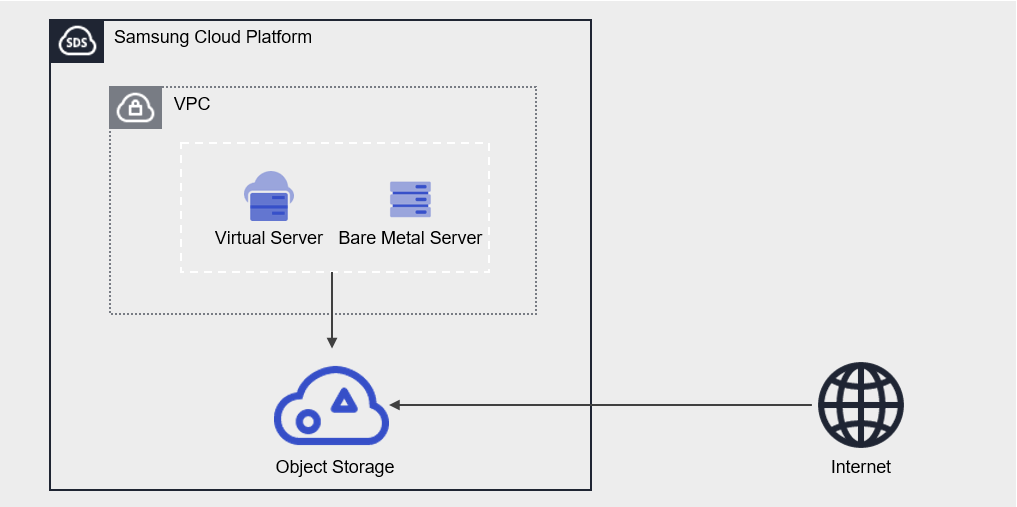
Provided Features
Object Storage provides the following features.
- Storage Management: Provides Object Storage creation, folder creation, folder deletion, file upload, file download, and file deletion functions.
- Version control: When you use version control, all versions of uploaded files are managed. * You can easily download previous files by viewing the version list.
- Encryption: If you enable encryption, encryption is provided using the SSE‑S3 method.
- Access Control: Using access control, you can directly enter the public IPs allowed to access Object Storage, or select resources within the same account (Virtual Server, Bare Metal Server, VPC Endpoint, etc.) that are permitted to access it.
- Replication: You can perform replication to a bucket in a different location or the same location.
- Multiple replication policies can be configured
- Permission Management: It is provided with Private permission by default, and offers Public permission and permission management features.
- Private permission: Allow file access and download only to users who know the authentication key.
- Public permission: If accessed via the file’s URL, the file is made public and downloadable to anyone worldwide.
- Monitoring: You can view monitoring information such as total file count, data size (Bytes), and HTTP method request counts through the Cloud Monitoring service.
- ServiceWatch Service Integration Provision: You can monitor data through the ServiceWatch service.
Component
authentication key
The authentication key is a required element that must be created in advance for using Object Storage.
The purpose of using the authentication key is as follows.
- In the Samsung Cloud Platform Console, you need an authentication key to create and access the Object Storage service.
- The API provided by Object Storage is compatible with Amazon S3, and you can use the same tools that leverage Amazon S3. * At this point, entering an authentication key is required, and it is used as a tool to identify whether the user has the appropriate permissions. For detailed instructions on creating and verifying authentication keys, see How-to guides > 인증키 생성하기.
Bucket
A bucket is the top-level folder, and all folders and files exist under the bucket. When you create an Object Storage service in the Samsung Cloud Platform Console, a bucket is created, and you can subsequently upload folders or files.
The bucket name creation rules are as follows.
- Bucket names must be at least 3 characters and no more than 63 characters.
- Bucket names can consist only of lowercase English letters, numbers, periods
.and hyphens-. - Bucket names must start with a lowercase letter or a digit.
- Bucket names must not contain two consecutive periods.
- Bucket names cannot end with a period or hyphen.
- Bucket names cannot have a period and hyphen adjacent to each other.
- Bucket names do not use the IP address format (e.g., 192.168.x.x).
- You cannot use admin as a bucket name.
- The bucket name must be unique within an Account/Region.
- The bucket name you previously used will be available in 1 hour.
| Example of a valid bucket name | Example of an invalid bucket name |
|---|---|
The following bucket names can be used
| The following bucket names cannot be used
|
Folder
Folder (Folder) is used to logically group files.
The folder name generation rules are as follows.
- Folder names can consist of Korean characters, English letters, numbers, and special characters.
- The special characters that cannot be entered are as follows.
| Special characters that cannot be used in folder names |
|---|
|
File
A file (File) refers to data stored in Object Storage and is the same as a regular file.
The filename generation rules are as follows.
- Filenames can consist of Korean characters, English letters, numbers, and special characters.
- The special characters that cannot be entered are listed below.
| Special characters that cannot be used in file names |
|---|
|
Folder names and file names are separated by a slash/. The following are examples of valid folder names and file names.
| Example of mixed use of folder and file names |
|---|
|
/), must be within 1,024 Bytes (UTF-8 encoding).URL
You can access the Object Storage bucket via URL. By providing both public and private URLs, access is possible not only within the same Samsung Cloud Platform environment but also from external internet environments.
The URL structure is organized as follows.
| URL without an Account ID | URL that uses the Account ID |
|---|---|
| https://[대표URL]/[bucket명]/[폴더명]/[파일명] | https://[대표URL]/[accountId]:[bucket명]/[폴더명]/[파일명] |
| Category | Explanation | Example |
|---|---|---|
| Main URL | Representative URL can be found at the Object Storage 상세 정보 확인하기 URL
| - |
| accountId | account ID
| c2ef8be0481d4094af3c6d046e536d25 |
| bucket name | User-created bucket name | bucketname |
| Folder name | Folder name where the file is located | folder/folder01/folder02/ |
| filename | File name | Filename02 |
The full URL information for the file can be found in 파일 정보 조회하기.
Constraints
The limitations of Object Storage are as follows.
| Category | Explanation |
|---|---|
| Number of creatable Object Storage services | Up to 1,000 per region |
| File name length (including path) | up to 1,024 Bytes |
| File upload size |
|
| Number of files in the bucket | 200 million or fewer |
- It is recommended to store up to 200 million files per bucket. * If the number exceeds 200 million, performance may degrade sharply, so manage the file count.
- S3 Backend Filesystem solution (ex. * When using s3fs, objectivefs, etc., we recommend not employing version control. * Performance degradation may occur when using version control.
- After changing IAM permissions, performing an Amazon S3 API call may take up to 30 seconds.
- Object Storage cannot be used for file upload and download when the IAM policy uses a temporary authentication type.
Please note that when IP access control is used in IAM policies, access between Object Storage and SCP resources is not possible.
To use the service, you must set the IAM policy to ‘Applied IP: All IPs, Excluded IP: Not used’.
- South Korea (kr-south3) region constraints
- File upload and download functions via the Samsung Cloud Platform Console are restricted.
- Use of the S3 API/CLI via a public URL is restricted.
- However, accessing a Private URL via resources (e.g., Virtual Server) created in the Samsung Cloud Platform Console is possible.
- Korea South 1 (kr-south1), Korea South 2 (kr-south2) region constraints
- A separate firewall rule must be allowed to enable access to the public URL.
- The public URL can be found on the Object Storage details page. * Please refer to Object Storage 상세 정보 확인하기.
Preliminary Service
Object Storage has no prerequisite services.
1.1 - Amazon S3 Usage Guide
Object Storage provides functions such as creating services, viewing lists, retrieving folder lists, creating folders, uploading files, and downloading files through the Samsung Cloud Platform Console. These features are also provided via an API compatible with Amazon S3. Therefore, tools that utilize Amazon S3 can be used in the same way.
Using Amazon S3’s utility tools requires generating and verifying an authentication key. For detailed information, please refer to 인증키 생성하기.
Amazon S3 API
The list of Amazon S3 APIs supported by the Samsung Cloud Platform Object Storage service is as follows.
| Category | Detailed description |
|---|---|
| head-bucket | View bucket information |
| list-buckets | View bucket list |
| get-bucket-versioning | Bucket version management lookup |
| put-bucket-versioning | Bucket version control modification |
| get-bucket-encryption | View bucket encryption settings |
| put-bucket-encryption | Apply bucket encryption settings |
| delete-bucket-encryption | Delete bucket encryption settings |
| copy-object | Copy, move, and rename objects |
| put-object | Object creation |
| get-object | Object download |
| list-objects | Object List Retrieval |
| head-object | Object Detail Lookup |
| get-object-acl | Object ACL lookup |
| delete-object | Delete object
|
| list-object-versions | Retrieve object version list |
| delete-object | Delete object version |
| presign | Issue a Presigned URL for PUT object |
| get-bucket-acl | Check bucket public permissions |
| create-bucket | Create bucket |
| delete-bucket | Delete bucket |
| get-bucket-cors | Check bucket CORS (Cross OriginResources) configuration |
| put-bucket-cors | Create bucket CORS (PUT) |
| delete-bucket-cors | Delete bucket CORS |
| put-bucket-tagging | Create bucket tagging |
| get-bucket-tagging | Bucket tagging lookup |
| delete-bucket-tagging | Delete bucket tagging |
| put-bucket-website | Create bucket website |
| get-bucket-website | View bucket website |
| delete-bucket-website | Delete bucket website |
| get-bucket-policy-status | Check bucket policy status |
| put-bucket-acl | Create bucket ACL |
| create-multipart-upload | Create multipart upload |
| upload-part | Perform multipart upload |
| complete-multipart-upload | Multipart upload completed |
| list-multipart-uploads | Multipart upload list |
| abort-multipart-upload | Delete incomplete Multipart upload |
| put-object-tagging | Object tagging creation |
| get-object-tagging | Object tagging lookup |
| delete-object-tagging | Delete object tagging |
| list-objects-V2 | Object Lookup (v2) |
| put-object-acl | Create object ACL |
| list-parts | Parts lookup |
| put-public-access-block | Create public access block |
| get-public-access-block | public access block lookup |
| delete-public-access-block | Delete public access block |
| put-bucket-lifecycle | Create bucket Lifecycle (only Expiration rule can be used) |
| get-bucket-lifecycle | View bucket lifecycle |
| delete-bucket-lifecycle | Delete bucket lifecycle |
| put-bucket-policy | Create bucket policy
|
| get-bucket-policy | View bucket policy |
| delete-bucket-policy | Delete bucket policy |
| put-bucket-replication | Modify bucket replication policy
|
| get-bucket-replication | View bucket replication policy |
| delete-bucket-replication | Delete bucket replication policy |
Bucket policy creation example
When using put-bucket-policy, refer to the following example to write the JSON file.
{
    "Statement": [
        {
            "Action": "s3:*"
            "Condition": {
                "IpAddress": {
                    "scp:SourceIp": []
                },
                "Resource": {
                    "scp:SourceDBaaSId": [],
                    "scp:SourceResourceId": [],
                    "scp:SourceVpcEndpointId": []
                },
                "Service": {
                    "scp:ServiceAiTraining": "true",
                    "scp:ServiceScf": "false"
                }
            },
            "Effect": "Allow"
            "Principal": "*"
            "Resource": [
                srn:e::1234:kr-west1::objectstorage:bucket/bucketname
                srn:e::1234:kr-west1::objectstorage:bucket/bucketname/*
            ]
        }
    ],
    "Version": "2012-10-17"
}
{
"Statement": [
{
"Action": "s3:*"
"Condition": {
"IpAddress": {
"scp:SourceIp": []
},
"Resource": {
"scp:SourceDBaaSId": [],
"scp:SourceResourceId": [],
"scp:SourceVpcEndpointId": []
},
"Service": {
"scp:ServiceAiTraining": "true",
"scp:ServiceScf": "false"
}
},
"Effect": "Allow"
"Principal": "*"
"Resource": [
srn:e::1234:kr-west1::objectstorage:bucket/bucketname
srn:e::1234:kr-west1::objectstorage:bucket/bucketname/*
]
}
],
"Version": "2012-10-17"
}Action,Effect,Principalcannot be modified.- Enter the Object Storage SRN and Object Storage SRN/* in
Resource. Condition’sIpAddress,Resource,Servicecan be modified as follows.IpAddress: Enter a single IP or CIDR format.Resource: Enter each resource ID.Service: Enterfalseortrue.- For detailed information about permissible targets, refer to Setting Access Control.
Bucket replication policy creation example
put-bucket-replication, when using it, refer to the following example to create the JSON file.
{
    "Role": "srn:e::1234:::iam:user/abc3d3442"
    "Rules": [
        {
            "ID": "replication-policy-1"
            "Status": "Enabled",
            "Priority": 1,
            "DeleteMarkerReplication": {
                "Status": "Enabled"
            },
            "Filter": {
                "Prefix": ""
            },
            "Destination": {
                "Bucket": "srn:e::1234:kr-west1::objectstorage:bucket/bucketname"
            }
        }
    ]
}
{
"Role": "srn:e::1234:::iam:user/abc3d3442"
"Rules": [
{
"ID": "replication-policy-1"
"Status": "Enabled",
"Priority": 1,
"DeleteMarkerReplication": {
"Status": "Enabled"
},
"Filter": {
"Prefix": ""
},
"Destination": {
"Bucket": "srn:e::1234:kr-west1::objectstorage:bucket/bucketname"
}
}
]
}Role: Enter the IAM SRN.Rules > Destination’s Bucket: Please enter the Bucket SRN.- If you do not provide the ID of
Rule, it will be automatically generated with a random value. - If you change the ID of
Rule, a new policy is created and the existing policy is deleted.
Amazon S3 CLI
To use Amazon S3 with the AWS CLI, refer to the Amazon S3 CLI Guide.
Amazon S3 SDK for Java
To use the Amazon S3 SDK for Java, refer to the Amazon S3 SDK Guide.
- Use the region parameter required for using the Amazon S3 SDK as referenced below.
- In case of Korea West (kr-west1): kr-west
- In the case of South Korea 1,2,3 (kr-south1,2,3): kr-south
- The region parameter is for reference only, and the actual region is determined based on the URL.
- Korea South 3 (kr-south3) region constraints
- File upload and download functions are limited through the Samsung Cloud Platform Console.
- Using the S3 API/CLI with a public URL is restricted.
- However, accessing a Private URL through resources (such as Virtual Server) created in the Samsung Cloud Platform Console is possible.
- Korea South 1 (kr-south1), Korea South 2 (kr-south2) region constraints
- You must allow a separate firewall rule to enable access to the public URL.
- The public URL can be found on the Object Storage details page. * Please refer to Object Storage 상세 정보 확인하기.
1.2 - Monitoring Metrics
According to Samsung Cloud Platform’s policy, the Cloud Monitoring service is scheduled to be discontinued.
Accordingly, after the September 2026 release, resource monitoring of the Samsung Cloud Platform via Cloud Monitoring will no longer be possible.
With the new alternative service, you can continuously perform resource monitoring by using ServiceWatch, released in October 2025.
ServiceWatch provides more modern and powerful features, replacing Cloud Monitoring to deliver a smooth monitoring environment.
Detailed information about ServiceWatch is available in the ServiceWatch Overview.
Object Storage Monitoring Metrics
The table below shows the monitoring metrics for Object Storage that can be viewed through Cloud Monitoring. For detailed usage of Cloud Monitoring, refer to the Cloud Monitoring guide.
| Performance Item Name | Explanation | unit |
|---|---|---|
| Objects | Number of objects stored in the bucket | cnt |
| Bucket Used | Amount of data stored in the bucket (bytes) | bytes |
| Requests [Upload Avg] | Upload usage per bucket | bytes |
| Requests [Download Avg] | Download usage per bucket | bytes |
| Requests [Total] | Total number of HTTP requests executed in the bucket | cnt |
| Requests [Get] | Number of HTTP GET requests executed on objects in the bucket | cnt |
| Requests [Head] | Number of HTTP HEAD requests executed for objects in the bucket | cnt |
| Requests [List] | Number of LIST requests executed for objects in the bucket | cnt |
| Requests [Post] | Number of HTTP POST requests executed on objects in the bucket | cnt |
| Requests [Put] | Number of HTTP PUT requests executed on objects in the bucket | cnt |
| Requests [Delete] | Number of HTTP DELETE requests executed on objects within the bucket | cnt |
1.3 - ServiceWatch metric
Object Storage sends metrics to ServiceWatch. The metrics provided by basic monitoring are data collected at 5‑minute intervals. In Object Storage, you can view replication metrics for each replication policy in ServiceWatch by enabling replication metrics per bucket.
Refer to How-to guides > Object Storage 복제 지표 활성화하기 for how to enable ServiceWatch replication metrics.
Basic Metrics
The following are basic metrics for the Object Storage namespace.
The indicators whose names are displayed in bold below are the indicators selected as key among the basic metrics provided by Object Storage. The key metrics are used to build service dashboards that are automatically created for each service in ServiceWatch.
Each metric provides guidance in the user guide on which statistical values are meaningful when querying that metric, and among the meaningful statistics, the values displayed in bold are the primary statistics. In the service dashboard, you can view key metrics through primary statistical values.
| Performance items | Detailed description | unit | meaningful statistics |
|---|---|---|---|
| object_count | Number of objects stored in the bucket | Count |
|
| object_byte | Amount of data stored in the bucket | Bytes |
|
| upload_bytes | Upload usage per bucket | bytes |
|
| download_bytes | Download usage per bucket | bytes |
|
| all_requests | Total number of HTTP requests executed in the bucket | cnt |
|
| get_requests | Number of HTTP GET requests executed for objects in the bucket | cnt |
|
| head_requests | Number of HTTP HEAD requests made for objects in the bucket | cnt |
|
| list_requests | Number of LIST requests executed for objects in the bucket | cnt |
|
| post_requests | Number of HTTP POST requests executed on objects in the bucket | cnt |
|
| put_requests | Number of HTTP PUT requests executed on objects in the bucket | cnt |
|
| delete_requests | Number of HTTP DELETE requests executed on objects within the bucket | cnt |
|
Replication metric
The following are replication metrics. Replication metrics are collected per replication policy. Replication metrics are collected only when ServiceWatch replication metrics are enabled for each bucket. The replication metrics are as follows.
| Performance items | Detailed description | unit | meaningful statistics |
|---|---|---|---|
| replication_total_count | Total number of objects to be transferred | Count |
|
| replication_transferred_count | Number of objects transmitted | Count |
|
| replication_progress_count | Number of objects being transferred | Count |
|
| replication_queued_count | Number of objects pending transmission | Count |
|
| replication_pending_count | Number of objects with transmission delay | Count |
|
| replication_failure_count | Number of failed transmission objects | Count |
|
| replication_total_bytes | Total transmission target size | Bytes |
|
| replication_transferred_bytes | Transferred data size | Bytes |
|
| replication_max_processing_time | Maximum processing time | Seconds |
|
| replication_avg_processing_time | Average processing time | Seconds |
|
2 - How-to guides
Users can create the service by entering the required Object Storage information and selecting detailed options through the Samsung Cloud Platform Console.
Create authentication key
To create and use the Object Storage service in the Samsung Cloud Platform Console, you need to generate an authentication key in advance.
Generating an authentication key is My menu > My Info. > Authentication Key Management > Authentication Key Creation can be created from . For more details, please refer to IAM > 인증키 생성하기.
- The authentication key (Access Key, Secret Key) is used when authenticating Amazon S3 utility tools.
- The authentication key is used not only for Object Storage but also for authentication in OpenAPI and CLI.
- Authentication keys can be generated up to a maximum of two.
- If the authentication key expires, access to the Object Storage service will be restricted. * Check the authentication key’s expiration period in advance to ensure smooth service usage.
- If you deactivate the authentication key, access permissions to the Object Storage service will be restricted.
Create Object Storage
You can create and use the Object Storage service from the Samsung Cloud Platform Console.
To create an Object Storage, follow the steps below.
- Click the All Services > Storage > Object Storage menu. 1. Navigate to the Service Home page of Object Storage.
- On the Service Home page, click the Create Object Storage button. 2. Go to the Create Object Storage page.
- Object Storage Creation page, enter the information required to create the service.
Category Required statusDetailed description Bucket name Required Bucket name created by the user - must start with a lowercase letter or digit and be entered using lowercase letters, digits, hyphen
-, period., with a length of 3 to 63 characters
- A period
.cannot appear consecutively two or more times.
- A period
.and hyphen-cannot be adjacent.
- A period
.or hyphen-cannot be at the end.
- IP address format is not allowed
- admin name is not allowed
- For detailed information about bucket naming, refer to 버킷명 생성 규칙.
Table. Object Storage required information input fields - must start with a lowercase letter or digit and be entered using lowercase letters, digits, hyphen
- Summary Verify the detailed information and estimated charges generated in the panel, then click the Create button.
- When creation is complete, check the created resources on the Object Storage List page.
View Object Storage detailed information
You can view and edit the full list of resources and detailed information for the Object Storage service.
The Object Storage Details page consists of the Details, Folder List, Replication, Original File Copy, and Tags tabs.
If you need to check the operation history, please use the Logging&Audit service. For more details, see Logging&Auddit > How-to Guides.
To view detailed information about the Object Storage service, follow these steps.
- Click the All Services > Storage > Object Storage menu. 1. Navigate to the Service Home page of Object Storage.
- On the Service Home page, click the Object Storage menu. 2. Go to the Object Storage List page.
- Click the resource to view detailed information on the Object Storage list page. 3. Navigate to the Object Storage Details page.
- The Object Storage Details page displays status information and additional feature information, and consists of Details, Folder List, Replication, Original File Copy, Tags tabs.
Category Detailed description Bucket status Bucket status - Active: Available
Service cancellation Button to cancel the service Table. Status information and additional functions
- The Object Storage Details page displays status information and additional feature information, and consists of Details, Folder List, Replication, Original File Copy, Tags tabs.
Detailed Information
Object Storage list page allows you to view detailed information of the selected resource and, if needed, modify the information.
| Category | Detailed description |
|---|---|
| service | Service name |
| Resource Type | Resource Type |
| SRN | Unique resource ID in Samsung Cloud Platform
|
| Resource name | Resource name
|
| Resource ID | Unique resource ID in the service |
| Bucket name | User-created bucket name |
| Usage | Total data usage of the bucket |
| Encryption | Encryption usage information
|
| Version control | Version Management Usage Information
|
| URL | Provide Public and Private URLs for accessing Object Storage via URL
|
| Access control | Access control usage status and allowed resource information
|
Folder list
You can view the list of folders and files stored in the bucket through the Folder List tab.
| Category | Detailed description |
|---|---|
| name | File name or folder name |
| Size | File size |
| Modification date and time | The file’s most recent modification timestamp |
| Additional features > More | File and folder management buttons
|
| New folder | Add new folder
|
| File upload | Upload a new file or a file you are working on
|
| Delete | Delete file or folder
|
| Download | File download
|
- South Korea Region 3 (kr-south3) constraints
- File upload and download functions are restricted through the Samsung Cloud Platform Console.
- Using the S3 API/CLI with a public URL is restricted.
- However, accessing a Private URL through resources (such as Virtual Server) created in the Samsung Cloud Platform Console is possible.
- Korea South 1 (kr-south1), Korea South 2 (kr-south2) region constraints
- To access the public URL, you must allow a separate firewall configuration.
- The public URL address can be found on the Details tab of the Object Storage detail page. * Please refer to the Detailed Information.
- If the delete marker is the latest version, it cannot be seen in the folder list.
- The delete marker version cannot be viewed in the version list.
Replication
Object Storage List page allows you to view and manage the replication information of the selected resource.
| Category | Detailed description |
|---|---|
| Policy Name | Enter the replication policy name
|
| Clone target | Replication target bucket name |
| Clone location | Replication location (region) |
| Target file | List of files to be cloned |
| Priority | Priority by policy |
| status | Replication policy status
|
| Add | Add new replication policy
|
| More | Policy management possible
|
| Service Watch replication metric | By enabling the replication metric, you can view monitoring data for Object Storage replication in Service Watch
|
Copy original file
On the Object Storage List page, you can view and manage the list of original file copy tasks and information for the selected resources.
| Category | Detailed description |
|---|---|
| Task name | Copy job name
|
| Target bucket name | Copy target bucket name |
| Target bucket location | Destination bucket location (region) |
| Start date and time | Copy start date and time |
| Completion time | Copy completion time |
| status | Task progress status
|
| Cancel operation | Cancel the selected task
|
| Add task | Add a new copy task
|
Tag
On the Object Storage List page, you can view the tag information of the selected resource, and add, modify, or delete it.
| Category | Detailed description |
|---|---|
| Tag list | Tag list
|
Object Storage Encryption Configuration
You can configure it to encrypt the data stored in the bucket. After configuring bucket encryption, the encryption settings are applied to data uploaded thereafter. When encryption is used, the SSE‑S3 encryption key method and the AES256 encryption algorithm are applied.
In this service, server-side encryption (SSE-S3) using Amazon S3 managed keys is offered as the default method, and server-side encryption (SSE-KMS) using Key Management Service (KMS) keys will be provided later according to the service roadmap.
If there is data saved before bucket encryption was configured, the encryption settings will not be applied.
- If you re-upload the file, the encryption will be applied.
- To set encryption for existing data, you need to re‑upload it.
Object Storage To use bucket encryption, follow the steps below.
- All Services > Storage > Object Storage menu, click it. 1. Navigate to the Service Home page of Object Storage.
- On the Service Home page, click the Object Storage menu. 2. Go to the Object Storage List page.
- On the Object Storage List page, click the resource (bucket) to use encryption. 3. Go to the Object Storage Details page.
- On the Object Storage Details page, verify that Encryption is Not Used.
- If Encryption is Unused, click the Edit button. The Encryption Edit Popup opens.
- After checking Enable for Encryption, click the Confirm button.
Terminate Object Storage
You can cancel unused Object Storage to reduce operating costs. However, if you terminate the service, the running service may be stopped immediately, so you should proceed with the termination only after fully considering the impact that may arise from the service interruption.
- Service termination is possible for buckets with no stored data.
- If a file is being uploaded, the upload will be canceled.
- Please be careful, as data cannot be recovered after deletion.
To cancel Object Storage, follow the steps below.
- All Services > Storage > Object Storage menu, click it. 1. Navigate to the Service Home page of Object Storage.
- On the Service Home page, click the Object Storage menu. 2. Go to the Object Storage List page.
- On the Object Storage List page, select the resource (bucket) to terminate, and click the Terminate Service button.
- Please enter the bucket name to confirm cancellation.
- If you entered the bucket name correctly, the Confirm button will be enabled. 5. Click the Confirm button.
- After termination is complete, check the Object Storage list page to see if the resource has been terminated.
2.1 - Access control
When you configure a bucket with access control enabled, only resources that are granted permission can access the bucket. Enter a public IP, or configure settings to allow access to resources created in the Samsung Cloud Platform Console.
Setting Access Control
You can set the bucket’s access control to enabled.
Object Storage Follow these steps to configure access control settings.
- Click the All Services > Storage > Object Storage menu. 1. Navigate to the Service Home page.
- On the Service Home page, click the Object Storage menu. 2. Go to the Object Storage List page.
- Object Storage list page, click the resource (bucket) for which you want to configure access control. 3. Go to the Object Storage Details page.
- On the Object Storage Details page, verify that Access Control is Not Used.
- If Access control is unused, click the Edit button. 5. Edit Access Control The popup window opens.
- After checking the use of access control, click the Confirm button. 6. On the Object Storage Details page, Access Control will be changed to enabled.
- If you change access control to Enabled, you can set access control for Public IP, service resources, Cloud Functions, Simple AI Training services.
- Click the Edit button of the resource or service you want to allow access to, to add resources or set whether to allow them.
Category Detailed description Allow public IP Registered Public IP or CIDR list - Example: 192.168.x.x, 192.168.x.x/24
- For detailed information on allowing Public IP access, see Public IP 접근 허용하기
Allow service resources List of service resources created in the same Account/Region - Service examples: Virutal Server, GPU Server, Bare Metal Server, Multi-node GPU Cluster, VPC Endpoint, PostgreSQL, MariaDB, MySQL, EPAS, Microsoft SQL Server
- For detailed information on allowing access to service resources, see 서비스 자원 접근 허용하기
Cloud Functions service Set whether to allow Object Storage access for modifying Java Runtime code in the Cloud Functions service - Allow when set, the Cloud Fuctions service can load Java Runtime executable files stored in Object Storage
- For detailed information about allowing the Cloud Functions service, see Cloud Functions 서비스 접근 허용하기
Simple AI Training Service Set whether to allow Object Storage access for retrieving the Training Script in the Simple AI Training service - Allow when set, the Simple AI Training service can retrieve the Training Script stored in Object Storage
- For more details about enabling the Simple AI Training service, see Simple AI Training 서비스 접근 허용하기
Table. Access control items
- When access control is set to unused, it is applied as full allow.
- If you modify the access permission, it may take up to 30 seconds for the changes to be applied.
When using IP access control in an IAM policy, note that access between Object Storage and SCP resources is not possible.
To use the service, you must set the IAM policy to Applied IP: All IPs, Excluded IP: Not used.
South Korea (kr-south) region constraints
- The South Korea (kr-south) region does not provide Cloud Funtions service, so the Allow Cloud Functions service feature cannot be used.
Allow public IP access
If the bucket’s access control is set to enabled, you can add a Public IP allowance. To enable Public IP access from Object Storage, follow these steps.
All Services > Storage > Object Storage Click the menu. 1. Navigate to the Service Home page.
On the Service Home page, click the Object Storage menu. 2. Go to the Object Storage List page.
On the Object Storage List page, click the resource (bucket) you want to set access control for. 3. Go to the Object Storage Details page.
Object Storage Details On the page, verify that access control is enabled.
- If Access Control is Unused, click the Edit button, then in the Access Control popup, change Access Control to Enabled.
- Access control can control access to IP access allowed, service resource allowed, Cloud Functions service, Simple AI Training service only when enabled.
Click the Edit button in Public IP Allow. 5. Public IP Allow Edit A popup window opens.
Enter the Public IP to allow access, and click the Add button. 6. The entered IP appears in the IP to add list.
column Required Detailed description Allow public IP Essential Enter a single IP or CIDR format - 192.168.x.x (IP format)
- 192.168.x.x/24 (CIDR format)
- Up to 150 entries can be entered
Table. Public IP Allowance Edit Popup Input ItemsAfter checking the IP to add list, press the Confirm button.
On the Object Storage Details page, check the added Public IP in the Access Control > Allow Public IP list.
- If you modify the Public IP allowance, it may take up to 30 seconds for the changes to be applied.
- Up to 150 public IPs are allowed.
Allow access to service resources
If access control on the bucket is set to enabled, you can add a service resource in the allowed service resources. Follow the steps below to allow access to service resources from Object Storage.
- All Services > Storage > Object Storage menu, click it. 1. Service Home Go to the page.
- On the Service Home page, click the Object Storage menu. 2. Go to the Object Storage List page.
- Object Storage List page, click the resource (bucket) for which you want to configure access control. 3. Go to the Object Storage Details page.
- Verify that Access Control is enabled on the Object Storage Details page.
- If Access Control is Unused, click the Edit button, then in the Access Control popup, change Access Control to Enabled.
- Access control can regulate access to IP access allowed, service resource allowed, Cloud Functions service, and Simple AI Training service only when it is enabled.
- Click the Edit button in Service Resource Allowance. 5. Select Service Resources The popup window opens.
- Select Service Resources In the popup window, select the service to grant access to, then select the resources to allow.
The allowed criteria for each service are as follows.
- Virtual Server/GPU Server/Bare Metal Server/Multi-node GPU Cluster: Allowed per server
- VPC Endpoint: Allow per VPC Endpoint
- PostgreSQL, MariaDB, MySQL, EPAS, Microsoft SQL Server: Allowed per cluster
To access Object Storage from the server, you must first perform the following steps.
- Check the Object Storage IP on the server using the nslookup command.
- After registering a rule through the Security Group or Firewall service, apply it to the server.
- Target address: Object Storage IP confirmed in step 1
- Direction: Outbound
- Service: TCP 80, 443 (port 80 for http / port 443 for https)
When each service is in the following states, access to service resources can be granted or revoked. If it is not in the following state, the previously authorized service resources may also be affected.
- Virtual Server/GPU Server: Build, Building, Networking, Scheduling, Block_Device_Mapping, Spawning, Deleting, Error and other states
- Bare Metal Server/Multi-node GPU Cluster: Running, Starting, Stopping, Stopped
- VPC Endpoint: Active
- PostgreSQL/MariaDB/MySQL/EPAS/Microsoft SQL Server: Running
- After you finish selecting the resources to allow access, press the Confirm button.
- Check the resources you added in the Access Control > Service Resource Allow list on the Object Storage Details page.
- If you modify service resource allowances, it may take up to 30 seconds for the changes to be applied.
- A maximum of 150 service resources is allowed.
Allow access to Cloud Functions service
If access control on the bucket is set to enabled, you can allow the Cloud Functions service to access Object Storage.
To allow access to the Cloud Functions service from Object Storage, follow these steps.
- All Services > Storage > Object Storage Click the menu. 1. Navigate to the Service Home page.
- On the Service Home page, click the Object Storage menu. 2. Go to the Object Storage List page.
- Object Storage List page, click the resource (bucket) you want to configure access control for. 3. Go to the Object Storage Details page.
- Object Storage Details On the page, check that access control is enabled.
- If Access Control is Unused, click the Edit button, then in the Access Control popup window, change Access Control to Enabled.
- Access can be controlled for IP access allowed, service resource allowed, Cloud Functions service, and Simple AI Training service only when access control is enabled.
- Click the Edit button of the Cloud Functions service. 5. Cloud Functions Service Edit A popup window opens.
- After checking Allow, click the Confirm button.
- Once the access permission settings for the Cloud Functions service are completed, the Cloud Functions service can retrieve the Java Runtime executable stored in Object Storage.
- In the Cloud Fuctions service, refer to Java Runtime 코드 변경하기 for how to load the Java Runtime executable.
South Korea (kr-south) region constraints
- The South Korea (kr-south) region does not provide the Cloud Functions service, so the Allow Cloud Functions service feature cannot be used.
Simple AI Training Allow Service Access
If access control for the bucket is set to enabled, you can allow the Simple AI Training service to access Object Storage.
If you want to permit access to the Simple AI Training service from Object Storage, follow the steps below.
- Click the All Services > Storage > Object Storage menu. 1. Go to the Service Home page.
- On the Service Home page, click the Object Storage menu. 2. Go to the Object Storage List page.
- Object Storage List page, click the resource (bucket) for which you want to configure access control. 3. Object Storage Details Navigate to the page.
- Object Storage Details Verify that access control is enabled on the page.
- If Access Control is Unused, click the Edit button, then in the Access Control popup, change Access Control to Enabled.
- When access control is enabled, you can control access to IP access allowed, service resource allowed, Cloud Functions service, and Simple AI Training service.
- Click the Edit button of Simple AI Training Service. 5. Simple AI Training Service Edit A popup window opens.
- After checking Allow, click the Confirm button.
- Once the access permission settings for the Simple AI Training service are completed, you can retrieve the Training Script stored in Object Storage from the Simple AI Training service.
- In the Simple AI Training service, see Training Job 생성하기 for how to load a Training Script stored in Object Storage.
2.2 - File and Folder Management
If you need to manage the created Object Storage, such as saving files to it or downloading stored files, you can perform tasks on the Object Storage Details and Folder List pages.
Create new folder
A new folder may need to be created to store new data in the bucket.
To create a new folder in Object Storage, follow the steps below.
- All Services > Storage > Object Storage Please click the menu. 1. Go to the Service Home page.
- On the Service Home page, click the Object Storage menu. 2. Go to the Object Storage List page.
- On the Object Storage list page, click the resource (bucket) where you want to create a new folder. 3. Navigate to the Object Storage Details page.
- Folder List Click the tab. 4. Navigate to the Folder List page.
- Click the New Folder button. 5. New Folder The popup window opens.
- Enter the folder name to use, and click the Confirm button. 6. A popup window notifying the creation of a new folder opens.
- Folder names must not contain prohibited special characters. * For more details, refer to 폴더명 생성 규칙.
- The total path length, including folder name, file name, and delimiter (
/), must be within 1,024 Bytes (UTF-8 encoding).
- After clicking the Confirm button, check the created folder in the Folder List.
Upload File
- Korea South 3 (kr-south3) region constraints
- File upload and download functions via the Samsung Cloud Platform Console are restricted.
- Using the S3 API/CLI with a public URL is restricted.
- However, accessing a Private URL through resources (such as Virtual Server) created in the Samsung Cloud Platform Console is possible.
- South Korea South 1 (kr-south1), South Korea South 2 (kr-south2) region constraints
- To access the public URL, you must allow a separate firewall configuration.
- The public URL can be found on the Object Storage details page. * Please refer to Object Storage 상세 정보 확인하기.
You can upload a new file or a file in progress to the bucket. Object Storage Follow the steps below to upload files.
- All Services > Storage > Object Storage menu, please click. 1. Go to the Service Home page.
- On the Service Home page, click the Object Storage menu. 2. Go to the Object Storage List page.
- On the Object Storage List page, click the resource (bucket) to upload files. 3. Object Storage Details Navigate to the page.
- Click the Folder List tab. 4. Navigate to the Folder List page.
- Click the File Upload button. 5. File Upload popup window opens.
- After clicking the Attach File button, select the file to upload or drag and drop the file to attach into the popup window.
- Connection test button can be clicked to verify the connection.
- You can upload up to three files, each up to 3 GB.
- The attachment filename must not contain prohibited special characters. * For more details, refer to 파일명 생성 규칙.
- The attachment filename must not contain two or more consecutive periods.
- The total path length, including the folder name, file name, and separator (
/), must be within 1,024 bytes (based on UTF-8 encoding). - If duplicate files exist, you cannot upload.
- If you have selected all files, click the Upload button.
- If the upload was successful, check the file in the folder list.
- If the Connection test or file upload fails, check the firewall connection and access control settings. * Access may be restricted in proxy environments.
- If you do not use the version control feature, you can overwrite a file when an identical file exists in the same location. * We recommend using version control for secure file management. * For detailed information about version management, please refer to 버전 관리 설정하기.
Download File
- South Korea Region 3 (kr-south3) constraints
- File upload and download functions are restricted through the Samsung Cloud Platform Console.
- Using the S3 API/CLI with a public URL is restricted.
- However, accessing a Private URL through resources (such as Virtual Server) created in the Samsung Cloud Platform Console is possible.
- Korea South 1 (kr-south1), Korea South 2 (kr-south2) region constraints
- To access the public URL, you must allow a separate firewall configuration.
- The public URL can be found on the Object Storage details page. * Please refer to Check Object Storage detailed information.
You can download files stored in the bucket. Object Storage Follow the steps below to download the file.
- All Services > Storage > Object Storage menu, click it. 1. Navigate to the Service Home page.
- On the Service Home page, click the Object Storage menu. 2. Go to the Object Storage List page.
- Object Storage List page, click the resource (bucket) you want to download. 3. Object Storage Details Go to the page.
- Click the Folder List tab. 4. Go to the Folder List page.
- Click the More > Download button located at the far right of the file to be downloaded. 5. The file download is starting.
- Check whether the file download has completed in the browser.
Query File Information
You can retrieve information about files stored in the bucket. Object Storage Follow the steps below to query file information.
- All Services > Storage > Object Storage menu, please click. 1. Navigate to the Service Home page.
- On the Service Home page, click the Object Storage menu. 2. Go to the Object Storage List page.
- On the Object Storage List page, click the resource (bucket) that contains the file you want to view information for. 3. Navigate to the Object Storage Details page.
- Click the Folder List tab. 4. Go to the Folder List page.
- Click the More > File Info button located at the far right of the file you want to view information for. 5. File Information The popup window opens.
- File Information View detailed file information in the popup window.
Category Detailed description Filename File name Content type Object type Total size File size Modification date and time The file’s most recent modification timestamp Permission Allow Public Access URL Provide Public and Private addresses to access the file path via URL - Public: Provided to be accessible from external internet network
- Private: Provides an address accessible from resources created in the same Account and region of the Samsung Cloud Platform Console
Table. File information items
Copy file
You can copy a file stored in a bucket to the same location. To copy a file, follow these steps.
- Click the Storage > Object Storage menu. 1. Go to the Object Storage List page.
- On the Object Storage List page, click the resource (bucket) to copy the file. 2. Go to the Object Storage Details page.
- Click the Folder List tab. 3. Navigate to the Folder List page.
- Click the More > Copy File button at the far right of the file to be copied. 4. File Copy a popup window opens.
- Enter the File name, then click the Confirm button. 5. A popup window indicating file copy opens.
- Only files whose full path—including bucket name, folder name, file name, and delimiter (
/)—is 1,024 bytes or less (based on URL encoding) can be copied. - In the Samsung Cloud Platform Console, you can only copy files if the file size is 5 GB or less. * If the file size exceeds 5 GB, you can copy it using the S3 API.
- You can copy within the same bucket and folder.
- If the bucket does not use versioning, a file with the same name in the folder will be overwritten.
- After clicking the Confirm button, check the copied file in the folder list.
Delete files and folders
You can delete files and folders stored in the bucket. Object Storage Follow the steps below to delete files and folders.
- When a folder is deleted, all subfolders and files inside it are also deleted.
- All versions are deleted at once when the file is deleted.
- Files with object lock (WORM) enabled cannot be deleted.
- All Services > Storage > Object Storage menu, click it. 1. Go to the Service Home page.
- On the Service Home page, click the Object Storage menu. 2. Go to the Object Storage List page.
- Object Storage List page, click the resource (bucket) that contains the file or folder you want to delete. 3. Object Storage Details Go to the page.
- Click the Folder List tab. 4. Go to the Folder List page.
- Click the More > Delete button located at the far right of the file or folder you want to delete. 5. Delete popup window opens.
- After selecting multiple files or folders in the left checkbox, you can delete multiple files or folders at once by clicking the Delete button at the top.
- In the delete popup, click the Confirm button to complete the deletion.
- Folder List Check that files or folders have been deleted from the list.
2.3 - Version Management
By enabling versioning on a bucket, you can track the history of file modifications when uploading files with the same name. You can also view the file’s version list and download previous versions of the file from the list.
Setting up version control
You can enable versioning on the bucket.
Object Storage To set up versioning, follow the steps below.
- Click the All Services > Storage > Object Storage menu. Navigate to the Service Home page.
- On the Service Home page, click the Object Storage menu. You will be taken to the Object Storage List page.
- On the Object Storage List page, click the resource (bucket) for which you want to configure versioning. You will be taken to the Object Storage Details page.
- On the Object Storage Details page, verify whether Versioning is unused.
- If Version control is unused, click the Edit button. The Edit version control popup window opens.
- After checking version management as Enabled, click the Confirm button. On the Object Storage Details page, Version Management will be changed to Enabled.
- When you configure version control for the first time, it may take some time for changes to be applied.
- The time required may vary depending on the size of the bucket. Work performed before the configuration is completed may not have the version applied.
Check version list
From the moment version control is configured, you can view and manage versions of file uploads and modifications.
- Version control for file uploads and edits is available from the moment version control is configured.
- All files have a version ID. However, before version control is configured, the version ID is null(-), and files uploaded after version control is set up are assigned a generated version ID.
- For example, if you upload a file with the same name to the same location, the file name remains the same, but a new version file with a different version ID appears in the version list.
Object Storage To check the version list of a file, follow these steps.
- Click the All Services > Storage > Object Storage menu. Navigate to the Service Home page.
- On the Service Home page, click the Object Storage menu. You will be taken to the Object Storage List page.
- Object Storage List page, click the resource (bucket) that contains the file whose version list you want to view. You will be taken to the Object Storage Details page.
- Click the Folder List tab. The folder and file list will be displayed.
- In the folder and file list, click the More > Version List button located at the far right of the file whose version list you want to view. The Version List popup will open.
Category Detailed description filename File name Modification date File modification date and time Version ID Version ID assigned to each individual file - Before version control is enabled, the version ID of saved files is displayed as null(-)
- Files saved after version control is enabled are assigned a unique version ID
- If a file with the same name is uploaded to the same location, a version ID is generated, a versioned file is added, and it can be viewed in the version list
Etag Object that identifies files, specific version Size Version file size More Provides version file download and delete functions as additional features - File Download: Download the file of the selected version
- To restore a file to a previous version, download the previous version and re‑upload it
- Delete: Delete the file of the selected version
- If all version files are deleted, the original file will also be deleted
- To retain the original file, at least one version must be kept
Delete Delete file - Enable the button when selecting the checkbox of the version file to delete from the list
Table. Version list popup items
Download version file
- South Korea Region 3 (kr-south3) constraints
- File upload and download capabilities are limited through the Samsung Cloud Platform Console.
- Use of the S3 API/CLI via a public URL is restricted.
- However, private URL access is possible through resources (such as Virtual Server) created in the Samsung Cloud Platform Console.
- South Korea South 1 (kr-south1), South Korea South 2 (kr-south2) region restrictions
- To access the public URL, you must allow a separate firewall configuration.
- You can view the public URL address on the Object Storage details page. Refer to Check Object Storage Details.
You can download the version file. To download the version file of a Object Storage file, follow these steps.
- Click the All Services > Storage > Object Storage menu. Navigate to the Service Home page.
- On the Service Home page, click the Object Storage menu. You will be taken to the Object Storage List page.
- On the Object Storage List page, click the resource (bucket) that contains the version file to download. You will be taken to the Object Storage Details page.
- Click the Folder List tab. The folder and file list will be displayed.
- In the folder and file list, click the More > Version List button located at the far right of the file for which you want to download the version file. The Version List popup window will open.
- Click the More > File Download button located at the far right of the version file. File download will start.
- Verify that the file download has completed in the browser.
Delete version file
You can delete a file’s version list.
- If you delete all version files, the original file will also be deleted. To avoid deleting the original file, you must keep at least one version.
- Version files with object lock (WORM) enabled cannot be deleted.
Object Storage To delete a file’s version list, follow these steps.
- Click the All Services > Storage > Object Storage menu. Navigate to the Service Home page.
- On the Service Home page, click the Object Storage menu. You will be taken to the Object Storage List page.
- Object Storage List: Click the resource (bucket) that contains the versioned file you want to delete. You will be taken to the Object Storage Details page.
- Click the Folder List tab. The folder and file list will be displayed.
- In the folder and file list, click the More > Version List button located at the far right of the file whose version list you want to delete. The Version List popup window will open.
- Click the More > Delete button at the far right of the version file you want to download. Deletion will be completed.
2.4 - Permission Management
Each file is provided with Private permission by default, and each file can be changed to Public permission through permission settings. Private permission allows file access and download only to users who know the Access Key and Secret Key, whereas Public permission allows anyone worldwide to access and download the file via its Public URL, so caution is required.
Check permission management
You can check the file’s permission settings.
Object Storage Follow the steps below to verify file permissions.
- Click the All Services > Storage > Object Storage menu. Navigate to the Service Home page.
- On the Service Home page, click the Object Storage menu. You will be taken to the Object Storage List page.
- Object Storage List page, click the resource (bucket) that contains the file whose permissions you want to check. You will be taken to the Object Storage Details page.
- Click the Folder List tab. Navigate to the Folder List page.
- Click the More > File Info button located at the far right of the file you want to view file information for. The File Info popup window will open.
- Check the Permissions in the File Information popup window.
Category Detailed description Permission Public Access allowed or Public Access not allowed Table. Permission information description
Allow Public Access
You can set the file’s Public Access permission to Allow. To set the file permissions of Object Storage to allow Public Access, follow these steps.
- Click the All Services > Storage > Object Storage menu. Navigate to the Service Home page.
- On the Service Home page, click the Object Storage menu. You will be taken to the Object Storage List page.
- Object Storage List page: click the resource (bucket) that contains files to allow Public Access. You will be taken to the Object Storage Details page.
- Click the Folder List tab. Navigate to the Folder List page.
- Click the More > File Info button located at the far right of the file you want to view information for. The File Info popup window will open.
- Check that Permission is in Public Access not allowed state, then click the Confirm button.
- Click the More > Permission Management button located at the right end of the file. The Edit Permission Management popup window opens.
- Edit Permission Management popup window, check Permission Management’s Allow Public Access, and click the Confirm button. You will be taken to the Folder List page.
- Click the More > File Info button at the far right of the file. The File Info popup opens.
- Check that Permission is Public Access allowed.
Please enable file sharing only when it is absolutely necessary.
2.5 - Replication Policy Management
Replication can be performed on buckets in a different location or the same location.
You can configure multiple replication policies, and if the source bucket becomes unavailable due to a failure or disaster, you can provide service through the replica bucket.
- The replication feature operates in a 1:N structure, allowing replication within a region or between regions. * Data transfer charges are added when performing cross-region replication.
- The replication feature applies only to files uploaded after the replication policy is set.
- Deleting the versioned file in the source does not delete the files in the replica bucket.
- Example: When set from Bucket A → Bucket B, even if the version file in Bucket A is deleted, it remains in Bucket B.
- Bidirectional replication can be configured.
- Example: When set to Bucket A ↔ Bucket B, files uploaded to Bucket A are replicated to Bucket B, and files uploaded to Bucket B are replicated to Bucket A.
- The duplicated file will not be duplicated.
- Example: When configured as Bucket A → Bucket B → Bucket C, files replicated from Bucket A to Bucket B are not replicated from Bucket B to Bucket C.
- If there are no files in the original folder, that folder will not be duplicated as a copy.
Add replication policy
- You can configure replication on the created bucket.
- To add a replication policy, you must set the versioning feature to enabled.
- For how to set up the version management feature, refer to 버전 관리 설정하기.
To add a replication policy, follow the steps below.
Click the All Services > Storage > Object Storage menu. 1. Navigate to the Service Home page of Object Storage.
On the Service Home page, click the Object Storage menu. 2. Go to the Object Storage List page.
On the Object Storage List page, click the resource to which you want to add a replication policy. 3. Object Storage Details Navigate to the page.
Click the Clone tab.
Click the Add button. 5. Add Replication Policy The popup window opens.
After entering the policy information, click the Confirm button. 6. A popup window notifying the creation of a backup policy opens.
Category Required status Detailed description Policy name Essential Enter the replication policy name - using English letters, numbers, and special characters (
-._) within 255 characters
Clone location Required Select the replication location (region) - Other locations can be selected
Replication bucket name Required Select the name of the replica bucket - If it is the same as the source bucket name or is being used as a replica bucket for another source, adding a replication policy is not allowed
Target file Essential Select files to replicate - All: Replicate all files
- Prefix: Replicate files that start with the value entered as a prefix
- Enter within 1,024 bytes based on UTF-8 encoding (same as file length restriction)
- Special characters(
%<>#\`^)
Priority Required When multiple replication policies are set, you can specify the priority - cannot be set redundantly with another replication policy that uses the same replication bucket
Delete marker duplication Selection Whether to use delete marker replication Table. Add replication policy popup items- using English letters, numbers, and special characters (
Click the Confirm button. 7. A replication policy will be added.
If an invalid policy exists, a replication policy cannot be added.
- Example: If a replication bucket has a deleted policy remaining, you cannot add a replication policy.
Modify replication policy
You can modify the replication location, replication bucket name, and target file of the replication policy.
- To modify the replication policy, you must set the versioning feature to enabled.
- For instructions on configuring the version management feature, see 버전 관리 설정하기.
Follow these steps to modify the replication policy.
All Services > Storage > Object Storage Click the menu. 1. Navigate to the Service Home page of Object Storage.
On the Service Home page, click the Object Storage menu. 2. Go to the Object Storage List page.
On the Object Storage List page, click the resource to edit the replication policy. 3. Object Storage Details Go to the page.
Click the Clone tab.
Click the More > Edit button for the policy you want to modify in the replication policy list. 5. Edit Replication Policy The popup window opens.
After modifying the replication policy information, click the Confirm button. 6. A popup window informing you of the replication policy modification opens.
Category Whether required Detailed description Clone location Required Select replication location (region) - Other locations can be selected
Replication bucket name Required Select the name of the replicated bucket - If the source or replica bucket does not have versioning enabled, selection is not allowed
- If it is the same as the source bucket name or is being used as a replica bucket for another source, selection is not allowed
Target file Required Select files to replicate - All: Replicate all files
- Prefix: Replicate files that start with the value entered as a prefix
- Enter within 1,024 bytes based on UTF-8 encoding (same as file length restriction)
- Special characters(
%<>#\`^)
Priority Required Specify priority when multiple replication policies are set - Cannot be configured redundantly with another replication policy that uses the same replication bucket
Delete marker duplication Selection Whether to use delete marker replication Table. Replication policy edit popup itemsClick the Confirm button. 7. The replication policy modification is complete.
If an invalid policy exists, a replication policy cannot be added.
- Example: If a replication bucket has a deleted policy remaining, you cannot add a replication policy.
Change Replication Policy Status
You can enable or disable the replication policy to change whether it is executed.
To change the replication policy status, follow these steps.
- Click the All Services > Storage > Object Storage menu. 1. Navigate to the Service Home page of Object Storage.
- On the Service Home page, click the Object Storage menu. 2. Go to the Object Storage List page.
- On the Object Storage list page, click the resource to change the replication policy status. 3. Object Storage Details Navigate to the page.
- Click the Clone tab.
- From the replication policy list, click the More > Enable or More > Disable button of the policy whose status you want to change. 5. A popup window opens to notify of a replication policy status change.
- Enabled: Performs replication according to the replication policy.
- Disable: Stop performing replication.
- Click the Confirm button. 6. The status of the replication policy changes.
Delete replication policy
You can delete unused replication policies.
Follow these steps to modify the replication policy.
- Click the All Services > Storage > Object Storage menu. 1. Navigate to the Service Home page of Object Storage.
- On the Service Home page, click the Object Storage menu. 2. Go to the Object Storage List page.
- On the Object Storage List page, click the resource to delete the replication policy. 3. Object Storage Details Navigate to the page.
- Click the Copy tab.
- Click the More > Delete button for the policy you want to edit in the replication policy list. 5. A popup window opens to notify the deletion of the replication policy.
- Click the Confirm button. 6. The replication policy is being deleted.
- If you change the versioning setting for the source and replica buckets, replication will not operate correctly.
- If versioning on the source bucket is set to disabled, replication will not be performed. * If you set it to use again, it will replicate uploaded files from the point it was set.
- If you set versioning of the replica bucket to disabled, replication will occur but versioning is not possible. * If you reset it to Use, version control will be applied from the point you set it.
- If you delete the source bucket, the configured replication policy will also be deleted.
- If you delete the replica bucket, the replication policy set on the source bucket remains.
- If you recreate a replication bucket with the same name as a deleted replication bucket, replication will be performed to that bucket.
Activating ServiceWatch replication metrics
By default, Object Storage is integrated with ServiceWatch and basic monitoring. To link Object Storage replication metrics to ServiceWatch, you must enable ServiceWatch replication metrics. For detailed information about ServiceWatch, see the ServiceWatch 개요.
- Basic monitoring is provided at no cost, but enabling replication metrics as a detailed monitoring item incurs additional fees.
- The ServiceWatch replication metric, once set for a bucket, applies to all replication policies of that bucket.
To enable the ServiceWatch replication metric for Object Storage, follow these steps.
- Click the All Services > Storage > Object Storage menu. 1. Navigate to the Service Home page of Object Storage.
- On the Service Home page, click the Object Storage menu. 2. Go to the Object Storage List page.
- Object Storage List page, click the resource to enable ServiceWatch replication metrics. 3. Object Storage Details Navigate to the page.
- On the Object Storage Details page, click the Replication tab. 4. Go to the Clone tab.
- Click the Edit button for ServiceWatch replication metrics. 5. ServiceWatch Replication Metric Edit Navigate to the popup window.
- ServiceWatch Replication Metric Modification In the popup window, after selecting Enable, check the guidance text and click the Confirm button.
- Check the ServiceWatch replication metric items in the Replication tab.
Disable ServiceWatch replication metrics
To disable the ServiceWatch replication metric for Object Storage, follow these steps.
- Click the All Services > Storage > Object Storage menu. 1. Navigate to the Service Home page of Object Storage.
- On the Service Home page, click the Object Storage menu. 2. Go to the Object Storage List page.
- On the Object Storage list page, click the resource to disable ServiceWatch detailed monitoring. 3. Navigate to the Object Storage Details page.
- On the Object Storage Details page, click the Replication tab. 4. Go to the Clone tab.
- Click the Edit button for the ServiceWatch replication metric. 5. ServiceWatch Replication Metric Edit Navigate to the popup window.
- ServiceWatch replication metric edit In the popup window, after deselecting Enable, review the guidance text and click the Confirm button.
- In the Replication tab, check the ServiceWatch replication metric items.
2.6 - Copy original file
Using the original file copy feature, you can copy the original file to the target bucket as is, regardless of replication policy settings.
- The entire file of the original is copied.
- If the original file copy operation fails, you need to re-execute it by adding a task, and the entire original file will be copied again during re-execution.
- If there are no files in the source folder, that folder will not be copied to the destination bucket.
- Copying the original file can only be performed in the Console and cannot be done via a separate API.
Add copy operation
To copy the original file in Object Storage, follow these steps.
- Click the All Services > Storage > Object Storage menu. 1. Navigate to the Service Home page of Object Storage.
- On the Service Home page, click the Object Storage menu. 2. Go to the Object Storage List page.
- On the Object Storage List page, click the resource to copy the original file. 3. Go to the Object Storage Details page.
- In the Copy Original File tab, click the Add Task button. 4. Add original file copy task A popup window opens.
- Add Task In the popup window, set the copy task information, then click the Confirm button.
Category Required status Detailed description Task name Required Enter the name of the copy job - Enter using English letters, numbers, and special characters (-,_) within 255 characters
Target bucket location Select the location of the target bucket Target bucket name Select the name of the target bucket Table. Copy task itemsReference- The file operates according to the versioning/encryption status of the replica bucket.
- Delete Marker is excluded from the copy target.
- Copying between the same bucket is not allowed.
- When a popup notifying the copy opens, click the Confirm button. 6. The original file copy operation is added.
Copy operation and view history
On the Object Storage Details page’s Original File Copy tab, you can view and manage the list of original file copy jobs and their information.
To view the list of source file copy jobs and job history, follow these steps.
- All Services > Storage > Object Storage Click the menu. 1. Navigate to the Service Home page of Object Storage.
- Service Home 페이지에서 Object Storage 메뉴를 클릭하세요. 2. Go to the Object Storage List page.
- Object Storage list On the Object Storage list page, click the resource to view the copy job information. 3. Object Storage Details Navigate to the page.
- Click the Original File Copy tab on the Object Storage Details page.
Category Detailed description Task name Copy job name - Click to view the status and detailed information of the job
Target bucket name Copy target bucket name Target bucket location Destination bucket location (region) Start date and time Copy start date and time Completion time Copy completion time status Task progress status - Pending: Task pending
- In progress: Task in progress
- Completed: Task completed
- Cancelled: Task cancelled
- Failed: Task failed due to an error during execution
Cancel Cancel the selected task - Pending or In progress tasks can only be canceled
Add task New copy task can be added - If there is an ongoing copy task, adding a copy task is not allowed
Table. Object Storage original file copy tab item
Cancel copy operation
To cancel the original file copy operation, follow these steps.
- All Services > Storage > Object Storage menu, click it. 1. Navigate to the Service Home page of Object Storage.
- On the Service Home page, click the Object Storage menu. 2. Go to the Object Storage List page.
- Object Storage List page, click the resource for which you want to cancel the copy operation. 3. Object Storage Details Navigate to the page.
- Original File Copy tab, click the Cancel Operation button for the copy job you want to cancel.
- When a popup indicating that the copy operation has been canceled opens, click the Confirm button.
- Original File Copy tab’s original file copy task list, verify whether the job was canceled.
3 - Release Note
Object Storage
- The replication feature of Object Storage has been improved.
- You can apply multiple replication policies by setting their priority.
- The original file copy feature has been added.
- You can copy the original file to the target bucket as is, regardless of the replication policy settings.
- The Simple AI Training service has been added to access control.
- You can load a Training Script stored in Object Storage from the Simple AI Training service.
- ServiceWatch service integration offering
- You can monitor data using the ServiceWatch service.
- The replication feature of Object Storage has been added.
- You can perform replication to buckets in a different location or the same location, and you can configure multiple replication policies.
- File copy feature has been added.
- You can copy the desired file within the same bucket and folder.
- The Cloud Functions service has been added to access control.
- You can upload Java Runtime executable files in Cloud Functions.
- A server resource target product has been added to Object Storage access control.
- Multi-node GPU Cluster, PostgreSQL, MariaDB, MySQL, EPAS, Microsoft SQL Server
- Presigned URL functionality has been added.
- You can download the file using a Presigned URL for the configured duration.
- You can perform Copyobject on encrypted files.
- Additional versions of the Amazon S3 SDK and Amazon S3 CLI are now available.
- Object Storage feature change
- Object Storage can be used from external networks via a VPC Endpoint connection.
- Samsung Cloud Platform Common Feature Changes
- Account, IAM, Service Home, tags, and other common CX changes have been reflected.
- We have launched an object storage service that facilitates data storage and retrieval.
- We have launched Object Storage, a service that offers space (bucket) for cost-effective storage of large amounts of data.