This is the multi-page printable view of this section. Click here to print.
File Storage
- 1: Overview
- 1.1: Monitoring Metrics
- 1.2: ServiceWatch Metrics
- 2: How-to guides
- 2.1: Connect to Server
- 2.2: Use Snapshot
- 2.3: File-level Recovery
- 2.4: Using Disk Backup
- 2.5: Using replication
- 3: API Reference
- 4: CLI Reference
- 5: Release Note
1 - Overview
Service Overview
File Storage is a storage solution that allows servers connected via the network to easily store and share data, suitable for application environments that use multiple servers.
You can select the disk type based on performance requirements, and it will automatically scale up or down according to the user’s data volume without capacity limits.
Features
- Free volume usage: The volume size automatically expands or shrinks based on data creation and deletion without user configuration. * There is no cost for creating a volume; only usage fees for the stored data capacity are incurred.
- Various disk types provided: You can select a disk type based on the user’s intended use. * You can use HDDs that provide cost‑effective large‑capacity data storage, SSDs that offer reduced response times and high IOPS performance, and high‑performance SSDs.
- Snapshot Backup: Through the image snapshot feature, recovery of changed or deleted data is possible, and during disk backup, snapshots can be stored in a location different from the original. * The user selects the snapshot created at the desired recovery point from the list and performs the recovery.
- Replication: Creates an identical replica volume at another location, and the user can configure the data replication schedule. * If the original volume cannot be used due to failures or disasters, service can be provided through a replica volume.
- Multi-AZ: Create the same volume in a different location (AZ) within the region, so the service continues even in the event of a failure. * We need to verify availability by region.
Configuration
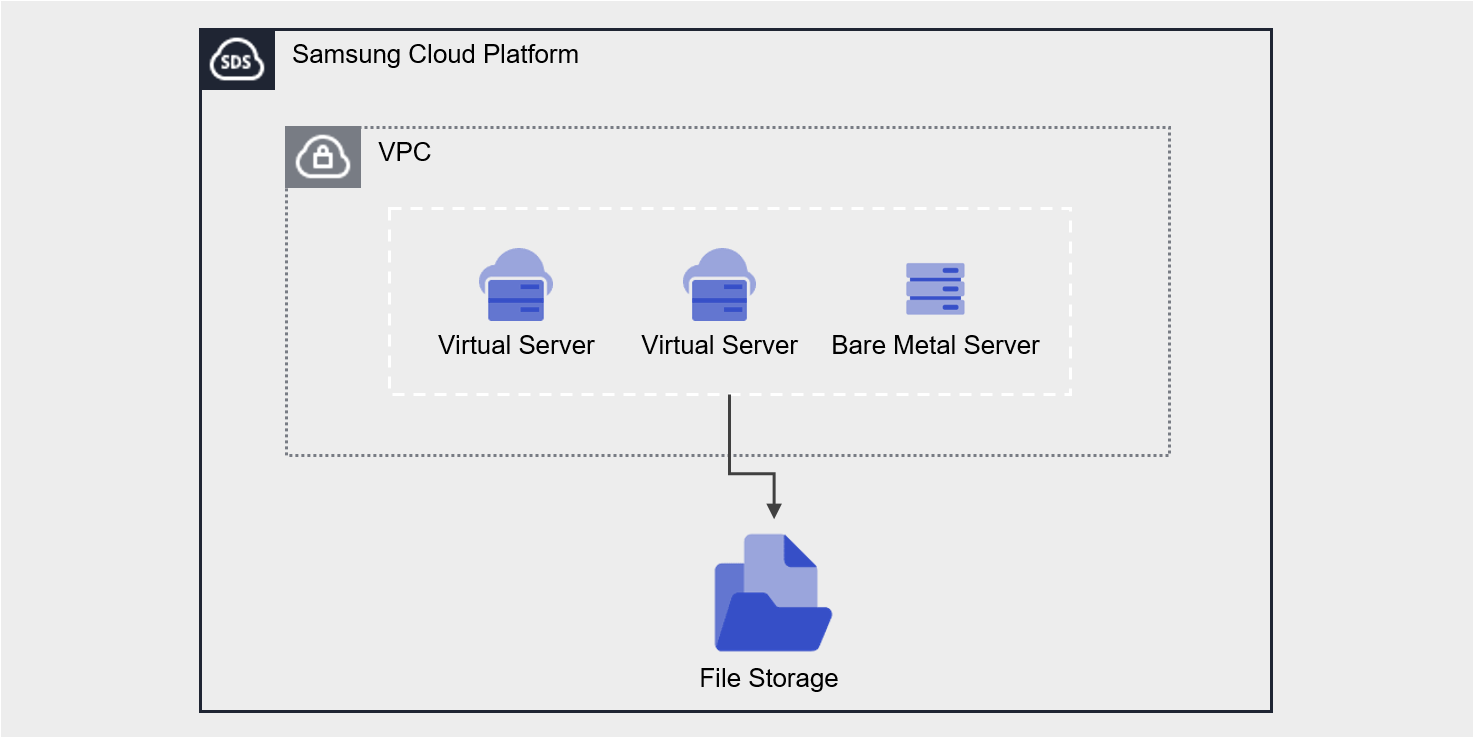
Provided features
File Storage provides the following features.
- Volume Name: You can set a name for each volume.
- Volume Type: You can select whether to enable Multi-AZ.
- Multi-AZ: Create the same volume in a different location (AZ) within the region
- Select the volume to connect to the server using Active Zone settings.
- When the Active Zone fails, it can be used with the volume replicated to the Standby Zone (with identical mount information).
- Single-AZ: Create a volume in a single location (AZ)
- Select an Availability Zone to specify the volume creation location.
- Multi-AZ: Create the same volume in a different location (AZ) within the region
- Disk Type: You can select the disk type based on performance requirements.
- HDD: General volume
- SSD: High‑performance General Volume
- High‑Performance SSD: Performance‑optimized volume that can be attached to a Multi-node GPU Cluster
- Protocol: You can select the protocol based on the user’s OS Image.
- NFS: primarily used on Linux operating systems
- CIFS: Primarily used in Windows operating systems
- Free Volume Usage: Provides flexible volume size based on stored data size without capacity settings.
- Connected Resources: Virtual Server, Bare Metal Server, GPU Server, Multi-node GPU Cluster can be connected to and used.
- Encryption: All volumes are encrypted with the XTS-AES-256 algorithm regardless of disk type.
- Snapshot: Through the image snapshot feature, you can create snapshots instantly or schedule snapshot creation.
- Retention Count: The number of snapshots retained that are automatically created by the schedule
- Schedule: Snapshot auto-creation interval
- Recovery: Recover the original volume to the latest snapshot, or select a snapshot at a specific point in time to create a recovery volume
- Replication: Replicates the volume to another location, and the user can set the replication schedule.
- Disk Backup: You can store snapshots on a backup-dedicated HDD storage and select the backup location.
- VPC Endpoint connection: File Storage can be used through a Private Network connection from an external network.
- ServiceWatch Service Integration: You can monitor data through the ServiceWatch service.
Component
You can create a volume by selecting the disk type and protocol according to the user’s service environment and performance requirements.
When using the snapshot feature, you can restore data to the desired point in time.
Volume
A volume (Volume) is the basic creation unit of the File Storage service and is used as data storage space. The user selects a name, disk type, and protocol (CIFS/NFS) to create a volume, then connects it to one or more servers for use.
The volume name creation rules are as follows.
- It must start with a lowercase English letter and can be set to 3-21 characters using lowercase letters, numbers, and special characters (
_).
Snapshot
A snapshot (Snapshot) is an image backup of a specific point in time. Using the image snapshot feature, you can recover changed or deleted data, or store snapshots in a different location from the original when performing disk backups. The user selects the snapshot created at the desired recovery point from the snapshot list and performs the recovery.
The following are considerations when using snapshots.
- The snapshot creation time is based on Asia/Seoul (GMT +09:00). Snapshots can be created up to a maximum of 800, and snapshots generated by schedule are not included. (Automatic creation via schedule is limited to a maximum of 128)
- Select the snapshot recovery button to restore the File Storage volume to the latest snapshot.
- If you select a specific snapshot from the snapshot list, you can recover by creating a new volume based on that snapshot.
- Automatic creation is possible through snapshot schedule settings.
- Since snapshot storage is included in File Storage usage and incurs charges, adjust the storage capacity by setting the snapshot retention period.
Preceding Service
This is a list of services that must be pre‑configured before creating the service. Refer to the guide provided for each service for detailed information and prepare in advance.
| Service Category | service | Detailed description |
|---|---|---|
| Compute | Virtual Server | Virtual server optimized for cloud computing |
| Compute | Bare Metal Server | High-performance physical server used without virtualization |
1.1 - Monitoring Metrics
According to Samsung Cloud Platform’s policy, the Cloud Monitoring service is scheduled to be discontinued.
Accordingly, after the September 2026 release, resource monitoring of the Samsung Cloud Platform via Cloud Monitoring will no longer be possible.
With the new alternative service, you can continuously perform resource monitoring by using ServiceWatch, released in October 2025.
ServiceWatch provides more modern and powerful features, replacing Cloud Monitoring to deliver a smooth monitoring environment.
Detailed information about ServiceWatch: see the ServiceWatch Overview.
File Storage Monitoring Metrics
The table below shows the monitoring metrics for File Storage that can be viewed in Cloud Monitoring. For detailed usage of Cloud Monitoring, refer to the Cloud Monitoring guide.
| Performance Item Name | Explanation | unit |
|---|---|---|
| Instance Status | File Storage Volume Status | status |
| Volume Used | Usage | bytes |
| Volume Usage | Utilization | % |
| Volume Total | Total byte count | bytes |
| IOPS [Total] | iops(total) | iops |
| IOPS [Read] | iops(read) | iops |
| IOPS [Write] | iops(write) | iops |
| IOPS [Other] | iops(other) | iops |
| Latency Time [Total] | Latency (total) | usec |
| Latency Time [Read] | Read latency | usec |
| Latency Time [write] | Latency (write) | usec |
| Latency Time [Other] | Latency (Other) | usec |
| Throughput [Total] | Throughput (total) | bytes/s |
| Throughput [Read] | Throughput (read) | bytes/s |
| Throughput [Write] | Throughput (write) | bytes/s |
| Throughput [Other] | Throughput (Other) | bytes/s |
1.2 - ServiceWatch Metrics
File Storage sends metrics to ServiceWatch. The metrics provided by default monitoring are data collected at 1‑minute intervals.
Basic Metrics
The following are the basic metrics for the File Storage namespace.
The indicators whose names are displayed in bold below are the indicators selected as major metrics among the basic metrics provided by File Storage. Key metrics are used to configure service dashboards that are automatically generated for each service in ServiceWatch.
Each metric indicates, via the user guide, which statistical value is meaningful when viewing that metric, and among the meaningful statistics, the values shown in bold are the primary statistics. In the service dashboard, you can view key metrics using these primary statistical values.
| Indicator Name | Detailed description | unit | Meaningful statistics |
|---|---|---|---|
| status | File storage volume status | None | - |
| total_byte | Total bytes of file storage | Bytes |
|
| iops_read | IOPS (read) | - |
|
| iops_write | IOPS (write) | - |
|
| latency_read | Read latency | Microseconds |
|
| latency_write | Latency (write) | Microseconds |
|
| throughput_read | Throughput (read) | Bytes/Second |
|
| throughput_write | Throughput (write) | Bytes/Second |
|
2 - How-to guides
Users can create a service by entering the required information for File Storage and selecting detailed options through the Samsung Cloud Platform Console.
- Service fees are charged based on usage without capacity limits.
- The volume is allocated 100 TB by default. * If you need to use more than 100 TB, please inquire through Support Center’s Contact.
- In Cost Management’s Billing Management, if you add or modify company information, the Mount name (IP information) of File Storage is automatically changed.
- Before editing company information, be sure to verify the service impact of changing the Mount name (IP information).
Create File Storage
You can create and use the File Storage service from the Samsung Cloud Platform Console.
To create a File Storage, follow these steps.
All Services > Storage > File Storage Click the menu. 1. Go to the Service Home page of File Storage.
On the Service Home page, click the Create File Storage button. 2. Go to the Create File Storage page.
File Storage Creation page: enter the information required to create the service and select detailed options.
Category required statusDetailed description Volume name Required Volume name - must start with a lowercase English letter and be entered using lowercase letters, numbers, and special characters (
_) for 3 to 21 characters
- ‘user input value+{6-character UUID composed of lowercase English letters and numbers}’ is generated
- cannot be modified after the service is created
Volume type Required Select volume type - Multi-AZ: Create an identical volume in a different location (AZ) within the region
- Select Active Zone location
- When the Active Zone fails, a volume replicated to the Standby Zone (with identical mount information) can be used
- If switched to a Standby Zone volume, volume control is unavailable from the user console
- Need to verify availability per region
- Single-AZ: Create a volume in a single location (AZ)
- When Single-AZ is selected, choose an Availability Zone location
Disk type Required Select disk type - HDD: Standard volume
- SSD: High‑performance standard volume
- High‑performance SSD: Performance‑optimized volume that can be attached to a Multi‑node GPU Cluster
- Available only in regions where high‑performance SSD equipment is installed
- Not available in Multi‑AZ
- Only the supported disk types are offered, and availability and schedule for Multi‑AZ must be inquired separately
- Cannot be modified after service creation
- When creating the service, it is set identical to the original via snapshot recovery volume creation and cannot be modified
Protocol Required Protocol for sharing volumes over the network from a server - NFS: primarily used on Linux operating systems
- CIFS: primarily used on Windows operating systems
- When creating a service, the snapshot recovery volume is set to be identical to the original and cannot be modified
Protocol > Password Required Set the account password for volume access when using the CIFS protocol - English letters, numbers, and special characters (
$%{}[]"\excluded) Enter 6 to 20 characters
Protocol > Password verification Required Confirm account password - Re-enter the password
Recovery snapshot name Selection Name of the recovery snapshot used when creating the volume - Provide the recovery snapshot name when creating a service via snapshot recovery volume creation
Table. File Storage service information input itemsCaution- Disk types and Multi-AZ availability differ by region. * If volume type is selected and disk type is not visible, please inquire about the availability of Multi-AZ or disk type in that region via Support Center’s Contact.
- must start with a lowercase English letter and be entered using lowercase letters, numbers, and special characters (
Summary Check the detailed information and estimated charges generated in the panel, and click the Create button.
When the popup notifying creation opens, click the Confirm button.
- When creation is complete, check the created resource on the File Storage List page.
- It is recommended to store up to 3.5 million files per directory within a volume. * If the number exceeds 3.5 million, performance may degrade sharply, so separate directories and manage the number of stored files.
- Disk types and Multi-AZ availability differ by region. * If volume type is selected and disk type is not visible, please inquire about the availability of Multi-AZ or disk type in that region via Support Center’s Contact.
- Regardless of disk type, all volumes have server-side encryption based on the XTS-AES-256 algorithm applied by default.
- The snapshot schedule can be set on the detail page.
File Storage Check Detailed Information
The File Storage service lets you view and edit the complete list of resources and their detailed information. The File Storage Details page consists of the Detailed Information, Snapshot List, Replication, Disk Backup, Tag, Job History tabs.
To view detailed information about the File Storage service, follow these steps.
- All Services > Storage > File Storage Click the menu. 1. Go to the Service Home page of File Storage.
- On the Service Home page, click the File Storage menu. 2. Go to the File Storage list page.
- File Storage list page, click the resource to view detailed information. 3. Go to the File Storage Details page.
- File Storage Details page displays status information and additional feature information, and consists of Details, Snapshot List, Replication, Disk Backup, Tags, Job History tabs.
Category Detailed description Volume status Volume status representation - Creating: Creating
- Creating From Snapshot: Creating a new volume from a snapshot
- Available: Creation complete, server connection available
- Deleting: Service termination in progress
- Error Deleting: Abnormal state during deletion
- Inactive: Abnormal state
- Error: Abnormal state during creation
- Migrating: Temporary maintenance state
- Migrating To: Temporary maintenance state
- Reverting: Snapshot recovery in progress
- Reverting Error: Abnormal snapshot recovery
Clone creation Create a replica in a different location - Backups and replicas cannot be used
- For detailed information on replica creation, see 복제 생성하기 refer
Create disk backup Create a backup copy to store snapshots on backup-dedicated HDD storage - HDD, SSD disk types are supported
- Up to 2 backup copies can be created
- Backup copies and replicas are not available
- For details on creating a disk backup, see 디스크 백업 생성하기
Create snapshot Immediately create a snapshot at the time of creation - For detailed information on creating snapshots, see 스냅샷 생성하기
More > Snapshot Recovery Recover the volume with the latest Available snapshot - For details on snapshot recovery, see 스냅샷 복구하기
More > File-level recovery Enable file-level recovery within snapshots - For detailed information on file-level recovery, see 파일 단위 복구 사용하기
More > Disable file-level recovery Disable file-level recovery within snapshots파일 단위 복구 해제하기 reference Service cancellation Cancel service button Table. Status information and additional features
- File Storage Details page displays status information and additional feature information, and consists of Details, Snapshot List, Replication, Disk Backup, Tags, Job History tabs.
Detailed Information
File Storage List page lets you view detailed information of the selected resource and edit the information if needed.
| Category | Detailed description |
|---|---|
| service | service name |
| Resource Type | Resource Type |
| SRN | Unique resource ID in Samsung Cloud Platform
|
| Resource name | Resource name
|
| Resource ID | Service’s unique resource ID |
| Constructor | User who created the service |
| Creation date and time | Service creation date and time |
| Volume name | Volume name |
| Category | Distinguish original status for duplication and disk backup |
| Disk type | Volume Disk Type |
| Protocol | NFS and CIFS protocols for sharing volumes over the network from a server. |
| Volume type | Volume types based on storage method
|
| Active Zone | Location of the Active volume to connect to the server among Multi-AZ volumes
|
| Availablity Zone | Volume location
|
| Usage | Volume usage |
| Encryption | Encryption status
|
| Mount information |
|
| Snapshot > Schedule | Snapshot automatic creation schedule
|
| Snapshot > Retention Count | Snapshot retention count
|
| connection resource | Connected resources (Bare Metal Server, Virtual Server, GPU Server)
|
| VPC Endpoint | Connected VPC Endpoint service
|
- When connecting a VPC Endpoint in a Multi-AZ region, once connections to all AZs are completed, the VPC Endpoint’s connection status is reported as success. If it appears as Failure or Partial Success, please check via Support Center > Contact.
Snapshot List
On the File Storage List page, you can view the snapshot of the selected resource.
| Category | Detailed description |
|---|---|
| Snapshot usage | Total size of stored snapshots |
| Snapshot name | Snapshot name |
| capacity | Snapshot capacity |
| Creation date and time | Snapshot creation time |
| status | Snapshot status
|
| Additional features > More | Snapshot Management Button
|
- The snapshot creation time is based on Asia/Seoul (GMT +09:00). Snapshots can be created up to a maximum of 800, and snapshots generated by schedule are not included. (Automatic creation via schedule is limited to a maximum of 128)
- If replication or disk backup is in use, you cannot delete the snapmirror snapshot.
- When you click the snapshot recovery button, the volume is restored to the latest snapshot in the Available state.
- When you select Create recovery volume on the snapshot list page, a new snapshot‑based volume is created without altering the existing volume.
- The snapshot list can be viewed in both the original and the backup. * The replica can be viewed after the policy is deleted.
- Snapshot creation, recovery, and recovery volume creation are available on the source.
- When using replication or disk backup, you cannot recover with a snapshot and can only create a recovery volume.
Replication
On the File Storage List page, you can view the replication information of the selected resource.
| Category | Detailed description |
|---|---|
| Replication Policy | User-configured replication policy
|
| Replication cycle | User-configured replication interval of the source
|
| Replication status | Replication progress status according to policy settings |
| Volume information | Volume information of the original and replica
|
- When creating a clone, a replica with the same disk type is created.
- Replication policy, replication schedule can be modified when the replication status in the replica is completed or stopped.
- The replica’s file-level recovery can be used when the replication status is completed or stopped.
- The replica’s connection server, VPC Endpoint can be modified when the replication status is stopped.
- The snapshot-related features of the replica can be used after the replication policy is deleted.
Disk Backup
File Storage List page lets you view the disk backup information of the selected resource.
- Disk backup is possible only from the source where the Disk type is HDD or SSD. * Cannot be used on copies or high-performance SSD.
- You can create up to two backup copies.
| Category | Detailed description |
|---|---|
| Backup Policy | Backup policy set by the user
|
| Backup frequency | User-configured backup cycle of the original
|
| Backup status | Backup progress status according to policy settings |
| Number of backup copies | Number of snapshots retained in the backup |
| Volume information | Volume information for the source and backup
|
- When creating a backup, it is created as an HDD disk type regardless of the original disk type.
- Backup Policy, Backup Schedule can be modified only when the backup status in the backup set is Completed or Stopped.
- File-level recovery of a backup can be used when the backup status is Completed or Stopped.
- The backup’s connected server, VPC Endpoint can be modified when the backup status is stopped.
- Snapshots of the backup can only be deleted.
Tag
File Storage List page lets you view the tag information of the selected resource, and you can add, modify, or delete it.
| Category | Detailed description |
|---|---|
| Tag list | Tag list
|
Operation History
On the File Storage List page, you can view the operation history of the selected resource.
| Category | Detailed description |
|---|---|
| Task History List | Resource Change History
|
File Storage Resource Management
If you need to modify the settings of the created File Storage or add or remove connected servers, you can perform the operation on the File Storage Details page.
Change account password
If you are using the CIFS protocol, you can modify the mount password. To change the password, follow these steps.
- All Services > Storage > File Storage Click the menu. 1. Go to the Service Home page of File Storage.
- On the Service Home page, click the File Storage menu. 2. Go to the File Storage list page.
- On the File Storage List page, click the CIFS resource to modify the password. 3. Navigate to the File Storage Details page.
- Click the Edit button of the Mount Secret Myeonho item. 4. Password Confirmation popup window opens.
- Enter the user password for Samsung Cloud Platform. 5. Edit Account Password popup window opens.
- After setting a new password, click the Confirm button.
Edit Snapshot
You can modify the snapshot schedule and retention count. To modify a snapshot, follow these steps.
- All Services > Storage > File Storage Click the menu. 1. Go to the Service Home page of File Storage.
- On the Service Home page, click the File Storage menu. 2. Go to the File Storage list page.
- On the File Storage list page, click the resource to edit the snapshot settings. 3. Go to the File Storage Details page.
- Click the Edit button of the snapshot item. 4. Snapshot Edit popup window opens.
- Set the usage status and schedule, retention count, then click the Confirm button.
- If you want to automatically create snapshots based on the Schedule, select Use.
- Schedule can be selected daily by hour, or weekly by day of week and hour.
- Storage count: Enter a number between 1 and 128. * If not entered, it defaults to 10.
- If the number of retained items after modification is less than before, older snapshots will be deleted first.
- When changed to unused, previously created snapshots are retained.
- Since snapshot storage is included in File Storage usage and incurs charges, adjust the storage capacity by setting the number of snapshots to retain.
- The snapshot schedule is based on Asia/Seoul (GMT +09:00).
Edit linked resources
You can connect or disconnect resources.
- You cannot edit while a connection resource modification is in progress.
- If the edit progress status remains unchanged, please contact us via Support Center’s Contact.
To modify the connection resource, follow these steps.
- All Services > Storage > File Storage Click the menu. 1. Go to the Service Home page of File Storage.
- On the Service Home page, click the File Storage menu. 2. Go to the File Storage list page.
- File Storage list page, click the resource you want to edit the linked resource. 3. Go to the File Storage Details page.
- Linked Resource item’s Edit button. 4. Connection Resource Selection popup window opens.
- After selecting or deselecting the resource, click the Confirm button.
- You can select multiple resources simultaneously.
- You can connect up to 300 resources at the same location. * If you need more than 300 connections, use the API.
- After adding a connected server, you can use it after performing the connection tasks (Mount, network drive connection) on the server. * For detailed information about server connections, see 서버 연결하기.
- The replica’s connection server can be modified only when the replication status is stopped.
- The backup’s linked server can only be modified when the backup status is stopped.
VPC Endpoint Updating
You can connect or disconnect a VPC Endpoint.
To modify the connection resource, follow these steps.
- All Services > Storage > File Storage Click the menu. 1. Go to the Service Home page of File Storage.
- On the Service Home page, click the File Storage menu. 2. Go to the File Storage list page.
- On the File Storage List page, click the resource to modify the VPC Endpoint connection. 3. Go to the File Storage Details page.
- Click the Edit button of the VPC Endpoint item. 4. VPC Endpoint selection The popup window opens.
- After selecting or deselecting the resource, click the Confirm button.
- You can select multiple resources simultaneously.
- When connecting a VPC Endpoint in a Multi-AZ region, once connections to all AZs are completed, the VPC Endpoint’s connection status is reported as success. * If it appears as Failure or Partial Success, please check via Support Center > Contact.
- Connect to the server, be sure to perform the disconnection tasks (Umount, disconnect network drive), and then release the VPC Endpoint. * If you release without OS operations, a status error (Hang) may occur on the connected server. * For detailed information on server disconnection, see 서버 연결 해제하기.
- High‑Performance SSD disk type also allows data sharing by connecting a VPC Endpoint, but be careful as it does not guarantee sufficient performance of the high‑performance SSD for internal VPC resource connections.
- high‑performance SSD disk type, after checking the connection IP in the VPC Endpoint section, apply for the VPC Endpoint service. * You can add a VPC Endpoint generated based on the connection IP.
- The replica’s connection server can be modified only when the replication status is stopped.
- The backup’s linked server can only be modified when the backup status is stopped.
Cancel File Storage
You can cancel unused File Storage to reduce operating costs. However, if you terminate the service, the running service may be discontinued immediately, so you should proceed with the termination only after fully considering the impact that may arise from the service interruption.
- Be careful, as data cannot be recovered after termination.
- Service termination is possible for File Storage volumes that have no attached resources. * After removing all connected servers, cancel the service.
- Service termination of File Storage volumes without a VPC Endpoint connection is possible. * After removing all VPC Endpoints, terminate the service.
- If the volume is in Available, Error, or Inactive state, it can be terminated.
- The source using Replication or disk backup can be terminated after deleting the policy.
- Replication policy: Pause > Delete
- Backup policy: Pause > Service termination
- A replica can be terminated after the replication policy is deleted.
- The backup can be cancelled after stopping the backup policy schedule.
To cancel File Storage, follow the steps below.
- Click the All Services > Storage > File Storage menu. 1. Go to the Service Home page of File Storage.
- On the Service Home page, click the File Storage menu. 2. Go to the File Storage list page.
- On the File Storage List page, select the resource to cancel, and click the Service Cancellation button.
- After termination is complete, check on the File Storage List page whether the resource has been terminated.
2.1 - Connect to Server
When using a volume on the server, a connect or disconnect operation is required.
File Storage Details on the page, after adding a connected server, access the server and perform the connection tasks (Mount, network drive connection). After use, perform the disconnection tasks (Umount, disconnect network drive) and then remove the connected server.
Connect to server (Mount, network drive connection)
To use the volume added to the connected server, you must log into the server and perform the connection tasks (Mount, network drive connection). Follow the steps below.
Linux operating system (NFS)
- Mount information: 10.10.10.10:/filestorage
- Mount location: /data
Click the All Services > Storage > File Storage menu. Navigate to the Service Home page of File Storage.
On the Service Home page, click the File Storage menu. You will be taken to the File Storage List page.
On the File Storage List page, click the resource to be used on the connected server. You will be taken to the File Storage Details page.
Check the server in the Connection Server item and then connect.
Refer to the procedure below to mount the volume.
Switch to root privileges
$ sudo -iPackage installation (Redhat family)
# yum install nfs-utilsPackage installation (Debian-based)
# apt-get install nfs-commonEnable and start NFS-related daemon
# systemctl enable rpcbind.service
# systemctl start rpcbind.service
Volume Mount
# mkdir /data

# mount -t nfs -o vers=3,noresvport 10.10.10.10:/filestorage /data

# vi /etc/fstab
(추가) 10.10.10.10:/filestorage /data nfs defaults,vers=3,_netdev,noresvport 0 0
- Supports NFS Version 3.
Windows operating system (CIFS)
Click the All Services > Storage > File Storage menu. Go to the Service Home page of File Storage.
On the Service Home page, click the File Storage menu. You will be taken to the File Storage list page.
On the File Storage List page, click the resource to be used on the connected server. You will be taken to the File Storage Details page.
In the Connection Server item, verify the server and then connect.
Refer to the steps below to connect the volume (network drive).
- In File Explorer, right-click This PC and click Connect network drive.
- Refer to the detailed information of the File Storage volume to be connected, enter the drive and folder, and then click Finish.
- To set it to reconnect automatically when the server restarts, select Reconnect when logging in.
In the network credential input popup, enter the account name (ID) and password, then click Confirm.
- Check the account name (ID) on the File Storage Details page.
- The password is the password set during File Storage creation.
- If you connect two or more volumes with the CIFS protocol enabled, add the storage IP and storage name to the hosts file before connecting.
* Mount명
\\10.10.10.10\filestorage1
\\10.10.10.10\filestorage2

* hosts 파일 내용 추가
10.10.10.10 filestoragename1 #설명
10.10.10.10 filestoragename2 #설명

* hosts 파일에 작성된 이름 사용
filestorage1 연결 시: \\ filestoragename1\filestorage1
filestorage2 연결 시: \\ filestoragename2\filestorage2
Disconnect server (Umount, disconnect network drive)
After connecting to the server and performing the disconnect tasks (Umount, disconnecting the network drive), you must detach the server in the Console. Follow the steps below.
Linux operating system (NFS)
Click the All Services > Storage > File Storage menu. Navigate to the Service Home page of File Storage.
On the Service Home page, click the File Storage menu. You will be taken to the File Storage List page.
On the File Storage List page, click the resource to detach the connected server. Go to the File Storage Details page.
In the Connection Server field, verify the server information and then connect to the server.
Refer to the commands listed in the table below to carry out the unmount (Umount) operation.
- Volume Umount
# umount /data

# vi /etc/fstab
(삭제) 10.10.10.10:/filestorage /data nfs defaults,vers=3,_netdev,noresvport 0 0
- Volume Umount
Windows operating system (CIFS)
- Click the All Services > Storage > File Storage menu. Navigate to the Service Home page of File Storage.
- On the Service Home page, click the File Storage menu. You will be taken to the File Storage list page.
- On the File Storage List page, click the resource to disconnect the server. Navigate to the File Storage Details page.
- In the Connection Server field, verify the server information and then connect to the server.
- Refer to the steps below to disconnect the volume (disconnect the network drive).
In
File Explorer, right-click thenetwork drivethat is already connected.Please select
Disconnect network drive
2.2 - Use Snapshot
You can create, delete, or restore snapshots of a created File Storage. You can perform these actions on the File Storage Details page and the Snapshot List page.
Create Snapshot
You can create a snapshot of the current point in time immediately. To create a snapshot, follow the steps below.
- Click the All Services > Storage > File Storage menu. Navigate to the Service Home page of File Storage.
- On the Service Home page, click the File Storage menu. You will be taken to the File Storage List page.
- File Storage List page, click the resource to create a snapshot. You will be taken to the File Storage Details page.
- Click the Snapshot Creation button. A popup indicating snapshot creation will open.
- Click the Confirm button. Creating a snapshot.
- Click the Snapshot List button. You will be taken to the File Storage Snapshot List page.
- Check the generated snapshot.
- Snapshot charges are included in the File Storage usage fees.
- When using replication or disk backup, you cannot recover with a snapshot; you can only create a recovery volume.
- The snapshot creation time is based on Asia/Seoul (GMT +09:00). Snapshots can be created up to 800, excluding those generated by schedule. (Automatic creation via schedule is limited to 128)
- If you want to automatically generate snapshots using a schedule, configure snapshots on the File Storage Details page.
- For detailed information about the snapshot schedule, see Update Snapshot.
Recover Snapshot
You can restore a File Storage volume to the latest snapshot in the Available state. To restore a snapshot, follow the steps below.
- Click the All Services > Storage > File Storage menu. Navigate to the Service Home page of File Storage.
- On the Service Home page, click the File Storage menu. You will be taken to the File Storage List page.
- On the File Storage List page, click the resource to restore from a snapshot. You will be taken to the File Storage Details page.
- Click the Snapshot List button. You will be taken to the File Storage Snapshot List page.
- Check the latest snapshot in the Available state. The volume will be restored using that snapshot.
- Click the snapshot recovery button. A popup indicating snapshot recovery will open.
- After checking the snapshot name and creation timestamp, click the Confirm button.
- When recovery starts, it becomes Reverting, and when completed, it becomes Available.
- If you want to restore from a snapshot that is not the latest, you can recover by creating a recovery volume.
- During recovery, it restores from the latest snapshot in the Available state, and recovery is not possible in the following situations.
- When the File Storage volume is not in the Available state.
- If there are no recoverable snapshots.
- If the latest snapshot changes while creating a recovery.
- If the latest snapshot is not in the Available state.
Create a snapshot recovery volume
You can create a volume using a snapshot. To create a snapshot recovery volume, follow these steps.
- Click the All Services > Storage > File Storage menu. Navigate to the Service Home page of File Storage.
- On the Service Home page, click the File Storage menu. You will be taken to the File Storage List page.
- On the File Storage List page, click the resource to restore from a snapshot. You will be taken to the File Storage Details page.
- Click the Snapshot List button. You will be taken to the File Storage Snapshot List page.
- After checking the Snapshot Name and Creation Time, click the More button of the snapshot you want to restore.
- Click Create Recovery Volume. A popup window indicating the creation of a snapshot recovery volume opens.
- Click the Confirm button. Go to the File Storage creation page.
- On the File Storage creation page, enter the information required to create the service, and select detailed options.
- Please enter the volume name and password.
- The disk type and protocol are set to match the original and cannot be modified.
Category Required or notDetailed description Volume name Required Volume name - must start with a lowercase English letter and be 3 to 21 characters using lowercase letters, numbers, and special characters (
_)
- is generated as ‘user input value + {6-character UUID composed of lowercase English letters and numbers}’
- cannot be modified after the service is created
Disk type Required Select disk type - HDD: Standard volume
- SSD: High‑performance standard volume
- Cannot be modified after service creation
- When creating a service via snapshot recovery volume, it is set identical to the original and cannot be modified
Protocol Required Protocols for sharing volumes over the network from a server - NFS: primarily used on Linux operating systems
- CIFS: primarily used on Windows operating systems
- When creating a service, the snapshot recovery volume is set identical to the original and cannot be modified
Protocol > Password Required Set the account password for volume access when using the CIFS protocol - Enter 6~20 characters, including English letters, numbers, and special characters(
$%{}[]"\excluded)
Protocol > Password Confirmation Required Confirm account password - Re-enter the same password
Recovery snapshot name Select Name of the recovery snapshot used when creating the volume - Provide the recovery snapshot name when creating a service via snapshot recovery volume creation
Table. File Storage Service Information Input Items - must start with a lowercase English letter and be 3 to 21 characters using lowercase letters, numbers, and special characters (
- Check the detailed information and estimated billing amount generated in the Summary panel, and click the Create button.
- When creation is complete, check the created resource on the File Storage List page.
Delete snapshot
You can select a snapshot to delete. To delete a snapshot, follow these steps.
- Click the All Services > Storage > File Storage menu. Navigate to the Service Home page of File Storage.
- On the Service Home page, click the File Storage menu. You will be taken to the File Storage list page.
- On the File Storage List page, click the resource to delete the snapshot. Go to the File Storage Details page.
- Click the Snapshot List button. You will be taken to the File Storage Snapshot List page.
- After checking the snapshot name and creation timestamp, click the More button of the snapshot you want to delete.
- Click the Delete button. The snapshot will be removed from the Snapshot List page.
- When using replication, snapmirror files cannot be deleted.
2.3 - File-level Recovery
You can restore data file by file using the generated snapshot. You can perform the operation on the File Storage Details page.
Using file-level recovery
You can enable the file-level recovery feature for use. After enabling the feature, connect to the server to select and recover data. To perform file-level recovery, follow these steps.
Click the All Services > Storage > File Storage menu. Navigate to the Service Home page of File Storage.
On the Service Home page, click the File Storage menu. You will be taken to the File Storage list page.
On the File Storage List page, click the resource to restore the file. You will be taken to the File Storage Details page.
Click the More button at the top right, then click the File-level Recovery button. The Enable File-level Recovery popup window opens.
Click the Confirm button. Activates the file-level recovery feature.
- When File-level recovery is enabled, the File-level recovery button is displayed as Disable file-level recovery.
In the Connection Server field, verify the server information and then connect to the server.
Refer to the procedure below to recover the data.
Connect to the server and verify the mount name of the File Storage.
Move to the snapshot location under the mount name.
# cd /Mount명/.snapshot/snapshot명- Check the files to be restored at the snapshot location and restore them to the required path.
Disable file-level recovery
You can disable the file-level recovery feature after using it. To disable file-level recovery, follow these steps.
- Click the All Services > Storage > File Storage menu. Navigate to the Service Home page of File Storage.
- On the Service Home page, click the File Storage menu. You will be taken to the File Storage list page.
- On the File Storage List page, click the resource to disable file-level recovery. You will be taken to the File Storage Details page.
- Click the More button at the top right, then click the Disable File-Level Recovery button. The Disable File-Level Recovery popup will open.
- Click the Confirm button. Disable the file-level recovery function.
2.4 - Using Disk Backup
After creating a backup of the File Storage on a dedicated backup HDD storage, you can periodically store snapshots. You can perform tasks on the File Storage Details page and the Disk Backup page.
- Disk backup is only possible from the original where the disk type is HDD or SSD. * It cannot be used on copies or high-performance SSD.
- You can create up to two backup copies.
Create Disk Backup
You can create a backup volume on the original or another backup‑only HDD storage location.
To create a backup volume, follow these steps.
- Click the All Services > Storage > File Storage menu. 1. Navigate to the Service Home page of File Storage.
- On the Service Home page, click the File Storage menu. 2. Go to the File Storage List page.
- File Storage list On the page, click the resource to create a backup. 3. Go to the File Storage Details page.
- Create Disk Backup Click the button. 4. Create Disk Backup The popup window opens.
- After entering the backup information, click the Create button. 5. Creates a backup of the HDD disk type.
- Backup Location: Select the location where the backup will be created (the same location can be selected).
- Backup Frequency: Choose from 1 hour, daily, weekly, or monthly. * Perform replication in the next cycle.
- Daily: 23:59:00
- Weekly: Every Sunday 23:59:00
- Monthly: the 1st of each month at 23:59:00
- Disk Backup Click the page. 6. Go to the Disk Backup page.
- Check the disk backup information.
- When selecting the volume name of the original or backup, you are taken to the File Storage Details page of that volume.
- A backup in HDD format is created regardless of the original disk type.
- You can create two backups per volume, and data transfer fees apply for cross‑region backups.
Edit Disk Backup Policy
You can change the backup status by modifying the backup policy. To modify the backup policy, follow the steps below.
- Click the All Services > Storage > File Storage menu. 1. Go to the Service Home page of File Storage.
- On the Service Home page, click the File Storage menu. 2. File Storage List Go to the page.
- On the File Storage List page, click the resource to modify the backup policy. 3. File Storage Details go to the page.
- Click the Disk Backup tab.
- Click the Edit button of the Backup Policy. 5. Edit Disk Backup Policy The popup window opens.
- Usage: Performs a backup. * If it is Paused, you can change it to Enabled.
- Pause: Temporarily pause the backup. * If use is the case, it can be changed to pause.
- Delete: Delete the backup. * If it is Paused, it can be changed to Delete, and after deletion you cannot use the backup again.
- Check the updated backup policy on the Disk Backup page of File Storage.
Modify disk backup schedule
You can change the synchronization interval between the original and the backup by modifying the backup schedule. To modify the backup schedule, follow these steps.
- Click the All Services > Storage > File Storage menu. 1. Go to the Service Home page of File Storage.
- On the Service Home page, click the File Storage menu. 2. Go to the File Storage list page.
- On the File Storage List page, click the resource whose backup schedule you want to modify. 3. Navigate to the File Storage Details page.
- Click the Disk Backup page.
- Click the Edit button of Backup Schedule. 5. Backup Schedule Edit popup opens.
- Backup Frequency: select from 1 hour, daily, weekly, or monthly. 6. Create snapshots on the next cycle. * Daily: Every day 23:59:00 * Weekly: Every Sunday 23:59:00 * Monthly: the 1st of each month 23:59:00
- Check the updated backup schedule on the disk backup page of File Storage.
Modify the number of retained disk backups
You can set the number of snapshots retained in the backup. To modify the number of backup copies, follow these steps.
- Click the All Services > Storage > File Storage menu. 1. Navigate to the Service Home page of File Storage.
- On the Service Home page, click the File Storage menu. 2. Go to the File Storage list page.
- On the File Storage list page, click the resource to modify the backup schedule. 3. Go to the File Storage Details page.
- Click the Disk Backup page.
- Click the Edit button of Backup retention count. 5. Edit Disk Backup Retention Count A popup window opens.
- Please enter the Backup retention count. * The number of retained items can be set from 1 to 128.
- Check the modified Backup Schedule on the Disk Backup tab of the File Storage Details page.
2.5 - Using replication
You can create a replica of File Storage at another location and synchronize it periodically. You can perform tasks on the File Storage Details page and the Replication page.
- The kr-south region does not provide File Storage replication functionality.
Create Clone
You can create a replica volume in a different location. To create a replica volume, follow these steps.
- All Services > Storage > File Storage click the menu. 1. Go to the Service Home page of File Storage.
- On the Service Home page, click the File Storage menu. 2. Go to the File Storage list page.
- File Storage list page, click the resource for which you want to create a replica. 3. Navigate to the File Storage Details page.
- Click the Create Clone button. 4. Create Clone popup window opens.
- Enter the Replication location and Replication volume name, Password, Replication schedule, and click the Create button. 6. Creates a replica with the same disk type.
- Replication Location: Select a location different from the original File Storage volume.
- Replication Volume Name: Start with a lowercase English letter and use lowercase letters, numbers, and special characters (
_) to enter 3 to 21 characters. - Password: the account password for accessing the CIFS volume. * Enter 6 to 20 characters, including English letters, numbers, and special characters (
$%{}[]"\except). - Replication interval: Select from 5 minutes, 1 hour, daily, weekly, or monthly. * Replication is performed at the intervals below.
- Daily: daily 23:59:00
- Weekly: Every Sunday 23:59:00
- Monthly: the 1st of each month at 23:59:00
- Click the Clone page. 7. Go to the Clone page.
- Check the replication information.
- When selecting the volume name of the source or replica, you are taken to the volume’s File Storage Details page.
- When creating a replica, a copy with the same disk type and protocol is generated.
- One replica can be created per volume, and data transfer charges apply for cross‑region replication.
Edit Replication Policy
You can change the replication status by modifying the replication policy.
- You cannot modify the replication policy while replication is in progress. * Refresh the screen to verify the replication status again.
- If the replication policy is stopped or the replication status is completed, you can modify the replication policy on the replica.
- All Services > Storage > File Storage Click the menu. 1. Navigate to the Service Home page of File Storage.
- On the Service Home page, click the File Storage menu. 2. Go to the File Storage list page.
- On the File Storage List page, click the resource to edit the replication policy. 3. Go to the File Storage Details page.
- Click the Copy page. 4. File Storage Replication Navigate to the page.
- Click the Edit button of the Replication Policy. 5. Edit Replication Policy The popup window opens.
- Usage: Performs replication. * If it is Paused, you can change it to Enabled.
- Pause: Temporarily stops replication. * If Use is selected, it can be changed to Pause.
- Delete: Delete the replica. * If it is Paused, it can be changed to Delete, and after deletion you cannot use replication again.
- On the File Storage Replication page, check the updated Replication Policy.
- After deletion, the replica becomes the original, so you cannot re‑replicate to the previous configuration by modifying the replication policy.
- After Pause, data stored only in the replica will be deleted when replication is used again.
- When using the replication policy, replicas become read-only and cannot modify data, so unmount from all connected resources before using replication.
Modify replication interval
You can change the synchronization interval between the primary and replica by modifying the replication interval.
- You cannot modify the replication interval while replication is in progress. * Refresh the page to verify the replication status again.
- If the replication policy is stopped or the replication status is completed, you can modify the replication interval on the replica.
- All Services > Storage > File Storage Click the menu. 1. Navigate to the Service Home page of File Storage.
- On the Service Home page, click the File Storage menu. 2. Go to the File Storage list page.
- On the File Storage list page, click the resource to modify the replication schedule. 3. File Storage Details navigate to the page.
- Click the Copy page. 4. File Storage Replication Navigate to the page.
- Click the Edit button of the Replication Cycle. 5. Edit Replication Cycle The popup window opens.
- Replication interval: Choose from 5 minutes, 1 hour, daily, weekly, monthly. * Replication is performed at the intervals below.
- Daily: Every day 23:59:00
- Weekly: Every Sunday 23:59:00
- Monthly: the 1st of each month at 23:59:00
- Replication interval: Choose from 5 minutes, 1 hour, daily, weekly, monthly. * Replication is performed at the intervals below.
- On the File Storage Replication page, check the updated Replication Interval.
3 - API Reference
4 - CLI Reference
5 - Release Note
File Storage
- When creating File Storage, you can select the volume type (Single-AZ/Multi-AZ) and create it.
- Single-AZ: You can select an Availability Zone.
- Multi-AZ: You can select the Active Zone.
- Even after creating a File Storage, you can change the account password for the CIFS protocol on the detail page.
- The SSD SAP_E, SSD SAP_E disk type, a volume dedicated to SAP Account, has been added.
- When using a volume dedicated to the SAP Account, the LIF (storage Mount IP) is automatically transferred when a failover occurs due to a fault.
- It can be used only with a SAP account.
- ServiceWatch service integration provision
- You can monitor data through the ServiceWatch service.
- High-performance SSD disk type has been added and can be used by connecting to a Multi-node GPU Cluster.
- Disk Backup allows you to store snapshots on a backup-dedicated HDD storage. * You can select a location other than the original location.
- File Storage feature change
- SSD disk types have been added, allowing you to select a disk type based on your purpose.
- You can create an identical replica volume at a different location and set the data replication schedule.
- File Storage can be used from external networks via a VPC Endpoint connection.
- Samsung Cloud Platform Common Feature Change
- Account, IAM, and Service Home, tags, etc., have been updated to reflect common CX changes.
- Since it automatically scales up or down based on usage, users can use the volume without capacity limits.
- You can select the connection target using the access control feature.
- We have launched the File Storage service, a storage solution that enables multiple client servers to share files over a network connection.