How-to Guides
A user can create the service by entering the required information for Block Storage(BM) and selecting detailed options through the Samsung Cloud Platform Console.
Create Block Storage(BM)
You can create and use the Block Storage (BM) service in the Samsung Cloud Platform Console.
To create Block Storage (BM), follow the steps below.
All Services > Storage > Block Storage(BM) Click the menu. 1. Go to the Service Home page of Block Storage (BM).
On the Service Home page, click the Create Block Storage (BM) button. 2. Navigate to the Block Storage(BM) Creation page.
On the Block Storage(BM) Creation page, enter the information required to create the service and select detailed options.
| Category | Required | Detailed description |
|---|
| Volume name | Required | Volume name- must start with an English letter and be entered using English letters, numbers, and special characters (
-) for 3~28 characters
- cannot be modified after service creation
|
| Disk type | Required | Select disk type- SSD: High-performance general volume
- Cannot be modified after service creation
|
| capacity | Required | Capacity setting- Enter a number between 1~16,384GB
- Cannot be modified after service creation
|
| Max IOPS | Required | Enter the IOPS value- Enter a number between 5,000~20,000
- HDD type does not provide performance metric configuration functionality
|
| Max Throughput | Essential | Enter the throughput speed (MB/s)- Enter a number between 250~1,000
- HDD type does not provide performance metric setting functionality
|
| Availability Zone | Required | Select the Availability Zone to create resources within the region- If you change the Availability Zone while a connection server has been added, the selected connection server will be reset
|
| Connection server | Required | Select Bare Metal Server connection- Provide up to 8 Bare Metal Server connections
- No limit on the number of volumes that can be attached to a Bare Metal Server
|
Table. Block Storage(BM) Service Information Input Items
Summary Check the detailed information and estimated billing amount generated in the panel, and click the Create button.
When the popup indicating creation opens, click the Confirm button.
- Once creation is complete, check the created resources on the Block Storage(BM) List page.
Reference
- You can only attach a volume to a Bare Metal Server in the same Availability Zone.
- Regardless of disk type, all volumes have server-side encryption based on the AES-256 algorithm applied by default.
- The snapshot schedule can be set on the details page.
- The performance metrics (IOPS, Throughput) of the configured storage are based on maximum values and do not guarantee consistent values.
Caution
Capacity can be expanded only for the original volume that does not use the snapshot feature. For volumes that use snapshots, add the volume to the connected server to secure capacity.
Volumes created by the user in addition to the OS default volume must be configured with iSCSI.
After checking the IP provided in the iSCSI information on the Block Storage (BM) Details page, follow the iSCSI configuration steps for each OS.
Linux operating system
Information
The iSCSI information (Storage Target IP) is assumed to be 10.40.40.41, 10.40.40.42.
- Check the iSCSI information on the Block Storage (BM) detail page.
- Click the All Services > Storage > Block Storage(BM) menu. 1. Go to the Service Home page of Block Storage (BM).
- On the Service Home page, click the Block Storage(BM) menu. 2. Block Storage(BM) List Navigate to the page.
- On the Block Storage(BM) List page, click the resource to be used on the connected server. 3. Block Storage(BM) Details Navigate to the page.
- After verifying the server in the Connection Server item, connect.
- Refer to the procedure below to set up iSCSI.
- Discover the connection information for Storage (target IP).
[root@localhost ~]# iscsiadm -m discovery -t st -p 10.40.40.41
10.40.40.41:3260,1024 iqn.2000-05.com.3pardata:20210002ac026169

[root@localhost ~]# iscsiadm -m discovery -t st -p 10.40.40.42
10.40.40.42:3260,1025 iqn.2000-05.com.3pardata:20220002ac026169
[root@localhost ~]# iscsiadm -m discovery -t st -p 10.40.40.41
10.40.40.41:3260,1024 iqn.2000-05.com.3pardata:20210002ac026169

[root@localhost ~]# iscsiadm -m discovery -t st -p 10.40.40.42
10.40.40.42:3260,1025 iqn.2000-05.com.3pardata:20220002ac026169
- Connect to the Storage (target IP). * If it is already connected, proceed to the next step.
[root@localhost ~]# iscsiadm -m node -p 10.40.40.41:3260 --login
Logging in to [iface: default, target: iqn.2000-05.com.3pardata:20210002ac026169, portal: 10.40.40.41,3260] (multiple)
Logging in to [iface: default, target: iqn.2000-05.com.3pardata:20210002ac026169, portal: 10.40.40.41,3260] (multiple)
Login to [iface: default, target: iqn.2000-05.com.3pardata:20210002ac026169, portal: 10.40.40.41,3260] successful.
Login to [iface: default, target: iqn.2000-05.com.3pardata:20210002ac026169, portal: 10.40.40.41,3260] successful

[root@localhost ~]# iscsiadm -m node -p 10.40.40.42:3260 --login
Logging in to [iface: default, target: iqn.2000-05.com.3pardata:20220002ac026169, portal: 10.40.40.42,3260] (multiple)
Logging in to [iface: default, target: iqn.2000-05.com.3pardata:20220002ac026169, portal: 10.40.40.42,3260] (multiple)
Login to [iface: default, target: iqn.2000-05.com.3pardata:20220002ac026169, portal: 10.40.40.42,3260] successful.
Login to [iface: default, target: iqn.2000-05.com.3pardata:20220002ac026169, portal: 10.40.40.42,3260] successful.
[root@localhost ~]# iscsiadm -m node -p 10.40.40.41:3260 --login
Logging in to [iface: default, target: iqn.2000-05.com.3pardata:20210002ac026169, portal: 10.40.40.41,3260] (multiple)
Logging in to [iface: default, target: iqn.2000-05.com.3pardata:20210002ac026169, portal: 10.40.40.41,3260] (multiple)
Login to [iface: default, target: iqn.2000-05.com.3pardata:20210002ac026169, portal: 10.40.40.41,3260] successful.
Login to [iface: default, target: iqn.2000-05.com.3pardata:20210002ac026169, portal: 10.40.40.41,3260] successful

[root@localhost ~]# iscsiadm -m node -p 10.40.40.42:3260 --login
Logging in to [iface: default, target: iqn.2000-05.com.3pardata:20220002ac026169, portal: 10.40.40.42,3260] (multiple)
Logging in to [iface: default, target: iqn.2000-05.com.3pardata:20220002ac026169, portal: 10.40.40.42,3260] (multiple)
Login to [iface: default, target: iqn.2000-05.com.3pardata:20220002ac026169, portal: 10.40.40.42,3260] successful.
Login to [iface: default, target: iqn.2000-05.com.3pardata:20220002ac026169, portal: 10.40.40.42,3260] successful.
- Delete all unused Storage (target IP) to minimize search time.
[root@localhost ~]# iscsiadm -m node show
100.100.100.10:3260,1026 iqn.1992-08.com.netapp:sn.c9adbd09cf301d039ea2bc878:vs.3
10.40.40.41:3260,1024 iqn.2000-05.com.3pardata:20210002ac026169
10.40.40.42:3260,1025 iqn.2000-05.com.3pardata:20220002ac026169

[root@localhost ~]# iscsiadm -m node -o delete -p 100.100.100.10:3260
[root@localhost ~]# iscsiadm -m node show
100.100.100.10:3260,1026 iqn.1992-08.com.netapp:sn.c9adbd09cf301d039ea2bc878:vs.3
10.40.40.41:3260,1024 iqn.2000-05.com.3pardata:20210002ac026169
10.40.40.42:3260,1025 iqn.2000-05.com.3pardata:20220002ac026169

[root@localhost ~]# iscsiadm -m node -o delete -p 100.100.100.10:3260
- Rescan to check the added Disk.
[root@localhost ~]# iscsiadm -m session --rescan
Rescanning session [sid: 65, target: iqn.2000-05.com.3pardata:20210002ac026169, portal: 10.40.40.41,3260]
Rescanning session [sid: 66, target: iqn.2000-05.com.3pardata:20210002ac026169, portal: 10.40.40.41,3260]
Rescanning session [sid: 67, target: iqn.2000-05.com.3pardata:20220002ac026169, portal: 10.40.40.42,3260]
Rescanning session [sid: 68, target: iqn.2000-05.com.3pardata:20220002ac026169, portal: 10.40.40.42,3260]
[root@localhost ~]# iscsiadm -m session --rescan
Rescanning session [sid: 65, target: iqn.2000-05.com.3pardata:20210002ac026169, portal: 10.40.40.41,3260]
Rescanning session [sid: 66, target: iqn.2000-05.com.3pardata:20210002ac026169, portal: 10.40.40.41,3260]
Rescanning session [sid: 67, target: iqn.2000-05.com.3pardata:20220002ac026169, portal: 10.40.40.42,3260]
Rescanning session [sid: 68, target: iqn.2000-05.com.3pardata:20220002ac026169, portal: 10.40.40.42,3260]
- Set Auto Login so that you are logged in automatically even after a reboot.
[root@localhost ~]# iscsiadm -m node --op=update -n node.conn[0].startup -v automatic
[root@localhost ~]# iscsiadm -m node --op=update -n node.startup -v automatic
[root@localhost ~]# iscsiadm -m node --op=update -n node.conn[0].startup -v automatic
[root@localhost ~]# iscsiadm -m node --op=update -n node.startup -v automatic
- Verify the configuration using the following command.
[root@localhost ~]# lsblk
[root@localhost ~]# lsblk
Windows operating system
information
The iSCSI information (Storage Target IP) is assumed to be 10.40.40.41, 10.40.40.42.
- Check the iSCSI information on the Block Storage(BM) details page.
- All Services > Storage > Block Storage(BM) Click the menu. 1. Go to the Service Home page of Block Storage (BM).
- On the Service Home page, click the Block Storage(BM) menu. 2. Block Storage(BM) List Go to the page.
- On the Block Storage(BM) List page, click the resource to be used on the connected server. 3. Block Storage(BM) Details Go to the page.
- Connection Server item, check the server and then connect.
- Proceed with iSCSI configuration by referring to the following procedure.
- Open Command Prompt (Admin) and run powershell.
Windows PowerShell
Copyright (C) Microsoft Corporation. All rights reserved.

PS C:\Users> cd ..
PS C:\>
Windows PowerShell
Copyright (C) Microsoft Corporation. All rights reserved.

PS C:\Users> cd ..
PS C:\>
- Start the volume service.
PS C:\> Set-Service -Name MSiSCSI -StartupType Automatic
PS C:\> Start-Service -Name MSiSCSI
PS C:\> get-service -Name MSiSCSI |  select -Property Name, DisplayName, Status, StartType

Name       DisplayName                           Status    StartType
-------    --------------                        -------   -----------
MSiSCSI    Microsoft iSCSI Initiator Service     Running   Automatic
PS C:\> Set-Service -Name MSiSCSI -StartupType Automatic
PS C:\> Start-Service -Name MSiSCSI
PS C:\> get-service -Name MSiSCSI |  select -Property Name, DisplayName, Status, StartType

Name       DisplayName                           Status    StartType
-------    --------------                        -------   -----------
MSiSCSI    Microsoft iSCSI Initiator Service     Running   Automatic
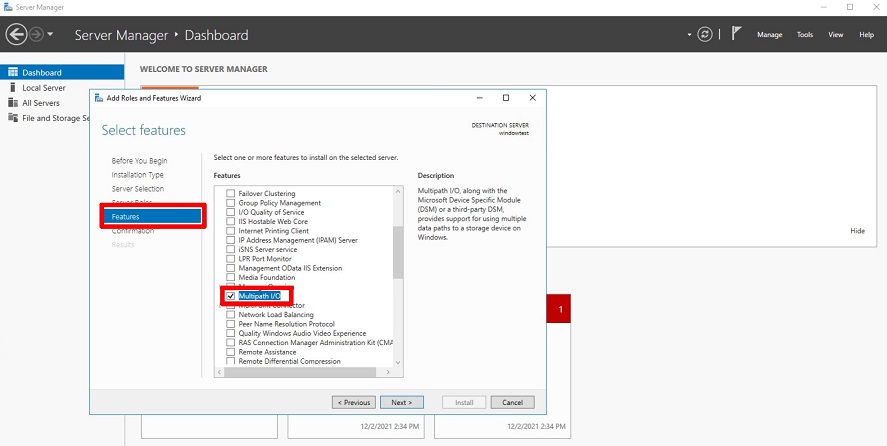
- Install Multipath I/O. * If the Restart Needed item is set to Yes, a restart is required.
PS C:\> Install-WindowsFeature -name Multipath-IO

Success   Restart Needed   Exit Code   Feature Result
-------   --------------   ---------   -----------------
True      No               Success     {Multipath I/O}
PS C:\> Install-WindowsFeature -name Multipath-IO

Success   Restart Needed   Exit Code   Feature Result
-------   --------------   ---------   -----------------
True      No               Success     {Multipath I/O}
- Modify the Initiator Port Address. *
If you are not an Active Directory member, skip this procedure. The Initiator Port Address needs to be modified only when it is an Active Directory member.
- The iqn is generated based on the hostname, but when joined to Active Directory, it changes to DNS format.
Since it is registered in Storage based on the default hostname, for iqn.1991-05.com.microsoft:iqn01.scp.com, iqn01 is the hostname. Remove the DNS information and change it to the name registered when creating the OS from the user Console, such as iqn.1991-05.com.microsoft:iqn01.
- If you are not an AD member, no changes are required.
PS C:\> $address = (Get-InitiatorPort | select NodeAddress)
PS C:\> echo $address
NodeAddress
-----------
iqn.1991-05.com.microsoft:iqn01.scp.com

PS C:\> Set-InitiatorPort -NodeAddress $address.NodeAddress -NewNodeAddress "iqn.1991-05.com.microsoft:iqn01"
PS C:\> Get-InitiatorPort | select NodeAddress
NodeAddress
-----------
iqn.1991-05.com.microsoft:iqn01
PS C:\> $address = (Get-InitiatorPort | select NodeAddress)
PS C:\> echo $address
NodeAddress
-----------
iqn.1991-05.com.microsoft:iqn01.scp.com

PS C:\> Set-InitiatorPort -NodeAddress $address.NodeAddress -NewNodeAddress "iqn.1991-05.com.microsoft:iqn01"
PS C:\> Get-InitiatorPort | select NodeAddress
NodeAddress
-----------
iqn.1991-05.com.microsoft:iqn01
- Set the Storage (target Portal) address as a variable.
PS C:\> $TargetPortalAddresses = @("10.40.40.41", "10.40.40.42")
PS C:\> $TargetPortalAddresses = @("10.40.40.41", "10.40.40.42")
- Discover the Storage (target Portal).
PS C:\> Foreach ($TargetPortalAddress in $TargetPortalAddresses){
    New-IscsiTargetPortal -TargetPortalAddress $TargetPortalAddress
}
InitiatorInstanceName   :
InitiatorPortalAddress  :
IsDataDigest            : False
IsHeaderDigest          : False
TargetPortalAddress     : 10.40.40.41
TargetPortalPortNumber  : 3260
PSComputerName          :

InitiatorInstanceName   :
InitiatorPortalAddress  :
IsDataDigest            : False
IsHeaderDigest          : False
TargetPortalAddress     : 10.40.40.42
TargetPortalPortNumber  : 3260
PSComputerName          :
PS C:\> Foreach ($TargetPortalAddress in $TargetPortalAddresses){
    New-IscsiTargetPortal -TargetPortalAddress $TargetPortalAddress
}
InitiatorInstanceName   :
InitiatorPortalAddress  :
IsDataDigest            : False
IsHeaderDigest          : False
TargetPortalAddress     : 10.40.40.41
TargetPortalPortNumber  : 3260
PSComputerName          :

InitiatorInstanceName   :
InitiatorPortalAddress  :
IsDataDigest            : False
IsHeaderDigest          : False
TargetPortalAddress     : 10.40.40.42
TargetPortalPortNumber  : 3260
PSComputerName          :
- Connect the disk (target).
PS C:\> Foreach ($TargetPortalAddress in $TargetPortalAddresses){
    Get-IscsiTarget | Connect-IscsiTarget -IsMultipathEnabled $true -IsPersistent $true -TargetPortalAddress $TargetPortalAddress
}
AuthenticationType      : NONE
InitiatorInstanceName   : ROOT\ISCSIPRT\0000_0
InitiatorNodeAddress    : iqn.1991-05.com.microsoft:iqn01
InitiatorPortalAddress  : 0.0.0.0
InitiatorSideIdentifier : 400001370000
IsConnected             : True
IsDataDigest            : False
IsDiscovered            : True
IsHeaderDigest          : False
IsPersistent            : True
NumberOfConnections     : 1
SessionIdentifier       : ffffcd0b7ba58010-4000013700000006
TargetNodeAddress       : iqn.1992-08.com.netapp:sn.f807925eeae311ec9270d039ea38b250:vs.3
TargetSideIdentifier    : 1100
PSComputerName          :

AuthenticationType      : NONE
InitiatorInstanceName   : ROOT\ISCSIPRT\0000_0
InitiatorNodeAddress    : iqn.1991-05.com.microsoft:iqn01
InitiatorPortalAddress  : 0.0.0.0
InitiatorSideIdentifier : 400001370002
IsConnected             : True
IsDataDigest            : False
IsDiscovered            : True
IsHeaderDigest          : False
IsPersistent            : True
NumberOfConnections     : 1
SessionIdentifier       : ffffcd0b7ba58010-4000013700000007
TargetNodeAddress       : iqn.1992-08.com.netapp:sn.f807925eeae311ec9270d039ea38b250:vs.3
TargetSideIdentifier    : 1000
PSComputerName          :IsHeaderDigest         : False
TargetPortalAddress     : 10.40.40.42
TargetPortalPortNumber  : 3260
PSComputerName          :
PS C:\> Foreach ($TargetPortalAddress in $TargetPortalAddresses){
    Get-IscsiTarget | Connect-IscsiTarget -IsMultipathEnabled $true -IsPersistent $true -TargetPortalAddress $TargetPortalAddress
}
AuthenticationType      : NONE
InitiatorInstanceName   : ROOT\ISCSIPRT\0000_0
InitiatorNodeAddress    : iqn.1991-05.com.microsoft:iqn01
InitiatorPortalAddress  : 0.0.0.0
InitiatorSideIdentifier : 400001370000
IsConnected             : True
IsDataDigest            : False
IsDiscovered            : True
IsHeaderDigest          : False
IsPersistent            : True
NumberOfConnections     : 1
SessionIdentifier       : ffffcd0b7ba58010-4000013700000006
TargetNodeAddress       : iqn.1992-08.com.netapp:sn.f807925eeae311ec9270d039ea38b250:vs.3
TargetSideIdentifier    : 1100
PSComputerName          :

AuthenticationType      : NONE
InitiatorInstanceName   : ROOT\ISCSIPRT\0000_0
InitiatorNodeAddress    : iqn.1991-05.com.microsoft:iqn01
InitiatorPortalAddress  : 0.0.0.0
InitiatorSideIdentifier : 400001370002
IsConnected             : True
IsDataDigest            : False
IsDiscovered            : True
IsHeaderDigest          : False
IsPersistent            : True
NumberOfConnections     : 1
SessionIdentifier       : ffffcd0b7ba58010-4000013700000007
TargetNodeAddress       : iqn.1992-08.com.netapp:sn.f807925eeae311ec9270d039ea38b250:vs.3
TargetSideIdentifier    : 1000
PSComputerName          :IsHeaderDigest         : False
TargetPortalAddress     : 10.40.40.42
TargetPortalPortNumber  : 3260
PSComputerName          :
- Refresh the Storage (target) information.
PS C:\> Update-IscsiTarget
PS C:\> Update-IscsiTarget
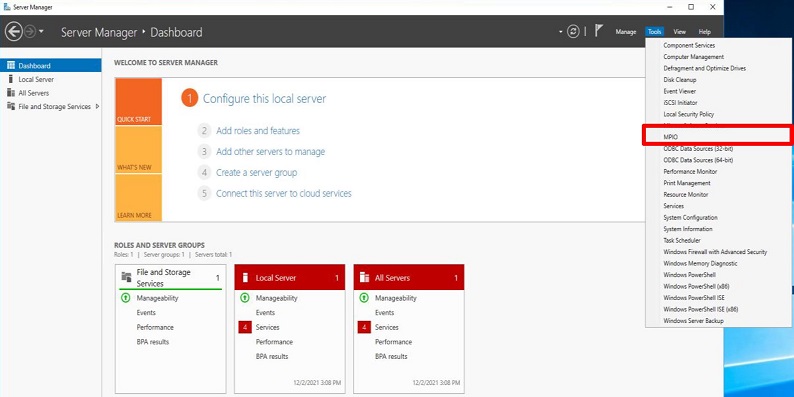
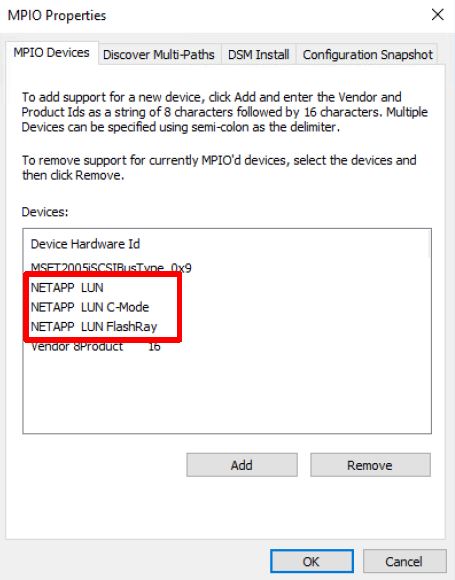
- Register the Multipath I/O DSM and create an MPIO Disk. *
Inquiries occur when a reboot is required during MPIO disk creation. Press Y or the Enter key to reboot.PS C:\> New-MSDSMSupportedHW -VendorId MSFT2005 -ProductId iSCSIBusType_0x9
PS C:\> Update-MPIOClaimedHW
Confirm
Are you sure you want to perform this action?
The operation may require a system restart.
[Y] Yes [A] Yes to All [N] No [L] No to All [S] Suspend [?] Help (default is "Y"):
False
PS C:\> New-MSDSMSupportedHW -VendorId MSFT2005 -ProductId iSCSIBusType_0x9
PS C:\> Update-MPIOClaimedHW

Confirm
Are you sure you want to perform this action?
The operation may require a system restart.
[Y] Yes  [A] Yes to All  [N] No  [L] No to All  [S] Suspend  [?] Help (default is "Y"):
False
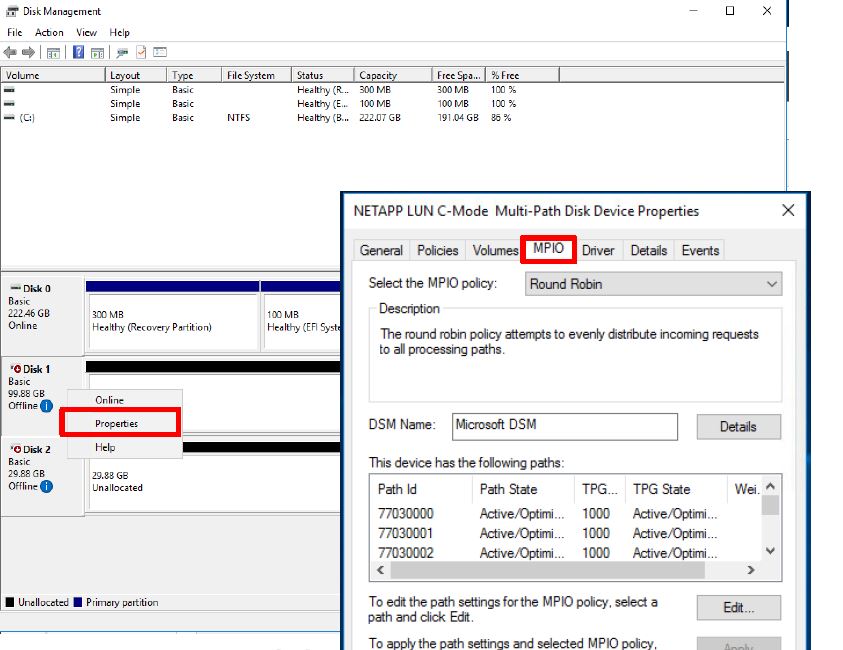
- Check the list and path of Multipath I/O Disks. *
You can view MPIO disk information using the mpclaim.exe command. Enter the generated MPIO disk number to view the disk path and status.PS C:\> mpclaim.exe -s -d
For more information about a particular disk, use 'mpclaim -s -d #' where # is the MPIO disk number.
MPIO Disk System Disk LB Policy DSM Name
-------------------------------------------------------------------------------
MPIO Disk3 Disk 1 RR Microsoft DSM
PS C:\> mpclaim.exe -s -d 3
MPIO Disk3: 02 Paths, Round Robin, Symmetric Access
Controlling DSM: Microsoft DSM
SN: 600A098038314853475D543544614131
Supported Load Balance Policies: FOO RR RRWS LQD WP LB
Path ID State SCSI Address Weight
---------------------------------------------------------------------------
0000000077040001 Active/Optimized 004|000|001|000 0
TPG_State : Active/Optimized , TPG_Id: 1000, : 25
0000000077040000 Active/Optimized 004|000|000|000 0
TPG_State : Active/Optimized , TPG_Id: 1001, : 26
PS C:\> mpclaim.exe -s -d
For more information about a particular disk, use 'mpclaim -s -d #' where # is the MPIO disk number.

MPIO Disk    System Disk  LB Policy    DSM Name
-------------------------------------------------------------------------------
MPIO Disk3   Disk 1       RR           Microsoft DSM

PS C:\> mpclaim.exe -s -d 3
MPIO Disk3: 02 Paths, Round Robin, Symmetric Access
    Controlling DSM: Microsoft DSM
    SN: 600A098038314853475D543544614131
    Supported Load Balance Policies: FOO RR RRWS LQD WP LB

    Path ID          State              SCSI Address      Weight
    ---------------------------------------------------------------------------
    0000000077040001 Active/Optimized   004|000|001|000   0
        TPG_State : Active/Optimized  , TPG_Id: 1000, : 25

    0000000077040000 Active/Optimized   004|000|000|000   0
        TPG_State : Active/Optimized  , TPG_Id: 1001, : 26
- Check in Disk Management.
Block Storage(BM) Check detailed information
Block Storage(BM) service allows you to view and edit the full resource list and detailed information. Block Storage(BM) Details page consists of the Detailed Information, Snapshot List, Replication, Operation History tabs.
To view detailed information about the Block Storage(BM) service, follow these steps.
- Click the All Services > Storage > Block Storage(BM) menu. 1. Go to the Service Home page of Block Storage (BM).
- On the Service Home page, click the Block Storage(BM) menu. 2. Go to the Block Storage(BM) List page.
- On the Block Storage(BM) List page, click the resource to view detailed information. 3. Block Storage(BM) Details Navigate to the page.
- The Block Storage(BM) Details page displays status information and additional feature information, and consists of Details, Snapshot List, Replication, Tags, Operation History tabs.
| Category | Detailed description |
|---|
| Volume status | 볼륨의 상태- Available: Creation complete, server connection available
- Attaching: Connecting to server
- Detaching: Disconnecting from server
- In Use: Server connection established
- Deleting: Service termination in progress
- Editing: Changing settings
- Error Deleting: Abnormal state during deletion
- Error: Abnormal state during creation
|
| Clone creation | Create a replica in a different location- For detailed information on creating a replica, see 복제 생성하기
|
| Create snapshot | Create a snapshot at a specific point in time- For detailed information on snapshot creation, see 스냅샷 생성하기
|
| Service cancellation | Button to cancel the service |
Table. Status information and additional features
Reference
In the case of a recovery copy, snapshot list, replication tabs are not displayed.
Detailed Information
Block Storage(BM) List page allows you to view detailed information of the selected resource and, if necessary, edit the information.
| Category | Detailed description |
|---|
| Service | Service name |
| Resource Type | Resource Type |
| SRN | Unique resource ID in Samsung Cloud Platform- In the Block Storage(BM) service, it refers to the volume SRN
|
| Resource Name | Resource name- In the Block Storage(BM) service, it means the volume name
|
| Resource ID | Service’s unique resource ID |
| Constructor | User who created the service |
| Creation date and time | Service creation date and time |
| Modifier | User who modified the service |
| Modification date and time | Service modification date and time |
| Volume name | Volume name- If you need to edit the volume name, click the Edit button
- For detailed information on editing the volume name, refer to 볼륨명 수정하기
|
| Category | Distinguish original status related to duplication |
| Availability Zone | Availability Zone information |
| Storage volume name | Volume name within the storage device- Information distinguishing the volume used for analysis when failures or issues occur
|
| capacity | Volume capacity- If you need to edit the volume name, click the Edit button
- For more information on capacity resizing, refer to 용량 수정하기
|
| Max IOPS | The IOPS value set when creating the service- HDD type does not provide this metric
- Edit button to change the maximum IOPS value
|
| Max Throughput | Throughput speed (MB/s) set when creating the service- HDD type does not provide this metric
- Edit button can be clicked to change the maximum Throughput value
|
| Disk type | Disk type |
| Encryption | Encryption status- Encryption provided by default regardless of disk type
|
| Volume Group | Name of the Volume Group that the volume belongs to |
| iSCSI information | Storage Target IP information for server connection |
| Snapshot capacity | Snapshot storage capacity- Charges are incurred based on the configured capacity
- If you need to set the snapshot capacity, click the edit button
|
| Snapshot schedule | Snapshot auto-creation interval- Schedule can be registered after setting snapshot capacity
- Click the edit button if a snapshot schedule needs to be set
- For detailed information about the snapshot schedule, see 스냅샷 스케줄 수정하기
|
| Recovery copy | Snapshot name- Displayed when a snapshot exists
- Click the name to go to the snapshot’s detail page
- For details on creating a snapshot, refer to 복구본 생성하기
|
| Connection server | Connected Bare Metal Server- When adding a Bare Metal Server connection, click the Add button
- When removing a Bare Metal Server connection, click the Disconnect button
- For detailed information about the connected server, refer to 연결 서버 수정하기
|
Table. Block Storage(BM) Detailed Information Items
Reference
For volumes created before December 18, 2025, IOPS and Throughput information is not displayed.
Snapshot List
Block Storage(BM) List page lets you view the snapshot of the selected resource.
| Category | Detailed description |
|---|
| Snapshot usage | Total size of stored snapshots |
| Snapshot name | Snapshot name |
| capacity | Snapshot capacity |
| Creation date and time | Snapshot creation time |
| Additional features > More | Snapshot management button- Restore: Recover volume from snapshot
- For details on snapshot restoration, see 스냅샷 복구하기
- Create restore point: Create a restore point from a snapshot
- For details on creating a restore point, see 복구본 생성하기
- Delete: Delete snapshot
- For details on deleting a snapshot, see 스냅샷 삭제하기
|
| Delete | Select the snapshots to delete from the snapshot list and delete them all at once. |
Table. Snapshot list tab detailed information items
Warning
- If the maximum number of snapshots or the snapshot space threshold (around 90%) is exceeded, older snapshots are deleted first.
- If the snapshot capacity usage is high (around 90%), replication may be stopped.
- Snapshots can be created up to a maximum of 1,023 (with up to 128 automatically generated via schedule), and if the maximum number is exceeded, no further snapshots can be created.
- Snapshot recovery must be performed while all connected servers are disconnected (Umount, Disk Offline), and the recovered volume can be used after it is reconnected (Mount, Disk Online).
- Only one recovery copy can be created, and it is a separate volume that incurs the same charges as the original.
Reference
- The snapshot creation time is based on Asia/Seoul (GMT +09:00).
- When using replication, snapmirror files cannot be deleted.
- When using a Volume Group, set the snapshot schedule on the Volume Group (BM) detail information screen. * The created snapshot can be viewed in the Block Storage (BM) snapshot list.
Replication
On the Block Storage(BM) List page, you can view the replication information of the selected resource.
| Category | Detailed description |
|---|
| Replication Policy | User-configured replication policy- For detailed information on modifying the replication policy, see 복제 정책 수정하기
|
| Replication cycle | User-configured replication interval of the source- For details on updating the replication interval, see 복제 주기 수정하기
|
| Replication status | Replication progress status based on policy settings |
| Lag Time | Time elapsed since the last successful replication- Available for verification after the replica is created
|
| Volume information | Volume information for the source and replica- Distinction: Indicates whether it is the source for replication
- Volume Name: Name of the source or replica volume
- Region: Region information when creating cross-region replication
- Availability Zone: Availability Zone information for creating the replica
- Permissions: User permissions of the volume as set by the replication policy
|
Table. Replication tab detailed information items
Caution
If the snapshot capacity usage is high (around 90%), replication may be stopped.
Reference
- When creating a clone, a replica with the same disk type is created.
- You can create a replica after setting the snapshot capacity.
- If you are using a Volume Group, check the replication information on the Volume Group (BM) list page.
- If the replication policy is stopped or deleted, the replica can modify the connected server.
- A replica can use the snapshot feature after the replication policy is deleted.
- If the replication policy is stopped or the replication status is completed, you can modify the policy and schedule on the replica.
Block Storage (BM) List page lets you view, add, modify, or delete the tag information of the selected resource.
| Category | Detailed description |
|---|
| Tag list | Tag list- You can view the Key and Value information of the tag
- Up to 50 tags can be added per resource
- When entering a tag, you can search and select from the list of previously created Keys and Values
|
Table. Block Storage (BM) Tag Tab Items
Operation History
Block Storage(BM) List page allows you to view the operation history of the selected resource.
| Category | Detailed description |
|---|
| Task History List | Resource Change History- Operation Time, Resource Type, Resource ID, Resource Name, Operation Details, Event Topic, Operation Result, Operator Information
- Click the Advanced Search button to perform a detailed search
|
Table. Work History Tab Detailed Information Items
Block Storage(BM) Managing Resources
If you need to modify the settings of a created Block Storage(BM) or add or remove a connected server, you can perform the operation on the Block Storage(BM) Details page.
Edit volume name
You can edit the volume name. To modify the volume name, follow these steps.
- All Services > Storage > Block Storage(BM) Click the menu. 1. Go to the Service Home page of Block Storage (BM).
- On the Service Home page, click the Block Storage(BM) menu. 2. Block Storage(BM) List Navigate to the page.
- Block Storage (BM) List Click the resource to edit the volume name on the page. 3. Block Storage(BM) Details Navigate to the page.
- Volume Name’s Edit button, click it. 4. Edit Volume Name the popup window opens.
- Enter the volume name and click the Confirm button.
Reference
Must start with a letter and can be set to 3–28 characters using letters, numbers, and special characters (-).
Expand Capacity
You can expand the volume capacity. To increase capacity, follow the steps below.
- All Services > Storage > Block Storage(BM) Click the menu. 1. Go to the Service Home page of Block Storage (BM).
- On the Service Home page, click the Block Storage(BM) menu. 2. Go to the Block Storage(BM) List page.
- Block Storage(BM) List Click the resource to expand capacity on the page. 3. Block Storage(BM) Details Go to the page.
- Click the Capacity Edit button. 4. Capacity Edit The popup window opens.
- After adding the capacity you want to expand (1/~16,384 GB) to the current capacity and entering the total capacity, click the Confirm button.
Caution
- Capacity can be expanded only for the original volume that does not use the snapshot feature.
- Size reduction is not provided.
Modify snapshot size
You can modify the capacity of the snapshot storage space. To modify the snapshot capacity, follow these steps.
- All Services > Storage > Block Storage(BM) Click the menu. 1. Go to the Service Home page of Block Storage (BM).
- On the Service Home page, click the Block Storage(BM) menu. 2. Navigate to the Block Storage(BM) List page.
- Block Storage (BM) List page, click the resource to modify the snapshot capacity. 3. Block Storage(BM) Details Navigate to the page.
- Click the Edit button for the Snapshot Capacity item. 4. Edit Snapshot Capacity A popup window opens.
- Set the Use status and Generation Capacity (%), and click the Confirm button.
- Generation Capacity (%) can be selected in increments of 50 between 100 and ~500.
Caution
- Charges change based on snapshot usage and capacity. * (Example: when the volume size is 10GB and the snapshot creation size is 100%, a total of 20GB charge occurs)
- If the maximum number of snapshots or the snapshot space threshold (around 90%) is exceeded, older snapshots are deleted first.
- If the size after modification is smaller than the original, older snapshots will be deleted first.
- If changed to unused, all snapshots will be deleted.
- You can create a replica after setting the snapshot capacity.
- After configuring the snapshot size, it can be added to the Volume Group.
- If the snapshot capacity usage is high (around 90%), replication may be stopped.
- A replica can use the snapshot feature after the replication policy is deleted.
Edit Snapshot Schedule
You can modify the snapshot auto-creation interval. To modify the snapshot schedule, follow these steps.
- Click the All Services > Storage > Block Storage(BM) menu. 1. Go to the Service Home page of Block Storage (BM).
- On the Service Home page, click the Block Storage(BM) menu. 2. Block Storage(BM) List Navigate to the page.
- Block Storage (BM) List page, click the resource to edit the snapshot schedule. 3. Block Storage(BM) Details Navigate to the page.
- Click the Edit button of the Snapshot Schedule item. 4. Edit Snapshot Schedule The popup window opens.
- Set the snapshot auto‑creation status and creation interval, and click the Confirm button.
- If you want to automatically create snapshots based on the Generation interval, select Automatic creation as Enabled.
- Generation cycle is daily, hourly selectable, or weekly, day of week, hourly selectable.
Caution
Snapshots can be created up to a maximum of 1,023 (with up to 128 automatically generated via schedule), and if the maximum number is exceeded, no further snapshots can be created.
Reference
- The snapshot schedule is based on Asia/Seoul (GMT +09:00).
- You can register a schedule after setting the snapshot capacity.
- When configuring a snapshot schedule, it cannot be added to a Volume Group.
Max IOPS Update
You can modify the Max IOPS value. To modify the Max IOPS value, follow these steps.
- All Services > Storage > Block Storage(BM) Click the menu. 1. Go to the Service Home page of Block Storage (BM).
- On the Service Home page, click the Block Storage(BM) menu. 2. Block Storage(BM) List Go to the page.
- On the Block Storage(BM) List page, click the resource to modify the IOPS value. 3. Block Storage(BM) Details Navigate to the page.
- Click the Edit button for Max IOPS. 4. Max IOPS Edit The popup window opens.
- After entering the Max IOPS value to change, click the Confirm button.
- You can enter a Max IOPS value between 5,000 and 20,000.
Reference
- The Max IOPS value can be modified after the initial server attach.
- For a recovery copy, the Max IOPS value cannot be modified.
Edit Max Throughput
You can modify the Max Throughput speed. To modify the Max Throughput speed, follow these steps.
- Click the All Services > Storage > Block Storage(BM) menu. 1. Go to the Service Home page of Block Storage (BM).
- On the Service Home page, click the Block Storage(BM) menu. 2. Navigate to the Block Storage(BM) List page.
- On the Block Storage(BM) List page, click the resource to modify the Throughput speed. 3. Block Storage(BM) Details Navigate to the page.
- Click the Edit button of Max Throughput. 4. Edit Max Throughput The popup window opens.
- After entering the Max Throughput speed to change, click the Confirm button.
- Max Throughput speed can be set to a value between 250 ~ 1,000.
Reference
- The Max Throughput speed can be modified after the initial server attach.
- For recovery copies, the Max Throughput speed cannot be modified.
Edit connection server
You can connect or disconnect the Bare Metal Server, Multi Node GPU Cluster. To modify the connection server, follow these steps.
- Click the All Services > Storage > Block Storage(BM) menu. 1. Go to the Service Home page of Block Storage (BM).
- On the Service Home page, click the Block Storage(BM) menu. 2. Navigate to the Block Storage(BM) List page.
- On the Block Storage(BM) List page, click the resource to edit the connected server. 3. Block Storage(BM) Details Navigate to the page.
- If adding a connection server, click the Add button in the Connection Server item. 4. Add Connection Server The popup window opens.
- After selecting the server you want to connect to, click the Confirm button.
- If you are disconnecting the server, click the Disconnect button in the Connection Server item.
- Be sure to connect to the server, perform the disconnect operation (Umount, Disk Offline), and then disconnect.
Caution
- Connect to the server, be sure to perform the disconnect operations (Umount, Disk Offline), and then disconnect the server. * Releasing without OS actions may cause a status error (Hang) on the connected server. * For detailed information about disconnecting the server, please refer to 서버 연결 해제하기.
Reference
- You can connect up to 8 Bare Metal Servers created in the same location as the Block Storage.
- There is no limit on the number of volume connections for a Bare Metal Server.
- After adding a connected server, you can use it after performing connection tasks (Mount, Disk Online) on the server. * For detailed information about server connections, see 서버 연결하기.
- Connect to the server, be sure to perform the disconnect tasks (Umount, Disk Offline), and then disconnect the server. * If you release without OS operations, a status error (Hang) may occur on the connected server. * For detailed information about server disconnection, please refer to 서버 연결 해제하기.
- A replica can modify the connected server when the replication policy is stopped or deleted.
Block Storage(BM) Cancel
You can reduce operating costs by terminating unused Block Storage(BM). However, if you terminate the service, the running service may be stopped immediately, so you should proceed with the termination only after fully considering the impact that may arise from the service interruption.
Caution
- Please note that data cannot be recovered after termination.
- If a connected server exists, you can terminate it after removing all linked resources.
- The volume can be detached only when it is in the Available or Error state.
- If a replication policy is in use, you can cancel it after removing the policy from the connected replica.
- If a Volume Group is in use, you can disconnect the associated Volume Group before terminating it.
- If a recovery copy of the original exists, you can delete the recovery copy before terminating.
To cancel Block Storage, follow the steps below.
- All Services > Storage > Block Storage(BM) Click the menu. 1. Go to the Service Home page of Block Storage (BM).
- On the Service Home page, click the Block Storage(BM) menu. 2. Go to the Block Storage(BM) List page.
- On the Block Storage(BM) List page, select the resource to terminate, and click the Terminate Service button.
- After navigating to the detailed page of the resource to be terminated, you can also terminate it individually by clicking the Cancel Service button.
- When the pop-up notifying service termination opens, enter Delete and then click the Confirm button.
- When termination is complete, check on the Block Storage(BM) List page whether the resource has been terminated.
1 - Connect to server
When using a volume on the server, a connect or disconnect operation is required.
Block Storage(BM) Details On the page, after adding a connected server, log into the server and perform Multi Path configuration and connection tasks (Mount, Disk Online). After use is complete, perform the disconnect operation (Umount, Disk Offline) and remove the connected server.
A Multi Path configuration is required before using the volume on the connected server. Follow the steps below.
Caution
If Multi Path is not configured, service impact may occur due to maintenance work, failures, etc.
Linux operating system
Click the All Services > Storage > Block Storage(BM) menu. 1. Go to the Service Home page of Block Storage (BM).
On the Service Home page, click the Block Storage(BM) menu. 2. Navigate to the Block Storage(BM) List page.
Block Storage(BM) List page, click the resource to configure Multi Path. 3. Block Storage(BM) Details Navigate to the page.
After checking the server in the Connection Server item, connect. 4. Configure Multi Path according to the guide below.
Device check
- The created volume can be verified with the
fdisk -l command.
Verify DM-Multipath application
- In the Linux system, Multi Path is automatically applied during volume detection, and it can be verified with the
multipath –ll command. - Volumes with Multi Path applied use Multipath device names such as
/dev/mapper/##### rather than the /dev/sd# format, and can be verified with the fdisk –l command.
iSCSI replacement timeout value setting
- When establishing an iscsi connection, set the
replacement timeout.
# vi /etc/iscsi/iscsid.conf
node.session.timeo.replacement_timeout = 5
(default 120 값을 5 로 변경)
- After modifying the above, restart the iscsi service.
# systemctl restart iscsid
Windows operating system
Click the All Services > Storage > Block Storage(BM) menu. 1. Navigate to the Service Home page of Block Storage (BM).
On the Service Home page, click the Block Storage(BM) menu. 2. Go to the Block Storage(BM) List page.
On the Block Storage(BM) List page, click the resource to configure Multi Path. 3. Block Storage(BM) Details Navigate to the page.
After verifying the server in the Connection Server item, connect. 4. Configure Multi Path according to the guide below.
Connect to Server (Mount, Disk Online)
To use the volume added to the connected server, you must log in to the server and perform the connection tasks (Mount, Disk Online). Follow the steps below.
Linux operating system
Server connection example configuration
- Server OS: LINUX
- Mount location: /data
- Volume size: 24 GB
- File system: ext3, ext4, xfs etc
- Additional allocated disk: /dev/vdb
- Click the All Services > Storage > Block Storage(BM) menu. 1. Navigate to the Service Home page of Block Storage (BM).
- On the Service Home page, click the Block Storage(BM) menu. 2. Go to the Block Storage(BM) List page.
- On the Block Storage(BM) List page, click the resource to connect the server. 3. Block Storage(BM) Details Navigate to the page.
- After checking the server in the Connection Server item, connect. 4. Follow the guide below to mount the volume.
- Switch to root privileges
Code block. Switch to root privileges - Check Disk
# lsblk
NAME    MAJ:MIN  RM   SIZE RO TYPE MOUNTPOINT
vda       252:0   0    24G  0 disk
├─vda1    252:1   0  23.9G  0 part [SWAP]
└─vda14   252:14  0     4M  0 part /
└─vda15   252:15  0   106M  0 part /boot/efi
vdb       252:16  0    24G  0 disk
# lsblk
NAME    MAJ:MIN  RM   SIZE RO TYPE MOUNTPOINT
vda       252:0   0    24G  0 disk
├─vda1    252:1   0  23.9G  0 part [SWAP]
└─vda14   252:14  0     4M  0 part /
└─vda15   252:15  0   106M  0 part /boot/efi
vdb       252:16  0    24G  0 disk
- Create partition
# fdisk /dev/vdb
Command (m for help): n

Partition type:
    p   primary (0 primary, 0 extended, 4 free)
    e   extended
Select (default p): p
Partition number (1-4, default 1): 1
First sector (2048-50331646, default 2048):
Last sector, +/-sectors or +/-size{K,M,G,T,P} (2048-50331646, default 50331646):

Created a new partition 1 of type 'Linux' and of size 24 GiB.

Command (m for help): w
The partition table has been altered!
Calling ioctl() to re-read partition table.
Syncing disks.
# fdisk /dev/vdb
Command (m for help): n

Partition type:
    p   primary (0 primary, 0 extended, 4 free)
    e   extended
Select (default p): p
Partition number (1-4, default 1): 1
First sector (2048-50331646, default 2048):
Last sector, +/-sectors or +/-size{K,M,G,T,P} (2048-50331646, default 50331646):

Created a new partition 1 of type 'Linux' and of size 24 GiB.

Command (m for help): w
The partition table has been altered!
Calling ioctl() to re-read partition table.
Syncing disks.
- Partition format setting (example: ext4)
# lsblk
NAME    MAJ:MIN  RM   SIZE RO TYPE MOUNTPOINT
vda       252:0   0    24G  0 disk
├─vda1    252:1   0  23.9G  0 part [SWAP]
└─vda14   252:14  0     4M  0 part /
└─vda15   252:15  0   106M  0 part /boot/efi
vdb       252:16  0    24G  0 disk
└─vdb1    252:17  0    24G  0 part

# mkfs.ext4 /dev/vdb1
mke2fs 1.46.5 (30-Dec-2021)
...
Writing superblocks and filesystem accounting information: done
# lsblk
NAME    MAJ:MIN  RM   SIZE RO TYPE MOUNTPOINT
vda       252:0   0    24G  0 disk
├─vda1    252:1   0  23.9G  0 part [SWAP]
└─vda14   252:14  0     4M  0 part /
└─vda15   252:15  0   106M  0 part /boot/efi
vdb       252:16  0    24G  0 disk
└─vdb1    252:17  0    24G  0 part

# mkfs.ext4 /dev/vdb1
mke2fs 1.46.5 (30-Dec-2021)
...
Writing superblocks and filesystem accounting information: done
- Volume Mount
# mkdir /data

# mount /dev/vdb1 /data

# lsblk
NAME    MAJ:MIN  RM   SIZE RO TYPE MOUNTPOINT
vda       252:0   0    24G  0 disk
├─vda1    252:1   0  23.9G  0 part [SWAP]
└─vda14   252:14  0     4M  0 part /
└─vda15   252:15  0   106M  0 part /boot/efi
vdb       252:16  0    24G  0 disk
└─vdb1    252:17  0    24G  0 part /data

# vi /etc/fstab
(add) /dev/vdb1     /data       ext4     defaults,_netdev   0 0
# mkdir /data

# mount /dev/vdb1 /data

# lsblk
NAME    MAJ:MIN  RM   SIZE RO TYPE MOUNTPOINT
vda       252:0   0    24G  0 disk
├─vda1    252:1   0  23.9G  0 part [SWAP]
└─vda14   252:14  0     4M  0 part /
└─vda15   252:15  0   106M  0 part /boot/efi
vdb       252:16  0    24G  0 disk
└─vdb1    252:17  0    24G  0 part /data

# vi /etc/fstab
(add) /dev/vdb1     /data       ext4     defaults,_netdev   0 0
| Item | Explanation |
|---|
| cat /etc/fstab | This is a Linux system’s filesystem information file. It is used when the server starts. |
| df -h | Check the total disk usage mounted on the Linux system. |
| fdisk -l | Check the partition information.- Physical disks are
/dev/sda, /dev/sdb, /dev/sdc, displayed as characters such as a, b, c
- Disk partitions are
/dev/sda1, /dev/sda2, /dev/sda3, displayed as numbers such as 1, 2, 3
|
Table. Refer to the Mount command
Reference
The _netdev option is used when mounting network‑based file systems (NFS, iSCSI, CIFS/SMB, etc.) on Linux, and can prevent mount errors that may occur during boot.
| command | Explanation |
|---|
| m | Check the usage of the fdisk command. |
| n | Create a new partition. |
| p | Check the updated partition information. |
| t | Change the partition’s system ID. |
| w | Save the partition information and then exit the fdisk configuration. |
Table. Refer to the partition creation command (fdisk)
Windows operating system
Click the All Services > Storage > Block Storage(BM) menu. 1. Go to the Service Home page of Block Storage (BM).
On the Service Home page, click the Block Storage(BM) menu. 2. Go to the Block Storage(BM) List page.
On the Block Storage(BM) List page, click the resource to connect the server. 3. Block Storage(BM) Details Go to the page.
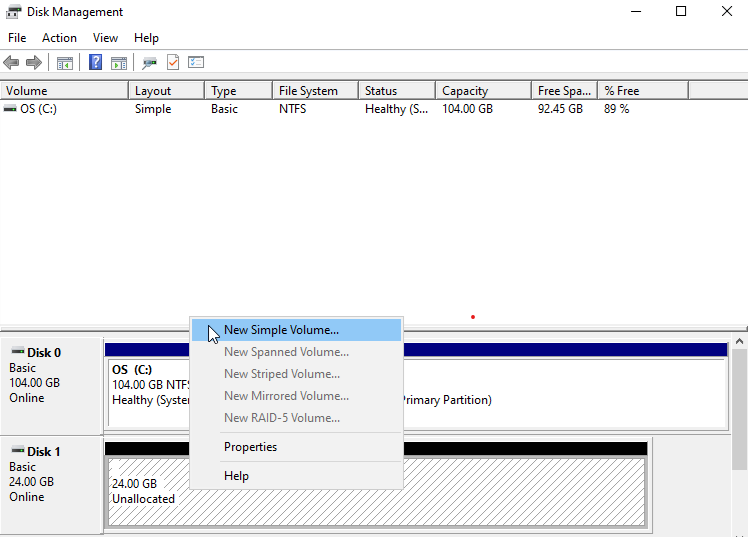
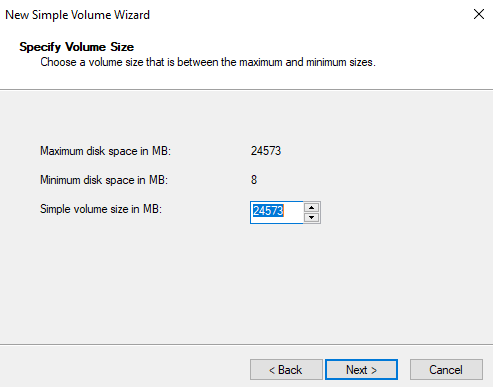
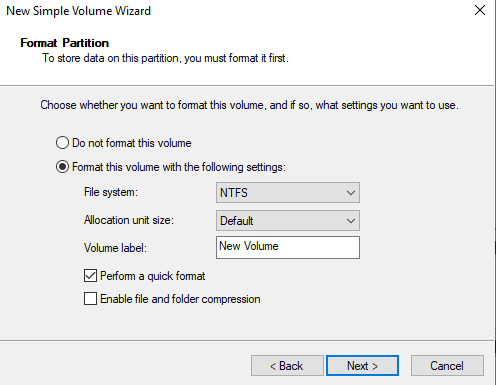
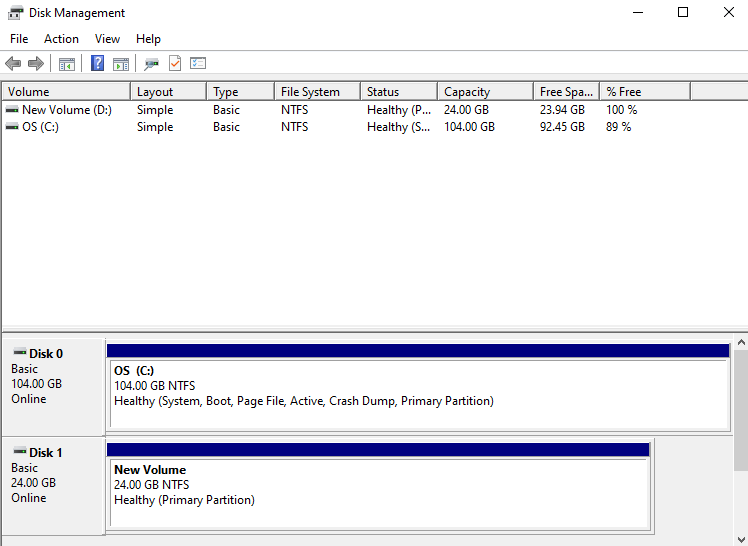
After verifying the server in the Connection Server item, connect. 4. Connect the volume (Disk Online) according to the guide below.
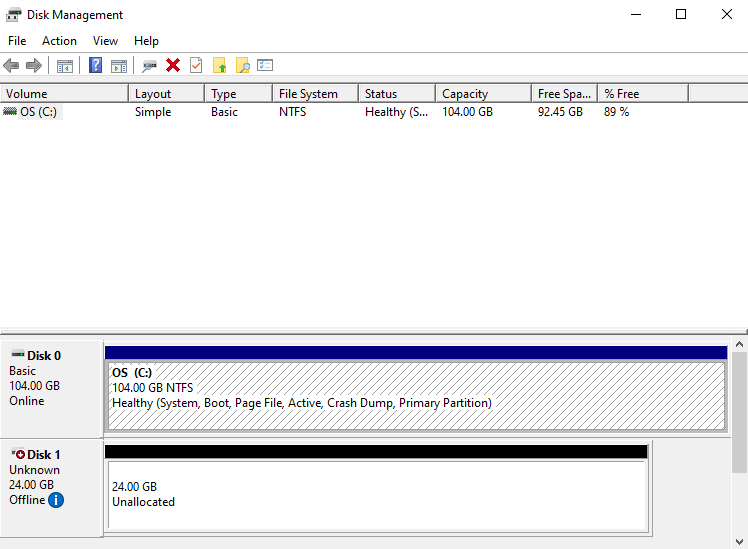
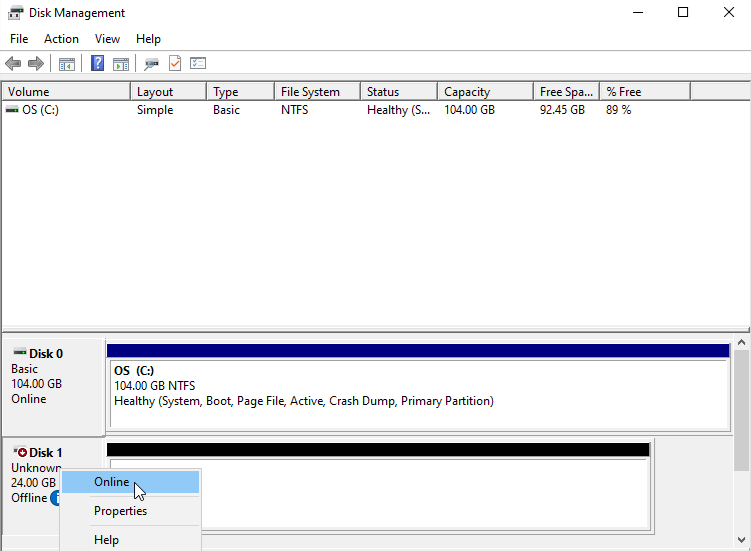
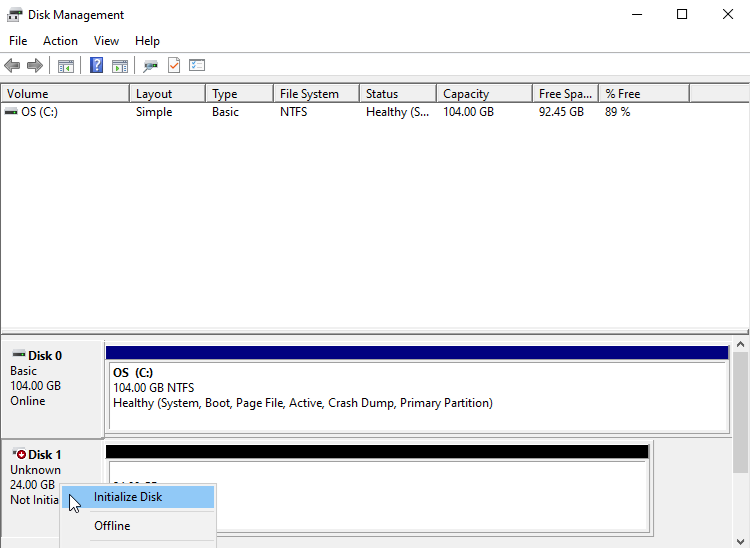
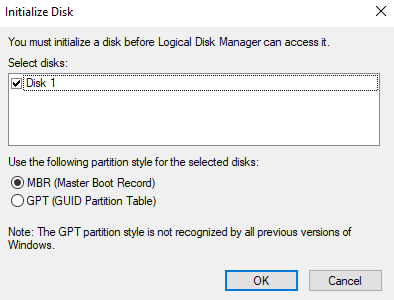
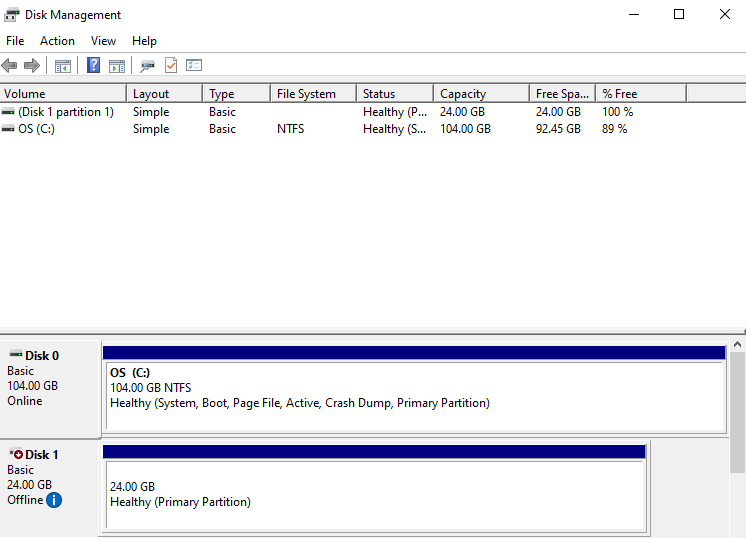
- Windows Start icon right-click, then run Computer Management.
- In the Computer Management tree structure, select Storage > Disk Management.
- Check Disk
Disconnect Server (Umount, Disk Offline)
After accessing the server and performing the disconnect tasks (Umount, Disk Offline), you need to detach the server in the Console. Follow the steps below.
Caution
If you disconnect the server from the console without performing the disconnect operations (Umount, Disk Offlline) on the server, a server status error (Hang) may occur. Be sure to complete the OS tasks first.
Linux operating system
- Click the All Services > Storage > Block Storage(BM) menu. 1. Go to the Service Home page of Block Storage (BM).
- On the Service Home page, click the Block Storage(BM) menu. 2. Go to the Block Storage(BM) List page.
- On the Block Storage(BM) List page, click the resource to disconnect the server. 3. Block Storage(BM) Details Navigate to the page.
- Connection Server item, verify the server and then connect. 4. Unmount the volume according to the guide below.
- Volume Umount
# umount /dev/vdb1 /data

# lsblk
NAME    MAJ:MIN  RM   SIZE RO TYPE MOUNTPOINT
vda       252:0   0    24G  0 disk
├─vda1    252:1   0  23.9G  0 part [SWAP]
└─vda14   252:14  0     4M  0 part /
└─vda15   252:15  0   106M  0 part /boot/efi
vdb       252:16  0    24G  0 disk
└─vdb1    252:17  0    24G  0 part

# vi /etc/fstab
(delete) /dev/vdb1     /data       ext4     defaults   0 0
# umount /dev/vdb1 /data

# lsblk
NAME    MAJ:MIN  RM   SIZE RO TYPE MOUNTPOINT
vda       252:0   0    24G  0 disk
├─vda1    252:1   0  23.9G  0 part [SWAP]
└─vda14   252:14  0     4M  0 part /
└─vda15   252:15  0   106M  0 part /boot/efi
vdb       252:16  0    24G  0 disk
└─vdb1    252:17  0    24G  0 part

# vi /etc/fstab
(delete) /dev/vdb1     /data       ext4     defaults   0 0
Windows operating system
Click the All Services > Storage > Block Storage(BM) menu. 1. Navigate to the Service Home page of Block Storage (BM).
On the Service Home page, click the Block Storage(BM) menu. 2. Go to the Block Storage(BM) List page.
Block Storage(BM) List On the page, click the resource to disconnect the server. 3. Block Storage (BM) Details Navigate to the page.
Connection Server item, verify the server and then connect. 4. Please disconnect the volume (Disk Offline) according to the guide below.
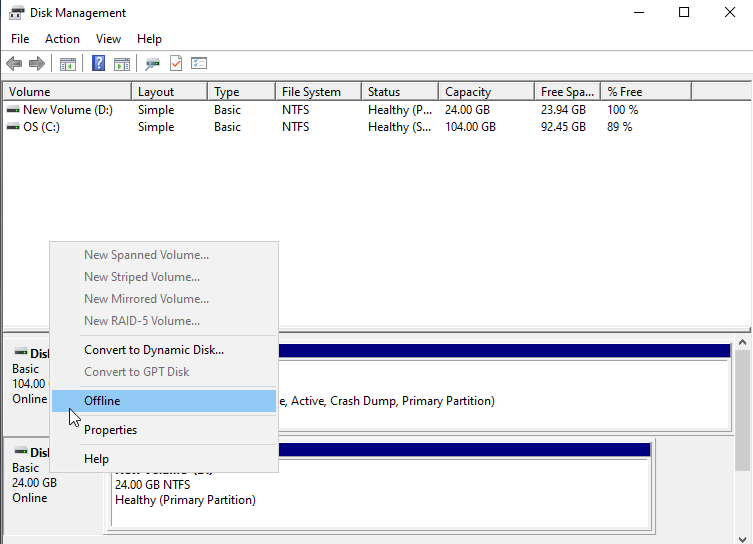
- Windows Start icon right-click, then run Computer Management
- In the Computer Management tree, select Storage > Disk Management
- Right-click the disk to be removed, then run Offline
2 - Use Snapshot
You can create, delete, or recover a snapshot of a created Block Storage (BM). You can perform these actions on the Block Storage (BM) Details page and the Snapshot List page.
Create Snapshot
Users can create a snapshot at the desired point in time.
guide
A replica can delete the replication policy, set the snapshot size for all block storage within the volume group, and then create a snapshot.
To create a snapshot, follow these steps.
- Click the All Services > Storage > Block Storage(BM) menu. Navigate to the Service Home page of Block Storage(BM).
- On the Service Home page, click the Block Storage(BM) menu. You will be taken to the Block Storage(BM) List page.
- Click the resource to create a snapshot on the Block Storage(BM) List page. Navigate to the Block Storage(BM) Details page.
- Check the setting status of the Snapshot Capacity item.
- Snapshots can be created only when storage space has been secured by configuring snapshot capacity.
- For detailed information, refer to Modify Snapshot Capacity.
- Click the Create Snapshot button. The Create Snapshot popup opens.
- Click the Create button. It creates a snapshot of the current point in time.
- Click the Snapshot List page. You will be taken to the Block Storage(BM) Snapshot list page.
- Check the generated snapshot.
Caution
- If the maximum number of snapshots or the snapshot space threshold (around 90%) is exceeded, older snapshots are deleted first.
- If the usage rate within the snapshot capacity is high (around 90%), replication may be stopped.
- If there is a volume in the Volume Group with snapshot capacity not set, you cannot create a snapshot. Set the snapshot capacity for all volumes first.
- Snapshots can be created up to a maximum of 1,023 (with up to 128 automatically generated via schedule), and if the maximum number is exceeded, no further snapshots can be created.
Reference
- The snapshot creation time is based on Asia/Seoul (GMT +09:00).
- If you want to automatically create snapshots using a schedule, set the snapshot schedule on the Block Storage(BM) Details page.
- For detailed information about the snapshot schedule, refer to Modify Snapshot Schedule.
- Capacity can be expanded only for the original volume that does not use the snapshot feature.
Recover Snapshot
Block Storage(BM) volumes can be restored from a snapshot. To restore a snapshot, follow the steps below.
- Click the All Services > Storage > Block Storage(BM) menu. Navigate to the Service Home page of Block Storage(BM).
- On the Service Home page, click the Block Storage(BM) menu. You will be taken to the Block Storage(BM) List page.
- Block Storage(BM) List Click the resource to restore from a snapshot. Block Storage(BM) Details page will be opened.
- If a server has been added in the Connected Server item, connect to the server and then perform the disconnect tasks (Umount, Disk Offline).
- Click the Snapshot List page. Navigate to the Block Storage(BM) Snapshot List page.
- After checking the Snapshot name and Creation timestamp, click the More button of the snapshot you want to restore.
- Recover button, click it. The snapshot recovery popup opens.
- After verifying the snapshot name and creation time, click the Confirm button. Recover the Block Storage volume from the snapshot.
- Click the Details button. Navigate to the Block Storage(BM) Details page.
- Connection Server If a server has been added to this item, connect to the server and perform the connection tasks (Mount, Disk Online).
Caution
- Snapshot recovery must be performed while all connected servers are disconnected (Umount, Disk Offline), and the restored volume can be used after it is reconnected (Mount, Disk Online).
- After the snapshot recovery is completed, all snapshots created after the snapshot used for recovery are deleted.
- When restoring a snapshot, the volume is restored to that point in time.
- If you are using Volume Group(BM), you can perform snapshot recovery from the detail page of Volume Group(BM).
Create a recovery copy
You can create a recovery copy from a snapshot of a Block Storage (BM) volume. To create a snapshot recovery copy, follow the steps below.
- Click the All Services > Storage > Block Storage(BM) menu. Navigate to the Service Home page of Block Storage(BM).
- On the Service Home page, click the Block Storage(BM) menu. You will be taken to the Block Storage(BM) List page.
- On the Block Storage(BM) List page, click the resource to restore from a snapshot. You will be taken to the Block Storage(BM) Details page.
- If a server has been added in the Connected Server item, connect to the server and then perform the disconnect tasks (Umount, Disk Offline).
- Click the Snapshot List page. Go to the Block Storage(BM) Snapshot List page.
- After confirming the Snapshot name and Creation timestamp, click the More button of the snapshot you want to create a recovery copy for.
- Click the Create Recovery button. The snapshot recovery creation popup opens.
- After entering the Recovery volume name, click the Create button. A popup notifying the creation of the recovery image will appear.
- Click the Confirm button. The recovery copy creation request is complete.
Caution
- Only one recovery copy can be created per original.
- A recovery copy is a separate volume created with the same capacity as the original, and it incurs additional costs.
- If you are using Volume Group(BM), you can create a recovery copy on the detail page of Volume Group(BM).
Delete Snapshot
You can select a snapshot to delete. To delete a snapshot, follow these steps.
- Click the All Services > Storage > Block Storage(BM) menu. Go to the Service Home page of Block Storage(BM).
- On the Service Home page, click the Block Storage(BM) menu. You will be taken to the Block Storage(BM) List page.
- On the Block Storage(BM) List page, click the resource to delete the snapshot. You will be taken to the Block Storage(BM) Details page.
- Click Snapshot List. It navigates to the Block Storage(BM) Snapshot List page.
- After confirming the Snapshot name and creation time, click the More button of the snapshot you want to delete.
- Click the Delete button. The snapshot will be removed from the Snapshot List page.
- After selecting the snapshots to delete from the snapshot list, you can click the Delete button at the top of the list to delete them all at once.
Reference
- Snapshots that contain snapmirror in the snapshot name cannot be deleted. snapmirror is included in the snapshot name when a replication is created.
- If you are using Volume Group(BM), you can delete snapshots from the detail page of Volume Group(BM).
3 - Using duplication
You can create a replica of the generated Block Storage (BM) in another location and synchronize it periodically. You can perform operations on the Block Storage(BM) Details page and the Replication page.
Reference
- The kr-south region does not provide Block Storage (BM) replication functionality.
Create Clone
You can create a replica volume in a different location.
Caution
Clones can only be created from the original volume.
To create a replica volume, follow these steps.
Click the All Services > Storage > Block Storage(BM) menu. 1. Go to the Service Home page of Block Storage (BM).
Service Home on the page, click the Block Storage(BM) menu. 2. Go to the Block Storage(BM) List page.
On the Block Storage(BM) List page, click the resource to create a replica. 3. Block Storage(BM) Details Navigate to the page.
Verify the setting of the Snapshot Capacity item.
- Replication can be created only when storage space is available through snapshot capacity configuration.
- For more details, see 스냅샷 용량 수정하기.
Click the Create Clone button. 5. Create Clone popup window opens.
After entering the information for creating a clone, click the Create button. 6. Creates a replica with the same disk type.
| Category | Required status | Detailed description |
|---|
| Replication Policy | Required | Select replication policy- Within region: Create replication in the same region’s Availability Zone
- Cross-region: Create replication in an Availability Zone of a different region
|
| Clone location | Essential | Select the location to create the replica- Region: Select a location different from the original Block Storage (BM) volume
- Selection is required only when creating replication between regions
- Availability Zone: Select the Availability Zone to create the replica
|
| 복제 볼륨명 | 필수 | 영문으로 시작하며 영문, 숫자와 특수문자(-)를 사용하여 3~28자로 입력하세요. |
| 복제 주기 | 필수 | 5분, 1시간, 매일, 매주, 매월 중 선택하세요. 아래 주기로 복제를 수행합니다. |
Table. Replication creation information items
On the Block Storage(BM) Details page, after clicking the Replication tab, check the replication information you created.
- When selecting the volume name of the source or replica, you are taken to the volume’s Block Storage(BM) Details page.
Reference
- When creating a clone, a replica with the same disk type is created.
- After setting the snapshot size, you can create a replica, and the disk type of the created replica is the same as the original.
- If the snapshot capacity usage is high (around 90%), replication may be stopped.
- After setting the snapshot capacity, volumes added to the Volume Group can be replicated at the group level on the Volume Group page.
- One replica can be created per volume, and data transfer charges apply for cross‑region replication.
- A volume created by cloning cannot be added to a Volume Group.
- If you are using a Volume Group, you can view replication information in the Volume Group (BM).
Edit replication policy
You can change the replication status by modifying the replication policy.
Caution
During replication, you cannot modify the replication interval and replication policy.
To modify the replication policy, follow these steps.
- Click the All Services > Storage > Block Storage(BM) menu. 1. Go to the Service Home page of Block Storage (BM).
- On the Service Home page, click the Block Storage(BM) menu. 2. Go to the Block Storage(BM) List page.
- On the Block Storage(BM) List page, click the resource to edit the replication policy. 3. Block Storage(BM) Details Go to the page.
- Clone page, please click. 4. Block Storage(BM) Replication Go to the page.
- Click the Edit button of the Replication Policy. 5. Edit Replication Policy The popup window opens.
- Usage: Performs replication. * If it is Paused, you can change it to Enabled.
- Pause: Temporarily stops replication. * If use is the case, it can be changed to pause.
- Delete: Delete the replica. * If it is Paused, you can change it to Delete, and after deletion, you cannot use replication again.
- Check the modified Replication Policy on the Block Storage(BM) Replication page.
Caution
- When deleting a policy, please pay attention to the following.
- After the policy is deleted, replicas are not switched back to the original and cannot be created.
- After deleting the policy, you cannot connect to existing replicas and can only create new replicas.
- Data stored only in the replica after pausing will be deleted if replication is used again.
- When a replication policy is used, replicas are in read (Read only) state and data cannot be modified. * Use replication after unmounting on all connected resources.
- Mounting on the connected server is possible only when the replication policy is deleted or paused.
Modify replication cycle
You can change the synchronization interval between the primary and replica by modifying the replication interval.
Caution
During replication, you cannot modify the replication interval and replication policy.
To modify the replication interval, follow these steps.
- All Services > Storage > Block Storage(BM) Click the menu. 1. Go to the Service Home page of Block Storage (BM).
- On the Service Home page, click the Block Storage(BM) menu. 2. Go to the Block Storage(BM) List page.
- Block Storage(BM) List page, click the resource whose replication schedule you want to modify. 3. Block Storage(BM) Details Navigate to the page.
- Click the Clone page. 4. Navigate to the Block Storage(BM) Replication page.
- Click the Edit button of the Replication Cycle. 5. Edit Replication Cycle A popup window opens.
- Replication interval: Select from 5 minutes, 1 hour, daily, weekly, monthly. * Replication is performed at the following intervals.
- Daily: daily 23:59:00
- Weekly: Every Sunday 23:59:00
- Monthly: the 1st of each month at 23:59:00
- Check the modified Replication Interval on the Block Storage(BM) Replication page.
4 - Using Volume Group
The Volume Group (BM) service allows you to configure up to 16 Block Storage (BM) volumes as a group, enabling the creation of consistent point-in-time snapshots and replication.
Users can create the service by entering the required information for the Volume Group(BM) and selecting detailed options through the Samsung Cloud Platform Console.
Create Volume Group(BM)
You can create and use the Volume Group (BM) service from the Samsung Cloud Platform Console.
To create Block Storage, follow the steps below.
All Services > Storage > Block Storage(BM) Click the menu. 1. Go to the Service Home page of Block Storage (BM).
Click the Volume Group(BM) menu. 2. Volume Group(BM) List Navigate to the page.
On the Volume Group(BM) page, click the Volume Group(BM) Create button. 3. Create Volume Group (BM) Navigate to the page.
| Category | whether required | Detailed description |
|---|
| Volume Group name | Required | Volume Group name- must start with an English letter and use English letters, numbers, and special characters (
-) to input 3~28 characters
- cannot be modified after service creation
|
| Availability Zone | Required | Select the Availability Zone to create resources within the region- If you change the Availability Zone while a connected server has been added, the connected server will be reinitialized
|
| Target volume | Essential | Add target volume to Volume Group- After clicking the Add button, select the target volume in the add target popup
- Target volume criteria
- Snapshot auto-creation, creation interval: Not used
|
Table. Volume Group (BM) Service Information Input Items
Click the Create button.
- When creation is complete, check the created resources on the Volume Group(BM) List page.
Reference
- When adding a target volume, you can add the following volume to the Volume Group (BM).
- Snapshot capacity: Settings
- Automatic snapshot creation, creation interval: not used
- Clone: Unused
- You can add up to 16 volumes that are created in the same Availability Zone.
Volume Group(BM) Check detailed information
The Volume Group (BM) service allows you to view and edit the full resource list and detailed information. The Volume Group(BM) Details page consists of the Details, Snapshot List, Replication, Activity Log tabs.
To view detailed information about the Volume Group (BM) service, follow these steps.
- All Services > Storage > Block Storage(BM) Click the menu. 1. Go to the Service Home page of Block Storage (BM).
- On the Service Home page, click the Volume Group(BM) menu. 2. Go to the Volume Group(BM) List page.
- Volume Group(BM) List On the page, click the resource to view detailed information. 3. Volume Group(BM) Details Go to the page.
- Volume Group(BM) Details page displays status information and additional feature information, and consists of Details, Snapshot List, Replication, Tags, Operation History tabs.
| Category | Detailed description |
|---|
| Volume Group status | Volume Group status- Available: Creation complete, server connection possible
- Deleting: Service termination in progress
- Editing: Changing settings
- Error Deleting: Abnormal state during deletion
- Error: Abnormal state during creation
|
| Clone creation | Create a replica in a different location- For details on creating a replica, see 복제 생성하기
- Replication is not possible if the snapshot size is not set or a replication policy already exists
|
| Create snapshot | Create a snapshot at a specific point in time- For more details on snapshot creation, see 스냅샷 생성하기
|
| Service termination | Button to cancel the service |
Table. Status information and additional functions
Reference
In the case of a recovery copy, snapshot list, replication tabs are not displayed.
Detailed Information
Volume Group(BM) List page lets you view detailed information of the selected resource and modify it if needed.
| Category | Detailed description |
|---|
| Service | Service name |
| Resource Type | Resource Type |
| SRN | Unique resource ID in Samsung Cloud Platform- In Volume Group (BM), it means the Volume Group SRN
|
| Resource Name | Resource Name- In Volume Group (BM), it means the Volume Group name
|
| Resource ID | Service’s unique resource ID |
| Constructor | User who created the service |
| Creation date and time | Service creation date and time |
| Modifier | User who modified the service |
| Modification date and time | Service modification date and time |
| Volume Group name | Volume Group name |
| Category | Distinguish original status related to duplication |
| Availability Zone | Availability Zone information |
| Storage Volume Group name | Volume Group name in the storage device- identification information of the Volume Group used for analysis when failures or issues occur
|
| Snapshot schedule | Snapshot auto-creation interval- Schedule can be registered after setting snapshot capacity
- Click the edit button if you need to set a snapshot schedule
- For detailed information about the snapshot schedule, see 스냅샷 스케줄 수정하기
|
| Recovery copy | Snapshot name of the Volume Group- Displayed when a snapshot exists
- Click the name to go to the snapshot’s detail page
- For details on creating a snapshot, see 복구본 생성하기
|
| Target volume | Block Storage (BM) added to the Volume Group- Disk Type: Disk type of the volume
- Capacity: Capacity of the volume
- Snapshot Capacity: Capacity of the snapshot storage set for the volume
- For details on modifying the target volume, see 대상 볼륨 수정하기
|
Table. Volume Group (BM) detailed information items
Snapshot List
Volume Group(BM) Resource List page allows you to view the snapshot of the selected resource.
| Category | Detailed description |
|---|
| Snapshot name | Snapshot name |
| Creation timestamp | Snapshot creation time |
| Additional features > More | Snapshot management button- Restore: Restore volume from snapshot
- For details on snapshot restoration, see 스냅샷 복구하기
- Create restore copy: Create a restore copy from snapshot
- For details on creating a restore copy, see 복구본 생성하기
- Delete: Delete snapshot
- For details on snapshot deletion, see 스냅샷 삭제하기
|
Table. Snapshot list tab detailed information items
Caution
- When creating a snapshot from a Volume Group, a snapshot is created in Block Storage (BM).
- When using Volume Group snapshots, manage the snapshot size and count of the target volume.
- If the maximum number of snapshots or the snapshot storage threshold (around 90%) is exceeded, older snapshots will be deleted first.
- If the snapshot capacity usage is high (around 90%), replication may be stopped.
- Snapshots can be created up to a maximum of 1,023 (with up to 128 automatically generated via schedule), and if the maximum number is exceeded, no further snapshots can be created.
- Snapshot recovery must be performed while all connected servers are disconnected (Umount, Disk Offline), and the recovered volume can be used after being reconnected (Mount, Disk Online).
Reference
- The snapshot creation time is based on Asia/Seoul (GMT +09:00).
- When using replication, snapmirror files cannot be deleted.
- When using a Volume Group, set the snapshot schedule on the Volume Group (BM) detail information screen. * The created snapshot can be viewed in the Block Storage (BM) snapshot list.
Replication
On the Volume Group(BM) Resource List page, you can view the replication information of the selected resource.
| Category | Detailed description |
|---|
| Replication Policy | the replication policy set by the user- For detailed information on modifying the replication policy, see 복제 정책 수정하기
|
| Replication cycle | User-configured source replication interval- For detailed information on modifying the replication interval, see 복제 주기 수정하기
|
| Replication status | Replication progress status based on policy settings |
| Lag Time | Time elapsed since the last successful replication- Available after the replica is created
|
| Volume information | Volume information of the source and replica- Distinction: Distinguish whether it is the source for replication
- Volume Group Name: Name of the Volume Group for the source or replica
- Region: Region information when creating cross‑region replication
- Availability Zone: Information about the Availability Zone where the replica is created
- Permissions: User permissions of the volume set according to the replication policy
|
Table. Replication tab detailed information items
Caution
- If the snapshot capacity utilization is high (around 90%), replication may be stopped.
Reference
- When creating a clone, a replica with the same disk type is created.
- You can create a replica after setting the snapshot capacity.
- If you are using a Volume Group, check the replication information on the Volume Group (BM) resource list page.
- Replica Block Storage can modify the connected server when the replication policy is paused or deleted.
- Replica Block Storage can use the snapshot feature after the replication policy is deleted.
- If the replication policy is stopped or the replication status is completed, you can modify the policy and schedule on the replica.
Volume Group(BM) List page lets you view the tag information of the selected resource, and you can add, modify, or delete it.
| Category | Detailed description |
|---|
| Tag list | Tag list- You can view the Key, Value information of the tag
- Up to 50 tags can be added per resource
- When entering tags, you can search and select from the list of previously created Keys and Values
|
Table. Volume Group (BM) Tag Tab Items
Operation History
Volume Group(BM) Resource List You can check the operation history of the selected resource on the page.
| Category | Detailed description |
|---|
| Task History List | Resource Change History- Operation Time, Resource Type, Resource ID, Resource Name, Operation Details, Event Topic, Operation Result, Operator Information
- Click the Advanced Search button to perform a detailed search
|
Table. Work History tab detailed information items
Volume Group(BM) Managing Resources
If you need to modify the settings of a created Volume Group(BM) or add or remove target volumes, you can perform the operation on the Volume Group(BM) Details page.
Edit Snapshot Schedule
You can modify the snapshot auto-creation interval. To modify the snapshot schedule, follow these steps.
- All Services > Storage > Block Storage(BM) Click the menu. 1. Go to the Service Home page of Block Storage (BM).
- On the Service Home page, click the Volume Group(BM) menu. 2. Navigate to the Volume Group(BM) List page.
- Volume Group(BM) List page, click the resource to edit the snapshot schedule. 3. Volume Group(BM) Details Navigate to the page.
- Click the Edit button of the Snapshot Schedule item. 4. Edit Snapshot Schedule The popup window opens.
- Set the snapshot automatic creation status and creation interval, and click the Confirm button.
- If you want to automatically generate snapshots based on the Creation Cycle, select Automatic Creation as Enabled.
- Generation cycle can be selected daily, hourly, or weekly, day of week, hourly.
Caution
When using Volume Group snapshots, manage the target volume’s snapshot size and count.
- Snapshots can be created up to a maximum of 1,023 (with up to 128 automatically generated through scheduling), and if the maximum number is exceeded, no further snapshots can be created.
Reference
The snapshot schedule is based on Asia/Seoul (GMT +09:00).
Modify target volume
You can add or detach the target volume. To modify the target volume, follow these steps.
- Click the All Services > Storage > Block Storage(BM) menu. 1. Go to the Service Home page of Block Storage (BM).
- On the Service Home page, click the Volume Group(BM) menu. 2. Volume Group(BM) List Go to the page.
- On the Volume Group(BM) List page, click the resource to modify the target volume. 3. Volume Group(BM) Details page is opened.
- If you are adding a target volume, click the Target Volume Add button. 4. Add Volume The popup window opens.
- When disconnecting a volume, click the Disconnect button in the Target Volume field.
- Select the volume you want to add, then click the Confirm button.
Caution
If the Volume Group’s replication policy is enabled, the target volume cannot be modified.
Reference
- When adding a target volume, you can add the following volume to the Volume Group (BM).
- Snapshot capacity: Settings
- Automatic snapshot creation, creation interval: not used
- Clone: Unused
- You can add up to 16 volumes that are created in the same Availability Zone.
Volume Group(BM) Using Snapshots
You can create, delete, or recover using snapshots on the created Volume Group (BM). You can perform actions on the Volume Group(BM) Details page and the Snapshot List page.
Create Snapshot
The user can create a snapshot at the desired point in time.
information
- A replica can delete the replication policy, set the snapshot capacity for all Block Storage within the Volume Group, and then create a snapshot.
- Recovery images cannot create snapshots.
To create a snapshot, follow these steps.
- Click the All Services > Storage > Block Storage(BM) menu. 1. Go to the Service Home page of Block Storage (BM).
- On the Service Home page, click the Volume Group(BM) menu. 2. Volume Group(BM) List Go to the page.
- On the Volume Group(BM) List page, click the resource for which you want to create a snapshot. 3. Volume Group(BM) Details Go to the page.
- Click the Create Snapshot button. 4. Create Snapshot The popup window opens.
- Click the Confirm button. 5. Creates a snapshot of the current point in time.
- Click the Snapshot List page. 6. Volume Group(BM) Snapshot Go to the list page.
- Check the generated snapshot.
Caution
- When creating a snapshot in a Volume Group, a snapshot is also created on the connected target volume.
- Manage the snapshot capacity and count of the target volume to use Volume Group snapshots.
- If the maximum number of snapshots or the snapshot space threshold (around 90%) is exceeded, older snapshots are deleted first.
- If the snapshot capacity usage is high (around 90%), replication may be stopped.
- Snapshots can be created up to a maximum of 1,023 (with up to 128 automatically generated through scheduling), and if the maximum number is exceeded, no further snapshots can be created.
Reference
- The snapshot creation time is based on Asia/Seoul (GMT +09:00).
- Snapshot storage space is applied based on the settings you configured on the target volume’s Block Storage(BM) Details page.
- If you want to automatically create snapshots via a schedule, set the snapshot schedule on the Volume Group(BM) Details page.
- For detailed information about snapshot schedules, see 스냅샷 스케줄 수정하기.
Restore Snapshot
All target volumes of Volume Group(BM) can be restored from snapshots. To restore from a snapshot, follow these steps.
- All Services > Storage > Block Storage(BM) Click the menu. 1. Navigate to the Service Home page of Block Storage (BM).
- On the Service Home page, click the Volume Group(BM) menu. 2. Volume Group(BM) List Go to the page.
- On the Volume Group(BM) List page, click the resource to restore from a snapshot. 3. Navigate to the Volume Group(BM) Details page.
- Click the volume name of the volume added to the target volume. 4. Block Storage(BM) Details Navigate to the page.
- If there is a server added in the Connection Server item, connect to the server and then perform the disconnect operation (Umount, Disk Offline).
- On the Volume Group(BM) Details page, click the Snapshot List page. 6. Go to the Volume Group(BM) Snapshot List page.
- After checking the snapshot name and creation timestamp, click the More button of the snapshot you want to restore.
- Click the Restore button. 8. The snapshot recovery popup window opens.
- After checking the snapshot name and creation timestamp, click the Confirm button. 9. Restores the target volumes from a snapshot.
- Detailed Information Click the button. 10. Volume Group(BM) Details Navigate to the page.
- Click the volume name of the volume added to the target volume. 11. Block Storage(BM) Details Navigate to the page.
- If a server has been added in the Connection Server item, connect to the server and then perform the connection tasks (Mount, Disk Online).
- For more details, please refer to 서버 연결하기.
Caution
- Snapshot recovery must be performed while all target volumes on the connected server are disconnected (Umount, Disk Offline), and the recovered volume can be used after being reconnected (Mount, Disk Online).
- After the snapshot recovery is completed, all snapshots created after the snapshot used for recovery are deleted.
Create a recovery copy
You can create a recovery copy from a snapshot of the target volume. To create a snapshot recovery copy, follow the steps below.
- Click the All Services > Storage > Block Storage(BM) menu. 1. Go to the Service Home page of Block Storage (BM).
- On the Service Home page, click the Volume Group(BM) menu. 2. Go to the Volume Group(BM) List page.
- Volume Group(BM) List page, click the resource for which you want to create a recovery copy. 3. Volume Group(BM) Details Go to the page.
- On the Volume Group(BM) Details page, click the Snapshot List page. 6. Volume Group(BM) Snapshot List Navigate to the page.
- After confirming the Snapshot Name and Creation Timestamp, click the More button of the snapshot you want to create a restore point for.
- Click the Create Recovery Copy button. 8. The snapshot recovery creation popup opens.
- After entering Prefix, click the Generate button. 9. A popup window notifying the creation of a recovery copy opens.
- The recovery copy’s name is generated as the entered Prefix value + original Block Storage name.
- Click the Confirm button. 10. The recovery copy creation request has been completed.
Caution
- Only one recovery copy can be created per original.
- A recovery copy is a separate volume created with the same capacity as the original, and it incurs additional costs.
Delete snapshot
You can select a snapshot and delete it. To delete a snapshot, follow these steps.
- All Services > Storage > Block Storage(BM) Click the menu. 1. Go to the Service Home page of Block Storage (BM).
- On the Service Home page, click the Volume Group(BM) menu. 2. Go to the Volume Group(BM) List page.
- On the Volume Group(BM) List page, click the resource to delete the snapshot. 3. Volume Group(BM) Details Navigate to the page.
- Click Snapshot List. 4. Go to the Volume Group (BM) Snapshot List page.
- After checking the Snapshot name and Creation time, click the More button of the snapshot you want to delete.
- Click the Delete button. 6. Snapshots are removed on the Snapshot List page.
Reference
When using replication, snapmirror files cannot be deleted.
Volume Group(BM) Using Replication
The created Volume Group (BM) can be synchronized at periodic, consistent points after creating a replica in another location. You can perform tasks on the Volume Group(BM) Details page and the Replication page.
Create Clone
You can create a replicated Volume Group and volumes at a different location.
guide
Clones and recovery copies cannot create replicas.
To create a copy, follow these steps.
Click the All Services > Storage > Block Storage(BM) menu. 1. Navigate to the Service Home page of Block Storage (BM).
On the Service Home page, click the Volume Group(BM) menu. 2. Volume Group(BM) List Navigate to the page.
Volume Group(BM) List page, click the resource for which you want to create a replica. 3. Volume Group(BM) Details Navigate to the page.
Click the Create Clone button. 4. Create Clone popup window opens.
After entering the information for creating a clone, click the Create button. 5. Creates a replica Block Storage volume with the same Volume Group and disk type as the replica.
| Category | Required | Detailed description |
|---|
| Replication Policy | Required | Select replication policy- Within region: Create replication in the same region’s Availability Zone
- Cross-region: Create replication in an Availability Zone of another region
|
| Clone location | Required | Select the location to create the replica- Region: Choose a location different from the original Block Storage(BM) volume
- Selection required only when creating replication between regions
- Availability Zone: Select the Availability Zone for the replica
|
| Clone Volume Group name | Required | Start with a letter and use letters, numbers, and special characters (-) to input 3~28 characters |
| Replication Block Storage Name Prefix | Required | Start with an English letter and enter 3 to 28 characters using English letters, numbers, and special characters (-)- A replica Block Storage (BM) is created with a volume name of ‘Replica Block Storage name Prefix + Original Block Storage volume name’
|
| Replication cycle | Required | Select from 5 minutes, 1 hour, daily, weekly, or monthly- Weekly: every Sunday 23:59:00
- Monthly: 1st day 23:59:00
|
Table. Replication creation information items
On the Block Storage(BM) Details page, click the Replication tab, then verify the replication information you created.
- When selecting the volume name of the source or replica, you are taken to the volume’s Block Storage(BM) Details page.
Reference
- When creating a replica in a Volume Group, a replica Volume Group and Block Storage (BM) are created.
- The replica Block Storage has the same disk type as the original.
- You can create one replica per Volume Group, and inter‑region replication incurs additional data transfer charges.
Edit Replication Policy
You can change the replication status by modifying the replication policy.
Caution
During replication, you cannot modify the replication interval and replication policy.
To modify the replication policy, follow these steps.
- Click the All Services > Storage > Block Storage(BM) menu. 1. Go to the Service Home page of Block Storage (BM).
- On the Service Home page, click the Volume Group(BM) menu. 2. Go to the Volume Group(BM) List page.
- Volume Group(BM) list page, click the resource to modify the replication policy. 3. Volume Group(BM) Details Navigate to the page.
- Click the Duplicate page. 4. Volume Group(BM) Replication Navigate to the page.
- Click the Edit button of the Replication Policy. 5. Edit Replication Policy The popup window opens.
- Usage: Performs replication. * If Paused, it can be changed to Enabled.
- Pause: Temporarily stops replication. * If use is the case, it can be changed to pause.
- Delete: Delete the replica. * If it is Paused, you can modify it to Delete, and after deletion, you cannot use replication again.
- On the Volume Group(BM) Replication page, check the modified Replication Policy.
Caution
- When deleting a policy, please note the following.
- After the policy is deleted, replicas are not switched back to the original and cannot be created.
- After deleting the policy, you cannot connect to existing replicas and can only create new replicas.
- Data stored only in the replica after pausing will be deleted if replication is used again.
- When using a replication policy, replicas are in read (Read only) state and data cannot be modified. * Use replication after Umount on all connected resources.
Edit replication cycle
You can change the synchronization interval between the primary and replica by modifying the replication interval.
Caution
During replication, you cannot modify the replication interval and replication policy.
To modify the replication interval, follow these steps.
- Click the All Services > Storage > Block Storage(BM) menu. 1. Go to the Service Home page of Block Storage (BM).
- On the Service Home page, click the Volume Group(BM) menu. 2. Volume Group(BM) List Go to the page.
- Volume Group(BM) List page, click the resource to modify the replication interval. 3. Volume Group(BM) Details Navigate to the page.
- Click the Duplicate page. 4. Navigate to the Volume Group(BM) Replication page.
- Click the Edit button of the Replication Cycle. 5. Edit Replication Cycle The popup window opens.
- Replication interval: Please select from 5 minutes, 1 hour, daily, weekly, monthly. * Replication is performed at the following intervals.
- Daily: Every day 23:59:00
- Weekly: Every Sunday 23:59:00
- Monthly: the 1st of each month 23:59:00
- On the Volume Group(BM) Replication page, check the modified replication interval.
Volume Group(BM) Cancel
You can delete an unused Volume Group (BM).
Volume Group (BM) has no separate termination procedure, and it is automatically deleted when you disconnect all volumes in the target volume item.
Caution
Please note that it cannot be recovered after cancellation.