This is the multi-page printable view of this section. Click here to print.
Backup
- 1: Overview
- 2: How-to guides
- 2.1: Instant Backup
- 2.2: Restore
- 2.3: Using Backup Agent
- 2.4: Install Backup Agent
- 2.5: Use Replication
- 3: API Reference
- 4: CLI Reference
- 5: Release Note
1 - Overview
Service Overview
Backup is a service that backs up and recovers in case of an emergency the user’s data in a safe manner.
Since a backup policy includes the backup target, frequency, retention period, etc., users set a backup plan according to their business environment and requirements.
Features
- Backup Scope: Providing optimal backup and recovery services tailored to various business purposes, ensuring customers’ important data is safely preserved.
- Flexible Policy Configuration: You can set backup policies based on the usage environment and data importance. Users select backup targets and types, and specify retention periods and schedules.
- Backup Network: We minimized potential service impact during backup by using a backup network connection. The backup system and network block unauthorized access through permission management.
- Remote backup: Agentless backup can store backup copies at a different location. If a failure or disaster occurs at the backup site, you can recover using the backup copies stored at the other location.
- Replication: Agent backup can replicate the same backup to another location for storage. The schedule and retention period are set the same as the original, and in case of a failure or disaster at the backup location, recovery can be performed using the backup copy stored at the other location.
Configuration diagram
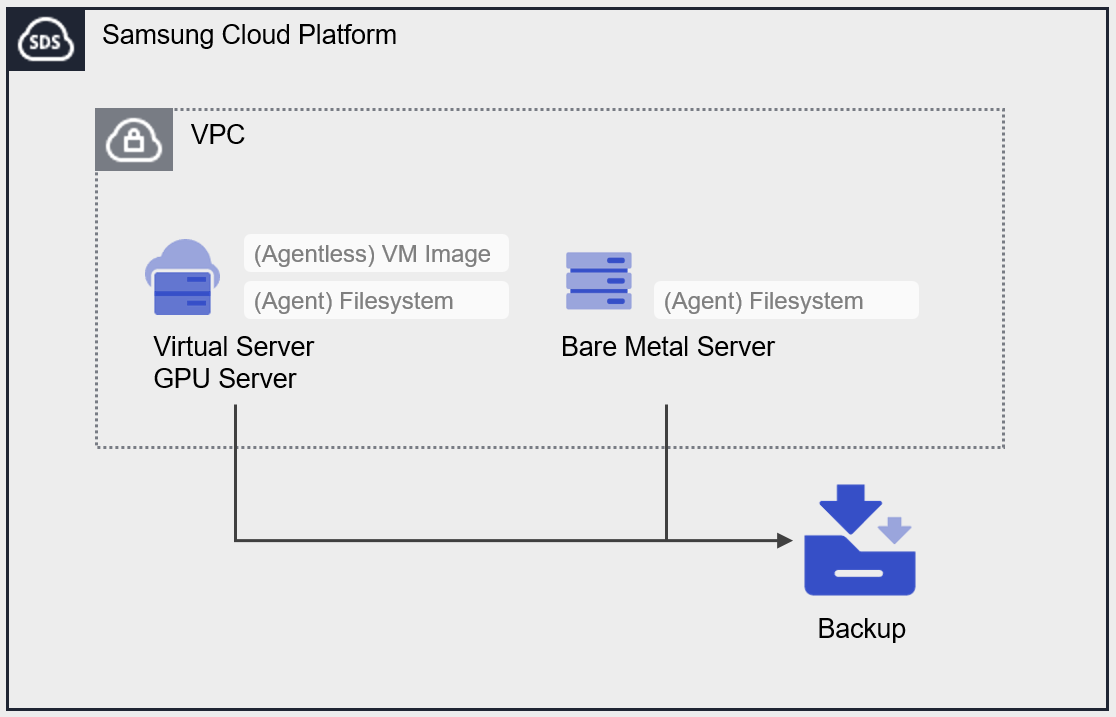
Provided features
Backup provides the following features.
- Backup target: The user can select the target server for which they want to obtain a backup.
- Backup Save: You can select the storage location for the backup.
- Encryption: AES-256 algorithm encryption is applied.
- Retention Period: You can set the retention period for backups. Backups whose retention period has elapsed are automatically deleted.
- Schedule: This is the automatic backup generation interval.
- Recovery: You can select a backup created at the desired point in time to restore resources.
Component
Backup provides a scheduling feature that automatically creates backup copies at predefined intervals and times. Users set retention periods and other parameters to ensure they can obtain backups from the desired point in time, and depending on the backup target and type, agent configuration may be required.
Backup type
Provides Agentless Backup and Agent Backup, and you can select based on the backup target.
- Agentless Backup: You can back up by creating a Backup service without configuring a separate agent. VM image backups of Virtual Server and GPU Server are considered Agentless Backup.
- Agent Backup: Before creating a Backup service, you need to create a Backup Agent and configure the Agent on the server you want to back up. This applies to filesystem backups.
Backup Category
- Full Backup: Backs up all data.
- Incremental Backup: Backs up data that has changed since the previous backup.
Schedule
Backups are automatically created according to the generation interval set by the user. You can schedule up to 1 Full Backup and up to 6 Incremental Backups.
When using the Immediate Backup feature, you can create a backup at a specific point in time desired by the user, in addition to the scheduled backups.
The backup intervals that can be configured in the schedule are as follows.
Daily: Start Time Select
Every week: day, start time select
Monthly: Week, Day of week, Start time selection
- Start Time: hour (1~23), minute (00, 30) select
- Day: Monday, Tuesday, Wednesday, Thursday, Friday, Saturday, Sunday Select
- Week: 1, 2, 3, 4, select the final week
Retention period
You can set the retention period for backups created through the Backup service.
The retention period can be selected and applied from 2 weeks (14 days), 1 month (31 days), 3 months (93 days), 6 months (186 days), or 1 year (365 days).
Preceding Service
This is a list of services that must be pre‑configured before creating the service. Please refer to the guide provided for each service for details and prepare in advance.
| Service Category | Service | Detailed description |
|---|---|---|
| Compute | Virtual Server | Virtual server optimized for cloud computing |
| Compute | Bare Metal Server | High-performance physical server used without virtualization |
2 - How-to guides
Users can enter the required backup information and select detailed options through the Samsung Cloud Platform Console to create a service.
Create Backup
You can create and use a Backup service from the Samsung Cloud Platform Console.
- If you back up the OS of a Virtual Server or GPU Server using Agent Backup, you can use the required data after restoring additional storage.
- You can obtain an OS backup by utilizing the Image creation feature of Virtual server and GPU Server.
To create a backup, follow these steps.
All Services > Storage > Backup Click the menu. 1. Go to the Service Home page of Backup.
On the Service Home page, click the Create Backup button. 2. Go to the Create Backup page.
In the Service Information Input area, enter the Backup name and then select the Backup type. Enter the information required to create the service, and select detailed options.
Category required statusDetailed description Backup name Required Enter Backup name - Enter using letters and numbers, 3 ~ 30 characters
- Cannot be modified after service creation
Backup type Required Select backup type - (Agentless) VM Image: Use backup service without an agent
- (Agent) Filesystem: Configure the agent on the target server, then use the backup service
- Cannot be modified after service creation
Table. Backup service Backup name and type inputIn the Service Information Input area, enter the information required for the selected Backup type and select detailed options.
- If the backup type is (Agentless) VM Image
Category required statusDetailed description Backup Save Required Select storage location for Agentless Backup - One Backup service can be created per storage location
- Servers in the Korea South (kr-south) region can select only the same location
- Cannot modify after service creation
Backup target Required After clicking the Target Server button, in the Select Backup Target popup, select the backup target server - Select one pre‑created server from the Virtual Server or GPU Server service
- For GPU Server, the target server location and backup storage location must be identical
- Cannot be modified after the service is created
Encryption - Basic encryption is applied and cannot be modified. Retention period Required Select the storage period for the recovery target (backup) - 2 weeks (14 days), 1 month (31 days), 3 months (93 days), 6 months (186 days), 1 year (365 days)
Schedule Selection Set the automatic backup generation interval - You can configure 1 Full Backup and up to 6 Incremental Backups
- Select Daily, Weekly, or Monthly
- Daily: Set the Start Time
- Weekly: Set the Day of Week and Start Time
- Monthly: Set the Week Number, Day of Week, and Start Time
- Week Number: Choose from 1, 2, 3, 4, or the last week
- Day of Week: Choose from Mon, Tue, Wed, Thu, Fri, Sat, Sun
- Start Time: Select in 30‑minute increments (00–23 hours, 00/30 minutes)
Table. Backup Service (Agentless) VM Image Information Input Items - When the backup type is (Agent) Filesystem
Category required statusDetailed description Availability Zone Required Required Backup target Required After clicking the Target Server button, in the Backup Target Selection popup, select the Backup target server - Agent: Select one pre‑created server from the Virtual Server, GPU Server, Bare Metal Server service
- Cannot be modified after service creation
Backup replication Selection Selection of replication option and location for Agent Backup - Replication can be set only when creating the Backup service
- When used, a Backup identical to the original (Backup name, schedule, retention period) is created at the replication location
- The South Korea (kr-south) region is not available
- Cannot be modified after service creation
Filesystem Required Set the backup target Filesystem - All can be checked, or you can enter a specific Filesystem name
- Backup is not possible in the following situations
- When the Filesystem in use by the operating system is not entered correctly
- When the Filesystem is already registered in another backup policy
- If it is a File Storage volume
/dev/zero,/dev/null
- When it contains the following special characters for each operating system
- Linux:
*<>\
- Linux:
Encryption Selection Select whether to use encryption - Cannot be modified after service creation
Retention period Required Select the storage period for the recovery target (backup) - 2 weeks (14 days), 1 month (31 days), 3 months (93 days), 6 months (186 days), 1 year (365 days)
Schedule Selection Set the automatic backup generation interval - You can configure 1 Full Backup and up to 6 Incremental Backups
- Select Daily, Weekly, or Monthly
- Daily: Set the Start Time
- Weekly: Set the Day of Week and Start Time
- Monthly: Set the Week Number, Day of Week, and Start Time
- Week Number: Choose from 1, 2, 3, 4, or the last week
- Day of Week: Choose from Mon, Tue, Wed, Thu, Fri, Sat, Sun
- Start Time: Select in 30‑minute increments (00–23 hours, 00/30 minutes)
Table. Backup Service (Agent) Filesystem Information Input ItemsCaution- File Storage volumes cannot be backed up. * Therefore, the added File Storage is excluded from Backup.
- Agent Backup applies server-side encryption based on the AES-256 algorithm when encryption is selected, which may cause a performance degradation of approximately 20 ~ 30%.
- If the backup type is (Agentless) VM Image
Additional Information Input in this area, enter or select the required information.
Category required statusDetailed description tag Selection Add Tag - Up to 50 per resource can be added
- Add Tag button after clicking, enter or select Key, Value values
Table. Backup service additional information input fieldsSummary Check the detailed information and estimated billing amount generated in the panel, and click the Create button.
When the popup notifying creation opens, click the Confirm button.
- When creation is complete, check the resources you created on the Backup List page.
- The initial backup is created as a Full Backup regardless of the request details.
- When you choose the Backup storage or Backup replication location in a different region, additional data transfer fees apply.
- When creating or terminating a Virtual, GPU Server, it may take approximately 180 minutes for the backup target list to be updated.
- Virtual Server’s (Agentless) VM Image backup can be performed to a remote location by selecting a storage location (excluding GPU Server).
- To create a remote backup, set up the Backup service at the location where the target Backup server is created. * Select the remote location in the Backup Save item.
- Backup target can create one Backup service per region. * It is possible to ensure reliability against failures and disasters by creating Backup services in two or more regions.
- To optimize backup and recovery speed, set the backup storage location to be the same as the target server’s location.
Backup View detailed information
The Backup service can view and modify the entire resource list and detailed information. Backup Details page consists of Details, Schedule, Backup History, Recovery Targets, Recovery History, Replication, Tags, Job History tabs.
To view detailed information about the Backup service, follow these steps.
- All Services > Storage > Backup Click the menu. 1. Go to the Service Home page of Backup.
- Click the Backup menu on the Service Home page. 2. Go to the Backup List page.
- On the Backup list page, click the resource to view detailed information. 3. Go to the Backup Details page.
- Backup Details page displays status information and additional feature information, and consists of Details, Schedule, Backup History, Recovery Target, Recovery History, Replication, Tags, Job History tabs.
Category Detailed description Backup status Backup status information - Creating: Creating
- Available: Creation complete
- Deleting: Service termination in progress
- Editing: Changing settings
- Error: Abnormal state
- Error Deleting: Abnormal state during deletion
- Restoring: Restoring
Immediate Backup Immediately create a backup at the time of creation - For more details about instant Backup, see 즉시 Backup하기
Service cancellation Cancel service button Table. Status information and additional functions
- Backup Details page displays status information and additional feature information, and consists of Details, Schedule, Backup History, Recovery Target, Recovery History, Replication, Tags, Job History tabs.
Detailed Information
Backup list page lets you view detailed information of the selected resource and edit the information if needed.
| Category | Detailed description |
|---|---|
| service | Service group |
| Resource Type | Resource Type |
| SRN | Unique resource ID in Samsung Cloud Platform |
| Resource name | resource name
|
| Resource ID | Service’s unique resource ID |
| Constructor | User who created the service |
| Creation date and time | Service creation date and time |
| Modifier | User who modified the service |
| Modification date and time | Service modification date and time |
| Backup name | Backup name
|
| Availability Zone | Target and Backup storage location
|
| Backup Save | Backup storage location
|
| Backup type | Backup types related to Agent configuration |
| Category | Original status identification information for duplication |
| Backup target | Backup target server
|
| Retention period | Retention period of the recovery target (backup)
|
| Filesystem | Backup target FileSystem information
|
| Encryption | Whether to use encryption |
Schedule
Backup List page allows you to view the automatic backup schedule of the selected resources.
| Category | Detailed description |
|---|---|
| Modify schedule | Schedule edit button
|
| Schedule name | Schedule name
|
| Backup type | Full, Incremental Backup distinction |
| Backup frequency | User-configured automatic backup creation interval |
- The schedule is based on Asia/Seoul (GMT +09:00).
- The schedule can be set to one Full Backup and up to six Incremental Backups.
- If the status is Available, the schedule can be modified.
- The schedule of the replica is the same as the original and can be viewed in the original.
- If the original is deleted, the replica’s schedule will be removed.
- If the Backup server is deleted, the Backup schedule will also be deleted. * At this point, the backup is retained and can be utilized during recovery.
Backup history
On the Backup List page, you can view the immediate backup and scheduled backup execution history of the selected resources.
| Category | Detailed description |
|---|---|
| Schedule name | Schedule name
|
| Backup timestamp | Backup start time |
| Completion time | Backup completion time |
| status | Backup status information (success/failure/in progress) |
| Cancel backup | Cancel button while backup is in progress
|
- Backup and completion times are based on Asia/Seoul (GMT +09:00).
- Queries can be performed based on the backup timestamp within a maximum of 30 days.
- When a backup fails, you can receive a notification and check it in Management > Logging&Audit.
- In the replica, the Cancel Backup button is not displayed.
- The backup history for both the original and the replica is provided by the original.
- Click the Excel Download button at the top of the list to download the retrieved Backup history list as an Excel file.
Restore target
On the Backup List page, you can view the recovery target (backup) of the selected resource.
| Category | Detailed description |
|---|---|
| Schedule | Schedule name
|
| Backup timestamp | Backup start time |
| Retention period | Retention period of the recovery target
|
| capacity | Capacity of the recovery target |
| Additional features > More | Management button for the recovery target
|
- Backup time is based on Asia/Seoul (GMT +09:00).
- Recovery can be performed using only Incremental Backup without a Full Backup.
- Queries can be performed based on the backup timestamp within a maximum of 30 days.
- You can click the Excel Download button at the top of the list to download the retrieved recovery target list as an Excel file.
- If the backup target server is terminated, you can verify the target server through the schedule name on the recovery target page.
Recovery History
Backup list page allows you to view the recovery execution history of the selected resources.
| Category | Detailed description |
|---|---|
| Schedule | Schedule name
|
| Recovery server name | The name of the server created through recovery |
| Backup timestamp | Backup start time of the recovery target used for recovery |
| Recovery date and time | Recovery start time |
| Recovery completion time | Recovery completion time |
| status | Recovery status information (success/failure/in progress) |
- Backup and recovery times are based on Asia/Seoul (GMT +09:00).
- Queries can be performed based on the recovery timestamp within a maximum of 30 days.
- Click the Excel Download button at the top of the list to download the retrieved recovery history list as an Excel file.
Replication
On the Backup List page, you can view the replication information of the selected resources.
- Replication tab information is provided only when you set Agent Backup and Backup Replication to Enabled when applying for the Backup service.
- (Agentless) VM Iamge Backup type does not provide the replication feature (Replication tab), and when applying for the service, you can select a Backup storage location to store the backup copy in a different location.
| Category | Detailed description |
|---|---|
| Replication Policy | User-configured replication policy
|
| Clone information | Volume information of the original and replica
|
Tag
Backup List page allows you to view the tag information of selected resources, and you can add, modify, or delete them.
| Category | Detailed description |
|---|---|
| Tag list | Tag list
|
Operation History
On the Backup List page, you can view the operation history of the selected resources.
| Category | Detailed description |
|---|---|
| Task History List | Resource Change History
|
Backup Resource Management
If you need to modify the schedule or retention period of a created backup, cancel a backup, or delete a recovery target, you can perform the tasks on the Backup Details, Schedule, Recovery Target pages.
Edit Retention Period
You can modify the backup retention period. To modify the retention period, follow these steps.
- All Services > Storage > Backup Click the menu. 1. Go to the Service Home page of Backup.
- Click the Backup menu on the Service Home page. 2. Go to the Backup List page.
- On the Backup List page, click the resource whose retention period you want to modify. 3. Navigate to the Backup Details page.
- Click the Edit button for Retention Period. 4. Edit Retention Period The popup window opens.
- Select the retention period and click the Confirm button.
- Choose from 2 weeks (14 days), 1 month (31 days), 3 months (93 days), 6 months (186 days), or 1 year (365 days).
- Check the modified retention period on the Backup Details page.
- Click the Recovery Target page. 7. Check the updated retention period for the recovery targets.
- Agentless Backup: When the retention period is modified, the retention period of all existing backup copies will be changed uniformly.
- Agent Backup: After modifying the retention period, the generated backup will have the updated retention period applied.
Modify Filesystem
You can modify the registered Filesystem.
To modify the Filesystem, follow the following procedure.
- All Services > Storage > Backup Click the menu. 1. Go to the Service Home page of Backup.
- On the Service Home page, click the Backup menu. 2. Go to the Backup List page.
- On the Backup List page, click the resource whose retention period you want to modify. 3. Navigate to the Backup Details page.
- Click the Edit button for Filesystem. 4. Filesystem Edit a popup window opens.
- Modify the Filesystem and click the Confirm button.
- After entering the Filesystem to add, click the Add Target button. * The filesystem is added to the list.
- Click the X button of the Filesystem you want to delete from the Filesystem list. * The specified Filesystem will be removed from the list.
- A Filesystem with the same name, or a Filesystem registered in another Backup, cannot be added.
- /dev/zero, /dev/null cannot be added to a Filesystem.
- Recovery is impossible when the following special characters are included, depending on the operating system.
- Linux:
:*<>|not allowed - Windows:
/?*<>|not allowed
- Linux:
Edit Schedule
You can modify the backup schedule.
- For replicas, the schedule cannot be modified.
- It is recommended to configure periodic Full Backups to optimize backup and recovery performance.
To modify the schedule, follow these steps.
- All Services > Storage > Backup Click the menu. 1. Go to the Service Home page of Backup.
- Click the Backup menu on the Service Home page. 2. Go to the Backup List page.
- On the Backup List page, click the resource to edit the schedule. 3. Backup Details navigate to the page.
- Click the Schedule page. 4. Go to the Backup schedule page.
- Click the Edit Schedule button. 5. Edit Schedule popup opens.
- Select the schedule and click the Confirm button.
- Please select daily, weekly, monthly.
- Daily: Set the Start time.
- Weekly: Please set the day, start time.
- Monthly: Week, Day, Start Time.
- Week: 1, 2, 3, 4, you can select the final week.
- Day: You can choose from Monday, Tuesday, Wednesday, Thursday, Friday, Saturday, Sunday.
- Start Time: can be selected in 30‑minute intervals (00–23 hours, 00/30 minutes).
- Click the Add button to add a schedule, or click the X button to delete a schedule.
- The schedule is based on Asia/Seoul (GMT +09:00).
- The schedule can be set to one Full Backup and up to six Incremental Backups, and at least one Full Backup schedule must be registered.
- If the status is Available, the schedule can be modified.
- After modifying the schedule, the initial backup is created as a Full Backup regardless of the request details.
- If you modify the original, the changes will also be applied to the copy.
Cancel backup
You can cancel an ongoing backup. To cancel the backup, follow these steps.
- All Services > Storage > Backup Click the menu. 1. Go to the Service Home page of Backup.
- Click the Backup menu on the Service Home page. 2. Go to the Backup List page.
- On the Backup List page, click the resource to cancel the backup. 3. Navigate to the Backup Details page.
- Click the Backup History page. 4. Go to the Backup History page.
- Check the backup you want to cancel. 5. When the Backup status is in progress, Backup cancellation is possible.
- Click the Backup Cancel button. 6. Backup Cancel The popup window opens.
- After checking information such as Backup name, Backup date/time, click the Confirm button. 7. The backup is canceled.
Delete recovery target
You can delete the generated recovery target (backup copy). To delete the recovery target, follow these steps.
- All Services > Storage > Backup Click the menu. 1. Go to the Service Home page of Backup.
- Click the Backup menu on the Service Home page. 2. Go to the Backup List page.
- On the Backup list page, click the resource to delete the recovery target. 3. Go to the Backup Details page.
- Click the Recovery Target page. 4. Navigate to the Backup recovery target page.
- After selecting all items you want to delete, click the Delete button. 5. Delete popup window opens.
- After verifying Backup schedule name, Backup date/time, authenticate via the logged-in user’s mobile phone.
- When deleting more than one item, you can only view the count of items to be deleted in the popup window.
- When authentication is complete, click the Confirm button. 7. The recovery target will be deleted.
- After the deletion is complete, check on the Backup recovery target page whether the target has been deleted.
- You can delete two or more recovery targets using multiple selection.
- Deleting the recovery target of the original does not delete the replica.
Terminate Backup
You can cancel unused Backup to reduce operating costs. However, if you terminate the service, the running service may be discontinued immediately, so you should proceed with the termination only after fully considering the impact that may arise from the service interruption.
- All saved backup data and history will be deleted. * Be careful, as data cannot be recovered after termination.
- If the status is Available, Error, or Error Deleting, it can be terminated.
- If you cancel the original Backup service, the replica’s schedule will be deleted, but the stored backup data will remain.
- Agent Backup that uses replication cannot be disabled. * After changing the replication policy to unused in the source, cancel it.
To cancel the backup, follow these steps.
- All Services > Storage > Backup Click the menu. 1. Go to the Service Home page of Backup.
- Click the Backup menu on the Service Home page. 2. Go to the Backup List page.
- On the Backup List page, select the resource to cancel and click the Service Cancellation button.
- Authenticate using the logged-in user’s mobile phone. 4. If verification is completed, the service will be terminated.
- After termination is complete, check on the Backup List page whether the resource has been terminated.
2.1 - Instant Backup
You can perform an immediate backup at the current time on a generated backup regardless of any schedule settings. You can perform the operation on the Backup Details page.
Instant Backup
You can create a backup of the current point in time immediately. To perform an immediate backup, follow these steps.
- Click the All Services > Storage > Backup menu. Go to the Service Home page of Backup.
- On the Service Home page, click the Backup menu. You will be taken to the Backup List page.
- Backup List page, click the resource to perform the backup. You will be taken to the Backup Details page.
- Click the Instant Backup button. The Instant Backup popup opens.
- Click the Confirm button. It will perform a backup immediately.
- Click the Backup History page. Navigate to the Backup History page.
- Check the ongoing backup.
- If the status is Available, backup can be performed immediately.
- Immediate backup is performed as a full backup.
2.2 - Restore
You can perform a restore using the generated backup as the restore target (backup copy). You can perform tasks on the Backup recovery target page.
Recover VM Image
You can restore using the backup copy intended for recovery.
To recover, follow the steps below.
Click the All Services > Storage > Backup menu. 1. Go to the Service Home page of Backup.
On the Service Home page, click the Backup menu. 2. Go to the Backup List page.
Backup List page, click the resource to perform the restore. 3. Backup Details page is accessed.
Click the Recovery Target page. 4. Navigate to the Backup recovery target page.
After checking the Schedule and Backup time, click the More button of the target you want to recover.
Click the Restore button. 6. Backup Recovery The popup window opens.
After reviewing the recovery information, enter the required information.
Category Required statusDetailed description Recovery information - Backup Basic Information: Backup Name, Backup Target, Backup Type, Backup Date/Time, Schedule Name Recovery location Essential For remote backups, select the recovery location (target server or backup location). Recovery server name Essential Enter the recovery server name using English letters, numbers, spaces, and special characters ( -_) within 63 charactersServer type Essential Set the server type Network Settings Essential Set the network of the recovery server - When recovering to the same location as the backup target server: no configuration needed
- When recovering to a different location from the backup target server: need to configure the recovery server’s VPC, standard Subnet, and local Subnet information
Security Group Select Configure Security Group for required access - Select button can be clicked to choose the recovery server’s Security Group
- If the Security Group is not configured, all connections will be blocked
Table. VM Image recovery itemsAfter reviewing the entered information, click Confirm.
Click the Recovery History page. 9. Navigate to the Backup Recovery History page.
Check the ongoing recovery tasks.
- If the status is Available, recovery is possible.
- Since the original Security Group, NAT IP, and Delete on termination settings are not restored, configure them after recovery.
- The original server’s Server Group is not applied to the recovery server.
- The restored server cannot use the Rebuild feature.
- During recovery, a new server is created, and the Block Storage type and Keypair are set to match the original.
Filesystem Restore
You can recover by using the backup copy to be restored.
When performing file-level recovery, also specify a file for the recovery location.
- Original location example:
/dir/test.txt - Recovery location example:
/dir_recovery/test.txt
- All Services > Storage > Backup Click the menu. 1. Go to the Service Home page of Backup.
- On the Service Home page, click the Backup menu. 2. Navigate to the Backup list page.
- On the Backup List page, click the resource to recover. 3. Navigate to the Backup Details page.
- Click the Recovery Target page. Backup 복구 대상 페이지로 이동합니다. 스케줄과 Backup 일시를 확인 후 복구하고자 하는 대상의 더보기 버튼을 클릭하세요. 복구 버튼을 클릭하세요. Backup 복구 팝업창이 열립니다. Backup 대상과 Backup 일시 등을 확인하세요.
- Click the Select Server button for the recovery target item. 8. Server Selection popup window opens.
- After selecting the server, click Confirm.
- Only servers that have been configured as Backup Agents can be selected among the servers created in the backup storage location.
- Only servers that use the same Backup Master and OS as the backup target server can be selected.
- Filesystem Check the Filesystem to recover from the list at the bottom of the item, then enter the recovery location.
- If you enter the same ‘Backup target server name’ in the top-level recovery location, the entire filesystem will be restored (e.g., source location: servername, recovery location: servername)
- Enter the exact name of the filesystem currently used on the OS.
- When /dev/zero or /dev/null is input, recovery is impossible.
- Recovery is impossible when the following special characters are included, depending on the operating system.
- Linux:
:*<>| - Windows:
/?*<>|
- Linux:
- When Overwrite is selected, files with the same type and name are overwritten. * If you do not select it, the file will be excluded from recovery.
- After reviewing the entered information, click Confirm.
- Click the Recovery History page. 12. Navigate to the Backup Recovery History page.
- Check the ongoing recovery tasks.
2.3 - Using Backup Agent
Users can create and manage the Agent required to use Filesystem backup in the Backup service.
Create Backup Agent
You can create and use the Backup Agent service in the Samsung Cloud Platform Console.
To create a Backup Agent, follow the steps below.
Click the All Services > Storage > Backup menu. 1. Go to the Service Home page of Backup.
On the Service Home page, click the Backup Agent menu. 2. Navigate to the Backup Agent list page.
On the Backup Agent List page, click the Create Service button. You will be taken to the Create Backup Agent page.
On the Backup Agent Creation page, enter the information required to create the service.
- In the Service Information Input area, enter or select the required information.
Category RequiredDetailed description Availability Zone Essential Select Availability Zone location Target server Required Click the Select button to choose the server for creating a Backup Agent - Virtual Server: 1 unit, GPU Server: 1 unit, Bare Metal Server: up to 100 units
Subnet Required Set Backup IP and Port information to be created in the Subnet - General Subnet Name: Select one General Subnet created in the VPC connected to the Target Server
- Target Server is selected when it is a Virtual Server or GPU Server
Table. Backup Agent Service Information Input Items - In the Additional Information Input area, enter or select the required information.
Category Required statusDetailed description tag Select Add tag - Up to 50 per resource can be added
- After clicking the Add tag button, enter or select Key, Value values
Table. Backup service additional information input fields
- In the Service Information Input area, enter or select the required information.
Summary Check the detailed information generated in the panel, and click the Done button.
When the popup notifying creation opens, click the Confirm button.
- When creation is complete, check the created resources on the Backup Agent List page.
- After creating the Backup Agent, connect to the target server and install the Agent.
- If the connection status on the Agent installation and Backup Agent details screen is confirmed as successful, you can create a Backup service to back up the filesystem.
- For performance optimization, use the Subnet and Port selected in the Backup Agent exclusively for backup.
- After creating the Bacup Agent service, access the backup target server and install the Backup Agent.
- For detailed information about installing the Backup Agent, please refer to Backup Agent 설치하기.
- After installation is complete, check the connection status on the Backup Agent Details page.
Backup Agent Check detailed information
The Backup Agent service can view and edit the full resource list and detailed information. Backup Agent Details page consists of Details, Tags, Job History tabs.
To view detailed information about the Backup Agent service, follow these steps.
- Click the All Services > Storage > Backup menu. 1. Go to the Service Home page of Backup.
- On the Service Home page, click the Backup Agent menu. 2. Go to the Backup Agent List page.
- On the Backup Agent List page, click the resource you want to view detailed information for. 3. Go to the Backup Agent Details page.
- The Backup Agent Details page displays status information and additional feature information, and consists of Details, Tags, Job History tabs.
Category Detailed description Backup Agent status Backup Agent status information - Creating: In progress
- Available: Creation completed
- Deleting: Service termination in progress
- Error: Abnormal state
Service cancellation Button to cancel the service Table. Status information and additional features
- The Backup Agent Details page displays status information and additional feature information, and consists of Details, Tags, Job History tabs.
Detailed Information
Backup Agent 목록 페이지에서 선택한 자원의 상세 정보를 확인하고, 필요한 경우 정보를 수정할 수 있습니다.
| Category | Detailed description |
|---|---|
| service | Service name |
| 자원 유형 | 자원 유형 |
| SRN | Unique resource ID in Samsung Cloud Platform |
| Resource name | Resource name
|
| Resource ID | Service’s unique resource ID |
| Constructor | User who created the service |
| Creation date and time | Service creation date and time |
| Modifier | User who modified the service |
| Modification date and time | Service modification date and time |
| Backup Agent name | Backup Agent name |
| Availability Zone | Availability Zone information |
| Number of backup policies | Number of Backup services connected to the backup target server |
| Backup Master | Management server (Backup Master) name and connection IP |
| Installation file URL | Agent installation file download location |
| Backup Media | Management server (Backup Media) name and connection IP |
| Target server | Backup Agent target server information
|
태그 {#tag}
Backup Agent 목록 페이지에서 선택한 자원의 태그 정보를 확인하고, 추가하거나 변경 또는 삭제할 수 있습니다.
| Category | Detailed description |
|---|---|
| Tag list | Tag list
|
작업 이력 {#job}
Backup Agent 목록 페이지에서 선택한 자원의 작업 이력을 확인할 수 있습니다.
| Category | Detailed description |
|---|---|
| Task History List | Resource Change History
|
Backup Agent 해지하기 {#terminate} 사용하지 않는 Backup Agent를 해지할 수 있습니다.
- Available, can be terminated only when in Error state.
- If a Backup service is connected to the Backup Agent, it cannot be terminated.
- Backup policy count is the number of Backup services connected to the Backup Agent. * After terminating all connected backups, terminate the Backup Agent.
To cancel the Backup Agent, follow these steps.
- All Services > Storage > Backup menu, click it. 1. Go to the Service Home page of Backup.
- On the Service Home page, click the Backup Agent menu. 2. Go to the Backup Agent list page.
- Backup Agent List On the page, select the resource to cancel and click the Cancel Service button.
- After the termination is complete, check on the Backup Agent List page whether the resource has been terminated.
2.4 - Install Backup Agent
To install the Backup Agent, you must first apply for the Backup Agent service. Please refer to Backup Agent 생성하기.
- Backup Agent Apply
- Install Backup Agent
- Register backup in the Backup service –>
To use an Agent-based backup, you must access the target server and install the Backup Agent. After installing the Backup Agent, register a backup through the Backup service.
Pre‑setup work
To install the Backup Agent, we check the installation space, download the Backup Agent file, verify Backup Master/Agent information, and perform other preparatory tasks.
Check Backup Agent installation space
The required storage for installing the Backup Agent is as follows.
| OS type | Path | Required capacity | Remarks |
|---|---|---|---|
| Linux | /tmp (temporarily used during installation) | 3 GB | When /usr space is insufficient, a separate space can be linked #ln -s separate space /usr/openv |
| Linux | /opt | 3 GB | When /usr space is insufficient, a separate space can be linked #ln -s separate space /usr/openv |
| Linux | openv installation path (typically /usr) | 3~5 GB | When /usr space is insufficient, a separate space can be linked #ln -s separate space /usr/openv |
| Windows | Veritas installation path (usually C:\) | 3~5 GB | If there is insufficient space on C:, you can install to another drive. |
| - | Installation file | 10 GB |
Download Backup Agent installation file
To download the Backup Agent installation file, follow these steps.
- All Services > Storage > Backup Click the menu. 1. Go to the Service Home page of Backup.
- On the Service Home page, click the Backup Agent menu. 2. Go to the Backup Agent list page.
- On the Backup Agent List page, click the resource to view detailed information. 3. Go to the Backup Agent Details page.
- After checking the installation file URL, go to that URL. 4. You can download the Backup Agent installation file.
Linux OS
If you are using Linux OS, refer to the following example and enter the command.
# cd [다운로드할 위치]
# curl -O 설치파일 → 설치 파일에 복사한 설치 파일 다운로드 URL을 넣어주세요.
Windows OS
If you are using Windows OS, you can download using a web browser or Windows PowerShell.
When using an internet browser
After launching the web browser, enter the copied installation file download URL into the address bar. After navigating to the download screen, the download will start.
- It may take some time to navigate to the download screen.
- If you do not go to the download screen, download using Windows PowerShell.
When using Windows PowerShell
- Right-click the Windows Start icon and run Command Prompt (Admin).
- Run Windows PowerShell in administrator mode.
- Please enter the command by referring to the following example.
# wget "다운로드 URL" -OutFile "저장할 파일명"
Check Backup Master and Agent information
To install the Backup Agent, you need the Backup Master and Agent information for routing configuration and host file registration. Backup Agent Details on the page, check the Backup Master IP, Backup IP, Gateway information. Please refer to View detailed information of Backup Agent.
Setting up Security Group (Linux/Window)
If it is a backup of a Virtual Server or GPU Server, you must configure the Security Group to communicate with the Backup Master. To set up a Security Group, check the backup information on the Backup Agent Details page and register it in the Security Group attached to the Server.
- IP: Backup Master IP
- Inbound / Outboud / (TCP) 1556, 13724 port
- Action: allow the connection
Register Backup Master information in the hosts file
To register Backup Master information in the hosts file, follow these steps.
- Open the host file using a file editing tool.
- Linux operating system: /etc/hosts
- Windows operating system: C:\Windows\System32\drivers\etc\hosts
- Open the hosts file and register the Backup Master and Backup Agent information (IP, name).
- You must append .scpbackup after the Backup Agent name as shown in the following example.
10.252.8.4 takre1p1bkm1
10.252.25.4 agent_tgdrhw.scpbackup
Adding a port for Backup Agent (when using Windows firewall)
If you are using the Windows firewall, you must add the Backup Agent port for communicating with the Backup Master to the Windows firewall.
The ports and settings to add to the Windows firewall are as follows.
- Inbound Rule: (TCP) 1556, 13724 port
- Action: allow the connection
- Profile: select all domain, private, public
Configure routing for communication with Backup Master
To communicate with the Backup Master, you must configure routing in the operating system.
Linux OS - CentOS/RHEL
Linux OS - To configure routing on CentOS/RHEL, follow the steps below.
- The IP, Gateway, and VLAN ID information for the Backup Master and Agent used in the routing configuration example are as follows.
- Backup Master IP: 10.242.8.4
- Backup IP (Agent IP): 10.252.25.4
- Gateway (Agent Gateway): 10.252.25.1
- vlan: 100
- vlan can be configured in the Config file of a Bare Metal Server. * For more details, refer to 로컬 Subnet 설정하기.
- Use the following command to check the backup network Interface information.
- ip a
- bash /usr/local/bin/ip.sh
- Set up routing using the nmcli command.
# nmcli connection NAME UUID TYPE DEVICE System eth0 abcdefghijklmnop ethernet eth0 Wired connection 1 cdefghijklmnopqr ethernet eth1 # nmcli con mod "Wired connection 1" +ipv4.routes "10.242.8.0/24 10.242.25.1" # nmcli device reapply eth1 Connection successfully reapplied to device 'eth1'. - Verify that the routing configuration has been applied correctly.
# telnet [Backup Master명] 1556
Linux OS - ubuntu
Linux OS - To set up routing on Ubuntu, follow these steps.
- The IP, Gateway, and VLAN ID information for the Backup Master and Agent used in the routing configuration example are as follows.
- Backup Master IP: 10.242.8.4
- Backup IP (Agent IP): 10.252.25.4
- Gateway (Agent Gateway): 10.252.25.1
- vlan: 100
- vlan can be configured in the Config file of a Bare Metal Server. * For detailed information, refer to 로컬 Subnet 설정하기.
- Use the following command to check the backup network Interface information.
- ip a
- bash /usr/local/bin/ip.sh
Open the 50-cloud-init.yaml file and configure routing.
# vi /etc/netplan/50-cloud-init.yaml (기존 내용에 routes 내용 추가)
  network:
  bonds:
  ...................... 생략
  ethernets:
  ...................... 생략
  vlans:
  bond.srv.100:
  addresses:
  ...................... 생략
  routes:
  - to:10.252.8.0/24
  via:10.252.25.1
  # netplan apply
Verify that the routing configuration has been applied correctly.
# telnet [Backup Master명] 1556
Windows OS
To set up routing in Windows OS, follow these steps.
- The IP, Gateway, and VLAN ID information for the Backup Master and Agent used in the routing configuration example are as follows.
- Backup Master IP: 10.242.8.4
- Backup IP (Agent IP): 10.252.25.4
- Gateway (Agent Gateway): 10.252.25.1
- ifindex: 100
- ifindex can be set in the Config file of a Bare Metal Server. * For more details, refer to 로컬 Subnet 설정하기.
- Right-click the Windows Start icon and run Command Prompt (Admin).
- Run Windows PowerShell in administrator mode.
- Use the ipconfig and Get‑NetAdapter commands to verify the backup network interface index (ifindex) settings.
# ipconfig /all → Agent IP에 할당된 interface name을 확인하세요.
# Get-NetAdapter → 위에서 확인한 interface name 참고해 interface index를 확인하세요.
Set up routing using the NetRoute command.
# Get-NetRoute -ifindex 100
# New-NetRoute -ifIndex 100 -DestinationPrefix 10.252.8.0/24 -NextHop 10.252.25.1
Verify that the routing configuration has been applied correctly.
# telnet [Backup Master명] 1556
Check whether the package is installed (when using RHEL 8)
If you are using RHEL 8, the libnsl package must be installed to install the Backup Agent.
- Use the following command to check whether the libnsl package is installed.
# rpm -qa | grep libnsl - If the libnsl package is not installed, install the package using the following command.
# yum install libnsl
Install Backup Agent
Install the Backup Agent appropriate for the operating system.
Linux OS
Follow the steps below to install the Backup Agent on Linux OS.
- After moving to the directory where the Backup Agent 10.1.1 installation file was extracted, change the permissions of the installation-related files.
# chmod 755 installs # chmod –R 755 NBClients - Run ./install.
- [root@bkclientlin ~]# ./install
- After the install description, when confirming whether to proceed with the installation, enter y and press the Enter key.
Do you wish to continue? [y,n] (y) y - When checking the installation progress status of Software on the client, enter y and press the Enter key.
Do you want to install the ~~~~~~~~~~~~ software for this client? [y,n] (y) y - When checking the Backup master server name, enter Backup Master name and press the Enter key.
Enter the name of the ~~~~~~ master server : bkmaster - When checking the client server configuration name, enter n and then input the Agent information.
- Agent information input required: Backup Agent name.scpbackup (e.g., agent_tgdrhw.scpbackup)
Would you like to use "bkclientlin" as the configured name of the ~~~~~~~ client? [y,n] (y) n agent_tgdrhw.scpbackup - Check the Master Server information and, if there are no issues, enter y.
Master server [bkmaster] reports the following CA Certificate fingerprints: SHA-256 Fingerprint: [BB:38:~~~~~~~~] SHA-1 Fingerpritn: [0D:E6:~~~~~~~] Is this correct [y,n] y ... Primary server [s-krw1a-dp-bk-msa] reports the following CA Certificate fingerprints: SHA-256 Fingerprint: [A0:C2:70:CA:4A:DA:DA:AF:6E:04:5D:87:38:B1:F0:89:A6:9A:7A:7B:F3:49:D8:5D:A9:9F:DD:55:70:4C:62:DB], SHA-1 Fingerprint: [4B:05:C3:21:8B:95:27:A5:5E:B7:D3:72:85:36:5B:CA:6F:18:BA:76]. Is this correct? [y,n] y ... Do you wish to proceed with installation even though NetBackup will not operate? [y,n] (n) y - When selecting the Java GUI and JRE option, enter 2. 8. Java GUI and JRE package installation are excluded.
Choose an option from the list below. 1) Include the Java GUI and JRE 2) Exclude the Java GUI and JRE Java GUI and JRE option: [1,2] (2) :2 Excluding the installation of Java GUI and JRE packages - Verify that the installation completed successfully.
Windows OS
To install the Backup Agent on Windows OS, follow these steps.
- After moving to the folder where the Backup Agent 10.1.1 installation file has been extracted, run the Setup.exe file with administrator privileges.
- If the installation archive contains an EEB directory in the
NB_10.4.0.1_ETXXXXXX_1format, you must perform the patch after installing the Backup Agent, following the steps below.- After the Backup Agent installation is complete, go to the
NB_10.4.0.1_ETXXXXXX_1folder. eebinstaller_XXXXXXX_1_AMD64.exeRun the file with administrator privileges.- If there are multiple files, install all of them.
- After the Backup Agent installation is complete, go to the
- After selecting the Client to install in the client selection popup, click the OK button.
- In the Vertias NetBackup popup window, select Yes. 3. The installation popup opens, and the installation steps are displayed on the left side of the popup.
- Welcome When the step description is displayed, click the Next button.
- License Agreement When the step description is displayed, select the Agree with the veritas Software License Agreement item, then click the Next button.
- If the Install Type step description is displayed, make sure the Install to the computer only option is checked, then select the Custom installation option. 6. After making your selection, click the Next button.
- Option When the step description is displayed, check the installation path and click the Next button. 7. Client option information is displayed.
- You can click the Change… button to change the installation path.
- After checking the Client Options information, click the Next button. 8. Log on information is displayed.
- After checking the Log on information, click the Next button.
- Safe Abort Option: If a system restart is required, this option aborts the installation (optional).
- When the System Name step description is displayed, enter the server environment information, then click the Next button. 10. Master Server information is displayed.
- Client Name: Enter the Agent information. * Backup Agent name.scpbackup (e.g., agent_tgdrhw.scpbackup)
- Master Server Name: Enter the Backup Master name.
- After checking the Master Server information, I recognize the fingerprint for this host. 11. Proceed with the certificate deployment. Please select an item. 11. After making your selection, click the Next button.
- Security When the step description appears, verify that the certificate deployment succeeded, then click the Next button.
- If the Install step description is displayed, review the Installation Summary and then click the Install button.
- When the installation is complete, click the Finish button.
Backup Agent status check
After the Backup Agent installation is complete, perform a communication test with the Backup Master and check the status.
Linux OS
To conduct a communication test with the Backup Master on Linux OS, follow these steps.
- After entering the following command, perform a communication test with the Backup Master and check the results.
- Command: # /usr/openv/netbackup/bin/bpclntcmd -pn
- An example of the communication test inspection results is as follows.
/usr/openv/netbackup/bin/bpclntcmd -pn
expecting response from server takre1p1bkm1
10.252.25.4 agent_tgdrhw.scpbackup 10.252.25.4 45789
- In the Samsung Cloud Platform Console, click the All Services > Storage > Backup menu. 2. Go to the Service Home page of Backup.
- On the Service Home page, click the Backup Agent menu. 3. Go to the Backup Agent list page.
- Backup Agent List page, click the resource to verify the communication test. 4. Go to the Backup Agent Details page.
- Click the Check Connection Status button in the Connection Status item. 5. When it communicates normally with Backup Master, Success is displayed.
- If an error such as certificate issuance failure occurs, execute the following command.
- Obtain Backup Master CA public certificate from the Agent:
/usr/openv/netbackup/bin/nbcertcmd -getcacertificate -server s-krw1a-dp-bk-msa - Authenticate the Agent (HostID) from the Backup Master:
/usr/openv/netbackup/bin/nbcertcmd -getcertificate -server s-krw1a-dp-bk-msa
- Obtain Backup Master CA public certificate from the Agent:
- If an error such as certificate issuance failure occurs, execute the following command.
- Verify that the result values of the Backup Master communication test performed on the OS and the Samsumg Cloud Platform Console are the same.
Windows OS
Follow these steps to conduct a communication test with Backup Master on Windows OS.
- After entering the following command, perform a communication test with the Backup Master and check the results.
- Command: # [설치경로]\Vertitas\NetBackup\bin\bpclntcmd.exe -pn
- An example of the communication test inspection results is as follows.
# C:\Vertitas\NetBackup\bin\bpclntcmd.exe -pn
expecting response from server takre1p1bkm1
agent_tgdrhw.scpbackup agent_tgdrhw.scpbackup 10.252.25.4 52096
- In the Samsung Cloud Platform Console, click the All Services > Storage > Backup menu. 2. Go to the Service Home page of Backup.
- On the Service Home page, click the Backup Agent menu. 3. Go to the Backup Agent list page.
- Backup Agent List page, click the resource to check the communication test. 4. Go to the Backup Agent Details page.
- Click the Check Connection Status button in the Connection Status item. 5. When it communicates normally with Backup Master, Success is displayed.
- Verify that the result values of the Backup Master communication test performed on the OS and the Samsumg Cloud Platform Console are the same.
Delete Backup Agent
If you do not use the Backup Agent, you must delete the Backup Agent installed on each operating system.
Linux OS
To uninstall the Backup Agent on Linux OS, follow these steps.
- Stop the Backup Agent service.
# /usr/openv/netbackup/bp.kill_all # /opt/VRTSpbx/bin/vxpbx_exchanged stop # /usr/openv/netbackup/bin/vxlogcfg -r -p 51216 - Delete the Backup Agent installation file.
# rpm –qa | grep –i VRTS → Backup Agent package 확인
# rpm –e VRTSnbcfg
# /opt/pdde/pddeuninstall.sh –forceclean
# rpm -e VRTSnbjava
# rpm -e VRTSnbjre
# rpm -e VRTSnbclt
# rpm -e VRTSpbx
# rpm -e VRTSnbpck
# rpm -qa | grep -i VRTS → Backup Agent package 확인 후 남은 package 삭제
# rm -rf /usr/openv
Windows OS
To uninstall the Backup Agent on Windows OS, follow these steps.
- Stop the Backup Agent service.
# [설치경로]\Vertitas\NetBackup\bin\bpdown.exe -f -v # [설치경로]\Vertitas\NetBackup\bin\bpps.exe → 남은 Process 확인 후 kill 수행 - Control Panel > Programs and Features: Remove the Backup Agent program.
- Delete the Backup Agent installation folder.
2.5 - Use Replication
You can create a replica of the Agent Backup in a different location.
- The kr-south region does not provide replication functionality.
- Agentless Backup does not provide a replication feature.
- With Agentless Backup, you can select a backup storage location when applying for the service and store the backup copy in a different location.
Create a clone
When creating a Backup service, you can set up replication for use.
To create a backup, follow the steps below.
- Click the All Services > Storage > Backup menu. Go to the Service Home page of Backup.
- On the Service Home page, click the Create Backup button. You will be taken to the Create Backup page.
- On the Backup Creation page, enter the information required to create the service and select detailed options.
Category RequiredDetailed description Backup name Required Backup name - Enter 3 to 30 characters using letters and numbers
- Cannot be edited after service creation
Backup type Required Agent > Filesystem selection Backup replication Select Use after checking, select the clone location (region) - South Korea (kr-south) region is unavailable
Backup target Required After clicking the Select Server button, select one pre‑created server from the Bare Metal Server service. Filesystem Required Enter the target FileSystem for backup - The exact Filesystem used by the operating system must be entered. Incorrect input will prevent backup
- Backup is not possible when /dev/zero, /dev/null is entered
- Backup is not possible if the following special characters are included, depending on the operating system
- Linux:
:*<>\
- Linux:
Encryption Select Select whether to apply encryption Retention period Selection Retention period of the recovery target (backup) - Select from 2 weeks (14 days), 1 month (31 days), 3 months (93 days), 6 months (186 days), 1 year (365 days)
Schedule Select Backup auto-creation schedule - Set 1 Full Backup and up to 6 Incremental Backups
- Select Daily, Weekly, or Monthly
- Daily: Set the start time
- Weekly: Set the day of week and start time
- Monthly: Set the week number, day of week, and start time
- Week number: Choose from 1, 2, 3, 4, or the last week
- Day of week: Choose from Monday, Tuesday, Wednesday, Thursday, Friday, Saturday, Sunday
- Start time: Select in 30‑minute increments (00–23 hours, 00/30 minutes)
Table. Backup service information input fields - Summary Verify the detailed information and estimated billing amount generated in the panel, then click the Complete button.
- Once creation is complete, check the created resources on the Backup List page.
- Agent Backup applies server‑side encryption based on the AES‑256 algorithm when encryption is selected, which may cause a performance degradation of approximately 20 ~ 30%.
- The initial backup is created as a Full Backup regardless of the request details.
- Backup replication If you select a location in a different region, data transfer fees will be added.
Edit replication policy
You can change the replication status by modifying the replication policy.
To modify the replication policy, follow these steps.
- Click the All Services > Storage > Backup menu. You will be taken to the Service Home page of Backup.
- On the Service Home page, click the Backup menu. You will be taken to the Backup List page.
- On the Backup List page, click the resource to edit the replication policy. You will be taken to the Backup Details page.
- On the Backup Details page, click the Clone tab.
- Click the Edit button of the Replication Policy. The Edit Replication Policy popup opens.
- Use: Performs replication. If it is not used, you can modify it to be used.
- Unused: Stop backup replication. If unused, the Backup service can be terminated.
- Check the modified replication policy in the Replication tab of the Backup Details page.
3 - API Reference
4 - CLI Reference
5 - Release Note
Backup
- When performing Agent Backup, Virtual Server and GPU Server have been added as target servers.
- Now you can select one of Virtual Server, GPU Server, or Bare Metal Server.
- Add Backup Replication Tab
- In the Backup detail page, you can view the original and replica information in the Clone tab.
- Add feature to download backup-related information
- On the Backup detail page, you can download the Backup history, recovery targets, and recovery history list as an Excel file.
- Expanded recovery scope
- When restoring from an agentless remote backup, you can select the restore location (target server or backup location).
- Expand backup locations and targets
- Agentless-based remote backup: You can back up and recover to a different location from the backup target server.
- Backup Agent feature added: You can back up the filesystem of a Bare Metal Server by configuring the Agent.
- Samsung Cloud Platform Common Feature Change
- Account, IAM, and Service Home, tags, etc., have been updated to reflect common CX changes.
- We launched the Backup service to provide secure data backup and recovery.
- Since backup policies include the target, frequency, retention period, and other factors, users can configure backup plans to suit their business environment and requirements.