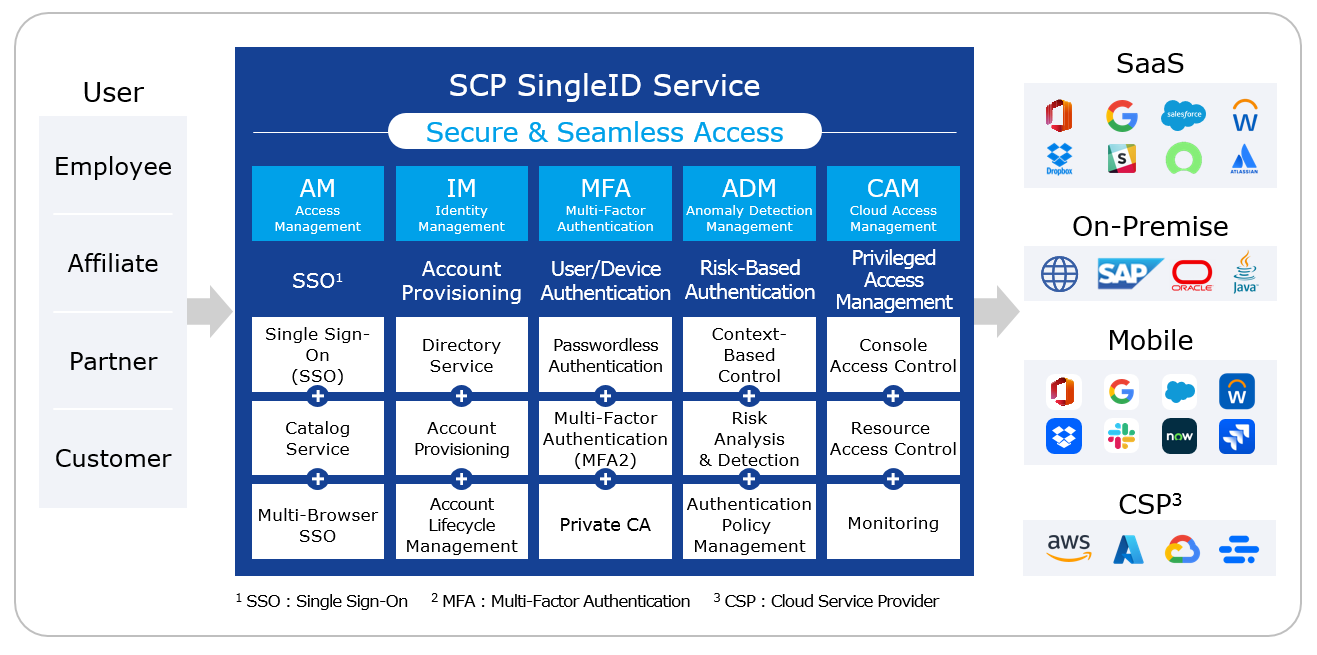
SingleID not only enables authorized users to easily access information assets with a single authentication, but also strengthens account security through policy‑based permission management and real‑time detection of abnormal authentication activities, and provides account management and access frameworks through various audit logs.
Provided features
Integrated Authentication and Account Management
Support for various authentication integration protocols (SAML, OIDC, etc.)
Providing a self-service feature for app usage requests and approvals
Account synchronization for platforms like Salesforce and Workday, as well as synchronization and management of roles (groups) within accounts.
Offer sign‑up and account termination functions that enable issuing accounts to partners, customers, and other non‑employee users.
Passwordless and Multi-Factor Authentication
PC·Mobile passwordless authentication and multi-factor authentication (MFA)
Providing composite authentication for secondary authentication by integrating with the existing primary authentication environment (MFA‑only service use case)
Support for certificate-based authentication through the Private CA (Certificate Service Authority) private certificate issuance and management feature (Separate Use Case)
Authentication and Account Information Integration
Automation of app integration via Pre‑Built Connector
Simplifying custom app integration through DIY integration templates
Risk-Based Authentication Anomaly Detection
Context-based access control based on authentication attempt scenarios
Enhancing security through detailed login and authentication policy configuration
Public cloud access management for cloud operators/developers
Console access control via role-based assigned accounts
Service Architecture Diagram
Figure. SingleID diagram
What is a User Portal?
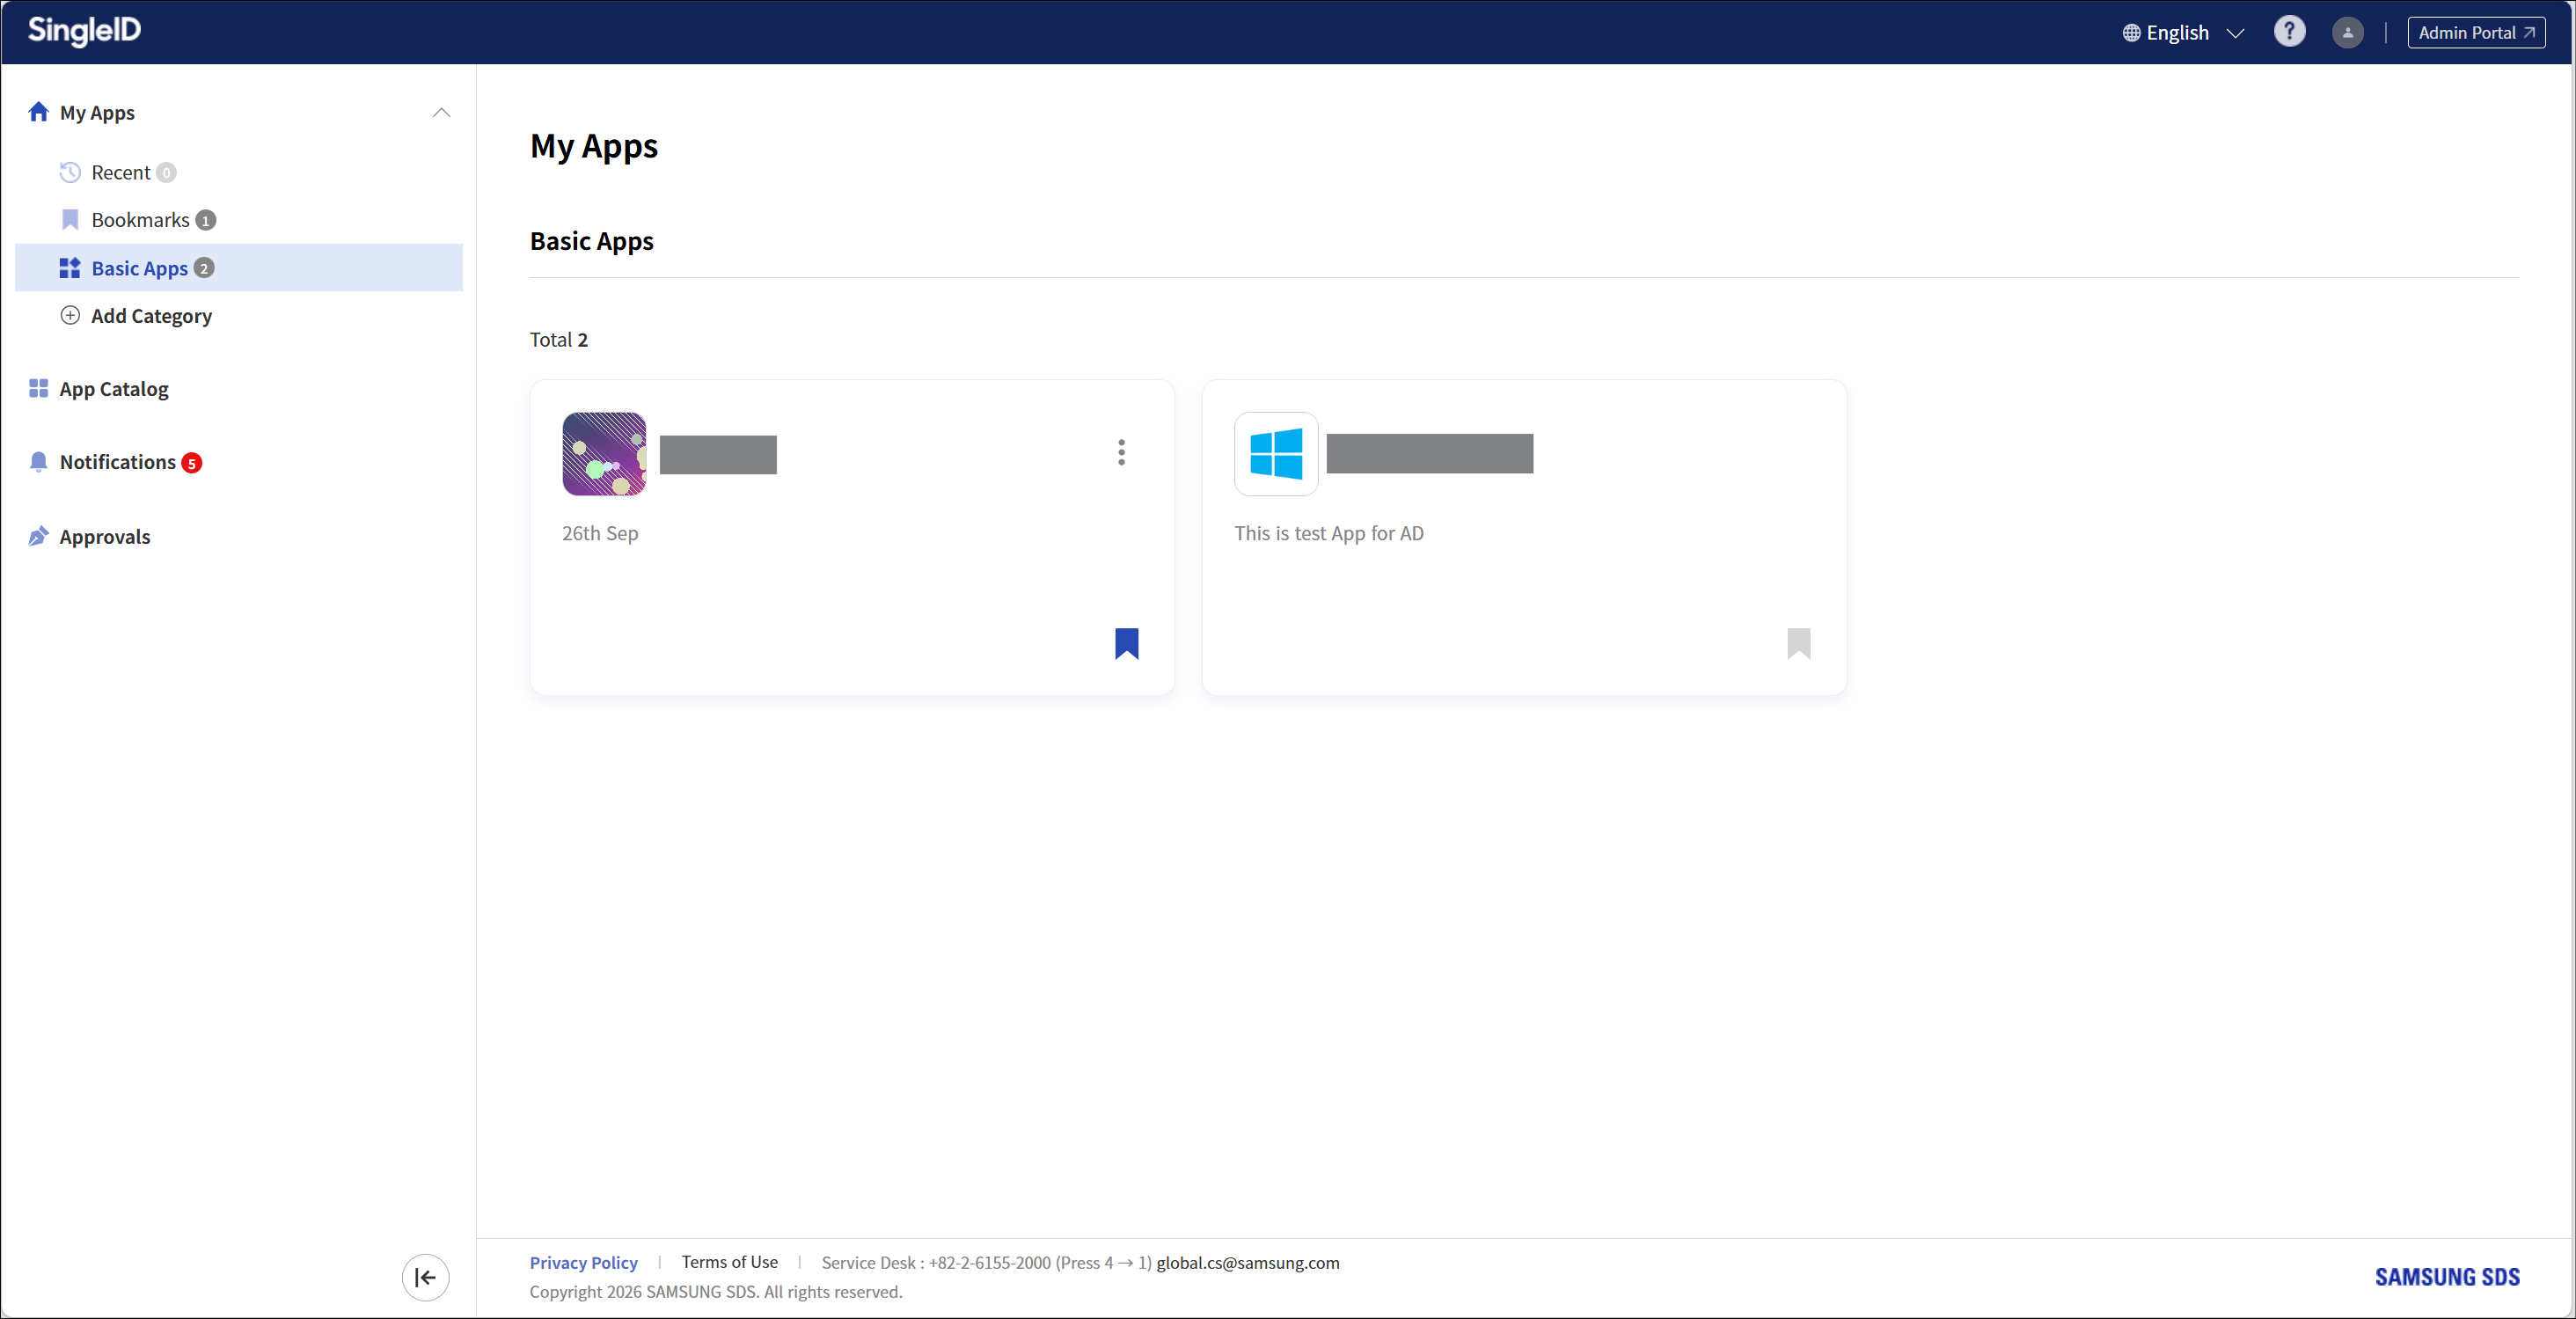
The SingleID User Portal is the user interface of the SingleID service, providing various security features such as access to company applications, SSO, and access permission requests.
User Portal screen layout
The User Portal consists of the following menus.
My App: A menu that allows users to view the list of applications they are currently using. 1. Users can conveniently access and manage approved apps.
App Catalog: A menu that displays a list of accessible applications.
Notice: This menu allows the SingleID administrator to display announcements to users.
Approval Requests: This menu allows you to manage approval requests related to application access, member registration, usage period extensions, and other similar items.
Figure. User Portal screen
Manual composition
This manual is organized as follows.
Announcements and Language Settings: It explains how to set the language in the SingleID solution and how to check urgent notices that can be viewed before logging in.
Login using authentication methods: Describes how to register and use various authentication methods for login.
Register Authentication Tool: Describes the enrollment process, which is the procedure for users to register authentication tools.
Sign Up: Describes the two methods of signing up.
Find ID and Reset Password: Describes the procedure by which a user finds their own ID through the ID recovery process.
Privacy Policy, Terms of Service, Service Desk: Explains the privacy policy and terms of service that can be accessed via the links at the bottom of the screen.
PC SSO Agent: Explains the PC SSO Agent, which assists with login and logout for SingleID.
My App: This explains the My App menu that can be accessed via SSO.
App Catalog: Describes the App Catalog menu that lets you view the list of apps that can be requested.
Notification: This explains the Notification menu that allows you to view urgent notices and regular notices.
Approval Request: Describes the Approval Request menu that allows you to request or approve app usage.
Personal Profile: It describes the personal settings menu, such as photo, preferred language, personal settings for configuring the system time zone, authentication settings, login history·environment, logout, and other options.
1 - Announcements and Language Settings
Notice
You can view the notice alerts posted by the administrator on the User Portal login screen and after logging into the User Portal. There are general notices and emergency notices.
General Notice: It is a general notice posted by the administrator and is used to convey information to users. * User Portal > Notifications can be viewed in the menu.
Urgent Notice: It is an urgent announcement posted by the administrator and is used to convey information to users. * User Portal > Login screen top and User Portal > Notifications can be viewed in the menu.
Language Settings
To change the language displayed on the screen, follow these steps.
In the User Portal screen > top language selection, click the language you want, Korean or English.
A dropdown list appears, allowing you to select between Korean and English.
Please select the desired language. 2. The screen switches according to the selected language.
Reference
On the first login, it is presented in the language configured in the user’s browser. If the language is Korean or any language other than English, it will be set to English.
2 - Log in using an authentication method
Log in using an authentication method
What is an authentication method?
An authentication method, commonly called Authenticator, refers to an authentication tool.
SingleID provides the following 11 authentication methods for user authentication.
Password: Enter the password on the SingleID login screen.
Email OTP: Send the OTP via email and enter the OTP on the SingleID login screen.
SMS OTP: Send the OTP via SMS and enter the OTP on the SingleID login screen.
Knox Messenger OTP: Send OTP via Knox Messenger and enter the OTP on the SingleID login screen.
Knox Identity: Enter the Knox Password for the Knox Portal user on the SingleID login screen.
SingleID Authenticator Bio: Send via the dedicated SingleID mobile app and authenticate with biometric verification on the mobile device.
SingleID Authenticator PIN: Send it to the dedicated SingleID mobile app and enter the PIN number on the mobile.
SingleID Authenticator mOTP: Install the SingleID‑only mobile app and enter the mOTP (Mobile OTP) number.
SingleID Authenticator TOTP: Install using the SingleID dedicated mobile app and enter the TOTP (time‑based OTP) code.
Passkey: An authentication method based on Mobile and Windows Hello that uses biometrics (fingerprint, facial), PIN, and security keys for authentication.
TOTP Authenticator: Generate TOTP (Time-based OTP) with a 3rd Party Authenticator and enter the OTP on the SingleID login screen
Admin Authentication: Request authentication on behalf of the admin to integrate authentication
Reference
The above authentication method only provides the authentication methods allowed by the SingleID administrator in the SingleID Admin Portal.
Reference
If this is your first time using the SingleID Authenticator mobile app, please refer to SingleID Authenticator.
Enter user ID
The user attempts to log in by entering their ID on the login screen below.
To log in using a user ID, follow these steps.
Login screen > Account ID input field, enter the ID, and click the Next button.
Enter the password in the password field, and click the Next button.
Login is complete.
Passwordless Login
SingleID provides a login service without a password.
To log in without using a password, follow these steps.
Click Login screen > Want to log in without a password?.
Select verification method screen appears. 2. Click one of the desired authentication methods.
Enter the authentication code according to the authentication method you selected.
After logging in, you will be taken to the User Portal main screen.
Reference
Authentication methods marked as registration required require registration. Registration Required click to register immediately, or see Register authentication tool.
Information
Passwordless login may not be provided depending on its configuration in login policy settings. Please contact the administrator.
Setting Preferred Authentication Method
SingleID users log in to the User Portal provided by SingleID and set their preferred primary and secondary authentication methods.
If the user sets their preferred method, the Select verification method screen is omitted during login and authentication, allowing immediate authentication with the first and second authentication methods.
To set your preferred authentication method, follow these steps.
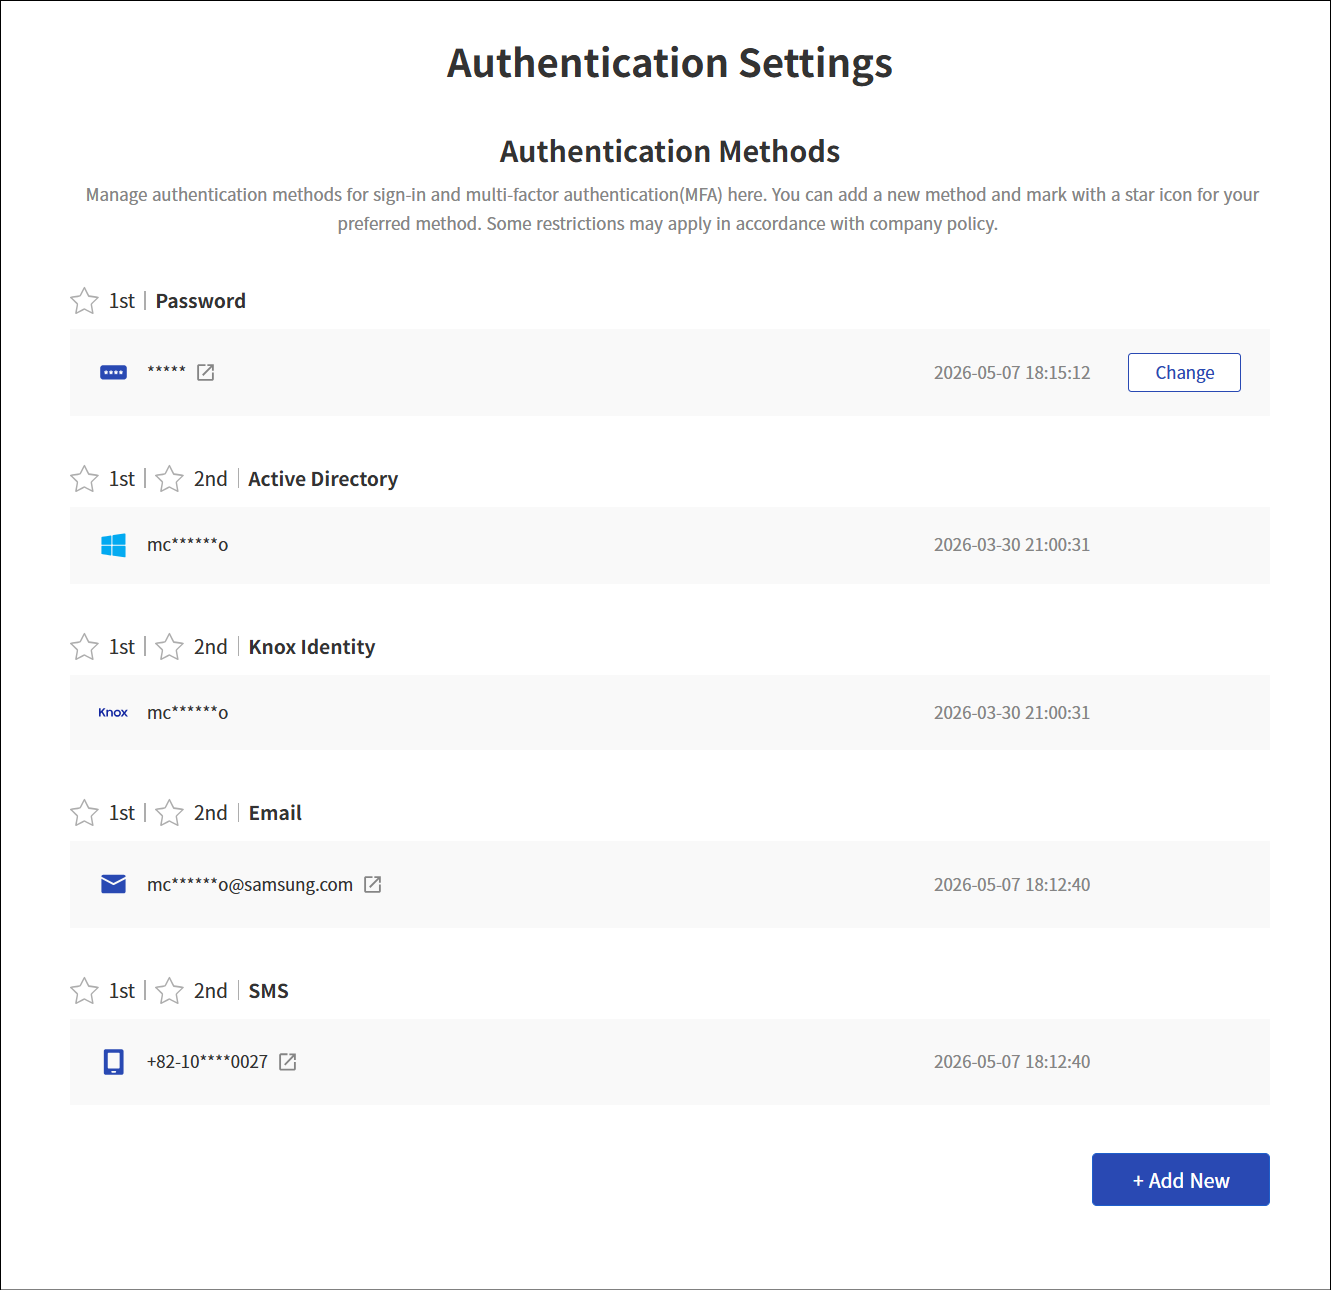
User Portal > Personal Profile > Authentication Settings Click the settings.
Authentication Settings screen appears.
Click the ☆ 1st, ☆ 2nd that matches the desired authentication method, placed before each method.
Only one selection is allowed for each of 1st, 2nd. 4. When it changes to ★, the selection is completed.
After the configuration is complete, the next login will use this method, offering convenient access.
Reference
Even if a user configures a preferred authentication method for primary and secondary authentication, an administrator can restrict it to a specific method through login policy settings.
Register authentication method
Users can configure all authentication methods. Registering an authentication method by a user is called enrollment. When a user account is created for the first time, the email OTP is automatically enrolled using the email information from the user data. Other authentication methods can be used by having the user enroll directly as needed.
There are two methods for authentication enrollment.
Register in Authentication Settings: User Portal > Profile > Authentication In the settings, click the + Add New button at the bottom to register.
Select verification method screen registration: At login, first authentication, and at second authentication, on the Select verification method screen, select the authentication method with a gray check mark (V) and register.
Reference
For detailed information about authentication method registration (Enrollement), refer to Register Authentication Tool.
First login
Password reset
When a user logs in for the first time, they can log in after resetting their password.
To reset your password, follow the steps below.
Login screen > Account ID input field, enter the ID, and click the Next button.
Click Password Reset under the Next button.
Consent to collection and use of personal information
When logging in with SingleID for the first time or within a certain period, consent to collect and use personal information is required. Follow the consent procedure and select the required, optional items to agree.
Required items must be selected to log in.
Password authentication
Password is the most fundamental authentication method, serving as SingleID’s default authentication tool.
Enter password
Log in using a user ID by following the steps below.
Login screen > Account ID input field, enter the ID, and click the Next button.
Password input field, enter the password, and click the Next button to log in.
Reference
If you click the eye-shaped icon in the password input field, you can view the password you entered.
Caution
When the entered password is entered incorrectly
If the entered password is incorrect, a ID or password is not correct. (1/3) message is shown, and re‑entry is required. The number of allowed retries is limited to the count set by the administrator in the password policy.
When the password is entered incorrectly repeatedly and becomes locked
If the password is entered incorrectly and the device becomes locked, you can unlock it in two ways.
Automatic unlock after 1~5 minutes: When automatic unlock is enabled, the account remains locked for 1~5 minutes. * Login will be available after that time.
Unlock with Password Reset: When the administrator sets the password policy to require a password reset, a password reset is required. * You can log in after resetting your password. * ID 찾기 및 비밀번호 재설정 you can view the detailed information.
Email OTP authentication
Authenticate
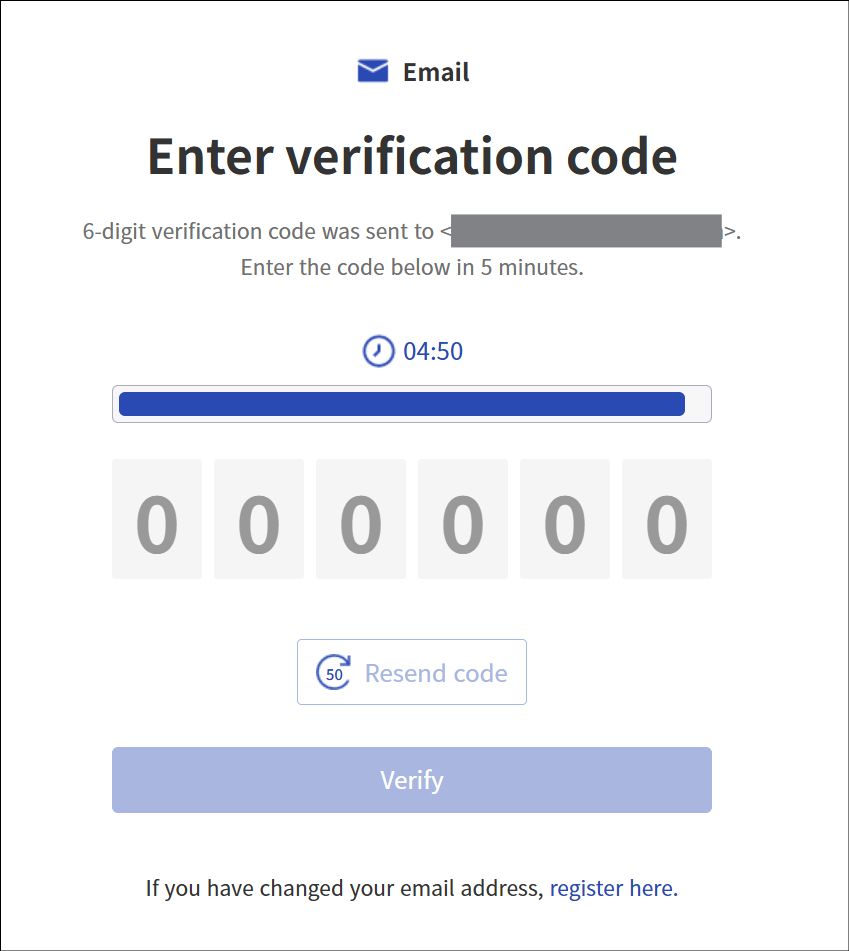
To authenticate with email OTP, an OTP will be sent to the email address registered by the user.
To authenticate with an email OTP, follow the steps below.
In the Identity Verification Selection method, click Email.
An OTP code will be sent to the registered email. 2. Enter the OTP within the time set by the administrator (usually 3~5 minutes).
After entering the OTP, click the Confirm button to complete authentication.
Reference
Resend Code: If the input validity period has expired, click the resend code button. 1. Resend the OTP code via email.
‘Would you like to authenticate using a different method?’: If the current authentication cannot be used, switch to a different authentication method.
‘If you have changed your email, please register it.’: Depending on the administrator’s settings, you can register (Enrollment) a different email for verification. 3. You can view the details at 이메일 인증 도구 등록하기.
Guide
If the code is entered incorrectly
If the user enters the OTP code incorrectly, they can re-enter it up to the number of times specified by the administrator.
When locked due to exceeding the user input limit
If the OTP code is entered incorrectly more times than the administrator allows, the screen will be locked from input for the duration set by the administrator. You can input after waiting for the specified duration. Refresh and try again after the input timeout.
SMS OTP authentication
Authenticate
To authenticate with SMS OTP, an SMS OTP will be sent to the mobile device registered by the user.
To authenticate with an email OTP, follow the steps below.
In the Identity verification selection method, click Email.
The OTP code will be sent to the registered mobile phone. 2. Enter the OTP within the time set by the administrator (usually 3~5 minutes).
After entering, click the Confirm button to complete authentication.
Reference
Resend Code: If the input validity period has expired, click the resend code button. 1. Resend the OTP code to the mobile phone.
‘Would you like to authenticate using a different method?’: If the current authentication cannot be used, switch to a different authentication method.
‘If you have changed your mobile phone, please register.’: Click the link to go to the enrollment screen for the new mobile. 3. You can view the details for registration at Register SMS authentication tool.
information
If the code is entered incorrectly
If the user enters the OTP code incorrectly, they can re-enter it up to the number of times specified by the administrator.
When locked due to exceeding the user input limit
If the OTP code is entered incorrectly more times than the administrator’s allowed limit, the screen will be locked from input for the duration set by the administrator. You can input after waiting for the specified time. Refresh and try again after the input timeout.
Knox Messenger OTP authentication
Authenticate
If you want to authenticate with Knox Messaenger OTP, the OTP will be sent to the Knox Messanger you are using.
To authenticate Knox Messenger OTP, follow the steps below.
In the Identity verification selection method, click Knox Messenger.
The OTP code is sent via Knox Messenger. 2. Enter the OTP within the time set by the administrator (usually 3~5 minutes).
After entering, click the Confirm button to complete authentication.
Reference
Resend Code: If the input validity period has expired, click the resend code button. 1. Resend the OTP code via Knox Messenger.
‘Would you like to authenticate using a different method?’: If the current authentication cannot be used, switch to a different authentication method.
‘Would you like to use a different Knox ID?’: Clicking the link takes you to the enrollment screen for a new Knox ID. 3. You can view the details at Register Knox Messenger Authentication Tool.
information
If the code is entered incorrectly
If the user enters the OTP code incorrectly, they can re-enter it up to the number of times specified by the administrator.
When locked due to exceeding the user input limit
If the OTP code is entered incorrectly more times than the administrator has allowed, the screen will be locked for the duration set by the administrator. You can input after waiting for the specified time. Refresh and try again after the input timeout.
Knox Identity Password Authentication
Authenticate
To authenticate with Knox Identity, you must enter your Knox Identity password.
To authenticate with Knox Identity, follow the steps below.
In the Identity verification selection method, click Knox Identity.
Enter the password for your Knox account.
After entering, click the Confirm button to complete authentication.
Reference
‘Would you like to authenticate using a different method?’: If the current authentication cannot be used, switch to another authentication method.
information
If the password is entered incorrectly
If the user enters the password incorrectly, they can re-enter it up to the number of attempts specified by the administrator.
When locked due to exceeding the user input limit
If the password is entered incorrectly more times than the administrator’s allowed limit, input on the screen will be restricted for the duration set by the administrator. You can input after waiting for the specified duration. Refresh and try again after the input timeout.
SingleID Authenticator authentication
The SingleID service provides a mobile authentication app called SingleID Authenticator and offers authentication in various ways.
Authentication method
Authentication method
Explanation
SingleID Authenticator Bio
Send a push via the installed SingleID Authenticator mobile app on the device to request biometric authentication.
SingleID Authenticator Pin
Send a push using the installed SingleID Authenticator mobile app on the device to request authentication with a PIN code. Not provided
SingleID Authenticator TOTP
Send a push from the installed SingleID Authenticator mobile app on the device to request authentication with TOTP.
SingleID Authenticator mOTP
Send a push using the installed SingleID Authenticator mobile app on the device to request authentication with mOTP.
In the SingleID service, the administrator provides authentication by delegating identity verification on behalf of the user.
To perform administrator authentication, follow the steps below.
If you cannot perform identity verification at the bottom of the screen in the Identity verification selection method, you can request verification from an administrator. 1. Click here. Click it.
Click the Request button.
You will be taken to the admin selection screen. 3. Select the administrator who requested authentication delegation and click the Request button.
Authentication delegation is requested to the selected administrator.
When the administrator approves the authentication delegation, it is completed automatically.
information
On the administrator selection screen, if the administrator is not assigned or has not registered a SingleID authenticator, a ‘Administrator Not Assigned’ screen appears.
Information
At the bottom If you cannot complete identity verification, you can request verification from an administrator. Click here** if the phrase is missing
The administrator has disabled the admin authentication delegation feature by policy. Please contact the administrator.
3 - Register authentication tool
Register authentication tool
The principle is that users register and use all authentication tools themselves. When a user registers an authentication tool, it is called enrollment (Enrollment). When a user is created for the first time, only the Email OTP is automatically registered using the email information from the user data. The remaining information can be directly registered and used by the user as needed.
There are three ways to register.
Login screen > ID/Password input > authentication method select and register on the screen
On the authentication method selection screen, if you click the authentication tool marked Registration Required (V mark), you can register.
Click the User Portal(after login) > Profile > Authentication Settings > + Add New button to register.
Register through the registration message link at the bottom of every authentication screen.
The screen below is an example of an SMS verification screen. * At the bottom, you can click the If you have changed your mobile phone, please register. message to register.
All authentication codes can be changed via a message at the bottom of the input (Message format: ~ Please register.)
Authentication code input screen example
Figure. Authentication screen
Register email verification tool
Email registration consists of the following three steps.
Verification Step: This is the identity verification step before registering the email authentication tool.
Registration step: This step registers a new email and checks whether the number is valid.
Completion Stage: This is the stage where you verify that the registration was completed successfully.
Verification step
This is the step of verifying your identity before using the authentication tool. To view the identity verification procedure, please refer to Login using authentication method.
Information
The authentication method used in the verification step is limited to the authentication tools configured by the administrator.
You can select an authentication method that is allowed by company policy.
Registration phase
This is the step where the user registers the desired email address and checks its validity.
The user should follow the steps below.
If you complete identity verification in the Confirmation step, you will automatically move to the Registration step.
Enter the email address you want to register.
Click the Send verification code button.
Check the OTP code sent to the entered email address, and enter the OTP code on the screen.
If the Authentication code is entered correctly, it proceeds to the Complete stage.
information
According to company policy, for security reasons, a new email address that is not a company email address may not be registered.
Completion Phase
Registration complete screen appears, and during the next login you can perform first and second authentication using the email verification tool.
Register SMS Authentication Tool
SMS registration consists of the following three steps.
Verification Step: This is the identity verification step before registering the SMS authentication tool.
Registration step: The stage where a new mobile phone number is registered and its validity is checked.
Completion Stage: This is the stage where you verify that the registration was completed successfully.
Verification step
This is the step of verifying your identity before using the authentication tool. To view the identity verification procedure, please refer to Login using authentication method.
Information
The authentication method used in the verification step is limited to the authentication tools configured by the administrator.
You can select an authentication method that is allowed by company policy.
Registration Phase
This step registers the mobile phone number the user wants to add and checks its validity.
The user should proceed with the following steps.
If you complete identity verification in the Confirmation step, you will automatically proceed to the Registration step.
Select the Country code, and enter the mobile phone number you want to register.
Click the Send verification code button.
Check the OTP code sent to the entered mobile phone number, and enter the OTP code on the screen.
If the Authentication code is entered correctly, it proceeds to the Complete stage.
Completion Phase
Registration Complete screen will appear, and on the next login you can perform first and second factor authentication using the SMS authentication tool.
Register Knox Messenger authentication tool
Knox Messenger registration consists of the following three steps.
Verification Step: This is the identity verification step before registering the Knox Messenger authentication tool.
Registration Step: Enter the Knox ID to register. 2. This is the step that checks whether the Knox ID to be registered is valid.
Completion Stage: This is the stage where you verify that the registration was completed successfully.
Check step
This is the step of verifying your identity before using the authentication tool. To view the identity verification process, refer to Login using authentication method.
information
The authentication method used in the verification step is limited to the authentication tools configured by the administrator.
You can select an authentication method that is permitted under company policy.
Registration stage
This step registers the mobile phone number the user wants to add and checks its validity.
The user should follow the steps below.
If you complete identity verification in the Verification step, you will automatically proceed to the Registration step.
Enter the Knox ID to register.
Click the Send verification code button.
Check the OTP code sent to Knox Messenger of the entered Knox ID, and enter the OTP code on the screen.
If the Authentication code is entered correctly, it proceeds to the Complete stage.
Completion Phase
Registration Complete screen will appear, and on the next login you can perform first and second factor authentication using the Knox Messenger authentication tool.
Register Passkey authentication tool
SingleID Passkey consists of the following three steps.
Verification stage: This is the identity verification step before registering the Passkey authentication tool.
Registration Stage: This is the Passkey registration stage.
Completion Stage: This is the step where you confirm that the registration was successful.
Check step
This is the step of identity verification before using the authentication tool. To view the identity verification process, refer to Log in using authentication method.
Information
The authentication method used in the verification step is limited to the authentication tools configured by the administrator.
You can select an authentication method that is allowed by company policy.
Registration Phase
This is the step to verify the mobile phone or PC environment where you want to register a Passkey.
Follow the four steps below to complete the registration process.
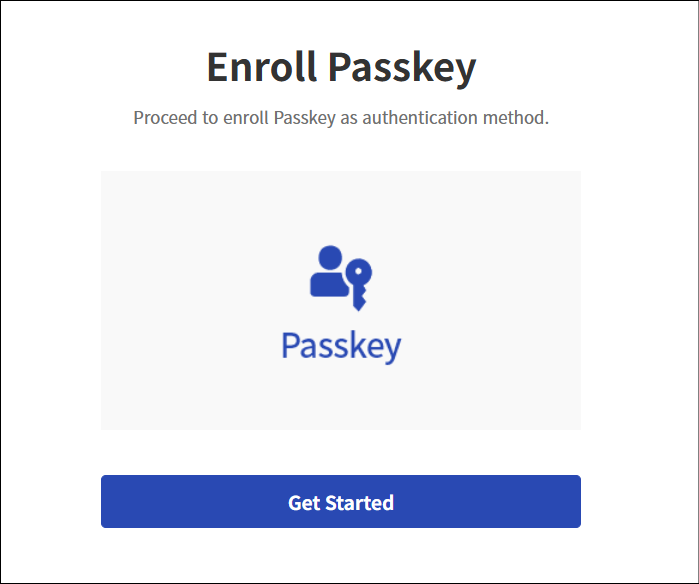
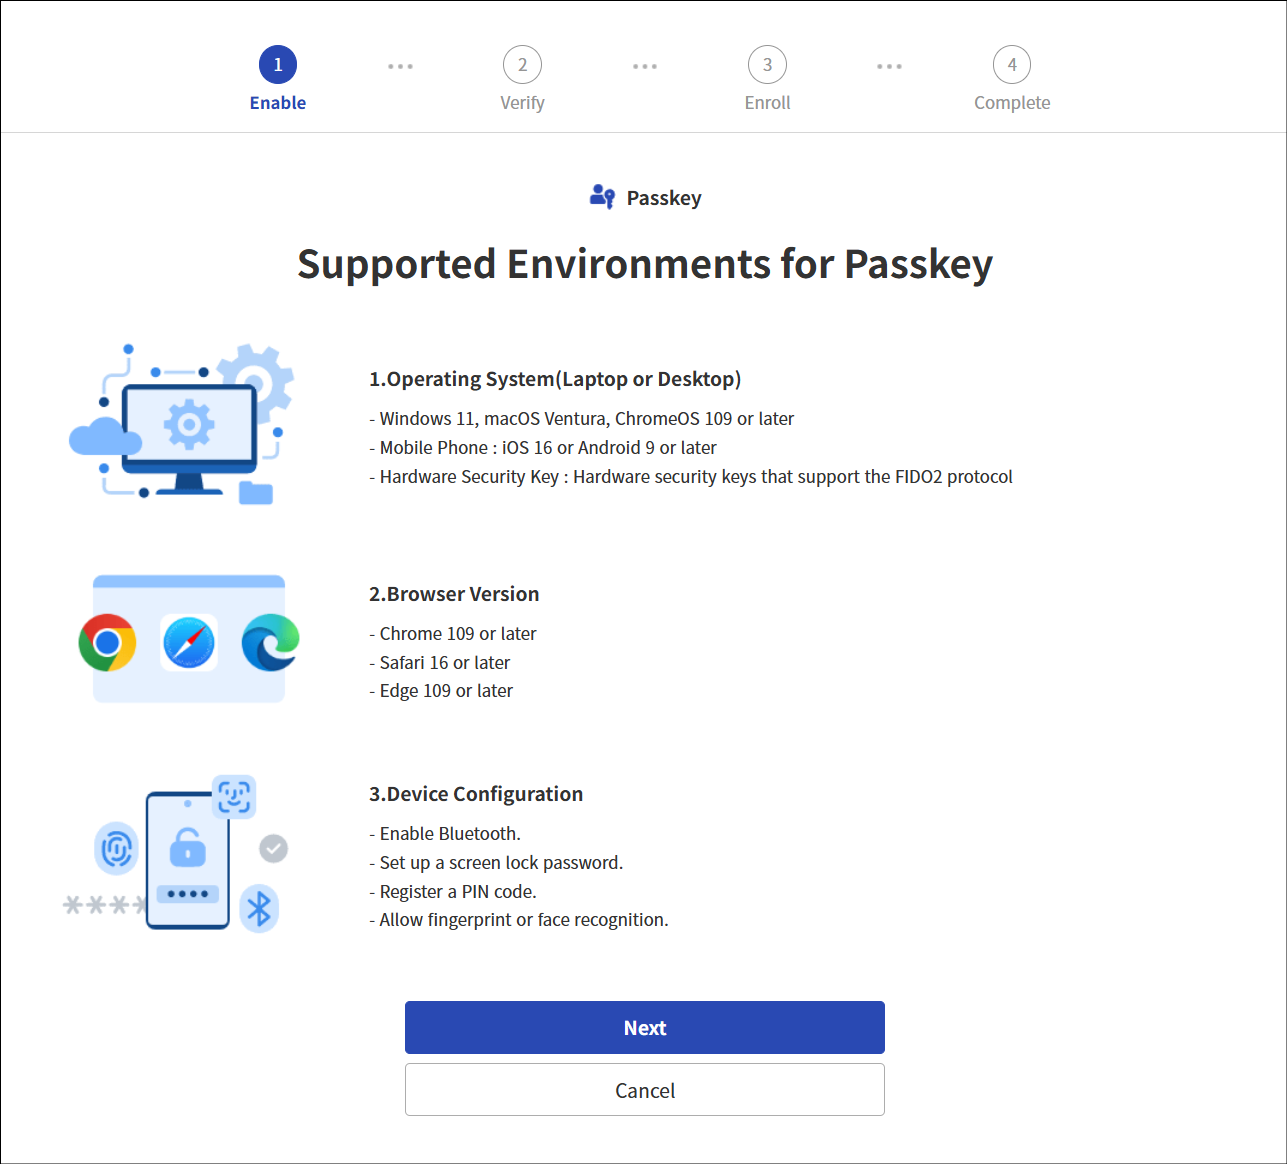
Activation: Passkey support environment guide.
Verification: Complete identity verification using an authentication method.
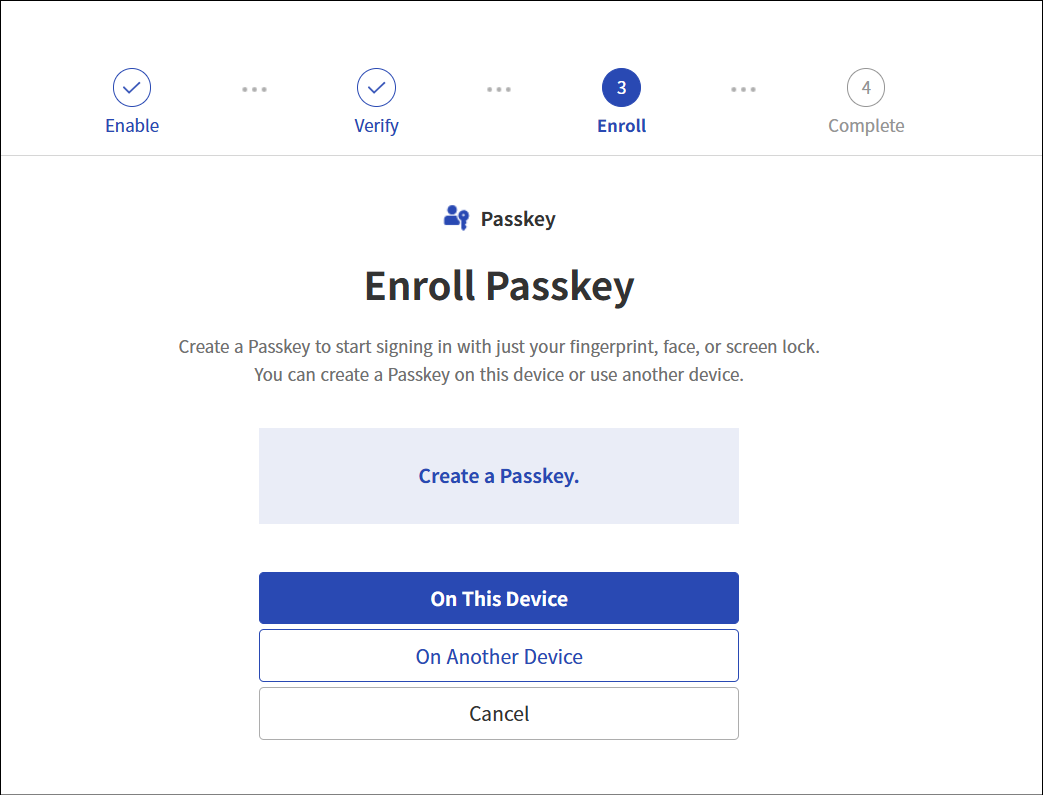
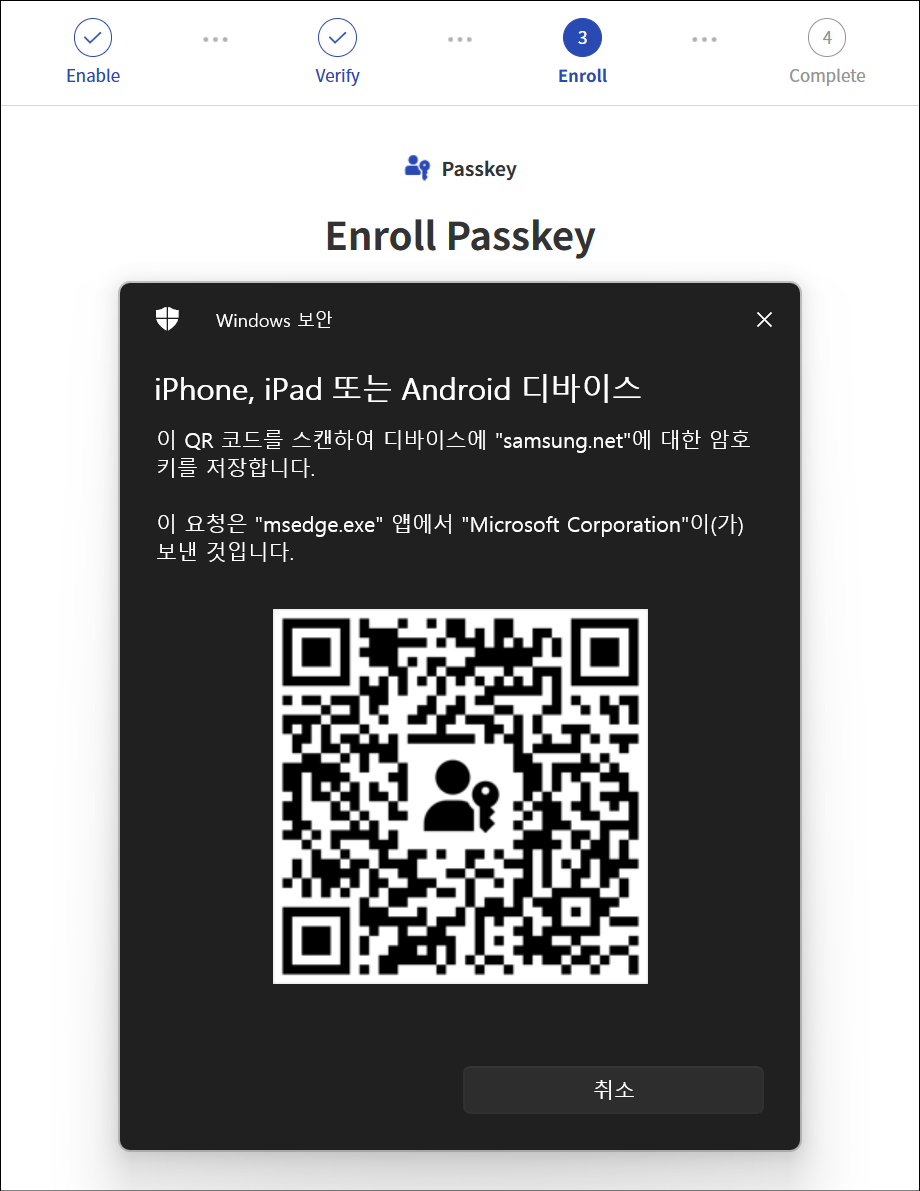
Registration: Passkey registration step. 3. When the Generate on this device button is clicked, a Passkey is created and registered on the PC. 3. Create on another device When the button is clicked, it registers with a mobile phone or hardware security key.
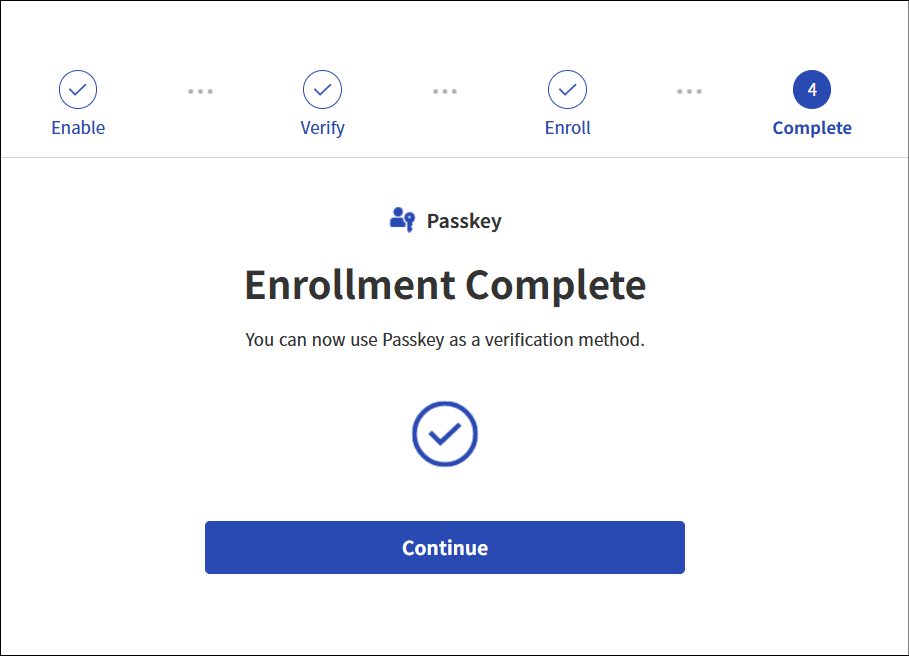
Completed: This step verifies that Registration Complete. 4. Click the Continue button.
Reference
Passkey Support Environment
Operating system (laptop or desktop)
Windows 11, macOS Ventura, ChromeOS 109 or later
Mobile phone: iOS 16 or Android 9 or later
Hardware security key: a hardware security key that supports the FIDO2 protocol
Browser version
Chrome 109 or later
Safari 16 or later
Edge 109
Device Settings
Enable Bluetooth
Set screen lock password
Register PIN code
Allow fingerprint or facial recognition
Completion Phase
After the Passkey registration is completed, the Registration Complete screen appears. You can perform first- and second-factor authentication with the Passky authentication tool on the next login.
Reference
PC Passkey requires that Windows Hello be configured in advance. For detailed information, see the reference link.
When registering a Passkey on mobile, you can set it in an environment where QR code scanning is possible.
How to Register PC Passkey
This guide explains how to register a Passkey using Windows Hello on a PC.
Passkey requires that Windows Hello be configured in advance. For detailed information, see the Windows Hello Settings.
If you have completed registering a fingerprint or PIN code in Windows Hello settings. Follow the steps below.
Click User Portal > Profile > Authentication Settings.
Click the Add New button.
On the Select registration authentication method screen, select Passkey.
Passkey supported environment The screen appears. 5. Check the supported operating system version and click the Next button.
Select verification method The screen appears. 6. Complete verification using an authentication method that can verify your identity.
Passkey Registration The screen appears. 7. Click the Generate on this device button. (Generate Passkey on Windows PC)
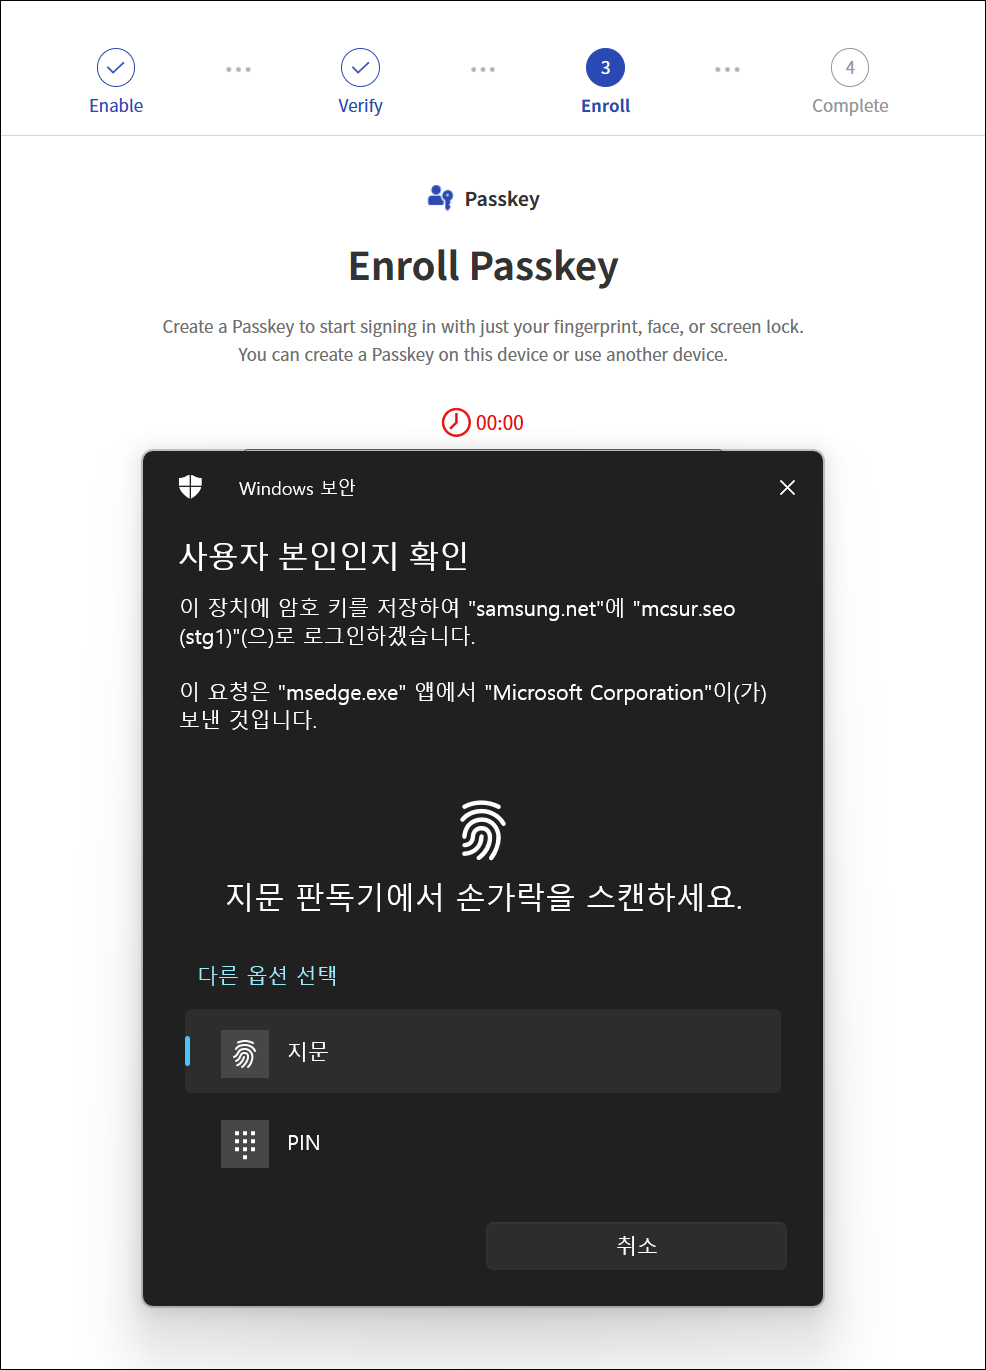
(If a fingerprint or PIN is set in Windows Hello) Fingerprint or PIN entry authentication screen appears.
When you enter a fingerprint or PIN code, the registration complete screen appears.
Reference
For PC Passkey, you can select the authentication method registered in the PC’s Windows Hello to support either simple authentication or MFA authentication.
Mobile Passkey Registration Method
This is a guide on registering a mobile Passkey.
The mobile Passkey requires the preconfiguration below to be completed beforehand.
Enable Bluetooth
Set screen lock password
Register PIN code
Allow fingerprint or facial recognition
If you have completed registering the Passkey via mobile. Follow the steps below.
Click User Portal > Profile > Authentication Settings.
Click the Add New button.
Select registration authentication method on the screen, select Passkey.
Passkey Registration The screen appears. 4. Click Start.
Passkey supported environment screen appears. 5. Check the supported operating system version and click the Next button.
Select verification method screen appears. 6. Complete verification using an authentication method that can verify your identity.
Passkey Registration The screen appears. 7. Create on another device button, click it. (Android or iOS)
The QR code appears on the screen. 8. Scan the QR code to generate a Passkey on your mobile.
When you enter a fingerprint or PIN code on the mobile device, the Registration Complete screen appears.
Reference
Mobile Passkey Support Scope
Andriod : Supports Samsung Pass, Google Passkey Manager.
The SingleID Authenticator is an authentication tool provided for the SingleID service.
SingleID Authenticator enrollment consists of the following four steps.
Verification step: This is the identity verification step before registering the SingleID Authenticator authentication tool.
Installation Step: This is the guide step for the user’s SingleID installation.
Registration Stage: This step registers a new mobile app and registers the service.
Completion Stage: This is the stage where you verify that the registration was completed successfully.
Check step
This is the step of verifying your identity before using the authentication tool. To view the identity verification process, refer to Login using authentication method.
guide
The authentication method used in the verification step is limited to the authentication tools configured by the administrator.
You can select an authentication method that is permitted under company policy.
Installation Steps
There are three main ways to install the SingleID mobile app.
How to install SingleID Authenticator by scanning a QR code on the user’s mobile or searching for “SinlgeID” on Google Play Store (Android) or App Store (iOS).
How to install by entering your mobile phone number and receiving the download link via SMS
How to install via a manual download link
Install the SingleID Authenticator app and click the Next button to proceed to the registration step.
Information
For security reasons, sending the download link via SMS by entering your mobile phone number is limited to a single transmission.
If you send more than three times within one minute, an error message stating “SMS messages cannot be sent multiple times for security reasons.” will be sent.
Please try again after a short while.
Registration stage
Install the SingleID Authenticator mobile app on the mobile phone you wish to register, then launch SingleID Authenticator.
Complete the registration process in the three steps below.
Service Registration: In the SingleID Authenticator app, click the ‘+’ at the top.
Enter QR or authentication number: Scan the QR code or enter the authentication code to register.
Service registration complete: Click the Confirm button to complete the registration.
Completion Phase
After registration is completed in SingleID Authenticator, the Registration Complete screen appears. You can perform first- and second-factor authentication with the Windows Hello authentication tool on the next login.
Information
Check device information
When the user clicks on device information such as password, SMS, email, SingleID authenticator, Nox messenger, Passkey, etc., they can view detailed information in a popup.
Device Information popup displays ’type’, ‘OS version’, ‘browser’, ‘IP’, etc.
Register TOTP Authenticator tool
TOTP Authenticator registers third‑party TOTP to support various authentication tools.
TOTP Authenticator enrollment consists of the following four steps.
Verification step: This is the identity verification step before registering the SingleID Authenticator authentication tool.
Installation Step: This is the user’s SingleID installation guide step.
Registration Stage: This step involves registering a new mobile app and registering the service.
Completion Stage: This is the stage where you verify that the registration was completed successfully.
Check step
This is the step of verifying your identity before using the authentication tool. To view the identity verification process, refer to Login using authentication method.
information
The authentication method used in the verification step is limited to the authentication tools configured by the administrator.
You can select an authentication method that is allowed by company policy.
Installation Steps
There are two main ways to install the TOTP Authenticator.
Mobile app
Web browser extension
Click the Next button to go to the registration step.
Service Registration and Verification Phase
This step registers and verifies the 3rd‑party TOTP authenticator you are adding.
Complete the registration process in the two steps below.
Service Registration: Scan the QR code of the TOTP Authenticator you want to register, or enter the manual code. 1. The code registration is completed in the TOTP mobile app or extension.
Service Verification: Run the TOTP mobile app or extension, and enter the OTP.
Information
TOTP Authenticator support
SingleID supports a variety of standardized 3rd‑party TOTP authentication apps. Non-standard TOTP is not supported.
The verified mobile and extension programs are as follows. We recommend the mobile app or extension below.
Mobile app
Google Authenticator, Microsoft Authenticator
Web browser extension
TOTP extension searchable in the Chrome Web Store and Microsoft Edge Add-ons
Completion Phase
After registration is completed in SingleID Authenticator, the Registration Complete screen appears. You can perform first and second factor authentication using the TOTP Authenticator tool on the next login.
Information
To register a new TOTP Authenticator, on the TOTP Authenticator OTP entry screen, click the bottom “If you want to change your TOTP Authenticator, register here” to register a new TOTP Authenticator.
Information
Check device information
When the user clicks on device information such as password, SMS, email, SingleID Authenticator, Nox Messenger, Passkey, a popup displays detailed information.
Device Information popup displays ’type’, ‘OS version’, ‘browser’, ‘IP’, etc.
Administrator authentication
Authenticate
In the SingleID service, the administrator provides authentication by delegating identity verification on behalf of the user.
To perform administrator authentication, follow the steps below.
At the bottom of the screen in the Identity verification selection method, “If you cannot complete identity verification, you can request verification from the administrator.” 1. Click here.
Click the Request button.
You will be taken to the admin selection screen. 3. Select the administrator who requested authentication delegation and click the Request button.
Authentication delegation is requested for the selected administrator.
When the administrator approves the authentication delegation, it is completed automatically.
Information
On the administrator selection screen, if the administrator is not assigned or has not registered a SingleID authenticator, a ‘Administrator Not Assigned’ screen appears.
Information
At the bottom **If you cannot complete identity verification, you can request verification from an administrator. If there is no “Click here” text
The administrator has disabled the admin authentication delegation feature by policy. Please contact the administrator.
4 - Sign up
Sign Up
According to internal company policy, users who are not employees—such as partners, subsidiaries, and customers—can create an account through a separate registration.
Sign up via login page link
This is the method to register via the Sign Up link on the login page.
On the login page, at the bottom of the login, click Sign Up in the “If you don’t have an account, click Sign Up.” message. Click Sign Up.
Agree to terms
To sign up, you need to agree to the terms.
Enter information
Follow the steps below.
Enter the email you want to register.
After entering the email, click the Send OTP button and the OTP code will be sent.
Enter the OTP code from the received email address and click the Confirm button.
When you correctly enter the verification code, the Sign Up button becomes active.
Click the Sign up button.
Enter information
Enter various personal information required for registration.
Category
Explanation
ID
Enter the ID to register
Korean name
Enter a Korean name
English name
Enter English name
Enter phone number
Enter the registered country and mobile number
OTP code
Enter the received OTP code
Department
Enter department name
Language and Time Zone
User language and time zone settings
Table. Personal Information Input Items
Information
The required information fields may vary depending on the company’s registration policy.
Sign up
After entering personal information, click the Sign Up button to complete the approval request. You can proceed to the next step after approval is complete.
If the administrator’s approval is completed, you can log in by resetting your password.
Sign up via invitation email
You can sign up via an invitation email from the administrator. If you click the Sign Up button in the received email, you can sign up.
If the user forgets their ID, click Find ID on the login screen.
Find ID using mobile phone number
The user can find their ID by entering their name and mobile phone number.
Please follow the procedure below.
Click the Mobile tab.
Please enter name.
Please enter Surname.
Please enter the Country code and phone number.
Click the Send verification code button.
On the authentication code entry screen, enter the received authentication code and click the Confirm button.
Reference
If there is no ID with the given information, a “ID not found.” message appears. If you want to search again, click the “Return to ID Search” button.
Password reset
Reset password
If the user wants to reset their password, click Password Reset at the bottom of the login screen.
Perform identity verification
To set a password, the user must first complete identity verification. When you click the Password Reset button, a Select Authentication Method screen appears according to the policy set by the administrator. For detailed information about authentication, see 인증 방식을 사용하여 로그인.
Password reset
After the user completes identity verification, they are taken to a screen where they can set a new password. Passwords must be set according to the password pattern and complexity defined by the administrator’s policy. When the user enters a password, it is shown in green if it meets the conditions, and in red otherwise. Set the password so that all items turn green.
Reset the password as follows.
Please enter a new password.
If the newly entered password fails to meet even one of the complexity or pattern requirements set by the administrator, generate a more complex password.
To prevent user input errors, please enter the same password again.
Click the Change Password button.
When password setup is complete, click the Log in with password button to return to the login screen.
6 - Privacy Policy, Terms of Service, Service Desk
On the lower left of every screen, there are links to the Privacy Policy and Terms of Service, allowing users to view them at any time.
Privacy Policy
A Privacy Policy link is placed at the bottom left of every screen, allowing users to view the SingleID service’s privacy policy at any time.
To view the privacy policy, follow the steps below.
Click the Privacy Policy at the bottom left of the screen. You can view the latest version of the privacy policy.
If you want to view a previous version, select the desired version at the top to retrieve it.
Terms of Use
Place a Terms of Service link at the bottom left of every screen so that users can view the SingleID service terms at any time.
To review the terms of service, follow the steps below.
Click the Terms of Service at the bottom left of the screen. You can view the latest version of the Terms of Service.
If you want to view a previous version, select the desired version at the top to retrieve it.
Service Desk Information
If users have inquiries about SingleID, they can contact using the Service Desk phone number and the main email address at the bottom of the screen.
7 - PC SSO Agent
SingleID PC SSO Agent provides integrated SSO authentication services in a Windows Desktop environment.
SingleID PC SSO Agent provides the following functions.
Integrated SSO and login/logout across web browsers
The SingleID PC SSO Agent may not be used depending on the administrator’s settings. (Agentless operation)
Reference
Recommended installation environment for PC SSO Agent
Windows Desktop 10 and 11 (x86 and x64 CPU Only)
Web Browser: Microsoft Edge 88.x or later, Chrome 87.x or later
.NET Framework 4.0 or later
Disk Capacity 100MB or more
Check whether PC SSO Agent is installed
If the administrator has set a policy to use the PC SSO Agent, SingleID automatically checks whether the SingleID SSO Agent is installed on the user’s PC as follows.
After the user logs in with SingleID, it automatically checks whether the PC SSO Agent is installed.
If the PC SSO Agent is installed on the user’s PC, it automatically proceeds to the next screen; otherwise, it automatically redirects to the installation prompt screen.
If the installation prompt does not appear automatically, click the Next button to install the PC SSO Agent.
Using the download link for the SSO Agent installation
PC SSO Agent installation prompt screen: Click the ‘Download’ button to download the Agent program to your PC and install it.
Install SingleID PC SSO Agent
If you download the SingleID Agent.exe file to the PC and install it correctly, a tray labeled ‘ID’ will appear in the lower‑right corner of the PC’s tray.
If the PC SSO Agent is installed correctly and SSO authentication succeeds, right‑click and click “View Status” to verify that it operates normally.
guide
If the installation does not proceed smoothly, remove the app named SingleIdAgent from the list of previously installed apps and reinstall it.
Re-authentication attempt
After installing the PC SSO Agent, you can either log in again from the beginning, or click the re-authenticate button at the bottom of the screen below to retry authentication using the Agent.
guide
The SingleID PC SSO Agent performs a unified logout of Chrome and Edge browsers upon logout.
8 - My App
Recently used apps
When a user logs into the User Portal, the first thing they see is the My Apps menu.
The left menu bar can be expanded or collapsed by clicking the arrow(→) icon at the bottom left.
When you click the My App menu, three submenus that are provided by default and cannot be edited will appear.
Recently used apps
Bookmark
Default app
Among these, clicking Recent Apps will display the apps the user has recently used. Recent apps are shown up to a maximum of 12.
Bookmark
My Apps menu, when you click the Bookmark menu, the apps you have bookmarked are displayed. You can conveniently use frequently used apps by bookmarking them.
You can add a bookmark by clicking the bookmark button at the lower right of the app card, and clicking it again will remove the bookmark. Up to 12 bookmarks are allowed.
Add/Delete Bookmark
If you click the Bookmark icon at the lower right of the app you want to add, it will be added to Bookmark. Clicking it once more will delete the bookmark.
Default App
The default app menu displays all apps available to the logged-in user. When the user clicks an app, they are authenticated via SSO and the app launches in a new browser window. If a disabled app is clicked, a popup appears indicating that the app is disabled.
Add Category
The user can click the Add Category button to create a category with a name of their choice and manage the app.
After clicking the Add Category button, enter the category name and click the Check button.
After adding a category, the user can click the More button located to the right of the category to move, edit, or delete the category.
If you delete a category while it contains apps, the remaining apps are moved to the Default App category.
9 - App Catalog
Using the App Catalog
When you click the app catalog menu, the list of apps that are pending approval is displayed by default.
The app catalog can be viewed as a list of apps in three states.
Unused: state where a usage request can be made
Pending Approval: The usage request has been completed and is awaiting approval.
In Use: The usage request has been approved and is currently in use.
If an app in an unused state does not have a request button, the user cannot request it themselves due to company policy. Please contact the administrator if you wish to use it.
Request App Usage
To request usage of an unused app, the user clicks the Request button, enters the purpose for using the app, and then clicks the Request button.
The app usage approval process may vary depending on the administrator’s settings.
By default, the approver list configured by the administrator is displayed, and if multiple approvers exist, the outcome is determined by whichever approver processes the approval or rejection first.
Once the app usage request is completed, you can view the request status from the two menus.
You can check the status in the App Catalog > Pending Approval state.
You can view the detailed information in App Usage Approval > My Requests.
In the My Requests list, click the App to view details, and when pending approval, you can cancel the request using the Cancel Request button.
10 - Notification
Notification
Click the notification menu to view the list of notifications. There are two types of notifications.
Urgent: Tenant administrators post urgent notices that users can view before logging in, regardless of the user’s login status, such as urgent alerts (system outages, etc.)
General: All notifications that are not emergency alerts, which the user can view in the Notifications menu after logging in.
Notifications menu, when clicked, is set by default to All status, so both urgent and regular notifications are shown.
If there are unread notifications, they appear as a number next to the notification menu, and because they are marked with a red dot in the list, unread notifications can be easily recognized.
If you click this notification, you can view the details.
Name
Explanation
type
This is the type of notice. It is divided into urgent and normal.
Title
This is a notice title.
Start date and time
The start date and time of the notice posting.
End time
The end date and time of the notice posting.
Table. Notification List
Approval request
When you click the approval request menu, the administrator can view and cancel all users’ approval requests.
Approval requests consist of the Approval Request List and Approval Request Queue tabs.
Approval request list
There are several types of approval request statuses. You can easily filter and view using the Approval Request, Approved, Rejected, Cancel Submission buttons at the top. If you want an advanced search, you can use the advanced search in the search bar at the top right.
Approval Request: Shows the status of all approval requests.
Approval: Shows all approved statuses.
Rejected: Shows approval request items that have been rejected.
Submission Cancellation: Displays approval requests that have been cancelled after submission.
The description of the approval request list items is as follows.
Name
Explanation
Approval System
It shows the approval system according to the approval policy. You can verify which approval system was used for the request. Please refer to Policy > Approval Policy.
Title
This is a notice title.
Start date and time
The start date and time of the notice posting.
End time
The end date and time of the notice posting.
Table. Notification List
11 - Approval Request
Request approval
The app usage approval menu provides two functions.
My Request Tab: A list of apps I have requested to use is displayed.
Approval List Tab: Displays the list of app usage requests submitted to me.
Request App Usage
To request usage of an unused app, the user clicks the Request button, enters the purpose for using the app, and then clicks the Request button again. The app usage approval process may vary by company.
By default, the list of approvers set by the tenant administrator is displayed, and when multiple approvers exist, it is determined by the result of the first approval or rejection.
Once the app usage request is completed, you can view the request status in both menus.
You can check the status from the App Catalog > Pending Approval status.
In Approval Request > My Requests, you can view the details and perform additional actions.
My request
In the My Requests list, you can click an app to view its details, and when the request is pending approval, you can cancel it using the Cancel Request button.
When usage approval is completed, the status item in my request list will change to Approved.
If you click Approved App in the list, you can view the detailed usage approval information.
Approval List
If you are the app usage approver, please click the Approval List tab.
If the user has a pending approval request for app usage, you can see that the status column in the list shows Pending Approval.
Click the relevant list to view the details of the approval request.
After reviewing the details and leaving the approver’s comments, click the Approve button to grant the requester permission to use the app.
You can confirm that the status item has been changed to Approved in the Approval List tab.
By clicking the app in the list, you can also view the detailed information of the approval history that the user approved as an approver.
Approval List
If you are the app usage approver, please click the Approval List tab.
If the user is in a state where approval for app usage has been requested, you can see that the status item in the list is displayed as Pending Approval.
Click the relevant list to view the details of the approval request.
After reviewing the details and leaving the approver’s comments, click the Approve button to allow the requester to use the app.
You can confirm that the status item has been changed to Approved in the Approval List tab.
By clicking the app in the list, you can also view the detailed information of the approval history that the user approved as an approver.
12 - Personal Profile
Configure Privacy Settings
This is a menu for user settings.
To set your privacy settings, follow these steps.
Click the Personal Profile > Personal Information setting at the top right of the screen.
You can view the photo, name, email, phone number, language, and time zone.
Image: Image > Image Click Change to upload the icon image you want to display.
Language: Choose your desired language in Korean or English.
Language/Time Zone: Please select the time zone you are currently in. Click the City Search button to open the city search popup. Search for the desired city in English and select it.
Click the Save button at the bottom of the screen to save.
Reference
If you click the Delete button at the lower left of the privacy screen, you can delete the current user account.
Since withdrawing will delete the user’s account, please only withdraw when you truly intend to delete it.
Configure Authentication
You can register a user’s authentication tool and set a preferred authentication tool.
To configure authentication, follow these steps.
Click the Personal Profile > Authentication setting at the top right of the screen.
Click the +Add New button to add using the authentication tool you prefer.
Click the Delete button to delete authentication tools you do not wish to use.
☆ Click the icon to set your preferred authentication method.
In the authentication settings, click Change Password to change your password after completing the identity verification process.
Check login history
You can view the user’s login history and environment.
To view a user’s login history/environment, follow these steps.
Click Personal Profile > Login History/Environment at the top right of the screen.
Login History tab allows you to view information such as login date and time, location, country, city, IP address, OS type, browser type, detection status, and result.
In the Login Environment tab, you can view details of any registered login environments, and if an environment is no longer used, you can delete it using the ‘Delete’ button.
When using the SingleID ADM(Anomaly Detection Management) feature, the detection items will display Normal or Detected. This item is a login record where abnormal authentication activity was detected.
Log out
Click the photo icon located at the top right of the screen and then click Logout.
When you click the Logout button, all applications visited through SingleID are logged out simultaneously, and if integrated logout is configured via the PC SSO Agent, logout also proceeds in the associated browsers.