This is the multi-page printable view of this section. Click here to print.

Return to the regular view of this page.

MFA Portal

Overview

SingleID’s MFA service provides users with a variety of additional second-factor authentication services through system integration, while maintaining the authentication system used by applications to enhance security. Additionally, SingleID provides an MFA Portal that lets you pre‑register and manage your preferred authentication methods for authentication, allowing convenient configuration.

The MFA Portal manual provides a feature that allows users to self-register secondary multi-factor authentication.

For detailed information, refer to the items below.

SingleID language settings

  • User portal screen > top language selection, choose the language you want from ‘Korean’ or ‘English’.
  • It will be changed to the language you selected.
Reference
On the first login, it is presented in the language configured in the user’s browser. If the language is other than Korean or English, it will be set to English.

SingleID connection environment and support

CategorySupportRecommendation
PCWindows : Windows Desktop 10 and 11 (x86 and x64 CPU Only)
  • Web Browser: Microsoft Edge, Latest public version
Windows : Windows Desktop 10 and 11 (x86 and x64 CPU Only)
  • Web Browser: Microsoft Edge 88.x or later, Chrome 87.x or later
Moblie(Android)Android : 8 and later versions
  • Web Browser: Samsung Internet Latest public version
Android : 8 and later versions
  • Models released in 2018 and beyond among Samsung Galaxy Mobile Products
  • Galaxy S9 ↑
  • Web Browser: Samsung Internet 9.0 ↑
Moblie(iOS)iOS : 16 ,17
  • Web Browser: Safari , Latest public version
iOS : 16 ,17
  • iPhone Xs ↑, Models released in 2018 and beyond among Apple iPhone Products
  • Web Browser: Safari 14.1 ↑
Table. SingleID connection environment support scope and recommended specifications

1 - Log in using an authentication method

Log in using an authentication method

What is an authentication method?

Authentication method, commonly called Authenticator, refers to an authentication tool.

SingleID provides the following 11 authentication methods for user authentication.

  • Password: Enter password on the SingleID login screen
  • Email OTP: Send the OTP via email and enter the OTP on the SingleID login screen
  • SMS OTP: Send OTP via SMS and enter the OTP on the SingleID login screen
  • Knox Messenger OTP: Send OTP via Knox Messenger and enter OTP on the SingleID login screen
  • Knox Identity: Knox Portal user ID password authentication integration
  • SingleID Authenticator Bio: Install the dedicated SingleID mobile app and link authentication using biometric authentication (fingerprint, facial recognition)
  • SingleID Authenticator PIN: Install the SingleID‑dedicated mobile app and link authentication with a PIN.
  • SingleID Authenticator mOTP: Install the SingleID‑exclusive mobile app and integrate authentication with mOTP (Mobile OTP).
  • SingleID Authenticator TOTP: Install the SingleID‑dedicated mobile app and integrate authentication with TOTP(Time base OTP).
  • Passkey: Login and authentication using biometrics (fingerprint, facial), mobile, or PIN code without a password, based on Windows Hello.
  • Admin Authentication: If the admin permits direct authentication, request authentication on the admin’s behalf
Reference
SingleID Authenticator If this is your first time using the SingleID Authenticator mobile app, please refer to SingleID Authenticator.

Setting the preferred authentication method

The user logs into the User Portal provided by SingleID and sets their preferred primary and secondary authentication methods.

If the user sets their preferred method, the screen for selecting a verification method is skipped during login and authentication, allowing immediate authentication using the primary and secondary methods.

If you want to set your preferred authentication method, follow the steps below.

  1. User Portal > Personal Profile > Authentication settings, click.
  2. Click the star (☆) for each of your preferred 1st authentication method, 2nd authentication method.

After the configuration is complete, the next login will use this method, offering convenient access.

Information
Even if users set their preferred authentication methods for primary and secondary authentication, administrators can restrict them to specific authentication methods through login policy settings.

Register authentication tool

All authentication methods can be configured by the user. Registering an authentication method by a user is called enrollment. When a user account is created for the first time, the email OTP is automatically enrolled using the email information from the user data. Other authentication methods can be used by having the user enroll directly as needed.

I will explain the two authentication enrollment methods.

  • Register in Authentication Settings: User Portal > Profile > Authentication settings, click the + Add New button at the bottom to register.
  • Register on the Identity Verification Method Selection Screen: During login, for first-factor authentication and second-factor authentication, on the Identity Verification Method Selection screen, select the authentication method marked with a gray check mark (V) and register it.
Reference
Refer to Register authentication tool for enrollment.

First login

Consent for collection/use of personal information

Consent for the collection and use of personal information is required when logging in with SingleID for the first time or during a certain period. According to the consent procedure, select the required, optional items to agree. Required items must be selected to log in.

Password authentication

Password is the most fundamental authentication method as SingleID’s default authentication tool.

Enter password

To log in using a user ID, follow the steps below.

  1. Login screen > Account ID input field, enter the ID, and click the Next button.
  2. Password field, enter your password, and click the Next button to log in.
Reference
If you click the eye-shaped icon in the password input field, you can view the password you entered.
Information

If you enter the password incorrectly

If the entered password is incorrect, you will see an error message and can try again. The number of allowed retries is limited to the count set by the administrator in the password policy.

When the password is entered incorrectly repeatedly and becomes locked

If the password is entered incorrectly and the device becomes locked, you can unlock it using two methods.

  • Automatic unlock after 1~5 minutes: When automatic unlock is enabled, the account remains locked for 1~5 minutes. * Login will be available after that time.
  • Unlock with password reset: When the administrator configures the password policy to use password reset, a password reset is required. * You can log in after resetting your password. Find ID you can view the detailed information there.

Email OTP authentication

Authenticate

To authenticate with email OTP, an OTP will be sent to the email address registered by the user.

To authenticate with an email OTP, follow the steps below.

  1. In Identity verification selection method, click Email.
  2. An OTP code will be sent to the registered email. 2. Enter the OTP within the time set by the administrator (usually 3~5 minutes).
  3. After you enter, click the Confirm button, and the authentication will be completed.
Reference
  1. Resend Code: If the input validity period has expired, click the resend code button. 1. Resend the OTP code via email.
  2. Would you like to authenticate using a different method?: If the current authentication cannot be used, switch to a different authentication method.
  3. If you changed your email, please register.: You can register (Enrollment) a different email and authenticate it according to admin settings. You can view the details for registration at Register Email Authentication Tool.
guide

If the code is entered incorrectly

If the user enters the OTP code incorrectly, they can re-enter it up to the number of times specified by the administrator.

When locked due to exceeding the user input limit

If the OTP code is entered incorrectly more times than the administrator’s allowed limit, the screen will be locked from input for the duration set by the administrator. You can input after waiting for the specified duration. Refresh and try again after the input timeout.

SMS OTP authentication

Authenticate

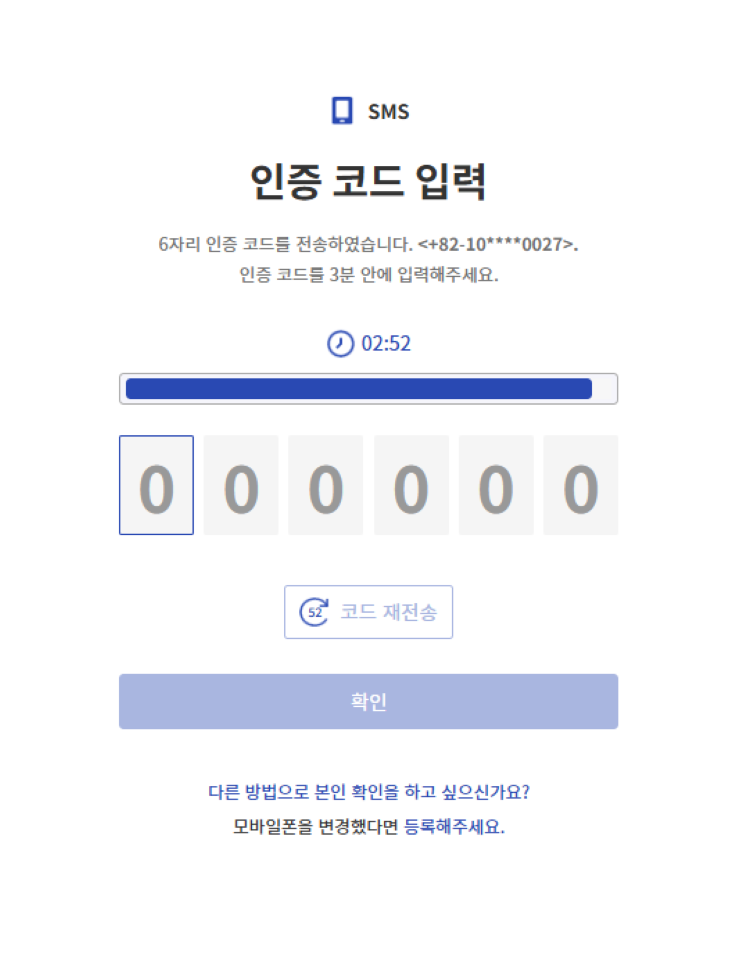
To authenticate with SMS OTP, an SMS OTP is sent to the mobile device registered by the user.

To authenticate with an email OTP, follow the steps below.

  1. In the Verification method selection, click Email.
  2. An OTP code will be sent to the registered mobile phone. 2. Enter the OTP within the time set by the administrator (usually 3~5 minutes).
  3. After entering, click the Confirm button, and the authentication will be completed.
Reference
  1. Resend Code: If the input validity period has expired, click the resend code button. 1. Resend the OTP code to the mobile phone.
  2. Would you like to authenticate using a different method?: If the current authentication cannot be used, switch to a different authentication method.
  3. If you have changed your mobile phone, please register.: Click the link to go to the enrollment screen for the new mobile. You can see the detailed information for registration at Register SMS authentication tool.
Information

If the code is entered incorrectly

If the user enters the OTP code incorrectly, they can re-enter it up to the number of times specified by the administrator.

When locked due to exceeding the user input limit

If the OTP code is entered incorrectly more times than the administrator’s allowed limit, the screen will be locked for the duration set by the administrator. You can input after waiting for the specified duration. Refresh and try again after the input timeout.

Knox Messenger OTP authentication

Authenticate

If you want to authenticate with Knox Messaenger OTP, the OTP will be sent to the Knox Messanger you are using.

To authenticate Knox Messenger OTP, follow the steps below.

  1. In Identity verification selection method, click Knox Messenger.
  2. The OTP code is sent via the Knox Messenger you are using. 2. Enter the OTP within the time set by the administrator (usually 3~5 minutes).
  3. After entering, click the Confirm button, and the authentication will be completed.
Reference
  1. Resend Code: If the input validity period has expired, click the resend code button. 1. Resend the OTP code to the mobile phone.
  2. Would you like to authenticate using a different method?: If the current authentication cannot be used, switch to a different authentication method.
  3. Would you like to use a different Knox ID?: Clicking the link will take you to the screen for enrolling a new Knox ID. You can find detailed information about registration at Register Knox Messenger authentication tool.
information

If the code is entered incorrectly

If the user enters the OTP code incorrectly, they can re-enter it up to the number of times specified by the administrator.

When locked due to exceeding the user input limit

If the OTP code is entered incorrectly more times than the administrator’s allowed limit, the screen will be locked from input for the duration set by the administrator. You can input after waiting for the specified duration. Refresh and try again after the input timeout.

Knox Identity Password Authentication

Authenticate

To authenticate with Knox Identity, you must enter your Knox Identity password.

To authenticate with Knox Identity, follow the steps below.

  1. In Verification selection method, click Knox Identity.
  2. Enter the password for your Knox account.
  3. After entering, click the Confirm button, and the authentication will be completed.
Reference
Would you like to authenticate using a different method?: If the current authentication cannot be used, switch to a different authentication method.
information

If the password is entered incorrectly

If the user enters the password incorrectly, they can re-enter it up to the number of attempts specified by the administrator.

When locked due to exceeding the user input limit

If the password is entered incorrectly more times than the administrator’s allowed limit, input on the screen will be restricted for the duration set by the administrator. You can input after waiting for the specified time. Refresh and try again after the input timeout.

SingleID Authenticator authentication

The SingleID service provides a mobile authentication app called SingleID Authenticator and offers authentication in various ways.

Authentication method

Authentication methodExplanation
SingleID Authenticator BioSend a push using the installed SingleID Authenticator mobile app on the device to request biometric authentication.
SingleID Authenticator PINSend a push using the installed SingleID Authenticator mobile app on the device to request authentication with a PIN code.
SingleID Authenticator TOTPSend a push notification to the installed ID Authenticator mobile app on the device to request authentication via TOTP.
SingleID Authenticator mOTPSend a push using the installed SingleID Authenticator mobile app on the device to request authentication with mOTP.
Table. SingleID Authenticator authentication method
Reference

Passkey authentication

The SingleID service provides simple authentication and multi-factor authentication using a Windows-based Passkey.

Authentication method

  1. Convenient authentication: Provides easy login without ID/Password by using Sign in with Passkey at the bottom of the login page.
  2. Multi-factor authentication: Offers convenient login without requiring ID/password during secondary authentication.

Authentication Types

  • Mobile Passkey: Scan the QR code to log in using Android and iOS mobile
  • Security key: Log in using the Windows security key
  • PIN: Login using the Windows PIN code
Reference

Passkey supported environment Operating system (laptop or desktop)

  • Windows 11, macOS Ventura, ChromeOS 109 or later
  • Mobile phone: iOS 16 or Android 9 and above
  • Hardware security key: a hardware security key that supports the FIDO2 protocol

Browse version

  • Chrome 109 or later
  • Safari 16 or later
  • Edge 109

Device Settings

  • Enable Bluetooth
  • Set screen lock password
  • Register PIN code
  • Allow fingerprint or facial recognition
Reference
Passkey requires that Windows Hello be set up in advance. For detailed information, see the reference link.

Administrator authentication

Authenticate

In the SingleID service, the administrator provides authentication by delegating identity verification on behalf of the user.

To perform administrator authentication, follow the steps below.

  1. In the Identity verification selection method, if you cannot perform identity verification at the bottom of the screen, you can request verification from the administrator. 1. Click here. Click it.
  2. Click the Request button.
  3. You will be taken to the admin selection screen. 3. Select the administrator who requested authentication delegation and click the Request button.
  4. Authentication delegation is requested to the selected administrator.
  5. When the administrator approves the authentication delegation, it is completed automatically.
Information
On the administrator selection screen, if the administrator is not assigned or has not registered a SingleID authenticator, a ‘Administrator Not Assigned’ screen appears.
information
If you cannot complete identity verification, you can request verification from the administrator. Click here** if the phrase is missing The administrator has disabled the admin authentication delegation feature by policy. Please contact the administrator.

2 - Register authentication tool

Register authentication tool (Enrollment)

The principle is that all authentication tools must be registered and used by the user themselves. Registering an authentication tool by a user is called enrollment (Enrollment). When a user is initially created, only the Email OTP is automatically registered using the user’s email information. The remaining information can be directly registered and used by the user as needed.

There are three ways to register.

  1. Login screen > ID/Password entry > Select verification method Register on the screen
    • On the authentication method selection screen, click the authentication tool marked as ‘Registration Required’ (gray check mark) to register.
  2. User Portal(after login) > Profile > Authentication Settings +Add New Click the button to register.
  3. Register through the registration message link at the bottom of every authentication screen.
    • The screen below is an example of an SMS verification screen. * You can register by clicking the ‘If you have changed your mobile phone, please register.’ message at the bottom.
    • All authentication code inputs can be changed via a message below (Message format: ~ please register.)
Diagram
Figure. Authentication screen example

Register Email Verification Tool

Email registration consists of the following three steps.

  1. Verification step: This is the identity verification step before registering the email authentication tool.
  2. Registration step: This step registers a new email and checks whether the number is valid.
  3. Completion Stage: This is the final step to confirm that the registration was successful.

Verification step

This is the step where you verify your identity before using the authentication tool. To view the identity verification process, please refer to 로그인하기.

Caution
In the verification stage, the authentication method to be used can only be performed with the authentication tool configured by the administrator.

Registration step

This is the step where the user registers the desired email address and checks its validity.

The user should follow the steps below.

  1. If you complete identity verification in the confirmation step, you will automatically proceed to the registration step.
  2. Enter the email address you want to register.
  3. Click the Send verification code button.
  4. Check the OTP code sent to the email address you entered, and enter the OTP code on the screen.
  5. If the verification code is entered correctly, you will proceed to the completion stage.

Completion phase

The registration completion screen will appear, and on the next login you can perform first- and second-factor authentication using the email verification tool.

Register SMS authentication tool

SMS registration consists of the following three steps.

  1. Verification Step: This is the identity verification step before registering the SMS authentication tool.
  2. Registration step: This step registers a new mobile phone number and checks whether the number is valid.
  3. Completion Stage: This is the final step to confirm that the registration was completed successfully.

Check step

This is the step where you verify your identity before using the authentication tool. To view the identity verification process, please refer to 로그인하기.

In the verification stage, the authentication method to be used can only be performed with the authentication tool configured by the administrator.

Registration Phase

This step registers the mobile phone number the user wants to add and checks its validity.

The user should follow the steps below.

  1. If you complete identity verification in the confirmation step, you will automatically proceed to the registration step.
  2. Select the country code and enter the mobile phone number you want to register.
  3. Click the Send verification code button.
  4. Check the OTP code sent to the mobile phone number you entered, and enter the OTP code on the screen.
  5. If the verification code is entered correctly, it proceeds to the completion stage.

Completion phase

Registration Complete screen will appear, and on the next login you can perform first and second authentication using the SMS verification tool.

Register Knox Messenger authentication tool

Knox Messenger registration consists of the following three steps.

  1. Verification step: This is the identity verification step before registering the Knox Messenger authentication tool.
  2. Registration Step: Enter the Knox ID to register. 2. This is the step that checks whether the Knox ID to be registered is valid.
  3. Completion Stage: This is the final step to confirm that the registration was successful.

Check step

This is the step where you verify your identity before using the authentication tool. If you want to view the identity verification process, refer to Log In.

In the verification stage, the authentication method to be used can only be performed with the authentication tool configured by the administrator.

Registration stage

This step registers the mobile phone number the user wants to add and checks its validity.

The user should follow the steps below.

  1. If you complete identity verification in the confirmation step, you will automatically proceed to the registration step.
  2. Please enter the Knox ID to register.
  3. Click the Send verification code button.
  4. Check the OTP code sent to the Knox Messenger of the entered Knox ID, and enter the OTP code on the screen.
  5. If the verification code is entered correctly, you will proceed to the completion stage.

Completion Phase

Registration Complete screen will appear, and on the next login you can perform first and second factor authentication using the Knox Messenger authentication tool.

Register Passkey authentication tool

The SingleID Authenticator is an authentication tool provided for the SingleID service.

Passkey enrollment consists of the following three steps.

  1. Verification Step: This is the identity verification step before registering the Passkey authentication tool.
  2. Registration Stage: This is the Passkey registration stage.
  3. Completion Stage: This is the final step to confirm that the registration was successful.

Verification step

This is the step where you verify your identity before registering the authentication tool. To view the identity verification process, refer to 로그인 및 인증하기.

Information
In the verification stage, the authentication method to be used can only be performed with the authentication tool configured by the administrator.

Registration Step

This is the step to verify the mobile phone or PC environment where you want to register a Passkey.

Complete the registration process in the four steps below.

  1. Activation: Passkey support environment guide.
  2. Verification: Complete identity verification using an authentication method.
  3. Registration: Passkey registration stage. 3. When you click the Generate on this device button, a passkey is generated and registered on the PC. 3. Create on another device button click registers with a mobile phone or a hardware security key.
  4. Complete: Registration Complete verification step. 4. Continue Click the button.
Reference

Passkey supported environment Operating system (laptop or desktop)

  • Windows 11, macOS Ventura, ChromeOS 109 or later
  • Mobile phone: iOS 16 or Android 9 or later
  • Hardware security key: a hardware security key that supports the FIDO2 protocol

Browse version

  • Chrome 109 or later
  • Safari 16 or later
  • Edge 109

Device Settings

  • Enable Bluetooth
  • Set screen lock password
  • Register PIN code
  • Allow fingerprint or facial recognition

Completion Phase

After the passkey registration is completed, the registration complete screen appears. You can perform first- and second-factor authentication with the Windows Hello authentication tool on the next login.

Reference

PC Passkey requires that Windows Hello be configured in advance. For detailed information, see the reference link.

When registering a passkey on mobile, it can be set in an environment where QR code scanning is possible.

SingleID Authenticator Register authentication tool

The SingleID Authenticator is an authentication tool provided for the SingleID service.

SingleID Authenticator enrollment consists of the following four steps.

  1. Verification step: This is the identity verification step before registering the SingleID Authenticator authentication tool.
  2. Installation Step: This is the user’s SingleID installation guide step.
  3. Registration Stage: This step registers a new mobile app and registers the service.
  4. Completion stage: This is the final step to confirm that the registration was completed successfully.

Verification step

This is the step where you verify your identity before using the authentication tool. If you want to view the identity verification process, please refer to 로그인하기.

Information
In the verification stage, the authentication method to be used can only be performed with the authentication tool configured by the administrator.

Installation steps

There are three main ways to install the SingleID mobile app.

  • How to install SingleID Authenticator by scanning a QR code on the user’s mobile device or searching for “SinlgeID” on Google Play (for Android) or the App Store (for iOS)
  • How to install by entering your mobile phone number and receiving the download link via SMS.
  • How to install via a manual download link Install the SingleID Authenticator app and click the Next button to proceed to the registration step.
Information
Entering your mobile phone number to receive the download link via SMS is limited to a single transmission for security reasons. If you attempt to send more than three times within one minute, an error message saying “Due to security reasons, SMS messages cannot be sent multiple times.” will be sent. Please try again after a short while.

Registration Phase

Install the SingleID Authenticator mobile app on the mobile phone you want to register, then launch SingleID Authenticator.

Complete the registration process using the three steps below.

  1. Service Registration: In the SingleID Authenticator app, click the ‘+’ at the top.
  2. Enter QR or authentication number: Scan the QR code or enter the authentication code to register.
  3. Service registration complete: Click the Confirm button to complete the registration.

Completion Phase

After registration is completed in SingleID Authenticator, the Registration Complete screen appears. You can perform first- and second-factor authentication with the Windows Hello authentication tool on the next login.

Registration Phase

Install the SingleID Authenticator mobile app on the mobile phone you want to register, then launch SingleID Authenticator.

Complete the registration process using the three steps below.

  1. Service Registration: In the SingleID Authenticator app, click the ‘+’ at the top.
  2. Enter QR or authentication number: Scan the QR code or enter the authentication code to register.
  3. Service registration complete: Click the Confirm button to complete the registration.

Completion Phase

After registration with SingleID Authenticator is completed, the Registration Complete screen appears. During the next login, you can use the Windows Hello authentication tool for primary and secondary authentication.

Register TOTP Authenticator authentication tool

TOTP Authenticator registers third‑party TOTP to support various authentication tools.

TOTP Authenticator enrollment consists of the following four steps.

  1. Verification step: This is the identity verification step before registering the SingleID Authenticator authentication tool.
  2. Installation Step: This is the user’s SingleID installation guide step.
  3. Registration Stage: This step registers a new mobile app and registers the service.
  4. Completion Stage: This is the final step to confirm that the registration was successful.

Verification step

This is the step of identity verification before using the authentication tool. To view the identity verification process, refer to the Login and Authentication.

guide
In the verification stage, the authentication method to be used can only be performed with the authentication tool configured by the administrator.

Installation steps

There are two main ways to install the TOTP Authenticator.

  • Mobile app
  • Web browser extension

If you click the Next button, you will proceed to the registration step.

Service Registration and Verification Phase

This step registers and verifies the 3rd‑party TOTP authenticator you want to add.

Complete the registration process in the two steps below.

  1. Service Registration: Scan the QR code of the TOTP Authenticator you want to register, or enter the manual code. 1. Code registration is completed in the TOTP mobile app or extension.
  2. Service verification: Run the TOTP mobile app or extension and enter the OTP.
Information

TOTP Authenticator Support SingleID supports a variety of standardized 3rd‑party TOTP authentication apps. Non-standard TOTP is not supported. The authenticated mobile and extension programs are listed below. We recommend the mobile app or extension below.

  • Mobile app
    • Google Authenticator, Microsoft Authenticator
  • Web browser extension
    • TOTP extension searchable in the Chrome Web Store, Microsoft Edge Add-ons
Information
To register a new TOTP Authenticator, on the TOTP Authenticator OTP input screen. Click the “If you want to change your TOTP Authenticator, register here” at the bottom to register a new TOTP Authenticator.
information
Check device information When the user clicks on device information such as password, SMS, email, SingleID authenticator, Nox messenger, and passkey, detailed information can be viewed in a popup. Device Information popup displays ’type’, ‘OS version’, ‘browser’, ‘IP’, etc.

3 - policy

When logging into SingleID or logging into an application registered with SingleID, various settings such as login method, authentication session, and password need to be configured according to the organization’s security policy.

SingleID provides a policy management feature that allows detailed configuration of login and authentication information.
If you have purchased the Anomalous Behavior Detection feature (ADM), you can configure it to analyze a user’s login activity at login and, when it detects authentication anomalies that differ from the norm, notify the user of a potential security threat.

The policy features provided by SingleID are as follows.

  • Login Policy
  • Authentication Policy
  • Anomaly detection policy

By using SingleID’s policy feature, you can configure a secure authentication environment that meets organizational security requirements by specifying detailed login methods based on who is logging in, when, in which environment, and to which application.

Login Policy

The administrator can set detailed policies specifying which authentication methods users can use when logging in with SingleID, and, if necessary, create condition-based authentication policies for users authenticating in specific environments.

Login policies can be configured using the following conditions.

  • Which application are you logging into?
  • Who is logging in?
  • In which environment are you logging in?

To access the login policy menu, navigate as follows.

  • Admin Portal > Policy > Login Policy

Basic login policy

The Admin Portal creates two default policies as follows.

  • Admin Portal Policy: Admin Portal access permission control policy
  • Default Policy: User’s default access control policy

The Admin Portal Policy is the login policy applied when attempting to log in to the Admin Portal, and the Default Policy is the login policy applied when attempting to log in to the user portal.

If you have linked an application to SingleID and have not assigned a separate login policy, the Default Policy is automatically assigned as the default login policy.

Information
The above two default policies cannot be disabled or deleted.

Register login policy

The login policy sets the login policies for administrators and users. You can configure login policies based on the connection environment, application, and situation.

Login policies can be registered through a screen consisting of four steps as follows.

  1. General
  2. Allocation
  3. Initial Redirection
  4. rule

General

On the general screen, enter the name and description of the login policy.

The fields that need to be entered are as follows.

NameExplanationRequired or not
nameEnter the name of the login policy.Required
ExplanationEnter the description of the login policy.Required
Table. General

Click the Next button to go to the assignment screen.

Allocation

Specify the application to which the login policy will be applied on the assignment screen.

nameExplanation
filterFilter applications by status.
Keyword searchSearch by application name and description.
Detailed SearchDisplays detailed options for searching applications on the screen.
Assign buttonDisplays the application allocation popup on the screen.
List of assigned applicationsThe assigned applications are displayed in a list format. It starts with an empty list.
Table. Assignment
  1. Click the Assign button to display the application assignment popup on the screen.
  2. In the Application Assignment popup, select one or more applications to assign to the login policy, then click the Assign button.
  3. If you have assigned all applications, click the Cancel button to close the Application Assignment popup.

Initial Redirection

Specifies the user’s login screen entry method and login method on the Initial Redirection screen.

  • Redirected to SingleID’s Sign-in page (login page)

  • Redirected to the external IdP


The explanations of the two methods above are as follows.

  • If you select Redirected to SingleID’s Sign-in page, the SingleID login page will be displayed to the user attempting to log in.
  • If you select Redirected to the external IdP, the user attempting to log in will see the login page of the selected Identity Provider.
  • After selecting Redirected to the external IdP, you must select the Identity Provider from the selection list and designate it.
  • If you select Redirected to SingleID’s Sign-in page, you can optionally display an additional button at the bottom of the SingleID login screen that allows login via an Identity Provider.
  • AND see the following external IdP buttons on the Sign-In page. Click the text input field below and select one or more Identity Providers registered in SingleID to configure them to be displayed on the login screen.
Information
The settings for registering an Identity Provider or displaying a registered Identity Provider on the login screen Please refer to Identity Provider registration.

Rule

In the Rules screen, edit or add login rules and set the priority among them.

nameExplanation
Rule ListLogin rules are displayed on the screen as a list. The Default Rule is shown by default, and the Default Rule cannot be deleted.
Keyword searchSearch by the name or description of the login rule.
Register buttonRegister a new login rule.
Complete buttonRegister a login policy.
Table. Rules

Default Rule configuration

The login rule list on the rule screen displays Default Rule by default.

Default Rule cannot be deleted and can only be modified. Also, you cannot set a priority when adding one or more login rules. (Always the lowest priority.)

To modify the Default Rule, follow the steps below.

  1. Click Default Rule in the rule list.
  2. The WHEN condition of Default Rule cannot be modified.
  3. You can modify the THEN result of Default Rule.
nameExplanation
Configure access permissionSet whether access is allowed.
Required authentication methodSet the primary login method. Additional login methods can be displayed on the login screen besides the default login method.
MFA authenticationConfigure it to require an additional login after the initial login succeeds.
Terms and conditions for collecting consentSet it to display the terms and conditions and request consent when a user logs into SingleID for the first time.
Save buttonSave the modified login rule.
Table. Default Rule

In the access permission setting, you can select one of the following two options.

  • Deny Access
  • Allow Access

If you select Deny Access, login will be denied for all users.

When Allow Access is selected in the access permission setting, you can configure the user’s login method.

Information
  • If you selected Redirected to the external IdP as the method to enter the login screen on the Initial Redirection screen, the primary login settings will not be displayed on the screen.

  • The required authentication method is performed by an external Identity Provider according to the Initial Redirection settings.

    • To have the user log in via multi-factor authentication, check the MFA authentication checkbox and then select one or more Authenticators in the text input box.

    • If a user logs in to SingleID for the first time, to display the terms and conditions and require the user’s consent, check the “Terms and Conditions Consent Setting (d)” checkbox and then select one or more terms or conditions to display on the screen in the text input box.

Add rule

To add a login rule, follow the steps below.

  1. Click the Register button at the top right of the rule list.
  2. On the rule registration screen, enter the rule’s name and description.
  3. Enter the rule items by referring to the below.
NameExplanation
NameThis is the name of the rule.
ExplanationThis is an explanation of the rules.
User group assignmentSelect the user group to apply the rule to.
Profile attribute assignmentClick the ‘Add’ button in the profile property assignment list to add a property. Refer to the help below for descriptions of the property and the operator.
Group SettingsSpecify the group that the logged-in user belongs to as a member.
User attribute listSpecifies the attributes of the logging-in user and the conditions for each attribute.
Add User Attribute button“Add Property” popup is displayed on the screen.
Table. Add rule
Access environment
NameExplanation
NetworkSpecify the IP or network range of the user logging in. The default is “IP address anywhere”.
- Desktop
- Mobile
platformSpecifies the device information of the user logging in. The default is “Any platforms”.
- Desktop
- Mobile
browserSpecifies the browser information of the user logging in. The default is “Any browsers”.
- Edge
- Chrome
- Safari
OSSpecifies the OS information for login. The default is “Any OS”.
- Windows 10
- Windows 11
- Android
- iOS
AND Anomalies (abnormal behavior)Set the condition to determine whether anomalous behavior is detected during login.
The anomalous behavior detection condition can be configured only for tenants that have purchased the Anomalous Behavior Detection (ADM) feature.
To use the Anomalous Behavior Detection (ADM) feature, you must select the additional option when contracting for SingleID.
If you wish to use the Anomalous Behavior Detection feature, you can purchase it additionally on the SCP product purchase page.
After configuring all “WHEN” condition areas, set the login method that will be used when a user matching the condition logs in.
Table. Access Environment
Information

The selectable user attributes are as follows.

User attribute information

Attribute nameData typeRequired or notExplanation
keyStringRequiredkey
usernameStringEssentialID
passwordGuardedStringRequiredPassword
statusStringRequiredstatus
mustChangePasswordBooleanRequiredForce password setting
suspendedBooleanRequiredStandby status
creatorString-Constructor
creationDateDate-Creation date
lastModifierString-Last editor
lastChangeDateDate-Last modified date
administratorBoolean-Admin status
displayNameString-Display name
cnString-Common Name
localString-Locale (email sending criteria)
userSourceString-User source
syncDateString-Last synchronization time
contractNumberString-Contract number
contractStartDateString-Contract start date
contractEndDateString-Subcontract termination date
agreementDateString-Date of required terms agreement
accountStartDateString-Account start date
accountEndDateString-Account expiration date
partnerOrganizationCodeString-Partner company code
approvalUserString-Approver ID
formattedNameString-Korean display name
familyNameString-Korean surname
givenNameString-Korean name
enFormattedNameString-English display name
enFamilyNameString-English surname
enGivenNameString-English name
adDomainString-AD Domain
nickNameString-Nickname
employeeNumberString-Employee ID
epIdString-EP ID
emailString-Email address
phoneNumberWorkString-Phone number
mobileString-mobile phone number
titleString-Job Title
enTitleString-English job title
titleCodeString-Rank code
entitlementString-Job Title
departmentString-Department name
enDepartmentString-English department name
departmentCodeString-Department code
organizationString-Company name
enOrganizationString-English company name
organizationCodeString-Company code
regionString-base
userStatusString-Employee status
userTypeString-Employee type
securityLevelString-Security rating
preferredLanguageString-Knox language
executiveYnString-Executive status
timeZoneString-Time zone
accountLockedBoolean-Forced account lock
accountAutoLockedBoolean-Automatic account lock
accountDisabledBoolean-Unused account
accountSuspendedBoolean-Dormant account
accountSuspendedTimeDate-Dormancy processing time
lastLoginTimeDate-Last login time
accountStateString-Account status
Table. User attributes

The operators are as follows.

operatorExplanation
EqualsSearches for users whose attribute value matches the condition value.
Not EqualsSearch for users whose attribute values do not match the condition value.
Starts withSearch for users whose attribute value starts with the condition string.
Ends withSearch for users whose attribute value ends with the condition string.
ContainsSearches for users whose attribute value includes the condition string.
Table.operator

THEN configuration

THEN Set the login method and procedure in the result area.

You can select one of the two options in the access permission setting (a).

  • Deny Access
  • Allow Access

Selecting Deny Access will deny login for all users. (The default value for access permission setting (a) is Deny Access.)

To allow users to log in and configure detailed login methods, select Allow Access.

NameExplanation
Configure access permissionSet whether access is allowed.
First login setupSet the primary login method. Additional login methods can be displayed on the login screen besides the default login method.
Additional login settingsConfigure it to require an additional login after the initial login succeeds.
Terms and Conditions Agreement SettingsWhen a user logs in to SIngleID for the first time, configure it to display the terms and conditions and request consent.
PC SSO Agent SettingsConfigure it to use the PC SSO Agent to verify whether a security program (Endpoint Security) is installed on the user’s PC.
Save buttonSave the modified login rules.
Table. THEN
  1. From the first login settings selection list, select the Authenticator to use for login.
  2. If you want users to be able to log in with another Authenticator besides the selected primary login method, select the checkbox (V) of And allow another factors below: and choose one or more Authenticators to add in the text input box.
Information

If you selected Redirected to the external IdP as the method to enter the login screen from the Initial Redirection screen, the primary login settings will not be displayed on the screen.

The first login is performed at an external Identity Provider according to the Initial Redirection settings.

  1. To have the user log in via multi-factor authentication, select the checkbox (V) in Additional Login Settings, then select one or more Authenticators in the text input field.
  2. If a user logs in to SingleID for the first time, to display the terms and conditions to the user and require their consent, check the terms and conditions consent checkbox and then select one or more terms or conditions to display on the screen in the text input box.
  3. To verify whether a security program (Endpoint Security) is installed on the user’s PC using the PC SSO Agent, select the checkbox (V) in the PC SSO Agent settings. 3. When this setting is enabled, login attempts by users without a security program installed on the PC are blocked.

If the PC SSO Agent is not registered, the PC SSO Agent configuration items will not be displayed on the screen.

If you want to require additional authentication instead of blocking the login of users who do not have security software installed on the PC while the PC SSO Agent setting (e) is enabled, select the checkbox (V) below and then choose one or more Authenticators in the text input box.

Click the Save button to register the login rule and return to the rule list.

Rule priority management

If one or more login rules are added, the administrator can set the priority among the login rules. If a user meets the conditions set in multiple rules, the login method is applied according to the rule with the highest priority.

To set the priority of login rules, follow the steps below.

  1. Drag the area displayed to the left of the rule name in the rule list with the mouse.
  2. The priority of login rules is set based on the drag-and-drop position.
  3. The higher a rule appears in the list, the higher its priority.
Reference
The Default Policy has the lowest priority and its priority cannot be changed.

Change Policy Status

The status of the login policies managed by SingleID is as follows.

statusExplanation
ActiveLogin policy operating normally
InactiveLogin policy disabled by the administrator
Table. Policy status

An administrator can change the status of the login policy according to its current state as follows.

Current statusModifiable stateExplanation
ActiveInactiveClick the Disable button to change an active login policy to an inactive state.
InactiveActiveActivate button can be clicked to change a disabled login policy to an enabled state. You can also delete a disabled login policy.
Table. Policy status
information

Among login policies, the two policies provided by default in SingleID, Admin Portal Policy and Default Policy, cannot be disabled.

If you disable a login policy, applications that were assigned the disabled policy will automatically be reassigned to the default policy (Default Policy).

Disable policy

To disable an active login policy, follow these steps.

  1. Click the policy you want to deactivate in the policy list to navigate to the policy detail screen.
  2. Click the Disable button.
  3. After reviewing the login policy information displayed in the Confirm popup (the number of assigned applications and the number of rules included in the login policy), click the Deactivate button.
information

If you disable the login policy, applications that were assigned the disabled login policy will automatically be reassigned to the default policy (Default Policy).

Even after reactivating a disabled login policy, the applications that were previously assigned are not automatically reassigned.

Activate policy

To change a login policy from inactive to active, follow these steps.

  1. Click the policy you want to activate in the policy list to navigate to the policy detail screen.
  2. Click the Activate button to change the login policy status to active.
information
When activating a login policy that is disabled, the status changes immediately without a separate confirmation popup.

Delete policy

Administrators can delete the login policy from SingleID.

To delete the login policy, follow the steps below.

  1. Click the policy you want to delete in the policy list to navigate to the policy detail screen.
  2. If the login policy is enabled, click the Disable button to deactivate the policy.
  3. Click the Delete button displayed at the top right of the disabled login policy.
  4. A popup screen confirming the deletion of the login policy is displayed.
  5. To delete a login policy, first verify the policy information, then enter the name of the policy you want to delete and click the Delete button.
Reference

Deleted login policies cannot be restored.

When a login policy is deleted, the rules contained within the policy are also deleted, and even if you re-register a login policy with the same name, the deleted rules or configuration information will not be restored.

Access Simulation

When there are many login policies and the rules they contain, it can be difficult to determine which user is governed by which policy for login methods.

SingleID provides an access simulation feature so that administrators can quickly verify the login policies and rules applied to users.

Using the access simulation feature, you can select the user and target application, arbitrarily define the user’s login environment (network, device, browser, OS), and predict in advance which login method the user will experience in each scenario.

Additionally, if there are review requests from users experiencing login difficulties, you can quickly verify using the access simulation feature and modify the problematic policies or rules.

To use the access simulation feature, click the Access Simulation button located at the top right of the login policy list screen.

NameExplanation
Enter user IDEnter the user ID of the simulation target.
Network SettingsSpecifies the IP of the user to simulate. The default is “IP address anywhere”.
Platform SettingsSpecify the device information of the user to be simulated. The default is “Any platforms”.
Browser SettingsSpecify the browser information of the user to be simulated. The default is “Any browsers”.
OS settingsSpecify the OS information of the user to be simulated. The default is “Any OS”.
Select ApplicationSelect the application to be simulated. Click the application selection button to display the popup.
Run Simulation buttonRun the access simulation.
Simulation resultsDisplays the access simulation results on the screen. The login policies and rules applied to the specified user are shown.
List buttonReturn to the login policy list.
Table. Access simulation

To run the access simulation, follow the steps below.

  1. Enter the ID of the user to be simulated.
  2. Specify the IP of the user to simulate. 2. After selecting Specific IP Address, you can manually enter the IP. 2. Enter the IP in the format 123.123.123.123.
  3. Specifies the device information of the user to be simulated. 3. After selecting Platform, you can select a device from the selection list.
  4. Specify the browser information of the user to be simulated. 4. After selecting Browser, you can select a browser from the selection list.
  5. Specify the OS information of the user to be simulated. 5. After selecting OS, you can select the OS from the selection list.
  6. Click the Application Selection button to select the target application for simulation.
  7. In the Application Selection popup, click the radio button to the left of the application name to select the application, then click the Add button.
Reference

If you want to re-select the application, click the X button to the right of the selected application name, then click the Select Application button again.

  1. Click the Run Simulation button.
  2. The access simulation runs, and when it finishes, the login policies and rules are displayed on the screen according to the simulation results as shown below.

Authentication Policy

The administrator needs to change detailed authentication settings according to the organization’s security policy.

SingleID categorizes and manages detailed authentication settings into the following four policies.

  • Session Policy
  • Authenticator policy
  • MFA Service Provider Policy
  • Password policy

To access the authentication policy menu, navigate as follows.

  • Admin Portal > Policy > Authentication Policy

To modify the authentication policy, click the Edit button at the lower right of the authentication policy screen to change the settings, then click the Save button.

Session Policy

To change the session policy, follow the steps below.

  1. Click the Edit button at the lower right of the authentication policy screen.
  2. In the maximum session limit setting, set the maximum number of sessions a user can create simultaneously.
  3. The minimum value that can be set is 1, and the maximum value is 100. 3. When set to 1, the user can only log in from one browser at a time and cannot log in simultaneously from multiple PCs or browsers.
  4. In the session priority settings, set the priority of sessions created by the user. 4. The priority can be set to one of the following two options.
    • Old session
    • New session

When you set the maximum session limit to 1 and select Old session in the maximum session count restriction setting, a logged-in user will have their login blocked when they attempt a new login from another PC or browser that is not logged in.

Also, when the maximum session limit setting (Œ) restricts the maximum number of sessions to 1 and New session is selected, if a logged-in user attempts a new login from another PC or browser that is not logged in, the session of the previously logged-in browser is forcibly expired and the session logged in from the new PC or browser is maintained.

In the maximum session time setting, set the maximum duration a session can be kept.

The maximum session time can be selected from one of the following two options.

  • No time limit
  • Set time limit

If set to No time limit, a session that has been created will not automatically expire until the user logs out. After configuring Set time limit and setting the time, when the specified time elapses, the session expires and the user is automatically logged out. In the Maximum Idle Session Time setting, set the session’s maximum idle time. If you set the maximum idle session time, the session will expire and the user will be automatically logged out when the user does not make an authentication request for the configured duration.

To save the changed settings, click the Save button at the bottom right of the authentication policy screen.

To avoid saving the changed settings, click the Cancel button at the lower right of the authentication policy screen.

NameExplanation
Set maximum session count limitSets the maximum number of concurrent sessions per user.
Session priority settingWhen a session exceeds the user’s maximum concurrent session limit, set the priority between the previous session and the new session.
Maximum session time settingSet the maximum session lifetime after the session is created. The session expires when the maximum session lifetime elapses.
Maximum idle session time settingSet the session expiration time for when the user does not make an authentication request to the server for a certain period after the session is created.
Table. Access Simulation

Authenticator policy

To change the Authenticator policy, follow the steps below.

  1. Click the Edit button at the lower right of the authentication policy screen.
  2. Configure each item as described below.
  3. When the setup is complete, click the Save button.
NameExplanation
Available Authenticator settings
(for login policy)
Configure an Authenticator that can be used for authentication.
Authentication method during registrationWhen registering the Authenticator, configure the user’s primary verification method.
Carry out the following additional authenticationWhen registering an Authenticator, configure additional identity verification methods to be allowed in addition to the user’s primary verification method.
Find AccountSet the authentication method when retrieving the ID.
Password resetSet the authentication method for password recovery.
Unlock settingIf a user repeatedly fails authentication while using Authenticators, the ID becomes locked. You can set a duration so that the lockout is automatically cleared after a specified period.
Table. Authenticator policy
Information
  1. To remove a specified Authenticator from the available Authenticator settings, it must first be removed from the rules of all login policies.

  2. Configurable Authenticators can be registered in the Add Authenticator menu. 2. Disabled Authenticators cannot be configured in the available Authenticator settings.

Information

If you have not purchased an MFA product

  • Available Authenticator Settings (for login policy) is not displayed on this screen.
  • If you want to purchase additional MFA products, please contact us via Support Center > Contact Us.
Information
  1. If a user repeatedly enters an incorrect password, fails to log in, and becomes locked out, the lock will not be released even after a certain amount of time has passed. 1. Configure lock and unlock methods based on the password in the Password Policy.

  2. If you reset a user’s password in the User menu, you can unlock a locked user before the unlock wait time expires. 2. Please refer to password reset.

MFA Service Provider Policy

To change the MFA Service Provider policy, follow the steps below.

  1. Click the Edit button at the lower right of the authentication policy screen.
  2. Refer to the table below and configure each item accordingly.
  3. When the setup is complete, click the Save button.
NameExplanation
Available Authenticator settings
(for MFA Service Provider)
Set the Authenticator that the user can use when an authentication request occurs from the MFA Service Provider.
Terms and Conditions OptionsWhen a user registers from the MFA Servicce Provider, you can show the terms and conditions and obtain the user’s consent.
Unlock settingWhen an authentication request occurs from the MFA Service Provider and the user repeatedly fails authentication, the ID becomes locked. You can set a time so that the locked user’s lockout is automatically cleared after a certain period.
Table. MFA Service Provider Policy
Information
  1. To remove a specified Authenticator from the available Authenticator settings, it must first be removed from all MFA Service Providers.

  2. Configurable Authenticators can be registered from the Add Authenticator menu. 2. Disabled Authenticators cannot be set in the available Authenticator settings.

  3. If a user authenticates with the MFA Service Provider for the first time, to configure the system to display terms and conditions to the user and require the user’s consent, check the terms and conditions option checkbox and then select one or more terms or conditions to display on the screen in the text input box.

  4. If a user authenticating with the MFA Service Provider repeatedly fails authentication, the user’s ID becomes locked. 4. To automatically release the locked state after a certain period, set the unlock wait time in the unlock settings.

Password policy

To change the password policy, follow the steps below.

  1. Click the Edit button at the lower right of the authentication policy screen.
  2. Refer to the table below and configure each item accordingly.
  3. When the setup is complete, click the Save button.
NameExplanation
Password historyYou can configure the system to prevent reuse of previously used passwords. Specify the number of recent passwords to prevent reuse.
users will be unable to use the number of previously used passwords set above.
Password expirationSpecify the password validity period. After the validity period expires, you must change the password to log in.
You can set it from 1 day up to 365 days.
Password lockIf the password is entered incorrectly repeatedly, the user’s ID will be locked. Specify the number of allowed repeated entry failures.
  • Automatic unlock after the configured time (minutes) (1~1,440): Accounts that exceed the failure count will be locked for the configured time (minutes). Enter the automatic unlock time (minutes).
  • Automatic unlock after password reset
Pattern and ComplexitySet the minimum password length, required characters, numbers, etc.
Set minimum character countSpecifies the minimum password length.
Set minimum number of lettersSpecifies the minimum number of alphabetic characters to include in the password.
Minimum number of digits settingSpecifies the minimum number of digits to include in the password.
Set minimum number of special charactersSpecifies the minimum number of special characters to include in the password.
Set maximum character countSpecifies the maximum password length.
Allow using the user ID as the password.Set whether to allow the user’s ID to be included in the password.
Table. Password Policy
Information
Users locked due to repeated password entry failures must reset their password themselves to unlock the account. To change the status of a user locked due to repeated password entry failures, refer to User Status Change.

Sign-up Policy

If you want to allow user registration, enable the sign‑up policy, and users other than those provisioned from the HR system or IdP can also be registered. Through account synchronization, it provides the ability to register, create, modify, and delete accounts, as well as to invite users via the login screen or email.

To enable and use the registration policy, follow the steps below.

  1. Admin Portal > Policy > Sign‑up Policy click.
  2. Enable User Registration Allowed.
  3. If you enable it, the Policy tab and User Invitation tab will appear.
  4. Review the descriptions of the Policy tab and the User Invitation tab below, and configure the policy.
  5. When the setup is complete, click the Save button.

Policy

You can configure general policies for member registration.

NameExplanation
Display the sign‑up link on the login screenDisplay a sign‑up link on the SingleID login screen.
  • Display the SingleID sign‑up screen as a link: Select this if you will use the default SingleID sign‑up screen
  • Display an external sign‑up screen as a link: Select this if you have a separate sign‑up page
Terms and Conditions OptionsSelect the option to agree to terms and conditions during sign‑up. During sign‑up, you can select and apply terms and conditions separately.
Allow sign‑up invitationsWhen the feature is enabled, you can invite users via email. You can configure it so that only invited users can sign up, rather than using a separate registration page. With this setting, registration through the SingleID sign‑up link is not possible.
Sign-up input formConfigure the user attributes to be collected during registration. You can also specify whether each attribute is required.
ID duplicate prevention settingWhen enabled, a suffix is added to the ID to prevent duplicate IDs.
This setting prevents duplicate IDs for automatically provisioned accounts. Since there are often cases where the ID values are the same, we recommend configuring it.
When you sign up through registration, the corresponding PostFix value is appended to the ID.
Maximum usage periodThe maximum usage period is set after registration. It can be set from day 1 to day 2000.
Approval upon sign‑up requestWhen a sign-up request is submitted, you can enable the approval setting to load and apply the registered approval policy.
Table. Policy tab

Dormant User Policy

Provides a function to set users who have not used the SingleID system for an extended period to a dormant status. Users who have been changed to a dormant state can be configured, according to settings, to allow either self-recovery by the user or recovery by an administrator.

To enable and use the dormant user policy, follow the steps below.

  1. Admin Portal > Policy > Human User Policy Click.
  2. Human User Policy Activation Click the toggle button.
Information
If even one human user exists, it cannot be reverted to a disabled state.

Additional settings are shown in the table below.

NameExplanation
Criteria for setting a user as dormantThis setting converts users who do not log into SingleID for N days into dormant users. It can be set from 1 day up to 365 days.
Send notification emailThis setting sends notification emails to users starting N days before the dormant state.
Additionally, you can also select the option to send notification emails to users when changing to the dormant state.
User exempt from dormant status changeYou can click the Add button to add an exception user to change to dormant status.
Dormant State Exception GroupYou can set exceptions for users included in the group.
Long-term human user managementThis feature automatically deletes the user account after it has been changed to a human user. It can be set for up to 1 to 365 days.
- You can configure it to send a reminder email N days before deleting the user (1 to 30 days)
- You can set it to send a notification email to the user when their information is deleted.
Allow dormant users to directly restore their status.Enabling the option allows dormant users to restore their status to active themselves. Dormant users can change their status to active by resetting their password through “Password Reset”.
Table. Human User Policy List

Approval Policy

The administrator can select an approval system and, depending on the type, configure sign‑up and app‑access policies across various approval lines. Various approval policies allow flexible application whenever the security policy changes.

Approval can be performed using either the built-in approval system feature or the Knox Portal approval system. If integration with another approval system is required, please request it via a 1:1 inquiry.

To check the approval policy, follow the path below.

  • Admin Portal > Policy > Approval Policy

Approval policy list

The administrator can select an approval system and, depending on the type, configure sign‑up and app‑access policies across various approval lines. It can be flexibly applied whenever the security policy changes, using various approval policies.

NameExplanation
IDThis is an automatically generated ID when creating an approval policy.
Approval systemIt is distinguished by SingleID and Knox Portal. If registration with another approval system is needed, please request it through a 1:1 inquiry.
typeIt is divided into app access and sign-up.
statusThis is the approval policy status. If unavailable, you must change the approver and notifier.
Approval useIt is categorized as in use and not in use. When you click the Details button, you can view applications where the approval policy is used.
Table. Approval Policy List

Register approval policy

When you click the Register button, you can set the approval system, type, approver, notification method, and approval period.

NameExplanation
Approval systemTwo options are available.
  • SingleID : Approval can be done through the user portal with self‑approval
  • Knox Portal : Approval can be done via Samsung Knox Portal approval system
typeTwo options are available.
  • App Access: Select to request application access permission
  • Sign Up: Select to apply for membership registration
ApproverSelect and register the approver and the notifier.
Notification methodWhen an approval request is received by the approver or notifier, select the notification method.
Table. Approval Policy Registration

Anomaly Detection Policy

SingleID provides a function that collects and analyzes user behavior information before and after authentication in real time to determine whether there is abnormal authentication behavior, and if identified as belonging to an abnormal authentication category, immediately notifies the user of the risk.

To access the Anomaly Detection Policy menu, navigate as follows.

  • Admin Portal > Policy > Anomalous Activity Detection Policy
Information
Detailed information about the anomalous behavior detection policy menu is provided separately to ADM purchasing customers. If you did not purchase the anomalous behavior detection feature as an option, you cannot view the policy management menu in the Admin Portal. If you wish to use the anomalous behavior detection feature, please contact us through a 1:1 inquiry or reach out to a sales representative.

User lifecycle management

User lifecycle management provides configuration functions for setting default values when a user is created or registers, and for extending the user account usage period.

To enable and configure user lifecycle management, refer to the following.

Onboarding (subscriber)

Set the phone country code, language, and time zone when creating a user and signing up. To configure, click the Edit button at the bottom right to make changes.

Offboarding (departed user)

Users can request an account usage period extension, and it can be configured to allow the maximum possible extension.

  1. When requesting a user usage period extension, click the Activate toggle.
  2. Enter N days for the maximum extendable period.
  3. Click the Change button in the usage period request approval to set the approver.

Conditional Authentication Policy

Conditional authentication policies can set rules to match the environment, settings, and individual circumstances of user accounts.

You can set the following rules.

NameExplanation
Use multiple authenticatorsUsers who have relied on a single authentication method for an extended period must additionally verify their identity using a different type of authentication tool.
Table. Register Conditional Authentication Policy
information
This conditional authentication policy will continuously have rules added and will be upgraded to a workflow feature in the future.

4 - Configure Privacy Settings

Configure Privacy Settings

This is a menu for user settings.

To set your privacy preferences, follow these steps.

  1. Click the Personal Profile > Personal Information setting at the top right of the screen.
  2. You can view the photo, name, email, phone number, language, and time zone.
  3. Image: Image > Image Click Change to upload the icon image you want to display.
  4. Language: Choose your desired language in Korean or English.
  5. Language/Time Zone: Please select the time zone you are currently in. Click the City Search button to open the city search popup. Search for the desired city in English and select it.
  6. Click the Save button at the bottom of the screen to save.
Reference
If you click the Delete button at the lower left of the privacy screen, you can delete the current user account. If you delete your account, it will be permanently removed, so please only proceed with withdrawal if you truly wish to delete it.

Configure Authentication

You can register a user’s authentication tool and set the preferred authentication tool.

To configure authentication, follow these steps.

  1. Click the Personal Profile > Authentication setting at the top right of the screen.
  2. +Add New button: click to add using the authentication tool of your choice.
  3. Click the Delete button to remove the authentication tool you do not wish to use.
  4. Star (☆) Click the icon to set your preferred authentication method.
Reference
For instructions on how users register or delete authentication tools, please refer to Register Authentication Tools.

Change Password

In the authentication settings, click Change Password to complete an identity verification process and update your password.

Check login history

You can view the user’s login history and environment.

To view a user’s login history/environment, follow these steps.

  1. Click Personal Profile > Login History/Environment at the top right of the screen.
  2. In the Login History tab, you can view information such as login date and time, location, country, city, IP address, OS type, browser type, detection status, and result.
  3. In the Login Environment tab, you can view the details of any registered login environments, and if an environment is no longer used, you can delete it via the ‘Delete’ button.
guide
Check the country ISO codes at the link below. Refer to the method at ISO 3166 - Wikipedia, the free encyclopedia.
guide
When using the SingleID ADM (Anomaly Detection Management) feature The detection items will display Normal or Detected. This entry represents a login record where abnormal authentication activity was detected.

Log out

Click the photo icon located at the top right of the screen and then click ‘Logout’.

When you click the Logout button, all applications visited through SingleID are logged out simultaneously, and if integrated logout is configured via the PC SSO Agent, logout also proceeds in the associated browsers.
5 - Settings

The Settings menu consists of Role Management, which manages the permissions of Admin Portal administrators; Ledger Management, which registers and manages SoT (ledger); and SMS Service, which registers SMS integration information used for secondary multi-factor authentication.

Role management

Role management can control the permissions of administrators in the Admin Portal. In line with the principle of least privilege, we provide role management to allow administrators to operate with minimal permissions.

The administrator has two roles by default.

  • ADMINSTRATOR - a super administrator account with all privileges
  • SOT_MANAGER - an account that is a director and application system administrator with app management capabilities
Information
Only the ADMINISTRATOR and SOT_MANAGER permissions are configured for the Role. If you need to add permissions, please contact us via 1:1 Inquiry.

User assignment

To add a user with ADMINISTRATOR privileges, follow the steps below.

  1. From the menu, select ADMINSTRATOR, and click the User tab.
  2. To add a user, click the Add button.
  3. You can search for a user using the user ID, name, email address you want to add.
  4. After searching for a user and selecting, click the Add button to add the user.
Reference
Delete User Select the user you want to delete and click Delete to delete them.

Director Management

SingleID can manage and view various SOTs.

NameExplanation
defaultThere are two basic types, and they are generated automatically.
- Mfa: Users coming from an MFA Service Provider (primary authentication system) correspond to the Mfa type. (When the MFA Service Provider does not specify a SoT)
- SingleID: Users and Groups created by an administrator through the Admin Portal’s Identity Store are linked to the corresponding SoT.
ApplicationThis is an SOT that is automatically created by receiving user/group information via Inbound Provisioning from an external application (SoT).
MFA service ProviderThis is the SoT automatically generated based on the User Tag entered when creating the MFA Service Provider.
Table. Ledger Management

default

  • It is the primary ledger of SingleID, receiving entries through the Identity Store and MFA Service Provider.
    • Mfa: Mfa is the basic SoT of the MFA service provider. * All users created through an MFA Service Provider that does not specify a User Tag are managed as MFA SoT. * MFA cannot be changed or deleted.
    • SingleID: SingleID is the default SoT. * It is used to manage users and groups created through the Admin Portal. * You cannot change or delete the SingleID.

Application

  • It is a ledger automatically generated by receiving user/group information via Inbound Provisionsing from an external application (SoT).
  • You can assign the person in charge of managing the ledger through the PIC tab (up to 50 people).

MFA Service Provider

  • When registered as an MFA Service Provider, if you set a User tag, a SoT is created, and new users who receive secondary authentication from that system are marked with #SoT.
  • You can view and manage ledgers that come in through this MFA Service Provider.
  • You can assign the person in charge of managing the ledger through the PIC tab (up to 50 people).

Information
The principal has a role designated as the person in charge. SoT managers can only view, edit, or delete the principals assigned to them.
 

SMS service configuration

The administrator can activate the SMS service using the activation toggle button.

SCP SMS Service Configuration

After activating the SMS service, set the SCP SMS service in the SMS service settings.

NameExplanation
Activate SMS serviceSet SMS service activation/deactivation to toggle mode
Select SMS serviceSelect SMS to use (SCP SMS)
Endpoint URLEnter the SCP SMS Endpoint URL.
API KeySet the API Key for the SCM SMS service.
SMS signature settingsWhen you click the activation button, the SMS signature input field appears.
The SMS signature is a signature used at the beginning of the message body when sending an SMS.
1. The signature can be used to verify the sender when the user receives a message and to exempt the message from blocking when sending international SMS.
2. The default signature is ‘[SingleID]’, and when a signature is set, it is automatically added at the beginning of the SMS message.
3. For the signature specifications used to exempt international SMS from blocking, contact the Infobank SMS service provider and configure it according to the specifications.
※ For detailed inquiries regarding signatures, please contact the Infobank SMS service provider.
SMS signaturePlease enter the SMS signature.
Table. SCP SMS Service Configuration

To set up and use the SMS service, follow the steps below.

  1. SMS Service Activation Click the toggle button to enable the service.
  2. Select SCP SMS Service.
  3. Click Edit, enter the required values to configure SMS, and save.
    • SCP SMS - SCP SMS Service Endpoint URL, SCP SMS Service App Key
  4. To save changes, click the Save button. 4. When you click the Save button, an alert popup appears asking whether to save the changes.
  5. When you click the Confirm button, the changes are saved, and a toast message appears when the changes are successfully completed. 5. When the Cancel button is clicked, the administrator’s registration/modification changes are not updated and it returns to the SMS screen.

SMS sending test

To set up and test the SMS service, follow the steps below.

  1. Enter the mobile number to receive the test.
  2. To verify that the SMS settings are correctly configured, enter a phone number for the SMS sending test and click Send to run the test.
  3. When you click the Send button, a popup appears asking whether to send an SMS test to the specified number. 3. When you click Confirm, an SMS is sent to the entered number and a popup window appears. 3. A toast message appears indicating that an SMS has been sent to the specified number.

Knox SMS Settings

Knox SMS is an SMS service provided by Knox. After activating the SMS service, select Knox SMS in the SMS service settings and configure it.

NameExplanation
Select SMS serviceSelect SMS service to use (Knox SMS)
Service IDEnter the service ID of Knox SMS.
Access TokenEnter the Access Token for Knox SMS.
Caller phone numberEnter the sender’s phone number for Knox SMS.
SMS signature settingsWhen you click the activation button, the SMS signature input field appears.
The SMS signature is a signature used at the beginning of the message body when sending an SMS.
1. The signature can be used for the recipient to verify the sender and to exempt the message from blocking when sending international SMS.
2. The default signature is ‘[SingleID]’, and when a signature is set, it is automatically added at the beginning of the SMS message.
3. For the signature specifications used to exempt international SMS from blocking, contact the Infobank SMS service provider and configure it according to the specifications.
※ For detailed inquiries about signatures, please contact the Infobank SMS service provider.
SMS signaturePlease enter the SMS signature.
Table. Knox SMS

SMS sending test

To set up and test the SMS service, follow the steps below.

  1. Enter the mobile number to receive the test.
  2. To verify that the SMS settings are correctly configured, enter a phone number for the SMS sending test and click Send to run the test.
  3. When you click the Send button, a popup appears asking whether to send an SMS test to the specified number. 3. When you click Confirm, an SMS is sent to the entered number and a popup window appears. 3. A toast message appears indicating that an SMS has been sent to the specified number.

InfoBank SMS Settings

After activating the SMS service, select Infobank SMS in the SMS service settings and configure it.

NameExplanation
Select SMS serviceSelect SMS service (InfoBank SMS)
API KeySet the API Key for the Infobank SMS service.
To use both domestic and international SMS services with a single API key, contact the Infobank provider.
Sender IDIt is an identification code entered to specify the original sending carrier when sending SMS, using the additional telecom carrier registration number (a 9‑digit number).
2. If the original sending carrier is a reseller, the original reseller’s registration number is used, and if the message is sent directly to a message relay without going through a reseller, the relay’s registration number is used.
For further inquiries, contact the Infobank SMS service provider.
Caller phone numberPlease enter the sending phone number.
SMS signature settingsWhen you click the activation button, the SMS signature input field appears.
The SMS signature is a signature used at the beginning of the message body when sending an SMS.
1. The signature can be used for confirming the sender when the user receives a message and for exempting from blocking when sending international SMS.
2. The default signature is ‘[SingleID]’, and when a signature is set, it is automatically added at the beginning of the SMS message.
3. For the signature specifications used to exempt from blocking when sending international SMS, contact the Infobank SMS service provider and configure it according to the specifications.
※ For detailed inquiries regarding signatures, please contact the Infobank SMS service provider.
SMS signaturePlease enter the SMS signature.
SMS sending testSettings for SMS sending test.
Table. Infobank SMS

SMS sending test

To set up and test the SMS service, follow the steps below.

  1. Enter the mobile number to receive the test.
  2. To verify that the SMS settings are correct, you can enter a phone number for the SMS sending test and click Send to perform the test.
  3. When you click the Send button, a popup appears asking whether to send an SMS test to the specified number. 3. When you click Confirm, an SMS is sent to the entered number and a popup window appears. 3. A toast message appears indicating that an SMS has been sent to the specified number.

Bizppurio SMS Settings

After activating the SMS service, select Bizburio SMS in the Bizburio SMS service settings to configure it.

NameExplanation
Select SMS serviceSelect SMS service to use (BizBuriO SMS)
Caller phone numberEnter the sending phone number.
SMS signature settingsClick the activation button to display the SMS signature input field.
The SMS signature is a signature used at the beginning of the message body when sending an SMS.
1. The signature can be used to verify the sender when the user receives a message and to exempt the message from blocking when sending international SMS.
2. The default signature is ‘[SingleID]’, and when a signature is set, it is automatically added at the beginning of the SMS message.
3. For the signature specifications used for exempting international SMS from blocking, contact the Infobank SMS service provider and configure it according to the specifications.
※ For detailed inquiries about signatures, please contact the Infobank SMS service provider.
SMS signaturePlease enter the SMS signature.
SMS sending testSettings for SMS sending test.
Table. BizpuriO SMS

SMS sending test

To set up and test the SMS service, follow the steps below.

  1. Enter the mobile number to receive the test.
  2. To verify that the SMS settings are correct, you can enter a phone number for the SMS sending test and click Send to perform the test.
  3. When you click the Send button, a popup appears asking whether to send an SMS test to the specified number. 3. When you click Confirm, an SMS is sent to the entered number and a popup window appears. 3. A toast message appears indicating that an SMS has been sent to the specified number.

User profile

You can view and edit the attributes that make up a user profile, or add custom attributes. Attributes are classified into three categories: default, system, and custom. You can modify some attribute settings based on the category.

Default : This is a property displayed on the Admin Portal or User Portal screen. Some property settings can be modified, but properties cannot be deleted. ㆍ System : a predefined attribute that can be used for inbound or outbound provisioning profile mapping of an application, and cannot be modified or deleted. ㆍ Custom : An attribute that administrators can add so it can be displayed on the screen or used for mapping the application’s provisioning profile. You can edit after adding, but you cannot delete.

Add custom property

You can add and manage custom attributes.