1 - Getting Started
This manual aims to help users quickly understand the essential functions and processes needed to use CAM effectively.
Network Environment
Access is allowed only from network environments authorized for each tenant.
- CAM portal and console access: can be accessed from the network environment permitted for each tenant.
- DEV, STG, ETC resource access: can be accessed from the allowed network environment for each tenant.
- PRD resource access: It can only be accessed in a network environment where the internet is blocked, and can only be accessed from specific IP ranges per tenant.
- Additional individual PC environment configuration is required.
Preliminary work
To use the CAM portal, several preliminary steps are required.
If you are a PM (Project Manager) or PL (Project Leader) group user, please review the cloud account and resource preparation items below and set up the environment in advance.
Prepare cloud account
To register and manage an account in CAM, you first need to create a role in the IAM service of the CSP (AWS, Azure, SCP), configure it with the policies required by CAM, and then assume the role in CAM.
information
If the document is external, please refer to the
Add Account of
Configuration.
Resource preparation
Resource configuration
To register resources in CAM and connect, several configuration steps are required when setting up the resources.
First, you must enable ‘Password authentication’. Since a One-Time-Password (OTP) for SSH connections is issued when accessing resources from CAM, this configuration is essential for accessing resources through CAM.
Additionally, when the resource type is Compute, you must add the configuration below.
- Add the following content to a file named /etc/sudoers.
- ubuntu : %sudo ALL=(ALL) NOPASSWD:ALL
- amazon linux : %wheel ALL=(ALL) NOPASSWD: ALL
- Restart the server using systemctl restart sshd.service.
Network Settings
To access resources through CAM, you must register firewalls and security groups according to each tenant’s network environment so that CAM can connect to the resources. Please verify the required information with the tenant administrator and proceed with the network configuration.
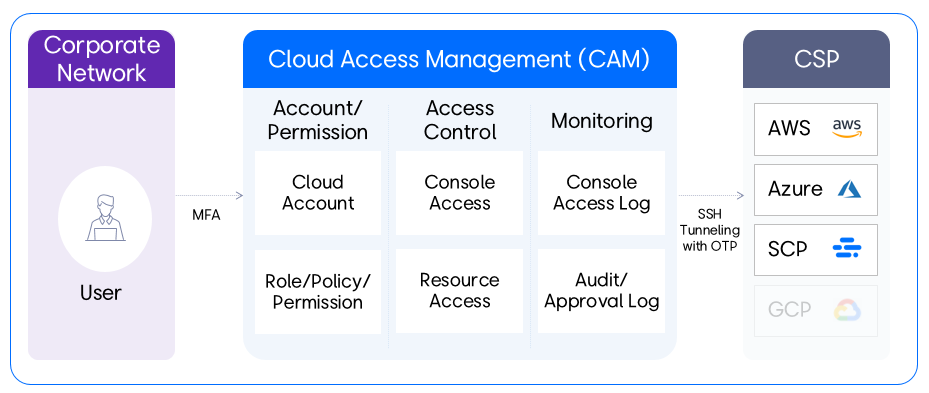
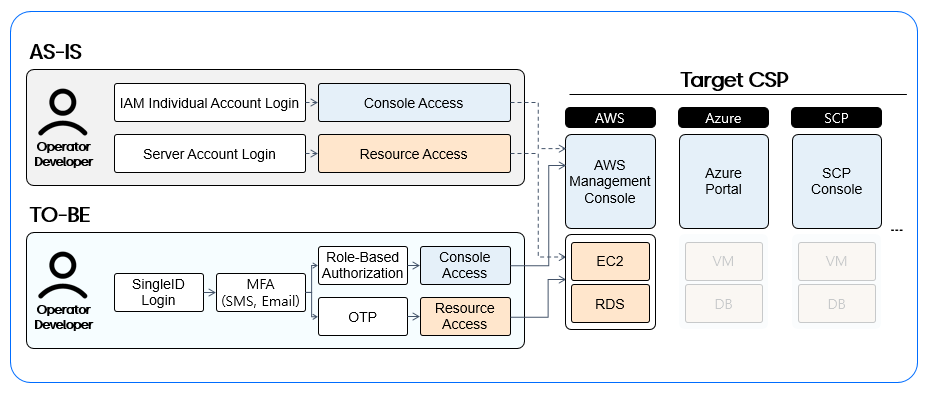
Service scope
Currently, Console Access supports AWS, Azure, and SCP, while Resource Access supports only AWS. We plan to gradually expand to other CSPs in the future.
| Item | Explanation |
|---|
| AWS | Amazon Web Services |
| IAM (Console) | AWS Identity and Access Management |
| SCP | Samsung Cloud Platform (KR EAST1 region, KR WEST1 region) |
| EC2 | Elastic Compute Cloud |
| RDS | Relational Database Service |
Table. CSP abbreviation
| OS | Version |
|---|
| Ubuntu | Ubuntu Server 24.04 LTS |
| Ubuntu | Ubuntu Server 22.04 LTS |
| Amazon Linux | Amazon Linux 2023 AMI |
| Redhat | Red Hat Enterprise Linux 9.4 |
Table. OS
| DB Engine | Version |
|---|
| PostgreSQL | 16.x |
| MySQL | 8.0.x |
| Aurora PostgreSQL | 15.x |
| Aurora MySQL | 3.05.x |
| Aurora MySQL | 3.04.x |
| Aurora MySQL | 3.03.x |
| MariaDB | 10.11.10x |
Table. DB
2 - Home
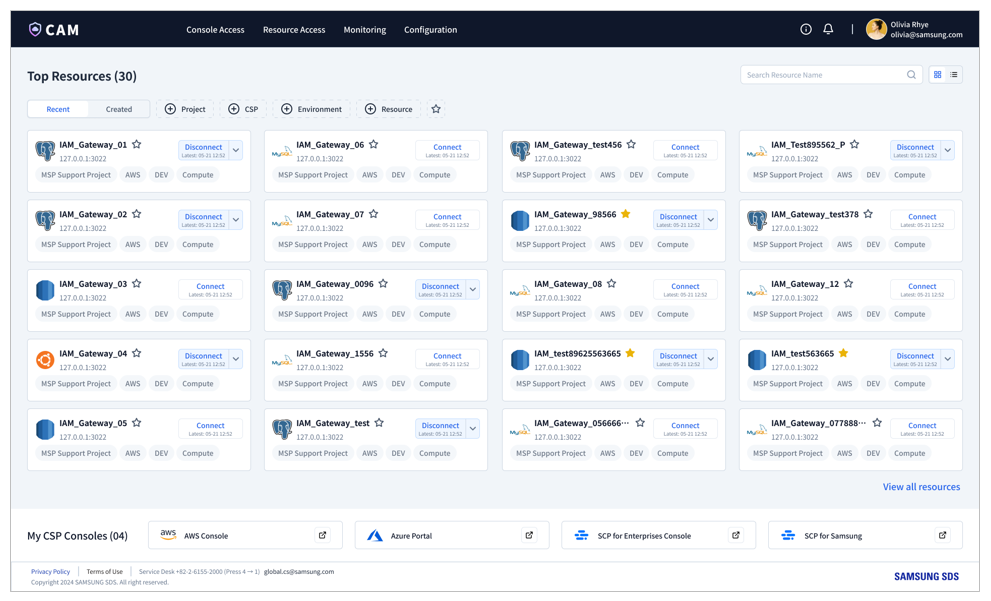
After logging in, you can access the CSP console and your individually allocated resources with a single click from the personalized homepage. Administrators and developers can efficiently streamline their work by quickly and easily accessing approved consoles and resources from a single location.
The home screen of CAM (Cloud Access Management) is divided into two sections.
- Top Resources
- My CSP Consoles
Both sections provide access to allocated resources and the CSP console.
Top Resources
This section shows a list of the top 30 accessible resources.
Card view and list view
By default, resources are displayed in a card view, and can be switched to a list view based on the icon.
Search and Filter
You can quickly find specific resources using the search function, and you can filter resources based on the following items.
- Project
- CSP(Cloud Service Provider)
- Environment (e.g., DEV, STG, PRD, ETC)
- Resource type (e.g., Compute, DB)
Favorites
Bookmark (★) You can set a bookmark using the icon, and you can set a bookmark filter to filter only resources that have been bookmarked.
Sorting
The resource list can be sorted by the following two criteria.
- Recent (default sorting)
- Creation date
Depending on the selected view mode, you can view detailed information about resources in cards and lists.
- Resource Name
- Project
- CSP (e.g., AWS, Azure, SCP)
- Environment (e.g., DEV, STG, PRD, ETC)
- Resource type (e.g., Compute, DB)
Resource Connect/Disconnect
Each resource has a Connect button that can be used to connect or disconnect.
If the resource is already connected, the following details are displayed:
- Last login date/time
- Connection status
Resource Access
When you click the Connect button on a card or in a list, a popup opens for connection.
To access the resource, enter the details of the following items.
- Local Port: Enter a port number between 1024 and 65535 that is not currently in use on the PC.
- Remote Port: Enter the port number of the resource.
- Launch Putty : To have Putty start automatically during the connection process, select ‘ON’.
Reference
Before attempting to connect, ensure that the client agent is installed and that the IP address is registered.
For configuration, refer to Resource Access > PC Settings.
When accessing a resource, click the dropdown to view detailed connection information such as user ID, password, and local IP. This information is provided via a popup as details that allow the user to connect to the resource through an SSH connection.
- User ID: Click the copy icon on the right to copy the user ID.
- Password: Click the copy icon on the right to copy the password.
- Local IP: Click the copy icon on the right to copy the local IP address.
- Client Server IP: Refer to the client server IP displayed on the screen.
Resource Access Release
When you access the resource, the Disconnect button appears. Click this button to start the disconnect process. A popup for final confirmation will be displayed before the connection is terminated.
My CSP Consoles
We provide a CSP access link in a sticky footer at the bottom of the page. Since access to the CSP console is offered through SAML SSO, you can connect directly without any additional authentication steps.
3 - Console Access
The console access feature allows PM and PL group users to assign roles and policies to cloud accounts and users, enabling management of access to the CSP console. Based on the permissions set here, users can access the console with the appropriate privileges.
The console access section consists of four main management areas.
- Role Management: Defines and manages the level at which a user (User) can access the CSP console.
- Policy Management: Define new policies (Policy) and manage the roles mapped to each policy.
- Account Management: Manage cloud accounts (Account) and ensure each account is mapped to the correct role permissions.
- User Management: By mapping each user to the appropriate role (Role), we ensure they have the permissions required to access the cloud console, thereby controlling user console access.
Role Management
In the role management menu, you can view and manage all roles registered in the project, and filter roles by CSP or by project for review.
Create role
To create a role, click the Create Role button.
To create a new role, you must fill in the following required information in the popup window.
- Project: Select a project from the user’s project list.
- CSP: Select CSP.
- Role Name: Enter a unique role name and click the Validate button to check consistency.
- Description: Add a brief description of the role.
View role
To access detailed information about a role, go to the role management menu and click the desired role. All project users can view role details, including policies, cloud accounts, and users mapped to the role.
The role view screen displays key details, including the following.
- Role Information: Basic details related to the role.
- Delete Role: Delete click the button to remove this role.
- Policy: Shows the list of policies mapped to the current role.
- Account: Shows a list of accounts related to the role.
- User: Shows the list of users associated with a role.
Reference
To set up policy, account, and user mappings, you must first create a policy in the policy management menu, and the cloud accounts and users must already be registered in the project.
Reference
- The CSP process starts after the user addition approval is completed. Therefore, it may take some time (up to 10 minutes) for the status to change to ‘Approved’ and appear in the user’s CSP role list.
- You can map up to 10 policies to an AWS role.
- Each account has role limits based on the CSP; AWS can have up to 800 roles, while Azure can have up to 5,000 roles.
- Each user has role limits based on the CSP, and in AWS up to 10 roles can be mapped, while in Azure up to 4,000 roles can be mapped.
Delete role
PM or PL group users can delete roles within a project. In the role management list, select the role to delete and click the Delete button. Or you can delete them one by one by clicking the Delete button on a specific role screen.
Policy Management
PM and PL group users can select or deselect policies from the policy list to add or remove policies mapped to a role.
Create Policy
To create a new policy, click the “Create Policy” button and fill in the required information in the “Create Policy” popup.
- Project: Select a project from the list of registered projects.
- CSP: Select CSP.
- Policy Name: Enter the policy name and click the “Validate” button to verify its consistency.
- JSON code: Enter the JSON code that defines the policy.
- Description: Add a brief description of the policy.
To map policies to a role, click the Add button above the policy list to open the popup window. In the popup, you can view and select policies defined within the same project. Click the Save button to complete the mapping process. You can map multiple policies at once.
Before mapping the policy, verify that the desired policy has been created in the policy management menu.
View policy
To view detailed information about a policy, go to the Policy Management menu and click the desired policy. All project users can view policy details, including the roles mapped to the policy.
Delete Policy
To remove a policy mapping from a role, select the policy from the list and click the Delete button. The deleted policy will reappear in the Add Policy popup list, and can be added again if needed. Removing the policy mapping eliminates the relationship between the role and the associated policies.
Account Management
PM and PL group users can map or remove cloud accounts from roles.
View Account
To view account details:
- Go to Account Management and click the desired account.
- All project users can access the details of that account, and the account includes a list of mapped roles.
- PM or PL group users can also edit or delete roles associated with the account.
Add role to account
- To map roles to an account, click the Add button above the role list to open the Add Roles popup.
- In the popup, select a role that belongs to the same project as the account and click the Save button to complete the mapping process.
Reference
- You can map up to 800 roles in an AWS account and up to 5,000 roles in an Azure account.
Delete role from account
To remove a role from an account, select the role from the list and click the Delete button. The removed role reappears in the Add Role popup, and you can add it again if needed. You can also delete multiple roles at once.
User Management
Through the User Management menu, users can view and manage all users registered within the project. Users can search for a user by name.
User view
To view the user’s details:
- Go to User Management and click the user.
- All project users can view user details, including the roles mapped to that user.
- PM or PL group users can add or remove roles for a user.
Add role to user
To map a role to a user, click the Add button above the role list to open the Add Role popup. In the popup, you can view all roles in the project the user belongs to, select the role to add, and click the Create Approval button to proceed with the approval process.
Reference
- Each user has role limits based on the CSP and can map up to 10 AWS roles and 4,000 Azure roles.
Create approval
To assign a role to a user, an approval process is required. The approval process proceeds through the Create Approval popup and then via the Knox approval system or CAM’s own approval system.
- Title: Automatically entered by the system and cannot be edited.
- Approver: The approval route is automatically assigned by the system, and you can manually add approvers and consentees according to the approval guide.
- Content: Project and role information is automatically entered by the system and cannot be edited.
Remove role from user
To unmap a role from a user, click the Delete button. After confirming the final deletion, the user’s role mapping is removed. The removed role reappears in the Add Role popup, allowing you to add it again if needed. Note that unmapping a role does not require approval, but re-adding a role does require approval.
4 - Resource Access
You can view all resources with individual permissions and access them.
To access resources, a PM or PL group user must register the cloud account resources associated with the project and go through the user’s permission request and approval process.
Resource
Displays all resources for which the user has been granted permission. The user can view the resource list and access resources directly.
Connection
Click the Connect button to access the resource, and after connecting, it provides connection details.
- Local Port: Enter a port number that is not being used for other purposes on the PC.
- Remote Port: Enter the port number of the resource.
- Putty Execution: To enable automatic execution of Putty, you need to set it to ON.
Reference
Before accessing the resource, please ensure that the client agent is installed and the IP address is registered.
For more details, refer to Resource Access > PC Settings.
Provides detailed connection information to access resources via SSH.
- User ID: Click the copy icon to copy the user ID for use.
- Password: You can click the copy icon to copy the password and use it.
- Local IP: Click the copy icon to copy the local IP for use.
- Cloud Server IP: Click the copy icon to copy the cloud server IP for use.
Disconnect
When the resource is connected, the Connect button changes to a Disconnect button. To disconnect the resource, click the Disconnect button.
Resource Registration
In this menu, you can register the resource information required for access, and it displays the list of resources that have been registered.
Register
To register a resource, cloud account registration must be performed first in the project menu. PM and PL group users can register resources created within a cloud account. Click the Enroll button to go to the resource registration screen, then configure the resource connection information.
- Project: Select a project among those registered for PM or PL group users.
- Account: Select a cloud account among those registered in the selected project.
- Region: Select the region information of the selected account.
- Resource Type: Select one of Compute or DB.
- Resource: Select resources that match the selected criteria.
- Connection Type: Choose between Direct (direct connection to the server) and Bastion (connection via a proxy server).
- Address: Enter the resource’s address information.
- Root User: Provides the root user’s IP and password for the resource.
Reference
Before registering resources, please ensure that the cloud account registration and resource creation have been completed.
Cloud account registration can be done in Configuration > Project.
guide
Supported OS/DB
Currently, the OSes and DBs that can perform ‘resource registration’ are limited as shown below, and supported OSes and DBs will be continuously added.
| OS | Version |
|---|
| Ubuntu | Ubuntu Server 24.04 LTS |
| Ubuntu | Ubuntu Server 22.04 LTS |
| Amazon Linux | Amazon Linux 2023 AMI |
| Redhat | Red Hat Enterprise Linux 9.4 |
Table. Supported OS
| DB Engine | Version |
|---|
| PostgreSQL | 16.x |
| MySQL | 8.0.x |
| Aurora PostgreSQL | 15.x |
| Aurora MySQL | 3.05.x |
| Aurora MySQL | 3.04.x |
| Aurora MySQL | 3.03.x |
| MariaDB | 10.11.10x |
Table. Supported DB
Network Settings
To register resources in CAM and access them through CAM, network configuration must be performed first.
After receiving guidance from the tenant administrator and completing network configurations appropriate for each tenant environment, such as firewall registration and security group registration, please proceed with resource registration.
Withdrawal
Resources that are no longer used must be removed from the registered resource list.
After selecting from the resource view or resource registration list, click the Withdraw button to prevent further access.
Permission request
In the permission request menu, you can view project members’ resource permissions and request permissions for each user’s CSP resource types.
Request
Users can select a duration and permission type to request resource permissions for each CSP resource type.
All permissions require approval, but when ‘Emergency’ is selected, the permission is granted simultaneously with the approval request.
Resource Information
- Project: Select a project from those the user belongs to.
- Account: Select the account registered in the selected project.
- Resource Type: Select one of Compute or DB.
Permission
- Period: Select the period (e.g., 4h, 8h, 24h, 10d, 30d, 12M).
- Emergency: If checked, permission is granted immediately upon the approval request, and a related email is sent to the approver.
- Permission Level: Choose one of USER, ADMIN, DBA.
- Comment: Add a comment for approval.
Create approval
To obtain resource access permissions, an approval process is required. To proceed with the approval process, go through the “Create Approval” popup, which is sent to Knox for approval and processed through Knox.
- Title: Automatically entered by the system and cannot be edited.
- Approver: Add the approver and the consenter according to the guide.
- Content: Project and permission information is automatically entered by the system and cannot be modified.
Withdrawal
To remove permissions that are no longer needed, select the permission in the request list and click the Withdraw button.
PC configuration
To access cloud resources, you must install the client agent and register the IP address of the access environment.
Client Agent Download
Click Download Client Agent to start the download, then install the client agent.
User Guide
To access the resource, you need to download and install the client. Also, if the installation is incomplete or the version is unsupported, you cannot connect to the resource even if all other preparations, such as permissions and IP registration, are completed.
Installation Guide
To start the installation process, click the Download Client Agent button to download the installation file. Once the download is complete, refer to the following information to proceed with the installation.
- Download Location: Specify a folder on the local drive.
- Execution: Select the downloaded file, right‑click, and click Run as administrator to execute.
IP registration
Access to cloud resources is allowed only from registered IPs, and up to five IPs can be registered.
Please register the IP using the following information.
- To add a new IP, click the Add button.
- To remove an existing IP, select the IP from the list and click the Delete button.
6 - Configuration
In the configuration module, PM and PL group users can manage projects, and tenant administrators can set approval routes and organizational charts.
Project
In the Project menu, users can view all projects they belong to. The project details are initially registered by the PM, and can be edited by the PM or PL group users as needed.
Create Project
To create a project, click the Create Project button and enter the project information.
- Project Name: Assign a name to the project.
- PM: Assign a project manager who can manage the project’s related information and permissions. Note that if you assign someone other than yourself, you will no longer be able to manage the project after creation.
- Organization: Choose the organization that will carry out the project.
- Description: Enter a description of the project.
View project
On the Project View screen, PM or PL group users manage project information and can add CSP accounts and users to the project.
- General Information: Project Creation screen displays the registered project information.
- Edit: Click the Edit button to modify the project’s general information.
- Delete: Click the Delete button to delete this project.
- User: Displays a list of users registered in the project.
- Cloud Account: Shows the list of accounts registered in the project.
Cloud Account Management
PM and PL group users can add new accounts to a project or delete accounts that are no longer used.
Add AWS account
CAM supports a keyless method to enhance security when connecting cloud accounts.
To register an account, you must create a new role in the AWS IAM service with the policy required by CAM. You can create the role in AWS by following the steps below.
- Access AWS IAM service
- Click Create Role in the Roles menu
- After accessing Access Management > Roles, click Create to go to the Create Role screen.
- Create Role > Step 1: Trusted Entity selection
This step is for entering CAM account information.
- Select AWS account and Another AWS account in order, then enter the CAM account ID 022499039571 in the account ID.
- Create Role > Step 2: Add Permission
Assign the CAM policy to the newly created role.
guide
Search for the item, select the relevant policy, and proceed to the next step.
- IAMFullAccess
- AmazonEC2FullAccess
- AmazonRDSFullAccess
- AWSCloudTrail_FullAccess
- AmazonS3FullAccess
- AmazonEventBridgeFullAccess
- Create Role > Step 3: Name, Confirm, Create
Enter the role name and click the Create Role button to complete role creation.
※ This role name is used as Role Name when registering an account in CAM.
guide
When role creation in IAM is complete, return to the Project View screen in CAM and register an account in CAM. Click the Add button above the account list and enter account information to register the account to the project. Completing account registration requires an approval process. To proceed with the approval process, press the Create Approval button to initiate approval, which is sent to an approval system such as Knox for processing. Once approval is complete, you can see the newly registered account in the account list.
- CSP: Select CSP.
- Environment: Select the service environment.
- Account Name: Assign a name to the account.
- Account ID: Enter the account ID registered in AWS and click the ‘Verify’ button to confirm.
- AWS type: Set to ON if the account is a China account.
- Role Name: Enter the role name created in AWS IAM.
Reference
Account registration policies vary by tenant. Depending on the tenant’s policy, an account may be restricted to registration in only one project.
- Title : It is automatically entered by the system and cannot be edited.
- Approver: The system automatically adds an approval line, and you can add approvers and co‑signers according to the approval guide.
- Content: Account information is entered automatically by the system and cannot be edited.
Add SCP account
PM and PL group users can add a new SCP account to a CAM project via the Add Account button on the View Project page. CAM supports a keyless connection method to enhance security, so credentials are not exchanged directly when registering an account. Before you begin, verify that the required settings have been completed in the SCP console.
Reference
SCP includes both the SCP for Samsung and SCP for Enterprises environments. Depending on the user’s CSP permissions or choices, the prerequisites and steps for adding an account are the same for both environments.
Step 1. Pre-configuration (One-time trust setup for CAM account)
Before adding an SCP account to CAM, verify that the following configuration has been completed on the SCP side. This setting enables CAM to securely access the target project and validate the account information.
First, if the policy has not already been created according to the steps described in the manual, you need to set it up. Then approve the CAM account through the permission group and add members.
- Create policy for CAM access
- Go to the SCP console.
- After logging in, navigate to the IAM > Policies section in the SCP console.
- Create a policy with the name ‘CAM_Linked_Policy’.
Create a new policy that includes the permissions required for CAM operation according to the table below.
| ID | Action | Reason |
|---|
| [Platform] Permission Management | List, Read, Create, Delete, Update Permission | Create/Delete Policy, Assign Policy to Role |
| [Platform] Resource Management | List, Read | View List, SCP Details |
| [Platform] Tag Management | List, Read | View Tag List/Information, etc. |
| [Platform] Project Management | List, Read | Assigned Project List/Information |
Table. Policy creation items for CAM access
- Or you can also add policy requirements in JSON mode.
- Since you can link permission groups and roles later, complete the policy creation without checking anything.
- CAM account approval through permission groups
- After a policy is created, link it to the CAM system account using a permission group.
- Step-by-step:
- IAM > Go to Permission Groups.
- Create a new permission group (e.g., CAM-Access-Group).
- Create a permission group named ‘CAM_Linked_Group’.
- Attach the CAM policy created above to this group.
- When adding a user to a project, the user is linked to a permission group, so you can complete the creation of the permission group without verifying the user at this time.
- Assign permission group to CAM service account
- Go to the project members section of the SCP console.
- Add the required account as a member of the target project.
- This account represents CAM and is used for integration.
- Select the target project for addition > Identity and Access Management > Add User > Add Project Member > Proceed to add an SCP user to the target project.
- Proceed with adding project members.
- Search for a CAM user using the email address cam.app@samsung.com.
- Click the ADD button to select a cam.app user.
- Add an available user from the list, or you can also search for a user using the search function.
- Search for users to add as project members.
- Select the permission group called ‘CAM_Linked_Group’ that you created above and complete the project member addition task.
- Connect a permission group to complete adding project members.
- After completing the above steps, return to the project view screen in CAM and add an SCP account.
Step 2. Add an account in the CAM console
- In CAM, go to View Project > Manage Accounts.
- Click the Add Account button.
- Enter the following information in the popup window that opens:
- CSP and Environment Selection
- CSP: Choose either SCP for Enterprises or SCP for Samsung.
- Environment: Select the environment to which this account belongs (e.g., DEV, STG, PRD, or ETC).
- Enter account information
- Account name:
- Enter a name to identify this account within CAM.
- You can enter up to 50 characters.
- Only English letters and numbers are allowed.
- Project ID (in the SCP console):
- Enter the project ID of the SCP project you prepared earlier.
- Allowed characters: only English alphabet letters, numbers, and hyphens.
- Maximum: 30 characters
- Enter the project ID and click the Confirm button. CAM checks the following:
- Whether the project exists in SCP.
- Check if the required roles (cam-Administrator, cam-Operator, cam-Developer) exist.
- Ensure that the project is not already registered in another CAM project or awaiting approval.
- If any of the above conditions is not met, a validation message will be displayed.
Step 3. Create Approval
When the project ID is verified and the other information is completed, the Create Approval button becomes active.
Click this button to send the account addition request as an approval request. Depending on the CAM settings, you can manually select an approver or have the system automatically route it to the default approver.
Once approval is completed, the SCP account will appear in CAM’s project account list.
Add Azure account
Before adding an Azure account to CAM, you must complete the following configuration steps in Microsoft Entra ID and the Azure Portal. These steps must be performed by the tenant administrator.
Step 1. Prerequisite setup (One-time trust configuration and domain configuration for CAM accounts)
This step ensures that CAM is trusted within the target Azure tenant and has the necessary access permissions. This step must be completed by the tenant administrator before adding an Azure account to CAM.
These pre-configurations are divided into two sections:
- Trust configuration
- Domain configuration
Trust configuration for CAM accounts
This step ensures that the CAM is trusted within the target Azure tenant and has the necessary access permissions. It must be performed by the tenant administrator of the target Azure tenant. The purpose is to grant the CAM the required permissions to access features within Microsoft Entra ID.
To enable CAM to integrate with Azure, the tenant administrator must open the CAM Admin Consent URL. This URL triggers the consent dialog in the Microsoft Entra Admin Center, where the administrator can approve the permissions requested for CAM.
The CAM Admin Consent URL includes the App Client ID associated with a specific tenant. Before using it, you must verify the tenant ID of the target Azure tenant.
- How to find the tenant ID:
- Log in to the Azure Portal.
- From the left navigation menu, go to Microsoft Entra ID.
- Find the tenant ID field on the Overview tab (first screen).
- Copy the tenant ID to use for the Admin Consent URL.
- Access the CAM Admin Consent URL.
Open the CAM Admin Consent URL in a web browser.
(https://login.microsoftonline.com/{Your_Tenant_ID}/adminconsent?client_id=39613ae7-2fd4-4f3c-9471-aba2391da0b5)
Replace the {Your_Tenant_ID} placeholder in the URL with the actual tenant ID you copied earlier.
When the prompt appears, select the Global Administrator account of the target tenant.
This account must have the highest administrative privileges in the tenant.
Please review the displayed consent agreement. This agreement specifies the exact authority that will be granted to CAM.
If you agree, click “Accept” to approve the integration.
By completing this step, CAM can access tenant-level features in Microsoft Entra ID.
No Subscription Access Yet: In this step, CAM does not receive access permissions to the Azure subscription. Subscription-level access permissions are configured separately in later steps (creating management group roles and assigning subscription roles).
- After granting consent, verify the CAM application registration.
- In Azure Portal, go to Microsoft Entra ID → Enterprise Applications.
- Search for the CAM application.
- Verify that the CAM app appears in the list and is correctly registered.
Reference
It provides tenant-level recognition to CAM when granting admin consent.
CAM Account Domain Settings
In Azure, a domain connection is required so that users can authenticate via email and integrate with CAM’s Keycloak authentication.
The domain configuration process consists of the following two main steps:
| Process | Executor | frequency |
|---|
| Domain creation | Tenant admin or PM/PL | Once per tenant (may be repeated for a new domain as needed) |
| Register a domain in an Azure tenant | Tenant admin | Once per tenant (unless additional domains are added later) |
Table. CAM account domain configuration steps
Create Domain
You can create a public domain using a DNS service that can create TXT records (e.g., AWS Route 53, SCP DNS).
This guide uses SCP DNS as an example.
- Tasks before creating a domain
- Log in to SCP DNS.
- After accessing the SCP console, navigate to the DNS menu.
- Starting public domain purchase.
- Click the product request button.
- This action opens the purchase form.
- Enter the details for the domain purchase form.
- Usage type: select ‘Public’.
- Domain name: Enter the desired public domain name.
- Registrant information: Enter name, email, address, and phone number.
- Description and designated fields
- Payment information is displayed before purchase confirmation.
- Purchase Confirmation
- Confirm the final payment amount.
- Click the following to verify.
- Check DNS status
- After creation, the domain appears in the SCP DNS list.
- Wait until the status shows “active”. This indicates that it is now publicly available.
- Now there is an activated public domain, and you can connect it to an Azure tenant to perform user authentication.
Register domain in Azure tenant
Now that we have a public domain, we need to connect it to Microsoft Entra ID for authentication.
Pre-domain configuration tasks (Azure tenant)
- Log in to the Azure Portal with a tenant administrator account.
- Microsoft Entra ID → Go to custom domain name.
- Click +Add Custom Domain.
- Enter the public domain name (created in SCP).
- Click Add Domain.
Create a TXT record for the domain (Azure → SCP DNS).
- After adding a domain in Azure:
- Azure displays the TXT record value that must be added to the DNS settings to verify domain ownership.
- Copy the TXT record value in Azure.
Add TXT record to SCP/Domain Host
- After accessing SCP DNS, select the active public domain.
- Click Add Record.
- Record Type: Select TXT.
- Value: Paste the TXT record value copied from Azure.
- TTL(Time to Live): Select according to preference.
- Click Confirm.
- Check whether the record appears in the domain’s DNS list.
Domain verification in Azure
- Return to the Azure Portal, select Microsoft Entra ID, and then select Custom Domain Names.
- Initially, the domain status is shown as “Unverified”.
- Click the domain, then click the “Verify” button.
- When Azure detects the TXT record (propagation may take a few minutes), the status changes to “Verified”.
- The public domain is now officially linked to the Azure tenant.
guide
Migration for existing Azure users
For users of a domain that has already been verified, an update is required by following the steps below.
When the previously-used Azure domain is connected to CAM, users of the domain can no longer login using the old method. If Azure Administrator is also registered as a user of that domain, the CAM integration cannot be removed either.
Therefore, execute the PowerShell script below to update the * ImmutableId* values of the users belonging to that domain.
Step 1. Install Azure CLI
winget install –exact –id Microsoft.AzureCLI
Step 2. Log into Azure CLI
Log in with an account that has Azure Entra ID edit permissions.
az login
Step 3. Update Azure Entra ID User
$UserId = “userid@domain"
$ImmutableId = “userid@domain”
az rest --method PATCH
–url “https://graph.microsoft.com/v1.0/users/$UserId" --headers "Content-Type=application/json"
–body “{`“onPremisesImmutableId`”:`"$ImmutableId`”}”
Step 2. Add an account in the CAM console
- In CAM, go to View Project > Manage Accounts.
- Click the Add Account button.
- Enter the following information in the popup window that opens:
- CSP and environment selection
- CSP: Select Azure.
- Environment: Select the environment to which this account belongs (e.g., DEV, STG, PRD, or ETC).
- Enter account information
- Account name:
- Enter a name to identify this account within CAM.
- You can enter up to 50 characters.
- Only English letters and numbers are allowed.
- Tenant ID (in Azure portal):
- Enter the tenant ID.
- Allowed characters: only English letters, numbers, and hyphens.
- You can enter up to 36 characters.
- When you click Verify, CAM checks the following:
- Check that the subscription ID format is correct.
- Validate Azure to confirm that it actually exists.
- The subscription ID field is enabled only after the tenant ID has been validated.
- Subscription ID (in Azure portal):
- Please enter the subscription ID.
- Only English letters, numbers, and hyphens are allowed.
- You can enter up to 36 characters.
- When you click Verify, CAM checks the following.
- Check that the subscription ID format is correct.
- Check whether the subscription ID is already linked to another CAM project.
- Check if the subscription ID is already registered or if an approval request is pending.
- The federation domain field is enabled only after the subscription ID has been verified.
- Federation domain (in Azure portal):
- Please enter the federation domain.
- Only English letters, numbers, hyphens, and periods are allowed.
- You can enter up to 48 characters.
- When you click Verify, CAM checks the following.
- Check whether the federation domain format is correct.
- Verify that it matches the existing validated domain registered in the Azure domain configuration.
Step 3. Create Approval
When all fields are validated and the details are completed, the Create Approval button becomes active.
Click this button to submit an account addition approval request. Depending on the CAM settings, you can manually select an approver or have the system automatically route it to the default approver.
When approval is complete, the Azure account will appear in CAM’s project account table.
Delete account
Click the Delete button in the View Account section to delete accounts that are no longer in use.
!!!!!!!!!!!!!!!!!!!!!!!!!!!!!!!!!!!!!
Add GCP account
Before adding an GCP account to CAM, you must complete the following configuration steps in GCP Console and GCP Admin Console. These steps must be performed with Super Admin account.
Step 1. Prerequisite setup (One-time permissions and domain-wide delegation configuration for CAM accounts)
“guide"
Migration for existing GCP users
When integrating existing GCP domain with CAM, the users of that domain will no longer be able to log in using the traditional username/password method. If any users still require login via the traditional method, please follow the procedure outlined below.
Step 1. Log into Admin Console as a Super Admin*
Super administrators can log in to GCP Admin Console using a username/password without any external integration.
Step 2. Create Group and Assign User*
Create a group for logging in with the traditional username/password method and assign users to it.
- “Directory > Group”
- “Create Group”
- Group Name: Enter name of group. (e.g., Group Example 01)
- Group Email: Enter value that serves as a unique identifier. (e.g., group-example-01@domain)
- “Next”
- “Create Group” (without modifying group settings)
- Go to the detail of created group
Step 3. Assign SSO profile to the group
Set up login method for the group.
- “Security > SSO > SSO via external IDP”
- “SSO Profile Assignment Management”
- Select “Group”
- Select “None” of “SSO Profile Select”
- “Redefine”
Follow this, users in that group can log in using the existing method (username/password).
This step involves configuring CAM so that it has the necessary permissions to operate within the target GCP Organization and Google Workspace/Cloud Identity environment. It must be completed with the super admin account before adding a GCP account to CAM.
These pre-configurations are divided into two sections:
- GCP Console Configuration
- GCP Admin Console Configuration
GCP Console Configuration
This step grants the permissions required for CAM to manage custom roles within the GCP Organization and to view policies and logs. The configuration can be performed only while logged into GCP with an account that has the designated super‑admin privileges in the GCP Admin Console. All settings must be applied at the Organization level, not at the project level.
Super-Admin Account Role Assignment
- Go to GCP Console’s IAM and Administrator > IAM menu.
- Click Edit(Edit Main Members) using super-admin account.
- Add the following roles.
- Organization Administrator
- Organization Policy Administrator
- Owner
Create User-defined Role
- Select Organization (not Project)
- Go to GCP Console’s IAM and Administrator > Roles menu.
- Click Create Role.
- Title: CamRole
- Create user-defined role by adding the following roles.
guide
- iam.roles.create
- iam.roles.delete
- iam.roles.get
- iam.roles.list
- iam.roles.undelete
- iam.roles.update
- resourcemanager.projects.get
- resourcemanager.projects.getIamPolicy
- resourcemanager.projects.setIamPolicy
- resourcemanager.organizations.get
Setup Organization Policy
- Go to GCP Console’s IAM and Administrator > Roles menu.
- Search for constraints/iam.allowedPolicyMemberDomains.
- Click Policy Management and select the following values.
- Policy Source : Override parent policy
- Policy Enforcement : Merge with parent items
- Rule > Allow All
- Click Policy Setup.
Add permissions to CAM service account
- Go to GCP Console’s IAM and Administrator > Roles menu.
- Click Grant access.
- Enter the CAM service account that was provided by CAM for the new main member.
- Add the following roles.
- Service Account User
- Service Account Token Creator
- Service account OpenID Connect ID token generator
- Identity Platform Viewer(Beta)
- Logs Viewer
- Monitoring Viewer
- Private Logs Viewer
- Organization Viewer
- Organization Policy Administrator
- CamRole (from Step 2)
Setup API Use
- Go to GCP Console’s API and Service menu.
- Search for Cloud Logging API.
- If there is a Settings button, click it to enable the API; if the Settings button isn’t visible on the screen, it means the settings have already been applied, so you can move on to the next step.
GCP Admin Console Configuration
This step involves CAM invoking the Google Workspace and Cloud Identity APIs and configuring it so that users can authenticate through CAM when accessing Google services.
Domain-wide Delegation Configuration
Setup for SSO profile redirection via external IDP
- Go to admin.google.com.
- Go to Security > SSO > SSO via External IDP menu.
- Click Service URL by Domains menu.
- Select the following option.
- Automatically redirects users to the third‑party IDP of the following SSO profile.
- Select SSO Profile within Organization.
guide
If there are organizational units (OUs) or groups that do not use SSO, selecting this option may prevent users from logging in.
Step 2. Adding an Account in the CAM Console
- In CAM, go to View Project > Manage Accounts.
- Click Add Account.
- In the popup window, fill out the following fields.
- Select CSP and Environment
- CSP: Choose GCP.
- Environment: Select the environment to which this account belongs (e.g., DEV, STG, PRD, or ETC).
- Account Information
- Account Name:
- Enter a name that will identify the account inside CAM.
- Up to 50 characters are allowed.
- Only English letters and numbers are permitted.
- Organzation ID (from GCP Console):
- Enter the organization ID.
- Allowed characters: English letters, numbers, and hyphens.
- Maximum length: 48 characters.
- Click Verify and CAM will check that:
- The organization‑ID format is correct.
- It actually exists in GCP.
- Only after the organization ID is validated will the Project ID field become active.
- Project ID (from GCP Console):
- Enter the project ID.
- Allowed characters: English letters, numbers, and hyphens.
- Click Verify and CAM will verify that:
- The organization‑ID format is correct
- It actually exists in GCP.
- The project is not already registered in another CAM project or pending approval.
- Domain (from GCP Console):
- Enter the domain.
- Click Verify and CAM will confirm that:
- The domain is registered in Google Workspace or Cloud Identity.
- The domain and organization information are linked under the same Customer ID.
- Admin Account (from GCP Console):
- Enter the super‑admin account.
- Click Verify and CAM will ensure that:
- The account exists.
- It holds the Super‑Admin role in the GCP Admin Console.
- It has Owner permission on the relevant organization or project in the GCP Console.
Step 3. Create Approval
Once all fields have been validated and the details are complete, Create Approval button becomes active.
Click this button to submit a request for account‑addition approval. Depending on the CAM configuration, you can either manually select an approver or let the system automatically route the request to the default approver.
After the approval is granted, the GCP account will appear in the project‑account table within CAM.
Account Deletion
In View Account section, click the Delete button to remove accounts that are no longer in use. This helps keep your account list clean and up‑to‑date.
User Management
PM and PL group users can add or remove users from a project. Only users registered in the project can be granted and managed console and resource access within that project, so users who need console or resource access must be registered as project users.
Add user
Click the Add button above the user list to add a user to the project.
- Name: Search by the user name registered in CAM.
- Group: Select the user’s group.
- PL : can manage project-related information and have the same permissions as the project manager.
- Operator, Developer: Users who can view project-related information and request resource permissions; they are categorized for role management within the project, but in the CAM portal they have identical permissions.
Delete User
Select the user to delete from the user list and click the Delete button.
After a user is deleted, the deleted user can no longer view project-related information.
Notice
The announcements section allows tenant administrators to create and manage notices for users within the tenant. These notices are displayed in the GNB announcement panel. Multiple notices can be active simultaneously. Each notice may include a title, detailed description, optional attachment, and a specified display period.
Create Notice
To create a notice, click the Create button on the list page. On the Create Notice page, enter the following details:
- Title: Enter the notice title.
- Description: Provide the content or message to display.
- Attachment(Optional): Upload supporting files (up to 5 files, total size up to 50MB). Empty files cannot be uploaded, and supported file formats are images, documents, .mp4, and .zip.
- Display: To show announcements in the GNB, turn the toggle ON. After turning the toggle ON, you can select the period or date range during which the announcement will be displayed to users.
To create an announcement, select *Save. The newly created announcement will appear in the announcement list.
Notice Details
Select a notice title from the list to navigate to the notice detail page. All notice information (title, description, attachment, display period, author, and creation date) is displayed in read-only mode.
In this view:
- Use Edit to modify the announcement.
- Use Delete to permanently delete the announcement.
Edit Notice
- Select a notice from the notice list and navigate to its detail view page.
- Select Edit.
- Edit the required fields (title, description, attachment, display settings, or date range).
- To update the notice, select Save.
Reference
Changes to the notice are applied immediately.
Delete Notice
- On the notice detail page, select Delete.
- If a prompt appears asking you to confirm deletion, confirm it.
The selected announcement will be removed from the list and will no longer appear in the GNB announcements.
Approval Path
The tenant administrator can predefine the approval route that users must specify when creating an approval.
Create Approval Path
To create an approval route, click the Create button and specify the approval case and organization to generate it.
- Name: Enter a workflow name for administrative purposes that is not exposed to users.
- Target : Select when and which organization to apply it to.
- Approver Guide: Enter the responsible person’s information that cannot be automatically assigned by the system but must be included in the approval route. When entered, it will be displayed on the user screen as shown below.
- Approver: The system automatically assigns the approver to be displayed; add them by searching for their name.
View approval path
To view detailed information about the approval route, go to the Approval Route menu and click the desired approval route. You can view information for all approval routes, and Edit or Delete them as well.
Edit Approval Path
On the View Approval Route screen, you can click the Edit button to modify the information.
Delete approval path
Click the Delete button to delete the approval route that is no longer used.
organization
In the Organization menu, a tenant administrator can manually manage the tenant’s organization.
When a tenant administrator creates an organization, they can manage projects and approval routes at the organization level.
Add organization
To add an organization, click the Add button and, when the Add Organization popup appears, enter the following details.
- Parent (Higher-level Organization): Select the name of the higher-level organization. The default is the tenant name.
- Name: Enter the name of the organization to create.
- Display: To have it appear in the list of organizations shown to the user, set the toggle to ON.
View organization
On the View Organization page, you can see a list of all created organizations. Clicking the organization name you want to view displays detailed organization information on the right.
You can expand the entire organization list. When you expand an organization, you can view the entire hierarchy down to the lowest level at once, and when you collapse the organization list, you can see only the top‑level items.
Organization modification
The data entered when creating the organization is displayed, and you can edit all data. After editing, click the Save button.
Delete organization
Click the Delete button on the View Organization screen to delete an Organization that is no longer used.
reference
Organizations that have parent organizations or registered projects cannot be deleted.
Tenant Administrator
In the tenant administrator menu, you can add or remove administrators who manage the tenant.
When the system is first opened, the user listed on the service application form is designated as the tenant administrator, and thereafter, users with tenant administrator privileges can directly add, delete, and manage.
Tenant administrators can manage tenant-level information through dedicated menus (Approval Line, Organization, etc.) and can view all content within the tenant.
Add tenant administrator
To add a tenant administrator, click the Add button, and when the tenant administrator addition popup appears, search among the users registered in the tenant and register them.
Delete Tenant Administrator
In the tenant administrator list, select the user to delete, then click the Delete button to remove them.