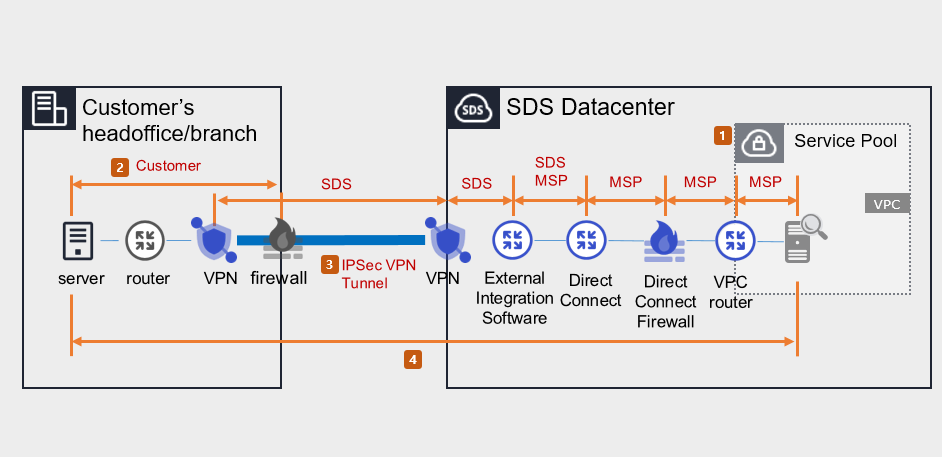
Users can create the service by entering the required information for using the Secured VPN (Virtual Private Network) service through the Samsung Cloud Platform Console.
Create Secured VPN
You can apply for and use the Secured VPN service from the Samsung Cloud Platform Console.
To request the creation of a Secured VPN service, follow these steps.
Click the All Services > Security > Secured VPN menu. You will be taken to the Service Home page of Secured VPN.
On the Service Home page, click the Secured VPN Service Request button. Navigate to the Support Center > Service Request List > Service Request page.
Service Request page, enter or select the required information in the mandatory input fields.
- In the task category, select Secured VPN creation.
Input field Detailed description Title Enter the title of the service request - Example: Secured VPN Service Creation Request
Region Select the location of the Samsung Cloud Platform - Automatically filled with the region corresponding to the Account
Service Select the service category and service. If you click the Secured VPN service request button, it is entered automatically - Service Category: Security
- Service: Secured VPN
Task classification Select the type you want to request - Create Secured VPN: select when requesting a new service
content Customer Basic Information Entry and Application Process Guide - Content: End Customer/MSP Information
Attachment If you have a completed Secured VPN service application (required) and any additional files you wish to share, proceed with the upload - You can attach up to 5 files, each no larger than 5 MB
- Only doc, docx, xls, xlsx, ppt, ppts, hwp, txt, pdf, jpg, jpeg, png, gif, and tif files are allowed
Table. Secured VPN service creation request items
- In the task category, select Secured VPN creation.
After reviewing the application process and reference information, click the Form Download > Service Request Form Download button to download the Secured VPN Service Application Form.
Please fill out the Secured VPN Service Application Form.
- Refer to the item descriptions in the Application Information and Monitoring Information tabs and complete the required fields.
Category Detailed description Application Information Complete required fields such as request type, usage period, and basic information - Application type: select application
- Usage period: enter desired start date
- Guaranteed bandwidth: select bandwidth
- Basic information: enter Account name, Project name, recipient information
Monitoring information Common application information, same-model/different-model connection application information, etc., fill in required items (specify usage per IP) - Same-model connection application information: when connecting SECUI equipment
- Different-model connection application information: when connecting equipment other than SECUI
Table. Main contents of the Secured VPN service creation request form
- Refer to the item descriptions in the Application Information and Monitoring Information tabs and complete the required fields.
Attach the completed application form in the attachment area.
Click the Request button on the service request page.
- After the request is completed, check the submitted details on the Support Center > Service Request List page.
After the monitoring personnel review the submitted service request, they proceed with the process to use the service.
Secured VPN service will be launched.
Terminate Secured VPN
To request termination of the Secured VPN service, follow the steps below.
- Click the All Services > Management > Support Center menu. Go to the Support Center > Service Home page.
- On the Support Center Service Home page, click the Service Request button. You will be taken to the Service Request List page.
- On the Service Request List page, click the Service Request button. You will be taken to the Service Request page.
- Service Request page, enter or select the required information in the mandatory input fields.
- In the task category, select Secured VPN termination.
Input field Detailed description Title Enter the title of the service request - Example: Secured VPN Service Termination Request
Region Select the location of the Samsung Cloud Platform - Automatically filled with the region corresponding to the Account
Service Select service category and service - Service Category: Security
- Service: Secured VPN
Task classification Select the type you want to request - Terminate Secured VPN: select if you are terminating the service
content Guide to Entering Customer Basic Information and Application Process - Content: End Customer/MSP Information
Attachment If you have a completed Secured VPN service application (required) and any additional files you wish to share, proceed with the upload - You can attach up to 5 files, each no larger than 5 MB
- Only doc, docx, xls, xlsx, ppt, ppts, hwp, txt, pdf, jpg, jpeg, png, gif, and tif files can be attached
Table. Table. Secured VPN Service Termination Request Items
- In the task category, select Secured VPN termination.
- After reviewing Application Process and Notes, click the Form Download > Service Request Form Download button to download the Secured VPN Service Request Form.
- Please fill out the Secured VPN Service Application Form.
- Refer to the item descriptions in the Application Information and Monitoring Information tabs, and fill out the required fields.
Category Detailed description Application Information Complete required fields such as request type, usage period, and basic information - Request type: select termination
- Usage period: enter desired termination date
- Guaranteed bandwidth: select the bandwidth you applied for
- Basic information: enter Account name, Project name, and recipient details
Monitoring information When terminating the entire service, no input is required. Table. Main contents of the Secured VPN service termination request form
- Refer to the item descriptions in the Application Information and Monitoring Information tabs, and fill out the required fields.
- Attach the completed application form to the attachment area.
- Click the Request button on the service request page.
- Once the request is completed, verify the submitted information on the Support Center > Service Request list page.
- After the monitoring team reviews the submitted service request, the termination is completed once the monitored IP is deleted.
- Service termination requires three business days, including the cancellation request date.