Users can create the service by entering the required information for the Key Management Service through the Samsung Cloud Platform Console and selecting detailed options.
Reference
Key Management Service provides the following two key services.
Customer-managed key: To securely protect important application data, users can generate and manage encryption keys themselves.
Platform-managed key: Since CSP(Cloud Service Provider) creates and manages it directly, users cannot change or delete the key’s properties.
Create a customer-managed key
You can create and use a customer-managed key in the Samsung Cloud Platform Console.
To create a customer-managed key, follow these steps.
All Services > Security > Key Management ServiceClick the menu. 1. Go to the Service Home page of Key Management Service.
On the Service Home page, click the Create Customer Managed Key button. 2. Go to the Customer Managed Key Creation page.
On the Customer Managed Key Creation page, enter the information required to create the service and provide additional details.
Enter or select the required information in the Service Information Input area.
Category
required status
Detailed description
Key name
Required
Enter key name
Public authentication algorithm
Selection
Use When selected, you can generate encryption keys that comply with public encryption standards
The public authentication algorithm option is available only in the KR SOUTH region
The public authentication algorithm provides the ARIA algorithm, which has passed security verification through Korea’s cryptographic module validation program
Purpose
Required
Select the key purpose and encryption method
If you do not select the use of public authentication algorithms, choose among encryption/decryption (AES-256), encryption/decryption and signing/verification (RSA-2048), signing/verification (ECDSA), and generation/verification (HMAC)
Auto rotation
Selection
Select whether to enable automatic key rotation
If Use is selected, the internal algorithm of the generated key is converted to a different value and applied at each configured rotation interval
The rotation interval can be set to a value between 1 and 730 days. If the rotation interval is not specified, it defaults to 90 days
Public access control
Required
Enter the IP range to allow access
After entering the IP range to use, click the Add button
You must enter at least one, and up to a maximum of 10 can be entered
/24 - /32 ranges can be used, but may be vulnerable to security risks
Click Delete All in the IP list to remove all registered entries
Private access control
Selection
Select the resource to allow access
Use select, then click the Add button to select the resource to use
Click Delete in the resource list to remove the registered item
If private access control is not set, you cannot access any private resources
Explanation
Selection
Enter additional information for the key
Table. Customer Managed Key Service Information Input Items
In the Additional Information Input area, enter or select the required information.
Category
required status
Detailed description
tag
Selection
Add Tag
Up to 50 per resource can be added
Add Tag After clicking the Add Tag button, enter or select Key, Value values
Table. Customer-managed key additional information input fields
Summary Check the detailed information and estimated charges generated in the panel, and click the Create button.
Once creation is complete, check the created resource on the Customer Managed Key List page.
Reference
When selecting a public authentication algorithm, you can create up to 100 customer-managed keys.
Check detailed information of customer-managed key
You can view and edit the full resource list and detailed information of customer-managed keys. Customer Managed Key Details page consists of Details, Tags, Activity Log tabs.
Reference
If the status of the customer-managed key service is Creating, the service is being created, so you cannot navigate to the detail page.
If it remains in the Creating state after a certain amount of time, delete the key and recreate it.
To view detailed information about the Key Management Service, follow these steps.
Click the All Services > Security > Key Management Service menu. 1. Go to the Service Home page of Key Management Service.
On the Service Home page, click the Customer Managed Key menu. 2. Navigate to the Customer Managed Key List page.
On the Customer Managed Key List page, click the resource to view its details. 3. Go to the Customer Managed Key Details page.
Customer Managed Key Details The top of the page displays status information and descriptions of additional features.
When the status is To be terminated, display the Cancel termination button
Table. Customer-managed key status information and additional features
Detailed Information
Customer Managed Key List page allows you to view detailed information of the selected resource and edit the information if necessary.
Category
Detailed description
service
Service Name
Resource Type
Resource Type
SRN
Unique resource ID in Samsung Cloud Platform
Resource Name
Resource Name
Resource ID
서비스에서의 고유 자원 ID
생성자
서비스를 생성한 사용자
생성 일시
서비스를 생성한 일시
키명
생성된 키의 이름
공공 인증 알고리즘
공공 인증 알고리즘 사용 여부
용도
암/복호화 및 서명/검증 같은 키의 용도 및 암호화 방식
현재 버전
생성된 키의 현재 버전
키 회전 시 버전이 1씩 증가
자동 회전
키의 자동 회전 사용 여부
수정 아이콘을 클릭하면 수정 가능
다음 회전일
회전 주기에 따른 키의 다음 회전일 표시
해당 날짜에 자동으로 키 회전 실행
회전 주기
자동 회전 사용 시 회전 주기 기간
URL
퍼블릭/프라이빗 접속 URL 주소
복사 아이콘을 클릭하면 주소 복사 가능
퍼블릭 접근 제어
퍼블릭 접근 허용 IP 주소
수정 아이콘을 클릭하면 수정 가능
프라이빗 접근 제어
프라이빗 접근 허용 리소스
수정 아이콘을 클릭하면 수정 가능
설명
키에 대한 추가 설명 표시
수정 아이콘을 클릭하면 수정 가능
Table. Customer-managed key detailed information tab items
Tag
On the Customer Managed Key List page, you can view the tag information of the selected resource and add, modify, or delete it.
구분
상세 설명
태그 목록
태그 목록
태그의 Key, Value 정보 확인 가능
태그는 자원 당 최대 50개까지 추가 가능
태그 입력 시 기존에 생성된 Key와 Value 목록을 검색하여 선택
Table. Customer-managed key tag tab items
Job History
On the Customer Managed Key List page, you can view the operation history of the selected resource.
구분
상세 설명
작업 내역
작업 수행 내용
암호화, 복호화, 서명, 검증, 데이터 키 생성, rewrap API 로그 항목 표시
작업 일시
작업 수행 일시
자원 유형
자원 유형
자원명
자원 이름
작업 결과
작업 수행 결과(성공/실패)
작업자 정보
작업을 수행한 사용자 정보
Table. Customer Managed Key Operation History Tab Detailed Information Items
Managing Customer-Managed Keys
You can create a new version of a registered key or change its usage status.
Configure customer-managed key rotation
Key rotation is a feature that transforms the internal algorithm of a generated key into a different value.
Reference
When rotating the key, only the master key value changes, and the ciphertext and plaintext values of previously generated data keys remain unchanged.
Even if key rotation is performed, the master key retains the previous version’s data, so decryption using the master key is unaffected, and the value of the data key in use also remains unchanged.
However, when wrapping with a changed master key (decrypting and then re‑encrypting), calling the rewrapData API will trigger the key rotation function.
When rotating a customer-managed key, the key’s version is changed internally. * By using a newly generated version key, you can decrypt data encrypted with the previous version’s key, preserving compatibility.
Versions changed by key rotation are compatible up to the 100th version, regardless of the encryption algorithm.
To create a new version of a customer-managed key (key rotation), follow these steps.
Click the All Services > Security > Key Management Service menu. 1. Go to the Service Home page of Key Management Service.
On the Service Home page, click the Customer Managed Key menu. 2. Navigate to the Customer Managed Key List page.
On the Customer Managed Key List page, click the resource to view detailed information. 3. Navigate to the Customer Managed Key Details page.
On the Customer Managed Key Details page, click the Key Rotation button. 4. Key Rotation Navigate to the notification window.
In the Key rotation notification dialog, click the Confirm button.
Configure Customer-Managed Key Activation
You can configure the usage of the selected key.
Reference
If you set the key to a disabled state, users who rely on that key will no longer be able to use it.
To set the activation/deactivation status of a customer-managed key you created, follow these steps.
Click the All Services > Security > Key Management Service menu. 1. Go to the Service Home page of Key Management Service.
On the Service Home page, click the Customer Managed Key menu. 2. Navigate to the Customer Managed Key List page.
On the Customer Managed Key List page, click the resource to view its details. 3. Navigate to the Customer Managed Key Details page.
On the Customer Managed Key Details page, click the Enable/Disable Key button. 4. Key activation/Key deactivation Navigate to the notification dialog.
In the Key activation/key deactivation notification dialog, click the OK button.
Encryption case using Key Management Service keys
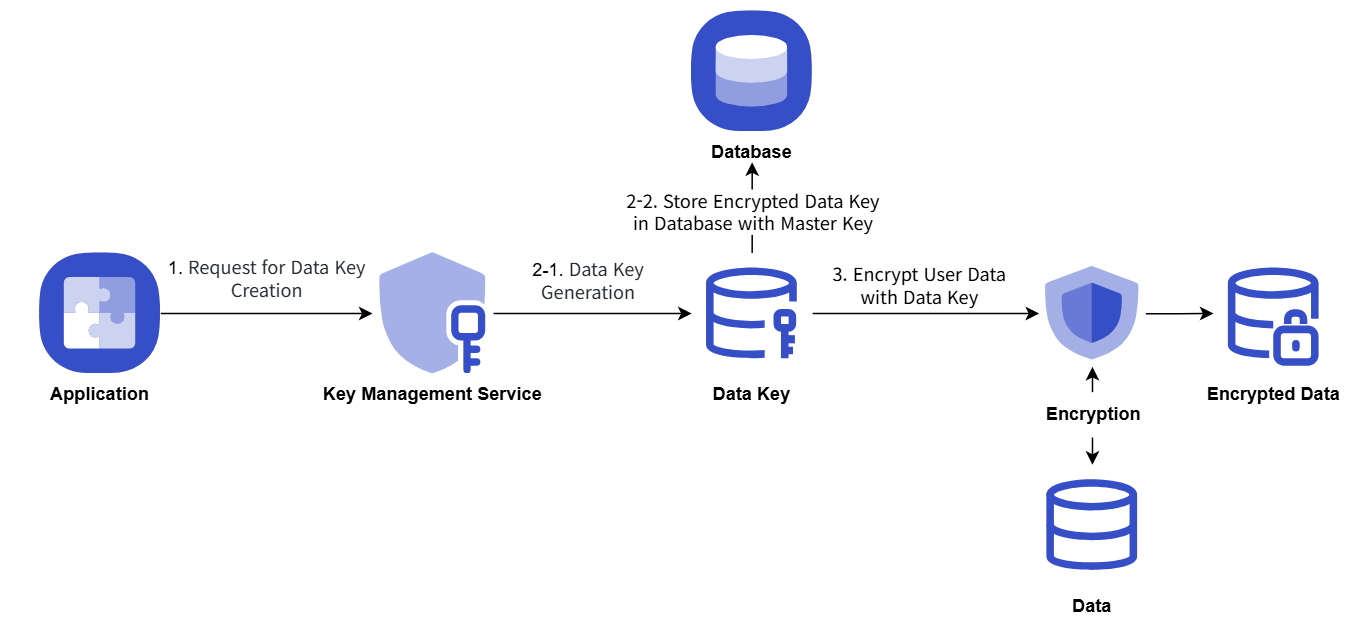
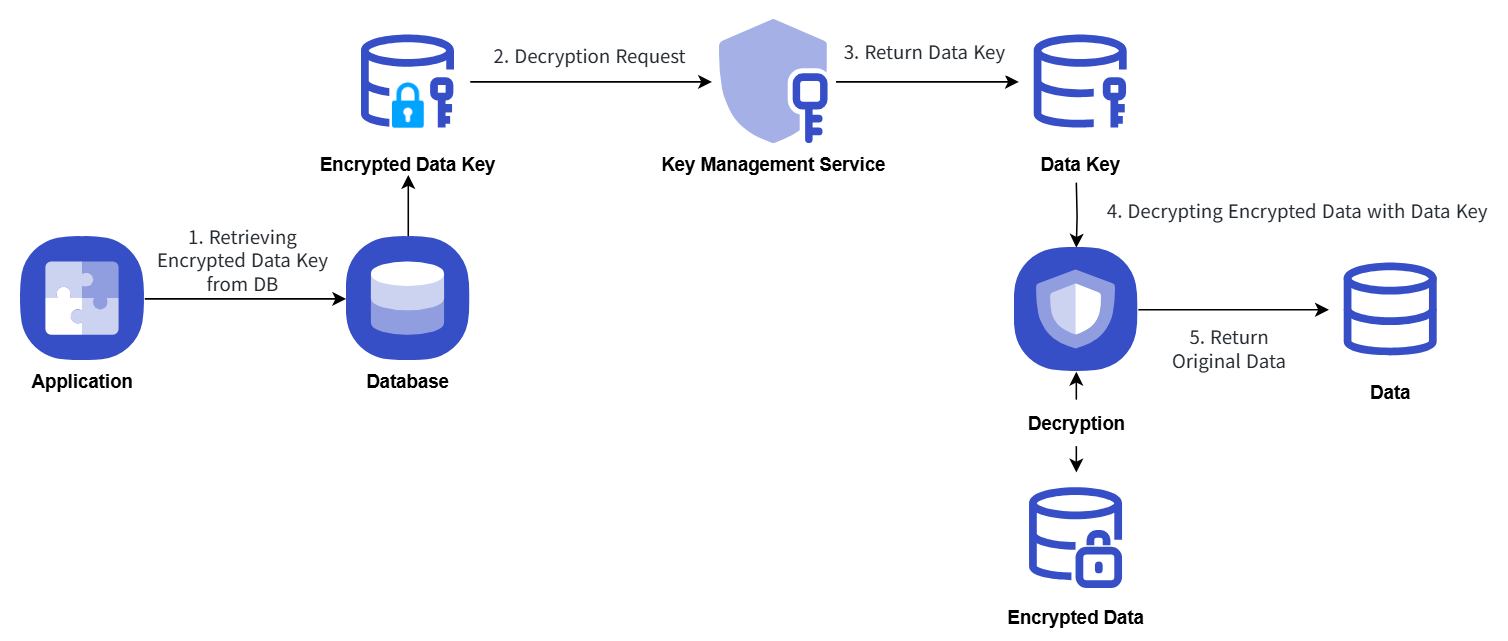
An example procedure for encrypting and storing a user application’s critical data by obtaining a data key from KMS is as follows.
When the application starts, it obtains a data key using the KMS master key information, and then uses the plaintext data key on the client side to perform secure data encryption and store it.
The data key is stored in the database in an encrypted form using the master key.
When performing secure data decryption, the data key stored in the database is retrieved and a decryption request is made using the KMS master key information.
The encryption/decryption process using the Key Management Service key is explained with the following diagram.
Encryption
Figure. KMS encryption process example
Decryption
Figure. KMS Decryption Procedure Example
Terminate Customer Managed Key
You can revoke customer-managed keys that are not in use.
Caution
If you revoke the key, you will no longer be able to use any requests or features of the customer-managed key, and it will be permanently deleted either immediately upon revocation or 72 hours later through a scheduled revocation.
To cancel a customer-managed key, follow these steps.
Click the All Services > Security > Key Management Service menu. 1. Go to the Service Home page of Key Management Service.
On the Service Home page, click the Customer Managed Key menu. 2. Go to the Customer Managed Key List page.
On the Customer Managed Key List page, click the resource to view its details. 3. Go to the Customer Managed Key Details page.
On the Customer Managed Key Details page, click the Terminate Service button. 4. Navigate to the Service Cancellation alert window.
Service cancellation alert dialog, select Immediate cancellation / Scheduled cancellation and verify the contents, then click the Confirm button.
When termination is complete, check on the Customer Managed Key List page whether the resource has been terminated.
When the key deletion is complete, a notification is sent to both the user who created the key and the user who deleted it.
Reference
Even if you click the Service Termination button in the More Options menu at the far right of the generated customer-managed key list, you can terminate the selected key.
To undo the cancellation of a reserved service, click the Cancel Cancellation button on the customer-managed key list page or the detail page.
Cancel Service Termination in the popup window, if you click Confirm, the selected key will not be deleted and will be restored in a disabled state.
To reuse the key, click the Customer Managed Key Details page’s Activate Key button.
1 - Encryption Example Using Key Management Service Keys
Encryption example using Key Management Service keys
This is a Java code example for implementing envelope encryption and data signing/verification using a key generated in KMS.
Reference
The code below is a simple reference example to help understand the Samsung Cloud Platform KMS.
Since only the functions required for KMS operation are described, executing it as is will cause an error. Be sure to modify and use it according to the user’s actual scenario.
Envelope encryption
It presents an envelope encryption scenario, and you can review the Java, Go, and Python example code and their output generated according to the scenario.
Scenario
To encrypt password information using the envelope encryption method, a Data Key is issued.
Encrypt the password using the issued Data Key information.
Encrypt the password and encrypted Data Key information using envelope encryption and store them in a JSON file.
Java example code
This is a Java example code written according to the provided scenario.
// URI
static String KMS_API_BASE_URI = {{ OpenAPI 가이드의 URL 참조 }};
// END POINT
static String KMS_API_DECRYPT = "/v1/kms/openapi/decrypt/%s";
static String KMS_API_CREATE_DATAKEY = "/v1/kms/openapi/datakey/%s";
// KEY ID
static String KEY_ID = {{마스터 키 ID}};

createEnvelop() {
    // 새로운 데이터 키 생성을 요청
    String encryptedDataKey = getDataKey();
    // 암호화를 할 데이터
    String example_json_data = "{\"PASSWORD\":\"SECRET_CREDENTIAL\"}";
    // 암호화된 데이터 봉투(Envelop encryption)
    String envelope = encryptData(example_json_data, encryptedDataKey);
    // 이 예제 코드에서는 암호화된 데이터 봉투를 파일로 저장
    File envelopeFile = new File("envelope.json");
}

getDataKey() {
    String endPoint = String.format(KMS_API_CREATE_DATAKEY, KEY_ID);
    String url = KMS_API_BASE_URI + endPoint;
    JSONObject data = new JSONObject();
    data.put("key_type", "plaintext");
    JSONObject respJsonObject = callApi(endPoint, data.toJSONString());
    return respJsonObject.get("ciphertext").toString();
}

encryptData() {
    Map<String, String> envelope = new HashMap<>();
    // 데이터 키 복호화
    String dataKey = decryptDataKey(encryptedDataKey);
    // Cipher Class 사용 (사용자가 기 사용 중인 암호화 알고리즘 사용 가능)
    SecretKey secretKey = new SecretKeySpec(decodeBase64(dataKey), "{사용자 선택 알고리즘}");
    Cipher cipher = Cipher.getInstance("{사용자 선택 알고리즘}");
    cipher.init(Cipher.ENCRYPT_MODE, secretKey);
    byte[] iv = cipher.getParameters().getParameterSpec(IvParameterSpec.class).getIV();
    byte[] cipherText = cipher.doFinal(obj.toString().getBytes());

    envelope.put("encryptedKey", encryptedDataKey);
    envelope.put("cipherText", encodeBase64(cipherText));
    envelope.put("iv", encodeBase64(iv));

    return JSONValue.toJSONString(envelope);
}

decryptDataKey() {
    String endPoint = String.format(KMS_API_DECRYPT, KEY_ID);
    JSONObject data = new JSONObject();
    data.put("cipherText", sealedKey);
    JSONObject respJsonObject = callApi(endPoint, data.toJSONString());
    String plaintext = (respJsonObject.get("plaintext")).toString();
    return plaintext;
}
Go example code
This is a Go example code written based on the provided scenario.
// URI
const KMS_API_BASE_URI = {{ OpenAPI 가이드의 URL 참조 }}

// END POINT
const KMS_API_DECRYPT = "/v1/kms/openapi/decrypt/%s"
const KMS_API_CREATE_DATAKEY = "/v1/kms/openapi/datakey/%s"

// KEY ID
const KEY_ID = {{마스터 키 ID}}

createEnvelop() {
        // 새로운 데이터 키 생성을 요청
        encryptedDataKey := getDataKey()
        // 암호화를 할 데이터
        example_json_data := "{\"PASSWORD\":\"SECRET_CREDENTIAL\"}"
        // 암호화된 데이터 봉투(Envelop encryption)
        envelope := encryptData(example_json_data, encryptedDataKey)
        // 이 예제 코드에서는 암호화된 데이터 봉투를 파일로 저장
        file, _ := os.Create("envelope.json")
        defer file.Close()
        file.WriteString(envelope)
}

getDataKey() {
        endPoint := fmt.Sprintf(KMS_API_CREATE_DATAKEY, KEY_ID)
        data := map[string]interface{}{
            "key_type": "plaintext",
        }
        jsonData, _ := json.Marshal(data)
        respJsonObject := callApi(endPoint, jsonData)
        info := &KMSDatakeyInfo{}
        json.Unmarshal([]byte(respJsonObject), info)

        return info.DataKey
}

encryptData() {
        envelope := make(map[string]string)
        // 데이터 키 복호화
        dataKey := decryptDataKey(encryptedDataKey)
        secretKey, _ := base64.StdEncoding.DecodeString(dataKey)

        // Cipher Class 사용
        block, _ := {사용자 선택 알고리즘}.NewCipher(secretKey)
        cipherText := make([]byte, {사용자 선택 알고리즘}.BlockSize+len(example_json_data))
        iv := cipherText[:{사용자 선택 알고리즘}.BlockSize]
        if _, err := io.ReadFull(rand.Reader, iv); err != nil {
               panic(err)
        }

        mode := cipher.NewCFBEncrypter(block, iv)
        mode.XORKeyStream(cipherText[{사용자 선택 알고리즘}.BlockSize:], []byte(example_json_data))

        envelope["encryptedKey"] = encryptedDataKey
        envelope["cipherText"] = base64.StdEncoding.EncodeToString(cipherText)
        envelope["iv"] = base64.StdEncoding.EncodeToString(iv)

        jsonString, _ := json.Marshal(envelope)

        return string(jsonString)
}

decryptDataKey() {
        endPoint := fmt.Sprintf(KMS_API_DECRYPT, KEY_ID)
        data := map[string]interface{}{
               "cipherText": sealedKey,
        }
        jsonData, _ := json.Marshal(data)
        respJsonObject := callApi(endPoint, jsonData)
        info := &KMSDecryptInfo{}
        json.Unmarshal([]byte(respJsonObject), info)

        return info.DecryptedData

}
Python example code
This is a Python example code written according to the presented scenario.
# URI
KMS_API_BASE_URI = {{ OpenAPI 가이드의 URL 참조 }}

# END POINT
KMS_API_DECRYPT = "/v1/kms/openapi/decrypt/"
KMS_API_CREATE_DATAKEY = "/v1/kms/openapi/datakey/"

# KEY ID
KEY_ID = {{마스터 키 ID}}

create_envelop()
    # 새로운 데이터 키 생성을 요청
    encrypted_data_key = get_dataKey()

    # 암호화를 할 데이터
    example_json_data = {"PASSWORDTEST":"SECRET_CREDENTIALTEST"}
    json_data_str = json.dumps(example_json_data)

    # 암호화된 데이터 봉투(Envelop encryption)
    envelope = encrypt_data(json_data_str,encrypted_data_key)

    # 이 예제 코드에서는 암호화된 데이터 봉투를 파일로 저장
    with open("envelope.json", "w") as file:
        file.write(envelope)


get_dataKey()
    end_point = f"{KMS_API_CREATE_DATAKEY}{KEY_ID}"
    data = {
        "key_type": "plaintext"
    }
    response_object = call_api(end_point, data)

    data_key = response_object.get("ciphertext", "")

    return data_key


encrypt_data()
    envelope = {}
    # 데이터 키 복호화
    dataKey = decrypt_data_key(encrypted_data_key)
    decoded_data_key = base64.b64decode(dataKey)

    # Cipher Class 사용
    iv = get_random_bytes(16)
    cipher = {사용자 선택 알고리즘}.new(decoded_data_key, {사용자 선택 알고리즘}.MODE_CBC, iv)
    data_to_encrypt = obj
    data_bytes = data_to_encrypt.encode()
    padded_data = pad(data_bytes, {사용자 선택 알고리즘}.block_size)
    cipher_text = cipher.encrypt(padded_data).hex()

    envelope["encryptedKey"] = encrypted_data_key
    envelope["cipherText"] = cipher_text
    envelope["iv"] = base64.b64encode(iv).decode()

    return json.dumps(envelope)

decrypt_data_key()
    end_point = f"{KMS_API_DECRYPT}{KEY_ID}"
    data = {}
    data["cipherText"] = sealed_key
    resp_json_object = call_api(end_point,data)
    plaintext = resp_json_object.get("decryptedData")
    return plaintext
You can present an envelope encryption usage scenario and view the Java, Go, and Python example code and results written according to the scenario.
Scenario
Decrypt the Data Key of the encrypted envelope file.
Decrypt the encrypted data of the envelope file using the decrypted Data Key.
Java example code
This is a Java example code written according to the provided scenario.
// URI
static String KMS_API_BASE_URI = {{ OpenAPI 가이드의 URL 참조 }};
// END POINT
static String KMS_API_DECRYPT = "/v1/kms/openapi/decrypt/%s";
// KEY ID
static String KEY_ID = {{마스터 키 ID}};;


getData() {
    // 암호화된 데이터 봉투(Envelop encryption)
    String envelope = new String(Files.readAllBytes(Paths.get("envelope.json")));
    JSONParser parser = new JSONParser();
    JSONObject envelopeJson = (JSONObject) parser.parse(envelope);
    String encryptedDataKey = envelopeJson.get("encryptedKey").toString();
    String cipherText = envelopeJson.get("cipherText").toString();
    String iv = envelopeJson.get("iv").toString();

    return decryptData(cipherText, encryptedDataKey, iv);
}

decryptData() {
    String dataKey = decryptDataKey(encryptedDataKey);
    IvParameterSpec ivParameterSpec = new IvParameterSpec(decodeBase64(iv));
    SecretKey secretKey = new SecretKeySpec(decodeBase64(dataKey), "{사용자 선택 알고리즘}");
    Cipher cipher = Cipher.getInstance("{사용자 선택 알고리즘}");
    cipher.init(Cipher.DECRYPT_MODE, secretKey, ivParameterSpec);
    byte[] plaintext = cipher.doFinal(decodeBase64(cipherText));

    return new String(plaintext);
}

decryptDataKey() {
    String endPoint = String.format(KMS_API_DECRYPT, KEY_ID);
    JSONObject data = new JSONObject();
    data.put("cipherText", sealedKey);
    JSONObject respJsonObject = callApi(endPoint, data.toJSONString());
    String plaintext = (respJsonObject.get("plaintext")).toString();
    return plaintext;
}
Go example code
This is a Go example code written according to the presented scenario.
// URI
const KMS_API_BASE_URI = {{ OpenAPI 가이드의 URL 참조 }}

// END POINT
const KMS_API_DECRYPT = "/v1/kms/openapi/decrypt/%s"

// KEY ID
const KEY_ID = {{마스터 키 ID}}

getData() {
    // 암호화된 데이터 봉투(Envelop encryption) 불러오기
    jsonData, _ := os.ReadFile("envelope.json")
    var envelope map[string]interface{}
    if err := json.Unmarshal(jsonData, &envelope); err != nil {
           fmt.Println("JSON 파싱 오류:", err)
           os.Exit(1)
    }
    encryptedDataKey := envelope["encryptedKey"].(string)
    cipherText := envelope["cipherText"].(string)
    iv := envelope["iv"].(string)

    return decryptData(cipherText, encryptedDataKey, iv)
}

decryptData() {
    dataKey := decryptDataKey(encryptedDataKey)
    ciphertext, _ := base64.StdEncoding.DecodeString(cipherText)
    dataKeyBytes, _ := base64.StdEncoding.DecodeString(dataKey)
    decodedData := ciphertext[{사용자 선택 알고리즘}.BlockSize:]
    ivparam := ciphertext[{사용자 선택 알고리즘}.BlockSize]
    block, _ := {사용자 선택 알고리즘}.NewCipher(dataKeyBytes)

    mode := cipher.NewCFBDecrypter(block, ivparam)
    mode.XORKeyStream(decodedData, decodedData)
    decryptedData := string(decodedData)

    return decryptedData
}

decryptDataKey() {
    endPoint := fmt.Sprintf(KMS_API_DECRYPT, KEY_ID)
    data := map[string]interface{}{
           "cipherText": sealedKey,
    }
    jsonData, _ := json.Marshal(data)
    respJsonObject := callApi(endPoint, jsonData)
    info := &KMSDecryptInfo{}
    json.Unmarshal([]byte(respJsonObject), info)

    return info.DecryptedData
}
Python example code
This is a Python example code written according to the presented scenario.
# URI
KMS_API_BASE_URI = {{ OpenAPI 가이드의 URL 참조 }}

# END POINT
KMS_API_DECRYPT = "/v1/kms/openapi/decrypt/"

# KEY ID
KEY_ID = {{마스터 키 ID}}

get_data()
    # 암호화된 데이터 봉투(Envelop encryption) 열기
    with open("envelope.json", "r") as file:
        envelope = file.read()
    envelope_json = json.loads(envelope)
    encrypted_data_key = envelope_json["encryptedKey"]
    cipher_text = envelope_json["cipherText"]
    iv = envelope_json["iv"]
    return decrypt_data(cipher_text, encrypted_data_key, iv)

decrypt_data()
    data_key = decrypt_data_key(encrypted_data_key)
    iv_bytes = base64.b64decode(iv)
    decoded_data_key = base64.b64decode(data_key)
    cipher_txt = bytes.fromhex(cipher_text)

    cipher = {사용자 선택 알고리즘}.new(decoded_data_key, {사용자 선택 알고리즘}.MODE_CBC, iv_bytes)
    plain_text_bytes = unpad(cipher.decrypt(cipher_txt), {사용자 선택 알고리즘}.block_size)
    plain_text = plain_text_bytes.decode('utf-8')
    return plain_text

decrypt_data_key()
    end_point = f"{KMS_API_DECRYPT}{KEY_ID}"
    data = {}
    data["cipherText"] = sealed_key
    resp_json_object = call_api(end_point,data)
    plaintext = resp_json_object.get("decryptedData")
    return plaintext
Example code result
Displays the result of the example code.
{"PASSWORD":"SECRET_CREDENTIAL"}
Use data signature
It provides a data signing usage scenario to guarantee data integrity, and you can review the Java, Go, and Python example code and their results as written according to the scenario.
Scenario
Call the OpenAPI to sign the data.
The signed data is enveloped and saved as a JSON file.
Java example code
This is a Java example code written according to the provided scenario.
// URI
static String KMS_API_BASE_URI = {{ OpenAPI 가이드의 URL 참조 }};

// END POINT
static String KMS_API_SIGN = "/v1/kms/openapi/sign/%s";

// KEY ID
static String KEY_ID = {{마스터 키 ID}};

signEnvelop() {
    // 서명 데이터 봉투(Envelop encryption)
    String envelope = sign();
    // 이 예제 코드에서는 서명 데이터 봉투를 파일로 저장
    File envelopeFile = new File("signEnvelope.json");
    OutputStream os = new BufferedOutputStream(new FileOutputStream(envelopeFile));

    try {
        os.write(envelope.getBytes());
    } finally {
        os.close();
    }
}

sign() {
    Map<String, String> envelope = new HashMap<>();

    String example_credential = "SCP KMS Sign Test!!!";
    String endPoint = String.format(KMS_API_SIGN, KEY_ID);
    JSONObject data = new JSONObject();
    data.put("input", encodeToBase64(example_credential));

    JSONObject respJsonObject = callApi(endPoint, data.toJSONString());

    envelope.put("signature", respJsonObject.get("signature").toString());
    if(respJsonObject.get("batch_results") != null) {

        envelope.put("batch_results", respJsonObject.get("batch_results").toString());
    }

    return JSONValue.toJSONString(envelope);
}
Go example code
This is a Go example code written according to the presented scenario.
// URI
const KMS_API_BASE_URI = {{ OpenAPI 가이드의 URL 참조 }}

// END POINT
const KMS_API_SIGN = "/v1/kms/openapi/sign/%s"

// KEY ID
const KEY_ID = {{마스터 키 ID}}

signEnvelop() {
    // 서명 데이터 봉투(Envelop encryption)
    envelope := sign()
    // 이 예제 코드에서는 서명 데이터 봉투를 파일로 저장
    file, _ := os.Create("signEnvelope.json")
    defer file.Close()
    file.WriteString(envelope)
}

sign() {
    envelope := make(map[string]string)
    example_credential := "SCP KMS Sign Test!!!"
    endPoint := fmt.Sprintf(KMS_API_SIGN, KEY_ID)
    data := map[string]interface{}{
        "input": base64.StdEncoding.EncodeToString([]byte(example_credential)),
    }
    jsonData, _ := json.Marshal(data)
    respJsonObject := callApi(endPoint, jsonData)
    info := &KMSSignInfo{}
    json.Unmarshal([]byte(respJsonObject), info)

    envelope["signature"] = info.Signature

    jsonString, _ := json.Marshal(envelope)

    return string(jsonString)
}
Python example code
This is a Python example code written according to the presented scenario.
# URI
KMS_API_BASE_URI = {{ OpenAPI 가이드의 URL 참조 }}

# END POINT
KMS_API_SIGN = "/v1/kms/openapi/sign/"

# KEY ID
KEY_ID = {{마스터 키 ID}}

sign_envelop()
    # 서명 데이터 봉투(Envelop encryption)
    envelope = sign()

    # 이 예제 코드에서는 서명 데이터 봉투를 파일로 저장
    with open("signEnvelope.json", "w") as file:
        file.write(envelope)


sign()
    envelope = {}

    example_credential = "SCP KMS Sign Test!!!"
    end_point = f"{KMS_API_SIGN}{KEY_ID}"
    credential_bytes = example_credential.encode('utf-8')

    data = {
        "input": base64.b64encode(credential_bytes).decode('utf-8')
    }

    resp_json_object = call_api(end_point,data)

    envelope["signature"] = resp_json_object.get("signature")

    return json.dumps(envelope)
It presents a verification usage scenario for validating data integrity, and you can view the Java, Go, and Python example code and their results written according to the scenario.
Scenario
Retrieves the signature value of the signed envelope file.
Validates the signed data and outputs the result.
Java example code
This is a Java example code written according to the provided scenario.
// URI
static String KMS_API_BASE_URI = {{ OpenAPI 가이드의 URL 참조 }};

// END POINT
static String KMS_API_VERIFY = "/v1/kms/openapi/verify/%s";

// KEY ID
static String KEY_ID = {{마스터 키 ID}};

getSign() {
    // 서명 데이터 봉투(Envelop encryption)
    String envelope = new String(Files.readAllBytes(Paths.get("signEnvelope.json")));
    JSONParser parser = new JSONParser();
    JSONObject envelopeJson = (JSONObject) parser.parse(envelope);
    String signature = envelopeJson.get("signature").toString();

    return verify(signature);
}

verify() {
    String endPoint = String.format(KMS_API_VERIFY, KEY_ID);
    JSONObject data = new JSONObject();
    data.put("input", "U0NQIEtNUyBTaWduIFRlc3QhISE=");
    data.put("signature", signature);
    JSONObject respJsonObject = callApi(endPoint, data.toJSONString());
    String valid = (respJsonObject.get("valid")).toString();
    return valid;
}
Go example code
This is a Go example code written according to the presented scenario.
// URI
const KMS_API_BASE_URI = {{ OpenAPI 가이드의 URL 참조 }}

// END POINT
const KMS_API_VERIFY = "/v1/kms/openapi/verify/%s"

// KEY ID
const KEY_ID = {{마스터 키 ID}}

getSign() {
    // 서명 데이터 봉투(Envelop encryption) 불러오기
    jsonData, _ := os.ReadFile("signEnvelope.json")
    var envelope map[string]interface{}
    if err := json.Unmarshal(jsonData, &envelope); err != nil {
           fmt.Println("JSON 파싱 오류:", err)
           os.Exit(1)
    }
    signature := envelope["signature"].(string)

    return verify(signature)
}

verify() {
    endPoint := fmt.Sprintf(KMS_API_VERIFY, KEY_ID)
    data := map[string]interface{}{
           "input":          "U0NQIEtNUyBTaWduIFRlc3QhISE=",
           "signature":      signature,
    }
    jsonData, _ := json.Marshal(data)
    respJsonObject := callApi(endPoint, jsonData)
    info := &KMSVerifyInfo{}
    json.Unmarshal([]byte(respJsonObject), info)

    return info.Valid
}
Python example code
This is a Python example code written according to the presented scenario.
# URI
KMS_API_BASE_URI = {{ OpenAPI 가이드의 URL 참조 }}

# END POINT
KMS_API_VERIFY = "/v1/kms/openapi/verify/"

# KEY ID
KEY_ID = {{마스터 키 ID}}

get_sign()
    # 서명 데이터 봉투(Envelop encryption) 열기
    with open("signEnvelope.json", "r") as file:
        envelope = file.read()
    envelope_json = json.loads(envelope)
    signature = envelope_json["signature"]

    return verify(signature)


verify()
    end_point = f"{KMS_API_VERIFY}{KEY_ID}"

    data = {
        "input": "U0NQIEtNUyBTaWduIFRlc3QhISE=",
        "signature": signature
    }

    resp_json_object = call_api(end_point,data)
    valid = resp_json_object.get("valid")

    return valid
Example code result
Displays the result of the example code.
  {
    "valid": true
}
2 - Platform-managed Key
Users can view detailed information about the platform-managed key automatically generated for service provisioning on the Samsung Cloud Platform.
Reference
Platform-managed keys are created and managed directly by the CSP (Cloud Service Provider), so users cannot modify or delete key attributes.
When another product within Samsung Cloud Platform uses a KMS key for encryption, the CSP generates a platform-managed key itself and performs the encryption, even if the user does not create a key directly in KMS.
Check detailed information of platform-managed key
You can view the full resource list and detailed information of platform-managed keys. The Platform Managed Key Details page consists of Details, Operation History tabs.
To view detailed information about the Key Management Service, follow these steps.
Click the All Services > Security > Key Management Service menu. You will be taken to the Service Home page of Key Management Service.
On the Service Home page, click the Platform Managed Key menu. You will be taken to the Platform Managed Key List page.
On the Platform Managed Key List page, click the resource to view detailed information. You will be taken to the Platform Managed Key Details page.
Platform Managed Key Details page displays status information and descriptions of additional features at the top.
Category
Detailed description
status
Display the status of the platform-managed key
Active: Available/Active
Table. Platform Managed Key Status Information
Detailed Information
On the Platform Managed Key List page, you can view detailed information of the selected resource.
Category
Detailed description
Service
Service name
Resource Type
Resource Type
SRN
Unique resource ID in Samsung Cloud Platform
Resource name
Resource Name
Resource ID
Unique resource ID in the service
Creation date and time
Service creation timestamp
key name
Name of the generated key
Explanation
Show additional description for the key
Edit icon can be clicked to edit
Table. Platform Managed Key Detailed Information Tab Items
Job History
You can view the operation history of the selected resource on the Platform Managed Key List page.
Category
Detailed description
Work log
Task execution details
Encryption, decryption, signing, verification, data key generation, rewrap API log entry display
Operation date and time
Task execution date and time
Resource Type
Resource Type
Resource name
Resource Name
Result
Task execution result (success/failure)
Operator Information
User information for the performed operation
Table. Platform Managed Key Operation History Tab Detailed Information Items