Axgate
This explains how to configure the firewall device and FPMS when the firewall is Axgate.
Configuring firewall device
This is a method for configuring firewall devices or verifying information to integrate FPMS with a firewall. Access the firewall and configure or verify the following.
Check firewall OS version
If you are using an older version, please update the OS beforehand before registering FPMS.
- [minimum] r38855 or higher
Check API connection port
- Enter
sh run line vtyin the CLI. - The port of
http secure-portis the API access port. - Port 443 does not need to be entered as it is the default port, and if it has been changed to a different port, the updated port number should be listed on the firewall application form. * (When integrating with the FPMS firewall, it must be entered in the “Firewall Port”.)
Create linked account
This is a login account for FPMS management. The guide ID is fpmsapi42, and after setting the password, please either record it on the firewall application form or inform the FPMS operator via messenger or email.
Configure the linked account as follows.
Permission: Manager(14)
If using an access IP ACL, add the FPMS server IP to the allowed IP list.
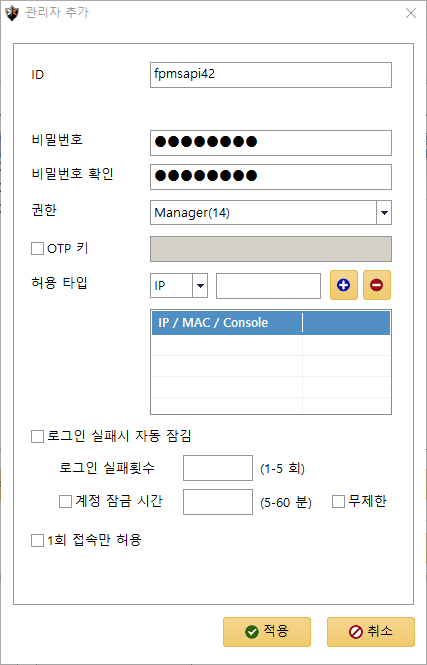
Figure. Linked Account Settings
Check virtual domain ID
- Each virtual domain (vdid) requires an account with a distinct name. * (Cannot convert to vdid via API)
- The virtual domain ID can be found in ‘AxgateManager > Network > Virtualization > Virtual Domain ID’.
- It is entered as the virtual ID of the FPMS virtual firewall.
SecurityZone check
SecurityZoneName is set as the interface name when registering the Zone address in FPMS. Please specify the SecurityZoneName, which can be viewed in AxgateManager, on the firewall application form, distinguishing each zone’s type (Internal, External).
AxgateManager > Network > SecurityZones > Check SecurityZone
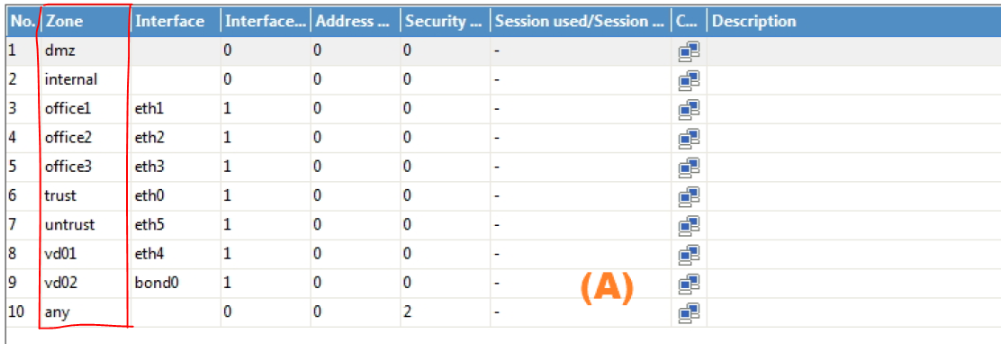
Figure. SecurityZone check
Setting up FPMS
Explains the additional settings required when registering a firewall in FPMS. Access the FPMS and configure the following.
Virtual firewall configuration
When using vdid, configure the virtual firewall.

- Use of virtual firewall: Yes
- Virtual ID: vdid ID (Refer to the above virtual domain ID verification for the vdid ID.)
Zone registration
When registering a Zone, set the interface name to the SecurityZone name. Refer to the SecurityZone verification above for the SecurityZone name.
internal
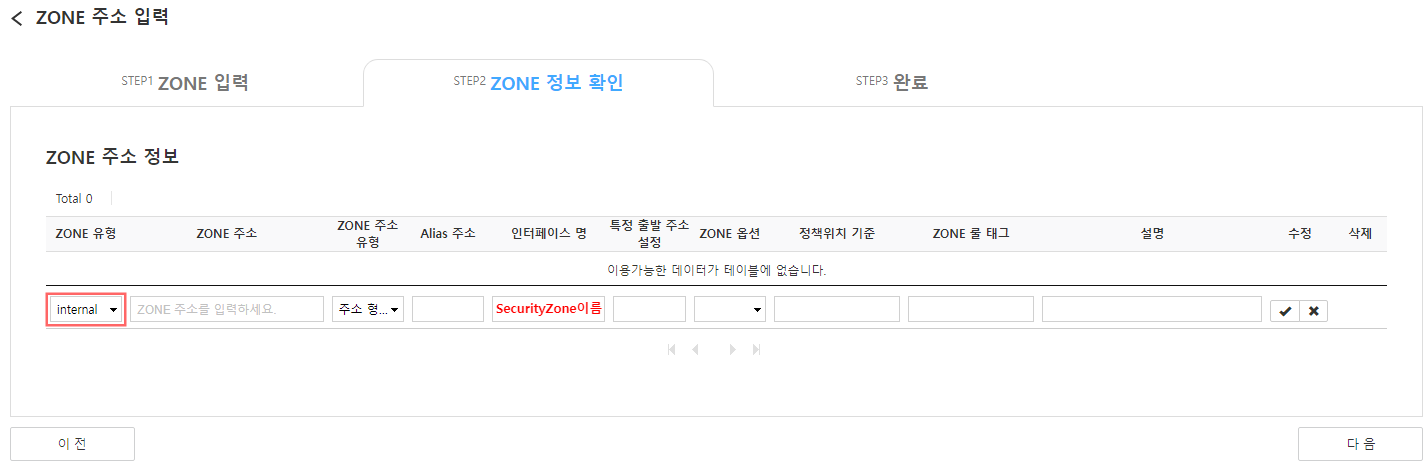
Figure. Zone registration (internal) external
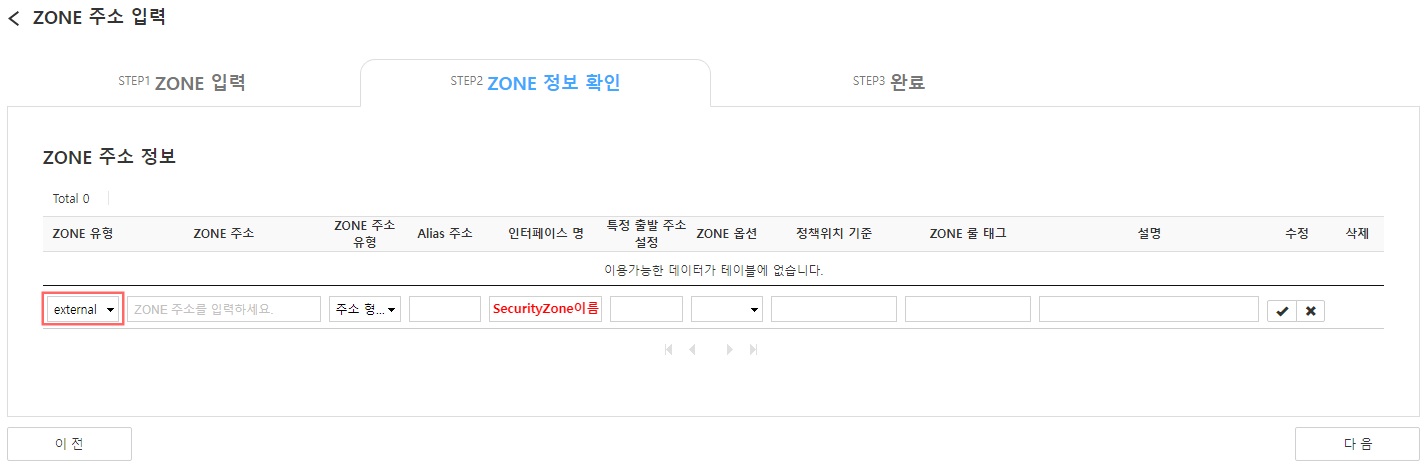
Figure. Zone registration (external)
Firewall Detailed Function Settings
Configure when using vdid. On the “Firewall Detailed Feature Creation” page, configure the following detailed features. (Refer to configuring detailed firewall functions in “Firewall Management”)
Address object name customization:
${ZONE_FULL}_${IP}
Figure. Address object name customization - To customize the address object name, see the Address object name customization in 「Configuration usage example」.
Axgate vdid object name format setting: true

Figure. vdid object name format setting
Configure firewall SYSLOG
This is how to configure the firewall’s Syslog to collect SYSLOG in a log analysis system. Connect to the firewall and configure the following.
Navigate to Monitoring > General Settings > Syslog Settings.
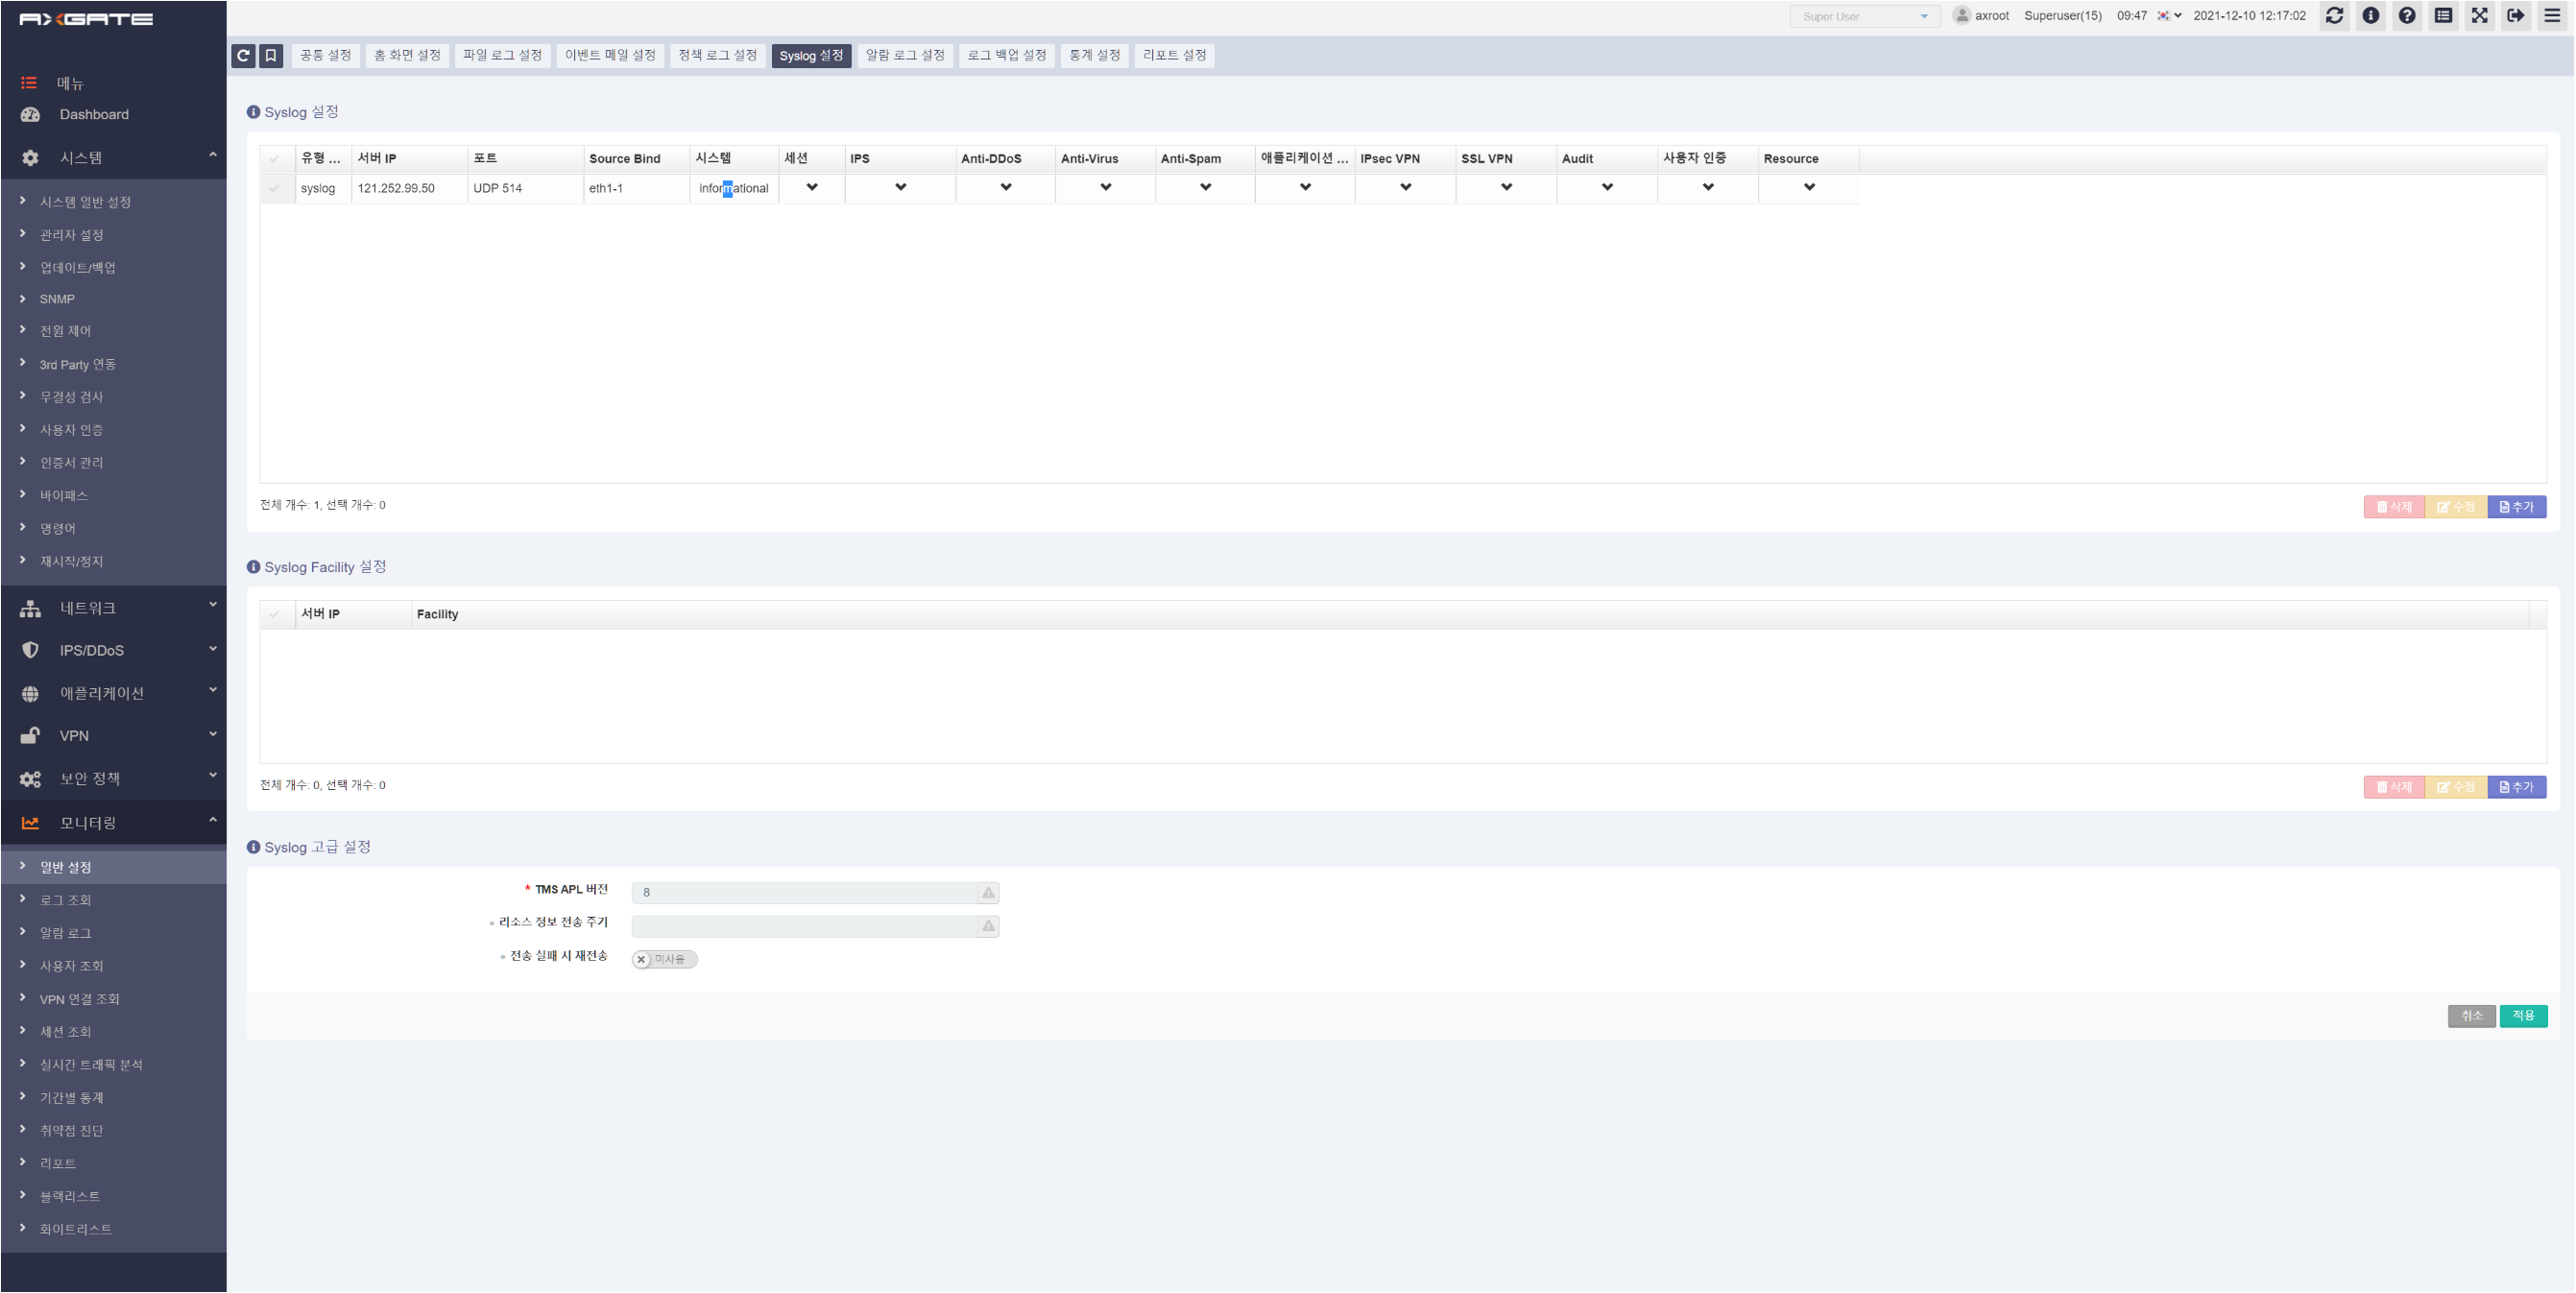
Figure. Syslog Settings Navigation Click Add Syslog Settings to configure the server IP, port information, and logs to collect.
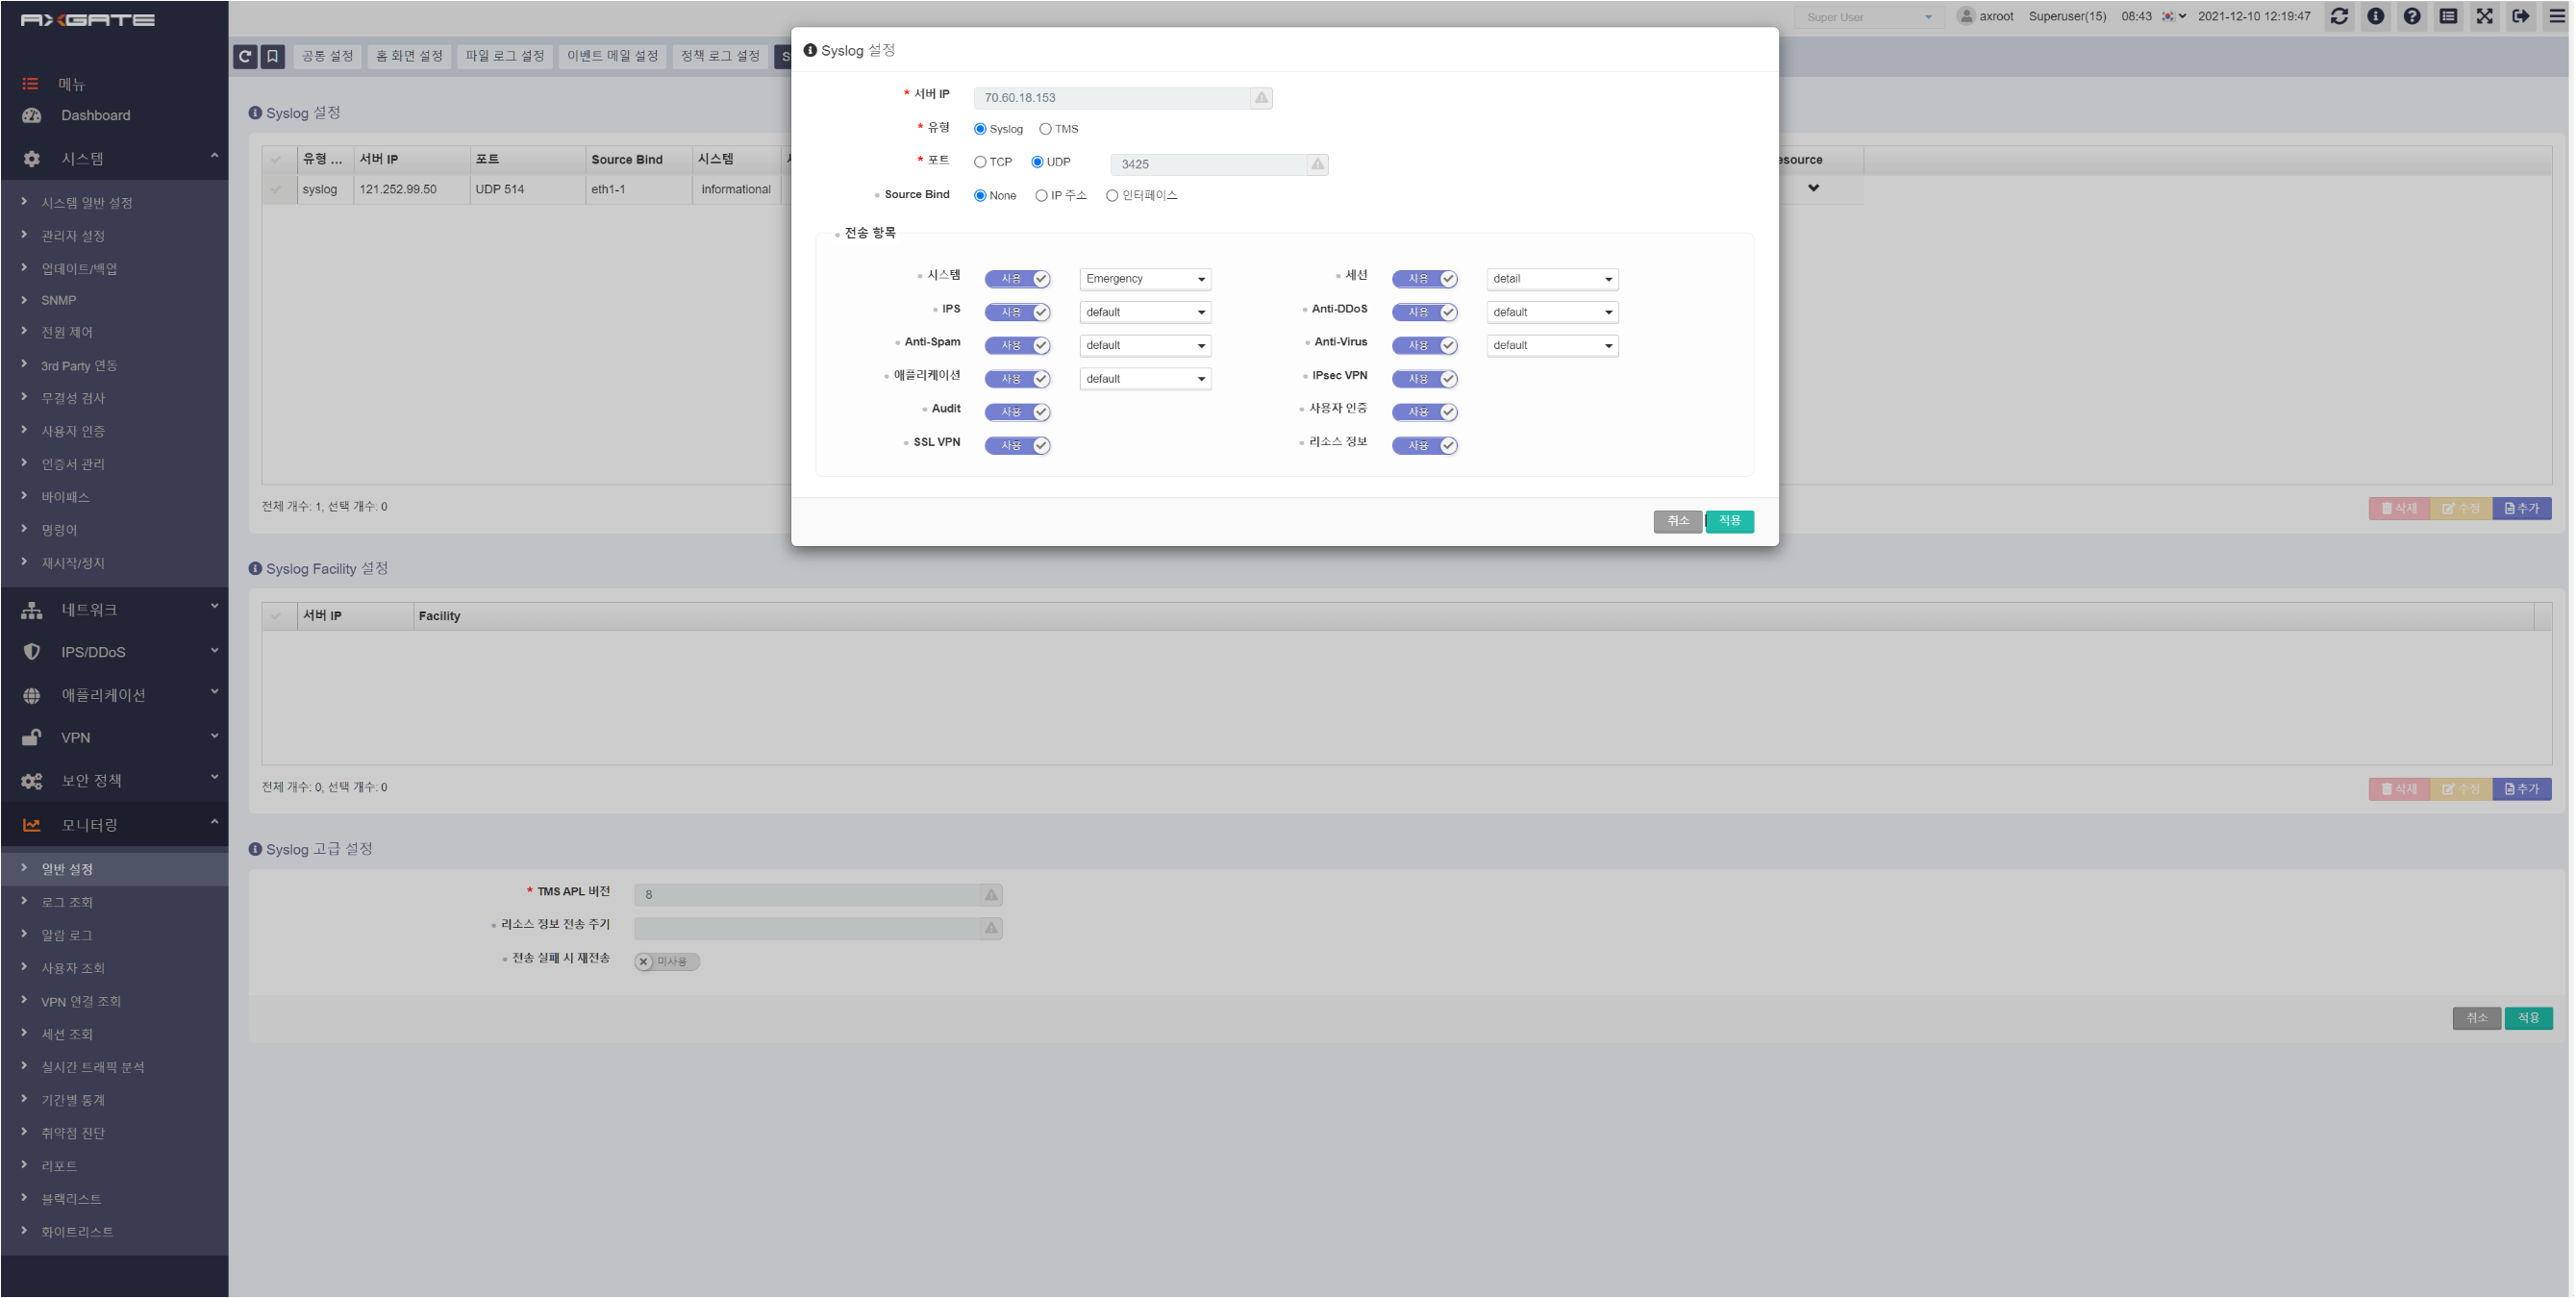
Figure. Add Syslog configuration
Configuring firewall SNMP
When automatically collecting network topology, network connection information is gathered via SNMP of L3 or higher network devices. To do this, you need to configure the firewall’s SNMP. Connect to the firewall and configure the following.
Axgate GUI access > System > SNMP access
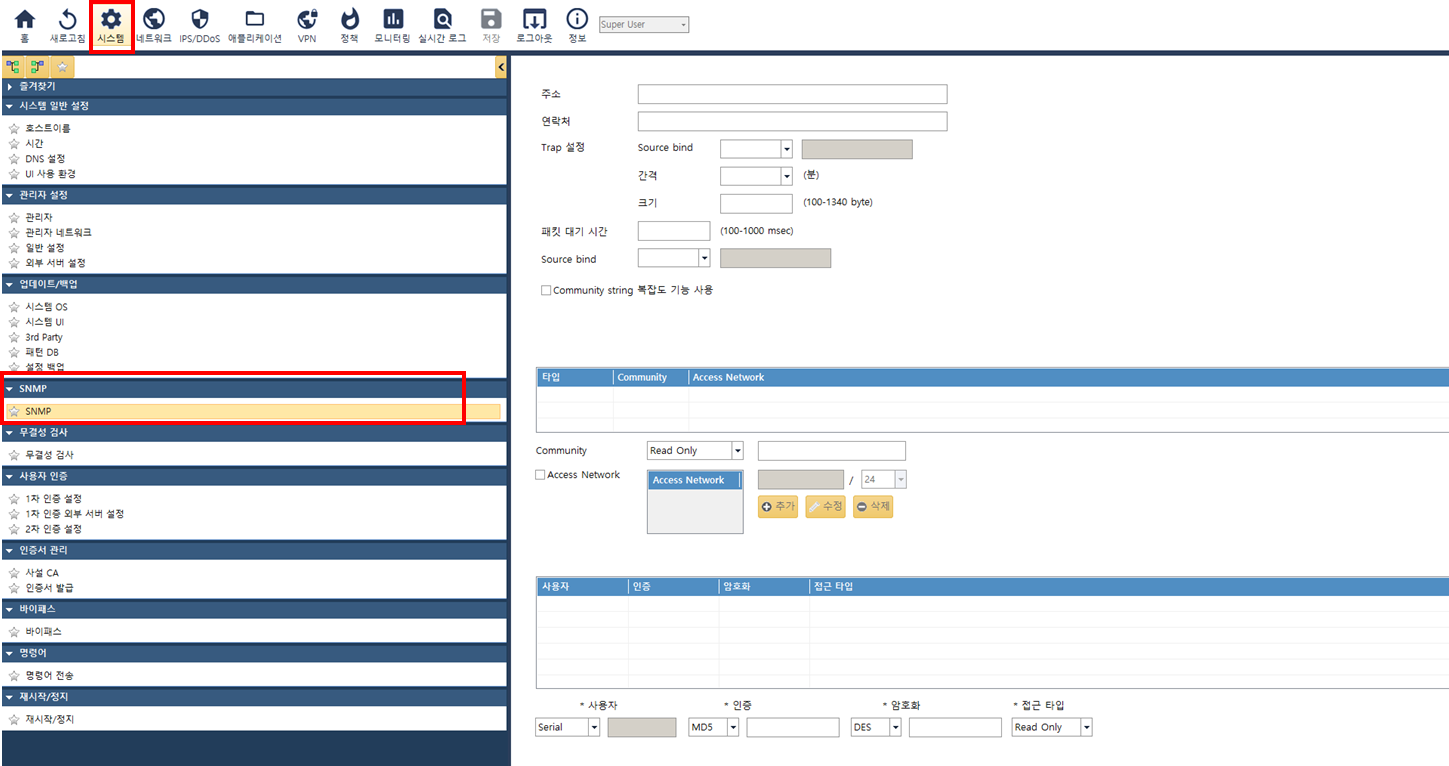
Figure. SNMP connection Configure SNMP
- Set ‘SNMP Community’
- Community: Permission (RW/RO) and SNMP Community value configuration
- Access Network: Access control IP address configuration for SNMP communication
- After completing the input, click the ‘Add’ button on the right

Figure. SNMP Community Settings ‘SNMP Host’ Configuration (Trap)
- Host: Set the server IP address that receives SNMP messages
- Type: Choose between Trap/Info
- Version: Select SNMP version
- Community: Set SNMP Community value
- Port: Set the port for sending SNMP messages (default UDP 162)
- After completing the input, click the ‘Add’ button on the right
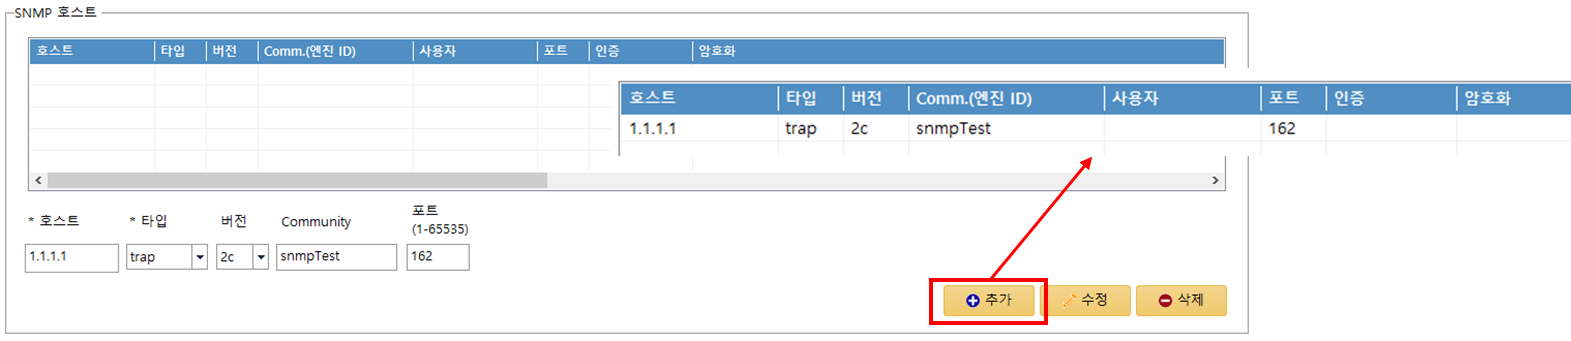
Figure. SNMP Host Settings After completing the settings, click ‘Apply’ at the top.
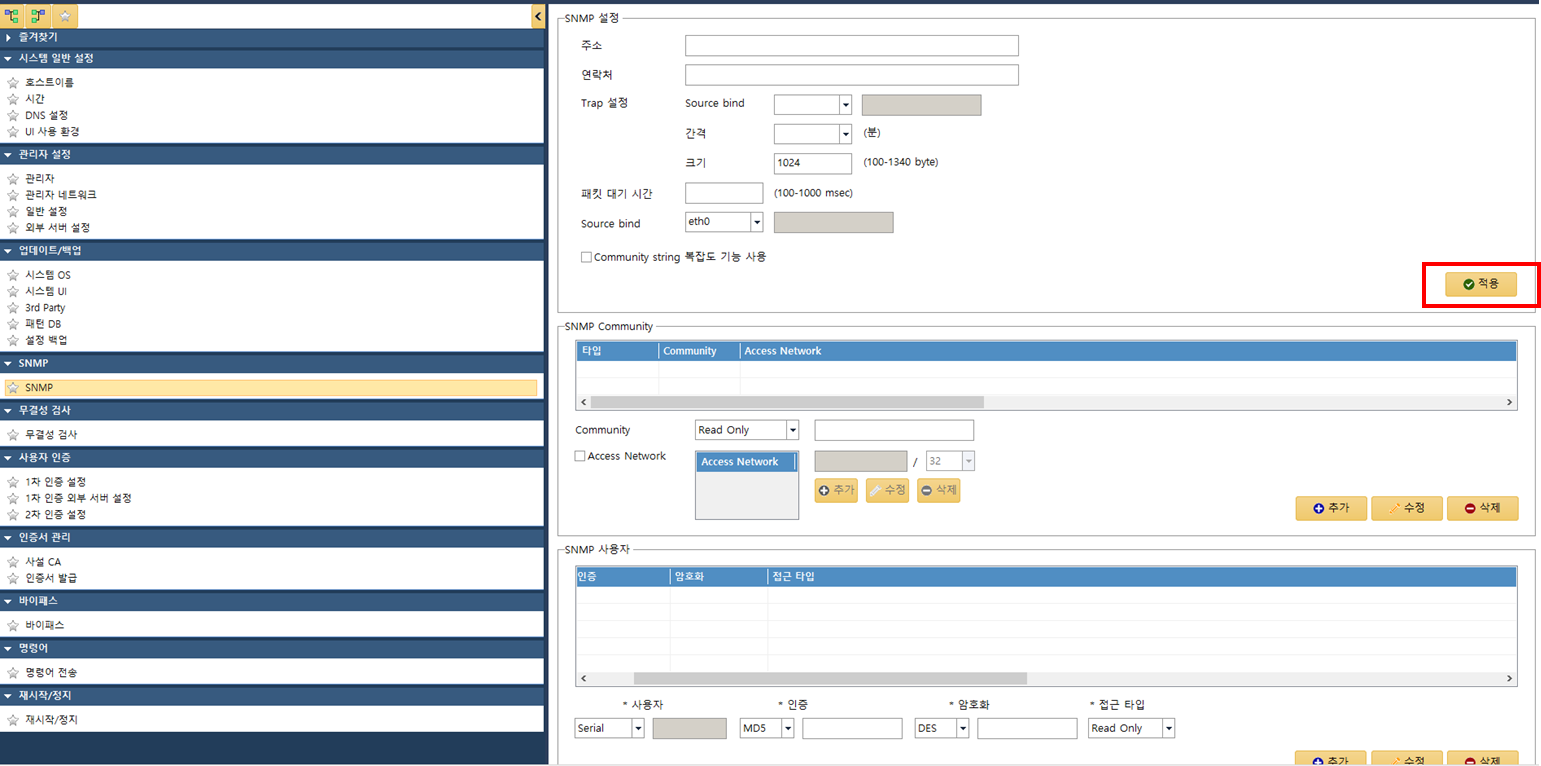
Figure. Apply SNMP Settings