Request Task Management
Manages the rule set of the request task list.
View request tasks
When a firewall applicant submits a request in the application system, an FPMS rule set is automatically generated for each approval. The FPMS administrator views the requested rule sets on the “Request Work List” page and checks the detailed information.
Click the Request Task List menu at the top to view the “Request Task List” page.
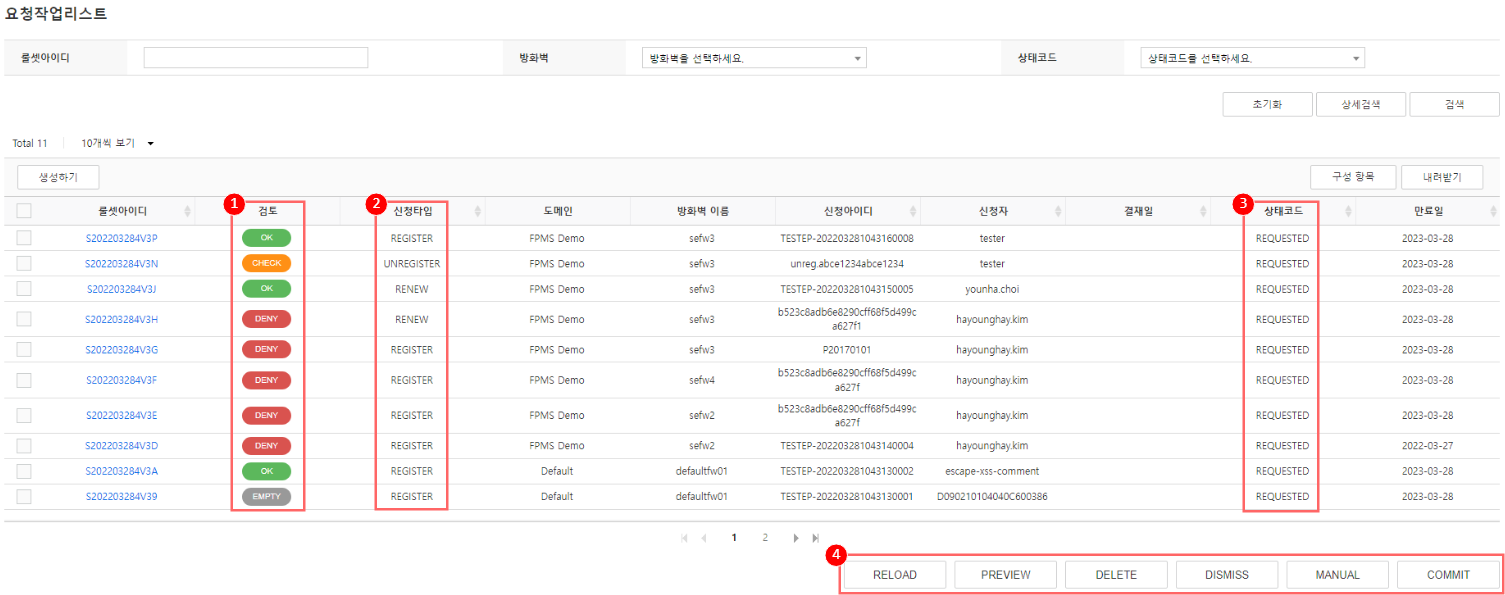
① Review: An item that reviews the rule set’s contents, serving as an indicator for confirming the rule set’s actual condition.
- Factors affecting rule set review: check application rule (refer to request rule status code), application period, applicant/approver comments (specific phrase detection feature), various application types (termination/block rule application), etc.
- Rule set review is performed via a Batch Job, and the result is stored in ‘review’.
| Review content | Explanation |
|---|---|
| OK | No special notes |
| CHECK | Automatically corrected rule set |
| FILTERED | Administrator-designated special notes |
| DENY | Apply for a blocking policy |
| FQDN | Apply for URL-based policy |
| ID/USER | ID-based firewall request |
| LARGE | More than 10,000 applications |
| TRANS | NAT rule conversion status |
| COMP | Corresponds to a registered compliance rule |
| EMPTY | No policy to register |
② Application Type: It is the application type of the rule set, categorized as registration, termination, extension, etc.
| Application type | Explanation |
|---|---|
| REGISTER | Firewall registration request |
| UNREGISTER | Firewall cancellation request |
| RENEW | Firewall extension request |
| EDIT | Modify firewall policy |
③ Status Code: Indicates the progress status of the rule set.
| Status code | Explanation |
|---|---|
| REQUESTING | The approval has been completed, and we are currently generating the FPMS rule set using information received from the application system. |
| REQUESTED | FPMS rule set creation is complete |
| RELOADING | In a state where the FPMS rule set is being regenerated by reflecting the firewall’s options/filters due to a RELOAD request
|
| CONFIRMED | Check the rule set in REQUESTED status to confirm it can be applied
|
④ Button: A button for rule set processing. Select at least one checkbox of the rule set you want to process, then click the button. The available buttons vary depending on the status code of the selected rule set.
| Button types | Explanation | REQUESTED | CONFIRMED |
|---|---|---|---|
| RELOAD | Reloads, reflecting the firewall’s options/filters. | O | X |
| PREVIEW | You can check the actual firewall policy before it is applied. | O | O |
| DELETE | Permanently delete without registering the rule set. | O | O |
| DISMISS | Process as not applied without registering the rule set. (View in 「Completed Work Management」) | O | O |
| MANUAL | To generate evidence, we process only in the DB without actually applying to the firewall. (View from 「Completed Task Management」) | O | X |
| COMMIT | Request to apply to the firewall. (Check the PROVISIONED status in 「Completed Work Management」) | X | O |
View request task details
When you click the rule set ID to view on the “Request Work List” page, the “Request Work Details” page appears. You can view detailed information about the applied rule set.
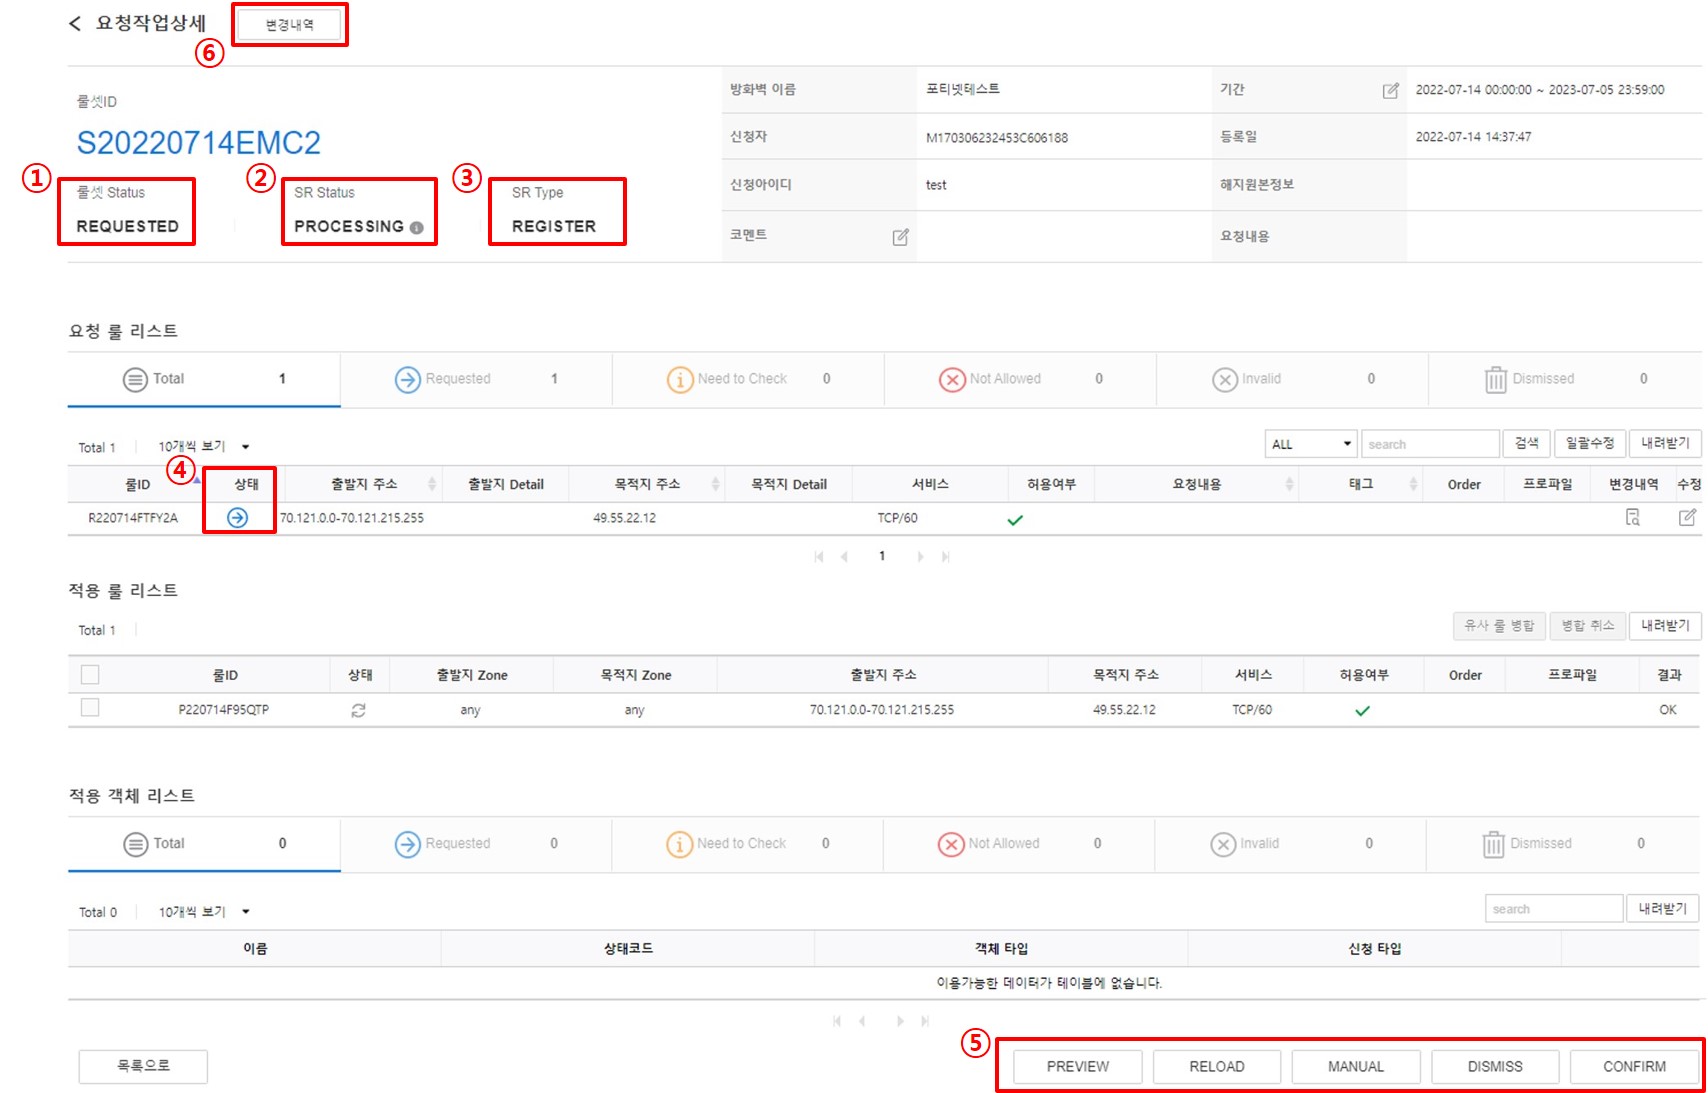
- The rule set (hereinafter RS) contains request rules (Request Rule, hereinafter RR).
- To view the applied rule, click the rule set ID on the “Request Work List” page. * Application rules are automatically classified into five states.
① Rule Set Status: Indicates the rule set’s progress status. (same as the rule set status code table)
② SR Status: Check the processing status of rule sets that share the same applicant ID, based on the applicant ID, to confirm completion.
- PROCESSING: In progress (remains PROCESSING status even if partially completed)
- DONE: Completed (All rule sets for the requested ID have been processed and completed)

③ SR Type: The request type of the rule set. (Same as the rule set application type table)
④ Status: The status of the request rule. Provides automatic checking of application rules transferred from the application system to FPMS and returns their status.
| Status code | Explanation |
|---|---|
 | Can be applied normally (switch to Provision Rule) |
 | It can be applied normally, but requires administrator verification. The typical occurrences are as follows.
|
 | Request for unauthorized IP address range (do not convert to Provision Rule) |
 | Incorrect Rule expression (not converted to a Provision Rule). Example: When an address in a private IP range or special-use IP range (127.0.0.0/8, 0.0.0.0/8, 169.254.0.0/16) is used in the request. |
 | Not applied based on the operator’s judgment. Click the edit icon on the right side of the rule |
⑤ Button: a button for rule set processing. The available buttons vary depending on the status code of the retrieved rule set.
| Button types | Explanation | REQUESTED | CONFIRMED |
|---|---|---|---|
| PREVIEW | You can verify the actual policies and object information to be applied to the firewall before they are reflected. | O | O |
| RELOAD | Reloads to apply the firewall’s options/filters. | O | X |
| MANUAL | To generate evidence, we process only in the DB without actually applying to the firewall. (viewed in 「Completed Task Management」) | O | X |
| DISMISS | Process as not applied without registering the rule set. (View in 「Completed Work Management」) | O | X |
| CONFIRM | Change the status so that the rule set can be reflected after verification. (Confirmed rule sets cannot be edited) | O | X |
| Cancel | Cancel the CONFIRMED status and change it to REQUESTED status. | X | O |
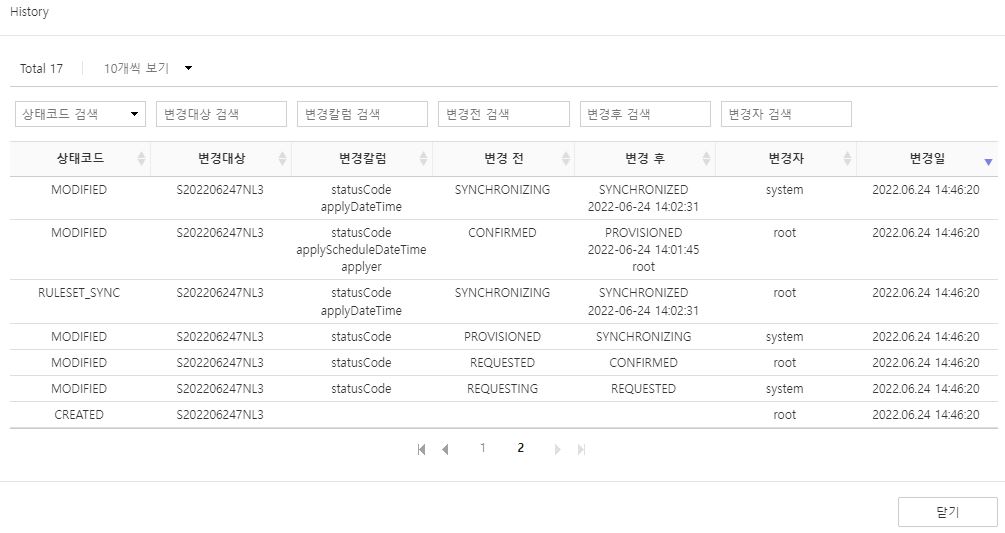
⑥ Change History: You can view the change history information until the requested rule is applied.
Modify rule set
If administrative action is required when reviewing a rule set, the rule set can be changed. The configurable items are the ruleset period, administrator comments, application rules, and merging of similar policies.
Modify rule set duration
Modify the schedule information of the rule set. You can change the start date and expiration date.
Click the Request Task List at the top.
Click the rule set ID to be edited on the “Request Work List” page. 2. Only rule sets with a status code of “REQUESTED” can be modified.
Click the
located in the ‘Period’ of the “Request Work Details” page. 3. ‘Period’ popup appears.
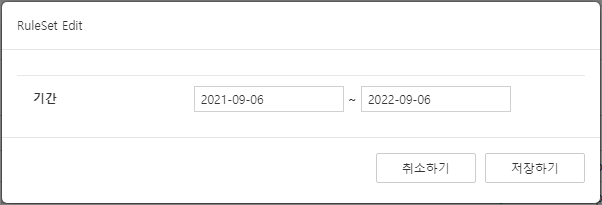
Figure. Period Change Click the start date or end date you want to edit.
Click the desired date in the date selection popup.
Click Save.
Enter rule set administrator comment
Enter the administrator’s comment for the rule set.
Click the Request Task List at the top.
Click the rule set ID to be edited on the “Request Work List” page.
Click the
in the ‘Comment’ of the “Request Work Details” page. 3. ‘Comment’ popup appears.
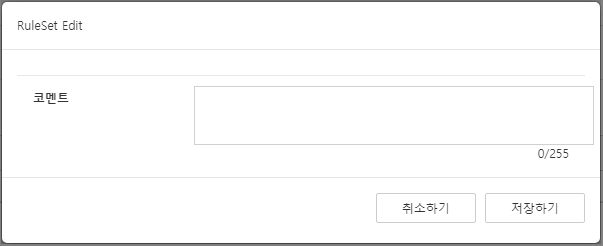
Figure. Administrator comment input Enter a comment. 4. (up to 255 characters)
Click Save.
Modify rule
Edit the application rule.
Click the Request Task List at the top.
Click the rule set ID to be edited on the “Request Work List” page. 2. Only rule sets with a status code of “REQUESTED” can be modified.
Click the
on the ‘Request Rule List’ of the “Request Work Details” page for the request rule you want to edit. 3. The ‘Rule Edit’ popup appears.
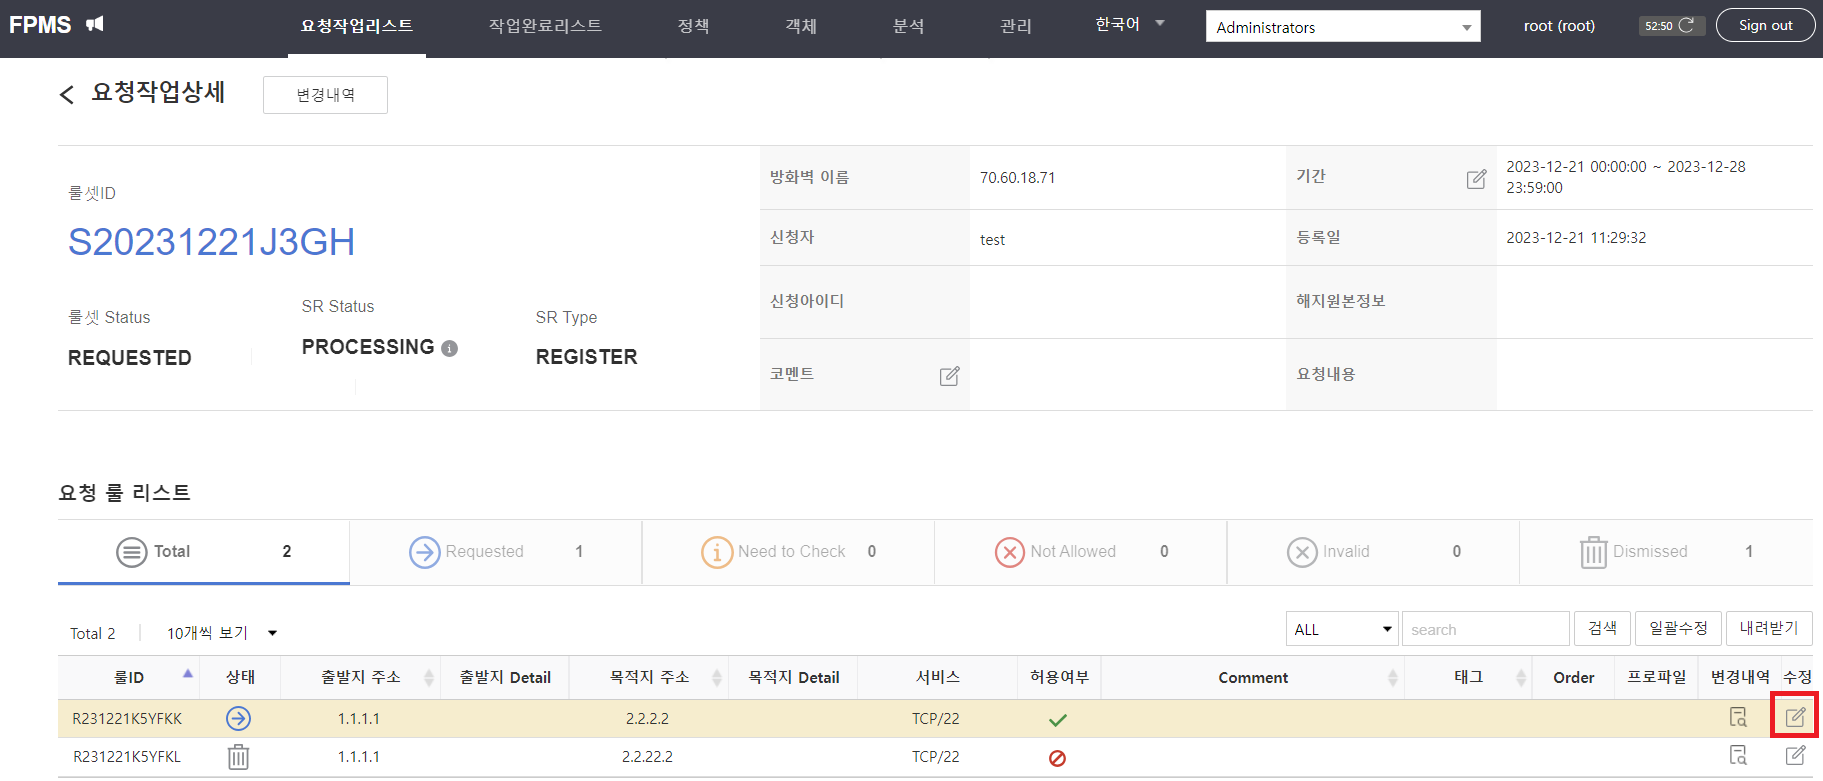
Figure. Edit request rule 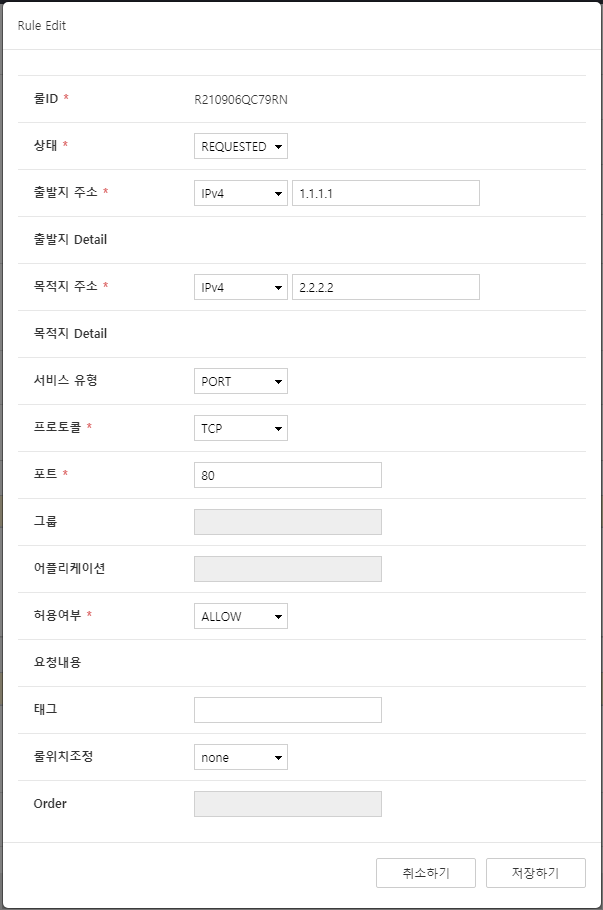
Figure. Rule Edit Popup Enter the items to edit in the “Rule Edit” popup.
Item content Required/Optional status Select the rule status. - REQUESTED: Normal state where firewall can be applied
- DISMISSED: When you do not want to register it in the firewall
Essential Source address / Destination address / Service type / Protocol / Port / Group / Application It is the same as the rule input fields for manually creating a rule set. Essential Permission status required tag Selection Adjust rule position required Order Selection Table. Rule modification itemsClick Save.
Merge similar policies
If the new policy is similar to the existing policy, merge it with the existing policy (Merge). Origin merging, destination merging, and service merging are possible.
- Search/merge is supported only for IP address type and Port service.
- Only Fortinet, Palo Alto, AhnLab, and SecuI vendors are supported.
Click the Request Task List at the top.
Click the target ruleset ID on the “Request Work List” page. 2. Only rule sets with a status code of “REQUESTED” can be merged.
Select the checkbox of the applied rule in the ‘Applied Rule List’ on the “Request Work Details” page. 3. (multiple selections possible)

Figure. Select Rule Click Merge Similar Rules. 4. The ‘Find Similar Rule’ popup appears.
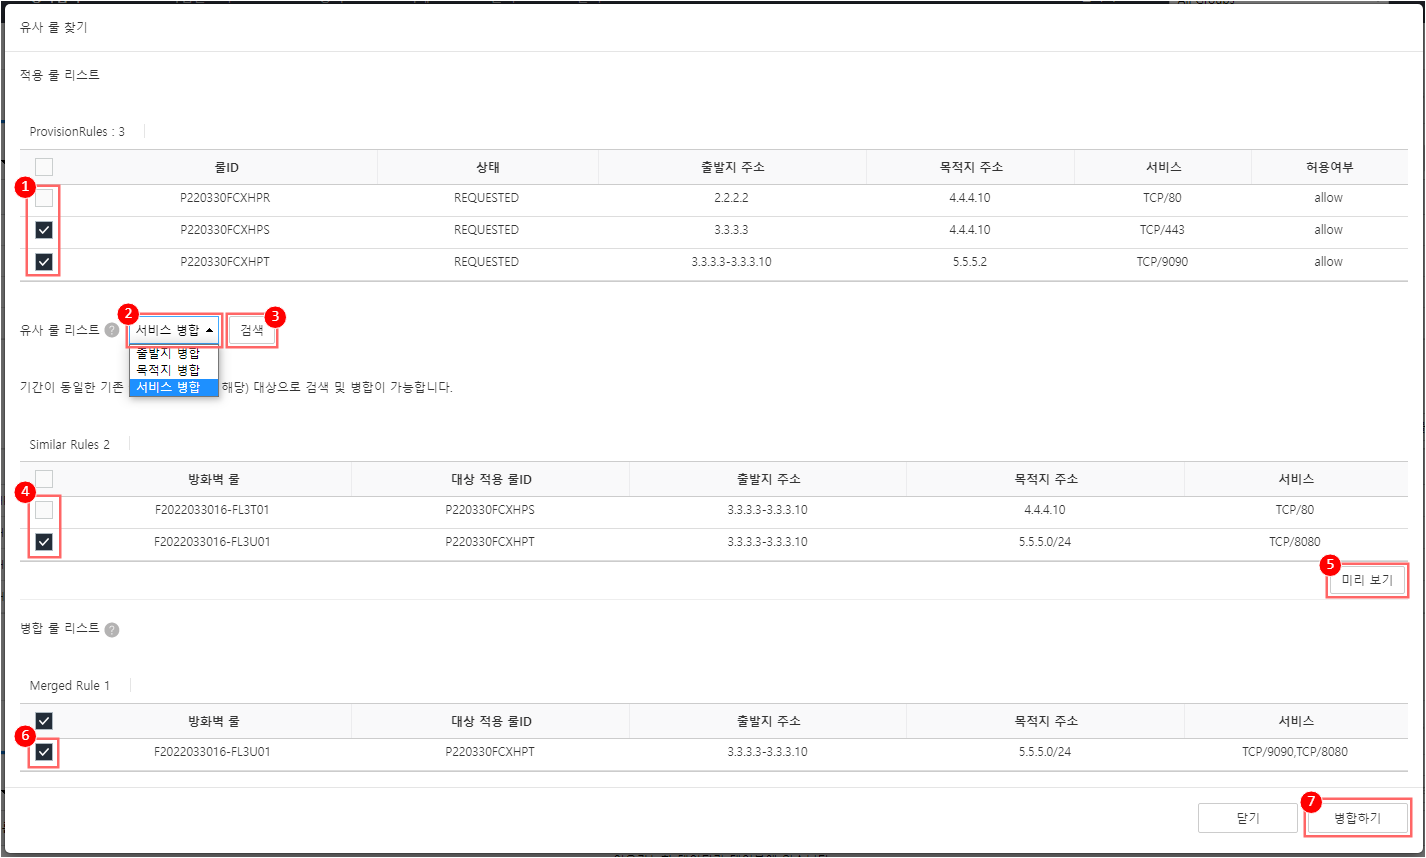
Figure. Find Similar Rule In the “Find Similar Rule” popup, perform the following.
- ① In the applied rule list, the rule selected earlier is displayed, and you can change the selection of the rule to search for.
- ② Choose the merge criteria from the similar rule list.
- Source merging: Locate existing similar policies that include the new policy based on the destination address/service, and merge the source addresses.
- Destination merge: Find existing similar policies that include the new policy based on the source address/service, and merge the destination address.
- Service merging: Find existing similar policies that include the new policy based on the origin address/destination address, and merge the services.
- ③ Click Search.
- Select the policy to merge with the new policy from the retrieved ‘similar rule list’. * At this time, the policies in the applied rule list cannot be merged with multiple similar policies. * (Applied rule 1: Similar rule 1)
- ⑤ Click Preview.
- ⑥ Select the policy to merge from the merge rule list.
- ⑦ Click Merge. * When a popup asking whether to proceed opens, click OK. * The “Find Similar Rule” popup closes, and in the “Request Work Details” page’s applied rule list you can see that the status of the merged applied rule has changed to the merged status.


Figure. Merge result - When you mouse over the status image, the merged firewall applied ID appears.

- To cancel the merge, click the checkbox of the merged applied rule, then click Cancel Merge. * It will be changed back to the original state.
When you click the PREVIEW button, you can view the state where the new policy is merged into the existing policy, and the policy will be highlighted.
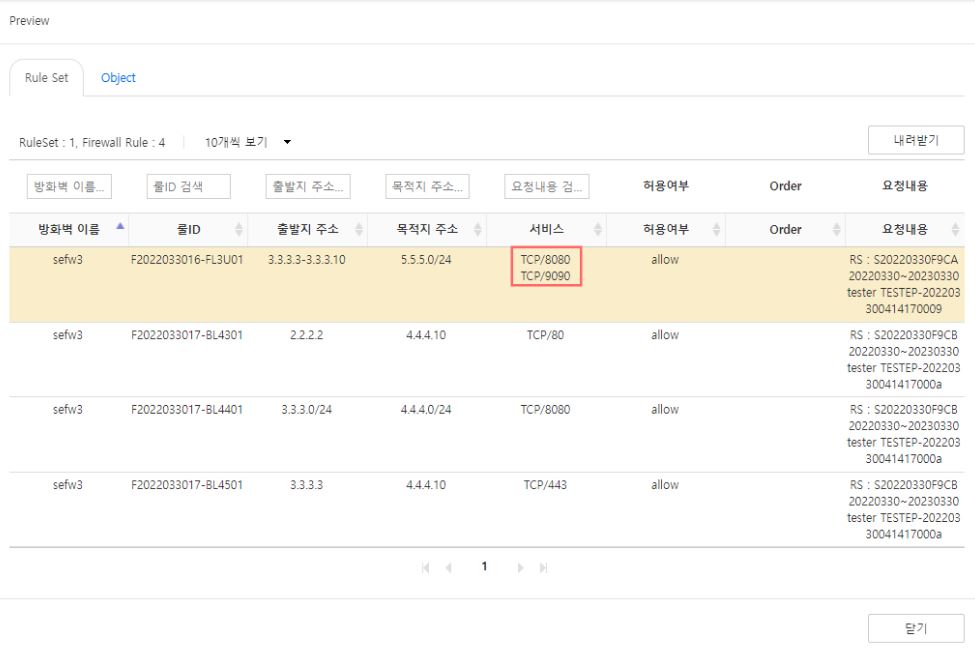
Confirm rule set
Review the contents of the ruleset and confirm that there are no issues. CONFIRM processing can be done on the “Request Work Details” page.
- Click the Request Task List at the top.
- Click the CONFIRM target ruleset ID on the “Request Work List” page. 2. Only rule sets with a status code of “REQUESTED” can CONFIRM.
- Click CONFIRM at the bottom of the “Request Work Details” page.
- When a confirmation dialog asking whether to proceed opens, click OK.
- To cancel CONFIRM, click Cancel at the bottom of the “Request Work Details” page.
Confirmed rule set appears on the “Request Work List” page with a ‘CONFIRMED’ status.
When viewing the “Request Task Details” page of a CONFIRM status ruleset, the “PREVIEW” and “Cancel” buttons are present.
- PREVIEW: Check the actual policy to be applied to the firewall before reflecting it.
- Cancel: Cancel CONFIRM to revert to REQUESTED state.
Commit rule set
Apply the confirmed rule set to the firewall. You can set the application time by choosing either immediate or a scheduled time.
Click the Request Task List in the top menu.
Check all rule set IDs you want to commit on the “Request Work List” page. 2. Only rule sets with CONFIRMED status can be committed.

Figure. CONFIRMED Rule Set Selection Click COMMIT below. 3. “Rule Apply Time Setting” popup window appears.
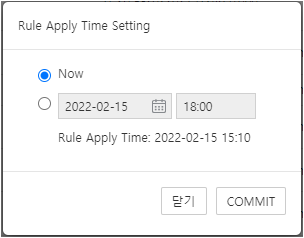
Figure. COMMIT time setting In the “Rule Apply Time Setting” popup, select Now or schedule apply and click COMMIT.
When a confirmation dialog asking whether to proceed with the operation appears, click OK.
The committed rule set appears as ‘PROVISIONED’ status on the “Work Completion List” page.

- FPMS commit takes about 15 minutes to reach SYNCHRONIZED when operating in Batch mode.
- When the policy registration is completed, the status changes to “SYNCHRONIZED”.
Processing rule set MANUAL
If the rule set was manually registered directly on the firewall or does not need to be applied to the firewall, set that rule set to MANUAL status. MANUAL state means that it is processed only in the DB for evidence generation, without actually applying it to the firewall.
Process multiple items manually from the request task list
- Click the Request Task List at the top.
- On the “Request Work List” page, check all rule set IDs for which you want MANUAL. 2. Only rule sets with a status code of “REQUESTED” can be processed MANUALLY.
- Click MANUAL at the bottom of the “Request Work List” page.
- When a confirmation dialog asking whether to proceed opens, click OK.
MANUAL processed rule sets are displayed with ‘MANUAL’ status on the “Work Completion List” page.
Process MANUAL in request task details
- Click the Request Task List at the top.
- Click the MANUAL target rule set ID on the “Request Work List” page. 2. Only rule sets with a status code of “REQUESTED” can be processed MANUAL.
- Click MANUAL at the bottom of the “Request Work Details” page.
- Click OK when a confirmation dialog asking whether to proceed opens.
MANUAL-processed rule sets are displayed on the “Work Completed List” page with a ‘MANUAL’ status.
Process rule set DISMISS
Process the rule set as unapplied without registering it on the firewall.
Dismiss multiple items in the request task list
- Click the Request Task List at the top.
- Check all rule set IDs you want to DISMISS on the “Request Work List” page. 2. Only rule sets with a status code of “REQUESTED” or “CONFIRMED” can be processed with DISMISS.
- Click DISMISS at the bottom of the “Request Work List” page.
- When a confirmation dialog asking whether to proceed opens, click OK.
DISMISS-processed rule sets are shown with a ‘DISMISSED’ status on the “Work Completion List” page.
Handling DISMISS in request task details
- Click the Request Task List at the top.
- Click the DISMISS target ruleset ID on the “Request Work List” page. 2. Only rule sets with a status code of “REQUESTED” can be DISMISSed on the “Request Work Details” page.
- Click DISMISS at the bottom of the “Request Work Details” page.
- When a confirmation dialog asking whether to proceed opens, click OK.
Dismissed rule sets are displayed with a ‘DISMISSED’ status on the “Work Completion List” page.
Apply termination policy
When requesting a full cancellation for an existing application, FPMS creates a cancellation request rule set with the application type “UNREGISTER”. When the termination request rule set is applied, the policy of the original information is deleted based on the termination source data received from the application system, and the existing rule set is changed to UNREG status. Both the termination request rule set and the original rule set cannot be rolled back.
1. The policies applied to the existing request rule set and firewall are as follows.
Existing application rule set
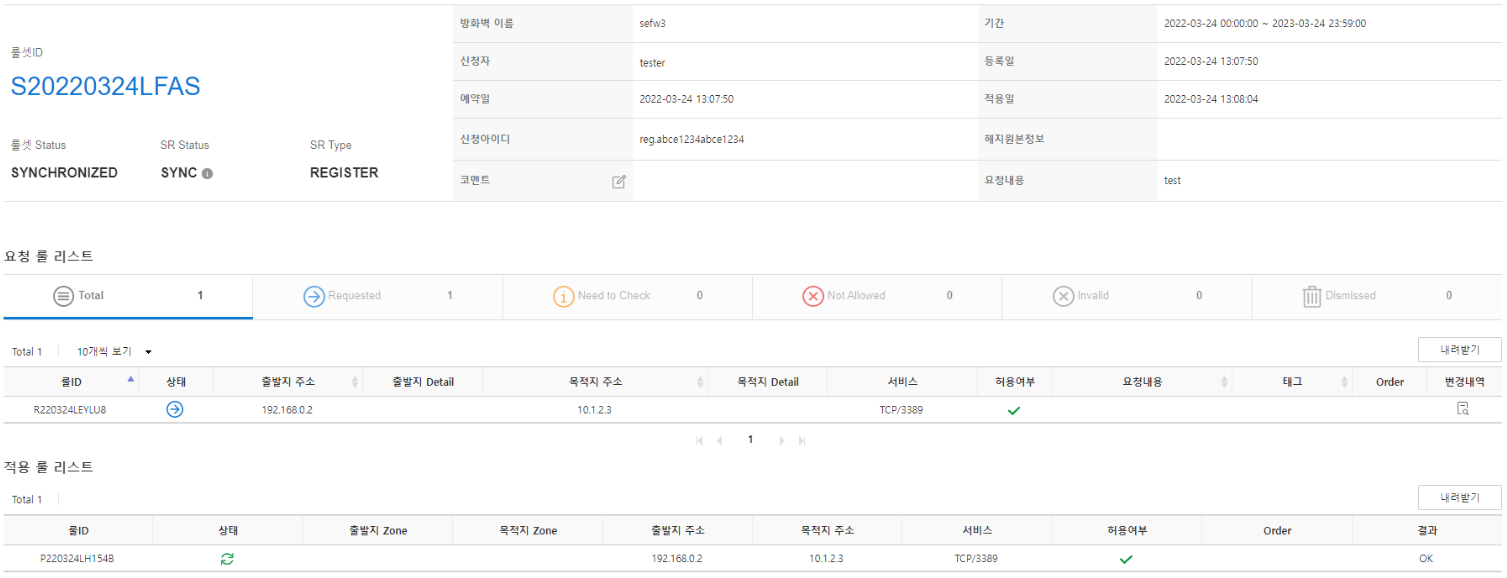
Figure. Existing request rule set FPMS > Policy > Firewall Policy

Figure. FPMS firewall policy Firewall device policy

Figure. Firewall Device Policy
2. Regarding the existing rule set, the cancellation request rule set is created with request type “UNREGISTER”. If a full cancellation is performed during a cancellation request, the original request payment information is displayed in the ‘cancellation original information’.
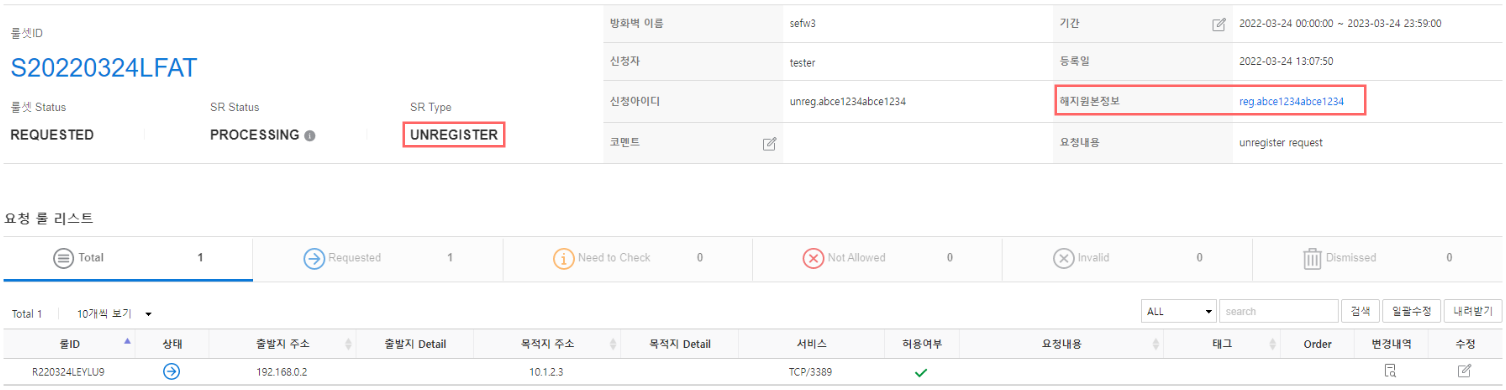
PREVIEW Click to view the information of the policy to be terminated.
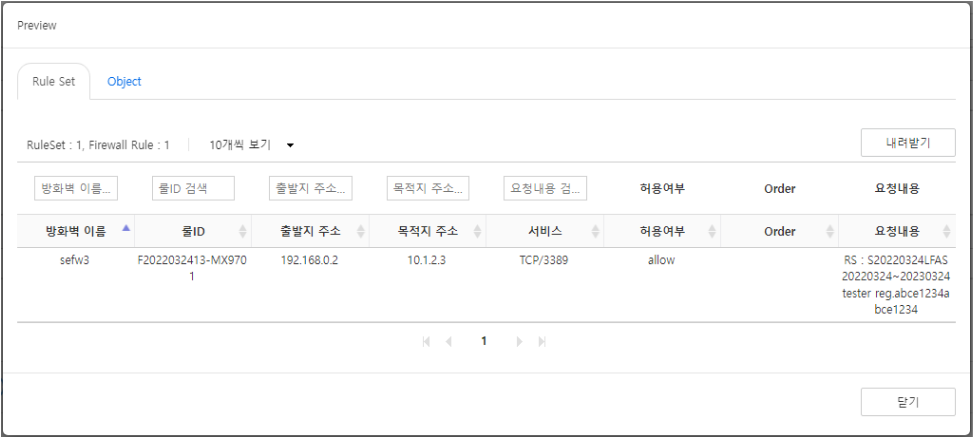
Figure. Cancellation PREVIEW You can view the original cancellation information of the existing application by clicking it on the request task detail screen, or you can search by application ID in the detailed search of the completed tasks list.
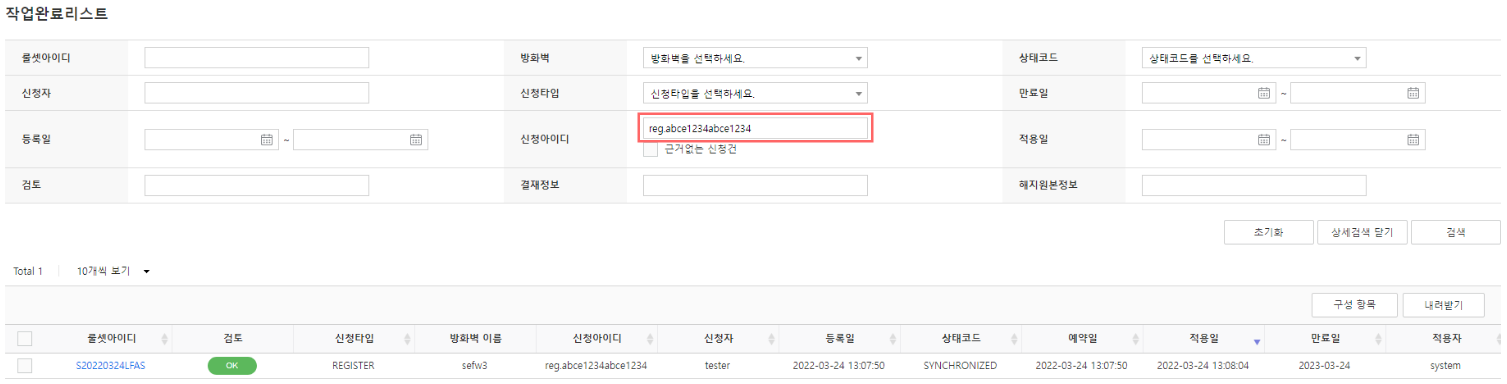
Figure. Existing request information lookup
3. We commit to the policy for termination requests.
4. When the COMMIT is completed, the existing policy changes to UNREG state.

Create rule set manually
Not only can rule sets come from the application system, but they can also be created within FPMS itself.
Click the Request Task List at the top.
Click Create on the “Request Work List” page.
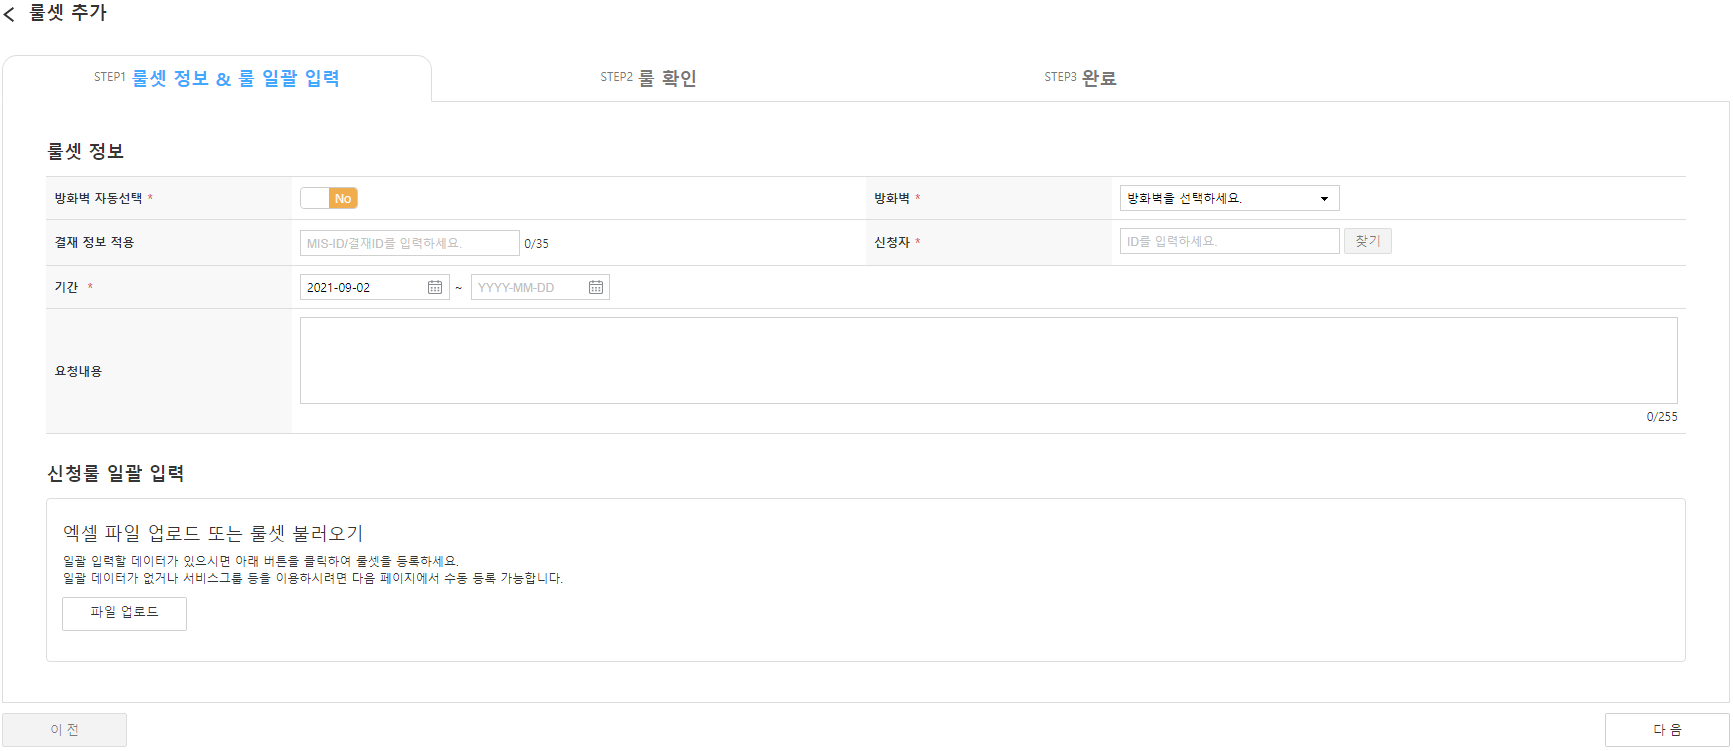
Figure. Create Rule Set Enter the rule set information on the “STEP1 Rule Set Information & Bulk Rule Input” tab of the “Add Rule Set” page.
Item content Required/Optional Automatic firewall selection If enabled (‘Yes’), it automatically selects and creates the firewalls corresponding to the rule set using FPMS’s firewall Zone settings. required Firewall If automatic firewall selection is not used, select the firewall for which to create the rule set. Required Apply approval information Enter up to 35 characters. If you cannot receive memo approval or use FPMS through the application system, create it by entering the approval ID. It will be marked as having evidence during rule analysis. Selection Applicant Enter the ID of the requester who applied for the rule set. After entering the ID, click Find. Required Period Enter the schedule information of the rule set (start date~expiration date). Click the item to open the calendar popup and select a date. The start date is set to today’s date by default. required Request content Write a request comment. Enter up to 255 characters. Selection Table. Rule set information input itemsIf you have data to input in bulk, click File Upload. 4. Choose one of the following methods to enter the application rule.
- Load rule set: Retrieve the rule set information already registered in FPMS and input it. * After entering the rule set information, click Confirm.
- Excel file: Download the Excel template, fill it out, and then enter the applications in bulk. * Form Download Click to download to your PC. * After selecting the Excel file, click Next at the bottom.
- Copy & Paste: Enter easily using the defined format. * Each item is separated by a tab, and clicking View Input Guide displays the input method. * After entering, click Next at the bottom.
- If there is no batch data or you want to use a service group, manual registration is possible from the “STEP2 Rule Check” tab. * Click Next at the bottom.
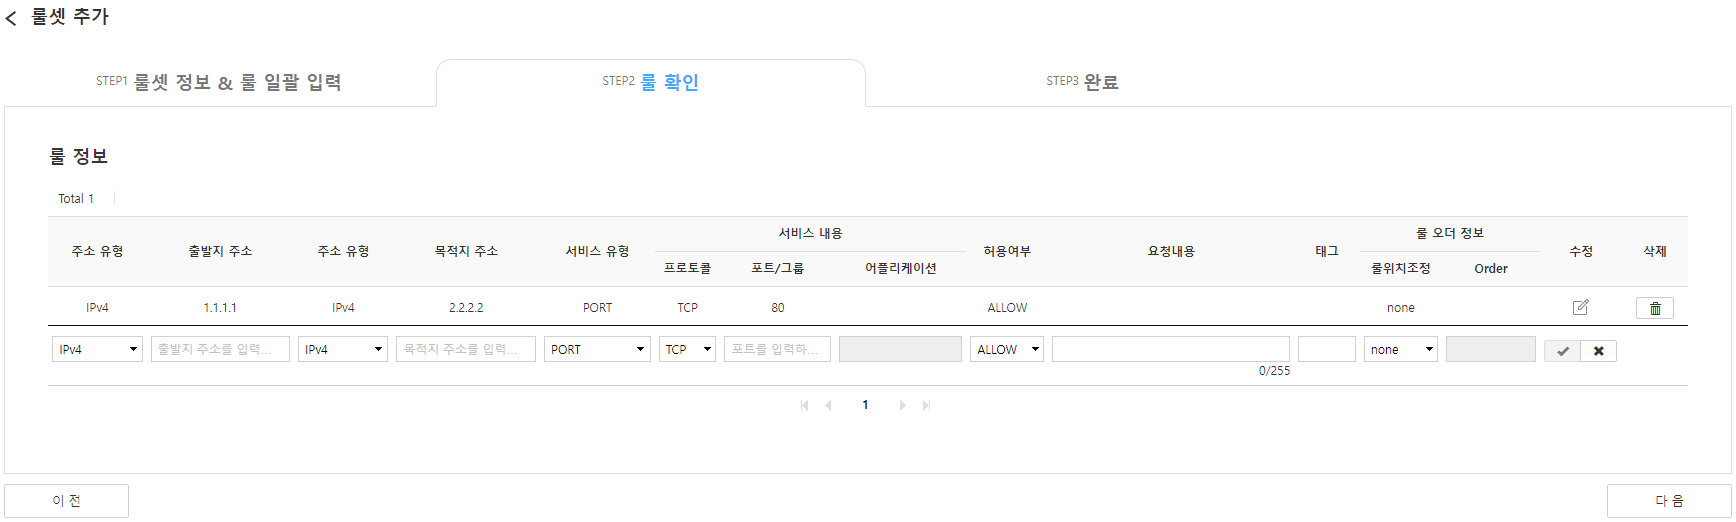
Figure. STEP2 Rule Check - If you select “Load rule set” or Excel, copy & paste in STEP1, the rule information from the Excel/text is automatically entered and displayed. * Editing or deleting is possible.
- Address group objects, service group objects, etc. can be entered in STEP2. * (Excel upload not possible) For more details, refer to Using the address/service group object in 「Setting Usage Example」.
Enter the following items on the “STEP2 Rule Check” page.
Category Item Content Required/Optional origin Address type Select the source address type. IPv4 (IP address), FQDN (URL), GROUP (group object), USER (ID‑based firewall USER ID), ADUSER (AD‑integrated USER ID), USERGROUP (ID‑based firewall USER GROUP), ADUSERGROUP (AD‑integrated USER GROUP). Supported address types vary by firewall vendor. (GROUP: Paloalto, Secui MF2/Bluemax, Cisco, Fortinet / USER·ADUSER·USERGROUP·ADUSERGROUP: Paloalto, Secui MF2/Bluemax, Fortinet) Essential origin Origin address Enter the address based on the address type. For IPv4, you can input multiple addresses (separated by commas ‘,’). Required Destination Address type Select the destination address type. IPv4 (IP address), FQDN (URL), GROUP (group object). required Destination Destination address Enter the address based on the address type. For IPv4, multiple entries are allowed (separated by commas ‘,’). required service Service type Select the service type. The supported service types vary depending on the firewall vendor. Essential service Protocol If the service type is PORT or PORT+APP, select the protocol. (TCP, UDP, ALL, ICMP, IP) Multiple entries allowed (separated by commas ‘,’). Required Service Port/Group If the service type is PORT or PORT+APP, enter the port; if it is GROUP or GROUP+APP, enter the service group. Multiple entries are allowed (separated by commas ‘,’). Required service Application If the service type is APP, PORT+APP, or GROUP+APP, enter the application. Multiple entries are allowed (separated by commas ‘,’). Required Permission status Select the permission status. (ALLOW, DENY, BLACKLIST) required Request content Enter the request content. Up to 255 characters. Selection tag Enter a tag. Special characters cannot be entered (except . _ -). Up to 40 characters. Selection Rule order information Adjust rule position Select the rule position. (none, top, bottom, after, before) required Rule order information Order If the rule position is after or before, enter the policy position. Selection Table. Rule input itemsAfter entering the rule information, click the
. 6. The entered content will be reflected in the table above. 6. When clicked, the input fields are reset. 6. To edit the table entry, click the
 , and to delete, click the
 .
.
After entering the application rule, click Next at the bottom. 7. Go to the “STEP3 Complete” tab and display the result screen for the entered application rule. 7. Clicking the rule set ID navigates to the “Request Information Details” page.
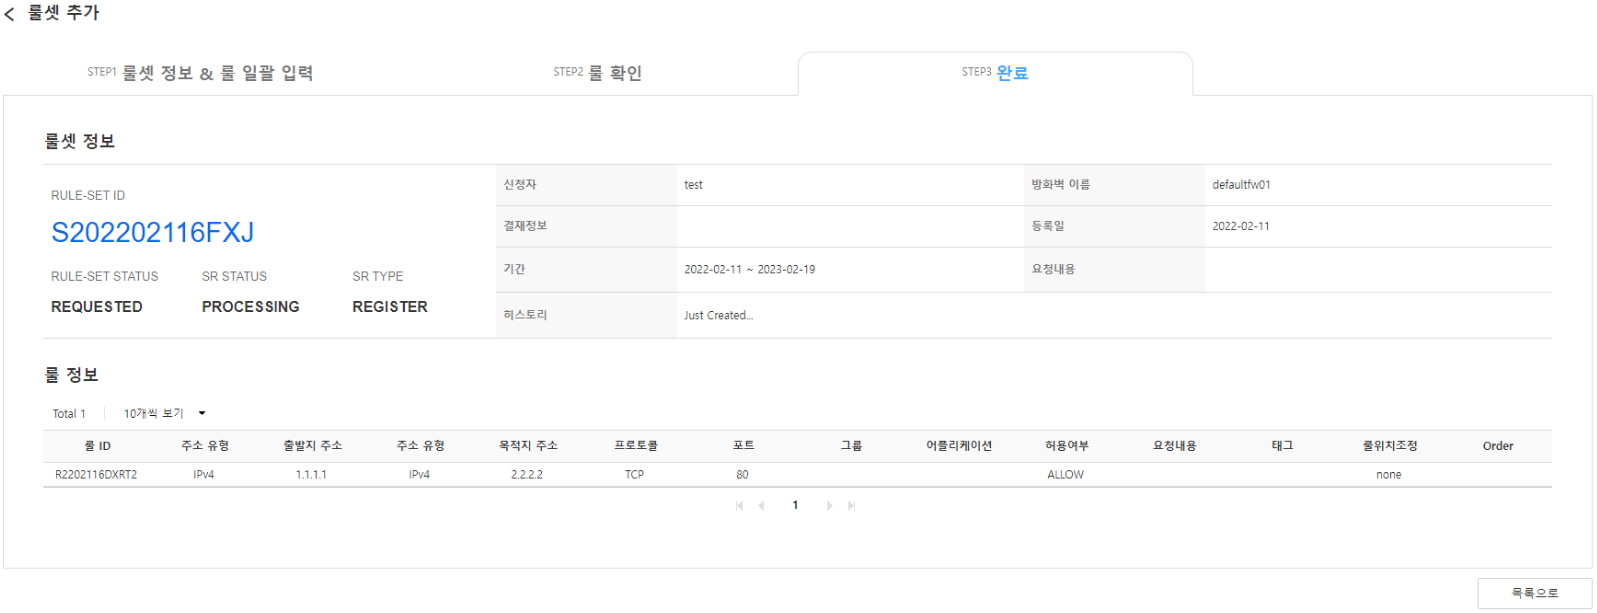
Figure. STEP3 Complete
The generated rule set can be viewed on the “Request Work List” page.