Policy Rule Management
Policy rules define specific regulations that modify application details or set response values when an API call is made. Depending on the type of policy rule, they are categorized as Rule rules, Compliance rules, Policy Separation rules, and NAT rules, and these detailed rules are managed at the rule‑group level.
Managing rule groups
Policy rules are managed at the rule group level. For each rule group, you can define Rule rules, Compliance rules, and NAT rules.
Create rule group
Create a rule group. Policy rule usage is possible on all firewalls that belong to the work group of the rule group.
Click Policy > Policy Rule Settings.
Click Create on the “Rule Group” page.

Figure. Create Rule Group Enter the following items on the “Create Rule Group” page.
Item content Required/Optional name Enter between 2 and 30 characters. Special characters are not allowed (except . _ - + @ ( )). Duplicate names are not allowed. Essential Work group Select the firewall workgroup to apply the policy rule. required code Please enter within a maximum of 40 characters. Selection Explanation Enter up to 255 characters. Selection Table. Rule group input itemsClick Create.
Edit rule group
Modify the rule group’s information. If it is a rule group applied to the firewall, changing the work group will cancel the firewall configuration. Before change, check the ‘Applied Firewall List’ on the “Rule Group Details” page.
- Click Policy > Policy Rule Settings.
- Click the name of the rule group you want to edit on the “Rule Group” page, or select the rule group from the rule group list at the top of the left menu.
- Click Edit on the “Rule Group Details” page.
- Enter the content to edit on the “Edit Rule Group” page. 4. All items can be edited.
- Click Save.
Delete rule group
Deletes the rule group and all rules defined in that rule group. If the rule group is applied to the firewall, deleting it will cancel the firewall settings. Before deletion, check the ‘Applied Firewall List’ on the “Rule Group Details” page.
- Click Policy > Policy Rule Settings.
- Click the name of the rule group you want to delete on the “Rule Group” page, or select the rule group from the rule group list at the top of the left menu.
- Click Delete on the “Rule Group Details” page.
- When a popup asking whether to delete appears, click OK.
Setting a rule group on the firewall
To use a rule group, you must configure the rule group on the target firewall.
Execute steps 1–3 to modify the firewall in 「Firewall Management」.
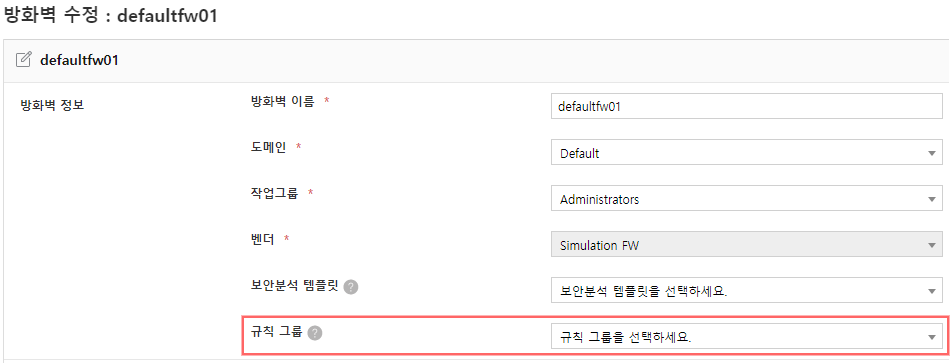
Figure. Firewall Rule Group Settings Select a rule group from the ‘Rule Group’ list on the “Edit Firewall” page. 2. Only rule groups that correspond to the same work group as the firewall are displayed.
Click Save.
Rule Management
Use the Rule rule when bulk-modifying a ruleset according to a specific rule. The content received from the application system is modified by the Rule policy and turned into a request rule. Rule After creating the rule, add the condition and the action.
Rule Create Rule
Rule is generated for the rule group. In Rule creation, basic information is generated, and through Rule modification, you can add condition lists and action lists.
Click Policy > Policy Rule Settings.
On the “Rule Group” page, click the name of the rule group, or select the rule group from the rule group list at the top of the left menu.
Click the Rule rule in the left menu. 3. (Click is possible only when a rule group is selected.)
Click Create on the “Rule” page.
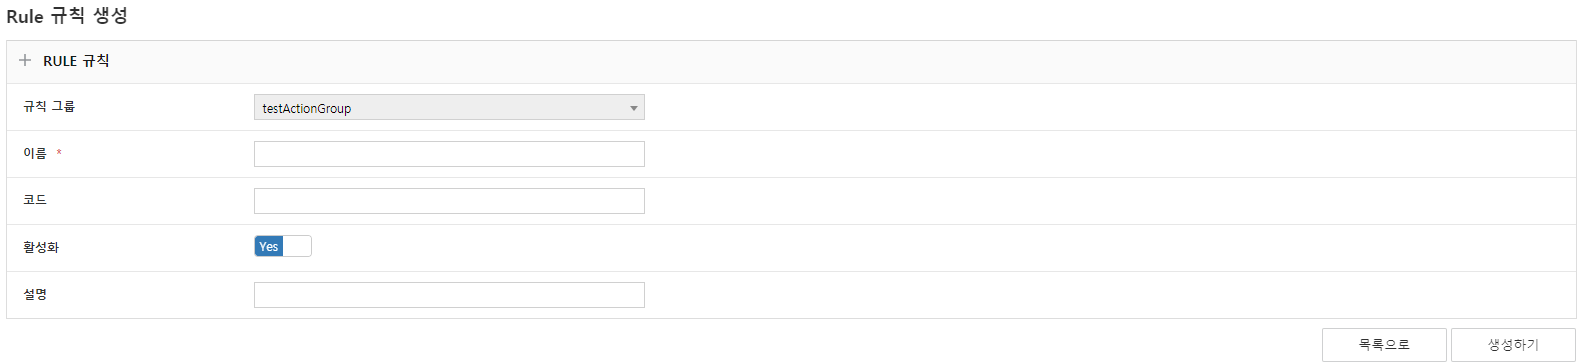
Figure. Rule Creation Enter the following items on the “Rule Creation” page.
Item Content Required/Optional Rule group This is a selected rule group. It cannot be modified. required Name Enter between a minimum of 2 characters and a maximum of 30 characters. Special characters cannot be entered (except . _ - + @ ( )). Required code Define the rule code. Enter up to 40 characters. Selection Activation Set the rule’s activation status. required Explanation Explain the rules. Enter within a maximum of 255 characters. Selection Condition list / Execution list Condition and execution statements can be entered only as a list in Edit mode. - Execute condition after rule duplication Choose whether to execute the condition after duplicating the rule without modifying the original. (Can be set only in Rule settings) Selection Table. Rule input itemsClick Create.
Rule Edit
Rule By modifying the rule, you can add or delete condition lists, execution lists, and modify other information.
Perform steps 1~3 of rule creation.
On the “Rule” page, click the name of the Rule you wish to edit.
Click Edit on the “Rule Details” page.
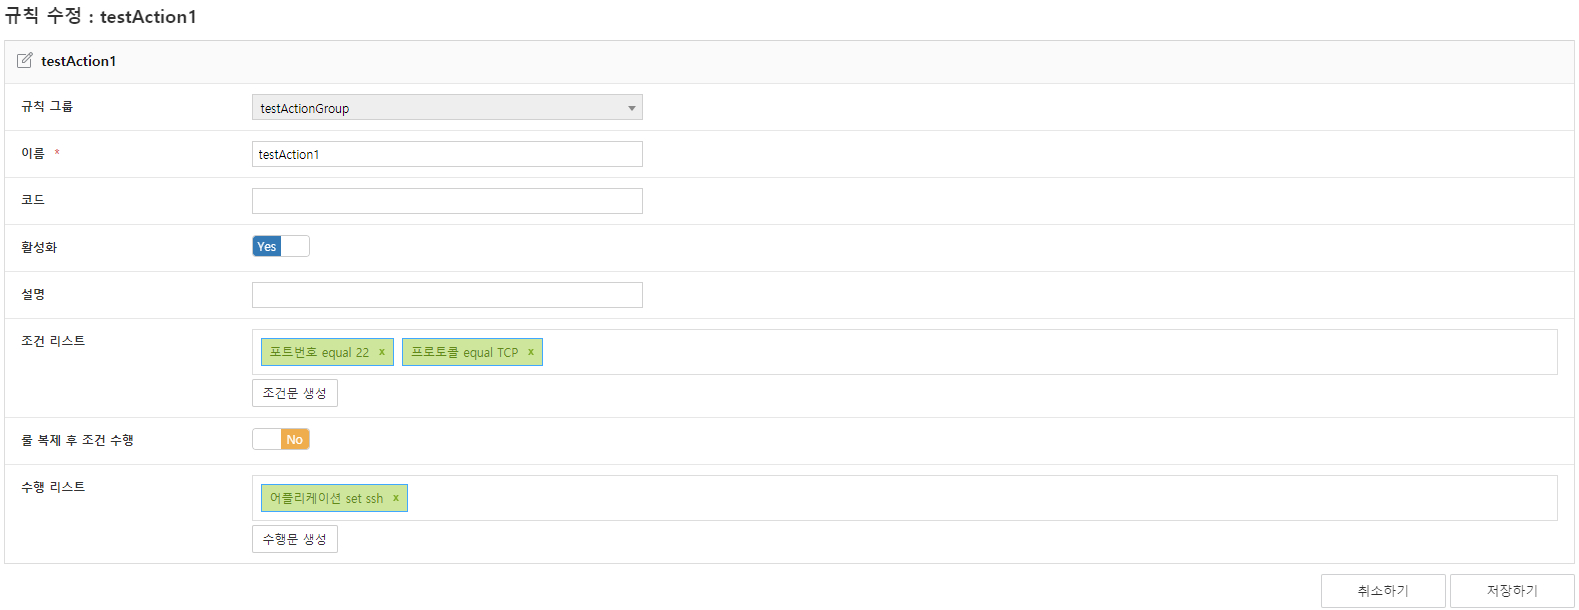
Figure. Rule edit Enter the content to edit on the “Edit Rule” page. 4. All items can be edited. 4. (For adding condition lists, refer to creating condition statements; for adding execution lists, refer to creating execution statements.)
Click Save.
Create conditional statement
Rule defines the conditions for a rule to be applied. One or more conditional statements can be set.
Perform steps 1~3 of rule editing.
Click Create Condition Statement in the condition list on the “Rule Edit” page. 2. The conditional statement creation popup page appears.
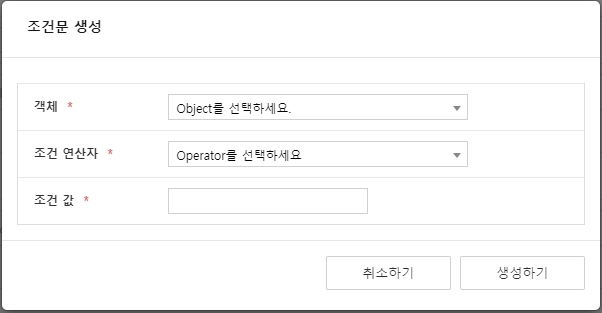
Figure. Create conditional statement Enter the following items on the “Condition Creation” popup page.
Item content Required/Optional object Select the object that is the target of the condition. (Refer to the condition object list for object types) required conditional operator Select an operator to verify the object. (e.g., equal, not equal, include, exclude, contains, greater, etc.) required condition value Enter a value that satisfies the condition for the selected object. required Table. Conditional statement input itemsClick Create. 4. To continue creating other conditional statements, repeat steps 2–4.
The objects and operators that can be used in conditional statements are as follows.
| Object name | Explanation | Remarks |
|---|---|---|
| Default Settings | All request rules | |
| Network (class) | Network class of the source/destination address (operates only when it is a network) | a, b, c class |
| Rule set request details | Request content of the rule set | |
| Expiration date | Expiration date of the application policy | |
| Number of destinations | Number of hosts when the destination is an IP | |
| Destination object | Whether the destination is included in a specific group object | Enter the group object name in the value |
| Destination interface | Destination interface name | |
| Destination zone type | Zone type of the destination address | internal, external, etc. |
| Destination address | Destination address | |
| Destination compartment | Name of the compartment that the destination address belongs to | Multiple entries can be entered, separated by commas |
| Destination type | Destination address type | ip, fqdn, user, etc. |
| Destination tag | Destination tag | |
| Change to the destination host network | If the destination is a host, change it to the network of the configured maskbit. | 8~31 |
| Destination address group object in the firewall | If the destination belongs to a group object created within the firewall where the rule group is set, change the destination to that group object. | |
| Source address group object in the firewall | If the source belongs to a group object created within the firewall where the rule group is set, change the source to that group object. | |
| Number of services | Number of service ports | |
| Request rule | Generated request rule | pre‑allow rule, pre‑reject rule, pre‑registration rule, etc. |
| Request rule request content | Request content of the request rule | |
| Request rule (application ID) | If it matches the request rule for the applying ID | Enter the application ID in the value |
| Number of starting points | Number of hosts when the source is an IP | |
| Source object | Whether the departure point is included in a specific group object | Enter the group object name in the value |
| Source Interface | Source interface name | |
| Origin zone type | Zone type of the origin address | internal, external, etc. |
| Origin address | Origin address | |
| Source compartment | Name of the compartment that the source address belongs to | ,(comma) separated, multiple entries can be entered |
| Source type | Type of the source address | ip, fqdn, user, etc. |
| Origin tag | Origin tag | |
| Change to source host network | If the source is a host, change it to the network of the configured maskbit. | 8~31 |
| Origin/Destination compartment | Name of the compartment that the origin/destination address belongs to | ,(comma) separated, multiple entries can be entered |
| Origin/Destination Type | Type of departure/destination address | origin type or destination type |
| tag | Tag of the request rule | |
| Port number | Port number | |
| Protocol | Protocol | TCP, UDP, etc. |
| Permission status | Whether to allow request proposals | allow, deny |
| Operator name | Explanation | Remarks |
|---|---|---|
| equal | Exact match case | |
| not equal | In case of mismatch | |
| include | If the object is included in the condition value | |
| exclude | When the object is not included in the condition value | |
| has | When the condition value is included in the object | |
| greater | When the object is greater than the condition value | |
| greaterOrEqual | If the object is greater than or equal to the condition value | |
| less | If the object is less than the condition value | |
| lessOrEqual | If the object is less than or equal to the condition value | |
| contain | If the object’s content is in the condition value | Only for string types such as comments |
| notContain | If the object’s content is not present in the condition value. | Only for string types such as comments |
Delete Conditional Statements
- Perform steps 1~3 of rule editing.
- In the “Rule Edit” page, click the X icon on the right of the condition you want to delete from the condition list

- Click Save.
Create operation statement
Define the actions to be performed when the condition is met. You can configure one or more execution statements.
Perform steps 1~3 of Rule editing.
On the “Rule Edit” page, click Create Execution Statement in the execution list. 2. The execution statement generation popup page appears.
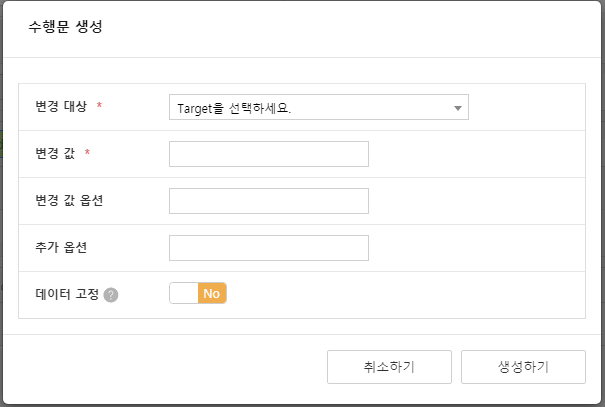
Figure. Statement Generation Enter the following items on the “Create Statement” popup page.
Item Content Required/Optional Change target Select the target (object) to modify when the condition is met. (Refer to the statement modification target list for target types) Essential changed value Enter or select the value to be changed for the selected target. Essential Changed value option Enter additional options for the changed value. (e.g., if the change target is ‘policy order setting’, you can select After or Before) Selection Additional options Enter additional options for the changed value. (e.g., if the target to change is ‘Departure Address’ and the changed value option is ‘GROUP’, you can select to add members to the group) Selection Data fixation If the target changes, the object will be locked from that point onward to prevent further data modifications. Selection Table 7-3. Statement column descriptionClick Create. 4. To continue generating other statements, repeat steps 2–4.
The changeable targets that can be used in statements are as follows.
| Target Name | Explanation | Remarks |
|---|---|---|
| Destination interface | Interface name of the destination address | untrust, trust, etc. |
| Destination zone type | Zone type of the destination address | internal, external, etc. |
| Destination address | Destination address | |
| Additional information | Additional information for the application rule | Used to exclude only some of the applied rules from optimization. |
| state value | Request rule status value | invalid, not allowed, etc. |
| Application | Application | icmp, skype, etc. |
| Priority | Priority of request rules | |
| Policy Order Settings | Policy order setting | Specific policy ID after etc. (When “ruleId” is entered, it is interpreted as that policy ID) |
| Source interface | Interface name of the source address | untrust, trust, etc. |
| Origin zone type | Zone type of the origin address | internal, external, etc. |
| Origin address | Departure address | |
| tag | Tag of the request rule | |
| Port number | Port number | |
| Protocol | Protocol | TCP, UDP, TCP+UDP, ICMP, IP(ANY: TCP+UDP+ICMP) |
| Permission status | The role of the request rule | allow, deny, etc. |
Delete operation
- Perform steps 1~3 of rule editing.
- On the “Rule Edit” page, click the X icon on the right of the statement you want to delete from the execution list.

- Click Save.
Rule Change rule priority
The rule is applied according to priority. The priority of a Rule is set to the last priority when created, and can be changed through priority adjustment.
Click Policy > Policy Rule Settings.
On the “Rule Group” page, click the name of the rule group, or select the rule group from the rule group list at the top of the left menu.
Click the Rule in the left menu.
Click the arrow in the ‘Priority Adjustment’ column of the “Rule” page. 4. To increase the priority, click
, and to decrease it, click . 4. Clicking the arrow changes the priority one step at a time.
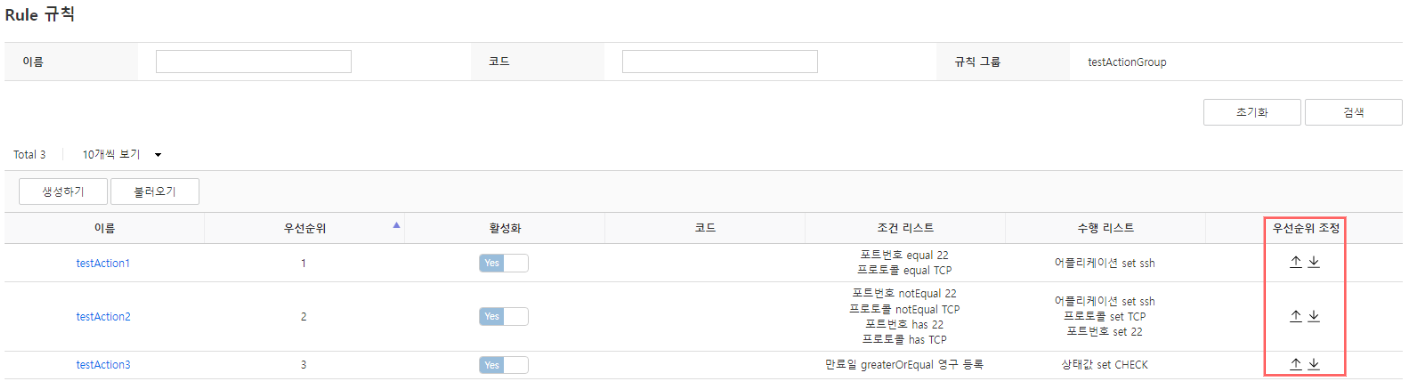
Figure. Rule priority change
Rule testing
Rule can be tested to ensure it operates correctly.
Click Policy > Policy Rule Settings.
On the “Rule Group” page, click the name of the rule group, or select the rule group from the rule group list at the top of the left menu.
Click the Rule rule in the left menu.
Click test at the bottom of the “Rule rule” page. 4. “Policy Rule Configuration Test” popup page opens.
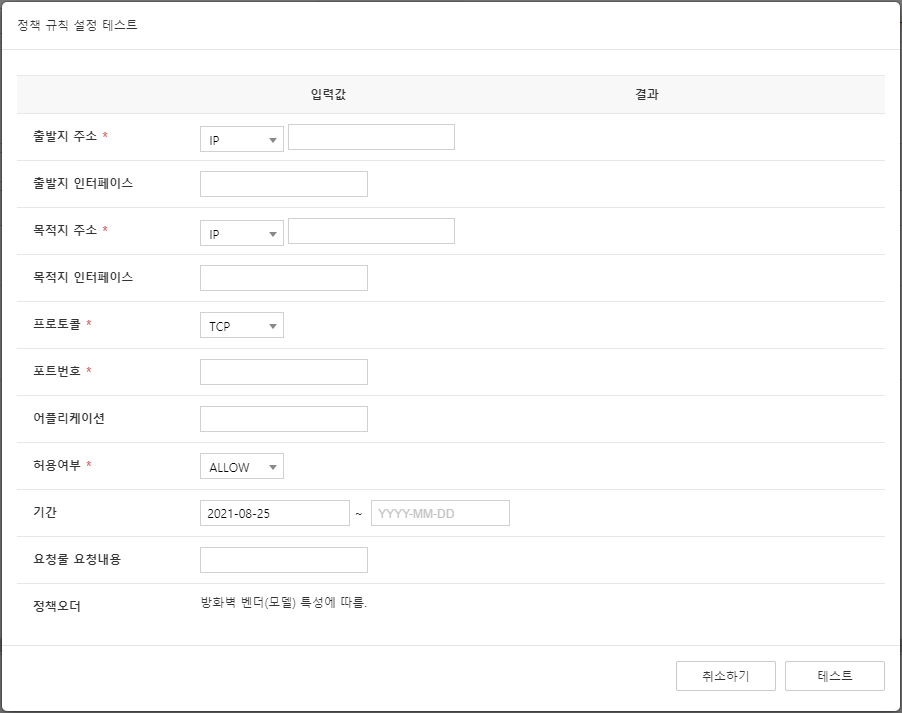
Figure. Rule rule test input Please enter the policy to test. 5. The origin address, destination address, protocol, port number, and allowance status are required input fields.
Click test. 6. When the test is complete, the changed values are displayed in blue in the result. 6. (Only the activated rules among the rules are tested.)
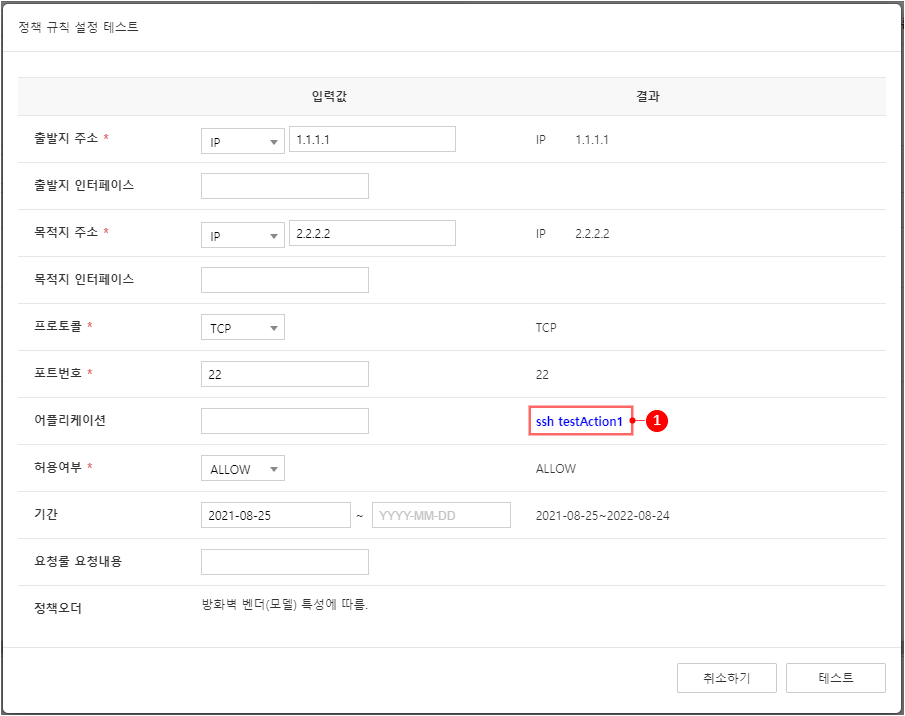
Figure. Rule Test Result
Compliance Rule Management
Set the compliance API call response value. The response returns both code and description, and if it applies to multiple compliances, it returns the code and description for all responses.
Compliance rule example: If the usage period is 12 months or longer and the use of port 8080 is requested, it falls under Compliance, so the corresponding code is returned when the API is called.
Configured compliance rules

Figure. Compliance Example Rule API call
{
    "srcAddr":"1.1.1.1",
    "dstAddr":"2.2.2.2",
    "dstPort":"8080",
    "protocol":"TCP",
    "expireDate":"20230101",
    "withDiscovery":"true",
    "checkDuplicated":"true"
}
Response value
{
    "complianceComment":"DURATION,CODE02",
    "compliance":true
}
Create compliance rule
Compliance rules are created for rule groups. In Compliance rule creation, basic information is generated, and through rule modification, a condition list can be added.
Click Policy > Policy Rule Settings.
Select a rule group on the “Rule Group” page.
Click Compliance Rule in the left menu. 3. (Click is possible only when a rule group is selected.)
Click Create on the “Compliance rule” page.
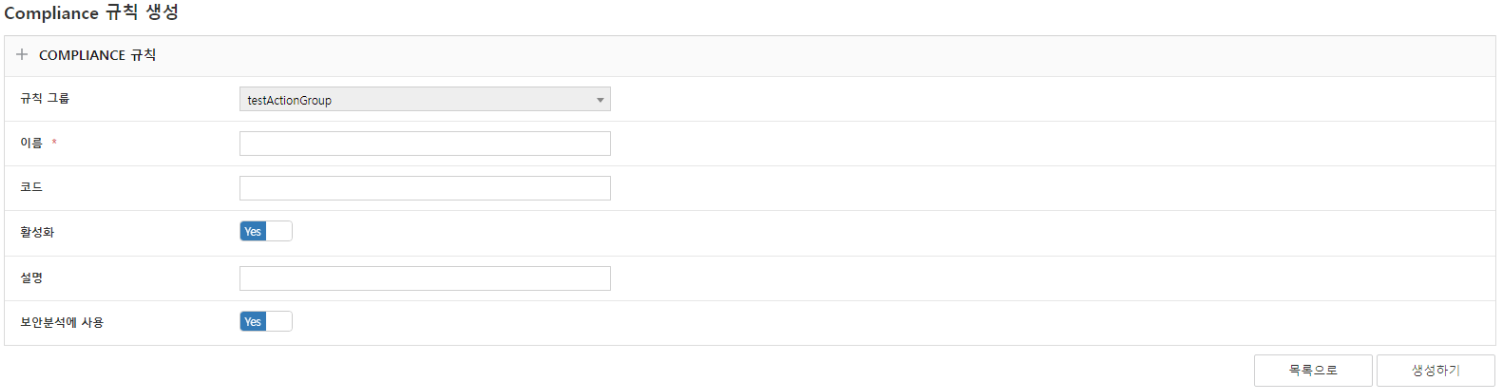
Figure. Compliance Rule Creation Enter the following items on the “Compliance Rule Creation” page.
Item content Required/Optional Rule Group This is a selected rule group. It cannot be modified. Required name Enter between a minimum of 2 characters and a maximum of 30 characters. Special characters cannot be entered (except . _ - + @ ( )). required Risk level Select the risk level (CRITICAL, HIGH, LOW, MEDIUM). Required (default: MEDIUM) code Define the rule code. Enter up to 40 characters. Selection Activation Set the rule’s activation status. Essential Explanation Explain the rules. Enter within a maximum of 255 characters. Selection Condition list Condition statements are listed; input is allowed only in edit mode. - Table. Compliance rule input itemsClick Create.
Edit compliance rules
Through editing the Compliance rule, you can add/delete condition lists and modify other information.
Perform steps 1–3 of creating a Compliance rule.
Click the name of the Compliance rule you want to edit on the “Compliance rule” page.
Click Edit on the “Compliance Rule Details” page.
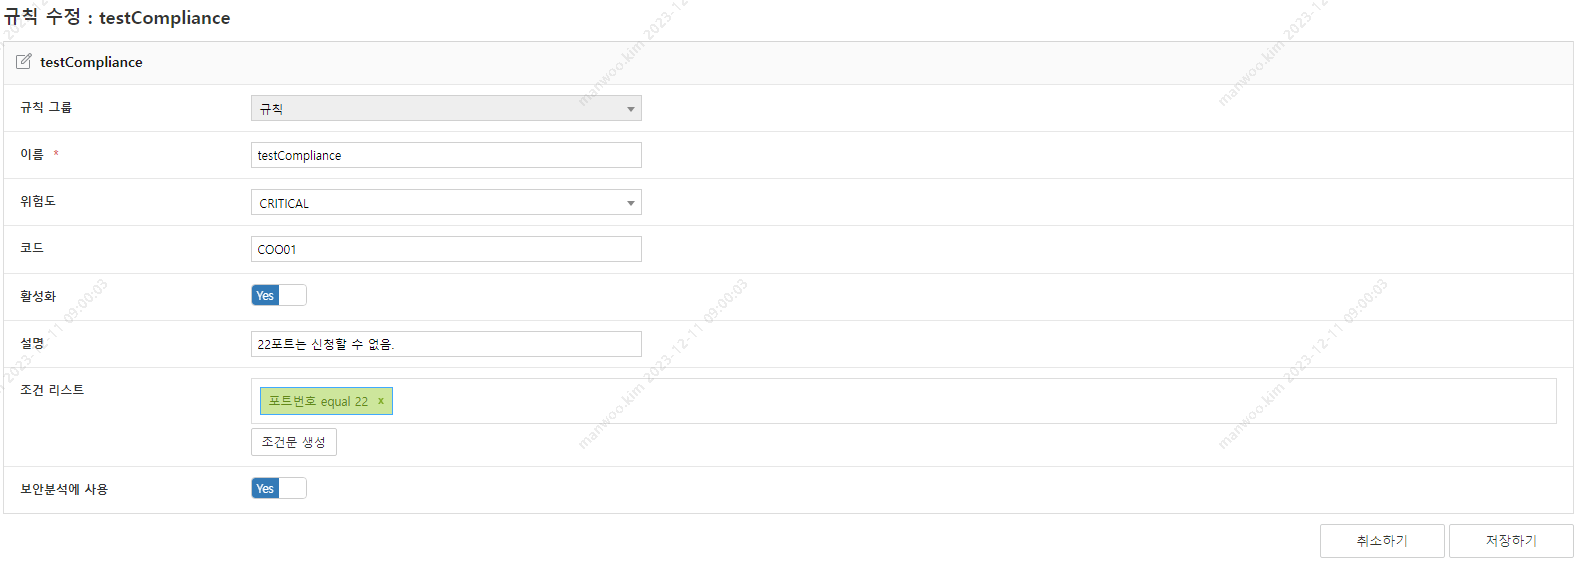
Figure. Compliance Rule Modification Enter the content to edit on the “Edit Rule” page. 4. All items can be edited. 4. (For adding condition lists, refer to creating condition statements.)
Click Save.
Create conditional statement
Defines the conditions for the Compliance rule to be applied. One or more condition statements can be set.
Perform steps 1–3 of modifying the Compliance rule.
Click Create Condition Statement in the condition list on the “Rule Edit” page. 2. The conditional statement creation popup page appears.
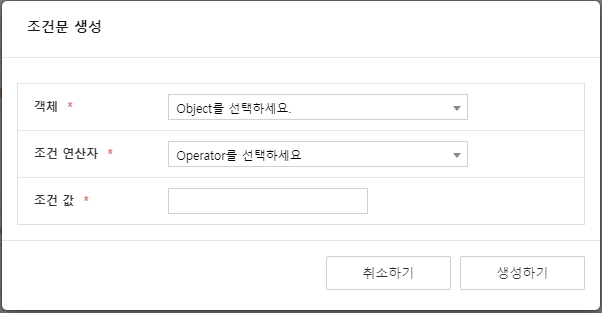
Figure. Compliance condition statement generation Enter the object, condition operator, and condition value on the “Create Condition” popup page. 3. Refer to the conditional object list (Table 7-1) in Rule Management for object types.
Click Create. 4. Repeat steps 2–4 to continue creating other conditional statements.
Delete condition
- Perform steps 1–3 of modifying the Compliance rule.
- In the “Rule Edit” page, click the X icon on the right of the condition statement you want to delete.

- Click Save.
Compliance rule testing
You can test whether the Compliance rule is functioning properly.
Click Policy > Policy Rule Settings.
Select a rule group on the “Rule Group” page.
Click the Compliance rule in the left menu.
Click test at the bottom of the “Compliance Rule” page. 4. The “Policy Rule Configuration Test” popup page opens.
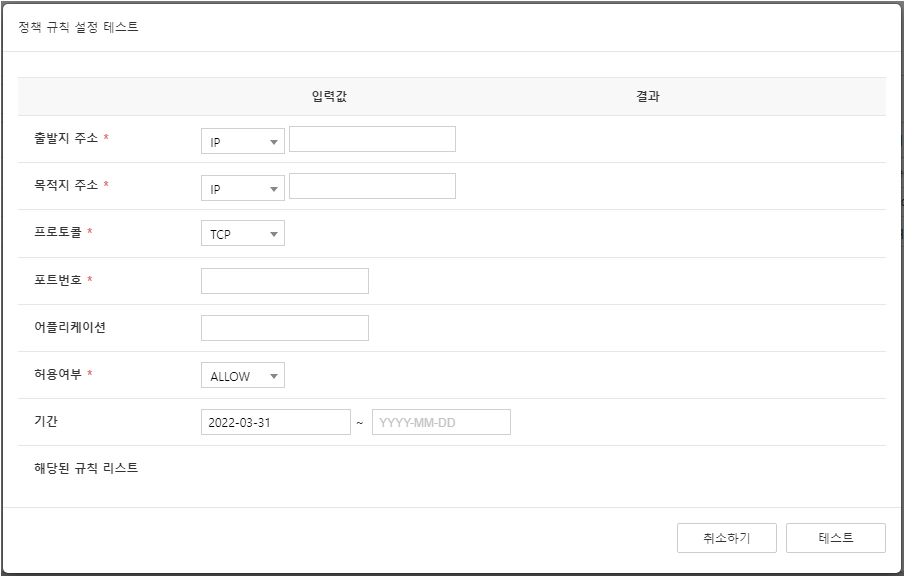
Figure. Compliance rule test input Please enter the policy to test. 5. The origin address, destination address, protocol, port number, and allowance status are required input fields.
Click test. 6. When the test is completed, the applicable rule will be displayed in the results. 6. (Only test the enabled rules among the Compliance rules.)
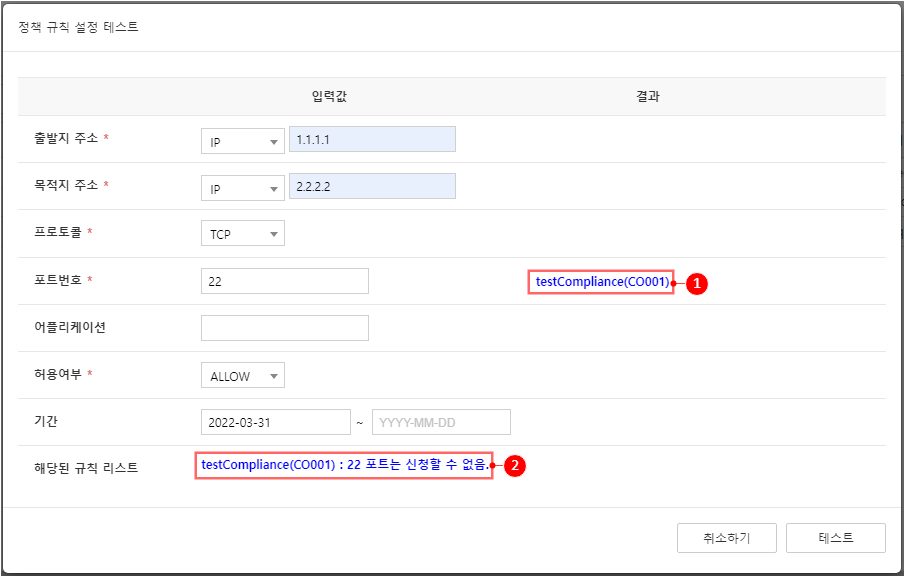
Figure. Compliance rule test result
Manage policy separation rules
Configure rules concerning the separation of firewall policies. Set the criteria for the 「Policy Management」 firewall policy separation function.
Create policy separation rule
Policy separation rules are created for rule groups. Policy separation rule creation generates basic information, and you can add condition lists by modifying the rule.
Click Policy > Policy Rule Settings.
Select a rule group on the “Rule Group” page.
Click Policy Separation Rules in the left menu. 3. (Click is enabled only when a rule group is selected.)
Click Create on the “Policy Separation Rule” page.

Figure. Create Policy Separation Rule Enter the following items on the “Policy Separation Rule Creation” page.
Item content Required/Optional Rule group This is a selected rule group. It cannot be changed. Required name Enter at least 2 characters and at most 30 characters. Special characters cannot be entered (except . _ - + @ ( )). Required code Define the rule code. Enter up to 40 characters. Required (although not marked as required on the screen, it must be entered for the separation rule to work.) Enable Set the rule’s activation status. Required Explanation Explain the rules. Enter within a maximum of 255 characters. Selection Condition list Condition statements are listed; input is allowed only in Edit. - Table. Policy separation rule input itemsClick Create.
Edit policy separation rule
Perform steps 1~3 of creating a policy separation rule.
Click the name of the policy separation rule you want to edit on the “Policy Separation Rule” page.
Click Edit on the “Policy Separation Rule Details” page.
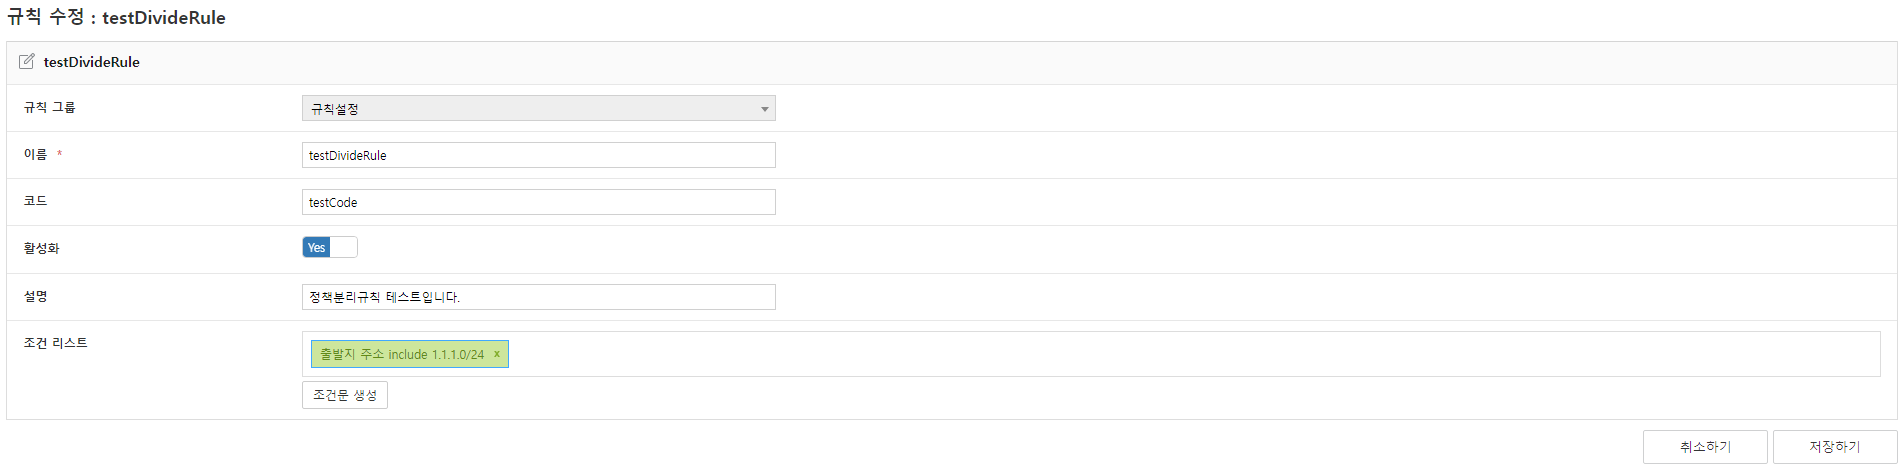
Figure. Policy Separation Rule Modification Enter the content to edit on the “Edit Rule” page. 4. You can edit all items. 4. (For adding condition lists, refer to creating condition statements.)
Click Save.
Create Conditional Statement
Defines the conditions for the policy separation rule to be applied. You can configure one or more conditional statements.
Perform steps 1~3 of modifying the policy separation rules.
Click Create Condition Statement in the condition list on the “Edit Rule” page. 2. The conditional statement creation popup page appears.
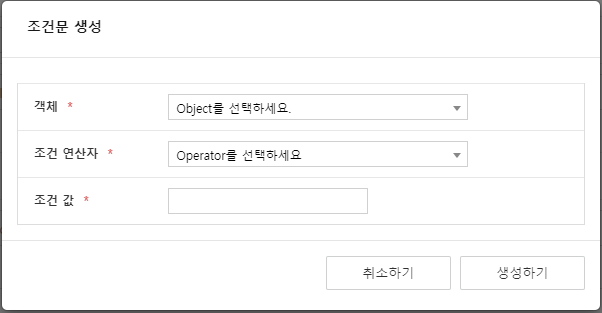
Figure. Policy Separation Rule Condition Statement Creation Enter the object, conditional operator, and condition value on the “Create Condition” popup page. 3. Refer to the conditional object list (Table 7‑1) in Rule Management for object types.
Click Create. 4. To continue creating other conditional statements, repeat steps 2~4.
Delete Conditional Statement
- Perform steps 1~3 of modifying the policy separation rules.
- On the “Rule Edit” page, in the condition list, click the X on the right of the condition you want to delete.

- Click Save.
Managing NAT Rules
Set additional rules when the request rule is changed by the NAT policy.
Create NAT rule
NAT rules are created for rule groups. In NAT rule creation, basic information is generated, and conditions can be added to the list through rule modification.
Click Policy > Policy Rule Settings.
Select a rule group on the “Rule Group” page.
Click the NAT rule in the left menu. 3. (Click is possible only when a rule group is selected.)
Click Create on the “NAT Rule” page.
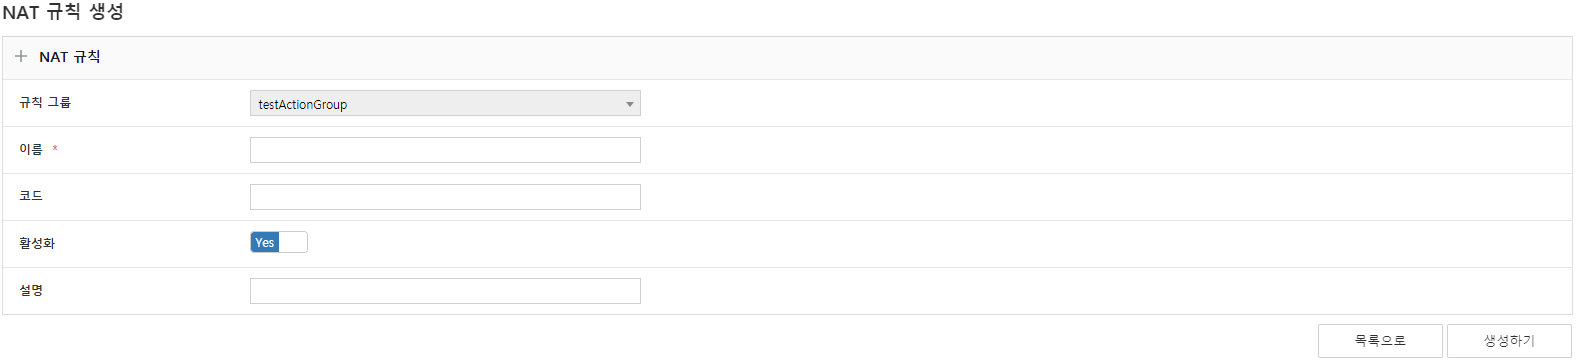
Figure. Create NAT rule Enter the following items on the “NAT Rule Creation” page.
Item content Required/Optional Rule Group This is a selected rule group. It cannot be modified. required Name Enter at least 2 characters and at most 30 characters. Special characters cannot be entered (except . _ - + @ ( )). required code Define the rule code. Enter up to 40 characters. Selection Activation Set the rule’s activation status. required Explanation Explain the rules. Enter within a maximum of 255 characters. Selection Condition list Condition statements are listed; input is allowed only in edit mode. - Table. NAT rule input itemsClick Create.
Edit NAT rule
Perform steps 1–3 of creating a NAT rule.
Click the name of the NAT rule you want to edit on the “NAT Rule” page.
Click Edit on the “NAT Rule Details” page.
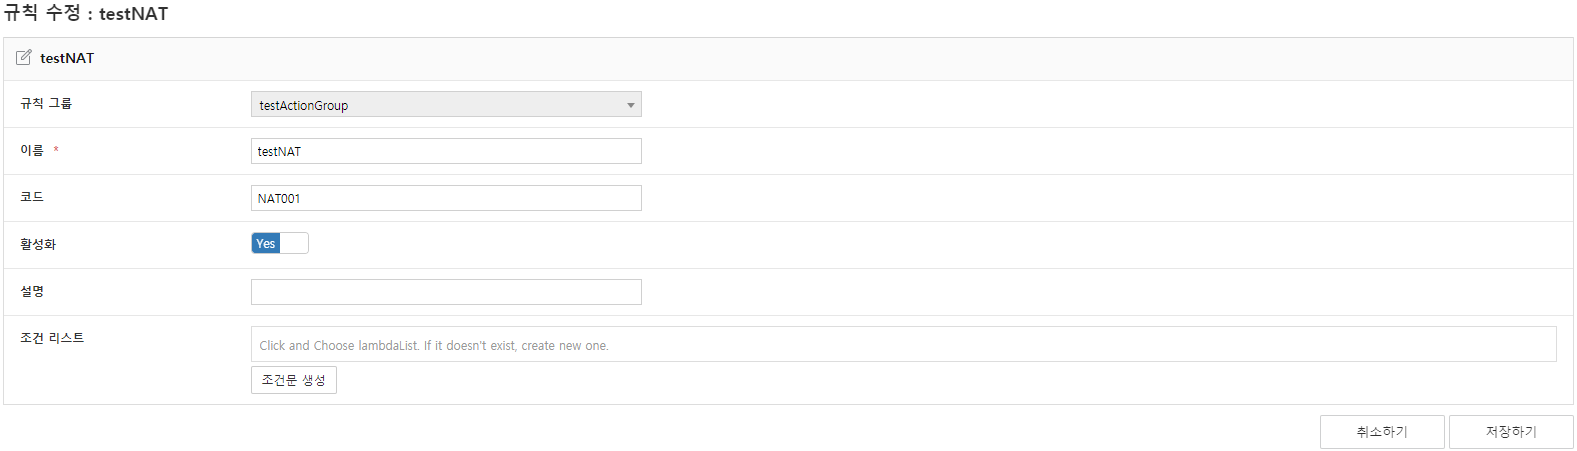
Figure. Edit NAT rule Enter the content to edit on the “Edit Rule” page. 4. You can edit all items. 4. (For adding condition lists, refer to creating condition statements.)
Click Save.
Create a conditional statement
Defines the conditions for a NAT rule to be applied. You can configure one or more conditional statements.
Perform steps 1~3 of modifying the NAT rule.
On the “Rule Edit” page, click Create Condition Statement in the condition list. 2. The conditional statement creation popup page appears.
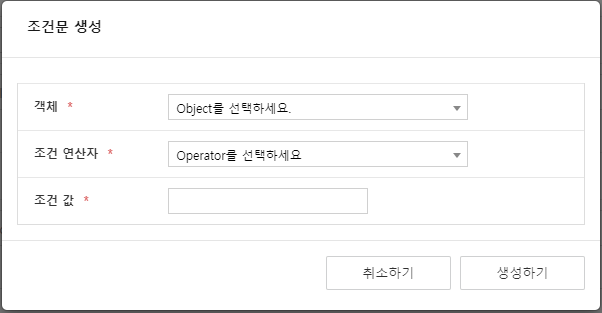
Figure. NAT rule condition statement creation Enter the object, condition operator, and condition value on the “Create Condition” popup page. 3. Refer to the conditional object list (Table 7‑1) in Rule Management for object types.
Click Create. 4. To continue creating other conditional statements, repeat steps 2–4.
Delete conditional statements
- Perform steps 1~3 of modifying the NAT rule.
- On the “Rule Edit” page, in the condition list, click the X on the right of the condition statement you want to delete.

- Click Save.
Bulk upload rule settings
Provides a bulk upload feature for rule settings within a rule group.
Click Policy > Policy Rule Settings.
Select a rule group on the “Rule Group” page.
In the left menu, click the rule to start batch upload. 3. (Click is enabled only when a rule group is selected.)
Click Batch Upload on the rule list page.
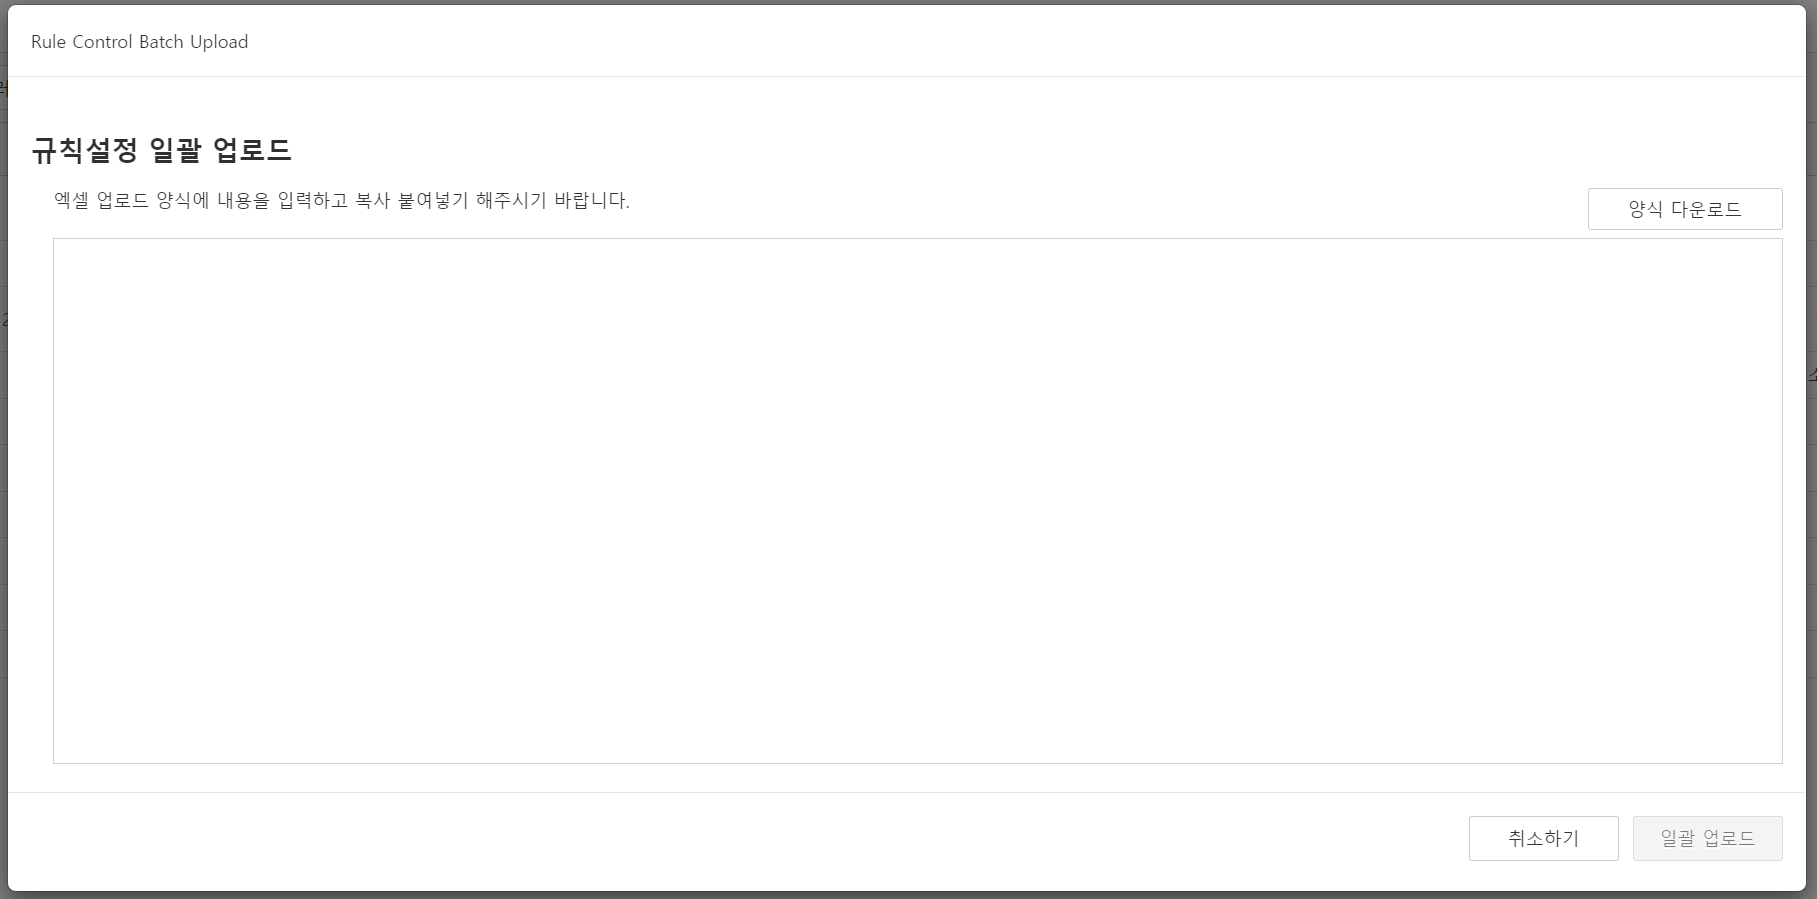
Figure. Bulk Rule Settings Upload Download the template, fill in the batch upload data in the Excel file, and then copy and paste the completed content exactly as is. 5. (Even if you copy and paste both the header and the example from the Excel file, it will be recognized correctly.)
Click Batch Upload to proceed.
The descriptions for each item in the Excel file are as follows.
| Item | Content | Required/Optional |
|---|---|---|
| LambdaActionName | Name of the rule to add | required |
| enable | Rule activation status | Select (default: true) |
| code | Rule code | Selection |
| priority | Priority of rules | Rule is required only in rule settings (other rule settings default to 0) |
| ruleCopy | Run after cloning | Optional (default: false) |
| useAnalysis | Use of analysis (compliance analysis within security analysis) | Optional (applies only to compliance rules, default: true) |
| description | Explanation | Selection |
| lambda_object | Conditional statement object | Required when entering a conditional statement |
| lambda_operator | Conditional operator in a conditional statement | Required when entering a conditional statement |
| labda_value | Condition value of the conditional statement | Required when entering a conditional statement |
| operation_target | Target of statement change | Required when entering a statement |
| operation_value | Changed value of the execution statement | Required when entering a statement |
| operation_compareObject | Execution statement change value option | Selection |
| operation_isFix | Whether the execution query data is fixed | Select (default: false) |
| operation_additionalOperation | Additional options for execution statements | Selection |
- Conditional statements/execution statements are required fields, but you can enter only one of the two and leave the other blank, and it will still be recognized correctly for batch generation.
- The condition statement objects are the condition object list (Table 7-1), the execution statement change values are the execution statement change target list (Table 7-4), and the selectable columns of the execution statement refer to the execution statement column description (Table 7-3).
Reference notes for condition operator input in conditional statements
When creating conditional statements, refer to the following and input the condition operators for each object. An error will be displayed if it does not meet the criteria below.
| Conditional statement object | conditional operator |
|---|---|
| Source address, destination address, protocol, port number | equal, notEqual, include, exclude, has |
| Source/Destination Interface, Source/Destination Zone Type, Source/Destination Type, Source/Destination Compartment, Allowance | equal, notEqual |
| Request rule request content, rule set request content | contains, notContains |
| Expiration date, number of origins, number of destinations, number of services | greaterOrEqual |
| Origin/Destination type, tag | equal |
| request rule, source object, destination object | include, exclude |
| Network (class) | equal, less, lessOrEqual, greater, greaterOrEqual |
| Request rule (application ID) | include, notInclude, exclude, related, notRelated |