Policy Management
Manages firewall policies, NAT policies, and firewall objects registered in FPMS.
View Applied Rule List
Retrieves rules that have been confirmed for firewall application, are currently being applied, or have already been applied. You can search for rules applied with various conditions using advanced search.
Click Policy > Applied Rule List.
Click Detailed Search on the “Applied Rule List” page. 2. Various search criteria are displayed.

Figure. Applied Rule List Detailed Search Please enter search criteria. 3. The source IP, destination IP, and destination Port fields support OR search, AND search, and NOT search.
Click Search.
Managing firewall policies
Firewall Policy Dashboard
You can view information on the policy status registered in FPMS and the results of policy security analysis, and it provides statistical data collected the previous day.
Click Policy > Firewall Policy.
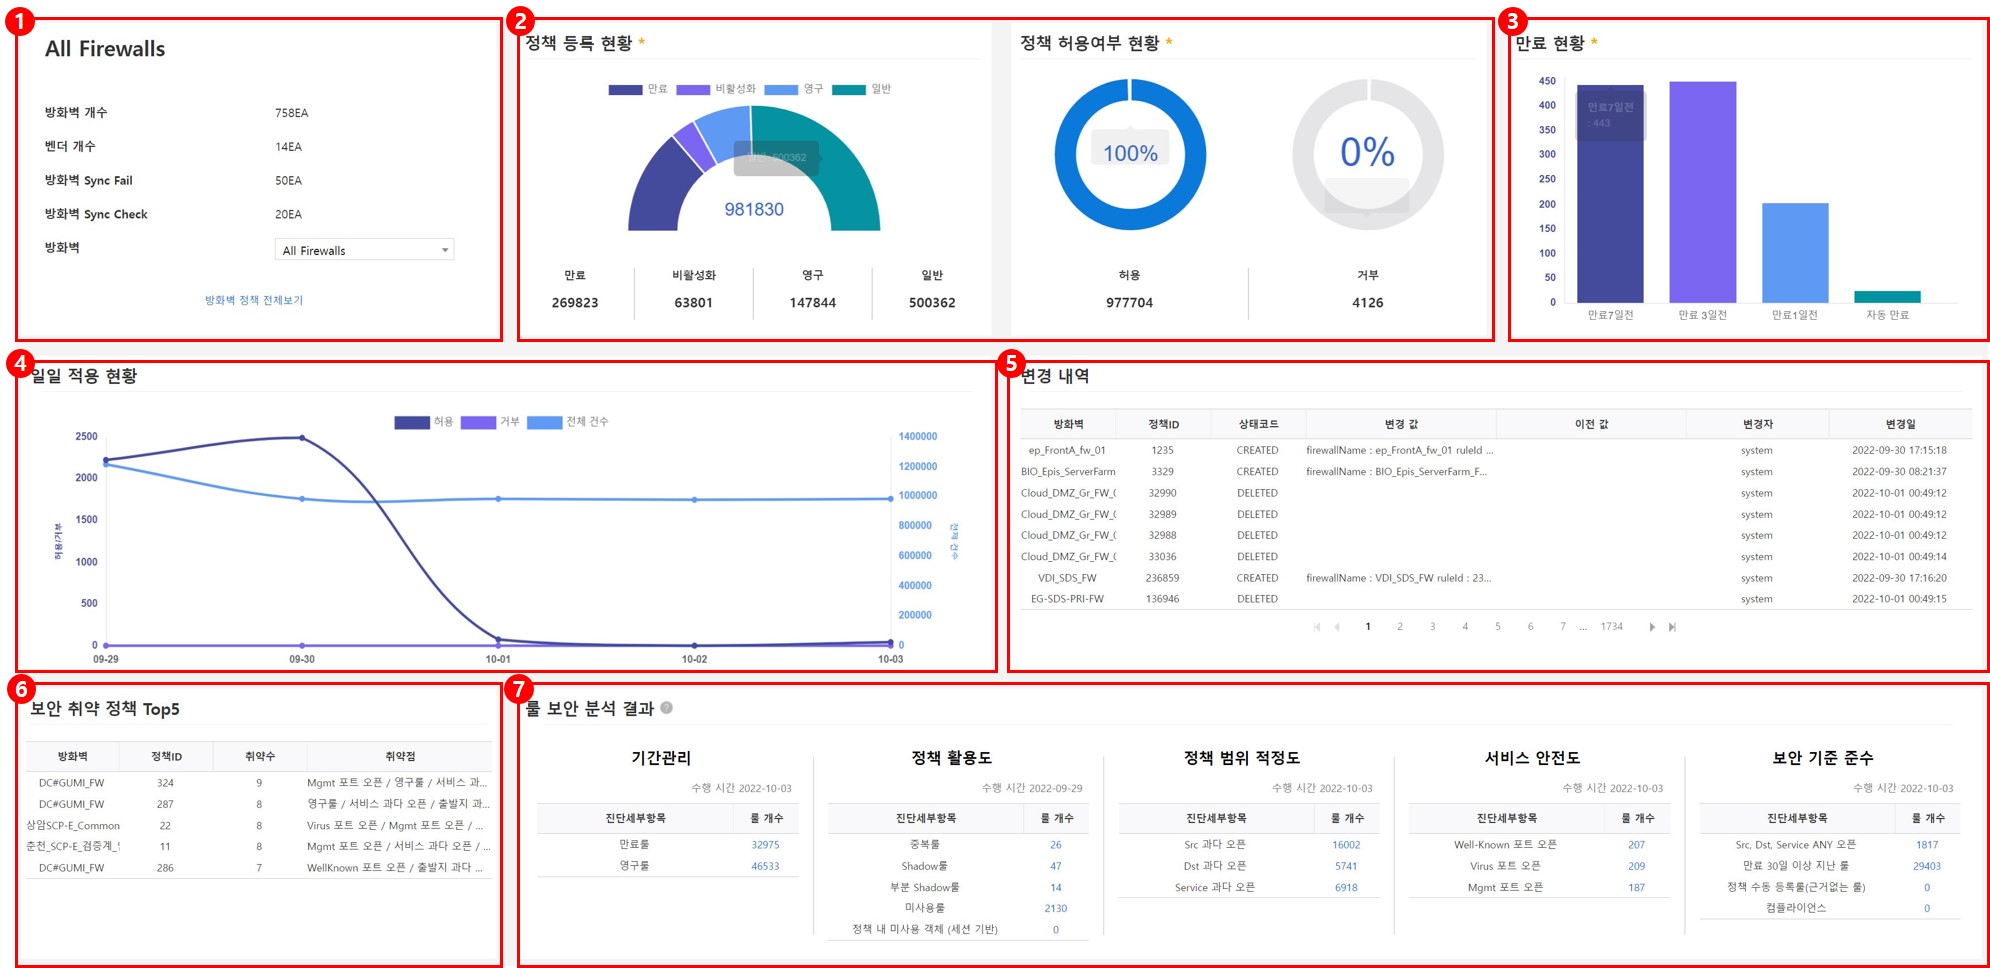
- ① DASHBOARD: It displays the current work group, and you can select a firewall to view its details. * (Default: ALL Firewalls) If you click View All Firewall Policies, you can see the policy list screen.
- ② Firewall Policy Status: Shows the status by policy type and action.
- ③ Expiration Status: Displays the expiration status. * (Automatic expiration: Number of policies disabled using the automatic expiration feature for policies that expired the previous day)
- ④ Daily Application Status: Shows the number of policy applications per day.
- ⑤ Change Log: Shows the change log of registrations, deletions, and modifications made through FPMS.
- ⑥ Security Violation Policy Top5: Displays the five policy IDs with the most security vulnerabilities according to the policy security vulnerability analysis.
- ⑦ Security Analysis Results: Shows the vulnerability details and rule counts for each sub-item within the five categories.
View Firewall Policy
You can view the policies actually applied to the firewall device.
Click Policy > Firewall Policy > All Firewalls > View All Firewall Policies.
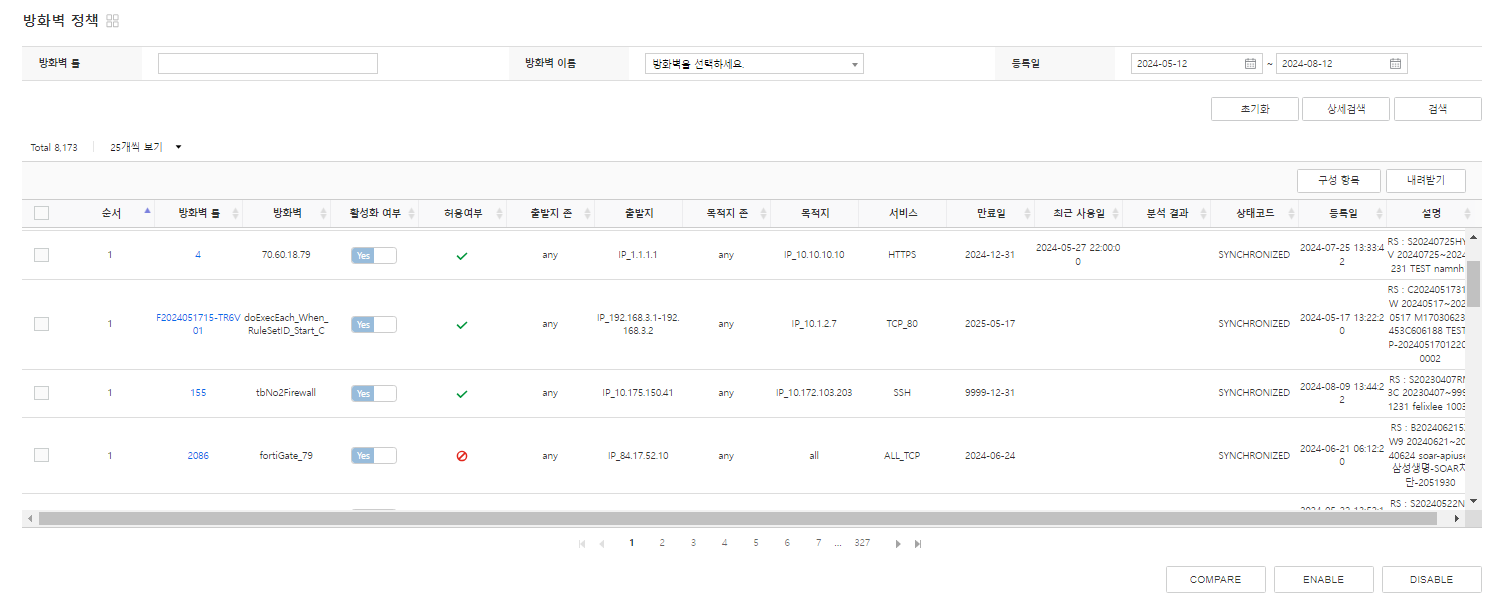
Figure. Firewall Policy Item Item description Content Content description Analysis result When conducting rule security analysis, the results are presented as keywords for each policy. Duplicate rule Duplicate rule Analysis result SHADOW rule Shadowed rule Analysis result Partial SHADOW rule Partial Shadowed Rule Analysis result Unused policy Unused rule Analysis result Unused objects in the policy Rule for unused objects or flows Analysis result Excessive opening of origin/destination/service Content exceeding the number of address hosts or ports configured in the template Status code Represents the status value of the firewall policy. SYNCHRONIZED The state reflected in the firewall device Status code PROVISIONED Waiting state after DISABLE request Status code PENDING DISABLE operation in progress Status code DISABLED Disabled state (activation status also changed to No) Table. Firewall policy itemsTo view detailed information about the firewall policy, click the firewall rule ID.
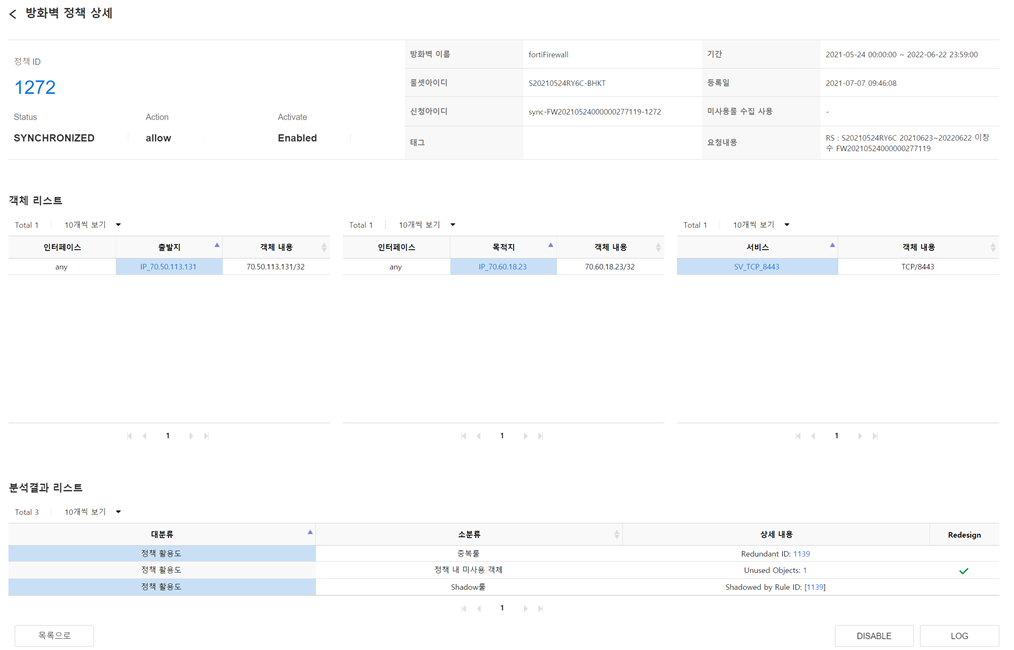
Figure. Firewall Policy Details
Improve firewall policy analysis results
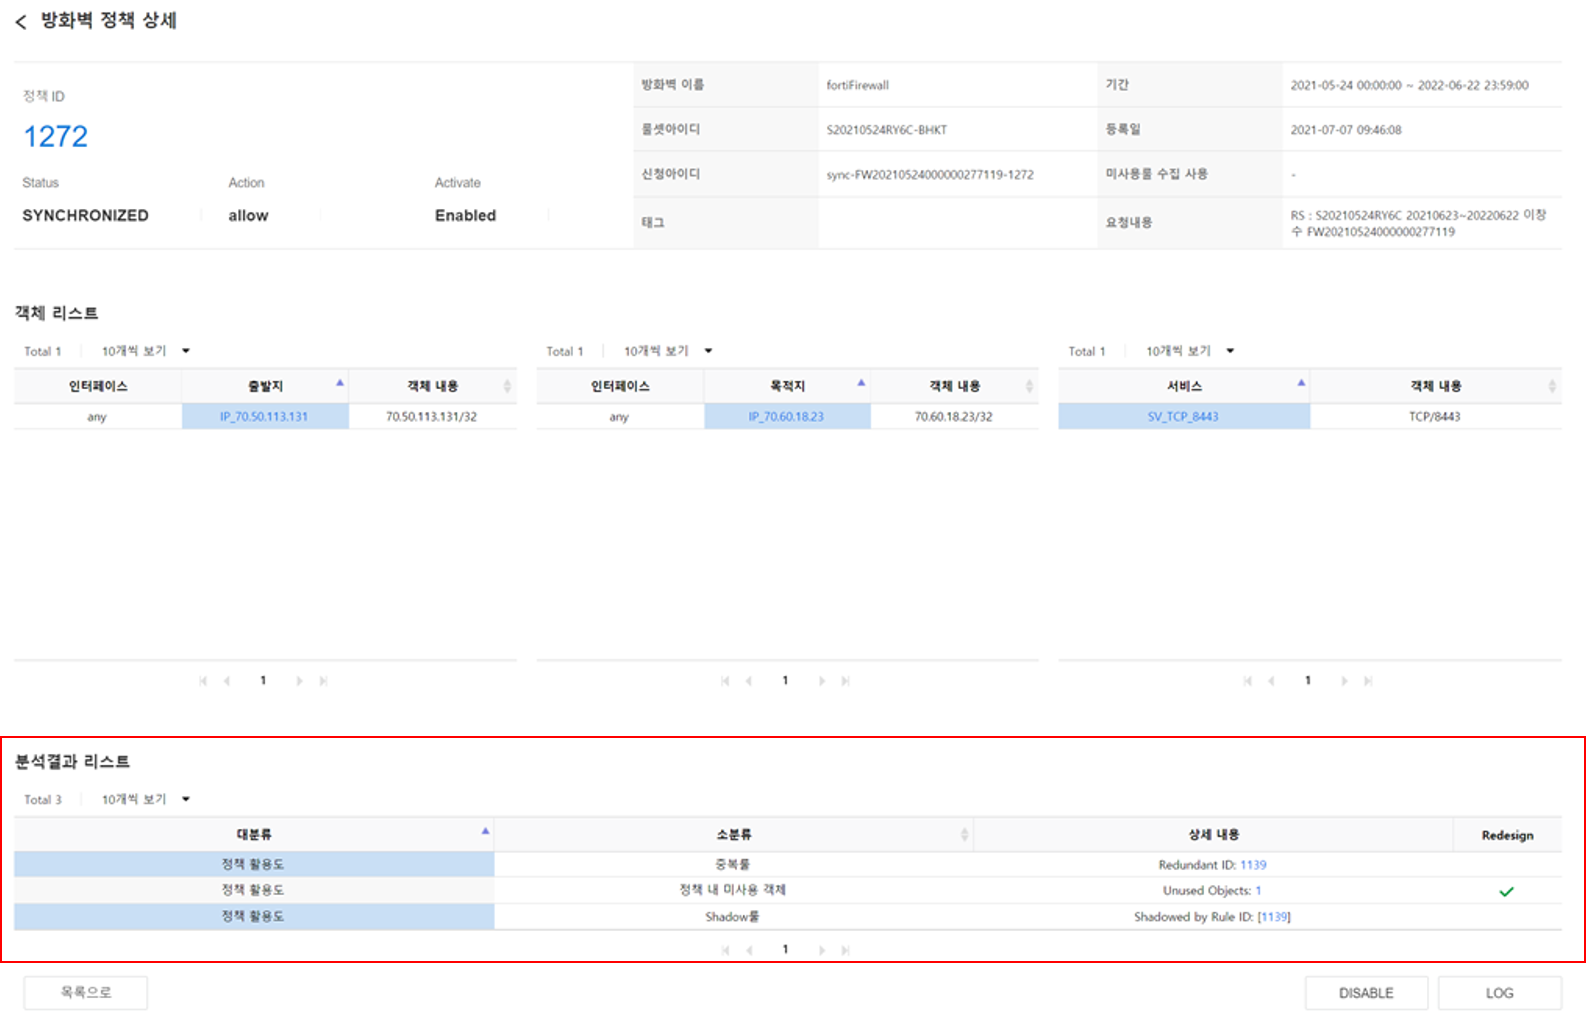
Based on the analysis results, improvements can be made for each item, and we will proceed as follows.
- Partial Shadow Rule (CORRELATION), Unused objects in policy (UNUSED_OBJECT): Click the REDESIGN button
- Redundant rule (REDUNDANT), Shadow rule, Unused policy (UNUSED): DISABLE button click
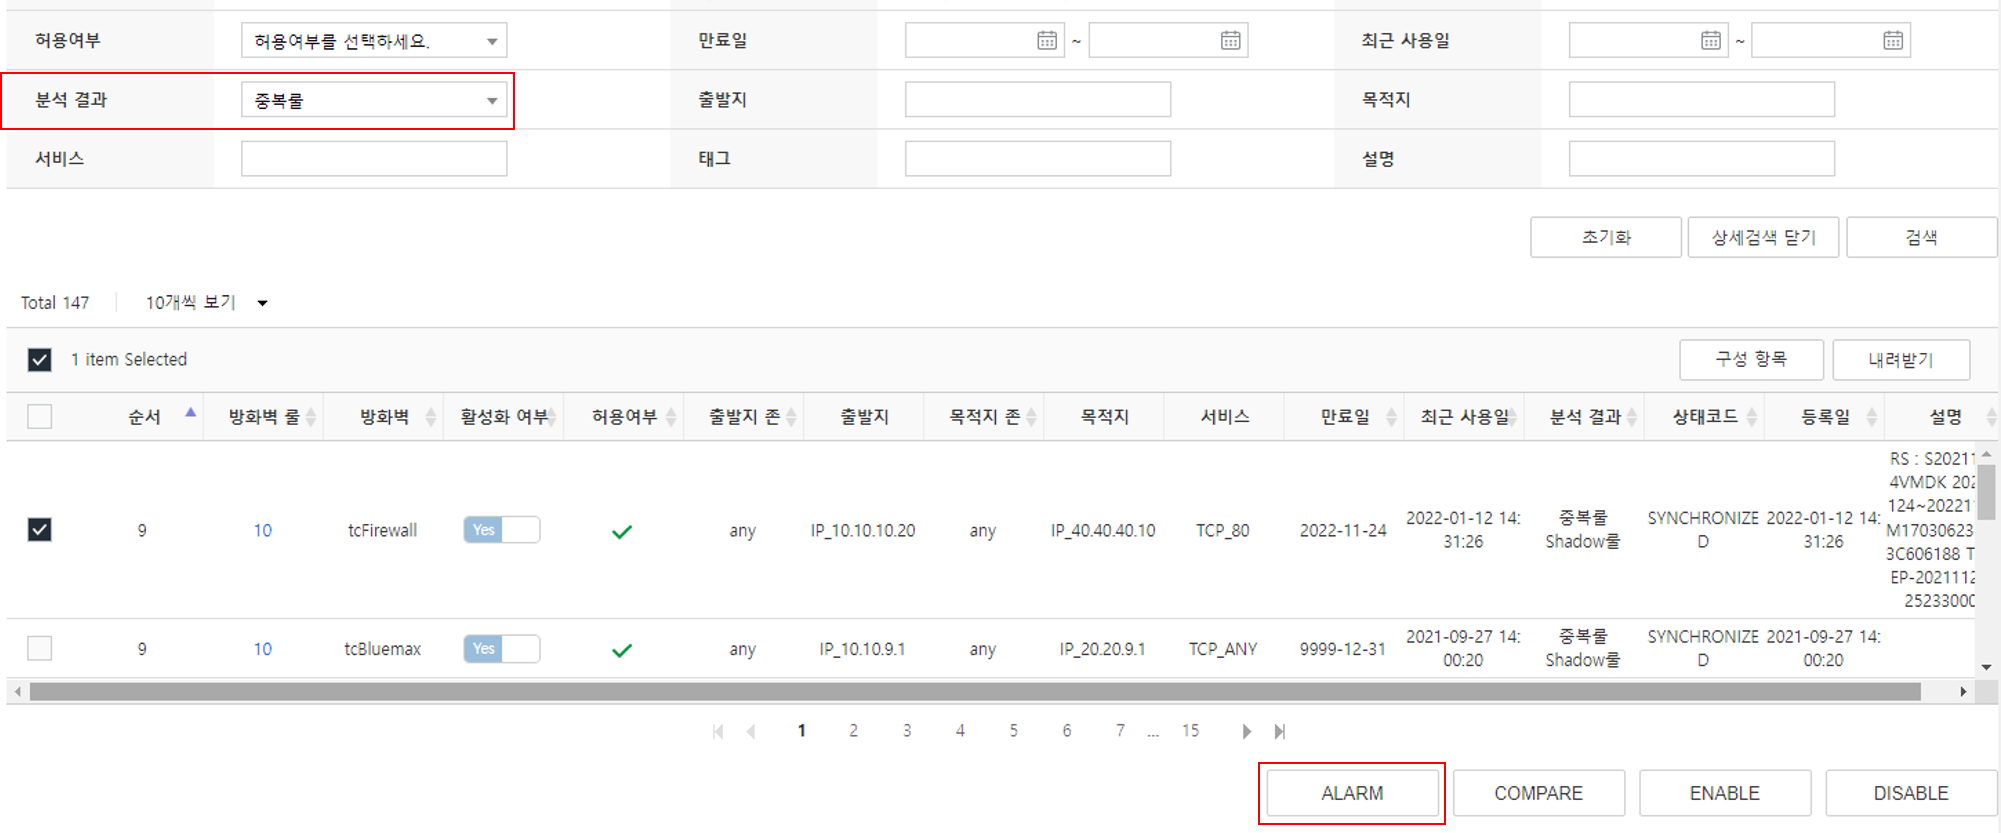
- Email notifications can be sent to users only for duplicate rules and unused rules.
| Item | Item description | content | Content description |
|---|---|---|---|
| Analysis result | When conducting rule security analysis, the results are presented as keywords for each policy. | Duplicate rule | Duplicate rule |
| Analysis result | SHADOW rule | Shadowed rule | |
| Analysis result | Partial SHADOW rule | Partial Shadowed Rule | |
| Analysis result | Unused policy | Unused rule | |
| Analysis result | Unused objects in the policy | Rule for unused objects or flows | |
| Analysis result | Excessive opening of origin/destination/service | Content exceeding the number of address hosts or ports configured in the template |
When you select duplicate rules or unused rules among the analysis result items, the ALARM button becomes active and you can send an email notification.
Compare firewall policies
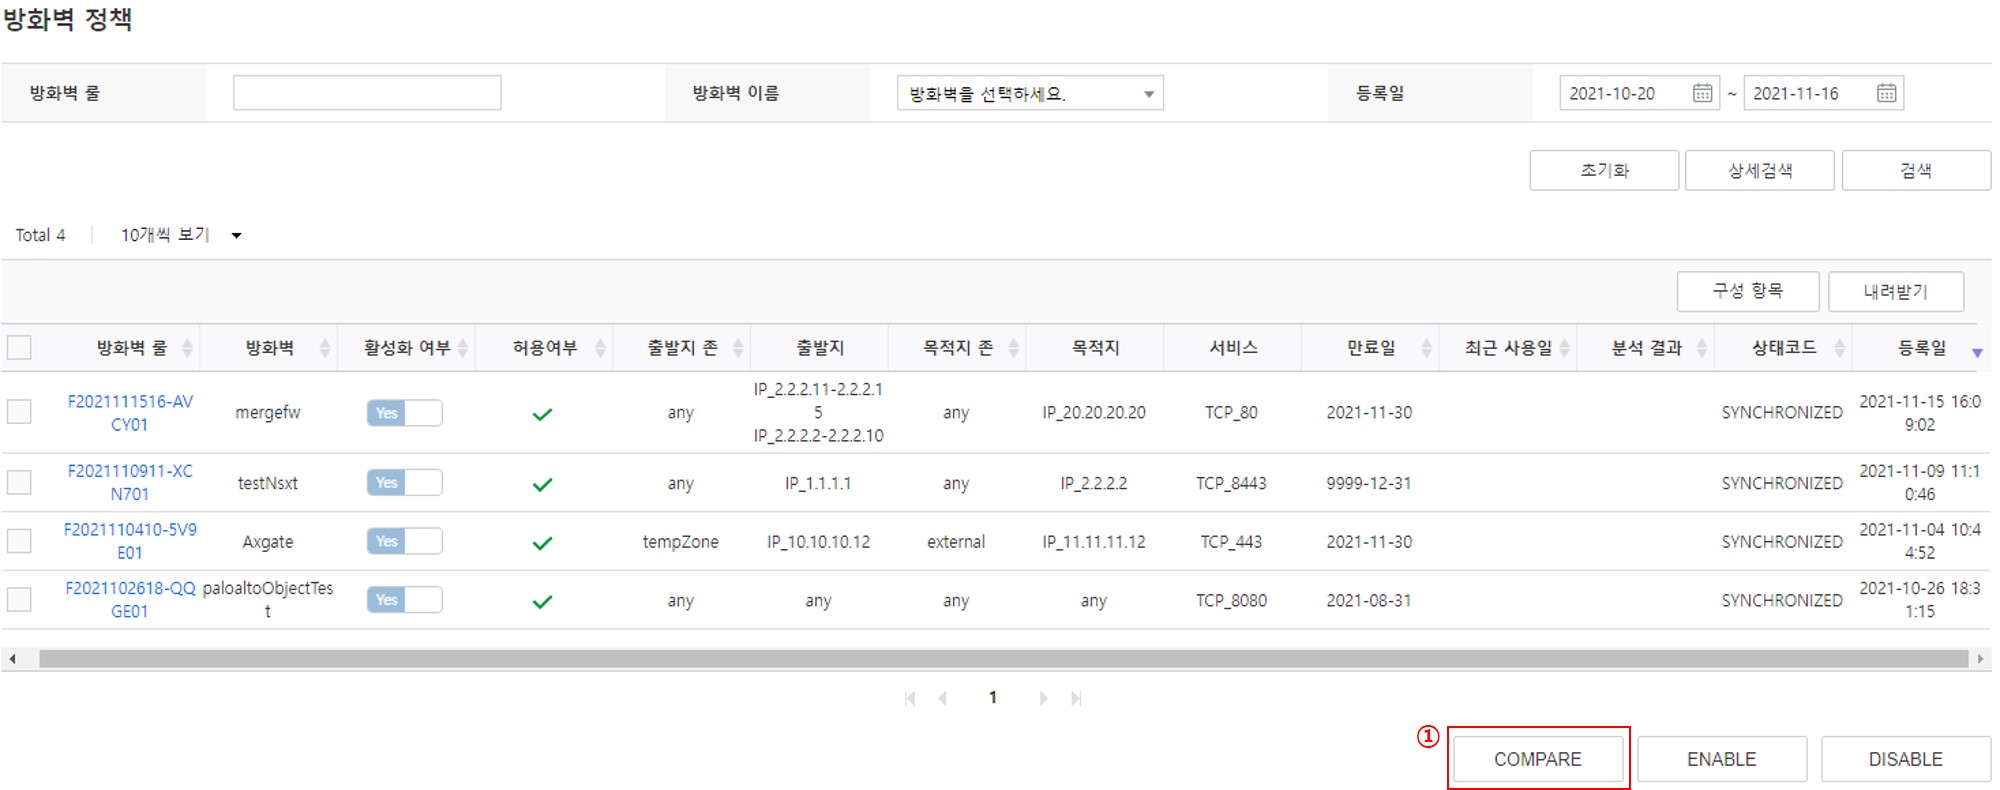
You can compare the firewall policies of the two selected dates to identify differences.
- Click Policy > Firewall Policy.
- Click the COMPARE button at the bottom of the firewall policy page.
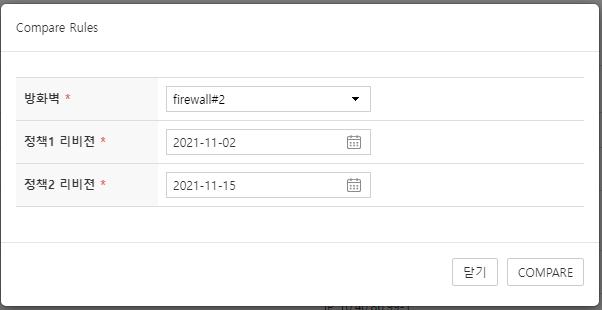
- Select the firewall in the ‘Compare Policies’ popup window.
- Select the date you want to compare. 4. Only active dates can be selected.
- Click the COMPARE button.
- The final compared data is downloaded as an Excel file.
Separate firewall policies
Separate policies based on the policy separation rule in Policy Rule Settings (manage policy separation rules in 「Policy Rule Management」).
- Click Policy > Firewall Policy > Policy Rule ID.
- Click the DIVIDE CHECK button at the bottom of the firewall policy detail page.
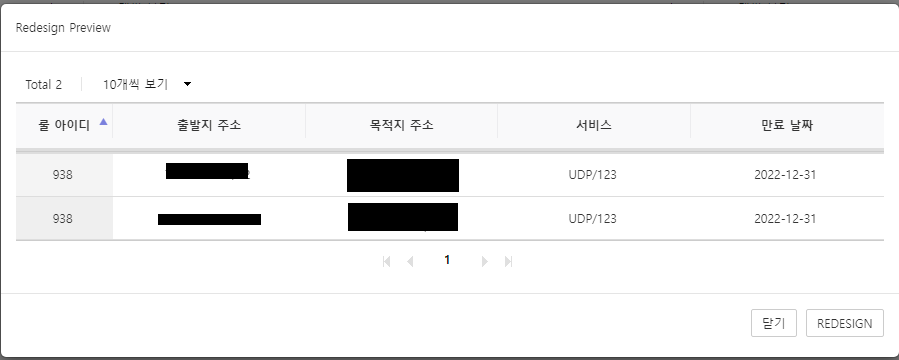
- After DIVIDE CHECK, click the checkbox of the result generated by the separation rule in the analysis result window to proceed with REDESIGN.
- After checking the REDESIGN PREVIEW, click the REDESIGN button to perform policy separation.

Edit firewall policy
Click Policy > Firewall Policy > Policy Rule ID.
In the “Firewall Policy Details” page, click the
to edit the desired content.
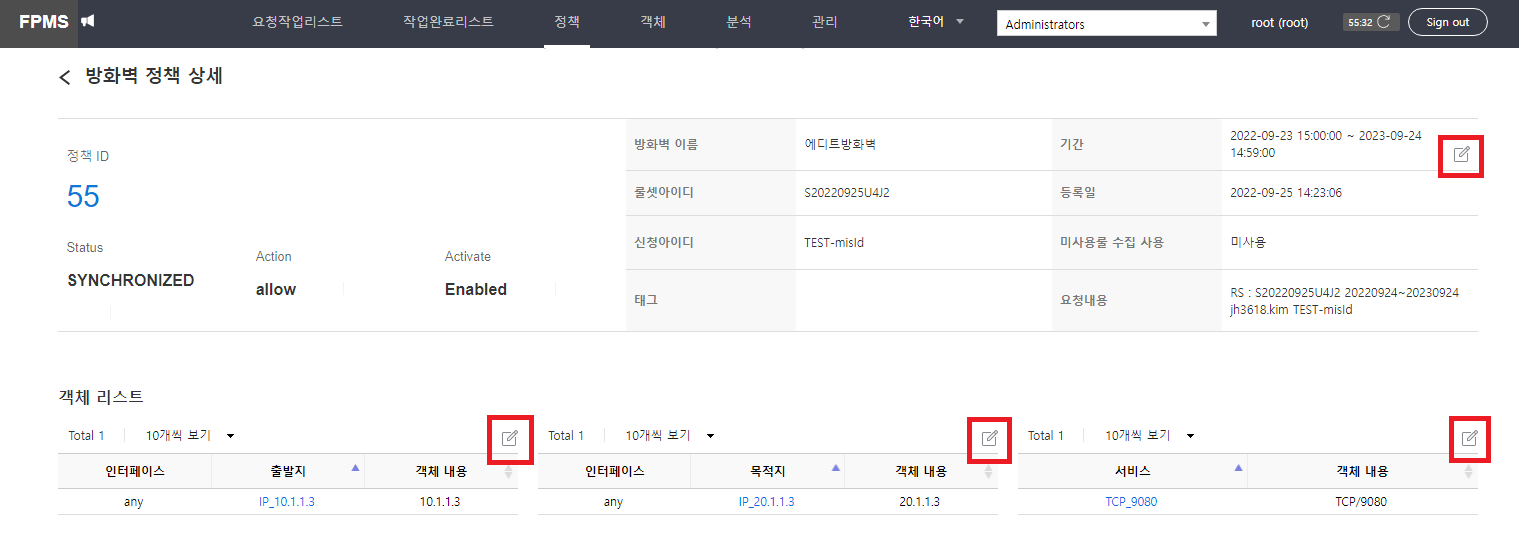
Figure. EDIT button Click the EDIT button at the bottom of the “Firewall Policy Details” page. 3. A rule set (SR Type: EDIT) for applying the modification policy is created, and you are taken to the “Request Work Details” page of that rule set.
Click PREVIEW on the “Request Task Details” page to view the preview content of the new request task.
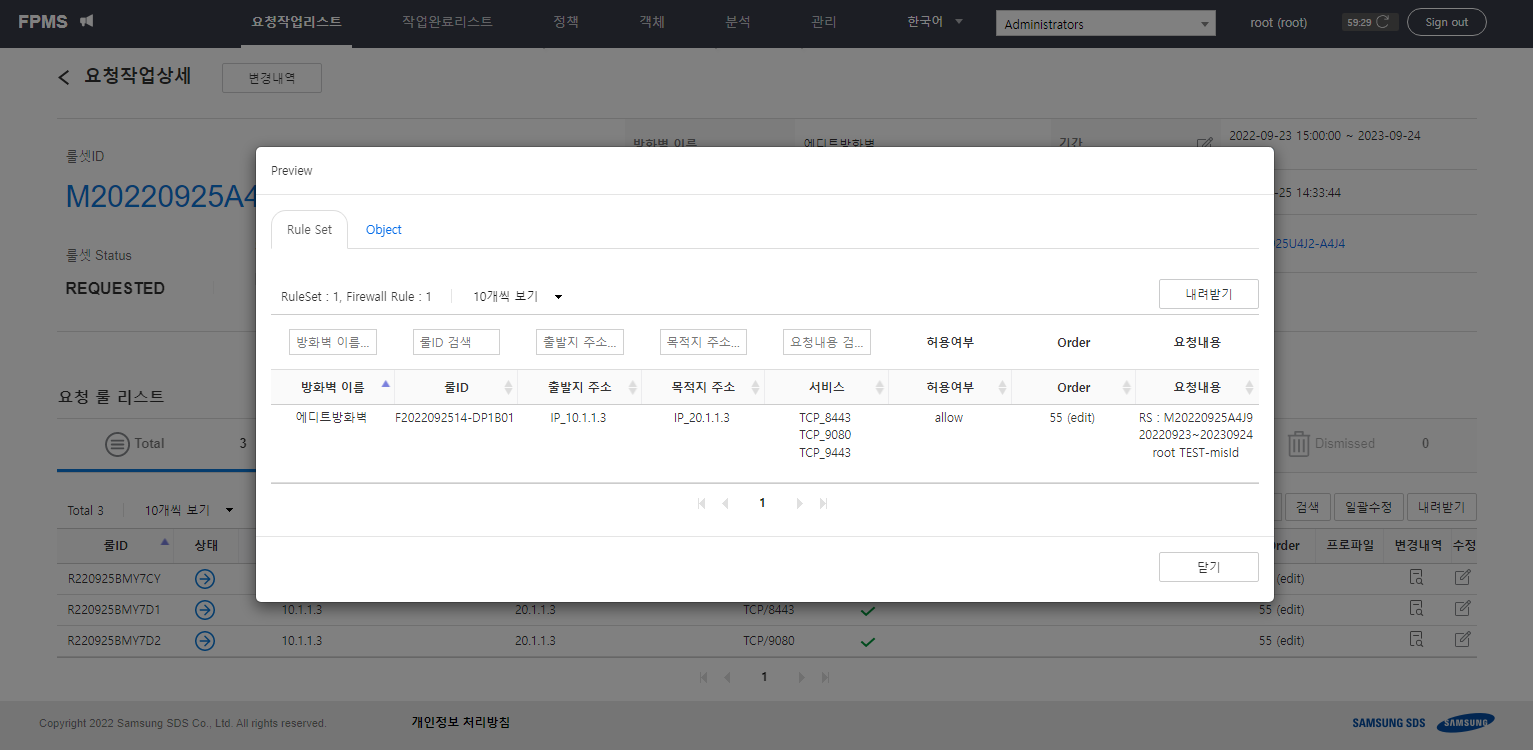
Figure. EDIT Rule Set Preview Perform CONFIRM → COMMIT as in the existing rule set to request firewall application.
When the policy modification is completed, the request task status of the rule set changes to CLOSED, and the modified content can be viewed on the “Firewall Policy” page.
Merging firewall policies
To merge policies, you must first perform a configuration analysis (the configuration analysis of 「policy analysis」).
- Click Policy > Firewall Policy > Policy Rule ID.
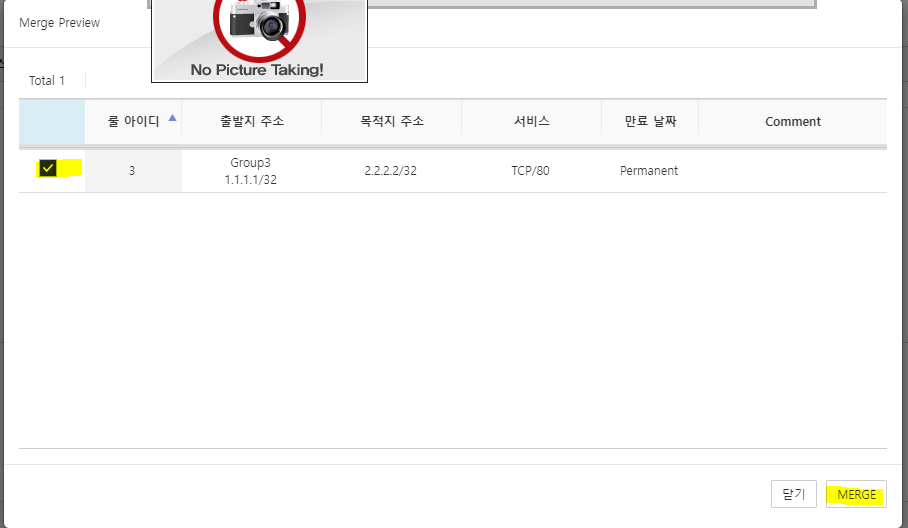
- Click the MERGE button at the bottom of the firewall policy detail page.
- Select the target to MERGE and perform the MERGE.
View NAT policy
When a NAT policy is synchronized (Synchronize NAT Policy) using NAT option settings and firewall resource synchronization, retrieve the NAT policy created by the synchronization.
- Click Policy > NAT Policy.
- If you have search criteria, enter the search criteria on the “NAT Policy” page and then click Search.
- The NAT policy that meets the conditions is retrieved.
NAT operation method
The NAT configuration on the firewall is set as follows.
| Standard departure | Standard purpose | Reference port | Change departure | Purpose of change | Change port |
|---|---|---|---|---|---|
| 1.1.1.1 | any | any | 2.2.2.2 | - | - |
| any | 30.30.30.30 | any | - | 40.40.40.40 | - |
If the applicant requests a firewall policy, the firewall policy must be registered while taking NAT policy conversion into account. Since SNAT operates before the firewall policy and DNAT operates after the firewall policy, the request information is modified and registered as follows.
| Apply for departure | Purpose of application | Requested port | Firewall policy start | Firewall policy purpose | Firewall policy port | Whether changes are needed |
|---|---|---|---|---|---|---|
| 1.1.1.1 | 9.9.9.9 | 80 | 1.1.1.1 | 9.9.9.9 | 80 | X |
| 2.2.2.2 | 9.9.9.9 | 80 | 1.1.1.1 | 9.9.9.9 | 80 | O |
| 9.9.9.9 | 30.30.30.30 | 80 | 9.9.9.9 | 40.40.40.40 | 80 | O |
| 9.9.9.9 | 40.40.40.40 | 80 | 9.9.9.9 | 40.40.40.40 | 80 | X |
When uploading a NAT policy to FPMS, it automatically changes when conversion of the application information is required.
Synchronize firewall resources
Synchronize firewall policies, NAT policies, and firewall objects to FPMS. Firewalls integrated with FPMS can be directly synchronized with firewall devices via API integration, and if an Excel file exported from the firewall device is available, Excel upload is also possible.
The firewall resource synchronization targets are firewall policies, NAT policies, and firewall objects.
Synchronize firewall policy
Synchronize the firewall device’s objects (Object) and policy contents to FPMS. For vendors that do not support schedule objects (e.g., NSX), schedule information is parsed from the policy’s description and generated.
In the description, schedule information is interpreted by matching characters to date patterns, and the schedule information is set by searching through the patterns in the order listed below.
- YYYYMMDD
YYYYMMDD, YYYYMMDD-YYYYMMDD, YYMMDDYYMMDD, YYMMDD-YYMMDD — If there are multiple matching date entries, set the most recent date as the expiration date. 1. (e.g., [SRR100000110237_extension]20231101-20241101 FPMS system 20221102-20231102 → set expiration date 20231102) - YYYYMMDD, YYMMDD — If there are multiple matching date entries, set the most recent date as the expiration date. 2. (e.g.: 240823_FPMS system administrator extension → set expiration date 20240823 / FW20241007000000924831 FPMS system access (permanent) → set expiration date 20241007)
※ If there is information that matches the above pattern in the description, please be aware that schedule information may be parsed incorrectly, differing from the intended meaning.
- Click Management > Firewall Resource Synchronization.
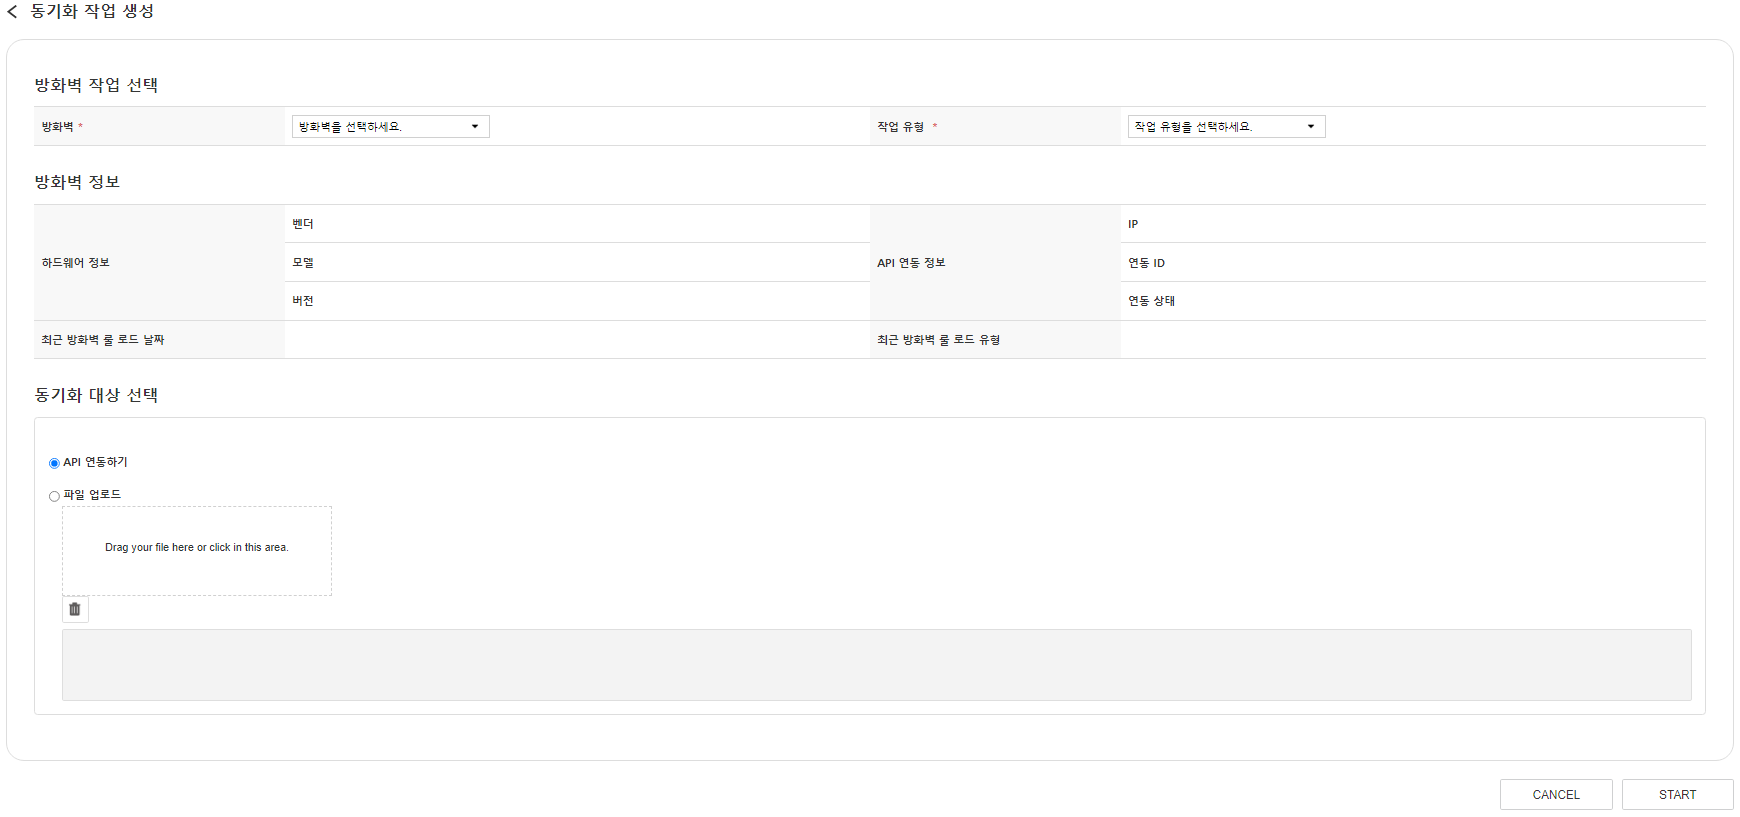
- Click Create on the “Firewall Resource Synchronization” page.
- In the “Create Sync Job” page’s ‘Firewall List’, select the firewall to synchronize. 3. The hardware and API integration information of the selected firewall is shown in the “Firewall Information” below.
- Select FirewallRule from ‘Task Type’. 4. ‘Firewall policy synchronization information’ appears.
- Select an option from the ‘Synchronization Options’ list.
- Full synchronization: synchronize all device policies
- Exclude expired rules: Policy synchronization excluding expired policies
- Include inactive policies: Policy synchronization that includes inactive policies
- Exclude expired rules & include inactive policies: synchronize policies that match both options
- Please select the synchronization target.
- API integration: For firewalls integrated with FPMS, synchronization is performed via API
- File upload: Upload the exported policy file from the firewall to proceed with synchronization (for Simulation firewalls, modify according to the provided Excel template before uploading)
- Click START. 7. The created synchronization job can be viewed on the “Firewall Resource Synchronization” page.
Synchronizing NAT policies
Synchronize the device’s NAT policy to FPMS. The vendors that support NAT policy synchronization are Secui MF2, Secui Bluemax, Fortinet, Paloalto, Cisco, and Checkpoint.
- Perform steps 1–3 of firewall policy synchronization.
- Select NatRule from ‘Task Type’. 2. ‘NAT vendor information’ appears.
- Select a vendor from the ‘NAT vendor’ list.
- Same as the firewall vendor: synchronize NAT policies within the integrated firewall
- Vendor selection: External integrated NAT data synchronization (supports file upload only)
- Please select the synchronization target.
- Integrate API: For firewalls linked to FPMS, synchronize via API. * Selection is possible when ‘Same as firewall vendor’ is selected at step 3. * (Supported vendors: SecuAI, Palo Alto, Fortinet, etc.)
- File upload: Upload the exported policy file from the firewall to proceed with synchronization.
- Click START. 5. The created synchronization job can be viewed on the “Firewall Resource Synchronization” page.
Synchronized NAT policies can be viewed in NAT policy lookup.
Vendor-specific NAT policy synchronization issue
- BlueMax: File upload is not yet supported, and it will be created after selecting the Secui vendor from the NAT vendor, deleting the Name in column D, and then uploading.
- Secui MF2: Since the enable status cannot be retrieved via the API, there is an issue where a disable rule is also created. - disable If uploading the rule is also required, we recommend using the file upload feature.
Synchronizing firewall objects
Synchronize the object contents of the firewall device to FPMS.
- Perform steps 1–3 of firewall policy synchronization.
- Select FirewallObject from ‘Task Type’. 2. ‘Firewall object synchronization information’ appears.
- Select an option from the ‘Synchronization Options’ list.
- ALL: Synchronize all objects
- Address group: synchronize only the address and address group objects
- Service group: synchronize only services and service group objects
- Please select the synchronization target.
- API integration: For firewalls integrated with FPMS, synchronization is performed via API
- File upload: Upload the exported policy file from the firewall to proceed with synchronization.
- Click START. 5. The created synchronization job can be viewed on the “Firewall Resource Synchronization” page.
Managing Security Profile Templates
Creating a security profile template
Creates a profile template for firewall devices that support security profiles.
Click Policy > Security Profile Template.
Click Create on the “Security Profile Template” page.
Enter the following items on the “Security Profile Template Creation” page.
Item Content Security profile template name Enter between 2 and 30 characters. Special characters are not allowed (except . _ - + @ ( )). Duplicate names are not allowed. vendor Select the firewall vendor. Work group Select the work group that the firewall will belong to. Security profile configuration Add the security profile configuration list. Table. Security Profile Template Input ItemsClick Save.
Click Edit.
Enter the security profile setting items on the “Security Profile Template Edit” page.
Click Save.
Edit Security Profile Template
Modify the security profile template.
- Click Policy > Security Profile Template.
- Click the template name you want to edit on the “Security Profile Template” page.
- Click Edit on the “Security Profile Template Details” page.
- Enter the content to modify on the “Security Profile Template Edit” page.
- Click Save.
Applying the Security Profile Template
Apply the security profile template.
- Create a condition to apply the security profile template by generating a conditional statement in “Policy Rule Management.”
- By creating an execution statement of 「Policy Rule Management」, select “Security Profile Template” from the change target and enter the security profile template name in the change value.