Object Management
Through FPMS, you can synchronize firewall objects and view, create, modify, or delete object information. Firewalls that do not support objects do not appear in the firewall list of the object menu.
Common Object Management
Object Dashboard
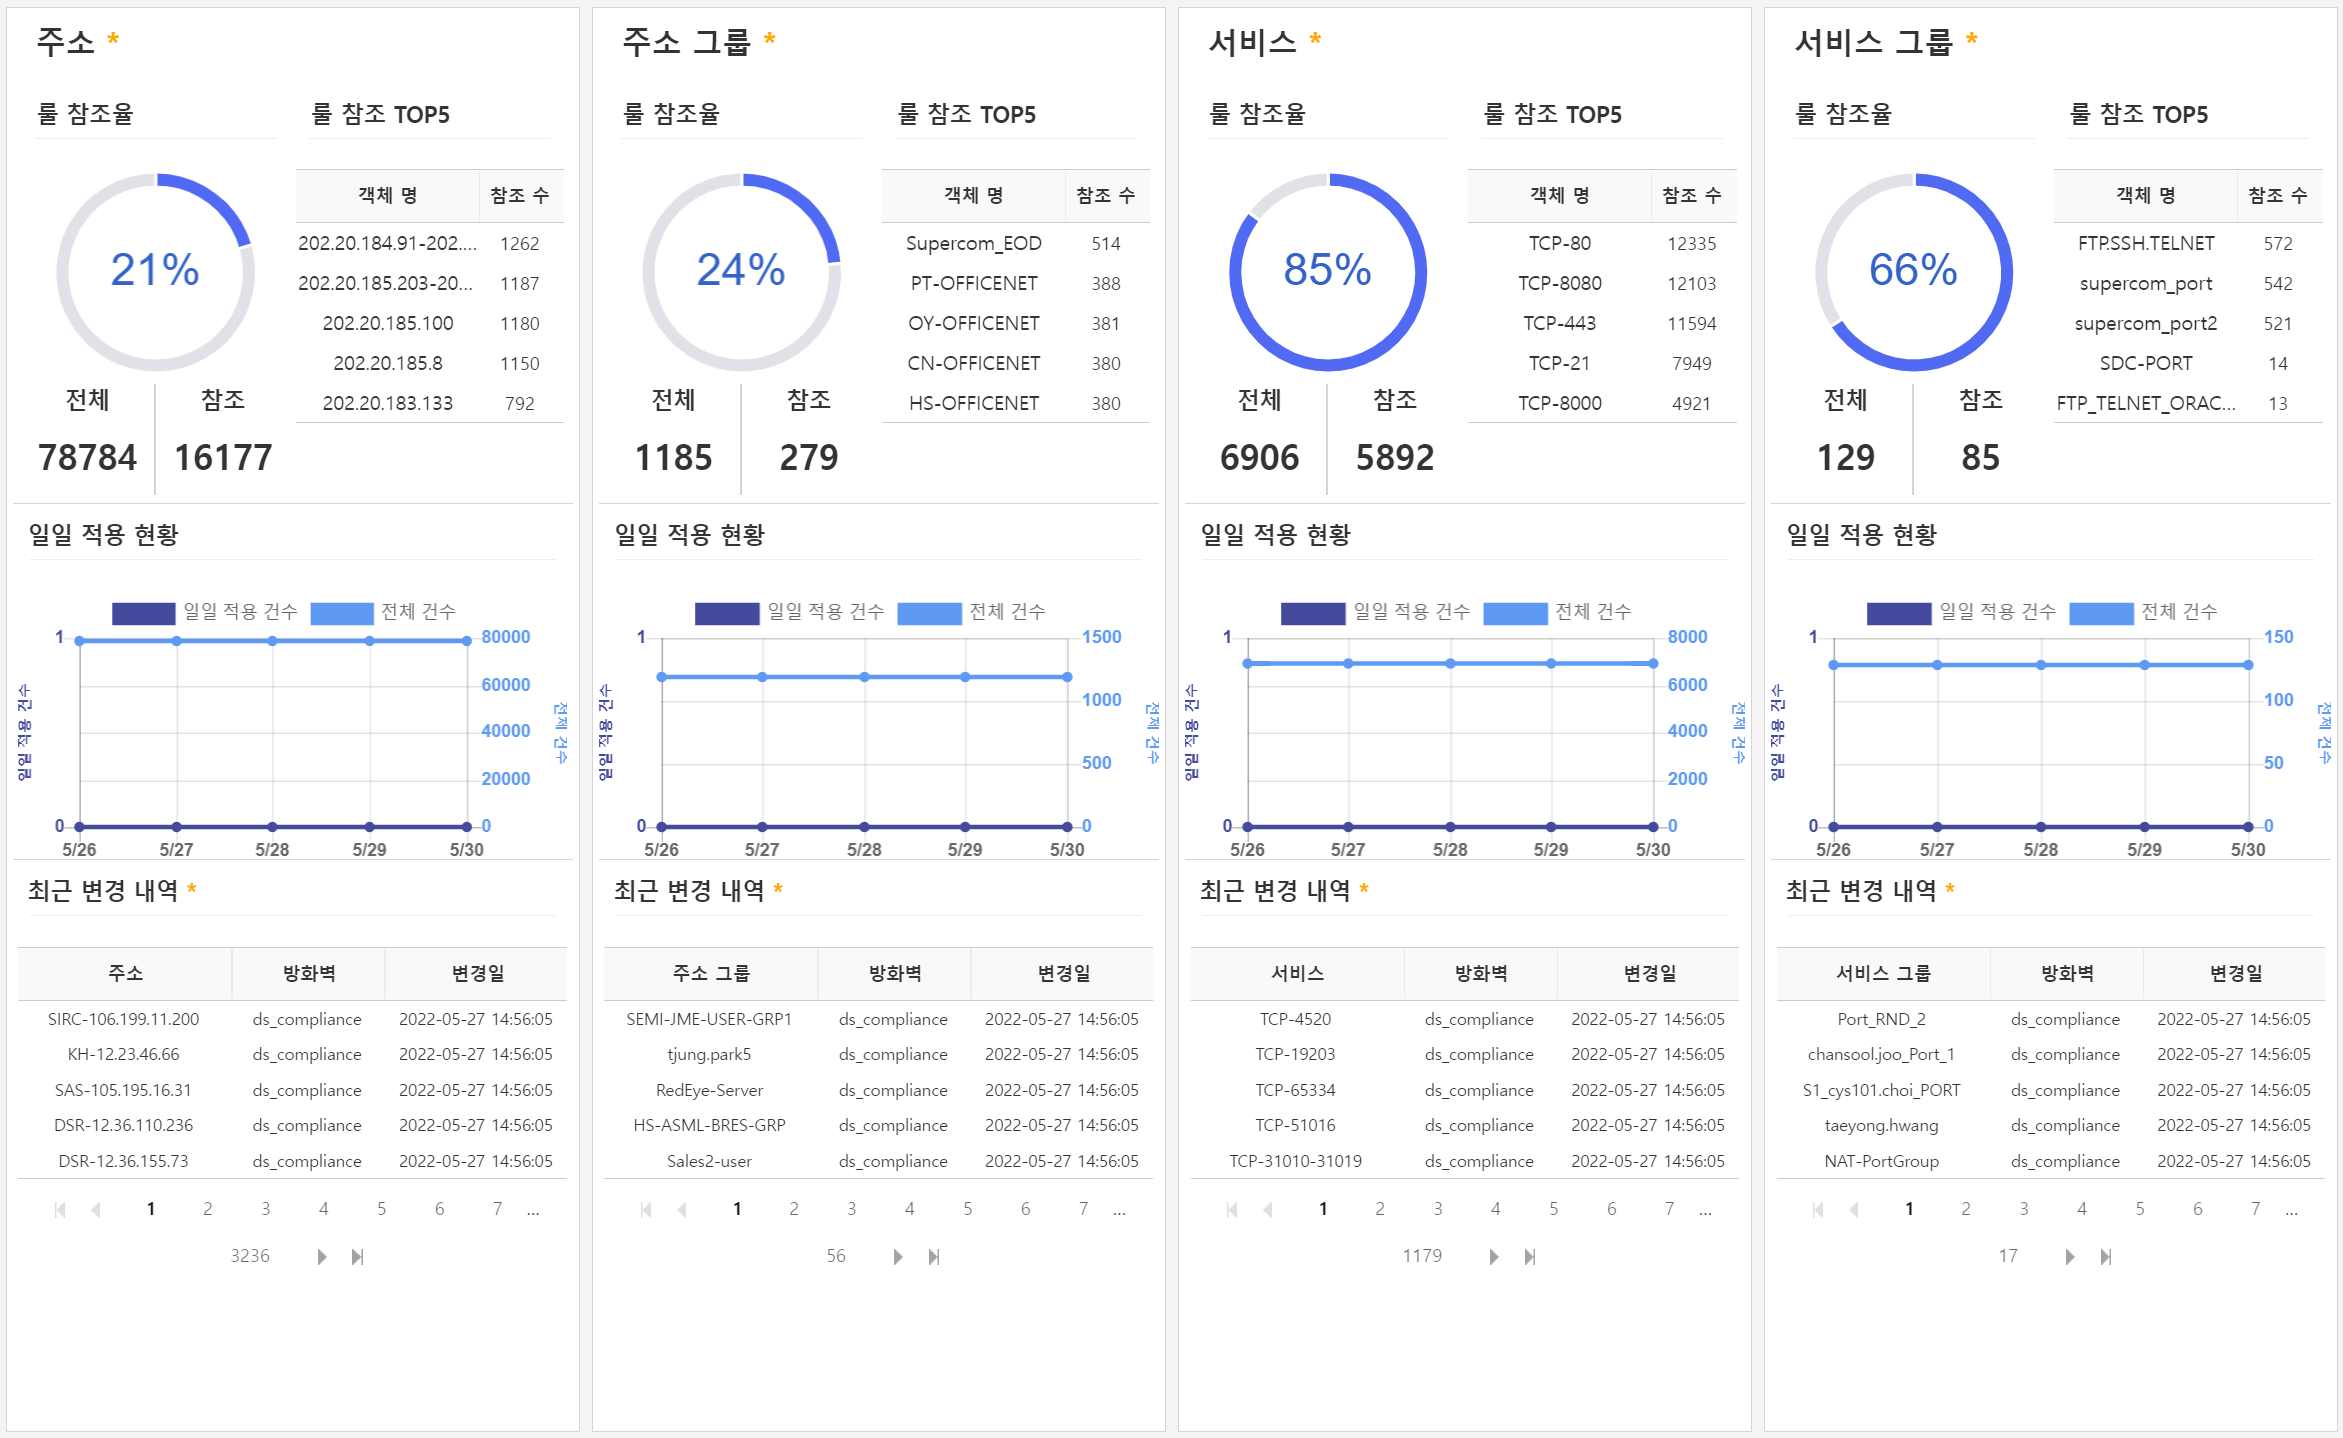
Vendor-specific object management
The objects supported by FPMS are address, address group, service, service group, and web rating, and the manageable objects may vary by firewall vendor.
| firewall vendor | address | address group | Service | Service Group | Web rating |
|---|---|---|---|---|---|
| Secui MF2 | O | O | O | O | X |
| Secui Bluemax (NGF) | O | O | O | O | X |
| Ahnlab | O | O | O | O | X |
| Axgate | O | O | O | O | X |
| CheckPoint | O | O | O | O | X |
| Fortinet | O | O | O | O | O |
| Fortimanager | X | X | X | X | O |
| Paloalto | O | O | O | O | X |
| CISCO ASA | O | O | O | O | X |
| Juniper Rest | O | O | O | O | X |
View Object
When you click the top menu Object > Select left firewall > Left object (choose one of address, address group, service, service group), the lookup page appears.

① Synchronization Status: You can verify the object’s status (synchronization and application status) according to the request through the object’s ‘Synchronization Status’.
| Synchronization status | Explanation |
|---|---|
| OK | Normal state after synchronization is complete |
| STANDBY | Temporary object for creation requests not applied to the firewall |
| REQUESTED | Object with a pending edit/delete request |
| CONFLICT | Object failed to synchronize because its content does not match the firewall. |
| STALE | Object that does not exist on the firewall (not displayed in the list, but can be accessed via a link within the rule set) |
② Rule Not Referenced: Indicates whether the object is not referenced in firewall policies. Update the policy reference status through the previous day’s batch job.
| Status code | Explanation |
|---|---|
| YES | The object is unused in all firewall policies. |
| NO | The object is in use across all firewall policies. |
Object creation/modification/deletion process
Object management is applied to the firewall through rule sets, just like standard rules. Object requests are processed in the following order.
Request to create, modify, or delete objects in each object (address, address group, service, service group, web rating) menu.
The requested object is retrieved as a rule set on the “Request Work List” page. 2. (The object rule set ID starts with “O”, and the rule set status is “REQUESTED”.)
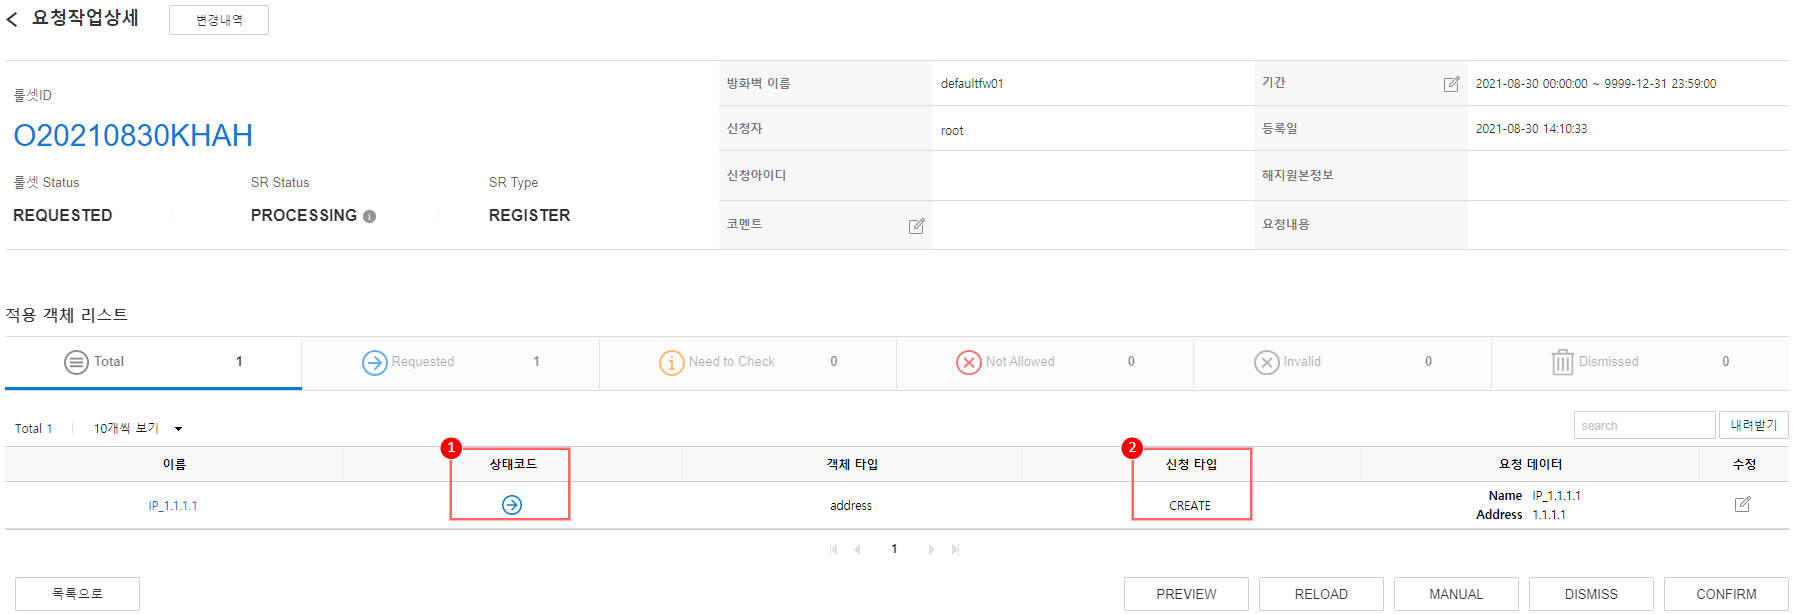
Figure. Object Request Rule Set The status codes for individual object requests in the applied object list are as follows.
| Status code | Explanation | |—|—| |
Requested | When the object state or request is normal. | | Need to Check | There are multiple requests for this object, so verification is required. | |
 Not Allowed | The object is in a CONFLICT state, meaning the request cannot be applied normally (predicting a ruleset ERROR). | |
 Invalid | A state where an abnormal request cannot be applied normally. This occurs when the request lacks content, when a creation request is made for an object that already exists with different content, or when a modification/deletion request targets a non‑existent object (predicting a ruleset error). |
 Table. Applied Object Status Code
The request types for individual object requests in the applied object list are as follows.
| Application type | Explanation | |—|—| | CREATE | Object creation | | UPDATE | Object modification (when modifying members of a group object, delete all existing members and overwrite) | | DELETE | Delete object | | ADD_MEMBER | Add member (applicable only to group objects) |
Table. Object request type
Request firewall application by performing CONFIRM → COMMIT as in the existing rule set.
It is applied to the firewall through batch jobs.
Managing address objects
Requests creation, modification, and deletion of address objects.
Request to create address object
Click the object in the top menu.
Select the firewall from the firewall list at the top of the left menu.
Click the address in the left menu. 3. (Click is possible only when the firewall is selected.)
Click Create on the “Address” page.

Figure. Address Object Creation Enter the following items on the “Address Creation” page.
Item Content Required/Optional Name Enter between a minimum of 2 characters and a maximum of 30 characters. Special characters cannot be entered (except . _ - + @). JuniperRest excludes (: . / - _), Fortinet does not allow duplicate names with address groups, and CheckPoint does not allow duplicate names across all objects. For FQDN, the address detail is automatically set as the address name, so entry is not allowed. required ZONE type Select the ZONE type (internal, external, dmz). Input is allowed only when the firewall vendor is Secui MF2 or Secui Bluemax, and it cannot be edited. required address type Select the address type (IPv4, Range, FQDN). Secui MF2 and Secui Bluemax cannot be edited. required Address Details Enter the address in the correct format according to the address type. required Table. Address object input fieldsClick Create. 6. Move to the “Address” page, and the created object is displayed in “STANDBY” state.
Request to edit address object
- Perform steps 1–3 of the address object creation request.
- Click the address name you want to edit on the “Address” page.
- Click Edit on the “Address Details” page.
- Enter the content to edit on the “Address Edit” page. 4. All items can be edited.
- Click Edit. 5. Navigate to the “Address Details” page.
- The synchronization status of the “Address Details” page is shown as “REQUESTED”, and the request details can be checked on the “Request Work Details” page by clicking the rule set ID in the ‘Request List’.
Request to delete address object
- Perform steps 1–3 of requesting address object creation.
- Click the address name you want to delete on the “Address” page.
- Click Delete on the “Address Details” page. 3. When the confirmation popup appears, click OK.
- The synchronization status of the “Address Details” page is displayed as “REQUESTED”, and the request details can be seen on the “Request Task Details” page by clicking the rule set ID in the ‘Request List’.
Managing Address Group Objects
Request creation, modification, and deletion of address group objects.
Request to create address group object
Click the object in the top menu.
Select the firewall from the firewall list at the top of the left menu.
Click the Address Group in the left menu. 3. (Click is possible only when the firewall is selected.)
Click Create on the “Address Group” page.
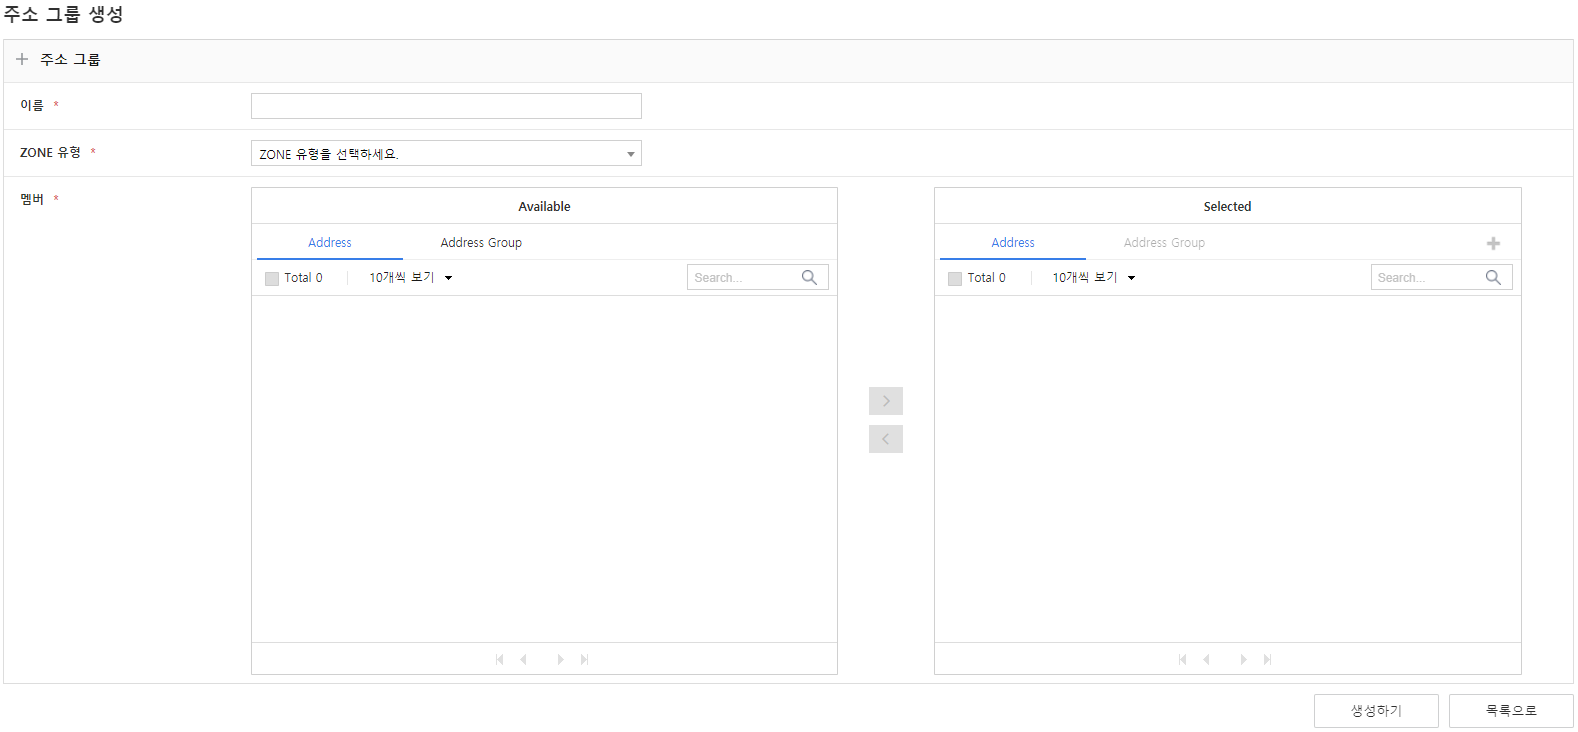
Figure. Create address group object Enter the following items on the “Create Address Group” page.
Item content Required/Optional name Enter between a minimum of 2 characters and a maximum of 30 characters. Special characters cannot be entered (except . _ - + @). JuniperRest excludes (: . / - _), Fortinet does not allow duplicate names for address groups, and CheckPoint does not allow duplicate names across all objects. required ZONE type Select the ZONE type (internal, external, dmz). Input is allowed only when the firewall vendor is Secui MF2, Secui Bluemax, or JuniperRest, and it cannot be edited. Required member Select the members of the group object (address member Address, address group member Address Group). For Secui MF2/Bluemax/JuniperRest, the ZONE type must be selected first for the members to be retrieved. Group members are supported in CheckPoint and Fortinet; for vendors that do not support group members, the address members of the group are added. required Table. Address group object input itemsTo add a member, follow these steps.
- Select the Address or Address Group tab in the “Available” table on the left.
- When the member list appears in the selected tab, click the checkbox of the member you want to add.
- Click. The selected member is added to the “Selected” table.

- To delete a member from the “Selected” table, click the checkbox of the member to be removed, then click.

To add a new member to the group object at the same time it is created, follow these steps.
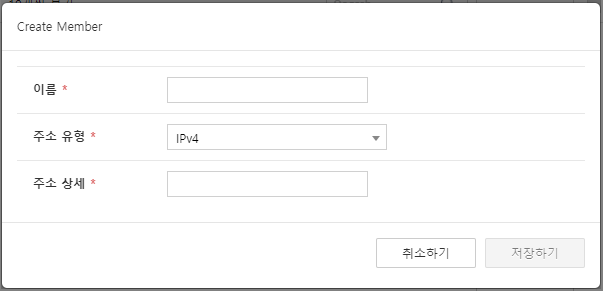
Figure. Address group member creation - Click thein the right “Selected” table.

- Click the
- The “Member Creation” popup page appears.
- Refer to the input fields of the address object creation request and enter the members. * (Secui MF2, Secui Bluemax, and JuniperRest have their Zone type automatically set to the Zone type of the address group.)
- Click Save. * The popup page closes and the entered content is added to the “Selected” table.
- To continue adding new members, repeat this step.
- Click Create. 8. Move to the “Address Group” page, and the requested object is displayed in “STANDBY” state. 8. (When a new member is added, a member creation request is also registered in the address group creation/modification rule set.)
Request to edit address group object
- Perform steps 1~3 of the address group object creation request.
- Click the address group name you want to edit on the “Address Group” page.
- Click Edit on the “Address Group Details” page.
- Enter the content to edit on the “Address Group Edit” page. 4. You can edit all items. 4. (For adding/removing members, follow step 6 of the creation request; for creating a new member, perform step 7.)
- Click Edit. 5. Navigate to the “Address Group Details” page, where the synchronization status appears as “REQUESTED”.
Request to delete address group object
- Perform steps 1~3 of the address group object creation request.
- Click the address group name you want to delete on the “Address Group” page.
- Click Delete on the “Address Group Details” page. 3. When the confirmation popup appears, click OK.
- The synchronization status of the “Address Group Details” page is shown as “REQUESTED”.
Managing Service Objects
Requests creation, modification, and deletion of the service object.
Request to create service object
Click the object in the top menu.
Select the firewall from the firewall list at the top of the left menu.
Click Service in the left menu. 3. (Click is possible only when the firewall is selected.)
Click Create on the “Service” page.

Figure. Service object creation On the “Create Service” page, enter the following items.
Item Content Required/Optional Name Enter between 2 and 30 characters. Special characters cannot be entered (. _ - + @ excluded). JuniperRest excludes (_), Fortinet does not allow duplicate names with service groups, and CheckPoint does not allow duplicate names among all objects. required Protocol Select a protocol (TCP, UDP, IP). Object modification is not possible for unsupported protocols (other than TCP, UDP, IP). Essential Destination port Enter the correct port according to the protocol. required Table. Service object input itemsClick Create. 6. “Port” page is navigated to, and the requested object is displayed in “STANDBY” state.
Request to edit service object
- Perform steps 1–3 of requesting service object creation.
- Click the service name you want to edit on the “Service” page.
- Click Edit on the “Service Details” page.
- Enter the content to be edited on the “Service Edit” page. 4. All items can be edited.
- Click Edit. 5. Move to the “Service Details” page, and the synchronization status is retrieved as “REQUESTED”.
Request to delete service object
- Perform steps 1~3 of requesting service object creation.
- Click the service name you want to delete on the “Service” page.
- Click Delete on the “Service Details” page. 3. When the confirmation popup appears, click OK.
- The synchronization status of the “Service Details” page is shown as “REQUESTED”.
Managing Service Group Objects
Requests to create, modify, and delete service group objects.
Request to create a service group object
Click the object in the top menu.
Select the firewall from the firewall list at the top of the left menu.
Click the Service Group in the left menu. 3. (Click is possible only when the firewall is selected.)
Click Create on the “Service Group” page.
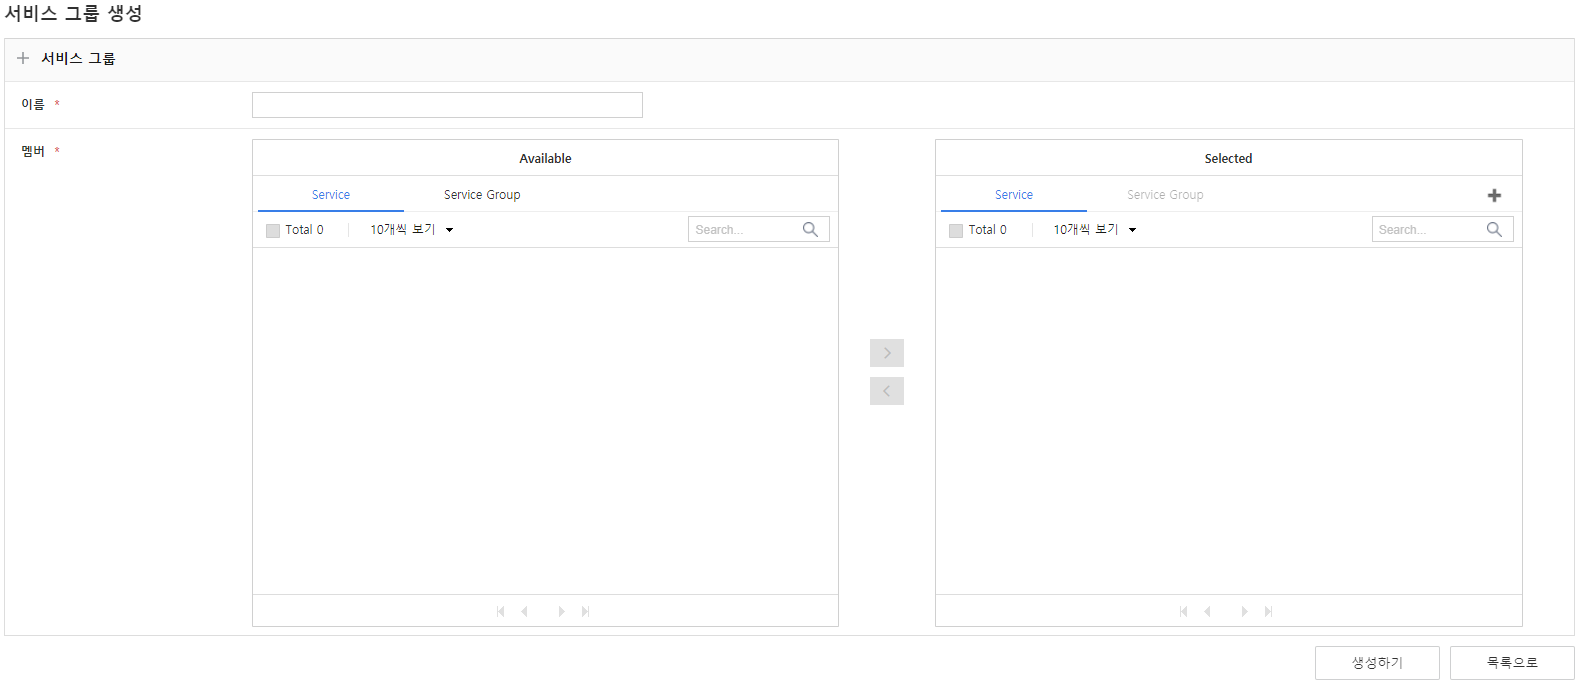
Figure. Create Service Group Object Enter the following items on the “Service Group Creation” page.
Item Content Required/Optional Name Enter between 2 and 30 characters. Special characters cannot be entered (except . _ - + @). JuniperRest (_ excluded), Fortinet does not allow duplicate names with service groups, CheckPoint does not allow duplicate names among any objects. Required Member Select the members of the service object (service member Service, service group member Service Group). Group members are supported on CheckPoint and Fortinet; for vendors that do not support group members, the service members of that group will be added. Required Table. Service group object input fieldsTo add a member, follow these steps.
- Select the Service or Service Group tab in the “Available” table on the left.
- When the member list appears in the selected tab, click the checkbox of the member you want to add.
- Click the image. The selected member is added to the “Selected” table.

- To delete a member from the “Selected” table, click the checkbox of the member to be deleted, then click.

To add a new member to the group object at the same time it is created, follow these steps.
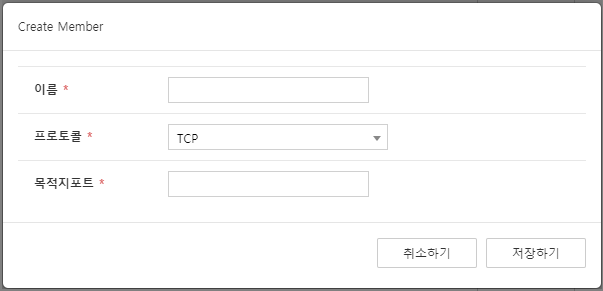
Figure. Service Group Member Creation - Click thein the right “Selected” table. * The “Member Creation” popup page appears.

- Refer to the input fields of the service object creation request and enter the members.
- Click Save. * The popup page closes and the entered content is added to the “Selected” table.
- Repeat this step to continue adding new members.
- Click the
Click Create. 8. Move to the “Service Group” page, and the requested object is displayed in “STANDBY” state.
Request to edit service group object
- Perform steps 1~3 of the service group object creation request.
- Click the service group name you want to edit on the “Service Group” page.
- Click Edit on the “Service Group Details” page.
- Enter the content to modify on the “Service Group Edit” page. 4. All items can be edited. 4. (For adding/removing members, follow step 6 of the creation request; for creating a new member, perform step 7.)
- Click Edit. 5. Move to the “Service Group Details” page, and the synchronization status is shown as “REQUESTED”.
Request to delete service group object
- Perform steps 1~3 of the service group object creation request.
- Click the name of the service group you want to delete on the “Service Group” page.
- Click Delete on the “Service Group Details” page. 3. When the confirmation popup appears, click OK.
- The synchronization status of the “Service Group Details” page is displayed as “REQUESTED”.
Managing Web Rating
Request creation, modification, and deletion of the web rating object.
Request to create a web rating object
Click the object in the top menu.
Select the firewall from the firewall list at the top of the left menu.
Click Web Rating in the left menu. 3. (Click is possible only when the firewall is selected.)
Click Create on the “Web Rating” page.
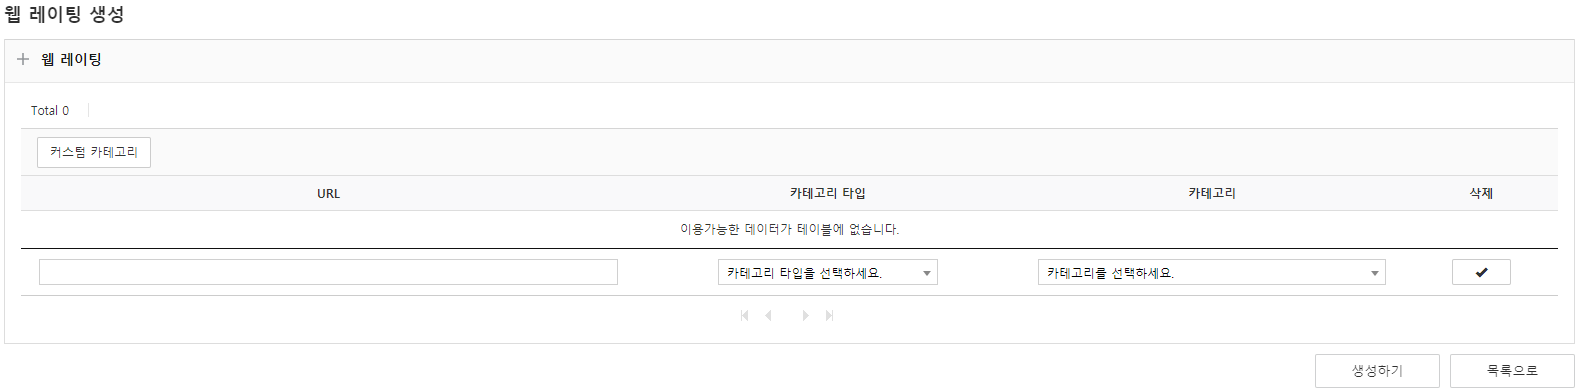
Figure. Web rating object creation Enter the following items on the “Web Rating Creation” page.
Item content Required/Optional URL Enter a valid URL up to 255 characters. URLs that are already registered cannot be entered, and URLs cannot be edited after creation. Required Category type Vendor-specific category types and custom categories Required Category Categories by type Required Table. Web rating object input itemsAfter entering the web rating information, click
. 6. The entered content is moved to the table. 6. To delete the table’s input content, click .
.
To add a custom category, follow these steps.
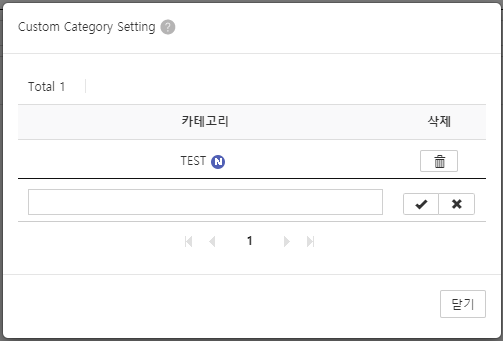
Figure. Custom Category - Click the Custom Category in the top left.
- After entering the category, click.

- The entered content will be moved to the table.
- Newly added categories are displayed withand are in an unregistered state on the firewall.

- (When registering a web rating object under this category, it is actually registered on the firewall.)
- Clicking it resets the category’s input. To delete a custom category, click
 .
.
- Click Close to close the popup page.
- The entered custom category can be found in the “Web Rating Creation” page > Category Type list by selecting ‘Custom’ > Category list.
- Click Create on the “Web Rating Creation” page. 8. Navigate to the “Web Rating” page, and the requested object appears in the “STANDBY” state.
Request to edit web rating object
- Perform steps 1~3 of creating a web rating object request.
- Click the URL you want to edit on the “Web Rating” page.
- Click Edit on the “Web Rating Details” page.
- Enter the content to edit on the “Web Rating Edit” page. 4. The URL cannot be edited.
- Click Edit. 5. Move to the “Web Rating Details” page, and the synchronization status is retrieved as “REQUESTED”.
Request to delete web rating object
- Perform steps 1~3 of creating a web rating object request.
- Click the URL you want to delete on the “Web Rating” page.
- Click Delete on the “Web Rating Details” page. 3. When the confirmation popup appears, click OK.
- The synchronization status of the “Web Rating Detail” page is displayed as “REQUESTED”.