Firewall Management
To add policies to a firewall using FPMS, the target firewall must be registered. You can manage API integration information (IP, integration accounts, etc.) for interfacing with firewalls and Zone information for linking with the application system, and you can configure firewall option settings according to the vendor to manage policies that match each vendor’s characteristics.
Register firewall
Create firewall
Generates firewall information for integration with FPMS.
Click Management > Firewall.
Click Create on the “Firewall” page.
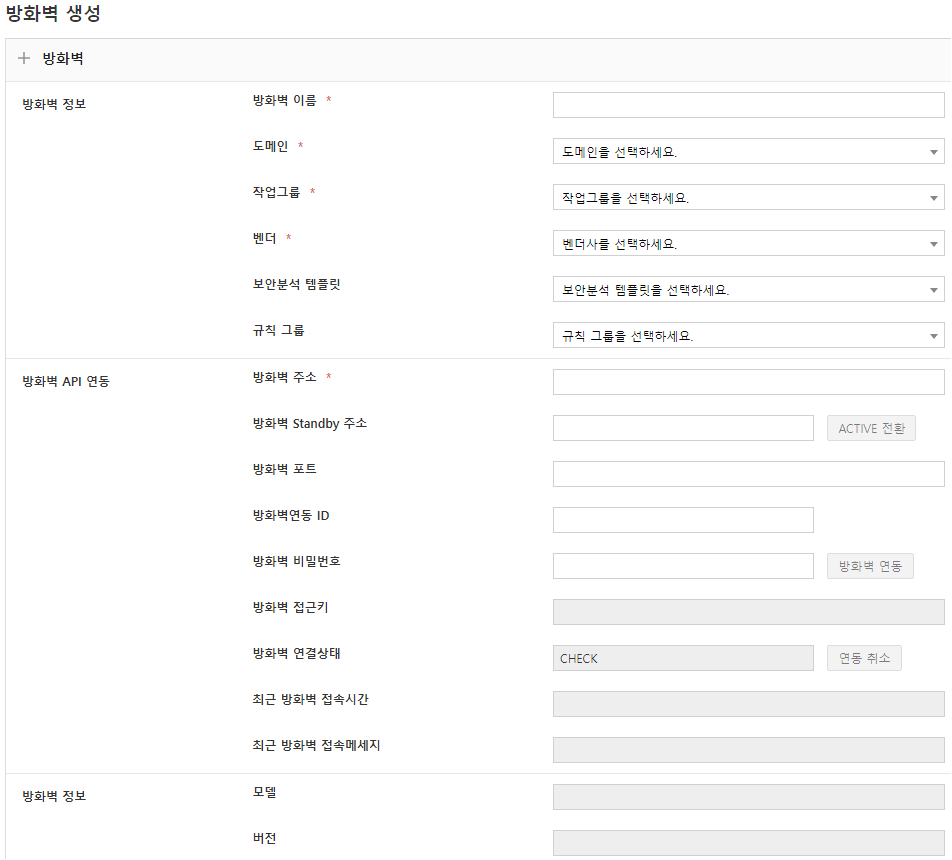
Figure. Create firewall Enter the following items on the “Create Firewall” page.
Category Item Explanation Required/Optional Firewall information Firewall name Firewall names cannot be duplicated. Special characters other than . _ # - ( ) [ ] { } + cannot be entered. Required Firewall information domain Represents the network location of the firewall. The super administrator account can add domains. Essential Firewall information Work group Select the work group that the firewall will belong to. (If there is no work group, refer to Create a work group in 「Administrator Settings」.) Required Firewall information vendor Select the firewall vendor. (stub is a simulation firewall) Required Firewall information Security Analysis Template Select the template to be used for rule security analysis. (Refer to Setting the rule security analysis template on the firewall in 「Policy Analysis」) Selection Firewall information Rule group Select the rule group defined by the administrator. Only rule groups that belong to the work group are displayed. (Refer to “Manage Rule Groups” in “Policy Rule Management”) Selection Firewall API integration Firewall address Enter the address that the firewall API will connect to. For NSX firewall, enter the Manager IP; for Future SMC registration, enter the SMC IP address. required Firewall API integration Firewall Standby address When you click the ACTIVE switch button using the firewall’s Secondary IP, it swaps the firewall address with the Standby address. Selection Firewall API integration Firewall port Enter if you have changed the default port (443). Selection Firewall API integration Firewall Integration ID Enter the account to be linked via API. Bluemax must enter the Client ID and Client Secret of ‘External Client Integration’. (For details of the linked account, refer to the vendor-specific account creation in the 「Firewall Vendor-specific Configuration Guide」.) Selection Firewall API integration Firewall password This is the password for the linked ID. Selection Firewall API integration firewall access key Enter when the vendor is Amazon AWS SG, Google Cloud Platform, or Microsoft Azure NSG. Selection Firewall API integration Firewall connection status When you click the firewall integration button, the connection status is automatically retrieved. (If integration fails, refer to the firewall vendor API integration error in 「Troubleshooting」) Read-only Firewall API integration Recent firewall connection time When the firewall is integrated, the connection time is retrieved. Read-only Firewall API integration Recent firewall connection messages When the firewall is integrated, the connection message is displayed. Read-only Firewall information Model / Version When integrating with the firewall, the firewall’s model and version are retrieved. Read-only Policy Application Management Automatic CONFIRM/COMMIT usage·level, bulk COMMIT mode Refer to policy application management. Selection Firewall policy application schedule You can input when modifying the firewall. Please refer to the firewall policy application schedule. Selection Expiration policy settings Enable automatic deletion of expired rules·Retention period (days) Please refer to the expiration policy settings. Selection Unreferenced object configuration Automatic unreferenced object notification setting·Notification period (days) Refer to the unreferenced object settings. Selection Schedule object configuration Refer to the schedule object settings. Selection Specific phrase detection settings Input is allowed when modifying the firewall. Refer to the specific phrase detection information settings. Selection Virtual firewall Please refer to the virtual firewall. Selection ID-based firewall configuration Please refer to the ID-based firewall configuration. Selection NAT option Please refer to the NAT option settings. Selection Optimization options Refer to the optimization option settings. Selection Both departure and destination are zone-managed Please refer to Zone management for both departure and destination. Selection User notification: rule registration completed Rule registration completed. Please refer to the user notification settings. Selection Node system Please select a node system. Select Explanation Please enter within a maximum of 255 characters. Selection Table 8-1. Firewall Input ItemsClick Create. 4. The created firewall can be viewed on the “Firewall” page.
Edit Firewall
Modify the firewall information. The firewall edit feature allows you to change the work group and modify option information.
- Click Management > Firewall.
- Click the firewall you want to edit on the “Firewall” page, or select a firewall from the firewall list at the top of the left menu.
- Click Edit on the “Firewall Details” page.
- Enter the content to modify on the “Firewall Edit” page. 4. All items can be edited. 4. (For details of the modified items, see the firewall input item table and configuring firewall detailed information.)
- Click Save.
Duplicate Firewall
Clone the firewall information to create a new firewall. Note that Zone information and firewall API integration information are not replicated.
Management > Firewall click it.
Click the firewall name you want to replicate on the “Firewall List” page.
Click Clone on the “Firewall Details” page. 3. “Duplicate Firewall” popup window appears.
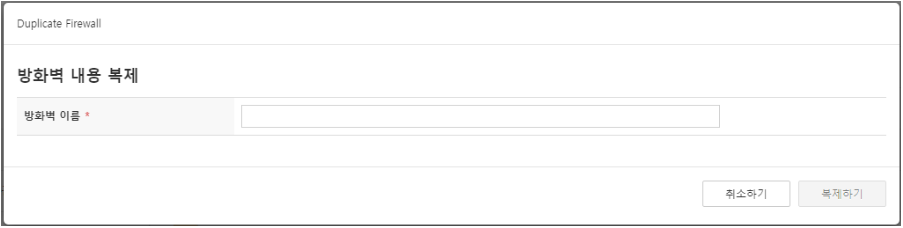
Figure. Firewall replication Please enter the firewall name. 4. (No duplicates allowed, . 4. _ # - ( ) [ ] { } + No other special characters can be entered)
Click Clone. 5. The created firewall can be viewed on the “Firewall” page.
Delete firewall
Delete the firewall and its related data. Only system administrators can delete the firewall.
- Click Management > Firewall.
- Click the firewall you want to delete on the “Firewall” page, or select the firewall from the firewall list at the top of the left menu.
- Click Delete on the “Firewall Details” page.
- When a popup asking whether to delete opens, click OK.
- When a firewall is deleted, the deleted firewall is moved to the “Deleted Firewall (Temporary Management)” work group. - Moved firewalls are permanently deleted by the terminate-entity job after a certain period.
- ‘Delete Firewall’ removes only the firewall in FPMS, while the integration with the application system remains unchanged. - If you no longer wish to integrate with FPMS due to replacement, disposal, or similar reasons, also complete the termination process with the application system. - (For details, contact the system administrator)
Configure firewall detailed information
Configure the environment and various settings for applying firewall policies. Firewall details can be configured through firewall creation or modification.
Policy Application Management
Configure this when you want to reduce the time required to apply firewall policies or apply them in real time.
Perform steps 1~3 of modifying the firewall.
On the “Firewall Edit” page, go to ‘Policy Application Management’ and configure according to the information below.
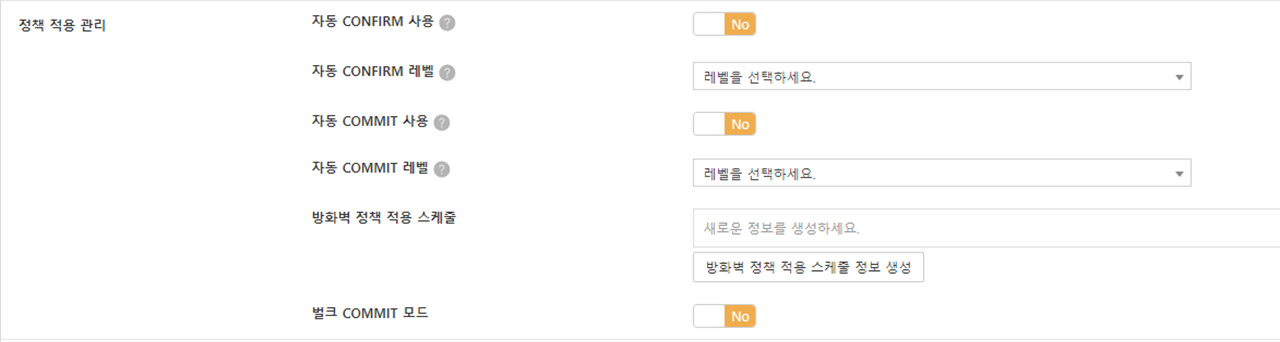
Figure. Policy Application Management Item Explanation Automatic CONFIRM usage If enabled, the rule set, including lower levels, is automatically CONFIRMed according to the automatic CONFIRM level. When enabled, only data up to one day before the approval date, starting from the set date, will be CONFIRMed. It cannot be enabled when using automatic COMMIT level 2. (Advantages: saves registration scheduling time, allows automatic CONFIRM per level) Automatic CONFIRM level Review criteria for the request task list. Level1 NORMAL(green), Level2 INFORMATION(sky blue, includes Level1), Level3 WARNING(orange, includes Level2), Level4 DANGER(red, includes Level3) Enable automatic COMMIT If enabled, it automatically commits the rule set—including sub‑levels—according to the automatic COMMIT level and registers it to the firewall. Automatic COMMIT runs every 20 minutes. (Pros: near real‑time registration / Cons: unverified requests may be registered) Automatic COMMIT level Status code criteria for the request work list. Level1 CONFIRMED, Level2 REQUESTED (including Level1). When using Level2, automatic CONFIRM cannot be used. Firewall policy application schedule Set the firewall policy application time when using automatic COMMIT. (Can be entered when modifying the firewall) Bulk COMMIT mode When enabled, it creates multiple (default 5) policies and performs the firewall apply operation once. It cannot be used when the firewall vendor is Fortinet. (Pros: reduced policy registration time / Cons: if an error occurs during registration, all policies bundled in bulk change to an error state) Table. Policy Application Management ItemsSave.
Firewall Policy Application Schedule
When using automatic COMMIT, set the scheduled time (00:00~24:00) so that the firewall policy is applied (COMMIT) at the desired time.
Perform steps 1~3 of modifying the firewall.
On the “Firewall Edit” page, go to the ‘Policy Application Management’ ‘Firewall Policy Application Schedule’.
Click Create firewall policy application schedule information. 3. A popup window appears.
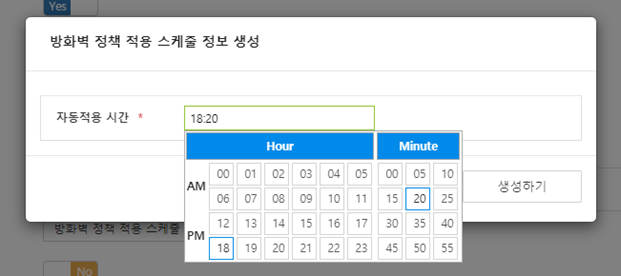
Figure. Firewall Policy Application Schedule Click the automatic apply time input field and select the hour and minute in the calendar popup.
Click Create. 5. If there are multiple schedules, repeat.
Expiration policy configuration
Set the expiration policy.
Perform steps 1~3 of modifying the firewall.
On the “Firewall Edit” page, navigate to ‘Expiration Policy Settings’ and configure it.

Figure. Expiration Policy Settings Item Explanation Enable automatic deletion of expired rules Set whether to automatically delete expired rules. Expiration rule retention period (days) When using automatic deletion of expiration rules, set the retention period (days) from the expiration date. (Maximum 10 years) Table. Expiration Policy Configuration ItemsClick Save.
Unreferenced object setting
Configure notifications for unreferenced objects.
Perform steps 1~3 of modifying the firewall.
On the “Firewall Edit” page, navigate to ‘Unreferenced Object Settings’ and configure.

Figure. Unreferenced Object Settings Item Explanation Enable unreferenced object notifications Set whether to automatically notify about unreferenced objects. Unreferenced object notification period (days) Set the notification period (in days) from the date registered as an unreferenced object. (Maximum 365 days) Table. Unreferenced object configuration itemsClick Save.
Schedule Object Configuration
When registering a firewall policy, set up the schedule object.
Perform steps 1~3 of modifying the firewall.
From the “Edit Firewall” page, go to ‘Schedule Object Settings’ and configure.

Figure. Schedule Object Configuration Item Explanation Use the start date when creating a schedule If inactive (‘No’), use the object created based on the expiration date. If active (‘Yes’), use the object where both the expiration date and start date match. (AhnLab firewall not supported) Whether to use weekend expiration When activated, schedule objects are created on a weekly basis. (For firewalls with a limit on the number of schedule objects) Example: Expiration date 2019/07/15(Mon) → created as Sunday 2019/07/21 of that week Monthly expiration usage When activated, creates the schedule object input on a monthly basis. Example: Expiration date 2019/07/15 → generated as month‑end 2019/07/31 Schedule object not used When activated, it creates a policy without using a schedule object (for firewalls that do not support schedules). If used together with the ‘Expiration Policy Setting’, FPMS will manage the schedule on its behalf and disable/delete the rule on the expiration date. Table. Schedule object configuration itemsClick Save.
Configure specific phrase detection information
This function extracts the phrase within the Comment field of the firewall application information. This feature allows you to receive review results that differ from the default FPMS review results.
Perform steps 1~3 of modifying the firewall.
On the “Firewall Edit” page, go to ‘Set Specific Phrase Detection Information’.

Figure. Specific phrase detection information settings Click Create specific phrase detection information.
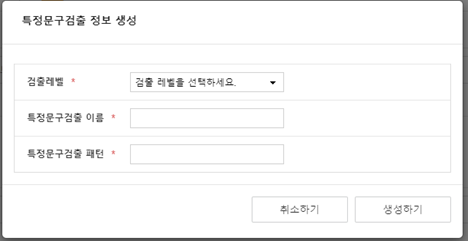
Figure. Specific Phrase Detection Information Generation Please refer to the following content and configure accordingly.
Item Explanation Detection level Set the priority of the content to be detected. According to the setting, the color of the review section in the request task list is configured. The priority order is success < info < warning < primary < danger, and only content of higher levels is displayed in the review section. Specific phrase detection name Set the keywords for the content to be detected. The name of the review section is set in the request task list. Specific phrase detection pattern Enter the content to be detected. Table. Specific phrase detection itemsClick Create. 5. If there are multiple items to detect, repeat steps 3 through 5.
- Example of specific phrase detection: If a comment contains the “permanent” pattern, set it to display “permanent rule” in red on the task list (Detection level: danger, name: permanent rule, pattern: permanent)
- For requests that have already been received, after configuring the corresponding function on the firewall, click the RELOAD button at the bottom of the “Request Work Details” page to apply the changes.
Virtual firewall
Configure when using the virtual firewall provided by the firewall.
Perform steps 1~3 of modifying the firewall.
On the “Firewall Edit” page, navigate to the ‘Virtual Firewall’ and configure it.

Figure. Virtual firewall Item Explanation Whether to use a virtual firewall Set whether to use the virtual firewall. Select ‘Yes’ if you use the virtual firewall provided by the firewall. (Bluemax, VMware NSX firewall is required) Virtual ID Enter the virtual firewall ID when using a virtual firewall. - NSX: Edge-ID
- Paloalto: vsys name
- Future: Security Management > Model Selection > Device Name
- Fortinet: vdom name
- Bluemax: vs (after connecting the virtual firewall, right-click > Properties > check the vs number in the address, example input → vs:4)
- Checkpoint: When not using the Default setting, enter in the order Policy, Layer, Target (ensure correct order and spacing)
Table. Virtual firewall itemsClick Save.
ID-based firewall configuration
If the firewall supports ID-based features, you must configure this setting for proper operation. (IP-based (legacy) firewall does not apply) FPMS supports ID‑based authentication firewalls, and firewall exceptions are processed using the authenticated user’s ID and IP address (e.g., Active Directory, u‑Ready, or other authentication systems).
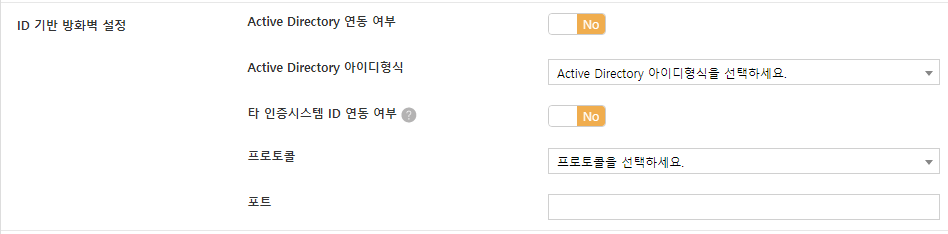
Active Directory integration settings
When using an ID-based firewall integrated with Active Directory, set the ‘Active Directory integration status’ and the ‘Active Directory ID format’.
- Perform steps 1~3 of modifying the firewall.
- On the “Firewall Edit” page, go to ‘ID-based Firewall Settings’.
- Click ‘Active Directory integration status’ and set it to ‘Yes’.
- From the ‘Active Directory ID format’ list, select the ID format used for integration (SAM: SAMAccountName / DN: DistinguishedName).
- Click Save.
Select the ‘Active Directory ID format’ according to the firewall vendor.
- Secui, PaloAlto: Select SAM
- Fortinet: For FortiOS version 6.2 or higher, select DN; for versions below 6.2, select SAM.
Other authentication system ID integration settings
When integrating authentication systems other than Active Directory (such as u-Ready) and using an ID‑based firewall, set the ‘Other authentication system ID integration’, ‘Protocol’, and ‘Port’.
- Perform steps 1~3 of modifying the firewall.
- On the “Edit Firewall” page, go to ‘ID-based firewall configuration’.
- Click ‘External authentication system ID linking’ and set it to ‘Yes’.
- Select the protocol used for integration from the ‘Protocol’ list (choose among TCP, UDP, TLS; varies by vendor).
- Enter the port number used to communicate with the firewall in the “Port” field.
- Click Save.
NAT option configuration
To create a NATed request rule, you must enable the NAT option. When the NAT option is enabled, FPMS creates request rules by referring to the “NAT policy”. (NAT policies are created from the NAT policy synchronization in 「Policy Management」)
Perform steps 1~3 of modifying the firewall.
From the “Edit Firewall” page, navigate to the ‘NAT Options’.

Figure. NAT option setting Click ‘NAT activation’ and set it to ‘Yes’.
Select a location from the ‘NAT application location’ list.
- Packet > Firewall > NAT: When a separate NAT device exists, and traffic passes through the firewall device first before reaching the NAT device.
- Packet > NAT > Firewall: When a separate NAT device exists and traffic passes through the NAT device before reaching the firewall.
- Packet > NAT, Firewall: When the NAT device and the firewall device are the same
Click Save.
Optimization Options Setting
Optimization is the process of eliminating duplicate application rules and simplifying them to create the applied rules. If you select ‘Apply Rule Optimization’, the rule set that comes in as a request task will be optimized.
Perform steps 1~3 of modifying the firewall.
From the “Firewall Edit” page, go to ‘Optimization Options’.
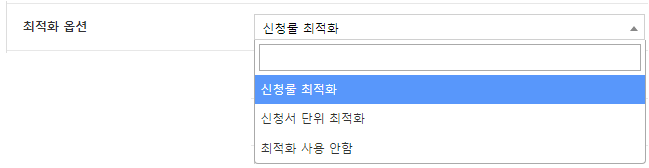
Figure. Optimization Options Setting Select the optimization options to use. 3. (Default: Application rule optimization)
Click Save.
- Application rule optimization: Merge and group by application rule units to create policies
- Application form unit optimization: merge at the application rule level and group by application form unit to create policies
- Do not use optimization: create policies by grouping only at the application rule level without merging.
Manage both departure and destination zones
This option allows creating application rules only for requests where both the origin and destination addresses are within the Zone area. When disabled, if a Zone address or Zone compartment is set, a request rule is created if either the origin or destination falls within a Zone.
Perform steps 1–3 of modifying the firewall.
On the “Firewall Edit” page, go to ‘Manage both source/destination Zones’.

Figure. Source/Destination All Zone Management Click ‘Manage all departure/destination zones’ and set it to ‘Yes’.
Click Save.
The following is an example of creating application rules per setting. (Zone address — Internal: 1.1.1.0/24, External: 2.2.2.0/24)
| Both departure and destination are zone-managed | Source 1.1.1.1, Destination 3.3.3.3 | Source 1.1.1.1, Destination 2.2.2.2 | Source 2.2.2.2, Destination 3.3.3.3 |
|---|---|---|---|
| NO | Create | Create | Generate |
| YES | X | Create | X |
- If you enable the ‘All source/destination Zone management’ option, inner zones such as int-int, ext-ext, dmz-dmz are also registered as request rules.
- If you want only directional rules such as int‑ext to be registered, add the “Exclude rule set creation when source/destination zones are the same” option in the firewall detailed feature settings.
Rule registration completed user notification setting
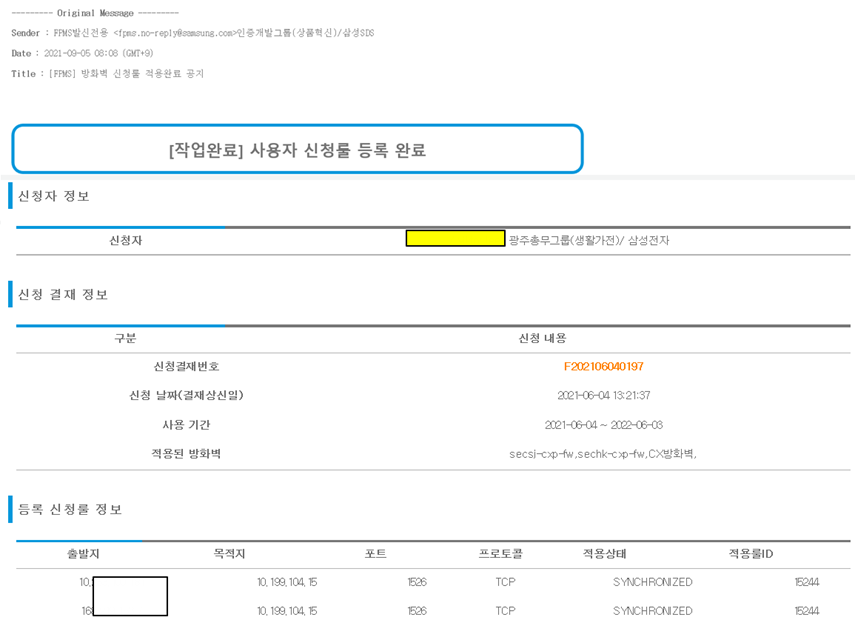
Configure the function that sends an email to the rule applicant when the rule application is completed.
Perform steps 1~3 of modifying the firewall.
On the “Firewall Edit” page, go to ‘Rule Registration Complete User Notification’.

Figure. Rule registration complete user notification setting Click ‘Rule registration complete user notification’ and set it to ‘Yes’.
Click Save.
Mail Sending Criteria: Emails are sent three times daily (12:00, 17:00, 20:00) to applicants of rule sets that have completed rule application.
Mail sending content: The sender is the FPMS account, the recipient is the rule applicant, and the detailed content includes the rule set list details (applicant, approval information, rule information).
Managing ZONE Addresses
Set the firewall-managed range in address units.
Create ZONE address
You can manually enter the ZONE address or generate it in bulk from a file or text.
Click Management > Firewall.
Select the firewall on the “Firewall” page.
Click the ZONE address in the left menu. 3. (Click is possible only when the firewall is selected.)
Click Create on the “ZONE address” page.
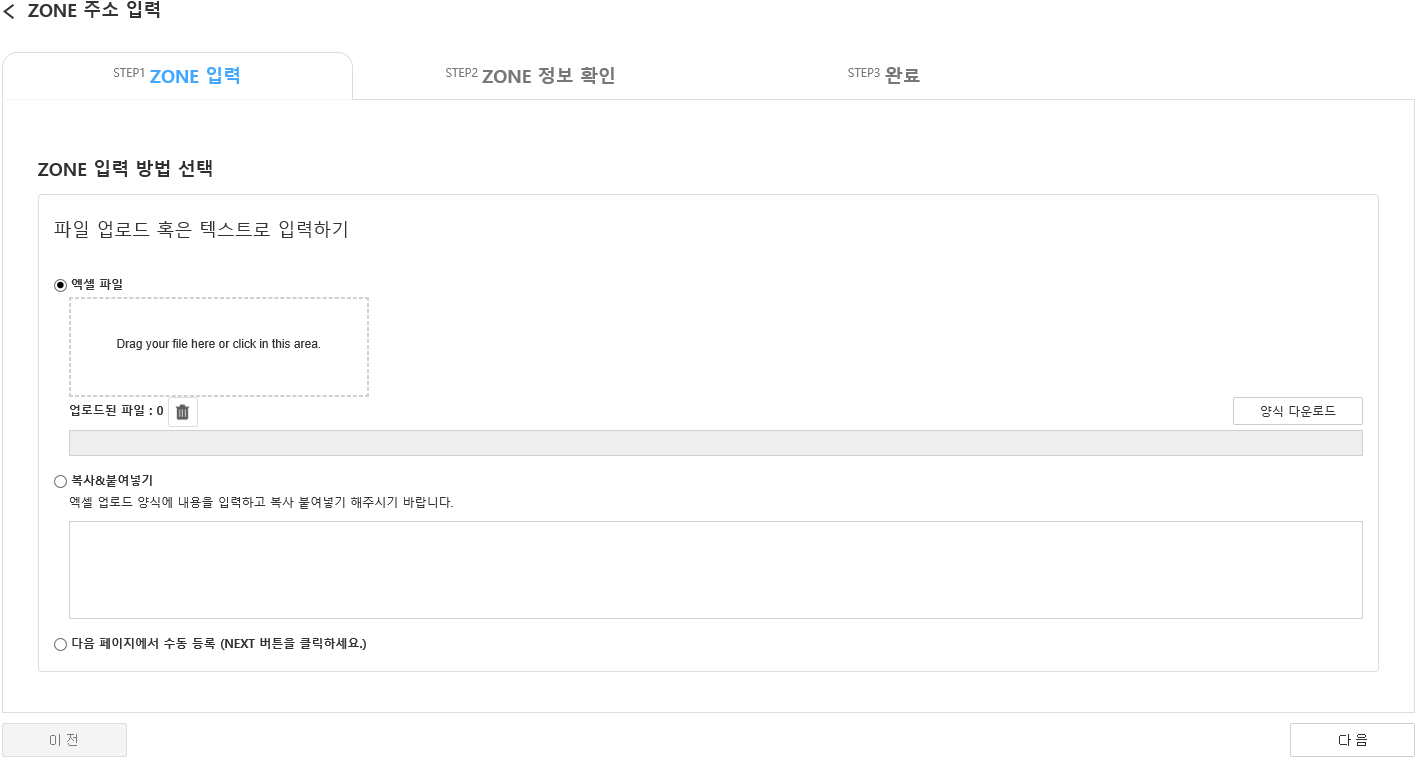
Figure. ZONE address creation (STEP1) On the “ZONE address input” page’s “STEP1 ZONE input” tab, select the input method (Excel file, copy&paste, manual registration on the next page) and click Next.
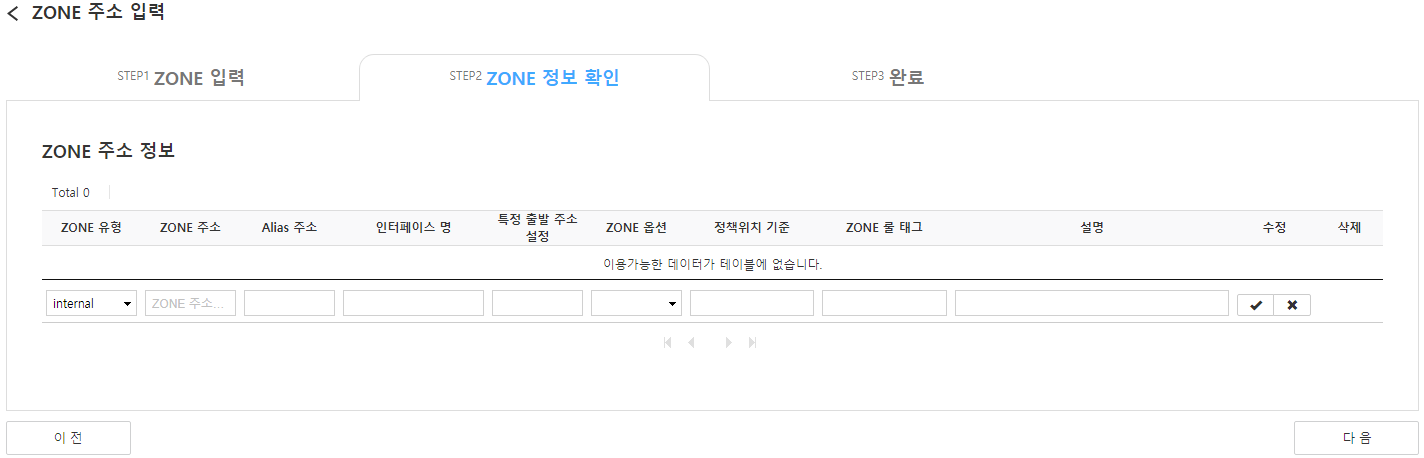
Figure. ZONE address creation (STEP2) Enter the following items on the “STEP2 ZONE Information Check” page.
Item Explanation example Required/Optional ZONE type Select the ZONE type for the specified IP range. internal, external required ZONE address Set the IP address. 1.1.1.1 / 1.1.1.0/24 / samsung.com Required Alias address It can be configured for cases where the range is broader than the Zone address (e.g., Zone address 1.1.1.0‑1.1.125.255, Alias address 1.1.0.0/16). 1.1.0.0/16 Selection Interface name Specify when an interface or ZONE uses a name different from the ZONE type. (Applies only to Juniper, Palo Alto, Cisco) Selection Set specific source address It only recognizes when the ZONE address range and a specific departure address range correspond to the origin and destination, respectively. ZONE address 1.1.1.0/24, specific source address 3.3.3.0/24 Selection ZONE option Blank: Not applied / srcOnly: Applied only when the source address is in the specified Zone / dstOnly: Applied only when the destination address is in the specified Zone srcOnly, dstOnly Selection Policy location criteria By setting the rule order, rules applied to the specified ZONE are stacked beneath the entered rule ID. Selection Explanation Description of the ZONE address. (Within 255 characters) Selection Table. ZONE address input fieldAfter entering the ZONE address information, click
. 7. The entered content is moved to the table. 7. When clicked, the input fields are reset. 7. To edit the table contents, click
 , and to delete, click
 .
.
When the input is complete, click the Next at the bottom, and when the popup appears, click OK. 8. Move to the “STEP3 Complete” tab.
The generated ZONE address can be viewed on the “ZONE address” page.
Edit ZONE address
- Perform steps 1–3 of creating a ZONE address.
- Click the ZONE type of the ZONE address you want to edit on the “ZONE address” page.
- Click Edit on the “ZONE Address Details” page.
- Enter the content to edit on the “ZONE address edit” page. 4. All items can be edited.
- Click Save.
Delete ZONE address
“ZONE address” page bulk deletion: After completing steps 1–3 of creation, on the “ZONE address” page, check all ZONE addresses you want to delete and click Delete > OK.
Delete on the “ZONE address details” page: after completing steps 1–3 of creation, click the ZONE type of the ZONE address you wish to delete, then click Delete > OK on the “ZONE address details” page.
Managing ZONE compartments
Set the range managed by the firewall in compartment units. (Compartment: a group of predefined IP addresses)
Create ZONE compartment
Click Management > Firewall.
Select the firewall on the “Firewall” page.
Click the ZONE Compartment in the left menu. 3. (Click is possible only when the firewall is selected.)
Click Create on the “ZONE compartment” page.

Figure. Create ZONE Compartment Enter the following items on the “ZONE Compartment Creation” page.
Item Explanation example Required/Optional ZONE type Select the ZONE type of the component. Internal, External required Component name Select the compartment. Required Set specific source address It only recognizes when the component range and the specific departure address range correspond to the origin and destination, respectively. Compartment: Samsung SDS, Specific source address: 3.3.3.0/24 Selection Interface name Specify when an interface or ZONE uses a name different from the ZONE type. (Applies only to Juniper, Palo Alto, and Cisco) Selection Table. ZONE compartment input itemsClick Create. 6. The created ZONE compartment can be viewed on the “ZONE compartment” page.
Edit ZONE compartment
- Perform steps 1~3 of creating a ZONE compartment.
- Click the ZONE type of the ZONE compartment you want to edit on the “ZONE compartment” page.
- Click Edit on the “ZONE Compartment Details” page.
- Enter the content to edit and click Save.
Delete ZONE compartment
- Perform steps 1~3 of creating a ZONE compartment.
- On the “ZONE compartment” page, click the ZONE type of the ZONE compartment you want to delete.
- Click Delete > OK on the “ZONE Compartment Details” page.
Manage detailed firewall functions
You can configure more detailed features such as baseline rules, comment settings, etc.
Configure detailed firewall functions
Additional features that can be configured may vary depending on the firewall vendor.
Click Management > Firewall.
On the “Firewall” page, select the firewall.
Click Firewall detailed feature settings in the left menu. 3. (Click is possible only when the firewall is selected.)
Click Create on the “Firewall Detailed Feature Settings” page.

Figure. Create firewall detailed function Select the additional feature to configure from the list of additional features on the “Firewall Detailed Feature Creation” page and enter the configuration value. 5. The selectable add‑ons and configuration values are as follows.
Additional feature Add-on ID Explanation Setting value Firewall SSH port configuration firewallSshPort Set firewall root shell password fwRootShellPwd Set SecuAI root password fwSecuiRootPwd Set firewall read user ID fwViewModeUserId Optimization not used no_optimize_tuples Enable similar address discovery explicit_zone_related Configure it to allow IP ranges with high relevance to be entered as rules. X Customizing address object names addr_object_name_format Rename address object Reference for customizing the Address object name in “Configuration Usage Example” Configure Axgate vdid object name format axgate_vdid_object_name_format Set Azure subscription ID azure_subscription_id If it matches a deny base rule, create a policy above the corresponding deny policy. base_deny_rule_discovery If a new allow rule is included in a permanent Deny rule, register it above the baseline rule or the corresponding permanent Deny rule. If the permanent Deny rule is a manually processed rule, register it at the TOP. Register above the baseline rule: Baseline rule ID / Register above the corresponding permanent Deny rule: null If it matches a deny base rule, create the policy at the topmost level. base_deny_rule_discovery_top_id If the base_deny_rule_discovery option is present, register the new rule included in the permanent Deny rule under the base rule. Standard Rule ID Configure the top order of the fqdn policy (create below the reference ID) base_internet_policy_id If the firewall has a base internet rule, merge it with the existing rule. Standard Rule ID Set lower policy order (create above the reference ID) bottom_policy_id Register the new rule above the base rule (if there is no setting value, place it at the bottom) Standard Rule ID Checkpoint object collection limit setting checkpoint_get_object_limit Set Cisco policy group object name cisco_rule_group_object_custom_name Automatically convert to a group object when applying for the high-capacity port service convert_service_group If you request multiple port services separated by commas and exceed the standard count, replace them with a service group to apply the policy Number of criteria (10 if blank) Checkpoint default VPN profile configuration defaultVpnProfile Configure the order at the bottom of the deny policy (create above the reference ID) deny_rule_bottom_policy_id When creating a Deny rule, register it above the base rule. Standard Rule ID Set the top order of the reject policy (create below the reference ID) deny_rule_top_policy_id When creating a Deny rule, register it under the base rule. Standard Rule ID Checkpoint disable install policy setting disable_install_policy Fortinet Local FSSO not used fortinet_no_local_fsso Port settings when applying for ICMP (0~13) icmp_type If the comment contains icmp and a request for ports ≤8, a tcp/8 request, or the protocol arrives as icmp → change the protocol to icmp and set the port in the configuration ICMP port number Exclude firewall rule set creation ignore_discovery Exclude to prevent triggering the FPMS discovery logic. X Exclude rule set creation when the source/destination zones are the same. ignore_inner_zone_rule blank (null): exclude when src, dst zone match / subnet: exclude when zone matches and the same zoneAddress applies / [zone name]: exclude when src, dst zone correspond to the value null / subnet / [zone name] (internal/external) NSX-T DFW ID configuration nsxt_dfw_Id Set NSX-T gateway policy ID nsxt_gateway_policy_id Disable NSX-T logging nsxt_log_disable Exclude rule set creation for cases that match the base rule. permanent_rule_filter Configure it to reject new rules that are already included in the existing permanent rule. X Set permanent policy top order (create below the reference ID) permanent_rule_top_id When adding a permanent rule, position it below the base rule. Standard Rule ID Maximum subnet mask setting (1~32) rewriting_max_netmask Set netmask length (e.g., 17 → convert 1.1.0.0/16 to 1.1.0.0/17) Netmask length Rule set duplication ruleset_copy Copy the policy to the configured firewall. Name of the firewall to copy Firewall policy comment setting set_custom_description Automatically generate comments according to the configured template (e.g., RS: S20190707 20190707-20200707 applicant name applicant system ID) See Comment template (Table 8-4) Top policy order setting (created under the reference ID) top_policy_id Register the new rule under the base rule (place at the top if no setting value) Standard Rule ID Unknown If the zone is unknown, specify the zone name unkown_custom_zone_name The default Zone name set when the firewall Zone cannot be identified. Default zone name Web rating basic category settings web_rating_default_category Log server key configuration log_server_key Automatic Application Management Items ruleset_automation_option Firewall policy application management’s functional granularity options. Item: Rule / Object Item[:confirm/commit] Daily analysis execution settings analysis.daily Whether to perform daily analysis true/false Daily analysis interval setting analysis.daily.cycle Daily analysis cycle (days) Number (daily unit) Set to perform comparative analysis between policies analysis.compare Whether to perform comparative analysis between policies true/false Set the comparison analysis interval between policies analysis.compare.cycle Policy comparison analysis cycle (weekly) Number (weekly unit) Configure daily policy synchronization execution sync.daily Whether to perform daily policy synchronization true/false Daily policy synchronization interval setting sync.daily.cycle Daily policy synchronization interval (in days) Number (daily unit) Table 8-2. Detailed Firewall FunctionsThe detailed options for each vendor are as follows.
Additional feature Add-on ID Explanation Setting value vendor SCTP protocol change settings (TCP/UDP) sctp_application_rule_id If there is sctp in the comment, change the protocol to sctp. X paloalto only Application port mapping configuration map_port_on_application If it matches “Protocol : Port : app”, application settings X paloalto only Palo Alto log configuration paloalto_log_setting Automatically set log when rule is converted, disabled, or deleted Log content paloalto only Tag expiration date setting set_expire_date_on_tag Manage by writing to the rule tag without creating an expiration period object. X paloalto only Enter the icmp application for the ICMP protocol. ip_application_rule Use an application protocol other than TCP/UDP X paloalto only Enable inline object usage use_string_address When the source or destination is a range, CIDR, or host, create the policy using a String address without creating an object. X paloalto only Palo Alto AntiVirus profile configuration securityAntivirusProfile anti-virus option settings anti virus profile name paloalto only Palo Alto vulnerability protection profile settings securityVulnerabilityProtectionProfile IDS option configuration IDS profile name paloalto only Palo Alto Anti-spyware profile configuration securityAntiSpywareProfile anti-spyware option setting anti spyware profile name paloalto only Palo Alto URL Filtering Profile Configuration securityUrlFilteringProfile URL Filtering option configuration url Filtering profile name paloalto only Palo Alto FQDN Web Filter Feature Configuration use_fqdn_rule_with_web_filter Change the FQDN rule to an ANY rule for the destination where the Web Filter Profile is applied. URL Filtering Profile name paloalto only Log Insight profile settings logInsightProfile Log viewing profile setting Log viewing profile name vmware only Checkpoint disable install policy setting disable_install_policy Set Install Policy feature to OFF checkpoint only Cisco log configuration cisco_log_setting Set the log setting value in fwRuleInfo. Log content cisco only Set Checkpoint Security Profile Layer name checkpoint_policy_layer Set the Threat Layer name used when creating a Security Profile rule Threat policy Layer name checkpoint only Table 8-3. Vendor-specific detailed optionsClick Create. 6. The generated firewall’s detailed functions can be viewed on the “Firewall Detailed Function Settings” page.
The Comment template objects that can be used in firewall policy comment setting (set_custom_description) are as follows.
| comment object | Explanation |
|---|---|
| ${RULESET_ID} | FPMS rule set ID |
| ${USER_NAME} | Applicant Name |
| ${USER_ID} | Applicant ID |
| ${APPLY_ID} | Application System Request ID |
| ${APPROVAL_ID} | ESB approval number |
| ${START_DATE} | Start date |
| ${END_DATE} | Expiration date |
| ${COMMENT} | Original applicant comment |
| ${OPERATOR_COMMENT} | Admin comment |
Edit firewall detailed function
- Perform steps 1~3 of configuring detailed firewall functions.
- Click the additional feature you want to edit on the “Firewall Detailed Feature Settings” page.
- Click Edit on the “Firewall Detailed Feature Settings Detail” page.
- Enter the content to edit and click Save.
Delete detailed firewall function
- Perform steps 1~3 of configuring detailed firewall functions.
- Click the additional feature you want to delete on the “Firewall Detailed Feature Settings” page.
- Click Delete > OK on the “Firewall Detailed Feature Settings Detail” page.
Terminate FPMS firewall
If the firewall is replaced, decommissioned, or no longer used with FPMS, the firewall must be terminated. To cancel the firewall, submit an SR to release billing, disconnect the request system integration, and delete the firewall in FPMS.
SR request for billing termination
- Please select DCManager > WORKSPACE > Service Request > SR Registration.
- On the “SR Registration” page, select the business group ‘FPMS Development (IT)’ and the request type ‘Service Request’ > ‘Firewall Integration Application/Change/Termination’.
- Enter the name of the firewall to be deleted and save it.
Terminate application system integration
The method for disconnecting the integration varies by the application system.
- DCManager: Apply using SR. * DCManager > WORKSPACE > Service Request > In SR registration, the work group is “Common System Service Desk (IT)”, the request type is “Common Portal (Portal, SR, Firewall)” > select “[Common] Data Change”, and enter the firewall name to be disconnected in the request details, then save.
- IT4U: Since integration uses the FPMS firewall’s ZONE address or compartment, deleting both the firewall’s ZONE address and ZONE compartment will cancel the integration. * (Delete ZONE address, Delete ZONE compartment reference)
- Samsung Electro-Mechanics Application System: Integration will be canceled when the firewall is removed.
Delete firewall from FPMS
Request the system administrator to delete the firewall. For instructions on deleting the firewall, refer to Delete Firewall.