This is the multi-page printable view of this section. Click here to print.
Config Inspection
- 1: Overview
- 2: How-to guides
- 3: Release Note
1 - Overview
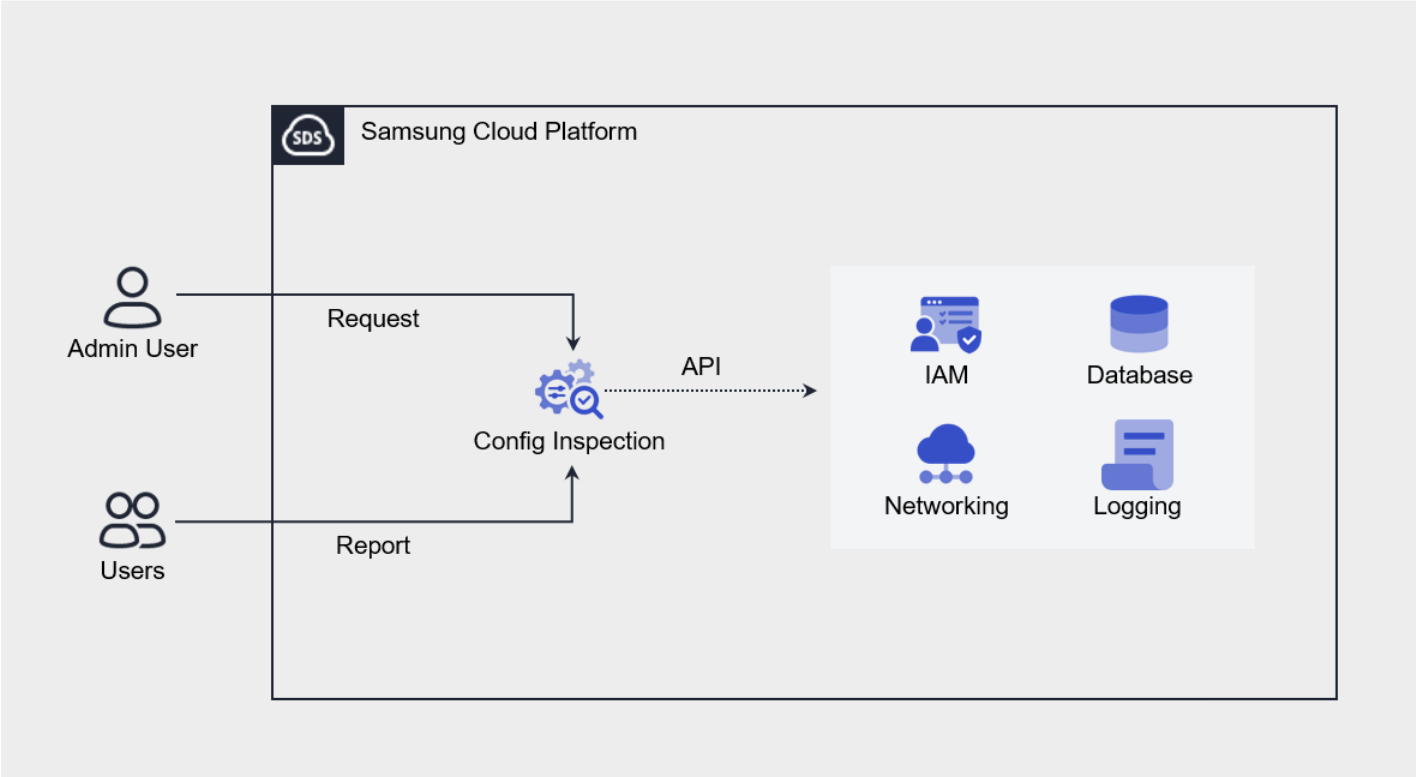
Service Overview
Config Inspection is a service that diagnoses the security level of console settings for each service of Samsung Cloud Platform. It provides a security checklist organized by areas such as IAM, Networking, Database, Logging, and checks the current status via API calls to see whether the recommended security settings for each diagnostic item are applied.
Users can create a diagnostic target through service creation and then request a diagnosis, and the diagnosis request results can be checked via the Report. The Report provides the diagnosis request history and item-specific diagnosis results, and for diagnostic items that require the user’s final confirmation or action, detailed results including the resource information corresponding to each item and a remedial guide can be viewed.
Provided Features
Config Inspection provides the following features.
- Console Diagnosis: You can diagnose the security level by calling the Console API using the authentication key method.
- Diagnosis Target Management: Through service creation, you can create and manage the user’s Samsung Cloud Platform account as a diagnosis target.
- Diagnosis Request: In the resource detail screen, you can request a diagnosis by clicking the Diagnosis Request button.
- Diagnostic Result Management: In Report, you can view the list of diagnosis requests and detailed diagnosis results, and download them as an Excel file.
Components
Checklist
The checklist is a collection of diagnostic items that serve as the basis for diagnostic results, and the checklist currently provided by Config Inspection is as follows.
| Cloud | Checklist Name | Number of Items |
|---|---|---|
| Samsung Cloud Platform | Best Practice | 18 |
The detailed diagnostic items of the Best Practice checklist provided by Samsung Cloud Platform are as follows.
| Area | Diagnostic Item |
|---|---|
| Networking |
|
| Container |
|
| Database |
|
| Logging |
|
Report
In the Config Inspection Report, you can view the diagnostic results in the order of result list, result details, and item details.
| Category | Detailed description |
|---|---|
| Diagnosis Result List | All diagnosis request history within Account
|
| Diagnosis Result Details | Result of a successfully completed diagnosis request (diagnosis item list)
|
| Diagnostic Item Details | Detailed Results per Diagnostic Item |
Preliminary Service
Config Inspection has no preceding service.
2 - How-to guides
The user can input the necessary information for the Config Inspection service and create the service by selecting detailed options through the Samsung Cloud Platform Console.
Create a certificate
To create and use the Config Inspection service in the Samsung Cloud Platform Console, authentication key creation is required in advance.
API key creation is available at My menu > My Info. > API key management > API key creation. For more information, please refer to API key management.
- The expiration period of the authentication key is up to 365 days.
- To create an authentication key with no expiration date, it must be created as permanent.
Config Inspection creation
You can create and use the Config Inspection service in the Samsung Cloud Platform Console.
To create a Config Inspection, follow these steps.
Click All Services > Security > Config Inspection menu. It moves to the Service Home page of Config Inspection.
On the Service Home page, click the Config Inspection creation button. It moves to the Config Inspection creation page.
Config Inspection Creation page where you enter the necessary inputs for service creation and select detailed options.
- Enter Service Information area, enter or select the required information.
Classification NecessityDetailed Description Diagnosis Type Required Console Cloud Required Select cloud to diagnose - SCP: Samsung Cloud Platform
- AWS: Amazon Web Service
- Azure: Microsoft Azure
- Detailed input items may vary depending on the selected cloud type
Diagnosis target > Diagnosis name Required Name to distinguish diagnosis target - Use the entered value as the resource name
- Use English, numbers, and special characters (
-,_) within 25 characters
Diagnosis target > Diagnosis account Required Diagnosis target is Console information - Select the Account ID to be diagnosed from the list
- If you select the same Account ID, it will be duplicated and an additional fee will be incurred
- If you select AWS, enter the Account ID in the diagnosis account (12-digit number)
- If you select Azure, enter the Subscription ID in the diagnosis account (36 characters including letters, numbers, and special characters)
Diagnosis Schedule > Check List Mandatory Automatically set when Using Diagnosis Schedule is selected Diagnosis Schedule > Diagnosis Cycle Required Diagnosis Cycle Selection - Diagnosis is executed on the selected date according to the specified cycle
- Monthly is selected, diagnosis may not be performed on the selected date
- Example) Monthly 31st selected - February does not have that date, so diagnosis is not performed
Diagnosis Schedule > Start Time Mandatory Diagnosis start time selection - Set the hour and minute information to start the diagnosis
Authentication Key Mandatory Select the authentication key to use for Open API calls - Select button to select the corresponding authentication key from the authentication key list in the Authentication Key Selection popup window
- If there are no selectable authentication keys, create a new authentication key through the Authentication Key Management button
- For more information about authentication keys, see Managing Authentication Keys
Rate Plan Selection Select the rate plan to use - General: Charges are based on the number of diagnoses
- Monthly Fee: Charges are based on a fixed monthly amount regardless of the number of diagnoses (up to 30 diagnoses per month)
- The rate plan cannot be changed after applying for the service
Table. Config Inspection service information input items- Enter Additional Information Please enter or select the required information in the area.
Classification NecessityDetailed Description Tag Select Add Tag - Up to 50 can be added per resource
- Click the Add Tag button and enter or select Key, Value
Table. Additional Information Input Items for Config InspectionIn the Summary panel, check the detailed information and estimated billing amount generated, and click the Create button.
- Once creation is complete, check the created resource on the Config Inspection list page.
Config Inspection detailed information check
Config Inspection service can check and modify the entire resource list and detailed information. The Config Inspection details page consists of detailed information, tags, and work history tabs.
To check the detailed information of the Config Inspection service, follow the next procedure.
- Click on the menu of all services > Security > Config Inspection. It moves to the Service Home page of Config Inspection.
- On the Service Home page, click the Config Inspection menu. It moves to the Config Inspection list page.
- Config Inspection list page, click on the resource to check the detailed information. Move to the Config Inspection details page.
- Config Inspection Details page displays status information and additional feature information, and consists of Details, Tags, Work History tabs.
Classification Detailed Description Status Config Inspection status is displayed - Ready: after service creation, when there is no diagnosis request (diagnosis request possible)
- In Progress: when a diagnosis request is being executed (diagnosis request/service cancellation not possible)
- Error: when an error occurs in the diagnosis request (diagnosis request possible)
- Completed: when the diagnosis request is completed normally (diagnosis request possible)
Diagnostic Request Button that can perform Console diagnosis Service Cancellation Button to cancel the service Fig. Config Inspection status information and additional features
- Config Inspection Details page displays status information and additional feature information, and consists of Details, Tags, Work History tabs.
Detailed Information
On the Config Inspection List page, you can check the detailed information of the selected resource and modify the information if necessary.
| Division | Detailed Description |
|---|---|
| Service | Service Category |
| Resource Type | Service Name |
| SRN | Unique resource ID in Samsung Cloud Platform |
| Resource Name | Resource Title |
| Resource ID | Unique resource ID in the service |
| Creator | Service creator user |
| Creation Time | Time when the service was created |
| Modifier | Service information modified user |
| Modified Time | Time when service information was modified |
| Diagnosis Type | Service-provided diagnosis type |
| Cloud | Diagnostic Target Type |
| Diagnosis Target | Diagnosis target is Console information
|
| Rate Plan | Selected Rate Plan Type |
| Recently diagnosed time | Last executed diagnosis request time |
| Recent diagnosis result | Last executed diagnosis request result
|
| Authentication Key | Registered user’s authentication key when the service is created
|
| Diagnosis Schedule | Displays the selected diagnosis schedule information
|
Tag
On the Config Inspection 목록 page, you can check the tag information of the selected resource, and add, change, or delete it.
| Classification | Detailed Description |
|---|---|
| Tag List | Tag List
|
Work History
Config Inspection 목록 page where you can check the operation history of the selected resource.
| Division | Detailed Description |
|---|---|
| Work history list | Resource change history
|
Config Inspection Resource Management
Config Inspection resource status inquiry and diagnosis request are required in case of Config Inspection list or Config Inspection detail page where work can be performed.
Modifying the authentication key
You can select the authentication key to use for diagnosis by diagnosis target.
To modify the service authentication key, follow these steps.
- Click on the menu for all services > Security > Config Inspection. It moves to the Service Home page of Config Inspection.
- On the Service Home page, click the Config Inspection menu. It moves to the Config Inspection list page.
- Config Inspection list page, click the resource to modify the authentication key. Move to the Config Inspection details page.
- Check the authentication key and click the edit icon. The edit authentication key popup window appears.
- Modify Authentication Key popup window, select the registered authentication key and click the OK button.
Classification Detailed Description Access Key Access Key information of the authentication key Creation Date Access Key Creation Date Expiration Date Access Key Expiration Date Status Authentication key status - In use: available status
- Expired: expiration of usage period status
Fig. Edit Authentication Key Popup Window Items
- If the authentication key is deleted, it will be displayed as
-state. - Authentication key information (Access Key, status) of resources created by other users will be displayed as
-.
Request Diagnosis
You can request a diagnosis from the Console based on the set checklist.
To request a console diagnosis, follow these steps.
Click on the menu for all services > Security > Config Inspection. It moves to the Service Home page of Config Inspection.
On the Service Home page, click the Config Inspection menu. It moves to the Config Inspection list page.
Config Inspection list page, click the resource to request diagnosis. Move to the Config Inspection details page.
Config Inspection details page, click the Diagnosis Request button. Diagnosis Request popup window appears.
Diagnosis Request In the diagnosis request popup window, enter the necessary information for diagnosis and click the Confirm button.
- Diagnostic Request The items in the popup window vary depending on the Console you select.
Classification Detailed Description Console access method The method of accessing the Console, with the authentication key method fixed Check List Fixed as Best Practice when SCP is selected Authentication Key Select the authentication key created in advance if SCP is selected Access Key If you selected AWS, enter the Access Key Secret Key If you choose AWS, enter the Secret Key Client ID Enter Client ID if Azure is selected Client Secret If Azure is selected, enter Client Secret Tenant ID If Azure is selected, enter the Tenant ID Fig. Diagnostic Request Popup Window Items
- Diagnostic Request The items in the popup window vary depending on the Console you select.
Check the Status value on the Config Inspection List page.
- When the diagnosis request is completed, the status value is displayed as Completed or Error.
- Completed case, you can check the diagnosis result in the diagnosis result menu. For more information, please refer to Report management.
Config Inspection disable
You can cancel the unused Config Inspection service. However, if you cancel Config Inspection, all saved diagnostic data will be deleted.
- If you cancel the resource, all diagnostic data will be deleted and you will not be able to view the diagnostic results in the Report.
- If the status of the Config Inspection service is In Progress, the service cannot be cancelled.
To disable Config Inspection, follow the next procedure.
- Click All Services > Security > Config Inspection menu. It moves to the Service Home page of Config Inspection.
- On the Service Home page, click the Config Inspection menu. It moves to the Config Inspection list page.
- Config Inspection list page, click the resource to be canceled. Move to the Config Inspection details page.
- Config Inspection details page, click the service cancellation button.
- Once the cancellation is complete, please check if the resource has been cancelled on the Config Inspection list page.
2.1 - Dashboard Check
Users can check the diagnostic results of the Config Inspection service at a glance on the dashboard through the Samsung Cloud Platform Console.
Check Dashboard
On the dashboard page, you can check the diagnosis status and history of Config Inspection, etc.
To check the dashboard, follow the next procedure.
- 모든 서비스 > Security > Config Inspection menu is clicked. It moves to the Service Home page of Config Inspection.
- On the Service Home page, click the Dashboard menu. It moves to the Dashboard page.
- Dashboard page where you can check the summary information of the diagnosis result.
- Dashboard page, you can check the dashboard information based on the period or diagnosis name at the top.
Period: You can check the summary information of the diagnosis results by setting a period within 6 months based on this month.
Diagnosis Name: If you select all, you can summarize the entire diagnosis result, and if you select a diagnosis account, you can check the detailed history of the diagnosis result.
- Download button allows you to download the information displayed on the dashboard page as a PDF file.
Division Detailed Description Security Level (Total) The average value of the latest diagnosis results of all diagnosis targets is displayed - The latest diagnosis results are listed
- Diagnosis score calculation formula = Total - (Fail + Error + Check)) / Total x 100
Diagnostic Status by Period Displays diagnostic status by target during the search period - Diagnosis Completed: Displays recent diagnosis completion records
- Diagnosis Error: Displays recent diagnosis error records, and moves to the detailed diagnosis result page when selecting a diagnosis name
Summary of diagnostic results by period (all) Displays summary information of diagnostic results (all) during the search period - Selecting a diagnosis name from the list moves to the diagnostic result details page
Table. Detailed description of dashboard items for overall diagnosis resultsClassification Detailed Description Security Level The last diagnosis result score of the selected diagnosis account is displayed - The latest diagnosis result is displayed in the list
Periodic diagnosis result summary Display a summary of the diagnosis results of the last diagnosis account during the search period Vulnerability Status by Period Displays the vulnerability diagnosis results of the diagnosis account during the search period in a graph - Displays detailed information of vulnerable items in the diagnosis results when selecting a graph
Fig. Detailed description of dashboard items for diagnostic results by diagnostic account
2.2 - Diagnosis Result Management
You can check the Config Inspection diagnosis request results on the diagnosis result page and change the diagnosis results.
Diagnosis results are created when a diagnosis request is made through the Config Inspection service, and the diagnosis results are deleted when the service is terminated.
Checking Diagnosis Results
On the diagnosis result page, you can check the results of the diagnosis request.
Checking the Diagnosis Result List
To check the diagnosis result list, follow these steps:
- Click All Services > Security > Config Inspection. You will be taken to the Service Home page of Config Inspection.
- On the Service Home page, click Diagnosis Result. You will be taken to the Diagnosis Result List page.
- On the Diagnosis Result List page, check the summary information of the diagnosis results.
Category Detailed Description Diagnosis Name Resource Name Diagnosis Account Console information that is the target of diagnosis Checklist A collection of diagnosis items that serve as the basis for the diagnosis result PASS The number of items in the checklist with a diagnosis result of PASS (normal) FAIL The number of items in the checklist with a diagnosis result of FAIL (vulnerable) CHECK The number of items in the checklist with a diagnosis result of CHECK (requires verification) ERROR The number of items in the checklist with a diagnosis result of ERROR (diagnosis not possible) N/A The number of items in the checklist with a diagnosis result of N/A (not applicable) Total The total number of items in the checklist Diagnosis Result The result of the diagnosis request - Completed: The diagnosis request was completed normally
- Error: The diagnosis request was not completed normally, and the error status items cannot be checked in detail
Diagnosis Time The time the diagnosis request was made Table. Diagnosis Result List Items
Checking Detailed Diagnosis Result Information
To check the detailed information of the diagnosis result, follow these steps:
Click All Services > Security > Config Inspection. You will be taken to the Service Home page of Config Inspection.
On the Service Home page, click Diagnosis Result. You will be taken to the Diagnosis Result List page.
- You can search for diagnosis results by entering the diagnosis name in the search area of the Diagnosis Result List page or by clicking the Detailed Search button.
On the Diagnosis Result List page, click on an item with a diagnosis result of Completed. You will be taken to the detailed diagnosis result page.
- Items with a diagnosis result of Error do not display detailed information.
On the Detailed Diagnosis Result page, check the detailed diagnosis results.
Category Detailed Description Excel Download Download the detailed diagnosis result list as an Excel file More > Diagnosis Result Management Move to the diagnosis result management page Checklist A collection of diagnosis items that serve as the basis for the diagnosis result Area The scope of diagnosis (Samsung Cloud Platform services) Diagnosis Item Security standards recommended for service settings Result The result of checking the diagnosis item Table. Detailed Diagnosis Result ItemsClick on the diagnosis item you want to check in detail. The Diagnosis Item Details popup window will appear.
- In the Diagnosis Item Details popup window, you can check the following information:
  | Category | Detailed Description |
  |---------|---------|
  | Area | The scope of diagnosis (Samsung Cloud Platform services) |
  | Diagnosis Item | Security standards recommended for service settings |
  | Result | The result of checking the diagnosis item |
  | Diagnosis Criteria | The criteria for determining the result |
  | Diagnosis Method | The method for checking the current settings |
  | Countermeasure Guide | The method for setting the security standards |
  | Detailed Result | Information about the resources and settings corresponding to the diagnosis item |
  | Change Diagnosis Result | A button to change the diagnosis result |
  <div class="figure-caption">
    Table. Config Inspection Diagnosis Item Details
  </div>
- In the Diagnosis Item Details popup window, you can check the following information:
Managing Diagnosis Results
The diagnosis result page allows you to change the results of items with a CHECK status.
Changing Diagnosis Results
To change a diagnosis result, follow these steps:
Click All Services > Security > Config Inspection menu. You will be directed to the Config Inspection Service Home page.
Click the Diagnosis Result menu on the Service Home page. You will be directed to the Diagnosis Result List page.
Click an item with a completed diagnosis result on the Diagnosis Result List page. You will be directed to the Diagnosis Result Detail page.
- Items with an Error status will not display detailed information.
Click the Diagnosis Result Management button at the top of the Diagnosis Result Detail page. You will be directed to the Diagnosis Result Management page.
Click the Result Change button for the item you want to change the diagnosis result for** on the Diagnosis Result Management page. You will be directed to the Result Change popup window.
Select or enter the required information for the result change in the Result Change popup window.
Category Required Description Register - Email of the person changing the diagnosis result Valid Period Required Set the valid period for the diagnosis result Result Change Required Select the new diagnosis result (Pass, Check, Fail) Detailed Reason Required Enter a detailed reason for changing the result Attachment Optional Upload a file required for result change confirmation - Click the File Attachment button to upload a file, up to 5 files can be registered
Inspection Result - Display detailed inspection results Table. Detailed Items for Changing Diagnosis ResultsConfirm the entered information and click the Register button. Verify that the diagnosis result has been changed in the Diagnosis Result Management list.
Deleting Diagnosis Result Change History
To delete the diagnosis result change history, follow these steps:
- Click All Services > Security > Config Inspection menu. You will be directed to the Config Inspection Service Home page.
- Click the Diagnosis Result menu on the Service Home page. You will be directed to the Diagnosis Result List page.
- Click an item with a completed diagnosis result on the Diagnosis Result List page. You will be directed to the Diagnosis Result Detail page.
- Items with an Error status will not display detailed information.
- Click the Diagnosis Result Management button at the top of the Diagnosis Result Detail page. You will be directed to the Diagnosis Result Management page.
- Click the Result Confirmation button for the item you want to delete the diagnosis result change history for** on the Diagnosis Result Management page. You will be directed to the Result Confirmation popup window.
- Click the Delete button in the Result Confirmation popup window.
2.3 - Setting up the Cloud
To use the Config Inspection service through the Samsung Cloud Platform Console, users must set up cloud prerequisites, such as generating authentication keys and adding access control IPs.
Setting up the Samsung Cloud Platform Console
To diagnose the Samsung Cloud Platform and external clouds using the Config Inspection service, configure the following items.
Checking policies connected to user groups
- Config Inspection can diagnose the Samsung Cloud Platform or external clouds. Depending on the diagnosis target, you can use the service by granting the necessary policy requirements to the user group.
- Make sure that the user group policy that matches the desired diagnosis target is set up.
- If policy creation is required, contact the Account administrator.
To check the policies of the user group you belong to, follow these steps:
- Click All Services > Management > IAM. You will be taken to the Service Home page of IAM.
- On the Service Home page, click User Group. You will be taken to the User Group List page.
- On the User Group List page, click the user group you want to check. You will be taken to the User Group Details page.
- On the User Group Details page, click the Policy tab. You will be taken to the Policy tab page.
- On the Policy tab page, click the policy you want to check. You will be taken to the Policy Details page.
- On the Policy Details page, check the detailed information.
Generating authentication keys
You can check and generate authentication keys to be used for the Config Inspection service.
- You can create up to two authentication keys.
- After creating a new authentication key, you must apply the changed API authentication key to the service you are using.
To generate an authentication key in the Samsung Cloud Platform Console, follow these steps:
- Click My Menu > My Info. You will be taken to the My Info. details page.
- On the My Info. details page, click the Authentication Key Management tab. You will be taken to the Authentication Key Management tab page.
- On the Authentication Key Management tab page, click the Create Authentication Key button. You will be taken to the Create Authentication Key page.
- On the authentication key management page, you can check the list of authentication keys.
- On the Create Authentication Key page, enter the expiration period and click the Confirm button.
- Check if the created authentication key is displayed in the authentication key list.
Adding Allowed Access IP
You can add an allowed access IP in the Samsung Cloud Platform Console.
To add an allowed access IP in the Console, follow these steps:
- Click the My menu > My info. menu in the Console. You will be moved to the My info. detail page.
- Click the Authentication key management tab on the My info. detail page. You will be moved to the Authentication key management tab page.
- On the Authentication key management tab page, click the Modify icon in the Security settings section. The Modify authentication key security settings popup window will open.
- In the Modify authentication key security settings popup window, enter the authentication method and allowed access IP.
- Select Authentication key as the authentication method.
- Set the allowed access IP to Use and enter the IP address, then click the Add button.
- Once the allowed access IP is added, click the Confirm button. Verify that the information entered in the Security settings section has been modified.
Setting up AWS
To diagnose the AWS (Amazon Web Services) cloud in the Config Inspection service, set up the following items.
Adding Permission Policy
You can add a permission policy for a user or user group in the AWS Console.
Adding User Permissions
To add a user access permission policy in the AWS Console, follow these steps:
- Click IAM > Users in the AWS Console.
- Select the diagnostic user name from the user list.
- Click the Permissions tab on the user information page.
- Select Add permissions in the permission policy.
- When adding permissions, select ReadOnlyAccess, ViewOnlyAccess.
Adding User Group Permissions
To add a user group access permission policy in the AWS Console, follow these steps:
- Click IAM > User groups in the AWS Console.
- Select the user group that the user belongs to from the user group list.
- Click the Permissions tab on the user group page.
- Select Add permissions in the permission policy.
- When adding permissions, select ReadOnlyAccess, ViewOnlyAccess.
Adding Access Control IP
If you are using an IP access control policy, you must add an exception IP to the policy.
Adding IP Access Control for Users
To add IP access control for users in the AWS Console, follow these steps:
- Click IAM > Users in the AWS Console.
- Select the diagnostic user name from the user list.
- Click the Permissions tab on the user information page.
- Click Edit on the IP Access Control Policy in the permissions policy item.
- Add 123.37.24.82 to the exception IP for blocking.
Adding IP Access Control for User Groups
To add IP access control for user groups in the AWS Console, follow these steps:
- Click IAM > User Groups in the AWS Console.
- Select the user group that the user belongs to from the user group list.
- Click the Permissions tab on the user group page.
- Click Edit on the IP Access Control Policy in the permissions policy item.
- Add 123.37.24.82 to the exception IP for blocking.
Creating Access Keys
To create access keys in the AWS Console, follow these steps:
- Click IAM > Users in the AWS Console.
- Select the diagnostic user name from the user list.
- Click the Security Credentials tab on the user information page.
- Click Access Keys on the Security Credentials page.
- Create an access key for third-party services on the Create Access Key page.
- Be sure to save the created access key information.
Secret Key can only be downloaded as a CSV file or recorded separately.
- Secret key information can only be checked during access key creation and cannot be recovered later.
Setting up Azure
To diagnose Azure cloud in the Config Inspection service, set up the following items.
Registering Entra ID Application
To register Entra ID Application in the Azure Console, follow these steps:
- Click Microsoft Entra ID > App Registration in the Azure Console.
- Click New Registration on the App Registration page.
- Register the application (client) ID.
- After completing the app registration, check the App Name, Application (Client) ID, Directory (Tenant) ID on the overview page.
Adding API Permissions
To add API permissions in the Azure Console, follow these steps:
- Click Microsoft Entra ID > App Registration (App registrations) > Entra ID Application Registration and select the created App Name > API Permissions (App permissions) > Add a permission.
- Select Microsoft Graph from the API Permissions list.
- Click Application Permissions on the API Permission Request page.
- Select Application.Read.All, Device.Read.All, Group.Read.All, User.Read.All, DeviceManagementManagedDevices.Read.All, AuditLog.Read.All, Directory.Read.All, Domain.Read.All, GroupMember.Read.All, Policy.Read.All, Reports.Read.All from the permission list.
- Click Grant admin consent for account name after adding permissions on the App API Permission Registration page.
- Check if the status has changed to Granted for account name.
Creating Client Secret
To create a client secret in the Azure Console, follow these steps:
- Click Microsoft Entra ID > App Registration (App registrations) > Entra ID Application Registration and select the created App Name > Certificates & Secrets.
- Click New Client Secret on the Certificates & Secrets list.
- Check the Value item of the client secret in the list after creating the client secret.
- Be sure to save the client secret value.
Adding Subscription Access Permissions in Azure Console
Subscription access permissions in the Azure Console can be added to the tenant root group or individual subscriptions. Choose the desired method to add subscription access permissions.
Adding Permissions to the Tenant Root Group
To add Azure Console subscription access permissions to the Tenant Root Group, follow these steps:
- Click on Management groups > Overview in the Azure Console.
- Click on Tenant Root Group > IAM.
- If you cannot access the Tenant Root Group menu, change the following settings:
- Microsoft Entra ID > Properties > ‘Account name’ can manage access to all Azure subscriptions and management groups in this tenant. > Yes
- After adding permissions, be sure to change it back to No.
- If you cannot access the Tenant Root Group menu, change the following settings:
- On the Access Control page, click on Add > Add role assignment.
- On the Add role assignment page, enter the details and click on Save (Review+assign).
- When entering role assignment information, select the following information in the Role and Member tabs to add the App created in Entra ID Application registration. All three permissions below must be added.
  |  Category  |  Permission  |
  |---------|---------|
  |Reader|User, group, or service principal|
  |Key Vault Reader|User, group, or service principal|
  |Reader and Data Access|User, group, or service principal|
  <div class="figure-caption">
    Table. Additional permission items when entering role assignment information
  </div>
- When entering role assignment information, select the following information in the Role and Member tabs to add the App created in Entra ID Application registration. All three permissions below must be added.
Adding Permissions to an Individual Subscription
To add Azure Console subscription access permissions to an individual subscription, follow these steps:
- Click on Subscription > Overview in the Azure Console.
- Check the Subscription ID in the basic information on the overview page.
- Click on Subscription > IAM.
- On the Access Control page, click on Add > Add role assignment.
- On the Add role assignment page, enter the details and click on Save (Review+assign).
- When entering role assignment information, select the following information in the Role and Member tabs to add the App created in Entra ID Application registration. All three permissions below must be added.
  |  Category  |  Permission  |
  |---------|---------|
  |Reader|User, group, or service principal|
  |Key Vault Reader|User, group, or service principal|
  |Reader and Data Access|User, group, or service principal|
  <div class="figure-caption">
    Table. Additional permission items when entering role assignment information
  </div>
- When entering role assignment information, select the following information in the Role and Member tabs to add the App created in Entra ID Application registration. All three permissions below must be added.
Adding Access Permissions using PowerShell
To add Azure Console subscription access permissions using PowerShell, follow these steps:
- In the Azure Console, run the following command in Cloud shell > PowerShell:
New-AzRoleAssignment -ObjectId “Object ID of the App confirmed in Enterprise Application” -Scope “/providers/Microsoft.aadiam” -RoleDefinitionName ‘Reader’ -ObjectType ‘ServicePrincipal’- If the command does not work, change the following settings:
- Microsoft Entra ID > Properties > ‘Account name’ can manage access to all Azure subscriptions and management groups in this tenant. > Yes
- After adding permissions, be sure to change it back to No.
- Run the following command to check if the settings are complete:
Get-AzRoleAssignment –ObjectId “Object ID of the App confirmed in Enterprise Application” –Scope “/providers/Microsoft.aadiam”- If you need to delete permissions, run the following command:
Remove-AzRoleAssignment -ObjectId “Object ID of the App confirmed in Enterprise Application” -Scope “/providers/Microsoft.aadiam” -RoleDefinitionName ‘Reader’
3 - Release Note
Config Inspection
- We have launched the Config Inspection product, which can comprehensively diagnose and manage security vulnerabilities in the customer’s multi-cloud console.
- The account (or other cloud account) to be diagnosed is registered, allowing for continuous diagnosis, and the dashboard and detailed results can be checked in the report.
- Samsung Cloud Platform common feature changes
- Account, IAM and Service Home, tags, etc. reflected common CX changes.
- You can manage Samsung Cloud Platform Console setting vulnerabilities through console diagnostics.
- It provides a Report that can view the security diagnosis results.