Leveraging the nation’s largest and longest‑standing experience in security service operations, we deliver automated security services customized for diverse customer environments.
This is the multi-page printable view of this section. Click here to print.
Security
- 1: Key Management Service
- 1.1: Overview
- 1.2: How-to guides
- 1.3: API Reference
- 1.4: CLI Reference
- 1.5: Release Note
- 2: Config Inspection
- 2.1: Overview
- 2.1.1: Checklist
- 2.2: How-to guides
- 2.2.1: Check dashboard
- 2.2.2: Diagnostic Result Management
- 2.2.3: Preconfigure
- 2.3: Release Note
- 3: Certificate Manager
- 3.1: Overview
- 3.2: How-to guides
- 3.2.1: Extract Certificate Chain
- 3.3: API Reference
- 3.4: CLI Reference
- 3.5: Release Note
- 4: Secrets Manager
- 4.1: Overview
- 4.2: How-to guides
- 4.3: Release Note
- 5: Secret Vault
- 5.1: Overview
- 5.2: How-to guides
- 5.3: API Reference
- 5.4: CLI Reference
- 5.5: Release Note
- 6: SingleID
- 6.1: Overview
- 6.2: How-to guides
- 6.2.1: SingleID Manuals
- 6.2.1.1: User Portal
- 6.2.1.1.1: Announcements and Language Settings
- 6.2.1.1.2: Log in using an authentication method
- 6.2.1.1.3: Register authentication tool
- 6.2.1.1.4: Sign up
- 6.2.1.1.5: Find ID and Reset Password
- 6.2.1.1.6: Privacy Policy, Terms of Service, Service Desk
- 6.2.1.1.7: PC SSO Agent
- 6.2.1.1.8: My App
- 6.2.1.1.9: App Catalog
- 6.2.1.1.10: Notification
- 6.2.1.1.11: Approval Request
- 6.2.1.1.12: Personal Profile
- 6.2.1.2: Admin Portal
- 6.2.1.2.1: Dashboard
- 6.2.1.2.2: Integration
- 6.2.1.2.3: Identity Store
- 6.2.1.2.4: Policy
- 6.2.1.2.5: Terms and Conditions
- 6.2.1.2.6: Settings
- 6.2.1.2.7: Monitoring
- 6.2.1.2.8: Open Source licence
- 6.2.1.3: MFA Portal
- 6.2.1.3.1: Log in using an authentication method
- 6.2.1.3.2: Register authentication tool
- 6.2.1.3.3: Configure Privacy Settings
- 6.2.1.4: CAM Portal
- 6.2.1.4.1: Getting Started
- 6.2.1.4.2: Home
- 6.2.1.4.3: Console Access
- 6.2.1.4.4: Resource Access
- 6.2.1.4.5: Monitoring
- 6.2.1.4.6: Configuration
- 6.2.1.5: SingleID Authenticator Manual Overview
- 6.2.1.5.1: Install App
- 6.2.1.5.2: User Authentication
- 6.2.1.5.3: Manage Authentication Method
- 6.2.1.5.4: Manage Service List
- 6.2.1.5.5: Open Source Licence(Android)
- 6.2.1.5.6: Open Source Licence(ISO)
- 6.2.1.6: Open API guides
- 6.2.1.6.1: ADFS Adapter Guide
- 6.2.1.6.2: Adapter Configuration Guide
- 6.3: Release Note
- 7: WAF
- 7.1: Overview
- 7.2: How-to guides
- 7.2.1: WAF Build Process Guide
- 7.3: Release Note
- 8: DDoS Protection
- 8.1: Overview
- 8.2: How-to guides
- 8.3: Release Note
- 9: IPS
- 9.1: Overview
- 9.2: How-to guides
- 9.3: Release Note
- 10: Secured Firewall
- 10.1: Overview
- 10.2: How-to guides
- 10.3: Release Note
- 11: Secured VPN
- 11.1: Overview
- 11.2: How-to guides
- 11.2.1: Secured VPN Build Process Guide
- 11.3: Release Note
- 12: Log Transmission
- 12.1: Overview
- 12.2: How-to guides
- 12.3: Release Note
- 13: ESS(Endpoint Security Suite)
- 13.1: Overview
- 13.2: How-to guides
- 13.3: Release Note
1 - Key Management Service
1.1 - Overview
Service Overview
Key Management Service(KMS) is a service that easily creates encryption keys and securely stores/manages them to safely protect an application’s critical data. Users encrypt and decrypt data using an encryption key, which is securely managed through a centrally controlled hierarchical encryption key system.
Provided features
Key Management Service provides the following features.
- Key Management: KMS can create/delete and manage customer-managed keys. * The user directly creates a data key that encrypts data using the master key generated by KMS.
- Key Permission Management: You can control and manage usage permissions for master keys based on custom policy.
- Key Lifecycle Management: Through key rotation, you can generate new encrypted data for the master key without creating a new key, and the key rotation interval can be set according to customer policy. * Through lifecycle management, encryption keys that are no longer used are deactivated or deleted, safely protecting data from cryptographic threats.
- Platform-managed key: When another product within the Samsung Cloud Platform encrypts using a KMS key, the CSP (Cloud Service Provider) generates a platform-managed key and performs encryption, so the user does not need to create a key directly in KMS.
Components
master key
Master key is used to generate data keys for encrypting data, and depending on the purpose, can generate symmetric key (encryption/decryption (AES), generation/verification (HMAC)) and asymmetric key (encryption/decryption and signing/verification (RSA), signing/verification (ECDSA)). By properly managing the master key to encrypt data keys, you can protect frequently used data keys during operation.
- The master key is a key generated through the creation of a KMS product service in the Samsung Cloud Platform Console.
Data key
The data key is used to encrypt the actual data and is generated for each target service that performs encryption. Through this, even if a single data key is leaked, it does not affect services encrypted with other data keys.
HSM (hardware security module)
Stores the root key of the KMS system domain. The master key is generated using the root key stored in an HSM (Hardware Security Module) that complies with the FIPS 140-2 Lv3 standard, and is securely distributed and stored in the KMS for protection.
Constraints
The Key Management Service of Samsung Cloud Platform limits the number of key creation and rotation as follows.
| Item | Detailed description | Quota |
|---|---|---|
| KMS Key | Number of KMS Keys created per region | 10000 |
| KMS Validation Password Key | Number of public authentication algorithm keys that can be generated per account | 100 |
Table. Key Management Service constraints
안내
When rotating a customer-managed key, the key’s version is changed internally. By using a newly generated version key, you can decrypt information encrypted with the previous version’s key to maintain compatibility.
- Versions changed by key rotation are compatible up to version 100, regardless of the encryption algorithm.
참고
- KMS keys created as a regional service can be used only within that region.
- The restrictions on the public authentication algorithm key apply only to the KR SOUTH region.
Preceding service
Key Management Service has no prerequisite services.
1.2 - How-to guides
Users can create the service by entering the required information for the Key Management Service through the Samsung Cloud Platform Console and selecting detailed options.
Reference
Key Management Service provides the following two key services.
- Customer-managed key: To securely protect important application data, users can generate and manage encryption keys themselves.
- Platform-managed key: Since CSP(Cloud Service Provider) creates and manages it directly, users cannot change or delete the key’s properties.
Create a customer-managed key
You can create and use a customer-managed key in the Samsung Cloud Platform Console.
To create a customer-managed key, follow these steps.
All Services > Security > Key Management ServiceClick the menu. 1. Go to the Service Home page of Key Management Service.
On the Service Home page, click the Create Customer Managed Key button. 2. Go to the Customer Managed Key Creation page.
On the Customer Managed Key Creation page, enter the information required to create the service and provide additional details.
- Enter or select the required information in the Service Information Input area.Categoryrequired status
Detailed description Key name Required Enter key name Public authentication algorithm Selection Use When selected, you can generate encryption keys that comply with public encryption standards - The public authentication algorithm option is available only in the KR SOUTH region
- The public authentication algorithm provides the ARIA algorithm, which has passed security verification through Korea’s cryptographic module validation program
Purpose Required Select the key purpose and encryption method - If you do not select the use of public authentication algorithms, choose among encryption/decryption (AES-256), encryption/decryption and signing/verification (RSA-2048), signing/verification (ECDSA), and generation/verification (HMAC)
Auto rotation Selection Select whether to enable automatic key rotation - If Use is selected, the internal algorithm of the generated key is converted to a different value and applied at each configured rotation interval
- The rotation interval can be set to a value between 1 and 730 days. If the rotation interval is not specified, it defaults to 90 days
Public access control Required Enter the IP range to allow access - After entering the IP range to use, click the Add button
- You must enter at least one, and up to a maximum of 10 can be entered
- /24 - /32 ranges can be used, but may be vulnerable to security risks
- Click Delete All in the IP list to remove all registered entries
Private access control Selection Select the resource to allow access - Use select, then click the Add button to select the resource to use
- Click Delete in the resource list to remove the registered item
- If private access control is not set, you cannot access any private resources
Explanation Selection Enter additional information for the key Table. Customer Managed Key Service Information Input Items - In the Additional Information Input area, enter or select the required information.
Category required statusDetailed description tag Selection Add Tag - Up to 50 per resource can be added
- Add Tag After clicking the Add Tag button, enter or select Key, Value values
Table. Customer-managed key additional information input fields
- Enter or select the required information in the Service Information Input area.
Summary Check the detailed information and estimated charges generated in the panel, and click the Create button.
- Once creation is complete, check the created resource on the Customer Managed Key List page.
Reference
When selecting a public authentication algorithm, you can create up to 100 customer-managed keys.
Check detailed information of customer-managed key
You can view and edit the full resource list and detailed information of customer-managed keys. Customer Managed Key Details page consists of Details, Tags, Activity Log tabs.
Reference
If the status of the customer-managed key service is Creating, the service is being created, so you cannot navigate to the detail page.
- If it remains in the Creating state after a certain amount of time, delete the key and recreate it.
To view detailed information about the Key Management Service, follow these steps.
- Click the All Services > Security > Key Management Service menu. 1. Go to the Service Home page of Key Management Service.
- On the Service Home page, click the Customer Managed Key menu. 2. Navigate to the Customer Managed Key List page.
- On the Customer Managed Key List page, click the resource to view its details. 3. Go to the Customer Managed Key Details page.
- Customer Managed Key Details The top of the page displays status information and descriptions of additional features.
Category Detailed description status Displays the status of a customer-managed key - Active: available/activated
- Stop: stopped/disabled
- To be terminated: scheduled for deletion
- Creating: creating/creation error (immediate retry possible)
Key rotation Button to manually rotate the generated key Key Deactivation Button to deactivate the generated key Service cancellation Button to terminate the service - When the status is To be terminated, display the Cancel termination button
Table. Customer-managed key status information and additional features
- Customer Managed Key Details The top of the page displays status information and descriptions of additional features.
Detailed Information
Customer Managed Key List page allows you to view detailed information of the selected resource and edit the information if necessary.
Category | Detailed description |
|---|---|
| service | Service Name |
| Resource Type | Resource Type |
| SRN | Unique resource ID in Samsung Cloud Platform |
| Resource Name | Resource Name |
| Resource ID | 서비스에서의 고유 자원 ID |
| 생성자 | 서비스를 생성한 사용자 |
| 생성 일시 | 서비스를 생성한 일시 |
| 키명 | 생성된 키의 이름 |
| 공공 인증 알고리즘 | 공공 인증 알고리즘 사용 여부 |
| 용도 | 암/복호화 및 서명/검증 같은 키의 용도 및 암호화 방식 |
| 현재 버전 | 생성된 키의 현재 버전
|
| 자동 회전 | 키의 자동 회전 사용 여부
|
| 다음 회전일 | 회전 주기에 따른 키의 다음 회전일 표시
|
| 회전 주기 | 자동 회전 사용 시 회전 주기 기간 |
| URL | 퍼블릭/프라이빗 접속 URL 주소
|
| 퍼블릭 접근 제어 | 퍼블릭 접근 허용 IP 주소
|
| 프라이빗 접근 제어 | 프라이빗 접근 허용 리소스
|
| 설명 | 키에 대한 추가 설명 표시
|
Table. Customer-managed key detailed information tab items
Tag
On the Customer Managed Key List page, you can view the tag information of the selected resource and add, modify, or delete it.
| 구분 | 상세 설명 |
|---|---|
| 태그 목록 | 태그 목록
|
Table. Customer-managed key tag tab items
Job History
On the Customer Managed Key List page, you can view the operation history of the selected resource.
| 구분 | 상세 설명 |
|---|---|
| 작업 내역 | 작업 수행 내용
|
| 작업 일시 | 작업 수행 일시 |
| 자원 유형 | 자원 유형 |
| 자원명 | 자원 이름 |
| 작업 결과 | 작업 수행 결과(성공/실패) |
| 작업자 정보 | 작업을 수행한 사용자 정보 |
Table. Customer Managed Key Operation History Tab Detailed Information Items
Managing Customer-Managed Keys
You can create a new version of a registered key or change its usage status.
Configure customer-managed key rotation
Key rotation is a feature that transforms the internal algorithm of a generated key into a different value.
Reference
- When rotating the key, only the master key value changes, and the ciphertext and plaintext values of previously generated data keys remain unchanged.
- Even if key rotation is performed, the master key retains the previous version’s data, so decryption using the master key is unaffected, and the value of the data key in use also remains unchanged.
- However, when wrapping with a changed master key (decrypting and then re‑encrypting), calling the rewrapData API will trigger the key rotation function.
- When rotating a customer-managed key, the key’s version is changed internally. * By using a newly generated version key, you can decrypt data encrypted with the previous version’s key, preserving compatibility.
- Versions changed by key rotation are compatible up to the 100th version, regardless of the encryption algorithm.
To create a new version of a customer-managed key (key rotation), follow these steps.
- Click the All Services > Security > Key Management Service menu. 1. Go to the Service Home page of Key Management Service.
- On the Service Home page, click the Customer Managed Key menu. 2. Navigate to the Customer Managed Key List page.
- On the Customer Managed Key List page, click the resource to view detailed information. 3. Navigate to the Customer Managed Key Details page.
- On the Customer Managed Key Details page, click the Key Rotation button. 4. Key Rotation Navigate to the notification window.
- In the Key rotation notification dialog, click the Confirm button.
Configure Customer-Managed Key Activation
You can configure the usage of the selected key.
Reference
If you set the key to a disabled state, users who rely on that key will no longer be able to use it.
To set the activation/deactivation status of a customer-managed key you created, follow these steps.
- Click the All Services > Security > Key Management Service menu. 1. Go to the Service Home page of Key Management Service.
- On the Service Home page, click the Customer Managed Key menu. 2. Navigate to the Customer Managed Key List page.
- On the Customer Managed Key List page, click the resource to view its details. 3. Navigate to the Customer Managed Key Details page.
- On the Customer Managed Key Details page, click the Enable/Disable Key button. 4. Key activation/Key deactivation Navigate to the notification dialog.
- In the Key activation/key deactivation notification dialog, click the OK button.
Encryption case using Key Management Service keys
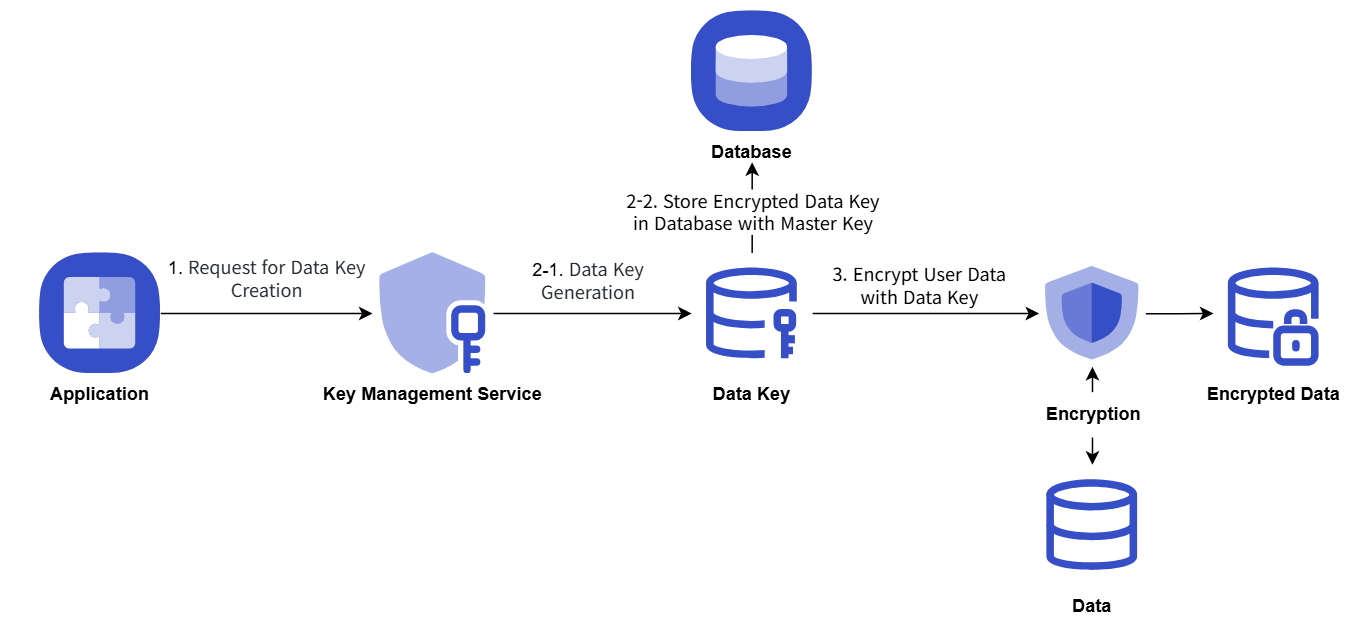
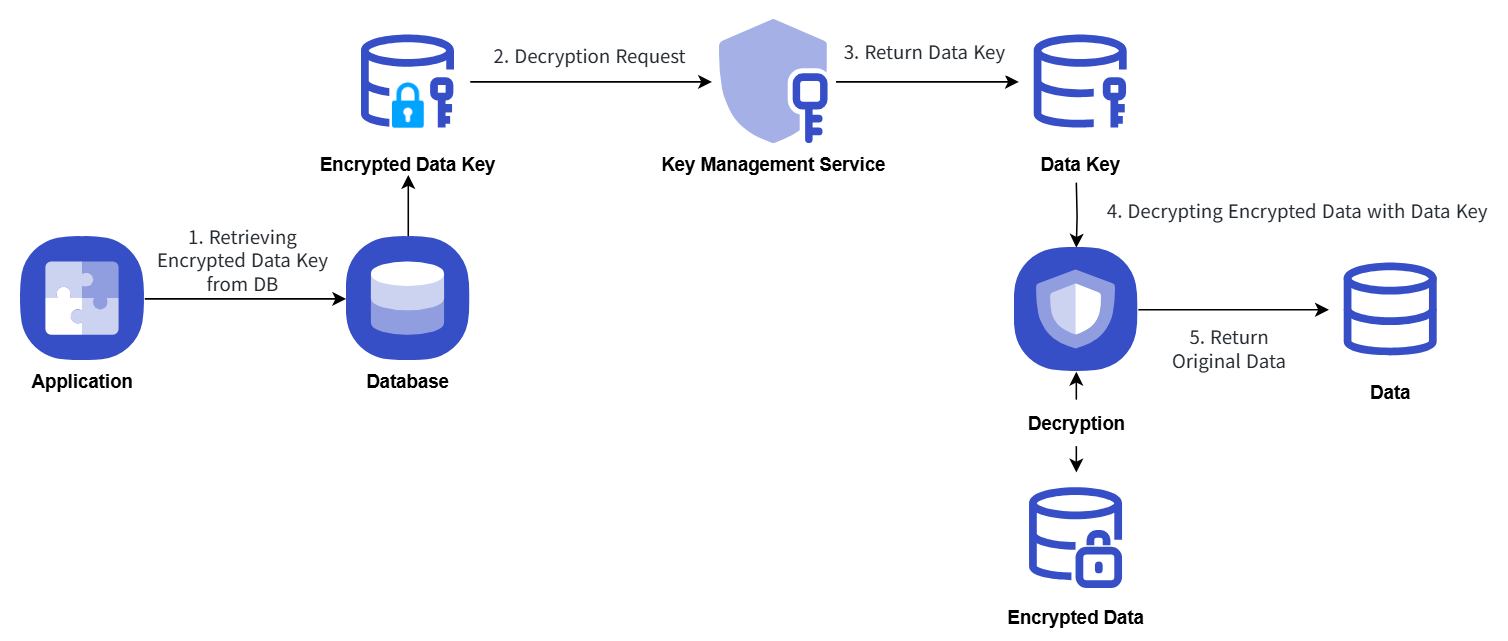
An example procedure for encrypting and storing a user application’s critical data by obtaining a data key from KMS is as follows.
- When the application starts, it obtains a data key using the KMS master key information, and then uses the plaintext data key on the client side to perform secure data encryption and store it.
- The data key is stored in the database in an encrypted form using the master key.
- When performing secure data decryption, the data key stored in the database is retrieved and a decryption request is made using the KMS master key information.
The encryption/decryption process using the Key Management Service key is explained with the following diagram.
Encryption
Decryption
Terminate Customer Managed Key
You can revoke customer-managed keys that are not in use.
Caution
If you revoke the key, you will no longer be able to use any requests or features of the customer-managed key, and it will be permanently deleted either immediately upon revocation or 72 hours later through a scheduled revocation.
To cancel a customer-managed key, follow these steps.
- Click the All Services > Security > Key Management Service menu. 1. Go to the Service Home page of Key Management Service.
- On the Service Home page, click the Customer Managed Key menu. 2. Go to the Customer Managed Key List page.
- On the Customer Managed Key List page, click the resource to view its details. 3. Go to the Customer Managed Key Details page.
- On the Customer Managed Key Details page, click the Terminate Service button. 4. Navigate to the Service Cancellation alert window.
- Service cancellation alert dialog, select Immediate cancellation / Scheduled cancellation and verify the contents, then click the Confirm button.
- When termination is complete, check on the Customer Managed Key List page whether the resource has been terminated.
- When the key deletion is complete, a notification is sent to both the user who created the key and the user who deleted it.
Reference
- Even if you click the Service Termination button in the More Options menu at the far right of the generated customer-managed key list, you can terminate the selected key.
- To undo the cancellation of a reserved service, click the Cancel Cancellation button on the customer-managed key list page or the detail page.
- Cancel Service Termination in the popup window, if you click Confirm, the selected key will not be deleted and will be restored in a disabled state.
- To reuse the key, click the Customer Managed Key Details page’s Activate Key button.
1.2.1 - Encryption Example Using Key Management Service Keys
Encryption example using Key Management Service keys
This is a Java code example for implementing envelope encryption and data signing/verification using a key generated in KMS.
Reference
The code below is a simple reference example to help understand the Samsung Cloud Platform KMS.
Since only the functions required for KMS operation are described, executing it as is will cause an error. Be sure to modify and use it according to the user’s actual scenario.
Envelope encryption
It presents an envelope encryption scenario, and you can review the Java, Go, and Python example code and their output generated according to the scenario.
Scenario
- To encrypt password information using the envelope encryption method, a Data Key is issued.
- Encrypt the password using the issued Data Key information.
- Encrypt the password and encrypted Data Key information using envelope encryption and store them in a JSON file.
Java example code
This is a Java example code written according to the provided scenario.
// URI
static String KMS_API_BASE_URI = {{ OpenAPI 가이드의 URL 참조 }};
// END POINT
static String KMS_API_DECRYPT = "/v1/kms/openapi/decrypt/%s";
static String KMS_API_CREATE_DATAKEY = "/v1/kms/openapi/datakey/%s";
// KEY ID
static String KEY_ID = {{마스터 키 ID}};

createEnvelop() {
    // 새로운 데이터 키 생성을 요청
    String encryptedDataKey = getDataKey();
    // 암호화를 할 데이터
    String example_json_data = "{\"PASSWORD\":\"SECRET_CREDENTIAL\"}";
    // 암호화된 데이터 봉투(Envelop encryption)
    String envelope = encryptData(example_json_data, encryptedDataKey);
    // 이 예제 코드에서는 암호화된 데이터 봉투를 파일로 저장
    File envelopeFile = new File("envelope.json");
}

getDataKey() {
    String endPoint = String.format(KMS_API_CREATE_DATAKEY, KEY_ID);
    String url = KMS_API_BASE_URI + endPoint;
    JSONObject data = new JSONObject();
    data.put("key_type", "plaintext");
    JSONObject respJsonObject = callApi(endPoint, data.toJSONString());
    return respJsonObject.get("ciphertext").toString();
}

encryptData() {
    Map<String, String> envelope = new HashMap<>();
    // 데이터 키 복호화
    String dataKey = decryptDataKey(encryptedDataKey);
    // Cipher Class 사용 (사용자가 기 사용 중인 암호화 알고리즘 사용 가능)
    SecretKey secretKey = new SecretKeySpec(decodeBase64(dataKey), "{사용자 선택 알고리즘}");
    Cipher cipher = Cipher.getInstance("{사용자 선택 알고리즘}");
    cipher.init(Cipher.ENCRYPT_MODE, secretKey);
    byte[] iv = cipher.getParameters().getParameterSpec(IvParameterSpec.class).getIV();
    byte[] cipherText = cipher.doFinal(obj.toString().getBytes());

    envelope.put("encryptedKey", encryptedDataKey);
    envelope.put("cipherText", encodeBase64(cipherText));
    envelope.put("iv", encodeBase64(iv));

    return JSONValue.toJSONString(envelope);
}

decryptDataKey() {
    String endPoint = String.format(KMS_API_DECRYPT, KEY_ID);
    JSONObject data = new JSONObject();
    data.put("cipherText", sealedKey);
    JSONObject respJsonObject = callApi(endPoint, data.toJSONString());
    String plaintext = (respJsonObject.get("plaintext")).toString();
    return plaintext;
}
Go example code
This is a Go example code written based on the provided scenario.
// URI
const KMS_API_BASE_URI = {{ OpenAPI 가이드의 URL 참조 }}

// END POINT
const KMS_API_DECRYPT = "/v1/kms/openapi/decrypt/%s"
const KMS_API_CREATE_DATAKEY = "/v1/kms/openapi/datakey/%s"

// KEY ID
const KEY_ID = {{마스터 키 ID}}

createEnvelop() {
        // 새로운 데이터 키 생성을 요청
        encryptedDataKey := getDataKey()
        // 암호화를 할 데이터
        example_json_data := "{\"PASSWORD\":\"SECRET_CREDENTIAL\"}"
        // 암호화된 데이터 봉투(Envelop encryption)
        envelope := encryptData(example_json_data, encryptedDataKey)
        // 이 예제 코드에서는 암호화된 데이터 봉투를 파일로 저장
        file, _ := os.Create("envelope.json")
        defer file.Close()
        file.WriteString(envelope)
}

getDataKey() {
        endPoint := fmt.Sprintf(KMS_API_CREATE_DATAKEY, KEY_ID)
        data := map[string]interface{}{
            "key_type": "plaintext",
        }
        jsonData, _ := json.Marshal(data)
        respJsonObject := callApi(endPoint, jsonData)
        info := &KMSDatakeyInfo{}
        json.Unmarshal([]byte(respJsonObject), info)

        return info.DataKey
}

encryptData() {
        envelope := make(map[string]string)
        // 데이터 키 복호화
        dataKey := decryptDataKey(encryptedDataKey)
        secretKey, _ := base64.StdEncoding.DecodeString(dataKey)

        // Cipher Class 사용
        block, _ := {사용자 선택 알고리즘}.NewCipher(secretKey)
        cipherText := make([]byte, {사용자 선택 알고리즘}.BlockSize+len(example_json_data))
        iv := cipherText[:{사용자 선택 알고리즘}.BlockSize]
        if _, err := io.ReadFull(rand.Reader, iv); err != nil {
               panic(err)
        }

        mode := cipher.NewCFBEncrypter(block, iv)
        mode.XORKeyStream(cipherText[{사용자 선택 알고리즘}.BlockSize:], []byte(example_json_data))

        envelope["encryptedKey"] = encryptedDataKey
        envelope["cipherText"] = base64.StdEncoding.EncodeToString(cipherText)
        envelope["iv"] = base64.StdEncoding.EncodeToString(iv)

        jsonString, _ := json.Marshal(envelope)

        return string(jsonString)
}

decryptDataKey() {
        endPoint := fmt.Sprintf(KMS_API_DECRYPT, KEY_ID)
        data := map[string]interface{}{
               "cipherText": sealedKey,
        }
        jsonData, _ := json.Marshal(data)
        respJsonObject := callApi(endPoint, jsonData)
        info := &KMSDecryptInfo{}
        json.Unmarshal([]byte(respJsonObject), info)

        return info.DecryptedData

}
Python example code
This is a Python example code written according to the presented scenario.
# URI
KMS_API_BASE_URI = {{ OpenAPI 가이드의 URL 참조 }}

# END POINT
KMS_API_DECRYPT = "/v1/kms/openapi/decrypt/"
KMS_API_CREATE_DATAKEY = "/v1/kms/openapi/datakey/"

# KEY ID
KEY_ID = {{마스터 키 ID}}

create_envelop()
    # 새로운 데이터 키 생성을 요청
    encrypted_data_key = get_dataKey()

    # 암호화를 할 데이터
    example_json_data = {"PASSWORDTEST":"SECRET_CREDENTIALTEST"}
    json_data_str = json.dumps(example_json_data)

    # 암호화된 데이터 봉투(Envelop encryption)
    envelope = encrypt_data(json_data_str,encrypted_data_key)

    # 이 예제 코드에서는 암호화된 데이터 봉투를 파일로 저장
    with open("envelope.json", "w") as file:
        file.write(envelope)


get_dataKey()
    end_point = f"{KMS_API_CREATE_DATAKEY}{KEY_ID}"
    data = {
        "key_type": "plaintext"
    }
    response_object = call_api(end_point, data)

    data_key = response_object.get("ciphertext", "")

    return data_key


encrypt_data()
    envelope = {}
    # 데이터 키 복호화
    dataKey = decrypt_data_key(encrypted_data_key)
    decoded_data_key = base64.b64decode(dataKey)

    # Cipher Class 사용
    iv = get_random_bytes(16)
    cipher = {사용자 선택 알고리즘}.new(decoded_data_key, {사용자 선택 알고리즘}.MODE_CBC, iv)
    data_to_encrypt = obj
    data_bytes = data_to_encrypt.encode()
    padded_data = pad(data_bytes, {사용자 선택 알고리즘}.block_size)
    cipher_text = cipher.encrypt(padded_data).hex()

    envelope["encryptedKey"] = encrypted_data_key
    envelope["cipherText"] = cipher_text
    envelope["iv"] = base64.b64encode(iv).decode()

    return json.dumps(envelope)

decrypt_data_key()
    end_point = f"{KMS_API_DECRYPT}{KEY_ID}"
    data = {}
    data["cipherText"] = sealed_key
    resp_json_object = call_api(end_point,data)
    plaintext = resp_json_object.get("decryptedData")
    return plaintext
Example code result
Displays the result of the example code.
  {
        "cipherText":"d3S81rzaGAl8U12LlKSlRbDekPlGuibTntXX962KCjBIKuXdPOG8N8vk3Jet8lyG",
        "iv":"0kP7QKZ6BUeQPlThk4tySA==",
        "encryptedKey":"vault:v1:KJjjLtGHTbaV5N8LWC5O9eMDCaJVeff5SM\/MAYseugjiqiXFVgdXaKXg6kym0NmjHkO\/wLPsa+YK0aVk"
    }
Use envelope encryption
You can present an envelope encryption usage scenario and view the Java, Go, and Python example code and results written according to the scenario.
Scenario
- Decrypt the Data Key of the encrypted envelope file.
- Decrypt the encrypted data of the envelope file using the decrypted Data Key.
Java example code
This is a Java example code written according to the provided scenario.
// URI
static String KMS_API_BASE_URI = {{ OpenAPI 가이드의 URL 참조 }};
// END POINT
static String KMS_API_DECRYPT = "/v1/kms/openapi/decrypt/%s";
// KEY ID
static String KEY_ID = {{마스터 키 ID}};;


getData() {
    // 암호화된 데이터 봉투(Envelop encryption)
    String envelope = new String(Files.readAllBytes(Paths.get("envelope.json")));
    JSONParser parser = new JSONParser();
    JSONObject envelopeJson = (JSONObject) parser.parse(envelope);
    String encryptedDataKey = envelopeJson.get("encryptedKey").toString();
    String cipherText = envelopeJson.get("cipherText").toString();
    String iv = envelopeJson.get("iv").toString();

    return decryptData(cipherText, encryptedDataKey, iv);
}

decryptData() {
    String dataKey = decryptDataKey(encryptedDataKey);
    IvParameterSpec ivParameterSpec = new IvParameterSpec(decodeBase64(iv));
    SecretKey secretKey = new SecretKeySpec(decodeBase64(dataKey), "{사용자 선택 알고리즘}");
    Cipher cipher = Cipher.getInstance("{사용자 선택 알고리즘}");
    cipher.init(Cipher.DECRYPT_MODE, secretKey, ivParameterSpec);
    byte[] plaintext = cipher.doFinal(decodeBase64(cipherText));

    return new String(plaintext);
}

decryptDataKey() {
    String endPoint = String.format(KMS_API_DECRYPT, KEY_ID);
    JSONObject data = new JSONObject();
    data.put("cipherText", sealedKey);
    JSONObject respJsonObject = callApi(endPoint, data.toJSONString());
    String plaintext = (respJsonObject.get("plaintext")).toString();
    return plaintext;
}
Go example code
This is a Go example code written according to the presented scenario.
// URI
const KMS_API_BASE_URI = {{ OpenAPI 가이드의 URL 참조 }}

// END POINT
const KMS_API_DECRYPT = "/v1/kms/openapi/decrypt/%s"

// KEY ID
const KEY_ID = {{마스터 키 ID}}

getData() {
    // 암호화된 데이터 봉투(Envelop encryption) 불러오기
    jsonData, _ := os.ReadFile("envelope.json")
    var envelope map[string]interface{}
    if err := json.Unmarshal(jsonData, &envelope); err != nil {
           fmt.Println("JSON 파싱 오류:", err)
           os.Exit(1)
    }
    encryptedDataKey := envelope["encryptedKey"].(string)
    cipherText := envelope["cipherText"].(string)
    iv := envelope["iv"].(string)

    return decryptData(cipherText, encryptedDataKey, iv)
}

decryptData() {
    dataKey := decryptDataKey(encryptedDataKey)
    ciphertext, _ := base64.StdEncoding.DecodeString(cipherText)
    dataKeyBytes, _ := base64.StdEncoding.DecodeString(dataKey)
    decodedData := ciphertext[{사용자 선택 알고리즘}.BlockSize:]
    ivparam := ciphertext[{사용자 선택 알고리즘}.BlockSize]
    block, _ := {사용자 선택 알고리즘}.NewCipher(dataKeyBytes)

    mode := cipher.NewCFBDecrypter(block, ivparam)
    mode.XORKeyStream(decodedData, decodedData)
    decryptedData := string(decodedData)

    return decryptedData
}

decryptDataKey() {
    endPoint := fmt.Sprintf(KMS_API_DECRYPT, KEY_ID)
    data := map[string]interface{}{
           "cipherText": sealedKey,
    }
    jsonData, _ := json.Marshal(data)
    respJsonObject := callApi(endPoint, jsonData)
    info := &KMSDecryptInfo{}
    json.Unmarshal([]byte(respJsonObject), info)

    return info.DecryptedData
}
Python example code
This is a Python example code written according to the presented scenario.
# URI
KMS_API_BASE_URI = {{ OpenAPI 가이드의 URL 참조 }}

# END POINT
KMS_API_DECRYPT = "/v1/kms/openapi/decrypt/"

# KEY ID
KEY_ID = {{마스터 키 ID}}

get_data()
    # 암호화된 데이터 봉투(Envelop encryption) 열기
    with open("envelope.json", "r") as file:
        envelope = file.read()
    envelope_json = json.loads(envelope)
    encrypted_data_key = envelope_json["encryptedKey"]
    cipher_text = envelope_json["cipherText"]
    iv = envelope_json["iv"]
    return decrypt_data(cipher_text, encrypted_data_key, iv)

decrypt_data()
    data_key = decrypt_data_key(encrypted_data_key)
    iv_bytes = base64.b64decode(iv)
    decoded_data_key = base64.b64decode(data_key)
    cipher_txt = bytes.fromhex(cipher_text)

    cipher = {사용자 선택 알고리즘}.new(decoded_data_key, {사용자 선택 알고리즘}.MODE_CBC, iv_bytes)
    plain_text_bytes = unpad(cipher.decrypt(cipher_txt), {사용자 선택 알고리즘}.block_size)
    plain_text = plain_text_bytes.decode('utf-8')
    return plain_text

decrypt_data_key()
    end_point = f"{KMS_API_DECRYPT}{KEY_ID}"
    data = {}
    data["cipherText"] = sealed_key
    resp_json_object = call_api(end_point,data)
    plaintext = resp_json_object.get("decryptedData")
    return plaintext
Example code result
Displays the result of the example code.
{"PASSWORD":"SECRET_CREDENTIAL"}
Use data signature
It provides a data signing usage scenario to guarantee data integrity, and you can review the Java, Go, and Python example code and their results as written according to the scenario.
Scenario
- Call the OpenAPI to sign the data.
- The signed data is enveloped and saved as a JSON file.
Java example code
This is a Java example code written according to the provided scenario.
// URI
static String KMS_API_BASE_URI = {{ OpenAPI 가이드의 URL 참조 }};

// END POINT
static String KMS_API_SIGN = "/v1/kms/openapi/sign/%s";

// KEY ID
static String KEY_ID = {{마스터 키 ID}};

signEnvelop() {
    // 서명 데이터 봉투(Envelop encryption)
    String envelope = sign();
    // 이 예제 코드에서는 서명 데이터 봉투를 파일로 저장
    File envelopeFile = new File("signEnvelope.json");
    OutputStream os = new BufferedOutputStream(new FileOutputStream(envelopeFile));

    try {
        os.write(envelope.getBytes());
    } finally {
        os.close();
    }
}

sign() {
    Map<String, String> envelope = new HashMap<>();

    String example_credential = "SCP KMS Sign Test!!!";
    String endPoint = String.format(KMS_API_SIGN, KEY_ID);
    JSONObject data = new JSONObject();
    data.put("input", encodeToBase64(example_credential));

    JSONObject respJsonObject = callApi(endPoint, data.toJSONString());

    envelope.put("signature", respJsonObject.get("signature").toString());
    if(respJsonObject.get("batch_results") != null) {

        envelope.put("batch_results", respJsonObject.get("batch_results").toString());
    }

    return JSONValue.toJSONString(envelope);
}
Go example code
This is a Go example code written according to the presented scenario.
// URI
const KMS_API_BASE_URI = {{ OpenAPI 가이드의 URL 참조 }}

// END POINT
const KMS_API_SIGN = "/v1/kms/openapi/sign/%s"

// KEY ID
const KEY_ID = {{마스터 키 ID}}

signEnvelop() {
    // 서명 데이터 봉투(Envelop encryption)
    envelope := sign()
    // 이 예제 코드에서는 서명 데이터 봉투를 파일로 저장
    file, _ := os.Create("signEnvelope.json")
    defer file.Close()
    file.WriteString(envelope)
}

sign() {
    envelope := make(map[string]string)
    example_credential := "SCP KMS Sign Test!!!"
    endPoint := fmt.Sprintf(KMS_API_SIGN, KEY_ID)
    data := map[string]interface{}{
        "input": base64.StdEncoding.EncodeToString([]byte(example_credential)),
    }
    jsonData, _ := json.Marshal(data)
    respJsonObject := callApi(endPoint, jsonData)
    info := &KMSSignInfo{}
    json.Unmarshal([]byte(respJsonObject), info)

    envelope["signature"] = info.Signature

    jsonString, _ := json.Marshal(envelope)

    return string(jsonString)
}
Python example code
This is a Python example code written according to the presented scenario.
# URI
KMS_API_BASE_URI = {{ OpenAPI 가이드의 URL 참조 }}

# END POINT
KMS_API_SIGN = "/v1/kms/openapi/sign/"

# KEY ID
KEY_ID = {{마스터 키 ID}}

sign_envelop()
    # 서명 데이터 봉투(Envelop encryption)
    envelope = sign()

    # 이 예제 코드에서는 서명 데이터 봉투를 파일로 저장
    with open("signEnvelope.json", "w") as file:
        file.write(envelope)


sign()
    envelope = {}

    example_credential = "SCP KMS Sign Test!!!"
    end_point = f"{KMS_API_SIGN}{KEY_ID}"
    credential_bytes = example_credential.encode('utf-8')

    data = {
        "input": base64.b64encode(credential_bytes).decode('utf-8')
    }

    resp_json_object = call_api(end_point,data)

    envelope["signature"] = resp_json_object.get("signature")

    return json.dumps(envelope)
Example code result
Displays the result of the example code.
  {
    "signature":"vault:v1:qHGf4ALkTao1Yy\/lpSbLQ2l8YVpsHWBP6ic3Ux1BKSodQQxnEIrjPyUwXXQ1NZfGSVxdeVe5Y6kb0nUPNADQpzkOh9\/e8T\/QCOs9==",
    "projectId":"PROJECT-qWrHRJX5sZnTkopcr9N1dk"
}
Use data validation
It presents a verification usage scenario for validating data integrity, and you can view the Java, Go, and Python example code and their results written according to the scenario.
Scenario
- Retrieves the signature value of the signed envelope file.
- Validates the signed data and outputs the result.
Java example code
This is a Java example code written according to the provided scenario.
// URI
static String KMS_API_BASE_URI = {{ OpenAPI 가이드의 URL 참조 }};

// END POINT
static String KMS_API_VERIFY = "/v1/kms/openapi/verify/%s";

// KEY ID
static String KEY_ID = {{마스터 키 ID}};

getSign() {
    // 서명 데이터 봉투(Envelop encryption)
    String envelope = new String(Files.readAllBytes(Paths.get("signEnvelope.json")));
    JSONParser parser = new JSONParser();
    JSONObject envelopeJson = (JSONObject) parser.parse(envelope);
    String signature = envelopeJson.get("signature").toString();

    return verify(signature);
}

verify() {
    String endPoint = String.format(KMS_API_VERIFY, KEY_ID);
    JSONObject data = new JSONObject();
    data.put("input", "U0NQIEtNUyBTaWduIFRlc3QhISE=");
    data.put("signature", signature);
    JSONObject respJsonObject = callApi(endPoint, data.toJSONString());
    String valid = (respJsonObject.get("valid")).toString();
    return valid;
}
Go example code
This is a Go example code written according to the presented scenario.
// URI
const KMS_API_BASE_URI = {{ OpenAPI 가이드의 URL 참조 }}

// END POINT
const KMS_API_VERIFY = "/v1/kms/openapi/verify/%s"

// KEY ID
const KEY_ID = {{마스터 키 ID}}

getSign() {
    // 서명 데이터 봉투(Envelop encryption) 불러오기
    jsonData, _ := os.ReadFile("signEnvelope.json")
    var envelope map[string]interface{}
    if err := json.Unmarshal(jsonData, &envelope); err != nil {
           fmt.Println("JSON 파싱 오류:", err)
           os.Exit(1)
    }
    signature := envelope["signature"].(string)

    return verify(signature)
}

verify() {
    endPoint := fmt.Sprintf(KMS_API_VERIFY, KEY_ID)
    data := map[string]interface{}{
           "input":          "U0NQIEtNUyBTaWduIFRlc3QhISE=",
           "signature":      signature,
    }
    jsonData, _ := json.Marshal(data)
    respJsonObject := callApi(endPoint, jsonData)
    info := &KMSVerifyInfo{}
    json.Unmarshal([]byte(respJsonObject), info)

    return info.Valid
}
Python example code
This is a Python example code written according to the presented scenario.
# URI
KMS_API_BASE_URI = {{ OpenAPI 가이드의 URL 참조 }}

# END POINT
KMS_API_VERIFY = "/v1/kms/openapi/verify/"

# KEY ID
KEY_ID = {{마스터 키 ID}}

get_sign()
    # 서명 데이터 봉투(Envelop encryption) 열기
    with open("signEnvelope.json", "r") as file:
        envelope = file.read()
    envelope_json = json.loads(envelope)
    signature = envelope_json["signature"]

    return verify(signature)


verify()
    end_point = f"{KMS_API_VERIFY}{KEY_ID}"

    data = {
        "input": "U0NQIEtNUyBTaWduIFRlc3QhISE=",
        "signature": signature
    }

    resp_json_object = call_api(end_point,data)
    valid = resp_json_object.get("valid")

    return valid
Example code result
Displays the result of the example code.
  {
    "valid": true
}
1.2.2 - Platform-managed Key
Users can view detailed information about the platform-managed key automatically generated for service provisioning on the Samsung Cloud Platform.
Reference
- Platform-managed keys are created and managed directly by the CSP (Cloud Service Provider), so users cannot modify or delete key attributes.
- When another product within Samsung Cloud Platform uses a KMS key for encryption, the CSP generates a platform-managed key itself and performs the encryption, even if the user does not create a key directly in KMS.
Check detailed information of platform-managed key
You can view the full resource list and detailed information of platform-managed keys. The Platform Managed Key Details page consists of Details, Operation History tabs.
To view detailed information about the Key Management Service, follow these steps.
- Click the All Services > Security > Key Management Service menu. You will be taken to the Service Home page of Key Management Service.
- On the Service Home page, click the Platform Managed Key menu. You will be taken to the Platform Managed Key List page.
- On the Platform Managed Key List page, click the resource to view detailed information. You will be taken to the Platform Managed Key Details page.
- Platform Managed Key Details page displays status information and descriptions of additional features at the top.
Category Detailed description status Display the status of the platform-managed key - Active: Available/Active
Table. Platform Managed Key Status Information
- Platform Managed Key Details page displays status information and descriptions of additional features at the top.
Detailed Information
On the Platform Managed Key List page, you can view detailed information of the selected resource.
Category | Detailed description |
|---|---|
| Service | Service name |
| Resource Type | Resource Type |
| SRN | Unique resource ID in Samsung Cloud Platform |
| Resource name | Resource Name |
| Resource ID | Unique resource ID in the service |
| Creation date and time | Service creation timestamp |
| key name | Name of the generated key |
| Explanation | Show additional description for the key
|
Table. Platform Managed Key Detailed Information Tab Items
Job History
You can view the operation history of the selected resource on the Platform Managed Key List page.
| Category | Detailed description |
|---|---|
| Work log | Task execution details
|
| Operation date and time | Task execution date and time |
| Resource Type | Resource Type |
| Resource name | Resource Name |
| Result | Task execution result (success/failure) |
| Operator Information | User information for the performed operation |
Table. Platform Managed Key Operation History Tab Detailed Information Items
1.3 - API Reference
API Reference
1.4 - CLI Reference
CLI Reference
1.5 - Release Note
Key Management Service
2026.07.16
FEATURE
Pubilc/Private Endpoint service provision- Provides an endpoint that allows API calls for encryption and decryption from internal and external resources of the Samsung Cloud Platform.
- You can select the resources for API calls and configure access control settings.
2026.03.19
FEATURE
Platform Managed Key Service Provision- In addition to the ‘customer-managed key’ created directly by the user, a ‘platform-managed key’ service generated and managed by the CSP (Cloud Service Provider) is also provided.
- When another product within the Samsung Cloud Platform encrypts using a KMS key, it can encrypt with a platform-managed key generated directly by the CSP without the user having to create a key in KMS.
2025.10.23
FEATURE
Log expansion and notification feature improvements- We enhanced traceability by segmenting operation logs for API calls—such as encryption and decryption—into individual API units and logging them.
- When an encryption key is deleted, notifications are provided not only to the user who deleted the key but also to the key creator, and the notification additionally includes the region name where the encryption key resides.
2025.07.01
FEATURE
Additional encryption method provided- Additionally provides the generation/verification (HMAC) encryption method used for creating and verifying hash-based message authentication codes.
2025.02.27
NEW
Key Management Service service official version release- We have launched an encryption key management service (Key Management Service) to securely protect critical data of customer applications.
- Encryption keys can be generated, provided, and managed for various purposes (encryption/decryption, signing/verification).
2 - Config Inspection
2.1 - Overview
Service Overview
Config Inspection is a service that diagnoses the security level of Console settings for each service of the Samsung Cloud Platform. Provides a security checklist organized by areas such as IAM, Networking, Database, and Logging, and checks the current status via API calls to verify whether the recommended security settings for each diagnostic item are applied.
Users can create a diagnostic target by creating a service, then request a diagnosis, and view the diagnostic request results through a Report. The report provides the diagnostic request history and item-specific diagnostic results, and for diagnostic items that require the user’s final confirmation or action, detailed results—including the associated resource information and remediation guide—can be viewed.
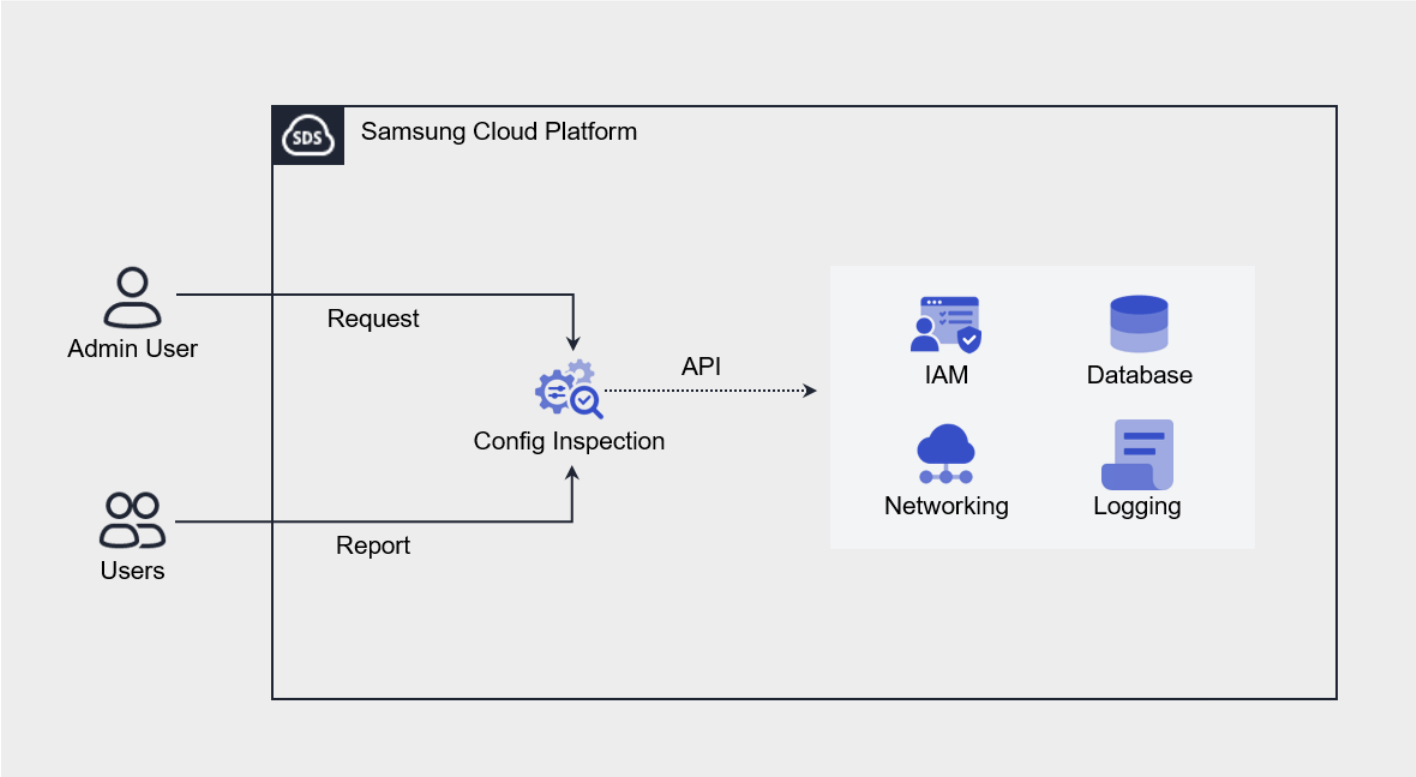
Provided Features
Config Inspection provides the following features.
- Console Diagnostics: You can call the Console API using an authentication key method to assess the security level.
- Diagnostic Target Management: You can create and manage a user’s Samsung Cloud Platform account as a diagnostic target through service creation.
- Diagnostic Request: On the resource detail screen, you can request a diagnosis by clicking the Diagnostic Request button.
- Diagnostic Result Management: In Report, you can view the list of diagnostic requests and detailed diagnostic results, and download them as an Excel file.
Component
Checklist
A checklist is a collection of diagnostic items that serve as the basis for diagnostic results, and the checklist currently provided by Config Inspection is as follows.
- Refer to the Checklist for detailed diagnostic items of the checklist provided by Samsung Cloud Platform.
| Cloud | Checklist name | Number of items |
|---|---|---|
| Samsung Cloud Platform | Best Practice | 27 |
Table. Config Inspection checklist types
Report
In the Config Inspection Report, you can view diagnostic results in the order of result list, result details, and item details.
| Category | Detailed description |
|---|---|
| Diagnostic Results List | All diagnostic request history in the Account
|
| Detailed Diagnosis Results | Result of a successfully completed diagnostic request (list of diagnostic items)
|
| Diagnostic Item Details | Detailed results by diagnostic item |
Table. Config Inspection Report Diagnostic Configuration
Preceding Service
Config Inspection has no prerequisite service.
2.1.1 - Checklist
You can view the types of checklists provided by Config Inspection and the detailed diagnostic items for each checklist.
Checklist
A checklist is a collection of diagnostic items that serve as the basis for diagnostic results, and the types of checklists currently provided by Config Inspection are as follows.
| Cloud | Checklist name | Number of items |
|---|---|---|
| Samsung Cloud Platform | Best Practice | 27 |
Table. Config Inspection checklist types
Best Practice
The detailed diagnostic items of the Best Practice checklist provided by Samsung Cloud Platform are as follows.
| area | Diagnostic Items |
|---|---|
| IAM |
|
| Networking |
|
| Compute |
|
| Container |
|
| Database |
|
| Logging |
|
Table. Samsung Cloud Platform Best Practice checklist items
2.2 - How-to guides
Users can create the service by entering the required information for the Config Inspection service and selecting detailed options through the Samsung Cloud Platform Console.
Create Certificate
To create and use the Config Inspection service in the Samsung Cloud Platform Console, you must first generate an authentication key.
Authentication key creation is **My 메뉴 > My Info. > Authentication Key Management > Authentication Key Creation can be created. For more details, please refer to Authentication Key Management.
Reference
- The expiration period of the authentication key is up to 365 days.
- To create an authentication key without an expiration date, it must be generated permanently.
Create Config Inspection
You can create and use the Config Inspection service in the Samsung Cloud Platform Console.
Reference
Users must belong to the AdministratorGroup user group in order to use the services provided by the Config Inspection service properly.
To create a Config Inspection, follow these steps.
- Click the All Services > Security > Config Inspection menu. 1. Navigate to the Service Home page of Config Inspection.
- On the Service Home page, click the Create Config Inspection button. 2. Go to the Create Config Inspection page.
- Config Inspection Creation On the page, enter the inputs required to create the service, and select detailed options.
- Enter or select the required information in the Service Information Input area.
Category required statusDetailed description Diagnosis Type - Automatic configuration via Console Cloud Required Select cloud to diagnose - SCP: Samsung Cloud Platform
- AWS: Amazon Web Services
- Azure: Microsoft Azure
- Detailed input fields vary depending on the selected cloud type
Diagnostic Target > Diagnosis Name Required Name to distinguish the diagnostic target - Use the entered value as the resource name
- Enter within 25 characters using English letters, numbers, and special characters (
-,_)
Diagnostic target > Diagnostic account Required Console information to be diagnosed - Select the Account ID to diagnose from the list
- If the same Account ID is selected, duplicate requests will be made, resulting in additional charges
- AWS is selected, enter the Account ID (12 digits) for the diagnostic account
- Azure is selected, enter the Subscription ID (36 characters, including letters, numbers, and special characters) for the diagnostic account
Checklist Required Select the checklist to apply during diagnosis version Required Select the checklist version to apply during diagnosis Diagnostic Schedule > Diagnostic Cycle Required After selecting Use, choose the diagnostic interval - The diagnosis runs on the selected date according to the specified interval
- If Monthly is selected, the diagnosis may not be performed on the selected date
- Example) Selecting the 31st of each month – February has no such date, so the diagnosis is not performed
Diagnostic Schedule > Start Time Required Select diagnostic start time - Set the hour and minute information for starting the diagnostic
authentication key Required Select authentication key to use for Open API calls - Select button click and, in the Select authentication key popup, choose the appropriate key from the authentication key list
- If no selectable authentication keys are available, click 인증키 관리 to create a new authentication key
- For detailed information about authentication keys, refer to Authentication Key Management
Pricing plan Selection Select a plan - Standard: Charges are based on the number of diagnoses
- Monthly subscription: Charges a fixed amount each month regardless of the number of diagnoses (up to 30 diagnoses per month)
- The plan cannot be changed after service enrollment
Table. Config Inspection service information input fields - Enter or select the required information in the Additional Information Input area.
Category required statusDetailed description tag Selection Add Tag - Up to 50 per resource can be added
- After clicking the Add Tag button, input or select Key, Value values
Table. Config Inspection additional information entry fields
- Enter or select the required information in the Service Information Input area.
- Summary Check the detailed information and estimated charges generated in the panel, and click the Create button.
- When creation is complete, check the created resources on the Config Inspection List page.
View detailed information of Config Inspection
The Config Inspection service allows you to view and edit the full list of resources and detailed information. On the Config Inspection Details page, it consists of the Detailed Information, Tags, Operation History tabs.
To view detailed information of the Config Inspection service, follow these steps.
- Click the All Services > Security > Config Inspection menu. 1. Navigate to the Service Home page of Config Inspection.
- On the Service Home page, click the Config Inspection menu. 2. Go to the Config Inspection List page.
- Config Inspection List page, click the resource to view detailed information. 3. Config Inspection Details page.
- Config Inspection Details page displays status information and additional feature information, and consists of Details, Tags, Activity Log tabs.
Category Detailed description status Indicates the status of Config Inspection - Ready: When there is no diagnostic request after the service is created (diagnostic request possible)
- In Progress: When a diagnostic request is being executed (diagnostic request/service termination not allowed)
- Error: When an error occurs in the diagnostic request (diagnostic request possible)
- Completed: When the diagnostic request completes successfully (diagnostic request possible)
Diagnosis request Button to perform console diagnostics Service termination Cancel service button Table. Config Inspection status information and additional features
- Config Inspection Details page displays status information and additional feature information, and consists of Details, Tags, Activity Log tabs.
Detailed Information
Config Inspection List page lets you view detailed information of the selected resource and, if needed, modify the information.
| Category | 상세 설명 |
|---|---|
| 서비스 | 서비스명 |
| 자원 유형 | 자원유형 |
| SRN | Samsung Cloud Platform에서의 고유 자원 ID |
| 자원명 | 자원 이름 |
| 자원 ID | 서비스에서의 고유 자원 ID |
| 생성자 | 서비스를 생성한 사용자 |
| 생성 일시 | 서비스를 생성한 일시 |
| 수정자 | 서비스 정보를 수정한 사용자 |
| 수정 일시 | 서비스 정보를 수정한 일시 |
| 진단 유형 | 서비스에서 제공하는 진단 유형 |
| 클라우드 | 진단 대상 종류 |
| 진단 대상 | 진단 대상이 되는 Console 정보
|
| 최근 진단 결과 | 마지막으로 실행된 진단 요청 결과
|
| 최근 진단 일시 | 마지막으로 실행된 진단 요청 일시 |
| 진단 스케줄 | 선택한 진단 스케줄 정보 표시
|
| 인증키 | 서비스 생성 시에 등록된 사용자의 인증키
|
| 체크 리스트 | 선택한 진단 체크 리스트 종류 |
| 버전 | 선택한 진단 체크 리스트 버전 정보 |
| 버전 상태 | 선택한 진단 체크 리스트 버전 상태 |
| 요금제 | 선택한 요금제 종류 |
Table. Config Inspection detailed information tab items
Tag
On the Config Inspection List page, you can view the tag information of the selected resource and add, modify, or delete it.
| 구분 | 상세 설명 |
|---|---|
| 태그 목록 | 태그 목록
|
Table. Config Inspection tag tab items
Job History
Config Inspection list On the page, you can view the operation history of the selected resource.
| 구분 | 상세 설명 |
|---|---|
| 작업 이력 목록 | 자원 변경 이력
|
Table. Config Inspection job history tab items
Config Inspection Resource Management
If you need to view the status of a Config Inspection resource and request a diagnosis, you can perform the task on the Config Inspection List or Config Inspection Details page.
Modify authentication key
You can select the authentication key to use for each diagnostic target.
To modify the service’s authentication key, follow these steps.
- All Services > Security > Config Inspection click the menu. 1. Navigate to the Service Home page of Config Inspection.
- On the Service Home page, click the Config Inspection menu. 2. Go to the Config Inspection List page.
- On the Config Inspection List page, click the resource to edit the authentication key. 3. Navigate to the Config Inspection Details page.
- Check the authentication key and click the Edit icon. 4. Edit Authentication Key The popup window opens.
- Edit Authentication Key Select the authentication key to use in the popup window and click the Confirm button.
구분 상세 설명 인증키 인증키 상세 정보 생성 일시 인증키 생성 일자 만료 일시 인증키 만료 일자 상태 인증키의 상태 - 사용: 사용 가능 상태
- 만료: 사용 기간 만료 상태
Table. Authentication key edit popup items
Reference
- When the authentication key is deleted, it is displayed as
-status. - The authentication key information (authentication key, status) of resources created by other users is displayed as
-.
Request Diagnosis
You can request a diagnosis from the Console based on the configured checklist.
To request a console diagnosis, follow these steps.
Click the All Services > Security > Config Inspection menu. 1. Navigate to the Service Home page of Config Inspection.
On the Service Home page, click the Config Inspection menu. 2. Go to the Config Inspection List page.
Config Inspection List page, click the resource for which you want to request a diagnosis. 3. Go to the Config Inspection Details page.
On the Config Inspection Details page, click the Diagnostic Request button. 4. Diagnostic Request The popup window opens.
Diagnosis Request In the popup window, enter the information required for the diagnosis and click the Confirm button.
- Diagnostic Request popup window items vary depending on the selected Console.
구분 상세 설명 콘솔 접근방식 Console을 접근하는 방식으로 인증키 방식 고정 인증키 SCP를 선택한 경우 사전에 생성한 인증키 선택 Access Key AWS를 선택한 경우 Access Key 입력 Secret Key AWS를 선택한 경우 Secret Key 입력 Client ID Azure를 선택한 경우 Client ID 입력 Client Secret Azure를 선택한 경우 Client Secret 입력 Tenant ID Azure를 선택한 경우 Tenant ID 입력 Table. Diagnosis request popup items
- Diagnostic Request popup window items vary depending on the selected Console.
On the Config Inspection List page, check the status value.
- When the diagnostic request is completed, the status value is displayed as Completed or Error.
- In the case of Completed, you can view the diagnostic request results in the diagnostic results menu. * For more details, please refer to Diagnostic Result Management.
Reference
For detailed information on the prerequisite settings required to run diagnostics for each console, refer to Preconfigure.
Terminate Config Inspection
You can cancel the Config Inspection service you are not using. Note that if you disable Config Inspection, all stored diagnostic data will be deleted.
Caution
- If you terminate the resource, all diagnostic data will be deleted, and you will not be able to view diagnostic results in the Report.
- If the status of the Config Inspection service is In Progress, the service cannot be terminated.
To disable Config Inspection, follow these steps.
- All Services > Security > Config Inspection Click the menu. 1. Navigate to the Service Home page of Config Inspection.
- On the Service Home page, click the Config Inspection menu. 2. Navigate to the Config Inspection List page.
- On the Config Inspection List page, click the resource to be terminated. 3. Navigate to the Config Inspection Details page.
- On the Config Inspection Details page, click the Service Termination button.
- When termination is complete, check on the Config Inspection List page whether the resource has been terminated.
2.2.1 - Check dashboard
Users can view the diagnostic results of the Config Inspection service at a glance on the dashboard through the Samsung Cloud Platform Console.
Check the dashboard
On the dashboard page, you can view the status of Config Inspection’s diagnostic targets, diagnostic history, and more.
To view the dashboard, follow these steps.
- Click the All Services > Security > Config Inspection menu. 1. Navigate to the Service Home page of Config Inspection.
- On the Service Home page, click the Dashboard menu. 2. Go to the Dashboard page.
- View the diagnostic result summary on the Dashboard page.
- Dashboard page at the top allows you to view dashboard information based on period or diagnosis name.
- Period: You can set a period within six months from the current month to view a summary of the diagnostic results.
- Diagnosis Name: If you select All, you can view a summary of the entire diagnostic results, and if you select a diagnostic account, you can view the detailed information of that diagnostic result.
- When you click the Download button, you can download the information displayed on the dashboard page as a PDF file.
Category Detailed description Security level (overall) Display the average of the latest diagnostic results for all subjects - The recent diagnostic results are displayed in the list
- Diagnostic score calculation formula = Total – (Fail + Error + Check)) / Total x 100
Diagnosis status by period Display diagnostic status by target during the search period - Diagnosis Completed: Show recent completed diagnosis records
- Diagnosis Error: Show recent diagnosis error records, and when a diagnosis name is selected, navigate to the detailed diagnosis result page
Summary of diagnostic results by period (overall) Display summary of diagnostic results (overall) for the search period - Selecting a diagnosis name from the list navigates to the detailed diagnostic result page
Table. Detailed description of dashboard items for overall diagnostic resultsCategory Detailed description Security level Display the last diagnostic result score of the selected diagnostic account - Recent diagnostic results are displayed in the list
Summary of Diagnostic Results by Period Display summary of the diagnostic results for the last diagnostic account within the search period Vulnerability status by period Display the vulnerability assessment results of the diagnostic account as a graph during the search period - When a graph is selected, display detailed information of the vulnerable item in the assessment results
Table. Detailed description of dashboard items for diagnostic results by diagnostic account
- Dashboard page at the top allows you to view dashboard information based on period or diagnosis name.
2.2.2 - Diagnostic Result Management
You can view the Config Inspection diagnostic request results on the diagnostic results page and modify the diagnostic results.
Reference
The diagnostic results are generated when a diagnostic request is made in the Config Inspection service, and they are deleted when the service is terminated.
- Config Inspection Request Diagnosis and Config Inspection Terminate please refer to.
Check diagnostic results
On the diagnosis results page, you can view the results of the diagnosis request.
Check diagnostic result list
To view the list of diagnostic results, follow these steps.
- Click the All Services > Security > Config Inspection menu. 1. Navigate to the Service Home page of Config Inspection.
- On the Service Home page, click the Diagnostic Results menu. 2. Diagnostic Results List navigate to the page.
- On the Diagnostic Results List page, check the summary information of diagnostic results.
Category Detailed description Diagnosis name Resource name diagnostic account Console information subject to diagnosis Checklist Collection of diagnostic items that serve as the basis for diagnostic results Version Version information of the diagnostic checklist used as the basis for diagnosis results Version status Diagnostic checklist version status used as the basis for diagnosis results PASS Number of checklist items with a diagnosis result of PASS (normal) FAIL Number of checklist items with a diagnosis result of FAIL (vulnerable) CHECK Number of checklist items with a diagnosis result of CHECK (verification needed) ERROR Number of checklist items with a diagnosis result of ERROR (diagnosis not possible) N/A Number of checklist items with a diagnosis result of N/A (not applicable) All Total number of checklist items Diagnostic Result Diagnosis request result - Completed: The diagnosis request has been successfully completed, clicking Completed moves to the detail page
- Error: The diagnosis request was not completed successfully, error items cannot view detailed information
Diagnosis date and time Diagnosis request date and time Table. Diagnosis result list items
View detailed diagnostic result information
To view detailed information of the diagnostic results, follow these steps.
All Services > Security > Config Inspection Click the menu. 1. Navigate to the Service Home page of Config Inspection.
Click the Diagnostic Results menu on the Service Home page. 2. Go to the Diagnostic Results List page.
- Diagnosis Result List You can search by entering a diagnosis name in the page’s search area or by clicking the Detailed Search button.
On the Diagnosis Result List page, click the item whose diagnosis result is Completed. 3. Go to the detailed diagnosis result page.
- Items with a diagnostic result in error status do not display detailed information.
On the Detailed Diagnosis Result page, view the detailed diagnosis results.
Category Detailed description Excel download Download the detailed list of diagnostic results as an Excel file More > Diagnosis Result Management Go to the diagnostic results management page Checklist Collection of diagnostic items that serve as the basis for diagnostic results version Version of the diagnostic checklist that serves as the basis for the diagnosis results area Diagnostic scope (services of Samsung Cloud Platform) Diagnostic Items Recommended security standards for service-specific configurations Result Diagnostic Item Standard Inspection Results Table. Detailed diagnosis result itemsClick the diagnostic item to view detailed information. 5. Diagnosis Item Details The popup window opens.
- Diagnosis Item Details In the popup window, you can view the following information.
Category Detailed description area Diagnostic scope (services of Samsung Cloud Platform) Diagnostic Items Recommended security standards for service-specific configurations Result Diagnostic Item Standard Inspection Results Diagnostic criteria Result Evaluation Criteria Diagnostic method How to check the current settings Action Guide Configuration method that complies with security standards Detailed results Resource information and settings for the diagnostic item Change diagnostic result Button to change the diagnosis result - When the diagnosis result is changed, the Check Result button is displayed, and you can delete the changed result by clicking the Delete button
Table. Config Inspection diagnostic item details
- Diagnosis Item Details In the popup window, you can view the following information.
Manage Diagnostic Results
On the diagnosis results page, you can modify the results of items whose diagnosis result is in the CHECK state.
Change diagnostic result
To change the diagnostic result, follow the steps below.
Click the All Services > Security > Config Inspection menu. 1. Navigate to the Service Home page of Config Inspection.
On the Service Home page, click the Diagnostic Results menu. 2. Go to the Diagnosis Result List page.
On the Diagnosis Result List page, click the item whose diagnosis result is Completed. 3. Go to the Diagnosis Result Details page.
- Items with a diagnostic result in error status do not display detailed information.
On the Diagnosis Result Details page, click the More > Diagnosis Result Management button at the top. 4. Navigate to the Diagnostic Result Management page.
On the Diagnosis Result Management page, click the Change Result button for the item whose diagnosis result you want to modify. 5. Result Change A popup window opens.
Result Change In the popup window, select or enter the information required to change the result.
Category Required or not Detailed description Registrant - Diagnostic result change registrant email Validity period Required Set the diagnostic result validity period Result change Required Select the diagnostic result to change among Pass, Check, Fail Detailed reason Required Enter the detailed reason for changing the result. Attachment Selection 결과 변경 확인 시 필요한 파일을 업로드 - 파일첨부 버튼을 클릭해 파일 업로드, 최대 5개까지 등록 가능
점검결과 - 상세 점검 결과 표시 Table. Detailed items of diagnostic result changesReview the entered information and click the Register button. 7. Diagnostic Result Management list, verify whether the diagnostic results have been changed.
Delete diagnostic result change history
To delete the diagnostic result change log, follow these steps.
- All Services > Security > Config Inspection click the menu. 1. Navigate to the Service Home page of Config Inspection.
- On the Service Home page, click the Diagnostic Results menu. 2. Go to the Diagnostic Results List page.
- On the Diagnosis Result List page, click the item whose diagnosis result is completed. 3. Navigate to the Diagnostic Result Details page.
- Items with a diagnostic result in error status do not display detailed information.
- On the Diagnosis Result Details page, click the Diagnosis Result Management button at the top. 4. Go to the Diagnosis Result Management page.
- On the Diagnosis Result Management page, click the Result Check button for the item whose diagnosis result you want to change. 5. Result Confirmation A popup window opens.
- Check Result in the popup window, click the Delete button.
2.2.3 - Preconfigure
Users must perform pre‑cloud configuration, such as creating authentication keys and adding access‑control IPs, through the Samsung Cloud Platform Console to use the Config Inspection service.
Reference
The configuration items differ depending on the type of cloud you use. Refer to the relevant chapter and configure the required items for each cloud.
Setting up Samsung Cloud Platform Console
To diagnose Samsung Cloud Platform and external clouds in the Config Inspection service, configure the items below.
Check policies attached to the user group
information
- In Config Inspection, you can diagnose the Samsung Cloud Platform or external clouds. * You can assign appropriate policy requirements to user groups based on the diagnostic target and use them.
- Verify that a user group policy appropriate for the desired diagnostic target is configured.
- If policy creation is required, please contact the Account administrator.
To check the policy of the user group to which the user belongs, follow the steps below.
- All Services > Management > IAM Click the menu. 1. Navigate to the Service Home page of IAM.
- On the Service Home page, click the User Group menu. 2. Navigate to the User Group List page.
- On the User Group List page, click the user group you want to view. 3. Navigate to the User Group Details page.
- On the User Group Details page, click the Policy tab. 4. Navigate to the Policy tab page.
- Policy tab page, click the policy you want to view. 5. Navigate to the Policy Details page.
- Policy Details page, view detailed information.
- Verify that the policy information in the table below is set. * If necessary, contact the administrator to add a policy.
Item Policy Requirement 1 Policy Requirement 2 action List, Read Create, Delete, List, Read, Update Applied resource All resources Individual Resource (Config Inspection) Authentication Type All authentication Temporary key authentication, Console login Applied IP 123.37.11.42, custom IP - the IP 123.37.11.42 for diagnostics, and the IP for the user to access the console must each be added
Custom IP Table: Detailed policy setting items for all cloud diagnostics
- Verify that the policy information in the table below is set. * If necessary, contact the administrator to add a policy.
Authentication key generation
You can view and generate the authentication key for the Config Inspection service.
Information
- You can create up to two authentication keys.
- After generating a new authentication key, you must apply the updated API authentication key to the service you are using.
To generate an authentication key in the Samsung Cloud Platform Console, follow these steps.
- Click the My menu > My info. menu in the Console. 1. My info. Go to the detail page.
- My info. Click the Authentication Key Management tab on the detail page. 2. Navigate to the Authentication Key Management tab page.
- On the Authentication Key Management tab page, click the Create Authentication Key button. 3. Navigate to the Create Authentication Key page.
- You can view the list of authentication keys on the authentication key management page.
- On the Create Auth Key page, after entering the expiration period, click the Confirm button.
- Verify that the generated authentication key is displayed in the authentication key list.
Add allowed IP
You can add allowed IP addresses in the Samsung Cloud Platform Console.
To add an allowed IP for the Console, follow these steps.
- Click the My menu > My info. menu in the Console. 1. My info. Go to the detail page.
- My info. On the detail page, click the Authentication Key Management tab. 2. Navigate to the Authentication Key Management tab page.
- On the Authentication Key Management tab page, click the Edit icon of the Security Settings item. 3. Edit Authentication Key Security Settings The popup window opens.
- Edit Authentication Key Security Settings Enter the authentication method and allowed IP addresses in the popup window.
- Select the authentication method authentication key.
- Set the allowed access IP to Use, enter the IP address, and click the Add button.
- When the allowed IP addition is complete, click the Confirm button. 5. Check that the Security Settings item has been updated with the entered information.
Configure AWS
To diagnose the AWS (Amazone Web Services) cloud in the Config Inspection service, set the items below.
Add permission policy
You can add permission policies for users or user groups in the AWS Console.
Add user permission
To add a user access policy in the AWS Console, follow these steps.
- Click IAM > Users in the AWS Console.
- Select the diagnostic user name from the user list.
- On the user information page, click the Permissions tab.
- Select Add Permission in the permission policy.
- When adding permissions, select ReadOnlyAccess, ViewOnlyAccess.
Add user group permission
To add a user group access permission policy in the AWS Console, follow these steps.
- Click IAM > User Groups in the AWS Console.
- Select the group that the user belongs to from the list of user groups.
- On the user group page, click the Permissions tab.
- Select Add Permission in the permission policy.
- When adding permissions, select ReadOnlyAccess, ViewOnlyAccess.
Add access control IP
When using an IP access control policy, you must add the exception IP for blocking to the policy.
Add user access control IP
To add a user access control IP in the AWS Console, follow these steps.
- Click IAM > Users in the AWS Console.
- Select the diagnostic user name from the user list.
- On the user information page, click the Permissions tab.
- Click Edit for the IP Access Control Policy in the permission policy section.
- Add 123.37.24.82 to the block exception IP.
Add user group access control IP
To add a user group access control IP in the AWS Console, follow these steps.
- Click IAM > User Groups in the AWS Console.
- Select the group that the user belongs to from the list of user groups.
- On the user group page, click the Permissions tab.
- In the permission policy item, click Edit of IP Access Control Policy.
- Add 123.37.24.82 to the block exception IP.
Create Access Key
To create an Access Key in the AWS Console, follow these steps.
- Click IAM > Users in the AWS Console.
- Select the diagnostic user name from the user list.
- On the user information page, click the Security Credentials tab.
- On the Security credentials page, click Access keys.
- On the Create Access Key page, generate an access key for third‑party services.
- Be sure to save the generated access key information.
Caution
Secret Key can be downloaded as a CSV file or saved separately.
- Secret key information can only be viewed when creating an access key and cannot be recovered later.
Configure Azure
To diagnose Azure cloud in the Config Inspection service, set the items below.
Entra ID Application registration
To register an Entra ID application in the Azure Console, follow these steps.
- Click Microsoft Entra ID > App registrations in the Azure Console.
- On the App Registration page, click New Registration.
- Register the application (client) ID.
- After the app registration is complete, check the app name, application (client) ID, directory (tenant) ID on the overview page.
Add API usage permission
Reference
To use the Config Inspection service, you must preconfigure it from an account that has the Global Administrator role among Azure AD roles.
To add API permissions in Azure Console, follow these steps.
- In the Azure Console, click Microsoft Entra ID > App registrations(App registrations) > Entra ID Application registration > App name > API permissions(App permissions) > Add a permission(Add a permission).
- API permissions From the list, select the Microsoft Graph to which you want to add permissions.
- On the API Permission Request page, click Application Permissions.
- Select Application.Read.All, Device.Read.All, Group.Read.All, User.Read.All, DeviceManagementManagedDevices.Read.All, AuditLog.Read.All, Directory.Read.All, Domain.Read.All, GroupMember.Read.All, Policy.Read.All, Reports.Read.All from the permission list.
- In App API permission registration, after adding a permission, click Grant admin consent (Grant admin consent for account name).
- Check whether it has been changed to the Allowed (Granted for account name) status for the account name.
Create Client Secret
To create a Client Secret in the Azure Console, follow these steps.
- Click the App name > Certificates & secrets that you created in the Azure Console’s Microsoft Entra ID > App registrations > Entra ID Application registration.
- Click New client password in the Certificates and passwords list.
- When the client secret is generated, check the Client Secret in the Value column of the list.
- Be sure to store the Client Secret value.
Caution
The Client Secret value (Value) can only be viewed at creation. Be sure to record or save it separately.
Add subscription access permission in Azure Console
Subscription access permissions in the Azure Console can be added from the tenant root group or an individual subscription. Select the desired method to add subscription access permissions.
Add permissions in Tenant Root Group
To add subscription access permissions in the Azure Console from the Tenant Root Group, follow these steps.
- Click Management groups (Management groups) > Overview (Overview) in the Azure Console.
- Tenant Root Group > Access Control (IAM) Click.
- If you cannot access the Tenant Root Group menu, change the settings below.
- Microsoft Entra ID > Properties > ‘Account name’ can manage access to all Azure subscriptions and management groups in this tenant. * Change to yes(yes)**
- After adding the permission, you must change it to No.
- If you cannot access the Tenant Root Group menu, change the settings below.
- On the Access Control page, click Add(Add) > Add role assignment(Add role assignment).
- On the Add role assignment page, after entering the detailed information, click Save (Review+assign).
- When entering role assignment information, select the information below in the Role and Member tabs to add the app created in Entra ID Application registration. * All three permissions below must be added.
Category Permission Reader(Reader) User, group, or service principal(Users, group, or service principal) Key Vault read permission (Key Vault Reader) User, group, or service principal(Users, group, or service principal) Reader and Data Access (Reader and Data Access) User, group, or service principal(Users, group, or service principal) Table. Additional permission items when entering role assignment information
- When entering role assignment information, select the information below in the Role and Member tabs to add the app created in Entra ID Application registration. * All three permissions below must be added.
Add permission in individual Subscription
To add subscription access permissions in the Azure Console for an individual subscription, follow these steps.
- Click Subscription > Overview in the Azure Console.
- Check the Subscription ID (Subscription ID) in the basic information on the Overview page.
- Click Subscription (Subscription) > Access Control (IAM).
- On the Access Control page, click Add(Add) > Add role assignment(Add role assignment).
- On the Add Role Assignment page, after entering the details, click Save (Review+assign).
- When entering role assignment information, select the information below in the Role and Member tabs to add the App created in Entra ID Application registration. * All three permissions below must be added.
Category Permission Reader(Reader) User, group, or service principal(Users, group, or service principal) Key Vault Reader (Key Vault Reader) User, group, or service principal(Users, group, or service principal) Reader and Data Access (Reader and Data Access) User, group, or service principal(Users, group, or service principal) Table. Additional permission items when entering role assignment information
- When entering role assignment information, select the information below in the Role and Member tabs to add the App created in Entra ID Application registration. * All three permissions below must be added.
Adding access permissions via PowerShell
To add subscription access permissions in the Azure Console using PowerShell, follow these steps.
- Run the following command in Cloud shell > PowerShell of Azure Console.
New-AzRoleAssignment -ObjectId “App’s Object ID as seen in Enterprise Application” -Scope “/providers/Microsoft.aadiam” -RoleDefinitionName ‘Reader’ -ObjectType ‘ServicePrincipal’- If the command does not execute, change the settings below.
- Microsoft Entra ID > Properties > ‘account name’ can manage access to all Azure subscriptions and management groups in this tenant. * > Change to yes
- After adding the permission, you must change it to No (no).
- Execute the following command to verify whether the configuration is complete.
Get-AzRoleAssignment –ObjectId "App Object ID found in Enterprise Application" –Scope "/providers/Microsoft.aadiam"- If you need to delete permissions, run the command below.
Remove-AzRoleAssignment -ObjectId “App’s Object ID found in Enterprise Application” -Scope “/providers/Microsoft.aadiam” -RoleDefinitionName ‘Reader’
2.3 - Release Note
Config Inspection
2026.07.16
FEATURE
Provide checklist version setting feature- When creating a diagnostic resource, you can select the checklist and version you wish to diagnose.
- You can request a diagnosis using the generated resource and view the specified checklist and version information in the diagnostic results.
2025.07.01
FEATURE
Expand service offering- We have launched the Config Inspection product that enables integrated diagnosis and management of customers’ multi‑cloud console security vulnerabilities.
- You can register the Account (or other cloud account) to be diagnosed, enabling continuous diagnostics, and view the dashboard and detailed results in the Report.
2025.02.27
FEATURE
Common feature change- Samsung Cloud Platform Common Feature Changes
- Account, IAM, Service Home, tags, and other common CX changes have been reflected.
2024.12.23
NEW
Beta version release- You can manage Samsung Cloud Platform Console configuration vulnerabilities through console diagnostics.
- Provides a report that allows you to view security diagnostic results.
3 - Certificate Manager
3.1 - Overview
Service Overview
Certificate Manager is a service that supports certificate distribution and integrated management, enabling users to generate SSL/TLS certificates issued by a Certificate Authority (CA) and self‑signed certificates for development or testing purposes, and use them on Samsung Cloud Platform resources. By receiving pre‑expiration notification emails, users can identify certificates that are about to expire and manage the certificate lifecycle.
Features
- Simple Creation: You can generate certificates with simple steps in the Samsung Cloud Platform Console. User certificates issued externally are validated, and only certificates that pass verification are distributed.
- Service Integration: Connect the certificates registered in Certificate Manager to the Load Balancer to encrypt network connections and protect the service.
- Certificate Expiration Alert: You can identify and replace certificates that are about to expire with periodic notifications up to 1 day before the expiration date.
Service Architecture Diagram
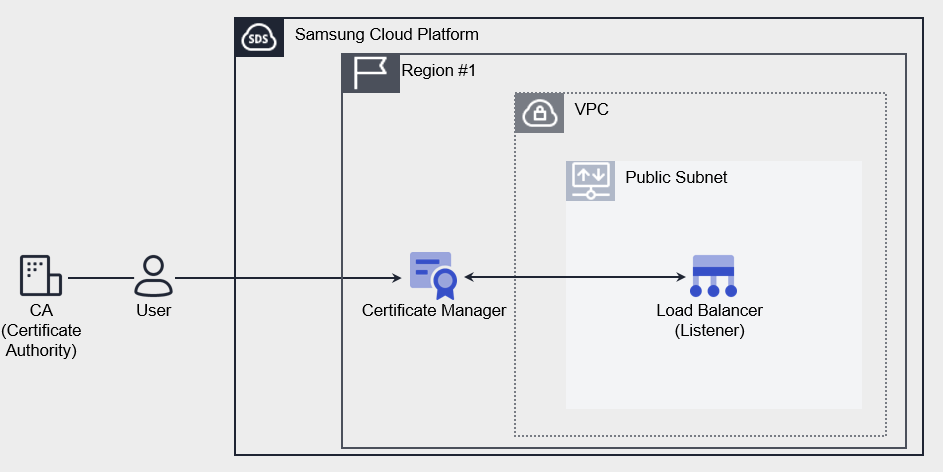
Provided features
Certificate Manager provides the following features.
- Certificate Creation: You can generate a user certificate issued by a certification authority or a self-signed certificate suitable for development/testing (Self-signed).
- Connected Resource Lookup: You can view Samsung Cloud Platform resources that are using the certificate. Currently, it provides a list of Load Balancer listeners (HTTPS).
- Expiration Alert: You can set expiration alert recipients for each certificate. Emails are sent to the recipients starting 45 days before expiration. (Sent 45/30/15/7/1 days before expiration)
Component
User certificates in Certificate Manager consist of a Private Key, Certificate Body, and Certificate Chain. Enter the entire certificate information, including the BEGIN and END lines.
Private Key
Enter the private key in PEM format. Private Key supports RSA and must be entered as a decrypted value.
-----BEGIN RSA PRIVATE KEY-----
(개인키)
-----END RSA PRIVATE KEY-----
Certificate Body
Enter the Server (Leaf) certificate in PEM format. Only one certificate can be entered in the Certificate Body.
-----BEGIN CERTIFICATE-----
(서버 인증서)
-----END CERTIFICATE-----
Certificate Chain
Enter the upper-level certificate in PEM format. Input them in the order Sub (Intermediate) CA → Root CA, and you may omit this only for self‑signed or self‑issued certificates.
-----BEGIN CERTIFICATE-----
(중간 인증서)
-----END CERTIFICATE-----
-----BEGIN CERTIFICATE-----
(루트 인증서)
-----END CERTIFICATE-----
Constraints
Certificate Manager provides services on a per‑Region basis. Create the service in the required Region and use it. The quota per Region is as follows.
| Category | Default quantity | Explanation |
|---|---|---|
| CERTIFICATE_MANAGER.USER_CERT_DEFAULT.COUNT | 100 | Number of user certificates per Region |
| CERTIFICATE_MANAGER.SELFSIGNED_CERT_DEFAULT.COUNT | 100 | Number of self-issued certificates per Region |
Table. Certificate Manager constraints
Prior Service
Certificate Manager has no prerequisite services.
3.2 - How-to guides
Users can create the service by entering the required information for the Certificate Manager service and selecting detailed options through the Samsung Cloud Platform Console.
Create Certificate Manager
You can create and use the Certificate Manager service in the Samsung Cloud Platform Console.
To request the creation of a Certificate Manager service, follow these steps.
- Click the All Services > Security > Certificate Manager menu. 1. Go to the Service Home page.
- On the Service Home page, click the Create Certificate Manager button. 2. Go to the Create Certificate Manager page.
- Create Certificate Manager page, enter the information needed to create the service, and choose detailed options.
- In the Service Information Input area, enter or select the required information.
Category required statusDetailed description Certificate name Required Enter the Certificate Manager name to use - Enter within 3-30 characters, including English letters, numbers, and special characters (
-,_,.)
- Cannot be the same as an existing name
type Required Select the Certificate Manager type to use - User Certificate: a public certificate issued by a Certificate Authority (CA)
- Self-issued Certificate: a certificate self-issued (Self-signed) by Samsung Cloud Platform
- Since it is relatively less secure, it is recommended for development/testing use only.
User Certificate > Certificate Body Required Enter Server(Leaf) certificate information - Only one certificate can be entered in the certificate body
Enter the full content, including the lines from —–BEGIN CERTIFICATE—–to—–END CERTIFICATE—–
User Certificate > Private Key Required Enter the private key information - The Private Key supports the RSA encryption method
- The Private Key can be entered in an unencrypted PEM format
Enter the entire content, including the lines from —–BEGIN RSA PRIVATE KEY—–to—–END RSA PRIVATE KEY—-
User Certificate > Certificate Chain Required Enter the Certificate Chain information - Can be omitted when using a private certificate
- The Certificate Chain should be entered in the order: Intermediate (Subordinate) certificate → Root certificate
- For a public certificate, the Certificate Chain information must be entered; only when there is no intermediate certificate (Chain CA) should use be disabled
Enter the full content, including the lines from —–BEGIN CERTIFICATE—–—–END CERTIFICATE—–
- If there are multiple Intermediate (Subordinate) certificates, enter each certificate’s content in order
User Certificate > Certificate Validation Required Validate the entered certificate’s validity Self-signed certificate > Common Name Required Enter the domain name to use the certificate Self-issued certificate > Organization Unit Required Enter the organization and department that will use the certificate Self-issued certificate > Start date Required Enter the certificate start date (creation date) Self-issued certificate > Expiration date Required Enter the certificate expiration date Expiration alert Selection Set whether to receive pre‑expiration certificate alerts - Select Use to enable expiration alerts
- If expiration alerts are set, an email is sent to the recipients 45, 30, 15, 7, and 1 days before the certificate expires
Expiration Alert > Alert Recipient Required Select notification recipients when using expiration alerts - Enter a user name in the search area to select notification recipients
- Up to 100 recipients can be registered
Table. Certificate Manager service information input itemsReference- If the entered certificate information is invalid, you cannot create the Certificate Manager service.
- If the Private Key is encrypted, enter the decrypted value using the openssl command below.
openssl rsa -in [Encrypted Private Key File name] -out [Decrypted Private Key File name]
- For certificates issued via Let’s Encrypt, even if you already have a previously issued Certificate Chain value, extract it again and enter it.
- For detailed instructions on extraction methods, see Extract Chain Certificate.
- Enter within 3-30 characters, including English letters, numbers, and special characters (
- In the Additional Information Input area, enter or select the required information.
Category required statusDetailed description tag Selection Add Tag - Up to 50 can be added per resource
- After clicking the Add Tag button, input or select Key, Value values
Table. Certificate Manager additional information input fields
- In the Service Information Input area, enter or select the required information.
- Review the entered service information and additional details, then click the Create button.
- When creation is complete, check the created resource on the Certificate Manager List page.Reference
To create a Load Balancer for use with the Certificate Manager service, click Load Balancer creation in Service Home.
- For detailed information on creating a Load Balancer, please refer to Load Balancer Creation.
- When creation is complete, check the created resource on the Certificate Manager List page.
Check Certificate Manager detailed information
The Certificate Manager service allows you to view and edit the full list of resources and detailed information. Certificate Manager Details page consists of Details, Connected Resources, Tags, Activity History tabs.
To view detailed information for Certificate Manager, follow these steps.
- All Services > Security > Certificate Manager Click the menu. 1. Go to the Service Home page of Certificate Manager.
- On the Service Home page, click the Certificate Manager menu. 2. Navigate to the Certificate Manager List page.
- On the Certificate Manager List page, click the resource to view its detailed information. 3. Navigate to the Certificate Manager Details page.
- Certificate Manager Details page displays the status and detailed information of the Certificate Manager, and consists of Details, Connected Resources, Tags, Activity History tabs.
Category Detailed description Service status Certificate Manager status - Creating: In progress
- Active/Valid: Certificate valid
- Expired: Certificate expired
- Editing: Changing settings
- Terminating: Terminating
- Error: Certificate error
Service termination Button to cancel Certificate Manager Table. Status information and additional features
- Certificate Manager Details page displays the status and detailed information of the Certificate Manager, and consists of Details, Connected Resources, Tags, Activity History tabs.
Detailed Information
Certificate Manager List page lets you view detailed information of the selected resource and, if necessary, edit the information.
| Category | Detailed description |
|---|---|
| service | Service Name |
| Resource type | Resource Type |
| SRN | Unique resource ID in Samsung Cloud Platform |
| Resource name | Resource Name |
| Resource ID | Unique resource ID in the service |
| Constructor | User who created the service |
| Creation date and time | Service creation date and time |
| Modifier | User who edited the service information |
| Modification date | Date and time the service information was modified |
| Certificate name | Certificate Manager certificate name |
| type | Certificate type information |
| Issuing Authority | User Certificate Issuing Authority Information |
| Common Name | Self-issued certificate display of information entered when creating the service |
| Organization Unit | Self-issued certificate Display the information entered when creating the service |
| Additional domain | User Certificate’s registered SAN information, displayed up to a maximum of 250 |
| Public Key information | User Certificate’s key algorithm type and length display |
| Signature algorithm | User Certificate’s issuing authority signature method display |
| Use status | Indicates whether the connected resource is registered |
| Start date/time / Expiration date/time | Display the certificate’s start/expiration date |
| Number of days remaining until expiration | Display the number of days remaining until expiration based on the current date
|
| Expiration alert | Certificate expiration alert settings details
|
Table. Certificate Manager detailed information items
Connected resource
On the Certificate Manager List page, you can view the connected Load Balancer information.
| Category | Detailed description |
|---|---|
| Load Balancer | Load Balancer resource ID attached to the service |
| Listener | Click the name of the Listener resource ID
|
| status | Display the status of Listeners connected to the service |
Table. Connected Resources tab items of Certificate Manager
Tag
On the Certificate Manager List page, you can view the tag information of the selected resource and add, modify, or delete it.
| Category | Detailed description |
|---|---|
| Tag list | Tag list
|
Table. Certificate Manager Tag tab items
Job History
You can view the operation history of the selected resource on the Certificate Manager List page.
| Category | Detailed description |
|---|---|
| Task History List | Resource Change History
|
Table. Certificate Manager operation history tab detailed information items
Terminate Certificate Manager
You can request the termination of the Certificate Manager service from the Samsung Cloud Platform Console.
Caution
You cannot delete it if there are resources connected to the Certificate Manager service. To cancel the service, first delete the connected resources.
To request termination of the Certificate Manager service, follow the steps below.
- Click the All Services > Security > Certificate Manager menu. 1. Go to the Service Home page of Certificate Manager.
- On the Service Home page, click the Certificate Manager menu. 2. Go to the Certificate Manager List page.
- On the Certificate Manager List page, click the resource to view its detailed information. 3. Navigate to the Certificate Manager Details page.
- On the Certificate Manager Details page, click the Cancel Service button.
- Once the termination is complete, verify the service termination status in the Certificate Manager list.
3.2.1 - Extract Certificate Chain
Users can extract and input the Certificate Chain certificate to be used when creating a Certificate Manager service.
Extract Certificate Chain
You can extract the Certificate Chain value required when creating a Certificate Manager.
Caution
The Certificate Chain consists of Intermediate (Subordinate) certificates issued by a trusted certification authority and the Root certificate.
- Even if you already have a Certificate Chain value, extract and register the Intermediate (Subordinate) certificate through the Root certificate again using the Certificate Body file. (Recommended)
Extract Intermediate (Subordinate) Certificate Value
You can extract the intermediate (subordinate) certificate from the certificate chain required for user certificate enrollment.
Reference
If there are two or more Intermediate(Subordinate) certificates, extract the values for each certificate.
To extract the Intermediate(Subordinate) certificate value, follow these steps.
- Run the certificate file in crt format on the PC. The certificate window will appear.
- In the certificate window, click the Certificate Path tab.
- If the file is in PEM format, convert it to a .crt file.
- Click the certificate under Root and click View Certificate.
- After clicking the Details tab, click Copy to file.
- When the certificate export wizard runs, click Next.
- Select the format Base 64-encoded X.509(.CER)(S) and click Next.
- Click Browse to select the folder where you want to save the file, then click Next.
- Click Finish. The certificate export wizard will complete.
- Open the exported file as a TEXT file and verify the values.
- The extracted certificate value must start and end with
—–BEGIN CERTIFICATE—–and—–END CERTIFICATE—-.
- The extracted certificate value must start and end with
Extract Root certificate value
You can extract the root certificate of the certificate chain required for user certificate enrollment.
To extract the Root certificate value, follow these steps.
- Run the certificate file in crt format on the PC. The certificate window will appear.
- In the certificate window, click the Certificate Path tab.
- If the file is in PEM format, convert it to a .crt file.
- Click the topmost Root certificate and click View Certificate.
- After clicking the Details tab, click Copy to File.
- When the certificate export wizard runs, click Next.
- Select the format Base 64-encoded X.509(.CER)(S) and click Next.
- Click Browse to select the path where you want to save the file, then click Next.
- Click Finish. The certificate export wizard will complete.
- Open the exported file in TEXT format and verify the values.
- The start and end of the extracted certificate value must include the
—–BEGIN CERTIFICATE—–and—–END CERTIFICATE—-entries.
- The start and end of the extracted certificate value must include the
Enter Certificate Chain value
This explains how to enter the extracted Intermediate (Subordinate) certificate and Root certificate values into the Certificate Chain field when creating a Certificate Manager.
Reference
For detailed instructions on creating a Certificate Manager, see Create Certificate Manager.
To enter the Intermediate (Subordinate) certificate and Root certificate values into the Certificate Chain field, follow these steps.
- Execute the Intermediate (Subordinate) certificate file and the Root certificate file as text files.
- Copy the entire value of the Intermediate (Subordinate) certificate file.
- Paste it into the Certificate Chain input area on the Certicafate Manager Creation page.
- Paste it, including the
—–BEGIN CERTIFICATE—–at the beginning and the—–END CERTIFICATE—-at the end of the certificate value.
- Paste it, including the
- Copy the entire value of the Root certificate file.
- Paste it into the Certificate Chain input area on the Create Certicafate Manager page.
- Paste it, including the
—–BEGIN CERTIFICATE—–at the beginning and—–END CERTIFICATE—-at the end of the certificate value. - Paste the Root certificate value on the line below the Intermediate (Subordinate) certificate.
- Paste it, including the
3.3 - API Reference
API Reference
3.4 - CLI Reference
CLI Reference
3.5 - Release Note
Certificate Manager
2025.07.01
NEW
Certificate Manager Service Official Version Release- We have launched the Certificate Manager service that supports SSL/TLS certificate deployment and unified management.
- You can register a certificate issued by a Certificate Authority (CA) or generate a Self-signed certificate for development/testing purposes.
- You can encrypt network communications and manage the certificate lifecycle by connecting to Samsung Cloud Platform resources.
4 - Secrets Manager
4.1 - Overview
Service Overview
Secrets Manager is a service that encrypts customers’ sensitive information as Secrets (secure data) and stores and manages it safely. Remove hard-coded sensitive information from the application source code and retrieve it by invoking Secrets stored securely in a Key-Value format. A secret is encrypted with a user‑managed key in conjunction with the Key Management Service and stored securely.
Service Architecture Diagram
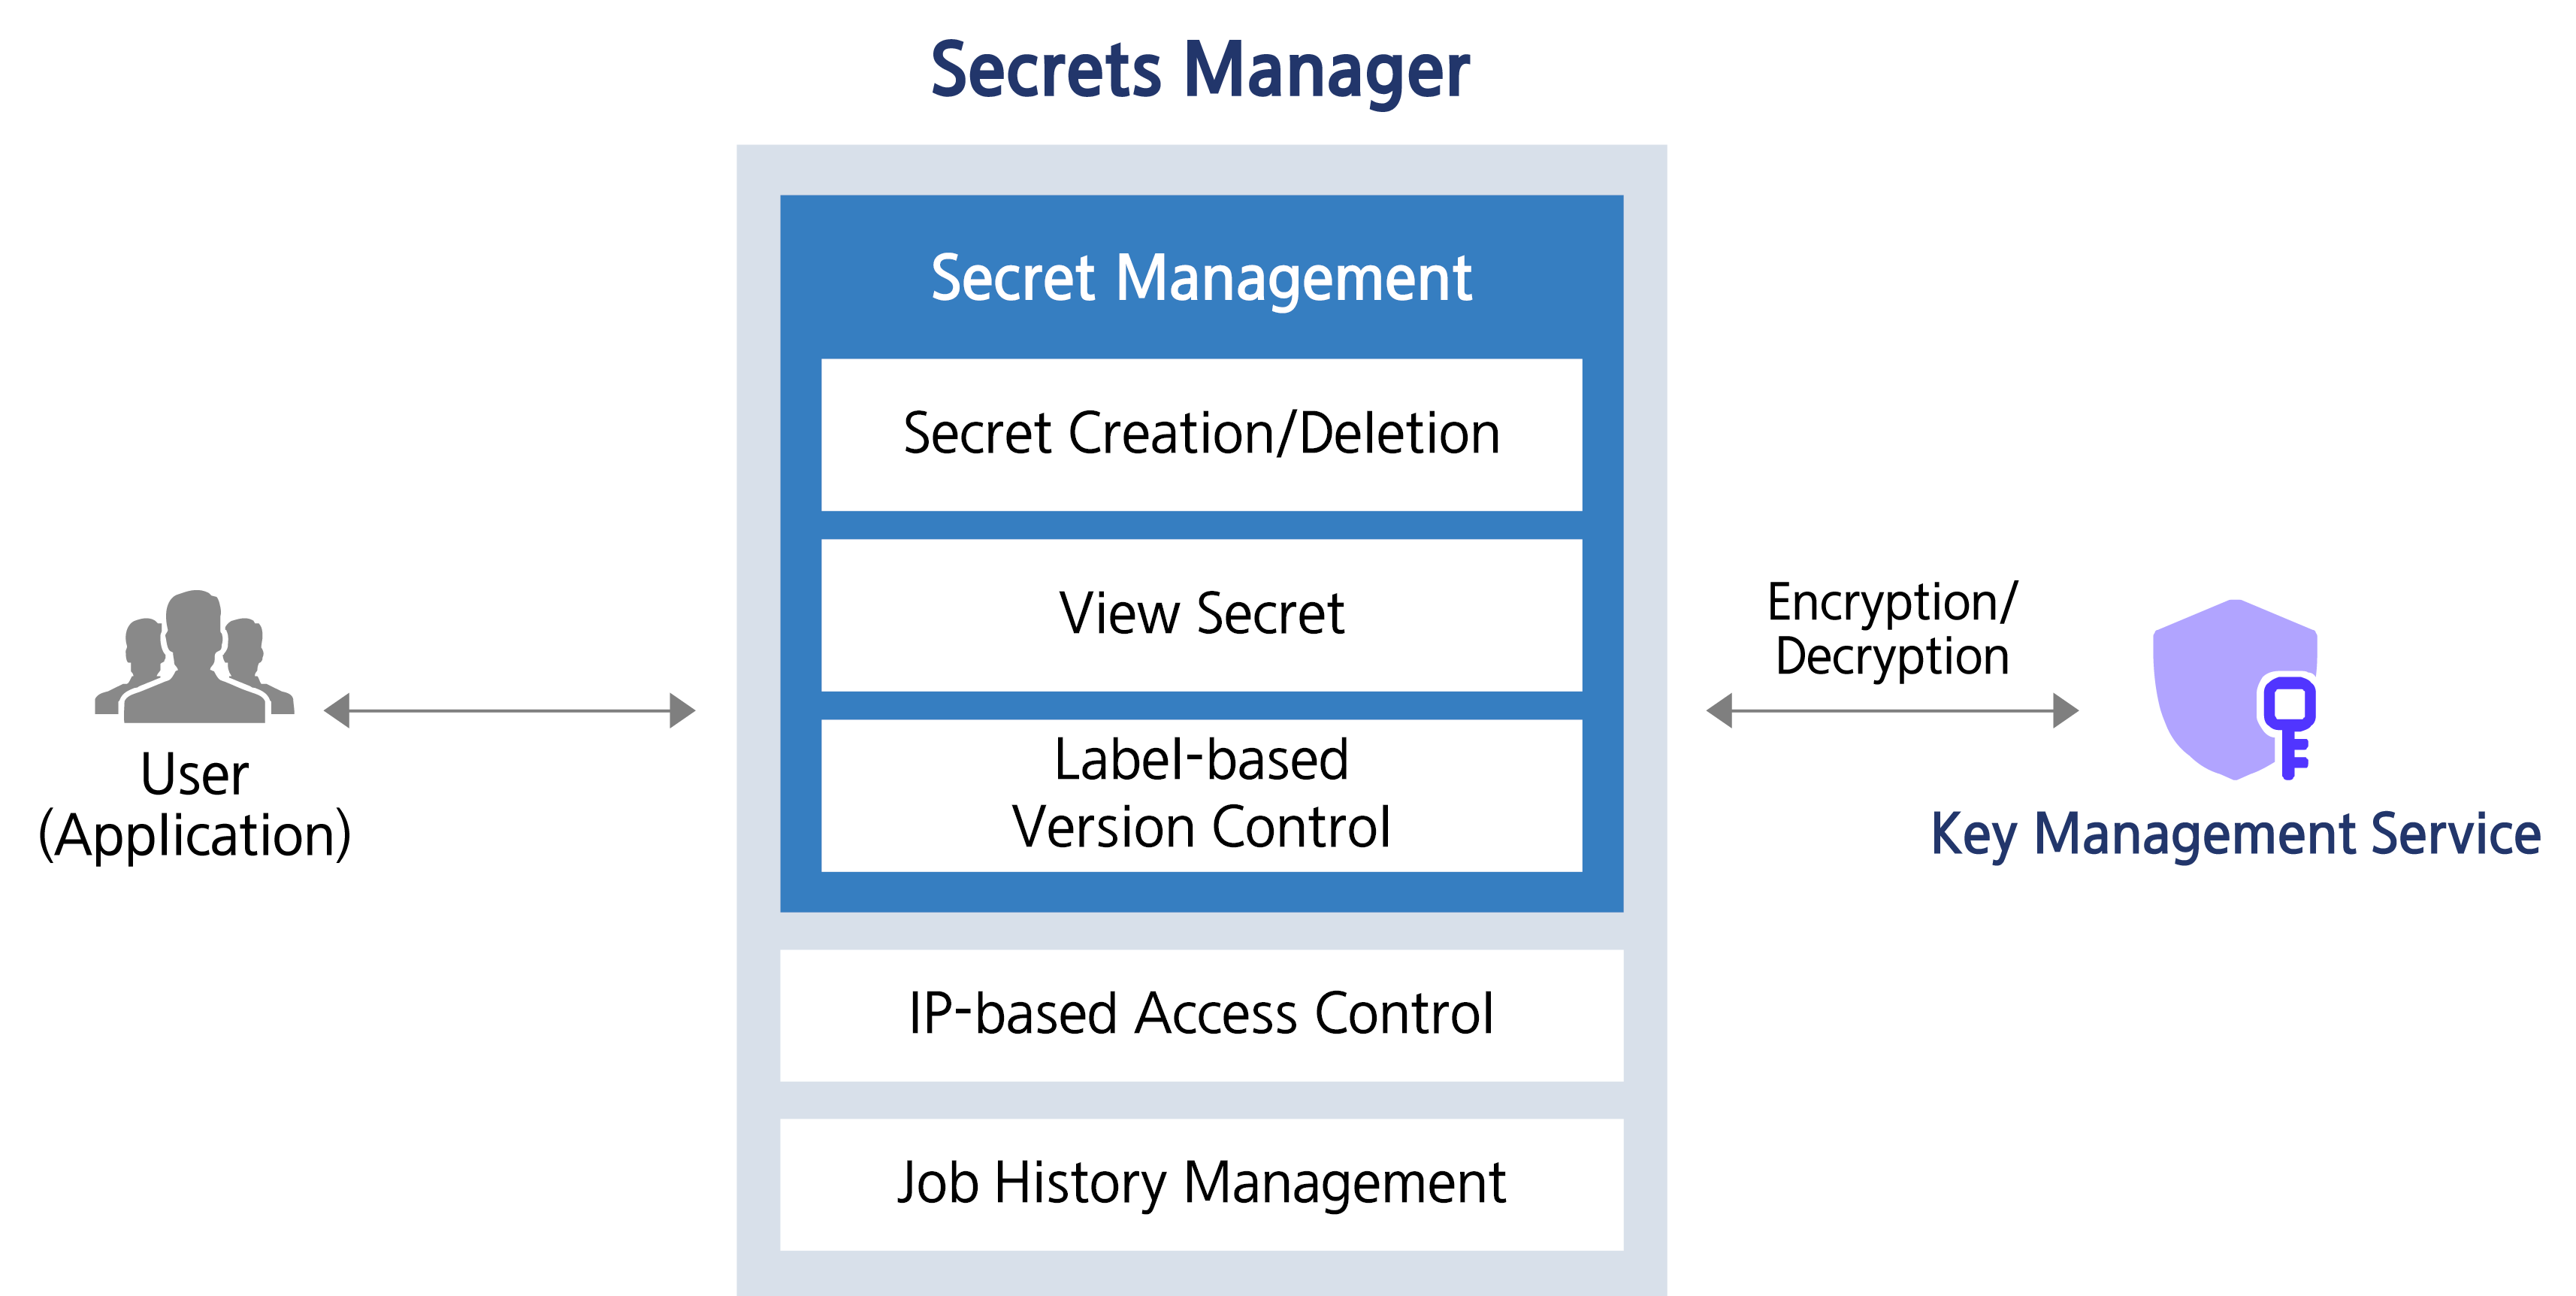
Provided features
Secrets Manager provides the following features.
- Secret creation/deletion: Secrets Manager can create, delete, and manage Secrets. * The user stores security (sensitive) information in key/value format in the generated Secret.
- Secret lookup: You can retrieve Secret values based on custom policies and permission settings.
- Label-based version control: When a Secret is modified, you can set a label on the version, which is a snapshot of the uniquely generated data, allowing you to manage Secrets more efficiently.
Component
Secret
It stores sensitive (critical) information as a logical unit, encrypting security information values in Key/Value format with a KMS key.
- A Secret is an object created through the creation of a Secrets Manager product service in the Samsung Cloud Platform Console.
Version
It is a snapshot of unique data that is newly created each time a Secret is modified (the unit that stores the actual value of the Secret).
Label
It is a label or tag attached to a specific version of a Secret (a pointer for referencing a specific version).
Constraints
The limitations of the Secrets Manager service are as follows. Before use, be sure to review the following constraints and incorporate them into your service usage plan.
Reference
- Secrets Manager is a regional service, and a created secret can be used only within that region.
- When rotating a customer-managed key, the key version is changed internally. * By using the newly generated version of the key, you can decrypt data that was encrypted with the previous version of the key. * (maintain compatibility)
- Versions through key rotation are compatible up to the 100th version, regardless of the encryption algorithm.
| Item | Detailed description | Quota |
|---|---|---|
| Secret Value Size | Size of the encrypted Secret value | 65,536 |
| Secrets | Number of Secrets per region in an account | 500,000 |
| Attached Labels for Secret | Number of Labels attached to all versions of Secret | 20 |
| Versions per Secret | Number of versions of Secret | 100 |
Table. Secrets Manager constraints
Preliminary Service
Secrets Manager has no prerequisite services.
4.2 - How-to guides
Users can create the service by entering the required information for the Secrets Manager service through the Samsung Cloud Platform Console and selecting detailed options.
Create Secrets Manager
You can create and use Secrets Manager in the Samsung Cloud Platform Console.
To create a Secrets Manager, follow these steps.
Click the All Services > Security > Secrets Manager menu. 1. Go to the Service Home page of Secrets Manager.
On the Service Home page, click the Create Secrets Manager button. 2. Navigate to the Create Secrets Manager page.
Create Secrets Manager page, enter the information required to create the service and input additional details.
- Enter or select the required information in the Service Information Input area.Categoryrequired status
Detailed description Secret name Required Enter the secret name type Required Select the type to manage encrypted with Secret from the list. Key/Value input Required Enter a pair of Key/Value for Secret information - Click the Add button to add up to 10 entries
- Click the X icon to delete the entry
encryption key Essential Select the KMS key from the list to encrypt the Secret - Select a key created in the KMS service from the list. Or click +Create New to create a KMS key
- Only KMS keys for encryption/decryption can be selected. The selectable encryption/decryption KMS key types are encryption/decryption (AES-256), encryption/decryption and signing/verification (RSA-2048), and encryption/decryption (ARIA) – three types.
- When entering Key/Value, input must be within 64 KB; registration is not allowed if the size exceeds this limit.
- For detailed information on creating KMS keys, see KMS 키 생성하기 for reference
Public access control Required Enter public access allowed IP - After entering the IP address, click the Add button to register up to 10 entries
- Click the Delete All button to remove all IP entries from the list
- You can register the 0.0.0.0/24 - 0.0.0.0/32 range, but it may be insecure
Private access control Selection Use After selecting, select the resource to allow private access - Click the Add button to add an access‑allowed resource
- If the setting is not enabled, access is allowed for all subnet resources in the same region
Explanation Selection Enter description for Secrets Manager Table. Secrets Manager service information input items - Enter or select the required information in the Additional Information Input area.
Category required statusDetailed description tag Selection Add Tag - Up to 50 per resource can be added
- After clicking the Add Tag button, input or select Key, Value values
Table. Secrets Manager additional information input fields
- Enter or select the required information in the Service Information Input area.
Summary Check the detailed information and estimated charges generated in the panel, and click the Create button.
- Once creation is complete, verify the created resource on the Secrets Manager list page.
Check Secrets Manager detailed information
Secrets Manager can view and edit the complete list of resources and detailed information. Secrets Manager Details page consists of Details, Versions, Tags, Activity History tabs.
To view detailed information about Secrets Manager, follow these steps.
- All Services > Security > Secrets Manager Click the menu. 1. Go to the Service Home page of Secrets Manager.
- On the Service Home page, click the Secrets Manager menu. 2. Go to the Secrets Manager List page.
- On the Secrets Manager List page, click the resource to view its details. 3. Go to the Secrets Manager Details page.
- Secrets Manager Details At the top of the page, status information and descriptions of additional features are displayed.
Category Detailed description status Display the status of Secrets Manager - Active: available/enabled
- To be terminated: scheduled for deletion
Service termination Cancel Service button Table. Secrets Manager status information and additional features
- Secrets Manager Details At the top of the page, status information and descriptions of additional features are displayed.
Detailed Information
Secrets Manager list page allows you to view detailed information of the selected resource and edit the information if necessary.
Category | Detailed description |
|---|---|
| service | Service name |
| Resource Type | Resource Type |
| SRN | Unique resource ID in Samsung Cloud Platform |
| Resource name | Resource Name |
| Resource ID | Unique resource ID in the service |
| Constructor | User who created the service |
| Creation date and time | Service creation date and time |
| Modifier | User who modified the service |
| Modification date | Service modification date and time |
| Secret name | Name of the generated Secret |
| Secret value | the entered Secret value
|
| type | Type of the generated Secret |
| Recent search date and time | Last retrieval time of the generated Secret |
| encryption key | Display the KMS key name selected by the user
|
| URL | Public/Private URL information display
|
| Public access control | Display the registered public access allowed IP
|
| Private access control | Display registered private access allowed resources
|
| Explanation | Display additional description for Secret
|
Table. Secrets Manager Details tab items
Version
Secrets Manager list page allows you to use labels to track the version of the selected Secret.
Reference
Refer to the definition of each item when checking the version information of Secret Manager.
- Secret: logical unit that stores sensitive (important) information
- Version: A snapshot of unique data generated each time a Secret is modified (the unit that stores the actual value of the Secret)
- Label: a nameplate or tag attached to a specific version of a Secret (a pointer for referencing a specific version)
| Category | Detailed description |
|---|---|
| Version ID | Current version, previous version, and the ID of the version with a custom label (Custom Label) displayed
|
| Label | Secret version display
|
| Last access time | Secret’s most recent access time |
| Creation date and time | Secret creation timestamp |
Table. Secrets Manager version tab items
Caution
The limitations when using a version of Secret are as follows.
- You can store up to 100 versions per Secret. * Regardless of whether a custom label is set, if the number of versions exceeds 100, the oldest versions are deleted first.
- For important versions with custom labels, create a new Secret before the version is deleted due to quota limits, and configure it so that the running application can reference the new Secret.
Tag
Secrets Manager list page allows you to view the tag information of the selected resource, and to add, modify, or delete it.
| Category | Detailed description |
|---|---|
| Tag list | Tag list
|
Table. Secrets Manager tag tab items
Job History
Secrets Manager list page lets you view the operation history of the selected resource.
| Category | Detailed description |
|---|---|
| Work history | Task execution details |
| Work Date/Time | Task execution date and time |
| Resource Type | Resource Type |
| Resource name | Resource Name |
| Operation result | Task execution result (success/failure) |
| Operator Information | User information of the person who performed the task |
Table. Secrets Manager operation history tab detailed information items
Terminate Secrets Manager
You can cancel Secrets Manager that you are not using.
Caution
If you cancel Secret Manager, you will not be able to use any features of Secrets Manager, and it will be permanently deleted after the cancellation waiting period. During the termination pending period, the Secret cannot be searched.
To cancel Secrets Manager, follow the steps below.
- All Services > Security > Secrets Manager Click the menu. 1. Go to the Service Home page of Secrets Manager.
- On the Service Home page, click the Secrets Manager menu. 2. Go to the Secrets Manager List page.
- On the Secrets Manager List page, click the resource to view its details. 3. Go to the Secrets Manager Details page.
- On the Secrets Manager Details page, click the Cancel Service button. 4. Service Cancellation popup will be opened.
- Service Cancellation in the popup window, enter the cancellation waiting period, and click the Confirm button.
- The termination waiting period can be entered within a range of 7 to 30 days.
- After termination is complete, check on the Secrets Manager List page whether the resource has been terminated.
Information
If you want to reuse a Secret during the termination pending period, on the Secrets Manager List page, open the context menu of the desired Secret item > click Cancel Termination.
If the cancellation succeeds, you can reuse the Secret.
4.2.1 - Secret Retrieval API Reference
This user guide explains how to use and invoke the Public/Private endpoints of Secrets Manager.
Caution
- Public Endpoint can be called from an environment that can communicate over the Internet.
- Private Endpoint can only be called from a Samsung Cloud Platform VM.
Pre-configuration for Endpoint Calls
Describes the prerequisite configuration items required when calling the Secrets Manager endpoint.
Register Outbound Rule for Security Group
To call the endpoint, you need to register an outbound rule in the security group.
To register an Outbound Rule for a Security Group, follow the steps below.
- Click the All Services > Security > Secrets Manager menu. You will be taken to the Service Home page of Secrets Manager.
- On the Service Home page, click the Secrets Manager menu. You will be taken to the Secrets Manager List page.
- On the Secrets Manager List page, click the resource whose details you want to view. You will be taken to the Secrets Manager Details page.
- On the Secrets Manager Details page, check the URL information.
- You can copy the public/private URL information from the URL field.
- Use the nslookup command to verify the IP to register in the Security Group.
nslookup <호출할 endpoint url>
- From Security Group > Security Group List, select the Security Group of the VM for which you want to set access control. Then navigate to the Security Group Details page.
- In the Security Group Details > Rules tab, click the Add Rule button. When the Add Rule window appears, enter the information below to add a rule.
Item Detailed description Target input method CIDR selection Target address Enter the IP address retrieved by nslookup type Select Destination Port/Type then enter protocol information - Select TCP among the protocols, and enter 443 in the TCP Destination Port
direction Outbound rule Select Explanation Enter the invocation rules for Secrets Manager public/private endpoints Table. Input items for adding Security Group rules - Security Group rules Verify that the rule you entered in the list has been added.
Register access control for Secrets Manager
You can register public/private access controls for Secrets Manager.
To configure the access control items of Secrets Manager, follow these steps.
- Click the All Services > Security > Secrets Manager menu. You will be taken to the Service Home page of Secrets Manager.
- On the Service Home page, click the Secrets Manager menu. You will be taken to the Secrets Manager list page.
- On the Secrets Manager List page, click the resource to view detailed information. You will be taken to the Secrets Manager Details page.
- On the Secrets Manager Details page, click the edit icon of Public Access Control to add an allowed IP for Public Endpoint access.
- Public Access Control Edit Popup window, enter the IP and click the Add button. When the addition is complete, click the Confirm button.
- For security, we recommend adding a single IP, and you can register up to 10.
- You can register the 0.0.0.0/24 – 0.0.0.0/32 range, but be careful as it may be insecure.
- On the Secrets Manager Details page, click the edit icon of Private Access Control to add a VM that allows Private Endpoint access.
- Private Access Control Edit Popup window, select the resource to allow access and click the Add button. When addition is complete, click the Confirm button.
- If you do not enable the setting, you can access all subnet resources in the same region.
Calling Secrets Manager API
Describes how to call the Secrets Manager API.
Check the URL information of Secrets Manager
On the All Services > Security > Secrets Manager > Secrets Manager Details page, check the URL information.
- You can copy the public/private URL information from the URL field.
Secrets Manager Retrieval API
get /v1/secret
Description
Secret value lookup
Parameters
| Type | Name | Description | Schema |
|---|---|---|---|
| query | secretId (required) | Secret ID (Example : b3ed8b7637574255b83c274a6ed79426) | string |
Table. API Call Parameters
Responses
| Http Code | Description | Schema |
|---|---|---|
| 200 | OK | None |
| 400 | Bad Request | None |
| 401 | Unauthorized | None |
| 403 | IP Not Allowed | None |
| 404 | Not Found | None |
Table. API call Responses items
Example HTTP request
Request path
/v1/secret?secretId={secretId}
Request header
"AccessKey = 341g54421b5d67a1gf2b30f1a5415e75",
"SecretKey = 87d5eec6-998h-4933-e865-fd837495je28"
Example HTTP response
Response 200
{
  "status": "success",
  "data": {
    "key": "value"
  },
  "timestamp": "2026-01-20T09:21:18.92730172"
}
4.3 - Release Note
Secrets Manager
2026.03.19
FEATURE
Private Endpoint service provision- Provides a Private Endpoint that can be called as a Secret from VM resources in the Samsung Cloud Platform.
- You can select a VM resource in Samsung Cloud Platform that stores secret security information and configure access control.
2025.12.16
NEW
Secrets Manager service official version release- We have launched a service that encrypts customers’ sensitive information as Secret(secure information) and safely stores and manages it.
- Remove hard-coded security information from the application source code and retrieve it by invoking securely stored Secrets.
5 - Secret Vault
5.1 - Overview
Service Overview
Secret Vault is a service that, by using the Open API to connect to the Samsung Cloud Platform, allows you to obtain a secure token‑based temporary key without hard‑coding security information in plain text, enabling access to the Samsung Cloud Platform’s services and resources. It also manages the lifecycle of the temporary key to maintain a hardened security environment when using APIs.
Features
- Enhanced Security Environment Implementation: Instead of hardcoding authentication credentials in the application source code, you can obtain a token-based temporary key to mitigate security threats arising from credential leakage.
- Life-Cycle based temporary key management: To meet security requirements, users do not need to manually manage the lifecycle of temporary keys. It provides automated temporary key management and replacement functions according to the initially configured lifecycle.
- Various resource utilization possible: Through the Token issued by Secret Vault, you can access not only resources within the Samsung Cloud Platform but also external resources (other CSPs, on‑premise, etc.) in a reinforced security environment.
Service Architecture Diagram
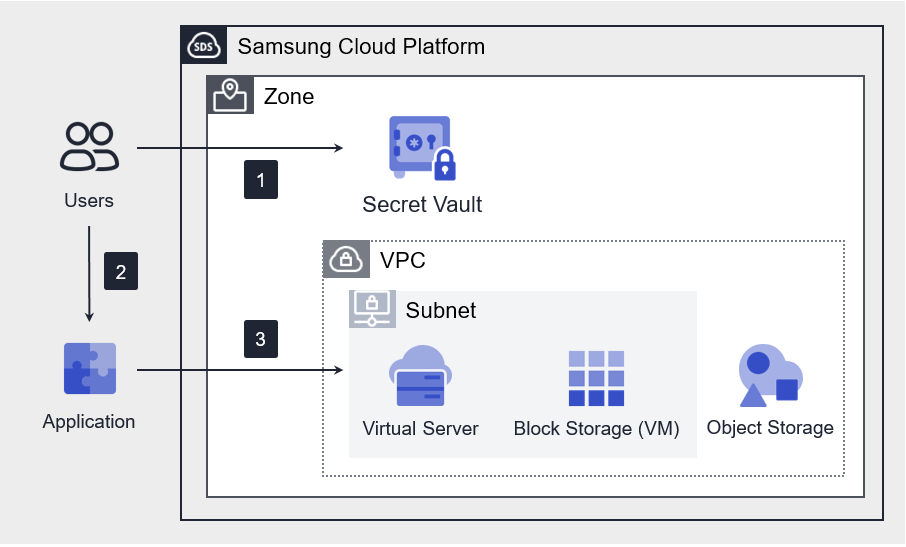
Provided features
Secret Vault provides the following features.
- Add Token authentication and encrypt authentication key storage: Provides token issuance via an authentication key and temporary key issuance using the token, and securely stores the authentication key information encrypted (AES-256).
- Temporary Key Life-cycle Management: Provides issuance and automatic replacement of temporary keys according to their life cycle, and allows setting a replacement interval in hours (up to 36 hours).
- Access Control Feature: IP-based access control of the resources where the user application runs is possible.
Component
Secret
A Secret is an object that combines token information and temporary key rotation information, and can be requested by the user in the console.
Token
A token is a unique string used to authenticate a user’s identity and verify permissions, and when making an Open API request, you can obtain a temporary token that allows access to the Samsung Cloud Platform.
Constraints
Secret Vault provides a region-based service. Therefore, when creating a Secret, you cannot select an authentication key that is being used by a Secret in another region.
Prior Service
Secret Vault does not require any separate prerequisite service work.
5.2 - How-to guides
Users can create the service by entering the required information for the Secret Vault service and selecting detailed options through the Samsung Cloud Platform Console.
Create Secret Vault
You can create and use the Secret Vault service in the Samsung Cloud Platform Console.
To create a Secret Vault, follow these steps.
- Click the All Services > Security > Secret Vault menu. Navigate to the Service Home page of Secret Vault.
- On the Service Home page, click the Create Secret Vault button. You will be taken to the Create Secret Vault page.
- On the Create Secret Vault page, enter the information required to create the service and select detailed options.
- Select the required information in the Service Information Input area.
Category Required statusDetailed description Secret name Required Enter Secret name - Enter 3~63 characters using lowercase English letters and numbers
type Required Select the type of encryption target authentication key Required Select an authentication key to use with the Secret Vault service - Click the Use button and select a pre‑generated authentication key from the Authentication Key Management menu.
- In the Authentication Key Management menu, you must select one‑time authentication as the security authentication method.
- Expired authentication keys are not displayed, and keys with a remaining validity of less than 30 days or keys already in use for a Secret Vault product cannot be used. (Only one Secret Vault product can be applied per authentication key.)
Token usage period Required Enter the usage period of the Token provided by encrypting the authentication key - The Token usage period is automatically set to match the validity period of the entered authentication key by default.
- If the authentication key validity period is set to permanent, the Token usage period can be set up to a maximum of 7,300 days (20 years).
- The Token usage period cannot be changed after the service application is completed.
- Periodic replacement of the Token is recommended to enhance security.
- When the Token usage period expires, temporary key issuance is not possible, and you must obtain a new Token by submitting a new service application.
- Once the Token usage period expires, it cannot be extended and the Token can no longer be used. Before the Token usage period expires, obtain a new Token by submitting a new service application and apply the issued Token information to your source code.
IMSI key replacement interval Required Select the temporary key rotation period to be used for accessing Samsung Cloud Platform resources - The temporary key usage time is applied from the moment the service creation is completed.
- For security enhancement, the temporary key usage period can be set to a maximum of 1.5 days (36 hours).
- A new temporary key is issued before the temporary key expires, and the same usage period applies.
Allowed IP Required Enter the IP to allow access, then click the Add button - The entered IP must also be set identically in Key Management > Security Settings > Allowed Access IP for access to be permitted.
- Even when entering a single IP, be sure to append ‘/32’ after the IP.
- You can register up to 10 IPs.
Explanation Select Enter additional information Table. Secret Vault service information input fields - Select the required information in the Additional Information Input area.
Category Required statusDetailed description tag Select Add Tag - Add Tag Click the button to create and add a tag, or add an existing tag.
- Up to 50 tags can be added per resource.
- The newly added tags are applied after the service creation is completed.
Table. Secret Vault additional information input fields
- Select the required information in the Service Information Input area.
- Summary Verify the detailed information and estimated billing amount generated in the panel, then click the Complete button.
- After creation is complete, check the created resources on the Secret Vault List page.
Check Secret Vault detailed information
You can view and edit the full list of resources and detailed information for the Secret Vault service. The Secret Vault Details page consists of Details, Tags, and Activity Log tabs.
To view detailed information about the Secret Vault service, follow these steps.
- Click the All Services > Security > Secret Vault menu. You will be taken to the Secret Vault Service Home page.
- On the Service Home page, click the Secret Vault menu. You will be taken to the Secret Vault List page.
- On the Secret Vault List page, click the resource to view detailed information. You will be taken to the Secret Vault Details page.
- Secret Vault Details page displays status information and additional feature information, and consists of Details, Tags, Activity Log tabs.
Category Detailed description Secret Vault status Status of the Secret Vault created by the user - Active: Running
- To be terminated: Pending termination after a service cancellation request
- The scheduled termination time of the service is displayed, and you can cancel the service termination.
- Expired: Token expired state
- Secrets that have changed to the Expired state cannot perform any actions such as information retrieval, and are automatically deleted after 7 days.
Replace temporary key Immediately delete the current temporary key and generate a new temporary key - Only the creator of the Secret Vault service can replace the temporary key.
Service termination Button to cancel the service Table. Secret Vault status information and additional features
- Secret Vault Details page displays status information and additional feature information, and consists of Details, Tags, Activity Log tabs.
Detailed Information
Secret Vault List page lets you view detailed information of the selected resource and modify the information if necessary.
| Category | Detailed description |
|---|---|
| Service | Service name |
| Resource Type | Resource Type |
| SRN | Unique resource ID in Samsung Cloud Platform |
| Resource name | Resource Name |
| Resource ID | Unique resource ID in the service |
| Constructor | User who created the service |
| Creation date and time | Service creation timestamp |
| Editor | User who edited the service information |
| Modification date | Date and time the service information was modified |
| Secret name | Name of the generated Secret |
| type | Encryption method |
| Explanation | Additional information or description about the Secret Vault service |
| authentication key | Authentication key used by the Secret Vault service |
| Token usage period | Validity period of the Token provided by encrypting the authentication key |
| Token expiration time | Token expiration date and time |
| Token ID | Token’s unique ID |
| Token Secret | Token Secret generated as a pair with Token ID |
| IMSI key replacement interval | Rotation period of the temporary key used to access Samsung Cloud Platform resources |
| Temporary key expiration date and time | Temporary key expiration date and time |
| Allowed IP | Allowed IP list |
| Explanation | Additional information or description about Secret Vault |
Table. Secret Vault detailed information tab items
tag
On the Secret Vault List page, you can view the tag information of the selected resource and add, modify, or delete it.
| Category | Detailed description |
|---|---|
| Tag list | Tag list
|
Table. Secret Vault tag tab items
Job History
On the Secret Vault List page, you can view the operation history of the selected resource.
| Category | Detailed description |
|---|---|
| Task History List | Resource Change History
|
Table. Secret Vault operation history tab detailed information items
Terminate Secret Vault
You can cancel the unused service to reduce operating costs. However, if you cancel the service, the running service may be terminated immediately, so you should thoroughly consider the impact of service interruption before proceeding with the cancellation.
Caution
Be careful, as data cannot be recovered after terminating the service.
To cancel Secret Vault, follow the steps below.
- Click the All Services > Security > Secret Vault menu. Navigate to the Service Home page of Secret Vault.
- On the Service Home page, click the Secret Vault menu. You will be taken to the Secret Vault List page.
- On the Secret Vault List page, select the resource to cancel and click the Cancel Service button. You will be taken to the Cancel Service popup window.
- Service Cancellation popup window, after entering the termination waiting period (7~30 days), click the Confirm button. The service will be terminated after the waiting period entered by the user.
Reference
- During the termination waiting period, the existing temporary key is deleted, and you cannot issue an additional temporary key to access Samsung Cloud Platform resources.
Cancel Secret Vault termination
You can cancel the termination of a service that is pending cancellation and use it again.
To cancel the termination of Secret Vault, follow these steps.
- Click the All Services > Security > Secret Vault menu. Navigate to the Service Home page of Secret Vault.
- On the Service Home page, click the Secret Vault menu to go to the Secret Vault List page.
- On the Secret Vault List page, click the resource to cancel the termination. You will be taken to the Secret Vault Detail page.
- On the Secret Vault Details page, click the Cancel Termination button. You will be taken to the Cancel Service Termination popup.
- Cancel Service Termination After reviewing the content in the popup window, click the Confirm button. The status of the resource for which the termination was canceled will be restored to Active.
Note
- If the authentication key used in the Secret has been deleted, you cannot cancel the service termination.
- If the authentication key used in the Secret has been disabled or deleted, you cannot cancel the service termination. Re‑enable the authentication key first.
- Only the creator of the Secret Vault service can cancel the service termination.
Configure Application Token
The Token information issued through the Secret Vault service application is required for API calls to request OpenAPI temporary key issuance. Set the Token information according to each Application environment.
To configure the token information, follow these steps.
- Apply the token information to the application’s environment variable configuration file.
- Configure the token information so that the API call logic within the application can reference it.
- Use OpenAPI → GET /v1/temporarykey/{secretvault_id}
- For more details, refer to the Open API Guide in the Samsung Cloud Platform Console.
- Configure the token information so that the API call logic within the application can reference it.
- The temporary key removes hard coding in the existing source code and can be obtained and used via OpenAPI calls using token information. For details, refer to the Open API Guide in the Samsung Cloud Platform Console.
guide
Below is a reference example. Configure the source code to align with the Application standard that intends to use the Token.
application.yml or application.properties environment variable configuration files
Apply the obtained Token information to the environment variable configuration file.
secretvault.secretvault.id= {{ ID }}
secretvault.tokenId= {{ Token ID }}
secretvault.tokenSecret= {{ Token Secret }}
Java file
Apply it to the class file for environment variable recognition.
import org.springframework.beans.factory.annotation.Value;
import org.springframework.context.annotation.Bean;
import org.springframework.context.annotation.Configuration;

@Configuration
public class SecretVaultConfiguration {
    @Value("${secretvault.id}")
    private String id;

    @Value("${secretvault.tokenId}")
    private String tokenId;

    @Value("${secretvault.tokenSecret}")
    private String tokenSecret;

    @Bean
    public OpenApiClient openApiClient() {
        // OpenApiClient 또는 다른 API 클라이언트를 생성하고 설정 값을 사용하여 초기화
        return new OpenApiClient(secretVaultName, tokenId, tokenSecret);
    }
}
5.3 - API Reference
API Reference
5.4 - CLI Reference
CLI Reference
5.5 - Release Note
Secret Vault
2025.07.01
NEW
Secret Vault service official version release- The Secret Vault service, which can issue token-based temporary keys and manage their lifecycle, has been launched.
6 - SingleID
6.1 - Overview
Service Overview
SingleID not only allows authorized users to easily access information assets with a single authentication, but also enhances account security through policy-based permission management and real-time detection of abnormal authentication activities, and provides account management and access structures via comprehensive audit logs.
Features
- Easy and convenient login and app integration: By establishing a unified authentication system that allows login from On-Premises to SaaS apps with a single ID, you can improve work productivity. Administrators can easily integrate various apps without domain knowledge of authentication by automating connections to diverse global SaaS apps through the ready-made Pre-Built Connector.
- Account Management Optimization and Security Enhancement: We systematically manage the account lifecycle—from creation to termination—for a diverse range of users, including employees, partners, corporations, and subsidiaries. Additionally, we grant permissions to authorized users in a timely manner and promptly revoke unnecessary permissions, thereby preventing unauthorized access and strengthening account security.
- Enhanced Anomaly Detection: By detecting authentication anomalies based on context such as user type, login IP, device information, and access time, security policies can be applied according to the situation to prevent account compromise incidents.
- Cloud Access Management: It consolidates the access paths of operators/developers accessing public clouds, and implements role‑based temporary‑token console/resource access control to further enhance cloud security in multi‑cloud environments.
Service Architecture Diagram
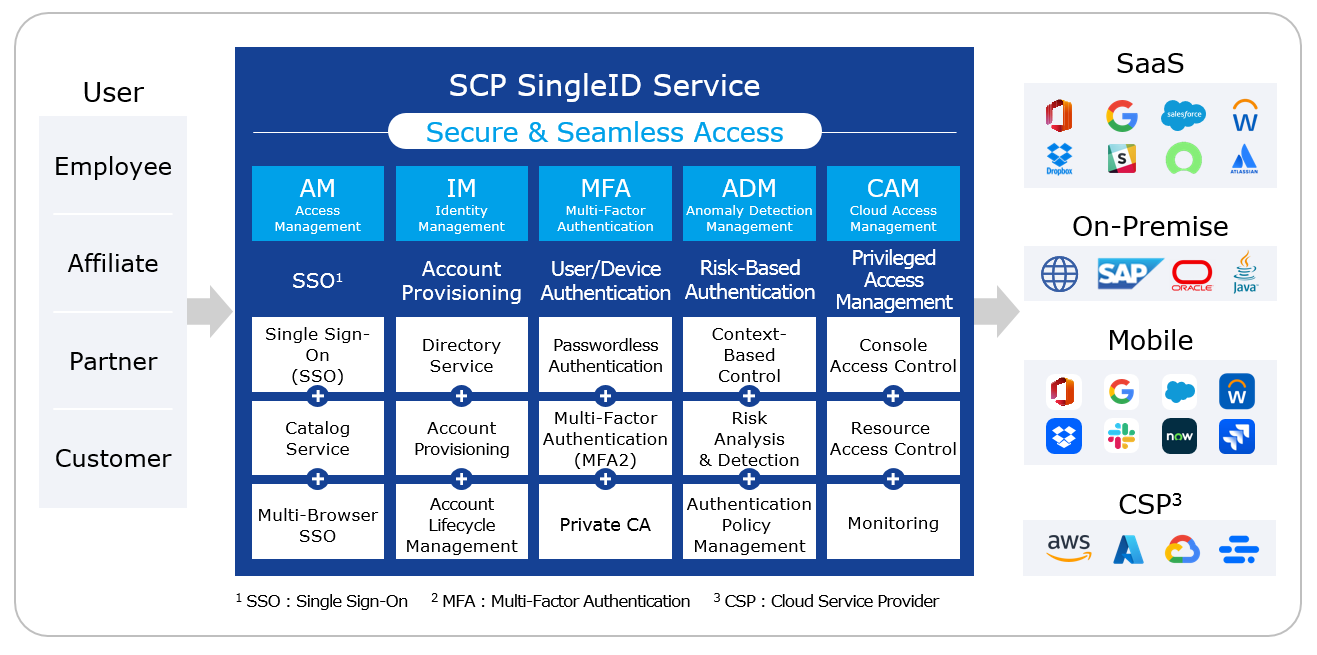
Provided features
SingleID provides the following features.
- Unified Authentication and Account Management
- Support for various authentication integration protocols (SAML, OIDC, etc.)
- Providing a self-service feature for app usage requests and approvals
- Account synchronization for Salesforce, Workday, etc., and synchronization/management of roles (groups) within accounts
- Provide a sign‑up/withdrawal feature that can issue accounts to partners, customers, and others who are not employees.
- Passwordless and Multi-Factor Authentication
- PC/mobile passwordless authentication and multi-factor authentication (MFA)
- Provide composite authentication for secondary authentication by integrating with the existing primary authentication environment (MFA-only service use case)
- Private CA(Certificate Service Authority), a private certificate issuance/management feature, provides certificate-based authentication support (separate Use Case)
- Authentication methods: SMS, email, mOTP, TOTP, PIN, biometrics, Knox Messenger, Windows Hello, etc
- Authentication and Account Information Integration
- Automating app integration via Pre-Built Connector
- Simplifying custom app integration through DIY integration templates
- Risk-Based Authentication Anomaly Detection
- Context-based access control according to authentication attempt scenarios
- Enhancing security through detailed login and authentication policy settings
- Public Cloud Access Management for Cloud Operators/Developers
- Console access control via role-based assigned accounts
- Resource access request/approval and OTP-based credential authentication for resource access
Component
The components of the SingleID service are as follows. Users can access the service through the Samsung Cloud Platform SingleID Console.
- Access Management
- Support for various authentication integration protocols (SAML, OIDC, etc.)
- Provide unified login to internal and external business systems with a single sign‑on.
- Identity Management
- Lifecycle management from account creation to decommission
- Directory integration and synchronization (Active Directory, LDAP, etc.)
- Multi Factor Authentication
- PC and mobile simple authentication
- SMS, email, mOTP, TOTP, PIN, biometric, Knox Messenger, Window Hello, etc., offering various multi-factor authentication methods
- Anomaly Detection Management
- Context-based access control according to authentication attempt scenarios
- Providing adaptive access control through risk analysis
- Cloud Access Management
- Enhancing cloud security by unifying access paths for cloud operators/developers
- Role-based temporary token method for console and resource access control
Provision status by region
SingleID is available in the environments below.
| Region | Provision status |
|---|---|
| Korea West (kr-west1) | Provided |
| Korea East (kr-east1) | Not provided |
| South Korea South 1 (kr-south1) | Not provided |
| South Korea South 2 (kr-south2) | Not provided |
| South Korea South 3 (kr-south3) | Not provided |
Table. SingleID regional availability status
Prior Service
SingleID has no prior service.
6.2 - How-to guides
Users can create the service by entering the required information for the SingleID service and selecting detailed options through the Samsung Cloud Platform Console.
Reference
Check the detailed services provided per item in SingleID and apply for the product. The services provided per item are as follows.
| Service | Detailed description |
|---|---|
| Access Management (AM) | Unified Authentication (AM) is an integrated authentication service that allows users to log in to everything from on-premises to SaaS applications with a single ID.
|
| Identity Management (IM) | Account Management (IM) enables systematic account lifecycle management—from creation to decommissioning—for a variety of users such as employees, partners, corporations, and subsidiaries
|
| Multi-Factor Authentication (MFA) | Multi-factor authentication (MFA) provides secondary authentication services in various methods when accessing major systems, external systems, mobile devices, etc.
|
| Anomaly Detection Management (ADM) | Anomalous behavior detection (ADM) is a service that detects authentication anomalies in login situations, such as user type, login IP, device information, and login time.
|
| Cloud Access Management (CAM) | Cloud Access Management (CAM) is a privileged account access management solution that strengthens cloud console/resource access control in public/multi-cloud environments
|
Table. Service guide for each SingleID item
Create SingleID
You can create and use the SingleID service in the Samsung Cloud Platform Console.
- Click the All Services > Security > SingleID menu. Go to the SingleID Service Home page.
- On the Service Home page, click the Create SingleID button. You will be taken to the Create SingleID page.
- On the SingleID Creation page, enter the required information in the service information input area and select the detailed options.
- In the Service Configuration Selection area, enter the information for the relevant service and select detailed options.
Category Required statusDetailed description Select Service Required Select SingleID service - You can select multiple services and apply
- MFA when applied alone does not provide the simple authentication feature
- When IM, MFA are selected, AM is automatically selected
- When ADM is selected, AM, IM, and MFA are automatically selected
- When CAM is selected, AM, IM, and MFA are automatically selected
- When AM, IM, MFA or AM, IM, MFA, ADM are selected, a tenant is automatically created in the TAP/UP/MFA portal. If only the MFA item is selected, a tenant is created in the TAP/MFA portal
Number of tenant users Required Enter the minimum number of Tenant users based on the selected service - Input allowed within the range 50 - 999,999
Number of Resource Units Select Enter the number of resource Units to register when selecting a CAM service - Enter a value within the range 20 - 99,999
Integration support Select Enter the number of integration support units - Enter a value within the range 1 - 9,999
- AM: 1 unit
- MFA: 1 unit
- IM: 2 units
- When AM and MFA are used simultaneously, they are counted as 1 unit
Table. SingleID Service Configuration Options - Enter the information required to create a service in the Service Information Input area.
Category Required statusDetailed description Tenant name Required Enter tenant name Tenant code Required Enter Tenant code Table. SingleID Service Information Input Items - In the Member selection area, select the tenant user who will use the service.
Category Required statusDetailed description User Required Select members from the user list - You must select at least one user to create the service
Table. SingleID Service Member Selection Items - In the Additional Information Input area, enter or select the required information.
Category Whether requiredDetailed description Tag Select Add Tag - Up to 50 can be added per resource
- After clicking the Add Tag button, enter or select Key and Value values
Table. SingleID additional information input fields
- In the Service Configuration Selection area, enter the information for the relevant service and select detailed options.
- Summary Check the detailed information and estimated billing amount generated in the panel, and click the Complete button.
- After creation is complete, check the created resource on the SingleID List page.
Check SingleID detailed information
The SingleID service allows you to view and edit the full resource list and detailed information. The SingleID Details page consists of Details, Tags, Activity Log tabs.
To view detailed information for SingleID, follow these steps.
- All Services > Security > SingleID Click the menu. Navigate to the Service Home page.
- On the Service Home page, click the SingleID menu. You will be taken to the SingleID List page.
- On the SingleID List page, click the resource to view detailed information. You will be taken to the SingleID Details page.
- SingleID Details page displays status information and additional feature information, and consists of Details, Tags, Work History tabs.
Category Detailed description Service status Service status display - Creating: Tenant creation in progress
- Active: Tenant creation completed
- Terminating: Service termination in progress
- Failed: Tenant creation failed
CAM Portal Cloud Access Management portal window popup button - CAM is displayed only when applying for the service
Admin Portal Admin portal popup button Service termination Service cancellation button Table. SingleID status information and additional features
- SingleID Details page displays status information and additional feature information, and consists of Details, Tags, Work History tabs.
Detailed Information
On the SingleID List page, you can view detailed information of the selected resource and edit the information if needed.
| Category | Detailed description |
|---|---|
| Service | Service name |
| Resource Type | Resource Type |
| SRN | Unique resource ID in Samsung Cloud Platform |
| Resource Name | Resource name |
| Resource ID | Service’s unique resource ID |
| constructor | User who created the service |
| Creation date | Service creation date and time |
| Editor | User who modified the service |
| Modification date | Date and time the service was modified |
| Tenant name | Entered Tenant name |
| Tenant code | Entered Tenant code information |
| Number of tenant users | Entered Tenant user count
|
| Number of Resource Units | Number of resource Units entered
|
| Billing status | Billing status and first billing date information |
| Application Service | Show requested services |
| Integration support | Click the Add Request button to apply for integration support. |
Table. SingleID detailed information tab items
Reference
If the service status is Failed, you can resolve the issue by checking the error details in the Support Center > Contact Us menu.
tag
SingleID List page allows you to view the tag information of the selected resource, and add, modify, or delete it.
| Category | Detailed description |
|---|---|
| Tag list | Tag list
|
Table. SingleID tag tab item
Job History
You can view the operation history of the selected resource on the SingleID List page.
| Category | Detailed description |
|---|---|
| Task History List | Resource Change History
|
Table. SingleID operation history tab information items
Using SingleID Admin Portal
In the Admin Portal, you can configure and manage SSO authentication settings, account synchronization integration, and multi-factor authentication, among other things.
To access SingleID’s Admin Portal, follow these steps.
- Click the All Services > Security > SingleID menu. You will be taken to the Service Home page.
- On the Service Home page, click the SingleID menu. You will be taken to the SingleID List page.
- SingleID List page, click the resource to view detailed information. SingleID Details page will be opened.
- On the SingleID Details page, click the Admin Portal button. The SingleID admin portal window appears.
- For a detailed description of the Admin Portal, see Admin Portal.
Using SingleID CAM Portal
In the CAM Portal, you can configure and manage console and resource access control and security management for the CSP.
To access SingleID’s CAM Portal, follow these steps.
- All Services > Security > SingleID Click the menu. Navigate to the Service Home page.
- On the Service Home page, click the SingleID menu. You will be taken to the SingleID List page.
- SingleID List page, click the resource to view detailed information. You will be taken to the SingleID Details page.
4.SingleID Details page, click the CAM Portal button. The SingleID cloud access management portal window appears.
- For detailed information about the CAM Portal, see CAM Portal.
Terminate SingleID
You can reduce operating costs by terminating the unused service.
To cancel SingleID, follow the steps below.
- Click the All Services > Security > SingleID menu. You will be taken to the SingleID Dashboard page.
- On the SingleID List page, click the resource to cancel. You will be taken to the SingleID Details page.
- Cancel Service button. Click it. A cancellation alert will appear.
- In the alert window, enter the Tenant name and click the Confirm button.
6.2.1 - SingleID Manuals
SingleID not only enables authorized users to easily access information assets with a single authentication, but also strengthens account security through policy-based permission management and real-time detection of abnormal authentication behavior, and provides account management and access frameworks through various activity logs.
SingleID Manual List
SingleID provides various manuals as shown in the table below.
| Category | description |
|---|---|
| User Portal | SingleID User Portal is the user interface of the SingleID service, providing various security features such as access to company applications, SSO, and access permission requests. For more information, see the User Portal. |
| Admin Portal | The SingleID Admin Portal provides all configuration and management functions for all authentication services, account management services, and security policy creation and settings for organizations using the service, through the Admin Portal. |
- For more details, see the Admin Portal. |
| MFA Portal | SingleID can maintain the authentication system used by existing applications while enhancing security by requiring users to perform various additional second-factor authentications through system integration. Additionally, SingleID provides an MFA Portal that allows users to pre-register and manage their preferred authentication methods during authentication.
- For more information, see the MFA Portal. |
| CAM Portal | CAM (Cloud Access Management) Portal is a service for cloud console and resource access management, providing users with an easy and convenient way to access cloud consoles and resources. Users can access the portal from a PC on the internal network using multi-factor authentication (MFA). It issues one-time tokens instead of passwords to enable access to cloud consoles and resources, and allows monitoring of all access, operation history, and abnormal behavior.
- For more details, see CAM Portal. | | SingleID Authenticator | SingleID Authenticator is a SingleID-specific authentication tool that enables easy and secure verification of website users’ identity and multi-factor authentication using a mobile phone.
For more information, see the SingleID Authenticator. | | SingleID Open API Guides | Provides various APIs such as applications, Idp, and authentication for using SingleID.
For more details, refer to the Open API Guides. |
Table. SingleID manual list
Reference
The features and configuration provided to the user may vary depending on the SingleID product configuration.
6.2.1.1 - User Portal
Overview
SingleID not only enables authorized users to easily access information assets with a single authentication, but also strengthens account security through policy‑based permission management and real‑time detection of abnormal authentication activities, and provides account management and access frameworks through various audit logs.
Provided features
- Integrated Authentication and Account Management
- Support for various authentication integration protocols (SAML, OIDC, etc.)
- Providing a self-service feature for app usage requests and approvals
- Account synchronization for platforms like Salesforce and Workday, as well as synchronization and management of roles (groups) within accounts.
- Offer sign‑up and account termination functions that enable issuing accounts to partners, customers, and other non‑employee users.
- Passwordless and Multi-Factor Authentication
- PC·Mobile passwordless authentication and multi-factor authentication (MFA)
- Authentication methods: SMS, email, SingleID Authenticator(mOTP, TOTP, PIN, biometrics), Knox Messenger, Passkey, etc
- Providing composite authentication for secondary authentication by integrating with the existing primary authentication environment (MFA‑only service use case)
- Support for certificate-based authentication through the Private CA (Certificate Service Authority) private certificate issuance and management feature (Separate Use Case)
- PC·Mobile passwordless authentication and multi-factor authentication (MFA)
- Authentication and Account Information Integration
- Automation of app integration via Pre‑Built Connector
- Simplifying custom app integration through DIY integration templates
- Risk-Based Authentication Anomaly Detection
- Context-based access control based on authentication attempt scenarios
- Enhancing security through detailed login and authentication policy configuration
- Public cloud access management for cloud operators/developers
- Console access control via role-based assigned accounts
Service Architecture Diagram
What is a User Portal?
The SingleID User Portal is the user interface of the SingleID service, providing various security features such as access to company applications, SSO, and access permission requests.
User Portal screen layout
The User Portal consists of the following menus.
- My App: A menu that allows users to view the list of applications they are currently using. 1. Users can conveniently access and manage approved apps.
- App Catalog: A menu that displays a list of accessible applications.
- Notice: This menu allows the SingleID administrator to display announcements to users.
- Approval Requests: This menu allows you to manage approval requests related to application access, member registration, usage period extensions, and other similar items.
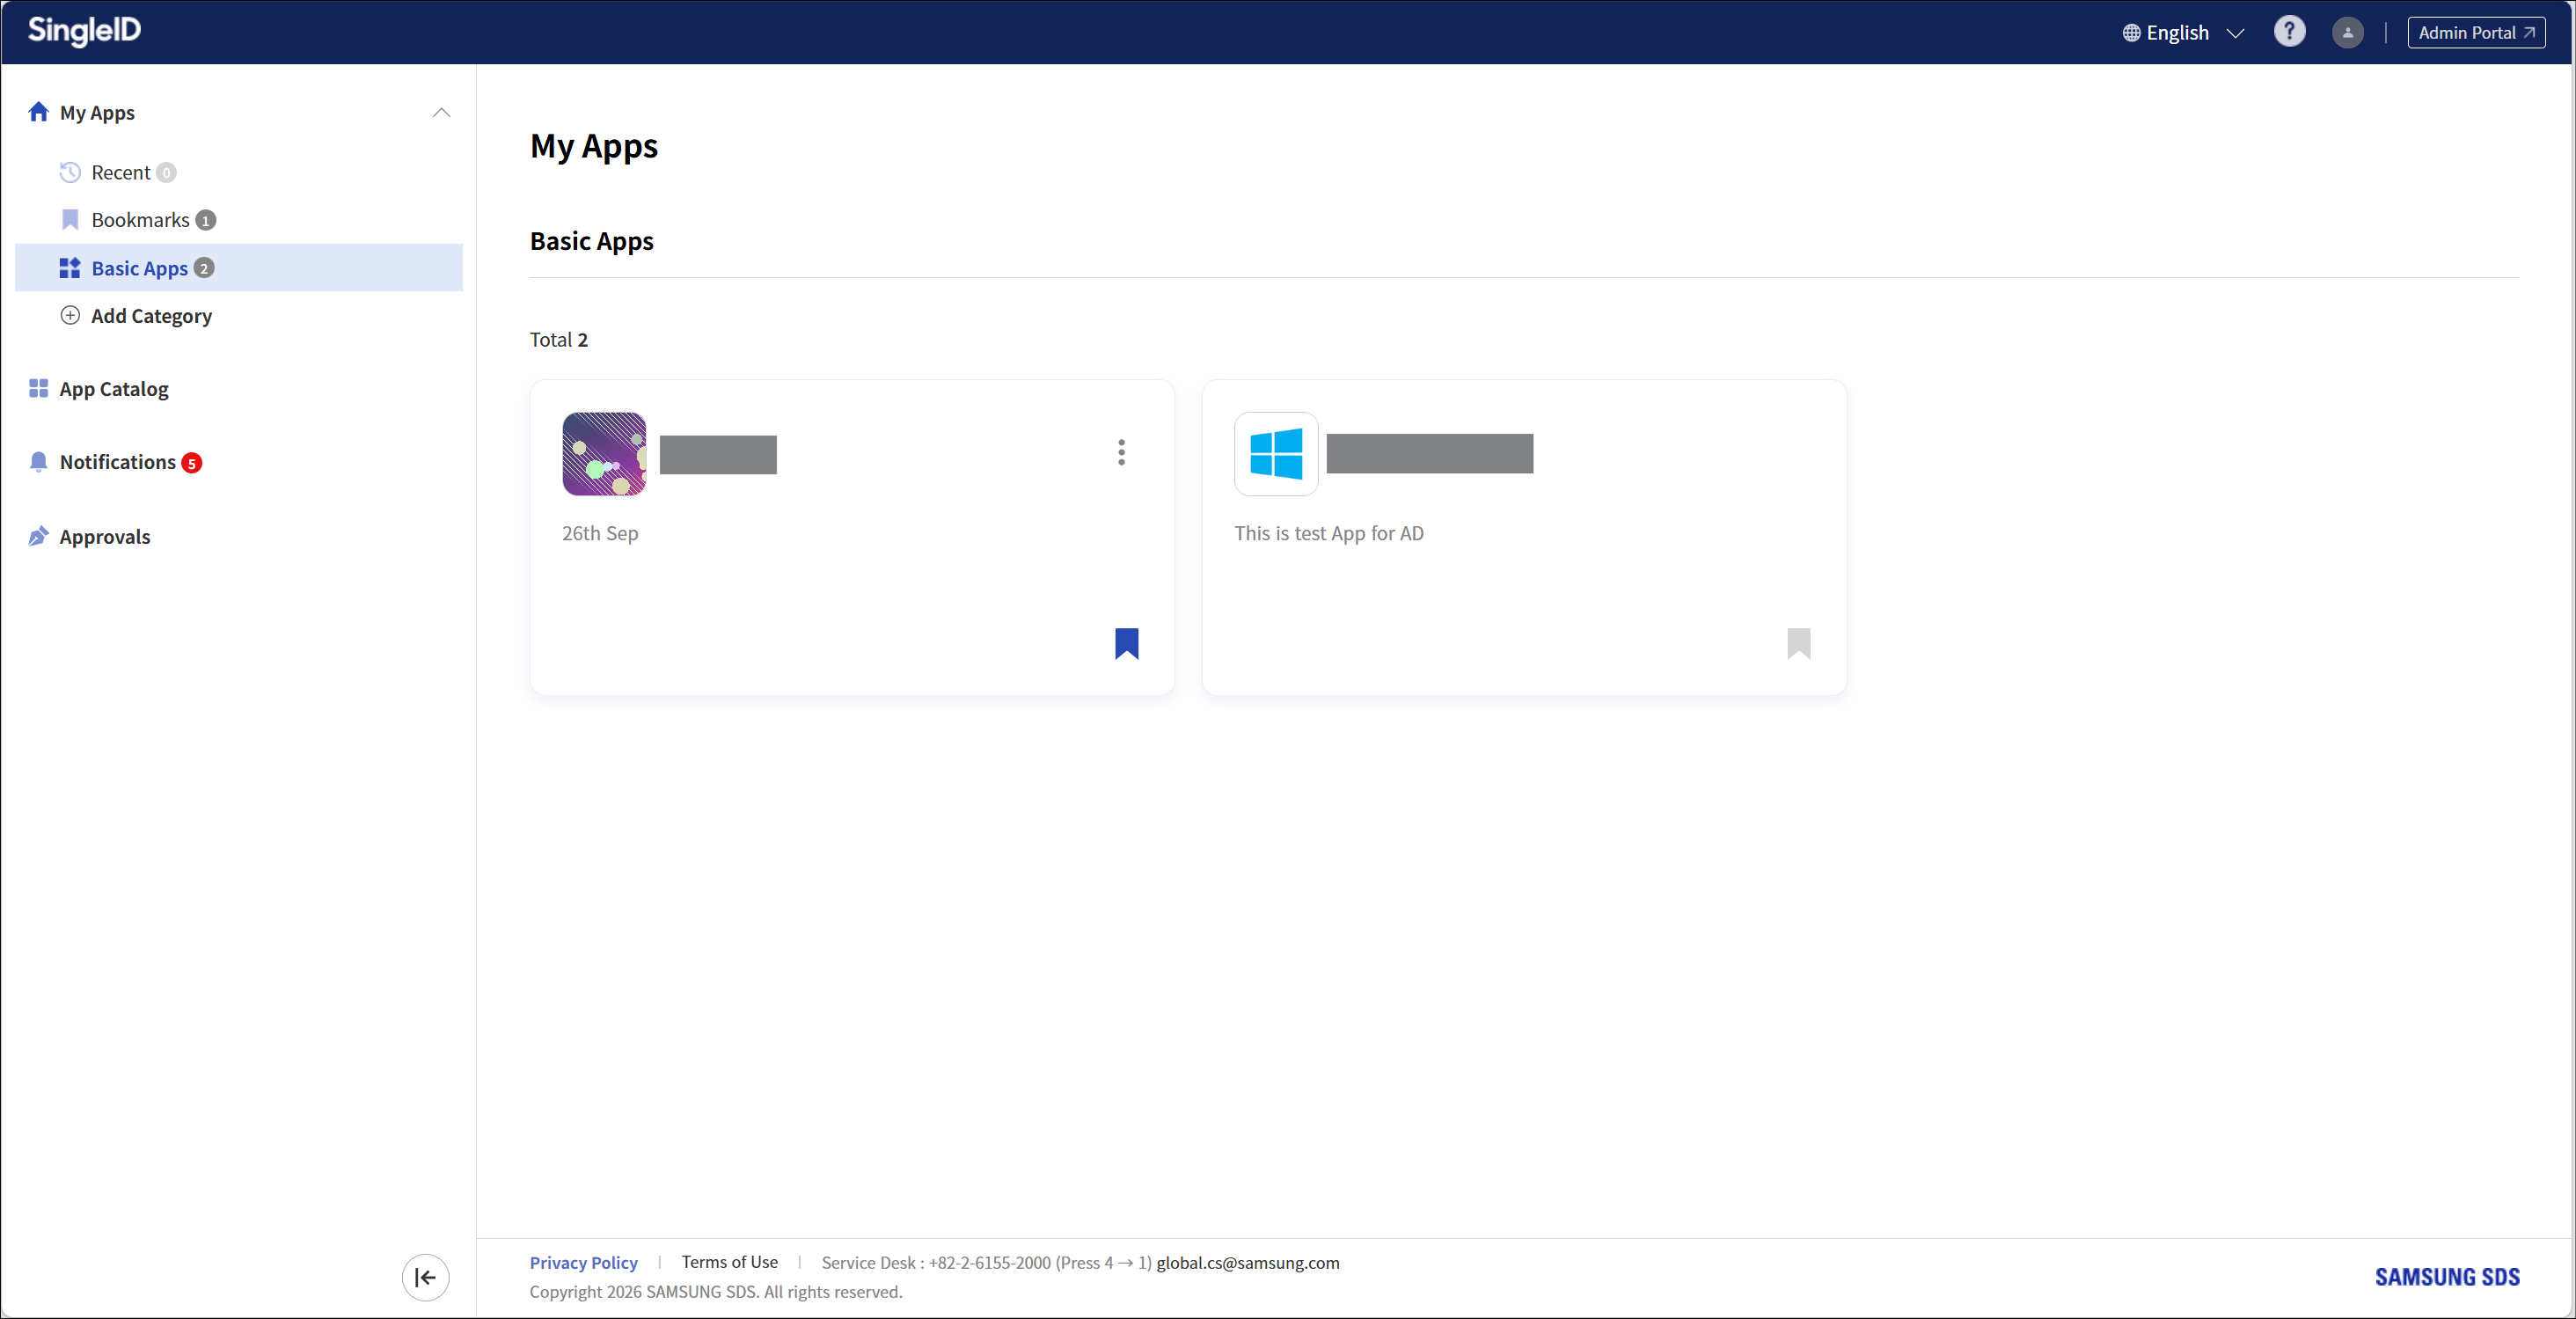
Manual composition
This manual is organized as follows.
- Announcements and Language Settings: It explains how to set the language in the SingleID solution and how to check urgent notices that can be viewed before logging in.
- Login using authentication methods: Describes how to register and use various authentication methods for login.
- Register Authentication Tool: Describes the enrollment process, which is the procedure for users to register authentication tools.
- Sign Up: Describes the two methods of signing up.
- Find ID and Reset Password: Describes the procedure by which a user finds their own ID through the ID recovery process.
- Privacy Policy, Terms of Service, Service Desk: Explains the privacy policy and terms of service that can be accessed via the links at the bottom of the screen.
- PC SSO Agent: Explains the PC SSO Agent, which assists with login and logout for SingleID.
- My App: This explains the My App menu that can be accessed via SSO.
- App Catalog: Describes the App Catalog menu that lets you view the list of apps that can be requested.
- Notification: This explains the Notification menu that allows you to view urgent notices and regular notices.
- Approval Request: Describes the Approval Request menu that allows you to request or approve app usage.
- Personal Profile: It describes the personal settings menu, such as photo, preferred language, personal settings for configuring the system time zone, authentication settings, login history·environment, logout, and other options.
6.2.1.1.1 - Announcements and Language Settings
Notice
You can view the notice alerts posted by the administrator on the User Portal login screen and after logging into the User Portal. There are general notices and emergency notices.
- General Notice: It is a general notice posted by the administrator and is used to convey information to users. * User Portal > Notifications can be viewed in the menu.
- Urgent Notice: It is an urgent announcement posted by the administrator and is used to convey information to users. * User Portal > Login screen top and User Portal > Notifications can be viewed in the menu.
Language Settings
To change the language displayed on the screen, follow these steps.
- In the User Portal screen > top language selection, click the language you want, Korean or English.
- A dropdown list appears, allowing you to select between Korean and English.
- Please select the desired language. 2. The screen switches according to the selected language.
Reference
On the first login, it is presented in the language configured in the user’s browser. If the language is Korean or any language other than English, it will be set to English.
6.2.1.1.2 - Log in using an authentication method
Log in using an authentication method
What is an authentication method?
An authentication method, commonly called Authenticator, refers to an authentication tool.
SingleID provides the following 11 authentication methods for user authentication.
- Password: Enter the password on the SingleID login screen.
- Email OTP: Send the OTP via email and enter the OTP on the SingleID login screen.
- SMS OTP: Send the OTP via SMS and enter the OTP on the SingleID login screen.
- Knox Messenger OTP: Send OTP via Knox Messenger and enter the OTP on the SingleID login screen.
- Knox Identity: Enter the Knox Password for the Knox Portal user on the SingleID login screen.
- SingleID Authenticator Bio: Send via the dedicated SingleID mobile app and authenticate with biometric verification on the mobile device.
- SingleID Authenticator PIN: Send it to the dedicated SingleID mobile app and enter the PIN number on the mobile.
- SingleID Authenticator mOTP: Install the SingleID‑only mobile app and enter the mOTP (Mobile OTP) number.
- SingleID Authenticator TOTP: Install using the SingleID dedicated mobile app and enter the TOTP (time‑based OTP) code.
- Passkey: An authentication method based on Mobile and Windows Hello that uses biometrics (fingerprint, facial), PIN, and security keys for authentication.
- TOTP Authenticator: Generate TOTP (Time-based OTP) with a 3rd Party Authenticator and enter the OTP on the SingleID login screen
- Admin Authentication: Request authentication on behalf of the admin to integrate authentication
Reference
The above authentication method only provides the authentication methods allowed by the SingleID administrator in the SingleID Admin Portal.
Reference
If this is your first time using the SingleID Authenticator mobile app, please refer to SingleID Authenticator.
Enter user ID
The user attempts to log in by entering their ID on the login screen below.
To log in using a user ID, follow these steps.
- Login screen > Account ID input field, enter the ID, and click the Next button.
- Enter the password in the password field, and click the Next button.
- Login is complete.
Passwordless Login
SingleID provides a login service without a password.
To log in without using a password, follow these steps.
- Click Login screen > Want to log in without a password?.
- Select verification method screen appears. 2. Click one of the desired authentication methods.
- Enter the authentication code according to the authentication method you selected.
- After logging in, you will be taken to the User Portal main screen.
Reference
Authentication methods marked as registration required require registration. Registration Required click to register immediately, or see Register authentication tool.
Information
Passwordless login may not be provided depending on its configuration in login policy settings. Please contact the administrator.
Setting Preferred Authentication Method
SingleID users log in to the User Portal provided by SingleID and set their preferred primary and secondary authentication methods.
If the user sets their preferred method, the Select verification method screen is omitted during login and authentication, allowing immediate authentication with the first and second authentication methods.
To set your preferred authentication method, follow these steps.
- User Portal > Personal Profile > Authentication Settings Click the settings.
- Authentication Settings screen appears.
- Click the ☆ 1st, ☆ 2nd that matches the desired authentication method, placed before each method.
- Only one selection is allowed for each of 1st, 2nd. 4. When it changes to ★, the selection is completed.
After the configuration is complete, the next login will use this method, offering convenient access.
Reference
Even if a user configures a preferred authentication method for primary and secondary authentication, an administrator can restrict it to a specific method through login policy settings.
Register authentication method
Users can configure all authentication methods. Registering an authentication method by a user is called enrollment. When a user account is created for the first time, the email OTP is automatically enrolled using the email information from the user data. Other authentication methods can be used by having the user enroll directly as needed.
There are two methods for authentication enrollment.
- Register in Authentication Settings: User Portal > Profile > Authentication In the settings, click the + Add New button at the bottom to register.
- Select verification method screen registration: At login, first authentication, and at second authentication, on the Select verification method screen, select the authentication method with a gray check mark (V) and register.
Reference
For detailed information about authentication method registration (Enrollement), refer to Register Authentication Tool.
First login
Password reset
When a user logs in for the first time, they can log in after resetting their password.
To reset your password, follow the steps below.
- Login screen > Account ID input field, enter the ID, and click the Next button.
- Click Password Reset under the Next button.
Consent to collection and use of personal information
When logging in with SingleID for the first time or within a certain period, consent to collect and use personal information is required. Follow the consent procedure and select the required, optional items to agree.
Required items must be selected to log in.
Password authentication
Password is the most fundamental authentication method, serving as SingleID’s default authentication tool.
Enter password
Log in using a user ID by following the steps below.
- Login screen > Account ID input field, enter the ID, and click the Next button.
- Password input field, enter the password, and click the Next button to log in.
Reference
If you click the eye-shaped icon in the password input field, you can view the password you entered.
Caution
When the entered password is entered incorrectly If the entered password is incorrect, a ID or password is not correct. (1/3) message is shown, and re‑entry is required. The number of allowed retries is limited to the count set by the administrator in the password policy.
When the password is entered incorrectly repeatedly and becomes locked If the password is entered incorrectly and the device becomes locked, you can unlock it in two ways.
- Automatic unlock after 1~5 minutes: When automatic unlock is enabled, the account remains locked for 1~5 minutes. * Login will be available after that time.
- Unlock with Password Reset: When the administrator sets the password policy to require a password reset, a password reset is required. * You can log in after resetting your password. * ID 찾기 및 비밀번호 재설정 you can view the detailed information.
Email OTP authentication
Authenticate
To authenticate with email OTP, an OTP will be sent to the email address registered by the user.
To authenticate with an email OTP, follow the steps below.
- In the Identity Verification Selection method, click Email.
- An OTP code will be sent to the registered email. 2. Enter the OTP within the time set by the administrator (usually 3~5 minutes).
- After entering the OTP, click the Confirm button to complete authentication.
Reference
- Resend Code: If the input validity period has expired, click the resend code button. 1. Resend the OTP code via email.
- ‘Would you like to authenticate using a different method?’: If the current authentication cannot be used, switch to a different authentication method.
- ‘If you have changed your email, please register it.’: Depending on the administrator’s settings, you can register (Enrollment) a different email for verification. 3. You can view the details at 이메일 인증 도구 등록하기.
Guide
If the code is entered incorrectly If the user enters the OTP code incorrectly, they can re-enter it up to the number of times specified by the administrator.
When locked due to exceeding the user input limit If the OTP code is entered incorrectly more times than the administrator allows, the screen will be locked from input for the duration set by the administrator. You can input after waiting for the specified duration. Refresh and try again after the input timeout.
SMS OTP authentication
Authenticate
To authenticate with SMS OTP, an SMS OTP will be sent to the mobile device registered by the user.
To authenticate with an email OTP, follow the steps below.
- In the Identity verification selection method, click Email.
- The OTP code will be sent to the registered mobile phone. 2. Enter the OTP within the time set by the administrator (usually 3~5 minutes).
- After entering, click the Confirm button to complete authentication.
Reference
- Resend Code: If the input validity period has expired, click the resend code button. 1. Resend the OTP code to the mobile phone.
- ‘Would you like to authenticate using a different method?’: If the current authentication cannot be used, switch to a different authentication method.
- ‘If you have changed your mobile phone, please register.’: Click the link to go to the enrollment screen for the new mobile. 3. You can view the details for registration at Register SMS authentication tool.
information
If the code is entered incorrectly If the user enters the OTP code incorrectly, they can re-enter it up to the number of times specified by the administrator.
When locked due to exceeding the user input limit If the OTP code is entered incorrectly more times than the administrator’s allowed limit, the screen will be locked from input for the duration set by the administrator. You can input after waiting for the specified time. Refresh and try again after the input timeout.
Knox Messenger OTP authentication
Authenticate
If you want to authenticate with Knox Messaenger OTP, the OTP will be sent to the Knox Messanger you are using.
To authenticate Knox Messenger OTP, follow the steps below.
- In the Identity verification selection method, click Knox Messenger.
- The OTP code is sent via Knox Messenger. 2. Enter the OTP within the time set by the administrator (usually 3~5 minutes).
- After entering, click the Confirm button to complete authentication.
Reference
- Resend Code: If the input validity period has expired, click the resend code button. 1. Resend the OTP code via Knox Messenger.
- ‘Would you like to authenticate using a different method?’: If the current authentication cannot be used, switch to a different authentication method.
- ‘Would you like to use a different Knox ID?’: Clicking the link takes you to the enrollment screen for a new Knox ID. 3. You can view the details at Register Knox Messenger Authentication Tool.
information
If the code is entered incorrectly If the user enters the OTP code incorrectly, they can re-enter it up to the number of times specified by the administrator.
When locked due to exceeding the user input limit If the OTP code is entered incorrectly more times than the administrator has allowed, the screen will be locked for the duration set by the administrator. You can input after waiting for the specified time. Refresh and try again after the input timeout.
Knox Identity Password Authentication
Authenticate
To authenticate with Knox Identity, you must enter your Knox Identity password.
To authenticate with Knox Identity, follow the steps below.
- In the Identity verification selection method, click Knox Identity.
- Enter the password for your Knox account.
- After entering, click the Confirm button to complete authentication.
Reference
‘Would you like to authenticate using a different method?’: If the current authentication cannot be used, switch to another authentication method.
information
If the password is entered incorrectly If the user enters the password incorrectly, they can re-enter it up to the number of attempts specified by the administrator.
When locked due to exceeding the user input limit If the password is entered incorrectly more times than the administrator’s allowed limit, input on the screen will be restricted for the duration set by the administrator. You can input after waiting for the specified duration. Refresh and try again after the input timeout.
SingleID Authenticator authentication
The SingleID service provides a mobile authentication app called SingleID Authenticator and offers authentication in various ways.
Authentication method
| Authentication method | Explanation |
|---|---|
| SingleID Authenticator Bio | Send a push via the installed SingleID Authenticator mobile app on the device to request biometric authentication. |
| SingleID Authenticator Pin | Send a push using the installed SingleID Authenticator mobile app on the device to request authentication with a PIN code. Not provided |
| SingleID Authenticator TOTP | Send a push from the installed SingleID Authenticator mobile app on the device to request authentication with TOTP. |
| SingleID Authenticator mOTP | Send a push using the installed SingleID Authenticator mobile app on the device to request authentication with mOTP. |
Table. SingleID Authenticator authentication method
Reference
Please refer to the SingleID Authenticator for installation and configuration methods.
Passkey authentication
The SingleID service provides simple authentication and multi-factor authentication using Passkey based on Windows Hello.
Authentication method
- Simple authentication: Provides convenient login without needing ID/Password via Sign in with Passkey at the bottom of the login page.
- Multi-factor authentication: Provides convenient login without requiring an ID/password during secondary authentication.
Authentication Types
- Mobile Passkey: Scan the QR code to log in using Android and iOS mobile devices.
- Biometrics: Login via fingerprint recognition based on Windows Hello
- PIN: Login using Window PIN code
- Security Key: Log in using the Windows security key
Reference
You can view the detailed information at Register Passkey Authentication Tool.
Administrator authentication
Authenticate
In the SingleID service, the administrator provides authentication by delegating identity verification on behalf of the user.
To perform administrator authentication, follow the steps below.
- If you cannot perform identity verification at the bottom of the screen in the Identity verification selection method, you can request verification from an administrator. 1. Click here. Click it.
- Click the Request button.
- You will be taken to the admin selection screen. 3. Select the administrator who requested authentication delegation and click the Request button.
- Authentication delegation is requested to the selected administrator.
- When the administrator approves the authentication delegation, it is completed automatically.
information
On the administrator selection screen, if the administrator is not assigned or has not registered a SingleID authenticator, a ‘Administrator Not Assigned’ screen appears.
Information
At the bottom If you cannot complete identity verification, you can request verification from an administrator. Click here** if the phrase is missing
The administrator has disabled the admin authentication delegation feature by policy. Please contact the administrator.
6.2.1.1.3 - Register authentication tool
Register authentication tool
The principle is that users register and use all authentication tools themselves.
When a user registers an authentication tool, it is called enrollment (Enrollment).
When a user is created for the first time, only the Email OTP is automatically registered using the email information from the user data.
The remaining information can be directly registered and used by the user as needed.
There are three ways to register.
- Login screen > ID/Password input > authentication method select and register on the screen
- On the authentication method selection screen, if you click the authentication tool marked Registration Required (V mark), you can register.
- Click the User Portal(after login) > Profile > Authentication Settings > + Add New button to register.
- Register through the registration message link at the bottom of every authentication screen.
- The screen below is an example of an SMS verification screen. * At the bottom, you can click the If you have changed your mobile phone, please register. message to register.
- All authentication codes can be changed via a message at the bottom of the input (Message format: ~ Please register.)
Authentication code input screen example
Register email verification tool
Email registration consists of the following three steps.
- Verification Step: This is the identity verification step before registering the email authentication tool.
- Registration step: This step registers a new email and checks whether the number is valid.
- Completion Stage: This is the stage where you verify that the registration was completed successfully.
Verification step
This is the step of verifying your identity before using the authentication tool. To view the identity verification procedure, please refer to Login using authentication method.
Information
The authentication method used in the verification step is limited to the authentication tools configured by the administrator.
You can select an authentication method that is allowed by company policy.
Registration phase
This is the step where the user registers the desired email address and checks its validity.
The user should follow the steps below.
- If you complete identity verification in the Confirmation step, you will automatically move to the Registration step.
- Enter the email address you want to register.
- Click the Send verification code button.
- Check the OTP code sent to the entered email address, and enter the OTP code on the screen.
- If the Authentication code is entered correctly, it proceeds to the Complete stage.
information
According to company policy, for security reasons, a new email address that is not a company email address may not be registered.
Completion Phase
Registration complete screen appears, and during the next login you can perform first and second authentication using the email verification tool.
Register SMS Authentication Tool
SMS registration consists of the following three steps.
- Verification Step: This is the identity verification step before registering the SMS authentication tool.
- Registration step: The stage where a new mobile phone number is registered and its validity is checked.
- Completion Stage: This is the stage where you verify that the registration was completed successfully.
Verification step
This is the step of verifying your identity before using the authentication tool. To view the identity verification procedure, please refer to Login using authentication method.
Information
The authentication method used in the verification step is limited to the authentication tools configured by the administrator.
You can select an authentication method that is allowed by company policy.
Registration Phase
This step registers the mobile phone number the user wants to add and checks its validity.
The user should proceed with the following steps.
- If you complete identity verification in the Confirmation step, you will automatically proceed to the Registration step.
- Select the Country code, and enter the mobile phone number you want to register.
- Click the Send verification code button.
- Check the OTP code sent to the entered mobile phone number, and enter the OTP code on the screen.
- If the Authentication code is entered correctly, it proceeds to the Complete stage.
Completion Phase
Registration Complete screen will appear, and on the next login you can perform first and second factor authentication using the SMS authentication tool.
Register Knox Messenger authentication tool
Knox Messenger registration consists of the following three steps.
- Verification Step: This is the identity verification step before registering the Knox Messenger authentication tool.
- Registration Step: Enter the Knox ID to register. 2. This is the step that checks whether the Knox ID to be registered is valid.
- Completion Stage: This is the stage where you verify that the registration was completed successfully.
Check step
This is the step of verifying your identity before using the authentication tool. To view the identity verification process, refer to Login using authentication method.
information
The authentication method used in the verification step is limited to the authentication tools configured by the administrator.
You can select an authentication method that is permitted under company policy.
Registration stage
This step registers the mobile phone number the user wants to add and checks its validity.
The user should follow the steps below.
- If you complete identity verification in the Verification step, you will automatically proceed to the Registration step.
- Enter the Knox ID to register.
- Click the Send verification code button.
- Check the OTP code sent to Knox Messenger of the entered Knox ID, and enter the OTP code on the screen.
- If the Authentication code is entered correctly, it proceeds to the Complete stage.
Completion Phase
Registration Complete screen will appear, and on the next login you can perform first and second factor authentication using the Knox Messenger authentication tool.
Register Passkey authentication tool
SingleID Passkey consists of the following three steps.
- Verification stage: This is the identity verification step before registering the Passkey authentication tool.
- Registration Stage: This is the Passkey registration stage.
- Completion Stage: This is the step where you confirm that the registration was successful.
Check step
This is the step of identity verification before using the authentication tool. To view the identity verification process, refer to Log in using authentication method.
Information
The authentication method used in the verification step is limited to the authentication tools configured by the administrator.
You can select an authentication method that is allowed by company policy.
Registration Phase
This is the step to verify the mobile phone or PC environment where you want to register a Passkey.
Follow the four steps below to complete the registration process.
- Activation: Passkey support environment guide.
- Verification: Complete identity verification using an authentication method.
- Registration: Passkey registration step. 3. When the Generate on this device button is clicked, a Passkey is created and registered on the PC. 3. Create on another device When the button is clicked, it registers with a mobile phone or hardware security key.
- Completed: This step verifies that Registration Complete. 4. Click the Continue button.
Reference
Passkey Support Environment
- Operating system (laptop or desktop)
- Windows 11, macOS Ventura, ChromeOS 109 or later
- Mobile phone: iOS 16 or Android 9 or later
- Hardware security key: a hardware security key that supports the FIDO2 protocol
- Browser version
- Chrome 109 or later
- Safari 16 or later
- Edge 109
- Device Settings
- Enable Bluetooth
- Set screen lock password
- Register PIN code
- Allow fingerprint or facial recognition
Completion Phase
After the Passkey registration is completed, the Registration Complete screen appears. You can perform first- and second-factor authentication with the Passky authentication tool on the next login.
Reference
PC Passkey requires that Windows Hello be configured in advance. For detailed information, see the reference link.
When registering a Passkey on mobile, you can set it in an environment where QR code scanning is possible.
How to Register PC Passkey
This guide explains how to register a Passkey using Windows Hello on a PC. Passkey requires that Windows Hello be configured in advance. For detailed information, see the Windows Hello Settings.
If you have completed registering a fingerprint or PIN code in Windows Hello settings. Follow the steps below.
- Click User Portal > Profile > Authentication Settings.
- Click the Add New button.
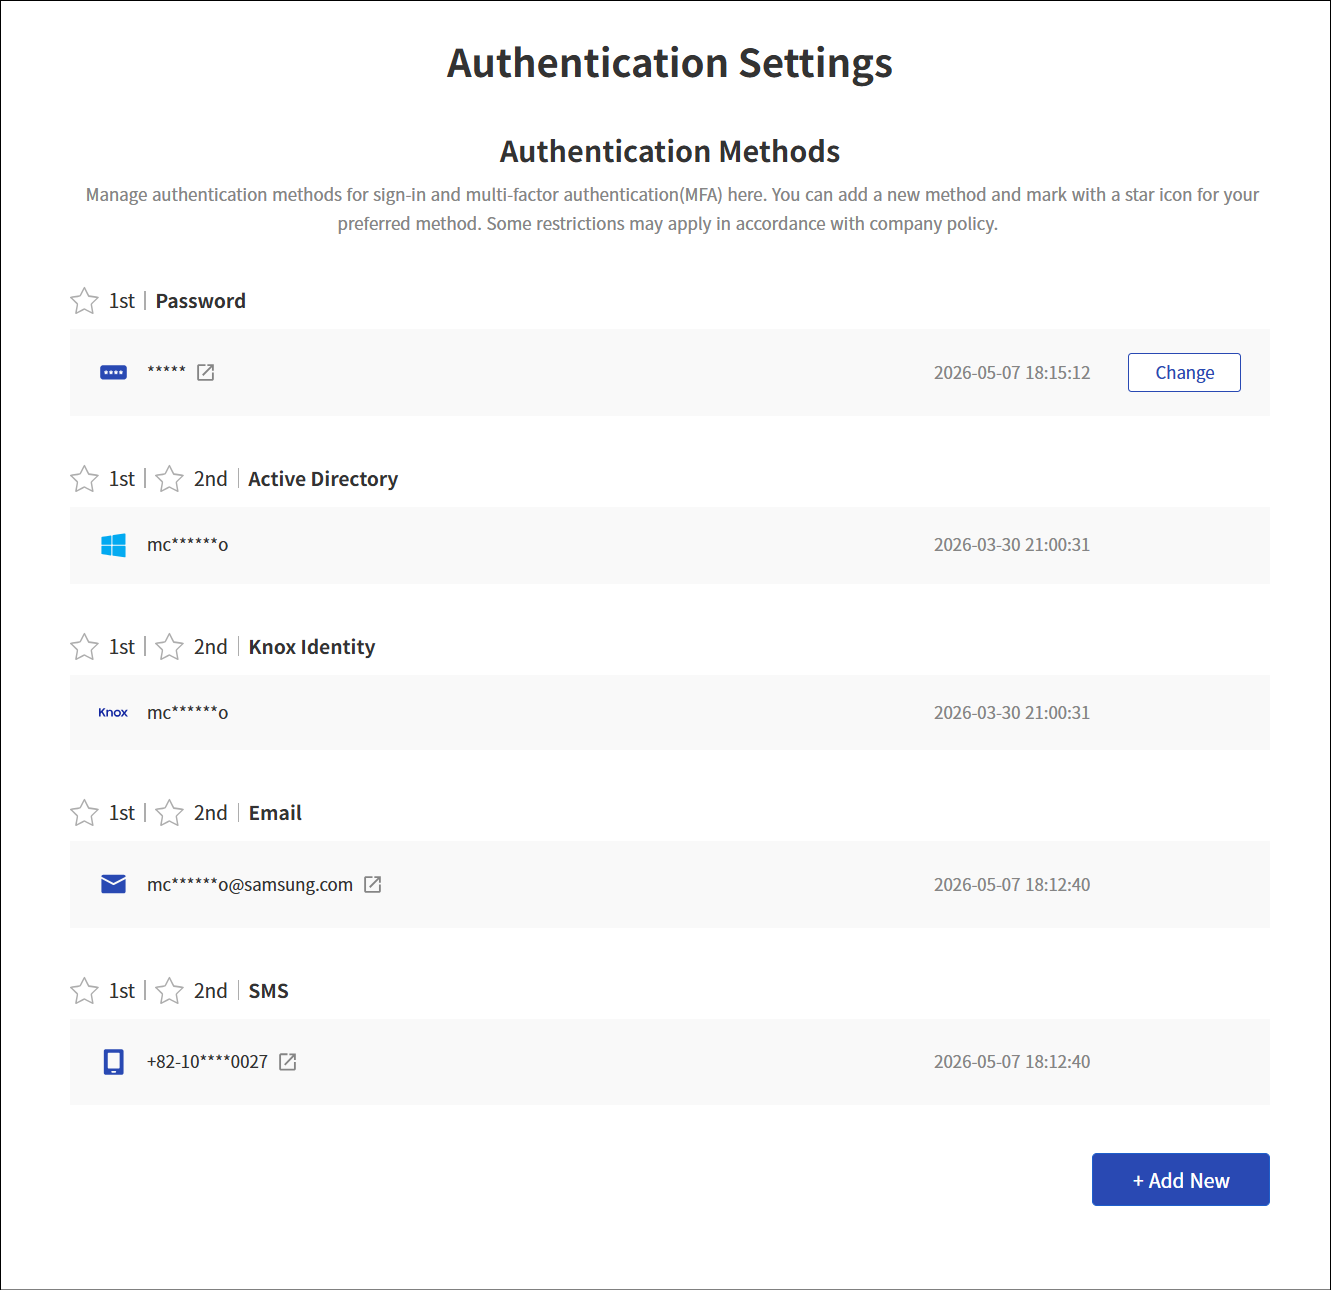
- On the Select registration authentication method screen, select Passkey.
- Passkey registration screen appears. 4. Click Start.
- Passkey supported environment The screen appears. 5. Check the supported operating system version and click the Next button.
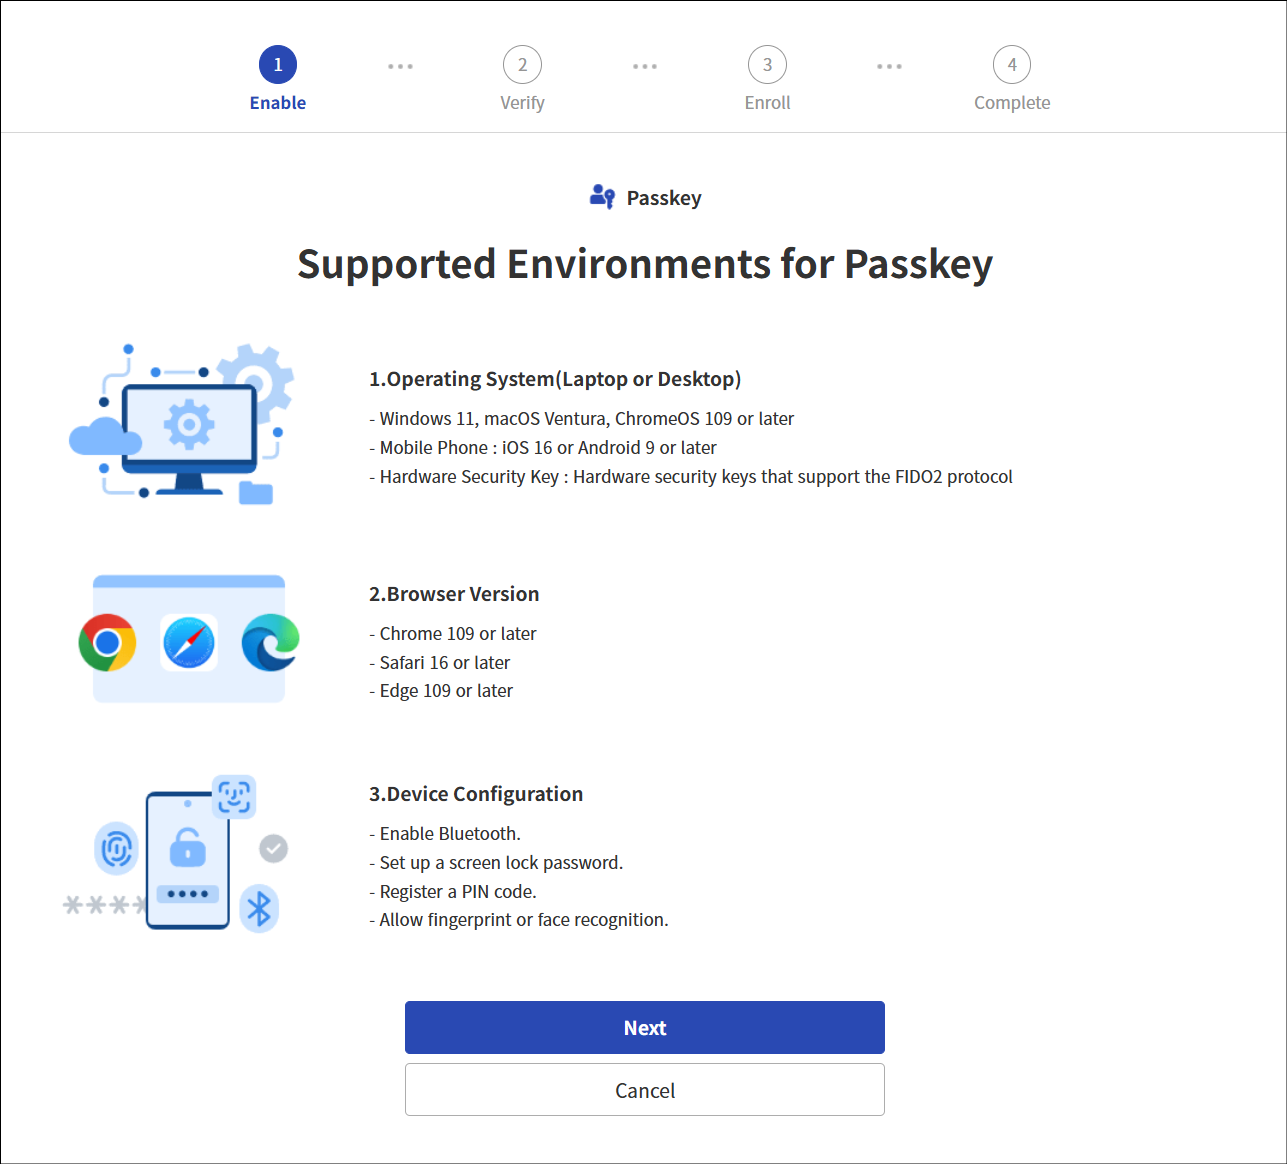
- Select verification method The screen appears. 6. Complete verification using an authentication method that can verify your identity.
- Passkey Registration The screen appears. 7. Click the Generate on this device button. (Generate Passkey on Windows PC)
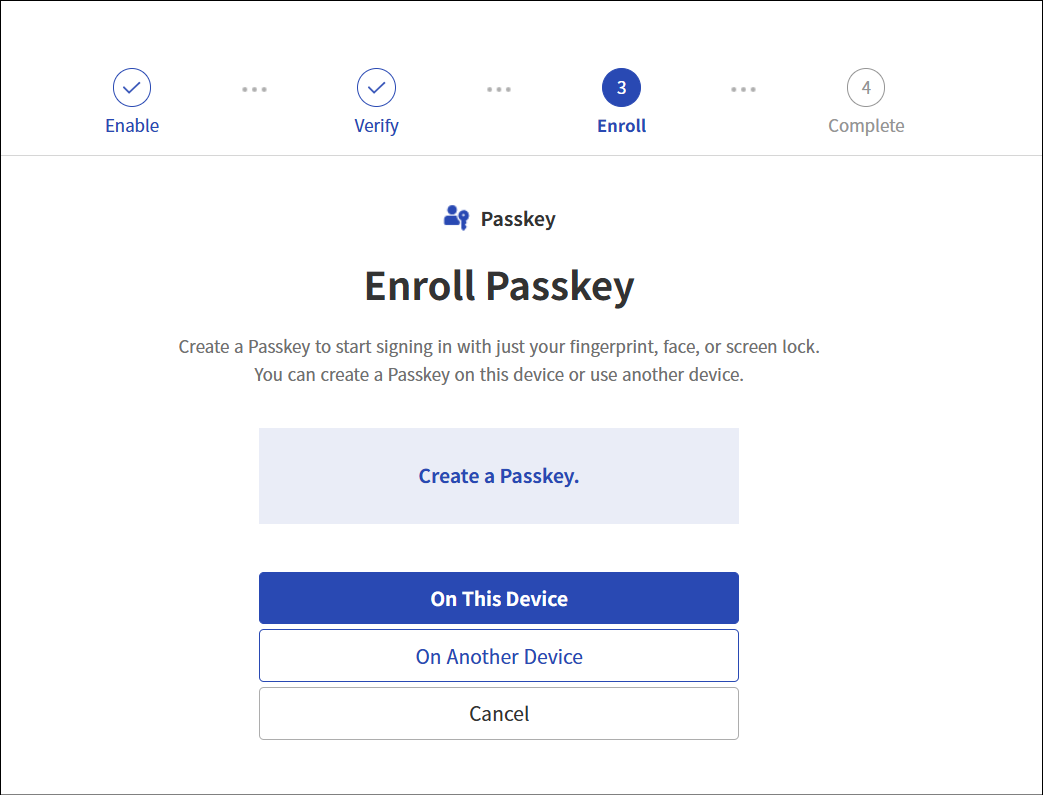
- (If a fingerprint or PIN is set in Windows Hello) Fingerprint or PIN entry authentication screen appears.
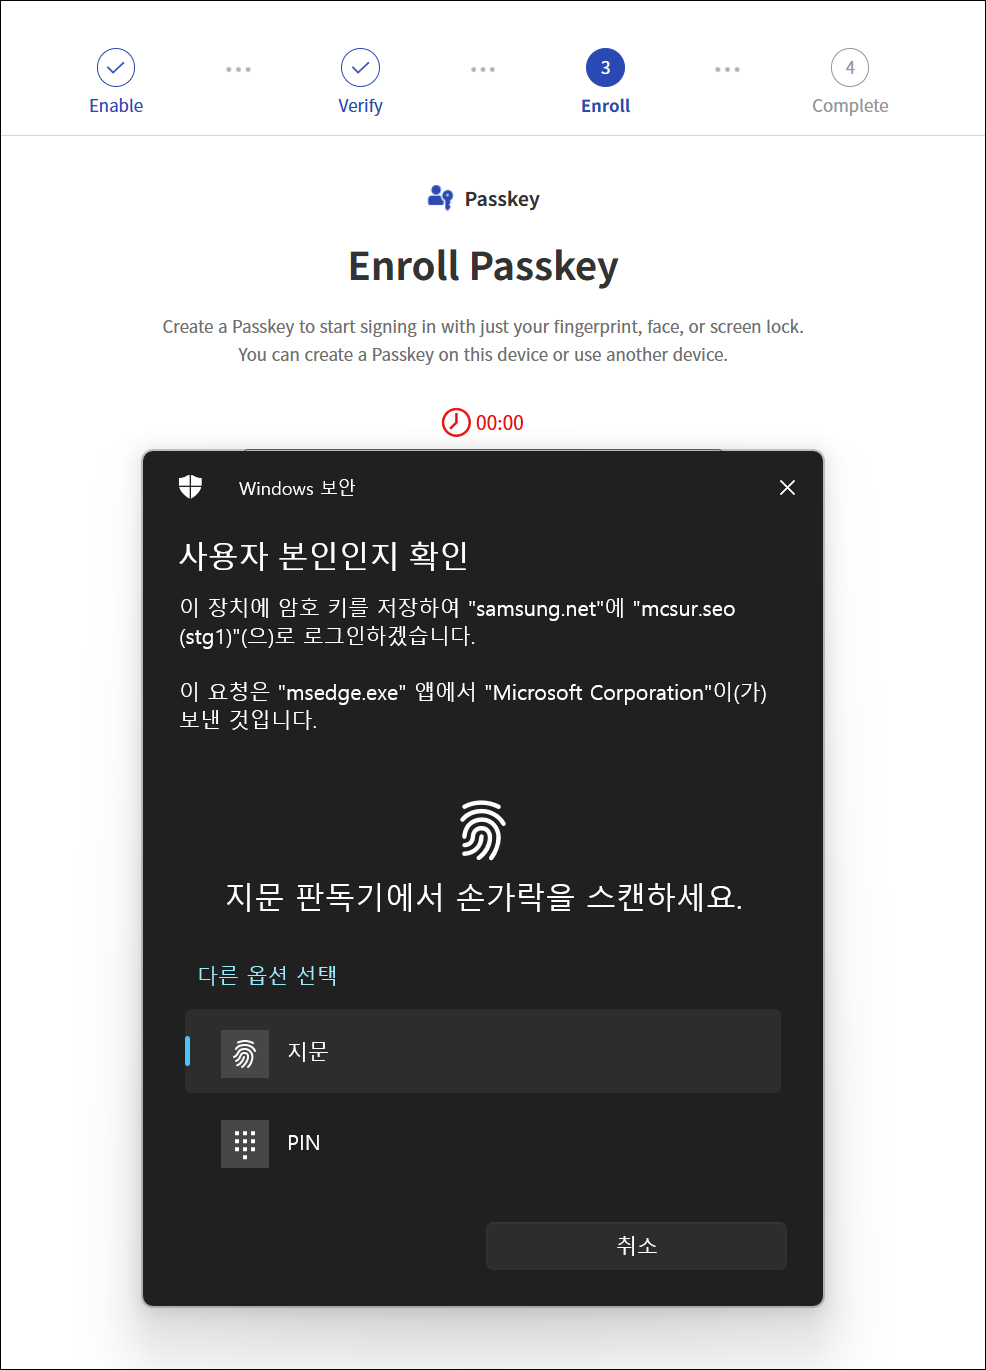
- When you enter a fingerprint or PIN code, the registration complete screen appears.
Reference
For PC Passkey, you can select the authentication method registered in the PC’s Windows Hello to support either simple authentication or MFA authentication.
Mobile Passkey Registration Method
This is a guide on registering a mobile Passkey. The mobile Passkey requires the preconfiguration below to be completed beforehand.
- Enable Bluetooth
- Set screen lock password
- Register PIN code
- Allow fingerprint or facial recognition
If you have completed registering the Passkey via mobile. Follow the steps below.
- Click User Portal > Profile > Authentication Settings.
- Click the Add New button.
- Select registration authentication method on the screen, select Passkey.
- Passkey Registration The screen appears. 4. Click Start.
- Passkey supported environment screen appears. 5. Check the supported operating system version and click the Next button.
- Select verification method screen appears. 6. Complete verification using an authentication method that can verify your identity.
- Passkey Registration The screen appears. 7. Create on another device button, click it. (Android or iOS)
- The QR code appears on the screen. 8. Scan the QR code to generate a Passkey on your mobile.
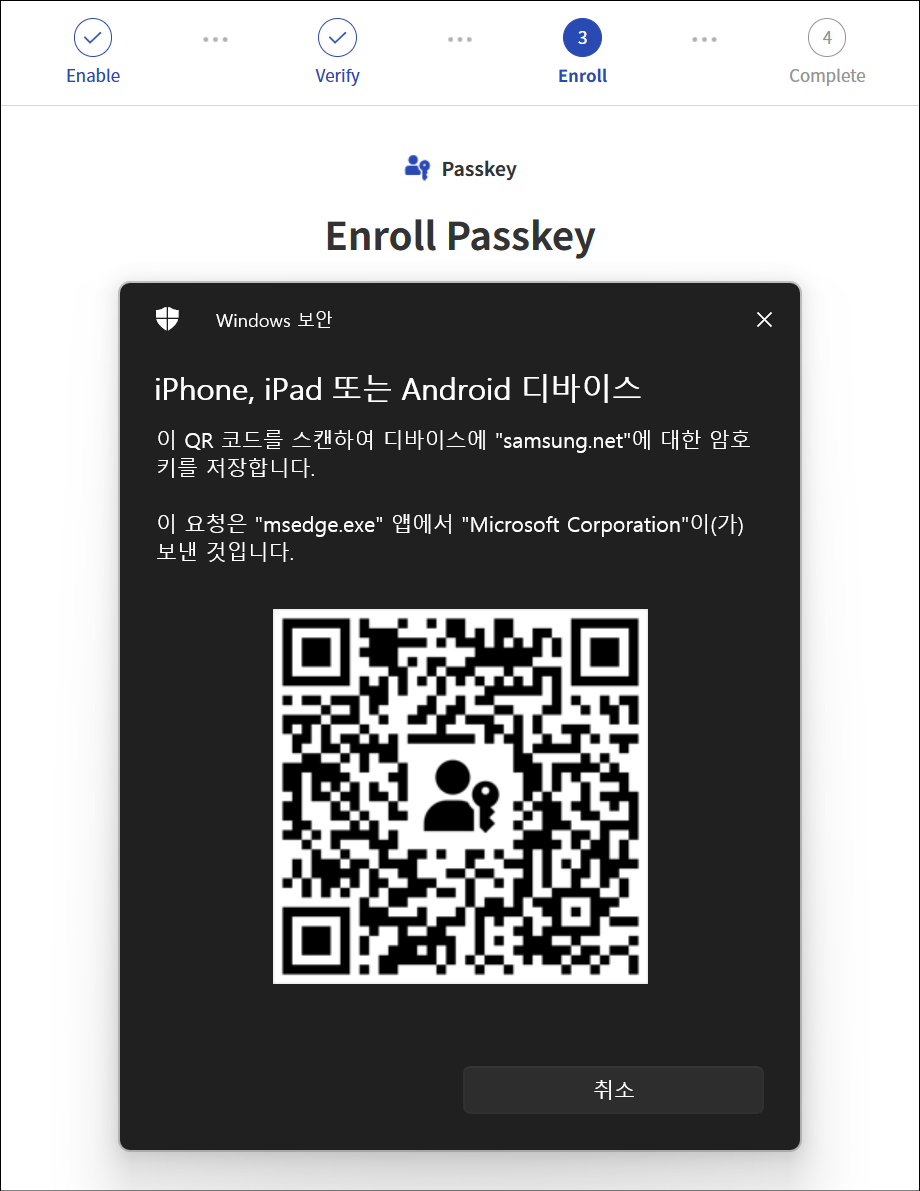
- When you enter a fingerprint or PIN code on the mobile device, the Registration Complete screen appears.
Reference
Mobile Passkey Support Scope
- Andriod : Supports Samsung Pass, Google Passkey Manager.
- iOS: Supports Passkey based on iCloud Keychain.
SingleID Authenticator Register authentication tool
The SingleID Authenticator is an authentication tool provided for the SingleID service.
SingleID Authenticator enrollment consists of the following four steps.
- Verification step: This is the identity verification step before registering the SingleID Authenticator authentication tool.
- Installation Step: This is the guide step for the user’s SingleID installation.
- Registration Stage: This step registers a new mobile app and registers the service.
- Completion Stage: This is the stage where you verify that the registration was completed successfully.
Check step
This is the step of verifying your identity before using the authentication tool. To view the identity verification process, refer to Login using authentication method.
guide
The authentication method used in the verification step is limited to the authentication tools configured by the administrator.
You can select an authentication method that is permitted under company policy.
Installation Steps
There are three main ways to install the SingleID mobile app.
- How to install SingleID Authenticator by scanning a QR code on the user’s mobile or searching for “SinlgeID” on Google Play Store (Android) or App Store (iOS).
- How to install by entering your mobile phone number and receiving the download link via SMS
- How to install via a manual download link Install the SingleID Authenticator app and click the Next button to proceed to the registration step.
Information
For security reasons, sending the download link via SMS by entering your mobile phone number is limited to a single transmission.
If you send more than three times within one minute, an error message stating “SMS messages cannot be sent multiple times for security reasons.” will be sent.
Please try again after a short while.
Registration stage
Install the SingleID Authenticator mobile app on the mobile phone you wish to register, then launch SingleID Authenticator.
Complete the registration process in the three steps below.
- Service Registration: In the SingleID Authenticator app, click the ‘+’ at the top.
- Enter QR or authentication number: Scan the QR code or enter the authentication code to register.
- Service registration complete: Click the Confirm button to complete the registration.
Completion Phase
After registration is completed in SingleID Authenticator, the Registration Complete screen appears. You can perform first- and second-factor authentication with the Windows Hello authentication tool on the next login.
Information
Check device information
When the user clicks on device information such as password, SMS, email, SingleID authenticator, Nox messenger, Passkey, etc., they can view detailed information in a popup.
Device Information popup displays ’type’, ‘OS version’, ‘browser’, ‘IP’, etc.
Register TOTP Authenticator tool
TOTP Authenticator registers third‑party TOTP to support various authentication tools.
TOTP Authenticator enrollment consists of the following four steps.
- Verification step: This is the identity verification step before registering the SingleID Authenticator authentication tool.
- Installation Step: This is the user’s SingleID installation guide step.
- Registration Stage: This step involves registering a new mobile app and registering the service.
- Completion Stage: This is the stage where you verify that the registration was completed successfully.
Check step
This is the step of verifying your identity before using the authentication tool. To view the identity verification process, refer to Login using authentication method.
information
The authentication method used in the verification step is limited to the authentication tools configured by the administrator.
You can select an authentication method that is allowed by company policy.
Installation Steps
There are two main ways to install the TOTP Authenticator.
- Mobile app
- Web browser extension
Click the Next button to go to the registration step.
Service Registration and Verification Phase
This step registers and verifies the 3rd‑party TOTP authenticator you are adding.
Complete the registration process in the two steps below.
- Service Registration: Scan the QR code of the TOTP Authenticator you want to register, or enter the manual code. 1. The code registration is completed in the TOTP mobile app or extension.
- Service Verification: Run the TOTP mobile app or extension, and enter the OTP.
Information
TOTP Authenticator support SingleID supports a variety of standardized 3rd‑party TOTP authentication apps. Non-standard TOTP is not supported. The verified mobile and extension programs are as follows. We recommend the mobile app or extension below.
- Mobile app
- Google Authenticator, Microsoft Authenticator
- Web browser extension
- TOTP extension searchable in the Chrome Web Store and Microsoft Edge Add-ons
Completion Phase
After registration is completed in SingleID Authenticator, the Registration Complete screen appears. You can perform first and second factor authentication using the TOTP Authenticator tool on the next login.
Information
To register a new TOTP Authenticator, on the TOTP Authenticator OTP entry screen, click the bottom “If you want to change your TOTP Authenticator, register here” to register a new TOTP Authenticator.
Information
Check device information
When the user clicks on device information such as password, SMS, email, SingleID Authenticator, Nox Messenger, Passkey, a popup displays detailed information.
Device Information popup displays ’type’, ‘OS version’, ‘browser’, ‘IP’, etc.
Administrator authentication
Authenticate
In the SingleID service, the administrator provides authentication by delegating identity verification on behalf of the user.
To perform administrator authentication, follow the steps below.
- At the bottom of the screen in the Identity verification selection method, “If you cannot complete identity verification, you can request verification from the administrator.” 1. Click here.
- Click the Request button.
- You will be taken to the admin selection screen. 3. Select the administrator who requested authentication delegation and click the Request button.
- Authentication delegation is requested for the selected administrator.
- When the administrator approves the authentication delegation, it is completed automatically.
Information
On the administrator selection screen, if the administrator is not assigned or has not registered a SingleID authenticator, a ‘Administrator Not Assigned’ screen appears.
Information
At the bottom **If you cannot complete identity verification, you can request verification from an administrator. If there is no “Click here” text
The administrator has disabled the admin authentication delegation feature by policy. Please contact the administrator.
6.2.1.1.4 - Sign up
Sign Up
According to internal company policy, users who are not employees—such as partners, subsidiaries, and customers—can create an account through a separate registration.
Sign up via login page link
This is the method to register via the Sign Up link on the login page.
On the login page, at the bottom of the login, click Sign Up in the “If you don’t have an account, click Sign Up.” message. Click Sign Up.
Agree to terms
To sign up, you need to agree to the terms.
Enter information
Follow the steps below.
- Enter the email you want to register.
- After entering the email, click the Send OTP button and the OTP code will be sent.
- Enter the OTP code from the received email address and click the Confirm button.
- When you correctly enter the verification code, the Sign Up button becomes active.
- Click the Sign up button.
Enter information
Enter various personal information required for registration.
| Category | Explanation |
|---|---|
| ID | Enter the ID to register |
| Korean name | Enter a Korean name |
| English name | Enter English name |
| Enter phone number | Enter the registered country and mobile number |
| OTP code | Enter the received OTP code |
| Department | Enter department name |
| Language and Time Zone | User language and time zone settings |
Table. Personal Information Input Items
Information
The required information fields may vary depending on the company’s registration policy.
Sign up
After entering personal information, click the Sign Up button to complete the approval request. You can proceed to the next step after approval is complete. If the administrator’s approval is completed, you can log in by resetting your password.
Sign up via invitation email
You can sign up via an invitation email from the administrator. If you click the Sign Up button in the received email, you can sign up.
After that, the registration process is the same as sign up via login page link.
6.2.1.1.5 - Find ID and Reset Password
Find ID
If the user forgets their ID, click Find ID on the login screen.
Find ID using mobile phone number
The user can find their ID by entering their name and mobile phone number.
Please follow the procedure below.
- Click the Mobile tab.
- Please enter name.
- Please enter Surname.
- Please enter the Country code and phone number.
- Click the Send verification code button.
- On the authentication code entry screen, enter the received authentication code and click the Confirm button.
Reference
If there is no ID with the given information, a “ID not found.” message appears. If you want to search again, click the “Return to ID Search” button.
Password reset
Reset password
If the user wants to reset their password, click Password Reset at the bottom of the login screen.
Perform identity verification
To set a password, the user must first complete identity verification. When you click the Password Reset button, a Select Authentication Method screen appears according to the policy set by the administrator. For detailed information about authentication, see 인증 방식을 사용하여 로그인.
Password reset
After the user completes identity verification, they are taken to a screen where they can set a new password.
Passwords must be set according to the password pattern and complexity defined by the administrator’s policy. When the user enters a password, it is shown in green if it meets the conditions, and in red otherwise. Set the password so that all items turn green.
Reset the password as follows.
- Please enter a new password.
- If the newly entered password fails to meet even one of the complexity or pattern requirements set by the administrator, generate a more complex password.
- To prevent user input errors, please enter the same password again.
- Click the Change Password button.
When password setup is complete, click the Log in with password button to return to the login screen.
6.2.1.1.6 - Privacy Policy, Terms of Service, Service Desk
On the lower left of every screen, there are links to the Privacy Policy and Terms of Service, allowing users to view them at any time.
Privacy Policy
A Privacy Policy link is placed at the bottom left of every screen, allowing users to view the SingleID service’s privacy policy at any time.
To view the privacy policy, follow the steps below.
- Click the Privacy Policy at the bottom left of the screen. You can view the latest version of the privacy policy.
- If you want to view a previous version, select the desired version at the top to retrieve it.
Terms of Use
Place a Terms of Service link at the bottom left of every screen so that users can view the SingleID service terms at any time.
To review the terms of service, follow the steps below.
- Click the Terms of Service at the bottom left of the screen. You can view the latest version of the Terms of Service.
- If you want to view a previous version, select the desired version at the top to retrieve it.
Service Desk Information
If users have inquiries about SingleID, they can contact using the Service Desk phone number and the main email address at the bottom of the screen.
6.2.1.1.7 - PC SSO Agent
SingleID PC SSO Agent provides integrated SSO authentication services in a Windows Desktop environment.
SingleID PC SSO Agent provides the following functions.
- Integrated SSO and login/logout across web browsers
- PC device authentication
- Essential security software installation verification feature (SingleID administrator setting)
guide
The SingleID PC SSO Agent may not be used depending on the administrator’s settings. (Agentless operation)
Reference
Recommended installation environment for PC SSO Agent
- Windows Desktop 10 and 11 (x86 and x64 CPU Only)
- Web Browser: Microsoft Edge 88.x or later, Chrome 87.x or later
- .NET Framework 4.0 or later
- Disk Capacity 100MB or more
Check whether PC SSO Agent is installed
If the administrator has set a policy to use the PC SSO Agent, SingleID automatically checks whether the SingleID SSO Agent is installed on the user’s PC as follows.
- After the user logs in with SingleID, it automatically checks whether the PC SSO Agent is installed.
- If the PC SSO Agent is installed on the user’s PC, it automatically proceeds to the next screen; otherwise, it automatically redirects to the installation prompt screen.
- If the installation prompt does not appear automatically, click the Next button to install the PC SSO Agent.
Using the download link for the SSO Agent installation
PC SSO Agent installation prompt screen: Click the ‘Download’ button to download the Agent program to your PC and install it.
Install SingleID PC SSO Agent
If you download the SingleID Agent.exe file to the PC and install it correctly, a tray labeled ‘ID’ will appear in the lower‑right corner of the PC’s tray. If the PC SSO Agent is installed correctly and SSO authentication succeeds, right‑click and click “View Status” to verify that it operates normally.
guide
If the installation does not proceed smoothly, remove the app named SingleIdAgent from the list of previously installed apps and reinstall it.
Re-authentication attempt
After installing the PC SSO Agent, you can either log in again from the beginning, or click the re-authenticate button at the bottom of the screen below to retry authentication using the Agent.
guide
The SingleID PC SSO Agent performs a unified logout of Chrome and Edge browsers upon logout.
6.2.1.1.8 - My App
Recently used apps
When a user logs into the User Portal, the first thing they see is the My Apps menu. The left menu bar can be expanded or collapsed by clicking the arrow(→) icon at the bottom left.
When you click the My App menu, three submenus that are provided by default and cannot be edited will appear.
- Recently used apps
- Bookmark
- Default app
Among these, clicking Recent Apps will display the apps the user has recently used. Recent apps are shown up to a maximum of 12.
Bookmark
My Apps menu, when you click the Bookmark menu, the apps you have bookmarked are displayed. You can conveniently use frequently used apps by bookmarking them. You can add a bookmark by clicking the bookmark button at the lower right of the app card, and clicking it again will remove the bookmark. Up to 12 bookmarks are allowed.
Add/Delete Bookmark
If you click the Bookmark icon at the lower right of the app you want to add, it will be added to Bookmark. Clicking it once more will delete the bookmark.
Default App
The default app menu displays all apps available to the logged-in user. When the user clicks an app, they are authenticated via SSO and the app launches in a new browser window. If a disabled app is clicked, a popup appears indicating that the app is disabled.
Add Category
The user can click the Add Category button to create a category with a name of their choice and manage the app.
- After clicking the Add Category button, enter the category name and click the Check button.
- After adding a category, the user can click the More button located to the right of the category to move, edit, or delete the category.
If you delete a category while it contains apps, the remaining apps are moved to the Default App category.
6.2.1.1.9 - App Catalog
Using the App Catalog
When you click the app catalog menu, the list of apps that are pending approval is displayed by default.
The app catalog can be viewed as a list of apps in three states.
- Unused: state where a usage request can be made
- Pending Approval: The usage request has been completed and is awaiting approval.
- In Use: The usage request has been approved and is currently in use.
If an app in an unused state does not have a request button, the user cannot request it themselves due to company policy. Please contact the administrator if you wish to use it.
Request App Usage
To request usage of an unused app, the user clicks the Request button, enters the purpose for using the app, and then clicks the Request button.
The app usage approval process may vary depending on the administrator’s settings. By default, the approver list configured by the administrator is displayed, and if multiple approvers exist, the outcome is determined by whichever approver processes the approval or rejection first.
Once the app usage request is completed, you can view the request status from the two menus.
- You can check the status in the App Catalog > Pending Approval state.
- You can view the detailed information in App Usage Approval > My Requests.
In the My Requests list, click the App to view details, and when pending approval, you can cancel the request using the Cancel Request button.
6.2.1.1.10 - Notification
Notification
Click the notification menu to view the list of notifications. There are two types of notifications.
- Urgent: Tenant administrators post urgent notices that users can view before logging in, regardless of the user’s login status, such as urgent alerts (system outages, etc.)
- General: All notifications that are not emergency alerts, which the user can view in the Notifications menu after logging in.
Notifications menu, when clicked, is set by default to All status, so both urgent and regular notifications are shown. If there are unread notifications, they appear as a number next to the notification menu, and because they are marked with a red dot in the list, unread notifications can be easily recognized. If you click this notification, you can view the details.
| Name | Explanation |
|---|---|
| type | This is the type of notice. It is divided into urgent and normal. |
| Title | This is a notice title. |
| Start date and time | The start date and time of the notice posting. |
| End time | The end date and time of the notice posting. |
Table. Notification List
Approval request
When you click the approval request menu, the administrator can view and cancel all users’ approval requests.
Approval requests consist of the Approval Request List and Approval Request Queue tabs.
Approval request list
There are several types of approval request statuses. You can easily filter and view using the Approval Request, Approved, Rejected, Cancel Submission buttons at the top. If you want an advanced search, you can use the advanced search in the search bar at the top right.
- Approval Request: Shows the status of all approval requests.
- Approval: Shows all approved statuses.
- Rejected: Shows approval request items that have been rejected.
- Submission Cancellation: Displays approval requests that have been cancelled after submission.
The description of the approval request list items is as follows.
| Name | Explanation |
|---|---|
| Approval System | It shows the approval system according to the approval policy. You can verify which approval system was used for the request. Please refer to Policy > Approval Policy. |
| Title | This is a notice title. |
| Start date and time | The start date and time of the notice posting. |
| End time | The end date and time of the notice posting. |
Table. Notification List
6.2.1.1.11 - Approval Request
Request approval
The app usage approval menu provides two functions.
- My Request Tab: A list of apps I have requested to use is displayed.
- Approval List Tab: Displays the list of app usage requests submitted to me.
Request App Usage
To request usage of an unused app, the user clicks the Request button, enters the purpose for using the app, and then clicks the Request button again. The app usage approval process may vary by company.
By default, the list of approvers set by the tenant administrator is displayed, and when multiple approvers exist, it is determined by the result of the first approval or rejection.
Once the app usage request is completed, you can view the request status in both menus.
- You can check the status from the App Catalog > Pending Approval status.
- In Approval Request > My Requests, you can view the details and perform additional actions.
My request
In the My Requests list, you can click an app to view its details, and when the request is pending approval, you can cancel it using the Cancel Request button.
When usage approval is completed, the status item in my request list will change to Approved. If you click Approved App in the list, you can view the detailed usage approval information.
Approval List
If you are the app usage approver, please click the Approval List tab.
- If the user has a pending approval request for app usage, you can see that the status column in the list shows Pending Approval.
Click the relevant list to view the details of the approval request.
After reviewing the details and leaving the approver’s comments, click the Approve button to grant the requester permission to use the app.
You can confirm that the status item has been changed to Approved in the Approval List tab.
By clicking the app in the list, you can also view the detailed information of the approval history that the user approved as an approver.
Approval List
If you are the app usage approver, please click the Approval List tab.
- If the user is in a state where approval for app usage has been requested, you can see that the status item in the list is displayed as Pending Approval.
Click the relevant list to view the details of the approval request.
After reviewing the details and leaving the approver’s comments, click the Approve button to allow the requester to use the app.
You can confirm that the status item has been changed to Approved in the Approval List tab.
By clicking the app in the list, you can also view the detailed information of the approval history that the user approved as an approver.
6.2.1.1.12 - Personal Profile
Configure Privacy Settings
This is a menu for user settings.
To set your privacy settings, follow these steps.
- Click the Personal Profile > Personal Information setting at the top right of the screen.
- You can view the photo, name, email, phone number, language, and time zone.
- Image: Image > Image Click Change to upload the icon image you want to display.
- Language: Choose your desired language in Korean or English.
- Language/Time Zone: Please select the time zone you are currently in. Click the City Search button to open the city search popup. Search for the desired city in English and select it.
- Click the Save button at the bottom of the screen to save.
Reference
If you click the Delete button at the lower left of the privacy screen, you can delete the current user account.
Since withdrawing will delete the user’s account, please only withdraw when you truly intend to delete it.
Configure Authentication
You can register a user’s authentication tool and set a preferred authentication tool.
To configure authentication, follow these steps.
- Click the Personal Profile > Authentication setting at the top right of the screen.
- Click the +Add New button to add using the authentication tool you prefer.
- Click the Delete button to delete authentication tools you do not wish to use.
- ☆ Click the icon to set your preferred authentication method.
Reference
Please refer to Register Authentication Tools for how users register or delete authentication tools.
Change Password
In the authentication settings, click Change Password to change your password after completing the identity verification process.
Check login history
You can view the user’s login history and environment.
To view a user’s login history/environment, follow these steps.
- Click Personal Profile > Login History/Environment at the top right of the screen.
- Login History tab allows you to view information such as login date and time, location, country, city, IP address, OS type, browser type, detection status, and result.
- In the Login Environment tab, you can view details of any registered login environments, and if an environment is no longer used, you can delete it using the ‘Delete’ button.
guide
Check the country ISO codes at the link below.
ISO 3166 - Wikipedia, the encyclopedia for everyone Please refer to the page.
ISO 3166 - Wikipedia, the encyclopedia for everyone Please refer to the page.
guide
When using the SingleID ADM(Anomaly Detection Management) feature, the detection items will display Normal or Detected.
This item is a login record where abnormal authentication activity was detected.
This item is a login record where abnormal authentication activity was detected.
Log out
Click the photo icon located at the top right of the screen and then click Logout.
When you click the Logout button, all applications visited through SingleID are logged out simultaneously, and if integrated logout is configured via the PC SSO Agent, logout also proceeds in the associated browsers.
6.2.1.2 - Admin Portal
SingleID not only enables authorized users to easily access information assets with a single authentication, but also strengthens account security through policy‑based permission management and real‑time detection of abnormal authentication behavior, and provides account management and access frameworks through various audit logs.
All authentication services and account management services of organizations using SingleID, as well as the establishment and configuration of security policies, are managed through the Admin Portal.
A user who can access the Admin Portal to configure and manage the system is called an administrator, and through the Admin Portal’s management functions they can integrate the organization’s business systems without restriction and define security policies for accessing each business system.
The administrative functions provided by the Admin Portal are as follows.
| function | Explanation |
|---|---|
| Notification Management | Through the user portal, you can register posts to announce to the organization’s users and manage posting periods and other settings. If there is urgent information related to system usage, you can post the content on the login screen so that even users who are not logged in can view it. |
| Application Integration Management | It connects the organization’s internal business systems or cloud‑based business systems. You can configure it to use standard protocols such as SAML or OIDC for authentication integration, or use the SCIM protocol to import information such as accounts and groups into SingleID or export them through SingleID. |
| Identity Provider Integration Management | If an integrated authentication environment is already established within the organization, you can register that system as an Identity Provider so that applications linked by SingleID can be used without re-authenticating through SingleID. Authentication integration with any Identity Providers that use standard protocols such as SAML or OIDC is possible. |
| Authenticator Management | You can add and manage Authenticators to configure user identity verification or multi-factor authentication. Adding a desktop Authenticator such as PC SSO Agent enables multi-browser SSO. |
| MFA Service Provider Integration Management | If you want to enhance security when accessing business systems while using an already configured in‑organization authentication system, you can connect the business system to an MFA Consumer Provider and add only the multi‑factor authentication function to the system. By linking the system to an MFA Consumer Provider, you can configure the authentication environment to perform second‑factor authentication using the Authenticators added to SingleID. |
| User Management | You can view and edit all users registered in the organization, delete users, or directly add new users. You can also change a user’s group membership or assign permissions so the user can use the application. |
| Group Management | You can view and edit all groups registered in the organization, delete groups, or register new groups. You can also modify a group’s membership rules or assign permissions so that group members can use the application. |
| Login Policy Management | You can set detailed policies specifying which authentication methods can be used when a user logs in with SingleID, and, if needed, create and manage condition-based authentication policies for users authenticating in specific environments. |
| Authentication Policy Management | According to the organization’s security policy, detailed authentication settings can be configured in the following four categories: Session policy, Authenticator policy, MFA Service Provider policy, Password policy |
| Anomaly Detection Policy Management | SingleID collects and analyzes user behavior information before and after authentication in real time to determine whether there are abnormal authentication activities, and provides a function that immediately notifies the user of risk when identified as belonging to an abnormal authentication category. Tenant administrators can manage detailed settings of policies for abnormal behavior detection and decide whether each policy is enabled or disabled. |
| Terms and Conditions Management | Use the provided templates to register privacy policies, terms of service, usage conditions, and other documents that fit the organization’s needs, then notify users and obtain their consent. |
| SMS Settings | SingleID issues an OTP via SMS for identity verification and authentication. In the SMS settings, you can configure and set the SMS messages sent by SingleID. |
Table. Features provided by the Admin Portal
If you are using SingleID for the first time, you can set up the basic environment by configuring the features in the following order.
- Register additional administrator (User Registration)
- User synchronization through application integration (Application Registration)
- Synchronized User Management (User)
- Group configuration (그룹)
- Business application integration (애플리케이션 등록)
- SMS Settings (SMS Service Settings)
- Register Authenticator (Add Authenticator)
- Login policy configuration (로그인 정책)
- Authentication policy configuration (Authentication policy)
The supported SingleID connection environment and recommended specifications are as follows.
| Category | Support | Recommended |
|---|---|---|
| PC | Windows : Windows Desktop 10 and 11 (x86 and x64 CPU Only)
| Windows : Windows Desktop 10 and 11 (x86 and x64 CPU Only)
|
| Moblie(Android) | Android : 8 and later versions
| Android : 8 and later versions
|
| Moblie(iOS) | iOS : 16 ,17
| iOS : 16 ,17
|
Table. SingleID connection environment support scope and recommended specifications
6.2.1.2.1 - Dashboard
The dashboard is an integrated management screen provided in the Admin Portal so that administrators can view and perform key management tasks such as notifications, approval requests, and member registrations at a glance. Each function is separated into its own tab, and users can easily perform actions such as viewing, searching, registering, editing, and deleting items as needed.
Notification
Ilrim is a feature that can deliver and share important notifications related to SingleID usage with users.
Administrators can register and manage notifications through the notifications menu. The administrator selects the notification type (normal/urgent) based on the notification content and priority, and when a notification is created, the user can receive the notification before login (urgent) or after login (normal/urgent).
Administrators can register and manage notifications to be delivered to users. There are two types of notifications, presented as follows.
| type | Explanation |
|---|---|
| General | You can create and deliver general notices to users. Users can view general notifications in the User Portal > Notifications menu. |
| Urgent | You can create and deliver urgent notices to users. Users can view urgent alerts in a popup window on the login page. |
Table. Notification Type
List
To view the notification list, access the menu as follows.
- Admin Portal > Dashboard > Notifications
| Category | Explanation |
|---|---|
| type | This is the type of notification.
|
| Title | This is the title of the notification. |
| Period | This is the period for announcing the notification. |
| Registrant | The name of the registered administrator. |
| Registration Date | The date of initial registration. |
| Modifier | Edited administrator name. |
| Modified Date | This is the date of the final modification. |
| All button | Both regular notifications and urgent notifications can be viewed in the list. |
| General button | Only regular notifications can be viewed in the list. |
| Emergency button | Only emergency alerts can be viewed in the list. |
| Search input field | Notification list can be searched. After entering a search term, click the magnifying glass icon or press Enter to perform the search. - Searchable items: Title, Creator, Modifier ※ Exact match search is possible using “full name,” “first name,” or “last name” for encrypted personal data. |
| Details button | You can perform detailed searches. Search conditions can be combined with AND. After entering multiple fields, click the Search button to retrieve results that match the criteria.
|
| Register button | You can register a new notification. |
Table. List
Register notification
To register a notification, follow the steps below.
- Admin Portal > Dashboard > Notifications Click the menu.
- Click the Register button to go to the notification registration page.
- Verify the input fields below, then select and enter the detailed information.
- Click the Save button.
- Check the notifications registered in the list.
| Category | Required status | Explanation |
|---|---|---|
| type | Required | Select notification type “Normal”, “Urgent” |
| Period | Required | Set notification posting period “Start date~End date” |
| language | Required | Select notification language (activates the “Language” tab based on the selected language) |
| Title | Required | Notification Title |
| Content | Required | Write notification content |
Table. Alarm registration
Reference
If you exceed the maximum number of characters that can be entered, an error message will be displayed.
All required fields must be entered in every active tab. Cancel button, when clicked, navigates to the notification list screen without saving data.
Edit notification
To edit the notification, follow the steps below.
- Click the Admin Portal > Dashboard > Notifications menu.
- Select the notification that needs editing, and click the Edit button at the bottom of the screen.
- After editing the field you want to modify, click the Save button.
- Check the edited notifications in the list.
Delete notification
To delete the notification, follow the steps below.
- Admin Portal > Dashboard > Notifications Click the menu.
- Select the notifications you want to delete, and click the Delete button at the top right of the screen.
- A notification deletion popup appears.
- When you click the Confirm button, the notification is deleted.
Approval request
When you click the Approval Request menu, the administrator can view and cancel all users’ approval requests.
Approval requests consist of the Approval Request List and Approval Request Queue tabs.
Approval request list
If you click the Approval Request List tab, you can view all approval requests.
There are four types of approval request statuses. You can easily filter and view using the Approval Request, Approve, Reject, Cancel Submission buttons at the top. If you want an advanced search, you can use the advanced search in the search bar at the top right.
- Approval Request: Shows the status of all approval requests.
- Approval: Shows all approved statuses.
- Rejected: Shows approval request items that have been rejected.
- Submission Cancel: Shows approval request items whose submission was cancelled.
The description of the approval request list items is as follows.
| Name | Explanation |
|---|---|
| Approval system | It shows the approval system according to the payment approval policy. You can verify which approval system the request was made through. policy > Please refer to the approval policy. |
| type | These are types of approval requests. App Access, Sign‑up, Usage Period types are available. - App Access: This is the type for application access requests. - Sign‑up: This is the type for sign‑up requests during registration. - Usage Period: This is the approval request used when extending an account’s usage period before expiration. |
| Title | Approval Request Title. |
| Requester | I am the approval requester. |
| Recent update date | This is the update date of the recent approval list. |
| Request date and time | This is the initial approval request date and time. |
| status | Indicates the status of the approval request. It corresponds to the button at the top. |
Table. Approval Request List
View and cancel approval requests
When you click the approval request list, the information for that approval request appears in a popup.
View approval request list
A list of all approval requests is displayed.
To view the details of an approval request, click the item and the information will appear in a popup.
| Name | Explanation |
|---|---|
| Title | Approval request title. |
| Approval system | It represents the approval system based on the approval policy. You can verify which approval system the request was made through. policy > Please refer to the Approval Policy. |
| status | Indicates the result of processing the approval request. |
| Request date | This is the initial approval request date and time. |
| Last modified date | This is the latest modification date for the approval request. |
| Requester | Information of the approval requester. ID, name, and organization/department details are displayed. |
| Approver | This is the approver’s information. ID, name, organization/department, task, and date information are displayed. |
| Notifier | This is the notifier’s information. ID, name, organization/department, and date information are displayed. |
Table. View approval request list
Reference
If an approval request has not yet been completed, it can be canceled through the Cancel Request button when deemed necessary by the administrator.
Approval request queue
If you click the Approval Request Queue tab, you can view all pending approval requests and delete them by selecting all or selecting specific items. Through detailed search, if the requester has left the company or the approver is absent, the administrator can arbitrarily cancel (delete) the approval request.
Delete approval request
To delete the approval request, follow the steps below.
- Please check (v) the left selection box in the list.
- The Delete button is activated at the top of the list. 2. Click the Delete button.
- Request Delete Popup appears. 3. Delete button, click it.
- The selected approval request(s) have been deleted from the list.
Sign up
When you click the Sign Up menu, the list of sign‑up requests appears.
Sign-up request
When you click the sign‑up request tab, the list of sign‑up requests appears.
There are four types of approval request statuses. You can easily filter and view using the Approval Request, Approved, Rejected, Cancel Submission buttons at the top. If you want an advanced search, you can use the advanced search in the search bar at the top right.
- Approval Request: Shows the status of all approval requests.
- Approval: Shows all approved statuses.
- Rejected: Shows approval request items that have been rejected.
- Submission Cancelled: Shows approval requests where the submission has been cancelled.
| Name | Explanation |
|---|---|
| type | These are the types of approval requests. General, IdP* types are available. - General: When the request is submitted through the sign‑up on the login page or a separate sign‑up page - Idp: When the sign‑up is requested via an Identity Provider |
| Approval system | It shows the approval system according to the approval policy. You can verify which approval system was used for the request. Please refer to the Policy > Approval Policy. |
| Requester | I am the approval requester. |
| Name | Requester name. Exact match search is possible using encrypted personal data such as ‘full name’, ‘first name’, or ’last name’. |
| This is the requester’s email address. Because it is encrypted personal data, you can perform an exact match search using the full email address or the part before the ‘@’. | |
| mobile | This is the requester’s mobile number. Since it is encrypted personal data, an exact match search using the last four digits of the phone number is possible. |
| status | Indicates the status of the approval request. It corresponds to the button at the top. |
| Registration Date | This is the sign-up registration date. |
| Modified date | This is the recent modification date and time. |
Table. Approval Request List
Sign-up email invitation
An email invitation for account registration is a method where the administrator sends an invitation email to the desired user’s email address, allowing them to sign up. You can send up to 50 invitation emails at a time.
If you want to send an invitation email, follow the steps below.
- Dashboard > Sign Up > Sign Up Email Invitation Click the tab.
- Click the Send Invitation Email button at the top right.
- Send Invitation Email Popup appears.
- Enter the email address to invite in the email field, and click the Add button.
- A group is selected to be automatically assigned when a recipient joins the group field. (If not set, the group remains unspecified)
- Click the Invite button at the bottom right of the popup.
- An invitation email will be sent to the specified email address.
Reference
Refer to the Policy > Sign‑up Policy menu for detailed sign‑up policies.
6.2.1.2.2 - Integration
Integration is a service that configures and manages authentication services and account information for various applications.
In SCP SingleID, we support integration with new applications through customized authentication integration and account provisioning services, as well as the DIY (Do-It-Yourself) feature.
Through the integration menu, it provides integration management functions such as Application, Identity Provider, Authenticator, MFA Service Provider.
Application
The application management feature enables administrators to register, modify, and delete various SAML·OIDC·SCIM integrated applications, as well as assign users and groups and configure policies all in one place.
Application List
Administrators can select a registered application on the application list screen to edit, delete, sort, search, and so on, and can navigate to a menu screen where they can register a new application.
To view the list of applications, access the menu as follows.
- Admin Portal > Integration > Application
| Category | Explanation |
|---|---|
| name | This is the name of the application. It can be entered when creating the application. |
| type | Application integration protocols are classified as SAML, OIDC, and SCIM. |
| Screen display | This is an item displayed in the User Portal application list.
|
| status | Application status. Distinguished as active or inactive.
|
| All button | Displays both active and inactive applications in the list. |
| Active button | Only active applications are displayed in the list. |
| Disabled button | Only inactive applications are displayed in the list. |
| Search term input field | You can search the application list. After entering a search term, click the magnifying glass icon or press Enter to perform the search.
|
| Details button | You can perform detailed searches. Search criteria can be combined using AND conditions. After entering multiple fields, clicking the ‘Search’ button performs a search that matches the criteria.
|
| Download button | SAML metadata download is available. You can download SAML metadata files from the internal network and the internet. |
| Register button | You can register a new application. |
Table. Application List
Application registration
The administrator can register the application by clicking the Register button on the list screen.
Application registration can be done using two methods: Custom App Integration and Pre-Built App Integration.
To register an application, access the menu as follows.
- Admin Portal > Integration > Application > Register Click button
- Custom App Integration or Pre-Built App Integration Select Tab
Custom App Integration
Custom App Integration registration is a connection menu for authenticating the application you wish to integrate and distributing accounts.
We offer three types of connection functions as follows.
When registering an application by linking authentication, you provide and select the type (SAML, OIDC) according to the standard authentication integration method.
When registering an application by linking account provisioning, we provide the standard online API method (SCIM).
Reference
The integration features provided by SingleID can be categorized as follows, and the information input and configuration steps vary depending on the required integration scope. When configuring the standard authentication integration methods SAML and OIDC, if you do not select account provisioning, the attribute linking step is omitted, shortening the registration process.
| Standard protocol | Authentication integration, account deployment integration | Authentication integration | Account deployment integration |
|---|---|---|---|
| SAML | ○ | ○ | - |
| OIDC | ○ | ○ | - |
| SCIM | - | - | ○ |
Table. Standard protocol
To register the application Custom App Integration, follow the steps below.
- Admin Portal > Integration > Application > Register Click the button
- Custom App Integration > Web Application(SAML) orWeb Application(OIDC) or Identity Provisioning(SCIM v2.0) Select > Next Click the button
- Go to detailed settings
You can register an application by entering and configuring the information required for integration through a six-step screen as shown below.
Applications using standard protocols (SAML, OIDC, SCIM) can register information and configure policies and attributes through a screen consisting of the following six steps.
General
Enter the general application information by referring to the following.
| Category | Explanation | Whether required |
|---|---|---|
| name | Enter the application name. | Required |
| Explanation | Enter a description for the application. | Select |
| Logo image | Register the logo. (File upload or URL link) | Select |
| Screen display | Displayed to the user in the User Portal. | Select |
| Access URL | Enter the application access URL. | Required |
| Automatic logout | Configure automatic logout according to the session policy. | Select |
| Automatic redirection | Set to automatically redirect to the Service Provider after logout. | Select |
| URL after logout | Enter the URL address to navigate to on logout (if not entered, use Access URL) | Select |
Table. Application General Information
Reference
Delete Application
If you want to delete, select the checkbox ([V]) and click the Delete button at the top of the list.
SSO
Enter the Single Sign On configuration information on the SSO information entry screen.
| Category | Explanation | Required status |
|---|---|---|
| Issuer | Enter the SP’s unique identifier value. | Required |
| Single Sign-On URL | Enter the full URL for login. | Required |
| Logout URL | Enter SLO Return URL. | Select |
| Logout method | Provides Back-Channel Logout, Front-Channel Logout (HTTP Redirect Binding), and Front-Channel Logout (HTTP POST Binding). | Required |
| Response Signing | SAML Response signature setting. | Select |
| Validation On-Request | This is the setting to enable or disable Signature Validation. | Select |
| Encryption | This is the setting for enabling encryption. | Select |
| Application Certificate | Certificate registration (PEM format) | Required |
| Attribute to map during SSO | Select SSO connection attribute information and set unique values. | Required |
| ‘Import metadata file’ button | Provides SAML metadata file upload functionality.(Identifies IdP endpoint and certificate) | Select |
Table. SSO Information
Reference
Single Sign-On configuration
- If you select either Validation On Request or Encryption, you must register a certificate. * (Register the certificate value exported as plain text)
- Attribute to map during SSO: Click Add to select attribute information provided by SingleID. * You must select a unique value for user identification among the selected attributes.
- To deliver SingleID attribute information to the connected target application, you can align the SingleID attribute name with the attribute name used in the application and transmit it. * The information exchanged during authentication is referred to as claim information, and the received data is used by the SP to configure permissions or as attribute information for operation and management.
Provisioning
The Provisioning menu is an account management feature that can distribute user information to applications for synchronization. SingleID provides global standard API specifications such as SCIM and REST.
Enter the configuration information for account information distribution on the Provisioning information input screen.
| Category | Explanation | Required status |
|---|---|---|
| Provisioning Configuration | To use account information synchronization, please click the On button. If you select Off, you can SKIP account synchronization. | Required |
| Base Address | Enter the Base Address(URL) that defines the Endpoint of the target system supporting the SCIM API. | Required |
| Accept | Enter the Accept information (e.g., application/json) used as the HTTP Accept Header value in SCIM REQUEST. | Required |
| Content Type | Enter the Content Type (e.g., application/json) used as the HTTP Content-Type header value for SCIM requests. | Required |
| User Name | Registers the User Name used for authentication to the target REST service. | Required |
| Password | Set the password used for authentication to the target REST service. | Required |
| Bearer Token | Register the Bearer Token used when calling the API (for authorization). | Select |
| Client ID | Register the Client ID. The Client ID is the identifier issued by the authorization server to a registered client, and because the Client ID itself is information disclosed to the resource owner, it must not be used alone for client authentication. | Select |
| Client Secret | Register the Client Secret information. The Client Secret is a secret generated by the authentication server, a unique value known only to the authentication server. | Select |
| Access Token Node ID | Register the Access Token Node ID. The Access Token Node ID is the Field ID of a JSON Object Node, which is returned from the target Access Token REST service and includes the token value. An Access Token is used to authorize access to resources. It is important that the resource server accepts only Access Tokens from the client. | Select |
| Access Token Base Address | Register the Access Token Base Address (URL) required to obtain an Access Token as the Base Address of the target REST service. | Selection |
| Access Token Content Type | Register the Access Token Content Type (e.g., application/x-www-form-urlencoded), which is the HTTP Content-Type header value of the target Access Token REST service. | Required |
| Provisioning | Select either a user or a group as the default provisioning target, and if needed, you can select both users and groups. | Select |
| Inbound Provisioning Schedule | Click On to register periodically (hour, day, month, year) via the Inbound Provisioning Schedule. | Select |
| Outbound Provisioning Schedule | You can click On to register an Outbound Provisioning Schedule. Clicking OFF allows real-time deployment. | Select |
Table. Enter provisioning information
Reference
If you select “Off” for Provisioning Configuration, the Provisioning and Profile stages are omitted, and the application registration is configured to use only the Authentication Service, completing the setup.
Profile
On the profile information entry screen, enter the configuration settings for User/Group for deployment.
| Category | Explanation | Required status |
|---|---|---|
| Profile name | Enter the profile name. | Required |
| Explanation | Register a description for the profile. | Select |
| Attribute | Click Add to select and enter the attribute information. | Select |
Table. Enter profile information
guide
Profile Mapping
- In the tab menu where you select the provisioning target, click User, Group to add properties.
- Click Profile Mapping to align and connect the required information in the target application based on the SCIM schema information.
- Provides a feature that allows you to configure an execution script (a conversion script based on the JEXL standard script) capable of performing conversion in real time when running provisioning. Note that it executes exactly as entered, without any validation checks.
After entering all items, click the Complete button to complete the basic application settings. When you complete registering a new application, it is added to the application list, and new tabs called Policy, Assignment are created.
Policy
You can configure login policy and access control information for application policy settings.
| Category | Explanation | Required status |
|---|---|---|
| Login Policy | Configure the login policy applied when logging into the application. To set it, please assign the application in the login policy. | Select |
| Access control | This setting controls the user’s access to the app. When enabled, you can configure whether to request permission to access the application and whether approval is granted. | Select |
Table. Policy Settings
Allocation
Register information for assigning application users based on users and groups. This menu assigns access permissions by configuring the users and groups that can access the registered application.
To assign a user, follow the steps below.
- When you click the application, you will be taken to the application’s detail page.
- Click the Assign tab and then click the User tab > Assign button.
- User Assignment popup appears, select the user to assign, and click the Assign button.
- In the Assignment tab, the selected user appears in the list.
Caution
Similarly, on the Group tab, you can assign a predefined group via the Assign button. Assign the group using the same method.
Group Settings
- When configuring the groups that can access the application, set it to include information that defines and distinguishes specific groups.
- You must define rules and groups in advance so that you can manage access permissions with member rules that can distinguish groups.
Reference
Application State
Activation (Active): It exposes the application on the User Portal, and by configuring Sign-On services, provisioning, policies, etc., puts the application in a state where users can access and use it.
Inactive: Does not expose the application in the User Portal and is a state where the application can be deleted.
Delete: When deleting a registered application, caution is required. * Thus, we display a popup window to allow a second verification of the application’s information and status.
Pre-Built App Integration
Pre-Built App Integration menu provides a convenient way to quickly connect and use the desired SaaS application by pre‑preparing necessary settings such as connection information, name, icon, and other required configurations.
To integrate the application using Pre-Built App Integration, refer to the menu path below.
- Admin Portal > Integration > Application > Register > Pre-Built App Integration Click tab
- Select Application > Next button click
- Go to detailed settings
The Pre-Built App Integration menu, like the Custom App Integration menu, allows you to register an application by entering the required integration information and configuring it through a six-step screen as shown below.
The input items and methods for each step are the same, except for the information that has been predefined and entered for Pre‑Built.
- [General] {#general-1}
- [SSO] {#sso-1}
- [Provisioning] {#provisioning-1}
- [Profile]{#file-1}
- [Policy] {#policy-1}
- [Assignment] {#configuration}
General
Enter the general application information by referring to the following.
| Category | Explanation | Required status |
|---|---|---|
| Name | Enter the name of the application. | Required |
| Explanation | Enter a description of the application (e.g., tasks, purposes, etc.). | Select |
| logo image | Register a logo that intuitively identifies the application. Both file upload and URL link methods are available. | Select |
| Screen display | When selected, it is displayed to the user in the User Protal. | Select |
| Access URL | Enter the application’s Access URL. Enter the login page for the application you will access. | Required |
| Automatic logout | If selected, you will be automatically logged out according to the session policy without any reconfirmation when logging out. | Select |
| Automatic redirection | When selected, it redirects to the Service Provider without displaying the logout completion page. | Select |
| URL after logout | Enter the URL to navigate to when the user logs out. If left blank, it will be set to the Access URL. | Select |
Table. General
SSO
Enter the Single Sign On configuration information on the SSO information entry screen.
| Category | Explanation | Required status |
|---|---|---|
| Issuer | Enter the Issuer, which is the unique identifier of the SP (Service Provider) and the value verified by the Response Issuer. | Required |
| Single Sign-On URL | Enter the Single Sign-On URL, the full URL required when logging into the system. | Required |
| Logout URL | Enter the Logout URL, which is the URL value for SLO (Single Logout) Return. | Select |
| Logout method | The logout methods for SLO (Single Logout) Return are provided in three ways as follows.
| Required |
| Response Signing | Use Response Signing to sign the returned SAML Response after the authentication process. | Select |
| Validation On-Request | Check to use Signature Validation. | Select |
| Encryption | Select whether to apply encryption. | Select |
| Application Certificate | If you select either Validation On Request or Encryption, you must register a “certificate”. Please enter a valid value in PEM (Privacy-Enhanced Mail) format. | Required |
| Attribute to map during SSO | Select the attribute information required for SSO connection to set a unique value for user identification. ※ The ‘Next’ button becomes active only after selecting Subject Attribute. | Required |
| ‘Import Metadata File’ button | The SAML metadata file contains information about various SAML identity providers that can be used for SAML 2.0 protocol message exchanges. This metadata identifies the IdP endpoints and certificates to secure SAML 2.0 message exchanges. Click Import metadata file to upload a file. | Select |
Table. SSO information
Information
Single Sign-On Settings
- If you select either Validation On Request or Encryption, you must register a certificate. * (Register the certificate value exported as Plain Text)
- Attribute to map during SSO: Click Add to select attribute information provided by SingleID. * A unique value for user identification must be selected from the chosen attributes.
- To deliver SingleID attribute information to the connected target application, you can align the SingleID attribute name with the attribute name that will be mapped in the application and transmit it. * The information communicated during authentication is called claim information, and the received data is used by the SP to set permissions or as attribute information for operation and management.
Provisioning
The Provisioning menu is an account management feature that can distribute user information to applications for synchronization. SingleID provides global standard API specifications such as SCIM and REST.
Enter the configuration settings for distributing account information on the Provisioning information input screen.
| Category | Explanation | Required status |
|---|---|---|
| Provisioning Configuration | To enable account information synchronization, click the ‘On’ button. Selecting ‘Off’ allows you to SKIP account synchronization. | Required |
| Base Address | Enter the Base Address(URL) that defines the Endpoint of the target system supporting the SCIM API. | Required |
| Accept | Enter the Accept information (e.g., application/json) that is the HTTP Accept Header value used in SCIM REQUEST. | Required |
| Content Type | Enter the Content Type (e.g., application/json) used as the HTTP Content-Type header value for SCIM requests. | Required |
| User Name | Registers the User Name used for authentication to the target REST service. | Required |
| Password | Set the password used for authentication to the target REST service. | Required |
| Bearer Token | Register the Bearer Token used when calling the API (for authorization). | Select |
| Client ID | Register the Client ID. The Client ID is an ID issued by the authorization server to a registered Client, and because the Client ID itself is information disclosed to the resource owner, it must not be used alone for Client authentication. | Select |
| Client Secret | Register the Client Secret information. The Client Secret is a secret generated by the authentication server, a unique value known only to the authentication server. | Select |
| Access Token Node ID | Register the Access Token Node ID. The Access Token Node ID is the Field ID of a JSON Object Node, received from the target Access Token REST service, and includes the token value. An Access Token is used to authorize access to resources. It is important that the resource server accepts only Access Tokens from the client. | Select |
| Access Token Base Address | Register the Access Token Base Address (URL) required to obtain an Access Token as the Base Address of the target REST service. | Select |
| Access Token Content Type | Register the Access Token Content Type (e.g., application/x-www-form-urlencoded), which is the HTTP Content-Type header value of the target Access Token REST service. | Required |
| Provisioning | Select either a user or a group as the default provisioning target, and if needed, you can select both users and groups. | Select |
| Inbound Provisioning Schedule | Click On to register periodically (hour, day, month, year) through the Inbound Provisioning Schedule. | Select |
| Outbound Provisioning Schedule | Click On to register an Outbound Provisioning Schedule. Click OFF to deploy in real time. | Select |
Table. Provisioning information
Reference
If you select “Off” for Provisioning Configuration, the Provisioning and profile stages are omitted, and the application registration is set to use only the authentication service, completing the process.
Profile
On the profile information entry screen, enter the user/group settings for deployment.
| Category | Explanation | Required status |
|---|---|---|
| Profile name | Enter the profile name. | Required |
| Explanation | Register a description for the profile. | Required |
| Attribute | Click Add to select and enter the attribute information. | Required |
Table. Profile
Information
Profile Mapping
- In the tab menu where you select the provisioning target, click User, Group to add properties.
- Click Profile Mapping to align and connect the required information in the target application based on the SCIM schema information.
- Provides the ability to configure an execution script (written as a conversion script based on the JEXL standard script) that can perform real-time conversion when running provisioning.
However, it processes input exactly as received without validation checks.
After filling in all fields, click the Complete button to finish the basic application setup. When you complete registering a new application, it is added to the application list, and new tabs called Policy, Assignment are created.
Policy
You can configure login policies and access control information for application policy settings.
| Category | Explanation | Required status |
|---|---|---|
| Login Policy | Configure the login policy applied when logging into the application. To set it, please assign the application in the ’login policy’ to be configured. | Select |
| Access control | This setting allows the user to control app access. When enabled, you can configure whether to request permission to access the application and whether approval is granted. | Select |
Table. Policy
Allocation Settings
Register information for assigning application users based on users and groups. This menu assigns access permissions by configuring the users and groups that can access the registered application.
To assign a user, follow the steps below.
- When you click the application, you will be taken to the application’s detail page.
- Click the Assign tab, then click the User tab > Assign button.
- User Assignment When the popup appears, select the user you want to assign, and click the Assign button.
- Assignment tab shows the selected user in the list.
Caution
Similarly, you can assign a predefined group via the Assign button in the Groups tab. Assign the group using the same method.
Group Settings
When configuring the groups that can access the application, set it to include information that defines and distinguishes specific groups. You must define rules and groups in advance so that you can manage access permissions with member rules that can distinguish groups.
Reference
Application State
- Activation(Active): Exposes the application on the User Portal and configures Sign-On services, provisioning, policies, etc., so that users can access and use the application.
- Inactive: The application is not exposed in the User Portal and can be deleted.
- Delete: When deleting a registered application, caution is required. * Thus, we display a popup window to allow a second verification of the application’s information and status.
Edit Application
From the list screen, you can modify the settings by clicking the application.
To modify the application, follow the steps below.
- Admin Portal > Integration > Select Application > Edit Click the button.
- General, SSO, Provisioning, Policies, Assignment, Aggregation, Permission items, Rebranding tab, click to edit the items you want to modify.
- Click the Save button.
Reference
For editing items of the General, SSO, Provisioning, Policy, Assignment tab, please refer to Application Registration.
Permission item
Permission items provide synchronization by linking the user roles of the integrated application with SingleID.
Register permission item
To configure permission items, follow the steps below.
- When you click the application, you will be taken to its detail page.
- Click the Assignment tab and then click the Permission Items tab > Register button.
- Permission item When the popup appears, you must register the permission item.
- Enter Name, Key, Display Name, Content and click Save to register the permission.
| Category | Explanation | Required status |
|---|---|---|
| Name | Enter the permission name. The permission name cannot be changed after it is registered. If you want to change it, you need to register a new one. | Required |
| key | Enter the authorization key. The authorization key cannot be changed after it is registered once. If you want to change it, you need to register a new one. | Select |
| Display name | Enter the permission display name. | Select |
| Explanation | Enter the permission description. | Select |
Table. Permission Registration
Reference
SSO, permission items, rebranding tab does not appear on the screen when integrated via the SCIM protocol.
Rebranding
A rebranding tab that does not appear during application registration is added. Rebranding of the application includes login page rebranding functionality when accessed as a separate application.
The included rebranding features are as follows.
- Favicon: The favicon can be modified in the browser.
- Header logo: The header logo on the login screen can be changed to the logo you want.
- Key visual image: The default key image on the login page can be modified.
- Sign‑up page redirection: Registration can be directed to a separate operational sign‑up page rather than SingleID’s sign‑up page.
- Privacy Policy Redirection: You can register the privacy policy URL used in the existing application.
- Terms of Service redirection: You can register the Terms of Service URL previously used in the existing application.
UI
From the list screen, click the application, then in the Rebranding tab, click the Edit button to configure application‑specific rebranding settings for the UI.
information
Clicking the temporary save button at the bottom right allows you to save the settings midway.
Change favicon
In the application, you can set a custom favicon to match the specific characteristics of the enterprise application.
To modify the favicon, follow the steps below.
- Click the Admin Portal > Integration > Select Application > UI > Edit button.
- Select custom in the Favicon item.
- Click the Favicon image (pencil shape) item, then click the favicon image.
- Upload an icon file or enter the icon image URL.
- Click the Save button and use the preview screen to confirm that the upload was successful. 6.Korean page Enter the title in Korean.
- English page Enter the title in English.
- Once the input is complete, use the preview on the right to confirm that it was entered correctly.
- Click the Publish button at the lower right corner.
Information
The recommended size for the favicon image is 256 × 256 px, and only ICO files are supported; please upload a file no larger than 2 MB.
Favicon images are applied only on PC screens.
Header logo change
In the application, you can configure separate header logo changes to match the characteristics of the corporate application.
To edit the header logo, follow the steps below.
- Admin Portal > Integration > Application Selection > UI > Edit Click the button.
- Select custom in the Header logo item.
- You can select and set a text logo or an image logo.
- Enter the Korean Redirect URL and the English Redirect URL.
- Once the input is complete, use the preview on the right to confirm that it was entered correctly.
- Click the Publish button at the lower right corner.
information
The recommended size for the header logo image is 288 × 72 px. Only PNG, JPG, and JPEG files are allowed, and please upload files no larger than 1 MB.
You can set a separate logo image for each language.
Key visual change
In the application, separate key visual changes can be configured to suit the characteristics of the corporate application.
To edit the key visual, follow the steps below.
- Admin Portal > Integration > Application Selection > UI > Edit Click the button.
- In the Key Visual item, select Custom.
- Click to use a single key visual for all languages and language-specific key visuals.
- If the image upload is complete, verify through the preview on the right that it was entered correctly.
- Click the Publish button at the lower right corner.
Information
The recommended size for the key visual image is 600 × 612 px. Only PNG, JPG, and JPEG files are allowed, and please upload files no larger than 1 MB.
Redirection
From the list screen, click the application, then in the Rebranding tab, click the Edit button to configure application‑specific rebranding settings for the redirect.
Information
Clicking the temporary save button at the lower right allows you to save the settings midway.
Sign up
Sign-up allows you to configure a registration link for each application.
| Category | Explanation |
|---|---|
| basic | We use the default registration provided by SingleID instead of a separate sign‑up page. The default settings can be configured in the registration policy. |
| User-defined | If you operate a separate sign‑up page, you can set a separate redirection link.
|
| Hidden | Select hidden if you do not accept separate registration. |
Table. Sign up
information
The login page design is displayed through the preview. You can click the Korean and English buttons to view previews for each language.
Privacy Policy
The privacy policy can be redirected to the URL link of the privacy policy provided for each application.
| Category | Explanation |
|---|---|
| basic | Set as the default privacy policy for SingleID. |
| User-defined | If you operate a separate application’s privacy policy, you can set a separate Redirection link.
|
Table. Privacy Policy
Terms of Use
The Terms of Service can be redirected to the privacy policy URL link provided for each application.
| Category | Explanation |
|---|---|
| basic | Set as SingleID default terms of service. |
| User-defined | If you operate terms of service for a separate application, you can set a separate Redirection link.
|
Table. Terms of Use
information
The login page design is displayed through the preview. You can click the Korean and English buttons to view previews for each language.
Reference
SSO, Permission Items, Rebranding tab is not displayed on the screen when integrated via the SCIM protocol.
Delete application
On the application list screen, select the application, deactivate it, then return to the list screen and you can delete it from the three‑dot menu.
Identity Provider
A menu for registering and managing IdPs that provide authentication services and credentials to SCP SingleID. At this point, the SCP SingleID acts as a Service Provider and receives authentication services from the IdP.
Identity Provider list
On the list screen, you can select a registered Identity Provider to edit/delete, sort, search, etc., and you can navigate to a menu screen where you can register a new Identity Provider.
To view the Identity Provider list, you can access the following menu.
- Admin Portal > Integration > Identity Provider
| Category | Explanation |
|---|---|
| Name | Identity Provider name. |
| type | Shows the standard protocols registered for the Identity Provider. Identity Provider types are categorized as SAML 2.0 and OIDC. |
| status | Displays the status of the Identity Provider. It is distinguished as active or inactive. |
| Active button | Only active Identity Providers are displayed in the list. |
| Disabled button | Only inactive Identity Providers are displayed in the list. |
| Search term input field | You can search the Identity Provider list. After entering a search term, click the magnifying glass icon or press Enter to perform the search. Searchable fields: name, description |
| Details button | You can perform detailed searches. Search criteria can be combined using AND conditions. After entering multiple fields, click the Search button to execute the search according to the criteria. Click the Reset button to clear all search fields. |
| Download button | SAML metadata download is available. You can download SAML metadata files from the internal network and the internet. |
| Register button | You can register a new application. |
Table. Identity Provider List
Reference
Identity Provider Delete
If you want to delete, select the checkbox (V) and click the Delete button at the top of the list.
Identity Provider registration
On the Identity Provider list screen, you can register by clicking Register at the top.
To register an Identity Provider, follow the steps below.
- Admin Portal > Integration > Identity Provider > Register Click the button
- Custom App Integration > Web Application(SAML) or Web Application(OIDC) Select > Next Click the button
- Go to detailed settings
You can register an Identity Provider by entering and configuring the required integration information through a three-step screen as follows.
- [General] {#General-2}
- [SSO] {#sso-2}
- [JIT provisioning] {#jit}
General
Enter general information for IdP (Identity Provider).
| Category | Explanation | Required status |
|---|---|---|
| Name | Enter the name of the Identity Provider. Since it is identified by its name, rules are needed for distinction and management. | Required |
| Explanation | Enter a description of the Identity Provider (including its functions, purposes, etc.). | Select |
| logo image | Register a logo that can intuitively identify the Identity Provider. | Select |
| Login button | Display the IdP as a button/link (text) etc.
| Required |
Table. Identity Provider General
SSO
Enter the Single Sign On configuration information on the SSO information entry screen.
When integrating with a Web Application (OIDC)
| Category | Explanation | Required status |
|---|---|---|
| Client ID | Register the Client ID. The Client ID is an ID issued by the authorization server to a registered Client, and because the Client ID itself is information disclosed to the resource owner, it must not be used alone for Client authentication. | Required |
| Client Secret | Register the Client Secret information. The Client Secret is a unique value known only to the authentication server, used as secret information when authenticating to the target REST service. | Required |
| Authorization Endpoint URL | The Authorization Endpoint must obtain authorization from the Resource Owner. Enter the Authorization Endpoint URL, which is the URL value used at this time. | Required |
| Token Endpoint URL | The Token Endpoint is used by the client and obtains an Access Token via an Authorization Grant or a Refresh Token. Enter the Token Endpoint URL, which is the URL value used at this time. | Required |
| Logout URL | Enter the Logout URL, which is the URL value for SLO (Single Logout) Return. | Select |
| Userinfo Endpoint URL | Enter the Userinfo Endpoint URL provided by the IdP (Identity Provider) that includes the user profile (username, name, etc.). | Select |
| IdP Sign-In Key | Set the IdP Sign-In Key value, and select the SingleID mapping property for the IdP Sign-In Key. | Required |
Table. Web Application(OIDC) SSO
Information
IdP Sign-In Key Setting There are two methods to process login in SCP SingleID by receiving the key value that provides the ID.
- How to obtain the identifier ID value using a standard SAML keyword
- How to create and receive a custom identifier ID
You can map the name obtained by one of the above methods to User ID mapping, and you can also map it to the CN value. This feature configures how authentication information is mapped to a value for processing login.
JIT provisioning
Identity Provider’s JIT provisioning feature tab has been added. This feature synchronizes the account in real time when a user’s changes occur. You can configure items when the account is synchronized in real time.
| Category | Explanation | Required status |
|---|---|---|
| JIT provisioning | JIT provisioning, short for Just-In Provisioning, is an ID and access management feature used to quickly create user accounts when a user logs into the system for the first time.
| Required |
| If there is no SingleID user mapped to the IdP user. | When a user accesses for the first time, manage the Action.
| Required |
| If a SingleID user is mapped to an IdP user. | If a user exists, update the user information. | Required |
Table. JIT provisioning
After filling in all fields, click the Complete button to finish the basic application setup.
Modify Identity Provider
You can edit the settings by clicking the Identity Provider on the list screen.
If you want to modify the Identity Provider, follow the steps below.
- Click the Admin Portal > Integration >Identity Provider Selection > Edit button.
- Click the General, SSO, Provisioning, Policy, Assignment tab to edit the items you want to modify.
- Click the Save button.
Information
To deactivate the application, select the application and click the Deactivate button.
Delete Identity Provider
On the Identity Provider list screen, select an Identity Provider, deactivate it, then return to the list screen where you can delete it from the three‑dot menu. To register again, click the Add button.
Authenticator
Configure by integrating the Authenticator provided by SCP SingleID. By default, passwords and Email are enabled.
The types and functions of Authenticators are as follows.
- Password: Password Authenticator verifies a password known only to the user to authenticate the user, serving as a knowledge‑based authentication method. * It is the built‑in Authenticator used for primary and secondary authentication, and it cannot be deleted or disabled for security reasons.
- Email: It is an ownership-based authentication method that verifies the user through an OTP (One-Time Password) delivered to the email account owned by the user.
- Active Directory: Enter the user password of the linked Active Directory to authenticate.
- Knox Identity: Enter the user password of the linked Knox Portal to authenticate.
- Knox Messenger: Enter the Knox Messenger OTP received via the registered Knox Messenger to authenticate.
- PC SSO Agent: Install SingleID’s PC SSO Agent on the PC to perform integrated authentication (SSO) and unified logout across various web browsers, and conduct authentication through PC security checks.
- SingleID Authenticator: SingleID dedicated authentication mobile app that supports biometrics (fingerprint, facial), PIN, mOTP, and TOTP.
- SMS: Enter the SMS OTP received on the registered mobile phone to authenticate.
- Passkey: Mobile Passkey, security key, a convenient authentication method that enables easy login with Windows biometric/PIN code.
- TOTP Authenticator: Enter the TOTP received via a registered authentication app or web extension to authenticate.
Authenticator list
We support all authenticators of the six supported types.
To check the Authenticator, please refer to the following path.
- Admin Portal > Integration > Authenticator
Add Authenticator
On the Authenticator list screen, clicking Register moves to the next screen, which transitions to a screen where you can add an Authenticator.
To add an Authenticator, follow the steps below.
- Admin Portal > Integration > Authentictor > Add Click the button.
- each authentication methodselect > next click the button.
- Enter the information required for authentication settings.
- Click the Save button.
guide
All nine types of Authenticators, covering various optimized work environments that a typical IdP service can provide, are already available and registered/configured, so there is no need to add a new Authenticator until a new type is required.
Information
To disable the Authenticator, select the application and click the Disable button.
Add Active Directory {#Active Directory-add}
Users can authenticate using the connected Active Directory.
To add Active Directory, follow the steps below.
- Click the Admin Portal > Integration > Authentictor > Add button.
- Select Active Directory > Click the Next button.
- General page appears. 3. Please review Authnticator Overview and click the Next button.
- Settings page appears. 4. Enter the information required to register Active Directory as an Authenticator.
- After entering all information, click the Connection Test button to verify.
- After checking everything, click the Save button.
| Category | Explanation | Required status |
|---|---|---|
| LDAP URL | Enter the LDAP URL of Active Directory. Enter a valid URL that includes ldap:// or ldaps:// for encrypted communication. Example) ldap://ldap.example.com/dc=example,dc=com | Required |
| Service User DN | Enter the unique identifier for the service-dedicated LDAP account. | Required |
| Service user password | Enter the service user’s password in password format. | Required |
| User search base DN | Enter the user search base DN, the string that specifies the starting point for searches in the LDAP directory tree. | Required |
| User attribute | Enter user attributes. | Required |
| Check LDAP connection | After entering all the above LDAP settings correctly, click the Connection Test button to perform the integration test. | Required |
Table. Add Active Directory
Reference
Active Directory Authenticator can be used as follows:
- Login
- Identity verification during the registration process
- Password reset
- Unlock ID
Add Knox Identity
Users can authenticate using the connected Nox portal.
To add Knox Identity, follow the steps below.
- Admin Portal > Integration > Authentictor > Add Click the button.
- Select Knox Identity > Click the Next button.
- General page appears. 3. Check the Authnticator Overview and click the Next button.
- Policy page appears. 4. Enter the information required to register Knox Identity as an Authenticator.
- After entering all information, click the Connection Test button to verify.
- After checking everything, click the Save button.
| Category | Explanation | Required status |
|---|---|---|
| Maximum allowed authentication failure attempts | Set the maximum allowed number of attempts when authentication fails via Knox Identity. It can be set from 1 to 10 times. | Required |
| Nox ID | Enter the Nox ID to test whether the account is linked. | Required |
| Nox password | Enter the Nox password to test whether the account is linked. | Required |
| Verify Knox Identity connection | Click the Connection Test button to perform the test. If the test result fails, contact the administrator. | Required |
Table. Add Knox Identity
Reference
Active Directory Authenticator can be used as follows:
- Login
- Identity verification during the registration process
- Password reset
- Unlock ID
Add Knox Messenger
Enter the Knox Messenger OTP received via Knox Messenger to authenticate.
To add Knox Messenger, follow the steps below.
- Admin Portal > Integration > Authentictor > Add Click the button.
- Select Knox Messenger > click the Next button.
- General page appears. 3. Please review Authnticator Overview and click the Next button.
- Policy page appears. 4. Enter the information required to register Knox Identity as an Authenticator.
- After entering everything, click the Save button.
| Category | Explanation | Required status |
|---|---|---|
| Access Token | Enter the Access Token for Knox Messenger. | Required |
| Authentication code timeout (minutes) | Enter the expiration time (minutes) for the verification code. It can be set from 3 minutes up to a maximum of 30 minutes. | Required |
| Maximum allowed authentication failure attempts | This is the maximum number of re‑entries allowed after authentication failure. Please select the maximum allowed attempts. You can choose from 1 to 10 times. | Required |
Table. Add Knox Messenger
Reference
Knox Messenger Authenticator can be used as follows:
- Login
- Passwordless authentication
- Identity verification during the registration process
- Find ID
- Password reset
- Unlock ID
Add PC SSO Agent
To use SSO across multiple browsers, you can install the PC SSO Agent on the user’s PC.
To add the PC SSO Agent, follow the steps below.
- Admin Portal > Integration > Authentictor > Add Click the button.
- Select PC SSO Agent > Click the Next button.
- General page appears. 3. Please review Authnticator Overview and click the Next button.
- Policy page appears. 4. Enter the information required to register with the PC SSO Agent.
- After entering everything, click the Save button.
| Category | Explanation | Required status |
|---|---|---|
| Use PC SSO Agent for multi-browser SSO | Click the Activate button to enable it. To enable multi-browser SSO, you must configure a login policy for each application. Once enabled, SSO works between Chrome and Edge browsers. Set the login policy in Policy > Login Policy. | Select |
| Prevent login with disallowed browsers | Click the Activate button to enable it. Once activated, login will be restricted on browsers other than Chrome and Edge. | Select |
| Force the browser to close when the PC SSO Agent logs out. | Click the Activate button to enable it. When activated, it will be forcibly closed on Chrome and Edge browsers upon logout. | Select |
| Property Settings | When launching the PC SSO Agent, you can configure the user attributes that will be passed from SingleID to the PC SSO Agent. The configured user attributes are used during multi-browser SSO and C/S program (Rich Client application) authentication. To set the attribute, click the Add button to configure user attributes. | Select |
| Force the browser to close when the PC SSO Agent logs out. | Click the Activate button to enable it. When activated, it will be forcibly closed on Chrome and Edge browsers upon logout. | Select |
Table. Add Knox Messenger
Reference
This Authenticator can be used as follows:
- Multi-browser SSO
- Rich Client application authentication
Add SingleID Authenticator
Authenticate using the SingleID Authenticator mobile app provided by SingleID.
To add the SingleID Authenticator, follow the steps below.
- Admin Portal > Integration > Authentictor > Add Click the button.
- Select SingleID Authenticator > Click the Next button.
- General page appears. 3. Please review Authnticator Overview and click the Next button.
- Policy page appears. Enter the information to register the SingleID Authenticator as an Authenticator.
- After entering everything, click the Save button.
| Category | Explanation | Required status |
|---|---|---|
| Authentication wait time (minutes) | Enter the authentication waiting time (minutes). This is the input time for authentication processing; it can be set between 3 and 30 minutes. | Required |
| Maximum allowed authentication failure attempts | This is the maximum number of re-entries allowed after authentication failure. Please select the maximum allowed attempts. You can select from 1 to 10 times. | Required |
| TOTP generation interval (seconds) | The interval (seconds) for automatically generating OTPs. It can be set from 15 to 120 seconds. | Required |
| Number of adjacent intervals in TOTP | This is the number of TOPT codes allowed before and after based on the SingleID server time. If this value is 3, three TOPT codes before and after the SingleID server time are allowed. This setting can prevent authentication failures caused by time differences between the SingleID server and the SingleID Authenticator. 0 ~ 5 can be selected. | Required |
| App Push Type | You can set the push type for the SingleID Authenticator app. | Required |
| SingleID Authenticator biometric authentication replacement setting | If the user’s mobile phone lacks fingerprint or facial recognition, authentication can be performed using alternative methods. It can be replaced with PIN, mOTP, or TOTP; when all users are selected, the user can switch to another authentication method for authentication. If you want to apply it only to a specific group, select Apply only to the group below. | Required |
Table. Add SingleID Authenticator
Reference
This Authenticator can be used as follows:
- Login
- Passwordless authentication
- Identity verification during the registration process
- Find ID
- Password reset
- Unlock ID
Add TOTP Authenticator
Enter the TOTP received through the registered authentication app or web extension to authenticate. You can use TOTP authentication methods to support 3rd Party Authenticators such as mobile authentication apps (Google Authenticator, Microsoft Authenticator, etc.) and web browser extensions (Chrome Web Store, Microsoft Edge Add-ons, etc.).
If you want to add the TOTP Authenticator, follow the steps below.
- Admin Portal > Integration > Authentictor > Add Click the button.
- Select TOTP Authenticator > click the Next button.
- General page appears. 3. Check the Authnticator Overview and click the Next button.
- Policy page appears. 4. Enter the information needed to register with the TOTP Authenticator.
- After entering everything, click the Save button.
| Category | Explanation | Required status |
|---|---|---|
| Maximum allowed authentication failure count | This is the number of allowed re‑entries when an incorrect TOTP is entered or a TOTP that exceeds the time limit is entered. It can be set from 1 to 10 times. | Required |
| TOTP adjacent interval count | This is the number of TOPT codes allowed before and after based on the SingleID server time. If this value is 3, three TOPT codes before and after the SingleID server time are allowed. This setting can prevent authentication failures caused by time differences between the SingleID server time and the SingleID Authenticator. 0 ~ 5 can be selected. | Required |
| Issuer | When a user registers a ‘TOTP Authenticator’ using the ‘Authenticator App’ or ‘Web Extention’ via a QR code, the format ‘Issuer : Tenanat/UserID’ appears on the user’s screen. | Required |
Table. Add Knox Messenger
Reference
This TOTP Authenticator can be used as follows:
- Login
- Multi-Factor Authentication (MFA)
- Authentication during Authenticator registration
- Password reset
- Unlock
- Conditional authentication
- Authentication for non‑compliant PCs
Reference
To enable the TOTP Authenticator, configure it in the authentication policy.
- Available Authenticator (for login policy) → Use TOTP Authenticator when user logs in
- Authenticator registration authentication → User uses TOTP Authenticator during Authenticator registration
- Account recovery > Password reset → Use TOTP Authenticator when the user resets the password
Modify Authenticator
On the Authenticator list screen, after selecting an Authenticator and clicking Edit, it switches to the edit screen.
To modify the Authenticator, follow the steps below.
- Admin Portal > Integration > Authentictor > Edit Click button
- Edit each item, then click the Edit button to complete the changes.
Reference
To edit each Authenticator, please refer to each Add Authenticator in the Authenticator List and make the modifications.
Delete Authenticator
On the Authenticator list screen, select the Authenticator, deactivate it, then return to the settings screen, and you can delete it via the delete button in the three‑dot menu. To apply the disable, you must exclude the authentication policy settings before deactivating.
To delete the Authenticator, follow the steps below.
- Admin Portal > Integration > Authenticator List > Authenticator right three dots Click.
- Disable popup click
- If a warning popup appears, check the applied authentication policy.
- To manage the lower authentication policy, please click here. Click to exclude the policy from the authentication settings.
- Deactivation is completed when the corresponding authentication policy is excluded from the authentication policy information.
- After deactivation is complete, click the Authenticator and then click the Delete button.
MFA Service Provider
MFA Service Provider provides a service that enhances user convenience by applying biometric and simple authentication technologies along with strengthened authentication methods, meeting the security requirements required by enterprises through multi-factor authentication.
Reference
The MFA Service Provider performs additional multi-factor authentication (MFA) for registered applications when users log in.
MFA Service Provider List
To view the list of MFA Service Providers, you can access the following menu.
- Admin Portal > Integration > MFA Service Provider
| Category | Explanation |
|---|---|
| Name | It is the name of the MFA Service Provider. |
| System code | Displays system code information. |
| Project code | Displays project code information. |
| User Tag | Displays the User Tag. |
| type | Shows how to integrate the MFA Service Provider. It is presented in the following three methods.
|
| System code input field | Enter the system code information. |
| Project code input field | Enter the project code information. |
| Search term input field | You can search the Identity Provider list. After entering a search term, click the magnifying glass icon or press Enter to perform the search.
|
| Details button | You can perform detailed searches. Search criteria can be combined using AND conditions. After entering multiple fields, click the Search button to retrieve results that match the criteria.
|
| Register button | You can register a new MFA Service Provider. |
Table. MFA Service Provider List
MFA Service Provider registration
To register the MFA Service Provider, follow the steps below.
- Admin Portal > Integration > MFA Service Provider > Register Click the button
- ADFS Federated Application or Custom Application or Network Equipment Select > Next Click the button
information
There are three types of MFA Service Providers.
- ADFS Federated Application : It uses the AD Flugin method and registers an ADFS federation application that will be linked with SingleID MFA.
- Custom Application : Registers an application that uses the MFA API in API mode and integrates with SingleID MFA.
- Network Equipment : It uses the RADIUS method and registers network devices that will be integrated with RADIUS‑based MFA.
You can register an MFA Service Provider by entering and configuring the required information for MFA Service Provider integration through a three-step screen as shown.
- [General] {#General-3}
- [MFA integration] {#integration}
- [Owner] {#owner}
General
Enter general information for the MFA Service Provider.
| Category | Explanation | Required status |
|---|---|---|
| Name | Enter the name of the MFA Service Provider. Since it is identified by its name, rules are needed for distinction and management. | Required |
| Explanation | Enter a description of the MFA Service Provider (including its functions, purposes, etc.). | Select |
| logo image | Register a logo that can intuitively identify the MFA Service Provider. | Select |
| Manage users using User Tag | If you enable User Tag usage, when a new user is registered from the MFA Service Provider, “#"+User Tag is automatically appended to the user’s ID, preventing duplicate ID registrations. | Select |
| User Tag | Only one User Tag can be registered per MFA Service Provider. - A User Tag cannot be modified after registration; it is a tag attached to the MFA Service Provider and the user. - Tenant administrators can define and use User Tags. Users provisioned via JIT through the MFA Service Provider have the same User Tag set as a user attribute, allowing identification of where the user was created. | Required |
| System code | Enter the system code information. | Select |
| project code | Enter the project code information. | Select |
| campaign | If only one authentication method is used, a pop‑up page guiding the user to register an authentication method is displayed. It becomes active when the selection box is chosen. | Select |
Table. MFA Service Provider General
MFA integration
Enter MFA integration information.
| Category | Explanation | Required status |
|---|---|---|
| Conditional authentication | Conditional authentication is a policy that performs additional authentication when the authentication conditions registered for conditional authentication are met. To apply conditional authentication, click the check box. Select the WHEN policy and the THEN policy. The WHEN policy is an authentication policy executed when specific conditions are met at login. The THEN policy carries out an additional identity verification when the WHEN policy is satisfied. | Select |
| Login | Add the provided Authenticator to the Chip Box. When logging in, click the Activate button to use the delegation to the administrator. Enabling the delegation to the administrator option allows you to view the guide messages below on the ‘Select Authentication Option’ page for registration. 1. “If you cannot complete identity verification due to any issue, you can request verification from the manager. Click here.” 2. “If a problem occurs with identity verification, you can request delegated verification from the administrator. Please click here." ※ Delegation is only possible to administrators who have registered the SingleID Authenticator mobile app as an Authenticator. | Required |
| Authentication during Authenticator registration | Set the identity verification method that the user must perform during the Authenticator registration process. The user configures an Authenticator for identity verification. Perform additional authentication: strengthen verification during the identity verification process. * Whether to perform authentication during registration when no Authenticator is registered: set whether to perform it when the user has no registered Authenticator. 1. Perform when selected, the user can add an authentication method and then authenticate. 2. Do not perform when selected, authentication is not carried out if there is no registered authentication method. 3. Follow JWT when selected, complies with the defined JWT policy. * To enable delegation of authentication to an administrator, click the Enable button. ※ Delegation of authentication is only possible for administrators who have registered the SingleID Authenticator mobile app as an Authenticator. | Selection |
| List of administrators for authentication delegation | Select the checkbox if you want to use the delegated administrator list of the SCP cloud object storage as a separate authentication administrator list when delegating authentication to an administrator. This option can only be used when “Delegate authentication to administrator” is enabled in the “Authenticate during Authenticator registration” or “Login” items. To retrieve and apply an administrator list stored as a JSON file in cloud object storage, the following settings are required. 1. Access Key: Enter the Access Key of the cloud object storage. 2. Secret Key: Enter the Secret Key of the cloud object storage. 3. Endpoint: Enter the URL of the cloud object storage service provider. It must start with “http://”. 4. Bucket name: Enter the bucket name of the cloud object storage. 5. File path: Enter the file path in the cloud object storage. 6. Verify cloud object storage connection: After entering all items, click the Connection Test button to view the result. The result will indicate success or failure. 7. If the connection test result shows success, the Test File Search button will appear. Click the button. 8. A file search test popup will appear; enter the file name and click the Validate button. 9. After clicking the button, a .json file will be created; if a file with the same name already exists, rename it to complete the test. | Selection |
| User information update method during login (MFA) process | Choose the user information update method during the login process. 1. Automatic update using JWT Claim information: a method that automatically updates the Claim information within the authentication data of a JWT token 2. Preserve the information at the moment the user data is created: retain the initially generated user information. Follow JWT When selected, it adheres to the defined JWT policy. | Required |
| Whether to automatically register Knox Messenger as Authenticator during the login (MFA) process | Select whether to automatically register Knox Messenger during login execution. If an ID is not registered in Knox Messenger, selecting ‘Register’ will not automatically register it. 1. Automatic update with JWT claim information: a method that automatically updates the claim information within the authentication data of a JWT token 2. Maintain the information as of the time the user data is created: retain the initially generated user information. Follow JWT When selected, it adheres to the defined JWT policy. | Required |
| Claim | Enter the Claim name. A Claim is an authentication method that manages user authentication and permissions through a specific key value, and can be used by adding the necessary data. Defines the mapping that verifies whether the user is the same. Up to 30 can be registered. | Required |
| Secret Key | The Secret Key is an encryption key for trusted communication between SingleID and the MFA Service Provider. Click the Issue button to issue it. | Required |
Table. MFA integration
information
The person who can perform identity verification on your behalf can be set in the person in charge tab.
Owner
Select the person responsible for the newly registered MFA Service Provider and register them.
| Category | Explanation |
|---|---|
| Add button | You can add a person in charge of the MFA Service Provider. |
| search | You can find the person in charge using a search term (ID, name, email, status). |
| Select (Check Box) | Select the person in charge retrieved from the list. |
| Add | You can add the selected assignee. |
| Completed | Complete assigning the person in charge. |
Table. Register person in charge
When you click the Complete button, registration is completed.
MFA Service Provider Modification
On the MFA Service Provider list screen, after selecting an Authenticator and clicking Edit, you will be taken to a screen where you can make changes.
To modify the MFA Service Provider, follow the steps below.
- Admin Portal > Integration > MFA Service Provider > Edit Click the button.
- Edit each item, then click the Edit button to complete the edit.
Delete MFA Service Provider
On the MFA Service Provider list screen, after selecting an MFA Service Provider and disabling it, return to the list screen and you can delete it from the three‑dot menu.
To delete the MFA Service Provider, follow the steps below.
- Admin Portal > Integration > MFA Service Provider List > Right three dots of MFA Service Provider Click.
- Click the Delete popup button.
- If a warning popup appears, check the MFA Service Provider information.
- Enter the MFA Service Provider name below and click the Delete button.
6.2.1.2.3 - Identity Store
Identity Store is an integrated directory service that centrally manages user, group, and authentication information, supports both cloud and on-premises environments, enables easy implementation of single sign-on (SSO) and multi-factor authentication (MFA), and automates secure integration between applications and user provisioning.
There are various cases in which users or groups are added to an organization, such as being provisioned through a registered application or being added directly by an administrator.
Identity Store allows integration and retrieval of users and groups registered in various ways, and provides various management features so that administrators can configure detailed settings for each user or group.
Administrators can manage all users and groups registered in the organization through the Identity Store.
User
Administrators can view and edit all users registered in the organization using the functions provided in the User menu, and can delete users or directly register new users.
You can also change a user’s group membership or assign permissions to allow the user to use the application.
Users are registered to SingleID in various ways as follows.
- Register via account synchronization (Inbound Provisioning) from the application
- Register via JIT (Just In Time) provisioning from the Identity Provider
- Register from MFA Service Provider
- Manually registered by administrator
Administrators can use the User menu to manage registered users collectively in various ways.
To access the user menu, navigate as follows.
- Admin Portal > Identity Store > User
User List
You can view and search all users registered in SingleID in a list format.
| Category | Explanation |
|---|---|
| ID | The user’s ID is displayed. |
| Name | The user’s name is displayed.(Surname, given name order) |
| The user’s email address is displayed. | |
| phone | The user’s mobile number is displayed. |
| Administrator | Displays whether the user is an administrator in the Admin Portal. |
| System Mapping ID | This is the application system mapping ID. |
| status | Indicates whether the account is active. Active: The user state where login is currently possible. Inactive: The user state that has been manually deactivated. Pending: The account synchronization is complete, and the account remains in a pending state until the user logs in. Locked: An account locked due to password errors. Dormant: An account that has been marked as dormant after being offline for a certain period. |
| Management entity | Indicates the entity that manages the account. You can tell whether it was automatically registered by a system or manually registered. SingleID: Account manually registered by the administrator Other: Account automatically synchronized. |
| Registration date | Account’s initial registration date |
| Modified Date | Latest update date |
| Expiration date | Account expiration date |
| Dormant User button | You can query dormant users. |
| Search term input field | You can search the user list. Enter a search term and click the magnifying glass icon or press Enter to perform the search. - Searchable fields: name, email, ID 1. Name: Exact match search is possible using encrypted personal data with ‘full name’, ‘first name’, or ’last name’. 2. Email: Exact match search is possible using encrypted personal data with the full email address or the part before ‘@’. 3. Phone number: Exact match search is possible using encrypted personal data with the last four digits of the phone number. |
| Details button | Detailed searches are possible. Search conditions can be combined with AND. After entering multiple fields and clicking the ‘Search’ button, the search is performed according to the criteria. Clicking the ‘Reset’ button clears all search fields. - Name: Exact match search is possible using encrypted personal data with ‘full name’, ‘first name’, or ’last name’. - Email: Exact match search is possible using encrypted personal data with the full email address or the part before ‘@’. - Phone number: Exact match search is possible using encrypted personal data with the last four digits of the phone number. |
| Register button | Register the MFA Service Provider. |
Table. User List
Information
Click the dormant user button in the list to display the dormant user list. After selecting the selection box and clicking the Activate button, the account will be changed to Active status. If you want to delete your account, click the delete button.
information
There are three ways to search for users in the user list.
- User status filter
- Keyword search
- Advanced Search
User status filter
To filter users by status, follow these steps.
- Click the button in the group that shows the user statuses (All, Active, Inactive, Pending, Locked) you want to filter.
- It is displayed in the list according to the user’s status.
- You can search for the desired user using keyword search while filters are applied. 3. (Note: If you perform an advanced search while filters are applied, the filters will be cleared)
- To remove the filter, click the All button.
Keyword Search
To perform a keyword search, follow these steps.
- Click the mouse on the keyword search input field.
- Enter the word to search. 2. Enter a search term, and a dropdown menu appears below the search input field. 2. If you select one of the “ID”,“Name”, “Email” displayed in the dropdown menu, the search will be executed on that field, and if you select All, the search will be executed on the ID, English name, and email fields.
- After entering a search term, press the Enter key or click the magnifying‑glass icon with the mouse to execute the search. 3. At this time, the search is executed across the ID, English name, and email fields.
- Search results are displayed in the user list.
- If you want to cancel the search results and display the full list, click the X icon to the right of the keyword search input box.
Advanced Search
To perform an advanced search, follow these steps.
- Click the Details button.
- On the detailed search screen, enter the search term in the field you want to search.
- In the advanced search screen, you can limit the search range by selecting the user’s registration and modification dates.
- When you enter search terms in multiple fields, the search is performed with an “AND” condition.
- After entering a search term, press Enter or click the Search button to execute the search.
- Search results are displayed in the user list.
- If you want to cancel the search results and display the full list, click the Reset button on the advanced search screen.
User registration
Tenant administrators can manually register users directly from the screen without going through account synchronization.
To register a user, follow the steps below.
- Admin Portal > Identity Store > User > Register Click button
Users can enter and register information through a three-step screen as follows.
- Profile
- User group
- Summary
Profile
Enter the user’s basic profile information on the profile screen.
The fields that need to be entered are as follows.
| Category | Explanation | Required or not |
|---|---|---|
| ID | Enter the user’s ID. Values that duplicate an already registered user’s ID cannot be entered. | Required |
| Administrator | Specify whether the user is an administrator. Selecting “Allow” grants administrator privileges. | Required |
| Name (Korean name, surname) | Enter the Korean given name and family name in order. | Essential |
| Name (English name, last name) | Enter the English given name and surname in order. If an English name is not available, enter the Korean given name and surname again. | Required |
| Enter the email address. Since this information is used for identity verification, accurate information must be entered. | Required | |
| Phone number | Enter your mobile number. Since this information is used for identity verification, accurate information must be entered. | Essential |
| Department | Enter the department name in Korean and English. | Selection |
| organization | Enter the Korean organization name and the English organization name. | Select |
| language | Specifies the user’s preferred language. When the user logs in, the screen is displayed in the specified language. | Essential |
| time zone | Specifies the user’s time zone. All times are displayed in the designated time zone when the user logs in. | Required |
| Expiration date | Set the user expiration date. The default is “Not set”. Choose the date to delete when automatic account deletion is set after the set date. | Selection |
Table. Profile Information
Click the Next button to go to the user group screen.
User group
Specify the group for the user to be registered on the User Group screen. All groups that can be assigned to the user are displayed on the left side of the screen. After selecting the group to assign to the user, click the > button to move to the assigned group.
To cancel a group assignment, select the group to cancel from the assigned groups, then click the < button. Click the Next button to go to the summary screen.
Reference
The reason for assigning groups to users is to control access organically across login policies, authentication policies, application access policies, and similar settings.
Summary
- After reviewing the information entered on the summary screen, register the user.
- If you want to edit the entered information, you can click the Back button to return to the screen you want to edit.
- To cancel the registration, click the Cancel button.
- When you click the Complete and Add button, it registers the user and returns to the profile screen so you can continue registering a new user.
- Clicking the Complete button registers the user and navigates to the registered user’s detail screen.
User edit
If you want to modify a user, follow the steps below.
- In Admin Portal > Identity Store > User, click the user you want to edit.
- profiles, groups, applications, multi-factor authentication (MFA) methods, devices, active sessions are displayed.
- Click the Edit button at the bottom and modify the data you want to change.
- Click the Save button.
User status change
The status of users managed by SingleID is as follows.
| Category | Explanation |
|---|---|
| Active | This is a user who, after initial registration, logged into SingleID, reset their password, and is now using it normally. |
| Inactive | This user has been disabled by the administrator. |
| Waiting | This is a user who has never logged into SingleID after the initial registration. |
| Locked | The user is locked due to repeated login failures, etc. (The user can unlock themselves by resetting the password) |
| Human user | The account is in a human‑processed status due to being inactive for a certain period. |
Table. User status
A tenant administrator can change a user’s status based on the user’s current state as follows.
| Current | Change | Explanation |
|---|---|---|
| Active | Inactive | You can click the Deactivate button to change an active user to an inactive state. |
| Inactive | Active | You can click the Activate button to change a user from inactive to active. |
| Waiting | None | A user in standby cannot be switched to active or inactive state. |
| Locked | Active | A locked user can click the password reset button to reset the password and simultaneously change the status to active. |
Table. User status
The button that changes the user’s status is displayed on the list and detail screens as follows.
- When one or more users in Active or Inactive state are selected on the list screen
- Active or Inactive state when navigating to the user detail screen
Information
When a tenant administrator attempts to deactivate a user, the following confirmation popup is displayed.
After verifying the information of the user to be deactivated, click the deactivate button once more to change the user’s status from active to inactive. In contrast, when changing a deactivated user to an active state, no separate confirmation popup is displayed.
Password reset
The tenant administrator can reset a user’s password. When a tenant administrator resets a user’s password, an informational email is sent to that user.
Reference
The reset password is not displayed to the administrator. Additionally, the reset password is not directly included in the notification email sent to the user.
After receiving the notification email, the user must log in to SingleID directly, use the password reset function to complete identity verification, and then change the password.
To change the user’s password, follow the steps below.
- Select the user whose password you want to change from the user list and click.
- Click the Reset Password button located at the top right of the user detail screen.
- If a confirmation popup appears, click the Confirm button.
- Resetting a locked user’s password unlocks the account and changes it to active status.
Group
The tenant administrator can view the groups that a user belongs to as a member and can add or remove group memberships.
To manage a user’s groups, click the Group tab on the detail screen.
| Category | Explanation |
|---|---|
| Group Tab | Displays the user’s group management screen. |
| All groups | Displays the full list of groups that can be assigned to the user. |
| Assigned group | Displays the list of groups already assigned to the user. |
| Search all groups | Search groups or group descriptions across all groups that can be assigned to the user. The search results are displayed in the list below. After searching, click the X button on the right of the search input field to display the full list. |
| Search assigned groups | Search for groups or group descriptions among groups already assigned to the user. The search results are displayed in the list below. After searching, click the X button on the right side of the search input field to show the full list. |
| Delete assigned group | Delete the selected group from the groups assigned to the user. The user will be removed from the deleted group’s members. |
| Group assignment | Assign the selected group to the user. The user becomes a member of the assigned group. |
Group tab
Delete group
To delete the group assigned to a user, follow the steps below.
- Select the group to delete from the assigned group list. 1. (Check the checkbox to the left of the group name)
- Click the < button to delete the assigned group.
information
Groups assigned by group rules do not display a checkbox next to the group name. Memberships established by rules cannot be manually removed by an administrator.
Group assignment
To assign a new group to a user, follow the steps below.
- Select the group to assign from the entire group list. 1. (Check the checkbox to the left of the group name)
- > Click the button to assign the group.
Information
Assigning a group automatically grants permissions for the applications assigned to the added group.
Application
The tenant administrator can view applications designated for user use and can add, assign, or delete applications. To manage the user’s application, click the Application tab on the detail screen.
| Category | Explanation |
|---|---|
| Application tab | Displays the user’s application management screen. |
| List of assigned applications | Applications assigned to the user are displayed in a list format. |
| Assign button | You can assign additional applications to a user. |
Application tab
Delete application
To delete an application assigned to a user, follow the steps below.
Select the application to delete from the list of assigned applications. (Check the checkbox to the left of the application name) Click the Unassigned button displayed above the application list. In the confirmation popup, click the Confirm button.
information
If you delete the assigned application, it will no longer appear in the User Portal > My Apps menu.
Application allocation
To assign a new application to a user, follow the steps below.
- Click the Assign button displayed at the top right of the application list.
- Application Assignment Select the application in the popup. 2. (Check the checkbox to the left of the application name)
- Click the Assign button.
- If you have assigned all applications, click the Cancel button to close the popup.
Reference
The assigned application can be found in the User Portal > My Apps menu. (If the assigned application’s “Display” option is turned off, it will not appear in the user portal)
View and Manage Multi-Factor Authentication (MFA) Methods
The tenant administrator can view the multi-factor authentication methods registered by users and can modify or delete parts of the registration information.
To manage a user’s multi-factor authentication (MFA) method, click the Multi-Factor Authentication (MFA) Method tab on the details screen.
| Category | Explanation |
|---|---|
| Multi-Factor Authentication (MFA) method tab | Displays the user’s multi-factor authentication (MFA) method management screen. |
| List of Multi-Factor Authentication (MFA) Methods | The multi-factor authentication (MFA) methods registered by the user are displayed as a list. |
| Edit button | Users can modify or delete the multi-factor authentication (MFA) methods they have registered. |
List of Multi-Factor Authentication (MFA) Methods
Modify multi-factor authentication (MFA) method
To modify the multi-factor authentication (MFA) method registered by the user, follow the steps below.
- Click the Edit button at the bottom right of the screen.
- Click the Registration Info column of the MFA list you want to edit.
- After editing the information, click the Save button at the bottom right of the screen.
Delete multi-factor authentication (MFA) method
To delete the multi-factor authentication (MFA) method registered by the user, follow the steps below.
- Click the Edit button at the bottom right of the screen.
- Click the Delete button on the right side of the MFA method you want to remove.
- Click the Confirm button in the warning popup.
- Click the Save button at the bottom right of the screen.
View user device information
Administrators can view the device information added when a user registers a multi-factor authentication method.
To view the user’s device information, click the Device tab on the detail screen.
| Category | Explanation |
|---|---|
| Device Tab | Displays the user’s device management screen. |
| Device List | When a user registers a multi-factor authentication (MFA) method, the added devices are displayed in a list format. |
Device Tab
information
Device information can only be viewed, and tenant administrators cannot add, modify, or delete it.
Information
Check user device information
If you click on the user’s registered password, SMS, email, SingleID authenticator, Nox messenger, passkey, and other devices, you can view detailed information in a popup.
Device Information popup displays ’type’, ‘OS version’, ‘browser’, ‘IP’, etc.
Active session
When a user logs into SingleID, SingleID manages the session information of the logged-in user.
The tenant administrator can view a user’s current active session and forcibly terminate the session to log the user out.
To manage the user’s session, click the Active Session tab on the detail screen.
| Category | Explanation |
|---|---|
| Active Sessions Tab | Displays the user’s session management screen. |
| Active session list | The user’s currently active sessions are displayed in a list format. |
| Exit button | Forcefully terminates the user’s active session. |
Active Sessions Tab
information
If the user’s active session list is displayed as an empty list, it means that the current user is not logged into SingleID.
Force Terminate Session
To forcibly terminate a user’s session, follow the steps below.
- Click the Terminate button displayed at the top right of the session you want to force close.
- In the Exit Confirmation popup, click the Exit button.
Information
Users whose session has ended are forcibly logged out of SingleID and must log in again to use the system.
However, the sessions of applications that logged in using SingleID are retained until the session ends, and each application’s sessions are managed by the respective application.
Force terminate multiple sessions
If you want to select one or more user sessions and terminate them simultaneously, follow the steps below.
- Select the sessions to forcefully terminate from the list and check the checkbox (V) displayed to the left of the session information.
- Click the Exit button displayed above the list.
- Exit Confirmation in the popup, click the Exit button.
Delete user
Tenant administrators can delete user information from SingleID.
The button for deleting a user appears on both the list and detail screens as shown.
- When one or more users are selected on the list screen
- After selecting a user, click the Delete button, and a confirmation popup appears on the screen.
- To delete a user, verify the user information, then enter the user’s ID and click the Delete button.
- After selecting multiple users and clicking the Delete button, a confirmation popup appears on the screen.
- To delete the selected users, use the <, > button, review all user information, then enter the phrase Delete All and click the Delete button.
information
Verify all users’ information and you must enter the phrase Delete All for the delete button to become active.
When navigating to the user detail screen
- When an administrator attempts to delete a user, a confirmation popup is displayed.
- To delete a user, verify the user information, then enter the user’s ID and click the Delete button.
Reference
Deleted user information cannot be recovered.
When a user’s information is deleted, the groups, applications, and multi-factor authentication (MFA) methods assigned to the user are also deleted, and even if the user is re-registered with the same ID, the deleted groups, applications, and MFA methods are not restored.
Users registered through an application’s inbound provisioning can be reprovisioned from that application even if they are deleted from SingleID.
To completely delete a user, you must remove them from the primary system that manages user information.
After deletion, even if the user registers again with the same ID, the deleted groups, applications, and multi‑factor authentication (MFA) methods will not be automatically restored.
Group
Administrators can use the functions provided in the Group menu to view and edit all groups registered in the organization, and can delete groups or register new groups.
You can also modify the group’s membership rules or assign permissions so that group members can use the application.
Groups are registered to SingleID in various ways as follows.
- Register via inbound provisioning from the application (Application)
- Manually registered by an administrator (그룹 생성)
Tenant administrators can centrally manage registered groups in various ways using the group menu.
To access the group menu, navigate as follows.
- Admin Portal > Identity Store > Group
Group List
Administrators can view and search all groups registered in the organization in a list format.
Category Description
| Category | Explanation |
|---|---|
| Group List | The group list is displayed. |
| Keyword search | Search by group name and description. |
| Detailed Search | Displays detailed options for searching groups on the screen. |
Table. Group List
Create group
Administrators can manually register groups directly on the screen without going through inbound provisioning.
- To register a group manually, click the Register button on the group list screen.
- When you click the Register button, the group registration popup is displayed on the screen.
The fields that need to be entered for group registration are as follows.
| Category | Explanation | Required or not |
|---|---|---|
| type | Select the group type. | Required |
| Name | Enter the name of the group. Values that duplicate an already registered group name cannot be entered. | Required |
| Explanation | Enter the description of the group. | Required |
Table. Group List
- Complete button click registers the group and navigates to the detailed information screen of the registered group.
View and edit detailed information
The administrator can click Group in the group list to navigate to the group’s detailed information view screen.
If you have newly registered a group, you will be taken directly to the group’s detail screen immediately after registration.
At the top of the group detail screen, the group’s name, description, and managing entity information are displayed, and below that, group information organized into multiple tabs is shown.
| Category | Explanation |
|---|---|
| type | The group’s type is displayed. |
| Name | The name of the group is displayed. |
| Management entity | The system that manages the group is displayed. For groups directly registered by a tenant administrator in SingleID, SingleID is shown; for groups provisioned inbound through an application, the application’s name is displayed. |
| Explanation | The group’s description is displayed. |
Table. View detailed information
The tenant administrator can view detailed information of registered groups via the Group Profile tab.
| Category | Explanation |
|---|---|
| Group profile | The group profile is displayed. |
| List | Button that returns to the list. |
| Edit | Edit the profile. |
Table. View detailed information
To edit the group’s detailed information, follow the steps below.
- On the group detail screen, select the Profile tab.
- Click the Edit button.
- Edit Group Information.
The fields that can be edited are as follows.
| Category | Explanation | Required or not |
|---|---|---|
| Name | Enter the group’s name. You cannot enter a value that duplicates an already registered group name. | Required |
| Explanation | Enter the description of the group. | Required |
Table. Edit field
- Click the Save button.
- To return to the view state without saving the edited information, click the Cancel button.
Group membership rule management
Administrators can set rules that automatically assign users meeting certain conditions as members of a group.
When you set rules for a group, members are automatically provisioned without the tenant administrator having to manually manage them, and members are added or removed according to the configured condition expression.
To manage the group’s membership rules, click the Rules tab on the detail screen.
| Category | Explanation |
|---|---|
| Rules tab | Group rules are displayed. |
| Rule | The rules of the configured group are displayed. (The default membership policy setting after creating a group is Off) If the membership policy setting is Off, members are not managed automatically. |
| List | This is a button that returns to the list. |
| Edit | Modify the rules. |
Table. Rules tab
To set the group’s rules, follow the steps below.
- Select the Rules tab on the group detail screen.
- Click the Edit button.
- Click the On button in the membership policy settings.
- Set the condition expression for the WHEN area.
- Click the Save button.
- If you want to return to the query state without saving the configured rule, click the Cancel button.
Information
When a group’s membership rule is set, if an administrator changes a user’s detailed information or the user’s details are changed by inbound provisioning, the system automatically searches for the user according to the configured rule and manages each group’s members automatically.
Members automatically added according to the group’s membership rules cannot be manually removed by the tenant administrator.
The condition expression in the WHEN clause is constructed as follows.
| Category | Explanation |
|---|---|
| Operator relationship between conditional expressions | When there is one or more condition expressions, define the logical relationship between them. You can choose either AND or OR, and it applies to all condition expressions. |
| Conditional expression type | Set the condition type. You can select User Attribute. |
| Condition item | Set the condition items of the condition expression. When the expression type is User Attribute, you can select a user’s attributes from the list. |
| operator | Set the operation mode of the conditional expression. |
| condition value | Set the condition value of the conditional expression. |
| Add condition expression | Add a condition expression. |
| Delete condition | Delete the condition. It cannot be deleted when there is only one condition. |
Table. Rules tab
The user attributes that can be set in the condition item are as follows.
| attribute | Data type | Explanation | Required or not |
|---|---|---|---|
| key | String | key | Required |
| username | String | ID | Required |
| password | GuardedString | Password | Required |
| status | String | status | Required |
| mustChangePassword | Boolean | Whether to enforce password setting | Required |
| suspended | Boolean | Standby status | Required |
| creator | String | Constructor | Selection |
| creationDate | Date | Creation date | Selection |
| lastModifier | String | Last editor | Selection |
| lastChangeDate | Date | Last modified date | Selection |
| administrator | Boolean | Admin status | Selection |
| displayName | String | Display name | Selection |
| cn | String | Common Name | Selection |
| local | String | Locale (email sending criteria) | Selection |
| userSource | String | User source | Selection |
| syncDate | String | Last synchronization time | Selection |
| contractNumber | String | Contract number | Selection |
| contractStartDate | String | Contract start date | Selection |
| contractEndDate | String | Contract End Date | Selection |
| agreementDate | String | Date of agreement to required terms | Selection |
| accountStartDate | String | Account start date | Selection |
| accountEndDate | String | Account expiration date | Selection |
| partnerOrganizationCode | String | Partner company code | Selection |
| approvalUser | String | Approver ID | Selection |
| formattedName | String | Korean display name | Selection |
| familyName | String | Korean surname | Selection |
| givenName | String | Korean name | Selection |
| enFormattedName | String | English display name | Selection |
| enFamilyName | String | English surname | Selection |
| enGivenName | String | English name | Selection |
| adDomain | String | AD Domain | Selection |
| nickName | String | Nickname | Selection |
| employeeNumber | String | Employee number | Select |
| epId | String | EP ID | Select |
| String | email address | Selection | |
| phoneNumberWork | String | Phone number | Select |
| mobile | String | mobile phone number | Selection |
| title | String | Job Title | Selection |
| executiveYn | String | Executive status | Select |
| timeZone | String | Time zone | Selection |
| accountLocked | Boolean | Forced account lock | Selection |
| accountAutoLocked | Boolean | Automatic account lock | Selection |
| accountDisabled | Boolean | Unused account | Selection |
| accountSuspended | Boolean | Dormant account | Selection |
| accountSuspendedTime | Date | Idle processing time | Selection |
| lastLoginTime | Date | Last login time | Selection |
| accountState | String | Account status | Selection |
Table. Condition attribute
The operators that can be configured in the operator are as follows.
| operator | Explanation |
|---|---|
| Equals | Searches for users whose condition field value matches the condition value. |
| Not Equals | Search for users whose condition item value does not match the condition value. |
| Starts with | Search for users whose condition field value begins with the condition string. |
| Ends with | Search for users whose condition field value ends with the condition string. |
| Contains | Search for users whose condition field value includes the condition string. |
Table. Operator List
Group member management
Tenant administrators can manually assign members to a group or remove users from the group’s members.
To manage the group’s members, click the Member tab on the details screen.
| Name | Explanation |
|---|---|
| Member tab | Displays the group member management screen. |
| Member list | Displays group members in a list format. |
| Filter button group | Filters group members by status and displays the list. |
| Keyword search | Enter a keyword to search for group members. - Name: Exact match search is possible using encrypted personal data with ‘full name’, ‘first name’, or ’last name’. Email: Exact match search is possible using encrypted personal data with the full email address or the part before ‘@’. - Phone number: Exact match search is possible using encrypted personal data with the last four digits of the phone number. |
| Detailed Search | Enter detailed search criteria to find group members. - Name: Exact match searches are possible using encrypted personal data with ‘full name’, ‘first name’, or ’last name’. - Email: Exact match searches are possible using encrypted personal data with the full email address or the part before ‘@’. - Phone number: Exact match searches are possible using encrypted personal data with the last four digits of the phone number. |
| Add button | Add a member to the group. |
Table. Member tab
There are three ways to search for members within the Group tab.
- Filter by member status
- Keyword search
- Advanced Search
information
Member Status Classification
- Active: User who, after initial registration, logs into SingleID, resets their password, and is now using it normally.
- Inactive: User disabled by the administrator
- Pending: users who have never logged into SingleID after initial registration
- Locked: User locked due to reasons such as repeated login failures (a state where the user can unlock themselves by resetting the password)
Filter by Member Status
To filter members by status, follow these steps.
- Click the button of the group that displays the status of the members you want to filter. 1. (Active, Inactive, Standby, Locked button)
- You can navigate pages in the filtered view to see the list of the desired members.
- You can search for the desired member using keyword search while the results are filtered. 3. (Note: If you perform an advanced search while filters are applied, the filters will be cleared.)
- To remove the filter, click the All button.
Keyword Search
To perform a keyword search, follow these steps.
- Click the mouse in the keyword search input field.
- Enter the word to search. 2. At this point, a dropdown menu appears below the search input field. 2. If you select one of “ID”, “English name”, or “Email” displayed in the dropdown menu, the search will be performed on that field, and if you select “All”, the search will be performed on the ID, English name, and Email fields.
- After entering a search term, press the Enter key or click the magnifying glass icon with the mouse to execute the search. 3. At this time, the search is executed across the ID, English name, and email fields.
- Search results are displayed in the member list.
- If you want to cancel the search results and display the full list, click the X icon to the right of the keyword search input box.
Advanced Search
To perform an advanced search, follow these steps.
- Click the Details button.
- On the detailed search screen, enter the search term in the field you wish to search.
- In the advanced search screen, you can select a member’s registration date to limit the search range.
- When you enter search terms in multiple fields, the search is performed with an “AND” condition.
- After entering a search term, press the Enter key or click the Search button to execute the search.
- Search results are displayed in the member list.
- If you want to cancel the search results and display the full list, click the Reset button on the advanced search screen.
Delete member
To remove a member from a group, follow these steps.
- Select one or more members to delete from the member list. 1. (Check the checkbox to the left of the member ID)
- Click the Delete button displayed at the top of the list.
- Click the Confirm button in the warning popup.
information
Removing a member from a group does not delete the member’s user information.
Deleted members lose the application permissions assigned via the group.
Add member
To add a member to a group, follow the steps below.
- Click the Add button at the top right of the member list.
- In the member addition popup, select the user to add as a member. 2. (Check the checkbox to the left of the user ID)
- Click the Add button.
- If you have added all desired users as members, click the Cancel button on the popup to close the member addition popup.
Information
Added members immediately obtain the application permissions assigned via the group upon being added.
Application Management
The tenant administrator can view applications assigned to a group and can add or remove applications.
To manage the group’s applications, click the Group tab on the details screen.
| Name | Explanation |
|---|---|
| Application tab | Displays the application management screen for the group. |
| List of assigned applications | Applications assigned to the group are displayed in a list format. |
| Assign button | You can add and assign applications to a group. |
Table. Application Management
Application deletion
To delete an application assigned to a group, follow the steps below.
- Select the application to delete from the list of assigned applications. 1. (Check the checkbox to the left of the application name.)
- Click the Unassigned button displayed above the application list.
- In the confirmation popup, click the Confirm button.
Information
If you delete an assigned application, it will no longer appear in the User Portal > My Apps menu for group members.
Application assignment
To assign a new application to a group, follow the steps below.
- Click the Assign button displayed at the top right of the application list.
- Select the application in the Application Assignment popup. 2. (Check the checkbox next to the left side of the application name)
- Click the Assign button.
- If you have assigned all applications, click the Cancel button to close the Application Assignment popup.
information
The assigned application can be viewed in the group members’ User Portal > My Apps menu. (If the assigned application’s screen display option is turned off, it will not appear in the user portal)
Delete Group
The tenant administrator can delete a group from SingleID.
The button for deleting a group is displayed on the list and detail screens as follows.
- When one or more groups are selected on the list screen.
- After selecting a group and clicking the Delete button, the following confirmation popup appears on the screen.
- To delete a group, verify the group information, then enter the group name and click the Delete button.
- After selecting multiple groups and clicking the Delete button, the following confirmation popup appears on the screen.
- To delete the selected groups, use the <, > button to view all group information, then enter the phrase Delete All and click the Delete button.
Information
You must verify the information of all groups and enter the phrase Delete All before the Delete button becomes active.
When navigating to the group detail screen
- When a tenant administrator attempts to delete a group, the following confirmation popup is displayed.
- To delete a group, verify the group information, then enter the group name and click the Delete button.
Reference
Information of a deleted group cannot be recovered.
When group information is deleted, the group’s members and the applications assigned to the group are also deleted, and re‑registering a group with the same name will not restore the members or application data.
Groups registered through the application’s inbound provisioning can be provisioned again from the application even if they are deleted in SingleID. To completely delete a group, you must remove it from the ledger system that manages group information. Even if the group is re‑registered with the same name after deletion, the deleted members or application information will not be automatically restored.
AI agent
AI agents are intelligent services used for various purposes such as internal workflow automation, data analysis, and customer support. Using SingleID(integrated authentication and certification system), control the access and permissions of AI agents registered with a single authentication.
To access the menu, navigate as follows.
- Admin Portal > Identity Store > AI Agent
Reference
The detailed access permission feature for AI agents is planned to be developed in the second half of 2026.
AI Agent List
The administrator can view and search all registered AI agents in a list format.
Category Description
| Category | Explanation |
|---|---|
| AI Agent List | AI agents are displayed in the list. |
| Keyword search | Searches for AI agent names and the agent list. |
| Detailed Search | Search using detailed options that search groups. |
Table. List of AI agents
Register AI Agent
Administrators can register, modify, or delete AI agents.
- To register an AI agent, click the Register button on the AI agent list screen.
- When you click the Register button, the AI agent registration popup appears on the screen.
The fields you need to enter to register an AI agent are as follows.
| Category | Explanation | Required or not |
|---|---|---|
| Name | Enter the AI agent name. Values that duplicate an already registered name cannot be entered. | Required |
| Agent purpose | Enter the AI agent’s purpose. | Selection |
| AI model | Enter the AI model name. eg. ChatGPT | Selection |
| URL | Enter the AI agent URL. eg. http://www.example.com | Selection |
Table. List of AI agents
- When you click the Complete button, a confirmation popup appears to finalize the AI agent registration.
| Category | Explanation |
|---|---|
| Agent ID | AI agent IDs are automatically generated for internal and external networks. Please copy the agent ID and keep it safe. |
| Agent Secret | AI agent secrets for internal and external networks are generated automatically. Since they cannot be viewed on the screen later, please copy them now and keep them safe. |
| Name | Verify the AI agent name you entered. |
| Agent purpose | Check the AI agent purpose you entered. |
| AI model | Check the AI model name. |
| URL | Check the AI agent URL. |
Table. AI Agent registration completed
- Click the Confirm button to register the AI agent successfully.
View and edit AI agent information
The administrator can click AI agent in the AI agent list to navigate to the AI agent’s detailed information view screen.
If you have newly registered an AI agent, you will be taken directly to the AI agent’s detail screen immediately after registration.
At the top of the AI agent detail screen, the AI agent’s agent ID and agent information are displayed.
| Category | Explanation |
|---|---|
| Agent ID | The AI agent ID can verify the unique identifiers for internal and external networks. The unique identifier cannot be changed after it is issued. |
| Name | The name of the AI agent is displayed. |
| Agent purpose | The purpose of the AI agent you entered is displayed. |
| AI model | The AI model name you entered is displayed. |
| URL | The URL you entered is displayed. |
| Agent Secret | You can view the secrets for internal and external networks. If you have lost or forgotten the agent secret, you can request a reissue. Click the Reissue button to request a reissue. |
Table. View detailed information
Reference
The agent ID and agent secret serve as the user’s ID and password, providing authentication.
Agent ID The agent ID is a unique identifier that the system automatically issues upon registration. Once issued, it cannot be reissued.
Agent Secret Authentication credentials for the agent to securely access applications and APIs. You can obtain a new agent secret by reissuing it, but you must update all APIs or applications that are currently using the agent secret.
To modify the AI agent information, follow the steps below.
- Select the AI agent you want to edit from the AI agent list screen.
- Click the Edit button at the lower right corner.
- Edit AI agent information.
The fields that can be edited are as follows.
| Category | Explanation | Required or not |
|---|---|---|
| Name | Enter the AI agent name. Values that duplicate an already registered group name cannot be entered. | Required |
| Agent purpose | Enter the agent’s objective. | Selection |
| AI model | Enter the AI model name. | |
| URL | Enter the AI agent URL. |
Table. Edit
- Click the Save button.
- To return to the view state without saving the edited information, click the Cancel button.
Delete AI agent
To delete an AI agent, you can delete it by clicking the Delete button on the right side of the AI agent detail screen.
To delete the AI agent, follow the steps below.
- Select the AI agent you want to edit from the AI agent list screen.
- Click the Delete button on the right.
- The AI Agent Deletion popup appears.
- Enter the name of the AI agent you want to delete, then click the Delete button.
- Click to complete the deletion.
6.2.1.2.4 - Policy
Add Dormant User Policy #User Lifecycle Management #Conditional Authentication Policy –>
When logging into SingleID or logging into an application registered with SingleID, various settings such as login methods, authentication sessions, and passwords need to be configured according to the organization’s security policy.
SingleID provides a policy management feature that allows detailed configuration of login and authentication information.
If you have purchased the anomalous behavior detection feature (ADM), you can configure it to analyze a user’s login activity at sign‑in and, when it detects authentication anomalies that differ from the norm, notify the user of a potential security threat.
The policy features provided by SingleID are as follows.
- Login Policy
- Authentication Policy
- Anomaly detection policy
By using SingleID’s policy feature, you can configure a secure authentication environment that meets organizational security requirements by specifying detailed login methods based on who is logging in, when, from which environment, and to which application.
Login Policy
The administrator can set detailed policies specifying which authentication methods users can use when logging in with SingleID, and, if necessary, create condition-based authentication policies for users authenticating in specific environments.
Login policies can be configured using the following conditions.
- Which application are you logging into?
- Who is logging in?
- In what environment are you logging in?
To access the login policy menu, navigate as follows.
- Admin Portal > Policy > Login Policy
Default login policy
The Admin Portal automatically creates the following two policies by default.
- Admin Portal Policy: Admin Portal access permission control policy
- Default Policy: User’s default access control policy
The Admin Portal Policy is the login policy applied when attempting to log in to the Admin Portal, and the Default Policy is the login policy applied when attempting to log in to the user portal.
If you have linked an application to SingleID and have not assigned a separate login policy, the Default Policy will be automatically assigned as the default login policy.
guide
The above two default policies cannot be disabled or deleted.
Register Login Policy
Login policy sets the login policies for administrators and users. You can configure login policies based on the access environment, application, and situation.
Login policies can be registered through a screen consisting of four steps as follows.
- General
- Allocation
- Initial Redirection
- Rule
General
Enter the name and description of the login policy on the general screen.
The fields that need to be entered are as follows.
| Name | Explanation | Required status |
|---|---|---|
| Name | Enter the name of the login policy. | Required |
| Explanation | Enter the description of the login policy. | Required |
Table. General
Click the Next button to go to the assignment screen.
allocation
Specify the application to which the login policy will be applied on the assignment screen.
| Name | Explanation |
|---|---|
| Filter | Filter applications by status. |
| Keyword search | Search by application name and description. |
| Advanced Search | Displays detailed options for searching applications on the screen. |
| Assign button | Displays the application assignment popup on the screen. |
| Assigned Application List | The assigned applications are displayed in a list format. It starts with an empty list. |
Table. Assignment
- Click the Assign button to display the application assignment popup on the screen.
- In the Application Assignment popup, select one or more applications to assign to the login policy, then click the Assign button.
- If you have assigned all applications, click the Cancel button to close the Application Assignment popup.
Initial Redirection
Specifies how users access the login screen and the login method on the Initial Redirection screen.
Redirected to SingleID’s Sign-in page (login page)
Redirected to the external IdP
The explanations of the two methods above are as follows.
- If you select Redirected to SingleID’s Sign-in page, the SingleID login page will be displayed to the user attempting to log in.
- If you select Redirected to the external IdP, the user trying to log in will see the login page of the selected Identity Provider.
- After selecting Redirected to the external IdP, you must choose the Identity Provider from the selection list and designate it.
- If you select Redirected to SingleID’s Sign-in page, you can optionally display an additional button at the bottom of the SingleID login screen that allows login via an Identity Provider.
- AND see the following external IdP buttons on the Sign-In page Click the text input field below, select one or more Identity Providers registered in SingleID, and configure them to be displayed on the login screen.
guide
The settings for registering an Identity Provider or displaying a registered Identity Provider on the login screen
Please refer to Identity Provider Registration.
Rule
On the Rules screen, modify or add login rules and set the priority among login rules.
| Name | Explanation |
|---|---|
| List of rules | Login rules are displayed on the screen as a list. The Default Rule is shown by default and cannot be deleted. |
| Keyword search | Search by the name or description of the login rule. |
| Register button | Register a new login rule. |
| Complete button | Register a login policy. |
Table. Rules
Default Rule configuration
In the rule screen’s login rule list, Default Rule is displayed by default.
Default Rule cannot be deleted and can only be edited. Also, when you add one or more login rules, you cannot set the priority. (It always has the lowest priority.)
To modify the Default Rule, follow the steps below.
- Click Default Rule in the rule list.
- Default Rule’s WHEN condition cannot be modified.
- You can modify the THEN result of Default Rule.
| Name | Explanation |
|---|---|
| Set access permission | Set whether access is allowed. |
| Mandatory authentication method | Configure the primary login method. Additional login methods can be displayed on the login screen in addition to the default login method. |
| MFA authentication | Configure it to require an additional login after the first login succeeds. |
| Terms and conditions for collecting consent | Set it to display the terms and conditions and request consent when a user logs into SingleID for the first time. |
| Save button | Save the modified login rules. |
Table. Default Rule
You can select one of the following two options when configuring access permission settings.
- Deny Access
- Allow Access
If you select Deny Access, it will reject login for all users.
When you select Allow Access in the access permission setting, you can configure the user’s login method.
guide
If you selected Redirected to the external IdP as the method to enter the login screen on the Initial Redirection screen, the first login settings will not be displayed.
The required authentication method is performed by an external Identity Provider according to the Initial Redirection settings.
To have the user log in via multi-factor authentication, check the MFA authentication checkbox and then select one or more Authenticators in the text input box.
If a user logs in to SIngleID for the first time, to display the terms and conditions and request the user’s consent, check the Terms and Conditions Consent Setting (d) checkbox and then select one or more terms or conditions to display on the screen from the text input box.
Add rule
To add a login rule, follow the steps below.
- Click the Register button at the top right of the rule list.
- Enter the rule’s name and description on the rule registration screen.
- Refer to the following and enter the rule items.
| Name | Explanation |
|---|---|
| Name | This is the name of the rule. |
| Explanation | This is an explanation of the rules. |
| User group assignment | Select the user group to apply the rule to. |
| Profile property assignment | Click the ‘Add’ button in the profile property assignment list to add a property. Refer to the help below for descriptions of the property and operator. |
| Group Settings | Specify the group that the logged-in user belongs to as a member. |
| User attribute list | Specify the attributes of the user logging in and the conditions for each attribute. |
| Add User Property button | Display the “Add Property” popup on the screen. |
Table. Add rule
Access Environment
| Name | Explanation |
|---|---|
| Network | Specify the IP or network range of the user logging in. The default is “IP address anywhere”.- Desktop- Mobile |
| Platform | Specify the device information of the user who logs in. The default is “Any platforms”.- Desktop- Mobile |
| browser | Specifies the browser information of the user who logs in. The default is “Any browsers”.- Edge- Chrome- Safari |
| OS | Specify the OS information for login. The default is “Any OS”.- Windows 10- Windows 11- Android- iOS |
| AND Anomalies (Abnormal behavior) | Set the condition to determine whether abnormal behavior is detected during login.Abnormal behavior detection condition settings are only available for tenants who have purchased the Abnormal Behavior Detection (ADM) feature option.To use the Abnormal Behavior Detection (ADM) feature, you must select the additional option when signing a SingleID contract.If you wish to use the Abnormal Behavior Detection feature, you can purchase it additionally on the SCP product purchase page.After configuring all “WHEN” condition areas, set the login method that will be used when a user matching the conditions logs in. |
Table. Access environment
guide
The selectable user attributes are as follows.
User attribute information
| attribute name | Data type | Required? | Explanation |
|---|---|---|---|
| key | String | Required | Key |
| username | String | Required | ID |
| password | GuardedString | Required | Password |
| status | String | Required | status |
| mustChangePassword | Boolean | Required | Whether password enforcement is required |
| suspended | Boolean | Required | Standby status |
| creator | String | - | constructor |
| creationDate | Date | - | Creation date |
| lastModifier | String | - | Last editor |
| lastChangeDate | Date | - | Last modified date |
| administrator | Boolean | - | Admin status |
| displayName | String | - | Display name |
| cn | String | - | Common Name |
| local | String | - | Locale (email sending standard) |
| userSource | String | - | User source |
| syncDate | String | - | Last synchronization time |
| contractNumber | String | - | Contract Number |
| contractStartDate | String | - | Contract start date |
| contractEndDate | String | - | Contract End Date |
| agreementDate | String | - | Date of required terms agreement |
| accountStartDate | String | - | Account start date |
| accountEndDate | String | - | Account expiration date |
| partnerOrganizationCode | String | - | Partner company code |
| approvalUser | String | - | Approver ID |
| formattedName | String | - | Korean display name |
| familyName | String | - | Korean surname |
| givenName | String | - | Korean name |
| enFormattedName | String | - | English display name |
| enFamilyName | String | - | English surname |
| enGivenName | String | - | English name |
| adDomain | String | - | AD Domain |
| nickName | String | - | nickname |
| employeeNumber | String | - | Employee ID |
| epId | String | - | EP ID |
| String | - | Email address | |
| phoneNumberWork | String | - | phone number |
| mobile | String | - | mobile phone number |
| title | String | - | Job title |
| enTitle | String | - | English job title |
| titleCode | String | - | Job grade code |
| entitlement | String | - | Job title |
| department | String | - | Department name |
| enDepartment | String | - | English department name |
| departmentCode | String | - | Department code |
| organization | String | - | Company name |
| enOrganization | String | - | English company name |
| organizationCode | String | - | Company code |
| region | String | - | base |
| userStatus | String | - | Employee status |
| userType | String | - | Employee type |
| securityLevel | String | - | Security rating |
| preferredLanguage | String | - | Knox language |
| executiveYn | String | - | Executive status |
| timeZone | String | - | Time zone |
| accountLocked | Boolean | - | Forced account lock |
| accountAutoLocked | Boolean | - | Automatic account lock |
| accountDisabled | Boolean | - | Unused account |
| accountSuspended | Boolean | - | Dormant account |
| accountSuspendedTime | Date | - | Dormant processing time |
| lastLoginTime | Date | - | Last login time |
| accountState | String | - | Account status |
Table. User attributes
The operators are as follows.
| operator | Explanation |
|---|---|
| Equals | Searches for users whose attribute value matches the condition value. |
| Not Equals | Search for users whose attribute values do not match the condition value. |
| Starts with | Search for users whose attribute value starts with the condition string. |
| Ends with | Search for users whose attribute value ends with the condition string. |
| Contains | Search for users whose attribute value includes the condition string. |
Table.operator
THEN configuration
THEN Set the login method and procedure in the result area.
In the access permission setting (a), you can select one of the following two options.
- Deny Access
- Allow Access
If you select Deny Access, login for all users will be denied. (The default value for the access permission setting (a) is Deny Access.)
To allow users to log in and configure detailed login methods, select Allow Access.
| Name | Explanation |
|---|---|
| Configure access permission | Set whether access is allowed. |
| First login setup | Set the primary login method. Additional login methods can be displayed on the login screen besides the default login method. |
| Additional login settings | Configure it to require an additional login after the initial login succeeds. |
| Terms and Conditions Agreement Settings | Configure it to display the terms and conditions and request consent when a user logs into SingleID for the first time. |
| PC SSO Agent Settings | Configure it to verify whether a security program (Endpoint Security) is installed on the user’s PC using the PC SSO Agent. |
| Save button | Save the modified login rules. |
Table. THEN
- Select the Authenticator to use for login from the first login configuration’s selection list.
- If you want users to be able to log in with another Authenticator in addition to the selected primary login method, select the checkbox (V) of And allow another factors below: and choose one or more Authenticators to add in the text input box.
guide
On the Initial Redirection screen, if you select Redirected to the external IdP as the method to enter the login screen, the first login settings will not be displayed.
The first login occurs at an external Identity Provider according to the Initial Redirection settings.
- To require users to log in via multi-factor authentication, select the checkbox (V) in the additional login settings, then choose one or more Authenticators in the text input field.
- If a user logs in to SIngleID for the first time, to display the terms and conditions and request the user’s consent, check the terms and conditions consent setting checkbox and then select one or more terms or conditions to display on the screen from the text input box.
- To verify whether a security program (Endpoint Security) is installed on a user’s PC using the PC SSO Agent, select the checkbox (V) in the PC SSO Agent settings. When this setting is enabled, login attempts from users whose PCs do not have the security program installed will be blocked.
If the PC SSO Agent is not registered, the PC SSO Agent configuration option will not be displayed on the screen.
When the PC SSO Agent setting (e) is enabled, if you want to require additional authentication instead of blocking the login of users who do not have a security program installed on the PC, select the checkbox (V) below and then choose one or more Authenticators in the text input box.
Click the Save button to register the login rule and return to the rule list.
Rule priority management
If one or more login rules are added, the administrator can set the priority among the login rules. If a user matches the conditions set in multiple rules, the login method of the rule with the higher priority will be applied.
Follow the steps below to set the priority of login rules.
- Drag the ≡ area displayed to the left of the rule name in the rule list with the mouse.
- The priority of login rules is determined by the drag-and-drop location.
- Rules that appear higher in the list have higher priority.
Reference
The Default Policy has the lowest priority and its priority cannot be changed.
Policy Status Change
The status of the login policies managed by SingleID is as follows.
| status | Explanation |
|---|---|
| Active | Login policy operating normally |
| Inactive | Login policy disabled by the administrator |
Table. Policy status
The administrator can change the login policy status according to its current state as follows.
| Current status | Mutable state | Explanation |
|---|---|---|
| Active | Inactive | Click the Disable button to change an active login policy to an inactive state. |
| Inactive | Active | Click the Activate button to change a disabled login policy to an active state. You can also delete a disabled login policy. |
Table. Policy status
information
Among login policies, the two policies provided by default in SingleID, Admin Portal Policy and Default Policy, cannot be disabled.
If you disable a login policy, applications assigned to the disabled login policy will automatically be changed to be assigned to the default policy (Default Policy).
Disable policy
To disable an active login policy, follow these steps.
- Click the policy you want to deactivate in the policy list to navigate to the policy detail screen.
- Click the Disable button.
- Confirm popup displays login policy information (number of assigned applications, number of rules included in the login policy); after reviewing it, click the Deactivate button.
guide
If you disable a login policy, applications assigned to the disabled login policy will automatically be changed to be assigned to the default policy (Default Policy).
Even if you reactivate a disabled login policy, the applications previously assigned are not automatically reassigned.
Policy activation
To change a login policy from inactive to active, follow these steps.
- Click the policy you want to activate in the policy list to navigate to the policy detail screen.
- Click the Activate button to change the login policy status to active.
guide
When activating a login policy that is disabled, the status changes immediately without a separate confirmation popup.
Delete Policy
Administrators can delete the login policy from SingleID.
To delete the login policy, follow these steps.
- Click the policy you want to delete in the policy list to navigate to the policy detail screen.
- If the login policy is enabled, click the Disable button to deactivate the policy.
- Click the Delete button displayed at the top right of the disabled login policy.
- A popup screen confirming the deletion of the login policy is displayed.
- To delete a login policy, first review the policy information, then enter the name of the policy you want to delete and click the Delete button.
Reference
Deleted login policies cannot be restored.
When a login policy is deleted, the rules contained within the policy are also deleted, and even if you re-register a login policy with the same name, the deleted rules or configuration information will not be restored.
Access Simulation
When there are many login policies and the rules they contain, it can be difficult to determine which user is governed by which policy for login methods.
SingleID provides an access simulation feature that allows administrators to quickly verify the login policies and rules applied to users.
Using the access simulation feature, you can select the user and the target application, arbitrarily define the user’s login environment (network, device, browser, OS), and predict in advance which login method the user will experience under various circumstances.
Additionally, if there are review requests from users experiencing login difficulties, you can quickly verify using the access simulation feature and modify the problematic policies or rules.
To use the access simulation feature, click the Access Simulation button located at the top right of the login policy list screen.
| Name | Explanation |
|---|---|
| Enter user ID | Enter the user ID of the simulation target. |
| Network Settings | Specify the IP address of the user to simulate. The default is “IP address anywhere”. |
| Platform Settings | Specify the device information of the user to be simulated. The default is “Any platforms”. |
| Browser Settings | Specifies the browser information of the user to be simulated. The default is “Any browsers”. |
| OS Settings | Specify the OS information of the user to be simulated. The default is “Any OS”. |
| Select Application | Select the application to be simulated. Click the application selection button to display the popup. |
| Run Simulation button | Run the access simulation. |
| Simulation results | Displays the access simulation results on the screen. The login policies and rules applied to the specified user are shown. |
| List button | Return to the login policy list. |
Table. Access Simulation
To run the access simulation, follow the steps below.
- Enter the ID of the user to be simulated.
- Specify the IP of the user to simulate. After selecting Specific IP Address, you can manually enter the IP. Enter the IP in the format 123.123.123.123.
- Specify the device information of the user to simulate. After selecting Platform, you can choose a device from the selection list.
- Specify the browser information of the user to be simulated. After selecting Browser, you can choose a browser from the dropdown list.
- Specify the OS information of the user to simulate. After selecting OS, you can choose the OS from the selection list.
- Click the Application Selection button to select the application to simulate.
- In the Application Selection popup, click the radio button to the left of the application name to select the application, then click the Add button.
Reference
If you want to re-select the application, click the X button to the right of the selected application name, then click the Select Application button again.
- Click the Run Simulation button.
- The access simulation runs, and when it finishes, the login policies and rules are displayed on the screen according to the simulation results as shown below.
Authentication Policy
The administrator needs to change detailed authentication settings according to the organization’s security policy.
SingleID classifies and manages detailed authentication settings into the following four policies.
- Session Policy
- Authenticator policy
- MFA Service Provider Policy
- Password Policy
To access the authentication policy menu, navigate as follows.
- Admin Portal > Policy > Authentication Policy
To modify the authentication policy, click the Edit button at the lower right of the authentication policy screen to change the settings, then click the Save button.
Session Policy
To change the session policy, follow the steps below.
- Click the Edit button at the lower right of the authentication policy screen.
- In the maximum session limit setting, you set the maximum number of sessions a user can create simultaneously.
- The minimum value that can be set is 1, and the maximum value is 100. When set to 1, a user can log in only from a single browser at a time and cannot log in simultaneously from multiple PCs or browsers.
- Set the priority of the session created by the user in the session priority settings. The priority can be selected from the following two options.
- Old session
- New session
When you set the maximum session limit to 1 and select Old session, a logged-in user will be blocked from logging in when they attempt a new login from another PC or browser where they are not logged in.
Also, when the maximum session limit setting (Œ) restricts the maximum number of sessions to 1 and New session is selected, if a logged-in user attempts a new login from another PC or browser that is not logged in, the previous browser’s session is forcibly expired and the session logged in from the new PC or browser is maintained.
In the maximum session time setting, set the maximum duration a session can be retained.
The maximum session time can be set to one of the following two options.
- No time limit
- Set time limit
If you set No time limit, a session that has been created will not automatically expire until the user logs out. After setting Set time limit and specifying a time, the session expires when the set time elapses, and the user is automatically logged out. Configure the maximum idle session time for the session in the maximum idle session time setting. If you set the maximum idle session time, the session will expire and the user will be automatically logged out when the user does not make an authentication request for the configured duration.
To save the changed settings, click the Save button at the bottom right of the authentication policy screen.
To avoid saving the changed settings, click the Cancel button at the lower right of the authentication policy screen.
| Name | Explanation |
|---|---|
| Maximum session limit setting | Sets the maximum number of concurrent sessions per user. |
| Session priority setting | When a session exceeds the user’s maximum concurrent session count, set the priority between the previous session and the new session. |
| Maximum session time setting | Set the maximum session duration after the session is created. The session expires when the maximum session duration elapses. |
| Maximum idle session time setting | Set the session expiration time for when the user does not make an authentication request to the server for a certain period after the session is created. |
Table. Access Simulation
Authenticator policy
To change the Authenticator policy, follow the steps below.
- Click the Edit button at the lower right of the authentication policy screen.
- Configure according to each item below.
- When the setup is complete, click the Save button.
| Name | Explanation |
|---|---|
| Available Authenticator settings(for login policy) | Configure an Authenticator that can be used for authentication. |
| Authentication method during registration | Set the user’s primary identity verification method when registering the Authenticator. |
| Perform the following authentication. | When registering an Authenticator, set additional identity verification methods to allow beyond the primary verification method designated for the user. |
| Find Account | Set the authentication method when retrieving the ID. |
| Password reset | Set the authentication method for password recovery. |
| Unlock setting | If a user repeatedly fails authentication while using Authenticators, the ID becomes locked. You can set a duration so that the locked user’s lockout is automatically cleared after a specified period. |
Table. Authenticator policy
guide
To remove a specified Authenticator from the available Authenticator settings, it must first be removed from the rules of all login policies.
Configurable Authenticators can be registered in the Authenticator addition menu. Disabled Authenticators cannot be configured in the available Authenticator settings.
guide
If you have not purchased an MFA product
- Available Authenticator Settings (for login policy) is not displayed on this screen.
- If you want to purchase additional MFA products, please contact us via Support Center > Contact Us.
guide
If a user repeatedly enters an incorrect password, fails to log in, and becomes locked, the lock will not be released even after a certain amount of time has passed. Configure the lock and unlock methods for password‑based lockouts in Password Policy.
If you reset a user’s password from the user menu, you can unlock a locked user before the unlock wait time expires. Refer to password reset.
MFA Service Provider Policy
To change the MFA Service Provider policy, follow the steps below.
- Click the Edit button at the lower right of the authentication policy screen.
- Refer to the table below and configure each item accordingly.
- When the configuration is complete, click the Save button.
| Name | description |
|---|---|
| Available Authenticator Settings (for MFA Service Provider) | Configure the Authenticator that the user can use when an authentication request is generated by the MFA Service Provider. |
| Terms and Conditions Options | When a user registers from the MFA Servicce Provider, you can display the terms and conditions and obtain the user’s consent. |
| Unlock setting | When an authentication request occurs from the MFA Service Provider and the user repeatedly fails authentication, the ID becomes locked. You can set a duration so that the locked user’s lockout is automatically cleared after a certain period. |
Table. MFA Service Provider Policy
guide
To remove a specified Authenticator from the available Authenticator settings, it must first be removed from all MFA Service Providers.
Configurable Authenticators can be registered from the Add Authenticator menu. Disabled Authenticators cannot be set in the available Authenticator settings.
If a user authenticates with the MFA Service Provider for the first time, to display the terms and conditions to the user and require their consent, check the terms and conditions option checkbox and then select one or more terms or conditions to display on the screen in the text input box.
If a user authenticating with the MFA Service Provider repeatedly fails authentication, the user’s ID becomes locked. To automatically unlock after a certain period, set the unlock wait time in the unlock settings.
Password Policy
To change the password policy, follow the steps below.
- Click the Edit button at the lower right of the authentication policy screen.
- Refer to the table below and configure each item accordingly.
- When the configuration is complete, click the Save button.
| Name | description |
|---|---|
| Password history | You can configure the system to prevent reuse of previously used passwords. Specify the number of recent passwords to block reuse. users will be unable to use the number of past passwords set above. |
| Password expiration | Specify the password validity period. After the validity period expires, you must change the password to log in. It can be set from 1 day to 365 days. |
| Password lock | If the password is entered incorrectly repeatedly, the user’s ID will be locked. Specify the number of allowed repeated entry failures.
|
| Pattern and Complexity | Set the minimum password length, minimum characters, numbers, etc. |
| Set minimum character count | Specifies the minimum password length. |
| Minimum alphabetic character count setting | Specifies the minimum number of alphabetic characters to include in the password. |
| Minimum number count setting | Specifies the minimum number of digits to include in the password. |
| Set minimum number of special characters | Specifies the minimum number of special characters to include in the password. |
| Set maximum character count | Specifies the maximum length of the password. |
| Allow using the user ID as the password | Set whether to allow the user’s ID to be included in the password. |
Table. Password Policy
guide
Users locked out due to repeated password entry failures must reset their password themselves to unlock the account.
To change the status of a user locked due to repeated password entry failures, refer to User Status Changes.
Sign‑up Policy
To allow user sign‑up, enable the registration policy, which permits registration of users other than those provisioned from the HR system or IdP. Through account synchronization, you can not only register, create, modify, and delete accounts but also provide features to invite users via the login screen or email.
To enable and use the registration policy, follow the steps below.
- Click Admin Portal > Policy > Sign‑up Policy.
- Enable Allow user registration.
- If you enable it, the Policy tab and User Invitation tab will appear.
- Review the descriptions of the Policy tab and the User Invitation tab below, and configure the policy.
- Click the Save button when the setup is complete.
Policy
You can set general policies for member registration.
| Name | Explanation |
|---|---|
| Display the sign‑up link on the login screen | Display the sign‑up link on the SingleID login screen.
|
| Terms and Conditions Options | Select the option to agree to the terms and conditions during sign‑up. During sign‑up, you can separately select and apply the terms and conditions. |
| Allow sign‑up invitations | When the feature is enabled, you can invite users via email. You can configure it so that only invited users can sign up, instead of using a separate registration page. With this setting, registration through the SingleID sign‑up link is not possible. |
| Sign-up input form | Set the user attributes to be entered during registration. Additional inputs can be requested based on whether they are required. |
| ID duplication prevention setting | When enabled, a suffix is added to the ID to prevent ID duplication. |
| This setting prevents cases where the ID of automatically provisioned accounts is the same. Since duplicate ID values are common, we recommend enabling this setting. When signing up, the specified PostFix value is appended to the ID. | |
| Maximum usage period | The maximum usage period is set after registration. It can be set from day 1 to day 2000. |
| Approval upon sign‑up request | When a sign‑up request is made, you can enable the approval setting to load and apply the registered approval policy. |
Table. Policy tab
Dormant User Policy
Provides a feature that changes users who have not used the SingleID system for an extended period to a dormant state. Users who have been set to a dormant state can be configured, according to the settings, to be restored either by the user themselves or by an administrator.
To enable and use the dormant user policy, follow these steps.
- Click Admin Portal > Policy > Human User Policy.
- Human User Policy Activation Click the toggle button
guide
If even one human user exists, it cannot be reverted to a disabled state.
Additional settings are as shown in the table below.
| Name | description |
|---|---|
| Criteria for setting a user as dormant | This setting converts users who do not log in to SingleID for N days into dormant users. It can be set from 1 day up to 365 days. |
| Send notification email | This setting sends notification emails to users starting N days before the dormant state. Additionally, you can also select the option to send notification emails to users when changing to the dormant state. |
| User exempt from dormant status change | Click the Add button to add an exception user for changing to dormant status. |
| Dormant State Exception Group | You can configure exceptions for users who are members of the group. |
| Long-term human user management | This feature automatically deletes a user account after it has been changed to a human user. It can be set for up to 1~365 days. - You can configure it to send a reminder email N days before deleting the user (1~30 days) - You can set it to send a notification email to the user when their information is deleted. |
| Allow dormant users to restore their status themselves. | When the option is enabled, a dormant user can restore their own status to active. A dormant user can change their status to active by resetting the password through ‘Password Reset’, which also updates the password. |
Table. Human User Policy List
Approval Policy
The administrator can select an approval system and, depending on the type, set policies for member registration and app access through various approval lines. With diverse approval policies, security policies can be flexibly applied each time they change.
Approval can be performed by distinguishing between the built-in approval system function and the Knox Portal approval system. If integration with another approval system is required, please request it via a 1:1 inquiry.
To check the approval policy, follow the path below.
- Admin Portal > Policy > Approval Policy
Approval Policy List
The administrator can select an approval system and, depending on the type, set policies for member registration and app access using various approval lines. With diverse approval policies, security policies can be flexibly applied each time they change.
| Name | Explanation |
|---|---|
| ID | This is an automatically generated ID when creating an approval policy. |
| Approval System | It is distinguished by SingleID and Knox Portal. If registration with another approval system is required, please request it via a 1:1 inquiry. |
| type | It is divided into app access and sign-up. |
| status | This is the approval policy status. If Not usable, you must change the approver and notifier. |
| Enable approval | It is categorized as in-use or not-in-use. Clicking the Details button lets you view applications that use the approval policy. |
Table. Approval Policy List
Register Approval Policy
When you click the Register button, you can set the approval system, type, approver, notification method, and approval period.
| Name | Explanation |
|---|---|
| Approval System | Two options are available.
|
| type | Two options are available.
|
| Approver | Select and register the approver and notifier. |
| Notification method | When an approval request is sent to the approver or notifier, choose the notification method. |
Table. Approval Policy Registration
Anomaly Detection Policy
SingleID provides a feature that collects and analyzes user behavior data before and after authentication in real time to determine whether there are abnormal authentication activities, and immediately notifies the user of risk when identified as belonging to an abnormal authentication category.
To access the anomalous behavior detection policy menu, proceed as follows.
- Admin Portal > Policy > Anomalous Activity Detection Policy
guide
Detailed explanations of the anomalous behavior detection policy menu are provided separately to ADM purchasing customers.
If you did not purchase the anomalous behavior detection feature as an option, you cannot view the policy management menu in the Admin Portal.
If you wish to use the anomalous behavior detection feature, please contact us via a 1:1 inquiry or reach out to a sales representative.
User Life Cycle Management
User lifecycle management provides configuration functions for setting default values when a user is created or registers, and for extending the user account’s usage period.
To enable and configure the user lifecycle management function, refer to the following.
Onboarding (subscriber)
Set the phone country code, language, and time zone when creating a user and signing up. To configure, click the Edit button at the bottom right to make changes.
Offboarding (former member)
Users can request an extension of their account usage period, and it can be configured to allow the maximum possible extension.
- Click the Activate toggle when requesting an extension of the user’s usage period.
- Enter N days for the maximum extendable period.
- Click the Change button in the usage period request approval to set the approver.
Conditional Authentication Policy
Conditional authentication policies can set rules to match the environment, settings, and individual circumstances of user accounts.
You can set the following rules.
| Name | description |
|---|---|
| Use multiple authenticators | Users who have relied on a single authentication method for an extended period must additionally verify their identity using a different type of authentication tool. |
Table. Register Conditional Authentication Policy
guide
This conditional authentication policy will have rules added continuously, and it is slated for an upgrade to a workflow feature in the future.
6.2.1.2.5 - Terms and Conditions
We provide a feature that lets each company using SingleID manage Privacy Policy, Terms of Service, and other items according to their specific circumstances and characteristics.
You can draft a privacy policy that meets your organization’s requirements and notify users, or for users of SingleID, display the terms of service or usage conditions before use and obtain their consent.
Through the Terms and Conditions menu, you can notify users of the privacy policy, terms of use, usage conditions, etc., and obtain their consent. SingleID provides a default template to make drafting terms and conditions easier.
To access the Terms and Conditions menu, proceed as follows.
- Tenant Admin Portal > Rebranding > Terms and Conditions
The features provided in the Terms and Conditions menu are as follows.
- Terms and Conditions Property Settings
- Version management of terms and conditions
- Issuance of terms and conditions
Terms and Conditions List
The tenant administrator can view the terms and conditions in a list format.
The default template provided by SingleID is as follows.
Terms Type Template
- Privacy
- Terms of Use
- Collection and Use of Personal Information
- Marketing
Condition Type Template
- Are you over age 14?
Cookie Type Template
- Cookie
From the list, click a term or condition to edit its settings and navigate to its detailed screen.
| Name | Explanation |
|---|---|
| type | The type is displayed as an icon. |
| Name | The name is displayed. |
| Explanation | The description is displayed. |
| Type Settings | You can change the type. |
| Name | You can edit the name. |
| Set required status | You can set whether it is required. |
| Email notification setting | You can configure whether to notify changes via email when terms or conditions are modified. |
| Explanation | You can edit the description. |
| Registration date and registrant | The registration date and registrant are displayed. |
| Modified Date | The last modified date and the last modifier are displayed. |
| List button | This is a button that returns to the list. |
| Edit button | Modify the terms or conditions. |
Table. List of terms and conditions
- In the detail screen of the terms or conditions, select the General Settings tab.
- Click the Edit button.
- Title can be edited.
- You can edit required status. The selectable options are as follows.
- Required: If these terms or conditions are presented to the user and they do not agree, usage will be restricted, preventing further login.
- Choice: Whether you agree is up to the user, and even if you do not agree to the terms or conditions, you will not be restricted from logging in.
- Note: We do not verify consent.
- You can edit the description of terms or conditions. The description is not shown to users and is used for the administrator’s reference.
- If you have modified all settings, click the Save button.
To return to the view state without saving the edited information, click the Cancel button.
Terms and Conditions Version Management
Tenant administrators can view and manage the versioned list of terms and conditions. The default version for each term and condition is v1.0.0, and it is registered by default for each template when a tenant is created. To view the version list, click the Version History tab on the detailed screen of the terms or conditions.
Version History
You can view the previous version by clicking the Version item at the top of the privacy policy and terms of use.
Click List to view the history of past publications. Once a version has been published, it cannot be edited.
Add version
If you click the Add button on the Version History tab, you can create a new version of terms and conditions.
If you want to add a version, follow the steps below.
- Click the Add button in the Version History tab.
- Click the desired locale to select the writing language.
- The language you selected indicates the region to be displayed in the privacy policy and terms of service. You need to draft the terms and conditions for each selected language.
- Enter the title and content for each locale language.
- Click the Save button and click the List button to return to the list.
After completing the draft, review the written article.
Reissue
Newly created versions are published by setting a reissue date.
To publish a new version, follow the steps below.
- In the Version History tab, click the Reissue Scheduled Date button.
- Set the version.
- Set the reissue date.
- Enable Reissue Modification. If enabled, the revised terms/conditions will be reissued, and users may need to consent based on the General Settings > Required status as of the terms/conditions modification date.
- Modification reason, please enter briefly.
- Click the Publish Settings button to complete the configuration.
Reference
Before the scheduled reissue date, you can edit the titles and content of the terms and conditions. After reissuance, editing is prohibited for version control.
In the version history tab, pressing the Delete button in the version history list cancels the republishing.
6.2.1.2.6 - Settings
The Settings menu consists of Role Management, which manages the permissions of Admin Portal administrators, Ledger Management, which registers and manages SoT (ledger), and SMS Service, which registers SMS integration information used for secondary multi-factor authentication.
Role management
Role management can control the permissions of administrators in the Admin Portal. In accordance with the principle of least privilege, we provide role management so administrators can have minimal permissions while managing.
Administrators have two roles by default.
- ADMINSTRATOR - Super administrator account with all privileges
- SOT_MANAGER - Director, an account with application system administrator and app management functions
Information
The Role permissions are configured only with ADMINISTRATOR and SOT_MANAGER permissions. If you need to add permissions, please contact us via 1:1 inquiry.
User assignment
To add a user with ADMINISTRATOR privileges, follow the steps below.
- Select ADMINSTRATOR from the menu and click the User tab.
- To add a user, click the Add button.
- You can search for a user using the user ID, name, email address you want to add.
- After searching for a user and selecting, click the Add button to add the user.
Reference
Delete User
Select the user you want to delete and click Delete to remove them.
Director Management
SingleID can manage, view, and administer various SoTs.
| Name | Explanation |
|---|---|
| default | There are two basic types, and they are generated automatically. - Mfa: Users coming from the MFA Service Provider (primary authentication system) correspond to the Mfa type. (When the MFA Service Provider does not specify a SoT) - SingleID: Users and Groups created by an administrator through the Admin Portal’s Identity Store are linked to the corresponding SoT. |
| Application | It is an SoT that is automatically created by receiving user/group information through inbound provisioning from an external application (SoT). |
| MFA service Provider | This is the SoT automatically generated based on the User Tag entered when creating an MFA Service Provider. |
Table. Ledger Management
default
- It is the primary ledger of SingleID, receiving entries via the Identity Store and MFA Service Provider.
- Mfa: Mfa is the default SoT of the MFA service provider. * All users created through an MFA Service Provider without a specified User Tag are managed as MFA SoT. * MFA cannot be changed or deleted.
- SingleID: SingleID is the default SoT. * It is used to manage users and groups created through the Admin Portal. * The SingleID cannot be changed or deleted.
Application
- It is a ledger that is automatically created by receiving user/group information via inbound provisioning from an external application (SoT).
- You can assign the person in charge of managing the ledger through the PIC tab (up to 50 people).
MFA Service Provider
- When registered as an MFA Service Provider, setting a User tag creates a SoT, and new users who receive secondary authentication from that system are tagged with #SoT.
- You can view and manage the ledger received through this MFA Service Provider.
- You can assign the person in charge of managing the ledger through the PIC tab (up to 50 people).
Information
The ledger has a role assigned to a responsible person, and SoT administrators can only view, edit, or delete the ledger that has been assigned to them.
SMS service configuration
The administrator can enable the SMS service using the activation toggle button.
SCP SMS Service Settings
After activating the SMS service, set the SCP SMS service in the SMS service settings.
| Name | Explanation |
|---|---|
| Activate SMS service | Set SMS service activation/deactivation to toggle mode |
| External SMS Service Configuration | Select SMS to use (SCP SMS) |
| SMS service configuration | Selected SMS settings (URL and key registration) |
| SMS sending test | Settings for SMS sending test |
Table. SCP SMS Service Configuration
To configure and use the SMS service, follow the steps below.
- SMS Service Activation Click the toggle button to activate the service.
- Select SCP SMS Service.
- Click Edit to enter the required values for configuring SMS and save.
- SCP SMS - SCP SMS Service Endpoint URL, SCP SMS Service App Key
- Click the Save button to save changes. 4. When you click the Save button, a notification popup appears asking whether to save the changes.
- When you click the Confirm button, the changes are saved, and a toast message appears when the changes are successfully completed. 5. When the Cancel button is clicked, the admin’s registration/edit changes are not updated and it returns to the SMS screen.
Knox SMS Settings
Knox SMS is an SMS service provided by Knox. After enabling the SMS service, select Knox SMS to configure it.
| Name | Explanation |
|---|---|
| External SMS Service Configuration | Select SMS service to use (Knox SMS) |
| Selected SMS service settings | Register caller phone number |
| SMS signature | When you enable the activation toggle, you can set the first phrase for SMS sending. It is added as the initial header in the SMS content according to the customer’s situation. Example: [XX Electronics] |
| SMS sending test | Settings for SMS sending test |
Table. Knox SMS
SMS sending test
To set up and use the Knox SMS service, follow the steps below.
- Knox selects the SMS service.
- Click Edit to register the sender phone number for configuring the SMS service.
- To save changes, click the Save button.
- To verify that the SMS settings are correct, you can enter a phone number for the SMS sending test and click Send to perform the test.
- When you click the Send button, a popup appears asking whether to send an SMS test to that number. 5. When you click Confirm, an SMS is sent to the entered number and a popup appears. 5. A toast message appears indicating that an SMS has been sent to the specified number.
InfoBank SMS Settings
After activating the SMS service, select Infobank SMS in the SMS service settings and configure it.
| Name | Explanation |
|---|---|
| Select SMS service | Select SMS service (InfoBank SMS) |
| API Key | Set the API Key for the Infobank SMS service. To use both domestic and international SMS services with a single API key, contact the Infobank provider. |
| Sender ID | It is an identification code entered to specify the original sending carrier when sending SMS, using the additional telecom carrier registration number (a 9‑digit number). |
| 2. If the original sending carrier is a reseller, the original reseller’s registration number is used, and if the message is sent directly by a message relay without going through a reseller, the relay’s registration number is used. | |
| For additional inquiries, please contact the Infobank SMS service provider. | |
| Caller phone number | Please enter the sending phone number. |
| SMS signature setting | Click the activation button to display the SMS signature input field. The SMS signature is a signature used at the beginning of the message body when sending an SMS. 1. The signature can be used for the recipient to verify the sender and to exempt the message from blocking when sending international SMS. 2. The default signature is ‘[SingleID]’, and when a signature is set, it is automatically added at the beginning of the SMS message. 3. For the signature specifications for exempting international SMS from blocking, contact the Infobank SMS service provider and configure according to the specifications. ※ For detailed inquiries regarding signatures, please contact the Infobank SMS service provider. |
| SMS signature | Please enter the SMS signature. |
| SMS sending test | Settings for SMS sending test. |
Table. Infobank SMS
SMS sending test
To set up and test the SMS service, follow the steps below.
- Enter the mobile number to receive the test.
- To verify that the SMS settings are correct, enter a phone number for the SMS sending test and click Send to perform the test.
- When you click the Send button, a popup appears asking whether to send an SMS test to that number. 3. When you click Confirm, an SMS is sent to the entered number and a popup window appears. 3. A toast message appears indicating that an SMS has been sent to the specified number.
Bizppurio SMS Settings
After activating the SMS service, select Bizburio SMS in the Bizburio SMS service settings to configure it.
| Name | Explanation |
|---|---|
| Select SMS service | Select SMS service to use (BizBburio SMS) |
| Caller phone number | Enter the sending phone number. |
| SMS signature setting | Click the activation button to display the SMS signature input field. The SMS signature is the signature used at the beginning of the message body when sending an SMS. 1. The signature can be used to verify the sender when the user receives a message and to exclude blocking when sending international SMS. 2. The default signature is ‘[SingleID]’, and when a signature is set, it is automatically added at the start of the SMS message. 3. For the signature specifications used to exclude blocking in international SMS sending, contact the Infobank SMS service provider and configure it according to the specifications. ※ For detailed inquiries about signatures, please contact the Infobank SMS service provider. |
| SMS signature | Please enter the SMS signature. |
Table. BizpuriO SMS
User profile
You can view and edit the attributes that compose a user profile, or add custom attributes. Attributes are classified into three categories: default, system, and custom. You can modify some attribute settings depending on the category.
ㆍ Default : This is a property displayed on the Admin Portal or User Portal screen. Some property settings can be modified, but properties cannot be deleted. ㆍ System : A predefined attribute that can be used for inbound or outbound provisioning profile mapping of an application, and cannot be modified or deleted. ㆍ Custom : A property that an administrator can add so that it can be displayed on the screen or used for mapping the application’s provisioning profile. You can edit after adding, but you cannot delete.
Add custom property
SingleID can be managed by adding custom attributes.
To add a custom property, follow the steps below.
- Select Admin Portal > Settings > User Profile.
- Click the Add Custom Property button in the user profile list.
- Add Custom Property A popup window appears.
- After entering and configuring all required fields, click the Add button.
- Click the Add button, and a custom property will be added.
Information
You can add up to 100 custom attributes, and added custom attributes cannot be deleted.
| Name | Explanation |
|---|---|
| Attribute name | Please add the attribute name. Only letters and numbers are allowed. |
| Data type | Please select the data type. - String : A type that represents text data. - Boolean : A logical data type that has only two values, true (True) or false (False). - Number : Numeric data that can be used in arithmetic operations. It includes both integers and decimals (floating-point numbers). - Date : A type that handles date and time information such as year, month, day, and hour. |
| Display on Admin Portal | Indicates whether to display in the detailed user list of the Admin Portal. - Display Name (English): Enter the English display name. - Display Name (Korean): Enter the Korean display name. - UI Component: Select the UI to display. - Required Input: Choose whether it is a required field. - Show in User Portal: Choose whether to display on the User Portal personal profile. |
| Service with SSO Claim | Select whether to provide the service using SSO Claim. |
| Service with Open API | Select whether to offer the service via Open API. |
Table. Add custom attribute
6.2.1.2.7 - Monitoring
The Monitoring menu lets you view the login history of all users, MFA history, and administrator audit logs.
Login History
Provides users’ login history through the Monitoring menu. Users can also view their own login history via the User Portal.
| Name | Explanation |
|---|---|
| All | Clicking All displays the history of successful and failed logins. |
| Success | When you click Success, the history of successful logins will be displayed. |
| This record shows that the user successfully logged in. | |
| Failure | Clicking Failure will display the history of failed login attempts. |
| This entry records a user login failure. | |
| CSV download | Clicking CSV Download will download the history as a CSV file. |
Table. Login History
| Name | Explanation |
|---|---|
| Login date and time | The date and time the user logged in |
| ID | User ID |
| Name | User name |
| Location | User’s connection location |
| country | Country of connection |
| city | Connected city |
| IP address | Connecting IP address |
| Application | Connecting application |
| Operating System | Operating system environment you are connecting to |
| Browser | Connecting browser |
| Detection | Detection |
| Result | Login success result |
Table. Login history items
MFA History
In the Admin Portal, you can view users’ MFA (multi-factor authentication) history through the Monitoring menu. Users can also view their own MFA history via the User Portal.
guide
You need to purchase the MFA product to view the log.
| Name | Explanation |
|---|---|
| All | Clicking All displays the history of successful and failed composite authentication. |
| Success | When you click Success, the history of successful multi-factor authentication is retrieved. This history is the record of the user successfully logging in. |
| Failure | Clicking “Failure” will display the history of failed multi-factor authentication. This history shows the user’s failed login attempts. |
| Expiration | Clicking Expire displays the history of expired multi-factor authentication. |
| CSV download | Clicking CSV Download will download the history as a CSV file. |
Table. MFA history
| Name | Explanation |
|---|---|
| Event date and time | Date and time the user attempted multi-factor authentication |
| ID | User ID |
| Name | User name |
| IP address | Connecting IP address |
| Management entity | User account management entity |
| Event type | Types used for authentication - Enrollment : Registration - Authentication : Authentication - Secondary multi-factor authentication |
| Application | Connecting application |
| System code | System code entered when registering the MFA provider |
| Authenticator | Authentication methods used for multi-factor authentication |
| Result | Login success result |
Table. MFA history items
guide
You need to purchase the MFA product to view the log.
Administrator audit log
In the Admin Portal, the monitoring menu records the administrator’s activity history.
| Name | Explanation |
|---|---|
| date | Log timestamp |
| ID | Administrator ID |
| Menu | Menu |
| Submenu | Submenu |
| Action | Activity Log - View : Retrieve - List : List View - Update : Edit - Create : Create |
| Event type | Types used for authentication - Enrollment : Registration - Authentication : Authentication - Secondary multi-factor authentication |
| Result | Result of activity log |
Table. Administrator Audit Log
guide
To download monitoring history as Excel (CSV), we recommend staying below the following count. You can adjust the number of retrieved items by changing the search criteria.
- Login history: 20,000 entries or less
- MFA history: 100,000 entries or less
- Administrator audit log: 20,000 entries or less
6.2.1.2.8 - Open Source licence
The open source licenses used in the SingleID solution are as follows. For more details, see below.
SingleID_SSO-Agent-Windows
The following sets forth attribution notices for third party software that may be contained in portions of this product. If you have any questions, please contact global.cs@samsung.com
| License | Open Source Component | License Text |
|---|---|---|
| BSD 3-clause “New” or “Revised” License | NLog - Advanced .NET Logging http://www.nuget.org/packages/NLog | NLog - Advanced .NET Logging: Copyright (c)2004-2023 Nlog Redistribution and use in source and binary forms, with or without modification, are permitted provided that the following conditions are met: * Redistributions of source code must retain the above copyright notice, this list of conditions and the following disclaimer. * Redistributions in binary form must reproduce the above copyright notice, this list of conditions and the following disclaimer in the documentation and/or other materials provided with the distribution. * Neither the name of the THIS SOFTWARE IS PROVIDED BY THE COPYRIGHT HOLDERS AND CONTRIBUTORS “AS IS” AND ANY EXPRESS OR IMPLIED WARRANTIES, INCLUDING, BUT NOT LIMITED TO, THE IMPLIED WARRANTIES OF MERCHANTABILITY AND FITNESS FOR A PARTICULAR PURPOSE ARE DISCLAIMED. IN NO EVENT SHALL THE COPYRIGHT OWNER OR CONTRIBUTORS BE LIABLE FOR ANY DIRECT, INDIRECT, INCIDENTAL, SPECIAL, EXEMPLARY, OR CONSEQUENTIAL DAMAGES (INCLUDING, BUT NOT LIMITED TO, PROCUREMENT OF SUBSTITUTE GOODS OR SERVICES; LOSS OF USE, DATA, OR PROFITS; OR BUSINESS INTERRUPTION) HOWEVER CAUSED AND ON ANY THEORY OF LIABILITY, WHETHER IN CONTRACT, STRICT LIABILITY, OR TORT (INCLUDING NEGLIGENCE OR OTHERWISE) ARISING IN ANY WAY OUT OF THE USE OF THIS SOFTWARE, EVEN IF ADVISED THE POSSIBILITY OF SUCH DAMAGE. |
| MIT License | Jose JWT: http://www.nuget.org/packages/jose-jwt cassia: http://www.nuget.org/packages/Cassia Bouncy-Castle: https://www.nuget.org/packages/Bouncy-Castle Fody: http://www.nuget.org/packages/Fody Json.NET: http://www.nuget.org/packages/Newtonsoft.Json Costura.Fody: http://www.nuget.org/packages/Costura.Fody Opencover: http://www.nuget.org/packages/OpenCover Fleck2: http://www.nuget.org/packages/Fleck2 chartist-js: http://github.com/gionkunz/chartist-js/ | The MIT License Jose JWT: Copyright (c) 2014-2021 dvsekhvalnov cassia: Copyright (c) 2008 - 2017 Dan Ports Bouncy-Castle: Copyright (c) 2000-2023 The Legion of the Bouncy Castle Inc. Bouncy-Castle: https://www.nuget.org/packages/Bouncy-Castle Fody: http://www.nuget.org/packages/Fody Json.NET: http://www.nuget.org/packages/Newtonsoft.Json Costura.Fody: http://www.nuget.org/packages/Costura.Fody Opencover: http://www.nuget.org/packages/OpenCover Fleck2: http://www.nuget.org/packages/Fleck2 chartist-js: http://github.com/gionkunz/chartist-js/ Fody: Copyright (c) Simon Cropp Json.NET: Copyright (c) 2007 James Newton-King Costura.Fody: Copyright (c) 2012 Simon Cropp and contributors Opencover: Copyright (c) 2011-2019 Shaun Wilde Fleck2: Copyright (c) 2013 Peter Sunde Copyright (c) 2010-2012 Jason Staten chartist-js: Copyright (c)2013 Gion Kunz gion.kunz@gmail.com Permission is hereby granted, free of charge, to any person obtaining a copy of this software and associated documentation files (the “Software”), to deal in the Software without restriction, including without limitation the rights to use, copy, modify, merge, publish, distribute, sublicense, and/or sell copies of the Software, and to permit persons to whom the Software is furnished to do so, subject to the following conditions: The above copyright notice and this permission notice shall be included in all copies or substantial portions of the Software. THE SOFTWARE IS PROVIDED “AS IS”, WITHOUT WARRANTY OF ANY KIND, EXPRESS OR IMPLIED, INCLUDING BUT NOT LIMITED TO THE WARRANTIES OF MERCHANTABILITY, FITNESS FOR A PARTICULAR PURPOSE AND NONINFRINGEMENT. IN NO EVENT SHALL THE AUTHORS OR COPYRIGHT HOLDERS BE LIABLE FOR ANY CLAIM, DAMAGES OR OTHER LIABILITY, WHETHER IN AN ACTION OF CONTRACT, TORT OR OTHERWISE, ARISING FROM, OUT OF OR IN CONNECTION WITH THE SOFTWARE OR THE USE OR OTHER DEALINGS IN THE SOFTWARE. |
| Mozilla Public License 2.0 | OpenRPA: https://github.com/open-rpa/openrpa.git | Mozilla Public License Version 2.0 1. Definitions 1.1. “Contributor” means each individual or legal entity that creates, contributes to the creation of, or owns Covered Software. 1.2. “Contributor Version” means the combination of the Contributions of others (if any) used by a Contributor and that particular Contributor’s Contribution. 1.3. “Contribution” means Covered Software of a particular Contributor. 1.4. “Covered Software” means Source Code Form to which the initial Contributor has attached the notice in Exhibit A, the Executable Form of such Source Code Form, and Modifications of such Source Code Form, in each case including portions thereof. 1.5. “Incompatible With Secondary Licenses” means a. that the initial Contributor has attached the notice described in Exhibit B to the Covered Software; or b. that the Covered Software was made available under the terms of version 1.1 or earlier of the License, but not also under the terms of a Secondary License. 1.6. “Executable Form” means any form of the work other than Source Code Form. 1.7. “Larger Work” means a work that combines Covered Software with other material, in a separate file or files, that is not Covered Software. 1.8. “License” means this document. 1.9. “Licensable” means having the right to grant, to the maximum extent possible, whether at the time of the initial grant or subsequently, any and all of the rights conveyed by this License. 1.10. “Modifications” means any of the following: c. any file in Source Code Form that results from an addition to, deletion from, or modification of the contents of Covered Software; or d. any new file in Source Code Form that contains any Covered Software. 1.11. “Patent Claims” of a Contributor means any patent claim(s), including without limitation, method, process, and apparatus claims, in any patent Licensable by such Contributor that would be infringed, but for the grant of the License, by the making, using, selling, offering for sale, having made, import, or transfer of either its Contributions or its Contributor Version. 1.12. “Secondary License” means either the GNU General Public License, Version 2.0, the GNU Lesser General Public License, Version 2.1, the GNU Affero General Public License, Version 3.0, or any later versions of those licenses. 1.13. “Source Code Form” means the form of the work preferred for making modifications. 1.14. “You” (or “Your”) means an individual or a legal entity exercising rights under this License. For legal entities, “You” includes any entity that controls, is controlled by, or is under common control with You. For purposes of this definition, “control” means (a) the power, direct or indirect, to cause the direction or management of such entity, whether by contract or otherwise, or (b) ownership of more than fifty percent (50%) of the outstanding shares or beneficial ownership of such entity. 2. License Grants and Conditions 2.1. Grants Each Contributor hereby grants You a world-wide, royalty-free, non-exclusive license: a. under intellectual property rights (other than patent or trademark) Licensable by such Contributor to use, reproduce, make available, modify, display, perform, distribute, and otherwise exploit its Contributions, either on an unmodified basis, with Modifications, or as part of a Larger Work; and b. under Patent Claims of such Contributor to make, use, sell, offer for sale, have made, import, and otherwise transfer either its Contributions or its Contributor Version. 2.2. Effective Date The licenses granted in Section 2.1 with respect to any Contribution become effective for each Contribution on the date the Contributor first distributes such Contribution. 2.3. Limitations on Grant Scope The licenses granted in this Section 2 are the only rights granted under this License. No additional rights or licenses will be implied from the distribution or licensing of Covered Software under this License. Notwithstanding Section 2.1(b) above, no patent license is granted by a Contributor: c. for any code that a Contributor has removed from Covered Software; or d. for infringements caused by: (i) Your and any other third party’s modifications of Covered Software, or (ii) the combination of its Contributions with other software (except as part of its Contributor Version); or e. under Patent Claims infringed by Covered Software in the absence of its Contributions. This License does not grant any rights in the trademarks, service marks, or logos of any Contributor (except as may be necessary to comply with the notice requirements in Section 3.4). 2.4. Subsequent Licenses No Contributor makes additional grants as a result of Your choice to distribute the Covered Software under a subsequent version of this License (see Section 10.2) or under the terms of a Secondary License (if permitted under the terms of Section 3.3). 2.5. Representation Each Contributor represents that the Contributor believes its Contributions are its original creation(s) or it has sufficient rights to grant the rights to its Contributions conveyed by this License. 2.6. Fair Use This License is not intended to limit any rights You have under applicable copyright doctrines of fair use, fair dealing, or other equivalents. 2.7. Conditions Sections 3.1, 3.2, 3.3, and 3.4 are conditions of the licenses granted in Section 2.1. 3. Responsibilities 3.1. Distribution of Source Form All distribution of Covered Software in Source Code Form, including any Modifications that You create or to which You contribute, must be under the terms of this License. You must inform recipients that the Source Code Form of the Covered Software is governed by the terms of this License, and how they can obtain a copy of this License. You may not attempt to alter or restrict the recipients’ rights in the Source Code Form. 3.2. Distribution of Executable Form If You distribute Covered Software in Executable Form then: a. such Covered Software must also be made available in Source Code Form, as described in Section 3.1, and You must inform recipients of the Executable Form how they can obtain a copy of such Source Code Form by reasonable means in a timely manner, at a charge no more than the cost of distribution to the recipient; and b. You may distribute such Executable Form under the terms of this License, or sublicense it under different terms, provided that the license for the Executable Form does not attempt to limit or alter the recipients’ rights in the Source Code Form under this License. 3.3. Distribution of a Larger Work You may create and distribute a Larger Work under terms of Your choice, provided that You also comply with the requirements of this License for the Covered Software. If the Larger Work is a combination of Covered Software with a work governed by one or more Secondary Licenses, and the Covered Software is not Incompatible With Secondary Licenses, this License permits You to additionally distribute such Covered Software under the terms of such Secondary License(s), so that the recipient of the Larger Work may, at their option, further distribute the Covered Software under the terms of either this License or such Secondary License(s). 3.4. Notices You may not remove or alter the substance of any license notices (including copyright notices, patent notices, disclaimers of warranty, or limitations of liability) contained within the Source Code Form of the Covered Software, except that You may alter any license notices to the extent required to remedy known factual inaccuracies. 3.5. Application of Additional Terms You may choose to offer, and to charge a fee for, warranty, support, indemnity or liability obligations to one or more recipients of Covered Software. However, You may do so only on Your own behalf, and not on behalf of any Contributor. You must make it absolutely clear that any such warranty, support, indemnity, or liability obligation is offered by You alone, and You hereby agree to indemnify every Contributor for any liability incurred by such Contributor as a result of warranty, support, indemnity or liability terms You offer. You may include additional disclaimers of warranty and limitations of liability specific to any jurisdiction. 4. Inability to Comply Due to Statute or Regulation If it is impossible for You to comply with any of the terms of this License with respect to some or all of the Covered Software due to statute, judicial order, or regulation then You must: (a) comply with the terms of this License to the maximum extent possible; and (b) describe the limitations and the code they affect. Such description must be placed in a text file included with all distributions of the Covered Software under this License. Except to the extent prohibited by statute or regulation, such description must be sufficiently detailed for a recipient of ordinary skill to be able to understand it. 5. Termination 5.1. The rights granted under this License will terminate automatically if You fail to comply with any of its terms. However, if You become compliant, then the rights granted under this License from a particular Contributor are reinstated (a) provisionally, unless and until such Contributor explicitly and finally terminates Your grants, and (b) on an ongoing basis, if such Contributor fails to notify You of the non-compliance by some reasonable means prior to 60 days after You have come back into compliance. Moreover, Your grants from a particular Contributor are reinstated on an ongoing basis if such Contributor notifies You of the non-compliance by some reasonable means, this is the first time You have received notice of non-compliance with this License from such Contributor, and You become compliant prior to 30 days after Your receipt of the notice. 5.2. If You initiate litigation against any entity by asserting a patent infringement claim (excluding declaratory judgment actions, counter-claims, and cross-claims) alleging that a Contributor Version directly or indirectly infringes any patent, then the rights granted to You by any and all Contributors for the Covered Software under Section 2.1 of this License shall terminate. 5.3. In the event of termination under Sections 5.1 or 5.2 above, all end user license agreements (excluding distributors and resellers) which have been validly granted by You or Your distributors under this License prior to termination shall survive termination. 6. Disclaimer of Warranty Covered Software is provided under this License on an “as is” basis, without warranty of any kind, either expressed, implied, or statutory, including, without limitation, warranties that the Covered Software is free of defects, merchantable, fit for a particular purpose or non-infringing. The entire risk as to the quality and performance of the Covered Software is with You. Should any Covered Software prove defective in any respect, You (not any Contributor) assume the cost of any necessary servicing, repair, or correction. This disclaimer of warranty constitutes an essential part of this License. No use of any Covered Software is authorized under this License except under this disclaimer. 7. Limitation of Liability Under no circumstances and under no legal theory, whether tort (including negligence), contract, or otherwise, shall any Contributor, or anyone who distributes Covered Software as permitted above, be liable to You for any direct, indirect, special, incidental, or consequential damages of any character including, without limitation, damages for lost profits, loss of goodwill, work stoppage, computer failure or malfunction, or any and all other commercial damages or losses, even if such party shall have been informed of the possibility of such damages. This limitation of liability shall not apply to liability for death or personal injury resulting from such party’s negligence to the extent applicable law prohibits such limitation. Some jurisdictions do not allow the exclusion or limitation of incidental or consequential damages, so this exclusion and limitation may not apply to You. 8. Litigation Any litigation relating to this License may be brought only in the courts of a jurisdiction where the defendant maintains its principal place of business and such litigation shall be governed by laws of that jurisdiction, without reference to its conflict-of-law provisions. Nothing in this Section shall prevent a party’s ability to bring cross-claims or counter-claims. 9. Miscellaneous This License represents the complete agreement concerning the subject matter hereof. If any provision of this License is held to be unenforceable, such provision shall be reformed only to the extent necessary to make it enforceable. Any law or regulation which provides that the language of a contract shall be construed against the drafter shall not be used to construe this License against a Contributor. 10. Versions of the License 10.1. New Versions Mozilla Foundation is the license steward. Except as provided in Section 10.3, no one other than the license steward has the right to modify or publish new versions of this License. Each version will be given a distinguishing version number. 10.2. Effect of New Versions You may distribute the Covered Software under the terms of the version of the License under which You originally received the Covered Software, or under the terms of any subsequent version published by the license steward. 10.3. Modified Versions If you create software not governed by this License, and you want to create a new license for such software, you may create and use a modified version of this License if you rename the license and remove any references to the name of the license steward (except to note that such modified license differs from this License). 10.4. Distributing Source Code Form that is Incompatible With Secondary Licenses If You choose to distribute Source Code Form that is Incompatible With Secondary Licenses under the terms of this version of the License, the notice described in Exhibit B of this License must be attached. Exhibit A - Source Code Form License Notice This Source Code Form is subject to the terms of the Mozilla Public License, v. 2.0. If a copy of the MPL was not distributed with this file, You can obtain one at http://mozilla.org/MPL/2.0/. If it is not possible or desirable to put the notice in a particular file, then You may include the notice in a location (such as a LICENSE file in a relevant directory) where a recipient would be likely to look for such a notice. You may add additional accurate notices of copyright ownership. Exhibit B - “Incompatible With Secondary Licenses” Notice This Source Code Form is “Incompatible With Secondary Licenses”, as defined by the Mozilla Public License, v. 2.0. |
SingleID_SSO-Agent-Windows
SingleID_ADFS-Adapter
The following sets forth attribution notices for third party software that may be contained in portions of this product. If you have any questions, please contact global.cs@samsung.com
| License | Open Source Component | License Text |
|---|---|---|
| Apache License 2.0 | Microsoft.NetFramework.Analyzers, Microsoft.CodeAnalysis.VersionCheckAnalyzer, Microsoft.NetCore.Analyzers, Microsoft.CodeAnalysis.FxCopAnalyzers, Microsoft.CodeQuality.Analyzers | Apache License Version 2.0, January 2004 http://www.apache.org/licenses/ TERMS AND CONDITIONS FOR USE, REPRODUCTION, AND DISTRIBUTION 1. Definitions. “License” shall mean the terms and conditions for use, reproduction, and distribution as defined by Sections 1 through 9 of this document. “Licensor” shall mean the copyright owner or entity authorized by the copyright owner that is granting the License. “Legal Entity” shall mean the union of the acting entity and all other entities that control, are controlled by, or are under common control with that entity. For the purposes of this definition, “control” means (i) the power, direct or indirect, to cause the direction or management of such entity, whether by contract or otherwise, or (ii) ownership of fifty percent (50%) or more of the outstanding shares, or (iii) beneficial ownership of such entity. “You” (or “Your”) shall mean an individual or Legal Entity exercising permissions granted by this License. “Source” form shall mean the preferred form for making modifications, including but not limited to software source code, documentation source, and configuration files. “Object” form shall mean any form resulting from mechanical transformation or translation of a Source form, including but not limited to compiled object code, generated documentation, and conversions to other media types. “Work” shall mean the work of authorship, whether in Source or Object form, made available under the License, as indicated by a copyright notice License Open Source Software License Text that is included in or attached to the work (an example is provided in the Appendix below). “Derivative Works” shall mean any work, whether in Source or Object form, that is based on (or derived from) the Work and for which the editorial revisions, annotations, elaborations, or other modifications represent, as a whole, an original work of authorship. For the purposes of this License, Derivative Works shall not include works that remain separable from, or merely link (or bind by name) to the interfaces of, the Work and Derivative Works thereof. “Contribution” shall mean any work of authorship, including the original version of the Work and any modifications or additions to that Work or Derivative Works thereof, that is intentionally submitted to Licensor for inclusion in the Work by the copyright owner or by an individual or Legal Entity authorized to submit on behalf of the copyright owner. For the purposes of this definition, “submitted” means any form of electronic, verbal, or written communication sent to the Licensor or its representatives, including but not limited to communication on electronic mailing lists, source code control systems, and issue tracking systems that are managed by, or on behalf of, the Licensor for the purpose of discussing and improving the Work, but excluding communication that is conspicuously marked or otherwise designated in writing by the copyright owner as “Not a Contribution.” “Contributor” shall mean Licensor and any individual or Legal Entity on behalf of whom a Contribution has been received by Licensor and subsequently incorporated within the Work. 2. Grant of Copyright License. Subject to the terms and conditions of this License, each Contributor hereby grants to You a perpetual, worldwide, non-exclusive, no-charge, royalty-free, irrevocable copyright license to reproduce, prepare Derivative Works of, publicly display, publicly perform, sublicense, and distribute the Work and such Derivative Works in Source or Object form. 3. Grant of Patent License. Subject to the terms and conditions of this License, each Contributor hereby grants to You a perpetual, worldwide, non-exclusive, no-charge, royalty-free, irrevocable (except as stated in this section) patent license to make, have made, use, offer to sell, sell, import, and otherwise transfer the Work, where such license applies only to those patent claims licensable by such Contributor that are necessarily infringed by their Contribution(s) alone or by combination of their Contribution(s) with the Work to which such Contribution(s) was submitted. If You institute patent litigation against any entity (including a cross-claim or counterclaim in a lawsuit) alleging that the Work or a Contribution incorporated within the Work constitutes direct or contributory patent infringement, then any patent licenses granted to You under this License for that Work shall terminate as of the date such litigation is filed. 4. Redistribution. You may reproduce and distribute copies of the Work or Derivative Works thereof in any medium, with or without modifications, and in Source or Object form, provided that You meet the following conditions: a. You must give any other recipients of the Work or Derivative Works a copy of this License; and b. You must cause any modified files to carry prominent notices stating that You changed the files; and c. You must retain, in the Source form of any Derivative Works that You distribute, all copyright, patent, trademark, and attribution notices from the Source form of the Work, excluding those notices that do not pertain to any part of the Derivative Works; and d. If the Work includes a “NOTICE” text file as part of its distribution, then any Derivative Works that You distribute must include a readable copy of the attribution notices contained within such NOTICE file, excluding those notices that do not pertain to any part of the Derivative Works, in at least one of the following places: within a NOTICE text file distributed as part of the Derivative Works; within the Source form or documentation, if provided along with the Derivative Works; or, within a display generated by the Derivative Works, if and wherever such third-party notices normally appear. The contents of the NOTICE file are for informational purposes only and do not modify the License. You may add Your own attribution notices within Derivative Works that You distribute, alongside or as an addendum to the NOTICE text from the Work, provided that such additional attribution notices cannot be construed as modifying the License. You may add Your own copyright statement to Your modifications and may provide additional or different license terms and conditions for use, reproduction, or distribution of Your modifications, or for any such Derivative Works as a whole, provided Your use, reproduction, and distribution of the Work otherwise complies with the conditions stated in this License. 5. Submission of Contributions. Unless You explicitly state otherwise, any Contribution intentionally submitted for inclusion in the Work by You to the Licensor shall be under the terms and conditions of this License, without any additional terms or conditions. Notwithstanding the above, nothing herein shall supersede or modify the terms of any separate license agreement you may have executed with Licensor regarding such Contributions. 6. Trademarks. This License does not grant permission to use the trade names, trademarks, service marks, or product names of the Licensor, except as required for reasonable and customary use in describing the origin of the Work and reproducing the content of the NOTICE file. 7. Disclaimer of Warranty. Unless required by applicable law or agreed to in writing, Licensor provides the Work (and each Contributor provides its Contributions) on an “AS IS” BASIS, WITHOUT WARRANTIES OR CONDITIONS OF ANY KIND, either express or implied, including, without limitation, any warranties or conditions of TITLE, NON-INFRINGEMENT, MERCHANTABILITY, or FITNESS FOR A PARTICULAR PURPOSE. You are solely responsible for determining the appropriateness of using or License Open Source Software License Text redistributing the Work and assume any risks associated with Your exercise of permissions under this License. 8. Limitation of Liability. In no event and under no legal theory, whether in tort (including negligence), contract, or otherwise, unless required by applicable law (such as deliberate and grossly negligent acts) or agreed to in writing, shall any Contributor be liable to You for damages, including any direct, indirect, special, incidental, or consequential damages of any character arising as a result of this License or out of the use or inability to use the Work (including but not limited to damages for loss of goodwill, work stoppage, computer failure or malfunction, or any and all other commercial damages or losses), even if such Contributor has been advised of the possibility of such damages. 9. Accepting Warranty or Additional Liability. While redistributing the Work or Derivative Works thereof, You may choose to offer, and charge a fee for, acceptance of support, warranty, indemnity, or other liability obligations and/or rights consistent with this License. However, in accepting such obligations, You may act only on Your own behalf and on Your sole responsibility, not on behalf of any other Contributor, and only if You agree to indemnify, defend, and hold each Contributor harmless for any liability incurred by, or claims asserted against, such Contributor by reason of your accepting any such warranty or additional liability. END OF TERMS AND CONDITIONS APPENDIX: How to apply the Apache License to your work To apply the Apache License to your work, attach the following boilerplate notice, with the fields enclosed by brackets “[]” replaced with your own identifying information. (Don’t include the brackets!) The text should be enclosed in the appropriate comment syntax for the file format. We also recommend that a file or class name and description of purpose be included on the same “printed page” as the copyright notice for easier identification within third-party archives. Copyright [yyyy] [name of copyright owner] Licensed under the Apache License, Version 2.0 (the “License”); you may not use this file except in compliance with the License. You may obtain a copy of the License at http://www.apache.org/licenses/LICENSE-2.0 Unless required by applicable law or agreed to in writing, software distributed under the License is distributed on an “AS IS” BASIS, WITHOUT WARRANTIES OR CONDITIONS OF ANY KIND, either express or implied. See the License for the specific language governing permissions and limitations under the License. |
| Microsoft .NET Library License | System.Security.Claims http://www.nuget.org/packages/System.Security.Claims | MICROSOFT SOFTWARE LICENSE TERMS MICROSOFT .NET LIBRARY These license terms are an agreement between Microsoft Corporation (or based on where you live, one of its affiliates) and you. Please read them. They apply to the software named above, which includes the media on which you received it, if any. The terms also apply to any Microsoft * updates, * supplements, * Internet-based services, and * support services for this software, unless other terms accompany those items. If so, those terms apply. BY USING THE SOFTWARE, YOU ACCEPT THESE TERMS. IF YOU DO NOT ACCEPT THEM, DO NOT USE THE SOFTWARE. IF YOU COMPLY WITH THESE LICENSE TERMS, YOU HAVE THE PERPETUAL RIGHTS BELOW. 1. INSTALLATION AND USE RIGHTS. a. Installation and Use. You may install and use any number of copies of the software to design, develop and test your programs. You may modify, copy, distribute or deploy any .js files contained in the software as part of your programs. b. Third Party Programs. The software may include third party programs that Microsoft, not the third party, licenses to you under this agreement. Notices, if any, for the third party program are included for your information only. 2. ADDITIONAL LICENSING REQUIREMENTS AND/OR USE RIGHTS. a. DISTRIBUTABLE CODE. In addition to the .js files described above, the software is comprised of Distributable Code. “Distributable Code” is code that you are permitted to distribute in programs you develop if you comply with the terms below. i. Right to Use and Distribute. * You may copy and distribute the object code form of the software. * Third Party Distribution. You may permit distributors of your programs to copy and distribute the Distributable Code as part of those programs. ii. Distribution Requirements. For any Distributable Code you distribute, you must * use the Distributable Code in your programs and not as a standalone distribution; * require distributors and external end users to agree to terms that protect it at least as much as this agreement; * display your valid copyright notice on your programs; and * indemnify, defend, and hold harmless Microsoft from any claims, including attorneys’ fees, related to the distribution or use of your programs. iii. Distribution Restrictions. You may not * alter any copyright, trademark or patent notice in the Distributable Code; * use Microsoft’s trademarks in your programs’ names or in a way that suggests your programs come from or are endorsed by Microsoft; * include Distributable Code in malicious, deceptive or unlawful programs; or * modify or distribute the source code of any Distributable Code so that any part of it becomes subject to an Excluded License. An Excluded License is one that requires, as a condition of use, modification or distribution, that * the code be disclosed or distributed in source code form; or * others have the right to modify it. 3. SCOPE OF LICENSE. The software is licensed, not sold. This agreement only gives you some rights to use the software. Microsoft reserves all other rights. Unless applicable law gives you more rights despite this limitation, you may use the software only as expressly permitted in this agreement. In doing so, you must comply with any technical limitations in the software that only allow you to use it in certain ways. You may not * work around any technical limitations in the software; * reverse engineer, decompile or disassemble the software, except and only to the extent that applicable law expressly permits, despite this limitation; * publish the software for others to copy; * rent, lease or lend the software; or * transfer the software or this agreement to any third party. BACKUP COPY. You may make one backup copy of the software. You may use it only to reinstall the software. DOCUMENTATION. Any person that has valid access to your computer or internal network may copy and use the documentation for your internal, reference purposes. EXPORT RESTRICTIONS. The software is subject to United States export laws and regulations. You must comply with all domestic and international export laws and regulations that apply to the software. These laws include restrictions on destinations, end users and end use. For additional information, see www.microsoft.com/exporting SUPPORT SERVICES. Because this software is “as is,” we may not provide support services for it. ENTIRE AGREEMENT. This agreement, and the terms for supplements, updates, Internet-based services and support services that you use, are the entire agreement for the software and support services. APPLICABLE LAW. a. United States. If you acquired the software in the United States, Washington state law governs the interpretation of this agreement and applies to claims for breach of it, regardless of conflict of laws principles. The laws of the state where you live govern all other claims, including claims under state consumer protection laws, unfair competition laws, and in tort. b. Outside the United States. If you acquired the software in any other country, the laws of that country apply. LEGAL EFFECT. This agreement describes certain legal rights. You may have other rights under the laws of your country. You may also have rights with respect to the party from whom you acquired the software. This agreement does not change your rights under the laws of your country if the laws of your country do not permit it to do so. DISCLAIMER OF WARRANTY. THE SOFTWARE IS LICENSED “AS-IS.” YOU BEAR THE RISK OF USING IT. MICROSOFT GIVES NO EXPRESS WARRANTIES, GUARANTEES OR CONDITIONS. YOU MAY HAVE ADDITIONAL CONSUMER RIGHTS OR STATUTORY GUARANTEES UNDER YOUR LOCAL LAWS WHICH THIS AGREEMENT CANNOT CHANGE. TO THE EXTENT PERMITTED UNDER YOUR LOCAL LAWS, MICROSOFT EXCLUDES THE IMPLIED WARRANTIES OF MERCHANTABILITY, FITNESS FOR A PARTICULAR PURPOSE AND NON-INFRINGEMENT. FOR AUSTRALIA – YOU HAVE STATUTORY GUARANTEES UNDER THE AUSTRALIAN CONSUMER LAW AND NOTHING IN THESE TERMS IS INTENDED TO AFFECT THOSE RIGHTS. LIMITATION ON AND EXCLUSION OF REMEDIES AND DAMAGES. YOU CAN RECOVER FROM MICROSOFT AND ITS SUPPLIERS ONLY DIRECT DAMAGES UP TO U.S. $5.00. YOU CANNOT RECOVER ANY OTHER DAMAGES, INCLUDING CONSEQUENTIAL, LOST PROFITS, SPECIAL, INDIRECT OR INCIDENTAL DAMAGES. This limitation applies to * anything related to the software, services, content (including code) on third‑party Internet sites, or third‑party programs; and claims for breach of contract, breach of warranty, guarantee or condition, strict liability, negligence, or other tort to the extent permitted by applicable law. It also applies even if Microsoft knew or should have known about the possibility of the damages. The above limitation or exclusion may not apply to you because your country may not allow the exclusion or limitation of incidental, consequential or other damages. Please note: As this software is distributed in Quebec, Canada, some of the clauses in this agreement are provided below in French. Note: This software is distributed in Quebec, Canada, and some of the clauses in this agreement are provided below in French. DISCLAIMER OF WARRANTY. The licensed software is provided “as is”. Any use of this software is at your sole risk. Microsoft gives no other express warranties. You may have additional rights under local consumer protection law, which this agreement cannot modify. Where permitted by local law, the implied warranties of merchantability, fitness for a particular purpose, and non‑infringement are excluded. LIMITATION OF DAMAGES AND EXCLUSION OF LIABILITY FOR DAMAGES. You may obtain compensation from Microsoft and its suppliers for direct damages only up to US $5.00. You cannot claim any compensation for other damages, including special, indirect, or incidental damages and loss of profits. This limitation applies to: * anything related to the software, services, or content (including code) on third‑party Internet sites or in third‑party programs; and * claims for breach of contract or warranty, or for strict liability, negligence, or any other fault to the extent permitted by applicable law. It also applies even if Microsoft knew or should have known about the possibility of such damage. If your country does not allow exclusion or limitation of liability for indirect, incidental, or any other type of damages, the above limitation or exclusion may not apply to you. LEGAL EFFECT. This agreement describes certain legal rights. You may have other rights under the laws of your country. This agreement does not alter the rights granted to you by your country’s laws if those laws do not permit it. |
| MIT License | System.IdentityModel.Tokens.Jwt, http://www.nuget.org/packages/System.IdentityModel.Tokens.Jwt Microsoft.IdentityModel.Abstractions, https://www.nuget.org/packages/Microsoft.IdentityModel.Abstractions System.ValueTuple, http://www.nuget.org/packages/System.ValueTuple System.Threading.Tasks.Extensions, http://www.nuget.org/packages/System.Threading.Tasks.Extensions System.Security.AccessControl, http://www.nuget.org/packages/System.Security.AccessControl System.IO.FileSystem.AccessControl, http://www.nuget.org/packages/System.IO.FileSystem.AccessControl System.Runtime.CompilerServices.Unsafe, http://www.nuget.org/packages/System.Runtime.CompilerServices.Unsafe Microsoft.Bcl.AsyncInterfaces, https://www.nuget.org/packages/Microsoft.Bcl.AsyncInterfaces System.DirectoryServices, http://www.nuget.org/packages/System.DirectoryServices System.Buffers, http://www.nuget.org/packages/System.Buffers System.Text.Json, http://www.nuget.org/packages/System.Text.Json Microsoft.IdentityModel.Tokens, http://www.nuget.org/packages/Microsoft.IdentityModel.Tokens System.Numerics.Vectors, http://www.nuget.org/packages/System.Numerics.Vectors Microsoft.IdentityModel.Logging, http://www.nuget.org/packages/Microsoft.IdentityModel.Logging System.Security.Principal.Windows, http://www.nuget.org/packages/System.Security.Principal.Windows System.Memory, http://www.nuget.org/packages/System.Memory System.Text.Encodings.Web, http://www.nuget.org/packages/System.Text.Encodings.Web azure-activedirectory-identitymodel-extensions-for-dotnet http://www.nuget.org/packages/Microsoft.IdentityModel.JsonWebTokens | The MIT License azure-activedirectory-identitymodel-extensions-for-dotnet Copyright (c) Microsoft Corporation. All rights reserved. Microsoft.Bcl.AsyncInterfaces Copyright (c) Microsoft Corporation. All rights reserved. Microsoft.IdentityModel.Abstractions Copyright (c) Microsoft Corporation. All rights reserved Microsoft.IdentityModel.Logging Copyright (c) Microsoft Corporation. All rights reserved Microsoft.IdentityModel.Tokens Copyright (c) Microsoft Corporation. All rights reserved System.Buffers Copyright (c) Microsoft Corporation. All rights reserved System.DirectoryServices Copyright (c) Microsoft Corporation. All rights reserved System.IdentityModel.Tokens.Jwt Copyright (c) Microsoft Corporation. All rights reserved System.IO.FileSystem.AccessControl Copyright (c) Microsoft Corporation. All rights reserved System.Memory Copyright (c) Microsoft Corporation. All rights reserved System.Numerics.Vectors Copyright (c) Microsoft Corporation. All rights reserved System.Runtime.CompilerServices.Unsafe Copyright (c) Microsoft Corporation. All rights reserved System.Security.AccessControl Copyright (c) Microsoft Corporation. All rights reserved System.Security.Principal.Windows Copyright (c) Microsoft Corporation. All rights reserved System.Text.Encodings.Web Copyright (c) Microsoft Corporation. All rights reserved System.Text.Json Copyright (c) Microsoft Corporation. All rights reserved System.Threading.Tasks.Extensions Copyright (c) Microsoft Corporation. All rights reserved System.ValueTuple Copyright (c) Microsoft Corporation. All rights reserved Permission is hereby granted, free of charge, to any person obtaining a copy of this software and associated documentation files (the “Software”), to deal in the Software without restriction, including without limitation the rights to use, copy, modify, merge, publish, distribute, sublicense, and/or sell copies of the Software, and to permit persons to whom the Software is furnished to do so, subject to the following conditions: The above copyright notice and this permission notice shall be included in all copies or substantial portions of the Software. THE SOFTWARE IS PROVIDED “AS IS”, WITHOUT WARRANTY OF ANY KIND, EXPRESS OR IMPLIED, INCLUDING BUT NOT LIMITED TO THE WARRANTIES OF MERCHANTABILITY, FITNESS FOR A PARTICULAR PURPOSE AND NONINFRINGEMENT. IN NO EVENT SHALL THE AUTHORS OR COPYRIGHT HOLDERS BE LIABLE FOR ANY CLAIM, DAMAGES OR OTHER LIABILITY, WHETHER IN AN ACTION OF CONTRACT, TORT OR OTHERWISE, ARISING FROM, OUT OF OR IN CONNECTION WITH THE SOFTWARE OR THE USE OR OTHER DEALINGS IN THE SOFTWARE. |
SingleID_ADFS-Adapter
6.2.1.3 - MFA Portal
Overview
SingleID’s MFA service provides users with a variety of additional second-factor authentication services through system integration, while maintaining the authentication system used by applications to enhance security. Additionally, SingleID provides an MFA Portal that lets you pre‑register and manage your preferred authentication methods for authentication, allowing convenient configuration.
The MFA Portal manual provides a feature that allows users to self-register secondary multi-factor authentication.
For detailed information, refer to the items below.
SingleID language settings
- User portal screen > top language selection, choose the language you want from ‘Korean’ or ‘English’.
- It will be changed to the language you selected.
Reference
On the first login, it is presented in the language configured in the user’s browser. If the language is other than Korean or English, it will be set to English.
SingleID connection environment and support
| Category | Support | Recommendation |
|---|---|---|
| PC | Windows : Windows Desktop 10 and 11 (x86 and x64 CPU Only)
| Windows : Windows Desktop 10 and 11 (x86 and x64 CPU Only)
|
| Moblie(Android) | Android : 8 and later versions
| Android : 8 and later versions
|
| Moblie(iOS) | iOS : 16 ,17
| iOS : 16 ,17
|
Table. SingleID connection environment support scope and recommended specifications
6.2.1.3.1 - Log in using an authentication method
Log in using an authentication method
What is an authentication method?
Authentication method, commonly called Authenticator, refers to an authentication tool.
SingleID provides the following 11 authentication methods for user authentication.
- Password: Enter password on the SingleID login screen
- Email OTP: Send the OTP via email and enter the OTP on the SingleID login screen
- SMS OTP: Send OTP via SMS and enter the OTP on the SingleID login screen
- Knox Messenger OTP: Send OTP via Knox Messenger and enter OTP on the SingleID login screen
- Knox Identity: Knox Portal user ID password authentication integration
- SingleID Authenticator Bio: Install the dedicated SingleID mobile app and link authentication using biometric authentication (fingerprint, facial recognition)
- SingleID Authenticator PIN: Install the SingleID‑dedicated mobile app and link authentication with a PIN.
- SingleID Authenticator mOTP: Install the SingleID‑exclusive mobile app and integrate authentication with mOTP (Mobile OTP).
- SingleID Authenticator TOTP: Install the SingleID‑dedicated mobile app and integrate authentication with TOTP(Time base OTP).
- Passkey: Login and authentication using biometrics (fingerprint, facial), mobile, or PIN code without a password, based on Windows Hello.
- Admin Authentication: If the admin permits direct authentication, request authentication on the admin’s behalf
Reference
SingleID Authenticator If this is your first time using the SingleID Authenticator mobile app, please refer to SingleID Authenticator.
Setting the preferred authentication method
The user logs into the User Portal provided by SingleID and sets their preferred primary and secondary authentication methods.
If the user sets their preferred method, the screen for selecting a verification method is skipped during login and authentication, allowing immediate authentication using the primary and secondary methods.
If you want to set your preferred authentication method, follow the steps below.
- User Portal > Personal Profile > Authentication settings, click.
- Click the star (☆) for each of your preferred 1st authentication method, 2nd authentication method.
After the configuration is complete, the next login will use this method, offering convenient access.
Information
Even if users set their preferred authentication methods for primary and secondary authentication, administrators can restrict them to specific authentication methods through login policy settings.
Register authentication tool
All authentication methods can be configured by the user. Registering an authentication method by a user is called enrollment. When a user account is created for the first time, the email OTP is automatically enrolled using the email information from the user data. Other authentication methods can be used by having the user enroll directly as needed.
I will explain the two authentication enrollment methods.
- Register in Authentication Settings: User Portal > Profile > Authentication settings, click the + Add New button at the bottom to register.
- Register on the Identity Verification Method Selection Screen: During login, for first-factor authentication and second-factor authentication, on the Identity Verification Method Selection screen, select the authentication method marked with a gray check mark (V) and register it.
Reference
Refer to Register authentication tool for enrollment.
First login
Consent for collection/use of personal information
Consent for the collection and use of personal information is required when logging in with SingleID for the first time or during a certain period. According to the consent procedure, select the required, optional items to agree. Required items must be selected to log in.
Password authentication
Password is the most fundamental authentication method as SingleID’s default authentication tool.
Enter password
To log in using a user ID, follow the steps below.
- Login screen > Account ID input field, enter the ID, and click the Next button.
- Password field, enter your password, and click the Next button to log in.
Reference
If you click the eye-shaped icon in the password input field, you can view the password you entered.
Information
If you enter the password incorrectly
If the entered password is incorrect, you will see an error message and can try again. The number of allowed retries is limited to the count set by the administrator in the password policy.
When the password is entered incorrectly repeatedly and becomes locked
If the password is entered incorrectly and the device becomes locked, you can unlock it using two methods.
- Automatic unlock after 1~5 minutes: When automatic unlock is enabled, the account remains locked for 1~5 minutes. * Login will be available after that time.
- Unlock with password reset: When the administrator configures the password policy to use password reset, a password reset is required. * You can log in after resetting your password. Find ID you can view the detailed information there.
Email OTP authentication
Authenticate
To authenticate with email OTP, an OTP will be sent to the email address registered by the user.
To authenticate with an email OTP, follow the steps below.
- In Identity verification selection method, click Email.
- An OTP code will be sent to the registered email. 2. Enter the OTP within the time set by the administrator (usually 3~5 minutes).
- After you enter, click the Confirm button, and the authentication will be completed.
Reference
- Resend Code: If the input validity period has expired, click the resend code button. 1. Resend the OTP code via email.
- Would you like to authenticate using a different method?: If the current authentication cannot be used, switch to a different authentication method.
- If you changed your email, please register.: You can register (Enrollment) a different email and authenticate it according to admin settings. You can view the details for registration at Register Email Authentication Tool.
guide
If the code is entered incorrectly
If the user enters the OTP code incorrectly, they can re-enter it up to the number of times specified by the administrator.
When locked due to exceeding the user input limit
If the OTP code is entered incorrectly more times than the administrator’s allowed limit, the screen will be locked from input for the duration set by the administrator. You can input after waiting for the specified duration. Refresh and try again after the input timeout.
SMS OTP authentication
Authenticate
To authenticate with SMS OTP, an SMS OTP is sent to the mobile device registered by the user.
To authenticate with an email OTP, follow the steps below.
- In the Verification method selection, click Email.
- An OTP code will be sent to the registered mobile phone. 2. Enter the OTP within the time set by the administrator (usually 3~5 minutes).
- After entering, click the Confirm button, and the authentication will be completed.
Reference
- Resend Code: If the input validity period has expired, click the resend code button. 1. Resend the OTP code to the mobile phone.
- Would you like to authenticate using a different method?: If the current authentication cannot be used, switch to a different authentication method.
- If you have changed your mobile phone, please register.: Click the link to go to the enrollment screen for the new mobile. You can see the detailed information for registration at Register SMS authentication tool.
Information
If the code is entered incorrectly
If the user enters the OTP code incorrectly, they can re-enter it up to the number of times specified by the administrator.
When locked due to exceeding the user input limit
If the OTP code is entered incorrectly more times than the administrator’s allowed limit, the screen will be locked for the duration set by the administrator. You can input after waiting for the specified duration. Refresh and try again after the input timeout.
Knox Messenger OTP authentication
Authenticate
If you want to authenticate with Knox Messaenger OTP, the OTP will be sent to the Knox Messanger you are using.
To authenticate Knox Messenger OTP, follow the steps below.
- In Identity verification selection method, click Knox Messenger.
- The OTP code is sent via the Knox Messenger you are using. 2. Enter the OTP within the time set by the administrator (usually 3~5 minutes).
- After entering, click the Confirm button, and the authentication will be completed.
Reference
- Resend Code: If the input validity period has expired, click the resend code button. 1. Resend the OTP code to the mobile phone.
- Would you like to authenticate using a different method?: If the current authentication cannot be used, switch to a different authentication method.
- Would you like to use a different Knox ID?: Clicking the link will take you to the screen for enrolling a new Knox ID. You can find detailed information about registration at Register Knox Messenger authentication tool.
information
If the code is entered incorrectly
If the user enters the OTP code incorrectly, they can re-enter it up to the number of times specified by the administrator.
When locked due to exceeding the user input limit
If the OTP code is entered incorrectly more times than the administrator’s allowed limit, the screen will be locked from input for the duration set by the administrator. You can input after waiting for the specified duration. Refresh and try again after the input timeout.
Knox Identity Password Authentication
Authenticate
To authenticate with Knox Identity, you must enter your Knox Identity password.
To authenticate with Knox Identity, follow the steps below.
- In Verification selection method, click Knox Identity.
- Enter the password for your Knox account.
- After entering, click the Confirm button, and the authentication will be completed.
Reference
Would you like to authenticate using a different method?: If the current authentication cannot be used, switch to a different authentication method.
information
If the password is entered incorrectly
If the user enters the password incorrectly, they can re-enter it up to the number of attempts specified by the administrator.
When locked due to exceeding the user input limit
If the password is entered incorrectly more times than the administrator’s allowed limit, input on the screen will be restricted for the duration set by the administrator. You can input after waiting for the specified time. Refresh and try again after the input timeout.
SingleID Authenticator authentication
The SingleID service provides a mobile authentication app called SingleID Authenticator and offers authentication in various ways.
Authentication method
| Authentication method | Explanation |
|---|---|
| SingleID Authenticator Bio | Send a push using the installed SingleID Authenticator mobile app on the device to request biometric authentication. |
| SingleID Authenticator PIN | Send a push using the installed SingleID Authenticator mobile app on the device to request authentication with a PIN code. |
| SingleID Authenticator TOTP | Send a push notification to the installed ID Authenticator mobile app on the device to request authentication via TOTP. |
| SingleID Authenticator mOTP | Send a push using the installed SingleID Authenticator mobile app on the device to request authentication with mOTP. |
Table. SingleID Authenticator authentication method
Reference
- For installation and configuration of SingleID Authenticator, refer to SingleID Authenticator.
- Detailed information on how to register the SingleID Authenticator authentication tool can be found at Register Authentication Tool.
Passkey authentication
The SingleID service provides simple authentication and multi-factor authentication using a Windows-based Passkey.
Authentication method
- Convenient authentication: Provides easy login without ID/Password by using Sign in with Passkey at the bottom of the login page.
- Multi-factor authentication: Offers convenient login without requiring ID/password during secondary authentication.
Authentication Types
- Mobile Passkey: Scan the QR code to log in using Android and iOS mobile
- Security key: Log in using the Windows security key
- PIN: Login using the Windows PIN code
Reference
Passkey supported environment Operating system (laptop or desktop)
- Windows 11, macOS Ventura, ChromeOS 109 or later
- Mobile phone: iOS 16 or Android 9 and above
- Hardware security key: a hardware security key that supports the FIDO2 protocol
Browse version
- Chrome 109 or later
- Safari 16 or later
- Edge 109
Device Settings
- Enable Bluetooth
- Set screen lock password
- Register PIN code
- Allow fingerprint or facial recognition
Reference
Passkey requires that Windows Hello be set up in advance. For detailed information, see the reference link.
Administrator authentication
Authenticate
In the SingleID service, the administrator provides authentication by delegating identity verification on behalf of the user.
To perform administrator authentication, follow the steps below.
- In the Identity verification selection method, if you cannot perform identity verification at the bottom of the screen, you can request verification from the administrator. 1. Click here. Click it.
- Click the Request button.
- You will be taken to the admin selection screen. 3. Select the administrator who requested authentication delegation and click the Request button.
- Authentication delegation is requested to the selected administrator.
- When the administrator approves the authentication delegation, it is completed automatically.
Information
On the administrator selection screen, if the administrator is not assigned or has not registered a SingleID authenticator, a ‘Administrator Not Assigned’ screen appears.
information
If you cannot complete identity verification, you can request verification from the administrator. Click here** if the phrase is missing
The administrator has disabled the admin authentication delegation feature by policy. Please contact the administrator.
6.2.1.3.2 - Register authentication tool
Register authentication tool (Enrollment)
The principle is that users should register and use all authentication tools themselves. Registering an authentication tool by a user is called enrollment. When a user is initially created, only the Email OTP is automatically registered using the user’s email information. The remaining information can be directly registered and used by the user as needed.
There are three ways to register.
- Login screen > ID/Password entry > Select authentication method Register on the screen
- On the authentication method selection screen, click the authentication tool marked as ‘Registration Required’ (gray check mark) to register.
- Click the User Portal (after login) > Profile > Authentication Settings +Add New button to register.
- Register through the registration message link at the bottom of every authentication screen.
- The screen below is an example of an SMS verification screen. * You can register by clicking the ‘If you have changed your mobile phone, please register.’ message at the bottom.
- All authentication codes can be changed via the message at the bottom (Message format: ~ please register.)
Register Email Verification Tool
Email registration consists of the following three steps.
- Verification Step: This is the identity verification step before registering the email authentication tool.
- Registration step: This step registers a new email and checks whether the number is valid.
- Completion Stage: This is the final step to confirm that the registration was completed successfully.
Verification step
This is the step of verifying your identity before using the authentication tool. To view the identity verification process, please refer to 로그인하기.
Caution
In the verification stage, the authentication method to be used can only be performed with the authentication tool configured by the administrator.
Registration phase
This is the step where the user registers the desired email address and checks its validity.
The user should follow the steps below.
- If you complete identity verification in the confirmation step, you will automatically proceed to the registration step.
- Enter the email address you want to register.
- Click the Send verification code button.
- Check the OTP code sent to the email address you entered, and enter the OTP code on the screen.
- If the verification code is entered correctly, you will proceed to the completion stage.
Completion stage
The registration completion screen will appear, and you can perform first- and second-factor authentication with the email verification tool on your next login.
Register SMS authentication tool
SMS registration consists of the following three steps.
- Verification Step: This is the identity verification step before registering the SMS authentication tool.
- Registration step: This step registers a new mobile phone number and checks whether the number is valid.
- Completion Stage: This is the final step to confirm that the registration was completed successfully.
Verification step
This is the identity verification step before using the authentication tool. To view the identity verification process, please refer to Log in.
In the verification stage, the authentication method to be used can only be performed with the authentication tool configured by the administrator.
Registration Phase
This step registers the mobile phone number the user wants to add and checks its validity.
The user should follow the steps below.
- If you complete identity verification in the confirmation step, you will automatically proceed to the registration step.
- Select the country code and enter the mobile phone number you want to register.
- Send verification code button, click it.
- Check the OTP code sent to the mobile phone number you entered, and enter the OTP code on the screen.
- If the verification code is entered correctly, you will proceed to the completion stage.
Completion Phase
Registration Complete screen will appear, and on the next login you can perform first and second factor authentication with the SMS authentication tool.
Register Knox Messenger authentication tool
Knox Messenger registration consists of the following three steps.
- Verification step: This is the identity verification step before registering the Knox Messenger authentication tool.
- Registration Step: Enter the Knox ID to register. 2. This is the step that checks whether the Knox ID to be registered is valid.
- Completion Stage: This is the final step to confirm that the registration was completed successfully.
Check step
This is the step of identity verification before using the authentication tool. To view the identity verification process, please refer to 로그인하기.
In the verification stage, the authentication method to be used can only be performed with the authentication tool configured by the administrator.
Registration stage
This step registers the mobile phone number the user wants to add and checks its validity.
The user should follow the steps below.
- If you complete identity verification in the confirmation step, you will automatically proceed to the registration step.
- Please enter the Knox ID to register.
- Click the Send verification code button.
- Verify the OTP code sent to the Knox Messenger of the entered Knox ID, then enter the OTP code on the screen.
- If the verification code is entered correctly, you will proceed to the completion stage.
Completion Phase
Registration Complete screen will appear, and on the next login you can perform first and second factor authentication using the Knox Messenger authentication tool.
Register Passkey authentication tool
The SingleID Authenticator is an authentication tool provided for the SingleID service.
Passkey enrollment consists of the following three steps.
- Verification step: This is the identity verification step before registering the Passkey authentication tool.
- Registration Stage: This is the Passkey registration stage.
- Completion Stage: This is the final step to confirm that the registration was completed successfully.
Verification step
This is the step where you verify your identity before registering the authentication tool. To view the identity verification process, refer to 로그인 및 인증하기.
Information
In the verification stage, the authentication method to be used can only be performed with the authentication tool configured by the administrator.
Registration stage
This step verifies the mobile phone or PC environment where you want to register a Passkey.
Complete the registration process in the four steps below.
- Activation: This is a guide to the Passkey-supported environment.
- Confirm: Complete identity verification using an authentication method.
- Registration: Passkey registration step. 3. When you click the Generate on this device button, a passkey is generated and registered on the PC. 3. Create on another device button click registers with a mobile phone or hardware security key.
- Complete: This step confirms that Registration Complete. 4. Click the Continue button.
Reference
Passkey Support Environment 1.Operating system (laptop or desktop)
- Windows 11, macOS Ventura, ChromeOS 109 or later
- Mobile phone: iOS 16 or Android 9 and above
- Hardware security key: a hardware security key that supports the FIDO2 protocol
Browse version
- Chrome 109 or later
- Safari 16 or later
- Edge 109
Device Settings
- Enable Bluetooth
- Set screen lock password
- Register PIN code
- Allow fingerprint or facial recognition
Completion Phase
After the Passkey registration is completed, the Registration Complete screen appears. You can perform first- and second-factor authentication with the Windows Hello authentication tool on the next login.
Reference
PC Passkey requires that Windows Hello be configured in advance. Check the reference link for detailed information.
When registering a passkey on mobile, it can be set in an environment where QR code scanning is possible.
SingleID Authenticator Register authentication tool
The SingleID Authenticator is an authentication tool provided for the SingleID service.
SingleID Authenticator enrollment consists of the following four steps.
- Verification step: This is the identity verification step before registering the SingleID Authenticator authentication tool.
- Installation Step: This is the user’s SingleID installation guide step.
- Registration Stage: This step registers a new mobile app and registers the service.
- Completion Stage: This is the final step to confirm that the registration was completed successfully.
Verification step
This is the step of verifying your identity before using the authentication tool. To view the identity verification process, please refer to 로그인하기.
Information
In the verification stage, the authentication method to be used can only be performed with the authentication tool configured by the administrator.
Installation Steps
There are three main ways to install the SingleID mobile app.
- How to install SingleID Authenticator by scanning a QR code on the user’s mobile device or searching for SinlgeID on Google Play (for Android) or the App Store (for iOS).
- How to install by entering your mobile phone number and receiving the download link via SMS
- How to install using a manual download link After installing the SingleID Authenticator app and clicking the Next button, you will proceed to the registration step.
Information
For security reasons, sending the download link via SMS to your mobile phone number is limited to a single transmission.
If you send more than three times within one minute, an error message stating “SMS messages cannot be sent multiple times for security reasons.” will be sent.
Please try again after a short while.
Registration stage
Install the SingleID Authenticator mobile app on the mobile phone you want to register, then launch SingleID Authenticator.
Complete the registration process in the three steps below.
- Service Registration: In the SingleID Authenticator app, click the ‘+’ at the top.
- Enter QR or authentication number: Scan the QR code or enter the authentication code to register.
- Service registration complete: Click the Confirm button to complete the registration.
Completion Phase
After registration is completed in SingleID Authenticator, the Registration Complete screen appears. You can perform first- and second-factor authentication with the Windows Hello authentication tool on the next login.
Registration Phase
Install the SingleID Authenticator mobile app on the mobile phone you want to register, then launch SingleID Authenticator.
Complete the registration process in the three steps below.
- Service Registration: In the SingleID Authenticator app, click the ‘+’ at the top.
- Enter QR or authentication number: Scan the QR code or enter the authentication code to register.
- Service registration complete: Click the Confirm button to complete the registration.
Completion Phase
After registration with SingleID Authenticator is completed, the Registration Complete screen appears. You can perform first- and second-factor authentication with the Windows Hello authentication tool on the next login.
TOTP Authenticator Register authentication tool
TOTP Authenticator registers third‑party TOTP to support various authentication tools.
TOTP Authenticator enrollment consists of the following four steps.
- Verification step: This is the identity verification step before registering the SingleID Authenticator authentication tool.
- Installation Step: This is the user’s SingleID installation guide step.
- Registration Stage: This step registers a new mobile app and registers the service.
- Completion Stage: This is the final step to confirm that the registration was completed successfully.
Check step
This step verifies your identity before using the authentication tool. To view the identity verification process, refer to Login and Authentication.
Information
In the verification stage, the authentication method to be used can only be performed with the authentication tool configured by the administrator.
Installation Steps
There are two main ways to install TOTP Authenticator.
- Mobile app
- Web browser extension
Click the Next button to go to the registration step.
Service Registration and Verification Phase
This step registers and verifies the 3rd Party TOTP Authenticator you want to add.
Complete the registration process in the two steps below.
- Service Registration: Scan the QR code of the TOTP Authenticator you want to register, or enter the manual code. 1. The code registration is completed in the TOTP mobile app or extension.
- Service verification: Run the TOTP mobile app or extension, and enter the OTP.
Guide
TOTP Authenticator support SingleID supports a variety of standardized 3rd‑party TOTP authentication apps. Non-standard TOTP is not supported. The authenticated mobile and extension programs are listed below. We recommend the mobile app or extension below.
- Mobile app
- Google Authenticator, Microsoft Authenticator
- Web browser extension
- TOTP extension searchable in the Chrome Web Store and Microsoft Edge Add-ons
Information
To register a new TOTP Authenticator, on the TOTP Authenticator OTP entry screen.
Click the “If you want to change your TOTP Authenticator, register here” at the bottom to register a new TOTP Authenticator.
Information
Check device information
When the user clicks on device information such as password, SMS, email, SingleID authenticator, Nox messenger, passkey, etc., detailed information can be viewed in a popup.
Device Information popup displays ’type’, ‘OS version’, ‘browser’, ‘IP’, etc.
6.2.1.3.3 - Configure Privacy Settings
Configure Privacy Settings
This is a menu for user settings.
To set your privacy preferences, follow these steps.
- Click the Personal Profile > Personal Information setting at the top right of the screen.
- You can view the photo, name, email, phone number, language, and time zone.
- Image: Image > Image Click Change to upload the icon image you want to display.
- Language: Choose your desired language in Korean or English.
- Language/Time Zone: Please select the time zone you are currently in. Click the City Search button to open the city search popup. Search for the desired city in English and select it.
- Click the Save button at the bottom of the screen to save.
Reference
If you click the Delete button at the lower left of the privacy screen, you can delete the current user account.
If you delete your account, it will be permanently removed, so please only proceed with withdrawal if you truly wish to delete it.
Configure Authentication
You can register a user’s authentication tool and set the preferred authentication tool.
To configure authentication, follow these steps.
- Click the Personal Profile > Authentication setting at the top right of the screen.
- +Add New button: click to add using the authentication tool of your choice.
- Click the Delete button to remove the authentication tool you do not wish to use.
- Star (☆) Click the icon to set your preferred authentication method.
Reference
For instructions on how users register or delete authentication tools, please refer to Register Authentication Tools.
Change Password
In the authentication settings, click Change Password to complete an identity verification process and update your password.
Check login history
You can view the user’s login history and environment.
To view a user’s login history/environment, follow these steps.
- Click Personal Profile > Login History/Environment at the top right of the screen.
- In the Login History tab, you can view information such as login date and time, location, country, city, IP address, OS type, browser type, detection status, and result.
- In the Login Environment tab, you can view the details of any registered login environments, and if an environment is no longer used, you can delete it via the ‘Delete’ button.
guide
Check the country ISO codes at the link below.
Refer to the method at ISO 3166 - Wikipedia, the free encyclopedia.
guide
When using the SingleID ADM (Anomaly Detection Management) feature
The detection items will display Normal or Detected. This entry represents a login record where abnormal authentication activity was detected.
Log out
Click the photo icon located at the top right of the screen and then click ‘Logout’.
When you click the Logout button, all applications visited through SingleID are logged out simultaneously, and if integrated logout is configured via the PC SSO Agent, logout also proceeds in the associated browsers.
6.2.1.4 - CAM Portal
Service Overview
CAM(Cloud Access Management) is a service for managing access to cloud consoles and resources, providing users with an easy and convenient way to access cloud consoles and resources.
Users can access the portal from PCs located on the internal network using multi-factor authentication (MFA, Multi-Factor Authentication). Instead of a password, a one-time token is issued to enable access to the cloud console and resources, and all console access logs, operation logs, and permission approval logs can be monitored.
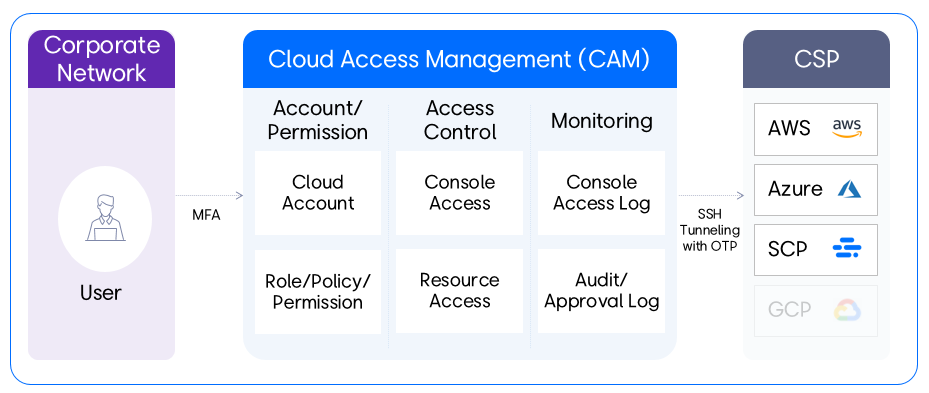
Service scenario
Previously, we accessed the console and resources directly with individual IAM accounts, but now we provide a unified access path through CAM.
- Step 1: During the transition period, newly establish the TO-BE access channel and operate it in parallel with the AS-IS access channel.
- Step 2: After blocking the AS-IS access channel via Cut-Over, switch to the TO-BE channel
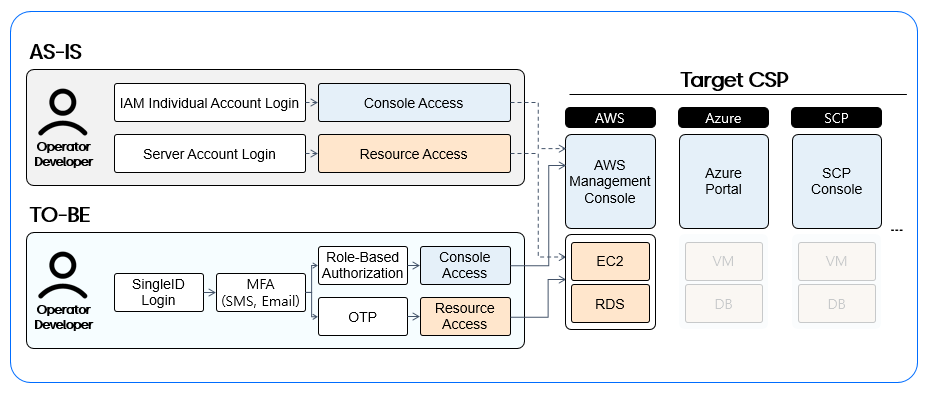
Key Features
User Scenario
The user scenario proceeds in the following order.
- Authentication → Base Information Settings → Console Access Management → Resource Access Management → Monitoring
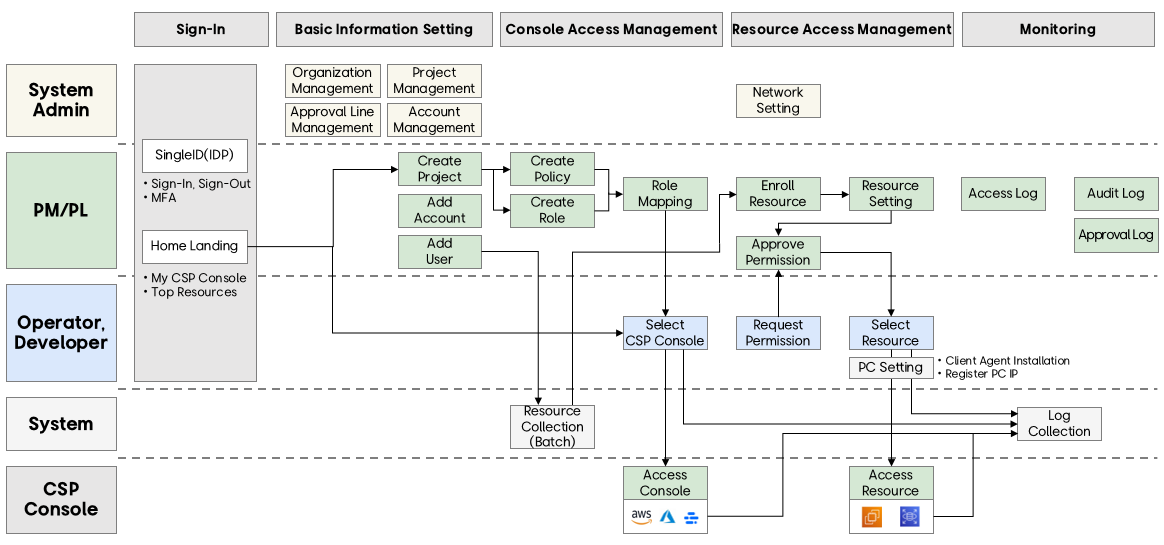
Login & Home
Log in using SingleID or an SSO account (e.g., Knox Portal) and complete multi-factor authentication (MFA). Enter the verification code received via SMS or email to finish the login process and access CAM.
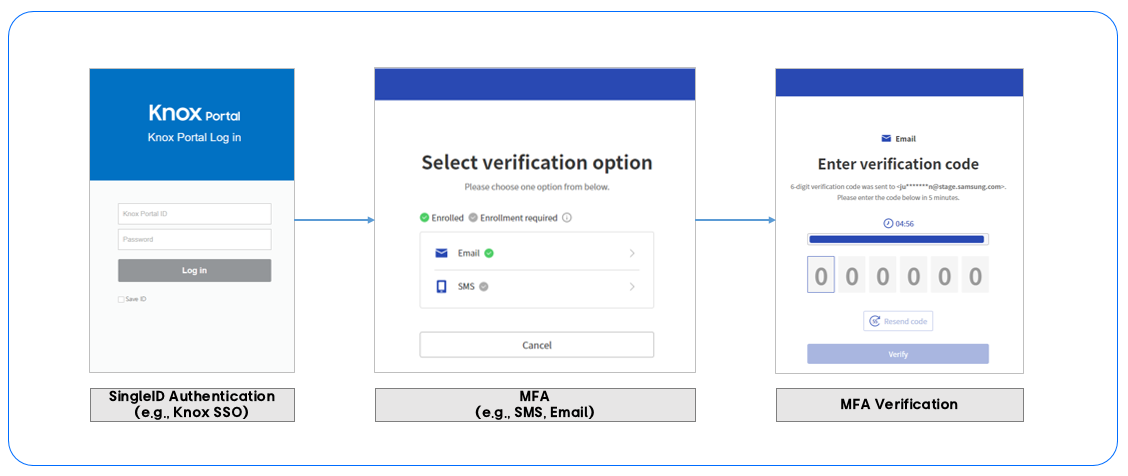
On the Home screen, a personalized custom view is provided so that users can access the cloud console and resources with a single click, allowing easy access to the console and resources.
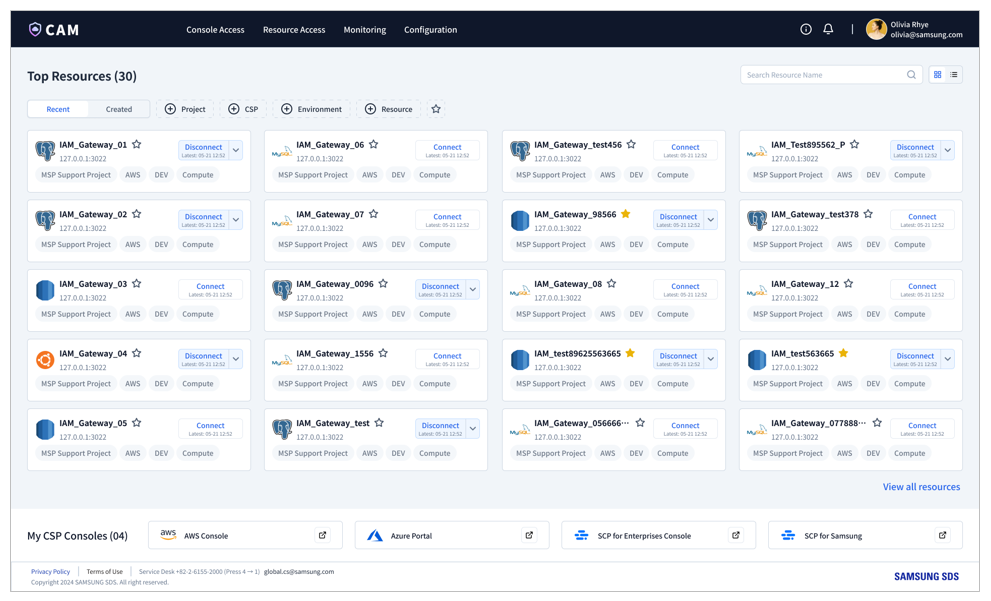
Configuration
After creating a project, you can easily register a CSP (Cloud Service Provider) account. You can also add users to the project to grant permissions within the project.
Console Access
You can create roles and policies to set and control access permissions for the cloud console, and map roles to specific accounts and users to define which users can access the CSP console and their permission levels.
Resource Access
Manages access permissions for cloud resources. To manage cloud resource access, each user first requests permission, downloads and installs the PC client agent, and registers the access IP address. Once the setup is complete, users can connect to the desired resources from their personalized resource list.
6.2.1.4.1 - Getting Started
This manual aims to help users quickly understand the essential functions and processes needed to use CAM effectively.
Network Environment
Access is allowed only from network environments authorized for each tenant.
- CAM portal and console access: can be accessed from the network environment permitted for each tenant.
- DEV, STG, ETC resource access: can be accessed from the allowed network environment for each tenant.
- PRD resource access: It can only be accessed in a network environment where the internet is blocked, and can only be accessed from specific IP ranges per tenant.
- Additional individual PC environment configuration is required.
Preliminary work
To use the CAM portal, several preliminary steps are required. If you are a PM (Project Manager) or PL (Project Leader) group user, please review the cloud account and resource preparation items below and set up the environment in advance.
Prepare cloud account
To register and manage an account in CAM, you first need to create a role in the IAM service of the CSP (AWS, Azure, SCP), configure it with the policies required by CAM, and then assume the role in CAM.
information
If the document is external, please refer to the Add Account of Configuration.
Resource preparation
Resource configuration
To register resources in CAM and connect, several configuration steps are required when setting up the resources.
First, you must enable ‘Password authentication’. Since a One-Time-Password (OTP) for SSH connections is issued when accessing resources from CAM, this configuration is essential for accessing resources through CAM.
Additionally, when the resource type is Compute, you must add the configuration below.
- Add the following content to a file named /etc/sudoers.
- ubuntu : %sudo ALL=(ALL) NOPASSWD:ALL
- amazon linux : %wheel ALL=(ALL) NOPASSWD: ALL
- Restart the server using systemctl restart sshd.service.
Network Settings
To access resources through CAM, you must register firewalls and security groups according to each tenant’s network environment so that CAM can connect to the resources. Please verify the required information with the tenant administrator and proceed with the network configuration.
Service scope
Currently, Console Access supports AWS, Azure, and SCP, while Resource Access supports only AWS. We plan to gradually expand to other CSPs in the future.
| Item | Explanation |
|---|---|
| AWS | Amazon Web Services |
| IAM (Console) | AWS Identity and Access Management |
| SCP | Samsung Cloud Platform (KR EAST1 region, KR WEST1 region) |
| EC2 | Elastic Compute Cloud |
| RDS | Relational Database Service |
Table. CSP abbreviation
| OS | Version |
|---|---|
| Ubuntu | Ubuntu Server 24.04 LTS |
| Ubuntu | Ubuntu Server 22.04 LTS |
| Amazon Linux | Amazon Linux 2023 AMI |
| Redhat | Red Hat Enterprise Linux 9.4 |
Table. OS
| DB Engine | Version |
|---|---|
| PostgreSQL | 16.x |
| MySQL | 8.0.x |
| Aurora PostgreSQL | 15.x |
| Aurora MySQL | 3.05.x |
| Aurora MySQL | 3.04.x |
| Aurora MySQL | 3.03.x |
| MariaDB | 10.11.10x |
Table. DB
6.2.1.4.2 - Home
After logging in, you can access the CSP console and your individually allocated resources with a single click from the personalized homepage. Administrators and developers can efficiently streamline their work by quickly and easily accessing approved consoles and resources from a single location.
The home screen of CAM (Cloud Access Management) is divided into two sections.
- Top Resources
- My CSP Consoles
Both sections provide access to allocated resources and the CSP console.
Top Resources
This section shows a list of the top 30 accessible resources.
Card view and list view
By default, resources are displayed in a card view, and can be switched to a list view based on the icon.
Search and Filter
You can quickly find specific resources using the search function, and you can filter resources based on the following items.
- Project
- CSP(Cloud Service Provider)
- Environment (e.g., DEV, STG, PRD, ETC)
- Resource type (e.g., Compute, DB)
Favorites
Bookmark (★) You can set a bookmark using the icon, and you can set a bookmark filter to filter only resources that have been bookmarked.
Sorting
The resource list can be sorted by the following two criteria.
- Recent (default sorting)
- Creation date
Resource Information
Depending on the selected view mode, you can view detailed information about resources in cards and lists.
- Resource Name
- Project
- CSP (e.g., AWS, Azure, SCP)
- Environment (e.g., DEV, STG, PRD, ETC)
- Resource type (e.g., Compute, DB)
Resource Connect/Disconnect
Each resource has a Connect button that can be used to connect or disconnect. If the resource is already connected, the following details are displayed:
- Last login date/time
- Connection status
Resource Access
When you click the Connect button on a card or in a list, a popup opens for connection.
To access the resource, enter the details of the following items.
- Local Port: Enter a port number between 1024 and 65535 that is not currently in use on the PC.
- Remote Port: Enter the port number of the resource.
- Launch Putty : To have Putty start automatically during the connection process, select ‘ON’.
Reference
Before attempting to connect, ensure that the client agent is installed and that the IP address is registered.
For configuration, refer to Resource Access > PC Settings.
Connection Details
When accessing a resource, click the dropdown to view detailed connection information such as user ID, password, and local IP. This information is provided via a popup as details that allow the user to connect to the resource through an SSH connection.
- User ID: Click the copy icon on the right to copy the user ID.
- Password: Click the copy icon on the right to copy the password.
- Local IP: Click the copy icon on the right to copy the local IP address.
- Client Server IP: Refer to the client server IP displayed on the screen.
Resource Access Release
When you access the resource, the Disconnect button appears. Click this button to start the disconnect process. A popup for final confirmation will be displayed before the connection is terminated.
My CSP Consoles
We provide a CSP access link in a sticky footer at the bottom of the page. Since access to the CSP console is offered through SAML SSO, you can connect directly without any additional authentication steps.
6.2.1.4.3 - Console Access
The console access feature allows PM and PL group users to assign roles and policies to cloud accounts and users, enabling management of access to the CSP console. Based on the permissions set here, users can access the console with the appropriate privileges.
The console access section consists of four main management areas.
- Role Management: Defines and manages the level at which a user (User) can access the CSP console.
- Policy Management: Define new policies (Policy) and manage the roles mapped to each policy.
- Account Management: Manage cloud accounts (Account) and ensure each account is mapped to the correct role permissions.
- User Management: By mapping each user to the appropriate role (Role), we ensure they have the permissions required to access the cloud console, thereby controlling user console access.
Role Management
In the role management menu, you can view and manage all roles registered in the project, and filter roles by CSP or by project for review.
Create role
To create a role, click the Create Role button. To create a new role, you must fill in the following required information in the popup window.
- Project: Select a project from the user’s project list.
- CSP: Select CSP.
- Role Name: Enter a unique role name and click the Validate button to check consistency.
- Description: Add a brief description of the role.
View role
To access detailed information about a role, go to the role management menu and click the desired role. All project users can view role details, including policies, cloud accounts, and users mapped to the role.
The role view screen displays key details, including the following.
- Role Information: Basic details related to the role.
- Delete Role: Delete click the button to remove this role.
- Policy: Shows the list of policies mapped to the current role.
- Account: Shows a list of accounts related to the role.
- User: Shows the list of users associated with a role.
Reference
To set up policy, account, and user mappings, you must first create a policy in the policy management menu, and the cloud accounts and users must already be registered in the project.
Reference
- The CSP process starts after the user addition approval is completed. Therefore, it may take some time (up to 10 minutes) for the status to change to ‘Approved’ and appear in the user’s CSP role list.
- You can map up to 10 policies to an AWS role.
- Each account has role limits based on the CSP; AWS can have up to 800 roles, while Azure can have up to 5,000 roles.
- Each user has role limits based on the CSP, and in AWS up to 10 roles can be mapped, while in Azure up to 4,000 roles can be mapped.
Delete role
PM or PL group users can delete roles within a project. In the role management list, select the role to delete and click the Delete button. Or you can delete them one by one by clicking the Delete button on a specific role screen.
Policy Management
PM and PL group users can select or deselect policies from the policy list to add or remove policies mapped to a role.
Create Policy
To create a new policy, click the “Create Policy” button and fill in the required information in the “Create Policy” popup.
- Project: Select a project from the list of registered projects.
- CSP: Select CSP.
- Policy Name: Enter the policy name and click the “Validate” button to verify its consistency.
- JSON code: Enter the JSON code that defines the policy.
- Description: Add a brief description of the policy.
To map policies to a role, click the Add button above the policy list to open the popup window. In the popup, you can view and select policies defined within the same project. Click the Save button to complete the mapping process. You can map multiple policies at once.
Before mapping the policy, verify that the desired policy has been created in the policy management menu.
View policy
To view detailed information about a policy, go to the Policy Management menu and click the desired policy. All project users can view policy details, including the roles mapped to the policy.
Delete Policy
To remove a policy mapping from a role, select the policy from the list and click the Delete button. The deleted policy will reappear in the Add Policy popup list, and can be added again if needed. Removing the policy mapping eliminates the relationship between the role and the associated policies.
Account Management
PM and PL group users can map or remove cloud accounts from roles.
View Account
To view account details:
- Go to Account Management and click the desired account.
- All project users can access the details of that account, and the account includes a list of mapped roles.
- PM or PL group users can also edit or delete roles associated with the account.
Add role to account
- To map roles to an account, click the Add button above the role list to open the Add Roles popup.
- In the popup, select a role that belongs to the same project as the account and click the Save button to complete the mapping process.
Reference
- You can map up to 800 roles in an AWS account and up to 5,000 roles in an Azure account.
Delete role from account
To remove a role from an account, select the role from the list and click the Delete button. The removed role reappears in the Add Role popup, and you can add it again if needed. You can also delete multiple roles at once.
User Management
Through the User Management menu, users can view and manage all users registered within the project. Users can search for a user by name.
User view
To view the user’s details:
- Go to User Management and click the user.
- All project users can view user details, including the roles mapped to that user.
- PM or PL group users can add or remove roles for a user.
Add role to user
To map a role to a user, click the Add button above the role list to open the Add Role popup. In the popup, you can view all roles in the project the user belongs to, select the role to add, and click the Create Approval button to proceed with the approval process.
Reference
- Each user has role limits based on the CSP and can map up to 10 AWS roles and 4,000 Azure roles.
Create approval
To assign a role to a user, an approval process is required. The approval process proceeds through the Create Approval popup and then via the Knox approval system or CAM’s own approval system.
- Title: Automatically entered by the system and cannot be edited.
- Approver: The approval route is automatically assigned by the system, and you can manually add approvers and consentees according to the approval guide.
- Content: Project and role information is automatically entered by the system and cannot be edited.
Remove role from user
To unmap a role from a user, click the Delete button. After confirming the final deletion, the user’s role mapping is removed. The removed role reappears in the Add Role popup, allowing you to add it again if needed. Note that unmapping a role does not require approval, but re-adding a role does require approval.
6.2.1.4.4 - Resource Access
You can view all resources with individual permissions and access them. To access resources, a PM or PL group user must register the cloud account resources associated with the project and go through the user’s permission request and approval process.
Resource
Displays all resources for which the user has been granted permission. The user can view the resource list and access resources directly.
Connection
Click the Connect button to access the resource, and after connecting, it provides connection details.
- Local Port: Enter a port number that is not being used for other purposes on the PC.
- Remote Port: Enter the port number of the resource.
- Putty Execution: To enable automatic execution of Putty, you need to set it to ON.
Reference
Before accessing the resource, please ensure that the client agent is installed and the IP address is registered.
For more details, refer to Resource Access > PC Settings.
Connection Information
Provides detailed connection information to access resources via SSH.
- User ID: Click the copy icon to copy the user ID for use.
- Password: You can click the copy icon to copy the password and use it.
- Local IP: Click the copy icon to copy the local IP for use.
- Cloud Server IP: Click the copy icon to copy the cloud server IP for use.
Disconnect
When the resource is connected, the Connect button changes to a Disconnect button. To disconnect the resource, click the Disconnect button.
Resource Registration
In this menu, you can register the resource information required for access, and it displays the list of resources that have been registered.
Register
To register a resource, cloud account registration must be performed first in the project menu. PM and PL group users can register resources created within a cloud account. Click the Enroll button to go to the resource registration screen, then configure the resource connection information.
- Project: Select a project among those registered for PM or PL group users.
- Account: Select a cloud account among those registered in the selected project.
- Region: Select the region information of the selected account.
- Resource Type: Select one of Compute or DB.
- Resource: Select resources that match the selected criteria.
- Connection Type: Choose between Direct (direct connection to the server) and Bastion (connection via a proxy server).
- Address: Enter the resource’s address information.
- Root User: Provides the root user’s IP and password for the resource.
Reference
Before registering resources, please ensure that the cloud account registration and resource creation have been completed.
Cloud account registration can be done in Configuration > Project.
guide
Supported OS/DB
Currently, the OSes and DBs that can perform ‘resource registration’ are limited as shown below, and supported OSes and DBs will be continuously added.
| OS | Version |
|---|---|
| Ubuntu | Ubuntu Server 24.04 LTS |
| Ubuntu | Ubuntu Server 22.04 LTS |
| Amazon Linux | Amazon Linux 2023 AMI |
| Redhat | Red Hat Enterprise Linux 9.4 |
Table. Supported OS
| DB Engine | Version |
|---|---|
| PostgreSQL | 16.x |
| MySQL | 8.0.x |
| Aurora PostgreSQL | 15.x |
| Aurora MySQL | 3.05.x |
| Aurora MySQL | 3.04.x |
| Aurora MySQL | 3.03.x |
| MariaDB | 10.11.10x |
Table. Supported DB
Network Settings
To register resources in CAM and access them through CAM, network configuration must be performed first.
After receiving guidance from the tenant administrator and completing network configurations appropriate for each tenant environment, such as firewall registration and security group registration, please proceed with resource registration.
Withdrawal
Resources that are no longer used must be removed from the registered resource list. After selecting from the resource view or resource registration list, click the Withdraw button to prevent further access.
Permission request
In the permission request menu, you can view project members’ resource permissions and request permissions for each user’s CSP resource types.
Request
Users can select a duration and permission type to request resource permissions for each CSP resource type. All permissions require approval, but when ‘Emergency’ is selected, the permission is granted simultaneously with the approval request.
Resource Information
- Project: Select a project from those the user belongs to.
- Account: Select the account registered in the selected project.
- Resource Type: Select one of Compute or DB.
Permission
- Period: Select the period (e.g., 4h, 8h, 24h, 10d, 30d, 12M).
- Emergency: If checked, permission is granted immediately upon the approval request, and a related email is sent to the approver.
- Permission Level: Choose one of USER, ADMIN, DBA.
- Comment: Add a comment for approval.
Create approval
To obtain resource access permissions, an approval process is required. To proceed with the approval process, go through the “Create Approval” popup, which is sent to Knox for approval and processed through Knox.
- Title: Automatically entered by the system and cannot be edited.
- Approver: Add the approver and the consenter according to the guide.
- Content: Project and permission information is automatically entered by the system and cannot be modified.
Withdrawal
To remove permissions that are no longer needed, select the permission in the request list and click the Withdraw button.
PC configuration
To access cloud resources, you must install the client agent and register the IP address of the access environment.
Client Agent Download
Click Download Client Agent to start the download, then install the client agent.
User Guide
To access the resource, you need to download and install the client. Also, if the installation is incomplete or the version is unsupported, you cannot connect to the resource even if all other preparations, such as permissions and IP registration, are completed.
Installation Guide
To start the installation process, click the Download Client Agent button to download the installation file. Once the download is complete, refer to the following information to proceed with the installation.
- Download Location: Specify a folder on the local drive.
- Execution: Select the downloaded file, right‑click, and click Run as administrator to execute.
IP registration
Access to cloud resources is allowed only from registered IPs, and up to five IPs can be registered. Please register the IP using the following information.
- To add a new IP, click the Add button.
- To remove an existing IP, select the IP from the list and click the Delete button.
6.2.1.4.5 - Monitoring
The monitoring menu of CAM provides essential features for tracking console access logs, user activity, and approval records. This feature ensures transparency, security, and compliance by offering detailed information.
Connection History
Connection logs provide a record of user activity within the CAM console, enabling administrators to track and review access-related actions across projects and the entire cloud environment. This ensures compliance with security regulations and offers visibility into how and when users interact with cloud resources through the CAM interface.
Console Access History
Console access logs record all events related to console connections performed through CAM. These logs enable tenant administrators to monitor console connection attempts, review event outcomes, and identify access patterns for AWS, Azure, and SCP accounts. The console access log page can be viewed from Monitoring > Access Log > Console Access Log.
Console Access History Feature
History Range
- Tenant (Company) Administrator: You can view the history of all console accesses within the tenant.
- User: You can only view the history of your own projects.
Detail History
- Console access history records event data for all console-related activities initiated through CAM.
- History is provided for all configured tenants and includes connection events across AWS, Azure, and SCP.
- The history details display information such as event type, date/time, project, Account ID, etc.
- Click the expand icon to view detailed information for all actions. This detailed view feature provides deeper insight into each connection attempt. Detailed event information includes the following:
- Event ID
- Event Source
- Event Result
- Request Type
- User Agent
- Region
- Source IP Address
- User Information
- You can narrow the results by using filters such as project, CSP, and environment.
- You can select a specific period to filter the history. The default period is 30 days.
- The history is sorted in reverse order, with the most recent action displayed at the top.
- Each log entry serves as an audit trail to track console access patterns and user activity across the entire CAM.
- You can download all history data for the selected period as an Excel file for offline analysis or record keeping.
Audit History
guide
- From the menu, go to Monitoring > Audit Log.
- Select the desired history type: Audit Log, Approval Log
- Search the history using search and filter options based on criteria such as user, resource type, or period.
- Check details such as the connection timestamp, user information, and resource specifics.
Audit logs provide a comprehensive history of user and system actions performed within the CAM portal, and are divided into two detailed categories.
- Activity Log (Audit Log)
- Permission Approval History (Approval Log)
Activity Log (Audit Log)
Activity history shows the operation logs related to creation, update, and deletion of data within the CAM portal.
Activity Log Feature
History Range
- Tenant (Company) Administrator: You can view the history of all projects within the tenant.
- User: You can only view the history of your own projects.
Detail History
- Displays information such as event type, date/time, user, and IP.
- Click the Expand icon to view detailed information for all actions.
- You can narrow the results by using filters such as project, event type, and user.
- You can select a period to filter the history. The default period is 30 days.
- The history is sorted in reverse chronological order, with the most recent actions displayed at the top.
- You can download all history data within the selected period as an Excel file for offline analysis or archiving.
Permission Approval Log (Approval Log)
The permission approval history provides all approval request details and approval statuses within CAM.
Permission Approval History Feature
History Range
- Tenant (Company) Administrator: You can view the approval history for permission approvals for all projects within the tenant.
- User: You can only view the authorization approval history for your own project.
History Details
- Displays the approval type, approval status, details, and approval history.
- You can check the approval status, such as pending, approved, or rejected.
- You can open a specific approval item to view its details.
- You can narrow the results by using filters such as project, approval type, approval status, and user.
- You can select a period to filter the history. The default period is 30 days.
- The history is sorted in reverse chronological order, with the most recent approvals displayed at the top.
- You can download all history data within the selected period as an Excel file for offline analysis or archiving.
6.2.1.4.6 - Configuration
In the configuration module, PM and PL group users can manage projects, and tenant administrators can set approval routes and organizational charts.
Project
In the Project menu, users can view all projects they belong to. The project details are initially registered by the PM, and can be edited by the PM or PL group users as needed.
Create Project
To create a project, click the Create Project button and enter the project information.
- Project Name: Assign a name to the project.
- PM: Assign a project manager who can manage the project’s related information and permissions. Note that if you assign someone other than yourself, you will no longer be able to manage the project after creation.
- Organization: Choose the organization that will carry out the project.
- Description: Enter a description of the project.
View project
On the Project View screen, PM or PL group users manage project information and can add CSP accounts and users to the project.
- General Information: Project Creation screen displays the registered project information.
- Edit: Click the Edit button to modify the project’s general information.
- Delete: Click the Delete button to delete this project.
- User: Displays a list of users registered in the project.
- Cloud Account: Shows the list of accounts registered in the project.
Cloud Account Management
PM and PL group users can add new accounts to a project or delete accounts that are no longer used.
Add AWS account
CAM supports a keyless method to enhance security when connecting cloud accounts. To register an account, you must create a new role in the AWS IAM service with the policy required by CAM. You can create the role in AWS by following the steps below.
- Access AWS IAM service
- After logging into the AWS console, go to the IAM service https://aws.amazon.com/console/
- Click Create Role in the Roles menu
- After accessing Access Management > Roles, click Create to go to the Create Role screen.
- Create Role > Step 1: Trusted Entity selection
This step is for entering CAM account information.
- Select AWS account and Another AWS account in order, then enter the CAM account ID 022499039571 in the account ID.
- Create Role > Step 2: Add Permission Assign the CAM policy to the newly created role.
guide
Search for the item, select the relevant policy, and proceed to the next step.
- IAMFullAccess
- AmazonEC2FullAccess
- AmazonRDSFullAccess
- AWSCloudTrail_FullAccess
- AmazonS3FullAccess
- AmazonEventBridgeFullAccess
- Create Role > Step 3: Name, Confirm, Create Enter the role name and click the Create Role button to complete role creation. ※ This role name is used as Role Name when registering an account in CAM.
guide
When role creation in IAM is complete, return to the Project View screen in CAM and register an account in CAM. Click the Add button above the account list and enter account information to register the account to the project. Completing account registration requires an approval process. To proceed with the approval process, press the Create Approval button to initiate approval, which is sent to an approval system such as Knox for processing. Once approval is complete, you can see the newly registered account in the account list.
- CSP: Select CSP.
- Environment: Select the service environment.
- Account Name: Assign a name to the account.
- Account ID: Enter the account ID registered in AWS and click the ‘Verify’ button to confirm.
- AWS type: Set to ON if the account is a China account.
- Role Name: Enter the role name created in AWS IAM.
Reference
Account registration policies vary by tenant. Depending on the tenant’s policy, an account may be restricted to registration in only one project.
- Title : It is automatically entered by the system and cannot be edited.
- Approver: The system automatically adds an approval line, and you can add approvers and co‑signers according to the approval guide.
- Content: Account information is entered automatically by the system and cannot be edited.
Add SCP account
PM and PL group users can add a new SCP account to a CAM project via the Add Account button on the View Project page. CAM supports a keyless connection method to enhance security, so credentials are not exchanged directly when registering an account. Before you begin, verify that the required settings have been completed in the SCP console.
Reference
SCP includes both the SCP for Samsung and SCP for Enterprises environments. Depending on the user’s CSP permissions or choices, the prerequisites and steps for adding an account are the same for both environments.
Step 1. Pre-configuration (One-time trust setup for CAM account) Before adding an SCP account to CAM, verify that the following configuration has been completed on the SCP side. This setting enables CAM to securely access the target project and validate the account information.
First, if the policy has not already been created according to the steps described in the manual, you need to set it up. Then approve the CAM account through the permission group and add members.
- Create policy for CAM access
- Go to the SCP console.
- After logging in, navigate to the IAM > Policies section in the SCP console.
- Create a policy with the name ‘CAM_Linked_Policy’.
Create a new policy that includes the permissions required for CAM operation according to the table below.
| ID | Action | Reason |
|---|---|---|
| [Platform] Permission Management | List, Read, Create, Delete, Update Permission | Create/Delete Policy, Assign Policy to Role |
| [Platform] Resource Management | List, Read | View List, SCP Details |
| [Platform] Tag Management | List, Read | View Tag List/Information, etc. |
| [Platform] Project Management | List, Read | Assigned Project List/Information |
Table. Policy creation items for CAM access
- Or you can also add policy requirements in JSON mode.
- Since you can link permission groups and roles later, complete the policy creation without checking anything.
- CAM account approval through permission groups
- After a policy is created, link it to the CAM system account using a permission group.
- Step-by-step:
- IAM > Go to Permission Groups.
- Create a new permission group (e.g., CAM-Access-Group).
- Create a permission group named ‘CAM_Linked_Group’.
- Attach the CAM policy created above to this group.
- When adding a user to a project, the user is linked to a permission group, so you can complete the creation of the permission group without verifying the user at this time.
- Assign permission group to CAM service account
- Go to the project members section of the SCP console.
- Add the required account as a member of the target project.
- This account represents CAM and is used for integration.
- Select the target project for addition > Identity and Access Management > Add User > Add Project Member > Proceed to add an SCP user to the target project.
- Proceed with adding project members.
- Search for a CAM user using the email address cam.app@samsung.com.
- Click the ADD button to select a cam.app user.
- Add an available user from the list, or you can also search for a user using the search function.
- Search for users to add as project members.
- Select the permission group called ‘CAM_Linked_Group’ that you created above and complete the project member addition task.
- Connect a permission group to complete adding project members.
- After completing the above steps, return to the project view screen in CAM and add an SCP account.
Step 2. Add an account in the CAM console
- In CAM, go to View Project > Manage Accounts.
- Click the Add Account button.
- Enter the following information in the popup window that opens:
- CSP and Environment Selection
- CSP: Choose either SCP for Enterprises or SCP for Samsung.
- Environment: Select the environment to which this account belongs (e.g., DEV, STG, PRD, or ETC).
- Enter account information
- Account name:
- Enter a name to identify this account within CAM.
- You can enter up to 50 characters.
- Only English letters and numbers are allowed.
- Project ID (in the SCP console):
- Enter the project ID of the SCP project you prepared earlier.
- Allowed characters: only English alphabet letters, numbers, and hyphens.
- Maximum: 30 characters
- Account name:
- Enter the project ID and click the Confirm button. CAM checks the following:
- Whether the project exists in SCP.
- Check if the required roles (cam-Administrator, cam-Operator, cam-Developer) exist.
- Ensure that the project is not already registered in another CAM project or awaiting approval.
- If any of the above conditions is not met, a validation message will be displayed.
- CSP and Environment Selection
Step 3. Create Approval When the project ID is verified and the other information is completed, the Create Approval button becomes active.
Click this button to send the account addition request as an approval request. Depending on the CAM settings, you can manually select an approver or have the system automatically route it to the default approver.
Once approval is completed, the SCP account will appear in CAM’s project account list.
Add Azure account
Before adding an Azure account to CAM, you must complete the following configuration steps in Microsoft Entra ID and the Azure Portal. These steps must be performed by the tenant administrator.
Step 1. Prerequisite setup (One-time trust configuration and domain configuration for CAM accounts) This step ensures that CAM is trusted within the target Azure tenant and has the necessary access permissions. This step must be completed by the tenant administrator before adding an Azure account to CAM.
These pre-configurations are divided into two sections:
- Trust configuration
- Domain configuration
Trust configuration for CAM accounts This step ensures that the CAM is trusted within the target Azure tenant and has the necessary access permissions. It must be performed by the tenant administrator of the target Azure tenant. The purpose is to grant the CAM the required permissions to access features within Microsoft Entra ID.
To enable CAM to integrate with Azure, the tenant administrator must open the CAM Admin Consent URL. This URL triggers the consent dialog in the Microsoft Entra Admin Center, where the administrator can approve the permissions requested for CAM.
- Retrieve the tenant ID.
The CAM Admin Consent URL includes the App Client ID associated with a specific tenant. Before using it, you must verify the tenant ID of the target Azure tenant.
- How to find the tenant ID:
- Log in to the Azure Portal.
- From the left navigation menu, go to Microsoft Entra ID.
- Find the tenant ID field on the Overview tab (first screen).
- Copy the tenant ID to use for the Admin Consent URL.
- Access the CAM Admin Consent URL.
Open the CAM Admin Consent URL in a web browser. (https://login.microsoftonline.com/{Your_Tenant_ID}/adminconsent?client_id=39613ae7-2fd4-4f3c-9471-aba2391da0b5)
Replace the {Your_Tenant_ID} placeholder in the URL with the actual tenant ID you copied earlier.
When the prompt appears, select the Global Administrator account of the target tenant.
This account must have the highest administrative privileges in the tenant.
Please review the displayed consent agreement. This agreement specifies the exact authority that will be granted to CAM.
If you agree, click “Accept” to approve the integration.
By completing this step, CAM can access tenant-level features in Microsoft Entra ID.
No Subscription Access Yet: In this step, CAM does not receive access permissions to the Azure subscription. Subscription-level access permissions are configured separately in later steps (creating management group roles and assigning subscription roles).
- After granting consent, verify the CAM application registration.
- In Azure Portal, go to Microsoft Entra ID → Enterprise Applications.
- Search for the CAM application.
- Verify that the CAM app appears in the list and is correctly registered.
Reference
It provides tenant-level recognition to CAM when granting admin consent.
CAM Account Domain Settings In Azure, a domain connection is required so that users can authenticate via email and integrate with CAM’s Keycloak authentication. The domain configuration process consists of the following two main steps:
| Process | Executor | frequency |
|---|---|---|
| Domain creation | Tenant admin or PM/PL | Once per tenant (may be repeated for a new domain as needed) |
| Register a domain in an Azure tenant | Tenant admin | Once per tenant (unless additional domains are added later) |
Table. CAM account domain configuration steps
Create Domain You can create a public domain using a DNS service that can create TXT records (e.g., AWS Route 53, SCP DNS). This guide uses SCP DNS as an example.
- Tasks before creating a domain
- Log in to SCP DNS.
- After accessing the SCP console, navigate to the DNS menu.
- Starting public domain purchase.
- Click the product request button.
- This action opens the purchase form.
- Enter the details for the domain purchase form.
- Usage type: select ‘Public’.
- Domain name: Enter the desired public domain name.
- Registrant information: Enter name, email, address, and phone number.
- Description and designated fields
- Payment information is displayed before purchase confirmation.
- Purchase Confirmation
- Confirm the final payment amount.
- Click the following to verify.
- Check DNS status
- After creation, the domain appears in the SCP DNS list.
- Wait until the status shows “active”. This indicates that it is now publicly available.
- Now there is an activated public domain, and you can connect it to an Azure tenant to perform user authentication.
- Log in to SCP DNS.
Register domain in Azure tenant
Now that we have a public domain, we need to connect it to Microsoft Entra ID for authentication.
Pre-domain configuration tasks (Azure tenant)
- Log in to the Azure Portal with a tenant administrator account.
- Microsoft Entra ID → Go to custom domain name.
- Click +Add Custom Domain.
- Enter the public domain name (created in SCP).
- Click Add Domain.
Create a TXT record for the domain (Azure → SCP DNS).
- After adding a domain in Azure:
- Azure displays the TXT record value that must be added to the DNS settings to verify domain ownership.
- Copy the TXT record value in Azure.
- After adding a domain in Azure:
Add TXT record to SCP/Domain Host
- After accessing SCP DNS, select the active public domain.
- Click Add Record.
- Record Type: Select TXT.
- Value: Paste the TXT record value copied from Azure.
- TTL(Time to Live): Select according to preference.
- Click Confirm.
- Check whether the record appears in the domain’s DNS list.
Domain verification in Azure
- Return to the Azure Portal, select Microsoft Entra ID, and then select Custom Domain Names.
- Initially, the domain status is shown as “Unverified”.
- Click the domain, then click the “Verify” button.
- When Azure detects the TXT record (propagation may take a few minutes), the status changes to “Verified”.
- The public domain is now officially linked to the Azure tenant.
guide
Migration for existing Azure users For users of a domain that has already been verified, an update is required by following the steps below. When the previously-used Azure domain is connected to CAM, users of the domain can no longer login using the old method. If Azure Administrator is also registered as a user of that domain, the CAM integration cannot be removed either. Therefore, execute the PowerShell script below to update the * ImmutableId* values of the users belonging to that domain.
Step 1. Install Azure CLI winget install –exact –id Microsoft.AzureCLI
Step 2. Log into Azure CLI Log in with an account that has Azure Entra ID edit permissions. az login
Step 3. Update Azure Entra ID User
$UserId = “userid@domain"
$ImmutableId = “userid@domain”
az rest --method PATCH
–url “https://graph.microsoft.com/v1.0/users/$UserId" --headers "Content-Type=application/json"
–body “{`“onPremisesImmutableId`”:`"$ImmutableId`”}”
Step 2. Add an account in the CAM console
- In CAM, go to View Project > Manage Accounts.
- Click the Add Account button.
- Enter the following information in the popup window that opens:
- CSP and environment selection
- CSP: Select Azure.
- Environment: Select the environment to which this account belongs (e.g., DEV, STG, PRD, or ETC).
- Enter account information
- Account name:
- Enter a name to identify this account within CAM.
- You can enter up to 50 characters.
- Only English letters and numbers are allowed.
- Tenant ID (in Azure portal):
- Enter the tenant ID.
- Allowed characters: only English letters, numbers, and hyphens.
- You can enter up to 36 characters.
- When you click Verify, CAM checks the following:
- Check that the subscription ID format is correct.
- Validate Azure to confirm that it actually exists.
- The subscription ID field is enabled only after the tenant ID has been validated.
- Subscription ID (in Azure portal):
- Please enter the subscription ID.
- Only English letters, numbers, and hyphens are allowed.
- You can enter up to 36 characters.
- When you click Verify, CAM checks the following.
- Check that the subscription ID format is correct.
- Check whether the subscription ID is already linked to another CAM project.
- Check if the subscription ID is already registered or if an approval request is pending.
- The federation domain field is enabled only after the subscription ID has been verified.
- Federation domain (in Azure portal):
- Please enter the federation domain.
- Only English letters, numbers, hyphens, and periods are allowed.
- You can enter up to 48 characters.
- When you click Verify, CAM checks the following.
- Check whether the federation domain format is correct.
- Verify that it matches the existing validated domain registered in the Azure domain configuration.
- Account name:
- CSP and environment selection
Step 3. Create Approval When all fields are validated and the details are completed, the Create Approval button becomes active.
Click this button to submit an account addition approval request. Depending on the CAM settings, you can manually select an approver or have the system automatically route it to the default approver.
When approval is complete, the Azure account will appear in CAM’s project account table.
Delete account
Click the Delete button in the View Account section to delete accounts that are no longer in use.
!!!!!!!!!!!!!!!!!!!!!!!!!!!!!!!!!!!!!
Add GCP account
Before adding an GCP account to CAM, you must complete the following configuration steps in GCP Console and GCP Admin Console. These steps must be performed with Super Admin account.
Step 1. Prerequisite setup (One-time permissions and domain-wide delegation configuration for CAM accounts)
“guide"
Migration for existing GCP users When integrating existing GCP domain with CAM, the users of that domain will no longer be able to log in using the traditional username/password method. If any users still require login via the traditional method, please follow the procedure outlined below.
Step 1. Log into Admin Console as a Super Admin* Super administrators can log in to GCP Admin Console using a username/password without any external integration.
Step 2. Create Group and Assign User* Create a group for logging in with the traditional username/password method and assign users to it.
- “Directory > Group”
- “Create Group”
- Group Name: Enter name of group. (e.g., Group Example 01)
- Group Email: Enter value that serves as a unique identifier. (e.g., group-example-01@domain)
- “Next”
- “Create Group” (without modifying group settings)
- Go to the detail of created group
- “Add user”
Step 3. Assign SSO profile to the group Set up login method for the group.
- “Security > SSO > SSO via external IDP”
- “SSO Profile Assignment Management”
- Select “Group”
- Select “None” of “SSO Profile Select”
- “Redefine”
Follow this, users in that group can log in using the existing method (username/password).
This step involves configuring CAM so that it has the necessary permissions to operate within the target GCP Organization and Google Workspace/Cloud Identity environment. It must be completed with the super admin account before adding a GCP account to CAM.
These pre-configurations are divided into two sections:
- GCP Console Configuration
- GCP Admin Console Configuration
GCP Console Configuration This step grants the permissions required for CAM to manage custom roles within the GCP Organization and to view policies and logs. The configuration can be performed only while logged into GCP with an account that has the designated super‑admin privileges in the GCP Admin Console. All settings must be applied at the Organization level, not at the project level.
Super-Admin Account Role Assignment
- Go to GCP Console’s IAM and Administrator > IAM menu.
- Click Edit(Edit Main Members) using super-admin account.
- Add the following roles.
- Organization Administrator
- Organization Policy Administrator
- Owner
Create User-defined Role
- Select Organization (not Project)
- Go to GCP Console’s IAM and Administrator > Roles menu.
- Click Create Role.
- Title: CamRole
- Create user-defined role by adding the following roles.
guide
- iam.roles.create
- iam.roles.delete
- iam.roles.get
- iam.roles.list
- iam.roles.undelete
- iam.roles.update
- resourcemanager.projects.get
- resourcemanager.projects.getIamPolicy
- resourcemanager.projects.setIamPolicy
- resourcemanager.organizations.get
Setup Organization Policy
- Go to GCP Console’s IAM and Administrator > Roles menu.
- Search for constraints/iam.allowedPolicyMemberDomains.
- Click Policy Management and select the following values.
- Policy Source : Override parent policy
- Policy Enforcement : Merge with parent items
- Rule > Allow All
- Click Policy Setup.
Add permissions to CAM service account
- Go to GCP Console’s IAM and Administrator > Roles menu.
- Click Grant access.
- Enter the CAM service account that was provided by CAM for the new main member.
- Add the following roles.
- Service Account User
- Service Account Token Creator
- Service account OpenID Connect ID token generator
- Identity Platform Viewer(Beta)
- Logs Viewer
- Monitoring Viewer
- Private Logs Viewer
- Organization Viewer
- Organization Policy Administrator
- CamRole (from Step 2)
Setup API Use
- Go to GCP Console’s API and Service menu.
- Search for Cloud Logging API.
- If there is a Settings button, click it to enable the API; if the Settings button isn’t visible on the screen, it means the settings have already been applied, so you can move on to the next step.
GCP Admin Console Configuration
This step involves CAM invoking the Google Workspace and Cloud Identity APIs and configuring it so that users can authenticate through CAM when accessing Google services.
Domain-wide Delegation Configuration
Go to admin.google.com.
Go to Security > Access and Data Management > API Management menu.
Click Domain-wide delegation).
Clic Add API Client.
Enter following values.
Client ID
- Client ID of the CAM service account provided by CAM.
OAuth Scope
- https://www.googleapis.com/auth/admin.directory.domain.readonly
- https://www.googleapis.com/auth/admin.directory.customer.readonly
- https://www.googleapis.com/auth/cloud-identity.inboundsso
- https://www.googleapis.com/auth/cloud-platform
- https://www.googleapis.com/auth/cloud-identity
- https://www.googleapis.com/auth/admin.directory.user
- https://www.googleapis.com/auth/admin.directory.orgunit
Setup for SSO profile redirection via external IDP
- Go to admin.google.com.
- Go to Security > SSO > SSO via External IDP menu.
- Click Service URL by Domains menu.
- Select the following option.
- Automatically redirects users to the third‑party IDP of the following SSO profile.
- Select SSO Profile within Organization.
guide
If there are organizational units (OUs) or groups that do not use SSO, selecting this option may prevent users from logging in.
Step 2. Adding an Account in the CAM Console
- In CAM, go to View Project > Manage Accounts.
- Click Add Account.
- In the popup window, fill out the following fields.
- Select CSP and Environment
- CSP: Choose GCP.
- Environment: Select the environment to which this account belongs (e.g., DEV, STG, PRD, or ETC).
- Account Information
- Account Name:
- Enter a name that will identify the account inside CAM.
- Up to 50 characters are allowed.
- Only English letters and numbers are permitted.
- Organzation ID (from GCP Console):
- Enter the organization ID.
- Allowed characters: English letters, numbers, and hyphens.
- Maximum length: 48 characters.
- Click Verify and CAM will check that:
- The organization‑ID format is correct.
- It actually exists in GCP.
- Only after the organization ID is validated will the Project ID field become active.
- Project ID (from GCP Console):
- Enter the project ID.
- Allowed characters: English letters, numbers, and hyphens.
- Click Verify and CAM will verify that:
- The organization‑ID format is correct
- It actually exists in GCP.
- The project is not already registered in another CAM project or pending approval.
- Domain (from GCP Console):
- Enter the domain.
- Click Verify and CAM will confirm that:
- The domain is registered in Google Workspace or Cloud Identity.
- The domain and organization information are linked under the same Customer ID.
- Admin Account (from GCP Console):
- Enter the super‑admin account.
- Click Verify and CAM will ensure that:
- The account exists.
- It holds the Super‑Admin role in the GCP Admin Console.
- It has Owner permission on the relevant organization or project in the GCP Console.
- Account Name:
- Select CSP and Environment
Step 3. Create Approval Once all fields have been validated and the details are complete, Create Approval button becomes active.
Click this button to submit a request for account‑addition approval. Depending on the CAM configuration, you can either manually select an approver or let the system automatically route the request to the default approver.
After the approval is granted, the GCP account will appear in the project‑account table within CAM.
Account Deletion
In View Account section, click the Delete button to remove accounts that are no longer in use. This helps keep your account list clean and up‑to‑date.
User Management
PM and PL group users can add or remove users from a project. Only users registered in the project can be granted and managed console and resource access within that project, so users who need console or resource access must be registered as project users.
Add user
Click the Add button above the user list to add a user to the project.
- Name: Search by the user name registered in CAM.
- Group: Select the user’s group.
- PL : can manage project-related information and have the same permissions as the project manager.
- Operator, Developer: Users who can view project-related information and request resource permissions; they are categorized for role management within the project, but in the CAM portal they have identical permissions.
Delete User
Select the user to delete from the user list and click the Delete button. After a user is deleted, the deleted user can no longer view project-related information.
Notice
The announcements section allows tenant administrators to create and manage notices for users within the tenant. These notices are displayed in the GNB announcement panel. Multiple notices can be active simultaneously. Each notice may include a title, detailed description, optional attachment, and a specified display period.
Create Notice
To create a notice, click the Create button on the list page. On the Create Notice page, enter the following details:
- Title: Enter the notice title.
- Description: Provide the content or message to display.
- Attachment(Optional): Upload supporting files (up to 5 files, total size up to 50MB). Empty files cannot be uploaded, and supported file formats are images, documents, .mp4, and .zip.
- Display: To show announcements in the GNB, turn the toggle ON. After turning the toggle ON, you can select the period or date range during which the announcement will be displayed to users.
To create an announcement, select *Save. The newly created announcement will appear in the announcement list.
Notice Details
Select a notice title from the list to navigate to the notice detail page. All notice information (title, description, attachment, display period, author, and creation date) is displayed in read-only mode.
In this view:
- Use Edit to modify the announcement.
- Use Delete to permanently delete the announcement.
Edit Notice
- Select a notice from the notice list and navigate to its detail view page.
- Select Edit.
- Edit the required fields (title, description, attachment, display settings, or date range).
- To update the notice, select Save.
Reference
Changes to the notice are applied immediately.
Delete Notice
- On the notice detail page, select Delete.
- If a prompt appears asking you to confirm deletion, confirm it. The selected announcement will be removed from the list and will no longer appear in the GNB announcements.
Approval Path
The tenant administrator can predefine the approval route that users must specify when creating an approval.
Create Approval Path
To create an approval route, click the Create button and specify the approval case and organization to generate it.
- Name: Enter a workflow name for administrative purposes that is not exposed to users.
- Target : Select when and which organization to apply it to.
- Approver Guide: Enter the responsible person’s information that cannot be automatically assigned by the system but must be included in the approval route. When entered, it will be displayed on the user screen as shown below.
- Approver: The system automatically assigns the approver to be displayed; add them by searching for their name.
View approval path
To view detailed information about the approval route, go to the Approval Route menu and click the desired approval route. You can view information for all approval routes, and Edit or Delete them as well.
Edit Approval Path
On the View Approval Route screen, you can click the Edit button to modify the information.
Delete approval path
Click the Delete button to delete the approval route that is no longer used.
organization
In the Organization menu, a tenant administrator can manually manage the tenant’s organization. When a tenant administrator creates an organization, they can manage projects and approval routes at the organization level.
Add organization
To add an organization, click the Add button and, when the Add Organization popup appears, enter the following details.
- Parent (Higher-level Organization): Select the name of the higher-level organization. The default is the tenant name.
- Name: Enter the name of the organization to create.
- Display: To have it appear in the list of organizations shown to the user, set the toggle to ON.
View organization
On the View Organization page, you can see a list of all created organizations. Clicking the organization name you want to view displays detailed organization information on the right. You can expand the entire organization list. When you expand an organization, you can view the entire hierarchy down to the lowest level at once, and when you collapse the organization list, you can see only the top‑level items.
Organization modification
The data entered when creating the organization is displayed, and you can edit all data. After editing, click the Save button.
Delete organization
Click the Delete button on the View Organization screen to delete an Organization that is no longer used.
reference
Organizations that have parent organizations or registered projects cannot be deleted.
Tenant Administrator
In the tenant administrator menu, you can add or remove administrators who manage the tenant. When the system is first opened, the user listed on the service application form is designated as the tenant administrator, and thereafter, users with tenant administrator privileges can directly add, delete, and manage.
Tenant administrators can manage tenant-level information through dedicated menus (Approval Line, Organization, etc.) and can view all content within the tenant.
Add tenant administrator
To add a tenant administrator, click the Add button, and when the tenant administrator addition popup appears, search among the users registered in the tenant and register them.
Delete Tenant Administrator
In the tenant administrator list, select the user to delete, then click the Delete button to remove them.
6.2.1.5 - SingleID Authenticator Manual Overview
SingleID Authenticator is a SingleID-specific authentication tool that enables easy and secure verification of website users’ identity and multi-factor authentication using a mobile phone.
SingleID Authenticator authentication method
- Biometric (fingerprint, facial)
- TOTP(Time base One Time Password)
- mOTP(mobile One Time Password)
- PINguideThe authentication methods that can be registered may vary depending on the authentication methods supported by the service and the range of device support.
Mobile environment support
SingleID Authenticator supports the mobile environments listed below.
| Support | Recommended |
|---|---|
Android : 8 and later versions
| Android : 8 and later versions
|
iOS : 16 ,17
| iOS : 16 ,17
|
Table. Mobile environment support
6.2.1.5.1 - Install App
The SingleID Authenticator mobile app can be downloaded in various ways.
Download by scanning QR
In SingleID User Protal, when setting up authentication or on authentication pages, you can scan the QR code during the SingleID Authenticator registration process to conveniently visit the app store and download it.
Reference
If you are a user in China who cannot access the App Store, please click “If you are a Chinese user or cannot access the App Store, click here” located just below the QR code on the screen to receive the SMS URL.
Search in the mobile app store and download
Due to internal company security, if you cannot scan the QR code with a camera, you can directly search for and download it from the Android and iOS app stores.
- Open the Play Store (Android) or the App Store on your smartphone.
- Enter ‘SingleID’ to search.
- After confirming the ‘SingleID Authenticator’, press the install button to install.
Access via a smartphone browser and download
If you access the additional authentication page on a mobile device, follow the steps below to download and install the app.
- Click the button below on the service registration guide page.
- Click the app download button to download the installation file, then install it.
Caution
For iOS, after installation, you can use it by setting Device Settings > General > Device Management to trust SAMSUNG SDS.
6.2.1.5.2 - User Authentication
Authenticate by receiving a PUSH
When a user registered with the service reaches the additional authentication screen, a PUSH is automatically sent to the user’s mobile app. To receive a PUSH and authenticate, follow the steps below.
- When additional authentication is requested, a PUSH is received from SingleID Authenticator. Press PUSH to launch the app.
- Authenticate using your preferred authentication method.
- If authentication is successful, return to the browser to complete the authentication.
Caution
For iOS, the user must manually click ◀Safari at the top left of the browser to switch to the browser for authentication to complete. For Android OS devices, it automatically switches to the browser.
Request Manual Authentication
If you launch the app without pressing PUSH or do not receive a PUSH, you can request additional verification directly from the app as shown below. To authenticate by requesting verification from the app, follow the steps below.
- Run the app and click the + button in the upper right corner.
- Scan the QR code displayed in the web browser or enter the manual code into the mobile app.
- When the input is completed correctly, the authentication service will be registered.
Authenticate with OTP
For users registered with the OTP service, the additional authentication screen automatically sends OTP information to the user’s mobile app via PUSH. Follow the steps below to view and verify the OTP in the app.
- When OTP authentication is requested, a PUSH is received in SingleID Authenticator. Press PUSH to launch the app.
- Verify that the OTP displayed in the app matches the OTP on the web screen. If they match, select Confirm in the app.
- If authentication is successful, return to the browser and complete the authentication.
Caution
If you are using an older version of the app that does not support OTP, you can use OTP authentication after updating the app. Follow the guide on the authentication screen to update the app, register OTP, and then use it.
6.2.1.5.3 - Manage Authentication Method
To use SingleID Authenticator, you must set a PIN, and you can add other authentication methods supported by the service.
Change PIN
When you first register a service in SingleID Authenticator, you will register a PIN as a required authentication method. To change the PIN, follow the steps below.
- Navigate to Main screen > Authentication method.
- Click Change on the PIN item. Complete the verification process and change to the desired number.
Reference
The authentication methods that can be registered may vary depending on the service’s supported methods and the device.
Terminate authentication method
If you no longer use a registered authentication method or need to re‑register, you can deactivate the authentication method. To deactivate the authentication method, follow the steps below.
- Go to Settings > Authentication Method Management.
- Authentication with a PIN is required when accessing the menu.
- Select the icon on the right of the authentication method you wish to cancel.
- A delete confirmation popup appears as shown below.
- If the authentication method is deregistered, the icon on the right changes to the Off state.
Reference
After registering the service, the initial PIN cannot be disabled as it is set by default. If you do not want to authenticate with SingleID Authenticator, delete the service.
6.2.1.5.4 - Manage Service List
You can change the order of the registered services list or delete services you no longer use.
Changing List Order
If you want to change the order of the service list, follow the steps below.
- From the home screen, select the icon to navigate to the service list change.
- Press and hold the icon of the service you want to reorder, then drag it to the desired location.
- Change to the desired order and click Done. The updated list will be saved.
Delete registered service
The process for deleting registered services offers both a method to delete a single service and a method to delete multiple services in bulk.
If you want to delete a service, you can delete it directly from the list. Follow the steps below.
- From the Home screen, select the service you want to delete and slide it to the left.
- If the trash icon appears on the right, click the trash icon.
- Do you want to delete the selected service? When the popup appears, click Confirm to delete.
- Confirm that the service has been removed from the list.
FAQ
The app does not open when using Samsung Browser.
For users of the latest Samsung Browser, the app logo appears in the browser as shown below depending on the smartphone settings, and the app does not open automatically.
You can open the app by selecting the app icon next to the browser address bar. To set the app to open automatically, follow the steps below.
- Go to Samsung Browser > Internet Settings > Useful Features.
- Change the “Open links in other apps” setting to On.
- If you return to the browser and run the app again, it operates correctly.
6.2.1.5.5 - Open Source Licence(Android)
The open source licenses used in the SingleID solution are as follows. For more details, see below.
SingleID_MobileApp_Client-APK
The following sets forth attribution notices for third party software that may be contained in portions of this product. If you have any questions, please contact <global.cs@samsung.com.>
| License | Open Source Component | License Text |
|---|---|---|
| Jdom License | JDOM(http://www.jdom.org/) | JDOM License Copyright (C) 2000-2004 Jason Hunter & Brett McLaughlin. All rights reserved. Redistribution and use in source and binary forms, with or without modification, are permitted provided that the following conditions are met: 1. Redistributions of source code must retain the above copyright notice, this list of conditions, and the following disclaimer. 2. Redistributions in binary form must reproduce the above copyright notice, this list of conditions, and the disclaimer that follows these conditions in the documentation and/or other materials provided with the distribution. 3. The name “JDOM” must not be used to endorse or promote products derived from this software without prior written permission. For written permission, please contact {request_AT_jdom_DOT_org}. 4. Products derived from this software may not be called “JDOM”, nor may “JDOM” appear in their name, without prior written permission from the JDOM Project Management {request_AT_jdom_DOT_org}. In addition, we request (but do not require) that you include in the end-user documentation provided with the redistribution and/or in the software itself an acknowledgment equivalent to the following: “This product includes software developed by the JDOM Project (http://www.jdom.org/)." Alternatively, the acknowledgment may be graphical using the logos available at http://www.jdom.org/images/logos. THIS SOFTWARE IS PROVIDED “AS IS” AND ANY EXPRESSED OR IMPLIED WARRANTIES, INCLUDING, BUT NOT LIMITED TO, THE IMPLIED WARRANTIES OF MERCHANTABILITY AND FITNESS FOR A PARTICULAR PURPOSE ARE DISCLAIMED. IN NO EVENT SHALL THE JDOM AUTHORS OR THE PROJECT CONTRIBUTORS BE LIABLE FOR ANY DIRECT, INDIRECT, INCIDENTAL, SPECIAL, EXEMPLARY, OR CONSEQUENTIAL DAMAGES (INCLUDING, BUT NOT LIMITED TO, PROCUREMENT OF SUBSTITUTE GOODS OR SERVICES; LOSS OF USE, DATA, OR PROFITS; OR BUSINESS INTERRUPTION) HOWEVER CAUSED AND ON ANY THEORY OF LIABILITY, WHETHER IN CONTRACT, STRICT LIABILITY, OR TORT (INCLUDING NEGLIGENCE OR OTHERWISE) ARISING IN ANY WAY OUT OF THE USE OF THIS SOFTWARE, EVEN IF ADVISED OF THE POSSIBILITY OF SUCH DAMAGE. |
| MIT License | Xamarin.Android.Support.VersionedParcelable (http://www.nuget.org/packages/Xamarin.Android .Support.VersionedParcelable) , Animal Sniffer Annotations (http://mojo.codehaus.org/animal-sniffer/ animal-sniffer-annotations) , Checker Qual (http://checkerframework.org) , Xamarin.Android.Support.SwipeRefreshLayout (http://www.nuget.org/packages/Xamarin.Android .Support.SwipeRefreshLayout) , chai (https://www.npmjs.org/package/chai) , The Legion of the Bouncy Castle (http://www.bouncycastle.org/index.html) , SLF4J API Module(http://www.slf4j.org) , jsrsasign(https://www.npmjs.org/package/jsrsasign) ,Checker Qual(http://checkerframework.org) , , jsrsasign (https://www.npmjs.org/package/jsrsasign) , Mocha(https://www.npmjs.org/package/mocha) , Xamarin.Android.Support.ViewPager (http://www.nuget.org/packages/Xamarin. Android.Support.ViewPager) , SLF4J LOG4J-12 Binding (http://www.slf4j.org) , android-gif-drawable (http://github.com/koral--/android-gif-drawable/) Android - platform - hardware - intel - common – libva (http://developer.android.com/index.html) | The MIT License Xamarin.Android.Support.VersionedParcelable : Copyright (c) .NET Foundation Contributors Animal Sniffer Annotations : Copyright (c) 2009 codehaus.org. Checker Qual : Copyright 2004-present by the Checker Framework developers Xamarin.Android.Support.SwipeRefreshLayout : Copyright (c) .NET Foundation Contributors chai : Copyright (c) 2017 Chai.js Assertion Library The Legion of the Bouncy Castle : Copyright © 2013 Legion of the Bouncy Castle Inc. (ABN 84 166 338 567) All rights reserved. SLF4J API Module , SLF4J LOG4J-12 Binding : Copyright © 2004-2023 QOS.ch jsrsasign : Copyright (c) 2010-2021 Kenji Urushima Checker Qual : Copyright 2004-present by the Checker Framework developers Mocha: Copyright (c) 2011-2022 OpenJS Foundation and contributors, https://openjsf.org Xamarin.Android.Support.ViewPager , Android - platform - hardware - intel - common - libva: Copyright (c) .NET Foundation Contributors android-gif-drawable : Copyright (c) 2013 - present Karol Wrótniak, Droids on Roids LLC Permission is hereby granted, free of charge, to any person obtaining a copy of this software and associated documentation files (the “Software”), to deal in the Software without restriction, including without limitation the rights to use, copy, modify, merge, publish, distribute, sublicense, and/or sell copies of the Software, and to permit persons to whom the Software is furnished to do so, subject to the following conditions: The above copyright notice and this permission notice shall be included in all copies or substantial portions of the Software. THE SOFTWARE IS PROVIDED “AS IS”, WITHOUT WARRANTY OF ANY KIND, EXPRESS OR IMPLIED, INCLUDING BUT NOT LIMITED TO THE WARRANTIES OF License Open Source Component License Text MERCHANTABILITY, FITNESS FOR A PARTICULAR PURPOSE AND NONINFRINGEMENT. IN NO EVENT SHALL THE AUTHORS OR COPYRIGHT HOLDERS BE LIABLE FOR ANY CLAIM, DAMAGES OR OTHER LIABILITY, WHETHER IN AN ACTION OF CONTRACT, TORT OR OTHERWISE, ARISING FROM, OUT OF OR IN CONNECTION WITH THE SOFTWARE OR THE USE OR OTHER DEALINGS IN THE SOFTWARE. |
SingleID_MobileApp_Client-APK
SingleID_MobileApp_Flutter-UMA
The following sets forth attribution notices for third party software that may be contained in portions of this product. If you have any questions, please contact global.cs@samsung.com
| License | Open Source Component | License Text |
|---|---|---|
| Apache License 2.0 | Android Support Library media compat, Converter: Gson, Adapter: RxJava 2, Android Support Library core utils, Android Arch-Runtime, Guava (Google Common Libraries), Android Support AnimatedVectorDrawable, Android Support Library core UI, Android Support Library Custom View - androidx.customview:customview, Android Lifecycle LiveData, OkHttp, Gson, android.support.annotation, Android Support Library Custom View - androidx.swiperefreshlayout:swiperefreshlayout, Android Support Library v4, OkHttp, Android Lifecycle ViewModel, Commons Lang, rxjava, Android Support Library compat, Roboto Fonts, Apache Commons Collections, Android Support Library v4, Android Lifecycle LiveData Core, RxAndroid, joda-time, okio, Apache Commons IO, JetBrains/java-annotations, Android AppCompat Library v7, Android Support Library Collections, Android Support VectorDrawable, Kotlin Stdlib, Android Lifecycle-Common, Android Support Library loader, Retrofit | Apache License Version 2.0, January 2004 http://www.apache.org/licenses/ TERMS AND CONDITIONS FOR USE, REPRODUCTION, AND DISTRIBUTION 1. Definitions. “License” shall me an the terms and conditions for use, reproduction, and distribution as defined by Sections 1 through 9 of this document. “Licensor” shall mean the copyright owner or entity authorized by the copyright owner that is granting the License. “Legal Entity” shall mean the union of the acting entity and all other entities that control, are controlled by, or are under common control with that entity. For the purposes of this definition, “control” means (i) the power, direct or indirect, to cause the direction or management of such entity, whether by contract or otherwise, or (ii) ownership of fifty percent (50%) or more of the outstanding shares, or (iii) beneficial ownership of such entity. “You” (or “Your”) shall mean an individual or Legal Entity exercising permissions granted by this License. “Source” form shall mean the preferred form for making modifications, including but not limited to software source code, documentation source, and configuration files. “Object” form shall mean any form resulting from mechanical transformation or translation of a Source form, including but not limited to compiled object code, generated documentation, and conversions to other media types. “Work” shall mean the work of authorship, whether in Source or Object form, made available under the License, as indicated by a copyright notice that is included in or attached to the work (an example is provided in the Appendix below). “Derivative Works” shall mean any work, whether in Source or Object form, that is based on (or derived from) the Work and for which the editorial revisions, annotations, elaborations, or other modifications represent, as a whole, an original work of authorship. For the purposes of this License, Derivative Works shall not include works that remain separable from, or merely link (or bind by name) to the interfaces of, the Work and Derivative Works thereof. “Contribution” shall mean any work of authorship, including the original version of the Work and any modifications or additions to that Work or Derivative Works thereof, that is intentionally submitted to Licensor for inclusion in the Work by the copyright owner or by an individual or Legal Entity authorized to submit on behalf of the copyright owner. For the purposes of this definition, “submitted” means any form of electronic, verbal, or written communication sent to the Licensor or its representatives, including but not limited to communication on electronic mailing lists, source code control systems, and issue tracking systems that are managed by, or on behalf of, the Licensor for the purpose of discussing and improving the Work, but excluding communication that is conspicuously marked or otherwise designated in writing by the copyright owner as “Not a Contribution.” “Contributor” shall mean Licensor and any individual or Legal Entity on behalf of whom a Contribution has been received by Licensor and subsequently incorporated within the Work. 2. Grant of Copyright License. Subject to the terms and conditions of this License, each Contributor hereby grants to You a perpetual, worldwide, non-exclusive, no-charge, royalty-free, irrevocable copyright license to reproduce, prepare Derivative Works of, publicly display, publicly perform, sublicense, and distribute the Work and such Derivative Works in Source or Object form. 3. Grant of Patent License. Subject to the terms and conditions of this License, each Contributor hereby grants to You a perpetual, worldwide, non-exclusive, no-charge, royalty-free, irrevocable (except as stated in this section) patent license to make, have made, use, offer to sell, sell, import, and otherwise transfer the Work, where such license applies only to those patent claims licensable by such Contributor that are necessarily infringed by their Contribution(s) alone or by combination of their Contribution(s) with the Work to which such Contribution(s) was submitted. If You institute patent litigation against any entity (including a cross-claim or counterclaim in a lawsuit) alleging that the Work or a Contribution incorporated within the Work constitutes direct or contributory patent infringement, then any patent licenses granted to You under this License for that Work shall terminate as of the date such litigation is filed. 4. Redistribution. You may reproduce and distribute copies of the Work or Derivative Works thereof in any medium, with or without modifications, and in Source or Object form, provided that You meet the following conditions: a. You must give any other recipients of the Work or Derivative Works a copy of this License; and b. You must cause any modified files to carry prominent notices stating that You changed the files; and c. You must retain, in the Source form of any Derivative Works that You distribute, all copyright, patent, trademark, and attribution notices from the Source form of the Work, excluding those notices that do not pertain to any part of the Derivative Works; and d. If the Work includes a “NOTICE” text file as part of its distribution, then any Derivative Works that You distribute must include a readable copy of the attribution notices contained within such NOTICE file, excluding those notices that do not pertain to any part of the Derivative Works, in at least one of the following places: within a NOTICE text file distributed as part of the Derivative Works; within the Source form or documentation, if provided along with the Derivative Works; or, within a display generated by the Derivative Works, if and wherever such third-party notices normally appear. The contents of the NOTICE file are for informational purposes only and do not modify the License. You may add Your own attribution notices within Derivative Works that You distribute, alongside or as an addendum to the NOTICE text from the Work, provided that such additional attribution notices cannot be construed as modifying the License. You may add Your own copyright statement to Your modifications and may provide additional or different license terms and conditions for use, reproduction, or distribution of Your modifications, or for any such Derivative Works as a whole, provided Your use, reproduction, and distribution of the Work otherwise complies with the conditions stated in this License. 5. Submission of Contributions. Unless You explicitly state otherwise, any Contribution intentionally submitted for inclusion in the Work by You to the Licensor shall be under the terms and conditions of this License, without any additional terms or conditions. Notwithstanding the above, nothing herein shall supersede or modify the terms of any separate license agreement you may have executed with Licensor regarding such Contributions. 6. Trademarks. This License does not grant permission to use the trade names, trademarks, service marks, or product names of the Licensor, except as required for reasonable and customary use in describing the origin of the Work and reproducing the content of the NOTICE file. 7. Disclaimer of Warranty. Unless required by applicable law or agreed to in writing, Licensor provides the Work (and each Contributor provides its Contributions) on an “AS IS” BASIS, WITHOUT WARRANTIES OR CONDITIONS OF ANY KIND, either express or implied, including, without limitation, any warranties or conditions of TITLE, NON-INFRINGEMENT, MERCHANTABILITY, or FITNESS FOR A PARTICULAR PURPOSE. You are solely responsible for determining the appropriateness of using or redistributing the Work and assume any risks associated with Your exercise of permissions under this License. 8. Limitation of Liability. In no event and under no legal theory, whether in tort (including negligence), contract, or otherwise, unless required by applicable law (such as deliberate and grossly negligent acts) or agreed to in writing, shall any Contributor be liable to You for damages, including any direct, indirect, special, incidental, or consequential damages of any character arising as a result of this License or out of the use or inability to use the Work (including but not limited to damages for loss of goodwill, work stoppage, computer failure or malfunction, or any and all other commercial damages or losses), even if such Contributor has been advised of the possibility of such damages. 9. Accepting Warranty or Additional Liability. While redistributing the Work or Derivative Works thereof, You may choose to offer, and charge a fee for, acceptance of support, warranty, indemnity, or other liability obligations and/or rights consistent with this License. However, in accepting such obligations, You may act only on Your own behalf and on Your sole responsibility, not on behalf of any other Contributor, and only if You agree to indemnify, defend, and hold each Contributor harmless for any liability incurred by, or claims asserted against, such Contributor by reason of your accepting any such warranty or additional liability. END OF TERMS AND CONDITIONS APPENDIX: How to apply the Apache License to your work To apply the Apache License to your work, attach the following boilerplate notice, with the fields enclosed by brackets “[]” replaced with your own identifying information. (Don’t include the brackets!) The text should be enclosed in the appropriate comment syntax for the file format. We also recommend that a file or class name and description of purpose be included on the same “printed page” as the copyright notice for easier identification within third-party archives. Copyright [yyyy] [name of copyright owner] Licensed under the Apache License, Version 2.0 (the “License”); you may not use this file except in compliance with the License. You may obtain a copy of the License at http://www.apache.org/licenses/LICENSE-2.0 Unless required by applicable law or agreed to in writing, software distributed under the License is distributed on an “AS IS” BASIS, WITHOUT WARRANTIES OR CONDITIONS OF ANY KIND, either express or implied. See the License for the specific language governing permissions and limitations under the License. |
| Creative Commons Zero v1.0 Universal | reactive-streams: http://www.reactive-streams.org/ | Creative Commons CC0 1.0 Universal Creative Commons Legal Code CC0 1.0 Universal CREATIVE COMMONS CORPORATION IS NOT A LAW FIRM AND DOES NOT PROVIDE LEGAL SERVICES. DISTRIBUTION OF THIS DOCUMENT DOES NOT CREATE AN ATTORNEY-CLIENT RELATIONSHIP. CREATIVE COMMONS PROVIDES THIS INFORMATION ON AN “AS-IS” BASIS. CREATIVE COMMONS MAKES NO WARRANTIES REGARDING THE USE OF THIS DOCUMENT OR THE INFORMATION OR WORKS PROVIDED HEREUNDER, AND DISCLAIMS LIABILITY FOR DAMAGES RESULTING FROM THE USE OF THIS DOCUMENT OR THE INFORMATION OR WORKS PROVIDED HEREUNDER. Statement of Purpose The laws of most jurisdictions throughout the world automatically confer exclusive Copyright and Related Rights (defined below) upon the creator and subsequent owner(s) (each and all, an “owner”) of an original work of authorship and/or a database (each, a “Work”). Certain owners wish to permanently relinquish those rights to a Work for the purpose of contributing to a commons of creative, cultural and scientific works (“Commons”) that the public can reliably and without fear of later claims of infringement build upon, modify, incorporate in other works, reuse and redistribute as freely as possible in any form whatsoever and for any purposes, including without limitation commercial purposes. These owners may contribute to the Commons to promote the ideal of a free culture and the further production of creative, cultural and scientific works, or to gain reputation or greater distribution for their Work in part through the use and efforts of others. For these and/or other purposes and motivations, and without any expectation of additional consideration or compensation, the person associating CC0 with a Work (the “Affirmer”), to the extent that he or she is an owner of Copyright and Related Rights in the Work, voluntarily elects to apply CC0 to the Work and publicly distribute the Work under its terms, with knowledge of his or her Copyright and Related Rights in the Work and the meaning and intended legal effect of CC0 on those rights. 1. Copyright and Related Rights. A Work made available under CC0 may be protected by copyright and related or neighboring rights (“Copyright and Related Rights”). Copyright and Related Rights include, but are not limited to, the following: i. the right to reproduce, adapt, distribute, perform, display, communicate, and translate a Work; ii. moral rights retained by the original author(s) and/or performer(s); iii. publicity and privacy rights pertaining to a person’s image or likeness depicted in a Work; iv. rights protecting against unfair competition in regards to a Work, subject to the limitations in paragraph 4(a), below; v. rights protecting the extraction, dissemination, use and reuse of data in a Work; vi. database rights (such as those arising under Directive 96/9/EC of the European Parliament and of the Council of 11 March 1996 on the legal protection of databases, and under any national implementation thereof, including any amended or successor version of such directive); and vii. other similar, equivalent or corresponding rights throughout the world based on applicable law or treaty, and any national implementations thereof. 2. Waiver. To the greatest extent permitted by, but not in contravention of, applicable law, Affirmer hereby overtly, fully, permanently, irrevocably and unconditionally waives, abandons, and surrenders all of Affirmer’s Copyright and Related Rights and associated claims and causes of action, whether now known or unknown (including existing as well as future claims and causes of action), in the Work i. in all territories worldwide, ii. for the maximum duration provided by applicable law or treaty (including future time extensions), iii. in any current or future medium and for any number of copies, and iv. for any purpose whatsoever, including without limitation commercial, advertising or promotional purposes (the “Waiver”). Affirmer makes the Waiver for the benefit of each member of the public at large and to the detriment of Affirmer’s heirs and successors, fully intending that such Waiver shall not be subject to revocation, rescission, cancellation, termination, or any other legal or equitable action to disrupt the quiet enjoyment of the Work by the public as contemplated by Affirmer’s express Statement of Purpose. 3. Public License Fallback. Should any part of the Waiver for any reason be judged legally invalid or ineffective under applicable law, then the Waiver shall be preserved to the maximum extent permitted taking into account Affirmer’s express Statement of Purpose. In addition, to the extent the Waiver is so judged Affirmer hereby grants to each affected person a royalty-free, non transferable, non sublicensable, non exclusive, irrevocable and unconditional license to exercise Affirmer’s Copyright and Related Rights in the Work i. in all territories worldwide, ii. for the maximum duration provided by applicable law or treaty (including future time extensions), iii. in any current or future medium and for any number of copies, and iv. for any purpose whatsoever, including without limitation commercial, advertising or promotional purposes (the “License”). The License shall be deemed effective as of the date CC0 was applied by Affirmer to the Work. Should any part of the License for any reason be judged legally invalid or ineffective under applicable law, such partial invalidity or ineffectiveness shall not invalidate the remainder of the License, and in such case Affirmer hereby affirms that he or she will not i. exercise any of his or her remaining Copyright and Related Rights in the Work or ii. assert any associated claims and causes of action with respect to the Work, in either case contrary to Affirmer’s express Statement of Purpose. 4. Limitations and Disclaimers. a. No trademark or patent rights held by Affirmer are waived, abandoned, surrendered, licensed or otherwise affected by this document. b. Affirmer offers the Work as-is and makes no representations or warranties of any kind concerning the Work, express, implied, statutory or otherwise, including without limitation warranties of title, merchantability, fitness for a particular purpose, non infringement, or the absence of latent or other defects, accuracy, or the present or absence of errors, whether or not discoverable, all to the greatest extent permissible under applicable law. c. Affirmer disclaims responsibility for clearing rights of other persons that may apply to the Work or any use thereof, including without limitation any person’s Copyright and Related Rights in the Work. Further, Affirmer disclaims responsibility for obtaining any necessary consents, permissions or other rights required for any use of the Work. Affirmer understands and acknowledges that Creative Commons is not a party to this document and has no duty or obligation with respect to this CC0 or use of the Work. |
| ISC License | gotham-fonts: https://www.npmjs.org/package/gotham-fonts | ISC License (ISCL) gotham-fonts : Copyright @ Bogdan Pop Permission to use, copy, modify, and/or distribute this software for any purpose with or without fee is hereby granted, provided that the above copyright notice and this permission notice appear in all copies. THE SOFTWARE IS PROVIDED “AS IS” AND THE AUTHOR DISCLAIMS ALL WARRANTIES WITH REGARD TO THIS SOFTWARE INCLUDING ALL IMPLIED WARRANTIES OF MERCHANTABILITY AND FITNESS. IN NO EVENT SHALL THE AUTHOR BE LIABLE FOR ANY SPECIAL, DIRECT, INDIRECT, OR CONSEQUENTIAL DAMAGES OR ANY DAMAGES WHATSOEVER RESULTING FROM LOSS OF USE, DATA OR PROFITS, WHETHER IN AN ACTION OF CONTRACT, NEGLIGENCE OR OTHER TORTIOUS ACTION, ARISING OUT OF OR IN CONNECTION WITH THE USE OR PERFORMANCE OF THIS SOFTWARE. |
| MIT License | Xamarin.Android.Support.VersionedParcelable: http://www.nuget.org/packages/Xamarin.Android.Support.VersionedParcelable Xamarin.Android.Support.CoordinaterLayout: http://www.nuget.org/packages/Xamarin.Android.Support.CoordinaterLayout The Legion of the Bouncy Castle: http://www.bouncycastle.org/index.html Xamarin.Android.Support.SlidingPaneLayout: http://www.nuget.org/packages/Xamarin.Android.Support.SlidingPaneLayout XamarinLibrary.Xamarin.Android.Support.Multidex: https://www.nuget.org/packages/XamarinLibrary.Xamarin.Android.Support.Multidex Xamarin.Android.Support.Interpolator: http://www.nuget.org/packages/Xamarin.Android.Support.Interpolator Xamarin.Android.Support.LocalBroadcastManager: http://www.nuget.org/packages/Xamarin.Android.Support.LocalBroadcastManager Xamarin.Android.Support.DrawerLayout: http://www.nuget.org/packages/Xamarin.Android.Support.DrawerLayout @fontsource/Montserrat: https://www.npmjs.org/package/@fontsource/montserrat Xamarin.Android.Support.DocumentFile: http://www.nuget.org/packages/Xamarin.Android.Support.DocumentFile Xamarin.Android.Support.Print: http://www.nuget.org/packages/Xamarin.Android.Support.Print Xamarin.Android.Support.AsyncLayoutInflater: http://www.nuget.org/packages/Xamarin.Android.Support.AsyncLayoutInflater SLF4J API Module: http://www.slf4j.org Xamarin.Android.Support.ViewPager: http://www.nuget.org/packages/Xamarin.Android.Support.ViewPager secure-random: http://github.com/avodonosov/secure-random/ Xamarin.Android.Support.CursorAdapter: http://www.nuget.org/packages/Xamarin.Android.Support.CursorAdapter | The MIT License Xamarin.Android.Support.VersionedParcelable: Copyright (c) .NET Foundation Contributors All rights reserved. Xamarin.Android.Support.CoordinaterLayout: Copyright (c) .NET Foundation Contributors All rights reserved. The Legion of the Bouncy Castle: Copyright (c) 2000-2023 The Legion of the Bouncy Castle Inc. (https://www.bouncycastle.org) All rights reserved. Xamarin.Android.Support.SlidingPaneLayout: Copyright (c) .NET Foundation Contributors All rights reserved. XamarinLibrary.Xamarin.Android.Support.Multidex: Copyright (c) .NET Foundation Contributors All rights reserved. Xamarin.Android.Support.Interpolator: Copyright (c) .NET Foundation Contributors All rights reserved. Xamarin.Android.Support.LocalBroadcastManager: Copyright (c) .NET Foundation Contributors All rights reserved. Xamarin.Android.Support.DrawerLayout: Copyright (c) .NET Foundation Contributors All rights reserved. @fontsource/Montserrat: Copyright (c) 2023 fontsource All rights reserved. Xamarin.Android.Support.DocumentFile: Copyright (c) .NET Foundation Contributors All rights reserved. Xamarin.Android.Support.Print: Copyright (c) .NET Foundation Contributors All rights reserved. Xamarin.Android.Support.AsyncLayoutInflater: Copyright (c) .NET Foundation Contributors All rights reserved. SLF4J API Module: Copyright © 2004-2023 QOS.ch All rights reserved. Xamarin.Android.Support.ViewPager: Copyright (c) .NET Foundation Contributors All rights reserved. secure-random: Copyright (C) 2011 by Anton Vodonosov (avodonosov@yandex.ru). All rights reserved. Xamarin.Android.Support.CursorAdapter: Copyright (c) .NET Foundation Contributors All rights reserved. Permission is hereby granted, free of charge, to any person obtaining a copy of this software and associated documentation files (the “Software”), to deal in the Software without restriction, including without limitation the rights to use, copy, modify, merge, publish, distribute, sublicense, and/or sell copies of the Software, and to permit persons to whom the Software is furnished to do so, subject to the following conditions: The above copyright notice and this permission notice shall be included in all copies or substantial portions of the Software. THE SOFTWARE IS PROVIDED “AS IS”, WITHOUT WARRANTY OF ANY KIND, EXPRESS OR IMPLIED, INCLUDING BUT NOT LIMITED TO THE WARRANTIES OF MERCHANTABILITY, FITNESS FOR A PARTICULAR PURPOSE AND NONINFRINGEMENT. IN NO EVENT SHALL THE AUTHORS OR COPYRIGHT HOLDERS BE LIABLE FOR ANY CLAIM, DAMAGES OR OTHER LIABILITY, WHETHER IN AN ACTION OF CONTRACT, TORT OR OTHERWISE, ARISING FROM, OUT OF OR IN CONNECTION WITH THE SOFTWARE OR THE USE OR OTHER DEALINGS IN THE SOFTWARE. |
| SIL Open Font License 1.1 | @fontsource/rubik, https://www.npmjs.org/package/@fontsource/rubik @fontsource/montserrat https://www.npmjs.org/package/@fontsource/montserrat | SIL OPEN FONT LICENSE Version 1.1 - 26 February 2007 PREAMBLE The goals of the Open Font License (OFL) are to stimulate worldwide development of collaborative font projects, to support the font creation efforts of academic and linguistic communities, and to provide a free and open framework in which fonts may be shared and improved in partnership with others. The OFL allows the licensed fonts to be used, studied, modified and redistributed freely as long as they are not sold by themselves. The fonts, including any derivative works, can be bundled, embedded, redistributed and/or sold with any software provided that any reserved names are not used by derivative works. The fonts and derivatives, however, cannot be released under any other type of license. The requirement for fonts to remain under this license does not apply to any document created using the fonts or their derivatives. DEFINITIONS “Font Software” refers to the set of files released by the Copyright Holder(s) under this license and clearly marked as such. This may include source files, build scripts and documentation. “Reserved Font Name” refers to any names specified as such after the copyright statement(s). “Original Version” refers to the collection of Font Software components as distributed by the Copyright Holder(s). “Modified Version” refers to any derivative made by adding to, deleting, or substituting — in part or in whole — any of the components of the Original Version, by changing formats or by porting the Font Software to a new environment. “Author” refers to any designer, engineer, programmer, technical writer or other person who contributed to the Font Software. PERMISSION & CONDITIONS Permission is hereby granted, free of charge, to any person obtaining a copy of the Font Software, to use, study, copy, merge, embed, modify, redistribute, and sell modified and unmodified copies of the Font Software, subject to the following conditions: 1. Neither the Font Software nor any of its individual components, in Original or Modified Versions, may be sold by itself. 2. Original or Modified Versions of the Font Software may be bundled, redistributed and/or sold with any software, provided that each copy contains the above copyright notice and this license. These can be included either as stand-alone text files, human-readable headers or in the appropriate machine-readable metadata fields within text or binary files as long as those fields can be easily viewed by the user. 3. No Modified Version of the Font Software may use the Reserved Font Name(s) unless explicit written permission is granted by the corresponding Copyright Holder. This restriction only applies to the primary font name as presented to the users. 4. The name(s) of the Copyright Holder(s) or the Author(s) of the Font Software shall not be used to promote, endorse or advertise any Modified Version, except to acknowledge the contribution(s) of the Copyright Holder(s) and the Author(s) or with their explicit written permission. 5. The Font Software, modified or unmodified, in part or in whole, must be distributed entirely under this license, and must not be distributed under any other license. The requirement for fonts to remain under this license does not apply to any document created using the Font Software. TERMINATION This license becomes null and void if any of the above conditions are not met. DISCLAIMER THE FONT SOFTWARE IS PROVIDED “AS IS”, WITHOUT WARRANTY OF ANY KIND, EXPRESS OR IMPLIED, INCLUDING BUT NOT LIMITED TO ANY WARRANTIES OF MERCHANTABILITY, FITNESS FOR A PARTICULAR PURPOSE AND NONINFRINGEMENT OF COPYRIGHT, PATENT, TRADEMARK, OR OTHER RIGHT. IN NO EVENT SHALL THE COPYRIGHT HOLDER BE LIABLE FOR ANY CLAIM, DAMAGES OR OTHER LIABILITY, INCLUDING ANY GENERAL, SPECIAL, INDIRECT, INCIDENTAL, OR CONSEQUENTIAL DAMAGES, WHETHER IN AN ACTION OF CONTRACT, TORT OR OTHERWISE, ARISING FROM, OUT OF THE USE OR INABILITY TO USE THE FONT SOFTWARE OR FROM OTHER DEALINGS IN THE FONT SOFTWARE. |
SingleID_MobileApp_Flutter-UMA
6.2.1.5.6 - Open Source Licence(ISO)
The open source licenses used in the SingleID solution are as follows. For more details, see below.
SingleID_MobileApp_Client-IOS
The following sets forth attribution notices for third party software that may be contained in portions of This product. If you have any questions, please contact global.cs@samsung.com.
| License | Open Source Component | License Text |
|---|---|---|
| Apache License 2.0 | Open Computer Vision Library (OpenCV): KA ProgressLabel: | Apache License Version 2.0, January 2004 http://www.apache.org/licenses/ TERMS AND CONDITIONS FOR USE, REPRODUCTION, AND DISTRIBUTION 1. Definitions. “License” shall mean the terms and conditions for use, reproduction, and distribution as defined by Sections 1 through 9 of this document. “Licensor” shall mean the copyright owner or entity authorized by the copyright owner that is granting the License. “Legal Entity” shall mean the union of the acting entity and all other entities that control, are controlled by, or are under common control with that entity. For the purposes of this definition, “control” means (i) the power, direct or indirect, to cause the direction or management of such entity, whether by contract or otherwise, or (ii) ownership of fifty percent (50%) or more of the outstanding shares, or (iii) beneficial ownership of such entity. “You” (or “Your”) shall mean an individual or Legal Entity exercising permissions granted by this License. “Source” form shall mean the preferred form for making modifications, including but not limited to software source code, documentation source, and configuration files. “Object” form shall mean any form resulting from mechanical transformation or translation of a Source form, including but not limited to compiled object code, generated documentation, and conversions to other media types. “Work” shall mean the work of authorship, whether in Source or Object form, made available under the License, as indicated by a copyright notice that is included in or attached to the work (an example is provided in the Appendix below). “Derivative Works” shall mean any work, whether in Source or Object form, that is based on (or derived from) the Work and for which the editorial revisions, annotations, elaborations, or other modifications represent, as a whole, an original work of authorship. For the purposes of this License, Derivative Works shall not include works that remain separable from, or merely link (or bind by name) to the interfaces of, the Work and Derivative Works thereof. “Contribution” shall mean any work of authorship, including the original version of the Work and any modifications or additions to that Work or Derivative Works thereof, that is intentionally submitted to Licensor for inclusion in the Work by the copyright owner or by an individual or Legal Entity authorized to submit on behalf of the copyright owner. For the purposes of this definition, “submitted” means any form of electronic, verbal, or written communication sent to the Licensor or its representatives, including but not limited to communication on electronic mailing lists, source code control systems, and issue tracking systems that are managed by, or on behalf of, the Licensor for the purpose of discussing and improving the Work, but excluding communication that is conspicuously marked or otherwise designated in writing by the copyright owner as “Not a Contribution.” “Contributor” shall mean Licensor and any individual or Legal Entity on behalf of whom a Contribution has been received by Licensor and subsequently incorporated within the Work. 1. Grant of Copyright License. Subject to the terms and conditions of this License, each Contributor hereby grants to You a perpetual, worldwide, non-exclusive, no-charge, royalty-free, irrevocable copyright license to reproduce, prepare Derivative Works of, publicly display, publicly perform, sublicense, and distribute the Work and such Derivative Works in Source or Object form. 2. Grant of Patent License. Subject to the terms and conditions of this License, each Contributor hereby grants to You a perpetual, worldwide, non-exclusive, no-charge, royalty-free, irrevocable (except as stated in this section) patent license to make, have made, use, offer to sell, sell, import, and otherwise transfer the Work, where such license applies only to those patent claims licensable by such Contributor that are necessarily infringed by their Contribution(s) alone or by combination of their Contribution(s) with the Work to which such Contribution(s) was submitted. If You institute patent litigation against any entity (including a cross-claim or counterclaim in a lawsuit) alleging that the Work or a Contribution incorporated within the Work constitutes direct or contributory patent infringement, then any patent licenses granted to You under this License for that Work shall terminate as of the date such litigation is filed. 4. Redistribution. You may reproduce and distribute copies of the Work or Derivative Works thereof in any medium, with or without modifications, and in Source or Object form, provided that You meet the following conditions: a. You must give any other recipients of the Work or Derivative Works a copy of this License; and b. You must cause any modified files to carry prominent notices stating that You changed the files; and c. You must retain, in the Source form of any Derivative Works that You distribute, all copyright, patent, rademark, and attribution notices from the Source form of the Work, excluding those notices that do not pertain to any part of the Derivative Works; and d. If the Work includes a “NOTICE” text file as part of its distribution, then any Derivative Works that You distribute must include a readable copy of the attribution notices contained within such NOTICE file, excluding those notices that do not pertain to any part of the Derivative Works, in at least one of the following places: within a NOTICE text file distributed as part of the Derivative Works; within the Source form or documentation, if provided along with the Derivative Works; or, within a display generated by the Derivative Works, if and wherever such third-party notices normally appear. The contents of the NOTICE file are for informational purposes only and do not modify the License. You may add Your own attribution notices within Derivative Works that You distribute, alongside or as an addendum to the NOTICE text from the Work, provided that such additional attribution notices cannot be construed as modifying the License. You may add Your own copyright statement to Your modifications and may provide additional or different license terms and conditions for use, reproduction, or distribution of Your modifications, or for any such Derivative Works as a whole, provided Your use, reproduction, and distribution of the Work otherwise complies with the conditions stated in this License. 5. Submission of Contributions. Unless You explicitly state otherwise, any Contribution intentionally submitted for inclusion in the Work by You to the Licensor shall be under the terms and conditions of this License, without any additional terms or conditions. Notwithstanding the above, nothing herein shall supersede or modify the terms of any separate license agreement you may have executed with Licensor regarding such Contributions. 6. Trademarks. This License does not grant permission to use the trade names, trademarks, service marks, or product names of the Licensor, except as required for reasonable and customary use in describing the origin of the Work and reproducing the content of the NOTICE file. 7. Disclaimer of Warranty. Unless required by applicable law or agreed to in writing, Licensor provides the Work (and each Contributor provides its Contributions) on an “AS IS” BASIS, WITHOUT WARRANTIES OR CONDITIONS OF ANY KIND, either express or implied, including, without limitation, any warranties or conditions of TITLE, NON-INFRINGEMENT, MERCHANTABILITY, or FITNESS FOR A PARTICULAR PURPOSE. You are solely responsible for determining the appropriateness of using or redistributing the Work and assume any risks associated with Your exercise of permissions under this License. 8. Limitation of Liability. In no event and under no legal theory, whether in tort (including negligence), contract, or otherwise, unless required by applicable law (such as deliberate and grossly negligent acts) or agreed to in writing, shall any Contributor be liable to You for damages, including any direct, indirect, special, incidental, or consequential damages of any character arising as a result of this License or out of the use or inability to use the Work (including but not limited to damages for loss of goodwill, work stoppage, computer failure or malfunction, or any and all other commercial damages or losses), even if such Contributor has been advised of the possibility of such damages. 9. Accepting Warranty or Additional Liability. While redistributing the Work or Derivative Works thereof, You may choose to offer, and charge a fee for, acceptance of support, warranty, indemnity, or other liability obligations and/or rights consistent with this License. However, in accepting such obligations, You may act only on Your own behalf and on Your sole responsibility, not on behalf of any other Contributor, and only if You agree to indemnify, defend, and hold each Contributor harmless for any liability incurred by, or claims asserted against, such Contributor by reason of your accepting any such warranty or additional liability. END OF TERMS AND CONDITIONS APPENDIX: How to apply the Apache License to your work To apply the Apache License to your work, attach the following boilerplate notice, with the fields enclosed by brackets “[]” replaced with your own identifying information. (Don’t include the brackets!) The text should be enclosed in the appropriate comment syntax for the file format. We also recommend that a file or class name and description of purpose be included on the same “printed page” as the copyright notice for easier identification within third-party archives. Copyright [yyyy] [name of copyright owner] Licensed under the Apache License, Version 2.0 (the “License”); you may not use this file except in compliance with the License. You may obtain a copy of the License at http://www.apache.org/licenses/LICENSE-2.0 Unless required by applicable law or agreed to in writing, software distributed under the License is distributed on an “AS IS” BASIS, WITHOUT WARRANTIES OR CONDITIONS OF ANY KIND, either express or implied. See the License for the specific language governing permissions and limitations under the License. |
| Apple MIT License | Apple Reachability: https://developer.apple.com/library/ios/samplecode/Reachability/Introduction/Intro.html | Disclaimer: IMPORTANT: This Apple software is supplied to you by Apple Computer, Inc. (“Apple”) in consideration of your agreement to the following terms, and your use, installation, modification or redistribution of this Apple software constitutes acceptance of these terms. If you do not agree with these terms, please do not use, install, modify or redistribute this Apple software. In consideration of your agreement to abide by the following terms, and subject to these terms, Apple grants you a personal, non-exclusive license, under Apple’s copyrights in this original Apple software (the “Apple Software”), to use, reproduce, modify and redistribute the Apple Software, with or without modifications, in source and/or binary forms; provided that if you redistribute the Apple Software in its entirety and without modifications, you must retain this notice and the following text and disclaimers in all such redistributions of the Apple Software. Neither the name, trademarks, service marks or logos of Apple Computer, Inc. may be used to endorse or promote products derived from the Apple Software without specific prior written permission from Apple. Except as expressly stated in this notice, no other rights or licenses, express or implied, are granted by Apple herein, including but not limited to any patent rights that may be infringed by your derivative works or by other works in which the Apple Software may be incorporated. The Apple Software is provided by Apple on an “AS IS” basis. APPLE MAKES NO WARRANTIES, EXPRESS OR IMPLIED, INCLUDING WITHOUT LIMITATION THE IMPLIED WARRANTIES OF NON-INFRINGEMENT, MERCHANTABILITY AND FITNESS FOR A PARTICULAR PURPOSE, REGARDING THE APPLE SOFTWARE OR ITS USE AND OPERATION ALONE OR IN COMBINATION WITH YOUR PRODUCTS. IN NO EVENT SHALL APPLE BE LIABLE FOR ANY SPECIAL, INDIRECT, INCIDENTAL OR CONSEQUENTIAL DAMAGES (INCLUDING, BUT NOT LIMITED TO, PROCUREMENT OF SUBSTITUTE GOODS OR SERVICES; LOSS OF USE, DATA, OR PROFITS; OR BUSINESS INTERRUPTION) ARISING IN ANY WAY OUT OF THE USE, REPRODUCTION, MODIFICATION AND/OR DISTRIBUTION OF THE APPLE SOFTWARE, HOWEVER CAUSED AND WHETHER UNDER THEORY OF CONTRACT, TORT (INCLUDING NEGLIGENCE), STRICT LIABILITY OR OTHERWISE, EVEN IF APPLE HAS BEEN ADVISED OF THE POSSIBILITY OF SUCH DAMAGE. |
| Brian Gladman AES License | Gladman AES: http://www.gladman.me.uk/AES | Brian Gladman AES License Copyright (c) 1998-2013, Brian Gladman, Worcester, UK. All rights reserved. The redistribution and use of this software (with or without changes) is allowed without the payment of fees or royalties provided that: source code distributions include the above copyright notice, this list of conditions and the following disclaimer; binary distributions include the above copyright notice, this list of conditions and the following disclaimer in their documentation. |
| This software is provided ‘as is’ with no explicit or implied warranties in respect of its operation, including, but not limited to, correctness and fitness for purpose. | ||
| BSD 3-clause “New” or “Revised” License | TPPropertyAnimation: http://atastypixel.com/blog/key-path-based-property-animation Sqlcipher: https://cocoapods.org/pods/SQLCipher ASM All: http://asm.objectweb.org/asm/ Protocol Buffers [BOM]: https://developers.google.com/protocol-buffers/ | TPPropertyAnimation: Copyright 2010 A TASTY PIXEL. All rights Reserved sqlcipher: Copyright (c) 2008-2023, ZETETIC LLC All rights reserved. ASM All: Copyright (c) 2000-2011 INRIA, France Telecom All rights reserved. Protocol Buffers [BOM]: Copyright 2008 Google Inc. All rights reserved. Redistribution and use in source and binary forms, with or without modification, are permitted provided that the following conditions are met: * Redistributions of source code must retain the above copyright notice, this list of conditions and the following disclaimer. * Redistributions in binary form must reproduce the above copyright notice, this list of conditions and the following disclaimer in the documentation and/or other materials provided with the distribution. * Neither the name of the THIS SOFTWARE IS PROVIDED BY THE COPYRIGHT HOLDERS AND CONTRIBUTORS “AS IS” AND ANY EXPRESS OR IMPLIED WARRANTIES, INCLUDING, BUT NOT LIMITED TO, THE IMPLIED WARRANTIES OF MERCHANTABILITY AND FITNESS FOR A PARTICULAR PURPOSE ARE DISCLAIMED. IN NO EVENT SHALL THE COPYRIGHT OWNER OR CONTRIBUTORS BE LIABLE FOR ANY DIRECT, INDIRECT, INCIDENTAL, SPECIAL, EXEMPLARY, OR CONSEQUENTIAL DAMAGES (INCLUDING, BUT NOT LIMITED TO, PROCUREMENT OF SUBSTITUTE GOODS OR SERVICES; LOSS OF USE, DATA, OR PROFITS; OR BUSINESS INTERRUPTION) HOWEVER CAUSED AND ON ANY THEORY OF LIABILITY, WHETHER IN CONTRACT, STRICT LIABILITY, OR TORT (INCLUDING NEGLIGENCE OR OTHERWISE) ARISING IN ANY WAY OUT OF THE USE OF THIS |
| MIT License | SlatherOrg/slather: https://github.com/SlatherOrg/slather FDKeychain: https://cocoapods.org/pods/FDKeychain JSONModel: https://cocoapods.org/pods/JSONModel FLAnimatedImage: https://cocoapods.org/pods/FLAnimatedImage Ssziparchive: https://cocoapods.org/pods/SSZipArchive | The MIT License SlatherOrg/slather: Copyright (c) 2014 Mark Larsen All rights reserved FDKeychain: Copyright (c) 2016 Reid Main All rights reserved JSONModel: Copyright (c) 2012-2016 Marin Todorov and JSONModel contributors All rights reserved FLAnimatedImage: Copyright (c) 2014-2016 Flipboard All rights reserved ssziparchive: Copyright (c) 2013-2021, ZipArchive, https://github.com/ZipArchive All rights reserved Permission is hereby granted, free of charge, to any person obtaining a copy of this software and associated documentation files (the “Software”), to deal in the Software without restriction, including without limitation the rights to use, copy, modify, merge, publish, distribute, sublicense, and/or sell copies of the Software, and to permit persons to whom the Software is furnished to do so, subject to the following conditions: The above copyright notice and this permission notice shall be included in all copies or substantial portions of the Software. THE SOFTWARE IS PROVIDED “AS IS”, WITHOUT WARRANTY OF ANY KIND, EXPRESS OR IMPLIED, INCLUDING BUT NOT LIMITED TO THE WARRANTIES OF MERCHANTABILITY, FITNESS FOR A PARTICULAR PURPOSE AND NONINFRINGEMENT. IN NO EVENT SHALL THE AUTHORS OR COPYRIGHT HOLDERS BE LIABLE FOR ANY CLAIM, DAMAGES OR OTHER LIABILITY, WHETHER IN AN ACTION OF CONTRACT, TORT OR OTHERWISE, ARISING FROM, OUT OF OR IN CONNECTION WITH THE SOFTWARE OR THE USE OR OTHER DEALINGS IN THE SOFTWARE. |
| OpenSSL Combined License | OpenSSL - in C: http://www.openssl.org | LICENSE ISSUES The OpenSSL toolkit stays under a dual license, i.e. both the conditions of the OpenSSL License and the original SSLeay license apply to the toolkit. See below for the actual license texts. Actually both licenses are BSD-style Open Source licenses. In case of any license issues related to OpenSSL please contact openssl-core@openssl.org. OpenSSL License ————— Copyright (c) 1998-2008 The OpenSSL Project. All rights reserved. Redistribution and use in source and binary forms, with or without modification, are permitted provided that the following conditions are met: 1. Redistributions of source code must retain the above copyright notice, this list of conditions and the following disclaimer. 2. Redistributions in binary form must reproduce the above copyright notice, this list of conditions and the following disclaimer in the documentation and/or other materials provided with the distribution. 3. All advertising materials mentioning features or use of this software must display the following acknowledgment: “This product includes software developed by the OpenSSL Project for use in the OpenSSL Toolkit. (http://www.openssl.org/)" 4. The names “OpenSSL Toolkit” and “OpenSSL Project” must not be used to endorse or promote products derived from this software without prior written permission. For written permission, please contact openssl-core@openssl.org. 5. Products derived from this software may not be called “OpenSSL” nor may “OpenSSL” appear in their names without prior written permission of the OpenSSL Project. 6. Redistributions of any form whatsoever must retain the following acknowledgment: “This product includes software developed by the OpenSSL Project for use in the OpenSSL Toolkit (http://www.openssl.org/)" THIS SOFTWARE IS PROVIDED BY THE OpenSSL PROJECT “AS IS” AND ANY EXPRESSED OR IMPLIED WARRANTIES, INCLUDING, BUT NOT LIMITED TO, THE IMPLIED WARRANTIES OF MERCHANTABILITY AND FITNESS FOR A PARTICULAR PURPOSE ARE DISCLAIMED. IN NO EVENT SHALL THE OpenSSL PROJECT OR ITS CONTRIBUTORS BE LIABLE FOR ANY DIRECT, INDIRECT, INCIDENTAL, SPECIAL, EXEMPLARY, OR CONSEQUENTIAL DAMAGES (INCLUDING, BUT NOT LIMITED TO, PROCUREMENT OF SUBSTITUTE GOODS OR SERVICES; LOSS OF USE, DATA, OR PROFITS; OR BUSINESS INTERRUPTION) HOWEVER CAUSED AND ON ANY THEORY OF LIABILITY, WHETHER IN CONTRACT, STRICT LIABILITY, OR TORT (INCLUDING NEGLIGENCE OR OTHERWISE) ARISING IN ANY WAY OUT OF THE USE OF THIS SOFTWARE, EVEN IF ADVISED OF THE POSSIBILITY OF SUCH DAMAGE. This product includes cryptographic software written by Eric Young (eay@cryptsoft.com). This product includes software written by Tim Hudson (tjh@cryptsoft.com). Original SSLeay License Copyright (C) 1995-1998 Eric Young (eay@cryptsoft.com) All rights reserved. This package is an SSL implementation written by Eric Young (eay@cryptsoft.com). The implementation was written so as to conform with Netscapes SSL. This library is free for commercial and non-commercial use as long as the following conditions are aheared to. The following conditions apply to all code found in this distribution, be it the RC4, RSA, lhash, DES, etc., code; not just the SSL code. The SSL documentation included with this distribution is covered by the same copyright terms except that the holder is Tim Hudson (tjh@cryptsoft.com). Copyright remains Eric Young’s, and as such any Copyright notices in the code are not to be removed. If this package is used in a product, Eric Young should be given attribution as the author of the parts of the library used. This can be in the form of a textual message at program startup or in documentation (online or textual) provided with the package. Redistribution and use in source and binary forms, with or without modification, are permitted provided that the following conditions are met: 1. Redistributions of source code must retain the copyright notice, this list of conditions and the following disclaimer. 2. Redistributions in binary form must reproduce the above copyright notice, this list of conditions and the following disclaimer in the documentation and/or other materials provided with the distribution. 3. All advertising materials mentioning features or use of this software must display the following acknowledgement: “This product includes cryptographic software written by Eric Young (eay@cryptsoft.com)” The word ‘cryptographic’ can be left out if the rouines from the library being used are not cryptographic related :-). 4. If you include any Windows specific code (or a derivative thereof) from the apps directory (application code) you must include an acknowledgement: “This product includes software written by Tim Hudson (tjh@cryptsoft.com)” THIS SOFTWARE IS PROVIDED BY ERIC YOUNG “AS IS” AND ANY EXPRESS OR IMPLIED WARRANTIES, INCLUDING, BUT NOT LIMITED TO, THE IMPLIED WARRANTIES OF MERCHANTABILITY AND FITNESS FOR A PARTICULAR PURPOSE ARE DISCLAIMED. IN NO EVENT SHALL THE AUTHOR OR CONTRIBUTORS BE LIABLE FOR ANY DIRECT, INDIRECT, INCIDENTAL, SPECIAL, EXEMPLARY, OR CONSEQUENTIAL DAMAGES (INCLUDING, BUT NOT LIMITED TO, PROCUREMENT OF SUBSTITUTE GOODS OR SERVICES; LOSS OF USE, DATA, OR PROFITS; OR BUSINESS INTERRUPTION) HOWEVER CAUSED AND ON ANY THEORY OF LIABILITY, WHETHER IN CONTRACT, STRICT LIABILITY, OR TORT (INCLUDING NEGLIGENCE OR OTHERWISE) ARISING IN ANY WAY OUT OF THE USE OF THIS SOFTWARE, EVEN IF ADVISED OF THE POSSIBILITY OF SUCH DAMAGE. The licence and distribution terms for any publically available version or derivative of this code cannot be changed. i.e. this code cannot simply be copied and put under another distribution licence [including the GNU Public Licence.] |
| zlib License | Base64: https://cocoapods.org/pods/Base64nl minizip: http://tracker.debian.org/pkg/minizip | The zlib/libpng License Copyright (c) This software is provided ‘as-is’, without any express or implied warranty. In no event will the authors be held liable for any damages arising from the use of this software. Permission is granted to anyone to use this software for any purpose, including commercial applications, and to alter it and redistribute it freely, subject to the following restrictions: 1. The origin of this software must not be misrepresented; you must not claim that you wrote the original software. If you use this software in a product, an acknowledgment in the product documentation would be appreciated but is not required. 2. Altered source versions must be plainly marked as such, and must not be misrepresented as being the original software. 3. This notice may not be removed or altered from any source distribution. |
SingleID_MobileApp_Client-APK
SingleID_MobileApp_Flutter-UMA
The following sets forth attribution notices for third party software that may be contained in portions of this product. If you have any questions, please contact global.cs@samsung.com
| License | Open Source Component | License Text |
|---|---|---|
| Apache License 2.0 | Android Support Library media compat, Converter: Gson, Adapter: RxJava 2, Android Support Library core utils, Android Arch-Runtime, Guava (Google Common Libraries), Android Support AnimatedVectorDrawable, Android Support Library core UI, Android Support Library Custom View - androidx.customview:customview, Android Lifecycle LiveData, OkHttp, Gson, android.support.annotation, Android Support Library Custom View - androidx.swiperefreshlayout:swiperefreshlayout, Android Support Library v4, OkHttp, Android Lifecycle ViewModel, Commons Lang, rxjava, Android Support Library compat, Roboto Fonts, Apache Commons Collections, Android Support Library v4, Android Lifecycle LiveData Core, RxAndroid, joda-time, okio, Apache Commons IO, JetBrains/java-annotations, Android AppCompat Library v7, Android Support Library Collections, Android Support VectorDrawable, Kotlin Stdlib, Android Lifecycle-Common, Android Support Library loader, Retrofit | Apache License Version 2.0, January 2004 http://www.apache.org/licenses/ TERMS AND CONDITIONS FOR USE, REPRODUCTION, AND DISTRIBUTION 1. Definitions. “License” shall me an the terms and conditions for use, reproduction, and distribution as defined by Sections 1 through 9 of this document. “Licensor” shall mean the copyright owner or entity authorized by the copyright owner that is granting the License. “Legal Entity” shall mean the union of the acting entity and all other entities that control, are controlled by, or are under common control with that entity. For the purposes of this definition, “control” means (i) the power, direct or indirect, to cause the direction or management of such entity, whether by contract or otherwise, or (ii) ownership of fifty percent (50%) or more of the outstanding shares, or (iii) beneficial ownership of such entity. “You” (or “Your”) shall mean an individual or Legal Entity exercising permissions granted by this License. “Source” form shall mean the preferred form for making modifications, including but not limited to software source code, documentation source, and configuration files. “Object” form shall mean any form resulting from mechanical transformation or translation of a Source form, including but not limited to compiled object code, generated documentation, and conversions to other media types. “Work” shall mean the work of authorship, whether in Source or Object form, made available under the License, as indicated by a copyright notice that is included in or attached to the work (an example is provided in the Appendix below). “Derivative Works” shall mean any work, whether in Source or Object form, that is based on (or derived from) the Work and for which the editorial revisions, annotations, elaborations, or other modifications represent, as a whole, an original work of authorship. For the purposes of this License, Derivative Works shall not include works that remain separable from, or merely link (or bind by name) to the interfaces of, the Work and Derivative Works thereof. “Contribution” shall mean any work of authorship, including the original version of the Work and any modifications or additions to that Work or Derivative Works thereof, that is intentionally submitted to Licensor for inclusion in the Work by the copyright owner or by an individual or Legal Entity authorized to submit on behalf of the copyright owner. For the purposes of this definition, “submitted” means any form of electronic, verbal, or written communication sent to the Licensor or its representatives, including but not limited to communication on electronic mailing lists, source code control systems, and issue tracking systems that are managed by, or on behalf of, the Licensor for the purpose of discussing and improving the Work, but excluding communication that is conspicuously marked or otherwise designated in writing by the copyright owner as “Not a Contribution.” “Contributor” shall mean Licensor and any individual or Legal Entity on behalf of whom a Contribution has been received by Licensor and subsequently incorporated within the Work. 2. Grant of Copyright License. Subject to the terms and conditions of this License, each Contributor hereby grants to You a perpetual, worldwide, non-exclusive, no-charge, royalty-free, irrevocable copyright license to reproduce, prepare Derivative Works of, publicly display, publicly perform, sublicense, and distribute the Work and such Derivative Works in Source or Object form. 3. Grant of Patent License. Subject to the terms and conditions of this License, each Contributor hereby grants to You a perpetual, worldwide, non-exclusive, no-charge, royalty-free, irrevocable (except as stated in this section) patent license to make, have made, use, offer to sell, sell, import, and otherwise transfer the Work, where such license applies only to those patent claims licensable by such Contributor that are necessarily infringed by their Contribution(s) alone or by combination of their Contribution(s) with the Work to which such Contribution(s) was submitted. If You institute patent litigation against any entity (including a cross-claim or counterclaim in a lawsuit) alleging that the Work or a Contribution incorporated within the Work constitutes direct or contributory patent infringement, then any patent licenses granted to You under this License for that Work shall terminate as of the date such litigation is filed. 4. Redistribution. You may reproduce and distribute copies of the Work or Derivative Works thereof in any medium, with or without modifications, and in Source or Object form, provided that You meet the following conditions: a. You must give any other recipients of the Work or Derivative Works a copy of this License; and b. You must cause any modified files to carry prominent notices stating that You changed the files; and c. You must retain, in the Source form of any Derivative Works that You distribute, all copyright, patent, trademark, and attribution notices from the Source form of the Work, excluding those notices that do not pertain to any part of the Derivative Works; and d. If the Work includes a “NOTICE” text file as part of its distribution, then any Derivative Works that You distribute must include a readable copy of the attribution notices contained within such NOTICE file, excluding those notices that do not pertain to any part of the Derivative Works, in at least one of the following places: within a NOTICE text file distributed as part of the Derivative Works; within the Source form or documentation, if provided along with the Derivative Works; or, within a display generated by the Derivative Works, if and wherever such third-party notices normally appear. The contents of the NOTICE file are for informational purposes only and do not modify the License. You may add Your own attribution notices within Derivative Works that You distribute, alongside or as an addendum to the NOTICE text from the Work, provided that such additional attribution notices cannot be construed as modifying the License. You may add Your own copyright statement to Your modifications and may provide additional or different license terms and conditions for use, reproduction, or distribution of Your modifications, or for any such Derivative Works as a whole, provided Your use, reproduction, and distribution of the Work otherwise complies with the conditions stated in this License. 5. Submission of Contributions. Unless You explicitly state otherwise, any Contribution intentionally submitted for inclusion in the Work by You to the Licensor shall be under the terms and conditions of this License, without any additional terms or conditions. Notwithstanding the above, nothing herein shall supersede or modify the terms of any separate license agreement you may have executed with Licensor regarding such Contributions. 6. Trademarks. This License does not grant permission to use the trade names, trademarks, service marks, or product names of the Licensor, except as required for reasonable and customary use in describing the origin of the Work and reproducing the content of the NOTICE file. 7. Disclaimer of Warranty. Unless required by applicable law or agreed to in writing, Licensor provides the Work (and each Contributor provides its Contributions) on an “AS IS” BASIS, WITHOUT WARRANTIES OR CONDITIONS OF ANY KIND, either express or implied, including, without limitation, any warranties or conditions of TITLE, NON-INFRINGEMENT, MERCHANTABILITY, or FITNESS FOR A PARTICULAR PURPOSE. You are solely responsible for determining the appropriateness of using or redistributing the Work and assume any risks associated with Your exercise of permissions under this License. 8. Limitation of Liability. In no event and under no legal theory, whether in tort (including negligence), contract, or otherwise, unless required by applicable law (such as deliberate and grossly negligent acts) or agreed to in writing, shall any Contributor be liable to You for damages, including any direct, indirect, special, incidental, or consequential damages of any character arising as a result of this License or out of the use or inability to use the Work (including but not limited to damages for loss of goodwill, work stoppage, computer failure or malfunction, or any and all other commercial damages or losses), even if such Contributor has been advised of the possibility of such damages. 9. Accepting Warranty or Additional Liability. While redistributing the Work or Derivative Works thereof, You may choose to offer, and charge a fee for, acceptance of support, warranty, indemnity, or other liability obligations and/or rights consistent with this License. However, in accepting such obligations, You may act only on Your own behalf and on Your sole responsibility, not on behalf of any other Contributor, and only if You agree to indemnify, defend, and hold each Contributor harmless for any liability incurred by, or claims asserted against, such Contributor by reason of your accepting any such warranty or additional liability. END OF TERMS AND CONDITIONS APPENDIX: How to apply the Apache License to your work To apply the Apache License to your work, attach the following boilerplate notice, with the fields enclosed by brackets “[]” replaced with your own identifying information. (Don’t include the brackets!) The text should be enclosed in the appropriate comment syntax for the file format. We also recommend that a file or class name and description of purpose be included on the same “printed page” as the copyright notice for easier identification within third-party archives. Copyright [yyyy] [name of copyright owner] Licensed under the Apache License, Version 2.0 (the “License”); you may not use this file except in compliance with the License. You may obtain a copy of the License at http://www.apache.org/licenses/LICENSE-2.0 Unless required by applicable law or agreed to in writing, software distributed under the License is distributed on an “AS IS” BASIS, WITHOUT WARRANTIES OR CONDITIONS OF ANY KIND, either express or implied. See the License for the specific language governing permissions and limitations under the License. |
| Creative Commons Zero v1.0 Universal | reactive-streams: http://www.reactive-streams.org/ | Creative Commons CC0 1.0 Universal Creative Commons Legal Code CC0 1.0 Universal CREATIVE COMMONS CORPORATION IS NOT A LAW FIRM AND DOES NOT PROVIDE LEGAL SERVICES. DISTRIBUTION OF THIS DOCUMENT DOES NOT CREATE AN ATTORNEY-CLIENT RELATIONSHIP. CREATIVE COMMONS PROVIDES THIS INFORMATION ON AN “AS-IS” BASIS. CREATIVE COMMONS MAKES NO WARRANTIES REGARDING THE USE OF THIS DOCUMENT OR THE INFORMATION OR WORKS PROVIDED HEREUNDER, AND DISCLAIMS LIABILITY FOR DAMAGES RESULTING FROM THE USE OF THIS DOCUMENT OR THE INFORMATION OR WORKS PROVIDED HEREUNDER. Statement of Purpose The laws of most jurisdictions throughout the world automatically confer exclusive Copyright and Related Rights (defined below) upon the creator and subsequent owner(s) (each and all, an “owner”) of an original work of authorship and/or a database (each, a “Work”). Certain owners wish to permanently relinquish those rights to a Work for the purpose of contributing to a commons of creative, cultural and scientific works (“Commons”) that the public can reliably and without fear of later claims of infringement build upon, modify, incorporate in other works, reuse and redistribute as freely as possible in any form whatsoever and for any purposes, including without limitation commercial purposes. These owners may contribute to the Commons to promote the ideal of a free culture and the further production of creative, cultural and scientific works, or to gain reputation or greater distribution for their Work in part through the use and efforts of others. For these and/or other purposes and motivations, and without any expectation of additional consideration or compensation, the person associating CC0 with a Work (the “Affirmer”), to the extent that he or she is an owner of Copyright and Related Rights in the Work, voluntarily elects to apply CC0 to the Work and publicly distribute the Work under its terms, with knowledge of his or her Copyright and Related Rights in the Work and the meaning and intended legal effect of CC0 on those rights. 1. Copyright and Related Rights. A Work made available under CC0 may be protected by copyright and related or neighboring rights (“Copyright and Related Rights”). Copyright and Related Rights include, but are not limited to, the following: i. the right to reproduce, adapt, distribute, perform, display, communicate, and translate a Work; ii. moral rights retained by the original author(s) and/or performer(s); iii. publicity and privacy rights pertaining to a person’s image or likeness depicted in a Work; iv. rights protecting against unfair competition in regards to a Work, subject to the limitations in paragraph 4(a), below; v. rights protecting the extraction, dissemination, use and reuse of data in a Work; vi. database rights (such as those arising under Directive 96/9/EC of the European Parliament and of the Council of 11 March 1996 on the legal protection of databases, and under any national implementation thereof, including any amended or successor version of such directive); and vii. other similar, equivalent or corresponding rights throughout the world based on applicable law or treaty, and any national implementations thereof. 2. Waiver. To the greatest extent permitted by, but not in contravention of, applicable law, Affirmer hereby overtly, fully, permanently, irrevocably and unconditionally waives, abandons, and surrenders all of Affirmer’s Copyright and Related Rights and associated claims and causes of action, whether now known or unknown (including existing as well as future claims and causes of action), in the Work i. in all territories worldwide, ii. for the maximum duration provided by applicable law or treaty (including future time extensions), iii. in any current or future medium and for any number of copies, and iv. for any purpose whatsoever, including without limitation commercial, advertising or promotional purposes (the “Waiver”). Affirmer makes the Waiver for the benefit of each member of the public at large and to the detriment of Affirmer’s heirs and successors, fully intending that such Waiver shall not be subject to revocation, rescission, cancellation, termination, or any other legal or equitable action to disrupt the quiet enjoyment of the Work by the public as contemplated by Affirmer’s express Statement of Purpose. 3. Public License Fallback. Should any part of the Waiver for any reason be judged legally invalid or ineffective under applicable law, then the Waiver shall be preserved to the maximum extent permitted taking into account Affirmer’s express Statement of Purpose. In addition, to the extent the Waiver is so judged Affirmer hereby grants to each affected person a royalty-free, non transferable, non sublicensable, non exclusive, irrevocable and unconditional license to exercise Affirmer’s Copyright and Related Rights in the Work i. in all territories worldwide, ii. for the maximum duration provided by applicable law or treaty (including future time extensions), iii. in any current or future medium and for any number of copies, and iv. for any purpose whatsoever, including without limitation commercial, advertising or promotional purposes (the “License”). The License shall be deemed effective as of the date CC0 was applied by Affirmer to the Work. Should any part of the License for any reason be judged legally invalid or ineffective under applicable law, such partial invalidity or ineffectiveness shall not invalidate the remainder of the License, and in such case Affirmer hereby affirms that he or she will not i. exercise any of his or her remaining Copyright and Related Rights in the Work or ii. assert any associated claims and causes of action with respect to the Work, in either case contrary to Affirmer’s express Statement of Purpose. 4. Limitations and Disclaimers. a. No trademark or patent rights held by Affirmer are waived, abandoned, surrendered, licensed or otherwise affected by this document. b. Affirmer offers the Work as-is and makes no representations or warranties of any kind concerning the Work, express, implied, statutory or otherwise, including without limitation warranties of title, merchantability, fitness for a particular purpose, non infringement, or the absence of latent or other defects, accuracy, or the present or absence of errors, whether or not discoverable, all to the greatest extent permissible under applicable law. c. Affirmer disclaims responsibility for clearing rights of other persons that may apply to the Work or any use thereof, including without limitation any person’s Copyright and Related Rights in the Work. Further, Affirmer disclaims responsibility for obtaining any necessary consents, permissions or other rights required for any use of the Work. Affirmer understands and acknowledges that Creative Commons is not a party to this document and has no duty or obligation with respect to this CC0 or use of the Work. |
| ISC License | gotham-fonts: https://www.npmjs.org/package/gotham-fonts | ISC License (ISCL) gotham-fonts : Copyright @ Bogdan Pop Permission to use, copy, modify, and/or distribute this software for any purpose with or without fee is hereby granted, provided that the above copyright notice and this permission notice appear in all copies. THE SOFTWARE IS PROVIDED “AS IS” AND THE AUTHOR DISCLAIMS ALL WARRANTIES WITH REGARD TO THIS SOFTWARE INCLUDING ALL IMPLIED WARRANTIES OF MERCHANTABILITY AND FITNESS. IN NO EVENT SHALL THE AUTHOR BE LIABLE FOR ANY SPECIAL, DIRECT, INDIRECT, OR CONSEQUENTIAL DAMAGES OR ANY DAMAGES WHATSOEVER RESULTING FROM LOSS OF USE, DATA OR PROFITS, WHETHER IN AN ACTION OF CONTRACT, NEGLIGENCE OR OTHER TORTIOUS ACTION, ARISING OUT OF OR IN CONNECTION WITH THE USE OR PERFORMANCE OF THIS SOFTWARE. |
| MIT License | Xamarin.Android.Support.VersionedParcelable: http://www.nuget.org/packages/Xamarin.Android.Support.VersionedParcelable Xamarin.Android.Support.CoordinaterLayout: http://www.nuget.org/packages/Xamarin.Android.Support.CoordinaterLayout The Legion of the Bouncy Castle: http://www.bouncycastle.org/index.html Xamarin.Android.Support.SlidingPaneLayout: http://www.nuget.org/packages/Xamarin.Android.Support.SlidingPaneLayout XamarinLibrary.Xamarin.Android.Support.Multidex: https://www.nuget.org/packages/XamarinLibrary.Xamarin.Android.Support.Multidex Xamarin.Android.Support.Interpolator: http://www.nuget.org/packages/Xamarin.Android.Support.Interpolator Xamarin.Android.Support.LocalBroadcastManager: http://www.nuget.org/packages/Xamarin.Android.Support.LocalBroadcastManager Xamarin.Android.Support.DrawerLayout: http://www.nuget.org/packages/Xamarin.Android.Support.DrawerLayout @fontsource/Montserrat: https://www.npmjs.org/package/@fontsource/montserrat Xamarin.Android.Support.DocumentFile: http://www.nuget.org/packages/Xamarin.Android.Support.DocumentFile Xamarin.Android.Support.Print: http://www.nuget.org/packages/Xamarin.Android.Support.Print Xamarin.Android.Support.AsyncLayoutInflater: http://www.nuget.org/packages/Xamarin.Android.Support.AsyncLayoutInflater SLF4J API Module: http://www.slf4j.org Xamarin.Android.Support.ViewPager: http://www.nuget.org/packages/Xamarin.Android.Support.ViewPager secure-random: http://github.com/avodonosov/secure-random/ Xamarin.Android.Support.CursorAdapter: http://www.nuget.org/packages/Xamarin.Android.Support.CursorAdapter | The MIT License Xamarin.Android.Support.VersionedParcelable: Copyright (c) .NET Foundation Contributors All rights reserved. Xamarin.Android.Support.CoordinaterLayout: Copyright (c) .NET Foundation Contributors All rights reserved. The Legion of the Bouncy Castle: Copyright (c) 2000-2023 The Legion of the Bouncy Castle Inc. (https://www.bouncycastle.org) All rights reserved. Xamarin.Android.Support.SlidingPaneLayout: Copyright (c) .NET Foundation Contributors All rights reserved. XamarinLibrary.Xamarin.Android.Support.Multidex: Copyright (c) .NET Foundation Contributors All rights reserved. Xamarin.Android.Support.Interpolator: Copyright (c) .NET Foundation Contributors All rights reserved. Xamarin.Android.Support.LocalBroadcastManager: Copyright (c) .NET Foundation Contributors All rights reserved. Xamarin.Android.Support.DrawerLayout: Copyright (c) .NET Foundation Contributors All rights reserved. @fontsource/Montserrat: Copyright (c) 2023 fontsource All rights reserved. Xamarin.Android.Support.DocumentFile: Copyright (c) .NET Foundation Contributors All rights reserved. Xamarin.Android.Support.Print: Copyright (c) .NET Foundation Contributors All rights reserved. Xamarin.Android.Support.AsyncLayoutInflater: Copyright (c) .NET Foundation Contributors All rights reserved. SLF4J API Module: Copyright © 2004-2023 QOS.ch All rights reserved. Xamarin.Android.Support.ViewPager: Copyright (c) .NET Foundation Contributors All rights reserved. secure-random: Copyright (C) 2011 by Anton Vodonosov (avodonosov@yandex.ru). All rights reserved. Xamarin.Android.Support.CursorAdapter: Copyright (c) .NET Foundation Contributors All rights reserved. Permission is hereby granted, free of charge, to any person obtaining a copy of this software and associated documentation files (the “Software”), to deal in the Software without restriction, including without limitation the rights to use, copy, modify, merge, publish, distribute, sublicense, and/or sell copies of the Software, and to permit persons to whom the Software is furnished to do so, subject to the following conditions: The above copyright notice and this permission notice shall be included in all copies or substantial portions of the Software. THE SOFTWARE IS PROVIDED “AS IS”, WITHOUT WARRANTY OF ANY KIND, EXPRESS OR IMPLIED, INCLUDING BUT NOT LIMITED TO THE WARRANTIES OF MERCHANTABILITY, FITNESS FOR A PARTICULAR PURPOSE AND NONINFRINGEMENT. IN NO EVENT SHALL THE AUTHORS OR COPYRIGHT HOLDERS BE LIABLE FOR ANY CLAIM, DAMAGES OR OTHER LIABILITY, WHETHER IN AN ACTION OF CONTRACT, TORT OR OTHERWISE, ARISING FROM, OUT OF OR IN CONNECTION WITH THE SOFTWARE OR THE USE OR OTHER DEALINGS IN THE SOFTWARE. |
| SIL Open Font License 1.1 | @fontsource/rubik, https://www.npmjs.org/package/@fontsource/rubik @fontsource/montserrat https://www.npmjs.org/package/@fontsource/montserrat | SIL OPEN FONT LICENSE Version 1.1 - 26 February 2007 PREAMBLE The goals of the Open Font License (OFL) are to stimulate worldwide development of collaborative font projects, to support the font creation efforts of academic and linguistic communities, and to provide a free and open framework in which fonts may be shared and improved in partnership with others. The OFL allows the licensed fonts to be used, studied, modified and redistributed freely as long as they are not sold by themselves. The fonts, including any derivative works, can be bundled, embedded, redistributed and/or sold with any software provided that any reserved names are not used by derivative works. The fonts and derivatives, however, cannot be released under any other type of license. The requirement for fonts to remain under this license does not apply to any document created using the fonts or their derivatives. DEFINITIONS “Font Software” refers to the set of files released by the Copyright Holder(s) under this license and clearly marked as such. This may include source files, build scripts and documentation. “Reserved Font Name” refers to any names specified as such after the copyright statement(s). “Original Version” refers to the collection of Font Software components as distributed by the Copyright Holder(s). “Modified Version” refers to any derivative made by adding to, deleting, or substituting — in part or in whole — any of the components of the Original Version, by changing formats or by porting the Font Software to a new environment. “Author” refers to any designer, engineer, programmer, technical writer or other person who contributed to the Font Software. PERMISSION & CONDITIONS Permission is hereby granted, free of charge, to any person obtaining a copy of the Font Software, to use, study, copy, merge, embed, modify, redistribute, and sell modified and unmodified copies of the Font Software, subject to the following conditions: 1. Neither the Font Software nor any of its individual components, in Original or Modified Versions, may be sold by itself. 2. Original or Modified Versions of the Font Software may be bundled, redistributed and/or sold with any software, provided that each copy contains the above copyright notice and this license. These can be included either as stand-alone text files, human-readable headers or in the appropriate machine-readable metadata fields within text or binary files as long as those fields can be easily viewed by the user. 3. No Modified Version of the Font Software may use the Reserved Font Name(s) unless explicit written permission is granted by the corresponding Copyright Holder. This restriction only applies to the primary font name as presented to the users. 4. The name(s) of the Copyright Holder(s) or the Author(s) of the Font Software shall not be used to promote, endorse or advertise any Modified Version, except to acknowledge the contribution(s) of the Copyright Holder(s) and the Author(s) or with their explicit written permission. 5. The Font Software, modified or unmodified, in part or in whole, must be distributed entirely under this license, and must not be distributed under any other license. The requirement for fonts to remain under this license does not apply to any document created using the Font Software. TERMINATION This license becomes null and void if any of the above conditions are not met. DISCLAIMER THE FONT SOFTWARE IS PROVIDED “AS IS”, WITHOUT WARRANTY OF ANY KIND, EXPRESS OR IMPLIED, INCLUDING BUT NOT LIMITED TO ANY WARRANTIES OF MERCHANTABILITY, FITNESS FOR A PARTICULAR PURPOSE AND NONINFRINGEMENT OF COPYRIGHT, PATENT, TRADEMARK, OR OTHER RIGHT. IN NO EVENT SHALL THE COPYRIGHT HOLDER BE LIABLE FOR ANY CLAIM, DAMAGES OR OTHER LIABILITY, INCLUDING ANY GENERAL, SPECIAL, INDIRECT, INCIDENTAL, OR CONSEQUENTIAL DAMAGES, WHETHER IN AN ACTION OF CONTRACT, TORT OR OTHERWISE, ARISING FROM, OUT OF THE USE OR INABILITY TO USE THE FONT SOFTWARE OR FROM OTHER DEALINGS IN THE FONT SOFTWARE. |
SingleID_MobileApp_Flutter-UMA
6.2.1.6 - Open API guides
SingleID Open API Guides
To use the Samsung Cloud Platform SingleID Open API, the system must first be registered in Applications. You must obtain a JWT token with the registered system information and include the JWT token in the HTTP header when calling the Samsung Cloud Platform SingleID Open API.
API Call Method
- Call with the token (JWT Token) value included in the HTTP header
- Set the access token header name to Authorization, and set the access token type value to Bearer - set the JWT Token value after the Bearer string.
- Test environment information
- domain :
- Internal: stg-scloud.iam.samsung.net
- External: stg2-cloud.singleid.samsung.net
- tenant-name : test-tenant
- domain :
- Test Swagger UI URL
API List
| Module | API | URI | Method | Description |
|---|---|---|---|---|
| Portal Common | get MFA Token | https://{domain}/{tenant-name}/common-api/open/v1.1/asis/{tenant-name}/user/mfa/token/authentication | GET | MFA token issuance |
| Portal Common | OTP Send | https://{domain}/{tenant-name}/common-api/open/v1.1/asis/otp/send | POST | Generate OTP based on the authentication type (email, sms, msg) |
| Portal Common | OTP Validation | https://{domain}/{tenant-name}/common-api/open/v1.1/asis/otp/validate | POST | OTP verification |
| Portal Common | MFA Consumer Request | https://{domain}/{tenant-name}/common-api/open/v1.1/mfa/request | GET | MFA request |
| Portal Common | MFA Consumer Request | https://{domain}/{tenant-name}/common-api/open/v1.1/mfa/request | POST | MFA request |
| Tenant Admin Portal | Send Email about Anomaly Detection | https://{domain}/{tenant-name}/admin-api/open/v1.1/emails/anomalyDetection | POST | Send email to the user when abnormal authentication activity is detected |
| Tenant Admin Portal | Send Email about New Sign-in Environment | https://{domain}/{tenant-name}/admin-api/open/v1.1/emails/newSignInEnvironment | POST | Send user verification email upon logging into a new environment |
| User Portal | Get User | https://{domain}/{tenant-name}/user-api/open/v1.1/users/{username} | GET | User name, email, preferred language, timezone lookup |
| User Portal | Get User Profile Image | https://{domain}/{tenant-name}/user-api/open/v1.1/users/image/{username} | GET | Retrieve user profile image |
| User Portal | Create account assignment list | https://{domain}/{tenant-name}/user-api/1.0/scp-auth/create | POST | Create user SCP permission |
| User Portal | Delete account assignment list | https://{domain}/{tenant-name}/user-api/1.0/scp-auth/delete | POST | Delete user SCP permission |
| User Portal | Get account assignment list | https://{domain}/{tenant-name}/user-api/1.0/scp-auth/list | GET | User SCP permission lookup |
| User Portal | Search User | https://{domain}/{tenant-name}/user-api/1.0/scp-user/list | GET | Search SCP target user |
| Portal Common | MFA Consumer Request | https://{domain}/{tenant-name}/common-api/open/v1.1/mfa/request/mfa | POST | MFA request (including device) |
| Portal Common | MFA Consumer Verification | https://{domain}/{tenant-name}/common-api/open/v1.1/mfa/verification/mfa | POST | MFA verification (including equipment) |
Table. API list
API Specification - get MFA Token(Portal Common)
| Module | API | URI | Method | Description |
|---|---|---|---|---|
| Portal Common | get MFA Token | https://{domain}/{tenant-name}/common-api/open/v1.1/asis/{tenant-name}/user/mfa/token/authentication | GET | MFA Token issuance |
Table. get MFA Token(Portal Common)
Request Parameters
| Properties | Attribute | Mandatory | Parameter Type | Data Type | Sample Data | Note |
|---|---|---|---|---|---|---|
| Tenant name | tenant-name | Y | Path | String | test-tenant | |
| username | userName | Y | query | String | mkdir.kim | |
| Protocol | protocol | Y | query | String | uma-uaf | |
| sessionDataKey | sessionDataKey | N | query | String | sessionDataKey1 | |
| redirectUrl | redirectUrl | N | query | String | redirectUrl1 | |
| errorRedirectUrl | errorRedirectUrl | N | query | String | errorRedirectUrl1 | |
| params | params | N | query | String | params1 | |
| language | language | N | query | String | ko |
Table. Request Parameters
Response Parameters
| Properties (Result) | Attribute | Data Type | Sample Data | Note |
|---|---|---|---|---|
| Result | result | String | SUCCESS | |
| Result value | value | Object | {"token": "eyJpc3MiOiJodHRwczov...","serviceUri": "/ua/MPHTOCHW5I/de6f67d0-8bec-46ac-bf53-16ef00eb2066/dgauth/mfa"} |
Table. Response Parameters
Sample
| Request | Response |
|---|---|
curl -X POST "https://stg-scloud.singleid.samsung.net:443/stg4/user-api/1.0/scp-auth/delete" -H "accept: application/json"-H "apiKey: {apiKey}" INPUT JSON{ "instanceId": "instnace-01", "permissionSetId": "PERMISSION-SET-Ablxc5__qEaIYmWGyMeqlf", "principalId": "singleid.test001", "principalType": "USER", "targetId": "PROJECT-ka2tfhLHsweVwm4BrR1rae", "targetType": "PROJECT" } | { "instanceId": "instnace-01", "permissionSetId": "PERMISSION-SET-Ablxc5__qEaIYmWGyMeqlf", "principalId": "singleid.test001", "principalType": "USER", "targetId": "PROJECT-ka2tfhLHsweVwm4BrR1rae", "targetType": "PROJECT" "status": "SUCCESS", "createdDate": "2024-04-03T01:58:46.538Z", "failureReason": "" } |
Table. Sample
Error Code
| HTTP Response Code | Error Code | Error Message | Action Required |
|---|---|---|---|
| 400 | N/A | N/A | userName verification required |
Table. Error Code
API Specification - OTP Send(Portal Common)
| Module | API | URI | Method | Description |
|---|---|---|---|---|
| Portal Common | OTP Send | https://{domain}/{tenant-name}/common-api/open/v1.1/asis/otp/send | POST | Generate OTP based on authentication type (email, sms, msg) |
Table. OTP Send (Portal Common)
Request Parameters
| Properties | Attribute | Mandatory | Parameter Type | Data Type | Sample Data | Note |
|---|---|---|---|---|---|---|
| locale | locale | Y | body | String | ko | |
| Authentication type | type | Y | body | String | email, sms, msg | |
| userName | userName | Y | body | String | gildong.hong |
Table. Request Parameters
Response Parameters
| Properties | Attribute | Data Type | Sample Data | Note |
|---|---|---|---|---|
| otpString | otpString | String | 0000000c5bb286c166530ac928d0bdf1f0894ed3a6d891eb3ab7ec89fc9faef7817b9f2f02f8c89ae91558cdc9afec94d6bede93a91d9825f4fe14dc2a282f6456d09f823d194570bc91b353830826e69d5f818172c12dbdb7b524 |
Table. Response Parameters
Sample
| Request | Response |
|---|---|
ccurl -X POST "https://localhost:7443/open/v1.1/asis/otp/send" -H "accept: */*" -H "Content-Type: application/json" -d "{\"locale\":\"ko\",\"type\":\"email\",\"userName\":\"gildong.hong\"}" | { "otpString": 0000000c5bb286c166530ac928d0bdf1f0894ed3a6d891eb3ab7ec89fc9faef7817b9f2f02f8c89ae91558cdc9afec94d6bede93a91d9825f4fe14dc2a282f6456d09f823d194570bc91b353830826e69d5f818172c12dbdb7b524} |
Table. Sample
Error Code
| Http Response Code | Error Code | Error Message | Action Plan |
|---|---|---|---|
| 404 | N/A | N/A | When the user does not exist |
| 429 | N/A | N/A | Duplicate call within 60 seconds |
| 500 | N/A | N/A | Server error, check the error message and contact the administrator |
Table. Error Code
API Specification - OTP Validation(Portal Common)
| Module | API | URI | Method | Description |
|---|---|---|---|---|
| Portal Common | OTP Validation | https://{domain}/{tenant-name}/common-api/open/v1.1/asis/otp/validate | POST | Validate the OTP. |
Table. OTP Validation(Portal Common)
Request Parameter
| Properties | Attribute | Mandatory | Parameter Type | Data Type | Sample Data | Note |
|---|---|---|---|---|---|---|
| userName | userName | Y | Body | String | gildong.hong | |
| otp(6 digits) | otp | Y | Body | String | 121215 | |
| checkValue | checkValue | Y | Body | String | 0000000c5bb286c166530ac928d0bdf1f0894ed3a6d891eb3ab7ec89fc9faef7817b9f2f02f8c89ae91558cdc9afec94d6bede93a91d9825f4fe14dc2a282f6456d09f823d194570bc91b353830826e69d5f818172c12dbdb7b524 | The otpString value received in the response from sendOtp |
| Authentication type | type | Y | Body | String | email, sms, msg |
Table. Request Parameters
Response Parameter
| Properties | Attribute | Data Type | Sample Data | Note |
|---|---|---|---|---|
| Result | result | String | SUCCESS |
Table. Response Parameters
Sample
| Request | Response |
|---|---|
| curl -X POST “https://localhost:7443/open/v1.1/asis/otp/validate” -H “accept: /” -H “Content-Type: application/json” -d “{"checkValue":"0000000c5bb286c166530ac928d0bdf1f0894ed3a6d891eb3ab7ec89fc9faef7817b9f2f02f8c89ae91558cdc9afec94d6bede93a91d9825f4fe14dc2a282f6456d09f823d194570bc91b353830826e69d5f818172c12dbdb7b524","otp":"791462","type":"email","userName":"gildong.hong"}” | { “result”: “success” } |
Table. Sample
Error Code
| Http Response Code | Error Code | Error Message | Action Plan |
|---|---|---|---|
| 400 | N/A | N/A | When the OTP is entered incorrectly |
| 404 | N/A | N/A | When the user does not exist |
| 410 | N/A | N/A | When the OTP expires |
| 429 | N/A | N/A | When API failure calls exceed 10 times |
| 500 | N/A | N/A | Server error, check the error message and contact the administrator |
Table. Error Code
API Specification - MFA Consumer Reques(Portal Common)
| Module | API | URI | Method | Description |
|---|---|---|---|---|
| Portal Common | MFA Consumer Request | https://{domain}/{tenant-name}/common-api/open/v1.1/mfa/request | GET | Request MFA. |
Table. MFA Consumer Reques(Portal Common)
Request Parameter
| Properties | Attribute | Mandatory | Parameter Type | Data Type | Sample Data | Note |
|---|---|---|---|---|---|---|
| JWT Token | jwtTokenRequest | Y | query | String | eyJ0eXAiOiJKV1QiLCJhbGciOiJIUzI1NiJ9.eyJ1aWQiOiJqaW5vbmUua2ltIiwiZGlzcGxheVVpZCI6Imppbm9uZS5raW1Ac2Ftc3VuZy5jb20iLCJlbWFpbCI6ImxUL3p4WngxNk81REo2SU91Z2VnRW9wVGk2eDh5bkxXY3NHLzRaWFE2TVlDSzNQV05oTS9hQUFnQmpkSEJMN1hkcFA2Y25jNCIsIm1vYmlsZSI6InlkVU54ZVl6YkNOY0xEYnFqN01rL2ZCdFcvaHZoRE1Bbm9lNzhRVTRvQTAzZUlwN2NsOVFpSGFoIiwicnRuIjoiaHR0cHM6Ly9zdGcxLWNsb3VkLnNpbmdsZWlkLnNhbXN1bmcubmV0L21vY2svcW1zL21mYS1jb25zdW1lci9yZXN1bHQiLCJyZXEiOiI3NjFlZmQ1Mi05N2QwLTQ1MWYtOWNmOS1jZjg2NzQwZTdjYTMiLCJzeXMiOiI4MDE0ODYyMS04MjZmLTQ5YmUtOGM5ZS0zMTE1ZTUzMDFlMWIiLCJuYmYiOjE3MTIwMjkxNDIsImV4cCI6MTcxNDYyMTE0MiwiaWF0IjoxNzEyMDI5MTQyfQ.-FWTK4IJsu8AonfJTTq7_OA1qAh-9FU89iC1JZcRg_c | Token original data sample{ "sys":"test-system", "req":"761efd52-97d0-451f-9cf9-cf86740e7ca3", "uid":"gildong.hong", "rtn":"https://test.com/mfa/response","email":"gildong.hong@samsung.com","mobile":"+82-1012345678", "nbf": 1698232068, "exp": 1698239268, "iat": 1698232068, "displayUid": "gildong.hong@samsung.com" } |
Table. Request Parameters
Response
Redirects to the MFA authentication page. By default, the response token is transmitted using POST, but to transmit it using GET (query), add the following parameter to the request token.
- returnMethod: get
Sample
| Request | Response |
|---|---|
curl -X GET "https://stg2-cloud.singleid.samsung.net/test-tenant/common-api/open/v1.1/mfa/request?jwtTokenRequest=eyJhbGciOiJIUzI1NiJ9.eyJzeXMiOiJ0ZXN0LXN5c3RlbSIsInJlcSI6Ijc2MWVmZDUyLTk3ZDAtNDUxZi05Y2Y5LWNmODY3NDBlN2NhMyIsInVpZCI6Imppbm9uZS5raW0iLCJydG4iOiJodHRwczovL3Rlc3QuY29tL21mYS9yZXNwb25zZSIsIm5iZiI6MTY5ODIzMjA2OCwiZXhwIjoxNjk4MjM5MjY4LCJpYXQiOjE2OTgyMzIwNjh9.cDgKMHIINaHhBiyAd_OIlVvQwmUs0QaXH_RfJ8B_KdY" | Page navigation |
Table. Sample
Error Code
| Http Response Code | Error Code | Error Message | Action Plan |
|---|---|---|---|
| 400 | N/A | N/A | Check token data. |
Table. Error Code
API Specification - MFA Consumer Reques(Portal Common)
| Module | API | URI | Method | Description |
|---|---|---|---|---|
| Portal Common | MFA Consumer Request | https://{domain}/{tenant-name}/common-api/open/v1.1/mfa/request | POST | Request MFA. |
Table. MFA Consumer Reques(Portal Common)
Request Parameter
| Properties | Attribute | Mandatory | Parameter Type | Data Type | Sample Data | Note |
|---|---|---|---|---|---|---|
| JWT Token | jwtTokenRequest | Y | query | String | eyJ0eXAiOiJKV1QiLCJhbGciOiJIUzI1NiJ9.eyJ1aWQiOiJqaW5vbmUua2ltIiwiZGlzcGxheVVpZCI6Imppbm9uZS5raW1Ac2Ftc3VuZy5jb20iLCJlbWFpbCI6ImxUL3p4WngxNk81REo2SU91Z2VnRW9wVGk2eDh5bkxXY3NHLzRaWFE2TVlDSzNQV05oTS9hQUFnQmpkSEJMN1hkcFA2Y25jNCIsIm1vYmlsZSI6InlkVU54ZVl6YkNOY0xEYnFqN01rL2ZCdFcvaHZoRE1Bbm9lNzhRVTRvQTAzZUlwN2NsOVFpSGFoIiwicnRuIjoiaHR0cHM6Ly9zdGcxLWNsb3VkLnNpbmdsZWlkLnNhbXN1bmcubmV0L21vY2svcW1zL21mYS1jb25zdW1lci9yZXN1bHQiLCJyZXEiOiI3NjFlZmQ1Mi05N2QwLTQ1MWYtOWNmOS1jZjg2NzQwZTdjYTMiLCJzeXMiOiI4MDE0ODYyMS04MjZmLTQ5YmUtOGM5ZS0zMTE1ZTUzMDFlMWIiLCJuYmYiOjE3MTIwMjkxNDIsImV4cCI6MTcxNDYyMTE0MiwiaWF0IjoxNzEyMDI5MTQyfQ.-FWTK4IJsu8AonfJTTq7_OA1qAh-9FU89iC1JZcRg_c | Token original data sample{ "sys":"test-system", "req":"761efd52-97d0-451f-9cf9-cf86740e7ca3", "uid":"gildong.hong", "rtn":"https://test.com/mfa/response","email":"gildong.hong@samsung.com","mobile":"+82-1012345678", "nbf": 1698232068, "exp": 1698239268, "iat": 1698232068, "displayUid": "gildong.hong@samsung.com" } |
| MFA Consumer Home move status | registerFlag | Y | query | Boolean | true | Determines whether to navigate to the MFA Consumer Home. If true, it navigates to the MFA Consumer Home. |
Table. Request Parameters
Response
- When registerFlag = true: Redirect to MFA Consumer Home.
- When registerFlag = false: Redirect to the MFA authentication page.
Sample
| Request | Response |
|---|---|
curl -X POST "https://stg2-cloud.singleid.samsung.net/test-tenant/common-api/open/v1.1/mfa/request?jwtTokenRequest=eyJhbGciOiJIUzI1NiJ9.eyJzeXMiOiJ0ZXN0LXN5c2t5bSIsInJlcSI6Ijc2MWVmZDUyLTk3ZDAtNDUxZi05Y2Y5LWNmODY3NDBlN2NhMyIsInVpZCI6Imppbm9uZS5raW0iLCJydG4iOiJodHRwczovL3Rlc3QuY29tL21mYS9yZXNwb25zZSIsIm5iZiI6MTY5ODIzMjA2OCwiZXhwIjoxNjk4MjM5MjY4LCJpYXQiOjE2OTgyMzIwNjh9.cDgKMHIINaHhBiyAd_OIlVvQwmUs0QaXH_RfJ8B_KdY®isterFlag=true" | Page navigation |
Table. Sample
Error Code
| Http Response Code | Error Code | Error Message | Action Plan |
|---|---|---|---|
| 400 | N/A | N/A | Checking token data. |
Table. Error Code
API Specification - Send Email about Anomaly Detection(Tenant Admin Portal)
| Module | API | URI | Method | Description |
|---|---|---|---|---|
| Tenant Admin Portal | Send Email about Anomaly Detection | https://{domain}/{tenant-name}/admin-api/open/v1.1/emails/anomalyDetection | POST | An email is sent when a user is detected engaging in abnormal authentication behavior. |
Table. Send Email about Anomaly Detection (Tenant Admin Portal)
Request Parameter
| Properties | Attribute | Mandatory | Parameter Type | Data Type | Sample Data | Note |
|---|---|---|---|---|---|---|
| User IP | accessIP | Y | Body | String | 10.0.0.0 | |
| Registration time | detectionTime | Y | Body | String | 2023-09-10 23:01:01 | |
| Y | Body | String | gildong.hong@samsung.com | |||
| User environment | environment | Y | Body | String | PC / Window / Chrome | |
| Language | language | Y | Body | String | ko | |
| Network environment (internal/external) | location | Y | Body | String | Internal | |
| Detection rule number | rule | Y | Body | String | P001 | |
| User account | username | Y | Body | String | gildong.hong | |
| Authentication unique value | envGuid | Y | Body | String | d8b09752-405a-4d52-8605-bff9aa3f4741 |
Table. Request Parameters
Response Parameter
| Properties | Data Type | Sample Data | Note |
|---|---|---|---|
| Result | boolean | true | true when mail sending succeeds / false when it fails |
Table. Response Parameters
Sample
| Request | Response |
|---|---|
curl -X POST "https://stg1-cloud.singleid.samsung.net:443/test-tenant/admin-api/open/v1.1/emails/anomalyDetection" -H "accept: application/json" -H "Content-Type: application/json" -d "{\"accessIP\":\"10.0.0.0\",\"detectionTime\":\"2023-09-10 23:01:01\",\"email\":\"gildong.hong@samsung.com\",\"environment\":\"PC / Window / Chrome\",\"language\":\"ko\",\"location\":\"Internal\",\"rule\":\"P001\",\"username\":\"gildong.hong\",\"envGuid\":\"d8b09752-405a-4d52-8605-bff9aa3f4741\"}" | true |
Table. Sample
Error code
| Http Response Code | Error Code | Error Message | Action Plan |
|---|---|---|---|
| 400 | N/A | N/A | Bad Request |
| 403 | N/A | N/A | Forbidden |
| 500 | N/A | N/A | Internal Server Error |
Table. Error Code
API Specification - Send Email about New Sign-in Environment(Tenant Admin Portal)
| Module | API | URI | Method | Description |
|---|---|---|---|---|
| Tenant Admin Portal | Send Email about New Sign-in Environment | https://{domain}/{tenant-name}/admin-api/open/v1.1/emails/newSignInEnvironment | POST | When a user logs in to a new environment, a notification is sent to the user and an email is dispatched to confirm the environment registration. |
Table. Send Email about New Sign-in Environment (Tenant Admin Portal)
Request Parameter
| Properties | Attribute | Mandatory | Parameter Type | Data Type | Sample Data | Note |
|---|---|---|---|---|---|---|
| User IP | accessIP | Y | Body | String | 10.0.0.0 | |
| Registration time | detectionTime | Y | Body | String | 2023-09-10 23:01:01 | |
| Y | Body | String | gildong.hong@samsung.com | |||
| User environment | environment | Y | Body | String | PC / Window / Chrome | |
| language | language | Y | Body | String | ko | |
| Network environment (internal/external) | location | Y | Body | String | Internal | |
| Detection rule number | rule | Y | Body | String | P001 | |
| User account | username | Y | Body | String | gildong.hong | |
| Authentication unique value | envGuid | Y | Body | String | d8b09752-405a-4d52-8605-bff9aa3f4741 |
Table. Request Parameters
Response Parameter
| Properties | Data Type | Sample Data | Note |
|---|---|---|---|
| Result | boolean | true | true when mail sending succeeds / false when it fails |
Table. Response Parameters
Sample
| Request | Response |
|---|---|
| curl -X POST “https://stg1-cloud.singleid.samsung.net:443/test-tenant/admin-api/open/v1.1/emails/anomalyDetection" -H “accept: application/json” -H “Content-Type: application/json” -d “{"accessIP":"10.0.0.0","detectionTime":"2023-09-10 23:01:01","email":"gildong.hong@samsung.com","environment":"PC / Window / Chrome","language":"ko","location":"Internal","rule":"P001","username":"gildong.hong","envGuid":"d8b09752-405a-4d52-8605-bff9aa3f4741"}” | true |
Table. Sample
Error Code
| Http Response Code | Error Code | Error Message | Action plan |
|---|---|---|---|
| 400 | N/A | N/A | Bad Request |
| 403 | N/A | N/A | Forbidden |
| 500 | N/A | N/A | Internal Server Error |
Table. Error Code
API Specification - Get User(User Portal)
| Module | API | URI | Method | Description |
|---|---|---|---|---|
| User Portal | Get User | https://{domain}/{tenant-name}/user-api/open/v1.1/users/{username} | GET | Retrieves the user’s name, email, preferred language, and timezone data. |
Table. Get User(User Portal)
Request Parameter
| Properties | Attribute | Mandatory | Parameter Type | Data Type | Sample Data | Note |
|---|---|---|---|---|---|---|
| User ID | username | Y | Path | String | gildong.hong |
Table. Request Parameters
Response Parameter
| Properties | Attribute | Data Type | Sample Data | Note |
|---|---|---|---|---|
| User ID | username | String | gildong.hong | |
| String | gildong.hong@stage.samsung.com | |||
| Name | formattedName | String | Dongho Kim | |
| Name | givenName | String | Dongho | |
| Surname | familyName | String | Kim | |
| English Full Name | enFormattedName | String | Dongho Kim | |
| English name | enGivenName | String | Dongho | |
| English surname | enFamilyName | String | Kim | |
| Preferred language | preferredLanguage | String | ko | 1) en : English 2) ko : Korean |
| Time zone | timeZone | String | Asia/Seoul |
Table. Response Parameters
Sample
| Request | Response |
|---|---|
curl -X GET "https://stg2-cloud.singleid.samsung.net/test-tenant/user-api/open/v1.1/users/gildong.hong" -H "accept: application/json" -H "Authorization: Bearer {JWT_TOKEN}" | { “username”: “gildong.hong”, “email”: “gildong.hong@stage.samsung.com”, “formattedName”: “Kim Dongho”, “givenName”: “Dongho”, “familyName”: “Kim”, “enFormattedName”: “Dongho Kim”, “enGivenName”: “Dongho”, “enFamilyName”: “Kim”, “preferredLanguage”: “ko”, “timeZone”: “Asia/Seoul” } |
Table. Sample
Error Code
| Http Response Code | Error Code | Error Message | Action Plan |
|---|---|---|---|
| 401 | N/A | N/A | We need to verify whether the JWT Token is valid. |
Table. Error Code
API Specification - Get User Profile Image(User Portal)
| Module | API | URI | Method | Description |
|---|---|---|---|---|
| User Portal | Get User Profile Image | https://{domain}/{tenant-name}/user-api/open/v1.1/users/image/{username} | GET | Retrieves the user’s profile image data. |
Table. Get User Profile Image(User Portal)
Request Parameter
| Properties | Attribute | Mandatory | Parameter Type | Data Type | Sample Data | Note |
|---|---|---|---|---|---|---|
| User ID | username | Y | Path | String | gildong. hong |
Table. Request Parameters
Response Parameter
| Properties | Attribute | Data Type | Sample Data | Note |
|---|---|---|---|---|
| username | username | String | null | |
2) File URL :  | –> |
Table. Response Parameters
Sample
| Request | Response |
|---|---|
curl -X GET "https://stg2-cloud.singleid.samsung.net:443/test-tenant/user-api/open/v1.1/users/image/gildong.hong" -H "accept: application/json" -H "Authorization: Bearer {JWT_TOKEN}" | File data { "username": null, "image": "" } File URL `{ “username”: “gildong.hong”, “image”: “ |
Table. Sample
Error Code
| Http Response Code | Error Code | Error Message | Action Plan |
|---|---|---|---|
| 401 | N/A | N/A | We need to verify whether the JWT Token is valid. |
Table. Error Code
API Specification - Create account assignment list(User Portal)
| Module | API | URI | Method | Description |
|---|---|---|---|---|
| User Portal | Create account assignment list | https://{domain}/{tenant-name}/user-api/1.0/scp-auth/create | POST | Create SCP permissions for the user. |
Table. Create account assignment list (User Portal)
Request Parameter
| Properties | Attribute | Mandatory | Parameter Type | Data Type | Sample Data | Note |
|---|---|---|---|---|---|---|
| instance id | instanceId | Y | JSON | String | SCP provision | |
| permission set id | permissionSetId | Y | JSON | String | PERMISSION-SET-Ablxc5__qEaIYmWGyMeqlf | SCP provision |
| principal id | principalId | Y | JSON | String | gildong.hong | user’s username |
| principal type | principalType | Y | JSON | String | USER | Only the current USER is allowed |
| target id | targetId | Y | JSON | String | “PROJECT-ka2tfhLHsweVwm4BrR1rae” | PROJECT ID, SCP provided |
| target type | targetType | Y | JSON | String | PROJECT | Only the current PROJECT functions |
Table. Request Parameters
Response Parameter
| Properties | Attribute | Data Type | Sample Data | Note |
|---|---|---|---|---|
| instance id | instanceId | JSON | Return stored value | |
| permission set id | permissionSetId | JSON | PERMISSION-SET-Ablxc5__qEaIYmWGyMeqlf | saved value |
| principal id | principalId | JSON | gildong.hong | saved value |
| principal type | principalType | JSON | USER | Return stored value |
| target id | targetId | JSON | “PROJECT-ka2tfhLHsweVwm4BrR1rae” | Return stored value |
| target type | targetType | JSON | PROJECT | Return stored value |
| status | status | JSON | “SUCCESS” | Success or failure |
| failure reason | failureReason | JSON | Reason for failure | |
| created date | createdDate | JSON | Creation Date/Time |
Table. Response Parameters
Sample
| Request | Response |
|---|---|
curl -X POST "https://stg-scloud.singleid.samsung.net:443/stg4/user-api/1.0/scp-auth/create" -H "accept: application/json"-H "apiKey: {apiKey}" INPUT JSON{ "instanceId": "instnace-01", "permissionSetId": "PERMISSION-SET-Ablxc5__qEaIYmWGyMeqlf", "principalId": "singleid.test001", "principalType": "USER", "targetId": "PROJECT-ka2tfhLHsweVwm4BrR1rae", "targetType": "PROJECT" } | { "instanceId": "instnace-01", "permissionSetId": "PERMISSION-SET-Ablxc5__qEaIYmWGyMeqlf", "principalId": "singleid.test001", "principalType": "USER", "targetId": "PROJECT-ka2tfhLHsweVwm4BrR1rae", "targetType": "PROJECT" "status": "SUCCESS", "createdDate": "2024-04-03T01:58:46.538Z", "failureReason": "" } |
Table. Sample
API Specification - Delete account assignment list(User Portal)
| Module | API | URI | Method | Description |
|---|---|---|---|---|
| User Portal | Delete account assignment list | https://{domain}/{tenant-name}/user-api/1.0/scp-auth/create](https://{domain}/{tenant-name}/user-api/1.0/scp-auth/delete) | POST | Delete the SCP permission for the user. |
Table. Delete account assignment list (User Portal)
Request Parameter
| Properties | Attribute | Mandatory | Parameter Type | Data Type | Sample Data | Note |
|---|---|---|---|---|---|---|
| instance id | instanceId | Y | JSON | String | SCP provision | |
| permission set id | permissionSetId | Y | JSON | String | PERMISSION-SET-Ablxc5__qEaIYmWGyMeqlf | SCP provision |
| principal id | principalId | Y | JSON | String | gildong.hong | user’s username |
| principal type | principalType | Y | JSON | String | USER | Only the current USER is allowed. |
| target id | targetId | Y | JSON | String | “PROJECT-ka2tfhLHsweVwm4BrR1rae” | PROJECT ID, SCP provided |
| target type | targetType | Y | JSON | String | PROJECT | Only the current PROJECT functions |
Table. Request Parameters
Response Parameter
| Properties | Attribute | Data Type | Sample Data | Note |
|---|---|---|---|---|
| instance id | instanceId | JSON | Return deleted value | |
| permission set id | permissionSetId | JSON | PERMISSION-SET-Ablxc5__qEaIYmWGyMeqlf | Return deleted value |
| principal id | principalId | JSON | gildong.hong | Return deleted value |
| principal type | principalType | JSON | USER | Return deleted value |
| target id | targetId | JSON | “PROJECT-ka2tfhLHsweVwm4BrR1rae” | Return deleted value |
| target type | targetType | JSON | PROJECT | Return deleted value |
| status | status | JSON | “SUCCESS” | Success or failure |
| failure reason | failureReason | JSON | Reason for failure | |
| created date | createdDate | JSON | Deletion time |
Table. Response Parameters
Sample
| Request | Response |
|---|---|
curl -X GET "https://stg1-cloud.singleid.samsung.net/test-tenant/common-api/open/v1.1/asis/test-tenant/user/mfa/token/authentication?userName=mkdir.kim&protocol=uma-uaf&sessionDataKey=sessionDataKey111&redirectUrl=redirectUrl1111&errorRedirectUrl=errorRedirectUrl1111¶ms=params111&language=ko" | { "result": "SUCCESS", "value": { "token": "eyJpc3MiOiJodHRwczovL3N0ZzItY2xvdWQuaWFtLnNhbXN1bmcubmV0Iiwic3ViIjoibWtkaXIua2ltIiwiYXVkIjoiaHR0cHM6Ly9zdGcyLWNsb3VkLmlhbS5zYW1zdW5nLm5ldCIsImV4cCI6MTY5ODEyOTM2OSwiaWF0IjoxNjk4MTI5MTg5LCJqdGkiOiJkNWZmZGE5Ny1mMzZkLTRjZDktYWJmZi1mMzY4ZTkxYWVkNTUiLCJhbXIiOltdLCJ6b25laW5mbyI6IkFzaWEvU2VvdWwiLCJsb2NhbGUiOiJlbl9VUyIsInByb3RvY29sIjoidW1hLXVhZiIsInJlZGlyZWN0X3VybCI6InJlZGlyZWN0VXJsMSIsImVycm9yX3JlZGlyZWN0X3VybCI6ImVycm9yUmVkaXJlY3RVcmwxIiwicGFyYW1zIjoicGFyYW1zMSIsInVzZXJJZCI6Im1rZGlyLmtpbSJ9:MEUCIHqWV_UcgKHsMlDI7Ks31fw1QPpCYnKorMpnr2L653LwAiEAz30ShMmACEi6H-IuF1YMV2bKT1WIFmAdJ6OCsmEzscA", "serviceUri": "/ua/MPHTOCHW5I/de6f67d0-8bec-46ac-bf53-16ef00eb2066/dgauth/mfa", "appId": null }, "message": "succeeded to get nexsign token.", "statusCode": null, "statusCodeValue": "0", "data": null} |
Table. Sample
Error Code
| Http Response Code | Error Code | Error Message | Action Plan |
|---|---|---|---|
| 400 | N/A | N/A | You need to verify the userName. |
Table. Error Code
API Specification - Get account assignment list(User Portal)
| Module | API | URI | Method | Description |
|---|---|---|---|---|
| User Portal | Get account assignment list | https://{domain}/{tenant-name}/user-api/1.0/scp-auth/list | POST | Retrieves the SCP permissions for a user. |
Table. Get account assignment list(User Portal)
Request Parameter
| No. | Properties | Attribute | Mandatory | Parameter Type | Data Type | Sample Data | Note |
|---|---|---|---|---|---|---|---|
| 1 | principal type | principalType | Y | query | String | USER | Only the current USER is allowed |
| 2 | principal id | principalId | Y | query | String | gildong.hong | username of the user to query |
Table. Request Parameters
Response Parameter
| Properties | Attribute | Data Type | Sample Data | Note |
|---|---|---|---|---|
| instance id | instanceId | JSON | ||
| permission set id | permissionSetId | JSON | PERMISSION-SET-Ablxc5__qEaIYmWGyMeqlf | |
| principal id | principalId | JSON | gildong.hong | |
| principal type | principalType | JSON | USER | |
| target id | targetId | JSON | “PROJECT-ka2tfhLHsweVwm4BrR1rae” | |
| target type | targetType | JSON | PROJECT |
Table. Response Parameters
Sample
| Request | Response |
|---|---|
curl -X GET "https://stg-scloud.singleid.samsung.net:443/stg4/user-api/1.0/scp-auth/list?principalType=USER&principalId=singleid.test001" -H "accept: application/json" -H "apiKey: {apiKey}" | [ { "instanceId": "instnace-01", "permissionSetId": "PERMISSION-SET-Ablxc5__qEaIYmWGyMeqlf", "principalId": "singleid.test001", "principalType": "USER", "targetId": "PROJECT-ka2tfhLHsweVwm4BrR1rae", "targetType": "PROJECT" }, { "instanceId": "instnace-01", "permissionSetId": "PERMISSION-SET-Ablxc5__qEaIYmWGyMe121", "principalId": "singleid.test001", "principalType": "USER", "targetId": "PROJECT-ka2tfhLHsweVwm4BrR1rae", "targetType": "PROJECT" } ] |
Table. Sample
Error Code
| Http Response Code | Error Code | Error Message | Action Plan |
|---|---|---|---|
| 401 | N/A | N/A | It is necessary to verify that the API key is valid. |
Table. Error Code
API Specification - Search User(User Portal)
| Module | API | URI | Method | Description |
|---|---|---|---|---|
| User Portal | Search User | https://{domain}/{tenant-name}/user-api/1.0/scp-user/list | POST | Search for the SCP target user. |
Table. Search User (User Portal)
Request Parameter
| Properties | Attribute | Mandatory | Parameter Type | Data Type | Sample Data | Note |
|---|---|---|---|---|---|---|
| page | page | N | query | Integer | 0 | Page to fetch |
| size | size | N | query | Integer | 10 | Page size |
| username | username | N | query | String | gildong.hong | User ID to query |
| group name | groupName | N | query | String | ADGroup | Group to query |
| create Date(from) | creationDateGe | N | query | DateTime | “2024-04-03T07:49:23.845Z” | |
| create Date(to) | creationDateLe | N | query | DateTime | “2024-04-03T07:49:23.845Z” | |
| last change date(from) | lastChangeDateGe | N | query | DateTime | “2024-04-03T07:49:23.845Z” | |
| last change date(to) | lastChangeDateLe | N | query | DateTime | “2024-04-03T07:49:23.845Z” |
Table. Request Parameters
Response Parameter
| Properties | Attribute | Data Type | Sample Data | Note |
|---|---|---|---|---|
| key | key | String | “01890501-74fa-7785-91e0-67bd71217a2e” | |
| username | username | String | gildong.hong | |
| administrator | administrator | Boolean | false | |
| formatted name | formattedName | String | Gil-dong Hong | |
| formatted Name(en) | enFormattedName | String | “gildong hong” | |
| String | “gildong.hong@samsung.com” | |||
| mobile | mobile | String | +02-01011112222 | |
| preferred language | preferredLanguage | String | ko | |
| time zone | timeZone | String | “Asia/Seoul” | |
| managed by | managedBy | String | SINGLEID | |
| creator | creator | String | “admin001” | |
| creation date | creationDate | DateTime | “2024-04-03T07:49:23.845Z” | |
| last modifier | lastModifier | String | “admin001” | |
| last change date | lastChangeDate | DateTime | “2024-04-03T07:49:23.845Z” |
Table. Response Parameters
Sample
| Request | Response |
|---|---|
curl -X POST "https://stg-scloud.singleid.samsung.net:443/stg4/user-api/1.0/scp-user/list" -H "accept: application/json" -H "apiKey: {apiKey}" | [ { “key”: “01890501-74fa-7785-91e0-67bd71217a2e”, “administrator”: false, “username”: “gildong.hong”, “enFormattedName”: “gildong hong”, “formattedName”: “Gildong Hong”, “email”: “gildong.hong@samsung.com”, “mobile”: “+02-01011112222”, “preferredLanguage”: “ko”, “timeZone”: “Asia/Seoul”, “managedBy”: “SINGLEID”, “creator”: “admin001”, “creationDate”: “2024-04-03T07:49:23.845Z”, “lastModifier”: “admin001”, “lastChangeDate”: “2024-04-03T07:49:23.845Z” }, { “key”: “01890501-74fa-7785-91e0-67bd71217a2e”, “administrator”: false, “username”: “gildong.hong”, “enFormattedName”: “gildong hong”, “formattedName”: “Gildong Hong”, “email”: “gildong.hong@samsung.com”, “mobile”: “+02-01011112222”, “preferredLanguage”: “ko”, “timeZone”: “Asia/Seoul”, “managedBy”: “SINGLEID”, “creator”: “admin001”, “creationDate”: “2024-04-03T07:49:23.845Z”, “lastModifier”: “admin001”, “lastChangeDate”: “2024-04-03T07:49:23.845Z” } ] |
Table. Sample
Error Code
| Http Response Code | Error Code | Error Message | Action Plan |
|---|---|---|---|
| 401 | N/A | N/A | It is necessary to verify that the API key is valid. |
Table. Error Code
API Specification - MFA Consumer Request(Portal Common)
| Module | API | URI | Method | Description |
|---|---|---|---|---|
| Portal Common | MFA Consumer Request | https://{domain}/{tenant-name}/common-api/open/v1.1/mfa/request/mfa | POST | Request MFA. |
Table. MFA Consumer Request(Portal Common)
Request Parameter
| No. | Properties | Attribute | Mandatory | Parameter Type | Data Type | Sample Data | Note |
|---|---|---|---|---|---|---|---|
| 1 | username | username | Y | Body | String | mkdir.kim | |
| 2 | Authentication type | type | N | Body | String | One of email, sms, msg, uaApp, uaMOTP. If unspecified, follow the default setting or the user’s preferred method. | |
| 3 | serviceProviderId | serviceProviderId | Y | Body | String | d8b09752-405a-4d52-8605-bff9aa3f4741 | UUID. Device-specific ID generated after registration in the SingleID Admin Portal. |
Table. Request Parameters
Response Parameter
| Properties | Attribute | Data Type | Sample Data | Note |
|---|---|---|---|---|
| requestId | requestId | String | 01890501-74fa-7785-91e0-67bd71217a2e | UUID. Used as a request parameter during MFA verification. |
| Authentication type | type | String | sms | email, sms, msg, uaApp, or uaMOTP. The verification logic may vary depending on the MFA type. |
| otp | otp | String | 123456 | A 6-digit or 8-digit number. Issued only when the type is uaMOTP (6 digits) or uaApp (8 digits). |
Table. Response Parameters
Sample
| Request | Response |
|---|---|
curl -X POST "https://stg1-cloud.singleid.samsung.net:443/test/common-api/open/v1.1/mfa/request/mfa" -H "accept: application/json" -H "Content-Type: application/json" -d "{\"username\":\"mkdir.kim\",\"type\":\"sms\",\"serviceProviderId\":\"dceef541-1f22-479d-96ac-c402ab0789e9\"} | { “otp”: “123456”, “requestId”: “d8b09752-405a-4d52-8605-bff9aa3f4741”, “serviceProviderId”: “”, “type”: “sms”, “username”: "" } |
Table. Sample
Error Codes and Responses
| Http Response Code | Error Code | Error Message | Action Plan |
|---|---|---|---|
| 400 | N/A | common.error.requiredValue | A required value is missing. Please check. |
| 400 | N/A | user.error.notFound | User not found. Please verify the user ID. |
| 400 | N/A | serviceProvider.error.notFound | Service provider not found. Please contact the administrator. |
| 400 | N/A | authenticator.error.notFound | Authentication method not found. Please contact the administrator. |
| 400 | N/A | common.error.disallowedValue | Invalid type. Please contact the administrator. |
| 400 | N/A | user.error.locked + remain | Your account is locked. Please try again after {remain} minutes. |
| 400 | N/A | otp.error.tooManyAttempts | Go to the security warning screen (your account has been locked due to multiple authentication failures) |
Table. Error Code
API Specification - MFA Consumer Verification(Portal Common)
| Module | API | URI | Method | Description |
|---|---|---|---|---|
| Portal Common | MFA Consumer Verification | https://{domain}/{tenant-name}/common-api/open/v1.1/mfa/verification/mfa | POST | Verifying MFA. |
Table. MFA Consumer Verification(Portal Common)
Request Parameter
| Properties | Attribute | Mandatory | Parameter Type | Data Type | Sample Data | Note |
|---|---|---|---|---|---|---|
| requestId | requestId | Y | Body | String | d8b09752-405a-4d52-8605-bff9aa3f4741 | UUID |
| otp | otp | N | Body | String | 123456 | 6-digit number / not required for uaApp, uaMOTP |
Table. Request Parameters
Response Parameter
| Http Status Code | status |
|---|---|
| 200 | Authentication complete |
| 202 | Authentication pending (occurs only when type is uaMOTP or uaApp. Periodically poll and verify the result until it is delivered with 200) |
| Other | Error |
Table. Response Parameters
Sample
| Request | Response |
|---|---|
curl -X POST "https://stg1-cloud.singleid.samsung.net:443/test/common-api/open/v1.1/mfa/verification/mfa" -H "accept: application/json" -H "Content-Type: application/json" -d "{\"otp\":\"000000\",\"requestId\":\"095db652-877f-42e5-b87f-e404fb07048b\"}" | { “statusCode”: “ACCEPTED”, } |
Table. Sample
Error Codes
| Http Response Code | Error Code | Error Message | Action Plan |
|---|---|---|---|
| 400 | N/A | common.error.requiredValue | A required value is missing. Please check. |
| 400 | N/A | common.error.invalidRequest | The request could not be found. Please contact the administrator. |
| 400 | N/A | request.error.invalidStatus | The request status is incorrect. Please contact the administrator. |
| 400 | N/A | otp.error.notMatch | Invalid OTP. Please check the OTP. |
| 400 | N/A | otp.error.tooManyAttempts | Go to the security warning screen (your account has been locked due to multiple authentication failures) |
Table. Error Code
6.2.1.6.1 - ADFS Adapter Guide
ADFS Adapter Guide
Microsoft ADFS (ActiveDirectory Federation Service) is a service that supports SAML/OAuth-based SSO (Single Sign-On) for web services based on AD accounts.
In MS, for web services linked with SSO, MFA (multi-factor authentication) using a 3rd Party solution is supported, and the component that must be developed/installed for this is the ADFS Adapter.
There are two primary methods for implementing an ADFS Adapter.
- Server-to-Server Call method
- WebClient method
Among them, the WebClient method minimizes firewall openings between the MFA server ↔ AD(FS) 間 and, by leveraging the CX offered by the MFA Provider, allows for a lightweight ADFS adaptor.
Reference
The SingleID ADFS Adapter was developed using the WebClient approach.
Caution
In the diagram of this document, it was written assuming a setting that stores the nonce value in LDAP.
The nonce value is used to verify MFA results, and it can be configured to be stored on the MFA server instead of LDAP.
For detailed information, please refer to the manual regarding ADFS Adaptor configuration.
Server-to-Server Call method
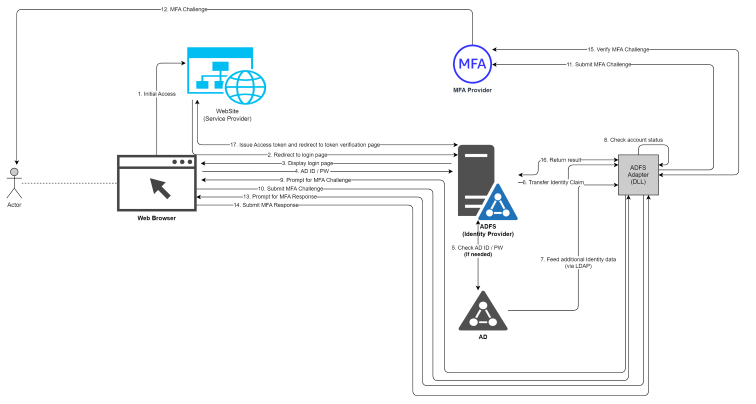
WebClient method
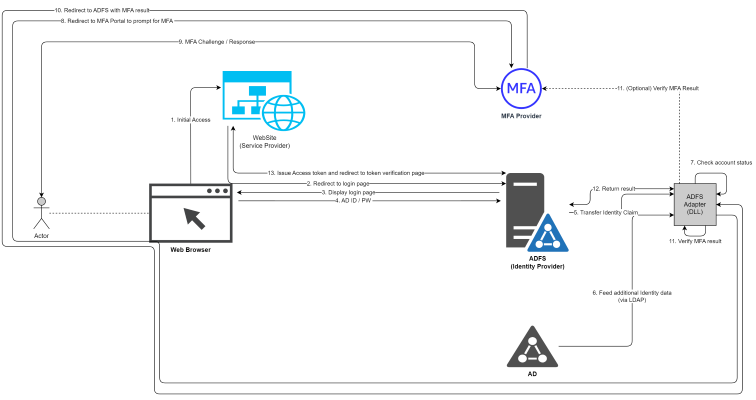
Internal operation
Overall flow diagram of the Adapter internals
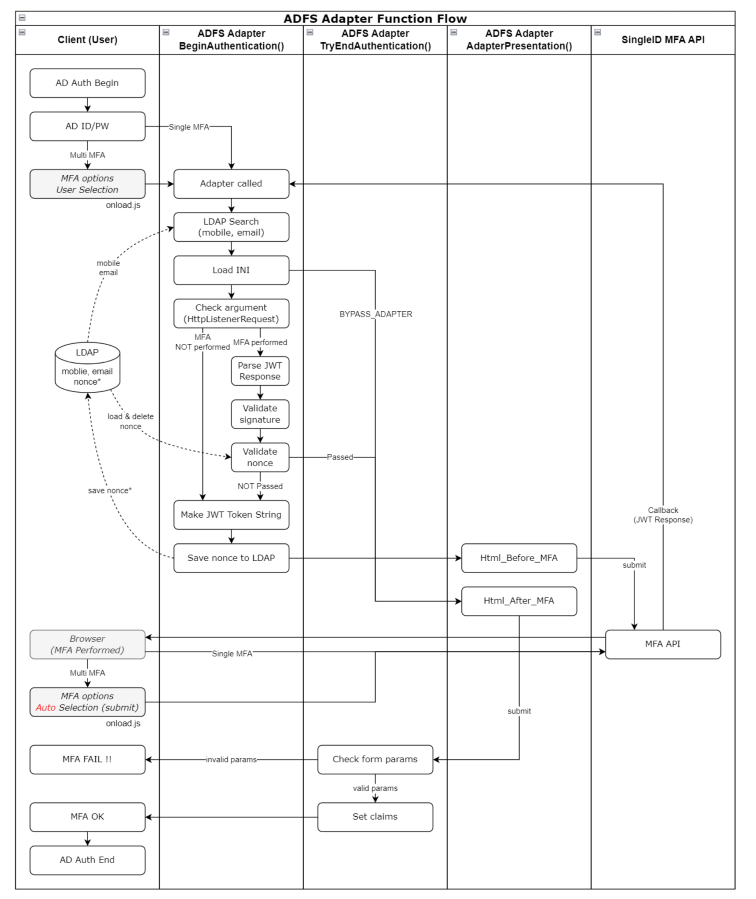
Adapter first execution flowchart
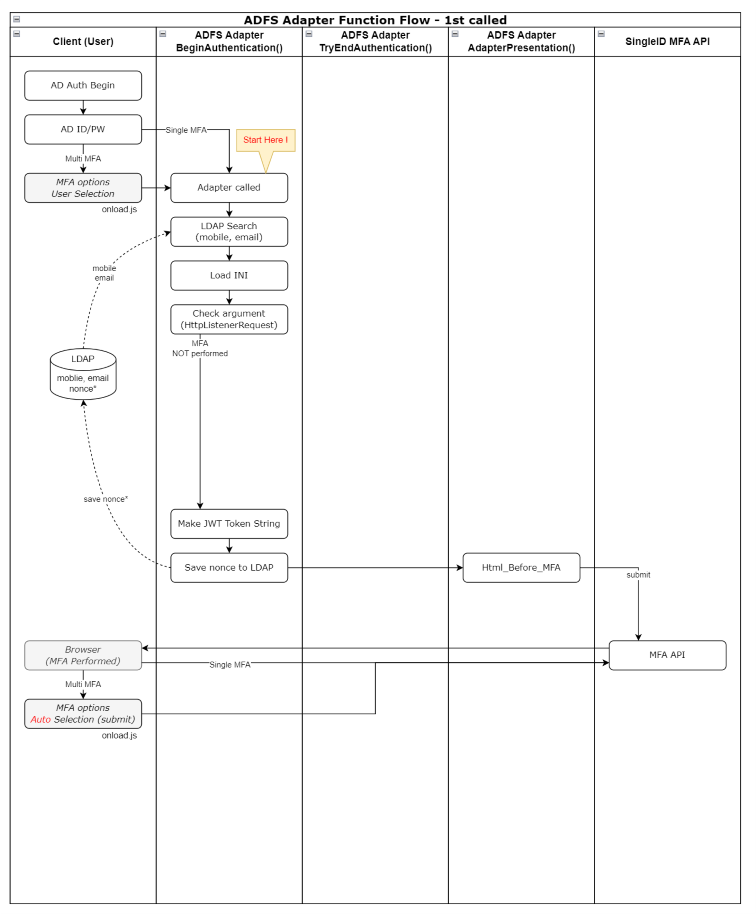
Flowchart after MFA execution (when MFA PASS)
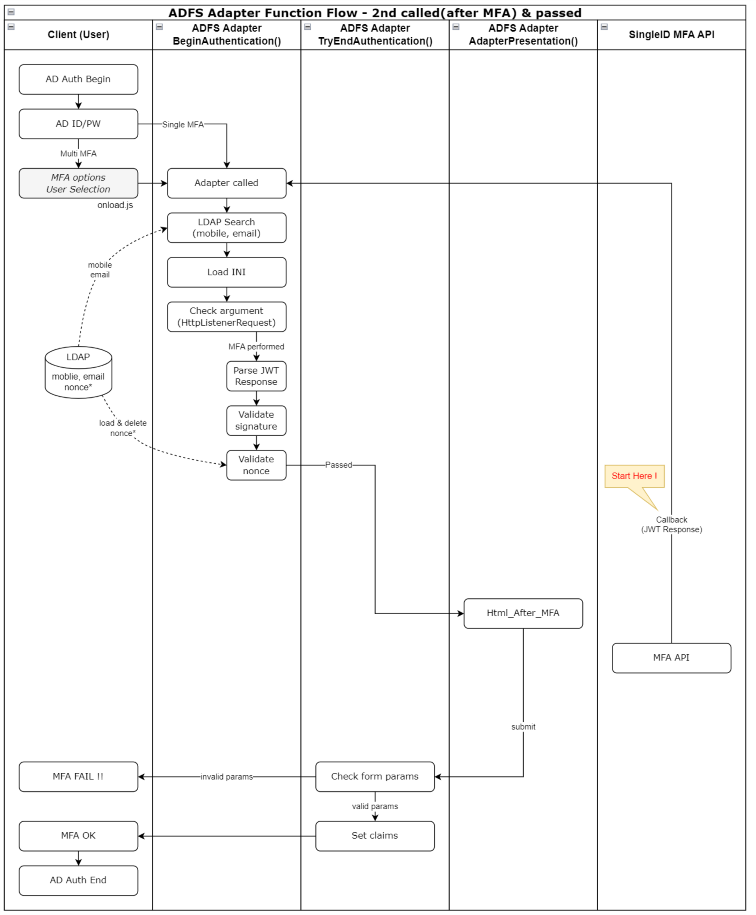
Flowchart after performing MFA (if MFA PASS not achieved)
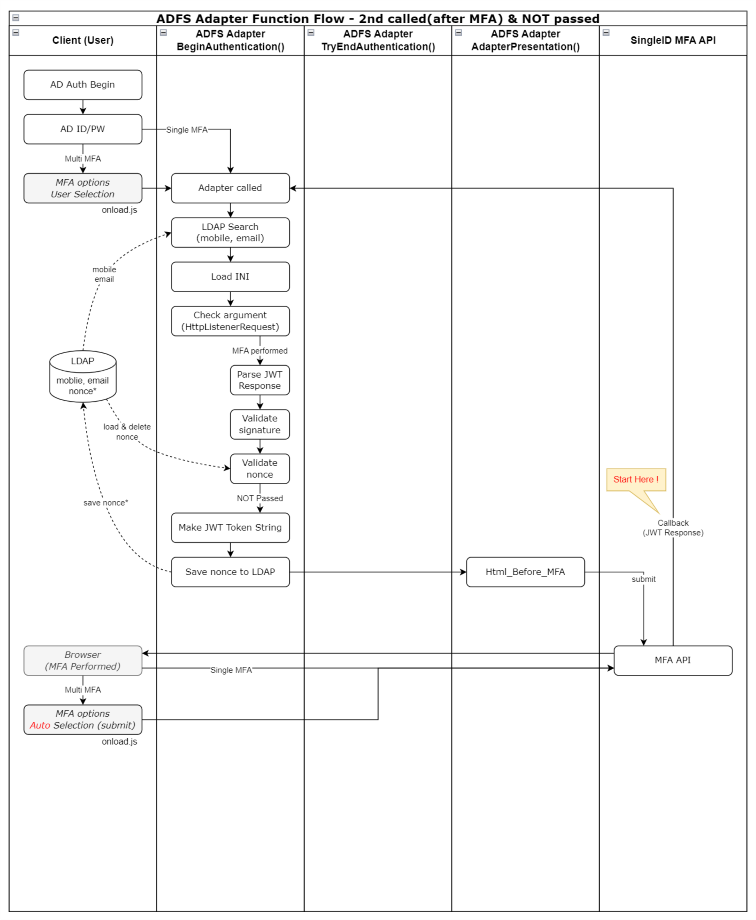
Scenario-specific behavior
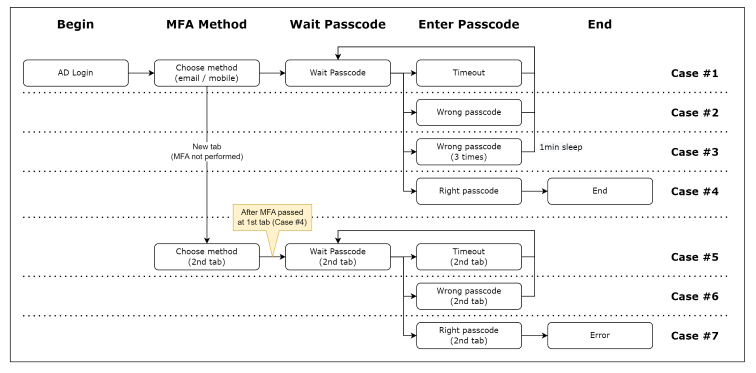
Case #1
- This occurs when the time limit is exceeded on the passcode entry screen, resulting in a timeout.
- When a timeout occurs, the “Resend Code” button becomes active, and you can press this button to retry the Passcode.
Case #2
- This is the case when an incorrect Passcode is entered.
- You can attempt to enter the Passcode up to three times.
Case #3
- This is the case where the passcode is entered incorrectly three times.
- You cannot enter the Passcode for 1 minute.
Case #4
- This is a normal MFA process.
Case #5
- This occurs when a new browser tab is added on the MFA selection screen without entering the Passcode, and the MFA selection is completed.
- After that, successfully complete MFA on the first tab.
- This is the case where a timeout occurs in a new tab later.
Case #6
- This occurs when a new browser tab is added on the MFA selection screen without entering the Passcode, and the MFA selection is completed.
- After that, successfully complete MFA on the first tab.
- This occurs when an incorrect Passcode is entered in a new tab later.
Case #7
- This occurs when a new browser tab is added on the MFA selection screen without entering the Passcode, and the MFA selection is completed.
- After that, MFA succeeds on the first tab.
- This is the case when a valid Passcode is entered thereafter.
- Both the 1st tab and 2nd tab are waiting for passcode input; after authenticating the 1st, attempting authentication on the 2nd yields no response on the 2nd (page freezes)
- 1st tab passcode waiting for input, 2nd tab MFA selection waiting state, after the 1st authentication, selecting the 2nd MFA type causes an error, AD displays an error message before the adapter operates
Scenario-specific behavior
Adapter installation
Application method
Pre-check
Pre‑inspection
| Location | Inspection items | Remarks |
|---|---|---|
| ADFS server | MFA server accessibility (internal network, TCP 80/443)
| If configured to store the nonce in LDAP, communication with the MFA server is unnecessary. |
| .NET Framework 4.8 installation status | ||
| User PC | MFA server connectivity (Internet network, TCP 80/443)
| If connection fails, check the following three items ① Firewall check ② Proxy check ③ Website blocking check |
Table. Personal Information Input Items
Adapter deployment
Caution
If the ADFS servers are configured as multiple instances, steps 1 through 4 of the seven steps below must be applied uniformly to all servers.
- Upload the adapter-related files to the ADFS server
위치 : [drvie]:\ADFSadapter\

ADFSadapter.dll : Adapter 파일
ADFSadatper.ini : 환경 설정 파일
replace_dll.ps1 : 이미 설치된 Adapter를 개선 버전으로 교체 시 사용하는 스크립트 파일
restart_adfs.ps1 : AD FS 서비스 재시작 스크립트 파일
Assembly_netstandard2.0 폴더 : Adapter 적용 전 사전 설치 dll 파일들
- Grant full permissions to the ADFS service account on the folder
C:\ADFSadapter 폴더 우클릭 > 속성 > 보안 > ADFS 서비스 계정 추가 후 모든 권한 허용 선택
※ ADFS 서비스 계정은 services.msc 실행 > ADFS 서비스 실행 계정 "다음 사용자로 로그온" 으로 확인
- Add Registry
Adapter 관련 이벤트를 Windows 이벤트 로그에 찍기 위한 Registry 생성

HKEY_LOCAL_MACHINE\SYSTEM\CurrentControlSet\Services\EventLog 아래에 키 및 값(2개) 생성
- 생성 키 : MFA_Adapter
- MFA_Adapter에 값 2개 생성
   . 이름 : AutoBackupLogFiles
   . 종류 : DWORD(32비트) 값(REG_DWORD)
   . 데이터 : 0

   . 이름 : MaxSize
   . 종류 : DWORD(32비트) 값(REG_DWORD)
   . 데이터 : 16진수 80000

MFA_Adapter 키 아래에 키 및 값(1개) 생성
- 생성 키 : AdapterDLL
- AdapterDLL에 값 1개 생성
  . 이름 : EventMessageFile
  . 종류 : 확장 가능한 문자열 값(REG_EXPAND_SZ)
  . 데이터 : C:\Windows\Microsoft.NET\Framework64\v4.0.30319\EventLogMessages.dll
- Pre-install the DLL required for the Adapter The Assembly_netstandard2.0 folder in C:\ADFSadapter contains libraries that require pre‑installation; refer to the following for the installation process. Install the DLL into the global assembly cache on the ADFS server so that the assembly required when the ADFS Adapter runs can be loaded.
**dll 설치**

#사전 작업
C:\ADFSadapter 폴더에 Assembly_netstandard2.0 폴더 압축을 풀어 복사해둔다.
#관리자 권한으로 Powershell 실행 후 수행 위치 이동
PS>cd C:\ADFSadapter

#dll 설치
PS>.\gacutil.exe /il .\Assembly_netstandard2.0\AssemblyList.txt
#dll 확인
PS>.\gacutil.exe /l
guide
Assembly_netstandard v2.0.zip file should be requested separately via email (singleid.scp@samsung.com).
The required assembly files for installation have been stored in the Assembly_netstandard2.0 folder, and after copying these files to the server, installation can be performed offline. Assembly_netstandard2.0 folder: Microsoft.IdentityModel.Tokens v7.2, System.IdentityModel.Tokens.Jwt v7.2 DLL files for installing the assembly (including all dependency files)
Installation DLL list
| Assembly name | Installed version | Package version |
|---|---|---|
| Microsoft.Bcl.AsyncInterfaces | 1.0.0.0 | 1.0.0 |
| Microsoft.IdentityModel.Abstractions | 7.2.0.0 | 7.2.0 |
| Microsoft.IdentityModel.JsonWebTokens | 7.2.0.0 | 7.2.0 |
| Microsoft.IdentityModel.Logging | 7.2.0.0 | 7.2.0 |
| Microsoft.IdentityModel.Tokens | 7.2.0.0 | 7.2.0 |
| System.Buffers | 4.0.3.0 | 4.5.1 |
| System.IdentityModel.Tokens.Jwt | 7.2.0.0 | 7.2.0 |
| System.Memory | 4.0.1.1 | 4.5.3 |
| System.Numerics.Vectors | 4.1.4.0 | 4.5.0 |
| Microsoft.CSharp | 4.0.4.0 | 4.5.0 |
| System.Runtime.CompilerServices.Unsafe | 4.0.4.1 | 4.5.3 |
| System.Security.Cryptography.Cng | 4.3.0.0 | 5.0.0 |
| System.Text.Encodings.Web | 4.0.5.1 | 4.7.2 |
| System.Text.Json | 4.0.1.2 | 4.7.2 |
| System.Threading.Tasks.Extensions | 4.2.0.1 | 4.5.4 |
Table. Installation DLL list
Adapter Deployment
The NuGet file was downloaded and installed; note that the version displayed for the NuGet package may differ from the version installed on the server. Based on .NET Framework 4.8, use the DLL with the .NET Standard 2.0 (supports .NET Framework 4.8) specification.
Package download : NuGet Gallery | Microsoft.IdentityModel.Tokens 7.2.0
- Apply Adapter Run PowerShell in administrator mode and execute the following command
#수행 위치 이동
PS>cd C:\ADFSadapter

#dll 등록
PS>./gacutil.exe /if ADFSadapter.dll

#dll 확인
PS>./gacutil.exe /l ADFSadapter
 전역 어셈블리 캐시에 다음 어셈블리가 들어 있습니다.
  ADFSadapter, Version=1.2.1.0, Culture=neutral, PublicKeyToken=0e0fe476002e81b3, processorArchitecture=MSIL
#ADFS에 인증 공급자로 등록
PS>$typename="ADFSadapter.AuthenticationAdapter, ADFSadapter, Version=1.2.1.0, Culture=neutral, PublicKeyToken=0e0fe476002e81b3, processorArchitecture=MSIL"
PS>Register-AdfsAuthenticationProvider -TypeName $typename -Name "ADFSadapter"
#ADFS에 인증 공급자 확인
PS>Get-AdfsAuthenticationProvider
AdminName                          : ADFS MFA Adapter
AllowedForPrimaryExtranet          : False
AllowedForPrimaryIntranet          : False
AllowedForAdditionalAuthentication : True
AuthenticationMethods              : {http://schemas.microsoft.com/ws/2012/12/authmethod/otp}
Descriptions                       : {[1033, ADFS MFA Adapter], [1042, ADFS MFA Adapter]}
DisplayNames                       : {[1033, ADFS MFA Adapter], [1042, ADFS MFA Adapter]}
Name                               : ADFSadapter
IdentityClaims                     : {http://schemas.xmlsoap.org/ws/2005/05/identity/claims/upn}
IsCustom                           : True
RequiresIdentity                   : True
#ADFS 서비스 재시작
PS>net stop adfssrv
PS>net start adfssrv

#수행 위치 이동
PS>cd C:\ADFSadapter
#dll 등록
PS>./gacutil.exe /if ADFSadapter.dll
#dll 확인
PS>./gacutil.exe /l ADFSadapter
 전역 어셈블리 캐시에 다음 어셈블리가 들어 있습니다.
  ADFSadapter, Version=1.2.1.0, Culture=neutral, PublicKeyToken=0e0fe476002e81b3, processorArchitecture=MSIL
#ADFS 서비스 재시작
PS>net stop adfssrv
PS>net start adfssrv
Configure multi-factor authentication methods for ADFS AD FS Management > Services > Authentication Methods > Multi-Factor Authentication Methods > Click Edit, then select the created mfa (ADFS MFA Adapter) and apply (multiple selection possible)
Apply MFA policy to the trusted party trust AD FS Management > Relying Party Trust > Select the Relying Party Trust to apply > Edit Access Control Policy > ‘Allow all users and require MFA’ Select and apply
Adapter Upgrade and Change
This method is the adapter replacement procedure performed when upgrading or modifying an already registered ADFS MFA Adapter. When performing the replacement, executing this script alone completes the Adapter change and its application.
#수행 위치 이동하여 변경된 Adapter.dll 파일 업로드
PS>cd C:\ADFSadapter

#Adapter 교체 수행

PS>./replace_dll.ps1

확인창 출력 시 예(Y) 혹은 모두 예(A) 클릭
 - 예(Y) 혹은 모두 예(A) 선택 : ADFS에서 기존 Adapter 제거 후 교체 작업 진행 (정상 절차)
 - 아니요(N) 혹은 모두 아니요(L) 선택 : Adapter 제거 안하고 다음 단계로 수행되어 오류 발생
 - 일시 중단(S) 선택: 해당 스크립트 중단
Reference
※ Execute on both the primary server and the secondary server.
Although an error occurs when registering with ADFS on the secondary server, the operation is required to install the DLL.
Adapter configuration
This is a description of the Adapter configuration file. Before applying the ADFS Adapter, you must first configure the environment.
guide
Adapter installation location changes
Starting with adapter 1.2.0.6, you can install to drives other than the C drive.
Existing: installed only in C:/ADFSadapter Change: Install at the root of the Z drive Example: C:/ADFSadapter , D:/ADFSadapter , E:/ADFSadapter , …… , Z:/ADFSadapter
Caution: Install on only one drive; if installed on multiple drives, the system scans from C to Z and uses the first directory it finds.
The following example assumes the adapter is installed in the C:\ADFSadapter directory.
If you installed on a drive other than C, simply change the drive letter in the example below.
Example: If installed in D:\ADFSadapter, the ini path → D:\ADFSadapter\ADFSadapter.ini
File name and path
- File name → ADFSadapter.ini
- Full path → C:\ADFSadapter\ADFSadapter.ini
- File encoding → be sure to save as UTF-8 (otherwise Korean characters will become garbled)
Things to note
When representing a value, you can use " and ‘, and you may include spaces on either side of =. Whitespace before and after the Value is trimmed The values below are all the same. Example 1) MAIN_TITLE=DWP MFA Adapter Example 2) MAIN_TITLE = DWP MFA Adapter Example 3) MAIN_TITLE = “DWP MFA Adapter” Example 4) MAIN_TITLE = " DWP MFA Adapter "
Sections whose names end with -1033 or -1042 indicate a locale. At least 1033 must be present.
locale number : 1033 (en-us), 1042 (ko) locale section : MFA-1033, MFA-1042, TXT-1033, TXT-1042, MSG-1033, MSG-1042
Example of ini file structure
# ADFS MFA Adapter 환경 설정
# 설치위치 변경 사항
#   - v1.2.0.6 이전 : C:\ADFSadapter\ADFSadapter.ini
#   - v1.2.0.6 부터 : C 이외의 다른 드라이브에 설치할 수 있음 (adapter 리소스 설치한 위치와 동일)
#     예시: C:\ADFSadapter\ADFSadapter.ini , D:\ADFSadapter\ADFSadapter.ini , E:\ADFSadapter\ADFSadapter.ini
# 주의 : DLL 파일명은 ADFSadapter.dll 이며, 기존의 Nexsign 연계한 MFAadapter.dll과는 다름


# 값을 표현할때 " 와 ' 를 사용할 수 있으며 = 좌우에 빈칸을 입력해도 됩니다
# Value 의 앞뒤에 있는 공백은 Trim 처리 됩니다.
# 아래의 Value는 모두 동일합니다.
# 예1) MAIN_TITLE=ADFS MFA Adapter
# 예2) MAIN_TITLE = ADFS MFA Adapter
# 예3) MAIN_TITLE = "ADFS MFA Adapter"
# 예4) MAIN_TITLE = "   ADFS MFA Adapter   "


# 섹션 이름들 중에 뒷부분에 -1033, -1042 가 붙는 것들은 locale 을 의미합니다
# 최소한 1033 은 반드시 있어야 합니다
# locale number : 1033 (en-us), 1042 (ko)
# locale section : MFA-1033, MFA-1042, TXT-1033, TXT-1042, MSG-1033, MSG-1042


# LOG_LEVEL (Windows 이벤트 로그에 기록하는 기준)
# 0 : Error
# 1 : Error + Warning
# 2 : Error + Warning + Information + Debug


[MAIN]
MAIN_MFA_TITLE="ADFS MFA Adapter"
MAIN_CLAIM1=http://schemas.microsoft.com/ws/2008/06/identity/claims/authenticationmethod
MAIN_CLAIM2=http://schemas.microsoft.com/ws/2012/12/authmethod/otp


# MFA API 정보
# URL 끝부분에 "/" 붙이지 말 것
#MFA_API_URL="https://stg2-cloud.singleid.samsung.net/test/common-api/open/v1.1/mfa/request"
MFA_API_URL="https://stg1-cloud.singleid.samsung.net/test/common-api/open/v1.1/mfa/request"
CONSUMER_KEY="**************************************"
SECRET_KEY="**************************************"


# Donmain vs Consumer Key 리스트
# 도메인별로 Consumer Key가 다른 경우에는 리스트로 나열 (이런 경우, 위의 CONSUMER_KEY 값을 비울 것)
# Reqeust Token의 sys 값에 대입
# 형태 : DOMAIN_CONSUMER_KEY_##=domain;consumerKey
# 예시: DOMAIN_CONSUMER_KEY_01=aaa.com;**************************************
#     DOMAIN_CONSUMER_KEY_02=bbb.com;**************************************
# (주의) CONSUMER_KEY 값과 리스트 값이 모두 있다면, CONSUMER_KEY 값만 사용함
DOMAIN_CONSUMER_KEY_01=aaa.com;**************************************
DOMAIN_CONSUMER_KEY_02=bbb.com;**************************************

# Donmain vs Secret Key 리스트
# 도메인별로 Secret Key가 다른 경우에는 리스트로 나열 (이런 경우, 위의 SECRET_KEY 값을 비울 것)
# 형태 : DOMAIN_SECRET_KEY_##=domain;secretKey
# 예시: DOMAIN_SECRET_KEY_01=aaa.com;**************************************
#     DOMAIN_SECRET_KEY_02=bbb.com;**************************************
# (주의) SECRET_KEY 값과 리스트 값이 모두 있다면, SECRET_KEY 값만 사용함
DOMAIN_SECRET_KEY_01=aaa.com;**************************************
DOMAIN_SECRET_KEY_02=bbb.com;**************************************

# LDAP Search 결과에 따른, MFA 진행 여부
# 0 : LDAP Search를 하지 않음 (아래의 LDAP_SERVER, LDAP_USE_IDPW, ... 등의 정보 사용하지 않음. token에는 빈 값 대입)
# 1 : LDAP Search를 시도하지만 실패해도 관계없음 (서버 실패, 정보 없음 등이 발생하여도 MFA 진행함. token에는 빈 값 대입)
# 2 : LDAP Search가 성공 & 사용자 정보가 존재해야 함 (사용자 정보가 존재할 경우에만 진행함. 단, 결과 값이 빈 값이어도 진행함)
USE_LDAP_SEARCH=1


# LDAP 주소와 ID/PW
# LDAP_SERVER는 domain, ipv4, ipv6 등의 3가지 모두 가능하며, 앞부분에 대문자 "LDAP://" 을 붙여야 함 (반드시 대문자)
# 예시: LDAP://adpw5004.hw.dev , LDAP://70.2.180.218 , LDAP://fe80::644b:3c9f:c5ac:ce1c%10
# ID/PW를 사용하려면 LDAP_USE_IDPW 값을 1, 사용하지 않으려면 LDAP_USE_IDPW 값을 0 으로 설정
# SSL/TLS 사용하려면 LDAP_SSLTLS 값을 1, 사용하지 않으려면 LDAP_SSLTLS 값을 0 으로 설정 (단, LDAP_USE_IDPW=1 인 경우에만 해당)
LDAP_SERVER="LDAP://adpw5004.hw.dev"
LDAP_USE_IDPW=1
LDAP_SSLTLS=1
LDAP_ID="isadmin"
LDAP_PW="sds*****"


# DNS Lookup을 하여 LDAP 서버(LDAP_SERVER)의 IP 주소를 확인하고, IP 주소 기반으로 접속 여부
# LDAP_SERVER 값이 IP(ipv4, ipv6)로 설정되어 있어도 DNS Lookup을 수행하며, IP 그대로 리턴됨
# 만약, DNS Lookup을 실패하면, LDAP_SERVER 값 그대로 접속
# 0 : LDAP_SERVER 값 그대로 서버에 접속 (DNS lookup 하지 않음)
# 1 : DNS lookup으로 IP 주소를 확인하여 LDAP 서버에 접속 (DNS lookup 결과 리스트에서 첫번째 IP 사용)
# 2 : DNS lookup으로 IP 주소를 확인하고, LDAP_WHITE_IP_## 리스트에서 가장 먼저 해당되는 IP를 사용 (리스트에 없으면, LDAP_SERVER 사용)
# 3 : DNS lookup으로 IP 주소를 확인하고, LDAP_WHITE_IP_## 리스트에서 가장 먼저 해당되는 IP를 사용 (리스트에 없으면, LDAP 접속 안함)
LDAP_DNS_LOOKUP=1


# DNS Lookup 결과가 여러 개일때, 첫번째 IP 주소로 연결이 안되면 그 다음 IP 주소로 시도할지 여부
# 예시: lookup 결과가 4개 : 1차 IP 연결 실패 -> 2차 IP 연결 시도 & 싪패 -> 3차 IP 연결 시도 & 싪패 -> 4차 IP 연결 시도
LDAP_DNS_IF_FAIL_USE_NEXT=1


# DNS Lookup 결과와 비교하는 접속 허용된 LDAP 서버 IP 리스트 (LDAP_DNS_LOOKUP = 2 or 3 인 경우에만 해당)
# LDAP_WHITE_IP_## 형태이며, 01부터 99까지 순차적으로 기록
# DNS Lookup 결과와 리스트를 순차적으로 비교
# IPv4, IPv6 형태로 기록 (동일한 서버의 IPv4, IPv6가 있다면 리스트의 앞순위에 있는 IP가 적용됨)
# DNS Lookup 결과 순서와 White IP 리스트 순서가 다르다면 -> White IP 리스트 순서를 따름
LDAP_WHITE_IP_01="70.2.180.218"
LDAP_WHITE_IP_02="fe80::644b:3c9f:c5ac:ce1c%10"


# 사용자 정보를 암호화할지 여부 (예: mobile, email 등)
# 대상 : USERINFO_## 리스트
# 암호화 여부에 따라 API 서버에 전송하는 token의 claim 이름이 다름
# 0 : 암호화 하지 않음 -> token의 claim 이름이 plainMobile, plainEmail
# 1 : 암호화 -> token의 claim 이름이 mobile, email
USERINFO_ENCRYPT=0


# LDAP Search할 사용자 정보 attribute name과 JWT token에 사용할 claim name (2개 값을 구분하는 delimeter = ";")
# 형태: USERINFO_## = attribute;encryptedClaim;plainClaim
#   예시: LDAP에서 "mail" 속성을 읽어서, JWT에 "email" claim으로 사용된다면 -> "mail;email;plainEmail"
# key 명칭은 "USERINFO_##" 형태로 하고, 시작은 USERINFO_01
# key 갯수 : 0개 ~ 최대 99개 (0개인 경우, ini에 아무것도 적지 않으면 되며, USERINFO_00 이라고 적지 말 것)
# 주의사항) USERINFO_##에서 ## 에 해당되는 숫자는 반드시 01부터 시작하며, 여러 개인 경우 번호가 끊어지지 않아야 함
#           USERINFO_01, USERINFO_02, USERINFO_03 : OK (01, 02, 03 정보가 사용됨)
#           USERINFO_01, USERINFO_02, USERINFO_05 : 02까지 읽고, 끊어진 번호 이후는 사용하지 않음 (01, 02 정보가 사용됨)
USERINFO_01=mobile;mobile;plainMobile
USERINFO_02=mail;email;plainEmail


# MFA API 서버가 Callback 해줄때, 결과 Parameter에 사용되는 Key 이름
# 예시: https://adpw5004.hw.dev/adfs/ls?client-request-id=xxxxxx&pullStatus=0&jwtTokenResponse=yyyyyy
KEY_NAME_IN_RESPONSE="jwtTokenResponse"


# JWT Token의 exp에 적용될 더하기 값
# 형테 : 일시분초(dhms) 형태의 문자열 -> 1d=86400, 1h=3600, 1m=60 (dhms 가 전혀 없는 단순 숫자는 초로 판단함)
# 예시1 : 1d02h38m27s -> 95907 초
# 예시2 : 12345 -> 12345 초
TOKEN_EXP_TIME=1d


# API 호출할때 구성하는 token에 client claim을 추가할지 여부
# client : SAML인 경우 issuer, OIDC인 경우 client-id
# 0 : token에 client 포함시키지 않음
# 1 : token에 client 포함
TOKEN_CLAIM_CLIENT=0


# MFA nonce(guid, requset-id) 검증 방법
# 0 : 검증 안함
# 1 : adapter가 생성한 guid를 LDAP에 저장/비교하는 방식 (adapter가 검증)
#     -> 관련 설정 값 : CACHE_ATTRIBUTE, CACHE_DELIMETER, SKEW_SECONDS, CACHE_LIFE_TIME
# 2 : API 서버가 생성한 requeset-id를 adapter가 받아서 호출 URL에 사용하는 방식 (API 서버가 검증)
#     -> 관련 설정 값 : MFA_VERIFY_URL
MFA_VERIFY_TYPE=2


# MFA 결과검증 URL (서버 to 서버 통신) : URL 뒷부분에 API 서버로부터 받은 {request-id}를 덧붙여서 호출함
# adapter는 리턴 200 (OK) 인지 확인하여 MFA 결과 처리
# URL 끝부분에 "/" 붙이지 말 것
MFA_VERIFY_URL="https://stg1-cloud.iam.samsung.net/test/common-api/open/v1.1/mfa/request/status"


# MFA 결과검증할때 사용할 보안 프로토콜
# 선택 가능한 프로토콜 (대소문자 구분 없음) : TLS12, TLS13
# (주의) SSL3, TLS, TLS11 은 사용하지 않음
MFA_VERIFY_SECURE_PROTOCOL="TLS12"


# 사용자의 req guid 값을 저장할 LDAP attribute의 이름
# (주의) LDAP에 write 권한이 있어야 함
CACHE_ATTRIBUTE="otherPager"


# LDAP에 저장하는 req + 시간 정보를 조합할때 사용하는 delimeter -> "req;시간"
CACHE_DELIMETER=";"


# LDAP에 저장된 req의 시간과 JWT 수신시 시간의 차이 허용치 (초단위)
# MFA 선택화면 누를 때가 아니라, AD 로그인 직후의 시간이므로 (MFA 선택화면 보일때 이미 시간이 저장되었음)
# 사용자가 MFA 선택화면 누르고 Passcode 입력할 때까지의 시간이 아님
# 따라서, tight 하게 시간을 설정하면 안되며, 1시간 정도가 적당?? (MFA 선택을 1시간 고민하는 사람이 있나?)
SKEW_SECONDS=3600


# LDAP에 저장된 req의 수명 -> 다음 access시 시간 확인해서 이전의 오래된 것들 삭제
# 형태 : 일시분초(dhms) 형태의 문자열 -> 1d=86400, 1h=3600, 1m=60 (dhms 가 전혀 없는 단순 숫자는 초로 판단함)
# 예시1 : 1d02h38m27s -> 95907 초
# 예시2 : 12345 -> 12345 초
CACHE_LIFE_TIME=1d


# Adapter 기능을 ByPass 할 것인지 여부 (0=정상 사용, 283901=무력화, 그 외 값들=정상 사용)
# MFA 기능 문제로 급하게 adapter 기능의 무력화가 필요한 비상 상황에서 사용
# 평상시에는 절대로 수정하지 말 것 -> 평상시 값은 0
# 주의 : 무력화하려면 반드시 정확한 값을 설정해야 함 (0 이외의 숫자가 해당되는 것이 아니며 정확한 숫자 필요함. noise 우려)
BYPASS_ADAPTER=0


[API]
API_SYSTEMNAME=SingleID


[MSG-1033]
MSG_INTERNAL_ERROR="Internal error occurred. Contact administrator."


[MSG-1042]
MSG_INTERNAL_ERROR="Internal error occurred. Contact administrator."


[MANAGE]
LOG_LEVEL=2
Configuration value description
- Fixed value: means that the value displayed in the “Configured Value” column of the table below is used unchanged when installing on the ADFS server.
- If you want to add languages other than English and Korean, you can add them for two sections. → MSG-1033, MSG-1042
| dss | Key | Configuration values (example) | Fixed value | Explanation |
|---|---|---|---|---|
| MAIN | MAIN_MFA_TITLE | ADFS MFA Adapter | O | HTML page title (no impact on MFA functionality) |
| MAIN_CLAIM1 | http://schemas.microsoft.com/ws/2008/06/identity/claims/authenticationmethod | O | Apply the left value exactly as is | |
| MAIN_CLAIM2 | http://schemas.microsoft.com/ws/2012/12/authmethod/otp | O | Apply the left value exactly as is | |
| MFA_API_URL | https://stg2-cloud.singleid.samsung.net/test/common-api/open/v1.1/mfa/request | Since the SingleID MFA API URL can vary depending on the tenant, you need to verify the exact URL. | ||
| CONSUMER_KEY | 4312a8b9-75c4-7897-89a7-89347f18943e | Consumer Key issued by SingleID | ||
| SECRET_KEY | gQgkyLVO6FR8vJkLtlgBiupsRM/ilgrbEfoKWRnhALd= | Secret Key issued by SingleID used for JWT Signautre verification External disclosure prohibited | ||
| DOMAIN_CONSUMER_KEY_01 | 4312a8b9-75c4-7897-89a7-89347f18943e | Domain vs Consumer Key list If the Consumer Key differs per domain, list them (in this case, clear the CONSUMER_KEY value above) Format: DOMAIN_CONSUMER_KEY_##=domain;consumerKey Example: DOMAIN_CONSUMER_KEY_01=aaa.com;4312a8b9-75c4-7897-89a7-89347f18943e DOMAIN_CONSUMER_KEY_02=bbb.com;96567780-2b12-23da-637c-9375a6502d5a (Note) If both CONSUMER_KEY and list values are present, use only the CONSUMER_KEY value. | ||
| DOMAIN_CONSUMER_KEY_02 | 96567780-2b12-23da-637c-9375a6502d5a | |||
| DOMAIN_CONSUMER_KEY_## | 367c89d5-88f7-978a-9739-8ed21748f36b | |||
| DOMAIN_SECRET_KEY_01 | gQgkyLVO6FR8vJkLtlgBiupsRM/ilgrbEfoKWRnhALd= | Domain vs Secret Key list If the Secret Key differs per domain, list them (in this case, clear the above SECRET_KEY value) Format: DOMAIN_SECRET_KEY_##=domain;secretKey Example: DOMAIN_SECRET_KEY_01=aaa.com;gQgkyLVO6FR8vJkLtlgBiupsRM/ilgrbEfoKWRnhALd= DOMAIN_SECRET_KEY_02=bbb.com;kgkWRnLygQhsRgrLVbtKlO6FiLdABupEgoMR8v/ilfJ= (Note) If both SECRET_KEY value and list values are present, use only the SECRET_KEY value. | ||
| DOMAIN_SECRET_KEY_02 | kgkWRnLygQhsRgrLVbtKlO6FiLdABupEgoMR8v/ilfJ= | |||
| DOMAIN_SECRET_KEY_## | dABupkRnLygQhsrLgWVRbt8vRgkLilLKlO1FioMgfJE= | |||
| USE_LDAP_SEARCH | 0 or 1 or 2 | LDAP Search based MFA decision 0 : Do not perform LDAP Search (do not use information such as LDAP_SERVER, LDAP_USE_IDPW, etc. Assign an empty value to the token) 1 : Attempt LDAP Search but failure is acceptable (proceed with MFA even if server failure, missing information, etc. Assign an empty value to the token) 2 : LDAP Search succeeds & user information must exist (proceed only if user information exists. However, proceed even if the result value is empty) | ||
| LDAP_SERVER | LDAP://adpw5004.hw.dev | LDAP address that can query AD user information All three types such as domain, ipv4, and ipv6 are supported, and you must prepend “LDAP://” to the beginning. | ||
| LDAP_USE_IDPW | 0 or 1 | Whether to use id/pw when connecting to LDAP Since the adapter operates with system privileges, it is typical for LDAP connections to work without id/pw, though there are cases where this is not true If the system is configured to connect without id/pw and an AD connection error appears in the event log, it is necessary to configure it to connect using id/pw. Setting this value to 1 requires that LDAP_ID and LDAP_PW be set. | ||
| LDAP_SSLTLS | 0 or 1 | Whether to use SSL/TLS when connecting to LDAP Set to use by default | ||
| LDAP_ID | LDAP connection ID | LDAP connection ID (when LDAP_USE_IDPW=1) | ||
| LDAP_PW | LDAP connection pw | LDAP connection password (when LDAP_USE_IDPW=1) | ||
| LDAP_DNS_LOOKUP | 0 or 1 or 2 or 3 | Perform a DNS lookup to obtain the IP address of the LDAP server (LDAP_SERVER) and determine connection status based on the IP address |
0 : Connect to the server using the LDAP_SERVER value directly (no DNS lookup)
1 : Perform a DNS lookup to obtain the IP address and connect to the LDAP server (use the first IP from the DNS lookup result list)
2 : Perform a DNS lookup to obtain the IP address and use the first matching IP from the LDAP_WHITE_IP_## list (if not found, use LDAP_SERVER)
3 : Perform a DNS lookup to obtain the IP address and use the first matching IP from the LDAP_WHITE_IP_## list (if not found, do not connect to LDAP) |
| | LDAP_DNS_IF_FAIL_USE_NEXT | 0 or 1 | | When there are multiple DNS lookup results, whether to try the next IP address if the first IP address fails to connect
Example: lookup results are 4: 1st IP connection failure -> attempt 2nd IP & failure -> attempt 3rd IP & failure -> attempt 4th IP |
| | LDAP_WHITE_IP_01 | 70.2.180.218 | | List of allowed LDAP server IPs compared with DNS Lookup results (applicable only when LDAP_DNS_LOOKUP = 2 or 3)
LDAP_WHITE_IP_## format, recorded sequentially from 01 to 99
Compare the DNS Lookup results with the list sequentially
Recorded in IPv4 or IPv6 format (if the same server has both IPv4 and IPv6, the IP appearing earlier in the list is used)
If the order of DNS Lookup results differs from the White IP list order → follow the White IP list order |
| | LDAP_WHITE_IP_02 | | | fe80::644b:3c9f:c5ac:ce1c%10 |
| | LDAP_WHITE_IP_## | | | A. : 01 ~ 99
White IP address (IPv4 or IPv6) |
| | USERINFO_ENCRYPT | 0 or 1 | | Whether to encrypt user information (e.g., mobile, email, etc.)
Target : USERINFO_## list
The claim name of the token sent to the API server varies depending on encryption status
0 : No encryption -> token claim names are plainMobile, plainEmail
1 : Encryption -> token claim names are mobile, email |
| | USERINFO_01 | mobile;mobile;plainMobile | O | The attribute name of user information to search in LDAP and the claim name to use in the JWT token (the delimiter separating the three values is “;”)
Format: USERINFO_## = attribute;encryptedClaim;plainClaim
Example: If you read the “mail” attribute from LDAP and use the encrypted value as the “email” claim and the plain value as the “plainEmail” claim in the JWT → “mail;email;plainEmail” |
| | USERINFO_02 | mail;email;plainEmail | O | |
| | USERINFO_## | | | A. : 01 ~ 99
[LDAP attribute name];[encrypted token claim name];[plain token claim name] |
| | KEY_NAME_IN_RESPONSE | jwtTokenResponse | O | Key name used in the result parameter when the MFA API server performs a callback
Example: https://adpw5004.hw.dev/adfs/ls?client-request-id=xxxxxx&pullStatus=0&jwtTokenResponse=yyyyyy |
| | TOKEN_EXP_TIME | 1d | | The additive value applied to the JWT token’s exp
a string in day-hour-minute-second (dhms) format
1d=86400, 1h=3600, 1m=60
A plain number without any dhms is interpreted as seconds
Example 1: 1d02h38m27s → 95907 seconds
Example 2: 12345 → 12345 seconds |
| | TOKEN_CLAIM_CLIENT | 0 or 1 | | Whether to add a client claim to the token configured when making an API call
client: issuer for SAML, client-id for OIDC
0: do not include client in the token
1: include client in the token |
| | MFA_VERIFY_TYPE | 0 or 1 or 2 | | MFA nonce(guid, requset-id) verification method
0 : No verification
1 : Method where the guid generated by the adapter is stored/compared in LDAP (adapter verifies) → related configuration values: CACHE_ATTRIBUTE, CACHE_DELIMETER, SKEW_SECONDS, CACHE_LIFE_TIME
2 : Method where the requeset-id generated by the API server is received by the adapter and used in the call URL (API server verifies) → related configuration value: MFA_VERIFY_URL |
| | MFA_VERIFY_URL | https://stg1-cloud.iam.samsung.net/test/common-api/open/v1.1/mfa/request/status | | MFA result verification URL (server-to-server communication): Append the {request-id} received from the API server to the end of the URL and call it → the adapter checks that the return is 200 (OK) to process the MFA result
Do not append a “/” at the end of the URL |
| | MFA_VERIFY_SECURE_PROTOCOL | TLS12 or TLS13 | | Security protocol to use when verifying MFA results
Available protocols (case-insensitive): TLS12, TLS13
(Note) Do not use SSL3, TLS, TLS11 |
| | CACHE_ATTRIBUTE | otherPager | O | Name of the LDAP attribute that stores the user’s req guid value |
| | CACHE_DELIMETER | ; | | Delimiter used when combining the req and time information stored in LDAP -> “req;time” |
| | SKEW_SECONDS | 3600 | | Allowed time difference (in seconds) between the request time stored in LDAP and the time when the JWT is received
It is the time immediately after AD login, not when the MFA selection screen is clicked (the time is already recorded when the MFA selection screen appears)
It is not the time until the user clicks the MFA selection screen and enters the passcode
Therefore, the time should not be set too tightly; about one hour is appropriate?? (Is there anyone who would consider MFA selection for an hour?) |
| | CACHE_LIFE_TIME | 1d | | Lifetime of req stored in LDAP -> On the next access, check the time and delete the older ones
String in dhms (days, hours, minutes, seconds) format
1d=86400, 1h=3600, 1m=60
(A plain number without dhms is interpreted as seconds) |
| | BYPASS_ADAPTER | 0 or 283901 | | Whether to bypass the Adapter function (0 = normal operation, 283901 = disable, other values = normal operation)
Used in emergency situations where the adapter function must be quickly disabled due to MFA issues
Never modify under normal circumstances -> the normal value is 0
Caution: To disable, you must set the exact value (numbers other than 0 are not applicable; a precise number is required. Concern about noise) |
| API | API_SYSTEMNAME | SingleID | O | (No impact on MFA functionality) |
| MSG-1033 | MSG_INTERNAL_ERROR | Internal error occurred. Contact administrator. | | Message displayed to the user when the process stops due to authentication interruption, error occurrence, etc. (English) |
| MSG-1042 | MSG_INTERNAL_ERROR | Internal error occurred. Contact administrator. | | Message displayed to the user when the process stops due to authentication interruption, error occurrence, etc. (Korean)
Since entering Korean causes an error, please input in English. |
| MANAGE | LOG_LEVEL | 0 or 1 or 2 | | Criteria for recording in the Windows event log
0 = Record only errors
1 = Record errors + warnings only
2 = Record errors + warnings + informational messages, etc. |
Table. Description of configuration values
INI configuration method
LDAP Search related
- When you want to use DNS lookup for the LDAP server’s hostName.
- When you want to use only the first address among multiple DNS lookup results
- When you want to attempt connections sequentially to all DNS lookup results.
- When you want to use an ID/password to connect to an LDAP server.
- When you want to connect only to allowed LDAP addresses (White IP list)
- Configure the user attributes to retrieve from LDAP
Regarding API connection
- Whether user information included in the token sent to the API server is encrypted
- MFA integrity verification method: Adapter verifies
- MFA integrity verification method: API server verification
etc.
- Options that must never be changed
- Options that must be obtained from the SingleID operations department and configured
- Options that need to be set according to the installation environment
Caution
The consumer key and secret key used on this page are sample data. (fake value)
LDAP Search related
When you want to use DNS Lookup with the hostName of the LDAP server
USE_LDAP_SEARCH=1
LDAP_SERVER="LDAP://adpw5004.hw.dev"
LDAP_DNS_LOOKUP=1
The leading part of the LDAP server address must be uppercase “LDAP://”. It was found that connections fail when using lowercase on the development server during testing. If the DNS lookup fails, the LDAP_SERVER value is used directly as the LDAP connection address.
When you want to use only the first address among multiple DNS lookup results
LDAP_DNS_LOOKUP=1
LDAP_DNS_IF_FAIL_USE_NEXT=0
DNS Lookup 결과가 다음과 같다고 하면,
- IP1 = 10.10.10.10
- IP2 = 10.10.10.20
- IP3 = 10.10.10.30
LDAP_DNS_IF_FAIL_USE_NEXT=0, because it is set to Only IP1 attempts to connect to the server and then stops, regardless of success or failure. Therefore, setting LDAP_DNS_IF_FAIL_USE_NEXT=0 requires caution.
When you want to attempt connections sequentially to all DNS lookup results
LDAP_DNS_LOOKUP=1
LDAP_DNS_IF_FAIL_USE_NEXT=1
If the DNS Lookup result is as follows,
- IP1 = 10.10.10.10
- P2 = 10.10.10.20
- IP3 = 10.10.10.30
LDAP_DNS_IF_FAIL_USE_NEXT=1 is set, so Attempt to connect to IP1, IP2, and IP3 sequentially until successful. For example, if the connection to IP2 succeeds, IP3 will not attempt to connect.
When you want to use an ID/password when connecting to an LDAP server
LDAP_ID="******"
LDAP_PW="******"
Since MFA operates with system privileges, it may not require an id/pw. If the LDAP connection fails without an ID/password (you can determine the connection status from the server logs) Please try a configuration that uses an ID/password.
When you want to connect only to allowed LDAP addresses (White IP list)
LDAP_DNS_LOOKUP=2
또는
LDAP_DNS_LOOKUP=3

LDAP_WHITE_IP_01="70.2.180.218"
LDAP_WHITE_IP_02="fe80::644b:3c9f:c5ac:ce1c%10"
Without using the DNS lookup result as is, It compares against the White IP list and uses only the addresses that are included in the White IP list. For example, the DNS Lookup result is as follows,
- IP1 = 10.10.10.10
- IP2 = 10.10.10.20
- IP3 = 10.10.10.30
If the white IP list is as follows,
- WIP1 = 10.10.10.20
- WIP2 = 10.10.10.40
The actual address used is IP2 = WIP1 = 10.10.10.20.
The order follows the White IP list order. In the following case, attempts to connect to the server are made in the order 10.10.10.30, 10.10.10.20.
- IP1 = 10.10.10.10
- IP2 = 10.10.10.20
- IP3 = 10.10.10.30
- WIP1 = 10.10.10.30
- WIP2 = 10.10.10.20
If there is nothing that belongs to the White IP list,
- LDAP_DNS_LOOKUP=2 → Use the LDAP_SERVER value directly as the LDAP connection address.
- LDAP_DNS_LOOKUP=3 → Does not connect to the LDAP server. (Option that requires careful use)
Configure user attributes to query from LDAP
USERINFO_01=mobile;mobile;plainMobile
USERINFO_02=mail;email;plainEmail
USERINFO_03=company;company;plainCompany
USERINFO_04=department;department;plainDepartment
USERINFO_05=displayname;displayname;plainDisplayname
User information claim to be included in the Request Token sent to the MFA API server. It queries LDAP for the number of items specified in the ini list, includes the results in the token, and sends them to the MFA API server. Please refer to the description of “USERINFO_##” in the table on the page below for the configuration rules.
If you configure as in the above sample and the LDAP query result is as follows,
- mobile = +82-10-1234-5678
- mail = gd.hong@samsung.com
- company = no value
- department = no value
- displayname = Hong Gil Dong
The Request Token is composed as follows. If the query result is empty, include the empty value in the token as is (as with plainCompany and plainDepartment below).
{
  "sys": "4312a8b9-75c4-7897-89a7-89347f18943e",
  "uid": "gd.hong",
  "displayUid": "gd.hong",
  "rtn": "https://adpw5004.hw.dev:443/adfs/ls?client-request-id=4b978185-59e1-4018-c800-0080020000f6&pullStatus=0",
  "nbf": 1716346465,
  "exp": 1716432865,
  "iat": 1716346465,
  "authType": "saml",
  "returnMethod": "get",
  "plainMobile": "+82-10-1234-5678",
  "plainEmail": "gd.hong@samsung.com",
  "plainCompany": "",
  "plainDepartment": "",
  "plainDisplayname": "Hong Gil Dong"
}
To prevent querying LDAP, clear the setting value or mark it as a remark. In this case, the token does not contain user information.
USERINFO_01=
또는
#USERINFO_01=mobile;mobile;plainMobile
API connection related
Whether user information included in the token sent to the API server is encrypted
USERINFO_ENCRYPT=0
As of adapter version 1.2.0.8, it is not implemented the same as the API server’s encryption logic, making encrypted transmission impossible. The server uses AES GCM encryption, but the adapter cannot use AES GCM due to the characteristics of the development environment.
- Target information: mobile, email
Therefore, use USERINFO_ENCRYPT=0. The adapter and the API server are connected via HTTPS, so there should be no man‑in‑the‑middle hijacking issue.
MFA integrity verification method : adapter verification
MFA_VERIFY_TYPE=1
CACHE_ATTRIBUTE="otherPager"
CACHE_DELIMETER=";"
SKEW_SECONDS=3600
CACHE_LIFE_TIME=1d
Prerequisite for using this option
- Must have write (write) permission on LDAP → important weekly!
It uses the otherPager attribute in LDAP user information as a temporary storage area. Adapters lack a session concept, so they cannot store or remember information themselves.
The LDAP server has the same address as the LDAP Search. In other words, it means that options such as LDAP SERVER and LDAP_DNS_LOOKUP are also applied.
The above configuration is interpreted as follows.
- MFA_VERIFY_TYPE=1 : The method of storing/comparing the guid generated by the adapter in LDAP (adapter verification)
- Use the attribute called “otherPager” in LDAP user information
- Multiple pieces of information to be stored are separated by ‘;’ and concatenated as a string → example: “aaa;bbb;ccc”
- The allowed time difference between the time stored in LDAP for the request and the time when the JWT is received is 3600 seconds.
- The lifetime of req stored in LDAP is 1d (one day) → On the next access, check the time and delete the older entries.
MFA integrity verification method: API server verification
MFA_VERIFY_TYPE=2
MFA_VERIFY_URL="https://stg1-cloud.iam.samsung.net/test/common-api/open/v1.1/mfa/request/status"
MFA_VERIFY_SECURE_PROTOCOL="TLS12"
When the adapter receives the MFA result JWT token returned by the API server, it uses the req value from the token’s information to It queries the API server again and verifies that the result is 200.
The above configuration is interpreted as follows.
- MFA_VERIFY_TYPE=2 : The method where the adapter receives the request-id generated by the API server and uses it in the call URL (validated by the API server)
- Re-queries the MFA_VERIFY_URL address
- The security protocol uses TLS 1.2
Other
MAIN_CLAIM1=http://schemas.microsoft.com/ws/2008/06/identity/claims/authenticationmethod
MAIN_CLAIM2=http://schemas.microsoft.com/ws/2012/12/authmethod/otp
KEY_NAME_IN_RESPONSE="jwtTokenResponse"
CACHE_ATTRIBUTE="otherPager"
CACHE_DELIMETER=";"
BYPASS_ADAPTER=0
You must keep the contents of the INI file provided during the initial installation unchanged. If changed arbitrarily, the adapter may not work at all. Some values may need to be changed depending on the system context, but gathering input from the relevant parties or responsible personnel must precede any changes.
Options that need to be obtained from the SingleID operations department and configured
MFA_API_URL="https://stg1-cloud.singleid.samsung.net/test/common-api/open/v1.1/mfa/request"
CONSUMER_KEY="4312a8b9-75c4-7897-89a7-89347f18943e"
SECRET_KEY="gQgkyLVO6FR8vJkLtlgBiupsRM/ilgrbEfoKWRnhALd="
MFA_VERIFY_URL="https://stg1-cloud.iam.samsung.net/test/common-api/open/v1.1/mfa/request/status"
MFA_VERIFY_SECURE_PROTOCOL="TLS12"
API-related URLs, keys, and bearer values, which are provided by the SingleID operations department. The typical setting for the security protocol (MFA_VERIFY_SECURE_PROTOCOL) is TLS 1.2.
Options that must be set according to the installation environment
LDAP_SERVER="LDAP://adpw5004.hw.dev"
LDAP_ID="******"
LDAP_PW="******"
LDAP_WHITE_IP_01="70.2.180.218"
LDAP_WHITE_IP_02="fe80::644b:3c9f:c5ac:ce1c%10"
These are the options determined after the installation environment assessment is completed.
INI configuration and results
- USERINFO_ENCRYPT
- USE_LDAP_SEARCH
- LDAP_DNS_LOOKUP
- LDAP_DNS_IF_FAIL_USE_NEXT
- LDAP_USE_IDPW
- MFA_VERIFY_TYPECautionThe consumer key and secret key used on this page are sample data. (fake value)
USERINFO_ENCRYPT
USERINFO_ENCRYPT=0
Set whether the user information included in the token sent by the adapter to the MFA API server is encrypted or plain text. (For example, mobile, email) Adapter version v1.2.0.8 (April 2024) currently cannot use AES/GCM/NoPadding, so it is set to plaintext. In other words, it is fixed at USERINFO_ENCRYPT=0. In the future, if the adapter can support AES/GCM/NoPadding, the configuration can be changed.
USE_LDAP_SEARCH
USE_LDAP_SEARCH=0
LDAP_SERVER=“LDAP://adpw5004.hw.dev” Since USE_LDAP_SEARCH is 0, the LDAP_SERVER value is not used. In other words, if USE_LDAP_SEARCH is 0, you can set LDAP_SERVER to an empty value or remove it.
USE_LDAP_SEARCH=1
What if the LDAP search fails?
- Treat the user information as empty and proceed to the next step.
- It doesn’t matter whether the cause of the failure is a server connection failure or missing information.
USE_LDAP_SEARCH=2
What if the LDAP search fails?
- Displays an error to the user and halts execution.
- The server log records as follows. (Or similar content) Unable to retrieve user information from LDAP.
This option should be used very carefully, and it is recommended to set it to USE_LDAP_SEARCH=1 whenever possible. It would be advisable to delegate handling of missing user information to the MFA API side. Because adapters inevitably provide insufficient user guidance and functionality in such situations.
LDAP_DNS_LOOKUP
LDAP_SERVER="LDAP://adpw5004.hw.dev"
LDAP_DNS_LOOKUP=1
LDAP_WHITE_IP_01="10.10.10.10"
LDAP_WHITE_IP_02="10.10.10.30"
The adapter stores DNS lookup results in memory as a list (an ordered list) → LDAP address list Assume LDAP server redundancy and that each IP is as follows. (The IP that is looked up in DNS)
- IP#1 : 10.10.10.10
- IP#2 : 10.10.10.20
Since the DNS lookup result applies to both IPv4 and IPv6, the result appears as follows. (The below is a sample and may differ from the actual.)
- IP#1 = fe80::644b:3c9f:c5ac:ce1c%10
- IP#2 = fe80::f03d:b045:8dc3:f5ed%3
- IP#3 = 10.10.10.10
- IP#4 = 10.10.10.20
In this state, we can consider the following cases.
Case 1) If DNS Lookup failed
- The LDAP address list contains one entry, and the LDAP_SERVER value is assigned directly.
- In other words, the first value of the LDAP address list = “LDAP://adpw5004.hw.dev”
Case 2) If DNS Lookup succeeds and there is a White IP list setting (LDAP_WHITE_IP_##=“x.x.x.x”)
- The LDAP address list is created in the order of the White IP list.
- In the above sample, the values of the LDAP address list are as follows.
- first value = 10.10.10.10
- The second White IP 10.10.10.30 is not included in the LDAP address list because it does not appear in the DNS lookup results.
Case 3) If DNS Lookup succeeds and there is no White IP list configuration value (LDAP_WHITE_IP_##="" or LDAP_WHITE_IP_## not set)
- Incorporate the DNS lookup results into the LDAP address list.
- In the above sample, the values of the LDAP address list are as follows.
- first value = fe80::644b:3c9f:c5ac:ce1c%10
- Second value = fe80::f03d:b045:8dc3:f5ed%3
- third value = 10.10.10.10
- 4th value = 10.10.10.20
LDAP_DNS_IF_FAIL_USE_NEXT
LDAP_DNS_IF_FAIL_USE_NEXT=0
Assume that the LDAP address list is as follows.
- First value = 10.10.10.10
- Second value = 10.10.10.20
If the connection attempt to the first address 10.10.10.10 fails, do not proceed further. Set the LDAP search result (user information) to an empty value.
LDAP_DNS_IF_FAIL_USE_NEXT=1
Assume that the LDAP address list is as follows.
- First value = 10.10.10.10
- Second value = 10.10.10.20
If the connection attempt to the first address 10.10.10.10 fails, it attempts to connect to the second address. If it fails up to the second connection attempt, set the LDAP search result (user information) to an empty value.
LDAP_USE_IDPW
LDAP_USE_IDPW=0
LDAP_ID="******"
LDAP_PW="******"
If LDAP_USE_IDPW is 0, the LDAP_ID and LDAP_PW values are not used. In other words, if LDAP_USE_IDPW is 0, you can set LDAP_ID and LDAP_PW to empty values or delete them.
LDAP_USE_IDPW=1
LDAP_ID=""
LDAP_PW=""
If LDAP_USE_IDPW is 1, LDAP_ID and LDAP_PW values are required. Therefore, if you leave the LDAP_ID and LDAP_PW values empty or delete them as shown in the sample above, you will not be able to connect to the LDAP server.
LDAP_USE_IDPW=1
LDAP_ID="******"
LDAP_PW="******"
It means that the LDAP connection uses an ID/password; if the connection fails, verify that the ID/password are correct. Since INI files are plain text, there is a risk that the ID/password could be exposed. Therefore, it is necessary to configure the server environment so that LDAP access works without using an ID/password whenever possible.
MFA_VERIFY_TYPE
MFA_VERIFY_TYPE=0
Verification of MFA results from the adapter’s perspective, The user’s MFA execution is performed via the MFA API, and the adapter revalidates the result. If the MFA_VERIFY_TYPE value is 0, it means that the MFA result is not verified. In normal operation, it is not set to 0.
MFA_VERIFY_TYPE=1
CACHE_ATTRIBUTE="otherPager"
CACHE_DELIMETER=";"
The adapter directly performs MFA result verification. To do this, you need to use an LDAP server, and LDAP write permission is required. The CACHE_ATTRIBUTE value must not be changed.
MFA_VERIFY_TYPE=2
MFA_VERIFY_URL="https://stg1-cloud.iam.samsung.net/test/common-api/open/v1.1/mfa/request/status"
MFA_VERIFY_SECURE_PROTOCOL="TLS12"
We request the MFA API server to verify the MFA result. This is an alternative when you lack LDAP write permission.
INI configuration example
Example 1
USE_LDAP_SEARCH=0
LDAP_SERVER="LDAP://adpw5004.hw.dev"
LDAP_DNS_LOOKUP=0
MFA_VERIFY_TYPE=1
CACHE_ATTRIBUTE="otherPager"
CACHE_DELIMETER=";"
- LDAP search is not used.
- The user information included in the token sent to the API server is set to an empty string value. (e.g., mobile, email, etc.)
- Even though LDAP search is not used, the LDAP_SERVER information is present because MFA_VERIFY_TYPE=1.
- DNS lookup for the LDAP server is not performed.
- In other words, use the LDAP_SERVER value directly as the LDAP address.
- The adapter directly validates the MFA result, using the LDAP server at this point. Therefore, an LDAP server address value must be provided.
- The above configuration means that the adapter stores the generated nonce in the “otherPager” attribute of the user information in the LDAP server, and retrieves it for comparison when MFA is completed.
Example 2
USE_LDAP_SEARCH=1
LDAP_SERVER="LDAP://adpw5004.hw.dev"
LDAP_USE_IDPW=0
LDAP_SSLTLS=1
LDAP_DNS_LOOKUP=0
MFA_VERIFY_TYPE=1
CACHE_ATTRIBUTE="otherPager"
CACHE_DELIMETER=";"
- Use LDAP search.
- Retrieve user information from LDAP (e.g., mobile, email, etc.).
- If the LDAP connection fails or there are no query results, the user information is set to an empty string.
- Do not use an ID/password when connecting to LDAP.
- This applies to cases where you can connect to LDAP without entering an ID/password.
- Use SSL/TLS when connecting to LDAP to enhance security.
- DNS lookup for the LDAP server is not performed.
- In other words, use the LDAP_SERVER value directly as the LDAP address.
- The adapter directly validates the MFA result, using the LDAP server. Therefore, an LDAP server address must be provided.
- The above configuration means that the adapter stores the generated nonce in the “otherPager” attribute of the user information in the LDAP server, and retrieves it for comparison when MFA is completed.
Example 3
USE_LDAP_SEARCH=1
LDAP_SERVER="LDAP://adpw5004.hw.dev"
LDAP_USE_IDPW=0
LDAP_DNS_LOOKUP=0
MFA_VERIFY_TYPE=2
MFA_VERIFY_URL="https://stg1-cloud.iam.samsung.net/test/common-api/open/v1.1/mfa/request/status"
MFA_VERIFY_SECURE_PROTOCOL="TLS12"
- Use LDAP search.
- Retrieve user information from LDAP. (e.g., mobile, email, etc.)
- If the LDAP connection fails or there are no query results, the user information is set to an empty string.
- Do not use an ID/password when connecting to LDAP.
- This applies to situations where LDAP can be accessed without entering an ID/password.
- DNS lookup is not performed for the LDAP server.
- In other words, use the LDAP_SERVER value directly as the LDAP address.
- The API server validates the MFA result, and the security protocol uses TLS 1.2.
- Extract the “req” value included in the MFA result response token received from the API server, and append it to the end of the result verification URL.
- → MFA_VERIFY_URL + “/” + req
- → Example: when req is “xxxxxx”,
- https://stg1-cloud.iam.samsung.net/test/common-api/open/v1.1/mfa/request/status/xxxxxx
Example 4
USE_LDAP_SEARCH=1
LDAP_SERVER="LDAP://adpw5004.hw.dev"
LDAP_USE_IDPW=1
LDAP_SSLTLS=1
LDAP_ID="******"
LDAP_PW="******"
LDAP_DNS_LOOKUP=1
LDAP_DNS_IF_FAIL_USE_NEXT=0
MFA_VERIFY_TYPE=1
CACHE_ATTRIBUTE="otherPager"
CACHE_DELIMETER=";"
- Use LDAP search.
- Retrieve user information from LDAP. (e.g., mobile, email, etc.)
- If the LDAP connection fails or there are no query results, the user information is set to an empty string.
- Use id/pw when connecting to LDAP. This account must have write permission.
- Use SSL/TLS when connecting to LDAP to enhance security.
- Use DNS lookup for the LDAP server.
- Assign the DNS lookup results directly to the LDAP address table.
- If DNS lookup fails, only one LDAP_SERVER value is recorded in the LDAP address table.
- Attempt to connect only to the first entry in the LDAP address table.
- Even if it fails, it does not attempt to connect to the next server in the sequence.
- The adapter directly validates the MFA result, using the LDAP server at this stage. Therefore, an LDAP server address value must be provided.
- The above configuration means that the adapter stores the generated nonce in the “otherPager” attribute of the user information in the LDAP server, and retrieves it for comparison when MFA is completed.
Example 5
USE_LDAP_SEARCH=1
LDAP_SERVER="LDAP://adpw5004.hw.dev"
LDAP_USE_IDPW=1
LDAP_SSLTLS=1
LDAP_ID="******"
LDAP_PW="******"
LDAP_DNS_LOOKUP=1
LDAP_DNS_IF_FAIL_USE_NEXT=0
LDAP_WHITE_IP_01=""
LDAP_WHITE_IP_02=""
MFA_VERIFY_TYPE=1
CACHE_ATTRIBUTE="otherPager"
CACHE_DELIMETER=";"
- The same configuration as Example 4.
- LDAP_WHITE_IP_## exists but is empty, which means it is equivalent to not existing.
Example 6
USE_LDAP_SEARCH=1
LDAP_SERVER="LDAP://adpw5004.hw.dev"
LDAP_USE_IDPW=1
LDAP_SSLTLS=1
LDAP_ID="******"
LDAP_PW="******"
LDAP_DNS_LOOKUP=1
LDAP_DNS_IF_FAIL_USE_NEXT=1
LDAP_WHITE_IP_01="70.2.180.218"
LDAP_WHITE_IP_02="fe80::644b:3c9f:c5ac:ce1c%10"
MFA_VERIFY_TYPE=2
MFA_VERIFY_URL="https://stg1-cloud.iam.samsung.net/test/common-api/open/v1.1/mfa/request/status"
MFA_VERIFY_SECURE_PROTOCOL="TLS12"
- Use LDAP search.
- Retrieve user information from LDAP (e.g., mobile, email, etc.).
- If the LDAP connection fails or there are no query results, the user information is set to an empty string.
- Use id/pw when connecting to LDAP.
- This account must have write permission.
- Use SSL/TLS when connecting to LDAP to enhance security.
- Use DNS lookup for the LDAP server.
- Create an LDAP address table in the order of the White IP list by comparing the DNS lookup results with the White IP list.
- Even if the DNS lookup succeeds, if it is not in the White IP list, only one LDAP_SERVER value is recorded in the LDAP address table.
- If DNS lookup fails, only one LDAP_SERVER value is recorded in the LDAP address table.
- Attempt to connect to the LDAP address table sequentially from the beginning,
- If it fails, it attempts to connect to the next server in order.
- The API server validates the MFA result, and the security protocol uses TLS 1.2.
- Extract the “req” value included in the MFA result response token received from the API server, and append it to the end of the result verification URL.
- → MFA_VERIFY_URL + “/” + req
- → Example: when req is “xxxxxx”, https://stg1-cloud.iam.samsung.net/test/common-api/open/v1.1/mfa/request/status/xxxxxx
ADFS Adapter Management
Service Check
Check configuration
- AD FS Management > Service > Authentication Methods > Multi-Factor Authentication Methods > Verify ADFS MFA Adapter Configuration
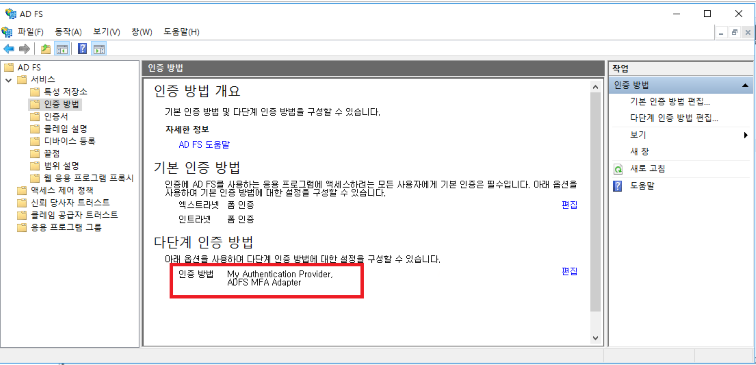
- AD FS Management > Relying Party Trust, Access Control Policy: Allow all users and require MFA
- Test SP access: https://sptest.iamshowcase.com/ixs?idp=9a72b90bb06815f52d57a2eb71898f56fca097d0
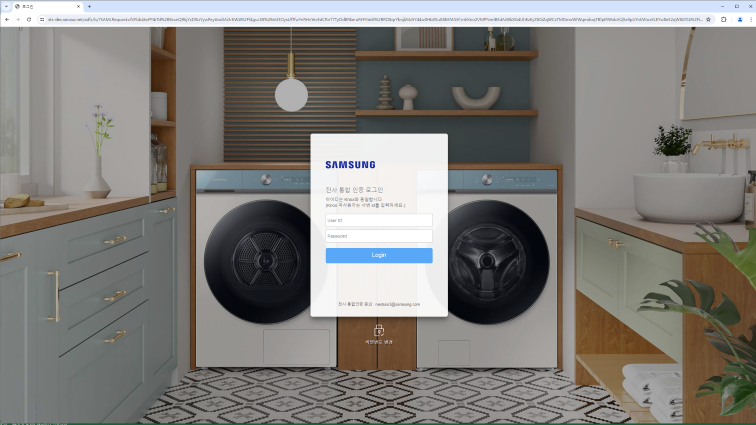
Server Event Log
The logs of the Adapter execution process are recorded in the Windows Event Log area.
By adjusting the LOG_LEVEL value in the ADFSadapter.ini configuration, you can selectively record errors, warnings, and general logs.
Setting LOG_LEVEL in ADFSadapter.ini
| Set value | recording log |
|---|---|
| LOG_LEVEL=0 | Error log |
| LOG_LEVEL=1 | Error and warning logs |
| LOG_LEVEL=2 | Log errors, warnings, and general messages |
Windows event log location
- Computer Management (Local) > System Tools > Event Viewer > Application and Services Logs > MFA_Adapter
- At the beginning of each account’s log, the MFA version and account name are displayed → reference for log analysis/tracing
- During operation, focus on monitoring parts marked as “error” or “warning”.
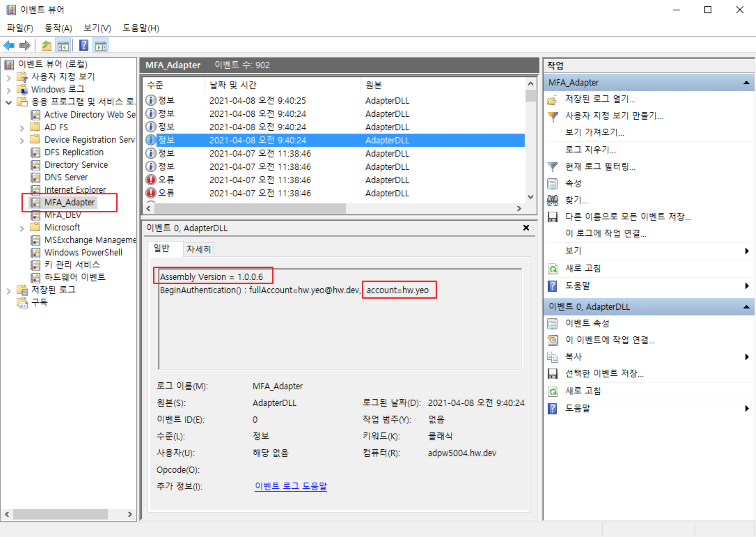
Windows Event Log Description and Mitigation Steps
[#0000] Success
Err.Success
에러가 아니고, 단순한 로그입니다.
불필요한 로그이며, 이 로그가 보인다면 개발자에게 해당 로그 삭제하라고 하시면 됩니다.

[#0001] Invalid Arguments
Err.InvalidArguments
에러 : adapter 프로그램 내부의 함수 호출할 때, 함수 인자(argument) 누락이 있다는 뜻입니다.
조치 : 심각한 에러이며, 개발자에게 즉시 전달하여 신속히 조치되도록 합니다.
참고
별다른 증상없이 adapter가 동작할 수도 있으나, 심각한 에러 잠재성이 있으므로 방치하면 안됩니다.

[#1000] identityClaim 에서 계정정보(account)를 추출할 수 없습니다.
Err.IdentityClaimHasNoAccount
에러 : adapter 실행 초기에 AD 서버로부터 현재 사용자의 정보를 받는데, account 정보를 찾을 수 없습니다.
조치 : AD 서버 상태를 확인해봅니다.
참고
LDAP에서 Query 하는 것이 아니라, ADFS 내부적으로 처리되는 정보 흐름으로서, 이 상황이 발생하면 adapter가 정상 동작할 수 없는 환경이라고 보면 됩니다.

[#1001] INI 파일을 load 할 수 없습니다.
Err.FailToLoadIni
에러 : 서버에서 MFA 환경설정 INI 파일을 읽을 수 없습니다.
조치 : 서버에 다음의 경로에 파일이 있는지 확인
C:\ ADFSadapter \ ADFSadapter.ini
참고
만일, 파일이 있다면, 파일 속성 또는 권한 확인합니다.

[#1002] HTML 파일들을 load 할 수 없습니다.
Err.FailToLoadHtml
에러 : 서버에서 HTML 파일을 읽을 수 없습니다.
조치 : 서버에 다음의 경로에 파일이 있는지 확인합니다.
C:\ ADFSadapter \ Html_*.txt
참고
만일, 파일이 있다면, 파일 속성 또는 권한 확인합니다. 1개라도 없으면 에러 발생힙니다. 어떤 것이 누락되었는지는 서버 이벤트 로그에서 알 수 있습니다.

[#1003] LDAP에서 사용자 정보를 가져올 수 없습니다.
Err.FailToLdapSearch
에러 : LDAP 서버에 Query를 헀으나, AD 사용자 정보를 가져오지 못했습니다.
조치 : AD 서버 상태를 확인해봅니다.
참고
Token 구성에 mobile, email 정보가 필요한데, 이 정보들을 가져올때 실패한 것입니다. 사용자 정보가 존재한다면, mobile, email이 빈 값이어도 에러로 처리하지 않습니다. 그래서, 본 에러가 발생한 것은 LDAP Query 자체가 안된다고 보면 됩니다.

[#1004] BeginAuthentication 함수의 request에 URL 정보가 없습니다.
Err.NoURLInRequest
에러 : Adapter 실행 초기에 실행되는 BeginAuthentication 함수의 인자 request에 URL 정보가 없습니다.
조치 : SingleID MFA API 서버가 정상적으로 response를 보내는지 확인합니다.
참고
URL 정보가 없으면, SingleID MFA API 서버가 GET 방식으로 전송한 response를 사용할 수 없습니다.

[#1005] JWT token 생성을 할 수 없습니다.
Err.FailToMakeJwtToken
에러 : GenerateRequestToken 함수가 token 생성에 실패했습니다.
조치 : 정확한 원인은 서버 이벤트 로그에서 확인 가능하며, 개발자에게 원인 분석을 요청합니다.

[#1006] ADFSadapter 디렉토리 또는 INI 파일을 찾을 수 없습니다. C to Z 드라이브 중의 한 곳에 [drive]:/ADFSadapter/ADFSadapter.ini 파일이 존재해야 합니다.
Err.CannotFindDirOrIni
에러 : adapter 버전 1.2.0.6 부터 adapter 설치 위치가 C 드라이브 고정이 아닌 C to Z 드라이브 중의 한 곳에 설치할 수 있으며, adapter는 C to Z 드라이브 스캔을 통해서 설치된 위치를 알아냅니다. [drive]:/ADFSadapter/ADFSadapter.ini 파일이 존재해야 합니다.
조치 : 서버에 adapter 설치가 제대로 되었는지, 디렉토리명과 파일명이 정확한지 확인합니다. 드라이브 억세스가 막혀있는지 확인합니다.

[#2000] TryEndAuthentication()에 계정정보(account)가 없습니다.
Err.TryEndHasNoAccount
에러 : TryEndAuthentication 단계로 넘어왔으나, 계정 정보를 알 수 없습니다. (adpater 자체 에러)
조치 : 개발자에게 신속히 상황 전달 및 원인 분석을 요청합니다.
참고
이러한 경우는 절대 발생할 수 없으며, 발생해서도 안됩니다.

[#2001] Step 정보가 없습니다.
Err.NoStepInfo
에러 : MFA 진행 단계(step) 정보가 없습니다. (adpater 자체 에러)
조치 : 개발자에게 신속히 상황 전달 및 원인 분석을 요청합니다.
참고
이러한 경우는 절대 발생할 수 없으며, 발생해서도 안됩니다.

[#2002] 잘못된 Step 정보입니다.
Err.InvalidStepInfo
에러 : MFA 진행 단계(step) 정보가 잘 못 되었습니다. (adpater 자체 에러)
조치 : 개발자에게 신속히 상황 전달 및 원인 분석을 요청합니다.
참고
이러한 경우는 절대 발생할 수 없으며, 발생해서도 안됩니다.

[#3000] HTML 문자열을 가져옵니다.
Err.SucceedInGetHtml
에러가 아니고, 단순한 로그입니다. 서버의 Html_.txt 파일을 읽은 내용을 보여줍니다. Html_.txt 파일 내용 수정 후에 adpater가 파일 내용을 제대로 읽었는지 확인할 때 도움이 됩니다.

[#3001] HTML을 가져올 수 없습니다.
Err.FailToGetHtml
에러 : 서버의 Html_*.txt 파일을 읽지 못한 것입니다.
조치 : 파일이 존재하는지, Read 권한이 있는지, Lock 걸려있는지 등을 확인해봅니다.

[#4000] Html 파일이 존재하지 않습니다.
Err.HtmlFileNotFound
에러 : 서버의 Html_*.txt 파일을 읽지 못한 것입니다.
조치 : 파일이 존재하는지, 확인해봅니다.

[#4001] Html 파일이 존재하나, 파일 내용이 없습니다.
Err.HtmlFileIsEmpty
에러 : 서버의 Html_*.txt 파일을 읽지 못한 것입니다.
조치 : 파일 Read 권한이 있는지, Lock 걸려있는지 등을 확인해봅니다.

[#4002] HtmlPrefix 리스트에 없는 step 입니다.
Err.StepNotInHtmlPrefixList
에러 : adapter 내부에는 처리 step 별로 정의해 둔 keyword 리스트가 있는데, 그 리스트에 없는 keyword가 발견되었다는 뜻입니다.
조치 : 개발자에게 신속히 상황 전달 및 원인 분석을 요청합니다.
참고
이러한 경우는 절대 발생할 수 없으며, 발생해서도 안됩니다.

[#4003] HtmlPrefix 리스트에서 prefix 값이 비어 있습니다.
Err.EmptyPrefixInHtmlPrefixList
에러 : adapter 내부에는 처리 step 별로 정의해 둔 keyword 리스트가 있는데, 그 리스트에 아무런 내용이 없다는 뜻입니다.
조치 : 개발자에게 신속히 상황 전달 및 원인 분석을 요청합니다.
참고
이러한 경우는 절대 발생할 수 없으며, 발생해서도 안됩니다.

[#5000] ini 파일을 읽을 수 없습니다.
Err.FailToReadIniFile
에러 : INI 파일을 읽을 수 없습니다.
조치 : 서버에 다음의 경로에 파일이 있는지 확인
C:\ ADFSadapter \ ADFSadapter.ini
참고
만일, 파일이 있다면, 파일 속성 또는 권한 확인합니다.

[#5001] 시스템명칭(API_SYSTEMNAME)이 ini 에 없습니다.
Err.NoSystemNameInIni
에러 : INI 파일에 "API_SYSTEMNAME" 설정 값이 없습니다.
조치 : INI 전체적으로 누락된 것이 없는지, INI 가 구버전의 것인지 등을 확인힙니다.

[#5002] claim1(MAIN_CLAIM1)이 ini 에 없습니다.
Err.NoClaim1InIni
에러 : INI 파일에 "MAIN_CLAIM1" 설정 값이 없습니다.
조치 : INI 전체적으로 누락된 것이 없는지, INI 가 구버전의 것인지 등을 확인힙니다.

[#5003] claim2(MAIN_CLAIM2)가 ini 에 없습니다.
Err.NoClaim2InIni
에러 : INI 파일에 "MAIN_CLAIM2" 설정 값이 없습니다.
조치 : INI 전체적으로 누락된 것이 없는지, INI 가 구버전의 것인지 등을 확인힙니다.

[#5004] ini 파일이 존재하지 않습니다.
Err.IniFileNotFound
에러 : 서버에서 MFA 환경설정 INI 파일을 찾을 수 없습니다.
조치 : 서버에 다음의 경로에 파일이 있는지 확인
C:\ ADFSadapter \ ADFSadapter.ini

[#5005] ini 리스트에 AddToList() 실패했습니다.
Err.FailToAddIniList
에러 : adapter 내부 에러입니다.
조치 : 개발자에게 신속히 상황 전달 및 원인 분석을 요청합니다.
참고
이러한 경우는 절대 발생할 수 없으며, 발생해서도 안됩니다.

[#5006] ini 파일에서 읽어온 key, value가 아무것도 없습니다.
Err.NoKeyValueInIni
에러 : INI 파일을 읽었으나, key, value 조합으로 설정된 것이 전혀 없습니다.
조치 : INI 파일 내용을 확인힙니다.

[#5007] LDAP 서버 정보가 ini 에 없습니다. (LDAP_SERVER)
Err.NoLdapServerValueInIni
에러 : INI 파일에 "LDAP_SERVER" 설정 값이 없습니다.
조치 : INI 전체적으로 누락된 것이 없는지, INI 가 구버전의 것인지 등을 확인힙니다.

[#5008] MFA API URL이 ini 에 없습니다. (MFA_API_URL)
Err.NoMfaApiUrlValueInIni
에러 : INI 파일에 "MFA_API_URL" 설정 값이 없습니다.
조치 : INI 전체적으로 누락된 것이 없는지, INI 가 구버전의 것인지 등을 확인힙니다.

[#5009] Consumer Key 값이 ini 에 없습니다. (CONSUMER_KEY)
Err.NoConsumerKeyValueInIni
에러 : INI 파일에 "CONSUMER_KEY" 설정 값이 없습니다.
조치 : INI 전체적으로 누락된 것이 없는지, INI 가 구버전의 것인지 등을 확인힙니다.

[#5010] Secret Key 값이 ini 에 없습니다. (SECRET_KEY)
Err.NoSecretKeyValueInIni
에러 : INI 파일에 "SECRET_KEY" 설정 값이 없습니다.
조치 : INI 전체적으로 누락된 것이 없는지, INI 가 구버전의 것인지 등을 확인힙니다.

[#5011] Cache Attribute 값이 ini 에 없습니다. (CACHE_ATTRIBUTE)
Err.NoCacheAttributeValueInIni
에러 : INI 파일에 "CACHE_ATTRIBUTE" 설정 값이 없습니다.
조치 : INI 전체적으로 누락된 것이 없는지, INI 가 구버전의 것인지 등을 확인힙니다.

[#5012] Cache Delimeter 값이 ini 에 없습니다. (CACHE_DELIMETER)
Err.NoCacheDelimeterValueInIni
에러 : INI 파일에 "CACHE_DELIMETER" 설정 값이 없습니다.
조치 : INI 전체적으로 누락된 것이 없는지, INI 가 구버전의 것인지 등을 확인힙니다.

[#5013] Skew Seconds 값이 ini 에 없습니다. (SKEW_SECONDS)
Err.NoSkewSecondsValueInIni
에러 : INI 파일에 "SKEW_SECONDS" 설정 값이 없습니다.
조치 : INI 전체적으로 누락된 것이 없는지, INI 가 구버전의 것인지 등을 확인힙니다.

[#5014] Token expiration time 값이 ini 에 없습니다. (TOKEN_EXP_TIME)
Err.NoTokenExpTimeInIni
에러 : INI 파일에 "TOKEN_EXP_TIME" 설정 값이 없습니다.
조치 : INI 전체적으로 누락된 것이 없는지, INI 가 구버전의 것인지 등을 확인힙니다.

[#5015] Cache life time 값이 ini 에 없습니다. (CACHE_LIFE_TIME)
Err.NoCacheLifeTimeInIni
에러 : INI 파일에 "CACHE_LIFE_TIME" 설정 값이 없습니다.
조치 : INI 전체적으로 누락된 것이 없는지, INI 가 구버전의 것인지 등을 확인힙니다.

[#5016] 사용자 정보 claim 리스트가 ini 에 없습니다. (USERINFO_##)
Err.NoUserinfoListInIni
reserved (예약된 에러 코드이며, 향후 사용 예정)

[#5017] LDAP 연결시 id/pw 사용하도록 설정되어 있으나(LDAP_USE_IDPW=1), LDAP id 또는 pw가 ini 에 없습니다. (LDAP_ID, LDAP_PW)
Err.NoLdapIdPwInIni
에러 : LDAP 접속시 id/pw 사용하도록 설정되어 있으나, INI 파일에 LDAP_ID, LDAP_PW 설정 값이 없습니다.
조치 : INI 전체적으로 누락된 것이 없는지, INI 가 구버전의 것인지 등을 확인힙니다.

[#6000] AD(LDAP)에서 사용자 정보를 검색하는 과정에 Exception이 발생했습니다.
Err.ExceptionInAD
에러 : LDAP 서버에 Query를 헀으나, 그 과정 중에 Exception이 발생했습니다.
조치 : INI에 설정한 AD 서버 주소가 정확한지 확인해봅니다. 그리고, AD 서버 상태를 확인해봅니다.
참고
이벤트 로그에 있는 자세한 Exception 내용을 개발자에게 전달합니다.

[#6001] AD(LDAP)에서 사용자 정보를 찾을 수 없습니다.
Err.CannotFindUserInAD
에러 : LDAP 서버에 Query를 헀으나, AD 사용자 정보를 가져오지 못했습니다.
조치 : AD 서버 상태를 확인해봅니다.
참고
Token 구성에 mobile, email 정보가 필요한데, 이 정보들을 가져올때 실패한 것입니다. 사용자 정보가 존재한다면, mobile, email이 빈 값이어도 에러로 처리하지 않습니다. 그래서, 본 에러가 발생한 것은 LDAP Query 자체가 안된다고 보면 됩니다
User error message
If an error occurs during the MFA process, an error message is displayed on the user’s PC screen. The error message is fixed as “Internal error occurred. Contact administrator.”, and the error code is displayed on the next line.
Internal error occurred. Contact administrator.
ErrorCode : 0001
The following provides an explanation of the causes and remedies for error codes.
※ Refer to event logs of server internal processing steps other than user error messages.
ErrorCode : 0001
* Err.IdentityClaimHasNoAccount
* 함수 호출시 인자(arguments)가 잘 못 되었음
* 사용자에게 보여주는 에러는 아님
+ → 혹시 보인다면, 개발자에게 문의
+ → 이 시점의 서버 이벤트 로그를 봐야 함

ErrorCode : 1000
* Err.IdentityClaimHasNoAccount
* "identityClaim 에서 계정정보(account)를 추출할 수 없습니다."
* adapter 실행 초기에 AD 서버로부터 현재 사용자의 정보를 받는데, account 정보를 찾을 수 없음
* LDAP에서 Query 하는 것이 아니라, ADFS 내부적으로 처리되는 정보 흐름으로서,
+ 이 상황이 발생하면 adapter가 정상 동작할 수 없는 환경이라고 보면 됨
* AD 서버 상태를 먼저 확인해 볼 것

ErrorCode : 1001
* Err.FailToLoadIni
* 서버에서 MFA 환경설정 INI 파일을 읽을 수 없음
* 서버에 다음의 경로에 파일이 있는지 확인
+ C:\ ADFSadapter \ ADFSadapter.ini
* 만일, 파일이 있다면, 파일 속성 또는 권한 확인

ErrorCode : 1002
* Err.FailToLoadHtml
* 서버에서 HTML 파일을 읽을 수 없음
* 서버에 다음의 경로에 파일이 있는지 확인
+ C:\ ADFSadapter \ Html_*.txt
* 만일, 파일이 있다면, 파일 속성 또는 권한 확인
* 1개라도 없으면 에러 발생함 → 어떤 것이 누락되었는지는 서버 이벤트 로그에서 알 수 있음

ErrorCode : 1003
* Err.FailToLdapSearch
* "LDAP에서 사용자 정보를 가져올 수 없습니다."
* LDAP 서버에 Query를 헀으나, AD 사용자 정보를 가져오지 못함
* Token 구성에 mobile, email 정보가 필요한데, 이 정보들을 가져올때 실패하였음
* mobile, email이 빈 값이어도 에러로 처리하지 않음
* 그래서, 본 에러가 발생한 것은 LDAP Query 자체가 안된다고 보면 됨

ErrorCode : 1004
* Err.NoURLInRequest
* "BeginAuthentication 함수의 request에 URL 정보가 없습니다."
* Adapter 실행 초기에 실행되는 BeginAuthentication 함수의 인자 request에 URL 정보가 없음
* URL 정보가 없으면, SingleID MFA API 서버가 GET 방식으로 전송한 response를 사용할 수 없음
* SingleID MFA API 서버가 정상적으로 response를 보내는지 확인 필요

ErrorCode : 1005
* Err.FailToMakeJwtToken
* "JWT token 생성을 할 수 없습니다."
* GenerateRequestToken 함수가 token 생성에 실패하였음
* 정확한 원인은 서버 이벤트 로그에서 확인

ErrorCode : 1006
* Err.CannotFindDirOrIni
* "JWT token 생성을 할 수 없습니다."
* ADFSadapter 디렉토리 또는 INI 파일을 찾을 수 없음
* adapter 버전 1.2.0.6 부터 adapter 설치 위치가 C 드라이브 고정이 아닌 C to Z 드라이브 중의 한 곳에 설치할 수 있으며,
+ adapter는 C to Z 드라이브 스캔을 통해서 설치된 위치를 알아냄
* [drive]:/ADFSadapter/ADFSadapter.ini 파일이 존재해야 함
* 서버에 adapter 설치가 제대로 되었는지, 디렉토리명과 파일명이 정확한지 확인
* 드라이브 억세스가 막혀있는지 확인

ErrorCode : 2000
* Err.TryEndHasNoAccount
* "TryEndAuthentication()에 계정정보(account)가 없습니다."
* TryEndAuthentication 단계로 넘어왔으나, 계정 정보를 알 수 없음
* 이러한 경우는 절대 발생할 수 없음 (발생하였다면, 개발자에게 문의)

ErrorCode : 2001
* Err.NoStepInfo
* MFA 진행 단계(step) 정보가 없음
* 상세 정보와 원인은 서버의 이벤트 로그를 확인할 것

ErrorCode : 2002
* Err.InvalidStepInfo
* MFA 진행 단계(step) 정보가 잘 못 되었음
* 상세 정보와 원인은 서버의 이벤트 로그를 확인할 것
Modify ADFS login page
onload.js edit
Background
If multiple MFA methods are configured, the user will see a selection screen as shown below. If you are viewing the screen for the first time (MFA not yet completed), you need to make a selection on this screen.
The issue is that after completing MFA, the selection screen is displayed again, and the user has to make the selection again. This creates a user inconvenience, and selecting a different MFA for the second option will lead to unintended results.
After MFA is completed and the above selection screen appears, an automatic transition feature is needed. (auto submit) To achieve this, edit the contents of the onload.js file that already exists in ADFS. If it is not Multi MFA, editing the onload.js file is not required.
File path
It is located at the following path on the AD server.
- Directory = C:/default_WebTheme/script
- Filename = onload.js
File Edit
Add the script below at the end of the file content.
Caution
Do not copy and paste the Script Text from the example below.
The multilingual message is not being entered properly in the Text below.
You need to prepare a separate file that contains valid script text.
onload.js must be saved as UTF-8.
// ------------------------------------------ SingleID MFA : begin
function singleidMfa() {
var authOptions = document.getElementById('authOptions')
if (authOptions) {
var noticeflag = document.getElementById('mfaGreeting');
var url = document.location.href;
var isToken = url.indexOf('jwtTokenResponse');
if (noticeflag && isToken < 1) {
var browserLang = navigator.language || navigator.userLanguage;
// 다국어 처리
// 한국어
if (lang == 'ko-KR' || lang == 'ko') {
document.getElementById('footerPlaceholder').innerHTML="<h3 style='font-weight: bold;'><br/> <br/> ※ 신규 복합인증솔루션 테스트 중 (13:00~15:00) <br/> 'My Authentication Provider' 메뉴를 이용해주세요. </h3>";
}
// 중국어
else if (lang == "zh" || lang.indexOf("zh-") > -1) {
document.getElementById('footerPlaceholder').innerHTML="<h3 style='font-weight: bold;'><br/> <br/> ※ 正在??新的?合??解?方案 (13:00~15:00) <br/> ?登? 'My Authentication Provider' 菜?。 </h3>";
}
// 베트남어
else if (lang == "vi") {
document.getElementById('footerPlaceholder').innerHTML="<h3 style='font-weight: bold;'><br/> <br/> ※ đang ki?m tra gi?i phap xac th?c k?t h?p m?i (13:00~15:00) <br/> Xin vui long đ?ng nh?p vao trinh đ?n 'My Authentication Provider'. </h3>";
}
// 스페인어
else if (lang == "es" || lang.indexOf("es-") > -1) {
document.getElementById('footerPlaceholder').innerHTML="<h3 style='font-weight: bold;'><br/> <br/> ※ Prueba de una nueva solucion de autenticacion compleja (13:00~15:00) <br/> Inicie sesion en el menu 'My Authentication Provider'. </h3>";
}
// 영어
else {
document.getElementById('footerPlaceholder').innerHTML="<h3 style='font-weight: bold;'><br/> <br/> ※ Testing a new MFA solution (13:00~15:00) <br/> Please use 'My Authentication Provider' menu. </h3>";
}
}
var opt = document.getElementById('optionSelection');
if (opt && isToken > 0) {
opt.value = 'ADFSadapter';
document.forms['options'].submit();
}
}
}
window.addEventListener('load', function () {
singleidMfa();
});
// ------------------------------------------ SingleID MFA : end
Script functionality
- This applies when the page’s controls include authOptions.
- This operates after the page load has fully completed. (Because executing before that causes an error)
- Add to the load event using window.addEventListener (same as the window.onload event)
- Case 1 : When mfaGreeting is present in the control and jwtTokenResponse is not in the URL, display a user guidance message according to the browser’s language settings (multilingual)
- Case 2: If there is an optionSelection among the controls and the URL contains jwtTokenResponse, assign ADFSadapter to optionSelection and force the options form to submit.
Cautions when adding scripts
- To avoid affecting the existing script and to make management easier, placing it at the end of the script is safest.
Apply onload.js
Modify the onload.js file and apply the changes to enable ADFS Sign-in Page customization.
Caution
The malicious script includes commands that could trigger false positives, and some commands are shown differently from the ones you actually need to input.
-ON-LOADScriptPath is actually the following command, so please avoid any confusion.
Application Method
Check Status
PS> Get-AdfsWebConfig ## Check the applied (active) WebTheme PS> Get-AdfsWebTheme ## Check the list of generated WebThemes
Apply theme
Theme application method 1) Create a new one from the default theme
PS> New-AdfsWebTheme -Name "custom_stg" -SourceName default  ## 새로운 WebTheme 생성
PS> Set-AdfsWebTheme -TargetName "custom_stg" -Illustration @{Path="C:\adfs_Login_dev\illustration\image_0624\8.jpg"} -Logo @{Path="C:\adfs_Login_dev\images\logo.png"} -StyleSheet @{Path="C:\adfs_Login_dev\css\style.css"} -ON-LOADScriptPath "C:\adfs_Login_dev\script\ON-LOAD_new.js"  ## custom 한 js 파일 적용
How to Apply Theme 2) Update from the Existing Theme
PS> New-AdfsWebTheme -Name "custom_stg" -SourceName [전자테마]  ## 새로운 WebTheme 생성
PS > Set-AdfsWebTheme -TargetName "custom_stg" -OnLoadScriptPath "C:\adfs_Login_dev\script\onload_stg.js"  ## custom 한 js 파일 적용

※ Theme application methods 1) and 2): server command screenshot. When organizing Confluence, the OnLoad command is automatically altered, so a screenshot is attached.
PS> Set-AdfsWebConfig -ActiveThemeName "custom_stg" ## 생성된 WebTheme 활성화
Restore existing theme
PS> Set-AdfsWebConfig -ActiveThemeName "default" ## 기존 WebTheme 활성화
Reference
A WebTheme can only apply one custom js file We also contacted Microsoft, but officially only one onload.js file can be applied, and the additional method we suggested does not work**
“the ON-LOAD.js is an integrated part of the HTML (the last script in the body) which always executes when the ADFS Page is loaded
There can be only one named ON-LOAD.JS per Web theme.

What is possible though is that additional ('external') scripts can be loaded as part of the actual ON-LOAD.js execution

let’s say in a specific part of your ON-LOAD.JS you want to load a bootstap.js which implements additional functionality
you would firstly import that additional JS to the webpage as AdditionalFileResource //it should not be named ON-LOAD.js

eg
Set-AdfsWebTheme -TargetName custom -AdditionalFileResource @{Uri='/adfs/portal/script/bootstrap.js';path="c:\theme\script\bootstrap.js"}

then you implement a loading functionality in the ON-LOAD.js which dynamically loads your additional script as needed”
Reference Document
http://www.javascriptkit.com/javatutors/loadjavascriptcss.shtml
https://www.codeproject.com/Articles/5310336/Dynamically-Loading-a-JavaScript-File
In other words, as stated in the official documentation, only one ON-LOAD.JS file can be applied to a single ADFS theme page. However, we presented that an additional file named bootstap.js can be applied on the same page using AdditionalFileResource.
Reference
Additional options can be applied when setting WebTheme
- You can apply illustration, logo, stylesheet, and other items through options.
PS> Set-AdfsWebTheme -TargetName "custom_stg" -Illustration @{Path="C:\adfs_Login_dev\illustration\image_0624\8.jpg"} -Logo @{Path="C:\adfs_Login_dev\images\logo.png"}
       -StyleSheet @{Path="C:\adfs_Login_dev\css\style.css"} -OnLoadScriptPath "C:\adfs_Login_dev\script\onload_stg.js"
Reference Document
https://learn.microsoft.com/en-us/powershell/module/adfs/set-adfswebtheme?view=windowsserver2022-ps
Adapter display name change
When applying multiple adapters and the user selects one, you can set the adapter’s display name to show it to the user (browser). By default, the name (Name) used when registering the Adapter is displayed.
- Before applying
- Displayed to the user (browser) using the name used when registering the adapter.
- After applying
- Displayed to the user (browser) as the Adapter’s display name
- You can set different display names for each language.
guide
During testing, the language setting is applied in three options: Korean, English, and Global
- The display name of the Adapter changes according to the browser’s language (chrome://settings/languages, edge://settings/languages).
- For browser languages that start with en- such as English (United States) and English (United Kingdom), the English setting is applied. If Korean or a non‑English language is selected, the global setting is applied.
- Configuration method
- Set the display name of ADFSadapter (new adapter name)
- ko(Korean), en(English), unset(global) set to three locales
Set-AdfsAuthenticationProviderWebContent -Name "ADFSadapter" -Locale ko -DisplayName "신규 ADFS 플러그인(ko)" -Description "신규 ADFS 플러그인 설명(ko)" Set-AdfsAuthenticationProviderWebContent -Name "ADFSadapter" -locale en -DisplayName "New ADFS Plugin (en)" -Description "New ADFS Plugin Description (en)" Set-AdfsAuthenticationProviderWebContent -Name "ADFSadapter" -DisplayName "New ADFS Plugin(global)" -Description "New ADFS Plugin Description(global)"- Set display name of MyAuthenticationProvider (existing Adapter name)
- ko(Korean), en(English), unset(global) set to three locales
Set-AdfsAuthenticationProviderWebContent -Name "MyAuthenticationProvider" -locale "ko" -DisplayName "기존 ADFS 플러그인(ko)" -Description "기존 ADFS 플러그인 설명 (ko)"
Set-AdfsAuthenticationProviderWebContent -Name "MyAuthenticationProvider" -locale "en" -DisplayName "ADFS Plugin (en)" -Description "ADFS Plugin Description (en)"
Set-AdfsAuthenticationProviderWebContent -Name "MyAuthenticationProvider"  -DisplayName "ADFS Plugin (global)" -Description "ADFS Plugin Description (global)"
Locale ID: see the following reference [MS-OE376]; separate inquiry
Tips related to ADFS Adapter
Adapter registration and operation sequence summary
- Adapter DLL → Register in the GAC area → Register in ADFS → Check the multi‑factor authentication method in ADFS management → Adapter operates when AD authentication requires MFA
Tools required for managing adapters (gacutil.exe)
- Tool for registering or unregistering the Adapter DLL in the AD FS server’s GAC.
Reference
What is GAC?
It is an abbreviation for Global Assembly Cache, and the special cache GAC for sharing .NET assemblies across the entire machine is located in a directory named assembly under the Windows directory.
- Assemblies installed in the GAC must be strongly-named assemblies.
- A DLL must include the Version, Culture, and public key along with its name.
- When a DLL is installed in the GAC, it takes priority at runtime.
- Even when using the same DLL name, multiple versions can coexist.
Register/Delete Adapter in GAC (using gacutil.exe)
Usually used in cmd, but for convenience we use it in PowerShell (however, it must be used in the form .\gacutil.exe).
- Register in GAC
PS C:\ADFSadapter> .\gacutil.exe /if ADFSadapter.dll
- Deleted from GAC → C:\ADFSadapter\ADFSadapter.dll file is not deleted
PS C:\ADFSadapter> .\gacutil.exe /u ADFSadapter
- Check whether it is registered in GAC
PS C:\ADFSadapter> .\gacutil.exe /l ADFSadapter
- DLL replacement order in the GAC
- Delete with gacutil.exe /u
- Replace the C:\ADFSadapter\ADFSadapter.dll file
- Register with gacutil.exe /if
Register/Delete GAC Assembly in ADFS (PowerShell commands)
- Register with ADFS First, check the Version, Culture, and public key information using the gacutil.exe /l option.
PS C:\ADFSadapter> .\gacutil.exe /l ADFSadapter
ADFSadapter, Version=1.0.0.0, Culture=neutral, PublicKeyToken=3b3a799d949dc414, processorArchitecture=MSIL
          결과 문자열을 이용하여 TypeName 구성하고, AD FS에 등록
           ( TypeName의 앞부분은 ADFSadapter.AuthenticationAdapter 는 고정값 )

PS C:\ADFSadapter> $typename = "ADFSadapter.AuthenticationAdapter, ADFSadapter, Version=1.0.0.0, Culture=neutral, PublicKeyToken=3b3a799d949dc414, processorArchitecture=MSIL"
PS C:\ADFSadapter> Register-AdfsAuthenticationProvider -TypeName $typename -Name "ADFSadapter" -Verbose
- Delete from ADFS
PS C:\ADFSadapter> Unregister-AdfsAuthenticationProvider -Name "ADFSadapter"
- Check if it is registered in ADFS
PS C:\ADFSadapter> Get-AdfsAuthenticationProvider
ADFS Adapter replacement order
- Disable multi-factor authentication method in ADFS management
- Unregister-AdfsAuthenticationProvider
- Restart ADFS service
- Replace the DLL in the GAC
- Register-AdfsAuthenticationProvider
- Restart ADFS service
- Set multi-factor authentication method in ADFS management
The above step1) ~ step7) process can be automated with the replace_dll.ps1 script file.
If the MFA feature does not work properly
AD account/password authentication unavailable
→ Since it is before the MFA stage, it is not related to the AdapterCheck adapter registration status
→ Verify that ADFS MFA Adapter is displayed when executing the Get-AdfsAuthenticationProvider commandCheck AD FS configuration
→ Check that ADFS MFA Adapter is specified in Service > Authentication Methods > Multi-Factor Authentication Methods
→ Service > Device Registration Check that it is configured
→ Access Control Policy is configured to require MFA, verify this.Check Adapter execution logs
→ Log location: Computer Management > System Tools > Event Viewer > Application and Services Logs > MFA_Adapter
→ Check if there are logs displayed as error
→ If an error occurs, forward the log details to the developer for analysis.
6.2.1.6.2 - Adapter Configuration Guide
Adapter Configuration Guide
This is a description of the Adapter configuration file. Before applying the ADFS Adapter, you must first configure the environment.
Caution
adapter installation location changes
Starting with adapter 1.2.0.6, installation is possible on drives other than the C drive.
- Existing : Installed only at C:/ADFSadapter
- Change : Install at the root of the C to Z drive
- Example: C:/ADFSadapter , D:/ADFSadapter , E:/ADFSadapter , …… , Z:/ADFSadapter
- Caution : It must be installed on only a single drive; if installed on multiple drives, the system scans from C to Z and uses the first directory found.
The following example assumes the adapter is installed in the C:\ADFSadapter directory.
If installed on a drive other than C, simply change the drive letter in the example below.
- Example: If installed in D:\ADFSadapter, the ini path → D:\ADFSadapter\ADFSadapter.ini
File name and path
- File name: ADFSadapter.ini
- Full path: C:\ADFSadapter\ADFSadapter.ini
- File encoding: must be saved as UTF-8 (Korean characters may become garbled)
Points to note
* 값을 표현할때 "와" 를 사용할 수 있으며 = 좌우에 빈칸을 입력해도 됩니다.
+ Value 의 앞뒤에 있는 공백은 Trim 처리 됩니다.
+ 아래의 Value는 모두 동일함
+ 예1) MAIN_TITLE = DWP MFA Adapter
+ 예2) MAIN_TITLE = DWP MFA Adapter
+ 예3) MAIN_TITLE = "DWP MFA Adapter"
+ 예4) MAIN_TITLE = " DWP MFA Adapter "

* 섹션 이름들 중에 뒷부분에 -1033, -1042 가 붙는 것들은 locale 을 의미합니다.
+ 최소한 1033 은 반드시 있어야 합니다.
+ locale number : 1033 (en-us), 1042 (ko)
+ locale section : MFA-1033, MFA-1042, TXT-1033, TXT-1042, MSG-1033, MSG-1042
Example of ini file structure
Among the example configuration values below, some values are masked for security purposes, and the actual values are not asterisks.
# ADFS MFA Adapter 환경 설정
# 설치위치 변경 사항
#   - v1.2.0.6 이전 : C:\ADFSadapter\ADFSadapter.ini
#   - v1.2.0.6 부터 : C 이외의 다른 드라이브에 설치할 수 있음 (adapter 리소스 설치한 위치와 동일)
#     예시: C:\ADFSadapter\ADFSadapter.ini , D:\ADFSadapter\ADFSadapter.ini , E:\ADFSadapter\ADFSadapter.ini
# 주의 : DLL 파일명은 ADFSadapter.dll 이며, 기존의 Nexsign 연계한 MFAadapter.dll과는 다름


# 값을 표현할때 " 와 ' 를 사용할 수 있으며 = 좌우에 빈칸을 입력해도 됩니다
# Value 의 앞뒤에 있는 공백은 Trim 처리 됩니다.
# 아래의 Value는 모두 동일합니다.
# 예1) MAIN_TITLE=ADFS MFA Adapter
# 예2) MAIN_TITLE = ADFS MFA Adapter
# 예3) MAIN_TITLE = "ADFS MFA Adapter"
# 예4) MAIN_TITLE = "   ADFS MFA Adapter   "


# 섹션 이름들 중에 뒷부분에 -1033, -1042 가 붙는 것들은 locale 을 의미합니다
# 최소한 1033 은 반드시 있어야 합니다
# locale number : 1033 (en-us), 1042 (ko)
# locale section : MFA-1033, MFA-1042, TXT-1033, TXT-1042, MSG-1033, MSG-1042


# LOG_LEVEL (Windows 이벤트 로그에 기록하는 기준)
# 0 : Error
# 1 : Error + Warning
# 2 : Error + Warning + Information + Debug


[MAIN]
MAIN_MFA_TITLE="ADFS MFA Adapter"
MAIN_CLAIM1=http://schemas.microsoft.com/ws/2008/06/identity/claims/authenticationmethod
MAIN_CLAIM2=http://schemas.microsoft.com/ws/2012/12/authmethod/otp


# MFA API 정보
# URL 끝부분에 "/" 붙이지 말 것
#MFA_API_URL="https://stg2-cloud.singleid.samsung.net/test/common-api/open/v1.1/mfa/request"
MFA_API_URL="https://stg1-cloud.singleid.samsung.net/test/common-api/open/v1.1/mfa/request"
CONSUMER_KEY="**************************************"
SECRET_KEY="**************************************"


# Donmain vs Consumer Key 리스트
# 도메인별로 Consumer Key가 다른 경우에는 리스트로 나열 (이런 경우, 위의 CONSUMER_KEY 값을 비울 것)
# Reqeust Token의 sys 값에 대입
# 형태 : DOMAIN_CONSUMER_KEY_##=domain;consumerKey
# 예시: DOMAIN_CONSUMER_KEY_01=aaa.com;**************************************
#     DOMAIN_CONSUMER_KEY_02=bbb.com;**************************************
# (주의) CONSUMER_KEY 값과 리스트 값이 모두 있다면, CONSUMER_KEY 값만 사용함
DOMAIN_CONSUMER_KEY_01=aaa.com;**************************************
DOMAIN_CONSUMER_KEY_02=bbb.com;**************************************

# Donmain vs Secret Key 리스트
# 도메인별로 Secret Key가 다른 경우에는 리스트로 나열 (이런 경우, 위의 SECRET_KEY 값을 비울 것)
# 형태 : DOMAIN_SECRET_KEY_##=domain;secretKey
# 예시: DOMAIN_SECRET_KEY_01=aaa.com;**************************************
#     DOMAIN_SECRET_KEY_02=bbb.com;**************************************
# (주의) SECRET_KEY 값과 리스트 값이 모두 있다면, SECRET_KEY 값만 사용함
DOMAIN_SECRET_KEY_01=aaa.com;**************************************
DOMAIN_SECRET_KEY_02=bbb.com;**************************************

# LDAP Search 결과에 따른, MFA 진행 여부
# 0 : LDAP Search를 하지 않음 (아래의 LDAP_SERVER, LDAP_USE_IDPW, ... 등의 정보 사용하지 않음. token에는 빈 값 대입)
# 1 : LDAP Search를 시도하지만 실패해도 관계없음 (서버 실패, 정보 없음 등이 발생하여도 MFA 진행함. token에는 빈 값 대입)
# 2 : LDAP Search가 성공 & 사용자 정보가 존재해야 함 (사용자 정보가 존재할 경우에만 진행함. 단, 결과 값이 빈 값이어도 진행함)
USE_LDAP_SEARCH=1


# LDAP 주소와 ID/PW
# LDAP_SERVER는 domain, ipv4, ipv6 등의 3가지 모두 가능하며, 앞부분에 대문자 "LDAP://" 을 붙여야 함 (반드시 대문자)
# 예시: LDAP://adpw5004.hw.dev , LDAP://70.2.180.218 , LDAP://fe80::644b:3c9f:c5ac:ce1c%10
# ID/PW를 사용하려면 LDAP_USE_IDPW 값을 1, 사용하지 않으려면 LDAP_USE_IDPW 값을 0 으로 설정
# SSL/TLS 사용하려면 LDAP_SSLTLS 값을 1, 사용하지 않으려면 LDAP_SSLTLS 값을 0 으로 설정 (단, LDAP_USE_IDPW=1 인 경우에만 해당)
LDAP_SERVER="LDAP://adpw5004.hw.dev"
LDAP_USE_IDPW=1
LDAP_SSLTLS=1
LDAP_ID="isadmin"
LDAP_PW="sds*****"


# DNS Lookup을 하여 LDAP 서버(LDAP_SERVER)의 IP 주소를 확인하고, IP 주소 기반으로 접속 여부
# LDAP_SERVER 값이 IP(ipv4, ipv6)로 설정되어 있어도 DNS Lookup을 수행하며, IP 그대로 리턴됨
# 만약, DNS Lookup을 실패하면, LDAP_SERVER 값 그대로 접속
# 0 : LDAP_SERVER 값 그대로 서버에 접속 (DNS lookup 하지 않음)
# 1 : DNS lookup으로 IP 주소를 확인하여 LDAP 서버에 접속 (DNS lookup 결과 리스트에서 첫번째 IP 사용)
# 2 : DNS lookup으로 IP 주소를 확인하고, LDAP_WHITE_IP_## 리스트에서 가장 먼저 해당되는 IP를 사용 (리스트에 없으면, LDAP_SERVER 사용)
# 3 : DNS lookup으로 IP 주소를 확인하고, LDAP_WHITE_IP_## 리스트에서 가장 먼저 해당되는 IP를 사용 (리스트에 없으면, LDAP 접속 안함)
LDAP_DNS_LOOKUP=1


# DNS Lookup 결과가 여러 개일때, 첫번째 IP 주소로 연결이 안되면 그 다음 IP 주소로 시도할지 여부
# 예시: lookup 결과가 4개 : 1차 IP 연결 실패 -> 2차 IP 연결 시도 & 싪패 -> 3차 IP 연결 시도 & 싪패 -> 4차 IP 연결 시도
LDAP_DNS_IF_FAIL_USE_NEXT=1


# DNS Lookup 결과와 비교하는 접속 허용된 LDAP 서버 IP 리스트 (LDAP_DNS_LOOKUP = 2 or 3 인 경우에만 해당)
# LDAP_WHITE_IP_## 형태이며, 01부터 99까지 순차적으로 기록
# DNS Lookup 결과와 리스트를 순차적으로 비교
# IPv4, IPv6 형태로 기록 (동일한 서버의 IPv4, IPv6가 있다면 리스트의 앞순위에 있는 IP가 적용됨)
# DNS Lookup 결과 순서와 White IP 리스트 순서가 다르다면 -> White IP 리스트 순서를 따름
LDAP_WHITE_IP_01="70.2.180.218"
LDAP_WHITE_IP_02="fe80::644b:3c9f:c5ac:ce1c%10"


# 사용자 정보를 암호화할지 여부 (예: mobile, email 등)
# 대상 : USERINFO_## 리스트
# 암호화 여부에 따라 API 서버에 전송하는 token의 claim 이름이 다름
# 0 : 암호화 하지 않음 -> token의 claim 이름이 plainMobile, plainEmail
# 1 : 암호화 -> token의 claim 이름이 mobile, email
USERINFO_ENCRYPT=0


# LDAP Search할 사용자 정보 attribute name과 JWT token에 사용할 claim name (2개 값을 구분하는 delimeter = ";")
# 형태: USERINFO_## = attribute;encryptedClaim;plainClaim
#   예시: LDAP에서 "mail" 속성을 읽어서, JWT에 "email" claim으로 사용된다면 -> "mail;email;plainEmail"
# key 명칭은 "USERINFO_##" 형태로 하고, 시작은 USERINFO_01
# key 갯수 : 0개 ~ 최대 99개 (0개인 경우, ini에 아무것도 적지 않으면 되며, USERINFO_00 이라고 적지 말 것)
# 주의사항) USERINFO_##에서 ## 에 해당되는 숫자는 반드시 01부터 시작하며, 여러 개인 경우 번호가 끊어지지 않아야 함
#           USERINFO_01, USERINFO_02, USERINFO_03 : OK (01, 02, 03 정보가 사용됨)
#           USERINFO_01, USERINFO_02, USERINFO_05 : 02까지 읽고, 끊어진 번호 이후는 사용하지 않음 (01, 02 정보가 사용됨)
USERINFO_01=mobile;mobile;plainMobile
USERINFO_02=mail;email;plainEmail


# MFA API 서버가 Callback 해줄때, 결과 Parameter에 사용되는 Key 이름
# 예시: https://adpw5004.hw.dev/adfs/ls?client-request-id=xxxxxx&pullStatus=0&jwtTokenResponse=yyyyyy
KEY_NAME_IN_RESPONSE="jwtTokenResponse"


# JWT Token의 exp에 적용될 더하기 값
# 형테 : 일시분초(dhms) 형태의 문자열 -> 1d=86400, 1h=3600, 1m=60 (dhms 가 전혀 없는 단순 숫자는 초로 판단함)
# 예시1 : 1d02h38m27s -> 95907 초
# 예시2 : 12345 -> 12345 초
TOKEN_EXP_TIME=1d


# API 호출할때 구성하는 token에 client claim을 추가할지 여부
# client : SAML인 경우 issuer, OIDC인 경우 client-id
# 0 : token에 client 포함시키지 않음
# 1 : token에 client 포함
TOKEN_CLAIM_CLIENT=0


# MFA nonce(guid, requset-id) 검증 방법
# 0 : 검증 안함
# 1 : adapter가 생성한 guid를 LDAP에 저장/비교하는 방식 (adapter가 검증)
#     -> 관련 설정 값 : CACHE_ATTRIBUTE, CACHE_DELIMETER, SKEW_SECONDS, CACHE_LIFE_TIME
# 2 : API 서버가 생성한 requeset-id를 adapter가 받아서 호출 URL에 사용하는 방식 (API 서버가 검증)
#     -> 관련 설정 값 : MFA_VERIFY_URL
MFA_VERIFY_TYPE=2


# MFA 결과검증 URL (서버 to 서버 통신) : URL 뒷부분에 API 서버로부터 받은 {request-id}를 덧붙여서 호출함
# adapter는 리턴 200 (OK) 인지 확인하여 MFA 결과 처리
# URL 끝부분에 "/" 붙이지 말 것
MFA_VERIFY_URL="https://stg1-cloud.iam.samsung.net/test/common-api/open/v1.1/mfa/request/status"


# MFA 결과검증할때 사용할 보안 프로토콜
# 선택 가능한 프로토콜 (대소문자 구분 없음) : TLS12, TLS13
# (주의) SSL3, TLS, TLS11 은 사용하지 않음
MFA_VERIFY_SECURE_PROTOCOL="TLS12"


# 사용자의 req guid 값을 저장할 LDAP attribute의 이름
# (주의) LDAP에 write 권한이 있어야 함
CACHE_ATTRIBUTE="otherPager"


# LDAP에 저장하는 req + 시간 정보를 조합할때 사용하는 delimeter -> "req;시간"
CACHE_DELIMETER=";"


# LDAP에 저장된 req의 시간과 JWT 수신시 시간의 차이 허용치 (초단위)
# MFA 선택화면 누를 때가 아니라, AD 로그인 직후의 시간이므로 (MFA 선택화면 보일때 이미 시간이 저장되었음)
# 사용자가 MFA 선택화면 누르고 Passcode 입력할 때까지의 시간이 아님
# 따라서, tight 하게 시간을 설정하면 안되며, 1시간 정도가 적당?? (MFA 선택을 1시간 고민하는 사람이 있나?)
SKEW_SECONDS=3600


# LDAP에 저장된 req의 수명 -> 다음 access시 시간 확인해서 이전의 오래된 것들 삭제
# 형태 : 일시분초(dhms) 형태의 문자열 -> 1d=86400, 1h=3600, 1m=60 (dhms 가 전혀 없는 단순 숫자는 초로 판단함)
# 예시1 : 1d02h38m27s -> 95907 초
# 예시2 : 12345 -> 12345 초
CACHE_LIFE_TIME=1d


# Adapter 기능을 ByPass 할 것인지 여부 (0=정상 사용, 283901=무력화, 그 외 값들=정상 사용)
# MFA 기능 문제로 급하게 adapter 기능의 무력화가 필요한 비상 상황에서 사용
# 평상시에는 절대로 수정하지 말 것 -> 평상시 값은 0
# 주의 : 무력화하려면 반드시 정확한 값을 설정해야 함 (0 이외의 숫자가 해당되는 것이 아니며 정확한 숫자 필요함. noise 우려)
BYPASS_ADAPTER=0


[API]
API_SYSTEMNAME=SingleID


[MSG-1033]
MSG_INTERNAL_ERROR="Internal error occurred. Contact administrator."


[MSG-1042]
MSG_INTERNAL_ERROR="Internal error occurred. Contact administrator."


[MANAGE]
LOG_LEVEL=2
Configuration value description
- Fixed value : It means that the value displayed in the Setting Value column of the table below is used as-is when installing on the ADFS server.
- If you want to add languages other than English and Korean, you can add them for two sections.
- MSG-1033, MSG-1042
| dss | Key | Configuration values (example) | Fixed value | Explanation |
|---|---|---|---|---|
| MAIN | MAIN_MFA_TITLE | ADFS MFA Adapter | O | HTML page title (no impact on MFA functionality) |
| MAIN_CLAIM1 | http://schemas.microsoft.com/ws/2008/06/identity/claims/authenticationmethod | O | Apply the left value exactly as is | |
| MAIN_CLAIM2 | http://schemas.microsoft.com/ws/2012/12/authmethod/otp | O | Apply the left value exactly as is | |
| MFA_API_URL | https://stg2-cloud.singleid.samsung.net/test/common-api/open/v1.1/mfa/request | SingleID MFA API URL
| ||
| CONSUMER_KEY | 4312a8b9-75c4-7897-89a7-89347f18943e | Consumer Key issued by SingleID | ||
| SECRET_KEY | gQgkyLVO6FR8vJkLtlgBiupsRM/ilgrbEfoKWRnhALd= | Secret Key issued by SingleID
| ||
| DOMAIN_CONSUMER_KEY_01 | 4312a8b9-75c4-7897-89a7-89347f18943e | Domain vs Consumer Key list
| ||
| DOMAIN_CONSUMER_KEY_02 | 96567780-2b12-23da-637c-9375a6502d5a | |||
| DOMAIN_CONSUMER_KEY_## | 367c89d5-88f7-978a-9739-8ed21748f36b | |||
| DOMAIN_SECRET_KEY_01 | gQgkyLVO6FR8vJkLtlgBiupsRM/ilgrbEfoKWRnhALd= | Domain vs Secret Key list
| ||
| DOMAIN_SECRET_KEY_02 | kgkWRnLygQhsRgrLVbtKlO6FiLdABupEgoMR8v/ilfJ= | |||
| DOMAIN_SECRET_KEY_## | dABupkRnLygQhsrLgWVRbt8vRgkLilLKlO1FioMgfJE= | |||
| USE_LDAP_SEARCH | 0 or 1 or 2 | Whether to proceed with MFA based on LDAP Search results
| ||
| LDAP_SERVER | LDAP://adpw5004.hw.dev | LDAP address that can query AD user information
| ||
| LDAP_USE_IDPW | 0 or 1 | Whether to use id/pw when connecting to LDAP
| ||
| LDAP_SSLTLS | 0 or 1 | Whether to use SSL/TLS when connecting to LDAP
| ||
| LDAP_ID | LDAP connection ID | LDAP connection ID (when LDAP_USE_IDPW=1) | ||
| LDAP_PW | LDAP connection pw | LDAP connection password (when LDAP_USE_IDPW=1) | ||
| LDAP_DNS_LOOKUP | 0 or 1 or 2 or 3 | Perform a DNS lookup to obtain the IP address of the LDAP server (LDAP_SERVER) and determine connection based on the IP address
| ||
| LDAP_DNS_IF_FAIL_USE_NEXT | 0 or 1 | When there are multiple DNS lookup results, whether to try the next IP address if the first IP address fails to connect
| ||
| LDAP_WHITE_IP_01 | 70.2.180.218 | LDAP server IP list allowed for connection compared with DNS Lookup results (applicable only when LDAP_DNS_LOOKUP = 2 or 3)
| ||
| LDAP_WHITE_IP_02 | fe80::644b:3c9f:c5ac:ce1c%10 | |||
| LDAP_WHITE_IP_## | A. : 01 ~ 99 White IP address (IPv4 or IPv6) | |||
| USERINFO_ENCRYPT | 0 or 1 | Whether to encrypt user information (e.g., mobile, email, etc.)
| ||
| USERINFO_01 | mobile;mobile;plainMobile | O | The attribute name of user information to search in LDAP and the claim name to use in the JWT token (delimiter separating the three values = “;”)
| |
| USERINFO_02 | mail;email;plainEmail | O | ||
| USERINFO_## | A. : 01 ~ 99 [LDAP attribute name];[encrypted token claim name];[plain token claim name] | |||
| KEY_NAME_IN_RESPONSE | jwtTokenResponse | O | When the MFA API server performs a callback, the key name used in the result parameters | |
| TOKEN_EXP_TIME | 1d | The additive value applied to the JWT token’s exp
| ||
| TOKEN_CLAIM_CLIENT | 0 or 1 | Whether to add a client claim to the token configured when calling the API
| ||
| MFA_VERIFY_TYPE | 0 or 1 or 2 | MFA nonce (guid, request-id) verification methods
| ||
| MFA_VERIFY_URL | https://stg1-cloud.iam.samsung.net/test/common-api/open/v1.1/mfa/request/status | MFA verification URL (server-to-server communication): Append the {request-id} received from the API server to the end of the URL and call it → the adapter checks that the return is 200 (OK) to process the MFA result
| ||
| MFA_VERIFY_SECURE_PROTOCOL | TLS12 or TLS13 | Security protocol to use when verifying MFA results
| ||
| CACHE_ATTRIBUTE | otherPager | O | Name of the LDAP attribute that stores the user’s req guid value | |
| CACHE_DELIMETER | ; | Delimiter used when combining the req and time information stored in LDAP -> “req;time” | ||
| SKEW_SECONDS | 3600 | Allowed time difference (in seconds) between the request time stored in LDAP and the time the JWT is received
| ||
| CACHE_LIFE_TIME | 1d | Lifetime of req stored in LDAP -> check the time on the next access and delete the older ones
| ||
| BYPASS_ADAPTER | 0 or 283901 | Whether to bypass the Adapter function (0 = normal operation, 283901 = disable, other values = normal operation)
| ||
| API | API_SYSTEMNAME | SingleID | O | (No impact on MFA functionality) |
| MSG-1033 | MSG_INTERNAL_ERROR | Internal error occurred. Contact administrator. | Message displayed to the user when the process stops due to authentication interruption, error occurrence, etc. (English) | |
| MSG-1042 | MSG_INTERNAL_ERROR | Internal error occurred. Contact administrator. | Message displayed to the user when the process stops due to authentication interruption, error occurrence, etc. (Korean)
| |
| MANAGE | LOG_LEVEL | 0 or 1 or 2 | Criteria for recording in the Windows Event Log
|
Table. Explanation of setting values
6.3 - Release Note
SingleID
2026.05.21
FEATURE
Add AI agent registration and management feature, add 3rd‑party TOTP authenticator method, add SMS provider (InfoBank)- Add AI agent registration and management functionality
- AI agent registration and configuration features for authentication between the MCP server and MCP client have been added.
- The features for registering information, generating authentication key values, and retrieving information for AI agent authentication have been newly added.
- Add 3rd Party TOTP Authenticator support
- A TOTP authentication method registration/setting feature has been added to support 3rd Party Authenticators such as Google Authenticator and Microsoft Authenticator in the Admin Portal.
- A feature has been added that allows users to register or delete a 3rd Party TOTP Authenticator in the User Portal and MFA Portal.
- New SMS Provider (InfoBank) added
- You can register and use the Infobank SMS service, an external SMS service provider.
2026.05.21
CHANGED
Improved admin authentication delegation functionality, enhanced security, improved SingleID Authenticator, support for console access control, expanded CSP, and other feature improvements- Improved admin authentication delegation feature
- When no authentication method is available for identity verification, we have enhanced the system so that the admin authentication delegation feature can be applied when 1) registering an authentication method or 2) attempting to log in.
- You can register a list of authentication delegation administrators in the JWT Token.
- Enhanced to allow the authentication delegation manager list to be registered in SCP Cloud Object Storage and utilized.
- The detailed MFA SP configuration feature has been added in the Admin Portal.
- Whether to perform delegated authentication at login
- Whether to perform verification during registration when no authentication method is registered.
- Use of SCP Cloud Object Storage
- Select user information update method when running MFA
- Select whether to automatically add Knox Messenger as an authentication factor when executing MFA.
- Security improvement
- Personal information fields (name, email, mobile phone number) are now stored encrypted.
- In admin screens such as TAP, searching personal information fields (name, email, mobile phone number) has been changed from Like to Exact search, and the existing sorting function has been removed.
- SingleID Authenticator improvement
- When retrieving authentication methods for SingleID Authenticator, a feature to view detailed information (OS version, browser, and IP) has been added.
- The process has been improved so that when SingleID Authenticator information is deleted on the authentication server, the authentication server (tenant) information is also removed from the user app.
- The registration failure error that occurred when registering biometric data in PIN registration mode has been resolved.
- Expanded CSP support for console access control
- Support CSP for console access control has been expanded from the existing AWS, Azure, Samsung Cloud Platform (KR EAST1 region, KR WEST1 region) to GCP.
- Other functional improvements
- Maintained overall UI/UX consistency of the Admin Portal/User Portal and improved usability.
- We improved it so that when a user accesses the SingleID service via a mobile device’s browser and authenticates, the appropriate mobile keypad (default, password, numeric, email keyboard) is automatically selected based on the attributes of the input data on the authentication screen.
- When creating or editing a SAML-type application, we removed the unnecessary input restriction (Issuer setting).
- Improved the usability and security of the CAM Portal.
- Added a masking feature for sensitive information (Password, Key).
- Users assigned the PM/PL role can now modify the IP/Port of registered resources, improving usability.
- When resource registration fails, we have improved it to provide information about the failure status based on a checklist.
- When registering resources, it has been improved to allow registering multiple resources at once and to support PEM key registration.
- After the resource connection expires, we improved usability so that clicking the Rotation button allows you to easily refresh the expired OTP connection information.
- Improved usability to display the Account ID information when submitting approval for a permission request to access resources.
2025.11.04
FEATURE
Add console access history log monitoring feature, expand CSP support for console access control, improve notice feature, improve approval system feature, improve batch scheduler management feature, improve CAM system user role management feature, improve system global variable management feature- Add console access history log monitoring feature
- You can view and download console access logs.
- Expand CSP support for console access control
- Support CSP for console access control has been expanded from the existing AWS to Azure and Samsung Cloud Platform (KR EAST1 region, KR WEST1 region).
- Notice feature improvement
- The feature that allows registering and managing notices per tenant has been improved.
- Improvement of the approval system functionality
- We added a self‑managed approval system feature to the existing approval function based on the Knox approval system.
- Improved batch scheduler management functionality
- The batch scheduler management feature has been enhanced to allow viewing execution results and details, and to enable immediate execution.
- Improvement of CAM system user role management functionality
- The CAM system has been improved to allow creating, listing, viewing, and detailing user roles for the system itself.
- System-wide global variable management feature improvement
- The system-wide variable management functionality for the CAM system itself has been improved.
- Other convenience improvements
- PM/PL authorized users can change the IP of an already enrolled resource (no need to re‑enroll the resource).
- Improved the multi-select functionality when searching User, Role, and Policy (preserves previously added items during multiple selections).
- Improved to allow navigation to the detailed pages for Role/Policy/Account from the Console Access menu.
- The Manual, Release Note, and FAQ URLs have been changed to the SCP Documentation URL.
2025.10.23
FEATURE
Add admin delegation feature, Add approval status menu to dashboard, Add member registration status menu to dashboard, Add user campaign feature, Add dormant account policy feature, Add user lifecycle management feature, Add rebranding feature to login page, Improve simple authentication feature, Add user security enhancement feature, Improve user profile attribute setting feature, Add application entitlement (Entitlement) management feature- Add admin delegation feature
- A feature has been added that allows delegating identity verification to an administrator. * This feature is available only for MFA products.
- Add approval status menu to the dashboard
- A feature has been added to the dashboard that allows managing users’ approval requests and statuses.
- Add a sign‑up status menu to the dashboard
- A feature has been added to the dashboard that allows managing users’ sign‑up status.
- Add user campaign feature
- A campaign feature that recommends registering additional authentication methods has been added when only one user authentication method is registered.
- Add dormant account policy feature
- Added features for dormant user settings, alarm dispatch configuration, exception user registration, long-term dormant users, and dormant self-recovery settings.
- Add user lifecycle management feature
- During sign-up and user registration, features for setting user defaults, configuring user account expiration periods, and defining approval policies have been added.
- Add rebranding functionality to the login page
- A feature has been added that allows changing the top and bottom logos, key visual images, and text in the Admin Portal.
- Redirection functionality for the sign‑up page settings, bottom privacy policy, terms of service, and similar items has been added.
- Improved simple authentication feature
- Mobile Passkey, security key, and Windows PIN code have been added as convenient authentication methods for easy login.
- Add user security enhancement feature
- A conditional authentication policy feature has been added that requires additional identity verification when only one authentication method is used for an extended period.
- User profile attribute setting feature improvement
- You can further expand and apply the user’s personal information attributes.
- Add application entitlement (Entitlement) management feature
- Synchronize application permissions to manage application access for users and groups.
- Other convenience improvements
- Improved the process when the authentication session timeout expires.
- Improved the app access process in the mobile app.
- We have improved the screen for mobile app download.
- Improved the application registration/edit screen (field modifications, mapping screen enhancements, etc.).
- Improved the Identity Providers registration/edit screen (added/modified fields)
- Added a user mobile app (device) reset feature.
- Added a feature to set a prefix text when sending SMS.
- Improved the image upload screen and process.
2025.07.01
NEW
Official release of SingleID service- We have launched the SingleID service, which integrates various access environments so that users can log into business systems with a single ID, and enables administrators to easily control access.
7 - WAF
7.1 - Overview
Service Overview
WAF (Web Application Firewall) is a service that monitors website traffic to securely protect web applications. It quickly detects and analyzes HTTP and HTTPS–based security threats that target website vulnerabilities.
Features
- Powerful Detection/Blocking: We monitor the HTTP and HTTPS traffic of web pages registered by the customer to detect hacker attack attempts in real time. We classify attacks such as SQL Injection, Cross-Site Scripting (XSS), Web Scan, and provide various defense features needed for web security to respond immediately to new web attack types.
- Stable Web Service Operation Support: Respond to new security threats through web firewall signature patterns and firmware updates. Detect hacker attack attempts such as the top 10 OWASP (Open Web Application Security Project) attacks, the 8 major vulnerabilities identified by the National Intelligence Service, Zero-Day attacks, emerging web threats, and Bad Bots, to help operate efficient and stable web services.
- Convenient Security Management: Provides monthly reports, allowing you to conveniently review event details.
Service Architecture Diagram
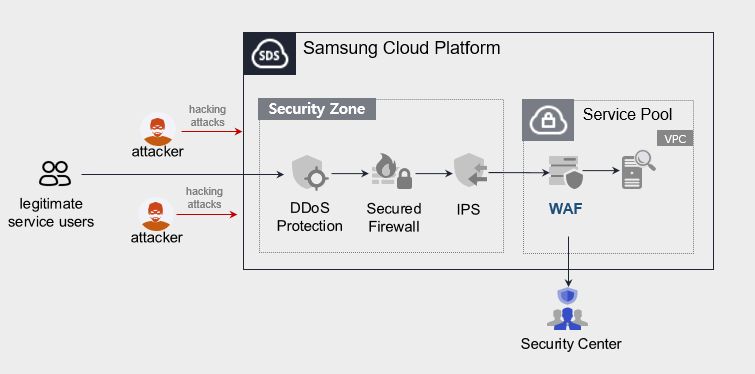
The public WAF service does not provide monitoring (Security Center).
Provided features
We provide the following features.
- Provides intrusion detection/analysis
- 24x365 event monitoring (alert issuance, monthly report provision), however, the public-facing WAF service does not provide this.
- Attack classification (Injection, XSS, File Include, File Up/Download, Web Scan, etc.) through web firewall event analysis
- Detection of latest attack patterns (e.g., Apache Struts vulnerabilities)
- Intrusion Response
- Provide IP information for attack attempts targeting registered URLs
Component
We install a WAF license on the Virtual Server within the VPC of Samsung Cloud Platform and provide the service.
Constraints
To use WAF, first verify the following items.
- If the WAF is configured as a single instance, service continuity cannot be guaranteed in the event of a failure of the WAF installation VM or the WAF application.
- The Load Balancer and WAF of Samsung Cloud Platform do not support bypass.
- The security monitoring service provided by Samsung Cloud Platform is offered only for Pentasecurity products. (operation + monitoring product)
- The public-facing WAF service does not provide security monitoring services.
- The WAF service is installed with direct support from an engineer, and it takes a certain amount of time from request to deployment.
Provision status by region
WAF is available in the environments below.
| Region | General (Enter) | Public |
|---|---|---|
| Korea West (kr-west1) | Provided | Not provided |
| Korea East (kr-east1) | Not provided | Not provided |
| South Korea South 1 (kr-south1) | Not provided | Provided |
| South Korea South 2 (kr-south2) | Not provided | Provided |
| South Korea South 3 (kr-south3) | Not provided | Provided |
Table. WAF regional availability status
Prior Service
This is a list of services that must be pre-configured before applying for the service. For details, refer to the guide provided for each service and prepare in advance.
- When using the WAF service, a WAF license is installed on the Virtual Server and provided. Install a Virtual Server that matches the service specifications you want first.
| Service Category | Service | Detailed description |
|---|---|---|
| Compute | Virtual Server | Virtual server optimized for cloud computing |
| Networking | Direct Connect | A service that securely and quickly connects the customer’s network to the Samsung Cloud Platform |
Table. WAF pre-service
Reference
Customers using Secured VPN do not need to apply for Direct Connect separately. (Direct Connect application is required when applying for Secured VPN)
However, regular (enterprise) customers who do not use Secured VPN must apply for Direct Connect separately.
* Application path : Console > Support Center > Service Request
* Service : Networking > Direct Connect
* Task Category : Uplink Line Request
7.2 - How-to guides
Users can apply for the service by entering the required information for using the WAF service through the Samsung Cloud Platform Console.
Apply for WAF
You can apply for and use the WAF service from the Samsung Cloud Platform Console.
To request the creation of a WAF service, follow these steps.
Click the All Services > Security > WAF menu. You will be taken to the WAF’s Service Home page.
On the Service Home page, click the WAF Service Request button. You will be taken to the Support Center > Service Request List > Service Request page.
Service Request page: enter or select the required information in the mandatory input fields.
- Select WAF creation in the task type.
Input field Detailed description Title Enter the title of the service request - Example: WAF Service Creation Request
Region Select the location of the Samsung Cloud Platform - Automatically filled with the region corresponding to the Account
Service Select the service category and service. If you click the WAF service request button, it is entered automatically - Service Category: Security
- Service: WAF
Task classification Select the type you want to request - Create WAF: select when requesting a new service
content Customer Basic Information Entry and Application Process Guide - Content: End Customer/MSP Information
Attachment Upload the completed WAF service application (required) and any additional files you wish to share - You can attach up to 5 files, each no larger than 5 MB
- Only doc, docx, xls, xlsx, ppt, ppts, hwp, txt, pdf, jpg, jpeg, png, gif, and tif files are allowed
Table. WAF Service Creation Request Items
- Select WAF creation in the task type.
After reviewing the application process and reference information, click the Form Download > Service Request Form Download button to download the WAF Service Application Form.
Please complete the WAF Service Application.
- Refer to the item descriptions in the Application Information and Monitoring Information tabs and complete the required fields.
Category Detailed description Application Information Write required items such as application type, usage period, throughput information, basic information, etc. Monitoring information Enter required items such as WAF service application information and SSL certificate information - Public-sector customers do not need to fill this out
Table. Main contents of the WAF service creation request form
- Refer to the item descriptions in the Application Information and Monitoring Information tabs and complete the required fields.
Attach the completed application form in the attachment area.
Click the Request button on the service request page.
- When the request is completed, check the submitted details on the Support Center > Service Request List page.
After the monitoring personnel review the submitted service request, they proceed with the process to use the service.
The WAF service is being launched.
Terminate WAF
To request termination of the WAF service, follow the steps below.
- Click the All Services > Management > Support Center menu. Go to the Support Center > Service Home page.
- On the Support Center Service Home page, click the Service Request button. You will be taken to the Service Request List page.
- On the Service Request List page, click the Service Request button. You will be taken to the Service Request page.
- Service Request page: enter or select the required information in the mandatory input fields.
- Select WAF termination in the task type.
Input field Detailed description Title Enter the title of the service request - Example: WAF Service Termination Request
Region Select the location of the Samsung Cloud Platform - automatically entered with the region corresponding to the Account
Service Select service category and service - Service Category: Security
- Service: WAF
Task classification Select the type you want to request - WAF termination: select if you are terminating the service
content Customer Basic Information Entry and Application Process Guide - Content: End Customer/MSP Information
Attachment If you have a completed WAF service application (required) and any additional files you wish to share, proceed with the upload - You can attach up to 5 files, each no larger than 5 MB
- Only doc, docx, xls, xlsx, ppt, ppts, hwp, txt, pdf, jpg, jpeg, png, gif, and tif files are allowed
Table. Table. WAF service termination request items
- Select WAF termination in the task type.
- After reviewing Application Process and Notes, click the Form Download > Service Request Form Download button to download the WAF Service Application Form.
- Please complete the WAF Service Application.
- Refer to the item descriptions in the Application Information and Monitoring Information tabs and complete the required fields.
Category Detailed description Application Information Fill out required fields such as application type, usage period, transaction volume information, and basic information. Monitoring information When terminating the entire service, no input is required. Table. Main contents of WAF service termination request form
- Refer to the item descriptions in the Application Information and Monitoring Information tabs and complete the required fields.
- Attach the completed application form to the attachment area.
- Click the Request button on the service request page.
- After the request is completed, verify the submitted information on the Support Center > Service Request list page.
- After the monitoring staff verifies the submitted service request, the termination process is completed once the monitored URL, port, and IP are removed.
- Service termination requires three business days, including the cancellation request date.
7.2.1 - WAF Build Process Guide
To start the WAF service, you need to apply for the service and then perform WAF license installation and monitoring integration verification. After you request the WAF service, the person in charge will review the service request details and contact you. Please refer to the process below to request the WAF service.
guide
WAF installation is directly supported by SDS engineers and proceeds after consulting with the client on configuration, specifications, and related details.
- Considering the overall process schedule, apply for the service at least one month before the service launch (business days).

Preliminary preparation work
The preliminary preparation steps for using the WAF service are carried out according to the following procedure.
- Submit a service request to install the WAF. (MSP → SDS)
- Please request WAF SW installation. (SDS → Engineer)
- Please provide the engineer information for the WAF installation work. (SDS → MSP)
Samsung Cloud Platform Console task (MSP execution)
To use the WAF service, the Samsung Cloud Platform Console performs the following steps.
- Register an SSL certificate in the Certificate Manager service.
- Application path: Samsung Cloud Platform Console > Security > Certificate Manager
- Purpose: Operation
- Create a Virtual Server service for WAF.
- Application path: Samsung Cloud Platform Console > Compute > Virtual Server
- Determine CPU, memory, and block storage capacity based on WAF specifications.
- WAF Virtual Server specifications: view quotation
- Create a Load Balancer service.
- Application path: Samsung Cloud Platform Console > Networking > Load Balancer
- Create an L7 service for SSL offloading.
- Create an L4 service when load balancing is required for WAF redundancy.
- Create an L4 service when load balancing is required for web server redundancy.
- Configure the required Load Balancer/Firewall/Security Group.
- Configure the Firewall and Security Group to match the Load Balancer’s communication path as follows.
- The source inputs the user’s network information.
Category Common Security Zone FW Internet Gateway FW Load Balancer FW Virtual Server SG Inbound (destination) LB service public IP LB service private IP LB service private IP LB Link IP IP (example) 123.43.8.xxx 10.10.0.xxx 10.10.0.xxx 192.168.254.xxx Port LB service port LB service port LB service port Forwarding/Health Check Port Table. FW/SG configuration items according to the Load Balancer's communication path
- Configure HTTP redirection for the LB service. (Optional)
- Set the Load Balancer’s HTTP redirection option as follows.
LB service L7 HTTP L7 HTTPS LB Profile > Profile Type Application Application LB Profile > Service Classification L7 HTTP L7 HTTP LB Profile > HTTP Redirection Settings Not set IP/NAT IP Set the same Set the same service port 80 443 forwarding port 80 80 Server Group > When Using WAF Not set WAF Virtual Server Server Group > When WAF is not used Not set WEB Virtual Server Certificate registration Unregistered Register Table. Load Balancer HTTP redirection configuration items
- Set the Load Balancer’s HTTP redirection option as follows.
- Grant the WAF engineer access permissions to the Virtual Server for WAF.
WAF SW Installation and Test (WAF Engineer & MSP)
When the WAF specifications are finalized, the engineer installs the WAF software and conducts testing.
Policy request and implementation for WAF security monitoring
Create and apply policies required for WAF security monitoring.
- Request the required policy from the Samsung Cloud Platform Console. (SDS → MSP)
- Deliver and apply the created policy. (SDS → MSP)
- Check the items that require policy registration. (Direct Connect Firewall/Security Group/Routing)
- SDS → Verify that the WAF access path for each client is secured. If additional registration is required, request it by email.
- Check whether the WAF → SIEM log transmission path is secured for each client. If additional registration is needed, request it via email.
Constraints
When installing the WAF, first check the following constraints before proceeding.
- When WAF is configured as a single instance, service continuity cannot be guaranteed in case of a failure of the WAF-installed Virtual Server or the WAF application. (Bypass is not supported between Samsung Cloud Platform LB and WAF)
- If service availability of the website where WAF is applied is critical, WAF redundancy must be implemented. If WAF redundancy is required, a separate request must be made.
- Security monitoring through the Samsung Cloud Platform service is available only for Penta Security products.
- Other vendors’ products are listed in the marketplace, but Samsung SDS security monitoring services are not offered.
7.3 - Release Note
WAF
2025.07.01
NEW
Official release of WAF service- We are launching a WAF service that protects web applications from web vulnerabilities and attacks.
8 - DDoS Protection
8.1 - Overview
Service Overview
DDoS Protection is a service that detects and defends against DDoS (Distributed Denial of Service) attacks, which generate large volumes of traffic to cause service disruptions. Continuous monitoring detects and blocks external traffic attacks, protecting the servers within the Samsung Cloud Platform. When a DDoS attack occurs, blocking the malicious traffic minimizes the traffic load entering the internal servers of the Samsung Cloud Platform, ensuring the continuity of web services.
Features
- Rapid Attack Detection: When a large volume of traffic arrives, it detects DDoS attacks in real time. Continuously updating DDoS defense items enables effective response to the latest attack techniques.
- Effective Attack Defense: When a DDoS attack occurs, we detect it in real time and block malicious traffic to ensure service availability, supporting regular users to access the website normally.
- Stable web service operation: Based on extensive network operation experience, we can effectively respond to external security threats. Additionally, we provide monthly reports so you can review event details.
Configuration diagram
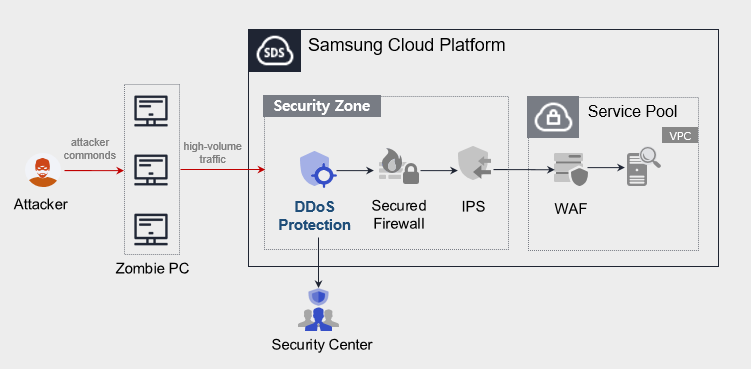
The public DDoS Protection service does not provide monitoring (Security Center).
Provided features
We provide the following features.
- Intrusion Detection and Analysis
- 24x365 event monitoring (Note: the public DDoS Protection service does not provide this feature.)
- Automatic detection of DDoS attacks
- Intrusion Response
- Provides learning-based detection and blocking for various DDoS attacks at the L3/L4 level.
- Monitoring Information Provision
- Alert on event detection
- Monthly report provision
Component
- DDoS Protection provides services based on public IPs configured within the VPC.
- We provide services for servers that can be accessed over the Internet, and blocking can be performed based on attacker IP addresses.
Constraints
When providing DDoS Protection service, a minimum one-month learning period is required to set the protection threshold, and we analyze the learned thresholds to provide optimal policy settings.
Provision status by region
DDoS Protection is available in the following environments.
| Region | General (Enter) | Public |
|---|---|---|
| Korea West (kr-west1) | Provided | Not provided |
| Korea East (kr-east1) | Not provided | Not provided |
| South Korea South 1 (kr-south1) | Not provided | Not provided |
| South Korea South 2 (kr-south2) | Not provided | Not provided |
| South Korea 3 (kr-south3) | Not provided | Provided |
Table. DDoS Protection regional availability status
Preceding Service
- This is a list of services that must be pre-configured before creating a DDoS Protection service. Refer to the guides provided for each service for detailed information and prepare in advance.
- When creating a VPC Internet Gateway, you must select SIGW (Secure Internet Gateway) in Category to be able to use DDoS Protection.
Caution
- When creating an Internet Gateway for a VPC, selecting Internet Gateway in ‘Category’ prevents the use of the DDoS Protection service.
- If you switch to Secure Internet Gateway, you need to change the public IP you are using.
| Service Category | Service | Detailed description |
|---|---|---|
| Networking | VPC | A service that provides an isolated virtual network in a cloud environment |
Table. DDoS Protection pre-service
8.2 - How-to guides
Users can apply for the service by entering the required information for using the DDoS Protection service through the Samsung Cloud Platform Console.
Create DDoS Protection
You can apply for and use the DDoS Protection service from the Samsung Cloud Platform Console.
To request the creation of a DDoS Protection service, follow these steps.
- Click the All Services > Security > DDoS Protection menu. Navigate to the Service Home page of DDoS Protection.
- On the Service Home page, click the DDoS Protection Service Request button. Navigate to the Support Center > Service Request List > Service Request page.
- Service Request page, enter or select the required information in the mandatory input fields.
- Select Create DDoS Protection in the task category.
Input field Detailed description Title Enter the title of the service request - Example: DDoS Protection service creation request
Region Select the location of the Samsung Cloud Platform - Automatically filled with the region corresponding to the Account
Service Select the service category and service. If you click the DDoS Protection service request button, it is entered automatically - Service Category: Security
- Service: DDoS Protection
Task classification Select the type you want to request - Create DDoS Protection: select when requesting a new service
content Guide to Creating Customer Basic Information and Application Process - Content: End Customer/MSP Information
- You can attach up to 5 files, each no larger than 5 MB
- Only doc, docx, xls, xlsx, ppt, ppts, hwp, txt, pdf, jpg, jpeg, png, gif, and tif files are allowed
Table. DDoS Protection Service Creation Request Items
- Select Create DDoS Protection in the task category.
- After reviewing the application process and reference information, click the Form Download > Service Request Form Download button to download the DDoS Protection Service Application Form.
- Please complete the DDoS Protection Service Application Form.
- Refer to the item descriptions in the Application Information and Monitoring Information tabs and complete the required fields.
Category Detailed description Application Information Fill out required items such as application type, usage period, and basic information - Application type: select application
- Usage period: enter desired start date, contract status, and estimated usage period
- Basic information: enter Account name, Project name, and recipient information
Monitoring information Enter required items such as protected IPs, exception handling IPs, etc. (Specify purpose per IP) - Specify application type per IP
- New: select when applying for a new service
- Public-sector customers do not need to fill this out
Table. Main contents of the DDoS Protection service creation request form
- Refer to the item descriptions in the Application Information and Monitoring Information tabs and complete the required fields.
- Attach the completed application form in the attachment area.
- On the service request page, click the Request button.
- After the request is completed, check the submitted details on the Support Center > Service Request List page.
- After the monitoring personnel review the submitted service request, they proceed with the process to use the service.
- The DDoS Protection service is now available.
DDoS Protection Terminate
To request cancellation of the DDoS Protection service, follow the steps below.
- Click the All Services > Management > Support Center menu. You will be taken to the Support Center > Service Home page.
- On the Support Center Service Home page, click the Service Request button. You will be taken to the Service Request List page.
- On the Service Request List page, click the Service Request button. You will be taken to the Service Request page.
- Service Request page, enter or select the required information in the mandatory input fields.
- Select DDoS Protection termination in the operation type.
Input field Detailed description Title Enter the title of the service request - Example: DDoS Protection Service Cancellation Request
Region Select the location of the Samsung Cloud Platform - Automatically filled with the region corresponding to the Account
Service Select service category and service - Service Category: Security
- Service: DDoS Protection
Task classification Select the type you want to request - Cancel DDoS Protection: select if you are canceling the service
content Guide to Entering Customer Basic Information and Application Process - Content: End Customer/MSP Information
Attachment Upload the completed DDoS Protection service application (required) and, if you have any additional files to share, proceed with the upload - You can attach up to 5 files, each no larger than 5 MB
- Only doc, docx, xls, xlsx, ppt, ppts, hwp, txt, pdf, jpg, jpeg, png, gif, and tif files are allowed
Table. Table. DDoS Protection service termination request items
- Select DDoS Protection termination in the operation type.
- After reviewing the Application Process and Reference Information, click the Form Download > Service Request Form Download button to download the DDoS Protection Service Application Form.
- Please fill out the DDoS Protection Service Application Form.
- Refer to the item descriptions in the Application Information and Monitoring Information tabs and complete the required fields.
Category Detailed description Application Information Fill out required fields such as application type, usage period, and basic information - Application type: select termination
- Usage period: enter desired termination date
- Basic information: Account name, Project name, recipient information
Monitoring information When terminating the entire service, no input is required. Table. Main contents of DDoS Protection service termination request form
- Refer to the item descriptions in the Application Information and Monitoring Information tabs and complete the required fields.
- Attach the completed application form to the attachment section.
- Click the Request button on the service request page.
- Once the request is completed, verify the submitted information on the Support Center > Service Request list page.
- After the monitoring staff verifies the submitted service request, the termination process is completed when the monitored IP/policy is deleted.
- Service termination requires three business days, including the cancellation request date.
8.3 - Release Note
DDoS Protection
2025.07.01
NEW
DDoS Protection Service Official Version Release- We are launching a DDoS Protection service that provides detection and mitigation of large-scale network traffic attacks.
9 - IPS
9.1 - Overview
Service Overview
IPS(Intrusion Prevention System) continuously updates IPS intrusion detection policies reflecting the latest security threats to respond in real time. Additionally, packet monitoring detects up to the application layer.
Features
- Latest Attack Type Detection: Generate detection patterns for new threats and improve detection rates through continuous signature management. Apply the TI DB of a security specialist company and our own advanced detection policies, and provide services by correlating attack patterns detected by IPS with patterns configured in SIEM(Security Information and Event Management) through correlation analysis.
- Cloud Optimized Operations: We provide detection services optimized for cloud environments. When a security threat occurs, we respond promptly with specialized security personnel.
- Efficient response and support: Monthly reports are provided so you can review the details of events.
Configuration diagram
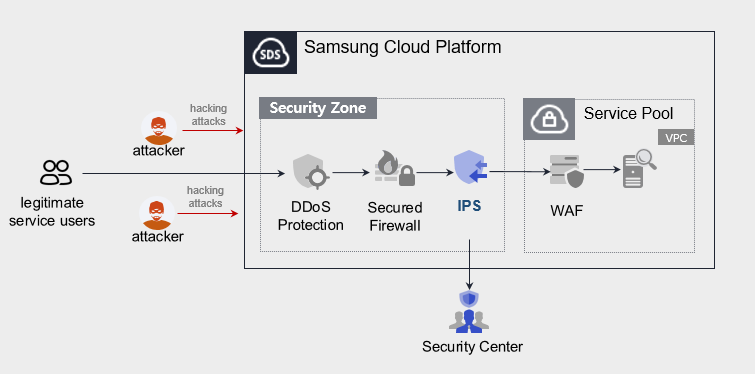
The public IPS service does not provide monitoring (Security Center).
Provided features
We provide the following features.
- Intrusion Detection and Analysis
- In-depth analysis using raw data
- Update new threat detection patterns incorporating external trend information
- Periodic detection pattern optimization
- Monitoring Information Provision
- Monthly report provision
- Intrusion Response
- Provide IP information of attack attempts targeting SCP client servers
Component
- IPS provides services based on public IPs configured within the VPC.
- We provide services for servers that are accessible over the Internet, and when a user requests a service, we refer to the server (Virtual Server) specifications listed in the service application form.
Constraints
IPS provides detection for traffic that is not encrypted with HTTP. It does not provide monitoring for HTTS SSL encrypted traffic.
The public IPS service does not provide monitoring (Security Center).
Provision status by region
IPS is available in the environments below.
| Region | General (Enter) | Public |
|---|---|---|
| Korea West (kr-west1) | Provided | Not provided |
| Korea East (kr-east1) | Not provided | Not provided |
| South Korea South 1 (kr-south1) | Not provided | Provided |
| South Korea South 2 (kr-south2) | Not provided | Provided |
| South Korea South 3 (kr-south3) | Not provided | Provided |
Table. IPS provision status by region
Preceding Service
- This is a list of services that must be pre-configured before creating an IPS service. Refer to the guides provided for each service and prepare them in advance.
- When creating a VPC Internet Gateway, you must select SIGW (Secure Internet Gateway) in Category to be able to use IPS.
Caution
- When creating a VPC Internet Gateway, if you select Internet Gateway in the ‘Category’, you cannot use the IPS service.
- If you switch to Secure Internet Gateway, you need to change the public IP you are using.
| Service Category | Service | Detailed description |
|---|---|---|
| Networking | VPC | A service that provides an isolated virtual network in a cloud environment |
Table. IPS pre-service
9.2 - How-to guides
Users can apply for the service by entering the required information for using the IPS service through the Samsung Cloud Platform Console.
Create IPS
You can apply for and use the IPS service from the Samsung Cloud Platform Console.
To request the creation of an IPS service, follow these steps.
- Click the All Services > Security > IPS menu. You will be taken to the IPS Service Home page.
- On the Service Home page, click the IPS Service Request button. You will be taken to the Support Center > Service Request List > Service Request page.
- Service Request page, enter or select the required information in the mandatory input fields.
- Select IPS creation in the task classification.
Input field Detailed description Title Enter the title of the service request content - Example: IPS Service Creation Request
Region Select the location of the Samsung Cloud Platform - Automatically filled with the region corresponding to the Account
Service Select the service category and service. If you click the IPS service request button, it is entered automatically - Service Category: Security
- Service: IPS
Task classification Select the type you want to request - Create IPS: select when requesting a new service
content Guide to Creating Customer Basic Information and Application Process - Content: End Customer/MSP Information
Attachment Upload the completed IPS service application (required) and any additional files you wish to share - You can attach up to 5 files, each no larger than 5 MB
- Only doc, docx, xls, xlsx, ppt, ppts, hwp, txt, pdf, jpg, jpeg, png, gif, tif files are allowed
Table. IPS Service Creation Request Items
- Select IPS creation in the task classification.
- After reviewing the application process and reference information, click the Form Download > Service Request Form Download button to download the IPS Service Application Form.
- Please fill out the IPS Service Application.
- Refer to the item descriptions in the Application Information and Monitoring Information tabs, and fill out the required fields.
Category Detailed description Application Information Fill out required items such as application type, usage period, and basic information - Application type: select application
- Usage period: enter desired start date, contract status, and estimated usage period
- Basic information: enter Account name, Project name, and recipient information
Monitoring information Enter required items such as protected IP and exception handling IP (specify purpose per IP) - Specify application category per IP
- New: select when applying for a new service
- Public-sector customers do not need to fill this out
Table. Main contents of the IPS service creation application form
- Refer to the item descriptions in the Application Information and Monitoring Information tabs, and fill out the required fields.
- Attach the completed application form in the attachment area.
- On the service request page, click the Request button.
- After the request is completed, check the submitted details on the Support Center > Service Request List page.
- After the monitoring personnel review the submitted service request, they proceed with the process to use the service.
- The IPS service is being launched.
Terminate IPS
To request termination of the IPS service, follow the steps below.
- Click the All Services > Management > Support Center menu. Go to the Support Center > Service Home page.
- On the Support Center Service Home page, click the Service Request button. You will be taken to the Service Request List page.
- On the Service Request List page, click the Service Request button. You will be taken to the Service Request page.
- Service Request page: enter or select the required information in the mandatory input fields.
- Select IPS termination in the task type.
Input field Detailed description Title Enter the title of the service request - Example: IPS Service Termination Request
Region Select the location of the Samsung Cloud Platform - Automatically filled with the region corresponding to the Account
Service Select service category and service - Service Category: Security
- Service: IPS
Task classification Select the type you want to request - IPS termination: select if you want to cancel the service
content Customer Basic Information Entry and Application Process Guide - Content: End Customer/MSP Information
Attachment If you have a completed IPS service application (required) and any additional files you wish to share, proceed with the upload - You can attach up to 5 files, each no larger than 5 MB
- Only doc, docx, xls, xlsx, ppt, ppts, hwp, txt, pdf, jpg, jpeg, png, gif, tif files can be attached
Table. Table. IPS service termination request items
- Select IPS termination in the task type.
- After reviewing the Application Process and Reference Information, click the Form Download > Service Request Form Download button to download the IPS Service Application Form.
- Please fill out the IPS Service Application.
- Refer to the item descriptions in the Application Information and Monitoring Information tabs and complete the required fields.
Category Detailed description Application Information Fill in required fields such as request type, usage period, and basic information - Request type: select termination
- Usage period: enter desired termination date
- Basic information: Account name, Project name, recipient information
Monitoring information When terminating the entire service, no input is required. Table. Main contents of IPS service termination application form
- Refer to the item descriptions in the Application Information and Monitoring Information tabs and complete the required fields.
- Attach the completed application form to the attachment section.
- Click the Request button on the service request page.
- Once the request is completed, verify the submitted information on the Support Center > Service Request list page.
- After the monitoring staff verifies the submitted service request, the termination process is completed once the monitored IP is removed.
- Service termination requires three business days, including the cancellation request date.
9.3 - Release Note
IPS
2025.07.01
NEW
Official release of IPS service- We have launched an IPS service that continuously updates intrusion detection policies to reflect the latest security threats and provides real‑time response.
10 - Secured Firewall
10.1 - Overview
Service Overview
Secured Firewall is a next‑generation firewall service for cloud network security provided by Samsung Cloud Platform. It manages network access to servers based on IP address/port policies and supports detailed analysis in the event of a security incident.
Features
- Protecting Diverse Network Environments: Supports setting robust network security policies to securely protect cloud assets. Detects and blocks based on IP and protocol/port‑based ACL policies, providing a safe network communication environment.
- Easy and Simple Network Management: You can easily establish firewall policies and conveniently create and manage applied rules such as source/destination IP, protocol/port, inbound/outbound, etc.
- Security expert-based firewall policy implementation: We support establishing firewall policies optimized for customers’ systems migrating to the cloud. To make it easier to apply security policies in cloud environments, we accept firewall policy requests from customers and provide a service where security experts incorporate the policies.
- Security Authentication Product-Based Service: You can use firewall services that meet various networks and requirements for internet connectivity and ensure an optimized security environment. This safely protects the internal network from unauthorized access.
Configuration diagram
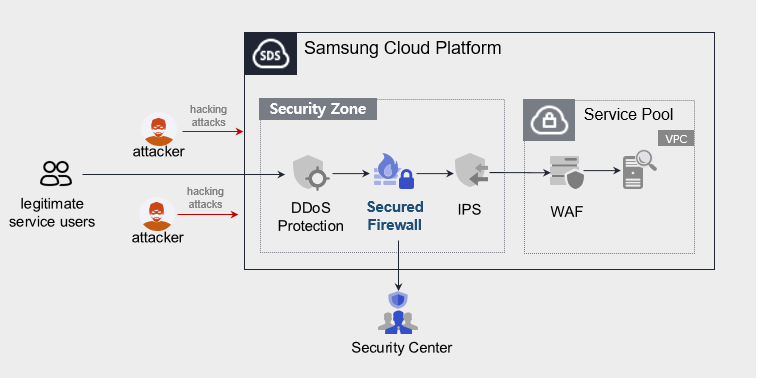
The public Secured Firewall service does not provide monitoring (Security Center).
Provided features
We provide the following features.
- Cloud Optimized Firewall
- Applying domain policies considering cloud environments
- Apply firewall rules and logging
- Monitoring Information Provision
- Monthly report provision
Component
- Secured Firewall provides services based on a public IP configured within the VPC.
- We provide services for servers that are accessible over the Internet, and when a user requests a service, we refer to the server (Virtual Server) specifications listed in the service application form.
Constraints
- Firewall policy requests cannot be submitted from the Samsung Cloud Platform Console.
- We will send the application form to the email you registered when applying for the service. Please refer to the form to proceed with the firewall request.
- The access control management (such as Security Group and other firewall policy management) for systems built inside the pool must be performed directly by the customer.
Provision status by region
Secured Firewall is available in the following environments.
| Region | General (Enter) | Public |
|---|---|---|
| Korea West (kr-west1) | Provided | Not provided |
| Korea East (kr-east1) | Not provided | Not provided |
| South Korea South 1 (kr-south1) | Not provided | Provided |
| South Korea South 2 (kr-south2) | Not provided | Provided |
| South Korea South 3 (kr-south3) | Not provided | Provided |
Table. Secured Firewall regional availability status
Preceding Service
- This is a list of services that must be pre‑configured before creating a Secured Firewall service. For details, refer to the guides provided for each service and prepare in advance.
- When creating a VPC’s Internet Gateway, you must select SIGW (Secure Internet Gateway) in Category to be able to use Secured Firewall.
Caution
- When creating an Internet Gateway for a VPC, selecting Internet Gateway in the “Category” prevents the use of the Secured Firewall service.
- If you switch to Secure Internet Gateway, you need to change the public IP you are using.
| Service Category | Service | Detailed description |
|---|---|---|
| Networking | VPC | A service that protects web applications from web vulnerabilities and attacks |
Table. Secured Firewall Pre‑Service
10.2 - How-to guides
Users can apply for the service by entering the required information for using the Secured Firewall service through the Samsung Cloud Platform Console.
Create Secured Firewall
You can request and use the Secured Firewall service from the Samsung Cloud Platform Console.
To request the creation of a Secured Firewall service, follow these steps.
Click the All Services > Security > Secured Firewall menu. You will be taken to the Service Home page of Secured Firewall.
On the Service Home page, click the Secured Firewall Service Request button. You will be taken to the Support Center > Service Request List > Service Request page.
Service Request page, enter or select the required information in the mandatory input fields.
- Select Secured Firewall creation in the task type.
Input field Detailed description Title Enter the title of the service request - Example: Secured Firewall service creation request
Region Select the location of the Samsung Cloud Platform - Automatically entered with the region corresponding to the Account
Service Select the service category and service. If you click the Secured Firewall service request button, it is entered automatically - Service Category: Security
- Service: Secured Firewall
Task classification Select the type you want to request - Create Secured Firewall: select when requesting a new service
content Customer Basic Information Entry and Application Process Guide - Content: End Customer/MSP Information
Attachment If you have a completed Secured Firewall service application (required) and any additional files you wish to share, proceed with the upload - You can attach up to 5 files, each no larger than 5 MB
- Only doc, docx, xls, xlsx, ppt, ppts, hwp, txt, pdf, jpg, jpeg, png, gif, and tif files can be attached
Table. Secured Firewall Service Creation Request Items
- Select Secured Firewall creation in the task type.
After reviewing the application process and reference information, click the Form Download > Service Request Form Download button to download the Secured Firewall Service Application Form.
Please fill out the Secured Firewall Service Application.
- Refer to the item descriptions in the Application Information and Monitoring Information tabs and complete the required fields.
Category Detailed description Application Information Fill in required items such as application type, usage period, and basic information - Application type: select application
- Usage period: enter desired start date, contract status, and estimated usage period
- Basic information: enter Account name, Project name, and recipient information
Monitoring information Enter required items such as protected IP and exception handling IP (specify purpose per IP) - Specify application category per IP
- New: select when applying for a new service
- Public-sector customers do not need to fill this out
Table. Main contents of the Secured Firewall service creation request form
- Refer to the item descriptions in the Application Information and Monitoring Information tabs and complete the required fields.
Attach the completed application form in the attachment area.
Click the Request button on the service request page.
- After the request is completed, check the submitted details on the Support Center > Service Request List page.
After the monitoring personnel review the submitted service request, they proceed with the process to use the service.
The Secured Firewall service is now being launched.
Terminate Secured Firewall
To request termination of the Secured Firewall service, follow the steps below.
- Click the All Services > Management > Support Center menu. You will be taken to the Support Center > Service Home page.
- On the Support Center Service Home page, click the Service Request button. You will be taken to the Service Request List page.
- On the Service Request List page, click the Service Request button. You will be taken to the Service Request page.
- Service Request page: enter or select the required information in the mandatory input fields.
- Select Secured Firewall termination in the task type.
Input field Detailed description Title Enter the title of the service request - Example: Secured Firewall service termination request
Region Select the location of the Samsung Cloud Platform - Automatically entered with the region corresponding to the Account
Service Select service category and service - Service Category: Security
- Service: Secured Firewall
Task classification Select the type of request you want to make - Terminate Secured Firewall: select when terminating the service
content Customer Basic Information Entry and Application Process Guide - Content: End Customer/MSP Information
Attachment If you have a completed Secured Firewall service application (required) and any additional files you wish to share, proceed with the upload - You can attach up to 5 files, each no larger than 5 MB
- Only doc, docx, xls, xlsx, ppt, ppts, hwp, txt, pdf, jpg, jpeg, png, gif, and tif files are allowed
Table. Table. Secured Firewall Service Termination Request Items
- Select Secured Firewall termination in the task type.
- After reviewing Application Process and Reference Information, click the Form Download > Service Request Form Download button to download the Secured Firewall Service Request Form.
- Please fill out the Secured Firewall Service Application.
- Refer to the item descriptions in the Application Information and Monitoring Information tabs, and fill out the required fields.
Category Detailed description Application Information Fill in required fields such as request type, usage period, and basic information - Request type: select termination
- Usage period: enter desired termination date
- Basic information: Account name, Project name, recipient information
Monitoring information When terminating the entire service, no input is required. Table. Main contents of Secured Firewall service termination application form
- Refer to the item descriptions in the Application Information and Monitoring Information tabs, and fill out the required fields.
- Attach the completed application form to the attachment area.
- Click the Request button on the service request page.
- After the request is completed, verify the submitted information on the Support Center > Service Request list page.
- After the monitoring team reviews the submitted service request, the termination is completed once the monitored IP is deleted.
- Service termination requires three business days, including the cancellation request date.
10.3 - Release Note
Secured Firewall
2025.07.01
NEW
Secured Firewall Service Official Version Release- We have launched the Secured Firewall service, a next‑generation firewall for cloud network security provided by Samsung Cloud Platform.
11 - Secured VPN
11.1 - Overview
Service Overview
Secured VPN(Virtual Private Network) is a service that securely connects external customer networks and the Samsung Cloud Platform network through an encrypted virtual private network. Authenticated customer networks can safely access the Samsung Cloud Platform at any time via a secure channel.
Features
- Rapid Service Provision: To ensure a secure VPN communication link between the customer’s network and the Samsung Cloud Platform, a dedicated VPN device must be deployed, and we provide installation support services by security specialists during deployment.
- Secure Access: Provides a virtual network tunnel equipped with certified authentication devices and nationally certified encryption modules that have proven performance and reliability, allowing customers to securely connect from their external network to their internal network built on the Samsung Cloud Platform.
- Simple operating environment: We provide network configuration and VPN operation services optimized for the customer’s environment by security experts, offering an operating environment that makes it easier to use VPN services.
Configuration diagram
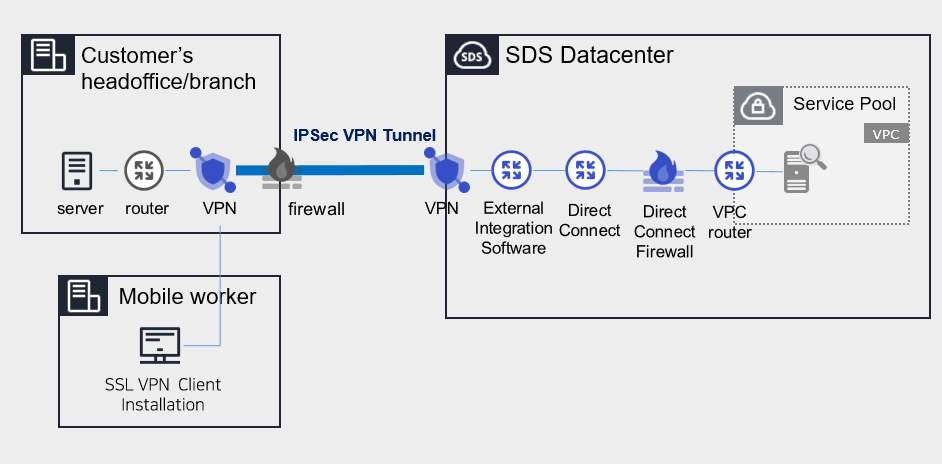
Provided features
We provide the following features.
- IPSec VPN Provision
- Providing IPSec VPN with a nationally certified cryptographic module
- Virtual Private Gateway Creation
- Create a Virtual Private Gateway to connect the cloud internal network with the customer’s network.
- Select traffic bandwidth for bidirectional communication based on network scale
- Create VPN Tunnel
- Ensuring service continuity in the event of a failure by configuring redundant IPsec VPN Gateways.
Component
Secured VPN(Virtual Private Network) provides services composed of Center VPN managed by SDS and Branch VPN installed within the customer’s premises.
Constraints
- The center VPN equipment is a shared device used by many customers, and it cannot be used if its address range overlaps with VPC ranges used by other customers or ranges currently used in Samsung Cloud Platform. Customers who need to use the Secured VPN service should check the available ranges in advance.
- Samsung Cloud Platform usage range: 172.16.0.0/12, 192.168.240.0/20
- Example: Customer A has applied for and is using the 10.0.0.1/24 range; when Customer B newly applies for a Secured VPN, the 10.0.0.1/24 range cannot be used. Verify the available ranges in advance and configure the VPC range accordingly.
Reference
- To verify the available band, contact Console > Support Center > Contact or email mssp.scp@samsung.com.
- After confirming the available address range, SDS performs NAT on the rented branch VPN to change the IP. However, if the branch VPN equipment was purchased directly by the customer, the NAT configuration is handled by the customer.
- The MSP adds the NATed IP to the VPC routing rules in the Samsung Cloud Platform Console.
- Check for cases where the branch VPN and Samsung Cloud Platform IP ranges overlap. If the destination IP range is included in the source IP range, the router will send traffic internally instead of outward, making communication impossible.
- Branch VPN is offered as a rental of SECUI equipment, and a separate fee applies for the equipment lease. If the client already uses VPN equipment, it is necessary to confirm whether non‑SECUI vendor devices are compatible with the center VPN equipment (SECUI).
- For compatibility testing matters other than SECUI equipment, please contact Console > Support Center > Contact Us or via mssp.scp@samsung.com.
Provision status by region
Secured VPN is available in the following environments.
| Region | General (Enter) | Public |
|---|---|---|
| Korea West (kr-west1) | Provided | Not provided |
| Korea East (kr-east1) | Not provided | Not provided |
| South Korea South 1 (kr-south1) | Not provided | Provided |
| South Korea South 2 (kr-south2) | Not provided | Provided |
| South Korea South 3 (kr-south3) | Not provided | Provided |
Table. Secured VPN regional availability status
Preceding Service
This is a list of services that must be pre‑configured before creating a Secured VPN service. Refer to the guides provided for each service for details and prepare them in advance.
- When creating a Direct Connect, create a connection to the target VPC and a DCon-VPN connection.
| Service Category | Service | Detailed description |
|---|---|---|
| Networking | Direct Connect | A service that securely and quickly connects the customer’s network with the Samsung Cloud Platform |
Table. Secured VPN preliminary service
- To use the Secured VPN service, configuration work is required for communication between the customer’s on-premise Office and the customer’s VPC within the Samsung Cloud Platform. Please follow the process below to request an uplink line, including external integration software and VPN configuration, and opening the Direct Connect firewall.
- Application path : Console > Support Center > Service Request
- Service : Networking > Direct Connect
- Task Category : Uplink line request
Reference
Direct Connect creation and Uplink line request must be completed to use the Secured VPN service.
11.2 - How-to guides
Users can create the service by entering the required information for using the Secured VPN (Virtual Private Network) service through the Samsung Cloud Platform Console.
Create Secured VPN
You can apply for and use the Secured VPN service from the Samsung Cloud Platform Console.
To request the creation of a Secured VPN service, follow these steps.
Click the All Services > Security > Secured VPN menu. You will be taken to the Service Home page of Secured VPN.
On the Service Home page, click the Secured VPN Service Request button. Navigate to the Support Center > Service Request List > Service Request page.
Service Request page, enter or select the required information in the mandatory input fields.
- In the task category, select Secured VPN creation.
Input field Detailed description Title Enter the title of the service request - Example: Secured VPN Service Creation Request
Region Select the location of the Samsung Cloud Platform - Automatically filled with the region corresponding to the Account
Service Select the service category and service. If you click the Secured VPN service request button, it is entered automatically - Service Category: Security
- Service: Secured VPN
Task classification Select the type you want to request - Create Secured VPN: select when requesting a new service
content Customer Basic Information Entry and Application Process Guide - Content: End Customer/MSP Information
Attachment If you have a completed Secured VPN service application (required) and any additional files you wish to share, proceed with the upload - You can attach up to 5 files, each no larger than 5 MB
- Only doc, docx, xls, xlsx, ppt, ppts, hwp, txt, pdf, jpg, jpeg, png, gif, and tif files are allowed
Table. Secured VPN service creation request items
- In the task category, select Secured VPN creation.
After reviewing the application process and reference information, click the Form Download > Service Request Form Download button to download the Secured VPN Service Application Form.
Please fill out the Secured VPN Service Application Form.
- Refer to the item descriptions in the Application Information and Monitoring Information tabs and complete the required fields.
Category Detailed description Application Information Complete required fields such as request type, usage period, and basic information - Application type: select application
- Usage period: enter desired start date
- Guaranteed bandwidth: select bandwidth
- Basic information: enter Account name, Project name, recipient information
Monitoring information Common application information, same-model/different-model connection application information, etc., fill in required items (specify usage per IP) - Same-model connection application information: when connecting SECUI equipment
- Different-model connection application information: when connecting equipment other than SECUI
Table. Main contents of the Secured VPN service creation request form
- Refer to the item descriptions in the Application Information and Monitoring Information tabs and complete the required fields.
Attach the completed application form in the attachment area.
Click the Request button on the service request page.
- After the request is completed, check the submitted details on the Support Center > Service Request List page.
After the monitoring personnel review the submitted service request, they proceed with the process to use the service.
Secured VPN service will be launched.
Terminate Secured VPN
To request termination of the Secured VPN service, follow the steps below.
- Click the All Services > Management > Support Center menu. Go to the Support Center > Service Home page.
- On the Support Center Service Home page, click the Service Request button. You will be taken to the Service Request List page.
- On the Service Request List page, click the Service Request button. You will be taken to the Service Request page.
- Service Request page, enter or select the required information in the mandatory input fields.
- In the task category, select Secured VPN termination.
Input field Detailed description Title Enter the title of the service request - Example: Secured VPN Service Termination Request
Region Select the location of the Samsung Cloud Platform - Automatically filled with the region corresponding to the Account
Service Select service category and service - Service Category: Security
- Service: Secured VPN
Task classification Select the type you want to request - Terminate Secured VPN: select if you are terminating the service
content Guide to Entering Customer Basic Information and Application Process - Content: End Customer/MSP Information
Attachment If you have a completed Secured VPN service application (required) and any additional files you wish to share, proceed with the upload - You can attach up to 5 files, each no larger than 5 MB
- Only doc, docx, xls, xlsx, ppt, ppts, hwp, txt, pdf, jpg, jpeg, png, gif, and tif files can be attached
Table. Table. Secured VPN Service Termination Request Items
- In the task category, select Secured VPN termination.
- After reviewing Application Process and Notes, click the Form Download > Service Request Form Download button to download the Secured VPN Service Request Form.
- Please fill out the Secured VPN Service Application Form.
- Refer to the item descriptions in the Application Information and Monitoring Information tabs, and fill out the required fields.
Category Detailed description Application Information Complete required fields such as request type, usage period, and basic information - Request type: select termination
- Usage period: enter desired termination date
- Guaranteed bandwidth: select the bandwidth you applied for
- Basic information: enter Account name, Project name, and recipient details
Monitoring information When terminating the entire service, no input is required. Table. Main contents of the Secured VPN service termination request form
- Refer to the item descriptions in the Application Information and Monitoring Information tabs, and fill out the required fields.
- Attach the completed application form to the attachment area.
- Click the Request button on the service request page.
- Once the request is completed, verify the submitted information on the Support Center > Service Request list page.
- After the monitoring team reviews the submitted service request, the termination is completed once the monitored IP is deleted.
- Service termination requires three business days, including the cancellation request date.
11.2.1 - Secured VPN Build Process Guide
To launch the Secured VPN service, you need to install a branch VPN in the client’s network and then perform an integration check. However, if you have a VPN that you operate directly, the integration check is not required. Refer to the process below to apply for the Secured VPN service.
Caution
Be sure to check the restrictions when using the Secured VPN service.
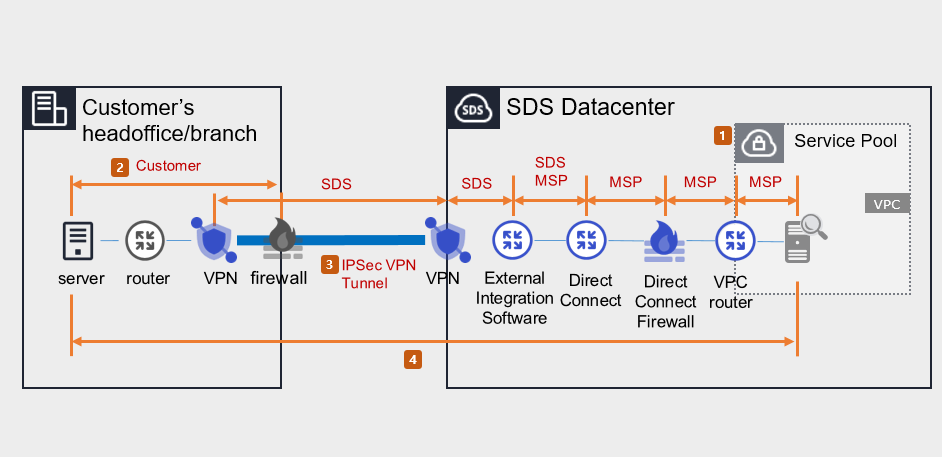
Samsung Cloud Platform Console task (perform MSP)
- Apply for Direct Connect.
- Create a VPC and DCon-VPN connection for the connection target.
- Apply for Uplink line.
- Purpose of request: Configuration work to enable communication between the customer’s Office(On-premise) and the customer’s VPC within the Samsung Cloud Platform.
- Select the application path: Console > Support Center > Service Request.
- Service: Networking > Direct Connect
- Task Category: Uplink line request
- For the construction lead time and Uplink line work schedule, please inquire via Console > Support Center > Contact.
- Set up routing for Firewall, Security Group, Direct Connect, etc.
Routing and firewall configuration (client performed)
- Configure routing between the client’s Office internal network and the branch VPN, and set up the client’s firewall.
- Prior consultation is required for routing and firewall configuration. (SDS → MSP → customer)
- Configure the Samsung Cloud Platform segment and the client Office segment for bidirectional communication.
Installation of client VPN equipment and tunnel activation (MSP/SDS performed)
When installing the customer’s VPM equipment, you can either rent equipment from SDS or use your own equipment. Check the process that applies to your situation.
Case 1) When using the branch VPN device as a SECUI rental device provided by SDS
- Check the specifications, quantity, schedule, and installation location of the leased VPN equipment. (MSP→SDS)
- Please request the preparation of a pre‑installation environment survey for VPN. (SDS → MSP)
- Visit the client site and install the SECUI rental VPN equipment. (SDS)
- Open a tunnel between the branch VPN and the center VPN. (SDS)
Case 2) When using the branch VPN device as the customer’s own equipment
- Check the branch VPN equipment specifications and schedule. (MSP→SDS)
- Request equipment compatibility and IPSec VPN license/equipment setup. (SDS → client/MSP)
- Establish a tunnel between the branch VPN ↔ center VPN. (Customer/SDS)
Reference
- If the client requests a VPN installation work plan, contact via Console > Support Center > Contact or mssp.scp@samsung.com.
- Proceed with the work in compliance with the National Intelligence Service VPN installation guide and security review standards.
End-to-End test (perform MSP/SDS)
- Verify and share the test schedule after installing the branch VPN equipment (or configuring existing equipment). (SDS → MSP)
- Verify communication between the branch VPN device and the VPC (bidirectional).
Caution
Uplink line not requested, customer routing and firewall configuration errors, etc., can cause the End-to-End test to fail.
11.3 - Release Note
Secured VPN
2025.07.01
NEW
Secured VPN Service Official Version Release- We have launched a Secured VPN service that safely connects external customer networks with the Samsung Cloud Platform’s cloud network via an encrypted virtual private network.
12 - Log Transmission
12.1 - Overview
Service Overview
Log Transmission is a service that collects and stores logs in real time from firewalls, IPS, and DDoS security devices, and transmits them to the areas required by the customer. It provides a foundation for performing security monitoring in the user domain using those logs.
Features
- Security Event Log Collection/Transmission: Collect and store logs in real time from security devices, and transmit security events.
- Secure Log Storage/Transmission: Log data can be stored securely, and backup and recovery are possible when needed. Collected logs are safely kept in a redundant storage, and data is transmitted by utilizing VPN services, etc. Sending securely.
Configuration diagram
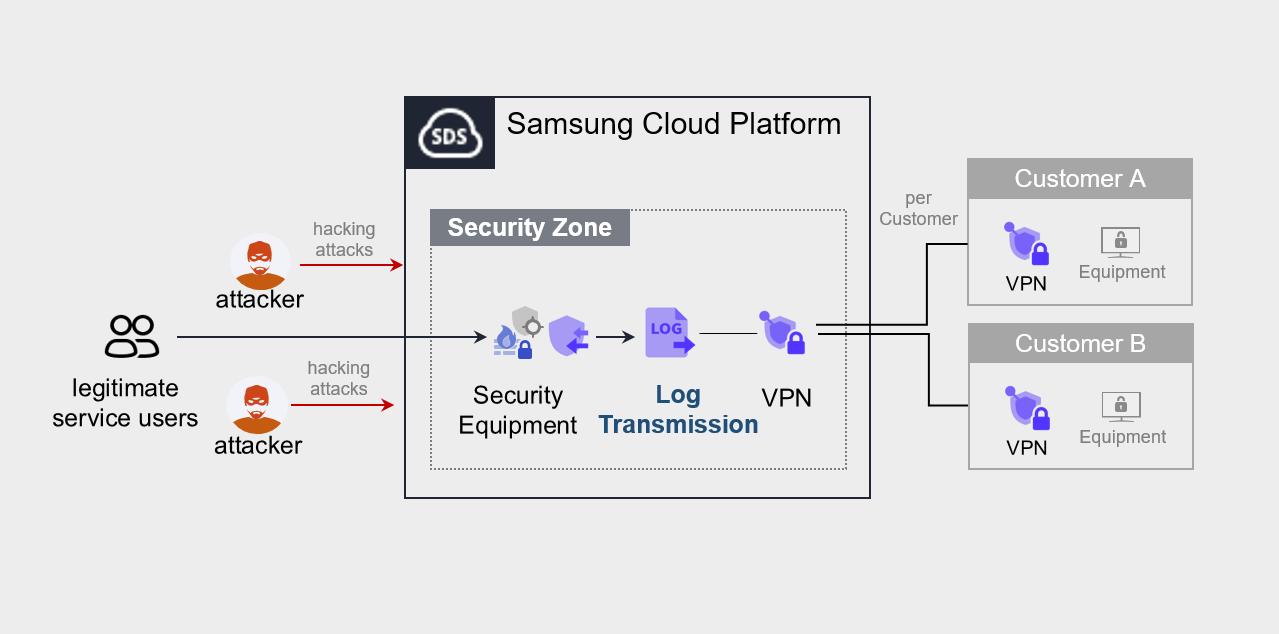
Provided features
We provide the following features.
- Integration of various security log sources
- Real-time log collection from various sources such as firewalls, IPS, and DDoS security devices.
- Log Filtering and Processing
- Filter out unnecessary logs or extract only the logs requested by the customer.
Component
Log Transmission sends service log sources from the Samsung Cloud Platform to the equipment or system desired by the customer.
- The service runs by connecting via VPN to the customer’s office (server room) where the device that receives the log source is located.
Constraints
To use Log Transmission, please check the following items in advance.
- We collect and transmit logs for Security products offered by the Samsung Cloud Platform.
- To send logs, you must be connected via VPN to the device that receives the logs.
Provision status by region
Log Transmission is available in the environments below.
| Region | Provision status |
|---|---|
| Korea West (kr-west1) | Provided |
| Korea East (kr-east1) | Not provided |
| South Korea South 1 (kr-south1) | Not provided |
| South Korea South 2 (kr-south2) | Not provided |
| South Korea South 3 (kr-south3) | Not provided |
Table. Log Transmission regional availability status
Preceding Service
This is a list of services that must be pre-configured before creating the Log Transmission service. Refer to the guide provided for each service for details and prepare in advance.
| Service Category | Service | Detailed description |
|---|---|---|
| Networking | Direct Connect | A service that securely and quickly connects the customer’s network with the Samsung Cloud Platform |
| Security | DDoS Protection | Large-scale network traffic attack detection and response service |
| Security | IPS | A service that detects and responds to intrusions on websites and application servers in real time. |
| Security | Secured Firewall | Next-generation firewall service that meets high security requirement levels |
Table. Log Transmission Pre-service
- When running Log Transmission, you must select the service to which logs will be sent. Once the log transmission service target is determined, a VPN connection is required for secure log transmission.
- To use the Log Transmission service, configuration work is required for communication between the customer’s Office (on‑premise) and the customer’s VPC within the Samsung Cloud Platform. Please follow the process below to request an uplink line, including external integration software and VPN settings, Direct Connect firewall opening, etc.
- Create a Direct Connect service.
- Create a connection between the customer’s VPC and DCon-VPN.
- Apply for an uplink line for communication between the client’s On-premise and VPC.
- Application path: Support Center > Service Request List > Service Request
- Select service: Networking > Direct Connect
- Task Category: Uplink line request
- Configure routing for the VPN path.
- Set up the required routing information such as Firewall, Security Group, Direct Connect, etc.
Reference
Direct Connect creation and Uplink line request must be completed to use the Log Transmission service.
12.2 - How-to guides
Users can create the service by entering the required information for using the Log Transmission service through the Samsung Cloud Platform Console.
Create Log Transmission
You can apply for and use the Log Transmission service from the Samsung Cloud Platform Console.
To request the creation of a Log Transmission service, follow these steps.
Click the All Services > Security > Log Transmission menu. Navigate to the Service Home page of Log Transmission.
On the Service Home page, click the Log Transmission Service Request button. You will be taken to the Support Center > Service Request List > Service Request page.
Service Request page, enter or select the required information in the mandatory input fields.
- In the task type, select Log Transmission creation.
Input field Detailed description Title Enter the title of the service request content - Example: Log Transmission Service Creation Request
Region Select the location of the Samsung Cloud Platform - Automatically filled with the region corresponding to the Account
Service Select the service category and service. If you click the Log Transmission service request button, it is entered automatically - Service Category: Security
- Service: Log Transmission
Task classification Select the type you want to request - Create Log Transmission: select when requesting a new service
content Customer Basic Information Entry and Application Process Guide - Content: End Customer/MSP Information
Attachment Upload the completed Log Transmission service application (required) and any additional files you wish to share - You can attach up to 5 files, each no larger than 5 MB
- Only doc, docx, xls, xlsx, ppt, ppts, hwp, txt, pdf, jpg, jpeg, png, gif, tif files are allowed
Table. Log Transmission Service Creation Request Items
- In the task type, select Log Transmission creation.
After reviewing the application process and reference information, click the Form Download > Service Request Form Download button to download the Log Transmission Service Application Form.
Please fill out the Log Transmission Service Application Form.
- Refer to the item descriptions in the Application Information and Monitoring Information tabs and complete the required fields.
Category Detailed description Application Information Fill in required items such as application type, usage period, recipient information, etc. - Application type: select application
- Usage period: enter desired start date
- Basic information: enter Account name, Project name, recipient information
Monitoring information Enter required items such as log transmission target and customer IP (range) - Complete all items except special cases
Table. Main contents of Log Transmission service creation request form
- Refer to the item descriptions in the Application Information and Monitoring Information tabs and complete the required fields.
Attach the completed application form in the attachment area.
On the service request page, click the Request button.
- After the request is completed, check the submitted details on the Support Center > Service Request List page.
After the monitoring personnel review the submitted service request, they proceed with the process to use the service.
The Log Transmission service is now available.
Log Transmission Check detailed information
The Log Transmission service proceeds with the process for the service after applying through an SR. Unlike other services, detailed Log Transmission information cannot be viewed in the Console.
- To view detailed information, click the Contact Us button on the Support Center > Inquiry List page. On the Contact Us page, you can write your question and submit it.
Terminate Log Transmission
To request cancellation of the Log Transmission service, follow the steps below.
- Click the All Services > Management > Support Center menu. You will be taken to the Support Center > Service Home page.
- On the Support Center Service Home page, click the Service Request button. You will be taken to the Service Request List page.
- On the Service Request List page, click the Service Request button. You will be taken to the Service Request page.
- Service Request page: enter or select the required information in the mandatory input fields.
- In the task category, select Log Transmission Cancellation.
Input field Detailed description Title Enter the title of the service request - Example: Log Transmission Service Termination Request
Region Select the location of the Samsung Cloud Platform - Automatically entered with the region corresponding to the Account
Service Select service category and service - Service Category: Security
- Service: Log Transmission
Task classification Select the type you want to request - Log Transmission termination: select if you are terminating the service
content Customer Basic Information Entry and Application Process Guide - Content: End Customer/MSP Information
Attachment Upload the completed Log Transmission service application (required) and, if you have additional files you want to share, proceed with the upload - You can attach up to 5 files, each no larger than 5 MB
- Only doc, docx, xls, xlsx, ppt, ppts, hwp, txt, pdf, jpg, jpeg, png, gif, and tif files are allowed
Table. Table. Log Transmission Service Termination Request Items
- In the task category, select Log Transmission Cancellation.
- After reviewing Application Process and Reference Information, click the Form Download > Service Request Form Download button to download the Log Transmission Service Application Form.
- Log Transmission Service Application Form please fill out.
- Refer to the item descriptions in the Application Information and Monitoring Information tabs and complete the required fields.
Category Detailed description Application Information Fill in required fields such as request type, usage period, recipient information, etc. - Request type: select request
- Usage period: enter desired service termination date
- Basic information: enter Account name, Project name, recipient information
- Usage amount does not need to be filled out
Monitoring information Fill in required items such as log transmission target and customer IP (range) - Fill out all items except special cases
Table. Log Transmission Service Termination Application Form Main Contents
- Refer to the item descriptions in the Application Information and Monitoring Information tabs and complete the required fields.
- Attach the completed application form to the attachment area.
- Click the Request button on the service request page.
- After the request is completed, verify the submitted information on the Support Center > Service Request list page.
- After the monitoring staff verifies the submitted service request, the termination process is completed once the log transmission target and the customer’s used IP (range) are removed.
- Service termination takes 2–3 business days, counting from the cancellation request date.
12.3 - Release Note
Log Transmission
2025.10.23
NEW
Log Transmission Service Official Version Release- We have launched the Log Transmission service that enables security monitoring of the user domain on Samsung Cloud Platform.
13 - ESS(Endpoint Security Suite)
13.1 - Overview
Service Overview
The Endpoint Security Suite (ESS) provides the existing on‑premise Endpoint Security solutions ESCORT, NASCA, and SecuPrint as SaaS, allowing reduced deployment and operational costs. Additionally, the One‑View integrated management console enables easy and convenient management of each point solution, supporting efficient security solution operation.
Features
One-View Integrated Management
By consolidating the management consoles previously provided for each solution—ESCORT, NASCA, and SecuPrint—into One-View, integrated installation and removal of the solutions became possible, improving the efficiency of solution management and security operations.Expansion of PC Security Management Scope
The traditional On-Premise solution managed only PCs within the site after configuring a local network, but the Endpoint Security Suite that uses the Internet enables the same level of PC security management regardless of whether the PCs are inside or outside the site.Flexible scalability based on Rest API
By providing various common functions such as personnel information, administrator account information, and license management information through Rest API, integration and expansion with point solutions become easy.
Service Architecture Diagram
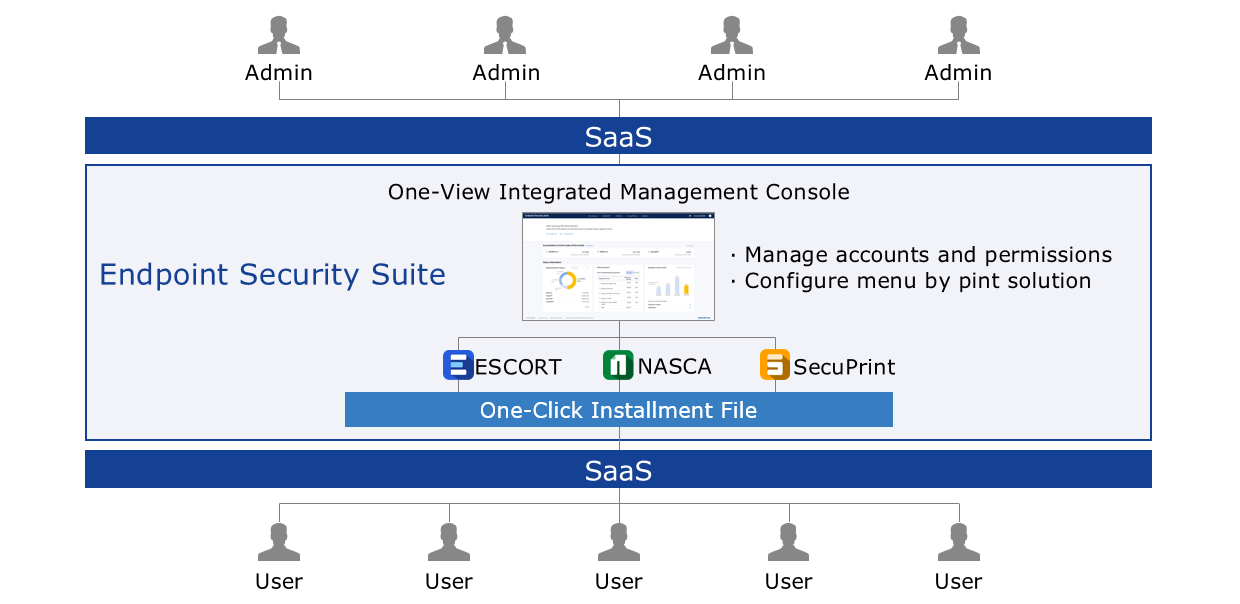
Provided features
ESS provides the following features.
ESCORT
- Control of information leakage through storage devices (USB, external HDD, etc.)
- Control of information leakage via network (WiFi, Bluetooth, etc.)
- Program execution control and vulnerability mitigation
NASCA
- Electronic document permission management and encryption/decryption
- Ensuring business continuity by providing automatic decryption functionality
- Screen watermark
SecuPrint
- Output watermark
- Output history management (log/statistics/tracking)
- Personal data search and blocking (resident registration number/account number/card number, etc.)
Component
ESCORT Windows Client
- ESCORT solution client for Windows PC to prevent internal information leakage
ESCORT Linux Client
- ESCORT solution client for Linux PC to prevent internal data leakage
NASCA Client
- Windows PC client for the NASCA solution for document encryption/decryption and permission management
SecuPrint Client
- Windows PC client for the SecuPrint solution, providing output watermarks and output security
Base Plan
- Annual license cost for each server software of the ESCORT, NASCA, and SecuPrint solutions
Provision status by region
ESS is available in the following environments.
| Region | Provision status |
|---|---|
| Korea West (kr-west1) | Provide |
| Korea East (kr-east1) | Not provided |
| South Korea South 1 (kr-south1) | Not provided |
| South Korea South 2 (kr-south2) | Not provided |
| South Korea South 3 (kr-south3) | Not provided |
Table. ESS availability by region
Preliminary Service
ESS has no prior service.
13.2 - How-to guides
Users can apply for the service by entering the required information for using the Endpoint Security Suite (ESS) service through the Samsung Cloud Platform Console.
Create ESS
You can apply for and use the ESS service from the Samsung Cloud Platform Console.
To request the creation of an ESS service, follow these steps.
- All Services > Security > ESS Click the menu. Navigate to the Service Home page of ESS.
- On the Service Home page, click the ESS Service Request button. You will be taken to the Support Center > Service Request List > Service Request page.
- Service Request page: enter or select the required information in the mandatory input fields.
- Select ESS creation in the task category.
Input field Detailed description Title Enter the title of the service request content - Example: ESS Service Creation Request
Region Select the location of the Samsung Cloud Platform - Automatically entered with the region corresponding to the Account
Service Select the service category and service. If you click the ESS service request button, it is entered automatically - Service Category: Security
- Service: ESS
Task classification Select the type you want to request - Create ESS: select when requesting a new service
content Guide to the service application process and reference information Attachment If you have a completed ESS service application (required) and any additional files you wish to share, proceed with the upload - You can attach up to 5 files, each no larger than 5 MB
- Only doc, docx, xls, xlsx, ppt, ppts, hwp, txt, pdf, jpg, jpeg, png, gif, and tif files are allowed
Table. ESS Service Creation Request Items
- Select ESS creation in the task category.
- Check the required information entered on the Service Request page, and click the Request button.
- When the request is completed, check the submitted details on the Support Center > Service Request List page.
- After the service manager reviews the submitted service request, the process for using the service is initiated.
Check ESS application details
After applying for the ESS service, you can view the detailed information and processing steps.
To check your ESS service application details, follow these steps.
- Click the All Services > Support Center menu. Go to the Service Home page of Support Center.
- On the Service Home page, click the Service Request menu. You will be taken to the Service Request List page.
- On the Service Request List page, select the request item. You will be taken to the Service Request Details page.
- Service Request Details page lets you view detailed information and processing steps.
Terminate ESS
To request termination of the ESS service, follow the steps below.
Click the All Services > Security > ESS menu. Go to the Service Home page of ESS.
On the Service Home page, click the ESS Service Request button. You will be taken to the Support Center > Service Request List > Service Request page.
Service Request page, enter or select the required information in the mandatory input fields.
- Select ESS Service Termination in the task category.
Input field Detailed description Title Enter the title of the service request - Example: ESS Service Termination Request
Region Select the location of the Samsung Cloud Platform - automatically entered with the region corresponding to the Account
Service Select the service group and service. If you click the ESS service request button, it is entered automatically - Service Group: Security
- Service: ESS
Task classification Select the task you want to request - ESS Service Termination: select if you want to terminate the service
content Review the service termination process and reference information, then enter the detailed application details. Attachment If you have any additional files you wish to share for service termination, proceed with the upload - You can attach up to 5 files, each within 5 MB
- Only files with the following extensions are allowed: doc, docx, xls, xlsx, ppt, ppts, hwp, txt, pdf, jpg, jpeg, png, gif, tif
Table. ESS Service Termination Request Items
- Select ESS Service Termination in the task category.
Check the required information entered on the Service Request page, and click the Request button.
- After you complete the ESS service termination request, the service manager will verify it, and the ESS service termination and deletion process will proceed.
13.3 - Release Note
ESS
2026.03.19
FEATURE
ESS external product launch- We are launching the ESS external-facing product that offers the previously on-premises Endpoint Security service, which was provided to external customers under a perpetual license, as a SaaS-based Endpoint Security service with a subscription license.
2025.12.16
NEW
ESS Service Official Version Launch- We are launching a service that offers the on‑premise Endpoint Security solutions ESCORT, NASCA, and SecuPrint as SaaS, and enables efficient management of endpoint security solutions from the One‑view integrated admin console.