This is the multi-page printable view of this section. Click here to print.
VPC
- 1: Overview
- 1.1: ServiceWatch Metrics
- 2: How-to guides
- 2.1: Subnet
- 2.2: Port
- 2.3: Internet Gateway
- 2.4: NAT Gateway
- 2.5: Public IP
- 2.6: Private NAT
- 2.7: VPC Endpoint
- 2.8: VPC Peering
- 2.9: Transit Gateway
- 2.10: PrivateLink Service
- 2.11: PrivateLink Endpoint
- 2.12: NAT Logging
- 3: API Reference
- 4: CLI Reference
- 5: Release Note
1 - Overview
Service Overview
Samsung Cloud Platform provides VPC services to enable the use of logically isolated, customer‑dedicated private network spaces in the cloud environment.
VPC(Virtual Private Cloud) is a service that provides a logically isolated, customer‑dedicated private network space in a cloud environment. Depending on the intended use, you can create a General Subnet or a Local Subnet for communication between servers, and freely select NAT Gateway and Internet Gateway to configure various networks. You can create multiple VPCs and operate them independently. VPC Peering allows configuration of connections between VPCs.
Service architecture diagram
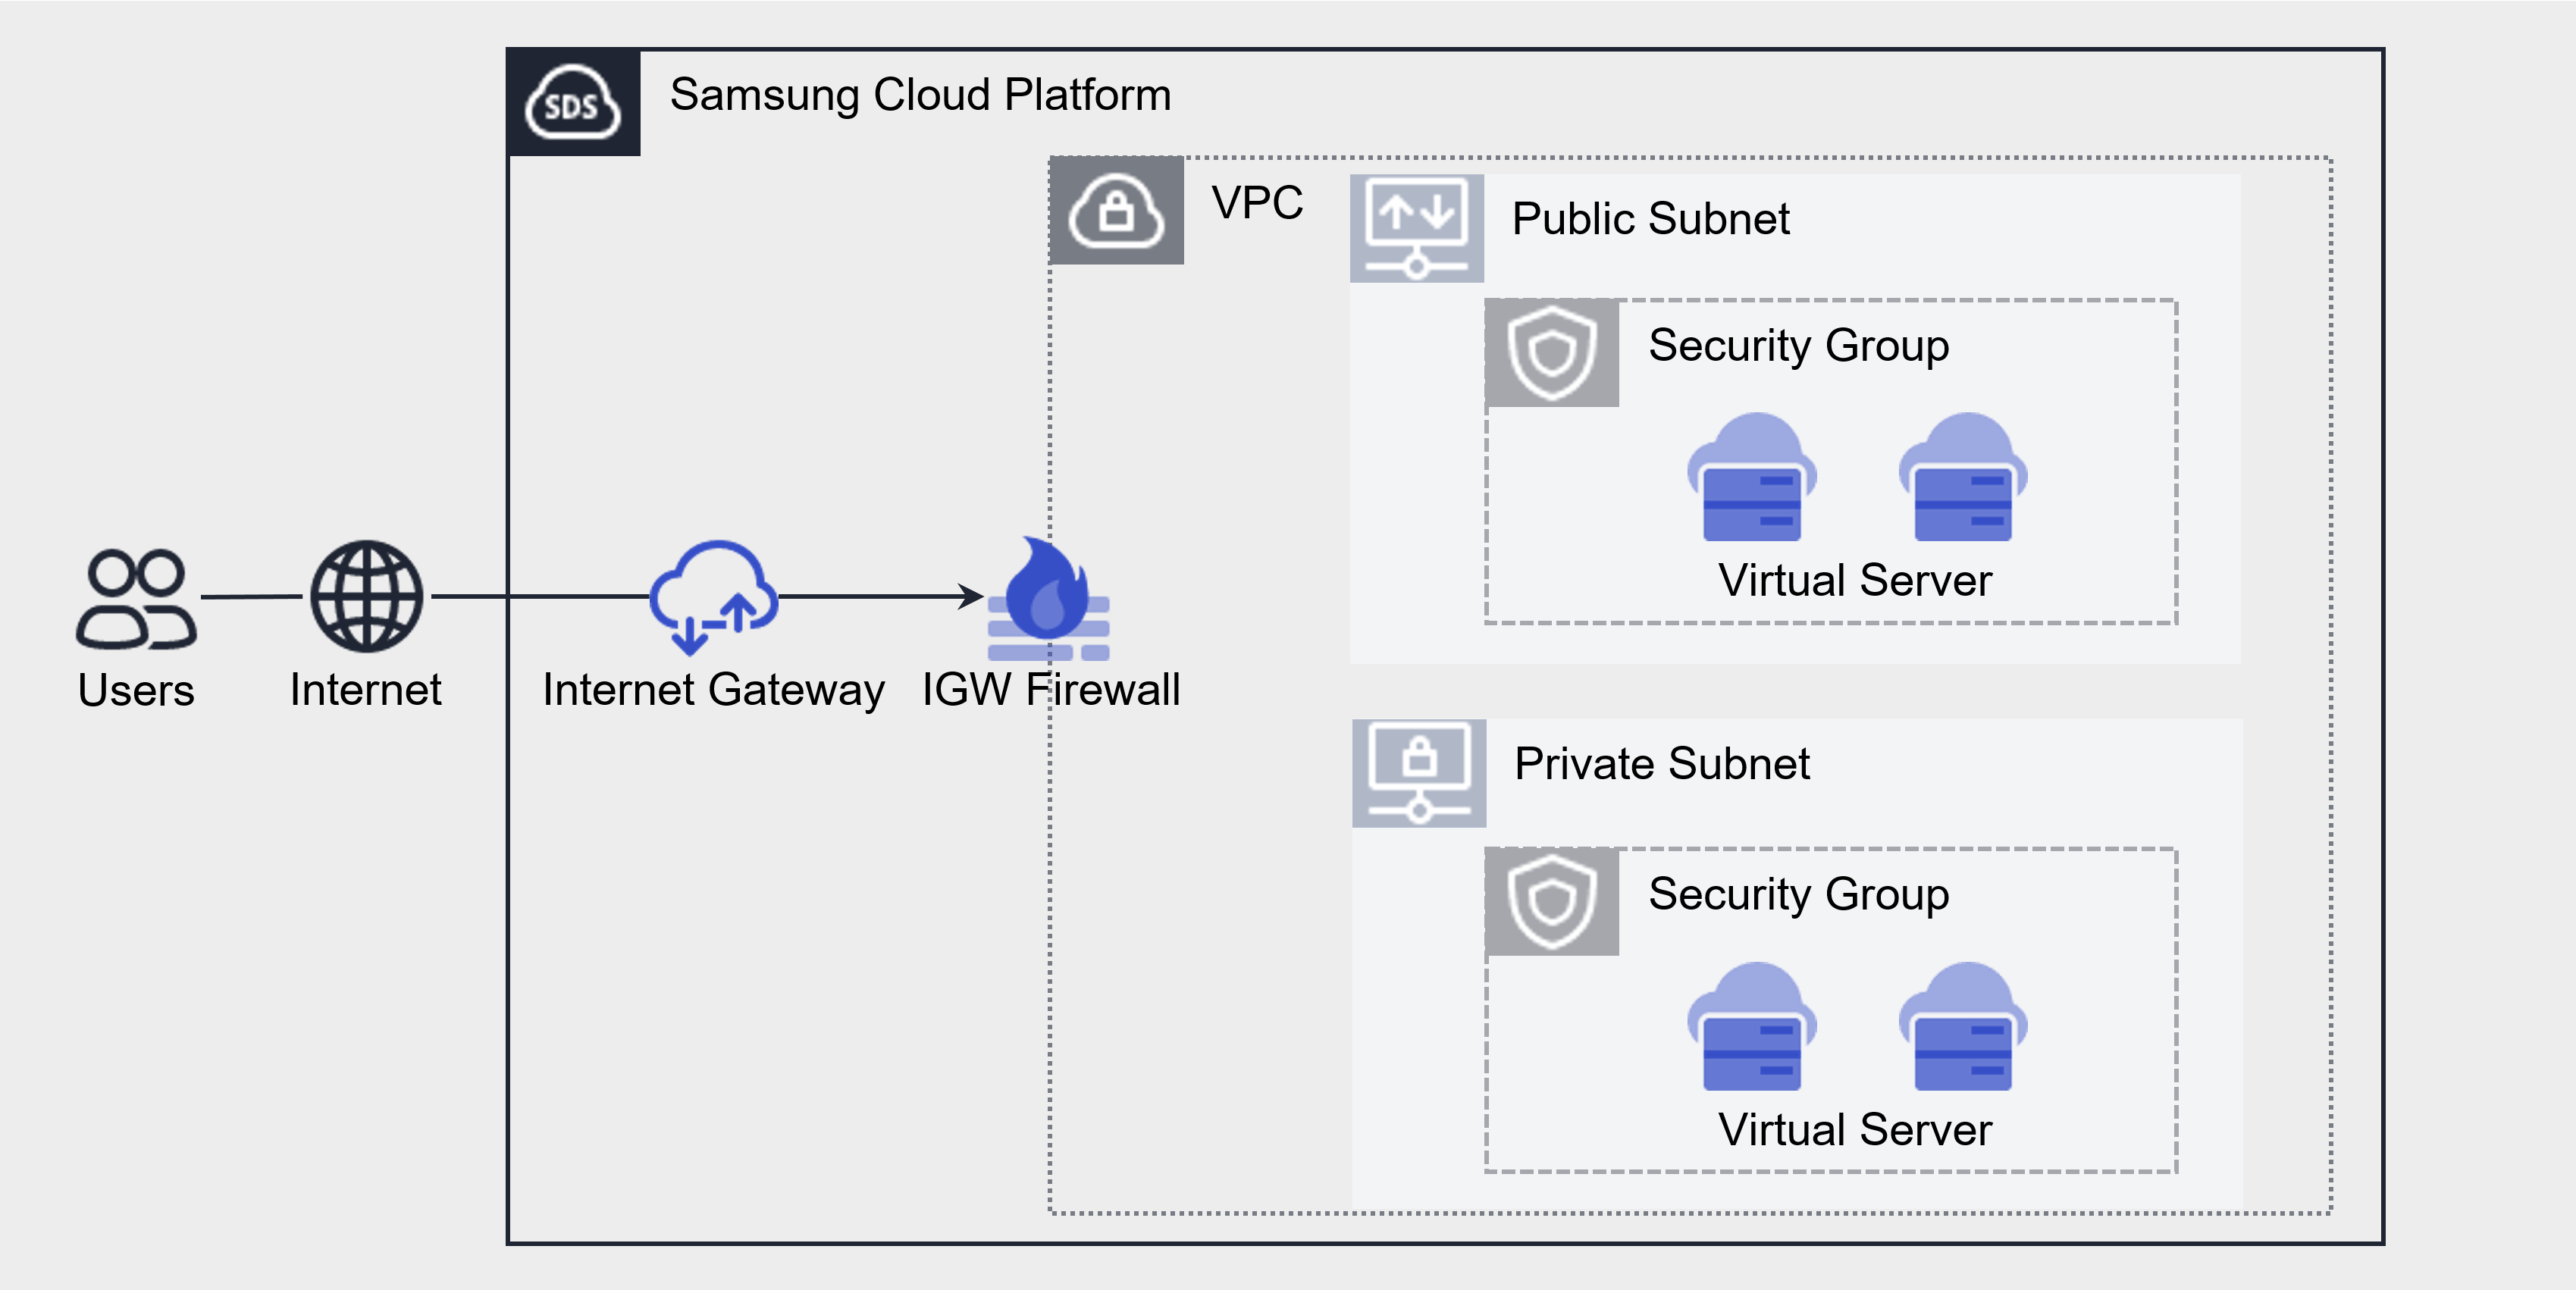
Components
Subnet
Subnet refers to the IP address range of a VPC. Depending on the purpose, use the General Subnet to create subnets for public or private use. It is a service that lets users segment the network within a VPC according to their purpose and scale. Subnet provides a standard Subnet and a Local Subnet for communication between servers.
General Subnet Creation/Read/Deletion: When creating a VPC, a Subnet is created by default, and you use the Subnet according to its purpose. * For example, you can separate and use a Public Subnet that can access the internet and a Private Subnet that cannot.
VPC Endpoint Subnet Create/Read/Delete: You can access the Samsung Cloud Platform via a private connection from an external network linked to the VPC, allowing entry into the VPC.
Local Subnet Creation/Query/Deletion: It does not allow connections to other Subnets or external access, and only permits direct connections between Virtual Server-Virtual Server or Bare Metal Server-Bare Metal Server, so it can be configured only for Virtual Server-Virtual Server within the VPC.
Subnet types
A network zone that logically partitions the VPC IP range, segmenting traffic and security through routing and public/private separation. The provided Subnet types are as follows.
| type | Detailed description |
|---|---|
| Public Subnet | Subnet that can perform internet inbound/outbound communication via Public IP NAT and NAT Gateway |
| Private Subnet | Subnet that can perform outbound Internet communication through a NAT Gateway |
| VPC Endpoint Subnet | Subnet for VPC Endpoint creation |
| Local Subnet | A subnet that does not permit external communication, used only for inter‑server communication. |
Internet Gateway
You can create an Internet Gateway, connect it to a VPC, view its details, or delete an Internet Gateway that is not in use. You can connect VPC resources to the internet using an Internet Gateway.
You can assign a Public IP to instances and load balancers that are internet‑connected so they can be accessed from outside.
NAT Gateway
You can create a NAT Gateway, connect it to a subnet, view its details, or delete a NAT Gateway that is not in use.
To create a NAT Gateway for a subnet, you must first create an Internet Gateway and attach it to the VPC. When you create a NAT Gateway, internet access is allowed for all resources belonging to the subnet. Apply firewall rules to restrict internet access.
A NAT Gateway can be created when it is of the General type, and it is a service that maps a single representative public IP for a Virtual Server without a public IP NAT to use the internet for outbound traffic.
Public IP
If you want to use the same IP address each time you stop and start an instance, reserve a Public IP and use it.
This is a service that creates a desired public IP within the available Public IP pool of Samsung Cloud Platform and assigns it to compute resources for use.
Compute resources assigned with the designated public IP retain the IP even after a reboot.
Port
Provides a connection point for connecting a single device, such as a server’s NIC, to the network. This allows adding NICs beyond the default provision.
VPC Endpoint
Provides an entry point for the VPC that allows access to the Samsung Cloud Platform via a private connection from an external network connected to the VPC.
VPC Peering
You can communicate via IP through a 1:1 private route between VPCs. By default, it provides peering between VPCs in the same account, and only one connection is allowed between different accounts.
Private NAT
You can map the customer’s IP and connect using Direct Connect from compute resources within the VPC.
Transit Gateway
Transit Gateway is a gateway service that easily connects the customer’s network with the Samsung Cloud Platform network and serves as a connection hub for multiple VPCs within the cloud environment.
Through the Transit Gateway, you can configure various network topologies that customers desire. Additionally, it provides independent firewall configuration and routing capabilities for each connected network segment, enabling thorough security management.
PrivateLink
It is a service that connects internal Samsung Cloud Platform data to a private path between the VPC and the SCP service without exposing it to the internet.
- PrivateLink Service is for service providers, and PrivateLink Endpoint is for service users.
Constraints
The VPC of Samsung Cloud Platform limits the number of VPCs and Subnets that can be created as follows.
| Category | Default quota | Detailed description |
|---|---|---|
| VPC | 5 | Default VPC creation limit per account |
| VPC IP range | 6 | Number of IP range creation limits per VPC (default 1 + additional 5) |
| VPC Peering | 5 | Maximum number of VPC Peerings per account |
| Primary Subnet | 3 | Maximum number of default Primary Subnets that can be created per VPC |
| Secondary Subnet | 10 | Maximum number of default Secondary Subnets that can be created per Primary Subnet
|
| Private NAT | 3 | Default Private NAT creation limit per VPC |
| Transit Gateway | 3 | Maximum number of Transit Gateways per account |
| Transit Gateway connection from VPC | 5 | Maximum number of VPC connections per Transit Gateway (only the same Account can be connected) |
Preceding Service
VPC has no prerequisite services.
1.1 - ServiceWatch Metrics
VPC - Internet Gateway sends metrics to ServiceWatch. The metrics provided by default monitoring are data collected at 5‑minute intervals.
Basic Metrics
Internet Gateway
The following are the basic metrics for the Internet Gateway namespace.
The indicators whose names are shown in bold below are the indicators selected as major indicators among the basic indicators provided by Internet Gateway. Key metrics are used to configure service dashboards that are automatically built for each service in ServiceWatch.
Each metric provides guidance in the user guide on which statistical value is meaningful to query, and among the meaningful statistics, the values displayed in bold text are the primary statistics. In the service dashboard, primary metrics can be viewed using the primary statistical values.
| Performance items | Detailed description | unit | Meaningful statistics |
|---|---|---|---|
| Network In Total Bytes_Internet | Cumulative traffic volume from Internet Gateway → VPC | Bytes |
|
| Network Out Total Bytes _Internet | Cumulative traffic volume heading from VPC → Internet Gateway | Bytes |
|
| Network In Total Bytes _Internet_Delta | Cumulative traffic volume over 5 minutes from Internet Gateway → VPC (Internet) | Bytes |
|
| Network Out Total Bytes _Internet_Delta | Cumulative traffic volume over 5 minutes from VPC → Internet Gateway (Internet) | Bytes |
|
2 - How-to guides
Users can create the service by entering the required VPC information and selecting detailed options through the Samsung Cloud Platform Console.
Create VPC
You can create and use VPC services in the Samsung Cloud Platform Console.
To create a VPC, follow these steps.
Click the All Services > Networking > VPC menu. 1. Navigate to the VPC Service Home page.
On the Service Home page, click the Create VPC button. 2. Navigate to the VPC creation page.
- Enter or select the required information in the Service Information Input area.
구분 필수 여부Detailed description VPC name Required Name of the VPC to create - Enter using English letters and numbers, within 3 to 20 characters
IP range Required Select IP range - in IP range format
/16 - /28enter within the range- Example:
192.168.0.0/24
- Example:
- Some IP ranges are reserved for management and cannot be used
Description Selection Enter description of VPC Table. VPC Service Information Input Items - In the Additional Information Input area, enter or select the required information.
Category whether requiredDetailed description tag Select Add Tag - Up to 50 per resource can be added
- After clicking the Add Tag button, input or select Key, Value values
Table. VPC additional information input items
- Enter or select the required information in the Service Information Input area.
Summary Check the detailed information and estimated billing amount generated in the panel, and click the Create button.
- When creation is complete, check the created resources on the VPC List page.
View VPC details
The VPC service can view and edit the complete resource list and detailed information. VPC Details page consists of Detailed Information, IP Range Management, Tags, Operation History tabs.
To view VPC details, follow these steps.
- Click the All Services > Networking > VPC menu. 1. Navigate to the VPC’s Service Home page.
- On the Service Home page, click the VPC menu. 2. Navigate to the VPC List page.
- On the VPC List page, click the resource whose details you want to view. 3. Navigate to the VPC Details page.
- The VPC Details page displays status information and additional feature information, and is organized into the Details, IP Range Management, Tags, Activity History tabs.
Category Detailed description status VPC status - Active: Operating normally
- Deleting: Deletion in progress
- Creating: Creation in progress
- Error: Unable to determine current status
- If it occurs continuously, contact the registered administrator
Service cancellation Cancel service button - If you cancel the service, the running service may be terminated immediately, so proceed with the cancellation only after fully considering the impact of service interruption
Table. VPC status information and additional features
- The VPC Details page displays status information and additional feature information, and is organized into the Details, IP Range Management, Tags, Activity History tabs.
Detailed Information
On the VPC List page, you can view detailed information of the selected resource and, if necessary, edit the information.
| Category | Detailed description |
|---|---|
| service | Service name |
| Resource Type | Resource Type |
| SRN | Unique resource ID in Samsung Cloud Platform
|
| Resource Name | VPC name |
| Resource ID | VPC’s unique resource ID |
| Constructor | User who created the VPC |
| Creation Date/Time | VPC creation timestamp |
| Modifier | User who modified VPC information |
| Modification date and time | Date and time the VPC information was modified |
| VPC name | VPC resource name |
| Availability Zone | VPC Availability Zone information |
| External connection | External resource information |
| VPC ID | VPC unique ID |
| IP range | VPC IP range |
| Explanation | VPC description
|
IP range management
VPC List page allows you to view and add IP range information associated with the selected resource.
| Category | Detailed description |
|---|---|
| IP range | Added IP range information |
| Creation Date/Time | IP range addition time |
| Add IP range | Add IP range button
|
When adding an IP range to a VPC, you cannot add it in the following cases.
- IP range currently used in the VPC
- The address range added as the destination to the peer VPC in the VPC Peering rule associated with the current VPC.
- The address range added as a remote destination in the Direct Connect rule connected to the current VPC.
- The range where the destination was added as remote in the Transit Gateway rule connected to the current VPC.
- NAT IP range currently used by the Private NAT connected to the VPC
Tag
On the VPC List page, you can view the tag information of the selected resource, and add, modify, or delete it.
| Category | Detailed description |
|---|---|
| Tag list | Tag list
|
작업 이력 {#job}
VPC 목록 페이지에서 선택한 자원의 작업 이력을 확인할 수 있습니다.
| Category | Detailed description |
|---|---|
| Task History List | Resource change history
|
VPC 해지하기 {#terminate}
사용하지 않는 VPC를 해지해 운영 비용을 절감할 수 있습니다.
VPC를 해지하려면 다음 절차를 따르세요.
모든 서비스 > Networking > VPC 메뉴를 클릭하세요. VPC의 Service Home 페이지로 이동합니다. Service Home 페이지에서 VPC 메뉴를 클릭하세요. VPC 목록 페이지로 이동합니다. VPC 목록 페이지에서 해지할 자원을 선택하고, 서비스 해지 버튼을 클릭하세요. 해지가 완료되면, VPC 목록 페이지에서 자원이 해지되었는지 확인합니다.
2.1 - Subnet
Create Subnet
You can create and use the VPC Subnet service from the Samsung Cloud Platform Console.
To create a Subnet, follow these steps.
All Services > Networking > VPC menu, click it. 1. Go to the Service Home page of VPC.
On the Service Home page, click the Create Subnet button. 2. Go to the Subnet creation page.
- Enter or select the required information in the Service Information Input area.
Category Required statusDetailed description VPC name Required Select the VPC to which the subnet will be attached from the list of existing VPCs - Display the Availability Zone information of the selected VPC
- Click + Create New to create a VPC and then select it
VPC IP range Selection Automatically input the CIDR range of the selected VPC Subnet type Required Select Subnet type - Public: Resources within the Subnet can use Public IP NAT and the Subnet’s NAT Gateway is available
- Private: Resources within the Subnet cannot use Public IP NAT, but can use the Subnet’s NAT Gateway
- Local: Available for Virtual Server and Bare Metal Server
- A Local Subnet is a Subnet for communication only between servers and cannot communicate with external networks
- VPC Endpoint: VPC Endpoint can be configured
Subnet classification Required 선택한 Subnet 유형에 따라 Primary/Secondary Subnet 생성 - Primary Subnet을 먼저 생성한 후 하위에 동일한 유형으로 Secondary Subnet 생성 가능
- 네트워크 격리가 필요한 경우에는 Primary Subnet 생성 필요
- VPC Endpoint 유형은 Primary Subnet만 제공
Availability Zone 필수 선택한 VPC가 Multi-AZ인 경우, VPC의 Availability Zone 정보 표시 - 3가지 Availability Zone이 자동으로 지정됨
Subnet name Required Subnet name to create - Enter using English letters (both uppercase and lowercase) and numbers, within 3 - 20 characters
IP range Required IP range to use - in IP range format
/16 ~ /28enter within the range- Example:
192.168.0.0/24
- Example:
- The IP range cannot overlap with IP ranges already in use within the VPC (other subnets)
Gateway IP Required Display the Gateway IP address of the Subnet - The first IP of the entered IP range is automatically filled in
- Cannot be modified after the service is created
표. Subnet 서비스 정보 입력 항목 - In the Additional Information Input area, enter or select the required information.
Category Required statusDetailed description Explanation Selection Enter description for Subnet IP allocation range Selection Range can be set within the IP range to be used - Select between the entire IP range or individual specification
- Subnet sub-resources receive IP assignments from the entered entire IP range or the individually specified range by the user
- When individual specification is selected, enter the start IP address and the end IP address
DNS Name Server Selection After selecting Use, enter the DNS Name Server IP Host path Selection Use after selecting, enter the host path - Enter the destination IP range and Next Hop IP address
- Destination IP ranges must not overlap each other
tag Selection Add Tag - Up to 50 per resource can be added
- After clicking the Add Tag button, enter or select Key, Value values
표. Subnet 추가 정보 입력 항목
- Enter or select the required information in the Service Information Input area.
In the Summary panel, verify the detailed information and estimated charges you generated, and click the Create button.
- Once creation is complete, check the created resources on the Subnet List page.
Check Subnet detailed information
The Subnet service allows you to view and edit the full resource list and detailed information. Subnet Details page consists of Detailed Information, Virtual IP Management, Tags, Operation History tabs.
To view detailed Subnet information, follow these steps.
- Click the All Services > Networking > VPC menu. 1. Go to the Service Home page of VPC.
- On the Service Home page, click the Subnet button. 2. Go to the Subnet List page.
- On the Subnet list page, click the resource to view detailed information. 3. Go to the Subnet Details page.
- Subnet Details page displays status information and additional feature information, and consists of Details, Virtual IP Management, Tags, Operation History tabs.
Category Detailed description Status Subnet status - Creating: Creation in progress
- Active: Operating normally
- Editing: Modification in progress
- Deleting: Deletion in progress
- Failed: State where creation failed
- Error: Unable to determine current state
- If it occurs continuously, contact the registered administrator
Delete Subnet Delete Subnet button 표. Subnet 상태 정보 및 부가 기능
- Subnet Details page displays status information and additional feature information, and consists of Details, Virtual IP Management, Tags, Operation History tabs.
Detailed Information
Subnet List page lets you view the operation history of the selected resource.
| Category | Detailed description |
|---|---|
| Service | Service name |
| Resource Type | Resource Type |
| SRN | Unique resource ID in Samsung Cloud Platform
|
| Resource Name | Subnet resource name |
| Resource ID | Unique resource ID in the service |
| Constructor | User who created the Subnet |
| Creation date and time | Subnet creation date/time |
| Modifier | User who modified Subnet information |
| Modification date and time | Date and time the subnet information was modified |
| Subnet name | Subnet name |
| Availability Zone | Subnet’s Availability Zone information |
| Subnet type | Subnet type |
| Subnet classification | Display the Primary/Secondary Subnet type generated according to the Subnet type |
| Subnet ID | Subnet Unique ID |
| Primary Subnet name | Created Primary Subnet information
|
| Secondary Subnet name | Created Secondary Subnet information
|
| VPC name | Click the name of the VPC
|
| IP range | Used IP range |
| Gateway IP | Subnet’s Gateway IP address |
| DHCP IP | Second IP address among the used IP range
|
| Explanation | Subnet additional description
|
| IP allocation range | IP allocation range |
| DNS Name Server | Whether to use DNS Name Server |
| Host path | Host route (destination IP range, Next Hop IP address) information |
Virtual IP Management
Subnet list page allows you to view the virtual IP information of the selected resource, and you can reserve or delete it.
| Category | Detailed description |
|---|---|
| Virtual IP reservation | Virtual IP usage reservation |
| Virtual IP | Virtual IP information
|
| Public Nat IP | Public Nat IP information |
| Number of connected ports | Number of ports connected to the IP |
| Reservation date and time | Virtual IP reservation date and time |
| Return | Virtual IP Return button
|
tag
On the Subnet list page, you can view the tag information of the selected resource, and add, modify, or delete it.
| Category | Detailed description |
|---|---|
| Tag list | Tag list
|
Job History
You can view the operation history of the selected resource on the Sunnet List page.
| Category | Detailed description |
|---|---|
| Task History List | Resource Change History
|
Managing Virtual IP
You can reserve or manage Virtual IPs to be used in a Subnet.
Reserve Virtual IP
You can reserve a Virtual IP to be used in the Subnet.
To reserve a Virtual IP, follow these steps.
- All Services > Networking > VPC Click the menu. 1. Go to the Service Home page of VPC.
- On the Service Home page, click the Subnet button. 2. Navigate to the Subnet List page.
- On the Subnet list page, click the resource to reserve a Virtual IP. 3. Subnet Details Navigate to the page.
- On the Subnet Details page, click the Virtual IP Management tab. 4. Navigate to the Virtual IP Management tab page.
- Click the Virtual IP Reservation button on the Virtual IP Management tab page. 5. The Virtual IP reservation window opens.
- In the Virtual IP reservation window, set the detailed items and click OK.
- Virtual IP: When you select Auto-Generate, an automatically generated IP is reserved, and when you select Enter, you can reserve a manually entered IP.
- Description: Enter additional description for Virtual IP.
- When the reservation confirmation window appears, click Confirm.
Check Virtual IP detailed information
You can view detailed information about the Virtual IP.
To view detailed information about the Virtual IP, follow these steps.
- All Services > Networking > VPC Click the menu. 1. Navigate to the Service Home page of VPC.
- On the Service Home page, click the Subnet button. 2. Go to the Subnet List page.
- On the Subnet list page, click the resource to reserve a Virtual IP. 3. Subnet Details page.
- On the Subnet Details page, click the Virtual IP Management tab. 4. Virtual IP Management Navigate to the tab page.
- Virtual IP Management Click the resource to view on the tab page. 5. Navigate to the Virtual IP Details page.
- *Virtual IP details The page displays the connected ports and detailed information.
Category Detailed description Virtual IP Virtual IP address Public NAT IP Public NAT IP address and status - Edit icon can be clicked to edit
- Use after setting, you can select an existing IP or create one to add
- Public NAT IP cannot be modified after configuration; changes require reconfiguration
Connection Port Port information connected to the Virtual IP - Add button click to add a connected port, you can also connect an existing port or create one to add
- Disconnect button click to disconnect the port
Explanation Virtual IP description - Edit click the icon to edit
Constructor User who reserved a Virtual IP Creation date and time Virtual IP reservation date and time Modifier User who modified the Virtual IP information Modification date and time Date and time the Virtual IP information was modified 표. Virtual IP 상세 정보 항목
- *Virtual IP details The page displays the connected ports and detailed information.
Virtual IP Release
You can release unused Virtual IPs in a Subnet.
- A Virtual IP cannot be released when a Port or NAT IP is attached. * Delete the linked resources first.
- You can return the Virtual IP only when the Subnet status is Active or Error.
To return the Virtual IP, follow these steps.
- All Services > Networking > VPC Click the menu. 1. Navigate to the VPC’s Service Home page.
- On the Service Home page, click the Subnet button. 2. Go to the Subnet List page.
- On the Subnet List page, click the resource to release the Virtual IP. 3. Go to the Subnet details page.
- On the Subnet Details page, click the Virtual IP Management tab. 4. Go to the Virtual IP Management tab page.
- On the Virtual IP Management tab page, select the Virtual IP to return and click the Return button.
- When the return confirmation window appears, click Confirm.
Terminate Subnet
You can delete an unused Subnet.
- You cannot cancel the service if there are connected resources. * Delete the connected resources first.
- You can delete the service only when its status is Active or Error.
- Since data cannot be recovered after a service is deleted, be sure to fully consider the impact before proceeding with the deletion of a Subnet.
To delete a Subnet, follow these steps.
- Click the All Services > Networking > VPC menu. 1. Navigate to the VPC’s Service Home page.
- On the Service Home page, click the Subnet menu. 2. Navigate to the Subnet list page.
- On the Subnet list page, click the resource to delete. 3. Go to the Subnet Details page.
- On the Subnet Details page, click the Delete Subnet button.
- After the deletion is complete, verify that the resource has been removed from the Subnet list.
Preliminary Service
This is a list of services that must be pre‑configured before creating the service. Please refer to the guide provided for each service and prepare in advance.
| Service Category | Service | Detailed description |
|---|---|---|
| Networking | VPC | A service that provides an isolated virtual network in a cloud environment |
2.2 - Port
Create Port
You can create and use the Port service in the Samsung Cloud Platform Console.
To create a port, follow these steps.
Click the All Services > Networking > VPC menu. 1. Navigate to the VPC’s Service Home page.
On the Service Home page, click the Create Port button. 2. Navigate to the Port creation page.
- In the Service Information Input area, enter or select the required information.
Category required statusDetailed description VPC name Required Select the VPC to create the Port - + Create New click to create VPC and then select
Subnet name Required Select the Subnet to create the Port - + New. Click to create a Subnet, then you can select it
Port name Required Port a name that is easy to identify - English letters, numbers,
-using enter within 3 - 20 characters
IP allocation method Required Select IP allocation method - Automatic allocation: IP is automatically assigned within the IP allocation range of the Subnet
- Manual entry: The entered IP is assigned within the Subnet’s range
- When Manual entry is selected, enter the IP address to be used for the Port in Fixed IP address
Explanation Selection Enter description for Port Security Group Selection When Use is selected, click the Select button to select up to 5 Security Groups. Table. Port service information input items - Enter or select the required information in the Additional Information Input area.
구분 required statusDetailed description Tag Selection Add Tag - Up to 50 per resource can be added
- After clicking the Add Tag button, enter or select Key, Value values
Table. Port additional information input fields
- In the Service Information Input area, enter or select the required information.
Summary Check the detailed information and estimated charges generated in the panel, and click the Create button.
- When creation is complete, check the created resources on the Port List page.
Check detailed port information
The Port service allows you to view and edit the complete resource list and detailed information. Port Details page consists of Details, Tags, Activity Log tabs.
To view detailed port information, follow these steps.
- All Services > Networking > VPC menu, click. 1. Navigate to the VPC’s Service Home page.
- On the Service Home page, click the Port menu. 2. Navigate to the Port list page.
- On the Port List page, click the resource (Port name) to view detailed information. 3. Navigate to the Port Details page.
- Port Details page displays status information and additional feature information, and is composed of Details, Tags, Work History tabs.
Category Detailed description status Port status - Active: Operating normally
- Down: Not connected to the resource, or connected but not operating
- Error: Current status cannot be determined
- If it occurs continuously, contact the registered administrator
Delete Port Button to delete the port Table. Port status information and additional functions
- Port Details page displays status information and additional feature information, and is composed of Details, Tags, Work History tabs.
Detailed Information
Port list page lets you view detailed information of the selected resource and, if needed, modify the information.
| Category | Detailed description |
|---|---|
| service | Service Name |
| Resource Type | Resource Type |
| SRN | Unique resource ID in Samsung Cloud Platform
|
| Resource Name | Port resource name |
| Resource ID | Unique resource ID in the service |
| Resource ID | Port’s unique resource ID |
| Constructor | User who created the port |
| Creation date and time | Port creation timestamp |
| Modifier | User who modified the port information |
| Modification Date | Date and time the port information was modified |
| Port name | Port resource name |
| Port ID | Port resource ID |
| Subnet name | Connected Subnet name
|
| Connected resource | Connected device information |
| Static IP | Static IP information |
| MAC address | MAC address information |
| Explanation | Port description
|
| Security Group | Connected Security Group information
|
| Virtual IP | Connected Virtual IP information |
Tag
On the Port List page, you can view the tag information of the selected resource and add, modify, or delete it.
| Category | Detailed description |
|---|---|
| Tag list | Tag list
|
Job History
On the Port List page, you can view the operation history of the selected resource.
| Category | Detailed description |
|---|---|
| Task History List | Resource Change History
|
Delete Port
You can decommission unused ports to reduce operating costs.
- If there are connected resources such as Virtual Server or PrivateLink, the service cannot be deleted. * Delete the connected resources first.
- After a service is deleted, the running service may be stopped immediately. * Fully consider the impact of deleting the service before proceeding with the deletion.
To delete a Port, follow these steps.
- All Services > Networking > VPC Click the menu. 1. Navigate to the VPC’s Service Home page.
- On the Service Home page, click the Port menu. 2. Go to the Port list page.
- On the Port list page, click the resource (Port name) you want to delete. 3. Navigate to the Port Details page.
- On the Port Details page, click the Delete Port button.
- After the deletion is complete, verify that the resource has been removed from the Port list.
Preliminary Service
This is a list of services that must be pre-configured before creating the service. Please refer to the guide provided for each service and prepare in advance.
| Service Category | service | Detailed description |
|---|---|---|
| Networking | VPC | A service that provides an isolated virtual network in a cloud environment |
2.3 - Internet Gateway
Create Internet Gateway
You can create and use the Internet Gateway service in the Samsung Cloud Platform Console.
To create an Internet Gateway, follow these steps.
- All Services > Networking > VPC menu, click it. 1. Go to the Service Home page of VPC.
- On the Service Home page, click the Create Internet Gateway button. 2. Go to the Create Internet Gateway page.
- Enter or select the required information in the Service Information Input area.
Category Required statusDetailed description VPC명 필수 Internet Gateway와 연결되는 VPC를 선택 - 선택한 VPC의 Availability Zone 정보 표시
- + 신규 생성을 클릭하면 VPC 생성 후 선택 가능
- Internet Gateway는 VPC의 Availability Zone에 따라 생성, 3개의 AZ를 사용하는 VPC를 선택하면 Internet Gateway도 3개의 Multi-AZ로 자동 생성
구분 필수 Internet Gateway 유형을 선택 - 전용 Internet Gateway, Secured Internet Gateway, Group Gateway 중에서 선택
Internet Gateway 명 선택 IGW 종류_{VPC명}으로 자동 생성 설명 선택 Internet Gateway에 대한 설명 입력 Use firewall Selection Select firewall usage Whether to save firewall logs Selection Select whether to save Firewall logs - When using the Firewall, save connection logs
- For details, refer to Firewall 로그 저장 사용하기
Table. Internet Gateway service information entry items - In the Additional Information Input area, enter or select the required information.
Category Required statusDetailed description tag Selection Add Tag - Up to 50 can be added per resource
- After clicking the Add Tag button, enter or select Key, Value values
Table. Internet Gateway additional information input fields
- Enter or select the required information in the Service Information Input area.
- Summary Check the detailed information and estimated billing amount generated in the panel, and click the Create button.
- After creation is complete, verify the created resource on the Internet Gateway List page.
Check Internet Gateway detailed information
The Internet Gateway service allows you to view and edit the full resource list and detailed information. Internet Gateway Details page consists of Details, Tags, Activity History tabs.
To view detailed information about the Internet Gateway, follow these steps.
- Click the All Services > Networking > VPC menu. 1. Navigate to the Service Home page of VPC.
- On the Service Home page, click the Internet Gateway menu. 2. Go to the Internet Gateway List page.
- On the Internet Gateway List page, click the resource to view detailed information. 3. Go to the Internet Gateway Details page.
- Internet Gateway Details page displays status information and additional feature information, and consists of Details, Tags, Activity History tabs.
Category Detailed description status Internet Gateway status - Creating: Creating resource
- Ative: Normal connection status
- Deleting: Deletion in progress
- Error: Unable to determine current status
- If it occurs continuously, contact the registered administrator
Delete Internet Gateway Internet Gateway Delete Button Table. Internet Gateway status information and additional functions
- Internet Gateway Details page displays status information and additional feature information, and consists of Details, Tags, Activity History tabs.
Detailed Information
Internet Gateway list page lets you view detailed information of the selected resource and, if needed, modify the information.
| Category | Detailed description |
|---|---|
| Service | Service name |
| Resource Type | Resource Type |
| SRN | Unique resource ID in Samsung Cloud Platform
|
| Resource Name | Internet Gateway resource name |
| Resource ID | Unique resource ID in the service |
| Constructor | User who created the Internet Gateway |
| Creation date and time | Date and time the Internet Gateway was created |
| Modifier | User who modified the Internet Gateway information |
| Modification date and time | Date and time the Internet Gateway information was modified |
| Internet Gateway name | Internet Gateway name |
| Internet Gateway ID | Internet Gateway 자원 ID |
| VPC 명 | VPC 이름
|
| VPC ID | VPC ID |
| Category | Internet Gateway type |
| Whether to use Multi-AZ | Indicates whether Multi-AZ is enabled |
| Explanation | Description of Internet Gateway
|
| Firewall name | Clicking Firewall navigates to the detail page. |
| Use Fireawall | Whether to use firewall |
| NAT Gateway | Clicking NAT Gateway navigates to the detail page |
| Whether to store NAT logs | Whether to store NAT logs
|
tag
On the Internet Gateway List page, you can view, add, modify, or delete the tag information of the selected resource.
| Category | Detailed description |
|---|---|
| Tag list | Tag list
|
Job History
On the Internet Gateway list page, you can view the operation history of the selected resource.
| Category | Detailed description |
|---|---|
| Task History List | Resource Change History
|
Internet Gateway Resource Management
You can manage resources, such as enabling Internet Gateway log storage.
Using NAT Log Storage
To store NAT logs, first create a bucket in Object Storage for the logs, and then configure that bucket in the NAT Logging log repository. Then, when you enable log storage in the NAT detail view, NAT logs will begin to be saved to the Object Storage bucket. The log storage settings can be checked in NAT Logging. For more details, refer to NAT Logging.
- When you set up a log repository, Object Storage fees for log storage will be charged.
To enable NAT log storage, follow these steps.
- All Services > Networking > VPC menu, click it. 1. Navigate to the VPC’s Service Home page.
- On the Service Home page, click the Internet Gateway menu. 2. Go to the Internet Gateway List page.
- On the Internet Gateway List page, click the resource to view detailed information. 3. Navigate to the Internet Gateway Details page.
- Click the Edit NAT Log Save Option button. 4. Modify NAT log storage setting Navigate to the popup window.
- Modify NAT log storage In the popup window, select Use for the log storage, and click the Confirm button.
Disable NAT log storage
To use NAT log storage, follow these steps.
- Click the All Services > Networking > VPC menu. 1. Go to the Service Home page of VPC.
- On the Service Home page, click the Internet Gateway menu. 2. Go to the Internet Gateway List page.
- On the Internet Gateway List page, click the resource to view detailed information. 3. Go to the Internet Gateway Details page.
- Click the Modify NAT log saving option button. 4. Modify NAT log storage setting Go to the popup window.
- Modify NAT log storage In the popup window, deselect Use for the log storage, and click the Confirm button.
- Notification Check the message in the popup window and click the Confirm button.
Delete Internet Gateway
- If there are connected resources such as NAT Gateway, Firewall rules, VPN, etc., the service cannot be terminated. * Delete the linked resources first.
- After the service is deleted, internet communication for VPC sub-resources will be stopped. * Before deleting the Internet Gateway, fully consider the impacts that may occur, and then proceed with the deletion.
To delete an Internet Gateway, follow these steps.
- All Services > Networking > VPC menu, click it. 1. Navigate to the VPC’s Service Home page.
- On the Service Home page, click the Internet Gateway menu. 2. Go to the Internet Gateway List page.
- On the Internet Gateway List page, click the resource you want to delete. 3. Internet Gateway Details go to the page.
- Click the Delete button on the Internet Gateway Details page.
- After deletion is complete, check in the Internet Gateway list whether the resource has been removed.
Preliminary Service
This is a list of services that must be pre-configured before creating the service. Please refer to the guide provided for each service and prepare in advance.
| Service Category | Service | Detailed description |
|---|---|---|
| Networking | VPC | A service that provides an isolated virtual network in a cloud environment |
2.4 - NAT Gateway
Creating a NAT Gateway
You can create and use the NAT Gateway service in the Samsung Cloud Platform Console.
To create a NAT Gateway, follow these steps.
- Click the All Services > Networking > VPC menu. 1. Go to the Service Home page of VPC.
- On the Service Home page, click the Create NAT Gateway button. 2. Go to the Create NAT Gateway page.
- In the Service Information Input area, enter or select the required information.
Category whether requiredDetailed description VPC name Required 연결될 VPC를 선택 - 선택한 VPC의 Availability Zone 정보 표시
- + 신규 생성을 클릭하면 VPC 생성 후 선택 가능
Subnet명 필수 연결된 Subnet을 선택 - 선택한 Subnet의 Availability Zone 정보 표시
- + 신규 생성을 클릭하면 Subnet 생성 후 선택 가능
NAT Gateway명 선택 NAT_GW_{서브넷명}으로 생성 Multi-AZ 사용 여부 선택 Multi-AZ 사용 여부 선택 - 2개 이상의 Availability Zone에 연결된 Subnet을 선택한 경우에만 표시됨
NAT Gateway용 IP 필수 Select a Public IP for NAT Gateway - If you click + Create new, you can generate the IP and then select it
Explanation Selection Enter description for NAT Gateway Table. NAT Gateway service information input items - Additional Information Input area, enter or select the required information.
Category Required statusDetailed description tag Selection Add Tag - Up to 50 per resource can be added
- Add Tag 버튼을 클릭한 후 Key, Value 값을 입력 또는 선택
Table. NAT Gateway additional information input items
- In the Service Information Input area, enter or select the required information.
- Summary Check the detailed information and estimated charges generated in the panel, and click the Create button.
- Once creation is complete, check the created resources on the NAT Gateway List page.
Check NAT Gateway detailed information
The NAT Gateway service allows you to view and modify the full list of resources and detailed information. The NAT Gateway Details page consists of Detailed Information, Tags, Operation History tabs.
- Click the All Services > Networking > VPC menu. 1. Go to the Service Home page of VPC.
- On the Service Home page, click the NAT Gateway menu. 2. Go to the NAT Gateway List page.
- On the NAT Gateway List page, click the resource to view detailed information. 3. Navigate to the NAT Gateway Details page.
- NAT Gateway Details page displays status information and additional feature information, and is organized into Details, Tags, Activity History tabs.
Category Detailed description Status NAT Gateway status - Creating: In progress
- Active: Operating normally
- Deleting: In progress
Delete NAT Gateway Button to terminate the service - Terminate the NAT Gateway when there are no connected services
- If you terminate the service, the running service may be stopped immediately, so proceed with the termination only after fully considering the impact of service interruption
Table. NAT Gateway status information and additional features
- NAT Gateway Details page displays status information and additional feature information, and is organized into Details, Tags, Activity History tabs.
Detailed Information
NAT Gateway List page lets you view detailed information of the selected resource and edit it if needed.
| Category | Detailed description |
|---|---|
| service | Service name |
| Resource Type | Resource Type |
| SRN | Unique resource ID in Samsung Cloud Platform
|
| Resource Name | NAT Gateway resource name |
| Resource ID | Unique resource ID in the service |
| Constructor | User who created the NAT Gateway |
| Creation date and time | NAT Gateway creation timestamp |
| Modifier | User who modified NAT Gateway information |
| Modification date | Date and time the NAT Gateway information was modified |
| NAT Gateway name | NAT Gateway name |
| NAT Gateway ID | NAT Gateway resource ID |
| VPC name | VPC name connected to the NAT Gateway
|
| VPC ID | NAT Gateway가 연결된 VPC 자원 ID |
| Subnet 명 | NAT Gateway가 연결된 서브넷 이름
|
| Subnet ID | Subnet resource ID connected to the NAT Gateway |
| Subnet IP range | Subnet IP range information |
| Whether to use Multi-AZ | Display Multi-AZ usage |
| IP for NAT Gateway | NAT Gateway IP information
|
| Explanation | Description of NAT Gateway
|
tag
On the NAT Gateway List page, you can view the tag information of the selected resource and add, modify, or delete it.
| Category | Detailed description |
|---|---|
| Tag list | Tag list
|
Job History
You can view the operation history of the selected resource on the NAT Gateway List page.
| Category | Detailed description |
|---|---|
| Task History List | Resource Change History
|
Delete NAT Gateway
To delete the NAT Gateway, follow these steps.
- Click the All Services > Networking > VPC menu. 1. Navigate to the Service Home page of VPC.
- On the Service Home page, click the NAT Gateway menu. 2. Go to the NAT Gateway List page.
- On the NAT Gateway List page, click the resource to view detailed information. 3. Navigate to the NAT Gateway Details page.
- NAT Gateway Details on the page, click the Delete button.
- When the deletion is complete, verify that the resource has been removed from the NAT Gateway list.
Preliminary Service
This is a list of services that must be pre‑configured before creating the service. Please refer to the guide provided for each service and prepare in advance.
| Service Category | service | Detailed description |
|---|---|---|
| Networking | VPC | A service that provides an isolated virtual network in a cloud environment |
2.5 - Public IP
Create Public IP
You can create and use the Public IP service from the Samsung Cloud Platform Console.
To create a Public IP, follow these steps.
Click the All Services > Networking > VPC menu. 1. Navigate to the VPC’s Service Home page.
On the Service Home page, click the Public IP reservation button. 2. Go to the Public IP reservation page.
- Service Information Input area: enter or select the required information.
Category RequiredDetailed description Category Required Select the gateway to reserve the Public IP - Default: Internet Gateway
Availability Zone 필수 Public IP의 Availability Zone 선택 설명 선택 Public IP에 대한 설명 입력 표. Public IP 서비스 정보 입력 항목 - In the Additional Information Input area, enter or select the required information.
구분 필수 여부상세 설명 태그 선택 태그 추가 - 자원 당 최대 50개까지 추가 가능
- 태그 추가 버튼을 클릭한 후 Key, Value 값을 입력 또는 선택
표. Public IP 추가 정보 입력 항목
- Service Information Input area: enter or select the required information.
Summary Review the detailed information and estimated charges generated in the panel, and click the Create button.
- Once creation is complete, check the created resources on the Public IP List page.
Check detailed information of Public IP
The Public IP service allows you to view and edit the full resource list and detailed information. Public IP Details page consists of Details, Tags, Activity History tabs.
To view detailed information about the Public IP, follow these steps.
- All Services > Networking > VPC menu, click it. 1. Go to the Service Home page of VPC.
- Click the Public IP menu on the Service Home page. 2. Go to the Public IP List page.
- On the Public IP List page, click the resource to view detailed information. 3. Navigate to the Public IP Details page.
- Public IP Details page displays status information and additional feature information, and consists of Details, Tags, Activity History tabs.
구분 Detailed description Status Public IP status - Attached: connected state
- Reserved: reserved state
- Error: status unknown
- If it occurs continuously, contact the registered administrator
Return Public IP Public IP Return Button 표. Public IP 상태 정보 및 부가 기능
- Public IP Details page displays status information and additional feature information, and consists of Details, Tags, Activity History tabs.
Detailed Information
Public IP List page lets you view detailed information of the selected resource and, if needed, modify the information.
| Category | Detailed description |
|---|---|
| service | Service name |
| Resource Type | Resource Type |
| SRN | Unique resource ID in Samsung Cloud Platform
|
| Resource Name | Public IP resource name |
| Resource ID | Unique resource ID in the service |
| Constructor | User who created the Public IP |
| Creation date and time | Date and time the Public IP was created |
| Modifier | User who modified the Public IP information |
| Modification date and time | Date and time the public IP information was modified |
| IP address | Designated (reserved) IP address |
| Availability Zone | Public IP Availability Zone information |
| Category | Gateway information with reserved Public IP |
| Public IP ID | Public IP resource ID |
| Explanation | Description of the Public IP
|
| Connection Resource Type | Resource information linked to the designated (reserved) IP address |
| Connection resource name | When you click the name of the resource connected to the designated (reserved) IP address
|
Tag
On the Public IP List page, you can view the tag information of the selected resource and add, modify, or delete it.
| Category | Detailed description |
|---|---|
| Tag list | Tag list
|
Job History
Public IP List page allows you to view the operation history of the selected resource.
| 구분 | 상세 설명 |
|---|---|
| 작업 이력 목록 | 자원 변경 이력
|
Return Public IP
To delete a Public IP, follow these steps.
- All Services > Networking > VPC menu, click it. 1. Go to the Service Home page of VPC.
- On the Service Home page, click the Public IP button. 2. Go to the Public IP List page.
- On the Public IP List page, click the resource to view its detailed information. 3. Navigate to the Public IP Details page.
- On the Public IP Details page, click the Public IP Return button.
- After the return is completed, check whether the resource has been deleted from the Public IP list.
Preliminary Service
This service must be installed in advance before creating it. Please prepare by referring to the user guide provided in advance.
| Service Category | service | Detailed description |
|---|---|---|
| Networking | VPC | It is a service that provides an isolated virtual network in a cloud environment. |
2.6 - Private NAT
Users can create the Private NAT service by entering the required information and selecting detailed options through the Samsung Cloud Platform Console.
Creating Private NAT
You can create a Private NAT service in the Samsung Cloud Platform Console and use it.
To create a Private NAT, follow these steps.
All Services > Networking > VPC Click the menu. 1. Navigate to the VPC’s Service Home page.
On the Service Home page, click the Create Private NAT button. 2. Navigate to the Create Private NAT page.
In the Service Information Input area, enter or select the required information.
Category required statusDetailed description Private NAT name Required Enter the Private NAT name - Enter using letters and numbers, 3 to 20 characters
Connection resource type Required Select the connection resource to connect the Private NAT - You can choose between Direct Connect and Transit Gateway
- Transit Gateway can be selected after connecting the uplink line
Connection resource name Essential Display entries of the selected connection resource - Click + New Creation in the list to create a connection resource
NAT IP range Essential Enter the NAT IP range to use - Enter in CIDR format, e.g., 192.168.2.0/23
- Cannot overlap with the connected VPC IP or other Private NAT IP ranges
Explanation Selection Enter description for Private NAT Table. Private NAT Service Information Input ItemsReference- It must not overlap with the IP range of the VPC connected to the selected Direct Connect or Transit Gateway.
- It must not overlap with other Private NAT ranges that are connected to the selected Direct Connect or Transit Gateway.
- It must not overlap with the IP range of the on‑premise network connected to the selected Direct Connect or Transit Gateway.
- Some IP ranges are reserved for management and cannot be used.
Additional Information Input area, enter or select the required information.
Category Required statusDetailed description Tag Selection Add Tag - Up to 50 per resource can be added
- After clicking the Add Tag button, enter or select Key, Value values
Table. Private NAT additional information input fields
Summary Check the detailed information and estimated charges generated in the panel, and click the Create button.
- When creation is complete, verify the created resources on the Private NAT List page.
Check Private NAT detailed information
The Private NAT service allows you to view and edit the complete resource list and detailed information. On the Private NAT Details page, it consists of Detail Information, IP Management, Tags, Operation History tabs.
To view detailed information about Private NAT, follow these steps.
- All Services > Networking > VPC menu, click it. 1. Navigate to the VPC’s Service Home page.
- On the Service Home page, click the Private NAT menu. 2. Go to the Private NAT List page.
- Private NAT List page, click the resource to view detailed information. 3. Navigate to the Private NAT Details page.
- Private NAT Details page displays status information and additional feature information, and consists of Details, IP Management, Tags, Activity Log tabs.
Category Detailed description status Private NAT status - Active: Running
- Creating: In progress
- Deleting: In progress
- Error: An error occurred
Delete Private NAT Button to delete Private NAT Table. Private NAT status information and additional features
- Private NAT Details page displays status information and additional feature information, and consists of Details, IP Management, Tags, Activity Log tabs.
Detailed Information
Private NAT List page allows you to view detailed information of the selected resource and edit the information if necessary.
| Category | Detailed description |
|---|---|
| service | Service name |
| Resource Type | Resource Type |
| SRN | Unique resource ID in Samsung Cloud Platform |
| Resource Name | Private NAT resource name |
| Resource ID | Unique resource ID in the service |
| Constructor | User who created a Private NAT |
| Creation date and time | Date and time the Private NAT was created |
| Modifier | User who modified the Private NAT information |
| Modification date | Date and time the Private NAT information was modified |
| Private NAT name | Private NAT resource name |
| Connection resource type | Information about resources connected to Private NAT |
| NAT IP range | NAT IP range information in use |
| Connection resource name | Clicking the resource information or resource name linked to the Private NAT navigates to the detailed information page. |
| Explanation | Description of Private NAT
|
IP Management
Private NAT List page allows you to view the Private NAT IP, and you can reserve or release it.
| Category | Detailed description |
|---|---|
| Private NAT IP List | Active Private NAT list
|
Tag
On the Private NAT List page, you can view the tag information of the selected resource, and you can add, modify, or delete it.
| Category | Detailed description |
|---|---|
| Tag list | Tag list
|
Job History
On the Private NAT List page, you can view the operation history of the selected resource.
| Category | Detailed description |
|---|---|
| Task History List | Resource Change History
|
Managing Private NAT IP
You can reserve or release a Private NAT IP.
Reserve Private NAT IP
To reserve a Private NAT IP, follow these steps.
- All Services > Networking > VPC Click the menu. 1. Navigate to the VPC’s Service Home page.
- On the Service Home page, click the Private NAT menu. 2. Private NAT List Go to the page.
- Private NAT List page, click the resource to reserve an IP. 3. Go to the Private NAT Details page.
- On the Private NAT Details page, click the IP Management tab. 4. Navigate to the IP Management tab page.
- Click the IP Management tab page’s Private NAT IP Reservation button. 5. The Private NAT IP reservation window appears.
- Enter the Private NAT IP to be used in the Private NAT IP reservation window and click the Confirm button. 6. A notification confirmation dialog appears.
- In the alert dialog, click the Confirm button. 7. Check whether a resource entry has been added to the IP list.
Return Private NAT IP
To return the Private NAT IP, follow these steps.
- All Services > Networking > VPC Click the menu. 1. Navigate to the VPC’s Service Home page.
- On the Service Home page, click the Private NAT menu. 2. Navigate to the Private NAT List page.
- On the Private NAT List page, click the resource to reserve an IP. 3. Go to the Private NAT Details page.
- On the Private NAT Details page, click the IP Management tab. 4. Navigate to the IP Management tab page.
- On the IP Management tab page, click the Return button for the IP item you want to return. 5. A notification confirmation dialog appears.
- Verify that the selected resource has been deleted from the IP list.
Delete Private NAT
You can cancel unused Private NAT to reduce operating costs.
To cancel Private NAT, follow the steps below.
- All Services > Networking > VPC Click the menu. 1. Navigate to the VPC’s Service Home page.
- On the Service Home page, click the Private NAT menu. 2. Go to the Private NAT List page.
- On the Private NAT List page, click the resource to delete. 3. Go to the Private NAT Details page.
- On the Private NAT Details page, click the Delete Private NAT button.
- After termination is complete, check whether the resource has been deleted from the Private NAT list.
Preliminary service
This service must be installed in advance before creating this service. Please prepare by referring to the user guide provided in advance.
| Service Category | service | Detailed description |
|---|---|---|
| Networking | VPC | A service that provides an isolated virtual network in a cloud environment |
| Networking | Direct Connect | A service that securely and quickly connects the customer’s network with the Samsung Cloud Platform environment. |
2.7 - VPC Endpoint
Create VPC Endpoint
You can create and use a VPC Endpoint service from the Samsung Cloud Platform Console.
To create a VPC Endpoint, follow these steps.
All Services > Networking > VPC Click the menu. 1. Navigate to the VPC’s Service Home page.
On the Service Home page, click the Create VPC Endpoint button. 2. VPC Endpoint creation page.
- Enter or select the required information in the Service Information Input area.
구분 필수 여부상세 설명 VPC명 Required Select the VPC to create the Endpoint - Display the Availability Zone information of the selected VPC
- + Create new click to create the VPC and then select it
Usage purpose > Target service Required Select the target service for creating the VPC Endpoint Usage > Connected Resources Required Select the resource to create the VPC Endpoint VPC Endpoint name Required Enter VPC Endpoint name - Enter using letters and numbers, 3 to 20 characters
VPC Endpoint IP > Subnet name required Select VPC Endpoint Subnet - Display the Availability Zone information of the selected Subnet
- Click + Create new to create a Subnet and then select it
VPC Endpoint IP > IP Required Enter the IP to be used for the VPC Endpoint - Example:
192.168.x.x
Description Selection Enter description for VPC Endpoint Table. VPC Endpoint Service Information Input Items - In the Additional Information Input area, enter or select the required information.
Category RequiredDetailed description tag Select Add Tag - Up to 50 per resource can be added
- After clicking the Add Tag button, enter or select Key, Value values
Table. VPC Endpoint additional information input fieldsReferenceAfter registering the VPC Endpoint, you must configure the Direct Connect firewall to integrate internal services of the Samsung Cloud Platform. Refer to the port information for each service and register the firewall rules.
service Port information DNS TCP 53, UDP 53 Object Storage TCP 8080, 8443, 80, 443, 4430 File Storage (NFS) TCP/UDP common 111, 300, 302, 304, 2049, 635, 4045, 4046, 4049
(CIFS) UDP 135, 137, 138, 389 / TCP 135, 139, 445, 40001Container Registry (authentication server, Registry) TCP 443 Table: Allowed ports per target service
- Enter or select the required information in the Service Information Input area.
Summary Verify the detailed information and estimated charges generated in the panel, then click the Create button.
- Once creation is complete, check the created resources on the VPC Endpoint List page.
Check VPC Endpoint detailed information
The VPC Endpoint service lets you view and modify the full list of resources and detailed information. VPC Endpoint Detail page consists of Detail Information, Tags, Operation History tabs.
Endpoint To view detailed information, follow the steps below.
- All Services > Networking > VPC Click the menu. 1. Go to the VPC Service Home page.
- On the Service Home page, click the VPC Endpoint menu. 2. Navigate to the VPC Endpoint List page.
- On the VPC Endpoint List page, click the resource to view detailed information. 3. VPC Endpoint Details Navigate to the page.
- VPC Endpoint Details page displays status information and additional feature information, and consists of Details, Tags, Activity History tabs.
Category Detailed description status VPC Endpoint status - Active: operating normally
- Creating: creation in progress
- Deleting: deleting resource attachment
- Deleted: resource attachment deleted
Delete VPC Endpoint Button to delete the VPC Endpoint connection resource Table. VPC Endpoint status information and additional features
- VPC Endpoint Details page displays status information and additional feature information, and consists of Details, Tags, Activity History tabs.
Detailed Information
On the VPC Endpoint List page, you can view detailed information of the selected resource and, if necessary, edit the information.
| Category | Detailed description |
|---|---|
| service | Service name |
| Resource Type | Resource type |
| SRN | Unique resource ID in Samsung Cloud Platform
|
| Resource Name | VPC Endpoint resource name |
| Resource ID | Unique resource ID in the service |
| Constructor | User who created the VPC Endpoint |
| Creation Date/Time | VPC Endpoint creation time |
| Modifier | User who modified the VPC Endpoint information |
| Modification date and time | Date and time the VPC Endpoint information was modified |
| VPC Endpoint name | VPC Endpoint name |
| VPC name | Connected VPC name
|
| VPC ID | Connected VPC ID |
| Target Service | Connected Object Storage information |
| Connection resource information | Connected resource information |
| Subnet name | Endpoint subnet information
|
| VPC Endpoint IP | VPC Endpoint IP information |
| Description | Description of VPC Endpoint
|
Tag
VPC Endpoint List page lets you view the tag information of the selected resource, and you can add, modify, or delete it.
| Category | Detailed description |
|---|---|
| Tag list | Tag list
|
Job History
VPC Endpoint List You can view the operation history of the selected resource on this page.
| Category | Detailed description |
|---|---|
| Task History List | Resource Change History
|
Delete VPC Endpoint
You can terminate unused Endpoints to reduce operating costs.
- If there are connected resources such as Object Storage or Container Registry, the service cannot be terminated. * Delete the connected resources first. VPC Endpoint를 삭제하면 운영 중인 서비스가 즉시 중단될 수 있습니다. 서비스 삭제 시 발생하는 영향을 충분히 고려한 후 삭제 작업을 진행하세요.
VPC Endpoint를 해지하려면 다음 절차를 따르세요. 모든 서비스 > Networking > VPC 메뉴를 클릭하세요. VPC의 Service Home 페이지로 이동합니다. Service Home 페이지에서 VPC Endpoint 메뉴를 클릭하세요. VPC Endpoint 목록 페이지로 이동합니다. VPC Endpoint 목록 페이지에서 삭제할 자원을 클릭하세요. VPC Endpoint 상세 페이지로 이동합니다. VPC Endpoint 상세 페이지에서 Endpoint 삭제 버튼을 클릭하세요. 해지가 완료되면, VPC Endpoint 목록에서 자원이 삭제되었는지 확인하세요.
선행 서비스 {#service}
해당 서비스를 생성하기 전에 미리 구성되어 있어야 하는 서비스 목록입니다. 자세한 내용은 각 서비스 별로 제공되는 가이드를 참고하여 사전에 준비해주세요.
| Service Category | service | Detailed description |
|---|---|---|
| Networking | VPC | A service that provides an isolated virtual network in a cloud environment. |
| Networking | Direct Connect | A service that securely and quickly connects the customer’s network with Samsung Cloud Platform. |
2.8 - VPC Peering
Users can create the service by entering the required information for the VPC Peering service and selecting detailed options through the Samsung Cloud Platform Console.
Create VPC Peering
You can create and use the VPC Peering service in the Samsung Cloud Platform Console.
To create a VPC Peering, follow these steps.
- Click the All Services > Networking > VPC menu. Navigate to the VPC’s Service Home page.
- On the Service Home page, click the Create VPC Peering button. You will be taken to the Create VPC Peering page.
- Enter or select the required information in the Service Information Input area.
Category Required statusDetailed description VPC Peering name Required Enter VPC Peering name - Enter using letters and numbers, 3~20 characters
Requested VPC name Required Select the VPC to request VPC Peering - Click + New in the list to create a VPC
Approved Account Required Select the account of the VPC to approve VPC peering, then select that VPC or enter its information - Same account: select the approved VPC name
- Click + New creation in the list to create a VPC
- Different account: enter the approved Account ID and approved VPC ID
description Select Enter a description of VPC Peering Table. VPC Peering service information input items - In the Additional Information Input area, enter or select the required information.
Category Whether requiredDetailed description Tag Select Add Tag - Up to 50 can be added per resource
- After clicking the Add Tag button, enter or select Key and Value values
Table. VPC Peering additional information input fields
- Enter or select the required information in the Service Information Input area.
- Check the detailed information and estimated billing amount generated in the Summary panel, and click the Create button.
- When connecting a VPC from another Account, the peering proceeds after an approval process, so the connection may take some time.
- When creation is complete, check the created resource on the VPC Peering List page.
Check VPC Peering details
The VPC Peering service allows you to view and edit the full list of resources and detailed information. VPC Peering Details page consists of Details, Rules, Tags, Activity Log tabs.
To view detailed VPC Peering information, follow these steps.
- Click the All Services > Networking > VPC menu. Navigate to the VPC’s Service Home page.
- On the Service Home page, click the VPC Peering menu. You will be taken to the VPC Peering List page.
- VPC Peering List Click the resource to view detailed information on the page. You will be taken to the VPC Peering Details page.
- VPC Peering Details page displays status information and additional feature information, and consists of Details, Rules, Tags, Activity History tabs.
Category Detailed description status VPC Peering status - Active: operational
- Requesting: connection or deletion request in progress
- Creating: connecting
- Creating Requesting: connection request in progress
- Deleting Requesting: deletion request in progress
- Editing: editing
- Rejected: rejected
- Canceled: canceled
- Error: error occurred
- If it persists, contact the registered administrator
VPC Peering deletion/VPC Peering deletion request Button to request deletion of VPC Peering resources - Cancel Connection Request: Can cancel if a VPC Peering connection was requested
- Approve Connection: Can approve when a VPC Peering connection request is received
- Reject Connection: Click to reject the connection
- Cancel Deletion Request: Can cancel if a VPC Peering deletion was requested
- Approve Deletion: Can approve when a VPC Peering deletion request is received
- Reject Deletion: Click to reject the deletion
- Reapproval Request: Request reapproval when VPC approval was denied
Table. VPC Peering status information and additional features
- VPC Peering Details page displays status information and additional feature information, and consists of Details, Rules, Tags, Activity History tabs.
Detailed Information
VPC Peering List page lets you view detailed information of the selected resource and edit it if needed.
| Category | Detailed description |
|---|---|
| Service | Service name |
| Resource Type | Resource Type |
| SRN | Unique resource ID in Samsung Cloud Platform |
| Resource name | VPC Peering resource name |
| Resource ID | Unique resource ID in the service |
| constructor | User who created the VPC Peering |
| Creation date | Timestamp of VPC Peering creation |
| Editor | User who modified the VPC Peering information |
| Modification date and time | Timestamp of VPC Peering information modification |
| VPC Peering name | VPC Peering name |
| Request information | The VPC name and VPC ID information of the VPC that requested VPC Peering, clicking the VPC name navigates to the detail information page
|
| Approval information | The VPC name and VPC ID of the VPC that approved the VPC peering; clicking the VPC name takes you to the detail page
|
| Explanation | Description of VPC Peering
|
rule
VPC Peering List page lets you view the rules associated with the selected resource, and add or remove them.
| Category | Detailed description |
|---|---|
| List of rules | Connected Rules List
|
tag
VPC Peering List page allows you to view the tag information of the selected resource, and you can add, modify, or delete it.
| Category | Detailed description |
|---|---|
| Tag list | Tag list
|
Job History
You can view the operation history of the selected resource on the VPC Peering List page.
| Category | Detailed description |
|---|---|
| Task History List | Resource Change History
|
Managing VPC Peering Rules
You can add or delete rules for VPC Peering.
Add Rule
- You can add rules only when the VPC peering status is Active.
- If you enter the destination IP incorrectly in the routing configuration, communication failures may occur. Verify the destination IP information once more before creating the rule.
To add a rule to VPC Peering, follow these steps.
- Click the All Services > Networking > VPC menu. Navigate to the VPC’s Service Home page.
- Click the VPC Peering menu on the Service Home page. You will be taken to the VPC Peering List page.
- On the VPC Peering List page, click the resource to delete. Navigate to the VPC Peering Details page.
- On the VPC Peering Details page, click the Rules tab. You will be taken to the Rules tab page.
- On the Rule tab page, click the Add Rule button. The Add Rule dialog appears.
- Enter the origin and destination in the rule addition window and click the Confirm button. A notification confirmation window will appear.
- It must not duplicate an already entered rule.
- You can enter within the IP address range of the destination VPC.
- It should be entered the same as the subnet range.
- The destination IP range 0.0.0.0/0 cannot be used.
- Click the Confirm button in the notification dialog. Verify that the resource entry has been added to the rule list.
Delete Rule
- You can delete the connected rules only when the VPC Peering service status is ACtive or Error.
- If the status of the linked rule is Creating or Deleting, it cannot be deleted.
To delete a VPC Peering rule, follow these steps.
- Click the All Services > Networking > VPC menu. Go to the VPC’s Service Home page.
- On the Service Home page, click the VPC Peering menu. You will be taken to the VPC Peering List page.
- On the VPC Peering List page, click the resource you want to delete. Navigate to the VPC Peering Details page.
- VPC Peering Details page, click the Rules tab. You will be taken to the Rules tab page.
- Rule tab page, click the Delete button of the item to delete. A notification confirmation dialog appears.
- Click the Confirm button in the alert dialog. Verify that the selected resource in the rule list has been deleted.
Terminate VPC Peering
You can terminate unused VPC Peering to reduce operating costs.
- If a rule is attached to the VPC Peering, you cannot terminate the service. Delete all attached rules before terminating the service.
- You can only terminate the VPC Peering service when its status is Active, Rejected, Canceled, or Error.
Terminate VPC Peering of the same Account
To terminate a VPC peering within the same account, follow these steps.
- Click the All Services > Networking > VPC menu. Navigate to the VPC’s Service Home page.
- Click the VPC Peering menu on the Service Home page. You will be taken to the VPC Peering List page.
- On the VPC Peering List page, click the resource to delete. Navigate to the VPC Peering Details page.
- On the VPC Peering Details page, click the VPC Peering Delete button.
- After termination is complete, verify that the resource has been deleted from the VPC Peering list.
Terminate VPC Peering connected to another account
To terminate a VPC peering connected to another account, follow these steps.
- Click the All Services > Networking > VPC menu. Navigate to the VPC’s Service Home page.
- Click the VPC Peering menu on the Service Home page. You will be taken to the VPC Peering List page.
- On the VPC Peering List page, click the resource you want to delete. You will be taken to the VPC Peering Details page.
- On the VPC Peering Details page, click the VPC Peering Delete Request button.
- Once the cancellation is complete, verify that the resource has been removed from the VPC Peering list.
- The deletion request must be approved by the counterpart account for the termination to be processed correctly.
Pre-service
This is a service that must be installed in advance before creating this service. Please refer to the provided user guide and prepare accordingly.
| Service Category | Service | Detailed description |
|---|---|---|
| Networking | VPC | A service that provides an isolated virtual network in a cloud environment |
2.9 - Transit Gateway
Users can create the service by entering the required information for the Transit Gateway service and selecting detailed options through the Samsung Cloud Platform Console.
Create Transit Gateway
You can create and use the Transit Gateway service from the Samsung Cloud Platform Console.
To create a Transit Gateway, follow these steps.
- Click the All Services > Networking > VPC menu. 1. Go to the VPC Service Home page.
- Service Home page, click the Create Transit Gateway button. 2. Navigate to the Create Transit Gateway page.
- Enter or select the required information in the Service Information Input area.
Category RequiredDetailed description Transit Gateway name Required Enter the Transit Gateway name - Enter using letters and numbers, 3 to 20 characters
Explanation Selection Enter a description of the Transit Gateway 표. Transit Gateway 서비스 정보 입력 항목 - Additional Information Input area, please enter or select the required information.
Category Required statusDetailed description tag Selection Add Tag - Up to 50 can be added per resource
- Add Tag 버튼을 클릭한 후 Key, Value 값을 입력 또는 선택
Table. Transit Gateway additional information input fields
- Enter or select the required information in the Service Information Input area.
- Summary Review the detailed information and estimated charges generated in the panel, then click the Create button.
- Once creation is complete, verify the created resource on the Transit Gateway List page.
Check Transit Gateway detailed information
You can view and edit the full list of resources and detailed information for the Transit Gateway service. Transit Gateway Details page consists of Detailed Information, Connected VPC Management, Rules, Tags, Activity History tabs.
To view detailed information about the Transit Gateway, follow these steps.
- All Services > Networking > VPC menu, click it. 1. Go to the Service Home page of VPC.
- Click the Transit Gateway menu on the Service Home page. 2. Go to the Transit Gateway List page.
- On the Transit Gateway List page, click the resource to view detailed information. 3. Go to the Transit Gateway details page.
- Transit Gateway Details page displays status information and additional feature information, and consists of Details, Connected VPC Management, Rules, Tags, Activity History tabs.
Category Detailed description Status Transit Gateway status - Active: operating
- Creating: creating
- Editing: editing
- Deleting: deleting
- Error: error occurred
Delete Transit Gateway Button to delete Transit Gateway resources Table. Transit Gateway status information and additional features
- Transit Gateway Details page displays status information and additional feature information, and consists of Details, Connected VPC Management, Rules, Tags, Activity History tabs.
Detailed Information
Transit Gateway List page lets you view detailed information of the selected resource and edit it if needed.
| Category | Detailed description |
|---|---|
| service | Service Name |
| Resource Type | Resource Type |
| SRN | Unique resource ID in Samsung Cloud Platform |
| Resource name | Transit Gateway resource name |
| Resource ID | Unique resource ID in the service |
| Constructor | User who created the Transit Gateway |
| Creation timestamp | Creation time of the Transit Gateway |
| Modifier | User who modified the Transit Gateway information |
| Modification date and time | Date and time the Transit Gateway information was modified |
| Transit Gateway name | Transit Gateway resource name |
| Connection Center | Connected Availability Zone information |
| Use Uplink | Uplink information connected to the Transit Gateway
|
| Explanation | Description of the Transit Gateway
|
| Firewall connection status | Firewall connection management and status display
|
Connected VPC Management
Transit Gateway List page allows you to view the VPCs attached to the selected resource, and add or delete them.
| Category | Detailed description |
|---|---|
| VPC list | Connected VPC list
|
rule
On the Transit Gateway List page, you can view the rules linked to the selected resource and add or delete them.
| Category | Detailed description |
|---|---|
| Rule List | Connected rule list
|
Tag
On the Transit Gateway list page, you can view the tag information of the selected resource, and add, modify, or delete it.
| Category | Detailed description |
|---|---|
| Tag list | Tag list
|
Job History
Transit Gateway List page allows you to view the operation history of the selected resource.
| Category | Detailed description |
|---|---|
| Task History List | Resource Change History
|
Manage Transit Gateway Integration Services
You can request, modify, and cancel the Uplink and Firewall connection services required to use the Transit Gateway service.
To apply for the Transit Gateway integration service, follow the steps below.
- All Services > Networking > VPC Click the menu. 1. Go to the VPC Service Home page.
- On the Service Home page, click the Transit Gateway menu. 2. Go to the Transit Gateway List page.
- On the Transit Gateway List page, click the resource you want to delete. 3. Go to the Transit Gateway Details page.
- On the Transit Gateway Details page, click Connected Services (IGW, BM VPC), Quick Access to Line Request/Modification/Cancellation. 4. Navigate to the service request page.
- On the Service Request page, enter or select the required information in the mandatory input fields.
Input field Detailed description Title Enter the title of the service request - Example: TGW Uplink circuit request
Region Select the location of Samsung Cloud Platform - Automatically filled with the region corresponding to the Account
Service Select service category and service - Service Category: Networking
- Service: Transit Gateway
Task classification Select the type you want to request - TGW Uplink line application/modification/termination: After selecting the work classification, enter detailed information in the service request classification item
Content Fill in the detailed items of the service request form - Service request type: manually enter one of Apply / Modify / Terminate
- Account name/ID: Enter the account name and ID
- Transit Gateway name/ID: Enter the created Transit Gateway name and ID
- Applicant information: Enter applicant’s email, phone number, etc.
- Service request task type: select and enter either Uplink line connection or BM VPC Firewall connection
- Firewall usage: Enter whether the firewall is used
Attachment If you have additional files you want to share, proceed with the upload - You can attach up to 5 files, each within 5 MB
- Only doc, docx, xls, xlsx, ppt, ppts, hwp, txt, pdf, jpg, jpeg, png, gif, tif files can be attached
Table. Linked Service Creation Request Items - On the service request page, click the Request button.
- After the request is completed, check the submitted details on the Support Center > Service Request List page.
- When the service request operation is completed, you can view the requested resources on the Transit Gateway Details page.
VPC connection for BareMetal
- VPC Peering does not support firewalls.
- If you cannot use a Security Group, as with BareMetal, you can set up VPC Peering using a Transit Gateway firewall.
- However, in a peered BM VPC, communication via UpLink (external) is not possible, and it cannot be connected to a Transit Gateway together with other VM VPCs.
Managing VPC connections of Transit Gateway
You can add or remove VPCs in a Transit Gateway.
Add VPC connection
To add a VPC attachment to a Transit Gateway, follow these steps.
- All Services > Networking > VPC Click the menu. 1. Go to the Service Home page of VPC.
- On the Service Home page, click the Transit Gateway menu. 2. Go to the Transit Gateway List page.
- Transit Gateway List page, click the resource to delete. 3. Go to the Transit Gateway Details page.
- On the Transit Gateway Details page, click the Manage Connected VPC tab. 4. Connected VPC Management tab page.
- On the Connection VPC Management tab page, click the Add VPC Connection button. 5. The VPC connection addition window appears.
- In the VPC addition window, select the VPC and click the Confirm button. 6. A notification confirmation window appears.
- Click +New in the list to create and select a VPC.
- Click the Confirm button in the alert dialog. 7. Check whether a resource item has been added in the VPC connection list.
Delete VPC connection
To delete a Transit Gateway’s VPC attachment, follow these steps.
- All Services > Networking > VPC Click the menu. 1. Go to the Service Home page of VPC.
- On the Service Home page, click the Transit Gateway menu. 2. Go to the Transit Gateway List page.
- On the Transit Gateway List page, click the resource you want to delete. 3. Navigate to the Transit Gateway Details page.
- On the Transit Gateway Details page, click the Connected VPC Management tab. 4. Go to the Connected VPC Management tab page.
- Connected VPC Management tab page, click the Delete button for the item you want to delete. 5. A notification confirmation window appears.
- In the notification dialog, click the Confirm button. 6. Verify that the selected resource has been deleted from the VPC connection list.
Managing Transit Gateway Rules
You can add or delete rules in the Transit Gateway.
Add rule
- You can add rules only when the Transit Gateway service status is Active.
- If you enter the destination IP incorrectly in the routing configuration, communication failures may occur. * Please double-check the destination IP information before creating the rule.
Transit Gateway must complete both routing rule registration and firewall rule registration to operate correctly.
- Register routing rule
- Rule 1: VPC - Transit Gateway rule registration
- Rule 2: VPC - Uplink rule registration (when connecting the Uplink line)
- Register firewall rule
- Add a Transit Gateway firewall and add its purpose (e.g., TGW Uplink, TGW BM VPC, etc.).
Next, select the firewall from the firewall product list and register the rule. (When adding a firewall purpose, the default is set to All/deny)
- Add a Transit Gateway firewall and add its purpose (e.g., TGW Uplink, TGW BM VPC, etc.).
To add a rule to the Transit Gateway, follow these steps.
- Click the All Services > Networking > VPC menu. 1. Go to the Service Home page of VPC.
- On the Service Home page, click the Transit Gateway menu. 2. Go to the Transit Gateway List page.
- On the Transit Gateway List page, click the resource you want to delete. 3. Transit Gateway Details Navigate to the page.
- On the Transit Gateway Details page, click the Rules tab. 4. Go to the Rules tab page.
- On the Rule tab page, click the Add Rule button. 5. The rule addition window appears.
- In the rule addition window, enter the origin and destination, and click the Confirm button. 6. A notification confirmation window appears.
Category Detailed description Rule type Select type for adding Transit Gateway rule - Select between VPC‑TGW rule and TGW‑Uplink rule
Connected VPC name Select the connected VPC when choosing a VPC‑TGW rule origin When selecting a VPC‑TGW rule, the destination is automatically selected when configured. Destination Select rule destination - When selecting a VPC-TGW rule, set between VPC and TGW
- When selecting a TGW-Uplink rule, set between TGW and remote site
- Cannot register duplicate of existing rules; can input up to the x.x.x.x/28 range
Destination IP range Enter the destination IP range to use Table. Add rule input itemCaution- VPC-TGW Rules When entering, please check the following items.
- When the destination is a VPC.
- You can enter within the VPC IP address range.
- It should be entered the same as the subnet range.
- The destination IP range 0.0.0.0/0 cannot be used.
- When the destination is a Transit Gateway.
- Some IP ranges cannot be used because they are reserved for management.
- The VPC IP address range cannot be entered.
- The destination IP range 0.0.0.0/0 can be entered only when the VPC’s Internet Gateway is not attached.
- When the destination is a VPC.
- TGW-Uplink Rule When entering, check the following items.
- When the destination is a Transit Gateway.
- You can enter it within the IP address range of the VPC connected to the Transit Gateway.
- The destination IP range 0.0.0.0/0 cannot be used.
- When the destination is remote
- The VPC IP address range connected to the Transit Gateway cannot be entered.
- The destination IP range 0.0.0.0/0 can be entered only when the Transit Gateway does not have an Internet Gateway attached.
- D and E class IP ranges cannot be entered.
- When the destination is a Transit Gateway.
- Click the Confirm button in the notification dialog. 7. Verify that a resource entry has been added to the rule list.
Delete rule
- You can delete the rule only when the Transit Gateway service status is Active.
- If the rule status is Creating or Deleting, the rule cannot be deleted.
To delete a Transit Gateway rule, follow these steps.
- All Services > Networking > VPC Click the menu. 1. Go to the Service Home page of VPC.
- On the Service Home page, click the Transit Gateway menu. 2. Go to the Transit Gateway List page.
- Transit Gateway List page, click the resource to delete. 3. Transit Gateway Details Navigate to the page.
- On the Transit Gateway Details page, click the Rules tab. 4. Navigate to the Rules tab page.
- Click the Delete button for the item to be deleted on the Rules tab page. 5. A notification confirmation window appears.
- In the notification dialog, click the Confirm button. 6. Verify that the selected resource has been deleted from the rule list.
Firewall Connection Management
You can attach or detach a firewall for use with the Transit Gateway.
Connect to Firewall
Follow these steps to add a Firewall connection to the Transit Gateway.
- All Services > Networking > VPC Click the menu. 1. Go to the Service Home page of VPC.
- On the Service Home page, click the Transit Gateway menu. 2. Go to the Transit Gateway List page.
- On the Transit Gateway List page, click the resource to connect the Firewall. 3. Go to the Transit Gateway Details page.
- On the Transit Gateway Details page, click the Details tab. 4. Go to the Detailed Information tab page.
- Detailed Information tab page, click the Firewall Connection button. 5. Firewall connection confirmation window appears.
- In the Firewall connection confirmation window, click the Confirm button. 6. Verify the connection status in the Firewall connection status item.
Add Firewall
After the Firwall connection is completed, you can add a Firewall.
Follow these steps to add a Firewall to the Transit Gateway.
- All Services > Networking > VPC Click the menu. 1. Go to the Service Home page of VPC.
- On the Service Home page, click the Transit Gateway menu. 2. Go to the Transit Gateway List page.
- On the Transit Gateway List page, click the resource to which you want to add a Firewall. 3. Go to the Transit Gateway Details page.
- On the Transit Gateway Details page, click the Detailed Information tab. 4. Navigate to the Detailed Information tab page.
- On the Detailed Information tab page, click the Add button in the Firewall list. 5. Firewall addition window appears.
- In the Firewall addition window, select the purpose and the connection center, then click the Confirm button. 6. Verify that a resource item has been added to the Firewall list.
- Connection Center can be selected only when the selected firewall is Multi-AZ. * When you select the Active connection center, the Standby connection center is assigned automatically.
Delete Firewall
After the Firwall connection is completed, you can delete the Firewall.
To delete a firewall from a Transit Gateway, follow these steps.
- All Services > Networking > VPC Click the menu. 1. Go to the VPC Service Home page.
- On the Service Home page, click the Transit Gateway menu. 2. Go to the Transit Gateway List page.
- On the Transit Gateway List page, click the resource to delete the Firewall. 3. Transit Gateway Details Navigate to the page.
- On the Transit Gateway Details page, click the Details tab. 4. Navigate to the Detailed Information tab page.
- Click the Delete button on the Detailed Information tab page of the Firewall list. 5. A notification confirmation window appears.
- Click the Confirm button in the notification dialog. 6. Verify that the resource entry has been removed from the Firewall list.
Disconnect Firewall
You can disconnect unused Firewall connections.
To detach the Firewall from the Transit Gateway, follow these steps.
- Click the All Services > Networking > VPC menu. 1. Navigate to the Service Home page of the VPC.
- On the Service Home page, click the Transit Gateway menu. 2. Go to the Transit Gateway List page.
- On the Transit Gateway List page, click the resource to detach the Firewall connection. 3. Go to the Transit Gateway Details page.
- On the Transit Gateway Details page, click the Details tab. 4. Navigate to the Detailed Information tab page.
- On the Detailed Information tab page, click the Disconnect Firewall button. 5. A notification confirmation window appears.
- Click the Confirm button in the alert dialog. 6. Check the disconnected status in the Firewall connection status item.
Terminate Transit Gateway
You can terminate unused Transit Gateways to reduce operating costs.
- You cannot cancel the service if the Uplink connected to the Transit Gateway is in use or if a firewall is connected. * After completing the termination request for the connected resource, terminate the service.
- If VPC resources or rules are attached to the Transit Gateway, the service cannot be terminated. * Delete all linked resources and rules, then terminate the service.
- If the Transit Gateway service status is Creating or Deleting, the service cannot be terminated.
To cancel the Transit Gateway, follow the steps below.
- All Services > Networking > VPC Click the menu. 1. Go to the Service Home page of VPC.
- On the Service Home page, click the Transit Gateway menu. 2. Go to the Transit Gateway List page.
- Transit Gateway List page, click the resource you want to delete. 3. Go to the Transit Gateway Details page.
- On the Transit Gateway Details page, click the Transit Gateway Delete button.
- After termination is complete, check whether the resource has been deleted from the Transit Gateway list.
Preliminary Service
This service must be installed in advance before creating it. Please refer to the user guide provided in advance and prepare.
| Service Category | Service | Detailed description |
|---|---|---|
| Networking | VPC | It is a service that provides an isolated virtual network in a cloud environment. |
2.10 - PrivateLink Service
Users can create the PrivateLink Service by entering the required information through the Samsung Cloud Platform Console and selecting detailed options.
Create PrivateLink Service
You can create and use a PrivateLink Service in the Samsung Cloud Platform Console.
To create a PrivateLink Service, follow these steps.
- Click the All Services > Networking > VPC menu. 1. Navigate to the VPC’s Service Home page.
- On the Service Home page, click the Create PrivateLink Service button. 2. Navigate to the Create PrivateLink Service page.
- In the Service Information Input area, enter or select the required information.
Category RequiredDetailed description PrivateLink Service name Required Enter PrivateLink Service name Approval method Required PrivateLink Service approval method selection input - Automatic: Automatic approval when a PrivateLink Service connection request is received
- Manual: Manual approval after verification when a PrivateLink Service connection request is received
- The approval method cannot be changed after creation
High-speed data transmission Selection The default setting is not used and does not appear in the Samsung Cloud Platform Console - To use high-speed data transfer, submit a service usage request in Support Center > 문의하기, and once processing is complete, it can be selected on the screen
VPC name Required Select VPC to connect - + New click to create a VPC and then select it
Subnet name required Select the Subnet of the VPC to connect - Click + Create new to create a Subnet and then select it
PrivateLink Service IP Required Select the Subnet to connect and enter the PrivateLink Service IP - IP addresses already in use within the Subnet cannot be entered, and the first/last IP of the Subnet IP range cannot be used
connection resource Required Select resources to connect to the selected VPC - Load Balancer: Select the Load Balancer to connect (cannot select LB when using a Local subnet)
- IP: Enter the Compute resource IP of the selected VPC
Security Group Select Select button to click and choose the Security Group to connect - Up to 5 can be selected
- If no Security Group is selected, all connections are blocked
Description Select Enter a description for the PrivateLink Service Table. PrivateLink Service service information input items - Additional Information Input area, please enter or select the required information.
Category required statusDetailed description tag Select Add Tag - Up to 50 can be added per resource
- Add Tag button, then enter or select Key, Value values
Table. PrivateLink Service additional information input fields
- In the Service Information Input area, enter or select the required information.
- Summary Verify the detailed information and estimated charges generated in the panel, then click the Create button.
- When creation is complete, check the created resource on the PrivateLink Service List page.
The PrivateLink product is a service that provides a unidirectional private path (a type of tunnel). The PrivateLink product is used by creating a PrivateLink Service (egress) in the service provider’s account, creating a PrivateLink Endpoint (ingress) in the user’s account, and then connecting to the PrivateLink Service.
The connection requirements for the PrivateLink product are as follows.
- When creating a PrivateLink Endpoint, you can connect only to the single PrivateLink Service you specified per endpoint. * (Only one pair of entrance and exit exists)
- Unable to attempt a session connection to a PrivateLink Endpoint through the PrivateLink Service. * (unidirectional)
- In the provider account, when creating a PrivateLink Service, you can provide a connection to a single IP by selecting one LB or entering it manually.
- In a user account, any client that the user account has allowed to access the PrivateLink Endpoint can use the PrivateLink Endpoint.
- It can be used in both General and Local Subnet.
Check PrivateLink Service detailed information
The PrivateLink Service lets you view and modify the complete list of resources and detailed information. The PrivateLink Service Details page consists of the Details, Connection Management, Tags, Activity Log tabs.
To view detailed information about the PrivateLink Service, follow these steps.
- All Services > Networking > VPC Click the menu. 1. Go to the Service Home page of VPC.
- On the Service Home page, click the PrivateLink Service menu. 2. Go to the PrivateLink Service List page.
- PrivateLink Service List on the page, click the resource to view detailed information. 3. Navigate to the PrivateLink Service Details page.
- The PrivateLink Service Details page displays status information and additional feature information, and is composed of Details, Connection Management, Tags, Activity History tabs.
Category Detailed description status PrivateLink Service 상태 - Active: Running
- Creating: Creating
- Deleting: Deleting
- Error: Error occurred
Delete PrivateLink Service Button to delete PrivateLink Service resources Table. PrivateLink Service status information and additional features
- The PrivateLink Service Details page displays status information and additional feature information, and is composed of Details, Connection Management, Tags, Activity History tabs.
Detailed Information
PrivateLink Service List page lets you view detailed information of the selected resource and edit the information if needed.
| Category | Detailed description |
|---|---|
| service | Service name |
| Resource Type | Resource Type |
| SRN | Unique resource ID in Samsung Cloud Platform |
| Resource Name | PrivateLink Service resource name |
| Resource ID | Unique resource ID in the service |
| Constructor | User who created the PrivateLink Service |
| Creation timestamp | Date and time the PrivateLink Service was created |
| Modifier | User who modified the PrivateLink Service information |
| Modification date and time | Date and time the PrivateLink Service information was modified |
| PrivateLink Service name | PrivateLink Service resource name |
| PrivateLink Service ID | PrivateLink Service ID information |
| Connection resource | Connected resources of PrivateLink Service
|
| PrivateLink Service IP | PrivateLink Service IP address |
| VPC name | Connected VPC information
|
| Subnet name | Connected Subnet information
|
| Port name | Port information of PrivateLink Service
|
| Security Group | Configured Security Group information
|
| Approval method | Configured PrivateLink Service approval method |
| High-speed data transmission | Use high-speed data transfer for the configured PrivateLink Service |
| Description | Description of PrivateLink Service
|
연결 관리 {#admin}
PrivateLink Service 목록 페이지에서 선택한 자원의 연결 정보를 확인할 수 있습니다. 연결 요청을 확인하고 승인하거나 거부할 수 있습니다.
| Category | Detailed description |
|---|---|
| PrivateLink Service list | PrivateLink Service connection list
|
태그 {#tag}
PrivateLink Service 목록 페이지에서 선택한 자원의 태그 정보를 확인하고, 추가하거나 변경 또는 삭제할 수 있습니다.
| Category | Detailed description |
|---|---|
| Tag list | Tag list
|
Job History
On the PrivateLink Service List page, you can view the operation history of the selected resource.
| Category | Detailed description |
|---|---|
| Task History List | Resource Change History
|
Terminate PrivateLink Service
You can cancel unused PrivateLink services to reduce operating costs.
Delete the PrivateLink Service after configuring the Private Endpoint to block or reject connections.
To cancel the PrivateLink Service, follow these steps.
- All Services > Networking > VPC menu, click it. 1. Go to the Service Home page of VPC.
- On the Service Home page, click the PrivateLink Service menu. 2. PrivateLink Service List Navigate to the page.
- On the PrivateLink Service List page, click the resource you want to delete. 3. Go to the PrivateLink Service Details page.
- On the PrivateLink Service Details page, click the PrivateLink Service Delete button.
- Once termination is complete, verify that the resource has been deleted from the PrivateLink Service list.
Preliminary Service
This service must be installed in advance before creating it. Please prepare by referring to the user guide provided in advance.
| Service Category | Service | Detailed description |
|---|---|---|
| Networking | VPC | It is a service that provides an isolated virtual network in a cloud environment. |
| Networking | Load Balancer | It is a service that distributes server traffic load in a cloud environment. |
2.11 - PrivateLink Endpoint
Users can create the service by entering the required information for the PrivateLink Endpoint service and selecting detailed options through the Samsung Cloud Platform Console.
Creating a PrivateLink Endpoint
You can create and use a PrivateLink Endpoint service from the Samsung Cloud Platform Console.
To create a PrivateLink Endpoint, follow these steps.
- All Services > Networking > VPC Click the menu. 1. Navigate to the VPC’s Service Home page.
- On the Service Home page, click the Create PrivateLink Endpoint button. 2. Navigate to the PrivateLink Endpoint creation page.
- Enter or select the required information in the Service Information Input area.
구분 필수 여부상세 설명 PrivateLink Endpoint명 Required Enter the PrivateLink Endpoint name VPC name Required Select the VPC to connect - + Create new click to create the VPC and then select it
Subnet name Required Select the Subnet of the VPC to connect - Click + New to create a Subnet, then you can select it
PrivateLink Endpoint IP required Select the Subnet to connect and enter the PrivateLink Endpoint IP - Subnet IP addresses already in use cannot be entered, and the first/last IP of the Subnet IP range cannot be used
PrivateLink Endpoint ID Required Enter the PrivateLink Service ID to connect - Enter using letters and numbers, within 3 to 60 characters
- Before requesting the service, you need to verify the Service ID of the PrivateLink Service to connect, and after creating the Endpoint, you must provide the Endpoint ID to the service provider
Security Group Select Click the Select button to choose the Security Group to connect - You can select up to 5
- If you do not select a Security Group, all connections will be blocked
Description Selection Enter a description for the PrivateLink Endpoint Table. PrivateLink Endpoint service information input fields - Additional Information Input area, please enter or select the required information.
Category Required statusDetailed description tag Select Add Tag - Up to 50 per resource can be added
- After clicking the Add Tag button, input or select Key, Value values
Table. PrivateLink Endpoint additional information input fields
- Enter or select the required information in the Service Information Input area.
- In the Summary panel, review the detailed information and estimated billing amount, then click the Create button.
- Once creation is complete, verify the created resource on the PrivateLink Endpoint List page.
- To request a connection to the service provider via PrivateLink, you must go through an approval process.
- When requesting a service connection, you must verify the target PrivateLink Service ID in advance.
- The usage agreement with the service provider must be completed before applying for the service.
- After the user creates a PrivateLink endpoint, they must provide the endpoint ID to the service provider. * The service provider can verify the user’s Endpoint ID and quickly proceed with usage approval.
Check PrivateLink Endpoint detailed information
The PrivateLink Endpoint service allows you to view and edit the full list of resources and detailed information. PrivateLink Endpoint Details page consists of Details, Tags, Activity History tabs.
To view detailed information about the PrivateLink Endpoint, follow these steps.
- All Services > Networking > VPC Click the menu. 1. Go to the Service Home page of VPC.
- On the Service Home page, click the PrivateLink Endpoint menu. 2. Go to the PrivateLink Endpoint List page.
- On the PrivateLink Endpoint List page, click the resource to view detailed information. 3. PrivateLink Endpoint Details Navigate to the page.
- The PrivateLink Endpoint Details page displays status information and additional feature information, and is organized into Details, Connection Management, Tags, Activity History tabs.
Category Detailed description status PrivateLink Endpoint status - Requesting: Connection request pending approval, Cancel request button displayed
- Active: Creation complete, operating
- Creating: Creating
- Deleting: Deleting
- Disconnected: Connection blocked
- Rejected: Connection rejected, Re-request approval button displayed
- Error: Error occurred
- Canceled: Connection request canceled, Re-request approval button displayed
Delete PrivateLink Endpoint Button to delete the PrivateLink Endpoint resource Table. PrivateLink Endpoint status information and additional features
- The PrivateLink Endpoint Details page displays status information and additional feature information, and is organized into Details, Connection Management, Tags, Activity History tabs.
Detailed Information
On the PrivateLink Endpoint List page, you can view detailed information of the selected resource and, if necessary, edit the information.
| Category | Detailed description |
|---|---|
| service | Service name |
| Resource Type | Resource Type |
| SRN | Unique resource ID in Samsung Cloud Platform |
| Resource name | PrivateLink Endpoint resource name |
| Resource ID | Unique resource ID in the service |
| Constructor | User who created the PrivateLink Endpoint |
| Creation Date/Time | Creation time of the PrivateLink Endpoint |
| Modifier | User who modified the PrivateLink Endpoint information |
| Modification date | Date and time the PrivateLink Endpoint information was modified |
| PrivateLink Endpoint name | PrivateLink Endpoint resource name |
| PrivateLink Endpoint ID | PrivateLink Endpoint ID information |
| PrivateLink Service ID | Connected PrivateLink Service ID information |
| PrivateLink Endpoint IP | PrivateLink Endpoint IP address |
| VPC name | Connected VPC information |
| Subnet name | Connected Subnet information |
| Port name | Port information of the PrivateLink Endpoint
|
| Security Group | Configured Security Group information
|
| Explanation | Description of the PrivateLink Endpoint
|
Tag
On the PrivateLink Endpoint List page, you can view the tag information of the selected resource and add, modify, or delete it.
| Category | Detailed description |
|---|---|
| Tag list | Tag list
|
Job History
On the PrivateLink Endpoint List page, you can view the operation history of the selected resource.
| Category | Detailed description |
|---|---|
| Task History List | Resource Change History
|
Terminate PrivateLink Endpoint
You can terminate unused PrivateLink Endpoints to reduce operational costs.
To cancel a PrivateLink Endpoint, follow these steps.
모든 서비스 > Networking > VPC 메뉴를 클릭하세요. VPC의 Service Home 페이지로 이동합니다. Service Home 페이지에서 PrivateLink Endpoint 메뉴를 클릭하세요. PrivateLink Endpoint 목록 페이지로 이동합니다. PrivateLink Endpoint 목록 페이지에서 삭제할 자원을 클릭하세요. PrivateLink Endpoint 상세 페이지로 이동합니다. PrivateLink Endpoint 상세 페이지에서 PrivateLink Endpoint 삭제 버튼을 클릭하세요. 해지가 완료되면, PrivateLink Endpoint 목록에서 자원이 삭제되었는지 확인하세요.
선행 서비스 {#service}
본 서비스를 생성하기 전에 미리 설치가 되어야 하는 서비스입니다. 사전에 안내된 사용자 가이드를 참고하여 준비해주세요.
| Service Category | service | Detailed description |
|---|---|---|
| Networking | VPC | It is a service that provides an isolated virtual network in a cloud environment. |
2.12 - NAT Logging
To store NAT logs, first create a bucket in Object Storage for the logs, and then configure that bucket in the NAT Logging log repository. Then, when you enable log storage in the NAT detail view, NAT logs will start being saved to the Object Storage bucket.
To store NAT logs, you need to configure in the following order.
- To store NAT logs, you can create a bucket in Object Storage or use an existing bucket. 1. To create a bucket, please refer to Create Object Storage.
- To set the bucket for the NAT Logging log repository, please refer to Using NAT Logging Log Repository.
- To set the log storage option to Enabled in the NAT detail view, refer to Using NAT Log Storage.
Using NAT Logging Log Repository
To set NAT log storage to enabled, you must first configure the log repository in NAT Logging.
- Click the All Services > Management > Network Logging > NAT Logging menu. 1. Navigate to the NAT Logging List page.
- Click the Log Repository Settings button at the top of the NAT Logging List page. 2. Log Repository Settings Navigate to the popup window.
- Log storage configuration In the popup window, select the log storage bucket. 3. When you select a bucket, the log storage path is displayed.
- Log storage settings In the popup window, verify the log storage bucket and log storage path, then click the Confirm button.
- Notification After checking the popup window’s message, click the Confirm button.
NAT Logging List
When you configure the NAT Logging log storage bucket, the NAT Logging list is displayed.
- All Services > Management > Network Logging > NAT Logging Click the menu. * Go to the NAT Logging List page.
구분 필수상세 설명 자원 ID 필수 NAT 자원 ID 저장 대상 필수 NAT 자원 이름 Registration Date and Time Required NAT log repository registration date and time Table. NAT Logging list items
Check NAT Logging contents
Refer to the following information to review the saved log entries.
저장된 로그 예시: 2024-10-11T11:19:03,accept,259,17,192.168.2.173,46937,192.168.0.53,53,100.100.14.52,26937
| Category | Explanation |
|---|---|
| 2024-10-11T11:19:03 | Log date and time (2024-10-11, 11:19:03) |
| accept | Action (deny / accept) |
| 259 | Firewall Rule ID (Policy ID) that generated the log |
| 17 | IP Protocol ID
|
| 192.168.2.173 | Source IP |
| 46937 | Departure Port |
| 192.168.0.53 | Destination IP |
| 53 | Destination Port |
| 100.100.14.52 | NAT-translated IP |
| 26937 | NAT-translated Port |
NAT Logging 로그 저장소 미사용하기 {#use-1}
NAT Logging에서 로그 저장소를 미사용으로 설정할 수 있습니다.
모든 서비스 > Management > Network Logging > NAT Logging 메뉴를 클릭하세요. NAT Logging 목록 페이지로 이동합니다. NAT Logging 목록 페이지에서 상단 로그 저장소 설정 버튼을 클릭하세요. 로그 저장소 설정 팝업창으로 이동합니다. 로그 저장소 설정 팝업창에서 로그 저장소 버킷을 미사용으로 선택하고, 확인 버튼을 클릭하세요.
3 - API Reference
4 - CLI Reference
5 - Release Note
VPC
- The Classification item is added to Subnet and is provided as Primary/Secondary Subnet.
- The previously provided Subnet is classified as the Primary Subnet.
- Depending on the type of the Primary Subnet, you can create additional Secondary Subnets beneath it.
- Subnet type is changed from General/Local/VPC Endpoint to Public/Private/Local/VPC Endpoint.
- The previously offered General type is changed to Public/Private, and the previously created General type is shown as Public.
- Provide VPC IP range addition feature
- You can add a new IP range to the VPC for use.
- Provides Virtual IP functionality
- You can reserve a Virtual IP in a Subnet for use.
- Private NAT feature improvement
- You can also use Private NAT with Transit Gateway.
- You can connect internal Samsung Cloud Platform data to the VPC and SCP services via a private path without exposing it to the internet.
- Add Transit Gateway feature
- Easily connect the customer’s network with the Samsung Cloud Platform network and serve as a connection hub for multiple VPCs within the cloud environment.
- Add VPC Peering feature
- You can communicate via IP over a 1:1 private route between VPCs.
- Add Private NAT functionality
- From Compute resources within a VPC, you can use Direct Connect to map the customer’s IP and establish a connection.
- Add VPC functionality
- Provides an Endpoint(entry point) that allows access to the Samsung Cloud Platform via a private connection from an external network connected to the VPC.
- Samsung Cloud Platform Common Feature Change
- Account, IAM, and Service Home, tags, etc., have been updated to reflect common CX changes.
- A feature to save NAT logs has been added.
- Decide whether to store NAT logs and you can store the logs in Object Storage.
- The VPC service that provides an isolated virtual network space has been launched.
- The VPC service that provides an isolated virtual network space has been launched.