This is the multi-page printable view of this section. Click here to print.
Security Group
- 1: Overview
- 2: How-to guides
- 2.1: Security Group Logging
- 2.2: Address Group
- 2.3: Migration Rules
- 3: API Reference
- 4: CLI Reference
- 5: Release Note
1 - Overview
Service Overview
A Security Group is a virtual logical firewall that controls inbound/outbound traffic generated on virtual servers in Samsung Cloud Platform. The resources that can have a Security Group applied include Virtual Server, Database, Kubernetes Engine, etc. Security Groups are applied to the ports of target resources, and multiple Security Groups can be applied depending on each resource’s characteristics.
When a Security Group is first created, it blocks all inbound and outbound traffic according to the default rule (Any/Deny).
Users can specify an IP address, port, and protocol to create inbound/outbound rules, and only traffic allowed by the created rules can access the target resources.
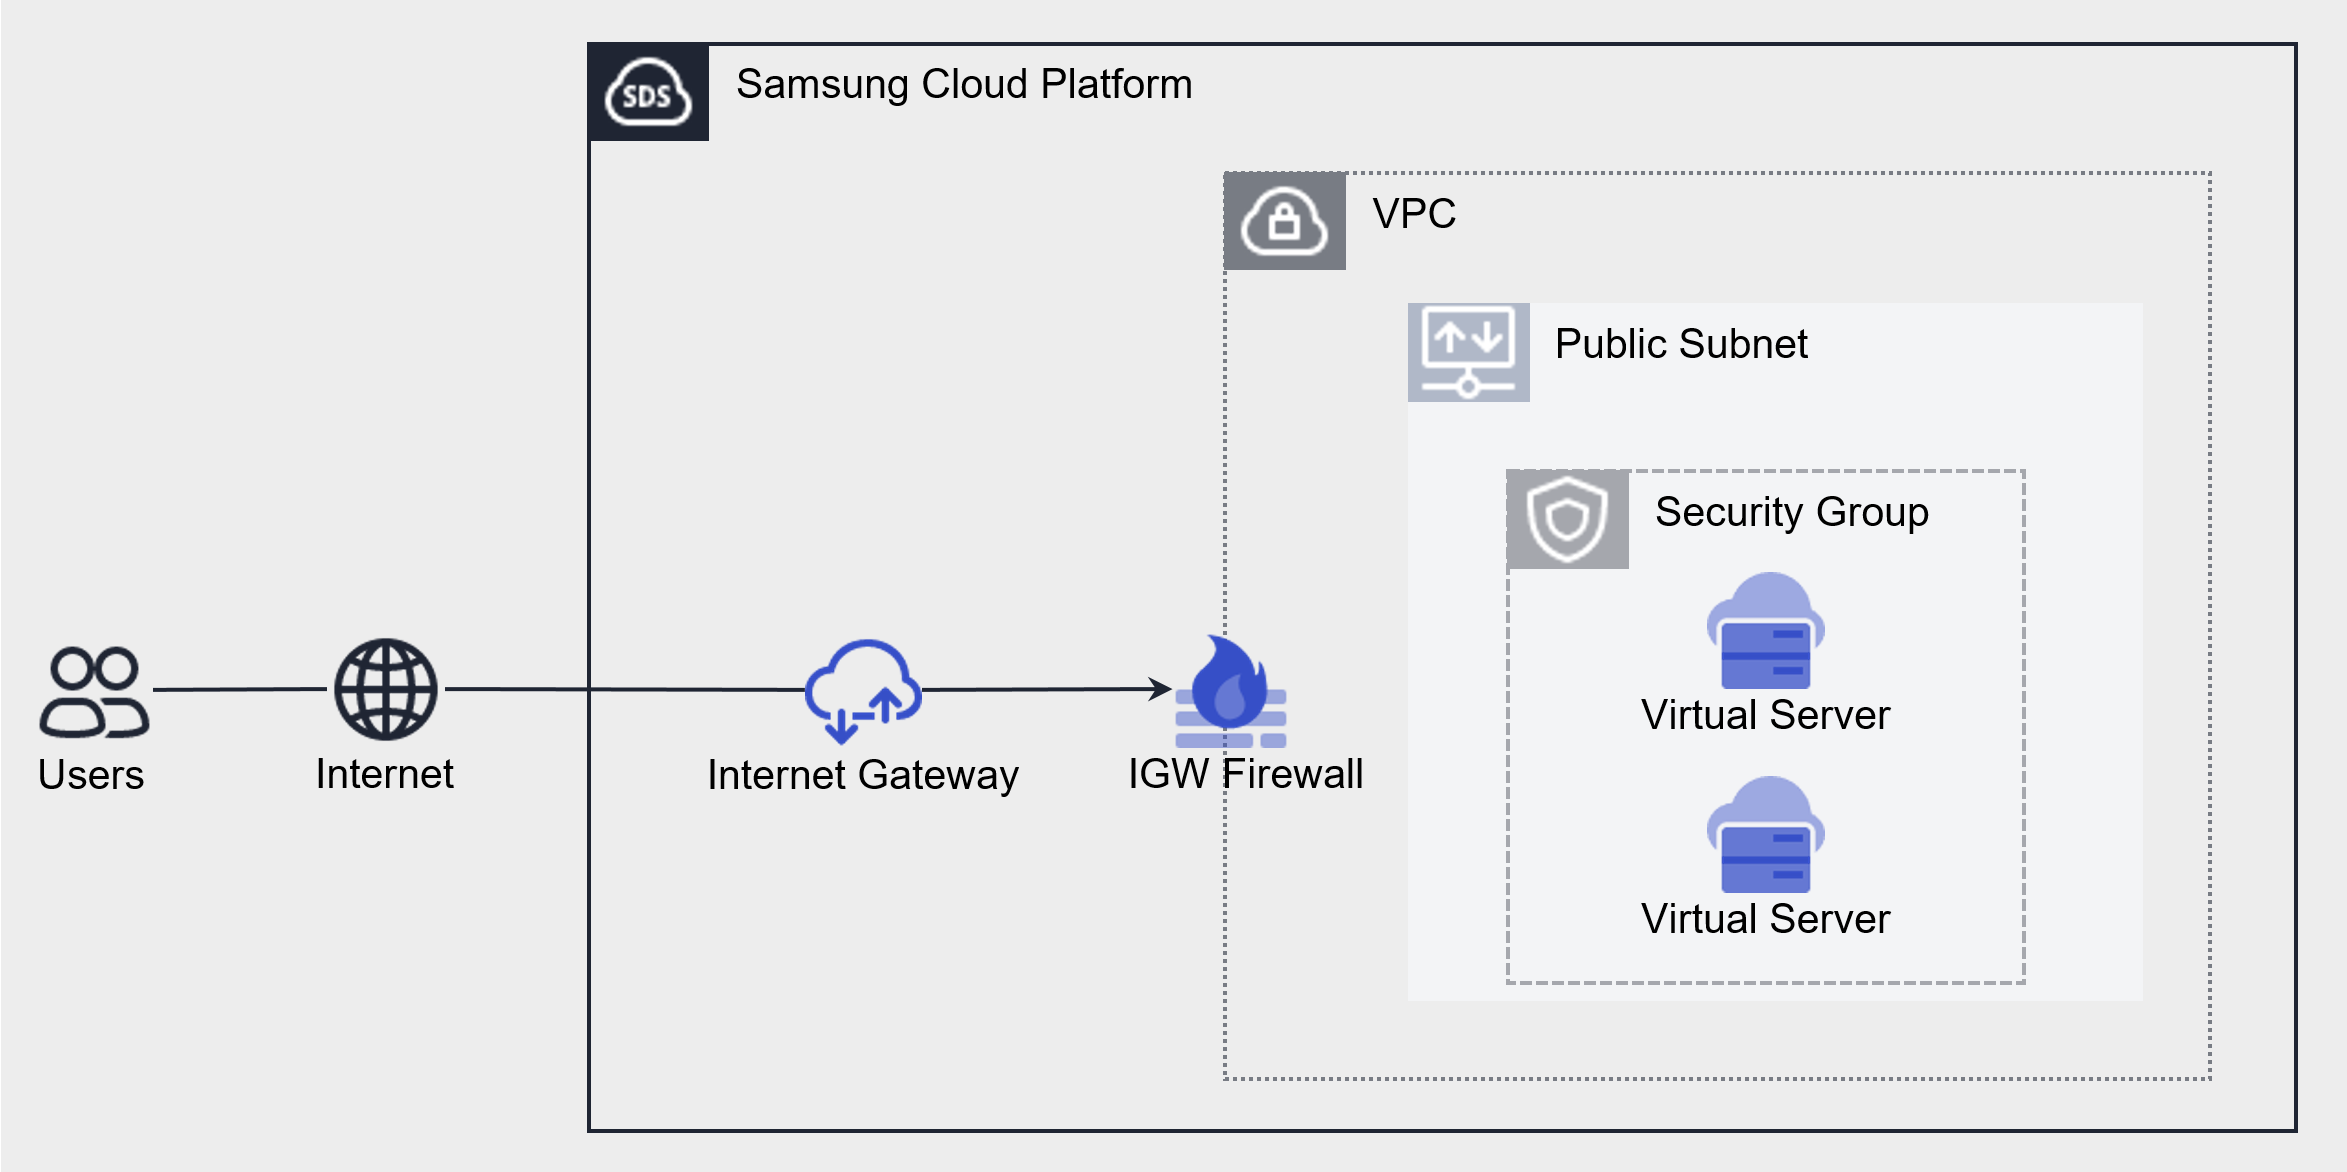
Components
The components that make up a Security Group are as follows.
| Component | Detailed description |
|---|---|
| Applicable target | Resources to which the Security Group will be applied
|
| Security Group Rules | When a Security Group is first created, it blocks all inbound and outbound traffic according to the default rule (Any/Deny)
|
Constraints
Samsung Cloud Platform’s Security Group has a default quota (limit) set. There is a maximum number of Security Groups and Security Group rules that can be created. The Samsung Cloud Platform Console is a space where you can view and manage quotas for the Samsung Cloud Platform service and request quota increases for many resources.
| Category | Default quota | Detailed description |
|---|---|---|
| Security Group | 200 items | Maximum number of default Security Groups that can be created per account |
| Security Group rule count | 100 items | Maximum number of default rules that can be created per Security Group |
| Security Group rule count > project | 1,000 items | Maximum number of default Security Group rules that can be created per account |
Preceding service
Security Group has no prerequisite service.
2 - How-to guides
Users can create the service by entering the required information for the Security Group service and selecting detailed options through the Samsung Cloud Platform Console.
Create Security Group
You can create and use the Security Group service from the Samsung Cloud Platform Console.
To create a Security Group, follow these steps.
- Click the All Services > Networking > Security Group menu. 1. Navigate to the Service Home page of the Security Group.
- On the Service Home page, click the Create Security Group button. 2. Go to the Create Security Group page.
- Enter the required information in the Service Information Input area.
Category Required statusDetailed description Security Group name Essential Name of the Security Group to create - English letters (both uppercase and lowercase), numbers, and special characters (
-) can be used, and up to 255 characters can be entered
- Duplicate Security Group names are allowed within the project
Log saving option Selection Select whether to save Security Group logs - Enabled: Save logs
- Disabled: Do not save logs
- Click Security Group Logging List Shortcut to go to the Security Group Logging list page
Table. Security Group service information input items - English letters (both uppercase and lowercase), numbers, and special characters (
- Enter the required information in the Service Information Input area.
To store Security Group logs, first create a bucket in Object Storage for the logs, and then configure that bucket as the log repository in Security Group Logging.
- The log storage settings can be verified in Security Group Logging, and for more details, refer to Security Group Logging.
- When you set up a log repository, Object Storage fees for log storage will be charged.
* **Additional Information Input** area, enter or select the required information.
| Category | Required status | Detailed description |
|---|---|---|
| tag | Selection | Add Tag
|
| Explanation | Selection | User additional description
|
- Check the input information and click the Create button.
- When creation is complete, verify the created resources on the Security Group list page.
Check Security Group detailed information
Security Group menu’s Security Group List page allows you to view and edit the full resource list and detailed information.
To view detailed information about the Security Group, follow the steps below.
- All Services > Networking > Security Group menu, click it. 1. Navigate to the Service Home page of the Security Group.
- On the Service Home page, click the Security Group menu. 2. Navigate to the Security Group list page.
- On the Security Group list page, click the resource to view detailed information. 3. Navigate to the Security Group Details page.
- The Security Group Details page displays status information and additional feature information, and consists of Details, Rules, Tags, Activity History tabs.
| Category | Detailed description |
|---|---|
| Service status | Security Group status
|
| Service cancellation | Cancel service button |
Detailed Information
View the detailed information of the resource selected from the Security Group list, and modify the information if needed.
| Category | Detailed description |
|---|---|
| service | Service name |
| Resource Type | Resource Type |
| SRN | Unique resource ID in Samsung Cloud Platform |
| Resource Name | Resource Name |
| Resource ID | Unique resource ID in the service |
| Constructor | User who created the service |
| Creation Date/Time | Service creation date and time |
| Editor | User who edited the service information |
| Modification date | Date and time the service information was modified |
| Security Group name | Resource Name |
| Security Group ID | Unique resource ID in the service |
| Security Group rule count | The rule quota and the number of rules currently in use for this Security Group |
| Security Group rule count per Account | Account’s Security Group rule quota and the total number of rules used across all Security Groups in the account |
| Explanation | User-added additional description
|
| Log saving status | Security Group log storage option
|
| Applied Service | Service type, service name, and status of the service to which the Security Group is applied |
rule
Security Group List page allows you to view the rule list of the selected resource and add or delete rules.
| Category | Detailed description |
|---|---|
| Excel download | Batch rule entry Excel file download button |
| More | Add-on button
|
| Detailed Search | Rule Detail Search Button |
| Add rule | Add Rule button |
| Direction | Traffic direction for servers with Security Group applied
|
| Rule ID | Unique ID value for the rule |
| Target address | Target address for communicating with a server that has a Security Group applied |
| Remote Security Group name | The Security Group resource name displayed when the target is set to a Security Group |
| Remote Security Group ID | Security Group ID displayed when the target is set to a Security Group |
| Service | Protocol and Port |
| Explanation | Additional description written by the user |
| Delete | Delete rule |
tag
Security Group List page allows you to view the tag information of the selected resource, and add, modify, or delete it.
| Category | Detailed description |
|---|---|
| Tag list | Tag list
|
Security Group List page allows you to view the operation history of the selected resource.
| Category | Detailed description |
|---|---|
| Task History List | Resource Change History
|
Security Group Resource Management
You can manage resources such as log storage settings and rule additions for a Security Group.
Using Log Storage
To store Security Group logs, first create a bucket in Object Storage for the logs, and then configure that bucket as the log repository in Security Group Logging.
- The log storage settings can be verified in Security Group Logging, and for more details, refer to Security Group Logging.
- When you set up a log repository, Object Storage fees for log storage will be charged.
To store Security Group logs, follow these steps.
- Click the All Services > Networking > Security Group menu. 1. Navigate to the Service Home page of the Security Group.
- On the Service Home page, click the Security Group menu. 2. Navigate to the Security Group list page.
- On the Security Group list page, click the resource (Security Group name) to store logs. 3. Navigate to the Security Group Details page.
- Click the log saving status edit icon. 4. Edit Log Save Setting Navigate to the popup window.
- Modify Log Saving Option In the popup window, select Use for the log repository, and click the Confirm button.
Disable Log Saving
To stop saving Security Group logs, follow these steps.
- Click the All Services > Networking > Security Group menu. 1. Navigate to the Service Home page of the Security Group.
- On the Service Home page, click the Security Group menu. 2. Navigate to the Security Group list page.
- On the Security Group List page, click the resource (Security Group name) that will not have logs saved. 3. Security Group Details go to the page.
- Click the Edit icon of Log Save Option. 4. Edit Log Save Setting Navigate to the popup window.
- Modify Log Saving Option In the popup window, deselect Use for the log repository, and click the Confirm button.
- Notification Check the message in the popup window and click the Confirm button.
Add rule
To add a Security Group rule, follow the steps below.
- Click the All Services > Networking > Security Group menu. 1. Navigate to the Service Home page of the Security Group.
- On the Service Home page, click the Security Group menu. 2. Navigate to the Security Group list page.
- On the Security Group List page, click the resource (Security Group name) for which you want to add a rule. 3. Navigate to the Security Group Details page.
- On the Security Group Details page, click the Rules tab. 4. Go to the Rules tab page.
- Click the Add Rule button in the Rule tab. 5. Navigate to the Add Rule page.
- Direct Input tab page, please enter the required information.
- After reviewing the rules to add, click the Done button.CautionIf you navigate to another page without clicking the Complete button after entering content on the Add Rule page, be aware that all entered items will be reset.
| Category | Required status | Detailed description |
|---|---|---|
| Target Input Method | Required | Rule remote type setting
|
| Target address | Required | If CIDR is selected, you need to enter the target IP address
|
| Address Group name | Required | If Address Group is selected, Address Group selection is required. |
| Security Group name | Required | If Security Group is selected, Security Group selection is required. |
| type | Required | Select protocol type to apply the rule
|
| type > protocol | Required | Select detailed protocol for the type
|
| Direction | Required | Application scope criteria, traffic direction configuration
|
| Explanation | Selection | Additional description written by the user |
Create rules in bulk
To add multiple Security Group rules at once, follow these steps.
- All Services > Networking > Security Group Click the menu. 1. Navigate to the Service Home page of the Security Group.
- On the Service Home page, click the Security Group menu. 2. Navigate to the Security Group list page.
- Security Group list page, click the resource (Security Group name) for which you want to add a rule. 3. Go to the Security Group Details page.
- On the Security Group Details page, click the Rules tab. 4. Go to the Rules tab page.
- In the Rules tab, click the Add Rule button. 5. Add Rule page is accessed.
- On the Add Rule page, click the Bulk Rule Input tab.
- Click the Form Download button in File Selection. 8. The rule batch input Excel file will be downloaded.
- Enter the rule information into the batch rule input Excel file, then save it.
- From File Selection, click Attach File to attach the Excel file you created, and click Add.
- You cannot upload the file if the attached Excel file format differs from the registration form or if the file is encrypted.
- You can upload up to 100 batch registration rules at a time. * Upload is not possible when the maximum number of registered rules is exceeded.
- If you exceed the maximum number of rules that can be registered per Account/Security Group, you cannot upload the file.
- If the Excel file is added successfully, click the File Upload button.
- If any uploaded rule contains invalid entries, a rule verification window will appear. * Click Confirm to apply all items except the invalid rules.
Delete rule
To delete a Security Group rule, follow the steps below.
- All Services > Networking > Security Group Click the menu. 1. Navigate to the Service Home page of the Security Group.
- On the Service Home page, click the Security Group menu. 2. Navigate to the Security Group list page.
- On the Security Group List page, click the resource (Security Group name) to which you want to add a rule. 3. Security Group Details Navigate to the page.
- On the Security Group Details page, click the Rules tab. 4. Go to the Rules tab page.
- In the Rule tab, click the Delete button for the rule you want to delete.
Security Group Termination
You can delete unused Security Groups.
To cancel the Security Group, follow the steps below.
- All Services > Networking > Security Group Click the menu. 1. Navigate to the Service Home page of the Security Group.
- On the Service Home page, click the Security Group menu. 2. Go to the Security Group list page.
- Security Group List page, select the resource (Security Group name) to terminate, and click the Terminate Service button.
- After termination is complete, check the Security Group list page to see if the resource has been deleted.
2.1 - Security Group Logging
To store Security Group logs, first create a bucket in Object Storage for the logs, and then set that bucket as the log repository in Security Group Logging. Next, on the Security Group Details page, when you enable log storage, the Security Group logs are saved to an Object Storage bucket.
To store Security Group logs, follow the steps below.
- To store Security Group logs, you can create a bucket in Object Storage or use an existing bucket. 1. To create a bucket, please refer to Object Storage 생성하기.
- To set the bucket for the log storage of Security Group Logging, refer to Security Group Logging 로그 저장소 사용 설정하기.
- In the Security Group detail view, to set the log storage option to Enabled, refer to Security Group 로그 저장 사용하기.
Security Group Logging Configure log storage usage
To set the log storage option of a Security Group to Enabled, you must first configure a log repository in Security Group Logging.
To enable the log repository for Security Group Logging, follow the steps below.
- Click the All Services > Management > Network Logging > Security Group Logging menu. 1. Go to the Security Group Logging List page.
- Security Group Logging List Click the drop-down list located at the top of the page and select Log storage bucket. 2. When you select a bucket, log storage path is displayed.
- After verifying the log storage bucket and log storage path, click the Apply button.
Retrieve Security Group Logging List
If you configure the log storage bucket for Security Group Logging, you can view the Security Group Logging list.
To view the Security Group Logging list, follow these steps.
- All Services > Management > Network Logging > Security Group Logging Click the menu. 1. Go to the Security Group Logging List page.
- Security Group Logging List On the page, check the resources in use and the log storage targets.
Category Detailed description Resource ID Security Group ID Save target Security Group name Save registration date and time Security Group log storage registration timestamp Table. Security Group Logging list itemsReferenceAfter setting the log repository for Security Group Logging, you must set the log storage option to Enabled in the Security Group detail view for logging to start. For more details, see Security Group 로그 저장 사용하기.
Check detailed information of Security Group Logging
Stored logs contain different detailed information for each protocol. Please refer to the content below for details.
TCP / UDP
Stored log example: 2024-10-11T02:18:39,drop,to-lport: tcp,198.19.65.2,6443,192.168.22.131,20427
| Category | Explanation |
|---|---|
| 2024-10-11T02:18:39 | Log date and time (2024-10-11, 02:18:39) |
| drop | Action (drop / allow) |
| to-lport | Direction
|
| tcp | Protocol (tcp / udp / icmp / ip) |
| 192.168.65.2 | Source IP |
| 6443 | Departure Port |
| 192.168.22.131 | Destination IP |
| 20427 | Destination Port |
ICMP
Stored log example: 2024-10-11T02:18:39,allow,to-lport: icmp,192.168.65.2,192.168.22.131,8
| Category | Explanation |
|---|---|
| 2024-10-11T02:18:39 | Log date and time (2024-10-11, 02:18:39) |
| to-lport | Direction
|
| allow | Action (drop / allow) |
| tcp | Protocol (tcp / udp / icmp / ip) |
| 192.168.65.2 | Source IP |
| 192.168.22.131 | Destination IP |
| 8 | ICMP type ID |
IP
Stored log example: 2024-10-11T02:18:39,deny,ip,192.168.65.2,192.168.22.131,103
| Category | Explanation |
|---|---|
| 2024-10-11T02:18:39 | Log date and time (2024-10-11, 02:18:39) |
| deny | Action (drop / allow) |
| ip | Protocol |
| 192.168.65.2 | Source IP |
| 192.168.22.131 | Destination IP |
| 103 | IP Protocol ID
|
Security Group Logging Configure to Not Use Log Storage
In Security Group Logging, you can set the log storage to not be used.
To disable the log repository for Security Group Logging, follow these steps.
- Click the All Services > Management > Network Logging > Security Group Logging menu. 1. Security Group Logging List Navigate to the page.
- On the Security Group Logging List page, click the Log Storage Settings icon at the top. 2. Log repository settings Navigate to the popup window.
- Log storage settings in the popup window, select log storage bucket as Not used, and click the Confirm button.
- The log storage settings can be changed when there is no log destination.
- To change the log storage bucket, first change the setting to unused. * You can then reset the settings to make changes.
2.2 - Address Group
The user can enter the required information for the Address Group service in the Samsung Cloud Platform Console, select detailed options, and create the service.
Address Group is a feature for managing and enhancing Security Groups more efficiently, offering the following advantages.
- Improved Flexibility of Service Configuration: You can configure services flexibly by exceeding the strict rule count (Quota) limit of Security Group.
- Performance Optimization: The performance of Security Group operations is improved compared to registering a single rule.
Create an Address Group and use it in the following cases.
- When registering multiple IPs and the Security Group lacks sufficient rule capacity.
- When you need to dynamically manage a large number of IPs targeting a specific service port.
To use Address Group, refer to the following steps.
- Create an Address Group.
- Register the CIDR required for the Address Group.
- When adding a rule to a Security Group, specify the previously created Address Group as the target address.
- All CIDRs registered in the Address Group are added as a single Security Group rule.
- When you add or remove a target address in an Address Group, the change is immediately reflected in all Security Groups that reference that Address Group.
Add Address Group
You can create and use the Address Group service in the Samsung Cloud Platform Console.
To create an Address Group, follow these steps.
All Services > Networking > Security Group Click the menu. 1. Navigate to the Service Home page of the Security Group.
On the Service Home page, click the Address Group menu. 2. Go to the Address Group page.
On the Address Group page, click the Add Address Group button. 3. Go to the Add Address Group page.
Enter the required information in the Service Information Input area.
Category Required statusDetailed description Address Group name Required Name of the Address Group to create - English letters, numbers, special characters (
-_) can be used, and up to 100 characters can be entered
- The same Address Group name cannot be used within the Account
Table. Address Group Service Information Input Items- English letters, numbers, special characters (
Additional Information Input area, please enter or select the required information.
Category Required statusDetailed description tag Selection Add Tag - Up to 50 per resource can be added
- After clicking the Add Tag button, input or select Key, Value values
Explanation Selection User additional description - Up to 255 characters can be entered
Table. Address Group additional information input fields
Check the input information and click the Done button.
- After creation is complete, check the created resource on the Address Group List page.
Check detailed information of Address Group
Address Group menu’s Address Group List page allows you to view the full resource list and detailed information.
To view detailed information of the Address Group, follow these steps.
- Click the All Services > Networking > Security Group menu. 1. Navigate to the Service Home page of the Security Group.
- On the Service Home page, click the Address Group menu. 2. Go to the Address Group page.
- On the Address Group list page, click the resource to view detailed information. 3. Go to the Address Group Details page.
- Address Group Details page displays status information and additional feature information, and consists of Details, Target Addresses, Tags, Operation History tabs.
| Category | Detailed description |
|---|---|
| Service status | Address Group status
|
| Delete Address Group | Button to delete the service |
Detailed Information
Address Group list lets you view the detailed information of the selected resource and, if needed, modify the information.
| Category | Detailed description |
|---|---|
| Service | Service Name |
| Resource Type | Resource Type |
| SRN | Unique resource ID in Samsung Cloud Platform |
| Resource Name | Resource Name |
| Resource ID | Unique resource ID in the service |
| Constructor | User who created the service |
| Creation Date/Time | Service creation date and time |
| Modifier | User who edited the service information |
| Modification date | Date and time the service information was modified |
| Address Group name | Resource Name |
| Address Group ID | Unique resource ID in the service |
| Number of target addresses in the Address Group | Number of target addresses in use for this Address Group |
| Explanation | Additional description written by the user
|
| Applied Security Group | Service name and service ID of the Security Group service to which the Address Group is applied |
Target address
Address Group List page lets you view the target address list of the selected resource and add or remove target addresses.
| Category | Detailed description |
|---|---|
| Excel download | Target address bulk input Excel file download button |
| More | Add-on button
|
| Add target address | Add Target Address Button |
| Target address | Target address IP information |
Tag
Address Group List page lets you view the tag information of the selected resource, and you can add, modify, or delete it.
| Category | Detailed description |
|---|---|
| Tag list | Tag list
|
Job History
You can view the operation history of the selected resource on the Address Group list page.
| Category | Detailed description |
|---|---|
| Task History List | Resource Change History
|
Address Group Managing Resources
You can add or remove target addresses in an Address Group.
Add Address Group
To add a target address to the Address Group, follow these steps.
- All Services > Networking > Security Group Click the menu. 1. Navigate to the Service Home page of the Security Group.
- On the Service Home page, click the Address Group menu. 2. Go to the Address Group page.
- On the Address Group List page, click the resource to add the target address. 3. Navigate to the Address Group Details page.
- On the Address Group Details page, click the Target Address tab. 4. Go to the Target Address tab page.
- Click the Add Target Address button on the Target Address tab. 5. Add target address A popup window opens.
- After entering the target address, click Confirm.
- The target address can be entered up to 100 at a time in CIDR (IP address/subnet mask) format using
,and-.- In the destination address, you cannot use ‘0.0.0.0/0’, which specifies the entire IP range (ANY).
- The target address can be entered up to 100 at a time in CIDR (IP address/subnet mask) format using
Delete Address Group
To delete the target address in an Address Group, follow these steps.
- All Services > Networking > Security Group Click the menu. 1. Navigate to the Service Home page of the Security Group.
- On the Service Home page, click the Address Group menu. 2. Go to the Address Group page.
- Address Group list 페이지에서 대상 주소를 삭제할 자원을 클릭하세요. 3. Go to the Address Group Details page.
- On the Address Group Details page, click the Target Address tab. 4. Go to the Target Address tab page.
- In the Target address tab, select the rule to delete and click the Delete button.
Terminate Address Group
You can delete unused Address Groups.
To delete an Address Group, follow these steps.
- Click the All Services > Networking > Security Group menu. 1. Navigate to the Service Home page of the Security Group.
- On the Service Home page, click the Address Group menu. 2. Go to the Address Group page.
- On the Address Group List page, select the resource for which you want to delete the service and click the Delete button.
- When the termination is complete, check on the Address Group List page whether the resource has been deleted.
2.3 - Migration Rules
Users can retrieve rules created in the V1 environment of the Samsung Cloud Platform Console and apply them to the V2 service.
Security Group Rule Retrieval
You can import rules created in the V1 environment of the Samsung Cloud Platform Console and migrate them to the V2 service for use.
- With the Migration feature, Security Group rule names transferred to the V2 environment are prefixed with the Migration label.
- If a Security Group rule description exceeds 255 characters, part of the description is truncated and appended.
- Each Security Group can have up to 200 rules, and any rule that exceeds the maximum allowable quantity will not be registered.
To retrieve the Security Group rules of V1, follow these steps.
All Services > Networking > Security Group Click the menu. 1. Navigate to the Service Home page of the Security Group.
On the Service Home page, click the Migration Rules menu. 2. Go to the Migration Rules page.
Select the rule information to retrieve from the Migration Rules page and click Complete.
Category Detailed description Original rule environment SCP v1 (Vmware) Auto-select Applicable target Select the Security Group list in the account to apply the transferred rule Retrieve rules Click the Attach File button to upload the decrypted Security Group rule file - After decrypting and saving the rule file extracted from the original environment, upload it
List of rules View uploaded Security Group rule file details - Delete: Delete selected rule
- Edit: Modify selected rule information, see Modify the Security Group rules to be transferred for details
Table: Migration Rules detailed itemsAfter the Security Group rule transfer request is completed, verify that the transfer item has been added to the Security Group list.
Modify the Security Group rules to be transferred
You can edit each item when retrieving rules created in the V1 environment of the Samsung Cloud Platform Console.
Follow these steps to modify the Security Group rules to be imported from V1.
Click the All Services > Networking > Security Group menu. 1. Navigate to the Service Home page of the Security Group.
On the Service Home page, click the Migration Rules menu. 2. Go to the Migration Rules page.
Click Attach File in the Import Rules item to upload the Security Group rule file.
Click Edit on the rule item you want to modify in the rule list.
Category Required statusDetailed description Target Input Method Required Rule remote type setting - CIDR: Set target address by directly entering IP
- Address Group: Set to target the created Address Group
- Security Group: Set to target the created Security Group, select when allowing access to all members within the chosen security group
Target address Required If CIDR is selected, you need to enter the target IP address - Enter in CIDR (IP address/subnet mask) format
,and-using you can input multiple addresses up to a maximum of 100 at once.
- To use the entire IP range (ANY), enter ‘0.0.0.0/0’
Address Group name Required When Address Group is selected, Address Group selection is required. Security Group name Required If Security Group is selected, a Security Group selection is required type Required Select protocol type to apply the rule - Destination Port/Type Selection: Select protocol type
- Internet Protocol: Enter protocol numbers, up to 100 entries
- All: Select destination port/Type and protocol for the entire range, meaning all ports for all protocols
Type > Protocol Required Select detailed protocol for the type - Select the desired protocol among TCP, UDP, and ICMP; input fields vary depending on the selected protocol
- When ICMP is selected in the protocol, you can set the ICMP Type
- Select a commonly used Type such as Echo from the values defined for ICMP Type
- Click the Add button to add an input value
- When TCP/UDP is selected in the protocol, you can choose allowed ports such as SSH, HTTP, etc.
- When entering manually, you can input values from 1 to 65535, and you can enter up to 100 entries at once using commas (,) or ranges (-)
- Click the Add button to add an input value
- When Internet Protocol is selected in the type
Enter a protocol number within 1 to 254
Direction Required Configure the traffic direction for the applicable target criteria - Inbound rule: External → Server
- Outbound rule: Server → External
Explanation Selection Additional description written by the user Table. Detailed items of the Security Group rule edit windowClick Confirm when the rule information edit is complete.
Verify the modified rule information and click Complete.
3 - API Reference
4 - CLI Reference
5 - Release Note
Security Group
- For user convenience, a Migration Rules page has been added that allows you to import Security Group rules created in the V1 environment and apply them to the V2 service.
- When adding a Security Group rule, multiple service ports can be selected
- Improved the console to allow selecting multiple service ports when adding a rule.
- Add Security Group rule input method
- A feature allowing IP protocol input has been added.
- A feature to select Well-known protocols has been added.
- Samsung Cloud Platform Common Feature Changes
- Account, IAM, Service Home, tags, and other common CX changes have been reflected.
- Improved to allow entering multiple IPs when adding Security Group rules.
- A feature to store Security Group logs has been added.
- You can decide whether to store Security Group logs and store the logs in Object Storage.
- The Security Group service, which provides virtual firewall functionality for instance resources, has been launched.
- You can control inbound and outbound traffic generated from instance resources through the Security Group service.
- The Security Group service, which provides virtual firewall functionality for instance resources, has been launched.
- You can control inbound and outbound traffic generated from instance resources through the Security Group service.