This is the multi-page printable view of this section. Click here to print.

Return to the regular view of this page.

How-to guides

The user can enter required Load Balancer information and select detailed options through the Samsung Cloud Platform Console to create a service.

Load Balancer Create

You can create and use the Load Balancer service from the Samsung Cloud Platform Console.

To create a Load Balancer, follow the steps below.

  1. All Services > Networking > Load Balancer Click the menu. Navigate to the Service Home page of Load Balancer.
  2. Click the Load Balancer Create button on the Service Home page. You will be taken to the Load Balancer Create page.
  3. Load Balancer creation on the page, enter the information required to create the service and select detailed options.
    • Service Information Input Enter or select the required information in the area.
Category
Required
Detailed description
Load Balancer nameRequiredLoad Balancer resource name
  • Enter 3 to 63 characters using English letters (uppercase and lowercase), numbers, and special characters (-_)
Service CategoryRequiredLoad Balancer Service Type
  • Select L4 or L7
VPCRequiredVPC where the Load Balancer will be created
  • Select from VPC list
Service SubnetRequiredVPC Subnet where the Load Balancer will be created
  • Select from the list of Subnets created in the selected VPC
Service IPSelectLoad Balancer service IP
  • Enter one IP from the Service Subnet range in IP address format
  • If not entered, automatically assign from the IP allocation range of the selected Subnet
Source NAT IPSelectIP to be used for member communication in the Load Balancer
  • Enter one IP from the Service Subnet range in IP address format
  • If not entered, automatically assign from the IP allocation range of the selected Subnet
  • If a Load Balancer already exists in the selected Subnet, display the previously assigned IP information
  • IP cannot be modified after Load Balancer creation
Health Check IPSelectIP to use for health check in Load Balancer
  • Enter two IPs from the Service Subnet range in IP address format each
  • If not entered, automatically assign from the IP allocation range of the selected Subnet (if only one IP is entered, the remaining IP is automatically assigned)
  • If a Load Balancer already exists in the selected Subnet, display the previously assigned IP information
  • IP cannot be modified after Load Balancer creation
Use FirewallSelectWhether to use Firewall
  • Select whether to enable Firewall for Load Balancer access control
    • Use when checked creates Firewall resource in active state
    • If not checked creates Firewall resource in inactive state
  • If there is already a Firewall in use on the selected Subnet, display Firewall resource information
Firewall log storageSelectSelect whether to save Firewall logs
Table. Load Balancer Service Information Input Items
  • Additional Information Input Enter or select the required information in the area.
    Category
    Required
    Detailed description
    DescriptionSelectEnter resource description
    TagSelectAdd Tag
    • Up to 50 tags can be added per resource
    Table. Load Balancer Additional Information Input Items
  1. Check the created service information and the estimated billing amount, and click the Complete button.
    • When creation is complete, check the created resources on the Load Balancer List page.
      Guide

      Load Balancer service does not provide access control functionality for Service IP and service ports.

      • Load Balancer when creating use Firewall to manage communication between client and Load Balancer, and between Load Balancer and members with Firewall rules, and use Firewall log storage to store access logs is recommended.
      Caution

      If you use the firewall, you must add rules required for Load Balancer communication. Register the rules, paying attention to the direction for each purpose.

      • If you do not add the rule, the Load Balancer service will not operate correctly.
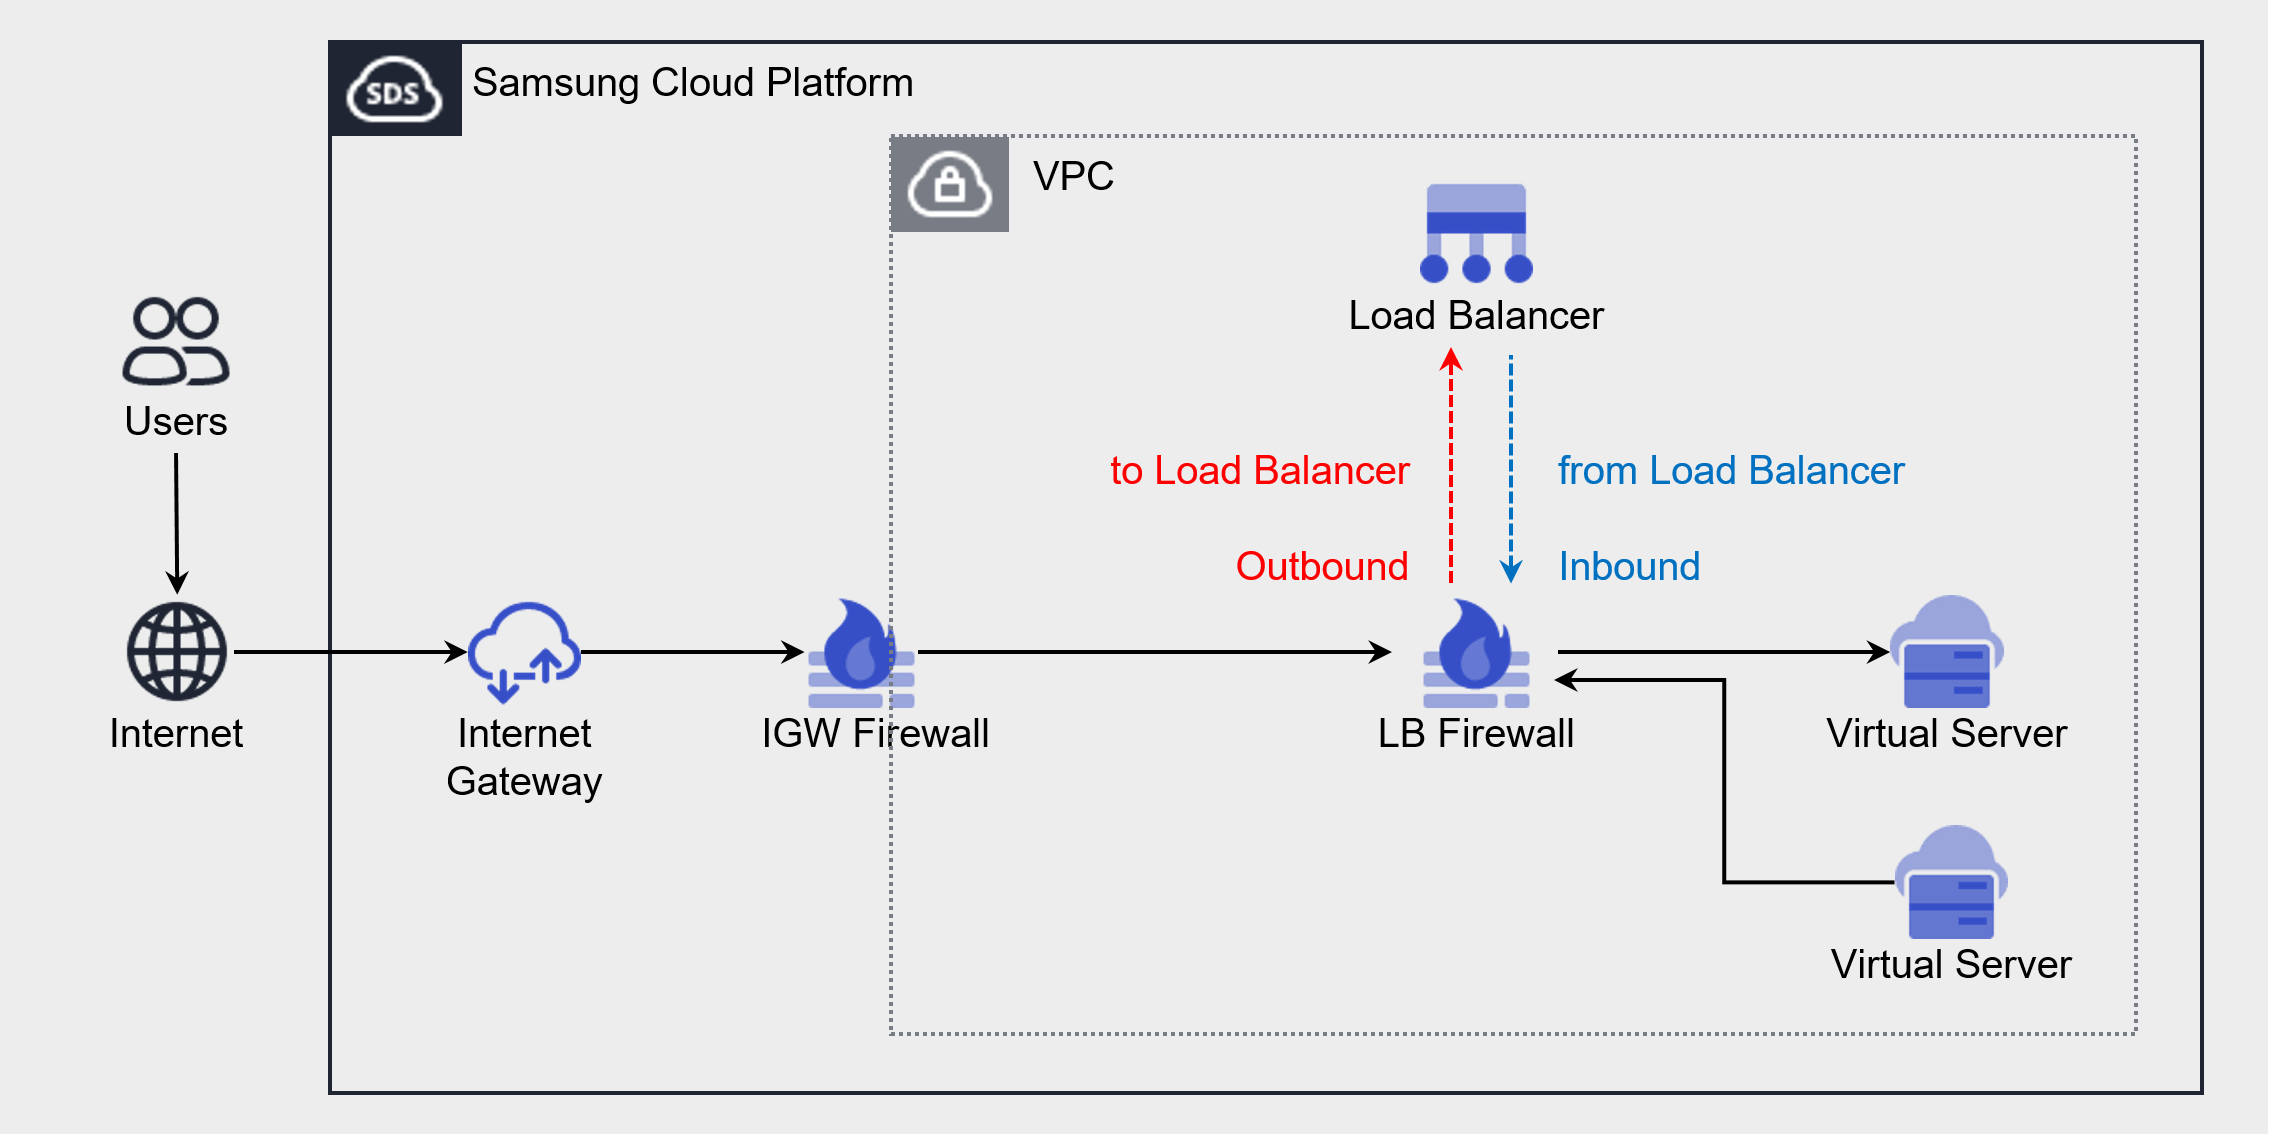
      Diagram
      PurposeSource IPDestination IPProtocolDestination Port/TypeDirection
      Client → LB connectionClient IPLB Service IPListener protocolListener service portOutbound
      LB → Member ConnectionLB Source NAT IPLB Server Group Member IPLB Server Group ProtocolMember PortInbound
      LB → Member Health CheckLB Health Check IPLB Server Group Member IPHealth Check ProtocolHealth Check Port
      • If the health check port and member port are different, register the member port
      Inbound
      Figures and Tables. Add Load Balancer Firewall Rule

Load Balancer Check Detailed Information

The Load Balancer service can view and edit the resource list and detailed information in the Load Balancer menu. Load Balancer Details page consists of Details, Connected Resources, Tags, Activity Log tabs.

To view detailed information of the Load Balancer service, follow the steps below.

  1. All Services > Networking > Load Balancer Click the menu. Go to the Service Home page of the Load Balancer.
  2. Click the Load Balancer menu on the Service Home page. Navigate to the Load Balancer List page.
  3. Click the resource to view detailed information on the Load Balancer List page. You will be taken to the Load Balancer Details page.
    • Load Balancer Detail page displays status information and additional feature information, and consists of Detail Information, Connected Resources, Tags, Operation History tabs.
      CategoryDetailed description
      StatusLoad Balancer resource status
      • Active: The service is properly activated
      • Deleting: Processing service termination request
      • Creating: Processing service creation request
      • Error: Cannot determine current status due to internal error
      • Editing: Processing service modification request
      Service terminationLoad Balancer resource deletion
      Table. Load Balancer status information and additional feature items

Detailed Information

Detailed Information tab allows you to view detailed information of the selected resource from the Load Balancer list, and modify necessary information.

CategoryDetailed description
ServiceService Name
Resource TypeResource Type
SRNResource unique ID in Samsung Cloud Platform
Resource NameResource Name
Resource IDUnique resource ID in the service
Creation Date/TimeService Creation Date/Time
Modification Date/TimeService Modification Date/Time
CreatorService creation request user
EditorService modification request user
Load Balancer nameLoad Balancer name
Service IPLoad Balancer’s Service IP (used for communication between client and Load Balancer)
  • Uses one IP from the Service Subnet
Service CategoryLoad Balancer Service Type
Source NAT IPLoad Balancer’s Source NAT IP (used for communication between Load Balancer and server)
  • Use one IP from Service Subnet
VPCVPC resource name where Load Balancer is created
Service SubnetSubnet resource name where Load Balancer is created
Public NAT IPLoad Balancer’s Public NAT IP (used when configuring internet service)
  • Click the Edit icon to modify the settings
Health Check IPLoad Balancer Health Check IP (used when checking health of LB server group members)
  • Use 2 IPs from Service Subnet
DescriptionAdditional information or description about the Load Balancer
Firewall nameFirewall resource name connected to Load Balancer
Table. Load Balancer detailed information items

Connected Resources

In the Connected Resources tab, you can view the list of Listeners attached to the Load Balancer, and create or delete Listeners.

  • connected resource tab, when you select the Listener item, you go to the Listener details page where you can view detailed information and edit or delete it.
  • Listener Details page items, clicking the Edit icon allows you to edit the information.
CategoryDetailed description
Listener creationListener creation button
Listener nameListener resource name
Routing RulesRouting rules connected to Listener
  • Routing Action: Traffic routing method
  • Setting Value: Setting value for routing action
ProtocolProtocol that the Listener receives
PortPort that the Listener receives
Creation TimeListener Creation Time
DeleteListener Delete Button
Table. Load Balancer Connected Resource List Items

Tag

Load Balancer list page allows you to view the tag information of the selected resource, and you can add, modify, or delete it.

CategoryDetailed description
Tag ListTag List
  • You can view the Key, Value information of tags
  • Up to 50 tags can be added per resource
  • When entering tags, search and select from the previously created Key and Value list
Table. Load Balancer Tag Tab Items

Work History

Work History tab allows you to view the work history of the selected resource.

CategoryDetailed description
Work DetailsWork Execution Content
Work date/timeWork execution date/time
Resource TypeResource Type
Resource NameLoad Balancer Name
Work ResultTask execution result (success/failure)
Operator InformationInformation of the user who performed the task
Table. Load Balancer operation history list items

Load Balancer Resource Management

You can manage resources such as creating and deleting Load Balancer listeners.

Creating a Listener

Create a Listener on the Load Balancer to receive client requests and handle traffic according to the Listener settings.

Notice

The protocol that receives client requests varies depending on the Load Balancer service type.

  • L4 Load Balancer case: TLS, TCP, UDP protocol
  • L7 Load Balancer in case: HTTP, HTTPS protocol

Creating a Listener in L4 Load Balancer

To create a Listener in L4 Load Balancer, follow the steps below.

  1. All Services > Networking > Load Balancer Click the menu. Navigate to the Load Balancer’s Service Home page.
  2. Click the Load Balancer menu on the Service Home page. Go to the Load Balancer List page.
  3. Load Balancer List page, click the Load Balancer resource to create a Listener. Go to the Load Balancer Details page.
  4. Click the Connected Resources tab on the Load Balancer Details page. It navigates to the Connected Resources tab page.
  5. Connected Resources tab page, click the Create Listener button in the upper right.
  6. Service Information Input Enter or select the required information in the area.
    • Protocol determines which information can be entered.
Category
Required
Detailed description
Load BalancerRequiredName of the Load Balancer resource where the Listener will be created
Listener nameRequiredListener resource name
ProtocolRequiredSelect Listener receiving protocol
  • TCP, UDP, or TLS
Service PortRequiredEnter Listener receiving port
  • Enter a value between 1 and 65,534
Routing RuleRequiredRouting Rule Settings
  • Routing Action: L4 Load Balancer is fixed to LB Server Group Forward
  • LB Server Group: Select an LB Server Group to handle client requests
    • Can select from LB Server Groups created in the same Service Subnet as the Load Balancer
    • LB Server Groups in use by other Load Balancers cannot be selected
Session Keep TimeRequiredSet client session keep time
  • Default 120 seconds
  • When using TCP, TLS protocols, input can be in 60‑second increments between 60 and 3,600 seconds
  • When using UDP protocol, input can be in 60‑second increments between 60 and 180 seconds
Insert Client IPSelectSet whether to insert client IP information (set when using TCP protocol)
  • Insert the client IP address into the TCP proxy protocol header and forward it to the server (supports Proxy Protocol v1)
SSL CertificateSelectSelect encrypted certificate and security level (set when using TLS protocol)
  • Select certificate to use for client and SSL/TLS Handshake
    • Default Certificate (required): Select certificate to use for client connection
    • SSL Security Level (required): Select security level when encrypting client connection (SSL Security Level Support Items see)
      • High: Supports Cipher Suite of TLS 1.3 version
      • Normal: Supports Cipher Suite including TLS 1.2 version
      • Low (not recommended): Supports Cipher Suite including TLS 1.1 version
Server SSL security levelRequiredSelect security level when configuring End-to-End SSL (set when using TLS protocol)
  • Select Do not use if you do not encrypt the server connection
PersistenceRequiredSelect session persistence (Sticky Session) method (set when using TCP, TLS protocols)
  • Source IP: Fix the connection server based on the client IP address
Table. Enter Listener Service Information - When Using L4 Load Balancer
  1. Enter Additional Information In the area, enter or select the required information.
Category
Required or not
Detailed description
DescriptionSelectEnter Resource Description
TagSelectAdd Tag
  • Up to 50 tags can be added per resource
Table. Listener additional information input items
  1. Check the created service information and click the Complete button.
    • When creation is complete, check the created resources in the Load Balancer Details page’s Connected Resources tab.

Creating a Listener in L7 Load Balancer

To create a Listener in L7 Load Balancer, follow the steps below.

  1. Click the All Services > Networking > Load Balancer menu. Go to the Load Balancer’s Service Home page.
  2. On the Service Home page, click the Load Balancer menu. You will be taken to the Load Balancer List page.
  3. Load Balancer List on the page, click the Load Balancer resource to create a Listener. Navigate to the Load Balancer Details page.
  4. Click the Connected Resources tab on the Load Balancer Details page. You will be taken to the Connected Resources tab page.
  5. Connected Resources tab page, click the Create Listener button at the top right.
  6. Service Information Input area, enter or select the required information.
    • The information that can be entered varies according to the Protocol.
Category
Required
Detailed description
Load BalancerRequiredName of the Load Balancer resource where the Listener is created
Listener nameRequiredListener resource name
ProtocolRequiredSelect Listener receiving protocol
  • Choose between HTTP, HTTPS
Service PortRequiredEnter Listener receiving port
  • Enter a value between 1 and 65,534
Routing RuleRequiredConfigure Routing Rule
  • Routing Action: Select routing processing method
    • LB Server Group Forwarding: Forward traffic to LB server group
    • URL Redirection: Redirection response from Load Balancer
  • Routing Condition: When Routing Action is LB Server Group Forwarding, set LB server group per routing condition
    • URL Path: Set LB server group per URL path
    • Host Header: Set LB server group based on Host value
  • Redirection Target: When Routing Action is URL Redirection, configure redirection response
    • Modified URL Path: Enter URL path to redirect
    • Modified Host: Enter Host value to redirect
    • Protocol/Port: Set protocol and port for redirection (HTTP protocol when used)
PersistenceSelectSelect session persistence (Sticky Session) method (set when routing action is LB server group forwarding)
  • Source IP: Fix the connection server based on the client IP address
  • Cookie: Fix the connection server based on the cookie initially inserted by the Load Balancer
Session Keep TimeOptionalSet HTTP connection keep-alive time
  • When enabled, input can be between 1 and 120 seconds
  • Since switching from enabled to disabled cannot be edited, it is recommended to use it selectively for required services
Response TimeoutSelectSet HTTP response timeout
  • When enabled, input possible between 1 ~ 120 seconds
  • Use → Not use; cannot modify, recommend using it restrictively for required services
X-Forwarded-ForOptionSet whether to insert client IP information
  • When enabled, add the client IP address to the X-Forwarded-For header
X-Forwarded-ProtoSelectSet whether to insert client request protocol information
  • When enabled, add client request protocol to X-Forwarded-Proto header
X-Forwarded-PortOptionalSet whether to insert client request port information
  • When enabled, add the client request port to the X-Forwarded-Port header
HTTP 2.0SelectSet whether to use HTTP/2 when connecting client and server
SSL CertificateSelectSelect encryption certificate and security level (set when using HTTPS protocol)
  • Select certificate to use for client and SSL/TLS Handshake
    • Default Certificate (required): Select certificate to use for client connection
    • High: Supports Cipher Suites of TLS 1.3 version
    • Medium: Supports Cipher Suites including TLS 1.2 version
    • Low (not recommended): Supports Cipher Suites including TLS 1.1 version
  • If it is a multi-domain service, add certificate registration to SNI Certificate after creating Listener
Server SSL security levelRequiredSelect security level when configuring End-to-End SSL (HTTPSS protocol setting)
  • Select Do not use if you do not encrypt the server connection
Table. Listener Service Information Input - When Using L7 Load Balancer
  1. Additional Information Input Please input or select the required information in the area.
Category
Required
Detailed description
DescriptionSelectEnter resource description
TagSelectAdd Tag
  • Up to 50 tags can be added per resource
Table. Listener additional information input items
  1. Check the created service information and click the Complete button.
    • When creation is complete, check the created resource in the Connected Resources tab of the Load Balancer Details page.

SSL Security Level Support Items

The list of TLS versions and Cipher Suites supported by the Listener for each SSL security level is as follows.

Security LevelTLS VersionCipher Suite (Encryption Algorithm)
HighTLS 1.3TLS13_AES_128_GCM_SHA256
TLS13_AES_256_GCM_SHA384
TLS13_CHACHA20_POLY1305_SHA256
Normal/LowNormal: TLS 1.3, 1.2
Low: TLS 1.3, 1.2, 1.1
TLS13_AES_128_GCM_SHA256
TLS13_AES_256_GCM_SHA384
TLS13_CHACHA20_POLY1305_SHA256
RC4-MD5
RC4-SHA
DES-CBC3-SHA
DHE-RSA-AES128-GCM-SHA256
DHE-RSA-AES256-GCM-SHA384
DHE-RSA-CHACHA20-PLY1305
ECDHE-RSA-AES128-SHA
ECDHE-RSA-AES256-SHA
ECDHE-RSA-AES128-SHA256
ECDHE-RSA-AES256-SHA384
ECDHE-RSA-CHACHA20-POLY135
ECDHE-ECDSA-AES128-SHA
ECDHE-ECDSA-AES256-SHA
ECDHE-ECDSA-AES128-SHA256
ECDHE-ECDSA-AES256-SHA384
ECDHE-ECDSA-AES128-GCM-SHA256
ECDHE-ECDSA-AES256-GCM-SHA384
ECDHE-ECDSA-CHACHA20-POLY1305
Table. SSL security level support items

Listener Check Detailed Information

Load Balancer Details page’s Connected Resources tab by selecting a Listener you can view and edit the detailed information.

To view the detailed information of the Listener, follow the steps below.

  1. All Services > Networking > Load Balancer Click the menu. Navigate to the Service Home page of Load Balancer.
  2. On the Service Home page, click the Load Balancer menu. You will be taken to the Load Balancer List page.
  3. Load Balancer List Click the resource to view detailed information on the page. Go to the Load Balancer Details page.
  4. Click the Connected Resources tab on the Load Balancer Details page.
  5. Click the Listener to view detailed information from the list of connected resources. It moves to the Listener Details page.
    • Listener Details page displays status information and additional feature information, and consists of Details, Tags, Activity History tabs.
CategoryDetailed description
StatusListener Status
  • Active: Service is normally activated
  • Deleting: Service termination request is being processed
  • Creating: Service creation request is being processed
  • Error: Unable to determine current status due to internal error
  • Editing: Service modification request is being processed
Listener deleteListener delete
Table. Listener status information and additional function items

Detailed Information

Detailed Information tab allows you to view the listener’s detailed information and edit necessary information. Detailed information varies depending on the Load Balancer in use.

L4 Load Balancer Detailed Information

CategoryDetailed description
ServiceService Name
Resource TypeResource Type
SRNResource unique ID in Samsung Cloud Platform
Resource NameResource Name
Resource IDUnique resource ID in the service
CreatorListener creation request user
Creation TimeListener Creation Time
EditorListener modification request user
Edit TimestampListener Edit Timestamp
Listener nameListener name
ProtocolListener usage protocol
PortListener used port
Session retention timeClient session retention time
  • Edit icon can be clicked to edit
Insert Client IPClient IP information insertion status
  • Edit icon can be clicked to edit
PersistenceWhether to use session fixation (Sticky Session)
  • Click the Edit icon to modify
Routing RulesRouting Action and LB Server Group Information
  • Click the Edit icon to modify the LB Server Group
SSL CertificateBasic certificate and SSL security level information
  • Edit icon can be clicked to edit
  • If a registered SNI certificate exists, the basic certificate cannot be edited (need to delete the SNI certificate before editing)
SNI certificateSNI certificate information
  • Edit icon click to add/register the SNI information and certificate to reference
Server SSL security levelServer connection encryption status
  • Click the Edit icon to edit
DescriptionAdditional information about Listener
Table. Listener detailed information tab - When using L4 Load Balancer

L7 Load Balancer Detailed Information

CategoryDetailed description
ServiceService Name
Resource TypeResource Type
SRNResource unique ID in Samsung Cloud Platform
Resource NameResource Name
Resource IDUnique resource ID in the service
CreatorListener creation request user
Creation TimeListener Creation Time
EditorListener modification request user
Edit TimestampListener Edit Timestamp
Listener nameListener name
ProtocolListener usage protocol
PortListener used port
Session retention timeHTTP connection keep-alive time
  • Edit icon to click to change from unused → used and modify input value possible
Response time outHTTP response timeout
  • Edit icon click to change from unused → used and modify input values
X-Forwarded-ForInsert client IP information
  • Edit icon can be clicked to edit
X-Forwarded-ProtoInsert client request protocol information
  • Edit icon can be clicked to edit
X-Forwarded-PortWhether to insert client request port information
  • Click the Edit icon to edit
HTTP 2.0Whether to use HTTP/2 when connecting client and server
  • Click the Edit icon to modify
PersistenceWhether to use session fixation (Sticky Session)
  • Click the Edit icon to modify
Routing RulesRouting action and routing condition/redirect target information
  • Click the Edit icon to modify routing condition or redirect target
SSL CertificateBasic certificate and SSL security level information
  • Edit Click the icon to edit
  • If a registered SNI certificate exists, the basic certificate cannot be edited (need to delete the SNI certificate before editing)
SNI certificateSNI certificate information
  • Edit icon click to add/register the SNI information and certificate to reference
Server SSL security levelWhether server connection is encrypted
  • Click the Edit icon to modify
DescriptionAdditional information about Listener
Table. Listener detailed information tab - when using L7 Load Balancer

Tag

You can view the tag information of the Listener, and add, modify, or delete it.

CategoryDetailed description
Tag ListTag List
  • You can view the Key, Value information of tags
  • Up to 50 tags can be added per resource
  • When entering tags, search and select from the previously created Key and Value list
Table. Listener Tag Tab Items

Work History

You can view the Listener’s operation history.

CategoryDetailed description
Work DetailsWork Execution Content
Work DateTask Execution Date
Resource TypeResource Type
Resource NameListener Name
Task ResultTask Execution Result (Success/Failure)
Worker InformationInformation of the user who performed the task
Table. Listener Task History Tab Items

Edit routing rules

On the Connected Resources tab of the Load Balancer Details page, you can modify the Listener’s routing rules.

To modify the Listener’s routing rules, follow the steps below.

  1. All Services > Networking > Load Balancer Click the menu. Navigate to Load Balancer’s Service Home page.
  2. Click the Load Balancer menu on the Service Home page. Navigate to the Load Balancer List page.
  3. Load Balancer List page, click the resource to view detailed information. It navigates to the Load Balancer Details page.
  4. Click the Connected Resources tab on the Load Balancer Details page.
  5. Click the Listener to add a lighting condition from the list of connected resources. Listener Details page.
  6. Click the Edit icon of the Routing Rule item on the Listener Details page. The Edit Routing Rule popup opens.
  7. After modifying the routing rules according to the routing action, click the Confirm button.
    Category
    Required or not
    Detailed description
    Routing Action-Current routing method (cannot be modified)
    Routing ConditionRequiredRouting condition can be modified when routing action is LB server group delivery
    • URL Path: modify request URL path and LB server group (up to 20 additions possible)
    • Host Header: modify request host and LB server group (up to 20 additions possible)
    Redirect targetRequiredIf the routing action is URL redirect, the redirect target can be edited
    • Path: Can modify the changed URL path
    • Host: Can modify the changed host
    • Protocol/Port: Cannot modify (only HTTP → HTTPS redirect is possible)
    Table. Listener Routing Rule Modification Items

Listener Delete

To delete an unused Listener, follow the steps below.

  1. All Services > Networking > Load Balancer Click the menu. Navigate to the Service Home page of the Load Balancer.
  2. Click the Load Balancer menu on the Service Home page. Move to the Load Balancer List page.
  3. Click the Load Balancer resource to delete the Listener on the Load Balancer List page. It navigates to the Load Balancer Detail page.
  4. Load Balancer Details 페이지에서 Connected Resources 탭을 클릭하세요. Connected Resources 탭 페이지로 이동합니다.
  5. On the Connected Resources tab page, click the Listener you want to delete. It navigates to the Listener Details page.
  6. Click the Delete Listener button on the Listener Details page.

Load Balancer Cancel

You can cancel unused Load Balancers to reduce costs. However, since it may affect the application service, request cancellation after sufficient prior review.

Caution

In the following cases, the Load Balancer cannot be terminated.

  • If there is a Listener attached to the Load Balancer: Load Balancer Details page’s Connected Resources tab, delete the attached Listener.
  • If using a Public NAT IP on the Load Balancer: Load Balancer Details page’s Details tab, deselect the Public NAT IP in use.
  • If there are rules registered in the Firewall: Load Balancer Details page’s Details tab, delete the rules of the Firewall in use.
  • If connected to a PrivateLink Service: Check the connected Load Balancer on the PrivateLink Service Details page.

To cancel the Load Balancer, follow the steps below.

  1. All Services > Networking > Load Balancer Click the menu. Navigate to the Service Home page of the Load Balancer.
  2. Click the Load Balancer menu on the Service Home page. You will be taken to the Load Balancer List page.
  3. On the Load Balancer List page, click the resource to be terminated. It navigates to the Load Balancer Details page.
  4. Click the Cancel Service button on the Load Balancer Details page.
  5. Once termination is complete, check the resource termination status in the Load Balancer list.

1 - LB Server Group

Users can create an LB server group through the Samsung Cloud Platform Console and connect it to the Load Balancer’s listener.

Create LB server group

To create an LB server group, follow the steps below.

  1. All Services > Networking > Load Balancer Click the menu. Navigate to the Service Home page of Load Balancer.
  2. On the Service Home page, click LB server group. Navigate to the LB server group list page.
  3. Click the Create LB Server Group button on the LB Server Group List page. It navigates to the Create LB Server Group page.
  4. Create LB Server Group 페이지에서 서비스 생성에 필요한 정보를 입력하고 상세 옵션을 선택하세요.
    • Enter Service Information area, input or select the required information.
      Category
      Required
      Detailed description
      LB server group nameRequiredLB server group resource name
      • Enter 3~63 characters using English letters (uppercase and lowercase), numbers, and special characters (-_)
      • LB server group name must be unique within the Account
      VPCRequiredSelect VPC to create LB server group
      • Select VPC where the Load Balancer that will connect to the LB server group is created
      Service SubnetRequiredSelect VPC Subnet to create LB server group
      • Select Subnet where Load Balancer that will connect to LB server group is created
      Load BalancingRequiredSelect load balancing algorithm
      • Round Robin: Distribute sequentially to registered members
      • Weighted round robin: Distribute sequentially in proportion to the weight assigned to each member
      • Least Connection: Distribute to the member with the fewest connections
      • Weighted least connection: Distribute to the member with higher priority considering the weight assigned to each member and the number of connections
      • IP Hash: Distribute to a specific member based on the hash value of the client IP address
      ProtocolRequiredSelect LB server group receive protocol
      • Select the protocol to deliver to members of the LB server group
      LB health checkRequiredSelect LB health check
      • Select from LB health checks created in the same Service Subnet as the LB server group
      Table. LB Server Group Service Information Input Items
    • Enter additional information Enter or select the required information in the area.
      Category
      Required
      Detailed description
      DescriptionSelectEnter resource description
      TagSelectAdd Tag
      • Up to 50 tags can be added per resource
      Table. LB Server Group Additional Information Input Items
  5. Check the created service information and the estimated billing amount, and click the Complete button.
  • Once creation is complete, check the created resources on the LB Server Group List page.

Check LB server group detailed information

LB server group menu allows you to view and edit the resource list and detailed information. The LB server group details page consists of Details, Connected Resources, Tags, Activity Log tabs.

To view detailed information of the LB server group, follow the steps below.

  1. All Services > Networking > Load Balancer Click the menu. Navigate to the Service Home page of Load Balancer.

  2. On the Service Home page, click LB server group. It navigates to the LB server group list page.

    • Column display can be modified by clicking the Settings button at the top right of the table.
      Category
      Display status
      Detailed description
      LB server group namedefaultLB server group resource name
      ProtocolDefaultLB Server Group Protocol
      Load BalancerDefaultLoad Balancer resource name connected to LB server group
      LB Health CheckDefaultName of LB health check resource used by LB server group
      Member countDefaultNumber of members registered in LB server group
      Creation TimeDefaultLB Server Group Creation Time
      StatusDefaultLB Server Group Resource Status
      Table. LB server group list item
  3. Click the resource to view detailed information on the LB Server Group List page. It moves to the LB Server Group Details page.

  • LB Server Group Details At the top of the page, status information and descriptions of additional functions are displayed.
    CategoryDetailed description
    StatusLB server group resource status
    • Active: Service is normally activated
    • Deleting: Processing service termination request
    • Creating: Processing service creation request
    • Error: Cannot determine current status due to internal error
      • If this status persists, contact via Support Center
    • Editing: Processing service modification request
    Delete LB server groupDelete LB server group resource
    Table. LB Server Group Status Information and Additional Feature Items

Detailed Information

Detailed Information tab allows you to view detailed information of resources in the LB server group list, and modify the information if needed.

CategoryDetailed description
ServiceService Name
Resource TypeResource Type
SRNResource unique ID in Samsung Cloud Platform
Resource NameResource Name
Resource IDUnique resource ID in the service
CreatorService creation request user
Creation Date/TimeService Creation Date/Time
EditorService modification request user
Modification Date/TimeService Modification Date/Time
Load Balancer nameLoad Balancer resource name connected to LB server group
LB server group nameLB server group name
VPCVPC resource name where LB server group is created
Service SubnetSubnet resource name where the LB server group is created
PortLB server group forwarding port
ProtocolLB server group forwarding protocol
Load BalancingLB server group traffic distribution method
  • Edit Click the icon to edit
LB Health CheckLB Health Check Resource Name
  • Edit Click the icon to edit
Table. LB Server Group Detailed Information Items

Linked Resources

Connected Resources tab allows you to view the list of members connected to the LB server group, and add or delete members.

CategoryDetailed description
Member NameMember name (server name) added to LB server group
IP addressmember IP address
PortMember Receive Port
WeightLoad Balancing Weight
  • Default 1
  • If using weighted load balancing (Weighted Round Robin, Weighted Least Connection) in the LB server group, you can input 1~1000
ActivationMember activation status
  • Enable: Receiving client requests
  • Disable: Excluded from receiving client requests
Creation Date/TimeMember Addition Date/Time
Health StateHealth Check Status
  • Healthy: Health check normal
  • Unhealthy: Health check abnormal
  • Unknown: Unable to determine health check status
StatusMember resource status
Table. LB Server Group Connected Resource List Items

Tag

LB server group list page, you can view the tag information of the selected resource, and you can add, modify, or delete it.

CategoryDetailed description
Tag ListTag List
  • You can check the Key and Value information of tags
  • Up to 50 tags can be added per resource
  • When entering tags, search and select from the previously created Key and Value list
Table. LB Server Group Tag Tab Items

Work History

Work History tab allows you to view the work history of the selected resource.

CategoryDetailed description
Work detailsWork execution content
Work date/timeWork execution date/time
Resource TypeResource Type
Resource NameLB Server Group Name
Work ResultTask Execution Result (Success/Failure)
Operator InformationInformation of the user who performed the task
Table. LB Server Group Operation History List Items

Managing LB Server Group Resources

You can view the member list of the LB server group and add or remove members.

Add Member

You can add members to the LB server group to register server resources that handle client requests.

To add a member to the LB server group, follow the steps below.

  1. All Services > Networking > Load Balancer Click the menu. Go to the Load Balancer’s Service Home page.

  2. Click LB server group on the Service Home page. You will be taken to the LB server group list page.

  3. Click the resource to edit detailed information on the LB Server Group List page. You will be taken to the LB Server Group Details page.

  4. LB Server Group Details 페이지에서 Connected Resources 탭을 클릭하세요. Connected Resources 탭 페이지로 이동합니다.

  5. Click the Add Member button at the top right of the Connected Resources tab page.

  6. Add Member After entering the required information in the popup window, click the Confirm button.

    Category
    Required
    Detailed description
    LB server group nameDefaultLB server group name to add members
    Target ServerRequiredServer information to add as member
    • Virtual Server/Bare Metal Server: Select from the list of servers created in the same VPC as the LB server group
    • Direct IP input: Directly input server IP
    • Add button can be clicked to add target server
    Member InformationRequiredMember Port and Weight Settings
    • Member Name: Display server name and IP to be added as a member
    • Port: Port that the member will receive
    • Weight: Weight applied to load balancing
      • When using Weighted Round Robin or Weighted Least Connection load balancing, a value between 1 and 1000 is required
    Table. LB server group member addition items

  7. Check whether members have been added in the Connected Resources tab.

Information

Add the following rule to the Security Group of the server added as a member, for communication between the Load Balancer and LB server group members.

  • (Direction) Inbound rule, (Target address) Load Balancer’s Source NAT IP, (Protocol) LB server group protocol, (Allowed port) member port
Reference
  • If the LB server group is in Creating, Editing, Deleting, Error state, you cannot add members.
  • If the number of members that can be created in the Account that the LB server group belongs to is exceeded, you cannot add members. The maximum number of members that can be created in a single Account is 1,000.
Reference
  • You can add a server created in another VPC as a member via VPC Peering. After adding the target server by direct IP input, check the added member’s health check status in the Connected Resources tab.
    For more details, please refer to VPC > VPC Peering.

Member Edit

When you click a member name in the member list, you are taken to the Member Details page. You can view the member detail information, and you can click the Edit icon to change the information.

Weight Modification

Member weight can be modified by following the steps below. It can be modified when using weighted load balancing (Weighted Round Robin, Weighted Least Connection).

  1. All Services > Networking > Load Balancer Click the menu. Navigate to the Service Home page of the Load Balancer.
  2. Click LB Server Group on the Service Home page. You will be taken to the LB Server Group List page.
  3. Click the resource to edit detailed information on the LB Server Group List page. You will be taken to the LB Server Group Details page.
  4. LB Server Group Details 페이지에서 Connected Resources 탭을 클릭하세요. Connected Resources 탭 페이지로 이동합니다.
  5. Connected Resources tab page, click the member to edit. Navigate to the Member Details page.
  6. Click the Edit Weight button on the Member Details page.
  7. Weight Modification In the popup, enter the weight to modify and click the Confirm button.
  8. Check whether the weight has been modified in the Connected Resources tab.

Port Edit

To modify the member port, follow the steps below.

  1. All Services > Networking > Load Balancer Click the menu. Navigate to the Service Home page of Load Balancer.
  2. Click LB Server Group on the Service Home page. You will be taken to the LB Server Group List page.
  3. Click the resource to edit detailed information on the LB Server Group List page. You will be taken to the LB Server Group Details page.
  4. LB Server Group Details 페이지에서 Connected Resources 탭을 클릭하세요. Connected Resources 탭 페이지로 이동합니다.
  5. Click the member to edit on the Connected Resources tab page. You will be taken to the Member Details page.
  6. Member Details 페이지에서 Edit Port 버튼을 클릭하세요.
  7. Port Modification In the popup, enter the port to modify and click the Confirm button.
  8. Connected Resources tab, check whether the port has been modified.

Activation Edit

To modify member activation, follow these steps.

  1. All Services > Networking > Load Balancer Click the menu. Go to the Load Balancer’s Service Home page.
  2. Click LB server group on the Service Home page. You will be taken to the LB server group list page.
  3. Click the resource to edit detailed information on the LB Server Group List page. It moves to the LB Server Group Details page.
  4. Click the Connected Resources tab on the LB Server Group Details page. You will be taken to the Connected Resources tab page.
  5. Connected Resources 탭 페이지에서 수정할 멤버를 클릭하세요. Member Details 페이지로 이동합니다.
  6. Member Details 페이지에서 Edit Activation 버튼을 클릭하세요.
  7. Edit Activation in the popup select Disable or Enable and click the Confirm button.
  8. Check whether activation editing is enabled in the Connected Resources tab.
Reference
  • If you change the activation to Disable, the member will only handle existing connections and stop new connections.

Member Deletion

To delete unused members, follow the steps below.

  1. All Services > Networking > Load Balancer menu. Navigate to the Load Balancer’s Service Home page.
  2. Click LB Server Group on the Service Home page. You will be taken to the LB Server Group List page.
  3. Click the resource to edit detailed information on the LB Server Group List page. You will be taken to the LB Server Group Details page.
  4. Click the Connected Resources tab on the LB Server Group Details page. Connected Resources tab page will be displayed.
  5. Connected Resources tab page, click the member to delete. You will be taken to the Member Details page.
  6. Click the Delete Member button on the Member Details page.
  7. In the Connected Resources tab, verify if the member has been deleted.

Cancel LB server group

You can cancel an unused LB server group. However, since it may affect the application service, please request cancellation after sufficient prior review.

Information

In the following case, the LB server group cannot be terminated.

  • If the LB server group is being used in the Listener: modify the Listener’s LB server group before deleting the LB server group.
  • If there are members registered in the LB server group: Delete all resources connected to the LB server group before terminating the LB server group.
  • When using LB server group in Auto-Scaling Group: Set Load Balancer to not used in Auto-Scaling Group or modify so that the LB server group is not used. For more details, refer to Auto-Scaling Group > Load Balancer usage.

To cancel the LB server group, follow the steps below.

  1. All Services > Networking > Load Balancer Click the menu. Navigate to the Service Home page of Load Balancer.
  2. Click LB Server Group on the Service Home page. You will be taken to the LB Server Group List page.
  3. Click the resource to be terminated in the LB server group list. You will be taken to the LB server group details page.
  4. Click the Delete LB Server Group button on the LB Server Group Details page.
  5. When the termination is completed, check the resource termination status in the LB server group list.

2 - LB Health Check

Users can create LB health checks through the Samsung Cloud Platform Console and use them for LB server groups.

LB Create health check

LB health check를 생성하려면 다음 절차를 따르세요.

  1. All Services > Networking > Load Balancer Click the menu. Navigate to the Service Home page of the Load Balancer.
  2. Click LB Health Check on the Service Home page. You will be taken to the LB Health Check List page.
  3. LB Health Check List on the page, click the LB Health Check Create button. Navigate to the LB Health Check Create page.
  4. LB Health Check Creation page, enter the information required to create the service and select detailed options.
    • Service Information Input area, enter or select the required information.
      Category
      Required
      Detailed description
      LB health check nameRequiredLB health check resource name
      • Enter using English letters (uppercase and lowercase), numbers, and special characters (-_) with 3 to 63 characters
      • LB health check name cannot be duplicated within an Account
      VPCRequiredSelect VPC to create LB health check
      • Select the VPC where the LB server group that will use the LB health check is created
      Service SubnetRequiredSelect VPC Subnet to create LB health check
      • Select Subnet where the LB server group that will use the LB health check is created
      Health Check Method > ProtocolRequiredHealth Check Protocol
      • Select TCP or HTTP as the protocol to use for member health checks
      Health Check Method > Health Check PortRequiredHealth Check Port
      • Enter a value between 1 and 65,534 to be used as the port for member health checks
      Health check method > IntervalRequiredHealth check interval
      • Default 5 seconds, input possible within 1~180 seconds
      Health Check Method > Wait TimeRequiredHealth Check Response Wait Time
      • Default 5 seconds, input possible within 1~180 seconds
      • Cannot set a value larger than the interval
      Health Check Method > Detection CountRequiredNumber of times to determine health check status
      • Default is 3 times, input possible within 1~10
      Health check method > HTTP methodRequiredHTTP request method setting (HTTP protocol used when setting)
      • Select GET, POST
      Health Check Method > URL MonitorRequiredEnter health check URL path (HTTP protocol setting when used)
      • Enter using English letters, numbers, special characters (/.-_?&=) within 50 characters
      Health Check Method > Response CodeRequiredEnter the HTTP response code to be received from the server (HTTP protocol used when setting)
      • Enter response codes in the 200~500 range
      Health check method > Request stringRequiredEnter health check request string (set when using HTTP protocol POST method)
      • Enter the content to be included in the Request Body using English letters, numbers, special characters (/.-_?&=) within 255 bytes
      Table. LB Health Check Service Information Input Items
    • Enter additional information Please input or select the required information in the area.
      Category
      Required
      Detailed description
      DescriptionSelectEnter resource description
      TagSelectAdd Tag
      • Up to 50 tags can be added per resource
      Table. LB server group additional information input items
  5. Summary Check the service information and estimated billing amount generated in the panel, and click the Complete button.
    • When creation is complete, check the created resources on the LB Health Check List page.
Information

Add the following rule to the Security Group of the server added as a member for member health checks in the Load Balancer.

  • (Direction) Inbound rule, (Target address) Load Balancer’s health check IP, (Protocol) health check protocol, (Allowed port) health check port
  • It is recommended to set the health check port the same as the member port.
  • If the health check port and the member port are different, the health check is performed based on the member port.
Guide

Set the LB health check to a value that can be responded to by members added to the LB server group.

  • Load Balancer determines member status based on health check response, so the LB health check result may differ from the actual service status.

LB Health Check Check detailed information

LB Health Check menu allows you to view and edit the resource list and detailed information. LB Health Check Details page consists of Details, Connected Resources, Tags, Operation History tabs.

To check the detailed LB health check information, follow the steps below.

  1. All Services > Networking > Load Balancer Click the menu. Navigate to the Load Balancer’s Service Home page.

  2. Click LB Health Check on the Service Home page. Navigate to the LB Health Check List page.

    • Column display can be modified by clicking the Settings button at the top right of the table.
      Category
      Display status
      Detailed description
      LB Health Check NameDefaultLB Health Check Resource Name
      Service SubnetDefaultVPC Subnet name where LB health check is created
      LB server group countdefaultLB server group count using health check
      TypeDefaultLB health check type
      ProtocolDefaultLB Health Check Protocol
      Creation TimeDefaultLB Health Check Creation Time
      StatusDefaultLB health check resource status
      Table. LB health check list items
  3. LB Health Check List page, click the resource to view detailed information. LB Health Check Details page will be opened.

    • LB Health Check Details At the top of the page, status information and descriptions of additional features are displayed.
      CategoryDetailed description
      StatusLB health check resource status
      • Active: The service is properly activated
      • Deleting: Processing service termination request
      • Creating: Processing service creation request
      • Error: Cannot determine current status due to internal error
        • If this status persists, please contact the Support Center.
      • Editing: Processing service modification request
      LB health check deleteLB health check resource delete
      Table. LB Health Check Status Information and Additional Feature Items

Detailed Information

Detailed Information tab allows you to view the resource’s detailed information from the LB health check list, and modify the information if needed.

CategoryDetailed description
ServiceService Name
Resource TypeResource Type
SRNResource unique ID in Samsung Cloud Platform
Resource NameResource Name
Resource IDUnique resource ID in the service
CreatorService creation request user
Creation Date/TimeService Creation Date/Time
EditorService modification request user
Modification Date/TimeService Modification Date/Time
LB Health Check NameLB Health Check Name
TypeLB health check type
VPCVPC to use LB health check
Service SubnetVPC Subnet to use for LB health check
Health Check MethodLB Health Check Method
  • Edit icon can be clicked to edit
DescriptionAdditional information about LB health check
Table. LB health check detailed information items

Connected Resources

Connected Resources tab allows you to view detailed information of the LB server group linked to LB Health Check.

CategoryDetailed description
LB Server GroupLB Server Group Resource Name
  • When clicking the resource name, move to the LB Server Group detail page
ProtocolLB health check protocol
Load BalancerLoad Balancer resource name connected to LB server group
Number of membersNumber of members added to LB server group
Creation TimeLB Server Group Creation Time
StatusLB server group resource status
  • Active: Service is normally activated
  • Deleting: Processing service termination request
  • Creating: Processing service creation request
  • Error: Cannot determine current status due to internal error
    • If this status persists, please contact the Support Center.
  • Editing: Processing service modification request
Table. LB Health Check Connected Resource List Items

Tag

LB Health Check List page allows you to view the tag information of the selected resource, and you can add, modify, or delete it.

CategoryDetailed description
Tag ListTag List
  • You can check the Key, Value information of tags
  • Up to 50 tags can be added per resource
  • When entering tags, search and select from the previously created Key and Value list
Table. LB Health Check Tag Tab Items

Work History

Work History tab allows you to view the work history of the selected resource.

CategoryDetailed description
Work DetailsTask Execution Content
Work Date/TimeWork Execution Date/Time
Resource TypeResource Type
Resource NameLB Health Check Name
Work ResultTask execution result (success/failure)
Worker InformationInformation of the user who performed the task
Table. LB Health Check Job History List Items

Modify LB health check method

LB Health Check Details page allows you to modify the health check method.

To modify the LB health check method, follow the steps below.

  1. All Services > Networking > Load Balancer Click the menu. Navigate to the Service Home page of the Load Balancer.
  2. Click LB Health Check on the Service Home page. You will be taken to the LB Health Check List page.
  3. Click the resource to edit detailed information on the LB Health Check List page. You will be taken to the LB Health Check Details page.
  4. LB Health Check Details page, click the Edit icon of Health Check Method. You will be taken to the Edit Health Check Method popup.
  5. Modify health check method After editing the required information in the popup window, click the Confirm button.

LB Health Check Cancellation

You can cancel the unused LB health check service.

Caution
  • Basic type LB health check resources cannot be deleted.
  • LB health check resources used in the LB server group cannot be deleted.

To cancel the LB health check, follow the steps below.

  1. All Services > Networking > Load Balancer > LB Health Check menu를 클릭하세요. LB Health Check List 페이지로 이동합니다.
  2. Click the resource to cancel in the LB health check list. You will be taken to the LB health check details page.
  3. Click the Delete LB Health Check button on the LB Health Check Details page.
  4. If termination is completed, check the resource termination status in the LB health check list.