How-to guides
Users can create a service by entering the required Load Balancer information and selecting detailed options through the Samsung Cloud Platform Console.
Create Load Balancer
You can create and use a Load Balancer service from the Samsung Cloud Platform Console.
To create a Load Balancer, follow these steps.
- All Services > Networking > Load Balancer click the menu. 1. Go to the Load Balancer’s Service Home page.
- Service Home on the page, click the Create Load Balancer button. 2. Go to the Load Balancer creation page.
- On the Load Balancer creation page, enter the information required to create the service and select detailed options.
- Enter or select the required information in the Service Information Input area.
| Category | Required | Detailed description |
|---|---|---|
| Load Balancer name | Required | Load Balancer resource name
|
| Service Category | Required | Load Balancer service type
|
| VPC name | Required | VPC where the Load Balancer will be created
|
| Service Subnet name | Required | VPC Subnet where the Load Balancer will be created
|
| Availability Zone 1 | Required | Select the Availability Zone to create the Load Balancer among the Availability Zones where the Service Subnet is created
|
| Availability Zone 2 | Required | This is an item provided only when a Multi-AZ Subnet is selected for the Service Subnet, and when configuring the Load Balancer as Multi-AZ, set
|
| Service IP | Required | Select automatic allocation or manual entry for the service IP exposed to the client
|
| Public NAT IP | Select | When allowing service access from external (Internet), select the Public IP to connect to the Service IP
|
| Source NAT IP | Required | Select automatic allocation or manual entry for the IP used by the Load Balancer for server communication
|
| Health check IP | Required | Select either automatic allocation or manual entry for the IP used for member health checks in the Load Balancer
|
| Use firewall | Selection | Select whether to enable the firewall for Load Balancer access control
|
| Store firewall logs | Select | Select whether to store Firewall logs
|
- In the Additional Information Input area, enter or select the required information.
Category Required statusDetailed description Explanation Select Enter resource description tag Select Add tags - Up to 50 tags can be added per resource
Table. Load Balancer additional information input fields
- Check the created service information and the estimated billing amount, and click the Create button.
- Once creation is complete, check the created resources on the Load Balancer List page.Information
- Load Balancer service does not provide access control for Service IP and service ports.
- When creating a Load Balancer, select Use Firewall to manage communication between the client and the Load Balancer, and between the Load Balancer and members with firewall rules, and enable Save Firewall Logs to store access logs, which is recommended.
- When creating a service and using the Firewall log storage feature, you must configure the log repository first. * If the log storage configuration is not completed, you cannot create a Load Balancer service.
CautionIf you use a firewall, you must add the rules required for Load Balancer communication. Register the rules, paying attention to the direction for each purpose.
- If you do not add a rule, the Load Balancer service will not operate correctly.
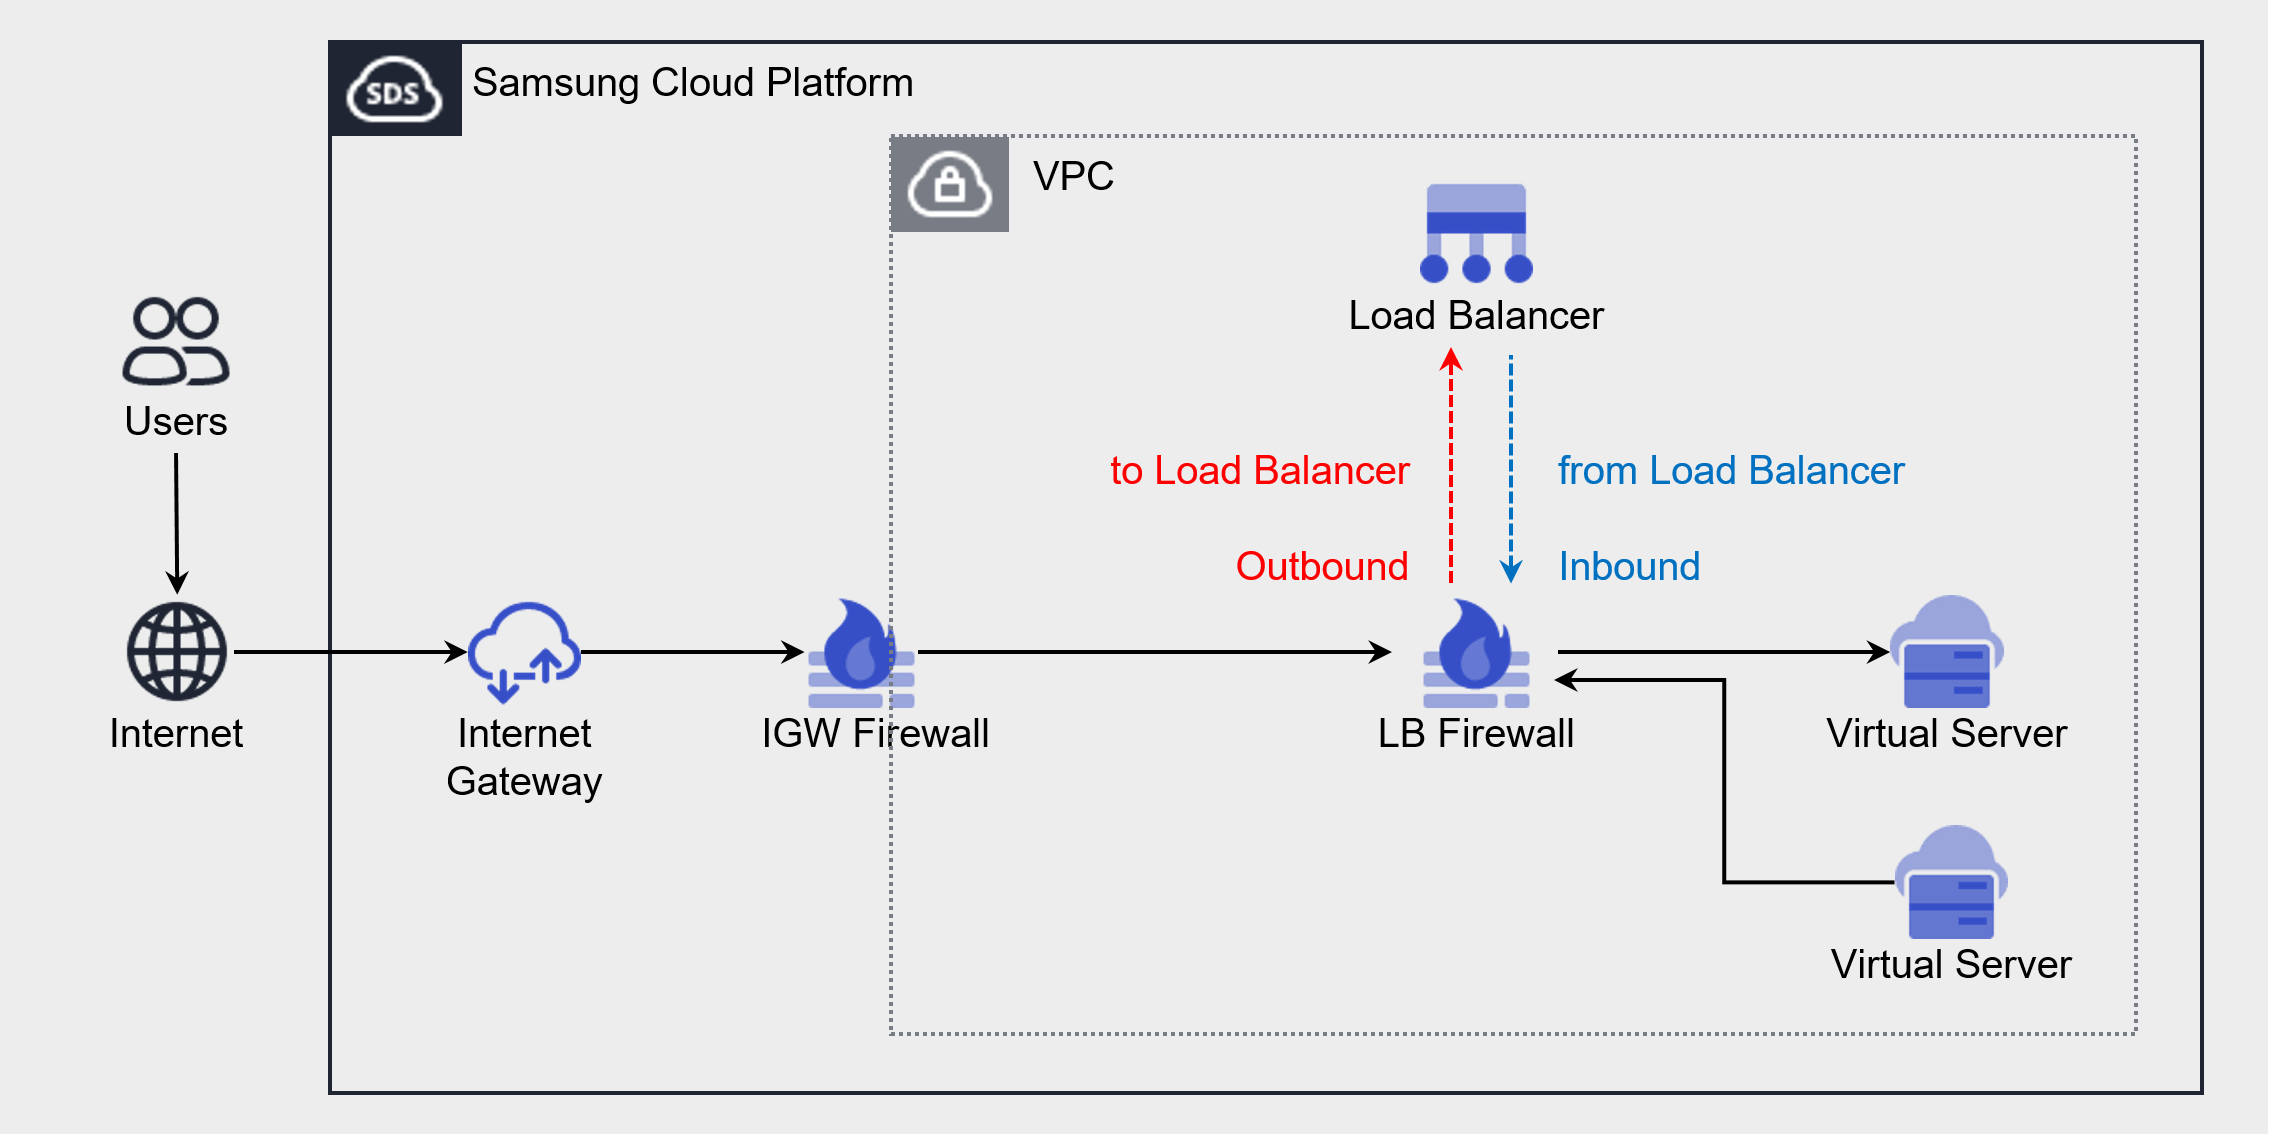
Purpose Source IP Destination IP Protocol Destination Port/Type Direction Client → LB connection Client IP LB Service IP Listener protocol Listener service port Outbound LB → Member connection LB Source NAT IP LB server group member IP LB server group protocol Member port Inbound LB → Member health check LB health check IP LB server group member IP Health check protocol Health check port - When the health check port and member port are different, register the member port
Inbound Figure and table. Add Load Balancer Firewall rule - Load Balancer service does not provide access control for Service IP and service ports.
- Once creation is complete, check the created resources on the Load Balancer List page.
Load Balancer View detailed information
The Load Balancer service can be viewed and edited for resource lists and detailed information in the Load Balancer menu. The Load Balancer Details page consists of the Details, Connected Resources, Tags, Operation History tabs.
To view detailed information about the Load Balancer service, follow these steps.
- All Services > Networking > Load Balancer Click the menu. 1. Navigate to the Load Balancer’s Service Home page.
- On the Service Home page, click the Load Balancer menu. 2. Go to the Load Balancer List page.
- On the Load Balancer List page, click the resource for which you want to view detailed information. 3. Go to the Load Balancer Details page.
- Load Balancer Details page displays status information and additional feature information, and consists of Detailed Information, Connected Resources, Tags, Operation History tabs.
Category Detailed description Status Load Balancer resource status - Active: Service is active and operating normally
- Deleting: Service termination request is being processed
- Creating: Service creation request is being processed
- Error: Unable to determine current status due to internal error
- Editing: Service modification request is being processed
Service cancellation Delete Load Balancer resource Table. Load Balancer status information and additional feature items
- Load Balancer Details page displays status information and additional feature information, and consists of Detailed Information, Connected Resources, Tags, Operation History tabs.
Detailed Information
In the Detailed Information tab, you can view the detailed information of the resource selected from the Load Balancer list and edit the necessary information.
| Category | Detailed description |
|---|---|
| service | Service name |
| Resource Type | Resource Type |
| SRN | Unique resource ID in Samsung Cloud Platform |
| Resource name | Resource name |
| Resource ID | Unique resource ID in the service |
| Creation Date/Time | Service creation date and time |
| Modification date | Service modification date and time |
| Constructor | User requesting service creation |
| Modifier | Service modification request user |
| Load Balancer name | Load Balancer name |
| Service IP | Service IP of the Load Balancer (used for client communication from the Load Balancer) |
| Service Category | Load Balancer service type |
| Source NAT IP | Source NAT IP of the Load Balancer (used for server communication from the Load Balancer) |
| VPC name | Resource name of the VPC where the Load Balancer was created
|
| Service Subnet name | Subnet where the Load Balancer is created resource name
|
| Public NAT IP | Load Balancer’s Public NAT IP
|
| Private NAT IP | Load Balancer’s Private NAT IP
|
| Health check IP | Load Balancer’s health check IP (used by the Load Balancer for member health checks) |
| Availability Zone 1 | Availability Zone information of the created Load Balancer |
| Availability Zone 2 | Information about the Availability Zone where the Load Balancer was created
|
| Explanation | Additional information or description about the Load Balancer
|
| Firewall name | Firewall resource name connected to Load Balancer
|
Connected resource
Connected Resources tab allows you to view the list of Listeners attached to the Load Balancer and to create or delete Listeners.
- In the Connected Resources tab, when you select the Listener item, you are taken to the Listener Details page where you can view, edit, and delete the detailed information.
- Listener Details page item, clicking the Edit icon lets you modify the information.
| Category | Detailed description | |
|---|---|---|
| Create Listener | Create Listener button | |
| Listener name | Listener resource name | |
| Routing rules | Routing rules set on the Listener
| |
| Protocol | Protocol that the Listener receives | |
| Port | The service port that the Listener receives | |
| Creation Date/Time | Listener creation time | |
| Status | Listener resource status | |
| Delete | Listener Delete Button |
Tag
On the Load Balancer List page, you can view the tag information of the selected resource and add, modify, or delete it.
| Category | Detailed description |
|---|---|
| Tag list | Tag list
|
Job History
Task History tab allows you to view the task history of the selected resource.
| Category | Detailed description |
|---|---|
| Work History | Task execution details |
| Work date and time | Task execution date and time |
| Resource Type | Resource Type |
| Resource name | Load Balancer name |
| Work result | Task execution result (success/failure) |
| Operator Information | User information of the person who performed the task |
Load Balancer Resource Management
You can manage resources such as creating and deleting a Load Balancer’s Listener.
Create Listener
Create a Listener on the Load Balancer to receive client requests and handle traffic according to the Listener configuration.
The protocol that receives client requests varies depending on the Load Balancer service type.
- L4 Load Balancer case: TCP, UDP, TLS, TCP_PROXY protocols
- L7 When using an L7 Load Balancer: HTTP, HTTPS protocols
Creating a Listener in L4 Load Balancer
To create a Listener in the L4 Load Balancer, follow these steps.
- All Services > Networking > Load Balancer Click the menu. 1. Navigate to the Load Balancer’s Service Home page.
- On the Service Home page, click the Load Balancer menu. 2. Navigate to the Load Balancer List page.
- Load Balancer List page, click the Load Balancer resource to create a Listener. 3. Load Balancer Details page.
- On the Load Balancer Details page, click the Connected Resources tab. 4. Navigate to the Connected Resources tab page.
- On the Connected Resources tab page, click the Create Listener button in the upper right.
- Enter or select the required information in the Service Information Input area.
- The information that can be entered varies depending on the protocol.
| Category | Required status | Detailed description |
|---|---|---|
| Load Balancer | Required | Load Balancer resource name where the Listener will be created |
| Listener name | Required | Listener resource name |
| Protocol | Required | Select Listener receive protocol
|
| Service port | Required | Listener receive port input
|
| Routing rules | Required | Routing rule configuration
|
| Session keep-alive time | Required | Client session timeout setting
|
| Proxy Protocol | Selection | When used, the client IP is added to the proxy protocol header and forwarded to the server
|
| persistence | Required | Select session persistence (Sticky Session) method (available when using TCP, TLS, TCP_PROXY protocols)
|
| SSL certificate | Selection | Select the default encryption certificate and security level (TLS protocol can be configured when used)
|
| Server SSL security level | Required | When configuring End-to-End SSL, select the security level (available when using the TLS protocol)
|
- In the Additional Information Input area, enter or select the required information.
| Category | Required status | Detailed description |
|---|---|---|
| Explanation | Select | Enter resource description |
| tag | Selection | Add tag
|
- Check the created service information and click the Create button.
- After creation is complete, check the created resources on the Load Balancer Details page’s Connected Resources tab.
Creating a Listener in L7 Load Balancer
To create a Listener in the L7 Load Balancer, follow these steps.
- All Services > Networking > Load Balancer menu, click it. 1. Navigate to the Load Balancer’s Service Home page.
- On the Service Home page, click the Load Balancer menu. 2. Navigate to the Load Balancer List page.
- Load Balancer List page, click the Load Balancer resource to create a Listener. 3. Go to the Load Balancer Details page.
- On the Load Balancer Details page, click the Connected Resources tab. 4. Go to the Connected Resources tab page.
- On the Connected Resources tab page, click the Create Listener button in the upper right.
- In the Service Information Input area, enter or select the required information.
- According to the Protocol, the information that can be entered varies.
| Category | Required status | Detailed description |
|---|---|---|
| Load Balancer | Required | Load Balancer resource name where the Listener is created |
| Listener name | Required | Listener resource name |
| Protocol | Required | Select Listener receiving protocol
|
| Service port | Required | Listener receive port input
|
| Routing Rules > Routing Action | Required | Select routing processing method
|
| Routing Rules > Routing Conditions | Required | When the routing action is LB server group forwarding, configure the LB server group per routing condition
|
| persistence | Select | Select session persistence (Sticky Session) method (available when the routing action is LB server group forwarding)
|
| Listener timeout setting > Session keep-alive time | Select | Session idle-timeout setting
|
| Listener timeout setting > HTTP connection timeout | Select | Client connection keep-alive time, response timeout setting
|
| X-Forwarded-For | Select | Set whether to insert client IP information
|
| X-Forwarded-Proto | Selection | Set whether to insert client request protocol information
|
| X-Forwarded-Port | Selection | Set insertion of client request port information
|
| HTTP 2.0 | Selection | Configure HTTP/2 usage when connecting client and server
|
| SSL certificate | Selection | Select encrypted certificate and security level (configurable when the Listener protocol is HTTPS)
|
| Server SSL security level | Required | Select security level when configuring End-to-End SSL (available when the Listener protocol is HTTPS)
|
Among routing conditions, the URL path matching method is start-with(prefix match).
- If the starting string of the HTTP Request header Path matches the routing condition’s requested URL path, the corresponding routing rule is applied.
- Example: Request URL Path when entered as
/api,- Matching cases:
/api/users, /api/v1/login, /api/images/logo.png - When not matched:
/auth/api/, /API/users
- Matching cases:
- In the Additional Information Input area, enter or select the required information.
| Category | required status | Detailed description |
|---|---|---|
| Explanation | Selection | Enter resource description |
| tag | Selection | Add tags
|
- Verify the created service information and click the Create button.
- When creation is complete, verify the created resources on the Load Balancer Details page’s Connected Resources tab.
Supported Items by SSL Security Level
The list of TLS versions and Cipher Suites supported by the Listener for each SSL security level is as follows.
| Security level | TLS version | Cipher Suite (encryption algorithm) |
|---|---|---|
| High | TLS 1.3 | TLS13_AES_128_GCM_SHA256 TLS13_AES_256_GCM_SHA384 TLS13_CHACHA20_POLY1305_SHA256 |
| Normal/Low | Normal: TLS 1.3, 1.2 Low: TLS 1.3, 1.2, 1.1 | TLS13_AES_128_GCM_SHA256 TLS13_AES_256_GCM_SHA384 TLS13_CHACHA20_POLY1305_SHA256 RC4-MD5 RC4-SHA DES-CBC3-SHA DHE-RSA-AES128-GCM-SHA256 DHE-RSA-AES256-GCM-SHA384 DHE-RSA-CHACHA20-PLY1305 ECDHE-RSA-AES128-SHA ECDHE-RSA-AES256-SHA ECDHE-RSA-AES128-SHA256 ECDHE-RSA-AES256-SHA384 ECDHE-RSA-CHACHA20-POLY135 ECDHE-ECDSA-AES128-SHA ECDHE-ECDSA-AES256-SHA ECDHE-ECDSA-AES128-SHA256 ECDHE-ECDSA-AES256-SHA384 ECDHE-ECDSA-AES128-GCM-SHA256 ECDHE-ECDSA-AES256-GCM-SHA384 ECDHE-ECDSA-CHACHA20-POLY1305 |
Check Listener detailed information
On the Load Balancer Details page, you can select the Listener in the Connected Resources tab to view and edit its detailed information.
To view detailed information about the Listener, follow these steps.
- All Services > Networking > Load Balancer menu, click it. 1. Navigate to the Load Balancer’s Service Home page.
- On the Service Home page, click the Load Balancer menu. 2. Go to the Load Balancer List page.
- On the Load Balancer List page, click the resource to view detailed information. 3. Navigate to the Load Balancer Details page.
- Click the Connected Resources tab on the Load Balancer Details page.
- Click the Listener to view detailed information in the list of connected resources. 5. Navigate to the Listener Details page.
- Listener Details The page displays status information and additional feature information, and is composed of the Details, Tags, Activity History tabs.
| Category | Detailed description |
|---|---|
| status | Listener 상태
|
| Delete Listener | Delete Listener |
Detailed Information
Detailed Information tab allows you to view the Listener’s detailed information and edit necessary details. Detailed information varies depending on the Load Balancer in use.
L4 Load Balancer Detailed Information
| Category | Detailed description |
|---|---|
| service | Service name |
| Resource Type | Resource Type |
| SRN | Unique resource ID in Samsung Cloud Platform |
| Resource name | Resource name |
| Resource ID | Unique resource ID in the service |
| Constructor | Listener creation request user |
| Creation Date/Time | Listener creation time |
| Modifier | User requesting listener modification |
| Modification date | Listener modification timestamp |
| Listener name | Listener name |
| Protocol | Listener usage protocol |
| Port | Listener port |
| Session keep-alive time | TCP session idle-timeout information
|
| Proxy Protocol | Whether to insert proxy protocol header
|
| persistence | Session stickiness (Sticky Session) status
|
| Routing rules | Routing action and routing condition information
|
| SSL certificate | Default certificate and SSL security level, expiration date and time information
|
| SNI certificate | SNI certificate details
|
| Server SSL security level | Server connection encryption status
|
| Explanation | Additional information about the Listener
|
L7 Load Balancer Detailed Information
| Category | Detailed description |
|---|---|
| service | Service name |
| Resource Type | Resource Type |
| SRN | Unique resource ID in Samsung Cloud Platform |
| Resource name | Resource Name |
| Resource ID | Unique resource ID in the service |
| Constructor | Listener creation request user |
| Creation Date/Time | Listener creation time |
| Modifier | User requesting listener modification |
| Modification date and time | Listener modification timestamp |
| Listener name | Listener name |
| Protocol | Listener usage protocol |
| Port | Listener port |
| Session keep-alive time | TCP session idle timeout information
|
| Client connection keep-alive time | HTTP client connection keep-alive time
|
| Server response latency | HTTP server response latency
|
| X-Forwarded-For | Insert X-Forwarded-For header
|
| X-Forwarded-Proto | X-Forwarded-Proto header insertion option
|
| X-Forwarded-Port | X-Forwarded-Port header insertion option
|
| persistence | Sticky Session setting
|
| HTTP 2.0 | HTTP/2 usage
|
| Routing rules | Routing action and routing condition settings
|
| SSL certificate | Default certificate and SSL security level, expiration date and time information
|
| SNI certificate | SNI certificate details
|
| Server SSL security level | Whether the server connection is encrypted
|
| Add response header | HTTP Response header insertion
|
| Explanation | Additional information about the Listener
|
Tag
You can view, add, modify, or delete a Listener’s tag information.
| Category | Detailed description |
|---|---|
| Tag list | Tag list
|
Job History
You can view the Listener’s operation history.
| Category | Detailed description |
|---|---|
| Work history | Task execution details |
| Work date and time | Task execution date and time |
| Resource Type | Resource Type |
| Resource name | Listener name |
| Task result | Task execution result (success/failure) |
| Operator Information | User information of the person who performed the task |
Modify routing rules
On the Load Balancer Details page, you can modify the Listener’s routing rules in the Connected Resources tab.
To modify the Listener’s routing rules, follow these steps.
- All Services > Networking > Load Balancer menu, click it. 1. Navigate to the Service Home page of the Load Balancer.
- On the Service Home page, click the Load Balancer menu. 2. Load Balancer List navigate to the page.
- On the Load Balancer list page, click the resource whose detailed information you want to view. 3. Go to the Load Balancer Details page.
- On the Load Balancer Details page, click the Connected Resources tab.
- In the list of connected resources, click the Listener to modify the routing condition. 5. Go to the Listener Details page.
- On the Listener Details page, click the Edit icon for the Routing Rules item. 6. Routing Rule Modification popup opens.
- After modifying the routing rule according to the routing action, click the Confirm button.
Category Required statusDetailed description Routing action - Current routing method (cannot be modified) Routing condition Required If the routing action is LB server group forwarding, you can modify the sub-settings of the routing condition - URL path: Modify request URL path and LB server group (up to 20 additions possible)
- host header: Modify request host and LB server group (up to 20 additions possible)
Redirect target Required If the routing action is URL redirection, the redirection target can be modified - URL: modify redirection URL
- Protocol/Port: modify redirection port
Table. Listener routing rule modification items
Add or modify response header
On the Load Balancer Details page, you can modify the addition of response headers for the Listener in the Connected Resources tab.
To modify the Listener’s response header addition, follow these steps.
- All Services > Networking > Load Balancer menu, click it. 1. Go to the Load Balancer’s Service Home page.
- On the Service Home page, click the Load Balancer menu. 2. Navigate to the Load Balancer List page.
- Load Balancer List page, click the resource to view detailed information. 3. Navigate to the Load Balancer Details page.
- Click the Connected Resources tab on the Load Balancer Details page.
- Click the Listener to edit the response header addition in the list of connected resources. 5. Navigate to the Listener Details page.
- On the Listener Details page, click the Edit icon of the Add Response Header item. 6. Response Header Add/Edit The popup window opens.
- After setting the header to insert, click the Confirm button.
Category required statusDetailed description HTTP Strict Transport Security (HSTS) header Select Select whether to insert the HSTS header (enforce HTTPS connections to enhance security) - When enabled, set max-age and subdomain applicability
- max-age: Enter a value between 1 and 63072000 (up to 2 years)
- Subdomain applicability: enabled applies to all subdomains
Table. Response Header Add/Modify Items - When enabled, set max-age and subdomain applicability
Delete Listener
To delete an unused Listener, follow these steps.
- All Services > Networking > Load Balancer menu, click it. 1. Navigate to the Load Balancer’s Service Home page.
- On the Service Home page, click the Load Balancer menu. 2. Go to the Load Balancer List page.
- On the Load Balancer List page, click the Load Balancer resource from which you want to delete the Listener. 3. Navigate to the Load Balancer Details page.
- On the Load Balancer Details page, click the Connected Resources tab. 4. Go to the Connected Resources tab page.
- On the Connected Resources tab page, click the Listener you want to delete. 5. Go to the Listener Details page.
- On the Listener Details page, click the Delete Listener button.
Terminate Load Balancer
You can terminate unused Load Balancers to reduce costs. However, because it may impact the application service, please request termination only after a thorough prior review.
In the following cases, the Load Balancer cannot be terminated.
- If there is a Listener attached to the Load Balancer: Delete the attached Listener on the Load Balancer Details page under the Connected Resources tab.
- If you are using a Public NAT IP with the Load Balancer: Load Balancer details page’s Detailed Information tab, deselect the Public NAT IP in use.
- If you are using a Private NAT IP with a Load Balancer: In the Load Balancer Details page’s Details tab, deselect the Private NAT IP in use.
- If there are rules registered in the Firewall: Delete the Firewall’s rules in use from the Load Balancer Details page’s Detailed Information tab.
- If connected to a PrivateLink Service: Check the connected Load Balancer on the PrivateLink Service Details page.
To cancel the Load Balancer, follow the steps below.
- All Services > Networking > Load Balancer click the menu. 1. Go to the Load Balancer’s Service Home page.
- On the Service Home page, click the Load Balancer menu. 2. Go to the Load Balancer list page.
- Load Balancer List page, click the resource to terminate. 3. Go to the Load Balancer Details page.
- On the Load Balancer Details page, click the Cancel Service button.
- After termination is complete, verify the resource termination status in the Load Balancer list.