This is the multi-page printable view of this section. Click here to print.
Load Balancer
- 1: Overview
- 1.1: ServiceWatch metric
- 2: How-to guides
- 2.1: LB server group
- 2.2: LB health check
- 3: API Reference
- 4: CLI Reference
- 5: Release Note
1 - Overview
Service Overview
The Load Balancer (LB) service of Samsung Cloud Platform automatically distributes traffic to available servers when there is an unpredictable traffic surge or server failure, ensuring the stability and continuity of customer services.
A Load Balancer serves as the service endpoint provided to clients, is deployed in a VPC subnet according to the service type (L4 / L7), and you can configure multiple services by adding listeners to the created Load Balancer.
The Listener receives client requests through the service port and processes traffic according to routing rules. L4 supports TCP / UDP / TLS protocols, and L7 supports HTTP / HTTPS protocols; in L7, you can specify an LB server group for each routing condition or set a redirect response for the request URL.
The LB server group forwards requests received by the Listener to specific servers based on load balancing and health checks. The servers receive client requests from the Load Balancer’s Source NAT IP through the ports configured for the members, and the server status is periodically monitored by the Load Balancer’s health check IP.
LB health check defines the member health check method registered in the LB server group. You can select a default LB health check resource provided for the LB server group, or create a new one to configure monitoring suitable for the application.
Features
- Various load balancing methods: Round Robin, Least Connection, IP Hash, etc., are provided.
- SSL Authentication Encryption and Offloading: Supports SSL offloading and allows selection of encryption level.
- Enhanced Security: Use a firewall to manage Load Balancer communication and view connection logs by storing logs.
Service Architecture Diagram
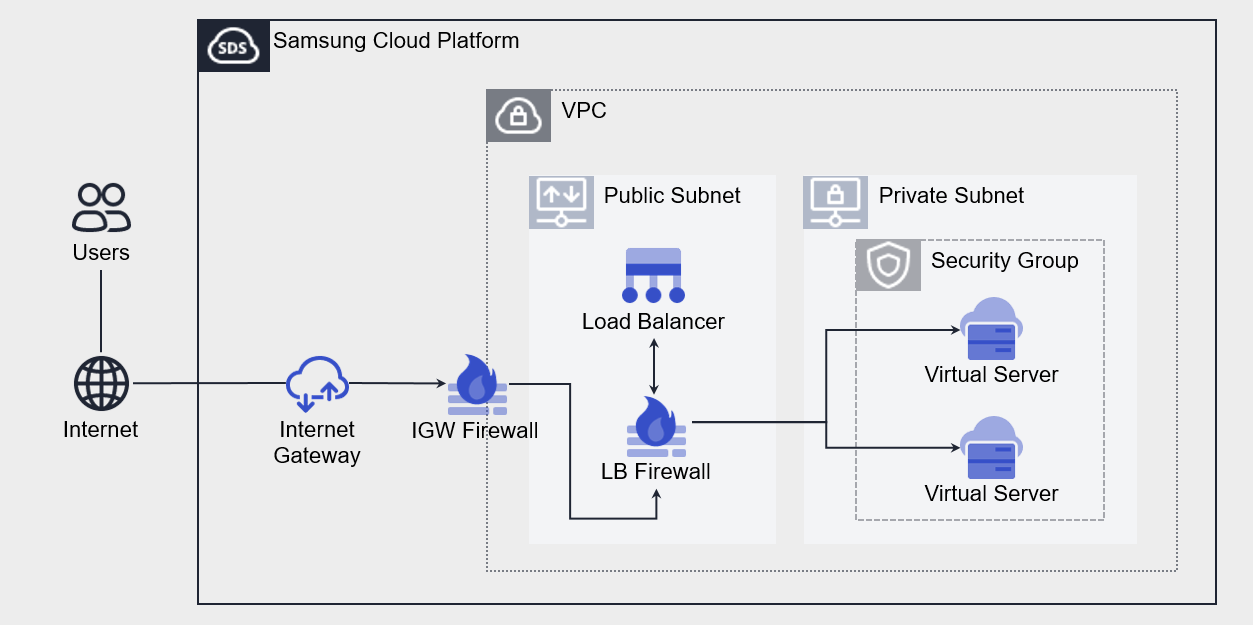
Provided features
- Load Balancer: Select the service type and configure the IP to be used by the Load Balancer.
- Listener: Set the protocol, port, and routing rules. You can add multiple Listeners to a single Load Balancer.
- LB server group: Sets the load balancing method. LB server group can be attached to a single Load Balancer.
- Member: Select the server to add to the LB server group. You can choose Virtual Server or Bare Metal Server resources created in the same VPC as the Load Balancer, or enter an IP address directly.
- LB health check: Sets the member health check method. LB health checks can be registered and used across multiple LB server groups.
Component
A Load Balancer consists of a Load Balancer (Listener), LB server group (member), and LB health check.
Load Balancer
The components that make up a Load Balancer are as follows. By configuring each component, you can set up load balancing suitable for the customer’s workload.
| Component | Detailed description |
|---|---|
| Service Category | Load Balancer service type
|
| Service Sunbet | Assign the Service IP, Source NAT IP, and Health Check IP required for the Load Balancer in the Subnet range of the VPC Subnet
|
| Service IP | Service IP that the client accesses |
| Source NAT IP | IP used to forward server traffic in the Load Balancer |
| Health check IP | IP used for health checks in the Load Balancer |
| Listener | Resources connected to the Load Balancer
|
LB server group
The elements that make up an LB server group are as follows. Traffic is delivered to members of the LB server group according to the settings of each component.
| Component | Detailed description |
|---|---|
| Protocol | LB server group forwarding protocol |
| Load balancing | Traffic distribution method
|
| LB health check | Member health check method
|
| Member | Server that processes client requests
|
LB health check
The elements that make up the LB health check are as follows. Member health checks are performed according to the settings of each component.
| Component | Detailed description |
|---|---|
| Protocol | Health check protocol |
| Health check port | Port used for health check |
| Period | Health check execution interval |
| Waiting time | Server response latency for health check |
| Detection count | Criteria for determining member health check status (Healthy / Unhealthy) |
Constraints
The Load Balancer of Samsung Cloud Platform has a default quota, which limits the number of Load Balancers, Listeners, LB server groups, and members that can be created. You can manage current usage through the Console and request additional quota for items that can be expanded.
| Item | Default quota | Detailed description |
|---|---|---|
| LOAD_BALANCER.SERVICE_SUBNET.DEFAULT.COUNT | 3 | Number of Service Subnets per VPC that can create a Load Balancer |
| LOAD_BALANCER.DEFAULT.COUNT | 50 | Number of Load Balancers created per Region |
| LOAD_BALANCER.LISTENER.DEFAULT.COUNT | 1000 | Number of Listeners created per Region |
| LOAD_BALANCER.SERVER_GROUP.DEFAULT.COUNT | 1000 | Number of LB server groups created per region |
| LOAD_BALANCER.MEMBER.DEFAULT.COUNT | 1000 | Number of members that can be registered to the entire LB server group per region |
| LOAD_BALANCER.HEALTH_CHECK.DEFAULT.COUNT | 500 | Number of LB health checks created per region |
Preliminary Service
This is a list of services that must be pre-configured before creating a Load Balancer service. Please refer to the guide provided for each service and prepare in advance.
| Service Category | Service | Detailed description |
|---|---|---|
| Networking | VPC | A service that provides an isolated virtual network in a cloud environment |
1.1 - ServiceWatch metric
The Load Balancer sends metrics to ServiceWatch. The metrics provided by basic monitoring are data collected at 5‑minute intervals.
Basic Metrics
The following are the default metrics for the Load Balancer namespace.
The indicators whose names are displayed in bold text below are the key metrics selected from the basic metrics provided by Load Balancer. Key metrics are used to build the service dashboards that are automatically created for each service in ServiceWatch.
Each metric provides guidance in the user guide on which statistical values are meaningful when querying that metric, and among the meaningful statistics, the values shown in bold are the primary statistics. In the service dashboard, you can view key metrics using primary statistical values.
| Performance items | Detailed description | unit | meaningful statistics |
|---|---|---|---|
| LB Status | Load Balancer status | - | - |
| LB Total Connections | LB cumulative connection count | Count |
|
| LB Total L4 Connections | Cumulative L4 connection count | Count |
|
| LB Total L7 Connections | Cumulative L7 connection count | Count |
|
| LB Total SSL Connections | Cumulative SSL connection count | Count |
|
| LB Total TCP Connections | Cumulative TCP connection count | Count |
|
| LB Current Connections | Current number of active connections | Count |
|
| LB Current SSL Connections | Current SSL connection count | Count |
|
| LB Peak Connections | LB maximum connections | Count |
|
| LB Total Requests | LB cumulative request count | Count |
|
| LB Current Requests | LB current request count | Count |
|
| LB Connection Rate (CPS) | Number of new inbound connections | Count |
|
| LB Forward Bytes | Cumulative bytes transferred from the LB to the server | Bytes |
|
| LB Forward Bytes (Delta) | Cumulative bytes (Delta) delivered from LB to server | Bytes |
|
| LB Forward Packets | Cumulative packets delivered from the LB to the server | Count |
|
| LB Forward Packets (Delta) | Cumulative packets (Delta) delivered from the LB to the server | Count |
|
| LB Reverse Bytes | Cumulative packets delivered from LB to the server | Bytes |
|
| LB Reverse Bytes (Delta) | Cumulative bytes (Delta) received from the server | Bytes |
|
| LB Reverse Packets | Cumulative packets received from the server | Count |
|
| LB Reverse Packets (Delta) | Cumulative packets (Delta) received from the server | Count |
|
| LB Current Responses | LB current response count | Count |
|
| LB Total Success Responses | Cumulative successful response count | Count |
|
| LB Last Response Time | LB last response time | Milliseconds |
|
| LB Fastest Response Time | LB shortest response time | Milliseconds |
|
| LB Slowest Response Time | LB maximum response time | Milliseconds |
|
| LB Total Failure Actions | Number of failures handled in LB | Count |
|
| Listener Status | Listener status | Count |
|
| Listener Total Connections | Listener cumulative connection count | Count |
|
| Listener Total L4 Connections | Cumulative L4 connection count | Count |
|
| Listener Total L7 Connections | Cumulative L7 connection count | Count |
|
| Listener Total SSL Connections | Cumulative SSL connection count | Count |
|
| Listener Total TCP Connections | Cumulative TCP connection count | Count |
|
| Listener Current Connections | Current number of active connections | Count |
|
| Listener Current SSL Connections | Current SSL connection count | Count |
|
| Listener Peak Connections | Maximum number of connections for the listener | Count |
|
| Listener Current Requests | Listener current request count | Count |
|
| Listener Total Requests | Listener cumulative request count | Count |
|
| Listener Connection Rate (CPS) | Number of new inbound connections | Count |
|
| Listener Forward Bytes | Cumulative bytes transferred from the Listener to the server | Bytes |
|
| Listener Forward Bytes (Delta) | Cumulative bytes (Delta) transmitted from the Listener to the server | Bytes |
|
| Listener Forward Packets | Cumulative packets transmitted from the Listener to the server | Count |
|
| Listener Forward Packets (Delta) | Cumulative packets (Delta) transmitted from the Listener to the server | Count |
|
| Listener Reverse Bytes | Cumulative bytes received from the server | Bytes |
|
| Listener Reverse Bytes (Delta) | Cumulative bytes (Delta) received from the server | Bytes |
|
| Listener Reverse Packets | Cumulative packets received from the server | Count |
|
| Listener Reverse Packets (Delta) | Cumulative packets (Delta) received from the server | Count |
|
| Listener Current Responses | Listener current response count | Count |
|
| Listener Total Success Responses | Cumulative successful response count | Count |
|
| Listener Last Response Time | Listener last response time | Milliseconds |
|
| Listener Fastest Response Time | Listener minimum response time | Milliseconds |
|
| Listener Slowest Response Time | Listener maximum response time | Milliseconds |
|
| Listener Total Failure Actions | Number of failures processed in the Listener | Count |
|
| ServerGroup Status | LB server group status | Count |
|
| ServerGroup Request Count | Cumulative request count for LB server group | Count |
|
| ServerGroup Response Count | LB server group cumulative response count | Count |
|
| ServerGroup 2xx Response Count | Number of HTTP 2xx responses | Count |
|
| ServerGroup 3xx Response Count | Number of HTTP 3xx responses | Count |
|
| ServerGroup 4xx Response Count | Number of HTTP 4xx responses | Count |
|
| ServerGroup 5xx Response Count | Number of HTTP 5xx responses | Count |
|
| ServerGroup Healthy Member Count | Number of healthy members | Count |
|
| ServerGroup Unhealthy Member Count | Health check abnormal member count | Count |
|
| ServerGroup Peak Connections | Maximum connections for LB server group | Count |
|
2 - How-to guides
Users can create a service by entering the required Load Balancer information and selecting detailed options through the Samsung Cloud Platform Console.
Create Load Balancer
You can create and use a Load Balancer service from the Samsung Cloud Platform Console.
To create a Load Balancer, follow these steps.
- All Services > Networking > Load Balancer click the menu. 1. Go to the Load Balancer’s Service Home page.
- Service Home on the page, click the Create Load Balancer button. 2. Go to the Load Balancer creation page.
- On the Load Balancer creation page, enter the information required to create the service and select detailed options.
- Enter or select the required information in the Service Information Input area.
| Category | Required | Detailed description |
|---|---|---|
| Load Balancer name | Required | Load Balancer resource name
|
| Service Category | Required | Load Balancer service type
|
| VPC name | Required | VPC where the Load Balancer will be created
|
| Service Subnet name | Required | VPC Subnet where the Load Balancer will be created
|
| Availability Zone 1 | Required | Select the Availability Zone to create the Load Balancer among the Availability Zones where the Service Subnet is created
|
| Availability Zone 2 | Required | This is an item provided only when a Multi-AZ Subnet is selected for the Service Subnet, and when configuring the Load Balancer as Multi-AZ, set
|
| Service IP | Required | Select automatic allocation or manual entry for the service IP exposed to the client
|
| Public NAT IP | Select | When allowing service access from external (Internet), select the Public IP to connect to the Service IP
|
| Source NAT IP | Required | Select automatic allocation or manual entry for the IP used by the Load Balancer for server communication
|
| Health check IP | Required | Select either automatic allocation or manual entry for the IP used for member health checks in the Load Balancer
|
| Use firewall | Selection | Select whether to enable the firewall for Load Balancer access control
|
| Store firewall logs | Select | Select whether to store Firewall logs
|
- In the Additional Information Input area, enter or select the required information.
Category Required statusDetailed description Explanation Select Enter resource description tag Select Add tags - Up to 50 tags can be added per resource
Table. Load Balancer additional information input fields
- Check the created service information and the estimated billing amount, and click the Create button.
- Once creation is complete, check the created resources on the Load Balancer List page.Information
- Load Balancer service does not provide access control for Service IP and service ports.
- When creating a Load Balancer, select Use Firewall to manage communication between the client and the Load Balancer, and between the Load Balancer and members with firewall rules, and enable Save Firewall Logs to store access logs, which is recommended.
- When creating a service and using the Firewall log storage feature, you must configure the log repository first. * If the log storage configuration is not completed, you cannot create a Load Balancer service.
CautionIf you use a firewall, you must add the rules required for Load Balancer communication. Register the rules, paying attention to the direction for each purpose.
- If you do not add a rule, the Load Balancer service will not operate correctly.
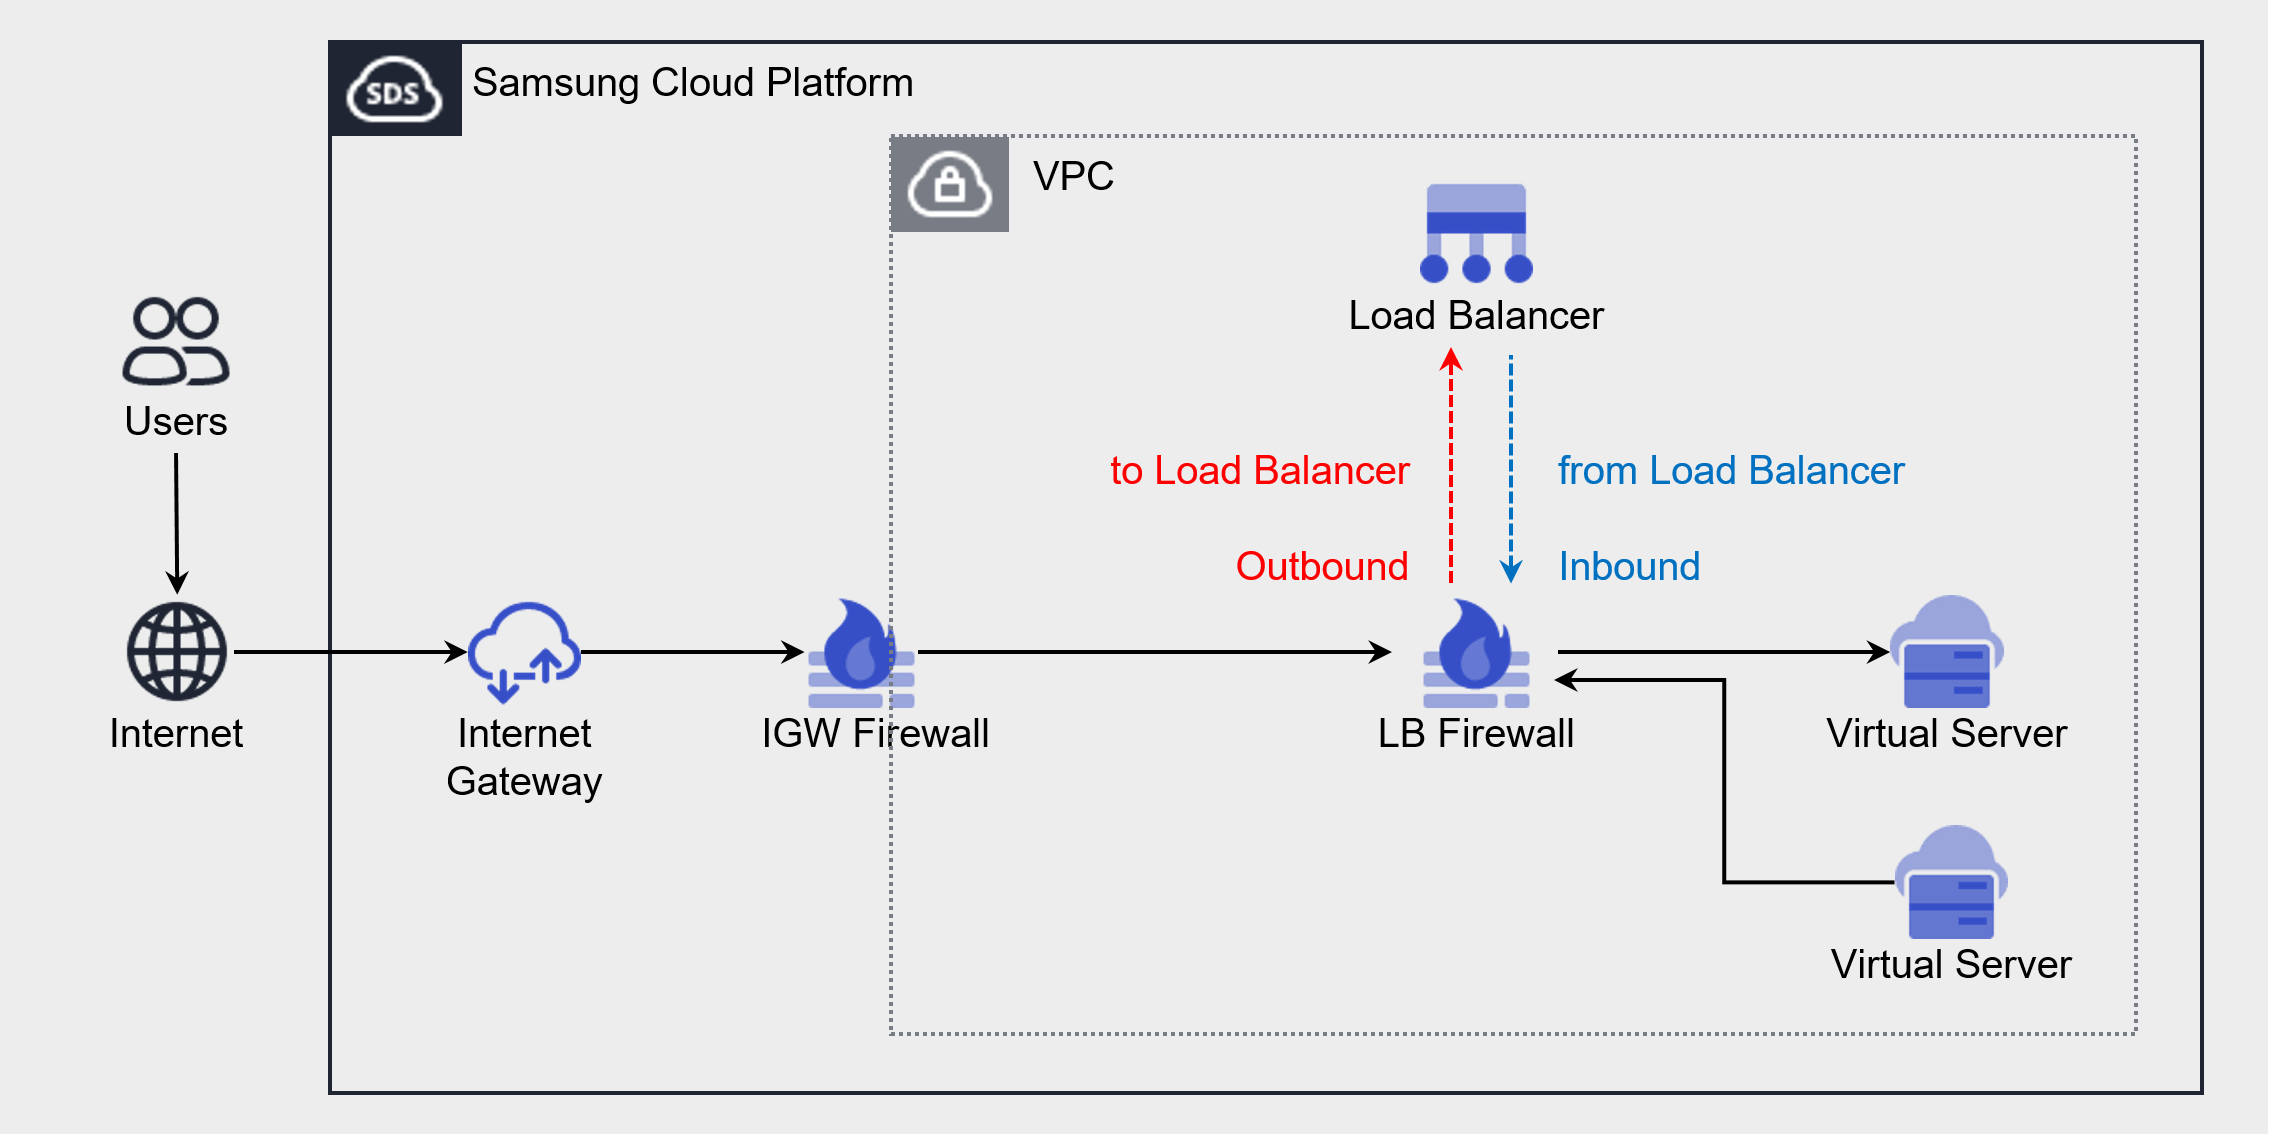
Purpose Source IP Destination IP Protocol Destination Port/Type Direction Client → LB connection Client IP LB Service IP Listener protocol Listener service port Outbound LB → Member connection LB Source NAT IP LB server group member IP LB server group protocol Member port Inbound LB → Member health check LB health check IP LB server group member IP Health check protocol Health check port - When the health check port and member port are different, register the member port
Inbound Figure and table. Add Load Balancer Firewall rule - Load Balancer service does not provide access control for Service IP and service ports.
- Once creation is complete, check the created resources on the Load Balancer List page.
Load Balancer View detailed information
The Load Balancer service can be viewed and edited for resource lists and detailed information in the Load Balancer menu. The Load Balancer Details page consists of the Details, Connected Resources, Tags, Operation History tabs.
To view detailed information about the Load Balancer service, follow these steps.
- All Services > Networking > Load Balancer Click the menu. 1. Navigate to the Load Balancer’s Service Home page.
- On the Service Home page, click the Load Balancer menu. 2. Go to the Load Balancer List page.
- On the Load Balancer List page, click the resource for which you want to view detailed information. 3. Go to the Load Balancer Details page.
- Load Balancer Details page displays status information and additional feature information, and consists of Detailed Information, Connected Resources, Tags, Operation History tabs.
Category Detailed description Status Load Balancer resource status - Active: Service is active and operating normally
- Deleting: Service termination request is being processed
- Creating: Service creation request is being processed
- Error: Unable to determine current status due to internal error
- Editing: Service modification request is being processed
Service cancellation Delete Load Balancer resource Table. Load Balancer status information and additional feature items
- Load Balancer Details page displays status information and additional feature information, and consists of Detailed Information, Connected Resources, Tags, Operation History tabs.
Detailed Information
In the Detailed Information tab, you can view the detailed information of the resource selected from the Load Balancer list and edit the necessary information.
| Category | Detailed description |
|---|---|
| service | Service name |
| Resource Type | Resource Type |
| SRN | Unique resource ID in Samsung Cloud Platform |
| Resource name | Resource name |
| Resource ID | Unique resource ID in the service |
| Creation Date/Time | Service creation date and time |
| Modification date | Service modification date and time |
| Constructor | User requesting service creation |
| Modifier | Service modification request user |
| Load Balancer name | Load Balancer name |
| Service IP | Service IP of the Load Balancer (used for client communication from the Load Balancer) |
| Service Category | Load Balancer service type |
| Source NAT IP | Source NAT IP of the Load Balancer (used for server communication from the Load Balancer) |
| VPC name | Resource name of the VPC where the Load Balancer was created
|
| Service Subnet name | Subnet where the Load Balancer is created resource name
|
| Public NAT IP | Load Balancer’s Public NAT IP
|
| Private NAT IP | Load Balancer’s Private NAT IP
|
| Health check IP | Load Balancer’s health check IP (used by the Load Balancer for member health checks) |
| Availability Zone 1 | Availability Zone information of the created Load Balancer |
| Availability Zone 2 | Information about the Availability Zone where the Load Balancer was created
|
| Explanation | Additional information or description about the Load Balancer
|
| Firewall name | Firewall resource name connected to Load Balancer
|
Connected resource
Connected Resources tab allows you to view the list of Listeners attached to the Load Balancer and to create or delete Listeners.
- In the Connected Resources tab, when you select the Listener item, you are taken to the Listener Details page where you can view, edit, and delete the detailed information.
- Listener Details page item, clicking the Edit icon lets you modify the information.
| Category | Detailed description | |
|---|---|---|
| Create Listener | Create Listener button | |
| Listener name | Listener resource name | |
| Routing rules | Routing rules set on the Listener
| |
| Protocol | Protocol that the Listener receives | |
| Port | The service port that the Listener receives | |
| Creation Date/Time | Listener creation time | |
| Status | Listener resource status | |
| Delete | Listener Delete Button |
Tag
On the Load Balancer List page, you can view the tag information of the selected resource and add, modify, or delete it.
| Category | Detailed description |
|---|---|
| Tag list | Tag list
|
Job History
Task History tab allows you to view the task history of the selected resource.
| Category | Detailed description |
|---|---|
| Work History | Task execution details |
| Work date and time | Task execution date and time |
| Resource Type | Resource Type |
| Resource name | Load Balancer name |
| Work result | Task execution result (success/failure) |
| Operator Information | User information of the person who performed the task |
Load Balancer Resource Management
You can manage resources such as creating and deleting a Load Balancer’s Listener.
Create Listener
Create a Listener on the Load Balancer to receive client requests and handle traffic according to the Listener configuration.
The protocol that receives client requests varies depending on the Load Balancer service type.
- L4 Load Balancer case: TCP, UDP, TLS, TCP_PROXY protocols
- L7 When using an L7 Load Balancer: HTTP, HTTPS protocols
Creating a Listener in L4 Load Balancer
To create a Listener in the L4 Load Balancer, follow these steps.
- All Services > Networking > Load Balancer Click the menu. 1. Navigate to the Load Balancer’s Service Home page.
- On the Service Home page, click the Load Balancer menu. 2. Navigate to the Load Balancer List page.
- Load Balancer List page, click the Load Balancer resource to create a Listener. 3. Load Balancer Details page.
- On the Load Balancer Details page, click the Connected Resources tab. 4. Navigate to the Connected Resources tab page.
- On the Connected Resources tab page, click the Create Listener button in the upper right.
- Enter or select the required information in the Service Information Input area.
- The information that can be entered varies depending on the protocol.
| Category | Required status | Detailed description |
|---|---|---|
| Load Balancer | Required | Load Balancer resource name where the Listener will be created |
| Listener name | Required | Listener resource name |
| Protocol | Required | Select Listener receive protocol
|
| Service port | Required | Listener receive port input
|
| Routing rules | Required | Routing rule configuration
|
| Session keep-alive time | Required | Client session timeout setting
|
| Proxy Protocol | Selection | When used, the client IP is added to the proxy protocol header and forwarded to the server
|
| persistence | Required | Select session persistence (Sticky Session) method (available when using TCP, TLS, TCP_PROXY protocols)
|
| SSL certificate | Selection | Select the default encryption certificate and security level (TLS protocol can be configured when used)
|
| Server SSL security level | Required | When configuring End-to-End SSL, select the security level (available when using the TLS protocol)
|
- In the Additional Information Input area, enter or select the required information.
| Category | Required status | Detailed description |
|---|---|---|
| Explanation | Select | Enter resource description |
| tag | Selection | Add tag
|
- Check the created service information and click the Create button.
- After creation is complete, check the created resources on the Load Balancer Details page’s Connected Resources tab.
Creating a Listener in L7 Load Balancer
To create a Listener in the L7 Load Balancer, follow these steps.
- All Services > Networking > Load Balancer menu, click it. 1. Navigate to the Load Balancer’s Service Home page.
- On the Service Home page, click the Load Balancer menu. 2. Navigate to the Load Balancer List page.
- Load Balancer List page, click the Load Balancer resource to create a Listener. 3. Go to the Load Balancer Details page.
- On the Load Balancer Details page, click the Connected Resources tab. 4. Go to the Connected Resources tab page.
- On the Connected Resources tab page, click the Create Listener button in the upper right.
- In the Service Information Input area, enter or select the required information.
- According to the Protocol, the information that can be entered varies.
| Category | Required status | Detailed description |
|---|---|---|
| Load Balancer | Required | Load Balancer resource name where the Listener is created |
| Listener name | Required | Listener resource name |
| Protocol | Required | Select Listener receiving protocol
|
| Service port | Required | Listener receive port input
|
| Routing Rules > Routing Action | Required | Select routing processing method
|
| Routing Rules > Routing Conditions | Required | When the routing action is LB server group forwarding, configure the LB server group per routing condition
|
| persistence | Select | Select session persistence (Sticky Session) method (available when the routing action is LB server group forwarding)
|
| Listener timeout setting > Session keep-alive time | Select | Session idle-timeout setting
|
| Listener timeout setting > HTTP connection timeout | Select | Client connection keep-alive time, response timeout setting
|
| X-Forwarded-For | Select | Set whether to insert client IP information
|
| X-Forwarded-Proto | Selection | Set whether to insert client request protocol information
|
| X-Forwarded-Port | Selection | Set insertion of client request port information
|
| HTTP 2.0 | Selection | Configure HTTP/2 usage when connecting client and server
|
| SSL certificate | Selection | Select encrypted certificate and security level (configurable when the Listener protocol is HTTPS)
|
| Server SSL security level | Required | Select security level when configuring End-to-End SSL (available when the Listener protocol is HTTPS)
|
Among routing conditions, the URL path matching method is start-with(prefix match).
- If the starting string of the HTTP Request header Path matches the routing condition’s requested URL path, the corresponding routing rule is applied.
- Example: Request URL Path when entered as
/api,- Matching cases:
/api/users, /api/v1/login, /api/images/logo.png - When not matched:
/auth/api/, /API/users
- Matching cases:
- In the Additional Information Input area, enter or select the required information.
| Category | required status | Detailed description |
|---|---|---|
| Explanation | Selection | Enter resource description |
| tag | Selection | Add tags
|
- Verify the created service information and click the Create button.
- When creation is complete, verify the created resources on the Load Balancer Details page’s Connected Resources tab.
Supported Items by SSL Security Level
The list of TLS versions and Cipher Suites supported by the Listener for each SSL security level is as follows.
| Security level | TLS version | Cipher Suite (encryption algorithm) |
|---|---|---|
| High | TLS 1.3 | TLS13_AES_128_GCM_SHA256 TLS13_AES_256_GCM_SHA384 TLS13_CHACHA20_POLY1305_SHA256 |
| Normal/Low | Normal: TLS 1.3, 1.2 Low: TLS 1.3, 1.2, 1.1 | TLS13_AES_128_GCM_SHA256 TLS13_AES_256_GCM_SHA384 TLS13_CHACHA20_POLY1305_SHA256 RC4-MD5 RC4-SHA DES-CBC3-SHA DHE-RSA-AES128-GCM-SHA256 DHE-RSA-AES256-GCM-SHA384 DHE-RSA-CHACHA20-PLY1305 ECDHE-RSA-AES128-SHA ECDHE-RSA-AES256-SHA ECDHE-RSA-AES128-SHA256 ECDHE-RSA-AES256-SHA384 ECDHE-RSA-CHACHA20-POLY135 ECDHE-ECDSA-AES128-SHA ECDHE-ECDSA-AES256-SHA ECDHE-ECDSA-AES128-SHA256 ECDHE-ECDSA-AES256-SHA384 ECDHE-ECDSA-AES128-GCM-SHA256 ECDHE-ECDSA-AES256-GCM-SHA384 ECDHE-ECDSA-CHACHA20-POLY1305 |
Check Listener detailed information
On the Load Balancer Details page, you can select the Listener in the Connected Resources tab to view and edit its detailed information.
To view detailed information about the Listener, follow these steps.
- All Services > Networking > Load Balancer menu, click it. 1. Navigate to the Load Balancer’s Service Home page.
- On the Service Home page, click the Load Balancer menu. 2. Go to the Load Balancer List page.
- On the Load Balancer List page, click the resource to view detailed information. 3. Navigate to the Load Balancer Details page.
- Click the Connected Resources tab on the Load Balancer Details page.
- Click the Listener to view detailed information in the list of connected resources. 5. Navigate to the Listener Details page.
- Listener Details The page displays status information and additional feature information, and is composed of the Details, Tags, Activity History tabs.
| Category | Detailed description |
|---|---|
| status | Listener 상태
|
| Delete Listener | Delete Listener |
Detailed Information
Detailed Information tab allows you to view the Listener’s detailed information and edit necessary details. Detailed information varies depending on the Load Balancer in use.
L4 Load Balancer Detailed Information
| Category | Detailed description |
|---|---|
| service | Service name |
| Resource Type | Resource Type |
| SRN | Unique resource ID in Samsung Cloud Platform |
| Resource name | Resource name |
| Resource ID | Unique resource ID in the service |
| Constructor | Listener creation request user |
| Creation Date/Time | Listener creation time |
| Modifier | User requesting listener modification |
| Modification date | Listener modification timestamp |
| Listener name | Listener name |
| Protocol | Listener usage protocol |
| Port | Listener port |
| Session keep-alive time | TCP session idle-timeout information
|
| Proxy Protocol | Whether to insert proxy protocol header
|
| persistence | Session stickiness (Sticky Session) status
|
| Routing rules | Routing action and routing condition information
|
| SSL certificate | Default certificate and SSL security level, expiration date and time information
|
| SNI certificate | SNI certificate details
|
| Server SSL security level | Server connection encryption status
|
| Explanation | Additional information about the Listener
|
L7 Load Balancer Detailed Information
| Category | Detailed description |
|---|---|
| service | Service name |
| Resource Type | Resource Type |
| SRN | Unique resource ID in Samsung Cloud Platform |
| Resource name | Resource Name |
| Resource ID | Unique resource ID in the service |
| Constructor | Listener creation request user |
| Creation Date/Time | Listener creation time |
| Modifier | User requesting listener modification |
| Modification date and time | Listener modification timestamp |
| Listener name | Listener name |
| Protocol | Listener usage protocol |
| Port | Listener port |
| Session keep-alive time | TCP session idle timeout information
|
| Client connection keep-alive time | HTTP client connection keep-alive time
|
| Server response latency | HTTP server response latency
|
| X-Forwarded-For | Insert X-Forwarded-For header
|
| X-Forwarded-Proto | X-Forwarded-Proto header insertion option
|
| X-Forwarded-Port | X-Forwarded-Port header insertion option
|
| persistence | Sticky Session setting
|
| HTTP 2.0 | HTTP/2 usage
|
| Routing rules | Routing action and routing condition settings
|
| SSL certificate | Default certificate and SSL security level, expiration date and time information
|
| SNI certificate | SNI certificate details
|
| Server SSL security level | Whether the server connection is encrypted
|
| Add response header | HTTP Response header insertion
|
| Explanation | Additional information about the Listener
|
Tag
You can view, add, modify, or delete a Listener’s tag information.
| Category | Detailed description |
|---|---|
| Tag list | Tag list
|
Job History
You can view the Listener’s operation history.
| Category | Detailed description |
|---|---|
| Work history | Task execution details |
| Work date and time | Task execution date and time |
| Resource Type | Resource Type |
| Resource name | Listener name |
| Task result | Task execution result (success/failure) |
| Operator Information | User information of the person who performed the task |
Modify routing rules
On the Load Balancer Details page, you can modify the Listener’s routing rules in the Connected Resources tab.
To modify the Listener’s routing rules, follow these steps.
- All Services > Networking > Load Balancer menu, click it. 1. Navigate to the Service Home page of the Load Balancer.
- On the Service Home page, click the Load Balancer menu. 2. Load Balancer List navigate to the page.
- On the Load Balancer list page, click the resource whose detailed information you want to view. 3. Go to the Load Balancer Details page.
- On the Load Balancer Details page, click the Connected Resources tab.
- In the list of connected resources, click the Listener to modify the routing condition. 5. Go to the Listener Details page.
- On the Listener Details page, click the Edit icon for the Routing Rules item. 6. Routing Rule Modification popup opens.
- After modifying the routing rule according to the routing action, click the Confirm button.
Category Required statusDetailed description Routing action - Current routing method (cannot be modified) Routing condition Required If the routing action is LB server group forwarding, you can modify the sub-settings of the routing condition - URL path: Modify request URL path and LB server group (up to 20 additions possible)
- host header: Modify request host and LB server group (up to 20 additions possible)
Redirect target Required If the routing action is URL redirection, the redirection target can be modified - URL: modify redirection URL
- Protocol/Port: modify redirection port
Table. Listener routing rule modification items
Add or modify response header
On the Load Balancer Details page, you can modify the addition of response headers for the Listener in the Connected Resources tab.
To modify the Listener’s response header addition, follow these steps.
- All Services > Networking > Load Balancer menu, click it. 1. Go to the Load Balancer’s Service Home page.
- On the Service Home page, click the Load Balancer menu. 2. Navigate to the Load Balancer List page.
- Load Balancer List page, click the resource to view detailed information. 3. Navigate to the Load Balancer Details page.
- Click the Connected Resources tab on the Load Balancer Details page.
- Click the Listener to edit the response header addition in the list of connected resources. 5. Navigate to the Listener Details page.
- On the Listener Details page, click the Edit icon of the Add Response Header item. 6. Response Header Add/Edit The popup window opens.
- After setting the header to insert, click the Confirm button.
Category required statusDetailed description HTTP Strict Transport Security (HSTS) header Select Select whether to insert the HSTS header (enforce HTTPS connections to enhance security) - When enabled, set max-age and subdomain applicability
- max-age: Enter a value between 1 and 63072000 (up to 2 years)
- Subdomain applicability: enabled applies to all subdomains
Table. Response Header Add/Modify Items - When enabled, set max-age and subdomain applicability
Delete Listener
To delete an unused Listener, follow these steps.
- All Services > Networking > Load Balancer menu, click it. 1. Navigate to the Load Balancer’s Service Home page.
- On the Service Home page, click the Load Balancer menu. 2. Go to the Load Balancer List page.
- On the Load Balancer List page, click the Load Balancer resource from which you want to delete the Listener. 3. Navigate to the Load Balancer Details page.
- On the Load Balancer Details page, click the Connected Resources tab. 4. Go to the Connected Resources tab page.
- On the Connected Resources tab page, click the Listener you want to delete. 5. Go to the Listener Details page.
- On the Listener Details page, click the Delete Listener button.
Terminate Load Balancer
You can terminate unused Load Balancers to reduce costs. However, because it may impact the application service, please request termination only after a thorough prior review.
In the following cases, the Load Balancer cannot be terminated.
- If there is a Listener attached to the Load Balancer: Delete the attached Listener on the Load Balancer Details page under the Connected Resources tab.
- If you are using a Public NAT IP with the Load Balancer: Load Balancer details page’s Detailed Information tab, deselect the Public NAT IP in use.
- If you are using a Private NAT IP with a Load Balancer: In the Load Balancer Details page’s Details tab, deselect the Private NAT IP in use.
- If there are rules registered in the Firewall: Delete the Firewall’s rules in use from the Load Balancer Details page’s Detailed Information tab.
- If connected to a PrivateLink Service: Check the connected Load Balancer on the PrivateLink Service Details page.
To cancel the Load Balancer, follow the steps below.
- All Services > Networking > Load Balancer click the menu. 1. Go to the Load Balancer’s Service Home page.
- On the Service Home page, click the Load Balancer menu. 2. Go to the Load Balancer list page.
- Load Balancer List page, click the resource to terminate. 3. Go to the Load Balancer Details page.
- On the Load Balancer Details page, click the Cancel Service button.
- After termination is complete, verify the resource termination status in the Load Balancer list.
2.1 - LB server group
Users can create an LB server group through the Samsung Cloud Platform Console and connect it to a Load Balancer’s Listener.
Create LB server group
Follow these steps to create an LB server group.
- All Services > Networking > Load Balancer click the menu. 1. Navigate to the Load Balancer’s Service Home page.
- On the Service Home page, click the LB Server Group menu. 2. Go to the LB server group list page.
- Click the Create LB Server Group button on the LB Server Group List page. 3. Go to the Create LB Server Group page.
- On the Create LB Server Group page, enter the information required to create a service and select detailed options.
- Enter or select the required information in the Service Information Input area.
Category required statusDetailed description LB server group name Required LB server group resource name - using English uppercase and lowercase letters, numbers, special characters(
-_) to enter 3 ~ 63 characters
- LB server group name must be unique within the Account
VPC name Required Select the VPC to create the LB server group - Select the VPC where the Load Balancer that will connect to the LB server group is created
Service Subnet name Required Select the VPC Subnet to create the LB server group - Select the Subnet where the Load Balancer that will connect to the LB server group is created
Load balancing Required Load Balancing Algorithm Selection - Round Robin: Distribute sequentially among registered members
- Weighted round robin: Distribute sequentially in proportion to the weight assigned to each member
- Least Connection: Distribute to the member with the fewest connections
- Weighted least connection: Distribute to the higher‑priority member considering each member’s weight and connection count
- Source IP/Port Hash: Distribute to a specific member based on the client IP address and port hash value
- Source IP Hash: Distribute to a specific member based on the source IP address hash value
Protocol Required Select the receiving protocol for the LB server group - Select the protocol to forward to members of the LB server group
LB health check Required Select LB health check - Select an LB health check created in the Service Subnet that is the same as the LB server group
Table. LB server group service information input fields - using English uppercase and lowercase letters, numbers, special characters(
- Additional Information Input in this area, enter or select the required information.
Category required statusDetailed description Explanation Selection Enter resource description tag Selection Add tags - Up to 50 tags can be added per resource
Table. LB server group additional information input fields
- Enter or select the required information in the Service Information Input area.
- Review the created service information and the estimated billing amount, then click the Create button.
- Once creation is complete, verify the created resources on the LB server group list page.
Check detailed information of LB server group
In the LB Server Group menu, you can view and edit the resource list and detailed information. LB Server Group Details page consists of Details, Connected Resources, Tags, Operation History tabs.
To view detailed information of the LB server group, follow these steps.
All Services > Networking > Load Balancer Click the menu. 1. Navigate to the Load Balancer’s Service Home page.
On the Service Home page, click the LB Server Group menu. 2. Go to the LB server group list page.
- You can modify column visibility by clicking the Settings button at the top right of the table.
Category display statusDetailed description LB server group name default LB server group resource name Protocol default LB server group protocol Load Balancer name default Load Balancer resource name connected to the LB server group LB health check ID default The name of the LB health check resource used by the LB server group Number of members default Number of members registered in the LB server group Creation date and time default LB server group creation timestamp status default LB server group resource status Table. LB server group list items
- You can modify column visibility by clicking the Settings button at the top right of the table.
LB server group list Click the resource to view its detailed information on the page. 3. Navigate to the LB Server Group Details page.
- LB Server Group Details page displays status information and descriptions of additional features at the top.
Category Detailed description status LB server group resource status - Active: The service is active and functioning normally
- Deleting: Processing service termination request
- Creating: Processing service creation request
- Error: Unable to determine current status due to an internal error
- If this status persists, contact the Support Center
- Editing: Processing service modification request
Delete LB server group Delete LB server group resources Table. LB server group status information and additional feature items
- LB Server Group Details page displays status information and descriptions of additional features at the top.
Detailed Information
Detailed Information tab allows you to view detailed information of resources from the LB server group list, and modify the information if needed.
| Category | Detailed description |
|---|---|
| service | service name |
| Resource Type | Resource Type |
| SRN | Resource unique ID in Samsung Cloud Platform |
| Resource name | Resource Name |
| Resource ID | Unique resource ID in the service |
| Constructor | User requesting service creation |
| Creation date and time | Service creation date and time |
| Modifier | Service Modification Request User |
| Modification date and time | Service modification date and time |
| Load Balancer name | Load Balancer resource name linked to the LB server group
|
| LB server group name | LB server group name |
| VPC name | VPC where the LB server group is created resource name
|
| Service Subnet name | Subnet where the LB server group is created resource name
|
| Protocol | LB server group forwarding protocol |
| Load balancing | LB server group traffic distribution method
|
| LB health check | LB health check resource name
|
| Member status by Availability Zone | Summary of member count and health check status by Availability Zone |
| Explanation | Add description for LB server group
|
Connected resource
Connected Resources tab allows you to view the list of members connected to the LB Server Group, and add or delete members.
| Category | Detailed description |
|---|---|
| Add member | Add LB server group member button |
| Member name | Member name (server name) added to the LB server group
|
| IP address | Member IP address |
| Port | Member receive port |
| Weight | Load balancing weight
|
| Activation | Member activation status
|
| Creation date and time | Member addition time |
| Availability Zone | Information about the Availability Zone where the member (server) was created |
| Health check status | Health check status information
|
| status | Member resource status |
| Delete | Delete member |
Tag
On the LB Server Group List page, you can view the tag information of the selected resource and add, modify, or delete it.
| Category | Detailed description |
|---|---|
| Tag list | Tag list
|
Job History
Job History tab allows you to view the operation history of the selected resource.
| Category | Detailed description |
|---|---|
| Work log | Task execution details |
| Task date and time | Task execution date and time |
| Resource Type | Resource Type |
| Resource name | LB server group name |
| Result | Task execution result (success/failure) |
| Operator Information | User information of the person who performed the task |
Managing LB Server Group Resources
You can view the member list of an LB server group and add or remove members.
Add member
You can add members to the LB server group to register server resources that handle client requests.
To add a member to the LB server group, follow the steps below.
All Services > Networking > Load Balancer Click the menu. 1. Navigate to the Load Balancer’s Service Home page.
On the Service Home page, click the LB Server Group menu. 2. Go to the LB server group list page.
On the LB server group list page, click the resource to edit its details. 3. Navigate to the LB Server Group Details page.
On the LB Server Group Details page, click the Connected Resources tab. 4. Go to the Connected Resources tab page.
On the Connected Resources tab page, click the Add Member button at the top right.
In the Add Member popup, after entering the required information, click the Confirm button.
Category required statusDetailed description LB server group name default LB server group name to add a member Target server Required Server information to add as a member - Virtual Server/Bare Metal Server/Multi-Node GPU Cluster: Select from the list of resources created in the same VPC as the LB server group
- Enter IP directly: Enter the server IP directly
- Click the Add button to add the target server
Member Information Required Member Port and Weight Settings - Member Name: Display the server name and IP to be added as a member
- Port: The port the member will receive
- Weight: The weight applied for load balancing
- When using Weighted Round Robin or Weighted Least Connection load balancing, a value between 1 and 1000 must be entered
Table. Add LB server group member itemClick the OK button in the alert dialog.
Check if members have been added in the Connected Resources tab.
Add the following rule to the Security Group of the server added as a member to enable communication between the Load Balancer and LB server group members.
- (Direction) Inbound rule, (Target address) Load Balancer’s Source NAT IP, (Protocol) LB server group protocol, (Allowed port) member port
- If the LB server group is in Creating, Editing, Deleting, Error state, you cannot add members.
- If the Account that the LB server group belongs to has exceeded its allowable number of members, you cannot add additional members. * The maximum number of members that can be created in a single Account is 1,000.
- You can add servers created in another VPC as members via VPC Peering. * After adding the target server by direct IP entry, check the Health Check Status of the added member in the Connected Resources tab.
For detailed information, refer to VPC > VPC Peering.
Edit member
When you click a member name in the member list, you go to the Member Details page. You can view member details, and click the Edit icon to change the information.
Follow these steps to edit member details.
- All Services > Networking > Load Balancer Click the menu. 1. Navigate to the Load Balancer’s Service Home page.
- On the Service Home page, click the LB Server Group menu. 2. Go to the LB server group list page.
- On the LB server group list page, click the resource you want to edit details for. 3. Navigate to the LB Server Group Details page.
- On the LB Server Group Details page, click the Connected Resources tab. 4. Navigate to the Connected Resources tab page.
- On the Connected Resources tab page, click the member to edit. 5. Navigate to the Member Details page.
- Edit the desired member information on the Member Details page.
Weight modification
If you use weighted load balancing (Weighted Round Robin, Weighted Least Connection), you can modify it.
- Click the Edit icon of the Weight item. * Enter the weight to modify in the edit window and click the Confirm button.
Port modification
To edit a member port, click the Edit icon in the Port field. Enter the port to modify in the edit window and click the Confirm button.
Activate edit
To edit member activation, click the Activate Edit icon. Set the activation status in the edit window and click the Confirm button.
Delete member
To delete unused members, follow the steps below.
- All Services > Networking > Load Balancer Click the menu. 1. Navigate to the Load Balancer’s Service Home page.
- On the Service Home page, click the LB Server Group menu. 2. Go to the LB server group list page.
- On the LB server group list page, click the resource to edit its details. 3. Navigate to the LB Server Group Details page.
- On the LB Server Group Details page, click the Connected Resources tab. 4. Go to the Connected Resources tab page.
- On the Connected Resources tab page, click the member to delete. 5. Navigate to the Member Details page.
- On the Member Details page, click the Delete Member button.
- Check the member deletion status in the Linked Resources tab.
Terminate LB server group
You can terminate LB server groups that are not being used. However, because it may impact the application service, please request termination only after a thorough prior review.
The LB server group cannot be terminated in the following case.
- If the LB server group is being used in a Listener: modify the Listener’s LB server group before deleting the LB server group.
- If there are members registered in the LB server group: Delete all resources connected to the LB server group before terminating the LB server group.
- When using an LB server group in an Auto-Scaling Group: Set the Load Balancer to disabled in the Auto-Scaling Group or modify it so that the LB server group is not used. * For more details, refer to Auto-Scaling Group > Load Balancer 사용.
To cancel the LB server group, follow the steps below.
- All Services > Networking > Load Balancer Click the menu. 1. Navigate to the Load Balancer’s Service Home page.
- On the Service Home page, click the LB Server Group menu. 2. Go to the LB server group list page.
- Click the resource to be terminated from the LB server group list. 3. Navigate to the LB Server Group Details page.
- On the LB Server Group Details page, click the Delete LB Server Group button.
- After termination is complete, check the resource termination status in the LB server group list.
2.2 - LB health check
Users can create an LB health check through the Samsung Cloud Platform Console and use it for an LB server group.
Create LB health check
To create an LB health check, follow these steps.
- All Services > Networking > Load Balancer click the menu. 1. Navigate to the Service Home page of the Load Balancer.
- On the Service Home page, click the LB Health Check menu. 2. LB health check list Navigate to the page.
- On the LB Health Check List page, click the Create LB Health Check button. 3. Go to the LB Health Check Creation page.
- On the Create LB health check page, enter the information required to create the service and select detailed options.
- Enter or select the required information in the Service Information Input area.
Category Required statusDetailed description LB health check name Required LB health check resource name - Enter using English uppercase and lowercase letters, numbers, and special characters (
-_) with a length of 3 to 63 characters
- LB health check name must be unique within the Account
VPC name Required Select the VPC to create the LB health check - Select the VPC where the LB server group that will use the LB health check is created
Service Subnet name Required Select the VPC Subnet to create the LB health check - Select the Service Subnet where the LB server group that will use the LB health check is created
Health check method > Protocol Required Select TCP or HTTP as the protocol to use for member health checks. Health check method > Health check port 필수 멤버 헬스 체크에 사용할 포트로 멤버 포트, 직접 입력 중 선택 - 직접 입력 시 1 ~ 65,534 사이의 값 입력
헬스 체크 방식 > 주기 필수 헬스 체크 주기 - 기본값 5초, 1 ~ 180초 내에서 입력 가능
Health check method > waiting time Required Health check response timeout - Default is 5 seconds, input allowed between 1 and 180 seconds
- Cannot be set to a value larger than the interval
Health check method > Detection count Required Number of times to evaluate health check status - Default is 3 times, input can be between 1 and 10
Health check method > HTTP method Required HTTP request method setting (HTTP protocol usage setting) - choose GET or POST
Health check method > URL monitor required Enter health check URL path (HTTP protocol when used) - Enter using English letters, numbers, and special characters (
/.-_?&=) within 50 characters
Health check method > response code Required Enter the HTTP response code to receive from the server (HTTP protocol setting when used) - Enter response codes in the 200 ~ 500 range
Health check method > request string Required Health check request string input (HTTP protocol POST method used) - Enter the content to include in the Request Body using English letters, numbers, and special characters (
/.-_?&=) within 255 bytes
Table. LB health check service information input items - Enter using English uppercase and lowercase letters, numbers, and special characters (
- In the Additional Information Input area, enter or select the required information.
Category RequiredDetailed description Explanation Select Enter resource description tag Select Add tag - Maximum of 50 tags can be added per resource
Table. LB server group additional information input fields
- Enter or select the required information in the Service Information Input area.
- Summary Check the service information and estimated billing amount created in the panel, and click the Create button.
- Once creation is complete, check the created resources on the LB Health Check List page.
Add the following rule to the Security Group of the server added as a member for member health checks in the Load Balancer.
- (Direction) Inbound rule, (Target address) Load Balancer’s health check IP, (Protocol) health check protocol, (Allowed port) health check port
Set the LB health check to a value that members added to the LB server group can respond to.
- Since the Load Balancer determines member status based on health check responses, the LB health check results may differ from the actual service status.
View detailed LB health check information
LB health check menu allows you to view and edit the resource list and detailed information. LB health check details page consists of Details, Connected resources, Tags, Operation history tabs.
Follow these steps to view detailed LB health check information.
All Services > Networking > Load Balancer Click the menu. 1. Navigate to the Load Balancer’s Service Home page.
On the Service Home page, click the LB Health Check menu. 2. Go to the LB health check list page.
- Column visibility can be modified by clicking the Settings button at the top right of the table.
Category display statusDetailed description LB health check name basic LB health check resource name Service Subnet ID basic VPC Subnet name where the LB health check was created Number of LB server groups basic Number of LB server groups using LB health check type basic LB health check type Protocol basic LB health check protocol Creation timestamp basic LB health check creation time status basic LB health check resource status Table. LB health check list items
- Column visibility can be modified by clicking the Settings button at the top right of the table.
LB Health Check List Click the resource to view detailed information on the page. 3. LB Health Check Details navigate to the page.
- LB Health Check Details At the top of the page, status information and descriptions of additional features are displayed.
Category Detailed description status LB health check resource status - Active: The service is active and functioning normally
- Deleting: Processing service termination request
- Creating: Processing service creation request
- Error: Unable to determine current status due to an internal error
- If this status persists, contact the Support Center
- Editing: Processing service modification request
Delete LB health check Delete LB health check resource Table. LB health check status information and additional feature items
- LB Health Check Details At the top of the page, status information and descriptions of additional features are displayed.
Detailed Information
Detailed Information tab allows you to view the resource’s detailed information from the LB health check list, and edit the information when necessary.
| Category | Detailed description |
|---|---|
| service | Service name |
| Resource Type | Resource Type |
| SRN | Unique resource ID in Samsung Cloud Platform |
| Resource name | Resource Name |
| Resource ID | Unique resource ID in the service |
| Constructor | Service creation request user |
| Creation timestamp | Service creation date and time |
| Modifier | User requesting service modification |
| Modification date and time | Service modification date and time |
| LB health check name | LB health check name |
| type | LB health check type |
| VPC name | VPC to use for LB health check
|
| Service Subnet name | VPC Subnet to use for LB health check
|
| Health check method | LB health check method configuration information
|
| Explanation | Additional information about LB health check
|
Connected resource
Connected Resources tab allows you to view detailed information of the LB server group linked to LB Health Check.
| Category | Detailed description |
|---|---|
| LB server group name | LB server group resource name
|
| Protocol | LB health check protocol |
| Load Balancer name | Load Balancer resource name linked to the LB server group |
| Number of members | Number of members added to the LB server group |
| Creation Date/Time | LB server group creation time |
| status | LB 서버 그룹 자원 상태
|
Tag
LB Health Check List page allows you to view the tag information of the selected resource, and add, modify, or delete it.
| Category | Detailed description |
|---|---|
| Tag list | Tag list
|
Job History
Task History tab allows you to view the task history of the selected resource.
| Category | Detailed description |
|---|---|
| Work History | Task execution details |
| Work date and time | Task execution date and time |
| Resource Type | Resource Type |
| Resource name | LB health check name |
| Task result | Task execution result (success/failure) |
| Operator Information | User information of the person who performed the operation |
Modify LB health check method
On the LB Health Check Details page, you can modify the health check method.
To modify the LB health check method, follow the steps below.
- Click the All Services > Networking > Load Balancer menu. 1. Navigate to the Load Balancer’s Service Home page.
- On the Service Home page, click the LB Health Check menu. 2. Navigate to the LB health check list page.
- On the LB Health Check List page, click the resource to edit its detailed information. 3. LB Health Check Details navigate to the page.
- LB Health Check Details page, click the Edit icon of the Health Check Method. 4. Modify Health Check Method Proceed to the popup window.
- Health Check Method Modification After editing the required information in the popup window, click the Confirm button.
Cancel LB health check
You can cancel the LB health check service that you are not using.
- default type LB health check resources cannot be deleted.
- LB health check resources used in the LB server group cannot be deleted.
To disable the LB health check, follow these steps.
- Click the All Services > Networking > Load Balancer menu. 1. Navigate to the Service Home page of the Load Balancer.
- On the Service Home page, click the LB Health Check menu. 2. Go to the LB health check list page.
- From the LB health check list, click the resource to terminate. 3. Go to the LB Health Check Details page.
- On the LB Health Check Details page, click the Delete LB Health Check button.
- When the termination is complete, check the resource termination status in the LB health check list.
3 - API Reference
4 - CLI Reference
5 - Release Note
Load Balancer
- Supports Multi-AZ configuration, allowing you to select the Availability Zone for creating a Load Balancer. * (SCP for Samsung KR-WEST1 target)
- The Source IP Hash option has been added to load balancing. * (The existing IP Hash option is displayed as Source IP/Port Hash and provides the same functionality.)
- You can view the member status by Availability Zone.
- A feature has been added to allow setting a Private NAT IP on the Service IP.
- The ‘TCP_PROXY’ protocol has been added to the L4 Listener.
- The conditions for creating L4 Listener service ports have been changed.
- It has been changed to allow creating a Listener on the same service port for both TCP and UDP protocols.
- The method for entering L7 Listener routing rules has been changed.
- LB server group forwarding > Updated to allow users to add ‘/’ path in the URL path.
- LB server group forwarding > The matching method for the entered path in the URL path has changed from ‘Contains (including match)’ to ‘Starts with (starting part match)’.
- LB server group forwarding > A ‘Default(Default)’ condition has been added to the request host of the host header.
- The LB health check port configuration method has been changed.
- You can select between member port and manual entry, and for manual entry, specify the port to use.
- The existing LB health check will be changed to the member port. * (Same as the current health check method)
- The HTTPS option has been added to the LB health check protocol.
- You can monitor the server TLS connection status.
- When using URL redirection in the HTTP Listener, you can specify the target port for the redirection.
- You can add Multi-node GPU Cluster resources to an LB server group member.
- When creating a Load Balancer, you can set the Source NAT IP and the health check IP.
- TLS protocol has been added to the L4 Listener.
- You can configure a TLS service based on TCP.
- A routing rule option has been added to the L7 Listener.
- Routing conditions allow you to configure branching by URL path or by host.
- Supports multiple SSL certificates.
- By supporting SNI, you can register multiple certificates on a single Listener.
- Add LB health check management feature
- You can create an LB health check to define the required health check method and attach it to an LB server group for use.
- Support for weighted load balancing of LB server groups
- Weighted Round Robin and Weighted Least Connection have been added to the load balancing options.
- You can set per-member weights to distribute server load.
- Add LB server group member activation feature
- You can enable or disable members of the LB server group to select their activation status.
- A more reliable and feature‑rich Load Balancer service has been released.
- Provides an L7 Load Balancer that supports HTTP and HTTPS protocols. TCP, UDP 프로토콜을 지원하는 L4 Load Balancer를 제공합니다.