This is the multi-page printable view of this section. Click here to print.
Cloud LAN-Data Center
- 1: Overview
- 2: How-to guides
- 3: Release Note
1 - Overview
Service Overview
The Cloud LAN-Data Center can connect various networks such as servers, WAN Edge, and CX (Cloud eXchange) through a shared network infrastructure based on SDDC (Software-Defined Data Center) within a Samsung Cloud Platform region data center or a customer’s on-premises data center.
Features
Cloud LAN-Data Center provides the following features.
- Rapid Network Access: When building a network environment in a Samsung Cloud Platform region or a customer’s on‑premises data center, a fast and secure, enterprise‑customized data center network can be configured using SDDC‑based infrastructure.
- Cost Efficiency: By using logical configurations of virtualized infrastructure and optimized designs by experts, a customer-dedicated network with the same effect as a costly standalone physical network infrastructure can be built. The virtualized network environment reduces costs required for building physical infrastructure such as network equipment, data center floor space, and cabling.
- Operational Continuity Maintenance: We provide a customized operational environment for each company, configured to preserve existing settings such as network security policies, IP schemes, and network protocols required in various on-premises environments.
- Flexible network environment provision: Within an SDDC-based infrastructure, separating edge nodes (external network connection), service nodes (built-in equipment connection), and computing nodes (server connection) enables support for both hardware-type security and network solution appliances that require physical installation in the data center and virtualized equipment.
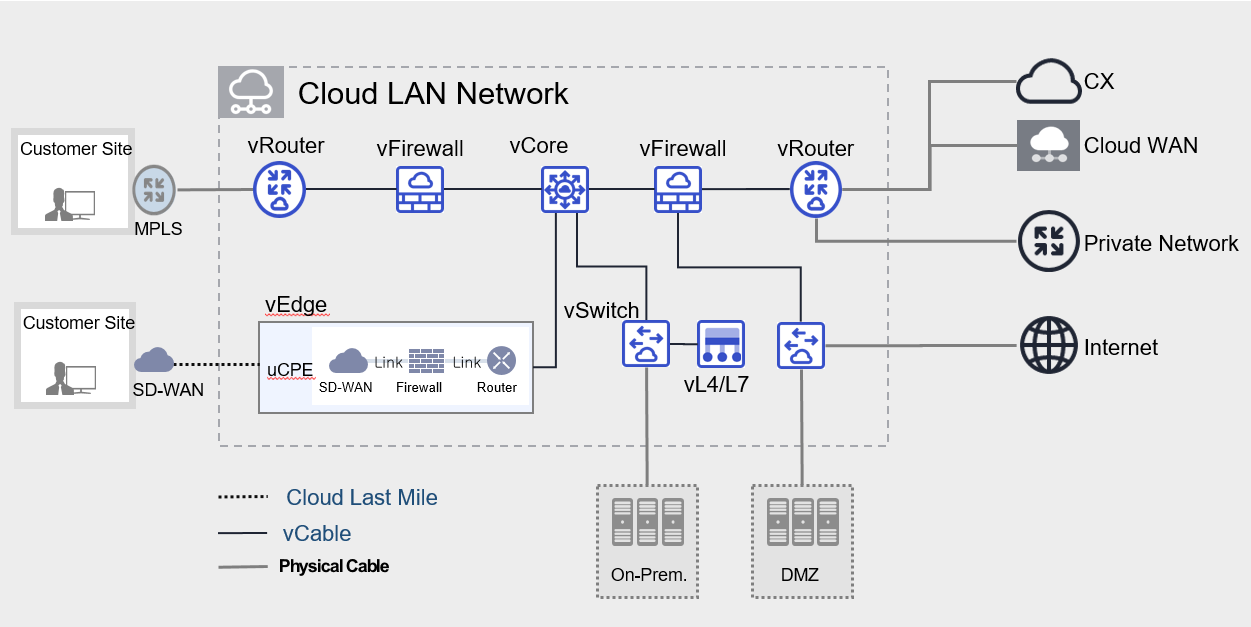
Provided features
Cloud LAN - Data Center provides the following features.
- Diverse Network Integration Virtualization: Provides virtualized resources for flexible N/W configurations and enables the creation of customer-dedicated networks using various Types of vDevice.
- Network/Security Solution Integration: Provides virtualization solutions in NFV form, and can configure networks by integrating various types of appliances.
Components
Cloud LAN-Data Center is a service that provides connections between various networks through virtual network configurations within a data center. The components are as follows, and related services can be created.
| Category | Detailed description |
|---|---|
| Cloud LAN Network | Virtual space for logically separated network configuration within the Cloud LAN‑Data Center infrastructure |
| vRouter | Virtual resources for connecting external lines (L2, L3) |
| vSwitch | Virtual resources for dedicated customer H/W connections and VLAN provisioning |
| vFirewall | Virtual firewall to protect infrastructure created within the Cloud LAN-Data Center |
| vL4/L7 | Virtual L4/L7 switch for traffic load balancing within the Cloud LAN-Data Center |
| vCore | Virtual resources for Full Mesh routing connections |
| vCable | Virtual Cable for routing connections between virtual resources |
| Interface | Provides a physical interface on the vDevice that can connect hardware equipment and circuits. |
Constraints
When using the Cloud LAN-Data Center service, there are the following limitations.
- Please inquire 1:1 about the available creation capacity per region.
Provision status by region
Cloud LAN-Data Center can be provided in the environments below.
| Region | Provision status |
|---|---|
| Korea West (kr-west1) | Provide |
| South Korea South 1 (kr-south1) | Not provided |
| South Korea South 2 (kr-south2) | Not provided |
| South Korea 3 (kr-south3) | Not provided |
Pre-service
Cloud LAN-Data Center has no prerequisite services.
2 - How-to guides
Users can create the service by entering the required information for the Cloud LAN Network service and selecting detailed options through the Samsung Cloud Platform Console.
Create Cloud LAN Network
You can create and use the Cloud LAN Network service in the Samsung Cloud Platform Console.
To request the creation of a Cloud LAN Network service, follow these steps.
- Click the All Services > Networking > Cloud LAN-Data Center menu. You will be taken to the Cloud LAN-Data Center Service Home page.
- On the Cloud LAN-Data Center Service Home page, click the Cloud LAN Network Create button. You will be taken to the Cloud LAN Network Create page.
- On the Cloud LAN Network Creation page, enter the required information in the service information input area, and click the Complete button.
- Enter or select the required information in the service information input area.
Category Required statusDetailed description Cloud LAN Network name Required Enter the name of the Cloud LAN Network to create - Enter 3‑21 characters using English letters, numbers, and special characters
Cloud LAN Network location Required Select Cloud LAN Network location description Select Enter additional information or description about the Cloud LAN Network service. Table. Cloud LAN Network service information input items
- Enter or select the required information in the service information input area.
- In the Additional Information Input area, enter or select the required information.
Category Required?Detailed description tag Select Add Tag - Up to 50 per resource can be added
- After clicking the Add Tag button, enter or select Key and Value values
Table. Cloud LAN Network additional information input fields
- Once creation is complete, check the created resources on the Cloud LAN Network List page.
Check detailed information of Cloud LAN Network
The Cloud LAN Network service allows you to view and edit the list of connected resources and detailed information. Cloud LAN Network Details page consists of Details, Connected Resources, Tags, Activity History tabs.
To view detailed information about the Cloud LAN Network, follow these steps.
- Click the All Services > Networking > Cloud LAN-Data Center menu. Navigate to the Cloud LAN-Data Center Service Home page.
- Cloud LAN-Data Center Service Home page, click the Cloud LAN Network menu. You will be taken to the Cloud LAN Network list page.
- On the Cloud LAN Network List page, click the resource you want to view detailed information for. You will be taken to the Cloud LAN Network Details page.
- Cloud LAN Network Details page displays status information and additional feature information, and is composed of Details, Connected Resources, Tags, Activity History tabs.
Category Detailed description Service status Service status display - Creating: Creating
- Active: Running
- Deleting: Deleting
- Failed: Creation/Deletion failed
Service termination Cancel Service button Table. Cloud LAN Network status information and additional functions
- Cloud LAN Network Details page displays status information and additional feature information, and is composed of Details, Connected Resources, Tags, Activity History tabs.
Detailed Information
Cloud LAN Network List page lets you view detailed information of the selected resource and modify it if necessary.
| Category | Detailed description |
|---|---|
| Service | service name |
| Resource Type | Resource Type |
| SRN | Unique resource ID in Samsung Cloud Platform |
| Resource Name | Resource Name |
| Resource ID | Service’s unique resource ID |
| constructor | User who created the service |
| Creation date and time | Service creation timestamp |
| Editor | User who modified the service |
| Modification date and time | Date and time the service was modified |
| Service Information | Created service details
|
Connected resource
On the Cloud LAN Network List page, you can view the vDevice information assigned to the selected resources.
| Category | Detailed description |
|---|---|
| vDevice List | Display vDevice information and status assigned to the created service |
tag
Cloud LAN Network List page lets you view the tag information of the selected resource, and you can add, modify, or delete it.
| Category | Detailed description |
|---|---|
| Tag list | Tag list
|
Job History
Cloud LAN Network List page allows you to view the operation history of the selected resource.
| Category | Detailed description |
|---|---|
| Task History List | Resource Change History
|
Terminate Cloud LAN Network
To cancel the Cloud LAN Network, follow these steps.
- If other resources are connected to the Cloud LAN Network, you cannot cancel the service. Delete all connected resources before canceling the service.
- If the Cloud LAN Network service status is Creating or Deleting, the service cannot be terminated.
- If you cancel the Cloud LAN Network service, it will be deleted immediately and cannot be recovered. Since canceling the service may cause the running service to stop immediately, please carefully consider the impact of service interruption before proceeding with the cancellation.
- Click the All Services > Networking > Cloud LAN-Data Center menu. You will be taken to the Cloud LAN-Data Center Service Home page.
- Cloud LAN-Data Center Service Home page, click the Cloud LAN Network menu. You will be taken to the Cloud LAN Network list page.
- On the Cloud LAN Network List page, click the resource you want to view detailed information for. You will be taken to the Cloud LAN Network Detail page.
- On the Cloud LAN Network Details page, click the Service Termination button.
- When the termination is complete, check whether the resource has been deleted in the Cloud LAN Network list.
2.1 - vDevice
Users can create the service by entering the required information for the vDevice service and selecting detailed options through the Samsung Cloud Platform Console.
Create vDevice
You can create and use the vDevice service in the Samsung Cloud Platform Console.
- To request a vDevice, a Cloud LAN Network must be created. * Check the Cloud LAN Network information before applying for a vDevice.
- The detailed configuration of the generated vDevice uses a separate operating platform (NiO). * For NiO-related inquiries, please submit your request through Support Center > Contact and we will provide guidance.
To request the creation of a vDevice service, follow these steps.
- All Services > Networking > Cloud LAN-Data Center menu, click it. 1. Navigate to the Cloud LAN-Data Center Service Home page.
- On the Cloud LAN-Data Center Service Home page, click the Create vDevice button. 2. Navigate to the vDevice Creation page.
- On the vDevice Creation page, enter the relevant information in the service information input area.
- Enter or select the required information in the service information input area.
Category required statusDetailed description Cloud LAN Network name Required Select the Cloud LAN Network to assign the vDevice vDevice Type Required Select the type of vDevice to create - vRouter: virtual resource for connecting external lines (L2, L3)
- vSwitch: virtual resource for connecting customer-dedicated hardware and providing VLANs
- vFirewall: virtual firewall for protecting infrastructure created within the Data Center
- vCore: inter-resource connection service for Full-Mesh communication between virtual resources
- vL4/L7: virtual L4/L7 switch for traffic load balancing within Cloud LAN-Data Center
- vTAP : virtual resource for replicating traffic within Cloud LAN-Data Center and sending it to other devices
vDevice Type > vRouter Required Enter the name to create when selecting vRouter - Enter using letters, numbers, and special characters, 3-21 characters long
vDevice Type > vSwitch Required Enter the name to create when selecting a vSwitch - Use English letters, numbers, and special characters, 3-21 characters
vDevice Type > vFirewall Required Select creation information when choosing vFirewall - vFirewall: Enter the name to create
- Vendor: Select vendor
- Type: Choose the plan of the selected vendor
- Redundancy: Choose whether to use redundancy, when Enabled is selected the cost for two firewalls is charged, and when not selected a single configuration is applied
- Log storage option: Choose whether to use log storage, logs are stored on a single server and even if redundancy is selected only one server’s fee is charged
- Contract period: Select contract period
vDevice Type > vCore Required Enter the name to create when selecting vCore - Enter using letters, numbers, and special characters, 3 to 21 characters
vDevice Type > vL4/L7 Required Select creation information when choosing vL4/L7 - vL4/L7 name: Enter the name to create
- Unit: Enter the number of units to use (1-20)
- Redundancy: Choose whether to use firewall redundancy
- Contract period: Select the contract period
vDevice Type > vTAP Required Select creation information when choosing vTAP - vTAP name: Enter the name to create
- Redundancy: Choose whether to use vTAP redundancy
- Contract period: Select contract period
Table. vDevice service information input itemsReferenceWhen applying for a vFirewall, a Firewall Interface is created automatically. Detailed firewall information by vendor is as follows.
vendor Firewall type Interface count Generated vFirewall Interface SECUI 6 Gbs, 5,000 Rules 3 int / ext / dmz.1 SECUI 12 Gbs, 15,000 Rules 3 int / ext / dmz.1 SECUI 30 Gbs, 30,000 Rules 4 int / ext / dmz.1 / dmz.2 SECUI 60 Gbs, 100,000 Rules 5 int / ext / dmz.1 / dmz.2 / dmz.3 Fortinet 1 Gbs, 1,000 Rules 3 int / ext / dmz.1 Table. Detailed Firewall information by vendor - In the Additional Information Input area, enter or select the required information.
Category required statusDetailed description Tag Select Add Tag - Up to 50 can be added per resource
- After clicking the Add Tag button, enter or select Key, Value values
Table. vDevice additional information entry fields
- Enter or select the required information in the service information input area.
- Summary Check the detailed information and estimated charges generated in the panel, and click the Complete button.
- When creation is complete, check the created resources on the vDevice List page.
Check vDevice detailed information
The vDevice service allows you to view and edit the list of connected resources and their detailed information. The vDevice Details page consists of Details, Connected Resources, Tags, Activity History tabs.
To view detailed information about the vDevice, follow these steps.
- Click the All Services > Networking > Cloud LAN-Data Center menu. 1. Navigate to the Cloud LAN-Data Center Service Home page.
- From the Cloud LAN-Data Center Service Home page, click the vDevice menu. 2. Navigate to the vDevice List page.
- vDevice List page, click the resource to view detailed information. 4. Go to the vDevice Details page.
- vDevice Details page displays status information and additional feature information, and consists of Details, Connected Resources, Tags, Activity History tabs.
Category Detailed description Service status Service status display - Creating: Creating
- Active: Running
- Deleting: Deleting
- Failed: Creation/Deletion failed
Delete vDevice Delete Service button Table. vDevice status information and additional functions
- vDevice Details page displays status information and additional feature information, and consists of Details, Connected Resources, Tags, Activity History tabs.
Detailed Information
On the vDevice List page, you can view detailed information of the selected resource and, if necessary, edit the information.
| Category | Detailed description |
|---|---|
| service | Service name |
| Resource Type | Resource Type |
| SRN | Unique resource ID in Samsung Cloud Platform |
| Resource name | Resource Name |
| Resource ID | Service’s unique resource ID |
| Constructor | User who created the service |
| Creation date and time | Service creation date and time |
| Editor | User who modified the service |
| Modification date | Date and time of service modification |
| Service Information | Created service details
|
Connected resource
On the vDevice List page, you can view the resources allocated to the selected resource.
| Category | Detailed description |
|---|---|
| List of connected resources | Display detailed information and status of resources allocated to the created service
|
Tag
On the vDevice list page, you can view the tag information of the selected resource and add, modify, or delete it.
| Category | Detailed description |
|---|---|
| Tag list | Tag list
|
Job History
You can view the operation history of the selected resource on the vDevice list page.
| Category | Detailed description |
|---|---|
| Task History List | Resource Change History
|
Terminate vDevice
To terminate the vDevice, follow the steps below.
- Click the All Services > Networking > Cloud LAN-Data Center menu. 1. Navigate to the Cloud LAN-Data Center Service Home page.
- On the Cloud LAN-Data Center Service Home page, click the vDevice menu. 2. Navigate to the vDevice List page.
- On the vDevice List page, click the resource to view its detailed information. 4. Navigate to the vDevice Details page.
- On the vDevice Detail page, click the vDevice Delete button.
- After termination is complete, check whether the resource has been deleted from the vDevice list.
2.2 - Interface
Users can create the Interface service by entering its required information and selecting detailed options through the Samsung Cloud Platform Console.
Create Interface
You can create and use an Interface service in the Samsung Cloud Platform Console.
- To request an Interface, a Cloud LAN Network and vDevice must be created. Before requesting an Interface, verify the Cloud LAN Network and vDevice information.
- Interface is a function that assigns a physical port to a pre‑created vDevice. Interface can only be requested for vRouter and vSwitch.
- When a vFirewall is created, interfaces are automatically generated to match the quantity specified for each spec.
To request the creation of an Interface service, follow these steps.
Click the All Services > Networking > Cloud LAN-Data Center menu. You will be taken to the Cloud LAN-Data Center Service Home page.
From the Cloud LAN-Data Center Service Home page, click the Create Interface button. You will be taken to the Create Interface page.
On the Interface creation page, enter the relevant information in the service information input area.
- Enter or select the required information in the service information input area.
Category Required statusDetailed description Cloud LAN Network name Required Select the Cloud LAN Network to assign to the Interface vDevice Type Required Select the type of vDevice to use - vRouter: virtual resource for connecting external lines (L2, L3)
- vSwitch: virtual resource for connecting customer-dedicated hardware and providing VLANs
vDevice Type Details Required Select detailed information for vDevice type - vDevice Name: Select a vDevice
- Interface Type: Select the type of Interface to use
- Interface Name: Enter the Interface name
- You can add up to 5 Interface entries; press the (+) button to add an entry, and the (x) button to delete an entry
- Interface Redundancy: Set whether Interface redundancy is enabled; selecting redundancy incurs charges for two ports
- Contract Period: Select the desired contract period
Table. Interface service information input fields - In the Additional Information Input area, enter or select the required information.
Category Required statusDetailed description Tag Select Add Tag - Up to 50 can be added per resource
- Add Tag button after clicking, input or select Key, Value values
Table. Interface additional information input fields
- Enter or select the required information in the service information input area.
Summary Check the detailed information and estimated billing amount generated in the panel, and click the Complete button.
- Once creation is complete, check the created resources on the Interface List page.
Check interface detailed information
The Interface service allows you to view and edit the list of connected resources and detailed information. Interface Details page consists of Detailed Information, Tags, Activity Log tabs.
To view detailed information about the Interface, follow these steps.
- Click the All Services > Networking > Cloud LAN-Data Center menu. Go to the Cloud LAN-Data Center Service Home page.
- On the Cloud LAN-Data Center Service Home page, click the Interface menu. You will be taken to the Interface List page.
- Click the resource to view detailed information on the Interface List page. You will be taken to the Interface Details page.
- Interface Details page displays status information and additional feature information, and consists of Details, Tags, Activity Log tabs.
Category Detailed description Service status Service status display - Creating: In progress
- Active: Running
- Deleting: In progress
- Failed: Creation/Deletion failed
Delete Interface Delete Service button Table. Interface status information and additional functions
- Interface Details page displays status information and additional feature information, and consists of Details, Tags, Activity Log tabs.
Detailed Information
Interface list page allows you to view detailed information of the selected resource and edit the information if needed.
| Category | Detailed description |
|---|---|
| service | Service name |
| Resource Type | Resource Type |
| SRN | Unique resource ID in Samsung Cloud Platform |
| Resource name | Resource Name |
| Resource ID | Service’s unique resource ID |
| constructor | User who created the service |
| Creation Timestamp | Service creation timestamp |
| Editor | User who modified the service |
| Modification date and time | Date and time the service was modified |
| vDevice Type | vDevice Type information |
| vDevice name | vDevice name |
| Interface Type | Interface Type information |
| Port redundancy | Whether to use port redundancy |
| Contract period | Selected contract term |
tag
On the Interface list page, you can view the tag information of the selected resource and add, modify, or delete it.
| Category | Detailed description |
|---|---|
| Tag list | Tag list
|
Job History
On the Interface list page, you can view the operation history of the selected resource.
| Category | Detailed description |
|---|---|
| Task History List | Resource Change History
|
Terminate Interface
To cancel the Interface, follow these steps.
- Click the All Services > Networking > Cloud LAN-Data Center menu. You will be taken to the Cloud LAN-Data Center Service Home page.
- On the Cloud LAN-Data Center Service Home page, click the Interface menu. You will be taken to the Interface List page.
- On the Interface List page, click the resource for which you want to view detailed information. You will be taken to the Interface Details page.
- On the Interface Details page, click the Delete Interface button.
- When the termination is complete, check whether the resource has been deleted in the Interface list.
2.3 - vCable
Users can create the service by entering the required information for the vCable service and selecting detailed options through the Samsung Cloud Platform Console.
Create vCable
You can create and use the vCable service in the Samsung Cloud Platform Console.
- To request a vCable, a Cloud LAN Network and a vDevice must be created. Before requesting a vCable, verify the Cloud LAN Network and vDevice information.
- Only vCable configurations between vDevices created in the same Cloud LAN Network are possible.
To request the creation of a vCable service, follow these steps.
- Click the All Services > Networking > Cloud LAN-Data Center menu. You will be taken to the Cloud LAN-Data Center Service Home page.
- On the Cloud LAN-Data Center Service Home page, click the Create vCable button. You will be taken to the Create vCable page.
- On the vCable Creation page, enter the relevant information in the service information input area.
- Enter or select the required information in the service information input area.
Category Required statusDetailed description Cloud LAN Network name Required Select the Cloud LAN Network to assign the vCable. vCable Type Required Select the type of vCable to create - Static: Provides a 1:1 connection between vDevices; when configuring vDevice A and vDevice B, select different virtual resources
- vCore: Provides Multi Peering between vDevices, connecting multiple vDevices to enable connections between vDevices
vCable Type > Details Required Enter detailed information according to vCable Type - vCable Name: Enter the name of the vCable to create
- vDevice A: Select vDevice A
- vDevice B: Select vDevice B
- Select vDevice A and B sequentially; if a vFirewall Interface is selected from the A list, it will not appear in the B list
- When the vCable Type is Static, vCore cannot be selected on vDevice A or vDevice B
- When the vCable Type is vCore, vCore can be selected only on vDevice A
- A vDevice can be connected to only one vCable
- A vFirewall can connect a vCable using a vFirewall Interface
Table. vCable Service Information Input Items - In the Additional Information Input area, enter or select the required information.
Category required or notDetailed description tag Select Add Tag - Up to 50 can be added per resource
- Add Tag After clicking the Add Tag button, enter or select Key, Value values
Table. vCable additional information input fields
- Enter or select the required information in the service information input area.
- Summary Check the detailed information and estimated billing amount generated in the panel, and click the Complete button.
- When creation is complete, check the created resources on the vCable List page.
Check vCable detailed information
The vCable service allows you to view and edit the list of connected resources and detailed information. vCable Details page consists of Details, Tags, Activity Log tabs.
To view detailed vCable information, follow these steps.
- Click the All Services > Networking > Cloud LAN-Data Center menu. You will be taken to the Cloud LAN-Data Center Service Home page.
- On the Cloud LAN-Data Center Service Home page, click the vCable menu. You will be taken to the vCable List page.
- Click the resource to view detailed information on the vCable List page. You will be taken to the vCable Detail page.
- vCable Details page displays status information and additional feature information, and consists of Details, Tags, Work History tabs.
Category Detailed description Service status Service status display - Creating: Creating
- Active: Running
- Deleting: Deleting
- Failed: Creation/Deletion failed
Delete vCable Delete Service button Table. vCable status information and additional functions
- vCable Details page displays status information and additional feature information, and consists of Details, Tags, Work History tabs.
Detailed Information
On the vCable List page, you can view detailed information of the selected resource and edit the information if needed.
| Category | Detailed description |
|---|---|
| service | Service name |
| Resource Type | Resource Type |
| SRN | Unique resource ID in Samsung Cloud Platform |
| Resource name | Resource name |
| Resource ID | Service’s unique resource ID |
| constructor | User who created the service |
| Creation date and time | Service creation timestamp |
| Editor | User who modified the service |
| Modification date and time | Date and time the service was modified |
| vDevice Type | vDevice Type categories |
| vDevice A name | vDevice A name |
| vDevice B name | vDevice B name |
tag
On the vCable List page, you can view the tag information of the selected resource and add, modify, or delete it.
| Category | Detailed description |
|---|---|
| Tag list | Tag list
|
Job History
You can view the operation history of the selected resource on the vCable List page.
| Category | Detailed description |
|---|---|
| Task History List | Resource Change History
|
Terminate vCable
To cancel vCable, follow the steps below.
- Click the All Services > Networking > Cloud LAN-Data Center menu. You will be taken to the Cloud LAN-Data Center Service Home page.
- On the Cloud LAN-Data Center Service Home page, click the vCable menu. You will be taken to the vCable List page.
- On the vCable List page, click the resource to view its details. You will be taken to the vCable Details page.
- On the vCable Details page, click the Delete vCable button.
- After termination is complete, verify that the resource has been deleted from the vCable list.
2.4 - vEdge
Users can apply for the service by entering the required information for using the vEdge service through the Samsung Cloud Platform Console.
Create vEdge
You can request and use the vEdge service from the Samsung Cloud Platform Console.
To request the creation of a vEdge service, follow these steps.
- Click the All Services > Networking > Cloud LAN-Data Center menu. You will be taken to the Cloud LAN-Data Center Service Home page.
- On the Service Home page, click the vEdge Service Request button. You will be taken to the Support Center > Service Request List > Service Request page.
- On the Service Request page, enter or select the required information in the mandatory input fields.
- In the task category, select vEdge creation.
Input field Detailed description Title Enter the title of the service request - Example: vEdge Service Creation Request
Region Select the location of the Samsung Cloud Platform - Automatically filled with the region corresponding to the Account
service Select the service category and service. If you click the vEdge service request button, it is entered automatically - Service Category: Networking
- Service: vEdge
Task classification Select the type you want to request - Create vEdge: select when requesting a new service
content Guidance on the service application process and reference information Attachment If you have a file you want to share via the repository, proceed with the upload - You can attach up to 5 files, each no larger than 5 MB
- Only files with the following extensions are allowed: doc, docx, xls, xlsx, ppt, ppts, hwp, txt, pdf, jpg, jpeg, png, gif, tif
Table. vEdge Service Creation Request Items
- In the task category, select vEdge creation.
- Check the required information entered on the Service Request page, and click the Request button.
- When the request is completed, check the submitted details on the Support Center > Service Request List page.
Check vEdge application details
You can view the vEdge service subscription and cancellation history in the Samsung Cloud Platform Console.
To check the vEdge service application details, follow these steps.
- Click the All Services > Management > Support Center menu. Go to the Support Center > Service Home page.
- On the Support Center Service Home page, click the Service Request menu. You will be taken to the Service Request List page.
- On the Service Request List page, click the Title of the service request you submitted. You will be taken to the Service Request Details page.
- On the Service Request Details page, view the request status and information.
Terminate vEdge
To request cancellation of the vEdge service, follow the steps below.
Click the All Services > Management > Support Center menu. You will be taken to the Support Center > Service Home page.
On the Support Center Service Home page, click the Service Request button. You will be taken to the Service Request List page.
On the Service Request List page, click the Service Request button. You will be taken to the Service Request page.
Service Request page: enter or select the required information in the mandatory input fields.
- Select vEdge termination in the task category.
Input field Detailed description Title Enter the title of the service request - Example: vEdge Service Termination Request
Region Select the location of Samsung Cloud Platform - Automatically filled with the region corresponding to the Account
Service Select service category and service - Service Category: Networking
- Service: vEdge
Task classification Select the type of request you want to make - vEdge termination: select if you are terminating the service
content Guide to the service application process and reference information Attachment If you have additional files you want to share, proceed with the upload - You can attach up to 5 files, each within 5 MB
- Only doc, docx, xls, xlsx, ppt, ppts, hwp, txt, pdf, jpg, jpeg, png, gif, tif files can be attached
Table. vEdge Service Termination Request Items
- Select vEdge termination in the task category.
Check the required information entered on the Service Request page, and click the Request button.
- When the request is completed, check the submitted details on the Support Center > Service Request List page.
- Service termination takes 5–7 business days, including the cancellation request date.
3 - Release Note
Cloud LAN-Data Center
- We have launched the Cloud LAN-Data Center service in the Enterprise offering.
- The services offered in specific Samsung regions (kr-west1/kr-east1) have changed.
- The vTAP option has been added to the Cloud LAN - Data Center service in Samsung’s offering.
- Samsung Cloud Platform Common Feature Change
- Account, IAM, Service Home, tags, and other common CX changes have been applied.
- We have launched the Cloud LAN‑Data Center service, which provides connections between various networks through virtual network configurations within the data center.