This is the multi-page printable view of this section. Click here to print.
Firewall
- 1: Overview
- 2: How-to guides
- 2.1: Firewall Logging
- 2.2: Migration Rules
- 3: API Reference
- 4: CLI Reference
- 5: Release Note
1 - Overview
Service Overview
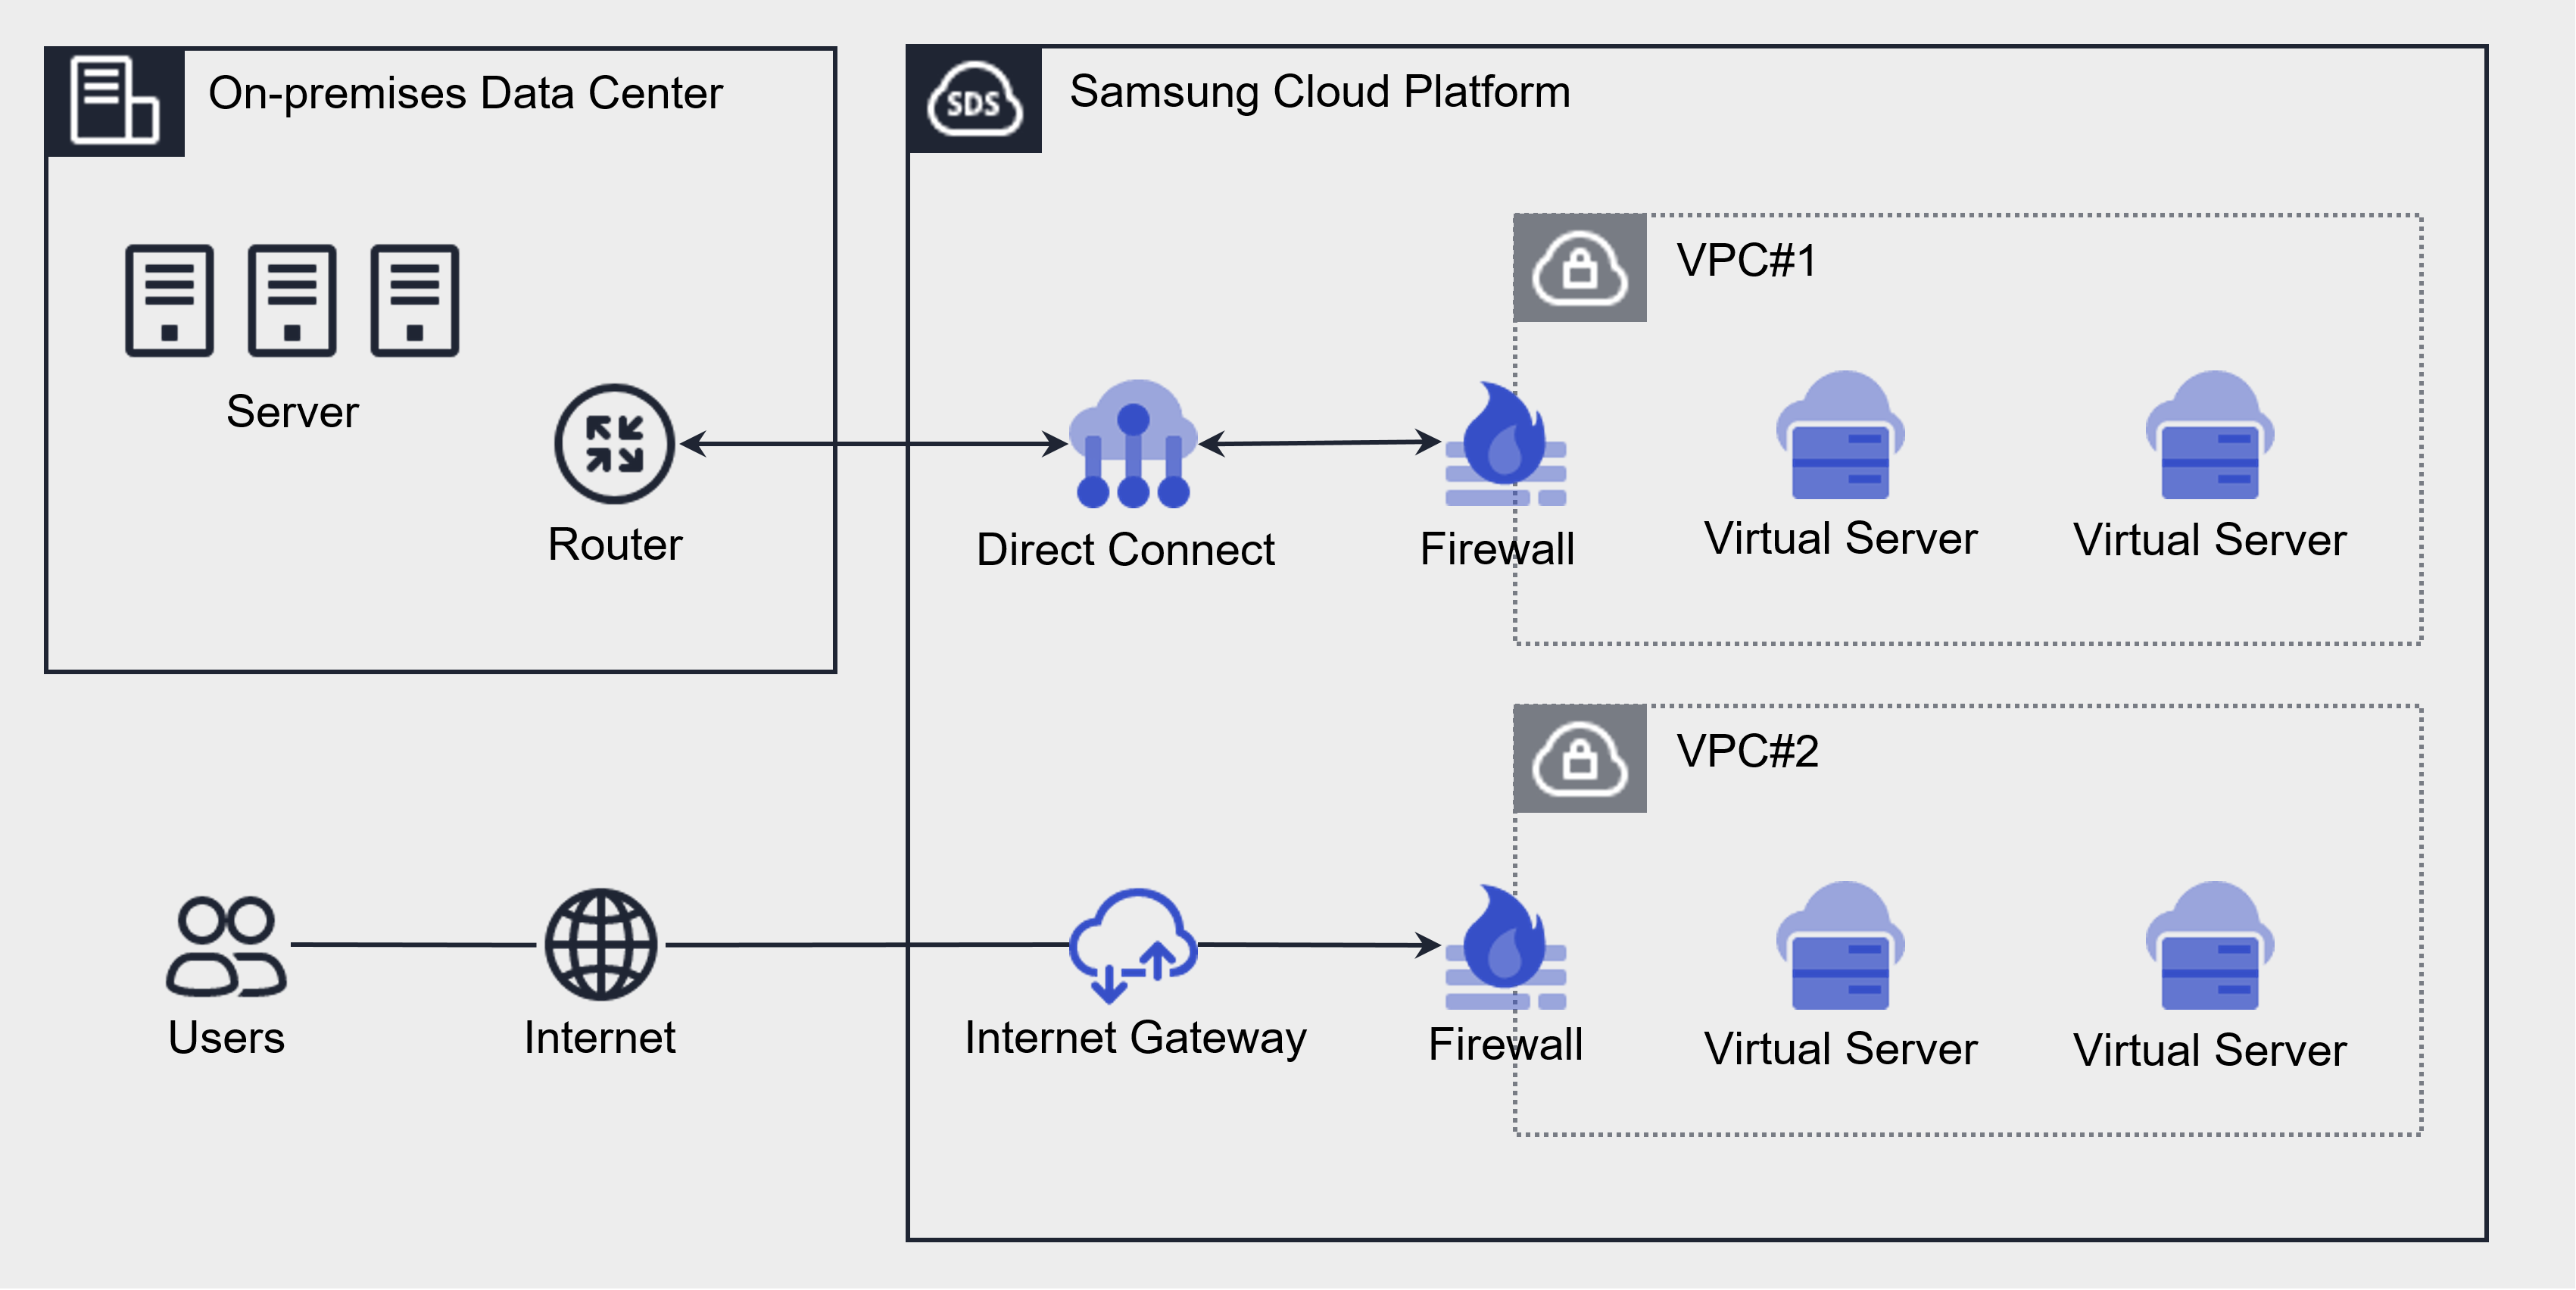
A firewall is a virtual logical firewall service that controls traffic occurring in the VPC and Load Balancer of Samsung Cloud Platform.
The resources that can be applied in the firewall are Internet Gateway, Direct Connect, and Load Balancer, and you can set rules for communication between the VPC and the Internet, and between the VPC and the customer network, enabling secure network management.
When a firewall is first created, it blocks all inbound and outbound traffic according to the default rule (Any Deny).
Users can specify an IP address, port, and protocol to create inbound/outbound rules, and only traffic permitted by the created rules can communicate.
Component
The components that make up a firewall are as follows.
| Component | Detailed description |
|---|---|
| Applicable target | Resources to which the firewall will be applied
|
| Firewall size | Firewall is offered in five sizes according to rule quota
|
| Firewall rule |
|
Constraints
The Firewall of Samsung Cloud Platform has a rule quota (limit) that can be created per size. When creating a Firewall, it is created by default as Extra Small, and you can change the Firewall size on the Firewall Details page of the Samsung Cloud Platform Console.
| Size | Rule quota | Detailed description |
|---|---|---|
| Extra Small | 5 | Maximum number of rules that can be created: 5 |
| Small | 100 items | Maximum number of rules that can be generated: 100 |
| Medium | 200 | Maximum number of rules that can be generated: 200 |
| Large | 500 | Maximum number of rules that can be generated: 500 |
| Extra Large | 1,000 items | Maximum number of rules that can be generated: 1,000 |
Preceding Service
This is a list of services that must be pre-configured before creating a Firewall service. Please refer to the user guide (reference link) provided below for details and prepare in advance.
| Service Category | Service | Detailed description |
|---|---|---|
| Networking | VPC | A service that provides an isolated virtual network in a cloud environment |
| Networking | Direct Connect | A service that quickly and securely connects the customer’s network with the Samsung Cloud Platform network. |
| Networking | Load Balancer | A service that distributes traffic across multiple servers to maintain stable service. |
2 - How-to guides
Users can create the service by entering the required information for the Firewall service and selecting detailed options through the Samsung Cloud Platform Console.
Create Firewall
You can create and use the Firewall service from the Samsung Cloud Platform Console.
The Firewall service is created only after it is enabled in the prerequisite Networking service. The enabled Firewall can be viewed in the Firewall list.
- A firewall cannot be created independently, unlike other services in the Samsung Cloud Platform Console.
To configure the firewall, follow the steps below.
All Services > Networking > Firewall click the menu. 1. Navigate to the Service Home page of the Firewall.
On the Service Home page, click the prerequisite service to create. 2. Navigate to the service creation page.
- VPC Creation: Enable the Internet Gateway and the Transit Gateway Firewall of the VPC service.
- When creating a VPC Internet Gateway service, set the Firewall Use item to Use. * For detailed information, please refer to Internet Gateway 생성하기.
- Create the Transit Gateway service for the VPC and request the Uplink Firewall integration service. * For detailed instructions, please refer to Transit Gateway 생성하기.
- Direct Connet creation: When creating a Direct Connet service, set the Firewall usage item to Enable. * For detailed instructions, please refer to Direct Connect 생성하기.
- Load Balancer creation: When creating a Load Balancer service, set the Firewall usage option to Enabled. * For detailed instructions, see Load Balancer 생성하기.
- VPC Creation: Enable the Internet Gateway and the Transit Gateway Firewall of the VPC service.
After the prerequisite service creation is complete, verify that the corresponding Firewall resource appears in the Firewall list.
Check firewall detailed information
The Firewall service can view and edit the full resource list and detailed information in the resource management menu.
To view detailed information about the firewall, follow these steps.
- All Services > Networking > Firewall Click the menu. 1. Go to the Service Home page of the Firewall.
- On the Service Home page, click Firewall List. 2. Navigate to the Firewall list page.
- On the Firewall List page, you can view the information below.
Category Detailed description Firewall name Firewall pre-service type_Firewall automatically generated in the format Firewall classification Firewall pre-service type (Internet Gateway, Direct Connect, Load Balancer) Size User-selected Firewall size VPC name VPC name connected to the firewall Connection name Automatically generate in the format preceding service name_Firewall using Firewall Number of rules Number of rules used on this firewall Usage Whether the Firewall is used (enabled), not used (disabled) - If not used, the Any Allow rule is applied and no charges are incurred for the Firewall
Status Firewall status display - click the More button to set Enabled/Disabled
Table. Firewall resource list items
- On the Firewall List page, you can view the information below.
- On the Firewall List page, click the resource to view detailed information. 3. Go to the Firewall Details page.
- Firewall Details page displays status information and additional feature information, and consists of Details, Rules, Tags, Action History tabs.
Category Detailed description Service status Firewall 상태 표시 - Creating: Creating
- Active: Running/All firewalls operating normally
- Editing: Editing
- Deploying: Deployment completed
- Deleting: Deleting
- Error: Error occurred/Errors occurred on one or more firewalls
Table. Firewall status information
- Firewall Details page displays status information and additional feature information, and consists of Details, Rules, Tags, Action History tabs.
Detailed Information
Firewall list page lets you view detailed information of the selected resource and edit the information if needed.
| Category | Detailed description |
|---|---|
| Service | Service name |
| Resource Type | Resource Type |
| SRN | Unique resource ID in Samsung Cloud Platform |
| Resource Name | Resource Name |
| Resource ID | Service’s unique resource ID |
| Constructor | User who created the service |
| Creation date and time | Service creation date and time |
| Modifier | User who edited the service information |
| Modification date and time | Date and time the service information was modified |
| Firewall name | Automatically generated using the resource name_Firewall_connection name |
| Firewall ID | Service’s unique resource ID |
| Firewall classification | Firewall pre-service type (Internet Gateway, Direct Connect, Load Balancer) |
| Size | The Firewall size selected by the user
|
| Firewall rule count/quota | The rule quota and the number of rules currently in use for the firewall |
| VPC name | VPC name connected to the firewall
|
| VPC ID | VPC ID connected to the Firewall |
| Connection name | Automatically generated as {Firewall 선행 서비스명_Firewall}
|
| Log saving status | Firewall log storage option
|
Rule
Firewall List page lets you view the rule list of the selected resource and add, modify, or delete rules.
| Category | Detailed description |
|---|---|
| Rule synchronization status | Availability Zone Firewall rule synchronization status
|
| Excel download | Download the currently entered rule list as an Excel (*.xlsx) file |
| Detailed Search | Search for rules that match user-defined conditions
|
| Rule modification | Edit and delete rules displayed in the rule list
|
| Add rule | Add new Firewall rule possible
|
| order | Display rule order, and apply top-down according to the rule order. |
| Rule ID | Unique ID value for the rule
|
| Origin address | The origin address added to the rule |
| Destination address | Destination address added to the rule, displayed as the IP address according to the entered rule |
| service | Protocol and destination port |
| Operation | Traffic Allow/Deny classification based on rules
|
| Direction | Firewall traffic direction criteria
|
| Activation status | Indicates whether the rule is active; if it is inactive, the rule does not operate. |
tag
On the Firewall List page, you can view the tag information of the selected resource, and you can add, modify, or delete it.
| Category | Detailed description |
|---|---|
| Tag list | Tag list
|
On the Firewall list page, you can view the operation history of the selected resource.
| Category | Detailed description |
|---|---|
| Task History List | Resource Change History
|
Firewall rule management
You can add, modify, or delete firewall rules.
- You can add or modify rules only when the firewall status is Active and the rule synchronization status is In Sync.
- If you lack permission to view the status in the preceding service, you cannot add a rule.
- The firewall periodically caches user‑registered Domain rules and stores the IP information for a set period.
- If the cached result of the registered domain rule does not match the user’s IP, communication may be restricted.
Create rule
In the Rules tab, you can directly enter and add Firewall rule information.
Follow these steps to add a firewall rule.
- Click the All Services > Networking > Firewall menu. 1. Go to the Service Home page of the Firewall.
- On the Service Home page, click Firewall List. 2. Navigate to the Firewall List page.
- On the Firewall List page, click the resource to add a rule. 3. Go to the Firewall Details page.
- On the Firewall Details page, click the Rules tab. 4. Go to the Rules tab page.
- Click the Add Rule button on the Rules tab. 5. Navigate to the Add Rule page.
- Enter the required information on the Direct Input tab page.
- After reviewing the added rules, click the Complete button.
| Category | Required status | Detailed description |
|---|---|---|
| Rule location | Required | Specify the location of the rule to be created |
| Rule ID to copy | Selection | Enter the Firewall rule ID to copy and click the Search button to select |
| Origin address | Required | Source addresses to add to the rule
|
| Destination address | Required | Select the type of destination address to add to the rule
|
| type | Required | Select protocol type to apply the rule
|
| type > protocol | Required | Select detailed protocol for the type
|
| Operation | Required | Traffic allow/block classification by rule
|
| Direction | Required | Firewall traffic direction criteria
|
| Explanation | Selection | Additional description written by the user |
| Added rules | - | Check list of entered rules
|
Create rules in bulk
To add multiple Firewall rules at once, follow these steps.
- All Services > Networking > Firewall Click the menu. 1. Navigate to the Firewall’s Service Home page.
- On the Service Home page, click Firewall List. 2. Go to the Firewall List page.
- On the Firewall List page, click the resource to add a rule. 3. Go to the Firewall Details page.
- On the Firewall Details page, click the Rules tab. 4. Go to the Rules tab page.
- Click the Rule tab’s Add Rule button. 5. Add Rule go to the page.
- On the Add Rule page, click the Bulk Rule Input tab.
- Select Rule location. 7. If no location is selected, it is added after the last rule.
- From Select File, click the Download Form button. 8. The rule batch input Excel file will be downloaded.
- Enter the rule information into the batch rule input Excel file, then save it.
- From File Selection, click Attach File to attach the Excel file you created, and click Add.
- You cannot upload the file if the attached Excel file format differs from the registration form or if the file is encrypted.
- You can upload up to 100 batch registration rules at a time. * Upload is not possible when the maximum number of registered rules is exceeded.
- If the configured maximum number of rules for the firewall size is exceeded, the file cannot be uploaded.
- Added rule Check that the rule you entered appears in the list and adjust its order.
- After reviewing the added rules, click the Complete button.
Modify rules
You can select a firewall rule to view and edit its information.
To modify firewall rules, follow the steps below.
All Services > Networking > Firewall Click the menu. 1. Go to the Service Home page of the Firewall.
On the Service Home page, click Firewall List. 2. Go to the Firewall list page.
On the Firewall List page, click the resource to edit the rule. 3. Go to the Firewall Details page.
On the Firewall Details page, click the Rules tab. 4. Go to the Rules tab page.
In the Rule tab, click the Edit Rule button. 5. Edit Rule Go to the page.
- On the rule edit page, you can configure the items below.
- Enable: Activates the selected rule.
- Disable: Disables the selected rule. * Disabled rules are not applied to preceding services.
- Delete: Deletes the selected rule. * When you click Delete, the changes will be shown with a Scheduled for Deletion status.
- Cancel Deletion: If the rule is in a pending deletion state, you can cancel the rule deletion.
- On the rule edit page, you can configure the items below.
Rule Edit page, click the Edit button for the item you want to modify. 6. Edit Rule The popup window opens.
Edit Rule Enter the item you want to edit in the popup window and click the Confirm button.
Category Required status Detailed description order - Order of rules - The order can be changed by clicking Move Up/Move Down in the added rules list
Rule ID - Cannot be changed to a unique ID value for the rule Origin address Required Source addresses registered in the rule - CIDR (IP/Subnet Mask) format, using commas (,) and ranges (-), can be entered up to 128 addresses at once for modification
Destination address Required Destination addresses to add to the rule - can be entered and modified at once using CIDR (IP/Subnet Mask) format, commas (,), and ranges (-) for up to 128 addresses
type Required Set the protocol type based on the selected destination address entry Operation Required Change the Allow/Deny traffic classification due to rules - Allow: Allow traffic when it matches the rule
- Deny: Block traffic when it matches the rule
Direction Required Ability to change the direction of traffic for Firewall criteria registered in the rule - Inbound: external → internal
- Outbound: internal → external
Activation status Required Whether the rule is active; if it is inactive, the rule does not function. Rule location Required Rule location setting Explanation Selection Additional description written by the user Table. Detailed items for modifying firewall rulesAfter confirming the revised rules, click the Complete button.
Delete rule
To delete a firewall rule, follow these steps.
- All Services > Networking > Firewall menu, click it. 1. Navigate to the Firewall’s Service Home page.
- On the Service Home page, click Firewall List. 2. Go to the Firewall List page.
- On the Firewall List page, click the resource to edit the rule. 3. Go to the Firewall Details page.
- On the Firewall Details page, click the Rules tab. 4. Go to the Rules tab page.
- On the Rule tab, click the Edit Rule button. 5. Go to the Edit Rule page.
- On the Rule Edit page, select the rule to delete and click the Delete button.
- Once the deletion request is completed, the item in the change log will be marked as Scheduled for Deletion.
- Click Cancel Deletion to cancel the rule deletion.
- On the Edit Rule page, click the Complete button.
Check rule synchronization history
In the Rules tab, you can check the synchronization status of firewall rules and view detailed information.
To view the synchronization history of firewall rules, follow these steps.
- All Services > Networking > Firewall Click the menu. 1. Navigate to the Firewall’s Service Home page.
- Click Firewall List on the Service Home page. 2. Go to the Firewall list page.
- On the Firewall List page, click the resource to add a rule. 3. Navigate to the Firewall Details page.
- On the Firewall Details page, click the Rules tab. 4. Go to the Rules tab page.
- In the Rules tab, click the Previous Sync History button. 5. Previous sync history popup window opens.
- Previous sync history In the popup, view the sync history and click the Confirm button.
- Resynchronization: If one or more rule states are Partial Fail/Pending, re-run the synchronization.
- Resynchronization cannot be performed when one or more items are in a Fail state.
- Delete Fail request: If one or more rule statuses are Fail, you can delete the corresponding entries.
- Status information: You can check the synchronization status of firewall rules.
- Success: Rule synchronization succeeded on all devices
- Partial Fail: Failed after attempting synchronization on one or more devices
- Pending: Synchronization stopped after Partial Fail for all devices
- Fail: All devices failed after attempting synchronization simultaneously
Managing Firewall Resources
You can modify the size of the firewall and change the log usage settings.
Modify firewall size
To modify the Firewall size, follow these steps.
- Click the All Services > Networking > Firewall menu. 1. Navigate to the Service Home page of the Firewall.
- On the Service Home page, click Firewall List. 2. Go to the Firewall list page.
- Firewall List page, click the resource you want to edit. 3. Go to the Firewall Details page.
- On the Firewall Details page, click the size edit icon. 4. Go to the Resize popup.
- Resize In the popup window, select the size to modify, then click the Confirm button.
The firewall size is provided as the default Extra Small (rule quota 5), and you can change the firewall size to add firewall rules for use. For more details, see Firewall 제약 사항.
- Firewall fees are charged based on the size of the Firewall service and traffic throughput.
Using Log Storage
To store firewall logs, first create a bucket in Object Storage for the logs, and then configure that bucket in the log repository of Firewall Logging. Then, when you enable log storage in the Firewall details view, the Firewall logs are saved to an Object Storage bucket.
- The log storage settings can be checked in Firewall Logging. * For detailed information, see Firewall Logging.
- If you configure a log repository, Object Storage charges for log storage will be billed.
To use Firewall log storage, follow these steps.
- All Services > Networking > Firewall menu, click it. 1. Navigate to the Service Home page.
- On the Service Home page, click the Firewall menu. 2. Go to the Firewall list page.
- On the Firewall List page, click the resource (Firewall) to enable log storage. 3. Go to the Firewall Details page.
- On the Firewall Details page, click the Edit icon for Log Save Setting. 4. Modify log save setting Navigate to the popup window.
- Modify Log Saving Option In the popup window, select Use for the log repository, and click the Confirm button.
Disable Log Saving
To set Firewall log storage to disabled, follow these steps.
- Click the All Services > Networking > Firewall menu. 1. Navigate to the Service Home page.
- On the Service Home page, click the Firewall menu. 2. Go to the Firewall List page.
- Firewall List page, click the resource (Firewall) for which you want to disable log storage. 3. Go to the Firewall Details page.
- Modify Log Save Setting Click the button. 4. Modify log save setting Navigate to the popup window.
- Modify Log Saving Option In the popup window, deselect Use for the log repository, and click the Confirm button.
- Notification Check the message in the popup window and click the Confirm button.
Disable firewall
The Firewall service cannot be deleted on its own. Deleting the preceding service will also delete the associated Firewall. When the preceding service is retained but the firewall is not used, you can set the firewall to an unused state on the firewall list page.
- If you change the firewall to an unused state, all previously registered rules will be deleted.
- You cannot delete the preceding service if there are associated firewall rules. * Delete the firewall rules before deleting the preceding service.
To disable the firewall, follow these steps.
- Click the All Services > Networking > Firewall menu. 1. Go to the Service Home page.
- On the Service Home page, click the Firewall menu. 2. Go to the Firewall list page.
- On the Firewall list page, click More > Unused for the resource you want to set as unused.
- After the usage status change is completed, check on the Firewall List page whether the resource’s usage status has been changed to unused.
2.1 - Firewall Logging
To store firewall logs, first create a bucket in Object Storage for log storage, and then configure that bucket in the Firewall Logging log repository. Then, on the Firewall Details page, if you configure log storage, the Firewall logs are stored in the Object Storage bucket.
To store firewall logs, configure according to the following steps.
- To store firewall logs, you can create a bucket in Object Storage or use an existing bucket. 1. To create a bucket, refer to Object Storage 생성하기.
- To configure the bucket for the Firewall Logging log repository, see Firewall Logging 로그 저장소 사용하기.
- To set the log storage option to Enabled in the Firewall detailed view, refer to Firewall 로그 저장 사용하기.
Firewall Logging Enable Log Storage
To set the Firewall’s log storage option to enabled, you must first configure the log repository in Firewall Logging.
To enable the log repository for Firewall Logging, follow these steps.
- All Services > Management > Network Logging > Firewall Logging Click the menu. 1. Go to the Firewall Logging List page.
- Firewall Logging List Click the drop-down list located at the top of the page and select Log storage bucket. 2. When you select a bucket, log storage path is displayed.
- After verifying the log storage bucket and log storage path, click the Apply button.
Firewall Logging List Query
When you set the Firewall Logging log storage bucket, you can view the Firewall Logging list.
To view the Firewall Logging list, follow these steps.
- Click the All Services > Management > Network Logging > Firewall Logging menu. 1. Go to the Firewall Logging List page.
- Firewall Logging List Check the resources in use and the log storage targets on the page.
Category Detailed description Resource ID Firewall ID Save target Firewall name Save registration date and time Firewall log repository registration timestamp Table. Firewall Logging list items
Firewall Logging Check detailed information
Refer to the information below to view the detailed contents of the saved log.
Stored log example: 2024-10-11T11:23:43,deny,0,17,4.1.1.100,45499,192.168.10.10,53
| Category | Explanation |
|---|---|
| 2024-10-11T11:23:43 | Log date and time (2024-10-11, 11:23:43) |
| deny | Action (deny / accept) |
| 0 | Firewall Rule ID (Policy ID) that generated the log |
| 17 | IP Protocol ID
|
| 4.1.1.100 | Source IP |
| 45499 | Origin Port |
| 192.168.10.10 | Destination IP |
| 53 | Destination Port |
Firewall Logging Set to Not Use Log Storage
You can set the log storage in Firewall Logging to unused.
To set the Firewall Logging log repository to unused, follow the steps below.
- All Services > Management > Network Logging > Firewall Logging Click the menu. 1. Navigate to the Firewall Logging List page.
- On the Firewall Logging List page, click the top Log Storage Settings button. 2. Log Repository Settings Navigate to the popup window.
- Log storage settings popup window, select Log storage bucket as Not used, and click the Confirm button.
- The log storage settings can be changed when there is no log destination.
- To change the log storage bucket, first change the setting to unused. * You can then reconfigure it to make changes.
2.2 - Migration Rules
Users can retrieve rules created in the V1 environment of the Samsung Cloud Platform Console and apply them to the V2 service.
Get firewall rules
You can import rules created in the V1 environment of the Samsung Cloud Platform Console and migrate them to the V2 service for use.
- When a firewall rule is transferred with the Migration feature, the Migration label is displayed before its name.
- If the firewall rule description exceeds 100 characters, part of the description will be omitted and appended.
- Rules that exceed the maximum quantity are not registered due to rule quantity limits based on the firewall size.
To retrieve the Firewall rules of V1, follow these steps.
Click the All Services > Networking > Firewall menu. 1. Navigate to the Firewall’s Service Home page.
On the Service Home page, click the Migration Rules menu. 2. Go to the Migration Rules page.
Select the rule information to retrieve from the Migration Rules page and click Done.
Category Required status Detailed description Original rule environment Required SCP v1 (Vmware) Auto-select Applicable target required Select the Firewall list within the account to apply the transferred rule Get rules Required Click the File Attachment button to upload the decrypted Firewall rule file - After decrypting and saving the rule file extracted from the original environment, upload it
List of Rules - View uploaded Firewall rule file details - Move up: Move the selected rule up in the list
- Move down: Move the selected rule down in the list
- Delete: Delete the selected rule
- Edit: Edit the selected rule information; see 이관할 Firewall 규칙 수정하기 for details
Rule location Required Set the position of the selected firewall rule - After the last rule: Move the selected rule after the last rule
- Set before the specified rule / Set after the specified rule: Enter the rule ID to move the selected rule before/after the specified rule
Table. Migration Rules detailed itemsAfter the firewall rule transfer request is completed, verify that the transfer item has been added to the firewall list.
Modify the Firewall rule to be transferred
You can edit each item when retrieving rules created in the V1 environment of the Samsung Cloud Platform Console.
To modify the Firewall rules to be imported from V1, follow these steps.
All Services > Networking > Firewall menu, click it. 1. Go to the Service Home page of the Firewall.
On the Service Home page, click the Migration Rules menu. 2. Go to the Migration Rules page.
Click Attach File in the Import Rules section to upload the firewall rule file.
Click Edit on the rule item you want to modify in the rule list.
Category Required status Detailed description Origin address Required Source addresses to add to the rule - CIDR (IP/Subnet Mask) format, using commas (,), ranges (-) to input multiple addresses, up to a maximum of 128 at once
Destination address Required Select the type of destination address to add to the rule - IP: In CIDR(IP/Subnet Mask) format, you can enter multiple addresses at once using commas(,) and range(-), up to a maximum of 128
- Domain: In FQDN format, you can enter up to 128 full domain names at once using commas(,)
- The type items vary depending on the selected destination address format
type Required Select protocol type to apply the rule - Destination Port/Type Selection: Select protocol type
- Internet Protocol: Enter protocol number, up to 128 entries allowed
- All: Destination port/Type, protocol selected for the entire range, meaning all ports for all protocols
Type > Protocol Essential Select detailed protocol for the type - Choose the desired protocol among TCP, UDP, and ICMP; input fields vary depending on the selected protocol.
- When ICMP is selected in the protocol, ICMP Type can be set.
- Select a commonly used Type, such as Echo, from the values defined for ICMP Type.
- Click the Add button to add the input value.
- When TCP/UDP is selected in the protocol, you can choose allowed ports such as SSH, HTTP, TELNET.
- When entering manually, you can input values from 1 to 65535, and you can enter up to 128 entries at once using commas (,) or ranges (-).
- Click the Add button to add the input value.
- If Internet Protocol is selected in the type
Enter a protocol number within 1 to 254.
Operation Required Traffic allow/deny classification based on rules - Allow: Allow traffic when it matches the rule
- Deny: Block traffic when it matches the rule
Direction Required Firewall standard traffic direction - Inbound: external → internal
- Outbound: internal → external
Activation status Required Set whether the rule is enabled - If disabled is selected, the rule does not operate
Explanation Selection Additional description written by the user Table. Detailed items of the Firewall rule edit windowWhen the rule information edit is complete, click Confirm in the edit window.
Check the modified rule information and click Done.
3 - API Reference
4 - CLI Reference
5 - Release Note
Firewall
- For user convenience, a Migration Rules page has been added that allows you to import firewall rules created in the V1 environment and apply them to the V2 service.
- The method for entering and modifying/deleting firewall rules has been changed for user convenience. * When managing firewall rules, you can navigate to a separate page to perform the desired actions.
- Add firewall rule input method
- In the KR WEST and KR EAST regions, you can enter the destination address in FQDN (Fully Qualified Domain Name) format.
- Add firewall rule input method
- A feature to input IP protocols has been added.
- Add firewall functionality
- You can use Firewall in the Load Balancer service.
- Samsung Cloud Platform Common Feature Changes
- Account, IAM, Service Home, tags, and other common CX changes have been reflected.
- A feature to save firewall logs has been added.
- You can decide whether to store firewall logs and store the logs in Object Storage.
- Through the Firewall service, you can control inbound and outbound traffic in a VPC.
- The Firewall service has been released.