This is the multi-page printable view of this section. Click here to print.
Firewall
- 1: Overview
- 2: How-to guides
- 2.1: Firewall Logging
- 3: API Reference
- 4: CLI Reference
- 5: Release Note
1 - Overview
Service Overview
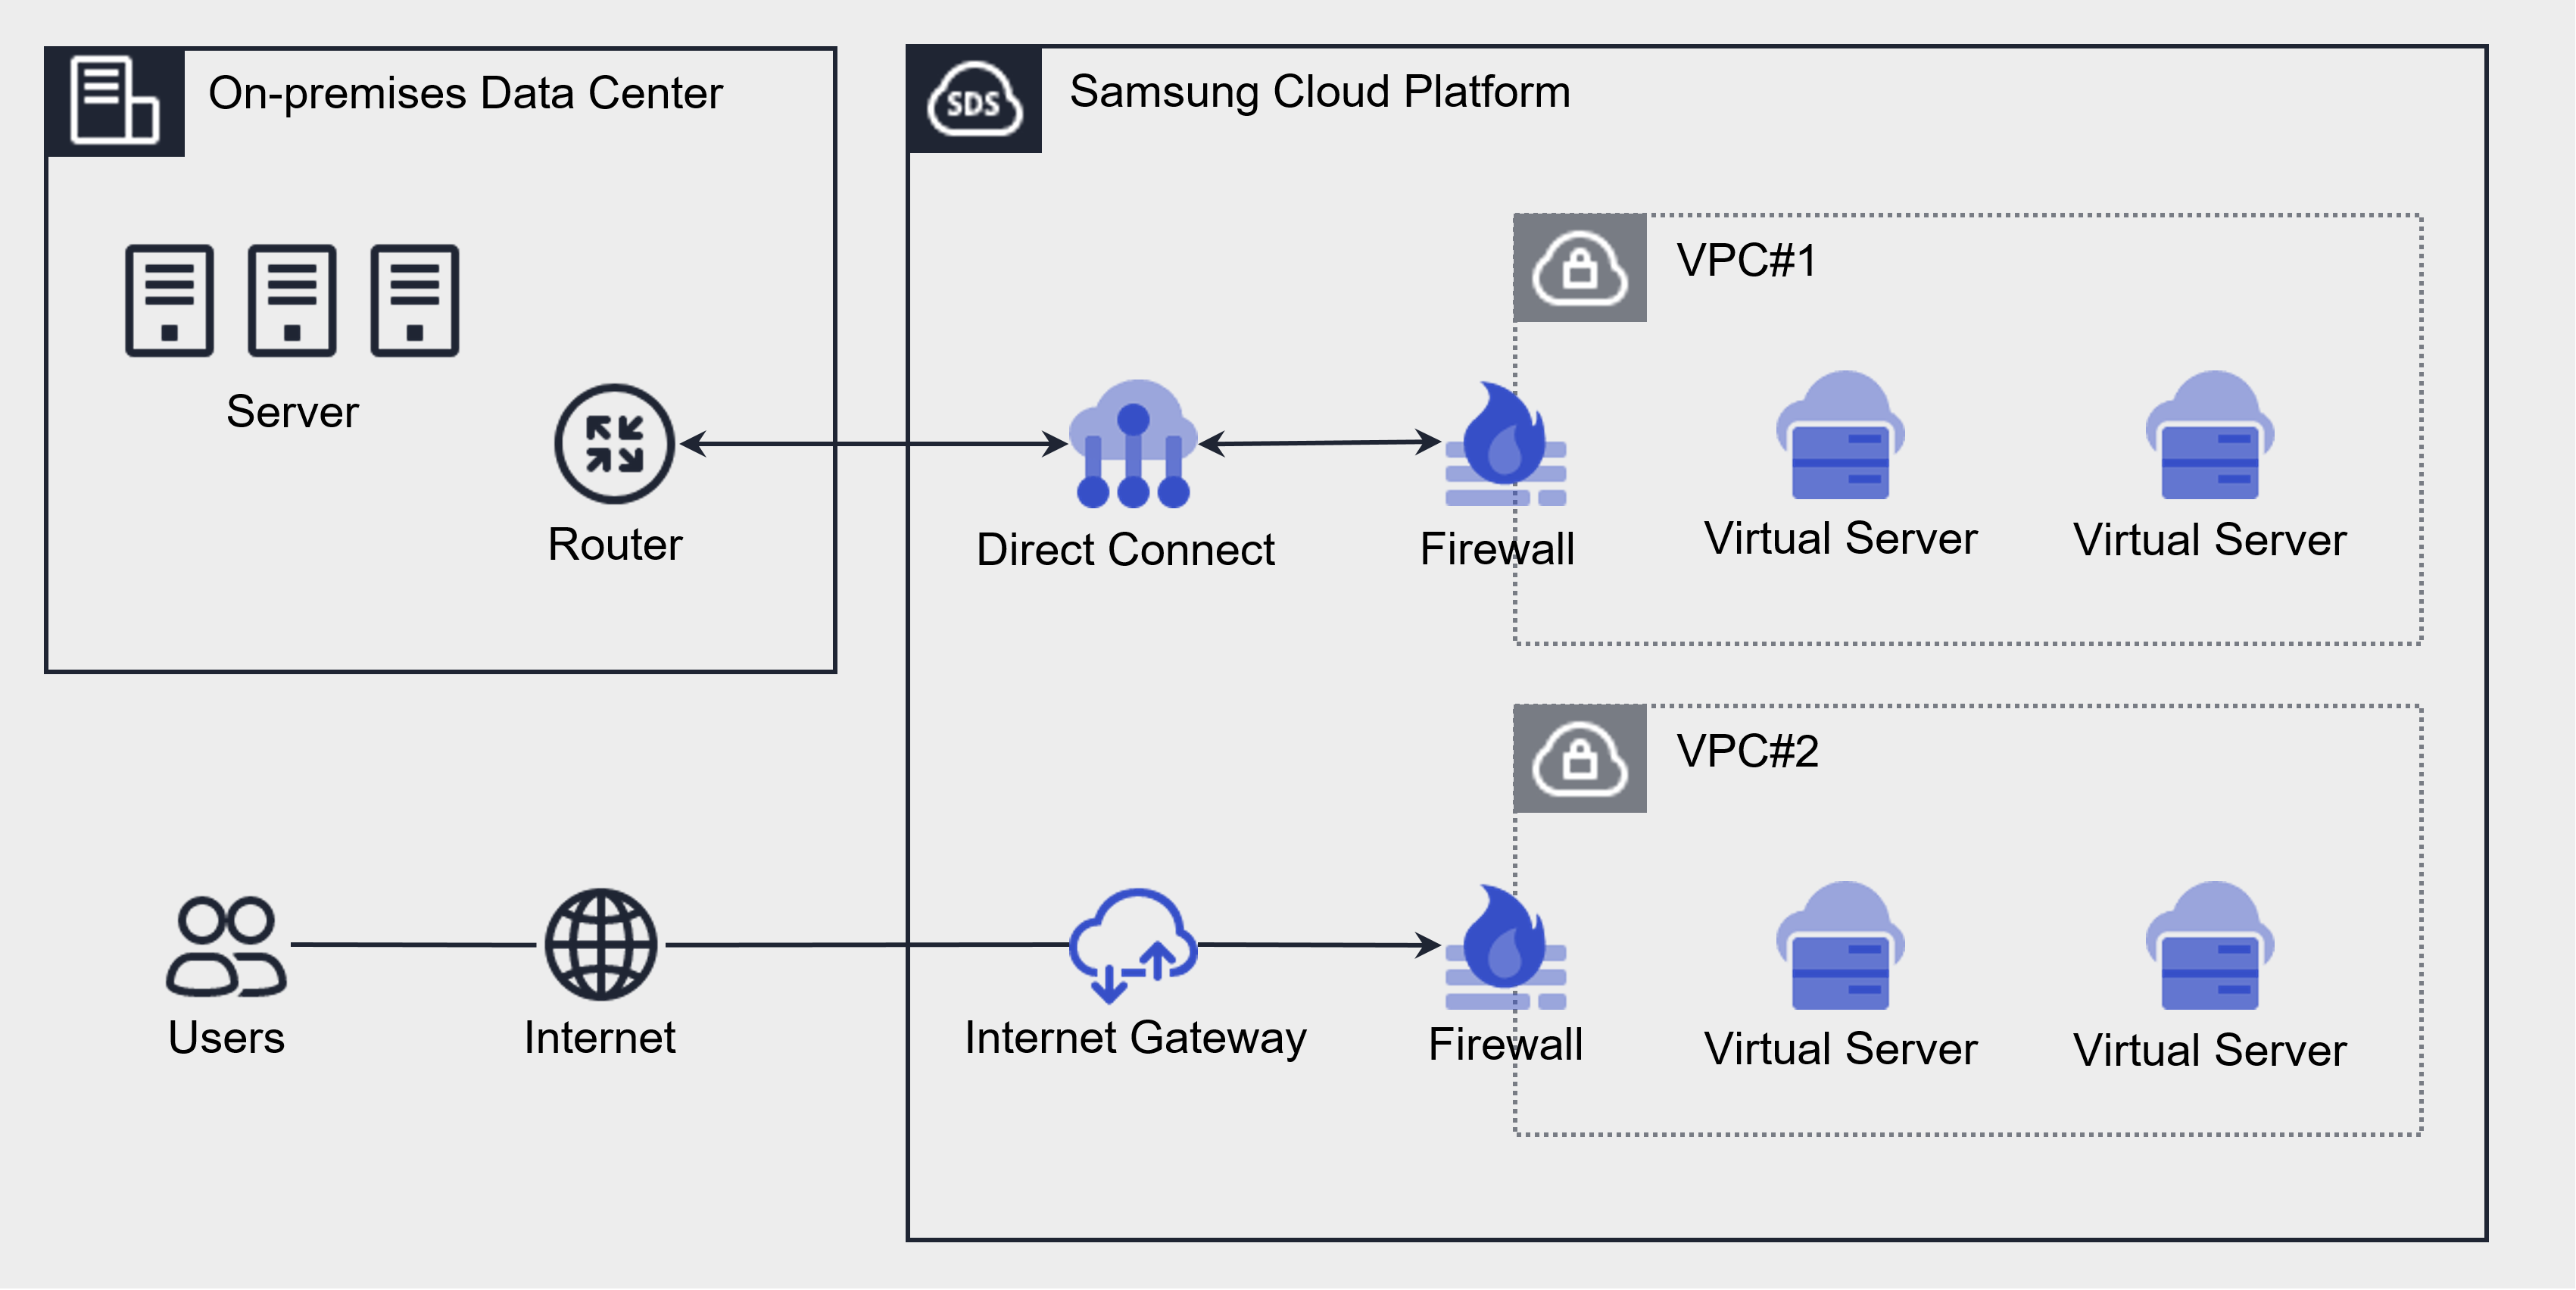
Firewall is a virtual logical firewall service that controls traffic occurring from VPC and Load Balancer of Samsung Cloud Platform.
The target resources that can be applied in the Firewall are Internet Gateway, Direct Connect, Load Balancer, and it is possible to manage a safe network by setting rules for communication between VPC and the internet, and VPC and customer network.
When the Firewall is first created, it blocks all Inbound/Outbound traffic according to the default rule (Any Deny).
Users can create Inbound/Outbound rules by specifying IP addresses, ports, and protocols, and only allowed traffic can communicate with the created rules.
Component
The components that make up the Firewall are as follows.
| Component | Detailed Description |
|---|---|
| Applied target | Firewall applied target resource
|
| Firewall size | Firewall is provided in 5 sizes according to the rule quota
|
| Firewall rules |
|
Constraints
The Samsung Cloud Platform’s Firewall has a quota (limit) for the maximum number of rules that can be created by size. When creating a Firewall, it is created with Extra Small by default, and the Firewall size can be changed on the Firewall details page in the Samsung Cloud Platform Console.
| Size | Rule Allocation | Detailed Description |
|---|---|---|
| Extra Small | 5 items | maximum number of rules that can be created 5 items |
| Small | 100 pieces | maximum number of rules that can be generated 100 pieces |
| Medium | 200 | maximum number of rules that can be generated 200 |
| Large | 500 pieces | maximum number of rules that can be generated 500 pieces |
| Extra Large | 1,000 items | maximum number of rules that can be created 1,000 items |
Preceding Service
This is a list of services that must be pre-configured before creating the Firewall service. Please refer to the user guide (reference link) below for more information and prepare in advance.
| Service Category | Service | Detailed Description |
|---|---|---|
| Networking | VPC | A service that provides an independent virtual network in a cloud environment |
| Networking | Direct Connect | A service that quickly and securely connects the customer’s network and the Samsung Cloud Platform’s network |
| Networking | Load Balancer | A service that distributes traffic to multiple servers to maintain a stable service |
2 - How-to guides
The user can enter the required information for the Firewall service through the Samsung Cloud Platform Console, select detailed options, and create the service.
Firewall Create
You can create and use the Firewall service from the Samsung Cloud Platform Console.
Firewall service must be enabled in the prerequisite service of Networking to be created. An enabled Firewall can be seen in the Firewall list.
- Firewall cannot be created independently as a new entity like other services of the Samsung Cloud Platform Console.
To set up the firewall, follow the steps below.
All Services > Networking > Firewall Click the menu. Go to the Firewall’s Service Home page.
Click the preceding service to be created on the Service Home page. You will be taken to the service creation page.
- Create VPC: Enable the Internet Gateway and Transit Gateway firewall of the VPC service.
- When creating the VPC’s Internet Gateway service, set the Firewall usage item to enabled. For detailed explanation, refer to Create Internet Gateway.
- Create the VPC’s Transit Gateway service and apply for the Uplink Firewall’s linked service. For detailed instructions, refer to Create Transit Gateway.
- Direct Connet Creation: When creating a Direct Connet service, set the Firewall Use item to Enabled. For detailed instructions, see Create Direct Connect.
- Load Balancer creation: When creating a Load Balancer service, set the Firewall usage item to enabled. For detailed description, refer to Load Balancer creation.
- Create VPC: Enable the Internet Gateway and Transit Gateway firewall of the VPC service.
When the prerequisite service creation is completed, check whether the corresponding Firewall resource is displayed in the Firewall list.
Firewall Check detailed information
The Firewall service can view and edit the full resource list and detailed information in the resource management menu.
To view detailed firewall information, follow the steps below.
- All Services > Networking > Firewall Click the menu. Go to the Firewall’s Service Home page.
- Service Home on the page, click Firewall list. Firewall list page will be opened.
- Firewall list On the page, you can see the information below.
Category Detailed description Firewall name Firewall pre-service type automatically generated in Firewall format Firewall classification Firewall preceding service type (Internet Gateway, Direct Connect, Load Balancer) Size User-selected Firewall size VPC name VPC name connected to Firewall Connection Name Automatically generated in the format of preceding service name_Firewall using Firewall Number of rules Number of rules used in the firewall Usage Whether Firewall is used (enabled) or not used (disabled) - If not used, the Any Allow rule is applied and no charges are incurred for the Firewall
Status Firewall status display - Click the More button to set On/Off
Table. Firewall resource list items
- Firewall list On the page, you can see the information below.
- Firewall List Click the resource to view detailed information on the page. Firewall Detail You will be taken to the page.
- Firewall Details page displays status information and additional feature information, and consists of Details, Rules, Tags, Activity History tabs.
Category Detailed description Service status Firewall status display - Creating: Creating
- Active: Active
- Editing: Editing
- Deploying: Deploying
- Deleting: Deleting
- Error: Error
Table. Firewall status information
Detailed Information
You can view detailed information of the selected resource from the Firewall list and, if necessary, edit the information.
| Category | Detailed description |
|---|---|
| Service | Service Name |
| Resource Type | Resource Type |
| SRN | Unique resource ID in Samsung Cloud Platform |
| Resource Name | Resource Name |
| Resource ID | Service’s unique resource ID |
| Creator | User who created the service |
| Creation Time | Service Creation Time |
| Editor | User who modified the service information |
| Modification Date/Time | Date/Time when service information was modified |
| Firewall name | Automatically generated as resource name_Firewall_connection name |
| Firewall ID | service’s unique resource ID |
| Firewall classification | Firewall preceding service type(Internet Gateway, Direct Connect, Load Balancer) |
| Size | Firewall size selected by the user
|
| Firewall Rule count/Quota | Rule quota and number of rules in use for the firewall |
| VPC name | VPC name connected to Firewall |
| VPC ID | VPC ID connected to firewall |
| Connection Name | Firewall Preceding Service Name_Automatically generated as Firewall |
| Log storage status | Firewall log storage status
|
Rules
Rule tab, you can view the Firewall rule list and add, edit, or delete rules.
| Category | Detailed description |
|---|---|
| Excel download | Rule bulk input Excel file download button |
| Batch rule input | Excel file upload button for batch rule input |
| Detailed Search | Rule Detailed Search Button |
| Add rule | Add rule button |
| Order | Rule order, applied top-down according to rule order |
| Rule ID | Unique ID value for the rule |
| Rule Index | Unique Index value for the rule, used in log analysis |
| Departure address | Departure address added to the rule |
| Destination address | Destination address added to the rule, displayed as an IP address according to the entered rule |
| Service | Protocol and Destination Port |
| Action | Traffic Allow/Deny classification by rule
|
| Direction | Firewall standard traffic access direction
|
| Active status | Active status of the rule, if inactive the rule does not operate |
| Explanation | Additional description written by the user
|
| Status | Rule status display |
| More > Change Order | Change the order of the selected rule |
| More > Activate | Enable the rule in disabled state |
| More > Disable | Disable active rules
|
| More > Copy | Copy existing rule settings to add a new rule |
| More > Delete | Delete selected rule |
tag
Firewall List page you can view the tag information of the selected resource, and you can add, modify, or delete it.
| Category | Detailed description |
|---|---|
| Tag List | Tag List
|
Work History
You can view the operation history of the selected resource in the Firewall list.
| Category | Detailed description |
|---|---|
| Work History List | Resource Change History
|
Firewall Rule Management
You can add, modify, or delete firewall rules.
Create Rule
Rule in the tab you can add Firewall rules.
To add a firewall rule, follow the steps below.
- All Services > Networking > Firewall Click the menu. Navigate to the Firewall’s Service Home page.
- Click Firewall List on the Service Home page. You will be taken to the Firewall List page.
- Firewall List Click the resource to add a rule on the page. Firewall Details Navigate to the page.
- Firewall Details on the page click the Rules tab. Navigate to the Rules tab page.
- Click the Add Rule button in the Rule tab. It will navigate to the Add Rule popup.
| Category | Required | Detailed description |
|---|---|---|
| Departure address | Required | Departure address to add to the rule
|
| Destination Address | Required | Select the type of destination address to add to the rule
|
| Type | Required | Select protocol type to apply rule
|
| Protocol | Required | Protocol
|
| Destination Port | Required | Allowed port setting when TCP/UDP is selected in the protocol
|
| Type | Required | ICMP Type setting when ICMP is selected in the protocol
|
| Protocol Number | Required | Enter protocol number when Internet Protocol is selected in type
|
| Action | Required | Traffic allow/block distinction
|
| Direction | Required | Access direction of traffic based on firewall standards
|
| Rule location | Required | Specify the location of the rule to be created and select the rule name |
| Description | Choice | Additional description written by the user
|
- After checking the rule to add, click the Confirm button.
Create Rules in Bulk
To add multiple firewall rules at once, follow these steps.
- All Services > Networking > Firewall Click the menu. Navigate to the Firewall’s Service Home page.
- Click Firewall list on the Service Home page. Navigate to the Firewall list page.
- Firewall List Click the resource to add a rule on the page. Firewall Details Navigate to the page.
- Click the Rules tab on the Firewall Details page. You will be taken to the Rules tab page.
- Click the Excel Download button in the Rules tab. The bulk rule entry Excel file will be downloaded.
- Enter the rule information in the batch input Excel file and then save.
- Click the Bulk Rule Input button. Bulk Rule Input popup appears.
- Batch Rule Input in the popup window, click Attach File to attach the Excel file you created, and click Upload File.
- If the attached Excel file format differs from the registration form or the file is encrypted, it cannot be uploaded.
- The maximum number of batch registration rules that can be uploaded at once is 100. If you exceed the maximum number of registration rules, you cannot upload.
- If you exceed the maximum number of rules that can be registered to the Account, you cannot upload the file.
- Rule Check Check the details in the popup window and click the Confirm button.
Edit Rules
From the Firewall rule list, you can select a specific rule to view and edit the rule.
If you want to modify the Firewall rules, follow the steps below.
- All Services > Networking > Firewall Please click the menu. Navigate to the Firewall’s Service Home page.
- Service Home on the page, click Firewall list. Navigate to the Firewall list page.
- Click the resource to edit the rule on the Firewall List page. You will be taken to the Firewall Details page.
- Click the Rules tab on the Firewall Details page. Navigate to the Rules tab page.
- Click the rule you want to edit on the Rule tab page. It will navigate to the Rule Details popup window.
- Rule Details In the popup window, click the Edit button. Navigate to the Rule Edit popup window.
- Rule Edit Enter the item you want to edit in the popup window and click the Confirm button.
Category Required? Detailed description Order - The order of the rules. To change the order, click More > Change Order in the rule list. Rule ID - Unique ID value for the rule cannot be changed Rule Index - Unique Index value for the rule, can be used for log analysis Departure address Required Departure address registered in the rule - Can be changed by entering multiple addresses at once using CIDR (IP/Subnet Mask) format with commas (,), ranges (-), up to a maximum of 128 addresses
Destination Address Required Destination address to add to the rule - Can input multiple addresses up to 128 at once using CIDR (IP/Subnet Mask) format with commas (,), range (-)
Protocol Required Protocol registered in the rule - You can select and change to the desired protocol among TCP, UDP, ICMP, ALL values
- ALL means all ports for all protocols
Destination Port Required TCP/UDP destination ports registered in the rule - You can select well-known ports such as SSH, HTTP, TELNET and change them
- When entering manually, you can input values from 1 to 65,535, and you can use commas (,) or ranges (-) to input up to 128 at once for changes
Type Required ICMP Type registered in the rule - Among values defined as ICMP Type, frequently used Types such as Echo can be selected and changed
- When entering directly, you can specify a range using start value-end value to change
Protocol Number Required Enter Protocol Number 1 ~ 254Value input possible
Action Required Ability to change traffic Allow/Deny classification due to rules - Allow: Traffic allowed when matched to rule
- Deny: Traffic blocked when matched to rule
Direction Required Ability to change the access direction of traffic based on the firewall criteria registered in the rule - Inbound: external → internal
- Outbound: internal → external
Active status - Active status of the rule, if inactive the rule does not operate Status - Status value for the rule Description Choice Additional description written by the user - Can be changed by entering up to 255 characters
Table. Firewall Rule Modification Details
Delete Rule
To delete the firewall rule, follow the steps below.
- All Services > Networking > Firewall Click the menu. Navigate to the Firewall’s Service Home page.
- Click Firewall List on the Service Home page. It navigates to the Firewall List page.
- Firewall List page, click the resource to edit the rule. Firewall Details page will be opened.
- Firewall Details page, click the Rules tab. Navigate to the Rules tab page.
- In the Rules tab, click More > Delete for the rule you want to delete.
Firewall Resource Management
You can modify the Firewall size and change the log usage settings.
Firewall Resize
To modify the Firewall size, follow the steps below.
- All Services > Networking > Firewall Click the menu. Navigate to the Firewall’s Service Home page.
- Click Firewall list on the Service Home page. Navigate to the Firewall list page.
- Click the resource to edit on the Firewall List page. Navigate to the Firewall Details page.
- Firewall Details page, click the Size Edit icon. It will navigate to the Size Edit popup.
- Resize In the popup window, select the size to modify, and click the Confirm button.
The Firewall size is provided as default Extra Small (rule quota 5), and you can change the Firewall size to add Firewall rules for use. For more details, please refer to Firewall Constraints.
- Firewall fees are charged based on the size of the Firewall service and traffic throughput.
Using Log Saving
To store firewall logs, first create a bucket in Object Storage to store the logs, and set that bucket in the log repository of Firewall Logging. Then, when you set log storage in the firewall detail view, the firewall logs will be stored in the Object Storage bucket.
- The log storage settings can be checked in Firewall Logging. For more details, refer to Firewall Logging.
- If you set up the log repository, Object Storage charges for log storage will be billed.
To use Firewall log storage, follow the steps below.
- All Services > Networking > Firewall Click the menu. Service Home Navigate to the page.
- Click the Firewall menu on the Service Home page. Navigate to the Firewall List page.
- Firewall list page, click the resource (Firewall) to use log storage. Firewall detail page is accessed.
- Click the Edit icon of Log Save Status on the Firewall Details page. Edit Log Save Status popup window will open.
- Log storage modification In the popup window, select Use of the log storage, and click the Confirm button.
Disable log saving
Firewall To set log storage to disabled, follow the steps below.
- All Services > Networking > Firewall Click the menu. Navigate to the Service Home page.
- Click the Firewall menu on the Service Home page. Go to the Firewall list page.
- Click the resource (Firewall) that will not use log storage on the Firewall List page. Go to the Firewall Details page.
- Edit Log Save Option Click the button. Edit Log Save Option It will move to the popup window.
- Modify log storage setting In the popup window, deselect Use for the log storage, and click the Confirm button.
- Notification Check the popup window’s message and click the Confirm button.
Firewall Disable setting
Firewall service cannot be deleted alone. If you delete the preceding service, the connected Firewall will be deleted together. If you do not use the firewall while maintaining the preceding service, you can change the firewall to an unused state on the firewall list page.
- If you change the firewall to an unused state, all previously registered rules will be deleted.
- If there are firewall rules connected when deleting a prerequisite service, you cannot delete it. Delete the firewall rules first before deleting the prerequisite service.
To disable the firewall, follow the steps below.
- All Services > Networking > Firewall Click the menu. Service Home Navigate to the page.
- Click the Firewall menu on the Service Home page. Go to the Firewall List page.
- On the Firewall list page, click More > Unused for the resource to be switched to unused.
- After the usage change is completed, check on the Firewall list page whether the resource’s usage status has changed to unused.
2.1 - Firewall Logging
To save Firewall logs, you must first create a bucket in Object Storage to save the logs and set the bucket as the log repository in Firewall Logging, then set up log saving on the Firewall details page, and the Firewall logs will be saved in the Object Storage bucket.
To save the firewall log, set it up in the following order.
- You can create a bucket in Object Storage to store Firewall logs or use an existing bucket. To create a bucket, refer to Object Storage creation.
- To set this bucket as the log repository for Firewall Logging, see Using Firewall Logging log repository.
- To set the log storage to use in the Firewall detailed inquiry, please refer to Firewall Log Storage Usage.
Firewall Logging Configure log storage settings
To set the log saving status of Firewall to use, you must first set the log storage in Firewall Logging.
To enable the Firewall Logging log storage, follow the procedure below.
- Click on the menu for all services > Management > Network Logging > Firewall Logging. It moves to the Firewall Logging list page.
- Firewall Logging list page, click the top Log Storage Settings button. Move to the Log Storage Settings popup window.
- Log Storage Settings In the popup window, select the Log Storage Bucket. Once the bucket is selected, the Log Storage Path will be displayed.
- In the Log Storage Settings popup window, check the Log Storage Bucket and Log Storage Path, then click the OK button.
- Check the message in the Notification pop-up window, then click the Confirm button.
Firewall Logging list inquiry
If you set the Firewall Logging log storage bucket, you can retrieve the Firewall Logging list.
To view the Firewall Logging list, follow these steps.
- Click on the menu for all services > Management > Network Logging > Firewall Logging. It moves to the Firewall Logging list page.
- Firewall Logging list page, please check the resources in use and the log storage target.
Division Detailed Description Resource ID Firewall ID Save Target Firewall Name Save Registration Time Firewall Log Storage Registration Time Table. Firewall Logging list itemsNoteAfter setting the Firewall Logging log storage, you must set the log storage to use in the Firewall detail inquiry for log storage to start. For more detailed information, please refer to Using Firewall Log Storage.
Firewall Logging Check detailed contents
Please check the detailed contents of the saved Log based on the following contents.
Saved log example: 2024-10-11T11:23:43,deny,0,17,4.1.1.100,45499,192.168.10.10,53
| Division | Description |
|---|---|
| 2024-10-11T11:23:43 | The date and time when the log occurred (2024-10-11, 11:23:43) |
| deny | action (deny / accept) |
| 0 | The Rule ID (Policy ID) where the log occurred on the firewall |
| 17 | IP Protocol ID
|
| 4.1.1.100 | Source IP |
| 45499 | Departure Port |
| 192.168.10.10 | Destination IP |
| 53 | Destination Port |
Firewall Logging Disable log storage setting
You can set the log storage to not used in Firewall Logging.
To set the log storage to not used for Firewall Logging, follow the next procedure.
- Click on the menu for all services > Management > Network Logging > Firewall Logging. It moves to the Firewall Logging list page.
- Firewall Logging list page, click the top Log Storage Settings button. Move to the Log Storage Settings popup window.
- In the 로그 저장소 설정 popup window, select 로그 저장소 버킷 as 미사용 and click the 확인 button.
- Log storage settings can be changed when there is no log storage target.
- To change the log storage bucket, first change the setting to inactive, then you can change it by setting it to active again.
3 - API Reference
4 - CLI Reference
5 - Release Note
Firewall
- Add firewall rule input method
- KR WEST, KR EAST can input destination address in FQDN (Fully Qualified Domain Name) format in the region.
- Firewall Add rule input method
- The ability to input the IP protocol has been added.
- Add Firewall feature
- Load Balancer service can use Firewall.
- Samsung Cloud Platform Common Feature Change
- Account, IAM and Service Home, tags, etc. have reflected common CX changes.
- Firewall A feature to store logs has been added.
- Firewall determine whether to store logs and Object Storage can store logs.
- Through the Firewall service, you can control inbound and outbound traffic generated in the VPC.
- Firewall service has been launched.