This is the multi-page printable view of this section. Click here to print.
DNS
- 1: Overview
- 1.1: TLD List
- 1.2: ServiceWatch Metrics
- 2: How-to guides
- 2.1: Private DNS
- 2.2: Hosted Zone
- 2.3: Public Domain Name
- 3: Release Note
1 - Overview
Service Overview
The DNS service converts domain names, which are convenient for humans to recognize, into numeric IP addresses that the system can identify, allowing access to services.
With the DNS service, users can easily register the desired domain and manage its DNS records themselves.
Features
- Easy Domain Registration: You can register and modify new domains via a web-based console. Without building separate DNS infrastructure or installing DNS solutions, you can easily create and manage domains through the web.
- Support for Various Records: You can configure various resource record types such as A, AAAA, CNAME, TXT, MX, SPF, and it automatically scales to handle large query volumes without user intervention.
- Convenient Hosting Environment Management: You can select and use a Public domain name, which is exposed to the Internet to provide web services, or a Private domain name, which is accessible only to designated internal users without an Internet connection, according to your usage environment and purpose.
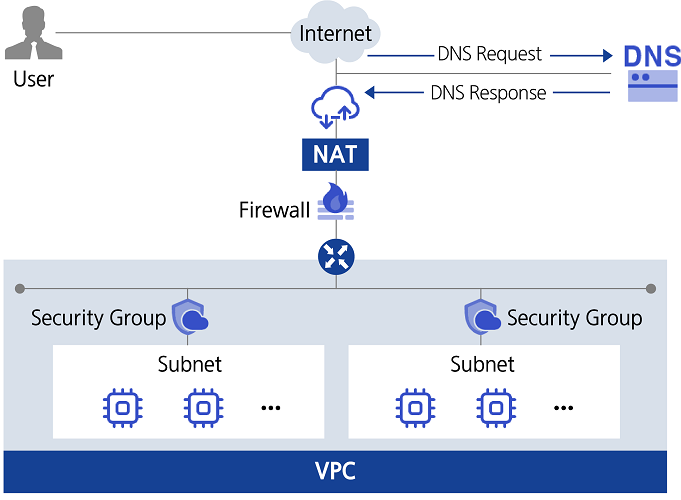
Configuration diagram
Provided features
The DNS service provides the following functions.
- Hosting Zone Creation/Management: You can create and manage Public Hosted Zones that are accessible from anywhere via the Internet, and Private Hosted Zones that are not exposed to the Internet and are only accessible within a designated network environment.
- Public Domain Name Application: You can apply for a Public Domain Name that can be accessed from anywhere via the Internet.
- Support for various resource records: You can select and use record types that suit your environment and purpose.
| Record type | Detailed description |
|---|---|
| A | Specify the IPv4 address corresponding to the domain name so that the IP address can be resolved from the domain name. |
| AAAA | Specify the IPv6 address corresponding to the domain name so that the IP address can be resolved from the domain name. |
| TXT | Set text information for the domain |
| CNAME | Assign an alias for the domain name |
| MX | Specify the mail server for the user’s domain and subdomains |
| SPF | To prevent spam mail, verify the sending mail server’s IP address or domain name, etc. (Sender Policy Framework) |
| NS | Name server responsible for this domain (auto-generated) |
| SOA | Define the domain’s initial information (the starting point of authority) (auto-generated) |
Component
Private DNS
To manage private domain names for use only within a designated network environment without exposing them to the internet, you must first create a Private DNS. The Private DNS name is used uniformly across all regions within the account. It can be initially created in any region of the account, and later it can be activated in other regions using the same Private DNS name from the Private DNS list. You can select the VPC to connect to Private DNS for each region. By using a common Private DNS name, you can share and manage the Private Hosted Zone information across all regions.
Hosted Zone
Private Hosted Zone allows you to create and manage domain names that can be used only in the network environment designated for VPCs connected to Private DNS. A Public Hosted Zone can manage the public domain name created through the Samsung Cloud Platform. Through a Hosted Zone, you can create and edit records that match your intended use.
Public Domain Name
You can apply for a Public Domain Name in partnership with Whois, the public domain name management provider. Public Domain Name can be purchased in one-year increments, and you can set or change the automatic renewal (in one-year increments) up to 7 days before the expiration date.
Constraints
The constraints of the DNS service are as follows.
| Category | description |
|---|---|
| Number of Private DNS that can be created per account | 1 |
| Number of Hosted Zones that can be created in an Account | 20 |
| Number of records that can be registered per Hosted Zone | 100 |
- Requests to use Public Domain Name and Public Hosted Zone in the Korea South (kr-south) region are restricted.
Preceding Service
The DNS service has no prerequisite services.
1.1 - TLD List
TLD (Top-Level Domain) list
The following TLDs are available. When applying for a Public Domain Name, an annual fee is incurred that varies by TLD type.
| TLD type | Public Domain Name registration fee (KRW/year, VAT excluded) |
|---|---|
| .COM | 20,000 |
| .NET | 20,000 |
| .ORG | 20,000 |
| .KR | 24,000 |
| .PE.KR | 16,000 |
| .BIZ | 20,000 |
| .INFO | 20,000 |
| .CN | 65,000 |
| .TV | 90,000 |
| .IN | 65,000 |
| .EU | 80,000 |
| .AC | 286,000 |
| .TW | 100,000 |
| .MOBI | 44,000 |
| .NAME | 30,000 |
| .CC | 90,000 |
| .JP | 198,000 |
| .ASIA | 55,000 |
| .ME | 44,000 |
| .TEL | 44,000 |
| .PRO | 44,000 |
| .SO | 103,000 |
| .SX | 90,000 |
| .CO | 100,000 |
| .XXX | 200,000 |
| .PW | 44,000 |
| .PH | 100,000 |
| .io | 91,000 |
| .app | 42,500 |
| .co.kr | 24,000 |
1.2 - ServiceWatch Metrics
DNS sends metrics to ServiceWatch. The metrics provided by default monitoring are data collected at 5‑minute intervals.
Basic Metrics
The following are the basic metrics for the Private DNS namespace.
The indicators whose names are displayed in bold below are the key indicators selected from the basic indicators provided by Private DNS. Key metrics are used to configure service dashboards that are automatically built for each service in ServiceWatch.
Each metric indicates, via the user guide, which statistical values are meaningful when viewing that metric, and among the meaningful statistics, the values shown in bold are the primary statistics. In the service dashboard, you can view key metrics using these primary statistical values.
| Performance items | Detailed description | unit | Meaningful statistics |
|---|---|---|---|
| privatedns.operation.per_sec | Number of UDP-based data requests processed per second on user request | Count/Second |
|
| privatedns.query.outbound.per_sec | Number of requests per second sent to external DNS servers for user queries | Count/Second |
|
| privatedns.query.answers_slow | Number of requests sent to external DNS servers for user queries with slow responses (within 1 second) | Count/Second |
|
| privatedns.response.nxdomain.per_sec | Number of NXDOMAIN responses received per second from external DNS servers for user queries | Count/Second |
|
| privatedns.response.servfail.per_sec | Number of SERVFAIL responses received per second from external DNS servers for user queries | Count/Second |
|
2 - How-to guides
The user explains the items to verify before creating a DNS service through the Samsung Cloud Platform Console.
Preface before Using Private Domain Name Management
Before using Private Domain Name management, first verify the following items.
- To manage private domain names for use only within a designated network environment without exposing them to the internet, you must first create a Private DNS.
- The defined Private DNS name is used uniformly across all regions within the account. It can be initially created in any region within the account, and thereafter, in other regions, it is activated and used from the Private DNS list with the same Private DNS name.
- You can optionally configure the VPCs you want to connect to Private DNS for each region. When first created or activated, no VPC is connected.
- The Private DNS name may already be in use within the Samsung Cloud Platform, and you can verify its availability by performing a duplicate check when entering the domain name.
- Hosted Zone information is shared across all regions. However, some detailed information (SRN, creator, modifier information) can only be viewed in the region where it was originally created.
General usage examples are shown below. For detailed usage instructions, refer to the How-to guides of the respective subservice.
| Order | Subservice | Key procedures |
|---|---|---|
| STEP 1 | Private DNS | Create Private DNS (Region A) → Connect VPC in Region A → Activate Private DNS (Region B) → Connect VPC in Region B |
| STEP 2 | Hosted Zone | Create Private Hosted Zone → Register record |
| STEP 3 | - | View detailed information, edit, and cancel |
Public Domain Name Management: Foreword Before Use
Before using Public Domain Name management, please check the following items first.
- Public Domain Names intended for use on the internet can be managed through a Hosted Zone only for domain names that have been registered via the Samsung Cloud Platform.
- The list of available top-level domains may change.
An example of the typical usage procedure is shown below. For detailed usage instructions, refer to the How-to guides of the respective subservice.
| Category | Subservice | Main Procedure |
|---|---|---|
| STEP 1 | Public Domain Name | Verify availability and apply for the Public Domain Name you wish to use |
| STEP 2 | Hosted Zone | Create a Hosted Zone for the requested Public Domain Name → Register records |
| STEP 3 | - | View detailed information, edit, cancel |
2.1 - Private DNS
Users can create the service by entering the required information for the Private DNS service and selecting detailed options through the Samsung Cloud Platform Console.
Create Private DNS
You can create and use a Private DNS service in the Samsung Cloud Platform Console.
To request the creation of a Private DNS service, follow the steps below.
- All Services > Networking > DNS Click the menu. Proceed to the Service Home page.
- Click the Private DNS Create button in the dropdown of the Service Home page. You will be taken to the Private DNS Create page.
- On the Private DNS Creation page, enter the information required to create the service and select detailed options.
- Enter or select the required information in the Service Information Input area.
Category RequiredDetailed description Private DNS name Required Enter the Private DNS name to use - Enter using 3 - 20 characters, including lowercase letters, numbers, and the special character (-)
- Cannot be the same as an existing name in use
VPC connection Select Register VPC to connect with Private DNS - Click the Select button to choose a VPC
- Up to 5 VPCs can be registered
Table. Private DNS service information input items - In the Additional Information Input area, enter or select the required information.
Category Required statusDetailed description description Selection Enter additional information and description for Private DNS tag Select Add Tag - Up to 50 per resource can be added
- After clicking the Add Tag button, enter or select Key, Value values
Table. Private DNS additional information input fields
- Enter or select the required information in the Service Information Input area.
- Check the creation history and click the Create button.
- When creation is complete, check the created resources on the Private DNS List page.
Check Private DNS detailed information
Private DNS service allows you to view and edit the full resource list and detailed information. Private DNS Details page consists of Details, Tags, Activity Log tabs.
To view the detailed information of Private DNS, follow these steps.
- Click the All Services > Networking > DNS menu. Navigate to the DNS Service Home page.
- On the Service Home page, click the Private DNS menu. You will be taken to the Private DNS List page.
- On the Private DNS List page, click the resource you want to view detailed information for. You will be taken to the Private DNS Details page.
- Private DNS Details page displays the status and detailed information of Private DNS, and consists of Details, Tags, Activity History tabs.
Category Detailed description Service status Private DNS status - Creating: creating
- Activing: activating
- Active: active
- Inactive: inactive
- Editing: editing settings
- Deleting: deleting
- Error: error occurred
Service termination Button to disable Private DNS Table. Private DNS status information and additional features
- Private DNS Details page displays the status and detailed information of Private DNS, and consists of Details, Tags, Activity History tabs.
Detailed Information
Private DNS List page allows you to view detailed information of the selected resource and edit the information if necessary.
| Category | Detailed description |
|---|---|
| Service | Service name |
| Resource Type | Resource Type |
| SRN | Unique resource ID in Samsung Cloud Platform |
| Resource Name | Resource Name |
| Resource ID | Unique resource ID in the service |
| Constructor | User who created the service |
| Creation date and time | Service creation timestamp |
| Editor | User who edited the service information |
| Modification date | Date and time the service information was modified |
| Initial creation location | Initial creation location of Private DNS |
| VPC connection | VPC information connected to Private DNS
|
| Explanation | Private DNS description
|
tag
Private DNS List page allows you to view the tag information of the selected resource, and to add, modify, or delete it.
| Category | Detailed description |
|---|---|
| Tag list | Tag list
|
Job History
Private DNS List page lets you view the operation history of the selected resource.
| Category | Detailed description |
|---|---|
| Task History List | Resource Change History
|
Activating Private DNS from a location other than its initial creation location
You can enable and use Private DNS in regions other than the region where it was originally created.
To enable the Private DNS service, follow these steps.
- Click the All Services > Networking > DNS menu. Navigate to the DNS Service Home page.
- On the Service Home page, click the Private DNS menu. You will be taken to the Private DNS List page.
- Click the More > Activate button of the resource you want to enable from the Private DNS list. A notification dialog will appear.
- The activation button is displayed only for Private DNS entries with Inactive status.
- Click OK in the alert dialog.
Configure VPC connection for Private DNS
You can configure the VPC information connected to the Private DNS service.
To configure the VPC connection for Private DNS, follow these steps.
- Click the All Services > Networking > DNS menu. Go to the DNS Service Home page.
- On the Service Home page, click the Private DNS menu. You will be taken to the Private DNS List page.
- On the Private DNS List page, click the resource you want to view detailed information for. You will be taken to the Private DNS Details page.
- On the Private DNS Details page, click the Edit icon of the VPC connection item. The VPC connection selection popup window opens.
- In the VPC connection selection popup window, select the VPC to connect and click OK.
- Check that the selected VPC is displayed in the VPC connection item.
Terminate Private DNS
You can request termination of the Private DNS service from the Samsung Cloud Platform Console.
To request cancellation of the Private DNS service, follow the steps below.
- Click the All Services > Networking > DNS menu. Navigate to the DNS Service Home page.
- On the Service Home page, click the Private DNS menu. You will be taken to the Private DNS List page.
- On the Private DNS List page, click the resource to view detailed information. You will be taken to the Private DNS Details page.
- On the Private DNS Details page, click the Cancel Service button.
- Once the termination is complete, check the service termination status in the Private DNS list.
2.2 - Hosted Zone
Users can create the service by entering the required information for the Hosted Zone service and selecting detailed options through the Samsung Cloud Platform Console.
Create Hosted Zone
You can create and use the Hosted Zone service in the Samsung Cloud Platform Console.
To request the creation of a Hosted Zone service, follow the steps below.
All Services > Networking > DNS menu, click it. You will be taken to the Service Home page.
Click the Create Hosted Zone button in the dropdown of the Service Home page. Proceed to the Create Hosted Zone page.
Create Hosted Zone page, enter the information needed to create the service, and choose detailed options.
- Enter or select the required information in the Service Information Input area.
Category Required statusDetailed description Usage classification Required Select a domain appropriate for the purpose of the Hosted Zone - Private: Domain that can be used only within the Samsung Cloud Platform
- Public: Domain that can be accessed from outside (the Internet)
Private DNS name to register Required Select from the pre-created Private DNS - Selectable only when Private is chosen in the usage classification
Hosted Zone name to register Required Enter the Hosted Zone name to use - Enter using lowercase letters, numbers, and hyphens (-), within 2 to 63 characters
- When applying for a new domain, click the Check Availability button to verify duplication
Table. Hosted Zone service information input items - In the Additional Information Input area, enter or select the required information.
Category Required statusDetailed description Explanation Select Enter additional information and description for the Hosted Zone tag Select Add Tag - Up to 50 can be added per resource
- After clicking the Add Tag button, enter or select Key and Value values
Table. Hosted Zone additional information input fields
- Enter or select the required information in the Service Information Input area.
Check the generation history and click the Generate button.
- After creation is complete, check the created resources on the Hosted Zone list page.
Check Hosted Zone details
The Hosted Zone service allows you to view and edit the full list of resources and detailed information. Hosted Zone Details page consists of Details, Records, Tags, Activity Log tabs.
To view detailed information about the Hosted Zone, follow these steps.
- All Services > Networking > DNS menu, click it. Then go to the Service Home page.
- On the Service Home page, click the Hosted Zone menu. You will be taken to the Hosted Zone List page.
- On the Hosted Zone List page, click the resource you want to view details for. You will be taken to the Hosted Zone Details page.
- Hosted Zone Details page displays the Hosted Zone’s status information and details, and consists of Details, Records, Tags, Activity History tabs.
Category Detailed description Service status Hosted Zone status - Creating: In progress
- Active: Running
- Editing: Changing settings
- Deleting: Terminating
- Error: An error occurred
Delete Hosted Zone Button to delete the Hosted Zone Table. Hosted Zone status information and additional features
- Hosted Zone Details page displays the Hosted Zone’s status information and details, and consists of Details, Records, Tags, Activity History tabs.
Detailed Information
On the Hosted Zone List page, you can view detailed information of the selected resource and edit the information if needed.
| Category | Detailed description |
|---|---|
| Service | Service name |
| Resource Type | Resource Type |
| SRN | Unique resource ID in Samsung Cloud Platform |
| Resource Name | Resource Name |
| Resource ID | Unique resource ID in the service |
| Constructor | User who created the service |
| Creation date and time | Service creation date and time |
| Editor | User who edited the service information |
| Modification date and time | Date and time the service information was modified |
| Hosted Zone name | Hosted Zone domain name |
| Usage classification | Display selected usage |
| Private DNS name | Selected Private DNS name |
| description | Hosted Zone description
|
record
On the Hosted Zone List page, you can view the registered record information and add, modify, or delete records. A record is an item that configures communication with the DNS server, informing the server of the IP address associated with the domain and how to handle requests sent to the domain.
| Category | Detailed description |
|---|---|
| Advanced Search | Record detailed search settings button |
| Add record | Add Record button |
| Name | Registered record name |
| type | Record Types
|
| value | IP address of the record |
| TTL | Time for DNS response servers to temporarily store records |
| Auto-generated | Indicate whether automatically generated |
| status | Service status display |
| More menu | Record editing and deletion are possible |
tag
Hosted Zone List page lets you view the tag information of the selected resource, and you can add, modify, or delete it.
| Category | Detailed description |
|---|---|
| Tag list | Tag list
|
Job History
On the Hosted Zone List page, you can view the operation history of the selected resource.
| Category | Detailed description |
|---|---|
| Task History List | Resource Change History
|
Managing records of a Hosted Zone
You can add or delete records in the Hosted Zone service.
Add Record
To add a record to a Hosted Zone, follow these steps.
- Click the All Services > Networking > DNS menu. Navigate to the DNS Service Home page.
- On the Service Home page, click the Hosted Zone menu. You will be taken to the Hosted Zone List page.
- On the Hosted Zone List page, click the resource you want to view details for. You will be taken to the Hosted Zone Details page.
- On the Hosted Zone Details page, click the Record tab. You will be taken to the Record tab page.
- Record tab page, click the Add Record button. The Add Record window opens.
- In the Add Record window, select the Type, Name, Value, and TTL fields, then click Confirm. A notification dialog will appear.
Category Detailed description A Enter an IP address in IPv4 format - Click the Add button to add an IP address, up to 8 can be registered
AAAA Enter an IPv6-formatted IP address - Click the Add button to add an IP address, up to 8 can be registered
SPF Enter the IP of the server that sent the spam email - If registering multiple servers, enter in the format v=spf1 ip4:211.214.160.28 ip4:211.214.16.29 ~all
CNAME Enter a record alias in domain name format - Registration is not possible if entered the same as a value of a different record type
MX Enter the priority and mail server address - Click the Add button to add a server address, up to 8 can be registered
- When entering priority, input a value within the range 0 - 65,535; the smaller the value, the higher the priority
TXT Enter text - Enter within 250 characters
Table. Detailed items by record type - Click Confirm in the notification dialog.
- Check that the added item appears in the record list.
Modify Record
To modify a Hosted Zone’s records, follow these steps.
- Click the All Services > Networking > DNS menu. Navigate to the DNS Service Home page.
- On the Service Home page, click the Hosted Zone menu. You will be taken to the Hosted Zone List page.
- On the Hosted Zone List page, click the resource you want to view details for. You will be taken to the Hosted Zone Details page.
- On the Hosted Zone Details page, click the Record tab. You will be taken to the Record tab page.
- On the Record tab page, click the list’s More menu and select Edit. The Record Edit window opens.
- In the record edit window, modify the desired fields and click OK.
- Click OK in the notification dialog.
Delete Record
To delete a record in a Hosted Zone, follow these steps.
- Click the All Services > Networking > DNS menu. Navigate to the DNS Service Home page.
- On the Service Home page, click the Hosted Zone menu. You will be taken to the Hosted Zone List page.
- On the Hosted Zone List page, click the resource to view its details. You will be taken to the Hosted Zone Details page.
- On the Hosted Zone Details page, click the Record tab. You will be taken to the Record tab page.
- Record tab page, click the More menu of the list and click Delete. A confirmation alert opens.
- Click Confirm in the alert dialog.
Terminate Hosted Zone
You can request cancellation of the Hosted Zone service from the Samsung Cloud Platform Console.
To request termination of the Hosted Zone service, follow the steps below.
- Click the All Services > Networking > DNS menu. Navigate to the DNS Service Home page.
- On the Service Home page, click the Hosted Zone menu. You will be taken to the Hosted Zone List page.
- On the Hosted Zone List page, click the resource you want to view details for. You will be taken to the Hosted Zone Details page.
- On the Hosted Zone Details page, click the Hosted Zone Delete button.
- After the termination is complete, check the service termination status in the Hosted Zone list.
2.3 - Public Domain Name
Users can create the service by entering the required information for the Public Domain Name service and selecting detailed options through the Samsung Cloud Platform Console.
Create Public Domain Name
You can create and use the Public Domain Name service in the Samsung Cloud Platform Console.
To request the creation of a Public Domain Name service, follow these steps.
- All Services > Networking > DNS Click the menu. You will be taken to the Service Home page.
- Click the Public Domain Name Create button in the dropdown of the Service Home page. You will be taken to the Public Domain Name Create page.
- On the Public Domain Name creation page, enter the information required to create the service and select detailed options.
- Enter or select the required information in the Service Information Input area.
Category Whether requiredDetailed description Domain name to register Required Enter the Public Domain Name to use - Enter using lowercase letters, numbers, and hyphens (-), within 2 to 63 characters
- When applying for a new domain, click the Check Availability button to verify duplication
Purchase period Required Automatically selected as 1 year Automatic extension Required Set whether to automatically renew when the domain usage period expires - Use selected, enter detailed information
- Registrant Name (Business Name): Enter the registrant name or business name within 30 characters
- Registrant Email: Enter the registrant’s email address
- Registrant Address: Enter the registrant’s company address, click the Find Postal Code button to search and then enter the address
- Phone Number: Enter the registrant’s phone number
Table. Public Domain Name Service Information Input Items - In the Additional Information Input area, enter or select the required information.
Category Required statusDetailed description Explanation Select Enter additional information and description for the Public Domain Name tag Select Add Tag - Up to 50 per resource can be added
- After clicking the Add Tag button, enter or select Key, Value values
Table. Public Domain Name additional information input fields
- Enter or select the required information in the Service Information Input area.
- Check the creation history and click the Create button.
- When creation is complete, check the created resource on the Public Domain Name list page.
Check detailed information of Public Domain Name
The Public Domain Name service allows you to view and edit the full resource list and detailed information. The Public Domain Name Details page consists of Details, Registration Info, Tags, Activity Log tabs.
To view detailed information about the Public Domain Name, follow these steps.
- All Services > Networking > DNS menu, click it. You will be taken to the Service Home page.
- On the Service Home page, click the Public Domain Name menu. You will be taken to the Public Domain Name List page.
- Click the resource on the Public Domain Name List page to view detailed information. You will be taken to the Public Domain Name Details page.
- Public Domain Name Details page displays the status information and detailed information of the Public Domain Name, and consists of the Details, Registration Information, Tags, Activity History tabs.
Category Detailed description Service status Public Domain Name status - Creating: In progress
- Active: Running
- Editing: Settings being changed
- Registered: Renewal registration
- Transfer Requested: Domain transfer request completed
- Expired: Usage period expired
Domain transfer between accounts Domain transfer request button between accounts - Cancel Transfer Request: Allows canceling a domain transfer request after the request is completed
- Approve Transfer Request: Allows approving a transfer request when a domain transfer request is received
- Reject Transfer Request: Allows rejecting a transfer request when a domain transfer request is received
Table. Public Domain Name status information and additional features
- Public Domain Name Details page displays the status information and detailed information of the Public Domain Name, and consists of the Details, Registration Information, Tags, Activity History tabs.
Detailed Information
On the Public Domain Name List page, you can view detailed information of the selected resource and edit the information if needed.
| Category | Detailed description |
|---|---|
| service | Service name |
| Resource Type | Resource Type |
| SRN | Unique resource ID in Samsung Cloud Platform |
| Resource Name | Resource Name |
| Resource ID | Unique resource ID in the service |
| constructor | User who created the service |
| Creation date and time | Service creation timestamp |
| Editor | User who edited the service information |
| Modification date and time | Date and time the service information was modified |
| domain name | Public Domain Name domain name |
| Registration date | Public Domain Name domain registration date |
| Purpose classification | Display selected usage |
| Expiration date | Public Domain Name Domain Usage Expiration Date |
| Automatic extension | Display whether the auto-renewal feature is enabled
|
| description | Public Domain Name description
|
Registration Information
On the Public Domain Name List page, you can view and edit domain registration information.
| Category | Detailed description |
|---|---|
| Registrant name (business name) | The registrant’s name or business name entered when applying for the service |
| Registrant email | The email address of the registrant entered when applying for the service |
| Registrant address | The registered company’s address entered when applying for the service |
| phone number | Registrant’s phone number entered during service application |
tag
On the Public Domain Name List page, you can view the tag information of the selected resource, and add, modify, or delete it.
| Category | Detailed description |
|---|---|
| Tag list | Tag list
|
Job History
You can view the operation history of the selected resource on the Public Domain Name List page.
| Category | Detailed description |
|---|---|
| Task History List | Resource Change History
|
Public Domain Request Transfer Between Accounts
You can transfer a registered Public Domain to a user of another account.
- If the domain you want to migrate is being used as a Hosted Zone, you cannot request migration. Delete the existing Hosted Zone first, then request migration.
- The domain you want to transfer must have auto-renewal set to unused to make a transfer request. After the domain transfer, you can enable auto-renewal in the account that received the transfer.
- Domain transfer requests can be made only up to one month before the domain’s registration expiration date.
To transfer Public Domain information to another account user, follow the steps below.
- Click the All Services > Networking > DNS menu. Navigate to the DNS Service Home page.
- On the Service Home page, click the Public Domain Name menu. You will be taken to the Public Domain Name list page.
- On the Public Domain Name List page, click the resource to view detailed information. You will be taken to the Public Domain Name Details page.
- Public Domain Name Details on the page, click the Domain Transfer Between Accounts button. The Domain Transfer Between Accounts popup will open.
- Domain transfer between accounts In the popup window, enter the account ID to transfer to and click the Confirm button.
- When the domain transfer request is completed, it changes to the Transfer requested status, and the applicant can click the Cancel transfer request button to cancel the transfer request.
- After a domain transfer request, if a user from another account approves the transfer, the domain information is deleted from the requesting account.
- If the user who received the prior request does not approve within 7 days of the approval request, the prior request will be automatically canceled.
Managing Public Domain Data Transfer Requests
If a user from another account transfers a Public Domain, you can approve or reject the request.
Approve Public Domain information transfer request
To approve a request to move to the Public Domain, follow these steps.
- Click the All Services > Networking > DNS menu. Navigate to the DNS Service Home page.
- On the Service Home page, click the Public Domain Name menu. You will be taken to the Public Domain Name List page.
- Public Domain Name List page, click the resource to view detailed information. You will be taken to the Public Domain Name Details page.
- Public Domain Name Details on the page, click the Approve Previous Request button. In the alert dialog, click the Confirm button.
Public Domain Reject request to transfer information
To reject a request before the Public Domain, follow these steps.
- Click the All Services > Networking > DNS menu. Navigate to the DNS Service Home page.
- On the Service Home page, click the Public Domain Name menu. You will be taken to the Public Domain Name List page.
- Public Domain Name List page: click the resource to view detailed information. You will be taken to the Public Domain Name Details page.
- On the Public Domain Name Details page, click the Reject Previous Request button. In the alert dialog, click the Confirm button.
Modify registration information of Public Domain Name
You can modify the registration information of a Public Domain Name.
To edit the registration information of a Public Domain Name, follow these steps.
- Click the All Services > Networking > DNS menu. Navigate to the DNS Service Home page.
- On the Service Home page, click the Public Domain Name menu. You will be taken to the Public Domain Name List page.
- On the Public Domain Name List page, click the resource to view detailed information. You will be taken to the Public Domain Name Details page.
- On the Public Domain Name Details page, click the Registration Information tab. You will be taken to the Registration Information tab page.
- Registration Information tab page, click the Edit button. You will be taken to the Edit Registration Information page.
- Go to the Edit Registration Information page. Modify the desired items and click the Done button.
3 - Release Note
DNS
- You can view measurement values for the following five items in conjunction with Service Watch.
- Number of server error responses (unit: seconds)
- NXDOMAIN response count (unit: seconds)
- Number of queries not responding within 1 second (unit: seconds)
- Number of outgoing UDP queries (unit: seconds)
- Number of UDP-based data request processing (unit: seconds)
- Through the Samsung Cloud Platform, a registered Public Domain Name can be transferred to another user account within the allowed period.
- We have officially launched a DNS service that can be used in private networks and internet environments. You can manage Private DNS and Private Hosted Zones for restricted networks, and apply for Public Domain Name registration and manage Public Hosted Zones for internet environments.
- We have launched a beta DNS service that offers domain registration request and management capabilities based on user requests.