Provides a stable and user-friendly network operation environment optimized for various cloud environments of customers.
This is the multi-page printable view of this section. Click here to print.
Networking
- 1: VPC
- 1.1: Overview
- 1.1.1: ServiceWatch Metrics
- 1.2: How-to guides
- 1.2.1: Subnet
- 1.2.2: Port
- 1.2.3: Internet Gateway
- 1.2.4: NAT Gateway
- 1.2.5: Public IP
- 1.2.6: Private NAT
- 1.2.7: VPC Endpoint
- 1.2.8: VPC Peering
- 1.2.9: Transit Gateway
- 1.2.10: PrivateLink Service
- 1.2.11: PrivateLink Endpoint
- 1.2.12: NAT Logging
- 1.3: API Reference
- 1.4: CLI Reference
- 1.5: Release Note
- 2: Security Group
- 2.1: Overview
- 2.2: How-to guides
- 2.2.1: Security Group Logging
- 2.3: API Reference
- 2.4: CLI Reference
- 2.5: Release Note
- 3: Load Balancer
- 3.1: Overview
- 3.2: How-to guides
- 3.2.1: LB Server Group
- 3.2.2: LB Health Check
- 3.3: API Reference
- 3.4: CLI Reference
- 3.5: Release Note
- 4: DNS
- 4.1: Overview
- 4.1.1: TLD List
- 4.2: How-to guides
- 4.2.1: Private DNS
- 4.2.2: Hosted Zone
- 4.2.3: Public Domain Name
- 4.3: Release Note
- 5: VPN
- 5.1: Overview
- 5.2: How-to guides
- 5.2.1: VPN Tunnel
- 5.3: API Reference
- 5.4: CLI Reference
- 5.5: Release Note
- 6: Firewall
- 6.1: Overview
- 6.2: How-to guides
- 6.2.1: Firewall Logging
- 6.3: API Reference
- 6.4: CLI Reference
- 6.5: Release Note
- 7: Direct Connect
- 7.1: Overview
- 7.1.1: ServiceWatch Metrics
- 7.2: How-to guides
- 7.3: API Reference
- 7.4: CLI Reference
- 7.5: Release Note
- 8: Cloud LAN-Campus
- 8.1: Overview
- 8.2: How-to guides
- 8.3: Release Note
- 9: Cloud LAN-Data Center
- 9.1: Overview
- 9.2: How-to guides
- 9.3: Release Note
- 10: Cloud WAN
- 10.1: Overview
- 10.1.1: Monitoring Metrics
- 10.2: How-to guides
- 10.3: Release Note
- 11: SASE
- 11.1: Overview
- 11.2: How-to guides
- 11.3: Release Note
- 12: Cloud Last Mile
- 12.1: Overview
- 12.2: How-to guides
- 12.3: Release Note
- 13: Global CDN
- 13.1: Overview
- 13.2: How-to guides
- 13.3: API Reference
- 13.4: CLI Reference
- 13.5: Release Note
- 14: GSLB
- 14.1: Overview
- 14.2: How-to guides
- 14.3: API Reference
- 14.4: CLI Reference
- 14.5: Release Note
- 15: Cloud Virtual Circuit
- 15.1: Overview
- 15.2: How-to guides
- 15.3: Release Note
- 16: Private 5G Cloud
- 16.1: Overview
- 16.2: How-to guides
- 16.3: Release Note
1 - VPC
1.1 - Overview
Service Overview
Samsung Cloud Platform provides VPC services to support the use of logically separated, customer-dedicated private network spaces in the cloud environment.
VPC (Virtual Private Cloud) is a service that provides a logically isolated, customer-dedicated private network space in a cloud environment. Depending on the usage purpose, you can create a General Subnet and a Local Subnet for communication between servers, and you can freely select NAT Gateway and Internet Gateway to configure various networks. You can create multiple VPCs and operate them independently. VPC Peering allows configuration of connections between VPCs.
Service Architecture Diagram
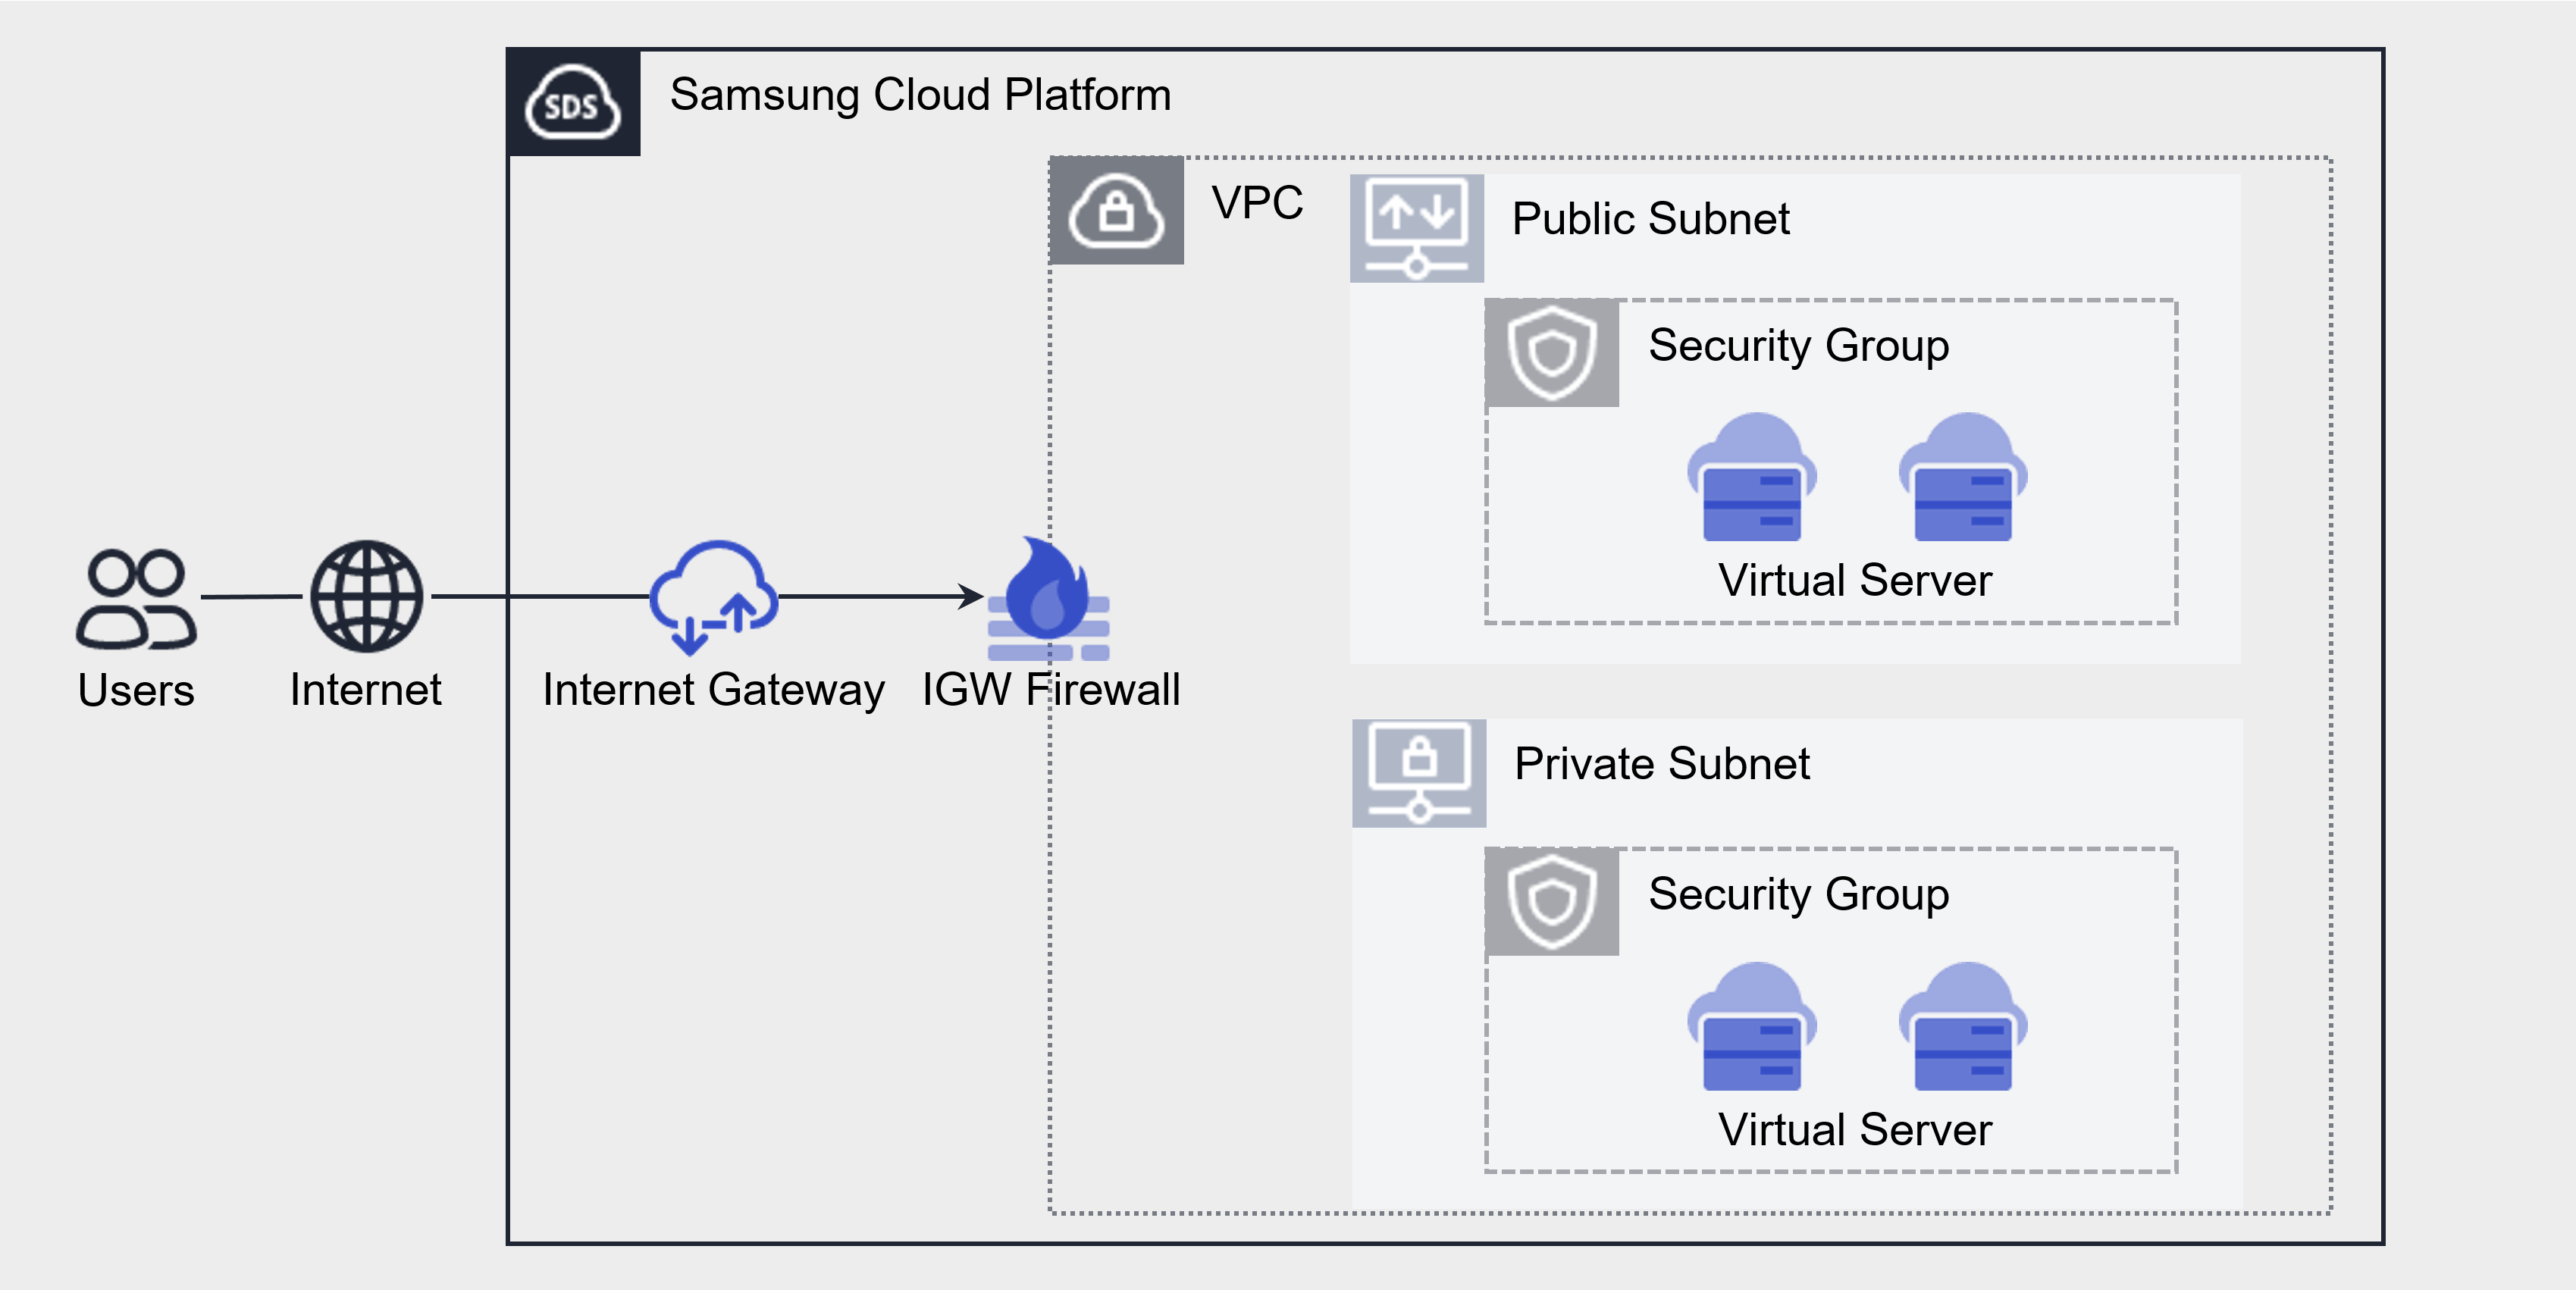
Components
Subnet
Subnet means the IP address range of a VPC. Depending on the purpose, use a General Subnet to create a Subnet for Public or Private use. It is a service that allows users to segment the network within a VPC according to their purpose/scale. Subnet provides a Local Subnet for communication between a regular Subnet and a server.
General Subnet Create/Read/Delete: When creating a VPC, the Subnet that is created by default is used according to purpose. For example, it can be used by distinguishing between a Public Subnet that can use the Internet and a Private Subnet that cannot use the Internet.
VPC Endpoint Subnet Create/Read/Delete: It is possible to access the Samsung Cloud Platform via a private connection from an external network connected to the VPC, allowing entry to the VPC.
Local Subnet creation/query/deletion: It does not allow connections to other Subnets or external access, and is a Subnet that only permits direct connections between Virtual Server-Virtual Server or Bare Metal Server-Bare Metal Server, so only settings between Virtual Server-Virtual Server within the VPC are possible.
Subnet types
It means Sub_network and is an IP address space subdivided into small units for use in IP networks. Subnet types are divided according to how routing for the Subnet is configured.
| Type | Detailed Description |
|---|---|
| Public Subnet | Subnet can be configured to use the internet as a General Subnet |
| Private Subnet | Can configure a Subnet where internet usage is not possible using General Subnet |
| VPC Endpoint Subnet | Subnet configuration that can be used as VPC Endpoint |
| Local Subnet | Possible to configure a Subnet that does not connect to other Subnets or external access |
Table. Subnet Type
Internet Gateway
You can create an Internet Gateway to connect to a VPC, view detailed information, or delete an unused Internet Gateway. You can use an Internet Gateway to connect VPC resources to the internet.
You can assign a public IP to instances and load balancers that can be connected to the internet, allowing access from outside.
NAT Gateway
Create a NAT Gateway, connect it to a subnet, view detailed information, or delete an unused NAT Gateway.
To create a NAT Gateway for a subnet, you must first create an Internet Gateway and attach it to the VPC. Creating a NAT Gateway allows internet access for all resources in the subnet. To restrict internet access, apply firewall rules.
A NAT Gateway can be created when it is of the General type, and it is a service that maps a single representative public IP for a Virtual Server without a public IP NAT, for outbound internet usage.
Public IP
If you want to use the same IP address each time you stop and start an instance, you reserve a Public IP and use it.
This is a service that creates a desired public IP within the available Public IP Pool of Samsung Cloud Platform and assigns it to compute resources for use.
Compute resources assigned with the designated public IP will not have their IP changed even if they are rebooted.
Port
Provides a connection point to connect a single device such as a server’s NIC to the network. This allows addition beyond the default provided NIC.
VPC Endpoint
Provides an entry point of the VPC that can access the Samsung Cloud Platform via a Private connection from an external network connected to the VPC.
VPC Peering
Through a 1:1 private route between VPCs, IP communication is possible. By default, peering is provided between VPCs in the same Account, and only one connection is allowed between different Accounts.
Private NAT
You can map and connect the customer’s IP using Direct Connect from compute resources within the VPC.
Transit Gateway
Transit Gateway connects the customer’s network and Samsung Cloud Platform’s network easily and serves as a gateway service that acts as a connection hub for multiple VPCs within the cloud environment.
Through Transit Gateway, customers can configure various network topologies they desire. Additionally, it provides independent firewall configuration and routing functions for each connected network segment, allowing thorough security management.
PrivateLink
It is a service that connects internal data of Samsung Cloud Platform to a private path between VPC and SCP services without exposing it to the internet.
- PrivateLink Service is for service providers, and PrivateLink Endpoint is for service users.
Constraints
The VPC of Samsung Cloud Platform limits the number of VPCs and Subnets created as follows.
| Category | Default Quota | Detailed Description |
|---|---|---|
| VPC | 5 | Number of default VPC creation limit per Account |
| VPC Peering | 5 | Number of VPC Peering creation limit per account |
| Subnet | 3 | Default Subnet creation limit per VPC |
| Private NAT | 3 | Default number of Private NATs that can be created per VPC |
| Transit Gateway | 3 | Number of Transit Gateways creation limit per account |
| Transit Gateway connection from VPC | 5 | Maximum number of VPC connections per Transit Gateway (only same account can connect) |
Table. VPC Constraints
Prior Service
VPC has no preceding service.
1.1.1 - ServiceWatch Metrics
VPC - Internet Gateway sends metrics to ServiceWatch. The metrics provided by basic monitoring are data collected at a 5-minute interval.
Reference
To check metrics in ServiceWatch, refer to the ServiceWatch guide.
Basic Indicators
Internet Gateway
The following are the basic metrics for the Internet Gateway namespace.
| Performance Item | Detailed Description | Unit | Meaningful Statistics |
|---|---|---|---|
| Network In Total Bytes_Internet | Cumulative traffic from Internet Gateway to VPC | Bytes |
|
| Network Out Total Bytes _Internet | Cumulative traffic volume towards VPC → Internet Gateway | Bytes |
|
| Network In Total Bytes _Internet_Delta | Internet Gateway → Cumulative traffic over 5 minutes towards VPC (Internet) | Bytes |
|
| Network Out Total Bytes _Internet_Delta | Cumulative traffic amount (Internet) over 5 minutes from VPC to Internet Gateway | Bytes |
|
Table. VPC - Internet Gateway Basic Metrics
1.2 - How-to guides
The user can enter the essential information of the VPC service and create the service by selecting detailed options through the Samsung Cloud Platform Console.
Create VPC
You can create and use VPC services on the Samsung Cloud Platform Console.
To create a VPC, follow the following procedure.
- All services > Networking > VPC menu is clicked. It moves to the Service Home page of VPC.
- Service Home page, click the VPC creation button. It moves to the VPC creation page.
- Service Information Input area, please enter or select the required information.
Classification MandatoryDetailed Description VPC name required name of the VPC to be created - enter within 3~20 characters using English letters and numbers
IP range required IP range to be used - In IP range format, enter within the range of
/16 ~ /24- Example:
192.168.0.0/16 ~ /24
- Example:
Description Selection Enter a description of the VPC Table. VPC Service Information Input Items - Additional Information Input area, please enter or select the required information.
Classification MandatoryDetailed Description Tag Selection Add Tag - Up to 50 can be added per resource
- Click the Add Tag button and enter or select Key, Value
Table. VPC Additional Information Input Items
- Summary panel where you created detailed information and estimated billing amount, and click the Complete button.
- Once creation is complete, check the created resource on the VPC list page.
VPC detailed information check
VPC service is a service that can check and modify the entire resource list and detailed information. The VPC details page consists of details, tags, and operation history tabs.
To check the VPC details, follow the next procedure.
- All services > Networking > VPC menu is clicked. It moves to the Service Home page of VPC.
- Service Home page, click the VPC menu. It moves to the VPC list page.
- VPC list page, click on the resource to check the detailed information. It moves to the VPC details page.
- VPC Details page displays status information and additional feature information, and consists of Details, Tags, Task History tabs.
Classification Detailed Description Status VPC’s status - Active: normal operation in progress
- Deleting: deletion in progress
- Creating: creation in progress
- Error: current status cannot be confirmed
- <li;if it occurs continuously, contact the registered administrator
Service Cancellation Button to cancel the service - To cancel the VPC, there should be no connected services.
- When the service is canceled, the operating service may be stopped immediately, so proceed with the cancellation work after fully considering the impact that occurs when the service is stopped
Table. VPC Status Information and Additional Features
Detailed Information
VPC List page where you can check the detailed information of the selected resource and modify the information if necessary.
| Classification | Detailed Description |
|---|---|
| Service | Service Name |
| Resource Type | Resource Type |
| SRN | Unique resource ID in Samsung Cloud Platform
|
| Resource Name | VPC Name |
| Resource ID | VPC’s unique resource ID |
| Creator | The user who created the VPC |
| Creation Time | The time when VPC was created |
| Modifier | User who modified VPC information |
| Revision Time | Time when VPC information was revised |
| VPC name | VPC resource name |
| VPC ID | VPC Unique ID |
| External Link | Information connected to the outside |
| IP range | Service IP range |
| Description | VPC Description |
Table. VPC Details Tab Items
Tag
VPC List page where you can check the tag information of the selected resource, and add, change or delete it.
| Classification | Detailed Description |
|---|---|
| Tag list | Tag list
|
Table. VPC tags tab items
Work History
VPC list page where you can check the work history of the selected resource.
| Classification | Detailed Description |
|---|---|
| Work history list | Resource change history
|
Table. VPC task history tab detailed information items
VPC Cancellation
You can cancel the unused VPC to reduce operating costs. However, when canceling the service, the operating service may be stopped immediately, so you should consider the impact of stopping the service sufficiently before proceeding with the cancellation work.
Caution
VPC cannot be terminated if there are connected resources.
To cancel the VPC, follow the following procedure.
- All services > Networking > VPC menu is clicked. It moves to the Service Home page of VPC.
- Service Home page, click the VPC menu. It moves to the VPC list page.
- VPC list page, select the resource to be canceled and click the service cancellation button.
- Once the cancellation is complete, check if the resource has been cancelled on the VPC list page.
1.2.1 - Subnet
Subnet creation
You can create and use the VPC Subnet service on the Samsung Cloud Platform Console.
To create a subnet, follow the following procedure.
- All services > Networking > VPC menu is clicked. It moves to the Service Home page of VPC.
- Service Home page, click the Subnet creation button. It moves to the Subnet creation page.
- Service Information Input area, please enter or select the required information.
Classification NecessityDetailed Description Subnet type required Select the Subnet type. - General: Public and Private configuration possible
- Local: Can be specified by selecting either Virtual Server or Bare Metal Server
- VPC Endpoint: VPC Endpoint configuration possible
- Local Subnet is a Subnet for communication between servers only, and external communication is not possible
VPC name required select a VPC to connect the subnet from the list of currently created VPCs Subnet name required name of the Subnet to be created - enter within 3-20 characters using English uppercase and lowercase letters, and numbers
IP range required IP range to be used - In the format of IP range, enter within the range of
/16 ~ /28- Example:
192.168.0.0/22 ~ /27
- Example:
- The IP range cannot be duplicated with the IP range (other subnets) currently in use within the VPC
Gateway Selection The Subnet’s Gateway address is displayed - If you enter the IP range, the corresponding IP will be automatically displayed
Table. VPC Subnet service information input items - Additional Information Input area, please enter or select the required information.
Classification MandatoryDetailed Description Description Selection Enter a description for the Subnet IP allocation range selection range setting possible within the IP range to be used - default: entire IP range
- Subnet sub-resources are assigned an IP within the entire IP range or the range individually specified by the user
DNS Name Server Select Use Select and then enter DNS Name Server IP host path selection use select and enter the host path after selection - destination IP ranges should not overlap with each other
Tag Selection Add Tag - Up to 50 can be added per resource
- Click the Add Tag button and enter or select Key, Value
Table. Subnet Additional Information Input Items
- Summary panel where you created detailed information and estimated billing amount, and click the Complete button.
- Once creation is complete, check the created resource on the Subnet list page.
Subnet detailed information check
Subnet service can check and modify the entire resource list and detailed information. The Subnet detail page consists of detailed information, tags, and operation history tabs.
To check the subnet detailed information, follow the next procedure.
- All services > Networking > VPC menu is clicked. It moves to the Service Home page of VPC.
- Service Home page, click the Subnet button. It moves to the Subnet list page.
- Subnet list page, click on the resource to check the detailed information. It moves to the Subnet details page.
- Subnet details page displays status information and additional feature information, and consists of details, tags, operation history tabs.
Classification Detailed Description Status Status of Subnet - Active: normal operation in progress
- Creating: creation in progress
- Deleting: deletion in progress
- Failed: failed to create
- Error: current status unknown
- if it occurs continuously, contact the registered administrator
Subnet deletion Button to delete subnet Table. Subnet status information and additional functions
Detailed Information
Subnet list page where you can check the operation history of the selected resource.
| Classification | Detailed Description |
|---|---|
| Service | Service Name |
| Resource Type | Resource Type |
| SRN | Unique resource ID in Samsung Cloud Platform
|
| Resource Name | Subnet Resource Name |
| Resource ID | Unique resource ID in the service |
| Creator | Subnet created user |
| Creation Time | Subnet Creation Time |
| Modifier | User who modified Subnet information |
| Revision Time | Time when Subnet information was revised |
| Subnet type | Subnet type |
| VPC name | VPC that subnet belongs to |
| Subnet name | Subnet title |
| Subnet ID | Subnet Unique ID |
| IP range | Used IP range |
| Gateway IP | Subnet’s Gateway IP address |
| IP assignment range | IP assignment range |
| DNS Name Server | Whether to use DNS Name Server |
| Host Path | Host path (destination IP range, Next Hop IP address) information |
Table. Subnet details tab items
Tag
Subnet list page where you can check the tag information of the selected resource, and add, change or delete it.
| Classification | Detailed Description |
|---|---|
| Tag List | Tag List
|
Table. Subnet tags tab items
Work History
Sunnet list page where you can check the work history of the selected resource.
| Classification | Detailed Description |
|---|---|
| Work history list | Resource change history
|
Table. Subnet job history tab detailed information items
Subnet cancellation
You can delete unused Subnet. However, since Subnet cannot be recovered once deleted, you should consider the impact of deleting the Subnet sufficiently before proceeding with the deletion work.
Caution
- If there are connected resources, you cannot cancel the service. Please delete the connected resources first.
- The service can only be deleted when the service status is Active or Error.
- After deleting the service, you cannot recover the data, so please be careful.
To delete a subnet, follow these procedures.
- All services > Networking > VPC menu is clicked. It moves to the Service Home page of VPC.
- Service Home page, click the Subnet menu. It moves to the Subnet list page.
- Subnet list page, click the resource to be deleted. It moves to the Subnet details page.
- Subnet details page, click the delete button.
- After deletion is complete, it checks if the resource has been deleted from the Subnet list.
Preceding service
This is a list of services that must be pre-configured before creating the service. Please refer to the guide provided for each service and prepare in advance for more details.
| Service Category | Service | Detailed Description |
|---|---|---|
| Networking | VPC | a service that provides an independent virtual network in a cloud environment |
Table. Preceding Subnet Service
1.2.2 - Port
Port creation
You can create and use the Port service on the Samsung Cloud Platform Console.
To create a port, follow the following procedure.
- All services > Networking > VPC menu is clicked. It moves to the Service Home page of VPC.
- Service Home page, click the Port creation button. Move to the Port creation page.
- Service Information Input area, please enter or select the required information.
Classification NecessityDetailed Description VPC Name Required Select a VPC to create a port Subnet name required Select the Subnet to create a Port Port name required A name that can easily identify the port - Enter within 3-20 characters using English uppercase and lowercase letters, and numbers
IP allocation method required IP allocation method selection - automatic allocation: IP is automatically allocated within the IP allocation range of Subnet
- direct input: The input IP is allocated within the subnet range
- fixed IP address Enter the IP address to be used for the Port
Description Selection Enter a description of the Port Security Group Selection Use Select up to 5 Security Groups when selected Table. Port Service Information Input Items - Additional Information Input area, please enter or select the required information.
Classification MandatoryDetailed Description Tag Selection Add Tag - Up to 50 can be added per resource
- Click the Add Tag button and enter or select Key, Value
Table. Additional Port Information Input Items
- Summary panel where you created detailed information and estimated billing amount, and click the Complete button.
- Once creation is complete, check the created resource on the Port list page.
Port detailed information check
Port service allows you to check and modify the entire resource list and detailed information. Port details page consists of detailed information, tags, work history tabs.
Port detailed information to confirm, please follow the next procedure.
- All services > Networking > VPC menu is clicked. It moves to the Service Home page of VPC.
- Service Home page, click the Port menu. It moves to the Port list page.
- Port list page, click the resource (Port name) to check the detailed information. It moves to the Port details page.
- Port Details page displays status information and additional feature information, and consists of Details, Tags, Work History tabs.
Classification Detailed Description Status Port’s status - Active: normal operation in progress
- Down: not connected to a resource, or connected but not operating
- Build: being created
- Error: current status cannot be confirmed
- if it occurs continuously, contact the registered administrator
Port deletion Button to delete the port Table. Port Status Information and Additional Functions
Detailed Information
Port list page where you can check the detailed information of the selected resource and modify the information if necessary.
| Classification | Detailed Description |
|---|---|
| Service | Service Name |
| Resource Type | Resource Type |
| SRN | Unique resource ID in Samsung Cloud Platform
|
| Resource Name | Port Resource Name |
| Resource ID | Unique resource ID in the service |
| Resource ID | Port’s unique resource ID |
| Creator | The user who created the Port |
| Creation Time | The time when the Port was created |
| Editor | User who modified the Port information |
| Revision Time | Time when Port information was revised |
| Port name | Port resource name |
| Port ID | Port Resource ID |
| Subnet name | Connected Subnet name |
| Connected Resources | Connected Device Information |
| Fixed IP | Fixed IP Information |
| MAC address | MAC address information |
| Description | Description of the Port |
| Security Group | Connected Security Group information
|
Table. Port detailed information tab items
Tag
Port list page where you can check the tag information of the selected resource, and add, change or delete it.
| Classification | Detailed Description |
|---|---|
| Tag List | Tag List
|
Table. Port tag tab item
Work History
Port list page where you can check the work history of the selected resource.
| Classification | Detailed Description |
|---|---|
| Work history list | Resource change history
|
Table. Port job history tab detailed information items
Port deletion
You can release unused Port to reduce operating costs. However, if you delete the Port, the service in operation may be stopped immediately, so you should consider the impact of stopping the service sufficiently and proceed with the cancellation work.
To delete a Port, follow the following procedure.
- All services > Networking > VPC menu is clicked. It moves to the Service Home page of VPC.
- Service Home page, click the Port menu. It moves to the Port list page.
- Port list page, click the resource (Port name) to be deleted. It moves to the Port details page.
- Port details page, click the delete button.
- After deletion is complete, it checks if the resource has been deleted from the Port list.
Preceding service
This is a list of services that must be pre-configured before creating the service. Please refer to the guide provided for each service and prepare in advance for more details.
| Service Category | Service | Detailed Description |
|---|---|---|
| Networking | VPC | a service that provides an independent virtual network in a cloud environment |
Table. Port Preceding Service
1.2.3 - Internet Gateway
Internet Gateway creation
You can create and use the Internet Gateway service on the Samsung Cloud Platform Console.
To create an Internet Gateway, follow the next procedure.
- All services > Networking > VPC menu is clicked. It moves to the Service Home page of VPC.
- Service Home page, click the Create Internet Gateway button. It moves to the Create Internet Gateway page.
- Service Information Input area, please enter or select the required information.
Classification MandatoryDetailed Description VPC name required Select a VPC connected to the Internet Gateway classification essential Select Internet Gateway type Internet Gateway name selection automatically generated as IGW_{VPC name} Description Selection Enter a description for the Internet Gateway Firewall use selection Firewall usage selection Firewall log storage option Select Select whether to store the Firewall log - Store access logs when using the Firewall
- For more information, see How to use Firewall log storage
Table. Internet Gateway service information input items - Additional Information Input area, please enter or select the required information.
Classification NecessityDetailed Description Tag Selection Add Tag - Up to 50 can be added per resource
- Click the Add Tag button and enter or select Key, Value
Table. Additional Information Input Items for Internet Gateway
Caution
You cannot connect Internet Gateway and Group Gateway to a single VPC at the same time.
- Summary panel where you can check the detailed information generated and the expected billing amount, and click the Complete button.
- Once creation is complete, check the created resource on the Internet Gateway list page.
Internet Gateway detailed information check
Internet Gateway 서비스는 전체 자원 목록과 상세 정보를 확인하고 수정할 수 있습니다. Internet Gateway 상세 페이지에서는 상세 정보, 태그, 작업 이력 탭으로 구성되어 있습니다. -> Internet Gateway service can check and modify the entire resource list and detailed information. The Internet Gateway details page consists of details, tags, and operation history tabs.
Internet Gateway detailed information to confirm, please follow the next procedure.
- All Services > Networking > VPC menu is clicked. It moves to the Service Home page of VPC.
- Service Home page, click the Internet Gateway menu. It moves to the Internet Gateway list page.
- Internet Gateway list page, click on the resource to check the detailed information. It moves to the Internet Gateway details page.
- Internet Gateway details page displays status information and additional feature information, and consists of details, tags, operation history tabs.
Classification Detailed Description Status Internet Gateway Status - Creating: Resource creation in progress
- Active: Connected
- Deleting: Deletion in progress
- Error: Current status cannot be confirmed
- If this occurs continuously, please contact the registered administrator
Internet Gateway deletion Internet Gateway delete button Table. Internet Gateway Status Information and Additional Functions
Detailed Information
Internet Gateway list page where you can check the detailed information of the selected resource and modify the information if necessary.
| Classification | Detailed Description |
|---|---|
| Service | Service Name |
| Resource Type | Resource Type |
| SRN | Unique resource ID in Samsung Cloud Platform
|
| Resource Name | Internet Gateway Resource Name |
| Resource ID | Unique resource ID in the service |
| Creator | The user who created the Internet Gateway |
| Creation Time | The time when the Internet Gateway was created |
| Editor | User who modified the Internet Gateway information |
| Modified Time | Time when Internet Gateway information was modified |
| Internet Gateway name | Internet Gateway title |
| Internet Gateway ID | Internet Gateway resource ID |
| VPC name | VPC title |
| VPC name | VPC ID |
| Classification | Internet Gateway Type |
| Description | Description of the Internet Gateway |
| Firewall name | Move to the Firewall detail page |
| Firewall use | Whether to use Firewall |
| NAT Gateway | Move to NAT Gateway detailed page |
| NAT log storage status | NAT log storage status
|
Table. Internet Gateway detailed information tab items
Tag
Internet Gateway list page where you can check the tag information of the selected resource, and add, change or delete it.
| Classification | Detailed Description |
|---|---|
| tag list | tag list
|
Table. Internet Gateway Tags Tab Items
Work History
Internet Gateway list page where you can check the operation history of the selected resource.
| Classification | Detailed Description |
|---|---|
| Work history list | Resource change history
|
Table. Internet Gateway job history tab detailed information items
Internet Gateway resource management
Internet Gateway log storage usage, etc. can be managed to manage resources.
NAT log storage usage
Reference
To save NAT logs, you must first create a bucket in Object Storage to save the logs, and then set the bucket as the log repository in NAT Logging settings, then after setting log saving in NAT detail inquiry, NAT logs will be saved in the Object Storage bucket, log repository settings can be checked in NAT Logging settings, for more information, please refer to NAT Logging.
- When you set up a log storage, you will be charged for Object Storage fees for log storage.
To use NAT log saving, follow the next procedure.
- All services > Networking > VPC menu is clicked. It moves to the Service Home page of VPC.
- Service Home page, click the Internet Gateway menu. It moves to the Internet Gateway list page.
- Internet Gateway list page, click the resource to check the detailed information. It moves to the Internet Gateway details page.
- Modify NAT log storage button, click. Modify NAT log storage popup window will move to.
- NAT log storage modification In the popup window, select use for the log storage and click the confirm button.
Caution
NAT Logging에서 로그 저장소 설정이 되어 있지 않으면 로그 저장소 use 설정이 불가합니다 becomes NAT Logging where log storage settings are not set, log storage use settings are not available.
Do not use NAT log storage
To use NAT log saving, follow the next procedure.
- All services > Networking > VPC menu is clicked. It moves to the Service Home page of VPC.
- Service Home page, click the Internet Gateway menu. It moves to the Internet Gateway list page.
- Internet Gateway list page, click on the resource to check the detailed information. It moves to the Internet Gateway details page.
- Modify NAT log storage status button, click. Modify NAT log storage status popup window will move to.
- NAT log storage modification In the popup window, uncheck use of the log storage and click the confirm button.
- Notification Check the message in the popup window and click the Confirm button.
Caution
If log saving is released, the log saving of the corresponding service will be stopped, and tracking management through log analysis will not be possible in case of a security accident.
Internet Gateway deletion
To delete the Internet Gateway, follow the next procedure.
- All services > Networking > VPC menu is clicked. It moves to the Service Home page of VPC.
- Service Home page, click the Internet Gateway menu. It moves to the Internet Gateway list page.
- Internet Gateway list page, click the resource to be deleted. It moves to the Internet Gateway details page.
- Internet Gateway details page, click the Delete button.
- After the deletion is complete, it checks if the resource has been deleted from the Internet Gateway list.
Preceding service
This is a list of services that must be pre-configured before creating the service. Please refer to the guide provided for each service and prepare in advance for more details.
| Service Category | Service | Detailed Description |
|---|---|---|
| Networking | VPC | a service that provides an independent virtual network in a cloud environment |
Table. Preceding Internet Gateway Service
1.2.4 - NAT Gateway
NAT Gateway creation
You can create and use the NAT Gateway service on the Samsung Cloud Platform Console.
To create an NAT Gateway, follow the next procedure.
- All services > Networking > VPC menu, click. It moves to the Service Home page of VPC.
- Service Home page, click the Create NAT Gateway button. It moves to the Create NAT Gateway page.
- Service Information Input area where you can input or select the necessary information.
Classification MandatoryDetailed Description VPC name required Select the VPC to be connected Subnet name required select the connected Subnet NAT Gateway name selection created as NAT_GW_{subnet name} IP for NAT Gateway required Select Public IP for NAT Gateway Description Selection Enter a description for the NAT Gateway Table. NAT Gateway service information input items - Additional Information Input area, please enter or select the required information.
Classification MandatoryDetailed Description Tag Selection Add Tag - Up to 50 can be added per resource
- Click the Add Tag button and enter or select Key, Value
Table. NAT Gateway Additional Information Input Items
- Summary panel where you created detailed information and estimated billing amount, and click the Complete button.
- Once creation is complete, check the created resource on the NAT Gateway list page.
NAT Gateway detailed information check
NAT Gateway 서비스는 전체 자원 목록과 상세 정보를 확인하고 수정할 수 있습니다. NAT Gateway details 페이지에서는 details, tags, operation history 탭으로 구성되어 있습니다.
- All services > Networking > VPC menu is clicked. It moves to the Service Home page of VPC.
- Service Home page, click the NAT Gateway menu. It moves to the NAT Gateway list page.
- NAT Gateway list page, click the resource to check the detailed information. It moves to the NAT Gateway details page.
- NAT Gateway details page displays status information and additional feature information, and consists of details, tags, operation history tabs.
Classification Detailed Description Status NAT Gateway’s status - Creating: Creating in progress
- Active: Operating normally
- Deleting: Deleting in progress
- Error: Current status cannot be confirmed
- If it occurs continuously, contact the registered administrator
NAT Gateway deletion a button to cancel the service - In the case of no connected service, the NAT Gateway is canceled
- If the service is canceled, the operating service may be stopped immediately, so proceed with the cancellation work after fully considering the impact that occurs when the service is stopped
Table. NAT Gateway Status Information and Additional Functions
Detailed Information
NAT Gateway List page where you can check the detailed information of the selected resource and modify the information if necessary.
| Classification | Detailed Description |
|---|---|
| Service | Service Name |
| Resource Type | Resource Type |
| SRN | unique resource ID in Samsung Cloud Platform
|
| Resource Name | NAT Gateway Resource Name |
| Resource ID | Unique resource ID in the service |
| Creator | The user who created the NAT Gateway |
| Creation Time | The time when the NAT Gateway was created |
| Modifier | User who modified the NAT Gateway information |
| Modified Time | The time when NAT Gateway information was modified |
| NAT Gateway name | NAT Gateway title |
| NAT Gateway ID | NAT Gateway resource ID |
| VPC Name | VPC name connected to NAT Gateway |
| VPC ID | VPC resource ID connected to the NAT Gateway |
| Subnet name | NAT Gateway connected subnet name |
| Subnet name | NAT Gateway connected subnet resource ID |
| Subnet IP Range | Subnet IP Range Information |
| NAT Gateway IP | NAT Gateway IP information |
| Description | Description of the NAT Gateway |
Table. NAT Gateway details tab items
Tag
NAT Gateway List page where you can check the tag information of the selected resource, and add, change or delete it.
| Classification | Detailed Description |
|---|---|
| Tag list | Tag list
|
Table. NAT Gateway tags tab items
Work History
NAT Gateway list page where you can check the operation history of the selected resource.
| Classification | Detailed Description |
|---|---|
| Work history list | Resource change history
|
Table. NAT Gateway task history tab detailed information items
NAT Gateway deletion
Caution
Deleting the Nat Gateway means that, excluding resources with 1:1 Nat set, all resources in the corresponding Subnet will not be able to communicate with the internet.
To delete an NAT Gateway, follow these procedures.
- All services > Networking > VPC menu is clicked. It moves to the Service Home page of VPC.
- Service Home page, click the NAT Gateway menu. It moves to the NAT Gateway list page.
- NAT Gateway list page, click the resource to check the detailed information. It moves to the NAT Gateway details page.
- NAT Gateway details page, click the delete button.
- After deletion is complete, it checks if the resource has been deleted from the NAT Gateway list.
Preceding service
This is a list of services that must be pre-configured before creating the service. Please refer to the guide provided for each service and prepare in advance for more details.
| Service Category | Service | Detailed Description |
|---|---|---|
| Networking | VPC | a service that provides an independent virtual network in a cloud environment |
Table. Preceding services for NAT Gateway
1.2.5 - Public IP
Public IP creation
You can create and use the Public IP service on the Samsung Cloud Platform Console.
To create a public IP, follow the following procedure.
- All services > Networking > VPC menu is clicked. It moves to the Service Home page of VPC.
- Service Home page, click the Public IP Reservation button. It moves to the Public IP Reservation page.
- Service Information Input area, please enter or select the required information.
Classification NecessityDetailed Description Classification Essential Select a gateway to reserve a Public IP - Default: Internet Gateway
Description Selection Enter a description for the Public IP Table. Public IP service information input items - Additional Information Input area, please enter or select the necessary information.
Classification MandatoryDetailed Description Tag Select Add Tag - Up to 50 can be added per resource
- Click the Add Tag button and enter or select Key, Value
Table. Public IP Additional Information Input Items
- Summary panel where you can check the detailed information generated and the estimated billing amount, and click the Complete button.
- Once creation is complete, check the created resource on the Public IP list page.
Public IP detailed information check
Public IP service can check and modify the entire resource list and detailed information. The Public IP details page consists of details, tags, work history tabs.
Public IP detailed information to check, please follow the following procedure.
- All services > Networking > VPC menu is clicked. It moves to the Service Home page of VPC.
- Service Home page, click the Public IP menu. It moves to the Public IP list page.
- Public IP list page, click on the resource to check the detailed information. It moves to the Public IP details page.
- Public IP details page displays status information and additional feature information, and consists of details, tags, operation history tabs.
Classification Detailed Description Status Public IP Status - Attached: Attached Status
- Reserved: Reserved Status
- Error: Current status unknown
- If it occurs continuously, contact the registered administrator
Public IP Return Public IP Return Button Table. Public IP Status Information and Additional Features
Detailed Information
Public IP list page where you can check the detailed information of the selected resource and modify the information if necessary.
| Classification | Detailed Description |
|---|---|
| Service | Service Name |
| Resource Type | Resource Type |
| SRN | Unique resource ID in Samsung Cloud Platform
|
| Resource Name | Public IP Resource Name |
| Resource ID | Unique resource ID in the service |
| Creator | The user who created the Public IP |
| Creation Time | The time when Public IP was created |
| Editor | User who modified the Public IP information |
| Revision time | Time when public IP information was revised |
| IP address | Designated (reserved) IP address |
| Classification | Information of Gateway that reserved Public IP |
| Public IP ID | Public IP resource ID |
| Description | Description of Public IP |
| Connected Resource Type | Information of the resource connected to the designated (reserved) IP address |
| Connected Resource Name | Name of the resource connected to the designated (reserved) IP address |
Table. Public IP detailed information tab items
Tag
Public IP list page where you can check the tag information of the selected resource, and add, change or delete it.
| Classification | Detailed Description |
|---|---|
| tag list | tag list
|
Fig. Public IP tags tab items
Work History
Public IP list page where you can check the operation history of the selected resource.
| Classification | Detailed Description |
|---|---|
| Work history list | Resource change history
|
Table. Port job history tab detailed information items
Public IP Return
To delete a public IP, follow the following procedure.
- All services > Networking > VPC menu is clicked. It moves to the Service Home page of VPC.
- Service Home page, click the Public IP button. It moves to the Public IP list page.
- Public IP list page, click on the resource to check the detailed information. It moves to the Public IP details page.
- Public IP details page, click the return button.
- When the return is complete, Public IP list is checked to see if the resource has been deleted.
Preceding service
This is a service that must be installed beforehand to create the service, please refer to the user guide provided in advance and prepare accordingly.
| Service Category | Service | Detailed Description |
|---|---|---|
| Networking | VPC | a service that provides an independent virtual network in a cloud environment. |
Table. Public IP Preceding Service
1.2.6 - Private NAT
The user can enter the required information for the Private NAT service through the Samsung Cloud Platform Console, select detailed options, and create the service.
Private NAT Create
You can create and use a Private NAT service from the Samsung Cloud Platform Console.
To create a Private NAT, follow the steps below.
- All Services > Networking > VPC Click the menu. Navigate to the VPC’s Service Home page.
- Click the Private NAT creation button on the Service Home page. You will be taken to the Private NAT creation page.
- Service Information Input Please enter or select the required information in the area.
Category RequiredDetailed description Private NAT name Required Enter Private NAT name - Enter using letters and numbers, 3 to 20 characters
Direct Connect name Required Select Direct Connect to connect Private NAT - Click + New in the list to create Direct Connect
Connected VPC Name Required Display VPC connected to Direct Connect NAT IP range Required Enter the NAT IP range to use - Enter in CIDR format, e.g., 192.168.2.0/23
- Cannot be used overlapping with connected VPCs or other Private NAT IP ranges
Description Select Enter description for Private NAT Table. Private NAT Detailed Information Tab Items - Additional Information Input Enter or select the required information in the area.
Category RequiredDetailed description Tag Select Add Tag - Up to 50 can be added per resource
- After clicking the Add Tag button, enter or select Key, Value values
Table. Private NAT additional information input items
- Service Information Input Please enter or select the required information in the area.
- Summary Check the detailed information and estimated billing amount generated in the panel, and click the Complete button.
- When creation is complete, check the created resources on the Private NAT List page.
Private NAT Check detailed information
Private NAT 서비스 can view and edit the full resource list and detailed information. Private NAT 상세 페이지 consists of 상세 정보, IP 관리, 태그, 작업 이력 tabs.
Private NAT To view detailed information, follow the steps below.
- All Services > Networking > VPC Click the menu. Navigate to the VPC’s Service Home page.
- Click the Private NAT menu on the Service Home page. Go to the Private NAT list page.
- Click the resource to view detailed information on the Private NAT List page. It navigates to the Private NAT Details page.
- Private NAT Details page displays status information and additional feature information, and consists of Details, IP Management, Tags, Operation History tabs.
Category Detailed description Status Private NAT Status - Active: Running
- Creating: Creating
- Deleting: Deleting
- Error: Error occurred
Private NAT Delete Button to delete Private NAT Table. Private NAT status information and additional features
Detailed Information
Private NAT List page allows you to view detailed information of the selected resource and, if necessary, edit the information.
| Category | Detailed description |
|---|---|
| Service | Service Name |
| Resource Type | Resource Type |
| SRN | Unique resource ID in Samsung Cloud Platform |
| Resource Name | Private NAT resource name |
| Resource ID | Unique resource ID in the service |
| Creator | User who created Private NAT |
| Creation time | Time when Private NAT was created |
| Editor | User who modified the Private NAT information |
| Modification date/time | Date/time when Private NAT information was modified |
| Private NAT name | Private NAT resource name |
| Direct Connet name | Information of Direct Connet connected with Private NAT, click the Direct Connet name to go to the detail information page |
| NAT IP range | Information on the NAT IP range in use |
| Connected VPC Name | VPC information connected to Private NAT, click the VPC name to go to the detail information page |
| Description | Description of Private NAT
|
Table. Private NAT detailed information items
IP Management
Private NAT list page, you can check the Private NAT IP, and reserve or return it.
| Category | Detailed description |
|---|---|
| Private NAT IP list | Used Private NAT list
|
Table. Private NAT Tag Tab Items
Tag
Private NAT list page allows you to view the tag information of the selected resource, and you can add, modify, or delete it.
| Category | Detailed description |
|---|---|
| Tag List | Tag List
|
Table. Private NAT Tag Tab Items
Work History
Private NAT List You can view the operation history of the selected resource on the page.
| Category | Detailed description |
|---|---|
| Work History List | Resource Change History
|
Table. Private NAT operation history tab detailed information items
Private NAT IP Management
You can reserve or release a private NAT IP.
Reserve Private NAT IP
To reserve Private NAT IP, follow the steps below.
- All Services > Networking > VPC Click the menu. Go to the VPC’s Service Home page.
- Click the Private NAT menu on the Service Home page. You will be taken to the Private NAT List page.
- Private NAT List page, click the resource to reserve an IP. Private NAT Details page will be opened.
- Private NAT Details on the page, click the IP Management tab. Navigate to the IP Management tab page.
- IP Management on the tab page, click the Private NAT IP Reservation button. The IP reservation window appears.
- Enter the Private NAT IP to be used in the IP reservation window and click the Confirm button. A notification confirmation window appears.
- Click the Confirm button in the notification dialog. Verify that the resource entry has been added to the IP list.
Private NAT IP Return
Caution
You can only return it when the Private NAT IP status is Reserved.
To return the Private NAT IP, follow the steps below.
- All Services > Networking > VPC Click the menu. Navigate to the VPC Service Home page.
- Click the Private NAT menu on the Service Home page. Navigate to the Private NAT List page.
- Private NAT List page, click the resource to reserve an IP. Move to the Private NAT Details page.
- Private NAT Details on the page, click the IP Management tab. Navigate to the IP Management tab page.
- IP Management on the tab page, click the Return button for the IP item to be returned. The IP return window appears.
- Verify that the selected resource from the IP list has been deleted.
Private NAT Delete
You can cancel the unused Private NAT to reduce operating costs.
Caution
If the Private NAT service status is Creating, Editing, or Deleting, the service cannot be terminated.
To cancel Private NAT, follow the steps below.
- Click the All Services > Networking > VPC menu. Navigate to the VPC’s Service Home page.
- Click the Private NAT menu on the Service Home page. Navigate to the Private NAT List page.
- Click the resource to delete on the Private NAT List page. It moves to the Private NAT Details page.
- Click the Delete Private NAT button on the Private NAT Details page.
- When termination is complete, check whether the resource has been deleted from the Private NAT list.
Preliminary Service
This is a service that must be installed in advance before creating this service. Please refer to the user guide provided in advance and prepare.
| Service Category | Service | Detailed Description |
|---|---|---|
| Networking | VPC | A service that provides an independent virtual network in a cloud environment |
| Networking | Direct Connect | A service that safely and quickly connects the customer’s network with the Samsung Cloud Platform environment |
Table. Private NAT Preceding Service
1.2.7 - VPC Endpoint
Create VPC Endpoint
You can create and use the VPC Endpoint service on the Samsung Cloud Platform Console.
To create a VPC Endpoint, follow the following procedure.
- All services > Networking > VPC menu is clicked. It moves to the Service Home page of VPC.
- Service Home page, click the VPC Endpoint creation button. It moves to the VPC Endpoint creation page.
- Service Information Input area, please enter or select the required information.
Classification MandatoryDetailed Description VPC Name Required Select the VPC to create the Endpoint Usage > Target Service Required Select the target service to create a VPC Endpoint usage purpose > connection resource essential Select the resource to create a VPC Endpoint VPC Endpoint name required Enter the VPC Endpoint name - Enter 3-20 characters using English and numbers
VPC Endpoint IP > Subnet name required Select VPC Endpoint Subnet VPC Endpoint IP > IP required Enter the IP to be used for VPC Endpoint - (example)
192.168.x.x
Description Selection Enter a description for the VPC Endpoint Table. VPC Endpoint details tab items - Additional Information Input area, please enter or select the required information.
Classification MandatoryDetailed Description Tag Select Add Tag - Up to 50 can be added per resource
- Click the Add Tag button and enter or select Key, Value
Table. VPC Endpoint Additional Information Input ItemsReferenceAfter registering the VPC Endpoint, to connect to internal services of the Samsung Cloud Platform, you must set up the Direct Connect firewall settings. Refer to the port information for each service and register the firewall rules.
Service Port Information DNS TCP 53, UDP 53 Object Storage TCP 8080, 8443, 80, 443, 4430 File Storage (NFS) TCP/UDP common 111, 300, 302, 304, 2049, 635, 4045, 4046, 4049
(CIFS) UDP 135, 137, 138, 389 / TCP 135, 139, 445, 40001Container Registry (authentication server, Registry) TCP 443 Table. Allowed port information by target service
- Summary panel where you created detailed information and estimated billing amount, and click the Complete button.
- Once creation is complete, check the created resource on the VPC Endpoint list page.
VPC Endpoint detailed information check
VPC Endpoint service can check and modify the entire resource list and detailed information. The VPC Endpoint details page consists of details, tags, operation history tabs.
Endpoint detailed information can be checked by following the next procedure.
- All services > Networking > VPC menu is clicked. It moves to the Service Home page of VPC.
- Service Home page, click the VPC Endpoint menu. It moves to the VPC Endpoint list page.
- VPC Endpoint list page, click the resource to check the detailed information. It moves to the VPC Endpoint details page.
- VPC Endpoint details page displays status information and additional feature information, and consists of details, tags, operation history tabs.
Classification Detailed Description Status VPC Endpoint status - Active: normal operation in progress
- Creating: creation in progress
- Deleting: deleting resource connection
- Deleted: resource connection deleted
VPC Endpoint deletion VPC Endpoint connection resource deletion button Table. VPC Endpoint Status Information and Additional Features
Detailed Information
VPC Endpoint List page where you can check the detailed information of the selected resource and modify the information if necessary.
| Classification | Detailed Description |
|---|---|
| Service | Service Name |
| Resource Type | Resource Type |
| SRN | unique resource ID in Samsung Cloud Platform
|
| Resource Name | VPC Endpoint Resource Name |
| Resource ID | Unique resource ID in the service |
| Creator | The user who created the VPC Endpoint |
| Creation Time | The time when the VPC Endpoint was created |
| Modifier | User who modified the VPC Endpoint information |
| Modified Time | Time when VPC Endpoint information was modified |
| VPC Endpoint name | VPC Endpoint title |
| VPC name | Connected VPC name |
| VPC ID | Connected VPC ID |
| Target Service | Connected Target Information |
| Linked Resource Information | Information of Linked Resources |
| Subnet name | Endpoint subnet information |
| VPC Endpoint IP | VPC Endpoint IP information |
| Description | Description of the VPC Endpoint |
Table. Endpoint detailed information items
Tag
VPC Endpoint list page where you can check the tag information of the selected resource, and add, change or delete it.
| Classification | Detailed Description |
|---|---|
| Tag List | Tag List
|
Table. VPC Endpoint Tags Tab Items
Work History
VPC Endpoint list page where you can check the operation history of the selected resource.
| Classification | Detailed Description |
|---|---|
| Work history list | Resource change history
|
Table. VPC Endpoint task history tab detailed information items
VPC Endpoint deletion
You can release unused Endpoints to reduce operating costs. However, deleting an Endpoint may immediately stop the service in operation, so you should consider the impact of the service stoppage sufficiently before proceeding with the cancellation work.
To cancel the VPC Endpoint, follow the following procedure.
- All services > Networking > VPC menu is clicked. It moves to the Service Home page of VPC.
- Service Home page, click the VPC Endpoint menu. It moves to the VPC Endpoint list page.
- VPC Endpoint list page, click the resource to be deleted. It moves to the VPC Endpoint details page.
- VPC Endpoint details page, click the Delete Endpoint button.
- Once the cancellation is complete, VPC Endpoint list is checked to see if the resource has been deleted.
Preceding service
This is a list of services that must be pre-configured before creating the service. Please refer to the guide provided for each service and prepare in advance for more details.
| Service Category | Service | Detailed Description |
|---|---|---|
| Networking | VPC | a service that provides an independent virtual network in a cloud environment |
| Networking | Direct Connect | A service that securely and quickly connects the customer network and Samsung Cloud Platform |
Table. Preceding Internet Gateway Service
1.2.8 - VPC Peering
The user can enter the essential information of the VPC Peering service and select detailed options through the Samsung Cloud Platform Console to create the service.
VPC Peering creation
You can create and use the VPC Peering service on the Samsung Cloud Platform Console.
To create VPC Peering, follow the following procedure.
- All services > Networking > VPC menu is clicked. It moves to the Service Home page of VPC.
- Service Home page, click the VPC Peering creation button. It moves to the VPC Peering creation page.
- Service Information Input area, please enter or select the required information.
Classification MandatoryDetailed Description VPC Peering name required Enter the VPC Peering name - Enter 3-20 characters using English and numbers
Request VPC name Mandatory Select the VPC to request VPC Peering - Clicking + New Creation in the list allows VPC creation
Approval Account Required Select the account to approve the VPC Peering and then select the corresponding VPC or enter the information - Same account selection: Select the approval VPC name
- Clicking + New Creation in the list allows VPC creation
- Different account selection: Enter the approval account ID and approval VPC ID
Description Selection Enter a description for VPC Peering Table. VPC Peering detailed information tab items - Additional Information Input area, please enter or select the required information.
Classification MandatoryDetailed Description Tag Select Add Tag - Up to 50 can be added per resource
- Click the Add Tag button and enter or select Key, Value
Table. VPC Peering Additional Information Input Items
- Summary panel where you created detailed information and estimated billing amount, and click the Complete button.
- When connecting to a different Account’s VPC, the peering process is performed after going through an approval process, so it may take time for the connection work to be completed.
- Once creation is complete, check the created resource on the VPC Peering list page.
VPC Peering detailed information check
VPC Peering service allows you to check and modify the entire resource list and detailed information. The VPC Peering details page consists of details, rules, tags, and operation history tabs.
VPC Peering detailed information to confirm, please follow the following procedure.
- All services > Networking > VPC menu is clicked. It moves to the Service Home page of VPC.
- Service Home page, click the VPC Peering menu. It moves to the VPC Peering list page.
- VPC Peering list page, click the resource to check the detailed information. It moves to the VPC Peering details page.
- VPC Peering Details page displays status information and additional feature information, and consists of Details, Rules, Tags, Operation History tabs.
Classification Detailed Description Status VPC Peering status - Active: in operation
- Requesting: connecting or deleting request in progress
- Creating Requesting: connecting request in progress
- Deleting Requesting: deletion request in progress
- Editing: being modified
- Rejected: approval rejected
- Canceled: request canceled
- Error: error occurred
- if it occurs continuously, contact the registered administrator
VPC Peering deletion/VPC Peering deletion request VPC Peering resource deletion request button - Cancel connection request: Possible to cancel if a VPC Peering connection is requested
- Approve connection: Possible to approve if a VPC Peering connection request is received
- Reject connection can be clicked to refuse the connection
- Cancel deletion request: Possible to cancel if a VPC Peering deletion is requested
- Approve deletion: Possible to approve if a VPC Peering deletion request is received
- Reject deletion can be clicked to refuse the deletion
- Re-approval request: Re-approval request if VPC approval is rejected
Table. VPC Peering Status Information and Additional Features
Detailed Information
VPC Peering List page where you can check the detailed information of the selected resource and modify the information if necessary.
| Classification | Detailed Description |
|---|---|
| Service | Service Name |
| Resource Type | Resource Type |
| SRN | Unique resource ID in Samsung Cloud Platform |
| Resource Name | VPC Peering Resource Name |
| Resource ID | Unique resource ID in the service |
| Creator | The user who created the VPC Peering |
| Creation Time | The time when VPC Peering was created |
| Modifier | The user who modified the VPC Peering information |
| Modified Time | Time when VPC Peering information was modified |
| VPC Peering name | VPC Peering title |
| Request Information | VPC Peering request VPC name and VPC ID information, click VPC name to move to detailed information page
|
| Approval Information | VPC Peering approval VPC name and VPC ID information, click the VPC name to move to the detailed information page
|
| Description | Description of VPC Peering
|
Table. VPC Peering detailed information items
Rule
VPC Peering List page where you can check the rules connected to the selected resource, and add or delete them.
| Classification | Detailed Description |
|---|---|
| Rule List | Connected Rule List
|
Table. VPC Peering tags tab items
Tag
VPC Peering list page where you can check the tag information of the selected resource, and add, change or delete it.
| Classification | Detailed Description |
|---|---|
| Tag List | Tag List
|
Table. VPC Peering tags tab items
Work History
VPC Peering List page where you can check the operation history of the selected resource.
| Classification | Detailed Description |
|---|---|
| Work history list | Resource change history
|
Table. VPC Peering task history tab detailed information items
VPC Peering rule management
You can add or delete rules to VPC Peering.
Adding rules
Caution
- VPC Peering status must be Active in order to add rules.
- If you enter the destination IP incorrectly in the routing settings, communication failures may occur. Please check the destination IP information again before creating the rule.
To add rules to VPC Peering, follow the following procedure.
- All services > Networking > VPC menu is clicked. It moves to the Service Home page of VPC.
- Service Home page, click the VPC Peering menu. It moves to the VPC Peering list page.
- VPC Peering list page, click the resource to be deleted. It moves to the VPC Peering details page.
- VPC Peering details page, click the Rules tab. It moves to the Rules tab page.
- Rule tab page where you click the Add Rule button. The add rule window appears.
- Enter the starting point and destination in the rule addition window and click the confirm button. A notification confirmation window appears.
- It must not overlap with the already entered rules.
- It can be entered within the IP address range of the destination VPC.
- Subnet range must be entered identically.
- Destination IP range 0.0.0.0/0 cannot be used.
- In the notification confirmation window, click the confirm button. Check if a resource item has been added to the rules list.
Deleting rules
Caution
- VPC Peering service status is Active, you can only delete the connected rules in this case.
- The state of the connected rule is Creating, Deleting, in which case it cannot be deleted.
To delete VPC Peering rules, follow the following procedure.
- All services > Networking > VPC menu is clicked. It moves to the Service Home page of VPC.
- Service Home page, click the VPC Peering menu. It moves to the VPC Peering list page.
- VPC Peering list page, click the resource to be deleted. It moves to the VPC Peering details page.
- VPC Peering details page, click the Rules tab. It moves to the Rules tab page.
- Rule tab page where you want to delete the item, click the Delete button. A notification confirmation window appears.
- Click the Confirm button in the notification confirmation window. Check if the selected resource has been deleted from the rule list.
VPC Peering cancellation
You can terminate unused VPC Peering to reduce operating costs.
Caution
- If VPC Peering has rules attached, you cannot cancel the service. Please cancel the service after deleting all attached rules.
- VPC Peering service status is Creating, Editing, Deleting, in this case, you cannot cancel the service.
To terminate VPC Peering within the same Account, follow the following procedure.
- All services > Networking > VPC menu is clicked. It moves to the Service Home page of VPC.
- Service Home page, click the VPC Peering menu. It moves to the VPC Peering list page.
- VPC Peering list page, click the resource to be deleted. It moves to the VPC Peering details page.
- VPC Peering details page, click the Delete VPC Peering button.
- Once the deletion is complete, VPC Peering list is checked to see if the resource has been deleted.
Disconnect VPC Peering connected to another Account
To disconnect VPC Peering connected to a different Account, follow the following procedure.
- All services > Networking > VPC menu is clicked. It moves to the Service Home page of VPC.
- Service Home page, click the VPC Peering menu. It moves to the VPC Peering list page.
- VPC Peering list page, click the resource to be deleted. It moves to the VPC Peering details page.
- VPC Peering details page, click the VPC Peering deletion request button.
- When the cancellation is complete, VPC Peering list is checked to see if the resource has been deleted.
- It will be normally terminated if the deletion request from the relative Account is approved.
Preceding service
This is a service that must be pre-installed before creating the service, please refer to the user guide provided in advance and prepare accordingly.
| Service Category | Service | Detailed Description |
|---|---|---|
| Networking | VPC | a service that provides an independent virtual network in a cloud environment |
Table. Pre-service for VPC Peering
1.2.9 - Transit Gateway
The user can enter the essential information of the Transit Gateway service through the Samsung Cloud Platform Console and create the service by selecting detailed options.
Creating Transit Gateway
You can create and use the Transit Gateway service on the Samsung Cloud Platform Console.
To create a Transit Gateway, follow the next procedure.
- All services > Networking > VPC menu is clicked. It moves to the Service Home page of VPC.
- Service Home page, click the Create Transit Gateway button. It moves to the Create Transit Gateway page.
- Service Information Input area, please enter or select the required information.
Classification MandatoryDetailed Description Transit Gateway name required Enter the Transit Gateway name - Enter 3-20 characters using English and numbers
Description Selection Enter a description for the Transit Gateway Table. Transit Gateway details tab items - Additional Information Input area, please enter or select the required information.
Classification MandatoryDetailed Description Tag Select Add Tag - Up to 50 can be added per resource
- Click the Add Tag button and enter or select Key, Value
Table. Input Items for Adding Transit Gateway Information
- Summary panel where you created detailed information and estimated billing amount, and click the Complete button.
- Once creation is complete, check the created resource on the Transit Gateway list page.
Transit Gateway detailed information check
The Transit Gateway service can view and modify the entire resource list and detailed information. The Transit Gateway details page consists of details, connected VPC management, rules, tags, and operation history tabs.
To check the Transit Gateway details, follow the next procedure.
- All services > Networking > VPC menu is clicked. It moves to the Service Home page of VPC.
- Service Home page, click the Transit Gateway menu. It moves to the Transit Gateway list page.
- Transit Gateway list page, click the resource to check the detailed information. It moves to the Transit Gateway details page.
- Transit Gateway details page displays status information and additional feature information, and consists of details, connected VPC management, rules, tags, task history tabs.
Classification Detailed Description Status Transit Gateway status - Active: in operation
- Creating: being created
- Editing: being modified
- Deleting: being deleted
- Error: error occurred
Transit Gateway deletion Transit Gateway resource deletion button Table. Transit Gateway Status Information and Additional Features
Detailed Information
Transit Gateway list page where you can check the detailed information of the selected resource and modify the information if necessary.
| Classification | Detailed Description |
|---|---|
| Service | Service Name |
| Resource Type | Resource Type |
| SRN | Unique resource ID in Samsung Cloud Platform |
| Resource Name | Transit Gateway Resource Name |
| Resource ID | Unique resource ID in the service |
| Creator | The user who created the Transit Gateway |
| Creation Time | The time when the Transit Gateway was created |
| Modifier | User who modified the Transit Gateway information |
| Modified Time | Time when Transit Gateway information was modified |
| Transit Gateway name | Transit Gateway resource name |
| Uplink use | Information about Uplink connected to Transit Gateway
|
| Description | Description of the Transit Gateway
|
| Firewall name | Firewall information applied as a linked service, clicking on the Firewall name will move to the detailed page |
Table. Transit Gateway detailed information items
Managing Connected VPC
Transit Gateway list page where you can check the VPC connected to the selected resource, and add or delete it.
| Classification | Detailed Description |
|---|---|
| VPC list | Connected VPC list
|
Table. Transit Gateway Connected VPC Management Tab Items
Rule
Transit Gateway list page where you can check the rules connected to the selected resource, and add or delete them.
| Classification | Detailed Description |
|---|---|
| Rule List | Linked Rule List
|
Table. Transit Gateway Rules Tab Items
Tag
Transit Gateway list page where you can check the tag information of the selected resource, and add, change or delete it.
| Classification | Detailed Description |
|---|---|
| tag list | tag list
|
Table. Transit Gateway tags tab items
Work History
Transit Gateway list page where you can check the operation history of the selected resource.
| Classification | Detailed Description |
|---|---|
| Work history list | Resource change history
|
Fig. Transit Gateway job history tab detailed information items
Transit Gateway associated service management
You can apply for, modify, and cancel the necessary Uplink, Firewall connection services to use the Transit Gateway service.
To apply for the associated services of Transit Gateway, follow the following procedure.
- All services > Networking > VPC menu, click. It moves to the Service Home page of VPC.
- Service Home page, click the Transit Gateway menu. It moves to the Transit Gateway list page.
- Transit Gateway list page, click the resource to be deleted. It moves to the Transit Gateway details page.
- Transit Gateway details page, click Connected Service (IGW, FW) line application/modification/cancellation request shortcut, it will move to the service request page.
- Service Request page, enter or select the corresponding information in the required input field.
Input Item Detailed Description Title Enter the title of the service request content - Example: TGW Uplink line application
Region Select the location of the Samsung Cloud Platform - Automatically entered as the region corresponding to the account
Service Service category and service selection - Service category: Networking
- Service: Transit Gateway
Work classification Select the type you want to request - Uplink line application/modification/cancellation: Enter detailed contents in the service request classification item after selecting the work classification
Content Write detailed items of the service application form - Service request classification: Directly enter the application / modification / cancellation
- Account name/ID: Enter the account name and ID
- Transit Gateway name/ID: Enter the created Transit Gateway name and ID
- Applicant information: Enter the applicant’s email, phone number, etc.
- Service request work classification: Select and enter Uplink line connection/BM VPC Firewall connection
- Firewall usage: Enter whether to use the firewall
attachment file if you have additional files you want to share, upload them - attached files can be up to 5 files, each within 5MB
- only doc, docx, xls, xlsx, ppt, ppts, hwp, txt, pdf, jpg, jpeg, png, gif, tif files can be attached
Table. Associated Service Creation Request Items - 서비스 요청 페이지에서 request 버튼을 클릭하세요. should be translated to: 6. On the service request page, click the request button.
- Once the application is completed, Support Center > Service Request List page will show the details of your application.
- When the service request task is completed, you can check the requested resource on the Transit Gateway details page.
Managing VPC connections for Transit Gateway
You can add or remove VPCs from the Transit Gateway.
VPC Connection Addition
To add a VPC connection to Transit Gateway, follow these procedures.
- All Services > Networking > VPC menu is clicked. It moves to the Service Home page of VPC.
- Service Home page, click the Transit Gateway menu. It moves to the Transit Gateway list page.
- Transit Gateway list page, click the resource to be deleted. It moves to the Transit Gateway details page.
- Transit Gateway details page, click the Connected VPC management tab. It moves to the Connected VPC management tab page.
- Connected VPC Management tab page, click the Add VPC Connection button. The Add VPC Connection window appears.
- VPC 연결 추가창에서 VPC를 선택하고 confirm 버튼을 클릭하세요. notification confirmation window appears.
- Clicking +Create New on the list allows you to create and select a VPC.
- In the notification confirmation window, click the Confirm button. Check if a resource item has been added to the VPC connection list.
VPC Connection Deletion
To delete a VPC attachment from Transit Gateway, follow these procedures.
- All services > Networking > VPC menu is clicked. It moves to the Service Home page of VPC.
- Service Home page, click the Transit Gateway menu. It moves to the Transit Gateway list page.
- Transit Gateway list page, click the resource to be deleted. It moves to the Transit Gateway details page.
- Transit Gateway details page, click the Connected VPC management tab. Move to the Connected VPC management tab page.
- Connected VPC Management tab page, click the Delete button of the item to be deleted. A notification confirmation window appears.
- Click the Confirm button in the notification confirmation window. Check if the selected resource has been deleted from the VPC connection list.
Managing Transit Gateway’s rule management
You can add or delete rules to the Transit Gateway.
Adding rules
Caution
- Transit Gateway service status must be Active in order to add rules.
- If you enter the destination IP incorrectly in the routing settings, communication failures may occur. Please check the destination IP information again before creating the rule.
To add rules to Transit Gateway, follow these procedures.
- All services > Networking > VPC menu, click. It moves to the Service Home page of VPC.
- Service Home page, click the Transit Gateway menu. It moves to the Transit Gateway list page.
- Transit Gateway list page, click the resource to be deleted. It moves to the Transit Gateway details page.
- Transit Gateway details page, click the rules tab. It moves to the rules tab page.
- Rules tab page, click the Add Rule button. The add rule window appears.
- Enter the starting point and destination in the rule addition window and click the confirm button. A notification confirmation window appears.
- It must not overlap with the already entered rules.
- x.x.x.x/28 range can be entered.
- In case the destination is VPC
- The destination VPC IP range can be entered within the range.
- Subnet range must be entered identically.
- Destination IP range 0.0.0.0/0 cannot be used.
- In case the destination is Transit Gateway
- Some IP ranges are for management purposes, so they cannot be used.
- VPC IP address range cannot be entered.
- In the notification confirmation window, click the confirm button. Check if a resource item has been added to the rules list.
Deleting rules
Caution
- Transit Gateway service status must be Active in order to delete the rule.
- In case the rule status is Creating, Deleting, you cannot delete the rule.
To delete Transit Gateway rules, follow these procedures.
- All services > Networking > VPC menu, click. It moves to the Service Home page of VPC.
- Service Home page, click the Transit Gateway menu. It moves to the Transit Gateway list page.
- Transit Gateway list page, click the resource to be deleted. It moves to the Transit Gateway details page.
- Transit Gateway details page, click the rules tab. It moves to the rules tab page.
- Rule tab page click the Delete button of the item to be deleted. A notification confirmation window appears.
- Click the Confirm button in the notification confirmation window. Check if the selected resource has been deleted from the rule list.
Transit Gateway cancellation
You can cancel the unused Transit Gateway to reduce operating costs.
Caution
- You cannot cancel the service if the Uplink connected to the Transit Gateway is in use or the Firewall is connected. Cancel the service after completing the cancellation request for the connected resources.
- If VPC resources or rules are connected to Transit Gateway, the service cannot be terminated. Please terminate the service after deleting all connected resources and rules.
- Transit Gateway service status is Creating, Deleting, in this case, you cannot cancel the service.
To cancel the Transit Gateway, follow the following procedure.
- All services > Networking > VPC menu is clicked. It moves to the Service Home page of VPC.
- Service Home page, click the Transit Gateway menu. It moves to the Transit Gateway list page.
- Transit Gateway list page, click the resource to be deleted. It moves to the Transit Gateway details page.
- Transit Gateway details page, click the Delete Transit Gateway button.
- Once the deletion is complete, Transit Gateway list is checked to see if the resource has been deleted.
Preceding service
This is a service that must be installed before creating this service, please refer to the user guide provided in advance and prepare.
| Service Category | Service | Detailed Description |
|---|---|---|
| Networking | VPC | a service that provides an independent virtual network in a cloud environment. |
Table. Preceding Transit Gateway Services
1.2.10 - PrivateLink Service
The user can enter the required information for the PrivateLink Service through the Samsung Cloud Platform Console, select detailed options, and create the service.
PrivateLink Service Create
You can create and use a PrivateLink Service in the Samsung Cloud Platform Console.
To create a PrivateLink Service, follow these steps.
- All Services > Networking > VPC Click the menu. Navigate to the VPC’s Service Home page.
- Service Home page, click the Create PrivateLink Service button. Navigate to the Create PrivateLink Service page.
- Service Information Input area, please enter or select the required information.
Category RequiredDetailed description PrivateLink Service name required Enter PrivateLink Service name Approval Method Required Select PrivateLink Service approval method - Automatic: Automatic approval when a PrivateLink Service connection request is received
- Manual: Manual approval after verification when a PrivateLink Service connection request is received
- The approval method cannot be changed after creation
High-speed Data Transfer Select By default, it is in an unused state and not displayed in the Samsung Cloud Platform Console - To use High-speed Data Transfer, submit a service usage request in Support Center > Contact Us, and once processing is complete, it can be selected on the screen
VPC name required Select VPC to connect Subnet name Required Select the Subnet of the VPC to connect PrivateLink Service IP Required Select the Subnet to connect and enter the PrivateLink Service IP - IP addresses already in use within the Subnet cannot be entered, and the first/last IP of the Subnet IP range cannot be used
Connected Resources Required Select resources to connect to the selected VPC - Load Balancer: Select Load Balancer to connect (cannot select LB when using Local subnet)
- IP: Enter Compute resource IP of the selected VPC
Security Group Select Select button click to select the Security Group to connect - You can select up to 5
- If no Security Group is selected, all connections will be blocked
Description Select Enter description for PrivateLink Service Table. PrivateLink Service Detailed Information Tab Items - Additional Information Input Enter or select the required information in the area.
Category RequiredDetailed description Tag Select Add Tag - Up to 50 can be added per resource
- After clicking the Add Tag button, enter or select Key, Value values
Table. PrivateLink Service Additional Information Input Items
- Service Information Input area, please enter or select the required information.
- Summary Check the detailed information and estimated billing amount generated in the panel, and click the Complete button.
- Once creation is complete, check the created resource on the PrivateLink Service List page.
Reference
The PrivateLink product is a service that provides a one-way private path (a kind of tunnel). The PrivateLink product is used by creating a PrivateLink Service (exit) in the service provider account, creating a PrivateLink Endpoint (entry) in the user account, and then connecting to the PrivateLink Service.
The connection conditions of the PrivateLink product are as follows.
- When creating per PrivateLink Endpoint, it can only be connected to the single designated PrivateLink Service. (Only one pair of entrance and exit exists)
- Cannot attempt to connect a session to the PrivateLink Endpoint via the PrivateLink Service. (One-way)
- In the provider account, when creating a PrivateLink Service, you can provide a connection with a single IP by selecting one LB or entering directly.
- In a user account, all clients that the user account has allowed to access the PrivateLink Endpoint can use the PrivateLink Endpoint.
- General / Local Subnet can be used everywhere.
PrivateLink Service Check detailed information
PrivateLink Service can view and edit the full resource list and detailed information. PrivateLink Service Detail page consists of Detailed Information, Connection Management, Tags, Operation History tabs.
To view detailed information of the PrivateLink Service, follow the steps below.
- All Services > Networking > VPC Click the menu. Navigate to the VPC’s Service Home page.
- Click the PrivateLink Service menu on the Service Home page. Navigate to the PrivateLink Service list page.
- Click the resource on the PrivateLink Service List page to view detailed information. You will be taken to the PrivateLink Service Detail page.
- PrivateLink Service Details page displays status information and additional feature information, and consists of Details, Connection Management, Tags, Activity History tabs.
Category Detailed description Status PrivateLink Service status - Active: Operating
- Creating: Being created
- Deleting: Being deleted
- Error: Error occurred
PrivateLink Service Delete Button to delete the PrivateLink Service resource Table. PrivateLink Service status information and additional features
- PrivateLink Service Details page displays status information and additional feature information, and consists of Details, Connection Management, Tags, Activity History tabs.
Detailed Information
On the PrivateLink Service List page, you can view detailed information of the selected resource and, if necessary, edit the information.
| Category | Detailed description |
|---|---|
| Service | Service Name |
| Resource Type | Resource Type |
| SRN | Unique resource ID in Samsung Cloud Platform |
| Resource Name | PrivateLink Service Resource Name |
| Resource ID | Unique resource ID in the service |
| Creator | User who created the PrivateLink Service |
| Creation Time | Creation Time of PrivateLink Service |
| Editor | User who modified the PrivateLink Service information |
| Modification Time | Time when PrivateLink Service information was modified |
| PrivateLink Service name | PrivateLink Service resource name |
| PrivateLink Service ID | PrivateLink Service ID information |
| Connection Resource | Connection resources of PrivateLink Service
|
| PrivateLink Service IP | PrivateLink Service IP address |
| VPC name | Connected VPC information |
| Subnet name | Connected Subnet information |
| Port name | PrivateLink Service’s port information
|
| Security Group | Configured Security Group information
|
| Approval method | Configured PrivateLink Service approval method |
| High-speed data transfer | Whether to use high-speed data transfer for the configured PrivateLink Service |
| Description | Description of PrivateLink Service
|
Table. PrivateLink Service detailed information items
Connection Management
PrivateLink Service List page, you can view the connection information of the selected resource. You can review connection requests and approve or reject them.
| Category | Detailed description |
|---|---|
| PrivateLink Service List | PrivateLink Service Connection List
|
Table. PrivateLink Service connection management tab items
Tag
On the PrivateLink Service List page, you can view the tag information of the selected resource, and you can add, modify, or delete it.
| Category | Detailed description |
|---|---|
| Tag List | Tag List
|
Table. PrivateLink Service Tag Tab Items
Work History
You can view the operation history of the selected resource on the PrivateLink Service List page.
| Category | Detailed description |
|---|---|
| Work History List | Resource Change History
|
Table. PrivateLink Service operation history tab detailed information items
PrivateLink Service Cancel
You can cancel unused PrivateLink Service to reduce operating costs.
Caution
If the status of the Private Endpoint connected to the PrivateLink Service is Active, Requesting, Creating, Deleting, or Error, the service cannot be terminated.
After setting the Private Endpoint connection to block or deny, delete the PrivateLink Service.
After setting the Private Endpoint connection to block or deny, delete the PrivateLink Service.
To cancel the PrivateLink Service, follow the steps below.
- All Services > Networking > VPC Click the menu. Navigate to the Service Home page of VPC.
- Click the PrivateLink Service menu on the Service Home page. Navigate to the PrivateLink Service list page.
- Click the resource to delete on the PrivateLink Service List page. Navigate to the PrivateLink Service Details page.
- Click the Delete PrivateLink Service button on the PrivateLink Service Details page.
- When termination is complete, check whether the resource has been deleted from the PrivateLink Service list.
Preliminary Service
This is a service that must be pre-installed before creating this service. Please refer to the user guide provided in advance and prepare.
| Service Category | Service | Detailed Description |
|---|---|---|
| Networking | VPC | It is a service that provides an independent virtual network in a cloud environment. |
| Networking | Load Balancer | It is a service that distributes server traffic load in a cloud environment. |
Table. PrivateLink Service Preliminary Service
1.2.11 - PrivateLink Endpoint
The user can enter the required information for the PrivateLink Endpoint service through the Samsung Cloud Platform Console, select detailed options, and create the service.
PrivateLink Endpoint Create
You can create and use a PrivateLink Endpoint service from the Samsung Cloud Platform Console.
To create a PrivateLink Endpoint, follow these steps.
- All Services > Networking > VPC Click the menu. Navigate to the VPC’s Service Home page.
- Click the Create PrivateLink Endpoint button on the Service Home page. You will be taken to the Create PrivateLink Endpoint page.
- Service Information Input Enter or select the required information in the area.
Category RequiredDetailed description PrivateLink Endpoint name Required Enter PrivateLink Endpoint name VPC name required Select VPC to connect Subnet name Required Select the Subnet of the VPC to connect PrivateLink Endpoint IP Required Select the Subnet to connect and enter the PrivateLink Endpoint IP - IP addresses already in use within the Subnet cannot be entered, and the first/last IP of the Subnet IP range cannot be used
PrivateLink Endpoint ID Required Enter the PrivateLink Service ID to connect - Enter using English letters and numbers, within 3-60 characters
- Before applying for the service, you need to verify the Service ID of the PrivateLink Service to connect; after creating the Endpoint, you must provide the Endpoint ID to the service provider
Security Group Select Select button click to select the Security Group to connect - You can select up to 5
- If no Security Group is selected, all connections will be blocked
Description Select Enter description for PrivateLink Endpoint Table. PrivateLink Endpoint Detailed Information Tab Items - Additional Information Input Enter or select the required information in the area.
Category RequiredDetailed description Tag Select Add Tag - Up to 50 can be added per resource
- After clicking the Add Tag button, enter or select Key, Value values
Table. PrivateLink Endpoint Additional Information Input Items
- Service Information Input Enter or select the required information in the area.
- Summary Check the detailed information and estimated billing amount generated in the panel, and click the Complete button.
- When creation is complete, check the created resource on the PrivateLink Endpoint List page.
- When connection approval is required in PrivateLink Service
Reference
- To request a connection to the service provider via PrivateLink, you must go through an approval process.
- When applying for a service connection, you must check the PrivateLink Service ID of the target in advance.
- Before applying for the service, an agreement on usage with the service provider must be completed.
- After the user creates a PrivateLink Endpoint, they must deliver the Endpoint ID to the service provider. The service provider can verify the user’s Endpoint ID and quickly proceed with usage approval.
PrivateLink Endpoint Check Detailed Information
PrivateLink Endpoint service can view and edit the full list of resources and detailed information. PrivateLink Endpoint Details page consists of Details, Tags, Activity History tabs.
To view detailed information of the PrivateLink Endpoint, follow the steps below.
- All Services > Networking > VPC Click the menu. Navigate to the VPC’s Service Home page.
- Click the PrivateLink Endpoint menu on the Service Home page. Navigate to the PrivateLink Endpoint List page.
- Click the resource to view detailed information on the PrivateLink Endpoint List page. It navigates to the PrivateLink Endpoint Details page.
- PrivateLink Endpoint Details The page displays status information and additional feature information, and consists of Details, Connection Management, Tags, Activity History tabs.
Category Detailed description Status PrivateLink Endpoint status - Requesting: Connection request/approval pending, Cancel request button displayed
- Active: Creation completed, operating
- Creating: Creating
- Deleting: Deleting
- Disconnected: Connection blocked
- Rejected: Connection rejected, Re-request approval button displayed
- Error: Error occurred
- Canceled: Connection request canceled, Re-request approval button displayed
PrivateLink Endpoint Delete PrivateLink Endpoint Button to delete the resource Table. PrivateLink Endpoint status information and additional features
- PrivateLink Endpoint Details The page displays status information and additional feature information, and consists of Details, Connection Management, Tags, Activity History tabs.
Detailed Information
PrivateLink Endpoint List page allows you to view detailed information of the selected resource and, if necessary, edit the information.
| Category | Detailed description |
|---|---|
| Service | Service Name |
| Resource Type | Resource Type |
| SRN | Unique resource ID in Samsung Cloud Platform |
| Resource Name | PrivateLink Endpoint resource name |
| Resource ID | Unique resource ID in the service |
| Creator | User who created the PrivateLink Endpoint |
| Creation time | Time when the PrivateLink Endpoint was created |
| Editor | User who modified the PrivateLink Endpoint information |
| Modification time | Time when PrivateLink Endpoint information was modified |
| PrivateLink Endpoint name | PrivateLink Endpoint resource name |
| PrivateLink Endpoint ID | PrivateLink Endpoint ID information |
| PrivateLink Service ID | Connected PrivateLink Service ID information |
| PrivateLink Endpoint IP | PrivateLink Endpoint IP address |
| VPC name | Connected VPC information |
| Subnet name | Connected Subnet information |
| Port name | PrivateLink Endpoint’s port information
|
| Security Group | Configured Security Group information
|
| Description | Description of PrivateLink Endpoint
|
Table. PrivateLink Endpoint detailed information items
Tag
PrivateLink Endpoint List page allows you to view the tag information of the selected resource, and you can add, modify, or delete it.
| Category | Detailed description |
|---|---|
| Tag List | Tag List
|
Table. PrivateLink Endpoint Tag Tab Items
Work History
You can view the operation history of the selected resource on the PrivateLink Endpoint List page.
| Category | Detailed description |
|---|---|
| Work History List | Resource Change History
|
Table. PrivateLink Endpoint operation history tab detailed information items
PrivateLink Endpoint Cancel
You can cancel unused PrivateLink Endpoints to reduce operating costs.
Caution
If the PrivateLink Endpoint service status is Requesting, Creating, or Deleting, the service cannot be terminated.
To cancel a PrivateLink Endpoint, follow the steps below.
- All Services > Networking > VPC Click the menu. Navigate to the VPC’s Service Home page.
- Service Home page, click the PrivateLink Endpoint menu. Navigate to the PrivateLink Endpoint List page.
- Click the resource to delete on the PrivateLink Endpoint List page. It navigates to the PrivateLink Endpoint Details page.
- Click the Delete PrivateLink Endpoint button on the PrivateLink Endpoint Details page.
- When the termination is complete, check whether the resource has been deleted from the PrivateLink Endpoint list.
Prior Service
This is a service that must be pre-installed before creating this service. Please refer to the user guide provided in advance and prepare.
| Service Category | Service | Detailed Description |
|---|---|---|
| Networking | VPC | It is a service that provides an independent virtual network in a cloud environment. |
Table. PrivateLink Endpoint Prerequisite Service
1.2.12 - NAT Logging
To save NAT logs, you must first create a bucket in Object Storage to save the logs, and then set the bucket as the log repository in NAT Logging, after that, by setting log saving in NAT detail inquiry, NAT logs will be saved in the Object Storage bucket.
NAT log saving requires settings in the following order.
- To save NAT logs, you can create a bucket in Object Storage or use an existing bucket. To create a bucket, refer to Creating Object Storage.
- To set this bucket as the log repository for NAT Logging, refer to Using NAT Logging log repository.
- To set the log storage to use in the NAT detailed inquiry, please refer to NAT log storage usage.
NAT Logging Using the log storage
To set the NAT log storage to use, you must first set the log storage setting in NAT Logging.
Reference
NAT Logging To set up a log storage, an Object Storage bucket for log storage is required, please create a bucket in the Object Storage service first.
For more detailed information, please refer to Object Storage creation.
- All services > Management > Network Logging > NAT Logging menu, click. It moves to the NAT Logging list page.
- NAT Logging List page, click the Log Storage Settings button at the top, it moves to the Log Storage Settings popup window.
- Log Storage Settings popup window, select the Log Storage Bucket. When you select a bucket, the Log Storage Path will be displayed.
- Log Storage Settings popup window, check the Log Storage Bucket and Log Storage Path, then click the Confirm button.
- Notification Confirm the message in the popup window, then click the Confirm button.
Notice
NAT Logging After setting the log storage, you must set the log storage to use in the NAT detailed inquiry for the log storage to start.
For more detailed information, please refer to Using NAT Log Storage.
NAT Logging list
NAT Logging log storage bucket is set, then the NAT Logging list is retrieved.
- All services > Management > Network Logging > NAT Logging menu is clicked. It moves to the NAT Logging list page.
Division RequiredDetailed Description Resource ID Required NAT Resource ID Save target Required NAT resource name Save Registration Time Required NAT Log Storage Registration Time Table. NAT Logging list items
Reference
NAT Logging After setting the log storage, you must set the log storage to use in the NAT detailed inquiry for the log storage to start.
For more detailed information, please refer to Using NAT Log Storage.
NAT Logging content check
Please refer to the contents below and check the saved Log contents.
Saved log example: 2024-10-11T11:19:03,accept,259,17,192.168.2.173,46937,192.168.0.53,53,100.100.14.52,26937
| Division | Description |
|---|---|
| 2024-10-11T11:19:03 | The date and time when the log occurred (2024-10-11, 11:19:03) |
| accept | action (deny / accept) |
| 259 | Log occurrence firewall Rule ID (Policy ID) |
| 17 | IP Protocol ID
|
| 192.168.2.173 | source IP |
| 46937 | Departure Port |
| 192.168.0.53 | Destination IP |
| 53 | Destination Port |
| 100.100.14.52 | NAT translated IP |
| 26937 | NAT translated Port |
NAT Logging do not use log storage
NAT Logging allows you to set the log repository to not be used.
- All services > Management > Network Logging > NAT Logging menu should be clicked. It moves to the NAT Logging list page.
- NAT Logging list page, click the top Log Storage Settings button. It moves to the Log Storage Settings popup window.
- Log Storage Settings popup window, select Log Storage Bucket as Not Used, and click the OK button.
Reference
The log repository setting can be changed when there is no log storage target.
The log storage bucket change can be changed by selecting and confirming not in use and then resetting it.
1.3 - API Reference
API Reference
1.4 - CLI Reference
CLI Reference
1.5 - Release Note
VPC
2025.10.23
FEATURE
Add PrivateLink feature- You can connect internal data of Samsung Cloud Platform to a private path between VPC and SCP services without exposing it to the internet.
2025.07.01
FEATURE
Add new services besides Transit Gateway- Add Transit Gateway feature
- Easily connect the customer network with the Samsung Cloud Platform network and serve as a connection hub for multiple VPCs within the cloud environment.
- VPC Peering feature added
- You can communicate via IP through a 1:1 private path between VPCs.
- Privagte NAT feature addition
- Compute resources within the VPC can use Direct Connect to map the customer’s dead IP and connect.
2025.02.27
FEATURE
VPC Endpoint Service Added- Add VPC feature
- Provides an endpoint (entry point) that can access the Samsung Cloud Platform via a private connection from an external network connected to the VPC.
- Samsung Cloud Platform Common Feature Change
- Account, IAM and Service Home, tags, etc. have been updated to reflect common CX changes.
2024.12.23
FEATURE
Add NAT log storage feature- A feature to save NAT logs has been added.
- Decide whether to store NAT logs and you can store logs in Object Storage.
2024.10.01
NEW
VPC Service Official Version Release- The VPC service that provides an isolated virtual network space has been launched.
2024.07.02
NEW
Beta version release- Independent virtual network space-providing VPC service has been launched.
2 - Security Group
2.1 - Overview
Service Overview
Security Group is a virtual logical firewall that controls Inbound/Outbound traffic occurring in the virtual server of Samsung Cloud Platform. The target resources that can apply Security Group are Virtual Server, Database, Kubernetes Engine, etc. Security Group is applied to the port of the target resource, and multiple Security Groups can be applied according to the characteristics of each resource.
When the Security Group is created for the first time, it blocks all Inbound/Outbound traffic according to the default rules (Any/Deny).
The user can create Inbound/Outbound rules by specifying the IP address, port, and protocol, and only allowed traffic to the target resource is possible according to the created rules.
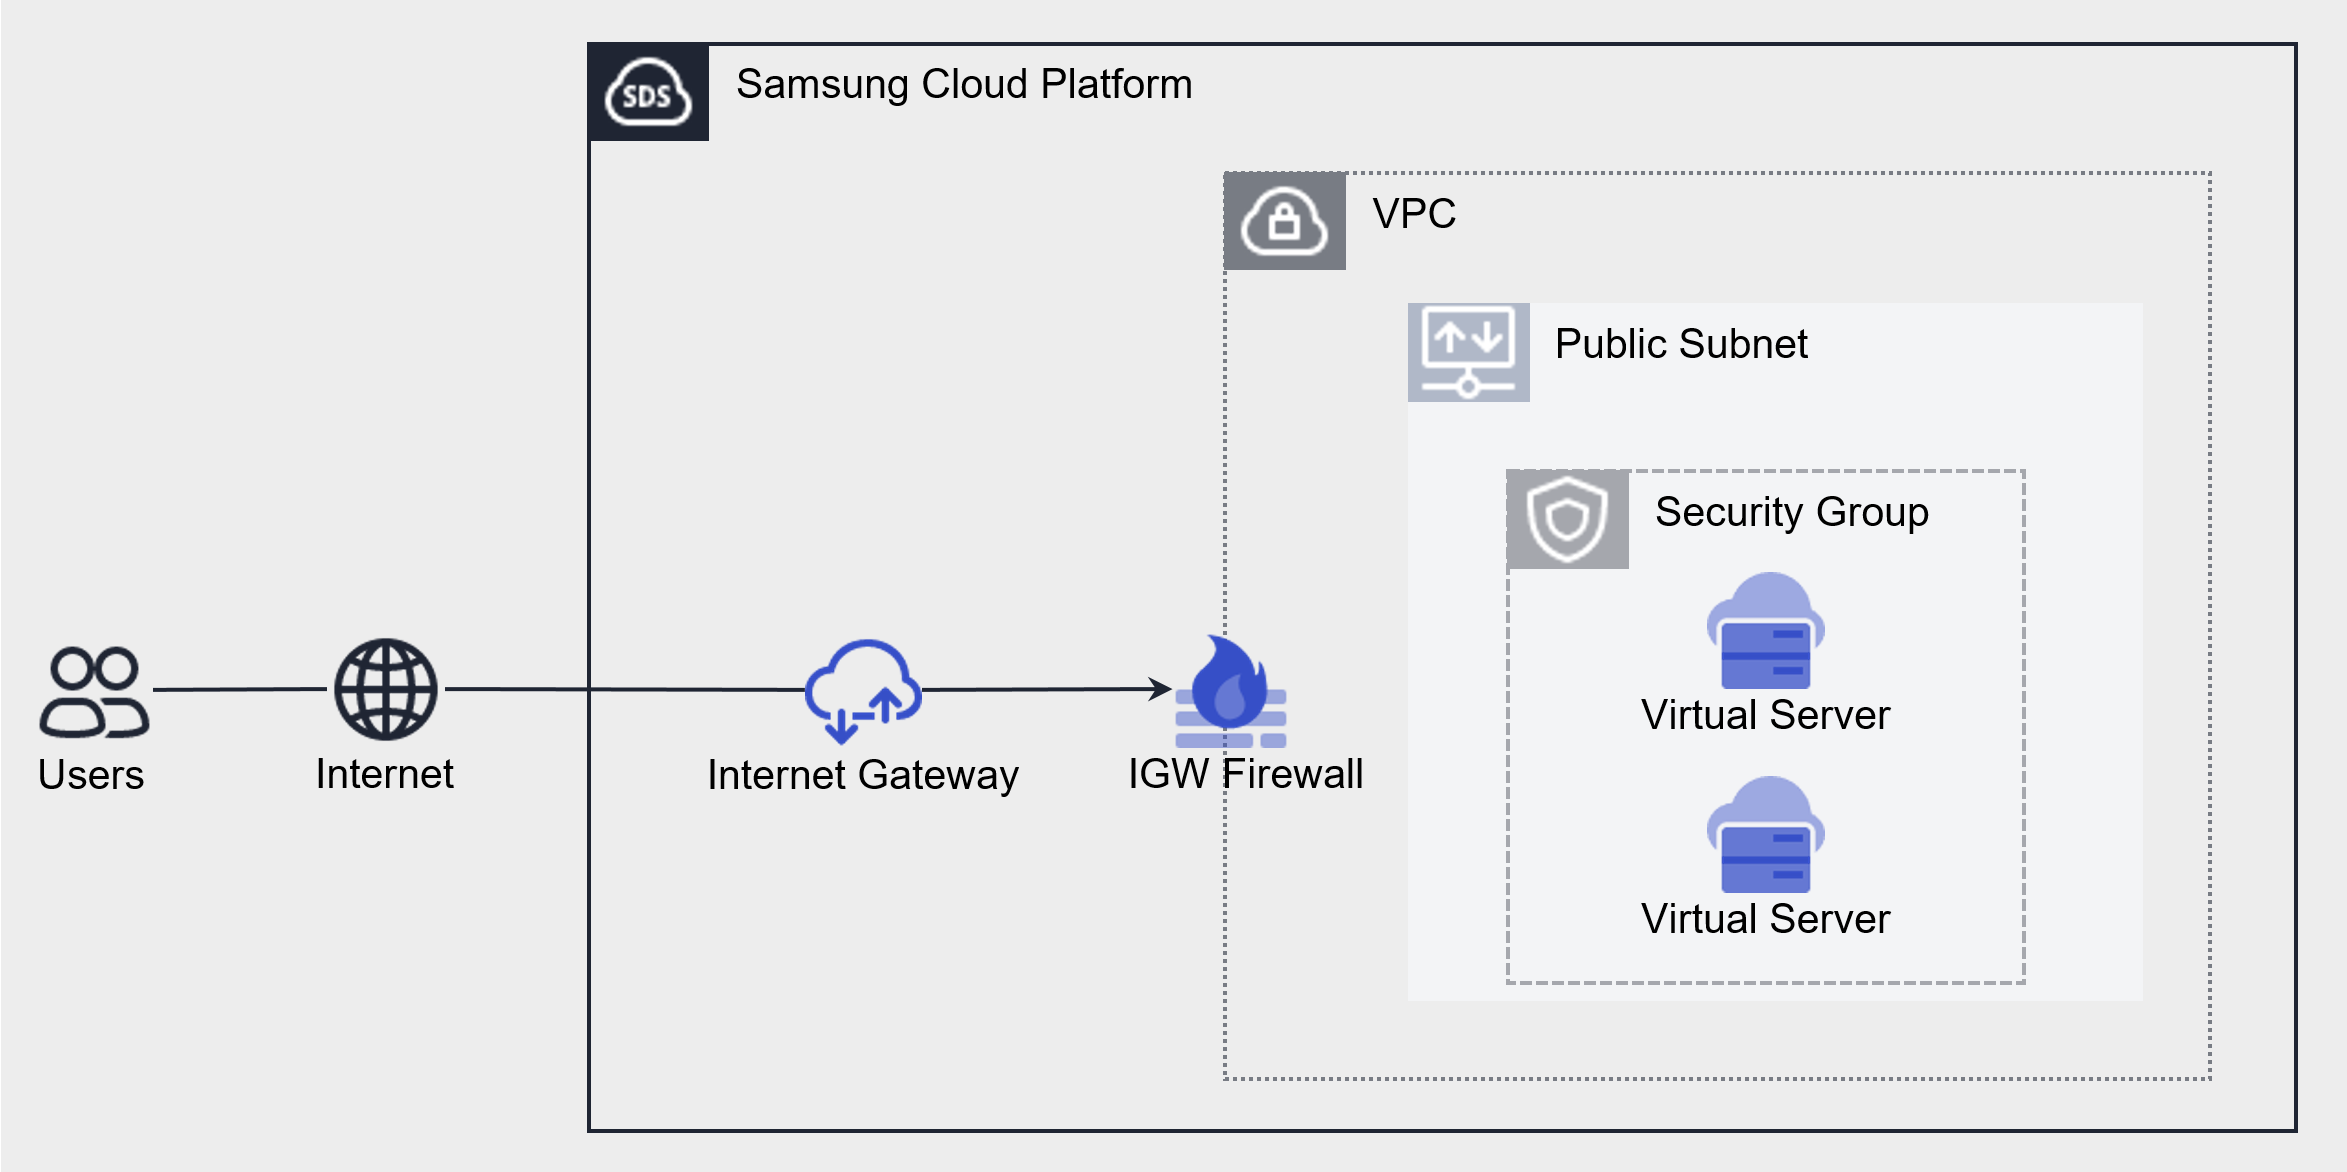
Component
The elements that make up the Security Group are as follows.
| Component | Detailed Description |
|---|---|
| Applicable Target | The target resource to which the Security Group is applied
|
| Security Group rules | When a Security Group is first created, it follows the default rules (Any/Deny) and blocks all Inbound/Outbound traffic
|
Fig. Security Group Components
Constraints
The Security Group of Samsung Cloud Platform has a default quota (limit) set. There is a maximum number of Security Groups and Security Group rules that can be created. Samsung Cloud Platform Console is a space where you can check and manage quotas for many resources related to Samsung Cloud Platform services and request quota increases.
| Classification | Basic Quota | Detailed Description |
|---|---|---|
| Security Group | 100 | The default number of Security Groups created per Account |
| Number of Security Group rules | 100 | Default rule creation limit per Security Group |
| Number of Security Group rules > per project | 1,000 | Default number of Security Group rules that can be created per Account |
Table. Security Group Restrictions
Preceding Service
Security Group has no preceding service.
2.2 - How-to guides
The user can enter the required information for the Security Group service through the Samsung Cloud Platform Console and create the service by selecting detailed options.
Create Security Group
You can create and use the Security Group service in the Samsung Cloud Platform Console.
To create a Security Group, follow these steps.
Click All Services > Networking > Security Group menu. It moves to the Service Home page of Security Group.
On the Service Home page, click the Create Security Group button. It moves to the Create Security Group page.
- Enter Service Information area, please enter the necessary information.
Division NecessityDetailed Description Security Group name required Name of the Security Group to be created - It can use English letters, numbers, special characters(
-) and can be entered up to a maximum of 255 characters
- Duplicated Security Group names can be used within the project
Log storage option Select Security Group log storage option select - Enabled: Store logs
- Disabled: Do not store logs
- Clicking Security Group Logging shortcut will move to the Security Group Logging list page
Table. Security Group service information input items - It can use English letters, numbers, special characters(
ReferenceTo save Security Group logs, you must first create a bucket in Object Storage to save the logs, and then set the bucket as the log repository in Security Group Logging.
- Log storage settings can be checked in Security Group Logging, and for more information, please refer to Security Group Logging.
- If you set up a log storage, you will be charged for Object Storage fees for log storage.
- Enter Additional Information Enter or select the required information in the area.
Classification MandatoryDetailed Description Tag Select Add Tag - Up to 50 can be added per resource
- Click the Add Tag button and enter or select Key, Value
Description Select User Additional Description - Up to 255 characters can be entered
Table. Input items for adding Security Group information
- Enter Service Information area, please enter the necessary information.
Check the input information and click the Complete button.
- Once creation is complete, check the created resource on the Security Group list page.
Check Security Group details
On the Security Group menu’s Security Group list page, you can check and modify the entire resource list and detailed information.
To check the Security Group details, follow the next procedure.
- Click All services > Networking > Security Group menu. It moves to the Service Home page of Security Group.
- On the Service Home page, click the Security Group menu. It moves to the Security Group list page.
- Security Group list page, click the resource to check the detailed information. Move to the Security Group details page.
- Security Group Details page displays status information and additional feature information, and consists of Details, Rules, Tags, Operation History tabs.
| Division | Detailed Description |
|---|---|
| Service Status | Security Group’s status
|
| Service Cancellation | Button to cancel the service |
Fig. Security Group status information and additional features
Detailed Information
You can check the detailed information of the selected resource in the Security Group list and modify the information if necessary.
| Classification | Detailed Description |
|---|---|
| Service | Service Name |
| Resource Type | Resource Type |
| SRN | Unique resource ID in Samsung Cloud Platform |
| Resource Name | Resource Title |
| Resource ID | Unique resource ID in the service |
| Creator | User who created the service |
| Creation Time | Time when the service was created |
| Modifier | User who modified the service information |
| Modified Date | Date when service information was modified |
| Security Group name | Resource name |
| Security Group ID | Unique resource ID in the service |
| Number of Security Group rules | The rule quota and the number of rules in use for the corresponding Security Group |
| Number of Security Group rules/Account | Total number of Security Group rules assigned to the Account and the number of rules used in all Security Groups in the Account |
| Description | Additional description written by the user
|
| Log saving status | Security Group log saving status
|
| Applied Service | Service type, service name, status value of the service to which the corresponding Security Group is applied |
Fig. Security Group detailed information
Rule
In the rules tab, you can check the Security Group rule list and add or delete rules.
| Division | Detailed Description |
|---|---|
| Excel Download | Excel file download button for bulk input of rules |
| Rule Bulk Input | Excel file upload button for rule bulk input |
| Detailed Search | Detailed Rule Search Button |
| Add Rule | Add Rule Button |
| direction | Security Group applies to the server based on the direction of traffic access
|
| Rule ID | Unique ID value for the rule |
| Target Address | Destination address to communicate with the server applied with Security Group |
| Remote Security Group name | The Security Group resource name displayed when the target is specified as a Security Group |
| Remote Security Group ID | Security Group ID displayed when the target is specified as a Security Group |
| Service | Protocol and Port |
| Description | Additional description written by the user |
| Delete | Rule Delete |
Fig. Security Group rule list
Tag
On the Security Group List page, you can check the tag information of the selected resource, and add, change, or delete it.
| Classification | Detailed Description |
|---|---|
| Tag list | Tag list
|
Fig. Security Group tags tab items
Work History
Security Group list page where you can check the operation history of the selected resource.
| Division | Detailed Description |
|---|---|
| Work history list | Resource change history
|
Table. Work history tab detailed information items
Security Group resource management
You can manage resources such as Security Group log storage settings, rule additions, and more.
Using Log Saving
Reference
To save Security Group logs, you must first create a bucket in Object Storage to save the logs, and then set the bucket as the log repository in Security Group Logging.
- Log storage settings can be checked in Security Group Logging, and for more information, please refer to Security Group Logging.
- Setting up a log storage will incur Object Storage fees for log storage.
To save Security Group logs, follow these procedures.
- Click All Services > Networking > Security Group menu. It moves to the Service Home page of Security Group.
- On the Service Home page, click the Security Group menu. It moves to the Security Group list page.
- Security Group list page, click on the resource (Security Group name) to save the log. Move to the Security Group details page.
- Click the Edit icon of Log Saving. It moves to the Edit Log Saving popup window.
- Modify log storage In the 로그 저장 여부 수정 popup window, select 사용 and click the 확인 button.
Caution
If the log storage setting is not set in the Security Group Logging, you cannot set the log storage use setting.
Setting to not use log saving
To stop saving Security Group logs, follow these steps.
- 모든 서비스 > Networking > Security Group menu should be clicked. It moves to the Service Home page of Security Group.
- On the Service Home page, click the Security Group menu. It moves to the Security Group list page.
- On the Security Group list page, click the Security Group name that does not save logs. It moves to the Security Group details page.
- Click the Edit icon of Log Saving. It moves to the Edit Log Saving popup window.
- Modify log saving In the pop-up window, uncheck Use for the log storage and click the OK button.
- Check the message in the Notification popup window and click the OK button.
Caution
If you disable log storage usage, log storage for the corresponding service will be stopped, and tracking management through log analysis will not be possible in case of a security incident.
Add a rule
To add a Security Group rule, follow these steps.
Click on the menu for all services > Networking > Security Group. It moves to the Service Home page of Security Group.
On the Service Home page, click the Security Group menu. It moves to the Security Group list page.
Security Group list page, click the resource (Security Group name) to add rules. Move to the Security Group details page.
Click the Rules tab on the Security Group Details page. It moves to the Rules tab page.
Click the Rule tab and click the Add Rule button. It moves to the Add Rule popup window.
Classification NecessityDetailed Description Direction Required Application target criteria, traffic access direction setting - Inbound rule: External → Server
- Outbound rule: Server → External
Type Required Protocol type selection by protocol - Detailed input items vary depending on the selected protocol type
Protocol Number Required If you select Custom Protocol in the protocol, enter the protocol number 1 ~ 254values can be entered
Protocol Required Protocol Type - TCP, UDP, ICMP, ALL Select the desired protocol from these values
- ALL means all ports for all protocols
Port Range Required If TCP/UDP is selected in the protocol, set the allowed port - Well-known ports such as SSH, HTTP, TELENT can be selected
- When entering directly, values from
1 ~ 65,535can be entered, and port range can be specified using ‘start value-end value’
Type Required If you select ICMP in the protocol, set the ICMP Type - Types defined as ICMP Type, such as Echo, can be used by selecting them
- When entering directly, values from
0 ~ 255can be entered
Remote Required Rule Remote Type Setting - CIDR: Set target address by directly entering IP
- Security Group: Set created Security Group as target
Remote > Destination Address Required If you select CIDR for the Remote type, entering the destination address is required - When selecting CIDR: Enter in CIDR (IP address/subnet mask) format
- You can enter up to 128 addresses at once using
,and-.
- To use the entire IP range (ANY), enter ‘0.0.0.0/0’
- You can enter up to 128 addresses at once using
원격 > Security Group 필수 Remote type is Security Group is selected, Security Group selection is required Description Optional Additional description written by the user - Up to 255 characters can be entered
Fig. Security Group rule addition detailsCheck the rules to be added, then click the Confirm button.
Rule Bulk Creation
To add multiple Security Group rules at once, follow these steps.
- Click All Services > Networking > Security Group menu. It moves to the Service Home page of Security Group.
- On the Service Home page, click the Security Group menu. It moves to the Security Group list page.
- Security Group list page, click the resource (Security Group name) to add a rule. Move to the Security Group details page.
- Click the Rules tab on the Security Group Details page. It moves to the Rules tab page.
- Click the 규칙 tab and click the 엑셀 다운로드 button. The 규칙 bulk input Excel file will be downloaded.
- Enter the rule information into the bulk input Excel file and save it.
- Click the Batch Rule Input button. The Batch Rule Input popup window appears.
- Bulk Input Rules In the Bulk Input Rules popup window, click File Attachment and attach the written Excel file, then click File Upload.
- You cannot upload if the attached Excel file format is different from the registration form or the file is encrypted.
- The number of bulk registration rules that can be uploaded at once is up to 100. If the maximum registration rule is exceeded, it cannot be uploaded.
- If the maximum number of rules that can be registered in Account is exceeded, the file cannot be uploaded.
- In the Check Rules popup window, check the details and click the Confirm button.
Deleting Rules
To delete a Security Group rule, follow these procedures.
- Click on the menu for all services > Networking > Security Group. It moves to the Service Home page of Security Group.
- On the Service Home page, click the Security Group menu. It moves to the Security Group list page.
- Security Group list page, click the resource (Security Group name) to add rules. Move to the Security Group details page.
- Click the Rule tab on the Security Group Details page. It moves to the Rule tab page.
- Click the Delete button of the rule to be deleted in the Rules tab.
Security Group cancellation
You can delete unused Security Groups.
Caution
If there is a Security Group applied service, the Security Group service cannot be cancelled.
To cancel the Security Group, follow the procedure below.
- Click All services > Networking > Security Group menu. It moves to the Service Home page of Security Group.
- On the Service Home page, click the Security Group menu. It moves to the Security Group list page.
- On the Security Group list page, select the resource (Security Group name) to be terminated and click the Service Termination button.
- Once the cancellation is complete, please check if the resource has been cancelled on the Security Group list page.
2.2.1 - Security Group Logging
To store Security Group logs, you must first create a bucket in Object Storage to store the logs and then set the bucket as the log storage for Security Group Logging. After that, you can enable log storage in the Security Group details, and Security Group logs will start being stored in the Object Storage bucket.
To store Security Group logs, you need to follow these steps:
- You can create a new bucket in Object Storage for storing Security Group logs or use an existing bucket. To create a bucket, refer to Creating Object Storage.
- To set the bucket as the log storage for Security Group Logging, refer to Using Security Group Logging Log Storage.
- To enable log storage in the Security Group details, refer to Enabling Security Group Log Storage.
Using Security Group Logging Log Storage
To enable Security Group log storage, you must first set up the log storage in Security Group Logging.
Note
To set up Security Group Logging log storage, you need an Object Storage bucket for log storage. First, create a bucket in the Object Storage service.
For more information, refer to Creating Object Storage.
- Click All Services > Management > Network Logging > Security Group Logging. You will be taken to the Security Group Logging List page.
- On the Security Group Logging List page, click the Log Storage Settings button at the top. You will be taken to the Log Storage Settings popup window.
- In the Log Storage Settings popup window, select the Log Storage Bucket. After selecting the bucket, the Log Storage Path will be displayed.
- In the Log Storage Settings popup window, confirm the Log Storage Bucket and Log Storage Path, and then click the Confirm button.
- Confirm the message in the Notification popup window and click the Confirm button.
Guide
After setting up Security Group Logging log storage, you must enable log storage in the Security Group details for log storage to start.
For more information, refer to Enabling Security Group Log Storage.
Security Group Logging List
After setting up the Security Group Logging log storage bucket, you can view the Security Group Logging list.
- Click All Services > Management > Network Logging > Security Group Logging. You will be taken to the Security Group Logging List page.
Category RequiredDescription Resource ID Required Security Group ID Storage Target Required Security Group Name Storage Registration Date Required Security Group Log Storage Registration Date Table. Security Group Logging List Items
Note
After setting up Security Group Logging log storage, you must enable log storage in the Security Group details for log storage to start.
For more information, refer to Enabling Security Group Log Storage.
Checking Security Group Logging Content
Refer to the following content to check the stored log content.
- TCP / UDP
Example of stored log: 2024-10-11T02:18:39,drop,to-lport: tcp,198.19.65.2,6443,192.168.22.131,20427
| Category | Description |
|---|---|
| 2024-10-11T02:18:39 | Date and time when the log occurred (2024-10-11, 02:18:39) |
| drop | Action (drop / allow) |
| to-lport | Direction
|
| tcp | Protocol (tcp / udp / icmp / ip) |
| 192.168.65.2 | Source IP |
| 6443 | Source Port |
| 192.168.22.131 | Destination IP |
| 20427 | Destination Port |
- ICMP
Example of stored log: 2024-10-11T02:18:39,allow,to-lport: icmp,192.168.65.2,192.168.22.131,8
| Category | Description |
|---|---|
| 2024-10-11T02:18:39 | Date and time when the log occurred (2024-10-11, 02:18:39) |
| to-lport | Direction
|
| allow | Action (drop / allow) |
| icmp | Protocol (tcp / udp / icmp / ip) |
| 192.168.65.2 | Source IP |
| 192.168.22.131 | Destination IP |
| 8 | ICMP Type ID |
Disabling Security Group Logging Log Storage
You can disable Security Group Logging log storage.
- Click All Services > Management > Network Logging > Security Group Logging. You will be taken to the Security Group Logging List page.
- On the Security Group Logging List page, click the Log Storage Settings button at the top. You will be taken to the Log Storage Settings popup window.
- In the Log Storage Settings popup window, select Do not use for the Log Storage Bucket, and then click the Confirm button.
Note
Log storage settings can be changed only when there is no log storage target.
To change the log storage bucket, select Do not use, confirm, and then set it again.
2.3 - API Reference
API Reference
2.4 - CLI Reference
CLI Reference
2.5 - Release Note
Security Group
2025.07.01
FEATURE
Security Group rules input method added- Security Group rule input method added
- The function to input IP protocol has been added.
- The feature to select well-known protocols has been added.
2025.02.27
FEATURE
Common Feature Changes- Samsung Cloud Platform common feature changes
- Account, IAM and Service Home, tags, etc. reflected common CX changes.
2025.02.27
CHANGED
Security Group feature improvement- Security Group rules have been improved to allow multiple IP inputs when adding rules.
2024.12.23
FEATURE
Security Group log storage feature added- The function to save Security Group logs has been added.
- Determine whether to save Security Group logs and save logs to Object Storage.
2024.10.01
NEW
Security Group Service Official Version Release- The Security Group service, which provides virtual firewall functionality for instance resources, has been released.
- You can control incoming and outgoing traffic from instance resources through the Security Group service.
2024.07.02
NEW
Beta version release- The Security Group service, which provides virtual firewall functionality for instance resources, has been released.
- You can control incoming and outgoing traffic from instance resources through the Security Group service.
3 - Load Balancer
3.1 - Overview
Service Overview
Samsung Cloud Platform’s Load Balancer (LB) service automatically distributes traffic to available servers in case of unpredictable traffic spikes or server failures, ensuring the stability and continuity of customer services.
Load Balancer is deployed in a VPC Subnet as the service endpoint provided to clients, depending on the service type (L4 / L7), and you can configure multiple services by adding a Listener to the created Load Balancer.
Listener receives client requests through the service port and processes traffic according to routing rules. L4 supports TCP/UDP/TLS protocols, L7 supports HTTP/HTTPS protocols, and in L7 you can specify LB server groups per routing condition or set a redirect response for request URLs.
The LB server group forwards requests received by the Listener to specific servers based on load balancing and health checks. The server receives client requests from the Load Balancer’s Source NAT IP through the port set on the member, and the server status is periodically monitored by the Load Balancer’s health check IP.
LB health check defines the member health check method registered in the LB server group. You can select the LB health check resource provided by default in the LB server group, or create a new one to configure monitoring suitable for the application.
Features
- Various load balancing methods: Round Robin, Least Connection, IP Hash etc. provides various load balancing methods.
- SSL authentication encryption and Offloading: Supports SSL offloading and allows selection of encryption level.
- Enhanced Security: Use a firewall to manage Load Balancer communication and view connection logs through log storage.
Service Diagram
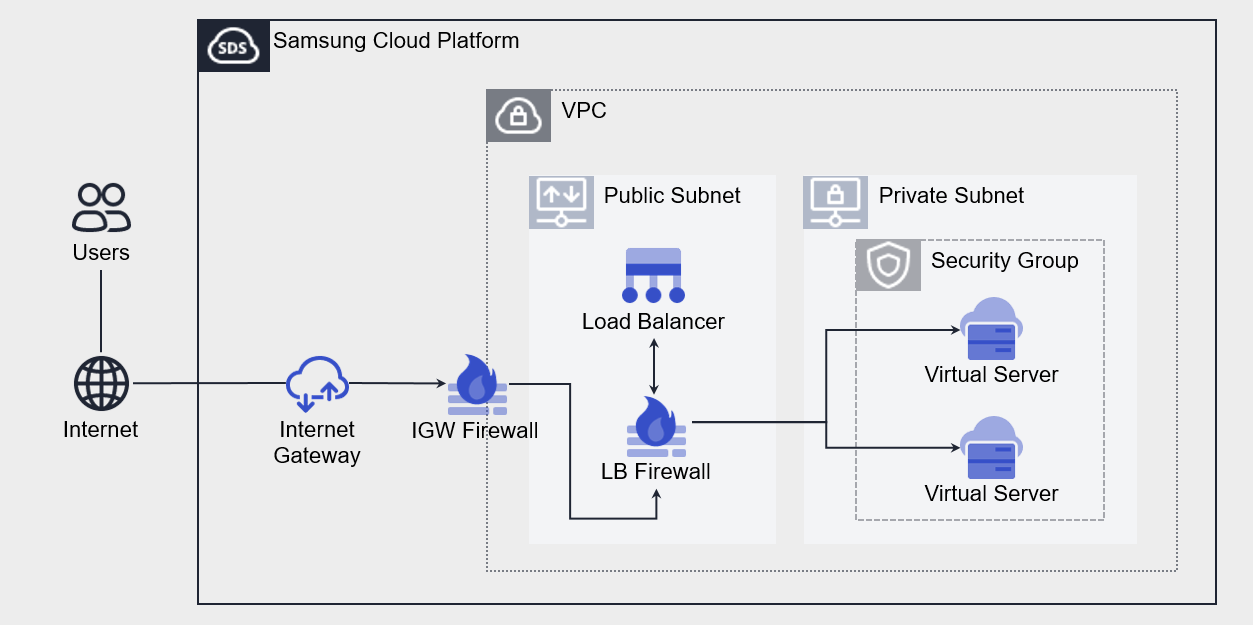
Provided Features
- Load Balancer: Choose the service type and set the IP to be used in the Load Balancer.
- Listener: Set the protocol, port, and routing rules. You can add multiple Listeners to a single Load Balancer.
- LB server group: Set the load balancing method. LB server group can be connected to a single Load Balancer.
- Member: Select the server to add to the LB server group. You can select Virtual Server or Bare Metal Server resources created in the same VPC as the Load Balancer, or directly enter an IP.
- LB Health Check: Set the member health check method. LB health check can be registered and used in multiple LB server groups.
Components
Load Balancer consists of Load Balancer(Listener), LB server group(member), LB health check.
Load Balancer
The components that make up a Load Balancer are as follows. Depending on the settings for each component, you can configure load balancing suitable for the customer’s workload.
| Component | Detailed Description |
|---|---|
| Service Classification | Load Balancer Service Type
|
| Service Sunbet | VPC Subnet where the Load Balancer will be deployed
|
| Service IP | Service IP that the client will access |
| Source NAT IP | IP to be used for delivering server traffic from the Load Balancer |
| Health Check IP | IP to be used for health check in Load Balancer |
| Listener | Resources connected to Load Balancer
|
Table. Load Balancer components
LB Server Group
The elements that make up the LB server group are as follows. Traffic is delivered to members of the LB server group according to the settings of each component.
| Component | Detailed Description |
|---|---|
| Protocol | LB server group forwarding protocol |
| Load Balancing | Traffic Distribution Method
|
| LB Health Check | Member Health Check Method
|
| Member | Server to handle client requests
|
Table. LB Server Group Components
LB Health Check
LB health check components are as follows. Member health checks are performed according to settings for each component.
| Component | Detailed Description |
|---|---|
| Protocol | Health Check Protocol |
| Health Check Port | Port used for health check |
| Period | Health check execution period |
| Waiting Time | Server response waiting time for health check |
| Detection Count | Criteria for determining member health check status (Healthy / Unhealthy) |
Table. LB health check components
Constraints
Samsung Cloud Platform’s Load Balancer has a default quota applied, which imposes restrictions on the number of Load Balancers, Listeners, LB server groups, and members that can be created. Through the console, you can manage current usage and request additional quota for items that can be expanded.
| Item | Default Quota | Detailed Description |
|---|---|---|
| LOAD_BALANCER.SERVICE_SUBNET.DEFAULT.COUNT | 3 | Number of Service Subnets that can create Load Balancers per VPC |
| LOAD_BALANCER.DEFAULT.COUNT | 50 | Number of Load Balancers created per Region |
| LOAD_BALANCER.LISTENER.DEFAULT.COUNT | 1000 | Number of Listeners created per Region |
| LOAD_BALANCER.SERVER_GROUP.DEFAULT.COUNT | 1000 | Number of LB server groups created per Region |
| LOAD_BALANCER.MEMBER.DEFAULT.COUNT | 1000 | Number of members that can be registered in the entire LB server group per Region |
| LOAD_BALANCER.HEALTH_CHECK.DEFAULT.COUNT | 500 | Number of LB health checks created per Region |
Table. Load Balancer Constraints
Preceding Service
Before creating the Load Balancer service, this is the list of services that must be pre-configured. Please refer to the guide provided for each service for detailed information and prepare in advance.
| Service Category | Service | Detailed Description |
|---|---|---|
| Networking | VPC | Service that provides an independent virtual network in a cloud environment |
Table. Load Balancer Preceding Service
3.2 - How-to guides
The user can enter required Load Balancer information and select detailed options through the Samsung Cloud Platform Console to create a service.
Load Balancer Create
You can create and use the Load Balancer service from the Samsung Cloud Platform Console.
To create a Load Balancer, follow the steps below.
- All Services > Networking > Load Balancer Click the menu. Navigate to the Service Home page of Load Balancer.
- Click the Load Balancer Create button on the Service Home page. You will be taken to the Load Balancer Create page.
- Load Balancer creation on the page, enter the information required to create the service and select detailed options.
- Service Information Input Enter or select the required information in the area.
| Category | Required | Detailed description |
|---|---|---|
| Load Balancer name | Required | Load Balancer resource name
|
| Service Category | Required | Load Balancer Service Type
|
| VPC | Required | VPC where the Load Balancer will be created
|
| Service Subnet | Required | VPC Subnet where the Load Balancer will be created
|
| Service IP | Select | Load Balancer service IP
|
| Source NAT IP | Select | IP to be used for member communication in the Load Balancer
|
| Health Check IP | Select | IP to use for health check in Load Balancer
|
| Use Firewall | Select | Whether to use Firewall
|
| Firewall log storage | Select | Select whether to save Firewall logs
|
Table. Load Balancer Service Information Input Items
- Additional Information Input Enter or select the required information in the area.
Category RequiredDetailed description Description Select Enter resource description Tag Select Add Tag - Up to 50 tags can be added per resource
Table. Load Balancer Additional Information Input Items
- Check the created service information and the estimated billing amount, and click the Complete button.
- When creation is complete, check the created resources on the Load Balancer List page.Guide
Load Balancer service does not provide access control functionality for Service IP and service ports.
- Load Balancer when creating use Firewall to manage communication between client and Load Balancer, and between Load Balancer and members with Firewall rules, and use Firewall log storage to store access logs is recommended.
CautionIf you use the firewall, you must add rules required for Load Balancer communication. Register the rules, paying attention to the direction for each purpose.
- If you do not add the rule, the Load Balancer service will not operate correctly.
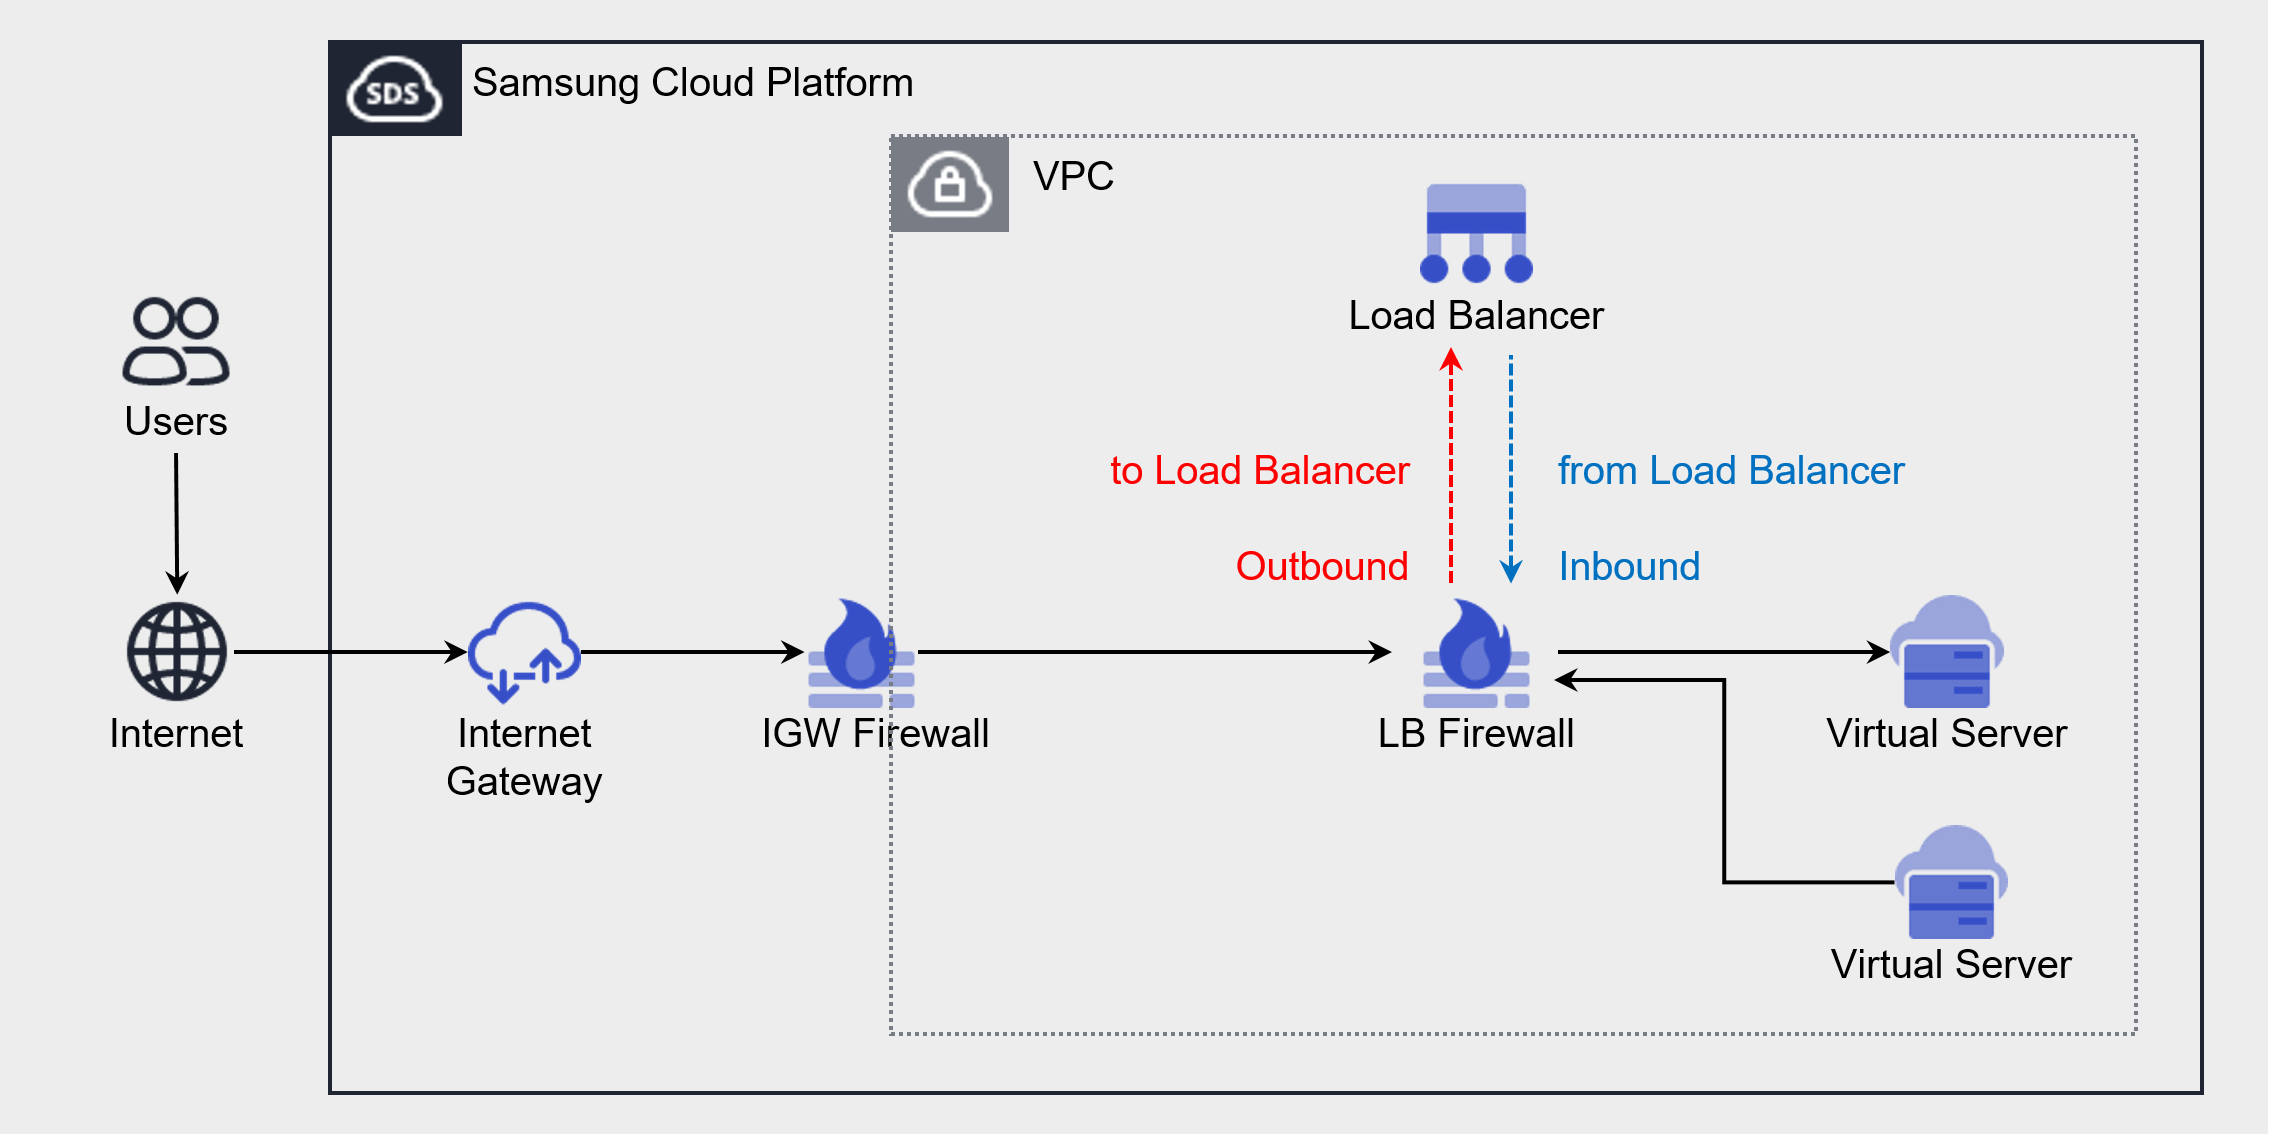
Purpose Source IP Destination IP Protocol Destination Port/Type Direction Client → LB connection Client IP LB Service IP Listener protocol Listener service port Outbound LB → Member Connection LB Source NAT IP LB Server Group Member IP LB Server Group Protocol Member Port Inbound LB → Member Health Check LB Health Check IP LB Server Group Member IP Health Check Protocol Health Check Port - If the health check port and member port are different, register the member port
Inbound Figures and Tables. Add Load Balancer Firewall Rule
- When creation is complete, check the created resources on the Load Balancer List page.
Load Balancer Check Detailed Information
The Load Balancer service can view and edit the resource list and detailed information in the Load Balancer menu. Load Balancer Details page consists of Details, Connected Resources, Tags, Activity Log tabs.
To view detailed information of the Load Balancer service, follow the steps below.
- All Services > Networking > Load Balancer Click the menu. Go to the Service Home page of the Load Balancer.
- Click the Load Balancer menu on the Service Home page. Navigate to the Load Balancer List page.
- Click the resource to view detailed information on the Load Balancer List page. You will be taken to the Load Balancer Details page.
- Load Balancer Detail page displays status information and additional feature information, and consists of Detail Information, Connected Resources, Tags, Operation History tabs.
Category Detailed description Status Load Balancer resource status - Active: The service is properly activated
- Deleting: Processing service termination request
- Creating: Processing service creation request
- Error: Cannot determine current status due to internal error
- Editing: Processing service modification request
Service termination Load Balancer resource deletion Table. Load Balancer status information and additional feature items
- Load Balancer Detail page displays status information and additional feature information, and consists of Detail Information, Connected Resources, Tags, Operation History tabs.
Detailed Information
Detailed Information tab allows you to view detailed information of the selected resource from the Load Balancer list, and modify necessary information.
| Category | Detailed description |
|---|---|
| Service | Service Name |
| Resource Type | Resource Type |
| SRN | Resource unique ID in Samsung Cloud Platform |
| Resource Name | Resource Name |
| Resource ID | Unique resource ID in the service |
| Creation Date/Time | Service Creation Date/Time |
| Modification Date/Time | Service Modification Date/Time |
| Creator | Service creation request user |
| Editor | Service modification request user |
| Load Balancer name | Load Balancer name |
| Service IP | Load Balancer’s Service IP (used for communication between client and Load Balancer)
|
| Service Category | Load Balancer Service Type |
| Source NAT IP | Load Balancer’s Source NAT IP (used for communication between Load Balancer and server)
|
| VPC | VPC resource name where Load Balancer is created |
| Service Subnet | Subnet resource name where Load Balancer is created |
| Public NAT IP | Load Balancer’s Public NAT IP (used when configuring internet service)
|
| Health Check IP | Load Balancer Health Check IP (used when checking health of LB server group members)
|
| Description | Additional information or description about the Load Balancer |
| Firewall name | Firewall resource name connected to Load Balancer |
Table. Load Balancer detailed information items
Connected Resources
In the Connected Resources tab, you can view the list of Listeners attached to the Load Balancer, and create or delete Listeners.
- connected resource tab, when you select the Listener item, you go to the Listener details page where you can view detailed information and edit or delete it.
- Listener Details page items, clicking the Edit icon allows you to edit the information.
| Category | Detailed description | |
|---|---|---|
| Listener creation | Listener creation button | |
| Listener name | Listener resource name | |
| Routing Rules | Routing rules connected to Listener
| |
| Protocol | Protocol that the Listener receives | |
| Port | Port that the Listener receives | |
| Creation Time | Listener Creation Time | |
| Delete | Listener Delete Button |
Table. Load Balancer Connected Resource List Items
Tag
Load Balancer list page allows you to view the tag information of the selected resource, and you can add, modify, or delete it.
| Category | Detailed description |
|---|---|
| Tag List | Tag List
|
Table. Load Balancer Tag Tab Items
Work History
Work History tab allows you to view the work history of the selected resource.
| Category | Detailed description |
|---|---|
| Work Details | Work Execution Content |
| Work date/time | Work execution date/time |
| Resource Type | Resource Type |
| Resource Name | Load Balancer Name |
| Work Result | Task execution result (success/failure) |
| Operator Information | Information of the user who performed the task |
Table. Load Balancer operation history list items
Load Balancer Resource Management
You can manage resources such as creating and deleting Load Balancer listeners.
Creating a Listener
Create a Listener on the Load Balancer to receive client requests and handle traffic according to the Listener settings.
Notice
The protocol that receives client requests varies depending on the Load Balancer service type.
- L4 Load Balancer case: TLS, TCP, UDP protocol
- L7 Load Balancer in case: HTTP, HTTPS protocol
Creating a Listener in L4 Load Balancer
To create a Listener in L4 Load Balancer, follow the steps below.
- All Services > Networking > Load Balancer Click the menu. Navigate to the Load Balancer’s Service Home page.
- Click the Load Balancer menu on the Service Home page. Go to the Load Balancer List page.
- Load Balancer List page, click the Load Balancer resource to create a Listener. Go to the Load Balancer Details page.
- Click the Connected Resources tab on the Load Balancer Details page. It navigates to the Connected Resources tab page.
- Connected Resources tab page, click the Create Listener button in the upper right.
- Service Information Input Enter or select the required information in the area.
- Protocol determines which information can be entered.
| Category | Required | Detailed description |
|---|---|---|
| Load Balancer | Required | Name of the Load Balancer resource where the Listener will be created |
| Listener name | Required | Listener resource name |
| Protocol | Required | Select Listener receiving protocol
|
| Service Port | Required | Enter Listener receiving port
|
| Routing Rule | Required | Routing Rule Settings
|
| Session Keep Time | Required | Set client session keep time
|
| Insert Client IP | Select | Set whether to insert client IP information (set when using TCP protocol)
|
| SSL Certificate | Select | Select encrypted certificate and security level (set when using TLS protocol)
|
| Server SSL security level | Required | Select security level when configuring End-to-End SSL (set when using TLS protocol)
|
| Persistence | Required | Select session persistence (Sticky Session) method (set when using TCP, TLS protocols)
|
Table. Enter Listener Service Information - When Using L4 Load Balancer
- Enter Additional Information In the area, enter or select the required information.
| Category | Required or not | Detailed description |
|---|---|---|
| Description | Select | Enter Resource Description |
| Tag | Select | Add Tag
|
Table. Listener additional information input items
- Check the created service information and click the Complete button.
- When creation is complete, check the created resources in the Load Balancer Details page’s Connected Resources tab.
Creating a Listener in L7 Load Balancer
To create a Listener in L7 Load Balancer, follow the steps below.
- Click the All Services > Networking > Load Balancer menu. Go to the Load Balancer’s Service Home page.
- On the Service Home page, click the Load Balancer menu. You will be taken to the Load Balancer List page.
- Load Balancer List on the page, click the Load Balancer resource to create a Listener. Navigate to the Load Balancer Details page.
- Click the Connected Resources tab on the Load Balancer Details page. You will be taken to the Connected Resources tab page.
- Connected Resources tab page, click the Create Listener button at the top right.
- Service Information Input area, enter or select the required information.
- The information that can be entered varies according to the Protocol.
| Category | Required | Detailed description |
|---|---|---|
| Load Balancer | Required | Name of the Load Balancer resource where the Listener is created |
| Listener name | Required | Listener resource name |
| Protocol | Required | Select Listener receiving protocol
|
| Service Port | Required | Enter Listener receiving port
|
| Routing Rule | Required | Configure Routing Rule
|
| Persistence | Select | Select session persistence (Sticky Session) method (set when routing action is LB server group forwarding)
|
| Session Keep Time | Optional | Set HTTP connection keep-alive time
|
| Response Timeout | Select | Set HTTP response timeout
|
| X-Forwarded-For | Option | Set whether to insert client IP information
|
| X-Forwarded-Proto | Select | Set whether to insert client request protocol information
|
| X-Forwarded-Port | Optional | Set whether to insert client request port information
|
| HTTP 2.0 | Select | Set whether to use HTTP/2 when connecting client and server |
| SSL Certificate | Select | Select encryption certificate and security level (set when using HTTPS protocol)
|
| Server SSL security level | Required | Select security level when configuring End-to-End SSL (HTTPSS protocol setting)
|
Table. Listener Service Information Input - When Using L7 Load Balancer
- Additional Information Input Please input or select the required information in the area.
| Category | Required | Detailed description |
|---|---|---|
| Description | Select | Enter resource description |
| Tag | Select | Add Tag
|
Table. Listener additional information input items
- Check the created service information and click the Complete button.
- When creation is complete, check the created resource in the Connected Resources tab of the Load Balancer Details page.
SSL Security Level Support Items
The list of TLS versions and Cipher Suites supported by the Listener for each SSL security level is as follows.
| Security Level | TLS Version | Cipher Suite (Encryption Algorithm) |
|---|---|---|
| High | TLS 1.3 | TLS13_AES_128_GCM_SHA256 TLS13_AES_256_GCM_SHA384 TLS13_CHACHA20_POLY1305_SHA256 |
| Normal/Low | Normal: TLS 1.3, 1.2 Low: TLS 1.3, 1.2, 1.1 | TLS13_AES_128_GCM_SHA256 TLS13_AES_256_GCM_SHA384 TLS13_CHACHA20_POLY1305_SHA256 RC4-MD5 RC4-SHA DES-CBC3-SHA DHE-RSA-AES128-GCM-SHA256 DHE-RSA-AES256-GCM-SHA384 DHE-RSA-CHACHA20-PLY1305 ECDHE-RSA-AES128-SHA ECDHE-RSA-AES256-SHA ECDHE-RSA-AES128-SHA256 ECDHE-RSA-AES256-SHA384 ECDHE-RSA-CHACHA20-POLY135 ECDHE-ECDSA-AES128-SHA ECDHE-ECDSA-AES256-SHA ECDHE-ECDSA-AES128-SHA256 ECDHE-ECDSA-AES256-SHA384 ECDHE-ECDSA-AES128-GCM-SHA256 ECDHE-ECDSA-AES256-GCM-SHA384 ECDHE-ECDSA-CHACHA20-POLY1305 |
Table. SSL security level support items
Listener Check Detailed Information
Load Balancer Details page’s Connected Resources tab by selecting a Listener you can view and edit the detailed information.
To view the detailed information of the Listener, follow the steps below.
- All Services > Networking > Load Balancer Click the menu. Navigate to the Service Home page of Load Balancer.
- On the Service Home page, click the Load Balancer menu. You will be taken to the Load Balancer List page.
- Load Balancer List Click the resource to view detailed information on the page. Go to the Load Balancer Details page.
- Click the Connected Resources tab on the Load Balancer Details page.
- Click the Listener to view detailed information from the list of connected resources. It moves to the Listener Details page.
- Listener Details page displays status information and additional feature information, and consists of Details, Tags, Activity History tabs.
| Category | Detailed description |
|---|---|
| Status | Listener Status
|
| Listener delete | Listener delete |
Table. Listener status information and additional function items
Detailed Information
Detailed Information tab allows you to view the listener’s detailed information and edit necessary information. Detailed information varies depending on the Load Balancer in use.
L4 Load Balancer Detailed Information
| Category | Detailed description |
|---|---|
| Service | Service Name |
| Resource Type | Resource Type |
| SRN | Resource unique ID in Samsung Cloud Platform |
| Resource Name | Resource Name |
| Resource ID | Unique resource ID in the service |
| Creator | Listener creation request user |
| Creation Time | Listener Creation Time |
| Editor | Listener modification request user |
| Edit Timestamp | Listener Edit Timestamp |
| Listener name | Listener name |
| Protocol | Listener usage protocol |
| Port | Listener used port |
| Session retention time | Client session retention time
|
| Insert Client IP | Client IP information insertion status
|
| Persistence | Whether to use session fixation (Sticky Session)
|
| Routing Rules | Routing Action and LB Server Group Information
|
| SSL Certificate | Basic certificate and SSL security level information
|
| SNI certificate | SNI certificate information
|
| Server SSL security level | Server connection encryption status
|
| Description | Additional information about Listener |
Table. Listener detailed information tab - When using L4 Load Balancer
L7 Load Balancer Detailed Information
| Category | Detailed description |
|---|---|
| Service | Service Name |
| Resource Type | Resource Type |
| SRN | Resource unique ID in Samsung Cloud Platform |
| Resource Name | Resource Name |
| Resource ID | Unique resource ID in the service |
| Creator | Listener creation request user |
| Creation Time | Listener Creation Time |
| Editor | Listener modification request user |
| Edit Timestamp | Listener Edit Timestamp |
| Listener name | Listener name |
| Protocol | Listener usage protocol |
| Port | Listener used port |
| Session retention time | HTTP connection keep-alive time
|
| Response time out | HTTP response timeout
|
| X-Forwarded-For | Insert client IP information
|
| X-Forwarded-Proto | Insert client request protocol information
|
| X-Forwarded-Port | Whether to insert client request port information
|
| HTTP 2.0 | Whether to use HTTP/2 when connecting client and server
|
| Persistence | Whether to use session fixation (Sticky Session)
|
| Routing Rules | Routing action and routing condition/redirect target information
|
| SSL Certificate | Basic certificate and SSL security level information
|
| SNI certificate | SNI certificate information
|
| Server SSL security level | Whether server connection is encrypted
|
| Description | Additional information about Listener |
Table. Listener detailed information tab - when using L7 Load Balancer
Tag
You can view the tag information of the Listener, and add, modify, or delete it.
| Category | Detailed description |
|---|---|
| Tag List | Tag List
|
Table. Listener Tag Tab Items
Work History
You can view the Listener’s operation history.
| Category | Detailed description |
|---|---|
| Work Details | Work Execution Content |
| Work Date | Task Execution Date |
| Resource Type | Resource Type |
| Resource Name | Listener Name |
| Task Result | Task Execution Result (Success/Failure) |
| Worker Information | Information of the user who performed the task |
Table. Listener Task History Tab Items
Edit routing rules
On the Connected Resources tab of the Load Balancer Details page, you can modify the Listener’s routing rules.
To modify the Listener’s routing rules, follow the steps below.
- All Services > Networking > Load Balancer Click the menu. Navigate to Load Balancer’s Service Home page.
- Click the Load Balancer menu on the Service Home page. Navigate to the Load Balancer List page.
- Load Balancer List page, click the resource to view detailed information. It navigates to the Load Balancer Details page.
- Click the Connected Resources tab on the Load Balancer Details page.
- Click the Listener to add a lighting condition from the list of connected resources. Listener Details page.
- Click the Edit icon of the Routing Rule item on the Listener Details page. The Edit Routing Rule popup opens.
- After modifying the routing rules according to the routing action, click the Confirm button.
Category Required or notDetailed description Routing Action - Current routing method (cannot be modified) Routing Condition Required Routing condition can be modified when routing action is LB server group delivery - URL Path: modify request URL path and LB server group (up to 20 additions possible)
- Host Header: modify request host and LB server group (up to 20 additions possible)
Redirect target Required If the routing action is URL redirect, the redirect target can be edited - Path: Can modify the changed URL path
- Host: Can modify the changed host
- Protocol/Port: Cannot modify (only HTTP → HTTPS redirect is possible)
Table. Listener Routing Rule Modification Items
Listener Delete
To delete an unused Listener, follow the steps below.
- All Services > Networking > Load Balancer Click the menu. Navigate to the Service Home page of the Load Balancer.
- Click the Load Balancer menu on the Service Home page. Move to the Load Balancer List page.
- Click the Load Balancer resource to delete the Listener on the Load Balancer List page. It navigates to the Load Balancer Detail page.
- Load Balancer Details 페이지에서 Connected Resources 탭을 클릭하세요. Connected Resources 탭 페이지로 이동합니다.
- On the Connected Resources tab page, click the Listener you want to delete. It navigates to the Listener Details page.
- Click the Delete Listener button on the Listener Details page.
Load Balancer Cancel
You can cancel unused Load Balancers to reduce costs. However, since it may affect the application service, request cancellation after sufficient prior review.
Caution
In the following cases, the Load Balancer cannot be terminated.
- If there is a Listener attached to the Load Balancer: Load Balancer Details page’s Connected Resources tab, delete the attached Listener.
- If using a Public NAT IP on the Load Balancer: Load Balancer Details page’s Details tab, deselect the Public NAT IP in use.
- If there are rules registered in the Firewall: Load Balancer Details page’s Details tab, delete the rules of the Firewall in use.
- If connected to a PrivateLink Service: Check the connected Load Balancer on the PrivateLink Service Details page.
To cancel the Load Balancer, follow the steps below.
- All Services > Networking > Load Balancer Click the menu. Navigate to the Service Home page of the Load Balancer.
- Click the Load Balancer menu on the Service Home page. You will be taken to the Load Balancer List page.
- On the Load Balancer List page, click the resource to be terminated. It navigates to the Load Balancer Details page.
- Click the Cancel Service button on the Load Balancer Details page.
- Once termination is complete, check the resource termination status in the Load Balancer list.
3.2.1 - LB Server Group
Users can create an LB server group through the Samsung Cloud Platform Console and connect it to the Load Balancer’s listener.
Create LB server group
To create an LB server group, follow the steps below.
- All Services > Networking > Load Balancer Click the menu. Navigate to the Service Home page of Load Balancer.
- On the Service Home page, click LB server group. Navigate to the LB server group list page.
- Click the Create LB Server Group button on the LB Server Group List page. It navigates to the Create LB Server Group page.
- Create LB Server Group 페이지에서 서비스 생성에 필요한 정보를 입력하고 상세 옵션을 선택하세요.
- Enter Service Information area, input or select the required information.
Category RequiredDetailed description LB server group name Required LB server group resource name - Enter 3~63 characters using English letters (uppercase and lowercase), numbers, and special characters (
-_)
- LB server group name must be unique within the Account
VPC Required Select VPC to create LB server group - Select VPC where the Load Balancer that will connect to the LB server group is created
Service Subnet Required Select VPC Subnet to create LB server group - Select Subnet where Load Balancer that will connect to LB server group is created
Load Balancing Required Select load balancing algorithm - Round Robin: Distribute sequentially to registered members
- Weighted round robin: Distribute sequentially in proportion to the weight assigned to each member
- Least Connection: Distribute to the member with the fewest connections
- Weighted least connection: Distribute to the member with higher priority considering the weight assigned to each member and the number of connections
- IP Hash: Distribute to a specific member based on the hash value of the client IP address
Protocol Required Select LB server group receive protocol - Select the protocol to deliver to members of the LB server group
LB health check Required Select LB health check - Select from LB health checks created in the same Service Subnet as the LB server group
Table. LB Server Group Service Information Input Items - Enter 3~63 characters using English letters (uppercase and lowercase), numbers, and special characters (
- Enter additional information Enter or select the required information in the area.
Category RequiredDetailed description Description Select Enter resource description Tag Select Add Tag - Up to 50 tags can be added per resource
Table. LB Server Group Additional Information Input Items
- Enter Service Information area, input or select the required information.
- Check the created service information and the estimated billing amount, and click the Complete button.
- Once creation is complete, check the created resources on the LB Server Group List page.
Check LB server group detailed information
LB server group menu allows you to view and edit the resource list and detailed information. The LB server group details page consists of Details, Connected Resources, Tags, Activity Log tabs.
To view detailed information of the LB server group, follow the steps below.
All Services > Networking > Load Balancer Click the menu. Navigate to the Service Home page of Load Balancer.
On the Service Home page, click LB server group. It navigates to the LB server group list page.
- Column display can be modified by clicking the Settings button at the top right of the table.
Category Display statusDetailed description LB server group name default LB server group resource name Protocol Default LB Server Group Protocol Load Balancer Default Load Balancer resource name connected to LB server group LB Health Check Default Name of LB health check resource used by LB server group Member count Default Number of members registered in LB server group Creation Time Default LB Server Group Creation Time Status Default LB Server Group Resource Status Table. LB server group list item
- Column display can be modified by clicking the Settings button at the top right of the table.
Click the resource to view detailed information on the LB Server Group List page. It moves to the LB Server Group Details page.
- LB Server Group Details At the top of the page, status information and descriptions of additional functions are displayed.
Category Detailed description Status LB server group resource status - Active: Service is normally activated
- Deleting: Processing service termination request
- Creating: Processing service creation request
- Error: Cannot determine current status due to internal error
- If this status persists, contact via Support Center
- Editing: Processing service modification request
Delete LB server group Delete LB server group resource Table. LB Server Group Status Information and Additional Feature Items
Detailed Information
Detailed Information tab allows you to view detailed information of resources in the LB server group list, and modify the information if needed.
| Category | Detailed description |
|---|---|
| Service | Service Name |
| Resource Type | Resource Type |
| SRN | Resource unique ID in Samsung Cloud Platform |
| Resource Name | Resource Name |
| Resource ID | Unique resource ID in the service |
| Creator | Service creation request user |
| Creation Date/Time | Service Creation Date/Time |
| Editor | Service modification request user |
| Modification Date/Time | Service Modification Date/Time |
| Load Balancer name | Load Balancer resource name connected to LB server group |
| LB server group name | LB server group name |
| VPC | VPC resource name where LB server group is created |
| Service Subnet | Subnet resource name where the LB server group is created |
| Port | LB server group forwarding port |
| Protocol | LB server group forwarding protocol |
| Load Balancing | LB server group traffic distribution method
|
| LB Health Check | LB Health Check Resource Name
|
Table. LB Server Group Detailed Information Items
Linked Resources
Connected Resources tab allows you to view the list of members connected to the LB server group, and add or delete members.
| Category | Detailed description |
|---|---|
| Member Name | Member name (server name) added to LB server group |
| IP address | member IP address |
| Port | Member Receive Port |
| Weight | Load Balancing Weight
|
| Activation | Member activation status
|
| Creation Date/Time | Member Addition Date/Time |
| Health State | Health Check Status
|
| Status | Member resource status |
Table. LB Server Group Connected Resource List Items
Tag
LB server group list page, you can view the tag information of the selected resource, and you can add, modify, or delete it.
| Category | Detailed description |
|---|---|
| Tag List | Tag List
|
Table. LB Server Group Tag Tab Items
Work History
Work History tab allows you to view the work history of the selected resource.
| Category | Detailed description |
|---|---|
| Work details | Work execution content |
| Work date/time | Work execution date/time |
| Resource Type | Resource Type |
| Resource Name | LB Server Group Name |
| Work Result | Task Execution Result (Success/Failure) |
| Operator Information | Information of the user who performed the task |
Table. LB Server Group Operation History List Items
Managing LB Server Group Resources
You can view the member list of the LB server group and add or remove members.
Add Member
You can add members to the LB server group to register server resources that handle client requests.
To add a member to the LB server group, follow the steps below.
All Services > Networking > Load Balancer Click the menu. Go to the Load Balancer’s Service Home page.
Click LB server group on the Service Home page. You will be taken to the LB server group list page.
Click the resource to edit detailed information on the LB Server Group List page. You will be taken to the LB Server Group Details page.
LB Server Group Details 페이지에서 Connected Resources 탭을 클릭하세요. Connected Resources 탭 페이지로 이동합니다.
Click the Add Member button at the top right of the Connected Resources tab page.
Add Member After entering the required information in the popup window, click the Confirm button.
Category RequiredDetailed description LB server group name Default LB server group name to add members Target Server Required Server information to add as member - Virtual Server/Bare Metal Server: Select from the list of servers created in the same VPC as the LB server group
- Direct IP input: Directly input server IP
- Add button can be clicked to add target server
Member Information Required Member Port and Weight Settings - Member Name: Display server name and IP to be added as a member
- Port: Port that the member will receive
- Weight: Weight applied to load balancing
- When using Weighted Round Robin or Weighted Least Connection load balancing, a value between 1 and 1000 is required
Table. LB server group member addition itemsCheck whether members have been added in the Connected Resources tab.
Information
Add the following rule to the Security Group of the server added as a member, for communication between the Load Balancer and LB server group members.
- (Direction) Inbound rule, (Target address) Load Balancer’s Source NAT IP, (Protocol) LB server group protocol, (Allowed port) member port
Reference
- If the LB server group is in Creating, Editing, Deleting, Error state, you cannot add members.
- If the number of members that can be created in the Account that the LB server group belongs to is exceeded, you cannot add members. The maximum number of members that can be created in a single Account is 1,000.
Reference
- You can add a server created in another VPC as a member via VPC Peering. After adding the target server by direct IP input, check the added member’s health check status in the Connected Resources tab.
For more details, please refer to VPC > VPC Peering.
Member Edit
When you click a member name in the member list, you are taken to the Member Details page. You can view the member detail information, and you can click the Edit icon to change the information.
Weight Modification
Member weight can be modified by following the steps below. It can be modified when using weighted load balancing (Weighted Round Robin, Weighted Least Connection).
- All Services > Networking > Load Balancer Click the menu. Navigate to the Service Home page of the Load Balancer.
- Click LB Server Group on the Service Home page. You will be taken to the LB Server Group List page.
- Click the resource to edit detailed information on the LB Server Group List page. You will be taken to the LB Server Group Details page.
- LB Server Group Details 페이지에서 Connected Resources 탭을 클릭하세요. Connected Resources 탭 페이지로 이동합니다.
- Connected Resources tab page, click the member to edit. Navigate to the Member Details page.
- Click the Edit Weight button on the Member Details page.
- Weight Modification In the popup, enter the weight to modify and click the Confirm button.
- Check whether the weight has been modified in the Connected Resources tab.
Port Edit
To modify the member port, follow the steps below.
- All Services > Networking > Load Balancer Click the menu. Navigate to the Service Home page of Load Balancer.
- Click LB Server Group on the Service Home page. You will be taken to the LB Server Group List page.
- Click the resource to edit detailed information on the LB Server Group List page. You will be taken to the LB Server Group Details page.
- LB Server Group Details 페이지에서 Connected Resources 탭을 클릭하세요. Connected Resources 탭 페이지로 이동합니다.
- Click the member to edit on the Connected Resources tab page. You will be taken to the Member Details page.
- Member Details 페이지에서 Edit Port 버튼을 클릭하세요.
- Port Modification In the popup, enter the port to modify and click the Confirm button.
- Connected Resources tab, check whether the port has been modified.
Activation Edit
To modify member activation, follow these steps.
- All Services > Networking > Load Balancer Click the menu. Go to the Load Balancer’s Service Home page.
- Click LB server group on the Service Home page. You will be taken to the LB server group list page.
- Click the resource to edit detailed information on the LB Server Group List page. It moves to the LB Server Group Details page.
- Click the Connected Resources tab on the LB Server Group Details page. You will be taken to the Connected Resources tab page.
- Connected Resources 탭 페이지에서 수정할 멤버를 클릭하세요. Member Details 페이지로 이동합니다.
- Member Details 페이지에서 Edit Activation 버튼을 클릭하세요.
- Edit Activation in the popup select Disable or Enable and click the Confirm button.
- Check whether activation editing is enabled in the Connected Resources tab.
Reference
- If you change the activation to Disable, the member will only handle existing connections and stop new connections.
Member Deletion
To delete unused members, follow the steps below.
- All Services > Networking > Load Balancer menu. Navigate to the Load Balancer’s Service Home page.
- Click LB Server Group on the Service Home page. You will be taken to the LB Server Group List page.
- Click the resource to edit detailed information on the LB Server Group List page. You will be taken to the LB Server Group Details page.
- Click the Connected Resources tab on the LB Server Group Details page. Connected Resources tab page will be displayed.
- Connected Resources tab page, click the member to delete. You will be taken to the Member Details page.
- Click the Delete Member button on the Member Details page.
- In the Connected Resources tab, verify if the member has been deleted.
Cancel LB server group
You can cancel an unused LB server group. However, since it may affect the application service, please request cancellation after sufficient prior review.
Information
In the following case, the LB server group cannot be terminated.
- If the LB server group is being used in the Listener: modify the Listener’s LB server group before deleting the LB server group.
- If there are members registered in the LB server group: Delete all resources connected to the LB server group before terminating the LB server group.
- When using LB server group in Auto-Scaling Group: Set Load Balancer to not used in Auto-Scaling Group or modify so that the LB server group is not used. For more details, refer to Auto-Scaling Group > Load Balancer usage.
To cancel the LB server group, follow the steps below.
- All Services > Networking > Load Balancer Click the menu. Navigate to the Service Home page of Load Balancer.
- Click LB Server Group on the Service Home page. You will be taken to the LB Server Group List page.
- Click the resource to be terminated in the LB server group list. You will be taken to the LB server group details page.
- Click the Delete LB Server Group button on the LB Server Group Details page.
- When the termination is completed, check the resource termination status in the LB server group list.
3.2.2 - LB Health Check
Users can create LB health checks through the Samsung Cloud Platform Console and use them for LB server groups.
LB Create health check
LB health check를 생성하려면 다음 절차를 따르세요.
- All Services > Networking > Load Balancer Click the menu. Navigate to the Service Home page of the Load Balancer.
- Click LB Health Check on the Service Home page. You will be taken to the LB Health Check List page.
- LB Health Check List on the page, click the LB Health Check Create button. Navigate to the LB Health Check Create page.
- LB Health Check Creation page, enter the information required to create the service and select detailed options.
- Service Information Input area, enter or select the required information.
Category RequiredDetailed description LB health check name Required LB health check resource name - Enter using English letters (uppercase and lowercase), numbers, and special characters (
-_) with 3 to 63 characters
- LB health check name cannot be duplicated within an Account
VPC Required Select VPC to create LB health check - Select the VPC where the LB server group that will use the LB health check is created
Service Subnet Required Select VPC Subnet to create LB health check - Select Subnet where the LB server group that will use the LB health check is created
Health Check Method > Protocol Required Health Check Protocol - Select TCP or HTTP as the protocol to use for member health checks
Health Check Method > Health Check Port Required Health Check Port - Enter a value between 1 and 65,534 to be used as the port for member health checks
Health check method > Interval Required Health check interval - Default 5 seconds, input possible within 1~180 seconds
Health Check Method > Wait Time Required Health Check Response Wait Time - Default 5 seconds, input possible within 1~180 seconds
- Cannot set a value larger than the interval
Health Check Method > Detection Count Required Number of times to determine health check status - Default is 3 times, input possible within 1~10
Health check method > HTTP method Required HTTP request method setting (HTTP protocol used when setting) - Select GET, POST
Health Check Method > URL Monitor Required Enter health check URL path (HTTP protocol setting when used) - Enter using English letters, numbers, special characters (
/.-_?&=) within 50 characters
Health Check Method > Response Code Required Enter the HTTP response code to be received from the server (HTTP protocol used when setting) - Enter response codes in the 200~500 range
Health check method > Request string Required Enter health check request string (set when using HTTP protocol POST method) - Enter the content to be included in the Request Body using English letters, numbers, special characters (
/.-_?&=) within 255 bytes
Table. LB Health Check Service Information Input Items - Enter using English letters (uppercase and lowercase), numbers, and special characters (
- Enter additional information Please input or select the required information in the area.
Category RequiredDetailed description Description Select Enter resource description Tag Select Add Tag - Up to 50 tags can be added per resource
Table. LB server group additional information input items
- Service Information Input area, enter or select the required information.
- Summary Check the service information and estimated billing amount generated in the panel, and click the Complete button.
- When creation is complete, check the created resources on the LB Health Check List page.
Information
Add the following rule to the Security Group of the server added as a member for member health checks in the Load Balancer.
- (Direction) Inbound rule, (Target address) Load Balancer’s health check IP, (Protocol) health check protocol, (Allowed port) health check port
- It is recommended to set the health check port the same as the member port.
- If the health check port and the member port are different, the health check is performed based on the member port.
Guide
Set the LB health check to a value that can be responded to by members added to the LB server group.
- Load Balancer determines member status based on health check response, so the LB health check result may differ from the actual service status.
LB Health Check Check detailed information
LB Health Check menu allows you to view and edit the resource list and detailed information. LB Health Check Details page consists of Details, Connected Resources, Tags, Operation History tabs.
To check the detailed LB health check information, follow the steps below.
All Services > Networking > Load Balancer Click the menu. Navigate to the Load Balancer’s Service Home page.
Click LB Health Check on the Service Home page. Navigate to the LB Health Check List page.
- Column display can be modified by clicking the Settings button at the top right of the table.
Category Display statusDetailed description LB Health Check Name Default LB Health Check Resource Name Service Subnet Default VPC Subnet name where LB health check is created LB server group count default LB server group count using health check Type Default LB health check type Protocol Default LB Health Check Protocol Creation Time Default LB Health Check Creation Time Status Default LB health check resource status Table. LB health check list items
- Column display can be modified by clicking the Settings button at the top right of the table.
LB Health Check List page, click the resource to view detailed information. LB Health Check Details page will be opened.
- LB Health Check Details At the top of the page, status information and descriptions of additional features are displayed.
Category Detailed description Status LB health check resource status - Active: The service is properly activated
- Deleting: Processing service termination request
- Creating: Processing service creation request
- Error: Cannot determine current status due to internal error
- If this status persists, please contact the Support Center.
- Editing: Processing service modification request
LB health check delete LB health check resource delete Table. LB Health Check Status Information and Additional Feature Items
- LB Health Check Details At the top of the page, status information and descriptions of additional features are displayed.
Detailed Information
Detailed Information tab allows you to view the resource’s detailed information from the LB health check list, and modify the information if needed.
| Category | Detailed description |
|---|---|
| Service | Service Name |
| Resource Type | Resource Type |
| SRN | Resource unique ID in Samsung Cloud Platform |
| Resource Name | Resource Name |
| Resource ID | Unique resource ID in the service |
| Creator | Service creation request user |
| Creation Date/Time | Service Creation Date/Time |
| Editor | Service modification request user |
| Modification Date/Time | Service Modification Date/Time |
| LB Health Check Name | LB Health Check Name |
| Type | LB health check type |
| VPC | VPC to use LB health check |
| Service Subnet | VPC Subnet to use for LB health check |
| Health Check Method | LB Health Check Method
|
| Description | Additional information about LB health check |
Table. LB health check detailed information items
Connected Resources
Connected Resources tab allows you to view detailed information of the LB server group linked to LB Health Check.
| Category | Detailed description |
|---|---|
| LB Server Group | LB Server Group Resource Name
|
| Protocol | LB health check protocol |
| Load Balancer | Load Balancer resource name connected to LB server group |
| Number of members | Number of members added to LB server group |
| Creation Time | LB Server Group Creation Time |
| Status | LB server group resource status
|
Table. LB Health Check Connected Resource List Items
Tag
LB Health Check List page allows you to view the tag information of the selected resource, and you can add, modify, or delete it.
| Category | Detailed description |
|---|---|
| Tag List | Tag List
|
Table. LB Health Check Tag Tab Items
Work History
Work History tab allows you to view the work history of the selected resource.
| Category | Detailed description |
|---|---|
| Work Details | Task Execution Content |
| Work Date/Time | Work Execution Date/Time |
| Resource Type | Resource Type |
| Resource Name | LB Health Check Name |
| Work Result | Task execution result (success/failure) |
| Worker Information | Information of the user who performed the task |
Table. LB Health Check Job History List Items
Modify LB health check method
LB Health Check Details page allows you to modify the health check method.
To modify the LB health check method, follow the steps below.
- All Services > Networking > Load Balancer Click the menu. Navigate to the Service Home page of the Load Balancer.
- Click LB Health Check on the Service Home page. You will be taken to the LB Health Check List page.
- Click the resource to edit detailed information on the LB Health Check List page. You will be taken to the LB Health Check Details page.
- LB Health Check Details page, click the Edit icon of Health Check Method. You will be taken to the Edit Health Check Method popup.
- Modify health check method After editing the required information in the popup window, click the Confirm button.
LB Health Check Cancellation
You can cancel the unused LB health check service.
Caution
- Basic type LB health check resources cannot be deleted.
- LB health check resources used in the LB server group cannot be deleted.
To cancel the LB health check, follow the steps below.
- All Services > Networking > Load Balancer > LB Health Check menu를 클릭하세요. LB Health Check List 페이지로 이동합니다.
- Click the resource to cancel in the LB health check list. You will be taken to the LB health check details page.
- Click the Delete LB Health Check button on the LB Health Check Details page.
- If termination is completed, check the resource termination status in the LB health check list.
3.3 - API Reference
API Reference
3.4 - CLI Reference
CLI Reference
3.5 - Release Note
Load Balancer
2025.12.16
FEATURE
LB health check setting change and addition of LB health check, LB server group options- LB health check port configuration method has been changed.
- You can choose between member port/direct input, and if you select direct input, specify the port to use.
- Existing LB health checks are changed to member ports. (Same as the current health check method)
- HTTPS option has been added to the LB health check protocol.
- You can monitor the server TLS connection status.
- When using URL redirection on the HTTP Listener, you can specify the target port for the redirection.
- You can add Multi-node GPU Cluster resources to LB server group members.
2025.10.23
FEATURE
Load Balancer Feature Added- You can set the Source NAT IP and health check IP when creating a Load Balancer.
- TLS protocol has been added to L4 Listener.
- You can configure TLS services based on TCP.
- Routing rule option has been added to L7 Listener.
- Routing conditions allow setting URL path or host-specific branching.
- Supports multiple SSL certificates.
- Supports SNI, allowing multiple certificates to be registered on a single Listener.
2025.07.01
FEATURE
LB health check and LB server group feature addition- Add LB health check management feature
- Create an LB health check to define the required health check method and connect it to an LB server group for use.
- LB server group weighted load balancing support
- Weighted Round Robin and Weighted Least Connection have been added to the load balancing options.
- By setting per-member weights, you can distribute server load.
- Add LB server group member activation feature
- You can select whether to enable or disable members belonging to the LB server group.
2025.02.27
NEW
New Load Balancer Service Launch- A Load Balancer service that provides more stable and enhanced features has been launched.
- Provides an L7 Load Balancer that supports HTTP, HTTPS protocols.
- Provides an L4 Load Balancer that supports TCP, UDP protocols.
4 - DNS
4.1 - Overview
Service Overview
The DNS service is a service that allows access to services by converting human-recognizable domain names into numerical IP addresses that the system can identify, making it convenient for people to access services.
Through the DNS service, users can easily register their desired domain and manage their domain records by themselves.
Features
- Easy Domain Registration: New domain registration and change management are possible in a web-based console. You can easily create and manage domains through the web without building a separate DNS infrastructure or installing a DNS solution.
- Support for various records: A, AAAA, CNAME, TXT, MX, SPF, etc. various resource record types can be set, and it can automatically scale to handle large query volumes without user intervention.
- Convenient hosting environment management: You can choose and use public domain names that are exposed to the internet and provide web services, and private domain names that can only be used by designated internal users without an internet connection, according to the usage environment and purpose.
Composition
Provided Features
The DNS service provides the following functions.
- 호스팅 영역 생성/관리: You can create and manage Public Hosted Zones that can be accessed from anywhere via the internet and Private Hosted Zones that can only be accessed within a designated network environment without exposing them to the internet.
- Public Domain Name Application: You can apply for a Public Domain Name that allows access from anywhere on the internet.
- Support for various resource records: You can choose and use the record type according to the usage environment and purpose.
| Record Type | Detailed Description |
|---|---|
| A | Specify the IPv4 address corresponding to the domain name so that the IP address can be found with the domain name |
| Specifies the IPv6 address corresponding to the domain name so that the IP address can be found with the domain name as | AAAA |
| Set text information for the domain | |
| CNAME | Specify an alias (Alias) for the domain name |
| MX | Specifies the mail server of the domain and subdomain owned by the user |
| SPF | To prevent spam mail, verify the IP address or domain name of the mail transmission server (Sender Policy Framework) |
| NS | Name server responsible for the domain (automatically generated) |
| SOA | Domain’s starting information (starting point of authority) is defined (automatically generated) |
Component
Private DNS
To manage private domain names for use only in a specified network environment without exposing them to the internet, you must first create a Private DNS. Private DNS names are commonly used in all regions within an Account. It can be created for the first time in any region within the Account, and then activated with the same Private DNS name in other regions from the Private DNS list. You can select the VPC you want to connect to Private DNS by region. By using a common Private DNS name, you can share and manage the information of the Private Hosted Zone across all regions.
Hosted Zone
Private Hosted Zone allows you to create and manage domain names that can only be used in a specified network environment targeting VPCs connected to Private DNS. Public Hosted Zone can manage Public Domain Name created through Samsung Cloud Platform. You can register and modify records suitable for your purpose through the Hosted Zone.
Public Domain Name
You can apply for a Public Domain Name in conjunction with the Whois company, a Public Domain Name management company. The Public Domain Name can be purchased on a yearly basis, and the automatic renewal (on a yearly basis) can be set or changed up to 7 days before the end of the purchase period.
Constraints
The limitations of the DNS service are as follows.
| Classification | Description |
|---|---|
| Number of Private DNS that can be created in Account | 1 |
| Number of Hosted Zones that can be created in Accoutn | 20 |
| Number of records that can be registered per Hosted Zone | 100 |
Reference
- The use of Public Domain Name and Public Hosted Zone in the kr-south region of southern Korea is restricted.
Preceding Service
The DNS service has no preceding service.
4.1.1 - TLD List
TLD (Top-Level Domain) list
You can use the TLD below. When applying for a Public Domain Name, different annual usage fees occur for each TLD type.
| TLD Type | Public Domain Name Registration Cost (KRW/year, excluding tax) |
|---|---|
| .COM | 20,000 |
| .NET | 20,000 |
| .ORG | 20,000 |
| Korean | 24,000 |
| Business Registration Number of Korea | 16,000 |
| .BIZ | 20,000 |
| .INFO | 20,000 |
| .CN | 65,000 |
| Television | 90,000 |
| .IN | 65,000 |
| .EU | 80,000 |
| .AC | 286,000 |
| .TW | 100,000 |
| .MOBI | 44,000 |
| Name | 30,000 |
| Credit Card | 90,000 |
| .JP | 198,000 |
| .ASIA | 55,000 |
| .ME | 44,000 |
| Phone | 44,000 |
| .PRO | 44,000 |
| .SO | 103,000 |
| .SX | 90,000 |
| .CO | 100,000 |
| .XXX | 200,000 |
| .PW | 44,000 |
| .PH | 100,000 |
| .io | 91,000 |
| .app | 42,500 |
| .co.kr | 24,000 |
4.2 - How-to guides
The user can enter the essential information of the DNS service through the Samsung Cloud Platform Console and create the service by selecting detailed options.
Private Domain Name management precautions before use
- To manage private domain names for use only in a specified network environment without exposing them to the internet, you must first create a Private DNS.
- The defined Private DNS name is commonly used in all regions within the account. It can be created for the first time in any region within the account, and then activated and used with the same Private DNS name in other regions from the Private DNS list.
- You can selectively set the VPC to be connected to Private DNS by region. There are no VPCs connected by default when first created or activated.
- Private DNS names may have been pre-used within Samsung Cloud Platform, and you can check their availability through duplicate checks when entering domain names.
- Hosted Zone information will be shared across all regions. However, some detailed information (SRN, creator, modifier information) can only be confirmed in the initial creation region.
General usage examples are as follows. For detailed usage instructions, please refer to the How-to guides of the corresponding sub-service.
| Order | Sub-service | Main Procedure |
|---|---|---|
| STEP 1 | Private DNS | Create Private DNS (A region) → Connect VPC within A region → Activate Private DNS (B region) → Connect VPC within B region |
| STEP 2 | Hosted Zone | Create Private Hosted Zone → Register records |
| STEP 3 | - | Detailed information inquiry, modification, cancellation |
Fig. General usage procedure
Note before using Public Domain Name management
- In the internet environment, the Public Domain Name can only be managed through Hosted Zone for the domain name applied through Samsung Cloud Platform.
- The list of available top-level domains may change.
Here is an example of a general usage procedure. For detailed usage instructions, please refer to the How-to guides of the corresponding sub-service.
| Division | Sub-service | Main Procedure |
|---|---|---|
| STEP 1 | Public Domain Name | Check the availability and apply for the Public Domain Name to be used |
| STEP 2 | Hosted Zone | Create a Hosted Zone for the applied Public Domain Name → Register records |
| STEP 3 | - | Detailed information inquiry, modification, cancellation |
Fig. General usage procedure
4.2.1 - Private DNS
Users can enter the essential information of the DNS service and select detailed options through the Samsung Cloud Platform Console to create the service.
Create Private DNS
You can create and use the DNS service in the Samsung Cloud Platform Console.
Reference
The Private DNS service can only be created one per account.
To request the creation of a Private DNS service, follow these steps.
Click All Services > Networking > DNS menu. It moves to the Service Home page.
Service Home page, click the Create Private DNS button in the drop-down menu. It moves to the Create Private DNS page.
Create Private DNS page, enter the information required for service creation, and select detailed options.
Enter Service Information Enter or select the required information in the area.
Classification NecessityDetailed Description Private DNS name required Enter the Private DNS name to use - Enter within 3-20 characters, including lowercase letters, numbers, and special characters (-)
- Cannot be used with the same name as the one currently in use
VPC Connection Select Register VPC to connect with Private DNS - Select button to choose VPC
- Up to 5 VPCs can be registered
Table. Private DNS service information input itemsAdditional Information Input area, please enter or select the necessary information.
Classification MandatoryDetailed Description Enter additional information and description for Private DNS Description Selection Tag Selection Add Tag - Up to 50 can be added per resource
- Click the Add Tag button and enter or select Key, Value
Table. DNS Additional Information Input Items
Check the application history and click the Complete button.
- Once creation is complete, check the created resource on the Private DNS list page.
Check Private DNS details
The Private DNS service allows you to view and modify the full list of resources and detailed information. The Private DNS details page consists of Details, VPC connections, Tags, Operation history tabs.
To check the Private DNS details, follow the next procedure.
- Click All Services > Networking > DNS menu. It moves to the Service Home page of DNS.
- Service Home page, click the Private DNS menu. Move to the Private DNS list page.
- Click on the resource to view detailed information on the Private DNS list page. It moves to the Private DNS details page.
- Private DNS details page displays the status information and detailed information of Private DNS, and consists of details, VPC connection, tags, operation history tabs.
Division Detailed Description Service Status Private DNS status - Creating: being created
- Activating: being activated
- Active: in operation
- Inactive: out of operation
- Editing: being edited
- Deleting: being deleted
- Error: error occurred
Service Cancellation Button to cancel Private DNS Table. Status Information and Additional Functions
- Private DNS details page displays the status information and detailed information of Private DNS, and consists of details, VPC connection, tags, operation history tabs.
Detailed Information
On the Private DNS list page, you can check the detailed information of the selected resource and modify the information if necessary.
| Classification | Detailed Description |
|---|---|
| Service | Service Name |
| Resource Type | Resource Type |
| SRN | Unique resource ID in Samsung Cloud Platform |
| Resource Name | Resource Title |
| Resource ID | Unique resource ID in the service |
| Creator | User who created the service |
| Creation Time | The time when the service was created |
| Modifier | Service information modified user |
| Modified Date | Date when service information was modified |
| Initial Creation Location | Private DNS Initial Creation Location |
| VPC Connection | VPC information connected to Private DNS
|
| Description | Private DNS description
|
Table. Private DNS detailed information items
VPC Connection
On the Private DNS List page, you can check the connected VPC information and add, change, or delete it.
| Classification | Detailed Description |
|---|---|
| VPC Name | Name of the VPC connected to the service
|
| Location | VPC location connected to the service |
| Connection Registration Date | Connection registration date of VPC connected to the service |
| Delete | Delete VPC peering connection connected to the service |
Fig. VPC connection tab items of Private DNS
Tag
On the Private DNS List page, you can check the tag information of the selected resource, and add, change, or delete it.
| Classification | Detailed Description |
|---|---|
| Tag List | Tag list
|
Table. Private DNS tags tab items
Work History
You can check the operation history of the selected resource on the Private DNS list page.
| Classification | Detailed Description |
|---|---|
| Work history list | Resource change history
|
Fig. Private DNS job history tab detailed information items
Private DNS activation from a location that is not the initial creation location
Private DNS is activated and used in a different location (region) than where it was first created (region).
To enable Private DNS service, follow these procedures.
- Click All Services > Networking > DNS menu. It moves to the Service Home page of DNS.
- Service Home page, click the Private DNS menu. It moves to the Private DNS list page.
- Private DNS list where you want to activate the resource, click the activation button. A notification window will appear.
- Inactive status of Private DNS items only shows the activation button.
- Click Confirm in the notification window.
Managing VPC connections for Private DNS
You can add or delete VPC information connected to the Private DNS service.
Add VPC Connection
To add a connection to the VPC of Private DNS, follow these steps.
- All Services > Networking > DNS menu is clicked. It moves to the Service Home page of DNS.
- Service Home page, click the Private DNS menu. It moves to the Private DNS list page.
- Click on a resource to view detailed information on the Private DNS list page. It moves to the Private DNS details page.
- Click the Private DNS details page VPC connections tab. Move to the VPC connections tab page.
- VPC Connection tab page, click the Add VPC Connection button. The VPC connection window appears.
- In the VPC connection window, select the location and VPC item and click Confirm.
- Check if the added item is displayed in the VPC connection list.
Deleting VPC Connection
To delete a connection to a VPC from Private DNS, follow these steps.
- Click All services > Networking > DNS menu. It moves to the Service Home page of DNS.
- Service Home page, click the Private DNS menu. It moves to the Private DNS list page.
- Click on the resource to view detailed information on the Private DNS List page. It moves to the Private DNS Details page.
- Private DNS details page, click the VPC connection tab. Move to the VPC connection tab page.
- VPC Connection tab page, click the Delete button of the VPC item to be deleted. A deletion confirmation window appears.
- Click Confirm in the deletion confirmation window.
Disable Private DNS
You can apply for cancellation of the Private DNS service in the Samsung Cloud Platform Console.
Caution
If the Private DNS service is linked to a VPC or Hosted Zone resource, it cannot be canceled. To cancel the service, delete the linked resources first.
To request the cancellation of Private DNS service, follow the procedure below.
- All Services > Networking > DNS menu should be clicked. It moves to the Service Home page of DNS.
- Service Home page, click the Private DNS menu. It moves to the Private DNS list page.
- Click on the resource to view detailed information on the Private DNS List page. It moves to the Private DNS Details page.
- Private DNS details page, click the cancel service button.
- When the cancellation is complete, please check the cancellation status in the Private DNS list.
4.2.2 - Hosted Zone
The user can enter the required information for the Hosted Zone service through the Samsung Cloud Platform Console, select detailed options, and create the service.
Create Hosted Zone
You can create and use the Hosted Zone service from the Samsung Cloud Platform Console.
To request Hosted Zone service creation, follow the steps below.
All Services > Networking > DNS Click the menu. Service Home page will be displayed.
Click the Create Hosted Zone button in the drop‑down of the Service Home page. You will be taken to the Create Hosted Zone page.
Hosted Zone creation On the page, enter the information required to create the service, and select detailed options.
- Service Information Input area, input or select the required information.
Category RequiredDetailed description Purpose Classification Required Select domain appropriate for the purpose of the Hosted Zone - Private: Domain that can only be used within Samsung Cloud Platform
- Public: Domain accessible from outside (Internet)
Private DNS name to register Required Select from previously created Private DNS - Set only when Private is selected in the usage classification
Hosted Zone name to register Required Enter the name of the Hosted Zone to use - Enter within 2-63 characters, including lowercase letters, numbers, and hyphens (-)
- When applying for a new domain, click the Check Availability button to verify duplication
Table. Hosted Zone Service Information Input Items - Additional Information Input Enter or select the required information in the area.
Category Required statusDetailed description Description Select Enter additional information and description for Hosted Zone Tag Select Add Tag - Up to 50 per resource can be added
- After clicking the Add Tag button, enter or select Key, Value values
Table. DNS additional information input items
- Service Information Input area, input or select the required information.
Check the creation history and click the Complete button.
- When creation is complete, check the created resources on the Hosted Zone list page.
Hosted Zone Check detailed information
The Hosted Zone service allows you to view and edit the full resource list and detailed information. Hosted Zone Details page consists of Details, Records, Tags, Activity History tabs.
To view detailed information of the Hosted Zone, follow these steps.
- All Services > Networking > DNS Click the menu. Service Home Navigate to the page.
- Click the Hosted Zone menu on the Service Home page. It navigates to the Hosted Zone List page.
- Hosted Zone List Click the resource to view detailed information on the page. Hosted Zone Details Navigate to the page.
- Hosted Zone Details page displays the status information and detailed information of the Hosted Zone, and consists of Details, Records, Tags, Activity History tabs.
Category Detailed description Service Status Hosted Zone status - Creating: Creating
- Active: Active
- Editing: Editing
- Deleting: Deleting
- Error: Error
Delete Hosted Zone Button to delete Hosted Zone Table. Status Information and Additional Functions
- Hosted Zone Details page displays the status information and detailed information of the Hosted Zone, and consists of Details, Records, Tags, Activity History tabs.
Detailed Information
Hosted Zone list page, you can view detailed information of the selected resource and, if necessary, edit the information.
| Category | Detailed description |
|---|---|
| service | service name |
| Resource Type | Resource Type |
| SRN | Unique resource ID in Samsung Cloud Platform |
| resource name | resource name |
| Resource ID | Unique resource ID in the service |
| Creator | User who created the service |
| Creation Time | Time the service was created |
| Editor | User who modified the service information |
| Modification Date/Time | Date/Time the service information was modified |
| Hosted Zone name | Hosted Zone domain name |
| Usage Category | Display Selected Usage |
| Private DNS name | Selected Private DNS name |
| Description | Hosted Zone description
|
Table. Hosted Zone detailed information items
Record
Hosted Zone list page, you can view the registered record information, and add, modify, or delete it. A record is an item that configures communication with the DNS server, informing the server of the IP address associated with the domain and how to handle requests sent to the domain.
| Category | Detailed description |
|---|---|
| Name | Registered record name |
| Type | Record Type
|
| value | IP address of the record |
| TTL | Time for DNS response servers to temporarily store records |
| Auto generation | Display auto generation status |
| Status | Service status display |
| Detailed menu | Record edit, delete possible |
Table. Hosted Zone's Record Tab Items
Tag
On the Hosted Zone List page, you can view the tag information of the selected resources, and you can add, modify, or delete them.
| Category | Detailed description |
|---|---|
| Tag List | Tag List
|
Table. Hosted Zone Tag Tab Items
Work History
You can view the operation history of the selected resource on the Hosted Zone list page.
| Category | Detailed description |
|---|---|
| Work History List | Resource Change History
|
Table. Hosted Zone operation history tab detailed information items
Managing Hosted Zone records
You can add or delete records in the Hosted Zone service.
Add Record
To add a record to the Hosted Zone, follow these steps.
- All Services > Networking > DNS Click the menu. Navigate to the DNS Service Home page.
- Click the Hosted Zone menu on the Service Home page. Navigate to the Hosted Zone list page.
- Click the resource to view detailed information on the Hosted Zone list page. It moves to the Hosted Zone details page.
- Click the Record tab on the Hosted Zone Details page. You will be taken to the Record tab page.
- Record on the tab page, click the Add Record button. The Add Record window appears.
- In the add record window, select the Type, Name, Value, and TTL items and click Confirm. A notification confirmation window appears.
Category Detailed description A Enter an IP address in IPv4 format - Click the Add button to add an IP address, up to 8 can be registered
AAAA Enter an IPv6 format IP address - Click the Add button to add an IP address, up to 8 can be registered
SPF Enter the IP of the server that sent the spam mail - If registering multiple servers, enter in the format v=spf1 ip4:211.214.160.28 ip4:211.214.16.29 ~all
CNAME Enter a record alias in domain name format - Registration is not possible if entered the same as a record value of another type
MX Enter priority and mail server address - Click the Add button to add a server address, up to 8 can be registered
- When entering priority, input within the range 0 - 65,535; the smaller the value, the higher the priority
TXT String input - Enter up to 250 characters
Table. Detailed items by record type - Click Confirm in the notification dialog.
- Verify that the added item is displayed in the record list.
Edit Record
To modify the records of a Hosted Zone, follow the steps below.
- Click the All Services > Networking > DNS menu. Go to the DNS Service Home page.
- Click the Hosted Zone menu on the Service Home page. Navigate to the Hosted Zone list page.
- Click the resource to view detailed information on the Hosted Zone List page. It navigates to the Hosted Zone Detail page.
- Hosted Zone Details page, click the Record tab. Record tab page moves.
- Record on the tab page, click the detailed menu of the list and click Edit. A notification confirmation window appears.
- In the record edit window, modify the desired items and click OK.
- In the notification confirmation window, click Confirm.
Delete Record
To delete a record in the Hosted Zone, follow these steps.
- Click the All Services > Networking > DNS menu. Go to the DNS Service Home page.
- Click the Hosted Zone menu on the Service Home page. Navigate to the Hosted Zone list page.
- Hosted Zone List page, click the resource to view detailed information. Navigate to the Hosted Zone Details page.
- Click the Record tab on the Hosted Zone Details page. You will be taken to the Record tab page.
- Record tab page, click the detailed menu of the list and click Delete. A notification confirmation window appears.
- Click Confirm in the notification confirmation window.
Hosted Zone Cancel
You can apply for termination of the Hosted Zone service in the Samsung Cloud Platform Console.
Caution
If a record is registered in the Hosted Zone service, it cannot be terminated. To terminate the service, first delete the registered record.
To request cancellation of the Hosted Zone service, follow the steps below.
- All Services > Networking > DNS Click the menu. Go to DNS’s Service Home page.
- Click the Hosted Zone menu on the Service Home page. It navigates to the Hosted Zone List page.
- Hosted Zone list On the page, click the resource to view detailed information. Hosted Zone details You will be taken to the page.
- Click the Delete Hosted Zone button on the Hosted Zone Details page.
- When the termination is complete, check the service termination status in the Hosted Zone list.
4.2.3 - Public Domain Name
The user can enter the required information for the Public Domain Name service through the Samsung Cloud Platform Console, select detailed options, and create the service.
Public Domain Name Create
You can create and use the Public Domain Name service in the Samsung Cloud Platform Console.
To request the creation of a Public Domain Name service, follow the steps below.
- All Services > Networking > DNS Click the menu. Go to the Service Home page.
- Click the Public Domain Name Creation button in the dropdown of the Service Home page. You will be taken to the Public Domain Name Creation page.
- Public Domain Name creation On the page, enter the information required to create the service, and select detailed options.
- Service Information Input Enter or select the required information in the area.
Category RequiredDetailed description Domain name to register Required Enter the name of the Public Domain Name to use - Enter within 2-63 characters, including lowercase letters, numbers, and special characters (-)
- When applying for a new domain, click the Check Availability button to verify duplication
Purchase Period Required Automatically selected as 1 year Auto Renewal Required Set whether to auto-renew when the domain usage period expires - Enter detailed information when Use is selected
- Registrant Name (Business Name): Enter the registrant name or business name within 30 characters
- Registrant Email: Enter the registrant’s email address
- Registrant Address: Enter the registrant’s company address, click the Find Postal Code button to search and then enter the address
- Phone Number: Enter the registrant’s phone number
Table. Public Domain Name Service Information Input Items
- Service Information Input Enter or select the required information in the area.
- Additional Information Input area, please enter or select the required information.
Category Required statusDetailed description Description Select Enter additional information and description about the Public Domain Name Tag Select Add Tag - Up to 50 can be added per resource
- After clicking the Add Tag button, enter or select Key, Value values
Table. DNS Additional Information Input Items
- Check the generation history and click the Complete button.
- Once creation is complete, check the created resource on the Public Domain Name list page.
Caution
The domain auto-renewal feature can be changed up to one week before the domain usage period expiration date. If the auto-renewal feature is not used, the information of the domain will be deleted on the domain usage period expiration date.
Public Domain Name Check Detailed Information
Public Domain Name service can view and edit the full resource list and detailed information. Public Domain Name detail page consists of Detail Information, Registration Information, Tags, Action History tabs.
Public Domain Name to view detailed information, follow the steps below.
- Click the All Services > Networking > DNS menu. You will be taken to the Service Home page.
- Click the Public Domain Name menu on the Service Home page. Navigate to the Public Domain Name list page.
- Click the resource to view detailed information on the Public Domain Name list page. It moves to the Public Domain Name details page.
- Public Domain Name Details page displays the status information and detailed information of the Public Domain Name, and consists of Details, Registration Information, Tags, Action History tabs.
Category Detailed description Service Status Status of Public Domain Name - Creating: In creation
- Active: Operating
- Editing: Changing settings
- Registered: Period extension registration
- Transfer Requesting: Domain transfer request completed
- Expired: Usage period expired
Domain Transfer Between Accounts Domain Transfer Request Button Between Accounts - Cancel Transfer Request: Can cancel domain transfer request after transfer request is completed
- Approve Transfer Request: If a domain transfer request is received, can approve the transfer request
- Reject Transfer Request: If a domain transfer request is received, can reject the transfer request
Table. Status Information and Additional Functions
- Public Domain Name Details page displays the status information and detailed information of the Public Domain Name, and consists of Details, Registration Information, Tags, Action History tabs.
Detailed Information
Public Domain Name List page lets you view detailed information of the selected resource and, if needed, edit the information.
| Category | Detailed description |
|---|---|
| service | service name |
| Resource Type | Resource Type |
| SRN | Unique resource ID in Samsung Cloud Platform |
| Resource Name | Resource Name |
| Resource ID | Unique resource ID in the service |
| Creator | User who created the service |
| Creation time | Service creation time |
| Editor | User who modified the service information |
| Modification DateTime | Date and time when service information was edited |
| Domain Name | Public Domain Name Domain Name |
| Registration Date | Public Domain Name Domain Registration Date |
| Usage classification | Display selected usage |
| Expiration Date | Public Domain Name Domain usage expiration date |
| Automatic Extension | Display whether automatic extension feature is used
|
| Description | Public Domain Name description
|
Table. Public Domain Name Detailed Information Items
Registration Information
You can view and edit domain registration information on the Public Domain Name List page.
| Category | Detailed description |
|---|---|
| Registrant Name (Business Name) | Name of registrant or business name entered when applying for service |
| Registrant Email | Registrant email address entered when applying for the service |
| Registrant Address | Company address of the registrant entered when applying for the service |
| Phone Number | Phone number of the registrant entered when applying for service |
Table. Public Domain Name registration information tab items
Tag
Public Domain Name List page allows you to view the tag information of the selected resource, and you can add, modify, or delete it.
| Category | Detailed description |
|---|---|
| Tag List | Tag List
|
Table. Public Domain Name tag tab item
Work History
You can view the operation history of the selected resource on the Public Domain Name list page.
| Category | Detailed description |
|---|---|
| Work History List | Resource Change History
|
Table. Public Domain Name Work History Tab Detailed Information Items
Public Domain Request transfer between accounts
You can transfer the registered Public Domain to another account user.
Reference
- If the domain you want to transfer is being used as a Hosted Zone, you cannot request a transfer. Please delete the existing Hosted Zone first and then request a transfer.
- The automatic renewal of the domain you want to transfer must be set to Unused in order to make the transfer request. After the domain transfer, you can set automatic renewal to be used in the account that received the transfer.
- You can only request a domain transfer up to one month before the registration period expiration date of the domain you want to transfer.
To transfer Public Domain information to another account user, follow the steps below.
- All Services > Networking > DNS Click the menu. Go to the DNS Service Home page.
- Click the Public Domain Name menu on the Service Home page. Navigate to the Public Domain Name List page.
- Click the resource to view detailed information on the Public Domain Name List page. It moves to the Public Domain Name Details page.
- Public Domain Name Details page, click the Inter-account domain transfer button. The Inter-account domain transfer popup appears.
- Domain Transfer Between Accounts In the popup window, enter the account ID to transfer and click the Confirm button.
- When the domain transfer request is completed, it changes to Transfer requesting status, and the applicant can click the Cancel transfer request button to cancel the transfer request.
- After a domain transfer request, if a user of another account approves the transfer, the domain information is deleted from the requesting account.
- If the user who received the previous request does not approve within 7 days after the approval request, the previous request will be automatically canceled.
Public Domain Manage Information Transfer Requests
If another account user transfers the Public Domain, you can approve or reject the request.
Public Domain Approve request for information transfer
To approve a request to move to the Public Domain, follow these steps.
- All Services > Networking > DNS Click the menu. Navigate to the DNS Service Home page.
- Click the Public Domain Name menu on the Service Home page. Navigate to the Public Domain Name list page.
- Public Domain Name List page, click the resource to view detailed information. It will navigate to the Public Domain Name Details page.
- Click the Approve Previous Request button on the Public Domain Name Details page. Click the Confirm button in the alert.
Public Domain Refuse information transfer request
To reject a request for public domain transfer, follow these steps.
- All Services > Networking > DNS Click the menu. Navigate to DNS’s Service Home page.
- Click the Public Domain Name menu on the Service Home page. You will be taken to the Public Domain Name List page.
- Click the resource to view detailed information on the Public Domain Name list page. It moves to the Public Domain Name details page.
- On the Public Domain Name Details page, click the Reject Previous Request button. In the alert, click the OK button.
Edit registration information of Public Domain Name
You can edit the registration information of the Public Domain Name.
To modify the registration information of the Public Domain Name, follow the steps below.
- All Services > Networking > DNS menu, click it. Go to DNS’s Service Home page.
- Click the Public Domain Name menu on the Service Home page. Navigate to the Public Domain Name list page.
- Click the resource to view detailed information on the Public Domain Name list page. It navigates to the Public Domain Name details page.
- Click the Public Domain Name Details page Registration Information tab. It will navigate to the Registration Information tab page.
- Click the Edit button on the Registration Information tab page. You will be taken to the Registration Information Edit page.
- Go to the Edit Registration Information page. Modify the desired items and click the Save button.
4.3 - Release Note
DNS
2025.12.16
FEATURE
Add Public Domain Name migration feature between user accounts- You can transfer a registered Public Domain Name through Samsung Cloud Platform to another user account within the allowed period.
2025.07.01
NEW
DNS Service Official Version Release- We have officially launched DNS services that can be used in private networks and internet environments. You can manage Private DNS and Private Hosted Zone for limited networks, and apply for Public Domain Name registration and manage Public Hosted Zone for internet environments.
2024.07.02
NEW
Beta version release- We have launched a beta DNS service that provides new domain registration application and management functions based on user requests.
5 - VPN
5.1 - Overview
Service Overview
VPN (Virtual Private Network) is a service that connects the customer network and Samsung Cloud Platform through an encrypted virtual private network.
Features
Rapid Service Provision You can set up automated services through the web-based Console, and you can use the VPN service immediately without any waiting time after creating the service.
Secure Access You can safely access your internal network built on the Samsung Cloud Platform from your customer’s network outside through encrypted virtual tunneling using a performance and stability verified IPsec VPN.
Easy Operation Environment You can easily and quickly manage web-based deployment, capacity provisioning, and service updates without the complex network environment configuration.
Efficient Service Use It is possible to manage costs efficiently because you can pay only for the amount of service used without any separate installation costs.
Provided Features
VPN provides the following functions.
- Providing virtual tunneling encrypted with IPsec
- Compatible VPN: Secui – Bluemax (TG360),Paloalto,Axgate,Cisco-router/ASA/Meraki, Checkpoint,AWS,Azure,Vmware NSX-T
- Create Virtual Private Gateway
- Create a Gateway to connect the customer’s network to a private network that cannot be accessed from the outside
- VPN Tunnel Creation
- Select IPsec VPN Gateway (The maximum number of VPN Tunnels per VPN Gateway is 5)
- IPsec VPN Gateway redundancy configuration, when a failure occurs in the Active device, the Standby device operates automatically
Constraints
| Division | Basic Quota | Detailed Description |
|---|---|---|
| VPN Gateway | 3 | 3 creations possible per Account |
| VPN Tunnel | 5 | Up to 5 can be created per VPN Gateway |
Table. VPN Restrictions
Region-based provision status
VPN is available in the following environments.
| Region | Availability |
|---|---|
| Western Korea(kr-west1) | Provided |
| South Korea, southern region1(kr-south1) | Not provided |
| South Korea, southern region 2(kr-south2) | Not provided |
| South Korea southern region 3(kr-south3) | Provided |
Table. Current Status of VPN Services by Region
Preceding Service
| Service Category | Service | Detailed Description |
|---|---|---|
| Networking | VPC | A service that provides an independent virtual network in a cloud environment |
Fig. Preceding VPN Service
5.2 - How-to guides
VPN creation
Samsung Cloud Platform Console where VPN services can be created and used.
Caution
VPN can be created up to 3 per Account. If the creation limit is exceeded, a new VPN cannot be created.
To create a VPN, follow the following procedure.
- All services > Networking > VPN menu, click. It moves to the Service Home page of VPN.
- Service Home page, click the Create VPN button. It moves to the Create VPN page.
- VPN creation page where you enter the information required for service creation and select detailed options.
Service Information Input area, please enter the necessary information.
Classification NecessityDetailed Description VPN Gateway name required Enter the VPN Gateway name - Enter within 3-20 characters using English uppercase and lowercase letters, and numbers
Connected VPC Name Required Select the VPC connected to the VPN Gateway Public IP required Select the IP to communicate with the remote site from the VPN Gateway Table. VPN service information input itemsAdditional Information Input area, please enter or select the required information.
Classification MandatoryDetailed Description Description Selection User Additional Description - Up to 255 characters can be entered
Tag Select Add Tag - Up to 50 can be added per resource
- Click the Add Tag button and enter or select Key, Value
Table. Additional Information Input Items for VPN Service
- Summary panel where you created detailed information and estimated billing amount, and click the Complete button.
- Once creation is complete, check the created resource on the VPN list page.
VPN detailed information check
VPN service can check and modify the entire resource list and detailed information. The VPN details page consists of details, tags, operation history tabs.
To check the detailed information of the VPN service, follow the following procedure.
- All services > Networking > VPN menu, click. It moves to the Service Home page of VPN.
- Service Home page, click the VPN menu. It moves to the VPN list page.
- VPN list page, click on the resource to check the detailed information. It moves to the VPN details page.
- VPC Details page displays status information and additional feature information, and consists of Details, Tags, Operation History tabs.
Detailed Information
VPN list page where you can check the operation history of the selected resource.
| Classification | Detailed Description |
|---|---|
| Status | Current Status
|
| Service Cancellation | VPN Service Cancellation |
| Service | Service Name |
| Resource Type | Resource Type |
| SRN | Unique resource ID in Samsung Cloud Platform |
| Resource Name | VPN Resource Name |
| Resource ID | Unique resource ID in the service |
| Creator | The user who created the service |
| Creation Date | The date and time the service was created |
| Editor | User who modified the service |
| Revision Date | Date and time when the service information was revised |
| VPN Gateway name | VPN Gateway name |
| Connected VPC Name | Name of VPC connected to VPN |
| Public IP | VPN Gateway where IP information is used to communicate with the remote site |
| Description | Additional description written by the user
|
Table. VPN Detailed Information Items
Tag
VPN List page where you can check the tag information of the selected resource, and add, change or delete it.
| Classification | Detailed Description |
|---|---|
| Tag List | Tag List
|
Table. VPN Tag Tab Items
Work History
VPN details page where you can check the operation history of the selected resource.
| Classification | Detailed Description |
|---|---|
| Work history list | Resource change history
|
Table. VPN task history tab detailed information items
VPN cancellation
You can cancel the unused VPC to reduce operating costs. However, when canceling the service, the operating service may be stopped immediately, so you should consider the impact of stopping the service sufficiently and proceed with the cancellation work.
Caution
- VPN Tunnel etc., in case there are resources connected to VPN, they cannot be canceled.
- The VPN service cannot be canceled when its status is Creating, Editing.
To cancel the VPN, follow the following procedure.
- All Services > Networking > VPN menu, click. It moves to the Service Home page of VPN.
- Service Home page, click the VPN menu. It moves to the VPN list page.
- VPN list page, select the resource to be canceled. It moves to the VPN details page.
- VPN details page, click the cancel service button.
- Once the cancellation is complete, check if the resource has been cancelled on the VPN list page.
5.2.1 - VPN Tunnel
VPN Tunnel creation
You can configure IPSec Tunning with a remote site in the VPN service on the Samsung Cloud Platform Console.
To create a VPN Tunnel, follow the following procedure.
- All services > Networking > VPN menu, click. It moves to the Service Home page of VPN.
- Service Home page, click the VPN Tunnel creation button. It moves to the VPN Tunnel creation page.
- VPN Tunnel Creation page where you enter the information required for service creation and select detailed options.
Service Information Input area, please enter the necessary information.
Classification MandatoryDetailed Description VPN Tunnel name required Enter the VPN Tunnel name - Use English uppercase and lowercase letters, numbers within 3-20 characters
VPC Gateway name required VPN Gateway to be selected VPC name default Check VPC information connected to VPN Gateway Public IP Basic Check IP information for communication with the remote site from the VPN Gateway Peer VPN GW IP required enter the IP information of the remote VPN - Example: 192.168.10.0
Romote Subnet(CIDR) required enter the subnet address of the remote site to connect - click the add button after entering the IP address, up to 10 can be added
- example: 20.0.0.0/24
Pre-shared Key required Enter the shared key (PSK) to be used for IKE mutual authentication between VPN gateways - Minimum 8 characters ~ Maximum 64 characters limited
- It is recommended to use a 32-character string of alphanumeric characters
Description Selection User Additional Description - Up to 255 characters can be entered
Table. VPN Tunnel Service Configuration ItemsTunnel settings area where you can enter or select the required information.
Classification MandatoryDetailed Description IKE 설정 > IKE Version required IKE version selection IKE settings > Algorithm settings required Encryption Algorithm and Digest Algorithm are selected and the Add button is clicked IKE 설정 > Diffie-Hellman required Diffie-Hellman group selection IKE 설정 > SA LifeTime required VPN session (Security Association) valid time input IPSec settings > Algorithm settings required Select Encryption Algorithm and Digest Algorithm, and click the Add button IPSec settings > Perfect Forward Secrecy(PFS) required Select whether to use the PFS group IPSec settings > Diffie-Hellman required Select Diffie-Hellman group IPSec settings > SA LifeTime required Enter the valid time of the VPN session (Security Association) Table. VPN Tunnel Setup ItemsAdditional Information Input area, please enter or select the required information.
Classification MandatoryDetailed Description DPD additional settings > DPD probe interval required Enter the DPD inspection cycle - Enter a value between 1-3,600 seconds
Tag Selection Add Tag - Up to 50 can be added per resource
- Click the Add Tag button and enter or select Key, Value
Table. Security Group Additional Information Input Items
- Summary panel where you created detailed information and estimated billing amount, and click the Complete button.
- Once creation is complete, check the created resource on the VPN Tunnel list page.
VPN Tunnel detailed information check
VPN Tunnel service can check and modify the entire resource list and detailed information. The VPN Tunnel details page consists of details, tags, and operation history tabs.
To check the VPN details, follow the following procedure.
- All services > Networking > VPN menu, click. It moves to the Service Home page of VPN.
- Service Home page, click the VPN Tunnel creation button. It moves to the VPN Tunnel list page.
- VPN Tunnel list page, click on the resource to check the detailed information. It moves to the VPN Tunnel details page.
- VPN Tunnel details page displays status information and additional feature information, and consists of details, tags, operation history tabs.
| Classification | Detailed Description |
|---|---|
| Status | Current Status
|
| VPN Tunnel deletion | VPN Tunnel deletion button |
Table. VPN Tunnel Status Information and Additional Functions
Detailed Information
VPN Tunnel list page where you can check the detailed information of the selected resource and modify the information if necessary.
| Classification | Detailed Description |
|---|---|
| Service | Service Name |
| Resource Type | Resource Type |
| SRN | Unique resource ID in Samsung Cloud Platform |
| Resource Name | VPN Resource Name |
| Resource ID | Unique resource ID in the service |
| Creator | User who created the service |
| Creation Time | The time when the service was created |
| Modifier | User who modified the service information |
| Modified Time | The time when service information was modified |
| VPN Tunnel name | VPN Tunnel title |
| VPN Gateway name | VPN Gateway title |
| Public IP | Public IP information |
| Peer VPN GW IP | Peer VPN GW information
|
| Remote Subnet (CIDR) | Remote Subnet information
|
| Pre-shared Key | Pre-shared Key information
|
| IKE | Revision button to click and modify the setting information in bulk possible |
| IKE Version | IKE Version Information |
| Encryption Algorithm/Digest Algorithm | Algorithm Information |
| Diffie-Hellman | Diffie-Hellman information |
| SA LifeTime | SA LifeTime information |
| IPSec | Modify button to click and modify the setting information in bulk |
| Encryption Algorithm/Digest Algorithm | Algorithm Information |
| Diffie-Hellman | Diffie-Hellman information |
| SA LifeTime | SA LifeTime information |
| Perfect Forward Secrecy(PFS) | PFS setting information |
| DPD probe interval | DPD probe interval information
|
Table. VPN Tunnel detailed information items
Tag
VPN Tunnel List page where you can check the tag information of the selected resource, and add, change or delete it.
| Classification | Detailed Description |
|---|---|
| Tag List | Tag List
|
Fig. VPN Tunnel Tag Tab Items
Work History
VPN Tunnel list page where you can check the operation history of the selected resource.
| Classification | Detailed Description |
|---|---|
| Work history list | Resource change history
|
Fig. VPN Tunnel Work History Tab Detailed Information Items
VPN Tunnel deletion
You can delete unused VPC Tunnels to reduce operating costs. However, deleting a Tunnel can immediately stop services in operation, so you must consider the impact of service interruption before proceeding with the deletion work.
To cancel the VPN, follow the following procedure.
- All services > Networking > VPN menu, click. It moves to the Service Home page of VPN.
- Service Home page, click the VPN Tunnel creation button. It moves to the VPN Tunnel list page.
- VPN Tunnel list page, click on the resource to check the detailed information. It moves to the VPN Tunnel details page.
- VPN Tunnel deletion button should be clicked.
- Once the cancellation is complete, please check if the resource has been deleted from the VPN Tunnel list page.
5.3 - API Reference
API Reference
5.4 - CLI Reference
CLI Reference
5.5 - Release Note
VPN
2025.10.23
FEATURE
Change in the number of additional remote site subnets for VPN Tunnel- You can enter up to 10 remote subnets (CIDR).
2024.02.27
NEW
Official Release of VPN Service- A VPN service has been released that connects the customer network and Samsung Cloud Platform through an encrypted (IPSec) virtual private network.
6 - Firewall
6.1 - Overview
Service Overview
Firewall is a virtual logical firewall service that controls traffic occurring from VPC and Load Balancer of Samsung Cloud Platform.
The target resources that can be applied in the Firewall are Internet Gateway, Direct Connect, Load Balancer, and it is possible to manage a safe network by setting rules for communication between VPC and the internet, and VPC and customer network.
When the Firewall is first created, it blocks all Inbound/Outbound traffic according to the default rule (Any Deny).
Users can create Inbound/Outbound rules by specifying IP addresses, ports, and protocols, and only allowed traffic can communicate with the created rules.
Component
The components that make up the Firewall are as follows.
| Component | Detailed Description |
|---|---|
| Applied target | Firewall applied target resource
|
| Firewall size | Firewall is provided in 5 sizes according to the rule quota
|
| Firewall rules |
|
Fig. Firewall Service Components
Constraints
The Samsung Cloud Platform’s Firewall has a quota (limit) for the maximum number of rules that can be created by size. When creating a Firewall, it is created with Extra Small by default, and the Firewall size can be changed on the Firewall details page in the Samsung Cloud Platform Console.
| Size | Rule Allocation | Detailed Description |
|---|---|---|
| Extra Small | 5 items | maximum number of rules that can be created 5 items |
| Small | 100 pieces | maximum number of rules that can be generated 100 pieces |
| Medium | 200 | maximum number of rules that can be generated 200 |
| Large | 500 pieces | maximum number of rules that can be generated 500 pieces |
| Extra Large | 1,000 items | maximum number of rules that can be created 1,000 items |
Table. Firewall Restrictions
Preceding Service
This is a list of services that must be pre-configured before creating the Firewall service. Please refer to the user guide (reference link) below for more information and prepare in advance.
| Service Category | Service | Detailed Description |
|---|---|---|
| Networking | VPC | A service that provides an independent virtual network in a cloud environment |
| Networking | Direct Connect | A service that quickly and securely connects the customer’s network and the Samsung Cloud Platform’s network |
| Networking | Load Balancer | A service that distributes traffic to multiple servers to maintain a stable service |
Fig. Preceding Firewall Service
6.2 - How-to guides
The user can enter the required information for the Firewall service through the Samsung Cloud Platform Console, select detailed options, and create the service.
Firewall Create
You can create and use the Firewall service from the Samsung Cloud Platform Console.
Notice
Firewall service must be enabled in the prerequisite service of Networking to be created. An enabled Firewall can be seen in the Firewall list.
- Firewall cannot be created independently as a new entity like other services of the Samsung Cloud Platform Console.
To set up the firewall, follow the steps below.
All Services > Networking > Firewall Click the menu. Go to the Firewall’s Service Home page.
Click the preceding service to be created on the Service Home page. You will be taken to the service creation page.
- Create VPC: Enable the Internet Gateway and Transit Gateway firewall of the VPC service.
- When creating the VPC’s Internet Gateway service, set the Firewall usage item to enabled. For detailed explanation, refer to Create Internet Gateway.
- Create the VPC’s Transit Gateway service and apply for the Uplink Firewall’s linked service. For detailed instructions, refer to Create Transit Gateway.
- Direct Connet Creation: When creating a Direct Connet service, set the Firewall Use item to Enabled. For detailed instructions, see Create Direct Connect.
- Load Balancer creation: When creating a Load Balancer service, set the Firewall usage item to enabled. For detailed description, refer to Load Balancer creation.
- Create VPC: Enable the Internet Gateway and Transit Gateway firewall of the VPC service.
When the prerequisite service creation is completed, check whether the corresponding Firewall resource is displayed in the Firewall list.
Firewall Check detailed information
The Firewall service can view and edit the full resource list and detailed information in the resource management menu.
To view detailed firewall information, follow the steps below.
- All Services > Networking > Firewall Click the menu. Go to the Firewall’s Service Home page.
- Service Home on the page, click Firewall list. Firewall list page will be opened.
- Firewall list On the page, you can see the information below.
Category Detailed description Firewall name Firewall pre-service type automatically generated in Firewall format Firewall classification Firewall preceding service type (Internet Gateway, Direct Connect, Load Balancer) Size User-selected Firewall size VPC name VPC name connected to Firewall Connection Name Automatically generated in the format of preceding service name_Firewall using Firewall Number of rules Number of rules used in the firewall Usage Whether Firewall is used (enabled) or not used (disabled) - If not used, the Any Allow rule is applied and no charges are incurred for the Firewall
Status Firewall status display - Click the More button to set On/Off
Table. Firewall resource list items
- Firewall list On the page, you can see the information below.
- Firewall List Click the resource to view detailed information on the page. Firewall Detail You will be taken to the page.
- Firewall Details page displays status information and additional feature information, and consists of Details, Rules, Tags, Activity History tabs.
Category Detailed description Service status Firewall status display - Creating: Creating
- Active: Active
- Editing: Editing
- Deploying: Deploying
- Deleting: Deleting
- Error: Error
Table. Firewall status information
Detailed Information
You can view detailed information of the selected resource from the Firewall list and, if necessary, edit the information.
| Category | Detailed description |
|---|---|
| Service | Service Name |
| Resource Type | Resource Type |
| SRN | Unique resource ID in Samsung Cloud Platform |
| Resource Name | Resource Name |
| Resource ID | Service’s unique resource ID |
| Creator | User who created the service |
| Creation Time | Service Creation Time |
| Editor | User who modified the service information |
| Modification Date/Time | Date/Time when service information was modified |
| Firewall name | Automatically generated as resource name_Firewall_connection name |
| Firewall ID | service’s unique resource ID |
| Firewall classification | Firewall preceding service type(Internet Gateway, Direct Connect, Load Balancer) |
| Size | Firewall size selected by the user
|
| Firewall Rule count/Quota | Rule quota and number of rules in use for the firewall |
| VPC name | VPC name connected to Firewall |
| VPC ID | VPC ID connected to firewall |
| Connection Name | Firewall Preceding Service Name_Automatically generated as Firewall |
| Log storage status | Firewall log storage status
|
Table. Firewall detailed information
Rules
Rule tab, you can view the Firewall rule list and add, edit, or delete rules.
| Category | Detailed description |
|---|---|
| Excel download | Rule bulk input Excel file download button |
| Batch rule input | Excel file upload button for batch rule input |
| Detailed Search | Rule Detailed Search Button |
| Add rule | Add rule button |
| Order | Rule order, applied top-down according to rule order |
| Rule ID | Unique ID value for the rule |
| Rule Index | Unique Index value for the rule, used in log analysis |
| Departure address | Departure address added to the rule |
| Destination address | Destination address added to the rule, displayed as an IP address according to the entered rule |
| Service | Protocol and Destination Port |
| Action | Traffic Allow/Deny classification by rule
|
| Direction | Firewall standard traffic access direction
|
| Active status | Active status of the rule, if inactive the rule does not operate |
| Explanation | Additional description written by the user
|
| Status | Rule status display |
| More > Change Order | Change the order of the selected rule |
| More > Activate | Enable the rule in disabled state |
| More > Disable | Disable active rules
|
| More > Copy | Copy existing rule settings to add a new rule |
| More > Delete | Delete selected rule |
Table. Firewall rule list detailed information
tag
Firewall List page you can view the tag information of the selected resource, and you can add, modify, or delete it.
| Category | Detailed description |
|---|---|
| Tag List | Tag List
|
Table. Firewall Tag Tab Items
Work History
You can view the operation history of the selected resource in the Firewall list.
| Category | Detailed description |
|---|---|
| Work History List | Resource Change History
|
Table. Firewall task history tab detailed information items
Firewall Rule Management
You can add, modify, or delete firewall rules.
Create Rule
Rule in the tab you can add Firewall rules.
To add a firewall rule, follow the steps below.
- All Services > Networking > Firewall Click the menu. Navigate to the Firewall’s Service Home page.
- Click Firewall List on the Service Home page. You will be taken to the Firewall List page.
- Firewall List Click the resource to add a rule on the page. Firewall Details Navigate to the page.
- Firewall Details on the page click the Rules tab. Navigate to the Rules tab page.
- Click the Add Rule button in the Rule tab. It will navigate to the Add Rule popup.
Caution
When entering the destination address, if you change the address type to add a rule, be careful because the entered items are reset.
| Category | Required | Detailed description |
|---|---|---|
| Departure address | Required | Departure address to add to the rule
|
| Destination Address | Required | Select the type of destination address to add to the rule
|
| Type | Required | Select protocol type to apply rule
|
| Protocol | Required | Protocol
|
| Destination Port | Required | Allowed port setting when TCP/UDP is selected in the protocol
|
| Type | Required | ICMP Type setting when ICMP is selected in the protocol
|
| Protocol Number | Required | Enter protocol number when Internet Protocol is selected in type
|
| Action | Required | Traffic allow/block distinction
|
| Direction | Required | Access direction of traffic based on firewall standards
|
| Rule location | Required | Specify the location of the rule to be created and select the rule name |
| Description | Choice | Additional description written by the user
|
Table. Firewall rule addition detailed items
- After checking the rule to add, click the Confirm button.
Create Rules in Bulk
To add multiple firewall rules at once, follow these steps.
- All Services > Networking > Firewall Click the menu. Navigate to the Firewall’s Service Home page.
- Click Firewall list on the Service Home page. Navigate to the Firewall list page.
- Firewall List Click the resource to add a rule on the page. Firewall Details Navigate to the page.
- Click the Rules tab on the Firewall Details page. You will be taken to the Rules tab page.
- Click the Excel Download button in the Rules tab. The bulk rule entry Excel file will be downloaded.
- Enter the rule information in the batch input Excel file and then save.
- Click the Bulk Rule Input button. Bulk Rule Input popup appears.
- Batch Rule Input in the popup window, click Attach File to attach the Excel file you created, and click Upload File.
- If the attached Excel file format differs from the registration form or the file is encrypted, it cannot be uploaded.
- The maximum number of batch registration rules that can be uploaded at once is 100. If you exceed the maximum number of registration rules, you cannot upload.
- If you exceed the maximum number of rules that can be registered to the Account, you cannot upload the file.
- Rule Check Check the details in the popup window and click the Confirm button.
Caution
Rules added with the bulk input feature are added in a disabled state. To use the rule, click More > Enable to change it to an enabled state.
Edit Rules
From the Firewall rule list, you can select a specific rule to view and edit the rule.
If you want to modify the Firewall rules, follow the steps below.
- All Services > Networking > Firewall Please click the menu. Navigate to the Firewall’s Service Home page.
- Service Home on the page, click Firewall list. Navigate to the Firewall list page.
- Click the resource to edit the rule on the Firewall List page. You will be taken to the Firewall Details page.
- Click the Rules tab on the Firewall Details page. Navigate to the Rules tab page.
- Click the rule you want to edit on the Rule tab page. It will navigate to the Rule Details popup window.
- Rule Details In the popup window, click the Edit button. Navigate to the Rule Edit popup window.
- Rule Edit Enter the item you want to edit in the popup window and click the Confirm button.
Category Required? Detailed description Order - The order of the rules. To change the order, click More > Change Order in the rule list. Rule ID - Unique ID value for the rule cannot be changed Rule Index - Unique Index value for the rule, can be used for log analysis Departure address Required Departure address registered in the rule - Can be changed by entering multiple addresses at once using CIDR (IP/Subnet Mask) format with commas (,), ranges (-), up to a maximum of 128 addresses
Destination Address Required Destination address to add to the rule - Can input multiple addresses up to 128 at once using CIDR (IP/Subnet Mask) format with commas (,), range (-)
Protocol Required Protocol registered in the rule - You can select and change to the desired protocol among TCP, UDP, ICMP, ALL values
- ALL means all ports for all protocols
Destination Port Required TCP/UDP destination ports registered in the rule - You can select well-known ports such as SSH, HTTP, TELNET and change them
- When entering manually, you can input values from 1 to 65,535, and you can use commas (,) or ranges (-) to input up to 128 at once for changes
Type Required ICMP Type registered in the rule - Among values defined as ICMP Type, frequently used Types such as Echo can be selected and changed
- When entering directly, you can specify a range using start value-end value to change
Protocol Number Required Enter Protocol Number 1 ~ 254Value input possible
Action Required Ability to change traffic Allow/Deny classification due to rules - Allow: Traffic allowed when matched to rule
- Deny: Traffic blocked when matched to rule
Direction Required Ability to change the access direction of traffic based on the firewall criteria registered in the rule - Inbound: external → internal
- Outbound: internal → external
Active status - Active status of the rule, if inactive the rule does not operate Status - Status value for the rule Description Choice Additional description written by the user - Can be changed by entering up to 255 characters
Table. Firewall Rule Modification Details
Delete Rule
Caution
You can delete only when the firewall is in Active state and the rule is in Active or Error state.
To delete the firewall rule, follow the steps below.
- All Services > Networking > Firewall Click the menu. Navigate to the Firewall’s Service Home page.
- Click Firewall List on the Service Home page. It navigates to the Firewall List page.
- Firewall List page, click the resource to edit the rule. Firewall Details page will be opened.
- Firewall Details page, click the Rules tab. Navigate to the Rules tab page.
- In the Rules tab, click More > Delete for the rule you want to delete.
Firewall Resource Management
You can modify the Firewall size and change the log usage settings.
Firewall Resize
To modify the Firewall size, follow the steps below.
- All Services > Networking > Firewall Click the menu. Navigate to the Firewall’s Service Home page.
- Click Firewall list on the Service Home page. Navigate to the Firewall list page.
- Click the resource to edit on the Firewall List page. Navigate to the Firewall Details page.
- Firewall Details page, click the Size Edit icon. It will navigate to the Size Edit popup.
- Resize In the popup window, select the size to modify, and click the Confirm button.
Reference
The Firewall size is provided as default Extra Small (rule quota 5), and you can change the Firewall size to add Firewall rules for use. For more details, please refer to Firewall Constraints.
- Firewall fees are charged based on the size of the Firewall service and traffic throughput.
Using Log Saving
Reference
To store firewall logs, first create a bucket in Object Storage to store the logs, and set that bucket in the log repository of Firewall Logging. Then, when you set log storage in the firewall detail view, the firewall logs will be stored in the Object Storage bucket.
- The log storage settings can be checked in Firewall Logging. For more details, refer to Firewall Logging.
- If you set up the log repository, Object Storage charges for log storage will be billed.
To use Firewall log storage, follow the steps below.
- All Services > Networking > Firewall Click the menu. Service Home Navigate to the page.
- Click the Firewall menu on the Service Home page. Navigate to the Firewall List page.
- Firewall list page, click the resource (Firewall) to use log storage. Firewall detail page is accessed.
- Click the Edit icon of Log Save Status on the Firewall Details page. Edit Log Save Status popup window will open.
- Log storage modification In the popup window, select Use of the log storage, and click the Confirm button.
Caution
If the log storage setting is not configured in Firewall Logging, you cannot set the log storage use setting.
Disable log saving
Firewall To set log storage to disabled, follow the steps below.
- All Services > Networking > Firewall Click the menu. Navigate to the Service Home page.
- Click the Firewall menu on the Service Home page. Go to the Firewall list page.
- Click the resource (Firewall) that will not use log storage on the Firewall List page. Go to the Firewall Details page.
- Edit Log Save Option Click the button. Edit Log Save Option It will move to the popup window.
- Modify log storage setting In the popup window, deselect Use for the log storage, and click the Confirm button.
- Notification Check the popup window’s message and click the Confirm button.
Caution
If log storage is disabled, the log storage for the service will be stopped, and in the event of a security incident, tracking management through log analysis will be impossible.
Firewall Disable setting
Firewall service cannot be deleted alone. If you delete the preceding service, the connected Firewall will be deleted together. If you do not use the firewall while maintaining the preceding service, you can change the firewall to an unused state on the firewall list page.
Caution
- If you change the firewall to an unused state, all previously registered rules will be deleted.
- If there are firewall rules connected when deleting a prerequisite service, you cannot delete it. Delete the firewall rules first before deleting the prerequisite service.
To disable the firewall, follow the steps below.
- All Services > Networking > Firewall Click the menu. Service Home Navigate to the page.
- Click the Firewall menu on the Service Home page. Go to the Firewall List page.
- On the Firewall list page, click More > Unused for the resource to be switched to unused.
- After the usage change is completed, check on the Firewall list page whether the resource’s usage status has changed to unused.
6.2.1 - Firewall Logging
To save Firewall logs, you must first create a bucket in Object Storage to save the logs and set the bucket as the log repository in Firewall Logging, then set up log saving on the Firewall details page, and the Firewall logs will be saved in the Object Storage bucket.
To save the firewall log, set it up in the following order.
- You can create a bucket in Object Storage to store Firewall logs or use an existing bucket. To create a bucket, refer to Object Storage creation.
- To set this bucket as the log repository for Firewall Logging, see Using Firewall Logging log repository.
- To set the log storage to use in the Firewall detailed inquiry, please refer to Firewall Log Storage Usage.
Firewall Logging Configure log storage settings
To set the log saving status of Firewall to use, you must first set the log storage in Firewall Logging.
Reference
To set up Firewall Logging, an Object Storage bucket for logging is required. First, create a bucket in the Object Storage service.
For more detailed information, please refer to Object Storage creation.
To enable the Firewall Logging log storage, follow the procedure below.
- Click on the menu for all services > Management > Network Logging > Firewall Logging. It moves to the Firewall Logging list page.
- Firewall Logging list page, click the top Log Storage Settings button. Move to the Log Storage Settings popup window.
- Log Storage Settings In the popup window, select the Log Storage Bucket. Once the bucket is selected, the Log Storage Path will be displayed.
- In the Log Storage Settings popup window, check the Log Storage Bucket and Log Storage Path, then click the OK button.
- Check the message in the Notification pop-up window, then click the Confirm button.
Notice
After setting the log storage, you must set the log storage to Use on the Firewall Details page for logging to start.
For more detailed information, please refer to Firewall log storage usage.
Firewall Logging list inquiry
If you set the Firewall Logging log storage bucket, you can retrieve the Firewall Logging list.
To view the Firewall Logging list, follow these steps.
- Click on the menu for all services > Management > Network Logging > Firewall Logging. It moves to the Firewall Logging list page.
- Firewall Logging list page, please check the resources in use and the log storage target.
Division Detailed Description Resource ID Firewall ID Save Target Firewall Name Save Registration Time Firewall Log Storage Registration Time Table. Firewall Logging list itemsNoteAfter setting the Firewall Logging log storage, you must set the log storage to use in the Firewall detail inquiry for log storage to start. For more detailed information, please refer to Using Firewall Log Storage.
Firewall Logging Check detailed contents
Please check the detailed contents of the saved Log based on the following contents.
Saved log example: 2024-10-11T11:23:43,deny,0,17,4.1.1.100,45499,192.168.10.10,53
| Division | Description |
|---|---|
| 2024-10-11T11:23:43 | The date and time when the log occurred (2024-10-11, 11:23:43) |
| deny | action (deny / accept) |
| 0 | The Rule ID (Policy ID) where the log occurred on the firewall |
| 17 | IP Protocol ID
|
| 4.1.1.100 | Source IP |
| 45499 | Departure Port |
| 192.168.10.10 | Destination IP |
| 53 | Destination Port |
Table. Log detail information items
Firewall Logging Disable log storage setting
You can set the log storage to not used in Firewall Logging.
To set the log storage to not used for Firewall Logging, follow the next procedure.
- Click on the menu for all services > Management > Network Logging > Firewall Logging. It moves to the Firewall Logging list page.
- Firewall Logging list page, click the top Log Storage Settings button. Move to the Log Storage Settings popup window.
- In the 로그 저장소 설정 popup window, select 로그 저장소 버킷 as 미사용 and click the 확인 button.
Reference
- Log storage settings can be changed when there is no log storage target.
- To change the log storage bucket, first change the setting to inactive, then you can change it by setting it to active again.
6.3 - API Reference
API Reference
6.4 - CLI Reference
CLI Reference
6.5 - Release Note
Firewall
2025.10.23
FEATURE
Add firewall rule input method- Add firewall rule input method
- KR WEST, KR EAST can input destination address in FQDN (Fully Qualified Domain Name) format in the region.
2025.07.01
FEATURE
Add firewall rule input method- Firewall Add rule input method
- The ability to input the IP protocol has been added.
2025.02.27
FEATURE
Load Balancer-Firewall feature addition- Add Firewall feature
- Load Balancer service can use Firewall.
- Samsung Cloud Platform Common Feature Change
- Account, IAM and Service Home, tags, etc. have reflected common CX changes.
2024.12.23
FEATURE
Add firewall log storage feature- Firewall A feature to store logs has been added.
- Firewall determine whether to store logs and Object Storage can store logs.
2024.10.01
NEW
Firewall service official version release- Through the Firewall service, you can control inbound and outbound traffic generated in the VPC.
2024.07.02
NEW
Beta version release- Firewall service has been launched.
7 - Direct Connect
7.1 - Overview
Service Overview
Samsung Cloud Platform provides Direct Connect service to support safe and fast connection between the customer’s network and the Samsung Cloud Platform environment. Through Direct Connect, you can allocate the internal private network range of the existing system to Samsung Cloud Platform resources and use it. You can deploy Backend systems such as application servers in a private network range without internet access, and you can enhance security by applying network services of Samsung Cloud Platform such as Security Group.
Through Direct Connect, even if the customer’s existing system hard-codes IPs on devices or has architecture dependencies on IP, it can seamlessly migrate to Samsung Cloud Platform.
Direct Connect Create Connection
Select a single VPC to connect to the customer network and support the connection.
Through Direct Connect Firewall provision, access blocking is possible, and by providing Route configuration functionality, a safe connection path is provided.
Constraints
| Category | Default quota | Detailed description |
|---|---|---|
| Direct Connect | 5 | It is possible to create one VPC per service zone per account (1:1). |
Table. Direct Connect Constraints
Preceding Service
This is a list of services that must be pre-configured before creating the service. Please refer to the guide provided for each service for details and prepare in advance.
| Service Category | Service | Detailed Description |
|---|---|---|
| Networking | VPC | Service that provides an independent virtual network in a cloud environment |
| Networking | Security Group | Virtual firewall that controls server traffic |
Table. Direct Connect Preliminary Service
7.1.1 - ServiceWatch Metrics
Direct Connect sends metrics to ServiceWatch. The metrics provided as basic monitoring are data collected at a 5‑minute interval.
Reference
To check metrics in ServiceWatch, refer to the ServiceWatch guide.
Basic Indicators
The following are the default metrics for the Direct Connect namespace.
| Indicator Name | Detailed Description | Unit | Meaningful Statistics |
|---|---|---|---|
| DirectConnect Network In Bytes | Cumulative traffic to VPC from Direct Connect | Bytes |
|
| DirectConnect Network Out Bytes | Cumulative traffic volume from VPC to Direct Connect | Bytes |
|
| DirectConnect Network In Bytes_Delta | Direct Connect → VPC cumulative traffic amount over 5 minutes | Bytes |
|
| DirectConnect Network Out Bytes_Delta | VPC → Direct Connect cumulative traffic amount over 5 minutes | Bytes |
|
Table. Direct Connect Basic Metrics
7.2 - How-to guides
The user can create a Direct Connect service by entering the required information and selecting detailed options through the Samsung Cloud Platform Console.
Creating Direct Connect
You can create a Direct Connect service using the Samsung Cloud Platform Console.
To create a Direct Connect, follow these steps:
Click on All Services > Networking > Direct Connect menu. It will move to the Service Home page of Direct Connect.
On the Service Home page, click the Create Direct Connect button. It will move to the Create Direct Connect page.
In the Service Information Input section, enter or select the required information.
Category RequiredDetailed Description Direct Connect Name Required A name that can easily identify Direct Connect - Enter within 3-20 characters using English letters and numbers
Uplink Usage Required Bandwidth of the communication port for remote communication - Select port capacity 1G or port capacity 10G
VPC Required Select a VPC for communication with the remote site Description Optional Enter a description of Direct Connect Firewall Usage Optional Select whether to use Direct Connect Firewall. Firewall Log Storage Optional Whether to store Firewall logs - Select whether to store Firewall logs
- Store access logs if Firewall is used
- For more information, see Using Firewall Log Storage
Table. Direct Connect Service Information Input ItemsIn the Additional Information Input section, enter or select the required information.
Category RequiredDetailed Description Tags Optional Add tags - Up to 50 tags can be added per resource
- Click the Add Tag button and enter or select Key and Value
Table. Direct Connect Additional Information Input Items
In the Summary panel, check the created details and estimated billing amount, and click the Complete button.
- Once created, check the created resource on the Direct Connect List page.
Checking Direct Connect Details
The Direct Connect service can be checked and modified in its entirety on the Resource Management menu. The Direct Connect Details page consists of Details, Rules, Tags, and Work History tabs.
To check the Direct Connect details, follow these steps.
- Click on All Services > Networking > Direct Connect menu. It will move to the Service Home page of Direct Connect.
- On the Service Home page, click the Direct Connect menu. It will move to the Direct Connect List page.
- On the Direct Connect List page, click the resource you want to check the details for. It will move to the Direct Connect Details page.
- The Direct Connect Details page displays status information and additional feature information, and consists of Details, Rules, Tags, and Work History tabs.
| Category | Detailed Description |
|---|---|
| Status | Current status
|
| Service Cancellation | Button to cancel the service
|
Table. Direct Connect Status Information and Additional Features
Details
You can check and modify the details of the selected resource on the Direct Connect List page.
| Category | Detailed Description |
|---|---|
| Service | Direct Connect service category |
| Resource Type | Direct Connect resource type |
| SRN | Unique resource ID in Samsung Cloud Platform
|
| Resource Name | Direct Connect resource name |
| Resource ID | Unique resource ID in Direct Connect |
| Creator | User who created Direct Connect |
| Creation Date | Direct Connect creation date and time information |
| Modifier | User who modified Direct Connect information |
| Modification Date | Direct Connect information modification date and time |
| Direct Connect Name | Direct Connect VPC resource name |
| Uplink Usage | Port bandwidth allocated for line connection |
| Line Application/Cancellation SR Shortcut | Line connection service between the customer’s line and Samsung Cloud Platform’s local segment
|
| Connected VPC Name | Name of VPC connected to Direct Connect |
| Firewall Name | Firewall name |
| Firewall Usage | Whether to use firewall |
Table. Direct Connect Details Tab Items
Rules
You can register or modify communication rules between the remote site and VPC.
| Category | Detailed Description |
|---|---|
| Destination IP | Destination IP information |
| Destination | Routing direction |
| Creation Date | Creation date and time information |
| Status | Connection status
|
| Deletion | You can delete the rule. |
Table. Direct Connect Rules Tab Items
Tags
You can check, add, change, or delete tag information of the selected resource on the Direct Connect List page.
| Category | Detailed Description |
|---|---|
| Tag List | Tag list
|
Table. Direct Connect Tags Tab Items
Work History
You can check the work history of the selected resource on the Direct Connect List page.
| Category | Detailed Description |
|---|---|
| Work History List | Resource change history
|
Table. Direct Connect Work History Tab Detailed Information Items
Adding Direct Connect Rules
- Click on All Services > Networking > Direct Connect menu. It will move to the Service Home page of Direct Connect.
- On the Service Home page, click the Direct Connect menu. It will move to the Direct Connect List page.
- On the Direct Connect List page, click the resource you want to add a rule to. It will move to the Direct Connect Details page of that resource.
- On the Direct Connect Details page, click the Rules tab.
- On the Rules tab, click the Add Rule button. It will move to the Add Rule popup window.
- On the Add Rule popup window, enter the required information and click the Confirm button.
Category Detailed Description Destination IP Enter the destination IP range - Example:
192.168.25.0/24
Destination Select the routing direction according to VPC and remote site. Table. Direct Connect Rule Addition Input Items - Example:
Canceling Direct Connect
You can cancel unused VPC to reduce operating costs. However, service cancellation may immediately stop the operating service, so consider the impact of service interruption before proceeding with the cancellation.
Note
Direct Connect cannot be canceled if there are connected resources.
To cancel Direct Connect, follow these steps:
- Click on All Services > Networking > Direct Connect menu. It will move to the Service Home page of Direct Connect.
- On the Service Home page, click the Direct Connect menu. It will move to the Direct Connect List page.
- On the Direct Connect List page, click the resource you want to cancel. It will move to the Direct Connect Details page of that resource.
- On the Direct Connect Details page, click the Service Cancellation button.
- Once canceled, check if the resource has been canceled on the Direct Connect List page.
7.3 - API Reference
API Reference
7.4 - CLI Reference
CLI Reference
7.5 - Release Note
Direct Connect
2025.02.27
NEW
Common Feature Changes- Samsung Cloud Platform common feature changes
- Reflected common CX changes, including Account, IAM, Service Home, and tags.
2024.10.01
NEW
Direct Connect Service Official Release- Launching Direct Connect service, which quickly and securely connects customer networks and Samsung Cloud Platform networks.
8 - Cloud LAN-Campus
8.1 - Overview
Service Overview
Cloud LAN-Campus is a service that provides a wired and wireless integrated network usage environment based on user authentication within the customer’s business site. It provides a variety of wired and wireless integrated network access environments that can be used freely regardless of the location within the business site through simple user/device authentication, based on SDN (Software Defined Network). It minimizes existing physical network equipment and enables easy connection to multiple locations geographically distributed using the cloud. This allows companies to reduce the complexity of infrastructure construction and operation, and build a flexible and expandable network environment. Additionally, it enables the operation of business site networks in a more stable and efficient manner through optimized network design/configuration for customer environments, professional operating systems, and enhanced security management.
Provided Features
Cloud LAN-Campus provides the following functions.
- Campus Network: Provides a wireless network usage environment and integrated authentication service for the workplace
- NW Access: Infrastructure for business network usage (AP, NW Switch, etc.) and SDN system services
- NW Authentication: User/device authentication-based network separation, multi-office authentication/security policy integrated management, support for various authentication methods (AD, certificate, etc.) and policy operation/management through service portal (user/administrator)
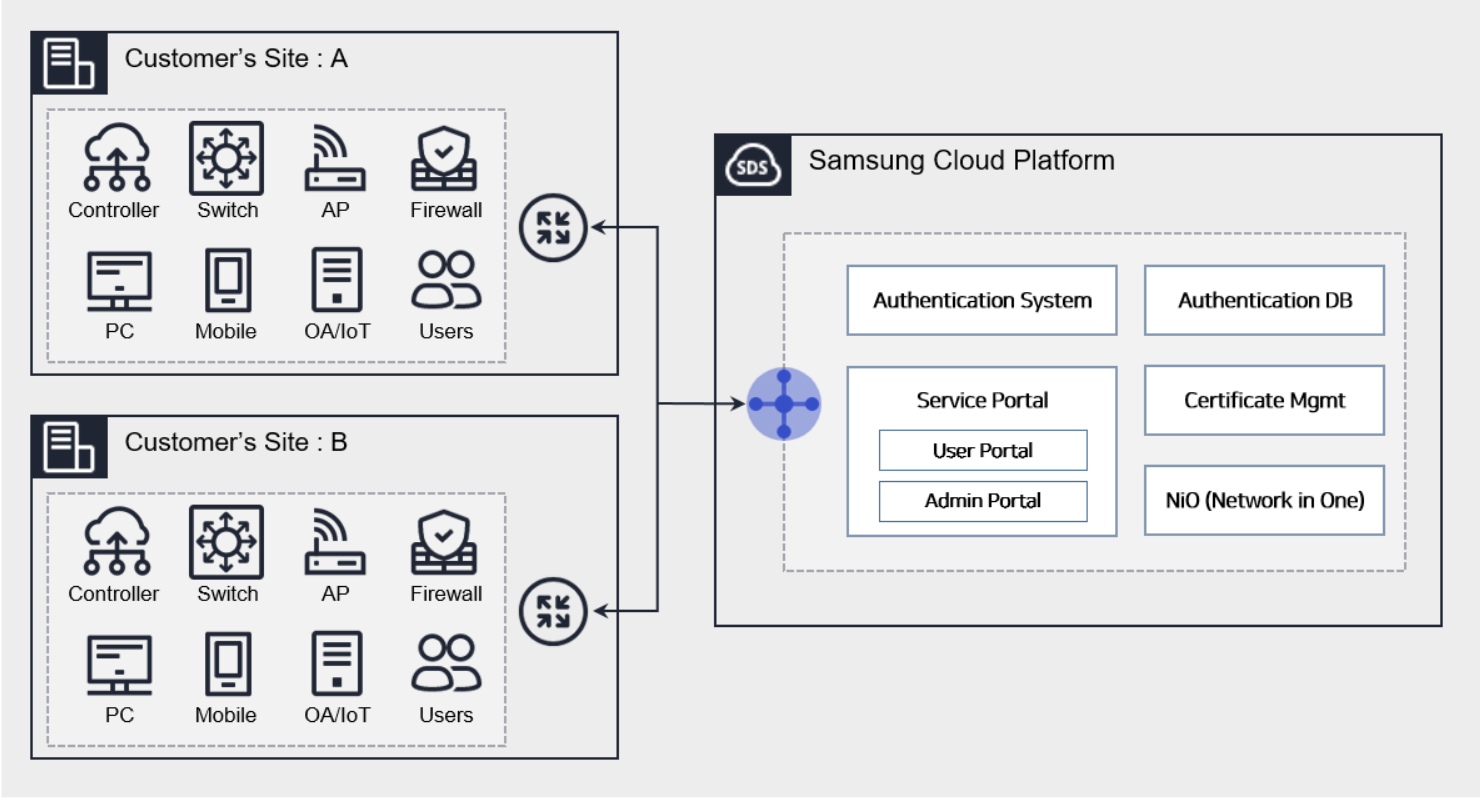
Features
- Rapid Business Network Work Environment: Provides a wired and wireless integrated network usage environment through a user authentication-based SDN (Software Defined Network) solution. IP Mobility and separate networks according to terminal purpose are applied immediately, and users can easily change the network through the service portal.
- Network Security Enhancement: Logical network separation and authentication-based wired/wireless integrated security management system enable consistent security policy operation for users/devices. Even in environments where users access multiple headquarters and business sites, the same network access environment and security policy application are possible, and authentication information is safely managed under the Samsung Cloud Platform security system.
- Multi-vendor accommodation and network total service provision: The configuration of SDN equipment in the business place becomes more flexible due to the multi-vendor network integrated authentication. Additionally, instead of customers designing, building, operating, and managing their own network infrastructure, a total service system is provided, thereby improving operational and management efficiency. Optimized network design for each business place and fast and stable network services are provided through a dedicated team.
- Service-based integrated billing system: The service billing system can reduce initial investment costs and enable network infrastructure expansion and capacity increase when needed. It provides usage-based authentication services, and no separate operating personnel or maintenance contract is required.
- Various authentication methods and extensibility: We provide optimal authentication solutions with various authentication methods. Additionally, functional extension and differential policy management according to the security level of each business site are possible through linkage with customer systems (groupware, security systems, etc.).
Component
Cloud LAN-Campus provides services across the entire network within the workplace. The components are as follows, and related service creation is possible.
| Division | Detailed Content |
|---|---|
| Network Authentication |
|
| Service Portal | Wired/Wireless Integrated Authentication Service Portal Provided
|
| Wired/Wireless Network | SDN-based Wired/Wireless Network Design and Integrated Configuration/Operation/Management |
| WIPS | Wireless Intrusion Prevention System configuration/operation/management |
| Network Solution | DHCP, NMS etc. network solution configuration/operation/management |
Fig. Cloud LAN-Campus Components
Constraints
When using the Cloud LAN-Campus service, there are the following restrictions.
- Network communication/connection between the customer’s business site and the Samsung Cloud Platform region is required for CLAN authentication use.
- Cloud Last Mile, dedicated line, VPN, etc. used In case of using network equipment from a specific vendor, prior consultation is required.
- The start and end points of the service created for the equipment configuration in the business place are determined after consultation with the person in charge of AM.
- When using AD integration as the authentication method, authentication-related policy rules must be normally deployed in advance on the user’s PC.
- AD functionality issues require management by the customer’s AD administrator.
- The network separation certificate method is supported for the specified OS type (currently limited to Windows), and additional costs are added excluding the authentication fee.
Regional Provision Status
Cloud LAN-Campus is available in the following environments.
| Region | Availability |
|---|---|
| Western Korea(kr-west1) | Provided |
| South Korea southern region 1(kr-south1) | Not provided |
| South Korea, southern region 2(kr-south2) | Not provided |
| South Korea southern region 3(kr-south3) | Not provided |
Table. Cloud LAN-Campus Region-based Provisioning Status
Preceding Service
Cloud LAN-Campus has no preceding service.
8.2 - How-to guides
The user can enter the essential information of the Cloud LAN-Campus service through the Samsung Cloud Platform Console and create the service by selecting detailed options.
Request to Create Campus Network Service
You can create and use the Campus Network service in the Samsung Cloud Platform Console.
To request the creation of a Campus Network service, follow the procedure below.
- Click All services > Networking > Cloud LAN-Campus menu. It moves to the Service Home page.
- On the Service Home page, click the Cloud LAN-Campus service request button. It moves to the Support Center > Service Request page.
- Service Request page, enter or select the corresponding information in the required input area.
- Select Campus Network service application in the work division.
Input Item Detailed Description Title Title of the service being requested Region Location selection of Samsung Cloud Platform - Automatically entered as the region of the account
Service Select the service category and service for the corresponding service (automatic selection) - Service category: Networking
- Service: Cloud LAN-Campus
Work Classification Select the type of service you want to perform - Campus Network service application: Select if you are newly requesting the service
Content Detailed information required to create Campus Network service - SCP account name: Enter the account name of Samsung Cloud Platform
- SCP project name: Enter the project name of Samsung Cloud Platform
- Company/Corporation name: Enter the company/corporation name
- Customer information (Name/E-mail/Phone number): Enter user information
- Desired service start date: Enter the service start date
- NW network separation: Enter Yes / No
- Wired Network usage: Enter Yes / No
- Wireless Network usage: Enter Yes / No
- Wireless WIPS usage: Enter Yes / No
- Network solution usage (NMS, WAN accelerator, DHCP, etc.): Enter Yes / No
- Expected contract period: Enter 4 years / 5 years / 6 years
- Operation service: Enter Yes / No
Attachments If you have additional files you want to share, upload them - Attached files can be up to 5 files, each 5MB or less
- Only doc, docx, xls, xlsx, ppt, ppts, hwp, txt, pdf, jpg, jpeg, png, gif, tif files can be attached
Table. Detailed contents of Campus Network service request items
- Select Campus Network service application in the work division.
- Check the required information entered on the Service Request page and click the Request button.
- Once the application is complete, check the contents of the application on the Support Center > Service Request List page.
- The requested task will take around 5 to 7 business days.
Note
- Once the service request is completed, the customer manager will contact you separately for business consulting and architecture optimization design.
- Please contact the Samsung SDS person in charge of AM for progress and service-related inquiries.
Request to Cancel Campus Network Service
You can cancel the Campus Network service on the Samsung Cloud Platform Console.
To request the cancellation of the Campus Network service, please follow the following procedure.
Click All services > Networking > Cloud LAN-Campus menu. It moves to the Service Home page.
On the Service Home page, click the Cloud LAN-Campus service request button. It moves to the Support Center > Service Request page.
Service Request page, please enter or select the corresponding information in the required input area.
- Select Campus Network service cancellation in the work classification.
Input Item Detailed Description Title Title of the service being requested Region Location selection of Samsung Cloud Platform - Automatically entered as the region of the account
Service Select the service category and service for the corresponding service (auto-select) - Service category: Networking
- Service: Cloud LAN-Campus
Work classification Select the type you want to perform - Campus Network service cancellation: Select if you want to request service cancellation
Content Detailed information required for Campus Network service cancellation - SCP account name: Enter the account name of Samsung Cloud Platform
- SCP project name: Enter the project name of Samsung Cloud Platform
- Customer information (name/company/department/E-mail/phone number): Enter user information
- Service cancellation request date: Enter the service cancellation date
- Content: Enter additional content
Attachments If you have additional files you want to share, upload them - Attached files can be up to 5MB each, with a maximum of 5 files
- Only doc, docx, xls, xlsx, ppt, ppts, hwp, txt, pdf, jpg, jpeg, png, gif, tif files can be attached
Fig. Campus Network Service Request Item Details
- Select Campus Network service cancellation in the work classification.
Check the required information entered on the Service Request page and click the Request button.
- Once the application is complete, check the contents of the application on the Support Center > Service Request List page.
- The requested task will take around 5 to 7 business days.
Note
When the service request is completed, the customer manager will contact you separately for service cancellation.
- Please contact the Samsung SDS person in charge of AM for progress and service-related inquiries.
8.3 - Release Note
Cloud LAN Campus
2025.07.01
NEW
Cloud LAN Campus_Enterprise Service Official Version Release- We have launched the Cloud LAN Campus service, which provides authentication-based wired and wireless integrated network services within the customer’s business site.
9 - Cloud LAN-Data Center
9.1 - Overview
Service Overview
Cloud LAN-Data Center is a shared network infrastructure based on SDDC (Software-Defined Data Center) in the data center of the Samsung Cloud Platform region or the customer’s on-premise data center, allowing connection between various networks such as servers, WAN Edge, CX (Cloud eXchange), etc.
Features
Cloud LAN-Data Center provides the following functions.
- Rapid Network Access: When building a network environment in the Samsung Cloud Platform region or the customer’s on-premises data center, a fast and secure corporate customized data center network configuration is possible through the SDDC-based infrastructure.
- Cost Optimization: Through the logical configuration of virtualized infrastructure and optimization design by experts, it is possible to build a customer-dedicated network with the same effect as building a high-cost physical network infrastructure alone. The cost of building a physical environment, such as network equipment, data center facilities, and cabling, is reduced through the virtual network environment.
- Operational Persistence: Provides a customized operating environment for each company by maintaining existing settings such as network security policies, IP systems, and network protocols required in various on-premises environments of enterprises.
- Flexible network environment provision: In the SDDC-based infrastructure, the separation of edge nodes (external network connection), service nodes (built-in equipment connection), and computing nodes (server connection) allows for the accommodation of not only physical security devices and network solution devices that require physical installation in the data center, but also virtualized devices.
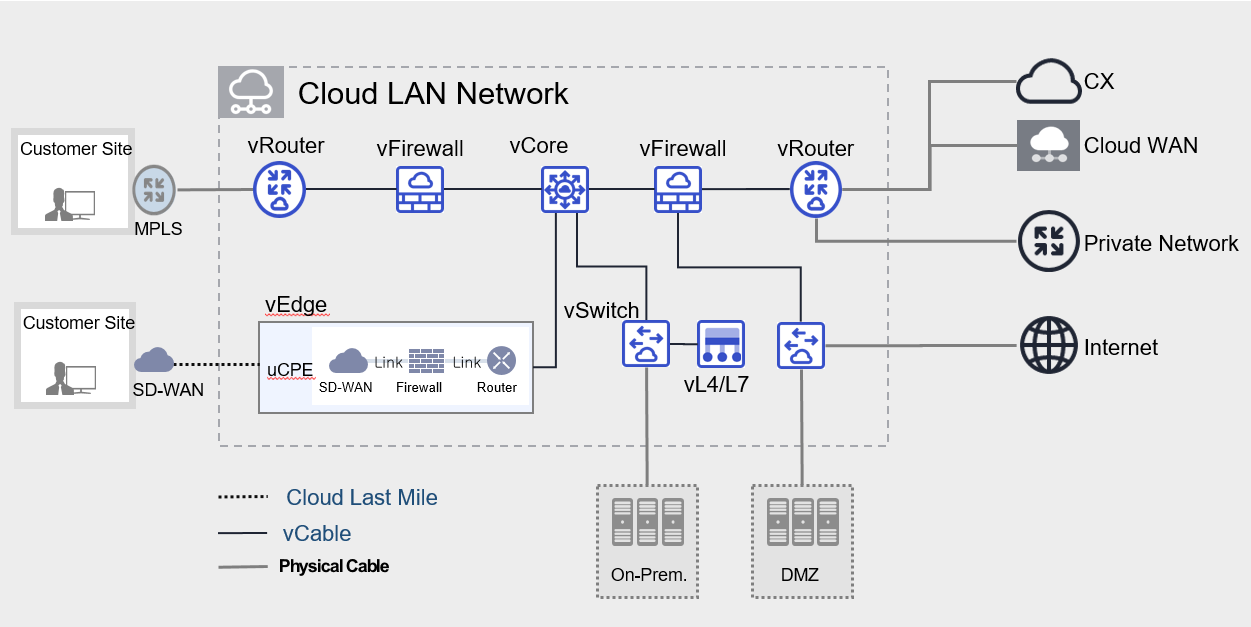
Provided Features
Cloud LAN - Data Center provides the following functions.
- Various network connection virtualization: Provides virtualization resources for flexible N/W configuration and allows customers to configure a dedicated network through various types of vDevices.
- Network/Security Solution Integration: It provides virtualization solutions in the form of NFV, and can configure a network by connecting various types of appliances.
Component
Cloud LAN-Data Center is a service that provides connections between various networks through virtual network configuration within the data center. The components are as follows, and related service creation is possible.
| Division | Detailed Content |
|---|---|
| Cloud LAN Network | Cloud LAN-Data Center infrastructure within a logically separated network configuration for virtual space |
| vRouter | virtual resource for external line (L2, L3) connection |
| vSwitch | Virtual resource for customer dedicated H/W connection and VLAN provision |
| vFirewall | Cloud LAN-Data Center internally created infrastructure protection for virtual firewall |
| vL4/L7 | Cloud LAN-Data Center internal traffic load balancing for virtual L4/L7 switch |
| vCore | Virtual resource for Full Mesh routing connection |
| vCable | virtual Cable for routing connections between virtual resources |
| Interface | Provides a physical interface where H/W devices and lines can be connected to vDevice |
Fig. Cloud LAN-Data Center Components
Constraints
When using the Cloud LAN-Data Center service, there are the following restrictions.
- The available creation capacity by region is 1:1, please inquire.
Regional Provision Status
Cloud LAN-Data Center is available in the following environment.
| Region | Availability |
|---|---|
| Western Korea(kr-west1) | Provided |
| South Korea, southern region 1 (kr-south1) | Not provided |
| South Korea 2(kr-south2) | Not provided |
| South Korea, southern region 3(kr-south3) | Not provided |
Table. Cloud LAN-Data Center Region-based Provision Status
Preceding Service
Cloud LAN-Data Center has no preceding service.
9.2 - How-to guides
The user can input the essential information of the Cloud LAN Network service and create the service by selecting detailed options through the Samsung Cloud Platform Console.
Create Cloud LAN Network
You can create and use the Cloud LAN Network service in the Samsung Cloud Platform Console.
Note
Cloud LAN Network can be applied up to a maximum of 5.
To request the creation of a Cloud LAN Network service, follow the procedure below.
All services > Networking > Cloud LAN-Data Center menu, click. It moves to the Cloud LAN-Data Center Service Home page.
On the Cloud LAN-Data Center Service Home page, click the Create Cloud LAN Network button. It moves to the Create Cloud LAN Network page.
Cloud LAN Network Creation page, enter the corresponding information in the service information input area and click the Complete button.
- Please enter or select the required information in the service information input area.
Division NecessityDetailed Description Cloud LAN Network name required Enter the name of the Cloud LAN Network to be created - Enter 3-21 characters using English, numbers, and special characters
Cloud LAN Network location required Select Cloud LAN Network location Description Selection Enter additional information or description for Cloud LAN Network service Table. Cloud LAN Network Service Information Input Items
- Additional Information Input area, please enter or select the necessary information.
Classification MandatoryDetailed Description Tag Select Add Tag - Up to 50 can be added per resource
- Click the Add Tag button and enter or select Key, Value
Fig. Cloud LAN Network Additional Information Input Items
- Once the creation is complete, check the created resource on the Cloud LAN Network list page.
Cloud LAN Network detailed information check
Cloud LAN Network service allows you to check and modify the list of connected resources and detailed information. The Cloud LAN Network details page consists of details, connected resources, tags, and operation history tabs.
To check the detailed information of Cloud LAN Network, follow the next procedure.
- All Services > Networking > Cloud LAN-Data Center menu is clicked. It moves to the Cloud LAN-Data Center Service Home page.
- Cloud LAN-Data Center Service Home page, click the Cloud LAN Network menu. Move to the Cloud LAN Network list page.
- Cloud LAN Network list page, click the resource to check the detailed information. Move to the Cloud LAN Network details page.
- Cloud LAN Network Details page displays status information and additional feature information, and consists of Details, Connected Resources, Tags, Operation History tabs.
Division Detailed Description Service Status Service Status Display - Creating: Being created
- Active: In operation
- Deleting: Being deleted
- Failed: Creation/deletion failed
Service Cancellation Service Cancellation Button Fig. Cloud LAN Network status information and additional features
- Cloud LAN Network Details page displays status information and additional feature information, and consists of Details, Connected Resources, Tags, Operation History tabs.
Detailed Information
On the Cloud LAN Network list page, you can check the detailed information of the selected resource and modify the information if necessary.
| Classification | Detailed Description |
|---|---|
| Service | Service Name |
| Resource Type | Resource Type |
| SRN | Unique resource ID in Samsung Cloud Platform |
| Resource Name | Resource Title |
| Resource ID | Service’s unique resource ID |
| Creator | Service creator user |
| Creation Time | The time when the service was created |
| Modifier | User who modified the service |
| Modified Time | Time the service was modified |
| Service Information | Detailed information of the created service
|
Fig. Cloud LAN Network Detailed Information Tab Items
Connected Resources
You can check the vDevice information assigned to the selected resource on the Cloud LAN Network list page.
| Classification | Detailed Description |
|---|---|
| vDevice list | Displays vDevice information and status assigned to the created service |
Fig. Cloud LAN Network Connected Resources Tab Detailed Information Items
Tag
On the Cloud LAN Network list page, you can check the tag information of the selected resource, and add, change, or delete it.
| Classification | Detailed Description |
|---|---|
| Tag List | Tag List
|
Fig. Cloud LAN Network Tags Tab Items
Work History
You can check the operation history of the selected resource on the Cloud LAN Network list page.
| Classification | Detailed Description |
|---|---|
| Work history list | Resource change history
|
Fig. Cloud LAN Network Work History Tab Detailed Information Items
Cloud LAN Network Cancellation
To cancel the Cloud LAN Network, follow the procedure below.
Caution
- If other resources are connected to Cloud LAN Network, the service cannot be terminated. Please delete all connected resources and then terminate the service.
- Cloud LAN Network service status is Creating or Deleting, the service cannot be cancelled.
- If you cancel the Cloud LAN Network service, it will be deleted immediately and cannot be recovered. If you cancel the service, the service in operation may be stopped immediately, so please proceed with the cancellation work after fully considering the impact that may occur when the service is stopped.
- Click All Services > Networking > Cloud LAN-Data Center menu. It moves to the Cloud LAN-Data Center Service Home page.
- Cloud LAN-Data Center Service Home page, click the Cloud LAN Network menu. It moves to the Cloud LAN Network list page.
- Cloud LAN Network list page, click on the resource to check the detailed information. It moves to the Cloud LAN Network details page.
- Cloud LAN Network details page, click the cancel service button.
- When the cancellation is complete, check if the resource has been deleted from the Cloud LAN Network list.
9.2.1 - vDevice
The user can enter the necessary information for the vDevice service through the Samsung Cloud Platform Console and create the service by selecting detailed options.
Create vDevice
You can create and use the vDevice service on the Samsung Cloud Platform Console.
Note
- To apply for a vDevice, a Cloud LAN Network must be created. Please check the Cloud LAN Network information before applying for a vDevice.
- The detailed settings of the created vDevice use a separate operation platform (NiO). For inquiries about NiO, please contact us through Support Center > Inquiry and we will guide you.
To request the creation of a vDevice service, follow the procedure below.
- All Services > Networking > Cloud LAN-Data Center menu, click. It moves to the Cloud LAN-Data Center Service Home page.
- On the Cloud LAN-Data Center Service Home page, click the vDevice creation button. It moves to the vDevice creation page.
- vDevice creation page, please enter the corresponding information in the service information input area.
- Please enter or select the required information in the service information input area.
Classification NecessityDetailed Description Cloud LAN Network name Required Select the Cloud LAN Network to assign to vDevice vDevice Type required Select the type of vDevice to create - vRouter: virtual resource for external line (L2, L3) connection
- vSwitch: virtual resource for customer dedicated hardware connection and VLAN provision
- vFirewall: virtual firewall for protecting infrastructure created in Data Center
- vCore: resource connection service for full-mesh communication between virtual resources
- vL4/L7: virtual L4/L7 switch for traffic load balancing in Cloud LAN-Data Center
vDevice Type > vRouter required Enter the name to be created when selecting vRouter - Enter 3-21 characters using English, numbers, and special characters
vDevice Type > vSwitch required Enter the name to be created when selecting vSwitch - Enter 3-21 characters using English, numbers, and special characters
vDevice Type > vFirewall required vFirewall selection creates selection information - vFirewall: enter the name to be created
- Vendor: select vendor
- Type: select the rate system of the selected vendor
- Redundancy: select whether to use redundancy, use selects the fee for 2 firewalls, and non-use applies for a single configuration
- Log storage option: select whether to use the log storage option, logs are stored on 1 server, and even if redundancy is selected, only the fee for 1 server is charged
- Contract period: select the contract period
vDevice Type > vCore Required Enter the name to be created when selecting vCore - Enter 3-21 characters using English, numbers, and special characters
vDevice Type > vL4/L7 Required When selecting vL4/L7, select creation information - vL4/L7 name: Enter the name to be created
- Unit: Enter the number of units to be used within 1-20
- Redundancy: Select whether to use firewall redundancy
- Contract period: Select the contract period
Table. vDevice Service Information Input ItemsNoteWhen applying for vFirewall, the Firewall Interface is automatically created. The detailed information of the firewall by vendor is as follows.
Vendor Firewall type Number of Interfaces Created vFirewall Interface SECUI 6 Gbs, 5,000 Rules 3 int / ext / dmz.1 SECUI 12 Gbs, 15,000 Rules 3 int / ext / dmz.1 SECUI 30 Gbs, 30,000 Rules 4 int / ext / dmz.1 / dmz.2 SECUI 60 Gbs, 100,000 Rules 5 int / ext / dmz.1 / dmz.2 / dmz.3 Fortinet 1 Gbs, 1,000 Rules 3 int / ext / dmz.1 Table. Detailed Firewall Information by Vendor - Additional Information Input area, please enter or select the necessary information.
Classification NecessityDetailed Description Tag Select Add Tag - Up to 50 can be added per resource
- Click the Add Tag button and enter or select Key, Value
Table. Input items for adding vDevice information
- Please enter or select the required information in the service information input area.
- In the Summary panel, review the detailed information and estimated charges, then click the Complete button.
- After creation is complete, check the created resource on the vDevice list page.
vDevice detailed information check
The vDevice service allows you to check and modify the list of connected resources and detailed information. The vDevice details page consists of detailed information, connected resources, tags, and operation history tabs.
To check the vDevice details, follow the next procedure.
- Click all services > Networking > Cloud LAN-Data Center menu. It moves to the Cloud LAN-Data Center Service Home page.
- Cloud LAN-Data Center Service Home page, click the vDevice menu. It moves to the vDevice list page.
- vDevice list page, click on the resource to check the detailed information. Move to the vDevice details page.
- vDevice details page displays status information and additional feature information, and consists of details, connected resources, tags, operation history tabs.
Division Detailed Description Service Status Service Status Display - Creating: Being created
- Active: In operation
- Deleting: Being deleted
- Failed: Creation/deletion failed
vDevice deletion service deletion button Table. vDevice Status Information and Additional Functions
- vDevice details page displays status information and additional feature information, and consists of details, connected resources, tags, operation history tabs.
Detailed Information
vDevice List page where you can view detailed information of the selected resource and modify the information if necessary.
| Classification | Detailed Description |
|---|---|
| Service | Service Name |
| Resource Type | Resource Type |
| SRN | Unique resource ID in Samsung Cloud Platform |
| Resource Name | Resource Title |
| Resource ID | Service’s unique resource ID |
| Creator | The user who created the service |
| Creation Time | Time when the service was created |
| Modifier | User who modified the service |
| Modified Date | Date the service was modified |
| Service Information | Detailed service information created
|
Table. vDevice detailed information tab items
Connected Resources
You can check the resources assigned to the selected resource on the vDevice list page.
| Classification | Detailed Description |
|---|---|
| Connected Resource List | Detailed information and status of resources assigned to the created service
|
Table. vDevice connected resource tab detailed information items
Tag
On the vDevice list page, you can check the tag information of the selected resource, and add, change, or delete it.
| Classification | Detailed Description |
|---|---|
| Tag list | Tag list
|
Table. vDevice tag tab items
Work History
You can check the operation history of the resource selected on the vDevice list page.
| Division | Detailed Description |
|---|---|
| Work history list | Resource change history
|
Table. vDevice task history tab detailed information items
vDevice cancellation
To cancel the vDevice, follow the procedure below.
Caution
If other resources are connected to the vDevice, the service cannot be terminated. Please delete all connected resources and then terminate the service.
- All services > Networking > Cloud LAN-Data Center menu, click. Move to the Cloud LAN-Data Center Service Home page.
- Cloud LAN-Data Center Service Home page, click the vDevice menu. Move to the vDevice list page.
- Click on the resource to check the detailed information on the vDevice list page. It moves to the vDevice details page.
- vDevice details page, click the vDevice delete button.
- When the cancellation is complete, check if the resource has been deleted from the vDevice list.
9.2.2 - Interface
The user can enter the required information of the Interface service through the Samsung Cloud Platform Console and create the service by selecting detailed options.
Create Interface
You can create and use the Interface service in the Samsung Cloud Platform Console.
Note
- To apply for the Interface, Cloud LAN Network and vDevice must be created. Please check the Cloud LAN Network and vDevice information before applying for the Interface.
- Interface is a function that assigns a physical port to a pre-created vDevice. Interface can only be applied to vRouter and vSwitch.
- vFirewall is automatically created with the number of interfaces specified in the specification when created.
To request the creation of an Interface service, follow the next procedure.
Click All Services > Networking > Cloud LAN-Data Center menu. It moves to the Cloud LAN-Data Center Service Home page.
On the Cloud LAN-Data Center Service Home page, click the Create Interface button. It moves to the Create Interface page.
Interface creation page, please enter the corresponding information in the service information input area.
- Please enter or select the necessary information in the service information input area.
Classification NecessityDetailed Description Cloud LAN Network name required Select the Cloud LAN Network to assign the Interface vDevice Type Required Select the type of vDevice to use - vRouter: virtual resource for connecting external lines (L2, L3)
- vSwitch: virtual resource for customer dedicated hardware connection and VLAN provision
vDevice Type details required Select detailed information of vDevice type - vDevice name: Select vDevice
- Interface Type: Select the type of Interface to use
- Interface name: Enter the Interface name
- Up to 5 Interface items can be added, click the (+) button to add an item, click the (x) button to delete an item
- Interface redundancy: Set whether to use Interface redundancy, if redundancy is selected, the fee for 2 ports will be charged
- Contract period: Select the desired contract period
Table. Interface service information input items - Enter Additional Information Enter or select the required information in the area.
Classification NecessityDetailed Description Tag Selection Add Tag - Up to 50 can be added per resource
- Click the Add Tag button and enter or select Key, Value
Table. Input items for additional interface information
- Please enter or select the necessary information in the service information input area.
In the Summary panel, check the detailed information generated and the expected billing amount, and click the Complete button.
- Once the creation is complete, check the created resource on the Interface list page.
Interface detailed information check
The Interface service allows you to check and modify the list of connected resources and detailed information. The Interface details page consists of details, tags, and work history tabs.
To check the interface details, follow the next procedure.
- All Services > Networking > Cloud LAN-Data Center menu, click. It moves to the Cloud LAN-Data Center Service Home page.
- Cloud LAN-Data Center Service Home page, click the Interface menu. It moves to the Interface list page.
- Interface List page, click on the resource to check the detailed information. Move to the Interface Detail page.
- Interface Detail page displays status information and additional feature information, and consists of Detail Info, Tags, Work History tabs.
Classification Detailed Description Service Status Service Status Display - Creating: Being created
- Active: In operation
- Deleting: Being deleted
- Failed: Creation/deletion failed
Interface deletion Service deletion button Table. Interface Status Information and Additional Functions
- Interface Detail page displays status information and additional feature information, and consists of Detail Info, Tags, Work History tabs.
Detailed Information
On the Interface List page, you can check the detailed information of the selected resource and modify the information if necessary.
| Classification | Detailed Description |
|---|---|
| Service | Service Name |
| Resource Type | Resource Type |
| SRN | Unique resource ID in Samsung Cloud Platform |
| Resource Name | Resource Title |
| Resource ID | Service’s unique resource ID |
| Creator | The user who created the service |
| Creation Time | Time when the service was created |
| Modifier | User who modified the service |
| Modified Date | Date the service was modified |
| vDevice Type | vDevice Type information |
| Virtual Device Name | Virtual Device Name |
| Interface Type | Interface Type Information |
| Port Duplication | Whether to use port duplication |
| Contract Period | Selected Contract Period |
Table. Interface detailed information tab items
Tag
On the Interface List page, you can check the tag information of the selected resource, and add, change, or delete it.
| Classification | Detailed Description |
|---|---|
| Tag list | Tag list
|
Table. Interface tag tab items
Work History
You can check the work history of the resource selected on the Interface list page.
| Classification | Detailed Description |
|---|---|
| Work history list | Resource change history
|
Table. Interface work history tab detailed information items
Interface cancellation
To cancel the interface, follow the next procedure.
- All Services > Networking > Cloud LAN-Data Center menu is clicked. It moves to the Cloud LAN-Data Center Service Home page.
- Cloud LAN-Data Center Service Home page, click the Interface menu. Move to the Interface list page.
- Interface List page, click on the resource to check the detailed information. Move to the Interface Detail page.
- Interface details page, click the Interface delete button.
- When the cancellation is complete, check if the resource has been deleted from the Interface list.
9.2.3 - vCable
The user can enter the necessary information for the vCable service through the Samsung Cloud Platform Console and create the service by selecting detailed options.
Create vCable
You can create and use the vCable service in the Samsung Cloud Platform Console.
Note
- To apply for vCable, Cloud LAN Network and vDevice must be created. Please check the Cloud LAN Network and vDevice information before applying for vCable.
- Only vCable configuration between vDevices created in the same Cloud LAN Network is possible.
To request the creation of a vCable service, follow these steps.
- All Services > Networking > Cloud LAN-Data Center menu is clicked. It moves to the Cloud LAN-Data Center Service Home page.
- Cloud LAN-Data Center Service Home page, click the vCable creation button. Move to the vCable creation page.
- vCable creation page, please enter the corresponding information in the service information input area.
- Please enter or select the necessary information in the service information input area.
Classification NecessityDetailed Description Cloud LAN Network name required Select the Cloud LAN Network to assign vCable vCable Type Required Select the type of vCable to be created - Static: Provides 1:1 connection between vDevices, when setting vDevice A and vDevice B, different virtual resources are selected
- vCore: Provides multi-peering between vDevices, connects multiple vDevices to provide connections between vDevices
vCable Type > details required Enter detailed information according to vCable Type - vCable name: Enter the name of the vCable to be created
- vDevice A: Select vDevice A
- vDevice B: Select vDevice B
- Select vDevice A and B in sequence, if vFirewall Interface is selected from A list, it will not be displayed in B list
- If vCable Type is Static, vCore cannot be selected from vDevice A and vDevice B
- If vCable Type is vCore, vCore can only be selected from vDevice A
- vDevice can only be connected to 1 vCable
- vFirewall can be connected to vCable using vFirewall Interface
Table. vCable Service Information Input Items - Enter Additional Information Enter or select the required information in the area.
Classification NecessityDetailed Description Tag Selection Add Tag - Up to 50 can be added per resource
- Click the Add Tag button and enter or select Key, Value
Table. Additional information input items for vCable
- Please enter or select the necessary information in the service information input area.
- In the Summary panel, review the detailed information and estimated charges, and click the Complete button.
- Once the creation is complete, check the created resource on the vCable list page.
Check vCable detailed information
The vCable service can check and modify the list of connected resources and detailed information. The vCable details page consists of detailed information, tags, and work history tabs.
To check the vCable details, follow the next procedure.
- Click All Services > Networking > Cloud LAN-Data Center menu. It moves to the Cloud LAN-Data Center Service Home page.
- Cloud LAN-Data Center Service Home page, click the vCable menu. It moves to the vCable list page.
- vCable list page, click the resource to check the detailed information. Move to the vCable detail page.
- vCable Details page displays status information and additional feature information, and consists of Details, Tags, Work History tabs.
Classification Detailed Description Service Status Service Status Display - Creating: Being created
- Active: In operation
- Deleting: Being deleted
- Failed: Creation/deletion failed
vCable delete service delete button Table. vCable Status Information and Additional Functions
- vCable Details page displays status information and additional feature information, and consists of Details, Tags, Work History tabs.
Detailed Information
On the vCable List page, you can check the detailed information of the selected resource and modify the information if necessary.
| Classification | Detailed Description |
|---|---|
| Service | Service Name |
| Resource Type | Resource Type |
| SRN | Unique resource ID in Samsung Cloud Platform |
| Resource Name | Resource Title |
| Resource ID | Service’s unique resource ID |
| Creator | Service creator user |
| Creation Time | The time when the service was created |
| Modifier | User who modified the service |
| Modified Time | Time the service was modified |
| vDevice Type | vDevice Type Category |
| vDevice A name | vDevice A name |
| vDevice B name | vDevice B title |
Table. vCable detailed information tab items
Tag
On the vCable List page, you can check the tag information of the selected resource, and add, change, or delete it.
| Classification | Detailed Description |
|---|---|
| Tag list | Tag list
|
Table. vCable tag tab items
Work History
You can check the operation history of the selected resource on the vCable List page.
| Division | Detailed Description |
|---|---|
| Work history list | Resource change history
|
Table. vCable job history tab detailed information items
Canceling vCable
To cancel vCable, follow the procedure below.
- All Services > Networking > Cloud LAN-Data Center menu is clicked. It moves to the Cloud LAN-Data Center Service Home page.
- Cloud LAN-Data Center Service Home page, click the vCable menu. It moves to the vCable list page.
- vCable list page, click on the resource to check the detailed information. It moves to the vCable details page.
- vCable details page, click the vCable delete button.
- Once the cancellation is complete, please check if the resource has been deleted from the vCable list.
9.2.4 - vEdge
Users can apply for the vEdge service by entering the necessary information for using the service through the Samsung Cloud Platform Console.
Create vEdge
You can apply for and use the vEdge service on the Samsung Cloud Platform Console.
To request the creation of a vEdge service, follow these steps.
All Services > Networking > Cloud LAN-Data Center menu is clicked. It moves to the Cloud LAN-Data Center Service Home page.
On the Service Home page, click the vEdge service request button. It moves to the Support Center > Service Request List > Service Request page.
Service Request page, please enter or select the corresponding information in the required input area.
- Select vEdge creation in the work division.
Input Item Detailed Description Title Enter the title of the service request content - Example: vEdge service creation request
Region Select the location of Samsung Cloud Platform - Automatically entered as the region corresponding to the Account
Service Select service category and service. If the vEdge service request button is pressed, it is automatically entered - Service category: Networking
- Service: vEdge
Work classification Select the type you want to request - vEdge creation: Select if you are newly requesting a service
Contents and guidance on the service application process and notes Attachments If you have files you want to share with others, proceed with uploading - Attached files can be up to 5MB each, with a maximum of 5 files
- Only doc, docx, xls, xlsx, ppt, ppts, hwp, txt, pdf, jpg, jpeg, png, gif, tif files can be attached
Table. vEdge Service Creation Request Items
- Select vEdge creation in the work division.
Check the required information entered on the Service Request page and click the Request button. When the application is complete, check the contents of the application on the Support Center > Service Request List page.
Check vEdge Application History
You can check the application and cancellation history of the vEdge service in the Samsung Cloud Platform Console.
To check the vEdge service application history, follow the procedure below.
- Click all services > Management > Support Center menu. It moves to the Support Center > Service Home page.
- Support Center Service Home page, click the Service Request menu. It moves to the Service Request List page.
- On the Service Request List page, click the title of the service request you applied for. It moves to the Service Request Details page.
- Service Request Details page to check the application status and information.
Notice
When a service request is received, the sales/operations manager checks the service application details and proceeds with the vEdge service based on the entered information.
vEdge cancellation
To request the cancellation of the vEdge service, follow the procedure below.
Click all services > Management > Support Center menu. It moves to the Support Center > Service Home page.
On the Support Center Service Home page, click the Service Request button. It moves to the Service Request List page.
On the Service Request List page, click the Service Request button. It moves to the Service Request page.
Service Request page, enter or select the corresponding information in the required input field.
- Select vEdge Cancellation in the work classification.
Input Item Detailed Description Title Enter the title of the service request content - Example: vEdge service cancellation request
Region Select the location of Samsung Cloud Platform - Automatically entered as the region corresponding to the account
Service Select service category and service - Service Category: Networking
- Service: vEdge
Work classification Select the type you want to request - vEdge cancellation: Select if you want to cancel the service
Content Guide to service application process and notes Attachment If you have additional files you want to share, upload them - Attached files can be up to 5 files, each within 5 MB
- Only doc, docx, xls, xlsx, ppt, ppts, hwp, txt, pdf, jpg, jpeg, png, gif, tif files can be attached
Table. vEdge Service Cancellation Request Items
- Select vEdge Cancellation in the work classification.
Check the required information entered on the Service Request page and click the Request button.
- Once the application is complete, check the contents of the application on the Support Center > Service Request List page.
- Service cancellation takes 5-7 business days from the date of cancellation application, including the cancellation application date.
9.3 - Release Note
Cloud LAN-Data Center
2025.07.01
NEW
Cloud LAN-Data Center common feature changes- Samsung Cloud Platform common feature change
- Account, IAM and Service Home, tags, etc. reflected common CX changes.
2025.02.27
NEW
Cloud LAN-Data Center Service Official Launch- We have launched the Cloud LAN-Data Center service, which provides connections between various networks through virtual network configuration within the data center.
10 - Cloud WAN
10.1 - Overview
Service Overview
Cloud WAN is a service that provides network connections between Samsung Cloud Platform global regions and customer bases. This product provides services based on network traffic usage, and provides differentiated operation management services according to the selected service level.
Cloud WAN service consists of Cloud WAN Network, which is a customer virtual backbone, Segment, which provides logical network separation by purpose, and Attachment, which connects Samsung Cloud Platform Compute resources or receives a dedicated line from the customer’s business site and connects it to the Segment.
For example, to configure a backbone network connection from a system in the Samsung Cloud Platform region to a customer’s overseas base, the following settings are required in the user console. First, create a customer virtual backbone Cloud WAN Network. Next, select the access location, service level, and contract period to create a segment that suits the purpose. Then, by connecting the attachment to the segment in the relevant region or customer base, the backbone network between the relevant SCP region and the customer base is connected, allowing communication between them.
Service Composition Diagram
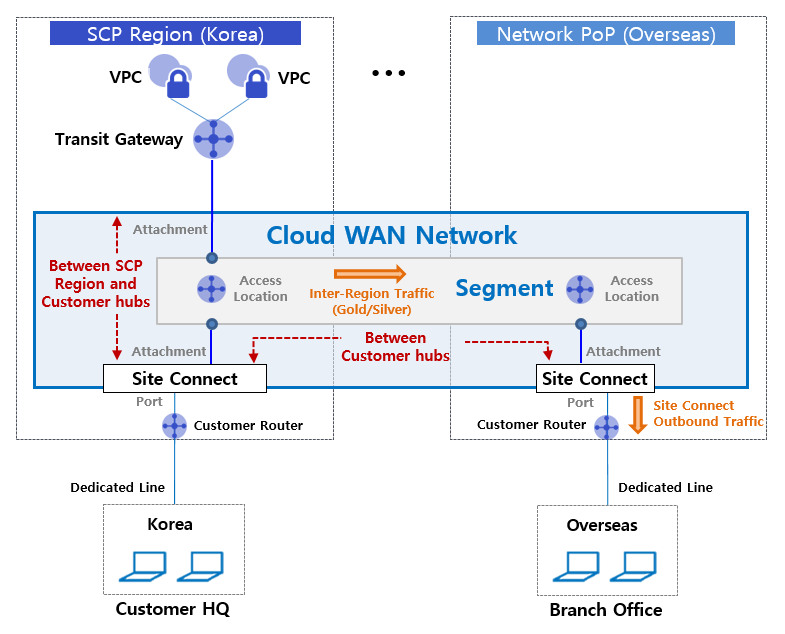
Provided Features
Cloud WAN provides the following features.
- Rapid Backbone Network Configuration: Samsung Cloud Platform customers can select their desired hub location and create a virtual global backbone network to quickly and securely configure cloud networks between Samsung Cloud Platform regions and customer hubs, and between customer hubs.
- Various Network Edge Connection Types Provided: Various Edge types that can be connected to Cloud WAN are provided, so Samsung Cloud Platform Compute resources can be connected as Transit Gateway, and local lines of customer’s business site can be connected as Site Connect, making it convenient.
- Multi-path transmission selection function for cost optimization: Unlike existing circuit bandwidth-based backbone network line services, customers are only charged for the actual usage in the desired section, and traffic characteristic-based transmission path options (Gold/Silver) are provided to optimize line costs.
- Service Level-Based Operation Management: Customers can receive differentiated network operation management services according to the selected service level, including the form of Cloud WAN backbone transmission network utilization, provided functions, monitoring, fault management, and technical support levels.
Component
Cloud WAN service provides a global customer virtual backbone network. The components are as follows, and users can create resources directly through the user Console.
| Division | Detailed Description |
|---|---|
| Cloud WAN Network | Customer-specific virtual backbone network |
| Segment | Cloud WAN Network by use case, logically separated virtual routing domain
|
| Access Location | Location of physical points to form a Segment |
| Attachment | Connect Samsung Cloud Platform or customer’s dedicated line Edge resources |
| Transit Gateway | Samsung Cloud Platform Compute resources connection type for Edge connection |
| Site Connect | Edge connection type for connecting customer business site dedicated line resources (CE equipment) |
| CE equipment | Network equipment that receives a dedicated line for customer business sites (Customer Edge) |
| Segment Sharing | Provides routing exchange settings to enable mutual communication between resources connected to different segments |
Fig. Cloud WAN Configuration Components
Constraints
The Cloud WAN service has the following restrictions.
- You can create one Cloud WAN Network per Account.
- You can create up to 5 segments in a single Cloud WAN Network.
- You can create up to 50 attachments in one segment.
- You can create up to 10 Segment Sharings in one Segment.
- Connection between Segment and Attachment is only allowed within the same project through request/approval.
- However, Segment Sharing can also be connected between different projects through requests and approvals.
Preceding Service
This is a list of services that must be pre-configured before creating this service. Please refer to the guide provided for each service and prepare in advance.
| Service Category | Service | Detailed Description |
|---|---|---|
| Networking | Transit Gateway | A service that safely and quickly connects Samsung Cloud Platform’s Compute resources to Cloud WAN Segment |
Fig. Cloud WAN Preceding Service
10.1.1 - Monitoring Metrics
Cloud WAN Monitoring Metrics
The following table shows the monitoring metrics of Cloud WAN that can be viewed through Cloud Monitoring. For detailed Cloud Monitoring usage, please refer to the Cloud Monitoring guide.
| Performance Item | Detailed Description | Unit |
|---|---|---|
| Instance Status | Attachment connection status | status |
| Network in bytes | In bytes(per cycle inbound traffic usage) | bytes |
| Network In Error Packets | In Error Packet count (number of received error packets per cycle) | Cnt |
| Network In Packets [Broadcast] | In Broadcast Packet count (number of broadcast packets per cycle) | Cnt |
| Network In Packets [Dropped] | In Dropped Packet count (number of Dropped packets per cycle) | Cnt |
| Network In Packets [Multicast] | In Multicast Packet count (number of Multicast packets per cycle) | Cnt |
| Network In Packets [Unicast] | In Unicast Packet count (number of Unicast packets per cycle) | Cnt |
| Network out bytes | Out bytes(per cycle outbound traffic usage) | bytes |
| Network Out Error Packets | Out Error Packet count (number of transmission error packets per cycle) | Cnt |
| Network Out Packets [Broadcast] | Out Broadcast Packet count (number of broadcast packets per cycle) | Cnt |
| Network Out Packets [Dropped] | Out Dropped Packet count (number of dropped packets per cycle) | Cnt |
| Network Out Packets [Multicast] | Out Multicast Packet count (number of Multicast packets per cycle) | Cnt |
| Network Out Packets [Unicast] | Out Unicast Packet count (number of Unicast packets per cycle) | Cnt |
Fig. Cloud WAN Basic Monitoring Metrics
10.2 - How-to guides
The user can create a service by entering the essential information of Cloud WAN and selecting detailed options through the Samsung Cloud Platform Console.
Creating a Cloud WAN Network
You can create a Cloud WAN Network through the Samsung Cloud Platform Console.
Note
Only one Cloud WAN Network can be applied per account.
To create a Cloud WAN Network, follow these steps:
- Click All Services > Networking > Cloud WAN menu. It moves to the Service Home page of Cloud WAN.
- Click the Create Cloud WAN Network button on the Service Home page. It moves to the Create Cloud WAN Network page.
- Enter the necessary information and select detailed options on the Create Cloud WAN Network page.
- Enter the necessary information in the Service Information section.
| Category | Required | Detailed Description |
|---|---|---|
| Cloud WAN Network Name | Required | Enter the name of the Cloud WAN Network to be created
|
Table. Cloud WAN Network Service Information Input Items
- Enter additional information in the Additional Information section.
Category RequiredDetailed Description Description Optional Enter a description of the resource Tag Optional Add a tag - Up to 50 tags can be added per resource
Table. Cloud WAN Network Additional Information Input Items
- Confirm the service information and estimated billing amount in the summary panel, and click the Complete button.
- After creation is complete, confirm the created resource on the Cloud WAN Network List page.
Checking Cloud WAN Network Details
The Cloud WAN Network service can be checked and modified on the Cloud WAN Network menu. The Cloud WAN Network Details page consists of Details, Connected Resources, Tags, and Operation History tabs.
To check the details of the Cloud WAN Network, follow these steps:
- Click All Services > Networking > Cloud WAN menu. It moves to the Service Home page of Cloud WAN.
- Click the Cloud WAN Network menu on the Service Home page. It moves to the Cloud WAN Network List page.
- Click the resource to check the details on the Cloud WAN Network List page. It moves to the Cloud WAN Network Details page.
- The Cloud WAN Network Details page displays status information and additional feature information, and consists of Details, Connected Resources, Tags, and Operation History tabs.
| Category | Detailed Description |
|---|---|
| Status | Current service status
|
| Service Cancellation | Service cancellation button
|
Table. Cloud WAN Network Status Information and Additional Features
Details
The Details tab displays detailed information about the selected Cloud WAN Network.
| Category | Detailed Description |
|---|---|
| Service | Service category |
| Resource Type | Service name (Cloud WAN Network) |
| SRN | Unique ID of the resource in Samsung Cloud Platform |
| Resource Name | Resource name |
| Resource ID | Unique ID of the resource in the service |
| Creator | User who requested service creation |
| Creation Time | Service creation time |
| Modifier | User who requested service modification |
| Modification Time | Service modification time |
| Cloud WAN Network Name | Cloud WAN Network name |
| Number of Segments | Number of segments used |
| Description | Description of the service |
Table. Cloud WAN Network Details Tab Items
Connected Resources
The Connected Resources tab displays the Segment connection status information.
| Category | Detailed Description |
|---|---|
| Segment Name | Segment resource name |
| Segment ID | Segment ID Information |
| Status | Service Resource Status Information |
Table. Cloud WAN Network Connected Resource Tab Items
Tags
In the Tags tab, you can view, add, modify, or delete tag information for the selected resource.
| Classification | Detailed Description |
|---|---|
| Tag List | Tag list
|
Table. Cloud WAN Network Tag Tab Items
Operation History
In the Operation History tab, you can view the operation history of the selected resource.
| Classification | Detailed Description |
|---|---|
| Operation History List | Resource change history
|
Table. Cloud WAN Network Operation History Tab Detailed Information Items
Canceling Cloud WAN Network
Canceling an unused Cloud WAN Network can help reduce operating costs.
Note
- If there are resources connected to the Cloud WAN Network, the service cannot be canceled. Delete the connected resources first and then cancel the service.
- If the service status of the Cloud WAN Network is Creating or Deleting, the service cannot be canceled.
To cancel a Cloud WAN Network, follow these steps:
- Click All Services > Networking > Cloud WAN. The Cloud WAN Service Home page will be displayed.
- On the Service Home page, click Cloud WAN Network. The Cloud WAN Network List page will be displayed.
- On the Cloud WAN Network List page, click the resource to be canceled. The Cloud WAN Network Details page will be displayed.
- On the Cloud WAN Network Details page, click the Cancel Service button.
- After cancellation is complete, check the resource cancellation status on the Cloud WAN Network List.
Creating a Segment
You can create a Segment on the Samsung Cloud Platform Console and use it.
Note
A maximum of 5 Segments can be applied per Cloud WAN Network.
To create a Segment, follow these steps:
- Click All Services > Networking > Cloud WAN. The Cloud WAN Service Home page will be displayed.
- On the Service Home page, click the Create Segment button in the drop-down menu. The Create Segment page will be displayed.
- On the Create Segment page, enter the necessary information for service creation and select detailed options.
- In the Service Information Input section, enter or select the necessary information.
| Classification | Mandatory | Detailed Description |
|---|---|---|
| Cloud WAN Network Name | Mandatory | Select a Cloud WAN Network
|
| Segment Name | Optional | Enter a Segment name and click the Duplicate Check button |
| Access Location | Mandatory | Select a location to connect the Segment
|
| Service Type | Mandatory | Select the Segment service type
|
| Multiple Paths | Optional | Select multiple transmission paths (to be provided from December 25)
|
Table. Segment Service Information Input Items
- In the Additional Information Input section, enter or select the necessary information.
Classification MandatoryDetailed Description Description Optional Enter a description of the Segment Tag Optional Add a tag - Up to 50 tags can be added per resource
Table. Segment Additional Information Input Items
- In the summary panel, check the service information and estimated billing amount, and click the Complete button.
- After creation is complete, check the created resource on the Segment List page.
Note
After creating a Segment, set the following in the Detailed Information > Connected Resources tab:
- Connect an Attachment created in the same Account to the Segment.
- To connect between different Accounts, set Segment Sharing.
Checking Segment Details
A Segment can be checked in the Segment menu, where you can view the entire resource list and detailed information, and modify it. The Segment Details page consists of Detailed Information, Connected Resources, Multiple Paths, Tags, and Operation History tabs.
To check the detailed information of a Segment, follow these steps:
- Click All Services > Networking > Cloud WAN. The Cloud WAN Service Home page will be displayed.
- On the Service Home page, click Segment. The Segment List page will be displayed.
- On the Segment List page, click the resource to check the detailed information. The Segment Details page will be displayed.
- The Segment Details page displays status information and additional feature information, and consists of Detailed Information, Connected Resources, Multiple Paths, Tags, and Operation History tabs.
Category Detailed Description Status Current service status - Creating: Service creation in progress
- Active: Service operating normally
- Deleting: Service deletion request in progress
- Failed: Service creation failed status
- Error: Unknown error occurred in the service
Service Deletion Service deletion button - If there are no connected services, the Segment can be deleted
Table. Segment Status Information and Additional Function Items
- The Segment Details page displays status information and additional feature information, and consists of Detailed Information, Connected Resources, Multiple Paths, Tags, and Operation History tabs.
Detailed Information
The Detailed Information tab allows you to view detailed information about the selected Segment.
| Category | Detailed Description |
|---|---|
| Service | Service category |
| Resource Type | Service name (Segment name) |
| SRN | Unique resource ID in Samsung Cloud Platform |
| Resource Name | Resource name |
| Resource ID | Unique resource ID in the service |
| Creator | User who requested service creation |
| Creation Time | Service creation time |
| Modifier | User who requested service modification |
| Modification Time | Service modification time |
| Segment Name | Segment name |
| Access Location Count | Number of Access Locations connected to the Segment |
| Region | Selected usage region (global, domestic)
|
| Service Level | Selected service level (PremiumPlusG, LIteG)
|
| Contract Period | Service usage contract period
|
| Attachment Count | Number of Attachments connected to the Segment |
| Multi-Path | Transmission path option (Gold/Silver) selected for the Segment
|
| Description | Description of the Segment |
Table. Segment Detailed Information Tab Items
Connected Resources
The Connected Resources tab allows you to view the connection status of Access Locations, Segment Sharing, and Attachments.
| Category | Detailed Description |
|---|---|
| Access Location | View location information connected to the Segment
|
| Segment Sharing | Request Segment Sharing connection between projects
|
| Attachment Connection | Request Attachment connection from the same project to the Segment
|
Table. Segment Connected Resources Tab Items
Multi-Path
The Multi-Path tab allows you to add or delete multi-path rules.
Note
The multi-path feature will be available from December 25th.
Adding Multi-Path Rules
To add a multi-path rule, follow these steps:
- Click All Services > Networking > Cloud WAN. The Cloud WAN Service Home page will be displayed.
- Click the Segment menu on the Service Home page. The Segment List page will be displayed.
- Click the resource you want to view detailed information about on the Segment List page. The Segment Details page will be displayed.
- Click the Multi-Path tab on the Segment Details page.
- Click the Add Rule button on the Multi-Path tab page. A rule addition popup window will appear.
- Enter detailed information in the popup window and click Confirm.
| Category | Required | Detailed Description |
|---|---|---|
| Source Access Location | Required | Select the source location information for the multi-path rule |
| Source IP Range | Required | Enter the source IP range
|
| Destination IP Range | Required | Enter the destination IP range
|
| Protocol | Optional | Select the protocol |
| Port Direction | Optional | Select the port direction for the selected protocol |
| Port Number | Optional | Enter the port number if TCP or UDP protocol is selected
|
| Description | Optional | Enter a description for the multi-path rule |
Table. Multi-Path Rule Addition Input Items
Caution
- If you enter the same information as an existing rule, you cannot register it as a new multi-path rule.
- You can apply for up to 20 multi-path rules.
Viewing Multi-Path Rules
To view multi-path rules, follow these steps:
- Click All Services > Networking > Cloud WAN. The Cloud WAN Service Home page will be displayed.
- Click the Segment menu on the Service Home page. The Segment List page will be displayed.
- Click the resource you want to view detailed information about on the Segment List page. The Segment Details page will be displayed.
- Click the Multi-Path tab on the Segment Details page.
- View the detailed information on the Multi-Path tab page.
| Category | Detailed Description |
|---|---|
| Origin Access Location | Origin location information for multi-path rules |
| Origin IP Range | Origin IP range |
| Destination IP Range | Destination IP range |
| Protocol | Protocol information |
| Port Direction | Port direction of the protocol |
| Port Number | Port number for TCP, UDP protocols |
| Description | Description of multi-path rules |
Table. Detailed information items for multi-path rules
Note
You can search by setting search filters by clicking the Detailed Search button on the right side of the rule list.
- You can quickly check multi-rules by searching with the desired filter among origin access location, origin IP, destination IP, and description.
Deleting Multi-Path Rules
To delete a multi-path rule, follow these steps.
- Click All Services > Networking > Cloud WAN menu. Move to the Service Home page of Cloud WAN.
- Click the Segment menu on the Service Home page. Move to the Segment List page.
- Click the resource to be checked in detail on the Segment List page. Move to the Segment Detail page.
- Click the Multi-Path tab on the Segment Detail page.
- Click the Delete button on the Multi-Path tab page. The rule will be deleted.
Tags
In the Tags tab, you can check the tag information of the selected resource and add, change, or delete it.
| Division | Detailed Description |
|---|---|
| Tag List | Tag list
|
Table. Segment tag tab items
Work History
In the Work History tab, you can check the work history of the selected resource.
| Division | Detailed Description |
|---|---|
| Work History List | Resource change history
|
Table. Segment work history tab detailed information items
Deleting a Segment
Deleting an unused Segment can reduce operating costs.
Caution
- If there is an Attachment connected to the Segment or Segment sharing, multi-path rules, it cannot be deleted. Delete the connected resources first and then cancel the service.
- The service cannot be deleted if the service status of the Segment is Creating, Deleting, Inactive, or Failed.
To delete a Segment, follow these steps.
- Click All Services > Networking > Cloud WAN menu. Move to the Service Home page of Cloud WAN.
- Click the Segment menu on the Service Home page. Move to the Segment List page.
- Click the resource to be deleted on the Segment List page. Move to the Segment Detail page.
- Click the Service Delete button on the Segment Detail page.
- After deletion is complete, check if the resource is deleted in the Segment List.
Creating an Attachment
You can create an Attachment service using the Samsung Cloud Platform Console.
Caution
Up to 50 Attachments can be applied per Segment.
To create an Attachment, follow these steps.
- Click All Services > Networking > Cloud WAN menu. Move to the Service Home page of Cloud WAN.
- Click the Attachment Creation button on the Service Home page. Move to the Attachment Creation page.
- Enter the necessary information for service creation and select detailed options on the Attachment Creation page.
- In the Service Information Input section, enter or select the necessary information.
| Division | Required | Detailed Description |
|---|---|---|
| Cloud WAN Network Name | Required | Select the Cloud WAN Network to apply for the Attachment
|
| Segment Name | Optional | Select the Segment to connect the Attachment
|
| Access Location | Required | Select the location connected to the Segment |
| Connection Type | Required | Set detailed connection information for Site Connect
|
| Connection Type | Required | Select a connectable Transit Gateway (available from December 25)
|
| Tag | Optional | Add a tag
|
Table. Attachment additional information input items
- Once created, check the created resource on the Attachment List page.
Checking Attachment Details
Attachments can be checked and modified in the Attachment menu, which includes a list of all resources and detailed information. The Attachment Details page consists of Details, Tags, and Work History tabs.
To check the details of an attachment, follow these steps:
- Click the All Services > Networking > Cloud WAN menu. This will move to the Cloud WAN Service Home page.
- On the Service Home page, click the Attachment menu. This will move to the Attachment List page.
- On the Attachment List page, click the resource you want to check the details for. This will move to the Attachment Details page.
- The Attachment Details page displays status information and additional feature information, and consists of Details, Tags, and Work History tabs.
| Category | Detailed Description |
|---|---|
| Status | Current service status
|
| Service Deletion | Service deletion button |
Table. Attachment Status Information and Additional Function Items
Details
The Details tab allows you to check the detailed information of the selected attachment.
| Category | Detailed Description |
|---|---|
| Service | Service category |
| Resource Type | Service name (Attachment name) |
| SRN | Unique ID of the resource in Samsung Cloud Platform |
| Resource Name | Resource name |
| Resource ID | Unique ID of the resource in the service |
| Creator | User who requested service creation |
| Creation Time | Service creation time |
| Modifier | User who requested service modification |
| Modification Time | Service modification time |
| Attachment Name | Attachment name |
| Segment Name | Name of the segment connected to the attachment |
| Access Location | Access location to be connected to the attachment |
| Connection Type | Attachment connection type (Site Connect or Transit Gateway) |
| ASN Information | If Site Connect is selected, the AS Number entered by the user
|
| Description | Description of the attachment |
Table. Attachment Details Tab Items
Tags
In the Tags tab, you can check the tag information of the selected resource and add, change, or delete it.
| Category | Detailed Description |
|---|---|
| Tag List | Tag list
|
Table. Attachment Tag Tab Items
Work History
The Work History tab allows you to check the work history of the selected resource.
| Category | Detailed Description |
|---|---|
| Work History List | Resource change history
|
Table. Attachment Work History Tab Detailed Information Items
Deleting an Attachment
Deleting an unused attachment can help reduce operating costs.
To delete an attachment, follow these steps:
- Click the All Services > Networking > Cloud WAN menu. This will move to the Cloud WAN Service Home page.
- On the Service Home page, click the Attachment menu. This will move to the Attachment List page.
- On the Attachment List page, click the resource you want to delete. This will move to the Attachment Details page.
- On the Attachment Details page, click the Service Deletion button.
- Once deleted, check if the resource has been deleted on the Attachment List page.
10.3 - Release Note
Cloud WAN
2025.07.01
NEW
Cloud WAN Service Official Version Release- Samsung Cloud Platform launched Cloud WAN service, providing network connections between global regions and customer bases.
11 - SASE
11.1 - Overview
Service Overview
SASE is a service that integrates network and security functions into the cloud to allow users to safely access internal assets and applications from anywhere. It transmits traffic through the optimal route and provides consistent security services inside and outside the company through SASE hubs located in Samsung Cloud Platform global regions.
Features
- Global SASE Fabric: Utilizing the systematic Samsung SDS Global communication network infrastructure, SASE points and vPOPs prepared in all regions are linked to continuously expand service coverage whenever customer demands arise.
- All in One Security: Covers a security layer that includes advanced SSL/TLS analysis, sophisticated application recognition/policy, and AI/ML-based real-time behavior analysis in one solution to optimize operational complexity and performance.
- Network/Security Unification: Provides network and security in a single operating system based on a single architecture, allowing for rapid traffic processing.
- End to End Full Managed: provides infrastructure necessary for customer site connection in a package form through a single contract, and provides comprehensive operation services from monitoring to failure notification and reporting.
Service Composition Diagram
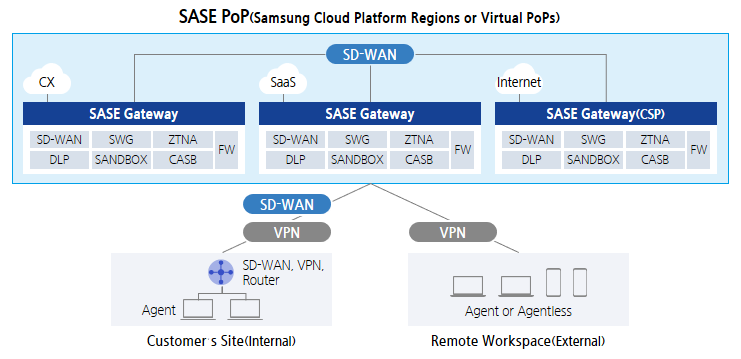
- SASE Hub: Composed of Gateway and control plane in SamsungSDS Global POP and CSP vPOP to provide network connection and security functions
- SASE Circuit: Physical circuit for connection between customer site and SASE hub, based on internet/MPLS/dedicated line SD-WAN or VPN configuration
- SASE Edge: SASE line connection for customer Edge equipment, in-house routers/SD-WAN equipment/VPN equipment, out-of-house PC/mobile etc. customer’s own Endpoint terminal
Provided Features
The SASE service provides the following functions.
- WAN Edge network
- Provides Intra, Inter region communication between various Edge devices (SD-WAN devices, routers, VPN devices, PCs, Mobile, etc.)
- Providing optimal route for each application using SD-WAN
- Provides traffic control (QoS) and TCP acceleration features for high-quality networks
- SSE(Secure Service Edge) Security
- ZTNA : Provide least privilege, security, and private connection to internal applications
- SWG : Security Gateway that provides internal user protection from insecure traffic such as the internet
- CASB : Provides a feature to apply corporate security policies between users and cloud applications
- FWaaS : Cloud-based firewall provides traffic inspection and control for all services
- Provides additional advanced security features such as RBI, DLP, SANDBOX, etc.
- Unified Orchestrator and DEM(Digital Experience Monitoring)
- Integrated network and security management for cloud, on-premises, and Edge devices
- Monitoring of user experience (recognition and identification of causes of problems such as network performance degradation, app suspension, etc.)
Constraints
The limitations of the SASE service are as follows.
- The service is not available in China and will be provided later.
Regional Provision Status
SASE can be provided in the following environments.
| Region | Availability |
|---|---|
| Western Korea(kr-west1) | Provided |
| Korean East(kr-east1) | Not provided |
| South Korea, southern region1(kr-south1) | Not provided |
| South Korea southern region 2(kr-south2) | Not provided |
| South Korea southern region 3(kr-south3) | Not provided |
Table. SASE Regional Provision Status
Preceding Service
SASE has no preceding service.
11.2 - How-to guides
The user can input the necessary information for the SASE service through the Samsung Cloud Platform Console and create the service by selecting detailed options.
Create SASE
You can create and use the SASE service in the Samsung Cloud Platform Console.
To request SASE service creation, follow these steps.
- Click All services > Networking > SASE menu. It moves to the Service Home page of SASE.
- On the Service Home page, click the SASE Service Request button. It moves to the Support Center > Service Request List > Service Request page.
- Service Request page, enter or select the corresponding information in the required input field.
Guide
Select SASE Service Creation in the task division
| Input Item | Detailed Description |
|---|---|
| Title | Enter the title of the service request content
|
| Region | Select the location of Samsung Cloud Platform
|
| Service | Select service group and service. If the SASE service request button is pressed, it is automatically entered
|
| Work Classification | Select the work you want to request
|
| Content | Enter detailed information required for SASE service creation
|
| Attachments | If you have additional files you want to share, upload them
|
Table. SASE Service Creation Request Items
- Check the required information entered on the Service Request page and click the Request button.
- SASE service creation work will proceed after confirmation by the person in charge, and it is expected to take around 5-7 business days.
Check SASE Application History
You can check the detailed information and processing procedure after applying for the SASE service.
To check the SASE service application history, follow the next procedure.
- All services > Support Center menu is clicked. It moves to the Service Home page of Support Center.
- On the Service Home page, click the Service Request menu. It moves to the Service Request List page.
- On the Service Request List page, select the application item. It moves to the Service Request Details page.
- Service Request Details page, please check the detailed information and processing procedure.
Canceling SASE
You can cancel through the SASE service request on the Samsung Cloud Platform Console.
To request cancellation of SASE service, follow the procedure below.
- Click All services > Networking > SASE menu. It moves to the Service Home page of SASE.
- On the Service Home page, click the SASE Service Request button. It moves to the Support Center > Service Request List > Service Request page.
- Service Request page, enter or select the corresponding information in the required input area.
Guide
In the task division, select SASE service cancellation
| Input Item | Detailed Description |
|---|---|
| Title | Enter the title of the service request content
|
| Region | Select the location of Samsung Cloud Platform
|
| Service | Select service group and service. If the SASE service request button is pressed, it is automatically entered
|
| Work classification | Select the work you want to request
|
| Content | Detailed information required for SASE service cancellation
|
| Attachment | If you have additional files you want to share, upload them
|
Table. SASE Service Cancellation Request Items
- Check the required information entered on the Service Request page and click the Request button. The SASE service cancellation process will be proceeded after confirmation by the person in charge, and it is expected to take around 5-7 business days.
11.3 - Release Note
SASE
2025.07.01
NEW
SASE Service Official Version Release- Released SASE service that combines network and security functions into a single cloud-based service, providing a single platform.
12 - Cloud Last Mile
12.1 - Overview
Service Overview
Cloud Last Mile is a service that provides Last Mile lines for network connection from the customer’s business site to the Samsung Cloud Platform region, and Customer Edge resources within the customer’s business site. Resources installed and operated in the customer’s business site can be easily applied for through a service request on the Samsung Cloud Platform user console.
Features
- Circuit and Edge Package Offering: The Last Mile circuit and Edge resources for connecting customer business sites and external networks are provided in a package format, combining the optimal equipment for the type of application that customers mainly use.
- Various Edge connection types provided: You can select virtual resources, physical device types, and use various functions required for network connection such as router/SD-WAN/WAN accelerator/Firewall.
- Last Mile Line Monitoring Service: The connection status and traffic usage of the Last Mile line connected to the network equipment in the Samsung Cloud Platform region can be easily checked using the monitoring service. The monitoring service is provided using NiO Tool, a self-developed platform by SamsungSDS.
Service Composition Diagram
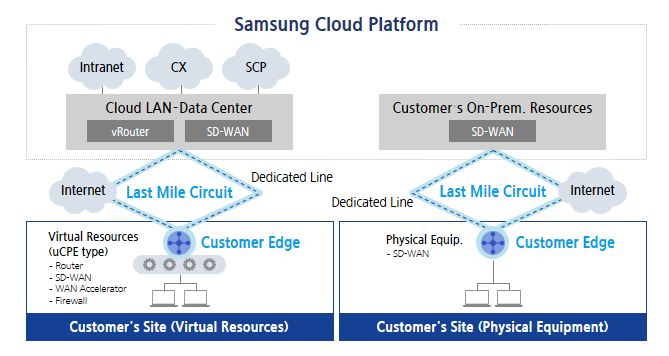
Provided Features
Cloud Last Mile service provides the following features.
- Last Mile circuit
- Line provision type: Dedicated line or Internet
- Upper-level country connection type: Cloud LAN - Data Center, Cloud WAN, On-Premise equipment inside Samsung SDS Data Center
- Customer Edge Resource Provisioning Type
- uCPE(VNF: Virtual Network Function): router, SD-WAN, WAN accelerator, firewall
- Physical equipment: SD-WAN
- Last Mile Line Monitoring Service
- Last Mile line up/down status and traffic usage monitoring
Constraints
The limitations of the Cloud Last Mile service are as follows.
- Only circuit and Edge equipment package forms are provided, so it is not possible to provide circuits or equipment alone.
- Depending on the method of connecting to the upper country, it may be necessary to build a dedicated device for customers within the Samsung Cloud Platform region. When connecting to the upper country’s public equipment, port costs may be incurred depending on the linked product.
Regional Provision Status
Cloud Last Mile can be provided in the following environments.
| Region | Availability |
|---|---|
| Western Korea(kr-west1) | Provided |
| Korea East(kr-east1) | Not provided |
| South Korea southern region 1(kr-south1) | Not provided |
| South Korea 2(kr-south2) | Not provided |
| South Korea, southern region 3(kr-south3) | Not provided |
Table. Cloud Last Mile Regional Provision Status
Preceding service
Cloud Last Mile has no preceding service.
12.2 - How-to guides
The user can input the essential information of the Cloud Last Mile service and create the service by selecting detailed options through the Samsung Cloud Platform Console.
Cloud Last Mile creation
You can create and use the Cloud Last Mile service in the Samsung Cloud Platform Console.
To request the creation of Cloud Last Mile service, follow the procedure below.
Click All services > Networking > Cloud Last Mile menu. It moves to the Service Home page of Cloud Last Mile.
On the Service Home page, click the Cloud Last Mile service request button. It moves to the Support Center > Service Request List > Service Request page.
Service Request page, enter or select the corresponding information in the required input area.
GuideIn the task division, select Cloud Last Mile service creation.Input Item Detailed Description Title Enter the title of the service request content - Example: Cloud Last Mile service creation request
Region Select the location of Samsung Cloud Platform - Automatically entered as the region of the project
Service Select service group and service. If you press the Cloud Last Mile service request button, it is automatically entered - Service group: Networking
- Service: Cloud Last Mile
Work Division Select the work you want to request - Cloud Last Mile service creation: Select if you are newly requesting the service
Content Enter detailed information required to create Cloud Last Mile service - Customer Information (Name/ E-Mail/ Phone Number): Enter user information
- Content: Enter detailed application content
Attachments If you have additional files you want to share, please upload them - Attached files can be up to 5MB each, with a maximum of 5 files
- Only doc, docx, xls, xlsx, ppt, ppts, hwp, txt, pdf, jpg, jpeg, png, gif, tif files can be attached
Table. Cloud Last Mile Service Creation Request ItemsCheck the required information entered on the Service Request page and click the Request button.
- Cloud Last Mile service creation work will proceed after confirmation by the person in charge, and it is expected to take around 5-7 business days.
Cloud Last Mile application history check
You can check the detailed information and processing procedure after applying for the Cloud Last Mile service.
To check the Cloud Last Mile service application history, follow the procedure below.
- Click all services > Support Center menu. It moves to the Service Home page of Support Center.
- On the Service Home page, click the Service Request menu. It moves to the Service Request List page.
- On the Service Request List page, select the application item. It moves to the Service Request Details page.
- Service Request Details page to check the detailed information and processing procedure.
Cloud Last Mile cancellation
You can cancel through the Cloud Last Mile service request on the Samsung Cloud Platform Console.
To request the cancellation of Cloud Last Mile service, follow the procedure below.
Click All services > Networking > Cloud Last Mile menu. It moves to the Service Home page of Cloud Last Mile.
On the Service Home page, click the Cloud Last Mile service request button. It moves to the Support Center > Service Request List > Service Request page.
Service Request page, enter or select the corresponding information in the required input area.
GuideIn the job classification, select Cloud Last Mile service cancellation.Input Item Detailed Description Title Enter the title of the service request content - Example: Cloud Last Mile service cancellation request
Region Select the location of Samsung Cloud Platform - Automatically entered as the region of the project
Service Select service group and service. If you click the Cloud Last Mile service request button, it is automatically entered - Service group: Networking
- Service: Cloud Last Mile
Work classification Select the work you want to request - Cloud Last Mile service cancellation: Select if you want to request service cancellation
Content Detailed information required for Cloud Last Mile service cancellation - Customer Information (Name/ E-Mail/ Phone Number): Enter user information
- Content: Enter detailed application content
Attachments If you have additional files you want to share, upload them - Attached files can be up to 5MB each, with a maximum of 5 files
- Only doc, docx, xls, xlsx, ppt, ppts, hwp, txt, pdf, jpg, jpeg, png, gif, tif files can be attached
Table. Cloud Last Mile Service Cancellation Request ItemsCheck the required information entered on the Service Request page and click the Request button. The Cloud Last Mile service cancellation process will proceed after confirmation by the person in charge, and it is expected to take around 5-7 business days.
12.3 - Release Note
Cloud Last Mile
2025.07.01
NEW
Cloud Last Mile Service Official Version Release- We launched the Cloud Last Mile service, which provides the Last Mile line for network connection from the customer’s business site to the Samsung Cloud Platform region and the Customer Edge resource within the customer’s business site.
13 - Global CDN
13.1 - Overview
Service Overview
Global CDN is a service that delivers static content stored in web servers or object storage to users more quickly and securely through numerous edge servers distributed across the global network. When traffic surges, it distributes the load of the origin server to protect the origin server, and by downloading content from adjacent edge servers, it can provide users with fast and stable web services.
Guide
Samsung Cloud Platform’s Global CDN service is provided through the services and infrastructure of the global CDN provider Akamai. Akamai informs that, in accordance with the Information and Communications Network Act, if it receives a list of URLs suspected of containing illegal information from the Broadcasting Media Communications Commission, it may take measures to restrict user access to those URLs.
Features
- Easy CDN Service Use: You can conveniently apply for Global CDN services through the web-based console of Samsung Cloud Platform. You can easily set the origin server settings of Samsung Cloud Platform and the caching policy settings of Global CDN edge servers, enabling rapid content delivery service usage.
- Improved Service Availability: Even if many users request content simultaneously, causing excessive traffic, thanks to edge servers distributed across multiple locations, users can access content quickly without degradation of usability. Therefore, when used for tasks that require stable global services, it ensures service availability.
- Safe content usage: HTTP, HTTPS, HTTP/2 protocols are supported, allowing content integration with various origin servers. If the cached content’s validity period expires or changes to the origin content are confirmed through validation, the edge server’s existing cache is deleted. Then, when a user requests content, the new content from the origin server is cached, so the user always receives valid, up-to-date content.
- Efficient Cost Management: Even in work environments that require large-scale traffic such as large file downloads, stable service is possible without the need for massive resource usage. Also, Global CDN usage fees are charged only for content usage, allowing efficient cost management.
Service Diagram
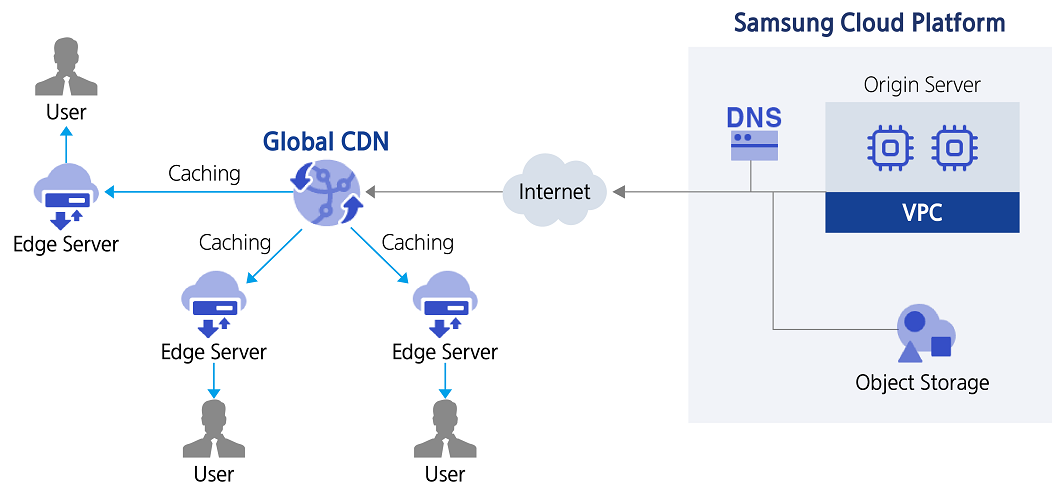
Provided Features
Global CDN provides the following features.
- Original Settings: Set the location and path of the original server and improve traffic reduction and response speed by providing basic compression of original content.
- Caching Settings: Set the cached content delivery policy and cache expiration time, and when the content’s validity period expires (TTL expiration), you can delete (Purge) the expired cached content on the edge server.
- Content Protection: By communicating with the origin server via the HTTPS protocol, the security of the content transmission path is strengthened, and with the powerful security features of the Global CDN network, you can protect content and users from DDoS attacks and web-based attacks.
Components
Connection between the source and the global CDN network
| Category | Description |
|---|---|
| Origin location and path setting | Based on the main name or IP address, set the origin server’s location, protocol, port number, and file path to connect the origin to the Global CDN network |
| Forward host header | Set the Host header value to be delivered to the user when requesting the origin server from Global CDN |
| Cache key hostname | Set cache key information to identify content on Global CDN Edge server |
| Custom header(request) | Custom header usage setting |
Table. Connection settings between the original and global CDN network
Caching in Global CDN Network
| Category | Description |
|---|---|
| Caching Options | Setting caching options on the Global CDN network using the origin server’s Cache-control and expiration time |
| Content Delivery Policy | Transmission policy setting based on validity according to TTL expiration |
| Cache expiration time | Set expiration time of cached content |
| Detailed Policy | Ignore query string, Range request, Custom header usage setting |
Table. Caching Settings in Global CDN Network
Constraints
The constraints of Global CDN service are as follows.
| Category | Description |
|---|---|
| Maximum number of domains that can be created per Account | 20 |
Table. Global CDN constraints
Region-specific provision status
Global CDN is available in the following environments.
| Region | Availability |
|---|---|
| Korea West (kr-west1) | Provided |
| Korea East (kr-east1) | Provided |
| South Korea 1(kr-south1) | Not provided |
| South Korea 2(kr-south2) | Not provided |
| South Korea 3(kr-south3) | Not provided |
Table. Global CDN regional provision status
Preliminary Service
Global CDN service has no preceding service.
13.2 - How-to guides
The user can enter the essential information of the Global CDN service through the Samsung Cloud Platform Console and create the service by selecting detailed options.
Create Global CDN
You can create and use the Global CDN service in the Samsung Cloud Platform Console.
Reference
To use the Global CDN service, you must add allow rules to the Firewall and Security Group for the origin server.
To request the creation of a Global CDN service, follow the procedure below.
Click All Services > Networking > Global CDN menu. It moves to the Service Home page.
On the Service Home page, click the Create Global CDN button. It moves to the Create Global CDN page.
Global CDN Creation page, enter the information required for service creation and select detailed options.
Enter Service Information Enter or select the required information in the area.
Classification NecessityDetailed Description CDN Name Required Enter the name of the Global CDN to use - Cannot be used with the same name as the one currently in use
CDN Domain Required Enter the domain name of the Global CDN to use Table. Global CDN service information input itemsOriginal Settings area, please enter or select the required information.
Classification NecessityDetailed Description Original Location > Domain or IP Required Enter the location of the original server - Enter the domain name (recommended) or the public IP of the original server directly
Original Location > Protocol Required Select the protocol to use - Service protocol and original protocol must be set the same
Original Location > Port Number Required Enter one source port to use - Allowed source ports: 72, 80-89, 443, 488, 591, 777, 1080, 1088, 1111, 1443, 2080, 7001, 7070, 7612, 7777, 8000-9001, 9090, 9901-9908, 11080-11110, 12900-12949, 45002
Original Path Select Enter the directory path of the original file - Example: /aaa/bbb/ccc/
Forward host header required Set the Host header value to be passed to the user when requesting the original server from the Global CDN - Incoming host header: Service domain name
- Origin host name: Original domain name
- Custom Value: Enter the domain name directly in the standard domain format, such as www.abc.com
Cache key hostname required Global CDN Edge server cache key setting to identify content - Incoming host header: Use the domain that the user is accessing as the cache key
- Origin hostname: Use the configured origin domain as the cache key
Custom header (Request) Select When requesting from the Global CDN Edge server to the origin server, change a specific header - Select to use and enter Header name and Header value
- (+) button to add an item, and (X) button to delete
- Up to 10 items can be entered
Fig. Global CDN Source Setup Input Items
Reference- You can apply for multiple Global CDN services from one Account.
- In the Global CDN service, only one origin location can be set.
Caching Settings area, please enter or select the necessary information. It determines how to handle the Cache header passed to the Global CDN Edge server.
Classification NecessityDetailed Description Caching options Required Sets the caching policy applied to all content transmitted to the Global CDN Edge server (Honor origin cache-control and expires recommended) - Honor origin cache-control and expires: Follows both the origin’s cache-control and expiration policies
- Cache: Follows the Global CDN provider’s policy
- Honor origin expires: Follows the origin’s expiration time policy
- Honor origin cache-control: Follows the origin server’s cache control policy
Content Delivery Policy Required Global CDN Edge server verifies content validity with the origin server - Provide only valid content: Set to not send when TTL expires (recommended)
- Provide all cached content: Provide all cached content regardless of TTL expiration
Cache expiration time required Enter the time when the cached content expires on the Global CDN Edge - Enter within 3,600 – 2,592,000 seconds
Ignore query string Selection When applying the caching policy, set whether to use the query string - Ignore query string when enabled
Range request allowed Optional Provides large file optimization feature for objects over 100MB - Supports optimization up to a maximum of 1.8 GB
Custom header (Response) Select When requesting from the Global CDN Edge server to the origin server, change a specific Header - Select usage and enter Header name and Header value
- (+) button to add items, and (X) button to delete
- Up to 10 inputs are possible
Fig. Global CDN Caching Settings Input ItemsEnter Additional Information Enter or select the required information in the area.
Classification NecessityDetailed Description Tag Selection Add Tag - Up to 50 can be added per resource
- Click the Add Tag button and enter or select Key, Value
Table. Global CDN additional information input items
In the Summary panel, review the detailed information and estimated charge amount, and click the Complete button.
- Once creation is complete, check the created resource on the Global CDN list page.
Check Global CDN Details
The Global CDN service allows you to check and modify the entire resource list and detailed information. The Global CDN details page consists of detailed information, tags, and operation history tabs.
To check the Global CDN details, follow the next procedure.
Click All services > Networking > Global CDN menu. It moves to the Service Home page of Global CDN.
On the Service Home page, click the Global CDN menu. It moves to the Global CDN list page.
Global CDN List page, click on the resource to view detailed information. Move to the Global CDN Details page.
- Global CDN Details page displays the status information and detailed information of Global CDN, and consists of Details, Tags, Operation History tabs.
Classification Detailed Description Service Status Global CDN’s status - Creating: being created/when Global CDN starts
- Active: creation completed/operating, information can be modified
- Inactive/Pending: operation stopped
- Aborted: failed to activate after property creation
- Stopped/Stopping: operation suspended/operation suspension in progress
- Editing: settings being changed
- Starting: starting up
- Deleting: being cancelled
- Mismatching: when the versions of Console and Global CDN partner are different
- Error: error occurred
Start Service Start Button Stop Service Stop Button Purge Applied Button to Apply Purger Function Service Cancellation Button to cancel Global CDN Table. Status Information and Additional Functions
Detailed Information
On the Global CDN List page, you can check the detailed information of the selected resource and modify the information if necessary.
| Classification | Detailed Description |
|---|---|
| Service | Service Name |
| Resource Type | Service Name |
| SRN | Unique resource ID in Samsung Cloud Platform |
| Resource Name | Resource Title |
| Resource ID | Unique resource ID in the service |
| Creator | User who created the service |
| Creation Time | The time when the service was created |
| Modifier | User who modified the service information |
| Modified Time | Time when service information was modified |
| CDN Name | CDN Title |
| CDN Domain | CDN Domain Information |
| CDN Setting Version | Information about the settings (Property) applied to the Global CDN service
|
| Original Settings | Entered CDN original information
|
| Caching settings | You can check the details of caching options, content transmission policies, cache expiration time, ignore query strings, range request permissions, and custom header (response) records entered in the CDN description
|
Table. Global CDN detailed information items
Tag
On the Global CDN List page, you can check the tag information of the selected resource, and add, change, or delete it.
| Classification | Detailed Description |
|---|---|
| Tag List | Tag list
|
Fig. Global CDN Tags Tab Items
Work History
You can check the operation history of the resource selected on the Global CDN List page.
| Classification | Detailed Description |
|---|---|
| Work history list | Resource change history
|
Fig. Global CDN job history tab detailed information items
Global CDN Setting Change
You can change and apply the Global CDN service settings.
To change the Global CDN settings, follow these procedures.
- Click All Services > Networking > Global CDN menu. It moves to the Service Home page of Global CDN.
- Service Home page, click the Global CDN menu. It moves to the Global CDN list page.
- Global CDN List page, click on the resource to view detailed information. Move to the Global CDN Details page.
- Global CDN Details page, click the Edit button. Move to the Global CDN Edit page.
- On the Global CDN Edit page, modify the desired information and click Save. A modification notification window will appear.
- Click Confirm in the notification window. The service information modification will be completed.
Global CDN Operation Control
You can stop or restart the Global CDN service.
To control the operation of Global CDN, follow these procedures.
- 모든 서비스 > Networking > Global CDN menu should be clicked. It moves to the Service Home page of Global CDN.
- On the Service Home page, click the Global CDN menu. It moves to the Global CDN list page.
- Global CDN List page, click the resource to check the detailed information. It moves to the Global CDN Details page.
- Global CDN Details page, click the control button. The service runs or stops.
- Start: Runs the Global CDN service.
- 중지: Global CDN service operation is stopped.
Caution
Starting or stopping the service will take more than an hour to be applied globally.
- If the service is stopped, the service domain provision will be stopped. Please use the stop function with caution.
Apply Global CDN Purge
Purge is a feature that forcibly deletes cached content on the CDN Edge server. If the content is modified before the object expires, you can set it to update with new content by deleting the existing content from the CDN Edge using Purge.
Caution
- When Purge is applied, all contents stored in the CDN Edge are deleted, and content requests from the CDN Edge to the origin may occur simultaneously.
- When executing Purge, the number of requests to the original server may increase, causing a load. Be careful when applying Purge.
To apply Purge of Global CDN, follow the next procedure.
- Click All services > Networking > Global CDN menu. It moves to the Service Home page of Global CDN.
- Service Home page, click the Global CDN menu. Move to the Global CDN list page.
- Global CDN List page, click on the resource to check the detailed information. Move to the Global CDN Details page.
- Global CDN details page, click the Purge apply button. Purge apply popup window appears.
- Set the detailed items in the popup window and click Confirm. Purge will be applied.
- Content selection: Select the type of content to apply Purge.
- Path information input: If you select Entire Domain, the set domain information is displayed, and if you select Path Input, you can directly enter the path excluding the domain.
Cancel Global CDN
You can apply for cancellation of the Global CDN service on the Samsung Cloud Platform Console.
Caution
Global CDN can only cancel products in a paused state. To cancel a product, click the pause button to change the status first.
To request the cancellation of the Global CDN service, please follow the procedure below.
- 모든 서비스 > Networking > Global CDN menu should be clicked. It moves to the Service Home page of Global CDN.
- Service Home page, click the Global CDN menu. It moves to the Global CDN list page.
- Global CDN List page, click on the resource to check the detailed information. Move to the Global CDN Details page.
- Global CDN Details page, click the Cancel Service button.
- Once the cancellation is complete, please check the service cancellation status in the Global CDN list.
13.3 - API Reference
API Reference
13.4 - CLI Reference
CLI Reference
13.5 - Release Note
Global CDN
2025.07.01
NEW
Global CDN Service Official Version Release- Released Global CDN service that delivers static content stored in web servers or object storage to users faster and more securely through distributed edge servers in the global network.
14 - GSLB
14.1 - Overview
Service Overview
GSLB (Global Server Load Balancing) automatically distributes network traffic to an available adjacent region based on DNS when traffic increases in a specific global region. In the event of a failure on a specific server, the service can continue stably by load balancing network traffic to available new resources.
Features
- Stable Service Provision: Through the health check function, which checks the normal operation of connected resources, if a failure occurs in a specific server, the corresponding resource is immediately failed over and removed from the domain response, thereby diverting traffic to other resources to provide stable services.
- Service Port Easy Setup: You can easily create and manage GSLB and set up/service ports through the web-based console. For L4 unit load balancing, multiple port settings are possible (e.g., 80, 443, 8080-8090), and you can apply and manage multiple load balancing rules simultaneously.
- Efficient Cost Management: The cost is determined by the number of configured domains, the number of added Health Check resources, and the number of queries, so the billing method is applied in a granular manner, allowing for efficient cost management.
Service Composition Diagram
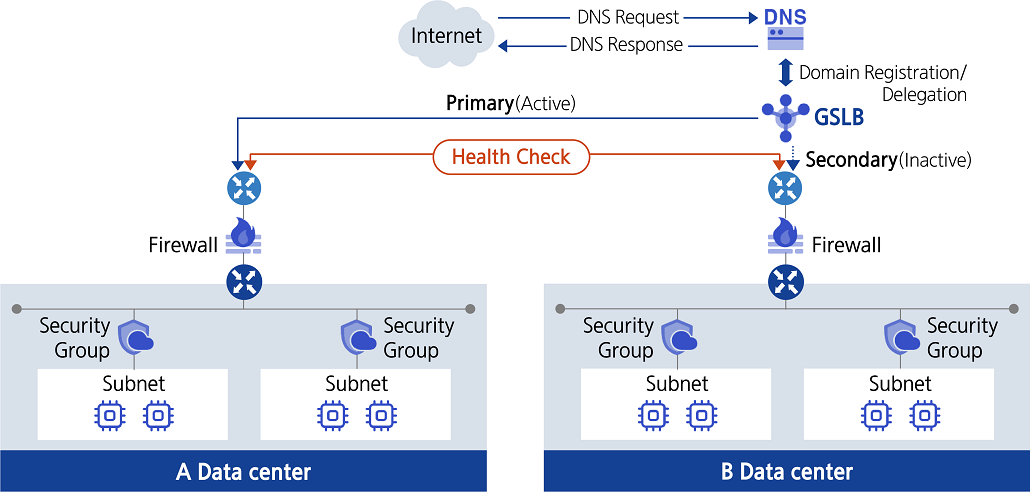
Provided Features
GSLB service provides the following features.
- GSLB Creation/Management: You can register multiple resources to a single GSLB.
- Distributed Algorithm Selection: Provides Ratio method, which distributes traffic in proportion to the weight of the connection target, and Round Robin method, which distributes traffic evenly in a circular manner.
- Health Check 설정: You can set the check cycle (Interval), service down detection time (Timeout), response wait time (Probe Timeout), protocol (ICMP, TCP, HTTP, HTTPS), and service port.
Constraints
The constraints of the GSLB service are as follows.
| Division | Description |
|---|---|
| Maximum number of domains that can be created per Account | 20 |
| Maximum connectable resources per domain | 8 |
Table. GSLB Restrictions
Note
- For GSLB to monitor the connection target, an allow rule must be added to the Firewall and Security Group of the connection target resource.
Regional Provision Status
GSLB service can be provided in the following environment.
| Region | Availability |
|---|---|
| Western Korea(kr-west1) | Provided |
| Korean East(kr-east1) | Provided |
| South Korea 1(kr-south1) | Not provided |
| South Korea southern region 2(kr-south2) | Not provided |
| South Korea southern region 3(kr-south3) | Not provided |
Table. GSLB Region-Based Provision Status
Preceding Service
The GSLB service has no preceding service.
14.2 - How-to guides
The user can enter required information for the GSLB service through the Samsung Cloud Platform Console, select detailed options, and create the service.
GSLB Create
You can create and use GSLB services from the Samsung Cloud Platform Console.
To request GSLB service creation, follow the steps below.
- All Services > Networking > GSLB 메뉴를 클릭하세요. Service Home 페이지로 이동합니다.
- Click the Create GSLB button on the Service Home page. You will be taken to the Create GSLB page.
- Create GSLB page, enter the information required to create the service, and select detailed options.
- Service Information Input area, input or select the required information.
Category RequiredDetailed description Purpose Required Automatically input PUBLIC when creating GSLB Domain Name Required Enter the GSLB domain name to use - Enter using lowercase English letters and numbers, within 4-40 characters
- Cannot be the same as an existing name in use
Add Connection Target > IP Required Enter connection target IP address Add Connection Target > Location Required Select the location to perform monitoring of the connection target - Recommended to specify a location close to the IP server
Add connection target > Description Optional Enter additional information or description about the connection target Add Connection Target > Connection Target List Required Display added connection target IP, location, description items - After entering connection target IP, location, description, click the Add button to add the item
- Up to 8 connection targets can be added to a single GSLB service
- Click x to delete the item from the list, click the Delete All button to delete all items in the list
Table. GSLB Service Information Input Items - Connection Target Monitoring Settings area, please enter or select the required information.
Category Required or notDetailed description Health Check Required Select the protocol type for health check - Options: ICMP, TCP, HTTP, HTTPS (HTTPS is recommended for security)
Interval Required Enter the time interval (seconds) for performing health checks Timeout Required Enter the waiting time (seconds) to determine the server status (UP or DOWN) during health check Probe Timeout Required Enter response wait time (seconds) - Enter the domain name (recommended) or the public IP of the origin server directly
Service Port Required Enter the port to be used for health check when using TCP/HTTP/HTTPS protocol - Enter the domain name (recommended) or the public IP of the origin server directly
User Name Select Enter the user name to use when authentication is required for health check communication when using HTTP/HTTPS protocol Password Select Enter the password to use when authentication is required for health check communication when using HTTP/HTTPS protocol - Enter 8-20 characters, including letters, numbers, and special characters (@$!%*#?&)
Send String Select When using HTTP/HTTPS protocol, enter the string to be sent when checking a specific webpage - Example) GET /www/example/index.html
- For HTTP 1.0/1.1, line breaks should be entered as /r/n, and special characters (<, >, #) cannot be used in the string
Receive String Required Enter the string to be received as a health check response when using HTTP/HTTPS protocol - Only English letters (uppercase and lowercase) and numbers are allowed in the string
Table. GSLB connection target monitoring setting input items - In the Load Balancing Policy Configuration area, enter or select the required information.
Category RequiredDetailed description Algorithm Required Select load balancing method - Ratio: Distribute traffic proportionally to the weight of each connection target (Weight)
- Round robin: Distribute traffic evenly based on a cyclic method
Connection Target Required When Ratio is selected, input Weight for each connection target - Weight is the weighting applied to the connection target when distributing service requests, entered within 0-100
- Click the detail view icon of the description item to view connection target information
Table. GSLB load balancing policy input items - Additional Information Input Enter or select the required information in the area.
Category Required statusDetailed description Description Select Enter additional information or description about the GSLB service Tag Select Add Tag - Up to 50 can be added per resource
- After clicking the Add Tag button, enter or select Key, Value values
Table. GSLB Additional Information Input Items
- Service Information Input area, input or select the required information.
- Check the creation history and click the Complete button.
- When creation is complete, check the created resources on the GSLB List page.
Reference
In order for GSLB to monitor the connection target, you must add allow rules to the Firewall and Security Group.
GSLB Check detailed information
GSLB service can view and edit the full resource list and detailed information. GSLB Detail page consists of Detail Information, Connection Targets, Tags, Operation History tabs.
To view detailed GSLB information, follow the steps below.
- All Services > Networking > GSLB Click the menu. Navigate to the GSLB’s Service Home page.
- Click the GSLB menu on the Service Home page. Navigate to the GSLB List page.
- Click the resource to view detailed information on the GSLB List page. It will navigate to the GSLB Details page.
- GSLB Detail page displays GSLB’s status information and detailed information, and consists of Detail Information, Connection Targets, Tags, Operation History tabs.
Category Detailed description Service Status GSLB Status - Creating: Creating
- Active: Running
- Editing: Editing
- Deleting: Deleting
- Error: Error occurred
Service termination Button to cancel GSLB Table. Status Information and Additional Functions
- GSLB Detail page displays GSLB’s status information and detailed information, and consists of Detail Information, Connection Targets, Tags, Operation History tabs.
Detailed Information
On the GSLB List page, you can view detailed information of the selected resource and, if necessary, edit the information.
| Category | Detailed description |
|---|---|
| service | service name |
| Resource Type | Resource Type |
| SRN | Unique resource ID in Samsung Cloud Platform |
| Resource Name | Resource Name |
| Resource ID | Unique resource ID in the service |
| Creator | User who created the service |
| Creation time | Date/time the service was created |
| Editor | User who modified the service information |
| Modification Date/Time | Date/Time when service information was modified |
| Domain Name | GSLB domain information |
| Purpose | GSLB Purpose |
| Algorithm | Configured GSLB algorithm information
|
| Health Check | Configured GSLB health check information
|
| Description | Entered GSLB description
|
Table. GSLB detailed information items
Connection Target
GSLB List page allows you to view the connection target information of the selected resource and, if necessary, edit the information.
| Category | Detailed description |
|---|---|
| IP | Target IP address |
| Resource ID | GSLB Resource ID |
| Location | Location to perform monitoring of the connection target |
| Description | Enter additional information or description about the connection target
|
| Usage status | Display usage status of connection target |
| Weight | Display of the connected target’s Weight |
| Connection Status | Connection Status Display
|
| Edit Connection Target | Add Connection Target and Edit Information
|
Table. GSLB connection target items
Tag
GSLB List page allows you to view the tag information of the selected resource, and you can add, modify, or delete it.
| Category | Detailed description |
|---|---|
| Tag List | Tag List
|
Table. GSLB Tag Tab Items
Work History
You can view the operation history of the selected resource on the GSLB List page.
| Category | Detailed description |
|---|---|
| Work History List | Resource Change History
|
Table. GSLB operation history tab detailed information items
Edit connection target information
You can add, modify, or delete GSLB connection target information.
To change the GSLB connection target information, follow the steps below.
- All Services > Networking > GSLB Click the menu. Go to the GSLB Service Home page.
- Click the GSLB menu on the Service Home page. Go to the GSLB list page.
- GSLB list Click the resource to view detailed information on the page. GSLB details Navigate to the page.
- GSLB Details page, click the Connection Target tab. Connection Target tab page will be displayed.
- Connection Target tab page, click the Edit Connection Target button. Edit Connection Target page will be opened.
- Edit Connection Target page, edit the desired information.
- Add: Enter the target IP, select the location, enter a description, and click the Add button to add an item.
- Delete: To delete the linked target item, click the Delete button.
- Click Save when editing is complete. An edit notification window will appear.
- Click Confirm in the alert window. Service information modification is completed.
Note
- You can add up to 8 connection targets to a single GSLB service.
- It is recommended to set the location item to a location close to the target server when adding a connection target.
Regional Routing Controller Setup
You can view the Regional Routing Controller and change its usage status.
To change the usage status of the Regional Routing Controller, follow the steps below.
All Services > Networking > GSLB Click the menu. Navigate to the GSLB Service Home page.
Click the Regional Routing Controller menu on the Service Home page. Navigate to the Regional Routing Controller list page.
Query the resource to view detailed information on the Regional Routing Controller List page.
- Detailed Search button, click to select domain, connection location, and usage status for searching.
Regional Routing Controller List on the page, check the resource information and change the usage status.
Category Detailed description Domain Name Registered Domain Name - Click the domain name to go to the GSLB Details > Connection Target tab page
Purpose Domain purpose Connection location Location to perform monitoring of the connection target Connection target by location Number of connection targets by location Usage status Displays the connection target usage setting status, you can change the usage status by clicking the more button - Use: Connection target enabled
- Stop: Connection target disabled
- You can also set usage by selecting a domain from the list and choosing Use or Stop at the top
Table. Regional Routing Controller ListClick Confirm in the alert window. The domain usage status change is complete.
GSLB Cancel
You can apply for a GSLB service hatch in the Samsung Cloud Platform Console.
To request termination of the GSLB service, follow the steps below.
- All Services > Networking > GSLB Click the menu. Navigate to the GSLB’s Service Home page.
- Click the GSLB menu on the Service Home page. Go to the GSLB list page.
- Click the resource to view detailed information on the GSLB List page. It moves to the GSLB Details page.
- GSLB Detail page, click the Cancel Service button.
- Once the termination is complete, check the service termination status in the GSLB list.
14.3 - API Reference
API Reference
14.4 - CLI Reference
CLI Reference
14.5 - Release Note
GSLB
2025.12.16
FEATURE
Regional Routing Controller Service Addition- You can control the usage of traffic you want to connect through GSLB by region.
2025.07.01
NEW
GSLB Service Official Version Release- We have launched a GSLB service that can automatically distribute network traffic to neighboring regions based on DNS, providing stable service when traffic increases in a specific global region.
15 - Cloud Virtual Circuit
Global Samsung Cloud Platform provides a 1:1 virtual circuit service based on the line bandwidth between regions or customer bases.
15.1 - Overview
Service Overview
becomes Cloud Virtual Circuit service is a service that provides a 1:1 virtual circuit based on circuit bandwidth between global Samsung Cloud Platform regions or customer bases.
Key Features
Cloud Virtual Circuit provides the following functions and features.
- Mesh-type one-to-one connection: The Samsung Cloud Platform infrastructure is connected between all global regions, so you can use one-to-one virtual circuit services from anywhere to anywhere.
- Non-contract short-term line service: Unlike existing network line services, it provides a non-contract rate system, allowing for cost-effective use when short-term line service is needed.
- Special feature provision: It provides a special feature that can divide a single virtual circuit into multiple logical circuits for different purposes and use them.
Service Composition Diagram
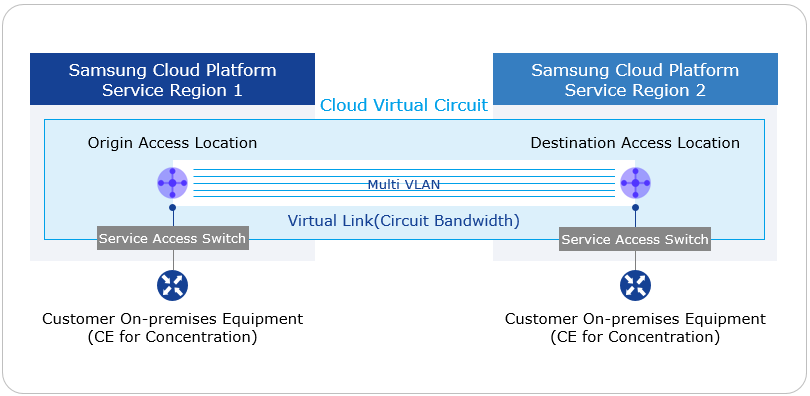
Provided Function
Cloud Virtual Circuit service provides the following functions.
- Korean and global service provision
- Korea: Suwon, Sangam, Chuncheon, Gumi, Nonhyeon
- Global: New Jersey, San Jose, Sao Paulo, London, Frankfurt, Hong Kong, Singapore, Delhi, Dubai, Tokyo
- Global region-to-region one-to-one virtual circuit service (based on L2VPN) provided
- You can select departure and destination access locations in all service areas.
- A single cloud virtual circuit consists of up to two virtual links for redundancy.
- Provided circuit bandwidth: * 10, 20, 50, 100, 200, 300, 400, 500, 600, 700, 800, 900 Mbps * 1, 2, 3, 4, 5, 6, 7, 8, 9, 10 Gbps
Reference
The maximum circuit bandwidth within the country is 10 Gbps, and the maximum circuit bandwidth between Korea-Global and Global-Global is 1 Gbps.
- Logical circuit separation function (Multi VLAN): Up to 5 individual VLANs can be used with a single cloud virtual circuit.
Components
Cloud Virtual Circuit provides a 1:1 virtual backbone line between global bases. The components are as follows, and you can create resources with related self-service through the user Console.
| Division | Content |
|---|---|
| Cloud Virtual Circuit | virtual resource that accommodates up to two Virtual Links for the same 1:1 point |
| Starting Point Access Location | 1:1 virtual circuit starting point Access Location information |
| Destination Access Location | 1:1 virtual circuit’s destination Access Location information |
| Multi VLAN | a function that separates one Virtual Link into multiple logical lines and provides them |
| Virtual Link | Cloud Virtual Circuit with virtual circuit based on dedicated line bandwidth (line bandwidth, contract period, transmission path level option selection) |
| CE equipment | network equipment that receives a dedicated line for the customer’s business site (Customer Edge) |
Fig. Cloud Virtual Circuit Components
Limitations
Cloud Virtual Circuit has the following restrictions.
- For one Cloud Virtual Circuit, you can create up to 2 Virtual Links.
- Multi VLAN feature can create up to 5 per one Cloud Virtual Circuit.
Regional provision status
Cloud Virtual Circuit service is available in the following environment.
| Region | Availability |
|---|---|
| Korea West 1(kr-west1) | Provided |
| Korea East 1 (kr-east1) | Not Provided |
| South Korea 1(kr-south1) | Not provided |
| South Korea 2(kr-south2) | Not provided |
| Korea South 3(kr-south3) | Not Provided |
Table. Cloud Virtual Circuit Service Availability by Region
Preceding service
There are no services that must be pre-configured before creating this service.
15.2 - How-to guides
The user can apply for the Cloud Virtual Circuit service through the service request of the Samsung Cloud Platform Console.
Cloud Virtual Circuit application
You can apply for Cloud Virtual Circuit through the Support Center of the Samsung Cloud Platform Console.
To apply for Cloud Virtual Circuit, follow the following procedure.
All services > Networking > Cloud Virtual Circuit menu is clicked. It moves to the Service Home page of Cloud Virtual Circuit.
Service Home page, click the Cloud Virtual Circuit service request button. It moves to the Service Request page of the Support Center.
Cloud Virtual Circuit application requires information to be selected and entered.
Classification NecessityDetailed Description title required title for service request - use Hangul, English, numbers, special characters (
+=,.@-_) to enter within 64 characters
Region Required Select the region to request the service Service Required Networking service group’s Cloud Virtual Circuit service selection job classification required Cloud Virtual Circuit new application selection Content Required Information input for Cloud Virtual Circuit application Table. Cloud Virtual Circuit Service Request Items- use Hangul, English, numbers, special characters (
Check the input information and click the request button.
Guidance
- After requesting the service, you cannot modify or delete the written content.
- After requesting a service, you can check the details of the request on the Service Request List page of the Support Center. Please refer to Checking Service Request Details for more information.
Cloud Virtual Circuit cancellation
You can request to cancel the Cloud Virtual Circuit in the Support Center of the Samsung Cloud Platform Console.
To apply for Cloud Virtual Circuit, follow the following procedure.
All services > Management > Support Center menu should be clicked. It moves to the Service Home page.
Service Home page, click the Cloud Virtual Circuit service request menu. It moves to the service request page.
Cloud Virtual Circuit cancellation requires information to be selected and entered.
Classification NecessityDetailed Description title required title for service request - use hangul, english, numbers, special characters (
+=,.@-_) to input within 64 characters
Region Required Select the region to request service cancellation Service Required Networking service group’s Cloud Virtual Circuit service selection job classification required Cloud Virtual Circuit cancellation application optional Content Required Information input for Cloud Virtual Circuit cancellation application Table. Cloud Virtual Circuit service cancellation request items- use hangul, english, numbers, special characters (
Check the input information and click the request button.
Guidance
- After requesting the service, you cannot modify or delete the written content.
- After requesting a service, you can check the details of the request on the Service Request List page in the Support Center. Please refer to Checking Service Request Details for more information.
15.3 - Release Note
Cloud Virtual Circuit
2025.09.08
NEW
Cloud Virtual Circuit Service Official Version Release- Cloud Virtual Circuit service has been officially launched.
- The user can apply for a 1:1 virtual circuit based on the line bandwidth between the Global Samsung Cloud Platform region or the customer’s hub.
16 - Private 5G Cloud
16.1 - Overview
Service Overview
Private 5G Cloud is a service based on the Samsung Cloud Platform that provides Private 5G Core, Edge solutions for enterprise customers. By utilizing the cloud, it minimizes the construction of physical 5G network equipment, allowing for the creation of a flexible and expandable network environment optimized for the customer’s private environment, and easily connecting multiple geographically dispersed locations.
It provides an enterprise-dedicated 5G Core in a cloud environment, guarantees service availability with stable operation, and enables real-time processing of large amounts of data within the enterprise and secure protection of important data through Edge solutions.
Features
- Stable Operation: Private 5G Cloud provides a combination of verified 5G Core quality and stability, and cloud security policies. Additionally, it offers 24-hour monitoring services by 5G professional operation personnel. This enables regular system diagnostics and prompt action in case of failures, allowing for stable service operation.
- Efficient cost management: By configuring a Private 5G network on the Samsung Cloud Platform, you can reduce the initial investment cost for building a 5G system and minimize operating costs. Fast and secure cloud-based Private 5G network configuration is possible, as well as flexible operation and capacity expansion.
- Private Edge solution provision: Provides application management and Edge Computing services based on Kubernetes applying 3GPP MEC standards. It configures the Edge Computing service environment within the customer’s company, enabling ultra-low latency data transmission, and since all data and services are located within the customer’s company, it can safely protect the company’s valuable information.
- Various linkage functions: Various solutions and software verified in Private 5G Open Lab can be used in the marketplace. Customers can introduce new technologies such as AI, machine learning, and big data by utilizing already configured development environments and related ecosystems, and customized solution use is possible.
Service Composition Diagram
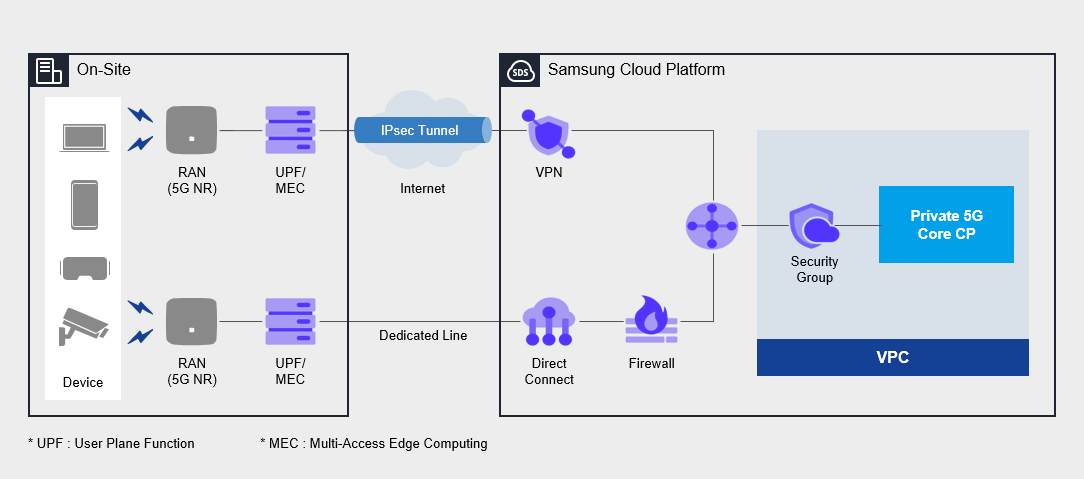
Provided Function
Private 5G Cloud provides the following functions.
- Private 5G Cloud Core: cloud-based 5G wireless network and authentication service provision
- Private 5G Core CP: cloud area where customer-specific 5G signal control processing
- UPF: handling data of unique services for each customer in the customer’s business area
- 5G Network: Cloud and customer premises dedicated network service processing between customers (VPN/Dedicated Line)
Components
Private 5G Cloud provides services across the entire 5G network within the customer’s business site, and the components are as follows.
5G Core network
- User authentication, session management, data processing
- Customer terminal registration/deletion/modification/management
Service Portal
- 5G integrated service portal provision
- User Portal: User Policy Creation/Change/Management
- Administrator Portal: Authentication Policy Management and Monitoring
Network Solution
VPN, dedicated lines, etc. cloud network solution configuration
Regional Provision Status
Private 5G Cloud can be provided in the following environments.
| Region | Availability |
|---|---|
| Korea West 1(kr-west1) | Provided |
| Korean East 1 (kr-east1) | provided |
| South Korea 1(kr-south1) | Provided |
| South Korea 2(kr-south2) | Provided |
| South Korea South 3 | provided |
Table. Private 5G Cloud Provision Status by Region
Preceding service
This is a list of services that must be pre-configured before creating the service. Please refer to the guide provided for each service and prepare in advance for more detailed information.
| Service Category | Service | Detailed Description |
|---|---|---|
| Compute | Virtual Server | virtual server optimized for cloud computing |
| Networking | VPC | a service that provides an independent virtual network in a cloud environment |
| Networking | Security Group | a virtual firewall that controls the server’s traffic |
| Networking | Direct Connect | A service that securely and quickly connects the customer network and Samsung Cloud Platform |
| Networking | Firewall | A service that provides a firewall for traffic connecting VPC and the internet, customer network |
| Networking | VPN | A service that connects the customer network and Samsung Cloud Platform through an encrypted virtual private network
|
Table. Private 5G Cloud Preceding Service
16.2 - How-to guides
The user can enter the essential information of the Private 5G Cloud service and select detailed options to create the service through the Samsung Cloud Platform Console.
Private 5G Cloud creation
You can create and use the Private 5G Cloud service on the Samsung Cloud Platform Console.
To create a Private 5G Cloud, follow the next procedure.
- All services > Networking > Private 5G Cloud menu is clicked. It moves to the Service Home page of Private 5G Cloud.
- Service Home page, click the Private 5G Cloud service request button. It moves to the service request page.
- Service Request 페이지에서 Private 5G Cloud에 대한 필수 정보를 선택하거나 입력하세요. -> 3. Service Request page, select or enter the essential information for Private 5G Cloud.NoticeIn the job classification, select and create Private 5G Cloud service creation.
| Input Item | Detailed Description |
|---|---|
| Title | Title of the service you want to request |
| Region | Location selection of Samsung Cloud Platform
|
| Service | Select the service group and service of the corresponding service
|
| Task classification | Select the task you want to perform
|
| Content | Private 5G Cloud creation requires detailed information input [Basic Information]
[Application Information]
|
| Attachment | Only upload when you have additional files to share
|
Table. Detailed contents of private 5G cloud service creation request items
- Check the entered creation information, and click the request button.
- Once creation is complete, check the Service Request List page to see if the resource has been created.
- This creation work proceeds with procedures such as purchasing physical servers, delivery, configuration work, and site construction, and takes at least 8 weeks or more based on business days.
Private 5G Cloud application history check
You can check the application and cancellation details of the Private 5G Cloud service on the Samsung Cloud Platform Console.
Reference
Private 5G Cloud’s service application and cancellation request details can be checked through the following procedure.
To check the application history of Private 5G Cloud service, follow the next procedure.
- All services > Management > Support Center menu, click. Support Center > Service Home page will be moved.
- Support Center Service Home page, click the Service Request menu. It moves to the Service Request List page.
- Service Request List page, click the title of the service request you applied for. It moves to the Service Request Details page.
- Service Request Details page where you can check the application status and information.
Notice
When a service request is received, the sales/operations manager checks the service application details and proceeds with the Private 5G Cloud service based on the entered information.
Private 5G Cloud Cancellation
You can cancel the Private 5G Cloud service whose contract period has expired to reduce operating costs.
Reference
- If the service is canceled, the service in operation may be stopped immediately, so the cancellation work must be proceeded after fully considering the impact that occurs when the service is stopped.
- To apply for service cancellation before the contract period expires, the user’s contract manager and SamsungSDS contract manager must complete the cancellation of the corresponding Private 5G Cloud contract through prior consultation before cancellation, and then proceed with the cancellation according to the following procedure.
To cancel Private 5G Cloud, follow the following procedure.
- All services > Networking > Private 5G Cloud menu is clicked. It moves to the Service Home page of Private 5G Cloud.
- Service Home page, click the Private 5G Cloud service request button. It moves to the service request page.
- Service Request 페이지에서 Private 5G Cloud에 대한 필수 정보를 선택하거나 입력하세요. -> 3. Service Request page, select or enter the required information for Private 5G Cloud.Notice작업 구분에서 Private 5G Cloud 서비스 해지를 선택해 해지하세요. -> In the job classification, select Private 5G Cloud service cancellation to cancel.
| Input Item | Detailed Description |
|---|---|
| title | title of the service you want to request |
| Region | Location selection of Samsung Cloud Platform
|
| Service | Select the service group and service for the corresponding service
|
| Task Classification | Select the task you want to perform
|
| Content | Private 5G Cloud cancellation requires detailed information input [Basic Information]
|
| Attachment file | Only upload when you have a file you want to share additionally
|
Table. Private 5G Cloud service cancellation request item detailed content
- Check the entered creation information, and click the request button.
- When the cancellation is complete, Service Request List page should be checked to see if the resource has been cancelled.
- The cancellation process is completed after returning the physical server, so it takes at least 3-4 weeks based on business days.