This is the multi-page printable view of this section. Click here to print.
Organization
1 - Overview
Service Overview
Organization is a service that organizes Accounts by organizational units, manages them hierarchically, and controls resource access permissions. Users can manage the resource usage of accounts belonging to an organization to optimize costs.
Features
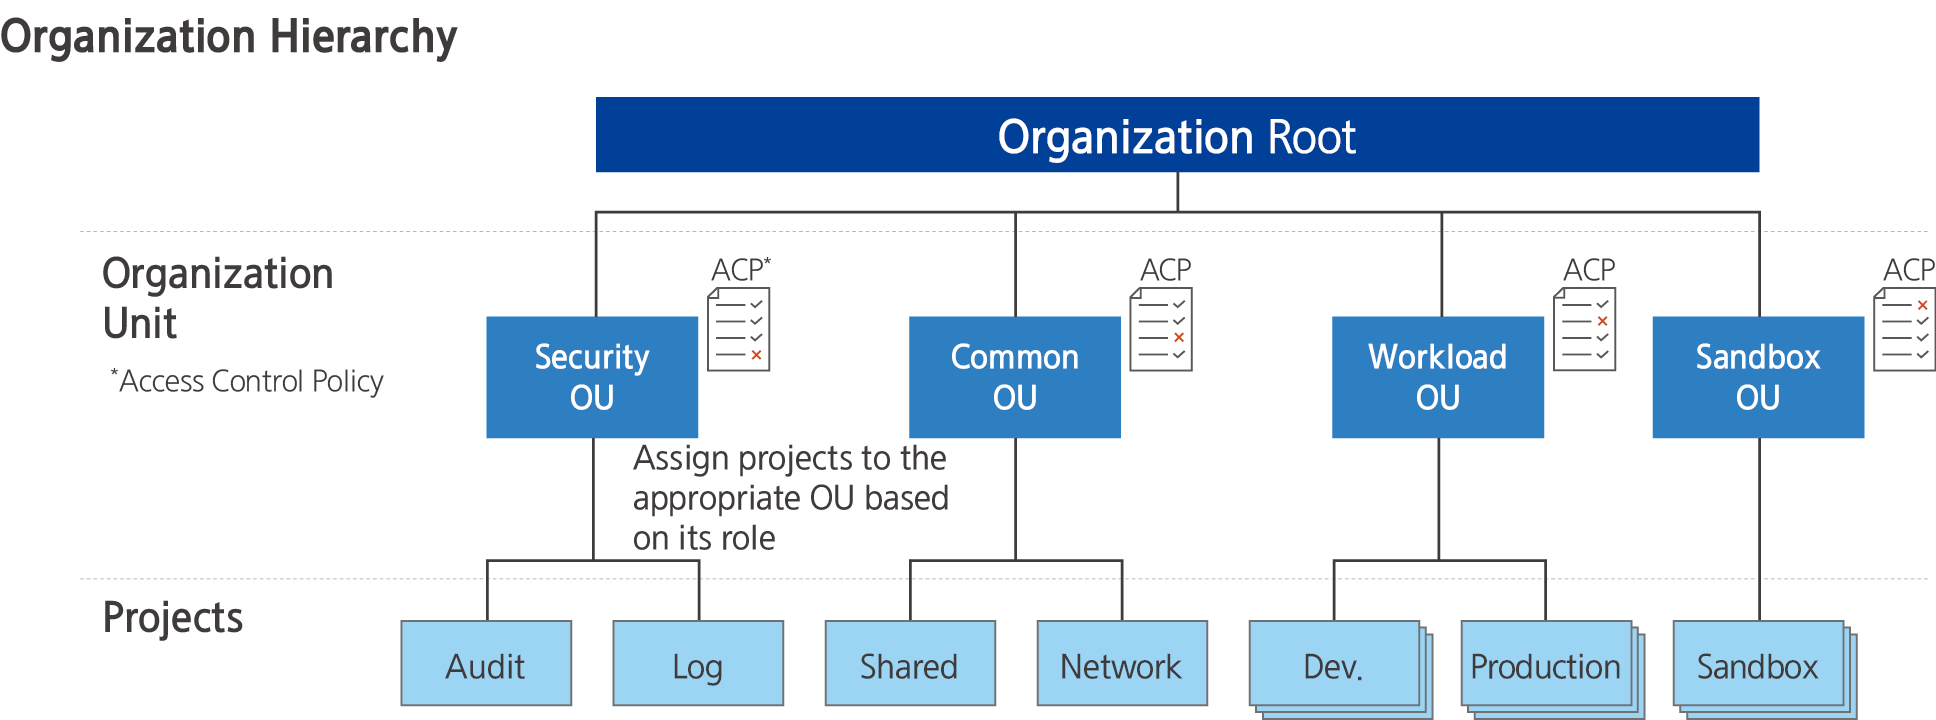
- Hierarchical Project Management: You can invite an Account created within the organization to an Organization and configure it by organizational units for hierarchical management.
- Organizational Unit Governance: You can configure the required policies as control policies based on the organizational unit and apply them uniformly to all organizational units and Accounts under the organization.
- Efficient resource management and cost optimization: You can monitor the resource usage of all accounts within the organization to optimize costs.
Configuration diagram
Provided features
Organization provides the following features.
- Account Management: You can create a new Account within the organization or invite an existing Account to manage.
- Organizational Unit Management: You can configure organizational units and manage them by creating subordinate organizational units or Accounts.
- Control Policy Management: Manage settings related to compliance as unified policies, and apply policies by organizational unit and by Account to proactively prevent or detect regulatory violations.
Preceding Service
Organization has no prior service.
2 - How-to guides
Users can enter the required information for an Organization and select detailed options to create a service through the Samsung Cloud Platform Console.
Create Organization
You can create an Organization in the Samsung Cloud Platform Console and use it. To create an Organization, follow these steps.
- Click the All Services > Management > Organization menu. Navigate to the Service Home page of Organization.
- On the Service Home page, click the Create Organization button. The Create Organization popup will open.
- Create Organization In the popup window, enter the Organization Name, then click the Create button.
- Write within 20 characters using Korean, English, numbers, spaces, and special characters (
+=,.@-_).
- Write within 20 characters using Korean, English, numbers, spaces, and special characters (
- When the popup notifying the creation of an Organization opens, click the Confirm button.
- Check the Organization’s dashboard on the Service Home page.
Category Detailed description Organization Information Display Management Account information - Click the Organization Information item to go to the Settings page where you can view detailed organization information
organizational unit Number of organizational units that make up the organization - Click the count to go to the Organization Structure page
Account Number of Accounts comprising the organization - Click the count to go to the Organization Structure page
- Click the Add item to go to the Add Account page
- For more details, see Add Account reference
Control Policy Number of control policies constituting the organization - Click the count to go to the Control Policy page
- Click the Add item to go to the Add Control Policy page
- For more details, refer to Create Control Policy
Table. Organization Service Home dashboard items
Organization Check detailed information
You can view detailed information of the Organization and manage permissions. To view detailed information of the Organization and manage permissions, follow these steps.
- Click the All Services > Management > Organization menu. Navigate to the Service Home page of Organization.
- On the Service Home page, click the Organization Settings menu. You will be taken to the Organization Settings page.
Category Detailed description Delete organization Delete organization button Organization name Organization name - Click the Edit button to modify
- Organization names distinguish between uppercase and lowercase English letters
Organization ID Organization ID constructor Name of the user who initially created the organization Creation date and time Organization creation date and time Editor Name of the user who last modified the organization information Modification date and time Last modified timestamp of organization information Management Account name Management Account name Management Account ID Management Account ID Management Account email Management Account email Control Policy Whether the control policy is enabled - Click the Edit button to change the status
- For more details, see Control Policy
Delegation of authority Organization Management Permission Delegation Information - Permission Delegation: Allows delegating permissions to accounts within the organization
- Displayed when no delegation information is available
- When the button is clicked, you can configure delegation at the Action level using the JSON Editor on the Permission Delegation page
- Permission Edit: Modify permission information
- Only the Management Account can be set
- When the button is clicked, you can configure delegation at the Action level using the JSON Editor on the Permission Delegation page
- Revoke Delegation: Delete delegated permission information
Table. Organization configuration items
- If Control policy is disabled, the connection to the associated control policy is removed, and even authorized users cannot view the control policy.
- Permission Delegation information can only be managed in the Management Account.
Invite Account to Organization
You can manage the list of Accounts invited to the Organization.
Click the All Services > Management > Organization menu. Go to the Service Home page of Organization.
On the Service Home page, click the Invitation History menu. You will be taken to the Invitation History List page.
On the Invitation History List page, click the Account Invite button. Proceed to the Account Add page.
Category Detailed description email Account email Account name Account name Account ID Account ID Request date and time Account invitation date and time Completion Date and Time Invitation canceled, rejected, , expired, completion time Invitation status Invitation status Invitation canceled Cancel the invitation for the selected account - Enabled when selecting an account in the invitation list
- Multiple accounts can be canceled simultaneously
Account invitation Invite a new Account to the organization - When clicking the Account Invite button, navigate to the Add Account page
Table. Organization invitation list itemsOn the Add Account page, create and register a new Account, or add an existing Account.
- For detailed information about adding an Account, see Account 추가하기.
Join another Organization
If you are invited from another organization, you can review and approve the invitation information.
- Click the All Services > Management > Organization menu. Navigate to the Service Home page of Organization.
- On the Service Home page, click the Received Invitations menu. You will be taken to the Received Invitations page.
Category Detailed description Invitation email Email information for organization invitation Organization name Organization name Organization ID Organization ID Management Account name Management Account name Management Account ID Management Account ID Management Account email Management Account email Invitation expiration date and time Invitation expiration date and time - Activated when selecting an account from the invitation list
- Multiple accounts can be canceled simultaneously
Invitation declined Decline invitation Accept invitation Accept the invitation and join the Organization Table. Organization Received Invitation Items
In the following cases, you cannot register even if you approve the invitation.
- When the number of accounts in the organization exceeds the limit.
- When the approval time is the expense settlement date (the 1st of each month, Asia/Seoul GMT +09:00)
- If the account has an outstanding balance.
Delete Organization
To delete the Organization, follow these steps.
- Click the All Services > Management > Organization menu. Go to the Service Home page of Organization.
- On the Service Home page, click the Organization Settings menu. You will be taken to the Organization Settings page.
- On the Organization Settings page, click the Delete Organization button. The Delete Organization popup window opens.
- Delete Organization in the popup, click the Confirm button.
2.1 - Organization Configuration Information
You can view the hierarchical structure of the Organization and verify and manage the organizational units and Accounts that are configured.
Check organization configuration information
You can view the configuration information of the Organization. Follow these steps to view the configuration information of the Organization.
- Click the All Services > Management > Organization menu. Navigate to the Service Home page of Organization.
- On the Service Home page, click the Organizational Structure menu. You will be taken to the Organizational Structure page.
- Select the view mode for the Organization unit and Account management area.
Category Detailed description View hierarchy Display organizational units in a hierarchical structure View Account List Display the list of Accounts within the organization Add Account Invite a new Account to the organization - When the Account Invite button is clicked, navigate to the Add Account page
- For more details, see Add Account
Table. Organization Organizational structure items
View hierarchy
On the Organization Configuration page, when you click the View Hierarchy button, you can view and manage the organizational units and Accounts that make up the Organization in a hierarchical structure.
| Category | Detailed description |
|---|---|
| Create a sub-organization unit | Add a new organizational unit under the selected organizational unit
|
| More > Delete organizational unit | Delete the selected organizational unit
|
| More > Move Account | Delete the selected organizational unit
|
| More > Exclude Account | Exclude the selected Account from the organization
|
| More > Delete Account | Delete the selected Account
|
| Organization unit/Account name | Display the names of organizational units and Accounts in a measurement structure format
|
| ID/Email | Organizational units display ID, and accounts display ID and email. |
| Creation/Join Date and Time | Organizational units display the creation date and time, while Accounts display the creation or registration date and time. |
View Account List
On the Organization Configuration page, clicking the View Account List button lets you view and manage the list of Accounts that compose the Organization.
| Category | Detailed description |
|---|---|
| Account Transfer | Move Account to another organization
|
| More > Exclude from organization | Exclude Account from organization
|
| Account name | Account name |
| Account ID | Account ID |
| Account user email | |
| Additional date/time | Account creation, addition timestamp |
| Additional type | Account addition method
|
Manage Account
You can view and manage the list of Accounts that make up the Organization.
Add Account
You can create a new Account or add an existing Account to an Organization. To add an Account to an Organization, follow these steps.
Click the All Services > Management > Organization menu. Navigate to the Service Home page of Organization.
On the Service Home page, click the Organizational Structure menu. You will be taken to the Organizational Structure page.
On the Organization Structure page, click the Add Account button. You will be taken to the Add Account page.
On the Add Account page, enter the Account information to be added, then click the Complete button.
Category Required statusDetailed description Additional method Required Select the method to add an Account - Create New Account: Add by creating a new Account
- Invite Existing Account: Add by entering the Root user email of an already created Account
Account name Required Enter the Account name to create - using Korean, English, numbers, spaces, special characters(
+=-_@[](),.) within 3 to 30 characters
email Required Email to set as the Root user of the new Account - When clicking the Account Invite button, navigate to the Account Add page
Check email Required Reconfirm email information - When you click the Organization Info button, you are taken to the Settings page where you can view detailed organization information.
IAM role name Required Display organizational units in a hierarchical structure - English letters, numbers, special characters(
+=-_@,.) to input within 64 characters
Root user email Required Account’s Root user email - If Existing Account invitation is selected, only Root user email is entered
- Click the Add button to add up to 10 simultaneously
Table. Add Organization AccountWhen the popup notifying account creation and invitation opens, click the Confirm button.
- You can add up to 200 accounts.
- The newly created Account can be accessed by logging in directly with email or through an automatically generated role.
- When logging in directly with email, you must use the password recovery feature to reset your password.
Check Account Detailed Information
You can view and edit the detailed information of the Account. To view the detailed information of the Account, follow these steps.
- Click the All Services > Management > Organization menu. Navigate to the Service Home page of Organization.
- On the Service Home page, click the Organization Configuration menu. You will be taken to the Organization Configuration page.
- On the Organization Structure page, click the View Account List button.
- In the Account list, click the Account name of the Account whose details you want to view. You will be taken to the Account Details page.
- Account Details page consists of Basic Information tab and Control Policy tab.
Category Detailed description Exclude from organization Exclude the Account from the organization - When you click the button, a popup notifying the Account exclusion opens
- For more details, see Account Removal
Account Transfer Move the Account to another organizational unit - Click the button to go to the Account Move page
- For more information, see Account 이동하기
Basic Information Tab Display basic information about the Account Control Policy Display the control policies linked to the Account Table. Account detail page items
- Account Details page consists of Basic Information tab and Control Policy tab.
Detailed information
You can view detailed information of the organizational unit and edit the information if needed.
| Category | Detailed description |
|---|---|
| Account name | Account name |
| Account ID | Account ID |
| constructor | User who created the Account |
| Creation date and time | Date and time the account was created |
| Editor | User who modified the Account |
| Modification date and time | Date and time the account was modified |
| Account’s user email | |
| Additional type | Account addition method
|
| higher-level organization unit | Display the upper level of the current organizational unit in a hierarchical structure
|
Control Policy
You can view the control policies linked to the Account and change their connection status.
| Category | Detailed description |
|---|---|
| Direct disconnect | Disconnect the selected control policy
|
| Control policy connection | Connect a new control policy
|
| Control Policy Name | Control Policy Name |
| type | Control Policy Types |
| Connection method | Control policy connection method
|
| Modification date and time | Last modified timestamp of the control policy |
Move Account
You can move accounts between organizational units within an Organization.
Click the All Services > Management > Organization menu. Go to the Service Home page of Organization.
On the Service Home page, click the Organizational Structure menu. You will be taken to the Organizational Structure page.
On the Organization Structure page, click the View Account List button.
After selecting the Account to which you want to move the organization unit, click the Account Move button. You will be taken to the Account Move page.
On the Account Transfer page, select the organizational unit to which you want to move the Account, then click the Complete button.
Category Detailed description Select Account Enter the name of the organizational unit - Organizational names distinguish between uppercase and lowercase English letters
Organization unit to move Select the organizational unit to move the Account to Organizational unit name Name of the organizational unit Organization Unit ID Organization unit ID Organization creation date and time Creation date and time of the organizational unit Table. Organization: Create Organizational UnitWhen the popup notifying the Account transfer opens, review the transfer information, then click the Confirm button.
- The newly created Account can be accessed by logging in directly with email or through an automatically generated role.
- When logging in directly with email, you must use the password recovery feature to reset your password.
Exclude Account
You can exclude an Account from the Organization.
In the following cases, the Account cannot be excluded.
- Account without a registered payment method
- When there is credit assigned to the account
- When the exclusion point is the cost settlement date (the 1st of each month, Asia/Seoul GMT +09:00)
- Click the All Services > Management > Organization menu. Go to the Service Home page of Organization.
- On the Service Home page, click the Organizational Structure menu. You will be taken to the Organizational Structure page.
- On the Organization Structure page, click the View Account List button.
- After selecting the Account to exclude from the Organization, click the More > Exclude Account button.
- When a popup notifying the account exclusion opens, click the Confirm button.
Delete Account
You can delete the account.
- When deleting from the Account list, you must select only one Account to delete.
- You cannot delete the Account in the following situations.
- If you want to delete on the expense settlement date (the 1st of each month)
- If there are resources in use
- When authority is delegated by the ID Center
- When credit is assigned to an account
- In the case of a Management Account or an account that was joined via invitation.
- If it is being registered in Cloud Control or already registered.
- Click the All Services > Management > Organization menu. Go to the Service Home page of Organization.
- On the Service Home page, click the Organization Configuration menu. You will be taken to the Organization Configuration page.
- On the Organization Structure page, click the View Account List button.
- From the Account list, select the Account to delete, then click the More > Delete Account button. The Delete Account popup window opens.
- After clicking the Account name of the Account to be deleted, you can also delete it by clicking the Account Details page’s Delete Account button.
- After entering the password for the Account to be deleted, click the Confirm button.
- After entering the Account name to delete, click the Confirm button.
If you delete the Account, an Account deletion notification email will be sent to the next user.
- Administrator who created the Organization
- Root user of the created Account
- User who has delegation for the created Account
Manage Organizational Units
You can view and manage the organizational units and accounts that make up the Organization in a hierarchical structure.
Create an organization unit
You can create a new organizational unit. To create and add an organizational unit in Organization, follow these steps.
Click the All Services > Management > Organization menu. Go to the Service Home page of Organization.
On the Service Home page, click the Organization Configuration menu. You will be taken to the Organization Configuration page.
On the Organizational Structure page, click the View Hierarchy button.
After selecting the location in the hierarchical list where you want to add an organizational unit, click the Create Organizational Unit Under button. You will be taken to the Create Organizational Unit page.
- Root or you can select only one existing organizational unit.
- You can create organizational units up to five levels below Root.
On the Organization Unit Creation page, enter the information for the organization unit you want to add, then click the Create button.
Category Required statusDetailed description Organizational unit name Required Enter the name of the organizational unit - Organizational names distinguish between uppercase and lowercase English letters
description Select Enter a description of the organizational unit within 1,000 characters. Control policy connection Required Select a control policy to attach to the organizational unit - For details on creating a control policy, refer to Creating a Control Policy
Table. Organization: Create Organizational UnitWhen the popup notifying the creation of an organizational unit opens, click the Confirm button.
- You can add up to 200 accounts.
- The newly created Account can be accessed by logging in directly with email or through an automatically generated role.
- When logging in directly with email, you need to use the password recovery feature to reset your password.
View detailed information of an organizational unit
You can view and edit detailed information of an organizational unit. To view detailed information of an organizational unit, follow these steps.
- Click the All Services > Management > Organization menu. Navigate to the Service Home page of Organization.
- On the Service Home page, click the Organizational Structure menu. You will be taken to the Organizational Structure page.
- On the Organizational Structure page, click the View Hierarchy button.
- Click the Root/Account name of the organizational unit whose details you want to view in the hierarchical list. You will be taken to the Organizational Unit Details page.
- Organization Unit Detail page is composed of Basic Information tab, Sub Items tab, and Control Policy tab.
Category Detailed description Delete organization unit Button that deletes an organizational unit - When the button is clicked, a popup notifying the organization deletion opens
- For more details, see Delete Organizational Unit
Basic Information Tab Display basic information about the organization unit Sub-item Display sub-elements of an organizational unit Control Policy Display control policies attached to the organizational unit Table. Organization unit detail page items
- Organization Unit Detail page is composed of Basic Information tab, Sub Items tab, and Control Policy tab.
Detailed information
You can view detailed information of the organizational unit and edit the information if needed.
| Category | Detailed description |
|---|---|
| service | Service name |
| Resource Type | Service Type |
| SRN | Unique resource ID in Samsung Cloud Platform |
| Resource Name | Resource Name |
| Resource ID | Unique resource ID in the service |
| constructor | User who created the service |
| Creation date | Service creation timestamp |
| Editor | User who edited the service information |
| Modification date and time | Date and time the service information was modified |
| Organizational unit name | Organization unit name
|
| description | Description of the organizational unit
|
| higher-level organization unit | Display the upper level of the current organizational unit in a hierarchical structure
|
Sub-item
You can view and manage the subordinate organization units and accounts of the current organization unit.
| Category | Detailed description |
|---|---|
| Create a sub-organization unit | Add a new organizational unit under the selected organizational unit
|
| More > Delete Organizational Unit | Delete selected organization unit
|
| Organization unit/Account name | Display the names of organizational units and Accounts in a measurement structure format
|
| ID/Email | Organizational units display ID, and Accounts display ID and email. |
| Creation/Join Date | Organization units display the creation timestamp, and accounts display the creation or sign‑up timestamp. |
Control Policy
You can view the control policies attached to an organizational unit and change their connection status.
| Category | Detailed description |
|---|---|
| Direct disconnect | Disconnect the selected control policy
|
| Control policy connection | Connect a new control policy. Click the
|
| Control Policy Name | Control Policy Name |
| type | Control Policy Types |
| Connection method | Control policy connection method
|
| Modification date and time | Last modified date and time of the control policy |
Delete organization unit
You can delete an organizational unit in the Organization.
- Click the All Services > Management > Organization menu. Navigate to the Service Home page of Organization.
- On the Service Home page, click the Organization Configuration menu. You will be taken to the Organization Configuration page.
- On the Organizational Structure page, click the View Hierarchy button.
- After selecting the organizational unit to delete from the hierarchical list, click the More > Delete Organizational Unit button.
- When the popup notifying the deletion of an organizational unit opens, click the Confirm button.
Connect control policy
You can attach control policies to an Organization’s organizational unit or Account. To attach a control policy, follow these steps.
Click the All Services > Management > Organization menu. Navigate to the Service Home page of Organization.
On the Service Home page, click the Organization Configuration menu. You will be taken to the Organization Configuration page.
On the Organization Structure page, click the View Hierarchy button.
Click the organizational unit or Account where you want to add the control policy from the hierarchical list. You will be taken to the detail page of that item.
- Root or you can select only one existing organizational unit.
- You can create organizational units up to five levels below Root.
On the detail page, click the Control Policy tab. You will be taken to the Control Policy Connection page.
After selecting the control policy to connect, click the Complete button.
Category Detailed description Linked control policy Enter the name of the organizational unit or the control policy linked to the current organizational unit or Account - Organizational names distinguish between uppercase and lowercase English letters
Control Policy Name Control Policy Name type Control Policy Types Modification date and time Control policy modification timestamp Control policy connection Required Table. Control policy linkage itemsWhen a popup notifying the connection of the control policy opens, click the Confirm button.
ReferenceTo create a new control policy, refer to Create Control Policy.
2.2 - Organization Control Policy
You can view and manage the Organization’s control policies.
Create Organization Control Policy
You can create control policies for the Organization.
To create a control policy, follow these steps.
Click the All Services > Management > Organization menu. Navigate to the Service Home page of Organization.
On the Service Home page, click the Control Policy menu. You will be taken to the Control Policy List page.
On the Control Policy List page, click the Create Control Policy button. You will be taken to the Create Control Policy page.
After entering items in the Basic Information area, click the Next button.
Category Required statusDetailed description Control Policy Name Required Enter the name of the control policy - English letters, numbers, special characters(
+=-_@,.) within 3 to 128 characters
Explanation Select Enter a description of the organizational unit within 1,000 characters. Table. Create organization control policy - set basic information- English letters, numbers, special characters(
In the Control Requirement Setting area, after selecting the control policy configuration method and the service to apply, click the Next button.
Category Required statusDetailed description Load control policy Select Enter the name of the control policy - When loading a policy, all previously entered content will be deleted
- For more details, see Load Policy
Basic mode/JSON mode Required Select the policy configuration method - Basic Mode: Configure using the mode provided by the Console
- JSON Mode: Configure directly using the JSON Editor
Service Required Select the service to set the control policy - Add Service: Add a service to configure the control policy
Table. Organization control policy creation - service configurationCautionIn the control policy settings, Basic Mode and JSON Mode are provided.
- After writing in Basic Mode and entering JSON Mode or navigating the screen, services with duplicate control requirements are merged into one, and services that have not completed configuration are deleted.
- If the content written in JSON mode does not conform to JSON format, you cannot switch to basic mode.
After setting the permissions, click the Next button.
Category RequiredDetailed description Control Type Required Select control policy type - Allow Policy: Control policy that allows the defined permissions
- Deny Policy: Control policy that denies the defined permissions
Action Required Select actions provided for each service - Actions that allow selection of individual resources are shown in purple
- Actions that target all resources are shown in black
- Add Action Directly: Use the wildcard
*to specify multiple actions at once
Applied resource Required Resources to which the action applies - All resources: Apply to all resources for the selected action
- Individual resources: Apply only to the specified resources for the selected action
- Individual resources are only available when selecting the purple action that allows individual resource selection
- Click the Add resource button to specify target resources by resource type
- For more details on Add resource, see Register individual resources as applicable resources
Authentication Type Required Authentication method of the user target to which the control policy will be applied - All authentication: Applies regardless of authentication method
- Authentication key authentication: Applies to users with authentication key authentication
- Temporary key authentication, Console login: Applies to users with temporary key authentication or Console login
Applied IP Required IP that allows the application of control policies - Custom IP: User registers and manages the IP directly
- Applied IP: User can directly register the IP address or range that the control policy applies to
- Excluded IP: IP addresses or ranges that can be registered as exclusions from the Applied IP
- All IPs: No IP access restriction
- Access is allowed for all IPs, but if exceptions are needed, register Excluded IP to restrict access for the registered IPs
Additional condition Select Add conditions for attribute-based access control (ABAC) - Condition Key: Select from Global condition keys and service condition keys list
- Qualifier: Default value, arbitrary value in the request, all values in the request
- Operator: Bool, Null
- Value: True, False
Table. Create organization control policy - set permissionsOn the Check Input Information page, after confirming the entered information, click the Create button.
When the popup notifying the creation of a control policy opens, click the Confirm button. You will be taken to the Integrated Policy List page.
Load control policy
When creating a control policy, you can generate it by modifying the policy requirements of an existing policy.
To load an existing policy and create a control policy, follow these steps.
Click the All Services > Management > Organization menu. Navigate to the Service Home page of Organization.
On the Service Home page, click the Control Policy menu. You will be taken to the Control Policy List page.
On the Control Policy List page, click the Create Control Policy button. You will be taken to the Create Control Policy page.
After entering items in the Basic Information area, click the Next button.
Category Required statusDetailed description Control Policy Name Required Enter the control policy name - English letters, numbers, and special characters (
+=-_@,.) within 3 to 128 characters
description Select Enter a description of the organizational unit within 1,000 characters. Table. Create organization control policy - set basic information- English letters, numbers, and special characters (
In the Control Requirement Setting area, click the Load Control Policy button. The Load Control Policy popup window opens.
Click the Load Policy button. The Load Control Policy popup opens.
After selecting the control policy to load from the control policy list, click the Confirm button. The loaded policy’s settings will be entered automatically.
After editing the information that needs to be changed, click the Next button.
Check Input Information page, verify the entered information and click the Complete button. You will be taken to the Integrated Policy List page.
Register individual resources as applied resources
Permission Settings allows you to register individual resources as applied resources. To register individual resources as applied resources, follow the steps below.
Click the All Services > Management > Organization menu. Navigate to the Service Home page of Organization.
On the Service Home page, click the Control Policy menu. You will be taken to the Control Policy List page.
On the Control Policy List page, click the Create Control Policy button. You will be taken to the Create Control Policy page.
After entering items in the Basic Information area, click the Next button.
Category Required statusDetailed description Control Policy Name Required Enter the control policy name - using English letters, numbers, special characters (
+=-_@,.) within 3~128 characters
description Selection Enter a description of the organizational unit within 1,000 characters. Table. Create organization control policy - set basic information- using English letters, numbers, special characters (
In the Control Requirement Setting area, after selecting the service to which the control policy will be applied, click the Next button.
Click the Load Policy button. The Load Control Policy popup opens.
After selecting the control policy to load from the control policy list, click the Confirm button. The loaded policy’s settings will be entered automatically.
After editing the information that needs to be changed, click the Next button.
On the Check Input Information page, verify the entered information and click the Complete button. You will be taken to the Integrated Policy List page.
Select an Action that allows selecting individual resources in the Action selection.
- Actions that allow individual resource selection are displayed in purple.
Click Individual Resource in Applied Resource.
Click the Add Resource button. The Add Resource popup window opens.
Category Whether requiredDetailed description Self type Required Select the resource type to add SRN - Unique resource ID in Samsung Cloud Platform - Automatically updated according to the input fields below
Account Required Account ID Settings - Current Account: Current Account ID is auto-filled and cannot be edited
- All Accounts: Add to all Accounts (not recommended)
- Manual Input: Manually enter the Account ID using lowercase English letters and numbers, up to 100 characters (wildcard input not allowed)
Region Select Enter the resource’s region information directly within 100 characters - Select All When checked, add resources from all regions
Resource ID Required Enter the resource ID to add directly, up to 100 characters - Select All when checked adds all resources of that resource type
Table. Create organization control policy - set basic informationAfter the settings are completed, click the Next button. You will be taken to the Check Input Information page.
After reviewing the entered information, click the Complete button. You will be taken to the Integrated Policy List page.
Check detailed information of control policy
On the Control Policy Details page, you can view and edit the detailed information of the control policy. To view detailed information of the control log, follow the steps below.
- All Services > Management > Organization Click the menu. Go to the Service Home page of Organization.
- On the Service Home page, click the Control Policy menu. You will be taken to the Control Policy List page.
- Control Policy List page, click the control policy you want to view detailed information for. You will be taken to the Control Policy Details page.
- The Policy Details page displays basic information and consists of the Basic Information tab, the Control Requirements tab, and the Connected Targets tab.
Basic Information
You can view the basic information of the control policy and, if necessary, edit the policy name and description.
| Category | Detailed description |
|---|---|
| service | Service name |
| Resource Type | Resource Type |
| SRN | Unique resource ID in Samsung Cloud Platform |
| Resource name | Resource Name
|
| Resource ID | Unique Resource ID |
| constructor | User who created the service |
| Creation date and time | Service creation date and time |
| Editor | User who edited the service information |
| Modification date and time | Date and time the service information was modified |
| Control Policy Name | Name of the control policy
|
| type | Types of control policies
|
| Explanation | Description of the control policy
|
Control Requirements
You can view the services with permissions configured in the current control policy.
- You can check in Basic mode and JSON mode.
- Click the arrow to the right of the service name to display the control requirements set for that service.
| Category | Detailed description |
|---|---|
| Control Type | Control Policy Types
|
| action | Features provided by each service that are subject to the control policy |
| Applied resource | Resources to which the action applies
|
| Authentication type | Authentication method for the user target to which the control policy will be applied
|
| Applied IP | IP that permits the application of control policies
|
Connection target
You can view the organizational units and accounts directly linked to the control policy.
| Category | Detailed description |
|---|---|
| Root | The connection status of the Root and the number of control policies attached to the Root are displayed
|
| organizational unit | The organizational units currently linked to the control policy and the total number of control policies linked to those units
|
| Account | The Account currently linked to the control policy and the total number of control policies linked to that Account
|
Connect organization unit
You can associate an organizational unit with a control policy. To connect an organizational unit, follow the steps below.
Click the All Services > Management > Organization menu. Go to the Service Home page of Organization.
On the Service Home page, click the Control Policy menu. You will be taken to the Control Policy List page.
On the Control Policy List page, click the control policy to link the organizational unit. You will be taken to the Control Policy Details page.
On the Control Policy Details page, click the Connection Target tab.
Click the Organization Unit Connection button in the Organization Unit area. You will be taken to the Organization Unit Connection page.
After selecting the organization unit to connect, click the Complete button.
Category Detailed description Organization unit/Account name Display the names of organizational units and Accounts in a measurement structure format - Click the +, - button to expand or collapse the hierarchy
ID/Email Organizational units display ID, and accounts display ID and email. Creation date and time The creation date and time of the organizational unit is the creation timestamp, and for Account it displays the creation or registration timestamp. Table. Organization Unit Connection ItemsWhen the popup notifying the organization unit connection opens, click the Confirm button.
Connect Account
You can link an Account to a control policy. To connect the Account, follow these steps.
Click the All Services > Management > Organization menu. Go to the Service Home page of Organization.
On the Service Home page, click the Control Policy menu. You will be taken to the Control Policy List page.
On the Control Policy List page, click the control policy to link the Account. You will be taken to the Control Policy Details page.
On the Control Policy Details page, click the Connection Target tab.
Click the Account Connect button in the Account area. You will be taken to the Account Connect page.
After selecting the Account to connect, click the Done button.
Category Detailed description Organization unit/Account name Display the names of organizational units and Accounts in a measurement structure format - Click the +, - buttons to expand or collapse the hierarchy
ID/Email Organizational units display ID, and Accounts display ID and email. Creation date and time The creation date and time of the organizational unit is the creation date and time, and Account displays the creation or registration date and time. Table. Account linking itemsWhen a popup notifying the Account connection opens, click the Confirm button.
Delete control policy
You can delete the control policy.
- Click the All Services > Management > Organization menu. Navigate to the Service Home page of Organization.
- On the Service Home page, click the Control Policy menu. You will be taken to the Control Policy List page.
- On the Control Policy List page, click the control policy you want to delete. You will be taken to the Control Policy Details page.
- Click the Delete Control Policy button on the Control Policy Details page.
- When the popup informing you that the control policy will be deleted opens, click the Confirm button.
3 - API Reference
4 - CLI Reference
5 - Release Note
Organization
- You can also delete an Account created in the Organization from the Member Account.
- Deletable Accounts are limited to those directly created in the Organization.
- The Organization service has been officially launched.
- You can organize accounts by organizational units, manage them hierarchically, and control resource access permissions.
- You can monitor the resource usage of all accounts within the organization to optimize costs.