This is the multi-page printable view of this section. Click here to print.
ID Center
1 - Overview
Service Overview
ID Center is a service that enables easy centralized management of access permissions for resources by account on the Samsung Cloud Platform. You can create permission policies for each service and assign accounts and policies linked to the Organization service to users, enabling management of tasks according to each user’s permissions.
Features
- Easy Access Permission Management: Through SAML (Security Assertion Markup Language) based credential authentication, you can receive authentication and authorization from Samsung Cloud Platform and access resources of multiple accounts within the organization.
- Efficient Account Management: By integrating with the Organization service, you can centrally manage the costs and resource usage incurred by all Accounts within the organization.
- Account Security Enhancement: Instead of the Samsung Cloud Platform Console, you can strengthen security by using the separately provided Access Portal so that only authorized ID Center users can access. Through the Access Portal, you can fundamentally prevent users outside the customer organization from accessing the Account.
Configuration
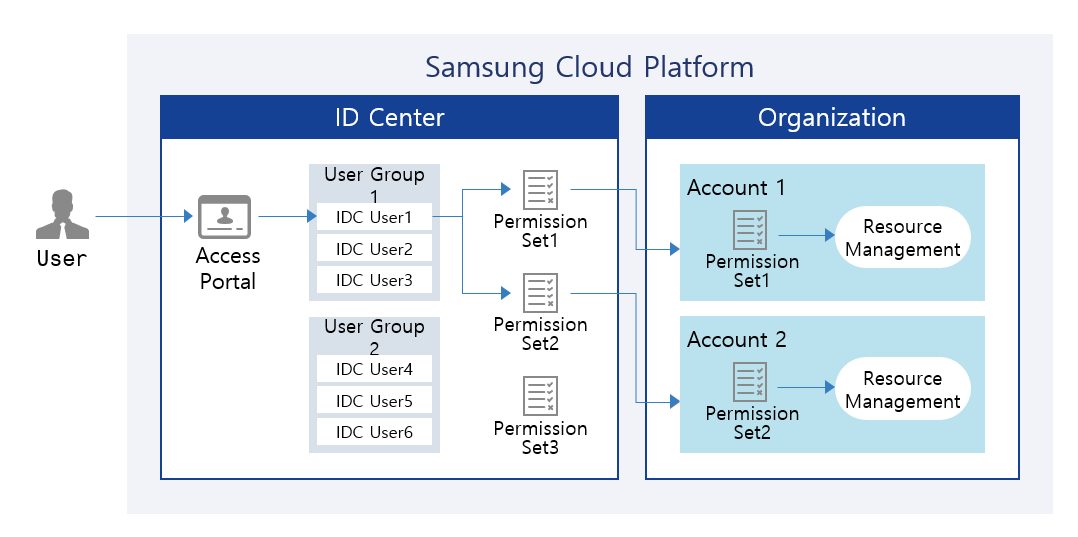
Provided features
ID Center provides the following functions.
- User and User Group Management: You can create users and user groups and configure service-specific permission management policies. Users are required to have MFA (Multi-Factor Authentication) applied, strengthening the management of Account access.
- Account Allocation Management: You can assign and manage Accounts corresponding to each user’s tasks.
- Permission Set Management: You can create and manage permission sets by using the default policies or custom policies that exist in each Account, or by configuring policies directly.
- Access Portal Provision: Provides an Access Portal that can be used instead of the Samsung Cloud Platform Console, allowing only ID Center users to access it.
Component
User
Administrators can create users and add them to user groups. They can generate passwords automatically or manually, and provide users with Access Portal login information. Additionally, users can be assigned to accounts according to their respective tasks.
User Group
You can link users and Accounts through user groups. You can create user groups appropriate for each task, register users, and assign them to Accounts.
Permission Set
You can create permission sets by using the default policies and custom policies that exist in the Account, or by configuring policies directly.
Provision status by region
ID Center is available in the environments below.
| Region | Whether provided |
|---|---|
| Korea West (kr-west1) | Provide |
| Korea East (kr-east1) | Provide |
| South Korea South 1 (kr-south1) | Provide |
| South Korea South 2 (kr-south2) | Provide |
| South Korea 3 (kr-south3) | Not provided |
Preceding Service
This is a list of services that must be pre-configured before creating the service. Please refer to the guide provided for each service for details and prepare in advance.
| Service Category | Service | Detailed description |
|---|---|---|
| Management | Organization | A service that organizes accounts by organizational units, manages them hierarchically, and controls resource access permissions. |
2 - How-to guides
Users can create the service by entering the required ID Center information and selecting detailed options through the Samsung Cloud Platform Console.
Create ID Center
You can create and use an ID Center in the Samsung Cloud Platform Console.
To create an ID Center, follow these steps.
Click the All Services > Management > ID Center menu. 1. Go to the Service Home page of ID Center.
Service Home on the page, click the ID Center Apply button. 2. Go to the ID Center Creation page.
ID Center Creation After entering the basic information on the page, click the Create button.
- In the Basic Information Input area, enter the name and description of the ID Center.
Category required statusDetailed description ID Center name Required Enter the ID Center name - using English letters, numbers, and special characters (
+=-_@,.) within 3 to 128 characters
Explanation Selection Enter a description of the organizational unit within 1,000 characters. Table. ID Center basic information items - using English letters, numbers, and special characters (
- In the Credential Source Selection area, select the credential source type and enter the required information.
Category required statusDetailed description ID Center’s own directory - Manage all users and user groups in the ID Center - Users log in via the Access Portal
AD (Active Directory) - 사용자가 직접 관리하는 Active Directory를 ID Center의 자격 증명 소스로 등록하여 사용 - 사용자는 Access Portal을 통해 로그인
- AD (Active Directory) 사용 시 상세 옵션 설정 필수
- LDAP Directory Service: LDAP Directory Service 서비스 유형(OpenLDAP, Microsoft AD, 389 Directory Server) 선택
- Connection URL: LDAP 서버 주소를 입력(예:
ldap://또는ldaps:)
- Bind DN: LDAP 서버에 접근할 때 사용하는 관리자 또는 서비스 계정의 DN (Distinguished Name)을 입력
- Bind credentials: Bind DN에 해당하는 계정의 비밀번호 입력
- User DN: 사용자 계정이 위치하는 디렉토리 경로 입력(예:
OU=Employees,OU=Accounts,DC=sub,DC=org)
- Username LDAP attribute: 사용자 계정 식별값 입력(예:
sAMAccountName,uid)
- RDN LDAP attribute: RDN (Relative Distinguished Name, 사용자 DN에서 최상위 속성) 입력
- User object classes: 사용자 객체를 정의하는 LDAP 클래스 목록 콤마(
,)로 구분하여 입력(예:persion,organizationPersion,usersAMAccount)
- 비밀번호 관리: 비밀번호 관리 방식 선택
- ID Center 관리 선택 시 사용자가 Access Portal에서 비밀번호 관리 가능
- 생성 시 자동으로 AD 정보를 동기화
Table. ID Center credential source selection item
- In the Basic Information Input area, enter the name and description of the ID Center.
When the popup notifying the creation of the ID Center opens, click the Confirm button.
On the Service Home page, check the ID Center dashboard.
구분 상세 설명 ID Center information Display the name, ID, and Access Portal URL of the ID Center - ID Center information When you click the ID Center settings item, you are taken to the ID Center configuration page where you can view detailed ID Center information
User Number of users created in ID Center - Clicking the user count navigates to the User List page
- Create item click navigates to the User Creation page. 사용자 생성하기 Reference
User group Number of user groups created in ID Center - Click the group count to go to the User Group List page
- Click the Create item to go to the User Group Creation page. 사용자 그룹 생성하기 Refer
Permission set Number of permission sets created in ID Center - Click the permission set count to navigate to the Permission Set List page
- Click the Add item to go to the Create Permission Set page. see 권한 세트 생성하기
Table. ID Center Service Home Dashboard Items
Check ID Center detailed information
You can view detailed information of the ID Center and manage permissions.
To view detailed information of the ID Center and manage permissions, follow these steps.
- Click the All Services > Management > ID Center menu. 1. Go to the Service Home page of ID Center.
- On the Service Home page, click the ID Center Settings menu. 2. Navigate to the ID Center Settings page.
Category Detailed description Delete ID Center Delete ID Center button - Not displayed on delegated Account
service Service name Resource Type Resource Type SRN Unique resource ID in Samsung Cloud Platform Resource Name Resource Name Resource ID Unique resource ID in the service Constructor User who created the service Creation Date/Time Service creation date and time Modifier User who edited the service information Modification date Date and time the service information was modified ID Center name ID Center name - Edit Click the button to change usage status
Region Region where the ID Center was created Explanation Description of ID Center - Edit button can be clicked to change usage status
Organization ID Organization’s ID Credential source Credential source type - Edit button can be clicked to change the credential source type
- ID Center native directory: Directory within ID Center
- AD (Active Directory): Active Directory managed directly by the user
- Last synchronization: Date and time of the last sync and its status
- Sync button can be clicked to perform a manual synchronization
- For details about Active Directory settings, see Change credential source type
Access Portal URL URL to access the Access Portal | Display the Account name, Account ID, Email, Delegation time information of the Account that delegated management authority in ID Center
- For delegated Accounts, the managing Account’s information is displayed, and delegation or cancellation of authority is not possible
- Permission delegation: Ability to delegate authority to an Account within ID Center
- Displayed when there is no delegation information
- When the button is clicked, you can select an Account on the Permission delegation page to set up delegation
- For more details, see 권한 위임하기
- Cancel delegation: Cancel the permission delegation
Table. ID Center configuration items
Managing Credential Sources
You can change the credential source type, or modify and manage the settings for the AD (Active Directory) type.
AD (Active Directory) Apply for Integration
If you want to use a user-managed AD (Active Directory) integration, you must first prepare the VPC and Load Balancer, then submit a request through SR. To apply for AD integration, follow the steps below.
Secure a VPC that integrates with the user’s AD.
- When a network connection is required, connect to the network where the user’s AD resides using the Direct Connect service.
- For more details, refer to Direct Connect 생성하기.
Configure the Load Balancer.
- Create a Load Balancer and an LB server group.
- Add the IP that will link AD as a member of the resources connected to the LB server group.
- Create a Listener from the Load Balancer’s connected resources and attach the LB server group.Information
- Through the Load Balancer service, call information for AD synchronization from ID Center can pass through the user’s VPC to invoke the user’s AD.
- For detailed information on creating and using the Load Balancer service, please refer to Load Balancer 서비스 이용하기.
Configure a PrivateLink Service in the user’s VPC.
- Create a PrivateLink Service for the user VPC that will be called from ID Center.
- When creating a PrivateLink Service, select the Load Balancer created in step 2 as the connection resource.
When the preparation work is complete, click the All Services > Management > Support Center menu. 4. Go to the Service Home page.
Service Home on the page, click the Service Request menu. 5. Service Request List page is accessed.
On the Service Request List page, select and enter the information required for the service request.
Category Required statusDetailed description Title Required Enter the title of the service request - using Korean, English, numbers, and special characters (
+=,.@-_) within 64 characters
Region Required Select the region to request the service service Required Management service group’s ID Center service selection Task classification Required ID Center AD Integration Request Select content Required Enter information for ID Center AD integration request Table. ID Center AD integration request items- using Korean, English, numbers, and special characters (
Check the input information and click the Request button.
- Once creation is complete, check the Service Request List page.
Changing the credential source type
You can change the credential source or modify the configuration values.
- Changing the credential source will delete all configuration information and resources, including previously configured users, user groups, account assignments, and permission sets.
- While resources are being deleted, you cannot access any screens in ID Center.
Follow these steps to change the credential source type.
All Services > Management > ID Center Click the menu. 1. Go to the Service Home page of ID Center.
On the Service Home page, click the ID Center Settings menu. 2. ID Center Details Go to the page.
On the ID Center Details page, click the Edit button of the Credential Source item. 3. Change Credential Source A popup window opens.
After selecting the credential source type to use, click the Confirm button. 4. A popup window notifying a credential source change opens.
Category Detailed description ID Center’s own directory Use directory within ID Center - No separate configuration items
AD (Active Directory) Use Active Directory managed directly by the user - LDAP Directory Service: Select LDAP Directory Service type (OpenLDAP, Microsoft AD, 389 Directory Server)
- Connection URL: Enter the LDAP server address (e.g.,
ldap://orldaps:)
- Bind DN: Enter the DN (Distinguished Name) of the administrator or service account used to access the LDAP server
- Bind credentials: Enter the password for the account corresponding to the Bind DN
- User DN: Enter the directory path where user accounts are located (e.g.,
OU=Employees,OU=Accounts,DC=sub,DC=org)
- Username LDAP attribute: Enter the user account identifier attribute (e.g.,
sAMAccountName,uid)
- RDN LDAP attribute: Enter the RDN (Relative Distinguished Name, the top-level attribute in the user DN)
- User object classes: Enter the list of LDAP classes that define user objects, separated by commas (
,) (e.g.,persion,organizationPersion,usersAMAccount)
- Password management: Select password management method
- ID Center management: If ID Center management is selected, users can manage passwords in the Access Portal
Table. Credential source type change itemsAfter reviewing the precautions for changes and checking the checkbox, click the Confirm button. 5. Go to the Service Home page and start changing the credential source type.
- The change time varies depending on the scale, and you can confirm it via a notification once the change is complete.
- You cannot navigate to other menu pages while changes are in progress.
AD (Active Directory) Synchronize Information
You can check the AD information and perform synchronization manually.
- AD information is automatically synchronized daily between 0:00 and 06:00 (Asia/Seoul, GMT +09:00).
- To connect new AD information, change the credential source, delete all ID Center resources, and then start synchronization anew.
To synchronize AD information, follow these steps.
- Click the All Services > Management > ID Center menu. 1. Go to the Service Home page of ID Center.
- On the Service Home page, click the ID Center Settings menu. 2. ID Center Details page will be opened.
- On the ID Center 상세 page, click the 동기화 button next to the sync time of the 자격 증명 소스 item. 3. AD Information Synchronization The popup window opens.
- After reviewing the synchronization notification, click the Confirm button. 4. AD information synchronization is starting.
- The change time varies depending on the scale.
Manage Permissions
You can delegate the ID Center’s administrative privileges to another account, or revoke previously delegated privileges.
Delegating Permissions
You can delegate the administrative rights of the ID Center to another account.
To delegate administrative privileges to another account, follow these steps.
- Click the All Services > Management > ID Center menu. 1. Go to the Service Home page of ID Center.
- On the Service Home page, click the ID Center Settings menu. 2. ID Center Details page is opened.
- On the ID Center Details page, click the Delegate Permissions button. 3. Go to the Permission Delegation page.
- Permission Delegation button is displayed only when there is no Account that has currently delegated the permission.
- Permission Delegation page, select the Account to delegate the permission to, then click the Complete button.
Category Detailed description Account name Account name Account ID Account ID email Account email Additional date/time Account creation or sign‑up time in the organization Additional type Method of adding an Account in Organization - Creation: Add Account page, create anew and add
- Sign-up: Add an already created Account
Table. ID Center Delegated Authority Account List
Cancel delegation
You can revoke the ID Center’s administrative privileges that were delegated to another account.
To cancel delegated administrative permissions, follow these steps.
- Click the All Services > Management > ID Center menu. 1. Go to the Service Home page of ID Center.
- On the Service Home page, click the ID Center Settings menu. 2. Navigate to the ID Center Details page.
- On the ID Center Details page, click the Cancel Permission Delegation button.
- When the popup notifying the revocation of delegation opens, click the Confirm button.
Delete ID Center
To delete the ID Center, follow these steps.
- Click the All Services > Management > ID Center menu. 1. Navigate to the Service Home page of ID Center.
- On the Service Home page, click the ID Center Settings menu. 2. Go to the ID Center Settings page.
- On the ID Center Settings page, click the Delete ID Center button. 3. ID Center Delete popup window opens.
- In the ID Center Delete popup, after entering the name of the ID Center to delete, click the Confirm button. 4. Go to the Service Home page.
- The deletion time for the ID Center varies depending on the scale, and you can confirm completion through a notification.
- You cannot navigate to other menu pages while the ID Center is being deleted.
2.1 - ID Center User Management
You can view and manage ID Center users.
Create User
You can create a user and add it to the ID Center. Follow the steps below to create a user.
All Services > Management > ID Center click the menu. 1. Go to the Service Home page of ID Center.
On the Service Home page, click the User menu. 2. User List page is opened.
On the User List page, click the Create User button. 3. Navigate to the User Creation page.
On the User Creation page, after entering the basic and additional information, click the Create button.
Category whether requiredDetailed description username Required Enter the user’s name - English letters, numbers, special characters (
+=-_@,.) using
- within 128 characters
Explanation Selection 사용자에 대한 설명을 1,000자 이내로 입력 비밀번호 필수 비밀번호 생성 방법 선택 - 자동 생성: 비밀번호를 자동으로 생성하여 사용자 생성 완료 시 팝업창에서 제공
- 직접 입력: 비밀번호 생성 규칙을 참고하여 직접 입력
사용자 실명 필수 Enter the user’s full name as their real name Enter affiliation information Selection Enter the division, department, manager, and employee ID information, each within 128 characters. Select user group Selection Select the user group to add the user - To create a user group, see 사용자 그룹 생성하기
Table. User-generated informationPassword creation rules- It must contain at least one uppercase letter (English), one lowercase letter (English), one digit, and one special character (
!@#$%&*^). - The length is 9 to 20 characters.
- ID cannot be used.
- You cannot use the same character more than three times.
- Passwords that are easy to guess cannot be used.
- You cannot use a password that was recently used.
- Consecutive characters or numbers of four or more cannot be used.
- The password change interval is 90 days.
- English letters, numbers, special characters (
When the popup that notifies a user addition opens, click the Create button. 5. ID Center User Login Information The popup window opens.
After verifying the ID Center user login information, click the Confirm button.
Category Detailed description Access Portal URL URL information for accessing the Access Portal Username Generated user name Password Generated user’s password - View Click the icon to view the password
Excel download Download ID Center user login information as an Excel file Email sending Send an Excel file containing ID Center user login information via email - After clicking the button, enter the address to receive the email
Table. ID Center user login information item
Check user detailed information
You can view and manage detailed information about users, user groups, and Account information. To view detailed user information, follow the steps below.
- Click the All Services > Management > ID Center menu. 1. Navigate to the Service Home page of ID Center.
- On the Service Home page, click the User menu. 2. User List page is accessed.
- On the User List page, click the user name to view detailed information. 3. Navigate to the User Details page.
- User Details page displays basic information and consists of Basic Information, User Group, Account tabs.
Basic Information
View the user’s basic information, and modify the user’s description and options if needed.
| Category | Detailed description |
|---|---|
| Delete user | Delete user button
|
| Username | User’s name |
| User real name | User’s actual name
|
| Explanation | Description of the username
|
| Last login | The date and time the user last logged in |
| Password | Date and time of the last password change
|
| Password reuse restriction | Number of recent passwords that cannot be set as a password
|
Email verification status
| |
| mobile phone number | Mobile phone number verification status |
| Affiliation information | User’s division, department, manager, employee number information
|
User group
The user can view the registered user groups and, if necessary, add or remove user groups.
| Category | Detailed description |
|---|---|
| Exclude | Exclude the selected user group from the user group list
|
| Add user group | Add a user group to register users
|
| User group name | Name of the user group |
| Explanation | Description of the user group |
| Modification date | Date and time the user group was modified |
Account
Verify the Account assigned to the user, and, if needed, add a permission set or assign an Account.
- For detailed information about Permission Set, please refer to 권한 세트.
- Account Assignment for detailed information, please refer to Account 할당.
| Category | Detailed description |
|---|---|
| Add a new permission set to the Account
- Activates when selecting an Account from the Account list
- For more details, see 권한 세트 추가하기
- If all permission sets are excluded, the Account assignment is cancelled
- For more information, see Account 할당하기
| Number of permission sets applied to the Account
- When the mouse cursor is placed over a permission set, a popup opens that allows you to exclude the permission set
- Direct: Policy directly attached to the Account
- Group: Policy attached via a user group
Add User Group
You can add a new user group. To add a user group, follow these steps.
All Services > Management > ID Center Click the menu. 1. Navigate to the Service Home page of ID Center.
On the Service Home page, click the User menu. 2. User List navigate to the page.
On the User List page, click the user name to add to the user group. 3. Navigate to the User Details page.
On the User Details page, click the User Group tab. 4. The list of user groups is displayed.
Click the Add User Group button. 5. Go to the Add User Group page.
Add User Group page, select the user group you want to add from the list of user groups, then click the Complete button.
Category Required statusDetailed description Added user group - User-added user group name User group Required Select the user group to add the user - when selected, add to the Added user group item
Table. Add user group itemWhen the popup notifying the addition of a user group opens, click the Confirm button.
Add Permission Set
You can add a permission set to the Account. To add a permission set to an Account, follow these steps.
Click the All Services > Management > ID Center menu. 1. Go to the Service Home page of ID Center.
On the Service Home page, click the User menu. 2. User List page is opened.
On the User List page, click the user name to add a permission set. 3. Navigate to the User Details page.
On the User Details page, click the Account tab. 4. The Account list is displayed.
After selecting the Account to which you want to add a permission set from the Account list, click the Add Permission Set button. 5. Go to the Add Permission Set page.
On the Add Permission Set page, select the permission set you want to add from the permission set list, then click the Done button.
Category Required statusDetailed description Selected Account - | | Applied permission set | - | Name of the permission set applied to the selected Account | |
| Required | Select one or more permission sets to apply to the Account
- When selected, add to the Applied Permission Set item
Table. Add Permission Set ItemWhen the popup notifying that a permission set has been added opens, click the Confirm button.
Allocate Account
You can assign a new Account to the user. To assign a new Account, follow the steps below.
All Services > Management > ID Center click the menu. 1. Go to the Service Home page of ID Center.
On the Service Home page, click the User menu. 2. Go to the User List page.
On the User List page, click the user name to assign the Account. 3. Navigate to the User Details page.
On the User Details page, click the Account tab. 5. The account list is displayed.
Click the Account Assignment button. 6. Go to the Account allocation page.
On the Account Assignment page, after selecting the Account to assign and the permission set to apply to the Account, click the Complete button.
Category Required statusDetailed description Select Account Required Select the Account to assign to the user - View hierarchical structure: Display the Account in an organizational hierarchical structure
- View Account list: Display the Account in a list format
| required | Select the permission set to apply to the selected Account |
Table. User Account Assignment itemInformationIf there is no IAM policy name that matches the custom policy name of the selected permission set, you cannot assign the account.When the popup indicating that the account has been assigned to the user group opens, click the Confirm button.
Delete User
To delete a user, follow these steps.
- All Services > Management > ID Center Click the menu. 1. Go to the Service Home page of ID Center.
- On the Service Home page, click the User menu. 2. Go to the User List page.
- Select at least one user to delete from the user list.
- After reviewing the selected users, click the Delete button.
- You can also delete individually from the User Details page of the user to be deleted.
- When the popup notifying user deletion opens, click the Confirm button.
2.2 - Managing ID Center User Groups
You can view and manage user groups in ID Center.
Create User Group
You can create a user group and add it to the ID Center. To create a user group, follow these steps.
Click the All Services > Management > ID Center menu. Go to the Service Home page of ID Center.
On the Service Home page, click the User Group menu. You will be taken to the User Group List page.
Click the Create User Group button on the User Group List page. You will be taken to the Create User Group page.
On the User Group Creation page, after entering the basic and additional information, click the Create button.
Category Required statusDetailed description User group name Required Enter the user group name - using English letters, numbers, and special characters (
+=-_@,.) within 3 to 30 characters
description Selection Enter a description of the user group within 1,000 characters. Add user Select Select users to add to the user group - Display the list of users registered in the Account
- To create a new user, see Create User
- If the user you want to add does not exist when linking with AD, add the user in the AD provider and go to the ID Center Settings > Credential Source page to perform synchronization
Table. User Group Creation Information- using English letters, numbers, and special characters (
When the popup notifying the addition of a user group opens, click the Confirm button.
View detailed information of user group
You can view and manage detailed information about user groups, as well as user group and account information.
To view detailed information about a user group, follow these steps.
- Click the All Services > Management > ID Center menu. Go to the Service Home page of ID Center.
- On the Service Home page, click the User Group menu. You will be taken to the User Group List page.
- On the User Group List page, click the user group name whose details you want to view. You will be taken to the User Group Details page.
- The User Group Detail page displays basic information and consists of Basic Information, User, and Account tabs.
Basic Information
You can view the basic information of a user group and, if necessary, edit its description and options.
| Category | Detailed description |
|---|---|
| Delete user group | Button to delete a user group |
| User group name | Name of the user group |
| User Group ID | User group ID |
| constructor | User who created the service |
| Creation date and time | Service creation date and time |
| Editor | User who edited the service information |
| Modification date and time | Date and time the service information was modified |
| User group name | User group name
|
| Explanation | Description of the user group name
|
User
You can view the users registered in a user group and, if necessary, add or remove users.
| Category | Detailed description |
|---|---|
| Exclude | Exclude the selected user(s) from the user list
|
| Add user | Add a user group to register
|
| Username | User’s name |
| User group | Number of user groups the user is registered in |
| Creation date and time | User creation timestamp |
Account
Check the Account assigned to the user, and if necessary, you can add a permission set or assign an Account.
- For detailed information about Permission Set, see the 권한 세트.
- Account Allocation for detailed information, please refer to Account Allocation.
| Category | Detailed description |
|---|---|
| Add permission set | Add a new permission set to the Account
|
| More > Cancel Assignment | Cancel the assignment of the selected Account
|
| Account allocation | Assign a new Account to the user group
|
| Account name | Account name |
| Permission set | Number of permission sets applied to the Account
|
Add User
You can add a new user to a user group. To add a user, follow these steps.
Click the All Services > Management > ID Center menu. Go to the Service Home page of ID Center.
On the Service Home page, click the User Group menu. You will be taken to the User Group List page.
User Group List page, click the user group name to which you want to add a user. You will be taken to the User Group Details page.
On the User Group Details page, click the User tab. The user list will be displayed.
Click the Add User button. You will be taken to the Add User page.
After selecting the user you want to add from the user list on the Add User page, click the Done button.
Category Required statusDetailed description Added user - Name of the user group added user Required User groups without added users - Display list of users registered in the Account
- When selected, add to Added User item
- To create a new user, see Create User
- If there is no user to add when linking with AD, add the user at the AD provider and go to ID Center Settings > Credential Source page to synchronize
Table. Add User ItemVerify that the added user appears in the list.
Add Permission Set
You can add a permission set to the Account. To add a permission set to an Account, follow these steps.
Click the All Services > Management > ID Center menu. Go to the Service Home page of ID Center.
On the Service Home page, click the User Group menu. You will be taken to the User Group List page.
Click the user group name to which you want to add a permission set on the User Group List page. You will be taken to the User Group Details page.
On the User Group Details page, click the Account tab. Account list will be displayed.
From the Account list, select the Account to which you want to add a permission set, then click the Add Permission Set button. You will be taken to the Add Permission Set page.
On the Add Permission Set page, select the permission set you want to add from the list, then click the Done button.
Category Required statusDetailed description Selected Account - Account name to add permission set Applied permission set - Name of the permission set applied to the selected account Permission set Required Select one or more permission sets to apply to the Account - When selected, add to the Applied Permission Set item
Table. Add permission set itemVerify that the added permission set has been applied to the Account.
Allocate Account
You can assign a new Account to a user group. To assign a new Account, follow the steps below.
Click the All Services > Management > ID Center menu. Go to the Service Home page of ID Center.
On the Service Home page, click the User Group menu. You will be taken to the User Group List page.
User Group List page, click the user group name to assign an Account. You will be taken to the User Group Details page.
On the User Group Details page, click the Account tab. The Account list will be displayed.
Click the Account Allocation button. You will be taken to the Account Allocation page.
On the Account Assignment page, after selecting the Account to assign and the permission set to apply to the Account, click the Complete button.
Category Required or notDetailed description Select Account Required Select Account to assign to user group - View hierarchy: Display Accounts in an organizational hierarchy
- View account list: Display Accounts in a list format
Select permission set Required Select the permission set to apply to the selected Account Table. Account Assignment ItemsinformationIf there is no IAM policy name that matches the custom policy name of the selected permission set, you cannot assign the Account.Verify that the added Account has been assigned to the user.
Delete user group
To delete a user group, follow the steps below.
- Click the All Services > Management > ID Center menu to go to the ID Center’s Service Home page.
- On the Service Home page, click the User Group menu. You will be taken to the User Group List page.
- Select at least one user group to delete from the user group list.
- After confirming the selected user group, click the Delete User Group button.
- You can also delete individually from the User Group Details page of the user group to be deleted.
- When the popup notifying that a user group has been deleted opens, click the Confirm button.
2.3 - Assigning ID Center Account
You can view the Account in ID Center and assign it to a user or user group.
Allocate Account
You can assign an Account to a user or a user group.
To assign an Account, follow these steps.
Click the All Services > Management > ID Center menu. Navigate to the Service Home page of ID Center.
On the Service Home page, click the Account Assignment menu. You will be taken to the Account List page.
On the Account List page, select the Account to assign, then click the Assign to User or Group button. You will be taken to the Assign to User or Group page.
Assign to Users or Groups on the Select Assignment Target area, after selecting the assignment target, click the Next button.
- You must select at least one user or user group to assign the account.
Category Requirement statusDetailed description Account to assign - Name of the Account to assign to a user or user group User Select Select the user to assign the account User group Select Select the user group to assign the Account Table. Account assignment target selection
- You must select at least one user or user group to assign the account.
In the Permission Set Selection area, select the permission set to apply to the Account, then click the Next button.
Category Required statusDetailed description Account to assign - Name of the Account to assign to a user or user group Permission set Required Select one or more permission sets to apply to the Account. Table. Account permission set selection itemsIn the Input Information Confirmation area, after verifying the assignment target and permission set, click the Complete button.
When the pop-up notifying the Account allocation opens, click the Confirm button.
Check account detailed information
You can view and manage detailed information about the account, its assignment targets, and permission sets.
To view the detailed information of the Account, follow these steps.
- Click the All Services > Management > ID Center menu. Navigate to the Service Home page of ID Center.
- On the Service Home page, click the Account Assignment menu. You will be taken to the Account Information page.
- Account Information page, click the Account for which you want to view detailed information. You will be taken to the Account Details page.
- Account Details page displays basic information, and consists of Basic Information, Assignment Target, Permission Set tabs.
Basic Information
You can view the basic information of the Account.
| Category | Detailed description |
|---|---|
| Account name | Account name |
| Account ID | Account ID |
| constructor | User who created the Account |
| Creation date | Account creation date and time |
| Editor | User who modified the Account |
| Modification date and time | Date and time the account was modified |
allocation target
You can view and manage the users and user groups assigned to an Account.
| Category | Detailed description |
|---|---|
| Unassign | Cancel the Account assignment for the selected user or user group
|
| More > Add Permission Set | Add a permission set to the selected Account
|
| Assign to user or group | Assign the selected Account to a new user or user group
|
| Allocation target name | Name of the allocation target |
| Target type | Type of assignment target (user, user group) |
| Permission set | Number of permission sets applied to the Account
|
Permission Set
You can check the permission sets applied to the Account and, if necessary, exclude them.
| Category | Detailed description |
|---|---|
| Exclude permission set | Exclude the selected permission set from the Account
|
| Permission set name | Name of the permission set |
| Explanation | Description of the permission set |
| Modification date and time | Date and time the permission set was last modified |
Add Permission Set
You can add a permission set to an account assigned to a user or user group.
To add a permission set to an Account, follow these steps.
Click the All Services > Management > ID Center menu. Go to the Service Home page of ID Center.
On the Service Home page, click the Account Assignment menu. You will be taken to the Account List page.
On the Account list page, click the Account to assign. You will be taken to the Account details page.
On the Account Details page, click the Allocation Target tab. The allocation target list will be displayed.
After selecting the assignment target to which you want to add a permission set from the assignment target list, click the More > Add Permission Set button. You will be taken to the Add Permission Set page.
Add Permission Set From the permission set list on the page, select the permission set you want to add, then click the Done button.
Category Required statusDetailed description allocation target - Name of the assignment target to add the permission set Applied permission set - Name of the permission set applied to the selected account Permission set Required Select one or more permission sets to apply to the Account - When selected, add to the Applied Permission Set item
Table. Add Permission Set ItemWhen the popup notifying that a permission set has been added opens, click the Confirm button.
Verify that the added permission set has been applied to the Account.
Add assignment to user or group
You can assign an additional Account to new users or user groups.
To assign an Account to a new user or user group, follow these steps.
Click the All Services > Management > ID Center menu. Go to the Service Home page of ID Center.
On the Service Home page, click the Account Assignment menu. You will be taken to the Account List page.
On the Account List page, click the Account to assign. You will be taken to the Account Details page.
On the Account Details page, click the Allocation Target tab.
In the Assignment Target tab, click the Assign to User or Group button. You will be taken to the Assign to User or Group page.
After selecting the allocation target in the Select Allocation Target area, click the Next button.
- You must select at least one user or user group to assign the Account to.
Category Whether requiredDetailed description Assigned user - Current user name assigned to the Account User Select Select the user to assign to the Account - When selected, add to the Assigned User field
- To create a new user, refer to Create User
- If the user you want to add does not exist when linking with AD, add the user in the AD provider and go to the ID Center Settings > Credential Source page to perform synchronization
Assigned user group - Current user group name assigned to the Account User group Select Select the user group to assign the Account - When selected, add to the Assigned User Group item
Table. Account assignment target selection
- You must select at least one user or user group to assign the Account to.
In the Permission Set Selection area, select the permission set to apply to the Account, then click the Next button.
Category Required statusDetailed description Permission set Required Select one or more permission sets to apply to the Account Table. Account permission set selection itemsIn the Input Information Confirmation area, after checking the assignment target and permission set, click the Complete button.
When the pop-up notifying the Account allocation opens, click the Confirm button.
Cancel Account Assignment
To cancel an Account assignment for a user or user group, follow these steps.
- Click the All Services > Management > ID Center menu. You will be taken to the Service Home page of ID Center.
- On the Service Home page, click the Account Assignment menu. You will be taken to the Account List page.
- On the Account List page, click the Account to assign. You will be taken to the Account Details page.
- On the Account Details page, click the Allocation Target tab. The allocation target list is displayed.
- After selecting the assignment target to cancel the Account assignment from the assignment target list, click the Cancel Assignment button.
- When the popup notifying that the Account allocation has been canceled opens, click the Confirm button.
2.4 - Managing ID Center Permission Sets
You can view and manage the permission sets of the ID Center.
Create Permission Set
You can create a permission set and add it to ID Center. To create a permission set, follow these steps.
Click the All Services > Management > ID Center menu. Go to the Service Home page of ID Center.
On the Service Home page, click the Permission Set menu. You will be taken to the Permission Set List page.
On the Permission Set List page, click the Create Permission Set button. You will be taken to the Create Permission Set page.
On the Create Permission Set page, after entering the basic information in the Basic Information Input area, click the Next button.
Category Required statusDetailed description Permission set name Required Enter the permission set name - using English letters, numbers, and special characters (
+=-_@,.) within 32 characters
description Select Enter a description of the permission set within 1,000 characters Maximum session duration Required Enter the session time allowed for the user when accessing the Console via the Access Portal - Select time: 1 hour, 2 hours, 4 hours, 8 hours, 12 hours
- Enter duration: can be entered in seconds ranging from 3,200 seconds (1 hour) to 43,200 seconds (12 hours)
Table. Permission set basic information items- using English letters, numbers, and special characters (
Permission Set Settings area, select the policy to use and configure the policy, then click the Next button.
Category Required statusDetailed description Default policy Selection Connect the default policies offered by the Samsung Cloud Platform Console - After selecting the Use item, select the default policy to associate with the permission set from the list
Custom policy Select Connect a custom policy created under the Account - Select the Use item, then directly enter the custom policy to attach to the permission set
- The permission set cannot be applied to Accounts that lack an IAM policy name matching the entered custom policy name
Inline policy Select Directly set the policies to apply to the permission set - Use after selecting the item, configure according to the policy setting mode
- Default mode: Configure using the mode provided by the Console. Refer to 인라인 정책 생성하기
- JSON mode: Directly configure using the JSON Editor
Table. Permission set configuration itemsguideA permission set can be linked with up to 20 policies in total, combining default and custom policies.In the Input Information Confirmation area, after reviewing the basic information and permission policies of the permission set, click the Create button.
When the popup notifying the creation of a permission set opens, click the Confirm button.
View permission set details
You can view and manage detailed information about permission sets, user groups, and account information. To view the detailed information of a permission set, follow these steps.
- Click the All Services > Management > ID Center menu. Go to the Service Home page of ID Center.
- On the Service Home page, click the Permission Set menu. You will be taken to the Permission Set List page.
- On the Permission Set List page, click the permission set whose details you want to view. You will be taken to the Permission Set Details page.
- The Permission Set Details page displays basic information and consists of Basic Information, Permissions, Account tabs.
Basic Information
You can view and edit the basic information of the permission set.
| Category | Detailed description |
|---|---|
| Delete permission set | Delete permission set button |
| Service | Service name |
| Resource Type | Resource Type |
| SRN | Unique resource ID in Samsung Cloud Platform |
| Resource name | resource name
|
| Resource ID | Unique Resource ID |
| constructor | User who created the service |
| Creation date | Service creation timestamp |
| Editor | User who edited the service information |
| Modification date and time | Date and time the service information was modified |
| Permission set name | Policy name |
| Maximum session duration | Session time allowed for users when entering the Console via Access Portal
|
| description | Description of the policy name
|
Permission
You can view and manage policies attached to a permission set.
| Category | Detailed description |
|---|---|
| Default policy | Default policies attached to the permission set
|
| Custom policy | Custom policies attached to the permission set
|
| Inline policy | Service name of the inline policy attached to the permission set
|
Account
You can view and edit the Account information of a permission set.
| Category | Detailed description |
|---|---|
| Account name | Account name |
| Account ID | Account ID |
| Account email |
Connect the default policy
You can attach a new default policy to a permission set. To link the default policy, follow the steps below.
Click the All Services > Management > ID Center menu. Go to the Service Home page of ID Center.
On the Service Home page, click the Permission Set menu. You will be taken to the Permission Set List page.
On the Permission Set List page, click the permission set to which you want to attach the default policy. You will be taken to the Permission Set Details page.
On the Permission Set Details page, click the Permission tab.
In the Default Policy area, click the Policy Connection button. Navigate to the Default Policy Connection page.
On the Basic Policy Connection page, select the policy you want to link from the default policy list, then click the Complete button.
Category RequiredDetailed description Linked default policy - Default policy name attached to the permission set Default policy connection Required Select the default policy to attach to the permission set - When selected, add to the Connected Default Policy item
Table. Attach default policy to permission set itemWhen the popup notifying the policy connection opens, click the Confirm button.
Connecting a custom policy
You can attach a new custom policy to a permission set. To link a custom policy, follow these steps.
Click the All Services > Management > ID Center menu. Go to the Service Home page of ID Center.
On the Service Home page, click the Permission Set menu. You will be taken to the Permission Set page.
Permission Set List page, click the permission set to attach a custom policy. You will be taken to the Permission Set Details page.
On the Permission Set Details page, click the Permission tab.
In the Custom Policy area, click the Policy Connect button. You will be taken to the Custom Policy Connect page.
On the Custom Policy Connection page, select the policy you want to connect from the custom policy list, then click the Done button.
Category Whether requiredDetailed description Attached custom policy - Default policy name attached to the permission set Custom policy association Required Directly enter a custom policy to attach to the permission set - When selected, add to the Attached Custom Policy item
- Click the Add button to further enter custom policies to attach
Table. Attach a custom policy to a permission set itemWhen the popup notifying the policy connection opens, click the Confirm button.
Create Inline Policy
You can modify the inline policy attached to the permission set. To modify the inline policy, follow these steps.
Click the All Services > Management > ID Center menu. Go to the Service Home page of ID Center.
On the Service Home page, click the Permission Set menu. You will be taken to the Permission Set List page.
Permission Set List page, click the permission set to edit the inline policy. You will be taken to the Permission Set Details page.
On the Permission Set Details page, click the Permission tab.
In the Inline Policy area, click the Create Policy button. You will be taken to the Create Inline Policy page.
Inline Policy Creation page’s Permission Settings area, after selecting the policy configuration method and the service to apply, click the Next button.
Category Required statusDetailed description Basic mode/JSON mode Required Select the policy configuration method - Default mode: Configure using the mode provided by the Console
- JSON mode: Configure directly using the JSON Editor
Service Required Select the service to set the policy - Add Service: Add a service to configure the policy
Table. Inline policy creation - Service configurationCautionThe policy settings provide Basic Mode and JSON Mode.
- After writing in Basic Mode and entering JSON Mode or navigating the screen, services with duplicate control requirements are consolidated into one, and services that have not completed configuration are deleted.
- If the content written in JSON mode does not conform to JSON format, you cannot switch to basic mode.
After setting the permissions, click the Next button.
- To register an individual resource as an applied resource, refer to Register an individual resource as an applied resource and proceed.
Category Whether requiredDetailed description Control type Required Select policy control type - Allow policy: A policy that permits the defined permissions
- Deny policy: A policy that denies the defined permissions
Action Required Select actions provided for each service - Actions that can select individual resources are shown in purple
- Actions that target all resources are shown in black
- Add Action Directly: You can specify multiple actions at once using the wildcard
*
Applied resource Required Resources to which the action applies - All resources: Apply to all resources for the selected action
- Individual resources: Apply only to the specified resources for the selected action
- Individual resources are only available when selecting the purple action that allows individual resource selection
- Click the Add resource button to specify target resources by resource type
- For more details on Add resource, see Register individual resources as applicable resources
Authentication Type Required Authentication method of the user target to which the policy will be applied - All authentication: Applied regardless of authentication method
- Authentication key authentication: Applied to users authenticated with an authentication key
- Temporary key authentication, Console login: Applied to users with temporary key authentication or Console login
Applied IP Required IP allowed for policy application - Custom IP: User registers and manages the IP directly
- Applied IP: IP that the user registers directly, to which control policies are applied; can be registered as an IP address or range
- Excluded IP: IP to be excluded from Applied IP, can be registered as an IP address or range
- All IPs: No IP access restriction
- Access is allowed for all IPs, but if exceptions are needed, register Excluded IP to restrict access for the specified IPs
Additional condition Select Add conditions for attribute-based access control (ABAC) - Condition Key: Select from Global condition keys and service condition key list
- Qualifier: Default value, arbitrary value in the request, all values in the request
- Operator: Bool, Null
- Value: True, False
Table. Policy Creation - Permission Settings
- To register an individual resource as an applied resource, refer to Register an individual resource as an applied resource and proceed.
After reviewing the information entered on the Check Input Information page, click the Complete button.
When the popup notifying a policy change opens, click the Confirm button.
Register individual resources as applied resources
Permission Settings allows you to register individual resources as applied resources. To register individual resources as applied resources, follow these steps.
- In the action selection, select an action that can select individual resources.
- Actions that allow individual resource selection are displayed in purple.
- In Applied Resource, click Individual Resource.
- Click the Add Resource button. The Add Resource popup opens.
Category Whether requiredDetailed description Self-type Required Select the type of resource to add SRN - Unique resource ID in Samsung Cloud Platform - Automatically updated according to the input fields below
Account Required Account ID Settings - Current Account: Current Account ID is auto-filled and cannot be edited
- All Accounts: Add to all Accounts (not recommended)
- Manual Input: Manually enter the Account ID using lowercase English letters and numbers, up to 100 characters (wildcard input not allowed)
Region Select Enter the resource’s region information directly within 100 characters - Select All When checked, add resources from all regions
Resource ID Required Enter the resource ID to add directly, up to 100 characters - Select All when checked adds all resources of that resource type
Table. Policy creation - Register individual resources as applicable resources
Delete Permission Set
To delete a permission set, follow these steps.
- Click the All Services > Management > ID Center menu. Go to the Service Home page of ID Center.
- On the Service Home page, click the Permission Set menu. You will be taken to the Permission Set List page.
- Select at least one permission set to delete from the permission set list.
- After verifying the selected permission set, click the Delete button.
- You can also delete individually from the Permission Set Details page of the permission set to be deleted.
- When the popup notifying the deletion of the permission set opens, click the Confirm button.
2.5 - Using the ID Center Access Portal
You can access and use Account resources through the Access Portal.
- To use the Access Portal, you must be registered as a user in the ID Center of the Samsung Cloud Platform Console.
- For detailed information on user registration, see 사용자 생성하기.
Log in to Access Portal for the first time
To log in to Access Portal for the first time, follow these steps.
- Use the Access Portal URL to navigate to the login page.
- The Access Portal login URL is activated when applying for ID Center and can be found on the ID Center Settings page.
- A firewall request may be required depending on the user environment.
- On the login page, enter username and password.
Select the method to send the verification code, and click the Send Verification Code button.
Enter the received verification code and click the Next button. 4. Identity verification for multi-factor authentication (MFA) A popup window opens.
Identity verification for multi-factor authentication (MFA) After completing personal information entry and terms verification for MFA in the popup window, click the Confirm button. 5. Change Password popup window opens.
Item Required statusExplanation Auto-input prevention Required After entering the characters displayed in the image into the input field, click the Confirm button. mobile phone number Required Enter mobile phone number - Enter the mobile phone number and click the Authenticate button to issue a verification code
- Enter the verification code received on the mobile phone and click the Confirm button
- If the verification code is valid, identity verification is completed
email Required Enter an email to be used for identity verification, within 60 characters - For accounts whose credential source is linked as AD type, select Provide email information registered on the AD side as Read-Only
Region Required Select region for personal data collection Collection and Use of Personal Information Required After reviewing the terms for the collection and use of personal information, check I agree. Table. Identity verification items for multi-factor authentication (MFA)Password Change In the popup window, after entering the password change information, click the Confirm button. 6. The Access Portal terms of use popup window opens.
Item required statusExplanation Existing password Required Enter the password received from the ID Center administrator New password Required Enter manually by referring to the password creation rules. Confirm password Required Re-enter the password Table. Password change itemsPassword creation rules- It must contain at least one uppercase letter (English), one lowercase letter (English), one digit, and one special character (
!@#$%&*^) each. - The length is 9 to 20 characters.
- You cannot use the ID as a password.
- You cannot use the same character more than three times.
- Passwords that are easy to guess cannot be used.
- You cannot use a password that was recently used.
- You cannot use consecutive characters or numbers of four or more characters.
- The password change interval is 90 days.
- It must contain at least one uppercase letter (English), one lowercase letter (English), one digit, and one special character (
Access Portal After reviewing the terms of use, click the Confirm button. 7. Access Portal page.
Access Portal Log in
- If you are accessing the Access Portal for the first time, refer to Access Portal 최초 접속하기, apply for the Access Portal URL first, and then log in.
To log in to the Access Portal, follow these steps.
- Enter the Access Portal access URL received via service request in the browser’s address bar. 1. Go to the Access Portal login page.
- On the login page, enter the username and password.
- Select the method to send the verification code, and click the Next button. 3. Navigate to the verification code confirmation page.
- If you did not receive the verification code or it has expired, click the Resend verification code button to request the code again.
- Enter the received verification code and click the Login button. 4. Go to the Access Portal page.
- If you lose your ID or password, click the Find Password button, then you can change it using the email or phone number registered in the Access Portal.
- For accounts whose credential source is linked as AD type, if Password Management is set to Customer AD Management, Password Recovery is restricted. * Contact the ID Center administrator.
- Please enter the password and verification code correctly. * If you enter the password or verification code incorrectly five or more times, the account will be locked for security.
- If the account is locked, provide the locked account information to the user.
Using Access Portal
When you log in to Access Portal, you will be taken to the Access Portal page. Access Portal page consists of Account tab and My Info tab.
Account
You can verify the Account and permission set assigned to the user, and access the Samsung Cloud Platform Console using the Account’s permission set.
Token issuance can be used to obtain a temporary token for accessing the Account.
| Category | Detailed description |
|---|---|
| Account list | The Account name and ID assigned to the user, and the Root user email information
|
| Permission Set List | Permission set applied to the Account
|
My Info.
Verify the user’s basic information, and, if needed, modify the user’s description and options.
| Category | Detailed description |
|---|---|
| Username | User’s name |
| 이메일 | 본인 인증으로 사용할 이메일
|
| 휴대전화 번호 | 본인 인증으로 사용할 휴대전화 번호
|
| 마지막 로그인 | 사용자가 마지막으로 로그인한 일시 |
| 비밀번호 | Date and time of the last password change
|
| Password reuse restriction | Number of recent passwords that cannot be set as the password
|
| time zone | User time zone (Time Zone)
|
| Terms and Conditions | Agreement to terms
|
- If you enter the password incorrectly 5 or more times, you will be automatically logged out.
- It must contain at least one uppercase letter (English), one lowercase letter (English), one digit, and one special character (
!@#$%&*^). - The length is 9 to 20 characters.
- You cannot use the ID as a password.
- You cannot use the same character more than three times.
- You cannot use passwords that are easy to guess.
- You cannot use a recently used password.
- Consecutive characters or numbers of four or more characters cannot be used.
- The password change interval is 90 days.
Account
You can verify the Account and permission set assigned to the user, and either access the Samsung Cloud Platform Console using the Account’s permission set or obtain a temporary token for access.
| Category | Detailed description |
|---|---|
| Account list | Account name and ID assigned to the user, and Root user email information
|
| Permission Set List | Permission set applied to the Account
|
Issue temporary key
You can obtain a temporary key to access the Samsung Cloud Platform Console from the Access Portal. To obtain an API key, follow the steps below.
- Enter the Access Portal connection URL received via service request in the browser’s address bar. 1. Navigate to the Access Portal login page.
- Log in to the Access Portal. 2. Go to the Access Portal page.
- On the Access Portal page, click the Account tab. 3. Go to the Account tab.
- In the permission set list, click the Issue Token button for the permission set that will receive a token. 4. A popup window notifying the issuance of a temporary key opens.
- After checking the account name, click the Confirm button. 5. ID Center temporary key issuance A popup window opens.
- After checking the token issuance information, click the Confirm button.
- ID Center credential issuance Please note that the information in the popup cannot be reviewed again, so be careful.
- If you lose the token issuance information, you must reissue the token.
3 - Release Note
ID Center
- If you select AD (Active Directory) as the credential source, you can configure the password management method.
- Client AD Management: Manage passwords in the client AD
- ID Center Management: Users manage passwords directly in the Access Portal
- When applying for the ID Center, we also provide the Access Portal access URL.
- We have changed the procedure so that the Access Portal URL, which was previously requested through a service request, is now provided together when applying for the ID Center.
- After completing the ID Center application, you can view the Access Portal connection URL on the ID Center settings screen.
- You can select AD (Active Directory) as the credential source.
- Using AD (Active Directory), users can directly manage credential sources.
- We have officially launched the ID Center service.
- You can create permission policies for each service and assign accounts and policies linked to the Organization service to users, enabling management of tasks according to each user’s permissions.
- You can strengthen security so that only authorized ID Center users can access through the Access Portal.