This is the multi-page printable view of this section. Click here to print.
IAM
- 1: Overview
- 2: How-to Guides
- 2.1: User Group
- 2.2: User
- 2.3: Policy
- 2.4: Role
- 2.5: Credential Providers
- 2.6: My Info.
- 2.7: JSON Writing Guide
- 3: API Reference
- 4: CLI Reference
- 5: Release Note
1 - Overview
Service Overview
IAM(Identity and Access Management) is a service that controls the range of access to services and resources by verifying the identity of users registered on the Samsung Cloud Platform and granting access permissions. Administrators can create and manage users, permission groups, policies, and role items in detail through IAM.
Users can create new users if they are the Root user or have been granted user registration authority by the Root user. Policies cannot be assigned directly to users; instead, users are added to user groups, and policies are attached to those groups, granting specific users permission to access or manage resources. In other words, the tasks a user can perform within an account depend on which user group they belong to and which policies are attached to that group.
Provided features
IAM provides the following features.
- User Authentication: Provides multi-factor authentication (MFA; Multi-Factor Authentication) for Console and API access. Additionally, it blocks unauthorized access by allowing access only from permitted IP ranges.
- Permission Management: Add users to user groups based on tasks, limiting their access permissions to the parts required for the work. Administrators can manage and assign custom policies.
- Role Management: You can switch from your own account to another role to access the Account.
- Credential Provider Offering: You can access and use the Account within the Console via the credential provider.
- Access Control Policy Management: Create access control policies for each service regarding control/action/resource type and authentication method/IP. This enables the application of least‑privilege policies when granting access to cloud resources, allowing user‑based access control.
Component
Users can create and manage user groups, users, policies through Identity and Access Management(IAM).
User group
In the user group, you can register users and add policies. You can create user groups tailored to each task, register users, and attach appropriate policies to grant the same permissions to users and manage them.
User
Administrators can create users and add them to user groups. They can generate a user’s password automatically or manually, and provide the user with account-specific login information.
User Policy
You can create policies for the functions provided by each service. Access control can be managed based on control type, applied resources, and authentication type.
role
It is a virtual user account with separate permissions, not affected by the permissions of the original user account.
Preceding Service
Identity and Access Management(IAM) has no prerequisite service.
2 - How-to Guides
Users can create and manage User Groups, Users, Policies, My Info. through Identity and Access Management(IAM).
Getting Started with IAM
- Click the All Services > Management > IAM menu. Go to the Service Home page of IAM.
- On the Service Home page, My Info., Account information, Quick Link, and IAM status are provided as widgets.
Category Detailed description My Info. User name, email, and user group information accessed in the Samsung Cloud Platform Console. Click the More button to go to the My Info page. Account information Provides the user’s Account ID, Account alias, and IAM user login URL if the user is an IAM user - Account ID: User’s Account ID
- Account alias: A name assigned to the Account. It allows you to attach an alias for easier identification and management of the Account
- Edit: If you edit the Account alias, the IAM user login URL that uses the current alias will no longer be usable. See Edit Account Alias
- Delete: If you delete the Account alias, IAM users will no longer be able to log in using the Account alias. See Delete Account Alias
- IAM user login URL can be used to log in without entering Account information
- For more details related to the Account, see Account see
Quick Link Description of My Info. and My Info. button navigates to the page. - For more details about My Info., see My Info.
IAM status Counts of user groups, users, and policies Table. IAM Service Home widget items
Modify Account Alias
You can edit the Account alias in the Service Home > Account widget of IAM.
- Click the All Services > Management > IAM menu. Go to the Service Home page of IAM.
- On the Service Home page, in the Account widget, click the Edit button of the Account alias. You will be taken to the Edit Account Alias popup.
- Edit Account Alias After reviewing the instructions in the popup window, edit the Account alias and click the Confirm button.ReferenceWhen modifying an Account alias, the Console login URL that uses the current alias will no longer be usable.
After making changes, if the alias is not used by another account, you can reuse the alias you were previously using.
Delete Account Alias
You can delete an Account alias from the IAM Service Home > Account widget.
- Click the All Services > Management > IAM menu. Navigate to the Service Home page of IAM.
- On the Service Home page, in the Account widget, click the Delete button of the Account alias. You will be taken to the Delete Account alias popup.
- Account Alias Deletion After reviewing the instructions in the popup window, click the Confirm button.Caution
If you delete the account alias, IAM users can no longer log in using the account alias.
- The IAM login URL is also unavailable.
2.1 - User Group
Users can create the service by entering the required information for a user group and selecting detailed options through the Samsung Cloud Platform Console.
Create user group
To create a user group, follow these steps.
All Services > Management > IAM menu, click it. 1. Navigate to the Service Home page of Identity and Access Management (IAM).
On the Service Home page, click the User Group menu. 2. Navigate to the User Group List page.
On the User Group List page, click the Create User Group button. 3. Navigate to the Create User Group page.
- Enter the required information in the Basic Information Entry, Add User, Policy Connection, and Additional Information Entry areas.
Category Required statusDetailed description User group name Required Enter user group name - using Korean, English, numbers, and special characters (
+=,.@-_) as a value of 3 to 24 characters
Explanation Select Description of the user group name - Detailed description of the user group name, up to 1,000 characters allowed
User Select User to add to the user group - The list of users registered in the Account is displayed, and when a checkbox is selected, the selected user’s name appears at the top of the screen
- At the top of the screen, click the X button for each user, or uncheck the checkbox in the user list to cancel the selection of the selected user
- If there are no users to add, you can click User Creation at the bottom of the user list to first register a new user
- After user creation is complete, refresh the user list, and once the user appears, you can select the user
- For detailed information on creating a user group, see Create User for reference
policy Select Policy to attach to the user group - The list of policies registered in the Account is displayed, and when a checkbox is selected, the name of the selected policy appears at the top of the screen
- At the top of the screen, you can click the X button for each policy, or deselect the checkbox in the policy list to cancel the selection of a policy
- If there is no policy to attach, you can click Create Policy at the bottom of the policy list to first register a new policy
- After creating the policy, refresh the policy list; once the policy appears, you can select it
- For detailed information on creating policies, see Create Policy for reference
tag Select Tags to add to the user group - can be added up to a maximum of 50 per resource
Table. User group creation information input fields - using Korean, English, numbers, and special characters (
- Enter the required information in the Basic Information Entry, Add User, Policy Connection, and Additional Information Entry areas.
Create button, click it.
When the popup indicating creation opens, click the Confirm button. 5. Navigate to the User Group List page.
Check user group detailed information
In the user groups, you can view and edit the list of user groups and their detailed information. The User Group Detail page consists of Basic Information, Users, Policies, Tags tabs.
To view detailed information of the user group service, follow these steps.
- All Services > Management > IAM Click the menu. 1. Go to the Service Home page of Identity and Access Management(IAM).
- On the Service Home page, click the User Group menu. 2. Go to the User Group List page.
- User Group List page, click the user group name to view its details. 3. Go to the User Group Details page.
- User Group Detail page displays basic information, and consists of Basic Information, Users, Policies, Tags tabs.
Basic Information
User Group List page allows you to view the basic information of the selected user group and, if necessary, edit the user group name and description.
| Category | Detailed description |
|---|---|
| service | Service Name |
| Resource Type | Resource Type |
| SRN | Unique resource ID in Samsung Cloud Platform |
| Resource name | Resource name
|
| Resource ID | Unique Resource ID |
| Constructor | User who created the service |
| Creation date and time | Service creation date and time |
| Modifier | User who edited the service information |
| Modification date and time | Date and time the service information was modified |
| User group name | Name of the user group |
| Explanation | Description of the user group name |
User
User Group List page lets you view the users included in the selected user group and, if needed, add or delete users.
| Category | Detailed description |
|---|---|
| Exclude | Exclude users from the user group
|
| Add user | Add another user to the user group
|
| Username | User’s name |
| User group | Number of user groups the user belongs to
|
| Creation date and time | User creation timestamp |
Policy
User Group List page allows you to view the policy attachment information of the selected user group, and, if necessary, modify the policy attachment information for the user group.
| Category | Detailed description |
|---|---|
| Disconnect | Disconnect the selected policy
|
| Policy connection | Connect a new policy to the user group
|
| Policy name | Policy name |
| Policy Type | Type of attached policy
|
| Explanation | Explanation of the policy |
| Creation date and time | Policy creation timestamp |
| Modification date and time | Policy modification date and time |
Tag
User Group List page allows you to view the tag information of the selected user group, and add, modify, or delete it.
| Category | Detailed description |
|---|---|
| Tag list | Tag list
|
Manage user groups
You can rename a user group, add users, attach policies, or modify tags. If you need to manage user groups, you can perform tasks on the User Group List or User Group Details page.
Edit Basic Information
You can edit the name and description of a user group. To modify the name and description of a user group, follow the steps below.
- Click the All Services > Management > IAM menu. 1. Navigate to the Service Home page of Identity and Access Management (IAM).
- On the Service Home page, click the User Group menu. 2. Go to the User Group List page.
- On the User Group List page, click the user group name whose basic information you want to edit. 3. Navigate to the User Group Details page.
- After confirming the basic information to be edited on the User Group Details page, click the Edit button.
- User Group Name: You can change the user group name. * Edit button click opens the Edit User Group Name popup.
- Description: You can edit the description of a user group. * Edit button click opens the Edit Description popup window.
- After editing the content to be changed in the popup window, click the Confirm button.
Manage Users
You can add or remove users from a user group.
Add User
To add a user to a user group, follow the steps below.
Click the All Services > Management > IAM menu. 1. Go to the Service Home page of Identity and Access Management (IAM).
On the Service Home page, click the User Group menu. 2. Go to the User Group List page.
User Group List page, click the user group name to which you want to add a user. 3. Navigate to the User Group Details page.
On the User Group Details page, click the User tab. 4. Go to the User tab.
In the User tab, click the Add User button. 5. Go to the Add User page.
On the Add User page, select the user you want to add from the User list, then click the Complete button. 6. A popup window notifying the addition of a user opens.
Category Detailed description Added user Display users included in the user group User Select users to add to the user group from the list of users registered in the Account - When the checkbox is selected, the name of the selected user group is displayed at the top of the list
- You can remove the added user by clicking the X button next to the user’s name at the top of the list, or by unchecking the checkbox in the user list
- If the desired user is not present, you can click the Create User item at the bottom of the user list to register a new user first
- After creating the user, refresh the user list and then you can select the newly created user
- For detailed information on creating users, see Create User
Table. User addition detailed itemsIn the popup that notifies you of adding a user, click the Confirm button. 7. You can view the added user in the list of the User tab.
Exclude user
To exclude a user from a user group, follow these steps.
- Click the All Services > Management > IAM menu. 1. Navigate to the Service Home page of Identity and Access Management(IAM).
- On the Service Home page, click the User Group menu. 2. Navigate to the User Group List page.
- User Group List page, click the user group name to exclude the user. 3. Navigate to the User Group Details page.
- On the User Group Details page, click the User tab. 4. Go to the User tab.
- In the User tab, select the user to exclude from the displayed user list, then click the Exclude User button.
- The selected user is excluded and the user list is refreshed.
Manage Policies
You can attach a policy to a user group or detach an attached policy.
Connect Policy
To attach a policy to a user group, follow these steps.
Click the All Services > Management > IAM menu. 1. Go to the Service Home page of Identity and Access Management(IAM).
On the Service Home page, click the User Group menu. 2. Navigate to the User Group List page.
User Group List page, click the user group name to which you want to attach the policy. 3. Navigate to the User Group Details page.
On the User Group Details page, click the Policy tab. 4. Go to the Policy tab.
In the Policy tab, click the Attach Policy button. 5. Navigate to the Policy Attachment page.
After selecting the policy to attach to the user group, click the Complete button. 6. A popup window notifying the policy connection opens.
Category Detailed description Linked policy Display policies directly attached to the user group policy Select a policy to attach to the user group from the list of policies registered in the Account - When you select the checkbox, the selected policy name is displayed at the top of the list
- You can cancel the policy by clicking the X button of the added policy name at the top of the list, or by unchecking the checkbox in the policy list
- If there is no policy to attach, you can first create a new policy by clicking the Create Policy item at the bottom of the policy list
- After creating the policy, refresh the policy list and you can select the newly created policy
- For detailed information on creating policies, see Create Policy reference
Table. Policy Connection DetailsIn the popup that notifies about policy linking, click the Confirm button. 7. You can view the attached policy in the list of the policy tab.
Disconnect policy
To detach the policies linked to a user group, follow these steps.
- All Services > Management > IAM Click the menu. 1. Navigate to the Service Home page of Identity and Access Management(IAM).
- On the Service Home page, click the User Group menu. 2. Go to the User Group List page.
- On the User Group List page, click the user group name to detach its policy connection. 3. Navigate to the User Group Details page.
- On the User Group Details page, click the Policy tab. 4. Go to the Policy tab.
- In the Policy tab, select the policy to disconnect from the displayed policy list, then click the Disconnect button.
- The selected policy is disconnected and the policy list is refreshed.
Manage Tags
You can edit the tags of a user group. To modify tags in a user group, follow these steps.
- All Services > Management > IAM Click the menu. 1. Navigate to the Service Home page of Identity and Access Management(IAM).
- On the Service Home page, click the User Group menu. 2. Go to the User Group List page.
- Click the user group name whose tag information you want to edit on the User Group List page. 3. Go to the User Group Details page.
- On the User Group Detail page, click the Tag tab. 4. Navigate to the Tag tab.
- In the Tag tab, click the Edit Tag button.
- After adding or editing tags, click the Save button. 6. A popup window notifying tag editing opens.
- You can modify the Key and Value of an already registered tag.
- You can click the Add Tag button to add a new tag.
- Click the X button before the added tag to delete that tag.
- Click the Confirm button. 7. You can view the edited tag information in the list.
Delete user group
To delete a user group, follow the steps below.
- All Services > Management > IAM Click the menu. 1. Navigate to the Service Home page of Identity and Access Management(IAM).
- On the Service Home page, click the User Group menu. 2. Navigate to the User Group List page.
- User Group List page, click the user group name you want to delete. 3. Navigate to the User Group Details page.
- On the User Group Details page, click the Delete User Group button.
- The user group is deleted, and you are redirected to the User Group List page.
To delete multiple user groups simultaneously, follow these steps.
- All Services > Management > IAM Click the menu. 1. Navigate to the Service Home page of Identity and Access Management(IAM).
- On the Service Home page, click the User Group menu. 2. Go to the User Group List page.
- Check the user groups to delete from the user group list.
- Check the selected user groups, and click the Delete button.
- The selected user groups are deleted and the User Group List page is refreshed.
2.2 - User
Users can create the service by entering the required policy information and selecting detailed options through the Samsung Cloud Platform Console.
Create User
Follow the steps below to create a user.
Click the All Services > Management > IAM menu. 1. Go to the Service Home page of Identity and Access Management (IAM).
Service Home on the page, click the User menu. 2. Navigate to the User List page.
On the User List page, click the Create User button. 3. Go to the User Creation page.
On the User Creation page, after entering the required information in the Basic Information Input, Permission Settings, and Additional Information Input sections, click the Create button. 4. A popup window announcing user creation opens.
When the checkbox is selected, the selected user group name is displayed at the top of the listCategory RequiredDetailed description Username Required Using the user’s name - English letters, numbers, and special characters (
+=,.@-_), enter a value within 64 characters
Explanation Selection Description of the username - Enter a detailed description of the username, up to 1,000 characters
Password Required There are two ways to generate a password for user use. - Automatic generation: The password is generated automatically and can be viewed at the time of user creation
- Direct input: The password is created manually
Password change settings Selection Password change setting at first user login - If not set, the user cannot change the password at first login, but can reset it via Password Reset
- For details on password reset, see 비밀번호 수정하기 for reference
Permission configuration method Required - Add to User Group: Select a user group from the list of user groups registered in the Account to include the user
- Click the **X** button next to the added user group name at the top of the list, or uncheck the checkbox in the user group list to cancel that user group
- After creating a user group, refresh the user group list and then you can select the newly created user group
- **Copy Permissions**: Select a user to copy the policies attached to that user's user groups
- **Select User**: Choose one user from the list to copy policies
- **Permission Summary**: Displays the list of policies directly attached to the selected user or attached via user groups
- Tags can be added up to a maximum of 50 per resource
Table. User-generated information input itemsPassword creation rules- If you enter the password incorrectly five or more times, you will be automatically logged out.
- It must contain at least one each of uppercase letters (English), lowercase letters (English), digits, and special characters (
!@#$%&*^). - The length is 9 to 20 characters.
- You cannot use the ID as a password.
- You cannot use the same character more than three times.
- Passwords that are easy to guess cannot be used.
- Consecutive characters or numbers of four or more characters are not allowed.
- The password change cycle is 90 days.
- English letters, numbers, and special characters (
In the popup that notifies user creation, click the Create button. 5. IAM user login information The popup window opens.
After checking the IAM user login information, click the Confirm button. 6. Navigate to the User List page.
Category Detailed description Account ID Account ID value username Generated user name Password Generated user’s password - View icon can be clicked to check the password
IAM user login URL IAM user’s login URL information Excel download Download IAM user login information as an Excel file Email sending Send an Excel file containing IAM user login information via email - After clicking the button, enter the address to receive the email
Table. IAM user login information items
Check user detailed information
In the user section, you can view and edit the user list and detailed information. User Details page consists of Basic Information, User Groups, Permissions, API Keys, Tags tabs.
To view detailed information of the user service, follow the steps below.
- All Services > Management > IAM menu, click it. 1. Go to the Service Home page of Identity and Access Management (IAM).
- On the Service Home page, click the User menu. 2. User List page is opened.
- On the User List page, click the user name to view detailed information. 3. Navigate to the User Details page.
- User Details page displays basic information and consists of Basic Information, Users, Permissions, API Keys, Tags tabs.
Basic Information
User List page allows you to view the basic information of the selected user and, if needed, modify the user’s description and options.
| Category | Detailed description |
|---|---|
| Service | Service name |
| Resource Type | Resource Type |
| SRN | Unique resource ID in Samsung Cloud Platform |
| Resource name | resource name
|
| Resource ID | Unique Resource ID |
| Constructor | User who created the service |
| Creation date and time | Service creation date and time |
| Modifier | User who edited the service information |
| Modification date and time | Date and time the service information was modified |
| username | User’s name |
| Last login | The date and time the user last logged in |
| Explanation | Description of the username |
| Password | The date and time the password was last changed
|
| Password reuse restriction | Prevent reuse of recently used passwords
|
| Email verification status | |
| mobile phone number | Mobile phone number verification status |
User group
User List page lets you check the user groups registered to the selected user, and, if necessary, add or remove user groups.
| Category | Detailed description |
|---|---|
| Exclude | Exclude the user from the user group
|
| Add user group | Add the user to another user group
|
| User group name | Name of the user group |
| Linked policy | Number of policies linked to the user group
|
| Explanation | Description of the user group |
| Modification date and time | Date and time the user group was modified |
Permission
User List page allows you to view the selected user’s policy information, and you can add, modify, or delete it.
| Category | Detailed description |
|---|---|
| Disconnect | Disconnect the selected policy
|
| More | Direct connection can be removed or excluded from user groups
|
| Add permission | Connect the new policy to the user
|
| Policy Name | Policy name
|
| type | Policy types |
| Explanation | Explanation of the policy |
| Connection method | Policy connection method
|
| Modification date and time | Last policy modification date and time |
Authentication key
User List page allows you to view the authentication key information of the selected user.
| Category | Detailed description |
|---|---|
| Access Key | Authentication key information |
| Secret Vault | Whether to use encryption |
| Creation timestamp | Authentication key creation time |
| Expiration date and time | Authentication key expiration time |
| status | Authentication key usage (use/disable) |
tag
On the User List page, you can view the selected user’s tag information, and you can add, modify, or delete it.
| Category | Detailed description |
|---|---|
| Tag List | Tag list
|
Manage Users
You can change a user’s basic information, add user groups, or edit tags. If user management is required, you can perform tasks on the User List or User Details page.
Edit basic information
You can edit the user’s basic information.
Edit description
Follow these steps to edit the user’s description.
- Click the All Services > Management > IAM menu. 1. Go to the Service Home page of Identity and Access Management (IAM).
- Click the User menu on the Service Home page. 2. User List page is opened.
- On the User List page, click the user name whose description you want to edit. 3. User Details page will be opened.
- User Details page, view the description and click the Edit button. 4. Edit description The popup window opens.
- Edit Description After modifying the description in the popup window, click the Confirm button.
Change Password
To change a user’s password, follow these steps.
- All Services > Management > IAM menu, click it. 1. Go to the Service Home page of Identity and Access Management(IAM).
- On the Service Home page, click the User menu. 2. User List page.
- On the User List page, click the username whose password you want to edit. 3. Navigate to the User Details page.
- On the User Details page, click the Edit password button. 4. Password Reset The popup window opens.
- After changing the password, click the Confirm button. 5. IAM user login information The popup window opens.
- Password has the following two settings.
- Automatic Generation: A random password is generated.
- Manual entry: It is generated with a password entered directly by the user. * It must contain at least one each of uppercase letters (English), lowercase letters (English), digits, and special characters (
!@#$%&*^). * Please refer to the password creation rules.
- Password Change Setting: It is recommended to change the password upon first login after resetting the password.
- Password has the following two settings.
- It must contain at least one uppercase letter (English), one lowercase letter (English), one digit, and one special character (
!@#$%&*^). - The length is 9 to 20 characters.
- You cannot use the ID as a password.
- You cannot use the same character more than three times.
- You cannot use passwords that are easy to guess.
- You cannot use a password that was recently used.
- Consecutive characters or numbers of four or more characters are not allowed.
- The password change interval is 90 days.
- After checking the user-generated information, click the Confirm button. 6. Password change has been completed.
Category Detailed description Account ID Account ID value username Generated user name Password Generated user’s password - View icon can be clicked to check the password
IAM user login URL IAM user’s login URL information Excel download Download IAM user login information as an Excel file Email sending Send an Excel file containing IAM user login information via email - After clicking the button, enter the address to receive the email
Table. IAM user login information items
Restrict password reuse
Specify the number of password history entries to check so that recently used passwords cannot be reused. To restrict users from reusing passwords, follow the steps below.
- All Services > Management > IAM Click the menu. 1. Go to the Service Home page of Identity and Access Management (IAM).
- Click the User menu on the Service Home page. 2. Navigate to the User List page.
- User List page, click the username to modify the password reuse restriction. 3. Navigate to the User Details page.
- On the User Details page, click the Edit button for the secret password reuse restriction. 4. Password reuse restriction edit The popup window opens.
- Password reuse restriction: Select the number of recent password history entries as a number between 1 and 24.
- Click the Confirm button. 5. Password reuse restriction count has been changed.
User Group Management
You can add a user to a user group or remove a user from a user group.
Add user group
To add a user to a user group, follow the steps below.
All Services > Management > IAM click the menu. 1. Go to the Service Home page of Identity and Access Management (IAM).
Click the User menu on the Service Home page. 2. Go to the User List page.
On the User List page, click the user name to add to the user group. 3. Navigate to the User Details page.
On the User Details page, click the User Group tab. 4. Go to the User Group tab.
In the User Group tab, click the Add User Group button. 5. Navigate to the Add User Group page.
On the Add User Group page, select the user group you want to add from the User Group list, then click the Done button. 6. A popup window announcing the addition of a user group opens.
Category Detailed description Added user group Display user groups that contain the user Add to user group Select the user group to which you want to add a user from the list of user groups registered in the Account - When you select the checkbox, the name of the selected user group is displayed at the top of the list
- You can remove the user group by clicking the X button next to the added user group name at the top of the list, or by unchecking the checkbox in the user group list
- If the desired user group is not present, you can click the Create User Group item at the bottom of the user group list to register a new user group first
- After creating the user group, refresh the user group list and then you can select the newly created user group
- For detailed information on creating user groups, see 사용자 그룹 생성하기
Table. User Group Add Detailed ItemsIn the popup that notifies you of adding a user group, click the Confirm button. 7. You can view the added user group in the list of the User Group tab.
Exclude user group
To remove a user from a user group, follow these steps.
- Click the All Services > Management > IAM menu. 1. Go to the Service Home page of Identity and Access Management(IAM).
- Click the User menu on the Service Home page. 2. Navigate to the User List page.
- On the User List page, click the username to exclude from the user group. 3. Navigate to the User Details page.
- On the User Details page, click the User Group tab. 4. Navigate to the User Group tab.
- In the User Group tab, select the user group to exclude from the displayed list of user groups, then click the Exclude User Group button.
- The selected user group is excluded and the user group list is refreshed.
Manage Permissions
You can attach a policy or detach an attached policy to configure user permissions.
Add Permission
You can include users in a user group to attach a policy, or attach a policy directly to the user.
To add permissions to a user, follow the steps below.
All Services > Management > IAM Click the menu. 1. Go to the Service Home page of Identity and Access Management (IAM).
On the Service Home page, click the User menu. 2. Navigate to the User List page.
On the User List page, click the username to which you want to add permissions. 3. Navigate to the User Details page.
On the User Details page, click the Permissions tab. 4. Go to the Permissions tab.
Click the Add Permission button on the Permission tab. 5. Go to the Add Permission page.
After selecting the method to add permissions, enter the required information.
When you select the checkbox, the selected user group name is displayed at the top of the listCategory Required statusDetailed description Permission addition method Required - Add to user group: Select a user group from the list of user groups registered in the Account to include the user
- You can cancel the user group by clicking the **X** button of the added user group name at the top of the list, or by unchecking the checkbox in the user group list
- After creating the user group, refresh the user group list and you can select the newly created user group
- **Copy permissions**: Select a user to copy the policies attached to that user's user groups
- **User selection**: Choose one user from the list to copy policies
Table. Permission addition detailed items- Add to user group: Select a user group from the list of user groups registered in the Account to include the user
When you finish entering the information, click the Done button.
When the popup notifying that permission has been added opens, click the Confirm button. 8. You can view the attached policy in the list of the Permissions tab.
Revoke permission
You can detach policies attached to the user.
To detach the policy linked to a user, follow these steps.
- All Services > Management > IAM Click the menu. 1. Go to the Service Home page of Identity and Access Management(IAM).
- On the Service Home page, click the User menu. 2. Go to the User List page.
- On the User List page, click the username to revoke permissions. 3. Navigate to the User Details page.
- On the User Details page, click the Permissions tab. 4. Go to the Permissions tab.
- From the Policy list, select the policy to disconnect, then click the Disconnect button. 5. A popup window notifying of disconnection opens.
- After clicking the More button, you can either remove the directly linked policy or exclude only the user groups that include the user.
- After checking the policy information that is being disconnected, click the Confirm button. 6. The policy connection will be disconnected.
Manage Tags
You can edit the user’s tags. To edit tags in the user, follow the steps below.
- Click the All Services > Management > IAM menu. 1. Go to the Service Home page of Identity and Access Management(IAM).
- Click the User menu on the Service Home page. 2. Go to the User List page.
- On the User List page, click the user name whose tag information you want to edit. 3. Go to the User Details page.
- On the User Details page, click the Tag tab. 4. Go to the Tag tab.
- In the Tag tab, click the Edit Tag button.
- After adding or editing tags, click the Save button. 6. A popup window notifying tag modification opens.
- You can modify the Key and Value of an existing tag.
- Click the Add Tag button to add a new tag.
- Click the X button in front of the added tag to delete that tag.
- Click the Confirm button. 7.
Delete User
To delete a user, follow the steps below.
- All Services > Management > IAM Click the menu. 1. Go to the Service Home page of Identity and Access Management (IAM).
- Service Home on the page, click the User menu. 2. Navigate to the User List page.
- On the User List page, click the username to delete. 3. Go to the User Details page.
- On the User Details page, click the Delete User button.
- The user is deleted, and you are taken to the User List page.
To delete multiple users simultaneously, follow these steps.
- Click the All Services > Management > IAM menu. 1. Go to the Service Home page of Identity and Access Management (IAM).
- On the Service Home page, click the User menu. 2. Navigate to the User List page.
- Check the users to be removed from the user list.
- Verify the selected users and click the Delete button.
- The selected users are deleted and the User List page is refreshed.
2.3 - Policy
Users can create the service by entering the required policy information and selecting detailed options through the Samsung Cloud Platform Console.
Create Policy
To create a policy, follow these steps.
Click the All Services > Management > IAM menu. You will be taken to the Service Home page of Identity and Access Management (IAM).
On the Service Home page, click the Policy menu. You will be taken to the Policy List page.
On the Policy List page, click the Create Policy button. You will be taken to the Create Policy page.
After entering the required information in the Basic Information Input and Additional Information Input sections, click the Next button. You will be taken to the Permission Settings section.
Category RequiredDetailed description Policy Name Required Enter policy name - using Korean, English, numbers, and special characters (
+=,.@-_) as a value of 3 to 128 characters
Explanation Select Description of the policy name - Enter a detailed description of the policy name, up to 1,000 characters
tag Selection Tags to add to the policy - Tags can be added up to a maximum of 50 per resource
Table. Policy creation information input fields - basic information and additional information- using Korean, English, numbers, and special characters (
Select the service for which you want to set permissions. The permission settings will be displayed below the selected service name.
- You can select a desired service or configure all services.
Enter the required information in the Permission Settings area.
Category Required statusDetailed description Control Type Required Select policy control type - Allow Policy: A policy that permits the defined permissions
- Deny Policy: A policy that denies the defined permissions
Action Required Select actions provided per service - Actions that can select individual resources are shown in purple
- Actions that target all resources are shown in black
- Add Action Directly: Use the wildcard
*to specify multiple actions at once
Applied resource Required Resources to which the action applies - All resources: Apply the selected action to all resources
- Individual resource: Apply the selected action only to the specified resources
- Individual resources are only available when selecting a purple action that allows individual resource selection
- Click the Add resource button to specify target resources by resource type
- For more information about Add resource, see Register individual resources as applied resources
Authentication Type Required Authentication method of the user target to which the policy will be applied - All authentication: Apply regardless of authentication method
- Authentication key authentication: Apply to users authenticated with an authentication key
- Temporary key authentication, Console login: Apply to users with temporary key authentication or Console login
Applied IP Required IP that allows policy application - Custom IP: Users directly register and manage the IP
- Applied IP: IP to which the policy is applied, which users can register directly as an IP address or range
- Excluded IP: IP to be excluded from Applied IP, which can be registered as an IP address or range
- All IP: No IP access restriction
- Access is allowed for all IPs, but if exceptions are required, you can register Excluded IP to restrict access for those IPs
Additional condition Selection Add conditions for attribute-based access control (ABAC) - Condition Key: Select from the list of Global condition keys and service condition keys
- Qualifier: Default value, arbitrary value in the request, all values in the request
- Operator: Bool, Null
- Value: True, False
Table. Policy creation information input fields - Permission settings
In permission settings, Basic Mode and JSON Mode are provided.
- In Basic Mode, after writing and entering JSON Mode or navigating the screen, services with identical conditions are merged into one, and services that have not completed configuration are deleted.
- If the content written in JSON mode does not conform to JSON format, you cannot switch to basic mode.
- In the Permission Settings area, first select the service for which you want to set permissions.
- You can load an existing registered policy and create a policy using Load Policy. For detailed information about Load Policy, refer to Load Policy.
- Click the Next button. It navigates to the Check Input Information page.
- After reviewing the input information, click the Create button.
- When the popup notifying policy creation opens, click the Confirm button. You will be redirected to the Policy List page.
Load Policy
You can load an existing policy to refer to when creating a new policy. To load an existing policy, follow these steps.
- Click the All Services > Management > IAM menu. You will be taken to the Service Home page of Identity and Access Management (IAM).
- On the Service Home page, click the Policy menu. You will be taken to the Policy List page.
- On the Policy List page, click the Create Policy button. You will be taken to the Create Policy page.
- Enter the required information in the Basic Information Input, Additional Information Input sections.
- Click the Next button. Go to the Permission Settings area.
- Load Policy button, click it. Load Policy popup opens.
- The list of policies registered in the Account is displayed. Select the policy you want to load and click Confirm.
- The loaded policy is entered into the Permission Settings area and can be edited.
Register individual resources as applied resources
In the Permission Settings area, you can register individual resources as applied resources. To register an individual resource as an applied resource, follow these steps.
- Click the All Services > Management > IAM menu. Go to the Service Home page of Identity and Access Management (IAM).
- On the Service Home page, click the Policy menu. You will be taken to the Policy List page.
- On the Policy List page, click the Create Policy button. You will be taken to the Create Policy page.
- Basic Information Input, Additional Information Input Enter the required information in the area.
- Click the Next button. Navigate to the Permission Settings area.
- In the Permission Settings area, select the service to configure permissions.
- Select an Action that allows selecting individual resources in the Action selection.
- Actions that allow individual resource selection are displayed in purple.
- In Applied Resource, click Individual Resource.
- Click the Add Resource button. The Add Resource popup window opens.
- Add Resource In the Add Resource tab, add the resources to which the policy will be applied. Resource addition can be done in two ways: Select Resource, Direct Input.
- Resource Selection: Check the resources retrieved for each Resource Type and select them.
- Manual entry: Add the target resource by manually entering it for each resource type.
- Wildcard
*,?can be used. Checking Select All adds all resources of that resource type, and any resources added later are automatically included.
- Wildcard
- Check the input information and click the Confirm button.
Check detailed policy information
In the policy, you can view and edit the policy list and detailed information. The Policy Details page consists of Basic Information, Permissions, Connected Targets, Tags tabs.
To view detailed information of the policy service, follow these steps.
- Click the All Services > Management > IAM menu. You will be taken to the Service Home page of Identity and Access Management (IAM).
- On the Service Home page, click the Policy menu. Navigate to the Policy List page.
- Click the policy name on the Policy List page to view its details. You will be taken to the Policy Details page.
- Policy Details page displays basic information and consists of Basic Information, Permissions, Connected Targets, Tags tabs.
Basic Information
Policy List page allows you to view the basic information of the selected policy and, if needed, edit the policy name and description.
| Category | Detailed description |
|---|---|
| Service | Service name |
| Resource Type | Resource Type |
| SRN | Unique resource ID in Samsung Cloud Platform |
| Resource name | Resource name
|
| Resource ID | Unique Resource ID |
| constructor | User who created the service |
| Creation date and time | Service creation date and time |
| Editor | User who edited the service information |
| Modification date and time | Date and time the service information was modified |
| Policy Name | Policy name |
| Policy type | Policy Types
|
| description | Description of the policy name |
Permission
On the Policy List page, you can view the permission information of the selected policy and modify the permissions if needed.
- Click the Expand button of the service name to view permission information, and the detailed policy information will be displayed.
| Category | Detailed description |
|---|---|
| Edit permissions | Permission editing is possible
|
| View mode | Policy control type
|
| Control Type | Policy control type
|
| Action | The functions provided by each service that are subject to the policy |
| Applied resource | Resources to which the action applies
|
| Authentication Type | Authentication method of the user target to which the policy will be applied
|
| Applied IP | IP that permits policy application
|
Connection target
Policy List page allows you to view the user groups registered to the selected policy, and, if necessary, add or remove user groups.
- User Group for detailed information, please refer to User Group.
| Category | Detailed description |
|---|---|
| User | List of users connected to the policy
|
| User group | List of user groups linked to the policy
|
| role | Display list of roles attached to the policy
|
tag
Policy List page allows you to view the tag information of the selected policy, and you can add, modify, or delete it.
| Category | Detailed description |
|---|---|
| Tag list | Tag list
|
Manage Policies
You can change the policy name, as well as modify permissions, connection targets, and tags. If policy management is required, you can perform tasks on the Policy List or Policy Details page.
Edit Basic Information
You can edit the policy’s name and description. To modify the policy’s name and description, follow the steps below.
- Click the All Services > Management > IAM menu. You will be taken to the Service Home page of Identity and Access Management (IAM).
- On the Service Home page, click the Policy menu. You will be taken to the Policy List page.
- Policy List page, click the policy name whose basic information you want to edit. You will be taken to the Policy Details page.
- On the Policy Details page, after confirming the basic information to be edited, click the Edit button.
- Policy Name: You can change the policy name. Edit button click opens the Edit Policy Name popup.
- Description: You can edit the policy description. Edit button click opens the Edit Description popup.
- After editing the content to be changed in the popup window, click the Confirm button.
Managing Permissions
You can modify the policy’s permissions. To modify the policy’s permissions, follow the steps below.
- All Services > Management > IAM Click the menu. Navigate to the Service Home page of Identity and Access Management (IAM).
- On the Service Home page, click the Policy menu. You will be taken to the Policy List page.
- On the Policy List page, click the policy name whose permissions you want to edit. You will be taken to the Policy Details page.
- On the Policy Details page, click the Permissions tab. Navigate to the Connection Permissions tab.
- On the Policy Details page, click the Edit Permissions button. You will be taken to the Edit Permissions page.
- On the Permission Modification page, after modifying the required permissions, click the Next button. You will be taken to the Input Information Confirmation page.
- For detailed explanations of each item in the permission information, refer to Creating a Policy.
- On the Check Input Information page, verify the updated permission information and click the Done button. Then go to the Permissions tab.
Managing User Connections
- In the Policy > Connection Targets tab, you can view the users registered to the policy and, if necessary, connect or disconnect users.
- For detailed information about User, please refer to 사용자.
Connect User
To attach a user to the policy, follow these steps.
- All Services > Management > IAM menu, click it. Go to the Service Home page of Identity and Access Management (IAM).
- On the Service Home page, click the Policy menu. You will be taken to the Policy List page.
- Policy List page, click the policy name to link the user. You will be taken to the Policy Details page.
- On the Policy Details page, click the Connection Target tab. You will be taken to the Connection Target tab.
- In the Connection Target tab, click the User Connection button. Go to the User Connection page.
- On the User Connection page, select the user you want to connect from the User list, then click the Done button. A popup notifying the user connection will open.
Category Detailed description Connected user group Display users linked to the policy User group Select the user to attach the policy from the list of users registered in the Account - When you select the checkbox, the selected user’s name appears at the top of the list
- You can remove the user by clicking the X button next to the added user name at the top of the list, or by unchecking the checkbox in the user list
- If the desired user is not present, you can click the Create User item at the bottom of the user list to register a new user first
- After creating the user, refresh the user list and then you can select the newly created user
- For detailed information on creating users, see Create User
Table. User connection details - In the popup that notifies you of a user connection, click the Confirm button. You can view the connected user in the list on the User tab.
Disconnect User
To disconnect a user linked to the policy, follow these steps.
- Click the All Services > Management > IAM menu. You will be taken to the Service Home page of Identity and Access Management (IAM).
- On the Service Home page, click the Policy menu. You will be taken to the Policy List page.
- Policy List page, click the policy name to disconnect the user. You will be taken to the Policy Details page.
- On the Policy Details page, click the Target Connection tab. You will be taken to the Target Connection tab.
- In the Connection Target tab’s user group list, select the user to disconnect, then click the Disconnect button. A popup confirming the disconnection will appear.
- Click the Confirm button in the popup that notifies of disconnection. The selected user’s connection will be terminated and the user group list will be refreshed.
Manage user group connections
- In the Policy > Connection Targets tab, you can view the user groups registered to the policy and, if needed, connect or disconnect user groups.
- User Group for detailed information, please refer to User Group.
Connect User Group
To connect a user group to a policy, follow the steps below.
- Click the All Services > Management > IAM menu. You will be taken to the Service Home page of Identity and Access Management (IAM).
- On the Service Home page, click the Policy menu. You will be taken to the Policy List page.
- Policy List page, click the policy name to associate the user group. You will be taken to the Policy Details page.
- Policy Details page, click the Connection Target tab. You will be taken to the Connection Target tab.
- In the Connection Target tab, click the User Group Connection button. Navigate to the User Group Connection page.
- On the User Group Connection page, select the user group you want to connect from the User Group list, then click the Done button. A popup notifying the user group connection will open.
Category Detailed description Connected user group Display user groups linked to the policy User group Select the user group to which the policy will be attached from the list of user groups registered in the Account - When you select the check box, the selected user group’s name appears at the top of the list
- You can remove the added user group at the top of the list by clicking its X button or by unchecking the box in the user group list
- If the desired user group is not present, you can first register a new user group by clicking the Create User Group item at the bottom of the user group list
- After creating the user group, refresh the user group list and then select the newly created user group
- For detailed information on creating a user group, see 사용자 그룹 생성하기
Table. User Group Connection Details - Click the Confirm button in the popup that notifies you of the user group connection. You can view the connected user group in the list under the User Group tab.
Disconnect User Group
To disconnect the user groups linked to the policy, follow these steps.
- Click the All Services > Management > IAM menu. Then go to the Service Home page of Identity and Access Management (IAM).
- On the Service Home page, click the Policy menu. You will be taken to the Policy List page.
- Click the policy name to detach the user group connection on the Policy List page. You will be taken to the Policy Details page.
- On the Policy Details page, click the Target Connection tab. You will be taken to the Target Connection tab.
- In the user group list of the Connection Target tab, select the user group to disconnect, then click the Disconnect button. A popup confirming the disconnection will appear.
- Click the Confirm button in the popup that notifies of disconnection. The selected user group’s connection will be disconnected, and the user group list will be refreshed.
Manage Role Bindings
- Policy > Connected Targets tab, you can view the roles registered to the policy and, if needed, connect or disconnect roles.
- For detailed information about role, please refer to 역할.
Connect role
To attach a role to a policy, follow these steps.
- Click the All Services > Management > IAM menu. Navigate to the Service Home page of Identity and Access Management (IAM).
- On the Service Home page, click the Policy menu. You will be taken to the Policy List page.
- On the Policy List page, click the policy name to which you want to assign a role. You will be taken to the Policy Details page.
- On the Policy Details page, click the Connection Target tab. You will be taken to the Connection Target tab.
- In the Connection Target tab, click the Role Binding button. You will be taken to the Role Binding page.
- On the Role Connection page, select the role you want to connect from the Role list, then click the Complete button. A popup notifying you of the role connection will open.
Category Detailed description Linked role Display roles linked to the policy role Select the role to attach the policy from the list of roles registered in the Account - When you select the checkbox, the selected role appears at the top of the list
- You can cancel the role by clicking the X button next to the role name added at the top of the list, or by unchecking the checkbox for the role
- If the desired role is not available, you can click the Create Role item at the bottom of the role list to create a new role first
- After role creation is complete, refresh the role list and then you can select the newly created role
- For detailed information on creating roles, see Create Role
Table. Role Connection Detailed Items - In the popup that notifies role linking, click the Confirm button. You can view the linked role in the list under the Roles tab.
Unlink role
To detach the role linked to the policy, follow these steps.
- Click the All Services > Management > IAM menu. You will be taken to the Service Home page of Identity and Access Management (IAM).
- On the Service Home page, click the Policy menu. Navigate to the Policy List page.
- On the Policy List page, click the policy name to detach role connections. You will be taken to the Policy Details page.
- On the Policy Details page, click the Target Connection tab. You will be taken to the Target Connection tab.
- After selecting the role to disconnect from the list in the Connection Target tab, click the Disconnect button. A popup notifying the disconnection will open.
- Click the Confirm button in the popup that notifies you of the disconnection. The selected role’s connection will be removed and the role list will be refreshed.
Tag Management
You can edit the policy’s tags.
To modify tags in the policy, follow the steps below.
- All Services > Management > IAM Click the menu. Navigate to the Service Home page of Identity and Access Management (IAM).
- On the Service Home page, click the Policy menu. You will be taken to the Policy List page.
- On the Policy List page, click the policy name to add a user. You will be taken to the Policy Details page.
- On the Policy Details page, click the Tag tab. You will be taken to the Tag tab.
- Click the Edit Tag button in the Tag tab.
- After adding or editing a tag, click the Save button. A popup notifying you of the tag edit will open.
- You can modify the Key and Value of an already registered tag.
- You can add a new tag by clicking the Add Tag button.
- Click the X button in front of the added tag to delete that tag.
- Click the Confirm button. You can view the edited tag information in the list.
Delete Policy
To delete a policy, follow the steps below.
- Click the All Services > Management > IAM menu. You will be taken to the Service Home page of Identity and Access Management (IAM).
- On the Service Home page, click the Policy menu. You will be taken to the Policy List page.
- Policy List page, click the policy name to delete. You will be taken to the Policy Details page.
- On the Policy Details page, click the Delete Policy button.
- The policy is deleted, and you are taken to the Policy List page.
To delete multiple policies simultaneously, follow these steps.
- Click the All Services > Management > IAM menu. You will be taken to the Service Home page of Identity and Access Management (IAM).
- On the Service Home page, click the Policy menu. You will be taken to the Policy List page.
- Select the policy to delete from the policy list.
- Verify the selected policies and click the Delete Policy button.
- The selected policies are deleted and the Policy List page is reloaded.
2.4 - Role
Users can create a role with separate permissions and switch from their own account to another role to access the Account.
Create Role
To create a role, follow the steps below.
Click the All Services > Management > IAM menu. You will be taken to the Service Home page of Identity and Access Management (IAM).
On the Service Home page, click the Role menu. Navigate to the Role List page.
On the Role List page, click the Create Role button. You will be taken to the Create Role page.
On the Role Creation page, enter the information required to create a role, then click the Create button.
- Please enter Basic Information Input.
Category Whether requiredDetailed description Role Name Required Enter the role name - using English letters, numbers, and special characters (
+=-_@,.) within 64 characters
description Selection Enter a description of the role within 1,000 characters. Maximum session duration Required Enter the session time allowed for the user when switching roles in the console - Select duration: 1 hour, 2 hours, 4 hours, 8 hours, 12 hours
- Enter duration: can be entered in seconds from 3,200 seconds (1 hour) to 43,200 seconds (12 hours)
Table. Role Creation Basic Information Items - using English letters, numbers, and special characters (
- Connect performing entity.
Category Required statusDetailed description Category Required Select the execution entity - Current Account, Other Account, User SRN, Credential Provider, Service
Value Required Enter the Value for the principal - Current Account: display the current Account ID
- Other Account: enter the Account ID to use this role
- User SRN: enter the SRN of the user registered in the Console
- Credential Provider: select the credential provider name
- Service: API Gateway, Config Inspection can be selected
Add Select Button to add an executor - Up to 20 connections can be added
Table. Role creation execution subject connection items - Connect the policy.
Category RequiredDetailed description policy Required Select the policy to attach to the role - When you select the checkbox, the selected policy name is displayed at the top of the list
- You can cancel the policy by clicking the X button next to the policy name added at the top of the list, or by unchecking the checkbox in the policy list
- If there is no policy to attach, you can first register a new policy by clicking the Create Policy item at the bottom of the policy list
- After creating the policy, refresh the policy list and then you can select the created policy
- For detailed information on policy creation, refer to 정책 생성하기
Table. Role creation policy mapping items - Please enter Additional Information.
Category Required statusDetailed description tag Select Tags to add to the role - tags can be added up to a maximum of 50 per resource
Table. Role creation additional information items
- Please enter Basic Information Input.
When the popup notifying role creation opens, click the Confirm button.
View role details
On the Role List page, you can view and edit the detailed information of the selected role.
To view detailed information about the role, follow these steps.
- Click the All Services > Management > IAM menu. You will be taken to the Service Home page of Identity and Access Management (IAM).
- On the Service Home page, click the Role menu. You will be taken to the Role List page.
- On the Role List page, click the credential provider you want to view. You will be taken to the Credential Provider Details page.
- Role Details page displays basic information and consists of Basic Information, Responsible Entity, Policy, Tag tabs.
Basic Information
You can view and edit the basic information of the role.
| Category | Detailed description |
|---|---|
| Service | Service name |
| Resource Type | Resource Type |
| SRN | Unique resource ID in Samsung Cloud Platform |
| Resource name | Resource name
|
| Resource ID | Unique Resource ID |
| constructor | User who created the service |
| Creation date | Service creation timestamp |
| Editor | User who edited the service information |
| Modification date and time | Date and time the service information was modified |
| Role Name | Role name |
| description | Description of the role proof provider
|
| Maximum session duration | Role session duration allowed for IAM users who assume a role in the Console
|
Executing entity
You can identify and manage the entity that performs the role.
| Category | Detailed description |
|---|---|
| Category | Executor name |
| Value | Value for the executing entity |
| Edit performer | Button to edit the performer
|
Policy
| Category | Detailed description |
|---|---|
| Disconnect | Detach the selected policy from the role
|
| Policy connection | Connect a new policy to a role
|
| Policy Name | Policy name
|
| type | Types of policies |
| description | Explanation of the policy |
| Modification date and time | Date and time of the last policy modification |
tag
You can view, add, modify, or delete the tag information of a credential provider.
| Category | Detailed description |
|---|---|
| Tag list | Tag list
|
Manage Roles
You can change a role’s basic information, as well as edit or delete its principal, attached policies, and tag information.
Edit Basic Information
You can modify the maximum session duration and description in the role details. To edit the basic information, follow these steps.
- Click the All Services > Management > IAM menu. Navigate to the Service Home page of Identity and Access Management (IAM).
- On the Service Home page, click the Role menu. You will be taken to the Role List page.
- Role List page, click the user role name to edit its basic information. Role Details page will be opened.
- After confirming the basic information to edit on the Role Details page, click the Edit button.
- Maximum Session Duration: You can set the role session duration allowed for IAM users who switch roles in the Console. When you click the Edit button, the Edit Maximum Session Duration popup opens.
- Description: You can edit the description of the role. Edit button click opens the Edit Description popup window.
- After editing the content to be changed in the popup window, click the Confirm button.
Managing the execution entity
You can add, modify, or delete the role’s performer.
To manage the role’s performer, follow these steps.
Click the All Services > Management > IAM menu. Navigate to the Service Home page of Identity and Access Management (IAM).
On the Service Home page, click the Role menu. You will be taken to the Role List page.
On the Role List page, click the user name to edit the performer. You will be taken to the Role Details page.
Click the Performer tab on the Role Details page. Navigate to the Performer tab.
In the Executor tab, click the Edit Executor button. You will be taken to the Edit Executor page.
Edit Performer page, after editing the performer, click the Complete button. A popup notifying the performer edit will open.
Category RequiredDetailed description Category Required Select the execution entity - Current Account, Other Account, User SRN, Credential Provider, Service
Value Required Enter the Value for the principal - Current Account: Display the current Account ID
- Other Account: Enter the Account ID to use this role
- User SRN: Enter the user’s SRN registered in the Console
- Credential Provider: Select the credential provider name
- Service: API Gateway, Config Inspection selectable
Add Select Button to add a responsible party - You can add up to 20 connections
- You can delete an added responsible party by clicking its X button
Table. Execution subject modification itemsIn the popup that notifies you of a performer entity edit, click the Confirm button. You can verify the edited performer in the list on the Performer tab.
Manage Policies
You can attach a policy to a role or detach an attached policy.
Connect Policy
You can attach policies to a role.
To attach a policy to a role, follow these steps.
All Services > Management > IAM menu, click it. Navigate to the Service Home page of Identity and Access Management (IAM).
On the Service Home page, click the Role menu. You will be taken to the Role List page.
On the Role List page, click the role name to which you want to attach a policy. You will be taken to the User Details page.
On the Role Details page, click the Policy tab. Go to the Policy tab.
In the Policy tab, click the Policy Connection button. You will be taken to the Policy Connection page.
After selecting the policy to attach to the role, click the Complete button. A popup notifying the policy attachment will appear.
Category Detailed description Linked policy Display policies attached to the role policy Select a policy to attach to the role from the list of policies registered in the Account - When you select the checkbox, the selected policy name appears at the top of the list
- You can remove the policy by clicking the X button added at the top of the list or by unchecking the checkbox in the policy list
- If there is no policy to attach, you can first create a new policy by clicking the Create Policy item at the bottom of the policy list
- After creating the policy, refresh the policy list and then you can select the newly created policy
- For details on creating policies, see Create Policy reference
Table. Policy Connection DetailsClick the Confirm button in the popup that notifies you of the policy connection. You can view the connected policies in the list on the Policy tab.
Disconnect Policy
You can detach policies attached to a user.
To detach the policy linked to a user, follow these steps.
- Click the All Services > Management > IAM menu. Navigate to the Service Home page of Identity and Access Management (IAM).
- Service Home page, click the Role menu. You will be taken to the Role List page.
- On the Role List page, click the role name to detach the policy connection. You will be taken to the Role Details page.
- On the Role Details page, click the Policy tab. You will be taken to the Policy tab.
- After selecting the policy to disconnect from the policy list, click the Disconnect button. A popup notifying the disconnection will appear.
- After reviewing the policy information that will be disconnected, click the Confirm button. The policy connection will be terminated.
Managing Tags
You can add, edit, or delete tags for a role.
Follow the steps below to manage role tags.
- Click the All Services > Management > IAM menu. Navigate to the Service Home page of Identity and Access Management (IAM).
- On the Service Home page, click the Role menu. You will be taken to the Role List page.
- On the Role List page, click the role name to edit tag information. You will be taken to the Role Details page.
- On the Role Details page, click the Tag tab. You will be taken to the Tag tab.
- On the Tag tab, click the Edit Tag button.
- After adding or editing a tag, click the Save button. A popup notifying the tag edit will open.
- You can modify the Key and Value of an already registered tag.
- Click the Add Tag button to add a new tag.
- Click the X button in front of the added tag to delete that tag.
- Click the Confirm button. You can view the edited tag information in the list.
Switch role
To switch roles in the Samsung Cloud Platform Console, follow these steps.
Click the profile-shaped button at the top right of the Console. The My Menu popup window opens.
In the My menu popup, click the role switch button. The role switch popup opens.
Role Switch After entering the role switch information in the popup window, click the Confirm button.
Category required or notDetailed description Account ID Required Enter the Account ID the user wants to assume via role switching. Role Name Required Enter the role name the user wants to switch to. alias Select Name to use when a user enters through role switching Color Required Select the color to use as the Account background when entering a role - No selection: Apply the existing Account background color
Table. Role transition information itemsWhen the popup notifying a role change opens, click the Confirm button.
Check role
You can view the switched role information by clicking the profile-shaped button at the top right of the console.
| Provided features | explanation |
|---|---|
| Account ID | Account ID logged in to Samsung Cloud Platform Console |
| Role Name | Alias set when switching roles
|
| Time zone | User-set time zone
|
| Account | Account information
|
| Cost Management | You can view usage and billing details, payment history, and cost analysis, and manage Credit, budget, Account, and payment methods
|
| Login user information | IAM user name after role assumption and the user’s Account ID |
| Switch to my account | Switch to the IAM user account and go to the Console Home page
|
| Role Switching | Can switch to another role
|
| Logout | Log out from Samsung Cloud Platform Console |
Delete role
To delete a role, follow these steps.
- Click the All Services > Management > IAM menu. You will be taken to the Service Home page of Identity and Access Management (IAM).
- Service Home page, click the Role menu. You will be taken to the Role List page.
- On the Role List page, click the role name to delete. Navigate to the Role Details page.
- On the Role Details page, click the Delete Role button.
- The role is deleted, and you are redirected to the Role List page.
To delete multiple roles at once, follow these steps.
- Click the All Services > Management > IAM menu. You will be taken to the Service Home page of Identity and Access Management (IAM).
- On the Service Home page, click the Role menu. You will be taken to the Role List page.
- Check the roles to delete from the role list.
- Verify the selected role and click the Delete Role button.
- The selected role is deleted and the Role List page is refreshed.
2.5 - Credential Providers
You can access and use the Account resource through a credential provider.
Create Credential Provider
To create a credential provider, follow these steps.
- Click the All Services > Management > IAM menu. You will be taken to the Service Home page of Identity and Access Management (IAM).
- On the Service Home page, click the Credential Provider menu. You will be taken to the Credential Provider List page.
- On the Credential Provider List page, click the Create Credential Provider button. You will be taken to the Create Credential Provider page.
- After entering information in the Enter basic information, Enter additional information areas, click the Generate button.
| Category | Whether required | Detailed description |
|---|---|---|
| Credential Provider Name | Required | Enter the credential provider name
|
| description | Selection | Enter a description of the credential provider within 1,000 characters |
| type | Required | Select the credential provider type
|
| metadata | Selection | Attach the metadata file provided by the IdP
|
| tag | Select | Tags to add to the credential provider group
|
- When the popup notifying the creation of a credential provider opens, click the Confirm button.
Check credential provider details
You can view and edit the detailed information of a credential provider. The Credential Provider page consists of Basic Information, Tags tabs.
To view detailed information about the credential provider, follow these steps.
- All Services > Management > IAM Click the menu. Go to the Service Home page of Identity and Access Management (IAM).
- On the Service Home page, click the Credential Provider menu. You will be taken to the Credential Provider List page.
- Click the credential provider you want to view on the Credential Provider List page. You will be taken to the Credential Provider Details page.
- Credential Provider Details page displays basic information and consists of Basic Information tab, Tags tab.
Basic Information
You can view and edit the basic information of the credential provider.
| Category | Detailed description |
|---|---|
| Service | Service name |
| Resource Type | Resource Type |
| SRN | Unique resource ID in Samsung Cloud Platform |
| Resource name | Resource Name
|
| Resource ID | Unique Resource ID |
| constructor | User who created the service |
| Creation date | Service creation date and time |
| Editor | User who edited the service information |
| Modification date and time | Date and time the service information was modified |
| Credential Provider Name | Credential provider name
|
| type | Types of credential providers |
| description | Description of the credential provider
|
| Login URL | Login URL |
| metadata | Metadata
|
tag
You can view, add, modify, or delete the tag information of a credential provider.
| Category | Detailed description |
|---|---|
| Tag list | Tag list
|
Delete Credential Provider
To delete a credential provider, follow these steps.
- All Services > Management > IAM menu, click it. Navigate to the Service Home page of Identity and Access Management (IAM).
- On the Service Home page, click the Credential Provider menu. You will be taken to the Credential Provider List page.
- On the Credential Provider List page, click the name of the credential provider you want to delete. You will be taken to the Credential Provider Details page.
- On the Credential Provider Details page, click the Delete Credential Provider button.
- The credential provider is deleted, and you are redirected to the Credential Provider List page.
To delete multiple credential providers simultaneously, follow these steps.
- Click the All Services > Management > IAM menu. You will be taken to the Service Home page of Identity and Access Management (IAM).
- On the Service Home page, click the Credential Provider menu. You will be taken to the Credential Provider List page.
- Select the credential provider to delete from the list of credential providers.
- Verify the selected credential provider and click the Delete Credential Provider button.
- The selected credential provider is deleted and the Credential Provider List page is refreshed.
2.6 - My Info.
My Info. provides basic user information and authentication key management functions.
My Info. # Check
User My Info On the screen, you can view and modify a user’s basic information, and manage authentication keys.
To view the information of My Info., follow these steps.
- Click the All Services > Management > IAM menu. 1. Go to the Service Home page of Identity and Access Management (IAM).
- On the Service Home page, click the My Info. menu. 2. My Info. Navigate to the page.
- My Info. The page displays basic information and consists of Basic Information, API Key Management, Access IP Control, Service Settings tabs.
Basic Information
My Info. > Basic Information tab allows you to view the user’s basic information and, if necessary, edit email, password, mobile phone number, password reuse restriction, and time zone.
| Category | Detailed description |
|---|---|
| Username | User’s name |
| SRN | User’s SRN |
| User’s email | |
| mobile phone number | User’s mobile phone number |
| Password | User’s password |
| Password reuse restriction | User password reuse limit count |
| Time zone | User’s time zone |
| Terms and Conditions | User’s name |
Authentication key management
My Info. > Authentication Key Management tab, you can view the user’s authentication key information and, if needed, generate an authentication key.
| Category | Detailed description |
|---|---|
| Authentication key | User-generated authentication key
|
| Security Settings | Security settings for authentication keys
|
Access IP control
My Info. In the Access IP Control tab, you can register and manage IPs that are allowed to access.
| Category | Detailed description |
|---|---|
| Console access IP control | Whether to use the access IP control feature
|
| Access IP List | IP addresses that can access the console |
- The access IP control feature can be used only by the Root user and IAM users. * ID Center and role users cannot be used.
- Even if you do not use the access IP control feature, you can add and manage IPs.
Service Settings
My Info. > Service Settings tab, you can check the user’s authentication key information and generate an authentication key if needed.
| Category | Detailed description |
|---|---|
| AI Recommendation Floating Guide | When used, an AI recommendation floating guide is provided at the bottom of the screen
|
Edit basic information
My Info. > In the Basic Information tab, you can edit email, password, mobile phone number, password reuse restriction, and time zone.
Edit Email
You can edit the user’s email. To modify a user’s email, follow the steps below.
- All Services > Management > IAM Click the menu. 1. Go to the Service Home page of Identity and Access Management (IAM).
- On the Service Home page, click the My Info. menu. 2. Go to the My Info. page.
- On the Basic Information tab of the My Info. page, click Edit Email. 3. Edit Email The popup window opens.
- Email Edit In the popup window, enter the characters displayed for anti-automation and press the Confirm button.
- Enter email and click the verify button. 6. A verification code will be sent to the entered email.
- Enter the verification code sent to the entered email and click the Confirm button.
- Edit Email Click the Confirm button in the popup window. 8. Password Confirmation popup opens.
- Password Confirmation In the popup window, after entering the password, click the Confirm button. 9. Go to the Basic Information tab.
- If you enter the password incorrectly five or more times, you will be automatically logged out.
- Enter your email information accurately. * If you do not receive the verification code, check your spam folder.
Change Password
You can modify the user’s password. To change a user’s password, follow these steps.
- Click the All Services > Management > IAM menu. 1. Go to the Service Home page of Identity and Access Management(IAM).
- On the Service Home page, click the My Info. menu. 2. Navigate to the My Info. page.
- On the Basic Information tab of the My Info. page, click Change Password. 3. Change Password popup window opens.
- Change Password in the popup window, please enter Current Password, New Password, Confirm Password.
- Change Password in the popup window, click the Confirm button. 5. Go to the Basic Information tab.
- If you enter the existing password incorrectly more than five times, you will be automatically logged out.
- It must contain at least one uppercase letter (English), one lowercase letter (English), one digit, and one special character (
!@#$%&*^). - The length is 9 to 20 characters.
- You cannot use the ID as a password.
- You cannot use the same character more than three times.
- Passwords that are easy to guess cannot be used.
- You cannot use a password that was recently used.
- Consecutive characters or numbers of four or more characters are not allowed.
- The password change cycle is 90 days.
Edit mobile phone number
You can edit the user’s mobile phone number. To modify the user’s mobile phone number, follow the steps below.
- Click the All Services > Management > IAM menu. 1. Go to the Service Home page of Identity and Access Management(IAM).
- Service Home page, click the My Info. menu. 2. My Info. Go to the page.
- On the Basic Information tab of the My Info. page, click the Change Mobile Phone Number button. 3. Change Mobile Phone Number the popup window opens.
- Change mobile phone number In the popup window, enter the characters displayed to prevent auto‑fill and press the Confirm button.
- Select the mobile phone number authentication method.
- SMS authentication: Send authentication code via mobile phone SMS
- Authenticate with Knox Teams: Send authentication code via Knox Teams
- After entering the mobile phone number to change, click the Verify button.
- After entering the verification code sent via SMS or Knox Teams, click the Confirm button.
- In the Change mobile phone number popup, click the Confirm button. 8. Password Confirmation popup window opens.
- Password Confirmation In the popup window, after entering the password, click the Confirm button. 9. Go to the Basic Information tab.
- If you enter the password incorrectly five or more times, you will be automatically logged out.
- Please accurately enter your mobile phone number information. * If you do not receive the verification code, check your spam folder.
Modify password reuse restriction
You can modify the limit on a user’s password reuse count. To modify the number of times a user can reuse a password, follow the steps below.
- All Services > Management > IAM menu, click it. 1. Navigate to the Service Home page of Identity and Access Management (IAM).
- On the Service Home page, click the My Info. menu. 2. Navigate to the My Info. page.
- On the Basic Information tab of the My Info. page, click Edit Password Reuse Restriction. 3. Password reuse restriction edit The popup window opens.
- Password reuse restriction edit Choose the number of recent passwords that cannot be reused in the popup.
- Modify password reuse restriction Click the Confirm button in the popup window. 5. Go to the Basic Information tab.
Edit Timezone
You can modify the user’s time zone. To modify the user’s time zone, follow the steps below.
- Click the All Services > Management > IAM menu. 1. Navigate to the Service Home page of Identity and Access Management (IAM).
- On the Service Home page, click the My Info. menu. 2. My Info. Go to the page.
- My Info. On the Basic Information tab of the My Info page, click Edit Timezone. 3. Time Zone Edit The popup window opens.
- Time Zone Edit Select the user’s time zone.
- Edit Time Zone in the popup window, click the Confirm button. 5. Go to the Basic Information tab.
Managing authentication keys
My Info. > Authentication Key Management tab allows you to create authentication keys and manage security settings.
Create Authentication Key
You can generate a user’s authentication key. To generate a user’s authentication key, follow the steps below.
- All Services > Management > IAM menu, click it. 1. Go to the Service Home page of Identity and Access Management (IAM).
- On the Service Home page, click the My Info. menu. 2. My Info. navigate to the page.
- My Info. page, click the Authentication Key Management tab. 3. Go to the Authentication Key Management tab.
- On the Authentication Key Management tab, click the Create Authentication Key button. 4. Go to the Create Authentication Key page.
- On the Authentication Key Generation page, enter the Expiration Period and Usage.
- Expiration Period can be entered as a number from 1 to 365.
- If you select Permanent in the Expiration period, it can be used permanently.
- Verify the key generation information and click the Create button. 6. Authentication Key Management tab.
- You can create up to two authentication keys.
- After generating a new authentication key, you must apply the updated API authentication key to the services you are using.
- In the security settings, you can configure authentication methods and allowed IP settings.
- You can call the API with the generated authentication key to issue a temporary key, and you can issue up to five per authentication key.
Check detailed authentication key information
To view the detailed information of the authentication key, follow the steps below.
- Click the All Services > Management > IAM menu. 1. Go to the Service Home page of Identity and Access Management (IAM).
- Service Home page, click the My Info. menu. 2. My Info. Navigate to the page.
- My Info. Click the Authentication Key Management tab on the page. 3. Go to the Authentication Key Management tab.
- Authentication Key Management tab, click the authentication key you want to view. 4. Go to the Authentication Key Details page.
- Authentication Key Details page consists of Basic Information, Authentication Key Management tabs.
Basic Information
Authentication Key Details > Basic Information You can view the basic information of the selected authentication key in this tab.
| Category | Detailed description |
|---|---|
| Whether to use the authentication key | Display whether the authentication key is used
|
| Delete authentication key | Delete the authentication key |
| Authentication key | Access Key and Secret Key information
|
| Usage | Purpose of the authentication key |
| Creation Date/Time | The date and time the user generated the authentication key |
| Expiration date and time | Expiration time of the authentication key generated by the user |
| Secret Vault | Whether to use the Secret Vault service
|
User temporary key
Authentication Key Details > User Token tab allows you to view the list of user tokens for the selected authentication key.
| Category | Detailed description |
|---|---|
| Delete | Delete the selected key from the user key list
|
| More | Select whether to use the user API key chosen from the user API key list
|
| Access Key | A unique string for calling the API |
| Secret Key | Security token used with the Access Key
|
| Creation Date/Time | The date and time the user generated the authentication key |
| Expiration date and time | Expiration time of the authentication key generated by the user |
| status | Whether to use the authentication key |
Secret Vault temporary key
Authentication Key Details > Secret Vault Secret Key tab allows you to view the list of Secret Vault secret keys for the selected authentication key.
- You can check it when using the Secret Vault service.
- Temporary keys can only be created via the API, and in the Secret Vault tab they can only be viewed and deleted.
| Category | Detailed description |
|---|---|
| Delete | Delete the selected key from the user key list
|
| More | Select whether to use the selected API key from the user API key list
|
| Access Key | A unique string for calling the API |
| Secret Key | Security token used with the Access Key
|
| Creation Date/Time | The date and time the user generated the authentication key |
| Expiration date and time | Expiration time of the authentication key generated by the user |
| status | Whether to use the authentication key |
Modify authentication key security settings
You can register security settings for the user’s authentication key. To register security settings for a user’s authentication key, follow the steps below.
- Click the All Services > Management > IAM menu. 1. Go to the Service Home page of Identity and Access Management(IAM).
- On the Service Home page, click the My Info. menu. 2. Navigate to the My Info. page.
- My Info. Click the Authentication Key Management tab on the page. 3. Go to the Authentication Key Management tab.
- On the Authentication Key Management tab, click the Edit Security Settings button. 4. Navigate to the Edit Authentication Key Security Settings page.
- On the Edit Authentication Key Security Settings page, enter the Authentication Method and Allowed Access IP.
- Authentication Method: temporary key, authentication key
- Access is permitted only when the authentication configured as the authentication method is used when calling the API.
- Temporary key: Authenticate using the temporary key issued with the authentication key and authentication number
- Authentication key: When authenticating with the authentication key generated in the Console
- Allowed Access IP: IP that controls user access
- When use is enabled, only allow access from specific IP ranges.
- After use setting, if the IP is not registered, access is denied for all IPs.
- When set to Not used, access is allowed for all IPs.
- You can register up to 50.
- You can enter an IP address or CIDR.
- Authentication Method: temporary key, authentication key
- Verify the authentication key security settings and click the Confirm button. 6. Go to the Authentication Key Management tab.
- South Korea (kr-south) region constraints
- Allowed Access IP is set to Use, only IP addresses can be entered. * CIDR cannot be entered.
- We recommend using temporary authentication and allowing IP access.
- When authenticating with an authentication key, the email or SMS verification step may be omitted, which can pose a security risk.
- Allowed Access IP If not used, arbitrary IPs can connect, which may create a security risk.
- When using Allowed IP, if you do not register an IP, all access will be restricted.
- Authentication keys with temporary keys generated by Secret Vault can be disabled and deleted after terminating the Secret Vault service in each region within the Account.
Delete authentication key
- Authentication key can be deleted only when it is in disabled state. * Before deleting the authentication key, disable its usage.
- When using the Secret Vault service, you cannot disable the use of authentication keys. * Please cancel the Secret Vault service first.
To delete the authentication key, follow the steps below.
- Click the All Services > Management > IAM menu. 1. Go to the Service Home page of Identity and Access Management (IAM).
- Click the My Info. menu on the Service Home page. 2. Navigate to the My Info. page.
- Click the Authentication Key Management tab on the My Info. page. 3. Go to the Authentication Key Management tab.
- In the Key Management tab, click the authentication key you want to delete from the list. 4. Go to the Authentication Key Details page.
- On the Authentication Key Details page, click the Delete Authentication Key button.
- The authentication key is deleted, and you are taken to the Authentication Key Management tab.
To delete multiple policies simultaneously, follow these steps.
- Click the All Services > Management > IAM menu. 1. Go to the Service Home page of Identity and Access Management(IAM).
- On the Service Home page, click the My Info. menu. 2.
- My Info. Click the Authentication Key Management tab on the page. 3. Authentication Key Management tab.
- In the Authentication Key Management tab’s authentication key list, check the keys you want to delete.
- Verify the selected authentication keys and click the Delete Authentication Key button.
- The selected authentication keys are deleted and the Authentication Key Management tab is refreshed.
Managing Access IP
My Info. Access IP Control tab allows you to register and manage IPs that can access the Console.
You can restrict console access to only the specified IP address.
- The access IP control feature can be used only by the Root user and IAM users. * ID Center and role holders cannot be used.
- Even if you do not use the access IP control feature, you can still add and manage IPs.
To manage access IP, follow the steps below.
- Click the All Services > Management > IAM menu. 1. Go to the Service Home page of Identity and Access Management(IAM).
- On the Service Home page, click the My Info. menu. 2. My Info. Navigate to the page.
- My Info. page, click the Access IP Control tab. 3. Go to the Access IP Control page.
- On the Access IP Control page, click the Edit button of Console Access IP Control. 4. Password Confirmation popup opens.
- After entering the password, click the Confirm button. 5. Edit Console Access IP Control A popup window opens.
- After setting the access IP to enabled, register the IP addresses that are allowed to access.
| Category | Detailed description |
|---|---|
| Remove console access IP | Whether to use the access IP control feature
|
| IP list | Allowed IP list
|
2.7 - JSON Writing Guide
Policies are divided into credential-based policies and resource-based policies.
- Credential-based policy: a policy assigned to the principal (the entity performing actions) such as users, groups, or roles.
- Resource-based policy: a policy granted to a resource that decides whether to allow or deny (Effect) an action (Action) on a specific resource (Resource) only for a principal (Principal).
Resource-based policy
A resource-based policy is a policy that grants the specified principal (requester) permission to perform specific actions on the resource. Therefore, a resource-based policy is attached directly to the resource, only the users defined in the policy can enforce it, and the user to whom the policy is assigned becomes the security principal.
{
  "Version": "2024-07-01"
  "Statement": [
        {
            "Sid": "statement1"
            "Action": ["object-store:UploadObject"],
            "Principal": {
                "scp":"srn:e::1234:::scp-iam:user/abc3d3442"
            },
            "Effect": "Allow"
            "Resource": "srn:e:::::object-store:bucket/foo"
        }
    ]
}
{
"Version": "2024-07-01"
"Statement": [
{
"Sid": "statement1"
"Action": ["object-store:UploadObject"],
"Principal": {
"scp":"srn:e::1234:::scp-iam:user/abc3d3442"
},
"Effect": "Allow"
"Resource": "srn:e:::::object-store:bucket/foo"
}
]
}Resource-Based Policy Structure
The syntax structure and item-by-item description of resource-based policies are as follows.
{
  "Version": "2024-07-01",                                 # Policy grammar version (fixed to 2024-07-01)
  "Statement": [
    {
      "Sid": "statement1",                                 # policy element ID
      "Effect": "Allow",                                   # Policy effect
      "Action": ["iam:showUser"],                          # Action defined in the policy
      "Principal": {
          "scp":"srn:e::1234:::iam:user/ROOT"              # the entity that is the target of the policy
      }
      "Resource": "srn:e::kr-west1:::scp-iam:group/foo",   # resource for which the policy action is allowed
      "Condition": {                                       # policy condition
          "StringEquals": {
            "iam:userName": [
              scp_test_user
              ]
          }
        }
    }
  ]
}
{
"Version": "2024-07-01", # Policy grammar version (fixed to 2024-07-01)
"Statement": [
{
"Sid": "statement1", # policy element ID
"Effect": "Allow", # Policy effect
"Action": ["iam:showUser"], # Action defined in the policy
"Principal": {
"scp":"srn:e::1234:::iam:user/ROOT" # the entity that is the target of the policy
}
"Resource": "srn:e::kr-west1:::scp-iam:group/foo", # resource for which the policy action is allowed
"Condition": { # policy condition
"StringEquals": {
"iam:userName": [
scp_test_user
]
}
}
}
]
}| Item | description | Required |
|---|---|---|
| Version |
| Required |
| Statement | Information on the key elements of the policy | Required |
| Statement.Sid | Policy element ID (unique ID for elements within the same policy) | Select |
| Statement.Effect | Policy application effect ( Allow : Allow / Deny : Deny ) | Required |
| Statement.Principal | Security Principal | Required |
| Statement.Action | Policy target action (must specify either Action or NotAction) | Select |
| Statement.Resource | List of resources subject to policy evaluation | Required |
| Statement.Condition | Policy decision condition information | Selection |
Version
Version is used with a different meaning from the policy version, and the current version is “2024-07-01”.
{
   "Version" : "2024-07-01"
}
Statement
Statement is information about the main elements of a policy and can be defined as a single element or an array of individual elements.
"Statement" : [{statement}]
"Statement" : [{statement}, {statement}, {statement}]
OR.Statement.Effect
Statement.Effect defines whether the policy action is allowed.
"Effect" : "Allow" # 허용
"Effect" : "Deny"  # 거부
Statement.Principal
Statement.Principal specifies the entity that is allowed or denied access to a resource in a resource-based policy.The subjects that can be specified in the Principal element are as follows.
- root user
- IAM user
- IAM role
- service account
- Principal can have one or more values, and when there are multiple, write them as an array.
- Principal cannot use wildcard(*).
"Principal" : { "scp": "srn:e::1234:::iam:user/root_user_id" }

"Principal" : {
    "scp": [
        "srn:e::1234:::iam:user/abc33333",
        "srn:e::1234:::iam:user/kef12344"
    ]
}

"Principal": {
    "Service": [
      "apigateway.samsungsdscloud.com"
    ]
}
Statement.Action
Statement.Action은 정책 검사에 평가될 액션을 정의합니다.
- 대소문자를 구분하여 작성하세요.
- 액션은 action definition에 정의되어 있는 액션 이름의 형식대로 작성하세요.
"Action" : ["{action_expression}"]                               # single action
"Action" : ["{action_expression}", "{action_expression}", ... ]  # multiple actions
Statement.Resource
Statement.Resource는 정책이 적용되는 특정 리소스 또는 리소스 집합을 지정하는 SRN을 정의합니다.
- 대소문자를 구분하여 작성하세요.
resource_expression은 와일드 카드("*") 또는 SRN 형식으로 작성하세요.
- 리소스 기반 정책이 부여된 자원의 SRN이 반드시 포함되어야 하며, 해당 자원의 하위 자원이 있는 경우에는 하위 자원을 포함하여 작성할 수 있습니다.
- 정책에 정의된 액션 정의(Action definition)에 기술된 자원에 한하여 Resources에 작성할 수 있으며, 정의되지 않은 자원의 경우에는 정책 평가 시 무시됩니다.
- 하위 자원에도 와일드 카드(*)를 사용할 수 있습니다.
"Resource" : ["{resource_expression}"]                                 # single resource
"Resource" : ["{resource_expression}", "{resource_expression}", ... ]  # multiple resources
resource_expression에선 SRN 각 요소에서도 wildcard 형태로 표시할 수 있으며, 요소의 종류에 따라 지원 형태가 달라집니다.
- wildcard 미지원 SRN 요소 SRN 요소 중 offering, account_id, service-type은 wildcard를 지원하지 않습니다.
"Resource" : ["srn:*::9b7653f6f47a42e38055934a0575a813:kr-west1::scp-compute:instance/d12937a6db0940499fdb0e18ad57b101"]   # offering wildcard notation (X)
"Resource" : ["srn:e::*:kr-west1::scp-compute:instance/d12937a6db0940499fdb0e18ad57b101"]                                  # account wildcard notation (X)
"Resource" : ["srn:e::9b7653f6f47a42e38055934a0575a813:kr-west1::*:instance/d12937a6db0940499fdb0e18ad57b101"]   # service type notation (X)
- wildcard 지원 SRN 요소
- SRN 요소 중 resource-type, resource-identifier, region은 전체 또는 부분에 대한 wildcard를 지원합니다.
- 부분 wildcard의 경우에는 “foo , foo*, foo, fo” 와 같은 표현식으로 작성 할 수 있습니다.
# region
"Resource" : ["srn:e::9b7653f6f47a42e38055934a0575a813:*::scp-compute:instance/d12937a6db0940499fdb0e18ad57b101"]     # All (O)
"Resource" : ["srn:e::9b7653f6f47a42e38055934a0575a813:kr-*::scp-compute:instance/d12937a6db0940499fdb0e18ad57b101"]  # part (O)

# resource-type
"Resource" : ["srn:e::9b7653f6f47a42e38055934a0575a813:kr-west1::scp-compute:*/d12937a6db0940499fdb0e18ad57b101"]     # All (O)
"Resource" : ["srn:e::9b7653f6f47a42e38055934a0575a813:kr-west1::scp-compute:ins*/d12937a6db0940499fdb0e18ad57b101"]  # part (O)

# resource-identifier
"Resource" : ["srn:e::9b7653f6f47a42e38055934a0575a813:kr-west1::scp-compute:instance/*"]                             # All (O)
"Resource" : ["srn:e::9b7653f6f47a42e38055934a0575a813:kr-west1::scp-compute:instance/d12*101"]                       # part (O)
단일 자원일 경우, user 조회에 대한 action_definition resources 정의 형태
kind: scp-iam:action-definition
service: iam
paths:
  /v1/users/{user_id}:
    get:
      resources:
      - "iam:user":
           resource_id: "path['user_id']"  # 사용자 조회 액션에서 지원되는 자원의 범위
kind: scp-iam:action-definition
service: iam
paths:
/v1/users/{user_id}:
get:
resources:
- "iam:user":
resource_id: "path['user_id']" # 사용자 조회 액션에서 지원되는 자원의 범위{
"Version": "2024-07-01",
"Statement": [
{
"Sid": "statement1",
"Action": ["iam:showUser"],
"Effect": "Allow",
"Resource": [
"*", # 전체 자원에 대한 표현,
"srn:e:::::scp-iam:user/94c2ae8e7d5d471683a6135446183a12", # 특정 사용자 자원에 대한 표현
"srn:e:::::scp-iam:policy/c23fb561c689455993874fa5d5ed4a2f" # 특정 정책 자원에 대한 표현 -> 사용자 조회 액션에서 해당 자원을 기술 할 경우 작성된 내용은 정책 평가 시 무시 된다.
]
}
]
}{
"Version": "2024-07-01",
"Statement": [
{
"Sid": "statement1",
"Action": ["iam:showUser"],
"Effect": "Allow",
"Resource": [
"*", # 전체 자원에 대한 표현,
"srn:e:::::scp-iam:user/94c2ae8e7d5d471683a6135446183a12", # 특정 사용자 자원에 대한 표현
"srn:e:::::scp-iam:policy/c23fb561c689455993874fa5d5ed4a2f" # 특정 정책 자원에 대한 표현 -> 사용자 조회 액션에서 해당 자원을 기술 할 경우 작성된 내용은 정책 평가 시 무시 된다.
]
}
]
}여러 자원일 경우, user 정책 조회에 대한 action_definition resources 정의 형태
서로 다른 여러 자원을 정의할 경우, 정책에 작성된 자원 유형을 정의하세요.
- 정책 판단 시 액션 정의 파일에 정의된 자원을 기준으로 정책에 작성된 내용이 조건에 만족한 경우에만 성공으로 판단합니다.
- 액션 정의 파일에 정의된 모든 자원이 정책에 작성되어 있지 않은 경우, 정책 조건에 맞지 않음으로 판단합니다.
kind: scp-iam:action-definition
service: iam
paths:
  /v1/user/{user_id}/policy/{policy_id}
    get:
      resources:
      - "iam:user"
         resource_id : "path['user_id']"
      - "iam:policy"
         resource_id : "path['policy_id']"
- 정상: 특정 사용자의 특정 policy 예시
{
  "Version": "2024-07-01",
  "Statement": [
        {
            "Sid": "statement1",
            "Action": ["iam:ShowUserPolicy"],
            "Effect": "Allow",
            "Resource": [
                    "srn:e:::::iam:user/94c2ae8e7d5d471683a6135446183a12",  # 특정 사용자 자원에 대한 표현
                    "srn:e:::::iam:policy/c23fb561c689455993874fa5d5ed4a2f" # 특정 정책 자원에 대한 표현
             ]
        }
    ]
}
{
"Version": "2024-07-01",
"Statement": [
{
"Sid": "statement1",
"Action": ["iam:ShowUserPolicy"],
"Effect": "Allow",
"Resource": [
"srn:e:::::iam:user/94c2ae8e7d5d471683a6135446183a12", # 특정 사용자 자원에 대한 표현
"srn:e:::::iam:policy/c23fb561c689455993874fa5d5ed4a2f" # 특정 정책 자원에 대한 표현
]
}
]
}정상: 모든 사용자의 특정 policy 예시
Color mode{ "Version": "2024-07-01", "Statement": [ { "Sid": "statement1", "Action": ["iam:ShowUserPolicy"], "Effect": "Allow", "Resource": [ "srn:e:::::iam:user/*", # 모든 사용자 자원에 대한 표현 "srn:e:::::iam:policy/c23fb561c689455993874fa5d5ed4a2f" # 특정 정책 자원에 대한 표현 ] } ] }{ "Version": "2024-07-01", "Statement": [ { "Sid": "statement1", "Action": ["iam:ShowUserPolicy"], "Effect": "Allow", "Resource": [ "srn:e:::::iam:user/*", # 모든 사용자 자원에 대한 표현 "srn:e:::::iam:policy/c23fb561c689455993874fa5d5ed4a2f" # 특정 정책 자원에 대한 표현 ] } ] }Normal: Example of a specific policy for all users 비정상: user 자원 미기술 예시
Color mode{ "Version": "2024-07-01", "Statement": [ { "Sid": "statement1", "Action": ["iam:ShowUserPolicy"], "Effect": "Allow", "Resource": [ "srn:e:::::iam:policy/c23fb561c689455993874fa5d5ed4a2f" # 특정 정책 자원에 대한 표현 ] } ] }{ "Version": "2024-07-01", "Statement": [ { "Sid": "statement1", "Action": ["iam:ShowUserPolicy"], "Effect": "Allow", "Resource": [ "srn:e:::::iam:policy/c23fb561c689455993874fa5d5ed4a2f" # 특정 정책 자원에 대한 표현 ] } ] }Abnormal: user resource not specified example
Statement.Condition
Statement.Condition은 정책 내에서 정책이 적용될 특정 대상에 대한 적용 조건을 정의합니다.
- 대소문자를 구분하여 작성하세요.
- 조건 연산자를 사용하여 정책에 정의된 자원의 속성 조건 키(또는 글로벌 조건 키), 값이 실제 요청(또는 자원의 속성)값과 비교하기 위한 조건 표현식을 작성하세요.
"Condition" : {
	"{qualifier:}{operator}" : {
    	"{condition-key}" : ["{condition-value}"],
	    "{condition-key2}" : ["{condition-value}"]
	}
}
| Item | Required or not | Case-sensitive | Explanation |
|---|---|---|---|
| operator | Required | O | Conditional operator
|
| condition-key | Required | X | Policy condition key (global condition key, resource attribute condition key)
|
| condition-value | Required | Depends on the operator. | policy condition value |
| qualifier | Select | O |
|
동일한 Condition Operator의 Condition Key에 Value가 2개 이상 정의된 경우, Value간 판단은 OR로 동작합니다. 단, Operator가 부정 연산자(Negative Operator) 유형인 경우에는 연산이 OR가 아닌 NOR로 동작합니다.
- 긍정 연산자(Positive Operator) 유형 및 예시(userName이 “foo” 또는 “bar"이고 company가 “Samsung"인 경우)
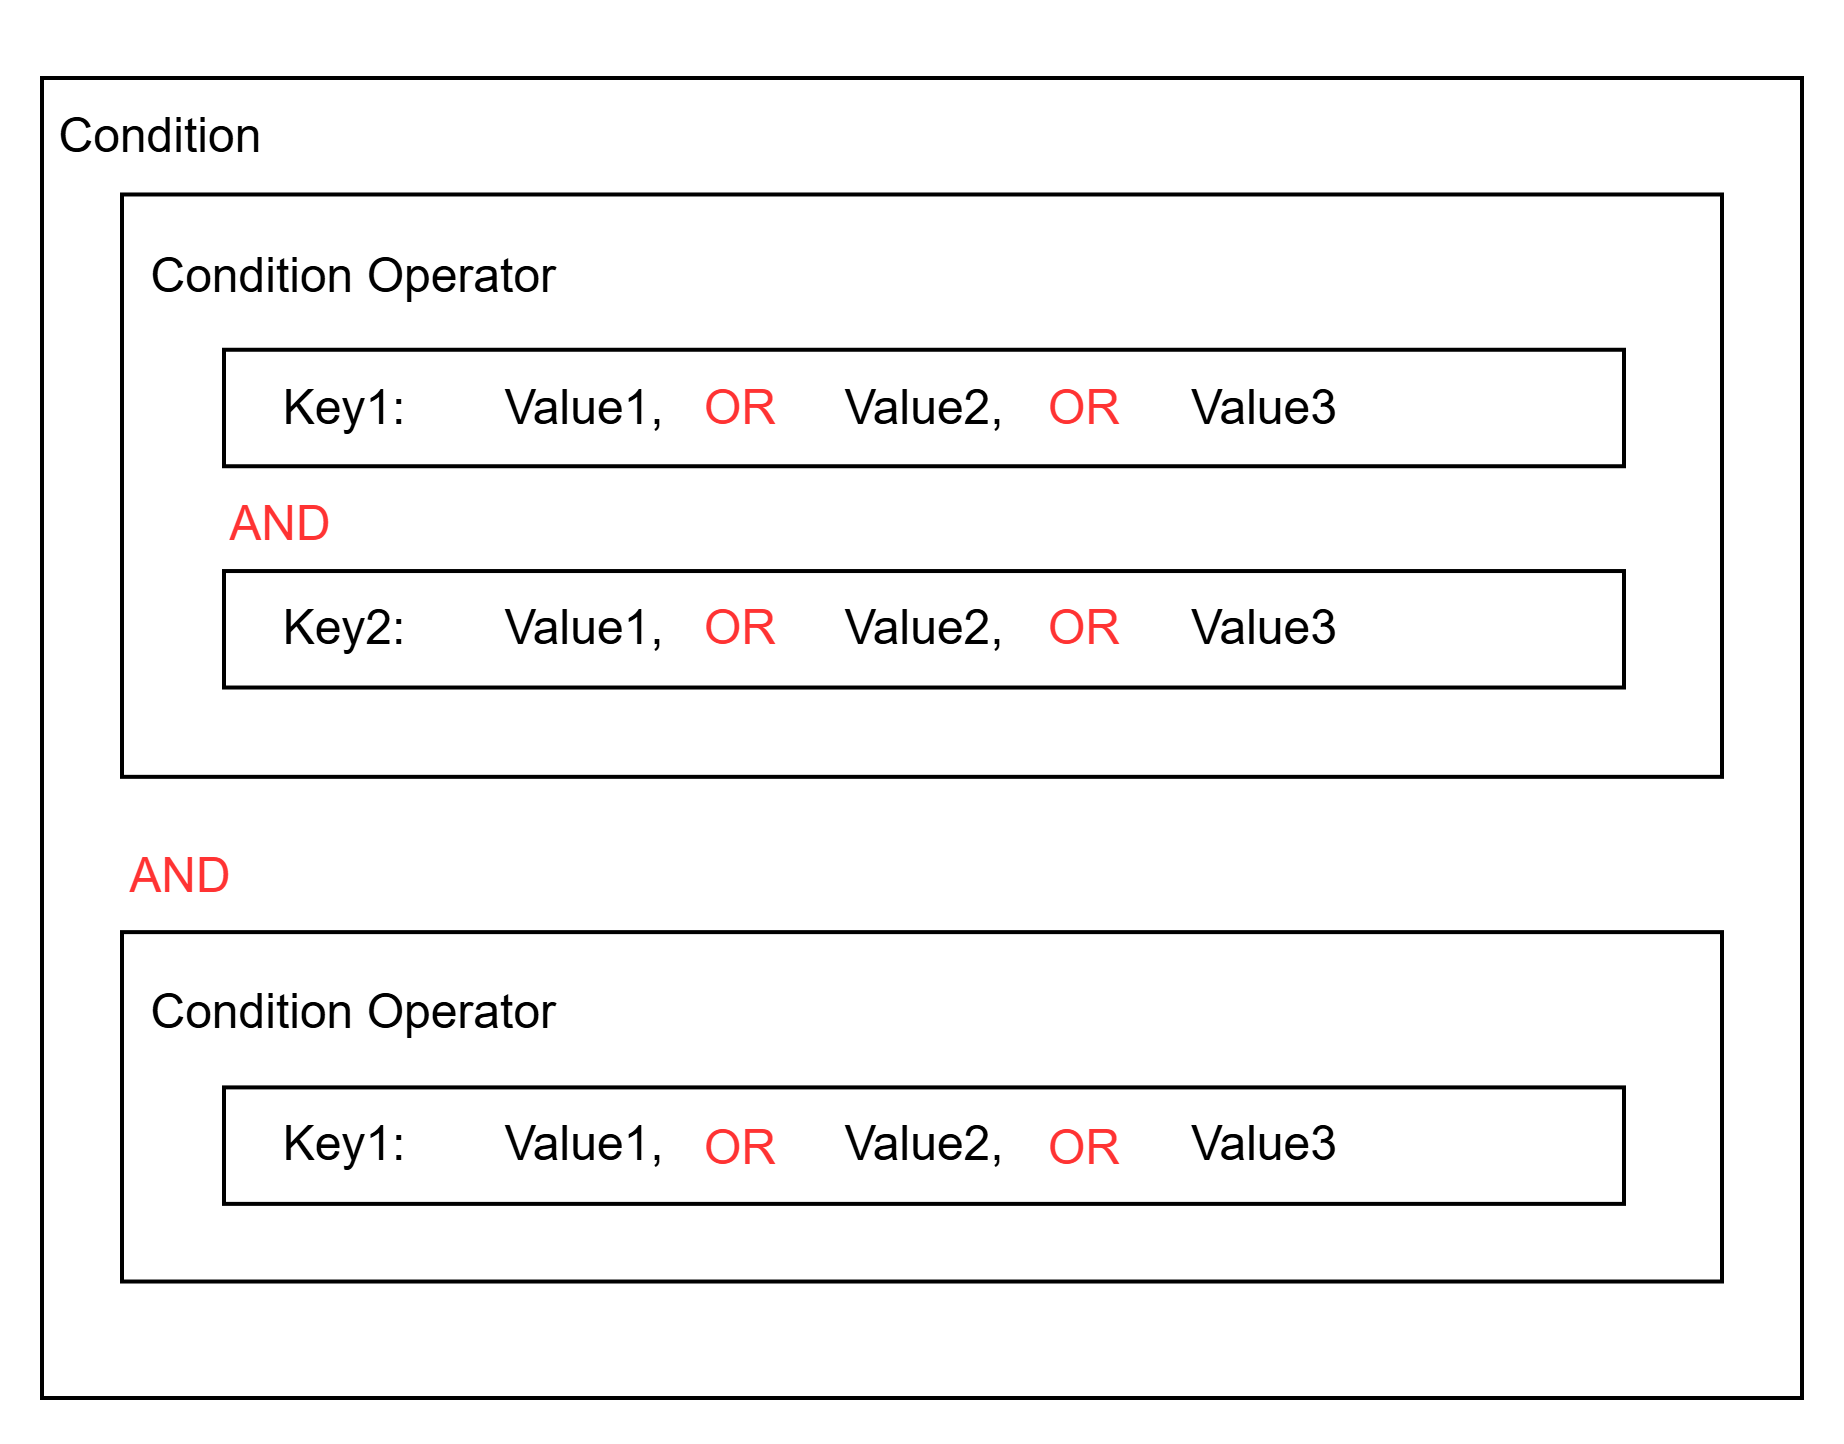
"Condition": {
   "StringEquals": {
      "iam:userName": [  # When the user's name is foo or bar
          "foo", "bar"
      ],
      "iam:userCompany": [  # when the user's company is Samsung
          Samsung
      ]
   }
 }
- 부정 연산자(Negative Operator) 유형 및 예시(IP가 1.1.1.1/24 와 2.2.2.2/24가 대역이 아닌 모든 IP)
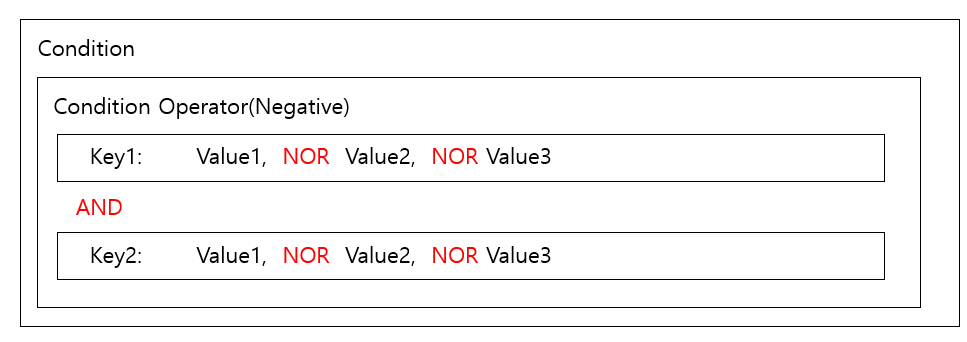
"Condition": {
   "NotIpAddress": {
      "scp:SourceIp": [  # when the request IP is neither 1.1.1.1 nor 2.2.2.2
          "1.1.1.1/24", "2.2.2.0/24"
      ]
   }
 }
조건 연산자(operator)
조건 연산자는 7가지(문자열, 숫자, 날짜, Bool, IP, SRN, Null) 연산자를 제공합니다.
문자열 연산자
conditional operator Operator type Explanation StringEquals positive operator Exact match, case-sensitive StringNotEquals negation operator mismatch StringEqualsIsIgnoreCase positive operator Exact match, case insensitive StringNotEqualsIsIgnoreCase negation operator Mismatch, case-insensitive StringLike positive operator Case-sensitive matching; multiple-character string matching (*) wildcard can be included in the value. StringNotLike negation operator Case sensitivity mismatch, wildcard that matches multiple characters (*) can be included in values Table. String operators숫자 연산자
conditional operator Operator Types description NumericEquals positive operator Match NumericNotEquals negation operator mismatch NumericLessThan positive operator Match less than NumericLessThanEquals positive operator as follows NumericGreaterThan positive operator overmatch NumericGreaterThanEquals positive operator Match above Table. Numeric operators날짜 연산자
conditional operator Operator type description DateEquals positive operator Match specific date DateNotEquals negation operator mismatch DateLessThan positive operator Match before a specific date/time DateLessThanEquals positive operator Match on a specific date/time or earlier DateGreaterThan positive operator Match after a specific date/time DateGreaterThanEquals positive operator Match on a specific date/time or later Table. Date operatorsBool 연산자
conditional operator Operator Types description Bool positive operator True, False match Table. Bool operatorIP 연산자
conditional operator Operator type description IpAddress positive operator specified IP address or range NotIpAddress negation operator All IP addresses except the specified IP address or range Table. IP operatorSRN 연산자
conditional operator Operator Types description SrnEquals, SrnLike positive operator SRN match SrnNotEquals, SrnNotLike negation operator SRN mismatch Table. SRN operatorNull 연산자
conditional operator Operator type description Null positive operator - If the key is missing or the value is null \→ True
- If the key exists and the value is not null \→ False
Table. Null operator
조건 키(condition-key)
조건 키는 전역 조건 키과 자원 속성 키로 구분됩니다.
전역 조건 키(Global condition key)
Samsung Cloud Platform에 사전 정의된 조건 키로써 요청 정보, 자원 공통 정보(ex-tag), 네트워크 정보 등의 데이터를 정의합니다.
| condition key | Data type | singular/plural | description | example |
|---|---|---|---|---|
| scp:UserId | string | single | request user id | “scp:UserId” : [“efda56a968cd45b2873d9bf5fab58e95”] |
| scp:UserName | string | single | Request user name | “scp:UserName” : [“foo”] |
| scp:MultiFactorAuthPresent | bool | string | Request via MFA authentication | “scp:MultiFactorAuthPresent” : [“True”] |
| scp:RequestedRegion | string | single | request region | “scp:RequestedRegion” : [“kr-west1”] |
| scp:RequestAttribute/{AttributeKey} | string | single | request attribute value(AttributeKey)
| “scp:RequestAttribute/body[‘foo’]” : [“true”] |
| scp:TagKeys | string | single / multiple | request tag key | “scp:TagKeys” : [“tag-key”] |
| scp:RequestTag | string | single | Request tag key value | “scp:RequestTag/tag-key” : [“tag-value”] |
| scp:ResourceTag/{TagKey} | string | single | Resource tag key value | “scp:ResourceTag/foo” : [“bab”] |
| scp:SourceIp | ip_address | single | IP of the current requesting entity | “scp:SourceIp” : [“1.1.1.1/24”] |
| scp:CurrentTime | datetime | single | Request time (UTC, ISO 8601 format) | “scp:CurrentTime” : [“2025-11-06T16:10:38Z”] |
자원 속성 키(Resource attribute key)
고유 자원에 대한 속성 키로써 자원의 속성값을 기준으로 조건값을 검사할 때 사용합니다.
{service}:{resource_type}{attribute_name}
Resource definition에서 정의된 attributes에 abac:true인 대상의 속성에 한해서만 정의할 수 있으며 정의되지 않은 속성값을 입력할 경우, 해당 condition 정책은 무시됩니다(Not found).- 자원 속성명 사용 예시
"iam:userLastname"  (O) # attribute name defined in the resource (service: iam, resource: user, attribute_name : lastname)
"iam:userLASTNAME"  (O) # Property name defined in the resource (case-insensitive)
"iam:userLast_name" (X) # When it is not an attribute name defined in the resource ㅎ
"iam:userEmail"     (X) # when abac is false
"iam:state"         (X) # when the abac field is not defined
kind: scp-resourcemanager:resource-definition
service_type: scp-iam
name: scp-iam:user
resources_uri: /v1/users
resource_type: user
display_name:
  ko: '사용자'
  en: 'User'
product_id: IAM
attributes:
  state:
    type: string
    uri: /v1/users/{resource_id}
    method: GET
    jsonpath: $.state
  firstname:
    type: string
    uri: /v1/users/{resource_id}
    method: GET
    jsonpath: $.first_name
    abac: true
  lastname:
    type: string
    uri: /v1/users/{resource_id}
    method: GET
    jsonpath: $.last_name
    abac: true
  email:
    type: string
    uri: /v1/users/{resource_id}
    method: GET
    jsonpath: $.email
    abac: false
kind: scp-resourcemanager:resource-definition
service_type: scp-iam
name: scp-iam:user
resources_uri: /v1/users
resource_type: user
display_name:
ko: '사용자'
en: 'User'
product_id: IAM
attributes:
state:
type: string
uri: /v1/users/{resource_id}
method: GET
jsonpath: $.state
firstname:
type: string
uri: /v1/users/{resource_id}
method: GET
jsonpath: $.first_name
abac: true
lastname:
type: string
uri: /v1/users/{resource_id}
method: GET
jsonpath: $.last_name
abac: true
email:
type: string
uri: /v1/users/{resource_id}
method: GET
jsonpath: $.email
abac: false- 자원의 속성명은
Resource definition에서 정의된attributes에 정의된 속성 데이터를 사용합니다. - Resource definition에 대한 자세한 내용은 Resource Definition 가이드를 참고하세요.
Condition Key 정의 예시
- 전역 조건 키(Global condition key) 예시: 특정 정책 자원 태그의 키(Environment)의 값이 “Local” 또는 “Dev"인 경우에만 그룹 상세 조회를 허용하는 정책
{
  "Version": "2024-07-01",
  "Statement": [
    {
      "Sid": "statement1",
      "Action": ["iam:showPolicy"],
      "Effect": "Allow",
      "Resource": ["*"],
      "Condition": {
          "StringEquals": {
            "scp:ResourceTag/Environment": [  # 전역 조건 키(scp:ResourceTag)를 사용한 정의 형태
              "Local", "Dev"
            ]
          }
      }
    }
  ]
}
{
"Version": "2024-07-01",
"Statement": [
{
"Sid": "statement1",
"Action": ["iam:showPolicy"],
"Effect": "Allow",
"Resource": ["*"],
"Condition": {
"StringEquals": {
"scp:ResourceTag/Environment": [ # 전역 조건 키(scp:ResourceTag)를 사용한 정의 형태
"Local", "Dev"
]
}
}
}
]
}- 자원 속성 키(Resource attribute key) 예시Color mode
{
  "Version": "2024-07-01",
  "Statement": [
    {
      "Sid": "statement1",
      "Action": ["server:showInstance"],
      "Effect": "Allow",
      "Resource": ["*"],
      "Condition" : {
           "StringEquals" : {
               "virtual-servers:instanceFlavor" : ["m1.small"] # virtual-servers 서비스의 intance 리소스의 flavor 속성이 "m1.small"인 경우
            }
       }
    }
  ]
}
{ "Version": "2024-07-01", "Statement": [ { "Sid": "statement1", "Action": ["server:showInstance"], "Effect": "Allow", "Resource": ["*"], "Condition" : { "StringEquals" : { "virtual-servers:instanceFlavor" : ["m1.small"] # virtual-servers 서비스의 intance 리소스의 flavor 속성이 "m1.small"인 경우 } } } ] }Resource attribute key example
정책 조건값(condition-value)
조건 키에 대한 값을 정의합니다.
"Condition" :  {
   "StringEquals" : {
        "scp:resourceTag/key1": ["value1", "value2", "value3"]    # If the resource's tag key is key1 and the value is value1, value2, or value3
 }
한정자(quailfier)
Condition key로부터 추출된 요청 컨텍스트값이 여러 개의 값을 가진인 경우에 동작 방법을 정의합니다.(요청 컨텍스트값이 1개일 경우에는 생략)한정자는 ForAnyValue, ForAllValues로 구분되며 한정자를 작성하지 않을 경우, ForAnyValue가 기본값으로 정의됩니다.
ForAnyValue: 요청 컨텍스트에 추출된 값들이 Condition에 정의된 Operand와 1개 이상 일치할 경우 TrueForAllValues: 요청 컨텍스트에 추출된 값들이 Condition에 정의된 Operand 리스트의 하위 집합일 경우 True
{

  "Condition" :  {
       "ForAllValues:StringEquals" : {
            "scp:TagKeys": ["key1", "key2", "key3"]
        }
  }
}
한정자 동작 예시
“scp:TagKeys”로 부터 추출되는 요청값이 1개인 경우: 한정자와 관계없이 Operand별로 OR로 동작“scp:TagKeys”로 부터 추출되는 요청값이 2개 이상인 경우: 한정자에 따라 결과 차이
# 추출되는 요청 컨텍스트값이 ["key1", "key2", "key4"] 인 경우
Operand: ["key1", "key2", "key3"]
   # 요청 컨텍스트값 중 key1는 Operand에 포함되므로 True
   # 요청 컨텍스트값 중 key2는 Operand에 포함되므로 True
   # 요청 컨텍스트값 중 key4는 Operand에 포함되지 않으므로 False

ForAnyValue는 3개의 요청 컨텍스트 값 중 1개라도 일치할 경우엔 True로 판단
ForAllValues는 3개의 요청 컨텍스트 값이 모두 True 일 경우에만 최종 True로 판단
# 추출되는 요청 컨텍스트값이 ["key1", "key2", "key4"] 인 경우
Operand: ["key1", "key2", "key3"]
# 요청 컨텍스트값 중 key1는 Operand에 포함되므로 True
# 요청 컨텍스트값 중 key2는 Operand에 포함되므로 True
# 요청 컨텍스트값 중 key4는 Operand에 포함되지 않으므로 False
ForAnyValue는 3개의 요청 컨텍스트 값 중 1개라도 일치할 경우엔 True로 판단
ForAllValues는 3개의 요청 컨텍스트 값이 모두 True 일 경우에만 최종 True로 판단3 - API Reference
4 - CLI Reference
5 - Release Note
IAM
- You can copy the permissions of another IAM user.
- When creating or modifying an IAM user, you can copy and import policies that are attached to another user’s group or directly attached.
- We have improved the CX-related functionality.
- You can manage IAM user access key creation records.
- You can configure the visibility of the AI recommendation floating guide displayed at the bottom of the screen.
- When viewing the IAM user list, you can click the user group to navigate to the detail page.
- If a password error occurs while using the console, you will be automatically logged out of the console.
- When password entry is required, such as changing the password or updating the mobile phone number, you will be automatically logged out after five or more incorrect attempts.
- We provide a guide on using the Json mode that can be referenced when creating policies.
- You can share related information via email when creating a user or changing a password.
- Virtual Server and Cloud Function have been added as the entities that perform role functions.
- When changing roles, you can check the session expiration time in My Menu.
- You can register and manage IPs that can access the console.
- Root users and IAM users with the same information (phone number, email) can switch between each other even after logging in.
- The role feature has been added.
- Users can switch from their own account to a different role to access the Account.
- Credential provider functionality has been added.
- You can create a credential provider and access the Account resource in the Console through the created credential provider.
- You can directly associate users with policies.
- You can add conditions for attribute-based access control (ABAC) when creating a policy.
- The mandatory requirements for creating a user password have been changed.
- When editing an authentication key, CIDR input is optional.
- A password reconfirmation step has been added when changing the user’s email or phone number.
- IAM(Identity and Access Management) feature change
- Added user group and user functions, and policy creation functionality.
- We provide a unified authentication key by consolidating the app authentication key and the storage authentication key.
- Samsung Cloud Platform Common Feature Changes
- Implemented common CX changes, including Account, Service Home, and tags.
- The IAM(Identity and Access Management) service has been released.
- Provide user authentication and authorization management.
- Access control policy management provided
- The IAM(Identity and Access Management) service has been launched.
- Provide user authentication and authorization management.
- Provides access control policy management