Users can enter the required information for Oracle Services through the Samsung Cloud Platform Console, select detailed options, and create the service.
Oracle Services Create
You can create and use Oracle Services from the Samsung Cloud Platform Console.
Oracle Services can be applied for only one per project.
- To proceed with a new creation, cancel the existing Oracle Services and create again.
To create Oracle Services, follow the steps below.
- All Services > Hybrid Cloud > Oracle Services menu, click the Create Service button. Navigate to the Service Home page of Oracle Services.
- Click the Oracle Services Creation button on the Service Home page. You will be taken to the Oracle Services Creation page.
- Oracle Services creation Enter the information required to create the service on the page.
- Service Information Input Enter the required information in the area.
Category RequiredDetailed description Oracle Services name Required Oracle Services name to be used by the user - Start with a lowercase English letter and use lowercase English letters, numbers, and the special character (
-) to input 3-30 characters
Description Option Enter additional description for Oracle Services Table. Oracle Services Service Information Input Items - Start with a lowercase English letter and use lowercase English letters, numbers, and the special character (
- Additional Information Input area, please enter or select the required information.
Category Required or notDetailed description Select Tenancy Option Tenancy name assigned to the user’s Organization - The tenancy name assigned to the account’s Organization is displayed automatically, so selection is not possible
- For service application, the account must belong to an Organization. The account’s Organization must be created and joined before creating the service
Tag Select Add Tag - Up to 50 can be added per resource
- After clicking the Add Tag button, enter or select Key, Value values
Table. Oracle Services Additional Information Input Items
- Service Information Input Enter the required information in the area.
- Check the detailed information and estimated billing amount generated in the summary panel, and click the Complete button.
- When creation is complete, check the created resource on the Resource List page.
- It can only be used after the operator approves the usage request after service creation. For detailed information about service usage approval, click ? > Support Center > Contact Us to check the details.
Oracle Services Detailed Information Check
Oracle Services service can view and edit the full resource list and detailed information from the Oracle Services menu. The Oracle Services Details page consists of Detail Information, Tags, Activity History tabs.
Detailed information of Oracle Services can only be viewed after the service is requested and the operator has completed approval.
- To check the detailed information, make sure the service status has changed to Active after the service approval is completed.
To view detailed information of Oracle Services, follow the steps below.
- All Services > Hybrid Cloud > Oracle Services Click the menu. Go to the Service Home page of Oracle Services.
- Click the Oracle Services menu on the Service Home page. Go to the Oracle Services list page.
- Oracle Services List click the resource to view detailed information on the page. Oracle Services Detail page will be opened.
- Oracle Services Details page displays status information and additional feature information, and consists of Details, Tags, Activity History tabs.
Category Detailed description Status Current Service Status - Creating: Service application in progress
- Active: Service approved and successfully created
- Creation Failed: Error occurred during creation
- Deletion Failed: Error occurred during deletion
- Denied: Operator approval denied
- Requested: Waiting for operator approval
- Deleting: Service termination request in progress
Service termination Service termination button Table. Oracle Services status information and additional feature items
Detailed Information
Details tab allows you to view the detailed information of the selected Oracle Services.
| Category | Detailed description |
|---|---|
| Service | Service Name |
| Resource Type | Resource Type (Oracle Services) |
| SRN | Resource unique ID in Samsung Cloud Platform |
| Resource Name | Resource Name |
| Resource ID | Unique resource ID in the service |
| Creator | Service creation request user |
| Creation Date/Time | Service Creation Date/Time |
| Editor | Service modification request user |
| Modification Date/Time | Service Modification Date/Time |
| Tenancy name | Tenancy name assigned to Organization |
| Oracle Services NW Configuration | Oracle Services Network Configuration Request and Edit
|
| Compartment name | Resource name connected to the service |
| SCP VPC ↔ Oracles Service connection | Oracle Services circuit request/modify/termination shortcut click to request uplink circuit in the service request popup
|
| Dynamic Group configuration | Dynamic Group configuration status
|
| Virtual Circuit OCID | Virtual Circuit OCID Path |
| Description | Oracle Services service additional description |
| Connected Users | List of users who can access the Oracle Services
|
Tag
In the Tag tab, you can view the tag information of the selected resource, and you can add, modify, or delete it.
| Category | Detailed description |
|---|---|
| Tag List | Tag List
|
Work History
Work History tab allows you to view the work history of the selected resource.
| Category | Detailed description |
|---|---|
| Work History List | Resource Change History
|
Oracle Services Network Configuration and Access
You can connect the user VPC of Samsung Cloud Platform with the VCN (Virtual Cloud Network) in Samsung Cloud Platform Dedicated Oracle Cloud to use Oracle Services. To connect the VPC and the VCN in Oracle Cloud, you must configure the Oracle Services network and then apply for a dedicated uplink for Oracle Services. Oracle Services network configuration and uplink request are completed, Samsung Cloud Platform VPC - TGW - dedicated line segment - Oracle Cloud DRG - VCN connection is completed, allowing various hybrid cloud configurations such as connecting the user’s VM in the VPC environment with the DB in the Oracle Cloud VCN.
Oracle Services Request Network Configuration
When using Samsung Cloud Platform Dedicated Oracle Cloud, it creates and configures the user’s essential network resources. This configuration request uses the user’s input data with the Oracle Cloud API, providing a service provisioning role that creates and deploys Oracle Cloud network services so that users can easily use Oracle software such as Oracle DBCS (Database Cloud Service) and ExaCS (Exadata Cloud Service).
To request the network configuration of Oracle Services, follow the steps below.
- All Services > Hybrid Cloud > Oracle Services Click the menu. Go to the Service Home page of Oracle Services.
- Service Home page, click the Oracle Services menu. Navigate to the Oracle Services list page.
- Click the resource to view detailed information on the Oracle Services list page. Navigate to the Oracle Services detail page.
- Click the edit icon of Oracle Services NW Configuration on the Oracle Services Details page. The Oracle Services Network Configuration Edit window appears.
- Oracle Services Network Configuration Modification Enter or select detailed information in the window and click OK.
Category Detailed description SCP TGW selection Select the Transit Gateway to connect to Samsung Cloud Platform Dedicated Oracle Cloud VCN name Enter the VCN name to be created on Samsung Cloud Platform Dedicated Oracle Cloud VCN IPv4 CIDR block Enter the VCN’s IPv4 CIDR block - Example: 10.0.0.0/16
Using DNS Hostname (VCN) Set to Enabled to use Oracle Exa/DBCS, etc. - Enable Enabled to assign instance host names using VCN DNS or third‑party DNS
DNS Label (VCN) The DNS label is generated from the value entered by the user - It is set to be the same as the VCN name, but may be changed according to DNS label constraints
Subnet name Enter the name of the Private subnet to be created in the VCN Subnet IPv4 block Enter the IPv4 CIDR block of the private subnet - Example: 10.0.0.0/24
Using DNS Hostname (Subnet) Set to Use to use Oracle Exa/DBCS, etc. - Set to Use to assign instance host names using VCN DNS or third‑party DNS
DNS Label (Subnet) DNS label is generated from the value entered by the user - It is set to be the same as the Subnet name, but may be changed according to DNS label constraints
Subnet resource logging Set whether to use Subnet resource logging - Set selection allows receiving resource tracing, troubleshooting, and data insight information
Routing table rule Enter Dynamic routing rule in Samsung Cloud Platform Dedicated Oracle Cloud Table. Oracle Services Network Configuration Items
Oracle Services Network Configuration Order
Oracle Services when you request network configuration attempts network service provisioning and automatic configuration with the values entered by the user. If the user needs to update after provisioning, they can directly update the configurable settings in the Oracle Cloud web console after creation.
- Create Oracle Cloud VCN.
- Create Oracle Cloud DRG.
- DRG(Dynamic Routing Gateway) is an optional virtual router that can be added to a VCN, serving a role similar to Samsung Cloud Platform Transit Gateway. This gateway provides private network traffic routing between the VCN and on-premises networks.
- Connect the DRG to the VCN.
- Enable the “Use DNS Hostnames” option of the VCN.
- After defining FastConnect, create a Virtual Circuit for logical allocation.
- FastConnect is a dedicated line product for Oracle Cloud, serving a role similar to Samsung Cloud Platform Direct Connect.
- When defining FastConnect, set it to the same bandwidth as the corresponding TGW’s bandwidth.
- Create a Private Subnet within VCN.
- Enable the “Use DNS Hostnames” option of the Subnet.
- Add DRG to the VCN Route Table as 0.0.0.0.
- The default input value of DRG is 0.0.0.0.
- Set up user logging.
- Create the log group first, then set up logging.
Request to connect Samsung Cloud Platform VPC and Oracle Services
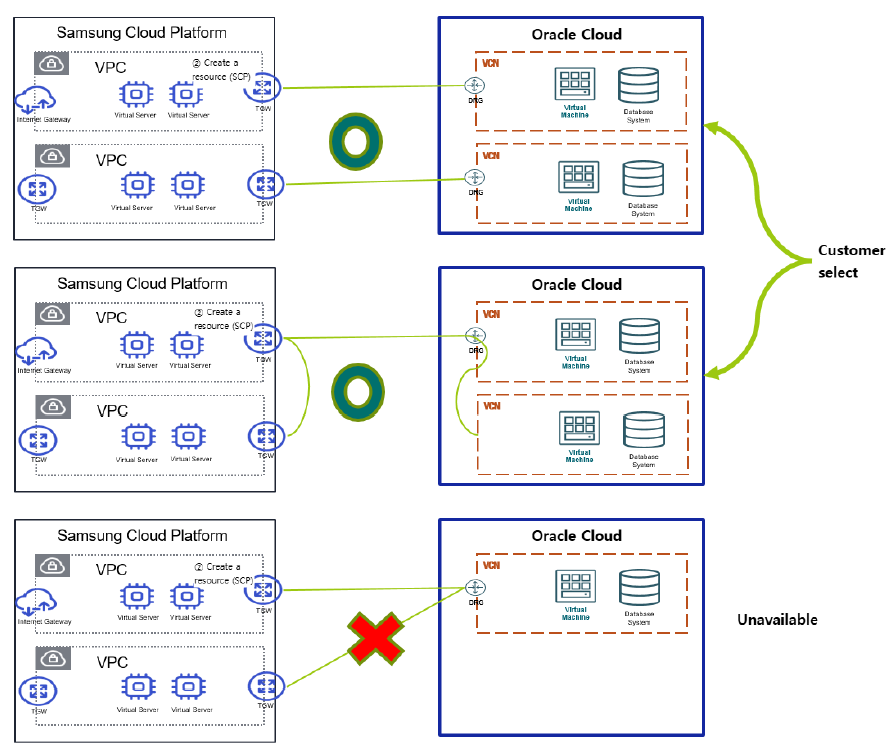
To provide Oracle Service, a connection as shown below has been established between Samsung Cloud Platform and Oracle Cloud.
- A common network is configured for service/authentication integration and console connection between Samsung Cloud Platform and Oracle Cloud.
- Through the Samsung Cloud Platform Oracle product, set up user-specific service connection networks, and based on the physical network connection between Samsung Cloud Platform and Oracle Cloud, connect the Samsung Cloud Platform VPC and Oracle Cloud VCN.
- Workloads configured in Oracle Cloud (e.g. Computing, DB instance) can be utilized using the pre-configured Cross network between Samsung Cloud Platform-Oracle Cloud.
- Samsung Cloud Platform TGW and Direct Connect routing configuration allows direct access/utilization of the DB configured in Oracle Cloud even in customer network environments connected via Direct Connect or TGW Uplink.
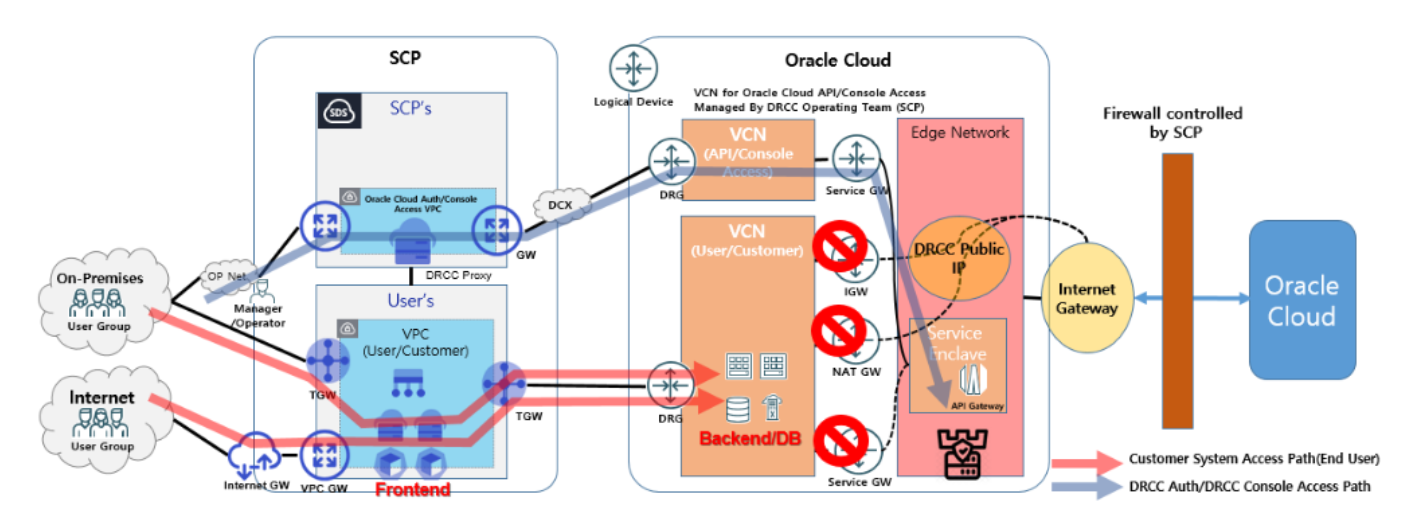
- Samsung Cloud Platform and Oracle Cloud single connection architecture can be implemented via TGW peering and TGW-to-TGW connections, and can be commonly used across multiple projects and VPCs. However, when used commonly, performance and bandwidth considerations are needed.
- Samsung Cloud Platform TGW and Oracle Cloud’s DRG must have a 1:1 connection structure.
- It is possible to share a single connection architecture across multiple projects and VPCs through peering.
- However, it is not possible to peer multiple Samsung Cloud Platform VPCs using a single Oracle Cloud DRG.
Oracle Services Uplink Apply for Line
After completing the Oracle Services network configuration, you must request a dedicated line connection to the DRG via the TGW of Samsung Cloud Platform.
- Oracle Services Uplink line connection can only be requested after network configuration.
- The Samsung Cloud Platform TGW to be uplinked can only have a 1:1 relationship with Oracle Cloud. Before requesting an uplink, first create a new TGW for exclusive use with Oracle Services, then proceed with the TGW-VPC connection task.
- Oracle Services Uplink application must be done via the Hybrid Cloud > Oracle Services > Oracle Services line request/modification/termination shortcut menu.
- Networking > Transit Gateway > Uplink line If you request an uplink connection, the application details may not be accurately conveyed to the responsible engineer.
To apply for Oracle Services’ Uplink line, follow the steps below.
- All Services > Hybrid Cloud > Oracle Services Click the menu. Navigate to the Service Home page of Oracle Services.
- Service Home page, click the Oracle Services menu. Go to the Oracle Services list page.
- Click the resource to view detailed information on the Oracle Services List page. Go to the Oracle Services Details page.
- Click Oracle Services line request/modify/termination shortcut on the Oracle Services Details page. You will be taken to the Service Request page.
- On the Service Request page, after entering the relevant information in the service information input area, click the Complete button.
Input Item Detailed Description Title Title of the service you want to request Region Select location of Samsung Cloud Platform - Automatically filled with the project’s region
Service Select the service group and service of the relevant service - Service group: Hybrid Cloud
- Service: Oracle Services
Task Category Select the task you want to perform - Oracle Services Uplink line request: select if you are applying for this service
Content Enter detailed information to connect the L3 switch for user VPC TGW-Oracle Services connection - Enter applicant information: user email, name, and contact. Application details, progress, and results will be delivered via email.
- Enter customer IP range information and Samsung Cloud Platform TGW, OCI virtual circuit information to connect to the Oracle Cloud dedicated for Samsung Cloud Platform
- Target DC/Region identifier: Korea (Seoul)/ap-seoul-2
- Customer OCI IP range: Enter the IP range to connect to the Oracle Cloud dedicated for Samsung Cloud Platform (e.g., 10.10.10.0/24)
- Samsung Cloud Platform VPC range communicating with OCI: Enter the Samsung Cloud Platform VPC range connected to Oracle Cloud (e.g., 20.20.20.0/24)
- SCP TGW name: Enter the TGW name to connect to the Oracle Cloud dedicated for Samsung Cloud Platform (how to check: Samsung Cloud Platform > Networking > TGW)
- SCP TGW resource ID: Enter the TGW ID to connect to the Oracle Cloud dedicated for Samsung Cloud Platform (how to check: Samsung Cloud Platform > Networking > TGW > Details)
- OCI virtual circuit OCID: Enter the OCID of the Virtual Circuit created in Network Configuration of Oracle Cloud (how to check: Samsung Cloud Platform > Hybrid Cloud > Oracle Services > Details)
- Progress can be checked in the service request menu
- If there is a work account of the network department that can coordinate the work, enter it additionally
Table. Oracle Services Network Configuration Items
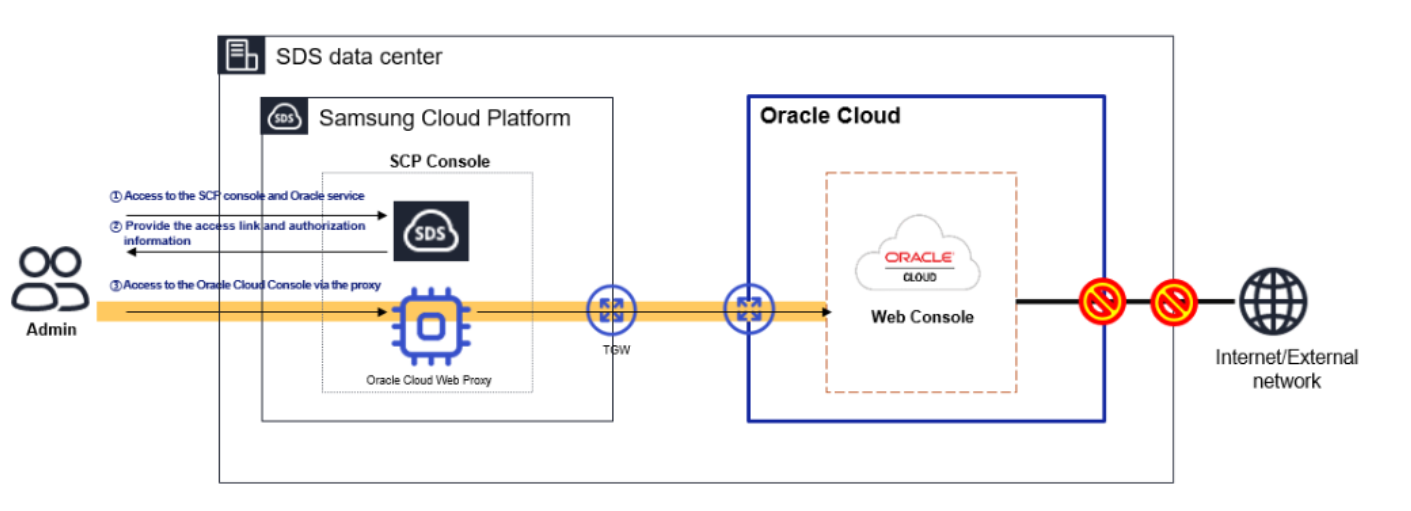
Oracle Services Connect
After connecting Oracle Services, you can proceed with Single Sign On (SSO) for Oracle Cloud login and access the Customer console.
- Since it is a Samsung Cloud Platform dedicated Oracle Cloud completely separated from Public Oralce Cloud, existing accounts of Public Oracle Cloud cannot be used.
- Oracle Services can be accessed only after the operator approves the service usage after application.
To access Oracle Services, follow the steps below.
- All Services > Hybrid Cloud > Oracle Services Click the menu. Navigate to the Service Home page of Oracle Services.
- Service Home page, click the Oracle Services menu. Go to the Oracle Services list page.
- Oracle Services List page, click the resource to view detailed information. Oracle Services Detail page will be opened.
- Click the Service Access button on the Oracle Services Details page. The Oracle Cloud Console Login window appears.
- Oracle Cloud Console Login After entering user information in the window, click Samsung Cloud Platform Login.
- In the Samsung Cloud Platform logged-in state, you can log in to Oracle Cloud by linking with SSO.
- After entering the 6-digit OTP generated in the mobile app, click Confirm.
- When the user information is authenticated, you will be redirected to the Tenancy page of Oracle Cloud.
Oracle Services Cancel
If you cancel unused Oracle Services, you can reduce operating costs.
To cancel Oracle Services, follow the steps below.
- All Services > Hybrid Cloud > Oracle Services Click the menu. Navigate to the Service Home page of Oracle Services.
- Click the Oracle Services menu on the Service Home page. Go to the Oracle Services list page.
- Click the resource to be terminated on the Oracle Services List page. It navigates to the Oracle Services Details page.
- Click the Cancel Service button on the Oracle Services Details page.
- When the termination is complete, check the resource termination status in the Oracle Services list.
Delete resources in Compartment
Oracle Services product termination is only possible when all resources within the user’s Compartment have been deleted.
To check and delete the remaining resources, follow the steps below.
- After clicking the top resource explorer in the Oracle Cloud console, click Advanced resource query. Enter the Resource Explorer.
- Click Show basic search mode.
- Click Search and Filter, then select Compartment.
- Please select the Compartment to delete.
- Compartment starts with PROJECT- xxx and is located under the Root.
- Apply Filter를 클릭해 삭제 대상 Compartment 내의 리소스를 확인하세요.
- Delete all resources in the Compartment.