This is the multi-page printable view of this section. Click here to print.
Planned Compute
- 1: Overview
- 2: How-to Guides
- 3: Release Note
1 - Overview
Service Overview
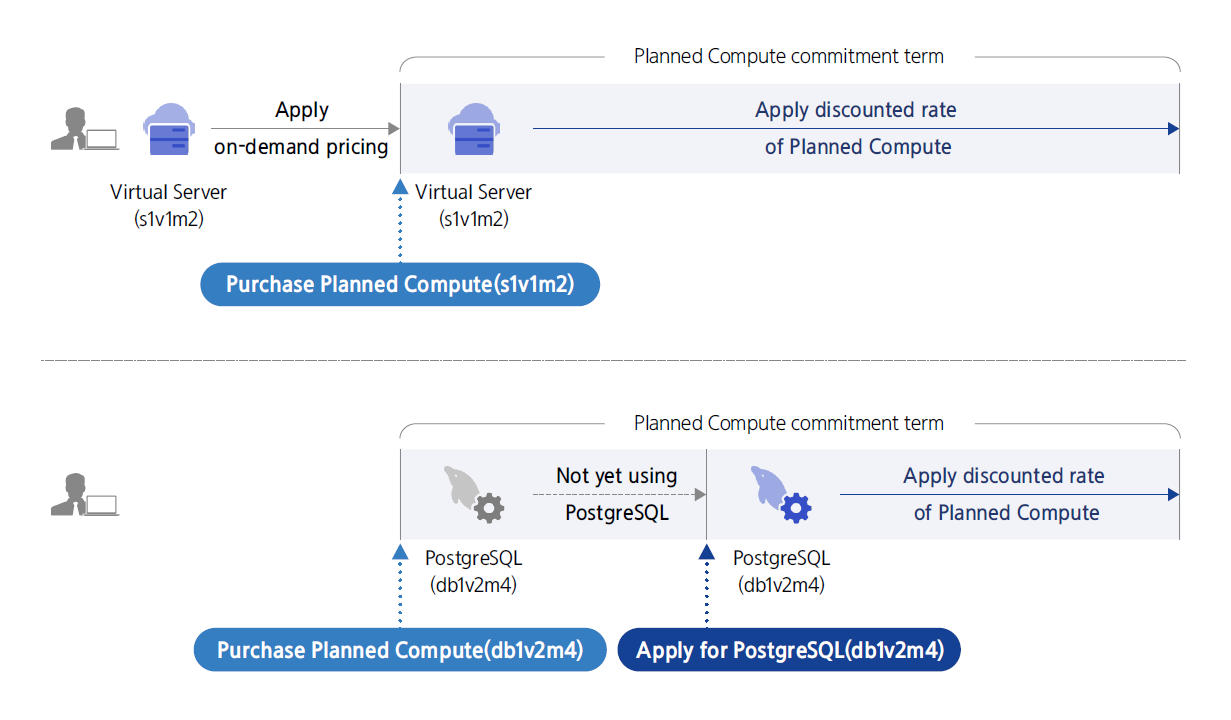
Planned Compute is a pricing policy that allows you to use resources up to 40% cheaper than on‑demand by committing to a 1‑year or 3‑year server type. It applies to resources in the on‑demand Compute, Database, and Data Analytics service families. When the attributes applied to Planned Compute match the attributes of the on‑demand resources, the discounted Planned Compute rate is applied automatically. You can view the discounts applied through Planned Compute in the Report and, if needed, submit an additional Planned Compute request.
Features
Planned Compute is a contract‑based discount service offered by Samsung Cloud Platform, allowing you to select the desired operating system and server type. It provides high flexibility by letting you apply for discounts for a contract period of one to three years without specifying particular resources.
- Discounted Pricing: Planned Compute is a pricing discount policy that allows resources to be used up to 40% cheaper than on‑demand, provided a 1‑year or 3‑year usage commitment. It applies to resources in the on‑demand Compute service category, Analytics service category, and Database service category, and when the attributes applied to Planned Compute match the attributes of the on‑demand target resources, the Planned Compute discount pricing is automatically applied.
- Various Feature Support: Planned Compute provides various functions such as application, extension, and server type changes. When applying for Planned Compute, select the contract‑discount‑eligible service, operating system, server type, and contract period, then enter the desired quantity to submit the request.
- Convenient Management and Monitoring: By checking the Planned Compute list, you can view Planned Compute usage information and modify the application details when contract terms need to be changed. Additionally, by reviewing Coverage, you can compare the Planned Compute usage cost against the amount used without a contract, enabling convenient management.
Service Architecture Diagram
Provided features
Planne Compute provides the following features.
- Planned Compute Service Application: Select the service, operating system, server type, and contract period for which you want to receive a contract discount, enter the requested quantity, and after confirming the application information, you can apply for Planned Compute.
- Planned Compute Extension: When the contracted period ends, the corresponding Planned Compute is terminated, and discounts no longer apply to on-demand resources. Planned Compute termination does not mean that on-demand resources are terminated. If you wish to extend the discount period, you can use the contract extension feature to schedule the next contract period after the current contract period ends.
- Planned Compute Server Type Change: The server type of Planned Compute can be changed to a value higher than the configured setting.
- Planned Compute termination: Unused Planned Compute can also be terminated, but upon termination, 50% of the usage fee for the remaining period will be billed two months after termination. Termination of Planned Compute does not imply termination of resources without a contract.
- Coverage Check: You can check the discount Coverage of on-demand resource usage amounts for the same target service, operating system, and server type. Select the period you want to query to display the on-demand resource name, usage time, the amount used without discount, and the amount not covered by Planned Compute. This allows you to see the difference in billed amounts between on-demand usage and Planned Compute usage.
Constraints
The constraints of Planned Compute are as follows.
- The application, modification, and coverage are all based on midnight in the Asia/Seoul (GMT +09:00) time zone.
- If you apply for Planned Compute, the discount will be applied starting at midnight the day after the application date.
- Coverage can be checked up to 2 days in advance to calculate the exact discount amount.
- Every day from 23:30 to 23:59 is the settlement window, during which new applications and changes are not applied.
- Discounts are applied to on-demand resources within the same region of the same account.
Preliminary Service
Planned Compute does not require any separate prerequisite service work.
2 - How-to Guides
Users can apply for the service by entering the required information for Planned Compute through the Samsung Cloud Platform Console.
Apply for Planned Compute
You can request and use the Planned Compute service from the Samsung Cloud Platform Console.
To apply for Planned Compute, follow these steps.
Click the All Services > Financial Management > Planned Compute menu. Navigate to the Service Home page of Planned Compute.
On the Service Home page, click the Planned Compute Apply button. You will be taken to the Planned Compute Apply page.
On the Planned Compute Application page, after entering the required information, click the Next button.
Item RequiredExplanation Service Required Select the service for which you want to apply for Planned Compute Operating system Required Select the operating system - After selecting the Service item, selection is possible
- Depending on the selected service, Open Source, RHEL, Windows, etc. can be selected
Server type Required Select the server type - After selecting the service item, selection is possible
Contract period Required Select contract period - Server Type After selecting the item, selection is possible
- 1-year or 3-year can be selected
Requested quantity Required Enter the requested quantity - Up to 100 units can be entered
- After applying the Planned Compute quantity, refunds are not possible, so caution is required when entering
- If an increase in quantity is needed, you can add a new Planned Compute of the same server type
Agreement start date Required Select the date when the contract becomes effective - Can be set starting from the day after the application date
Table. Planned Compute service input informationCheck the detailed information and estimated charges generated in the Summary panel, and click the Complete button.
When the popup notifying the creation of Planned Compute opens, click the Confirm button.
- After the request is completed, check the resources you created on the Planned Compute List page.
Check Planned Compute List
You can view and edit the full list of resources and detailed information for Planned Compute.
To view the list of Planned Compute, follow the steps below.
Click the All Services > Financial Management > Planned Compute menu. Navigate to the Service Home page of Planned Compute.
On the Service Home page, click the Planned Compute menu. You will be taken to the Planned Compute list page.
On the Planned Compute List page, click the contract number of the Planned Compute to view detailed information. You will be taken to the Planned Compute Details page.
- Resource items other than the required columns can be added via the Settings button.
Item Required Explanation Contract number Required Key values for each billing unit visible in the invoice details Resource Name Select Resource contract number Target Service Required Planned Compute discount-eligible service - Apply discount to non-contract resources that match the given value
Server type Required Planned Compute discount-eligible server type - Apply discount to non-contract resources that match the given value
Operating System Required Planned Compute discount-eligible operating system - Apply discount to non-contract resources that match the given value
Initial contract start date Required Planned Compute start date when the commitment applies - Planned Compute Details date can be changed on the page
- For more information, see Change Commitment Start Date reference
Contract period Required Check the applicable period based on the selected individual Planned Compute term of 1 year or 3 years - When the Planned Compute term ends, the discount no longer applies.
- If you want to continue applying discounts with Planned Compute, you need to extend the term.
Extension period Required Check the extension period of an individual Planned Compute commitment - Before the extension date arrives, you can modify the 1-year or 3-year term of the extension period
- Additionally, you can cancel the extension reservation.
status Required Planned Compute’s status after a change request is reflected - Creating: State after the contract is requested but before it is applied
- Active: State where the contract is currently applied
- In Progress: State while the change request is being processed
constructor Selection User who created Planned Compute Creation date and time Select Planned Compute creation time Editor Select Planned Compute edited user Modification date Select Planned Compute modification timestamp Table. Planned Compute list item information
- Resource items other than the required columns can be added via the Settings button.
In the Planned Compute list, clicking the right more button provides the contract management item. When multiple items are selected via the checkboxes, the same option is also available through the top button.
Category Detailed description Contract extension The button to extend the contract - becomes active when there is no next contract reservation. After the current contract, select the next contract period to schedule
- For details, see Extend Contract
Contract amendment Button to modify the contract - You can change the server type. Changes are allowed only to a higher specification than the current setting.
- For details, see Change Contract.
Contract termination Button to terminate the contract - Terminate the contracted Planned Compute during the term
- When terminated, a termination fee is incurred based on the remaining usage period (monthly fee * 50% * remaining months of the contract period) and will be reflected on the invoice after two months.
- For details, refer to Terminate the contract.
Contract Extension Modification Button to edit the next contract reservation - It becomes active when there is a next contract reservation. It changes the contract period for the next contract after the current one.
- For more details, see Edit contract extension.
Cancel contract extension Button to cancel the next contract reservation - It becomes active when there is a next contract reservation. It cancels the contract extension reservation for the next contract after the current contract.
- For more details, see Cancel contract extension
Table. Planned Compute list item information - contract management
Planned Compute View detailed information
You can view and edit the detailed information of Planned Compute.
To view detailed information about Planned Compute, follow these steps.
- Click the All Services > Financial Management > Planned Compute menu. You will be taken to the Service Home page of Planned Compute.
- On the Service Home page, click the Planned Compute menu. You will be taken to the Planned Compute List page.
- On the Planned Compute List page, click the contract number of the Planned Compute to view detailed information. You will be taken to the Planned Compute Details page.
- Planned Compute Details page consists of Detail Information, Tags, Operation History tabs.
Detailed Information
Planned Compute list page lets you view and edit the detailed information of the selected resource.
| Item | Explanation |
|---|---|
| Category | Detailed description |
| ——— | ——— |
| Service | Service name |
| Resource Type | Resource Type |
| SRN | Unique resource ID in Samsung Cloud Platform |
| Resource Name | Resource Name |
| Resource ID | Unique resource ID in the service |
| constructor | User who created Planned Compute |
| Creation Date/Time | Planned Compute creation timestamp |
| Editor | User who modified Planned Compute |
| Modification date | Planned Compute modification timestamp |
| Contract number | Key values for each billing unit visible in the invoice details |
| Target Service | Planned Compute discount-eligible service
|
| Server type | Planned Compute discount eligible server type
|
| Operating System | Planned Compute discount‑eligible operating system
|
| Initial contract start date | Planned Compute start date to which the commitment applies
|
| Contract period | Applied contract period and the corresponding date |
| Extension period | If the contract is extended, the extension period and the relevant date
|
| status | Planned Compute’s status after a change request is reflected
|
- When the Planned Compute commitment ends, the discount will no longer apply. To continue receiving the Planned Compute discount, extend the commitment.
- For detailed information about contract extension, see Extend Contract.
tag
On the Planned Compute list page, you can view the tag information of the selected resource and add, modify, or delete it.
| Category | Detailed description |
|---|---|
| Tag list | Tag list
|
Job History
Planned Compute List page allows you to view the operation history of the selected resource.
| Category | Detailed description |
|---|---|
| Task History List | Resource Change History
|
Managing Planned Compute Commitments
Change contract start date
You can change the contract effective start date for Planned Compute. To change the contract start date for Planned Compute, follow the steps below.
- Click the All Services > Financial Management > Planned Compute menu. Navigate to the Service Home page of Planned Compute.
- On the Service Home page, click the Planned Compute menu. You will be taken to the Planned Compute list page.
- On the Planned Compute List page, click the contract number of the Planned Compute whose commitment start date you want to change. You will be taken to the Planned Compute Details page.
- On the Planned Compute Details page, click the Edit button of the Initial Contract Start Date. The Edit Initial Contract Start Date popup opens.
- After changing the contract start date, click the Confirm button.
- The agreement start date can be set to a date after the next day.
- If the contract has started, the original contract start date cannot be modified.
Extend Agreement
You can extend the Planned Compute commitment. To extend the Planned Compute commitment, follow the steps below.
- Click the All Services > Financial Management > Planned Compute menu. Navigate to the Service Home page of Planned Compute.
- On the Service Home page, click the Planned Compute menu. You will be taken to the Planned Compute List page.
- On the Planned Compute list page, click the rightmost more button of the Planned Compute for the resource whose contract you want to extend, then click the Extend Contract button. The Extend Contract popup will open.
- Select the next contract period and click the Confirm button. You will be taken to the Planned Compute list page.
- Contract Extension button can be clicked before the current contract expires if the next contract has not yet been scheduled.
- If you schedule the next appointment through Extend Agreement, you can modify or cancel the next appointment’s extension period up to its start date.
Change Agreement
You can change the commitment of Planned Compute. To change the commitment of Planned Compute, follow the steps below.
- Click the All Services > Financial Management > Planned Compute menu. It takes you to the Planned Compute Service Home page.
- On the Service Home page, click the Planned Compute menu. You will be taken to the Planned Compute List page.
- Planned Compute On the list page, click the more button at the far right of the Planned Compute of the resource whose contract you want to change, then click the Change Contract button. The Change Contract popup window opens.
- Select the server type to change, and click the Confirm button. You will be taken to the Planned Compute list page.
- Contract change is only possible to a higher spec than the current contract’s configuration.
- If you change the server type using Change Contract, it takes effect at midnight of the same day based on the Asia/Seoul, GMT +09:00 time zone, and resources with the updated server type are moved to the appropriate Coverage list.
Modify contract extension
- Click the All Services > Financial Management > Planned Compute menu. Navigate to the Service Home page of Planned Compute.
- On the Service Home page, click the Planned Compute menu. You will be taken to the Planned Compute list page.
- On the Planned Compute list page, click the more button at the far right of the Planned Compute of the resource whose contract you want to change, then click the Modify Contract Extension button. The Modify Contract Extension popup window will open.
- After the current contract, change the contract period for the next contract and click the Confirm button. You will be taken to the Planned Compute list page.
- Contract Extension Edit button becomes active when a subsequent contract is scheduled. After the current contract, it modifies the contract period for the next contract.
- If there is a subsequent reservation, you may modify or cancel the extension period of the next agreement up to its start date.
Cancel contract extension
- Click the All Services > Financial Management > Planned Compute menu. You will be taken to the Planned Compute Service Home page.
- On the Service Home page, click the Planned Compute menu. You will be taken to the Planned Compute List page.
- On the Planned Compute list page, click the more button at the far right of the Planned Compute of the resource whose contract you want to change, then click the Cancel Contract Extension button. The Cancel Contract Extension popup will open.
- Cancel Contract Extension After confirming the popup message, click the Confirm button. You will be redirected to the Planned Compute list page.
- Cancel Contract Extension button is enabled when there is a reservation for the next contract. It cancels the contract extension reservation for the next contract after the current one.
- Cancel contract extension cancels the upcoming contract reservation, and after the current contract term expires, it will be treated as a non‑contract.
Terminate Agreement
You can cancel the Planned Compute commitment. To cancel the Planned Compute commitment, follow the steps below.
- Click the All Services > Financial Management > Planned Compute menu. Go to the Service Home page of Planned Compute.
- On the Service Home page, click the Planned Compute menu. You will be taken to the Planned Compute list page.
- Planned Compute On the list page, click the more button at the far right of the Planned Compute of the resource whose contract you want to cancel, then click the Cancel Contract button. The Cancel Contract popup window opens.
- Terminate Agreement popup message, review it, and click the Confirm button. Navigate to the Planned Compute list page.
- When terminating, a cancellation fee will be incurred based on the remaining usage period (monthly fee * 50% * remaining months of the contract term) and will be reflected on the invoice after two months. Please consider the cancellation fee carefully before proceeding with the termination.
- For same‑day requests, based on the Asia/Seoul GMT+09:00 time zone, if the cancellation occurs before midnight on the same day, no cancellation fee will be charged.
Planned Compute Coverage
Planned Compute You can check the discount amount applied to the requested quantity and non‑contract resources based on the same target service, server type, and operating system. Planned Compute Coverage To view detailed information, follow these steps.
Check Planned Compute Coverage List
- Click the All Services > Financial Management > Planned Compute menu. Navigate to the Service Home page of Planned Compute.
- On the Service Home page, click the Coverage menu. You will be taken to the Coverage list page.
Category Detailed description Target Service The Planned Compute discount‑eligible service for checking coverage Operating System The operational system that is the target of the Planned Compute discount for checking coverage Server type Server type eligible for Planned Compute discount to check coverage Requested quantity Planned Compute request quantity to verify coverage Table. Coverage resource list items
Planned Compute Coverage View detailed information
On the Coverage list page, you can view detailed information of the selected resource and download the required information.
- Click the All Services > Financial Management > Planned Compute menu. You will be taken to the Service Home page of Planned Compute.
- On the Service Home page, click the Coverage menu. You will be taken to the Coverage List page.
- Coverage List: Click the resource (Coverage) whose detailed information you want to view. You will be taken to the Coverage Details page.
Category Detailed description Target Service The Planned Compute discount‑eligible service for checking coverage Operating System The operational system that is the target of the Planned Compute discount for checking coverage Server type Server type eligible for Planned Compute discount to check coverage Requested quantity Planned Compute request quantity to verify coverage Table. Coverage Details - Target Planned Compute and Requested Quantity Items
- You can select the desired period at the top of the Coverage table to perform the query.
- Coverage data can be downloaded via the Excel Download button.
- We provide information up to two days before the query date, based on the Asia/Seoul (GMT +09:00) time zone, taking into account the settlement time of the discount amount.
- The billing calculation reference point is midnight in the Asia/Seoul (GMT +09:00) time zone, and the list can be viewed starting from the contract start date.
| Item | Explanation |
|---|---|
| Resource Name | Name of the non‑contract resource |
| Usage time | Time used by the list’s non‑contract resources during the selected period |
| No-contract hourly rate | Hourly rate when non‑contract resources are not discounted |
| Non-contract usage amount | The amount used by the non‑contract resources in the list during the selected period
|
| Unapplied amount | Planned Compute deducts the charges of the list’s non‑contracted resources as consideration for paying the contracted fee
|
| Non-contract usage amount | Billing amount when Planned Compute is not used |
| Planned Compute usage amount | Amount paid for Planned Compute during the selected period
|
| Planned Compute Unapplied Amount | Total amount not applied because it could not be covered by Planned Compute |
| Billing amount | Sum of the Planned Compute usage amount and the non‑applied Planned Compute amount
|
3 - Release Note
Planned Compute
- When applying for a Planned Compute contract, you can set the start date on which the contract takes effect.
- You can begin applying the agreement from the day after the application date by selecting your preferred date.
- A planned compute target service has been added.
- Data Catalog, Vertica(DBaaS)
- We have launched the Planned Compute service.
- We offer discounted pricing for services in the Compute and Database categories when you commit to a specific server type.