On the Samsung Cloud Platform, you can search for the software you need based on your intended use, apply for it directly, and manage the detailed information of the software you have requested.
This is the multi-page printable view of this section. Click here to print.
Financial Management
- 1: Cost Management
- 1.1: Overview
- 1.2: How-to Guides
- 1.2.1: Usage and Billing Details
- 1.2.2: Payment History
- 1.2.3: Cost Analysis
- 1.2.4: Credit Management
- 1.2.5: Budget Management
- 1.2.6: Cost Savings
- 1.2.7: Account
- 1.2.8: Payment Management
- 1.2.9: Carbon emissions
- 1.2.10: EDP Report
- 1.3: Release Note
- 2: Planned Compute
- 2.1: Overview
- 2.2: How-to Guides
- 2.3: Release Note
- 3: Marketplace
- 3.1: Overview
- 3.2: How-to Guides
- 3.3: Release Note
1 - Cost Management
1.1 - Overview
Service Overview
Cost Management service provides tools to manage and track Samsung Cloud Platform service costs.
By identifying cost trends and savings opportunities, you can make faster and more accurate financial decisions. Users can efficiently obtain the information they need by grouping and segmenting data.
Provided features
- Usage and Billing Details: You can forecast the estimated amount for this month and verify the billed amount. * Provides the cost, usage, and unit price per resource, and can be saved as an Excel file.
- Payment History: Provided when the payment method is a credit card. * Check the billed amount, overdue amount, payment date, and payment status.
- Cost Analysis: You can view cost trends for up to 6 months. * Provides cost grouping and various search filters to analyze cost and usage data.
- Credit Management: You can manage and use Credit.
- Billing Tag: Apply tags to cost data to view and analyze by tag in usage and billing details and cost analysis. * You can categorize and manage costs based on various criteria such as projects, services, departments, and environments.
- Budget Management: You can set and manage budgets.
- Cost Savings: You can reduce usage costs by setting a time commitment for the Compute services in the Samsung Cloud Platform Console.
- Account: You can view the Account’s information. * You can view the Account name, Account ID, alias, and company name.
- Payment Management: Provides information about the payment methods of the Account. * Credit card and bank transfer deposit information will be displayed.
- Carbon Emissions: You can view the carbon emissions generated when using services on the Samsung Cloud Platform Console, monthly carbon emission trends, carbon emissions by service group, and carbon emissions by account.
Constraints
- Provided based on the Asia/Seoul(GMT +09:00) timezone.
- Termination fees and Support plan amounts are viewable in the month when billing settlement is completed.
- Cost analysis is provided on a monthly basis.
- Tag information for the billing report is provided when the email is sent.
Preceding Service
Cost Management has no prerequisite service.
1.2 - How-to Guides
Users can support cloud efficiency optimization by utilizing various cost management tools through the Cost Management of the Samsung Cloud Platform Console. Through Cost Management, you can view usage and billing details, payment history, and cost analysis, and you can manage Credit, budget, Account, and payment methods.
Check usage and billing details
You can forecast this month’s estimated costs for services used in the Samsung Cloud Platform Console and view the billed amount.
To view usage and billing details, follow these steps.
- Click the All Services > Financial Management > Cost Management menu. 1. Navigate to the Service Home page of Cost Management.
- On the Service Home page, click the Usage and Billing Details menu. 2. Navigate to the Usage and Billing Details page.
- Usage and Billing Details page’s top‑right period setting area, select the year and month for which you want to view usage and billing details. 3. The usage or billing details for the specified period are displayed.
- Select the item to view details from the top right of the cost detail list. 4. Detailed information for this item is displayed.
Reference
For detailed information about usage and billing details, refer to 이용 및 청구 내역 확인하기.
Check payment history
You can view items such as billed amount, usage amount, overdue amount, and payment amount in the monthly payment history of the Account.
In the Samsung Cloud Platform Console, you can view a user’s account payment history by month.
To use the payment history, follow these steps.
- All Services > Financial Management > Cost Management Click the menu. 1. Go to the Service Home page of Cost Management.
- Click the Payment History menu on the Service Home page. 2. Go to the Payment History page.
- Payment History page allows you to view the payment history for the specified Account.
Item Explanation Billing Year-Month Billing reference year-month Billing amount The amount obtained by adding the accumulated unpaid amount to the current month’s usage amount. Usage amount Current month’s usage amount Outstanding amount (current month) Unpaid amount for the current month Outstanding amount (cumulative) Total … amount Payment amount Show the actual payment currency symbol instead of the account’s contract currency. Payment date Date of credit card payment Table. Payment details items
Reference
- All fees are exclusive of VAT.
- For detailed information about the payment history, refer to 납부 내역 확인하기.
Cost analysis
You can view cost analysis data, such as an account’s estimated or actual billing amount for up to six months, the monthly average billing amount, and the top 5 costs. Follow the steps below to check the cost analysis.
Reference
- The billing calculation reference is midnight in the Asia/Seoul (GMT +09:00) time zone. * The predicted data may differ from the actual.
- You can configure an abnormal cost detection alert to trigger when the usage amount increases by more than 100% compared to the previous day. * For detailed information about notification settings, refer to 알림 설정 확인하기.
- All Services > Financial Management > Cost Management Click the menu. 1. Go to the Service Home page of Cost Management.
- On the Service Home page, click the Cost Analysis menu. 2. Go to the Cost Analysis page.
- On the Cost Analysis page, you can view the cost analysis for the relevant Account.
- Select the query period in the upper right corner to view the cost analysis for that period.
- The query period can be selected for up to six months from the start to the end.
Reference
- The query period is based on the 1st of the start month through the last day of the end month.
- Provides a graph visualized based on the search period.
- When selecting by service group, colors are applied to each group, and on mouse over, the group’s color and amount information are displayed in a tooltip.
*is displayed when it is an estimated amount.
- Cost Analysis page allows you to view detailed cost information.
Item Explanation service group Resource Service Group Notation service Resource service name display Resource name Resource name notation Billing amount or estimated billing amount* The resource’s billed amount or estimated billed amount is displayed. Table. Detailed cost analysis items
Reference
For detailed information on cost analysis, please refer to 비용 분석 확인하기.
Using Billing Tag
You can apply tags to cost data in the Samsung Cloud Platform Console to manage and analyze expenses.
information
- Simply adding tags to resources in the Samsung Cloud Platform is not sufficient for cost analysis. * Enable billing tags for cost analysis.
- It is recommended to establish and operate a standard tag (Key/Value) policy within the organization to ensure the accuracy of cost analysis.
- Activated billing tags let you view and analyze data by tag in Usage and Billing Details and Cost Analysis.
To use the billing tag, follow these steps.
- Click the All Services > Financial Management > Cost Management menu. 1. Navigate to the Service Home page of Cost Management.
- On the Service Home page, click the Billing Tag menu. 2. Navigate to the Billing Tag List page.
- Billing Tag List page, check the tag Key list and set the billing tag usage.
Item Explanation Tag Key Tag key value - Display all key list within the Account
- For an organization’s Management Account, display tag keys of all Member Accounts
- If tag keys are duplicated, provide only one
Status Whether to use billing tags Status change timestamp Date and time used as a billing tag Used/Unused You can change the billing tag’s usage status by clicking the active Use or Unused button. Excel download Download the selected information from the list as an Excel file - Activated when a tag key is selected from the list
More Change the usage status of the selected tag key in the list - Allow changing the status of multiple tag keys at once
Table. Billing tag list itemsReference- You can use up to 500 billing tags.
- In a Management Account, you can manage billing tags for the entire organization (Member Account).
Check Credit
You can view and manage the monthly usage of Credit received through the Samsung Cloud Platform Console.
- All Services > Financial Management > Cost Management Click the menu. 1. Go to the Service Home page of Cost Management.
- On the Service Home page, click the Credit Management menu. 2. Credit Management 페이지로 이동합니다.
- On the Credit Management page, check the monthly usage of Credit.
- By clicking the Expand button at the far right of the Account item, you can view the monthly detailed information.
Category Detailed description Category Credit type Validity period It applies up to the usage amount for the month indicated by the validity period. - In the credit expiration month, a extend button appears.
Payment Credit Credits paid for each Credit type and issuance date Remaining Credti Remaining Credit amount after subtracting total used Credit from the received Credit Usage month You can view the monthly limit amount set by the user for the given month. - In the current month, a Set Limit button appears, allowing you to set the Credit amount you wish to use for the month within the remaining Credit.
Monthly limit This is the monthly limit amount set by the user. If not set, it displays the same amount as the remaining Credit each month. Monthly usage credit This is the Credit cost actually incurred within the monthly limit set for that month. Monthly remaining credit This is the amount after subtracting the Credit actually used from the monthly limit set for that month. The balance is included in the remaining Credit. Table. Credit management list
- By clicking the Expand button at the far right of the Account item, you can view the monthly detailed information.
Caution
If the billed amount up to the previous month has not been settled, the credit will not be applied this month.
Reference
For detailed information about Credit verification, see Credit 확인하기.
Budget Management
You can set and manage budgets. To view the budget management information, follow these steps.
- All Services > Financial Management > Cost Management menu, please click. 1. Navigate to the Service Home page of Cost Management.
- Click the Budget Management menu on the Service Home page. 2. Go to the Budget Management page.
- Budget Management page lets you view the list of configured budgets.
Category Detailed description Budget Name Budget name for distinguishing generated budgets Management Type You can view the type that manages the budget. - Monthly Budget Setting: Reset the amount spent on a monthly basis
- Total Budget Setting: Accumulate the spent amount from the set month onward
Budget setting amount Check the configured budget. This month’s usage amount Displays the amount used for the Account up to yesterday in the current month. Consumption rate It indicates the proportion of the amount used up to yesterday relative to the budgeted amount for this month. - For the total budget, it is calculated as the sum of this month’s usage from the start month.
Estimated usage amount for this month It indicates the estimated total usage amount for this month, based on the usage fees up to yesterday in the current month of the Account. Estimated consumption rate Indicates the ratio of the expected usage amount this month to the budgeted amount. - For the total budget, it is calculated as the sum of the estimated usage amount from the start month through the current month.
More button Click the More button in the list to go to the Budget Edit page. Table. Budget Management List Information
Reference
For detailed information on budget management, refer to 예산 관리하기.
Cost Savings
Users can set time commitments for Compute services in the Samsung Cloud Platform Console to reduce usage costs. To view detailed information of Cost Savings, follow the steps below.
- All Services > Financial Management > Cost Management Click the menu. 1. Go to the Service Home page of Cost Management.
- On the Service Home page, click the Cost Savings > Cost Savings List menu. 2. Cost Savings List Navigate to the page.
- Click the plan group name to view detailed information in the Cost Savings list. 3. Cost Savings Details Go to the page.
- The Cost Savings Details page consists of Coverage, Utilization, Plan Group tabs.
Category Detailed description Plan group name Plan group name Plan ID Plan group ID Contract period Plan group’s contract period Start date Plan start date Expiration date Plan expiration date Hourly contracted amount Hourly contracted amount Status Plan application status - Creating: Waiting for plan creation after application is completed
- Active: Plan start status
- Expired: Plan term expiration status
Cancel application Cancel the plan application - Cancellation is only possible in Creating status
Table. Cost Savings list information
- The Cost Savings Details page consists of Coverage, Utilization, Plan Group tabs.
Reference
For detailed information about Cost Savings, please refer to Cost Savings.
Check Account Information
You can view Account information and manage Account aliases. To check the Account information, follow these steps.
Reference
To view and edit account information, a payment method must be registered.
For detailed information about registering a payment method, see 결제 수단 등록하기.
For detailed information about registering a payment method, see 결제 수단 등록하기.
- Click the All Services > Financial Management > Cost Management menu. 1. Navigate to the Service Home page of Cost Management.
- On the Service Home page, click the Account menu. 2. Go to the Account page.
- You can also navigate by clicking My menu > Account in the top right of the Console.
- On the Account page, check the Account information.
Item Explanation Account name The name assigned to an Account when creating the Account. It allows the Account to be easily identified when managing multiple accounts. AccountID The unique identifier of the Account. Used when an IAM user logs in. Account alias Alias assigned to the Account when creating the Account. - When managing multiple Accounts, it helps to easily identify the Account for billing management and other purposes.
- IAM users can log in to the Console using the Account alias.
- Edit: Modify the Account alias. Account 별칭 수정하기 See
- Delete: Delete the Account alias. Account 별칭 삭제하기 See
Company name Company name entered when registering a payment method Table. Account detailed information
Reference
For detailed information about the Account, please refer to Account 정보 확인하기.
Manage payment methods
In the Samsung Cloud Platform Console, you can view and add payment methods registered to the Account. To verify the payment method, follow these steps.
- All Services > Financial Management > Cost Management Click the menu. 1. Go to the Service Home page of Cost Management.
- On the Service Home page, click the Payment Management menu. 2. Go to the Payment Management page.
- Payment Management page allows you to view the currently registered payment methods.
Information
- For payment-related inquiries such as payment methods and statement receipt, please request them through the sales representative or 문의하기.
- For detailed information about payment methods, please refer to 결제 수단 확인하기.
Check carbon emissions
You can check the carbon emissions generated when using services in the Samsung Cloud Platform Console. To check the carbon emissions per service, follow the steps below.
- All Services > Financial Management > Cost Management Click the menu. 1. Navigate to the Service Home page of Cost Management.
- On the Service Home page, click the Carbon Emissions menu. 2. Go to the Carbon Emissions page.
- In the period setting area at the top right, set the period to view carbon emissions.
Category Detailed description Carbon emissions by period Carbon emissions from day 1 to the present and On-prem. vs carbon emissions display - Month-end forecast On-prem. vs: Display month-end forecast On-prem. vs increase/decrease amount
- Month-end forecast carbon emissions: Month-end forecast carbon emissions
Carbon Emission Trend Display the carbon emission trend compared to last month as a graph - Hover the mouse cursor over the graph to view the total carbon emissions
- Month-over-month: Shows the percentage change (%) of carbon emissions compared to the previous month
- Change amount: The increase/decrease in carbon emissions compared to the previous month
- Previous month’s carbon emissions: Carbon emissions of the previous month
Monthly average carbon emissions Average carbon emissions over the past six months Carbon Emissions Graph Carbon emission graph from day 1 to the present - Overall: Display carbon emissions of all services
- By Service Category: Select a service category (e.g., Compute, Storage) to display its carbon emissions Hover the mouse cursor over the graph to view detailed information for that graph
Carbon emissions by service Carbon emissions by service from the 1st to the present - Download detailed Excel: Download carbon emissions by service as an Excel file
Table. This month's carbon emission information
Reference
- Data is not displayed on the 1st of each month. * (Asia/Seoul, based on GMT +09:00)
- The month-end estimate is a projection based on current emissions.
- For detailed information on carbon emissions, please refer to 탄소 배출량 확인하기.
information
- Carbon emissions are rounded after summing the fractional parts by service group, so there may be differences in the total.
- Indirect service group: includes emissions generated from all usage services except Compute and Storage services.
Check EDP Report
When entering an EDP contract, you can view the contract information and usage cost details.
- All Services > Financial Management > Cost Management Click the menu. 1. Navigate to the Service Home page of Cost Management.
- On the Service Home page, click the EDP Report menu. 2. Navigate to the EDP Report page.
| Category | Detailed description |
|---|---|
| Basic Information Tab | Company information, agreement and contract information, discount rate information |
| EDP Report tab | EDP cumulative graph and detailed breakdown |
Table. EDP Report verification information
Reference
For detailed information about the EDP Report, please refer to EDP Report 확인하기.
1.2.1 - Usage and Billing Details
You can predict this month’s estimated cost for the services used in the Samsung Cloud Platform Console and view the billed amount.
Check usage and billing details
You can view usage or billing details in the Samsung Cloud Platform Console.
Reference
- The billing calculation reference is midnight in the Asia/Seoul (GMT +09:00) time zone. * Usage details may differ from the actual billed amount.
- If it is an estimated amount, a
(*)mark is displayed next to the item.
To view usage and billing details, follow these steps.
All Services > Financial Management > Cost Management menu, click it. 1. Navigate to the Service Home page of Cost Management.
On the Service Home page, click the Usage and Billing Details menu. 2. Go to the Usage and Billing Details page.
On the Usage and Billing Details page, in the period setting area at the top right, select the year and month for which you want to view usage and billing details. 3. The usage or billing details for the specified period are displayed.
- If the selected period is an unbilled month, you can view the estimated usage amount, estimated billing amount, monthly average billing amount in the usage details.
Item Explanation Estimated usage amount(*) Estimated usage amount from the 1st of the current month to the day before the query date Estimated billing amount(*) Predicted billing amount based on the usage amount trend from the 1st to the end of the current month. Monthly average billing amount Average monthly billing amount for the past 6 months Table. Unbilled monthly usage details items - If the selected period is the billing settlement month, you can view billing amount, billing trend, monthly average billing amount in the billing details.
Item Explanation Billing amount The billed amount for the queried month. The billing date is the tax invoice issuance date. Claim Trend Billing amount for two months. Check the change rate and change amount. Monthly average billing amount Average monthly billing amount for the past 6 months Table. Billing settlement monthly billing details items
- If the selected period is an unbilled month, you can view the estimated usage amount, estimated billing amount, monthly average billing amount in the usage details.
In the top right of the cost detail list, select the item whose details you want to view. 4. Detailed information for this item is displayed.
- Service Fees by Category: You can view detailed fee information for each service.
- You can use Tag filter. * For more details, please refer to Using Tag Filter.
Item Explanation service group Service name service Resource Type type Server type Resource name Resource name Region Resource usage region Contract period Contract term unit price Rate units and pricing criteria Usage Resource usage time Estimated usage amount(*) / Total usage amount Estimated usage amount from day 1 to the present - If the selected period is the billing settlement month, total usage amount
Estimated discount amount(*) / Discount amount Estimated discount amount - If the set period is the billing settlement month, discount amount
Estimated billing amount(*) / Billing amount Estimated monthly billing amount per resource - If the selected period is the billing settlement month, billing amount
Detailed usage history / Detailed billing history Detailed usage information and cost per service - After expanding the details, you can click the button to view detailed information
- If the selected period is the billing settlement month, Billing Details
Detailed fee breakdown by serviceReferenceThe discount amount through Planned Compute, Cost Saving, etc., is the amount up to D‑1 based on the query date.
- You can use Tag filter. * For more details, please refer to Using Tag Filter.
- Discount Rate: You can view the detailed discount rate information.
Item Explanation Account name Account name Discount Type Discount Type type Server type Resource name Resource name Region Resource usage region Estimated discount amount Estimated discount amount Table. Discount Rate DetailsReferenceThe discount amount through Planned Compute, Cost Saving, etc., is the amount up to D‑1 based on the query date. - Charges per Account: You can view detailed charge information for each account.
Item Explanation Account name/Service group Account name and service categories used by the Account Service Service name type Server type Resource name Resource name Region Resource usage region Contract period Contract term Unit price Rate Units and Pricing Criteria Usage Resource usage time Estimated usage amount(*) / Total usage amount Estimated usage amount from day 1 to now - If the selected period is the billing settlement month, total usage amount
Estimated discount amount(*) / Discount amount Estimated discount amount - If the set period is the billing settlement month, discount amount
Estimated billing amount(*) / Billing amount Estimated monthly billing amount per resource - If the selected period is the billing settlement month, billing amount
Detailed usage history / Detailed billing history Detailed usage information and cost per service - Account name/Service group After expanding the item, you can click the button to view detailed information
- If the selected period is the billing settlement month, Billing details
Table. Detailed charge breakdown by account
- Service Fees by Category: You can view detailed fee information for each service.
Using Tag Filter
You can set a filter to select a tag and view detailed cost information for resources that have that tag applied.
To use the tag filter, follow these steps.
- All Services > Financial Management > Cost Management Click the menu. 1. Go to the Service Home page of Cost Management.
- On the Service Home page, click the Usage and Billing Details menu. 2. Navigate to the Usage and Billing Details page.
- Usage and Billing Details page’s top-right period setting area, select the year and month to view usage and billing details. 3. The usage or billing details for the specified period are displayed.
- Click the Service-specific charges button in the upper right corner of the cost detail list, then click the Tag filter button. 4. Tag Filter The popup window opens.
- The Tag Filter button is enabled only when Service-specific pricing is selected.
- Select the key of the resource to view the cost details. 5. The Value corresponding to the entered Key is displayed below.
- After selecting the Value of the resource for which you want to view the cost details, click the Apply Filter button.
- Check the detailed breakdown with the Tag Filter applied in Service-specific Pricing.
Reference
- The tag list for checking cost information is updated daily at midnight (Asia/Seoul, GMT +09:00).
- Tags created today will be added to the list during the midnight update tomorrow.
Download detailed file
You can download the detailed cost information for the full usage or billing records of the selected period as an Excel file.
To download the detailed report file, follow these steps.
- All Services > Financial Management > Cost Management Click the menu. 1. Navigate to the Service Home page of Cost Management.
- On the Service Home page, click the Usage and Billing Details menu. 2. Navigate to the Usage and Billing Details page.
- On the Usage and Billing Details page, select the year and month in the period setting area at the top right to view usage and billing details. 3. The usage or billing details for the specified period are displayed.
- In the top right of the cost detail list, select the item to view its details. 4. Detailed information for this item is displayed.
- Click the Download detailed Excel button. 5. File Download popup window opens.
- After selecting the download method, click the Confirm button.
- Direct download (without tags): Download the Excel file using the current browser
- Email sending (including tags): Send the Excel file to the email registered in the Console
- Send usage email for abnormal cost detection verification: If there is an abnormal cost detection record, send an Excel file to the email registered in the Console.
- Open the downloaded Excel file and check the details.
Item Explanation Contract number Ledger ID (unique key of the instance) Account ID Account ID Account name Account name Billing Year-Month Cost billing year-month Service service group type Service name Resource name Resource name Region Resource usage region name tag Resource tag information - displayed only when sending email
- not included when downloading directly
Unit price Rate units and rate criteria Usage Resource usage time call Account currency Usage amount Amount before discount Planned Compute Discounted amount with Planned Compute Estimated payment amount Final payment amount after the discount is excluded from the usage amount Table. Detailed Excel file items
1.2.2 - Payment History
Users can view items such as billed amount, usage amount, overdue amount, and payment amount for each category in their account’s monthly payment history through the payment history in the Samsung Cloud Platform Console.
Check payment history
In the Samsung Cloud Platform Console, you can view a user’s account payment history by month.
To use the payment history, follow these steps.
- Click the All Services > Financial Management > Cost Management menu. Navigate to the Service Home page of Cost Management.
- On the Service Home page, click the Payment History menu. You will be taken to the Payment History page.
- Payment History page lets you view the payment history for the relevant Account.
Item description Billing Year-Month Billing reference year-month Billing amount The amount that adds the accumulated unpaid balance to the current month’s usage amount. Usage amount Current month usage amount Handsome amount (current month) Unpaid amount for the current month Handsome amount (cumulative) Total outstanding amount Payment amount Display the actual payment currency symbol rather than the account’s contract currency. Payment date Date of credit card payment Payment status Payment status - Normal: Payment completed
- Delinquent: Overdue for more than 1 month
Table. Payment details items
Reference
- All fees are exclusive of VAT.
- The outstanding amount will be re‑billed on next month’s billing date.
Download detailed Excel
You can download the payment history as an Excel file.
To download the payment history as an Excel file, follow these steps.
- All Services > Financial Management > Cost Management Click the menu. Navigate to the Service Home page of Cost Management.
- On the Service Home page, click the Payment History menu. You will be taken to the Payment History page.
- On the Payment History page, click the Download Detailed Excel button.
- Please check the downloaded Excel file.
1.2.3 - Cost Analysis
Users can view cost analysis data, such as the estimated or actual charges for up to six months, the monthly average charge, and the top 5 costs for their account, through the cost analysis in the Samsung Cloud Platform Console.
Check cost analysis
You can view cost analysis in the Samsung Cloud Platform Console.
To check the cost analysis, follow the steps below.
Reference
- The billing calculation reference is midnight in the Asia/Seoul (GMT +09:00) time zone. The estimated data may differ from the actual.
- You can set up an abnormal cost detection alert to trigger a notification when the usage amount increases by more than 100% compared to the previous day.
- Weekends are excluded from the comparison group.
- New resources are excluded from detection for two weeks.
- The default alarm sender is set to the Root user.
- To add notification policies and notification groups, add [Billing System] Anomlay Detection Notification as a notification in the Samsung Cloud Platform notification settings.
- For detailed information about notification settings, see Check Notification Settings.
- Click the All Services > Financial Management > Cost Management menu. Navigate to the Service Home page of Cost Management.
- On the Service Home page, click the Cost Analysis menu. You will be taken to the Cost Analysis page.
- On the Cost Analysis page, you can view the cost analysis for the relevant Account.
- If you select the query period in the upper right corner, you can view the cost analysis for that period.
- The query period can be set for a maximum of six months, from the start date to the end date.
- For the query period, refer to each of the following: When the billing unsettled month is included, When only the billing settled month is present, When only the billing unsettled month is present, When only the current month is included.
Reference
- The query period is defined from the 1st of the start month to the last day of the end month.
- Provides a graph visualized based on the search period.
- When selecting a service group, colors are applied to each group, and on mouse over, the group’s color and amount information are displayed in a tooltip.
*is displayed when it is the estimated amount.
- You can view detailed cost breakdowns on the Cost Analysis page.
Item description service group Resource Service Group Notation Service Resource service name display Resource name Resource name notation Billing amount or estimated billing amount* The resource’s billed amount or estimated billed amount is displayed. Table. Cost analysis detailed breakdown items
If the query period includes a month with unsettled billing
In cost analysis, if the query period includes months with unbilled charges, we provide the total estimated charge amount*, monthly average charge amount, estimated monthly average charge amount*, and a graph.
| Item | Explanation |
|---|---|
| Total estimated billing amount* | Estimated usage amount from the 1st of the current month to one day before the query date |
| Monthly average billing amount | The invoice amount forecasted from the usage amount trend from the 1st to the end of the current month. |
| Estimated monthly average billing amount* | Estimated monthly average billing amount for the query period |
| Monthly graph | Monthly graph provided
|
Table: When the billing unsettled month is included in the cost analysis query period.
If only the billing settlement month falls within the query period
In cost analysis, when only billing settlement months exist within the query period, we provide total billing amount, monthly average billing amount, top 5 costs, and a graph.
| Item | description |
|---|---|
| Total billed amount | Actual billed amount and discount amount within the query period |
| Monthly average billing amount | Average actual billed amount and discount amount within the query period |
| Cost Top5 | Top 5 costs and discount amounts within the query period |
| Monthly graph | Monthly graph provided |
Table. When only the billing settlement month exists within the cost analysis query period
If only months with unbilled charges exist within the query period
In cost analysis, when only unsettled months are included within the query period, we provide the total estimated charge amount*, the monthly average charge amount, the estimated monthly average charge amount*, and a graph.
| Item | Explanation |
|---|---|
| Total estimated billing amount* | Estimated billing amount and discount amount for the query period |
| Monthly average billing amount | Marked as no data |
| Estimated monthly average billing amount* | Estimated billing amount for the month from the 1st to the end. |
| graph | Monthly graph provided |
Table. When only months with unbilled charges exist within the cost analysis query period
When the query period includes only the current month
In cost analysis, when only the current month is included within the query period, we provide the usage amount, estimated billing amount*, monthly average billing amount, and a graph.
| Item | Explanation |
|---|---|
| Usage amount* | Estimated usage amount from the 1st of the current month to the day before the query date |
| Estimated billing amount* | Estimated billing amount from the 1st of the month to the end of the month |
| Monthly average billing amount | Average billed amount for the past six months |
| graph | Daily graph/Daily cumulative graph |
Table: Cost analysis includes only the current month
Download detailed Excel
You can download the detailed cost analysis as an Excel file.
To download the detailed cost analysis as an Excel file, follow these steps.
- All Services > Financial Management > Cost Management Click the menu. Navigate to the Service Home page of Cost Management.
- On the Service Home page, click the Cost Analysis menu. You will be taken to the Cost Analysis page.
- On the Cost Analysis page, click the Detailed Excel Download button.
- Please check the downloaded Excel file.
Item Explanation Contract number Ledger ID (unique key of the instance) Account ID Account ID Account name Account name Billing Year-Month Expense billing year-month Service Service group type Service name Resource name Resource name Region Resource usage region name Unit price Rate unit and rate criteria Usage Resource usage time Call Account’s currency Usage amount Amount before discount Planned Compute Discounted amount with Planned Compute Termination fee Termination fees are incurred for terminated resources. They apply for the termination date plus two months. Total amount used Usage amount + termination fee - Planned Compute amount SLA SLA discount amount Credit Credit applied amount Other discounts Total discount excluding SLA/Credit discount Billing amount Final payable amount after discount is deducted from the total usage amount Table. Download detailed cost analysis Excel
1.2.4 - Credit Management
Users can view and manage the monthly usage of credits received through the Samsung Cloud Platform Console.
Check Credit
You can check the Credit received in the Samsung Cloud Platform Console. To check the credit, follow these steps.
- All Services > Financial Management > Cost Management Click the menu. 1. Go to the Service Home page of Cost Management.
- Service Home on the page, click the Credit Management menu. 2. Credit Management 페이지로 이동합니다.
- On the Credit Management page, check the monthly usage of Credit.
- Credit Summary Information: You can view summary information of valid Credit and expired Credit.
Category Detailed description Summary Category Select Credit type to view summary information - Valid Credit: Summary of currently valid Credits
- Expired Credit (last 6 months): Summary of Credits that expired within the last 6 months
Summary Information Summary information by summary category - Valid Credit
- Total Remaining Credit: Total amount of Credit remaining
- Total Used Credit: Total amount of Credit used
- Number of Active Credits: Total count of valid Credits
- Expired Credit (last 6 months)
- Total Remaining Credit: Total amount of Credit unused
- Total Used Credit: Total amount of Credit used
- Number of Expired Credits: Total count of expired Credits
Table. Credit summary items - Credit Detailed Information: You can view detailed information for each Credit type. * Click the Expand button at the far right of the Account item to display the monthly details.
Category Detailed description Category Credit type Validity period Apply up to the usage amount for the month shown as the Credit’s validity period - In the month Credit expires, a renew button appears, and clicking the button allows renewal
- Credit 연장하기 see
Payment Credit Credits paid for each credit type and issuance date Remaining Credit Remaining Credit amount after deducting total used Credit from the received Credit Usage month Credit usage month - When the usage month is clicked, you can view the monthly limit amount set by the user for that month
- In the current month, a Set Limit button appears, and clicking the button allows you to set the Credit amount you wish to use for the month within the remaining Credit
- Credit 한도 설정하기 see
Monthly limit User-defined monthly limit amount - If not set, display the same amount as the remaining Credit each month
Monthly usage credit Credit cost actually used within the monthly limit set for that month Monthly remaining credit The cost after subtracting the Credit actually used from the monthly limit set for that month - the remaining balance is included in the remaining Credit
Table. Credit detailed items
- Credit Summary Information: You can view summary information of valid Credit and expired Credit.
Caution
If the billed amount up to the previous month has not been settled, the Credit will not be applied in the current month.
Extend Credit
In the Credit expiration month, you can see the Extend button to the right of the validity period.
- All Services > Financial Management > Cost Management Click the menu. 1. Go to the Service Home page of Cost Management.
- On the Service Home page, click the Credit Management menu. 2. Credit Management 페이지로 이동합니다.
- On the Credit Management page, click the Extend button. 3. Credit Extension The popup window opens.
- Select the desired extension period among 1 month, 2 months, 3 months, then click the Confirm button.Caution
- If the remaining amount of Credit that was not extended within the extension period expires, the Credit will be forfeited and can no longer be used.
- Credit extensions are allowed only once, and after the extension is completed, the extended usage period cannot be changed.
- Credit extensions can only be changed if you have IAM permissions or are a Root Account or Organization Manager Account.
Configure Credit Limit
Users can set the amount to be deducted from Credit among the current month’s usage amount in Credit management.
- All Services > Financial Management > Cost Management Click the menu. 1. Navigate to the Service Home page of Cost Management.
- Service Home on the page, click the Credit Management menu. 2. Go to the Credit Management page.
- On the Credit Management page, click the Set Limit button. 3. Credit limit setting The popup window opens.
- Credit Limit Setting Check the Credit balance in the popup window.
- When Automatic Full Deduction is enabled, the Credit monthly limit input field is disabled, and the full amount is automatically deducted each month.
- If you disable the Automatic full deduction setting, the Credit monthly limit input field becomes active, allowing you to set the limit amount.
- Credit Monthly Limit Enter the amount you wish to deduct each month in the input field.
- KRW: Please enter an integer up to 12 digits only.
- USD: Please enter an integer up to 12 digits. * You can enter up to two decimal places.
- Amounts larger than the remaining Credit amount cannot be entered.Reference
- Credit monthly limit The amount remains the same until the Credit period expires, and if the remaining Credit amount is less than the monthly set limit, the monthly limit will be the remaining Credit amount.
- If you do not set a credit limit, the full amount will be automatically deducted.
- A credit limit cannot be set when there is unsettled credit or when the billed amount is being settled.
- From the 1st to the 10th of each month, which is the settlement period for the previous month’s billed amount, the Set Limit button does not appear.
Caution- Since modifications are not possible after the set limit by 23:00 on the last day of each month (Asia/Seoul (GMT +09:00)), please be sure to check the monthly limit.
- Credit limit settings can only be changed if you have IAM permissions or are a Root Account, Organization Manager Account.
1.2.5 - Budget Management
Users can enter the required budget management information through the Samsung Cloud Platform Console, select detailed options, and create the service.
Create Budget
You can create a budget and use it in the Samsung Cloud Platform Console. To create a budget, follow these steps.
All Services > Financial Management > Cost Management Click the menu. 1. Go to the Service Home page of Cost Management.
On the Service Home page, click the Create Budget button. 2. Go to the Budget Creation page.
On the Budget Creation page, enter the information required to create a budget and select the detailed options.
Category Required status Detailed description Budget Name Required Enter the budget name to distinguish when creating multiple budgets. - Korean, English, numbers, spaces, and special characters(
+=.,@-_) can be used to input within 20 characters.
Management Type Required Select a budget management method. - Monthly Budget Setting: The used amount is reset and calculated on a monthly basis, and you can set a notification when the used amount reaches the set limit.
- Overall Budget Setting: From the configured month onward, the used amount is accumulated and calculated, and you can set a notification when the used amount reaches the set limit.
Budget Essential Enter the budget based on this month’s usage amount. - KRW: Enter as an integer not exceeding 100 billion KRW
- USD: Enter as an integer up to 100 million USD, or a decimal value with up to two decimal places
Start month Required Select the month to start budget management. - The usage amount from the starting month will be applied to budget management.
Threshold reached alert Selection Set whether to send notifications when the budget consumption rate reaches the threshold. - If enabled, configure the notification method additionally.
- Notification Timing: You can set to receive a notification email when the budget consumption rate reaches this point.
- Notification Sending: Set whether the email should be repeatedly sent when the threshold notification point is reached.
- First Notification: Sent once on the day after the threshold is reached, based on midnight (Asia/Seoul, GMT +09:00).
- Daily Notification: Sent daily starting the day after the threshold is reached, based on midnight (Asia/Seoul, GMT +09:00).
- Notification Recipients: Enter the email address to receive the threshold notifications.
Prevent new creation Selection When new creation prevention is enabled, the creation of new services included in the Compute or Database service groups is restricted. - When using it, additionally set the prevention timing and notification recipients.
- New Creation Prevention Timing: When the budget consumption rate reaches this point, the creation of new services is restricted.
- Notification Recipient: Enter the email address that will receive notifications when the new creation prevention timing is reached.
Table. Budget creation input informationInformationNew Creation Prevention feature target services (as of December 2025) are as follows.
- Virtual Server, Database Category, Event Streams, Serch Engine, Vertica, Oracle Service
- Korean, English, numbers, spaces, and special characters(
Check the input content and click the Generate button. 4. A popup window notifying budget creation opens.
Click the Confirm button. 5. Budget creation is complete.
- Completed budgets can be viewed on the Budget Management list page.
Caution
New Creation Prevention feature, even when used, keeps existing resources unchanged and continues billing, so the set amount does not guarantee the final cost.
Check budget management list
Budget management allows you to view and edit the entire budget list. To view the budget management information, follow these steps.
- All Services > Financial Management > Cost Management Click the menu. 1. Navigate to the Service Home page of Cost Management.
- Click the Budget Management menu on the Service Home page. 2. Navigate to the Budget Management page.
- Budget Management page lets you view the list of configured budgets.
Category Detailed description Budget name Budget name for distinguishing generated budgets Management Type You can see the type that manages the budget. - Monthly budget setting: reset the usage amount on a monthly basis
- Overall budget setting: accumulate the used amount from the set month onward
Budget setting amount Check the configured budget. This month’s usage amount Displays the amount used for the Account up to yesterday in the current month. It indicates the proportion of the amount used up to yesterday relative to the budgeted amount. - For the total budget, it is calculated as the sum of this month’s usage from the start month.
- For budgets that have not started, the consumption rate cannot be determined.
Estimated usage amount for this month It indicates the estimated total usage amount for this month, based on the usage fees up to yesterday in the current month of the Account. Estimated depletion rate It shows the ratio of the expected usage amount for this month to the budgeted amount. - For the total budget, it is calculated as the sum of the expected usage amounts from the start month to this month.
- For budgets that have not started, the expected consumption rate cannot be determined.
Start month Indicates the month when the usage amount starts to be applied to budget management. More button You can click the More button in the list to navigate to the Budget Edit page. Table. Budget management list information
Modify Budget
The user can modify the budget they created. To modify the budget management information, follow these steps.
All Services > Financial Management > Cost Management Click the menu. 1. Go to the Service Home page of Cost Management.
Click the Budget Management menu on the Service Home page. 2. Navigate to the Budget Management page.
Click the More button > Edit Budget button in the list. 3. Navigate to the Budget Revision page.
Budget Edit page, enter the information that needs to be edited, and select the detailed options.
Category Required status Detailed description Budget name Required Enter the budget name used to distinguish when creating multiple budgets. - Korean, English, numbers, spaces, and special characters (
+=.,@-_) to input within 20 characters.
Management type Required Select a budget management method. - Monthly Budget Setting: The used amount is reset each month for calculation, and you can set a notification when the used amount reaches the set limit.
- Overall Budget Setting: The used amount is accumulated from the configured month for calculation, and you can set a notification when the used amount reaches the set limit.
Budget Essential Enter the budget based on this month’s usage amount. - KRW: Enter as an integer up to 10 billion KRW
- USD: Enter as an integer up to 100 million USD, or with up to two decimal places
Start month Essential Select the month to start budget management. - The usage amount from the starting month will be applied to budget management.
Threshold reached alert Selection Set whether to send notifications when the budget consumption rate reaches the threshold. - If enabled, configure additional notification methods.
- Notification Timing: You can set to receive a notification email when the budget consumption rate reaches this point.
- Notification Sending: Set whether the email should be repeatedly sent when the threshold notification timing is reached.
- First Notification: Send once on the day after the threshold is reached, based on midnight (Asia/Seoul, GMT +09:00).
- Daily Notification: Send daily starting the day after the threshold is reached, based on midnight (Asia/Seoul, GMT +09:00).
- Notification Recipients: Enter the email address to receive threshold notifications.
Prevent new creation Selection When new creation prevention is enabled, the creation of new services included in the Compute or Database service groups is restricted. - When using it, additionally set the prevention timing and notification recipients.
- New Creation Prevention Timing: When the budget consumption rate reaches that point, the creation of new services is restricted.
- Notification Recipient: Enter the email address to receive notifications when the new creation prevention timing is reached.
Table. Budget modification input informationCautionIf you change the budget amount or the threshold alert settings, existing alerts may be reset and resent.- Korean, English, numbers, spaces, and special characters (
Check the input content and click the Complete button. 5. A popup window notifying budget changes opens.
Click the Confirm button. 6. Budget creation is complete.
- The revised budget can be viewed on the Budget Management list page.
Delete Budget
Unused budgets can be deleted. However, because a budget cannot be recovered once deleted, you should thoroughly consider the impact of deleting the budget before proceeding with the deletion.
Caution
Please note that the budget cannot be restored after it is deleted.
- Click the All Services > Financial Management > Cost Management menu. 1. Navigate to the Service Home page of Cost Management.
- Click the Budget Management menu on the Service Home page. 2. Go to the Budget Management page.
- Click the More button > Delete budget button in the list. 3. A notification popup appears for budget deletion.
- Confirm button, when pressed, deletes the budget.
- Once deletion is complete, check the Budget Management list page to confirm whether the budget was deleted.
1.2.6 - Cost Savings
Users can set time commitments for instance-based services in the Compute, Database, and Data Analytics service categories of the Samsung Cloud Platform Console to reduce usage costs.
Cost Savings Apply
You can apply for and use Cost Savings in the Samsung Cloud Platform Console. To apply for Cost Savings, follow the steps below.
All Services > Financial Management > Cost Management Click the menu. 1. Navigate to the Service Home page of Cost Management.
Click the Cost Savings request button on the Service Home page. 2. Navigate to the Cost Savings Plan Application page.
Cost Savings Plan Application on the page, enter the information required for the Cost Savings plan application.
Category Required status Detailed description Plan Group Required Select the plan group to set the plan - If there is no plan group to set, create a plan group on the plan group list page, then proceed
- For details on creating a plan group, see Cost Savings 플랜 그룹 생성하기
Plan name Required Enter the plan name to create - Plan cannot be changed after creation
Reference usage fee Selection Select past billing period to reference - 7 days (default), 30 days, 60 days selectable
- When selected, recommends an hourly committed rate based on the charges during that period
- If there is an existing Cost Savings applied, it is excluded from the billing history before recommendation
- Billing plan can be entered manually
View charge history Selection Select the previous billing verification period to reference when recommending a pricing plan - 7 days, 30 days, 60 days
- If there is an existing Cost Savings applied, exclude the existing Cost Savings from the billing history
Contract period Selection Select plan application period Contracted amount per hour (₩) Selection Enter the contracted amount per hour - Recommended contract amount: Analyzes non‑contract usage history to recommend a contract amount. Varies by contract period
- Manual entry: Directly enter the contracted amount per hour
- KRW: Only integer values between 10 and 1000000 are allowed
- USD: Values between 0.01 and 900.00 are allowed. Up to two decimal places are permitted
Plan start date Required Select plan start date - Selectable from the day after application
Table. Cost Savings Application InformationAfter checking the estimated discount amount, click the Create button.
When the popup notifying the Cost Savings application opens, click the Confirm button.
- Once creation is complete, check the created budget on the Budget Management list page.
Information
- Grouping into a plan group shares the plan amount with other accounts within the organization.
- A single plan group cannot be shared.
Manage Cost Savings Plan Group
You can create and manage Cost Savings plan groups.
Cost Savings Create plan group
information
- Organization Management Account can create plan groups for Member Accounts and share the committed amounts between groups.
- Plan groups can only be created in the Management Account. * However, if the account belongs to a plan group created by a Management Account, you can create a plan group that contains only a Member Account.
To create a Cost Savings plan group, follow the steps below.
All Services > Financial Management > Cost Management Click the menu. 1. Navigate to the Service Home page of Cost Management.
On the Service Home page, click the Cost Savings > Cost Savings Plan Group menu. 2. Navigate to the Cost Savings Plan Group List page.
Cost Savings Plan Group List on the page, click the Create Plan Group button. 3. Go to the Create Plan Group page.
Cost Savings Plan Group Application page, after setting the basic information and target Account, click the Create button.
Category Required status Detailed description Plan group name Required Enter the plan group name - using Korean, English, numbers, and special characters (+=,.@-_) to be between 3 and 24 characters
Explanation Selection Description of the plan group Target Account Required Select the Account for the plan group target Table. Cost Savings plan group application informationReferenceTarget Account selection: target accounts already assigned to a plan group created by the Management Account are not displayed in the list.When the popup notifying the creation of a plan group opens, click the Confirm button.
Cost Savings Plan Group Detailed Information Check
You can view the list of Cost Savings plan groups that are currently applied or pending, along with detailed information. To view detailed information of the Cost Savings plan group, follow these steps.
- All Services > Financial Management > Cost Management Click the menu. 1. Navigate to the Service Home page of Cost Management.
- On the Service Home page, click the Cost Savings > Cost Savings Plan Group menu. 2. Cost Savings Plan Group List page.
- Click the plan group name to view detailed information in the Cost Savings list. 3. Cost Savings Plan Group Details page is accessed.
- Cost Savings Plan Group Details page consists of Basic Information, Plan, Coverage, Utilization tabs.
Basic Information
You can view basic information about the plan group.
| Category | Detailed description |
|---|---|
| Constructor | Plan Group Creator |
| Creation date | Plan group creation timestamp |
| Modifier | Plan Group Editor |
| Modification date | Plan Group Modification Timestamp |
| Plan group name | Plan group name
|
| Plan Group ID | Plan group ID |
| Contract period | Plan group’s contract period |
| Explanation | Description of the plan group
|
| Create Account | Create plan group Account |
| Target Account | Plan group target Account
|
Table. Cost Savings Plan Group Details - Basic Information Tab
Plan
You can view the plan information included in the plan group.
| Category | Detailed description |
|---|---|
| Plan | Plan ID, contract period, hourly contract amount, start date, status display
|
| Monthly billing amount | Basic information and billing amount details by plan ID
|
| Cancel application | Cancel the plan application
|
Table. Cost Savings Plan Group Details - Plan Tab
Reference
- You can register Cost Savings as a notification to receive alerts when the contract expires or when usage exceeds or falls short of the agreement.
- Cost Savings If the contract expiration date is approaching, a notification email is sent 60, 30, 7, and 1 days before.
- If an excess (Cost Savings Coverage not met) or shortage (Cost Savings Utilization not met) of contract usage occurs, a notification email will be sent.
- For detailed information about notification settings, see 알림.
Coverage
You can view coverage with Cost Savings applied to non-contract resources for a specific period.
| Category | Detailed description |
|---|---|
| Estimated total amount (no contract) | Total amount of non-contract instances for the set period
|
| Total coverage amount | Total Coverage amount for the configured period |
| Coverage (%) | Proportion of Coverage amount among the estimated non‑contract amount for the set period
|
| Used resources | Plan start date |
| Usage time | Plan start date |
| No contract | Plan expiration date |
| Cost Savings | Hourly contract amount |
| Cost Savings Unapplied Amount | Plan application status
|
Table. Coverage tab information
Reference
- Since it displays based on the amount used up to two days before the reference date, the current month’s amount is not shown on the 1st and 2nd of each month.
- Download Detailed Excel button, when clicked, lets you download detailed information about the Coverage amount as an Excel file.
Utilization
You can view the used amount, unused amount, and savings amount relative to the committed amount for Cost Savings.
| Category | Detailed description |
|---|---|
| Plan ID | Plan group ID |
| Total contract amount | Total contract amount of the plan group |
| Usage amount | Amount used compared to the contracted amount |
| Unused amount | ‘Total contract amount - used amount’ as the unused amount of the plan’s contract amount |
| Utilization (%) | Ratio of used amount to total contracted amount |
| Savings amount | Difference between the instance’s non‑contracted amount and the actual plan‑applied amount for instance usage (including the plan’s contracted amount) |
| Expiration date | Contract end date of the plan |
Table. Utilization tab information
Reference
- Since it displays based on the amount used up to two days before the reference date, the current month’s amount is not shown on the 1st and 2nd of each month.
- When you click the Excel Download button, you can download detailed Utilization information as an Excel file.
Delete Cost Savings plan group
You can delete the Cost Savings plan group.
To delete the Cost Savings plan group, follow the steps below.
- All Services > Financial Management > Cost Management menu, click. 1. Go to the Service Home page of Cost Management.
- On the Service Home page, click the Cost Savings > Cost Savings Plan Group menu. 2. Navigate to the Cost Savings Plan Group List page.
- After selecting all plan groups to delete from the Cost Savings plan group list, click the Delete button at the top of the list.
- You can also delete individually by clicking the Plan Group Delete button on the Cost Savings Plan Group Details page.
- When the pop-up indicating deletion opens, click the Confirm button.
Cost Savings Plan Management
You can create and manage Cost Savings plans.
Apply for Cost Savings Plan
Follow the steps below to apply for the new Cost Savings plan.
- All Services > Financial Management > Cost Management Click the menu. 1. Navigate to the Service Home page of Cost Management.
- On the Service Home page, click the Cost Savings > Cost Savings Plan menu. 2. Go to the Cost Savings plan list page.
- Cost Savings Plan List on the page, click the Apply for Plan button. 3. Go to the Cost Savings Plan Application page.
- Cost Savings Plan Application page, enter the information required for the Cost Savings plan application.
- After checking the estimated discount amount, click the Complete button.
- When the popup notifying a Cost Savings request opens, click the Confirm button.
- When creation is complete, check the created budget on the Budget Management list page.
Reference
For detailed information about the new Cost Savings plan application, refer to Cost Savings 신청하기.
information
- When you group them into a plan group, the plan amount is shared with other accounts within the organization.
- A single plan group cannot be shared.
Cost Savings Check detailed plan information
You can view the list of Cost Savings plans that are currently applied or pending, along with detailed information. To view detailed information of the Cost Savings plan, follow the steps below.
- All Services > Financial Management > Cost Management Click the menu. 1. Go to the Service Home page of Cost Management.
- On the Service Home page, click the Cost Savings > Cost Savings Plan menu. 2. Navigate to the Cost Savings plan list page.
- Click the plan name to view detailed information in the Cost Savings list. 3. Navigate to the Cost Savings Plan Details page.
- Cost Savings Plan Details page consists of Basic Information, Tag tabs.
Reference
On the Cost Savings Plan List page, clicking the Export to Excel button allows you to download the Cost Savings Plan List as an Excel file.
Basic Information
You can view the basic information for the plan group.
| Category | Detailed description |
|---|---|
| service | Service name |
| Resource Type | Resource Type |
| SRN | Unique resource ID in Samsung Cloud Platform |
| Resource name | Resource Name |
| Resource ID | Service’s unique resource ID |
| Constructor | User who created the service |
| Creation Date/Time | Service creation date and time |
| Modifier | User who modified the service |
| Modification date | Service modification date and time |
| Constructor | Plan creator |
| Creation date and time | Plan creation date and time |
| Modifier | Plan Group Editor |
| Modification date | Plan modification date/time |
| Plan name | Plan name |
| Plan group name | Name of the plan group set in the plan |
| Plan ID | Plan ID |
| Contract period | Plan commitment period |
| Hourly contracted amount | Hourly contracted amount |
| Start date | Plan start date
|
| Expiration date | Plan expiration date |
| Create Account | Create plan group Account |
Table. Cost Savings Plan Details - Basic Information Tab
Reference
- You can register Cost Savings as a notification to receive alerts when the contract expires or when usage exceeds or falls short of the contracted rate.
- Cost Savings: When the contract expiration date is approaching, send a notification email 60, 30, 7, and 1 days in advance.
- If an excess (Cost Savings Coverage not met) or shortage (Cost Savings Utilization not met) of contract usage occurs, a notification email will be sent.
- For detailed information about notification settings, refer to 알림.
tag
You can view, add, modify, or delete a plan’s tag information.
| Category | Detailed description |
|---|---|
| Tag list | Tag list
|
Table. Cost Savings plan details - Tag tab items
Terminate Cost Savings Plan
You can cancel the Cost Savings plan you are currently subscribed to.
To cancel the Cost Savings plan, follow the steps below.
- All Services > Financial Management > Cost Management Click the menu. 1. Navigate to the Service Home page of Cost Management.
- On the Service Home page, click the Cost Savings > Cost Savings Plan menu. 2. Navigate to the Cost Savings plan list page.
- After selecting all plans to cancel from the Cost Savings plan list, click the Delete button at the top of the list.
- You can also click the Plan Cancellation button on the Cost Savings Plan Details page to cancel individually.
- When the pop-up notifying termination opens, click the Confirm button.
1.2.7 - Account
When you sign up for the Samsung Cloud Platform Console, an account is created, and the person who creates the account becomes the Root user. In the Account, you can view account information and manage account aliases.
Check Account Information
To check the Account information, follow these steps.
Reference
To view and edit Account information, a payment method must be registered.
Please refer to Register a payment method for information on registering a payment method.
Please refer to Register a payment method for information on registering a payment method.
- Click the All Services > Financial Management > Cost Management menu. You will be taken to the Service Home page of Cost Management.
- On the Service Home page, click the Account menu. You will be taken to the Account page.
- You can also navigate by clicking My menu > Account in the top right corner of the Console.
- Check the Account information on the Account page.
Item description Account name The name assigned to an Account when creating the Account. It allows the Account to be easily identified when managing multiple accounts. AccountID The unique identifier of the Account. Used when an IAM user logs in. Account alias Alias assigned to an Account when creating the Account. - When managing multiple Accounts, it helps to easily identify the Account for billing management and other purposes.
- IAM users can log in to the Console using the Account alias.
- Edit: Modify the Account alias. See Edit Account Alias.
- Delete: Delete the Account alias. See Delete Account Alias.
Company Name Company name entered when registering a payment method Table. Account detailed information
Caution
When an Account alias is modified or deleted, the Console login URL that uses the current alias can no longer be used. IAM users cannot log in to the Console using the previous Account alias.
Modify account alias
Caution
If you change an account alias, the Console login URL that uses the current alias will no longer work.
To modify the account alias, follow these steps.
- Click the All Services > Financial Management > Cost Management menu. You will be taken to the Cost Management Service Home page.
- Click the Account menu on the Service Home page. You will be taken to the Account page.
- You can also navigate by clicking My menu > Account in the upper right corner of the Console.
- Account page, click the Edit button in the Account alias field. You will be taken to the Edit Account alias popup.
- Edit Account Alias After reviewing the instructions in the popup window, edit the Account alias and click the Confirm button.
Reference
After making changes, if the alias is not used by another account, you can reuse the alias you were previously using.
Delete Account Alias
Caution
- If you delete the account alias, IAM users can no longer log in using the account alias.
- The IAM login URL cannot be used either.
- All Services > Financial Management > Cost Management Click the menu. Navigate to the Service Home page of Cost Management.
- On the Service Home page, click the Account menu. You will be taken to the Account page.
- You can also navigate by clicking My menu > Account in the upper right corner of the Console.
- On the Account page, click the Delete button in the Account alias item. It moves to the Account alias deletion popup window.
- Delete Account Alias After reviewing the instructions in the popup window, click the Confirm button.
1.2.8 - Payment Management
You can view and add payment methods registered to the Account in the Samsung Cloud Platform Console.
Check payment method
You can view the payment methods registered to the Account in the Samsung Cloud Platform Console.
To verify the payment method, follow these steps.
- All Services > Financial Management > Cost Management > Payment Management Click the menu. You will be taken to the Payment Management page.
- On the Payment Management page, you can view the registration date and alias of the currently registered payment methods.
Reference
- To view and edit account information, a payment method must be registered.
- If you belong to an Organization, the charge will be billed to the Management Account’s payment method.
Change payment method
You can change the payment method registered to the Account in the Samsung Cloud Platform Console.
- All Services > Financial Management > Cost Management > Payment ManagementClick the menu. Payment Managementpage will be opened.
- Payment method Click the edit button on the right to change the payment method.
- Through the Create Alias button of a registered payment method, you can register an alias for the payment method to distinguish it, and you can delete it via Delete Alias.
guide
For payment methods, statement receipt, other payment-related matters, and requests to change to bank transfer, please contact the sales representative or Contact us.
Register Payment Method
You must register a payment method to use all services of the Samsung Cloud Platform. To register a payment method, follow these steps.
- All Services > Financial Management > Cost Management > Payment Management Click the menu. You will be taken to the Payment Management page.
- If no payment method is registered, the Add Payment Method button is enabled. Click the Add Payment Method button.
- Please enter the business registration number, then provide the company name, representative name, and address.
- If there is a transaction history with Samsung SDS, the company name, representative name, and address are automatically entered.
If a lot-number address is entered, it may be necessary to convert it to a road name address and save it.
- If there is a transaction history with Samsung SDS, the company name, representative name, and address are automatically entered.
- After attaching the applicant’s business card and business registration certificate, click the Next button to proceed with payment method registration.
Information
If you register a payment method in the Samsung Cloud Platform Console, you can use all services of the Samsung Cloud Platform Consle.
1.2.9 - Carbon emissions
It visualizes the carbon emission data generated when using services in the Samsung Cloud Platform Console, allowing you to track emission trends. Additionally, you can estimate the expected carbon emissions that could have been reduced by using Samsung Cloud Platform instead of an on‑premise data center, and review the emissions predicted based on current usage.
Information
Carbon emission data is automatically linked when a new service is created within the Samsung Cloud Platform.
Check carbon emissions
You can view the carbon emissions per service in the Samsung Cloud Platform Console.
To check the carbon emissions per service, follow these steps.
- All Services > Financial Management > Cost Management Click the menu. 1. Navigate to the Service Home page of Cost Management.
- On the Service Home page, click the Carbon Emissions menu. 2. Navigate to the Carbon Emissions page.
- In the period setting area at the top right, set the time frame for viewing carbon emissions. 3. Carbon emissions for the configured period are displayed.
Check this month’s carbon emissions
Carbon Emissions 페이지의 기간 설정 영역에서 This Month 버튼을 클릭하세요.
| Category | Detailed description |
|---|---|
| Carbon emissions by period | Carbon emissions from day 1 to the present and On-prem. vs carbon emissions
|
| Carbon Emission Trend | Graph comparing carbon emission trends with the previous month
|
| 월평균 탄소 배출량 | 최근 6개월 동안 평균 탄소 배출량 |
| 탄소 배출량 그래프 | Carbon emission graph from day 1 to the present
|
| Carbon emissions by service | Service-specific carbon emissions from the 1st to the present
|
Table. This month's carbon emission information
Reference
- Data is not displayed on the 1st of each month. * (Asia/Seoul, GMT +09:00 based on)
- The month-end estimate is a projection based on current emissions.
Information
- Carbon emissions are rounded after summing the fractional parts for each service group, so the total may differ.
- Indirect service group: includes emissions from all other usage services except Compute and Storage services.
Check carbon emissions for a specific period
In the period setting area of the Carbon Emissions page, click the Direct button and then select the period for which you want to view the carbon emissions.
Reference
Carbon emissions can be viewed from up to 12 months ago to the present.
| Category | Detailed description |
|---|---|
| Carbon emissions by period | Total carbon emissions during the configured period and On-prem. vs carbon emissions display
|
| Carbon Emission Trend | Display the trend of carbon emissions during the set period as a graph
|
| Monthly average carbon emissions | Average carbon emissions during the set period |
| Carbon Emissions Graph | Carbon emissions graph for the selected period
|
| Carbon emissions by service | Carbon emissions by service during the selected period
|
Table. This month's carbon emission information
information
- Carbon emissions are rounded after summing the fractional parts for each service group, so there may be differences in the total.
- Indirect Service group: Includes emissions from all other usage services except Compute and Storage services.
1.2.10 - EDP Report
You can view contract information and usage cost details when signing an EDP contract.
EDP Report Check Basic Information
To view the basic information of the EDP Report, follow these steps.
- All Services > Financial Management > Cost Management Click the menu. 1. Navigate to the Service Home page of Cost Management.
- On the Service Home page, click the EDP Report menu. 2. EDP Report Navigate to the page.
| Category | Detailed description |
|---|---|
| Company name | Company name |
| Target information | Samsung Cloud Platform Offering and target ID information by version
|
| Contract period | Contract period |
| Whether it is an annual contract | Whether it is an annual contract |
| Contract amount | Annual commitment amount
|
| Base discount rate | Base discount rate upon agreement |
| 서비스별 할인율 | 약정 시 서비스별 할인율
|
Table. EDP Report basic information items
Check EDP Report
To view the EDP Report, follow these steps.
- Click the All Services > Financial Management > Cost Management menu. 1. Navigate to the Service Home page of Cost Management.
- On the Service Home page, click the EDP Report menu. 2. Navigate to the EDP Report page.
- On the EDP Report page, click the Report tab.
| 구분 | Detailed description |
|---|---|
| EDP cumulative graph | Total contracted amount data of the EDP contract
|
| EDP Details | Contract period, contract amount, Offering, Target ID, usage amount, shortage and excess amount display
|
Table. EDP Report items
Reference
For USD contracts, the used amount is converted to Korean won and displayed.
1.3 - Release Note
Cost Management
2026.07.16
FEATURE
Add billing tag functionality and other CX improvements- The billing tag feature has been added.
- You can apply tags to cost data, enabling you to view and analyze by tag in usage, billing details, and cost analysis.
- By using billing tags, you can categorize and manage costs based on various criteria such as projects, services, departments, and environments.
- The cost entry criteria within the Budget, Credit, and Cost Savings services have been changed.
- KRW: Only integer values can be entered according to each service’s criteria.
- USD: You can enter an integer or a decimal (up to two decimal places) according to each service’s criteria.
- You can check the type and contract period of GPU Server and Multi-node GPU Cluster in the EDP Report.
- When registering an EDP, you can set discount rates by adding the type of GPU Server, Multi-node GPU Cluster, and the contract term.
- You can view carbon emission data from up to 12 months ago.
2026.05.21
FEATURE
Improved integration of usage and billing details with carbon emission data- The CX for checking usage and billing details has been updated.
- You can view the estimated discount amount when checking usage and billing details.
- If there is an abnormal cost detection record, you can receive an Excel file at the email registered in the Console and review it.
- When downloading usage and billing details, we also provide billing information for each resource, such as Account ID, instance type, OS, contract period, unit price, and unit basis.
- When a new service is created in Samsung Cloud Platform, carbon emission data is automatically integrated.
2026.03.19
FEATURE
Add notification feature related to Cost Management and other improvements- You can register cost management as an alert to trigger a notification when abnormal signs are detected in usage records.
- If the usage amount changes by 100% or more compared to the day before yesterday versus yesterday, a notification will be sent.
- Weekends are excluded from the control group.
- New resources are excluded from detection for two weeks.
- The default alarm sender is set to the Root user.
- To add notification policies and notification groups, add [Billing System] Anomlay Detection Notification as a notification in the Samsung Cloud Platform notification settings.
- You can register Cost Savings as a notification to receive alerts when the contract expires or when usage exceeds or falls short of the contracted rate.
- You can download the Cost Savings plan list as an Excel file.
- Improvement of carbon emission calculation formula: The carbon emission calculation formula has been improved by considering factors such as electricity consumption.
2025.10.23
FEATURE
Credit and budget management feature added- On the Credit Management page, you can view summary information of valid and expired Credits.
- A feature for budget management has been added.
- When creating a budget, you can specify the month when the budget application starts.
- You can set it to limit the creation of new services when the budget consumption rate reaches that point.
2025.07.01
FEATURE
Add carbon emission verification feature- Cost Savings, Carbon Emissions feature has been added.
- Cost Savings: You can reduce usage costs by setting a time commitment for the Compute services of the Samsung Cloud Platform Console.
- Carbon Emissions: You can view the carbon emissions generated when using services on the Samsung Cloud Platform Console.
2025.02.27
NEW
Cost Management service launch- We have launched the Cost Management service. * You can manage and optimize service costs.
- Provides usage and billing details, cost analysis, and Credit management features.
- You can set and manage budgets, and it provides Account and payment method information.
2 - Planned Compute
2.1 - Overview
Service Overview
Planned Compute is a pricing policy that allows you to use resources up to 40% cheaper than on‑demand by committing to a 1‑year or 3‑year server type. It applies to resources in the on‑demand Compute, Database, and Data Analytics service families. When the attributes applied to Planned Compute match the attributes of the on‑demand resources, the discounted Planned Compute rate is applied automatically. You can view the discounts applied through Planned Compute in the Report and, if needed, submit an additional Planned Compute request.
Features
Planned Compute is a contract‑based discount service offered by Samsung Cloud Platform, allowing you to select the desired operating system and server type. It provides high flexibility by letting you apply for discounts for a contract period of one to three years without specifying particular resources.
- Discounted Pricing: Planned Compute is a pricing discount policy that allows resources to be used up to 40% cheaper than on‑demand, provided a 1‑year or 3‑year usage commitment. It applies to resources in the on‑demand Compute service category, Analytics service category, and Database service category, and when the attributes applied to Planned Compute match the attributes of the on‑demand target resources, the Planned Compute discount pricing is automatically applied.
- Various Feature Support: Planned Compute provides various functions such as application, extension, and server type changes. When applying for Planned Compute, select the contract‑discount‑eligible service, operating system, server type, and contract period, then enter the desired quantity to submit the request.
- Convenient Management and Monitoring: By checking the Planned Compute list, you can view Planned Compute usage information and modify the application details when contract terms need to be changed. Additionally, by reviewing Coverage, you can compare the Planned Compute usage cost against the amount used without a contract, enabling convenient management.
Service Architecture Diagram
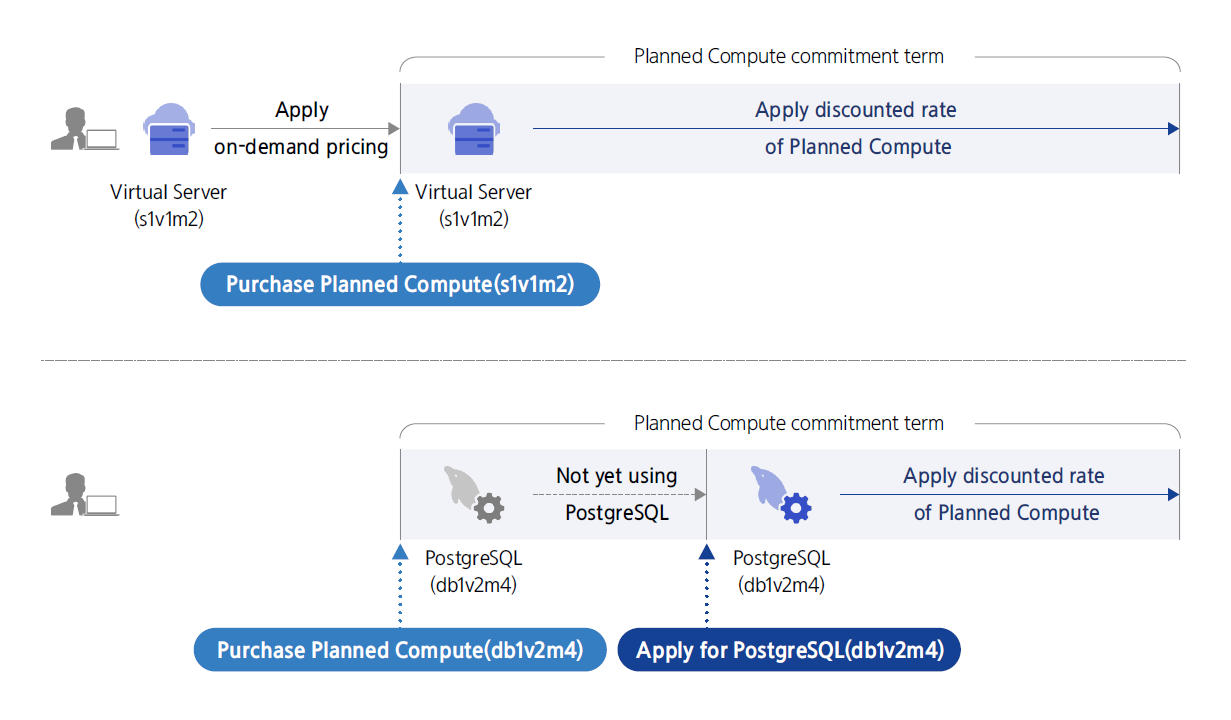
Provided features
Planne Compute provides the following features.
- Planned Compute Service Application: Select the service, operating system, server type, and contract period for which you want to receive a contract discount, enter the requested quantity, and after confirming the application information, you can apply for Planned Compute.
- Planned Compute Extension: When the contracted period ends, the corresponding Planned Compute is terminated, and discounts no longer apply to on-demand resources. Planned Compute termination does not mean that on-demand resources are terminated. If you wish to extend the discount period, you can use the contract extension feature to schedule the next contract period after the current contract period ends.
- Planned Compute Server Type Change: The server type of Planned Compute can be changed to a value higher than the configured setting.
- Planned Compute termination: Unused Planned Compute can also be terminated, but upon termination, 50% of the usage fee for the remaining period will be billed two months after termination. Termination of Planned Compute does not imply termination of resources without a contract.
- Coverage Check: You can check the discount Coverage of on-demand resource usage amounts for the same target service, operating system, and server type. Select the period you want to query to display the on-demand resource name, usage time, the amount used without discount, and the amount not covered by Planned Compute. This allows you to see the difference in billed amounts between on-demand usage and Planned Compute usage.
Constraints
The constraints of Planned Compute are as follows.
- The application, modification, and coverage are all based on midnight in the Asia/Seoul (GMT +09:00) time zone.
- If you apply for Planned Compute, the discount will be applied starting at midnight the day after the application date.
- Coverage can be checked up to 2 days in advance to calculate the exact discount amount.
- Every day from 23:30 to 23:59 is the settlement window, during which new applications and changes are not applied.
- Discounts are applied to on-demand resources within the same region of the same account.
Preliminary Service
Planned Compute does not require any separate prerequisite service work.
2.2 - How-to Guides
Users can apply for the service by entering the required information for Planned Compute through the Samsung Cloud Platform Console.
Apply for Planned Compute
You can request and use the Planned Compute service from the Samsung Cloud Platform Console.
To apply for Planned Compute, follow these steps.
Click the All Services > Financial Management > Planned Compute menu. Navigate to the Service Home page of Planned Compute.
On the Service Home page, click the Planned Compute Apply button. You will be taken to the Planned Compute Apply page.
On the Planned Compute Application page, after entering the required information, click the Next button.
Item RequiredExplanation Service Required Select the service for which you want to apply for Planned Compute Operating system Required Select the operating system - After selecting the Service item, selection is possible
- Depending on the selected service, Open Source, RHEL, Windows, etc. can be selected
Server type Required Select the server type - After selecting the service item, selection is possible
Contract period Required Select contract period - Server Type After selecting the item, selection is possible
- 1-year or 3-year can be selected
Requested quantity Required Enter the requested quantity - Up to 100 units can be entered
- After applying the Planned Compute quantity, refunds are not possible, so caution is required when entering
- If an increase in quantity is needed, you can add a new Planned Compute of the same server type
Agreement start date Required Select the date when the contract becomes effective - Can be set starting from the day after the application date
Table. Planned Compute service input informationCheck the detailed information and estimated charges generated in the Summary panel, and click the Complete button.
When the popup notifying the creation of Planned Compute opens, click the Confirm button.
- After the request is completed, check the resources you created on the Planned Compute List page.
Check Planned Compute List
You can view and edit the full list of resources and detailed information for Planned Compute.
To view the list of Planned Compute, follow the steps below.
Click the All Services > Financial Management > Planned Compute menu. Navigate to the Service Home page of Planned Compute.
On the Service Home page, click the Planned Compute menu. You will be taken to the Planned Compute list page.
On the Planned Compute List page, click the contract number of the Planned Compute to view detailed information. You will be taken to the Planned Compute Details page.
- Resource items other than the required columns can be added via the Settings button.
Item Required Explanation Contract number Required Key values for each billing unit visible in the invoice details Resource Name Select Resource contract number Target Service Required Planned Compute discount-eligible service - Apply discount to non-contract resources that match the given value
Server type Required Planned Compute discount-eligible server type - Apply discount to non-contract resources that match the given value
Operating System Required Planned Compute discount-eligible operating system - Apply discount to non-contract resources that match the given value
Initial contract start date Required Planned Compute start date when the commitment applies - Planned Compute Details date can be changed on the page
- For more information, see Change Commitment Start Date reference
Contract period Required Check the applicable period based on the selected individual Planned Compute term of 1 year or 3 years - When the Planned Compute term ends, the discount no longer applies.
- If you want to continue applying discounts with Planned Compute, you need to extend the term.
Extension period Required Check the extension period of an individual Planned Compute commitment - Before the extension date arrives, you can modify the 1-year or 3-year term of the extension period
- Additionally, you can cancel the extension reservation.
status Required Planned Compute’s status after a change request is reflected - Creating: State after the contract is requested but before it is applied
- Active: State where the contract is currently applied
- In Progress: State while the change request is being processed
constructor Selection User who created Planned Compute Creation date and time Select Planned Compute creation time Editor Select Planned Compute edited user Modification date Select Planned Compute modification timestamp Table. Planned Compute list item information
- Resource items other than the required columns can be added via the Settings button.
In the Planned Compute list, clicking the right more button provides the contract management item. When multiple items are selected via the checkboxes, the same option is also available through the top button.
Category Detailed description Contract extension The button to extend the contract - becomes active when there is no next contract reservation. After the current contract, select the next contract period to schedule
- For details, see Extend Contract
Contract amendment Button to modify the contract - You can change the server type. Changes are allowed only to a higher specification than the current setting.
- For details, see Change Contract.
Contract termination Button to terminate the contract - Terminate the contracted Planned Compute during the term
- When terminated, a termination fee is incurred based on the remaining usage period (monthly fee * 50% * remaining months of the contract period) and will be reflected on the invoice after two months.
- For details, refer to Terminate the contract.
Contract Extension Modification Button to edit the next contract reservation - It becomes active when there is a next contract reservation. It changes the contract period for the next contract after the current one.
- For more details, see Edit contract extension.
Cancel contract extension Button to cancel the next contract reservation - It becomes active when there is a next contract reservation. It cancels the contract extension reservation for the next contract after the current contract.
- For more details, see Cancel contract extension
Table. Planned Compute list item information - contract management
Planned Compute View detailed information
You can view and edit the detailed information of Planned Compute.
To view detailed information about Planned Compute, follow these steps.
- Click the All Services > Financial Management > Planned Compute menu. You will be taken to the Service Home page of Planned Compute.
- On the Service Home page, click the Planned Compute menu. You will be taken to the Planned Compute List page.
- On the Planned Compute List page, click the contract number of the Planned Compute to view detailed information. You will be taken to the Planned Compute Details page.
- Planned Compute Details page consists of Detail Information, Tags, Operation History tabs.
Detailed Information
Planned Compute list page lets you view and edit the detailed information of the selected resource.
| Item | Explanation |
|---|---|
| Category | Detailed description |
| ——— | ——— |
| Service | Service name |
| Resource Type | Resource Type |
| SRN | Unique resource ID in Samsung Cloud Platform |
| Resource Name | Resource Name |
| Resource ID | Unique resource ID in the service |
| constructor | User who created Planned Compute |
| Creation Date/Time | Planned Compute creation timestamp |
| Editor | User who modified Planned Compute |
| Modification date | Planned Compute modification timestamp |
| Contract number | Key values for each billing unit visible in the invoice details |
| Target Service | Planned Compute discount-eligible service
|
| Server type | Planned Compute discount eligible server type
|
| Operating System | Planned Compute discount‑eligible operating system
|
| Initial contract start date | Planned Compute start date to which the commitment applies
|
| Contract period | Applied contract period and the corresponding date |
| Extension period | If the contract is extended, the extension period and the relevant date
|
| status | Planned Compute’s status after a change request is reflected
|
Table. Planned Compute detailed information items
guide
- When the Planned Compute commitment ends, the discount will no longer apply. To continue receiving the Planned Compute discount, extend the commitment.
- For detailed information about contract extension, see Extend Contract.
tag
On the Planned Compute list page, you can view the tag information of the selected resource and add, modify, or delete it.
| Category | Detailed description |
|---|---|
| Tag list | Tag list
|
Table. Planned Compute Details - Tag Tab Items
Job History
Planned Compute List page allows you to view the operation history of the selected resource.
| Category | Detailed description |
|---|---|
| Task History List | Resource Change History
|
Table. Planned Compute Details - Job History Tab Items
Managing Planned Compute Commitments
Change contract start date
You can change the contract effective start date for Planned Compute. To change the contract start date for Planned Compute, follow the steps below.
- Click the All Services > Financial Management > Planned Compute menu. Navigate to the Service Home page of Planned Compute.
- On the Service Home page, click the Planned Compute menu. You will be taken to the Planned Compute list page.
- On the Planned Compute List page, click the contract number of the Planned Compute whose commitment start date you want to change. You will be taken to the Planned Compute Details page.
- On the Planned Compute Details page, click the Edit button of the Initial Contract Start Date. The Edit Initial Contract Start Date popup opens.
- After changing the contract start date, click the Confirm button.
Reference
- The agreement start date can be set to a date after the next day.
- If the contract has started, the original contract start date cannot be modified.
Extend Agreement
You can extend the Planned Compute commitment. To extend the Planned Compute commitment, follow the steps below.
- Click the All Services > Financial Management > Planned Compute menu. Navigate to the Service Home page of Planned Compute.
- On the Service Home page, click the Planned Compute menu. You will be taken to the Planned Compute List page.
- On the Planned Compute list page, click the rightmost more button of the Planned Compute for the resource whose contract you want to extend, then click the Extend Contract button. The Extend Contract popup will open.
- Select the next contract period and click the Confirm button. You will be taken to the Planned Compute list page.
Reference
- Contract Extension button can be clicked before the current contract expires if the next contract has not yet been scheduled.
- If you schedule the next appointment through Extend Agreement, you can modify or cancel the next appointment’s extension period up to its start date.
Change Agreement
You can change the commitment of Planned Compute. To change the commitment of Planned Compute, follow the steps below.
- Click the All Services > Financial Management > Planned Compute menu. It takes you to the Planned Compute Service Home page.
- On the Service Home page, click the Planned Compute menu. You will be taken to the Planned Compute List page.
- Planned Compute On the list page, click the more button at the far right of the Planned Compute of the resource whose contract you want to change, then click the Change Contract button. The Change Contract popup window opens.
- Select the server type to change, and click the Confirm button. You will be taken to the Planned Compute list page.
Reference
- Contract change is only possible to a higher spec than the current contract’s configuration.
- If you change the server type using Change Contract, it takes effect at midnight of the same day based on the Asia/Seoul, GMT +09:00 time zone, and resources with the updated server type are moved to the appropriate Coverage list.
Modify contract extension
- Click the All Services > Financial Management > Planned Compute menu. Navigate to the Service Home page of Planned Compute.
- On the Service Home page, click the Planned Compute menu. You will be taken to the Planned Compute list page.
- On the Planned Compute list page, click the more button at the far right of the Planned Compute of the resource whose contract you want to change, then click the Modify Contract Extension button. The Modify Contract Extension popup window will open.
- After the current contract, change the contract period for the next contract and click the Confirm button. You will be taken to the Planned Compute list page.
Reference
- Contract Extension Edit button becomes active when a subsequent contract is scheduled. After the current contract, it modifies the contract period for the next contract.
- If there is a subsequent reservation, you may modify or cancel the extension period of the next agreement up to its start date.
Cancel contract extension
- Click the All Services > Financial Management > Planned Compute menu. You will be taken to the Planned Compute Service Home page.
- On the Service Home page, click the Planned Compute menu. You will be taken to the Planned Compute List page.
- On the Planned Compute list page, click the more button at the far right of the Planned Compute of the resource whose contract you want to change, then click the Cancel Contract Extension button. The Cancel Contract Extension popup will open.
- Cancel Contract Extension After confirming the popup message, click the Confirm button. You will be redirected to the Planned Compute list page.
Reference
- Cancel Contract Extension button is enabled when there is a reservation for the next contract. It cancels the contract extension reservation for the next contract after the current one.
- Cancel contract extension cancels the upcoming contract reservation, and after the current contract term expires, it will be treated as a non‑contract.
Terminate Agreement
You can cancel the Planned Compute commitment. To cancel the Planned Compute commitment, follow the steps below.
- Click the All Services > Financial Management > Planned Compute menu. Go to the Service Home page of Planned Compute.
- On the Service Home page, click the Planned Compute menu. You will be taken to the Planned Compute list page.
- Planned Compute On the list page, click the more button at the far right of the Planned Compute of the resource whose contract you want to cancel, then click the Cancel Contract button. The Cancel Contract popup window opens.
- Terminate Agreement popup message, review it, and click the Confirm button. Navigate to the Planned Compute list page.
Caution
- When terminating, a cancellation fee will be incurred based on the remaining usage period (monthly fee * 50% * remaining months of the contract term) and will be reflected on the invoice after two months. Please consider the cancellation fee carefully before proceeding with the termination.
- For same‑day requests, based on the Asia/Seoul GMT+09:00 time zone, if the cancellation occurs before midnight on the same day, no cancellation fee will be charged.
Planned Compute Coverage
Planned Compute You can check the discount amount applied to the requested quantity and non‑contract resources based on the same target service, server type, and operating system. Planned Compute Coverage To view detailed information, follow these steps.
Check Planned Compute Coverage List
- Click the All Services > Financial Management > Planned Compute menu. Navigate to the Service Home page of Planned Compute.
- On the Service Home page, click the Coverage menu. You will be taken to the Coverage list page.
Category Detailed description Target Service The Planned Compute discount‑eligible service for checking coverage Operating System The operational system that is the target of the Planned Compute discount for checking coverage Server type Server type eligible for Planned Compute discount to check coverage Requested quantity Planned Compute request quantity to verify coverage Table. Coverage resource list items
Planned Compute Coverage View detailed information
On the Coverage list page, you can view detailed information of the selected resource and download the required information.
- Click the All Services > Financial Management > Planned Compute menu. You will be taken to the Service Home page of Planned Compute.
- On the Service Home page, click the Coverage menu. You will be taken to the Coverage List page.
- Coverage List: Click the resource (Coverage) whose detailed information you want to view. You will be taken to the Coverage Details page.
Category Detailed description Target Service The Planned Compute discount‑eligible service for checking coverage Operating System The operational system that is the target of the Planned Compute discount for checking coverage Server type Server type eligible for Planned Compute discount to check coverage Requested quantity Planned Compute request quantity to verify coverage Table. Coverage Details - Target Planned Compute and Requested Quantity Items
Reference
- You can select the desired period at the top of the Coverage table to perform the query.
- Coverage data can be downloaded via the Excel Download button.
- We provide information up to two days before the query date, based on the Asia/Seoul (GMT +09:00) time zone, taking into account the settlement time of the discount amount.
- The billing calculation reference point is midnight in the Asia/Seoul (GMT +09:00) time zone, and the list can be viewed starting from the contract start date.
| Item | Explanation |
|---|---|
| Resource Name | Name of the non‑contract resource |
| Usage time | Time used by the list’s non‑contract resources during the selected period |
| No-contract hourly rate | Hourly rate when non‑contract resources are not discounted |
| Non-contract usage amount | The amount used by the non‑contract resources in the list during the selected period
|
| Unapplied amount | Planned Compute deducts the charges of the list’s non‑contracted resources as consideration for paying the contracted fee
|
| Non-contract usage amount | Billing amount when Planned Compute is not used |
| Planned Compute usage amount | Amount paid for Planned Compute during the selected period
|
| Planned Compute Unapplied Amount | Total amount not applied because it could not be covered by Planned Compute |
| Billing amount | Sum of the Planned Compute usage amount and the non‑applied Planned Compute amount
|
Table. Coverage Details - Coverage Information
2.3 - Release Note
Planned Compute
2025.10.23
FEATURE
Planned Compute Add commitment start date setting feature- When applying for a Planned Compute contract, you can set the start date on which the contract takes effect.
- You can begin applying the agreement from the day after the application date by selecting your preferred date.
2025.07.01
FEATURE
Add target service for Planned Compute- A planned compute target service has been added.
- Data Catalog, Vertica(DBaaS)
2024.10.01
NEW
Planned Compute service official version release- We have launched the Planned Compute service.
- We offer discounted pricing for services in the Compute and Database categories when you commit to a specific server type.
3 - Marketplace
3.1 - Overview
Service Overview
Marketplace is a service that supports subscription and installation of products across various domains through the Samsung Cloud Platform. Users can search for the required Marketplace products based on their intended use, apply for subscriptions directly, and manage detailed information of the subscribed products as well as view usage costs.
Provided features
Marketplace provides the following features.
- Product Overview: Provides information on the main features, pricing, and seller details of marketplace products offered by SCP.
- Product Subscription: Users can select the desired marketplace product through the product Catalog and apply for a subscription.
- Product Installation: You can install and deploy to match the user’s environment based on the subscribed product type.
- Product Management: You can easily manage cancellations or terminations by checking the subscription status, installation, and termination status of marketplace products you have applied for.
Software delivery type
In the Marketplace, you can subscribe to products in the following two ways.
- Seller Support: This is a form where the software vendor installs it directly. When you subscribe to a product, the application information is sent to the software vendor by email. The vendor reviews the request details and, in consultation with the user, installs the software.
- Machine Image: It is a format that can be installed on an SCP Virtual Server. After subscribing to the product, the user can select a Marketplace image through the Virtual Server offering, and the software will be installed automatically.
Component
Marketplace provides product subscription management and product catalog features.
- Product Subscription Management: Users can view and manage detailed information and subscription status of marketplace products they have applied for.
- Product Catalog: You can view detailed information about marketplace products available from SCP and subscribe to the desired product.
Constraints
Services sold in the Samsung Cloud Platform Marketplace are offered by individual sellers. In the case of these services, Samsung SDS acts as an e‑commerce intermediary and is not a party to the sales. Therefore, Samsung SDS assumes no responsibility for the service information or transactions conducted by individual sellers.
Preceding Service
Please verify the prerequisite services for each product in the service portal’s product catalog and with the vendor.
3.2 - How-to Guides
Users can apply for, install, and manage subscriptions to marketplace products across various domains through the Marketplace service of Samsung Cloud Platform. They can view detailed information, subscription management, and usage charges for the subscribed marketplace products.
Subscribe to a product from the product Catalog
You can view the features and pricing of the marketplace product you want to use in the product catalog of the Samsung Cloud Platform Console and apply for a subscription.
Caution
The services sold in the Samsung Cloud Platform Marketplace are offered by individual sellers. In these cases, Samsung SDS serves as an e‑commerce intermediary and is not a party to the transaction. Accordingly, Samsung SDS assumes no responsibility for the service information or transactions conducted by individual sellers.
Reference
In the Marketplace, you can subscribe to products in the following two ways.
- Seller Support: This is a form where the software vendor installs it directly. When you subscribe to a product, the application information is sent to the software vendor by email. The vendor reviews the application details and, in consultation with the user, installs the software.
- Machine Image: It is a form that can be installed on an SCP Virtual Server. After subscribing to the product, the user can select a Marketplace image through the Virtual Server product, and the software will be installed automatically.
Search marketplace products in the product Catalog
To search for marketplace products in the Product Catalog, follow these steps.
- Click the All Services > Financial Management > Marketplace > Product Catalog menu. You will be taken to the Product Catalog page.
- On the Product Catalog page, search for the desired marketplace product. The search results list will be displayed based on the selected criteria.
- You can enter the product name you want to find in the search area to search.
- Click Advanced Search to filter by product name, category, offering type, and status.
- Click the product whose detailed information you want to view from the search results list. You will be taken to the Product Catalog Details page.
- On the Product Catalog Detail page, view the detailed information of the selected product.
Item description Product specifications Product name and version, manufacturer information Product subscription request Subscribe to this product Overview Product overview description Fee Product fee details Technical Support Product Technical Support Information Manufacturer Product manufacturer information Seller Information Product seller information Table. Product Catalog detailed information items
Apply for product subscription in the product catalog
To subscribe to marketplace products in the Product Catalog, follow the steps below.
- Click the All Services > Financial Management > Marketplace > Product Catalog menu. You will be taken to the Product Catalog page.
- Product Catalog page, search for the desired marketplace product. The search results list will be displayed according to the selected criteria.
- Click the product whose detailed information you want to view from the search results list. You will be taken to the Product Catalog Details page.
- Product Catalog Details page, check the detailed information of the selected product and click the Product Subscription Request button.
- Product Terms Agreement and Application window appears, select the required agreement items, and click the Complete button.
- Read the entire product terms of use and review them carefully.
- If you do not select all required agreement items in the product terms, you cannot apply for the product.
- When the alert appears, click the Confirm button. The product application will be completed.
- You can view product subscription details in the Subscription Management menu.
- If you subscribe to a Seller Support‑type marketplace product, the subscription details will be emailed to the software vendor. Coordinate product specifications and schedule with the vendor. Software installation and charges will be billed based on the agreed installation date.
- If you subscribe to a marketplace product of type Machine Image, the user must select the marketplace image from Virtual Server > Virtual Server Create > Marketplace tab. Charges for the Virtual Server service and software usage begin from the moment the Virtual Server is created.
Check product subscription details
You can view detailed information of the marketplace product you applied for in the Product Catalog.
To check product subscription information, follow these steps.
- Click the All Services > Financial Management > Marketplace > Subscription Management menu. You will be taken to the Subscription Management page.
- Subscription Management page, search for the desired software. The list of search results is displayed based on the selected criteria.
- You can enter the product name you want to find in the search area to search.
- Click Advanced Search to filter by product name, category, offering type, and status.
- Click the product whose details you want to view in the search results list. You will be taken to the Subscription Management Details page.
- Check the detailed information of the selected product on the Subscription Management Details page.
- Subscription Management Details page displays the product’s status information and detailed information, and consists of Basic Information, Terms Agreement tabs.
Category Detailed description Subscription status Product subscription status - Seller Support type product
- Install Requesting: Product is subscribed and awaiting vendor installation request
- Active: Product is subscribed and installation completed
- Terminate Requesting: Product is being terminated and vendor termination request pending
- Terminated: Product subscription termination completed
- Canceled: Product subscription has been canceled
- Error: Installation error, service abnormality occurred
- Machine Image type product
- Active: Product is subscribed
- Terminated: Product subscription terminated
- Canceled: Product subscription has been canceled
- Error: Installation error, service abnormality occurred
Cancel product subscription Button to cancel the subscribed software Cancel subscription Cancel subscription button Table. Status information and additional functions - Seller Support type product
- Subscription Management Details page displays the product’s status information and detailed information, and consists of Basic Information, Terms Agreement tabs.
Basic Information
You can view detailed information of the selected product on the Subscription Management page.
| Item | Explanation |
|---|---|
| Subscription ID | Unique subscription identifier |
| Product Name | Subscribed product name |
| Provision format | Product offering type |
| Category | Product Category |
| Product Details | If you click Product Details, you can view the information on the corresponding software detail page in the product Catalog. |
| Applicant | Subscriber |
| Application date and time | Subscription request date and time |
| Start date | Product usage start date |
| License quantity | Number of installed product licenses |
Table. Subscription Management Basic Information Items
Reference
For terminated products, you can view the termination applicant, termination request date and time, and termination date on the basic information page.
Agree to terms
You can view the terms the user agreed to when subscribing.
- Clicking View Details for each term item allows you to view the agreed terms information in a popup window when applying for the product.
Cancel Product
If you do not use the marketplace product you subscribed to, cancel the subscription and proceed with service termination.
Reference
- If you cancel the subscription, the active service may be terminated immediately; therefore, proceed with the cancellation only after thoroughly considering the impact of a service interruption.
- After requesting cancellation of the Machine Image product, delete the Virtual Server that has this product installed from the Virtual Server list. If you do not delete the Virtual Server with the product installed, Virtual Server charges will continue to accrue even after you request product subscription cancellation.
To cancel a product subscription, follow these steps.
- Click the All Services > Financial Management > Marketplace > Subscription Management menu. You will be taken to the Subscription Management page.
- On the Subscription Management page, click the software you want to cancel. You will be taken to the Subscription Management Details page.
- On the Subscription Management Details page, click the Cancel Product Subscription button.
- Cancel product subscription In the popup window, enter the product name and click the Confirm button.
- When a Seller Support product cancellation request is completed, the cancellation details are sent to the user’s email.