To start managing Helm charts, follow these steps.
Main page, click the Admin icon at the top right. Admin page opens.
In the left menu, click the Tools & Templates > Helm Chart menu.
Getting Started with Project Helm Chart
Note
You can register, modify, or delete Helm charts that are usable only within the project.
On the Main page, click the Project card. You will be taken to the Project Dashboard page.
Click the Repository > Helm Chart menu in the left sidebar. You will be taken to the Helm Chart page.
Add Helm chart
Users can add their own Helm charts.
Before registering a Helm chart, the user must first upload the chart to be used via Upload Chart.
To add a Helm chart, follow these steps.
Click the Admin icon at the top right of the Main page. The Admin page opens.
From the left menu, click the Tools & Templates > Helm Chart menu. The Helm Chart page opens.
Select the Helm chart type from the menu. The Add Helm chart button appears only if you have registration permission based on the selected information.
Click the Add Helm Chart button. You will be taken to the Helm Chart Registration page.
Enter Helm chart basic information and click the Start button.
Item
Explanation
Helm chart type
Select the type of Helm chart to add.
Tenant/Project Group
Select the tenant/project group to add the Helm chart
When selecting a tenant, you can use the registered chart only in projects of the selected tenant.
When selecting a project group, you can use the registered chart only in projects of the selected project group.
Allow new installation
Select whether to allow a new installation via Helm install.
Table. Helm Chart Basic Information Settings
After selecting Helm chart repository and Helm chart, click the Validation Check button.
After entering the remaining information, click the Next button.
repository
Item
Explanation
ChartMuseum
Helm chart repository
Select the chart repository as ChartMuseum.
Select chart
Select the chart you want to register as a Helm chart among the charts registered via 차트 업로드하기.
Harbor OCI
Helm chart repository
Select the chart repository as Harbor OCI.
Authentication information
Enter the chart repository credentials and click the Connection Test button.
Chart selection
Select a Helm chart that can be queried with the entered credentials and click the Validation Check button.
OCI
Helm chart repository
Select the chart repository as OCI.
Authentication information
Enter the chart repository credentials and click the Connection Test button.
Chart input
Enter the Helm chart that can be queried using the authentication information entered in Authentication Information, and click the Validation Check button. (ex. oci://chart.url/repo/chartname:version)
common
icon
Select an icon to represent the Helm chart.
CI/CD information
Select whether to support CI/CD functionality
Indicates whether it is linked with the App template.
The chart’s Values.yaml file must contain the keys image.repository, image.tag, and imagePullSecrest[0].name.
Support CI/CDWhen selected, a CI/CD information step is added.
Chart image
Select whether to register an image
The chart’s Values.yaml file must contain the key imagePullSecrets[0].name.
No image If selected, the image secret information step will be omitted.
Table. Chart Repository Configuration Items
After selecting the image repository and entering the authentication information, click the Connection Test button.
After entering the remaining information, click the Next button.
Item
Explanation
Image repository information
Select an image repository and enter the authentication information.
The image repository requires administrator privileges.
Grant read access to the image repository for users who want to perform a Helm install using a Helm chart.
Assign permissions to the image repository using the entered authentication information.
Add used images
Add the image path of the selected image repository.
Select an image from the list: choose Organization, Repository, and Tag to add.
User input: directly enter the image’s docker repository and docker tag to add.
Multiple entries are allowed.
Use the registrant’s authentication credentials
This is an option that can be selected when the image repository chosen in the image registry is a tool that cannot grant permissions (e.g., SCR).
If not checked, when the Helm chart user performs an installation, the Pull permission for the image used by the Helm chart user is added. If the tool cannot grant permissions, no permission granting is performed.
If not checked, when the Helm chart user performs an installation, the Helm chart registrant’s credentials are used instead of the Helm chart user’s permissions.
Cautions when checked
Since the registrant’s credentials may be exposed to the Helm chart user, it should be used only when necessary.
If the image repository provides only image Pull, it must be selected to avoid issues during use. You must enter an image repository that will be used exclusively for Pull. (When checked, Pull and Push cannot be performed simultaneously on a single image repository.)
The registrant’s credentials are used in Project > Image Repository > Pull-only images and the Helm release’s ImagePull Secret. These credentials cannot be changed by Helm chart users, and if the registrant’s credentials are changed in the Helm chart, they are updated globally.
Select Docker base image
Select the image to be used as the Docker base image
Only select this if you chose Support CI/CD in the previous step, and it will be used as the base image for Docker build.
Table. Image secret information configuration items
App to support. After selecting a template, click the Done button.
Reference
App marked as Environment Only. The template provides only the build/deployment environment without project sample source code.
Modify Helm chart
To modify the Helm chart, follow these steps.
Main page, click the Admin icon at the top right. Admin page opens.
Click the Tools & Templates > Helm Chart menu in the left menu.
Click the Helm chart card you want to edit from the Helm chart list. The Helm chart details page opens.
Click the Edit button at the bottom right.
After editing the information, click the Save button to complete the edit.
Add Helm chart version
To add a Helm chart version, the same chart with only a different version must already be registered via Upload Chart.
To add a version to the Helm chart, follow these steps.
Main page, click the Admin icon at the top right. The Admin page opens.
In the left menu, click the Tools & Templates > Helm Chart menu.
Click the Helm chart card you want to edit from the Helm chart list. The Helm chart details page opens.
Click the Add Version button at the bottom right. The Add Helm Chart Version popup window opens.
After entering the information, click the Save button to complete adding the version.
Item
Explanation
Chart version
Select the chart version to add
Shows the versions of charts in the chart repository that are not registered as Helm charts.
Table. Additional Helm Chart Version Settings
Delete Helm chart
To delete a Helm chart, follow these steps.
Main page, click the Admin icon at the top right. The Admin page opens.
From the left menu, click the Tools & Templates > Helm Chart menu. The Helm Chart page opens.
Click the Helm chart card you want to delete from the Helm chart list. The Helm chart details page opens.
Click the Delete button at the bottom right.
In the confirmation popup, click the Confirm button to complete the deletion.
1 - Creating Helm Charts with Form Input Support
Users can create a Helm chart that supports Form input.
Reference
Only available in versions Helm 3 or higher.
Helm chart that supports Form input
When you use a Helm chart that supports Form input and run helm install, a user UI is provided that allows you to enter each field.
Helm chart file structure and values.schema.json file
Helm chart file structure
To support Form input, an additional values.schema.json file is required in the basic Helm chart file structure.
Figure. Helm chart directory structure
The relationship between values.schema.json and values.yaml files
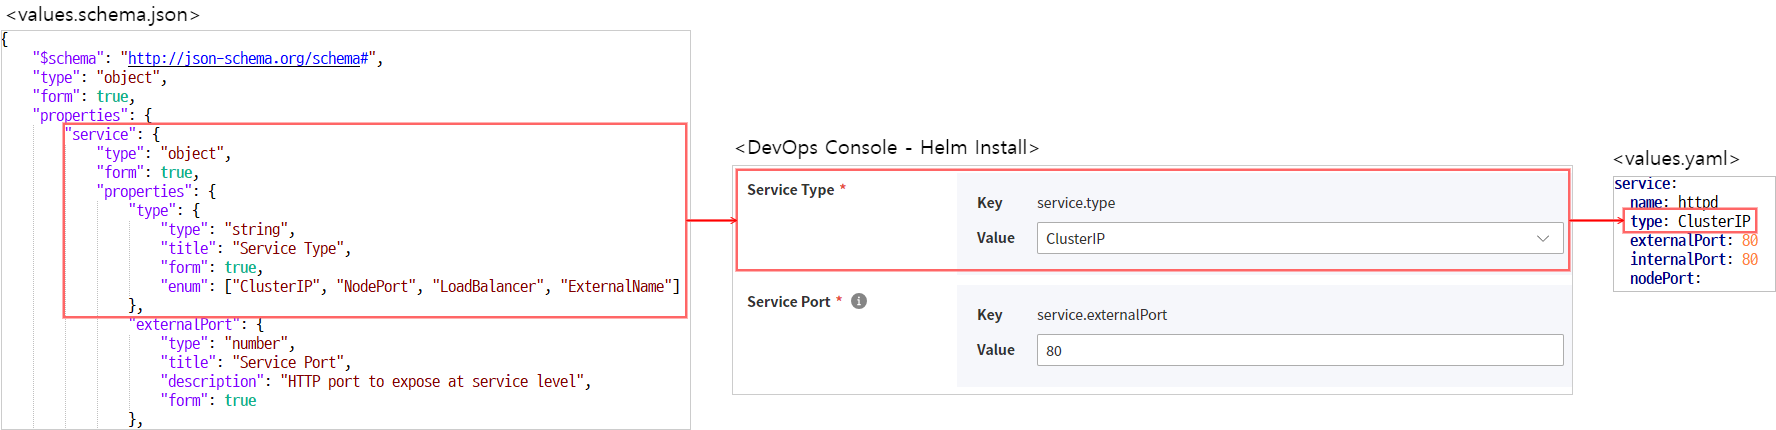
Figure. Relationship between values.schema.json and values.yaml files
values.schema.json
This file defines a JSON Schema to validate the values entered in the values.yaml file.
In the DevOps Console, in addition to the JSON Schema functionality, we added a feature that displays a form on the screen so that users can easily input data.
JSON Schema Basics
The values.schema.json file used in DevOps Console supports the standard format defined by JSON Schema.
Reference
For detailed guidance on the standard format, refer to the site below.
ip, hostname, uri, etc.: you can input formats provided by default in JSON Schema
password_confirm: create an input field for password confirmation
form_locale
Define for internationalization processing
If no locale is set, use the default property values
Korean (ko)/English (en) support
object
ko
label
description
en
label
description
Table. Items defined in DevOps Console
hierarchical processing
To handle hierarchical structures, JSON Schema can define a "type": "object" property value and a properties attribute. For child properties, define them under the properties item.
Below is an example that defines the service.internalPort property.
Color mode
"service": {"type": "object","form": true,"properties": {"internalPort": {"type": "number","title": "Container Port","description": "HTTP port to expose at container level","form": true}<중략>
"service": {"type": "object","form": true,"properties": {"internalPort": {"type": "number","title": "Container Port","description": "HTTP port to expose at container level","form": true}<중략>
Hierarchical processing example
Internationalization handling
For internationalization processing, use the form_locale attribute and define it as follows.
To display the fields defined in the values.schema.json file as a form on the screen, you must set the form field’s value to true.
Color mode
{"$schema": "http://json-schema.org/schema#","type": "object","properties": {"form_field": {"type": "string",<--- create an input field that receives a string"form": true<----- displayed on screen when true},"hide_field": {<-- not displayed"type": "string"}}}
{"$schema": "http://json-schema.org/schema#","type": "object","properties": {"form_field": {"type": "string",<--- create an input field that receives a string"form": true<----- displayed on screen when true},"hide_field": {<-- not displayed"type": "string"}}}
Input processing example
Password
Color mode
{"$schema": "http://json-schema.org/schema#","type": "object","properties": {"password_field": {"type": "string","form": true,"render": "password",<---- displayed as password"format": "password_confirm"<--- when adding a password confirmation input field}}}
{"$schema": "http://json-schema.org/schema#","type": "object","properties": {"password_field": {"type": "string","form": true,"render": "password",<---- displayed as password"format": "password_confirm"<--- when adding a password confirmation input field}}}
Use this when the displayed text on the screen and the stored value need to be different.
Color mode
"Oneof": {"type": "string","title": "DB","description": "choose db type","oneOf": [{"const": "in",<-- value saved to the yaml file when selected"title": "internal"<-- value displayed in the dropdown form},{"const": "ex","title": "external"}],"form": true}
"Oneof": {"type": "string","title": "DB","description": "choose db type","oneOf": [{"const": "in",<-- value saved to the yaml file when selected"title": "internal"<-- value displayed in the dropdown form},{"const": "ex","title": "external"}],"form": true}