This is the multi-page printable view of this section. Click here to print.
Repository
1 - Code Repository
Users can view the list of code repositories used in the project and add new repositories from the code repository menu in the project.
Getting Started with Code Repository
To start using the code repository, follow these steps:
- Main page, click the Project card. Move to the Project Dashboard page.
- Click the Repository > Code Repository menu from the left menu. Move to the Code Repository page.
Adding a Code Repository
To add a code repository, follow the procedure below.
- Code Repository page, click the Add Code Repository button in the top right corner. It will move to the Add Code Repository page.
- On the Add Code Repository page, enter/set each item.
- Click the Connection Test button.
- Click the Save button.
| Item | Description |
|---|---|
| Repository Type | Select the repository to use
|
| New/Existing Usage | Select Create New Repository or Use Existing Repository
|
| Repository Information | Enter repository information
|
| Authentication Information | Enter authentication information. |
| Repository Information | Enter repository information
|
Managing Code Repositories
Code Repository List
| Item | Description |
|---|---|
| User Permission Settings | User Permission Settings popup window opens. |
| Webhook Settings | Webhook Settings popup window opens. |
| Edit Icon | Authentication Information Modification popup window for the code repository opens. |
| Delete | Deletes the code repository. When deleting, you can choose whether to delete the code repository in SCM as well. |
Adding an Account to a Code Repository
To add an account to a code repository, follow these steps:
- On the Code Repository page, click the User Permission Settings icon for the code repository you want to set up. The User Permission Settings popup window opens.
- In the User Permission Settings popup window, enter the authentication information for the account you want to add, and then click the Save button to complete adding the account.
Setting up a Webhook for a Code Repository
You can set up a webhook to run a pipeline when changes such as commit, push occur in a code repository branch.
To set up a webhook, follow these steps:
- On the Code Repository page, click the Webhook Settings icon for the code repository you want to set up. The Webhook Settings popup window opens.
- In the Webhook Settings popup window, click the Add button.
- In the Webhook Settings popup window, select the pipeline you want to run, enter the branch name, and then click the Save button to complete setting up the webhook.
Changing an Account in a Code Repository
To change an account in a code repository, follow these steps:
- On the Code Repository page, click the Edit icon for the code repository you want to change. The Authentication Information Modification popup window opens.
- In the Authentication Information Modification popup window, enter the authentication information and then click the Save button to complete changing the account.
Deleting a Code Repository
To delete a code repository, follow these steps:
- On the Code Repository page, click the X icon for the code repository you want to delete. The Code Repository Deletion popup window opens.
- In the Code Repository Deletion popup window, select Delete the repository in SCM as well and then click the Confirm button to complete deleting the code repository.
Delete the repository in SCM as well
- Selected: Both the code repository list and the actual code repository in SCM are deleted.
- Not selected: Only the code repository list is deleted, and the code repository in SCM remains.
2 - Artifact Repository
Users can create and utilize projects in conjunction with Nexus and retrieve created projects.
Getting Started with Artifact Repository
To start managing the artifact repository, follow these steps.
- Main page, click the Project card. It moves to the Project Dashboard page.
- Click the Repository > Artifact Repository menu from the left menu. It moves to the Artifact Repository page.
Adding an Artifact Repository
To add an artifact repository, follow these steps:
- Artifact Repository page, click the Add Artifact Repository button in the top right corner. It will move to the Add Artifact Repository page.
- On the Add Artifact Repository page, enter/set each item.
- Click the Connection Test button.
- Click the Save button.
| Item | Description |
|---|---|
| Repository Creation Option | Select whether to create a new repository or use an existing one. |
| Basic Information Input | Enter Base URL, select repository type, and enter repository/authentication information. |
Managing Artifact Repository
Artifact Repository List
| Item | Description |
|---|---|
| Account Change | Modifies the artifact repository authentication information. |
| Delete | Deletes the artifact repository. |
Changing Artifact Repository Account
To change the account of an artifact repository, follow these steps.
- On the Artifact Repository page, click the Edit icon of the artifact repository you want to change. The Authentication Information Modification popup window opens.
- In the Authentication Information Modification popup window, enter the authentication information and click the Save button to complete the account change.
Deleting an Artifact Repository
To delete an artifact repository, follow these steps.
- On the Artifact Repository page, click the X icon of the artifact repository you want to delete. The Artifact Repository Deletion popup window opens.
- In the Artifact Repository Deletion popup window, select Delete the repository in Nexus as well and click the Confirm button to complete the deletion of the artifact repository.
Delete the repository in Nexus as well
- Selected: Both the artifact repository list and the Nexus repository are deleted.
- Not selected: Only the artifact repository list is deleted, and the Nexus repository remains.
3 - Image Repository
The user can manage the image repository used in the project from the project’s image repository menu.
Getting Started with Image Repository
To start managing the image repository, follow these steps.
- Main page, click the Project card. Move to the Project Dashboard page.
- In the left menu, click the Repository > Image Repository menu. Move to the Image Repository page.
Adding an Image Repository
To add an image repository, follow these steps.
App. Adding an Image Repository
- Image Repository page, click the App Image Repository Addition button in the top right. Move to the App Image Repository Addition page.
- On the App Image Repository Addition page, enter/settings for each item.
- Click the Connection Test button.
- Click the Save button.
| Item | Description |
|---|---|
| Repository Type Selection | Select the image repository type. If you want to use an image repository not registered in Devops Console, select the Image Registry type. |
| Repository Creation Selection | Choose whether to create a new repository or use an existing one.
|
| Registered Tool | Enter repository information. |
| Unregistered Tool | Enter repository information
|
Adding a Pull-only Image Repository
- Image Repository page, click the Add Pull-only Image Repository button at the top right. It moves to the Add Pull-only Image Repository page.
- On the Add Pull-only Image Repository page, enter/set each item.
- Click the Connection Test button.
- Click the Save button.
Managing an Image Repository
Image Repository List
| Item | Description |
|---|---|
| Account Change | The Authentication Information Modification popup window for the image repository opens |
| Delete | The Image Repository Deletion popup window opens |
Changing an Image Repository Account
To change the account of an image repository, follow these steps.
- On the Image Repository page, click the Edit icon of the image repository to be changed. The Authentication Information Modification popup window opens.
- In the Authentication Information Modification popup window, enter the authentication information and click the Save button to complete the account change.
Deleting an Image Repository
To delete an image repository, follow these steps.
- On the Image Repository page, click the X icon of the image repository to be deleted. The Image Repository Deletion popup window opens.
- In the Image Repository Deletion popup window, select Also delete the repository in IR and click the Confirm button to complete the image repository deletion.
Also delete the repository in IR
- Selected: Both the image repository list and the actual image repository’s repository are deleted.
- Not selected: Only the image repository list is deleted, and the actual image repository’s repository remains.
4 - Chart Repository
Users can upload and delete Helm charts in the chart repository.
The charts uploaded to the chart repository are used in Adding Helm Charts and are used for Helm installation or project creation.
Getting Started with Chart Repository
To start managing the chart repository, follow these steps.
- Main page, click the Manage icon at the top right. Move to the Tenant Dashboard page.
- Click the Tools & Templates > Chart Repository menu on the left menu. The Chart Repository screen appears.
Getting Started with Project Chart Repository
- Click the Project card on the Main page. Move to the Project Dashboard page.
- Click the Repository > Chart Repository menu on the left menu. Move to the Chart Repository page.
Uploading Charts
Chart.yaml, see the Helm Official Page.The registration information is automatically generated based on the name and version of the Chart.yaml file of the uploaded chart.
To upload a chart to the chart repository, follow these steps.
- Click the Manage icon at the top right of the Main page. Move to the Tenant Dashboard page.
- Click the Tools & Templates > Chart Repository menu on the left menu. The Chart Repository screen appears.
- Click the Upload button on the Chart Repository page. The Chart File Upload popup window opens.
- Enter the contents in the Chart File Upload popup window and click the Upload button
| Item | Description |
|---|---|
| Chart Type | Select the chart type. |
| Tenant / Project Group | Select the tenant / project group where the chart will be used. |
| Chart File | Click the Browse button to upload the chart file.
|
Deleting Charts
To delete a chart, follow these steps.
- Click the Manage icon at the top right of the Main page. Move to the Tenant Dashboard page.
- Click the Tools & Templates > Chart Repository menu on the left menu. The Chart Repository screen appears.
- Select the checkbox of the item to be deleted in the Chart Repository list and click the Delete button.
- Click the Confirm button in the confirmation popup window.
Deleting a Specific Version of a Chart
To delete a specific version of a chart, follow these steps.
- Click the Manage icon at the top right of the Main page. Move to the Tenant Dashboard page.
- Click the Tools & Templates > Chart Repository menu on the left menu. The Chart Repository screen appears.
- Click the item to be deleted in the Chart Repository list. Move to the Chart Version List page.
- Select the checkbox of the item to be deleted on the Chart Version List page and click the Delete button.
- Click the Confirm button in the confirmation popup window.
5 - Helm Chart
Helm Chart is a feature that allows you to register charts from the Chart Repository to be used in the DevOps Console.
Helm Chart can be used through Helm Install. It can also be linked to App templates through Adding Supported Helm Charts.
Getting Started with Helm Chart
To start managing Helm Charts, follow these steps:
- Main page, click the Manage icon at the top right. The Manage page opens.
- In the left menu, click Tools & Templates > Helm Chart.
Getting Started with Project Helm Chart
- Main page, click the Project card. The Project Dashboard page moves.
- In the left menu, click Repository > Helm Chart. The Helm Chart page moves.
Adding Helm Chart
Users can add their own Helm Charts.
Before registering a Helm Chart, users must upload the chart to be used through Uploading Charts.
To add a Helm Chart, follow these steps:
- Main page, click the Manage icon at the top right. The Manage page opens.
- In the left menu, click Tools & Templates > Helm Chart. The Helm Chart page opens.
- In the Helm Chart Type menu, select the type of Helm Chart. The Add Helm Chart button is only visible if you have registration permissions based on the selected information.
- Click the Add Helm Chart button. The Register Helm Chart page opens.
- Enter the Helm Chart Basic Information and click the Start button.
Item Description Helm Chart Type Select the type of Helm Chart to add. Tenant/Project Group Select the tenant or project group where the Helm Chart will be added. - If you select a tenant, the registered chart can only be used in projects within that tenant.
- If you select a project group, the registered chart can only be used in projects within that project group.
Allow New Installation Select whether to allow new installations through Helm Install Table. Helm Chart Basic Information Setting Items - Select the Helm Chart Repository and Helm Chart, then click the Validation Check button.
- Enter the remaining information and click the Next button.
Repository ItemDescription ChartMuseumHelm Chart Repository Select ChartMuseumas the chart repository.Chart Selection Select the chart to register as a Helm Chart from the charts uploaded through Uploading Charts. Harbor OCIHelm Chart Repository Select Harbor OCIas the chart repository.Authentication Information Enter the authentication information for the chart repository and click the Connection Test button. Chart Selection Select the Helm Chart that can be retrieved using the entered authentication information and click the Validation Check button. OCIHelm Chart Repository Select OCIas the chart repository.Authentication Information Enter the authentication information for the chart repository and click the Connection Test button. Chart Input Enter the Helm Chart that can be retrieved using the authentication information entered in Authentication Information and click the Validation Check button.
(e.g., oci://chart.url/repo/chartname:version)Common Icon Select an icon to represent the Helm Chart. CI/CD Information Select whether to support CI/CD functionality. - This indicates whether the Helm Chart can be linked to an App template.
- The Values.yaml file of the chart must contain the image.repository, image.tag, and imagePullSecrets[0].name keys.
- If Support CI/CD is selected, the CI/CD information step is added.
Chart Image Select whether to register an image. - The Values.yaml file of the chart must contain the imagePullSecrets[0].name key.
- If No Image is selected, the image secret information step is excluded.
Table. Chart Repository Setting Items - Select the image repository and enter the authentication information, then click the Connection Test button.
- Enter the remaining information and click the Next button.
Item Description Image Repository Information Select the image repository and enter the authentication information. - Administrator privileges are required for the image repository.
- The user who will use the Helm Chart to perform Helm Install will be granted Read privileges for the image repository.
- The entered authentication information will be used to grant privileges to the image repository.
Add Used Images Add the image paths from the selected image repository. - Select images from the list: Organization, Repository, and Tag can be selected and added.
- User input: The docker repository and docker tag of the image can be entered directly and added.
- Multiple inputs are possible.
Use Register’s Authentication Information This option is available when the selected image repository is a tool that cannot grant privileges (e.g., SCR). - If not checked, when a user performs Helm Install, the user will be granted Pull privileges for the used image. If the tool cannot grant privileges, no privileges will be granted.
- If checked, the Helm Chart user will use the registrant’s authentication information instead of their own privileges when performing Helm Install.
- The registrant’s authentication information may be exposed to the Helm Chart user, so use this option only when necessary.
- This option must be selected for image repositories that only provide image pull functionality. A separate image repository for pull purposes only must be entered. (If checked, one image repository cannot be used for both pull and push at the same time.)
- The registrant’s authentication information is used in Project > Image Repository > Pull-only Image and Helm Release’s Image Pull Secret. This information cannot be changed by the Helm Chart user, and changes to the registrant’s authentication information in the Helm Chart will be applied universally.
Select Docker Base Image Select the image to be used as the Docker base image. - This option is only available if Support CI/CD was selected in the previous step.
- The selected image will be used as the base image for Docker build.
Table. Image Secret Information Setting Items - Select the supported App template and click the Complete button.
Environment Only provide only build/deployment environments without project sample code.Modifying Helm Chart
To modify a Helm Chart, follow these steps:
- Main page, click the Manage icon at the top right. The Manage page opens.
- In the left menu, click Tools & Templates > Helm Chart.
- In the Helm Chart list, click the Helm Chart card you want to modify. The Helm Chart Details page opens.
- Click the Modify button at the bottom right.
- Modify the information and click the Save button to complete the modification.
Adding Helm Chart Version
To add a Helm Chart version, the chart with a different version must be registered in advance through Uploading Charts.
To add a Helm Chart version, follow these steps:
- Main page, click the Manage icon at the top right. The Manage page opens.
- In the left menu, click Tools & Templates > Helm Chart.
- In the Helm Chart list, click the Helm Chart card you want to modify. The Helm Chart Details page opens.
- Click the Add Version button at the bottom right. The Add Helm Chart Version popup opens.
- Enter the information and click the Save button to complete the version addition.
Item Description Chart Version Select the chart version to add. - Chart versions that are not registered as Helm Charts in the chart repository are displayed.
Table. Helm Chart Version Addition Setting Items
Deleting Helm Chart
To delete a Helm Chart, follow these steps:
- Main page, click the Manage icon at the top right. The Manage page opens.
- In the left menu, click Tools & Templates > Helm Chart. The Helm Chart page opens.
- In the Helm Chart list, click the Helm Chart card you want to delete. The Helm Chart Details page opens.
- Click the Delete button at the bottom right.
- In the confirmation popup, click the Confirm button to complete the deletion.
5.1 - Creating a Helm Chart that Supports Form Input
Users can create a Helm chart that supports form input.
Helm 3 or later versions.Form Input Support Helm Chart
Using a Helm chart that supports form input, users can input each item through a user interface when installing the Helm chart.
Helm Chart File Composition and values.schema.json File
Helm Chart File Composition
To support form input, a values.schema.json file is required in addition to the basic Helm chart file composition.

Relationship between values.schema.json and values.yaml Files
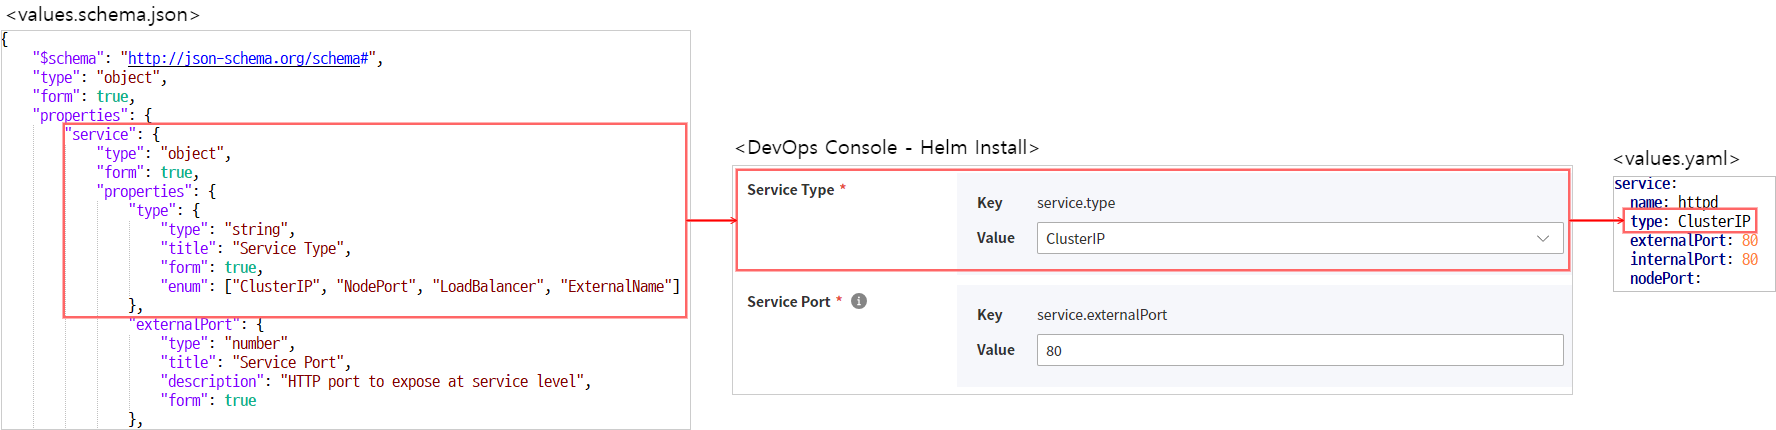
values.schema.json
- A file defined in JSON Schema to validate the values entered in the
values.yamlfile. - DevOps Console provides additional features to display forms on the screen and allow users to easily input values.
JSON Schema Basics
The values.schema.json file used in DevOps Console supports the standard format defined in JSON Schema.
For detailed guides on standard formats, please refer to the following sites:
The basic properties are described as follows:
| Property | Description | Data Type | Allowed Values |
|---|---|---|---|
| $schema |
| string | http://json-schema.org/schema# |
| type | Data type
| string |
|
| |||
| |||
| |||
| |||
| |||
| |||
| title | Label | string | Defines the label for the item |
| description | Description | string | Displays as a tooltip |
| readOnly | Read-only status | boolean |
|
| required | List of required input items | array | e.g., "required": ["username", "password"] |
DevOps Console Defined Items
The following items are defined in DevOps Console and only work in DevOps Console.
| Property | Description | Data Type | Allowed Values |
|---|---|---|---|
| form | DevOps Console screen display status
| boolean | default: false |
| render | Renderer change | string |
|
| format | String format reference | string |
|
| form_locale | Defined for internationalization processing
| object |
|
|
Hierarchical Processing
To process hierarchical structures, JSON Schema defines the "type": "object" property value and the properties property. Sub-properties are defined under the properties item.
The following example defines the service.internalPort property.
"service": {
    "type": "object",
    "form": true,
    "properties": {
        "internalPort": {
            "type": "number",
            "title": "Container Port",
            "description": "HTTP port to expose at container level",
            "form": true
        }
<omitted>
"service": {
"type": "object",
"form": true,
"properties": {
"internalPort": {
"type": "number",
"title": "Container Port",
"description": "HTTP port to expose at container level",
"form": true
}
<omitted>Internationalization Processing
For internationalization processing, use the form_locale property and define it as follows.
Supports Korean and English.
"db": {
  "type": "string",
  "title": "DB",
  "description": "choose db type",
  "oneOf": [
    {
      "const": "in",
      "title": "internal"
    },
    {
      "const": "ex",
      "title": "external"
    }
  ],
  "form": true,
  "form_locale": {
    "ko": {
      "label": "데이터베이스",
      "description": "데이터베이스 타입을 선택하세요",
      "internal": "내부",
      "external": "외부"
    },
    "en": {
      "label": "Database"
    }
  }
}
"db": {
"type": "string",
"title": "DB",
"description": "choose db type",
"oneOf": [
{
"const": "in",
"title": "internal"
},
{
"const": "ex",
"title": "external"
}
],
"form": true,
"form_locale": {
"ko": {
"label": "데이터베이스",
"description": "데이터베이스 타입을 선택하세요",
"internal": "내부",
"external": "외부"
},
"en": {
"label": "Database"
}
}
}values.schema.json Writing Example
Form Type Examples
Input
To display the defined fields in the values.schema.json file as a form on the screen, set the form field value to true.
{
  "$schema": "http://json-schema.org/schema#",
  "type": "object",
  "properties": {
    "form_field": {
      "type": "string",
      "form": true
    },
    "hide_field": {
      "type": "string"
    }
  }
}
{
"$schema": "http://json-schema.org/schema#",
"type": "object",
"properties": {
"form_field": {
"type": "string",
"form": true
},
"hide_field": {
"type": "string"
}
}
}Password
{
  "$schema": "http://json-schema.org/schema#",
  "type": "object",
  "properties": {
    "password_field": {
      "type": "string",
      "form": true,
      "render": "password",
      "format": "password_confirm"
    }
  }
}
{
"$schema": "http://json-schema.org/schema#",
"type": "object",
"properties": {
"password_field": {
"type": "string",
"form": true,
"render": "password",
"format": "password_confirm"
}
}
}Checkbox
"enabled": {
  "title": "enable persistence",
  "type": "boolean",
  "form": true
}
"enabled": {
"title": "enable persistence",
"type": "boolean",
"form": true
}Dropdown
To display a dropdown field on the screen and specify allowed values, use the enum and oneOf properties.
enum
Used when the displayed text and stored value are the same.
"postgres": {
  "type": "string",
  "title": "Postgres",
  "description": "choose PostgreSQL type.",
  "enum": [
    "internal",
    "external",
    "both"
  ],
  "form": true
}
"postgres": {
"type": "string",
"title": "Postgres",
"description": "choose PostgreSQL type.",
"enum": [
"internal",
"external",
"both"
],
"form": true
}oneOf
Used when the displayed text and stored value are different.
"Oneof": {
  "type": "string",
  "title": "DB",
  "description": "choose db type",
  "oneOf": [
    {
      "const": "in",
      "title": "internal"
    },
    {
      "const": "ex",
      "title": "external"
    }
  ],
  "form": true
}
"Oneof": {
"type": "string",
"title": "DB",
"description": "choose db type",
"oneOf": [
{
"const": "in",
"title": "internal"
},
{
"const": "ex",
"title": "external"
}
],
"form": true
}Array
"Array": {
  "type": "array",
  "items": {
    "type": "string",
    "form": true
  },
  "form": true
}
"Array": {
"type": "array",
"items": {
"type": "string",
"form": true
},
"form": true
}Object Array
"objectArray": {
  "type": "array",
  "title": "Object Array",
  "form": true,
  "items": {
    "type": "object",
    "form": true,
    "properties": {
      "host": {
        "type": "string",
        "form": true
      },
      "path": {
        "type": "string",
        "form": true
      }
    }
  }
}
"objectArray": {
"type": "array",
"title": "Object Array",
"form": true,
"items": {
"type": "object",
"form": true,
"properties": {
"host": {
"type": "string",
"form": true
},
"path": {
"type": "string",
"form": true
}
}
}
}values.schema.json full file writing example
system-nginx
{
    "$schema": "http://json-schema.org/schema#",
    "type": "object",
    "form": true,
    "properties": {
        "service": {
            "type": "object",
            "form": true,
            "properties": {
                "type": {
                    "type": "string",
                    "title": "Service Type",
                    "form": true,
                    "enum": ["ClusterIP", "NodePort", "LoadBalancer", "ExternalName"]
                },
                "externalPort": {
                    "type": "number",
                    "title": "Service Port",
                    "description": "HTTP port to expose at service level",
                    "form": true
                },
                "internalPort": {
                    "type": "number",
                    "title": "Container Port",
                    "description": "HTTP port to expose at container level",
                    "form": true
                }
            },
            "required": ["type", "externalPort", "internalPort"]
        },
        "ingress": {
            "type": "object",
            "form": true,
            "properties": {
                "enabled": {
                    "type": "boolean",
                    "title": "Use Ingress",
                    "form": true
                },
                "domain": {
                    "type": ["string", "null"],
                    "format": "hostname",
                    "title": "Ingress Domain",
                    "description": "Default host for the ingress resource (required when `ingress.enabled=true`)",
                    "form": true
                }
            }
        },
        "networkPolicy": {
            "type": "object",
            "form": true,
            "properties": {
                "enabled": {
                    "type": "boolean",
                    "title": "Use NetworkPolicy",
                    "form": true
                }
            }
        }
    }
}
{
"$schema": "http://json-schema.org/schema#",
"type": "object",
"form": true,
"properties": {
"service": {
"type": "object",
"form": true,
"properties": {
"type": {
"type": "string",
"title": "Service Type",
"form": true,
"enum": ["ClusterIP", "NodePort", "LoadBalancer", "ExternalName"]
},
"externalPort": {
"type": "number",
"title": "Service Port",
"description": "HTTP port to expose at service level",
"form": true
},
"internalPort": {
"type": "number",
"title": "Container Port",
"description": "HTTP port to expose at container level",
"form": true
}
},
"required": ["type", "externalPort", "internalPort"]
},
"ingress": {
"type": "object",
"form": true,
"properties": {
"enabled": {
"type": "boolean",
"title": "Use Ingress",
"form": true
},
"domain": {
"type": ["string", "null"],
"format": "hostname",
"title": "Ingress Domain",
"description": "Default host for the ingress resource (required when `ingress.enabled=true`)",
"form": true
}
}
},
"networkPolicy": {
"type": "object",
"form": true,
"properties": {
"enabled": {
"type": "boolean",
"title": "Use NetworkPolicy",
"form": true
}
}
}
}
}