This is the multi-page printable view of this section. Click here to print.
Deployment Target
1 - K8S Cluster
Users can register a K8S cluster in DevOps Console and deploy various applications through DevOps Console.
Users can add, edit, and delete K8S clusters and namespaces. Added K8S clusters and namespaces can be selected and used in various menus such as project creation (Getting Started with Project Creation), helm install (Getting Started with Helm Install), etc.
Getting Started with a K8S Cluster
To begin managing the K8S cluster, follow these steps.
- Click the Admin icon at the top right of the Main page. Navigate to the Tenant Dashboard page.
- From the left menu, click the Deploy Target > K8S Cluster menu. You will be taken to the K8S Cluster page.
Add a K8S cluster
To add a K8S cluster, follow the steps below.
- Click the Admin icon at the top right of the Main page. You will be taken to the Tenant Dashboard page.
- From the left menu, click the Deploy Target > K8S Cluster menu. You will be taken to the K8S Cluster page.
- On the K8S Cluster page, click the Add button. You will be taken to the Add K8S Cluster page.
- Add K8S Cluster page, after entering the basic information and connection details, click the Connection Test button.
- After selecting the Helm version, click the Save button.
Item Explanation K8S cluster name Please enter the cluster name. K8S Cluster ID Enter the cluster ID.
The cluster ID is a unique identifier used to distinguish clusters; please determine and enter it yourself.CA Certificate Enter the server’s certificate information to be used for configuring the kubeconfigfile- Enter the contents of
clusters[0].cluster.certificate-authority-datafrom the existingkubeconfigfile. - Contact the cluster provider (administrator) and then enter it.
- If verification is not possible, enter a temporary value (e.g.,
temp) and replace it with the correct value once verification is possible.
Authentication method Select the admin token method. API server URL Enter the Kubernetes API Server address. admin token Enter the Token with Admin privileges to use for configuring the kubeconfigfile.
Please refer to Check Cluster Admin Token.Helm version Select Helm version - A list of Helm versions available for the K8S cluster version is displayed.
Table. Add K8S Cluster – Add using admin token authenticationItem Explanation Authentication method Select the client certificate method. API server URL Enter the Kubernetes API Server address. client certificate Enter the client certificate information. Client Key Enter the client Key information. Table. Add K8S Cluster - Item for adding by authenticating with a client certificateItem Explanation Authentication method Select the kubeconfigfile upload method.kubeconfig file Browse button to select the kubeconfigfile- Only files with the
.ymlor.yamlextension can be uploaded. - If the file is uploaded successfully, the CA Certificate, API server URL, user, admin token, or client certificate will be populated automatically.
API server URL Select the Kubernetes API Server address. user Select the user to authenticate - Depending on the selected user, the admin token or client certificate information is displayed below
Table. Adding K8S Cluster - Adding via kubeconfig file upload item - Enter the contents of
Managing a K8S cluster
Modify K8S cluster
To modify the K8S cluster, follow these steps.
- Click the Admin icon at the top right of the Main page. You will be taken to the Tenant Dashboard page.
- From the left menu, click the Deploy Target > K8S Cluster menu. You will be taken to the K8S Cluster page.
- From the list on the K8S Cluster page, click the K8S cluster. You will be taken to the K8S Cluster Details page of the selected K8S cluster.
- On the K8S Cluster Details page, click the Edit button.
- After editing the information, click the Connection Test button.
- After selecting the Helm version, click the Save button.
Delete K8S cluster
To delete a K8S cluster, follow these steps.
- Click the Admin icon at the top right of the Main page. You will be taken to the Tenant Dashboard page.
- From the left menu, click the Deploy Target > K8S Cluster menu. You will be taken to the K8S Cluster page.
- From the list on the K8S Cluster page, click the K8S cluster. You will be taken to the K8S Cluster Details page of the selected K8S cluster.
- On the K8S Cluster Details page, click the Delete button.
- Click the Confirm button in the confirmation popup to complete the deletion.
Add a member to a K8S cluster
To add a K8S cluster member, follow the steps below.
- Click the Admin icon at the top right of the Main page. Navigate to the Tenant Dashboard page.
- From the left menu, click the Deploy Target > K8S Cluster menu. You will be taken to the K8S Cluster page.
- In the list on the K8S Cluster page, click the K8S cluster. You will be taken to the K8S Cluster Details page of the selected K8S cluster.
- On the K8S Cluster Details page, click the Members tab.
- When you click the Add button in the Member tab, the Add Member popup window opens.
- Add Member In the popup, enter the email address and click the Search icon.
- Click the Add button to add the member to the list below.
- After selecting the permission, click the Save button to complete adding the member.
Delete K8S cluster member
To delete a K8S cluster member, follow these steps.
- Click the Admin icon at the top right of the Main page. You will be taken to the Tenant Dashboard page.
- From the left menu, click the Deploy Target > K8S Cluster menu. You will be taken to the K8S Cluster page.
- From the list on the K8S cluster page, click the K8S cluster. You will be taken to the K8S cluster details page of the selected K8S cluster.
- On the K8S Cluster Details page, click the Members tab.
- In the Member tab, select the checkbox of the user you want to delete.
- Click the Delete button to remove the selected user from the members.
Managing K8S Cluster Permission Requests
To approve or reject a K8S cluster access request, follow these steps.
- Click the Admin icon at the top right of the Main page. You will be taken to the Tenant Dashboard page.
- From the left menu, click the Deploy Target > K8S Cluster menu. You will be taken to the K8S Cluster page.
- Click the K8S cluster permission request item for the cluster whose permission request you want to approve. The displayed number indicates the number of permissions requested.
- K8S Cluster Permission Request Approval The popup window opens.
- Click the application you want to approve or reject.
- After entering your comment, click the Approve or Reject button.
View K8S cluster permission approval history
To view the K8S cluster permission request approval history, follow these steps.
- Click the Admin icon at the top right of the Main page. You will be taken to the Tenant Dashboard page.
- From the left menu, click the Deploy Target > K8S Cluster menu. You will be taken to the K8S Cluster page.
- From the list on the K8S Cluster page, click the K8S Cluster. You will be taken to the K8S Cluster Details page of the selected K8S Cluster.
- Click the Approval History tab. The approval history list appears.
Managing namespaces
- To use the K8S cluster from menus such as project creation and helm install, you must have permissions on the namespace.
- You cannot create a namespace in the actual K8S cluster. You can only import an already created namespace into the DevOps Console.
Import namespace
To import the namespace, follow these steps.
- Click the Admin icon at the top right of the Main page. You will be taken to the Tenant Dashboard page.
- From the left menu, click the Deploy Target > K8S Cluster menu. You will be taken to the K8S Cluster page.
- On the K8S Cluster page, click the K8S cluster from the list. You will be taken to the K8S Cluster Details page of the selected K8S cluster.
- Click the Namespace tab. The namespace list appears.
- On the Namespace tab screen, clicking the Import button opens the Import Namespace popup.
- Namespace Import In the popup window, select the namespace and click the Save button to complete the namespace import.
Delete namespace
To delete a namespace, follow these steps.
- Click the Admin icon at the top right of the Main page. You will be taken to the Tenant Dashboard page.
- From the left menu, click the Deploy Target > K8S Cluster menu. You will be taken to the K8S Cluster page.
- On the K8S cluster page, click the K8S cluster from the list. You will be taken to the K8S cluster details page of the selected K8S cluster.
- Click the Namespace tab. The namespace list appears.
- On the Namespace tab screen, clicking a namespace navigates to the Namespace Details page.
- On the Namespace Details page, click the Delete button to complete the namespace deletion.
Adding a namespace member
To add a namespace member, follow these steps.
- Main page, click the Admin icon at the top right. It navigates to the Tenant Dashboard page.
- From the left menu, click the Deploy Target > K8S Cluster menu. You will be taken to the K8S Cluster page.
- From the list on the K8S Cluster page, click the K8S cluster. You will be taken to the K8S Cluster Details page of the selected K8S cluster.
- Click the Namespace tab. The namespace list appears.
- Namespace tab screen, when you click the namespace, you are taken to the Namespace Details page.
- Namespace Details page, when you click the Members tab, the namespace member list appears.
- When you click the Add button, the Add Member popup opens.
- In the Add Member popup, enter the email address and click the Search icon.
- Click the Add button to add the member to the list below.
- After selecting the permission, click the Save button to complete adding the member.
Delete namespace member
To delete a namespace member, follow these steps.
- Click the Admin icon at the top right of the Main page. You will be taken to the Tenant Dashboard page.
- From the left menu, click the Deploy Target > K8S Cluster menu. You will be taken to the K8S Cluster page.
- On the K8S Cluster page, click the K8S cluster from the list. You will be taken to the K8S Cluster Details page of the selected K8S cluster.
- Click the Namespace tab. The namespace list appears.
- On the Namespace tab screen, clicking the namespace takes you to the Namespace Details page.
- Namespace Details page, when you click the Members tab, the namespace member list appears.
- Select the checkbox of the user you want to delete from the list.
- Click the Delete button to remove the selected user from the members.
Manage namespace permission requests
To approve or reject a namespace permission request, follow these steps.
- Click the Admin icon at the top right of the Main page. You will be taken to the Tenant Dashboard page.
- From the left menu, click the Deploy Target > K8S Cluster menu. You will be taken to the K8S Cluster page.
- From the list on the K8S Cluster page, click the Namespace Permission Request item for the cluster whose permission request you want to approve. The displayed number indicates the number of permission requests.
- Namespace Permission Request Approval A popup window opens.
- Select the checkbox for the application you want to approve or reject.
- After entering your comment, click the Approve or Reject button.
View namespace permission request approval history
To view the namespace permission request approval history, follow these steps.
- Click the Admin icon at the top right of the Main page. You will be taken to the Tenant Dashboard page.
- From the left menu, click the Deploy Target > K8S Cluster menu. You will be taken to the K8S Cluster page.
- In the list on the K8S Cluster page, click the K8S cluster. You will be taken to the K8S Cluster Details page of the selected K8S cluster.
- Namespace tab, click it. The namespace list appears.
- On the Namespace tab screen, clicking a namespace takes you to the Namespace Details page.
- Namespace Details page, when you click the Approval History tab, the approval history list appears.
Managing Ingress Domains
- This is reference information that is managed only in the DevOps Console.
- The registered information is displayed so that users can refer to it when creating a project or performing a Helm install using the cluster.
Add Ingress Domain
To add an ingress domain, follow these steps.
- Click the Admin icon at the top right of the Main page. You will be taken to the Tenant Dashboard page.
- From the left menu, click the Deploy Target > K8S Cluster menu. You will be taken to the K8S Cluster page.
- On the K8S cluster page, click the K8S cluster from the list. You will be taken to the K8S cluster details page of the selected K8S cluster.
- Click the Ingress Domain tab. The Ingress Domain list appears.
- Ingress Domain tab screen, when you click the Add button, the Add Ingress Domain Information popup opens.
- Add Ingress Domain Information Enter the information in the popup window and click the Save button to complete adding the ingress domain.
Item Explanation Node selector Enter the node selector.
It is composed of a key that includes a prefix separated by the first slash (/) of the input value, and its corresponding value.
The prefix is optional.
e.g.,kubernetes.io/nodetype: appProxy IP Enter the Proxy Server IP or Proxy Server LoadBalancer IP. Ingress domain Enter the domain that the application will use by default. Ingress class Enter the Ingress controller class. Table. Ingress Domain Additional Input Items
Modify Ingress Domain
To modify the Ingress domain, follow these steps.
- Click the Admin icon at the top right of the Main page. You will be taken to the Tenant Dashboard page.
- From the left menu, click the Deploy Target > K8S Cluster menu. You will be taken to the K8S Cluster page.
- From the list on the K8S Cluster page, click the K8S cluster. You will be taken to the K8S Cluster Details page of the selected K8S cluster.
- Click the Ingress Domain tab. The Ingress Domain list appears.
- On the Ingress Domain tab screen, when you click the Ingress Domain you want to edit, the Edit Ingress Domain Information popup opens.
- Edit Ingress Domain Information In the popup window, modify the information and click the Save button to complete the Ingress domain edit.
Delete Ingress Domain
To modify the Ingress domain, follow these steps.
- Click the Admin icon at the top right of the Main page. You will be taken to the Tenant Dashboard page.
- From the left menu, click the Deploy Target > K8S Cluster menu. You will be taken to the K8S Cluster page.
- From the list on the K8S Cluster page, click the K8S cluster. You will be taken to the K8S Cluster Details page of the selected K8S cluster.
- Ingress Domain Click the tab. Ingress Domain list appears.
- On the Ingress Domain tab, select the checkbox of the Ingress Domain you want to delete.
- On the Ingress Domain tab screen, click the Delete button to delete the selected ingress domain.
1.1 - Verify Cluster Admin Token
To register a K8S cluster, you must verify the cluster’s Admin Token.
An Admin Token refers to the token value of a ServiceAccount that has the ClusterRole/cluster-admin bound by a ClusterRoleBinding.
Preparation before start
Before checking the Admin Token, review and prepare the following.
- Environment where the kubectl CLI can be used
- Check cluster admin permissions
- View and create ClusterRole, ClusterRoleBinding
- Namespace and ServiceAccount lookup and creation
- The cluster-admin ClusterRole is listed.
$ kubectl get clusterrole cluster-admin
NAME            CREATED AT
cluster-admin   2022-12-09T08:21:50Z
$ kubectl get clusterrole cluster-admin
NAME CREATED AT
cluster-admin 2022-12-09T08:21:50ZQuery Admin Token
View existing generated Admin Token
- Retrieve the ClusterRoleBinding that has ClusterRole/cluster-admin bound.
- Check the ServiceAccount that is bound by a ClusterRoleBinding.Color mode
# admin token lookup
$ kubectl get clusterrolebinding | grep ClusterRole/cluster-admin
[crb_name]     ClusterRole/cluster-admin     77d

$ kubectl describe clusterrolebinding [crb_name]
Name:         [crb_name]
Labels:       <none>
Annotations:  <none>
Role:
Kind:  ClusterRole
Name:  cluster-admin
Subjects:
Kind            Name       Namespace
  ----            ----       ---------
ServiceAccount  [sa_name]  [namespace_name]
# admin token lookup $ kubectl get clusterrolebinding | grep ClusterRole/cluster-admin [crb_name] ClusterRole/cluster-admin 77d $ kubectl describe clusterrolebinding [crb_name] Name: [crb_name] Labels: <none> Annotations: <none> Role: Kind: ClusterRole Name: cluster-admin Subjects: Kind Name Namespace ---- ---- --------- ServiceAccount [sa_name] [namespace_name]Result of retrieving previously generated Admin Token - Check the Secret associated with the ServiceAccount and retrieve the token (Admin Token).Color mode
# Secret lookup
$ kubectl get secret -n [namespace_name] | grep [sa_name]
[sa_name]-token-xxxxx                            kubernetes.io/service-account-token   3      77d

# token lookup
$ kubectl describe secret [sa_name]-token-xxxxx -n [namespace_name]
Name:         [sa_name]-token-xxxxx
...<중략>...
Data
====
ca.crt:     1070 bytes
namespace:  11 bytes
token:      eyJhbGciOiJSUzI1NiI...
# Secret lookup $ kubectl get secret -n [namespace_name] | grep [sa_name] [sa_name]-token-xxxxx kubernetes.io/service-account-token 3 77d # token lookup $ kubectl describe secret [sa_name]-token-xxxxx -n [namespace_name] Name: [sa_name]-token-xxxxx ...<중략>... Data ==== ca.crt: 1070 bytes namespace: 11 bytes token: eyJhbGciOiJSUzI1NiI...Result of retrieving the Secret and token associated with the ServiceAccount
Create Admin Token
- Create the Namespace for the ServiceAccount. If it already exists, proceed to the next step.Color mode
$ kubectl create namespace [namespace_name]

# ex) kubectl create namespace my-app
$ kubectl create namespace [namespace_name] # ex) kubectl create namespace my-appAdmin Token creation command - Create the [namespace_name]-additional-cluster-admin-sa.yaml file and then run it.Color mode
apiVersion: v1 kind: ServiceAccount metadata: name: [namespace_name]-additional-cluster-admin namespace: [namespace_name]apiVersion: v1 kind: ServiceAccount metadata: name: [namespace_name]-additional-cluster-admin namespace: [namespace_name]ServiceAccount creation example Color mode# Create ServiceAccount $ kubectl apply -f [namespace_name]-additional-cluster-admin-sa.yaml -n [namespace_name] # ex) kubectl apply -f my-app-additional-cluster-admin-sa.yaml -n my-app# Create ServiceAccount $ kubectl apply -f [namespace_name]-additional-cluster-admin-sa.yaml -n [namespace_name] # ex) kubectl apply -f my-app-additional-cluster-admin-sa.yaml -n my-appServiceAccount creation command - Create the [namespace_name]-additional-cluster-admin-crb.yaml file and then run it.Color mode
kind: ClusterRoleBinding apiVersion: rbac.authorization.k8s.io/v1 metadata: name: [namespace_name]-additional-cluster-admin subjects: - kind: ServiceAccount name: [namespace_name]-additional-cluster-admin namespace: [namespace_name] roleRef: kind: ClusterRole name: cluster-admin apiGroup: ""kind: ClusterRoleBinding apiVersion: rbac.authorization.k8s.io/v1 metadata: name: [namespace_name]-additional-cluster-admin subjects: - kind: ServiceAccount name: [namespace_name]-additional-cluster-admin namespace: [namespace_name] roleRef: kind: ClusterRole name: cluster-admin apiGroup: ""Example of creating a ClusterRoleBinding Color mode# Create ClusterRoleBinding $ kubectl apply -f [namespace_name]-additional-cluster-admin-crb.yaml # ex) kubectl apply -f my-app-additional-cluster-admin-crb.yaml# Create ClusterRoleBinding $ kubectl apply -f [namespace_name]-additional-cluster-admin-crb.yaml # ex) kubectl apply -f my-app-additional-cluster-admin-crb.yamlCommand to create a ClusterRoleBinding - Check the Secret associated with the ServiceAccount and retrieve the token (Admin Token).Color mode
# Secret lookup
$ kubectl get secret -n [namespace_name] | grep [namespace_name]-additional-cluster-admin
[namespace_name]-additional-cluster-admin-token-xxxxx   kubernetes.io/service-account-token   3      4m53s

# Token lookup
$ kubectl describe secret [namespace_name]-additional-cluster-admin-token-xxxxx -n [namespace_name]
Name:         [namespace_name]-additional-cluster-admin-token-xxxxx
...<중략>...
Data
====
ca.crt:     1111 bytes
namespace:  6 bytes
token:      eyJhbGciOiJSUzI1Ni...
# Secret lookup $ kubectl get secret -n [namespace_name] | grep [namespace_name]-additional-cluster-admin [namespace_name]-additional-cluster-admin-token-xxxxx kubernetes.io/service-account-token 3 4m53s # Token lookup $ kubectl describe secret [namespace_name]-additional-cluster-admin-token-xxxxx -n [namespace_name] Name: [namespace_name]-additional-cluster-admin-token-xxxxx ...<중략>... Data ==== ca.crt: 1111 bytes namespace: 6 bytes token: eyJhbGciOiJSUzI1Ni...Result of retrieving the Secret and token associated with the ServiceAccount ReferenceIf there is no generated Secret (afterKuberentes 1.24), create one manually and then retrieve the token.Color modeapiVersion: v1 kind: Secret type: kubernetes.io/service-account-token metadata: name: [namespace_name]-additional-cluster-admin-token namespace: [namespace_name] annotations: kubernetes.io/service-account.name: "[namespace_name]-additional-cluster-admin"apiVersion: v1 kind: Secret type: kubernetes.io/service-account-token metadata: name: [namespace_name]-additional-cluster-admin-token namespace: [namespace_name] annotations: kubernetes.io/service-account.name: "[namespace_name]-additional-cluster-admin"Example of creating a secret
Verify Admin Token Validity
You can verify the validity of the retrieved Admin Token value by editing the ~/.kube/config file.
- Modify
~/.kube/configto use a token for user authentication.
Modify toex) users[0].user.tokenand then enter the Admin Token value.Color modeapiVersion: v1 clusters: - cluster: certificate-authority-data: LS0... server: https://devopscluster-12345.sk... name: devopscluster-12345 contexts: - context: cluster: devopscluster-12345 user: user name: user@devopscluster-12345 current-context: user@devopscluster-12345 kind: Config users: - name: user user: token: [admin_token]apiVersion: v1 clusters: - cluster: certificate-authority-data: LS0... server: https://devopscluster-12345.sk... name: devopscluster-12345 contexts: - context: cluster: devopscluster-12345 user: user name: user@devopscluster-12345 current-context: user@devopscluster-12345 kind: Config users: - name: user user: token: [admin_token]Example of editing ~/.kube/config - Run the
kubectlcommand to verify that you have cluster-admin privileges.Color mode$ kubectl get nodes $ kubectl get namespace $ kubectl get all -n kube-system $ kubectl create namespace admin-test $ kubectl delete namespace admin-test # Run other commands$ kubectl get nodes $ kubectl get namespace $ kubectl get all -n kube-system $ kubectl create namespace admin-test $ kubectl delete namespace admin-test # Run other commandsCommand to check cluster-admin permissions
2 - VM Server Group
A VM server group is a logical unit for grouping and managing VM servers.
Users can add, modify, and delete VM server groups and VM servers. Configured VM server groups and VM servers can be used as deployment target VMs in project creation (배포대상 환경 설정하기) or VM deployment (VM 배포 추가하기).
| Deployment method | Explanation |
|---|---|
| SSH | Using Secure Shell (SSH), Jenkins, where the build pipeline runs, directly deploys to the Target VM server.
|
| agent | You must refer to Connecting the Agent and run the agent on the Target VM server. Jenkins, where the build pipeline runs, does not execute deployments directly. The running agent collects deployment information from the DevOps Console via REST API and executes it.
|
If SSH or an agent runs with root privileges, there is a risk that malicious commands could compromise the entire server.
- It is recommended to use an account other than the root account.
Getting Started with VM Server Group
To start managing VM server groups, follow these steps.
- Click the Admin icon at the top right of the Main page. You will be taken to the Tenant Dashboard page.
- In the left menu, click the Deploy Target > VM Server Group menu. You will be taken to the VM Server Group page.
Add VM server group
To add a VM server group, follow these steps.
- Click the Management icon at the top right of the Main page. You will be taken to the Tenant Dashboard page.
- Click the Deployment Target > VM Server Group menu in the left menu. You will be taken to the VM Server Group page.
- On the VM Server Group page, click the Add button. It navigates to the Add VM Server Group page.
- Enter the basic information, then click the Save button to complete the VM server group configuration.
Item Explanation Server group name Enter the VM server group name. Explanation Please enter a description. type Select the type of VM server group - SSH: Perform deployment using SSH commands when deploying a VM.
- Agent: Perform deployment using an agent when deploying a VM. (Connect Agent)
VM server - Add: Add the VM server that belongs to the VM server group.
- Delete: Check the checkbox of the VM server you want to delete from the VM server group, then click Delete to remove it.
Table. VM Server Group Add Input Items
Add VM server
To add a VM server, you need Manager permission for the corresponding VM server group.
To add a VM server, follow the steps below.
- Click the Admin icon at the top right of the Main page. Navigate to the Tenant Dashboard page.
- Click the Deployment Target > VM Server Group menu in the left menu. You will be taken to the VM Server Group page.
- VM server group page, click the VM server group in the VM server group list where you want to add a VM server. You will be taken to the VM server group detail page.
- On the VM Server Group Details page, click the Add button. You will be taken to the Add VM Server page.
- Add VM Server page, after entering the basic information, click the Add button to complete the VM server configuration.
Item Explanation Server name Enter the VM server name. Explanation Enter the description. IP Please enter the IP. SSH Port Enter the port of the VM server to use for SSH connections. OS Please enter the OS. Location Please select a location. Authentication information Enter the authentication information for the VM server to be used for SSH connections. Secret Key This is the secret key for authenticating the VM server where the agent is installed. Table. VM Server Additional Input Items
Modify VM server group
To modify a VM server group, you need Manager permission for that VM server group.
To modify a VM server group, follow the steps below.
- Click the Admin icon at the top right of the Main page. You will be taken to the Tenant Dashboard page.
- Click the Deployment Target > VM Server Group menu in the left menu. You will be taken to the VM Server Group page.
- On the VM Server Group page, click the VM Server Group you want to edit from the list. You will be taken to the VM Server Group Details page.
- On the VM Server Group Details page, click the Edit button. You will be taken to the Edit VM Server Group page.
- After completing the edit, click the Save button to finish modifying the VM server group.
Modify VM server
To modify a VM server, you need Manager permission for the corresponding VM server group.
To modify the VM server, follow the steps below.
- Click the Admin icon at the top right of the Main page. You will be taken to the Tenant Dashboard page.
- Click the Deployment Target > VM Server Group menu in the left menu. You will be taken to the VM Server Group page.
- On the VM Server Group page, click the VM Server Group you want to edit from the list of VM server groups. You will be taken to the VM Server Group Details page.
- VM Server Group Details page’s VM server list, click the VM server you want to edit. You will be taken to the VM Server Details page.
- On the VM Server Details page, clicking the Edit button navigates to the VM Server Edit page.
- On the VM Server Edit page, after completing the edit, click the Save button to finish editing the VM server.
Delete VM server group
To delete a VM server group, follow these steps.
- Click the Admin icon at the top right of the Main page. Navigate to the Tenant Dashboard page.
- In the left menu, click the Deploy Target > VM Server Group menu. You will be taken to the VM Server Group page.
- VM server group page’s VM server group list, click the VM server group you want to delete. You will be taken to the VM server group details page.
- On the VM server group details page, click the Delete button to complete the VM server group deletion.
Delete VM server
To delete a VM server, follow these steps.
- Click the Admin icon at the top right of the Main page. You will be taken to the Tenant Dashboard page.
- From the left menu, click the Deploy Target > VM Server Group menu. You will be taken to the VM Server Group page.
- On the VM Server Group page, click the VM server group of the VM server you want to delete from the VM server group list. You will be taken to the VM Server Group Details page.
- On the VM Server Group Details page, click the VM server you want to delete. You will be taken to the VM Server Details page.
- On the VM server details page, click the Delete button to complete the VM server deletion.
Managing VM Server Group Members
To manage members of a VM server group, you need Manager permission for that VM server group.
Add VM server group member
To add a member to a VM server group, follow these steps.
- Click the Admin icon at the top right of the Main page. You will be taken to the Tenant Dashboard page.
- Click the Deployment Target > VM Server Group menu in the left menu. You will be taken to the VM Server Group page.
- VM Server Group page’s VM Server Group list, click the VM Server Group you want to add a member to. You will be taken to the VM Server Group Details page.
- On the VM Server Group Details page, click the User tab.
- When you click the Add button on the User tab, the Add Member popup window opens.
- After completing the setup, click the Confirm button to finish adding a VM server group member. (Managers can modify or delete the server group, and Members can use the server group when creating projects or adding pipelines.)
Delete VM server group member
To delete a member from a VM server group, follow these steps.
- Click the Admin icon at the top right of the Main page. You will be taken to the Tenant Dashboard page.
- Click the Deployment Target > VM Server Group menu in the left menu. You will be taken to the VM Server Group page.
- On the VM server group page, click the VM server group in the list from which you want to delete a member. You will be taken to the VM server group details page.
- On the VM Server Group Details page, click the User tab.
- In the User list, select the checkbox of the user you want to delete.
- Click the Delete button to remove the selected user from the VM server group members.
Manage VM server group permission requests
To approve or reject a VM server group permission request, follow these steps.
- Click the Admin icon at the top right of the Main page. You will be taken to the Tenant Dashboard page.
- Click the Deployment Target > VM Server Group menu in the left menu. You will be taken to the VM Server Group page.
- On the VM Server Group page, click the permission request item of the VM Server Group whose request you want to approve from the VM Server Group list. The displayed number indicates the number of permission requests. The VM Server Group Permission Request Approval popup window opens.
- VM Server Group Permission Request Approval In the popup window, click the request you want to approve or reject.
- After entering your comment, click the Approve or Reject button.
View VM Server Group Permission Approval History
To view the VM server group permission request approval history, follow these steps.
- Main page, click the Admin icon at the top right. You will be taken to the Tenant Dashboard page.
- From the left menu, click the Deploy Target > VM Server Group menu. You will be taken to the VM Server Group page.
- On the VM Server Group page, click the VM server group you want to view from the list. You will be taken to the VM Server Group Details page.
- On the VM Server Group Details page, click the Approval History tab.
Disable firewall on VM server
SSH method
SSH-based VM deployment uses Secure Shell (Secure SHell, SSH) to deploy directly from Jenkins → Target VM server.
Firewall exemption information for deployment
- Source IP: Jenkins IP selected when configuring the pipeline
- Target IP: IP of the VM server to be deployed
To disable the firewall, follow these steps.
- Click the Admin icon at the top right of the Main page. You will be taken to the Tenant Dashboard page.
- Click the Deployment Target > VM Server Group menu in the left menu. You will be taken to the VM Server Group page.
- On the VM Server Group page, click the Firewall Application Guide link. The Firewall Application Guide popup window opens.
- Jenkins firewall information is displayed.
- These details are displayed as the information entered when registering the Jenkins tool, and if no input was provided during tool registration, they may appear as empty values.
- If needed, contact the tool administrator.
Agent-based approach
Agent-based VM deployment requires the agent to run on the target VM server. The running agent collects information from the DevOps Console and proceeds with the deployment.
- Source IP: IP of the VM server to be deployed
- Target IP: DevOps Console IP, (if using Rollback) Rollback Artifact Repository IP
- Click the Admin icon at the top right of the Main page. You will be taken to the Tenant Dashboard page.
- Click the Deployment Target > VM Server Group menu in the left menu. You will be taken to the VM Server Group page.
- On the VM Server Group page, click the Agent Installation Guide link. The Agent Installation Guide popup will open.
- The DevOps Console firewall details, User Guide shortcut, and Agent file download links are displayed.
Integrate Agent
Agent-based VM deployment requires the agent to run on the target VM server. The running agent collects information from the DevOps Console and performs the deployment.
Preparation before agent integration
VM Server Preparation Requirements
Install Java
The agent was written and tested based on Java 8. Install a Java 8 or higher version on the target VM server.
Disable firewall and edit hosts file
The agent collects deployment execution information from the DevOps Console using the REST API, so communication on port 8443 from the Target VM where the agent runs to the DevOps Console is required.
Additionally, when using Rollback, communication with the Rollback Artifact Repository is also required.
If necessary, you may need to disable the firewall or register entries in the hosts file. Refer to the Agent Installation Guide(Agent Method) popup in the DevOps Console for firewall information.
DevOps Console Prerequisites
Prepare authentication key
Target VM server requires agent authentication when the agent runs. Generate a user authentication key and a secret key for authentication. (Manage authentication keys)
Prepare VM server Secret Key
When executing the agent on the target VM server, a Secret Key is required to authorize the VM server that corresponds to the agent.
When adding an agent-type VM server group or VM server, a VM server Secret Key is automatically generated. It can also be viewed later on the VM Server Details page.
Run the agent
Download the agent file
Agent Installation Guide You can download the agent executable from the popup window.
- Click the Admin icon at the top right of the Main page. You will be taken to the Tenant Dashboard page.
- In the left menu, click the Deploy Target > VM Server Group menu. You will be taken to the VM Server Group page.
- On the VM Server Group page, click the Agent Installation Guide link. The Agent Installation Guide popup will open.
- Agent Installation Guide In the popup window, click the Agent File Download button.
- The
deploy-agent.jarfile is downloaded.
Run the agent directly
To run the agent on the target VM server, follow these steps.
- Create a directory on the target VM server.
- Move the
deploy-agent.jarfile to the target directory. - Refer to the Usage below and run the agent.Color mode
usage: java -jar deploy-agent.jar -A <arg> -L <arg> [-P <arg>] -S <arg> -V <arg>
 -A,--accessKey <arg>               AccessKey for HMAC
 -L,--serverUrl <arg>               Api server url
 -P,--loggingConfigFilePath <arg>   Path to the property file with 'java.util.logging' settings
 -S,--secretKey <arg>               SecretKey for HMAC
 -V,--vmSecretKey <arg>             VM SecretKey
usage: java -jar deploy-agent.jar -A <arg> -L <arg> [-P <arg>] -S <arg> -V <arg> -A,--accessKey <arg> AccessKey for HMAC -L,--serverUrl <arg> Api server url -P,--loggingConfigFilePath <arg> Path to the property file with 'java.util.logging' settings -S,--secretKey <arg> SecretKey for HMAC -V,--vmSecretKey <arg> VM SecretKeyRun deployment agent Usage
| Item | Explanation |
|---|---|
| -A, –accessKey | Authentication key generated with the user authentication key |
| -L, –serverUrl | API URL path of the DevOps Console ex) https://{DEVOPS_CONSOLE_URL}:8443/devops-console-api |
| -P, –loggingConfigFilePath | Agent log file path If not entered, the {JAVA_HOME}\jre\lib\logging.properties file will be applied. |
| -S, –secretKey | Secret key generated using the user authentication key |
| -V, –vmSecretKey | Secret key generated on the VM server |
Running the Agent Using a Script File
To run the agent on the target VM server using a script, follow these steps.
- Create a directory on the target VM server.
- Move the
deploy-agent.jarfile to the specified directory. - Create the file by referring to the sample execution script below.
- Modify the information of the sample execution script.
DC_URL,ACCESS_KEY,SECRET_KEY,VM_SECRET_KEY
- Run the script.
Linux sample script

#!/bin/sh

JAVA_EXE="java"
DC_URL="https://devops-console-url.com:8443/devops-console-api"
ACCESS_KEY="user-access-key"
SECRET_KEY="user-secret-key"
VM_SECRET_KEY="vm-secret-key"

start()
{
  [ -f deploy-agent.jar ] || { echo "ERROR: deploy-agent.jar file does not exist."; exit 1; }
  echo "Starting Deploy Agent..."
  $JAVA_EXE -jar deploy-agent.jar -A $ACCESS_KEY -S $SECRET_KEY -V $VM_SECRET_KEY -L $DC_URL > deploy-agent.log 2>&1 &
  PID=`ps aux | grep 'java -jar deploy-agent.jar' | grep '\-A' | grep '\-S' | grep '\-V' | grep '\-L' | awk '{print $2}'`
  echo "Process ID : $PID"
  echo $PID > deploy-agent.pid
  echo "Done."
}
stop()
{
  echo "Shutdown Deploy Agent..."
  ps aux | grep 'java -jar deploy-agent.jar' | grep '\-A' | grep '\-S' | grep '\-V' | grep '\-L' | awk '{print $2}' | xargs kill
  echo "Done."
}

case "$1" in
  start)
    start
    ;;
  stop)
    stop
    ;;
  restart)
    stop
    start
    ;;
  *)
    echo $ "Usage: $0 {start|stop|restart}"
    exit 1
    ;;
esac
exit 0
#!/bin/sh
JAVA_EXE="java"
DC_URL="https://devops-console-url.com:8443/devops-console-api"
ACCESS_KEY="user-access-key"
SECRET_KEY="user-secret-key"
VM_SECRET_KEY="vm-secret-key"
start()
{
[ -f deploy-agent.jar ] || { echo "ERROR: deploy-agent.jar file does not exist."; exit 1; }
echo "Starting Deploy Agent..."
$JAVA_EXE -jar deploy-agent.jar -A $ACCESS_KEY -S $SECRET_KEY -V $VM_SECRET_KEY -L $DC_URL > deploy-agent.log 2>&1 &
PID=`ps aux | grep 'java -jar deploy-agent.jar' | grep '\-A' | grep '\-S' | grep '\-V' | grep '\-L' | awk '{print $2}'`
echo "Process ID : $PID"
echo $PID > deploy-agent.pid
echo "Done."
}
stop()
{
echo "Shutdown Deploy Agent..."
ps aux | grep 'java -jar deploy-agent.jar' | grep '\-A' | grep '\-S' | grep '\-V' | grep '\-L' | awk '{print $2}' | xargs kill
echo "Done."
}
case "$1" in
start)
start
;;
stop)
stop
;;
restart)
stop
start
;;
*)
echo $ "Usage: $0 {start|stop|restart}"
exit 1
;;
esac
exit 0Windows sample script

@ECHO OFF

SET JAVA_EXE="java"
SET DC_URL="https://devops-console-url.com:8443/devops-console-api"
SET ACCESS_KEY="user-access-key"
SET SECRET_KEY="user-secret-key"
SET VM_SECRET_KEY="vm-secret-key"

IF NOT EXIST deploy-agent.jar (
    ECHO "ERROR: deploy-agent.jar file does not exist."
    EXIT /b 0
)
ECHO "Starting Deploy Agent..."
%JAVA_EXE% -jar deploy-agent.jar -A %ACCESS_KEY% -S %SECRET_KEY% -V %VM_SECRET_KEY% -L %DC_URL%

EXIT /b 0
@ECHO OFF
SET JAVA_EXE="java"
SET DC_URL="https://devops-console-url.com:8443/devops-console-api"
SET ACCESS_KEY="user-access-key"
SET SECRET_KEY="user-secret-key"
SET VM_SECRET_KEY="vm-secret-key"
IF NOT EXIST deploy-agent.jar (
ECHO "ERROR: deploy-agent.jar file does not exist."
EXIT /b 0
)
ECHO "Starting Deploy Agent..."
%JAVA_EXE% -jar deploy-agent.jar -A %ACCESS_KEY% -S %SECRET_KEY% -V %VM_SECRET_KEY% -L %DC_URL%
EXIT /b 0- It can be executed on
java 8or later. - Assume the jar file execution location is
{WORKSPACE}. - Additional directories such as backup and logs are created in
{WORKSPACE}. - If you do not specify
-loggingConfigFilePath, the{JAVA_HOME}\jre\lib\logging.propertiesfile will be used. - Deployment-related files are stored under
{WORKSPACE}/backup. - Only the most recent
3successfully deployed files are retained. deploy-agent.jarfull logs are not saved automatically. Only deployment-related logs from the full logs are saved to{WORKSPACE}/logs.- Logs are retained for
30days.
Agent problem solving
Changing the log level
If needed, you can change the agent log level. Refer to the sample log file below and add the -P, --loggingConfigFilePath options.
Sample log file
############################################################
#      Default Logging Configuration File
#
# You can use a different file by specifying a filename
# with the java.util.logging.config.file system property.
# For example java -Djava.util.logging.config.file=myfile
############################################################

############################################################
#      Global properties
############################################################

# "handlers" specifies a comma separated list of log Handler
# classes.  These handlers will be installed during VM startup.
# Note that these classes must be on the system classpath.
# By default we only configure a ConsoleHandler, which will only
# show messages at the INFO and above levels.
handlers= java.util.logging.ConsoleHandler

# To also add the FileHandler, use the following line instead.
#handlers= java.util.logging.FileHandler, java.util.logging.ConsoleHandler

# Default global logging level.
# This specifies which kinds of events are logged across
# all loggers.  For any given facility this global level
# can be overriden by a facility specific level
# Note that the ConsoleHandler also has a separate level
# setting to limit messages printed to the console.
#.level= INFO
.level= FINE

############################################################
# Handler specific properties.
# Describes specific configuration info for Handlers.
############################################################

# default file output is in user's home directory.
java.util.logging.FileHandler.pattern = %h/java%u.log
java.util.logging.FileHandler.limit = 50000
java.util.logging.FileHandler.count = 1
java.util.logging.FileHandler.formatter = java.util.logging.XMLFormatter

# Limit the message that are printed on the console to INFO and above.
#java.util.logging.ConsoleHandler.level = INFO
java.util.logging.ConsoleHandler.level = FINE
java.util.logging.ConsoleHandler.formatter = java.util.logging.SimpleFormatter

# Example to customize the SimpleFormatter output format
# to print one-line log message like this:
#     <level>: <log message> [<date/time>]
#
# java.util.logging.SimpleFormatter.format=%4$s: %5$s [%1$tc]%n

############################################################
# Facility specific properties.
# Provides extra control for each logger.
############################################################

# For example, set the com.xyz.foo logger to only log SEVERE
# messages:
com.xyz.foo.level = SEVERE
############################################################
# Default Logging Configuration File
#
# You can use a different file by specifying a filename
# with the java.util.logging.config.file system property.
# For example java -Djava.util.logging.config.file=myfile
############################################################
############################################################
# Global properties
############################################################
# "handlers" specifies a comma separated list of log Handler
# classes. These handlers will be installed during VM startup.
# Note that these classes must be on the system classpath.
# By default we only configure a ConsoleHandler, which will only
# show messages at the INFO and above levels.
handlers= java.util.logging.ConsoleHandler
# To also add the FileHandler, use the following line instead.
#handlers= java.util.logging.FileHandler, java.util.logging.ConsoleHandler
# Default global logging level.
# This specifies which kinds of events are logged across
# all loggers. For any given facility this global level
# can be overriden by a facility specific level
# Note that the ConsoleHandler also has a separate level
# setting to limit messages printed to the console.
#.level= INFO
.level= FINE
############################################################
# Handler specific properties.
# Describes specific configuration info for Handlers.
############################################################
# default file output is in user's home directory.
java.util.logging.FileHandler.pattern = %h/java%u.log
java.util.logging.FileHandler.limit = 50000
java.util.logging.FileHandler.count = 1
java.util.logging.FileHandler.formatter = java.util.logging.XMLFormatter
# Limit the message that are printed on the console to INFO and above.
#java.util.logging.ConsoleHandler.level = INFO
java.util.logging.ConsoleHandler.level = FINE
java.util.logging.ConsoleHandler.formatter = java.util.logging.SimpleFormatter
# Example to customize the SimpleFormatter output format
# to print one-line log message like this:
# <level>: <log message> [<date/time>]
#
# java.util.logging.SimpleFormatter.format=%4$s: %5$s [%1$tc]%n
############################################################
# Facility specific properties.
# Provides extra control for each logger.
############################################################
# For example, set the com.xyz.foo logger to only log SEVERE
# messages:
com.xyz.foo.level = SEVEREIf the IP is not recognized
When integrating the agent, not only the entered Secret Key but also the VM server’s actual OS name and IP (IPv4) must match the information registered in the DevOps Console for the integration to work.
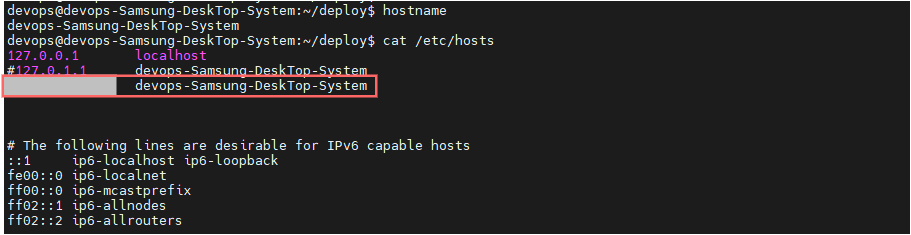
For VM servers with some multi-network devices installed, the agent may fail to recognize the IP correctly. In such cases, add the IP and hostname settings to the /etc/hosts file as shown below.
3 - Request Permission
You can request permission to use the K8S clusters, namespaces, and VM server groups managed as deployment targets in the DevOps Console.
Getting Started with Permission Request
To begin the permission request, follow the steps below.
- Click the Admin icon at the top right of the Main page. You will be taken to the Tenant Dashboard page.
- From the left menu, click the Deployment Target > Permission Request menu. The Permission Request screen appears.
Apply for K8S cluster permissions
To apply for K8S cluster permissions, follow the steps below.
- Click the Admin icon at the top right of the Main page. You will be taken to the Tenant Dashboard page.
- From the left menu, click the Deployment Target > Permission Request menu. The Permission Request screen appears.
- On the Permission Request screen, click the K8S Cluster tab. The K8S Cluster screen appears.
- On the K8S Cluster screen, click the Apply button. The K8S Cluster Permission Request popup window opens.
- K8S Cluster Permission Request Search for the K8S cluster to request permission in the popup window.
- Enter the reason for the application and click the Add button.
- After selecting the permissions for the added K8S cluster, click the Save button.
Cancel K8S cluster permission request
To cancel a K8S cluster permission request, follow these steps.
- Click the Admin icon at the top right of the Main page. You will be taken to the Tenant Dashboard page.
- From the left menu, click the Deployment Target > Permission Request menu. The Permission Request screen appears.
- On the Permission Request screen, click the K8S Cluster tab. The K8S Cluster screen appears.
- On the K8S cluster screen, select a cluster and click the Cancel button.
REQUESTED display the Cancel button.Apply for namespace permission
To request namespace permissions, follow these steps.
- Click the Admin icon at the top right of the Main page. You will be taken to the Tenant Dashboard page.
- From the left menu, click the Deployment Target > Permission Request menu. The Permission Request screen appears.
- On the Permission Request screen, click the Namespace tab. The Namespace screen appears.
- On the Namespace screen, click the Apply button. The Namespace Permission Request popup opens.
- Namespace Permission Request In the popup, search for the K8S cluster that contains the namespace for which you are requesting permission.
- Select a namespace, enter the request reason, and then click the Add button.
- After selecting the permissions for the added namespace, click the Save button.
Cancel namespace permission request
To cancel a namespace permission request, follow these steps.
- Click the Admin icon at the top right of the Main page. You will be taken to the Tenant Dashboard page.
- From the left menu, click the Deployment Target > Permission Request menu. The Permission Request screen appears.
- On the Permission Request screen, click the Namespace tab. The Namespace screen appears.
- On the Namespace screen, select a namespace and click the Cancel button.
REQUESTED display the Cancel button.Apply for VM server group permission
To apply for VM server group permissions, follow the steps below.
- Main page, click the Admin icon at the top right. You will be taken to the Tenant Dashboard page.
- From the left menu, click the Deployment Target > Permission Request menu. The Permission Request screen appears.
- On the Permission Request screen, click the VM Server Group tab. The VM Server Group screen appears.
- On the VM Server Group screen, click the Apply button. The VM Server Group Permission Request popup opens.
- VM Server Group Permission Request Search for the VM server group for which you want to request permission in the popup window.
- Enter the reason for application and click the Add button.
- After selecting the permissions for the added VM server group, click the Save button.
Cancel VM server group permission request
To cancel the VM server group permission request, follow the steps below.
- Click the Admin icon at the top right of the Main page. You will be taken to the Tenant Dashboard page.
- From the left menu, click the Deployment Target > Permission Request menu. The Permission Request screen appears.
- On the Permission Request screen, click the VM Server Group tab. The VM Server Group screen appears.
- VM server group on the screen, select the VM server group and click the Cancel button.
REQUESTED display the Cancel button.