This is the multi-page printable view of this section. Click here to print.

Return to the regular view of this page.

Build Pipeline

Reference
For detailed information about the Jenkins pipeline, refer to the official site.

Users can group consecutive tasks into a single pipeline. The pipeline configured here is created as a Jenkins pipeline.

Starting the Build Pipeline

To start using the build pipeline, follow these steps.

  1. Click the Project card on the Main page. You will be taken to the Project Dashboard page.
  2. In the left menu, click the Build/Deploy > Build Pipeline menu. You will be taken to the Build Pipeline page.

Add Build Pipeline

To add a build pipeline, follow these steps.

  1. On the Main page, click the Project card. You will be taken to the Project Dashboard page.
  2. In the left menu, click the Build/Deploy > Build Pipeline menu. You will be taken to the Build Pipeline page.
  3. Build Pipeline page, click the Add Pipeline button at the top right. You will be taken to the Add Pipeline page.
  4. Add Pipeline Enter or configure each field on the page.
  5. Click the Next button.
    ItemExplanation
    CategorySelect Development or Operations
    Jenkins URLSelect Jenkins from the list to add a build pipeline.
    Build AgentSelect the agent (build environment) on which the build pipeline will run.
    Click the Info icon to view the list of tools provided by the agent.
    Build environment OSDisplays the OS information of the environment where the build agent runs.
    Folder typeSelect the folder type.
    • Existing folder: Add a pipeline under an already created folder in Jenkins.
    • New folder: Create a new folder in Jenkins and add a pipeline under it.
    folderSelect a folder from the list or enter the name of a new folder to create.
    Pipeline namePlease enter the pipeline name.
    Parameter settingSet the parameters to be used in the pipeline.
    Environment variable configurationSet the environment variables to be used in the pipeline.
    Stage SettingsConfigure the stage to be used in the pipeline.
    Configure email recipients for build resultsSet the recipients who will receive the result email after the pipeline completes (success/failure).
    Table. Additional Build Pipeline Settings

Setting Parameters

Follow these steps to set the parameters used when running the pipeline.

  1. Click the Parameter card.
  2. Click the Add button to add a parameter.
  3. Click the Apply button to complete the parameter settings.

Setting Environment Variables

Follow these steps to set environment variables for use in the pipeline.

  1. Click the Environment Variable area. The Environment Variable Registration page opens on the right.
  2. A list of pre-registered environment variables appears, and select the checkboxes for the environment variables you want to use.
  3. Check the selected environment variable and click the Apply button to complete the environment variable configuration.

Setting up the stage

To set up the stages to be used in the pipeline, follow these steps.

  1. Click the New Stage card. The Stage area appears on the right.
  2. In the Stage area, select the tool and Stage type.
  3. Enter the required information according to the stage type and click the Apply button to complete the stage configuration.
Reference
Click the Add icon to add a stage.
For detailed information about stage configuration, see Stage.

Configure email recipients for build results

To set the recipients who will receive the build results by email, follow these steps.

  1. Click the Mail Recipient area. The Add Mail Recipient page opens on the right.
  2. In the Search area, search for the recipient and add them.
  3. Click the Apply button to complete the mail recipient settings.

Check the final pipeline script

  1. Check the build pipeline script that will actually be generated. If needed, edit the script directly.
  2. Click the Complete button to finish adding the pipeline.

Pipeline addition result

  1. The added result appears on the Build Pipeline page.
Note
The added pipeline does not run automatically. If execution is required, run the pipeline manually.

Managing Build Pipelines

Build pipeline list

ItemExplanation
statusDisplays the build pipeline status.
  • Green: Completed successfully
  • Blue (blinking): Running
  • Red: Failed
  • Gray: Others
URLGo to the Build Pipeline page of Jenkins.
Recent build execution history URLNavigate to the Build Execution History page of Jenkins.
logpipeline log The popup window opens.
RunRun the build pipeline.
View moreDisplays additional menu.
  • Edit pipeline
  • Duplicate pipeline
  • Delete pipeline
  • Build history
View pipeline stageWhen you click the Expand icon, the stage view expands.
Table. Build pipeline list view feature

Build Pipeline Credentials

When performing build pipeline actions (run, stop, edit, delete, etc.), user credentials are required, so you may request them from the user as needed.

When integrating IDP with Jenkins

If you are not registered as a Jenkins user, when the User Registration Guide popup appears, click the Go to Jenkins link to sign up or perform your first Jenkins login.

For Jenkins without IDP integration

Jenkins credentials are not stored; when the Add Account popup appears, select Use Existing User or Create New User in Account Type to add credentials.

Run Build Pipeline

To run the build pipeline, follow these steps.

  1. On the Build pipeline page, click the Run button of the build pipeline you want to execute.
  2. If there are parameters, the Pipeline Execution Parameter Input popup window opens.
  3. After entering the required fields, click the Confirm button.
Caution

If the Number of executors setting for the Built-In Node in Jenkins system configuration is set to 1 or higher, a security issue may arise, preventing the pipeline from running.

  • In this case, you need to contact the Jenkins administrator to change the settings.
    • In the Jenkins administration menu, you can enable it by changing the Number of executors item of the Built-In Node to 0.
  • Note Jenkins officially recommends avoiding running builds on the Controller Node.

View build pipeline execution logs

Follow these steps to view the build pipeline execution logs.

  1. On the Build Pipeline page, click the Log button of the build pipeline you want to run.
  2. pipeline log A popup window opens, allowing you to view the execution log.
Reference
If a build pipeline is running, the Pipeline Log popup window refreshes periodically to display the latest logs.

Build pipeline build history view

To view the complete build history of the build pipeline, follow these steps.

  1. On the Build pipeline page, click the More icon of the build pipeline you want to view.
  2. Click the Build History menu. The Build History page opens.
    ItemExplanation
    Config DiffConfig Diff The popup window opens.
    logPipeline Log The popup window opens.
    Additional menuNavigate to the Build Details page.
    View pipeline stageClick the Expand icon to expand the stage view.
    Table. Build Pipeline List View Feature

Compare configuration information

You can compare the configuration information with previous build history using the Config Diff button.

Log View

Through the Log button, you can view the logs of the build history.

Build Details

You can view detailed build information via the More icon.

Modify Build Pipeline

To modify the build pipeline, follow these steps.

  1. On the Build pipeline page, click the More icon of the build pipeline you want to edit.
  2. Click the Edit Pipeline button. You will be taken to the Edit Pipeline page.

Edit the script directly

To edit the pipeline script directly, follow these steps.

  1. In the script editor window of the Pipeline Edit page, directly enter a script that conforms to the syntax supported by Jenkins.
  2. After completing the input, click the Save button to finish editing the pipeline.

Modify using the Script Generator feature

Reference
In the Script Generator feature, only one stage can be set. If you want to edit multiple stages, perform it multiple times.

Follow these steps to modify the pipeline script using the Script Generator feature.

  1. On the Pipeline Edit page, change Script Generator to ON.
  2. Select the build agent and script type.
  3. After completing Stage Setup, click the Create Script button to generate the script.
  4. Refer to the generated script to modify the pipeline, and click the Save button to complete the pipeline modification.
    ItemExplanation
    Script GeneratorTurn the Script Generator feature ON/OFF.
    Script Basic InformationSelect the basic information for script generation.
    Existing scriptThis is an existing script.
    New scriptThis is a new script generated by the Script Generator.
    Script modificationRefer to the newly created script and directly edit the existing script on the left.
    Update Jenkins CredentialIf the newly created script contains new credentials, click the Jenkins Credential Update button. This updates (saves) the credentials in Jenkins.
    K8S Secret updateDeploy to K8S stage: when changing the K8S Secret, click the K8S Secret Update button. Update (save) it for use during Secret creation and deployment.
    Table. Script Generator feature

Clone Build Pipeline

To duplicate the build pipeline, follow these steps.

  1. Click the More icon of the build pipeline you want to clone.
  2. Click the Clone Pipeline menu. The Clone Pipeline popup window opens.
  3. After completing the information entry, click the Save button to finish replicating the pipeline.
    ItemExplanation
    Pipeline replication informationEnter the information for the pipeline to be cloned.
    Pipeline modificationModify the pipeline to be cloned.
    Table. Build Pipeline Replication Feature

Delete Build Pipeline

To delete a build pipeline, follow these steps.

  1. On the Build pipeline page, click the More icon of the build pipeline you want to delete.
  2. Click the Delete Pipeline menu. The Delete Pipeline popup window opens.
  3. Delete Pipeline In the popup window, click the Confirm button to complete the pipeline deletion.
Note

Also delete the pipeline in Jenkins

  • Selection: The pipeline is actually deleted from Jenkins.
  • Unselected: Build pipeline is deleted only from the list and remains in Jenkins.
1 - Stage

The user can view the description of stage types and each stage-specific item.

You can configure stages in Add Build Pipeline or Edit Build Pipeline.

Common Items

Stage Settings page is organized as follows.

ItemExplanation
ToolsIf you want to specify and use a particular tool other than the default tools set in the stage, select
  • JDK
  • Maven
  • Git
  • Ant
  • Go
  • Gradle
  • NodeJS
Stage typesSelect the required stage from the list and enter the necessary information.
Stage nameEnter the stage name.
Table. Stage Input Item Configuration

Checkout

This stage executes the checkout command on the Git repository registered in the code repository.

Select Checkout as the stage type.

ItemExplanation
URLSelect the code repository to perform checkout.
Branch nameEnter the branch name to checkout.
Table. Checkout stage input items

Build

This is the stage that executes the command to build the application.

Select Build as the stage type.

ItemExplanation
languageSelect the programming language used by the application.
Build toolSelect the build tool used for building the application.
Provides default Shell commands based on the selected build tool.
Shell commandEnter the command to use for building the application.
All commands available in the Shell can be used.
Table. Build Stage Input Items

Docker Build

This stage performs the Docker image build.

Select Docker Build as the stage type.

item
Explanationexample
Registry URL (docker push)Select the image repository where the Docker build result image will be pushed.
IDThe ID value of the account to be used for the image repository
image tag patternThe Docker image tag is automatically generated according to the selected pattern.
  • {YYYYMMDD}: year, month, and day
  • {HHMMSS}: hour, minute, and second
  • {BUILD_NUM}: the number of the current build pipeline execution
  • {YYYYMMDD}.{HHMMSS}: 20200414.150938
  • {YYYYMMDD}.{BUILD_NUM}: 20220414.13
Add base image repositoryAdd Base Image Repository A popup window opens.
Registry URL (docker pull)Select the image repository for docker pull when the repository providing the Base Image used in the Dockerfile (FROM clause, docker pull) differs from the repository of the Registry URL (docker push).
Image build toolDisplays the image build tool.
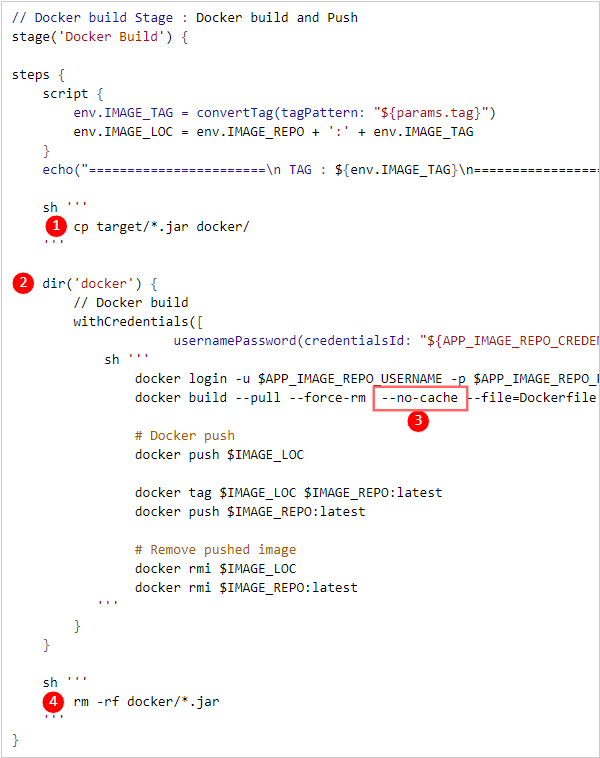
Pre-build commandIf there are any commands that need to be run before building a Docker image, write them in shell command format.cp target/*.jar docker/
Image Build folderIf you need to run the Docker image build from a specific folder, select the checkbox and enter the folder path.docker
DockerfileEnter the Dockerfile filename.Dockerfile
Image build optionsEnter it if you need to use additional options with the image build tool.--no-cache
Build commandDisplays the image build command that will actually be executed.
Post-build commandIf there are commands that need to be executed after building a Docker image, write them in Shell command format.rm -rf docker/*.jar
Table. Docker Build Stage Input Items

example script

The build pipeline script generated as a result of the example is as follows.

Example Script
Figure. Docker Build Example Script
ItemExplanation
Pre-build command
Image Build folder
Image build options
Post-build command
Table. Docker Build example script description

Deploy to K8S

This is the stage that performs a Kubernetes deployment.

Select Deploy to K8S as the stage type.

Item
Explanation
typeSelect deployment type
  • Helm release (Helm chart type)
  • Workload
  • ArgoCD
K8S clusterSelect a K8S cluster
  • Helm release (Helm chart type) When selected, a list of Helm releases deployed via the DevOps Console is displayed.
namespacePlease select a namespace.
Helm releaseSelect HelmRelease.
Deployment methodSelect deployment method
  • Recreate
  • Rolling Update
Registry URLSelect the image repository where the image to be deployed to Kubernetes has been docker pushed.
SecretSelect the secret information input method
  • Auto-generate: Automatically create the secret corresponding to the selected image repository from the Registry URL in the DevOps Console and use it.
  • Use existing secret: Use a pre-created secret through K8S secret management.
Table. Deploy to K8S stage input items

Deploy to VM

This is the stage that performs VM deployment.

Select Deploy to VM as the stage type.

ItemExplanation
Deployment configurationSelect deployment configuration method
  • Set deployment target (SSH command/Agent): Deploy using SSH commands or an Agent.
  • Write script manually: The user enters all commands directly to deploy.
deployment groupSelect a deployment group
Release InformationThe contents stored in the deployment group are automatically configured.
Manual deploymentSelect the default value for manual deployment
  • Select the default setting for manual deployment parameters when running the pipeline.
Table. Deploy to VM stage input items

Trigger Build

This is a stage that runs the pipeline remotely.

Select Trigger Build as the stage type.

ItemExplanation
Target pipelineChoose the target pipeline to run remotely.
The selectable items vary depending on whether the pipeline is for development or production.
Parameter informationIt is displayed depending on whether the target pipeline’s parameters are set.
The parameter information entered at pipeline execution time is used.
Table. Trigger Build Stage Input Items

Check Remote Execution Information

Remote execution information (parent/child pipelines) through the Trigger Build stage can be viewed on the Build Details screen.

Other stages

ItemExplanation
ArchiveArchive the application build results. The archived file can be downloaded from Jenkins.
Code QualityThis is the stage for executing the Code Quality step.
CustomThe user directly writes the pipeline script in the desired format.
Table. Other Stage Settings

2 - Multibranch Pipeline

Reference
For detailed information about Jenkins multibranch pipelines, refer to the official site.

Users can integrate multiple branches of a code repository through a multibranch pipeline and manage them as a single job.

Starting a Multibranch Pipeline

To start using a multibranch pipeline, follow these steps.

  1. On the Main page, click the Project card. You will be taken to the Project Dashboard page.
  2. From the left menu, click the Build/Deploy > Build Pipeline menu. You will be taken to the Build Pipeline page.

Add a multibranch pipeline

To add a multibranch pipeline, follow these steps.

  1. Click the Project card on the Main page. You will be taken to the Project Dashboard page.
  2. From the left menu, click the Build/Deploy > Build Pipeline menu. You will be taken to the Build Pipeline page.
  3. On the Build Pipeline page, click the Add Multi-branch Pipeline button at the top right. The Add Multi-branch Pipeline popup will open.
  4. Add Multi-branch Pipeline In the popup window, enter each field and click the Save button.
    ItemExplanation
    CategorySelect development or operation
    Jenkins URLSelect the Jenkins to add a multibranch pipeline from the list.
    Folder typeSelect folder type
    • Existing folder: Add a pipeline under a folder that already exists in Jenkins.
    • New folder: Create a new folder in Jenkins and add a pipeline under it.
    Folder nameSelect a folder from the list or enter the name of a new folder to create.
    pipeline namePlease enter the pipeline name.
    Git RepositorySelect the code repository to perform builds per branch.
    Only code repositories registered in the DevOps Console project can be selected.
    Branch filteringYou can filter the branch names to build among the branches registered in the code repository.
    When using filtering, enter the filter condition as a Java regular expression.
    Jenkinsfile pathEnter the path within the code repository of the Jenkinsfile where the pipeline build is defined.
    Table. Multi-branch pipeline additional information input items

Managing Multi-Branch Pipelines

Multi-branch pipeline list

ItemExplanation
Multi-branch icon and labelIcons and labels representing a multibranch pipeline are displayed.
URLNavigate to the Jenkins Multibranch Pipeline page.
Scan logMulti-branch pipeline scan log The popup window opens.
ScanScanning the multibranch pipeline.
View moreDisplays additional menu.
  • Edit pipeline
  • Delete pipeline
  • Build history
Table. Multi-branch pipeline list screen items

Scanning a multibranch pipeline

To scan a multibranch pipeline, follow these steps.

  1. On the Build Pipeline page, click the Scan button of the multibranch pipeline card you want to scan.
  2. Click the Confirm button in the confirmation popup.

View multi-branch pipeline scan logs

To view the scan logs of a multibranch pipeline, follow these steps.

  1. Build Pipeline page, click the Scan Log button of the multibranch pipeline card for which you want to view the scan log. The Multibranch Pipeline Scan Log popup window opens.
  2. Multi-branch pipeline scan log After reviewing the contents in the popup window, click the Confirm button to exit.

View multi-branch pipeline build history

To view the build history for each branch in a multibranch pipeline, follow these steps.

  1. On the Build Pipeline page, click the More icon of the multibranch pipeline card for which you want to view the build history.
  2. Click the Build History menu. You will be taken to the Branch-specific Build History screen of Jenkins. (This feature is not provided in DevOps Console)

Modify multi-branch pipeline

To modify a multibranch pipeline, follow these steps.

  1. On the Build Pipeline page, click the More icon of the multibranch pipeline card you want to edit.
  2. Click the Edit Pipeline menu. You will be taken to the Settings screen of Jenkins. (Feature not provided in DevOps Console)

Delete Multi-branch Pipeline

To delete a multibranch pipeline, follow these steps.

  1. On the Build Pipeline page, click the More icon of the multibranch pipeline card you want to delete.
  2. Click the Delete Pipeline menu. The Delete Pipeline popup window opens.
  3. In the Delete Pipeline popup, select whether to Delete the pipeline in Jenkins as well, and click the Confirm button.
Reference

Delete the pipeline in Jenkins as well.

  • Selection: The pipeline is actually deleted in Jenkins.
  • Unselected: Build pipeline is deleted only from the list and remains in Jenkins.