This is the multi-page printable view of this section. Click here to print.
Build/Deploy
- 1: Build Pipeline
- 1.1: Stage
- 1.2: Multibranch Pipeline
- 2: Kubernetes Deployment
- 2.1: Helm Release
- 2.2: Workload
- 2.3: Blue/Green Deployment
- 2.4: Canary Deployment
- 2.5: Istio
- 2.6: ArgoCD
- 3: VM Deployment
- 4: Helm Install
- 5: Ingress/Service Management
- 6: Kubernetes Secret Management
- 7: Environment Variable Management
1 - Build Pipeline
Jenkins pipeline, refer to the official site.Users can group consecutive tasks into a single pipeline. The pipeline configured here is created as a Jenkins pipeline.
Starting the Build Pipeline
To start using the build pipeline, follow these steps.
- Click the Project card on the Main page. You will be taken to the Project Dashboard page.
- In the left menu, click the Build/Deploy > Build Pipeline menu. You will be taken to the Build Pipeline page.
Add Build Pipeline
To add a build pipeline, follow these steps.
- On the Main page, click the Project card. You will be taken to the Project Dashboard page.
- In the left menu, click the Build/Deploy > Build Pipeline menu. You will be taken to the Build Pipeline page.
- Build Pipeline page, click the Add Pipeline button at the top right. You will be taken to the Add Pipeline page.
- Add Pipeline Enter or configure each field on the page.
- Click the Next button.
Item Explanation Category Select Development or Operations - The actions that each role can perform differ depending on development or operations.
- Refer to Table. Role-specific permissions within the project (1) for role-specific permissions.
Jenkins URL Select Jenkinsfrom the list to add a build pipeline.Build Agent Select the agent (build environment) on which the build pipeline will run.
Click the Info icon to view the list of tools provided by the agent.Build environment OS Displays the OS information of the environment where the build agent runs. Folder type Select the folder type. - Existing folder: Add a pipeline under an already created folder in
Jenkins. - New folder: Create a new folder in
Jenkinsand add a pipeline under it.
folder Select a folder from the list or enter the name of a new folder to create. Pipeline name Please enter the pipeline name. Parameter setting Set the parameters to be used in the pipeline. Environment variable configuration Set the environment variables to be used in the pipeline. Stage Settings Configure the stage to be used in the pipeline. Configure email recipients for build results Set the recipients who will receive the result email after the pipeline completes (success/failure). Table. Additional Build Pipeline Settings
Setting Parameters
Follow these steps to set the parameters used when running the pipeline.
- Click the Parameter card.
- Click the Add button to add a parameter.
- Click the Apply button to complete the parameter settings.
Setting Environment Variables
Follow these steps to set environment variables for use in the pipeline.
- Click the Environment Variable area. The Environment Variable Registration page opens on the right.
- A list of pre-registered environment variables appears, and select the checkboxes for the environment variables you want to use.
- Check the selected environment variable and click the Apply button to complete the environment variable configuration.
Setting up the stage
To set up the stages to be used in the pipeline, follow these steps.
- Click the New Stage card. The Stage area appears on the right.
- In the Stage area, select the tool and Stage type.
- Enter the required information according to the stage type and click the Apply button to complete the stage configuration.
For detailed information about stage configuration, see Stage.
Configure email recipients for build results
To set the recipients who will receive the build results by email, follow these steps.
- Click the Mail Recipient area. The Add Mail Recipient page opens on the right.
- In the Search area, search for the recipient and add them.
- Click the Apply button to complete the mail recipient settings.
Check the final pipeline script
- Check the build pipeline script that will actually be generated. If needed, edit the script directly.
- Click the Complete button to finish adding the pipeline.
Pipeline addition result
- The added result appears on the Build Pipeline page.
Managing Build Pipelines
Build pipeline list
| Item | Explanation |
|---|---|
| status | Displays the build pipeline status.
|
| URL | Go to the Build Pipeline page of Jenkins. |
| Recent build execution history URL | Navigate to the Build Execution History page of Jenkins. |
| log | pipeline log The popup window opens. |
| Run | Run the build pipeline. |
| View more | Displays additional menu.
|
| View pipeline stage | When you click the Expand icon, the stage view expands. |
Build Pipeline Credentials
When performing build pipeline actions (run, stop, edit, delete, etc.), user credentials are required, so you may request them from the user as needed.
When integrating IDP with Jenkins
If you are not registered as a Jenkins user, when the User Registration Guide popup appears, click the Go to Jenkins link to sign up or perform your first Jenkins login.
For Jenkins without IDP integration
Jenkins credentials are not stored; when the Add Account popup appears, select Use Existing User or Create New User in Account Type to add credentials.
Run Build Pipeline
To run the build pipeline, follow these steps.
- On the Build pipeline page, click the Run button of the build pipeline you want to execute.
- If there are parameters, the Pipeline Execution Parameter Input popup window opens.
- After entering the required fields, click the Confirm button.
If the Number of executors setting for the Built-In Node in Jenkins system configuration is set to 1 or higher, a security issue may arise, preventing the pipeline from running.
- In this case, you need to contact the Jenkins administrator to change the settings.
- In the Jenkins administration menu, you can enable it by changing the Number of executors item of the Built-In Node to 0.
- Note Jenkins officially recommends avoiding running builds on the Controller Node.
View build pipeline execution logs
Follow these steps to view the build pipeline execution logs.
- On the Build Pipeline page, click the Log button of the build pipeline you want to run.
- pipeline log A popup window opens, allowing you to view the execution log.
Build pipeline build history view
To view the complete build history of the build pipeline, follow these steps.
- On the Build pipeline page, click the More icon of the build pipeline you want to view.
- Click the Build History menu. The Build History page opens.
Item Explanation Config Diff Config Diff The popup window opens. log Pipeline Log The popup window opens. Additional menu Navigate to the Build Details page. View pipeline stage Click the Expand icon to expand the stage view. Table. Build Pipeline List View Feature
Compare configuration information
You can compare the configuration information with previous build history using the Config Diff button.
Log View
Through the Log button, you can view the logs of the build history.
Build Details
You can view detailed build information via the More icon.
Modify Build Pipeline
To modify the build pipeline, follow these steps.
- On the Build pipeline page, click the More icon of the build pipeline you want to edit.
- Click the Edit Pipeline button. You will be taken to the Edit Pipeline page.
Edit the script directly
To edit the pipeline script directly, follow these steps.
- In the script editor window of the Pipeline Edit page, directly enter a script that conforms to the syntax supported by
Jenkins. - After completing the input, click the Save button to finish editing the pipeline.
Modify using the Script Generator feature
Follow these steps to modify the pipeline script using the Script Generator feature.
- On the Pipeline Edit page, change Script Generator to ON.
- Select the build agent and script type.
- After completing Stage Setup, click the Create Script button to generate the script.
- Refer to the generated script to modify the pipeline, and click the Save button to complete the pipeline modification.
Item Explanation Script Generator Turn the Script Generator feature ON/OFF. Script Basic Information Select the basic information for script generation. Existing script This is an existing script. New script This is a new script generated by the Script Generator. Script modification Refer to the newly created script and directly edit the existing script on the left. Update Jenkins Credential If the newly created script contains new credentials, click the Jenkins CredentialUpdate button. This updates (saves) the credentials in Jenkins.K8S Secret update Deploy to K8S stage: when changing the K8S Secret, click the K8S Secret Update button. Update (save) it for use during Secret creation and deployment. Table. Script Generator feature
Clone Build Pipeline
To duplicate the build pipeline, follow these steps.
- Click the More icon of the build pipeline you want to clone.
- Click the Clone Pipeline menu. The Clone Pipeline popup window opens.
- After completing the information entry, click the Save button to finish replicating the pipeline.
Item Explanation Pipeline replication information Enter the information for the pipeline to be cloned. Pipeline modification Modify the pipeline to be cloned. Table. Build Pipeline Replication Feature
Delete Build Pipeline
To delete a build pipeline, follow these steps.
- On the Build pipeline page, click the More icon of the build pipeline you want to delete.
- Click the Delete Pipeline menu. The Delete Pipeline popup window opens.
- Delete Pipeline In the popup window, click the Confirm button to complete the pipeline deletion.
Also delete the pipeline in Jenkins
- Selection: The pipeline is actually deleted from
Jenkins. - Unselected: Build pipeline is deleted only from the list and remains in
Jenkins.
1.1 - Stage
The user can view the description of stage types and each stage-specific item.
You can configure stages in Add Build Pipeline or Edit Build Pipeline.
Common Items
Stage Settings page is organized as follows.
| Item | Explanation |
|---|---|
| Tools | If you want to specify and use a particular tool other than the default tools set in the stage, select
|
| Stage types | Select the required stage from the list and enter the necessary information. |
| Stage name | Enter the stage name. |
Checkout
This stage executes the checkout command on the Git repository registered in the code repository.
Select Checkout as the stage type.
| Item | Explanation |
|---|---|
| URL | Select the code repository to perform checkout. |
| Branch name | Enter the branch name to checkout. |
Build
This is the stage that executes the command to build the application.
Select Build as the stage type.
| Item | Explanation |
|---|---|
| language | Select the programming language used by the application. |
| Build tool | Select the build tool used for building the application. Provides default Shell commands based on the selected build tool. |
| Shell command | Enter the command to use for building the application. All commands available in the Shell can be used. |
Docker Build
This stage performs the Docker image build.
Select Docker Build as the stage type.
item | Explanation | example |
|---|---|---|
Registry URL (docker push) | Select the image repository where the Docker build result image will be pushed. | |
| ID | The ID value of the account to be used for the image repository | |
| image tag pattern | The Docker image tag is automatically generated according to the selected pattern.
|
|
| Add base image repository | Add Base Image Repository A popup window opens.
| |
Registry URL (docker pull) | Select the image repository for docker pull when the repository providing the Base Image used in the Dockerfile (FROM clause, docker pull) differs from the repository of the Registry URL (docker push). | |
| Image build tool | Displays the image build tool. | |
| Pre-build command | If there are any commands that need to be run before building a Docker image, write them in shell command format. | cp target/*.jar docker/ |
| Image Build folder | If you need to run the Docker image build from a specific folder, select the checkbox and enter the folder path. | docker |
| Dockerfile | Enter the Dockerfile filename. | Dockerfile |
| Image build options | Enter it if you need to use additional options with the image build tool. | --no-cache |
| Build command | Displays the image build command that will actually be executed. | |
| Post-build command | If there are commands that need to be executed after building a Docker image, write them in Shell command format. | rm -rf docker/*.jar |
example script
The build pipeline script generated as a result of the example is as follows.
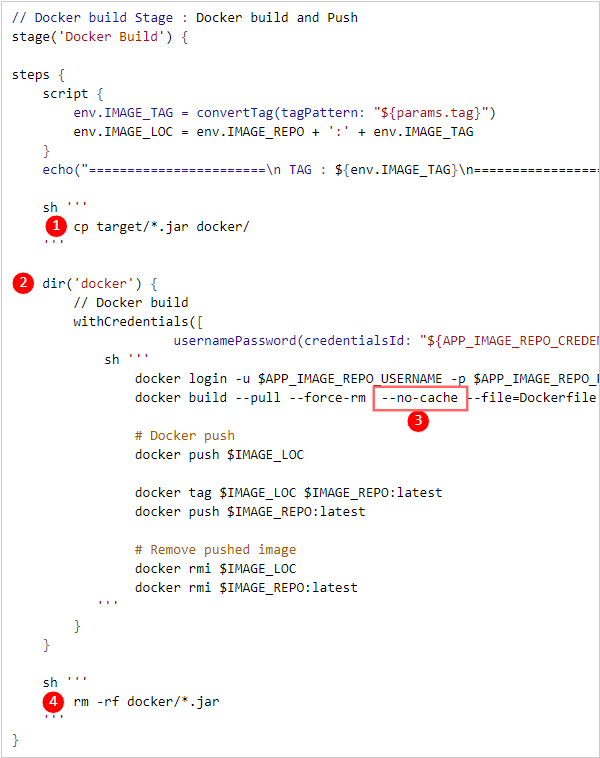
| Item | Explanation |
|---|---|
➊ | Pre-build command |
➋ | Image Build folder |
➌ | Image build options |
➍ | Post-build command |
Deploy to K8S
This is the stage that performs a Kubernetes deployment.
Select Deploy to K8S as the stage type.
Item | Explanation |
|---|---|
| type | Select deployment type
|
| K8S cluster | Select a K8S cluster
|
| namespace | Please select a namespace. |
| Helm release | Select HelmRelease. |
| Deployment method | Select deployment method
|
| Registry URL | Select the image repository where the image to be deployed to Kubernetes has been docker pushed. |
| Secret | Select the secret information input method
|
Deploy to VM
This is the stage that performs VM deployment.
Select Deploy to VM as the stage type.
| Item | Explanation |
|---|---|
| Deployment configuration | Select deployment configuration method
|
| deployment group | Select a deployment group
|
| Release Information | The contents stored in the deployment group are automatically configured. |
| Manual deployment | Select the default value for manual deployment
|
Trigger Build
This is a stage that runs the pipeline remotely.
Select Trigger Build as the stage type.
| Item | Explanation |
|---|---|
| Target pipeline | Choose the target pipeline to run remotely. The selectable items vary depending on whether the pipeline is for development or production. |
| Parameter information | It is displayed depending on whether the target pipeline’s parameters are set. The parameter information entered at pipeline execution time is used. |
Check Remote Execution Information
Remote execution information (parent/child pipelines) through the Trigger Build stage can be viewed on the Build Details screen.
Other stages
| Item | Explanation |
|---|---|
| Archive | Archive the application build results. The archived file can be downloaded from Jenkins. |
| Code Quality | This is the stage for executing the Code Quality step. |
| Custom | The user directly writes the pipeline script in the desired format. |
1.2 - Multibranch Pipeline
Users can integrate multiple branches of a code repository through a multibranch pipeline and manage them as a single job.
Starting a Multibranch Pipeline
To start using a multibranch pipeline, follow these steps.
- On the Main page, click the Project card. You will be taken to the Project Dashboard page.
- From the left menu, click the Build/Deploy > Build Pipeline menu. You will be taken to the Build Pipeline page.
Add a multibranch pipeline
To add a multibranch pipeline, follow these steps.
- Click the Project card on the Main page. You will be taken to the Project Dashboard page.
- From the left menu, click the Build/Deploy > Build Pipeline menu. You will be taken to the Build Pipeline page.
- On the Build Pipeline page, click the Add Multi-branch Pipeline button at the top right. The Add Multi-branch Pipeline popup will open.
- Add Multi-branch Pipeline In the popup window, enter each field and click the Save button.
Item Explanation Category Select development or operation - The actions that each role can perform differ depending on development or operation.
- Refer to Table. Role-specific permissions within the project (1) for role-specific permissions.
Jenkins URL Select the Jenkins to add a multibranch pipeline from the list. Folder type Select folder type - Existing folder: Add a pipeline under a folder that already exists in Jenkins.
- New folder: Create a new folder in Jenkins and add a pipeline under it.
Folder name Select a folder from the list or enter the name of a new folder to create. pipeline name Please enter the pipeline name. Git Repository Select the code repository to perform builds per branch.
Only code repositories registered in the DevOps Console project can be selected.Branch filtering You can filter the branch names to build among the branches registered in the code repository.
When using filtering, enter the filter condition as a Java regular expression.Jenkinsfile path Enter the path within the code repository of the Jenkinsfile where the pipeline build is defined. Table. Multi-branch pipeline additional information input items
Managing Multi-Branch Pipelines
Multi-branch pipeline list
| Item | Explanation |
|---|---|
| Multi-branch icon and label | Icons and labels representing a multibranch pipeline are displayed. |
| URL | Navigate to the Jenkins Multibranch Pipeline page. |
| Scan log | Multi-branch pipeline scan log The popup window opens. |
| Scan | Scanning the multibranch pipeline. |
| View more | Displays additional menu.
|
Scanning a multibranch pipeline
To scan a multibranch pipeline, follow these steps.
- On the Build Pipeline page, click the Scan button of the multibranch pipeline card you want to scan.
- Click the Confirm button in the confirmation popup.
View multi-branch pipeline scan logs
To view the scan logs of a multibranch pipeline, follow these steps.
- Build Pipeline page, click the Scan Log button of the multibranch pipeline card for which you want to view the scan log. The Multibranch Pipeline Scan Log popup window opens.
- Multi-branch pipeline scan log After reviewing the contents in the popup window, click the Confirm button to exit.
View multi-branch pipeline build history
To view the build history for each branch in a multibranch pipeline, follow these steps.
- On the Build Pipeline page, click the More icon of the multibranch pipeline card for which you want to view the build history.
- Click the Build History menu. You will be taken to the Branch-specific Build History screen of
Jenkins. (This feature is not provided in DevOps Console)
Modify multi-branch pipeline
To modify a multibranch pipeline, follow these steps.
- On the Build Pipeline page, click the More icon of the multibranch pipeline card you want to edit.
- Click the Edit Pipeline menu. You will be taken to the Settings screen of
Jenkins. (Feature not provided in DevOps Console)
Delete Multi-branch Pipeline
To delete a multibranch pipeline, follow these steps.
- On the Build Pipeline page, click the More icon of the multibranch pipeline card you want to delete.
- Click the Delete Pipeline menu. The Delete Pipeline popup window opens.
- In the Delete Pipeline popup, select whether to Delete the pipeline in Jenkins as well, and click the Confirm button.
Delete the pipeline in Jenkins as well.
- Selection: The pipeline is actually deleted in
Jenkins. - Unselected: Build pipeline is deleted only from the list and remains in
Jenkins.
2 - Kubernetes Deployment
Users can view the list of Helm releases used in the project and their deployment status. Depending on the development classification, the releases appear in the development or production list when the project is created or a chart is installed.
Users can differentiate deployments using icons.
 Helm chart
 Istio
Istio Workload
 Canary(Canary)
 Blue/Green (Blue-Green)
 ArgoCD
Getting Started with Kubernetes Deployment
To start using Kubernetes deployment, follow these steps.
- On the Main page, click the Project card. You will be taken to the Project Dashboard page.
- Click the Build/Deploy > Kubernetes Deploy menu in the left menu. You will be taken to the Kubernetes Deploy page.
2.1 - Helm Release
HelmRelease is an instance of a chart running on a Kubernetes cluster. Users can create a HelmRelease when creating a project or via the HelmInstall menu.
Getting Started with Helm Release
To start HelmRelease, follow these steps.
- From the Main page, click the Project card. You will be taken to the Project Dashboard page.
- Click the Build/Deploy > Kubernetes Deploy menu in the left menu. You will be taken to the Kubernetes Deploy page.
Item Explanation Name Displays the deployment name. Click to view detailed information. Chart Displays the Helm chart information used for deployment. Cluster/Namespace Displays the deployed cluster/namespace. Pod status Displays the current status of the Pod. Deployment result Displays the deployment execution result. Deployment time Displays the deployment execution time. Refresh Refresh the current items. The items that will be updated are the Pod status, deployment result, and deployment time. Delete Delete the current item. Table. Helm release items - Kubernetes deployment page, click name in the Helm release list. You will be taken to the deployment details page.
Add Helm Release
Helm install
You can add a Helm release through Helm install.
Add related Helm release
To add the related Helm release, follow these steps.
- Click the Project card on the Main page. You will be taken to the Project Dashboard page.
- Click the Build/Deploy > Kubernetes Deployment menu in the left menu. You will be taken to the Kubernetes Deployment page.
- Click the Add related Helm release button. The Add related Helm release popup opens.
- Add related Helm release Enter each item in the popup window.
- Click the Save button to complete adding the Helm release.
Item Explanation Helm release already registered in the project Shows the Helm release already registered in the project. - A Helm release already registered in the project cannot be added.
Table. Items displayed when adding related Helm release
Managing Helm Release Secrets
Getting Started with Helm Release Secrets
In HelmRelease secrets, you can manage the ImagePull Secret used for images deployed through the build pipeline in HelmRelease.
To start HelmRelease secret management, follow the steps below.
- On the Deployment Details page, click the Edit Credentials icon to the right of Helm Release.
- Helm Release Secret The popup window opens.
Adding a secret to a Helm release
To add a Helm release secret, follow these steps.
- On the Deployment Details page, click the Edit Authentication Info icon to the right of the Helm Release. The Helm Release Secret popup will open.
- Helm Release Secret popup window, if you need to add a secret to pull a private Chart Image, click the Add button in the Chart Install Secret area. The Add Secret popup will open.
- If you need to add a secret required to pull the App Image used during build/deployment, click the Add button in the ImagePull Secret area. The Add Secret popup will open.
- Add Secret In the popup window, enter the secret information and click the Save button to complete the addition.
Item Explanation Registry URL From the list of images registered in Image Repository, select the image that ImagePull Secret will use. Secret Select secret input method - Auto-generate: Automatically create a secret using the credentials of the selected image repository from the Docker URL.
- Use existing secret: Select and use one of the already created secrets.
Table. Additional Helm Release Secret Configuration Items
Edit Helm Release Secret
To modify the Helm release secret, follow these steps.
- On the Deployment Details page, click the Edit Authentication Info icon to the right of the Helm Release. The Helm Release Secret popup will open.
- In the HelmRelease secret list, click the secret name you want to edit. Secret Edit popup opens.
- Edit the content and click the Save button to complete the edit.
Delete Helm release secret
To delete a Helm release secret, follow these steps.
- On the Deployment Details page, click the Edit Authentication Info icon to the right of the Helm Release. The Helm Release Secret popup will open.
- Click the secret name you want to delete from the Helm release secret list.
- Click the Delete button to complete the deletion.
Modify K8S credentials
K8S credentials are the authentication information used to verify permission to use a K8S cluster/namespace when performing a deployment in the build pipeline.
To modify the K8S credentials, follow these steps.
- On the Deployment Details page, click the Edit Credentials icon to the right of K8S Cluster/Namespace. The Edit Credentials popup will open.
- Authentication information is fixed to the logged-in user’s account. Click the Save button to edit.
- In the confirmation popup, click the Confirm button.
- K8S authentication information will be changed to the logged-in user.
Check the values.yaml used in the Helm release
To view the contents of values.yaml, follow these steps.
- On the Deployment Details page, click the History tab.
- Click the View icon in the Values column. Revision # - Values.yaml The popup window opens.
- Check the contents of the
values.yamlfile.
Comparing values.yaml used in Helm release
To compare the values.yaml contents used in each release, follow the steps below.
- Click the History tab on the Deployment Details page.
- In the list, click the check box of each of the two revisions you want to compare.
- Click the Yaml Diff button. The Yaml Diff popup window opens.
- Yaml Diff (Revision #>#) Check the comparison details in the popup window.
Rollback Helm Release
To roll back a Helm release to a previous revision, follow these steps.
- On the Deployment Details page, click the History tab.
- Click the Rollback button of the revision you want to roll back. The Rollback popup window will open.
- Click the Confirm button to complete the rollback.
Upgrade Helm Release
To upgrade HelmRelease, follow the following procedure.
- On the Deployment Details page, click the History tab.
- In the Values column, click the View icon. The Revision # - Values.yaml popup window opens.
- Modify the contents of Current Values.yaml, and click the Upgrade button. The Upgrade popup window will open.
- Check the upgrade information.
- Click the Run button to complete the upgrade.
View Pod logs
To view the logs of the Pod related to a Helm release, follow these steps.
- On the Deployment Details page, click the Release Object tab.
- Click the view icon in the LOG column of the Pod entry. The Log popup window opens.
Item Explanation container Select the container from which you want to output logs. Real-time refresh Refresh the log output in real time. Refresh stopped Stop real-time refresh. Download Download the Pod logs to a file. Table. Log popup window function description
Delete Helm Release
To delete HelmRelease, follow the steps below.
- On the Deployment Details page, click the Delete button at the lower right of the Helm Release. The Delete Helm Release popup opens.
- Click the Confirm button to complete the deletion.
Also execute the helm delete command.
- Select: The Helm release is actually deleted from the cluster.
- Unselected: Kubernetes deployment is removed only from the list and remains in the cluster.
2.2 - Workload
A workload is an application that runs on Kubernetes, and users can add workloads to the DevOps Console for management.
The workload types that can be managed from the DevOps Console are Deployment, StatefulSet, and DaemonSet.
Getting Started
To begin using the workload, follow these steps.
- On the Main page, click the Project card. You will be taken to the Project Dashboard page.
- Click the Build/Deploy > Kubernetes Deploy menu in the left menu. You will be taken to the Kubernetes Deploy page.
- On the Kubernetes Deployment page, click the workload name.
Item Explanation Workload type Displays the workload type. DeploymentStatefulSetDaemonSet
Name Displays the workload name. Click to view detailed information. Chart Displays the Helm chart information used for deployment. Cluster/Namespace Displays the deployed cluster/namespace. Pod status Displays the current status of the Pod. Deployment result Displays the deployment execution result. Deployment time Displays the deployment execution time. Refresh Refresh the current items. The items that will be updated are the Pod status, deployment result, and deployment time. Delete Delete the current item. Table. Workload screen items
Add workload
To add a workload, follow the steps below.
- On the Main page, click the Project card. You will be taken to the Project Dashboard page.
- Click the Build/Deploy > Kubernetes Deploy menu in the left menu. You will be taken to the Kubernetes Deploy page.
- On the Kubernetes deployment page, click the Add workload menu. The Add workload popup opens.
- Add Workload Enter the information in the popup window and click the Save button.
- In the confirmation popup, click the Confirm button to complete adding the workload.Item
Explanation Query target Only workloads deployed with the same Base image as the App template used when the project was first created are displayed. Workload already registered in the project Shows the workload already registered in the project. - Workloads already registered in the project cannot be added.
Table. Additional Workload Input Items
Modify K8S authentication information
K8S credentials are the authentication information used to verify permission to use a K8S cluster/namespace when performing a deployment in the build pipeline.
To modify the K8S credentials, follow these steps.
- On the Deployment Details page, click the Edit Credentials icon to the right of K8S Cluster/Namespace. The Edit Credentials popup will open.
- Authentication information is fixed to the logged-in user’s account. Click the Save button to edit.
- In the confirmation popup, click the Confirm button.
- K8S authentication information will be changed to the logged-in user.
Rollback Workload
To roll back the workload to a previous image, follow these steps.
- On the Main page, click the Project card. You will be taken to the Project Dashboard page.
- In the left menu, click the Build/Deploy > Kubernetes Deployment menu. You will be taken to the Kubernetes Deployment page.
- Kubernetes deployment page, click the workload name to roll back. You will be taken to the Workload details page.
- Click the Details tab on the Workload Details page.
- In the Details tab list, click the Rollback button in the row that contains the image you want to roll back. The Rollback popup window opens.
- Rollback popup window, click the desired button to complete the rollback.
- Recreate
- Rolling Update
Add recipient to deployment results
To add a distribution result recipient, follow these steps.
- Click the Deployment Result Recipients tab on the Workload Details page.
- Click the Add button on the Distribution Result Recipients tab. The Add Distribution Result Recipients popup window opens.
- Add Distribution Result Recipients In the popup window, select the target and click the Confirm button to complete adding distribution result recipients.
- Search button or click an entry in the list to add the recipient to the lower part of the popup.
- Added recipients can be removed by clicking the X icon on the right.
Delete workload
To delete the workload, follow these steps.
- On the Kubernetes deployment page, click the X icon of the workload you want to delete.
- In the confirmation popup, click the Confirm button to complete the deletion.ReferenceWorkloads are not deleted in the actual cluster.
If you want to delete in the actual cluster, delete it using the same method you used to initially deploy the workload.
2.3 - Blue/Green Deployment
Users can perform blue/green deployments using Ingress or Service.
Adding a blue/green deployment means creating a new K8S Ingress or K8S Service so that the two Helm releases can be swapped.
Only two Helm releases that have the same project, cluster, namespace, release type, chart name, chart version, development classification can be grouped.
Starting Blue/Green Deployment
To start using blue/green deployment, follow these steps.
- On the Main page, click the Project card. You will be taken to the Project Dashboard page.
- Click the Build/Deploy > Kubernetes Deploy menu in the left menu. You will be taken to the Kubernetes Deploy page.Item
Explanation Name Displays the blue/green deployment name. Click to view detailed information. Cluster/Namespace Displays the deployed cluster/namespace. (operation) Displays information about the currently deployed Helm release. (operational standby) Shows the Helm release that will be the next version in operation. Using blue/green switching, the standby switches to active. Delete Delete the current item. Table. Kubernetes deployment screen Blue/Green deployment card items - Click the name of the Blue/Green deployment you want to start from the deployment list on the Kubernetes deployment page. You will be taken to the Deployment details page.
Add blue/green deployment
To add a blue/green deployment, follow these steps.
- Click the Project card on the Main page. You will be taken to the Project Dashboard page.
- Click the Build/Deploy > Kubernetes Deploy menu in the left menu. You will be taken to the Kubernetes Deploy page.
- Click the Add Blue/Green Deployment button at the top right of the Kubernetes deployment page. The Add Blue/Green Deployment popup opens.
- Add Blue/Green deployment After entering the information in the popup window, click the Save button to complete adding the Blue/Green deployment.Item
Explanation Category Select Development, Operations - The actions each role can perform differ depending on the Development or Operations classification.(Table. Role-based permissions within the project (2))
Blue/Green deployment name Enter the deployment name. Operation Release and Jenkins Job selection - Release name: Select the name of the currently running Helm release from the list.
- Jenkins Job: Select the Jenkins Job from the list to build/deploy the selected Helm release.
Standby Release and Jenkins Job selection - Release name: Select the name of the Helm release to be applied to production in the next version from the list.
- Jenkins Job: Select the Jenkins Job from the list to build/deploy the selected Helm release.
K8S cluster/namespace Displays the K8S cluster/namespace where the Helm release is installed. Type classification Select whether to use Ingress or Service to perform a blue/green switch. New classification Choose whether to create a new Ingress or Service, or use an existing one. Name Enter name - New: Enter the name of an Ingress or Service.
- Existing: Select an already created Ingress or Service from the list.
Service (Operation) Select the Kubernetes Service related to the currently running Helm release from the list. Service (Operational Standby) Select the Kubernetes Service related to the Helm release that will be applied to operations in the next version from the list. Rules Enter the information to be used for Ingress. Table. Ingress type input items when adding blue/green deploymentItem Explanation type Select the type of Kubernetes Service from the list ClusterIPNodePortLoadBalancer
Deployment (Production) Select the Kubernetes Deployment related to the currently running Helm release from the list. Deployment (Operational standby) Select the Kubernetes Deployment related to the Helm release that will be operated in the next version from the list. Ports Enter the information to be used by the Service. Table. Service type input items when adding Blue/Green deployment
Replace Blue/Green
To replace the blue/green, follow these steps.
- Click the Blue/Green Switch button on the Deployment Details page. The Blue/Green Switch popup opens.
- In the Blue/Green replacement popup, click the Confirm button to complete the Blue/Green replacement.
- The Helm releases for production and staging are being swapped.
- A replacement record will be added.
Check the yaml of Ingress or Service for blue/green deployment
To check the yaml of the Ingress or Service used in blue/green, follow these steps.
- On the Deployment Details page, click the view icon for Ingress YAML or Service YAML. The Ingress YAML or Service YAML popup window opens.
- Ingress YAML or Service YAML popup window, review the contents and click the Confirm button to exit.
Managing Jenkins Jobs for Blue/Green Deployments
Jenkins Job View Log
To view the Jenkins Job log, follow these steps.
- On the Deployment Details page, click the Log button in the Jenkins Job entry for the desired release. The Pipeline Log popup window opens.
- Pipeline Log After confirming the log in the popup window, click the Confirm button.
Running a Jenkins Job
To run a Jenkins job, follow these steps.
- On the Deployment Details page, click the Run button in the Jenkins Job entry for the desired release. The Enter Pipeline Execution Parameters popup will open.
- Pipeline Execution Parameter Input In the popup window, enter or select each item, then click the Confirm button to complete the Jenkins Job execution.
Modify blue/green deployment
To modify a blue/green deployment, follow these steps.
- Deployment Details page, click the Edit button. The Blue/Green Deployment Edit popup window opens.
- Blue/Green Deployment Edit In the popup window, modify the desired items and click the Save button to complete the edit.
Delete blue/green deployment
To delete a blue/green deployment, follow these steps.
- Deployment Details page, click the Delete button. The Blue/Green Deployment Delete popup opens.
- Blue/Green deployment deletion in the popup window, select whether to execute the Ingress/Service deletion command, and click the Confirm button to complete the deletion.
Execute Ingress/Service deletion command
- Selection: The Ingress or Service used for blue/green deployment is actually deleted from the cluster.
- Unselected: Ingress or Service used for blue/green deployment is not deleted and remains in the cluster.
2.4 - Canary Deployment
The user can add a canary deployment.
Adding a canary means configuring two Helm releases together so that a canary test can be performed.
Only two Helm releases that have the same Project, Cluster, Release Type, Chart Name, Chart Version, and Development Classification can be grouped.
Getting Started with Canary Deployment
To start using Canary, follow these steps.
- On the Main page, click the Project card. You will be taken to the Project Dashboard page.
- Click the Build/Deploy > Kubernetes Deploy menu in the left menu. You will be taken to the Kubernetes Deploy page.
Item Explanation Name Displays the Canary name. Click to view detailed information. cluster Displays the deployed cluster. (operation) Displays the currently running Helm release. (Canary) Displays the HelmRelease that is in Canary. Exit Shutting down Canary. Table. Kubernetes deployment screen Canary card items - On the Kubernetes deployment page, click the name of the canary you want to use in the deployment list. You will be taken to the deployment details page.
Add Canary
To add a canary, follow these steps.
Canary is supported in the following environments. Verify before adding Canary.
Kubernetesv1.17or laternginx-ingressv0.29.0or later
- On the Main page, click the Project card. You will be taken to the Project Dashboard page.
- Click the Build/Deploy > Kubernetes Deploy menu in the left sidebar. You will be taken to the Kubernetes Deploy page.
- Click the Add Canary button at the top right of the Kubernetes Deployment page. The Add Canary popup opens.
- Add Canary In the popup window, after entering the information, click the Save button to complete adding the canary.
Item Explanation Category Select Development or Operations. - The actions each role can perform differ depending on whether it is Development or Operations. (Table. Permissions by role within the project (2))
Canary name Enter the canary name. Operation - Release name: Select the name of the currently deployed Helm release from the list.
- Jenkins Job: Select the Jenkins job for building/deploying the currently deployed Helm release from the list.
Canary - Release name: Select the name of the Helm release that will be the next version in operation from the list.
- Jenkins Job: Select the Jenkins job that will build/deploy the Helm release for the next operational version from the list.
K8S cluster Displays the K8S cluster where the Helm release is installed. Ingress annotation Enter the annotation item you want to apply among the Canary annotations provided by nginx-ingress. Table. Canary Additional Input Items
Check Canary’s Ingress YAML
Operational Ingress YAML used in Canary, to view the Canary Ingress YAML, follow these steps.
- On the Deployment Details page, click the View icon for Production Ingress YAML and Canary Ingress YAML. The Ingress YAML popup opens.
- Ingress YAML Check the contents in the popup window and click the Confirm button to exit.
Managing Canary’s Jenkins Job
View Jenkins Job log
To view the Jenkins Job log, follow these steps.
- On the Deployment Details page, click the Log button in the Jenkins Job entry for the desired release. The Pipeline Log popup window will open.
- Pipeline Log After confirming the log in the popup window, click the Confirm button.
Running a Jenkins Job
To run a Jenkins job, follow these steps.
- On the Deployment Details page, click the Run button in the Jenkins Job entry for the desired release. The Enter Pipeline Execution Parameters popup will open.
- Pipeline Execution Parameter Input In the popup window, enter or select each item, then click the Confirm button to complete the Jenkins job execution.
Modify Canary
To modify the canary, follow these steps.
- On the Deployment Details page, click the Edit button. The Canary Edit popup window opens.
- Canary Edit In the popup window, modify the desired items and click the Save button to complete the edit.
Recover Canary
If the ingress annotation data for the production and canary releases fails to operate correctly due to a Helm release change, restore it so it works properly again.
To restore the canary, follow these steps.
- On the Deployment Details page, click the Restore button. The Restore popup window opens.
- In the Recovery popup, click the Confirm button to complete the recovery.
Delete Canary (termination)
To shut down Canary, follow these steps.
- On the Deployment Details page, click the Terminate button. The Canary Termination popup window opens.
- Canary termination In the popup window, select the desired item and click the Confirm button to complete the termination.item
Explanation Canary release Select Canary Release - Rollback Ingress Host: Restores the Ingress host of the Helm release used for the canary to its original value.
- Delete Helm Release: Deletes the Helm release that was used for the canary.
Production Release Select the production release - Upgrade to the canary image: Upgrade the production Helm release to the image used in the canary. You can modify the
Values.yamlfile. - No action: End the canary without any changes to the production Helm release.
Table. Canary termination selection items
2.5 - Istio
Gateway- Virtual Service
- Destination Rule
Getting Started with Istio
To start using Istio, follow these steps.
- On the Main page, click the Project card. You will be taken to the Project Dashboard page.
- From the left menu, click the Build/Deploy > Kubernetes Deploy menu. You will be taken to the Kubernetes Deploy page.
Item Explanation Name Displays the Istio name. Click to view detailed information. Cluster/Namespace Displays the deployed cluster/namespace. Delete Delete the current item. Table. Kubernetes deployment screen Istio card items - In the deployment list on the Kubernetes Deployment page, click the name of the Istio you want to use. You will be taken to the Istio Details page.
Add Istio
To add Istio, follow the steps below.
- Click the Project card on the Main page. You will be taken to the Project Dashboard page.
- Click the Build/Deploy > Kubernetes Deploy menu in the left menu. You will be taken to the Kubernetes Deploy page.
- Click the Add Istio button at the top right of the Kubernetes deployment page. Add Istio popup opens.
- Add Istio In the popup window, after entering the information, click the Save button to add Istio.
Item Explanation Category Select Development or Operations. K8S cluster Please select a K8S cluster. Namespace Select a namespace.
Only namespaces that can use Istio are displayed in the list.Table. Istio Additional Input Items
Istio has been added, but since no Istio objects have been created, Istio-related functionality cannot be used yet.
Add Istio object using the creation wizard or Add Istio object using object addition to add and use an Istio object.
Istio objects
Adding Istio object
Add Istio object using the creation wizard
- On the Istio details page, click the Istio objects tab.
- Click the Create Wizard button in the Istio objects tab. You will be taken to the Create Wizard page.
Helm Release
This step selects the Helm release to use with Istio.
- Create Wizard page, click the Add button to select all Helm releases to be used in Istio.
- Click the Start button. The Gateway screen appears.
Gateway
The Istio Gateway is the frontmost object that receives traffic from external sources.
- On the Gateway screen of the Creation Wizard page, select whether to create a Gateway.
- If you want to create a Gateway, enter each item.
- If you do not want to create a Gateway, select Pass without creating an Object.
- Click the Next button. The Destination Rule screen appears.
Item Explanation Name Prefix Specify the prefix name of the Istio Gateway object to be created. Host Specifies the domain of the Gateway Object accessed from outside. Table. Creation Wizard Gateway Input Items
Destination Rule
Destination Rule defines traffic policies in Istio.
- On the Create Wizard page’s Destination Rule screen, select whether to create a Destination Rule.
- If you want to create a Destination Rule, fill in each field.
- If you do not want to create a Destination Rule, select Pass without creating the Object.
- Click the Next button. The Virtual Service screen appears.
Item Explanation Name Prefix Enter the Prefix name for the Istio Destination Rule Object to be created. LoadBalancer Select the load balancer mode. ROUND_ROBIN: Round RobinLEAST_CONN: Continue using the last connectionRANDOM: Random
maxConnections Enter the maximum allowed number of connections. Table. Creation Wizard Destination Rule Input Items
Virtual Service
The Virtual Service routes incoming traffic to a service.
- On the Creation Wizard page’s Virtual Service screen, if you want to create a Virtual Service, fill in each field.
- Click the Complete button to finish adding an Istio object using the creation wizard.
Item Explanation Name Prefix Enter the prefix name for the Istio Virtual Service to create. Prefix-Uri Enter a prefix URI to enable routing when traffic arrives at that URI. Helm Release Weight If there are two or more helm releases, enter the connection weight. The sum of each number must be 100.Table. Create Wizard Virtual Service Input Items
Add an Istio object using Object addition
- On the Istio details page, click the Istio objects tab.
- Click the Add Object button in the Istio objects tab. The Add Object popup window opens.
- Add Object In the popup window, fill in each field and click the Save button to finish adding the Istio object.
Item Explanation Object Select the Object to create GatewayVirtual ServiceDestination Rule
input The input fields differ for each object. Refer to the creation wizard for input GatewayVirtual ServiceDestination Rule
Generate Click the Generate button. Based on the information entered earlier, a default Yaml will be generated in the Yaml area. Yaml Modify the base YAML to complete the final YAML of the object you want to generate. Save Click the Save button to create an Object. Table. Screen items for adding an Istio object using Object addition
Modify Istio object
To modify an Istio object, follow these steps.
- On the Istio details page, click the Istio objects tab.
- In the Istio objects tab, click the Object you want to edit from the Istio object list. The Object popup opens.
- Object In the popup window, edit the Yaml and click the Save button to complete the Istio object modification.
Delete Istio object
To delete an Istio object, follow these steps.
- On the Istio Details page, click the Istio objects tab.
- In the Istio objects tab, click the Object you want to edit from the Istio object list. The Object popup window will open.
- In the Object popup, click the Delete button to complete the deletion of the Istio object.
Helm release
Add Helm Release
To add the Helm release used by Istio, follow these steps.
- On the Istio details page, click the Helm Release tab.
- In the Helm Release tab, click the Add button. The Add Helm Release popup opens.
- Add Helm Release In the popup window, fill out each field and click the Save button to complete adding the Helm release.
Delete Helm Release
To delete the Helm release used by Istio, follow these steps.
- On the Istio Details page, click the Helm Release tab.
- In the Helm release tab, select the checkbox of the Helm release you want to delete and click the Delete button.
- In the confirmation popup, click the Confirm button to complete the Helm release deletion.
Delete Istio
To uninstall Istio, follow these steps.
- On the Istio Details page, click the Delete button at the lower right.
- Click the Confirm button in the confirmation popup to complete the deletion.
2.6 - ArgoCD
ArgoCD is software used for GitOps deployments in a Kubernetes environment. Users can configure deployments via ArgoCD when creating a project or through the Kubernetes deployment menu.
Getting Started with ArgoCD
To view the details of an ArgoCD application, follow these steps.
- Main page, click the Project card. You will be taken to the Project Dashboard page.
- Click the Build/Deploy > Kubernetes Deploy menu in the left menu. You will be taken to the Kubernetes Deploy page.
- Click the ArgoCD application card you want to start from the list. You will be taken to the deployment details page.Item
Explanation Name Displays the ArgoCD project name/ArgoCD URL. Git information Displays the Git information used for deployment. Cluster/Namespace Displays the deployed cluster/namespace. App status Displays the current state of the App. Deployment result Displays the current Sync status. Deployment time Displays the deployment execution time. Refresh Click the Refresh icon to refresh the current item. The items that are updated are App status, deployment result. Delete Delete the current item. Table. ArgoCD Application Detailed ItemsItemExplanation Modify ArgoCD app secret Click the Edit credentials icon to the right of the application name to open a popup that manages the image secret used for deployment. Go to the ArgoCD app The actual ArgoCD tool’s Application Details screen opens in a new window. Table. ArgoCD Deployment Details
Adding an ArgoCD Application
Create and add a new ArgoCD application - generate with Helm chart
To create and add a new ArgoCD application using a Helm chart, follow the steps below.
- Click the Project card on the Main page. You will be taken to the Project Dashboard page.
- In the left menu, click the Build/Deploy > Kubernetes Deployment menu. You will be taken to the Kubernetes Deployment page.
- Click the Create New ArgoCD App button at the top right. You will be taken to the Create New ArgoCD App page.
- Enter ArgoCD information and click the Confirm button. The authentication information input field appears.
- Enter authentication information and click the Connection Test button.
- Application Basic Information, Deployment Target K8S Cluster input fields appear.
- Enter the Application Name and click the Check Duplicate button.
- Enter Project Name.
- Select Repository type as Create a new repository as a Helm chart.
- Select a K8S cluster and namespace.
- Select Helm chart. Information about the Helm chart and the Helm chart Git repository will be displayed.
- After modifying the contents of the default Values.yaml included in the chart located in the K8S cluster Values of the Helm chart, click the Validation Check button.
- After entering the Helm chart Git repository information, click the Connection Test button.
- Manifest Keys Enter the information.
- Click the Create button to complete creation.
Deploy Strategy is not a required input.| Item | Explanation |
|---|---|
| URL input method | Select URL input method
|
| ArgoCD URL | After entering the ArgoCD URL, click the Confirm button. |
| Authentication information | Enter the credentials and click the Connection Test button. |
| Application name | Enter the ArgoCD application name and click the Check Duplicate button. |
| Project name | Enter the project name of the ArgoCD application. |
| Repository type | Select repository type
|
| K8S cluster | Select the target cluster for deployment
|
| Namespace | Select the target namespace for deployment
|
| Helm chart | Please select a Helm chart. |
| Helm chart Git repository | Enter the information of the Git repository to be used for GitOps. |
| Manifest Key Information | Enter the Manifest file/key information to be used for continuous deployment. |
Create and add a new ArgoCD application – create from an existing Git repository
To create and add a new ArgoCD application using an existing Git repository, follow the steps below.
- Main page, click the Project card. You will be taken to the Project Dashboard page.
- Click the Build/Deploy > Kubernetes Deploy menu in the left menu. You will be taken to the Kubernetes Deploy page.
- Click the Create New ArgoCD App button at the top right. You will be taken to the Create New ArgoCD App page.
- Enter ArgoCD information and click the Confirm button. The Authentication information input field appears.
- Enter authentication information and click the Connection Test button.
- Application Basic Information, Deployment Target K8S Cluster input fields appear.
- Enter the Application Name and click the Check Duplicate button.
- Enter the Project Name.
- Select Repository type as Use existing Git repository.
- Select K8S cluster and namespace.
- Select Helm chart. Information about Helm chart and Helm chart Git repository appears.
- After modifying the contents of the default Values.yaml included in the chart located in the K8S cluster Values of the Helm chart, click the Validation Check button.
- Enter the Helm chart Git repository information and click the Connection Test button.
- Enter the Manifest Root path, Manifest type, (values.yaml path if the Manifest type is Helm), and the Manifest file and key information (Image repository, Image tag, Image Secret, Deploy Strategy) for Manifest Keys.
- Click the Create button to complete creation.ReferenceIn the Manifest file and key information, the Deploy Strategy is not a required input.Item
Explanation URL input method Select URL input method - Select from list: ArgoCD tools registered as tools appear.
- Enter manually
ArgoCD URL After entering the ArgoCD URL, click the Confirm button. authentication information Enter the authentication information and click the Connection Test button. Application name Enter the ArgoCD application name and click the Check Duplicate button. Project name Enter the project name of the ArgoCD application. Repository type Select repository type - Create a new repository with Helm chart: Use a Helm chart to create a Git repository for
GitOps. - Use existing Git repository
K8S cluster Select the target cluster for deployment - Only clusters that the user has permission to access can be selected from the clusters in the DevOps Console K8S cluster.
namespace Select the target namespace for deployment - In the K8S cluster, only namespaces that the user has access rights to can be selected from the chosen cluster.
Git repository Enter the Git repository information that stores the Manifest data for creating the ArgoCD application to be used in GitOps.Manifest Keys information Enter the information required for continuous deployment (Manifest Root path, Manifest type ( Helm,Customize,Directory), Manifest file/key information).Table. New ArgoCD application creation - Settings for creating with existing Git repository
Add existing ArgoCD application
To add an existing ArgoCD application, follow these steps.
- Click the Project card on the Main page. You will be taken to the Project Dashboard page.
- In the left menu, click the Build/Deploy > Kubernetes Deployment menu. You will be taken to the Kubernetes Deployment page.
- Click the Add ArgoCD App button at the top right. Navigate to the Add ArgoCD App page.
- Enter the ArgoCD URL and click the Confirm button.
- The input screen for the existing application name and credentials appears.
- Enter the Existing Application Name and Authentication Information, then click the Connection Test button.ReferenceIf the Git repository linked to the ArgoCD application is not registered in the DevOps Console, the URL Check popup window opens. Follow steps 7–8.
- A URL Check popup opens to identify the Git repository linked to the ArgoCD application.
- After modifying the Base URL, click the Confirm button.
- The Git repository information linked to the application is displayed.
- Enter the authentication information for the Git repository and click the Connection Test button.
- Enter the
yamlfile and key to modify among the Manifest Keys items. - After entering the information, click the Save button to complete Add ArgoCD Application.item
Explanation URL input method Select URL input method - Select from list: ArgoCD tools registered as tools appear.
- Enter manually
ArgoCD URL After entering the ArgoCD URL, click the Confirm button. Application name / authentication information Enter the Existing application name and authentication information, then click the Connection Test button. Git repository credentials Enter the credentials for the Git repository used by the selected existing application. Image Repo Key Enter the path to the Yaml file that records the image repository information and the Key value. If the key values for repository and tag are the same, enter the same value. Image Tag Key Enter the path to the Yaml file containing the image tag information and the Key value. If the repository and tag have the same key, enter the same value. Image Secret Key Enter the path to the Yaml file that contains the image secret information and the Key value. Deploy Strategy Key Enter the path to the Yaml file containing the deployment strategy information and the Key value. (It is not required.) Table. Adding Existing ArgoCD Application Configuration Items
Managing ArgoCD Applications
To view the details of an ArgoCD application, follow these steps.
- Main page, click the Project card. You will be taken to the Project Dashboard page.
- Click the Build/Deploy > Kubernetes Deployment menu in the left sidebar. You will be taken to the Kubernetes Deployment page.
- Click the ArgoCD application card you want to start from the list. You will be taken to the deployment details page.
Modify Manifest information
Follow these steps to modify the Manifest information.
- Git related information Click the tab.
- Click the Edit icon next to Manifest information. The Edit Manifest key information popup opens.
- Modify the Manifest key value and click the Save button.
Modify ArgoCD authentication information
To modify the ArgoCD credentials, follow these steps.
- Click the Edit icon next to the ArgoCD User ID. The Edit Authentication Info popup will open.
- Modify the authentication information value and click the Save button to complete the edit.
Modify linked Git repository credentials
To modify the authentication information of the linked Git repository, follow these steps.
- Click the Edit icon next to Linked Git ID. The Edit authentication information popup opens.
- Modify the authentication information and click the Save button to complete the changes.
Configure Sync
To change the Sync settings, follow the steps below.
- Click the Sync icon next to Current Sync. The ArgoCD App Sync popup opens.
- Enter the content to edit and click the Sync button to complete the Sync settings.
Item Explanation Revision Select the branch to synchronize. Sync Options Select the synchronization-related options. Synchronize Resources Select the synchronization target. Table. Sync SettingsReferenceArgoCDFor detailed information about synchronization, please refer to the official site.
Configure Auto-Sync
To change the Auto-Sync settings of an ArgoCD application, follow these steps.
- Click the Edit icon next to Auto‑Sync. The Auto‑Sync option popup window opens.
- Edit and click the Save button to complete the settings.
Item description Prune Resources When the Git settings are deleted, choose whether to also delete the synchronization target. Self Heal In the cluster, when the value of synchronization target changes, select whether to automatically change it to the value defined in Git. Table. Auto-Sync Settings
Managing Application Secrets
If it is an ArgoCD application created with a Helm chart, you can add, modify, or delete the application’s secrets.
To start application secret management, follow these steps.
- Click the application secret to the right of the application name.
- Application Secret Settings popup window opens.
Add application secret
To add an application secret, follow these steps.
- Click the Edit authentication information icon next to the Application name. The Application secret settings popup opens.
- If you need to add a secret to use when pulling the Chart Image, click the Add button in the Chart Install Secret section.
- When you need to add a secret for pulling the App Image used during build/deployment, click the Add button in the ImagePull Secret section.
- Enter the content and click the Save button to complete the addition.Item
description Registry URL From the list of images registered in Image Repository, select the image that ImagePull Secret will use. Secret Select the method for entering ImagePull Secret information - Auto-generate: Use the credentials of the image repository selected from the Docker URL to automatically create an ImagePull Secret.
- Use existing secret: Choose one of the already created secrets to use as the ImagePull Secret.
Table. Application Secret Additional Configuration Items
Edit Application Secret
To modify the application secret, follow these steps.
- Click the Edit authentication information icon next to the Application name. The Application secret settings popup opens.
- Click the secret name you want to edit in the application secret list.
- Enter the content and click the Save button to complete the edit.
Delete Application Secret
To delete the application secret, follow the steps below.
- Click the Edit Authentication Info icon next to Application Name. The Application Secret Settings popup opens.
- Click the secret name you want to delete from the application secret list.
- Click the Delete button to complete the deletion.
Comparing Values.yaml file
For an ArgoCD application using a Helm chart, you can compare the values.yaml file.
To compare the values.yaml files used in each release, follow these steps.
- Click the History tab.
- Click the two revisions you want to compare.
- Click the App Diff button. The App Diff popup window opens.
Rolling Back an Application
To roll back the application to a previous revision, follow these steps.
- Click the History tab.
- Click the Rollback button in the rollback column of the revision you want to roll back. The Rollback popup will open.
- Click the Confirm button to complete the rollback.
Delete Application
To uninstall the application, follow these steps.
- Click the Delete button at the bottom right. The Application Delete popup will open.
- Click the Confirm button to complete the deletion.
3 - VM Deployment
Users can register and manage VM deployment through DevOps Console.
Before registering a VM deployment, an available VM server group(VM server group) must exist, and the registered VM deployment can be used in the build pipeline (Deploy to VM).
Users can differentiate deployment methods using icons.
 (SSH method) VM deployment
 (Agent mode) VM deployment
Start VM deployment
To start VM deployment, follow these steps.
- Click the Project card on the Main page. You will be taken to the Project Dashboard page.
- From the left menu, click the Build/Deploy > VM Deploy menu. You will be taken to the VM Deploy page.
Item Explanation Deployment group name Displays the name of the deployment group. VM deployment result (Success)/(Total): Displays the number of VM servers targeted for deployment and the number of VM servers successfully deployed. - Green: All successful
- Blue: In progress
- Red: Partial failure
- Gray: Ready, Stopped
Deployment time Displays the deployment time. Delete Delete the VM deployment. Table. VM deployment display items
Add VM deployment
To add a VM deployment, follow these steps.
- Click the Project card on the Main page. You will be taken to the Project Dashboard page.
- From the left menu, click the Build/Deploy > VM Deploy menu. You will be taken to the VM Deploy page.
- VM Deployment page, click the Add VM Deployment button in the top right. The Add VM Deployment popup opens.
- Add VM deployment After entering the information in the popup window, click the Save button.
Item Explanation deployment group Please enter the deployment group name. Execution method Select the execution mode. - File transfer and command execution: Choose this when you typically deploy files to a VM.
- Execute command only: Choose this when you run only commands without transferring files to the VM (e.g., Docker commands).
Deployment method Select deployment method Deployment order If there are multiple target servers, choose whether to deploy in parallel or sequentially. Deployment target VM Set the deployment target server. - Click the Settings button to open the Configure Deployment Target VM popup.
Command before file deployment Write the commands that need to be executed before file distribution. File to send - Source: Enter the file path after the build pipeline execution directory (Jenkins workspace).
- Target: Enter the path where the file will be deployed on the VM server.
- Add button can be used to add files.
Command after file distribution Write the commands to be executed after file deployment. Automatic restore setting Select whether to enable automatic rollback - If the deployment fails, it will be rolled back to the most recent successful deployment.
- Deployment method is enabled when it is Agent.
Artifact repository Select whether to use the artifact repository for rollback. - deployment method is activated when it is Agent.
Repository name Only exposed when using an artifact repository. - A list of already registered artifact repository is displayed
Table. Additional Input Items for VM Deployment
Deployment Target VM Settings The popup window displays the server groups you have access to.
For more details, refer to the VM Server Group.
VM Deployment Details
To view the detailed information of the VM deployment, follow these steps.
- On the Main page, click the Project card. You will be taken to the Project Dashboard page.
- From the left menu, click the Build/Deploy > VM Deploy menu. You will be taken to the VM Deploy page.
- On the VM deployment page, in the VM deployment list, click the VM deployment you want to view in detail. You will be taken to the VM deployment details page.
- In the History tab, click the server list. The Deployment Details popup opens.
- Deployment Details You can view the detailed history in the popup window.
- When you click the Log button of the execution pipeline, the Pipeline Log popup window opens.
- Pipeline Log You can view detailed logs in the popup window.
- In the history list for each deployment server, click the Log button of the server whose logs you want to view, and the VM Agent Log popup window will open.
- VM Agent log You can view detailed logs in the popup window.
Item Explanation Stop / Start Deployment Stop, Start Deployment button becomes active. rollback You can roll back to a previous version. History tab Deployment history is displayed. Pipeline Information tab The build pipeline information associated with this VM deployment is displayed. log You can view the logs of the build pipeline. Table. VM deployment detail screen itemsItem Explanation Execution pipeline log You can view the logs of the build pipeline. History logs per deployment server You can view the deployment agent’s logs. - Only displayed for AGENT type
Table. Deployment Detail Screen Items
Delete VM deployment
Delete from list
To delete a VM deployment, follow these steps.
- Click the Project card on the Main page. You will be taken to the Project Dashboard page.
- From the left menu, click the Build/Deploy > VM Deploy menu. You will be taken to the VM Deploy page.
- On the VM deployment page, click the X icon of the VM deployment you want to delete from the list.
- In the confirmation popup, click the Confirm button to complete the deletion of the VM deployment.
Delete on the detail page
To delete a VM deployment, follow these steps.
- Main page, click the Project card. You will be taken to the Project Dashboard page.
- From the left menu, click the Build/Deploy > VM Deploy menu. You will be taken to the VM Deploy page.
- On the VM deployment page, click the VM deployment you want to delete from the VM deployment list. You will be taken to the VM deployment details page.
- On the VM Deployment Details page, click the Delete button.
- Click the Confirm button in the confirmation popup to complete the VM deployment deletion.
Using environment variables in VM deployment commands
You can use environment variables in the pre‑deployment command, post‑deployment command, source path of the file to be transferred, and target path of the file to be transferred.
You can use the $ placeholder or ${} placeholder within commands to access environment variables in the build pipeline.
echo ${BUILD_NUMBER}
echo $JOB_NAME
echo ${BUILD_NUMBER}
echo $JOB_NAMEIf you want to refer to the environment variables of the VM server where the command runs, add a \.
echo \${PATH}
echo \$LANG
echo \${PATH}
echo \$LANGStop VM deployment
On the Deployment Details page, you can stop a VM deployment that is in progress. Clicking the Stop button in the recent deployment status area of the Deployment Details page will stop the VM deployment.
The states in which deployment can be halted are listed in the table below, and the Stop button is displayed only when in those states.
| method | status value | Explanation |
|---|---|---|
| SSH | request | The build pipeline is running. |
| AGENT | request | The build pipeline is running. |
| AGENT | Build complete | When the build pipeline is completed
|
| AGENT | Ready | After the build pipeline completes, the AGENT is ready to perform deployment. |
| AGENT | In progress | AGENT is currently executing a deployment. |
Understanding VM deployment status values
Deployment Details page lets you check the current status of the VM deployment.
status value | Explanation |
|---|---|
| Not executed | Never run since its initial creation |
| request | The build pipeline is running. |
| Success | Build/deployment succeeded |
| Failure | Failed state during build or deployment |
status value | Explanation |
|---|---|
| Not executed | Never executed after initial creation |
| request | The build pipeline is running. |
| Build complete | When the build pipeline is completed
|
| Ready | After the build pipeline completes, the AGENT is ready to perform deployment. |
| In progress | AGENT is currently executing a deployment. |
| Success | Build/deployment succeeded |
| Failure | Failed state during build or deployment |
| Stop | Build or deployment is in a paused state
|
4 - Helm Install
Users can use the Helm Install menu to view and install project charts, project group charts, tenant charts, and system charts.
Getting Started with Helm Install
To begin using Helm Install, follow the steps below.
- Click the Project card on the Main page. You will be taken to the Project Dashboard page.
- From the left menu, click the Build/Deploy > Helm Install menu. The Helm Install page opens.
Item Explanation K8S cluster Select the K8S cluster to be the target of the Helm install.
The Helm chart list below shows only the Helm charts that can be installed on the selected K8S cluster.Chart name Displays the chart name. Chart repository Displays information about the chart repository where the Helm chart files are stored. Table. Helm install screen items
Helm Chart Details
To view the Helm chart details, follow these steps.
- On the Main page, click the Project card.
- From the left menu, click the Build/Deploy > HelmInstall menu. The HelmInstall page opens.
- On the Helm Install page, select the K8S cluster you want to install. A list of Helm charts belonging to that cluster will be displayed.
- From the Helm chart list, click the Helm chart card you want to view in detail. The Helm chart details page opens.
Helm Chart Details
| Item | Explanation |
|---|---|
| Version | If there are multiple versions, you can select the desired version. |
| Download | You can download the Helm chart file to the user’s PC. |
| helm install | You can install Helm. |
Summary tab
Displays the README.md file included in the Helm chart. You can view the information provided by the chart author.
Values.yaml tab
Displays the values.yaml file included in the Helm chart. You can view the values that can be modified in the chart before running helm install.
Details tab
Item | Explanation |
|---|---|
| Helm chart repository information | Displays the repository where the Helm chart is stored. |
| Api Version | Displays the API version of the Helm chart.
|
| Support CI/CD | When creating a build pipeline, the Deploy to K8S stage indicates whether the Helm chart type can be selected as a Helm release. |
| Allow new installation? |
|
| Image in the chart | Displays the image information used in the Helm chart. |
Install Helm
To install Helm, follow these steps.
- On the Helm Install page, select the K8S cluster you want to install in the K8S cluster field. A list of Helm charts belonging to that cluster will be displayed.
- On the Helm Install page, click the Helm chart card you want to view in detail. The Helm Chart Details page opens.
- On the Helm Chart Details page, click the Helm Install button. The Helm Install page opens.
- On the Helm Install page, fill in each field on the screen and click the Next button. The Helm Chart Install popup opens.
- Helm chart installation Check the contents in the popup window and click the Run button to complete the Helm installation.
- When the installation is complete, the Kubernetes deployment page opens automatically.Item
Explanation Release name Enter the name to be used in Helm.
It must be unique and cannot be duplicated within the namespace.Category Development, Operations Version Select the version of the chart you want to install with Helm. K8S cluster Displays the target K8S cluster for helm install.
Changes are not allowed; if you wish to change, select the K8S cluster in Start Helm Install.Namespace Select the target namespace for the helm install from the list. Reference information Reference information provided by the selected K8S cluster.
You can click each tab to view detailed information.included in the chart
default Values.yamlYou can edit the values.yamlfile to run helm install with the desired values.
If needed, refer to the reference information and modifyvalues.yamlwith those values.Table. Common Helm chart installation screen itemsItemExplanation Release name Enter the name to be used in Helm.
It must be unique and cannot be duplicated within the namespace.Category Development, Operations Version Select the version of the chart you want to install with Helm. K8S cluster Displays the target K8S cluster for helm install.
Changes are not possible, and if you wish to change, select a K8S cluster in Start Helm Install.namespace Select the target namespace for helm install from the list. Reference information This is reference information provided by the selected K8S cluster. You can click each tab to view detailed information. Default Values.yaml included in the chart You can edit the values.yamlfile and run helm install with the desired values.
If needed, refer to the reference information and modifyvalues.yamlwith those values.Writing type - Form: Enter the items displayed on the screen. Form-type items are displayed only for Helm charts that support form input. For creating Helm charts that support form input, refer to Creating Helm Charts that Support Form Input.
- Values.yaml: Modify the values in the same YAML editor screen as a typical Helm chart.
Form input This is the screen displayed when you select Form in the creation type; review each item and enter values. After completing the input, click the Validation Check button to validate the entered values. Table. Helm chart installation screen items that support Form input
5 - Ingress/Service Management
Users can add and manage Ingress/Service using the DevOps Console.
Getting Started with Ingress/Service Management
To start managing Ingress/Service, follow these steps.
- On the Main page, click the Project card. You will be taken to the Project Dashboard page.
- Click the Build/Deploy > Ingress/Service Management menu in the left menu. You will be taken to the Ingress/Service Management page.
Ingress management
- On the Ingress/Service Management page, click the Ingress tab.
- Select K8S cluster and namespace in the Ingress tab. The list of Ingresses belonging to the selected namespace will be displayed.
Ingress
DevOps Console are shown.| Item | Explanation |
|---|---|
| K8S cluster | Select a K8S cluster from the list. |
| Namespace | Select a namespace from the list. Ingresses created in the selected namespace will be displayed. |
| Ingress list | Displays the list of Ingresses. |
| Search | You can search for Ingress. |
| Add | You can add an Ingress. |
Add Ingress
To add an Ingress, follow these steps.
- Click the Add button on the Ingress tab. The Add Ingress popup window opens.
- Add Ingress After entering the information in the popup window, click the Confirm button.
- Click the Confirm button in the confirmation popup to complete adding the Ingress.
Item Explanation Ingress name Please enter the Ingress name. K8S cluster Specifies the K8S cluster where the Ingress will be created. Namespace Specifies the namespace where the Ingress will be created. Service Select the Service that Ingress will use as a target from the list of Services. Rules Enter the Host, Path, and Service Port to configure in the Ingress.
Click Add to input multiple entries.Table. Additional Ingress Input Items
Ingress Details
To view the detailed information of an Ingress, follow the steps below.
- Click the Ingress you want to view in the Ingress tab. Navigate to the Ingress Details page.
- On the Ingress Details page, view the detailed information of the Ingress.
- When you click the View icon, the Ingress YAML popup window opens.
- Ingress YAML In the popup window, you can view the Ingress YAML content.
Edit Ingress
To modify the Ingress, follow these steps.
- In the Ingress tab, click the Ingress you want to edit. You will be taken to the Ingress Details page.
- On the Ingress Details page, click the Edit button. The Ingress Edit popup opens.
- Ingress Edit In the popup window, edit the Ingress information and click the Confirm button.
- In the confirmation popup, click the Confirm button to complete the Ingress modification.
Delete Ingress
To delete an Ingress, follow these steps.
- In the Ingress tab, click the Ingress you want to delete. You will be taken to the Ingress Details page.
- On the Ingress Details page, click the Delete button.
- In the confirmation popup, click the Confirm button to complete the Ingress deletion.
Service Management
- On the Ingress/Service Management page, click the Service tab.
- In the Service tab, select the K8S cluster and namespace. The list of Services belonging to the selected namespace will be displayed.
Service
DevOps Console are shown.| Item | Explanation |
|---|---|
| K8S cluster | Select a K8S cluster from the list. |
| namespace | Select a namespace from the list. Services created in the selected namespace will be displayed. |
| Service List | Displays the list of services. |
| search | You can search for Service. |
| Add | You can add a Service. |
| External Endpoint information icon | If there is related additional information, display it. |
Add Service
To add a Service, follow these steps.
- Click the Add button in the Service tab. The Service Add popup opens.
- Add Service After entering the information in the popup window, click the Confirm button.
- In the confirmation popup, click the Confirm button to complete adding the Service.
Item Explanation Service name Please enter the service name. K8S cluster Displays the K8S cluster where the Service will be created. namespace Specifies the namespace where the Service will be created. type Select the Service type ClusterIPNodePortLoadBalancer
Deployment Select the Deployment that will be the Service’s target from the list. Ports Enter the Port Name, Port, Target, and Protocol that the Service will use.
Click the Add button to input multiple entries.Table. Service addition input fields
Service Details
To view the Service details, follow these steps.
- On the Service tab, click the Service you want to view in detail. You will be taken to the Service Details page.
- Service Details page shows detailed information.
- Click the View icon to open the Service YAML popup window.
- Service YAML You can view the Service YAML content in the popup window.
Edit Service
To modify the Service, follow these steps.
- In the Service tab, click the Service you want to edit. Go to the Service Details page.
- On the Service Details page, click the Edit button. The Service Edit popup window opens.
- Service Edit In the popup window, edit the Service information and click the Confirm button.
- In the confirmation popup, click the Confirm button to complete the Service edit.
Delete Service
To delete a Service, follow the steps below.
- On the Service tab screen, click the Service you want to edit. You will be taken to the Service Details page.
- On the Service Details page, click the Delete button.
- Click the Confirm button in the confirmation popup to complete the Service deletion.
6 - Kubernetes Secret Management
Users can view secrets created in a namespace. In addition, they can create and delete secrets.
Getting Started with Kubernetes Secret
To start managing Kubernetes Secrets, follow the steps below.
- Main page, click the Project card. You will be taken to the Project Dashboard page.
- From the left menu, click the Build/Deploy > Kubernetes Secret Management menu. You will be taken to the Kubernetes Secret Management page.
Item Explanation K8S cluster Select a K8S cluster from the list. namespace Select a namespace from the list. Secrets created in the selected namespace will be displayed. Secret List Displays the list of secrets. search You can search for secrets. Detailed filter You can perform detailed searches by using the detailed filter. Add You can add a secret. Table. Kubernetes Secret Management Screen Items
Add secret
Docker Config Secret is a secret used to store Docker registry credentials for an image.
Follow these steps to add a Kubernetes Secret.
- Select K8S Cluster on the Kubernetes Secret Management page.
- Select namespace.
- Click the Add button. The Add Secret popup opens.
- Add Secret Enter the information in the popup window and click the Connection Test button.
- If Connection Test succeeds, click the Save button.
- In the confirmation popup, click the Confirm button to complete the addition.
Item Explanation K8S cluster Displays the K8S cluster where the secret will be created. Namespace Specifies the namespace where the secret will be created. Image repository URL Select the image repository to use in Secret. Secret name Enter the secret name. Select authentication information - Use new credentials: Enter new credentials.
- Use saved credentials: Choose one of the previously used credentials.
Table. Input fields for adding a secret
View Secret Details
To view the secret details, follow these steps.
- Kubernetes Secret Management On the page, click the secret whose details you want to view. Secret Details popup window opens.
- Secret Details View the secret’s detailed information in the popup window.
Delete secret
To delete the secret, follow these steps.
- Kubernetes Secret Management On the page, select the checkbox of the secret you want to delete.
- Click the Delete button.
- In the confirmation popup, click the Confirm button to complete the deletion.
7 - Environment Variable Management
Users can add frequently used parameters and credentials as environment variables for use when creating a build pipeline.
Getting Started with Environment Variable Management
Follow these steps to manage environment variables used in the build pipeline.
- On the Main page, click the Project card. You will be taken to the Project Dashboard page.
- Click the Build/Deploy > Environment Variable Management menu in the left menu of the Project Dashboard page. You will be taken to the Environment Variable Management page.
Adding environment variables
Add parameter environment variable
Parameter environment variables act as Linux Environment variables and are used in the NAME=VALUE format.
To add a parameter environment variable, follow these steps.
- On the Environment Variable Management page, click the Add button. The Add Environment Variable popup window opens.
- Add environment variable In the popup window, select the type as parameter.
- After entering the information, click the Save button.
- In the confirmation popup, click the Confirm button to complete the addition.
Item Explanation Name Please enter the parameter name. value Please enter the parameter value. Explanation Enter a description for the user to refer to. Table. Parameter environment variable addition input items
Add authentication credentials environment variable
The authentication environment variable stores credentials for use. You can pre-register and share credentials so they can be easily used in stages that require authentication (preventing duplicate entry).
To add authentication environment variables, follow these steps.
- On the Environment Variable Management page, click the Add button. The Add Environment Variable popup window opens.
- Add Environment Variable In the popup window, select the type as “Authentication Information”.
- After entering the information, click the Save button.
- In the confirmation popup, click the Confirm button to complete the addition.
Item Explanation Name Enter the name of the credential. Category Select a category value - Development: Credentials can be used only in build pipelines of type Development.
- Production: Credentials can be used only in build pipelines of type Production.
Authentication type Please select an authentication type. ID Please enter your ID. Password/Private Key Enter the password or private key according to the authentication type. Explanation Enter a description for the user to refer to. Table. Parameter Environment Variable Additional Input Fields
Modify environment variables
To modify environment variables, follow these steps.
- On the Environment Variable Management page, click the environment variable you want to edit. The Edit Environment Variable popup will open.
- Edit Environment Variables In the popup window, modify the desired items and click the Save button.
- In the confirmation popup, click the Confirm button to complete the addition.
Delete environment variable
To delete an environment variable, follow these steps.
Delete from list
- On the Environment Variable Management screen, select the checkbox of the environment variable you want to delete.
- Click the Delete button on the Environment Variable Management screen.
- In the confirmation popup, click the Confirm button to complete the deletion.
Delete in the environment variable edit popup
- Environment Variable Management screen, click the environment variable you want to delete. Environment Variable Edit popup window opens.
- Edit Environment Variable in the popup window, click the Delete button.
- Click the Confirm button in the confirmation popup to complete the deletion.