We provide a service that easily integrates and configures application and system development environments on a platform.
This is the multi-page printable view of this section. Click here to print.
DevOps Tools
- 1: DevOps Service
- 1.1: Overview
- 1.2: How-to guides
- 1.3: API Reference
- 1.4: CLI Reference
- 1.5: Release Note
- 2: DevOps Console
- 2.1: Overview
- 2.1.1: DevOps Console Introduction
- 2.1.2: Roles
- 2.1.3: Screen Configuration
- 2.2: Getting Started
- 2.2.1: Getting Started with DevOps Console
- 2.2.1.1: Registration Information
- 2.2.2: Tutorial (From Project Creation to Build/Deploy)
- 2.3: Project
- 2.3.1: Project Overview
- 2.3.2: Create Project
- 2.3.2.1: Create Project (Helm Chart Deployment)
- 2.3.2.2: Create Project (Workload Deployment)
- 2.3.2.3: Create Project (ArgoCD Deployment)
- 2.3.2.4: Create Project (VM Deployment)
- 2.3.2.5: Create Project (Empty)
- 2.3.3: Start Project
- 2.3.4: Project Dashboard
- 2.3.5: Project Members
- 2.4: Build/Deploy
- 2.4.1: Build Pipeline
- 2.4.1.1: Stage
- 2.4.1.2: Multibranch Pipeline
- 2.4.2: Kubernetes Deployment
- 2.4.2.1: Helm Release
- 2.4.2.2: Workload
- 2.4.2.3: Blue/Green Deployment
- 2.4.2.4: Canary Deployment
- 2.4.2.5: Istio
- 2.4.2.6: ArgoCD
- 2.4.3: VM Deployment
- 2.4.4: Helm Install
- 2.4.5: Ingress/Service Management
- 2.4.6: Kubernetes Secret Management
- 2.4.7: Environment Variable Management
- 2.5: Project Group
- 2.5.1: Project Group Overview
- 2.5.2: Create Project Group
- 2.5.3: Project Group Dashboard
- 2.6: Tenant
- 2.6.1: Tenant Management
- 2.6.2: Tenant Dashboard
- 2.6.3: Tenant Notice
- 2.7: Repository
- 2.7.1: Code Repository
- 2.7.2: Artifact Repository
- 2.7.3: Image Repository
- 2.7.4: Chart Repository
- 2.7.5: Helm Chart
- 2.8: Quality
- 2.8.1: Code Quality
- 2.9: Tools & Templates
- 2.9.1: Tool Management
- 2.9.2: App Template
- 2.9.3: Register User-installed Jenkins Tool
- 2.10: Deployment Target
- 2.10.1: K8S Cluster
- 2.10.1.1: Verify Cluster Admin Token
- 2.10.2: VM Server Group
- 2.10.3: Request Permission
- 2.11: Release Management
- 2.11.1: Release Management
- 2.11.2: Workflow Management
- 2.11.3: Approval Template Settings
- 2.11.4: Task
- 2.11.5: JIRA Project
- 2.12: Release Note
1 - DevOps Service
1.1 - Overview
Service Overview
DevOps Service is a service that provides standardized development tools, code‑framework‑based development templates, and integrated management functions for application and system development, deployment, and operation through the DevOps Console. This enables fast and reliable software development, deployment, and operation, and allows convenient integrated management of Samsung Cloud Platform resources and CI/CD tools within the DevOps Workflow.
Features
- Convenient Code Management and Deployment: Users can conveniently manage everything from source code management to build and deployment via a web-based console. It also supports integration with various tools to analyze source code and improve quality.
- Flexible Deployment Options: Minimize user service downtime and provide deployment environment configurations for k8s clusters or Virtual Machines, allowing users to configure deployments that fit their services and offering flexible deployment methods.
- Repository for Deployment Management: Provides a repository that can manage source code, libraries, application artifacts, container images, and other assets for the deployment management of user services.
Service Architecture Diagram
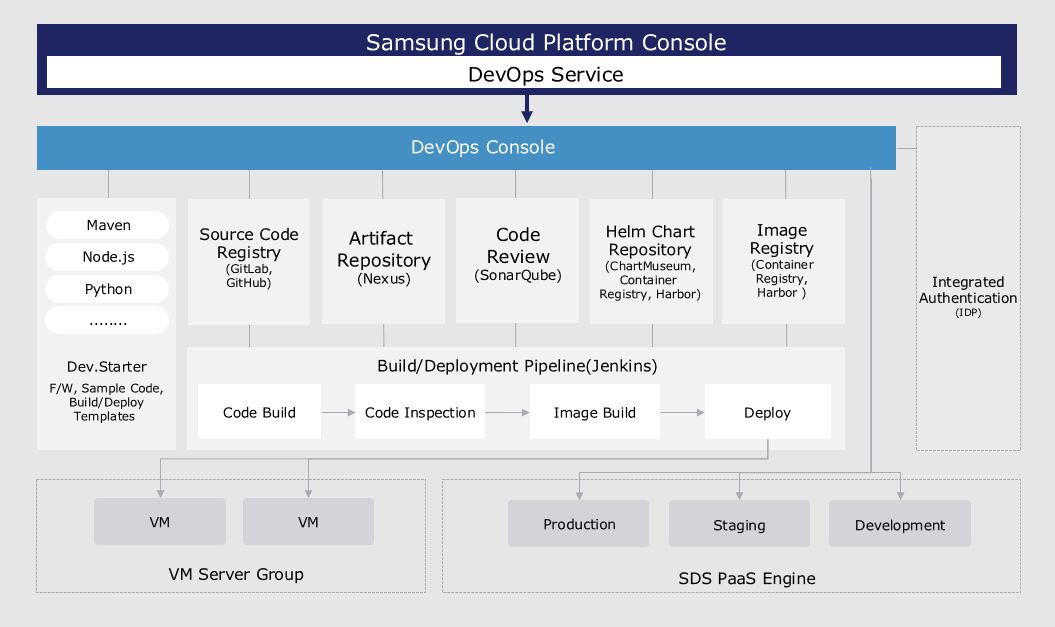
Provided features
DevOps Service integrates standard development tools to easily set up the development environment and provides convenience for build/deployment, offering the following features.
- Continuous Integration and Deployment (CI/CD Continuous Integration/Continuous Deployment): Users can access tools responsible for source code repositories, artifact repositories, code analysis, image registries, and build/deployment with a single login.
- Application template-based project configuration: Users can easily set up a project using a wizard approach with a template that reflects development standards.
- Major Development Languages and Frameworks Provided: Users can select the development languages (Java, C#, Python, Ruby, etc.) and frameworks (SpringBoot, Vue.js, .Net, etc.) required for application development to configure a project for building/deployment.
- Automated Build/Deployment Pipeline Configuration: Users can automatically generate pipeline scripts using the build/deployment pipeline template included in the application template, or configure each stage of the pipeline through a GUI-based interface.
- Support for Various Deployment Strategies and Rollback: Users can use deployment strategies (RollingUpdate, Blue-Green) to minimize downtime of running applications, and can roll back to the desired version with a single click. If a user wants to use a Virtual Server as the deployment environment, they can deploy to the Virtual Server as a packaged file or a Docker image.
- Custom Release Process Support: Users can define and repeatedly execute various release processes, taking into account the type of application changes.
Components
Users can easily use the DevOps Service through the Samsung Cloud Platform DevOps Console.
DevOps Console
DevOps Console provides integrated support for the tools required for application development and build/deployment, allowing easy management of project configuration and build/deployment.
- Dev.Starter: An application template that provides integrated templates required for build and deployment, as well as sample code reflecting development standards.
- Source Code Repository (Source Code Repository): Supports integration with source code configuration management tools. Can be linked with Git Repository.
- Artifact Repository (Artifact Repository): Supports integration with an artifact repository for storing libraries needed for application builds and application artifacts.
- Code Quality (Code Review): Supports integration with code quality tools that can measure and manage source code quality through static code analysis.
- Helm Chart Repository (Helm Chart Repository): In Kubernetes, Helm charts are used to install and upgrade software easily. To install software, users must create Helm charts themselves. ChartMuseum is provided as the default repository for managing Helm charts. Integration with other chart repository tools is also supported.
- Image Registry: Supports integration with an image registry for storing container images.
- VM server group: a collection of Virtual Servers that serve as the deployment target for an application. Users can register Virtual Servers in the DevOps Console and designate them as deployment targets.
- Kubernetes Cluster: The cluster that serves as the deployment target for applications. Users can register a Kubernetes Cluster in the DevOps Console and designate it as a deployment target.
Provision status by region
The DevOps Service is available in the environments below.
| region | Provision status |
|---|---|
| Korea West (kr-west1) | Provide |
| Korea East (kr-east1) | Provide |
| South Korea South 1 (kr-south1) | Provide |
| South Korea South 2 (kr-south2) | Provide |
| South Korea 3 (kr-south3) | Provide |
Table. DevOps Service availability by region
Preliminary Service
The DevOps Service has no prerequisite services.
1.2 - How-to guides
The user can create the service by entering the required information for the DevOps Service and selecting detailed options through the Samsung Cloud Platform Console. Additionally, by using the DevOps Service’s standardized development tools, code, framework-based development templates, and integrated management features, the user can efficiently carry out development projects.
Reference
After creating the DevOps Serivce service, to configure the CI/CD environment in the DevOps Console, you need to use the Kubernetes Engine service and the Container Registry service.
Create DevOps Service
You can create and use a DevOps Service in the Samsung Cloud Platform Console.
Reference
- Each account can use one DevOps Service.
- Only IAM users can create the DevOps Service.
- When creating a DevOps Service, the creator’s ID is granted Tenant Admin privileges in the DevOps Console.
To create a DevOps Service, follow these steps.
- From the All Services > DevOps Tools > DevOps Service menu, click the Create Service button. You will be taken to the Service Home page of the DevOps Service.
- On the Service Home page, click the DevOps Service Create button. You will be taken to the DevOps Service Create page.
- On the DevOps Service Creation page, enter the information required to create the service.
- Enter the required information in the Service Information Input area.
Category Required statusDetailed description Tenant name Required Tenant name of the DevOps Service created by the user - Name displayed logically when accessing the DevOps Console
- Start with a lowercase English letter and use lowercase English letters, numbers, and special characters (
-) to enter 3 to 30 characters
Tenant code Required ID used internally by the system - It is an ID value used internally, similar to a project ID, generated from the value entered by the user
- It must start with a lowercase English letter and be entered using lowercase English letters, numbers, and special characters (
-) with a length of 3 to 30 characters
Table. DevOps Service required information input items - In the Add Tenant Member area, select the tenant user who will use the service.
Category Required statusDetailed description user Required Select members from the user list - Service applicants are included as default members of the Tenant
- You must select at least one user to create the service
Table. DevOps Service Tenant member addition items - Enter or select the required information in the Additional Information Input area.
Category RequiredDetailed description tag Selection Add Tag - Up to 50 can be added per resource
- After clicking the Add Tag button, enter or select Key, Value values
Table. DevOps Service Additional Information Input Fields
- Enter the required information in the Service Information Input area.
- Verify the detailed information and estimated charges generated in the summary panel, and click the Create button.
- Once creation is complete, check the created resource on the Resource List page.
Using DevOps Service
The DevOps Service can configure an actual DevOps environment in a separate console called DevOps Console.
To use the DevOps Service, follow these steps.
- Click the All Services > DevOps Tools > DevOps Service menu. Go to the Service Honme page of DevOps Service.
- From the Service Home page, click the DevOps Service menu. You will be taken to the DevOps Service list page.
- DevOps Service List page, click the resource you want to view detailed information for. You will be taken to the DevOps Service Details page.
- On the DevOps Service Details page, click the DevOps Console button. You will be taken to the Samsung Cloud Platform DevOps Console page.
Reference
For detailed information on how to use the DevOps Console, see the Samsung Cloud Platform DevOps Console User Guide provided within the DevOps Console.
Check DevOps Service details
DevOps Service service allows you to view and edit the full list of resources and detailed information. The DevOps Service Details page consists of Details, Tags, Activity Log tabs.
To view the detailed information of the DevOps Service, follow the steps below.
- Click the All Services > DevOps Tools > DevOps Service menu. Navigate to the Service Honme page of DevOps Service.
- On the Service Home page, click the DevOps Service menu. You will be taken to the DevOps Service list page.
- On the DevOps Service List page, click the resource you want to view detailed information for. You will be taken to the DevOps Service Details page.
- DevOps Service Details page displays status information and consists of Details, Tags, Activity History tabs.
Category Detailed description Status indicator Display the status of the DevOps Service - Active: Available state
- Creating: Creating state
- Error: Operational error state
DevOps Console Navigate to the DevOps Console to control the service. Service termination Service cancellation button Table. DevOps Service status information and additional features
- DevOps Service Details page displays status information and consists of Details, Tags, Activity History tabs.
Detailed information
You can view detailed information of the selected resource on the DevOps Service List page.
| Category | Detailed description |
|---|---|
| service | Service name |
| Resource Type | Resource Type |
| SRN | Unique resource ID in Samsung Cloud Platform
|
| Resource name | Resource Name
|
| Resource ID | Unique resource ID within the service |
| Constructor | User who created the service |
| Creation date and time | Service creation date and time |
| Tenant name | User-created Tenant name |
| Tenant code | System unique ID for the Tenant created by the user |
Table. DevOps Service detailed information items
tag
DevOps Service List page lets you view the tag information of the selected resource, and you can add, modify, or delete it.
| Category | Detailed description |
|---|---|
| Tag list | Tag list
|
Table. Virtual Server Tag Tab Items
Work History
On the DevOps Service List page, you can view the operation history of the selected resource.
| Category | Detailed description |
|---|---|
| Task History List | Resource Change History
|
Table. Work History Tab Detailed Information Items
Cancel DevOps Service
Reference
- If a project in the DevOps Console has resources attached, you cannot terminate the DevOps Service.
- To cancel the DevOps Service, delete all resources connected within the DevOps Console.
- For detailed information on using the DevOps Console, refer to the Samsung Cloud Platform DevOps Console User Guide.
To cancel the DevOps Service, follow the steps below.
- Click the All Services > DevOps Tools > DevOps Service menu. You will be taken to the Service Home page of the DevOps service.
- On the Service Home page, click the DevOps Service menu. You will be taken to the DevOps List page.
- On the DevOps Service List page, click the resource to cancel. You will be taken to the DevOps Service Detail page.
- On the DevOps Service Details page, click the Cancel Service button.
- When termination is complete, verify on the DevOps Service List page whether the resource has been terminated.
1.3 - API Reference
API Reference
1.4 - CLI Reference
CLI Reference
1.5 - Release Note
2025.10.23
FEATURE
Korea East(kr-east1) region service launch- You can also use the DevOps Service in the Korea East (kr-east1) region.
2025.07.01
FEATURE
Add user member- Add user member
- When creating a DevOps Service, you can add members who will perform the Admin role.
2025.02.27
FEATURE
Common feature change- Samsung Cloud Platform Common Feature Changes
- We have incorporated common CX changes, such as Account, IAM, Service Home, and tags.
2024.12.23
NEW
DevOps Service official version release- We have launched the DevOps Service, which delivers an integrated, fast, and secure software development, deployment, and operations environment.
2 - DevOps Console
2.1 - Overview
2.1.1 - DevOps Console Introduction
Service Overview
DevOps Console integrates standard development tools, making it easy to configure development environments and providing convenience for building and deploying, with the following features.
Key tool integration and unified authentication for Continuous Integration and Deployment (CI/CD Continuous Integration/Continuous Deployment)
Users can access tools responsible for source code repositories, artifact repositories, code analysis, image repositories, and build/deployment with a single login.
Project configuration based on application template
Users can easily configure a project using a wizard-style approach with templates that incorporate development standards.
Major development languages and frameworks provided
Users can select the development languages (Java, C#, Python, Ruby, etc.) and frameworks (SpringBoot, Vue.js, .Net, etc.) required for application development to configure a project for building and deployment.
Automatic Build/Deployment Pipeline Configuration
Users can automatically generate pipeline scripts using the build/deployment pipeline templates included in the application template, or configure each pipeline stage through a GUI-based approach.
Support for multiple deployment methods and rollback
Users can employ deployment strategies (RollingUpdate, Blue-Green) to minimize downtime of running applications, and can roll back to a desired version with a single click. If users wish to use a VM server as the deployment environment, they can deploy to the VM server in the form of packaged files or Docker images.
Custom Release Process Support
Users can define and repeatedly execute various release processes, taking into account the type of application changes.
Component
Users can easily use the DevOps Service through the DevOps Console.
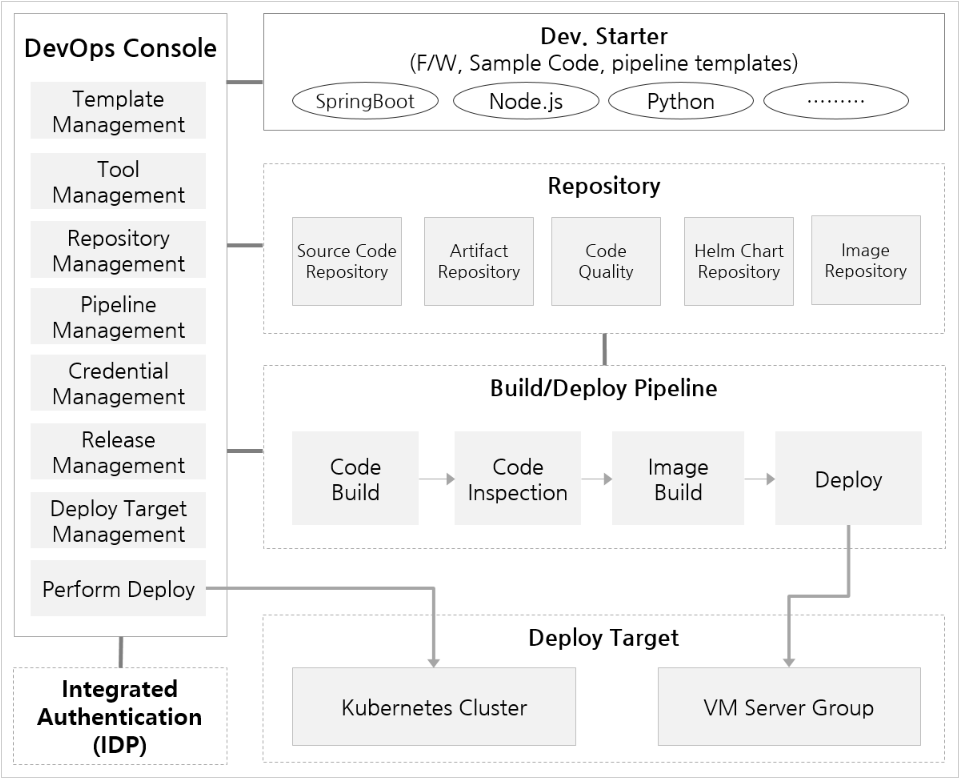
DevOps Console
It provides integrated support for the tools required for application development and build/deployment, allowing easy management of project configuration and build/deployment.
Dev. Starter
It is an application template that provides not only sample code reflecting development standards but also integrated templates required for build and deployment.
IDP(ID Provider)
It manages users centrally and handles authentication.
Source Code Repository
Supports integration with source code version control tools.
Artifact Repository
Supports integration with an artifact repository for storing libraries required for application builds and application artifacts.
code quality
Supports integration with code quality tools that can measure and manage source code quality through static code analysis.
Helm chart repository
In Kubernetes, Helm charts are used to easily install and upgrade software. Users must create Helm charts themselves to install software. It provides ChartMuseum as the default repository for managing Helm charts. It also supports integration with other chart repository tools.
Image Repository
Supports integration with an image registry for storing container images.
VM Server Group
A group of VM servers that serve as the deployment target for the application. Users can register VMs and designate them as deployment targets in the DevOps Console.
Kubernetes Cluster
The cluster that serves as the deployment target for the application. Users can register a Kubernetes Cluster in the DevOps Console and designate it as a deployment target.
Note
The list of tools that support integration in the current
DevOps Console can be found in Tool Classification.Key concepts and relationships
System administrators (System Admin) or administrators (Admin) must predefine the tools and application templates required when a user creates a project.
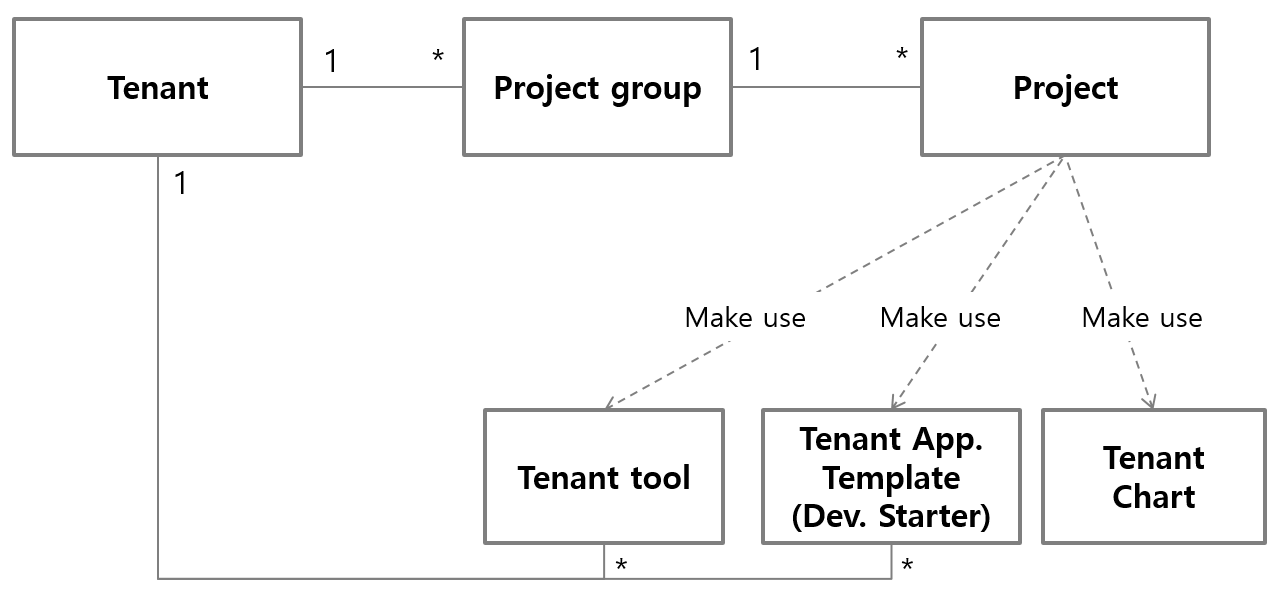
tenant
It is a logical unit that independently provides and shares tools and application templates usable in projects. The system administrator registers a tenant for each organization (or client) unit that must guarantee independence and assigns a tenant administrator. The tenant administrator can register tenant tools, application templates, and tenant members that can be used within that tenant.
Project Group
As a unit for managing individual projects, a member belonging to a specific tenant can create a project group. Therefore, a project group belongs to a single tenant and can utilize the tools and templates configured for that tenant.
project
A project is a unit that develops and manages an application or microservice that is deployed and run independently. Consequently, it is common to structure a project around a single source code repository, but it can be flexibly organized according to the characteristics of the application or the development and operations teams.
tool
It is a development tool that supports source code repositories, image registries, build/deployment pipelines, and code quality used in projects. Each project can use the tools assigned to its project group, tenant, or the Kubernetes Cluster that is the deployment target of the application. Typically, when assigned at the cluster level, the tools support build/pipelines and image registries that affect deployment speed. Tools are broadly classified into three types based on their scope of use.
ProjectGroup Tool: It is a tool that can be used only in projects belonging to a Project Group. Multiple Project Groups can be mapped and used. The Project Group Owner and Master register and manage it.
Tenant Tool: A tool that can only be used within project groups belonging to a tenant. Multiple tenants can be mapped for use. When registering the tool, only the tenant administrator of the initially registered tenant can manage it. Tenants added later to the tool can only use it. Additionally, it can be designated and managed to be usable in clusters accessible to the tenant administrator.
System Tool: DevOps Service is a tool that can be used as a service across the entire project. System administrators designate and manage the tenants and clusters that can be registered and used.
Application Template
This is a template that makes it easy to set up a project. A template that reflects development standards and even provides sample code is called Dev. Starter, while a template that simply supports development environment setup is called Environment Only. Like tools, it is divided into three main types based on the scope of use.
Project Group Template: A template that can be used only by projects belonging to a project group. The project group Owner and Master register and manage it.
Tenant Template: This is a template that can only be used by project groups belonging to a tenant. It is registered and managed by the tenant administrator.
System Template: This template can be used across all projects in DevOps Service. It designates and manages the tenants that system administrators can register and use.
2.1.2 - Roles
Project group roles and permissions
- The project group creator has Owner permission by default.
- Master lacks the project group deletion permission among the Owner’s permissions.
- Developers and Viewers have view‑only permissions.
| Category | Permission | Owner | Master | Developer | Viewer |
|---|---|---|---|---|---|
| Project Group | Lookup | ○ | ○ | ○ | ○ |
| Project Group | Edit | ○ | ○ | ||
| Project Group | Delete | ○ | |||
| project | Create | ○ | ○ | ||
| Project | Lookup | ○ | ○ | ○ | ○ |
| Member | Add | ○ | ○ | ||
| member | Lookup | ○ | ○ | ○ | ○ |
| Member | Delete | ○ | ○ |
Table. Permissions for each role within the project group
Project roles and permissions
- They are classified as Owner, Master, Developer, and Viewer.
- Viewer can only view.
- Developers can create or delete development-related functions.
- Example) build pipeline, Helm chart, deployment
- Owner/Master can view, create, and delete all functions within a project.
- The project role holder inherits the role holder of the project group.
- Even if you are not registered as a project member, you can perform the role in the project if you are a member of the project group.
- When a user’s project role and project group role differ, the project role takes precedence.
- In other words, you can restrict permissions for a specific project among the members of a project group.
- Example) If you do not want to grant Master permissions to the Master role holder of a project group for a specific project, register them as a project member and assign Developer or Viewer permissions.
| Category | Permission | Owner | Master | Developer | Viewer |
|---|---|---|---|---|---|
| Dashboard | Lookup | ○ | ○ | ○ | ○ |
| Build pipeline | Lookup | ○ | ○ | ○ | ○ |
| Build pipeline | Import | ○ | ○ | ○ | |
| Build pipeline | (development) create/add | ○ | ○ | ○ | |
| Build pipeline | (development) run | ○ | ○ | ○ | |
| Build pipeline | (Development) Fix | ○ | ○ | ○ | |
| Build pipeline | (development) delete | ○ | ○ | ○ | |
| Build pipeline | (Operation) Create/Add | ○ | ○ | ||
| Build pipeline | (operation) execution | ○ | ○ | ||
| Build pipeline | (Operation) Edit | ○ | ○ | ||
| Build pipeline | (Operation) Delete | ○ | ○ | ||
| helm install | (development) install | ○ | ○ | ○ | |
| helm install | (Operation) Installation | ○ | ○ | ||
| Project | Edit | ○ | ○ | ||
| Project | Delete | ○ |
Table. Permissions by role within the project (1)
| Daegu division | Subcategory | Permission | Owner | Master | Developer | Viewer |
|---|---|---|---|---|---|---|
| Kubernetes deployment | Helm release | (development) lookup | ○ | ○ | ○ | ○ |
| Kubernetes deployment | Helm release | (development) upgrade | ○ | ○ | ○ | |
| Kubernetes deployment | Helm release | (development) rollback | ○ | ○ | ○ | |
| Kubernetes deployment | Helm release | (development) delete | ○ | ○ | ○ | |
| Kubernetes deployment | Helm release | (Operation) Lookup | ○ | ○ | ○ | ○ |
| Kubernetes deployment | Helm release | (Operation) Upgrade | ○ | ○ | ||
| Kubernetes deployment | Helm release | (Production) Rollback | ○ | ○ | ||
| Kubernetes deployment | Helm release | (operation) Delete | ○ | ○ | ||
| Kubernetes deployment | Helm release | Import | ○ | ○ | ||
| Kubernetes deployment | Ingress/Service | Create/Update/Delete | ○ | ○ | ||
| Kubernetes deployment | Blue/Green | (development) create/modify/delete | ○ | ○ | ||
| Kubernetes deployment | Blue/Green | (Operations) Create/Update/Delete | ○ | ○ | ||
| Kubernetes deployment | Canary | (development) lookup | ○ | ○ | ○ | ○ |
| Kubernetes deployment | Canary | (Development) Create/Delete | ○ | ○ | ○ | |
| Kubernetes deployment | Canary | (Operation) Query | ○ | ○ | ○ | ○ |
| Kubernetes deployment | Canary | (Operation) Create | ○ | ○ | ||
| Kubernetes deployment | Canary | (Operation) Delete | ○ | ○ | ||
| Kubernetes deployment | Istio | (development) query | ○ | ○ | ○ | ○ |
| Kubernetes deployment | Istio | (development) create/modify/delete | ○ | ○ | ○ | |
| Kubernetes deployment | Istio | (Operation) Lookup | ○ | ○ | ○ | ○ |
| Kubernetes deployment | Istio | (Operation) Create/Edit | ○ | ○ | ||
| Kubernetes deployment | Istio | (Operation) Delete | ○ | ○ | ||
| Kubernetes deployment | Workload | (development) query | ○ | ○ | ○ | ○ |
| Kubernetes deployment | workload | (Development) Create/Delete/Rollback | ○ | ○ | ○ | |
| Kubernetes deployment | workload | (Operation) Lookup | ○ | ○ | ○ | ○ |
| Kubernetes deployment | Workload | (Operational) Create/Rollback | ○ | ○ | ||
| Kubernetes deployment | Workload | (Operation) Delete | ○ | ○ | ||
| Code repository/Code quality/Artifact repository/Image repository | All | Lookup | ○ | ○ | ○ | ○ |
| Code repository/Code quality/Artifact repository/Image repository | All | Create | ○ | ○ | ○ | |
| Code repository/Code quality/Artifact repository/Image repository | All | Delete | ○ | ○ |
Table. Permissions by role within the project (2)
- Jenkins system permissions
- Access permissions are granted based on the project permission hierarchy of
DevOps Console. - Permissions are assigned to the Jenkins pipeline based on the project’s role assignments.
- For tools other than Jenkins, you can set permissions in the tool’s menu.
- Access permissions are granted based on the project permission hierarchy of
| Category | Permission | Owner | Master | Developer | Viewer |
|---|---|---|---|---|---|
| (Folder) Project Group | Folder view | ○ | ○ | ○ | ○ |
| (folder) project | Credential lookup | ○ | ○ | ○ | ○ |
| (folder) project | Create/Update/Delete credentials | ○ | ○ | ||
| (folder) project | Folder view | ○ | ○ | ○ | ○ |
| (folder) project | Create folder | ||||
| (folder) project | Folder Settings | ||||
| (folder) project | Delete folder | ○ | ○ | ||
| (folder) type | (Development) Folder Lookup | ○ | ○ | ○ | |
| (folder) type | (Development) Create pipeline | ||||
| (folder) type | (development) folder settings | ||||
| (folder) type | (Development) Delete folder | ○ | ○ | ○ | |
| (folder) type | (Production) Folder Lookup | ○ | ○ | ||
| (folder) type | (Production) Pipeline creation | ||||
| (folder) type | (Production) Folder Settings | ||||
| (folder) type | (Operation) Delete folder | ○ | ○ | ||
| pipeline | (Development) View Pipeline | ○ | ○ | ○ | |
| pipeline | (Development) Pipeline Configuration | ○ | ○ | ○ | |
| pipeline | (Development) Delete pipeline | ○ | ○ | ○ | |
| pipeline | (development) pipeline build | ○ | ○ | ○ | |
| pipeline | (Production) Pipeline Lookup | ○ | ○ | ||
| pipeline | (Production) Pipeline Configuration | ○ | ○ | ||
| pipeline | (Production) Delete pipeline | ○ | ○ | ||
| pipeline | (Production) Pipeline Build | ○ | ○ |
Table. Jenkins system permissions by role within the project
System roles and permissions
| Daegu division | Subcategory | Permission | System Administrator | Administrator (Tenant Manager) | User (Project Group Owner) |
|---|---|---|---|---|---|
| tool | System tool | Register/Edit/Delete | ○ | ||
| Tool | System tool | Add/Modify supported tenant | ○ | ||
| tool | System tool | Delete supported tenant | ○ | ○ | |
| tool | System tool | Add/Modify supported cluster | ○ | ||
| tool | System tool | Delete supported cluster | ○ | ○ | ○ |
| tool | Tenant tool | Register/Edit/Delete | ○ | ○ | |
| tool | Tenant tool | Add/Modify/Delete supported tenant | ○ | ○ | |
| tool | Project Group Tool | Register/Edit/Delete | ○ | ○ | |
| tool | Project Group Tool | Add/Modify/Delete supported tenant | ○ | ○ |
Table. System Roles and Permissions(1)
| Daegu division | Subcategory | Permission | System Administrator | Administrator (Tenant Manager) | User (Project Group Owner) |
|---|---|---|---|---|---|
| App. Template | System template | Register/Edit/Delete | ○ | ||
| App. Template | System template | Add/Modify supported tenant | ○ | ||
| App. Template | System template | Delete supported tenant | ○ | ○ | |
| App. Template | System template | Add/Modify/Delete Supported Images | ○ | ||
| App. Template | System template | Add/Modify/Delete supported Helm charts | ○ | ||
| App. Template | Tenant template | Register/Edit/Delete | ○ | ○ | |
| App. Template | Tenant template | Add/Modify/Delete supported images | ○ | ○ | |
| App. Template | Tenant template | Add/Modify/Delete supported Helm charts | ○ | ○ | |
| App. Template | Project Group Template | Register/Edit/Delete | ○ | ○ | |
| App. Template | Project Group Template | Add/Modify/Delete Supported Images | ○ | ○ | |
| App. Template | Project Group Template | Add/Modify/Delete supported Helm charts | ○ | ○ | |
| Helm chart management | System Helm chart | Add/Edit/Delete | ○ | ||
| Helm chart management | Tenant Helm chart | Add/Edit/Delete | ○ | ○ | |
| Helm chart management | Project group Helm chart | Add/Edit/Delete | ○ | ○ | |
| Project Group | All | Create | ○ | ○ | ○ |
Table. System Roles and Permissions(2)
2.1.3 - Screen Configuration
Describes the main menu pages of DevOps Console.
When you first log in, the top menu and all project groups and projects you have permission for are displayed.
Top menu
Through the top menu, you can navigate to the Main screen, Management screen, etc., and edit user information. The top menu is always displayed while using DevOps Console.
| Item | Explanation |
|---|---|
| Main page | Go to the main page. |
| management | Navigate to the admin page. |
| Support | You can view the guide, inquiries, and announcements. |
| Link | You can view the related system links. |
| User Information | You can view and edit user information or log out.
|
Table. Top menu items
Main Page
Displays the status of all project groups and projects for which the user has permissions.
| Item | Explanation |
|---|---|
| Create project group | You can create a new project group. |
| Project group name | Indicates the project group name. |
| Tenant name | Represents the tenant name. |
| Project Group Management | Navigate to the project group page. |
| Release Management | Go to the release management page. |
| Create project | You can create a new project. |
| Project Details | All projects the user has permission for are displayed
|
| Go to the user guide | Go to the user guide page. |
Table. Main page items
Admin Page
It includes overall management functions of the DevOps Console, such as dashboard, tenant, project, tool, and user.
| Item | Explanation |
|---|---|
| Management menu | DevOps Console These are the management feature menus.
|
Table. Management Page Items
Project Group Management Page
This is the management page for project groups and releases.
| Item | Explanation |
|---|---|
| Project Group Management Menu | This is the project group management menu. |
| Release Management Menu | This is the release management menu. |
Table. Project Group Management Page Items
Project page
This is a page about the project.
| Item | Explanation |
|---|---|
| Project Management Menu | This is the project management menu. |
Table. Project Management Page Items
2.2 - Getting Started
2.2.1 - Getting Started with DevOps Console
Describes how to log in to the DevOps Console and set the display language and user information.
Sign up
To use DevOps Console, you need to create a DevOps Console account that is separate from Samsung Cloud Platform, and you can create the account through sign‑up.
To create an account in DevOps Console, follow the steps below.
- Click the Sign Up link on the login page. You will be taken to the sign‑up page.
- Please proceed with Identity verification. When identity verification is complete, click the Next button.
Item Required statusExplanation Auto Input Prevention Required Enter the characters displayed in the image into the input field. Table. Authentication Information - Please agree to the terms of the Sign-up Information item.
Item Required statusExplanation Terms of Service Required Check if the service terms are agreed Privacy Policy Required Check consent for collection and use of personal information Must be at least 14 years old. Required Check whether the user is 14 or older. Table. Sign-up Information Input - Enter the required information for the Member Information field.
Item Whether requiredExplanation User ID (email) Required Email to be used as the subscriber ID mobile phone number Required Enter mobile phone number - Enter the mobile phone number and click the OTP Send button to generate an OTP
- Enter the OTP number received on the mobile phone and click the Verify button
- If the OTP is valid, mobile phone number verification is completed
Password Required The password that the subscriber can use must be entered within 8 to 20 characters - User ID or name cannot be used as the password
- Must include at least one uppercase letter (English), one lowercase letter (English), one digit, and one special character (
!@#$%^&*) - The same character cannot be used three or more times
- Sequences of four or more consecutive letters or numbers are not allowed
- Password change interval: 90 days
Confirm Password Required Confirm the password the subscriber will use Name Required Subscriber name - Can be entered using letters, numbers, and spaces, up to 100 characters
language Required Notification language settings for email, SMS, etc. Time zone Required Set user’s timezone information Table. Member Information Input - After entering all the information, click the Complete button, and a verification email will be sent to the entered email address.
- Click the Email address verification button in the received email to complete registration.
Log in
To log in to DevOps Console, enter your account information on the login page and click the Next button.
After entering the OTP number issued for the selected OTP type on the OTP authentication page, click the Login button.
If you cannot remember your ID or password, click the ID/Password Recovery link, locate your account information first, and then attempt to log in.
After logging in, the DevOps Console main page opens.
Caution
If you enter the password incorrectly more than five times, your account will be locked, so please enter it correctly.
To unlock your account, click the ID/Password Recovery link to reset your password.
Edit User Information
To edit user information, follow these steps.
- Click the Shortcut icon at the upper right of the Main page.
- DevOps IDP Click the link. DevOps IDP page opens in a new tab.
- You can change information such as mobile phone number, password, name, timezone, and language on the user information page.
Information
The timezone and language settings of DevOps IDP are not synchronized with
DevOps Console.To modify the information used in DevOps Console, follow these steps.
- Click the User icon in the top menu of the Main page.
- Click the Account Information menu. The Account Information popup window opens.
- After changing the language and time zone information, click the Save button to complete updating your account information.
Changing Console Language
To change the language displayed in DevOps Console, after logging in, click Language Settings located below the DevOps Console page to select the desired language.
Manage authentication keys
Information
The authentication key is used when accessing the Open API service of
DevOps Console.You can manage each user’s individual authentication keys through the Authentication Key Management menu after clicking the User icon in the top menu of the Main page.
Add authentication key
To add an authentication key, follow these steps.
- Click the User icon at the top right of the Main page.
- Click the Authentication Key Management menu. The Authentication Key Management popup window opens.
- Click the Create Authentication Key button. The Create Authentication Key popup will appear.
- After setting the expiration date, click the Save button to complete the creation of the authentication key.
Information
If an authentication key has already been added, you cannot add another one.
Configure security settings
You can restrict the IPs that are allowed to use this authentication key through security settings.
To add security settings, follow these steps.
- Click the User icon at the top right of the Main page.
- Click the Authentication Key Management menu. The Authentication Key Management popup window opens.
- Click the Security Settings tab, then click the Edit button. The Change Security Settings popup window opens.
- Set IP access control to use.
- After entering the allowed IP, click the Save button to complete the security settings.
Delete authentication key
To delete the authentication key, follow these steps.
- Click the User icon at the top right of the Main page.
- Click the Authentication Key Management menu. The Authentication Key Management popup window opens.
- Click the Status Change button.
- When the Authentication Key Status Change popup opens, process it as Unused and click the Save button.
- Click the Delete button to complete the authentication key deletion.
Information
Authentication keys that are in use cannot be deleted. Change them to Unused status before deletion.
Check My Activity History
If you click the User Icon > My Activity History menu in the top menu of the Main page, you can view your DevOps Console activity history.
Configure Access Control IP
You can register IP addresses that are allowed to access the DevOps Console to control access.
Follow these steps to register an access control IP.
- Click the Main page’s top‑right shortcut icon.
- DevOps IDP Click the link. DevOps IDP page opens in a new tab.
- Click the Access Control menu in the left menu.
- On the Access Control page, click the Edit button below. You will be taken to the Access Control Edit page.
- Set Access Control IP Settings to Enable.
- After adding the IP to allow access, click the Save button to complete the access control settings.
Information
If the IP has changed or is incorrectly registered making access impossible, you can click the Access Control IP Settings link below the login page to change the settings.
Delete Account
Caution
DevOps Console When the account is deleted, all permissions related to the collected user information and resources are terminated.To delete your DevOps Console account, follow the steps below.
- Click the Main page’s top‑right shortcut icon.
- DevOps IDP Click the link. DevOps IDP page opens in a new tab.
- On the user information page, click the Delete Account button at the top right. The Delete Account popup will appear.
- Enter your current password in the input field, then click the Delete Account button to complete the deletion.
2.2.1.1 - Registration Information
Users can view and manage their basic information, authentication information, subscribed tenants, subscribed project groups, and subscribed projects.
Getting Started with Sign-up Information
To start managing your registration information, follow these steps.
- Main page, click the Admin icon in the upper right. Navigate to the Tenant Dashboard page.
- Please click the Sign-up Information menu in the left menu. It navigates to the Sign-up Information page.
Managing authentication information
Authentication information automatically saves the credentials the user used for tool registration, usage, and related activities. If necessary, you can add new credentials, or modify or delete existing credentials.
To manage authentication information, follow the steps below.
- Click the Admin icon at the top right of the Main page. You will be taken to the Tenant Dashboard page.
- Click the Registration Information menu in the left menu. You will be taken to the Registration Information page.
- On the Registration Information page, click the Authentication Information tab.
Add authentication information
To add authentication information, follow these steps.
- In the Credentials tab, click the Add button. The Add Credentials popup opens.
- Add Authentication Info Enter the information in the popup window.
- All tools and URLs that the user can access are displayed.
- After completing the information entry, click the Connection Test button.
- Click the Save button.
Modify authentication information
To modify the authentication information, follow these steps.
- In the Authentication Information tab, click the authentication information you want to edit. The Edit Authentication Information popup will open.
- Edit Authentication Information After entering the information in the popup window, click the Connection Test button.
- Save button is enabled, click the Save button.
Delete authentication information
To delete the credentials, follow these steps.
- In the Credential tab, select the checkbox of the credential you want to delete.
- Click the Delete button in the Authentication information list.
- In the confirmation popup, click the Confirm button.
Caution
If the authentication information is in use, it cannot be deleted.
Manage Subscribed Tenants
Users can view the list of tenants they have joined.
You can also request to join a new tenant, and you can leave a tenant you are already a member of.
To manage the tenant you have joined, follow these steps.
- Click the Admin icon at the top right of the Main page. You will be taken to the Tenant Dashboard page.
- Click the Sign-up Information menu in the left menu. You will be taken to the Sign-up Information page.
- On the Registration Info page, click the Registered Tenant tab.
Request tenant registration
To request tenant enrollment, follow the steps below.
- Click the Join button in the Joined Tenant tab. The Tenant Join Request popup window opens.
- Tenant Registration Request In the popup window, enter the tenant code you wish to register and click the Search icon.
- Enter the request reason and click the Add button.
- After selecting the permissions of the added tenant, click the Save button.
- Click the Confirm button in the confirmation popup.
Leave tenant
To withdraw from the tenant, follow the steps below.
- In the Joined Tenants tab, select the checkbox of the tenant you wish to withdraw.
- Click the Delete button.
- In the confirmation popup, click the Confirm button.
Manage Joined Project Groups
Users can view the list of project groups they have joined.
To manage the project groups you have joined, follow these steps.
- Click the Admin icon at the top right of the Main page. You will be taken to the Tenant Dashboard page.
- From the left menu, click the Sign-up Information menu. You will be taken to the Sign-up Information page.
- On the Sign-up Information page, click the Joined Project Group tab.
When you click a project group in the project group list, you are taken to the Project Group Management page.
For detailed information on project group management, please refer to the Project Group Overview.
Manage Joined Projects
Users can view the list of projects they have joined.
To manage the projects you have joined, follow these steps.
- Click the Admin icon at the top right of the Main page. You will be taken to the Tenant Dashboard page.
- Click the Sign-up Information menu in the left menu. You will be taken to the Sign-up Information page.
- On the Sign-up Information page, click the Joined Projects tab.
When you click a project in the project list, you are taken to the Project Management page.
For detailed information about the project, see the 프로젝트.
2.2.2 - Tutorial (From Project Creation to Build/Deploy)
Through the following steps, the user can create a DevOps Console project, build the source to create an image, and deploy the Helm chart to a Kubernetes cluster.
Create Project Group
Users can create a project group. Users must be a member of the tenant where they will create the project group.
Create Project Group
To create a project group, follow these steps.
- On the Main page, click the Create Project Group and Start button or the Create Project Group button. The Create Project Group popup opens.
- After entering the items, click the Save button to complete the creation of the project group.
Reference
- Approval from the tenant administrator may be required.
- If there are no selectable tenants, click the Tenant Registration Shortcut link to proceed with tenant registration.
Register Tenant
To join a tenant, follow these steps.
- In the Create Project Group popup, click the Tenant Join Shortcut link. The Tenant Join Request popup opens.
- Enter the tenant code to register in the Tenant Search field accurately and click the Search icon. The tenant information will be retrieved.
- Verify that the displayed tenant is correct, enter the request reason, and click the Add button. It will be added to the list below.
- After selecting the permissions for the tenant added to the list below, click the Save button.
(Helm chart deployment)Create a project
Reference
- Users must be members of a project group and tenant to be able to create projects.
- Refer to Creating a Project Group for how to join a project group and tenant.
Users can create a project that deploys an application to a specific Kubernetes cluster using App.Template, Helm Chart, and Tool Management.
Start Project Creation
To start creating a project, follow these steps.
- On the Main page, click the Create Project button. The Create Project page opens.
Enter basic information
Enter the basic information of the project. The project name and project ID must be unique and cannot be duplicated.
To enter the basic information, follow the steps below.
- On the Project Creation page, select the App. Template Utilization option of the Project Configuration Method item.
- For the deployment target field, select Kubernetes.
- After entering additional content, click the Start button.
Item Explanation Project name Please enter the project name. Project ID Please enter the project ID. Project configuration method Select a project configuration method - Use App template: select a pre‑provided App template.
- Manual configuration: configure without an App template.
deployment target Select deployment target - Kubernetes: Deploy the application to a Kubernetes cluster.
- Kubernetes(ArgoCD): Deploy the application to a Kubernetes cluster using ArgoCD.
- VM(Artifact): Deploy the application to a VM server.
- VM(Docker): Package the application as a Docker image and deploy it to a VM server.
- N/A: Choose this when you do not deploy the build output.
K8S cluster Select the target cluster for deployment DevOps ConsoleOnly clusters that the user has access rights to can be selected among the K8S clusters.
namespace Select the target namespace for deployment - Only namespaces that the user has access rights to, among the clusters retrieved from the K8S cluster, can be selected.
Table. Project creation basic information entry items
Select Application Template
Note
For detailed information about the application template, see App.템플릿.
The user can select an application template to configure the project.
If you create a project based on an application template that includes sample source code, you can view the application that will be deployed.
In contrast, using a template labeled Environment Only configures only the build/deployment environment without sample source code.
If you configure a project using an already set up source code repository, select the template marked Environment Only.
To start selecting an application template, follow these steps.
- On the Application Template screen, enter the template name, select the application template card you want, and then click.
- When the Next button is enabled, click the Next button.
Item Explanation Filter You can easily find application templates using predefined filters. search You can easily find application templates through search. Table. Project Creation Application Template Items
Set up the code repository
Users can configure a repository for managing source code through the code repository setup step.
Create new repository and use existing repository activation conditions differ depending on the application template and tool.
| Repository type | App with source code. Template + DevOps Console registration tool | App with source code included. Template + DevOps Console unregistered tool | Source code not included (EnvironmentOnly) App. Template + DevOps Console registration tool | Source code not included (Environment Only) App. Template + DevOps Console unregistered tool |
|---|---|---|---|---|
| Create new repository | ○ | X | ○ | X |
| Use existing repository | X | X | ○ | ○ |
Table. Conditions for creating a new repository and enabling use of existing repository
Note
Once authentication information is saved, you can perform a Connection Test without entering account information by using Use Saved Authentication Information thereafter.
To modify or delete stored credentials, refer to Manage Authentication Information.
To set up the code repository, follow these steps.
- In the Code repository item, select the Code repository type.
- Select Create new repository or Use existing repository, then enter the information.
- Enter authentication information and click the Connection Test button.
- When the Next button is enabled, click the Next button.
Item Explanation Repository type Select the code repository to use - Registered tool: The user can select and use the types of SCM Repository tools (
Github,Gitlab, etc.) that are available. - Unregistered tool: You can enter the domain of an unregistered tool to use it. The unregistered tool entry appears only when the source code is not included (Environment Only) App. Template.
New/Existing usage Please select New repository creation or whether to use an existing repository. - Activation status varies depending on specific conditions. For details, refer to Table. Activation conditions for creating a new repository and using an existing repository.
Repository information Enter repository information - When creating a new repository, the URL is formed from the project group name/project name.
Authentication information Enter authentication information - If you do not have an account, Don’t have an account? click the link to open the Account Creation Information popup where you can create an account.
- After creating a new account, be sure to change your password via the Set Initial Password link.
(Unregistered tool)
Repository informationEnter repository information - You can use a code repository that is not registered as a tool in
DevOps Console. - Click the URL Check button to undergo an additional verification process.
Table. Project Creation Code Repository Settings - Registered tool: The user can select and use the types of SCM Repository tools (
Configure code quality
Users can configure a repository for quality management.
To set code quality, follow these steps.
- In the Code Quality item, select Repository Type.
- Enter Basic Information and Authentication Information, then click the Connection Test button.
- Next button is enabled, click the Next button.
Item Explanation Repository type Select the repository to use - The types of Code Quality tools available to the user are displayed.
New / Existing / Unused status Select repository creation method - If you select Create new repository, you must enter the quality project name/quality project key.
- If you select Do not create, you can proceed directly to the next step.
Base URL Select the SonarQubeURL.Quality Project Name Enter the name of the SonarQubeproject.Quality Project Key Enter the Key of the SonarQubeproject.authentication information Enter authentication credentials - You can create a new user or use existing authentication credentials.
Table. Project Creation Code Quality Settings
Configure image repository
Users can configure a repository to store the built container images through the image repository configuration step.
Note
Once authentication information is saved, you can perform a Connection Test without entering account information by using Use Saved Authentication Information thereafter.
To modify or delete stored credentials, refer to Manage Authentication Information.
To set up the image repository, follow these steps.
- In the Image Repository item, select the Repository Type.
- Create new repository / Use existing repository select, then enter the information.
- Enter authentication information and click the Connection Test button.
- When the Next button is enabled, click the Next button.
Item Explanation Repository type Select the repository type to use - The types of Image Registry tools available to the user are displayed.
Repository information Select the repository creation method. - When creating a new repository, the URL is formed with the project group name/project name.
Authentication information Enter your credentials. Table. Project Creation Image Repository Settings
Configure the deployment target environment
Users can deploy by directly configuring via Helm charts.
Helm release name and Helm chart when selected, the Helm chart installation options and the default Values.yaml entries included in the chart are displayed.
Available Helm charts are associated with the App template. You can edit or delete them through Manage supported Helm charts.
To set the deployment target environment, follow these steps.
- In the Deployment target field, select Configure directly via Helm chart.
- Please enter the Helm release name.
- Click the Search button to select the Helm chart to use.
- After editing Values.yaml, click the Validation Check button.
- When the Next button is enabled, click the Next button.
Item Explanation deployment target Please select the deployment target. Helm release name Enter the name of the Helm release to create. - The name must be unique within the namespace of the target cluster.
Helm chart Select a Helm chart. - When a Helm chart is selected, detailed information about the chosen chart is displayed below
K8S information Shows the information of the Kubernetes cluster required for configuring Value.yaml. Values. yaml Edit the contents of Values.yaml. values.yamlfile to be used when installing the Helm chart.
Table. Project creation deployment target environment configuration items
Setting up the Build Pipeline
Users can configure pipelines that build and deploy applications.
You can view each stage of the pipeline to be configured and rename the build job.
To set up the build pipeline, follow these steps.
- Build Pipeline screen branches based on IDP integration status.
- For IDP-integrated Jenkins, click the User Check button to perform User Registration Confirmation.
- For Jenkins not integrated with IDP, enter the authentication information and click the Connection Test button.
- When the Next button is enabled, click the Next button.Item
Explanation Build/Deployment pipeline Displays build/deployment pipeline information. - The build/deployment pipeline is displayed based on the information registered in the App template’s Manage Pipeline Templates.
Category Select the development/operation distinction. - The permissions for the pipeline vary according to the development/operation distinction.
- Refer to Table. Role-based permissions within the project (1) for role-based permissions.
URL Select Jenkinsto configure the pipeline, then enter the job name.- The
Jenkinsinstances available to the user are displayed.
Build Agent Select the agent to be used for pipeline builds. - For information about the agent, please refer to Managing agents (kubernetes), Managing agents (VM).
Build environment OS Displays the OS information of the environment in which the build agent runs. User information IDP Integrated Jenkins - Click the User Check button to verify user registration.
- If you are not registered as a Jenkins user, when the User Registration Guide popup appears, click the Go to Jenkins link to proceed with User Sign‑Up or Initial Jenkins Login.
- Enter the authentication information and click the Connection Test button.
Set environment variables Set the environment variables to be registered in the Jenkins pipeline. Image Tag Pattern Select the tag assignment method for the container image. Deploy Strategy Select the deployment method for the container image. Recipient of deployment results Select the user who will receive the results after the build pipeline completes. Table. Project creation build pipeline configuration items
Customize Settings
The user can specify and modify the path of the Dockerfile file used for the build.
Additionally, you can view the final script generated based on the information configured in Configure Build Pipeline and also edit it.
Dockerfile, follow these steps to configure the pipeline script.
- After entering information on the Custom settings page, click the Connection Test button.
- Click the Next button when the Next button is enabled.
Item Explanation Dockerfile configuration Create New Dockerfile or Use Existing Dockerfile. Please select. - «Use Existing Dockerfile is only selectable after choosing the
Environment OnlyApp template and, in 코드 저장소 설정하기, selecting Use Existing Repository.
Dockerfile path Specify the Dockerfilefile path in the source code.Branch name The branch name is automatically registered when you set it in Code Repository Configuration. Dockerfile Check and modify the contents of the Dockerfile.pipeline script Check and modify the pipeline script. Table. Project Creation Custom Settings Items - «Use Existing Dockerfile is only selectable after choosing the
Note
For detailed information about Jenkins pipeline scripts, see the official site.
Complete project creation
The user can review the project and tool information to be created and start project creation.
To complete project creation, follow the steps below.
- Summary Information After checking the information on the screen, click the Complete button.
- Project Creation popup window opens and the project creation proceeds.
- After the project creation is complete, click the Confirm button to go to the Project page.
Notice
It cannot be canceled during creation, and when the project is created successfully, the Confirm button becomes active.
Check Build Pipeline Execution
On the Project page, you can view the pipeline execution status, and once the initial project creation is complete, the build pipeline runs automatically.
If the build pipeline fails, use the left Build Pipeline menu to modify and rerun the pipeline.
To verify the build pipeline execution, follow these steps.
- On the Main page, click the Project card. You will be taken to the Project Dashboard page.
- Click the Build/Deploy > Build Pipeline menu in the left menu.
Check deployment results
After the pipeline finishes running, you can check the Helm chart deployment results.
For detailed information about the Helm chart deployment results, refer to the Helm release.
To verify the deployment results, follow the steps below.
- Main page, click the Project card. Project Dashboard page will be displayed.
- Click the Build/Deploy > Kubernetes Deploy menu in the left menu. You will be taken to the Kubernetes Deploy page.
- Click the Helm Release list to view detailed deployment results.
2.2.2.1 - Add Build/Deploy (Helm Chart Deployment)
The user can, through the following steps, create a new build pipeline in an already created DevOps Console project, build the source to create an image, and perform Helm chart deployment to a Kubernetes cluster.
Through Helm install, the deployed Helm release will be used in Deploy to K8S stage configuration.
Getting Started with Build/Deploy Additions
To begin adding build and deployment, follow these steps.
- Click the Project card on the Main page. You will be taken to the Project Dashboard page.
Add code repository (Option)
Reference
Proceed only if a new code repository is needed.
| Repository type | App with source code. Template + DevOps Console registration tool | App with source code included. Template + DevOps Console unregistered tool | Source code not included (EnvironmentOnly) App. Template + DevOps Console registration tool | Source code not included (Environment Only) App. Template + DevOps Console unregistered tool |
|---|---|---|---|---|
| Create new repository | ○ | X | ○ | X |
| Use existing repository | X | X | ○ | ○ |
Table. Conditions for creating a new repository and enabling use of existing repository
To add a code repository, follow these steps.
- On the Main page, click the Project card. You will be taken to the Project Dashboard page.
- Click Repository > Code Repository in the left menu.
- Click the Add Code Repository button at the top right. The Add Code Repository page opens.
- Enter/set each item and click the Connection Test button.
- Click the Save button to complete Add code repository.
Item Explanation Repository type Select the repository to use - Registered tool: The user can select and use the types of SCM Repository tools (
Github,Gitlab, etc.) that are available. - Unregistered tool: You can enter the domain of a tool that will not be registered to use it. The unregistered tool option appears only for App templates that do not include source code (
Environment Only).
New/Existing usage Select Create new repository or Use existing repository - The activation status changes depending on specific conditions. For more information, see Table. Conditions for activating new repository creation and existing repository usage.
Repository information Enter repository information - When creating a new repository, the URL is formed from the project group name/project name.
Authentication information Enter authentication credentials. Repository information Enter repository information - You can use a code repository that is not registered as a tool in
DevOps Console. - Click the URL Check button to proceed with the verification process.
Table. Code Repository Configuration Items - Registered tool: The user can select and use the types of SCM Repository tools (
Add image repository (Option)
Note
Proceed only if a new image repository is needed.
To add an image repository, follow these steps.
App. Add image repository
- On the Image Repository page, click the App. Add Image Repository button in the upper right. You will be taken to the App. Add Image Repository page.
- App. Add Image Repository page, enter and configure each item.
- Connection Test Click the button.
- Click the Save button.
Item Explanation Select repository type Select the image repository type.
To use an image repository not registered in the Devops Console, select the Image Registry type.Choose whether to create a repository Choose whether to create a new repository or use an existing one. - If you selected the
Docker huborImage Registrytype earlier, you can only select Use existing repository.
Registered tool Enter repository information. Unregistered tool Enter repository information - You can register an image repository that is not registered with the DevOps Console tool.
- Click the URL Check button to proceed with the verification process.
- Only Use existing repository can be selected.
Table. App. Add Image Repository Input Fields - If you selected the
Add pull-only image repository
- On the Image Repository page, click the Add Pull-Only Image Repository button in the upper right. You will be taken to the Add Pull-Only Image Repository page.
- Add Pull‑only Image Repository On the page, enter and configure each field.
- Connection Test Click the button.
- Click the Save button.
Install Helm
To install Helm, follow these steps.
- Click the Project card on the Main page. You will be taken to the Project Dashboard page.
- Click the Build/Deploy > HelmInstall menu in the left menu.
- In the K8S cluster field, select the K8S cluster you wish to install.
- Click the Helm chart you want to install to go to the Helm Chart Details screen.
- Click the Helm Install button. It navigates to the Helm Chart Install screen.
- Enter each item and click the Next button.
Item Explanation Release name Enter the name to use in the Helm chart release.
It must be unique and cannot be duplicated within the namespace.Category Development, Operations Version Select the version of the chart you want to install with Helm. K8S cluster Displays the target K8S cluster for Helm install.
Changes cannot be made, and if you wish to change, please select the K8S cluster from Start Helm Install.namespace Select the target namespace for the helm install from the list. Reference information This is reference information provided by the selected K8S cluster. Click each tab to view detailed information. Default Values.yaml included in the chart You can edit the values.yamlfile to run helm install with the desired values.
If needed, refer to the reference information and edit thevalues.yamlfile with those values.Writing type Form type items are displayed only for Helm charts that support Form input - Form: Enter the items shown on the screen. For creating Helm charts that support Form input, see Creating Helm charts that support Form input.
values.yaml: Edit values in the yaml editor screen just like a regular Helm chart.
Form input This is the screen displayed when you select Form in the creation type; review each item and enter the values. After completing the entry, click the Validation Check button to verify the input values. Table. Helm Install Configuration Items - Helm chart installation A popup window opens. Click the Run button to complete the Helm install.
- When the installation is complete, the Kubernetes deployment page opens.
Add Build Pipeline
To add a build pipeline, follow these steps.
- On the Main page, click the Project card. You will be taken to the Project Dashboard page.
- In the left menu, click the Build/Deploy > Build Pipeline menu. You will be taken to the Build Pipeline page.
- Build Pipeline page, click the Add Pipeline button at the top right. You will be taken to the Add Pipeline page.
- Add Pipeline Enter or configure each field on the page.
- Click the Next button.
Item Explanation Category Select Development or Operations - The actions that each role can perform differ depending on development or operations.
- Refer to Table. Role-specific permissions within the project (1) for role-specific permissions.
Jenkins URL Select Jenkinsfrom the list to add a build pipeline.Build Agent Select the agent (build environment) on which the build pipeline will run.
Click the Info icon to view the list of tools provided by the agent.Build environment OS Displays the OS information of the environment where the build agent runs. Folder type Select the folder type. - Existing folder: Add a pipeline under an already created folder in
Jenkins. - New folder: Create a new folder in
Jenkinsand add a pipeline under it.
folder Select a folder from the list or enter the name of a new folder to create. Pipeline name Please enter the pipeline name. Parameter setting Set the parameters to be used in the pipeline. Environment variable configuration Set the environment variables to be used in the pipeline. Stage Settings Configure the stage to be used in the pipeline. Configure email recipients for build results Set the recipients who will receive the result email after the pipeline completes (success/failure). Table. Additional Build Pipeline Settings
Setting parameters
Follow these steps to set the parameters to use when running the pipeline.
- Click the Parameter area. The Parameter registration page opens on the right.
- When you click the Add button, the Add Parameter popup window opens.
- Add a parameter and click the Apply button to complete the parameter configuration.
Setting Environment Variables
Follow these steps to set environment variables for use in the pipeline.
- Click the Environment Variable area. The Environment Variable Registration page opens on the right.
- A list of pre-registered environment variables appears, and select the checkboxes for the environment variables you want to use.
- Check the selected environment variable and click the Apply button to complete the environment variable configuration.
Configure email recipients for build results
To set the recipients who will receive the build results by email, follow these steps.
- Click the Mail Recipient area. The Add Mail Recipient page opens on the right.
- In the Search area, search for the recipient and add them.
- Click the Apply button to complete the mail recipient settings.
Configure additional stage
Setting up the Checkout stage
To add a Checkout stage, follow these steps.
- Click the New Stage area. The stage settings page opens on the right.
- Choose Checkout as the Stage type.
- Enter the information and click Apply. (In the URL, you can select the code repository you added from Add Code Repository (Option).)
Item Explanation URL Select the code repository to perform the checkout. Branch name Enter the name of the branch to checkout. Table. Checkout Stage Settings
Configure the Build stage
To add a Build stage, follow these steps.
- Click the Add icon to add a new stage.
- Click the New Stage area. The Stage Settings page opens on the right.
- On the Stage Settings page, select Build as the Stage Type.
- After entering information on the Stage Settings page, click the Apply button.
Item Explanation language Select the programming language used by the application. Build tool Select the Build tool used for building the application.
Provides default Shell commands based on the selected Build tool.Shell command Enter the command to use for building the application.
All commands available in the Shell can be used.Table. Build stage input items
Setting Up Docker Build Stages
To add a Docker Build stage, follow these steps.
- Click the Add icon to add a new stage.
- Click the New Stage area. The Stage Settings page opens on the right.
- Select Docker Build as the Stage Type.
- After entering the information, click the Apply button. (You can select the image repository you added in Registry URL from Add Image Repository (Option).)
item | Explanation | example |
|---|---|---|
Registry URL (docker push) | Select the image repository where the Docker build result image will be pushed. | |
| ID | The ID value of the account to be used for the image repository | |
| image tag pattern | The Docker image tag is automatically generated according to the selected pattern.
|
|
| Add base image repository | Add Base Image Repository A popup window opens.
| |
Registry URL (docker pull) | Select the image repository for docker pull when the repository providing the Base Image used in the Dockerfile (FROM clause, docker pull) differs from the repository of the Registry URL (docker push). | |
| Image build tool | Displays the image build tool. | |
| Pre-build command | If there are any commands that need to be run before building a Docker image, write them in shell command format. | cp target/*.jar docker/ |
| Image Build folder | If you need to run the Docker image build from a specific folder, select the checkbox and enter the folder path. | docker |
| Dockerfile | Enter the Dockerfile filename. | Dockerfile |
| Image build options | Enter it if you need to use additional options with the image build tool. | --no-cache |
| Build command | Displays the image build command that will actually be executed. | |
| Post-build command | If there are commands that need to be executed after building a Docker image, write them in Shell command format. | rm -rf docker/*.jar |
Table. Docker Build Stage Input Items
Deploy to K8S Stage Configuration
Deploy to K8S To add a stage, follow the steps below.
- Click the Add icon to add a new stage.
- Click the New Stage area. The stage settings page opens on the right.
- Select Deploy to K8S as the Stage type.
- After entering the information, click the Apply button. (Type Helm Release (Helm Chart type) can be selected to choose the Helm Release added in Install Helm.)
Item | Explanation |
|---|---|
| type | Select deployment type
|
| K8S cluster | Select a K8S cluster
|
| namespace | Please select a namespace. |
| Helm release | Select HelmRelease. |
| Deployment method | Select deployment method
|
| Registry URL | Select the image repository where the image to be deployed to Kubernetes has been docker pushed. |
| Secret | Select the secret information input method
|
Table. Deploy to K8S stage input items
Check the final pipeline script
- Check the build pipeline script that will actually be generated. If needed, edit the script directly.
- Click the Complete button to finish adding the pipeline.
Pipeline addition result
Note
The added pipeline does not run automatically. If execution is required, run the pipeline manually.
2.2.2.2 - Add Build/Deploy (Workload Deployment)
The user can, through the following steps, create a new build pipeline in an already created DevOps Console project, build the source to create an image, and perform workload deployment on a Kubernetes cluster.
The workload added via Add Workload will be used in Deploy to K8S Stage Setup.
Build/Deploy Add Getting Started
To begin adding build/deployment, follow these steps.
- Click the Project card on the Main page. You will be taken to the Project Dashboard page.
Add code repository (Option)
Info
Proceed only if a new code repository is needed.
To add a code repository, follow these steps.
- On the Code Repository page, click the Add Code Repository button in the upper right. You will be taken to the Add Code Repository page.
- On the Add Code Repository page, enter and configure each item.
- Connection Test Click the button.
- Click the Save button.
Item Explanation Repository type Select the repository to use - Registered tools: Users can select and use the types of SCM Repository tools (
Github,Gitlab, etc.) that are available. - Unregistered tools: You can enter the domain of a tool that is not registered. The unregistered tool entry appears only for App templates that do not include source code (
Environment Only).
New/Existing usage Select Create new repository or Use existing repository - The activation status varies depending on specific conditions. For details, see Table. Conditions for activating new repository creation and existing repository usage.
Repository information Enter repository information - When creating a new repository, the URL is formed from the project group name/project name.
Authentication information Enter authentication credentials. Repository information Enter repository information - You can use a code repository that is not registered as a tool in DevOps Console.
- You must also go through the URL check process.
Table. Code Repository Add Input Items - Registered tools: Users can select and use the types of SCM Repository tools (
Add image repository (Option)
Information
Proceed only if a new image repository is needed.
To add an image repository, follow these steps.
App. Add image repository
- On the Image Repository page, click the App. Add Image Repository button in the upper right. You will be taken to the App. Add Image Repository page.
- App. Add Image Repository page, enter and configure each item.
- Connection Test Click the button.
- Click the Save button.
Item Explanation Select repository type Select the image repository type.
To use an image repository not registered in the Devops Console, select the Image Registry type.Choose whether to create a repository Choose whether to create a new repository or use an existing one. - If you selected the
Docker huborImage Registrytype earlier, you can only select Use existing repository.
Registered tool Enter repository information. Unregistered tool Enter repository information - You can register an image repository that is not registered with the DevOps Console tool.
- Click the URL Check button to proceed with the verification process.
- Only Use existing repository can be selected.
Table. App. Add Image Repository Input Fields - If you selected the
Add pull-only image repository
- On the Image Repository page, click the Add Pull-Only Image Repository button in the upper right. You will be taken to the Add Pull-Only Image Repository page.
- Add Pull‑only Image Repository On the page, enter and configure each field.
- Connection Test Click the button.
- Click the Save button.
Add workload
To add a workload, follow the steps below.
- On the Main page, click the Project card. You will be taken to the Project Dashboard page.
- Click the Build/Deploy > Kubernetes Deploy menu in the left menu. You will be taken to the Kubernetes Deploy page.
- On the Kubernetes deployment page, click the Add workload menu. The Add workload popup opens.
- Add Workload Enter the information in the popup window and click the Save button.
- In the confirmation popup, click the Confirm button to complete adding the workload.Item
Explanation Query target Only workloads deployed with the same Base image as the App template used when the project was first created are displayed. Workload already registered in the project Shows the workload already registered in the project. - Workloads already registered in the project cannot be added.
Table. Additional Workload Input Items
Modify K8S authentication information
K8S credentials are the authentication information used to verify permission to use a K8S cluster/namespace when performing a deployment in the build pipeline.
To modify the K8S credentials, follow these steps.
- On the Deployment Details page, click the Edit Credentials icon to the right of K8S Cluster/Namespace. The Edit Credentials popup will open.
- Authentication information is fixed to the logged-in user’s account. Click the Save button to edit.
- In the confirmation popup, click the Confirm button.
- K8S authentication information will be changed to the logged-in user.
Add Build Pipeline
To add a build pipeline, follow these steps.
- On the Main page, click the Project card. You will be taken to the Project Dashboard page.
- In the left menu, click the Build/Deploy > Build Pipeline menu. You will be taken to the Build Pipeline page.
- Build Pipeline page, click the Add Pipeline button at the top right. You will be taken to the Add Pipeline page.
- Add Pipeline Enter or configure each field on the page.
- Click the Next button.
Item Explanation Category Select Development or Operations - The actions that each role can perform differ depending on development or operations.
- Refer to Table. Role-specific permissions within the project (1) for role-specific permissions.
Jenkins URL Select Jenkinsfrom the list to add a build pipeline.Build Agent Select the agent (build environment) on which the build pipeline will run.
Click the Info icon to view the list of tools provided by the agent.Build environment OS Displays the OS information of the environment where the build agent runs. Folder type Select the folder type. - Existing folder: Add a pipeline under an already created folder in
Jenkins. - New folder: Create a new folder in
Jenkinsand add a pipeline under it.
folder Select a folder from the list or enter the name of a new folder to create. Pipeline name Please enter the pipeline name. Parameter setting Set the parameters to be used in the pipeline. Environment variable configuration Set the environment variables to be used in the pipeline. Stage Settings Configure the stage to be used in the pipeline. Configure email recipients for build results Set the recipients who will receive the result email after the pipeline completes (success/failure). Table. Additional Build Pipeline Settings
Setting Parameters
Follow these steps to set the parameters used when running the pipeline.
- Click the Parameter card.
- Click the Add button to add a parameter.
- Click the Apply button to complete the parameter settings.
Setting Environment Variables
Follow these steps to set environment variables for use in the pipeline.
- Click the Environment Variable area. The Environment Variable Registration page opens on the right.
- A list of pre-registered environment variables appears, and select the checkboxes for the environment variables you want to use.
- Check the selected environment variable and click the Apply button to complete the environment variable configuration.
Configure email recipients for build results
To set the recipients who will receive the build results by email, follow these steps.
- Click the Mail Recipient area. The Add Mail Recipient page opens on the right.
- In the Search area, search for the recipient and add them.
- Click the Apply button to complete the mail recipient settings.
Add additional stage
Checkout stage setup
To add a Checkout stage, follow these steps.
- Click the New Stage area. The Stage Settings page opens on the right.
- On the Stage Settings page, select Checkout as the Stage Type.
- After entering the information, click the Apply button. (You can select the code repository you added from 코드 저장소 추가하기 (Option) on the URL.)
Item description URL Select the code repository to perform the checkout. Branch name Enter the name of the branchto checkout.표. Checkout 스테이지 입력 항목
Setting up the Build stage
To add a Build stage, follow these steps.
- Click the Add icon to add a new stage.
- Click the New Stage area. The Stage Settings page opens on the right.
- On the Stage Settings page, select Build as the Stage Type.
- After entering information on the Stage Settings page, click the Apply button.
Item Explanation language Select the programming language used by the application. Build tool Select the Build tool used for building the application.
Provides default Shell commands based on the selected Build tool.Shell command Enter the command to use for building the application.
All commands available in the Shell can be used.Table. Build stage input items
Docker Build Stage Setup
To add a Docker Build stage, follow these steps.
- Click the Add icon to add a new stage.
- Click the New Stage area. The Stage Settings page opens on the right.
- Select Docker Build as the Stage Type.
- After entering the information, click the Apply button. (You can select the image repository you added in Registry URL from Add Image Repository (Option).)
item | Explanation | example |
|---|---|---|
Registry URL (docker push) | Select the image repository where the Docker build result image will be pushed. | |
| ID | The ID value of the account to be used for the image repository | |
| image tag pattern | The Docker image tag is automatically generated according to the selected pattern.
|
|
| Add base image repository | Add Base Image Repository A popup window opens.
| |
Registry URL (docker pull) | Select the image repository for docker pull when the repository providing the Base Image used in the Dockerfile (FROM clause, docker pull) differs from the repository of the Registry URL (docker push). | |
| Image build tool | Displays the image build tool. | |
| Pre-build command | If there are any commands that need to be run before building a Docker image, write them in shell command format. | cp target/*.jar docker/ |
| Image Build folder | If you need to run the Docker image build from a specific folder, select the checkbox and enter the folder path. | docker |
| Dockerfile | Enter the Dockerfile filename. | Dockerfile |
| Image build options | Enter it if you need to use additional options with the image build tool. | --no-cache |
| Build command | Displays the image build command that will actually be executed. | |
| Post-build command | If there are commands that need to be executed after building a Docker image, write them in Shell command format. | rm -rf docker/*.jar |
Table. Docker Build Stage Input Items
Deploy to K8S Stage Setup
Deploy to K8S To add a stage, follow the steps below.
- Click the + icon to add a new stage.
- Click the New Stage area. The Stage Settings page opens on the right.
- On the Stage Settings page, select Deploy to K8S as the Stage Type.
- On the Stage Settings page, after entering the information, click the Apply button. (If you select a workload in the type, you can select the workload added in 워크로드 추가하기.)
Item | Explanation |
|---|---|
| type | Select deployment type
|
| K8S cluster | Select a K8S cluster
|
| namespace | Please select a namespace. |
| Helm release | Select HelmRelease. |
| Deployment method | Select deployment method
|
| Registry URL | Select the image repository where the image to be deployed to Kubernetes has been docker pushed. |
| Secret | Select the secret information input method
|
Table. Deploy to K8S stage input items
Check the final pipeline script
- Check the build pipeline script that will actually be generated. If needed, edit the script directly.
- Click the Complete button to finish adding the pipeline.
Pipeline addition result
Note
The added pipeline does not run automatically. If execution is required, run the pipeline manually.
2.2.2.3 - Add Build/Deploy (VM Deployment)
The user can, through the following steps, create a new build pipeline in an already created DevOps Console project, build the source to create an image, and proceed with (VM deployment) on the VM server.
The VM server group/VM server added via Add VM Server Group/VM Server (Option) will be used in Configure Deploy to VM Stage.
Build/Deploy Add Getting Started
To begin adding build/deployment, follow these steps.
- On the Main page, click the Project card to go to the Project Dashboard page.
Add code repository (Option)
information
Proceed only if you need a new code repository.
To add a code repository, follow these steps.
- On the Code Repository page, click the Add Code Repository button in the upper right. You will be taken to the Add Code Repository page.
- On the Add Code Repository page, enter and configure each item.
- Connection Test Click the button.
- Click the Save button.
Item Explanation Repository type Select the repository to use - Registered tools: Users can select and use the types of SCM Repository tools (
Github,Gitlab, etc.) that are available. - Unregistered tools: You can enter the domain of a tool that is not registered. The unregistered tool entry appears only for App templates that do not include source code (
Environment Only).
New/Existing usage Select Create new repository or Use existing repository - The activation status varies depending on specific conditions. For details, see Table. Conditions for activating new repository creation and existing repository usage.
Repository information Enter repository information - When creating a new repository, the URL is formed from the project group name/project name.
Authentication information Enter authentication credentials. Repository information Enter repository information - You can use a code repository that is not registered as a tool in DevOps Console.
- You must also go through the URL check process.
Table. Code Repository Add Input Items - Registered tools: Users can select and use the types of SCM Repository tools (
Add image repository (Option)
information
Proceed only if a new image repository is needed.
To add an image repository, follow these steps.
App. Add image repository
- On the Image Repository page, click the App. Add Image Repository button in the upper right. You will be taken to the App. Add Image Repository page.
- App. Add Image Repository page, enter and configure each item.
- Connection Test Click the button.
- Click the Save button.
Item Explanation Select repository type Select the image repository type.
To use an image repository not registered in the Devops Console, select the Image Registry type.Choose whether to create a repository Choose whether to create a new repository or use an existing one. - If you selected the
Docker huborImage Registrytype earlier, you can only select Use existing repository.
Registered tool Enter repository information. Unregistered tool Enter repository information - You can register an image repository that is not registered with the DevOps Console tool.
- Click the URL Check button to proceed with the verification process.
- Only Use existing repository can be selected.
Table. App. Add Image Repository Input Fields - If you selected the
Add pull-only image repository
- On the Image Repository page, click the Add Pull-Only Image Repository button in the upper right. You will be taken to the Add Pull-Only Image Repository page.
- Add Pull‑only Image Repository On the page, enter and configure each field.
- Connection Test Click the button.
- Click the Save button.
Add artifact repository (Option)
information
Proceed only if a new artifact repository is needed.
When using a rollback artifact repository, Nexus can only use the raw(hosted) repository type.
To add an artifact repository, follow these steps.
- Click the Add Artifact Repository button at the top right of the Artifact Repository page. You will be taken to the Add Artifact Repository page.
- On the Add Artifact Repository page, enter and configure each item.
- Connection Test Click the button.
- Click the Save button.
Item Explanation Select whether to create a repository Choose whether to create a new repository or use an existing one. Enter basic information Base URL, select repository type and enter repository/authentication information. Table. Input fields for adding an artifact repository
Add VM Server Group/VM Server (Option)
information
Proceed only if a new VM server group or VM server is required.
To add a VM server group, follow these steps.
- Click the Management icon at the top right of the Main page. You will be taken to the Tenant Dashboard page.
- Click the Deployment Target > VM Server Group menu in the left menu. You will be taken to the VM Server Group page.
- On the VM Server Group page, click the Add button. It navigates to the Add VM Server Group page.
- Enter the basic information, then click the Save button to complete the VM server group configuration.
Item Explanation Server group name Enter the VM server group name. Explanation Please enter a description. type Select the type of VM server group - SSH: Perform deployment using SSH commands when deploying a VM.
- Agent: Perform deployment using an agent when deploying a VM. (Connect Agent)
VM server - Add: Add the VM server that belongs to the VM server group.
- Delete: Check the checkbox of the VM server you want to delete from the VM server group, then click Delete to remove it.
Table. VM Server Group Add Input Items
Add VM server
To add a VM server, you need Manager permission for the corresponding VM server group.
Note
The Add VM Server popup opens differently depending on the type of VM server group.
To add a VM server, follow the steps below.
- Click the Admin icon at the top right of the Main page. Navigate to the Tenant Dashboard page.
- Click the Deployment Target > VM Server Group menu in the left menu. You will be taken to the VM Server Group page.
- VM server group page, click the VM server group in the VM server group list where you want to add a VM server. You will be taken to the VM server group detail page.
- On the VM Server Group Details page, click the Add button. You will be taken to the Add VM Server page.
- Add VM Server page, after entering the basic information, click the Add button to complete the VM server configuration.
Item Explanation Server name Enter the VM server name. Explanation Enter the description. IP Please enter the IP. SSH Port Enter the port of the VM server to use for SSH connections. OS Please enter the OS. Location Please select a location. Authentication information Enter the authentication information for the VM server to be used for SSH connections. Secret Key This is the secret key for authenticating the VM server where the agent is installed. Table. VM Server Additional Input Items
Add Build Pipeline
To add a build pipeline, follow these steps.
- On the Main page, click the Project card. You will be taken to the Project Dashboard page.
- In the left menu, click the Build/Deploy > Build Pipeline menu. You will be taken to the Build Pipeline page.
- Build Pipeline page, click the Add Pipeline button at the top right. You will be taken to the Add Pipeline page.
- Add Pipeline Enter or configure each field on the page.
- Click the Next button.
Item Explanation Category Select Development or Operations - The actions that each role can perform differ depending on development or operations.
- Refer to Table. Role-specific permissions within the project (1) for role-specific permissions.
Jenkins URL Select Jenkinsfrom the list to add a build pipeline.Build Agent Select the agent (build environment) on which the build pipeline will run.
Click the Info icon to view the list of tools provided by the agent.Build environment OS Displays the OS information of the environment where the build agent runs. Folder type Select the folder type. - Existing folder: Add a pipeline under an already created folder in
Jenkins. - New folder: Create a new folder in
Jenkinsand add a pipeline under it.
folder Select a folder from the list or enter the name of a new folder to create. Pipeline name Please enter the pipeline name. Parameter setting Set the parameters to be used in the pipeline. Environment variable configuration Set the environment variables to be used in the pipeline. Stage Settings Configure the stage to be used in the pipeline. Configure email recipients for build results Set the recipients who will receive the result email after the pipeline completes (success/failure). Table. Additional Build Pipeline Settings
Setting Parameters
Follow these steps to set the parameters used when running the pipeline.
- Click the Parameter card.
- Click the Add button to add a parameter.
- Click the Apply button to complete the parameter settings.
Setting Environment Variables
Follow these steps to set environment variables for use in the pipeline.
- Click the Environment Variable area. The Environment Variable Registration page opens on the right.
- A list of pre-registered environment variables appears, and select the checkboxes for the environment variables you want to use.
- Check the selected environment variable and click the Apply button to complete the environment variable configuration.
Configure email recipients for build results
To set the recipients who will receive the build results by email, follow these steps.
- Click the Mail Recipient area. The Add Mail Recipient page opens on the right.
- In the Search area, search for the recipient and add them.
- Click the Apply button to complete the mail recipient settings.
Configure additional stage
Setting up the Checkout stage
To add a Checkout stage, follow these steps.
- Click the New Stage area. The Stage Settings page opens on the right.
- On the Stage Settings page, select Checkout as the Stage Type.
- After entering the information, click the Apply button. (You can select the code repository you added from 코드 저장소 추가하기 (Option) on the URL.)
Item description URL Select the code repository to perform the checkout. Branch name Enter the name of the branchto checkout.표. Checkout 스테이지 입력 항목
Setting up the Build stage
To add a Build stage, follow these steps.
- Click the Add icon to add a new stage.
- Click the New Stage area. The Stage Settings page opens on the right.
- On the Stage Settings page, select Build as the Stage Type.
- After entering information on the Stage Settings page, click the Apply button.
Item Explanation language Select the programming language used by the application. Build tool Select the Build tool used for building the application.
Provides default Shell commands based on the selected Build tool.Shell command Enter the command to use for building the application.
All commands available in the Shell can be used.Table. Build stage input items
Configuring Docker Build Stage
To add a Docker Build stage, follow these steps.
- Click the Add icon to add a new stage.
- Click the New Stage area. The Stage Settings page opens on the right.
- Select Docker Build as the Stage Type.
- After entering the information, click the Apply button. (You can select the image repository you added in Registry URL from Add Image Repository (Option).)
item | Explanation | example |
|---|---|---|
Registry URL (docker push) | Select the image repository where the Docker build result image will be pushed. | |
| ID | The ID value of the account to be used for the image repository | |
| image tag pattern | The Docker image tag is automatically generated according to the selected pattern.
|
|
| Add base image repository | Add Base Image Repository A popup window opens.
| |
Registry URL (docker pull) | Select the image repository for docker pull when the repository providing the Base Image used in the Dockerfile (FROM clause, docker pull) differs from the repository of the Registry URL (docker push). | |
| Image build tool | Displays the image build tool. | |
| Pre-build command | If there are any commands that need to be run before building a Docker image, write them in shell command format. | cp target/*.jar docker/ |
| Image Build folder | If you need to run the Docker image build from a specific folder, select the checkbox and enter the folder path. | docker |
| Dockerfile | Enter the Dockerfile filename. | Dockerfile |
| Image build options | Enter it if you need to use additional options with the image build tool. | --no-cache |
| Build command | Displays the image build command that will actually be executed. | |
| Post-build command | If there are commands that need to be executed after building a Docker image, write them in Shell command format. | rm -rf docker/*.jar |
Table. Docker Build Stage Input Items
Deploy to VM Stage Setup
To add a Deploy to VM stage, follow these steps.
- + Click the icon to add a new stage.
- Click the New Stage area. The Stage Settings page opens on the right.
- On the Stage Settings page, select Deploy to VM as the Stage Type.
- On the Stage Settings page, after entering the information, click the Apply button.
| Item | Explanation |
|---|---|
| Deployment configuration | Select deployment configuration method
|
| deployment group | Select a deployment group
|
| Release Information | The contents stored in the deployment group are automatically configured. |
| Manual deployment | Select the default value for manual deployment
|
Table. Deploy to VM stage input items
Check the final pipeline script
- Check the build pipeline script that will actually be generated. If needed, edit the script directly.
- Click the Complete button to finish adding the pipeline.
Pipeline addition result
Note
The added pipeline does not run automatically. If execution is required, run the pipeline manually.
2.2.2.4 - Check Deployment Target Namespace Permissions (Before Project Creation)
The user should create a DevOps Console project following the steps below, verify that they have permission for the target cluster / namespace before building and deploying the source, and, if necessary, request the responsible person to add permissions to the cluster / namespace.
DevOps Console K8S Cluster Namespace Permission Check
To verify permissions for a namespace of the K8S cluster used in the DevOps Console, follow these steps.
- Main page, click the Admin icon in the top right. Tenant Dashboard page will open.
- In the left menu, click the Deployment Target > K8S Cluster menu. You will be taken to the K8S Cluster list page.
- Click the K8S cluster. You will be taken to the Details page of the selected K8S cluster.
- Click the Namespace tab. The Namespace List screen appears.
- Clicking the namespace takes you to the Namespace Details page.
Caution
You must have Administrator or User permissions. If you do not have permission, request access from the cluster administrator.
Reference
If the deployment target cluster is not registered, register the deployment target cluster manually.
For detailed information, refer to the K8S Cluster.
2.3 - Project
2.3.1 - Project Overview
Users can view not only the detailed information of the project but also related Helm release information, the tools they are using, and other relevant details.
Users with a project role of Master or higher can edit the project name through this menu, and the Owner can delete the project.
Project Overview Getting Started
To start using the project overview, follow these steps.
- On the Main page, click the Project card. You will be taken to the Project Dashboard page.
- From the left menu, click the Project Overview menu. The Project Overview screen appears.
Modify project name
To change the project name, follow these steps.
- Project Overview On the screen, click the Edit Project Name button at the top right. The Edit Project Name popup window will open.
- Edit Project Name In the popup window, edit the project name and click the Save button to complete the project name edit.
Delete Project
To delete a project, follow these steps.
- Project Overview On the screen, click the Delete Project button in the upper right. The Delete Project popup window opens.
- In the Project Deletion popup, click the Confirm button. You will be taken to the Project Deletion page.
- On the Project Deletion page, enter and select the required information, then click the Delete button. The Project Deletion popup window opens.
- Project Deletion Enter the project name in the popup window.
- Click the Confirm button to complete the project deletion.
Item Explanation Check project name Enter the name of the current project you want to delete. Delete Helm release
Delete build pipeline
Delete code repositoryIf you want to delete together with the project, select - Select: When the project is deleted, the actual physical deletion command is executed.
- Deselect: It is only logically deleted in
DevOps Console, and remains in each tool.
Table. Project Deletion Input Items
Manage all projects
Note
Shows information for all projects that the user has permission for. Except for Project Name Change, Project Deletion, it provides the same functionality as Project Overview and Project Members.
For detailed information, refer to Project Overview and Project Members.
- Click the Admin icon at the top right of the Main page. Navigate to the Tenant Dashboard page.
- Click the Tenant > Project menu in the left menu. You will be taken to the Project page.
2.3.2 - Create Project
2.3.2.1 - Create Project (Helm Chart Deployment)
Note
Users must be members of a project group and tenant to be able to create projects.
Refer to Create Project Group for how to join a project group and tenant.
Users can create a project that deploys an application to a specific Kubernetes cluster using App.Template, Helm Chart, and Tool Management.
Getting Started with Project Creation
To start creating a project, follow these steps.
- Click the Create Project button on the Main page. You will be taken to the Create Project page.
Enter basic information
Enter the basic information of the project. The project name and project ID must be unique and cannot be duplicated.
To enter the basic information, follow the steps below.
- On the Project Creation page, select the App. Template Utilization option of the Project Configuration Method item.
- For the deployment target field, select Kubernetes.
- After entering additional content, click the Start button.
Item Explanation Project name Please enter the project name. Project ID Please enter the project ID. Project configuration method Select a project configuration method - Use App template: select a pre‑provided App template.
- Manual configuration: configure without an App template.
deployment target Select deployment target - Kubernetes: Deploy the application to a Kubernetes cluster.
- Kubernetes(ArgoCD): Deploy the application to a Kubernetes cluster using ArgoCD.
- VM(Artifact): Deploy the application to a VM server.
- VM(Docker): Package the application as a Docker image and deploy it to a VM server.
- N/A: Choose this when you do not deploy the build output.
K8S cluster Select the target cluster for deployment DevOps ConsoleOnly clusters that the user has access rights to can be selected among the K8S clusters.
namespace Select the target namespace for deployment - Only namespaces that the user has access rights to, among the clusters retrieved from the K8S cluster, can be selected.
Table. Project creation basic information entry items
App. Select Template
Note
For detailed information about the application template, see App.템플릿.
The user can select an application template to configure the project.
If you create a project based on an application template that includes sample source code, you can view the application that will be deployed.
In contrast, using a template labeled Environment Only configures only the build/deployment environment without sample source code.
If you configure a project using an already set up source code repository, select the template marked Environment Only.
To start selecting an application template, follow these steps.
- On the Application Template screen, enter the template name, select the application template card you want, and then click.
- When the Next button is enabled, click the Next button.
Item Explanation Filter You can easily find application templates using predefined filters. search You can easily find application templates through search. Table. Project Creation Application Template Items
Configure code repository
Users can configure a repository for managing source code through the code repository setup step.
Create new repository and use existing repository activation conditions differ depending on the application template and tool.
| Repository type | App with source code. Template + DevOps Console registration tool | App with source code included. Template + DevOps Console unregistered tool | Source code not included (EnvironmentOnly) App. Template + DevOps Console registration tool | Source code not included (Environment Only) App. Template + DevOps Console unregistered tool |
|---|---|---|---|---|
| Create new repository | ○ | X | ○ | X |
| Use existing repository | X | X | ○ | ○ |
Table. Conditions for creating a new repository and enabling use of existing repository
Note
Once authentication information is saved, you can perform a Connection Test without entering account information by using Use Saved Authentication Information thereafter.
To modify or delete stored credentials, refer to Manage Authentication Information.
To set up the code repository, follow these steps.
- In the Code repository item, select the Code repository type.
- Select Create new repository or Use existing repository, then enter the information.
- Enter authentication information and click the Connection Test button.
- When the Next button is enabled, click the Next button.
Item Explanation Repository type Select the code repository to use - Registered tool: The user can select and use the types of SCM Repository tools (
Github,Gitlab, etc.) that are available. - Unregistered tool: You can enter the domain of an unregistered tool to use it. The unregistered tool entry appears only when the source code is not included (Environment Only) App. Template.
New/Existing usage Please select New repository creation or whether to use an existing repository. - Activation status varies depending on specific conditions. For details, refer to Table. Activation conditions for creating a new repository and using an existing repository.
Repository information Enter repository information - When creating a new repository, the URL is formed from the project group name/project name.
Authentication information Enter authentication information - If you do not have an account, Don’t have an account? click the link to open the Account Creation Information popup where you can create an account.
- After creating a new account, be sure to change your password via the Set Initial Password link.
(Unregistered tool)
Repository informationEnter repository information - You can use a code repository that is not registered as a tool in
DevOps Console. - Click the URL Check button to undergo an additional verification process.
Table. Project Creation Code Repository Settings - Registered tool: The user can select and use the types of SCM Repository tools (
Configure Code Quality
Users can configure a repository for quality management.
To set code quality, follow these steps.
- In the Code Quality item, select Repository Type.
- Enter Basic Information and Authentication Information, then click the Connection Test button.
- Next button is enabled, click the Next button.
Item Explanation Repository type Select the repository to use - The types of Code Quality tools available to the user are displayed.
New / Existing / Unused status Select repository creation method - If you select Create new repository, you must enter the quality project name/quality project key.
- If you select Do not create, you can proceed directly to the next step.
Base URL Select the SonarQubeURL.Quality Project Name Enter the name of the SonarQubeproject.Quality Project Key Enter the Key of the SonarQubeproject.authentication information Enter authentication credentials - You can create a new user or use existing authentication credentials.
Table. Project Creation Code Quality Settings
Configure Image Repository
Users can configure a repository to store the built container images through the image repository configuration step.
Note
Once authentication information is saved, you can perform a Connection Test without entering account information by using Use Saved Authentication Information thereafter.
To modify or delete stored credentials, refer to Manage Authentication Information.
To set up the image repository, follow these steps.
- In the Image Repository item, select the Repository Type.
- Create new repository / Use existing repository select, then enter the information.
- Enter authentication information and click the Connection Test button.
- When the Next button is enabled, click the Next button.
Item Explanation Repository type Select the repository type to use - The types of Image Registry tools available to the user are displayed.
Repository information Select the repository creation method. - When creating a new repository, the URL is formed with the project group name/project name.
Authentication information Enter your credentials. Table. Project Creation Image Repository Settings
Configure the deployment target environment
Users can deploy by directly configuring via Helm charts.
Helm release name and Helm chart when selected, the Helm chart installation options and the default Values.yaml entries included in the chart are displayed.
Available Helm charts are associated with the App template. You can edit or delete them through Manage supported Helm charts.
To set the deployment target environment, follow these steps.
- In the Deployment target field, select Configure directly via Helm chart.
- Please enter the Helm release name.
- Click the Search button to select the Helm chart to use.
- After editing Values.yaml, click the Validation Check button.
- When the Next button is enabled, click the Next button.
Item Explanation deployment target Please select the deployment target. Helm release name Enter the name of the Helm release to create. - The name must be unique within the namespace of the target cluster.
Helm chart Select a Helm chart. - When a Helm chart is selected, detailed information about the chosen chart is displayed below
K8S information Shows the information of the Kubernetes cluster required for configuring Value.yaml. Values. yaml Edit the contents of Values.yaml. values.yamlfile to be used when installing the Helm chart.
Table. Project creation deployment target environment configuration items
Setting up the build pipeline
Users can configure pipelines that build and deploy applications.
You can view each stage of the pipeline to be configured and rename the build job.
To set up the build pipeline, follow these steps.
- Build Pipeline screen branches based on IDP integration status.
- For IDP-integrated Jenkins, click the User Check button to perform User Registration Confirmation.
- For Jenkins not integrated with IDP, enter the authentication information and click the Connection Test button.
- When the Next button is enabled, click the Next button.Item
Explanation Build/Deployment pipeline Displays build/deployment pipeline information. - The build/deployment pipeline is displayed based on the information registered in the App template’s Manage Pipeline Templates.
Category Select the development/operation distinction. - The permissions for the pipeline vary according to the development/operation distinction.
- Refer to Table. Role-based permissions within the project (1) for role-based permissions.
URL Select Jenkinsto configure the pipeline, then enter the job name.- The
Jenkinsinstances available to the user are displayed.
Build Agent Select the agent to be used for pipeline builds. - For information about the agent, please refer to Managing agents (kubernetes), Managing agents (VM).
Build environment OS Displays the OS information of the environment in which the build agent runs. User information IDP Integrated Jenkins - Click the User Check button to verify user registration.
- If you are not registered as a Jenkins user, when the User Registration Guide popup appears, click the Go to Jenkins link to proceed with User Sign‑Up or Initial Jenkins Login.
- Enter the authentication information and click the Connection Test button.
Set environment variables Set the environment variables to be registered in the Jenkins pipeline. Image Tag Pattern Select the tag assignment method for the container image. Deploy Strategy Select the deployment method for the container image. Recipient of deployment results Select the user who will receive the results after the build pipeline completes. Table. Project creation build pipeline configuration items
Configure Custom Settings
The user can specify and modify the path of the Dockerfile file used for the build.
Additionally, you can view the final script generated based on the information configured in Configure Build Pipeline and also edit it.
Dockerfile, follow these steps to configure the pipeline script.
- After entering information on the Custom settings page, click the Connection Test button.
- Click the Next button when the Next button is enabled.
Item Explanation Dockerfile configuration Create New Dockerfile or Use Existing Dockerfile. Please select. - «Use Existing Dockerfile is only selectable after choosing the
Environment OnlyApp template and, in 코드 저장소 설정하기, selecting Use Existing Repository.
Dockerfile path Specify the Dockerfilefile path in the source code.Branch name The branch name is automatically registered when you set it in Code Repository Configuration. Dockerfile Check and modify the contents of the Dockerfile.pipeline script Check and modify the pipeline script. Table. Project Creation Custom Settings Items - «Use Existing Dockerfile is only selectable after choosing the
Note
For detailed information about Jenkins pipeline scripts, see the official site.
Complete project creation
The user can review the project and tool information to be created and start project creation.
To complete project creation, follow the steps below.
- Summary Information After checking the information on the screen, click the Complete button.
- Project Creation popup window opens and the project creation proceeds.
- After the project creation is complete, click the Confirm button to go to the Project page.
Notice
It cannot be canceled during creation, and when the project is created successfully, the Confirm button becomes active.
2.3.2.2 - Create Project (Workload Deployment)
Reference
The user must be a member of a project group and tenant to be able to create a project.
Refer to Create Project Group for how to join a project group and tenant.
Refer to Create Project Group for how to join a project group and tenant.
Users can create a project that deploys to a specific Kubernetes cluster using App.Template, Tool Management and workloads.
Getting Started with Project Creation
To begin creating a project, follow the steps below.
- On the Main page, click the Create Project button. You will be taken to the Create Project page.
Enter basic information
Enter the basic information of the project. The project name and project ID must be unique and cannot be duplicated.
To enter the basic information, follow the steps below.
- On the Project Creation page, select the App. Template Utilization option of the Project Configuration Method item.
- For the deployment target field, select Kubernetes.
- After entering additional content, click the Start button.
Item Explanation Project name Please enter the project name. Project ID Please enter the project ID. Project configuration method Select a project configuration method - Use App template: select a pre‑provided App template.
- Manual configuration: configure without an App template.
deployment target Select deployment target - Kubernetes: Deploy the application to a Kubernetes cluster.
- Kubernetes(ArgoCD): Deploy the application to a Kubernetes cluster using ArgoCD.
- VM(Artifact): Deploy the application to a VM server.
- VM(Docker): Package the application as a Docker image and deploy it to a VM server.
- N/A: Choose this when you do not deploy the build output.
K8S cluster Select the target cluster for deployment DevOps ConsoleOnly clusters that the user has access rights to can be selected among the K8S clusters.
namespace Select the target namespace for deployment - Only namespaces that the user has access rights to, among the clusters retrieved from the K8S cluster, can be selected.
Table. Project creation basic information entry items
Select Application Template
Note
For detailed information about the application template, see App.템플릿.
The user can select an application template to configure the project.
If you create a project based on an application template that includes sample source code, you can view the application that will be deployed.
In contrast, using a template labeled Environment Only configures only the build/deployment environment without sample source code.
If you configure a project using an already set up source code repository, select the template marked Environment Only.
To start selecting an application template, follow these steps.
- On the Application Template screen, enter the template name, select the application template card you want, and then click.
- When the Next button is enabled, click the Next button.
Item Explanation Filter You can easily find application templates using predefined filters. search You can easily find application templates through search. Table. Project Creation Application Template Items
Configure code repository
Users can configure a repository for managing source code through the code repository setup step.
Create new repository and use existing repository activation conditions differ depending on the application template and tool.
| Repository type | App with source code. Template + DevOps Console registration tool | App with source code included. Template + DevOps Console unregistered tool | Source code not included (EnvironmentOnly) App. Template + DevOps Console registration tool | Source code not included (Environment Only) App. Template + DevOps Console unregistered tool |
|---|---|---|---|---|
| Create new repository | ○ | X | ○ | X |
| Use existing repository | X | X | ○ | ○ |
Table. Conditions for creating a new repository and enabling use of existing repository
Note
Once authentication information is saved, you can perform a Connection Test without entering account information by using Use Saved Authentication Information thereafter.
To modify or delete stored credentials, refer to Manage Authentication Information.
To set up the code repository, follow these steps.
- In the Code repository item, select the Code repository type.
- Select Create new repository or Use existing repository, then enter the information.
- Enter authentication information and click the Connection Test button.
- When the Next button is enabled, click the Next button.
Item Explanation Repository type Select the code repository to use - Registered tool: The user can select and use the types of SCM Repository tools (
Github,Gitlab, etc.) that are available. - Unregistered tool: You can enter the domain of an unregistered tool to use it. The unregistered tool entry appears only when the source code is not included (Environment Only) App. Template.
New/Existing usage Please select New repository creation or whether to use an existing repository. - Activation status varies depending on specific conditions. For details, refer to Table. Activation conditions for creating a new repository and using an existing repository.
Repository information Enter repository information - When creating a new repository, the URL is formed from the project group name/project name.
Authentication information Enter authentication information - If you do not have an account, Don’t have an account? click the link to open the Account Creation Information popup where you can create an account.
- After creating a new account, be sure to change your password via the Set Initial Password link.
(Unregistered tool)
Repository informationEnter repository information - You can use a code repository that is not registered as a tool in
DevOps Console. - Click the URL Check button to undergo an additional verification process.
Table. Project Creation Code Repository Settings - Registered tool: The user can select and use the types of SCM Repository tools (
Configure Code Quality
Users can configure a repository for quality management.
To set code quality, follow these steps.
- In the Code Quality item, select Repository Type.
- Enter Basic Information and Authentication Information, then click the Connection Test button.
- Next button is enabled, click the Next button.
Item Explanation Repository type Select the repository to use - The types of Code Quality tools available to the user are displayed.
New / Existing / Unused status Select repository creation method - If you select Create new repository, you must enter the quality project name/quality project key.
- If you select Do not create, you can proceed directly to the next step.
Base URL Select the SonarQubeURL.Quality Project Name Enter the name of the SonarQubeproject.Quality Project Key Enter the Key of the SonarQubeproject.authentication information Enter authentication credentials - You can create a new user or use existing authentication credentials.
Table. Project Creation Code Quality Settings
Configure Image Repository
Users can configure a repository to store the built container images through the image repository configuration step.
Note
Once authentication information is saved, you can perform a Connection Test without entering account information by using Use Saved Authentication Information thereafter.
To modify or delete stored credentials, refer to Manage Authentication Information.
To set up the image repository, follow these steps.
- In the Image Repository item, select the Repository Type.
- Create new repository / Use existing repository select, then enter the information.
- Enter authentication information and click the Connection Test button.
- When the Next button is enabled, click the Next button.
Item Explanation Repository type Select the repository type to use - The types of Image Registry tools available to the user are displayed.
Repository information Select the repository creation method. - When creating a new repository, the URL is formed with the project group name/project name.
Authentication information Enter your credentials. Table. Project Creation Image Repository Settings
Configure the deployment target environment
The user can deploy by selecting Select deployment target workload.
To configure the deployment target environment, follow the steps below.
- In the Deployment Target item, select Select Deployment Target Workload. The Deployment Target Workload area appears.
- In the Deployment Target Workload area, select the workload and container to be deployed.
- When the Next button is enabled, click the Next button.
Item Explanation deployment target Select deployment target - Configure directly via Helm chart
- Select workload for deployment target
Query target Select the item to view. Workload Select workload - Displays the workloads that exist in the selected Kubernetes cluster when starting project creation.
target container Select the target container to use for the selected workload. Table. Deployment Target Environment Configuration Items
Setting up the build pipeline
Users can configure pipelines that build and deploy applications.
You can view each stage of the pipeline to be configured and rename the build job.
To set up the build pipeline, follow these steps.
- Build Pipeline screen branches based on IDP integration status.
- For IDP-integrated Jenkins, click the User Check button to perform User Registration Confirmation.
- For Jenkins not integrated with IDP, enter the authentication information and click the Connection Test button.
- When the Next button is enabled, click the Next button.Item
Explanation Build/Deployment pipeline Displays build/deployment pipeline information. - The build/deployment pipeline is displayed based on the information registered in the App template’s Manage Pipeline Templates.
Category Select the development/operation distinction. - The permissions for the pipeline vary according to the development/operation distinction.
- Refer to Table. Role-based permissions within the project (1) for role-based permissions.
URL Select Jenkinsto configure the pipeline, then enter the job name.- The
Jenkinsinstances available to the user are displayed.
Build Agent Select the agent to be used for pipeline builds. - For information about the agent, please refer to Managing agents (kubernetes), Managing agents (VM).
Build environment OS Displays the OS information of the environment in which the build agent runs. User information IDP Integrated Jenkins - Click the User Check button to verify user registration.
- If you are not registered as a Jenkins user, when the User Registration Guide popup appears, click the Go to Jenkins link to proceed with User Sign‑Up or Initial Jenkins Login.
- Enter the authentication information and click the Connection Test button.
Set environment variables Set the environment variables to be registered in the Jenkins pipeline. Image Tag Pattern Select the tag assignment method for the container image. Deploy Strategy Select the deployment method for the container image. Recipient of deployment results Select the user who will receive the results after the build pipeline completes. Table. Project creation build pipeline configuration items
Configure Custom Settings
The user can specify and modify the path of the Dockerfile file used for the build.
Additionally, you can view the final script generated based on the information configured in Configure Build Pipeline and also edit it.
Dockerfile, follow these steps to configure the pipeline script.
- After entering information on the Custom settings page, click the Connection Test button.
- Click the Next button when the Next button is enabled.
Item Explanation Dockerfile configuration Create New Dockerfile or Use Existing Dockerfile. Please select. - «Use Existing Dockerfile is only selectable after choosing the
Environment OnlyApp template and, in 코드 저장소 설정하기, selecting Use Existing Repository.
Dockerfile path Specify the Dockerfilefile path in the source code.Branch name The branch name is automatically registered when you set it in Code Repository Configuration. Dockerfile Check and modify the contents of the Dockerfile.pipeline script Check and modify the pipeline script. Table. Project Creation Custom Settings Items - «Use Existing Dockerfile is only selectable after choosing the
Note
For detailed information about Jenkins pipeline scripts, see the official site.
Complete project creation
The user can review the project and tool information to be created and start project creation.
To complete project creation, follow the steps below.
- Summary Information After checking the information on the screen, click the Complete button.
- Project Creation popup window opens and the project creation proceeds.
- After the project creation is complete, click the Confirm button to go to the Project page.
Notice
It cannot be canceled during creation, and when the project is created successfully, the Confirm button becomes active.
2.3.2.3 - Create Project (ArgoCD Deployment)
Note
- Users must be members of a project group and tenant to be able to create projects.
- Refer to Create Project Group for how to join a project group and tenant.
- Deployment via ArgoCD requires that ArgoCD and the Git repository to be used for GitOps deployment be prepared in advance.
- In the Devops Console, deployment is performed using the pre‑configured ArgoCD and its associated Git information.
Users can create a project that deploys using App.Template, Tool Management, and ArgoCD.
Getting Started with Project Creation
To start creating a project, follow the steps below.
- On the Main page, click the Create Project button. You will be taken to the Create Project page.
Enter basic information
Enter the project’s basic information. The project name and project ID must be unique and cannot be duplicated.
To enter the basic information, follow the steps below.
- Enter the project name and project ID.
- For the Project Configuration Method item, select App. Template Utilization.
- Please select deployment target as Kubernetes(ArgoCD).
- Please select the ArgoCD App creation method.
- Create a new App: When creating a project, create a new ArgoCD application in ArgoCD.
- Use existing App: Create a project using the existing ArgoCD application.
- After completing each input, click the Start button.
App. Select Template
Note
For detailed information about the application template, see App.템플릿.
The user can select an application template to configure the project.
If you create a project based on an application template that includes sample source code, you can view the application that will be deployed.
In contrast, using a template labeled Environment Only configures only the build/deployment environment without sample source code.
If you configure a project using an already set up source code repository, select the template marked Environment Only.
To start selecting an application template, follow these steps.
- On the Application Template screen, enter the template name, select the application template card you want, and then click.
- When the Next button is enabled, click the Next button.
Item Explanation Filter You can easily find application templates using predefined filters. search You can easily find application templates through search. Table. Project Creation Application Template Items
Configure code repository
Users can configure a repository for managing source code through the code repository setup step.
Create new repository and use existing repository activation conditions differ depending on the application template and tool.
| Repository type | App with source code. Template + DevOps Console registration tool | App with source code included. Template + DevOps Console unregistered tool | Source code not included (EnvironmentOnly) App. Template + DevOps Console registration tool | Source code not included (Environment Only) App. Template + DevOps Console unregistered tool |
|---|---|---|---|---|
| Create new repository | ○ | X | ○ | X |
| Use existing repository | X | X | ○ | ○ |
Table. Conditions for creating a new repository and enabling use of existing repository
Note
Once authentication information is saved, you can perform a Connection Test without entering account information by using Use Saved Authentication Information thereafter.
To modify or delete stored credentials, refer to Manage Authentication Information.
To set up the code repository, follow these steps.
- In the Code repository item, select the Code repository type.
- Select Create new repository or Use existing repository, then enter the information.
- Enter authentication information and click the Connection Test button.
- When the Next button is enabled, click the Next button.
Item Explanation Repository type Select the code repository to use - Registered tool: The user can select and use the types of SCM Repository tools (
Github,Gitlab, etc.) that are available. - Unregistered tool: You can enter the domain of an unregistered tool to use it. The unregistered tool entry appears only when the source code is not included (Environment Only) App. Template.
New/Existing usage Please select New repository creation or whether to use an existing repository. - Activation status varies depending on specific conditions. For details, refer to Table. Activation conditions for creating a new repository and using an existing repository.
Repository information Enter repository information - When creating a new repository, the URL is formed from the project group name/project name.
Authentication information Enter authentication information - If you do not have an account, Don’t have an account? click the link to open the Account Creation Information popup where you can create an account.
- After creating a new account, be sure to change your password via the Set Initial Password link.
(Unregistered tool)
Repository informationEnter repository information - You can use a code repository that is not registered as a tool in
DevOps Console. - Click the URL Check button to undergo an additional verification process.
Table. Project Creation Code Repository Settings - Registered tool: The user can select and use the types of SCM Repository tools (
Configure Code Quality
Users can configure a repository for quality management.
To set code quality, follow these steps.
- In the Code Quality item, select Repository Type.
- Enter Basic Information and Authentication Information, then click the Connection Test button.
- Next button is enabled, click the Next button.
Item Explanation Repository type Select the repository to use - The types of Code Quality tools available to the user are displayed.
New / Existing / Unused status Select repository creation method - If you select Create new repository, you must enter the quality project name/quality project key.
- If you select Do not create, you can proceed directly to the next step.
Base URL Select the SonarQubeURL.Quality Project Name Enter the name of the SonarQubeproject.Quality Project Key Enter the Key of the SonarQubeproject.authentication information Enter authentication credentials - You can create a new user or use existing authentication credentials.
Table. Project Creation Code Quality Settings
Configure Image Repository
Users can configure a repository to store the built container images through the image repository configuration step.
Note
Once authentication information is saved, you can perform a Connection Test without entering account information by using Use Saved Authentication Information thereafter.
To modify or delete stored credentials, refer to Manage Authentication Information.
To set up the image repository, follow these steps.
- In the Image Repository item, select the Repository Type.
- Create new repository / Use existing repository select, then enter the information.
- Enter authentication information and click the Connection Test button.
- When the Next button is enabled, click the Next button.
Item Explanation Repository type Select the repository type to use - The types of Image Registry tools available to the user are displayed.
Repository information Select the repository creation method. - When creating a new repository, the URL is formed with the project group name/project name.
Authentication information Enter your credentials. Table. Project Creation Image Repository Settings
Configure the deployment target environment
Note
To set the deployment target environment, ArgoCD and the Git repository to be used for GitOps deployment must be prepared.
ArgoCD App creation method The input values vary depending on the selection.
- Create new App
- Use existing App
Create new App
To create a new ArgoCD application and set the target deployment environment, follow the steps below.
- On the Deployment target environment screen, enter the ArgoCD URL and click the Confirm button.
- The authentication information entry screen appears.
- Enter Authentication information and click the Connection Test button.
- The input screen for the new ArgoCD application appears.
- Enter ArgoCD application name and ArgoCD project name.
- Select the Repository type.
- Please select Helm chart.
- Information about Helm chart and Helm chart Git repository is displayed.
- After editing Values.yaml, click the Validation Check button.
- After entering the Git repository information and authentication details, click the Connection Test button.
- When the Next button is enabled, click the Next button.
Item Explanation URL input method Select the URL input method. - Select from the list: the ArgoCD tools registered as tools will appear.
- Enter manually
ArgoCD URL After entering the ArgoCD URL, click the Confirm button. The Authentication Information area appears. Authentication information Enter Authentication Information and click the Connection Test button. The Application Basic Information area opens. Application name Enter the name of the ArgoCD application to create in ArgoCD. Project name Enter the project name of the ArgoCD application. Repository type Select the repository type. - Create a new repository with Helm chart: Use a Helm chart to create a Git repository for
GitOps. Helm chart information area opens. - Use existing Git repository
Helm chart Please select a Helm chart. Helm chart Git repository Enter the information for the Git repository to be used by GitOps.Table. New App Creation Settings
Use existing App
To configure the target deployment environment using an existing ArgoCD application, follow these steps.
- Target deployment environment screen, enter ArgoCD URL, then click the Confirm button.
- The screen for entering the existing ArgoCD application name and credentials appears.
- Enter the Existing Application Name and Authentication Information, then click the Connection Test button.
- A URL Check popup window opens to distinguish the Git repository linked to the ArgoCD application..
- URL Check After editing the Base URL in the popup window, click the Confirm button.
- The Git repository information associated with the ArgoCD application is displayed.
- Enter the authentication information for the Git repository, then click the Connection Test button.
- Enter the yaml file name and key value to change in the Manifest Root path area.
- When the Next button is enabled, click the Next button.
Item Explanation URL input method Select URL input method - Select from list: ArgoCD tools registered as tools appear.
- Enter manually
ArgoCD URL After entering the ArgoCD URL, click the Confirm button. The Existing application name and credentials section will appear. Application name / authentication information Enter the Existing application name and credentials, then click the Connection Test button. The Git repository and ArgoCD information area appears. URL Check Separate the Base URL and Path in the full URL. Git repository credentials Enter the credentials for the Git repository used by the selected existing application. Image Repo Key Enter the path to the Yaml file that records the image repository information and the Key value. If the key values for repository and tag are the same, enter the same value. Image Tag Key Enter the path to the Yaml file containing the image tag information and the Key value. If the repository and tag have the same key, enter the same value. Image Secret Key Enter the path to the Yaml file containing the image secret information and the Key value. Deploy Strategy Key Enter the path to the Yaml file containing deployment strategy information and the Key value (optional). Table. Existing App usage configuration items
Reference
The ArgoCD deployment project in the DevOps Console performs deployments by modifying the information registered in the Image Repo Key, Image Tag Key, Image Secret Key, and Deploy Strategy Key.
Setting up the build pipeline
Users can configure pipelines that build and deploy applications.
You can view each stage of the pipeline to be configured and rename the build job.
To set up the build pipeline, follow these steps.
- Build Pipeline screen branches based on IDP integration status.
- For IDP-integrated Jenkins, click the User Check button to perform User Registration Confirmation.
- For Jenkins not integrated with IDP, enter the authentication information and click the Connection Test button.
- When the Next button is enabled, click the Next button.Item
Explanation Build/Deployment pipeline Displays build/deployment pipeline information. - The build/deployment pipeline is displayed based on the information registered in the App template’s Manage Pipeline Templates.
Category Select the development/operation distinction. - The permissions for the pipeline vary according to the development/operation distinction.
- Refer to Table. Role-based permissions within the project (1) for role-based permissions.
URL Select Jenkinsto configure the pipeline, then enter the job name.- The
Jenkinsinstances available to the user are displayed.
Build Agent Select the agent to be used for pipeline builds. - For information about the agent, please refer to Managing agents (kubernetes), Managing agents (VM).
Build environment OS Displays the OS information of the environment in which the build agent runs. User information IDP Integrated Jenkins - Click the User Check button to verify user registration.
- If you are not registered as a Jenkins user, when the User Registration Guide popup appears, click the Go to Jenkins link to proceed with User Sign‑Up or Initial Jenkins Login.
- Enter the authentication information and click the Connection Test button.
Set environment variables Set the environment variables to be registered in the Jenkins pipeline. Image Tag Pattern Select the tag assignment method for the container image. Deploy Strategy Select the deployment method for the container image. Recipient of deployment results Select the user who will receive the results after the build pipeline completes. Table. Project creation build pipeline configuration items
Configure Custom Settings
The user can specify and modify the path of the Dockerfile file used for the build.
Additionally, you can view the final script generated based on the information configured in Configure Build Pipeline and also edit it.
Dockerfile, follow these steps to configure the pipeline script.
- After entering information on the Custom settings page, click the Connection Test button.
- Click the Next button when the Next button is enabled.
Item Explanation Dockerfile configuration Create New Dockerfile or Use Existing Dockerfile. Please select. - «Use Existing Dockerfile is only selectable after choosing the
Environment OnlyApp template and, in 코드 저장소 설정하기, selecting Use Existing Repository.
Dockerfile path Specify the Dockerfilefile path in the source code.Branch name The branch name is automatically registered when you set it in Code Repository Configuration. Dockerfile Check and modify the contents of the Dockerfile.pipeline script Check and modify the pipeline script. Table. Project Creation Custom Settings Items - «Use Existing Dockerfile is only selectable after choosing the
Note
For detailed information about Jenkins pipeline scripts, see the official site.
Complete project creation
The user can review the project and tool information to be created and start project creation.
To complete project creation, follow the steps below.
- Summary Information After checking the information on the screen, click the Complete button.
- Project Creation popup window opens and the project creation proceeds.
- After the project creation is complete, click the Confirm button to go to the Project page.
Notice
It cannot be canceled during creation, and when the project is created successfully, the Confirm button becomes active.
2.3.2.4 - Create Project (VM Deployment)
Note
Users must be members of a project group and tenant to be able to create projects.
Refer to Create Project Group for how to join a project group and tenant.
Users can create a project that deploys to a specific VM server using App.Template and Tool Management.
Before creating a project for VM deployment, register information about the target VM server. For detailed information on VM server registration, refer to Getting Started with VM Server Group.
Getting Started with Project Creation
To start creating a project, follow these steps.
- On the Main page, click the Create Project button. It navigates to the Create Project page.
Enter basic information
- On the Create Project page, enter the project name and project ID.
- For the Project Configuration Method item, select App. Template Utilization.
- Select VM(Artifact) or VM(Docker) for the Deployment Target field.
- VM(Artifact) creates a
war/jarfile and transfers it to the deployment target server. - VM(Docker) runs the
dockercommand after the build and image creation.
- VM(Artifact) creates a
- Please select the deployment method.
- Differences by deployment method: Table. SSH method vs Agent method
- After each input is completed, click the Start button.
App. Select Template
Note
For detailed information about the application template, see App.템플릿.
The user can select an application template to configure the project.
If you create a project based on an application template that includes sample source code, you can view the application that will be deployed.
In contrast, using a template labeled Environment Only configures only the build/deployment environment without sample source code.
If you configure a project using an already set up source code repository, select the template marked Environment Only.
To start selecting an application template, follow these steps.
- On the Application Template screen, enter the template name, select the application template card you want, and then click.
- When the Next button is enabled, click the Next button.
Item Explanation Filter You can easily find application templates using predefined filters. search You can easily find application templates through search. Table. Project Creation Application Template Items
Configure code repository
Users can configure a repository for managing source code through the code repository setup step.
Create new repository and use existing repository activation conditions differ depending on the application template and tool.
| Repository type | App with source code. Template + DevOps Console registration tool | App with source code included. Template + DevOps Console unregistered tool | Source code not included (EnvironmentOnly) App. Template + DevOps Console registration tool | Source code not included (Environment Only) App. Template + DevOps Console unregistered tool |
|---|---|---|---|---|
| Create new repository | ○ | X | ○ | X |
| Use existing repository | X | X | ○ | ○ |
Table. Conditions for creating a new repository and enabling use of existing repository
Note
Once authentication information is saved, you can perform a Connection Test without entering account information by using Use Saved Authentication Information thereafter.
To modify or delete stored credentials, refer to Manage Authentication Information.
To set up the code repository, follow these steps.
- In the Code repository item, select the Code repository type.
- Select Create new repository or Use existing repository, then enter the information.
- Enter authentication information and click the Connection Test button.
- When the Next button is enabled, click the Next button.
Item Explanation Repository type Select the code repository to use - Registered tool: The user can select and use the types of SCM Repository tools (
Github,Gitlab, etc.) that are available. - Unregistered tool: You can enter the domain of an unregistered tool to use it. The unregistered tool entry appears only when the source code is not included (Environment Only) App. Template.
New/Existing usage Please select New repository creation or whether to use an existing repository. - Activation status varies depending on specific conditions. For details, refer to Table. Activation conditions for creating a new repository and using an existing repository.
Repository information Enter repository information - When creating a new repository, the URL is formed from the project group name/project name.
Authentication information Enter authentication information - If you do not have an account, Don’t have an account? click the link to open the Account Creation Information popup where you can create an account.
- After creating a new account, be sure to change your password via the Set Initial Password link.
(Unregistered tool)
Repository informationEnter repository information - You can use a code repository that is not registered as a tool in
DevOps Console. - Click the URL Check button to undergo an additional verification process.
Table. Project Creation Code Repository Settings - Registered tool: The user can select and use the types of SCM Repository tools (
Configure Code Quality
Users can configure a repository for quality management.
To set code quality, follow these steps.
- In the Code Quality item, select Repository Type.
- Enter Basic Information and Authentication Information, then click the Connection Test button.
- Next button is enabled, click the Next button.
Item Explanation Repository type Select the repository to use - The types of Code Quality tools available to the user are displayed.
New / Existing / Unused status Select repository creation method - If you select Create new repository, you must enter the quality project name/quality project key.
- If you select Do not create, you can proceed directly to the next step.
Base URL Select the SonarQubeURL.Quality Project Name Enter the name of the SonarQubeproject.Quality Project Key Enter the Key of the SonarQubeproject.authentication information Enter authentication credentials - You can create a new user or use existing authentication credentials.
Table. Project Creation Code Quality Settings
Configure Artifact Repository
Users can configure a repository for artifacts.
If you select Uncreated, you can proceed directly to the next step.
To configure the artifact repository, follow these steps.
- On the Artifact Repository screen, select the repository type.
- Enter the basic information and authentication information, then click the Connection Test button.
- When the Next button is enabled, click the Next button.
Item Explanation Repository type Select the repository type to use - The types of Artifact Repository tools available to the user are displayed.
New / Existing / Unused status Select the repository creation method - If you select Uncreated, you can proceed directly to the next step.
Base URL / Endpoint URL Select a NexusURL or anObject StorageURL.Storage type / bucket name - In the case of
Nexus, it is automatically registered asraw(hosted). - In the case of
Object Storage, the bucket name entered during tool registration is automatically registered.
Repository name / Folder name - Enter the repository name to use in
Nexus. - Enter the folder name to use in
Object Storage.
Authentication information Enter authentication information - You can create a new user or use existing authentication information.
Table. Artifact Repository Configuration Input Items
Configure the deployment target environment
Reference
Deployment target configuration requires that VM server group/VM server be registered.
For registration methods and detailed information, refer to VM서버 그룹.
To set the deployment target environment, follow these steps.
- Deployment Target Environment on the screen, after entering the required information, click the Next button.
Item Explanation Deployment configuration Choose whether to write a deployment script manually - When selecting to write a deployment script manually, write the content in the custom step.
Deployment method The selected deployment method is displayed. Artifact repository The address of the repository to use when the agent mode is selected is displayed. - Deployment mode is enabled when it is Agent.
Manual deployment Select the default value for manual deployment - Select the default setting for parameters related to manual deployment when running the pipeline.
Deployment order If there are multiple target servers, choose whether to deploy in parallel or sequentially. Deployment target settings Set the deployment target server. - When you click Settings, the Deploy Target VM Settings popup opens.
Automatic recovery setting Select whether to enable automatic rollback - If the deployment fails, it will be rolled back to the most recent successful deployment.
- Deployment method is enabled when it is Agent.
Command before file deployment Write the commands that need to be executed before file deployment. File to send - Source: Enter the file path after the build pipeline execution path (Jenkins workspace).
- Target: Enter the path where the file will be deployed on the VM server.
- Add button can be used to add files.
Command after file distribution Write the commands that must be executed after file deployment. Table. Deployment Target Environment Configuration Items
Setting up the build pipeline
Users can configure pipelines that build and deploy applications.
You can review each stage of the pipeline to be configured and rename the build job.
To set up the build pipeline, follow these steps.
- In the build pipeline configuration step, enter the authentication information and click the Connection Test button.
- Next button is enabled, click the Next button.
Item Explanation Build/Deployment pipeline Displays build/deployment pipeline information. - The build/deployment pipeline is displayed based on the information registered in the App. template’s Manage Pipeline Templates
Category Select Development/Operation mode - The permissions for the pipeline vary depending on the Development/Operation distinction.
- Refer to Table. Permissions by role within the project (1) for role-specific permissions.
URL Select Jenkinsto configure the pipeline, then enter the Job nameJenkinsavailable to the user appears.
Build Agent Select the agent to be used for pipeline builds - For information about agents, refer to Managing agents (kubernetes), Managing agents (VM).
Build environment OS Displays the OS information of the environment in which the build agent runs. Authentication information Enter the credentials for Jenkins.Set environment variables JenkinsSet the environment variables to be registered in the pipeline.Deployment result recipient Select the user who will receive the results after the build pipeline completes. Table. Build pipeline configuration input items
Configure Custom Settings
In the deployment target server and deployment settings step, if you select the deployment configuration item write deployment script directly, complete the deployment configuration by modifying the pipeline contents at this stage.
To customize the settings, follow these steps.
- After reviewing and editing the content in the Custom step, click the Next button.
Complete project creation
The user can review the project and tool information to be created and start project creation.
To complete project creation, follow the steps below.
- Summary Information After checking the information on the screen, click the Complete button.
- Project Creation popup window opens and the project creation proceeds.
- After the project creation is complete, click the Confirm button to go to the Project page.
Notice
It cannot be canceled during creation, and when the project is created successfully, the Confirm button becomes active.
2.3.2.5 - Create Project (Empty)
Reference
- Users must be members of a project group and tenant to be able to create projects.
- For instructions on joining a project group and tenant, refer to Create Project Group.
The user can create an Empty (Empty) project without any configuration.
To create an empty project and configure build/deployment, the user must manually perform tasks such as Add code repository, Add image repository, Install Helm, Add build pipeline.
Getting Started with Project Creation
To start creating an empty project, follow these steps.
- On the Main page, click the Create Project button. You will be taken to the Create Project page.
Enter basic information
Enter the basic information for the project. The project name and project ID must be unique and cannot be duplicated.
To enter the basic information, follow these steps.
- On the Project Creation page, select Direct Configuration under the Project Configuration Method item.
- Enter Project Name and Project ID, then click the Start button. The Summary Information screen appears.
Complete project creation
The user can review the project and tool information to be created and start project creation.
To complete project creation, follow the steps below.
- Summary Information After checking the information on the screen, click the Complete button.
- Project Creation popup window opens and the project creation proceeds.
- After the project creation is complete, click the Confirm button to go to the Project page.
Notice
It cannot be canceled during creation, and when the project is created successfully, the Confirm button becomes active.
2.3.3 - Start Project
The user can create a project via Create a project.
On the project page, users can utilize various menus for project management.
Getting Started
To start the project, follow these steps.
- On the Main page, click the Project card. You will be taken to the Project Dashboard page.
Project menu
Dashboard
Dashboard (Project Dashboard)
This is a dashboard menu that lets you view information about the individual items that make up the project at a glance.
Build/Deployment
Build pipeline(Build/Deploy - Build Pipeline)
This menu allows you to view the Jenkins pipeline and perform and modify build/deployment tasks.
Kubernetes deployment (Build/Deploy - Kubernetes Deployment)
This menu lets you view the list of deployed Helm releases and their deployment status.
VM deployment (Build/Deploy - VM Deployment)
This menu allows you to view the list of deployed VMs and their deployment status.
Helm install (Helm install)
This is the menu where you can view Helm charts.
Ingress/Service management (Ingress/Service management)
A menu where you can view and add Ingress/Service.
Kubernetes Secret management (Kubernetes Secret management)
This menu allows you to view and add Kubernetes Secrets.
Environment Variable Management (환경변수 관리)
This is a menu that allows you to view and add environment variables.
storage
Code repository (repository)
This is a menu that allows you to view and add code repositories for a project.
Artifact Repository (Artifact Repository)
This menu lets you view and add the project’s image repository.
Image Repository (Image Repository)
This menu allows you to view and add the project’s image repository.
Chart repository (Chart repository)
This menu lets you view and add a project’s chart repositories.
Helm chart (헬름차트)
A menu for viewing and adding project Helm charts.
Quality
Code Quality (Code Quality)
Project code quality. This is a menu that allows you to view and add projects.
Project Overview
Project Overview (프로젝트 개요)
This menu allows you to view not only the project’s detailed information but also related Helm release information and details about the tools you are using.
member
Member (Project Member)
This is a menu for managing project users.
2.3.4 - Project Dashboard
You can view the information of individual items that make up the project at a glance on the dashboard.
Getting Started with Project Dashboard
To start using the dashboard, follow these steps.
- Click the Project card on the Main page. You will be taken to the Project Dashboard page.
- Click the Dashboard menu in the left menu.
Item Explanation Project information Displays the basic project information. pipeline Displays the status of pipelines added to the build pipeline.
Click the numeric link to view the status of other pipelines.Helm release status You can check the status of the Helm release added to the Kubernetes deployment. Blue/Green deployment status You can check the status of blue/green deployments. Canary status You can check the canary status. ArgoCD application status You can check the status of the ArgoCD application added to the Kubernetes deployment. Kubernetes deployment history Displays the Kubernetes deployment history in reverse chronological order. VM deployment history Displays the VM deployment history in reverse chronological order. code quality Displays code quality tool analysis information by integrating with the code quality tool. Code history Displays the history of the added code repository.
For the following items, you can select from the list to display in the code history.- Git configuration
- Git Branch
Scale and Usage Status Displays the project’s users, tools, and build/deployment status. Monthly pipeline execution trend Shows the monthly pipeline execution count, average execution interval, and execution time for the project. Inactive pipeline Shows a list of pipelines that have not been run and have no successful history, according to the reference date. Required stage Shows which stage tasks were performed in the pipeline, based on the code repository. Recent event history You can view the recent event history that occurred in the project. Table. Project Dashboard Display Items
2.3.5 - Project Members
Reference
Users with Master or higher can manage the permissions of project users.
It includes features to grant other users access to the project, modify the permissions of users who already have access, or delete permissions so they can no longer access the project.
Getting Started with Project Members
To start using project members, follow these steps.
- On the Main page, click the Project card. You will be taken to the Project Dashboard page.
- Click the Member menu in the left menu. The Member screen appears.
Add Project Member
To add members to a project, follow these steps.
- Click the Add button in the Member list. Member Add popup opens.
- After completing the settings in the Add Member popup, click the Confirm button to finish adding a project member.
Item Explanation User tab After searching for the email, click the Add button to add as a member. Project tab Select to add all members from another project to the current project’s members. Add member Click the user you want to add as a project member to add them. Permission Settings Set the role to assign to members. - Owner
- Master
- Developer
- Viewer
Delete member Click the X icon to delete from the project members. Table. Project Member Add Screen Items
Reference
Please refer to the Project Roles and Permissions for project role permissions.
Change Project Member Role
To change a project member’s role, follow these steps.
- Identify the user whose role you want to change in the Member list.
- Select the user’s project role from the list. It is saved immediately upon selection, and the user’s project role will be updated.
Delete project member
To remove a member from a project, follow these steps.
- In the Member list, select the checkbox of the user you wish to delete.
- Click the Delete button above the Member list to remove the selected user from the project members.
2.4 - Build/Deploy
2.4.1 - Build Pipeline
Reference
For detailed information about the
Jenkins pipeline, refer to the official site.Users can group consecutive tasks into a single pipeline. The pipeline configured here is created as a Jenkins pipeline.
Starting the Build Pipeline
To start using the build pipeline, follow these steps.
- Click the Project card on the Main page. You will be taken to the Project Dashboard page.
- In the left menu, click the Build/Deploy > Build Pipeline menu. You will be taken to the Build Pipeline page.
Add Build Pipeline
To add a build pipeline, follow these steps.
- On the Main page, click the Project card. You will be taken to the Project Dashboard page.
- In the left menu, click the Build/Deploy > Build Pipeline menu. You will be taken to the Build Pipeline page.
- Build Pipeline page, click the Add Pipeline button at the top right. You will be taken to the Add Pipeline page.
- Add Pipeline Enter or configure each field on the page.
- Click the Next button.
Item Explanation Category Select Development or Operations - The actions that each role can perform differ depending on development or operations.
- Refer to Table. Role-specific permissions within the project (1) for role-specific permissions.
Jenkins URL Select Jenkinsfrom the list to add a build pipeline.Build Agent Select the agent (build environment) on which the build pipeline will run.
Click the Info icon to view the list of tools provided by the agent.Build environment OS Displays the OS information of the environment where the build agent runs. Folder type Select the folder type. - Existing folder: Add a pipeline under an already created folder in
Jenkins. - New folder: Create a new folder in
Jenkinsand add a pipeline under it.
folder Select a folder from the list or enter the name of a new folder to create. Pipeline name Please enter the pipeline name. Parameter setting Set the parameters to be used in the pipeline. Environment variable configuration Set the environment variables to be used in the pipeline. Stage Settings Configure the stage to be used in the pipeline. Configure email recipients for build results Set the recipients who will receive the result email after the pipeline completes (success/failure). Table. Additional Build Pipeline Settings
Setting Parameters
Follow these steps to set the parameters used when running the pipeline.
- Click the Parameter card.
- Click the Add button to add a parameter.
- Click the Apply button to complete the parameter settings.
Setting Environment Variables
Follow these steps to set environment variables for use in the pipeline.
- Click the Environment Variable area. The Environment Variable Registration page opens on the right.
- A list of pre-registered environment variables appears, and select the checkboxes for the environment variables you want to use.
- Check the selected environment variable and click the Apply button to complete the environment variable configuration.
Setting up the stage
To set up the stages to be used in the pipeline, follow these steps.
- Click the New Stage card. The Stage area appears on the right.
- In the Stage area, select the tool and Stage type.
- Enter the required information according to the stage type and click the Apply button to complete the stage configuration.
Reference
Click the Add icon to add a stage.
For detailed information about stage configuration, see Stage.
For detailed information about stage configuration, see Stage.
Configure email recipients for build results
To set the recipients who will receive the build results by email, follow these steps.
- Click the Mail Recipient area. The Add Mail Recipient page opens on the right.
- In the Search area, search for the recipient and add them.
- Click the Apply button to complete the mail recipient settings.
Check the final pipeline script
- Check the build pipeline script that will actually be generated. If needed, edit the script directly.
- Click the Complete button to finish adding the pipeline.
Pipeline addition result
- The added result appears on the Build Pipeline page.
Note
The added pipeline does not run automatically. If execution is required, run the pipeline manually.
Managing Build Pipelines
Build pipeline list
| Item | Explanation |
|---|---|
| status | Displays the build pipeline status.
|
| URL | Go to the Build Pipeline page of Jenkins. |
| Recent build execution history URL | Navigate to the Build Execution History page of Jenkins. |
| log | pipeline log The popup window opens. |
| Run | Run the build pipeline. |
| View more | Displays additional menu.
|
| View pipeline stage | When you click the Expand icon, the stage view expands. |
Table. Build pipeline list view feature
Build Pipeline Credentials
When performing build pipeline actions (run, stop, edit, delete, etc.), user credentials are required, so you may request them from the user as needed.
When integrating IDP with Jenkins
If you are not registered as a Jenkins user, when the User Registration Guide popup appears, click the Go to Jenkins link to sign up or perform your first Jenkins login.
For Jenkins without IDP integration
Jenkins credentials are not stored; when the Add Account popup appears, select Use Existing User or Create New User in Account Type to add credentials.
Run Build Pipeline
To run the build pipeline, follow these steps.
- On the Build pipeline page, click the Run button of the build pipeline you want to execute.
- If there are parameters, the Pipeline Execution Parameter Input popup window opens.
- After entering the required fields, click the Confirm button.
Caution
If the Number of executors setting for the Built-In Node in Jenkins system configuration is set to 1 or higher, a security issue may arise, preventing the pipeline from running.
- In this case, you need to contact the Jenkins administrator to change the settings.
- In the Jenkins administration menu, you can enable it by changing the Number of executors item of the Built-In Node to 0.
- Note Jenkins officially recommends avoiding running builds on the Controller Node.
View build pipeline execution logs
Follow these steps to view the build pipeline execution logs.
- On the Build Pipeline page, click the Log button of the build pipeline you want to run.
- pipeline log A popup window opens, allowing you to view the execution log.
Reference
If a build pipeline is running, the Pipeline Log popup window refreshes periodically to display the latest logs.
Build pipeline build history view
To view the complete build history of the build pipeline, follow these steps.
- On the Build pipeline page, click the More icon of the build pipeline you want to view.
- Click the Build History menu. The Build History page opens.
Item Explanation Config Diff Config Diff The popup window opens. log Pipeline Log The popup window opens. Additional menu Navigate to the Build Details page. View pipeline stage Click the Expand icon to expand the stage view. Table. Build Pipeline List View Feature
Compare configuration information
You can compare the configuration information with previous build history using the Config Diff button.
Log View
Through the Log button, you can view the logs of the build history.
Build Details
You can view detailed build information via the More icon.
Modify Build Pipeline
To modify the build pipeline, follow these steps.
- On the Build pipeline page, click the More icon of the build pipeline you want to edit.
- Click the Edit Pipeline button. You will be taken to the Edit Pipeline page.
Edit the script directly
To edit the pipeline script directly, follow these steps.
- In the script editor window of the Pipeline Edit page, directly enter a script that conforms to the syntax supported by
Jenkins. - After completing the input, click the Save button to finish editing the pipeline.
Modify using the Script Generator feature
Reference
In the Script Generator feature, only one stage can be set. If you want to edit multiple stages, perform it multiple times.
Follow these steps to modify the pipeline script using the Script Generator feature.
- On the Pipeline Edit page, change Script Generator to ON.
- Select the build agent and script type.
- After completing Stage Setup, click the Create Script button to generate the script.
- Refer to the generated script to modify the pipeline, and click the Save button to complete the pipeline modification.
Item Explanation Script Generator Turn the Script Generator feature ON/OFF. Script Basic Information Select the basic information for script generation. Existing script This is an existing script. New script This is a new script generated by the Script Generator. Script modification Refer to the newly created script and directly edit the existing script on the left. Update Jenkins Credential If the newly created script contains new credentials, click the Jenkins CredentialUpdate button. This updates (saves) the credentials in Jenkins.K8S Secret update Deploy to K8S stage: when changing the K8S Secret, click the K8S Secret Update button. Update (save) it for use during Secret creation and deployment. Table. Script Generator feature
Clone Build Pipeline
To duplicate the build pipeline, follow these steps.
- Click the More icon of the build pipeline you want to clone.
- Click the Clone Pipeline menu. The Clone Pipeline popup window opens.
- After completing the information entry, click the Save button to finish replicating the pipeline.
Item Explanation Pipeline replication information Enter the information for the pipeline to be cloned. Pipeline modification Modify the pipeline to be cloned. Table. Build Pipeline Replication Feature
Delete Build Pipeline
To delete a build pipeline, follow these steps.
- On the Build pipeline page, click the More icon of the build pipeline you want to delete.
- Click the Delete Pipeline menu. The Delete Pipeline popup window opens.
- Delete Pipeline In the popup window, click the Confirm button to complete the pipeline deletion.
Note
Also delete the pipeline in Jenkins
- Selection: The pipeline is actually deleted from
Jenkins. - Unselected: Build pipeline is deleted only from the list and remains in
Jenkins.
2.4.1.1 - Stage
The user can view the description of stage types and each stage-specific item.
You can configure stages in Add Build Pipeline or Edit Build Pipeline.
Common Items
Stage Settings page is organized as follows.
| Item | Explanation |
|---|---|
| Tools | If you want to specify and use a particular tool other than the default tools set in the stage, select
|
| Stage types | Select the required stage from the list and enter the necessary information. |
| Stage name | Enter the stage name. |
Table. Stage Input Item Configuration
Checkout
This stage executes the checkout command on the Git repository registered in the code repository.
Select Checkout as the stage type.
| Item | Explanation |
|---|---|
| URL | Select the code repository to perform checkout. |
| Branch name | Enter the branch name to checkout. |
Table. Checkout stage input items
Build
This is the stage that executes the command to build the application.
Select Build as the stage type.
| Item | Explanation |
|---|---|
| language | Select the programming language used by the application. |
| Build tool | Select the build tool used for building the application. Provides default Shell commands based on the selected build tool. |
| Shell command | Enter the command to use for building the application. All commands available in the Shell can be used. |
Table. Build Stage Input Items
Docker Build
This stage performs the Docker image build.
Select Docker Build as the stage type.
item | Explanation | example |
|---|---|---|
Registry URL (docker push) | Select the image repository where the Docker build result image will be pushed. | |
| ID | The ID value of the account to be used for the image repository | |
| image tag pattern | The Docker image tag is automatically generated according to the selected pattern.
|
|
| Add base image repository | Add Base Image Repository A popup window opens.
| |
Registry URL (docker pull) | Select the image repository for docker pull when the repository providing the Base Image used in the Dockerfile (FROM clause, docker pull) differs from the repository of the Registry URL (docker push). | |
| Image build tool | Displays the image build tool. | |
| Pre-build command | If there are any commands that need to be run before building a Docker image, write them in shell command format. | cp target/*.jar docker/ |
| Image Build folder | If you need to run the Docker image build from a specific folder, select the checkbox and enter the folder path. | docker |
| Dockerfile | Enter the Dockerfile filename. | Dockerfile |
| Image build options | Enter it if you need to use additional options with the image build tool. | --no-cache |
| Build command | Displays the image build command that will actually be executed. | |
| Post-build command | If there are commands that need to be executed after building a Docker image, write them in Shell command format. | rm -rf docker/*.jar |
Table. Docker Build Stage Input Items
example script
The build pipeline script generated as a result of the example is as follows.
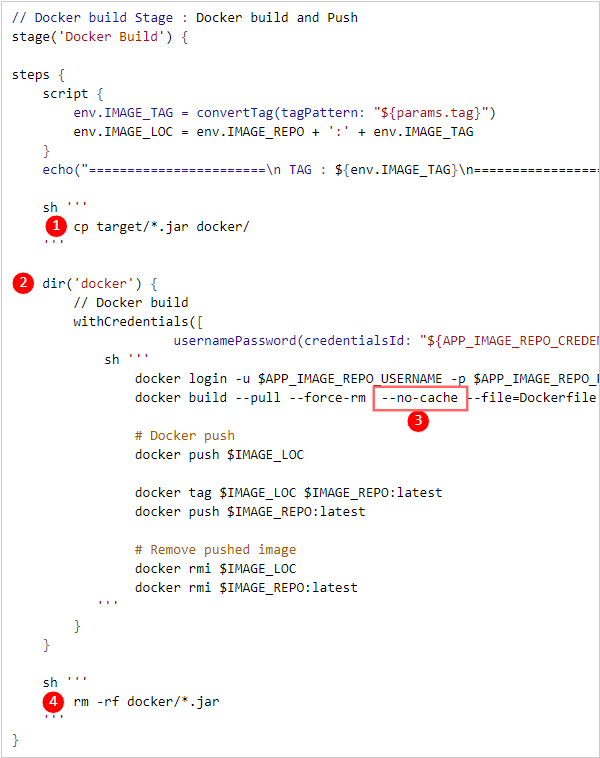
| Item | Explanation |
|---|---|
➊ | Pre-build command |
➋ | Image Build folder |
➌ | Image build options |
➍ | Post-build command |
Table. Docker Build example script description
Deploy to K8S
This is the stage that performs a Kubernetes deployment.
Select Deploy to K8S as the stage type.
Item | Explanation |
|---|---|
| type | Select deployment type
|
| K8S cluster | Select a K8S cluster
|
| namespace | Please select a namespace. |
| Helm release | Select HelmRelease. |
| Deployment method | Select deployment method
|
| Registry URL | Select the image repository where the image to be deployed to Kubernetes has been docker pushed. |
| Secret | Select the secret information input method
|
Table. Deploy to K8S stage input items
Deploy to VM
This is the stage that performs VM deployment.
Select Deploy to VM as the stage type.
| Item | Explanation |
|---|---|
| Deployment configuration | Select deployment configuration method
|
| deployment group | Select a deployment group
|
| Release Information | The contents stored in the deployment group are automatically configured. |
| Manual deployment | Select the default value for manual deployment
|
Table. Deploy to VM stage input items
Trigger Build
This is a stage that runs the pipeline remotely.
Select Trigger Build as the stage type.
| Item | Explanation |
|---|---|
| Target pipeline | Choose the target pipeline to run remotely. The selectable items vary depending on whether the pipeline is for development or production. |
| Parameter information | It is displayed depending on whether the target pipeline’s parameters are set. The parameter information entered at pipeline execution time is used. |
Table. Trigger Build Stage Input Items
Check Remote Execution Information
Remote execution information (parent/child pipelines) through the Trigger Build stage can be viewed on the Build Details screen.
Other stages
| Item | Explanation |
|---|---|
| Archive | Archive the application build results. The archived file can be downloaded from Jenkins. |
| Code Quality | This is the stage for executing the Code Quality step. |
| Custom | The user directly writes the pipeline script in the desired format. |
Table. Other Stage Settings
2.4.1.2 - Multibranch Pipeline
Reference
For detailed information about Jenkins multibranch pipelines, refer to the official site.
Users can integrate multiple branches of a code repository through a multibranch pipeline and manage them as a single job.
Starting a Multibranch Pipeline
To start using a multibranch pipeline, follow these steps.
- On the Main page, click the Project card. You will be taken to the Project Dashboard page.
- From the left menu, click the Build/Deploy > Build Pipeline menu. You will be taken to the Build Pipeline page.
Add a multibranch pipeline
To add a multibranch pipeline, follow these steps.
- Click the Project card on the Main page. You will be taken to the Project Dashboard page.
- From the left menu, click the Build/Deploy > Build Pipeline menu. You will be taken to the Build Pipeline page.
- On the Build Pipeline page, click the Add Multi-branch Pipeline button at the top right. The Add Multi-branch Pipeline popup will open.
- Add Multi-branch Pipeline In the popup window, enter each field and click the Save button.
Item Explanation Category Select development or operation - The actions that each role can perform differ depending on development or operation.
- Refer to Table. Role-specific permissions within the project (1) for role-specific permissions.
Jenkins URL Select the Jenkins to add a multibranch pipeline from the list. Folder type Select folder type - Existing folder: Add a pipeline under a folder that already exists in Jenkins.
- New folder: Create a new folder in Jenkins and add a pipeline under it.
Folder name Select a folder from the list or enter the name of a new folder to create. pipeline name Please enter the pipeline name. Git Repository Select the code repository to perform builds per branch.
Only code repositories registered in the DevOps Console project can be selected.Branch filtering You can filter the branch names to build among the branches registered in the code repository.
When using filtering, enter the filter condition as a Java regular expression.Jenkinsfile path Enter the path within the code repository of the Jenkinsfile where the pipeline build is defined. Table. Multi-branch pipeline additional information input items
Managing Multi-Branch Pipelines
Multi-branch pipeline list
| Item | Explanation |
|---|---|
| Multi-branch icon and label | Icons and labels representing a multibranch pipeline are displayed. |
| URL | Navigate to the Jenkins Multibranch Pipeline page. |
| Scan log | Multi-branch pipeline scan log The popup window opens. |
| Scan | Scanning the multibranch pipeline. |
| View more | Displays additional menu.
|
Table. Multi-branch pipeline list screen items
Scanning a multibranch pipeline
To scan a multibranch pipeline, follow these steps.
- On the Build Pipeline page, click the Scan button of the multibranch pipeline card you want to scan.
- Click the Confirm button in the confirmation popup.
View multi-branch pipeline scan logs
To view the scan logs of a multibranch pipeline, follow these steps.
- Build Pipeline page, click the Scan Log button of the multibranch pipeline card for which you want to view the scan log. The Multibranch Pipeline Scan Log popup window opens.
- Multi-branch pipeline scan log After reviewing the contents in the popup window, click the Confirm button to exit.
View multi-branch pipeline build history
To view the build history for each branch in a multibranch pipeline, follow these steps.
- On the Build Pipeline page, click the More icon of the multibranch pipeline card for which you want to view the build history.
- Click the Build History menu. You will be taken to the Branch-specific Build History screen of
Jenkins. (This feature is not provided in DevOps Console)
Modify multi-branch pipeline
To modify a multibranch pipeline, follow these steps.
- On the Build Pipeline page, click the More icon of the multibranch pipeline card you want to edit.
- Click the Edit Pipeline menu. You will be taken to the Settings screen of
Jenkins. (Feature not provided in DevOps Console)
Delete Multi-branch Pipeline
To delete a multibranch pipeline, follow these steps.
- On the Build Pipeline page, click the More icon of the multibranch pipeline card you want to delete.
- Click the Delete Pipeline menu. The Delete Pipeline popup window opens.
- In the Delete Pipeline popup, select whether to Delete the pipeline in Jenkins as well, and click the Confirm button.
Reference
Delete the pipeline in Jenkins as well.
- Selection: The pipeline is actually deleted in
Jenkins. - Unselected: Build pipeline is deleted only from the list and remains in
Jenkins.
2.4.2 - Kubernetes Deployment
Users can view the list of Helm releases used in the project and their deployment status. Depending on the development classification, the releases appear in the development or production list when the project is created or a chart is installed.
Users can differentiate deployments using icons.
 Helm chart
 Istio
Istio Workload
 Canary(Canary)
 Blue/Green (Blue-Green)
 ArgoCD
Getting Started with Kubernetes Deployment
To start using Kubernetes deployment, follow these steps.
- On the Main page, click the Project card. You will be taken to the Project Dashboard page.
- Click the Build/Deploy > Kubernetes Deploy menu in the left menu. You will be taken to the Kubernetes Deploy page.
2.4.2.1 - Helm Release
HelmRelease is an instance of a chart running on a Kubernetes cluster. Users can create a HelmRelease when creating a project or via the HelmInstall menu.
Getting Started with Helm Release
To start HelmRelease, follow these steps.
- From the Main page, click the Project card. You will be taken to the Project Dashboard page.
- Click the Build/Deploy > Kubernetes Deploy menu in the left menu. You will be taken to the Kubernetes Deploy page.
Item Explanation Name Displays the deployment name. Click to view detailed information. Chart Displays the Helm chart information used for deployment. Cluster/Namespace Displays the deployed cluster/namespace. Pod status Displays the current status of the Pod. Deployment result Displays the deployment execution result. Deployment time Displays the deployment execution time. Refresh Refresh the current items. The items that will be updated are the Pod status, deployment result, and deployment time. Delete Delete the current item. Table. Helm release items - Kubernetes deployment page, click name in the Helm release list. You will be taken to the deployment details page.
Add Helm Release
Helm install
You can add a Helm release through Helm install.
Add related Helm release
To add the related Helm release, follow these steps.
- Click the Project card on the Main page. You will be taken to the Project Dashboard page.
- Click the Build/Deploy > Kubernetes Deployment menu in the left menu. You will be taken to the Kubernetes Deployment page.
- Click the Add related Helm release button. The Add related Helm release popup opens.
- Add related Helm release Enter each item in the popup window.
- Click the Save button to complete adding the Helm release.
Item Explanation Helm release already registered in the project Shows the Helm release already registered in the project. - A Helm release already registered in the project cannot be added.
Table. Items displayed when adding related Helm release
Managing Helm Release Secrets
Getting Started with Helm Release Secrets
In HelmRelease secrets, you can manage the ImagePull Secret used for images deployed through the build pipeline in HelmRelease.
To start HelmRelease secret management, follow the steps below.
- On the Deployment Details page, click the Edit Credentials icon to the right of Helm Release.
- Helm Release Secret The popup window opens.
Adding a secret to a Helm release
To add a Helm release secret, follow these steps.
- On the Deployment Details page, click the Edit Authentication Info icon to the right of the Helm Release. The Helm Release Secret popup will open.
- Helm Release Secret popup window, if you need to add a secret to pull a private Chart Image, click the Add button in the Chart Install Secret area. The Add Secret popup will open.
- If you need to add a secret required to pull the App Image used during build/deployment, click the Add button in the ImagePull Secret area. The Add Secret popup will open.
- Add Secret In the popup window, enter the secret information and click the Save button to complete the addition.
Item Explanation Registry URL From the list of images registered in Image Repository, select the image that ImagePull Secret will use. Secret Select secret input method - Auto-generate: Automatically create a secret using the credentials of the selected image repository from the Docker URL.
- Use existing secret: Select and use one of the already created secrets.
Table. Additional Helm Release Secret Configuration Items
Edit Helm Release Secret
To modify the Helm release secret, follow these steps.
- On the Deployment Details page, click the Edit Authentication Info icon to the right of the Helm Release. The Helm Release Secret popup will open.
- In the HelmRelease secret list, click the secret name you want to edit. Secret Edit popup opens.
- Edit the content and click the Save button to complete the edit.
Delete Helm release secret
To delete a Helm release secret, follow these steps.
- On the Deployment Details page, click the Edit Authentication Info icon to the right of the Helm Release. The Helm Release Secret popup will open.
- Click the secret name you want to delete from the Helm release secret list.
- Click the Delete button to complete the deletion.
Modify K8S credentials
K8S credentials are the authentication information used to verify permission to use a K8S cluster/namespace when performing a deployment in the build pipeline.
To modify the K8S credentials, follow these steps.
- On the Deployment Details page, click the Edit Credentials icon to the right of K8S Cluster/Namespace. The Edit Credentials popup will open.
- Authentication information is fixed to the logged-in user’s account. Click the Save button to edit.
- In the confirmation popup, click the Confirm button.
- K8S authentication information will be changed to the logged-in user.
Check the values.yaml used in the Helm release
To view the contents of values.yaml, follow these steps.
- On the Deployment Details page, click the History tab.
- Click the View icon in the Values column. Revision # - Values.yaml The popup window opens.
- Check the contents of the
values.yamlfile.
Comparing values.yaml used in Helm release
To compare the values.yaml contents used in each release, follow the steps below.
- Click the History tab on the Deployment Details page.
- In the list, click the check box of each of the two revisions you want to compare.
- Click the Yaml Diff button. The Yaml Diff popup window opens.
- Yaml Diff (Revision #>#) Check the comparison details in the popup window.
Rollback Helm Release
To roll back a Helm release to a previous revision, follow these steps.
- On the Deployment Details page, click the History tab.
- Click the Rollback button of the revision you want to roll back. The Rollback popup window will open.
- Click the Confirm button to complete the rollback.
Upgrade Helm Release
To upgrade HelmRelease, follow the following procedure.
- On the Deployment Details page, click the History tab.
- In the Values column, click the View icon. The Revision # - Values.yaml popup window opens.
- Modify the contents of Current Values.yaml, and click the Upgrade button. The Upgrade popup window will open.
- Check the upgrade information.
- Click the Run button to complete the upgrade.
View Pod logs
To view the logs of the Pod related to a Helm release, follow these steps.
- On the Deployment Details page, click the Release Object tab.
- Click the view icon in the LOG column of the Pod entry. The Log popup window opens.
Item Explanation container Select the container from which you want to output logs. Real-time refresh Refresh the log output in real time. Refresh stopped Stop real-time refresh. Download Download the Pod logs to a file. Table. Log popup window function description
Delete Helm Release
To delete HelmRelease, follow the steps below.
- On the Deployment Details page, click the Delete button at the lower right of the Helm Release. The Delete Helm Release popup opens.
- Click the Confirm button to complete the deletion.
Reference
Also execute the helm delete command.
- Select: The Helm release is actually deleted from the cluster.
- Unselected: Kubernetes deployment is removed only from the list and remains in the cluster.
2.4.2.2 - Workload
A workload is an application that runs on Kubernetes, and users can add workloads to the DevOps Console for management.
The workload types that can be managed from the DevOps Console are Deployment, StatefulSet, and DaemonSet.
Getting Started
To begin using the workload, follow these steps.
- On the Main page, click the Project card. You will be taken to the Project Dashboard page.
- Click the Build/Deploy > Kubernetes Deploy menu in the left menu. You will be taken to the Kubernetes Deploy page.
- On the Kubernetes Deployment page, click the workload name.
Item Explanation Workload type Displays the workload type. DeploymentStatefulSetDaemonSet
Name Displays the workload name. Click to view detailed information. Chart Displays the Helm chart information used for deployment. Cluster/Namespace Displays the deployed cluster/namespace. Pod status Displays the current status of the Pod. Deployment result Displays the deployment execution result. Deployment time Displays the deployment execution time. Refresh Refresh the current items. The items that will be updated are the Pod status, deployment result, and deployment time. Delete Delete the current item. Table. Workload screen items
Add workload
To add a workload, follow the steps below.
- On the Main page, click the Project card. You will be taken to the Project Dashboard page.
- Click the Build/Deploy > Kubernetes Deploy menu in the left menu. You will be taken to the Kubernetes Deploy page.
- On the Kubernetes deployment page, click the Add workload menu. The Add workload popup opens.
- Add Workload Enter the information in the popup window and click the Save button.
- In the confirmation popup, click the Confirm button to complete adding the workload.Item
Explanation Query target Only workloads deployed with the same Base image as the App template used when the project was first created are displayed. Workload already registered in the project Shows the workload already registered in the project. - Workloads already registered in the project cannot be added.
Table. Additional Workload Input Items
Modify K8S authentication information
K8S credentials are the authentication information used to verify permission to use a K8S cluster/namespace when performing a deployment in the build pipeline.
To modify the K8S credentials, follow these steps.
- On the Deployment Details page, click the Edit Credentials icon to the right of K8S Cluster/Namespace. The Edit Credentials popup will open.
- Authentication information is fixed to the logged-in user’s account. Click the Save button to edit.
- In the confirmation popup, click the Confirm button.
- K8S authentication information will be changed to the logged-in user.
Rollback Workload
To roll back the workload to a previous image, follow these steps.
- On the Main page, click the Project card. You will be taken to the Project Dashboard page.
- In the left menu, click the Build/Deploy > Kubernetes Deployment menu. You will be taken to the Kubernetes Deployment page.
- Kubernetes deployment page, click the workload name to roll back. You will be taken to the Workload details page.
- Click the Details tab on the Workload Details page.
- In the Details tab list, click the Rollback button in the row that contains the image you want to roll back. The Rollback popup window opens.
- Rollback popup window, click the desired button to complete the rollback.
- Recreate
- Rolling Update
Add recipient to deployment results
To add a distribution result recipient, follow these steps.
- Click the Deployment Result Recipients tab on the Workload Details page.
- Click the Add button on the Distribution Result Recipients tab. The Add Distribution Result Recipients popup window opens.
- Add Distribution Result Recipients In the popup window, select the target and click the Confirm button to complete adding distribution result recipients.
- Search button or click an entry in the list to add the recipient to the lower part of the popup.
- Added recipients can be removed by clicking the X icon on the right.
Delete workload
To delete the workload, follow these steps.
- On the Kubernetes deployment page, click the X icon of the workload you want to delete.
- In the confirmation popup, click the Confirm button to complete the deletion.ReferenceWorkloads are not deleted in the actual cluster.
If you want to delete in the actual cluster, delete it using the same method you used to initially deploy the workload.
2.4.2.3 - Blue/Green Deployment
Users can perform blue/green deployments using Ingress or Service.
Adding a blue/green deployment means creating a new K8S Ingress or K8S Service so that the two Helm releases can be swapped.
Only two Helm releases that have the same project, cluster, namespace, release type, chart name, chart version, development classification can be grouped.
Starting Blue/Green Deployment
To start using blue/green deployment, follow these steps.
- On the Main page, click the Project card. You will be taken to the Project Dashboard page.
- Click the Build/Deploy > Kubernetes Deploy menu in the left menu. You will be taken to the Kubernetes Deploy page.Item
Explanation Name Displays the blue/green deployment name. Click to view detailed information. Cluster/Namespace Displays the deployed cluster/namespace. (operation) Displays information about the currently deployed Helm release. (operational standby) Shows the Helm release that will be the next version in operation. Using blue/green switching, the standby switches to active. Delete Delete the current item. Table. Kubernetes deployment screen Blue/Green deployment card items - Click the name of the Blue/Green deployment you want to start from the deployment list on the Kubernetes deployment page. You will be taken to the Deployment details page.
Add blue/green deployment
To add a blue/green deployment, follow these steps.
Reference
To add a blue/green deployment, you need two Helm releases installed with the same chart.
- Click the Project card on the Main page. You will be taken to the Project Dashboard page.
- Click the Build/Deploy > Kubernetes Deploy menu in the left menu. You will be taken to the Kubernetes Deploy page.
- Click the Add Blue/Green Deployment button at the top right of the Kubernetes deployment page. The Add Blue/Green Deployment popup opens.
- Add Blue/Green deployment After entering the information in the popup window, click the Save button to complete adding the Blue/Green deployment.Item
Explanation Category Select Development, Operations - The actions each role can perform differ depending on the Development or Operations classification.(Table. Role-based permissions within the project (2))
Blue/Green deployment name Enter the deployment name. Operation Release and Jenkins Job selection - Release name: Select the name of the currently running Helm release from the list.
- Jenkins Job: Select the Jenkins Job from the list to build/deploy the selected Helm release.
Standby Release and Jenkins Job selection - Release name: Select the name of the Helm release to be applied to production in the next version from the list.
- Jenkins Job: Select the Jenkins Job from the list to build/deploy the selected Helm release.
K8S cluster/namespace Displays the K8S cluster/namespace where the Helm release is installed. Type classification Select whether to use Ingress or Service to perform a blue/green switch. New classification Choose whether to create a new Ingress or Service, or use an existing one. Name Enter name - New: Enter the name of an Ingress or Service.
- Existing: Select an already created Ingress or Service from the list.
Service (Operation) Select the Kubernetes Service related to the currently running Helm release from the list. Service (Operational Standby) Select the Kubernetes Service related to the Helm release that will be applied to operations in the next version from the list. Rules Enter the information to be used for Ingress. Table. Ingress type input items when adding blue/green deploymentItem Explanation type Select the type of Kubernetes Service from the list ClusterIPNodePortLoadBalancer
Deployment (Production) Select the Kubernetes Deployment related to the currently running Helm release from the list. Deployment (Operational standby) Select the Kubernetes Deployment related to the Helm release that will be operated in the next version from the list. Ports Enter the information to be used by the Service. Table. Service type input items when adding Blue/Green deployment
Replace Blue/Green
To replace the blue/green, follow these steps.
- Click the Blue/Green Switch button on the Deployment Details page. The Blue/Green Switch popup opens.
- In the Blue/Green replacement popup, click the Confirm button to complete the Blue/Green replacement.
- The Helm releases for production and staging are being swapped.
- A replacement record will be added.
Check the yaml of Ingress or Service for blue/green deployment
To check the yaml of the Ingress or Service used in blue/green, follow these steps.
- On the Deployment Details page, click the view icon for Ingress YAML or Service YAML. The Ingress YAML or Service YAML popup window opens.
- Ingress YAML or Service YAML popup window, review the contents and click the Confirm button to exit.
Managing Jenkins Jobs for Blue/Green Deployments
Jenkins Job View Log
To view the Jenkins Job log, follow these steps.
- On the Deployment Details page, click the Log button in the Jenkins Job entry for the desired release. The Pipeline Log popup window opens.
- Pipeline Log After confirming the log in the popup window, click the Confirm button.
Running a Jenkins Job
To run a Jenkins job, follow these steps.
- On the Deployment Details page, click the Run button in the Jenkins Job entry for the desired release. The Enter Pipeline Execution Parameters popup will open.
- Pipeline Execution Parameter Input In the popup window, enter or select each item, then click the Confirm button to complete the Jenkins Job execution.
Modify blue/green deployment
To modify a blue/green deployment, follow these steps.
- Deployment Details page, click the Edit button. The Blue/Green Deployment Edit popup window opens.
- Blue/Green Deployment Edit In the popup window, modify the desired items and click the Save button to complete the edit.
Delete blue/green deployment
To delete a blue/green deployment, follow these steps.
- Deployment Details page, click the Delete button. The Blue/Green Deployment Delete popup opens.
- Blue/Green deployment deletion in the popup window, select whether to execute the Ingress/Service deletion command, and click the Confirm button to complete the deletion.
Reference
Execute Ingress/Service deletion command
- Selection: The Ingress or Service used for blue/green deployment is actually deleted from the cluster.
- Unselected: Ingress or Service used for blue/green deployment is not deleted and remains in the cluster.
2.4.2.4 - Canary Deployment
The user can add a canary deployment.
Adding a canary means configuring two Helm releases together so that a canary test can be performed.
Only two Helm releases that have the same Project, Cluster, Release Type, Chart Name, Chart Version, and Development Classification can be grouped.
Getting Started with Canary Deployment
To start using Canary, follow these steps.
- On the Main page, click the Project card. You will be taken to the Project Dashboard page.
- Click the Build/Deploy > Kubernetes Deploy menu in the left menu. You will be taken to the Kubernetes Deploy page.
Item Explanation Name Displays the Canary name. Click to view detailed information. cluster Displays the deployed cluster. (operation) Displays the currently running Helm release. (Canary) Displays the HelmRelease that is in Canary. Exit Shutting down Canary. Table. Kubernetes deployment screen Canary card items - On the Kubernetes deployment page, click the name of the canary you want to use in the deployment list. You will be taken to the deployment details page.
Add Canary
To add a canary, follow these steps.
Reference
Canary is supported in the following environments. Verify before adding Canary.
Kubernetesv1.17or laternginx-ingressv0.29.0or later
information
Adding a canary requires two Helm releases installed with the same chart.
- On the Main page, click the Project card. You will be taken to the Project Dashboard page.
- Click the Build/Deploy > Kubernetes Deploy menu in the left sidebar. You will be taken to the Kubernetes Deploy page.
- Click the Add Canary button at the top right of the Kubernetes Deployment page. The Add Canary popup opens.
- Add Canary In the popup window, after entering the information, click the Save button to complete adding the canary.
Item Explanation Category Select Development or Operations. - The actions each role can perform differ depending on whether it is Development or Operations. (Table. Permissions by role within the project (2))
Canary name Enter the canary name. Operation - Release name: Select the name of the currently deployed Helm release from the list.
- Jenkins Job: Select the Jenkins job for building/deploying the currently deployed Helm release from the list.
Canary - Release name: Select the name of the Helm release that will be the next version in operation from the list.
- Jenkins Job: Select the Jenkins job that will build/deploy the Helm release for the next operational version from the list.
K8S cluster Displays the K8S cluster where the Helm release is installed. Ingress annotation Enter the annotation item you want to apply among the Canary annotations provided by nginx-ingress. Table. Canary Additional Input Items
Reference
For detailed guidance on each ingress annotation provided by nginx-ingress, refer to the following page.
Check Canary’s Ingress YAML
Operational Ingress YAML used in Canary, to view the Canary Ingress YAML, follow these steps.
- On the Deployment Details page, click the View icon for Production Ingress YAML and Canary Ingress YAML. The Ingress YAML popup opens.
- Ingress YAML Check the contents in the popup window and click the Confirm button to exit.
Managing Canary’s Jenkins Job
View Jenkins Job log
To view the Jenkins Job log, follow these steps.
- On the Deployment Details page, click the Log button in the Jenkins Job entry for the desired release. The Pipeline Log popup window will open.
- Pipeline Log After confirming the log in the popup window, click the Confirm button.
Running a Jenkins Job
To run a Jenkins job, follow these steps.
- On the Deployment Details page, click the Run button in the Jenkins Job entry for the desired release. The Enter Pipeline Execution Parameters popup will open.
- Pipeline Execution Parameter Input In the popup window, enter or select each item, then click the Confirm button to complete the Jenkins job execution.
Modify Canary
To modify the canary, follow these steps.
- On the Deployment Details page, click the Edit button. The Canary Edit popup window opens.
- Canary Edit In the popup window, modify the desired items and click the Save button to complete the edit.
Recover Canary
If the ingress annotation data for the production and canary releases fails to operate correctly due to a Helm release change, restore it so it works properly again.
To restore the canary, follow these steps.
- On the Deployment Details page, click the Restore button. The Restore popup window opens.
- In the Recovery popup, click the Confirm button to complete the recovery.
Delete Canary (termination)
To shut down Canary, follow these steps.
- On the Deployment Details page, click the Terminate button. The Canary Termination popup window opens.
- Canary termination In the popup window, select the desired item and click the Confirm button to complete the termination.item
Explanation Canary release Select Canary Release - Rollback Ingress Host: Restores the Ingress host of the Helm release used for the canary to its original value.
- Delete Helm Release: Deletes the Helm release that was used for the canary.
Production Release Select the production release - Upgrade to the canary image: Upgrade the production Helm release to the image used in the canary. You can modify the
Values.yamlfile. - No action: End the canary without any changes to the production Helm release.
Table. Canary termination selection items
2.4.2.5 - Istio
Reference
For detailed guidance on Istio, refer to the following page.
Gateway- Virtual Service
- Destination Rule
Getting Started with Istio
To start using Istio, follow these steps.
- On the Main page, click the Project card. You will be taken to the Project Dashboard page.
- From the left menu, click the Build/Deploy > Kubernetes Deploy menu. You will be taken to the Kubernetes Deploy page.
Item Explanation Name Displays the Istio name. Click to view detailed information. Cluster/Namespace Displays the deployed cluster/namespace. Delete Delete the current item. Table. Kubernetes deployment screen Istio card items - In the deployment list on the Kubernetes Deployment page, click the name of the Istio you want to use. You will be taken to the Istio Details page.
Add Istio
To add Istio, follow the steps below.
- Click the Project card on the Main page. You will be taken to the Project Dashboard page.
- Click the Build/Deploy > Kubernetes Deploy menu in the left menu. You will be taken to the Kubernetes Deploy page.
- Click the Add Istio button at the top right of the Kubernetes deployment page. Add Istio popup opens.
- Add Istio In the popup window, after entering the information, click the Save button to add Istio.
Item Explanation Category Select Development or Operations. K8S cluster Please select a K8S cluster. Namespace Select a namespace.
Only namespaces that can use Istio are displayed in the list.Table. Istio Additional Input Items
Reference
Istio has been added, but since no Istio objects have been created, Istio-related functionality cannot be used yet.
Add Istio object using the creation wizard or Add Istio object using object addition to add and use an Istio object.
Istio objects
Adding Istio object
Add Istio object using the creation wizard
- On the Istio details page, click the Istio objects tab.
- Click the Create Wizard button in the Istio objects tab. You will be taken to the Create Wizard page.
Helm Release
This step selects the Helm release to use with Istio.
- Create Wizard page, click the Add button to select all Helm releases to be used in Istio.
- Click the Start button. The Gateway screen appears.
Gateway
The Istio Gateway is the frontmost object that receives traffic from external sources.
- On the Gateway screen of the Creation Wizard page, select whether to create a Gateway.
- If you want to create a Gateway, enter each item.
- If you do not want to create a Gateway, select Pass without creating an Object.
- Click the Next button. The Destination Rule screen appears.
Item Explanation Name Prefix Specify the prefix name of the Istio Gateway object to be created. Host Specifies the domain of the Gateway Object accessed from outside. Table. Creation Wizard Gateway Input Items
Destination Rule
Destination Rule defines traffic policies in Istio.
- On the Create Wizard page’s Destination Rule screen, select whether to create a Destination Rule.
- If you want to create a Destination Rule, fill in each field.
- If you do not want to create a Destination Rule, select Pass without creating the Object.
- Click the Next button. The Virtual Service screen appears.
Item Explanation Name Prefix Enter the Prefix name for the Istio Destination Rule Object to be created. LoadBalancer Select the load balancer mode. ROUND_ROBIN: Round RobinLEAST_CONN: Continue using the last connectionRANDOM: Random
maxConnections Enter the maximum allowed number of connections. Table. Creation Wizard Destination Rule Input Items
Virtual Service
The Virtual Service routes incoming traffic to a service.
- On the Creation Wizard page’s Virtual Service screen, if you want to create a Virtual Service, fill in each field.
- Click the Complete button to finish adding an Istio object using the creation wizard.
Item Explanation Name Prefix Enter the prefix name for the Istio Virtual Service to create. Prefix-Uri Enter a prefix URI to enable routing when traffic arrives at that URI. Helm Release Weight If there are two or more helm releases, enter the connection weight. The sum of each number must be 100.Table. Create Wizard Virtual Service Input Items
Add an Istio object using Object addition
- On the Istio details page, click the Istio objects tab.
- Click the Add Object button in the Istio objects tab. The Add Object popup window opens.
- Add Object In the popup window, fill in each field and click the Save button to finish adding the Istio object.
Item Explanation Object Select the Object to create GatewayVirtual ServiceDestination Rule
input The input fields differ for each object. Refer to the creation wizard for input GatewayVirtual ServiceDestination Rule
Generate Click the Generate button. Based on the information entered earlier, a default Yaml will be generated in the Yaml area. Yaml Modify the base YAML to complete the final YAML of the object you want to generate. Save Click the Save button to create an Object. Table. Screen items for adding an Istio object using Object addition
Modify Istio object
To modify an Istio object, follow these steps.
- On the Istio details page, click the Istio objects tab.
- In the Istio objects tab, click the Object you want to edit from the Istio object list. The Object popup opens.
- Object In the popup window, edit the Yaml and click the Save button to complete the Istio object modification.
Delete Istio object
To delete an Istio object, follow these steps.
- On the Istio Details page, click the Istio objects tab.
- In the Istio objects tab, click the Object you want to edit from the Istio object list. The Object popup window will open.
- In the Object popup, click the Delete button to complete the deletion of the Istio object.
Helm release
Add Helm Release
To add the Helm release used by Istio, follow these steps.
- On the Istio details page, click the Helm Release tab.
- In the Helm Release tab, click the Add button. The Add Helm Release popup opens.
- Add Helm Release In the popup window, fill out each field and click the Save button to complete adding the Helm release.
Delete Helm Release
To delete the Helm release used by Istio, follow these steps.
- On the Istio Details page, click the Helm Release tab.
- In the Helm release tab, select the checkbox of the Helm release you want to delete and click the Delete button.
- In the confirmation popup, click the Confirm button to complete the Helm release deletion.
Delete Istio
To uninstall Istio, follow these steps.
- On the Istio Details page, click the Delete button at the lower right.
- Click the Confirm button in the confirmation popup to complete the deletion.
2.4.2.6 - ArgoCD
ArgoCD is software used for GitOps deployments in a Kubernetes environment. Users can configure deployments via ArgoCD when creating a project or through the Kubernetes deployment menu.
Getting Started with ArgoCD
To view the details of an ArgoCD application, follow these steps.
- Main page, click the Project card. You will be taken to the Project Dashboard page.
- Click the Build/Deploy > Kubernetes Deploy menu in the left menu. You will be taken to the Kubernetes Deploy page.
- Click the ArgoCD application card you want to start from the list. You will be taken to the deployment details page.Item
Explanation Name Displays the ArgoCD project name/ArgoCD URL. Git information Displays the Git information used for deployment. Cluster/Namespace Displays the deployed cluster/namespace. App status Displays the current state of the App. Deployment result Displays the current Sync status. Deployment time Displays the deployment execution time. Refresh Click the Refresh icon to refresh the current item. The items that are updated are App status, deployment result. Delete Delete the current item. Table. ArgoCD Application Detailed ItemsItemExplanation Modify ArgoCD app secret Click the Edit credentials icon to the right of the application name to open a popup that manages the image secret used for deployment. Go to the ArgoCD app The actual ArgoCD tool’s Application Details screen opens in a new window. Table. ArgoCD Deployment Details
Adding an ArgoCD Application
Create and add a new ArgoCD application - generate with Helm chart
To create and add a new ArgoCD application using a Helm chart, follow the steps below.
- Click the Project card on the Main page. You will be taken to the Project Dashboard page.
- In the left menu, click the Build/Deploy > Kubernetes Deployment menu. You will be taken to the Kubernetes Deployment page.
- Click the Create New ArgoCD App button at the top right. You will be taken to the Create New ArgoCD App page.
- Enter ArgoCD information and click the Confirm button. The authentication information input field appears.
- Enter authentication information and click the Connection Test button.
- Application Basic Information, Deployment Target K8S Cluster input fields appear.
- Enter the Application Name and click the Check Duplicate button.
- Enter Project Name.
- Select Repository type as Create a new repository as a Helm chart.
- Select a K8S cluster and namespace.
- Select Helm chart. Information about the Helm chart and the Helm chart Git repository will be displayed.
- After modifying the contents of the default Values.yaml included in the chart located in the K8S cluster Values of the Helm chart, click the Validation Check button.
- After entering the Helm chart Git repository information, click the Connection Test button.
- Manifest Keys Enter the information.
- Click the Create button to complete creation.
Reference
In the Manifest file and Key information,
Deploy Strategy is not a required input.| Item | Explanation |
|---|---|
| URL input method | Select URL input method
|
| ArgoCD URL | After entering the ArgoCD URL, click the Confirm button. |
| Authentication information | Enter the credentials and click the Connection Test button. |
| Application name | Enter the ArgoCD application name and click the Check Duplicate button. |
| Project name | Enter the project name of the ArgoCD application. |
| Repository type | Select repository type
|
| K8S cluster | Select the target cluster for deployment
|
| Namespace | Select the target namespace for deployment
|
| Helm chart | Please select a Helm chart. |
| Helm chart Git repository | Enter the information of the Git repository to be used for GitOps. |
| Manifest Key Information | Enter the Manifest file/key information to be used for continuous deployment. |
Table. New ArgoCD Application Creation - Settings for creation with Helm chart
Create and add a new ArgoCD application – create from an existing Git repository
To create and add a new ArgoCD application using an existing Git repository, follow the steps below.
- Main page, click the Project card. You will be taken to the Project Dashboard page.
- Click the Build/Deploy > Kubernetes Deploy menu in the left menu. You will be taken to the Kubernetes Deploy page.
- Click the Create New ArgoCD App button at the top right. You will be taken to the Create New ArgoCD App page.
- Enter ArgoCD information and click the Confirm button. The Authentication information input field appears.
- Enter authentication information and click the Connection Test button.
- Application Basic Information, Deployment Target K8S Cluster input fields appear.
- Enter the Application Name and click the Check Duplicate button.
- Enter the Project Name.
- Select Repository type as Use existing Git repository.
- Select K8S cluster and namespace.
- Select Helm chart. Information about Helm chart and Helm chart Git repository appears.
- After modifying the contents of the default Values.yaml included in the chart located in the K8S cluster Values of the Helm chart, click the Validation Check button.
- Enter the Helm chart Git repository information and click the Connection Test button.
- Enter the Manifest Root path, Manifest type, (values.yaml path if the Manifest type is Helm), and the Manifest file and key information (Image repository, Image tag, Image Secret, Deploy Strategy) for Manifest Keys.
- Click the Create button to complete creation.ReferenceIn the Manifest file and key information, the Deploy Strategy is not a required input.Item
Explanation URL input method Select URL input method - Select from list: ArgoCD tools registered as tools appear.
- Enter manually
ArgoCD URL After entering the ArgoCD URL, click the Confirm button. authentication information Enter the authentication information and click the Connection Test button. Application name Enter the ArgoCD application name and click the Check Duplicate button. Project name Enter the project name of the ArgoCD application. Repository type Select repository type - Create a new repository with Helm chart: Use a Helm chart to create a Git repository for
GitOps. - Use existing Git repository
K8S cluster Select the target cluster for deployment - Only clusters that the user has permission to access can be selected from the clusters in the DevOps Console K8S cluster.
namespace Select the target namespace for deployment - In the K8S cluster, only namespaces that the user has access rights to can be selected from the chosen cluster.
Git repository Enter the Git repository information that stores the Manifest data for creating the ArgoCD application to be used in GitOps.Manifest Keys information Enter the information required for continuous deployment (Manifest Root path, Manifest type ( Helm,Customize,Directory), Manifest file/key information).Table. New ArgoCD application creation - Settings for creating with existing Git repository
Add existing ArgoCD application
To add an existing ArgoCD application, follow these steps.
- Click the Project card on the Main page. You will be taken to the Project Dashboard page.
- In the left menu, click the Build/Deploy > Kubernetes Deployment menu. You will be taken to the Kubernetes Deployment page.
- Click the Add ArgoCD App button at the top right. Navigate to the Add ArgoCD App page.
- Enter the ArgoCD URL and click the Confirm button.
- The input screen for the existing application name and credentials appears.
- Enter the Existing Application Name and Authentication Information, then click the Connection Test button.ReferenceIf the Git repository linked to the ArgoCD application is not registered in the DevOps Console, the URL Check popup window opens. Follow steps 7–8.
- A URL Check popup opens to identify the Git repository linked to the ArgoCD application.
- After modifying the Base URL, click the Confirm button.
- The Git repository information linked to the application is displayed.
- Enter the authentication information for the Git repository and click the Connection Test button.
- Enter the
yamlfile and key to modify among the Manifest Keys items. - After entering the information, click the Save button to complete Add ArgoCD Application.item
Explanation URL input method Select URL input method - Select from list: ArgoCD tools registered as tools appear.
- Enter manually
ArgoCD URL After entering the ArgoCD URL, click the Confirm button. Application name / authentication information Enter the Existing application name and authentication information, then click the Connection Test button. Git repository credentials Enter the credentials for the Git repository used by the selected existing application. Image Repo Key Enter the path to the Yaml file that records the image repository information and the Key value. If the key values for repository and tag are the same, enter the same value. Image Tag Key Enter the path to the Yaml file containing the image tag information and the Key value. If the repository and tag have the same key, enter the same value. Image Secret Key Enter the path to the Yaml file that contains the image secret information and the Key value. Deploy Strategy Key Enter the path to the Yaml file containing the deployment strategy information and the Key value. (It is not required.) Table. Adding Existing ArgoCD Application Configuration Items
Managing ArgoCD Applications
To view the details of an ArgoCD application, follow these steps.
- Main page, click the Project card. You will be taken to the Project Dashboard page.
- Click the Build/Deploy > Kubernetes Deployment menu in the left sidebar. You will be taken to the Kubernetes Deployment page.
- Click the ArgoCD application card you want to start from the list. You will be taken to the deployment details page.
Modify Manifest information
Follow these steps to modify the Manifest information.
- Git related information Click the tab.
- Click the Edit icon next to Manifest information. The Edit Manifest key information popup opens.
- Modify the Manifest key value and click the Save button.
Modify ArgoCD authentication information
To modify the ArgoCD credentials, follow these steps.
- Click the Edit icon next to the ArgoCD User ID. The Edit Authentication Info popup will open.
- Modify the authentication information value and click the Save button to complete the edit.
Modify linked Git repository credentials
To modify the authentication information of the linked Git repository, follow these steps.
- Click the Edit icon next to Linked Git ID. The Edit authentication information popup opens.
- Modify the authentication information and click the Save button to complete the changes.
Configure Sync
To change the Sync settings, follow the steps below.
- Click the Sync icon next to Current Sync. The ArgoCD App Sync popup opens.
- Enter the content to edit and click the Sync button to complete the Sync settings.
Item Explanation Revision Select the branch to synchronize. Sync Options Select the synchronization-related options. Synchronize Resources Select the synchronization target. Table. Sync SettingsReferenceArgoCDFor detailed information about synchronization, please refer to the official site.
Configure Auto-Sync
To change the Auto-Sync settings of an ArgoCD application, follow these steps.
- Click the Edit icon next to Auto‑Sync. The Auto‑Sync option popup window opens.
- Edit and click the Save button to complete the settings.
Item description Prune Resources When the Git settings are deleted, choose whether to also delete the synchronization target. Self Heal In the cluster, when the value of synchronization target changes, select whether to automatically change it to the value defined in Git. Table. Auto-Sync Settings
Managing Application Secrets
If it is an ArgoCD application created with a Helm chart, you can add, modify, or delete the application’s secrets.
To start application secret management, follow these steps.
- Click the application secret to the right of the application name.
- Application Secret Settings popup window opens.
Add application secret
To add an application secret, follow these steps.
- Click the Edit authentication information icon next to the Application name. The Application secret settings popup opens.
- If you need to add a secret to use when pulling the Chart Image, click the Add button in the Chart Install Secret section.
- When you need to add a secret for pulling the App Image used during build/deployment, click the Add button in the ImagePull Secret section.
- Enter the content and click the Save button to complete the addition.Item
description Registry URL From the list of images registered in Image Repository, select the image that ImagePull Secret will use. Secret Select the method for entering ImagePull Secret information - Auto-generate: Use the credentials of the image repository selected from the Docker URL to automatically create an ImagePull Secret.
- Use existing secret: Choose one of the already created secrets to use as the ImagePull Secret.
Table. Application Secret Additional Configuration Items
Edit Application Secret
To modify the application secret, follow these steps.
- Click the Edit authentication information icon next to the Application name. The Application secret settings popup opens.
- Click the secret name you want to edit in the application secret list.
- Enter the content and click the Save button to complete the edit.
Delete Application Secret
To delete the application secret, follow the steps below.
- Click the Edit Authentication Info icon next to Application Name. The Application Secret Settings popup opens.
- Click the secret name you want to delete from the application secret list.
- Click the Delete button to complete the deletion.
Comparing Values.yaml file
For an ArgoCD application using a Helm chart, you can compare the values.yaml file.
To compare the values.yaml files used in each release, follow these steps.
- Click the History tab.
- Click the two revisions you want to compare.
- Click the App Diff button. The App Diff popup window opens.
Rolling Back an Application
To roll back the application to a previous revision, follow these steps.
- Click the History tab.
- Click the Rollback button in the rollback column of the revision you want to roll back. The Rollback popup will open.
- Click the Confirm button to complete the rollback.
Delete Application
To uninstall the application, follow these steps.
- Click the Delete button at the bottom right. The Application Delete popup will open.
- Click the Confirm button to complete the deletion.
Reference
It is deleted only from DevOps Console, and the actual ArgoCD application is not deleted.
2.4.3 - VM Deployment
Users can register and manage VM deployment through DevOps Console.
Before registering a VM deployment, an available VM server group(VM server group) must exist, and the registered VM deployment can be used in the build pipeline (Deploy to VM).
Users can differentiate deployment methods using icons.
 (SSH method) VM deployment
 (Agent mode) VM deployment
Note
Differences by deployment method: Table. SSH method vs Agent method
Start VM deployment
To start VM deployment, follow these steps.
- Click the Project card on the Main page. You will be taken to the Project Dashboard page.
- From the left menu, click the Build/Deploy > VM Deploy menu. You will be taken to the VM Deploy page.
Item Explanation Deployment group name Displays the name of the deployment group. VM deployment result (Success)/(Total): Displays the number of VM servers targeted for deployment and the number of VM servers successfully deployed. - Green: All successful
- Blue: In progress
- Red: Partial failure
- Gray: Ready, Stopped
Deployment time Displays the deployment time. Delete Delete the VM deployment. Table. VM deployment display items
Add VM deployment
To add a VM deployment, follow these steps.
- Click the Project card on the Main page. You will be taken to the Project Dashboard page.
- From the left menu, click the Build/Deploy > VM Deploy menu. You will be taken to the VM Deploy page.
- VM Deployment page, click the Add VM Deployment button in the top right. The Add VM Deployment popup opens.
- Add VM deployment After entering the information in the popup window, click the Save button.
Item Explanation deployment group Please enter the deployment group name. Execution method Select the execution mode. - File transfer and command execution: Choose this when you typically deploy files to a VM.
- Execute command only: Choose this when you run only commands without transferring files to the VM (e.g., Docker commands).
Deployment method Select deployment method Deployment order If there are multiple target servers, choose whether to deploy in parallel or sequentially. Deployment target VM Set the deployment target server. - Click the Settings button to open the Configure Deployment Target VM popup.
Command before file deployment Write the commands that need to be executed before file distribution. File to send - Source: Enter the file path after the build pipeline execution directory (Jenkins workspace).
- Target: Enter the path where the file will be deployed on the VM server.
- Add button can be used to add files.
Command after file distribution Write the commands to be executed after file deployment. Automatic restore setting Select whether to enable automatic rollback - If the deployment fails, it will be rolled back to the most recent successful deployment.
- Deployment method is enabled when it is Agent.
Artifact repository Select whether to use the artifact repository for rollback. - deployment method is activated when it is Agent.
Repository name Only exposed when using an artifact repository. - A list of already registered artifact repository is displayed
Table. Additional Input Items for VM Deployment
Note
Deployment Target VM Settings The popup window displays the server groups you have access to.
For more details, refer to the VM Server Group.
VM Deployment Details
To view the detailed information of the VM deployment, follow these steps.
- On the Main page, click the Project card. You will be taken to the Project Dashboard page.
- From the left menu, click the Build/Deploy > VM Deploy menu. You will be taken to the VM Deploy page.
- On the VM deployment page, in the VM deployment list, click the VM deployment you want to view in detail. You will be taken to the VM deployment details page.
- In the History tab, click the server list. The Deployment Details popup opens.
- Deployment Details You can view the detailed history in the popup window.
- When you click the Log button of the execution pipeline, the Pipeline Log popup window opens.
- Pipeline Log You can view detailed logs in the popup window.
- In the history list for each deployment server, click the Log button of the server whose logs you want to view, and the VM Agent Log popup window will open.
- VM Agent log You can view detailed logs in the popup window.
Item Explanation Stop / Start Deployment Stop, Start Deployment button becomes active. rollback You can roll back to a previous version. History tab Deployment history is displayed. Pipeline Information tab The build pipeline information associated with this VM deployment is displayed. log You can view the logs of the build pipeline. Table. VM deployment detail screen itemsItem Explanation Execution pipeline log You can view the logs of the build pipeline. History logs per deployment server You can view the deployment agent’s logs. - Only displayed for AGENT type
Table. Deployment Detail Screen Items
Delete VM deployment
Delete from list
To delete a VM deployment, follow these steps.
- Click the Project card on the Main page. You will be taken to the Project Dashboard page.
- From the left menu, click the Build/Deploy > VM Deploy menu. You will be taken to the VM Deploy page.
- On the VM deployment page, click the X icon of the VM deployment you want to delete from the list.
- In the confirmation popup, click the Confirm button to complete the deletion of the VM deployment.
Delete on the detail page
To delete a VM deployment, follow these steps.
- Main page, click the Project card. You will be taken to the Project Dashboard page.
- From the left menu, click the Build/Deploy > VM Deploy menu. You will be taken to the VM Deploy page.
- On the VM deployment page, click the VM deployment you want to delete from the VM deployment list. You will be taken to the VM deployment details page.
- On the VM Deployment Details page, click the Delete button.
- Click the Confirm button in the confirmation popup to complete the VM deployment deletion.
Using environment variables in VM deployment commands
You can use environment variables in the pre‑deployment command, post‑deployment command, source path of the file to be transferred, and target path of the file to be transferred.
You can use the $ placeholder or ${} placeholder within commands to access environment variables in the build pipeline.
Color mode
echo ${BUILD_NUMBER}
echo $JOB_NAME
echo ${BUILD_NUMBER}
echo $JOB_NAMEIf you want to refer to the environment variables of the VM server where the command runs, add a \.
Color mode
echo \${PATH}
echo \$LANG
echo \${PATH}
echo \$LANGStop VM deployment
On the Deployment Details page, you can stop a VM deployment that is in progress. Clicking the Stop button in the recent deployment status area of the Deployment Details page will stop the VM deployment.
The states in which deployment can be halted are listed in the table below, and the Stop button is displayed only when in those states.
| method | status value | Explanation |
|---|---|---|
| SSH | request | The build pipeline is running. |
| AGENT | request | The build pipeline is running. |
| AGENT | Build complete | When the build pipeline is completed
|
| AGENT | Ready | After the build pipeline completes, the AGENT is ready to perform deployment. |
| AGENT | In progress | AGENT is currently executing a deployment. |
Table. State where deployment can be paused
Understanding VM deployment status values
Deployment Details page lets you check the current status of the VM deployment.
status value | Explanation |
|---|---|
| Not executed | Never run since its initial creation |
| request | The build pipeline is running. |
| Success | Build/deployment succeeded |
| Failure | Failed state during build or deployment |
Table. Description of SSH deployment status values
status value | Explanation |
|---|---|
| Not executed | Never executed after initial creation |
| request | The build pipeline is running. |
| Build complete | When the build pipeline is completed
|
| Ready | After the build pipeline completes, the AGENT is ready to perform deployment. |
| In progress | AGENT is currently executing a deployment. |
| Success | Build/deployment succeeded |
| Failure | Failed state during build or deployment |
| Stop | Build or deployment is in a paused state
|
Table. AGENT deployment status value description
2.4.4 - Helm Install
Users can use the Helm Install menu to view and install project charts, project group charts, tenant charts, and system charts.
Getting Started with Helm Install
To begin using Helm Install, follow the steps below.
- Click the Project card on the Main page. You will be taken to the Project Dashboard page.
- From the left menu, click the Build/Deploy > Helm Install menu. The Helm Install page opens.
Item Explanation K8S cluster Select the K8S cluster to be the target of the Helm install.
The Helm chart list below shows only the Helm charts that can be installed on the selected K8S cluster.Chart name Displays the chart name. Chart repository Displays information about the chart repository where the Helm chart files are stored. Table. Helm install screen items
Helm Chart Details
To view the Helm chart details, follow these steps.
- On the Main page, click the Project card.
- From the left menu, click the Build/Deploy > HelmInstall menu. The HelmInstall page opens.
- On the Helm Install page, select the K8S cluster you want to install. A list of Helm charts belonging to that cluster will be displayed.
- From the Helm chart list, click the Helm chart card you want to view in detail. The Helm chart details page opens.
Helm Chart Details
| Item | Explanation |
|---|---|
| Version | If there are multiple versions, you can select the desired version. |
| Download | You can download the Helm chart file to the user’s PC. |
| helm install | You can install Helm. |
Table. Helm Chart Detail Screen Items
Summary tab
Displays the README.md file included in the Helm chart. You can view the information provided by the chart author.
Values.yaml tab
Displays the values.yaml file included in the Helm chart. You can view the values that can be modified in the chart before running helm install.
Details tab
Item | Explanation |
|---|---|
| Helm chart repository information | Displays the repository where the Helm chart is stored. |
| Api Version | Displays the API version of the Helm chart.
|
| Support CI/CD | When creating a build pipeline, the Deploy to K8S stage indicates whether the Helm chart type can be selected as a Helm release. |
| Allow new installation? |
|
| Image in the chart | Displays the image information used in the Helm chart. |
Table. Detailed Information Tab View Items
Install Helm
To install Helm, follow these steps.
- On the Helm Install page, select the K8S cluster you want to install in the K8S cluster field. A list of Helm charts belonging to that cluster will be displayed.
- On the Helm Install page, click the Helm chart card you want to view in detail. The Helm Chart Details page opens.
- On the Helm Chart Details page, click the Helm Install button. The Helm Install page opens.
- On the Helm Install page, fill in each field on the screen and click the Next button. The Helm Chart Install popup opens.
- Helm chart installation Check the contents in the popup window and click the Run button to complete the Helm installation.
- When the installation is complete, the Kubernetes deployment page opens automatically.Item
Explanation Release name Enter the name to be used in Helm.
It must be unique and cannot be duplicated within the namespace.Category Development, Operations Version Select the version of the chart you want to install with Helm. K8S cluster Displays the target K8S cluster for helm install.
Changes are not allowed; if you wish to change, select the K8S cluster in Start Helm Install.Namespace Select the target namespace for the helm install from the list. Reference information Reference information provided by the selected K8S cluster.
You can click each tab to view detailed information.included in the chart
default Values.yamlYou can edit the values.yamlfile to run helm install with the desired values.
If needed, refer to the reference information and modifyvalues.yamlwith those values.Table. Common Helm chart installation screen itemsItemExplanation Release name Enter the name to be used in Helm.
It must be unique and cannot be duplicated within the namespace.Category Development, Operations Version Select the version of the chart you want to install with Helm. K8S cluster Displays the target K8S cluster for helm install.
Changes are not possible, and if you wish to change, select a K8S cluster in Start Helm Install.namespace Select the target namespace for helm install from the list. Reference information This is reference information provided by the selected K8S cluster. You can click each tab to view detailed information. Default Values.yaml included in the chart You can edit the values.yamlfile and run helm install with the desired values.
If needed, refer to the reference information and modifyvalues.yamlwith those values.Writing type - Form: Enter the items displayed on the screen. Form-type items are displayed only for Helm charts that support form input. For creating Helm charts that support form input, refer to Creating Helm Charts that Support Form Input.
- Values.yaml: Modify the values in the same YAML editor screen as a typical Helm chart.
Form input This is the screen displayed when you select Form in the creation type; review each item and enter values. After completing the input, click the Validation Check button to validate the entered values. Table. Helm chart installation screen items that support Form input
2.4.5 - Ingress/Service Management
Users can add and manage Ingress/Service using the DevOps Console.
Getting Started with Ingress/Service Management
To start managing Ingress/Service, follow these steps.
- On the Main page, click the Project card. You will be taken to the Project Dashboard page.
- Click the Build/Deploy > Ingress/Service Management menu in the left menu. You will be taken to the Ingress/Service Management page.
Ingress management
- On the Ingress/Service Management page, click the Ingress tab.
- Select K8S cluster and namespace in the Ingress tab. The list of Ingresses belonging to the selected namespace will be displayed.
Ingress
Reference
Not all Ingresses created in the namespace are displayed; only the Ingresses created from the
DevOps Console are shown.| Item | Explanation |
|---|---|
| K8S cluster | Select a K8S cluster from the list. |
| Namespace | Select a namespace from the list. Ingresses created in the selected namespace will be displayed. |
| Ingress list | Displays the list of Ingresses. |
| Search | You can search for Ingress. |
| Add | You can add an Ingress. |
Table. Ingress management screen items
Add Ingress
To add an Ingress, follow these steps.
- Click the Add button on the Ingress tab. The Add Ingress popup window opens.
- Add Ingress After entering the information in the popup window, click the Confirm button.
- Click the Confirm button in the confirmation popup to complete adding the Ingress.
Item Explanation Ingress name Please enter the Ingress name. K8S cluster Specifies the K8S cluster where the Ingress will be created. Namespace Specifies the namespace where the Ingress will be created. Service Select the Service that Ingress will use as a target from the list of Services. Rules Enter the Host, Path, and Service Port to configure in the Ingress.
Click Add to input multiple entries.Table. Additional Ingress Input Items
Ingress Details
To view the detailed information of an Ingress, follow the steps below.
- Click the Ingress you want to view in the Ingress tab. Navigate to the Ingress Details page.
- On the Ingress Details page, view the detailed information of the Ingress.
- When you click the View icon, the Ingress YAML popup window opens.
- Ingress YAML In the popup window, you can view the Ingress YAML content.
Edit Ingress
Caution
The Ingress used in blue/green deployments and canary cannot be modified.
To modify the Ingress, follow these steps.
- In the Ingress tab, click the Ingress you want to edit. You will be taken to the Ingress Details page.
- On the Ingress Details page, click the Edit button. The Ingress Edit popup opens.
- Ingress Edit In the popup window, edit the Ingress information and click the Confirm button.
- In the confirmation popup, click the Confirm button to complete the Ingress modification.
Delete Ingress
Caution
Ingress used in blue/green deployments and canary cannot be deleted.
To delete an Ingress, follow these steps.
- In the Ingress tab, click the Ingress you want to delete. You will be taken to the Ingress Details page.
- On the Ingress Details page, click the Delete button.
- In the confirmation popup, click the Confirm button to complete the Ingress deletion.
Service Management
- On the Ingress/Service Management page, click the Service tab.
- In the Service tab, select the K8S cluster and namespace. The list of Services belonging to the selected namespace will be displayed.
Service
Reference
Not all Services created in the namespace are displayed; only the Services created from the
DevOps Console are shown.| Item | Explanation |
|---|---|
| K8S cluster | Select a K8S cluster from the list. |
| namespace | Select a namespace from the list. Services created in the selected namespace will be displayed. |
| Service List | Displays the list of services. |
| search | You can search for Service. |
| Add | You can add a Service. |
| External Endpoint information icon | If there is related additional information, display it. |
Table. Service Management Screen Items
Add Service
To add a Service, follow these steps.
- Click the Add button in the Service tab. The Service Add popup opens.
- Add Service After entering the information in the popup window, click the Confirm button.
- In the confirmation popup, click the Confirm button to complete adding the Service.
Item Explanation Service name Please enter the service name. K8S cluster Displays the K8S cluster where the Service will be created. namespace Specifies the namespace where the Service will be created. type Select the Service type ClusterIPNodePortLoadBalancer
Deployment Select the Deployment that will be the Service’s target from the list. Ports Enter the Port Name, Port, Target, and Protocol that the Service will use.
Click the Add button to input multiple entries.Table. Service addition input fields
Service Details
To view the Service details, follow these steps.
- On the Service tab, click the Service you want to view in detail. You will be taken to the Service Details page.
- Service Details page shows detailed information.
- Click the View icon to open the Service YAML popup window.
- Service YAML You can view the Service YAML content in the popup window.
Edit Service
Caution
The Service used in blue/green deployments cannot be modified.
To modify the Service, follow these steps.
- In the Service tab, click the Service you want to edit. Go to the Service Details page.
- On the Service Details page, click the Edit button. The Service Edit popup window opens.
- Service Edit In the popup window, edit the Service information and click the Confirm button.
- In the confirmation popup, click the Confirm button to complete the Service edit.
Delete Service
Caution
The Service used in blue/green deployments cannot be deleted.
To delete a Service, follow the steps below.
- On the Service tab screen, click the Service you want to edit. You will be taken to the Service Details page.
- On the Service Details page, click the Delete button.
- Click the Confirm button in the confirmation popup to complete the Service deletion.
2.4.6 - Kubernetes Secret Management
Users can view secrets created in a namespace. In addition, they can create and delete secrets.
Getting Started with Kubernetes Secret
To start managing Kubernetes Secrets, follow the steps below.
- Main page, click the Project card. You will be taken to the Project Dashboard page.
- From the left menu, click the Build/Deploy > Kubernetes Secret Management menu. You will be taken to the Kubernetes Secret Management page.
Item Explanation K8S cluster Select a K8S cluster from the list. namespace Select a namespace from the list. Secrets created in the selected namespace will be displayed. Secret List Displays the list of secrets. search You can search for secrets. Detailed filter You can perform detailed searches by using the detailed filter. Add You can add a secret. Table. Kubernetes Secret Management Screen Items
Add secret
Note
In Kubernetes Secret management, the only secret you can add is the Docker config secret, and other secrets cannot be added on the current screen.
Docker Config Secret is a secret used to store Docker registry credentials for an image.
Docker Config Secret is a secret used to store Docker registry credentials for an image.
Follow these steps to add a Kubernetes Secret.
- Select K8S Cluster on the Kubernetes Secret Management page.
- Select namespace.
- Click the Add button. The Add Secret popup opens.
- Add Secret Enter the information in the popup window and click the Connection Test button.
- If Connection Test succeeds, click the Save button.
- In the confirmation popup, click the Confirm button to complete the addition.
Item Explanation K8S cluster Displays the K8S cluster where the secret will be created. Namespace Specifies the namespace where the secret will be created. Image repository URL Select the image repository to use in Secret. Secret name Enter the secret name. Select authentication information - Use new credentials: Enter new credentials.
- Use saved credentials: Choose one of the previously used credentials.
Table. Input fields for adding a secret
View Secret Details
To view the secret details, follow these steps.
- Kubernetes Secret Management On the page, click the secret whose details you want to view. Secret Details popup window opens.
- Secret Details View the secret’s detailed information in the popup window.
Delete secret
To delete the secret, follow these steps.
- Kubernetes Secret Management On the page, select the checkbox of the secret you want to delete.
- Click the Delete button.
- In the confirmation popup, click the Confirm button to complete the deletion.
2.4.7 - Environment Variable Management
Users can add frequently used parameters and credentials as environment variables for use when creating a build pipeline.
Getting Started with Environment Variable Management
Follow these steps to manage environment variables used in the build pipeline.
- On the Main page, click the Project card. You will be taken to the Project Dashboard page.
- Click the Build/Deploy > Environment Variable Management menu in the left menu of the Project Dashboard page. You will be taken to the Environment Variable Management page.
Adding environment variables
Add parameter environment variable
Parameter environment variables act as Linux Environment variables and are used in the NAME=VALUE format.
To add a parameter environment variable, follow these steps.
- On the Environment Variable Management page, click the Add button. The Add Environment Variable popup window opens.
- Add environment variable In the popup window, select the type as parameter.
- After entering the information, click the Save button.
- In the confirmation popup, click the Confirm button to complete the addition.
Item Explanation Name Please enter the parameter name. value Please enter the parameter value. Explanation Enter a description for the user to refer to. Table. Parameter environment variable addition input items
Add authentication credentials environment variable
The authentication environment variable stores credentials for use. You can pre-register and share credentials so they can be easily used in stages that require authentication (preventing duplicate entry).
To add authentication environment variables, follow these steps.
- On the Environment Variable Management page, click the Add button. The Add Environment Variable popup window opens.
- Add Environment Variable In the popup window, select the type as “Authentication Information”.
- After entering the information, click the Save button.
- In the confirmation popup, click the Confirm button to complete the addition.
Item Explanation Name Enter the name of the credential. Category Select a category value - Development: Credentials can be used only in build pipelines of type Development.
- Production: Credentials can be used only in build pipelines of type Production.
Authentication type Please select an authentication type. ID Please enter your ID. Password/Private Key Enter the password or private key according to the authentication type. Explanation Enter a description for the user to refer to. Table. Parameter Environment Variable Additional Input Fields
Modify environment variables
To modify environment variables, follow these steps.
- On the Environment Variable Management page, click the environment variable you want to edit. The Edit Environment Variable popup will open.
- Edit Environment Variables In the popup window, modify the desired items and click the Save button.
- In the confirmation popup, click the Confirm button to complete the addition.
Delete environment variable
To delete an environment variable, follow these steps.
Delete from list
- On the Environment Variable Management screen, select the checkbox of the environment variable you want to delete.
- Click the Delete button on the Environment Variable Management screen.
- In the confirmation popup, click the Confirm button to complete the deletion.
Delete in the environment variable edit popup
- Environment Variable Management screen, click the environment variable you want to delete. Environment Variable Edit popup window opens.
- Edit Environment Variable in the popup window, click the Delete button.
- Click the Confirm button in the confirmation popup to complete the deletion.
2.5 - Project Group
2.5.1 - Project Group Overview
Users can view and modify information about project groups according to their permissions.
Project Group Overview
To view the project group overview, follow these steps.
- On the Main page, click the Project Group Management icon of the project group. You will be taken to the Project Group Dashboard page.
- Click the Project Group Overview menu in the left menu. The Project Group Overview screen appears.
Modify project group name
To modify the project group name, follow these steps.
- On the Project Group Overview screen, click the Edit Project Group Name button. The Edit Project Group Name popup opens.
- Project Group Name Edit In the popup window, edit the project group name and click the Save button to complete the project group name edit.
Delete project group
To delete a project group, follow these steps.
- On the Project Group Overview screen, click the Project Group Delete button. The Project Group Delete popup opens.
- Project Group Deletion In the popup window, verify the path of the
Jenkinsfolder to be deleted, enter the project group name, and then click the Delete button. - In the confirmation popup, click the Confirm button to complete the deletion of the project group.
Caution
- A project group cannot be deleted if it contains projects.
- Deleted project groups cannot be restored.
- All available
Jenkinsproject group level folders will be deleted, so please verify.
Project group members
Getting Started with Project Group Members
To view the project group members, follow these steps.
- Project Group Overview screen, click the Member tab.
Add project group members
To add members to a project group, follow these steps.
- On the Project Group Overview screen, click the Member tab. The Project Group Member List screen appears.
- On the Project Group Member List screen, click the Add button. The Project Group Member Add popup opens.
- Add Project Group Member In the popup window, after completing the settings, click the Save button to complete adding the project group member.
Item Explanation Add member Search for the user you want to add as a project group member by email, then click the Add button. Permission Settings Set the role to assign to the member you want to add - Owner
- Master
- Developer
- Viewer
Delete member Click the X icon to remove the member from the project group. Table. Project Group Member Additional Items
Change the role of a project group member
To change a project group’s member role, follow these steps.
- On the Project Group Overview screen, click the Member tab. The Project Group Member List screen appears.
- Project Group Member List screen, locate the user whose role you want to change.
- Select the user’s project group role from the list. It is saved immediately upon selection, and the user’s project group role will be updated.
Delete project group member
To remove a member from a project group, follow these steps.
- On the Project Group Overview screen, click the Member tab. The Project Group Member List screen appears.
- Project Group Member List screen, select the checkbox of the user you want to delete.
- Click the Delete button at the top of the list to remove the selected user from the project group members.
Project group common settings
Getting Started with Project Group Common Settings
To view the project group common settings, follow these steps.
- On the Project Group Overview screen, click the Common Settings tab. The Common Settings screen appears.
Configure Messenger
If you configure the messenger, you can send event details to the messenger when an event occurs in the project group.
To set up the messenger for the project group, follow these steps.
- On the Project Group Overview screen, click the Common Settings tab. The Common Settings screen appears.
- On the Common Settings screen, click the Edit icon for Messenger Settings. The Messenger Settings popup window opens.
- Messenger Settings popup window, after completing the settings, click the Save button to finish the messenger settings.
Manage all project groups
Note
It displays information for all project groups that the user has permission to access. Except for Project Group Name Change, Delete Project Group, it provides the same functionality as the Project Group Overview.
- Click the Admin icon at the top right of the Main page. You will be taken to the Tenant Dashboard page.
- From the left menu, click the Tenant > Project Group menu. You will be taken to the Project Group page.
2.5.2 - Create Project Group
Create Project Group
To create a project group, follow these steps.
- Click the Create Project Group button at the top of the Main page. The Create Project Group popup opens.
- Create Project Group After entering the fields in the popup, click the Confirm button to complete the project group creation.
Item Explanation Project group name Enter the project group name that will be displayed on the screen. Project Group ID Enter the ID of the project group to be managed in DevOps Console.
The project group ID is used in build pipelines, etc.tenant Select the tenant for which the project group will be created from the list - Tenant Join Shortcut: If the tenant for creating the project group is not visible in the list, click the Tenant Join Shortcut link to request to join.
Table. Project Group Creation Input Items
Note
Depending on the selected tenant, a tenant administrator’s approval process may be required.
Register Tenant
To join a tenant, follow these steps.
- In the Create Project Group popup, click the Tenant Join Shortcut link. The Tenant Join Request popup opens.
- Enter the tenant code to register in the Tenant Search field accurately and click the Search icon. The tenant information will be retrieved.
- Verify that the displayed tenant is correct, enter the request reason, and click the Add button. It will be added to the list below.
- After selecting the permissions for the tenant added to the list below, click the Save button.
2.5.3 - Project Group Dashboard
Getting Started with Project Group Dashboard
To view the project group dashboard, follow these steps.
- On the Main page, click the Project Group Management icon of the project group. You will be taken to the Project Group Dashboard page.
- Click the Dashboard menu in the left menu.
Item Explanation Basic Information Displays the basic information of the project group. Scale and Usage Status Displays the organization size, tool usage status, and build/deployment status of the project group. Monthly pipeline execution trend Shows the monthly pipeline execution count, average execution interval, and execution time for the project group. Inactive pipeline Shows a list of pipelines that have not been run and have no successful history, according to the reference date. Release Execution Trend Displays the daily release execution count, average lead time, and average release cycle within the project group. Recent event history You can view recent events that occurred in the project group. Table. Project Group Dashboard Items
2.6 - Tenant
2.6.1 - Tenant Management
A tenant is a logical partition that independently provides and shares tools, apps, and templates usable in a project.
Each project belongs to a single project group, and each project group belongs to a single tenant; therefore, a project can access and utilize the tools and App templates assigned to its tenant.
Getting Started with Tenant Management
To start tenant management, follow these steps.
- Main page, click the Admin icon at the top right. You will be taken to the Tenant Dashboard page.
- Click the Tenant > Tenant Management menu in the left menu. You will be taken to the Tenant Management page.
Tenant detail view
To view tenant details, follow the steps below.
- On the Tenant Management page, click the tenant you want to view in detail. You will be taken to the Tenant Details page.
Managing tenant members
To manage tenant members, follow these steps.
- On the Tenant Details page, click the Member tab.
Add tenant member
To add a tenant member, follow these steps.
- Click the Member tab on the Tenant Details page.
- Click the Add button in the Member tab. The Add Member popup opens.
- Add Member In the popup window, select a member, set permissions, and click the Save button.
- In the confirmation popup, click the Confirm button to complete.
Delete Tenant Member
To delete a tenant member, follow these steps.
- On the Tenant Details page, click the Member tab.
- In the Member tab, select the checkbox of the member you want to delete.
- Delete Click the button.
- In the confirmation popup, click the Confirm button to complete.
Check tenant tool
To check the tenant tool, follow these steps.
- On the Tenant Details page, click the Tool tab.
Check tenant member approval history
To view the tenant member approval history, follow these steps.
- On the Tenant Details page, click the Approval History tab.
Manage Tenant Common Settings
To manage tenant common settings, follow these steps.
- On the Tenant Details page, click the Common Settings tab.
Item Explanation Billing Select whether to charge. Project group creation approval Select whether project group creation requires approval - If not used, tenant members can freely create project groups.
Delete release Select whether to delete the release - You can set whether to delete a completed release.
Release suspension approval Select whether to require approval for release suspension - You can configure it to submit an internal approval request to stop an ongoing release.
Approval Task - Add JIRA Field When linking a Jira project to an approval Task, add a custom field of the Jira project to be included in the approval details. email Enter the email address to receive - You can receive inquiries related to the tenant.
Table. Tenant Common Configuration Items
Manage tenant join requests
To manage tenant enrollment requests, follow these steps.
- Click the Admin icon at the top right of the Main page. You will be taken to the Tenant Dashboard page.
- Click the Tenant > Tenant Management menu in the left menu. You will be taken to the Tenant Management page.
- On the Tenant Management page, click the Join Request link for the tenant. The displayed number indicates the number of join requests for the tenant.
- Tenant Registration Request popup window opens.
- Tenant Registration Request In the popup’s request list, select the requester’s checkbox to approve or reject.
- After entering your comment, click the Approve or Reject button.
Manage Project Group Creation Requests
To manage project group creation requests, follow these steps.
- Main page, click the Admin icon at the top right. You will be taken to the Tenant Dashboard page.
- Click the Tenant > Tenant Management menu in the left menu. You will be taken to the Tenant Management page.
- On the Tenant Management page, click the Project Group Creation Request link for the tenant. The displayed number is the count of project group creation requests.
- Project Group Creation Request A popup window opens.
- Project Group Creation Request In the request list of the popup window, select the requester’s checkbox to approve or reject.
- After entering your comment, click the Approve or Reject button.
2.6.2 - Tenant Dashboard
Users can assess various usage metrics per system (tenant) via the dashboard.
Getting Started with the Tenant Dashboard
To view the tenant dashboard, follow these steps.
- Click the Management icon at the top right of the Main page. You will be taken to the Tenant Dashboard page.
- In the left menu, click the Tenant > Dashboard menu.
Item Explanation tenant Select the tenant to display on the tenant dashboard. Download status data You can download the basic billing data report needed by tenant administrators. Scale and Usage Status You can view the organization size, tool usage status, and the number of builds/deployments under the tenant. Monthly pipeline execution trend Displays the monthly pipeline execution count, average execution interval, and execution time for the tenant. Inactive pipeline Shows a list of pipelines that have not been run and have no successful history, according to the reference date. Release execution trend You can view the execution trend of releases under a tenant. Tool usage status You can view the usage status of each tool located under the tenant.
Usage status refers to the number of projects, repositories, pipelines, etc., for each tool.App. Template usage status App that exists under a tenant. You can view usage per template.
Usage status refers to the number of templates used when creating a project.Helm Chart Usage Status You can view the usage status of each Helm chart under the tenant.
The usage status indicates the number of Helm charts used during chart installation.Recent event history You can view the recent event history that occurred in the tenant. Table. Tenant Dashboard Display Items
2.6.3 - Tenant Notice
Note
The tenant administrator can add, edit, and delete notices displayed to users belonging to the tenant.
Editing and deletion are allowed only for registered users.
Getting Started with Tenant Announcements
To start tenant announcements, follow these steps.
- Click the Admin icon at the top right of the Main page. You will be taken to the Tenant Dashboard page.
- From the left menu, click the Tenant > Tenant Announcements menu. You will be taken to the Tenant Announcements page.
Add tenant announcement
To add a tenant announcement, follow these steps.
- On the Tenant Notices page, click the Add button. The Add Notice popup opens.
- Add Notice In the popup window, specify the notice title, notice content, and target tenant, then click the Save button.
Item Explanation Notice Title Please enter the notice title. Notice Enter the notice body.
You can specify tables, lists, fonts, etc.Popup width/height Enter the width and height of the popup to be displayed on the screen. target tenant Select the tenant(s) to which the notice will be displayed. You can specify one or more tenants.
Only tenants where you are registered with administrator privileges will be shown.Notice period Depending on the nature of the notice, the following options are available. - Always notice
- Notice for a specific period only
- No notice
Email sending time Select immediate email sending, scheduled sending, or no sending according to the purpose of the notice.
It will not be displayed if mail is not used in the system.Table. Additional Input Items for Tenant Announcements
Manage Tenant Announcements
Edit tenant announcement
To edit the tenant announcement, follow these steps.
- Tenant Notices page, click the notice. Notice Details popup window opens.
- Click the Edit button in the Notice Details popup window. The Notice Edit popup window opens.
- Edit Notice After modifying the information in the popup window, click the Save button.
- In the confirmation popup, click the Confirm button to complete the edit.
Delete tenant announcement
To delete a tenant announcement, follow these steps.
- On the Tenant Notices page, click the notice. The Notice Details popup window opens.
- In the Notice Details popup, click the Delete button.
- In the confirmation popup, click the Confirm button to complete the deletion.
Tenant notice preview
To preview tenant announcements, follow these steps.
- On the Tenant Announcements page, click the Preview button for the announcement.
- The notice popup window opens at its actual display size.
- When the check is complete, click the Confirm button.
2.7 - Repository
2.7.1 - Code Repository
Users can view the list of code repositories, such as GitHub and GitLab, used in the project and add repositories from the project’s code repository menu.
Getting Started with Code Repository
To start a code repository, follow these steps.
- On the Main page, click the Project card. You will be taken to the Project Dashboard page.
- In the left menu, click the Repository > Code Repository menu. You will be taken to the Code Repository page.
Add code repository
To add a code repository, follow these steps.
- On the Code Repository page, click the Add Code Repository button in the upper right. You will be taken to the Add Code Repository page.
- On the Add Code Repository page, enter and configure each item.
- Connection Test Click the button.
- Click the Save button.
Item Explanation Repository type Select the repository to use - Registered tools: Users can select and use the types of SCM Repository tools (
Github,Gitlab, etc.) that are available. - Unregistered tools: You can enter the domain of a tool that is not registered. The unregistered tool entry appears only for App templates that do not include source code (
Environment Only).
New/Existing usage Select Create new repository or Use existing repository - The activation status varies depending on specific conditions. For details, see Table. Conditions for activating new repository creation and existing repository usage.
Repository information Enter repository information - When creating a new repository, the URL is formed from the project group name/project name.
Authentication information Enter authentication credentials. Repository information Enter repository information - You can use a code repository that is not registered as a tool in DevOps Console.
- You must also go through the URL check process.
Table. Code Repository Add Input Items - Registered tools: Users can select and use the types of SCM Repository tools (
Managing code repositories
Code repository list
| Item | Explanation |
|---|---|
| User permission settings | User Permission Settings The popup window opens. |
| Webhook configuration | Webhook Settings The popup window opens. |
| Edit icon | The code repository’s Edit Authentication Information popup window opens. |
| Delete | Delete the code repository. When deleting, you can choose whether to also delete the code repository in SCM. |
Table. Code Repository List Screen Items
Add account to code repository
To add an account to the code repository, follow these steps.
- On the Code Repository page, click the User Permission Settings icon for the repository you want to configure. The User Permission Settings popup window will open.
- User Permission Settings In the popup window, enter the credentials of the account you want to add, then click the Save button to complete adding the account.
Setting up a webhook in the code repository
You can configure a webhook to trigger the pipeline when changes such as commit or push occur on a code repository branch.
To set up a webhook, follow these steps.
- Click the Webhook Settings icon for the code repository you want to configure on the Code Repository page. The Webhook Settings popup opens.
- In the Webhook Settings popup, click the Add button.
- Webhook Settings In the popup window, select the pipeline you want to run, enter the branch name, and click the Save button to complete the webhook configuration.
Change account in code repository
To change the account in the code repository, follow the steps below.
- On the Code Repository page, click the Edit icon of the code repository you want to change. The Edit Authentication Information popup will open.
- Edit authentication information after entering the authentication information in the popup window, click the Save button to complete the account change.
Delete code repository
To delete the code repository, follow these steps.
- Code Repository page, click the X icon of the code repository you want to delete. Delete Code Repository popup opens.
- In the Delete code repository popup, select also delete the repository in SCM and click the Confirm button to complete the code repository deletion.
Reference
Also delete the repository in SCM.
- Selection: Both the code repository list and the actual code repository in SCM will be deleted.
- Unselected: It is deleted only from the code repository list, while the code repository in SCM remains.
2.7.2 - Artifact Repository
Users can integrate with Nexus to create projects in Nexus and retrieve and utilize the created projects.
Getting Started with Artifact Repository
To start managing the artifact repository, follow these steps.
- On the Main page, click the Project card. You will be taken to the Project Dashboard page.
- Click the Repository > Artifact Repository menu in the left navigation. You will be taken to the Artifact Repository page.
Add artifact repository
To add an artifact repository, follow these steps.
- Click the Add Artifact Repository button at the top right of the Artifact Repository page. You will be taken to the Add Artifact Repository page.
- On the Add Artifact Repository page, enter and configure each item.
- Connection Test Click the button.
- Click the Save button.
Item Explanation Select whether to create a repository Choose whether to create a new repository or use an existing one. Enter basic information Base URL, select repository type and enter repository/authentication information. Table. Input fields for adding an artifact repository
Managing the artifact repository
Artifact storage list
| Item | Explanation |
|---|---|
| Account Change | Modify the artifact repository credentials. |
| Delete | Delete the artifact repository. |
Table. Artifact Repository List Screen Items
Changing the artifact repository account
To change the account in the artifact repository, follow the steps below.
- On the Artifact Repository page, click the Edit icon of the artifact repository you want to modify. The Edit Authentication Information popup will open.
- Edit authentication information after entering authentication information in the popup window, click the Save button to complete the account change.
Delete Artifact Repository
To delete the artifact repository, follow the steps below.
- On the Artifact Repository page, click the X icon of the repository you want to delete. Artifact Repository Deletion popup opens.
- In the Delete Artifact Repository popup, select also delete the repository in Nexus and click the Confirm button to complete the artifact repository deletion.
Note
Delete the repository in Nexus as well.
- Selection: Both the artifact repository list and the Nexus repository will be deleted.
- Unselected: It is only removed from the artifact repository list, and the repository in Nexus remains.
2.7.3 - Image Repository
Users can manage the image repositories used in a project from the project’s image repository menu.
Getting Started with Image Repository
To start managing the image repository, follow these steps.
- Click the Project card on the Main page. You will be taken to the Project Dashboard page.
- Click the Repository > Image Repository menu in the left menu. You will be taken to the Image Repository page.
Add Image Repository
To add an image repository, follow these steps.
App. Add image repository
- On the Image Repository page, click the App. Add Image Repository button in the upper right. You will be taken to the App. Add Image Repository page.
- App. Add Image Repository page, enter and configure each item.
- Connection Test Click the button.
- Click the Save button.
Item Explanation Select repository type Select the image repository type.
To use an image repository not registered in the Devops Console, select the Image Registry type.Choose whether to create a repository Choose whether to create a new repository or use an existing one. - If you selected the
Docker huborImage Registrytype earlier, you can only select Use existing repository.
Registered tool Enter repository information. Unregistered tool Enter repository information - You can register an image repository that is not registered with the DevOps Console tool.
- Click the URL Check button to proceed with the verification process.
- Only Use existing repository can be selected.
Table. App. Add Image Repository Input Fields - If you selected the
Add pull-only image repository
- On the Image Repository page, click the Add Pull-Only Image Repository button in the upper right. You will be taken to the Add Pull-Only Image Repository page.
- Add Pull‑only Image Repository On the page, enter and configure each field.
- Connection Test Click the button.
- Click the Save button.
Manage Image Repository
Image repository list
| Item | Explanation |
|---|---|
| Account Change | The Edit Authentication Information popup window of the image repository opens. |
| Delete | Image Repository Deletion a popup window opens |
Table. Image Repository List Screen Items
Change Image Repository Account
To change the account in the image repository, follow these steps.
- On the Image Repository page, click the Edit icon of the image repository you want to change. The Edit Authentication Information popup window will open.
- Edit authentication information after entering authentication information in the popup window, click the Save button to complete the account change.
Delete Image Repository
To delete the image repository, follow these steps.
- On the Image Repository page, click the X icon of the image repository you want to delete. The Delete Image Repository popup window opens.
- Delete Image Repository in the popup window, select also delete the Repository in IR, then click the Confirm button to complete the image repository deletion.
Reference
Delete the Repository in IR as well
- Selection: The image repository list and the actual image repository’s repository will both be deleted.
- Unselected: It is deleted only from the image repository list, while the actual repository in the image registry remains.
2.7.4 - Chart Repository
Users can upload and delete Helm-created charts to the chart repository.
Charts uploaded to the chart repository are used in Add Helm Chart and are utilized during helm install or when creating a project.
Getting Started with Chart Repository
To begin managing the chart repository, follow these steps.
- Click the Admin icon at the top right of the Main page. You will be taken to the Tenant Dashboard page.
- From the left menu, click the Tools & Templates > Chart Repository menu. The Chart Repository screen appears.
Getting Started with Project Chart Repository
Note
You can upload, edit, or delete charts that are usable only within the project in the chart repository.
- Click the Project card on the Main page. You will be taken to the Project Dashboard page.
- In the left menu, click the Repository > Chart Repository menu. You will be taken to the Chart Repository page.
Upload Chart
Reference
For detailed information about
Chart.yaml, refer to the Helm official page.Registration information is automatically generated based on the name and version of the uploaded chart’s Chart.yaml file.
To upload a chart to the chart repository, follow these steps.
- Click the Admin icon at the top right of the Main page. Navigate to the Tenant Dashboard page.
- From the left menu, click the Tools & Templates > Chart Repository menu. The Chart Repository screen appears.
- On the Chart Repository page, click the Upload button. The Chart File Upload popup window opens.
- Chart File Upload In the popup window, after entering the content, click the Upload button.
Item Explanation Chart type Please select a chart type. Tenant / Project Group Select the tenant/project group where the chart will be used. Chart file Click the Browse button to upload the chart file. - Only
.tgzfiles generated with thehelm packagecommand can be uploaded.
Table. Chart Upload Input Items - Only
Delete chart
To delete the chart, follow these steps.
- Click the Admin icon at the top right of the Main page. You will be taken to the Tenant Dashboard page.
- From the left menu, click the Tools & Templates > Chart Repository menu. The Chart Repository screen appears.
- Select the checkbox of the item you want to delete from the Chart Repository list and click the Delete button.
- Click the Confirm button in the confirmation popup.
Caution
The chart cannot be deleted when it is registered in the Helm chart. Please first remove the information from the Helm chart menu.
Delete only a specific version of a chart
To delete only a specific version from the chart, follow these steps.
- Click the Admin icon at the top right of the Main page. You will be taken to the Tenant Dashboard page.
- From the left menu, click the Tools & Templates > Chart Repository menu. The Chart Repository screen appears.
- Chart Repository Click the item you want to delete from the list. You will be taken to the Chart Version List page.
- On the Chart version list page, select the checkbox for the items you want to delete and click the Delete button.
- Click the Confirm button in the confirmation popup.
2.7.5 - Helm Chart
Helm chart is a feature that registers charts stored in the chart repository so they can be used in the DevOps Console.
Helm charts can be used through Helm install. Additionally, you can integrate them with the App template via Add supported Helm chart.
Getting Started with Helm Chart
To start managing Helm charts, follow these steps.
- Main page, click the Admin icon at the top right. Admin page opens.
- In the left menu, click the Tools & Templates > Helm Chart menu.
Getting Started with Project Helm Chart
Note
You can register, modify, or delete Helm charts that are usable only within the project.
- On the Main page, click the Project card. You will be taken to the Project Dashboard page.
- Click the Repository > Helm Chart menu in the left sidebar. You will be taken to the Helm Chart page.
Add Helm chart
Users can add their own Helm charts.
Before registering a Helm chart, the user must first upload the chart to be used via Upload Chart.
To add a Helm chart, follow these steps.
- Click the Admin icon at the top right of the Main page. The Admin page opens.
- From the left menu, click the Tools & Templates > Helm Chart menu. The Helm Chart page opens.
- Select the Helm chart type from the menu. The Add Helm chart button appears only if you have registration permission based on the selected information.
- Click the Add Helm Chart button. You will be taken to the Helm Chart Registration page.
- Enter Helm chart basic information and click the Start button.
Item Explanation Helm chart type Select the type of Helm chart to add. Tenant/Project Group Select the tenant/project group to add the Helm chart - When selecting a tenant, you can use the registered chart only in projects of the selected tenant.
- When selecting a project group, you can use the registered chart only in projects of the selected project group.
Allow new installation Select whether to allow a new installation via Helm install. Table. Helm Chart Basic Information Settings - After selecting Helm chart repository and Helm chart, click the Validation Check button.
- After entering the remaining information, click the Next button.
repository ItemExplanation ChartMuseumHelm chart repository Select the chart repository as ChartMuseum.Select chart Select the chart you want to register as a Helm chart among the charts registered via 차트 업로드하기. Harbor OCI Helm chart repository Select the chart repository as Harbor OCI.Authentication information Enter the chart repository credentials and click the Connection Test button. Chart selection Select a Helm chart that can be queried with the entered credentials and click the Validation Check button. OCI Helm chart repository Select the chart repository as OCI.Authentication information Enter the chart repository credentials and click the Connection Test button. Chart input Enter the Helm chart that can be queried using the authentication information entered in Authentication Information, and click the Validation Check button.
(ex. oci://chart.url/repo/chartname:version)common icon Select an icon to represent the Helm chart. CI/CD information Select whether to support CI/CD functionality - Indicates whether it is linked with the App template.
- The chart’s Values.yaml file must contain the keys image.repository, image.tag, and imagePullSecrest[0].name.
- Support CI/CDWhen selected, a CI/CD information step is added.
Chart image Select whether to register an image - The chart’s Values.yaml file must contain the key imagePullSecrets[0].name.
- No image If selected, the image secret information step will be omitted.
Table. Chart Repository Configuration Items - After selecting the image repository and entering the authentication information, click the Connection Test button.
- After entering the remaining information, click the Next button.
Item Explanation Image repository information Select an image repository and enter the authentication information. - The image repository requires administrator privileges.
- Grant read access to the image repository for users who want to perform a Helm install using a Helm chart.
- Assign permissions to the image repository using the entered authentication information.
Add used images Add the image path of the selected image repository. - Select an image from the list: choose Organization, Repository, and Tag to add.
- User input: directly enter the image’s docker repository and docker tag to add.
- Multiple entries are allowed.
Use the registrant’s authentication credentials This is an option that can be selected when the image repository chosen in the image registry is a tool that cannot grant permissions (e.g., SCR). - If not checked, when the Helm chart user performs an installation, the Pull permission for the image used by the Helm chart user is added. If the tool cannot grant permissions, no permission granting is performed.
- If not checked, when the Helm chart user performs an installation, the Helm chart registrant’s credentials are used instead of the Helm chart user’s permissions.
- Since the registrant’s credentials may be exposed to the Helm chart user, it should be used only when necessary.
- If the image repository provides only image Pull, it must be selected to avoid issues during use. You must enter an image repository that will be used exclusively for Pull. (When checked, Pull and Push cannot be performed simultaneously on a single image repository.)
- The registrant’s credentials are used in Project > Image Repository > Pull-only images and the Helm release’s ImagePull Secret. These credentials cannot be changed by Helm chart users, and if the registrant’s credentials are changed in the Helm chart, they are updated globally.
Select Docker base image Select the image to be used as the Docker base image - Only select this if you chose Support CI/CD in the previous step, and it will be used as the base image for Docker build.
Table. Image secret information configuration items - App to support. After selecting a template, click the Done button.
Reference
App marked as
Environment Only. The template provides only the build/deployment environment without project sample source code.Modify Helm chart
To modify the Helm chart, follow these steps.
- Main page, click the Admin icon at the top right. Admin page opens.
- Click the Tools & Templates > Helm Chart menu in the left menu.
- Click the Helm chart card you want to edit from the Helm chart list. The Helm chart details page opens.
- Click the Edit button at the bottom right.
- After editing the information, click the Save button to complete the edit.
Add Helm chart version
To add a Helm chart version, the same chart with only a different version must already be registered via Upload Chart.
To add a version to the Helm chart, follow these steps.
- Main page, click the Admin icon at the top right. The Admin page opens.
- In the left menu, click the Tools & Templates > Helm Chart menu.
- Click the Helm chart card you want to edit from the Helm chart list. The Helm chart details page opens.
- Click the Add Version button at the bottom right. The Add Helm Chart Version popup window opens.
- After entering the information, click the Save button to complete adding the version.
Item Explanation Chart version Select the chart version to add - Shows the versions of charts in the chart repository that are not registered as Helm charts.
Table. Additional Helm Chart Version Settings
Delete Helm chart
To delete a Helm chart, follow these steps.
- Main page, click the Admin icon at the top right. The Admin page opens.
- From the left menu, click the Tools & Templates > Helm Chart menu. The Helm Chart page opens.
- Click the Helm chart card you want to delete from the Helm chart list. The Helm chart details page opens.
- Click the Delete button at the bottom right.
- In the confirmation popup, click the Confirm button to complete the deletion.
2.7.5.1 - Creating Helm Charts with Form Input Support
Users can create a Helm chart that supports Form input.
Reference
Only available in versions
Helm 3 or higher.Helm chart that supports Form input
When you use a Helm chart that supports Form input and run helm install, a user UI is provided that allows you to enter each field.
Helm chart file structure and values.schema.json file
Helm chart file structure
To support Form input, an additional values.schema.json file is required in the basic Helm chart file structure.

The relationship between values.schema.json and values.yaml files
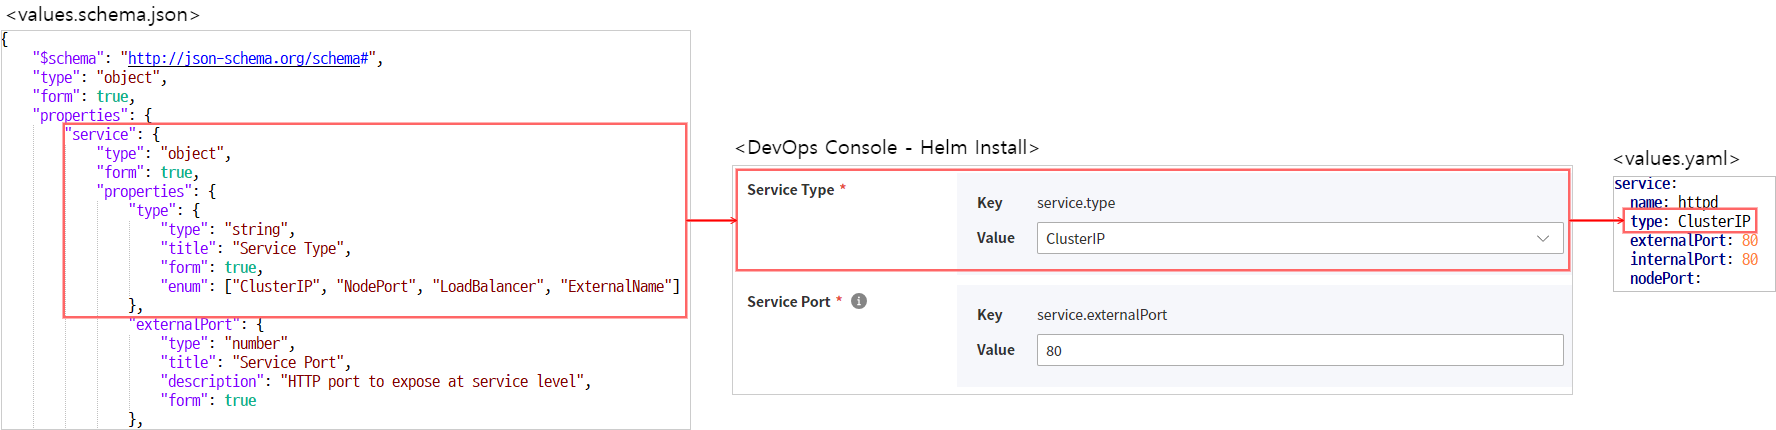
values.schema.json
- This file defines a JSON Schema to validate the values entered in the
values.yamlfile. - In the DevOps Console, in addition to the JSON Schema functionality, we added a feature that displays a form on the screen so that users can easily input data.
JSON Schema Basics
The values.schema.json file used in DevOps Console supports the standard format defined by JSON Schema.
Reference
For detailed guidance on the standard format, refer to the site below.
The description of the basic attributes is as follows.
| attribute | Description | Data type | Allowed value |
|---|---|---|---|
| $schema |
| string | http://json-schema.org/schema# |
| type | Data type
| string |
|
| |||
| |||
| |||
| |||
| |||
| |||
| title | Label | string | Item label definition |
| description | description | string | Displayed as a tooltip |
| readOnly | read-only status | boolean |
|
| required | List of required input items | array | e.g, "required": ["username", "password"] |
Table. JSON Schema property items
Items defined in the DevOps Console
The following items are defined in the DevOps Console and operate only within the DevOps Console.
| attribute | Description | Data type | Allowed value |
|---|---|---|---|
| form | DevOps Console screen display option
| boolean | default: false |
| render | Change renderer | string |
|
| format | string format reference reference | string |
|
| form_locale | Define for internationalization processing
| object |
|
|
Table. Items defined in DevOps Console
hierarchical processing
To handle hierarchical structures, JSON Schema can define a "type": "object" property value and a properties attribute.
For child properties, define them under the properties item.
Below is an example that defines the service.internalPort property.
Color mode
"service": {
    "type": "object",
    "form": true,
    "properties": {
        "internalPort": {
            "type": "number",
            "title": "Container Port",
            "description": "HTTP port to expose at container level",
            "form": true
        }
<중략>
"service": {
"type": "object",
"form": true,
"properties": {
"internalPort": {
"type": "number",
"title": "Container Port",
"description": "HTTP port to expose at container level",
"form": true
}
<중략>Internationalization handling
For internationalization processing, use the form_locale attribute and define it as follows.
Korean and English are supported.
Color mode
"db": {
  "type": "string",
  "title": "DB",
  "description": "choose db type",
  "oneOf": [
    {
      "const": "in",
      "title": "internal"
    },
    {
      "const": "ex",
      "title": "external"
    }
  ],
  "form": true,
  "form_locale": {
    "ko": {
      "label": "Database",
      "description": "Select the database type"
      "internal": "internal"
      "external": "external"
    },
    "en": {
      "label": "Database"
    }
  }
}
"db": {
"type": "string",
"title": "DB",
"description": "choose db type",
"oneOf": [
{
"const": "in",
"title": "internal"
},
{
"const": "ex",
"title": "external"
}
],
"form": true,
"form_locale": {
"ko": {
"label": "Database",
"description": "Select the database type"
"internal": "internal"
"external": "external"
},
"en": {
"label": "Database"
}
}
}values.schema.json example
Examples by Form Type
Input
To display the fields defined in the values.schema.json file as a form on the screen, you must set the form field’s value to true.
Color mode
{
  "$schema": "http://json-schema.org/schema#",
  "type": "object",
  "properties": {
    "form_field": {
      "type": "string", <--- create an input field that receives a string
      "form": true <----- displayed on screen when true
    },
    "hide_field": {  <-- not displayed
      "type": "string"
    }
  }
}
{
"$schema": "http://json-schema.org/schema#",
"type": "object",
"properties": {
"form_field": {
"type": "string", <--- create an input field that receives a string
"form": true <----- displayed on screen when true
},
"hide_field": { <-- not displayed
"type": "string"
}
}
}Password
Color mode
{
  "$schema": "http://json-schema.org/schema#",
  "type": "object",
  "properties": {
    "password_field": {
      "type": "string",
      "form": true,
      "render": "password", <---- displayed as password
      "format": "password_confirm" <--- when adding a password confirmation input field
    }
  }
}
{
"$schema": "http://json-schema.org/schema#",
"type": "object",
"properties": {
"password_field": {
"type": "string",
"form": true,
"render": "password", <---- displayed as password
"format": "password_confirm" <--- when adding a password confirmation input field
}
}
}Checkbox
Color mode
"enabled": {
  "title": "enable persistence",
  "type": "boolean",
  "form": true
}
"enabled": {
"title": "enable persistence",
"type": "boolean",
"form": true
}Dropdown
To display a dropdown field on the screen and specify allowed values, you can use the enum and oneOf properties.
enum
Use when the text displayed on the screen matches the stored value.
Color mode
"postgres": {
  "type": "string",
  "title": "Postgres",
  "description": "choose PostgreSQL type.",
  "enum": [
    "internal",
    "external",
    "both"
  ],
  "form": true
}
"postgres": {
"type": "string",
"title": "Postgres",
"description": "choose PostgreSQL type.",
"enum": [
"internal",
"external",
"both"
],
"form": true
}oneOf
Use this when the displayed text on the screen and the stored value need to be different.
Color mode
"Oneof": {
  "type": "string",
  "title": "DB",
  "description": "choose db type",
  "oneOf": [
    {
      "const": "in",  <-- value saved to the yaml file when selected
      "title": "internal" <-- value displayed in the dropdown form
    },
    {
      "const": "ex",
      "title": "external"
    }
  ],
  "form": true
}
"Oneof": {
"type": "string",
"title": "DB",
"description": "choose db type",
"oneOf": [
{
"const": "in", <-- value saved to the yaml file when selected
"title": "internal" <-- value displayed in the dropdown form
},
{
"const": "ex",
"title": "external"
}
],
"form": true
}Array
Color mode
"Array": {
  "type": "array",
  "items": {
    "type": "string",
    "form": true
  },
  "form": true
}
"Array": {
"type": "array",
"items": {
"type": "string",
"form": true
},
"form": true
}Object Array
Color mode
"objectArray": {
  "type": "array",
  "title": "Object Array",
  "form": true,
  "items": {
    "type": "object",
    "form": true,
    "properties": {
      "host": {
        "type": "string",
        "form": true
      },
      "path": {
        "type": "string",
        "form": true
      }
    }
  }
}
"objectArray": {
"type": "array",
"title": "Object Array",
"form": true,
"items": {
"type": "object",
"form": true,
"properties": {
"host": {
"type": "string",
"form": true
},
"path": {
"type": "string",
"form": true
}
}
}
}values.schema.json full file creation example
system-nginx
Color mode
{
    "$schema": "http://json-schema.org/schema#",
    "type": "object",
    "form": true,
    "properties": {
        "service": {
            "type": "object",
            "form": true,
            "properties": {
                "type": {
                    "type": "string",
                    "title": "Service Type",
                    "form": true,
                    "enum": ["ClusterIP", "NodePort", "LoadBalancer", "ExternalName"]
                },
                "externalPort": {
                    "type": "number",
                    "title": "Service Port",
                    "description": "HTTP port to expose at service level",
                    "form": true
                },
                "internalPort": {
                    "type": "number",
                    "title": "Container Port",
                    "description": "HTTP port to expose at container level",
                    "form": true
                }
            },
            "required": ["type", "externalPort", "internalPort"]
        },
        "ingress": {
            "type": "object",
            "form": true,
            "properties": {
                "enabled": {
                    "type": "boolean",
                    "title": "Use Ingress",
                    "form": true
                },
                "domain": {
                    "type": ["string", "null"],
                    "format": "hostname",
                    "title": "Ingress Domain",
                    "description": "Default host for the ingress resource (required when `ingress.enabled=true`)",
                    "form": true
                }
            }
        },
        "networkPolicy": {
            "type": "object",
            "form": true,
            "properties": {
                "enabled": {
                    "type": "boolean",
                    "title": "Use NetworkPolicy",
                    "form": true
                }
            }
        }
    }
}
{
"$schema": "http://json-schema.org/schema#",
"type": "object",
"form": true,
"properties": {
"service": {
"type": "object",
"form": true,
"properties": {
"type": {
"type": "string",
"title": "Service Type",
"form": true,
"enum": ["ClusterIP", "NodePort", "LoadBalancer", "ExternalName"]
},
"externalPort": {
"type": "number",
"title": "Service Port",
"description": "HTTP port to expose at service level",
"form": true
},
"internalPort": {
"type": "number",
"title": "Container Port",
"description": "HTTP port to expose at container level",
"form": true
}
},
"required": ["type", "externalPort", "internalPort"]
},
"ingress": {
"type": "object",
"form": true,
"properties": {
"enabled": {
"type": "boolean",
"title": "Use Ingress",
"form": true
},
"domain": {
"type": ["string", "null"],
"format": "hostname",
"title": "Ingress Domain",
"description": "Default host for the ingress resource (required when `ingress.enabled=true`)",
"form": true
}
}
},
"networkPolicy": {
"type": "object",
"form": true,
"properties": {
"enabled": {
"type": "boolean",
"title": "Use NetworkPolicy",
"form": true
}
}
}
}
}2.8 - Quality
2.8.1 - Code Quality
Users can create a project in SonarQube by integrating with SonarQube, and utilize the created project in the DevOps Console.
Getting Started with Code Quality
To start code quality management, follow these steps.
- Main page, click the Project card. You will be taken to the Project Dashboard page.
- From the left menu, click the Quality > Code Quality menu. You will be taken to the Code Quality page.
Add Code Quality Project
To add a code quality project, follow these steps.
- On the Code Quality page, click the Add Code Quality Project button. You will be taken to the Add Project page.
- Add Code Quality Project On the page, enter and configure each item.
- After clicking the Connection Test button, click the Save button.
- Click the Confirm button in the confirmation popup to complete adding the code quality project.
Item Explanation Select repository creation option Choose whether to create a new repository or use an existing one - 툴 추가하기 If you select new creation allowed as No in [툴 추가하기], you cannot create a repository.
Base URL Select the code quality server to use. Project name Please enter the project name to use. project key Enter the project key to use. Authentication information Choose whether to create a new user profile or use an existing one, then enter the username and password. Table. Add code quality project
Managing code quality projects
Code Quality Project List
Users can change or delete accounts in the Code Quality project.
| Item | Explanation |
|---|---|
| Account change | Edit Code Quality Certification Information The popup window opens. |
| Delete | Code Quality Project Deletion the popup window opens. |
Table. Code Quality Project List Items
Change account in the code quality project
To change the account in the Code Quality project, follow these steps.
- On the Code Quality page, click the Edit icon. The Edit Authentication Information popup opens.
- In the Edit Authentication Information popup, after entering the authentication information, click the Save button to complete the account change.
Delete Code Quality Project
To delete the code quality project, follow these steps.
- Code Quality page, click the X icon on the Code Quality Project card you want to delete. The Delete Code Quality Project popup will open.
- Delete Code Quality Project popup, select also delete the project in SonarQube and click the Confirm button.
Reference
Also delete the project in SonarQube
- Selection: The project is actually deleted in SonarQube.
- Unselected: Code Quality is removed only from the list and remains in SonarQube.
2.9 - Tools & Templates
2.9.1 - Tool Management
Tools refer to applications that interact with the DevOps Console to support CI/CD functionality.
Please refer to Tool Classification for the list of tools supported by DevOps Console.
Getting Started with Tool Management
To begin tool management, follow the steps below.
- Click the Management icon at the top right of the Main page. You will be taken to the Tenant Dashboard page.
- From the left menu, click the Tools & Templates > Tools menu. You will be taken to the Tools page.
Tool type
Each tool’s applicable domain varies according to its type.
| Tool type | description |
|---|---|
| System Tool |
|
| Tenant Tool |
|
| ProjectGroup Tool |
|
Table. Tool Type
Tool classification
The list of tools currently supported by the DevOps Console is as follows.
| Tool classification | tool |
|---|---|
| CICD Pipeline | Jenkins |
| SCM Repository | GitLab, GitHub, Git-based SCM |
| Image Registry | Harbor, Docker Hub, SCP Container Registry, Docker Image Registry |
| Code Quality | SonarQube |
| Artifact Repository | Nexus, Object Storage (S3 compatible) |
| Helm Chart Repository | Harbor |
| Project Management Software | JIRA |
Table. Tool Classification
Note
- Supported tools may change (be added or removed) according to the release schedule.
- You can receive technical support for installing CI/CD tools through the Marketplace service of Samsung Cloud Platform. (Provided by eScore, and the supported tools can be checked in the Marketplace service)
Admin
Indicates the selected tenant or project group when adding a tool with the tenant/project group type.
Distinguish the types of management affiliation using the following icons.
- The management belongs to the tenant.
- The management affiliation is the project group.
Add tool
To add a tool, follow these steps.
- On the Tool page, click the Add button. The Add Tool popup appears.
Select tool support type
- Add Tool Select the tool’s supported type in the popup window.
- Complete the selection and click the Next button. The Basic Information input screen appears.
Item Explanation type Select the tool’s supported type - Refer to Tool Type for descriptions by type.
Tenant/Project Group Select which tenant/project group to map to. Table. Supported type selection items when adding a tool
Enter basic information
- Add Tool In the Basic Information input screen of the popup, select the tool category and the tool. The input screen changes based on the selected tool.
- Refer to Tool Classification for explanations by tool category.
- After entering the required information, click the Connection Test button.
- Click the Next button.
SCM Repository
| Item | description |
|---|---|
| Tool name | Enter the tool name for user identification. |
| Tool classification | Please select a tool category. |
| tool | Please select a tool. |
| URL | Enter the URL address to access the tool
|
| URL for API | Github.com Please enter the API path. |
| Whether Org creation is possible | Choose whether to enable the creation of a new Github Organization in this tenant/project group. |
| Whether new creation is possible | Select whether to allow creating new repositories in this tenant/project group. |
| IDP usage | Select whether to use IDP. |
| User account authentication type | Select the authentication type for the tool user. |
| Administrator account authentication type | Select the authentication type for the tool administrator. |
| Administrator ID | Please enter the tool administrator’s ID. |
| Administrator password / token | Enter the tool administrator’s password or token. |
Table. SCM Repository Input Items
CICD Pipeline
| Item | Explanation |
|---|---|
| Tool name | Enter the tool name for user identification. |
| Tool classification | Please select a tool category. |
| tool | Please select a tool. |
| URL | Enter the URL address to access the tool
|
| Mail Service | Choose whether to use the email sending feature. |
| Category | Select whether to use this tool for development or operation. |
| IP | Enter IP list
|
| IP range | Enter IP range
|
| IDP usage | Select whether to use IDP. |
| IDP type | When using IDP, select the IDP type (CMP IDP, other IDP). |
| User account authentication type | Select the authentication type for the tool user. |
| Administrator account authentication type | Select the authentication type for the tool administrator. |
| Admin ID | Please enter the tool administrator’s ID. |
| Administrator password / token | Enter the tool administrator’s password or token. |
Table. CICD Pipeline input items
Warning
If the Number of executors field of the Built-In Node in Jenkins system settings is set to 1 or higher, a security issue may arise, so the tool cannot be added.
- In the Jenkins management menu, the Number of executors field of the Built-In Node must be set to 0.
- Note Jenkins officially recommends avoiding running builds on the Controller Node.
Image Registry
| Item | description |
|---|---|
| Tool name | Enter the tool name for user identification. |
| Tool classification | Please select a tool category. |
| tool | Please select a tool. |
| Whether new creation is possible | Select whether to allow creating new repositories in this tenant/project group. |
| URL | Enter the URL address to access the tool
|
| URL for API | Enter the Docker Hub API path. |
| Image repository URL | Enter the URL for using Docker Registry. |
| Use private SSL certificate | Select whether to use a private SSL. |
| Include system common image | Select whether to include the system-wide image. |
| IDP usage | Select whether to use IDP. |
| User account authentication type | Select the authentication type for the tool user. |
| Administrator account authentication type | Select the authentication type for the tool administrator. |
| Administrator ID | Enter the tool administrator’s ID. |
| Administrator password / token | Enter the tool administrator’s password or token. |
Table. Image Registry Input Items
Code Quality
| Item | Explanation |
|---|---|
| Tool name | Enter the tool name for user identification. |
| Tool classification | Please select a tool category. |
| tool | Please select a tool. |
| Whether new creation is possible | Select whether to enable creation of new SonarQube projects in this tenant/project group. |
| URL | Enter the URL address to access the tool
|
| Tool version | Enter the version of SonarQube. |
| IDP usage | Select whether to use IDP. |
| User account authentication type | Select the authentication type for the tool user. |
| Administrator account authentication type | Select the authentication type for the tool administrator. |
| Administrator ID | Enter the tool administrator’s ID. |
| Administrator password / token | Enter the tool administrator’s password or token. |
Table. Code Quality Input Items
Artifact Repository
| Item | Explanation |
|---|---|
| Tool name | Enter the tool name for user identification. |
| Tool classification | Please select a tool category. |
| tool | Please select a tool. |
| Whether new creation is possible | Select whether to enable creation of a new Nexus repository in this tenant/project group. |
| URL | Enter the URL address to access the tool
|
| IDP usage | Select whether to use IDP. |
| User account authentication type | Select the authentication type for the tool user. |
| Administrator account authentication type | Select the authentication type for the tool administrator. |
| Administrator ID | Please enter the tool administrator’s ID. |
| Administrator password / token | Enter the tool administrator’s password or token. |
Table. Artifact Repository Input Items
Helm Chart Repository
| Item | description |
|---|---|
| Tool name | Enter the tool name for user identification. |
| Tool classification | Please select a tool category. |
| tool | Please select a tool. |
| Whether new creation is possible | Select whether to allow creating new repositories in this tenant/project group. |
| URL | Enter the URL address to access the tool
|
| Use private SSL certificate | Select whether to use a private SSL. |
| Helm chart repository URL | Enter the repository URL for the tool
|
| IDP usage | Select whether to use IDP. |
| User account authentication type | Select the authentication type for the tool user. |
| Administrator account authentication type | Select the authentication type for the tool administrator. |
| Administrator ID | Please enter the tool administrator’s ID. |
| Administrator password / token | Enter the tool administrator’s password or token. |
Table. Helm Chart Repository Input Items
Project Management Software
| Item | description |
|---|---|
| Tool name | Enter the tool name for user identification. |
| Tool classification | Please select a tool category. |
| tool | Please select a tool. |
| Whether new creation is possible | Choose whether to allow creation of new JIRA projects in this tenant/project group. |
| URL | Enter the URL address to access the tool
|
| IDP usage | Select whether to use IDP. |
| User account authentication type | Select the authentication type for the tool user. |
| Administrator account authentication type | Select the authentication type for the tool administrator. |
| Administrator ID | Please enter the tool administrator’s ID. |
| Administrator password / token | Enter the tool administrator’s password or token. |
Table. Project Management Software Input Items
Enter additional information
- Tool addition In the popup window’s Basic Information input screen, when you click the Next button, the Additional Information input screen appears.
- Select each item and click the Complete button.
- In the confirmation popup, click the Confirm button to complete adding the tool.
Item description Use status Select whether to use the tool in this tenant/project group. Whether new creation is possible Select whether to allow creating a new repository in the given tenant/project group. - It is displayed only when the tool category is SCM Repository.
Table. Additional Information Input Items
Tool Details
To begin managing the tool’s detailed information, follow these steps.
- On the Tool page, click the tool for which you want to manage detailed information. You will be taken to the Tool Details page.
Manage tool basic information
To check the tool’s basic information, follow these steps.
- On the Tool Details page, click the Basic Information tab.
To modify the tool’s basic information, follow these steps.
- On the Tool Details page, click the Basic Information tab.
- Click the Edit button.
- After editing the required information, click the Save button.
Managing Global Tools
Reference
Only when the tool is
Jenkins, the global tool tab is displayed.Jenkins web interface’s Jenkins Management > Global Tool Configuration menu can be operated from the DevOps Console.
Only one-way registration to Jenkins is supported from the DevOps Console. (In other words, changes made by the user in the DevOps Console will overwrite the information in Jenkins.)
Users can manage the list of tools available in Jenkins, and tools registered in Global Tools are used in Tools when configuring a stage.
To manage the global tool, follow the steps below.
- On the Tool Details page, click the Global Tool tab.
Add global tool
To add a global tool, follow these steps.
- In the Global Tool tab, click the Edit icon of the item you want to add. The Global Tool Management popup opens.
- Essential tool is automatically configured in the DevOps Console.
- essential tool cannot be deleted, and only the home path can be modified.
- Click the Add button. A new row will be added at the bottom of the list.
- Enter the information in the newly added row and click the Save button.
- Click the Confirm button in the confirmation popup to complete.
Item description Tool types The tool type is set automatically. Name Please enter the tool name. Home path Enter the path where the tool is installed. Table. Global Tool Additional Input Items
Modify Global Tool
To modify the global tool, follow these steps.
- Click the Edit icon of the item you want to add in the Global Tool tab. The Global Tool Management popup opens.
- After editing the content, click the Save button.
- In the confirmation popup, click the Confirm button to complete.
Delete Global Tool
To delete the global tool, follow these steps.
- Click the Edit icon of the item you want to add in the Global Tool tab. The Global Tool Management popup window opens.
- After deleting the list, click the Save button.
- In the confirmation popup, click the Confirm button to complete.
Managing agents (kubernetes)
Note
Only when the tool is
Jenkins, the Agent (kubernetes) tab is displayed.Users can manage the agents (slave) used for builds in Jenkins.
Jenkins web screen’s 1) Jenkins Management > System Configuration > Cloud > Pod Templates or 2) Jenkins Management > Node Management > Configure Clouds > Pod Templates menu is a feature that can be operated from the DevOps Console.
DevOps Console only supports one-way registration to Jenkins. (In other words, changes made by the user in DevOps Console will overwrite the information in Jenkins.)
To manage the agent (Kubernetes), follow the steps below.
- On the Tool Details page, click the Agent (Kubernetes) tab.
- Click the information icon in the Pod Template Management list. The Pod Template Usage Guide popup opens.
Adding Container Resource Types
Notice
If the user modifies the container resource type, it affects the Pod Template.
- If you change the container resource type from unused → used, the number of Pod Templates will increase by (container resource type number X Pod Template number).
- If you change the container resource type from used → unused, the expanded Pod Template will shrink back to its original number.
- The agent names, labels, and other attributes of the expanding Pod Templates are automatically generated by combining the Resource Type entry entered by the user when registering the container resource type, to avoid duplication.
To add a container resource type, follow these steps.
- On the Tool Details page, click the Agent (Kubernetes) tab.
- Click the Edit icon of Container Resource Type Management. The Container Resource Type Management popup window opens.
- Click the Add button, enter the content, and then click the Save button.
- In the confirmation popup, click the Confirm button to complete.
Item description Whether to use Set the usage. - To change the usage, there must be no build pipeline configured using the
Jenkinstool.
Resource Type Please enter the resource name. CPU/Memory (Request) When configuring the Kubernetes Pod Agent, enter the requested resource values to be used. CPU/Memory (Limit) Enter the limit values for the resources to be used when configuring the Kubernetes Pod Agent. Table. Container Resource Type Additional Input Items - To change the usage, there must be no build pipeline configured using the
Modify container resource type
To modify the container resource type, follow these steps.
- On the Tool Details page, click the Agent (Kubernetes) tab.
- Click the Edit icon of Container Resource Type Management. The Container Resource Type Management popup opens.
- After editing the content, click the Save button.
- In the confirmation popup, click the Confirm button to complete.
Delete Container Resource Type
To delete a container resource type, follow these steps.
- On the Tool Details page, click the Agent (Kubernetes) tab.
- Click the Edit icon of Container Resource Type Management. The Container Resource Type Management popup opens.
- After deleting the content, click the Save button.
- In the confirmation popup, click the Confirm button to complete.
Add Pod Template
To add a Pod Template, follow these steps.
- On the Tool Details page, click the Agent (Kubernetes) tab.
- Pod Template Management Click the Add button in the list. The Add Agent (Kubernetes) screen appears.
- After entering the content, click the Save button.
- In the confirmation popup, click the Confirm button to complete.
Item description Target Kubernetes Select the target Kubernetes to which the Pod Template will be added - Displays the list of Kubernetes clusters registered in Jenkins.
Agent name Enter the name of the Pod Template. Label Enter the Label value to invoke the agent in the Jenkins Pipeline Script. Inherited Pod Template Select the Pod Template that inherits configuration values (environment variables, Volume…) - Shows the list of Pod Templates registered in the actual Jenkins.
container Enter the name, Docker image, working directory, command, and argument values that map to the Container Template field in Jenkins. - Required container information cannot be deleted, and its name cannot be changed.
Tool path Information that maps to the Tool Locations field in Jenkins, enter the name/home path - Only tools that have been added to the global tool list can be selected.
Support stage Select the supported stage configuration - This information is used for configuring the build pipeline template in the DevOps Console.
- Required stage information cannot be deselected.
Table. Input items for adding a Pod Template
Reference
If the user does not check Docker Build in the Supported Stage item,
- When setting up a project using the App.Template of type Kubernetes or VM(Docker) that requires Docker Build, Jenkins cannot be used.
- When configuring the build pipeline via Add Build Pipeline, you cannot add a Docker Build stage.
Pod Template Details
To view the detailed information of a Pod Template, follow these steps.
- On the Tool Details page, click the Agent (Kubernetes) tab.
- Pod Template Management Click the Details button of the agent you want to view from the list. The Agent (Kubernetes) Details screen appears.
Modify Pod Template
To modify the Pod Template, follow these steps.
- On the Tool Details page, click the Agent (Kubernetes) tab.
- Pod Template Management Click the View Details button of the agent you want to view in the list. The Agent (Kubernetes) Details screen appears.
- Click the Edit button.
- After editing the content, click the Save button.
- In the confirmation popup, click the Confirm button to complete the edit.
Delete Pod Template
To delete a Pod Template, follow these steps.
- On the Tool Details page, click the Agent (Kubernetes) tab.
- Pod Template Management In the list, click the Details button of the agent you want to view. Agent (Kubernetes) Details screen appears.
- Click the Delete button.
- In the confirmation popup, click the Confirm button to complete the deletion.
Managing Agents (VM)
Note
Only when the tool is
Jenkins, the Agent (VM) tab is displayed.You can manage the list of Nodes available for use in Jenkins.
This feature allows you to operate the Jenkins Management > Node Management menu of Jenkins from the DevOps Console.
DevOps Console only supports one-way registration to Jenkins. (In other words, changes made by the user in DevOps Console will overwrite the information in Jenkins.)
To manage the agent (VM), follow the steps below.
- On the Tool Details page, click the Agent (VM) tab.
- Click the Info icon in the Node Management list. The Node Usage Guide popup opens.
Manage Agent Connections
Register the tunneling port that connects the actual Jenkins and the agent (VM). The tunneling port may vary for each Jenkins.
To manage agent connections, follow these steps.
- On the Tool Details page, click the Agent (VM) tab.
- Click the Edit icon of Agent Connection Management. The Agent Connection Management popup window opens.
- After entering the content, click the Save button.
Add Agent (VM)
To add an agent (VM), follow the steps below.
- On the Tool Details page, click the Agent (VM) tab.
- Click the Add button in Agent Connection Management. The Add Agent (VM) screen appears.
- After entering the content, click the Save button.
- In the confirmation popup, click the Confirm button to complete the deletion.
Item description Target OS Enter the VM’s OS information. Agent name Enter the VM name. Remote root directory Enter the directory path. Label Enter the Label value to invoke the agent in the Jenkins Pipeline Script. Tool path Information that maps to the Jenkins Tool Locations field, enter the name/home path - Only tools added to the global tool list can be selected.
Support stage Select the supported stage configuration - This information is used for configuring the build pipeline template in the DevOps Console.
- Required stage information cannot be deselected.
Table. Agent (VM) Add Input Items
Note
If the user does not check Docker Build in the Supported Stage item,
- When configuring a project through the App.Template of type Kubernetes or VM(Docker) that requires Docker Build, the
Jenkinscannot be used. - Through Add Build Pipeline, when configuring the build pipeline, you cannot add a Docker Build stage.
Agent (VM) Details
To view the detailed information of an agent (VM), follow the steps below.
- On the Tool Details page, click the Agent (VM) tab.
- In the Node Management list, click the agent. The Agent (VM) Details screen appears.
- Click the Information icon of Jenkins - Agent Connection Information.
- Agent Connection Guide The popup window opens.
Integrate Agent (VM)
Note
The agent integration requires that
Java be installed on the VM server.To register and use the agent (VM), you must connect to the actual VM server.
To integrate the agent (VM), follow these steps.
- On the Tool Details page, click the Agent (VM) tab.
- From the Node Management list, click the agent you want to integrate. The Agent (VM) Details screen appears.
- Refer to
jnlpUrlandsecret. - Click the Info icon of Jenkins - Agent Connection Information. The Agent Connection Guide popup opens.
- Agent File Download Click the button to download the
agent.jarfile.- There may be issues running depending on the version of
agent.jar. - You can also download it directly from your own
Jenkins. ({JENKINS_URL}/jnlpJars/agent.jar)
- There may be issues running depending on the version of
- Connect to the VM server to be deployed and create a directory.
- Copy the downloaded
agent.jarfile to the generated directory. - Run the following command in the generated directory path.
Color mode
java -jar agent.jar -jnlpUrl {jnlpUrl} -secret {secret}java -jar agent.jar -jnlpUrl {jnlpUrl} -secret {secret}Modify Agent (VM)
To modify the agent (VM), follow the procedure below.
- On the Tool Details page, click the Agent (VM) tab.
- Click the agent you want to edit in the Node Management list. The Agent (VM) Details screen appears.
- Click the Edit button.
- After editing the content, click the Save button.
- In the confirmation popup, click the Confirm button to complete.
Delete Agent (VM)
To delete the agent (VM), follow these steps.
- On the Tool Details page, click the Agent (VM) tab.
- Click the agent you want to delete from the Node Management list. The Agent (VM) Details screen appears.
- Click the Delete button.
- Click the Confirm button in the confirmation popup to complete.
Managing Global Libraries
You can manage the list of libraries available in the build pipeline.
The Jenkins Management → System Settings → Global Pipeline Libraries menu of Jenkins can be managed through the DevOps Console.
The Credential information linked to the library can be viewed in the Jenkins Management > Manage Credentials menu.
DevOps Console only supports one-way registration to Jenkins. (In other words, changes made by the user in DevOps Console will overwrite the information in Jenkins.)
To manage the agent(VM), follow these steps.
- On the Tool Details page, click the Global Library tab.
Add Global Library
Caution
If the required library flag is Y, it cannot be edited or deleted.
To add a global library, follow these steps.
- Tool Details on the page, click the Global Library tab.
- Click the Add button. The Add Global Library screen appears.
- After entering the content, click the Save button.
- In the confirmation popup, click the Confirm button to complete.
Item description Library name Enter the name of the library. type It is fixed to SCM and cannot be changed. Library URL Enter the Git repository URL where the library is located. Default version Enter the branch name or tag of the Git repository that contains the library. ID Enter the ID to pull the library. password Enter the password to pull the library. Table. Global Library Additional Input Items
Global Library Details
To view the detailed information of the global library, follow these steps.
- On the Tool Details page, click the Global Library tab.
- In the Global Library list, click the item you want to view in detail. The Global Library Details screen appears.
Reference
When type is SCM, SCM-related information is displayed.
- Required library status, library name, type, library URL, default version, ID
Modify Global Library
To modify the global library, follow these steps.
- On the Tool Details page, click the Global Library tab.
- From the Global Library list, click the item you want to view in detail. The Global Library Details screen appears.
- Click the Edit button.
- After editing the content, click the Save button.
- Click the Confirm button in the confirmation popup to complete.
Delete Global Library
To delete the global library, follow these steps.
- Tool Details on the page, click the Global Library tab.
- Global Library Click the item you want to delete from the list. Global Library Detail screen appears.
- Click the Delete button.
- In the confirmation popup, click the Confirm button to complete.
Manage supported tenants/project groups
Note
The tab name is displayed differently depending on the tool type.
- System Tool/Tenant Tool: Supported Tenant
- ProjectGroup Tool: Support Information
The user can manage the tenant or project group that will use the tool.
To manage supported tenants or project groups, follow these steps.
- On the Tool Details page, click the Supported Tenant or Supported Information tab.
Note
The Primary icon is displayed for tenant/project groups you manage.
Add supported tenant/project group
To add a supported tenant or project group, follow these steps.
- On the Tool Details page, click the Supported Tenant or Supported Information tab.
- Click the Add button. The Add Tenant/Project Group popup window opens.
- After entering the content, click the Save button.
- In the confirmation popup, click the Confirm button to complete.
Item description Tenant/Project Group Select the tenant/project group that will use the tool. Use status Select whether to use the tool in this tenant/project group. Whether new creation is possible Select whether to allow creating new repositories in this tenant/project group.
This setting can only be configured for the tool categories listed below.- SCM Repository
- Image Registry
- Code Quality
- Artifact Repository
- Helm Chart Repository
- Test Management
- Project Management Software
Table. Additional Input Items for Supported Tenant/Project Group
Modify supported tenant/project group
To modify the supported tenant/project group, follow these steps.
- On the Tool Details page, click the Supported Tenant or Support Information tab.
- In the Supported Tenant or Supported Information list, select Usage status and New creation allowed to modify.
Transfer Management Tenant/Project Group
To transfer the management tenant/project group, follow the steps below.
- On the Tool Details page, click the Supported Tenant or Supported Information tab.
- Click the Transfer Management Tenant or Transfer Management Project Group button. The Transfer Management Tenant or Transfer Management Project Group popup window opens.
- Select the target tenant or project group for transfer, then click the Save button.
Delete supported tenant/project group
To delete a managed tenant/project group, follow these steps.
- On the Tool Details page, click the Supported Tenant or Supported Information tab.
- Select the checkbox of the tenant/project group you want to delete.
- Click the Delete button.
- Click the Confirm button in the confirmation popup to complete.
Note
A tenant/project group designated as Primary cannot be deleted.
Support K8S cluster management
The user can manage the K8S cluster where the tool will be used.
To manage the supported K8S cluster, follow these steps.
- On the Tool Details page, click the Supported K8S Cluster tab.
Add supported K8S cluster
To add a supported K8S cluster, follow the steps below.
- On the Tool Details page, click the Supported K8S Cluster tab.
- On the Supported K8S Cluster page, click the Add button. The Add K8S Cluster popup window opens.
- After entering the content, click the Save button.
- In the confirmation popup, click the Confirm button to complete.
Item description K8S cluster Select the K8S cluster to use with the tool. Use status Select whether to use the tool in this tenant/project group. Whether new creation is possible Select whether to allow creating new repositories in this tenant/project group.
This setting can only be configured for the tool categories below.- SCM Repository
- Image Registry
- Code Quality
- Artifact Repository
- Helm Chart Repository
- Test Management
- Project Management Software
Table. Additional input fields for supported K8S clusters
Modify supported K8S cluster
To modify the supported K8S cluster, follow the steps below.
- On the Tool Details page, click the Supported K8S Cluster tab.
- In the Supported K8S Clusters list, select Usage Status and New Creation Availability to edit.
Delete supported K8S cluster
To delete the supported K8S cluster, follow these steps.
- Click the Supported K8S Cluster tab on the Tool Details page.
- Supported K8S clusters list, select the checkbox of the K8S cluster you want to delete.
- Click the Delete button.
- In the confirmation popup, click the Confirm button to complete.
Manage tool operators
To manage tool operators, follow the steps below.
- On the Tool Details page, click the Tool Operator tab.
Add tool operator
To add a tool operator, follow these steps.
- Tool Details page, click the Tool Operator tab.
- Click the Add button. The Add Tool Operator popup opens.
- Select the operator and click the Save button.
- In the confirmation popup, click the Confirm button to complete.
Delete tool operator
To delete a tool operator, follow these steps.
- Tool Details page, click the Tool Operator tab.
- Select the checkbox for the item you want to delete from the tool administrator list.
- Click the Delete button.
- In the confirmation popup, click the Confirm button to complete.
Managing Jenkins Recommended Plugins
Note
Only when the tool is
Jenkins, the plugin tab is displayed.You can check the installed Jenkins version and whether recommended plugins are installed and their version information, and you can update and install the recommended plugins.
- Tool version: Jenkins version information
- Recommended plugins: installation status and version information
Check tool version and recommended plugin information
To check the tool version and recommended plugin information, follow these steps.
- Tool Details page, click the Basic Information tab.
- If there is recommended plugin information that requires installation or update, an informational popup appears, and clicking OK moves you to the Plugins tab.
- On the Tool Details page, click the Plugin tab.
- Check the entries for Tool Version, Recommended Plugins.
Install recommended plugins
To install the recommended plugin, follow these steps.
- In the Recommended plugins area, select the Install button of the plugin you want to install.
- In the Recommended Plugin Installation popup, select the OK button.
- A popup appears indicating that the installation request has been completed, and the actual installation details can be viewed via the link in the popup.
Update recommended plugins
To update the recommended plugin, follow these steps.
- In the Recommended plugins area, select the Update button of the plugin you want to update.
- Select the Confirm button in the Recommended Plugin Update popup.
- A popup appears indicating that the installation request has been completed, and the actual installation details can be viewed via the link in the popup.
- You must restart Jenkins to apply the update you need to do so.
Delete tool
Note
Tools currently used in the project cannot be deleted.
To uninstall the tool, follow these steps.
- On the Tool page, click the tool you want to delete. You will be taken to the Tool Details page.
- Click the Delete button.
- In the confirmation popup, click the Confirm button to complete.
2.9.2 - App Template
App. A template is a feature provided to enable users to quickly set up a development environment.
The App. template consists of sample source code, Dockerfile, Helm chart, etc., and users can quickly set up a development environment using the App. template when creating a project.
We provide App templates for various frameworks such as Node.js, Python, Spring Boot, and users can also create and register their own App templates.
| App. template type | Explanation |
|---|---|
| System Template |
|
| Tenant Template |
|
| ProjectGroup Template |
|
Table. App. Template Types
App. Getting Started with Template
App. To start template management, follow the steps below.
- Click the Admin icon at the top right of the Main page. You will be taken to the Tenant Dashboard page.
- From the left menu, click the Tools & Templates > App. Templates menu. You will be taken to the App. Templates page.
App. Add Template
Users can add their own App templates.
Source code
App. This is the source code that will be used in the template to build a sample project.
App. A usable SCM Repository must exist in the tenant or project group where the template will be registered. For instructions on registering an SCM Repository tool, see Add Tool.
Register the source code in the SCM Repository in advance. When registering an App template, the corresponding SCM Repository appears, and you should enter the path of the pre-registered source code.
Dockerfile
Note
You can manage the
See the official site for documentation and instructions on writing a
Dockerfile without registering it inside the source code. For related information, see Dockerfile Template Management.See the official site for documentation and instructions on writing a
Dockerfile.To register an App. Template that supports deployment target projects in the form of Kubernetes or VM (Docker), you must either add a Dockerfile to the source code when registering the source code or register a Dockerfile through Manage Dockerfile Templates.
When writing a Dockerfile, the FROM clause must be fixed as FROM ${BASE_IMAGE}.
The registered ${BASE_IMAGE} value is substituted via the Velocity Template Engine as the image.repository value in the Helm chart when the deployment target is Kubernetes, and as the image path registered in Managing Supported Images when the deployment target is VM (Docker).
Dockerfile file sample
Color mode
FROM ${BASE_IMAGE}

COPY *.jar app.jar
ENTRYPOINT ["java","-jar","/app.jar"]
FROM ${BASE_IMAGE}
COPY *.jar app.jar
ENTRYPOINT ["java","-jar","/app.jar"]App. Register Template
App. To register a template, follow these steps.
- Click the Add button on the App. Template page. You will be taken to the App. Template Add page.
- App. Add Template On the page, select the template support type and click the Start button.
- After entering the required information, click the Complete button.
Item Explanation type Select the template type. - Refer to App. Template Type for type-specific descriptions.
Tenant/Project Group Select the tenant/project group to map. Table. App. Add Template - Template Supported Type Selection ItemItem Explanation Deployment target Select the deployment target supported by the template - Kubernetes: when the deployment target is a cluster using Helm charts
- VM(Artifact): when the deployment target is a VM server using an Artifact file
- VM(Docker): when the deployment target is a VM server using a Docker image
- N/A: when there is no deployment target (ex. Android)
Template name App. Enter the name of the template. Application classification Select the category of the application included in the template - Used to classify the template.
language Select the programming language of the source code included in the template. source code Select whether the template includes source code. Source code repository type Select the location where the source code to be included in the template is stored. You can choose SCM or a compressed file (ZIP). Repository URL Enter the repository URL where the template source code is located - The list of SCM Repository tool available in the tenant and project group will be displayed.
Repository branch Enter the branch of the repository where the template source code is located. Individual authentication information Enter the credentials to access the repository - If you select ‘Do not use’, the credentials used when registering the tool will be used.
Dockerfile path Enter the Dockerfile path within the repository - Used when building the Docker image.
code quality Select whether to use code quality. Explanation App. Write a description for the template. Document URL Enter the URL of the document that describes the template - It will appear as a link on the template selection page when creating a project.
Template icon Select the icon to use in the template. Build output path Specify the build output path and filename. Dockerfile type Select Dockerfile type - You can choose whether to use the Dockerfile file within SosoCode, or to use the information registered in Manage Dockerfile Templates.
- When you select the GUI template, the Dockerfile Template tab becomes active.
Table. App. Add Template - Basic Information Input Items
Reference
App. Only when the template’s deployment target is Kubernetes, the supported Helm chart step is added.
- Select the Helm chart that can be used when deploying with this App template.
- After selecting the checkbox, you can select the Helm chart list using the Add, Delete buttons in the center.
information
App. The template cannot be used immediately after registration and requires additional configuration.
After completing Add Pipeline Template, please refer to Modify Supported Tenant Information and modify the usage status.
After completing Add Pipeline Template, please refer to Modify Supported Tenant Information and modify the usage status.
App. Edit template basic information
App. To modify the template’s basic information, follow these steps.
- On the App. Template page, click the item you want to edit. You will be taken to the App. Template Details page.
- Click the Basic Information tab on the App. Template Details page.
- Click the Edit button in the Basic Information tab.
- After editing the required information, click the Save button.
Note
If a pipeline template is not registered, the notification popup window will be activated.
Manage pipeline templates
This is the build pipeline configuration that is automatically set up when a user creates a project using the App template.
Notice
If the pipeline template is not registered, the App template cannot be used.
Add pipeline template
To add a pipeline template, follow these steps.
- On the App. Template page, click the item you want to add. You will be taken to the App. Template Details page.
- On the App. Template Details page, click the Pipeline Template tab.
- Click the Add button on the Pipeline Template tab. You will be taken to the Add Pipeline Template page.
- On the Add Pipeline Template page, enter the required information and click the Save button.
Item Explanation Template name Enter the name of the pipeline template. Base Template
(Base Template)- The default template is used for pipeline configuration when creating a project.
- If a default template is not registered, it is automatically set to ON, and this setting cannot be changed.
Support Jenkins Select the Jenkinsthat will support this pipeline template- A list of CICD pipeline tools available in the tenant and project group is displayed.
- It is required to refer to the necessary information in the Tools area when configuring stages.
environment variable Enter environment variable information - For detailed information about environment variables, refer to Configure environment variables.
Stage Enter information for each stage - For detailed information about stages, refer to Setting up stages.
Table. Pipeline Template Additional Input Items
Note
For an explanation and instructions on setting
Jenkins environment variables, refer to the official site official site.Edit pipeline template
To modify the pipeline template, follow these steps.
- On the App. Template page, click the item you want to edit. You will be taken to the App. Template Details page.
- On the App. Template Details page, click the Pipeline Template tab.
- Click the item you want to edit in the Pipeline Template tab. You will be taken to the Pipeline Template Details page.
- On the Pipeline Template Details page, click the Edit button. You will be taken to the Pipeline Template Edit page.
- On the Pipeline Template Edit page, after modifying the information, click the Save button.
Delete pipeline template
information
Pipeline templates marked as (Base) cannot be deleted.
To delete a pipeline template, follow these steps.
- Click the item you want to delete on the App. Template page. You will be taken to the App. Template Details page.
- On the App. Template Details page, click the Pipeline Template tab.
- Click the item you want to delete in the Pipeline Template tab. You will be taken to the Pipeline Template Details page.
- On the Pipeline Template Details page, click the Delete button.
- Click the Confirm button in the confirmation popup.
Managing Dockerfile Templates
App. In the Basic Information section of the template, the tab appears only when the Dockerfile Type item is GUI Template.
Modify Dockerfile template
Follow these steps to modify the Dockerfile template.
- On the App. Template page, click the item you want to edit. You will be taken to the App. Template Details page.
- On the App. Template Details page, click the Dockerfile Template tab.
- Click the Edit or Create button in the Dockerfile Template tab.
- After entering the content in the Dockerfile Template tab, click the Save button.
Item Explanation Authentication Settings Register the authentication information for the image to be used in the FROM clause of a multi-stage build. Add Add the image to be used in the FROM clause of the multi-stage build. Multi-stage Dockerfile Configure the Multi-stage based on the credentials and additional items you registered. Dockerfile Create a basic Dockerfile. Table. Dockerfile Template Modification Input Items
Notice
You can manage it within the source code via Dockerfile without registering a Dockerfile template.
- When using a Dockerfile file included in the source code, the Basic Information section of the App template must have the Dockerfile Type field set to File in Code Repository.
The FROM clause is automatically set to the image path registered in 지원 이미지 관리하기.
Note
Refer to the official site for explanations and instructions on writing Dockerfile files.
Manage supported tenants/project groups
information
The tab name is displayed differently depending on the template type.
- System Template/Tenant Template: Supported Tenant
- ProjectGroup Template: Support Information
The user can manage the tenant or project group where the App template will be used.
To manage supported tenants or project groups, follow these steps.
- Click the item you want to edit on the App. Template page. You will be taken to the App. Template Details page.
- On the App. Template Details page, click the Supported Tenant or Supported Information tab.
Reference
Primary icon appears on the tenant you manage.Add supported tenant
To add a supported tenant, follow these steps.
- Click the item you want to edit on the App. Template page. You will be taken to the App. Template Details page.
- On the App. Template Details page, click the Supported Tenants tab.
- Click the Add button on the Supported Tenant tab. The Add Tenant popup window opens.
- Add Tenant In the popup window, select the tenant you want to support, then click the Save button.
Edit supported tenant information
To modify the information of the supported tenant, follow these steps.
- Click the item you want to edit on the App. Template page. You will be taken to the App. Template Details page.
- On the App. Template Details page, click the Supported Tenants tab.
- In the Supported Tenant tab, select the verification status and usage status items for the tenant you want to change, and edit them.
Item Explanation Tenant Available tenant information. Verification status Select verification status - Verifying
- Verification complete
Whether to use Select usage status - It can be changed to Use only when Verification status is Verified.
Table. Supported Tenant Screen Items
Reference
If the verification status is under verification, only users who have registered the App template can use it.
- Other users can use the App template after verification and approval are completed.
Edit supported project group information
To modify the information of the supported project group, follow these steps.
- Click the item you want to edit on the App. Template page. You will be taken to the App. Template Details page.
- On the App. Template Details page, click the Support Information tab.
- Click the Edit button in the Support Information tab. The App. Template Edit screen appears.
- On the App. Template Edit screen, select the verification status and usage status items to edit them.
- Click the Save button.
Item Explanation Project Group Available project group information. Verification status Select verification status - Verifying
- Verification complete
Whether to use Select usage - Verification status can be changed to Use only when it is Verification completed.
Table. Support Information Screen Items
Note
If the verification status is “in verification,” only users who have registered the App template can use it.
- Other users can use the App template after verification and approval are completed.
Transfer Management Tenant
To transfer the management tenant, follow these steps.
- Click the item you want to edit on the App. Template page. You will be taken to the App. Template Details page.
- On the App. Template Details page, click the Supported Tenants tab.
- On the Support Tenant tab, click the Transfer Management Tenant button. The Transfer Management Tenant popup window opens.
- Management Tenant Transfer In the popup window, after selecting the target tenant for transfer, click the Save button.
Delete supported tenant
To delete a supported tenant, follow these steps.
- Click the item you want to edit on the App. Template page. You will be taken to the App. Template Details page.
- On the App. Template Details page, click the Supported Tenants tab.
- In the Supported Tenant tab, select the tenant you want to delete and click the Delete button.
- In the confirmation popup, click the Confirm button.
Caution
A tenant designated as Primary cannot be deleted.
Manage supported images
Information
App. The Supported Images tab appears only when the template’s deployment target is Kubernetes or VM(Docker).
The supported image registered by the user is used in the FROM clause registered in the source code’s Dockerfile or Dockerfile template.
Add supported image
information
When adding a supported image, only the Image Registry tool available in the respective tenant and project group appears in the list.
To add a supported image, follow the steps below.
- On the App. Template page, click the item you want to edit. You will be taken to the App. Template Detail page.
- On the App. Template Details page, click the Supported Image tab.
- In the Supported Image tab, click the Add button. The Add Supported Image popup window opens.
- Add supported image After entering the information in the popup window, click the Connection Test button.
- Save button is enabled, click the Save button.
- In the confirmation popup, click the Confirm button.
Item Explanation Enter image information Enter the supported image and authentication information. Use the registrant’s authentication information This is an option that can be selected when the chosen image registry is a tool that cannot grant permissions (e.g., SCR). - If not checked, when a supported image user creates a project, the Pull permission for the image entered by the supported image user is added. If the tool cannot grant permissions, no permission granting is performed.
- If not checked, when a supported image user creates a project, the authentication credentials of the supported image registrant are used instead of the supported image user’s permissions.
Table. Additional Input Fields for Supported Image
Caution
Precautions when checking the use of the registrant’s authentication information
- Since the registrant’s authentication credentials may be exposed to users of the supported image, it should be used only when necessary.
- If the image repository only supports pulling images, you must select it to avoid problems during use. You must specify an image repository that will be used exclusively for pulling. (If selected, pulling and pushing cannot be performed simultaneously on the same image repository.)
- The registrant’s credentials are used in the project > image repository > pull-only image. These credentials cannot be changed by supported image users, and if the registrant’s credentials are re-registered in a supported image, they are updated uniformly.
Delete supported image
To delete the support image, follow these steps.
- On the App. Template page, click the item you want to edit. You will be taken to the App. Template Details page.
- On the App. Template Details page, click the Supported Image tab.
- In the Supported Images tab, select the checkbox of the item to delete and click the Delete button.
- In the confirmation popup, click the Confirm button.
Manage supported Helm charts
information
App. The Kubernetes deployment target only, the Supported Helm Chart tab is displayed.
Refer to Add Helm Chart for registering supported Helm charts.
Refer to Add Helm Chart for registering supported Helm charts.
The supported Helm chart registered by the user is used when creating a project using the App. template.
Add support for Helm chart
To add a supported Helm chart, follow these steps.
- Click the item you want to edit on the App. Template page. You will be taken to the App. Template Details page.
- App. Template Details on the page, click the Supported Helm Chart tab.
- In the Supported Helm Chart tab, click the Edit button. The App. Template Edit screen appears.
- App. Template Modification On the screen’s Helm Chart List, select the checkbox of the Helm chart to be used, then add it to the Selected Helm Chart List using the Add button, and click the Save button.
Modify the supported Helm chart
To modify the supported Helm chart, follow these steps.
- On the App. Template page, click the item you want to edit. You will be taken to the App. Template Details page.
- Click the Supported Helm Chart tab on the App. Template Details page.
- Click the Edit button in the Supported Helm Chart tab. The App. Template Edit screen appears.
- On the App. Template Edit screen’s Helm Chart List, select the checkboxes of the Helm charts to use, then modify the Selected Helm Chart List using the Add and Delete buttons, and click the Save button.
Delete supported Helm chart
To delete the support Helm chart, follow these steps.
- Click the item you want to edit on the App. Template page. You will be taken to the App. Template Details page.
- On the App. Template Details page, click the Supported Helm Chart tab.
- Click the Edit button in the Supported Helm Chart tab. The App. Template Edit screen appears.
- App. Template Edit on the Selected Helm Chart List screen, select the checkbox of the Helm chart to delete, then delete it using the Delete button and click the Save button.
App. Delete Template
App. To delete the template, follow these steps.
- Click the item you want to delete on the App. Template page. Navigate to the App. Template Details page.
- On the App. Template Details page, click the Basic Information tab.
- Click the Delete button on the Basic Information tab.
- In the confirmation popup, click the Confirm button.
2.9.3 - Register User-installed Jenkins Tool
Reference
- It is recommended to use the Samsung Cloud Platform Marketplace for installing and operating Jenkins.
- If you cannot use the Marketplace or need to register a self‑installed Jenkins as a tool in the DevOps Console, refer to this document.
- This document guides the registration of the Jenkins tool in DevOps Console, so it provides only a brief overview of Jenkins installation and operation.
Getting started with registering a user-installed Jenkins tool
Install Jenkins and plugins.
Jenkins installation
Before installing
To register Jenkins in the DevOps Console, Jenkins generally must meet the following conditions. If there are other conditions, register an SR before installation to verify.
- Use a domain for Jenkins access
- Jenkins domain is registered in DNS
- Use HTTPS (port 443) and a public certificate for Jenkins communication.
Installation
Install Jenkins on a VM or Kubernetes
Plugin Installation
Install the following plugins in Jenkins.
| Plugin ID | Name |
|---|---|
| apache-httpcomponents-client-4-api | Apache HttpComponents Client 4.x API |
| credentials | Credentials |
| credentials-binding | Credentials Binding |
| github | GitHub |
| jobConfigHistory | Job Configuration History |
| kubernetes | Kubernetes |
| mask-passwords | Mask Passwords |
| maven-plugin | Maven Integration |
| matrix-auth | Matrix Authorization Strategy |
| metrics | Metrics |
| pipeline-stage-view | Pipeline: Stage View |
| pipeline-utility-steps | Pipeline Utility Steps |
| script-security | Script Security |
| ssh-steps | SSH Pipeline Steps |
| workflow-aggregator | Pipeline |
| workflow-step-api | Pipeline: Step API |
Table. List of installed plugins
Reference
You can view the plugin details at https://plugins.jenkins.io/{Plugin ID}.
Jenkins configuration
Common Settings
Jenkins Administration > System
| Item | value | Explanation |
|---|---|---|
| of executors | 0 | Set to 0 to restrict direct build execution on the Controller and allow builds only on the Agent. |
| Jenkins URL | (ex) https://{YOUR_DOMAIN}/jenkins/ | |
| System Admin e-mail address | (ex) admin@example.com |
Table. Jenkins Management > System Settings
Jenkins Administration > Security
| Item | value | Explanation |
|---|---|---|
| Authorization | Project-based Matrix Authorization Strategy | |
| Authenticated Users | Overall > Read | |
| <ADMIN_USER> | Overall > Administer | Add admin account using Add user |
Table. Jenkins Management > Security Settings
Support email format for Jenkins Username
- By default, Jenkins does not allow the @ sign or dot (.) to be used in the login username. However, since DevOps Console uses an email address as the username, we configure Jenkins to allow email addresses as usernames as well.
- Create the file
/{JENKINS_HOME}/init.groovy.d/init.groovy, add the following content, and restart Jenkins.- (ex)
/var/jenkins_home/init.groovy.d/init.groovy
- (ex)
Color mode
hudson.security.HudsonPrivateSecurityRealm.ID_REGEX=/^[\w-\.\@\_]+$/hudson.security.HudsonPrivateSecurityRealm.ID_REGEX=/^[\w-\.\@\_]+$/Additional Jenkins configuration installed on Kubernetes
RBAC
Configure RBAC on Jenkins’s Service Account so that Jenkins can create Pods in Kubernetes.
Color mode
# In GKE need to get RBAC permissions first with
# kubectl create clusterrolebinding cluster-admin-binding --clusterrole=cluster-admin [--user=<user-name>|--group=<group-name>]

---
apiVersion: v1
kind: ServiceAccount
metadata:
  name: jenkins

---
kind: Role
apiVersion: rbac.authorization.k8s.io/v1
metadata:
  name: jenkins
rules:
- apiGroups: [""]
  resources: ["pods"]
  verbs: ["create","delete","get","list","patch","update","watch"]
- apiGroups: [""]
  resources: ["pods/exec"]
  verbs: ["create","delete","get","list","patch","update","watch"]
- apiGroups: [""]
  resources: ["pods/log"]
  verbs: ["get","list","watch"]
- apiGroups: [""]
  resources: ["events"]
  verbs: ["watch"]
- apiGroups: [""]
  resources: ["secrets"]
  verbs: ["get"]

---
apiVersion: rbac.authorization.k8s.io/v1
kind: RoleBinding
metadata:
  name: jenkins
roleRef:
  apiGroup: rbac.authorization.k8s.io
  kind: Role
  name: jenkins
subjects:
- kind: ServiceAccount
  name: jenkins
# In GKE need to get RBAC permissions first with
# kubectl create clusterrolebinding cluster-admin-binding --clusterrole=cluster-admin [--user=<user-name>|--group=<group-name>]
---
apiVersion: v1
kind: ServiceAccount
metadata:
name: jenkins
---
kind: Role
apiVersion: rbac.authorization.k8s.io/v1
metadata:
name: jenkins
rules:
- apiGroups: [""]
resources: ["pods"]
verbs: ["create","delete","get","list","patch","update","watch"]
- apiGroups: [""]
resources: ["pods/exec"]
verbs: ["create","delete","get","list","patch","update","watch"]
- apiGroups: [""]
resources: ["pods/log"]
verbs: ["get","list","watch"]
- apiGroups: [""]
resources: ["events"]
verbs: ["watch"]
- apiGroups: [""]
resources: ["secrets"]
verbs: ["get"]
---
apiVersion: rbac.authorization.k8s.io/v1
kind: RoleBinding
metadata:
name: jenkins
roleRef:
apiGroup: rbac.authorization.k8s.io
kind: Role
name: jenkins
subjects:
- kind: ServiceAccount
name: jenkinsReference
Jenkins Management > Clouds
kubernetes
- Add the kubernetes cloud.
- Set up the Kubernetes cloud as follows. Use the default values for the remaining items.
| Item | value | Explanation |
|---|---|---|
| Cloud name | kubernetes | |
| Type | Kubernetes selection | |
| Kubernetes URL | https://kubernetes.default | Create a Pod (Agent) in the cluster where Jenkins is running |
| Disable https certificate | check | |
| Kubernetes Namespace | (example) jenkins | Enter the Namespace where the Jenkins Controller is running, and a Pod (Agent) is created in that Namespace. |
| WebSocket | check | |
| Jenkins URL | (example) http://{JENKINS_SERVICE_NAME}:{PORT}/jenkins |
|
Table. Jenkins Management > Clouds > kubernetes Configuration
kubernetes > Pod Templates
- Add a Pod Template.
- BASE-TEMPLATE is a parent template used in the DevOps Console to define values that should be shared across all Pod Templates.
| Item | value | Explanation |
|---|---|---|
| Name | BASE-TEMPLATE | |
| Image Pull Secret | {IMAGE_PULL_SECRET} Enter name | Create a Secret in the Namespace so that the Pod(Agent) image can be pulled, and enter its name. |
Table. Jenkins Management > Clouds > kubernetes > Pod Templates Settings
Register Jenkins tool in DevOps Console
Register Firewall
Refer to the table below and register the firewall in Jenkins.
| Origin | Destination | Destination Port |
|---|---|---|
| User install Jenkins | DevOps Console web | 443 |
| DevOps Console source IP | User install Jenkins web | 443 |
Table. Jenkins (Destination) Firewall List
Reference
To check the source IP of the DevOps Console, click the URL ⓘ on the Add Tool screen. You can view the DevOps Console’s source IP in the tooltip.
DevOps Console Tasks
- For detailed information about registering the Jenkins tool, see Add Tool
- In the tool registration step, check the plugins installed on Jenkins, and if any plugins need to be installed, a plugin installation guide page will be displayed. Download and install the plugins as instructed.
Jenkins Verification
Jenkins Management > System
Global Trusted Pipeline Libraries
- Check that cicdpaas is configured in the Library.
- If it is not configured
- Verify the communication between DevOps Console and Jenkins.
- DevOps Console > Management > Jenkins detail screen > Check the settings in the Global Library tab.
DevOps Console Credentials
- Test Connection Click the button to confirm that Success appears.
Add an agent (VM) to Jenkins
DevOps Console Tasks
Jenkins Tasks
Jenkins Management > Nodes > Agent Detail View
Verify that the Agent added in the DevOps Console has been created. Run the Agent according to the guide on the Jenkins screen and connect it to Jenkins.
Add an agent (Kubernetes) to Jenkins
Before Adding a Kubernetes Agent
Create User‑Jenkins Agent Image
- For CI/CD in Jenkins, an agent image is required.
- Create a Jenkins agent image that matches the user’s needs by using the default images provided by Jenkins.
- After creating the image, push it to the user’s image repository.
Color mode
FROM jenkins/inbound-agent:latest-jdk17

USER root

# Docker CLI
RUN curl -L0 "https://download.docker.com/linux/static/stable/x86_64/docker-29.1.3.tgz" -o /tmp/docker.tgz && \
    tar --extract \
      --file /tmp/docker.tgz \
      --strip-components 1 \
      --directory /usr/local/bin/ && \
    rm /tmp/docker.tgz

COPY --from=docker/buildx-bin /buildx /usr/libexec/docker/cli-plugins/docker-buildx

# Install your build tools...
# xxx

USER jenkins
FROM jenkins/inbound-agent:latest-jdk17
USER root
# Docker CLI
RUN curl -L0 "https://download.docker.com/linux/static/stable/x86_64/docker-29.1.3.tgz" -o /tmp/docker.tgz && \
tar --extract \
--file /tmp/docker.tgz \
--strip-components 1 \
--directory /usr/local/bin/ && \
rm /tmp/docker.tgz
COPY --from=docker/buildx-bin /buildx /usr/libexec/docker/cli-plugins/docker-buildx
# Install your build tools...
# xxx
USER jenkinsDocker‑in‑Docker Image
- In the DevOps Console, Docker in Docker is used to create Docker images in a Kubernetes environment.
- Use Docker’s provided
dind(Docker‑in‑Docker) image and push it to your repository.
Reference
DevOps Console Tasks
- Add Pod Template
- By default, one (or multiple) agents are registered. Delete the default registered agent.
- If you need to build a Docker image, select Docker in Docker.
- Enter the JNLP image URL with the Jenkins agent address of the user you created above.
Jenkins Tasks
Jenkins Management > Clouds > Kubernetes > Pod Templates
- The agent (Kubernetes) added from the DevOps Console is registered as a Pod Template.
- If Docker‑in‑Docker is selected in DevOps Console, the default image address is pre‑filled in the dind container. Replace it with the image address you pushed to your repository.
2.10 - Deployment Target
2.10.1 - K8S Cluster
Users can register a K8S cluster in DevOps Console and deploy various applications through DevOps Console.
Users can add, edit, and delete K8S clusters and namespaces. Added K8S clusters and namespaces can be selected and used in various menus such as project creation (Getting Started with Project Creation), helm install (Getting Started with Helm Install), etc.
Reference
To use the K8S cluster from menus such as project creation and helm install, you must have permissions on the namespace.
Getting Started with a K8S Cluster
To begin managing the K8S cluster, follow these steps.
- Click the Admin icon at the top right of the Main page. Navigate to the Tenant Dashboard page.
- From the left menu, click the Deploy Target > K8S Cluster menu. You will be taken to the K8S Cluster page.
Add a K8S cluster
To add a K8S cluster, follow the steps below.
- Click the Admin icon at the top right of the Main page. You will be taken to the Tenant Dashboard page.
- From the left menu, click the Deploy Target > K8S Cluster menu. You will be taken to the K8S Cluster page.
- On the K8S Cluster page, click the Add button. You will be taken to the Add K8S Cluster page.
- Add K8S Cluster page, after entering the basic information and connection details, click the Connection Test button.
- After selecting the Helm version, click the Save button.
Item Explanation K8S cluster name Please enter the cluster name. K8S Cluster ID Enter the cluster ID.
The cluster ID is a unique identifier used to distinguish clusters; please determine and enter it yourself.CA Certificate Enter the server’s certificate information to be used for configuring the kubeconfigfile- Enter the contents of
clusters[0].cluster.certificate-authority-datafrom the existingkubeconfigfile. - Contact the cluster provider (administrator) and then enter it.
- If verification is not possible, enter a temporary value (e.g.,
temp) and replace it with the correct value once verification is possible.
Authentication method Select the admin token method. API server URL Enter the Kubernetes API Server address. admin token Enter the Token with Admin privileges to use for configuring the kubeconfigfile.
Please refer to Check Cluster Admin Token.Helm version Select Helm version - A list of Helm versions available for the K8S cluster version is displayed.
Table. Add K8S Cluster – Add using admin token authenticationItem Explanation Authentication method Select the client certificate method. API server URL Enter the Kubernetes API Server address. client certificate Enter the client certificate information. Client Key Enter the client Key information. Table. Add K8S Cluster - Item for adding by authenticating with a client certificateItem Explanation Authentication method Select the kubeconfigfile upload method.kubeconfig file Browse button to select the kubeconfigfile- Only files with the
.ymlor.yamlextension can be uploaded. - If the file is uploaded successfully, the CA Certificate, API server URL, user, admin token, or client certificate will be populated automatically.
API server URL Select the Kubernetes API Server address. user Select the user to authenticate - Depending on the selected user, the admin token or client certificate information is displayed below
Table. Adding K8S Cluster - Adding via kubeconfig file upload item - Enter the contents of
Managing a K8S cluster
Modify K8S cluster
To modify the K8S cluster, follow these steps.
- Click the Admin icon at the top right of the Main page. You will be taken to the Tenant Dashboard page.
- From the left menu, click the Deploy Target > K8S Cluster menu. You will be taken to the K8S Cluster page.
- From the list on the K8S Cluster page, click the K8S cluster. You will be taken to the K8S Cluster Details page of the selected K8S cluster.
- On the K8S Cluster Details page, click the Edit button.
- After editing the information, click the Connection Test button.
- After selecting the Helm version, click the Save button.
Delete K8S cluster
To delete a K8S cluster, follow these steps.
- Click the Admin icon at the top right of the Main page. You will be taken to the Tenant Dashboard page.
- From the left menu, click the Deploy Target > K8S Cluster menu. You will be taken to the K8S Cluster page.
- From the list on the K8S Cluster page, click the K8S cluster. You will be taken to the K8S Cluster Details page of the selected K8S cluster.
- On the K8S Cluster Details page, click the Delete button.
- Click the Confirm button in the confirmation popup to complete the deletion.
Add a member to a K8S cluster
To add a K8S cluster member, follow the steps below.
- Click the Admin icon at the top right of the Main page. Navigate to the Tenant Dashboard page.
- From the left menu, click the Deploy Target > K8S Cluster menu. You will be taken to the K8S Cluster page.
- In the list on the K8S Cluster page, click the K8S cluster. You will be taken to the K8S Cluster Details page of the selected K8S cluster.
- On the K8S Cluster Details page, click the Members tab.
- When you click the Add button in the Member tab, the Add Member popup window opens.
- Add Member In the popup, enter the email address and click the Search icon.
- Click the Add button to add the member to the list below.
- After selecting the permission, click the Save button to complete adding the member.
Delete K8S cluster member
To delete a K8S cluster member, follow these steps.
- Click the Admin icon at the top right of the Main page. You will be taken to the Tenant Dashboard page.
- From the left menu, click the Deploy Target > K8S Cluster menu. You will be taken to the K8S Cluster page.
- From the list on the K8S cluster page, click the K8S cluster. You will be taken to the K8S cluster details page of the selected K8S cluster.
- On the K8S Cluster Details page, click the Members tab.
- In the Member tab, select the checkbox of the user you want to delete.
- Click the Delete button to remove the selected user from the members.
Managing K8S Cluster Permission Requests
To approve or reject a K8S cluster access request, follow these steps.
- Click the Admin icon at the top right of the Main page. You will be taken to the Tenant Dashboard page.
- From the left menu, click the Deploy Target > K8S Cluster menu. You will be taken to the K8S Cluster page.
- Click the K8S cluster permission request item for the cluster whose permission request you want to approve. The displayed number indicates the number of permissions requested.
- K8S Cluster Permission Request Approval The popup window opens.
- Click the application you want to approve or reject.
- After entering your comment, click the Approve or Reject button.
Note
A comment is required to reject a permission request.
View K8S cluster permission approval history
To view the K8S cluster permission request approval history, follow these steps.
- Click the Admin icon at the top right of the Main page. You will be taken to the Tenant Dashboard page.
- From the left menu, click the Deploy Target > K8S Cluster menu. You will be taken to the K8S Cluster page.
- From the list on the K8S Cluster page, click the K8S Cluster. You will be taken to the K8S Cluster Details page of the selected K8S Cluster.
- Click the Approval History tab. The approval history list appears.
Note
Access is allowed only for users with Administrator privileges on the K8S cluster.
Managing namespaces
Notice
- To use the K8S cluster from menus such as project creation and helm install, you must have permissions on the namespace.
- You cannot create a namespace in the actual K8S cluster. You can only import an already created namespace into the DevOps Console.
Import namespace
To import the namespace, follow these steps.
- Click the Admin icon at the top right of the Main page. You will be taken to the Tenant Dashboard page.
- From the left menu, click the Deploy Target > K8S Cluster menu. You will be taken to the K8S Cluster page.
- On the K8S Cluster page, click the K8S cluster from the list. You will be taken to the K8S Cluster Details page of the selected K8S cluster.
- Click the Namespace tab. The namespace list appears.
- On the Namespace tab screen, clicking the Import button opens the Import Namespace popup.
- Namespace Import In the popup window, select the namespace and click the Save button to complete the namespace import.
Delete namespace
Notice
Only the namespace information managed by the DevOps Console is deleted, and the actual namespace in the cluster is not deleted.
To delete a namespace, follow these steps.
- Click the Admin icon at the top right of the Main page. You will be taken to the Tenant Dashboard page.
- From the left menu, click the Deploy Target > K8S Cluster menu. You will be taken to the K8S Cluster page.
- On the K8S cluster page, click the K8S cluster from the list. You will be taken to the K8S cluster details page of the selected K8S cluster.
- Click the Namespace tab. The namespace list appears.
- On the Namespace tab screen, clicking a namespace navigates to the Namespace Details page.
- On the Namespace Details page, click the Delete button to complete the namespace deletion.
Adding a namespace member
To add a namespace member, follow these steps.
- Main page, click the Admin icon at the top right. It navigates to the Tenant Dashboard page.
- From the left menu, click the Deploy Target > K8S Cluster menu. You will be taken to the K8S Cluster page.
- From the list on the K8S Cluster page, click the K8S cluster. You will be taken to the K8S Cluster Details page of the selected K8S cluster.
- Click the Namespace tab. The namespace list appears.
- Namespace tab screen, when you click the namespace, you are taken to the Namespace Details page.
- Namespace Details page, when you click the Members tab, the namespace member list appears.
- When you click the Add button, the Add Member popup opens.
- In the Add Member popup, enter the email address and click the Search icon.
- Click the Add button to add the member to the list below.
- After selecting the permission, click the Save button to complete adding the member.
Delete namespace member
To delete a namespace member, follow these steps.
- Click the Admin icon at the top right of the Main page. You will be taken to the Tenant Dashboard page.
- From the left menu, click the Deploy Target > K8S Cluster menu. You will be taken to the K8S Cluster page.
- On the K8S Cluster page, click the K8S cluster from the list. You will be taken to the K8S Cluster Details page of the selected K8S cluster.
- Click the Namespace tab. The namespace list appears.
- On the Namespace tab screen, clicking the namespace takes you to the Namespace Details page.
- Namespace Details page, when you click the Members tab, the namespace member list appears.
- Select the checkbox of the user you want to delete from the list.
- Click the Delete button to remove the selected user from the members.
Manage namespace permission requests
To approve or reject a namespace permission request, follow these steps.
- Click the Admin icon at the top right of the Main page. You will be taken to the Tenant Dashboard page.
- From the left menu, click the Deploy Target > K8S Cluster menu. You will be taken to the K8S Cluster page.
- From the list on the K8S Cluster page, click the Namespace Permission Request item for the cluster whose permission request you want to approve. The displayed number indicates the number of permission requests.
- Namespace Permission Request Approval A popup window opens.
- Select the checkbox for the application you want to approve or reject.
- After entering your comment, click the Approve or Reject button.
Reference
Providing a comment is required to reject a permission request.
View namespace permission request approval history
To view the namespace permission request approval history, follow these steps.
- Click the Admin icon at the top right of the Main page. You will be taken to the Tenant Dashboard page.
- From the left menu, click the Deploy Target > K8S Cluster menu. You will be taken to the K8S Cluster page.
- In the list on the K8S Cluster page, click the K8S cluster. You will be taken to the K8S Cluster Details page of the selected K8S cluster.
- Namespace tab, click it. The namespace list appears.
- On the Namespace tab screen, clicking a namespace takes you to the Namespace Details page.
- Namespace Details page, when you click the Approval History tab, the approval history list appears.
Managing Ingress Domains
information
- This is reference information that is managed only in the DevOps Console.
- The registered information is displayed so that users can refer to it when creating a project or performing a Helm install using the cluster.
Add Ingress Domain
To add an ingress domain, follow these steps.
- Click the Admin icon at the top right of the Main page. You will be taken to the Tenant Dashboard page.
- From the left menu, click the Deploy Target > K8S Cluster menu. You will be taken to the K8S Cluster page.
- On the K8S cluster page, click the K8S cluster from the list. You will be taken to the K8S cluster details page of the selected K8S cluster.
- Click the Ingress Domain tab. The Ingress Domain list appears.
- Ingress Domain tab screen, when you click the Add button, the Add Ingress Domain Information popup opens.
- Add Ingress Domain Information Enter the information in the popup window and click the Save button to complete adding the ingress domain.
Item Explanation Node selector Enter the node selector.
It is composed of a key that includes a prefix separated by the first slash (/) of the input value, and its corresponding value.
The prefix is optional.
e.g.,kubernetes.io/nodetype: appProxy IP Enter the Proxy Server IP or Proxy Server LoadBalancer IP. Ingress domain Enter the domain that the application will use by default. Ingress class Enter the Ingress controller class. Table. Ingress Domain Additional Input Items
Modify Ingress Domain
To modify the Ingress domain, follow these steps.
- Click the Admin icon at the top right of the Main page. You will be taken to the Tenant Dashboard page.
- From the left menu, click the Deploy Target > K8S Cluster menu. You will be taken to the K8S Cluster page.
- From the list on the K8S Cluster page, click the K8S cluster. You will be taken to the K8S Cluster Details page of the selected K8S cluster.
- Click the Ingress Domain tab. The Ingress Domain list appears.
- On the Ingress Domain tab screen, when you click the Ingress Domain you want to edit, the Edit Ingress Domain Information popup opens.
- Edit Ingress Domain Information In the popup window, modify the information and click the Save button to complete the Ingress domain edit.
Delete Ingress Domain
To modify the Ingress domain, follow these steps.
- Click the Admin icon at the top right of the Main page. You will be taken to the Tenant Dashboard page.
- From the left menu, click the Deploy Target > K8S Cluster menu. You will be taken to the K8S Cluster page.
- From the list on the K8S Cluster page, click the K8S cluster. You will be taken to the K8S Cluster Details page of the selected K8S cluster.
- Ingress Domain Click the tab. Ingress Domain list appears.
- On the Ingress Domain tab, select the checkbox of the Ingress Domain you want to delete.
- On the Ingress Domain tab screen, click the Delete button to delete the selected ingress domain.
2.10.1.1 - Verify Cluster Admin Token
To register a K8S cluster, you must verify the cluster’s Admin Token.
An Admin Token refers to the token value of a ServiceAccount that has the ClusterRole/cluster-admin bound by a ClusterRoleBinding.
Preparation before start
information
Before checking the Admin Token, review and prepare the following.
- Environment where the kubectl CLI can be used
- Check cluster admin permissions
- View and create ClusterRole, ClusterRoleBinding
- Namespace and ServiceAccount lookup and creation
- The cluster-admin ClusterRole is listed.
Color mode
$ kubectl get clusterrole cluster-admin
NAME            CREATED AT
cluster-admin   2022-12-09T08:21:50Z
$ kubectl get clusterrole cluster-admin
NAME CREATED AT
cluster-admin 2022-12-09T08:21:50ZQuery Admin Token
View existing generated Admin Token
- Retrieve the ClusterRoleBinding that has ClusterRole/cluster-admin bound.
- Check the ServiceAccount that is bound by a ClusterRoleBinding.Color mode
# admin token lookup
$ kubectl get clusterrolebinding | grep ClusterRole/cluster-admin
[crb_name]     ClusterRole/cluster-admin     77d

$ kubectl describe clusterrolebinding [crb_name]
Name:         [crb_name]
Labels:       <none>
Annotations:  <none>
Role:
Kind:  ClusterRole
Name:  cluster-admin
Subjects:
Kind            Name       Namespace
  ----            ----       ---------
ServiceAccount  [sa_name]  [namespace_name]
# admin token lookup $ kubectl get clusterrolebinding | grep ClusterRole/cluster-admin [crb_name] ClusterRole/cluster-admin 77d $ kubectl describe clusterrolebinding [crb_name] Name: [crb_name] Labels: <none> Annotations: <none> Role: Kind: ClusterRole Name: cluster-admin Subjects: Kind Name Namespace ---- ---- --------- ServiceAccount [sa_name] [namespace_name]Result of retrieving previously generated Admin Token - Check the Secret associated with the ServiceAccount and retrieve the token (Admin Token).Color mode
# Secret lookup
$ kubectl get secret -n [namespace_name] | grep [sa_name]
[sa_name]-token-xxxxx                            kubernetes.io/service-account-token   3      77d

# token lookup
$ kubectl describe secret [sa_name]-token-xxxxx -n [namespace_name]
Name:         [sa_name]-token-xxxxx
...<중략>...
Data
====
ca.crt:     1070 bytes
namespace:  11 bytes
token:      eyJhbGciOiJSUzI1NiI...
# Secret lookup $ kubectl get secret -n [namespace_name] | grep [sa_name] [sa_name]-token-xxxxx kubernetes.io/service-account-token 3 77d # token lookup $ kubectl describe secret [sa_name]-token-xxxxx -n [namespace_name] Name: [sa_name]-token-xxxxx ...<중략>... Data ==== ca.crt: 1070 bytes namespace: 11 bytes token: eyJhbGciOiJSUzI1NiI...Result of retrieving the Secret and token associated with the ServiceAccount
Create Admin Token
- Create the Namespace for the ServiceAccount. If it already exists, proceed to the next step.Color mode
$ kubectl create namespace [namespace_name]

# ex) kubectl create namespace my-app
$ kubectl create namespace [namespace_name] # ex) kubectl create namespace my-appAdmin Token creation command - Create the [namespace_name]-additional-cluster-admin-sa.yaml file and then run it.Color mode
apiVersion: v1 kind: ServiceAccount metadata: name: [namespace_name]-additional-cluster-admin namespace: [namespace_name]apiVersion: v1 kind: ServiceAccount metadata: name: [namespace_name]-additional-cluster-admin namespace: [namespace_name]ServiceAccount creation example Color mode# Create ServiceAccount $ kubectl apply -f [namespace_name]-additional-cluster-admin-sa.yaml -n [namespace_name] # ex) kubectl apply -f my-app-additional-cluster-admin-sa.yaml -n my-app# Create ServiceAccount $ kubectl apply -f [namespace_name]-additional-cluster-admin-sa.yaml -n [namespace_name] # ex) kubectl apply -f my-app-additional-cluster-admin-sa.yaml -n my-appServiceAccount creation command - Create the [namespace_name]-additional-cluster-admin-crb.yaml file and then run it.Color mode
kind: ClusterRoleBinding apiVersion: rbac.authorization.k8s.io/v1 metadata: name: [namespace_name]-additional-cluster-admin subjects: - kind: ServiceAccount name: [namespace_name]-additional-cluster-admin namespace: [namespace_name] roleRef: kind: ClusterRole name: cluster-admin apiGroup: ""kind: ClusterRoleBinding apiVersion: rbac.authorization.k8s.io/v1 metadata: name: [namespace_name]-additional-cluster-admin subjects: - kind: ServiceAccount name: [namespace_name]-additional-cluster-admin namespace: [namespace_name] roleRef: kind: ClusterRole name: cluster-admin apiGroup: ""Example of creating a ClusterRoleBinding Color mode# Create ClusterRoleBinding $ kubectl apply -f [namespace_name]-additional-cluster-admin-crb.yaml # ex) kubectl apply -f my-app-additional-cluster-admin-crb.yaml# Create ClusterRoleBinding $ kubectl apply -f [namespace_name]-additional-cluster-admin-crb.yaml # ex) kubectl apply -f my-app-additional-cluster-admin-crb.yamlCommand to create a ClusterRoleBinding - Check the Secret associated with the ServiceAccount and retrieve the token (Admin Token).Color mode
# Secret lookup
$ kubectl get secret -n [namespace_name] | grep [namespace_name]-additional-cluster-admin
[namespace_name]-additional-cluster-admin-token-xxxxx   kubernetes.io/service-account-token   3      4m53s

# Token lookup
$ kubectl describe secret [namespace_name]-additional-cluster-admin-token-xxxxx -n [namespace_name]
Name:         [namespace_name]-additional-cluster-admin-token-xxxxx
...<중략>...
Data
====
ca.crt:     1111 bytes
namespace:  6 bytes
token:      eyJhbGciOiJSUzI1Ni...
# Secret lookup $ kubectl get secret -n [namespace_name] | grep [namespace_name]-additional-cluster-admin [namespace_name]-additional-cluster-admin-token-xxxxx kubernetes.io/service-account-token 3 4m53s # Token lookup $ kubectl describe secret [namespace_name]-additional-cluster-admin-token-xxxxx -n [namespace_name] Name: [namespace_name]-additional-cluster-admin-token-xxxxx ...<중략>... Data ==== ca.crt: 1111 bytes namespace: 6 bytes token: eyJhbGciOiJSUzI1Ni...Result of retrieving the Secret and token associated with the ServiceAccount ReferenceIf there is no generated Secret (afterKuberentes 1.24), create one manually and then retrieve the token.Color modeapiVersion: v1 kind: Secret type: kubernetes.io/service-account-token metadata: name: [namespace_name]-additional-cluster-admin-token namespace: [namespace_name] annotations: kubernetes.io/service-account.name: "[namespace_name]-additional-cluster-admin"apiVersion: v1 kind: Secret type: kubernetes.io/service-account-token metadata: name: [namespace_name]-additional-cluster-admin-token namespace: [namespace_name] annotations: kubernetes.io/service-account.name: "[namespace_name]-additional-cluster-admin"Example of creating a secret
Verify Admin Token Validity
You can verify the validity of the retrieved Admin Token value by editing the ~/.kube/config file.
- Modify
~/.kube/configto use a token for user authentication.
Modify toex) users[0].user.tokenand then enter the Admin Token value.Color modeapiVersion: v1 clusters: - cluster: certificate-authority-data: LS0... server: https://devopscluster-12345.sk... name: devopscluster-12345 contexts: - context: cluster: devopscluster-12345 user: user name: user@devopscluster-12345 current-context: user@devopscluster-12345 kind: Config users: - name: user user: token: [admin_token]apiVersion: v1 clusters: - cluster: certificate-authority-data: LS0... server: https://devopscluster-12345.sk... name: devopscluster-12345 contexts: - context: cluster: devopscluster-12345 user: user name: user@devopscluster-12345 current-context: user@devopscluster-12345 kind: Config users: - name: user user: token: [admin_token]Example of editing ~/.kube/config - Run the
kubectlcommand to verify that you have cluster-admin privileges.Color mode$ kubectl get nodes $ kubectl get namespace $ kubectl get all -n kube-system $ kubectl create namespace admin-test $ kubectl delete namespace admin-test # Run other commands$ kubectl get nodes $ kubectl get namespace $ kubectl get all -n kube-system $ kubectl create namespace admin-test $ kubectl delete namespace admin-test # Run other commandsCommand to check cluster-admin permissions
2.10.2 - VM Server Group
A VM server group is a logical unit for grouping and managing VM servers.
Users can add, modify, and delete VM server groups and VM servers. Configured VM server groups and VM servers can be used as deployment target VMs in project creation (배포대상 환경 설정하기) or VM deployment (VM 배포 추가하기).
| Deployment method | Explanation |
|---|---|
| SSH | Using Secure Shell (SSH), Jenkins, where the build pipeline runs, directly deploys to the Target VM server.
|
| agent | You must refer to Connecting the Agent and run the agent on the Target VM server. Jenkins, where the build pipeline runs, does not execute deployments directly. The running agent collects deployment information from the DevOps Console via REST API and executes it.
|
Table. SSH method vs Agent method
Caution
If SSH or an agent runs with root privileges, there is a risk that malicious commands could compromise the entire server.
- It is recommended to use an account other than the root account.
Getting Started with VM Server Group
To start managing VM server groups, follow these steps.
- Click the Admin icon at the top right of the Main page. You will be taken to the Tenant Dashboard page.
- In the left menu, click the Deploy Target > VM Server Group menu. You will be taken to the VM Server Group page.
Add VM server group
To add a VM server group, follow these steps.
- Click the Management icon at the top right of the Main page. You will be taken to the Tenant Dashboard page.
- Click the Deployment Target > VM Server Group menu in the left menu. You will be taken to the VM Server Group page.
- On the VM Server Group page, click the Add button. It navigates to the Add VM Server Group page.
- Enter the basic information, then click the Save button to complete the VM server group configuration.
Item Explanation Server group name Enter the VM server group name. Explanation Please enter a description. type Select the type of VM server group - SSH: Perform deployment using SSH commands when deploying a VM.
- Agent: Perform deployment using an agent when deploying a VM. (Connect Agent)
VM server - Add: Add the VM server that belongs to the VM server group.
- Delete: Check the checkbox of the VM server you want to delete from the VM server group, then click Delete to remove it.
Table. VM Server Group Add Input Items
Add VM server
To add a VM server, you need Manager permission for the corresponding VM server group.
Note
The Add VM Server popup opens differently depending on the type of VM server group.
To add a VM server, follow the steps below.
- Click the Admin icon at the top right of the Main page. Navigate to the Tenant Dashboard page.
- Click the Deployment Target > VM Server Group menu in the left menu. You will be taken to the VM Server Group page.
- VM server group page, click the VM server group in the VM server group list where you want to add a VM server. You will be taken to the VM server group detail page.
- On the VM Server Group Details page, click the Add button. You will be taken to the Add VM Server page.
- Add VM Server page, after entering the basic information, click the Add button to complete the VM server configuration.
Item Explanation Server name Enter the VM server name. Explanation Enter the description. IP Please enter the IP. SSH Port Enter the port of the VM server to use for SSH connections. OS Please enter the OS. Location Please select a location. Authentication information Enter the authentication information for the VM server to be used for SSH connections. Secret Key This is the secret key for authenticating the VM server where the agent is installed. Table. VM Server Additional Input Items
Modify VM server group
To modify a VM server group, you need Manager permission for that VM server group.
To modify a VM server group, follow the steps below.
- Click the Admin icon at the top right of the Main page. You will be taken to the Tenant Dashboard page.
- Click the Deployment Target > VM Server Group menu in the left menu. You will be taken to the VM Server Group page.
- On the VM Server Group page, click the VM Server Group you want to edit from the list. You will be taken to the VM Server Group Details page.
- On the VM Server Group Details page, click the Edit button. You will be taken to the Edit VM Server Group page.
- After completing the edit, click the Save button to finish modifying the VM server group.
Modify VM server
To modify a VM server, you need Manager permission for the corresponding VM server group.
To modify the VM server, follow the steps below.
- Click the Admin icon at the top right of the Main page. You will be taken to the Tenant Dashboard page.
- Click the Deployment Target > VM Server Group menu in the left menu. You will be taken to the VM Server Group page.
- On the VM Server Group page, click the VM Server Group you want to edit from the list of VM server groups. You will be taken to the VM Server Group Details page.
- VM Server Group Details page’s VM server list, click the VM server you want to edit. You will be taken to the VM Server Details page.
- On the VM Server Details page, clicking the Edit button navigates to the VM Server Edit page.
- On the VM Server Edit page, after completing the edit, click the Save button to finish editing the VM server.
Delete VM server group
To delete a VM server group, follow these steps.
- Click the Admin icon at the top right of the Main page. Navigate to the Tenant Dashboard page.
- In the left menu, click the Deploy Target > VM Server Group menu. You will be taken to the VM Server Group page.
- VM server group page’s VM server group list, click the VM server group you want to delete. You will be taken to the VM server group details page.
- On the VM server group details page, click the Delete button to complete the VM server group deletion.
Delete VM server
To delete a VM server, follow these steps.
- Click the Admin icon at the top right of the Main page. You will be taken to the Tenant Dashboard page.
- From the left menu, click the Deploy Target > VM Server Group menu. You will be taken to the VM Server Group page.
- On the VM Server Group page, click the VM server group of the VM server you want to delete from the VM server group list. You will be taken to the VM Server Group Details page.
- On the VM Server Group Details page, click the VM server you want to delete. You will be taken to the VM Server Details page.
- On the VM server details page, click the Delete button to complete the VM server deletion.
Managing VM Server Group Members
To manage members of a VM server group, you need Manager permission for that VM server group.
Add VM server group member
To add a member to a VM server group, follow these steps.
- Click the Admin icon at the top right of the Main page. You will be taken to the Tenant Dashboard page.
- Click the Deployment Target > VM Server Group menu in the left menu. You will be taken to the VM Server Group page.
- VM Server Group page’s VM Server Group list, click the VM Server Group you want to add a member to. You will be taken to the VM Server Group Details page.
- On the VM Server Group Details page, click the User tab.
- When you click the Add button on the User tab, the Add Member popup window opens.
- After completing the setup, click the Confirm button to finish adding a VM server group member. (Managers can modify or delete the server group, and Members can use the server group when creating projects or adding pipelines.)
Delete VM server group member
To delete a member from a VM server group, follow these steps.
- Click the Admin icon at the top right of the Main page. You will be taken to the Tenant Dashboard page.
- Click the Deployment Target > VM Server Group menu in the left menu. You will be taken to the VM Server Group page.
- On the VM server group page, click the VM server group in the list from which you want to delete a member. You will be taken to the VM server group details page.
- On the VM Server Group Details page, click the User tab.
- In the User list, select the checkbox of the user you want to delete.
- Click the Delete button to remove the selected user from the VM server group members.
Manage VM server group permission requests
To approve or reject a VM server group permission request, follow these steps.
- Click the Admin icon at the top right of the Main page. You will be taken to the Tenant Dashboard page.
- Click the Deployment Target > VM Server Group menu in the left menu. You will be taken to the VM Server Group page.
- On the VM Server Group page, click the permission request item of the VM Server Group whose request you want to approve from the VM Server Group list. The displayed number indicates the number of permission requests. The VM Server Group Permission Request Approval popup window opens.
- VM Server Group Permission Request Approval In the popup window, click the request you want to approve or reject.
- After entering your comment, click the Approve or Reject button.
Note
A comment is required to reject a permission request.
View VM Server Group Permission Approval History
To view the VM server group permission request approval history, follow these steps.
- Main page, click the Admin icon at the top right. You will be taken to the Tenant Dashboard page.
- From the left menu, click the Deploy Target > VM Server Group menu. You will be taken to the VM Server Group page.
- On the VM Server Group page, click the VM server group you want to view from the list. You will be taken to the VM Server Group Details page.
- On the VM Server Group Details page, click the Approval History tab.
Disable firewall on VM server
SSH method
SSH-based VM deployment uses Secure Shell (Secure SHell, SSH) to deploy directly from Jenkins → Target VM server.
Reference
Firewall exemption information for deployment
- Source IP: Jenkins IP selected when configuring the pipeline
- Target IP: IP of the VM server to be deployed
To disable the firewall, follow these steps.
- Click the Admin icon at the top right of the Main page. You will be taken to the Tenant Dashboard page.
- Click the Deployment Target > VM Server Group menu in the left menu. You will be taken to the VM Server Group page.
- On the VM Server Group page, click the Firewall Application Guide link. The Firewall Application Guide popup window opens.
- Jenkins firewall information is displayed.
- These details are displayed as the information entered when registering the Jenkins tool, and if no input was provided during tool registration, they may appear as empty values.
- If needed, contact the tool administrator.
Agent-based approach
Agent-based VM deployment requires the agent to run on the target VM server. The running agent collects information from the DevOps Console and proceeds with the deployment.
Note
Firewall exception information for deployment
- Source IP: IP of the VM server to be deployed
- Target IP: DevOps Console IP, (if using Rollback) Rollback Artifact Repository IP
- Click the Admin icon at the top right of the Main page. You will be taken to the Tenant Dashboard page.
- Click the Deployment Target > VM Server Group menu in the left menu. You will be taken to the VM Server Group page.
- On the VM Server Group page, click the Agent Installation Guide link. The Agent Installation Guide popup will open.
- The DevOps Console firewall details, User Guide shortcut, and Agent file download links are displayed.
Integrate Agent
Agent-based VM deployment requires the agent to run on the target VM server. The running agent collects information from the DevOps Console and performs the deployment.
Preparation before agent integration
VM Server Preparation Requirements
Install Java
The agent was written and tested based on Java 8. Install a Java 8 or higher version on the target VM server.
Disable firewall and edit hosts file
The agent collects deployment execution information from the DevOps Console using the REST API, so communication on port 8443 from the Target VM where the agent runs to the DevOps Console is required.
Additionally, when using Rollback, communication with the Rollback Artifact Repository is also required.
If necessary, you may need to disable the firewall or register entries in the hosts file. Refer to the Agent Installation Guide(Agent Method) popup in the DevOps Console for firewall information.
DevOps Console Prerequisites
Prepare authentication key
Target VM server requires agent authentication when the agent runs. Generate a user authentication key and a secret key for authentication. (Manage authentication keys)
Prepare VM server Secret Key
When executing the agent on the target VM server, a Secret Key is required to authorize the VM server that corresponds to the agent.
When adding an agent-type VM server group or VM server, a VM server Secret Key is automatically generated. It can also be viewed later on the VM Server Details page.
Reference
When integrating the agent, not only the entered Secret Key but also the VM server’s actual OS name and IP (IPv4) must match the information registered in the DevOps Console for the integration to work.
Run the agent
Download the agent file
Agent Installation Guide You can download the agent executable from the popup window.
- Click the Admin icon at the top right of the Main page. You will be taken to the Tenant Dashboard page.
- In the left menu, click the Deploy Target > VM Server Group menu. You will be taken to the VM Server Group page.
- On the VM Server Group page, click the Agent Installation Guide link. The Agent Installation Guide popup will open.
- Agent Installation Guide In the popup window, click the Agent File Download button.
- The
deploy-agent.jarfile is downloaded.
Run the agent directly
To run the agent on the target VM server, follow these steps.
- Create a directory on the target VM server.
- Move the
deploy-agent.jarfile to the target directory. - Refer to the Usage below and run the agent.Color mode
usage: java -jar deploy-agent.jar -A <arg> -L <arg> [-P <arg>] -S <arg> -V <arg>
 -A,--accessKey <arg>               AccessKey for HMAC
 -L,--serverUrl <arg>               Api server url
 -P,--loggingConfigFilePath <arg>   Path to the property file with 'java.util.logging' settings
 -S,--secretKey <arg>               SecretKey for HMAC
 -V,--vmSecretKey <arg>             VM SecretKey
usage: java -jar deploy-agent.jar -A <arg> -L <arg> [-P <arg>] -S <arg> -V <arg> -A,--accessKey <arg> AccessKey for HMAC -L,--serverUrl <arg> Api server url -P,--loggingConfigFilePath <arg> Path to the property file with 'java.util.logging' settings -S,--secretKey <arg> SecretKey for HMAC -V,--vmSecretKey <arg> VM SecretKeyRun deployment agent Usage
| Item | Explanation |
|---|---|
| -A, –accessKey | Authentication key generated with the user authentication key |
| -L, –serverUrl | API URL path of the DevOps Console ex) https://{DEVOPS_CONSOLE_URL}:8443/devops-console-api |
| -P, –loggingConfigFilePath | Agent log file path If not entered, the {JAVA_HOME}\jre\lib\logging.properties file will be applied. |
| -S, –secretKey | Secret key generated using the user authentication key |
| -V, –vmSecretKey | Secret key generated on the VM server |
Table. Direct Agent Execution Option Items
Running the Agent Using a Script File
To run the agent on the target VM server using a script, follow these steps.
- Create a directory on the target VM server.
- Move the
deploy-agent.jarfile to the specified directory. - Create the file by referring to the sample execution script below.
- Modify the information of the sample execution script.
DC_URL,ACCESS_KEY,SECRET_KEY,VM_SECRET_KEY
- Run the script.
Linux sample script

Color mode
#!/bin/sh

JAVA_EXE="java"
DC_URL="https://devops-console-url.com:8443/devops-console-api"
ACCESS_KEY="user-access-key"
SECRET_KEY="user-secret-key"
VM_SECRET_KEY="vm-secret-key"

start()
{
  [ -f deploy-agent.jar ] || { echo "ERROR: deploy-agent.jar file does not exist."; exit 1; }
  echo "Starting Deploy Agent..."
  $JAVA_EXE -jar deploy-agent.jar -A $ACCESS_KEY -S $SECRET_KEY -V $VM_SECRET_KEY -L $DC_URL > deploy-agent.log 2>&1 &
  PID=`ps aux | grep 'java -jar deploy-agent.jar' | grep '\-A' | grep '\-S' | grep '\-V' | grep '\-L' | awk '{print $2}'`
  echo "Process ID : $PID"
  echo $PID > deploy-agent.pid
  echo "Done."
}
stop()
{
  echo "Shutdown Deploy Agent..."
  ps aux | grep 'java -jar deploy-agent.jar' | grep '\-A' | grep '\-S' | grep '\-V' | grep '\-L' | awk '{print $2}' | xargs kill
  echo "Done."
}

case "$1" in
  start)
    start
    ;;
  stop)
    stop
    ;;
  restart)
    stop
    start
    ;;
  *)
    echo $ "Usage: $0 {start|stop|restart}"
    exit 1
    ;;
esac
exit 0
#!/bin/sh
JAVA_EXE="java"
DC_URL="https://devops-console-url.com:8443/devops-console-api"
ACCESS_KEY="user-access-key"
SECRET_KEY="user-secret-key"
VM_SECRET_KEY="vm-secret-key"
start()
{
[ -f deploy-agent.jar ] || { echo "ERROR: deploy-agent.jar file does not exist."; exit 1; }
echo "Starting Deploy Agent..."
$JAVA_EXE -jar deploy-agent.jar -A $ACCESS_KEY -S $SECRET_KEY -V $VM_SECRET_KEY -L $DC_URL > deploy-agent.log 2>&1 &
PID=`ps aux | grep 'java -jar deploy-agent.jar' | grep '\-A' | grep '\-S' | grep '\-V' | grep '\-L' | awk '{print $2}'`
echo "Process ID : $PID"
echo $PID > deploy-agent.pid
echo "Done."
}
stop()
{
echo "Shutdown Deploy Agent..."
ps aux | grep 'java -jar deploy-agent.jar' | grep '\-A' | grep '\-S' | grep '\-V' | grep '\-L' | awk '{print $2}' | xargs kill
echo "Done."
}
case "$1" in
start)
start
;;
stop)
stop
;;
restart)
stop
start
;;
*)
echo $ "Usage: $0 {start|stop|restart}"
exit 1
;;
esac
exit 0Windows sample script

Color mode
@ECHO OFF

SET JAVA_EXE="java"
SET DC_URL="https://devops-console-url.com:8443/devops-console-api"
SET ACCESS_KEY="user-access-key"
SET SECRET_KEY="user-secret-key"
SET VM_SECRET_KEY="vm-secret-key"

IF NOT EXIST deploy-agent.jar (
    ECHO "ERROR: deploy-agent.jar file does not exist."
    EXIT /b 0
)
ECHO "Starting Deploy Agent..."
%JAVA_EXE% -jar deploy-agent.jar -A %ACCESS_KEY% -S %SECRET_KEY% -V %VM_SECRET_KEY% -L %DC_URL%

EXIT /b 0
@ECHO OFF
SET JAVA_EXE="java"
SET DC_URL="https://devops-console-url.com:8443/devops-console-api"
SET ACCESS_KEY="user-access-key"
SET SECRET_KEY="user-secret-key"
SET VM_SECRET_KEY="vm-secret-key"
IF NOT EXIST deploy-agent.jar (
ECHO "ERROR: deploy-agent.jar file does not exist."
EXIT /b 0
)
ECHO "Starting Deploy Agent..."
%JAVA_EXE% -jar deploy-agent.jar -A %ACCESS_KEY% -S %SECRET_KEY% -V %VM_SECRET_KEY% -L %DC_URL%
EXIT /b 0Notice
- It can be executed on
java 8or later. - Assume the jar file execution location is
{WORKSPACE}. - Additional directories such as backup and logs are created in
{WORKSPACE}. - If you do not specify
-loggingConfigFilePath, the{JAVA_HOME}\jre\lib\logging.propertiesfile will be used. - Deployment-related files are stored under
{WORKSPACE}/backup. - Only the most recent
3successfully deployed files are retained. deploy-agent.jarfull logs are not saved automatically. Only deployment-related logs from the full logs are saved to{WORKSPACE}/logs.- Logs are retained for
30days.
Agent problem solving
Changing the log level
If needed, you can change the agent log level. Refer to the sample log file below and add the -P, --loggingConfigFilePath options.
Sample log file
Color mode
############################################################
#      Default Logging Configuration File
#
# You can use a different file by specifying a filename
# with the java.util.logging.config.file system property.
# For example java -Djava.util.logging.config.file=myfile
############################################################

############################################################
#      Global properties
############################################################

# "handlers" specifies a comma separated list of log Handler
# classes.  These handlers will be installed during VM startup.
# Note that these classes must be on the system classpath.
# By default we only configure a ConsoleHandler, which will only
# show messages at the INFO and above levels.
handlers= java.util.logging.ConsoleHandler

# To also add the FileHandler, use the following line instead.
#handlers= java.util.logging.FileHandler, java.util.logging.ConsoleHandler

# Default global logging level.
# This specifies which kinds of events are logged across
# all loggers.  For any given facility this global level
# can be overriden by a facility specific level
# Note that the ConsoleHandler also has a separate level
# setting to limit messages printed to the console.
#.level= INFO
.level= FINE

############################################################
# Handler specific properties.
# Describes specific configuration info for Handlers.
############################################################

# default file output is in user's home directory.
java.util.logging.FileHandler.pattern = %h/java%u.log
java.util.logging.FileHandler.limit = 50000
java.util.logging.FileHandler.count = 1
java.util.logging.FileHandler.formatter = java.util.logging.XMLFormatter

# Limit the message that are printed on the console to INFO and above.
#java.util.logging.ConsoleHandler.level = INFO
java.util.logging.ConsoleHandler.level = FINE
java.util.logging.ConsoleHandler.formatter = java.util.logging.SimpleFormatter

# Example to customize the SimpleFormatter output format
# to print one-line log message like this:
#     <level>: <log message> [<date/time>]
#
# java.util.logging.SimpleFormatter.format=%4$s: %5$s [%1$tc]%n

############################################################
# Facility specific properties.
# Provides extra control for each logger.
############################################################

# For example, set the com.xyz.foo logger to only log SEVERE
# messages:
com.xyz.foo.level = SEVERE
############################################################
# Default Logging Configuration File
#
# You can use a different file by specifying a filename
# with the java.util.logging.config.file system property.
# For example java -Djava.util.logging.config.file=myfile
############################################################
############################################################
# Global properties
############################################################
# "handlers" specifies a comma separated list of log Handler
# classes. These handlers will be installed during VM startup.
# Note that these classes must be on the system classpath.
# By default we only configure a ConsoleHandler, which will only
# show messages at the INFO and above levels.
handlers= java.util.logging.ConsoleHandler
# To also add the FileHandler, use the following line instead.
#handlers= java.util.logging.FileHandler, java.util.logging.ConsoleHandler
# Default global logging level.
# This specifies which kinds of events are logged across
# all loggers. For any given facility this global level
# can be overriden by a facility specific level
# Note that the ConsoleHandler also has a separate level
# setting to limit messages printed to the console.
#.level= INFO
.level= FINE
############################################################
# Handler specific properties.
# Describes specific configuration info for Handlers.
############################################################
# default file output is in user's home directory.
java.util.logging.FileHandler.pattern = %h/java%u.log
java.util.logging.FileHandler.limit = 50000
java.util.logging.FileHandler.count = 1
java.util.logging.FileHandler.formatter = java.util.logging.XMLFormatter
# Limit the message that are printed on the console to INFO and above.
#java.util.logging.ConsoleHandler.level = INFO
java.util.logging.ConsoleHandler.level = FINE
java.util.logging.ConsoleHandler.formatter = java.util.logging.SimpleFormatter
# Example to customize the SimpleFormatter output format
# to print one-line log message like this:
# <level>: <log message> [<date/time>]
#
# java.util.logging.SimpleFormatter.format=%4$s: %5$s [%1$tc]%n
############################################################
# Facility specific properties.
# Provides extra control for each logger.
############################################################
# For example, set the com.xyz.foo logger to only log SEVERE
# messages:
com.xyz.foo.level = SEVEREIf the IP is not recognized
When integrating the agent, not only the entered Secret Key but also the VM server’s actual OS name and IP (IPv4) must match the information registered in the DevOps Console for the integration to work.
For VM servers with some multi-network devices installed, the agent may fail to recognize the IP correctly. In such cases, add the IP and hostname settings to the /etc/hosts file as shown below.
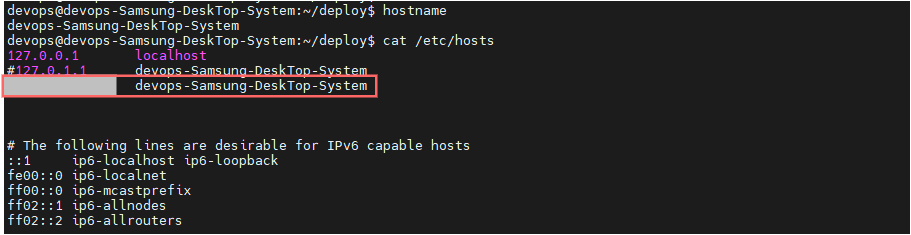
2.10.3 - Request Permission
You can request permission to use the K8S clusters, namespaces, and VM server groups managed as deployment targets in the DevOps Console.
Getting Started with Permission Request
To begin the permission request, follow the steps below.
- Click the Admin icon at the top right of the Main page. You will be taken to the Tenant Dashboard page.
- From the left menu, click the Deployment Target > Permission Request menu. The Permission Request screen appears.
Apply for K8S cluster permissions
To apply for K8S cluster permissions, follow the steps below.
- Click the Admin icon at the top right of the Main page. You will be taken to the Tenant Dashboard page.
- From the left menu, click the Deployment Target > Permission Request menu. The Permission Request screen appears.
- On the Permission Request screen, click the K8S Cluster tab. The K8S Cluster screen appears.
- On the K8S Cluster screen, click the Apply button. The K8S Cluster Permission Request popup window opens.
- K8S Cluster Permission Request Search for the K8S cluster to request permission in the popup window.
- Enter the reason for the application and click the Add button.
- After selecting the permissions for the added K8S cluster, click the Save button.
Cancel K8S cluster permission request
To cancel a K8S cluster permission request, follow these steps.
- Click the Admin icon at the top right of the Main page. You will be taken to the Tenant Dashboard page.
- From the left menu, click the Deployment Target > Permission Request menu. The Permission Request screen appears.
- On the Permission Request screen, click the K8S Cluster tab. The K8S Cluster screen appears.
- On the K8S cluster screen, select a cluster and click the Cancel button.
Note
Only requests with status
REQUESTED display the Cancel button.Apply for namespace permission
To request namespace permissions, follow these steps.
- Click the Admin icon at the top right of the Main page. You will be taken to the Tenant Dashboard page.
- From the left menu, click the Deployment Target > Permission Request menu. The Permission Request screen appears.
- On the Permission Request screen, click the Namespace tab. The Namespace screen appears.
- On the Namespace screen, click the Apply button. The Namespace Permission Request popup opens.
- Namespace Permission Request In the popup, search for the K8S cluster that contains the namespace for which you are requesting permission.
- Select a namespace, enter the request reason, and then click the Add button.
- After selecting the permissions for the added namespace, click the Save button.
Cancel namespace permission request
To cancel a namespace permission request, follow these steps.
- Click the Admin icon at the top right of the Main page. You will be taken to the Tenant Dashboard page.
- From the left menu, click the Deployment Target > Permission Request menu. The Permission Request screen appears.
- On the Permission Request screen, click the Namespace tab. The Namespace screen appears.
- On the Namespace screen, select a namespace and click the Cancel button.
Note
Only applications with status
REQUESTED display the Cancel button.Apply for VM server group permission
To apply for VM server group permissions, follow the steps below.
- Main page, click the Admin icon at the top right. You will be taken to the Tenant Dashboard page.
- From the left menu, click the Deployment Target > Permission Request menu. The Permission Request screen appears.
- On the Permission Request screen, click the VM Server Group tab. The VM Server Group screen appears.
- On the VM Server Group screen, click the Apply button. The VM Server Group Permission Request popup opens.
- VM Server Group Permission Request Search for the VM server group for which you want to request permission in the popup window.
- Enter the reason for application and click the Add button.
- After selecting the permissions for the added VM server group, click the Save button.
Cancel VM server group permission request
To cancel the VM server group permission request, follow the steps below.
- Click the Admin icon at the top right of the Main page. You will be taken to the Tenant Dashboard page.
- From the left menu, click the Deployment Target > Permission Request menu. The Permission Request screen appears.
- On the Permission Request screen, click the VM Server Group tab. The VM Server Group screen appears.
- VM server group on the screen, select the VM server group and click the Cancel button.
Reference
Only applications with status
REQUESTED display the Cancel button.2.11 - Release Management
2.11.1 - Release Management
A release is a task that performs the actual deployment process using a workflow.
Users with Owner, Master, or higher permissions within a project group can configure and apply a release process appropriate for the project.
Getting Started with Release Management
To start release management, follow the steps below.
- Main page, click the Release Management icon next to the project group name. You will be taken to the Release Management page.
- From the left menu, click the Release Management > Release Management menu. You will be taken to the Release Management page.
Create Release
Release creation proceeds in the following order.
Progress Order
Enter basic information - Configure workflow - Review/edit task - Configure release - Review summary information
Pre-release checklist
Before creating a release, verify the following items.
Item | Required | Explanation |
|---|---|---|
| Workflow | Y | The workflow must be created as a release process template before creating a release. Please refer to Workflow Management. |
| Approval template | N | You can preconfigure the approval line and approval content to be used in a release in the approval template. Please refer to Approval Template Settings. |
Table. Pre-release checklist
Getting Started with Release Creation
Start creating a release on the Release Management screen
To create a release, follow the steps below.
- On the Main page, click the Release Management icon next to the project group name. You will be taken to the Release Management page.
- From the left menu, click the Release Management > Release Management menu. You will be taken to the Release Management page.
- Click the Create Release button.
Start creating a release from the workflow list
To create a release, follow the steps below.
- On the Main page, click the Release Management icon next to the project group name. You will be taken to the Release Management page.
- Click the Release Management > Workflow Management menu in the left menu.
- In the Workflow list, click the More icon. In the More menu, click the Release with this workflow option.
Start creating a release from the workflow detail screen
To create a release, follow the steps below.
- On the Main page, click the Release Management icon next to the project group name. You will be taken to the Release Management page.
- On the Release Management page, click the Release Management > Workflow Management menu in the left menu.
- In the workflow list, click the workflow you want to view in detail.
- On the Workflow Details screen, click the Release with this workflow menu.
Enter basic release information
Enter the basic release information.
- Click the Start button.
Workflow Settings
- Select the workflow to perform the release. If you started creating a release through Workflow Management, the corresponding workflow is automatically selected.
- If you set an environment variable in the workflow, verify the variable and modify its value.
- Click the Next button.
Task view/edit
- Check the tasks that will be performed in the release.
- Edit or delete the task as needed.
- If you have completed checking/editing all tasks, click the Next button.
Release Settings
- Add the person responsible for receiving email/messenger notifications when the release or task status changes.
- Select whether to automatically end the release when all tasks are completed.
- Click the Next button.
Summary information
- Check the release creation summary information and click the Done button.
- In the confirmation popup, click the Confirm button to complete the creation.
- When the release creation is complete, the Release Details screen appears.
Release Detail Lookup
To view release details, follow these steps.
- In the Release list, click the release you want to view in detail.
- The Release Details screen appears.
Proceed with Release
Ongoing release
To proceed with the release, follow the steps below.
- In the Release list, click the release card with status In Progress.
- Release Details The screen appears.
- You can execute the release tasks included in the release.
Proceed with task
Only the person assigned to the release task or the release manager registered when the release is created can proceed with the task. To proceed with the release task, follow the steps below.
- If you are the task owner or the release owner, click the Task card. The task information appears in the task edit screen on the right.
- Pre-task Editing: You can edit some items of the task before it starts. After completing the edits, click the Apply button.
task Editable items User Estimated time required
- Description
- Person in charge
- Receive email upon completion
- AttachmentJenkins Parameters
- Person in charge
- Email recipient upon completionBlue/Green transition Person in charge
- mail recipient upon completionImage repository replication Source tag
- Target tag
- Person in charge
- Email recipient upon completionSCM repository release SCM tag
- person in charge
- email recipient upon completionCreate a GIT branch Project
- Repository branch
- New branch
- Person in charge
- Email recipient upon completionInternal approval JIRA Version Issue
- Approver
- Approval Title
- Approval Content
- Assignee
- Email Recipient on CompletionHelm release SET VALUES
- Person in charge
- Receive email upon completionJIRA release JIRA Project
- JIRA Version
- Assignee
- Receive email upon completionTable. Items that can be edited before starting the task - Task Start: Click the Start button to begin the task. If Task Auto-Run is selected, the task will start automatically without clicking the Start button.
- Task in progress: While the task is in progress, the status bar at the top of the task is displayed as In progress.
Note
If a task is in progress, all tasks except the User task cannot be edited.
However, for a User task, you can still modify the estimated time, description, attachments, and other details even while it is in progress.
However, for a User task, you can still modify the estimated time, description, attachments, and other details even while it is in progress.
- Task Completion: Click the Complete button to complete the task. Some tasks cannot be completed by the user clicking the Complete button; the system automatically checks the status and completes them.
- Proceed with the other tasks in the same way and complete them.
Pause/Restart/Skip Task
Only the person assigned to the task or the release manager registered when creating the release can pause, restart, or skip.
To stop, restart, or skip a task, follow these steps.
- If you are the task owner or the release owner, click the More icon of the task.
- In the More menu, click the Stop/Restart/Skip menu.
Note
Depending on the task’s status, some menus may be unavailable.
Complete the release
The release manager can complete the release. The final outcome of a release is classified into three categories: success, failure, or stop.
- Success: After all release tasks are completed, the release manager marks the release as successful.
- Failure: After all release tasks are completed, the release manager marked the release as failed.
- Stop: There is at least one incomplete task in the release, but the release manager stopped the release.
Complete the release as success/failure
To complete the release, follow the steps below.
- Click the Release card with status In Progress in the Release list.
- Release Details screen appears.
- Confirm that all tasks included in the release have been completed.
- Click the ””Release Complete”” button.
- Release Complete popup appears, select Release Result (Success/Failure) and click the Complete button to finish the release.
Stop the release
To stop without completing the release, follow these steps.
However, according to the Release Management of the tenant common settings, approval is required when stopping.(테넌트 공통설정 관리하기)
- From the Release list, click the release card with status In Progress.
- The Release Details screen appears.
- Confirm that none of the tasks included in the release are in progress, and that any remaining tasks have not been started.
- Click the Release Complete button.
- Release Complete popup opens, and the release result is displayed as Interrupted. Click the Complete button to stop the release.
- If you set approval required on stop in the tenant common settings, clicking the Release Complete button opens the Release Stop Approval popup.
Delete release history
If the release status is success/failure/aborted, you can delete the release history. Releases in progress cannot be deleted.
Note that the delete function may not be visible depending on the Release Management setting in the tenant common settings. (Manage Tenant Common Settings)
To delete the release history, follow these steps.
- To delete the release history, use one of the following methods.
- On the Release Details screen, click the Delete button.
- Click the More icon in the release list. In the More menu, click the Delete menu.
- Delete Release History popup appears, and please enter the release name to confirm deletion.
- Click the Confirm button to complete the deletion.
2.11.2 - Workflow Management
A workflow is a collection of tasks and task groups of various types, and it must be configured before creating a release.
A workflow is a release process template that helps by turning a series of tasks required for the build-to-deployment stages into tasks, assigning owners to each task, and enabling sequential task execution during deployment.
Getting Started with Workflow Management
To begin workflow management, follow these steps.
- On the Main page, click the Release Management icon next to the project group name. You will be taken to the Release Management page.
- Release Management page, click the Release Management > Workflow Management menu. The Workflow Management page appears.
Create workflow
Start Creating a Workflow
To create a workflow, follow the steps below.
- Workflow Management page, click the Create Workflow button. The Create Workflow popup opens.
- Workflow Creation Enter the information in the popup window, select the project to be released via the workflow, and click the Start button. You will be taken to the Workflow Creation page.
- Edit the workflow on the Create Workflow screen.
Edit basic information
To modify the workflow’s basic information, follow these steps.
- On the Create Workflow screen, click the Edit Basic Information button. The Edit Basic Information popup opens.
- Edit Basic Information In the popup window, edit the information and click the Save button.
- Save Confirmation when the popup opens, click the Confirm button to complete the edit.
Modify Environment Variables
You can manage variable values that are available throughout the entire workflow by using workflow environment variables.
Follow these steps to modify the workflow environment variables.
- On the Create Workflow screen, click the Edit Environment Variables button. The Edit Environment Variables popup opens.
- Edit Environment Variables Edit the environment variables in the popup window.
- Click the Add button to add an environment variable.
- Enter key/value.
- Click the X icon to delete the environment variable.
- After completing the environment variable edit, click the Save button.
- In the confirmation popup, click the Confirm button to complete the edit.
Add Task
To add a task in the workflow, follow these steps.
- On the Create Workflow screen, add a task using one of the following methods.
- Click the Task button to add a task at the very bottom of the workflow.
- Click the task header to add a task above the current task.
- Click the bottom of the task to add a task below the current task.
- Set the task in the task editing screen on the right.
- Click the Apply button to apply the task to the workflow.
Item Explanation Add task Add a task. Add task at the top Add a task at the top. Add task at the bottom Add a task at the bottom. Task editing Edit the selected task. Table. Workflow creation screen items
Information
For detailed information about tasks you can add, refer to the 태스크.
Add task group
By using task groups, you can manage the execution (sequential or parallel) of related tasks and their prerequisites.
To add a task group in a workflow, follow these steps.
- On the Create Workflow screen, click the Task Group button.
- Click the generated new task group card.
- In the task group edit screen on the right, set the task group and click the Apply button.
Item Explanation Add task group Add a task group. Task group Click to display the task group edit screen. Task group name Please enter the task group name. Task in progress Select the task execution mode within the task group - Parallel: Execute tasks in the group simultaneously.
- Sequential: Execute tasks in the group sequentially.
Conditional execution Select whether to use the execution condition for the task group.
- ON: Set the task group execution according to the status of preceding tasks.
- OFF: The task group’s tasks run regardless of the status of preceding tasks.Predecessor task status for task group execution Execute the current task group when the selected preceding task is in the specified state.
If multiple preceding tasks are selected, it operates as an AND condition.Receive email upon completion Search for and enter the recipient to receive an email when the task completes successfully - Email recipients can be searched among project group members.
Table. Workflow task group additional items
Edit task, task group
To edit tasks and task groups in a workflow, follow these steps.
- Click the Task, Task Group cards you want to edit in the workflow.
- The Task, Task Group Edit screen appears on the right.
- After completing the editing of tasks and task groups, click the Apply button to apply the tasks and task groups to the workflow.
Delete task, task group
To delete tasks and task groups in a workflow, follow these steps.
- In the workflow, click the Task, Task Group card you want to edit. The Task, Task Group Edit screen appears on the right.
- On the Task, Task Group Edit screen, click the Delete button.
- In the confirmation popup, click the Confirm button to complete the deletion of the task and task group.
Complete workflow creation
To complete workflow creation after adding tasks and task groups to the workflow, follow these steps.
- On the Workflow Creation screen, click the Save button. The Workflow Save popup opens.
- In the Save Workflow popup, click the Confirm button to complete workflow creation.
Workflow Detail View
To view the workflow in detail, follow the steps below.
- On the Workflow Management page, click the workflow you want to view in detail.
- The Workflow Details screen appears.
Modify workflow
To modify the workflow, follow these steps.
- To display the workflow edit screen, use one of the following methods.
- On the Workflow Details screen, click the Edit button.
- On the Workflow List screen, click the More icon. In the More menu, click the Edit menu.
- On the Workflow Edit screen, edit the workflow. Editing is the same as Create Workflow.
- After completing the workflow edit, click the Save button. The Workflow Save popup opens.
- In the Workflow Save popup, click the Confirm button to complete editing the workflow.
Delete workflow
To delete a workflow, follow the steps below.
- To delete a workflow, use one of the following methods.
- On the Workflow Details screen, click the Delete button.
- On the Workflow List screen, click the More icon. From the More menu, click the Delete menu.
- When the Workflow Deletion popup opens, please enter the workflow name to confirm deletion.
- In the Workflow Delete popup, click the Confirm button to complete the deletion.
Replicate workflow
You can duplicate a workflow to create a new workflow.
To duplicate the workflow, follow these steps.
- On the Workflow List screen, click the More icon. In the More menu, click the Clone this workflow menu. The Workflow Clone popup opens.
- Workflow duplication Enter the information in the popup window and click the Start button. Workflow creation screen appears.
- On the Workflow Creation screen, edit the workflow. Editing is the same as Create Workflow.
- On the Create Workflow screen, after completing the edit, click the Save button.
- In the Save Workflow popup, click the Confirm button to complete workflow creation.
Create a Release with a Workflow
Note
For detailed information on creating a release, see Getting Started with Release Management.
On the Workflow Management screen, you can create a new release.
To create a release using a workflow, follow these steps.
- To create a release with a workflow, use one of the following methods.
- On the Workflow Details screen, click the Release with this workflow button.
- On the Workflow List screen, click the More icon. In the More menu, click the Release with this workflow menu.
- Create Release screen appears, and you can create a release.
2.11.3 - Approval Template Settings
The approval template can be used in workflows and releases, and it includes an approval line and approval content.
| Item | Explanation |
|---|---|
| Approval line | You can predefine frequently used approval lines. |
| Approval content | You can already set up frequently used approval content. |
Table. Approval Template Provided Items
Getting Started with Approval Template Configuration
To begin setting up the approval template, follow these steps.
- On the Main page, click the Release Management icon next to the project group name. You will be taken to the Release Management page.
- On the Release Management page, click the Release Management > Approval Template Settings menu in the left menu.
Approval line
Getting Started with Approval Line
To start using the approval line, follow the steps below.
- On the Main page, click the Release Management icon next to the project group name. You will be taken to the Release Management page.
- On the Release Management page, click the Release Management > Approval Template Settings menu in the left menu. The Approval Template Settings screen appears.
- On the Approval Template Settings screen, click the Approval Line tab.
Add approval line template
To add an internal approval line template, follow the steps below.
You can create an approval line for users who are Owners or Masters within the project group via the internal approval line.
- On the Approval Template Settings screen, click the Internal Approval Line tab. The Internal Approval Line screen appears.
- On the Internal approval line screen, click the Add button. The Add approval line template popup opens.
- Add Approval Line Template Enter the information in the popup window and click the Save button.
Item Explanation Template name Please enter the template name. Approval Officer Search for the approver and add them to the approval line. - Only project group members can be searched and added as approvers.
Approval editing - Change of approval, agreement, and notification
- Change approval order
- Delete approver
Table. Additional Input Items for Approval Line Template
Approval Line Details
To view the approval line in detail, follow these steps.
- Internal approval line screen: click the approval line you want to view in detail.
- Approval Line Details screen appears.
Edit approval line
To modify the approval line, follow the steps below.
- On the Internal approval line screen, click the approval line you want to edit. The Approval line details screen will appear.
- On the Approval Line Details screen, click the Edit button. The Edit Approval Line screen appears.
- On the Edit Approval Line screen, after completing the approval line modification, click the Save button.
- In the confirmation popup, click the Confirm button to complete the edit.
Delete Approval Line
To delete the approval line, follow these steps.
- To delete an approval line, use one of the following methods.
- On the Approval Line Details screen, click the Delete button.
- In the Approval line list, select the approval line you wish to delete, then click the Delete button.
- In the confirmation popup, click the Confirm button to complete the deletion.
Manage approval content
Getting Started with Approval Content
To start using the approval content, follow the steps below.
- On the Main page, click the Release Management icon next to the project group name. You will be taken to the Release Management page.
- Release Management page, click the Release Management > Approval Template Settings menu in the left menu. The Approval Template Settings screen appears.
- Approval Template Settings on the screen, click the Approval Content tab.
Create approval content template
To add an approval content template, follow these steps.
- On the Approval Template Settings screen, click the Approval Content tab. The Approval Content screen appears.
- On the Approval Content screen, click the Add button. The Add Approval Content Template popup opens.
- Add approval content template Enter the information in the popup window and click the Save button.
- In the confirmation popup, click the Confirm button to complete the addition.
View approval details
To view the approval details in detail, follow these steps.
- On the Approval Content screen, click the approval item you wish to view in detail.
- Approval Details screen appears.
Modify approval content
To edit the approval content, follow the steps below.
- On the Approval Content screen, click the approval content you want to edit.
- When the Approval Details screen appears, click the Edit button. The Edit Approval Details screen appears.
- On the Edit Approval Content screen, after completing the approval content edit, click the Save button.
- In the confirmation popup, click the Confirm button to complete the edit.
Delete approval content
To delete the approval content, follow the steps below.
- To delete the approval content, use one of the following methods.
- On the Approval Details screen, click the Delete button.
- On the Approval Content List screen, select the approval content you want to delete and click the Delete button.
- In the confirmation popup, click the Confirm button to complete the deletion.
2.11.4 - Task
A task is the smallest executable unit that composes a workflow (or release), and each task can perform its designated operation.
A workflow (or release) consists of one or more tasks.
You can add and edit tasks from Release Management, Workflow Management.
Task List
The tasks provided in release management are as follows.
item | Explanation |
|---|---|
| Jenkins | You can run it by integrating with a Jenkins pipeline that belongs to the DevOps Console project or a Jenkins job that is separate from the DevOps Console project. |
| User | You can register tasks that users perform manually, rather than integrating with a specific tool. |
| Blue/Green switch | You can integrate with Blue/Green deployments that belong to the DevOps Console project. |
| Internal approval | You can approve through a USER belonging to the DevOps Console project group. |
| Helm release | You can integrate with Helm releases belonging to the DevOps Console project. |
| Image repository replication | You can replicate the image to another repository. |
| SCM repository release | Release using the SCM repository’s release feature. |
| Create a Git branch | You can copy a specific branch of a repository belonging to the DevOps Console project and create a new branch. |
| JIRA release | You can release or unrelease a specific version in a JIRA project. |
| VM deployment | This task can deploy a VM deployment group that is in the Build Completed state, or roll back to a previous version. |
Table. Project Creation Basic Information Input Items
Common task items
You can add and edit tasks in workload (or release) management. When you select a task, the Task Edit screen appears, and the Task Edit screen is composed as follows.
| Item | Explanation |
|---|---|
| Task name | Please enter the task name. |
| Task type | Please select the task type. |
| Auto-run | Select whether to run automatically after the preceding task is completed.
|
| Conditional execution | Select whether to allow the current task to run based on the status of the preceding task (success/failure/skip).
|
| Conditional execution item |
|
| person in charge | Search for and enter the personnel who will perform the task among the members of the project group.
|
| Assign yourself as the person in charge | Click to set the current task’s assignee to yourself. |
| Receive email upon completion | Search for and enter the recipient who will receive an email when the task is completed.
|
| Delete | Delete the current task. |
| Apply | Apply the current task settings to the workflow. |
Table. Task Common Items
Jenkins task
This is a task that can run a build pipeline added to the project or a Jenkins Job not registered in the DevOps Console.
| Item | Explanation |
|---|---|
| Jenkins Type | Select Jenkins Type
|
| Project | Please select the project to run the pipeline. |
| Jenkins URL | Select the URL of the Jenkins tool registered for the chosen project. |
| Job | Select a job from the selected Jenkins URL. Jobs that the current user has permission to run are displayed in the list. |
| Parameter | Enter the parameters required to run the build pipeline
|
| Jenkins Job URL | Enter the URL of a Jenkins Job that is not registered in the DevOps Console. |
| Jenkins ID Jenkins Password or Token |
|
Table. Jenkins task items
User Task
This task registers cases where the user has work that must be performed manually.
| Item | description |
|---|---|
| Estimated time | Please enter the estimated time required for the User task. |
| Explanation | Enter the tasks that the responsible person must perform according to the manual. |
Table. User task items
Blue/Green transition task
This is a task that can be integrated with the project’s Blue/Green deployment.
| Item | Explanation |
|---|---|
| Project | Select the project to perform the blue-green transition. |
| Blue‑green list | Select the bluegreen you want to run in the task from the list of bluegreens in the selected project. |
Table. Blue/Green transition task items
If the Blue/Green switch task is performed during a release, you can carry out the following actions.
| Item | Explanation |
|---|---|
| Check operational status | Click the Check operation status button to open the Blue/Green operation status check popup. |
| Conversion | Check the status of operation/operation standby and click the Switch button. Operation and operation standby will be switched. |
| Completed | Check the blue/green transition result and click the Complete button to complete the blue/green task. If there is a problem with the transition, you can click the Check operation status button to revert to the previous state. |
Table. Possible task items in Blue/Green transition
Internal approval task
This task enables approval by a USER who belongs to the project group.
Item | Explanation |
|---|---|
| Include JIRA version issues | Select whether to include JIRA Version issues in the approval content. When proceeding with a release, select the JIRA Version set in the project group; the list of all issues corresponding to that Version will be automatically added to the approval text. |
| JIRA Project | Select a JIRA Project. JIRA Project you can select from the JIRA Projects that have been registered. |
| Approval line template | Select the approval line you added in Approval Template Settings and add approvers in bulk. |
| Approver | Search for the approver and add them. You can search for members of the project group and add them. |
| Approver List | Modify the approver list by changing the approval type, adjusting the order, or deleting entries. |
| Approval content template | Select the approval content added from Manage Approval Content and add a title and description. |
| Approval content | Enter the approval title and approval content. |
Table. Internal Approval Task Items
When the internal approval task runs in a release, you can perform the following actions.
- Approver: Can approve or reject the approval.
- Approval: Click the Approve button. In the Approve confirmation popup, enter the approval comments and click the Confirm button to approve the document.
- Reject Approval: Click the Reject button. In the Reject confirmation popup, enter your approval comments and click the Confirm button to reject the approval.
- Other roles: You can check the approval status.
Helm release task
This is a task that can be linked with Helm releases belonging to the project.
Item | Explanation |
|---|---|
| Auto shutdown | After the Helm release execution is completed, select whether to automatically terminate the task. |
| project | Select the project to perform the Helm release. |
| Helm release | Select the Helm release to use in the task during the project’s Kubernetes deployment. workload, Helm release can be selected. Information about the selected Helm release is displayed. |
| SET_VALUES (Helm release) | It is displayed when the previously selected Helm release is Helm release.
|
| SET_VALUES (workload) | If the Helm release selected earlier is a workload, display
|
Table. Helm Release Task Items
When the Helm release task runs in a release, you can view the following information on the task edit screen.
When you select Helm Release, you can view the following items.
| Item | Explanation |
|---|---|
| Current status | Displays the current Helm release status. |
| Runtime status | Displays the result of the Helm release execution. |
| Details | Displays the Helm release history. View icon can be clicked to check the Values.yaml used in the Helm release by revision. To roll back to a previous deployment, click the Rollback button. In the confirmation popup, click the Confirm button to complete. |
Table. Items displayed for Helm release type
When you select 워크로드, you can see the following items.
| Item | Explanation |
|---|---|
| Runtime status | Displays the result of the Helm release execution. |
| Details | Displays the deployment history. To roll back to a previous deployment, click the Rollback button. In the confirmation popup, click the Confirm button to complete. |
Table. Project creation basic information entry items
Image Repository Replication Task
This task can replicate an image to another repository.
Source image → (copy) Target image
Item | Explanation |
|---|---|
| Type | Select Type
|
| Source project | Select a project with a registered source image repository. |
| Source image repository | Select the image repository registered in the Source project. |
| Source tag | Enter the Source tag. tag can be set by entering a value directly or by selecting an environment variable. Refer to Modify environment variables for environment variables. |
| Target project | Select a project where the target image repository is registered. |
| Target image repository | Select the image repository registered in the Target project. |
| Target tag | Enter the target tag. |
| Source Host | Enter the Source Host domain name. |
| Source Path | Please enter the Source Path. |
| Source ID Source Password | Enter the account information for the source image repository. After entering, click the Connection Test button to verify that the connection is successful. |
| Target Host | Target Host Please enter the domain name. |
| Target Path | Please enter the target path. |
| Target ID Target Password | Enter the account information for the target image repository. After entering, click the Connection Test button to verify that the connection is successful. |
Table. Image Repository Replication Task Items
SCM repository release task
This task executes a release of the SCM repository.
SCM repository releases perform release creation or tag creation depending on the SCM repository tool (GitHub, GitLab, other Git repositories).
| Item | Explanation |
|---|---|
| Git Type | Select Git Type
|
| project | Select a project with a registered code repository. |
| SCM repository | Select the code repository registered in the project. |
| SCM branch | Select a branch of the code repository. |
| SCM tag | Enter the tags to create in the release. |
| Git URL | Enter the Git URL. |
| Git ID Git Password or Token | Enter your Git account information. |
| branch | Enter the Git branch. After entering, click the Connection Test button to verify that the connection is successful. |
Table. SCM Repository Release Task Items
GIT branch creation task
This is a task that can copy a specific Git branch and create a new branch.
| Item | description |
|---|---|
| Git Type | Select Git Type
|
| project | Select a project with a registered code repository. |
| repository | Select the code repository registered in the project. |
| branch | Select the existing branch that the newly created branch will reference. |
| new branch | Enter the name of the new branch. |
| Apply Protected | Select whether to apply the protection rule to the newly created branch. |
| Protection Rule | When applying a Protection Rule, set the Merge and Push permissions.
|
| Git URL | Enter the Git URL. |
| Git ID Git Password or Token | Enter your Git account information. |
| branch | Enter the existing branch that the newly created branch will reference. After entering, click the Connection Test button to verify that the connection is normal. |
Table. GIT branch creation task items
JIRA release task
This is a task that can set a specific version of a JIRA project to Released or Unreleased.
| Item | Explanation |
|---|---|
| JIRA project | Select a JIRA project registered in the project group. |
| JIRA URL | You can view the Server of the selected JIRA project. (Readonly) |
| JIRA Version | Select the Version of the JIRA project
|
Table. JIRA Release Task Items
If a JIRA release task is in progress in the release, you can perform the following actions.
| Item | description |
|---|---|
| status | When you click the Status button, the JIRA release popup opens. |
| State change | Click the Change Status button to change the JIRA version to Released, or change it back to Unreleased. |
| Confirm | Confirm click the button to complete the JIRA release. |
Table. Actions that can be performed in JIRA release tasks
VM deployment task
a task that can deploy a VM deployment group in the Build Complete state or roll back to a previous version.
| Item | description |
|---|---|
| project | Please select a project. |
| deployment group | Select a deployment group
|
| Deployment group information | The contents stored in the deployment group are set automatically. |
Table. VM Deployment Task Items
2.11.5 - JIRA Project
Users can manage the JIRA project information used in JIRA tasks for release management.
Note
This feature is supported only when the JIRA tool is registered in the system.
Starting a JIRA Project
To start JIRA project management, follow the steps below.
- Main page, click the Project Group Management icon of the project group. You will be taken to the Project Group Dashboard page.
- Click the JIRA Project menu on the Project Group Dashboard page. The JIRA Project screen appears.
Add JIRA project
To add a JIRA project, follow these steps.
- On the JIRA project screen, click the Add button. The Add JIRA project popup opens.
- Add JIRA Project In the popup window, after entering the JIRA URL and authentication information, click the Connection Test button.
- Select JIRA Project and click the Save button.
Item Explanation JIRA URL Select the JIRA URL - A list of JIRA tools available in the project group is displayed.
Tool Registration Shortcut If you need to register a JIRA tool, you can go directly to the tool registration page. Authentication information Enter authentication credentials. JIRA project Select JIRA project - A list of projects accessible based on the JIRA URL and authentication information is displayed.
- Only projects for which you have administrator rights in JIRA can be selected.
Table. JIRA Project Additional Input Items
Delete JIRA project
To delete a JIRA project, follow the steps below.
- On the JIRA Project screen, select the checkbox of the item you want to delete, then click the Delete button.
- Click the Confirm button in the confirmation popup to complete the deletion of the JIRA project.
2.12 - Release Note
DevOps Console
2025.07.01
FEATURE
v1.16.0 Changes- Built-in user management and authentication features have been added.
- Manage and authenticate users using
DevOps IDP.
- Manage and authenticate users using
- The Jenkins DevOps Plugin installation and update features have been added.
- You can verify the installed Jenkins version, the installation status and version information of recommended plugins, and perform installation and updates.
- From the tenant dashboard, you can download the billing base data in the status data as an Excel file.
2024.10.24
FEATURE
v1.15.0 ChangesA supported Helm chart repository has been added.
- You can now use the OCI standard Helm chart repository.
The pipeline feature has been added.
- Supports creating multi-branch pipelines.
- Note: Multibranch Pipeline
Other changes
- A new item that can be viewed on the dashboard has been added.
2024.10.24
CHANGED
v1.15.0 Changes- The permission management feature for deployment targets has been improved.
- Deployment target(K8S cluster, namespace, VM server group) now has a permission request/approval feature added.
- Note: Permission Request
- The management and organization features for tools/templates have been improved.
- It has been improved to allow the transfer of the organization that manages tools and templates (tenants, project groups).
Note
- Other changes
- The supported versions of the image registry tool
Harborhave been expanded. (~2.10) - It is no longer possible to create a Job directly in
Jenkins. (Jobs can only be created through the DevOps Service)
- The supported versions of the image registry tool