MariaDB(DBaaS) is an open-source relational database(RDBMS) with high compatibility with MySQL. Samsung Cloud Platform provides an environment that can automate MariaDB installation and perform management functions for operation through a web-based console.
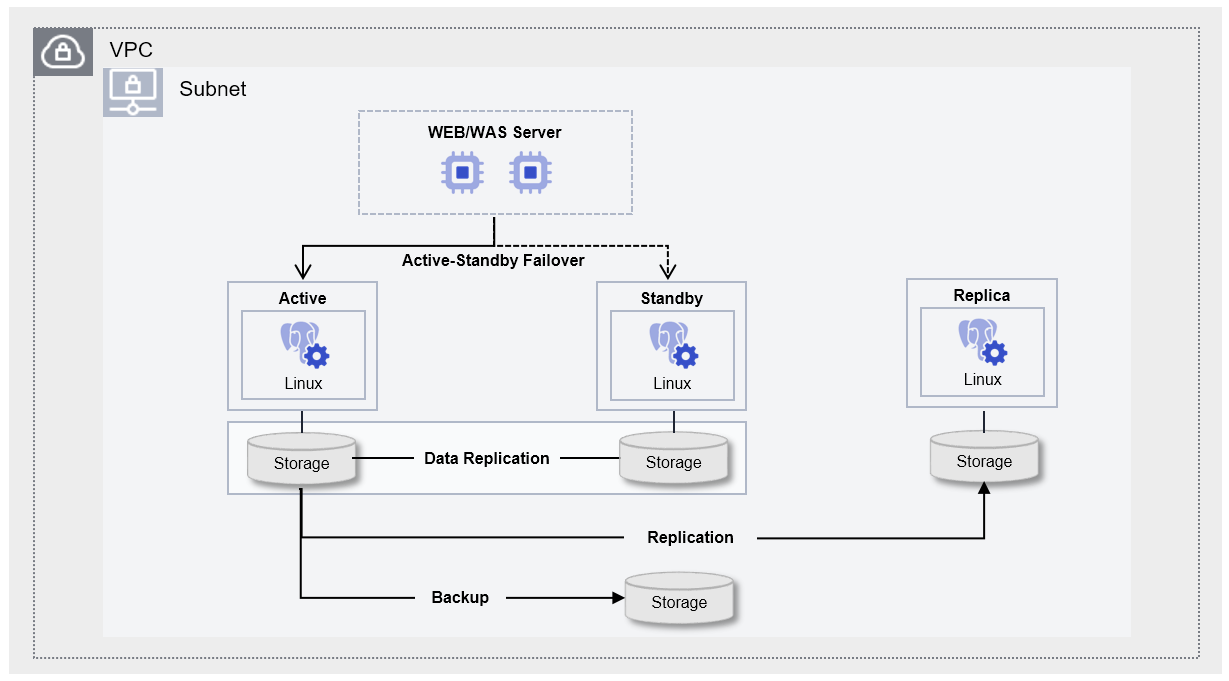
MariaDB(DBaaS) is designed as a high‑availability architecture that performs storage‑based data replication and minimizes failover time. To prevent data loss, when the contents of the Active server change, they are synchronously replicated to the Standby server, and the read‑only server called Replica, used for read load balancing and disaster recovery (DR), is provided up to five instances. Additionally, it provides an automatic backup feature at user-specified times to prepare for issues with the DB server or data, enabling data recovery at the desired point in time.
Figure. MariaDB(DBaaS) Architecture
Provided features
MariaDB (DBaaS) provides the following features.
Auto Provisioning (Auto Provisioning): UI allows installation and configuration of Database (DB), and provides an Active-standby redundancy configuration built on storage replication. * When the active server fails, it automatically fails over to standby.
Operation Control Management: Provides a function to control the status of running servers. * In addition to start and stop, a restart is possible if there is a DB issue or to apply configuration changes. * When high availability (HA) is configured, a switch-over allows the user to directly perform the Active-Standby node transition.
Backup and Recovery: Provides data backup functionality based on its own backup commands. * The backup time window and storage provider can be configured by the user, and additional charges may be incurred based on the backup size. * It also provides a recovery function for backed‑up data, so when a user initiates a recovery, a separate database is created and the recovery proceeds to the point in time selected by the user (the backup creation time or a user‑specified time). * When restoring to a user-specified point in time, the restore point can be set up to 5 minutes, 10 minutes, 30 minutes, or 1 hour before the stored backup and archive files.
Version Management: Provides Major and Minor version upgrade features based on certain functionality improvements and security patches.
Replica configuration: For load balancing reads and disaster recovery (DR), up to five Read Replicas can be configured in the same or different regions.
Audit setting: Provides an Audit setting feature that can monitor users’ DB access and the results of DDL (Data Definition Language)/DML (Data Manipulation Language) operations.
Parameter management: It is possible to modify DB configuration parameters related to performance improvement and security.
Service Status Lookup: Retrieve the final status of the current DB service.
Monitoring: CPU, memory, performance monitoring information can be viewed through Cloud Monitoring and Servicewatch.
DB User Management: View and manage the DB account (user) information registered in the DB.
DB Access Control Management: Based on DB accounts registered in the DB, you can register and revoke allowed IPs for access.
Archive Management: Within the DB server, you can set the Archive file retention period (1 day~35 days) and configure the Archive mode (On/Off).
Export DB Log: You can export stored logs to the user’s Object Storage via Audit settings.
Migration: Synchronizes data in real time with the operational database and supports migration using replication without service interruption.
OS Kernel Upgrade: You can upgrade the OS Kernel to apply some feature improvements and security patches.
Components
MariaDB (DBaaS) provides pre‑validated engine versions and various server types in accordance with its open‑source support policy. Users can select and use it based on the scale of the service they wish to configure.
Engine version
The engine versions supported by MariaDB (DBaaS) are as follows.
Technical support is available until the supplier’s EoTS (End of Technical Service) date, and the EOS date when new creation is halted is set to six months before the EoTS date.
Since the EOS and EoTS dates may change according to the supplier’s policy, please refer to the supplier’s license management policy page for details.
EOS Date (Samsung Cloud Platform new creation stop date)
EoTS Date(Community Technical Support End Date)
MariaDB (Community)
10.6.5
2026-03-19
2026-07-06
10.6.9
2026-03-19
2026-07-06
10.6.10
2026-03-19
2026-07-06
10.6.12
2026-03-19
2026-07-06
10.6.14
2026-03-19
2026-07-06
10.6.15
2026-03-19
2026-07-06
10.6.16
2026-03-19
2026-07-06
10.6.17
2026-03-19
2026-07-06
10.6.19
2026-03-19
2026-07-06
10.6.22
2026-03-19
2026-07-06
10.11.8
2027-09 (scheduled)
2028-02-16
10.11.9
2027-09 (scheduled)
2028-02-16
10.11.13
2027-09 (scheduled)
2028-02-16
10.11.15
2027-09 (scheduled)
2028-02-16
11.4.7
2028-12 (scheduled)
2029-05-29
11.4.10
2028-12 (scheduled)
2029-05-29
Table. Engine versions provided for MariaDB (DBaaS)
notice
The next version of MariaDB is scheduled to be available after September 2026. The actual service delivery schedule is subject to change.
MariaDB 10.11.16
Server type
The server types supported by MariaDB (DBaaS) are as follows.
For detailed information about the server types provided by MariaDB (DBaaS), see MariaDB(DBaaS) 서버 타입.
Standard db1v2m4
Category
Example
Detailed description
Server type
Standard
Provided server types
Standard: Standard configuration commonly used (vCPU, Memory)
High Capacity: Large server specifications of 24 vCores or more
Server specifications
db1
Provided server specifications
db1: Standard specifications (vCPU, Memory) commonly used
dbh2: Large-scale server specifications
Provides servers with 24 vCores or more
Server specifications
v2
Number of vCores
v2: 2 virtual cores
Server specifications
m4
Memory capacity
m4: 4GB Memory
Table. MariaDB (DBaaS) server type components
Preceding Service
This is a list of services that must be pre‑configured before creating the service. For detailed information, please refer to the guide provided for each service and prepare in advance.
A service that provides an isolated virtual network in a cloud environment
Table. MariaDB (DBaaS) pre-service
1.1 - Server type
MariaDB(DBaaS) server type
MariaDB (DBaaS) provides server types composed of various combinations such as CPU, Memory, and Network Bandwidth.
When creating a MariaDB(DBaaS), the Database Engine is installed according to the server type selected for the intended use.
Reference
The server types provided may differ depending on the region and AZ.
The server types supported by MariaDB (DBaaS) are as follows.
Standard db1v2m4
Category
example
Detailed description
Server type
Standard
Provided server type categories
Standard: Configured with the commonly used standard specifications (vCPU, Memory)
High Capacity: Large-capacity server specifications exceeding Standard
Server specifications
db1
Provided server type classification and generation
db1: means a standard specification, and 1 indicates the generation
dbh2: h indicates a large-capacity server specification, and 2 indicates the generation
Server specifications
v2
Number of vCores
v2: 2 virtual cores
Server specifications
m4
Memory capacity
m4: 4GB Memory
Table. MariaDB (DBaaS) server type format
db1 server type
The db1 server type of MariaDB (DBaaS) is offered with standard specifications (vCPU, Memory) and is suitable for various database workloads.
Intel 3rd Generation (Ice Lake) Xeon Gold 6342 Processor up to 3.3 GHz
Supports up to 16 vCPUs and 256 GB of memory
Maximum networking speed of 12.5 Gbps
Category
Server type
vCPU
Memory
Network Bandwidth
Standard
db1v1m2
1 vCore
2 GB
Up to 10 Gbps
Standard
db1v2m4
2 vCore
4 GB
Up to 10 Gbps
Standard
db1v2m8
2 vCore
8 GB
Up to 10 Gbps
Standard
db1v2m16
2 vCore
16 GB
Up to 10 Gbps
Standard
db1v2m24
2 vCore
24 GB
Maximum 10 Gbps
Standard
db1v2m32
2 vCore
32 GB
Up to 10 Gbps
Standard
db1v4m8
4 vCore
8 GB
Up to 10 Gbps
Standard
db1v4m16
4 vCore
16 GB
Up to 10 Gbps
Standard
db1v4m32
4 vCore
32 GB
Up to 10 Gbps
Standard
db1v4m48
4 vCore
48 GB
Up to 10 Gbps
Standard
db1v4m64
4 vCore
64 GB
Up to 10 Gbps
Standard
db1v6m12
6 vCore
12 GB
Up to 10 Gbps
Standard
db1v6m24
6 vCore
24 GB
Up to 10 Gbps
Standard
db1v6m48
6 vCore
48 GB
Up to 10 Gbps
Standard
db1v6m72
6 vCore
72 GB
Up to 10 Gbps
Standard
db1v6m96
6 vCore
96 GB
Up to 10 Gbps
Standard
db1v8m16
8 vCore
16 GB
Up to 10 Gbps
Standard
db1v8m32
8 vCore
32 GB
Up to 10 Gbps
Standard
db1v8m64
8 vCore
64 GB
Up to 10 Gbps
Standard
db1v8m96
8 vCore
96 GB
Up to 10 Gbps
Standard
db1v8m128
8 vCore
128 GB
Up to 10 Gbps
Standard
db1v10m20
10 vCore
20 GB
Up to 10 Gbps
Standard
db1v10m40
10 vCore
40 GB
Up to 10 Gbps
Standard
db1v10m80
10 vCore
80 GB
Maximum 10 Gbps
Standard
db1v10m120
10 vCore
120 GB
Maximum 10 Gbps
Standard
db1v10m160
10 vCore
160 GB
Up to 10 Gbps
Standard
db1v12m24
12 vCore
24 GB
Up to 12.5 Gbps
Standard
db1v12m48
12 vCore
48 GB
Up to 12.5 Gbps
Standard
db1v12m96
12 vCore
96 GB
Up to 12.5 Gbps
Standard
db1v12m144
12 vCore
144 GB
Up to 12.5 Gbps
Standard
db1v12m192
12 vCore
192 GB
Up to 12.5 Gbps
Standard
db1v14m28
14 vCore
28 GB
Up to 12.5 Gbps
Standard
db1v14m56
14 vCore
56 GB
Up to 12.5 Gbps
Standard
db1v14m112
14 vCore
112 GB
Up to 12.5 Gbps
Standard
db1v14m168
14 vCore
168 GB
Up to 12.5 Gbps
Standard
db1v14m224
14 vCore
224 GB
Up to 12.5 Gbps
Standard
db1v16m32
16 vCore
32 GB
Up to 12.5 Gbps
Standard
db1v16m64
16 vCore
64 GB
Up to 12.5 Gbps
Standard
db1v16m128
16 vCore
128 GB
Up to 12.5 Gbps
Standard
db1v16m192
16 vCore
192 GB
Up to 12.5 Gbps
Standard
db1v16m256
16 vCore
256 GB
Up to 12.5 Gbps
Table. MariaDB(DBaaS) server type specifications - db1 server type
Database password
Required
Password to use when accessing the DB
Include English letters, numbers, and special characters (“‘ excluded) and enter 8~30 characters
Check database password
Required
Re-enter the same password to use for DB access
Database Port number
Required
Port number required for DB connection
Enter the DB port within the range 1200 ~ 65535
Backup > Use
Selection
Backup usage
Select Use to set backup file retention period, backup start time, and Archive backup interval
Backup > Retention Period
Selection
Backup retention period
Select the backup retention period. Set the file retention period from 7 days to 35 days
Backup files incur additional charges based on size
Backup > Backup Start Period
Selection
Backup start time
Select backup start time
The minutes (minutes) at which the backup runs are set randomly, and the backup end time cannot be configured
Backup > Archive backup schedule
Selection
Archive backup interval
Select the archive backup interval
The archive backup interval is recommended to be 1 hour. Selecting 5 minutes, 10 minutes, or 30 minutes may affect DB performance
Audit Log configuration
Selection
Whether to store Audit Log
Select Use to enable the Audit Log feature
User connection information records are stored
Users can specify the types of events to audit via the server_audit_events parameter, and it can be modified through the Parameter screen
In the Additional Information Input area, enter or select the required information.
Category
Required
Detailed description
tag
Selection
Add Tag
Up to 50 can be added per resource
After clicking the Add Tag button, enter or select Key, Value values
Table. MariaDB(DBaaS) additional information input items
Summary Review the detailed information and estimated charges generated in the panel, and click the Create button.
Once creation is complete, check the created resource on the Resource List page.
MariaDB(DBaaS) Check detailed information
The MariaDB (DBaaS) service lets you view and modify the complete resource list and detailed information. The MariaDB(DBaaS) Details page consists of Details, Tags, Activity History tabs, and for databases with a configured Replica, a Replica Information tab is added.
To view detailed information about the MariaDB (DBaaS) service, follow the steps below.
All Services > Database > MariaDB (DBaaS) Click the menu. 1. Navigate to the Service Home page of MariaDB (DBaaS).
On the Service Home page, click the MariaDB(DBaaS) menu. 2. MariaDB(DBaaS) List Navigate to the page.
On the MariaDB (DBaaS) List page, click the resource to view detailed information. 3. MariaDB(DBaaS) Details Go to the page.
MariaDB(DBaaS) Details At the top of the page, status information and additional feature details are displayed.
Category
Detailed description
Cluster status
Cluster status with DB installed
Creating: Cluster creation in progress
Editing: Cluster is transitioning to an operational state
Error: Cluster encountered a failure while performing a task
If this persists, contact the administrator
Failed: Cluster failed during creation
Restarting: Restarting the cluster
Running: Cluster is operating normally
Starting: Starting the cluster
Stopped: Cluster is stopped
Stopping: Cluster is being stopped
Synchronizing: Synchronizing the cluster
Terminating: Deleting the cluster
Unknown: Cluster status is unknown
If this persists, contact the administrator
Upgrading: Cluster is transitioning to an upgrading state
Cluster control
Buttons to change the cluster state
Start: Start a stopped cluster
Stop: Stop a running cluster
Restart: Restart a running cluster
Switch-Over: Switch a standby cluster to Active
View more features
Cluster management buttons
Service status synchronization: Real-time DB service status lookup
Backup history: Verify successful backup execution and view history when backup is configured
Database recovery: Recover the DB based on a specific point in time
Parameter management: View and modify DB configuration parameters
Replica configuration: Configure a read-only cluster as a Replica
Replica configuration (Other-Region): Configure a disaster recovery Replica in another region; the button is disabled if the account has no region to configure
DB user management: View and manage DB account (user) information registered in the DB
DB access control management: Register and revoke allowed IPs based on DB accounts registered in the DB
Archive settings management: Set archive file retention period and configure archive mode
DB Log export: Export stored logs to the user’s Object Storage via Audit settings
Migration configuration: Provides Migration functionality using a Replication method
Block Storage usage management: Provides usage query functionality per Block Storage type
OS (Kernel) upgrade: Upgrade OS Kernel version
Service cancellation
Cancel Service button
Table. MariaDB(DBaaS) status information and additional features
Detailed Information
MariaDB (DBaaS) List page allows you to view detailed information of the selected resource and, if needed, modify the information.
Category
Detailed description
Server Information
Server information configured in this cluster
Category: Server type (Active, Standby, Replica)
Server name: Server name
IP Port: Server IP and port
Availability Zone: Server creation location
Status: Server status
service
Service name
Resource Type
Resource Type
SRN
Unique resource ID in Samsung Cloud Platform
In the DB service, it means the cluster SRN
Resource name
Resource name
In the DB service, it refers to the cluster name
Resource ID
Unique resource ID in the service
Constructor
User who created the service
Creation Date/Time
Service creation date and time
Modifier
User who edited the service information
Modification date and time
Date and time the service information was modified
Image version
Installed DB image and version information
If a version upgrade is required, click the Edit icon to configure
If log collection configuration is required, click the Edit icon next to Log Collection to configure
DB character set
Character encoding to use for the DB
Time zone
Standard time zone used by the database
VIP
Virtual IP information
can be checked only when high availability is enabled
Network
Network information of the DB installation (VPC, Subnet, VIP, NAT IP(VIP))
IP access control
Service access policy configuration
If you need to add or remove an IP, click the Edit icon to configure
Active & Standby
Active/Standby server type, default OS, additional Disk information
If you need to modify the server type, click the Edit icon next to the server type to configure it. See the server type modification procedure at 서버 타입 변경하기
Modifying the server type requires a server reboot
If you need to expand storage, click the Edit icon next to the storage capacity to expand it. See the storage expansion procedure at 스토리지 증설하기
If you need to add storage, click the Add Disk button next to the additional Disk to add it. See the storage addition procedure at 스토리지 추가하기
Table. MariaDB (DBaaS) Database detailed information items
Replica information
Replica information tab is enabled only when a Replica is configured in the cluster. Replica information tab lets you view the Master cluster name, the number of replicas, and the Replica status.
Category
Detailed description
Master information
Name of the Master cluster
Replica count
Number of Replicas created in the Master cluster
Replica status
Replica server status in the Master cluster
You can view the server name, status query, status details, and status check time
To view the Replica status, click the Status Query button
While the query is in progress, the cluster remains in the Synchronizing state, and once the query completes, the cluster changes to the Running state
Table. Replica information tab detailed information items
tag
MariaDB (DBaaS) List page allows you to view the tag information of the selected resource, and you can add, modify, or delete it.
Category
Detailed description
Tag List
Tag list
You can view the tag’s Key, Value information
Up to 50 tags can be added per resource
When entering tags, you can search and select from the list of previously created Keys and Values
Table. MariaDB (DBaaS) Tag Tab Items
Job History
MariaDB (DBaaS) List page allows you to view the operation history of the selected resource.
Category
Detailed description
Task History List
Resource change history
Operation date and time, resource ID, resource name, operation details, event topic, operation result, operator information verification
Table. Work History tab detailed information items
MariaDB(DBaaS) Managing Resources
If you need to change or restore the existing configuration options of a provisioned MariaDB (DBaaS) resource, or set up a replica, you can perform the task on the MariaDB (DBaaS) Details page.
Operation Control
If changes occur to a running MariaDB (DBaaS) resource, you can start, stop, or restart it. Also, when HA is configured, you can switch the Active‑Standby servers via a switch‑over.
To control the operation of MariaDB (DBaaS), follow the steps below.
Click the All Services > Database > MariaDB(DBaaS) menu. 1. Navigate to the Service Home page of MariaDB (DBaaS).
On the Service Home page, click the MariaDB(DBaaS) menu. 2. Go to the MariaDB(DBaaS) List page.
On the MariaDB(DBaaS) List page, click the resource to control its operation. 3. MariaDB(DBaaS) Details Go to the page.
Check the MariaDB (DBaaS) status and complete the change using the control button below.
Start: DB service is installed on the server and the DB service is running (Running).
Stop: The server where the DB service is installed and the DB service will be stopped (Stopped).
Restart: Only the DB service will be restarted.
Switch Over: You can switch the DB’s Active server and Standby server.
Synchronize service status
You can synchronize the real-time service status of MariaDB (DBaaS).
To view the service status of MariaDB (DBaaS), follow the steps below.
Click the All Services > Database > MariaDB(DBaaS) menu. 1. Navigate to the Service Home page of MariaDB (DBaaS).
On the Service Home page, click the MariaDB(DBaaS) menu. 2. MariaDB(DBaaS) List Navigate to the page.
MariaDB (DBaaS) List page, click the resource to view the service status. 3. MariaDB(DBaaS) Details Go to the page.
Click the Service Status Sync button. 4. While it is being queried, the cluster changes to Synchronizing state.
When the query completes, the status in the server information item is updated, and the cluster changes to the Running state.
Change Server Type
You can change the configured server type.
Caution
If you modify the server type, a server restart is required. Please verify separately any software license modifications or software settings and their implementation due to server specification changes.
To change the server type, follow these steps.
All Services > Database > MariaDB(DBaaS) Click the menu. 1. Go to the Service Home page of MariaDB (DBaaS).
On the Service Home page, click the MariaDB(DBaaS) menu. 2. MariaDB(DBaaS) List Navigate to the page.
MariaDB(DBaaS) List page, click the resource to change the server type. 3. MariaDB(DBaaS) Details Navigate to the page.
Click the Edit icon for the server type you want to change at the bottom of the detailed information. 4. Edit Server Type The popup window opens.
Server Type Edit After selecting the server type in the popup, click the Confirm button.
Add storage
If you need more than 5 TB of data storage space, you can add additional storage. In a redundant DB setup, all redundant servers are added simultaneously.
Caution
It is applied in the same way as the Storage type selected when creating the service.
For a DB configured with redundancy, adding storage is applied simultaneously to the storage of both the Active DB and the Standby DB.
The storage of a Replica cannot be larger than the storage of the primary. * Expand the Replica storage first, then expand the Master storage.
When adding Archive/Temp storage, the DB restarts and is temporarily unavailable.
To add storage, follow these steps.
All Services > Database > MariaDB(DBaaS) Click the menu. 1. Navigate to the Service Home page of MariaDB (DBaaS).
On the Service Home page, click the MariaDB(DBaaS) menu. 2. MariaDB(DBaaS) List Navigate to the page.
On the MariaDB(DBaaS) List page, click the resource to add storage. 3. MariaDB(DBaaS) Details Go to the page.
Click the Add Disk button at the bottom of the detailed information. 4. Additional Storage Request The popup window opens.
Additional Storage Request In the popup window, after entering the purpose and capacity, click the Confirm button.
Expanding Storage
Storage added to the data area can be expanded up to a maximum of 5 TB based on the initially allocated capacity. In a redundant DB setup, all redundant servers are expanded simultaneously.
To increase storage capacity, follow the steps below.
Click the All Services > Database > MariaDB(DBaaS) menu. 1. Navigate to the Service Home page of MariaDB (DBaaS).
On the Service Home page, click the MariaDB(DBaaS) menu. 2. MariaDB(DBaaS) List Navigate to the page.
On the MariaDB(DBaaS) List page, click the resource to change the server type. 3. MariaDB(DBaaS) Details Go to the page.
Click the Edit icon of the additional Disk you want to add at the bottom of the detailed information. 4. Edit Additional Storage popup opens.
Edit Additional Storage After entering the expanded capacity in the popup window, click the Confirm button.
Terminate MariaDB(DBaaS)
You can cancel unused MariaDB (DBaaS) to reduce operating costs. However, if you terminate the service, the running service may be discontinued immediately, so you should proceed with the termination only after fully considering the impact that may arise from the service interruption.
Caution
Replica is not deleted together. * If you delete the replica as well, please cancel it separately from the resource list.
If you terminate the DB, all stored data and any backup data that was configured will be deleted.
To cancel MariaDB (DBaaS), follow the steps below.
Click the All Services > Database > MariaDB(DBaaS) menu. 1. Navigate to the Service Home page of MariaDB (DBaaS).
On the Service Home page, click the MariaDB(DBaaS) menu. 2. MariaDB(DBaaS) List Navigate to the page.
On the MariaDB(DBaaS) List page, select the resource to cancel and click the Terminate Service button.
After termination is complete, check on the MariaDB(DBaaS) list page whether the resource has been terminated.
2.1 - Managing DB Services
Users can manage MariaDB (DBaaS) through the Samsung Cloud Platform Console.
Parameter Management
Provides a feature that allows you to easily view and modify database configuration parameters.
Parameter View
To view configuration parameters, follow these steps.
Click the All Services > Database > MariaDB(DBaaS) menu. 1. Go to the Service Home page of MariaDB (DBaaS).
On the Service Home page, click the MariaDB(DBaaS) menu. 2. MariaDB(DBaaS) List Navigate to the page.
On the MariaDB(DBaaS) List page, click the resource whose parameters you want to view or modify. 3. MariaDB(DBaaS) Details Go to the page.
Click the More button, then click the Parameter Management button. 4. Parameter Management The popup window opens.
Parameter Management in the popup window, click the Search button. 5. View Notification popup window opens.
When the View Notification popup appears, click the Confirm button. 6. Retrieving may take a short amount of time.
Edit Parameter
To modify the configuration parameters, follow the steps below.
Click the All Services > Database > MariaDB(DBaaS) menu. 1. Navigate to the Service Home page of MariaDB (DBaaS).
On the Service Home page, click the MariaDB(DBaaS) menu. 2. MariaDB(DBaaS) List Navigate to the page.
MariaDB(DBaaS) List page, click the resource whose parameters you want to view or modify. 3. MariaDB(DBaaS) Details Go to the page.
Click the More button and click the Parameter Management button. 4. Parameter Management The popup window opens.
Parameter Management In the popup window, click the Search button. 5. View Notification The popup window opens.
View Notification when the popup window opens, click the Confirm button. 6. Retrieving may take a short amount of time.
If editing is required, click the Edit button and enter the changes in the custom value area of the Parameter to be edited.
When the input is complete, click the Complete button.
참고
If you change the character_set_server value, first verify the collation that matches the character set using the command below.
SQL> SHOW COLLATION WHERE Charset = 'character set name';
Set the parameter values for character-set-server, collation-server, and init_connect using the verified collation.
Item
Detailed description
Whether to restart
character-set-server
Specify default character set
Restart required
collation-server
Specify default collation (Collation)
Restart required
init_connect
SQL statement executed when the client connects to the database
No restart required
Table. Parameter configuration items
Managing DB Users
Provides administrative features for viewing DB user information and modifying status information.
Query DB Users
Follow these steps to query DB users.
All Services > Database > MariaDB(DBaaS) Click the menu. 1. Navigate to the Service Home page of MariaDB (DBaaS).
On the Service Home page, click the MariaDB(DBaaS) menu. 2. MariaDB (DBaaS) List Navigate to the page.
MariaDB(DBaaS) List page, click the resource whose DB users you want to view. 3. MariaDB(DBaaS) Details Go to the page.
Click the More button, then click the DB User Management button. 4. Navigate to the DB User Management page.
DB User Management on the page, click the Search button. 5. Retrieving may take a short amount of time.
Change DB user status
To change the status of the retrieved DB user, follow these steps.
Click the All Services > Database > MariaDB(DBaaS) menu. 1. Navigate to the Service Home page of MariaDB (DBaaS).
On the Service Home page, click the MariaDB(DBaaS) menu. 2. MariaDB(DBaaS) List Navigate to the page.
MariaDB(DBaaS) List On the page, click the resource you want to edit the DB user for. 3. MariaDB(DBaaS) Details Navigate to the page.
Click the More button, then click the DB User Management button. 4. Navigate to the DB User Management page.
On the DB User Management page, click the Search button. 5. Retrieving may take a short amount of time.
If modification is required, click the Edit button, and change the status area value or enter remarks.
When the input is complete, click the Done button.
Managing DB Access Control
Provides IP-based DB user access control management functionality. Users can directly specify the IP addresses that can access the database, configuring it so that only authorized IPs are allowed access.
안내
Perform a DB user lookup before setting DB access control. For DB user lookup, please refer to DB 사용자 관리하기.
View DB Access Control
To view DB users with IP access control enabled, follow these steps.
Click the All Services > Database > MariaDB(DBaaS) menu. 1. Navigate to the Service Home page of MariaDB (DBaaS).
On the Service Home page, click the MariaDB(DBaaS) menu. 2. MariaDB(DBaaS) List Navigate to the page.
MariaDB(DBaaS) List On the page, click the resource you want to manage access control for. 3. MariaDB(DBaaS) Details Navigate to the page.
Click the More button, then click the DB Access Control Management button. 4. Navigate to the DB Access Control Management page.
On the DB Access Control Management page, click the Search button. 5. Retrieving may take a short amount of time.
Add DB access control
To add IP access control, follow these steps.
Click the All Services > Database > MariaDB(DBaaS) menu. 1. Navigate to the Service Home page of MariaDB (DBaaS).
On the Service Home page, click the MariaDB(DBaaS) menu. 2. MariaDB(DBaaS) List Navigate to the page.
On the MariaDB(DBaaS) List page, click the resource for which you want to add IP access control. 3. MariaDB(DBaaS) Details Go to the page.
Click the More button and then click the DB Access Control Management button. 4. Navigate to the DB Access Control Management page.
Click the Search button on the DB Access Control Management page. 5. Retrieving may take a short amount of time.
When the query is complete, click the Add button. 6. Add DB Access Control The popup window opens.
Add DB Access Control In the popup window, select the DB username and enter the IP address.
When the input is complete, click the Done button.
Delete DB Access Control
To delete IP access control, follow these steps.
Click the All Services > Database > MariaDB(DBaaS) menu. 1. Navigate to the Service Home page of MariaDB (DBaaS).
On the Service Home page, click the MariaDB(DBaaS) menu. 2. MariaDB(DBaaS) List Navigate to the page.
MariaDB(DBaaS) List page, click the resource for which you want to delete the IP access control. 3. MariaDB(DBaaS) Details Go to the page.
Click the More button, then click the DB Access Control Management button. 4. Navigate to the DB Access Control Management page.
Click the Search button on the DB Access Control Management page. 5. Retrieving may take a short amount of time.
When the query is complete, click the Delete button. 6. Delete popup window opens.
Click the Confirm button on the Delete popup.
Configure Archive mode
Provides the ability to configure Archive mode and set the retention period for Archive logs, allowing users to flexibly configure Archive log management policies to suit their operating environment.
안내
When creating a service, the default setting is Archive mode enabled, and the retention period is 3 days.
To set the Archive mode, follow these steps.
Click the All Services > Database > MariaDB(DBaaS) menu. 1. Navigate to the Service Home page of MariaDB (DBaaS).
On the Service Home page, click the MariaDB(DBaaS) menu. 2. MariaDB(DBaaS) List Navigate to the page.
MariaDB(DBaaS) List Click the resource on the page for which you want to set Archive mode. 3. MariaDB(DBaaS) Details Go to the page.
Click the More button and then click the Archive Settings Management button. 4. Navigate to the Archive Settings Management page.
On the Archive Settings Management page, click the Search button. 5. Retrieving may take a short amount of time.
Click the Edit button and select the usage status and retention period.
When the edit is complete, click the Complete button.
Modify Audit Settings
You can change the Audit log storage settings of MariaDB (DBaaS).
Follow these steps to change the Audit log storage settings for MariaDB (DBaaS).
Click the All Services > Database > MariaDB(DBaaS) menu. 1. Navigate to the Service Home page of MariaDB (DBaaS).
On the Service Home page, click the MariaDB(DBaaS) menu. 2. MariaDB(DBaaS) List Navigate to the page.
MariaDB(DBaaS) List On the MariaDB(DBaaS) List page, click the resource to view the service status. 3. MariaDB(DBaaS) Details Go to the page.
Click the Edit icon of the Audit settings at the bottom of the detailed information. 4. Edit Audit Settings The popup window opens.
Modify Audit Settings After changing the usage status in the popup window, click the Confirm button.
Select Use to enable the Audit log feature. * Enabling audit logging may degrade database performance.
If you disable use, the Audit log storage file will be deleted. * Back up the Audit log file separately before disabling.
DB Log Export
Supports exporting log data that requires long-term retention among audit (Audit) logs to Object Storage. Users can directly configure the log types that need to be stored, the destination Bucket for export, and the log export interval. Copies logs to the designated Object Storage for retention according to the configured criteria.
Additionally, to efficiently manage disk space, we also provide an option that exports logs to Object Storage while automatically deleting the original log files. By using this option, you can effectively free up storage capacity while safely retaining the necessary log data for the long term.
안내
To use the DB Log export feature, you need to create an Object Storage. * Please refer to the Object Storage 사용자 가이드 for creating Object Storage.
Please be sure to verify the authentication key’s expiration date and time. * If the authentication key expires, logs will not be stored in the Bucket.
Please ensure that the authentication key information is not exposed to external parties.
Setting DB Log Export Mode
Follow these steps to set the DB Log export mode.
All Services > Database > MariaDB(DBaaS) Click the menu. 1. Navigate to the Service Home page of MariaDB (DBaaS).
On the Service Home page, click the MariaDB(DBaaS) menu. 2. MariaDB(DBaaS) List Navigate to the page.
MariaDB(DBaaS) List On the page, click the resource for which you want to export the DB Log. 3. MariaDB(DBaaS) Details Go to the page.
Click the More button, then click the DB Log Export button. 4. Navigate to the DB Log Export page.
On the DB Log Export page, click the Register button. 5. Navigate to the Register DB Log Export page.
After entering the required information on the DB Log Export Registration page, click the Complete button.
Category
Required
Detailed description
Log type
Required
Log type to be saved
Save bucket name
Required
Object Storage bucket name to be saved
Authentication key > Access key
Required
Access key for accessing the Object Storage you want to store
Authentication key > Secret key
Required
Secret key for accessing the Object Storage you want to store
File creation cycle
Required
File creation frequency in Object Storage
Whether to delete the original log
Selection
Whether to delete the original logs when exporting to Object Storage
Table. MariaDB (DBaaS) DB Log Export Configuration Items
Manage DB Log Export
To modify, cancel, or immediately export the DB Log export settings, follow the steps below.
Click the All Services > Database > MariaDB(DBaaS) menu. 1. Navigate to the Service Home page of MariaDB (DBaaS).
On the Service Home page, click the MariaDB(DBaaS) menu. 2. MariaDB(DBaaS) List Navigate to the page.
MariaDB(DBaaS) List On this page, click the resource for which you want to manage DB Log export. 3. MariaDB(DBaaS) Details Go to the page.
Click the More button, then click the Export DB Log button. 4. Navigate to the DB Log Export page.
On the DB Log Export page, depending on the log type you want to manage, click the More button and then click the Export Now, Edit, Terminate buttons.
Export Immediately: The selected logs are exported to the bucket of the previously configured Object Storage.
Edit: Modify the DB Log export mode setting.
Cancel: Cancel the DB Log export mode setting.
Upgrade version
If a latest patch that includes security enhancements and feature improvements is available, you can apply it using the version upgrade feature.
Caution
First retrieve the service status via service status synchronization, then proceed with the version upgrade.
It is recommended to perform an immediate backup in advance to prepare for any issues that may arise during the upgrade process. * If this is not the case, a failure may occur and some data may not be recoverable.
In a DB with a Replica configured, the Master DB version cannot be higher than the Replica version. * Please check the version of Replica first, and if necessary, perform a version upgrade.
The backed-up data is automatically deleted after the version upgrade is completed.
Major version upgrade
Caution
Major version upgrades require a pre‑upgrade simulation test.
Please set up a separate Replica DB, promote it to Master, and pre‑validate the Major upgrade. * Afterward, we recommend proceeding only after thoroughly reviewing the service impact with the Application manager.
To perform a Major version upgrade, follow the steps below.
Click the All Services > Database > MariaDB(DBaaS) menu. 1. Navigate to the Service Home page of MariaDB (DBaaS).
On the Service Home page, click the MariaDB(DBaaS) menu. 2. MariaDB(DBaaS) List Navigate to the page.
On the MariaDB(DBaaS) List page, click the resource to upgrade the Major version. 3. MariaDB(DBaaS) Details Go to the page.
Click the Edit icon of the Image version item. 4. Version Upgrade A popup window opens.
Version Upgrade In the popup window, select the upgrade type and patch version, then click the Confirm button.
Version Upgrade Notification: Click the Confirm button in the popup window.
Minor version upgrade
Supports minor version upgrades within the same major version.
To perform a minor version upgrade, follow the steps below.
Click the All Services > Database > MariaDB(DBaaS) menu. 1. Navigate to the Service Home page of MariaDB (DBaaS).
On the Service Home page, click the MariaDB(DBaaS) menu. 2. MariaDB(DBaaS) List Navigate to the page.
On the MariaDB(DBaaS) List page, click the resource to upgrade the Minor version. 3. MariaDB(DBaaS) Details Go to the page.
Click the Edit icon of the Image version item. 4. Version Upgrade A popup window opens.
Version Upgrade In the popup window, select the upgrade type and the patch version, then click the Confirm button.
Version Upgrade Notification In the popup window, click the Confirm button.
Configure Migration
Provides a Migration feature that synchronizes in real time with the operational database and replicates using a Replication method without service interruption.
You can promote a fully configured Migration Cluster to a Master Cluster.
Caution
When the master is promoted, synchronization with the source DB that is the migration target is stopped.
To promote the Migration Cluster to Master, follow the steps below.
Click the All Services > Database > MariaDB(DBaaS) menu. 1. Navigate to the Service Home page of MariaDB (DBaaS).
On the Service Home page, click the MariaDB(DBaaS) menu. 2. MariaDB(DBaaS) List Navigate to the page.
On the MariaDB(DBaaS) List page, click the resource to promote to Master. 3. MariaDB(DBaaS) Details Go to the page.
Click the More button, then click the Master Promotion button. 4. Master Promotion Notification The popup window opens.
Master Promotion Notification Click the Confirm button in the popup window.
Managing Block Storage Usage
You can view the usage of Block Storage by type allocated to the DB instance.
To view Block Storage usage, follow these steps.
Click the All Services > Database > MariaDB(DBaaS) menu. 1. Navigate to the Service Home page of MariaDB (DBaaS).
On the Service Home page, click the MariaDB(DBaaS) menu. 2. MariaDB(DBaaS) List Navigate to the page.
On the MariaDB(DBaaS) List page, click the resource to view Block Storage usage. 3. MariaDB(DBaaS) Details Go to the page.
Click the More button, then click the Block Storage Usage Management button. 4. Block Storage Usage Management Navigate to the page.
On the Block Storage Usage Management page, click the Search button. 5. Block Storage Usage Management The page displays usage by Block Storage type.
Retrieving usage by Block Storage type takes a short amount of time.
OS Kernel Upgrade
You can upgrade the OS Kernel to enhance the functionality of the operational database and apply security patches.
Caution
The service will be unavailable while the OS upgrade is in progress.
The upgrade duration may vary depending on the version, and if the upgrade fails, it will be rolled back to the previous configuration.
After the upgrade is complete, you cannot revert to the original OS.
Follow these steps to upgrade the OS Kernel.
All Services > Database > MariaDB(DBaaS) Click the menu. 1. Navigate to the Service Home page of MariaDB (DBaaS).
On the Service Home page, click the MariaDB(DBaaS) menu. 2. MariaDB(DBaaS) List Navigate to the page.
On the MariaDB(DBaaS) List page, click the resource to upgrade the OS Kernel. 3. MariaDB(DBaaS) Details Navigate to the page.
Click the More button, then click the OS(Kernel) Upgrade button. 4. OS (Kernel) Upgrade Notification A popup window opens.
OS(Kernel) Upgrade Notification Check the instructions in the popup window and click the Confirm button.
2.2 - Backing up and restoring the DB
Users can set up backups for MariaDB (DBaaS) through the Samsung Cloud Platform Console and restore from the backed‑up files.
Backing up MariaDB(DBaaS)
PostgreSQL (DBaaS) provides data backup functionality based on its own backup commands. Additionally, it provides an optimized backup environment for data protection and management through backup history verification and backup file deletion features.
Configure Backup
For backup configuration of MariaDB (DBaaS), please refer to MariaDB(DBaaS) 생성하기.
To modify the backup settings of the created resource, follow the steps below.
Caution
For reliable backups, we recommend adding separate BACKUP storage or sufficiently expanding storage capacity. * Especially when the backup data exceeds 100 GB and experiences frequent changes, please provision additional storage equal to approximately 60 % of the data size. * For instructions on adding and expanding storage, refer to the MariaDB(DBaaS) 스토리지 추가하기, MariaDB(DBaaS) 스토리지 증설하기 guides.
If a backup is configured, it runs at the specified time after the set time, and additional fees are incurred based on the backup size.
If you change the backup setting to Unconfigured, backup execution will stop immediately, and stored backup data will be deleted and can no longer be used.
Click the All Services > Database > MariaDB(DBaaS) menu. 1. Navigate to the Service Home page of MariaDB (DBaaS).
On the Service Home page, click the MariaDB(DBaaS) menu. 2. MariaDB(DBaaS) List Go to the page.
MariaDB(DBaaS) List Click the resource for which you want to set up a backup. 3. MariaDB(DBaaS) Details Go to the page.
Click the Edit button of the backup item. 4. Backup Settings The popup window opens.
When configuring a backup, click Use in the Backup Settings popup, select retention period, backup start time, and Archive backup interval, then click the Confirm button.
If you wish to stop the backup configuration, deselect Use in the Backup Settings popup and authenticate using the logged-in user’s mobile phone. Once user authentication is complete, the backup configuration is disabled and backup execution stops.
Perform backup immediately
If additional data protection is needed, you can quickly create a backup using the instant backup feature.
To perform an immediate backup, follow these steps.
Click the All Services > Database > MariaDB(DBaaS) menu. 1. Navigate to the Service Home page of MariaDB (DBaaS).
On the Service Home page, click the MariaDB(DBaaS) menu. 2. MariaDB(DBaaS) List Navigate to the page.
On the MariaDB(DBaaS) List page, click the resource to perform an immediate backup. 3. MariaDB(DBaaS) Details Go to the page.
Click the Immediate Backup button of the backup item. 4. Immediate backup settings The popup window opens.
In the Immediate backup setup popup, click the Confirm button.
Check backup history
안내
To set notifications for backup success and failure, you can configure them through the Notification Manager product. For a detailed usage guide on configuring notification policies, refer to 알림 정책 생성하기.
To check the backup history, follow these steps.
Click the All Services > Database > MariaDB(DBaaS) menu. 1. Navigate to the Service Home page of MariaDB (DBaaS).
On the Service Home page, click the MariaDB(DBaaS) menu. 2. MariaDB(DBaaS) List Go to the page.
MariaDB(DBaaS) List On the page, click the resource to view the backup history. 3. MariaDB(DBaaS) Details Go to the page.
Click the Backup History button. 4. Backup History The popup window opens.
Backup History In the popup window, you can view the backup status, version, backup start date and time, backup completion date and time, and size.
Delete backup file
To delete the backup file, follow these steps.
Caution
Backup files cannot be restored after deletion. Please be sure to confirm that the data is unnecessary before deleting it.
All Services > Database > MariaDB(DBaaS) Click the menu. 1. Navigate to the Service Home page of MariaDB (DBaaS).
On the Service Home page, click the MariaDB(DBaaS) menu. 2. MariaDB(DBaaS) List Navigate to the page.
MariaDB(DBaaS) List page, click the resource to view the backup history. 3. MariaDB(DBaaS) Details Go to the page.
Click the Backup History button. 4. Backup History The popup window opens.
Backup History In the popup window, select the files you wish to delete, then authenticate via the logged-in user’s mobile phone.
When user authentication is completed, the backup file will be deleted.
Recover MariaDB(DBaaS)
If a failure or data loss requires restoration from a backup file, recovery can be performed based on a specific point in time using the recovery feature. When you perform a MariaDB(DBaaS) recovery, a new server is created using the OS image from the initial provisioning point, the database is installed with the version from the backup point, and the recovery proceeds with the database’s configuration information and data.
Caution
To perform recovery, at least twice the capacity of the Disk data type is required. If disk space is insufficient, recovery may fail.
To recover MariaDB (DBaaS), follow the steps below.
Click the All Services > Database > MariaDB(DBaaS) menu. 1. Navigate to the Service Home page of MariaDB (DBaaS).
On the Service Home page, click the MariaDB(DBaaS) menu. 2. MariaDB(DBaaS) List Go to the page.
On the MariaDB(DBaaS) List page, click the resource you want to recover. 3. MariaDB(DBaaS) Details Go to the page.
Click the Database Recovery button. 4. Database Recovery Navigate to the page.
After entering information in the Database recovery configuration area, click the Complete button.
Category
Required
Detailed description
Recovery type
Required
Set the point in time the user wants to recover
Backup point (recommended): Recover based on the backup file. Select from the list of backup points displayed in the list
Custom point: Recover to a user‑desired point within the recoverable backup time range. The recoverable period depends on the Archive backup interval setting, allowing recovery from the start of the first backup up to 1 hour/30 minutes/10 minutes/5 minutes before the current time. Select the date and time to back up
Server name prefix
Required
Recovery DB server name
Start with a lowercase English letter and use lowercase letters, numbers, and special characters (-) to enter 3 to 16 characters
Based on the server name, a postfix such as 001, 002 is appended to generate the actual server name
Cluster name
Required
Cluster name of the recovery DB
Enter using English letters, 3 ~ 20 characters
A cluster is a unit that groups multiple servers
Service Type > Server Type
Required
Server type for the recovery DB installation
Standard: Standard specifications commonly used
High Capacity: Large-capacity server of 24vCore or more (to be provided later)
Service Type > Planned Compute
Selection
Status of resources with Planned Compute set
In Use: Number of resources with Planned Compute that are currently in use
Configured: Number of resources with Planned Compute set
Coverage Preview: Amount applied per resource by Planned Compute
Create Planned Compute Service: Go to the Planned Compute service application page
DATA: Storage area for table data, archive files, etc.
Apply the same storage type as set in the original cluster
Enter capacity as a multiple of 8 within the range 16 to 5,120
Add: Storage area for DATA, Archive, TEMP, Backup data
Apply the same storage type as set in the original cluster
In the recovery DB, only DATA, TEMP, and Archive purposes can be added
After selecting Use, enter the storage purpose and capacity
To add storage, click the Add button; to delete, click the x button
Capacity can be entered as a multiple of 8 within the range 16 to 5,120, and up to 9 can be created
Database username
Required
Database username set in the source DB
Database Port number
Required
Database Port number set in the source DB
IP access control
Selection
IP address for accessing the recovery DB
Enter in IP format (example: 192.168.10.1) or CIDR format (example: 192.168.10.1/32, 192.168.10.1/32), then click the Add button
To delete an entered IP, click the x button next to the entered IP
maintenance period
Selection
DB maintenance window
If you select Use, you can set the day, start time, and duration
The maintenance window is a feature that allows the user to set the time slot for performing patch operations, and patch tasks within that time are the user’s responsibility.
We ask you to set a maintenance window for the stable operation of the system, and we are not responsible for any issues arising from not setting it or failing to perform tasks within the window.
tag
Selection
Add Tag
Add Tag after clicking the button, enter or select Key, Value values
Users can enter the required information for a Read Replica through the Samsung Cloud Platform Console and create the service using detailed options.
Configure Replica
Through replica configuration, you can create replica servers for read-only or disaster recovery purposes. You can create up to 5 replicas per database.
information
To configure a disaster recovery Replica, please create it via Replica Configuration (Other Region).
To configure a Replica, follow these steps.
All Services > Database > MariaDB (DBaaS) Click the menu. 1. Go to the Service Home page of MariaDB (DBaaS).
On the Service Home page, click the MariaDB(DBaaS) menu. 2. MariaDB (DBaaS) List page is accessed.
On the MariaDB (DBaaS) List page, click the resource to configure a Replica. 3. MariaDB(DBaaS) Details Go to the page.
Click the Replica configuration button. 4. Replica configuration Navigate to the page.
After entering information in the Replica configuration area, click the Complete button.
Category
required status
Detailed description
Region
Required
Region to configure the Replica
Replica configuration (Other Region) is displayed only when selected
Replica count
Required
Number of Replicas to configure
Up to 5 can be configured per cluster
If you select more than one value, additionally enter the Replica name and service type information
Replica name
Required
Replica server name
must start with a lowercase English letter, and use lowercase letters, numbers, and special characters (-) to enter 3 to 19 characters
The entered Replica name is displayed as the cluster name in the list
Service Type > Server Type
Essential
Replica server type
Standard: standard specification commonly used
High Capacity: large-capacity server with 24vCore or more (to be provided later)
Service Type > Planned Compute
Select
Status of resources with Planned Compute configured
In Use: Number of resources with Planned Compute configured that are currently in use
Configured: Number of resources with Planned Compute configured
Coverage Preview: Amount applied per resource by Planned Compute
Create Planned Compute Service: Navigate to the Planned Compute service application page
DATA: Storage area for table data, archive files, etc.
Applied identically with the storage type set in the source cluster
Capacity cannot be set
Additional: DATA, Archive, TEMP, Backup data storage area
Applied identically with the storage type set in the source cluster
In a Replica, only DATA and TEMP can be added
After selecting Use, input the storage purpose and capacity
To add storage, click the Add button, and to delete, click the x button
Capacity can be entered in multiples of 8 within the range 16–5,120, and up to a maximum of 9 can be created, including the number set in the source cluster
IP access control
Selection
Service Access Policy Configuration
Since the access policy is set for the IP entered on the page, a separate Security Group policy configuration is not required
Enter in IP format (example: 192.168.10.1) or CIDR format (example: 192.168.10.0/24, 192.168.10.1/32) and click the Add button
To delete an entered IP, click the x button next to the entered IP
maintenance period
Select
Database maintenance window
If you select Use, set the day of week, start time, and duration
It is recommended to set a maintenance window for stable management of the DB. Patch operations will be performed at the scheduled time, causing service interruptions
If set to unused, we are not responsible for issues arising from patches not being applied.
tag
Select
Add Tag
after clicking the Add Tag button, Key, Value enter or select
If a network outage or replication delay with the Master Cluster occurs, you can use the Replica reconstruction function to replicate the Master Cluster’s data again.
To reconfigure the Replica, follow these steps.
Click the All Services > Database > MariaDB(DBaaS) menu. 1. Go to the Service Home page of MariaDB (DBaaS).
On the Service Home page, click the MariaDB(DBaaS) menu. 2. Navigate to the MariaDB(DBaaS) List page.
On the MariaDB(DBaaS) List page, click the resource to reconfigure the Replica. 3. MariaDB(DBaaS) Details Go to the page.
Click the Replica Reconstruction button. 4. Replica Reconfiguration Notice A popup window opens.
Replica Reconfiguration Notification In the popup window, click the OK button.
Promote Replica Cluster to Master Cluster
You can promote a fully configured Replica Cluster to a Master Cluster.
Caution
When the Master is promoted, synchronization with the existing Master Cluster is stopped.
To promote a Replica Cluster to Master, follow these steps.
All Services > Database > MariaDB(DBaaS) Click the menu. 1. Navigate to the Service Home page of MariaDB (DBaaS).
On the Service Home page, click the MariaDB(DBaaS) menu. 2. Navigate to the MariaDB(DBaaS) List page.
On the MariaDB(DBaaS) List page, click the resource to promote to Master. 3. MariaDB(DBaaS) Details Go to the page.
Click the More button and then click the Master Promotion button. 4. Master Promotion Notification The popup window opens.
Master Promotion Notification in the popup window, click the Confirm button.
2.4 - MariaDB(DBaaS) server connection
Scenario Overview
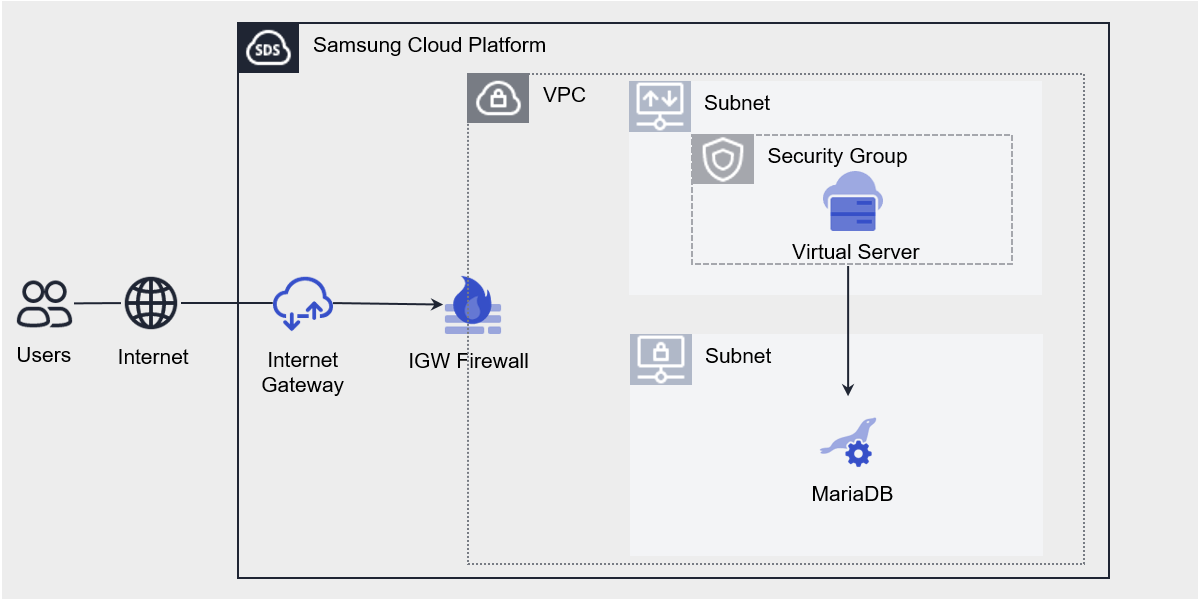
MariaDB(DBaaS) Server Connection scenario involves creating a Bastion host (Virtual Server) and a Database service, and accessing the DB service through the Bastion host. To reliably connect to MariaDB (DBaaS) in the Samsung Cloud Platform environment, you need to create a Bastion host and establish a network connection using it. To maintain stability and a high level of security, we recommend configuring the Database service in a Private Subnet environment and setting up the Bastion host in a restricted Public Subnet environment.
This scenario primarily describes creating a Bastion host and Database service, configuring the network environment for Bastion host and Database access, and connecting through a DB client.
Figure. MariaDB(DBaaS) server connection architecture
Scenario components
You can build the scenario using the following services.
Service group
service
Detailed description
Networking
VPC
A service that provides an isolated virtual network in a cloud environment
Networking
VPC > Subnet
A service that lets users segment the network within a VPC to match their purpose and scale
Networking
VPC > Public IP
A service that reserves a public IP and allocates and releases it to Compute resources.
Networking
VPC > Internet Gateway
A service that connects VPC resources to the Internet
Networking
Security Group
Virtual firewall that controls server traffic
Database
MariaDB(DBaaS)
A service that easily creates and manages MariaDB in a web environment
Compute
Virtual Server
Virtual server optimized for cloud computing
Compute
Virtual Server > Keypair
Encryption file used to connect to the Virtual Server
Table. Scenario component list
Reference
Since the default policy of the Security Group is Deny All, you must register only the allowed IPs.
The All Open(Any IP, Any Port) policy for In/Outbound can expose cloud resources directly to external threats.
By specifying the required IP and Port and setting a policy, you can strengthen security.
Scenario setup method
Create the services needed to build the scenario by following the procedure below.
1. ## Configure Network
Describes the process of configuring the network environment for accessing the Bastion Host and Database services.
Click the All Services > Networking > Firewall menu. 1. Navigate to the Firewall’s Service Home page.
On the Service Home page, click the Firewall menu. 2. Go to the Firewall List page.
On the Firewall List page, select the Internet Gateway resource name created in 1-3. Internet Gateway 생성하기. 3. Go to the detailed information page for the resource.
On the detail information page, click the Rules tab. 4. Go to the Rules tab.
Click the Add Rule button on the Rule tab. 5. Add Rule Navigate to the popup window.
Add Rule In the popup window, enter the rule below, and click the Confirm button.
Origin address
Destination address
Protocol
Port
Operation
Direction
Explanation
Bastion connection PC IP
Bastion host IP
TCP
3389(RDP)
Allow
Inbound
User PC → Bastion host
Table. Internet Gateway Firewall rules to be added
5. ## Database Connect
Describes the process of a user connecting to a database through a DB client program.
This guide provides instructions on how to connect using MySQL Workbench. Database client programs and CLI utilities are diverse, so you can install and use the tool that best suits your needs.
5-1. ### Connecting to Bastion host
In the Windows environment of the PC that will connect to the Bastion host, run Remote Desktop Connection, then enter the NAT IP of the Bastion Host and click the Connect button.
When the remote desktop connection succeeds, user credential input window opens. 2. Enter the ID and Password verified in 2-3. Bastion host 접속 ID 및 PW 확인하기 and click the Confirm button.
5-2. ### Install the DB client program (MySQL Workbench) on the Bastion host
Go to the official MySQL page and download the MySQL Workbench program.
Connect the user’s PC hard drive to upload the file to the Bastion host.
Click the Details button of the Local devices and resources item on the Local Resources tab of the Remote Desktop Connection.
Select the local disk of the location where the file was downloaded on the drive, and click the Confirm button.
Copy the downloaded file, upload it to the Bastion Host, and click the MySQL Workbench installer to install it.
5-3. ### Connect to the database using a DB client program (MySQL Workbench)
Run MySQL Workbench and click Database > Manage connections. 1. Manage Server Connection A popup window appears.
Manage Server Connection In the popup window, click the New button at the lower left, enter the Database server information created in 3-1. MariaDB(DBaaS) 서비스 생성하기, and click the Test Connection button. 2. Password a popup window appears.
Required input element item
input value
Connection Name
Custom (ex. service name)
Host name
Database server IP
Port
Database Port
Username
Database username
Table DB connection client program input fields
Password In the popup window, enter the password set in 3-1. MariaDB(DBaaS) 서비스 생성하기 and click the OK button. 3. When the operation succeeds, click the OK button in the Manage Server Connection popup window.
Click Database > Connect to Database. 4. Connect to Database A popup window appears.
Select the Connection Name registered in Stored Connection to perform a Database connection. 5. After connecting, you can perform simple queries, etc.
3 - API Reference
API Reference
4 - CLI Reference
CLI Reference
5 - Release Note
MariaDB(DBaaS)
2026.07.16
FEATUREImmediate backup, Disk usage monitoring, addition of Major version upgrade feature, and addition of third-generation server type
Immediate backup, Disk usage monitoring, Add major version upgrade feature
If additional data protection is needed, you can quickly create a backup using the instant backup feature.
Through the Disk usage query feature, you can view the usage of each Block Storage type assigned to an instance.
Through the Major version upgrade feature, users can perform a Major version upgrade.
Add third-generation server type
The third-generation server type has been newly added. * Please refer to the MariaDB(DBaaS) 서버 타입 for more details.
2026.03.19
FEATUREConfigure Replica for disaster recovery, add OS (Kernel) upgrade feature, provide Servicewatch integration feature
You can configure a disaster recovery Replica using the Replica configuration (Other Region) feature.
Strengthen the latest security patches and stability via the OS (Kernel) upgrade feature.
You can monitor metrics and logs by integrating with Servicewatch.
2025.07.01
FEATUREUser (access control) management, Archive configuration feature, Add DB Audit Log export feature, Provide backup notification feature, Add migration feature
Add MariaDB (DBaaS) feature
Add 2nd-generation server type
Add a second‑generation (db2) server type based on Intel 4th‑generation (Sapphire Rapids) processors. * For more details, refer to the MariaDB(DBaaS) server type.
DB user and access control management and Archive configuration feature Add