CacheStore (DBaaS) server connection
Scenario Overview
The Connecting to CacheStore (DBaaS) scenario involves creating a Bastion host (Virtual Server) and a Database service, and then accessing the DB service through the Bastion host. To connect to CacheStore (DBaaS) reliably in the Samsung Cloud Platform environment, you must create a bastion host and use it to establish a network connection. To maintain a stable and highly secure environment, we recommend configuring the Database service in a private subnet and the bastion host in a restricted public subnet.
This scenario describes the process of creating a Bastion host and a Database service, configuring the network environment for connecting the Bastion host to the Database, and then connecting to the database using a DB client.
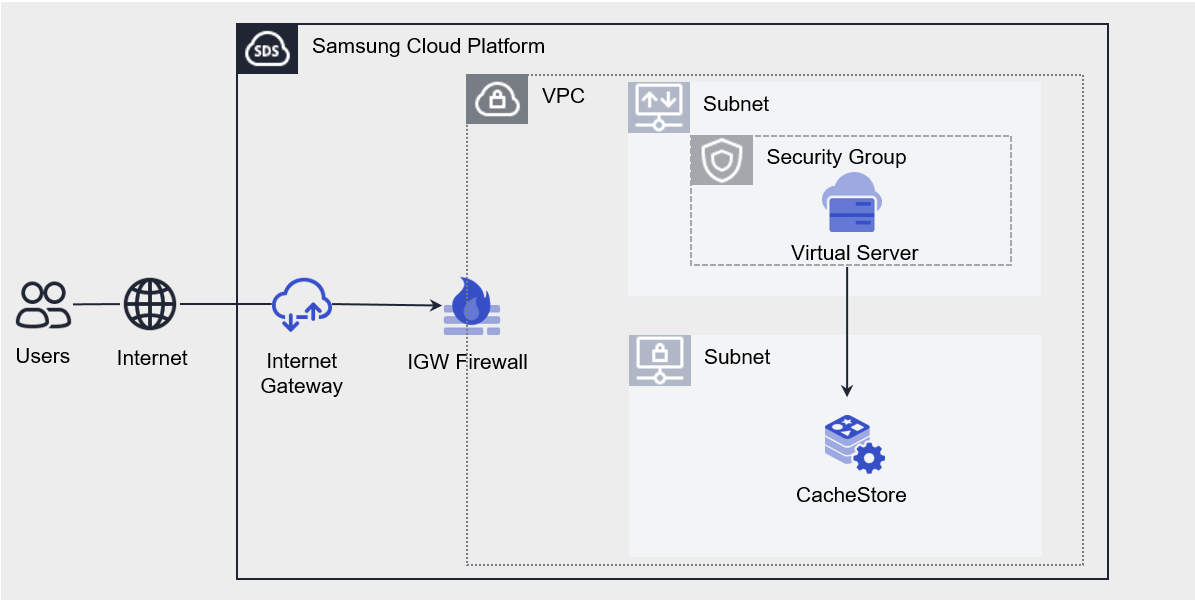
Scenario Components
You can configure the scenario using the following services.
| Service group | Service | Detailed Description | |
|---|---|---|---|
| Networking | VPC | A service that provides an isolated virtual network in a cloud environment | |
| Networking | VPC > Subnet | A service that allows users to subdivide their network within a VPC according to their specific use case and scale. | |
| Networking | VPC > Public IP | A service that reserves public IP addresses and allocates and releases them to Compute resources. | |
| Networking | VPC > Internet Gateway | A service that connects VPC resources to the internet | |
| Networking | Security Group | A virtual firewall that controls server traffic | |
| Database | CacheStore(DBaaS) | A service for easily creating and managing CacheStore in web environments | |
| Compute | Virtual Server | Virtual servers optimized for cloud computing | |
| Compute | Virtual Server > Keypair | An encrypted file used to connect to a Virtual Server |
- The default policy for a Security Group is Deny All, so you must register only the IPs to allow.
- The All Open (Any IP, Any Port) policy for In/Outbound traffic can expose cloud resources to external threats.
- You can enhance security by configuring policies that specify the required IP addresses and ports.
How to Configure Scenarios
Create the services required to build a scenario by following the steps below.
1. Configure the network
This section describes the process of configuring the network environment for connecting to the Bastion Host and Database services.
1-1. Create a VPC
- Click the All Services > Networking > VPC menu. 1. Go to the Service Home page of the VPC.
- On the Service Home page, click the Create VPC button. 2. Go to the Create VPC page.
- On the Create VPC page, enter the information required to create the service.
- Enter the IP range as
192.168.x.0/16.
- Enter the IP range as
- Review the details and estimated billing amount generated in the Summary panel, and then click the Complete button.
- After creation is complete, verify the created resources on the VPC List page.
1-2. Create a Subnet
- Click the All Services > Networking > VPC menu. 1. Go to the Service Home page of the VPC.
- On the Service Home page, click the Subnet menu. 2. Go to the Subnet List page.
- Click the Create Subnet button. 3. Go to the Create Subnet page.
- On the Create Subnet page, enter the information required to create the service.
- Select General as the subnet type.
- Select a pre-created VPC.
- Enter the IP range as
192.168.x.0/24.
- Review the details and estimated billing amount generated in the Summary panel, and click the Complete button.
- After creation is complete, verify the created resource on the Subnet List page.
1-3. Create an Internet Gateway
- Click the All Services > Networking > VPC menu. 1. Go to the Service Home page of the VPC.
- On the Service Home page, click the Internet Gateway menu. 2. Go to the Internet Gateway List page.
- Click the Create Internet Gateway button. 3. Navigate to the Create Internet Gateway page.
- On the Create Internet Gateway page, enter the required information to create the service.
- Select a pre-created VPC.
- Select Use in the Firewall usage field.
- Review the details and estimated billing amount generated in the Summary panel, and then click the Complete button.
- After creation is complete, verify the created resource on the Internet Gateway List page.
1-4. Create a Public IP
- Click the All Services > Networking > VPC menu. 1. Go to the Service Home page of the VPC.
- On the Service Home page, click the Public IP menu. 2. Navigates to the Public IP List page.
- Click the Reserve Public IP button. 3. Go to the Public IP Reservation page.
- On the Public IP Reservation page, enter the required information for the service reservation.
- Review the details and estimated billing amount generated in the Summary panel, and then click the Complete button.
- After generation is complete, verify the created resource on the Public IP List page.
1-5. Create a Security Group
- Click the All Services > Networking > Security Group menu. 1. Go to the Service Home page of the Security Group.
- On the Service Home page, click the Create Security Group button. 2. Navigate to the Create Security Group page.
- On the Create Security Group page, enter the required information needed to create the service.
- Review the input information and click the Complete button.
- After creation is complete, verify the created resource on the Security Group List page.
2. Create a Bastion Host
This section describes the process of configuring a Bastion Host where the database connection client must be installed.
2-1. Create a Server Keypair
- Click the All Services > Compute > Virtual Server menu. 1. Go to the Service Home page of the Virtual Server.
- On the Service Home page, click the Keypair menu. 2. Go to the Keypair List page.
- Click the Create Keypair button. 3. Navigate to the Create Keypair page.
- On the Create Keypair page, enter the required information needed to create the service.
- Review the generation information and click the Complete button.
- You can download the key only on the first occasion, and reissuance is not available.
- Be sure to store the downloaded key in a secure location.
2-2. Create a Bastion Host
- Click the All Services > Compute > Virtual Server menu. 1. Go to the Service Home page of the Virtual Server.
- On the Service Home page, click the Create Virtual Server button. 2. Go to the Create Virtual Server page.
- Enter the required information to create a service on the Create Virtual Server page.
- Select Windows for the image.
- Select the pre-created VPC and Subnet.
- Click Use NAT and select the Public IP reserved in 1-4. Create a Public IP.
- Connect the Keypair created in 2-1. Create a Server Keypair.
- Review the details and estimated billing amount generated in the Summary panel, and then click the Complete button.
- After creation is complete, verify the created resource on the Virtual Server List page.
2-3. Check the Bastion host login ID and password
- Click the All Services > Compute > Virtual Server menu. 1. Go to the Service Home page of the Virtual Server.
- On the Service Home page, click the Virtual Server menu. 2. Go to the Virtual Server List page.
- On the Virtual Server List page, click the resource created in 2-2. Create a Bastion Host. 3. Navigates to the detailed information page for the resource.
- On the details page, click the RDP password lookup button in the Keypair name field. 4. The RDP password lookup popup window opens.
- In the RDP password lookup popup, attach the keypair file downloaded from 2-1. Create server Keypair.
- After attaching, click the Password 확인 button. 6. The ID and password for accessing the resource are displayed.
- The ID and password are used to connect to the Bastion host, as described in 5-1. Connecting to the Bastion host.
3. Creating a Database
This section describes the process of creating a Database service.
3-1. Create a CacheStore (DBaaS) Service
- Click the All Services > Database > CacheStore(DBaaS) menu. 1. Go to the Service Home page of CacheStore(DBaaS).
- On the Service Home page, click the Create CacheStore(DBaaS) button. 2. Go to the Create CacheStore (DBaaS) page.
- On the Create CacheStore (DBaaS) page, enter the required information to create the service.
- Select the pre-created VPC and subnets to connect.
- Enter the Database-related creation information on the required information input screen.
- Add the Bastion host IP to the IP access control entry.
- The default database port is 2866, but you can specify a different port.
- Review the details and estimated billing amount generated in the Summary panel, and then click the Complete button.
- After creation is complete, verify the created resource on the CacheStore(DBaaS) list page.
4. Configure Rules
This section describes how to configure the rules for connecting to a Bastion host and the rules for connecting to a database from the Bastion host.
4-1. Add Security Group Rules
- Click the All Services > Networking > Security Group menu. 1. Go to the Service Home page of the Security Group.
- On the Service Home page, click the Security Group menu. 2. Go to the Security Group List page.
- **1-5. 3. Select the Security Group resource created in Create a Security Group. 3. Navigates to the detailed information page for the resource.
- On the details page, click the Rules tab. 4. Go to the Rules tab.
- Click the Add Rule button in the Rules tab. 5. Navigates to the Add Rule popup.
- In the Add Rule dialog box, enter the following rule and click the OK button.
Direction Remote Target Address Protocol Port Description Inbound CIDR User PC IP TCP 3389 (RDP) PC connected to Bastion → Bastion host Outbound CIDR DB IP TCP Database Port (Manual Entry) Bastion host → Database Table. Security Group security rules that must be added
4-2. Add an IGW Firewall Rule
- Click the All Services > Networking > Firewall menu. 1. Go to the Service Home page of the Firewall.
- On the Service Home page, click the Firewall menu. 2. Go to the Firewall List page.
- On the Firewall List page, select the Internet Gateway resource name that you created in 1-3. Create an Internet Gateway. 3. Navigates to the detailed information page for the specified resource.
- On the details page, click the Rules tab. 4. Go to the Rules tab.
- Click the Add Rule button in the Rules tab. 5. Navigates to the Add Rule popup.
- In the Add Rule popup, enter the rule below and click the OK button.
Origin address Destination address Protocol Port Operation Direction Description IP address of the PC connected to Bastion Bastion host IP TCP 3389(RDP) Allow Inbound User PC → Bastion host Table. Internet Gateway Firewall rules that must be added
5. Connecting to the Database
This section describes the process of connecting to a database using a DB client program.
This guide explains how to connect using Another Redis Desktop Manager. Database client programs and CLI utilities vary, so you can install and use the tool that best suits your needs.
5-1. Connecting to a Bastion Host
- In the Windows environment of the PC you want to use to connect to the Bastion host, run Remote Desktop Connection, enter the Bastion Host’s NAT IP, and click the Connect button.
- If the remote desktop connection is successful, the user credentials input window opens. 2. Enter the ID and Password that you verified in 2-3. Check the bastion host login ID and password, and then click the OK button.
5-2. Installing a DB client program (Another Redis Desktop Manager) on a bastion host
- Download another Redis Desktop Manager program.
- Download path for the Another Redis Desktop Manager program: https://github.com/qishibo/AnotherRedisDesktopManager/releases
- Connect the hard drive of your user PC to the bastion host to upload the file.
- In the Local Resources tab of Remote Desktop Connection, click the Details button for the local devices and resources item.
- Select the local disk where you downloaded the file from the drive, and click the OK button.
- Copy the downloaded file and upload it to the Bastion Host, then click the pgAdmin installation file to install it.
5-3. Connect to the Database Using a DB Client Program (Another Redis Desktop Manager)
- Run another instance of Redis Desktop Manager and click New Connection. 1. A New Connection popup window appears.
- In the New Connection popup, enter the Database server information created in 3-1. Create a CacheStore (DBaaS) service and click the OK button.
Required input element items Input Host Database server IP Port Database Port Password Database password Connection Name Custom (e.g., service name) Table. Database client program input fields - After connecting, you can check basic Redis information, manage data, and perform CRUD operations on keys.