This is the multi-page printable view of this section. Click here to print.

Return to the regular view of this page.

How-to guides

The user can enter the necessary information of CacheStore(DBaaS) through the Samsung Cloud Platform Console and create the service by selecting detailed options.

Creating CacheStore(DBaaS)

You can create and use the CacheStore(DBaaS) service in the Samsung Cloud Platform Console.

Notice

Please configure the Subnet type of VPC to General before creating the service.

  • If the Subnet type is Local, the creation of the corresponding Database service is not allowed.

To create a CacheStore(DBaaS), follow these steps.

  1. Click All Services > Database > CacheStore(DBaaS) menu. It moves to the Service Home page of CacheStore(DBaaS).

  2. On the Service Home page, click the CacheStore(DBaaS) creation button. It moves to the CacheStore(DBaaS) creation page.

  3. CacheStore(DBaaS) creation page, enter the information required for service creation and select detailed options.

    • Image and Version Selection area, please select the necessary information.

      Classification
      Necessity
      Detailed Description
      Image VersionRequiredProvides a list of CacheStore (DBaaS) versions
      Fig. CacheStore(DBaaS) image and version selection items

    • Enter Service Information Enter or select the required information in the area.

      Classification
      Necessity
      Detailed Description
      Server Name PrefixRequiredServer name where Redis/Valkey will be installed
      • Starts with lowercase English letters, and consists of 3 to 13 characters using lowercase letters, numbers, and special characters (-)
      • A postfix such as 001, 002 is attached based on the server name to create the actual server name
      Cluster NameRequiredName of the cluster where Redis/Valkey is installed
      • Enter in English, 3-20 characters
      • Cluster is a unit that bundles multiple servers
      Service Type > Server TypeRequiredServer type where Redis/Valkey will be installed
      • Standard: Standard specification commonly used
      Service Type > Planned ComputeRequiredCurrent status of resources with Planned Compute set
      • In Use: Number of resources with Planned Compute set that are currently in use
      • Settings: Number of resources with Planned Compute set
      • Coverage Preview: Amount applied by Planned Compute for each resource
      • Create Planned Compute Service: Move to the Planned Compute service application page
      Service Type > Block StorageRequiredBlock Storage settings used by DB according to purpose
      • Basic OS: Area where DB engine is installed
      • DATA: Storage area for table data, archive files, etc.
        • Please select the storage type and enter the capacity. (For more information on each Block Storage type, see Creating Block Storage)
          • SSD: High-performance general volume
          • HDD: General volume
          • SSD_KMS, HDD_KMS: Additional encrypted volumes using Samsung Cloud Platform KMS (Key Management System) encryption key
        • The set Storage type will be applied equally to additional storage
        • Capacity should be entered in multiples of 8 within the range of 16 to 5,120
      High AvailabilityOptionalWhether to configure High Availability (HA)
      • Using High Availability (HA) configuration provides Master-Replica configuration, and Replica can be configured with 1 or 2
      • Sentinel Port Number: Port number used when connecting to Sentinel
        • Port for Master-Replica communication, enter within the range of 1,024 to 65,535
      • Number of Replicas: Number of Replicas to be configured
        • If 1 is selected, it is configured as Master-Replica-Sentinel
        • If 2 is selected, it is configured as Master-Replica-Replica, and Sentinel is automatically installed on the server where Redis is installed
        • The server type of Sentinel is set to the minimum specification
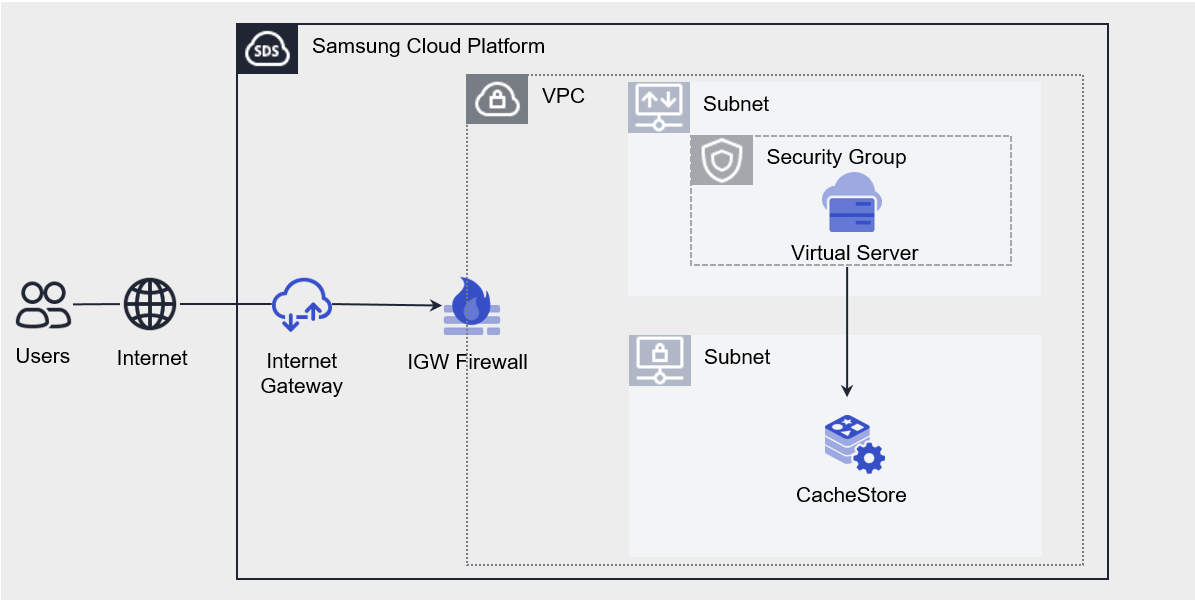
      NetworkRequiredThe network where CacheStore(DBaaS) is installed
      • Select and connect the pre-created VPC and Subnet
      • IP can only be generated automatically
      Network > Common SettingsRequiredNetwork settings for servers created by the service
      • Select if you want to apply the same settings to all servers being installed
      • Select pre-created VPC and Subnet
        • IP can only be generated automatically
      Network > Server-specific settingsRequiredNetwork settings for servers created by the service
      • Select to apply different settings for each server being installed
      • Select pre-created VPC and Subnet, IP, Public NAT
        • Enter the IP for each server
        • The Public NAT function is only available if the VPC is connected to the Internet Gateway. If Use is checked, you can select from the reserved IP in the VPC product’s Public IP. For more information, see Creating Public IP
      IP Access ControlSelectSet service access policy
      • Set access policy for the IP entered on the page, so you don’t need to set Security Group policy separately
      • Enter in IP format (e.g., 192.168.10.1) or CIDR format (e.g., 192.168.10.0/24, 192.168.10.1/32), and click the Add button
      • To delete the entered IP, click the x button next to the entered IP
      Maintenance periodSelectionCacheStore(DBaaS) maintenance period
      • Use is selected to set the day of the week, start time, and duration
      • It is recommended to set the maintenance period for stable DB management, and patch work is performed at the set time, resulting in service interruption
      • If not used, Samsung SDS is not responsible for any problems that occur due to non-application of patches
      Fig. CacheStore(DBaaS) Service Configuration Items

    • Database Configuration Required Information Input area, please enter or select the required information.

      Classification
      Necessity
      Detailed Description
      BackupSelectionWhether to use backup
      • Use is selected to set the backup file storage period and backup start time
      • Backup files are charged separately according to capacity
        • The file storage period can be set from 7 to 35 days
      • The minute (minutes) when the backup is performed is set randomly, and the backup end time cannot be set
      Redis/Valkey Port numbermandatoryPort number required for Redis/Valkey connection
      • Port must be entered within the range of 1,024 ~ 65,535
      Redis/Valkey passwordmandatoryPassword required when connecting to Redis/Valkey
      • Enter 8-30 characters, including English, numbers, and special characters (excluding $ " )
      Redis/Valkey password confirmationrequiredRe-enter the password identically
      ParameterRequiredRedis/Valkey parameters to use
      • Query button can be clicked to check detailed information of parameters
      • Parameters can be modified after creation is completed, and DB restart is required after modification
      Time ZoneRequiredTime zone where the Database will be used
      Fig. CacheStore(DBaaS) Database Configuration Items

    • Enter Additional Information Enter or select the required information in the area.

      Classification
      Mandatory
      Detailed Description
      TagSelectionAdd Tag
      • Up to 50 can be added per resource
      • Click the Add Tag button and enter or select Key, Value
      Table. Additional information input items for CacheStore(DBaaS)

  4. In the Summary panel, review the detailed information and estimated charges, and click the Complete button.

    • Once creation is complete, check the created resource on the Resource List page.

Check CacheStore(DBaaS) detailed information

The CacheStore(DBaaS) service allows you to view and modify the entire resource list and detailed information. The CacheStore(DBaaS) details page consists of detailed information, tags, and operation history tabs.

To check the detailed information of the CacheStore(DBaaS) service, follow the next procedure.

  1. Click All Services > Database > CacheStore(DBaaS) menu. It moves to the Service Home page of CacheStore(DBaaS).
  2. Service Home page, click the CacheStore(DBaaS) menu. Move to the CacheStore(DBaaS) list page.
  3. CacheStore(DBaaS) list page, click the resource to check the detailed information. Move to the CacheStore(DBaaS) details page.
    • CacheStore(DBaaS) details page top shows status information and additional features.
DivisionDetailed Description
Cluster StatusRedis cluster status installed
  • Creating: The cluster is being created
  • Editing: The cluster is changing to the operation performance state
  • Error: The cluster has an error occurred during operation
    • If it occurs continuously, contact the administrator
  • Failed: The cluster failed during the creation process
  • Restarting: The cluster is being restarted
  • Running: The cluster is operating normally
  • Starting: The cluster is being started
  • Stopped: The cluster is stopped
  • Stopping: The cluster is being stopped
  • Synchronizing: The cluster is being synchronized
  • Terminating: The cluster is being deleted
  • Unknown: The cluster status is unknown
    • If it occurs continuously, contact the administrator
Cluster ControlButtons that can change the cluster status
  • Start: Start a stopped cluster
  • Stop: Stop a running cluster
  • Restart: Restart a running cluster
  • Switch-Over: Switch a Replica cluster to Master
Additional features moreCluster-related management buttons
  • Service status synchronization: Real-time Redis/Valkey service status inquiry
  • Backup history: If backup is set, check the normal execution of backup and history
  • Database recovery: Recover DB based on a specific point in time
  • Parameter management: Possible to inquire and modify Redis/Valkey configuration parameters
  • Rename-Command: Change the name of Redis/Valkey Command
Service CancellationA button to cancel the service
Fig. CacheStore(DBaaS) Status Information and Additional Features

Detailed Information

On the CacheStore(DBaaS) list page, you can check the detailed information of the selected resource and modify the information if necessary.

ClassificationDetailed Description
Server InformationServer information configured in the corresponding cluster
  • Category: Server type (Master, Replica, Sentinel)
  • Server Name: Server name
  • IP:Port: Server IP and port
  • Status: Server status
ServiceService Name
Resource TypeResource Type
SRNUnique resource ID in Samsung Cloud Platform
  • In DB service, it means cluster SRN
Resource NameResource Name
  • In DB service, it means cluster name
Resource IDUnique resource ID in the service
CreatorThe user who created the service
Creation TimeTime when the service was created
ModifierService information modified user
Modified TimeTime when service information was modified
Image/VersionInstalled Redis/Valkey Image and Version Information
Cluster NameRedis/Valkey server cluster name
Planned ComputePlanned Compute settings for current resources
Maintenance periodDB patch work period setting status
  • If maintenance period setting is required, click the Edit icon to set
BackupBackup setting status
  • If backup setting is required, click the Edit icon to set
Redis/Valkey Port numberPort number required for Redis/Valkey connection
Time ZoneRedis/Valkey Time Zone
Sentinel Port numberPort number for Master and Replica to communicate
VIPVirtual IP information
  • Only available when high availability is set
NetworkNetwork information (VPC, Subnet) where CacheStore (DBaaS) is installed
IP Access ControlService Access Policy Setting
  • If IP addition or deletion is required, click the Modify icon to set
Master & ReplicaMaster, Replica server type, default OS, additional Disk information
  • In case of server type modification, click the Modify icon next to the server type to set
  • Modifying the server type requires a server restart. Please check separately for SW license modifications and SW settings due to specification changes.
SentinelSentinel server type, basic OS information
  • When configuring HA, it is possible to check when 1 replica is selected
Table. CacheStore(DBaaS) Database detailed information items

Tag

On the CacheStore(DBaaS) list page, you can check the tag information of the selected resource, and add, change, or delete it.

ClassificationDetailed Description
Tag ListTag list
  • Check Key, Value information of tag
  • Up to 50 tags can be added per resource
  • Search and select existing Key and Value lists when entering tags
Fig. CacheStore(DBaaS) Tags Tab Items

Work History

CacheStore(DBaaS) list page where you can check the operation history of the selected resource.

DivisionDetailed Description
Work History ListResource Change History
  • Work time, resource ID, resource name, work details, event topic, work result, and worker information can be checked
  • To perform a detailed search, click the Detailed Search button
Fig. CacheStore(DBaaS) Work History Tab Detailed Information Items

CacheStore(DBaaS) resource management

If you need to change or restore the existing setting options of the generated CacheStore(DBaaS) resource, or change the command, you can perform the task from the CacheStore(DBaaS) details page.

Operating Control

If changes occur in the running CacheStore (DBaaS) resource, you can start, stop, and restart it. Also, if HA is configured, you can switch the Master-Replica server through Switch-over.

To control the operation of CacheStore(DBaaS), follow the next procedure.

  1. Click All Services > Database > CacheStore(DBaaS) menu. It moves to the Service Home page of CacheStore(DBaaS).
  2. On the Service Home page, click the CacheStore(DBaaS) menu. It moves to the CacheStore(DBaaS) list page.
  3. CacheStore(DBaaS) list page, click the resource to control the operation. Move to the CacheStore(DBaaS) details page.
  4. Check the CacheStore status and complete the change through the control button below.
    • Start: The CacheStore service is installed on the server and the CacheStore service is running.
    • Stop: CacheStore service can stop the server where CacheStore service is installed.
    • Restart: Only the CacheStore service can be restarted.
    • Switch Over: You can switch between the Master server and the Replica server.

Synchronizing Service Status

You can synchronize the real-time service status of CacheStore(DBaaS).

To check the service status of CacheStore(DBaaS), follow the next procedure.

  1. Click All Services > Database > CacheStore(DBaaS) menu. It moves to the Service Home page of CacheStore(DBaaS).
  2. Service Home page, click the CacheStore(DBaaS) menu. It moves to the CacheStore(DBaaS) list page.
  3. CacheStore(DBaaS) list page, click the resource to query the service status. Move to the CacheStore(DBaaS) details page.
  4. Click the 서비스 상태 동기화 button. During the query, the cluster changes to Synchronizing status.
  5. When the query is complete, the status is updated in the server information item, and the cluster changes to Running status.

Changing Server Type

You can change the configured server type.

Caution
Modifying the server type requires a server restart. Please check separately for SW license modifications and SW settings due to server specification changes.

To change the server type, follow these steps.

  1. Click All Services > Database > CacheStore(DBaaS) menu. It moves to the Service Home page of CacheStore(DBaaS).
  2. On the Service Home page, click the CacheStore(DBaaS) menu. It moves to the CacheStore(DBaaS) list page.
  3. On the CacheStore(DBaaS) list page, click the resource you want to change the server type for. It moves to the CacheStore(DBaaS) details page.
  4. Click the Edit icon of the server type you want to change at the bottom of the detailed information. The Server Type Edit popup window opens.
  5. In the Server Type Modification popup window, select the server type and click the OK button.

Cancel CacheStore(DBaaS)

You can cancel unused CacheStore (DBaaS) to reduce operating costs. However, when canceling the service, the operating service may be stopped immediately, so you should consider the impact of stopping the service sufficiently before proceeding with the cancellation work.

To cancel CacheStore(DBaaS), follow the procedure below.

  1. All Services > Database > CacheStore(DBaaS) menu is clicked. It moves to the Service Home page of CacheStore(DBaaS).
  2. Service Home page, click the CacheStore(DBaaS) menu. Move to the CacheStore(DBaaS) list page.
  3. On the CacheStore(DBaaS) list page, select the resource to be canceled and click the Service Cancellation button.
  4. Once the cancellation is complete, please check if the resource has been cancelled on the CacheStore(DBaaS) list page.

1 - Managing CacheStore Service

Users can manage CacheStore (DBaaS) through the Samsung Cloud Platform Console.

Managing Parameters

It provides a feature to easily view and modify database configuration parameters.

Viewing Parameters

To view configuration parameters, follow these steps:

  1. Click the All Services > Database > CacheStore (DBaaS) menu. It moves to the Service Home page of CacheStore (DBaaS).
  2. Click the CacheStore (DBaaS) menu on the Service Home page. It moves to the CacheStore (DBaaS) List page.
  3. Click the resource you want to view and modify parameters on the CacheStore (DBaaS) List page. It moves to the CacheStore (DBaaS) Details page.
  4. Click the More button and then click the Parameter Management button. The Parameter Management popup window opens.
  5. Click the View button in the Parameter Management popup window. The View Notification popup window opens.
  6. When the View Notification popup window opens, click the OK button. It takes some time to view.

Modifying Parameters

To modify configuration parameters, follow these steps:

  1. Click the All Services > Database > CacheStore (DBaaS) menu. It moves to the Service Home page of CacheStore (DBaaS).
  2. Click the CacheStore (DBaaS) menu on the Service Home page. It moves to the CacheStore (DBaaS) List page.
  3. Click the resource you want to view and modify parameters on the CacheStore (DBaaS) List page. It moves to the CacheStore (DBaaS) Details page.
  4. Click the More button and then click the Parameter Management button. The Parameter Management popup window opens.
  5. Click the View button in the Parameter Management popup window. The View Notification popup window opens.
  6. When the View Notification popup window opens, click the OK button. It takes some time to view.
  7. If modification is necessary, click the Modify button and enter the modification contents in the custom value area of the parameter to be modified.
  8. When the input is complete, click the Save button.

Renaming Commands

Note
When applying Rename-Command, the CacheStore (DBaaS) service is interrupted due to restart.

It provides a function to view and modify Redis OSS/Valkey Command names. To view and modify Command names, follow these steps:

  1. Click the All Services > Database > CacheStore (DBaaS) menu. It moves to the Service Home page of CacheStore (DBaaS).
  2. Click the CacheStore (DBaaS) menu on the Service Home page. It moves to the CacheStore (DBaaS) List page.
  3. Click the resource you want to modify the Command name on the CacheStore (DBaaS) List page. It moves to the CacheStore (DBaaS) Details page.
  4. Click the More button and then click the Rename-Command button. It moves to the Rename-Command page.
  5. Click the View button on the Rename-Command page. The View Notification popup window opens.
  6. When the View Notification popup window opens, click the OK button. It takes some time to view.
  7. If modification is necessary, click the Modify button and enter the modification contents in the custom value area of the Command to be modified.
  8. When the input is complete, click the Complete button.

2 - CacheStore Backup and Recovery

The user can set up backups of CacheStore(DBaaS) through the Samsung Cloud Platform Console and recover with the backed-up files.

CacheStore(DBaaS) backup

CacheStore(DBaaS) provides a data backup function based on its own backup command. It also provides an optimized backup environment for data protection and management through backup history check and backup file deletion functions.

Setting up backup

The method of setting up a backup for CacheStore(DBaaS) is described in CacheStore(DBaaS) creation guide, please refer to it.

To modify the backup settings of the generated resource, follow these steps.

Caution

If backup is set, backup will be performed at the specified time after the set time, and additional fees will be incurred depending on the backup capacity.

  • If the backup setting is changed to unset, the backup operation will be stopped immediately, and the stored backup data will be deleted and can no longer be used.
  1. All Services > Database > CacheStore(DBaaS) menu, click. It moves to the Service Home page of CacheStore(DBaaS).
  2. On the Service Home page, click the CacheStore(DBaaS) menu. It moves to the CacheStore(DBaaS) list page.
  3. CacheStore(DBaaS) list page, click the resource to set the backup. It moves to the CacheStore(DBaaS) detail page.
  4. Click the Edit icon of the backup item. The Backup Settings popup window opens.
  5. If you set up a backup, click Use in the Backup Settings popup window, select the retention period, backup start time, and Archive backup cycle, and then click the OK button.
    • If you want to stop the backup setting, uncheck Use in the Backup Setting popup window and click the OK button.

Check Backup History

Notice
To set up notifications for backup success and failure, you can set them up through the Notification Manager product. For detailed usage guidelines on setting up notification policies, please refer to Creating a Notification Policy.

To check the backup history, follow these steps.

  1. Click All Services > Database > CacheStore(DBaaS) menu. It moves to the Service Home page of CacheStore(DBaaS).
  2. On the Service Home page, click the CacheStore(DBaaS) menu. It moves to the CacheStore(DBaaS) list page.
  3. CacheStore(DBaaS) list page, click the resource to check the backup history. It moves to the CacheStore(DBaaS) details page.
  4. Click the Backup History button. The Backup History popup window opens.
  5. Backup History popup window where you can check the backup status, version, backup start time, backup completion time, and capacity.

Deleting Backup Files

To delete the backup history, follow these steps.

Caution
Backup files cannot be restored after deletion. Please make sure to check if the data is unnecessary before deleting it.
  1. Click All Services > Database > CacheStore(DBaaS) menu. It moves to the Service Home page of CacheStore(DBaaS).
  2. On the Service Home page, click the CacheStore(DBaaS) menu. It moves to the CacheStore(DBaaS) list page.
  3. CacheStore(DBaaS) list page, click the resource to check the backup history. It moves to the CacheStore(DBaaS) detail page.
  4. Click the Backup History button. The Backup History popup window opens.
  5. Backup History popup window, check the file you want to delete and click the Delete button.

CachStore(DBaaS) recovery

In the event of a failure or data loss, where recovery from a backup file is necessary, the recovery function allows recovery based on a specific point in time.

To recover CacheStore(DBaaS), follow these steps.

  1. Click All Services > Database > CacheStore(DBaaS) menu. It moves to the Service Home page of CacheStore(DBaaS).
  2. On the Service Home page, click the CacheStore(DBaaS) menu. It moves to the CacheStore(DBaaS) list page.
  3. CacheStore(DBaaS) list page, click the resource you want to restore. It moves to the CacheStore(DBaaS) details page.
  4. Database Recovery 버튼을 클릭하세요. Database Recovery 페이지로 이동합니다.
  5. After entering information in the Database recovery configuration area, click the Complete button.
Classification
Necessity
Detailed Description
Recovery TypeRequiredUser sets the point in time to recover
  • Recover based on backup files, and select from the list of backup file timestamps displayed
Server name prefixRequiredServer name of the recovery DB
  • Start with lowercase English letters, using lowercase letters, numbers, and special characters (-) to enter 3 to 16 characters
  • A postfix such as 001, 002 is attached based on the server name to create the actual server name
Cluster NameRequiredCluster name of the recovery DB
  • Enter in English, 3-20 characters
  • A cluster is a unit that bundles multiple servers
Service Type > Server TypeRequiredServer type where the recovery DB will be installed
  • Standard: Standard specification commonly used
  • High Capacity: High-capacity server with 24vCore or more (to be provided later)
Service Type > Planned ComputeSelectionCurrent status of resources with Planned Compute set
  • In Use: Number of resources with Planned Compute set that are in use
  • Settings: Number of resources with Planned Compute set
  • Coverage Preview: Amount applied by resource-based Planned Compute
  • Create Planned Compute Service: Move to the Planned Compute service application page
Service Type > Block StorageRequiredBlock Storage setting used by recovery DB
  • Basic OS: Area where DB engine is installed
  • DATA: Area where files such as AOF (Append Only File) and RDB (Redis Database) are stored
    • Applied equally to the storage type set in the original cluster
    • Capacity can be entered in multiples of 8 within the range of 56 to 5,120
Redis/Valkey Port numberrequiredRedis/Valkey Port number set in the original DB
IP Access ControlSelectSet service access policy
  • Set access policy for the IP entered on the page, so you don’t need to set Security Group policy separately
  • Enter in IP format (e.g., 192.168.10.1) or CIDR format (e.g., 192.168.10.0/24, 192.168.10.1/32) and click the Add button
  • To delete the entered IP, click the x button next to the entered IP
Maintenance periodSelectCacheStore(DBaaS) DB maintenance period
  • Use is selected, set the day of the week, start time, and duration
  • It is recommended to set the maintenance period for stable DB management. Patch work is performed at the set time and service interruption occurs
  • If not used, Samsung SDS is not responsible for problems that occur due to non-application of patches.
TagSelectionAdd Tag
  • Click the Add Tag button and enter or select Key, Value
Fig. CacheStore(DBaaS) recovery configuration items

3 - CacheStore(DBaaS) server connection

Scenario Overview

CacheStore(DBaaS) connection scenario is a scenario where Bastion host (Virtual Server) and Database service are created, and the DB service is accessed through the Bastion host. To connect to CacheStore (DBaaS) stably in the Samsung Cloud Platform environment, it is necessary to create a Bastion host and use it for network connection. To maintain a stable and high level of security, it is recommended to configure the Database service in a Private Subnet environment and configure the Bastion host in a limited Public Subnet environment.

This scenario largely describes the process of creating a Bastion host and Database service, and configuring the network environment for Bastion host and Database connection, allowing access through a DB connection client.

Architecture
Figure. CacheStore(DBaaS) server connection architecture

Scenario Components

You can configure the scenario using the following services.

Service Group
Service
Detailed Description
NetworkingVPCA service that provides an independent virtual network in a cloud environment
NetworkingVPC > SubnetA service that allows users to subdivide the network according to purpose,size in VPC
NetworkingVPC > Public IPA service that reserves public IP and assigns and returns it to Compute resources
NetworkingVPC > Internet GatewayA service that connects VPC resources to the internet
NetworkingSecurity GroupA virtual firewall that controls the server’s traffic
DatabaseCacheStore(DBaaS)A service that easily creates and manages CacheStore in a web environment
ComputeVirtual ServerCloud computing optimized virtual server
ComputeVirtual Server > KeypairEncryption file used to connect to the Virtual Server
Table. Scenario Component List
Note
  • The default policy of Security Group is Deny All, so only allowed IPs should be registered.
  • In/Outbound’s All Open(Any IP, Any Port) policy can expose cloud resources to external threats.
    • By specifying the necessary IP and Port to set the policy, you can enhance security.

Scenario composition method

To configure the scenario, create the necessary services through the following procedure.

1. Configuring the Network

This describes the process of configuring the network environment for connecting to the Bastion Host and Database services.

1-1. Creating a VPC

For detailed creation methods, please refer to the Networking > VPC > How-to guides guide.
  1. Click All services > Networking > VPC menu. It moves to the Service Home page of VPC.
  2. On the Service Home page, click the Create VPC button. It moves to the Create VPC page.
  3. VPC Creation page, please enter the information required for service creation.
    • IP range should be entered as 192.168.x.0/16.
  4. In the Summary panel, review the detailed information and estimated charges, and then click the Complete button.
    • Once creation is complete, check the created resource on the VPC list page.

1-2. Creating a Subnet

For detailed creation methods, please refer to the Networking > VPC > How-to guides > Subnet guide.
  1. Click All services > Networking > VPC menu. It moves to the Service Home page of VPC.
  2. Service Home page, click the Subnet menu. It moves to the Subnet list page.
  3. Click the Subnet Creation button. It moves to the Subnet Creation page.
  4. Subnet Creation page where you enter the information needed to create a service.
    • Subnet type should be selected as General.
    • Please select a pre-created VPC.
    • IP range should be entered as 192.168.x.0/24.
  5. In the Summary panel, review the detailed information and estimated charges, and click the Complete button.
    • Once creation is complete, check the created resource on the Subnet list page.

1-3. Creating an Internet Gateway

For detailed creation methods, please refer to the Networking > VPC > How-to guides > Internet Gateway guide.
  1. Click All services > Networking > VPC menu. It moves to the Service Home page of VPC.
  2. Service Home page, click the Internet Gateway menu. Move to the Internet Gateway list page.
  3. Click the Create Internet Gateway button. It moves to the Create Internet Gateway page.
  4. Internet Gateway creation page, please enter the required information necessary for service creation.
    • Please select a pre-created VPC.
    • Select Use in the Firewall usage item.
  5. In the Summary panel, review the detailed information and the estimated charge amount, and then click the Complete button.
    • Once the creation is complete, check the created resource on the Internet Gateway list page.

1-4. Creating a Public IP

For detailed creation methods, please refer to the Networking > VPC > How-to guides > Public IP guide.
  1. Click All services > Networking > VPC menu. It moves to the Service Home page of VPC.
  2. Service Home page, click the Public IP menu. It moves to the Public IP list page.
  3. Public IP Reservation 버튼을 클릭하세요. Public IP Reservation 페이지로 이동합니다.
  4. Public IP Reservation page, please enter the required information necessary for service reservation.
  5. In the Summary panel, review the detailed information and estimated charges, and then click the Complete button.
    • Once creation is complete, check the created resource on the Public IP list page.

1-5. Creating a Security Group

For detailed creation methods, please refer to the Networking > Security Group > How-to guides guide.
  1. Click All Services > Networking > Security Group menu. It moves to the Service Home page of Security Group.
  2. Service Home page, click the Create Security Group button. Move to the Create Security Group page.
  3. Security Group Creation page, please enter the required information necessary for service creation.
  4. Check the input information and click the Complete button.
    • Once creation is complete, check the created resource on the Security Group list page

2. Creating a Bastion host

This describes the process of configuring the Bastion Host where the database connection client should be installed.

2-1. Creating a Server Keypair

For detailed creation methods, please refer to the Compute > Virtual Server > How-to guides > Keypair guide.
  1. Click All Services > Compute > Virtual Server menu. It moves to the Service Home page of Virtual Server.
  2. Service Home page, click the Keypair menu. It moves to the Keypair list page.
  3. Create Keypair button will be clicked. It moves to the Create Keypair page.
  4. Keypair creation page where you enter the required information necessary for service creation.
  5. Check the creation information and click the Complete button.
    • The key download is only available for the first time, and re-issuance is not provided.
    • Please make sure to store the downloaded key in a safe place.

2-2. Creating a Bastion Host

For detailed creation methods, please refer to the Compute > Virtual Server > How-to guides guide.
  1. Click All Services > Compute > Virtual Server menu. It moves to the Service Home page of Virtual Server.
  2. Service Home page, click the Virtual Server creation button. Move to the Virtual Server creation page.
  3. Virtual Server Creation page, please enter the required information necessary for service creation.
  4. In the Summary panel, review the detailed information and estimated billing amount, and click the Complete button.
    • Once the creation is complete, check the created resource on the Virtual Server list page.

2-3. Check Bastion host connection ID and PW

  1. Click All Services > Compute > Virtual Server menu. It moves to the Service Home page of Virtual Server.
  2. Service Home page, click the Virtual Server menu. Move to the Virtual Server list page.
  3. Virtual Serve list page, click on the resource created in 2-2. Creating a Bastion host. It moves to the detailed information page of the corresponding resource.
  4. Click the RDP password inquiry button in the Keypair item on the detailed information page. The RDP password inquiry popup window opens.
  5. RDP password inquiry popup window, attach the keypair file downloaded from 2-1. Server Keypair creation.
  6. After attaching, click the Password confirmation button. The ID and password required to access the resource will be displayed.

3. Creating a Database

It describes the process of creating a Database service.

3-1. Creating CacheStore (DBaaS) Service

For detailed creation methods, please refer to the Database > CacheStore(DBaaS) > How-to guides guide.
  1. All services > Database > CacheStore(DBaaS) menu is clicked. It moves to the Service Home page of CacheStore(DBaaS).
  2. On the Service Home page, click the CacheStore(DBaaS) creation button. It moves to the CacheStore(DBaaS) creation page.
  3. CacheStore(DBaaS) creation page, please enter the required information needed for service creation.
    • Select and connect to the pre-created VPC and Subnet.
    • Enter database-related creation information on the essential information input screen.
    • Add the Bastion host IP to the IP access control item.
    • Database Port is 2866 by default, but users can also specify it.
  4. In the Summary panel, review the detailed information and estimated charges, and then click the Complete button.
    • Once creation is complete, check the created resource on the CacheStore(DBaaS) list page.

4. Setting Rules

This describes the process of setting rules for users to access the Bastion host and for the Bastion host to access the Database.

4-1. Security Group Add Security Rules

For detailed creation methods, please refer to the Networking > Security Group > How-to guides guide.
  1. Click All Services > Networking > Security Group menu. It moves to the Service Home page of Security Group.
  2. Service Home page, click the Security Group menu. Move to the Security Group list page.
  3. 1-5. Creating a Security Group Select the Security Group resource created from 1-5. Creating a Security Group. It moves to the detailed information page of the corresponding resource.
  4. Click the Rules tab on the detailed information page. It moves to the Rules tab.
  5. Rule tab, click the Add Rule button. It moves to the Add Rule popup window.
  6. In the Add Rule popup window, enter the following rules and click the OK button
DirectionRemoteTarget AddressProtocolPortDescription
InboundCIDRUser PC IPTCP3389 (RDP)Bastion connection PC → Bastion host
OutboundCIDRDB IPTCPDatabase Port (direct input)Bastion host → Database
Fig. Security Group security rules to be added

4-2. Adding IGW Firewall Rules

For detailed creation methods, please refer to the Networking > Firewall > How-to guides guide.
  1. Click All services > Networking > Firewall menu. It moves to the Service Home page of Firewall.
  2. Service Home page, click the Firewall menu. It moves to the Firewall list page.
  3. Firewall list page, select the Internet Gateway resource name created in 1-3. Internet Gateway creation. It moves to the detailed information page of the corresponding resource.
  4. Click the Rules tab on the detailed information page. It moves to the Rules tab.
  5. Rule tab, click the Add Rule button. Move to the Add Rule popup window.
  6. In the Add Rule popup window, enter the following rules and click the OK button.
Departure AddressDestination AddressProtocolPortActionDirectionDescription
Bastion connection PC IPBastion host IPTCP3389(RDP)AllowInboundUser PC → Bastion host
Fig. Internet Gateway Firewall rules to be added

5. Connecting to the Database

This explains the process of a user accessing the Database through a DB connection client program.

This guide provides instructions on how to connect using Another Redis Desktop Manager. There are various database client programs and CLI utilities, so you can also install and use the tools that are suitable for the user.

5-1. Connecting to the Bastion host

  1. Run Remote Desktop Connection in the Windows environment of the PC you want to connect to the Bastion host, enter the NAT IP of the Bastion Host, and click the Connect button.
  2. When the remote desktop connection is successful, the User Credential Input Window opens. Enter the ID and Password confirmed in 2-3. Check Bastion host access ID and PW and click the Confirm button.

5-2. Install DB connection client program (Another Redis Desktop Manager) on the Bastion host

  1. Download another Redis Desktop Manager program.
  2. Connect the hard drive of the user PC to upload the file to the Bastion host.
  3. Click the Details button for local devices and resources items in the Local Resources tab of the remote desktop connection.
  4. Select the local disk where the file was downloaded to the drive and click the Confirm button.
  5. Download the file, copy it to the Bastion Host, and upload it, then click on the pgAdmin installation file to install it.

5-3. Using DB connection client program(Another Redis Desktop Manager) to connect to Database

  1. Run Another Redis Desktop Manager and click New Connection. The New Connection popup window will appear.
  2. New Connection popup window, enter the Database server information created in 3-1. CacheStore(DBaaS) 서비스 생성하기 and click the OK button.
    Required Input Element ItemsInput Value
    HostDatabase Server IP
    PortDatabase Port
    PasswordDatabase password
    Connection NameCustom (ex. Service Name)
    DB Connection Client Program Input Items
  3. After connecting, you can perform basic information checks on Redis, data management, and CRUD operations on keys.