This is the multi-page printable view of this section. Click here to print.
Container Registry
- 1: Overview
- 1.1: Monitoring Metrics
- 1.2: ServiceWatch Metrics
- 2: How-to guides
- 2.1: Managing the Repository
- 2.2: Managing Images and Tags
- 2.3: Manage Image Security Vulnerabilities
- 2.4: Manage Image Tag Deletion Policy
- 2.5: Use Container Registry with CLI
- 2.6: Example of Registry and Repository Policies
- 3: API Reference
- 4: CLI Reference
- 5: Release Note
1 - Overview
Service Overview
Container Registry is a service that provides a registry for storing and managing container images and OCI (Open Container Initiative) standard artifacts. Users can easily store, manage, and share images using the Docker CLI.
Features
- Simple registry management and image distribution: You can easily create a container registry for your project on Samsung Cloud Platform. By using the standard Docker CLI, you can easily pull images for deployment from the Container Registry, streamlining development and service deployment workflows.
- Efficient Container Image Storage: You can easily store container images anytime, anywhere. By integrating with Object Storage, you can store and retrieve images, enabling efficient image management. It also supports the Docker Registry V2 API specification for convenient use.
- Enhanced Security Registry Management: You can securely store and use images using Container Registry. Container Registry encrypts images stored in Object Storage and transfers images via HTTPS. Use resource-based IAM policies of Samsung Cloud Platform to set repository-specific access permissions, and you can use images according to the configured permissions.
- Container Image Vulnerability Analysis: Container Registry provides a feature that analyzes security vulnerabilities in stored container images. Users can view vulnerability results through a simple process of selecting and scanning an image, and can identify and remediate vulnerabilities based on the analysis results.
Service Architecture Diagram
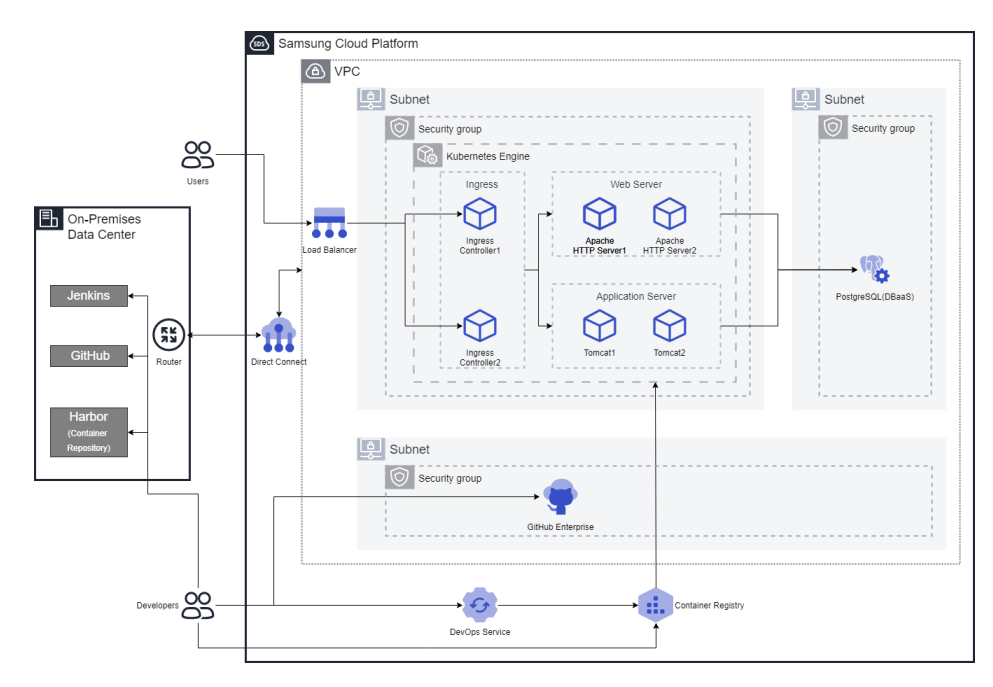
Provided features
Container Registry provides the following features.
- Registry Management: Provides Container Registry creation, deletion, registry access control management (private), and visibility features.
- Repository Management: It is created under the Container Registry and provides functions to create, view, delete repositories, and set security policies.
- Image Management: Container images stored in the repository, providing image Push, image Pull, view, delete, applied tag management, and security policy configuration functions.
- Image Vulnerability Assessment: You can manually or automatically scan OS packages and language packages for security vulnerabilities, as well as secrets embedded in images stored in the Container Registry. Based on the scan results, users can identify and remove known vulnerabilities (CVE) and secrets to prevent the use of insecure images.
Component
Registry
The registry is a repository or collection of repositories used to store, access, and manage container images. Container registries can often support container‑based application development as part of the development and operations process. They can connect directly to container orchestration platforms such as Docker and Kubernetes. A registry acts as an intermediary that shares container images between systems, saving developers time in creating and delivering cloud‑native applications. In the case of Samsung Cloud Platform, it is provided in conjunction with Object Storage and transfers images over HTTPS.
repository
A repository is a logical management unit for image tags. Using a repository allows efficient management of image tags. A repository is a centralized virtual storage that developers use to modify and manage application source code. When developing applications, if there is a need to store and share various types of documents and source code, it enables developers to easily collaborate within the same account, edit simultaneously, and track/manage changes.
image
An image refers to something that includes all files and configuration values required to run a container. An image acts like a class that creates containers, and a container can be seen as the program or process that runs the image. For example, an Ubuntu image contains all files needed to run Ubuntu, and a MySQL image contains all files, IDs, passwords, port information, etc., required to run MySQL.
Preliminary Service
Container Registry has no prerequisite services.
1.1 - Monitoring Metrics
According to Samsung Cloud Platform’s policy, the Cloud Monitoring service is scheduled to be discontinued in September 2026.
Accordingly, after the September 2026 release, resource monitoring of the Samsung Cloud Platform via Cloud Monitoring will no longer be possible.
With the new alternative service, you can continuously perform resource monitoring by leveraging ServiceWatch released in October 2025.
ServiceWatch provides more modern and powerful features, replacing Cloud Monitoring to deliver a smooth monitoring environment.
Detailed information about ServiceWatch can be found in the ServiceWatch Overview.
Container Registry monitoring metrics
The table below shows the monitoring metrics for Container Registry that can be viewed through Cloud Monitoring. For detailed usage of Cloud Monitoring, see the Cloud Monitoring guide.
| Performance items | Detailed description | unit |
|---|---|---|
| container.registry.status.alive | Registry status | status |
| containerregistry.statics.image.pull.count | Allowed Image Tag (digest) Pull Count | cnt |
| containerregistry.statics.image.denied_pull.count | Number of rejected Image Tag (digest) Pulls | cnt |
| containerregistry.statics.image.push.count | Allowed Image Tag (digest) Push count | cnt |
| containerregistry.statics.image.denied_push.count | Number of rejected Image Tag (digest) pushes | cnt |
| containerregistry.statics.image.scan.count | Allowed Image Tag (digest) Scan count | cnt |
| containerregistry.statics.image.denied_scan.count | Number of rejected Image Tag (digest) scans | cnt |
| containerregistry.statics.tag.deleted.count | Number of deleted Image Tags (digest) | cnt |
| containerregistry.statics.image.created.count | Number of generated images | cnt |
| containerregistry.statics.image.deleted.count | Number of deleted images | cnt |
| containerregistry.statics.login.count | Allowed Registry Login count | cnt |
| containerregistry.statics.denied_login.count | Number of denied registry logins | cnt |
| containerregistry.statics.repository.created.count | Number of generated repositories | cnt |
| containerregistry.statics.repository.deleted.count | Number of deleted repositories | cnt |
1.2 - ServiceWatch Metrics
Container Registry sends metrics to ServiceWatch. The metrics provided by default monitoring are data collected at a 1‑minute interval.
Basic Metrics
The following are the basic metrics for the Container Registry namespace.
The indicators whose names are shown in bold below are the indicators selected as key metrics among the default metrics provided by Container Registry. Key metrics are used to compose the service dashboards that ServiceWatch automatically builds for each service.
Each metric guides users via the user guide on which statistical values are meaningful when viewing that metric, and among the meaningful statistics, the values displayed in bold are the primary statistics. In the service dashboard, you can view key metrics using the primary statistical values.
| Indicator Name | Detailed description | unit | meaningful statistics |
|---|---|---|---|
| Image Pull Count [Allowed] | Allowed Image Tag (digest) Pull Count | Count/Minute |
|
| Image Push Count [Denied] | Number of rejected Image Tag (digest) pushes | Count/Minute |
|
| Repository Count [Deleted] | Number of Deleted Repositories | Count/Minute |
|
| Repository Count [Created] | Number of created repositories | Count/Minute |
|
| Registry Login Count [Allowed] | Number of allowed Registry Logins | Count/Minute |
|
| Image Scan Count [Denied] | Number of rejected Image Tag (digest) scans | Count/Minute |
|
| Image Pull Count [Denied] | Number of rejected Image Tag (digest) Pulls | Count/Minute |
|
| Registry Login Count [Denied] | Number of denied Registry Logins | Count/Minute |
|
| Image Push Count [Allowed] | Allowed Image Tag (digest) Push count | Count/Minute |
|
| Image Scan Count [Allowed] | Allowed Image Tag (digest) Scan count | Count/Minute |
|
| Image Count [Deleted] | Number of deleted images | Count/Minute |
|
| Image Count [Created] | Number of generated images | Count/Minute |
|
| Image Tag Count [Deleted] | Number of deleted Image Tag (digest) | Count/Minute |
|
2 - How-to guides
Users can create a service by entering the required information for the Container Registry service and selecting detailed options through the Samsung Cloud Platform Console.
Creating a Container Registry
You can create and use the Container Registry service from the Samsung Cloud Platform Console.
To create a Container Registry service, follow the steps below.
- Click the All Services > Container > Container Registry menu. 1. Go to the Service Home page of Container Registry.
- On the Service Home page, click the Create Registry button. 2. Navigate to the Create Registry page.
- On the Create Registry page, enter the information required to create the service and select detailed options.
- Enter or select the required information in the Service Information Input area.
Category RequiredDetailed description registry name Essential The registry name created by the user - must start with a lowercase English letter and be entered using lowercase English letters and numbers, with a length of 3 to 25 characters
Endpoint Essential Access type settings for the registry endpoint - Private: Only private endpoint access control items can be set
- Private & Public: Private endpoint access control items and public endpoint access control settings can be configured
Private endpoint access control Selection Private endpoint access control settings - Use when selected, you can configure it so that only specific resources within the same region’s account, such as the registry, can be accessed
- Click Add on the private access allowed resources to add resources that can access the registry using the private endpoint
- If Use is not selected, access is allowed from resources in all subnets within the same region
Public endpoint access control Selection Public endpoint access control settings - If Use is selected, you can configure it so that only specific IPs in the same region as the registry can access
- After entering the IP to allow public access, click Add to add an IP that can access the registry using the public endpoint
- Click Add in the public access allowed resources to add a resource that is allowed access
- If Use is not selected, access is allowed from resources in all subnets within the same region
Visibility Selection Anonymous access setting for registry read (Pull) operations - Selecting Public allows unauthenticated anonymous users to perform read operations (Anonymous Pull) on all content in the registry
- This setting can be enabled as Public only when creating the service
Table. Container Registry service information input itemsCaution- If you do not select the use of private endpoint access control, the customer’s registry may be exposed to other resources within the Samsung Cloud Platform.
- If you do not select the use of public endpoint access control, external IP access is possible in an internet environment, so the user’s bucket can be exposed externally via the internet. * If external access is not needed, deselect the use checkbox to minimize security threats.
- In the Additional Information Input area, enter or select the required information.
Category Required statusDetailed description tag Selection Add Tag - Up to 50 can be added per resource
- After clicking the Add Tag button, input or select Key, Value values
Table. Container Registry additional information input fields
- Enter or select the required information in the Service Information Input area.
- Summary Review the detailed information and estimated charges generated in the panel, then click the Create button.
- When creation is complete, check the created resource on the Registry List page.
View detailed information of Container Registry
You can view and edit the full list of resources and detailed information for the Container Registry service. Container Registry Details page consists of Details, Tags, Activity History tabs.
To view the detailed information of the Container Registry, follow these steps.
- Click the All Services > Container > Container Registry menu. 1. Navigate to the Service Home page of Container Registry.
- On the Service Home page, click the Registry menu. 2. Go to the Registry list page.
- Registry List page, click the resource (Registry) to view detailed information. 3. Go to the Registry Details page.
- Registry Details page displays the Registry’s status information and detailed information, and consists of Details, Tags, Activity History tabs.
Category Detailed description Registry status Registry status - Creating: Creating
- Running: Created / running normally
- Editing: Changing settings
- Terminating: Deleting
- Error: Error occurred
- Unknown: Unknown
User Guide CLI-based Registry Usage Guide Service cancellation Button to cancel the service Table. Container Registry status information and additional features
- Registry Details page displays the Registry’s status information and detailed information, and consists of Details, Tags, Activity History tabs.
Detailed Information
On the Registry list page, you can view detailed information of the selected resource and, if necessary, edit the information.
| Category | Detailed description |
|---|---|
| service | Service Name |
| Resource Type | Resource Type |
| SRN | Unique resource ID in Samsung Cloud Platform
|
| Resource name | Resource Name
|
| Resource ID | Unique resource ID in the service |
| Constructor | User who created the service |
| Creation timestamp | Service creation date and time |
| Modifier | User who edited the service information |
| Modification date and time | Date and time the service information was modified |
| registry name | Registry name |
| Bucket name | The name of the Samsung Cloud Platform Object Storage bucket where the registry data is stored |
| Usage | Data usage of the Object Storage bucket for the registry |
| Endpoint | Access type for the registry endpoint
|
| Private endpoint | Private endpoint URL available within the Samsung Cloud Platform network
|
| Public endpoint | Samsung Cloud Platform public endpoint URL available within the network
|
| Private endpoint access control | Private endpoint access control settings
|
| Public endpoint access control | Public endpoint access control settings
|
| Visibility | Anonymous access setting for registry read (Pull) operations
|
Tag
Registry list page lets you view the tag information of the selected resource, and you can add, modify, or delete it.
| Category | Detailed description |
|---|---|
| Tag list | Tag list
|
Job History
On the Registry list page, you can view the operation history of the selected resource.
| Category | Detailed description |
|---|---|
| Task History List | Resource change history
|
Terminate Container Registry
You can cancel an unused Container Registry to reduce operating costs. However, terminating the service may cause the running service to stop immediately, so be sure to fully consider the impact of any interruption before proceeding with the termination.
- Cannot delete when there are resources linked to the Registry. * After terminating the linked service shown in the “Service Cancellation Not Allowed” popup, delete the Registry.
- When the service is terminated, all data, including the bucket linked to the Registry, will be deleted. * Be careful, as data cannot be recovered after deletion.
To cancel the Container Registry, follow these steps.
- Click the All Services > Container > Container Registry menu. 1. Go to the Service Home page of Container Registry.
- On the Service Home page, click the Registry menu. 2. Go to the Registry List page.
- On the Registry List page, click the resource (Registry) to view its detailed information. 3. Navigate to the Registry Details page.
- On the Registry Details page, click Service Cancellation.
- To confirm cancellation, click the checkbox and enter the Registry name to delete.
- Registry name is entered correctly, the Confirm button becomes active. 6. Click the Confirm button.
- When termination is complete, check on the Registry list page whether the resource has been terminated.
2.1 - Managing the Repository
A repository is a logical management unit for images within a registry. By using a repository, you can set the default security policy for images generated beneath it.
Creating a repository
To create a repository, follow these steps.
- Click the All Services > Container > Container Registry menu. 1. Go to the Service Home page of Container Registry.
- On the Service Home page, click the Repository menu. 2. Go to the Repository list page.
- On the Repository List page, click the Create Repository button. 3. Go to the Create Repository page.
- Repository list at the top of the page, click the Settings icon to select an existing registry, or click Create new to create a registry.
- Enter the required information on the Repository creation page and select the detailed options.
- In the Service Information Input area, enter or select the required information.
Category RequiredDetailed description registry name Essential Select the registry name to create the repository - If there is no existing registry, you can create a new one via the Create New button
Repository name Essential Repository name to create - using lowercase English letters, numbers, and special characters (
-) with a length of 3 to 30 characters (the start and end must be lowercase English letters or numbers only)
Table. Repository Service Information Input Items - In the Repository Basic Policy Input area, enter or select the required information.
Category Required statusDetailed description Image scan Option Automatic scanning of image vulnerabilities generated in the repository and setting scan exclusion policies - You can set the default scan policy applied when an image is created in the repository
- If you set automatic scanning to enabled, the image’s vulnerabilities are automatically checked when the image is pushed. In this case, the vulnerability scanning cost is billed.
- If you set the scan exclusion policy to enabled, you can specify the inspection targets and vulnerabilities to exclude during image scanning
- You can choose to exclude Language Package checks, Secret checks, and vulnerabilities without a Fix Version
- Excludable vulnerabilities: you can select one of the following levels
- (None / Unknown / Negligible / Low / Medium / High / Critical) Exclude vulnerabilities at or below this level
Image Pull limit Option Policy settings for enabling the image Pull restriction feature in the repository and its limit values - You can set the default Pull restriction policy applied when an image is created in the repository
- If the Pull restriction for unscanned images is set to Enabled, pulling images that have not been vulnerability‑checked is not allowed
- If the Pull restriction policy for vulnerable images is set to Enabled, pulling an image is prohibited when Critical or High‑level vulnerabilities exceeding the specified values are found. The allowable input and selectable values for this policy are as follows
- Critical: 1 (default) ~ 9,999,999
- High: 1 (default) ~ 9,999,999
- Exclude vulnerabilities without a Fix Version
- When Enabled, vulnerabilities lacking a Fix Version (i.e., vulnerable packages/libraries without a patched version) are excluded from the Pull restriction policy
Image lock status Option You can set a lock to prevent deleting or updating any images inside the repository - If the repository’s image lock status is Lock, the Lock/Unlock function for individual images in the repository is disabled.
- Changing the image lock status of a repository that is in the Lock state to Unlock enables the Lock/Unlock function for individual images.
- Pushing new images is allowed.
Delete image tag Option You can set an automatic image deletion policy for images stored in the repository - Selecting Enable Deletion Policy applies the image deletion policy
- Selecting Untagged Image Auto Deletion, Tagged Image Auto Deletion applies the respective image deletion policy
- Enter an automatic deletion period in the deletion policy; the image is automatically deleted after the specified period has elapsed since its initial push
- For detailed information on image tag deletion, see 이미지 태그 삭제 정책 관리.
Table. Repository default policy input items - Additional Information Input area, enter or select the required information.
Category RequiredDetailed description Explanation Selection Repository description - Enter repository description
tag Selection Add Tag - Up to 50 per resource can be added
- Add Tag After clicking the Add Tag button, enter or select Key, Value values
Table. Repository additional information input fields
- In the Service Information Input area, enter or select the required information.
- The Repository default policy input fields are used to set the default (initial) policy for Images created in the Repository. * (Role of the policy configuration template applied when creating an Image)
- This setting can be changed on the detail view screen after creating a Repository, and it will be applied to Images created after the Repository default policy input items are modified. * The Image policy generated before the change will not be modified.
- The default policy set for the Image can be modified on the Image detail screen.
- Summary Review the detailed information and estimated charges generated in the panel, and click the Create button.
- Once creation is complete, check the created resources on the Repository List page.
View repository details
The Repository service allows you to view and edit the full list of resources and detailed information. Repository Details page consists of Details, Tags, Activity History tabs.
To view the repository details, follow these steps.
- Click the All Services > Container > Container Registry menu. 1. Go to the Service Home page of Container Registry.
- On the Service Home page, click the Repository menu. 2. Go to the Repository list page.
- Repository List page, click the resource (Repository) to view its detailed information. 3. Navigate to the Repository Details page.
- Repository Details page displays the Repository’s status information and detailed information, and consists of Details, Tags, Activity History tabs.
Category Detailed description Repository status Repository status display - Active: available state
- Deleting: deleting state
- Inactive: state where deletion failed and is not available (only deletion request allowed)
- Editing: editing settings or deleting sub-resources (images, tags) within the image
User Guide Repository usage guide - CLI-based commands for using images within the repository are available
Delete repository Button to delete the repository Table. Status information and additional features
- Repository Details page displays the Repository’s status information and detailed information, and consists of Details, Tags, Activity History tabs.
Detailed Information
Repository List page lets you view detailed information of the selected resource and edit the information if needed.
| Category | Detailed description |
|---|---|
| Service | Service name |
| Resource Type | Resource Type |
| SRN | Unique resource ID in Samsung Cloud Platform
|
| Resource name | Resource name
|
| Resource ID | Unique resource ID in the service |
| Constructor | User who created the repository |
| Creation timestamp | Repository creation timestamp |
| Modifier | User who modified the repository |
| Modification date and time | Repository modification timestamp |
| Repository name | User-created repository name |
| registry name | Registry name linked to the repository
|
| Explanation | For the generated repository, the user-entered description
|
| image | Link to view the list of stored images in the repository |
| Image scan | Automatic image vulnerability scanning and scan exclusion policy settings for images generated in the repository
|
| Image Pull limit | Policy settings for enabling the image Pull restriction feature and its limit values for images generated in the repository
|
| Image lock status | You can set a lock to prevent deleting or updating any images inside the repository
|
| Delete image tag | Set the automatic image deletion policy for images stored in the repository
|
Tag
Repository list page lets you view the tag information of the selected resource, and you can add, modify, or delete it.
| Category | Detailed description |
|---|---|
| Tag list | Tag list
|
Job History
On the Repository List page, you can view the operation history of the selected resource.
| Category | Detailed description |
|---|---|
| Task History List | Resource Change History
|
Delete Repository
To delete a repository, follow these steps.
- Click the All Services > Container > Container Registry menu. 1. Navigate to the Service Home page of Container Registry.
- On the Service Home page, click the Repository menu. 2. Go to the Repository list page.
- On the Repository List page, click the resource (Repository) to view its detailed information. 3. Navigate to the Repository Details page.
- On the Repository Details page, click Delete Repository.
- Delete Repository in the popup window, please enter the Repository name.
- If you enter the Repository name correctly, the Confirm button becomes active. 6. Click the Confirm button.
- Once termination is complete, check the Repository List page to see if the resource has been terminated.
2.2 - Managing Images and Tags
Images are the logical management units of tags. Users can efficiently manage image versions using tags.
Create Image
To generate an image, the repository must be created first. For detailed information on creating a repository, see Manage Repository.
- Images are created by pushing an image or OCI-standard artifact to the registry endpoint using the CLI.
- Refer to the official documentation provided by the client tool you are using or the Use Container Registry with CLI for instructions on pushing an image with the CLI.
Check image details
Image can view and edit the entire resource list and detailed information. The Image detail page consists of Detail Information, Tags, Delete Policy Test tabs.
To view the image details, follow these steps.
- Click the All Services > Container > Container Registry menu. 1. Go to the Service Home page of Container Registry.
- Click the Image menu on the Service Home page. 2. Go to the Image list page.
- Click the Settings icon at the top of the page, select the Registry name and Repository name where the Image to view detailed information is stored, and click Search.
- On the Image List page, click the resource (Image) to view its detailed information. 5. Image Details go to the page.
- Image Details page displays the Image’s status and detailed information, and is composed of Details, Tags, Delete Policy Test tabs.
Category Detailed description Image status Image status representation - Active: Available state
- Deleting: Deleting state
- Inactive: State where deletion failed and is not usable (only deletion request is possible)
- Editing: State where settings are being modified or image sub-resources (tags) are being deleted
User Guide CLI-based Image Usage Guide Delete Image Delete image button Table. Image status information and additional functions
- Image Details page displays the Image’s status and detailed information, and is composed of Details, Tags, Delete Policy Test tabs.
Detailed Information
Image list page lets you view detailed information of the selected resource and modify the information when necessary.
| Category | Detailed description |
|---|---|
| Constructor | User who generated the image |
| Creation Date/Time | Image creation timestamp |
| Modifier | User who edited the image |
| Modification date and time | Image modification date and time |
| Image name | User-generated image name |
| registry name | Registry name and view link of the repository where the image is stored |
| Pulls | Number of times the image was pulled |
| Repository name | Repository name and view link for the stored image |
| Explanation | The description entered by the user for the image
|
| Image scan | Image vulnerability automatic scanning and scan exclusion policy settings
|
| Image Pull limit | Set whether to use the image Pull restriction feature and its limit values
|
| Image lock status | You can set a lock to prevent the selected image from being deleted or updated
|
| Delete image tag | Set the automatic image deletion policy for images stored in the repository
|
Delete Image
To delete the Image, follow these steps.
- Click the All Services > Container > Container Registry menu. 1. Go to the Service Home page of Container Registry.
- On the Service Home page, click the Image menu. 2. Navigate to the Image list page.
- On the Image List page, click the Settings icon at the top and select the Registry name and Repository name where the Image to be deleted is stored.
- On the Image list page, click the resource (Image) to delete. 4. Go to the Image Details page.
- Image Details on the page, click the Image Delete button.
- Image Delete popup appears, click the Confirm button.
- After deletion is complete, check on the Image list page whether the resource has been deleted.
View detailed information of image tag
To view detailed information about the image tag, follow these steps.
- Click the All Services > Container > Container Registry menu. 1. Go to the Service Home page of Container Registry.
- Click the Image menu on the Service Home page. 2. Navigate to the Image list page.
- Click the Settings icon at the top of the Image List page, select the Registry name and Repository name where the Image to be inspected is stored, and click Search.
- Image List page, click the resource (Image) to view detailed information. 4. Go to the Image Details page.
- Image Details Click the Tags tab on the right side of the Details tab at the top of the page. * Go to the Tags list page.
column Detailed description Tags Tag name of the image Digest - A single image Digest can have multiple tag names
Digest Image Digest value Size Image Digest size Modification date and time Image Digest (Tags) Modification Time Inspection date and time Image Digest (Tags) Vulnerability Inspection Date and Time Vulnerability Assessment Results Image Digest(Tags) Vulnerability Scan Results - A summary of vulnerability count information and a view results button are displayed
- View Results button can be clicked to view detailed vulnerability analysis results for image tags
Status Status of image Digest (Tags) - Active: Normal, usable state
- Deleting: Deleting state
- Inactive: Deletion failed and not usable (deletion request only possible)
Copy URL Copy the endpoint URL for using the image Digest - You can copy the private/public endpoint URL for commands that use the image Digest
More button Menu for selecting deletion, modification, vulnerability assessment, and detailed usage guide for image Digest (Tags) - Delete: Delete the corresponding image Digest (Tags)
- Tags Edit: In the Tags edit window, you can modify the tag name of the image Digest
- Vulnerability Assessment: Allows vulnerability assessment of image Digest (Tags)
- Detailed Usage Guide: You can view a CLI‑based guide for using image Digest (Tags)
- Tags Lock: You can set a lock to prevent the selected image Tags from being deleted or updated
- Tags Unlock: You can remove the lock to allow the selected image Tags to be deleted or updated
Table. Tags list items
- Image Details Click the Tags tab on the right side of the Details tab at the top of the page. * Go to the Tags list page.
Detailed Information
Click the Tags of the image Digest whose details you want to view in the Tags list of the Image details. The detailed information window for the image Digest (Tags) appears.
| column | Detailed description | |
|---|---|---|
| Tag information | Display tag name, digest, creation time, and modification time
| |
| Manifest information | Display the manifest type and details
|
- In the tag details window, after reviewing the information and clicking Confirm, the window closes.
Delete image tag
To delete an image tag, follow these steps.
- Click the All Services > Container > Container Registry menu. 1. Go to the Service Home page of Container Registry.
- On the Service Home page, click the Image menu. 2. Go to the Image list page.
- Image List at the top of the page, click the Settings icon, select the Registry name and Repository name where the Image whose detailed information you want to view is stored, and click Search.
- Image List page, click the resource (Image) to view detailed information. 4. Navigate to the Image Details page.
- Image Details Click the Tags tab on the right of the Details tab at the top of the page. * Tags list Go to the page.
- Tags list select the checkbox located to the left of the tag you want to delete, then click Delete.
- By selecting the checkboxes of multiple items, you can delete several tags at once, and you can select and delete up to 50 tags in a single operation.
- You can delete tags one by one by clicking the Delete button inside the More button located at the far right of the tag to be removed.
- Tags Delete When the popup window opens, click Confirm.
- After deletion is complete, check the Tags list page to see if the resource has been removed.
Testing image tag deletion policy
To test the configured image tag deletion policy, follow these steps.
- Click the All Services > Container > Container Registry menu. 1. Navigate to the Service Home page of Container Registry.
- On the Service Home page, click the Image menu. 2. Navigate to the Image list page.
- Click the Settings icon at the top of the Image List page, select the Registry name and Repository name where the Image to be inspected is stored, and click Search.
- Image List page, click the resource (Image) to view its detailed information. 4. Go to the Image Details page.
- Image Details Click the Delete Policy Test tab located to the right of the Details tab at the top of the page. * Delete Policy Test Go to the tab page.
- On the Delete Policy Test tab page, click the Policy Test button for the Delete Target Tags item. 5. The deletion policy test is being executed.
- When the notification popup for the deletion policy test execution opens, click the Confirm button.
- When the test execution request is completed, Deletion policy test execution request has been completed is displayed.
- Check the test results once the deletion policy test is complete.
- Deletion Target Tags field displays the image tags (digests) that are subject to the deletion policy.
2.3 - Manage Image Security Vulnerabilities
By using the image security vulnerability scanning feature, you can manually or automatically scan OS package security vulnerabilities in images stored in Container Registry and the Secrets contained within the images. Based on the scan results, users can identify and remove known vulnerabilities (CVE) and Secrets, preventing the use of insecure images.
Vulnerability assessment support information
Supported OS
- The vulnerability scanning feature supports checking libraries installed via the package manager on the following operating systems.
| Supported OS |
|---|
| Ubuntu |
| Cent OS |
| Oracle |
| Debian |
| Alpine |
| AlmaLinux |
| AWS Linux |
| Rocky Linux |
| RHEL |
| Suse |
| VMWare Photon |
Supported Language
- The vulnerability assessment feature supports checks for the following Language.
| Supported Language |
|---|
| Python |
| PHP |
| Node.js |
| .NET |
| Go |
| Supported Language |
|---|
| Java |
Support Secret
- The vulnerability scanning feature supports the following types of Secrets contained in the image.
| Support Secret |
|---|
| AWS access key |
| GitHub personal access token |
| GitLab personal access token |
| Asymmetric Private Key |
Checking image security vulnerabilities (manual)
To check image security vulnerabilities, follow the steps below.
- Click the All Services > Container > Container Registry menu. Navigate to the Service Home page of Container Registry.
- On the Service Home page, click the Image menu. You will be taken to the Image List page.
- Image List Click the Settings icon at the top of the page and select the Registry name and Repository name where the Image for detailed information is stored.
- On the Image List page, click the resource (Image) to check for security vulnerabilities. You will be taken to the Image Details page.
- Image Details Click the Tags tab to the right of the detailed information tab at the top of the page. You will be taken to the Tags tab page.
- On the Tags tab page, click the More button located at the far right of the tag you want to check for security vulnerabilities, then click Vulnerability Check.
- When the vulnerability check notification popup opens, click the Confirm button.
- When the inspection starts, the phrase Vulnerability assessment will be performed. is displayed.
- When the inspection is finished, the Vulnerability Inspection Results item displays a summary of the inspection results and a View Results button. Clicking the View Results button opens a popup that shows detailed analysis of Vulnerabilities by Image Digest (Tags).Reference
- Click the View Results button to see the detailed vulnerability analysis results for the image tag.
- After a vulnerability scan, if a red exclamation mark icon (!) appears in the scan date/time field, it means the vulnerability scan list for the Container Registry service has been updated. Click Vulnerability Scan to re‑scan, as new vulnerability items need to be checked for the image Digest (Tags).
- Click the View Results button to see the detailed vulnerability analysis results for the image tag.
View Image Security Vulnerability Scan Results
To view the vulnerability assessment results, follow these steps.
- Click the All Services > Container > Container Registry menu. Navigate to the Service Home page of Container Registry.
- On the Service Home page, click the Image menu. You will be taken to the Image List page.
- Click the Settings icon at the top of the Image List page and select the Registry name and Repository name where the Image to be inspected is stored.
- Image List page, click the resource (Image) to check for security vulnerabilities. You will be taken to the Image Details page.
- Image Details Click the Tags tab on the right side of the detailed information tab at the top of the page. You will be taken to the Tags tab page.
- On the Tags tab page, click the View Results button of the Vulnerability Check Result item for the tag whose vulnerability check results you want to view.
- Image Tags Vulnerabilities Check the results in the popup window that displays the detailed analysis results.
View inspection results by vulnerability
Image Tag Vulnerabilities On the detailed page’s Vulnerabilities tab, you can view the image security vulnerability assessment results for each vulnerability.
| Item | Detailed description |
|---|---|
| Vulnerability Assessment | Vulnerability check button
|
| Inspection date and time | Vulnerability assessment date and time |
| Distribution | OS name and version of the image Digest (Tags) under inspection
|
| Total number of vulnerabilities | Summary of vulnerability assessment results
|
In the Vulnerability tab, you can view the list of all discovered vulnerabilities.
| Item | Detailed description |
|---|---|
| CVE | External links to verify the detected vulnerability ID (CVE ID) and detailed information about the vulnerability
|
| Severity | Severity of detected vulnerabilities |
| CVSS | CVSS (Common Vulnerability Scoring System) based vulnerability score |
| Category | Inspection target type of detected vulnerabilities
|
| OS/Language | OS or Language package type of the detected vulnerability
|
| package | Package name with the discovered vulnerability |
| Current version | Current version of the package with the vulnerability (vulnerable version) |
| Revised version | Version of the package with the vulnerability fixed |
| Whether to edit | Whether a version with the vulnerability fixed exists for the package with the discovered vulnerability (whether a vulnerability patch version exists) |
| Expand button | View vulnerability detailed information
|
View inspection results by package
Image Tag Vulnerabilities On the detail page, clicking the Package tab navigates to the package-specific vulnerability page. In the Package tab, you can view the image security vulnerability assessment results by package.
| Item | Detailed description |
|---|---|
| Vulnerability Assessment | Vulnerability assessment button
|
| Inspection date and time | Vulnerability assessment date and time |
| Distribution | OS name and version of the image Digest (Tags) to be inspected
|
| Total number of packages | Overall package information summary
|
In the Package tab, you can view the full list of packages and the lists of packages with detected vulnerabilities and without detected vulnerabilities.
| Item | Detailed description |
|---|---|
| Category | Type of discovered package
|
| OS/Language | Detailed OS or Language type of the discovered package
|
| Package | Detected package name |
| Version | Current version of the package |
| Vulnerability assessment results | Summary of the number of vulnerabilities contained in the package |
| type | OS or language type and details of the discovered package |
Check inspection results by secret unit
Image Tag Vulnerabilities On the detail page, clicking the Secret tab takes you to the vulnerability page for each secret. You can view the image security vulnerability assessment results by secret.
| Item | Detailed description |
|---|---|
| Vulnerability Assessment | Vulnerability check button
|
| Inspection date and time | Vulnerability assessment date and time |
| Distribution | OS name and version of the image Digest (Tags)
|
| Total number of vulnerabilities | Vulnerability Result Summary
|
In the Secrets tab, you can view the complete list of secret files, as well as the lists of files with detected vulnerabilities and files without detected vulnerabilities.
| Item | Detailed description |
|---|---|
| File | File name of detected secret |
| Category | Detected secret type
|
| Severity | Detected secret severity |
| Match | Secret match information in the detected file |
2.4 - Manage Image Tag Deletion Policy
Users can register and manage image tag deletion policies.
Manage image tag deletion policy
The image tag deletion policy refers to a policy that automatically deletes an image after a specified period has elapsed since the image was first pushed to the repository. Enabling the image tag deletion policy causes image tags (digests) stored in the Container Registry to be automatically deleted according to the configured deletion policy.
- After setting the deletion policy activation to use, the image tag (digest) that first receives the deletion policy will be deleted within a maximum of 3 days (72 hours). Subsequent image tags (digests) to which the deletion policy applies will be deleted within a maximum of 1 day (24 hours).
- Image tags (digests) subject to the deletion policy are permanently deleted and cannot be recovered.
Support Deletion Policy Information
Describes policy information that supports the removal of image tags.
Support Policy
Supports policies that enable automatic deletion and retention period settings for image tags (digests).
| Support Policy |
|---|
| Untagged Image |
| Old Image |
Setting the image tag (digest) deletion policy
To set the image tag (digest) deletion policy, follow these steps.
- Click the All Services > Container > Container Registry menu. Navigate to the Service Home page of Container Registry.
- On the Service Home page, click the Image menu. You will be taken to the Image List page.
- Click the gear button at the top of the Image List page. The Registry/Repository Settings popup will open.
- Registry/Repository Settings In the popup window, select the Registry name and Repository name where the image to set the deletion policy is stored, and click the Confirm button.
- On the Image List page, click the resource (Image) for which you want to set the deletion policy. You will be taken to the Image Details page.
- On the Image Detail page, in the Detail Information tab, click the Edit icon of the Delete Image Tag item. The Edit Delete Image Tag popup opens.
- Image Tag Delete Edit In the popup window, enter and select the activation status and required information, then click the Confirm button.
- If you select Enable for Deletion policy activation, image tags (digests) will be automatically deleted according to the configured deletion policy.
- Select the deletion policy to apply and enter the period from when the image is first pushed to the repository until it is automatically deleted.
- When the edit notification popup opens, click the Confirm button.
- When the modification is complete, the message Image tag removal edit was successful will be displayed.
Testing image tag (digest) deletion policy
To test the image tag (digest) deletion policy, follow these steps.
- Click the All Services > Container > Container Registry menu. Navigate to the Service Home page of Container Registry.
- On the Service Home page, click the Image menu. You will be taken to the Image List page.
- Image list Click the gear button at the top of the page. Registry/Repository settings A popup window will open.
- Registry/Repository Settings In the popup window, select the Registry name and Repository name where the image to set the deletion policy is stored, and click the Confirm button.
- Image List page, click the resource (Image) to test the deletion policy. You will be taken to the Image Details page.
- On the Image Detail page, click the Delete Policy Test tab. You will be taken to the Delete Policy Test tab page.
- On the Delete Policy Test tab page, to test the configured delete policy, click the Policy Test button below the target Tags.
- When the delete policy test execution notification popup opens, click the Confirm button.
- When the test execution request is completed, the message Deletion policy test execution request has been completed is displayed.
- When the test is completed, the Deletion Target Tags item will display the image tags (digests) that are subject to the deletion policy.
2.5 - Use Container Registry with CLI
This explains how to log in to the Container Registry using CLI commands and manage container images and Helm charts.
Managing container images with CLI
You can log in to the Container Registry using CLI commands and push or pull container images.
Log in to the Container Registry
The user can log in to the Container Registry using an authentication key.
For detailed information on policies and permission settings, see Management > IAM > Policies.
Log in with an authentication key
Log in using the authentication key’s AccessKey, SecretKey, and the registry endpoint.
- Registry endpoint: can be found on the Container Registry Details page.
- Private endpoint: [registryname-registryid].scr.private.[region].[offering].samsungsdscloud.com
1 docker login <registry_endpoint>
2 Username: <accessKey>
3 Password: <secretKey>
- To log in with an authentication key, create an authentication key on the IAM > Authentication Key Management page, and set the authentication method to Authentication Key Authentication in Security Settings.
- Before modifying Security Settings, be sure to check the guidance text about the authentication key authentication method at the top of the Edit Authentication Key Security Settings popup.
- For detailed information on how to create an authentication key and set up authentication key verification, see Management > IAM > Manage Authentication Keys.
Push image
To push an image to the registry, refer to the following command.
1 docker push [registryname]-[registryid].scr.private.[region].[offering].samsungsdscloud.com/[repository]/[image:tag]
- To push an image to a registry, you need the LoginContainerRegistry permission for the registry you will use and the PushRepositoryImages permission for the repository.
- For detailed information on policy and permission settings, refer to Management > IAM > 정책.
Pull image
To pull an image from the registry, refer to the following command.
1 docker pull [registryname]-[registryid].scr.private.[region].[offering].samsungsdscloud.com/[repository]/[image:tag]
- To pull an image from a registry, you need the LoginContainerRegistry permission for the registry you will use and the PullRepositoryImages permission for the repository.
- For detailed information on policies and permission settings, see Management > IAM > Policies.
Managing Helm charts with CLI
You can log in to the Container Registry using CLI commands and push or pull Helm charts.
Log in to Container Registry
The user can log in to the Container Registry using an authentication key.
For detailed information on policies and permission settings, see Management > IAM > Policy.
Log in with authentication key
Log in using the authentication key’s AccessKey, SecretKey, and the registry endpoint.
- Registry endpoint: Container Registry Details can be found on the page.
- Private endpoint : [registryname-registryid].scr.private.[region].[offering].samsungsdscloud.com
1 helm registry login <registry_endpoint>
2 Username: <accessKey>
3 Password: <secretKey>
- To log in with an authentication key, create an authentication key on the IAM > Authentication Key Management page, and set the authentication method to Authentication Key Authentication in Security Settings.
- Before modifying Security Settings, be sure to review the guidance text about the authentication key method at the top of the Edit Authentication Key Security Settings popup.
- For detailed information on how to create an authentication key and set up authentication key verification, see Management > IAM > Manage Authentication Keys.
Push chart
To push a chart to the registry, refer to the following command.
1 helm push [hello-world-0.1.0].tgz oci://[registryname]-[registryid].scr.private.[region].[offering].samsungsdscloud.com/[mychart]
If you write and execute the command as shown in the example, it saves (uploads) the chart by applying the 0.1.0 tag to the hello-world image in the mychart repository.
- To push a chart to a registry, you need the LoginContainerRegistry permission for the registry you will use and the PushRepositoryImages permission for the repository.
- For detailed information on policies and permission settings, see Management > IAM > Policies.
Pull chart
To pull a chart from the registry, refer to the following command.
1 helm pull oci://[registryname]-[registryid].scr.private.[region].[offering].samsungsdscloud.com/[mychart/hello-world] -version [0.1.0]
By writing and executing the command as shown in the example, you download the chart stored with tag 0.1.0 in the hello-world image of the mychart repository.
- To pull a chart from a registry, you need the LoginContainerRegistry permission for the registry you will use and the PullRepositoryImages permission for the repository.
- For detailed information on policies and permission settings, see Management > IAM > Policy.
2.6 - Example of Registry and Repository Policies
After creating the Samsung Cloud Platform Container Registry (hereinafter SCR) service, an endpoint is provided. This endpoint provides an example policy that grants specific permissions when using SCR.
- IAM > Policy > Policy List page lets you create permission policies for registries and repositories, and view or edit existing policies.
- For detailed information on policy management, please refer to the Samsung Cloud Platform User Guide’s Management > IAM > 정책.
- Please refer to the required permissions for using Container Registry with the CLI in Using Container Registry with the CLI.
Allow pulling all repository images created in all registries
If you apply the ScrPullOnlyAccess policy provided as an IAM default policy, you can grant IAM users and user groups permission to pull all repository images created in all registries within the account.
To allow pulling all repository images created in all registries, follow these steps.
- All Services > Management > IAM Click the menu. 1. Navigate to the Service Home page of Identity and Access Management (IAM).
- On the Service Home page, click the Policy menu. 2. Go to the Policy List page.
- On the Policy List page, select ScrPullOnlyAccess. 3. Policy Details navigate to the page.
- On the Policy Details page, select the Connected Targets tab.
- On the Connection Target tab page, connect the target to which you will grant permissions.
- User: Click User Connection above the list to go to the User Connection page. * Select the user to connect and click Done to complete the user connection.
- User Group: Click User Group Link above the list to go to the User Group Link page. * Select the user group to connect and click Done, and the user group connection will be completed.
- Role: Click Role Link above the list to go to the role link page. * Select the role to connect and click Done to complete the role linking.
The ScrPullOnlyAccess policy consists of the following permissions.
- Permission to allow the LoginContainerRegistry Action required for Registry authentication
- Permission to allow the PullRepositoryImages action required for repository image pull
IP access control for SCR endpoints is provided via Private Endpoint Access Control and Public Endpoint Access Control on the Registry detail page.
- Please note that when IP access control is used in the IAM policy for the SCR endpoint, you cannot use Registy and Repository Image via the SCR endpoint.
- Set the IP access control entries to Applied IP: All IPs, Excluded IP: Not used.
Allow pulling and pushing all repository images created in all registries
If you apply the ScrPullPushOnlyAccess policy provided as an IAM default policy, you can grant IAM users and user groups permission to allow Pull and Push for all repository images created in all registries within the account.
To allow Pull and Push for all Repository Images created in all Registries, follow these steps.
- Click the All Services > Management > IAM menu. 1. Navigate to the Service Home page of Identity and Access Management (IAM).
- On the Service Home page, click the Policy menu. 2. Go to the Policy List page.
- On the Policy List page, select ScrPullPushOnlyAccess. 3. Navigate to the Policy Details page.
- On the Policy Details page, select the Connection Targets tab.
- On the Connection Target tab page, connect the target to which you will grant permissions.
- User: Click User Connection above the list to go to the User Connection page. * Select the user to connect and click Done to complete the user connection.
- User Group: Clicking User Group Link above the list navigates to the User Group Link page. * Select the user group to connect and click Done, and the user group connection will be completed.
- Role: Click Role Link above the list to go to the role link page. * Select the role to connect and click Complete, then the role connection will be completed.
The ScrPullPushOnlyAccess policy consists of the following permissions.
- Permission to allow the LoginContainerRegistry Action required for Registry authentication
- Permission to allow the PullRepositoryImages Action required for Repository Image Pull
- Permission to allow the PushRepositoryImages Action required for Push
IP access control for SCR endpoints is provided via Private Endpoint Access Control and Public Endpoint Access Control on the Registry detail page.
- Please note that when IP access control is used in the IAM policy for the SCR endpoint, you cannot use Registy and Repository Image via the SCR endpoint.
- Set the IP access control entries to Applied IP: All IPs, Excluded IP: Not used.
Allow pulling all repository images created in a specific registry
By applying the ScrPullOnlyAccess policy provided as an IAM default policy, you can create a policy that allows only Pull for all repository images created in a specific Registry.
To create a pull permission policy for all repository images created in a specific registry, follow these steps.
- All Services > Management > IAM Click the menu. 1. Navigate to the Service Home page of Identity and Access Management (IAM).
- On the Service Home page, click the Policy menu. 2. Go to the Policy List page.
- On the Policy List page, click Create Policy.
- On the Policy Creation page, enter the Basic Information Input fields and click Next.
- On the Permission Settings page, click Load Policy.
- Load Policy in the window’s list, select ScrPullOnlyAccess and click OK.
- On the Permission Settings page, select the Individual Resource of the Applied Resources item.
- Click Add Resource in the applied resource list.
- In the Add Resource window, select container-registy from the resource type list. 9. In the resource detail list, check the registy resource you want to add, then click Confirm.
- Check the individual resources you added in the applied resources list and click Next.
- Check the input information and click Create. 11. Policy creation is complete.
The ScrPullOnlyAccess policy consists of the following permissions.
- LoginContainerRegistry Action permission
- Permission to allow the PullRepositoryImages action required for repository image pull
IP access control for SCR endpoints is provided via Private Endpoint Access Control and Public Endpoint Access Control on the Registry detail page.
- When creating an IAM policy for using the SCR endpoint, if you use IP access control, please note that you cannot use Registy and Repository Image through the SCR endpoint.
- Set the IP access control entries to Applied IP: All IPs, Excluded IP: Not used.
Allow Image Pull and Push for a Specific Repository Created in a Specific Registry
If you apply the ScrPullPushOnlyAccess policy provided as a default IAM policy, you can create a policy that allows Pull and Push for a specific repository image created in a particular registry.
To create a policy that allows Pull and Push for a specific Repository Image created in a specific Registry, follow these steps.
- All Services > Management > IAM Click the menu. 1. Navigate to the Service Home page of Identity and Access Management (IAM).
- On the Service Home page, click the Policy menu. 2. Go to the Policy List page.
- On the Policy List page, click Create Policy.
- On the Policy List page, enter the items of Basic Information Input and click Next.
- On the Permission Settings page, click Load Policy.
- In the Load Policy window’s list, select ScrPullPushOnlyAccess and click OK.
- On the Permission Settings page, select the Individual Resource of the Applied Resources item.
- Click Add Resource in the applied resource list.
- In the Add Resource dialog, select the following items.
- Select container-registy from the resource type list. * In the resource detail list, check the registry resource to add, then click Confirm.
- Select the repository from the resource type list. * In the resource detail list, check the repository resource to add, then click Confirm.
- Verify the individual resources you added in the applied resource list and click Next.
- Check the input information and click Create. 12. Policy creation is complete.
The ScrPullPushOnlyAccess policy consists of the following permissions.
- Permission to allow the LoginContainerRegistry Action required for Registry authentication
- Permission to allow the PullRepositoryImages action required for repository image pull
- PushRepositoryImages Action required for Push
IP access control for SCR endpoints is provided via Private Endpoint Access Control and Public Endpoint Access Control on the Registry detail page.
- When creating an IAM policy for using the SCR endpoint, if you use IP access control, please note that you will not be able to use Registy and Repository Image through the SCR endpoint.
- Set the IP access control entries to Applied IP: All IPs, Excluded IP: Not used.
3 - API Reference
4 - CLI Reference
5 - Release Note
Container Registry
- Container Registry feature change
- Improved internal processes related to lifecycle management policies to enhance the convenience of the Image Tag deletion feature.
- We provide a Registry Endpoint‑based (CLI) vulnerability assessment lookup feature by improving internal storage and management methods.
- Container Registry feature change
- General-purpose Container Registry related OCI (Open Container Initiative) Distribution Spec. * Ensured v1.1.1 compatibility and improved the user Registry.
- Improved internal processes related to the Container Registry creation/deletion logic to enhance convenience.
- We improved usability by adding a refresh button where needed, just like with other products.
- Container Registry feature change
- OCI (Open Container Initiative) Distribution Spec related to Registry. * Ensured v1.1.1 compatibility and improved the user Registry.
- We expand the coverage by adding OS and language types to the container image vulnerability assessment targets.
- Container Registry feature changes and improvements
- We additionally offer the image tag deletion policy feature based on count.
- We improve the validation of Public Endpoint access control IP input values according to the IP range constraints of the Firewall product.
- Container Registry feature change
- Provides a feature to enable the deletion policy setting for image tag deletion items.
- Provides log collection functionality based on ServiceWatch integration.
- Container Registry feature change
- Provides a Container Registry service based on Object Storage with self‑encryption and the S3 API compatibility issue patch applied.
- Provides public endpoints and access control features for the Registry.
- We additionally offer the Multi-Node GPU Cluster product among the private endpoint access control targets of the Registry.
- Provides a feature to set automatic deletion policies for repositories, stored images, and their individual tags (digests).
- Container Registry feature change
- Provides a lock feature for images stored in the Registry.
- Provides monitoring capabilities for the Registry in conjunction with the Cloud Monitoring product.
- Provides integration with VPC Endpoint.
- Samsung Cloud Platform Common Feature Changes
- Account, IAM, and Service Home, tags, etc., have been updated to reflect common CX changes.
- Container Registry is a service that provides a registry and repository where you can easily store, manage, and share container images and OCI (Open Container Initiative) standard artifacts.
- It was released as a temporary version and will be migrated to the official version once the encryption solution is updated.