We provide execution and monitoring environments, as well as open-source software, to ensure containerized applications can operate reliably with Kubernetes.
This is the multi-page printable view of this section. Click here to print.
Container
- 1: Kubernetes Engine
- 1.1: Overview
- 1.1.1: Monitoring Metrics
- 1.1.2: ServiceWatch Metrics
- 1.2: How-to guides
- 1.2.1: Managing Nodes
- 1.2.2: Managing Namespaces
- 1.2.3: Managing Workloads
- 1.2.4: Manage services and ingresses
- 1.2.5: Manage Storage
- 1.2.6: Configuration Management
- 1.2.7: Manage Permissions
- 1.3: Kubernetes Engine Usage Guide
- 1.3.1: Access Cluster
- 1.3.2: Authentication and Authorization
- 1.3.3: Using type LoadBalancer service
- 1.3.4: Using the Block Storage storage class
- 1.3.5: Usage Considerations
- 1.3.6: Version information
- 1.4: API Reference
- 1.5: CLI Reference
- 1.6: Release Note
- 2: Container Registry
- 2.1: Overview
- 2.1.1: Monitoring Metrics
- 2.1.2: ServiceWatch Metrics
- 2.2: How-to guides
- 2.2.1: Managing the Repository
- 2.2.2: Managing Images and Tags
- 2.2.3: Manage Image Security Vulnerabilities
- 2.2.4: Manage Image Tag Deletion Policy
- 2.2.5: Use Container Registry with CLI
- 2.2.6: Example of Registry and Repository Policies
- 2.3: API Reference
- 2.4: CLI Reference
- 2.5: Release Note
1 - Kubernetes Engine
1.1 - Overview
Service Overview
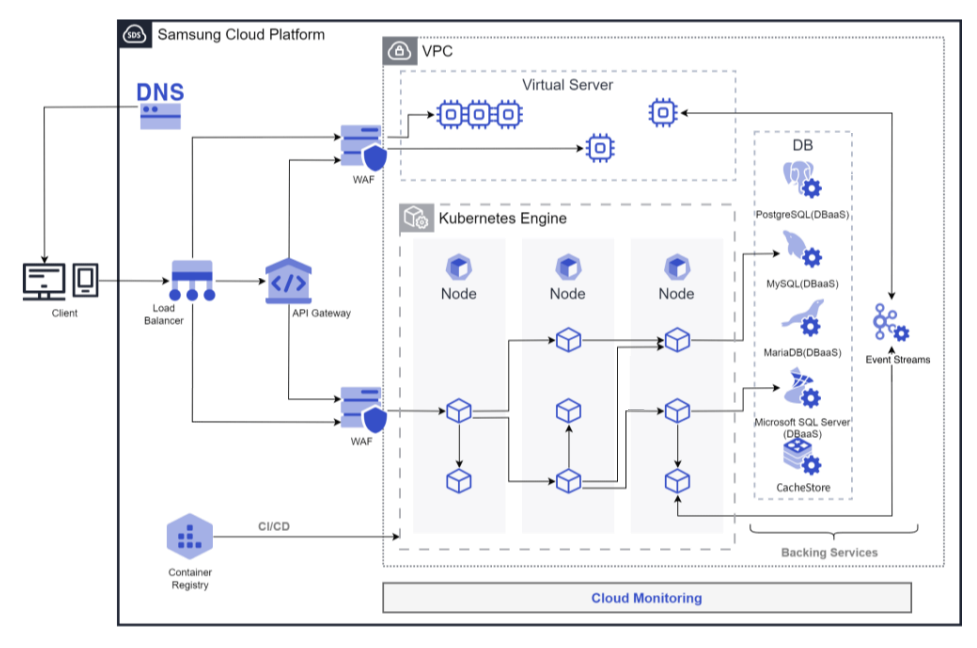
Kubernetes Engine is a service that provides lightweight virtual computing, containers, and a Kubernetes cluster to manage them. Users can leverage a Kubernetes environment without complex preparation by installing, operating, and maintaining the Kubernetes Control Plane.
Features
Standard Kubernetes Environment Setup: You can use a standard Kubernetes environment without additional configuration through the built-in Kubernetes Control Plane. It is compatible with applications in other standard Kubernetes environments, allowing you to use standard Kubernetes applications without modifying code.
Easy Kubernetes Deployment: provides secure communication between the worker node (Worker Node) and the managed control plane, and quickly provisions worker nodes so users can focus on building applications on the provided container environment.
Convenient Kubernetes Management: For enterprise environments, we provide various management features to conveniently use the created Kubernetes clusters, including cluster information lookup and management via a dashboard, namespace management, and workload management functions.
Service Diagram
Provided features
Kubernetes Engine provides the following features.
- Cluster Management: You can create and manage clusters to use the Kubernetes Engine service. After creating a cluster, you can add services needed for operation such as nodes, namespaces, and workloads.
- Node Management: A node is a set of machines that run containerized applications. Every cluster must have at least one worker node to deploy applications. Nodes can be used by defining node pools. Nodes belonging to a node pool must have the same server type, size, and OS image, and creating multiple node pools enables flexible deployment strategies.
- Namespace Management: A namespace is a logical partition within a Kubernetes cluster and is used to specify access permissions or resource usage limits per namespace.
- Workload Management: A workload is an application running on Kubernetes Engine. After creating a namespace, you can add or delete workloads. Workloads are created and managed per item such as Deployment, Pod, StatefulSet, DaemonSet, Job, and CronJob.
- Service and Ingress Management: A service is an abstraction that exposes applications running in a set of pods as a network service, and an ingress is used to expose HTTP and HTTPS paths from outside the cluster to inside the cluster. After creating a namespace, you can create or delete services, endpoints, ingresses, and ingress classes.
- Storage Management: You can create and manage the storage to be used when using Kubernetes Engine. Storage is created and managed per PVC, PV, and StorageClass items.
- Configuration Management: When you need to manage values that change inside containers across multiple environments such as Dev/Prod, creating separate images to handle them via environment variables is inconvenient and wasteful. In Kubernetes, you can manage environment variables or configuration settings as variables that can be changed externally and injected when a Pod is created; at that point you can use ConfigMaps and Secrets.
- Permission Management: When multiple users access a Kubernetes cluster, you can assign permissions per specific API or namespace to define the access scope. By applying Kubernetes’ role-based access control (RBAC) feature, you can set permissions for clusters or namespaces. You can create and manage ClusterRoles, ClusterRoleBindings, Roles, and RoleBindings.
Component
control plane
Control Plane is the component that serves as the master node in the Kubernetes Engine service. The master node is the cluster’s management node, responsible for managing the other nodes in the cluster. A cluster is the basic creation unit of the Kubernetes Engine service and is used for managing node pools, objects, controllers, etc., that belong to it. Users configure the cluster name (cluster name), control plane, network, File Storage, and then create node pools within the cluster for use. The master node assigns work to the cluster, monitors node status, and handles data communication between nodes.
The cluster name creation rules are as follows.
- It must start with a letter and can be set using letters, numbers, and special characters (
-) within 3 to 30 characters. - It must not duplicate an already existing cluster name.
worker node
The worker node (Worker Node) is a compute node in the cluster that performs tasks. It receives task assignments from the cluster’s master node, executes them, and reports the results back to the master node. All nodes created within a node pool and namespace serve as worker nodes.
The rules for creating a node pool, which is a collection of worker nodes, are as follows.
- A node pool must contain at least one node for the application deployment to be possible.
- A maximum of 100 nodes can be created within a node pool.
- Since the maximum number of nodes is 100, you can freely create up to 100 nodes—for example, with 100 node pools you get 1 node per pool, and with 50 node pools you get 2 nodes per pool.
- It is possible to configure block storage attached to a node pool.
- You can configure the server type, size, and OS image for nodes in a node pool, and they must all be identical.
- Through the Auto-Scaling service, you can configure automatic scaling and shrinking of node pools according to the requirements of the deployed application.
Preliminary Service
This is a list of services that must be pre-configured before creating the service. Please refer to the guide provided for each service for details and prepare in advance.
| Service Category | service | Detailed description |
|---|---|---|
| Networking | VPC | A service that provides an isolated virtual network in a cloud environment |
| Networking | Security Group | Virtual firewall that controls server traffic |
| Storage | File Storage | A storage that allows multiple clients to share files over the network
|
Table. Kubernetes Engine Prerequisite Services
1.1.1 - Monitoring Metrics
Cloud Monitoring service termination notice
According to Samsung Cloud Platform’s policy, the Cloud Monitoring service is scheduled to be discontinued in September 2026.
Accordingly, after the September 2026 release, resource monitoring of the Samsung Cloud Platform via Cloud Monitoring will no longer be possible.
With the new alternative service, you can continuously perform resource monitoring by using ServiceWatch, released in October 2025.
ServiceWatch provides more modern and powerful features, replacing Cloud Monitoring to deliver a seamless monitoring environment.
Detailed information about ServiceWatch is available in the ServiceWatch Overview.
Kubernetes Engine monitoring metrics
The table below shows the monitoring metrics of Kubernetes Engine that can be viewed through Cloud Monitoring. For detailed usage of Cloud Monitoring, refer to the Cloud Monitoring guide.
| Performance items | Detailed description | unit |
|---|---|---|
| Cluster Namespaces [Active] | Number of namespaces in active state | cnt |
| Cluster Namespaces [Total] | Total number of namespaces in the cluster | cnt |
| Cluster Nodes [Ready] | Number of nodes in READY state | cnt |
| Cluster Nodes [Total] | Total number of nodes in the cluster | cnt |
| Cluster Pods [Failed] | Number of failed-state pods in the cluster | cnt |
| Cluster Pods [Pending] | Number of pending pods in the cluster | cnt |
| Cluster Pods [Running] | Number of pods in running state within the cluster | cnt |
| Cluster Pods [Succeeded] | Number of succeeded pods in the cluster | cnt |
| Cluster Pods [Unknown] | Number of pods in unknown state within the cluster | cnt |
| Instance Status | cluster status | status |
| Namespace Pods [Failed] | Number of failed-state pods in a namespace | cnt |
| Namespace Pods [Pending] | Number of pending pods in a namespace | cnt |
| Namespace Pods [Running] | Number of running pods in a namespace | cnt |
| Namespace Pods [Succeeded] | Number of succeeded-state pods in a namespace | cnt |
| Namespace Pods [Unknown] | Number of pods in unknown state within a namespace | cnt |
| Namespace GPU Clock Frequency | SM clock frequency in the Namespace | MHz |
| Namespace GPU Memory Usage | Memory utilization in the Namespace | % |
| Namespace GPU Usage | GPU utilization in the Namespace | % |
| Node CPU Size [Allocatable] | Node CPU allocatable | cnt |
| Node CPU Size [Capacity] | CPU capacity in the node | cnt |
| Node CPU Usage | CPU usage per node | % |
| Node CPU Usage [Request] | CPU request_ratio within node | % |
| Node CPU Used | CPU utilization within the node | status |
| Node Filesystem Usage | Node FS utilization | % |
| Node Memory Size [Allocatable] | memory allocatable within the node | bytes |
| Node Memory Size [Capacity] | Node memory utilization | bytes |
| Node Memory Usage | Node memory utilization | % |
| Node Memory Usage [Request] | memory request_ratio within node | % |
| Node Memory Workingset | memory working set within the node | bytes |
| Node Network In Bytes | Node network rx bytes | bytes |
| Node Network Out Bytes | Node network tx bytes | bytes |
| Node Network Total Bytes | Node network total bytes | bytes |
| Node Pods [Failed] | Number of pods in failed state within the node | cnt |
| Node Pods [Pending] | Number of pending pods in the node | cnt |
| Node Pods [Running] | Number of running pods per node | cnt |
| Node Pods [Succeeded] | Number of succeeded pods in the node | cnt |
| Node Pods [Unknown] | Number of unknown‑state pods in the node | cnt |
| Pod CPU Usage [Limit] | CPU usage_limit_ratio in the pod | % |
| Pod CPU Usage [Request] | CPU request_ratio in the pod | % |
| Pod CPU Usage | CPU usage within the pod | % |
| Pod GPU Clock Frequency | SM clock frequency in the Pod | MHz |
| Pod GPU Memory Usage | Memory utilization within the Pod | % |
| Pod GPU Usage | GPU utilization within the Pod | % |
| Pod Memory Usage [Limit] | memory usage_limit_ratio in pod | % |
| Pod Memory Usage [Request] | memory request_ratio in pod | % |
| Pod Memory Usage | Memory usage within pod | bytes |
| Pod Network In Bytes | network rx bytes in pod | bytes |
| Pod Network Out Bytes | network tx bytes in pod | bytes |
| Pod Network Total Bytes | Network total bytes in pod | bytes |
| Pod Restart Containers | container restart count in pod | cnt |
| Workload Pods [Running] | - | cnt |
Table. Kubernetes Engine monitoring metrics
1.1.2 - ServiceWatch Metrics
Kubernetes Engine sends metrics to ServiceWatch. The metrics provided by default monitoring are data collected at a 1‑minute interval.
Reference
To view metrics in ServiceWatch, refer to the ServiceWatch guide.
Basic Metrics
The following are the basic metrics for the Kubernetes Engine namespace.
The metrics whose names are displayed in bold below are the metrics selected as key metrics among the default metrics provided by Kubernetes Engine. Key metrics are used to configure service dashboards that are automatically generated for each service in ServiceWatch.
Each metric indicates through the user guide which statistical values are meaningful when viewing that metric, and among the meaningful statistics, the values displayed in bold are the primary statistics. In the service dashboard, you can view key metrics using these primary statistical values.
| Indicator name | Detailed description | unit | meaningful statistics |
|---|---|---|---|
| cluster_up | Cluster up | Count |
|
| cluster_node_count | Cluster node count | Count |
|
| cluster_failed_node_count | Number of failed nodes in the cluster | Count |
|
| cluster_namespace_phase_count | Number of cluster namespace phases | Count |
|
| cluster_pod_phase_count | Number of cluster pod phases | Count |
|
| node_cpu_allocatable | Node CPU allocatable amount | - |
|
| node_cpu_capacity | Node CPU capacity | - |
|
| node_cpu_usage | Node CPU usage | - |
|
| node_cpu_utilization | Node CPU utilization | - |
|
| node_memory_allocatable | Node memory allocatable amount | Bytes |
|
| node_memory_capacity | Node memory capacity | Bytes |
|
| node_memory_usage | Node memory usage | Bytes |
|
| node_memory_utilization | Node memory usage rate | - |
|
| node_network_rx_bytes | Node network received bytes | Bytes/Second |
|
| node_network_tx_bytes | Node network transmitted bytes | Bytes/Second |
|
| node_network_total_bytes | Total bytes of the node network | Bytes/Second |
|
| node_number_of_running_pods | Number of pods running on a node | Count |
|
| namespace_number_of_running_pods | Number of running pods in a namespace | Count |
|
| namespace_deployment_pod_count | Namespace deployment pod count | Count |
|
| namespace_statefulset_pod_count | Namespace StatefulSet pod count | Count |
|
| namespace_daemonset_pod_count | Namespace DaemonSet Pod Count | Count |
|
| namespace_job_active_count | Active namespace job count | Count |
|
| namespace_cronjob_active_count | Number of active namespace cron jobs | Count |
|
| pod_cpu_usage | Pod CPU usage | - |
|
| pod_memory_usage | Pod memory usage | Bytes |
|
| pod_network_rx_bytes | Pod network received bytes | Bytes/Second |
|
| pod_network_tx_bytes | Pod network transmit bytes | Bytes/Second |
|
| pod_network_total_bytes | Pod network total bytes | Count |
|
| container_cpu_usage | Container CPU usage | - |
|
| container_cpu_limit | Container CPU limit | - |
|
| container_cpu_utilization | Container CPU usage | - |
|
| container_memory_usage | Container memory usage | Bytes |
|
| container_memory_limit | Container memory limit | Bytes |
|
| container_memory_utilization | Container memory usage | - |
|
| node_gpu_count | Number of node GPUs | Count |
|
| gpu_temp | GPU temperature | - |
|
| gpu_power_usage | GPU power consumption | - |
|
| gpu_util | GPU utilization | Percent |
|
| gpu_sm_clock | GPU SM clock | - |
|
| gpu_fb_used | GPU FB usage | Megabytes |
|
| gpu_tensor_active | GPU Tensor Utilization | - |
|
| pod_gpu_util | Pod GPU utilization | Percent |
|
| pod_gpu_tensor_active | Pod GPU Tensor Utilization | - |
|
Table. Kubernetes Engine Basic Metrics
1.2 - How-to guides
Users can enter the required information for the Kubernetes Engine and select detailed options through the Samsung Cloud Platform Console to create a service.
Create Kubernetes Engine
You can create and use the Kubernetes Engine service from the Samsung Cloud Platform Console.
You can create and manage clusters to use the Kubernetes Engine service. After creating the cluster, you can add services needed for operation, such as nodes, namespaces, and workloads.
Caution
You can select up to 4 Security Groups in the network settings of Kubernetes Engine.
- If you manually add a Security Group to a node created by Kubernetes Engine on the Virtual Server service page, it may be automatically removed because it is not managed by Kubernetes Engine.
- For nodes, be sure to add and manage the Security Group in the network settings of the Kubernetes Engine service.
Managed Security Group is automatically managed in Kubernetes Engine.
- Do not use it for any user-defined purpose because if you delete a Managed Security Group or add/delete rules, it will automatically be restored.
Create a cluster
You can create and use a Kubernetes Engine cluster service in the Samsung Cloud Platform Console.
To create a Kubernetes Engine cluster, follow these steps.
- Click the All Services > Container > Kubernetes Engine menu. 1. Go to the Service Home page of Kubernetes Engine.
- On the Service Home page, click the Create Cluster button. 2. Go to the Create Cluster page.
- On the Create Cluster page, enter the information required to create a service and select detailed options.
- Enter or select the required information in the Service Information Input area.
Category Required statusDetailed description Cluster name Essential Cluster name - must start with an English letter and be entered using English letters, numbers, and special characters (
-) within 3 - 30 characters
Control Plane Settings > Kubernetes Version Essential Select Kubernetes version Control Plane Settings > Private Endpoint Access Allowed Resources Selection After selecting a resource, click Add to select the resource that will be allowed to access the private endpoint - Only resources in the same account and the same region can be registered
- Regardless of whether it is enabled, the nodes of the cluster can access the private endpoint
Control Plane Settings > Public Endpoint Selection After selecting Use, enter the public endpoint Allowed IP range as 192.168.99.0/24 - Set the access control IP range to allow external access to the Kubernetes API server endpoint
- If external access is not required, you can disable it to reduce security threats
ServiceWatch log collection Selection Set whether to enable log collection so that cluster logs can be viewed in ServiceWatch - If you select Enable, log storage up to 5 GB for all services within the Account is provided free of charge, and charges apply based on storage volume if it exceeds 5 GB
- If you need to view cluster logs, it is recommended to enable the ServiceWatch log collection feature
Cloud Monitoring log collection Selection Set whether to enable log collection so that logs for the cluster can be viewed in Cloud Monitoring - If you select Enable, 1 GB of log storage is provided for free across all services in the Account, and any data exceeding 1 GB is deleted sequentially
Network Settings Required Network connection settings for the node pool - VPC name: Select a pre-created VPC
- Subnet name: Select a standard Subnet to use from the subnets of the selected VPC
Network Settings > Security Group Selection Security Group: After clicking the Select button, select a Security Group in the Select Security Group popup - Up to 4 Security Group can be selected
StorageClass configuration Required Select the storage volume to use in the cluster - NFS Volume: Click the Search button and then select File Storage in the File Storage Selection popup. The default File Storage supports only the NFS format. A StorageClass and Provisioner appropriate for the selected File Storage are provided
- Block Storage provides a StorageClass and CSI by default, so no additional configuration is required
Table. Kubernetes Engine service information input fields - must start with an English letter and be entered using English letters, numbers, and special characters (
- Additional Information Input area, enter or select the required information.
Category RequiredDetailed description tag Selection Add Tag - Up to 50 per resource can be added
- After clicking the Add Tag button, enter or select Key, Value values
Table. Kubernetes Engine additional information input items
- Enter or select the required information in the Service Information Input area.
- Summary Review the detailed information and estimated charges generated in the panel, then click the Create button.
- When creation is complete, check the created resources on the Cluster List page.
Check cluster detailed information
The Kubernetes Engine service allows you to view and edit the full list of resources and detailed information. Cluster Details page includes Details, Node Pools, Tags, Job History tabs.
To view detailed cluster information, follow these steps.
- All Services > Container > Kubernetes Engine Click the menu. 1. Go to the Service Home page of Kubernetes Engine.
- On the Service Home page, click the Cluster menu. 2. Navigate to the Cluster List page.
- Cluster List page, click the resource (cluster) to view its detailed information. 3. Go to the Cluster Details page.
- Cluster Details page displays the cluster’s status information and detailed information, and consists of Details, Node Pool, Tags, Job History tabs.
Category Detailed description Cluster status Kubernetes Engine cluster status - Creating: Creating
- Running: Creation complete/running
- Updating: Upgrading version
- Deleting: Deleting
- Error: Error occurred
Service cancellation Button to delete a Kubernetes Engine cluster - To delete a Kubernetes Engine service, you must delete all node pools added to the cluster
- If the service is deleted, the running service may be stopped immediately, so deletion is required after considering the impact of service interruption
Table. Cluster status information and additional features
- Cluster Details page displays the cluster’s status information and detailed information, and consists of Details, Node Pool, Tags, Job History tabs.
Detailed Information
On the Cluster List page, you can view detailed information of the selected resource and, if necessary, edit the information.
| Category | Detailed description |
|---|---|
| service | Service name |
| Resource Type | Resource Type |
| SRN | Unique resource ID in Samsung Cloud Platform |
| Resource Name | Resource name
|
| Resource ID | Unique resource ID in the service |
| Constructor | User who created the service |
| Creation Date/Time | Service creation date and time |
| Modifier | User who edited the service information |
| Modification date and time | Date and time the service information was modified |
| Cluster name | Cluster name |
| LLM Endpoint | LLM Endpoint information |
| Control Area Settings | Check the assigned Kubernetes control plane (Control Plane) version and allowed access range
|
| Network Settings | View the VPC, Subnet, and Security Group information configured when creating a Kubernetes Engine cluster
|
| StorageClass configuration | If you click the NFS volume name, you can view detailed information on the storage details page |
Table. Cluster Details Tab Items
Reference
- The version of Kubernetes Engine is expressed as
[major].[minor].[patch], and you can upgrade only one minor version at a time.- Example: version
1.11.x > 1.13.x(Not allowed) / version1.11.x > 1.12.x(Allowed)
- Example: version
- If you are using a Kubernetes version that has reached end of support or a version that is scheduled to reach end of support, a red exclamation mark will appear to the right of the version. * If this icon appears, we recommend upgrading the Kubernetes version.
Node pool
You can view, add, modify, or delete cluster node pool information. For detailed information on using node pools, refer to Managing Nodes.
| Category | Detailed description |
|---|---|
| Add node pool | Add a node pool to the current cluster
|
| Node pool list | View the list of node pools created in the current cluster
|
| Node pool details | Provides node pool management features
|
Table. Node pool tab items
Reference
If a red exclamation mark icon appears on the node pool version, the server OS of that node pool is not supported in newer Kubernetes versions. The node pool server OS must be upgraded to ensure stable service.
- To upgrade the node pool version, delete the existing node pool and then create a new node pool with a higher server OS version.
Tag
On the Cluster List page, you can view the tag information of the selected resource and add, modify, or delete it.
| Category | Detailed description |
|---|---|
| Tag list | Tag list
|
Table. Cluster Tag Tab Items
Job History
You can view the operation history of the selected resource on the Cluster List page.
| Category | Detailed description |
|---|---|
| Task History List | Resource Change History
|
Table. Cluster job history tab items
Managing Cluster Resources
To manage cluster resources, we provide cluster version upgrade, kubeconfig download, and control plane logging modification features.
Caution
To use Kubernetes Engine, you need minimum view permissions for VPC, VPC Subnet, Security Group, FileStorage, and Virtual Server.
Security Group and Virtual Server are created/deleted by Kubernetes Engine for lifecycle management purposes even without create/delete permissions, and the creator/modifier is recorded as System.
Security Group and Virtual Server are created/deleted by Kubernetes Engine for lifecycle management purposes even without create/delete permissions, and the creator/modifier is recorded as System.
Cluster version upgrade
If there is a version that can be upgraded from the cluster’s Kubernetes version, you can perform the upgrade on the Cluster Details page.
Reference
- Check the following items before upgrading the cluster.
- Check if the cluster status is Running
- Check whether the status of all node pools in the cluster is Running or Deleting.
- Check that all node pool versions in the cluster match the cluster’s version.
- Check whether automatic scaling up/down of all node pools in the cluster and the node auto-recovery feature are disabled.
- After upgrading the cluster, proceed with the node pool upgrade. * The control plane and node pool upgrades of a Kubernetes cluster are performed separately.
- You can upgrade only one minor version at a time.
- Example: version 1.12.x > 1.13.x (possible) / version 1.11.x > 1.13.x (not possible)
- After an upgrade, you cannot perform a downgrade or rollback, so to use a previous version again, you must create a new cluster.
Caution
- Since user systems using an end‑of‑life Kubernetes version may become vulnerable, upgrade the control plane and node pool versions directly from the Samsung Cloud Platform Console.
- There is no additional cost for the upgrade.
- Please conduct compatibility testing of the upgrade version in advance to ensure stable system operation for users.
Pre-upgrade preparation for cluster version
When upgrading the cluster version, there is no need to delete and recreate API objects. For the migrated API, all existing API objects can be read and updated using the new API version. However, due to the deprecated API in older versions of Kubernetes, you may be unable to read or modify existing objects, or create new ones. Therefore, to ensure system stability, it is recommended to migrate the client and manifest before upgrading.
Migrate the client and manifest using the following method.
- Download the latest version of the client (e.g., kubectl), install it on the cluster, and modify the YAML to reference the new API.
- Or use a separate plugin (kubectl convert) to convert automatically. * For detailed instructions, refer to the 쿠버네티스 공식 문서 > 리눅스에 kubectl 설치 및 설정.
Reference
Since the deprecated API differs for each cluster version, the scope of application and system impact may vary. For detailed information, refer to the 쿠버네티스 공식 문서 > Deprecation Guide.
Upgrade cluster and node pool versions
To update the cluster and node pool, follow these steps.
- Click the All Services > Container > Kubernetes Engine menu. 1. Navigate to the Service Home page of Kubernetes Engines.
- Service Home page, click the Cluster menu. 2. Navigate to the Cluster List page.
- On the Cluster List page, click the resource (cluster) to upgrade the version. 3. Navigate to the Cluster Details page.
- Cluster Details page, click the Edit icon for the Kubernetes Version. 4. Cluster version upgrade A popup window opens.
- Select the Kubernetes version to upgrade, and click the Confirm button.
- It may take a few minutes for the cluster upgrade to complete.
- While the upgrade is in progress, the cluster status is shown as Updating, and when the upgrade completes, it is shown as Running.
- When the upgrade is complete, select the Node Pool tab. 6. Go to the Node Pool page.
- Click the More button of the node pool item and click Upgrade. 7. Node pool version upgrade A popup window opens.
- Node Pool Version Upgrade After checking the message in the popup window, click the Confirm button.
- It may take a few minutes for the node pool upgrade to complete.
- While the upgrade is in progress, the node pool status is shown as Updating, and when the upgrade is complete, it is shown as Running.
kubeconfig download
You can download the admin/user kubeconfig settings for the cluster’s public and private endpoints as a yaml document.
To download the cluster’s kubeconfig settings, follow these steps.
- Click the All Services > Container > Kubernetes Engine menu. 1. Navigate to the Service Home page of Kubernetes Engines. Service Home 페이지에서 클러스터 메뉴를 클릭하세요. 2. Navigate to the Cluster List page.
- On the Cluster List page, click the resource (cluster) to download the kubeconfig. 3. Navigate to the Cluster Details page.
- Cluster Details page, click the Download admin kubeconfig/Download user kubeconfig button for the desired endpoint.
- You can download the kubeconfig file in YAML format for each permission.
Modify resources that allow private endpoint access
You can modify the resource settings that allow private endpoint access to the cluster.
- Click the All Services > Container > Kubernetes Engine menu. 1. Navigate to the Service Home page of Kubernetes Engines.
- On the Service Home page, click the Cluster menu. 2. Navigate to the Cluster List page.
- On the Cluster List page, click the resource (cluster) for which you want to modify the private endpoint access control. 3. Navigate to the Cluster Details page.
- On the Cluster Details page, click the Edit icon of Private Endpoint Access Allowed Resources. 4. Edit Private Endpoint Access Allowed Resources The popup window opens.
- Edit Private Endpoint Access Allowed Resources In the popup window, set the Use status of Private Endpoint Access Allowed Resources, add the allowed access resource, and then click the Confirm button.
Modify public endpoint
You can change the public endpoint settings of the cluster.
- Click the All Services > Container > Kubernetes Engine menu. 1. Navigate to the Service Home page of Kubernetes Engines.
- Click the Cluster menu on the Service Home page. 2. Navigate to the Cluster List page.
- On the Cluster List page, click the resource (cluster) for which you want to modify the public endpoint access control. 3. Navigate to the Cluster Details page.
- Click the Edit icon of the Public Endpoint on the Cluster Details page. 4. Edit Public Endpoint The popup window opens.
- Public Endpoint Edit In the popup, set the Public Endpoint’s Usage status and add the allowed IP range, then click the Confirm button.
Modify control plane log collection settings
You can change the log collection settings of the cluster’s control plane (Control Plane). Detailed logs of the cluster can be viewed in the ServiceWatch service or the Cloud Monitoring service.
Reference
Even if you configure Cloud Monitoring log collection, you can view the cluster logs.
- However, since the Cloud Moniotring log collection feature is scheduled for discontinuation, we recommend using ServiceWatch log collection.
To change the control plane log collection settings of the cluster, follow the steps below.
- Click the All Services > Container > Kubernetes Engine menu. 1. Navigate to the Service Home page of Kubernetes Engines. Service Home 페이지에서 클러스터 메뉴를 클릭하세요. 2. Navigate to the Cluster List page.
- Cluster List page, click the resource (cluster) you want to modify control plane logging for. 3. Go to the Cluster Details page.
- On the Cluster Details page, click the Edit icon for ServiceWatch log collection. 4. ServiceWatch log collection The popup window opens.
- The Cloud Monitoring log collection feature can also be configured in the same way.
- ServiceWatch Log Collection in the popup window, set the use option for ServiceWatch Log Modification, then click the Confirm button.
Reference
When log collection is enabled, you can view the Audit/Event logs of the cluster control plane in each service. Detailed logs can be viewed on the next page.
Security Group Modify
You can modify the cluster’s Security Group.
Caution
In the network settings of Kubernetes Engine, you can select up to four Security Groups.
- If you manually add a Security Group to a node created by Kubernetes Engine on the Virtual Server service page, it may be automatically removed because it is not managed by Kubernetes Engine.
- For nodes, be sure to add and manage the Security Group in the network settings of the Kubernetes Engine service.
Managed Security Group is automatically managed in Kubernetes Engine.
- Do not use it for any user-defined purpose because if you delete a Managed Security Group or add/delete rules, it will automatically be restored.
To modify the cluster’s Security Group, follow these steps.
- Click the All Services > Container > Kubernetes Engine menu. 1. Navigate to the Service Home page of Kubernetes Engines.
- Service Home page, click the Cluster menu. 2. Navigate to the Cluster List page.
- Cluster List page, click the resource (cluster) whose Security Group you want to modify. 3. Navigate to the Cluster Details page.
- On the Cluster Details page, click the Edit icon of the Security Group. 4. Security Group Edit The popup window opens.
- After selecting or deselecting the Security Group to modify, click the Confirm button.
Terminate Cluster
Caution
If you terminate the cluster, all associated node pools will be deleted, and all data in every pod within the cluster will be permanently removed.
To terminate the cluster, follow these steps.
- Click the All Services > Container > Kubernetes Engine menu. 1. Navigate to the Service Home page of Kubernetes Engines.
- On the Service Home page, click the Cluster menu. 2. Navigate to the Cluster List page.
- Cluster List page, click the resource (cluster) to view its detailed information. 3. Navigate to the Cluster Details page.
- On the Cluster Details page, click Cancel Service.
- Service Termination After reviewing the content in the popup window, click the Confirm button.
1.2.1 - Managing Nodes
A node is a set of machines that run containerized applications. A cluster must have at least one node to deploy the application. A node can be defined and used in a node pool. Nodes belonging to a node pool must have the same server type, size, and OS image, and you can establish a flexible deployment strategy by creating multiple node pools.
After creating a Kubernetes Engine cluster, add a node pool and modify or delete it as needed.
Caution
- It is recommended not to use the OS firewall on Kubernetes Engine nodes that use Calico.
- The firewall settings of the Samsung Cloud Platform are set to Inactive by default.
- As recommended in the reference link below, in environments using Calico, it is advisable to configure the firewall as disabled.
Add node pool
A node refers to a machine that runs containerized applications, and at least one node is required to deploy applications in a Kubernetes cluster. After the creation of the Kubernetes Engine cluster is complete, add a node pool on the details page.
- In Kubernetes Engine, you can define and use a node pool, which is a set of nodes. * Since the nodes in a node pool use the same server type, size, and OS image, users can devise flexible deployment strategies by using multiple node pools.
Reference
In the Virtual Server menu, you can create a node pool using the user’s Custom Image. To create a node pool using a Custom Image, follow the steps below.
- Create a Virtual Server that includes a Kubernetes Engine image of Samsung Cloud Platform.
- Use the Image creation feature of the Virtual Server to create the image.
- Select the registered Custom Image to create a node pool.
- For more details, please refer to Virtual Server > Image 생성하기.
To add a node pool, follow these steps.
- Click the All Services > Container > Kubernetes Engine menu. 1. Navigate to the Service Home page of Kubernetes Engine.
- On the Service Home page, click the Cluster menu. 2. Navigate to the Cluster List page.
- On the Cluster List page, select the cluster you want to add a node pool to. 3. Navigate to the Cluster Details page.
- On the Cluster Details page, select the Node Pool tab, then click the Add Node Pool button. 4. Add Cluster Node Pool Navigate to the page.
- Add Cluster Node Pool page, enter the information required to create a node pool, and select detailed options.
- Enter or select the required information in the Service Information Input area.
Category required statusDetailed description Node pool name Required Node pool name - must start with a lowercase English letter and use lowercase letters, numbers, and special characters (
-) within 3-20 characters- cannot end with a special character (
-)
- cannot end with a special character (
Server Information > Server Type Required Node’s Virtual Server server types - Standard: Standard specifications commonly used
- High Capacity: Large server specifications exceeding Standard
- GPU: GPU specifications available when securing resources for special requirements such as AI/ML
- For detailed information about the server types provided by Virtual Server, refer to Virtual Server 서버 타입
Server Information > Server OS Required Node’s Virtual Sever OS image - Standard: RHEL 8.10, Ubuntu 22.04
- Custom: Custom image for Kubernetes created from the Virtual Server product (RHEL, Ubuntu)
Server Information > Block Storage Required Block Storage settings used by the node’s Virtual Server - SSD: high-performance general volume
- HDD: general volume
- SSD/HDD_KMS: additional encrypted volume using Samsung Cloud Platform KMS (Key Management System) encryption keys
- Encryption can only be applied at initial creation and cannot be changed after the service is created
- Performance degradation occurs when using the SSD_KMS disk type
- SSD_Provisioned: enter detailed settings for the selected storage type
- Enter a value in the Max IOPS field within the range 5000-20000, and in the Max Throughput field within the range 250-1000
- For a Custom Image with SSD_Provisioned, the predetermined values are auto-filled and the fields are disabled
- Capacity is entered in Units, with a value between 13 and 1536
- Since 1 Unit equals 8 GB, this creates 104–12,288 GB
Server Information > Server Group Selection Apply a pre‑created Server Group in the Virtual Server service on the node - Click Use to configure Server Group usage
- When usage is enabled, select a Server Group
- Supports Affinity or Anti‑Affinity policies
- Partition policy is not supported
- Cannot modify after node pool creation
- GPU server type cannot be selected
Server Information > Keypair Required User authentication method used to connect to a node’s Virtual Server - New: Create a new one if a new Keypair is required
- For instructions on creating a new Keypair, see Keypair 생성하기
- Default login account list by OS
- Alma Linux: almalinux
- RHEL: cloud-user
- Rocky Linux: rocky
- Ubuntu: ubuntu
- Windows: sysadmin
Network Information > Subnet Name Required Select the Subnet of the chosen VPC - Only Subnets with a registered DNS IP can be used
Network Information > Availability Zone Required Select Availability Zone Network Information > Prioritize IP Assignment Selection Use click and enter an IP address or IP range - Multiple IP addresses or ranges can be entered separated by commas
- Refer to 노드 풀 우선 IP 지정 설정하기 for configuration instructions
Node Information > Node Pool Auto Scaling/Downscaling Required Automatically adjust the number of nodes in a node pool - Refer to 노드 풀 자동 확장/축소하기 for configuration.
Node Information > Node Count Required Number of nodes to create within a node pool - Enter a value within the range of 1-100
Node Information > Node Auto Recovery Required When an abnormal node is detected in the node pool, automatically delete and create a new one - For configuration, refer to 노드 풀 자동 복구하기
Node Information > Label Selection Optionally schedule the workload on a node - Add click the button to enter the label key and value
- Refer to 노드 풀 레이블 설정하기 for configuration instructions
Node Info > Taint Selection Prevent workloads from being scheduled onto nodes - Add button to click for taint effect, enter key and value
- For configuration method, see 노드 풀 테인트 설정하기
Node Information > Advanced Settings Selection Settings for detailed areas such as pods and logs for the node - Click Use to select whether to apply advanced configuration items for the node pool to be created
- Refer to 노드 풀 고급 설정하기 for configuration instructions
connection resource Selection Configure File Storage and Object Storage resources for nodes at the node pool level - Click the Add button to select the File Storage and Object Storage resources to attach to the node pool you will create
Table. Kubernetes Engine node pool service information input items - must start with a lowercase English letter and use lowercase letters, numbers, and special characters (
- Enter or select the required information in the Service Information Input area.
- Summary Check the detailed information and estimated charges generated in the panel, and click the Create button.
- When creation is complete, check the created resources on the Cluster Details > Node Pool Tab > Node Pool List page.
- When the notification popup opens, click the Confirm button.
Adjusting the number of nodes
If needed, modify the number of nodes in the node pool on the Kubernetes Engine detail page.
Reference
Modifying the node count will automatically add or remove nodes, causing the container operation to terminate. At this time, the container moves to another node, which may cause the running service to be interrupted.
To modify the number of nodes, follow these steps.
- Click the All Services > Container > Kubernetes Engine menu. 1. Navigate to the Service Home page of Kubernetes Engine.
- On the Service Home page, click the Cluster menu. 2. Navigate to the Cluster List page.
- On the Cluster List page, select the cluster whose node count you want to modify. 3. Navigate to the Cluster Details page.
- On the Cluster Details page, select the Node Pool tab, then click the Node Pool Name you want to edit. 4. Go to the Node Pool Details page.
- On the Node Pool Details page, click the Adjust Node Count icon to the right of Node Pool Information. 5. Or click More > Adjust Node Count at the far right of the node pool entry in the Node Pool tab. 5. Adjust Node Count The popup window opens.
- Node Count Adjustment In the popup window, modify the node count information, then click the Confirm button.
Upgrade Node Pool
If the control plane’s Kubernetes version and the node pool’s version differ, you can upgrade the node pool to synchronize the versions.
Caution
- After upgrading the cluster, proceed with a node pool upgrade. The control plane and node pool upgrades of a Kubernetes cluster are performed separately.
- When a node pool upgrade is performed, a rolling update is carried out on the nodes belonging to the node pool. At this point, a brief service interruption may occur, but this is a normal effect of the rolling update and will automatically normalize after a short period.
- The server OS version may vary depending on the Kubernetes version of the node pool.
To upgrade the node pool, follow these steps.
- Click the All Services > Container > Kubernetes Engine menu. 1. Navigate to the Service Home page of Kubernetes Engine.
- On the Service Home page, click the Cluster menu. 2. Navigate to the Cluster List page.
- Select the cluster on the Cluster List page for which you want to perform a node pool version upgrade. 3. Navigate to the Cluster Details page.
- On the Cluster Details page, after selecting the Node Pool tab, click More > Upgrade at the far right of the node pool entry. 4. Or click the Upgrade button at the top right of the node pool detail page. 4. Node Pool Version Upgrade A popup window opens.
- You can upgrade the node pool only when the node’s status is Running.
- Node Pool Version Upgrade After reviewing the information in the popup window, click the Confirm button.
Auto-scaling node pool
Node pool auto-scaling is a feature that automatically adjusts the number of nodes in a specified node pool by adding new nodes or removing existing nodes according to workload demands. This feature operates based on the node pool.
- When a node pool auto‑scales, it is adjusted based on the resource requests of the pods running on the node pool’s nodes, rather than the actual resource utilization, and it periodically checks the status of pods and nodes and executes the auto‑scaling operation.
To set up the node pool’s automatic scaling feature, follow these steps.
- Click the All Services > Container > Kubernetes Engine menu. 1. Navigate to the Service Home page of Kubernetes Engine.
- On the Service Home page, click the Cluster menu. 2. Navigate to the Cluster List page.
- On the Cluster List page, select the cluster you want to use the node auto‑scaling feature for. 3. Navigate to the Cluster Details page.
- On the Cluster Details page, select the Node Pool tab, then click the Node Pool Name you want to edit. 4. Go to the Node Pool Details page.
- On the Node Pool Details page, click the Adjust Node Count icon to the right of Node Pool Information. 5. Or click More > Adjust Node Count at the far right of the node pool entry in the Node Pool tab. 5. Adjust Node Count The popup window opens.
- In the Node Count Adjustment popup, select Node Pool Auto-Scaling as Enabled.
- After entering the minimum and maximum node counts, click the Confirm button.Reference
Node pool auto‑scaling settings can also be configured on the cluster node pool creation page.
- Node pool scaling conditions
- When a pod fails to start in the cluster due to insufficient resources (Pending pod occurs)
- Node pool reduction condition (when all are met)
- If the sum of resource requests (CPU/Memory) of all pods running on a node is less than 50% of the node’s allocatable resources.
- If all pods running on a node can be run on another node (there must be no pods subject to PDB restrictions, etc.)
- When using automatic node pool scaling, add the following annotation to the node to prevent deletion caused by node reduction.
cluster-autoscaler.kubernetes.io/scale-down-disabled: “true”
- Node pool scaling conditions
Caution
- Node pool auto-scaling works only when the NotReady nodes among all nodes in the cluster are 45% or less of the total and no more than three.
- If there are nodes directly connected instead of node pools created by the Kubernetes Engine service, the feature may malfunction when used.
Automatically restore node pool
Node auto-recovery is a feature that automatically deletes an abnormal node detected in the cluster, creates a new node, and restores the node count in the node pool to a normal state. This feature operates based on the node pool.
Caution
Node auto-recovery deletes the existing node and creates a new one when communication between K8S control planes is disrupted due to node (Virtual Server) problems, a stopped state, network issues, etc., according to the auto-recovery criteria, so it should be used with caution.
- When creating a node pool, it is restored according to the initially set conditions, and custom settings made after node creation are not restored.
If there are nodes directly connected instead of node pools created by the Kubernetes Engine service, the feature may malfunction when used.
To enable the node auto-recovery feature, follow these steps.
- Click the All Services > Container > Kubernetes Engine menu. 1. Navigate to the Service Home page of Kubernetes Engine.
- On the Service Home page, click the Cluster menu. 2. Navigate to the Cluster List page.
- On the Cluster List page, select the cluster for which you want to use the node auto-recovery feature. 3. Navigate to the Cluster Details page.
- On the Cluster Details page, select the Node Pool tab, then click the Node Pool Name you want to edit. 4. Go to the Node Pool Details page.
- On the Node Pool Details page, click the Adjust Node Count icon to the right of Node Pool Information. 5. Or click More > Adjust Node Count at the far right of the node pool entry in the Node Pool tab. 5. Adjust Node Count The popup window opens.
- In the Node Count Adjustment popup, select Node Auto Recovery as Enabled, then click the Confirm button.
Reference
Node auto-recovery can also be configured on the cluster node pool creation page.
- If the node is a target for automatic recovery
- When a node reports a NotReady status in successive checks for a certain time threshold (about 10 minutes).
- When a node does not report its status at all for a certain time threshold (approximately 10 minutes)
- If the node is not a target for automatic recovery
- When the initial node is created, it remains in the Creating state and does not become Running.
- When more than five abnormal nodes occur simultaneously in the same node pool.
Configure Node Pool Labels
Node pool labels are a feature for optionally scheduling workloads onto nodes.
Caution
- When applying a node pool label, it does not affect existing nodes; the label is applied only to nodes created thereafter.
- If you need to apply a label to an existing node, the user must set it directly with kubectl.
To set the node pool label, follow these steps.
- Click the All Services > Container > Kubernetes Engine menu. 1. Navigate to the Service Home page of Kubernetes Engine.
- On the Service Home page, click the Cluster menu. 2. Navigate to the Cluster List page.
- Select the cluster for which you want to set the node pool label on the Cluster List page. 3. Navigate to the Cluster Details page.
- On the Cluster Details page, select the Node Pool tab, then click the Node Pool Name you want to edit. 4. Go to the Node Pool Details page.
- On the Node Pool Details page, clicking the Edit icon of a label opens the Edit Label popup.
- Edit Label In the popup window, click the Add button to add as many labels as needed.
- Enter the label information and click the Confirm button.
Configure Node Pool Taint
Node pool taint is a feature that prevents workloads from being scheduled onto nodes.
Caution
- If you set taints on all node pools, pods required for normal cluster operation may not be scheduled.
- When applying a node pool taint, it does not affect existing nodes; the taint is applied only to newly created nodes.
- If you need to apply a taint to an existing node, the user must configure it directly with kubectl.
To set the node pool taint, follow these steps.
- Click the All Services > Container > Kubernetes Engine menu. 1. Navigate to the Service Home page of Kubernetes Engine.
- On the Service Home page, click the Cluster menu. 2. Go to the Cluster List page.
- On the Cluster List page, select the cluster for which you want to set a node pool taint. 3. Navigate to the Cluster Details page.
- On the Cluster Details page, select the Node Pool tab, then click the Node Pool Name you want to edit. 4. Go to the Node Pool Details page.
- On the Node Pool Details page, when you click the Edit icon of the taint, the Edit Taint popup opens.
- Tint Edit In the popup window, click the Add button to add as many tints as needed.
- Enter the tint information and click the Confirm button.
Configure advanced node pool settings
Node pool advanced settings are a feature for applying detailed configurations such as the number of pods per node, PID, logs, and image garbage collection.
Caution
Node pools cannot be modified after creation. If an invalid value is entered, the node may not operate correctly.
Reference
Each setting corresponds to the kubelet configuration as follows.
- Maximum pods per node: maxPods
- Image GC upper limit percent: imageGCHighThresholdPercent
- Image GC lower bound percent: imageGCLowThresholdPercent
- Container log maximum size MB: containerLogMaxSize
- Maximum number of container log files: containerLogMaxFiles
- Pod PID limit: podPidsLimit
- Unsafe Sysctl allowed: allowedUnsafeSysctls
To configure advanced settings for the node pool, follow these steps.
- Click the All Services > Container > Kubernetes Engine menu. 1. Navigate to the Service Home page of Kubernetes Engine.
- On the Service Home page, click the Cluster menu. 2. Navigate to the Cluster List page.
- Cluster List page, select the cluster you want to configure advanced node pool settings for. 3. Navigate to the Cluster Details page.
- On the Cluster Details page, after selecting the Node Pool tab, click Create Node Pool. 4. Navigate to the Create Node Pool page.
- On the Node Pool Creation page, select Advanced Settings as Enabled.
- Use After selecting, enter the required information for the items that appear.
- In the Summary tab, verify that the required information has been entered correctly, then click the Create button.
Configure linked resources for node pool
Node pool connection resources are a feature for connecting or disconnecting File Storage and Object Storage on a per‑node‑pool basis.
Caution
- There is a limit on the number of node pool connection resources.
- You can add up to three File Storage and three Object Storage, for a total of six connection resources.
- StorageClass and Provisioner for the connected resource are not provided.
- Do not arbitrarily modify the automatically added connection resources in the node pool for File Storage and Object Storage services. * Changes may be reverted or cause unexpected behavior.
To configure node pool connection resources, follow these steps.
- Click the All Services > Container > Kubernetes Engine menu. 1. Navigate to the Service Home page of Kubernetes Engine.
- On the Service Home page, click the Cluster menu. 2. Navigate to the Cluster List page.
- Select the cluster you want to configure node pool connection resources for on the Cluster List page. 3. Navigate to the Cluster Details page.
- On the Cluster Details page, select the Node Pool tab, then click the Node Pool Name you want to edit. 4. Go to the Node Pool Details page.
- Node Pool Details page, when you click the Edit icon of a connected resource, the Edit Connected Resource popup opens.
- Edit Connection Resource popup, when you click the Add button, the Add Connection Resource popup opens.
- Add Connected Resource In the popup window, select File Storage and Object Storage.
- After verifying the resources to connect to the node pool, click the Confirm button.
Configure Preferred IP for Node Pool
It is a feature that prioritizes assigning IPs to new nodes on a per‑node‑pool basis. If you enable Priority IP assignment, IPs within the specified range are allocated sequentially when a new node is created. If an IP cannot be assigned within the specified range, the IP within the cluster Subnet will be automatically allocated, just as when Priority IP assignment is not set.
To configure priority IP assignment for the node pool, follow the steps below.
- Click the All Services > Container > Kubernetes Engine menu. 1. Navigate to the Service Home page of Kubernetes Engine.
- On the Service Home page, click the Cluster menu. 2. Navigate to the Cluster List page.
- Select the cluster on the Cluster List page for which you want to set the node pool preferred IP assignment. 3. Navigate to the Cluster Details page.
- On the Cluster Details page, select the Node Pool tab, then click the Node Pool Name you want to edit. 4. Go to the Node Pool Details page.
- Node Pool Details page, when you click the Edit icon of the priority IP assignment, the Edit Priority IP Assignment popup opens.
- Edit Priority IP Assignment In the popup window, enter the priority IP range and click the Confirm button.
Reference
First, the input format for the IP range is as follows.
- Single IP: a single IPv4 address (e.g., 192.168.99.0)
- IP range: specify a continuous address in the startIP‑endIP format (e.g., 192.168.0.0-192.168.0.255)
- Combination: Enter as a single string separating the two above with commas (,) (e.g., 192.168.99.0,192.168.0.0-192.168.0.255,10.0.0.5)
Delete Node Pool
Delete the node pool from the Kubernetes Engine detail page if needed.
To delete a node pool, follow these steps.
- Click the All Services > Container > Kubernetes Engine menu. 1. Navigate to the Service Home page of Kubernetes Engine.
- On the Service Home page, click the Cluster menu. 2. Go to the Cluster List page.
- On the Cluster List page, select the cluster whose node count you want to modify. 3. Navigate to the Cluster Details page.
- On the Cluster Details page, select the Node Pool tab, then click the More button at the far right of the node pool entry. 4. Or click the Delete Node Pool button at the top right of the node pool detail page. 4. Node Pool Deletion A popup window opens.
- Node Pool Deletion In the popup window, select the checkbox, enter the name of the node pool to delete, and click the Confirm button.
- You must select the checkbox in the node deletion confirmation message for the confirm button to become active.
View node detailed information
After creating the cluster, you can view metadata, object information, and other details of the added nodes, and edit resource files using a YAML editor.
To view detailed information about the node pool, follow these steps.
- Click the All Services > Container > Kubernetes Engine menu. 1. Navigate to the Service Home page of Kubernetes Engine.
- On the Service Home page, click the Node menu. 2. Navigate to the Node List page.
- On the Node List page, select the cluster you want to view detailed information for from the gear button at the top left, then click the Confirm button.
- Select the node you want to view detailed information for and click. 4. Node Details page is accessed.
Category Detailed descriptionStatus Indicator Display the current status of the node Detailed Information Check the node’s account information, metadata, and object information. YAML Node resources can be edited in the YAML editor - Edit button click, modify the resource, then click the Save button to apply the changes
- When editing content, you can click the Diff button to view the changed content
event Check events that occurred on the node Pod Check node pod information - Pod (pod) is the smallest compute unit that can be created, managed, and deployed in Kubernetes Engine
Account information Check basic information about the Account, such as name, location, and creation date/time. Metadata Information Check the node’s label, annotation, taint, and other metadata information. Object Information The internal IP, machine ID, capacity, resources, etc., of the created node are displayed - If GPU resources are present, check the number of GPUs in the Capacity > Nvidia.com/GPU column
Table. Node detailed information items
1.2.2 - Managing Namespaces
A namespace is a logical separation unit within a Kubernetes cluster and is used to specify access permissions or resource usage limits per namespace.
Create a namespace
To create a namespace, follow these steps.
- Click the All Services > Container > Kubernetes Engine menu. 1. Go to the Service Home page of Kubernetes Engine.
- Click the Namespace menu on the Service Home page. 2. Go to the Namespace List page.
- On the Namespace List page, select the cluster for which you want to create a namespace from the list in the upper left, then click Create Object.
- In the Object Creation Popup, enter the object information and click the Create button.
Reference
For detailed information on object creation, refer to the 쿠버네티스 공식 문서 > 쿠버네티스 오브젝트.
Check detailed namespace information
You can view the namespace status and detailed information on the namespace detail page.
To view detailed namespace information, follow these steps.
- Click the All Services > Container > Kubernetes Engine menu. 1. Go to the Service Home page of Kubernetes Engine.
- Click the Namespace menu on the Service Home page. 2. Go to the Namespace List page.
- Namespace List page, after selecting the cluster that the namespace requiring detailed information belongs to from the list at the top left, click View.
- On the Namespace List page, select the item you want to view details for and click it. 4. Navigate to the Namespace Details page.
Category Detailed description Status display Display the current state of the namespace Delete Namespace Delete the namespace - A namespace containing workloads cannot be deleted. To delete the namespace, you must delete all associated workloads
Detailed Information Check the Account information and metadata of the namespace YAML Namespaces can be edited in the YAML editor - Click the Edit button, modify the namespace, then click the Done button to apply the changes
- When editing content, click the Diff button to view the changed content
event Check events that occurred within the namespace Pod Check the pod information of the namespace Account information Check basic information about the Account, such as its name, location, and creation date/time. Metadata Information Check the namespace’s metadata information Table. Namespace detailed information items
Delete namespace
To delete a namespace, follow these steps.
- All Services > Container > Kubernetes Engine menu, click it. 1. Go to the Service Home page of Kubernetes Engine.
- On the Service Home page, click the Namespace menu. 2. Go to the Namespace List page.
- On the Namespace List page, select the cluster that the namespace you want to delete belongs to from the list at the top left, then click Search.
- On the Namespace List page, select the item you want to view details for and click it. 4. Navigate to the Namespace Details page.
- On the Namespace Details page, click Delete Namespace.
- Notification dialog appears, click the Confirm button.
Caution
On the namespace list page, after selecting the item you want to delete, click Delete to remove the selected namespace.
- Namespaces containing workloads cannot be deleted. To delete a namespace, delete all associated workloads.
1.2.3 - Managing Workloads
The workload is an application that runs on Kubernetes Engine. After creating a namespace, you can add or delete workloads. Workloads are created and then managed for each item such as Deployment, Pod, StatefulSet, DaemonSet, Job, and CronJob.
Reference
Deployments, Pods, StatefulSets, DaemonSets, Jobs, and CronJobs are set to the cluster (namespace) selected when creating the service by default. Even if you select a different item in the list, the default cluster (namespace) setting is retained.
- To select a different cluster (namespace), click the list at the top left of the list page. * Select the cluster and namespace to modify from the list, and click the View button. * You can view the services created in the selected cluster/namespace.
Managing Deployments
A Deployment is a resource that provides updates for Pods and ReplicaSets (ReplicaSet). You can create a deployment in the workload, view its details, or delete it.
Create Deployment
To create a deployment, follow the steps below.
- Click the All Services > Container > Kubernetes Engine menu. 1. Go to the Service Home page of Kubernetes Engine.
- On the Service Home page, click Deployment under the Workload menu. 2. Go to the Deployment List page.
- Deployment List page, after selecting the cluster and namespace from the list in the upper left, click Create Object.
- In the Object Creation Popup, enter the object information and click the Create button.
- The following is an example
.yamlfile showing the required fields and object Spec for creating a Deployment. * (application/deployment.yaml)Color modeapiVersion: apps/v1 kind: Deployment metadata: name: nginx-deployment spec: selector: matchLabels: app: nginx replicas: 2 # tells deployment to run 2 pods matching the template template: metadata: labels: app: nginx spec: containers: - name: nginx image: nginx:1.14.2 ports: - containerPort: 80apiVersion: apps/v1 kind: Deployment metadata: name: nginx-deployment spec: selector: matchLabels: app: nginx replicas: 2 # tells deployment to run 2 pods matching the template template: metadata: labels: app: nginx spec: containers: - name: nginx image: nginx:1.14.2 ports: - containerPort: 80Code block. Required fields and object Spec for deployment creation
- The following is an example
Reference
For detailed information on the concept of Deployments and object creation, please refer to the 쿠버네티스 공식 문서 > 디플로이먼트.
Check deployment detailed information
To view deployment details, follow these steps.
- Click the All Services > Container > Kubernetes Engine menu. 1. Go to the Service Home page of Kubernetes Engine.
- On the Service Home page, click Deployment under the Workload menu. 2. Navigate to the Deployment List page.
- Deployment List page, select the cluster and namespace from the list at the top left, then click Search.
- Deployment List page, select the item you want to view detailed information for. 4. Navigate to the Deployment Details page.
- If you select System Object Display at the top of the list, all items except the Kubernetes object entries will be shown.
- Click each tab to view the service information.
Category Detailed descriptionDelete Deployment Delete the deployment Detailed Information Detailed deployment information can be viewed YAML The deployment’s resource file can be edited in the YAML editor - Edit button, modify the resource, then click the Done button to apply the changes
- When editing content, click the Diff button to view the changes
event Check events that occurred within the deployment Pod Check the pod information of the deployment - Pod(파드) is the smallest compute unit that can be created, managed, and deployed in Kubernetes Engine
Account information Check basic information about the Account, such as its name, location, and creation date/time. Metadata Information Check the deployment’s metadata information Object Information Check the deployment’s object information Table. Deployment detailed information items
Delete Deployment
To delete the deployment, follow these steps.
- Click the All Services > Container > Kubernetes Engine menu. 1. Go to the Service Home page of Kubernetes Engine.
- On the Service Home page, click Deployment under the Workload menu. 2. Go to the Deployment List page.
- Deployment List page, select the cluster and namespace from the list at the top left, then click View.
- Select the item you want to delete on the Deployment List page. 4. Go to the Deployment Details page.
- Click Delete Deployment on the Deployment Details page.
- When the notification dialog appears, click the OK button.
Caution
On the deployment list page, after selecting the item you want to delete, click Delete to remove the selected deployment.
Managing Pods
A Pod is the smallest compute unit in Kubernetes that can be created, managed, and deployed, representing a group of one or more containers. You can create pods in a workload, view detailed information, or delete them.
Create Pod
To create a pod, follow these steps.
- All Services > Container > Kubernetes Engine Click the menu. 1. Go to the Service Home page of Kubernetes Engine.
- On the Service Home page, click Pod under the Workload menu. 2. Go to the Pod List page.
- On the Pod List page, select the cluster and namespace from the list at the top left, then click Create Object.
- In the Object Creation Popup, enter the object information and click the Create button.
Reference
For detailed information on the concept of pods and object creation, refer to the 쿠버네티스 공식 문서 > 파드.
Check pod details
To view detailed pod information, follow these steps.
- Click the All Services > Container > Kubernetes Engine menu. 1. Go to the Service Home page of Kubernetes Engine.
- On the Service Home page, click Pod under the Workload menu. 2. Navigate to the Pod List page.
- On the Pod List page, select the cluster and namespace from the list at the top left, then click Search.
- Select the item whose detailed information you want to view on the Pod List page. 4. Navigate to the Pod Details page.
- If you select System Object Display at the top of the list, all items except the Kubernetes object entries will be shown.
- Click each tab to view the service information.
Category Detailed descriptionStatus display Display the current status of the pod Delete pod Delete the pod Detailed Information Can view detailed pod information YAML The pod’s resource file can be edited in the YAML editor - Click the Edit button, modify the resource, then click the Done button to apply the changes
- When editing content, click the Diff button to view the changed content
event Check events that occurred within the pod log Select a container to view the pod’s container information. Account information Check basic information about the Account, such as its name, location, and creation date/time. Metadata Information Check the pod’s metadata information Object Information Check the pod’s object information Initialization Container Information Check the pod’s init container information Container Information Check the pod’s container information Table. Pod detailed information items
Delete Pod
To delete a pod, follow these steps.
- Click the All Services > Container > Kubernetes Engine menu. 1. Go to the Service Home page of Kubernetes Engine.
- On the Service Home page, click Pod under the Workload menu. 2. Go to the Pod List page.
- On the Pod List page, select the cluster and namespace from the list in the upper left, then click Search.
- On the Pod List page, select the item you want to delete. 4. Go to the Pod Details page.
- On the Pod Details page, click Delete Pod.
- Notification dialog appears, click the Confirm button.
On the pod list page, after selecting the item you want to delete, click Delete to delete the selected pod.
Managing StatefulSets
A StatefulSet is a workload API object used to manage an application’s stateful components. You can create a StatefulSet in the workload, view its details, or delete it.
Create a StatefulSet
To create a StatefulSet, follow the steps below.
- Click the All Services > Container > Kubernetes Engine menu. 1. Navigate to the Service Home page of Kubernetes Engine.
- On the Service Home page, click StatefulSet under the Workload menu. 2. Navigate to the StatefulSet list page.
- On the StatefulSet List page, select the cluster and namespace from the top‑left list, then click Create Object.
- Enter the object information in the Object Creation Popup and click the Create button.
Reference
For detailed information on the StatefulSet concept and object creation, see the 쿠버네티스 공식 문서 > 스테이트풀셋.
Check detailed information of StatefulSet
To view detailed information about a StatefulSet, follow these steps.
- Click the All Services > Container > Kubernetes Engine menu. 1. Navigate to the Service Home page of Kubernetes Engine.
- On the Service Home page, click StatefulSet under the Workload menu. 2. StatefulSet List page is accessed.
- StatefulSet List page, select the cluster and namespace from the list at the top left, then click Search.
- StatefulSet List page, select the item you want to view detailed information for. 4. Navigate to the StatefulSet Details page.
- If you select System Object Display at the top of the list, all items except the Kubernetes object entries will be shown.
- Click each tab to view the service information.
Category Detailed descriptionDelete StatefulSet Delete the StatefulSet Detailed Information Detailed information of the StatefulSet can be viewed YAML The resource file of a StatefulSet can be edited in the YAML editor - Edit button click and after modifying the resource, click the Done button to apply the changes
- When editing content, click the Diff button to view the changes
event Check events that occurred within the StatefulSet Pod Check the pod information of the StatefulSet Account information Check basic information about the Account, such as its name, location, and creation date/time. Metadata Information Check the metadata information of the StatefulSet Object Information Check the object information of the StatefulSet Table. StatefulSet detailed information items
Delete StatefulSet
To delete a StatefulSet, follow these steps.
- Click the All Services > Container > Kubernetes Engine menu. 1. Go to the Service Home page of Kubernetes Engine.
- On the Service Home page, click StatefulSet under the Workload menu. 2. Go to the StatefulSet List page.
- StatefulSet list page, select the cluster and namespace from the list at the top left, then click Search.
- Select the items you want to delete on the StatefulSet list page. 4. StatefulSet Details navigate to the page.
- On the StatefulSet details page, click Delete StatefulSet.
- Notification dialog appears, click the Confirm button.
Caution
On the StatefulSet list page, after selecting the item you want to delete, click Delete to remove the selected StatefulSet.
Managing DaemonSets
A DaemonSet is a resource that ensures a copy of a pod runs on every node or on a subset of nodes. You can create a DaemonSet in the workload, view its details, or delete it.
Create DaemonSet
To create a DaemonSet, follow the steps below.
- Click the All Services > Container > Kubernetes Engine menu. 1. Navigate to the Service Home page of Kubernetes Engine.
- On the Service Home page, click DaemonSet under the Workloads menu. 2. Navigate to the DaemonSet List page.
- DaemonSet List page, after selecting the cluster and namespace from the list at the top left, click Create Object.
- In the Object Creation Popup, enter the object information and click the Create button.
Reference
For detailed information on the concept of DaemonSets and object creation, refer to the 쿠버네티스 공식 문서 > 데몬셋.
Check DaemonSet detailed information
Follow these steps to view the detailed information of a DaemonSet.
- Click the All Services > Container > Kubernetes Engine menu. 1. Go to the Service Home page of Kubernetes Engine.
- On the Service Home page, click DaemonSet under the Workloads menu. 2. Go to the DaemonSet List page.
- On the DaemonSet List page, select the cluster and namespace from the list in the upper left, then click Search.
- On the DaemonSet list page, select the item you want to view detailed information for. 4. Navigate to the DaemonSet Details page.
- If you select System Object Display at the top of the list, all items except the Kubernetes object entries will be shown.
- Click each tab to view the service information.
Category Detailed descriptionDelete DaemonSet Delete the DaemonSet Detailed Information Can view detailed DaemonSet information YAML The DaemonSet resource file can be edited in the YAML editor - Click the Edit button, modify the resource, then click the Done button to apply the changes
- When editing content, click the Diff button to view the changes
event Check events that occurred within the DaemonSet Pod Check the DaemonSet pod information Account information Check basic information about the Account, such as its name, location, and creation date/time. Metadata Information Check the DaemonSet’s metadata information. Object Information Check the DaemonSet object information Table. DaemonSet detailed information items
Delete DaemonSet
To delete a DaemonSet, follow the steps below.
- Click the All Services > Container > Kubernetes Engine menu. 1. Go to the Service Home page of Kubernetes Engine.
- On the Service Home page, click DaemonSet under the Workloads menu. 2. Navigate to the DaemonSet List page.
- On the DaemonSet List page, select the cluster and namespace from the list at the top left, then click View.
- Select the items you want to delete on the DaemonSet list page. 4. Go to the DaemonSet Details page.
- Click Delete DaemonSet on the DaemonSet Details page.
- Notification dialog appears, click the Confirm button.
---
After selecting the item to delete on the DaemonSet list page, click Delete to delete the selected DaemonSet.
Job Management
It refers to a resource that creates one or more pods and continues to run pods until the specified number of pods have successfully terminated. You can create a job in the workload, view its details, or delete it.
Create Job
Follow these steps to create a job.
- Click the All Services > Container > Kubernetes Engine menu. 1. Go to the Service Home page of Kubernetes Engine.
- On the Service Home page, click Job under the Workload menu. 2. Go to the Job List page.
- On the Job List page, after selecting the cluster and namespace from the top‑left list, click Create Object.
- In the Object Creation Popup, enter the object information and click the Create button.
Reference
For detailed information on the concept of jobs and object creation, refer to the 쿠버네티스 공식 문서 > 잡.
Check job details
To view job details, follow these steps.
- Click the All Services > Container > Kubernetes Engine menu. 1. Navigate to the Service Home page of Kubernetes Engine.
- On the Service Home page, click Job under the Workload menu. 2. Go to the Job List page.
- On the Job List page, select the cluster and namespace from the list at the top left, then click Search.
- Select the item you want to view detailed information for on the Job List page. 4. Job Details page is opened.
- If you select Show system objects at the top of the list, the remaining items, excluding the Kubernetes object entries, will be displayed.
- Click each tab to view the service information.
Category Detailed descriptionDelete job Delete job Detailed Information Job detailed information can be viewed YAML You can edit the job’s resource file in the YAML editor - Click the Edit button, modify the resource, then click the Done button to apply the changes
- When editing content, you can click the Diff button to view the changed content
event Check events that occurred within the job Pod Check the job’s pod information Account information Check basic information about the Account, such as its name, location, and creation date/time. Metadata Information Check the job’s metadata information Object Information Check job object information Table. Job detailed information items
Delete job
To delete a job, follow these steps.
- Click the All Services > Container > Kubernetes Engine menu. 1. Navigate to the Service Home page of Kubernetes Engine.
- On the Service Home page, click Job under the Workload menu. 2. Go to the Job List page.
- On the Job List page, select the cluster and namespace from the list in the upper left, then click Search.
- Job List Select the items you want to delete on the page. 4. Go to the Job Details page.
- On the Job Details page, click Delete Job.
- Notification dialog appears, click the Confirm button.
On the job list page, after selecting the item you want to delete, click Delete to delete the selected job.
Managing Cron Jobs
A cron job is a resource that periodically runs a job (Job) according to a schedule written in cron format. It can be used when executing repetitive tasks at regular intervals, such as backups and report generation. You can create a cron job in the workload, view its details, or delete it.
Creating a Cron Job
To create a cron job, follow these steps.
- Click the All Services > Container > Kubernetes Engine menu. 1. Navigate to the Service Home page of Kubernetes Engine.
- On the Service Home page, click CronJob under the Workload menu. 2. Cron Job List Navigate to the page.
- On the CronJob List page, select the cluster and namespace from the list in the upper‑left corner, then click Create Object.
- In the Object Creation Popup, enter the object information and click the Confirm button.
Reference
For detailed information on the concept of CronJobs and object creation, refer to 쿠버네티스 공식 문서 > 크론잡.
Check detailed information of cron job
To view detailed information about the cron job, follow these steps.
- All Services > Container > Kubernetes Engine menu, click it. 1. Go to the Service Home page of Kubernetes Engine.
- On the Service Home page, click CronJob under the Workload menu. 2. Go to the Cron Job List page.
- On the CronJob List page, select the cluster and namespace from the list at the top left, then click View.
- Select the item you want to view detailed information for on the Cron Job List page. 4. Navigate to the Cron Job Details page.
- If you select System Object Display at the top of the list, all items except the Kubernetes object entries will be shown.
- Click each tab to view the service information.
Category Detailed descriptionDelete cron job Delete the cron job Detailed Information View detailed information of cron jobs YAML The cron job’s resource file can be edited in the YAML editor - Click the Edit button, modify the resource, then click the Done button to apply the changes
- When editing content, you can click the Diff button to view the changes
event Check events that occurred within the cron job Job Check the cron job’s job information. Selecting a job item moves to the job detail page. Account information Check basic information about the Account, such as its name, location, and creation date/time. Metadata Information Check the metadata information of the cron job Object Information Check the object information of the cron job Table. Cron job detailed information items
Delete cron job
To delete a cron job, follow these steps.
- Click the All Services > Container > Kubernetes Engine menu. 1. Go to the Service Home page of Kubernetes Engine.
- On the Service Home page, click CronJob under the Workload menu. 2. Go to the Cron Job List page.
- On the CronJob List page, select the cluster and namespace from the list at the top left, then click View.
- Select the items you want to delete on the Cron Job List page. 4. Go to the Cron Job Details page.
- On the Cron Job Details page, click Delete Cron Job.
- Notification dialog appears, click the Confirm button.
Caution
On the cron job list page, after selecting the item you want to delete, click Delete to remove the selected cron job.
1.2.4 - Manage services and ingresses
A Service is an abstraction that exposes applications running in a set of Pods as a network service, and an Ingress is used to expose HTTP and HTTPS routes from outside the cluster to inside the cluster. After creating a namespace, you can create or delete services, endpoints, ingresses, and ingress classes.
Reference
Services, endpoints, ingresses, and ingress classes are set by default to the cluster (namespace) selected when creating the service. Even if you select a different item in the list, the default cluster (namespace) setting is retained.
- To select a different cluster (namespace), click the list in the top-left corner of the list page. * From the list, select the cluster and namespace to modify, then click the Query button. * You can view the services created in the selected cluster/namespace.
Manage Services
You can create a service and view or delete its detailed information.
Create Service
To create a service, follow these steps.
- Click the All Services > Container > Kubernetes Engine menu. 1. Go to the Service Home page of Kubernetes Engine.
- On the Service Home page, click Service under the Service and Ingress menu. 2. Go to the Service List page.
- On the Service List page, select the cluster and namespace from the list in the upper left, then click Create Object.
- In the Object Creation Popup, enter the object information and click the Create button.
Reference
For detailed information on the concept of services and object creation, refer to the 쿠버네티스 공식 문서 > 서비스.
Check service detailed information
To view the detailed service information, follow these steps.
- Click the All Services > Container > Kubernetes Engine menu. 1. Go to the Service Home page of Kubernetes Engine.
- On the Service Home page, click Service under the Service and Ingress menu. 2. Go to the Service List page.
- On the Service List page, select the cluster and namespace from the list in the upper left, then click View.
- On the Service List page, select the item for which you want to view detailed information. 4. Navigate to the Service Details page.
- If you select System Object Display at the top of the list, all items except the Kubernetes object entries will be shown.
- Click each tab to view the service information.
Category Detailed descriptionDelete Service Delete the service Detailed Information View detailed service information. YAML The service’s resource file can be edited in the YAML editor - Click the Edit button and modify the resource, then click the Done button to apply the changes
- When editing content, click the Diff button to view the changed content
event Check events that occurred within the service Account information Check basic information about the Account, such as name, location, and creation timestamp. Metadata Information Check the service’s metadata information Object Information Check the service’s object information Table. Service detailed information items
Delete Service
To delete the service, follow these steps.
- All Services > Container > Kubernetes Engine Click the menu. 1. Navigate to the Service Home page of Kubernetes Engine.
- On the Service Home page, click Service under the Service and Ingress menu. 2. Navigate to the Service List page.
- On the Service List page, select the cluster and namespace from the list in the upper left, then click View.
- On the Service List page, select the item you want to delete. 4. Navigate to the Service Details page.
- On the Service Details page, click Delete Service.
- Notification dialog appears, click the Confirm button.
Caution
On the service list page, after selecting the item you want to delete, click Delete to remove the selected service.
Managing Endpoints
You can create an endpoint and view or delete its details.
Create Endpoint
To create an endpoint, follow these steps.
- All Services > Container > Kubernetes Engine Click the menu. 1. Go to the Service Home page of Kubernetes Engine.
- On the Service Home page, click Endpoint under the Service and Ingress menu. 2. Navigate to the Endpoint List page.
- Endpoint List page, after selecting the cluster and namespace from the list at the top left, click Create Object.
- In the Object Creation Popup, enter the object information and click the Create button.
View endpoint detailed information
To view the endpoint details, follow these steps.
- Click the All Services > Container > Kubernetes Engine menu. 1. Navigate to the Service Home page of Kubernetes Engine.
- On the Service Home page, click Endpoint under the Service and Ingress menu. 2. Go to the Endpoint List page.
- On the Endpoint List page, select the cluster and namespace from the list in the upper left, then click Query.
- On the Endpoint List page, select the item for which you want to view detailed information. 4. Navigate to the Endpoint Details page.
- If you select System Object Display at the top of the list, all items except the Kubernetes object entries will be shown.
- Click each tab to view the service information.
Category Detailed descriptionEndpoint Deletion Delete the endpoint Detailed Information Can view detailed information of the endpoint YAML The endpoint’s resource file can be edited in the YAML editor - Click the Edit button, modify the resource, then click the Done button to apply the changes
- When editing content, click the Diff button to view the changes
event Check events that occurred within the endpoint Account information Check basic information about the Account, such as name, location, and creation date/time. metadata information Check the endpoint’s metadata information Object Information Check the endpoint’s object information Table. Endpoint detailed information items
Delete endpoint
To delete an endpoint, follow these steps.
- Click the All Services > Container > Kubernetes Engine menu. 1. Go to the Service Home page of Kubernetes Engine.
- On the Service Home page, click Endpoint under the Service and Ingress menu. 2. Navigate to the Endpoint List page.
- On the Endpoint List page, select the cluster and namespace from the list in the upper left, then click Search.
- Select the item you want to delete on the Endpoint List page. 4. Navigate to the Endpoint Details page.
- On the Endpoint Details page, click Delete Endpoint.
- Notification dialog appears, click the Confirm button.
Reference
On the endpoint list page, after selecting the item you want to delete, click Delete to delete the selected endpoint.
Manage Ingress
Ingress is an API object that manages external access (HTTP, HTTPS) to services within the Kubernetes Engine, used to expose workloads externally, and provides L7 load balancing functionality.
Create Ingress
To create an ingress, follow these steps.
- Click the All Services > Container > Kubernetes Engine menu. 1. Go to the Service Home page of Kubernetes Engine.
- Service Home page, click Ingress under the Service and Ingress menu. 2. Navigate to the Ingress List page.
- On the Ingress List page, after selecting the cluster and namespace from the list at the top left, click Create Object.
- In the Object Creation Popup, enter the object information and click the Create button.
Reference
For detailed information on the concept of Ingress and object creation, refer to the 쿠버네티스 공식 문서 > Ingress.
Check Ingress Detailed Information
To view the detailed ingress information, follow these steps.
- Click the All Services > Container > Kubernetes Engine menu. 1. Navigate to the Service Home page of Kubernetes Engine.
- Click Ingress under the Service and Ingress menu on the Service Home page. 2. Go to the Ingress List page.
- On the Ingress List page, select the cluster and namespace from the list at the top left, then click 조회.
- Select the item whose detailed information you want to view on the Ingress List page. 4. Navigate to the Ingress Details page.
- If you select System Object Display at the top of the list, all items except the Kubernetes object entries will be shown.
- Click each tab to view the service information.
Category Detailed descriptionDelete Ingress Delete ingress Detailed Information Detailed information of the Ingress can be viewed YAML The Ingress resource file can be edited in the YAML editor - Click the Edit button, modify the resource, then click the Done button to apply the changes
- When editing content, click the Diff button to view the changes
event Check events that occurred within the ingress Account information Check basic information about the Account, such as name, location, and creation date/time. Metadata Information Check the metadata information of the Ingress Object Information Check the object information of the Ingress Table. Ingress detailed information items
Delete Ingress
To delete the ingress, follow these steps.
- All Services > Container > Kubernetes Engine menu, click it. 1. Go to the Service Home page of Kubernetes Engine.
- On the Service Home page, click Ingress under the Service and Ingress menu. 2. Go to the Ingress List page.
- On the Ingress List page, select the cluster and namespace from the list at the top left, then click 조회.
- On the Ingress List page, select the item you want to delete. 4. Go to the Ingress Details page.
- On the Ingress Details page, click Delete Ingress.
- When the notification confirmation window appears, click the Confirm button.
Caution
On the Ingress list page, after selecting the item you want to delete, click Delete to delete the selected Ingress.
Managing Ingress Class
IngressClass refers to an API resource that enables the use of multiple ingress controllers within a single cluster. In each Ingress, you must specify a reference class for the IngressClass resource that includes the configuration, including the controller that must implement the class.
Create Ingress Class
To create an Ingress class, follow the steps below.
- Click the All Services > Container > Kubernetes Engine menu. 1. Navigate to the Service Home page of Kubernetes Engine.
- On the Service Home page, click Ingress Class under the Service and Ingress menu. 2. Navigate to the Ingress Class List page.
- On the IngressClass List page, select the cluster and namespace from the list at the top left, then click Create Object.
- In the Object Creation Popup, enter the object information and click the Confirm button.
Reference
For detailed information on the concept of IngressClass and object creation, please refer to the 쿠버네티스 공식 문서 > Ingress.
View detailed information of the Ingress class
To view detailed information about the Ingress class, follow these steps.
- Click the All Services > Container > Kubernetes Engine menu. 1. Go to the Service Home page of Kubernetes Engine.
- On the Service Home page, click Ingress Class under the Service and Ingress menu. 2. Navigate to the Ingress Class List page.
- On the IngressClass List page, select the cluster and namespace from the list in the upper left, then click Search.
- On the Ingress Class List page, select the item you want to view detailed information for. 4. Go to the Ingress Class Details page.
- If you select System Object Display at the top of the list, all items except the Kubernetes object entries will be shown.
- Click each tab to view the service information.
Category Detailed descriptionDelete IngressClass Delete the Ingress class Detailed Information Detailed information of the Ingress class can be viewed YAML The resource file of the Ingress class can be edited in the YAML editor - Click the Edit button, modify the resource, then click the Done button to apply the changes
- When editing content, you can click the Diff button to view the changed content
event Check the events that occurred within the Ingress class Account information Check basic information about the Account, such as name, location, and creation date/time. Metadata Information Check the metadata information of the Ingress class Object Information Check the object information of the Ingress class Table. Ingress class detailed information items
Delete Ingress Class
To delete the Ingress class, follow these steps.
- Click the All Services > Container > Kubernetes Engine menu. 1. Go to the Service Home page of Kubernetes Engine.
- On the Service Home page, click Ingress Class under the Service and Ingress menu. 2. Navigate to the Ingress Class List page.
- On the IngressClass List page, select the cluster and namespace from the list in the upper left, then click Search.
- Select the item you want to delete on the Ingress Class List page. 4. Navigate to the Ingress Class Details page.
- On the Ingress Class Details page, click Delete Ingress Class.
- Notification dialog appears, click the Confirm button.
Caution
On the IngressClass list page, after selecting the item you want to delete, click Delete to delete the selected IngressClass.
1.2.5 - Manage Storage
You can create and manage storage for use with Kubernetes Engine. Storage is created and managed for each PVC, PV, and StorageClass.
Reference
PVC, PV, and storage class services are set by default to the cluster (namespace) selected when creating the service. Even if you select a different item in the list, the default cluster (namespace) setting is retained.
- To select a different cluster (namespace), click the list in the top-left corner of the list page. * Select the cluster and namespace to modify from the list and click the View button. * You can view the services created in the selected cluster/namespace.
Information
The items associated with each storage type are as follows.
| Type | Detailed description |
|---|---|
| Block storage | Supports a storage class that utilizes the volume of the Block storage product integrated with Virtual Server. |
| Object Storage | Can be integrated with Samsung Cloud Platform products or external Object Storage
|
| File storage | Supports storage classes for NFS and CIFS protocol volumes in conjunction with the File Storage product
|
Table. Storage linkage items by type
Managing PVC
A Persistent Volume Claim(PVC) is an object defined to allocate the required storage capacity. PVC provides high usability through abstraction and can prevent the issue of data being deleted together when the container lifecycle expires (maintaining Data Persistence).
Create PVC
To create a PVC, follow these steps.
- All Services > Container > Kubernetes Engine Click the menu. 1. Navigate to the Service Home page of Kubernetes Engine.
- On the Service Home page, click PVC under the Storage menu. 2. PVC List Navigate to the page.
- PVC List page, after selecting the cluster and namespace from the top‑left list, click Create Object.
- In the Object Creation Popup, enter the object information and click the Create button.
Reference
For detailed information on the concept of PVCs and object creation, refer to 쿠버네티스 공식 문서 > 퍼시스턴트 볼륨.
Check PVC detailed information
To view detailed PVC information, follow these steps.
- Click the All Services > Container > Kubernetes Engine menu. 1. Go to the Service Home page of Kubernetes Engine.
- On the Service Home page, click PVC under the Storage menu. 2. Go to the PVC list page.
- On the PVC List page, select the cluster and namespace from the list in the upper left, then click Search.
- PVC List page, select the item for which you want to view detailed information. 4. PVC Details Navigate to the page.
- If you select Show system objects at the top of the list, all items except the Kubernetes object entries are displayed.
- Click each tab to view the service information.
Category Detailed descriptionStatus indicator Displays the current status of the PVC. - Bound: Normal connection
Delete PVC Delete PVC Detailed Information You can view detailed information of the PVC. YAML The PVC resource file can be edited in the YAML editor - Click the Edit button, modify the resource, then click the Done button to apply the changes
- When editing content, you can click the Diff button to view the changed content
event Check events that occurred within the PVC Account information Check basic information about the Account, such as name, location, and creation time. metadata information Check the metadata information of the PVC Object Information Check PVC object information Table. PVC detailed information items
Delete PVC
To delete a PVC, follow these steps.
- All Services > Container > Kubernetes Engine click the menu. 1. Navigate to the Service Home page of Kubernetes Engine.
- On the Service Home page, click PVC under the Storage menu. 2. Navigate to the PVC List page.
- On the PVC list page, select the cluster and namespace from the list at the top left, then click Query.
- On the PVC List page, select the items you want to delete. 4. PVC Details Navigate to the page.
- On the PVC Details page, click Delete PVC.
- When the notification confirmation window appears, click the Confirm button.
Caution
After selecting the item you want to delete on the PVC list page, click Delete to delete the selected PVC.
- Before deleting the PVC, verify the backup status of the PV and volume to be removed.
Managing PV
Persistent Volume (PV) refers to the physical disk that a system administrator creates in the Kubernetes Engine.
Create PV
To create a PV, follow these steps.
- Click the All Services > Container > Kubernetes Engine menu. 1. Go to the Service Home page of Kubernetes Engine.
- On the Service Home page, click PV under the Storage menu. 2. Go to the PV list page.
- On the PV List page, after selecting the cluster and namespace from the list at the top left, click Create Object.
- In the Object Creation Popup, enter the object information and click the Create button.
Reference
For detailed information on the concept of PVs and object creation, refer to 쿠버네티스 공식 문서 > 퍼시스턴트 볼륨.
Check PV detailed information
To view detailed PV information, follow these steps.
- All Services > Container > Kubernetes Engine Click the menu. 1. Navigate to the Service Home page of Kubernetes Engine.
- Service Home page, click PV under the Storage menu. 2. Navigate to the PV list page.
- On the PV List page, after selecting the cluster and namespace from the list at the top left, click Search.
- Select the item you want to view detailed information for on the PV List page. 4. PV Details Navigate to the page.
- If you select Show system objects at the top of the list, all items except the Kubernetes object entries are displayed.
- Click each tab to view the service information.
Category Detailed description Status indicator Displays the current status of the PV. - Bound: Normal connection
Delete PV Delete PV Detailed Information Detailed PV information can be viewed. YAML The PV’s resource file can be edited in the YAML editor - Click the Edit button, modify the resource, then click the Done button to apply the changes
- When editing content, click the Diff button to view the changes
event Check events that occurred within the PV Account information Check basic information about the Account, such as name, location, and creation time. metadata information Check the PV metadata information Object Information Check the PV’s object information Table. PV detailed information items
Delete PV
To delete a PV, follow these steps.
- All Services > Container > Kubernetes Engine menu, click it. 1. Navigate to the Service Home page of Kubernetes Engine.
- On the Service Home page, click PV under the Storage menu. 2. Navigate to the PV list page.
- PV List page, after selecting the cluster and namespace from the list at the top left, click Search.
- Select the item you want to delete on the PV List page. 4. PV Details navigate to the page.
- On the PV Details page, click Delete PV.
- When the notification confirmation window appears, click the Confirm button.
Caution
On the PV list page, after selecting the item you want to delete, click Delete to delete the selected PV.
Managing Storage Classes
Storage Class (Storage Class) is a Kubernetes resource that defines the type, performance, and other levels of storage.
Reference
Kubernetes Engine provides the nfs-subdir-external-sc and bs-ssd storage classes by default, and has the following characteristics.
- The nfs-subdir-external-sc storage class shares and uses file storage attached to the cluster.
- Access mode: RWX - ReadWriteMany Reclaim policy: Delete (when PVC is deleted, PV and stored data are deleted together), Retain (when PVC is deleted, PV and stored data are retained)
- Volume binding mode: Immediate (creates a PV as soon as the PVC is created or binds to an existing PV) Capacity expansion: individual PVC expansion not allowed / entire file storage expansion allowed
- The bs-ssd storage class supports using SSD-type volumes in conjunction with the Block Storage product.
- Access mode: RWO - ReadWriteOnce
- Reclaim policy: Delete (when PVC is deleted, PV and stored data are deleted together), Retain (when PVC is deleted, PV and stored data are retained)
- Volume binding mode: WaitForFirstConsumer (wait for PV creation until a Pod using the PVC is created) Capacity expansion support: individual PVC expansion support (automatic volume expansion in 8 Gi increments)
predefined storage class
| Storage Class | Volume Binding Mode* | Default volume type** | Reclaim Policy*** | Allow volume expansion | Mount options | Remarks |
|---|---|---|---|---|---|---|
| nfs-subdir-external-sc (default) | Immediate | - | Delete | Unsupported | nfsvers=3, noresvport | Associate with the NFS volume selected in “StorageClass setting”. |
| nfs-subdir-external-sc-retain | Immediate | - | Retain | Unsupported | nfsvers=3, noresvport | Associate with the NFS volume selected in “StorageClass setting”. |
| bs-ssd | WaitForFirstConsumer | SSD | Delete | Support | - | VirtualServer > Block Storage integration |
| bs-ssd-retain | WaitForFirstConsumer | SSD | Retain | Support | - | VirtualServer > Block Storage integration |
- To use a storage class other than the default, you need to specify the storage class name in PVC’s spec.storageClassName.
- Users can directly change the default storage class (adjust the storageclass.kubernetes.io/is-default-class: “true” annotation)
Table. Predefined storage class list
Reference
(*) The characteristics of the volume binding mode are as follows.
- Immediate: Create PV at the time the PVC is created (regardless of POD creation)
- WaitForFirstConsumer: Create PV after the POD to be bound is created
(**) For the bs-ssd storage class, you can change the volume type to be used by modifying parameter.type.
- SSD (default): standard SSD Block Storage type
- SSD_Provisioned: max_iops, max_throughput configurable type (see “Block Storage Storage Class Usage” for detailed usage)
(***) The characteristics of the reclamation policy are as follows.
- Delete: If you delete the PVC, the associated PV and physical data will also be deleted.
- Retain: Even if the PVC is deleted, the associated PV and physical data are not deleted and are retained. * Physical data not used by the workload may remain in storage, so careful capacity management is required.
Caution
When using volume expansion, consider the following.
- nfs-subdir-external-sc storage class
- Cannot adjust the PVC’s capacity. * (Volume expansion not supported)
- All PVs share the total capacity of the File Storage volume, so expanding the volume for each PVC is not required.
- bs-ssd storage class
- You can expand the PVC capacity. * (Zoom function not supported)
- A PVC’s requested capacity does not guarantee that the corresponding PV will have that amount of capacity. * (Support expansion in 8 Gi units)
Caution
Consider the following when using Multi-AvailabilityZone.
- nfs-subdir-external-sc storage class
- Cannot specify the AZ where the volume will be created
- PV can be mounted on nodes in any AZ, regardless of the AZ assigned to the File Storage.
- bs-ssd storage class
- You can specify the AZ where the volume and Pod are created by setting allowedTopologies in the StorageClass.
- Pod scheduling nodes and volume creation AZ must match. * (Cross-AZ not supported)
Create StorageClass
To create a storage class, follow these steps.
- All Services > Container > Kubernetes Engine Click the menu. 1. Go to the Service Home page of Kubernetes Engine.
- On the Service Home page, click StorageClass under the Storage menu. 2. Navigate to the StorageClass List page.
- On the StorageClass List page, select the cluster and namespace from the list in the upper left, then click Create Object.
- In the Object Creation Popup, enter the object information and click the Create button.ReferenceFor detailed information on the concept of storage classes and object creation, please refer to 쿠버네티스 공식 문서 > 스토리지 클래스.
Check detailed storage class information
To view detailed information about the StorageClass, follow these steps.
- Click the All Services > Container > Kubernetes Engine menu. 1. Navigate to the Service Home page of Kubernetes Engine.
- Service Home page, click StorageClass under the Storage menu. 2. Navigate to the StorageClass List page.
- StorageClass List page, select the cluster and namespace from the list at the top left, then click Search.
- Select the item you want to view detailed information for on the StorageClass List page. 4. Go to the StorageClass Details page.
- If you select Show system objects at the top of the list, all items except the Kubernetes object entries are displayed.
- Click each tab to view the service information.
Category Detailed descriptionDelete StorageClass Delete the storage class Detailed Information Detailed information of the storage class can be viewed YAML The resource file of the StorageClass can be edited in the YAML editor - Click the Edit button, modify the resource, then click the Done button to apply the changes
- When editing content, you can click the Diff button to view the changes
event Check events that occurred within the storage class Account information Check basic information about the Account, such as name, location, and creation time. metadata information Check the metadata information of the StorageClass Object Information Check the object information of the storage class Table. StorageClass detailed information items
Delete StorageClass
To delete a StorageClass, follow these steps.
- Click the All Services > Container > Kubernetes Engine menu. 1. Go to the Service Home page of Kubernetes Engine.
- On the Service Home page, click StorageClass under the Storage menu. 2. Navigate to the StorageClass List page.
- On the StorageClass List page, select the cluster and namespace from the list in the upper left, then click Search.
- Select the items you want to delete on the StorageClass List page. 4. Go to the StorageClass Details page.
- Click Delete StorageClass on the StorageClass Details page.
- Notification dialog appears, click the Confirm button.
Caution
If you delete the storage class referenced by a PVC in use, the following issue may occur.
- PVC deletion, recreation failed
- PVC volume size expansion failure (Block Storage)
- When expanding statefulset replicas and creating an additional PVC, it fails
1.2.6 - Configuration Management
When you need to manage values that change inside a container across various environments such as development and production, creating separate images to handle them via environment variables is inconvenient and incurs significant cost waste. In Kubernetes, you can manage environment variables or configuration values as variables so they can be changed externally and injected when a Pod is created; at this point, you can use ConfigMap and Secret.
Reference
ConfigMaps and Secret services default to the cluster (namespace) selected when the service is created. Even if you select a different item in the list, the default cluster (namespace) setting is retained.
- To select a different cluster (namespace), click the list in the top-left corner of the list page. * Select the cluster and namespace to modify from the list and click the View button. * You can view the services created in the selected cluster/namespace.
Managing ConfigMaps
You can create and manage the Config information used in a namespace as a ConfigMap.
Create ConfigMap
To create a ConfigMap, follow these steps.
- Click the All Services > Container > Kubernetes Engine menu. 1. Go to the Service Home page of Kubernetes Engine.
- On the Service Home page, click ConfigMap under the Configuration menu. 2. Go to the ConfigMap List page.
- On the ConfigMap list page, select the cluster and namespace from the list in the upper left, then click Create Object.
- In the Object Creation Popup, enter the object information and click the Create button.
Reference
For detailed information on the concept of ConfigMaps and object creation, refer to the 쿠버네티스 공식 문서 > 컨피그맵.
Check ConfigMap detailed information
To view detailed ConfigMap information, follow these steps.
- Click the All Services > Container > Kubernetes Engine menu. 1. Go to the Service Home page of Kubernetes Engine.
- On the Service Home page, click ConfigMap under the Configuration menu. 2. Navigate to the ConfigMap List page.
- On the ConfigMap List page, select the cluster and namespace from the list in the upper left, then click View.
- Select the item you want to view detailed information for on the ConfigMap List page. 4. Navigate to the ConfigMap Details page.
- If you select System Object Display at the top of the list, all items except the Kubernetes object entries will be shown.
- Click each tab to view the service information.
Category Detailed descriptionDelete ConfigMap Delete ConfigMap Detailed Information Detailed ConfigMap information can be viewed YAML The ConfigMap’s resource file can be edited in the YAML editor - Click the Edit button, modify the resource, then click the Done button to apply the changes
- When editing content, you can click the Diff button to view the changed content
event Check events that occurred in the ConfigMap Account information Check basic information about the Account, such as name, location, and creation date/time. Metadata Information Check the ConfigMap’s metadata information Object Information Check the object information of the ConfigMap - In Data,
- - -separates rows, and value is displayed in a textarea format - The binary data value outputs its length
Table. ConfigMap detailed information items
Delete ConfigMap
To delete a ConfigMap, follow these steps.
- Click the All Services > Container > Kubernetes Engine menu. 1. Navigate to the Service Home page of Kubernetes Engine.
- On the Service Home page, click ConfigMap under the Configuration menu. 2. Navigate to the ConfigMap list page.
- ConfigMap List page, after selecting the cluster and namespace from the list in the top‑left corner, click View.
- Select the item you want to delete on the ConfigMap List page. 4. Navigate to the ConfigMap Details page.
- On the ConfigMap Details page, click Delete ConfigMap.
- Notification dialog appears, click the Confirm button.
Caution
On the ConfigMap list page, after selecting the item you want to delete, click Delete to delete the selected ConfigMap.
Manage Secrets
Using secrets allows you to securely store and manage sensitive information such as passwords, OAuth tokens, and SSH keys.
Create Secret
To create a secret, follow these steps.
- All Services > Container > Kubernetes Engine menu, click it. 1. Go to the Service Home page of Kubernetes Engine.
- On the Service Home page, click Secret under the Configuration menu. 2. Go to the Secret List page.
- Secret List page, after selecting the cluster and namespace from the list at the top left, click Create Object.
- Enter the object information in the Object Creation Popup and click the Create button.
Reference
For detailed information on the concept of Secrets and object creation, refer to the 쿠버네티스 공식 문서 > 시크릿.
Check secret detailed information
To view the secret details, follow these steps.
- Click the All Services > Container > Kubernetes Engine menu. 1. Go to the Service Home page of Kubernetes Engine.
- On the Service Home page, click Secret under the Configuration menu. 2. Navigate to the Secret List page.
- On the Secret List page, select the cluster and namespace from the list at the top left, then click View.
- Select the item you want to view details for on the Secret List page. 4. Navigate to the Secret Detail page.
- If you select System Object Display at the top of the list, all items except the Kubernetes object entries will be shown.
- Click each tab to view the service information.
Category Detailed descriptionDelete Secret Delete the secret Detailed Information You can view detailed information of the secret YAML The secret’s resource file can be edited in the YAML editor - Click the Edit button, modify the resource, then click the Done button to apply the changes
- When editing content, you can click the Diff button to view the changed content
event Check events that occurred within the secret Account Information Check basic information about the Account, such as its name, location, and creation date/time. metadata information Check the metadata information of the secret Object Information Check the secret object’s information Table. Secret detailed information items
Delete Secret
To delete the secret, follow these steps.
- Click the All Services > Container > Kubernetes Engine menu. 1. Navigate to the Service Home page of Kubernetes Engine.
- On the Service Home page, click Secret under the Configuration menu. 2. Go to the Secret List page.
- Secret List page, select the cluster and namespace from the list at the top left, then click View.
- Select the item you want to delete on the Secret List page. 4. Go to the Secret Detail page.
- On the Secret Details page, click Delete Secret.
- Notification dialog appears, click the Confirm button.
Caution
On the secret list page, after selecting the item you want to delete, click Delete to remove the selected secret.
1.2.7 - Manage Permissions
When multiple users access a Kubernetes cluster, you can assign permissions for specific APIs or namespaces to define access scopes. You can apply Kubernetes’ role-based access control (RBAC, Role-based access control) feature to set permissions for each cluster or namespace. You can create and manage ClusterRoles, ClusterRoleBindings, Roles, and RoleBindings.
Reference
ClusterRole, ClusterRoleBinding, Role, and RoleBinding services are set by default to the cluster (namespace) selected when creating the service. Even if you select a different item in the list, the default cluster (namespace) setting is retained.
- To select a different cluster (namespace), click the list in the top‑left corner of the list page. * Select the cluster and namespace to modify from the list and click the View button. * You can view the services created in the selected cluster/namespace.
Reference
- The RBAC API declares the following four types of Kubernetes objects.
- Role
- ClusterRole RoleBinding
- ClusterRoleBinding
- For detailed information on RBAC description and modification, refer to the Kubernetes authentication and authorization section (https://kubernetes.io/docs/reference/access-authn-authz/authentication/).
Managing Cluster Roles
You can set and manage access permissions on a per-cluster basis. You can also set permissions for APIs or resources that are not limited to a namespace.
Create ClusterRole
To create a cluster role, follow these steps.
- Click the All Services > Container > Kubernetes Engine menu. 1. Navigate to the Service Home page of Kubernetes Engine.
- On the Service Home page, click Cluster Role under the Permissions menu. 2. Go to the Cluster role list page.
- Cluster Role List page, after selecting the cluster and namespace from the list at the top left, click Create Object.
- Enter the object information in the Object Creation Popup and click the Create button.
Reference
For detailed information about ClusterRoles, refer to the 쿠버네티스 공식 문서 > Using RBAC Authorization.
Check detailed information of the cluster role
To view detailed information about the cluster role, follow these steps.
- All Services > Container > Kubernetes Engine menu, click it. 1. Go to the Service Home page of Kubernetes Engine.
- On the Service Home page, click Cluster Role under the Permissions menu. 2. Go to the Cluster role list page.
- Cluster Role List page, select the cluster and namespace from the list at the top left, then click Search.
- Select the item you want to view detailed information for on the Cluster Role List page. 4. Navigate to the Cluster role details page.
- If you select System Object Display at the top of the list, all items except the Kubernetes object entries will be shown.
- Click each tab to view the service information.
Category Detailed descriptionDelete ClusterRole Delete the cluster role Detailed Information Detailed information of the cluster role can be viewed YAML The resource file of the ClusterRole can be edited in the YAML editor - Edit button, modify the resource, then click the Done button to apply the changes
- When editing content, click the Diff button to view the changed content
event Check events that occurred within the cluster role Account information Check basic information about the Account, such as name, location, and creation timestamp. Metadata Information Check the metadata information of the ClusterRole Policy Rule Information View the policy rule information of a ClusterRole - Resources: List of resources to which the rule applies
- Non-Resource URLs: Non-Resource URLs are the set of partial URLs that a user needs to access
*is allowed but only as the final segment of the path
- Since non-resource URLs are not namespaced, this field can only be applied to a ClusterRole referenced by a ClusterRoleBinding
- A rule can apply to an API resource (e.g., “pods” or “secrets”) or a non-resource URL path (e.g., “/api”), but not to both
- Resource Names: Resource names are an optional whitelist of names to which the rule applies. An empty set means everything is allowed
- Verbs: Verbs refer to the API verbs used in resource requests such as get, list, create, update, patch, watch, delete, deletecollection
- For more details, refer to the 쿠버네티스 공식 문서 > API Verbs
Table. Cluster role detailed information items
Delete cluster role
To delete the cluster role, follow these steps.
- Click the All Services > Container > Kubernetes Engine menu. 1. Go to the Service Home page of Kubernetes Engine.
- On the Service Home page, click Cluster Role under the Permissions menu. 2. Go to the Cluster role list page.
- Cluster Role List page, after selecting the cluster and namespace from the list at the top left, click Search.
- On the Cluster role list page, select the items you want to delete. 4. Navigate to the Cluster role details page.
- On the Cluster Role Details page, click Delete Cluster Role.
- Notification dialog appears, click the Confirm button.
Caution
On the cluster role list page, after selecting the item you want to delete, click Delete to delete the selected cluster role.
Managing ClusterRoleBinding
You can create and manage a cluster role binding by linking a cluster role with a specific target.
Create ClusterRoleBinding
To create a ClusterRoleBinding, follow these steps.
- Click the All Services > Container > Kubernetes Engine menu. 1. Go to the Service Home page of Kubernetes Engine.
- On the Service Home page, click ClusterRoleBinding under the Permissions menu. 2. Go to the Cluster Role Binding List page.
- Cluster Role Binding List On the page, after selecting the cluster and namespace from the list at the top left, click Create Object.
- Enter the object information in the Object Creation Popup and click the Create button.
Reference
For detailed information about ClusterRoleBinding, refer to the 쿠버네티스 공식 문서 > Using RBAC Authorization.
View detailed information of ClusterRoleBinding
To view detailed information about the ClusterRoleBinding, follow these steps.
- Click the All Services > Container > Kubernetes Engine menu. 1. Go to the Service Home page of Kubernetes Engine.
- On the Service Home page, click ClusterRoleBinding under the Permissions menu. 2. Navigate to the Cluster Role Binding List page.
- On the Cluster Role Binding List page, select the cluster and namespace from the list at the top left, then click Search.
- Cluster Role Binding List page, select the item for which you want to view detailed information. 4. Navigate to the Cluster Role Binding Details page.
- If you select System Object Display at the top of the list, all items except the Kubernetes object entries will be shown.
- Click each tab to view the service information.
Category Detailed descriptionDelete ClusterRoleBinding Delete the cluster role binding Detailed Information View detailed information of the ClusterRoleBinding YAML The resource file of the cluster role binding can be edited in the YAML editor - Edit button, modify the resource, and then click the Done button to apply the changes
- When editing content, click the Diff button to view the changes
event Check the events that occurred within the ClusterRoleBinding Account information Check basic information about the Account, such as name, location, and creation timestamp. Metadata Information Check the metadata information of the ClusterRoleBinding Role/Target Information Check the role and target information of the ClusterRole Table. ClusterRoleBinding detailed information items
Delete ClusterRoleBinding
To delete a ClusterRoleBinding, follow these steps.
- Click the All Services > Container > Kubernetes Engine menu. 1. Go to the Service Home page of Kubernetes Engine.
- On the Service Home page, click ClusterRoleBinding under the Permissions menu. 2. Navigate to the Cluster Role Binding List page.
- Cluster Role Binding List page, select the cluster and namespace from the list at the top left, then click View.
- Select the item you want to delete on the Cluster Role Binding List page. 4. Go to the Cluster Role Binding Details page.
- On the Cluster Role Binding Details page, click Delete Cluster Role Binding.
- Notification dialog appears, click the Confirm button.
Caution
On the ClusterRoleBinding list page, after selecting the item you want to delete, click Delete to remove the selected ClusterRoleBinding.
Manage roles
A role refers to a rule that specifies permissions for a particular API or resource. You can create and manage permissions that allow access only to the namespace to which the role belongs.
Create role
To create a role, follow the steps below.
- All Services > Container > Kubernetes Engine menu, click it. 1. Go to the Service Home page of Kubernetes Engine.
- On the Service Home page, click Role under the Permission menu. 2. Go to the Roll List page.
- On the Role List page, after selecting the cluster and namespace from the list in the upper left, click Create Object.
- Enter the object information in the Object Creation Popup and click the Create button.
Reference
For detailed information about roles, see the 쿠버네티스 공식 문서 > Using RBAC Authorization.
Check detailed roll information
To view detailed roll information, follow the steps below.
- Click the All Services > Container > Kubernetes Engine menu. 1. Navigate to the Service Home page of Kubernetes Engine.
- On the Service Home page, click Role under the Permission menu. 2. Go to the Role List page.
- Roll List page, after selecting the cluster and namespace from the list at the top left, click View.
- Roll List page, select the item you want to view detailed information for. 4. Roll Details page is accessed.
- Selecting Show system objects at the top of the list displays all items except the Kubernetes object entries.
- Click each tab to view the service information.
Category Detailed descriptionDelete role Delete the role Detailed Information View detailed information of the roll YAML Roll’s resource file can be edited in the YAML editor - Click the Edit button, modify the resource, then click the Done button to apply the changes
- When editing content, click the Diff button to view the changed content
event Check events that occurred within LoL Account information Check basic information about the Account, such as name, location, creation date and time, etc. Metadata Information Check the metadata information of LoL Policy Rule Information Check the policy rule information for a Role - Resources: List of resources to which the rule applies
- Non-Resource URLs: Non-Resource URLs are the set of partial URLs that a user must access
*is allowed, but only as the final segment of the entire path
- Since non-resource URLs are not namespaced, this field can only be applied to a ClusterRole referenced by a ClusterRoleBinding
- A rule can apply to an API resource (e.g., “pods” or “secrets”) or a non-resource URL path (e.g., “/api”), but not to both
- Resource Names: Resource names are an optional whitelist of names to which the rule applies; an empty set means everything is allowed
- Verbs: Verbs are the API actions used in resource requests such as get, list, create, update, path, watch, delete, deletecollection
- For more details, see the Kubernetes official documentation > API Verbs
Table. Role detailed information items
Delete role
To delete the role, follow the steps below.
- Click the All Services > Container > Kubernetes Engine menu. 1. Go to the Service Home page of Kubernetes Engine.
- On the Service Home page, click Role under the Permissions menu. 2. Go to the Role List page.
- On the Roll List page, select the cluster and namespace from the list at the top left, then click View.
- On the Role List page, select the item you want to delete. 4. Navigate to the Roll Details page.
- On the Roll Details page, click Delete Roll.
- When the Notification dialog appears, click the Confirm button.
Caution
On the role list page, after selecting the item you want to delete, click Delete to delete the selected role.
Managing Role Bindings
You can create and manage role bindings by linking a role to a specific subject.
Create Role Binding
To create a roll binding, follow these steps.
- Click the All Services > Container > Kubernetes Engine menu. 1. Go to the Service Home page of Kubernetes Engine.
- On the Service Home page, click Role Binding under the Permissions menu. 2. Go to the Roll Binding List page.
- On the Roll Binding List page, select the cluster and namespace from the list at the top left, then click Create Object.
- In the Object Creation Popup, enter the object information and click the Create button.
Reference
For detailed information about role binding, see the 쿠버네티스 공식 문서 > Using RBAC Authorization.
Check detailed information of role binding
To view detailed Roll Binding information, follow these steps.
- Click the All Services > Container > Kubernetes Engine menu. 1. Go to the Service Home page of Kubernetes Engine.
- On the Service Home page, click Role Binding under the Permissions menu. 2. Go to the Roll Binding List page.
- On the Roll Binding List page, select the cluster and namespace from the list in the upper left, then click Search.
- Roll Binding List page, select the item you want to view detailed information for. 4. Go to the Roll Binding Details page.
- If you select Show System Objects at the top of the list, all items except the Kubernetes object entries will be displayed.
- Click each tab to view the service information.
Category Detailed descriptionDelete roll binding Delete roll binding Detailed Information View detailed information of roll binding YAML The resource file of RollBinding can be edited in a YAML editor - Click the Edit button, edit the resource, and then click the Done button to apply the changes
- When editing content, click the Diff button to view the changes
event Check events that occurred within the role binding Account information Check basic information about the Account, such as its name, location, and creation date/time. Metadata Information Check the metadata information of the roll binding Role/Target Information Check the role’s responsibilities and target information. Table. RoleBinding detailed information items
Delete Role Binding
To delete the roll binding, follow the steps below.
- Click the All Services > Container > Kubernetes Engine menu. 1. Go to the Service Home page of Kubernetes Engine.
- On the Service Home page, click Role Binding under the Permissions menu. 2. Go to the Roll Binding List page.
- On the Roll Binding List page, select the cluster and namespace from the list in the upper left, then click View.
- Select the item you want to delete on the Roll Binding List page. 4. Go to the Roll Binding Details page.
- On the Roll Binding Details page, click Delete Roll Binding.
- Notification dialog appears, click the Confirm button.
Caution
After selecting the item you want to delete on the role binding list page, click Delete to delete the selected role binding.
1.3 - Kubernetes Engine Usage Guide
Provides a guide for using Kubernetes Engine.
Kubernetes Engine Utilization Guide
In the Kubernetes Engine usage, the following features are described. For more details, refer to the guide.
| Provision Guide | Explanation |
|---|---|
| Access the cluster | kubectl installation and usage guide, kubeconfig download, login method using kubectl plugin
|
| Authentication and Authorization | Explain the authentication and authorization features and how to integrate them with Kubernetes Engine and IAM
|
| Configure a LoadBalancer type service | Guide to configuring a Service of type LoadBalancer using a Service manifest file
|
| Considerations when using | Explanation of constraints when using SKE
|
| Version information | Kubernetes version and support period description
|
Table. Description of the Kubernetes Engine Utilization Guide
1.3.1 - Access Cluster
kubectl Installation and Usage
After creating a Kubernetes Engine service, you can use the Kubernetes command-line tool kubectl to execute commands against your Kubernetes cluster. With kubectl, you can deploy applications, inspect and manage cluster resources, and view logs. You can find how to install and use kubectl in the official Kubernetes documentation.
| Category | Reference URL |
|---|---|
| kubectl installation (Linux) | https://kubernetes.io/docs/tasks/tools/install-kubectl-linux/ |
| kubectl installation (Windows) | https://kubernetes.io/docs/tasks/tools/install-kubectl-windows/ |
| kubectl Introduction | https://kubernetes.io/docs/reference/kubectl/ |
| kubectl Quick Reference | https://kubernetes.io/docs/reference/kubectl/quick-reference/ |
| kubectl command reference | https://kubernetes.io/docs/reference/kubectl/kubectl/ |
Table. kubectl reference documentation
Reference
You must use a kubectl version that is within the cluster’s minor version difference. For example, if the cluster version is 1.30, you can use kubectl versions 1.29, 1.30, or 1.31.
- Please refer to the following document for the version skew policy of kubectl. https://kubernetes.io/releases/version-skew-policy/#kubectl
To access a Kubernetes cluster with kubectl, you need a kubeconfig file that contains the Kubernetes server address and authentication information.
Reference
For detailed information on Kubernetes authentication and authorization, refer to the Authentication and Authorization.
Kubernetes Engine supports authentication via admin certificate kubeconfig and user authentication key kubeconfig.
Admin certificate kubeconfig
This kubeconfig uses the admin certificate as the authentication method when accessing the Kubernetes API.
Download admin kubeconfig
Kubernetes Engine > Cluster List > Cluster Details > Admin kubeconfig download Click the button to download the kubeconfig file.
Caution
- Downloading the admin kubeconfig is allowed only for Admin.
- There are separate private endpoint and public endpoint versions, and each can be downloaded only once.
Use admin kubeconfig
Reference
- By default, kubectl looks for a file named config in the $HOME/.kube directory. You can also set the KUBECONFIG environment variable or specify the
kubeconfigflag to use a different kubeconfig file. - Private endpoints are, by default, only accessible from the nodes of the respective cluster. For resources in the same account and the same region, you can allow access by adding them to the private endpoint access control settings.
- If you need to access the cluster from the external internet, setting public endpoint access to enabled allows you to access it using the public endpoint kubeconfig.
User authentication key kubeconfig
This kubeconfig uses the user’s Open API authentication key as the credential when accessing the Kubernetes API.
User kubeconfig download
Kubernetes Engine > Cluster List > Cluster Details > User kubeconfig Download Click the button to download the kubeconfig file.
Caution
- Downloading a user’s kubeconfig is allowed only for users with cluster read permissions.
- There are separate ones for private endpoints and public endpoints.
- Since the downloaded kubeconfig file does not contain the authentication key token, you must add the authentication key token information before using it. (See the next paragraph)
Add authentication key token to the user kubeconfig file
Below is an example of a user kubeconfig file. To use the kubeconfig file, you must add the authentication key token (AUTHKEY_TOKEN) information to the token field inside the file.
Color mode
apiVersion: v1
clusters:
- cluster:
    certificate-authority-data: LS0tLS1CRUdJTiBDRVJUSUZJQ0FURS0t...
    server: https://my-cluster-a1c3e.ske.xxx.samsungsdscloud.com:6443
  name: my-cluster-a1c3e
contexts:
- context:
    cluster: my-cluster-a1c3e
    user: jane.doe
  name: jane.doe@my-cluster-a1c3e
current-context: jane.doe@my-cluster-a1c3e
kind: Config
preferences: {}
users:
- name: jane.doe
  user:
token: <AUTHKEY_TOKEN> #### Writing requiredapiVersion: v1
clusters:
- cluster:
certificate-authority-data: LS0tLS1CRUdJTiBDRVJUSUZJQ0FURS0t...
server: https://my-cluster-a1c3e.ske.xxx.samsungsdscloud.com:6443
name: my-cluster-a1c3e
contexts:
- context:
cluster: my-cluster-a1c3e
user: jane.doe
name: jane.doe@my-cluster-a1c3e
current-context: jane.doe@my-cluster-a1c3e
kind: Config
preferences: {}
users:
- name: jane.doe
user:
token: <AUTHKEY_TOKEN> #### Writing requiredAUTHKEY_TOKEN can be generated by concatenating the ACCESS_KEY and SECRET_KEY of the authentication key with a colon (:) and then Base64 encoding it. The following is an example of creating an AUTHKEY_TOKEN in a Linux environment.
Color mode
$ ACCESS_KEY=5df418813aed051548a72f4a814cf09e
$ SECRET_KEY=6ba7b810-9dad-11d1-80b4-00c04fd430c8
$ AUTHKEY_TOKEN=$(echo -n "$ACCESS_KEY:$SECRET_KEY" | base64 -w0)
$ echo $AUTHKEY_TOKEN
NWRmNDE4ODEzYWVkMDUxNTQ4YTcyZjRhODE0Y2YwOWU6NmJhN2I4MTAtOWRhZC0xMWQxLTgwYjQtMDBjMDRmZDQzMGM4r
$ ACCESS_KEY=5df418813aed051548a72f4a814cf09e
$ SECRET_KEY=6ba7b810-9dad-11d1-80b4-00c04fd430c8
$ AUTHKEY_TOKEN=$(echo -n "$ACCESS_KEY:$SECRET_KEY" | base64 -w0)
$ echo $AUTHKEY_TOKEN
NWRmNDE4ODEzYWVkMDUxNTQ4YTcyZjRhODE0Y2YwOWU6NmJhN2I4MTAtOWRhZC0xMWQxLTgwYjQtMDBjMDRmZDQzMGM4rReference
- For detailed information on generating authentication keys, refer to API Reference > Common > Samsung Cloud Platform Open API Call Procedure.
User kubeconfig execution example
You can view an example of executing the user kubeconfig.
When access is blocked by access control or a firewall
Color mode
$ kubectl --kubeconfig=user-kubeconfig.yaml get namespaces
Unable to connect to the server: dial tcp 123.123.123.123:6443: i/o timeout
$ kubectl --kubeconfig=user-kubeconfig.yaml get namespaces
Unable to connect to the server: dial tcp 123.123.123.123:6443: i/o timeoutWhen authentication fails because the AUTHKEY_TOKEN does not match
Color mode
$ kubectl --kubeconfig=user-kubeconfig.yaml get namespaces
error: You must be logged in to the server (Unauthorized)
$ kubectl --kubeconfig=user-kubeconfig.yaml get namespaces
error: You must be logged in to the server (Unauthorized)AUTHKEY_TOKEN when authentication succeeds
Color mode
$ kubectl --kubeconfig=user-kubeconfig.yaml get namespaces
...
kube-node-lease    Active 10d
kube-public        Active 10d
kube-system        Active 10d
$ kubectl --kubeconfig=user-kubeconfig.yaml get namespaces
...
kube-node-lease Active 10d
kube-public Active 10d
kube-system Active 10dAUTHKEY_TOKEN Authentication succeeded but lacks permission
Color mode
$ kubectl --kubeconfig=user-kubeconfig.yaml get nodes
Error from server (Forbidden): nodes is forbidden: User "jane.doe" cannot list resource "nodes" in API group "" at the cluster scope
$ kubectl --kubeconfig=user-kubeconfig.yaml get nodes
Error from server (Forbidden): nodes is forbidden: User "jane.doe" cannot list resource "nodes" in API group "" at the cluster scopeReference
If AUTHKEY_TOKEN authentication succeeds but lacks permission, the authentication process completed correctly, but the authority to perform the requested operation was not granted (authorized). For detailed information about authorization, see 인증 및 인가.
1.3.2 - Authentication and Authorization
Kubernetes Engine applies Kubernetes authentication and RBAC authorization features. It explains how Kubernetes authentication and authorization functions integrate with Kubernetes Engine and IAM.
Kubernetes authentication and authorization
Describes Kubernetes authentication and RBAC authorization features.
Authentication
The Kubernetes API server obtains the information required for authenticating a user (User) or a service account (ServiceAccount) from certificates or authentication tokens, and then carries out the authentication process.
Reference
For a detailed explanation of Kubernetes authentication, refer to the following document.
https://kubernetes.io/docs/reference/access-authn-authz/authentication/
Reference
For detailed information on using kubectl and kubeconfig, refer to Accessing the Cluster.
Authorization
The Kubernetes API server uses the user information obtained through the authentication process to verify, via RBAC-related objects, whether the user has permission for the requested operation. RBAC-related objects come in four types as follows.
| object | Scope | Explanation |
|---|---|---|
| Cluster Role (ClusteRole) | cluster-wide | Definition of permissions across all namespaces in the cluster |
| ClusterRoleBinding(ClusteRoleBinding) | cluster-wide | Definition of the connection between ClusterRole and user |
| Roll (Role) | namespace (namespace) | Permission definition for a specific namespace |
| RoleBinding(RoleBinding) | namespace (namespace) | Definition of the binding between a ClusterRole or Role and a user |
Table. RBAC related objects
Reference
For detailed information on Kubernetes RBAC authorization, refer to the following document.
https://kubernetes.io/docs/reference/access-authn-authz/rbac/
Roll
Kubernetes defines several cluster roles by default. Some of those cluster roles do not include the prefix (system:). These are cluster roles intended for user use. This includes a superuser role (cluster-admin) applied to the entire cluster using a ClusterRoleBinding, and roles (admin, edit, view) applied to a specific namespace using a RoleBinding.
| Default cluster role | Default ClusterRoleBinding | Explanation |
|---|---|---|
| cluster-admin | system:masters group | Allows superuser access that can perform any operation on all resources.
|
| admin | None | Allows administrator access applied within a namespace using role binding. When used in role binding, it grants read/write access to most resources within the namespace, including the ability to create roles and role bindings inside the namespace. This role does not permit write access to resource quotas or the namespace itself. |
| edit | None | Allows read/write access to most objects within the namespace.
|
| view | None | Allows read‑only access to view most objects within a namespace. Roles or role bindings cannot be viewed.
|
Table. Description of basic cluster role and cluster role binding
Reference
For detailed information about the user role, refer to the following document.
https://kubernetes.io/docs/reference/access-authn-authz/rbac/#user-facing-roles
If necessary, you can define additional roles (or cluster roles) beyond the default cluster role, as shown below.
Color mode
# A role that grants permission to view pods in the "default" namespace.
apiVersion: rbac.authorization.k8s.io/v1
kind: Role
metadata:
  namespace: default
  name: pod-reader
rules:
- apiGroups: [""]
  resources: ["pods"]
  verbs: ["get", "list", "watch"]
# A role that grants permission to view pods in the "default" namespace.
apiVersion: rbac.authorization.k8s.io/v1
kind: Role
metadata:
namespace: default
name: pod-reader
rules:
- apiGroups: [""]
resources: ["pods"]
verbs: ["get", "list", "watch"]Color mode
# Cluster role that grants permission to view nodes
apiVersion: rbac.authorization.k8s.io/v1
kind: ClusterRole
metadata:
  name: node-reader
rules:
- apiGroups: [""]
  resources: ["nodes"]
  verbs: ["get", "list", "watch"]
# Cluster role that grants permission to view nodes
apiVersion: rbac.authorization.k8s.io/v1
kind: ClusterRole
metadata:
name: node-reader
rules:
- apiGroups: [""]
resources: ["nodes"]
verbs: ["get", "list", "watch"]Reference
For detailed explanations about roles and cluster roles, refer to the following document.
https://kubernetes.io/docs/reference/access-authn-authz/rbac/#role-and-clusterrole
Role Binding
To manage access to the Kubernetes Engine using Samsung Cloud Platform IAM, you need to understand the relationship between Kubernetes role bindings and IAM. The subjects of a role binding (or cluster role binding) may include individual users (User) or groups (Group).
- User corresponds to the Samsung Cloud Platform username, and Group corresponds to the IAM user group name, respectively.
For RoleBinding/ClusterRoleBinding, subjects.kind can be set to one of the following.
- User: Samsung Cloud Platform is connected to individual users.
- Group: Connected to the Samsung Cloud Platform IAM user group.
Reference
In addition, you can also specify a service account, but service accounts are generally not for end users and cannot be linked to a Samsung Cloud Platform user.
The subjects.name of a role binding/cluster role binding can be specified as follows. If the user is a User: individual Samsung Cloud Platform username (e.g., jane.doe) For a group: Samsung Cloud Platform IAM user group name (e.g., ReadPodsGroup)
Reference
subjects.name is case-sensitive.
In this way, the IAM user group is linked to the group defined in the RoleBinding (or ClusterRoleBinding) of the Kubernetes Engine cluster. It is also granted permission to perform the API actions included in the Role (or ClusterRole) associated with the group.
Example) role binding read-pods #1
The example of writing User (individual Samsung Cloud Platform user) in a role binding is as follows.
Color mode
# This role binding allows the user "jane.doe" to view pods in the "default" namespace.
# The namespace must have a role named "pod-reader".
apiVersion: rbac.authorization.k8s.io/v1
metadata:
  name: read-pods
  namespace: default
roleRef:
  # The "roleRef" specifies the link to a Role or ClusterRole.
  kind: Role       # Must be Role or ClusterRole.
  name: pod-reader # Must match the name of the Role or ClusterRole you want to bind to.
  apiGroup: rbac.authorization.k8s.io
subjects:
# You can specify one or more "target (subject)".
- kind: User
  name: jane.doe
  apiGroup: rbac.authorization.k8s.io
# This role binding allows the user "jane.doe" to view pods in the "default" namespace.
# The namespace must have a role named "pod-reader".
apiVersion: rbac.authorization.k8s.io/v1
metadata:
name: read-pods
namespace: default
roleRef:
# The "roleRef" specifies the link to a Role or ClusterRole.
kind: Role # Must be Role or ClusterRole.
name: pod-reader # Must match the name of the Role or ClusterRole you want to bind to.
apiGroup: rbac.authorization.k8s.io
subjects:
# You can specify one or more "target (subject)".
- kind: User
name: jane.doe
apiGroup: rbac.authorization.k8s.ioWhen a role binding like the above is created in the cluster, a user whose username is jane.doe is granted permission to perform the API actions defined in the pod-reader role.
Example) role binding read-pods #2
The example of creating a group (IAM user group) in role binding is as follows.
Color mode
# This role binding allows users in the "ReadPodsGroup" group to view pods in the "default" namespace.
# The namespace must have a role called "pod-reader".
apiVersion: rbac.authorization.k8s.io/v1
kind: RoleBinding
metadata:
  name: read-pods
  namespace: default
roleRef:
  kind: Role
  name: pod-reader
  apiGroup: rbac.authorization.k8s.io
subjects:
# You can specify one or more "target (subject)".
- kind: Group
  name: ReadPodsGroup
  apiGroup: rbac.authorization.k8s.io
# This role binding allows users in the "ReadPodsGroup" group to view pods in the "default" namespace.
# The namespace must have a role called "pod-reader".
apiVersion: rbac.authorization.k8s.io/v1
kind: RoleBinding
metadata:
name: read-pods
namespace: default
roleRef:
kind: Role
name: pod-reader
apiGroup: rbac.authorization.k8s.io
subjects:
# You can specify one or more "target (subject)".
- kind: Group
name: ReadPodsGroup
apiGroup: rbac.authorization.k8s.ioIf a role binding like the above is created in the cluster, users in the IAM user group ReadPodsGroup are granted permission to perform the API actions defined in the role pod-reader.
Example) ClusterRoleBinding read-nodes
Color mode
# This cluster role binding allows users in the "ReadNodesGroup" group to view nodes.
# A cluster role named "node-reader" must exist.
apiVersion: rbac.authorization.k8s.io/v1
kind: ClusterRoleBinding
metadata:
  name: read-nodes
roleRef:
  kind: ClusterRole
  name: node-reader
  apiGroup: rbac.authorization.k8s.io
subjects:
- kind: Group
  name: ReadNodesGroup
  apiGroup: rbac.authorization.k8s.io
# This cluster role binding allows users in the "ReadNodesGroup" group to view nodes.
# A cluster role named "node-reader" must exist.
apiVersion: rbac.authorization.k8s.io/v1
kind: ClusterRoleBinding
metadata:
name: read-nodes
roleRef:
kind: ClusterRole
name: node-reader
apiGroup: rbac.authorization.k8s.io
subjects:
- kind: Group
name: ReadNodesGroup
apiGroup: rbac.authorization.k8s.ioWhen a cluster role binding like the above is created in the cluster, users belonging to the IAM user group ReadNodesGroup are granted permission to perform the API actions defined in the cluster role node-reader.
Reference
For detailed instructions on creating role bindings, refer to the following document.
https://kubernetes.io/docs/reference/access-authn-authz/rbac/#role-binding-examples
Predefined roles and role bindings for Samsung Cloud Platform
In the Kubernetes Engine of Samsung Cloud Platform, the cluster role bindings scp-cluster-admin, scp-view, scp-namespace-view, and the cluster role scp-namespace-view are predefined. The table below shows the predefined roles and role bindings for Samsung Cloud Platform and the relationships of Samsung Cloud Platform users. Here, the cluster roles cluster-admin and view are predefined within the Kubernetes cluster. For more details, see role.
| ClusterRoleBinding | ClusterRole | subjects (user) |
|---|---|---|
| scp-cluster-admin | cluster-admin | Cluster creator username (e.g., jane.doe) |
| scp-view | view | - |
| scp-namespace-view | scp-namespace-view | All users authenticated to this cluster |
Table. Predefined roles and role bindings for Samsung Cloud Platform, user relationships
- According to the cluster role binding scp-cluster-admin, the Kubernetes Engine service creator is granted cluster admin privileges.
- Users or groups registered in the cluster role binding scp-view are granted cluster viewer permissions. It is bound to the predefined Kubernetes cluster role view, and does not grant access to cluster‑scoped resources (e.g., namespaces, nodes, ingress classes, etc.) or to secrets within a namespace. For more details, see role.
- According to the cluster role binding scp-namespace-view, all users authenticated to the cluster are granted permission to view namespaces.
Reference
- Predefined roles and role bindings for Samsung Cloud Platform are created once during cluster service creation.
- Users can modify or delete the predefined cluster role bindings and cluster roles for Samsung Cloud Platform as needed.
The details of the predefined roles and role bindings for Samsung Cloud Platform are as follows.
ClusterRoleBinding scp-cluster-admin
Cluster role binding scp-cluster-admin is linked to the cluster role cluster-admin, and is bound to the Samsung Cloud Platform user (Kubernetes Engine cluster creator) according to the subjects field.
Color mode
apiVersion: rbac.authorization.k8s.io/v1
kind: ClusterRoleBinding
  name: scp-cluster-admin
roleRef:
  kind: ClusterRole
  name: cluster-admin
  apiGroup: rbac.authorization.k8s.io
subjects:
- kind: User
  name: jane.doe # cluster creator username
apiGroup: rbac.authorization.k8s.ioapiVersion: rbac.authorization.k8s.io/v1
kind: ClusterRoleBinding
name: scp-cluster-admin
roleRef:
kind: ClusterRole
name: cluster-admin
apiGroup: rbac.authorization.k8s.io
subjects:
- kind: User
name: jane.doe # cluster creator username
apiGroup: rbac.authorization.k8s.ioClusterRoleBinding scp-view
ClusterRoleBinding scp-view is bound to the ClusterRole view, and you can add Samsung Cloud Platform users or IAM user groups to the subjects field.
Color mode
apiVersion: rbac.authorization.k8s.io/v1
kind: ClusterRoleBinding
metadata:
  name: scp-view
roleRef:
  kind: ClusterRole
  name: view
apiGroup: rbac.authorization.k8s.ioapiVersion: rbac.authorization.k8s.io/v1
kind: ClusterRoleBinding
metadata:
name: scp-view
roleRef:
kind: ClusterRole
name: view
apiGroup: rbac.authorization.k8s.ioClusterRole and ClusterRoleBinding scp-namespace-view
The cluster role scp-namespace-view defines view permissions for namespaces. The cluster role binding scp-namespace-view is bound to the cluster role scp-namespace-view, granting namespace read permissions to all authenticated users in the cluster.
Color mode
apiVersion: rbac.authorization.k8s.io/v1
kind: ClusterRole
metadata:
  name: scp-namespace-view
rules:
- apiGroups: [""]
  resources: ["namespaces"]
  verbs: ["get", "list", "watch"]
---
apiVersion: rbac.authorization.k8s.io/v1
kind: ClusterRoleBinding
metadata:
  name: scp-namespace-view
roleRef:
  kind: ClusterRole
  name: scp-namespace-view
  apiGroup: rbac.authorization.k8s.io
subjects:
- kind: Group
  name: system:authenticated
apiGroup: rbac.authorization.k8s.ioapiVersion: rbac.authorization.k8s.io/v1
kind: ClusterRole
metadata:
name: scp-namespace-view
rules:
- apiGroups: [""]
resources: ["namespaces"]
verbs: ["get", "list", "watch"]
---
apiVersion: rbac.authorization.k8s.io/v1
kind: ClusterRoleBinding
metadata:
name: scp-namespace-view
roleRef:
kind: ClusterRole
name: scp-namespace-view
apiGroup: rbac.authorization.k8s.io
subjects:
- kind: Group
name: system:authenticated
apiGroup: rbac.authorization.k8s.ioIAM user group RBAC use case
This chapter explains examples of granting permissions for each major user scenario. The IAM user groups, ClusterRoleBinding/RoleBinding, and ClusterRole names presented here are just examples to aid understanding. Administrators should define and apply appropriate names and permissions as needed.
| Scope | use case | IAM user group | ClusterRoleBinding/RoleBinding | ClusterRole | Remarks |
|---|---|---|---|---|---|
| cluster | Cluster Administrator | ClusterAdminGroup | ClusterRoleBinding cluster-admin-group | cluster-admin | Administrator for a specific cluster |
| cluster | Cluster Editor | ClusterEditGroup | ClusterRoleBinding cluster-edit-group | edit | Editor for a specific cluster |
| cluster | Cluster Viewer | ClusterViewGroup | ClusterRoleBinding cluster-view-group | view | Viewer for a specific cluster |
| namespace | Namespace Manager | NamespaceAdminGroup | Role binding namespace-admin-group | admin | Administrator for a specific namespace |
| namespace | Namespace editor | NamespaceEditGroup | Role binding namespace-edit-group | edit | Editor for a specific namespace |
| namespace | Namespace viewer | NamespaceViewGroup | Role binding namespace-view-group | view | Viewer for a specific namespace |
Table. Example of binding IAM user groups and cluster role users by use case
Reference
The cluster roles (cluster-admin, admin, edit, view) shown in the table are predefined within the Kubernetes cluster. For more details, see role.
Cluster Administrator
To create a cluster administrator, follow these steps.
- Create an IAM user group named ClusterAdminGroup.
- Create a cluster role binding with the following contents in the target cluster.Color mode
apiVersion: rbac.authorization.k8s.io/v1 kind: ClusterRoleBinding metadata: name: cluster-admin-group roleRef: kind: ClusterRole name: cluster-admin apiGroup: rbac.authorization.k8s.io subjects: - kind: Group name: ClusterAdminGroup apiGroup: rbac.authorization.k8s.ioapiVersion: rbac.authorization.k8s.io/v1 kind: ClusterRoleBinding metadata: name: cluster-admin-group roleRef: kind: ClusterRole name: cluster-admin apiGroup: rbac.authorization.k8s.io subjects: - kind: Group name: ClusterAdminGroup apiGroup: rbac.authorization.k8s.ioCode block. Create cluster administrator
- It is linked with cluster-admin of the base cluster, granting administrator privileges for that cluster.
Cluster Editor
To create a cluster editor, follow these steps.
- Create an IAM user group named ClusterEditGroup.
- Create a ClusterRoleBinding with the following specifications in the target cluster.Color mode
apiVersion: rbac.authorization.k8s.io/v1 kind: ClusterRoleBinding metadata: name: cluster-edit-group roleRef: kind: ClusterRole name: edit apiGroup: rbac.authorization.k8s.io subjects: - kind: Group name: ClusterEditGroup apiGroup: rbac.authorization.k8s.ioapiVersion: rbac.authorization.k8s.io/v1 kind: ClusterRoleBinding metadata: name: cluster-edit-group roleRef: kind: ClusterRole name: edit apiGroup: rbac.authorization.k8s.io subjects: - kind: Group name: ClusterEditGroup apiGroup: rbac.authorization.k8s.ioCode block. Create cluster editor
- It is linked with the edit role of the base cluster, granting editor permissions for that cluster.
Cluster Viewer
To create a cluster viewer, follow these steps.
- Create an IAM user group named ClusterViewGroup.
- Create a ClusterRoleBinding with the following specifications in the target cluster.Color mode
apiVersion: rbac.authorization.k8s.io/v1 kind: ClusterRoleBinding metadata: name: cluster-view-group roleRef: kind: ClusterRole name: view apiGroup: rbac.authorization.k8s.io subjects: - kind: Group name: ClusterViewGroup apiGroup: rbac.authorization.k8s.ioapiVersion: rbac.authorization.k8s.io/v1 kind: ClusterRoleBinding metadata: name: cluster-view-group roleRef: kind: ClusterRole name: view apiGroup: rbac.authorization.k8s.io subjects: - kind: Group name: ClusterViewGroup apiGroup: rbac.authorization.k8s.ioCode block. Create cluster viewer
- It is associated with the view role of the default cluster, granting viewer permissions for that cluster.
Namespace Administrator
To create a namespace manager, follow these steps.
- Create an IAM user group named NamespaceAdminGroup.
- Create a RoleBinding with the following contents in the target cluster.Color mode
apiVersion: rbac.authorization.k8s.io/v1 kind: RoleBinding metadata: name: namespace-admin-group namespace: <namespace_name> roleRef: kind: ClusterRole name: admin apiGroup: rbac.authorization.k8s.io subjects: - kind: Group name: NamespaceAdminGroup apiGroup: rbac.authorization.k8s.ioapiVersion: rbac.authorization.k8s.io/v1 kind: RoleBinding metadata: name: namespace-admin-group namespace: <namespace_name> roleRef: kind: ClusterRole name: admin apiGroup: rbac.authorization.k8s.io subjects: - kind: Group name: NamespaceAdminGroup apiGroup: rbac.authorization.k8s.ioCode block. Create a namespace manager
- It is linked with the admin role of the default cluster, granting administrator privileges for the namespace.
Namespace Editor
To create a namespace editor, follow these steps.
- Create an IAM user group named NamespaceEditGroup.
- Create a RoleBinding with the following specifications in the target cluster.Color mode
apiVersion: rbac.authorization.k8s.io/v1 kind: RoleBinding metadata: name: namespace-edit-group namespace: <namespace_name> roleRef: kind: ClusterRole name: edit apiGroup: rbac.authorization.k8s.io subjects: - kind: Group name: NamespaceEditGroup apiGroup: rbac.authorization.k8s.ioapiVersion: rbac.authorization.k8s.io/v1 kind: RoleBinding metadata: name: namespace-edit-group namespace: <namespace_name> roleRef: kind: ClusterRole name: edit apiGroup: rbac.authorization.k8s.io subjects: - kind: Group name: NamespaceEditGroup apiGroup: rbac.authorization.k8s.ioCode block. Create namespace editor
- It is linked with the default cluster role edit, granting editor permissions for the namespace.
Namespace Viewer
To create a namespace viewer, follow these steps.
- Create an IAM user group named NamespaceViewGroup.
- Create a RoleBinding with the following contents in the target cluster.Color mode
apiVersion: rbac.authorization.k8s.io/v1 kind: RoleBinding metadata: name: namespace-view-group namespace: <namespace_name> roleRef: kind: ClusterRole name: view apiGroup: rbac.authorization.k8s.io subjects: - kind: Group name: NamespaceViewGroup apiGroup: rbac.authorization.k8s.ioapiVersion: rbac.authorization.k8s.io/v1 kind: RoleBinding metadata: name: namespace-view-group namespace: <namespace_name> roleRef: kind: ClusterRole name: view apiGroup: rbac.authorization.k8s.io subjects: - kind: Group name: NamespaceViewGroup apiGroup: rbac.authorization.k8s.ioCode block. Create namespace viewer
- It is associated with the default cluster role view, granting viewer permissions for the namespace.
1.3.3 - Using type LoadBalancer service
Service Configuration Method
Service 매니페스트 파일(예시:
my-lb-svc.yaml
)을 작성하여 적용하면 LoadBalancer 형식(type)의 Service를 구성할 수 있습니다.
Caution
- LoadBalancer is created in the cluster Subnet by default.
- Use the annotation service.beta.kubernetes.io/scp-load-balancer-subnet-id to create a LoadBalancer in a different Subnet. * For detailed information, refer to 어노테이션 상세 설정.
To create and apply a type LoadBalancer Service, follow these steps.
Service 매니페스트 파일
my-lb-svc.yaml을 작성합니다.Color modeapiVersion: v1 kind: Service metadata: name: my-service spec: selector: app.kubernetes.io/name: MyApp ports: - protocol: TCP port: 80 targetPort: 9376 appProtocol: tcp # Refer to the LB service protocol type setting section type: LoadBalancerapiVersion: v1 kind: Service metadata: name: my-service spec: selector: app.kubernetes.io/name: MyApp ports: - protocol: TCP port: 80 targetPort: 9376 appProtocol: tcp # Refer to the LB service protocol type setting section type: LoadBalancerCode block. Example of writing a Service manifest file my-lb-svc.yaml Deploy the Service manifest using the kubectl apply command.
Color modekubectl apply -f my-lb-svc.yamlkubectl apply -f my-lb-svc.yamlCode block. Deploy Service manifest with the kubectl apply command.
Caution
- When a type LoadBalancer Service is created, the corresponding Load Balancer service is automatically created. * It may take a few minutes for the configuration to complete.
- Do not arbitrarily modify the automatically generated Load Balancer service and LB server group. * Changes may be reverted or cause unexpected behavior.
- For configurable detailed features, refer to 어노테이션 상세 설정.
kubectl get service명령어를 사용하여 Load Balancer 구성을 확인합니다.Color mode# kubectl get service my-lb-svc NAMESPACE NAME TYPE CLUSTER-IP EXTERNAL-IP PORT(S) AGE default my-lb-svc LoadBalancer 172.20.49.206 123.123.123.123 80:32068/TCP 3m# kubectl get service my-lb-svc NAMESPACE NAME TYPE CLUSTER-IP EXTERNAL-IP PORT(S) AGE default my-lb-svc LoadBalancer 172.20.49.206 123.123.123.123 80:32068/TCP 3mCode block. Verify Load Balancer configuration with the kubectl get service command
Protocol type
You can create a Service manifest and use it. The following is a simple example.
Color mode
apiVersion: v1
kind: Service
metadata:
  name: my-service
spec:
  selector:
    ...
  ports:
    - port: 80
      targetPort: 9376
      protocol: TCP    # required (choose one of TCP, UDP)
      appProtocol: tcp # selection (if omitted, choose one of tcp, http, https)
type: LoadBalancer # type LoadBalancerapiVersion: v1
kind: Service
metadata:
name: my-service
spec:
selector:
...
ports:
- port: 80
targetPort: 9376
protocol: TCP # required (choose one of TCP, UDP)
appProtocol: tcp # selection (if omitted, choose one of tcp, http, https)
type: LoadBalancer # type LoadBalancerThe list of protocols (protocol and appProtocol) supported by the Load Balancer Service type in Kubernetes Engine, and the settings applied to the Load Balancer service accordingly, are as follows.
| Category | (k8s) protocol | (k8s) appProtocol | (LB) Service classification | (LB) LB Listener | (LB) LB server group | (LB) health check |
|---|---|---|---|---|---|---|
| L4 TCP | TCP | (tcp) | L4 | TCP {port} | TCP {nodePort} | TCP {nodePort} |
| L4 UDP | UDP | - | L4 | UDP {port} | UDP {nodePort} | TCP {nodePort} |
| L7 HTTP | TCP | http | L7 | HTTP {port} | TCP {nodePort} | TCP/HTTP {nodePort} |
| L7 HTTPS | TCP | https | L7 | HTTPS {port} | TCP {nodePort} | TCP/HTTP {nodePort} |
Table. k8s Service manifest and Load Balancer service configuration
- According to the k8s Service manifest spec, you can assign multiple ports to a single service.
Caution
Depending on the Load Balancer service classification (L4, L7), you cannot mix protocol layers within a single Service.
- In other words, L4 (TCP, UDP) and L7 (HTTP, HTTPS) cannot be used together in a single Service.
L4 Service Manifest Creation Example
Color mode
apiVersion: v1
kind: Service
metadata:
  name: my-service
spec:
  selector:
    app.kubernetes.io/name: MyApp
  ports:
    - protocol: TCP
      port: 80
      targetPort: 9376
type: LoadBalancerapiVersion: v1
kind: Service
metadata:
name: my-service
spec:
selector:
app.kubernetes.io/name: MyApp
ports:
- protocol: TCP
port: 80
targetPort: 9376
type: LoadBalancerL7 Service Manifest Creation Example
Color mode
apiVersion: v1
kind: Service
metadata:
  annotations:
    service.beta.kubernetes.io/scp-load-balancer-layer-type: "L7" # required
    service.beta.kubernetes.io/scp-load-balancer-client-cert-id: "24da35de187b450eb0cf09fb6fa146de" # required
  name: my-service
spec:
  selector:
    app.kubernetes.io/name: MyApp
  ports:
    - appProtocol: http # required
      protocol: TCP
      port: 80
      targetPort: 9376
    - appProtocol: https # required
      protocol: TCP
      port: 443
      targetPort: 9898
  type: LoadBalancer
Annotation detailed configuration
You can add annotations to the service manifest to configure detailed features.
Color mode
apiVersion: v1
kind: Service
metatdata:
  name: my-lb-svc
  annotations:
    service.beta.kubernetes.io/scp-load-balancer-public-ip-enabled: "true"
    service.beta.kubernetes.io/scp-load-balancer-health-check-interval: "5"
    service.beta.kubernetes.io/scp-load-balancer-health-check-timeout: "5"
    service.beta.kubernetes.io/scp-load-balancer-health-check-count: "3"
    service.beta.kubernetes.io/scp-load-balancer-session-duration-time: "300"
  spec:
  type: LoadBalancer
  ...
Reference
- If no separate annotation is added to the service, the default annotation values are applied.
- Even when the annotation added to the service does not satisfy the allowed values, the annotation’s default value is applied.
Below is a description of all annotations available for the type LoadBalancer service.
| annotation | Protocol | Default | Allowed value | Example | Explanation |
|---|---|---|---|---|---|
| service.beta.kubernetes.io/scp-load-balancer-source-ranges-firewall-rules | All | false | true, false | false | Automatically add firewall rule (LB source ranges → LB service IP) |
| service.beta.kubernetes.io/scp-load-balancer-snat-healthcheck-firewall-rules | All | false | true,false | false | Automatically add firewall rules (LB Source NAT IP, HealthCheck IP → member IP:Port)
|
Table. Firewall-related settings in Kubernetes annotations
| annotation | Protocol | Default | Allowed value | Example | Explanation |
|---|---|---|---|---|---|
| service.beta.kubernetes.io/scp-load-balancer-security-group-id | All | - | UUID | 92d84b44-ee71-493d-9782-3a90481ce5f3 | Automatically add rules to the Security Group corresponding to the specified ID
|
| service.beta.kubernetes.io/scp-load-balancer-security-group-name | All | - | string | security-group-1 | Automatically add rules to the Security Group corresponding to the specified Name
|
Table. Settings related to Security Group in Kubernetes annotations
| annotation | Protocol | Default | Allowed value | Example | Explanation |
|---|---|---|---|---|---|
| service.beta.kubernetes.io/scp-load-balancer-layer-type | All | L4 | L4, L7 | L4 | Specify the service type of the Load Balancer
|
| service.beta.kubernetes.io/scp-load-balancer-subnet-id | All | - | ID | 7f05eda5e1cf4a45971227c57a6d60fa | Specify the Service Subnet of the Load Balancer
|
| service.beta.kubernetes.io/scp-load-balancer-zones | All | - | Availability Zone | kr-west1-a | Specify the Load Balancer’s Availability Zone.
|
| service.beta.kubernetes.io/scp-load-balancer-service-ip | All | - | IP address | 192.168.10.7 | Specify the Service IP of the Load Balancer
|
| service.beta.kubernetes.io/scp-load-balancer-public-ip-enabled | All | false | true, false | false | Specify whether the Load Balancer uses a Public NAT IP
|
| service.beta.kubernetes.io/scp-load-balancer-public-ip-id | All | - | ID | 4119894bd9614cef83db6f8dda667a20 | Specify the ID of the Public IP to be used as the Load Balancer’s Public NAT IP
|
Table. Load Balancer related settings in Kubernetes annotations
| annotation | Protocol | Default | Allowed value | Example | Explanation |
|---|---|---|---|---|---|
| service.beta.kubernetes.io/scp-load-balancer-idle-timeout | HTTP, HTTPS | - | 60 - 3600(60-second unit) | 600 | Specify the LB Listener’s idle timeout (seconds)
|
| service.beta.kubernetes.io/scp-load-balancer-session-duration-time | All | L4: 120L7: - | L4 TCP: 60 - 3600(60-second unit)L4 UDP: 60 - 180(60-second unit)L7: 0 - 120 | 120 | Specify the LB Listener’s session-duration-time (seconds)
|
| service.beta.kubernetes.io/scp-load-balancer-response-timeout | HTTP, HTTPS | - | 0 - 120 | 60 | Specify the response-timeout (seconds) of the LB Listener
|
| service.beta.kubernetes.io/scp-load-balancer-insert-client-ip | TCP | false | true, false | false | Specify Insert Client IP for the LB Listener |
| service.beta.kubernetes.io/scp-load-balancer-x-forwarded-proto | HTTP, HTTPS | false | true, false | false | Specify whether to use the X-Forwarded-Proto header for the LB Listener. |
| service.beta.kubernetes.io/scp-load-balancer-x-forwarded-port | HTTP, HTTPS | false | true, | false | Specify whether to use the X-Forwarded-Port header for the LB Listener |
| service.beta.kubernetes.io/scp-load-balancer-x-forwarded-for | HTTP, HTTPS | false | true, false | false | Specify whether to use the X-Forwarded-For header for the LB Listener. |
| service.beta.kubernetes.io/scp-load-balancer-support-http2 | HTTP, HTTPS | false | true, false | false | Specify whether the LB Listener supports HTTP 2.0. |
| service.beta.kubernetes.io/scp-load-balancer-persistence | TCP, HTTP, HTTPS | "" | "", source-ip, cookie | source-ip | Specify the persistence of the LB Listener (none, source IP, or cookie)
|
| service.beta.kubernetes.io/scp-load-balancer-client-cert-id | HTTPS | - | UUID | 78b9105e00324715b63700933125fa83 | Specify the ID of the client SSL certificate for the LB Listener
|
| service.beta.kubernetes.io/scp-load-balancer-client-cert-level | HTTPS | HIGH | HIGH, NORMAL, LOW | HIGH | Specify the security level of the client SSL certificate for the LB Listener. |
| service.beta.kubernetes.io/scp-load-balancer-server-cert-level | HTTPS | - | HIGH, NORMAL, LOW | HIGH | Specify the security level of the server SSL certificate for the LB Listener. |
Table. Settings related to LB Listener in Kubernetes annotations
| annotation | Protocol | Default | Allowed value | Example | Explanation |
|---|---|---|---|---|---|
| service.beta.kubernetes.io/scp-load-balancer-lb-method | All | ROUND_ROBIN | ROUND_ROBIN, LEAST_CONNECTION, IP_HASH | ROUND_ROBIN | Specify the load balancing policy for the LB server group |
Table. Settings related to LB server group in Kubernetes annotations
| annotation | Protocol | Default | Allowed value | Example | Explanation |
|---|---|---|---|---|---|
| service.beta.kubernetes.io/scp-load-balancer-health-check-enabled | All | true | true, false | true | Specify whether to use LB health check |
| service.beta.kubernetes.io/scp-load-balancer-health-check-protocol | All | TCP | TCP, HTTP, HTTPS | TCP | Specify the protocol for the LB health check |
| service.beta.kubernetes.io/scp-load-balancer-health-check-port | All | {nodeport} | 1 - 65534 | 30000 | Specify the health check port of the LB health check
|
| service.beta.kubernetes.io/scp-load-balancer-health-check-count | All | 3 | 1 - 10 | 3 | Specify the number of detection attempts for LB health check |
| service.beta.kubernetes.io/scp-load-balancer-health-check-interval | All | 5 | 1 - 180 | 5 | Specify the LB health check interval |
| service.beta.kubernetes.io/scp-load-balancer-health-check-timeout | All | 5 | 1 - 180 | 5 | Specify the wait time for LB health checks |
| service.beta.kubernetes.io/scp-load-balancer-health-check-http-method | HTTP | GET | GET, POST | GET | Specify the HTTP method for the LB health check |
| service.beta.kubernetes.io/scp-load-balancer-health-check-url | HTTP | / | string | /healthz | Specify the URL for the LB health check |
| service.beta.kubernetes.io/scp-load-balancer-health-check-response-code | HTTP | 200 | 200 - 500 | 200 | Specify the response code for LB health check |
| service.beta.kubernetes.io/scp-load-balancer-health-check-request-data | HTTP | - | string | username=admin&password=1234 | Specify the request string for LB health check
|
| service.beta.kubernetes.io/scp-load-balancer-port-{port}-health-check-enabled | All | true | true, false | true | Specify whether to use LB health check for the Service’s {port} port number. |
| service.beta.kubernetes.io/scp-load-balancer-port-{port}-health-check-protocol | All | TCP | TCP, HTTP, HTTPS | TCP | Specify the LB health check protocol for the Service’s {port} port number. |
| service.beta.kubernetes.io/scp-load-balancer-port-{port}-health-check-port | All | - | 1 - 65534 | 30000 | Specify the LB health check port for the Service’s {port} port number. |
| service.beta.kubernetes.io/scp-load-balancer-port-{port}-health-check-count | All | 3 | 1 - 10 | 3 | Specify the number of LB health check detections for the Service’s {port} port number. |
| service.beta.kubernetes.io/scp-load-balancer-port-{port}-health-check-interval | All | 5 | 1 - 180 | 5 | Specify the LB health check interval for the Service’s {port} port number. |
| service.beta.kubernetes.io/scp-load-balancer-port-{port}-health-check-timeout | All | 5 | 1 - 180 | 5 | Specify the LB health check wait time for the Service’s {port} port number. |
| service.beta.kubernetes.io/scp-load-balancer-port-{port}-health-check-http-method | HTTP | GET | GET, POST | GET | Specify the LB health check HTTP method for the Service’s {port} port number |
| service.beta.kubernetes.io/scp-load-balancer-port-{port}-health-check-url | HTTP | / | string | /healthz | Specify the LB health check URL for the Service’s {port} port number. |
| service.beta.kubernetes.io/scp-load-balancer-port-{port}-health-check-response-code | HTTP | 200 | 200 - 500 | 200 | Specify the LB health check response code for the Service’s {port} port number. |
| service.beta.kubernetes.io/scp-load-balancer-port-{port}-health-check-request-data | HTTP | - | string | username=admin&password=1234 | Specify the LB health check request string for the Service’s {port} port number
|
Table. Settings related to LB health check in Kubernetes annotations
Constraints
The constraints to consider when using Kubernetes annotations are as follows.
| Constraints | Related annotations |
|---|---|
| When changing the Security Group, rules created in the existing Security Group are not automatically deleted. | service.beta.kubernetes.io/scp-load-balancer-security-group-id service.beta.kubernetes.io/scp-load-balancer-security-group-name |
| Cannot change the service classification (L4/L7) of the Load Balancer. | service.beta.kubernetes.io/scp-load-balancer-layer-type |
| L4 and L7 cannot be used together within the same k8s Service. | service.beta.kubernetes.io/scp-load-balancer-layer-type |
| Cannot change Load Balancer subnet | service.beta.kubernetes.io/scp-load-balancer-subnet-id |
| Cannot change the Service IP of the Load Balancer | service.beta.kubernetes.io/scp-load-balancer-service-ip |
| The LB Listener idle-timeout cannot be changed from enabled to disabled after it has been used. | service.beta.kubernetes.io/scp-load-balancer-idle-timeout |
| LB Listener session-duration-time cannot be changed to unused after it has been used. | service.beta.kubernetes.io/scp-load-balancer-session-duration-time |
| The LB Listener response-timeout cannot be changed from enabled to disabled after it has been used. | service.beta.kubernetes.io/scp-load-balancer-response-timeout |
| LB Listener idle-timeout cannot be set simultaneously with session-duration-time or response-timeout. | service.beta.kubernetes.io/scp-load-balancer-idle-timeout service.beta.kubernetes.io/scp-load-balancer-session-duration-time service.beta.kubernetes.io/scp-load-balancer-response-timeout |
| Within the same k8s Service, you cannot use TCP and UDP together on the same port number. | - |
L7 Listener’s routing rules only support the default URL path of the LB server group delivery method
| - |
Table. Constraints when using Kubernetes annotations
1.3.4 - Using the Block Storage storage class
Deploying Pods and PVCs Using Storage Classes
매니페스트 파일(예시:
bs-pod.yaml
와
bs-pvc.yaml
)을 작성하여 bs-ssd를 사용하는 Pod와 Pvc를 배포할 수 있습니다.
Caution
- The manifest file below is an example. * Please adjust key fields such as Image to suit the user’s environment.
Follow these steps to create a Pod and PVC using the bs-ssd storage class.
Pvc 매니페스트 파일
bs-pvc.yaml을 작성합니다.Color modekind: PersistentVolumeClaim apiVersion: v1 metadata: name: pvc-bs-ssd spec: accessModes: - ReadWriteOnce storageClassName: bs-ssd volumeMode: Filesystem resources: requests: storage: 8Gikind: PersistentVolumeClaim apiVersion: v1 metadata: name: pvc-bs-ssd spec: accessModes: - ReadWriteOnce storageClassName: bs-ssd volumeMode: Filesystem resources: requests: storage: 8GiCode block. Example of creating a PVC manifest file bs-pvc.yaml Pod 매니페스트 파일
bs-pod.yaml을 작성합니다.Color modekind: Pod apiVersion: v1 metadata: name: pod-bs-ssd spec: containers: - name: busybox image: busybox:latest command: - sleep - 3600 volumeMounts: - mountPath: "/data" name: my-csi-volume volumes: - name: my-csi-volume persistentVolumeClaim: claimName: pvc-bs-ssdkind: Pod apiVersion: v1 metadata: name: pod-bs-ssd spec: containers: - name: busybox image: busybox:latest command: - sleep - 3600 volumeMounts: - mountPath: "/data" name: my-csi-volume volumes: - name: my-csi-volume persistentVolumeClaim: claimName: pvc-bs-ssdCode block. Example of a Service manifest file bs-pod.yaml Deploy the Pvc and Pod manifests using the kubectl apply command.
Color modekubectl apply -f bs-pvc.yaml -f bs-pod.yamlkubectl apply -f bs-pvc.yaml -f bs-pod.yamlcode block. Deploy the manifest with the kubectl apply command. kubectl get pod,pvc명령어를 사용하여 배포 결과를 확인합니다.Color mode# kubectl get pod,pvc NAME STATUS VOLUME CAPACITY ACCESS MODES STORAGECLASS persistentvolumeclaim/pvc-bs-ssd Bound pvc-5a085a06-164f-45e1-b4c6-d2bfa3b0012c 8Gi RWO bs-ssd NAME READY STATUS RESTARTS AGE pod/pod-bs-ssd 1/1 Running 0 75s# kubectl get pod,pvc NAME STATUS VOLUME CAPACITY ACCESS MODES STORAGECLASS persistentvolumeclaim/pvc-bs-ssd Bound pvc-5a085a06-164f-45e1-b4c6-d2bfa3b0012c 8Gi RWO bs-ssd NAME READY STATUS RESTARTS AGE pod/pod-bs-ssd 1/1 Running 0 75sCode block. Check deployment results with the kubectl get pod,pvc command.
Deploy Pod and PVC to a specific AZ (allowedTopologies)
A user can create a separate storage class that includes the allowedTopologies setting, enabling Pods and volumes to be scheduled to a specific AZ.
Caution
- Based on the default deployed bs-ssd storage class, we recommend creating additional storage classes.
- It is recommended to use “topology.bs.csi.samsungsdscloud.com/zone” with matchLabelExpressions. * (Label not applied to all nodes)
storageclass 매니페스트 파일
bs-az-a-sc.yaml을 작성합니다.Color modeapiVersion: storage.k8s.io/v1 kind: StorageClass metadata: name: bs-ssd-az-a provisioner: bs.csi.samsungsdscloud.com reclaimPolicy: Delete volumeBindingMode: WaitForFirstConsumer allowVolumeExpansion: true parameters: type: SSD allowedTopologies: - matchLabelExpressions: - key: topology.bs.csi.samsungsdscloud.com/zone values: - kr-west1-aapiVersion: storage.k8s.io/v1 kind: StorageClass metadata: name: bs-ssd-az-a provisioner: bs.csi.samsungsdscloud.com reclaimPolicy: Delete volumeBindingMode: WaitForFirstConsumer allowVolumeExpansion: true parameters: type: SSD allowedTopologies: - matchLabelExpressions: - key: topology.bs.csi.samsungsdscloud.com/zone values: - kr-west1-aCode block. Example of writing a Pvc manifest file bs-az-a-sc.yaml Deploy the Storageclass, Pvc, and Pod manifests using the kubectl apply command.
Color modekubectl apply -f bs-az-a-sc.yaml -f bs-pvc.yaml -f bs-pod.yamlkubectl apply -f bs-az-a-sc.yaml -f bs-pvc.yaml -f bs-pod.yamlcode block. Deploy the manifest with the kubectl apply command. kubectl get pod,pvc명령어를 사용하여 배포 결과를 확인합니다.Color mode# kubectl get pod,pvc NAME STATUS VOLUME CAPACITY ACCESS MODES STORAGECLASS pvc-bs-ssd Bound pvc-42365cee-724c-446a-af35-e54d9b16ad51 8Gi RWO bs-ssd-az-a NAME READY STATUS RESTARTS AGE IP NODE pod-bs-ssd 1/1 Running 0 46s 172.21.52.3 ske-aaa-lrwdj-vwww2# kubectl get pod,pvc NAME STATUS VOLUME CAPACITY ACCESS MODES STORAGECLASS pvc-bs-ssd Bound pvc-42365cee-724c-446a-af35-e54d9b16ad51 8Gi RWO bs-ssd-az-a NAME READY STATUS RESTARTS AGE IP NODE pod-bs-ssd 1/1 Running 0 46s 172.21.52.3 ske-aaa-lrwdj-vwww2Code block. Check deployment results with the kubectl get pod,pvc command.
Deploying Pods and PVCs using the ssd_provisioned volume type
Users can specify the max_iops and max_throughput of a volume created using the SSD_Provisioned volume type. max_iops and max_throughput can be specified in the storage class parameters (2nd priority) of the created PVC Annotation (1st priority). The example below demonstrates a case that incorporates both settings. (If all are set, the PVC Annotation value is applied.)
Caution
- Based on the default deployed bs-ssd storage class, we recommend creating additional storage classes.
- If max_iops and max_throughput are not applied, the PVC creation request will fail.
storageclass 매니페스트 파일
bs-ssdprovisioned-sc.yaml을 작성합니다.Color modeapiVersion: storage.k8s.io/v1 kind: StorageClass metadata: name: bs-ssdprovisioned-sc provisioner: bs.csi.samsungsdscloud.com reclaimPolicy: Delete volumeBindingMode: WaitForFirstConsumer allowVolumeExpansion: true parameters: type: SSD_Provisioned # Volume type change (SSD > SSD_Provisioned) max_iops: "17000" # max_iops setting (5000-20000) max_throughput: "250" # max_throughput setting (250-1000)apiVersion: storage.k8s.io/v1 kind: StorageClass metadata: name: bs-ssdprovisioned-sc provisioner: bs.csi.samsungsdscloud.com reclaimPolicy: Delete volumeBindingMode: WaitForFirstConsumer allowVolumeExpansion: true parameters: type: SSD_Provisioned # Volume type change (SSD > SSD_Provisioned) max_iops: "17000" # max_iops setting (5000-20000) max_throughput: "250" # max_throughput setting (250-1000)Code block. Example of creating a PVC manifest file bs-ssdprovisioned-sc.yaml Pvc 매니페스트 파일
bs-ssdprovisioned-pvc.yaml을 작성합니다.Color modekind: PersistentVolumeClaim apiVersion: v1 metadata: name: pvc-bs-ssdprovisioned annotations: "bs.csi.samsungsdscloud.com/max-iops": "5000" # max_iops setting "bs.csi.samsungsdscloud.com/max-throughput": "250" # max_throughput setting spec: accessModes: - ReadWriteOnce storageClassName: bs-ssdprovisioned-sc volumeMode: Filesystem resources: requests: storage: 8Gikind: PersistentVolumeClaim apiVersion: v1 metadata: name: pvc-bs-ssdprovisioned annotations: "bs.csi.samsungsdscloud.com/max-iops": "5000" # max_iops setting "bs.csi.samsungsdscloud.com/max-throughput": "250" # max_throughput setting spec: accessModes: - ReadWriteOnce storageClassName: bs-ssdprovisioned-sc volumeMode: Filesystem resources: requests: storage: 8GiCode block. Example of creating a PVC manifest file bs-ssdprovisioned-pvc.yaml Deploy the Storageclass, Pvc, and Pod manifests using the kubectl apply command.
Color modekubectl apply -f bs-ssdprovisioned-sc.yaml -f bs-ssdprovisioned-pvc.yaml -f bs-pod.yamlkubectl apply -f bs-ssdprovisioned-sc.yaml -f bs-ssdprovisioned-pvc.yaml -f bs-pod.yamlcode block. Deploy the manifest with the kubectl apply command. The max-iops and max-throughput values of the created volume can be viewed in the console under Virtual Server > Block Storage.
Below is an explanation of the max-iops and max-throughput PVC annotations.
| Annotation | Essential | Default | Scope | Explanation |
|---|---|---|---|---|
| bs.csi.samsungscloud.com/max-iops | Optional | - | 5000-20000 | IOPS value set when creating the service |
| bs.csi.samsungscloud.com/max-throughput | Optional | - | 250-1000 | Throughput speed (MB/s) set when creating the service |
Table. Firewall-related settings in Kubernetes annotations
1.3.5 - Usage Considerations
Managed Port Constraints
The following ports are used for SKE management and cannot be used for service access. Additionally, if they are blocked by the OS firewall or similar, node functions or some features may not operate correctly.
| Port | Explanation |
|---|---|
| UDP 4789 | calico-vxlan |
| TCP 5473 | calico-typha |
| TCP 10250 | kubelet |
| TCP 19100 | node-exporter |
| TCP 19400 | dcgm-exporter |
Table. Managed Port List
kube-reserved resource constraints
kube-reserved is a feature that reserves resources for system daemons that do not run as pods on a node.
- System daemons that do not run as pods include kubelet, container runtime, etc.
Reference
For detailed information about kube-reserved, refer to the following document.
Kubernetes Engine reserves CPU and memory based on the following criteria.
| CPU specifications | Memory specifications |
|---|---|
|
|
Table. CPU and Memory Standard Resource Reservation Items
Example: For a Virtual Server with 16 vCPU cores and 32 GB memory, kube-reserved is calculated as follows.
- CPU: (1 core × 0.06) + (1 core × 0.01) + (2 core × 0.005) + (12 core × 0.0025) = 0.11 core
- Memory: (4 GB × 0.25) + (4 GB × 0.2) + (8 GB × 0.1) + (16 GB × 0.06) = 3.56 GB
Example: The resources reserved based on CPU size are as follows.
| CPU specifications | Resource Specification 1 | Resource Specification 2 | Resource Specification 3 | Resource Specification 4 |
|---|---|---|---|---|
| kube-reserved CPU | 70 m | 80 m | 90 m | 110 m |
Table. Example of resources reserved according to CPU size
- Example: The resources reserved based on memory size are as follows.
| Memory specifications | Resource Specification 1 | Resource Specification 2 | Resource Specification 3 | Resource Specification 4 | Resource Specification 4 | Resource Specification 4 | Resource Specification 4 |
|---|---|---|---|---|---|---|---|
| kube-reserved memory | 1 GB | 1.8 GB | 2.6 GB | 3.56 GB | 5.48 GB | 9.32 GB | 11.88 GB |
Table. Example of resources reserved according to memory size
1.3.6 - Version information
Kubernetes version and support period
Kubernetes version lifecycle
The Kubernetes open-source software (OSS) community releases minor versions three times a year, with a release cycle of approximately 15 weeks. A released minor version goes through a support period of about 14 months (standard patch 12 months, maintenance 2 months) before reaching EOL (End of Life).
Notice
Please refer to the following link for Kubernetes release and EOL dates and support periods.
Samsung Cloud Platform Kubernetes Engine (SKE) version release plan
SKE verifies and provides the patch versions in a Stable state among the released OSS minor versions. Therefore, the release timing of the version provided by SKE differs from the release timing of the same OSS version.
Additionally, for previously released versions, considering factors such as the open-source EOL timing, technical support will be terminated sequentially from the older versions (End of Tech support, EoTS).
The release and end dates for OSS and SKE are as follows.
| Version | OSS release | OSS EOL | SKE release | SKE EoTS |
|---|---|---|---|---|
| v1.29 | 2023-12-13 | 2025-02-28 | 2024-10 | 2026-03-31 |
| v1.30 | 2024-04-17 | 2025-06-28 | 2025-02 | 2026-06-30 |
| v1.31 | 2024-08-13 | 2025-10-28 | 2025-07 | 2026-10-28 |
| v1.32 | 2024-12-11 | 2026-02-28 | 2025-10 | 2027-02-28 |
| v1.33 | 2025-04-23 | 2026-06-28 | 2025-12 | 2027-06-28 |
| v1.34 | 2025-08-27 | 2026-10-27 | 2026-03 | 2027-10-27 |
| v1.35 | 2025-12-17 | 2027-02-28 | 2026-07 | 2028-02-28 |
Table. OSS and SKE release and termination schedule
Feature restrictions when technical support ends (EoTS)
If the Kubernetes version offered by SKE reaches end‑of‑technical‑support (EoTS) status, the features available in that version may be limited.
- Create new cluster → Creation not possible
- Existing cluster upgrade → upgrade possible (upgrade possible even if the newer version is EoTS)
- Create node pool from existing cluster → possible
Reference
- Since EOL versions may have vulnerabilities, we recommend upgrading to a newer version.
- You can upgrade the control plane and node pools from the Samsung Cloud Platform Console, and no additional costs are incurred for the upgrade.
- For stable operation, perform compatibility testing of the upgrade version before proceeding with the upgrade.
OS and GPU drivers
The OS and GPU driver version information available for each K8s server type is as follows.
Caution
- The OS versions provided may vary by K8s version.
- When using GPU nodes, the related K8s components (nvidia-device-plugin, dcgm-exporter) are provisioned by default in the cluster.
- When deploying the gpu-operator, conflicts may occur due to duplicate component configurations. * Distribution and use are recommended, excluding the default-provided components.
- For end-of-support operating systems, node pool creation is possible, but we recommend using the latest OS version.
| k8s version | Standard and High Capacity | GPU |
|---|---|---|
| v1.29 |
|
|
| v1.30 |
|
|
| v1.31 |
|
|
| v1.32 |
|
|
| v1.33 |
|
|
| v1.34 |
|
|
| v1.35 |
|
|
Table. OS / GPU driver versions by K8s version and server type
The OS versions and supported GPU server models for each GPU driver version are as follows.
Caution
- When creating a GPU node with the GPU-B300-3 server type, you must use an image with GPU driver version 580.126.20.
| GPU driver version | OS version | Supported model (server type) |
|---|---|---|
| ND 535.183.06 | Ubuntu 22.04 |
|
| ND 570.195.03 | Ubuntu 24.04 |
|
| ND 580.126.20 | Ubuntu 24.04 |
|
Table. OS / Supported Models by GPU driver version
1.4 - API Reference
API Reference
1.5 - CLI Reference
CLI Reference
1.6 - Release Note
Kubernetes Engine
2026.07.16
FEATURE
Add Kubernetes version, Provide node pool IP assignment feature, Improve node pool UI, Provide Block Storage CSI performance metric settings, Improve inability to delete VMs linked to Backup, Reflect compatibility features with other products related to Multi-AZ implementation- Kubernetes Engine feature changes and bug fixes
- Supports Kubernetes v1.35.
- Provides a priority IP assignment feature for node pools.
- A meta area that includes user information has been added to the node pool detail screen, and the overall layout has been improved.
- Additional Block Storage CSI performance metric settings are provided for the node pool.
- Improved to allow deletion of nodes (Virtual Server product) associated with a Backup product.
- We have reflected compatible features according to the Multi-AZ implementation for basic products such as VPC, Storage, VM, and GPU VM.
2026.05.21
FEATURE
Node pool Block Storage performance metric configuration, Add B300 GPU node, Improve dropdown functionality to consider GPU driver version when upgrading node pool, Improvements related to type: LB configuration, Event log error and nuri-auth-webhook related improvements- Kubernetes Engine feature changes and bug fixes
- We also provide Block Storage performance metric settings for node pools.
- Among GPU node types, we also offer the B300 GPU type.
- During node pool upgrades, we improved the selection dropdown to consider the GPU driver version.
- type: LB health check protocol has been improved by adding https.
- Improved the event log timestamp error and the nuri-auth-webhook authentication key expiration and activation status check functionality.
2026.03.19
FEATURE
Add Kubernetes version, Provide GPU VM custom image, Provide management logic for k8s and OS version EoTS, Handle node pool OS image EOS and set default values during upgrade, Do not provide kubeconfig in Terraform, type: LB setting improvements- Kubernetes Engine feature change
- Supports Kubernetes v1.34.
- Provides a custom GPU VM image for the node pool.
- Provides EoTS management logic and display functionality for cluster and node pool Kubernetes versions and node pool OS versions.
- Provides an OS selection dropdown feature when upgrading a node pool.
- type: LB L7 listener idle-timeout addition and default session-duration-time change will be improved.
- Terraform does not provide the kubeconfig feature.
2025.12.18
FEATURE
Add Kubernetes version, Display GPU Driver version in node pool, MNGC node support (SR), Change maximum capacity of default disk in node pool, Add and improve node pool validation- Kubernetes Engine feature change
- Supports Kubernetes v1.33.
- Provides GPU driver version information on node pool GPU nodes.
- Provides the MNGC node in SR request configuration form.
- We provide the node pool OS’s maximum Block Storage capacity, changed from 1 TB to 12 TB to match the VM product.
- When creating or editing a node pool, we provide enhanced label key validation and add validation for unsupported GPU node pool server groups.
2025.10.23
FEATURE
Add Kubernetes version, Advanced node pool configuration feature, Node pool server group setting, Integration with ServiceWatch, UserKubeconfig download, Node pool upgrade enhancements considering OS version- Kubernetes Engine feature change
- Supports Kubernetes v1.32.
- Provides advanced node pool configuration features.
- Provides node pool server group (Affinity or Anti-affinity) configuration functionality.
- Provides a user Kubeconfig download feature following the admin Kubeconfig download button.
- When upgrading a node pool, we additionally provide upgrade logic that considers the OS version.
- Provides log collection functionality based on ServiceWatch integration.
2025.07.01
FEATURE
Kubernetes version added, public endpoint provided, private endpoint access control target added, node pool Label/Taint, Block Storage CSI, kubectl login plugin added- Kubernetes Engine feature change
- Supports Kubernetes v1.31.
- Provides the cluster’s public endpoint.
- The cluster’s private endpoint access control targets will now include the MNGC (Baremetal) and DevOps Service products.
- Provides node pool label and taint configuration functionality.
- Provides Block Storage CSI and kubectl login plugin functionality.
- The kubeconfig vulnerability has been addressed.
2025.04.28
FEATURE
Private endpoint access control, type: LB feature added- Kubernetes Engine feature change
- Provides private endpoint and access control features.
- type: LoadBalancer provides this functionality.
2025.02.27
FEATURE
Add Kubernetes version and upgrade Kubernetes version, Custom Image, GPU node creation feature added- Kubernetes Engine feature change
- Supports Kubernetes v1.30.
- Provides the Kubernetes version upgrade feature for clusters and node pools.
- Provides Multi-Security Group functionality.
- Provides the ability to create Custom Image nodes and GPU nodes.
- Samsung Cloud Platform Common Feature Change
- Account, IAM, Service Home, tags, and other common CX changes have been reflected.
2024.10.01
NEW
Kuberntes Engine service official release- We have launched the Kuberntes Engine product, which provides lightweight virtual computing Container and Kubernetes clusters for managing it.
- You can create container nodes and centrally manage them through a cluster, enabling deployment of various container applications.
2024.07.02
NEW
Beta version release- We have released the beta version of the Kuberntes Engine product.
2 - Container Registry
2.1 - Overview
Service Overview
Container Registry is a service that provides a registry for storing and managing container images and OCI (Open Container Initiative) standard artifacts. Users can easily store, manage, and share images using the Docker CLI.
Features
- Simple registry management and image distribution: You can easily create a container registry for your project on Samsung Cloud Platform. By using the standard Docker CLI, you can easily pull images for deployment from the Container Registry, streamlining development and service deployment workflows.
- Efficient Container Image Storage: You can easily store container images anytime, anywhere. By integrating with Object Storage, you can store and retrieve images, enabling efficient image management. It also supports the Docker Registry V2 API specification for convenient use.
- Enhanced Security Registry Management: You can securely store and use images using Container Registry. Container Registry encrypts images stored in Object Storage and transfers images via HTTPS. Use resource-based IAM policies of Samsung Cloud Platform to set repository-specific access permissions, and you can use images according to the configured permissions.
- Container Image Vulnerability Analysis: Container Registry provides a feature that analyzes security vulnerabilities in stored container images. Users can view vulnerability results through a simple process of selecting and scanning an image, and can identify and remediate vulnerabilities based on the analysis results.
Service Architecture Diagram
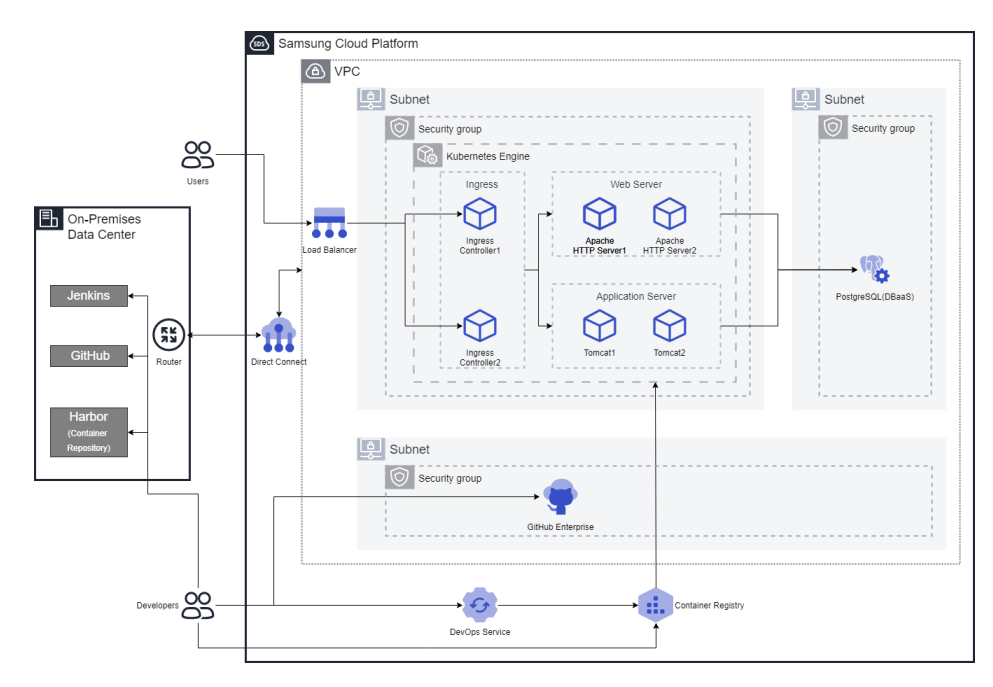
Provided features
Container Registry provides the following features.
- Registry Management: Provides Container Registry creation, deletion, registry access control management (private), and visibility features.
- Repository Management: It is created under the Container Registry and provides functions to create, view, delete repositories, and set security policies.
- Image Management: Container images stored in the repository, providing image Push, image Pull, view, delete, applied tag management, and security policy configuration functions.
- Image Vulnerability Assessment: You can manually or automatically scan OS packages and language packages for security vulnerabilities, as well as secrets embedded in images stored in the Container Registry. Based on the scan results, users can identify and remove known vulnerabilities (CVE) and secrets to prevent the use of insecure images.
Component
Registry
The registry is a repository or collection of repositories used to store, access, and manage container images. Container registries can often support container‑based application development as part of the development and operations process. They can connect directly to container orchestration platforms such as Docker and Kubernetes. A registry acts as an intermediary that shares container images between systems, saving developers time in creating and delivering cloud‑native applications. In the case of Samsung Cloud Platform, it is provided in conjunction with Object Storage and transfers images over HTTPS.
repository
A repository is a logical management unit for image tags. Using a repository allows efficient management of image tags. A repository is a centralized virtual storage that developers use to modify and manage application source code. When developing applications, if there is a need to store and share various types of documents and source code, it enables developers to easily collaborate within the same account, edit simultaneously, and track/manage changes.
image
An image refers to something that includes all files and configuration values required to run a container. An image acts like a class that creates containers, and a container can be seen as the program or process that runs the image. For example, an Ubuntu image contains all files needed to run Ubuntu, and a MySQL image contains all files, IDs, passwords, port information, etc., required to run MySQL.
Preliminary Service
Container Registry has no prerequisite services.
2.1.1 - Monitoring Metrics
Cloud Monitoring service termination notice
According to Samsung Cloud Platform’s policy, the Cloud Monitoring service is scheduled to be discontinued in September 2026.
Accordingly, after the September 2026 release, resource monitoring of the Samsung Cloud Platform via Cloud Monitoring will no longer be possible.
With the new alternative service, you can continuously perform resource monitoring by leveraging ServiceWatch released in October 2025.
ServiceWatch provides more modern and powerful features, replacing Cloud Monitoring to deliver a smooth monitoring environment.
Detailed information about ServiceWatch can be found in the ServiceWatch Overview.
Container Registry monitoring metrics
The table below shows the monitoring metrics for Container Registry that can be viewed through Cloud Monitoring. For detailed usage of Cloud Monitoring, see the Cloud Monitoring guide.
| Performance items | Detailed description | unit |
|---|---|---|
| container.registry.status.alive | Registry status | status |
| containerregistry.statics.image.pull.count | Allowed Image Tag (digest) Pull Count | cnt |
| containerregistry.statics.image.denied_pull.count | Number of rejected Image Tag (digest) Pulls | cnt |
| containerregistry.statics.image.push.count | Allowed Image Tag (digest) Push count | cnt |
| containerregistry.statics.image.denied_push.count | Number of rejected Image Tag (digest) pushes | cnt |
| containerregistry.statics.image.scan.count | Allowed Image Tag (digest) Scan count | cnt |
| containerregistry.statics.image.denied_scan.count | Number of rejected Image Tag (digest) scans | cnt |
| containerregistry.statics.tag.deleted.count | Number of deleted Image Tags (digest) | cnt |
| containerregistry.statics.image.created.count | Number of generated images | cnt |
| containerregistry.statics.image.deleted.count | Number of deleted images | cnt |
| containerregistry.statics.login.count | Allowed Registry Login count | cnt |
| containerregistry.statics.denied_login.count | Number of denied registry logins | cnt |
| containerregistry.statics.repository.created.count | Number of generated repositories | cnt |
| containerregistry.statics.repository.deleted.count | Number of deleted repositories | cnt |
Table. Container Registry monitoring metrics
2.1.2 - ServiceWatch Metrics
Container Registry sends metrics to ServiceWatch. The metrics provided by default monitoring are data collected at a 1‑minute interval.
Reference
For how to view metrics in ServiceWatch, refer to the ServiceWatch guide.
Basic Metrics
The following are the basic metrics for the Container Registry namespace.
The indicators whose names are shown in bold below are the indicators selected as key metrics among the default metrics provided by Container Registry. Key metrics are used to compose the service dashboards that ServiceWatch automatically builds for each service.
Each metric guides users via the user guide on which statistical values are meaningful when viewing that metric, and among the meaningful statistics, the values displayed in bold are the primary statistics. In the service dashboard, you can view key metrics using the primary statistical values.
| Indicator Name | Detailed description | unit | meaningful statistics |
|---|---|---|---|
| Image Pull Count [Allowed] | Allowed Image Tag (digest) Pull Count | Count/Minute |
|
| Image Push Count [Denied] | Number of rejected Image Tag (digest) pushes | Count/Minute |
|
| Repository Count [Deleted] | Number of Deleted Repositories | Count/Minute |
|
| Repository Count [Created] | Number of created repositories | Count/Minute |
|
| Registry Login Count [Allowed] | Number of allowed Registry Logins | Count/Minute |
|
| Image Scan Count [Denied] | Number of rejected Image Tag (digest) scans | Count/Minute |
|
| Image Pull Count [Denied] | Number of rejected Image Tag (digest) Pulls | Count/Minute |
|
| Registry Login Count [Denied] | Number of denied Registry Logins | Count/Minute |
|
| Image Push Count [Allowed] | Allowed Image Tag (digest) Push count | Count/Minute |
|
| Image Scan Count [Allowed] | Allowed Image Tag (digest) Scan count | Count/Minute |
|
| Image Count [Deleted] | Number of deleted images | Count/Minute |
|
| Image Count [Created] | Number of generated images | Count/Minute |
|
| Image Tag Count [Deleted] | Number of deleted Image Tag (digest) | Count/Minute |
|
Table. Container Registry Basic Metrics
2.2 - How-to guides
Users can create a service by entering the required information for the Container Registry service and selecting detailed options through the Samsung Cloud Platform Console.
Creating a Container Registry
You can create and use the Container Registry service from the Samsung Cloud Platform Console.
Reference
You can create up to two Container Registries per Account. (1 per visibility type)
To create a Container Registry service, follow the steps below.
- Click the All Services > Container > Container Registry menu. 1. Go to the Service Home page of Container Registry.
- On the Service Home page, click the Create Registry button. 2. Navigate to the Create Registry page.
- On the Create Registry page, enter the information required to create the service and select detailed options.
- Enter or select the required information in the Service Information Input area.
Category RequiredDetailed description registry name Essential The registry name created by the user - must start with a lowercase English letter and be entered using lowercase English letters and numbers, with a length of 3 to 25 characters
Endpoint Essential Access type settings for the registry endpoint - Private: Only private endpoint access control items can be set
- Private & Public: Private endpoint access control items and public endpoint access control settings can be configured
Private endpoint access control Selection Private endpoint access control settings - Use when selected, you can configure it so that only specific resources within the same region’s account, such as the registry, can be accessed
- Click Add on the private access allowed resources to add resources that can access the registry using the private endpoint
- If Use is not selected, access is allowed from resources in all subnets within the same region
Public endpoint access control Selection Public endpoint access control settings - If Use is selected, you can configure it so that only specific IPs in the same region as the registry can access
- After entering the IP to allow public access, click Add to add an IP that can access the registry using the public endpoint
- Click Add in the public access allowed resources to add a resource that is allowed access
- If Use is not selected, access is allowed from resources in all subnets within the same region
Visibility Selection Anonymous access setting for registry read (Pull) operations - Selecting Public allows unauthenticated anonymous users to perform read operations (Anonymous Pull) on all content in the registry
- This setting can be enabled as Public only when creating the service
Table. Container Registry service information input itemsCaution- If you do not select the use of private endpoint access control, the customer’s registry may be exposed to other resources within the Samsung Cloud Platform.
- If you do not select the use of public endpoint access control, external IP access is possible in an internet environment, so the user’s bucket can be exposed externally via the internet. * If external access is not needed, deselect the use checkbox to minimize security threats.
- In the Additional Information Input area, enter or select the required information.
Category Required statusDetailed description tag Selection Add Tag - Up to 50 can be added per resource
- After clicking the Add Tag button, input or select Key, Value values
Table. Container Registry additional information input fields
- Enter or select the required information in the Service Information Input area.
- Summary Review the detailed information and estimated charges generated in the panel, then click the Create button.
- When creation is complete, check the created resource on the Registry List page.
View detailed information of Container Registry
You can view and edit the full list of resources and detailed information for the Container Registry service. Container Registry Details page consists of Details, Tags, Activity History tabs.
To view the detailed information of the Container Registry, follow these steps.
- Click the All Services > Container > Container Registry menu. 1. Navigate to the Service Home page of Container Registry.
- On the Service Home page, click the Registry menu. 2. Go to the Registry list page.
- Registry List page, click the resource (Registry) to view detailed information. 3. Go to the Registry Details page.
- Registry Details page displays the Registry’s status information and detailed information, and consists of Details, Tags, Activity History tabs.
Category Detailed description Registry status Registry status - Creating: Creating
- Running: Created / running normally
- Editing: Changing settings
- Terminating: Deleting
- Error: Error occurred
- Unknown: Unknown
User Guide CLI-based Registry Usage Guide Service cancellation Button to cancel the service Table. Container Registry status information and additional features
- Registry Details page displays the Registry’s status information and detailed information, and consists of Details, Tags, Activity History tabs.
Detailed Information
On the Registry list page, you can view detailed information of the selected resource and, if necessary, edit the information.
| Category | Detailed description |
|---|---|
| service | Service Name |
| Resource Type | Resource Type |
| SRN | Unique resource ID in Samsung Cloud Platform
|
| Resource name | Resource Name
|
| Resource ID | Unique resource ID in the service |
| Constructor | User who created the service |
| Creation timestamp | Service creation date and time |
| Modifier | User who edited the service information |
| Modification date and time | Date and time the service information was modified |
| registry name | Registry name |
| Bucket name | The name of the Samsung Cloud Platform Object Storage bucket where the registry data is stored |
| Usage | Data usage of the Object Storage bucket for the registry |
| Endpoint | Access type for the registry endpoint
|
| Private endpoint | Private endpoint URL available within the Samsung Cloud Platform network
|
| Public endpoint | Samsung Cloud Platform public endpoint URL available within the network
|
| Private endpoint access control | Private endpoint access control settings
|
| Public endpoint access control | Public endpoint access control settings
|
| Visibility | Anonymous access setting for registry read (Pull) operations
|
Table. Container Registry detailed information tab items
Tag
Registry list page lets you view the tag information of the selected resource, and you can add, modify, or delete it.
| Category | Detailed description |
|---|---|
| Tag list | Tag list
|
Table. Container Registry Tag tab item
Job History
On the Registry list page, you can view the operation history of the selected resource.
| Category | Detailed description |
|---|---|
| Task History List | Resource change history
|
Table. Container Registry operation history tab items
Terminate Container Registry
You can cancel an unused Container Registry to reduce operating costs. However, terminating the service may cause the running service to stop immediately, so be sure to fully consider the impact of any interruption before proceeding with the termination.
Caution
- Cannot delete when there are resources linked to the Registry. * After terminating the linked service shown in the “Service Cancellation Not Allowed” popup, delete the Registry.
- When the service is terminated, all data, including the bucket linked to the Registry, will be deleted. * Be careful, as data cannot be recovered after deletion.
To cancel the Container Registry, follow these steps.
- Click the All Services > Container > Container Registry menu. 1. Go to the Service Home page of Container Registry.
- On the Service Home page, click the Registry menu. 2. Go to the Registry List page.
- On the Registry List page, click the resource (Registry) to view its detailed information. 3. Navigate to the Registry Details page.
- On the Registry Details page, click Service Cancellation.
- To confirm cancellation, click the checkbox and enter the Registry name to delete.
- Registry name is entered correctly, the Confirm button becomes active. 6. Click the Confirm button.
- When termination is complete, check on the Registry list page whether the resource has been terminated.
2.2.1 - Managing the Repository
A repository is a logical management unit for images within a registry. By using a repository, you can set the default security policy for images generated beneath it.
Creating a repository
To create a repository, follow these steps.
- Click the All Services > Container > Container Registry menu. 1. Go to the Service Home page of Container Registry.
- On the Service Home page, click the Repository menu. 2. Go to the Repository list page.
- On the Repository List page, click the Create Repository button. 3. Go to the Create Repository page.
- Repository list at the top of the page, click the Settings icon to select an existing registry, or click Create new to create a registry.
- Enter the required information on the Repository creation page and select the detailed options.
- In the Service Information Input area, enter or select the required information.
Category RequiredDetailed description registry name Essential Select the registry name to create the repository - If there is no existing registry, you can create a new one via the Create New button
Repository name Essential Repository name to create - using lowercase English letters, numbers, and special characters (
-) with a length of 3 to 30 characters (the start and end must be lowercase English letters or numbers only)
Table. Repository Service Information Input Items - In the Repository Basic Policy Input area, enter or select the required information.
Category Required statusDetailed description Image scan Option Automatic scanning of image vulnerabilities generated in the repository and setting scan exclusion policies - You can set the default scan policy applied when an image is created in the repository
- If you set automatic scanning to enabled, the image’s vulnerabilities are automatically checked when the image is pushed. In this case, the vulnerability scanning cost is billed.
- If you set the scan exclusion policy to enabled, you can specify the inspection targets and vulnerabilities to exclude during image scanning
- You can choose to exclude Language Package checks, Secret checks, and vulnerabilities without a Fix Version
- Excludable vulnerabilities: you can select one of the following levels
- (None / Unknown / Negligible / Low / Medium / High / Critical) Exclude vulnerabilities at or below this level
Image Pull limit Option Policy settings for enabling the image Pull restriction feature in the repository and its limit values - You can set the default Pull restriction policy applied when an image is created in the repository
- If the Pull restriction for unscanned images is set to Enabled, pulling images that have not been vulnerability‑checked is not allowed
- If the Pull restriction policy for vulnerable images is set to Enabled, pulling an image is prohibited when Critical or High‑level vulnerabilities exceeding the specified values are found. The allowable input and selectable values for this policy are as follows
- Critical: 1 (default) ~ 9,999,999
- High: 1 (default) ~ 9,999,999
- Exclude vulnerabilities without a Fix Version
- When Enabled, vulnerabilities lacking a Fix Version (i.e., vulnerable packages/libraries without a patched version) are excluded from the Pull restriction policy
Image lock status Option You can set a lock to prevent deleting or updating any images inside the repository - If the repository’s image lock status is Lock, the Lock/Unlock function for individual images in the repository is disabled.
- Changing the image lock status of a repository that is in the Lock state to Unlock enables the Lock/Unlock function for individual images.
- Pushing new images is allowed.
Delete image tag Option You can set an automatic image deletion policy for images stored in the repository - Selecting Enable Deletion Policy applies the image deletion policy
- Selecting Untagged Image Auto Deletion, Tagged Image Auto Deletion applies the respective image deletion policy
- Enter an automatic deletion period in the deletion policy; the image is automatically deleted after the specified period has elapsed since its initial push
- For detailed information on image tag deletion, see 이미지 태그 삭제 정책 관리.
Table. Repository default policy input items - Additional Information Input area, enter or select the required information.
Category RequiredDetailed description Explanation Selection Repository description - Enter repository description
tag Selection Add Tag - Up to 50 per resource can be added
- Add Tag After clicking the Add Tag button, enter or select Key, Value values
Table. Repository additional information input fields
- In the Service Information Input area, enter or select the required information.
Reference
- The Repository default policy input fields are used to set the default (initial) policy for Images created in the Repository. * (Role of the policy configuration template applied when creating an Image)
- This setting can be changed on the detail view screen after creating a Repository, and it will be applied to Images created after the Repository default policy input items are modified. * The Image policy generated before the change will not be modified.
- The default policy set for the Image can be modified on the Image detail screen.
- Summary Review the detailed information and estimated charges generated in the panel, and click the Create button.
- Once creation is complete, check the created resources on the Repository List page.
View repository details
The Repository service allows you to view and edit the full list of resources and detailed information. Repository Details page consists of Details, Tags, Activity History tabs.
To view the repository details, follow these steps.
- Click the All Services > Container > Container Registry menu. 1. Go to the Service Home page of Container Registry.
- On the Service Home page, click the Repository menu. 2. Go to the Repository list page.
- Repository List page, click the resource (Repository) to view its detailed information. 3. Navigate to the Repository Details page.
- Repository Details page displays the Repository’s status information and detailed information, and consists of Details, Tags, Activity History tabs.
Category Detailed description Repository status Repository status display - Active: available state
- Deleting: deleting state
- Inactive: state where deletion failed and is not available (only deletion request allowed)
- Editing: editing settings or deleting sub-resources (images, tags) within the image
User Guide Repository usage guide - CLI-based commands for using images within the repository are available
Delete repository Button to delete the repository Table. Status information and additional features
- Repository Details page displays the Repository’s status information and detailed information, and consists of Details, Tags, Activity History tabs.
Detailed Information
Repository List page lets you view detailed information of the selected resource and edit the information if needed.
| Category | Detailed description |
|---|---|
| Service | Service name |
| Resource Type | Resource Type |
| SRN | Unique resource ID in Samsung Cloud Platform
|
| Resource name | Resource name
|
| Resource ID | Unique resource ID in the service |
| Constructor | User who created the repository |
| Creation timestamp | Repository creation timestamp |
| Modifier | User who modified the repository |
| Modification date and time | Repository modification timestamp |
| Repository name | User-created repository name |
| registry name | Registry name linked to the repository
|
| Explanation | For the generated repository, the user-entered description
|
| image | Link to view the list of stored images in the repository |
| Image scan | Automatic image vulnerability scanning and scan exclusion policy settings for images generated in the repository
|
| Image Pull limit | Policy settings for enabling the image Pull restriction feature and its limit values for images generated in the repository
|
| Image lock status | You can set a lock to prevent deleting or updating any images inside the repository
|
| Delete image tag | Set the automatic image deletion policy for images stored in the repository
|
Table. Repository detailed information tab items
Tag
Repository list page lets you view the tag information of the selected resource, and you can add, modify, or delete it.
| Category | Detailed description |
|---|---|
| Tag list | Tag list
|
Table. Repository tag tab items
Job History
On the Repository List page, you can view the operation history of the selected resource.
| Category | Detailed description |
|---|---|
| Task History List | Resource Change History
|
Table. Work History tab items
Delete Repository
Caution
If an Image exists in the repository, the repository cannot be deleted. To delete a Repository, first delete all Images within that Repository, then delete the Repository.
To delete a repository, follow these steps.
- Click the All Services > Container > Container Registry menu. 1. Navigate to the Service Home page of Container Registry.
- On the Service Home page, click the Repository menu. 2. Go to the Repository list page.
- On the Repository List page, click the resource (Repository) to view its detailed information. 3. Navigate to the Repository Details page.
- On the Repository Details page, click Delete Repository.
- Delete Repository in the popup window, please enter the Repository name.
- If you enter the Repository name correctly, the Confirm button becomes active. 6. Click the Confirm button.
- Once termination is complete, check the Repository List page to see if the resource has been terminated.
2.2.2 - Managing Images and Tags
Images are the logical management units of tags. Users can efficiently manage image versions using tags.
Create Image
To generate an image, the repository must be created first. For detailed information on creating a repository, see Manage Repository.
- Images are created by pushing an image or OCI-standard artifact to the registry endpoint using the CLI.
- Refer to the official documentation provided by the client tool you are using or the Use Container Registry with CLI for instructions on pushing an image with the CLI.
Check image details
Image can view and edit the entire resource list and detailed information. The Image detail page consists of Detail Information, Tags, Delete Policy Test tabs.
To view the image details, follow these steps.
- Click the All Services > Container > Container Registry menu. 1. Go to the Service Home page of Container Registry.
- Click the Image menu on the Service Home page. 2. Go to the Image list page.
- Click the Settings icon at the top of the page, select the Registry name and Repository name where the Image to view detailed information is stored, and click Search.
- On the Image List page, click the resource (Image) to view its detailed information. 5. Image Details go to the page.
- Image Details page displays the Image’s status and detailed information, and is composed of Details, Tags, Delete Policy Test tabs.
Category Detailed description Image status Image status representation - Active: Available state
- Deleting: Deleting state
- Inactive: State where deletion failed and is not usable (only deletion request is possible)
- Editing: State where settings are being modified or image sub-resources (tags) are being deleted
User Guide CLI-based Image Usage Guide Delete Image Delete image button Table. Image status information and additional functions
- Image Details page displays the Image’s status and detailed information, and is composed of Details, Tags, Delete Policy Test tabs.
Detailed Information
Image list page lets you view detailed information of the selected resource and modify the information when necessary.
| Category | Detailed description |
|---|---|
| Constructor | User who generated the image |
| Creation Date/Time | Image creation timestamp |
| Modifier | User who edited the image |
| Modification date and time | Image modification date and time |
| Image name | User-generated image name |
| registry name | Registry name and view link of the repository where the image is stored |
| Pulls | Number of times the image was pulled |
| Repository name | Repository name and view link for the stored image |
| Explanation | The description entered by the user for the image
|
| Image scan | Image vulnerability automatic scanning and scan exclusion policy settings
|
| Image Pull limit | Set whether to use the image Pull restriction feature and its limit values
|
| Image lock status | You can set a lock to prevent the selected image from being deleted or updated
|
| Delete image tag | Set the automatic image deletion policy for images stored in the repository
|
Table. Image detailed information items
Delete Image
Caution
If you delete an image, all tags within the image are also deleted.
To delete the Image, follow these steps.
- Click the All Services > Container > Container Registry menu. 1. Go to the Service Home page of Container Registry.
- On the Service Home page, click the Image menu. 2. Navigate to the Image list page.
- On the Image List page, click the Settings icon at the top and select the Registry name and Repository name where the Image to be deleted is stored.
- On the Image list page, click the resource (Image) to delete. 4. Go to the Image Details page.
- Image Details on the page, click the Image Delete button.
- Image Delete popup appears, click the Confirm button.
- After deletion is complete, check on the Image list page whether the resource has been deleted.
View detailed information of image tag
To view detailed information about the image tag, follow these steps.
- Click the All Services > Container > Container Registry menu. 1. Go to the Service Home page of Container Registry.
- Click the Image menu on the Service Home page. 2. Navigate to the Image list page.
- Click the Settings icon at the top of the Image List page, select the Registry name and Repository name where the Image to be inspected is stored, and click Search.
- Image List page, click the resource (Image) to view detailed information. 4. Go to the Image Details page.
- Image Details Click the Tags tab on the right side of the Details tab at the top of the page. * Go to the Tags list page.
column Detailed description Tags Tag name of the image Digest - A single image Digest can have multiple tag names
Digest Image Digest value Size Image Digest size Modification date and time Image Digest (Tags) Modification Time Inspection date and time Image Digest (Tags) Vulnerability Inspection Date and Time Vulnerability Assessment Results Image Digest(Tags) Vulnerability Scan Results - A summary of vulnerability count information and a view results button are displayed
- View Results button can be clicked to view detailed vulnerability analysis results for image tags
Status Status of image Digest (Tags) - Active: Normal, usable state
- Deleting: Deleting state
- Inactive: Deletion failed and not usable (deletion request only possible)
Copy URL Copy the endpoint URL for using the image Digest - You can copy the private/public endpoint URL for commands that use the image Digest
More button Menu for selecting deletion, modification, vulnerability assessment, and detailed usage guide for image Digest (Tags) - Delete: Delete the corresponding image Digest (Tags)
- Tags Edit: In the Tags edit window, you can modify the tag name of the image Digest
- Vulnerability Assessment: Allows vulnerability assessment of image Digest (Tags)
- Detailed Usage Guide: You can view a CLI‑based guide for using image Digest (Tags)
- Tags Lock: You can set a lock to prevent the selected image Tags from being deleted or updated
- Tags Unlock: You can remove the lock to allow the selected image Tags to be deleted or updated
Table. Tags list items
- Image Details Click the Tags tab on the right side of the Details tab at the top of the page. * Go to the Tags list page.
Reference
An image Digest that is in an Untagged state without a tag name is displayed as None in the Tags field.
Detailed Information
Click the Tags of the image Digest whose details you want to view in the Tags list of the Image details. The detailed information window for the image Digest (Tags) appears.
| column | Detailed description | |
|---|---|---|
| Tag information | Display tag name, digest, creation time, and modification time
| |
| Manifest information | Display the manifest type and details
|
Table. Tags detailed information window items
- In the tag details window, after reviewing the information and clicking Confirm, the window closes.
Delete image tag
Caution
If there are other tags that reference the selected tag, you cannot delete the tag. Delete the reference tag first, then delete the tag.
To delete an image tag, follow these steps.
- Click the All Services > Container > Container Registry menu. 1. Go to the Service Home page of Container Registry.
- On the Service Home page, click the Image menu. 2. Go to the Image list page.
- Image List at the top of the page, click the Settings icon, select the Registry name and Repository name where the Image whose detailed information you want to view is stored, and click Search.
- Image List page, click the resource (Image) to view detailed information. 4. Navigate to the Image Details page.
- Image Details Click the Tags tab on the right of the Details tab at the top of the page. * Tags list Go to the page.
- Tags list select the checkbox located to the left of the tag you want to delete, then click Delete.
- By selecting the checkboxes of multiple items, you can delete several tags at once, and you can select and delete up to 50 tags in a single operation.
- You can delete tags one by one by clicking the Delete button inside the More button located at the far right of the tag to be removed.
- Tags Delete When the popup window opens, click Confirm.
- After deletion is complete, check the Tags list page to see if the resource has been removed.
Testing image tag deletion policy
To test the configured image tag deletion policy, follow these steps.
- Click the All Services > Container > Container Registry menu. 1. Navigate to the Service Home page of Container Registry.
- On the Service Home page, click the Image menu. 2. Navigate to the Image list page.
- Click the Settings icon at the top of the Image List page, select the Registry name and Repository name where the Image to be inspected is stored, and click Search.
- Image List page, click the resource (Image) to view its detailed information. 4. Go to the Image Details page.
- Image Details Click the Delete Policy Test tab located to the right of the Details tab at the top of the page. * Delete Policy Test Go to the tab page.
- On the Delete Policy Test tab page, click the Policy Test button for the Delete Target Tags item. 5. The deletion policy test is being executed.
- When the notification popup for the deletion policy test execution opens, click the Confirm button.
- When the test execution request is completed, Deletion policy test execution request has been completed is displayed.
- Check the test results once the deletion policy test is complete.
- Deletion Target Tags field displays the image tags (digests) that are subject to the deletion policy.
2.2.3 - Manage Image Security Vulnerabilities
By using the image security vulnerability scanning feature, you can manually or automatically scan OS package security vulnerabilities in images stored in Container Registry and the Secrets contained within the images. Based on the scan results, users can identify and remove known vulnerabilities (CVE) and Secrets, preventing the use of insecure images.
Vulnerability assessment support information
Supported OS
- The vulnerability scanning feature supports checking libraries installed via the package manager on the following operating systems.
| Supported OS |
|---|
| Ubuntu |
| Cent OS |
| Oracle |
| Debian |
| Alpine |
| AlmaLinux |
| AWS Linux |
| Rocky Linux |
| RHEL |
| Suse |
| VMWare Photon |
Table. Supported OS Types
Supported Language
- The vulnerability assessment feature supports checks for the following Language.
| Supported Language |
|---|
| Python |
| PHP |
| Node.js |
| .NET |
| Go |
Table. Supported Language Types I (Libraries installed via Language package manager)
| Supported Language |
|---|
| Java |
Table. Supported Language Types II (Libraries identified based on pom.properties and MANIFEST.MF files contained in jar, war, par, ear type files)
Support Secret
- The vulnerability scanning feature supports the following types of Secrets contained in the image.
| Support Secret |
|---|
| AWS access key |
| GitHub personal access token |
| GitLab personal access token |
| Asymmetric Private Key |
Table. Supported Secret Types
Checking image security vulnerabilities (manual)
To check image security vulnerabilities, follow the steps below.
- Click the All Services > Container > Container Registry menu. Navigate to the Service Home page of Container Registry.
- On the Service Home page, click the Image menu. You will be taken to the Image List page.
- Image List Click the Settings icon at the top of the page and select the Registry name and Repository name where the Image for detailed information is stored.
- On the Image List page, click the resource (Image) to check for security vulnerabilities. You will be taken to the Image Details page.
- Image Details Click the Tags tab to the right of the detailed information tab at the top of the page. You will be taken to the Tags tab page.
- On the Tags tab page, click the More button located at the far right of the tag you want to check for security vulnerabilities, then click Vulnerability Check.
- When the vulnerability check notification popup opens, click the Confirm button.
- When the inspection starts, the phrase Vulnerability assessment will be performed. is displayed.
- When the inspection is finished, the Vulnerability Inspection Results item displays a summary of the inspection results and a View Results button. Clicking the View Results button opens a popup that shows detailed analysis of Vulnerabilities by Image Digest (Tags).Reference
- Click the View Results button to see the detailed vulnerability analysis results for the image tag.
- After a vulnerability scan, if a red exclamation mark icon (!) appears in the scan date/time field, it means the vulnerability scan list for the Container Registry service has been updated. Click Vulnerability Scan to re‑scan, as new vulnerability items need to be checked for the image Digest (Tags).
- Click the View Results button to see the detailed vulnerability analysis results for the image tag.
View Image Security Vulnerability Scan Results
To view the vulnerability assessment results, follow these steps.
- Click the All Services > Container > Container Registry menu. Navigate to the Service Home page of Container Registry.
- On the Service Home page, click the Image menu. You will be taken to the Image List page.
- Click the Settings icon at the top of the Image List page and select the Registry name and Repository name where the Image to be inspected is stored.
- Image List page, click the resource (Image) to check for security vulnerabilities. You will be taken to the Image Details page.
- Image Details Click the Tags tab on the right side of the detailed information tab at the top of the page. You will be taken to the Tags tab page.
- On the Tags tab page, click the View Results button of the Vulnerability Check Result item for the tag whose vulnerability check results you want to view.
- Image Tags Vulnerabilities Check the results in the popup window that displays the detailed analysis results.
View inspection results by vulnerability
Image Tag Vulnerabilities On the detailed page’s Vulnerabilities tab, you can view the image security vulnerability assessment results for each vulnerability.
| Item | Detailed description |
|---|---|
| Vulnerability Assessment | Vulnerability check button
|
| Inspection date and time | Vulnerability assessment date and time |
| Distribution | OS name and version of the image Digest (Tags) under inspection
|
| Total number of vulnerabilities | Summary of vulnerability assessment results
|
Table. Summary of Vulnerability Inspection Results
In the Vulnerability tab, you can view the list of all discovered vulnerabilities.
| Item | Detailed description |
|---|---|
| CVE | External links to verify the detected vulnerability ID (CVE ID) and detailed information about the vulnerability
|
| Severity | Severity of detected vulnerabilities |
| CVSS | CVSS (Common Vulnerability Scoring System) based vulnerability score |
| Category | Inspection target type of detected vulnerabilities
|
| OS/Language | OS or Language package type of the detected vulnerability
|
| package | Package name with the discovered vulnerability |
| Current version | Current version of the package with the vulnerability (vulnerable version) |
| Revised version | Version of the package with the vulnerability fixed |
| Whether to edit | Whether a version with the vulnerability fixed exists for the package with the discovered vulnerability (whether a vulnerability patch version exists) |
| Expand button | View vulnerability detailed information
|
Table. Vulnerability List Items
View inspection results by package
Image Tag Vulnerabilities On the detail page, clicking the Package tab navigates to the package-specific vulnerability page. In the Package tab, you can view the image security vulnerability assessment results by package.
| Item | Detailed description |
|---|---|
| Vulnerability Assessment | Vulnerability assessment button
|
| Inspection date and time | Vulnerability assessment date and time |
| Distribution | OS name and version of the image Digest (Tags) to be inspected
|
| Total number of packages | Overall package information summary
|
Table. Summary Items of Package Vulnerability Inspection Results
In the Package tab, you can view the full list of packages and the lists of packages with detected vulnerabilities and without detected vulnerabilities.
| Item | Detailed description |
|---|---|
| Category | Type of discovered package
|
| OS/Language | Detailed OS or Language type of the discovered package
|
| Package | Detected package name |
| Version | Current version of the package |
| Vulnerability assessment results | Summary of the number of vulnerabilities contained in the package |
| type | OS or language type and details of the discovered package |
Table. Package list items
Check inspection results by secret unit
Image Tag Vulnerabilities On the detail page, clicking the Secret tab takes you to the vulnerability page for each secret. You can view the image security vulnerability assessment results by secret.
| Item | Detailed description |
|---|---|
| Vulnerability Assessment | Vulnerability check button
|
| Inspection date and time | Vulnerability assessment date and time |
| Distribution | OS name and version of the image Digest (Tags)
|
| Total number of vulnerabilities | Vulnerability Result Summary
|
Table. Summary of Secret Vulnerability Inspection Results
In the Secrets tab, you can view the complete list of secret files, as well as the lists of files with detected vulnerabilities and files without detected vulnerabilities.
| Item | Detailed description |
|---|---|
| File | File name of detected secret |
| Category | Detected secret type
|
| Severity | Detected secret severity |
| Match | Secret match information in the detected file |
Table. Secret List Items
2.2.4 - Manage Image Tag Deletion Policy
Users can register and manage image tag deletion policies.
Manage image tag deletion policy
The image tag deletion policy refers to a policy that automatically deletes an image after a specified period has elapsed since the image was first pushed to the repository. Enabling the image tag deletion policy causes image tags (digests) stored in the Container Registry to be automatically deleted according to the configured deletion policy.
guide
- After setting the deletion policy activation to use, the image tag (digest) that first receives the deletion policy will be deleted within a maximum of 3 days (72 hours). Subsequent image tags (digests) to which the deletion policy applies will be deleted within a maximum of 1 day (24 hours).
- Image tags (digests) subject to the deletion policy are permanently deleted and cannot be recovered.
Support Deletion Policy Information
Describes policy information that supports the removal of image tags.
Support Policy
Supports policies that enable automatic deletion and retention period settings for image tags (digests).
| Support Policy |
|---|
| Untagged Image |
| Old Image |
Table. Types of Image Tag Deletion Support Policies
Setting the image tag (digest) deletion policy
To set the image tag (digest) deletion policy, follow these steps.
- Click the All Services > Container > Container Registry menu. Navigate to the Service Home page of Container Registry.
- On the Service Home page, click the Image menu. You will be taken to the Image List page.
- Click the gear button at the top of the Image List page. The Registry/Repository Settings popup will open.
- Registry/Repository Settings In the popup window, select the Registry name and Repository name where the image to set the deletion policy is stored, and click the Confirm button.
- On the Image List page, click the resource (Image) for which you want to set the deletion policy. You will be taken to the Image Details page.
- On the Image Detail page, in the Detail Information tab, click the Edit icon of the Delete Image Tag item. The Edit Delete Image Tag popup opens.
- Image Tag Delete Edit In the popup window, enter and select the activation status and required information, then click the Confirm button.
- If you select Enable for Deletion policy activation, image tags (digests) will be automatically deleted according to the configured deletion policy.
- Select the deletion policy to apply and enter the period from when the image is first pushed to the repository until it is automatically deleted.
- When the edit notification popup opens, click the Confirm button.
- When the modification is complete, the message Image tag removal edit was successful will be displayed.
Reference
You can also set a deletion policy in the Repository, which serves as the template for Images. When configuring a deletion policy in the Repository, the same policy is applied to all Images stored within it.
Testing image tag (digest) deletion policy
To test the image tag (digest) deletion policy, follow these steps.
- Click the All Services > Container > Container Registry menu. Navigate to the Service Home page of Container Registry.
- On the Service Home page, click the Image menu. You will be taken to the Image List page.
- Image list Click the gear button at the top of the page. Registry/Repository settings A popup window will open.
- Registry/Repository Settings In the popup window, select the Registry name and Repository name where the image to set the deletion policy is stored, and click the Confirm button.
- Image List page, click the resource (Image) to test the deletion policy. You will be taken to the Image Details page.
- On the Image Detail page, click the Delete Policy Test tab. You will be taken to the Delete Policy Test tab page.
- On the Delete Policy Test tab page, to test the configured delete policy, click the Policy Test button below the target Tags.
- When the delete policy test execution notification popup opens, click the Confirm button.
- When the test execution request is completed, the message Deletion policy test execution request has been completed is displayed.
- When the test is completed, the Deletion Target Tags item will display the image tags (digests) that are subject to the deletion policy.
2.2.5 - Use Container Registry with CLI
This explains how to log in to the Container Registry using CLI commands and manage container images and Helm charts.
Managing container images with CLI
You can log in to the Container Registry using CLI commands and push or pull container images.
Log in to the Container Registry
The user can log in to the Container Registry using an authentication key.
Note
To log in to a Container Registry, you need the LoginContainerRegistry permission for the registry you will use.
For detailed information on policies and permission settings, see Management > IAM > Policies.
For detailed information on policies and permission settings, see Management > IAM > Policies.
Log in with an authentication key
Log in using the authentication key’s AccessKey, SecretKey, and the registry endpoint.
- Registry endpoint: can be found on the Container Registry Details page.
- Private endpoint: [registryname-registryid].scr.private.[region].[offering].samsungsdscloud.com
1 docker login <registry_endpoint>
2 Username: <accessKey>
3 Password: <secretKey>
Note
- To log in with an authentication key, create an authentication key on the IAM > Authentication Key Management page, and set the authentication method to Authentication Key Authentication in Security Settings.
- Before modifying Security Settings, be sure to check the guidance text about the authentication key authentication method at the top of the Edit Authentication Key Security Settings popup.
- For detailed information on how to create an authentication key and set up authentication key verification, see Management > IAM > Manage Authentication Keys.
Push image
To push an image to the registry, refer to the following command.
1 docker push [registryname]-[registryid].scr.private.[region].[offering].samsungsdscloud.com/[repository]/[image:tag]
Note
- To push an image to a registry, you need the LoginContainerRegistry permission for the registry you will use and the PushRepositoryImages permission for the repository.
- For detailed information on policy and permission settings, refer to Management > IAM > 정책.
Pull image
To pull an image from the registry, refer to the following command.
1 docker pull [registryname]-[registryid].scr.private.[region].[offering].samsungsdscloud.com/[repository]/[image:tag]
Note
- To pull an image from a registry, you need the LoginContainerRegistry permission for the registry you will use and the PullRepositoryImages permission for the repository.
- For detailed information on policies and permission settings, see Management > IAM > Policies.
Managing Helm charts with CLI
You can log in to the Container Registry using CLI commands and push or pull Helm charts.
Note
Container Registry supports Helm v3.8.1 or later.
Log in to Container Registry
The user can log in to the Container Registry using an authentication key.
Reference
To log in to a Container Registry, you need the LoginContainerRegistry permission for the registry you will use.
For detailed information on policies and permission settings, see Management > IAM > Policy.
For detailed information on policies and permission settings, see Management > IAM > Policy.
Log in with authentication key
Log in using the authentication key’s AccessKey, SecretKey, and the registry endpoint.
- Registry endpoint: Container Registry Details can be found on the page.
- Private endpoint : [registryname-registryid].scr.private.[region].[offering].samsungsdscloud.com
1 helm registry login <registry_endpoint>
2 Username: <accessKey>
3 Password: <secretKey>
Note
- To log in with an authentication key, create an authentication key on the IAM > Authentication Key Management page, and set the authentication method to Authentication Key Authentication in Security Settings.
- Before modifying Security Settings, be sure to review the guidance text about the authentication key method at the top of the Edit Authentication Key Security Settings popup.
- For detailed information on how to create an authentication key and set up authentication key verification, see Management > IAM > Manage Authentication Keys.
Push chart
To push a chart to the registry, refer to the following command.
1 helm push [hello-world-0.1.0].tgz oci://[registryname]-[registryid].scr.private.[region].[offering].samsungsdscloud.com/[mychart]
If you write and execute the command as shown in the example, it saves (uploads) the chart by applying the 0.1.0 tag to the hello-world image in the mychart repository.
- To push a chart to a registry, you need the LoginContainerRegistry permission for the registry you will use and the PushRepositoryImages permission for the repository.
- For detailed information on policies and permission settings, see Management > IAM > Policies.
Pull chart
To pull a chart from the registry, refer to the following command.
1 helm pull oci://[registryname]-[registryid].scr.private.[region].[offering].samsungsdscloud.com/[mychart/hello-world] -version [0.1.0]
By writing and executing the command as shown in the example, you download the chart stored with tag 0.1.0 in the hello-world image of the mychart repository.
- To pull a chart from a registry, you need the LoginContainerRegistry permission for the registry you will use and the PullRepositoryImages permission for the repository.
- For detailed information on policies and permission settings, see Management > IAM > Policy.
2.2.6 - Example of Registry and Repository Policies
After creating the Samsung Cloud Platform Container Registry (hereinafter SCR) service, an endpoint is provided. This endpoint provides an example policy that grants specific permissions when using SCR.
Reference
- IAM > Policy > Policy List page lets you create permission policies for registries and repositories, and view or edit existing policies.
- For detailed information on policy management, please refer to the Samsung Cloud Platform User Guide’s Management > IAM > 정책.
- Please refer to the required permissions for using Container Registry with the CLI in Using Container Registry with the CLI.
Allow pulling all repository images created in all registries
If you apply the ScrPullOnlyAccess policy provided as an IAM default policy, you can grant IAM users and user groups permission to pull all repository images created in all registries within the account.
To allow pulling all repository images created in all registries, follow these steps.
- All Services > Management > IAM Click the menu. 1. Navigate to the Service Home page of Identity and Access Management (IAM).
- On the Service Home page, click the Policy menu. 2. Go to the Policy List page.
- On the Policy List page, select ScrPullOnlyAccess. 3. Policy Details navigate to the page.
- On the Policy Details page, select the Connected Targets tab.
- On the Connection Target tab page, connect the target to which you will grant permissions.
- User: Click User Connection above the list to go to the User Connection page. * Select the user to connect and click Done to complete the user connection.
- User Group: Click User Group Link above the list to go to the User Group Link page. * Select the user group to connect and click Done, and the user group connection will be completed.
- Role: Click Role Link above the list to go to the role link page. * Select the role to connect and click Done to complete the role linking.
Reference
The ScrPullOnlyAccess policy consists of the following permissions.
- Permission to allow the LoginContainerRegistry Action required for Registry authentication
- Permission to allow the PullRepositoryImages action required for repository image pull
IP access control for SCR endpoints is provided via Private Endpoint Access Control and Public Endpoint Access Control on the Registry detail page.
- Please note that when IP access control is used in the IAM policy for the SCR endpoint, you cannot use Registy and Repository Image via the SCR endpoint.
- Set the IP access control entries to Applied IP: All IPs, Excluded IP: Not used.
Allow pulling and pushing all repository images created in all registries
If you apply the ScrPullPushOnlyAccess policy provided as an IAM default policy, you can grant IAM users and user groups permission to allow Pull and Push for all repository images created in all registries within the account.
To allow Pull and Push for all Repository Images created in all Registries, follow these steps.
- Click the All Services > Management > IAM menu. 1. Navigate to the Service Home page of Identity and Access Management (IAM).
- On the Service Home page, click the Policy menu. 2. Go to the Policy List page.
- On the Policy List page, select ScrPullPushOnlyAccess. 3. Navigate to the Policy Details page.
- On the Policy Details page, select the Connection Targets tab.
- On the Connection Target tab page, connect the target to which you will grant permissions.
- User: Click User Connection above the list to go to the User Connection page. * Select the user to connect and click Done to complete the user connection.
- User Group: Clicking User Group Link above the list navigates to the User Group Link page. * Select the user group to connect and click Done, and the user group connection will be completed.
- Role: Click Role Link above the list to go to the role link page. * Select the role to connect and click Complete, then the role connection will be completed.
Reference
The ScrPullPushOnlyAccess policy consists of the following permissions.
- Permission to allow the LoginContainerRegistry Action required for Registry authentication
- Permission to allow the PullRepositoryImages Action required for Repository Image Pull
- Permission to allow the PushRepositoryImages Action required for Push
IP access control for SCR endpoints is provided via Private Endpoint Access Control and Public Endpoint Access Control on the Registry detail page.
- Please note that when IP access control is used in the IAM policy for the SCR endpoint, you cannot use Registy and Repository Image via the SCR endpoint.
- Set the IP access control entries to Applied IP: All IPs, Excluded IP: Not used.
Allow pulling all repository images created in a specific registry
By applying the ScrPullOnlyAccess policy provided as an IAM default policy, you can create a policy that allows only Pull for all repository images created in a specific Registry.
To create a pull permission policy for all repository images created in a specific registry, follow these steps.
- All Services > Management > IAM Click the menu. 1. Navigate to the Service Home page of Identity and Access Management (IAM).
- On the Service Home page, click the Policy menu. 2. Go to the Policy List page.
- On the Policy List page, click Create Policy.
- On the Policy Creation page, enter the Basic Information Input fields and click Next.
- On the Permission Settings page, click Load Policy.
- Load Policy in the window’s list, select ScrPullOnlyAccess and click OK.
- On the Permission Settings page, select the Individual Resource of the Applied Resources item.
- Click Add Resource in the applied resource list.
- In the Add Resource window, select container-registy from the resource type list. 9. In the resource detail list, check the registy resource you want to add, then click Confirm.
- Check the individual resources you added in the applied resources list and click Next.
- Check the input information and click Create. 11. Policy creation is complete.
Reference
The ScrPullOnlyAccess policy consists of the following permissions.
- LoginContainerRegistry Action permission
- Permission to allow the PullRepositoryImages action required for repository image pull
IP access control for SCR endpoints is provided via Private Endpoint Access Control and Public Endpoint Access Control on the Registry detail page.
- When creating an IAM policy for using the SCR endpoint, if you use IP access control, please note that you cannot use Registy and Repository Image through the SCR endpoint.
- Set the IP access control entries to Applied IP: All IPs, Excluded IP: Not used.
Allow Image Pull and Push for a Specific Repository Created in a Specific Registry
If you apply the ScrPullPushOnlyAccess policy provided as a default IAM policy, you can create a policy that allows Pull and Push for a specific repository image created in a particular registry.
To create a policy that allows Pull and Push for a specific Repository Image created in a specific Registry, follow these steps.
- All Services > Management > IAM Click the menu. 1. Navigate to the Service Home page of Identity and Access Management (IAM).
- On the Service Home page, click the Policy menu. 2. Go to the Policy List page.
- On the Policy List page, click Create Policy.
- On the Policy List page, enter the items of Basic Information Input and click Next.
- On the Permission Settings page, click Load Policy.
- In the Load Policy window’s list, select ScrPullPushOnlyAccess and click OK.
- On the Permission Settings page, select the Individual Resource of the Applied Resources item.
- Click Add Resource in the applied resource list.
- In the Add Resource dialog, select the following items.
- Select container-registy from the resource type list. * In the resource detail list, check the registry resource to add, then click Confirm.
- Select the repository from the resource type list. * In the resource detail list, check the repository resource to add, then click Confirm.
- Verify the individual resources you added in the applied resource list and click Next.
- Check the input information and click Create. 12. Policy creation is complete.
Reference
The ScrPullPushOnlyAccess policy consists of the following permissions.
- Permission to allow the LoginContainerRegistry Action required for Registry authentication
- Permission to allow the PullRepositoryImages action required for repository image pull
- PushRepositoryImages Action required for Push
IP access control for SCR endpoints is provided via Private Endpoint Access Control and Public Endpoint Access Control on the Registry detail page.
- When creating an IAM policy for using the SCR endpoint, if you use IP access control, please note that you will not be able to use Registy and Repository Image through the SCR endpoint.
- Set the IP access control entries to Applied IP: All IPs, Excluded IP: Not used.
2.3 - API Reference
API Reference
2.4 - CLI Reference
CLI Reference
2.5 - Release Note
Container Registry
2026.07.16
FEATURE
Lifecycle management policy improvement, improvement of storage and management method for vulnerability assessment results- Container Registry feature change
- Improved internal processes related to lifecycle management policies to enhance the convenience of the Image Tag deletion feature.
- We provide a Registry Endpoint‑based (CLI) vulnerability assessment lookup feature by improving internal storage and management methods.
2026.05.21
FEATURE
OCI Distribution Spec. Ensuring compatibility, improving Registry creation/deletion logic, providing per-section refresh button- Container Registry feature change
- General-purpose Container Registry related OCI (Open Container Initiative) Distribution Spec. * Ensured v1.1.1 compatibility and improved the user Registry.
- Improved internal processes related to the Container Registry creation/deletion logic to enhance convenience.
- We improved usability by adding a refresh button where needed, just like with other products.
2026.03.19
FEATURE
OCI Distribution Spec. Ensure compatibility, expand image vulnerability scanning capabilities- Container Registry feature change
- OCI (Open Container Initiative) Distribution Spec related to Registry. * Ensured v1.1.1 compatibility and improved the user Registry.
- We expand the coverage by adding OS and language types to the container image vulnerability assessment targets.
2025.12.18
FEATURE
Add image tag deletion policy, improve Public Endpoint access control IP Validation- Container Registry feature changes and improvements
- We additionally offer the image tag deletion policy feature based on count.
- We improve the validation of Public Endpoint access control IP input values according to the IP range constraints of the Firewall product.
2025.10.23
FEATURE
Add option to enable image tag deletion policy, support ServiceWatch integration- Container Registry feature change
- Provides a feature to enable the deletion policy setting for image tag deletion items.
- Provides log collection functionality based on ServiceWatch integration.
2025.07.01
FEATURE
Self-encryption / S3 API compatible bucket-based Container Registry, provide public endpoint, add private endpoint access control target, support Image Life Cyle Policy- Container Registry feature change
- Provides a Container Registry service based on Object Storage with self‑encryption and the S3 API compatibility issue patch applied.
- Provides public endpoints and access control features for the Registry.
- We additionally offer the Multi-Node GPU Cluster product among the private endpoint access control targets of the Registry.
- Provides a feature to set automatic deletion policies for repositories, stored images, and their individual tags (digests).
2025.02.27
FEATURE
Add Image Lock functionality and monitoring, and VPC Endpoint integration- Container Registry feature change
- Provides a lock feature for images stored in the Registry.
- Provides monitoring capabilities for the Registry in conjunction with the Cloud Monitoring product.
- Provides integration with VPC Endpoint.
- Samsung Cloud Platform Common Feature Changes
- Account, IAM, and Service Home, tags, etc., have been updated to reflect common CX changes.
2024.11.28
NEW
Container Registry service temporary version release- Container Registry is a service that provides a registry and repository where you can easily store, manage, and share container images and OCI (Open Container Initiative) standard artifacts.
- It was released as a temporary version and will be migrated to the official version once the encryption solution is updated.