This is the multi-page printable view of this section. Click here to print.
Cloud Functions
1 - Overview
Service Overview
Cloud Functions is a serverless computing-based FaaS (Function as a Service) that lets you easily run function‑based applications without provisioning servers. Users don’t have to hassle with managing servers or containers for scaling, and can focus on writing code and deploying applications.
Features
- Easy and Convenient Development Environment: Developers can easily create Function resources that connect to events across multiple environments using a Code Editor suitable for the selected runtime, and can write and invoke code with ease.
- Serverless Computing: You can use a serverless code execution service for development in the Samsung Cloud Platform environment. * The resources required to invoke and run function-based applications are allocated and managed by the Samsung Cloud Platform according to the scale of execution.
- Efficient Cost Management: The invoked Function aggregates usage (total number of calls, total execution time) and is billed for the time actually used to run the application. * Functions with low usage can have the Cloud Functions scaler adjusted to a scale-to-zero state, so they do not consume resources, enabling efficient cost management.
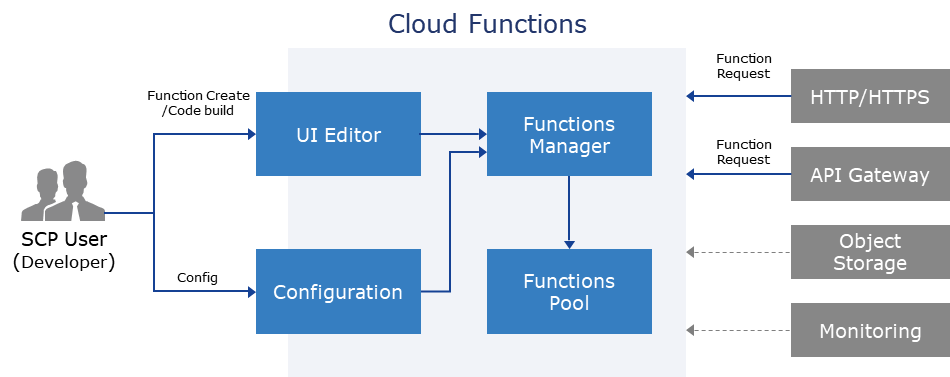
Service diagram
Provided Features
Cloud Functions provides the following features.
- Code Development Environment: Create Runtime-optimized functions, write and edit code
- Refer to 구성 요소 > Runtime for supported runtimes.
- Function execution, environment management, monitoring: endpoint definition, Token management, access control configuration, trigger configuration, etc., runtime environment/variable definition and modification, artifact invocation/testing for Deploy/Test, service deployment, progress status monitoring/logging
- Serverless Computing: All elements required for code writing and deployment are managed by Samsung Cloud Platform, with automatic scaling adjustments based on deployment.
- Sample Code Provided: By providing various sample codes through Blueprint, you can start easily and quickly
Component
Runtime
Cloud Functions currently supports the following runtimes. Additional continuously supported runtimes will also be added.
| Runtime | Version | Deprecation date |
|---|---|---|
| GO | 1.21 | 2026.7.30 |
| GO | 1.23 | 2026.7.30 |
| GO | 1.25 | - |
| java | 17 | - |
| Node.js | 18 | 2026.7.30 |
| Node.js | 20 | 2026.7.30 |
| Node.js | 22 | - |
| Node.js | 24 | - |
| PHP | 8.1 | 2026.7.30 |
| PHP | 8.4 | - |
| PHP | 8.5 | - |
| Python | 3.9 | 2026.7.30 |
| Python | 3.10 | - |
| Python | 3.11 | - |
| Python | 3.14 | - |
Runtime scheduled for deprecation
- For Runtime versions slated for deprecation, technical support is expected to end within 60 days (End of Technical Support) (detailed schedule will be announced on the console).
- When technical support for a Runtime version ends, security patches and updates will no longer be applied to that Runtime version.
- Already created functions can be used continuously without a call time limit, but they cannot be modified.
- We do not guarantee bugs, errors, defects, or vulnerabilities that arise in Runtime versions for which technical support has ended.
- We recommend migrating to and using an alternative version of a function that is scheduled for deprecation to ensure safe usage.
Provision status by region
The Cloud Functions service is available in the environments below.
| Region | Whether provided |
|---|---|
| Korea West 1 (kr-west1) | Provide |
| Korea East 1 (kr-east1) | Provided |
| South Korea 1 (kr-south1) | Not provided |
| South Korea South 2 (kr-south2) | Not provided |
| South Korea 3 (kr-south3) | Not provided |
Preceding Service
This is a list of services that can be configured as optional before creating the service. Please refer to the guide provided for each service and prepare in advance.
| Service Category | service | Detailed description |
|---|---|---|
| Application Service | API Gateway | A service that easily manages and monitors APIs |
1.1 - ServiceWatch Metrics
Cloud Functions sends metrics to ServiceWatch. The metrics provided by default monitoring are data collected at a 1‑minute interval.
Basic Metrics
The following are the basic metrics for the Cloud Functions namespace.
The metrics whose names are displayed in bold below are the metrics selected as key metrics among the default metrics provided by Cloud Functions. The key metrics are used to build service dashboards that are automatically created per service in ServiceWatch. You can also view the key metrics on the Monitoring tab of the Cloud Functions detail page.
Each metric guides users, through the user guide, on which statistical values are meaningful when querying that metric, and among the meaningful statistics, the values displayed in bold are the primary statistics. In the service dashboard or monitoring tab, you can view key metrics using these primary statistics.
| Performance items | Detailed description | unit | meaningful statistics |
|---|---|---|---|
| Invocations | Average number of times the function is called per unit time | Count |
|
| Success Calls | Average number of times the runtime code operates correctly and returns a response code per unit time during a function call. | Count |
|
| Error Calls | Average number of calls per unit time that encounter errors during function invocation, including runtime errors due to response timeouts and logic errors. | Count |
|
| Memory Usage | Average memory usage per unit time while the function is executing | Kilobytes |
|
| Active Operations | When a function is called multiple times simultaneously, the average number of tasks generated per unit time for concurrent processing. | Count |
|
2 - How-to guides
Users can create the service by entering the required information for Cloud Functions and selecting detailed options through the Samsung Cloud Platform Console.
Creating Cloud Functions
All Services > Compute > Cloud Functions Click the menu. 1. Go to the Service Home page of Cloud Functions.
On the Service Home page, click the Create Cloud Functions button. 2. Go to the Create Cloud Functions page.
On the Create Cloud Functions page, enter the information required to create the service.
Category RequiredDetailed description Function name Required Enter the name of the Funtion to create - Start with a lowercase English letter and use lowercase English letters, numbers, and special characters (
-) to enter between 3 and 64 characters
Runtime Required Select Runtime creation method - New: Create a new Runtime
- Start with Blueprint: Write using the Runtime source code provided by the service
Runtime & Vesion Essential Select Runtime and Version - When Create New is selected
- Refer to the Runtime & Version list in Components > Runtime
- For the Java runtime, UI code editing is not supported, but you can import a JAR file from Object Storage and execute it
- When Start with Blueprint is selected
- You can view a source code example by clicking the View Source Code button for that Runtime & Version
- Refer to the Blueprint Detailed Guide for more information on Blueprint settings
- If the Runtime version has reached End of Technical Support (EoTS), it cannot be modified after creation
Table. Cloud Functions service information input fields- Start with a lowercase English letter and use lowercase English letters, numbers, and special characters (
Summary Check the detailed information and estimated charges generated in the panel, and click the Create button.
- When creation is complete, check the created resources on the Cloud Functions list page.
View Cloud Functions details
Cloud Functions Details page consists of Details, Monitoring, Logs, Code, Configuration, Triggers, Tags, Job History tabs.
To view detailed information about the Cloud Functions service, follow these steps.
- All Services > Compute > Cloud Functions Click the menu. 1. Navigate to the Service Home page of Cloud Functions.
- On the Service Home page, click the Function menu. 2. Function list Go to the page.
- On the Function list page, click the resource to view detailed information. 3. Navigate to the Function Details page.
- Function Details page displays status information and additional feature information, and consists of Details, Monitoring, Logs, Code, Configuration, Triggers, Tags, Job History tabs.
Category Detailed description Cloud Functions status Cloud Functions status information - Ready: green icon, a state where normal function invocations are possible
- Not Ready: gray icon, a state where normal function invocations are not possible
- Deploying: yellow icon, a state where the function is being created or updated, which triggers the next action
- Function creation and modification
- Code tab: edit code in the editor
- Code tab: inspect jar file
- Trigger tab: add and modify
- Configuration tab: modify
- Running: blue icon, a state where normal function invocations are possible and a cold‑start prevention policy is applied
Service cancellation Cancel service button Table. Cloud Functions status information and additional features
- Function Details page displays status information and additional feature information, and consists of Details, Monitoring, Logs, Code, Configuration, Triggers, Tags, Job History tabs.
Detailed Information
Function list page allows you to view detailed information of the selected resource and edit the information if needed.
| Category | Detailed description |
|---|---|
| service | Service name |
| Resource Type | Resource Type |
| SRN | Unique resource ID in Samsung Cloud Platform |
| Resource name | Resource name
|
| Resource ID | Service’s unique resource ID |
| Constructor | User who created the service |
| Creation date and time | Service creation timestamp |
| Modifier | User who modified the service |
| Modification date | Date and time of service modification |
| Function name | Name of the Cloud Function |
| Runtime | Runtime types and versions
|
- Even after technical support for the Runtime version ends, functions that have already been created can continue to be used without any call time limit. * However, security patches and updates for that Runtime version will not be applied.
- Bugs, errors, defects, or vulnerabilities that occur in Runtime versions that are no longer supported are not covered.
- If support for a Runtime has ended, the user must create a replacement Runtime version and then manually delete the function of the previous version.
- To use this function safely, create a new instance using the Lastest or Stable version.
Monitoring
Function List page lets you view the Cloud Functions usage information for the selected resource.
| Category | Detailed description |
|---|---|
| Number of calls | Average number of times the function is called per unit time (instances) |
| execution time | Average execution time (seconds) of the function per unit time |
| Memory usage | Average memory usage (KB) during the function execution per unit time |
| Current number of tasks | When the function is called multiple times simultaneously, the average number of tasks (count) generated per unit time for concurrent processing. |
| Successful call count | Average number of times (cases) the runtime code operated correctly and returned a response code per unit time during a function call. |
| Failed call count | Average number of calls with errors per unit time during function invocation
|
log
Function list page allows you to view the Cloud Functions logs of the selected resource.
| Category | Detailed description |
|---|---|
| unit period | Select the period to view Cloud Functions log information
|
| log message | Functions are displayed in order, starting with the most recent occurrence. |
code
Function List page lets you view and edit the Cloud Functions code of the selected resource.
The way to view and edit source code varies depending on the runtime used.
- Inline Editor: Node.js, Python, PHP, Go
- Compressed file (.jar/.zip) execution: Java
| Category | Detailed description |
|---|---|
| source code | Inline editor method |
| code information | Display code information |
| Edit | After clicking the Edit button, you can modify the code in the inline editor. |
| Category | Detailed description |
|---|---|
| source code | Execution method for compressed files (.jar/.zip) |
| code information | Display compressed file information
|
| Edit | Jar file can be modified
|
- If technical support for the runtime version has ended, you cannot modify the code. * Also, because security patches and updates are not applied, create and use the function anew with the Latest or Stable version to ensure safe usage.
- In the case of Java Runtime, it does not provide a UI code editing feature, and you must select a compressed file (.jar/.zip) from a bucket in the Object Storage service.
- If a user does not have an authentication key generated for the Object Storage service, they cannot execute Import from Object Storage, so they must create an authentication key in advance.
- For detailed information on creating an authentication key, see Creating an Authentication Key.
- The Object Storage bucket for the Cloud Functions service must have its access control set to allow.
- For detailed information on Object Storage access control, see Allowing Cloud Functions Service Access.
Configuration
On the Function list page, you can view the Cloud Functions configuration of the selected resource.
| Category | Detailed description |
|---|---|
| General configuration | Memory and timeout settings of Cloud Function
|
| function URL | Issue an HTTPS URL address that can access the function
|
| environment variable | Set runtime environment variables
|
| Private connection configuration | Can be used in conjunction with PrivateLink Service
|
| Permission | Add and manage resource policies for IAM-based functions
|
- If technical support for the Runtime version has been discontinued, configuration items cannot be modified. * Also, because security patches and updates are not applied, create and use the function anew with the Latest or Stable version to ensure safe usage.
- If access control is disabled, the registered access information is deleted, making function access control impossible, which can expose the system to security attacks such as external scanning, hacking, etc.
- CPU cores proportional to the memory allocation of General configuration are automatically assigned.
- If the minimum number of executions of General configuration is 1 or more, Cold Start is prevented, but continuous costs are incurred.
Trigger
On the Function List page, you can view and configure the trigger information of the selected resource. By setting a trigger, you can automatically execute the Function when an event occurs.
| Category | Detailed description |
|---|---|
| Cronjob | Use Cronjob as a trigger
|
| API Gateway | Use API Gateway as a trigger
|
- If technical support for the Runtime version has ended, you cannot modify the trigger item. * Also, because security patches and updates are not applied, create and use the function anew with the Latest or Stable version to ensure safe usage.
- If the Cronjob trigger is called before the function’s timeout, the function will execute concurrently, increasing both the execution count and the total time. * Therefore, be cautious because continuous additional costs can lead to high expenses.
- If the status is Deploying, it cannot be modified.
- Refer to Setting up triggers for trigger configuration.
Tag
In the Tag tab, you can view the resource’s tag information, and add, modify, or delete it.
| Category | Detailed description |
|---|---|
| Tag list | Tag list
|
Job History
Job History page allows you to view the resource’s job history.
| Category | Detailed description |
|---|---|
| Task History List | Resource Change History
|
Changing Java Runtime code
If you are using Java Runtime, you cannot modify the code directly, so you must select and replace the archive file (.jar/.zip) in the bucket of the Object Storage service.
To modify a compressed file, follow these steps.
All Services > Compute > Cloud Functions menu, click. 1. Navigate to the Service Home page of Cloud Functions.
On the Service Home page, click the Function menu. 2. Go to the Function list page.
On the Function List page, click the resource to change the compressed file in the code. 3. Go to the Function Details page.
Click the Edit button on the Code tab of the Function Details page. 4. Edit Function code Navigate to the page.
Click the Import from Object Storage button. 5. Import from Object Storage The popup window opens.
Category Detailed description Java Runtime Java Runtime Information Handler information Handler information - Execution Class: Automatically entered when setting the archive file (.jar/.zip)
- Execution Method: Automatically entered when setting the archive file (.jar/.zip)
Compressed file (.jar/.zip) Set the archive file to modify - Archive file name (.jar/.zip): Displays the name of the archive file. Import from Object Storage after configuration, it is entered automatically
- Import from Object Storage: Configure the Object Storage to retrieve the archive file (.jar/.zip)
Table. Cloud Functions Details - Function Code Modification ItemsEnter the URL information of the Object Storage to retrieve the compressed file in Object Storage URL, then click the Confirm button. 6. The notification popup opens.
- URL information can be found in the Folder List tab of the detailed page of the Object Storage to retrieve, under the File Information > Private URL item.
Click the Confirm button. 7. On the Function code edit page, the name of the imported compressed file is displayed in the Compressed file name (.jar/.zip).
Click the Save button.
- Users without a generated authentication key cannot execute Import from Object Storage.
- If the URL does not exist or the archive file matches any of the following, it cannot be changed.
- When using an unsupported file extension
- If there are harmful files inside the compressed file.
- If the size exceeds the supported limit
Terminate Cloud Functions
To cancel the Cloud Functions service, follow these steps.
- Click the All Services > Compute > Cloud Functions menu. 1. Navigate to the Service Home page of Cloud Functions.
- On the Service Home page, click the Function menu. 2. Navigate to the Function list page.
- On the Function List page, click the resource you want to terminate and then click the Terminate Service button.
- When the termination is complete, check on the Function list page whether the resource has been terminated.
2.1 - Configure Trigger
Configure Trigger
- By default, all triggers can be added in Cloud Functions.
- If it is triggered for a specific product, it should be passed to Cloud Functions.
Setting up Cronjob trigger
To set up a Cronjob trigger, follow these steps.
- Click the All Services > Compute > Cloud Functions menu. Navigate to the Service Home page of Cloud Functions.
- On the Service Home page, click the Function menu. You will be taken to the Function list page.
- Function List page, click the resource for which you want to set a trigger. You will be taken to the Function Details page.
- After clicking the Trigger tab, click the Add Trigger button. Set it. The Add Trigger popup window opens.
- Add Trigger In the popup, select Cronjob from Trigger Type. A required information input area appears at the bottom.
Category Detailed description Cronjob configuration Set the trigger’s repeat frequency - Can be set in minutes, hours, days, months, weekdays
Timezone setting Set the trigger’s reference time zone Table. Cronjob Trigger Required Information Items - After entering the required information, click the Confirm button.
- When the popup notifying an addition opens, click the Confirm button.
Configure API Gateway Trigger
To set up an API Gateway trigger, follow these steps.
- Click the All Services > Compute > Cloud Functions menu. Navigate to the Service Home page of Cloud Functions.
- On the Service Home page, click the Function menu. You will be taken to the Function List page.
- Click the resource to set the trigger on the Function List page. Go to the Function Details page.
- Click the Trigger tab, then click the Add Trigger button. Set it. The Add Trigger popup opens.
- In the Add Trigger popup, select API Gateway under Trigger Type. A required information input area appears at the bottom.
Category Detailed description API name Select API - You can select an existing API or create a new one
Stage Select deployment target - You can select an existing stage or create a new one
Table. API Gateway Trigger Required Information Items - After entering the required information, click the Confirm button.
- When the popup notifying the addition opens, click the Confirm button.
Configure Multi-Trigger
You can attach multiple triggers to a single function.
Modify Trigger
To modify the added trigger, follow these steps.
- Click the All Services > Compute > Cloud Functions menu. Navigate to the Service Home page of Cloud Functions.
- On the Service Home page, click the Function menu. You will be taken to the Function list page.
- On the Function List page, click the resource to edit the trigger. You will be taken to the Function Details page.
- Click the Trigger tab, then in the trigger list, click the Edit button of the trigger whose settings you want to modify. The Edit Trigger popup window opens.
- Edit Trigger After modifying the settings in the popup window, click the Confirm button.
- The configuration values differ depending on the trigger type (refer to Cronjob Trigger, API Gateway Trigger).
- When the edit notification popup appears, click Confirm.
Delete Trigger
To delete a trigger, follow these steps.
- Click the All Services > Compute > Cloud Functions menu. Navigate to the Service Home page of Cloud Functions.
- On the Service Home page, click the Function menu. You will be taken to the Function List page.
- Function List page, click the resource for which you want to set a trigger. You will be taken to the Function Details page.
- In the Trigger tab’s trigger list, select the trigger you want to delete, then click the Delete button.
- When the popup notifying you of trigger deletion opens, click the Confirm button.
2.2 - Blueprint Detailed Guide
Blueprint Overview
When creating Cloud Functions, you can set a Blueprint to utilize the Runtime source code provided by Cloud Functions. Refer to the following for the Blueprint items provided by Cloud Functions.
| Category | Detailed description | Remarks |
|---|---|---|
| Hello World | When the function is invoked, it responds with Hello Serverless World! | |
| Execution after timeout | It outputs code that should run after the function call timeout but does not execute. | PHP, Python not supported |
| HTTP request body | Parse the request body. | PHP not supported |
| Send HTTP requests | The Cloud function sends an HTTP request. | PHP not supported |
| Print logs | Logs the user’s Samsung Cloud Platform Console request. | PHP not supported |
| Throw a custom error | Enter the error logic directly to handle the error. | |
| Using Environment Variable | Configure environment variables within the Cloud function and execute it. |
Hello World
Hello World Explains the response-receiving configuration and a function call example (using the function URL).
Hello World Setup
To set up Hello World, follow these steps.
Click the All Services > Compute > Cloud Functions menu. Go to the Service Home page of Cloud Functions.
On the Service Home page, click the Function menu. You will be taken to the Function List page.
Function List page, click the resource to be called via URL. You will be taken to the Function Detail page.
After clicking the Configuration tab, click the Edit button for the Function URL item. The Edit Function URL popup window opens.
In the Function URL Edit popup, set Activation status to Enabled, then click the Confirm button.
Category Detailed description Enable status Configure the use of the function URL Authentication type Select whether to use IAM authentication for requests to the function URL Access control Add accessible IPs to enable management - Set to Use, then you can input and add a public access IP
Table. Required input fields when adding a triggerAfter navigating to the Code tab, click the Edit button. You will be taken to the Function Code Edit page.
After adding the handling logic for success and failure cases, click the Save button.
- Node.js source codeColor mode
exports.handleRequest = async function (params) {
    /**
    * @description User writing area (Function details)
    */
    const response = {
    statusCode: 200,
    body: JSON.stringify('Hello Serverless World!'),
    };
    return response;
};
exports.handleRequest = async function (params) { /** * @description User writing area (Function details) */ const response = { statusCode: 200, body: JSON.stringify('Hello Serverless World!'), }; return response; };Hello World - Node.js source code - Python source codeColor mode
import json

def handle_request(params):
    # User writing area (Function details)
    return {
    'statusCode': 200,
    'body': json.dumps('Hello Serverless World!')
    }
import json def handle_request(params): # User writing area (Function details) return { 'statusCode': 200, 'body': json.dumps('Hello Serverless World!') }Hello World - Python source code - PHP source codeColor mode
<?php function handle_request() { # User writing area (Function details) $res = array( 'statusCode' => 200, 'body' => 'Hello Serverless World!', ); return $res; } ?><?php function handle_request() { # User writing area (Function details) $res = array( 'statusCode' => 200, 'body' => 'Hello Serverless World!', ); return $res; } ?>Hello World - PHP source code
- Node.js source code
Check function call
On the Function Details page, in the Configuration tab, invoke the function URL and then verify the response.
Hello Serverless World!
Execution after timeout
Describes configuring execution after timeout (Execution after timeout) and provides an example of invoking the function (using the function URL).
Configure execution after timeout
To set Execution after timeout, follow these steps.
- Click the All Services > Compute > Cloud Functions menu. Navigate to the Service Home page of Cloud Functions.
- On the Service Home page, click the Function menu. You will be taken to the Function List page.
- On the Function List page, click the resource for which you want to set a trigger. You will be taken to the Function Details page.
- After clicking the Trigger tab, click the Add Trigger button. The Add Trigger popup window opens.
- Add Trigger In the popup window, after selecting the Trigger Type item, enter the required information displayed at the bottom and click the OK button.
- Required information varies depending on the trigger type.
Trigger Types Input field API Gateway - API name: Select an existing API or create a new one
- Stage: Select an existing stage or create a new one
Cronjob - Refer to the example and enter the trigger’s repeat frequency(minute, hour, day, month, day of week)
- Timezone setting: select the reference time zone to apply
Table. Required input fields when adding a trigger
- Required information varies depending on the trigger type.
- After moving to the Code tab, click the Edit button. You will be taken to the Function Code Edit page.
- After adding the handling logic for success and failure cases, click the Save button.
- Node.js source codeColor mode
exports.handleRequest = async function (params) {
    /**
     * @description User writing area (Function details)
     */
    console.log("Hello world 3");
    await delay(3000);

    const response = {
        statusCode: 200,
        body: JSON.stringify('Hello Serverless World!'),
    };
    return response;
};

const delay = (ms) => {
    return new Promise(resolve=>{
        setTimeout(resolve,ms)
    })
}
exports.handleRequest = async function (params) { /** * @description User writing area (Function details) */ console.log("Hello world 3"); await delay(3000); const response = { statusCode: 200, body: JSON.stringify('Hello Serverless World!'), }; return response; }; const delay = (ms) => { return new Promise(resolve=>{ setTimeout(resolve,ms) }) }Execution after timeout - Node.js source code
- Node.js source code
Check function call
On the Function Detail page’s Configuration tab, invoke the function URL and, after a brief period, check the response.
Hello Serverless World!
HTTP request body
Explains the configuration for parsing the Request Body and an example of calling the function (using the function URL).
Setting HTTP request body
To set the HTTP request body, follow these steps.
- Click the All Services > Compute > Cloud Functions menu. Navigate to the Service Home page of Cloud Functions.
- On the Service Home page, click the Function menu. You will be taken to the Function List page.
- Function List page, click the resource to set the trigger. You will be taken to the Function Details page.
- After clicking the Trigger tab, click the Add Trigger button. The Add Trigger popup window opens.
- Add Trigger In the popup window, select the Trigger Type option, then fill in the required information shown at the bottom and click the OK button.
- Required information varies depending on the trigger type.
Trigger Types Input field API Gateway - API name: Select an existing API or create a new one
- Stage: Select an existing stage or create a new one
Cronjob - Refer to the example and enter the trigger’s repeat frequency (minutes, hours, day, month, day of week)
- Timezone setting: select the reference time zone to apply
Table. Required input fields when adding a trigger
- Required information varies depending on the trigger type.
- After moving to the Code tab, click the Edit button. You will be taken to the Function Code Edit page.
- After adding the handling logic for success and failure cases, click the Save button.
- Node.js source codeColor mode
exports.handleRequest = async function (params) {
    /**
    * @description User writing area (Function details)
    */
    const response = {
    statusCode: 200,
    body: JSON.stringify(params.body),
    };
    return response;
};
exports.handleRequest = async function (params) { /** * @description User writing area (Function details) */ const response = { statusCode: 200, body: JSON.stringify(params.body), }; return response; };Execution after timeout - Node.js source code - Python source codeColor mode
import json

def handle_request(params):
    # User writing area (Function details)
    return {
        'statusCode': 200,
        'body': json.dumps(params.json)
}
import json def handle_request(params): # User writing area (Function details) return { 'statusCode': 200, 'body': json.dumps(params.json) }Execution after timeout - Python source code
- Node.js source code
Check function call
In the Configuration tab of the Function Details page, after calling the Function URL, check the Body data, request Body value, and response Body value.
Request Body value
Color mode{ "testKey" :"cloud-001", "testNames": [ { "name": "Son" }, { "name": "Kim" } ], "testCode":"test" }{ "testKey" :"cloud-001", "testNames": [ { "name": "Son" }, { "name": "Kim" } ], "testCode":"test" }Request Body value Response Body value
Color mode{ "testKey" :"cloud-001", "testNames": [ { "name": "Son" }, { "name": "Kim" } ], "testCode":"test" }{ "testKey" :"cloud-001", "testNames": [ { "name": "Son" }, { "name": "Kim" } ], "testCode":"test" }Response Body value
Send HTTP requests
Explains the HTTP request configuration and an example of calling a function (using the function URL).
Send HTTP requests Configure
To configure Send HTTP requests, follow these steps.
- Click the All Services > Compute > Cloud Functions menu. Navigate to the Service Home page of Cloud Functions.
- On the Service Home page, click the Function menu. You will be taken to the Function List page.
- Click the resource to set the trigger on the Function List page. Go to the Function Details page.
- After clicking the Trigger tab, click the Add Trigger button. The Add Trigger popup window opens.
- Add Trigger In the popup window, after selecting the Trigger Type item, enter the required information displayed at the bottom and click the OK button.
- Required information varies depending on the trigger type.
Trigger Types Input field API Gateway - API name: Select an existing API or create a new one
- Stage: Select an existing stage or create a new one
Cronjob - Refer to the example and enter the trigger’s repeat frequency (minutes, hours, day, month, day of week)
- Timezone setting: select the reference time zone to apply
Table. Required input items when adding a trigger
- Required information varies depending on the trigger type.
- After moving to the Code tab, click the Edit button. You will be taken to the Function Code Edit page.
- After adding the handling logic for success and failure cases, click the Save button.
- Node.js source codeColor mode
const request = require('request');

/**
* @description User writing area (Function details)
*/
exports.handleRequest = async function (params) {
return await sendRequest(params);
};

async function sendRequest(req) {
    return new Promise((resolve, reject) => {
        // Port 80 and Port 443 are available
        url = "https://example.com"; // Destination URL

            const options = {
            uri: url,
            method:'GET',
            json: true,
            strictSSL: false,
            rejectUnauthorized: false
        }
        request(options, (error, response, body) => {
            if (error) {
                reject(error);
            } else {
                resolve({
                    statusCode: response.statusCode,
                    body: JSON.stringify(body)
                });
            }
        });
    });
}
const request = require('request'); /** * @description User writing area (Function details) */ exports.handleRequest = async function (params) { return await sendRequest(params); }; async function sendRequest(req) { return new Promise((resolve, reject) => { // Port 80 and Port 443 are available url = "https://example.com"; // Destination URL const options = { uri: url, method:'GET', json: true, strictSSL: false, rejectUnauthorized: false } request(options, (error, response, body) => { if (error) { reject(error); } else { resolve({ statusCode: response.statusCode, body: JSON.stringify(body) }); } }); }); }Send HTTP requests - Node.js source code - Python source codeColor mode
import json
import requests

def handle_request(params):
    # User writing area (Function details)

    # Port 80 and Port 443 are available
    url = "https://example.com" # Destination URL

    try:
        response = requests.get(url, verify=True)
        return {
            'statusCode': response.status_code,
            'body': json.dumps(response.text)
        }
    except requests.exceptions.RequestException as e:
        return str(e)
import json import requests def handle_request(params): # User writing area (Function details) # Port 80 and Port 443 are available url = "https://example.com" # Destination URL try: response = requests.get(url, verify=True) return { 'statusCode': response.status_code, 'body': json.dumps(response.text) } except requests.exceptions.RequestException as e: return str(e)Send HTTP requests - Python source code
- Node.js source code
Check Function Call
On the Function Details page, after invoking the function URL in the Configuration tab, verify the response.
<!doctype html>
<html>
<head>
    <title>Example Domain</title>

    <meta charset="utf-8" />
    <meta http-equiv="Content-type" content="text/html; charset=utf-8" />
    <meta name="viewport" content="width=device-width, initial-scale=1" />
    <style type="text/css">
    body {
        background-color: #f0f0f2;
        margin: 0;
        padding: 0;
        font-family: -apple-system, system-ui, BlinkMacSystemFont, "Segoe UI", "Open Sans", "Helvetica Neue", Helvetica, Arial, sans-serif;
    }
    div {
        width: 600px;
        margin: 5em auto;
        padding: 2em;
        background-color: #fdfdff;
        border-radius: 0.5em;
        box-shadow: 2px 3px 7px 2px rgba(0,0,0,0.02);
    }
    a:link, a:visited {
        color: #38488f;
        text-decoration: none;
    }
    @media (max-width: 700px) {
        div {
            margin: 0 auto;
            width: auto;
        }
    }
    </style>
</head>

<body>
<div>
    <h1>Example Domain</h1>

    <p>This domain is for use in illustrative examples in documents. You may use this
    domain in literature without prior coordination or asking for permission.</p>
    <p><a href="https://www.iana.org/domains/example">More information...</a></p>
</div>
</body>
</html>
<!doctype html>
<html>
<head>
<title>Example Domain</title>
<meta charset="utf-8" />
<meta http-equiv="Content-type" content="text/html; charset=utf-8" />
<meta name="viewport" content="width=device-width, initial-scale=1" />
<style type="text/css">
body {
background-color: #f0f0f2;
margin: 0;
padding: 0;
font-family: -apple-system, system-ui, BlinkMacSystemFont, "Segoe UI", "Open Sans", "Helvetica Neue", Helvetica, Arial, sans-serif;
}
div {
width: 600px;
margin: 5em auto;
padding: 2em;
background-color: #fdfdff;
border-radius: 0.5em;
box-shadow: 2px 3px 7px 2px rgba(0,0,0,0.02);
}
a:link, a:visited {
color: #38488f;
text-decoration: none;
}
@media (max-width: 700px) {
div {
margin: 0 auto;
width: auto;
}
}
</style>
</head>
<body>
<div>
<h1>Example Domain</h1>
<p>This domain is for use in illustrative examples in documents. You may use this
domain in literature without prior coordination or asking for permission.</p>
<p><a href="https://www.iana.org/domains/example">More information...</a></p>
</div>
</body>
</html>Print logs
This explains how to configure log output and an example of calling a function (using the function URL).
Configure Print logs
Print logs To set up response receiving, follow these steps.
- Click the All Services > Compute > Cloud Functions menu. Navigate to the Service Home page of Cloud Functions.
- On the Service Home page, click the Function menu. You will be taken to the Function List page.
- Function List page, click the resource to set the trigger. Function Details page will be displayed.
- After clicking the Trigger tab, click the Add Trigger button. The Add Trigger popup window opens.
- In the Add Trigger popup, select the Trigger Type item, then enter the required information displayed at the bottom and click the OK button.
- Required information varies depending on the trigger type.
Trigger Types Input field API Gateway - API name: Select an existing API or create a new one
- Stage: Select an existing stage or create a new one
Cronjob - Refer to the example and enter the trigger’s repeat frequency(minutes, hours, day, month, day of week)
- Timezone setting: select the reference time zone to apply
Table. Required input fields when adding a trigger
- Required information varies depending on the trigger type.
- After moving to the Code tab, click the Edit button. You will be taken to the Function Code Edit page.
- After adding the handling logic for success and failure cases, click the Save button.
- Node.js source codeColor mode
const winston = require('winston');

// Log module setting
const logger = winston.createLogger({
    format: winston.format.combine(
        winston.format.timestamp(),
        winston.format.printf(info => info.timestamp + ' ' + info.level + ': ' + info.message)
        ),
        transports: [
            new winston.transports.Console()
            ]
});

exports.handleRequest = async function (params) {
    /**
    * @description User writing area (Function details)
    */
    const response = {
        statusCode: 200,
        body: JSON.stringify(params.body),
    };

    logger.info(JSON.stringify(response, null, 2));

    return response;
};
const winston = require('winston'); // Log module setting const logger = winston.createLogger({ format: winston.format.combine( winston.format.timestamp(), winston.format.printf(info => info.timestamp + ' ' + info.level + ': ' + info.message) ), transports: [ new winston.transports.Console() ] }); exports.handleRequest = async function (params) { /** * @description User writing area (Function details) */ const response = { statusCode: 200, body: JSON.stringify(params.body), }; logger.info(JSON.stringify(response, null, 2)); return response; };Print logs - Node.js source code - Python source codeColor mode
import json
import logging

# Log module setting
logging.basicConfig(level=logging.INFO)

def handle_request(params):
    # User writing area (Function details)
    response = {
        'statusCode': 200,
        'body': json.dumps(params.json)
    }

    logging.info(response)

    return response
import json import logging # Log module setting logging.basicConfig(level=logging.INFO) def handle_request(params): # User writing area (Function details) response = { 'statusCode': 200, 'body': json.dumps(params.json) } logging.info(response) return responsePrint logs - Python source code
- Node.js source code
Check Function Call
After calling the function URL in the Configuration tab of the Function Details page, check the log in the Log tab.
[2023-09-07] 12:06:23] "host": "scf-xxxxxxxxxxxxxxxxxxxxx",
[2023-09-07] 12:06:23] "ce-id": "xxxxxxxxxxxxxxxxxxxxx",
[2023-09-07] 12:06:23] "ce-source": "xxxxxxxxxxxxxxxxxxxxx",[2023-09-07] 12:06:23] "host": "scf-xxxxxxxxxxxxxxxxxxxxx",
[2023-09-07] 12:06:23] "ce-id": "xxxxxxxxxxxxxxxxxxxxx",
[2023-09-07] 12:06:23] "ce-source": "xxxxxxxxxxxxxxxxxxxxx",Throw a custom error
Explains setting up a custom error (Throw a custom error) and an example of calling a function (using a function URL).
Configure Throw a custom error
To configure Throw a custom error, follow these steps.
- Click the All Services > Compute > Cloud Functions menu. Navigate to the Service Home page of Cloud Functions.
- On the Service Home page, click the Function menu. You will be taken to the Function List page.
- Click the resource to set the trigger on the Function List page. Go to the Function Details page.
- After clicking the Trigger tab, click the Add Trigger button. The Add Trigger popup window opens.
- Add Trigger In the popup window, after selecting the Trigger Type item, enter the required information displayed at the bottom and click the OK button.
- Required information varies depending on the trigger type.
Trigger Types Input field API Gateway - API name: Select an existing API or create a new one
- Stage: Select an existing stage or create a new one
Cronjob - Refer to the example and enter the trigger’s repeat frequency (minutes, hours, day, month, day of week)
- Timezone setting: select the reference time zone to apply
Table. Required input fields when adding a trigger
- Required information varies depending on the trigger type.
- After moving to the Code tab, click the Edit button. You will be taken to the Function Code Edit page.
- After adding the handling logic for success and failure cases, click the Save button.
- Node.js source codeColor mode
class CustomError extends Error {
    constructor(message) {
        super(message);
        this.name = 'CustomError';
    }
}

exports.handleRequest = async function (params) {
    /**
    * @description User writing area (Function details)
    */
    throw new CustomError('This is a custom error!');
};
class CustomError extends Error { constructor(message) { super(message); this.name = 'CustomError'; } } exports.handleRequest = async function (params) { /** * @description User writing area (Function details) */ throw new CustomError('This is a custom error!'); };Throw a custom error - Node.js source code - Python source codeColor mode
class CustomError(Exception):
    def __init__(self, message):
    self.message = message

def handle_request(parmas):
    raise CustomError('This is a custom error!')
class CustomError(Exception): def __init__(self, message): self.message = message def handle_request(parmas): raise CustomError('This is a custom error!')Throw a custom error - Python source code - PHP source codeColor mode
<?php class CustomError extends Exception { public function __construct($message) { parent::__construct($message); $this->message = $message; } } function handle_request() { throw new CustomError('This is a custom error!'); } ?><?php class CustomError extends Exception { public function __construct($message) { parent::__construct($message); $this->message = $message; } } function handle_request() { throw new CustomError('This is a custom error!'); } ?>Throw a custom error - PHP source code
- Node.js source code
Check Function Call
On the Function Details page, after calling the Function URL in the Configuration tab, verify whether an error occurred in the Log tab.
Using Environment Variable
Explains the use of environment variables (Using Environment Variable) settings and a function call example (using function URL).
Using Environment Variable Configure
To configure Using Environment Variable, follow these steps.
- Click the All Services > Compute > Cloud Functions menu. Navigate to the Service Home page of Cloud Functions.
- On the Service Home page, click the Function menu. You will be taken to the Function List page.
- Click the resource to set the trigger on the Function List page. Go to the Function Details page.
- After clicking the Trigger tab, click the Add Trigger button. The Add Trigger popup window opens.
- In the Add Trigger popup, select the Trigger Type item, then enter the required information displayed at the bottom and click the OK button.
- Required information varies depending on the trigger type.
Trigger Types Input field API Gateway - API name: Select an existing API or create a new one
- Stage: Select an existing stage or create a new one
Cronjob - Refer to the example and enter the trigger’s repeat frequency(minutes, hours, days, months, day of week)
- Timezone setting: select the reference time zone to apply
Table. Required input fields when adding a trigger
- Required information varies depending on the trigger type.
- After moving to the Code tab, click the Edit button. You will be taken to the Function Code Edit page.
- After adding the handling logic for success and failure cases, click the Save button.
- Node.js source codeColor mode
exports.handleRequest = async function (params) {
    /**
    * @description User writing area (Function details)
    */
    return process.env.test;
};
exports.handleRequest = async function (params) { /** * @description User writing area (Function details) */ return process.env.test; };Using Environment Variable - Node.js source code - Python source codeColor mode
import json

import os

def handle_request(params):
    # User writing area (Function details)
    return os.environ.get("test")
import json import os def handle_request(params): # User writing area (Function details) return os.environ.get("test")Using Environment Variable - Python source code - PHP source codeColor mode
import json

def handle_request(params):
    # User writing area (Function details)
    return os.environ.get("test")
import json def handle_request(params): # User writing area (Function details) return os.environ.get("test")Using Environment Variable - PHP source code
- Node.js source code
- After moving to the Configuration tab, click the Edit button in the Environment Variables area. The Edit Environment Variables popup will open.
- After entering the environment variable information, click the Confirm button.
Category Detailed description Name Enter the key value value Enter the value Table. Environment Variable Input Items
Check function call
On the Function Details page, after calling the function URL in the Configuration tab, check the environment variable value in the Log tab.
2.3 - Integrate PrivateLink Service
By integrating Cloud Functions with the PrivateLink service, you can connect VPCs within the Samsung Cloud Platform to other VPCs, and VPCs to services, without using the external internet.
The data uses only the internal network, providing high security, and does not require public IP, NAT, VPN, or an internet gateway.
Enable PrivateLink Service
To connect the PrivateLink Service, you must first enable the service.
To enable the PrivateLink service, follow these steps.
- All Services > Compute > Cloud Functions Click the menu. 1. Navigate to the Service Home page of Cloud Functions.
- On the Service Home page, click the Function menu. 2. Go to the Function list page.
- On the Function List page, click the resource to associate with PrivateLink. 3. Function Details page.
- On the Function Details page, click the Configuration tab.
- In Private connection configuration, click the Edit button of PrivateLink Service. 5. PrivateLink Service Edit The popup window opens.
- PrivateLink Service Edit In the popup window, after checking the Use item of Activation Status, click the Confirm button. 6. Configuration tab’s Private connection configuration displays PrivateLink Service information.
| Category | Detailed description |
|---|---|
| Private URL | PrivateLink Service URL information |
| PrivateLink Service ID | PrivateLink Service ID information |
| Request Endpoint Management | List of PrivateLink Endpoints that requested a PrivateLink Service connection
|
Integrating PrivateLink Service
You can expose the function for private access from another VPC by integrating with PrivateLink Service.
To integrate the PrivateLink service, review the following tasks.
- Register the domain for the PrivateLink Endpoint IP address and the Private URL address to invoke the issued Private URL.
192.168.0.13 abc123.scf.private.kr-west1.qa2.samsungsdscloud.com - When invoking the PrivateLink Service, verify IAM authentication based on the credentials of the Endpoint creator required for the Endpoint.
Create PrivateLink Endpoint
Create an entry point to access the PrivateLink Service of the user VPC.
To create a PrivateLink Endpoint, follow these steps.
- Click the All Services > Compute > Cloud Functions menu. 1. Go to the Service Home page of Cloud Functions.
- On the Service Home page, click the Function menu. 2. Go to the Function list page.
- On the Function list page, click the resource to associate with PrivateLink. 3. Function Details Go to the page.
- On the Function Details page, click the Configuration tab.
- Click the Add button in Private connection configuration of PrivateLink Endpoint. 5. Add PrivateLink Endpoint The popup window opens.
- Add PrivateLink Service in the popup window, after entering the PrivateLink Service ID and Alias information, click the Confirm button.
- When the popup indicating creation opens, click the Confirm button. 7. Configuration tab’s Private connection configuration displays PrivateLink Endpoint information.
| Category | Detailed description |
|---|---|
| PrivateLink Endpoint ID | PrivateLink Endpoint ID information |
| PrivateLink Service ID | PrivateLink Service ID information |
| Alias | hostalias information that can be used instead of an IP address for accessing a PrivateLink Endpoint |
| status | Approval status of PrivateLink Endpoint
|
Integrating APIGW Private EPS
To connect the SCF Endpoint and the APIGW Private Endpoint, you must specify the Private URL in the SCF Endpoint Alias instead of the APIGW EPS resource path.
- Private URL example:
181b6126ef6d4e4b81370df5.apigw.private.kr-west1.s.samsungsdscloud.com/get/resourcepath
To integrate APIGW Private EPS, refer to the following code.
const request = require('request');

/**
 * @description User writing area (Function details)
*/
exports.handleRequest = async function (params) {
    return await sendRequest(params);
};

async function sendRequest(req) {
    return new Promise((resolve, reject) => {
        // Port 80 and Port 443 are available
        url = "https://{alias}/{resource_path}"; // Destination URL
        /**
        {alias} is the alias name entered when creating an Endpoint within the function
        {resoure_path} is the resource path (/get/resourcepath) specified in the Private URL of APIGW EPS
        */

        const options = {
            uri: url,
            method:'GET',
            json: true,
            strictSSL: false,
            rejectUnauthorized: false
        }

        request(options, (error, response, body) => {
            if (error) {
                reject(error);
            } else {
                resolve({
                    statusCode: response.statusCode,
                    body: JSON.stringify(body)
                });
            }
        });
    });
}
const request = require('request');
/**
* @description User writing area (Function details)
*/
exports.handleRequest = async function (params) {
return await sendRequest(params);
};
async function sendRequest(req) {
return new Promise((resolve, reject) => {
// Port 80 and Port 443 are available
url = "https://{alias}/{resource_path}"; // Destination URL
/**
{alias} is the alias name entered when creating an Endpoint within the function
{resoure_path} is the resource path (/get/resourcepath) specified in the Private URL of APIGW EPS
*/
const options = {
uri: url,
method:'GET',
json: true,
strictSSL: false,
rejectUnauthorized: false
}
request(options, (error, response, body) => {
if (error) {
reject(error);
} else {
resolve({
statusCode: response.statusCode,
body: JSON.stringify(body)
});
}
});
});
}2.4 - Resource-based Policy Guide
Resource-based policy overview
The resource-based policy (Resource-based Policy) of Cloud Functions is a policy granted to a resource that can decide to allow or deny (Effect) an action (Action) on a specific resource for a principal (Principal). You can directly define the principal that can invoke a function by using resource-based policies.
You can allow function calls by defining the following in a resource-based policy.
- User of the specified Samsung Cloud Platform account
- Specified source IP address range or CIDR block
A source policy is defined as a JSON policy document attached to the API, which controls whether the specified security principal (typically an IAM role or group) can call the API.
| Category | description | example |
|---|---|---|
| Principal | Specify the caller of the function | Specific object storage bucket, API Gateway, other Samsung Cloud Platform accounts, etc. |
| Task(Action) | Define the allowed functions | Mostly scf:InvokeFunction |
| Condition(Condition) | Restrict to allow only in specific situations | Allow only requests originating from a bucket with a specific SRN. |
- Cloud Functions’ resource-based policies leverage the rules of IAM’s resource-based policies.
- For instructions on creating or modifying policies using JSON, refer to the JSON Mode Utilization Guide.
Resource-based policy usage scenario
The primary use cases for resource-based policies are as follows.
Resource-based policy scenario
The resource-based policy scenarios used when a Cloud Functions function runs are as follows.
| Category | description | Reference example |
|---|---|---|
| Function URL - Authentication Type None | It is required when generating a function URL for invocation.
| Function URL (Auth Type None) Example |
| Function URL - Authentication Type IAM |
| Function URL (authentication type IAM) example |
| API Gateway trigger | It is required when API Gateway calls Lambda to handle external API requests.
| API Gateway Trigger Example |
| PrivateLink connection | You can connect a PrivateLink Service to define the function for private access from another VPC.
| PrivateLink connection example |
User addition usage scenario
Although it is not automatically registered as a resource-based policy for Cloud Functions, users can add and use it as needed. The scenarios that users can add and utilize are as follows.
- Cross-Account Access
- If an IAM user in account A wants to invoke a Lambda in account B, register account A in the function policy of account B.
- Hybrid Access Control
- It can be configured so that access is allowed only when both conditions are met—a specific user and a specific IP range—rather than merely restricting by account or IP alone.
Resource-based policy management for Cloud Functions
To view and configure resource-based policies for Cloud Functions, follow these steps.
- Click the All Services > Compute > Cloud Functions menu. Navigate to the Service Home page of Cloud Functions.
- On the Service Home page, click the Function menu. You will be taken to the Function list page.
- On the Function List page, click the resource for which you want to set a policy. You will be taken to the Function Details page.
- Click the Configuration tab on the Function Details page.
- Click the Edit button of the Resource-based policy permission item. The Resource policy edit popup window opens.
- In the Resource Policy edit popup, after selecting the Policy Template, write the policy.
- For policy examples by policy template, refer to Resource-based policy examples.
- When the writing is complete, click the Confirm button.
- Click the Delete button to delete the registered policy.
Example of resource-based policy
Users can define additional resource-based policies as needed or modify existing policies for use.
- For some features, a resource‑based policy (or credential) must be registered to use them in Cloud Functions.
- In the resource-based policy examples described in this guide, Cloud Functions automatically registers the example resource-based policies when each feature is enabled or linked.
Function URL - Authentication Type None
Principal is /* a policy that allows public calls.
Policy Template
{
    "Statement": [
        {
        	"Action": ["scf:InvokeFunctionUrl"],
        	"Condition": {
            	"StringEquals": {
                	"scf:CloudFunctionAuthType": ["NONE"]
            	}
        	},
        	"Effect": "Allow"
        	"Principal": "*"
            "Resource": ["{{CloudFunctionSrn}}"],
            "Sid": "InvokeFunctionURLAllowPublicAccess"
        }
    ],
    "Version": "2024-07-01"
}
{
"Statement": [
{
"Action": ["scf:InvokeFunctionUrl"],
"Condition": {
"StringEquals": {
"scf:CloudFunctionAuthType": ["NONE"]
}
},
"Effect": "Allow"
"Principal": "*"
"Resource": ["{{CloudFunctionSrn}}"],
"Sid": "InvokeFunctionURLAllowPublicAccess"
}
],
"Version": "2024-07-01"
}Policy example
{
    "Statement": [
        {
            "Action": ["scf:InvokeFunctionUrl"],
            "Condition": {
                "StringEquals": {
                    "scf:CloudFunctionAuthType": ["NONE"]
                }
            },
            "Effect": "Allow"
            "Principal": "*"
            "Resource": ["srn:e::accountID:kr-west1::scf:cloud-function/functionsID"],
            "Sid": "InvokeFunctionURLAllowPublicAccess"
        }
    ],
    "Version": "2024-07-01"
}
{
"Statement": [
{
"Action": ["scf:InvokeFunctionUrl"],
"Condition": {
"StringEquals": {
"scf:CloudFunctionAuthType": ["NONE"]
}
},
"Effect": "Allow"
"Principal": "*"
"Resource": ["srn:e::accountID:kr-west1::scf:cloud-function/functionsID"],
"Sid": "InvokeFunctionURLAllowPublicAccess"
}
],
"Version": "2024-07-01"
}Function URL - Authentication Type IAM
This policy permits a specific user to invoke a public URL.
Policy Template
{
    "Statement": [
        {
            "Action": ["scf:InvokeFunctionUrl"],
            "Condition": {
                "StringEquals": {
                    "scf:CloudFunctionAuthType": ["SCP_IAM"]
                }
            },
            "Effect": "Allow"
            "Principal": {
                "scp": ["srn:{{Environment}}::{{AccountID}}:::iam:user/{{UserId}}"]
            },
            "Resource": ["{{CloudFunctionSrn}}"],
            "Sid": "Statement1"
        }
    ],
    "Version": "2024-07-01"
}
{
"Statement": [
{
"Action": ["scf:InvokeFunctionUrl"],
"Condition": {
"StringEquals": {
"scf:CloudFunctionAuthType": ["SCP_IAM"]
}
},
"Effect": "Allow"
"Principal": {
"scp": ["srn:{{Environment}}::{{AccountID}}:::iam:user/{{UserId}}"]
},
"Resource": ["{{CloudFunctionSrn}}"],
"Sid": "Statement1"
}
],
"Version": "2024-07-01"
}Policy Example
{
    "Statement": [
        {
            "Action": ["scf:InvokeFunctionUrl"],
            "Condition": {
                "StringEquals": {
                    "scf:CloudFunctionAuthType": ["SCP_IAM"]
                }
            },
            "Effect": "Allow"
            "Principal": "*",
            "Resource":  ["srn:e::accountID:kr-west1::scf:cloud-function/functionsID"],
            "Sid": "accountID-iam-invokefunctionurl"
        }
    ],
    "Version": "2024-07-01"
}
{
"Statement": [
{
"Action": ["scf:InvokeFunctionUrl"],
"Condition": {
"StringEquals": {
"scf:CloudFunctionAuthType": ["SCP_IAM"]
}
},
"Effect": "Allow"
"Principal": "*",
"Resource": ["srn:e::accountID:kr-west1::scf:cloud-function/functionsID"],
"Sid": "accountID-iam-invokefunctionurl"
}
],
"Version": "2024-07-01"
}API Gateway trigger
Principal is a policy that permits public calls with a * principal.
Policy Template
{
    "Statement": [
        {
            "Action": ["scf:InvokeFunction"],
            "Condition": {
                "SrnLike": {
                    "scp:RequestAttribute/body['x-scf-request-obj-srn']": ["{{ApiGatewayMethodSrn}}"]
                }
            },
            "Effect": "Allow",
            "Principal": {
                "Service": ["apigateway.samsungsdscloud.com"]
            },
            "Resource": ["{{CloudFunctionSrn}}"],
            "Sid": "Statement1"
        }
    ],
    "Version": "2024-07-01"
}
{
"Statement": [
{
"Action": ["scf:InvokeFunction"],
"Condition": {
"SrnLike": {
"scp:RequestAttribute/body['x-scf-request-obj-srn']": ["{{ApiGatewayMethodSrn}}"]
}
},
"Effect": "Allow",
"Principal": {
"Service": ["apigateway.samsungsdscloud.com"]
},
"Resource": ["{{CloudFunctionSrn}}"],
"Sid": "Statement1"
}
],
"Version": "2024-07-01"
}Policy Example
{
    "Statement": [
        {
            "Action": [
                scf:InvokeFunction
            ],
            "Condition": {
                "SrnLike": {
                    "scp:RequestAttribute/body['x-scf-request-obj-srn']": [
                        srn:e::accountID:kr-west1::apigateway:method/MethodID/*/GET/test
                    ]
                }
            },
            "Effect": "Allow"
            "Principal": {
                "Service": [
                    "apigateway.samsungsdscloud.com"
                ]
            },
            "Resource": [
                srn:e::accountID:kr-west1::scf:cloud-function/functionID
            ],
            "Sid": "999e9a9999de4d4683c9e10c74ee999z"
        }
    ],
    "Version": "2024-07-01"
}
{
"Statement": [
{
"Action": [
scf:InvokeFunction
],
"Condition": {
"SrnLike": {
"scp:RequestAttribute/body['x-scf-request-obj-srn']": [
srn:e::accountID:kr-west1::apigateway:method/MethodID/*/GET/test
]
}
},
"Effect": "Allow"
"Principal": {
"Service": [
"apigateway.samsungsdscloud.com"
]
},
"Resource": [
srn:e::accountID:kr-west1::scf:cloud-function/functionID
],
"Sid": "999e9a9999de4d4683c9e10c74ee999z"
}
],
"Version": "2024-07-01"
}PrivateLink connection
This is a policy that allows function calls through a Privatelink Endpoint for specific users.
Policy Template
{
    "Statement": [
        {
            "Action": ["scf:InvokeFunction"],
            "Condition": {
                "StringEquals": {
           			"scf:CloudFunctionPrivatelinkServiceAuthType": ["SCP_IAM"]
                }
            },
            "Effect": "Allow"
            "Principal": {
                "scp": ["srn:{{Environment}}::{{AccountID}}:::iam:user/{{UserId}}"]
            },
            "Resource": ["{{CloudFunctionSrn}}"],
            "Sid": "Statement1"
        }
    ],
    "Version": "2024-07-01"
}
{
"Statement": [
{
"Action": ["scf:InvokeFunction"],
"Condition": {
"StringEquals": {
"scf:CloudFunctionPrivatelinkServiceAuthType": ["SCP_IAM"]
}
},
"Effect": "Allow"
"Principal": {
"scp": ["srn:{{Environment}}::{{AccountID}}:::iam:user/{{UserId}}"]
},
"Resource": ["{{CloudFunctionSrn}}"],
"Sid": "Statement1"
}
],
"Version": "2024-07-01"
}Policy Example
{
    "Statement": [
        {
            "Action": [
                scf:InvokeFunction
            ],
            "Condition": {
                "StringEquals": {
                    "scf:CloudFunctionAuthType": [
                        SCP_IAM
                    ]
                }
            },
            "Effect": "Allow",
            "Principal": {
                "scp": [
                    srn:e::accountID:::iam:user/userID
                ]
            },
            "Resource": [
                srn:e::accountID:kr-west1::scf:cloud-function/functionID
            ],
"Sid": "rrrrrrrrrrrrrrrrrrrrrrrrrrrrrrrrrrrrrrrrrrrrrrrrrrrrrrrrrrrrrrrrrrrrrrrrrrrrrrrrrrrrrrrrrrrrrrrrrrrrrrrrrrrrrrrrrrrrrrrrrrrrrrrrrrrrrrrrrrrrrrrrrrrrrrrrrrrrrrrrrrrrrrrrrrrrrrrrrrrrrrrrrrrrrrrrrrrrrrrrrrrrrrrrrrrrrrrrrrrrrrrrrrrrrrrrrrrrrrrrrrrrrrrrrrrrrrrrrrrrrrrrrrrrrrrrrrrrrrrrrrrrrrrrrrrrrrrrrrrrrrrrrrrrrrrrrrrrrrrrrrrrrrrrrrrrrrrrrrrrrrrrrrrrrrrrrrrrrrrrrrrrrrrrrrrrrrrrrrrrrrrrrrrrrrrrrrrrrrrrrrrrrrrrrrrrrrrrrrrrrrrrrrrrrrrrrrrrrrrrrrrrrrrrrrrrrrrrrrrr-privatelink-invokefunction"
        }
    ],
    "Version": "2024-07-01"
}
{
"Statement": [
{
"Action": [
scf:InvokeFunction
],
"Condition": {
"StringEquals": {
"scf:CloudFunctionAuthType": [
SCP_IAM
]
}
},
"Effect": "Allow",
"Principal": {
"scp": [
srn:e::accountID:::iam:user/userID
]
},
"Resource": [
srn:e::accountID:kr-west1::scf:cloud-function/functionID
],
"Sid": "rrrrrrrrrrrrrrrrrrrrrrrrrrrrrrrrrrrrrrrrrrrrrrrrrrrrrrrrrrrrrrrrrrrrrrrrrrrrrrrrrrrrrrrrrrrrrrrrrrrrrrrrrrrrrrrrrrrrrrrrrrrrrrrrrrrrrrrrrrrrrrrrrrrrrrrrrrrrrrrrrrrrrrrrrrrrrrrrrrrrrrrrrrrrrrrrrrrrrrrrrrrrrrrrrrrrrrrrrrrrrrrrrrrrrrrrrrrrrrrrrrrrrrrrrrrrrrrrrrrrrrrrrrrrrrrrrrrrrrrrrrrrrrrrrrrrrrrrrrrrrrrrrrrrrrrrrrrrrrrrrrrrrrrrrrrrrrrrrrrrrrrrrrrrrrrrrrrrrrrrrrrrrrrrrrrrrrrrrrrrrrrrrrrrrrrrrrrrrrrrrrrrrrrrrrrrrrrrrrrrrrrrrrrrrrrrrrrrrrrrrrrrrrrrrrrrrrrrrrrr-privatelink-invokefunction"
}
],
"Version": "2024-07-01"
}3 - API Reference
4 - CLI Reference
5 - Release Note
Cloud Functions
- Technical support end-of-life information (EoTS) for the Runtime version is provided.
- When technical support ends, security patches and updates will no longer be applied to that Runtime version.
- Already created functions can be used continuously without any call time limit. * However, we do not guarantee bugs, errors, defects, or vulnerabilities that arise in Runtime versions for which support has ended.
- End of technical support scheduled The Runtime versions are as follows (For the full list of supported Runtime versions, see Rutime)
- GO: 1.21, 1.23
- Node.js: 18, 20
- PHP 8.1
- Python: 3.9
- Including runtime of additionally excluded functions
- The AIOS service integration has been stopped.
- Since the AIOS service has been discontinued, the AIOS integration service has been removed from Cloud Functions.
- You can set a resource-based policy on the function.
- Resource-based policies are policies applied directly to the function that permit external access.
- You can use resource-based policies to allow or deny actions on specific resources to specific principals.
- You can use functions in conjunction with the AIOS service.
- You can integrate Cloud Functions with AIOS to utilize LLMs.
- You can use the function in conjunction with the PrivateLink service.
- Through a Private connection (PrivateLink), you can establish internal connections between VPCs and between a VPC and a service on the Samsung Cloud Platform without traversing the Internet.
- The feature to upload Java Runtime executable files has been added.
- You can import and configure a Java Runtime executable archive file (.jar/.zip) in Object Storage.
- We have officially launched the Cloud Functions service.
- It is a serverless computing‑based FaaS (Function as a Service) that lets you easily run function‑style applications without server provisioning.