The user can enter the required information for Block Storage through the Samsung Cloud Platform Console, select detailed options, and create the service.
Create Block Storage
You can create and use the Block Storage service in the Samsung Cloud Platform Console.
To create Block Storage, follow the steps below.
All Services > Compute > Virtual Server Click the menu. Navigate to the Service Home page of Virtual Server.
Block Storage Click the menu. Navigate to the Block Storage List page.
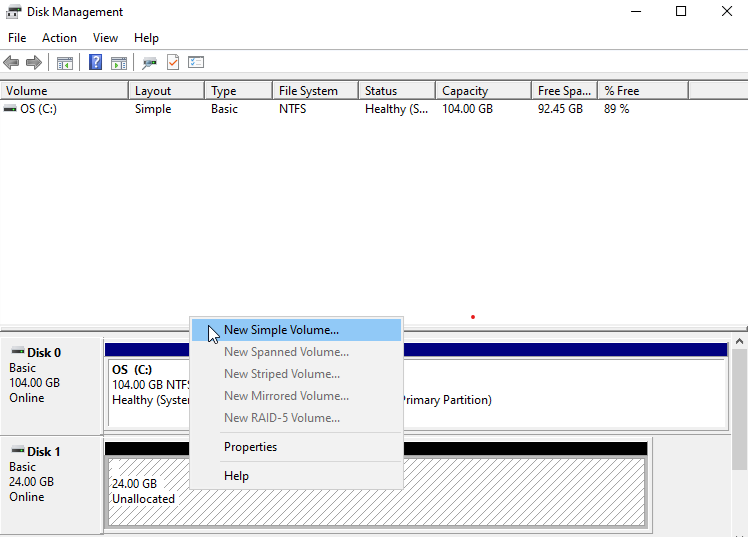
Click the Create Service button on the Block Storage page. You will be taken to the Create Block Storage page.
Block Storage Creation On the page, enter the information required to create the service, and select detailed options.
Category RequiredDetailed description Volume Name Required Volume Name - Enter up to 255 characters using English letters, numbers, spaces, and special characters (
-,_)
Snapshot Name Select Select a snapshot to use when creating a volume via snapshot - Provide the recovery snapshot name when creating a service through snapshot recovery volume creation
- If not selected, an empty volume is created
- After selection, can delete by clicking the X button next to the name
Disk Type Required Select Disk Type - HDD: Standard volume
- SSD: High-performance standard volume
- HDD/SSD_KMS: Volume that additionally provides in-transit encryption between the instance and Block Storage
- HDD/SSD_MultiAttach: Volume that can be attached to two or more servers
- Cannot be modified after service creation
- When creating the service via snapshot recovery volume creation, it is set identical to the original and cannot be modified
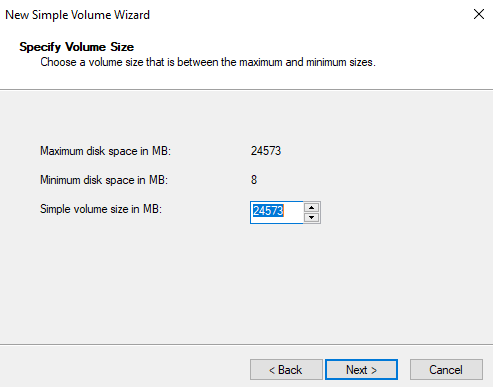
Capacity Select Capacity Settings - Can be created within 8~12,228 GB
- Enter the number of units provided in 8 GB increments
- When creating a service via snapshot recovery volume creation, input a capacity that is equal to or larger than the original
Table. Block Storage Service Information Input Items- Enter up to 255 characters using English letters, numbers, spaces, and special characters (
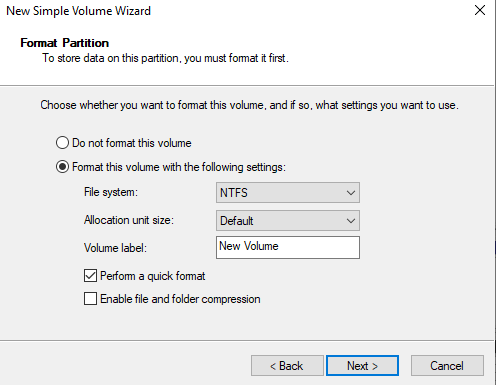
Summary Check the detailed information and estimated billing amount generated in the panel, and click the Complete button.
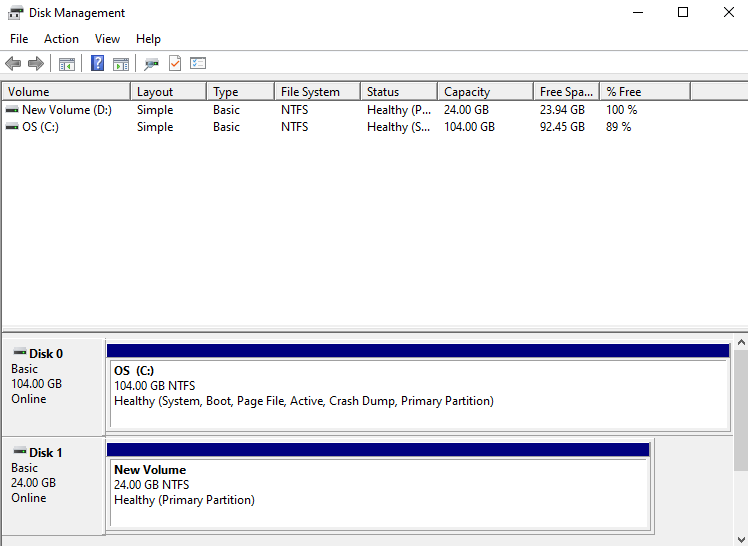
- Once creation is complete, check the created resource on the Block Storage List page.
- All volumes of Block Storage have AES-256 AES-256 algorithm encryption applied by default.
- Windows-based Virtual Server cannot use MultiAttach disks. Use a separate replication method or solution.
- If the volume is HDD/SSD_KMS disk type, it additionally provides transmission encryption for the block storage segment connected to the instance and the instance.
Block Storage Check Detailed Information
Block Storage 서비스는 전체 자원 목록과 상세 정보를 확인하고 수정할 수 있습니다. Block Storage 상세 페이지는 상세 정보, 스냅샷 목록, 태그, 작업 이력 탭으로 구성되어 있습니다.
To view detailed information about the Block Storage service, follow these steps.
- All Services > Compute > Virtual Server Click the menu. Navigate to the Service Home page of Virtual Server.
- Click the Block Storage menu. Go to the Block Storage List page.
- Click the resource to view detailed information on the Block Storage List page. It moves to the Block Storage Details page.
- Block Storage Details page displays status information and additional feature information, and consists of Details, Snapshot List, Tags, Operation History tabs.
Category Detailed description Volume Status Status of the volume - Creating: Creating
- Downloading: Creating (applying OS image)
- Available: Creation completed, server connection possible
- Reserved: Waiting for server connection
- Attaching: Connecting to server
- Detaching: Server connection released
- In Use: Server connection completed
- Deleting: Service termination in progress
- Awaiting Transfer: Waiting for volume transfer
- Extending: Capacity expansion
- Error Extending: Abnormal state during capacity expansion
- Backing Up: Volume backup in progress
- Restoring Backup: Volume backup restoration in progress
- Error Backing Up: Abnormal state of volume backup
- Error Restoring: Abnormal state of volume backup restoration
- Error Deleting: Abnormal state during deletion
- Error Managing: Abnormal state
- Error: Abnormal state
- Maintenance: Temporary maintenance state
- Reverting: Snapshot restoration in progress
Volume Transfer Transfer the volume to another account - For detailed information about volume transfer, refer to Volume Transfer
Snapshot Creation Immediately create a snapshot at the time of creation - For detailed information on snapshot creation, see Create Snapshot
Snapshot Recovery Recover the volume with the latest snapshot in Available state - For detailed information about snapshot recovery, see Snapshot Recovery
Service Cancellation Button to cancel the service Table. Status Information and Additional Functions
- Block Storage Details page displays status information and additional feature information, and consists of Details, Snapshot List, Tags, Operation History tabs.
Detailed Information
Block Storage list page, you can view detailed information of the selected resource and edit the information if needed.
| Category | Detailed Description |
|---|---|
| service | service group |
| Resource Type | Resource Type |
| SRN | Unique resource ID in Samsung Cloud Platform
|
| Resource Name | Resource Name
|
| Resource ID | Unique resource ID of the service |
| Creator | User who created the service |
| Creation time | Time when the service was created |
| Editor | User who modified the service |
| Modification Date/Time | Date/Time the service was modified |
| Volume Name | Volume Name
|
| Volume ID | Volume Unique ID |
| Disk type | Disk type |
| Type | Classification by volume creation method and usage |
| Capacity | Volume Capacity
|
| Connected Server | Connected Virtual Server
|
Snapshot List
Block Storage List page allows you to view the snapshot of the selected resource.
| Category | Detailed description |
|---|---|
| Snapshot name | Snapshot name |
| Description | Snapshot description |
| Volume Capacity | Capacity of the original Block Storage volume targeted for snapshot
|
| Creation Time | Snapshot Creation Time |
| Status | Snapshot status
|
| Additional Features > More | Snapshot Management Button
|
- Snapshots can affect volume capacity management. Delete unnecessary snapshots after use.
- Snapshot recovery is possible when not connected to the server.
- The snapshot creation time is based on Asia/Seoul (GMT +09:00).
- When the snapshot recovery button is clicked, the volume is restored to the latest snapshot in Available state.
- When selecting to create a recovery volume on the snapshot list page, a new volume based on the snapshot is created without modifying the existing volume.
- Snapshots containing vProtect are temporary snapshots created when using the Backup service and are not charged.
Tag
Block Storage List page allows you to view the tag information of selected resources, and you can add, modify, or delete them.
| Category | Detailed Description |
|---|---|
| Tag List | Tag List
|
Work History
You can view the operation history of the selected resource on the Block Storage List page.
| Category | Detailed description |
|---|---|
| Work History List | Resource Change History
|
Block Storage Resource Management
If you need to modify the settings of a created Block Storage or add or delete a connected server, you can perform the tasks on the Block Storage Details page.
Edit Volume Name
You can edit the name of the volume. To edit the volume name, follow the steps below.
- All Services > Compute > Virtual Server menu, click it. Navigate to the Virtual Server’s Service Home page.
- Block Storage Click the menu. Navigate to the Block Storage List page.
- Block Storage List page, click the resource to edit the volume name. Block Storage Details page, navigate.
- Click the Volume name Edit button. The Volume name Edit popup opens.
- Enter the volume name and click the Confirm button.
-, _).Increase Capacity
You can increase the volume capacity. To increase the capacity, follow the steps below.
- All Services > Compute > Virtual Server Click the menu. Navigate to the Service Home page of Virtual Server.
- Click the Block Storage menu. Go to the Block Storage List page.
- Block Storage List page, click the resource to expand the capacity. Block Storage Details page, navigate.
- Click the Capacity Edit button. The Capacity Edit popup window opens.
- Enter the capacity and click the Confirm button.
- We do not provide size reduction.
- After capacity expansion, it cannot be restored from a snapshot taken before the expansion.
- Only recovery using the new volume creation method is possible with snapshots created before capacity expansion.
- Within 8~12,228GB, it can be expanded to a larger capacity than the existing capacity.
- Enter the number of Units provided in 8GB increments.
Edit Connected Server
You can connect or disconnect the server. To modify the connected server, follow the steps below.
- All Services > Compute > Virtual Server Click the menu. Navigate to the Service Home page of Virtual Server.
- Click the Block Storage menu. You will be taken to the Block Storage List page.
- Click the resource to edit the connected server on the Block Storage List page. You will be taken to the Block Storage Detail page.
- When adding a Virtual Server connection, click the Connection Server item’s Add button. The Add Connection Server popup window opens.
- After selecting the Virtual Server you want to connect to, click the Confirm button.
- When disconnecting the Virtual Server, click the Connection Server Disconnect button.
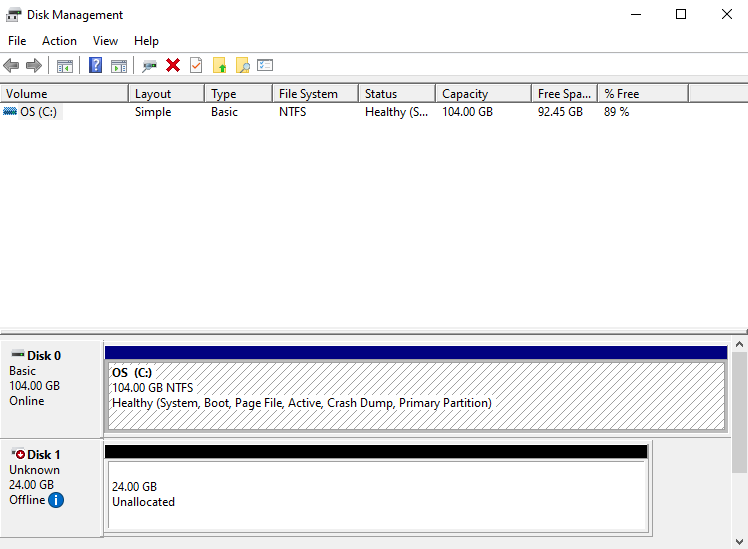
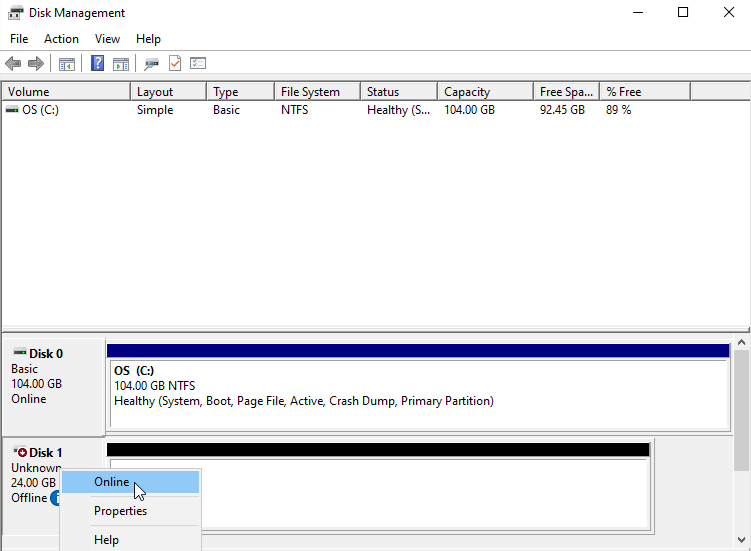
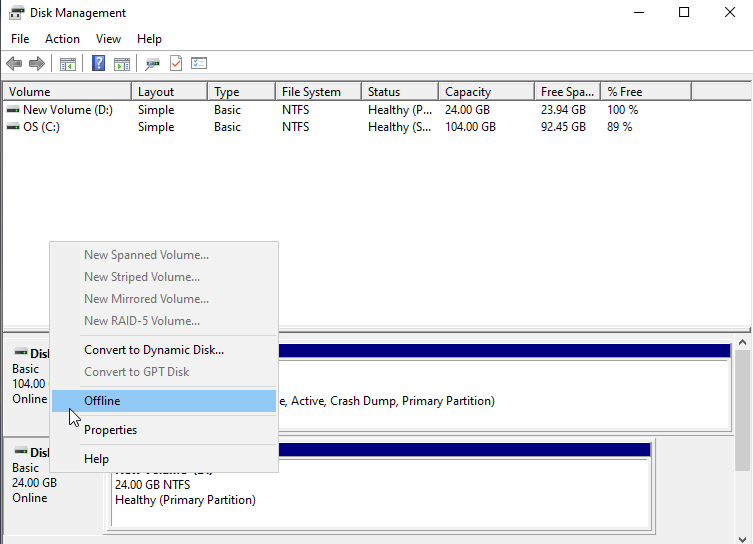
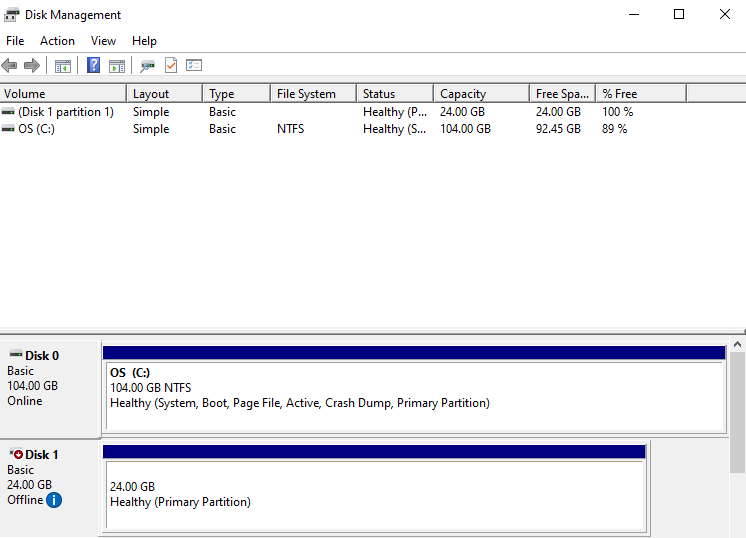
- Please perform the disconnection after the disconnect operation (Umount, Disk Offline) on the server.
- You can connect a Virtual Server created in the same location as Block Storage.
- Virtual Server that uses Partition with Server Group policy cannot be connected.
- For HDD/SSD_MultiAttach disk type, it can be connected to more than two Virtual Servers, and there is no limit on the number of connections.
- Windows-based Virtual Server cannot use MultiAttach disks and must use a separate replication method or solution.
- Virtual Server can connect up to 26 volumes, including the OS default.
- OS basic volume cannot be modified on the connected server nor can the service be terminated.
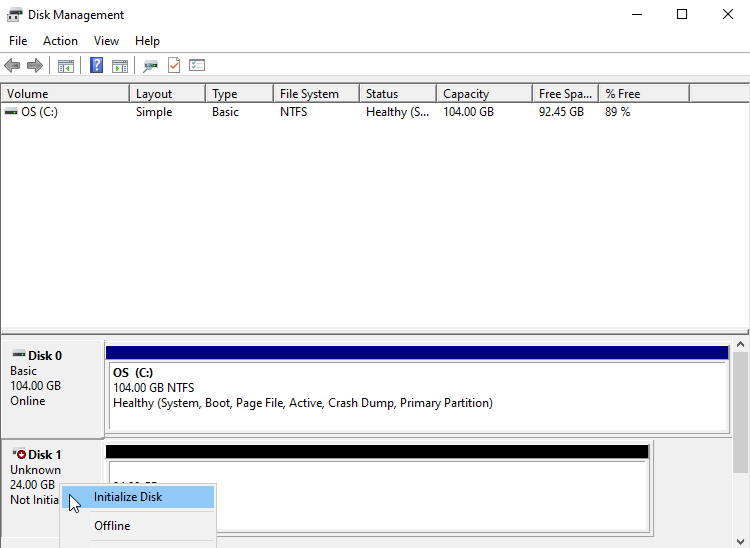
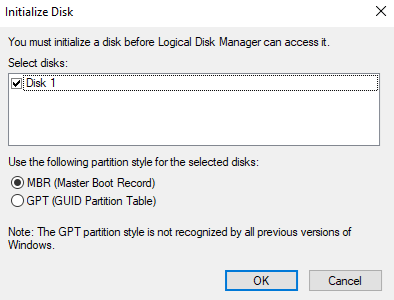
- When adding a connected server, you can use it after performing connection tasks (Mount, Disk Online) on the server. For detailed information about server connection, refer to Server Connection.
Block Storage Cancel
You can reduce operating costs by terminating unused Block Storage. However, if you terminate the service, the running service may be stopped immediately, so you should consider the impact of service interruption sufficiently before proceeding with the termination.
- Be careful as data cannot be recovered after termination.
- In the following case, the Block Storage volume cannot be terminated.
- Connecting to server
- OS default volume
- Connect Virtual Server’s Custom Image
- If the volume status is not Available, Error, Error Extending, Error Restoring, Error Managing
- If you select and cancel more than one volume, only the volumes that can be cancelled will be cancelled.
To cancel Block Storage, follow the steps below.
- All Services > Compute > Virtual Server Click the menu. Navigate to the Service Home page of Virtual Server.
- Click the Block Storage menu. You will be taken to the Block Storage List page.
- On the Block Storage List page, select the resource to cancel and click the Cancel Service button.
- When termination is complete, check on the Block Storage list page whether the resource has been terminated.